Veracity Timenet User Manual

USER MANUAL
How to use TIMENET
TIMENET is used to provide an accurate atomic clock reference time to network devices using Network Time Protocol (NTP). TIMENET receives the reference time directly from the GPS satellite system, and so is a top level (i.e. Stratum 1) system clock and provides a legally verifiable time with full traceability.
TIMENET allows CCTV systems (especially DVRs) and Access Control Systems to be properly synchronised to the precisely correct time, without using an external Internet connection.
Windows PC
Linux Server |
DVR 1 |
|
|
|
DVR 1 |
TIMENET |
Network |
|
|
NTP Master |
DVR 1 |
|
ACS |
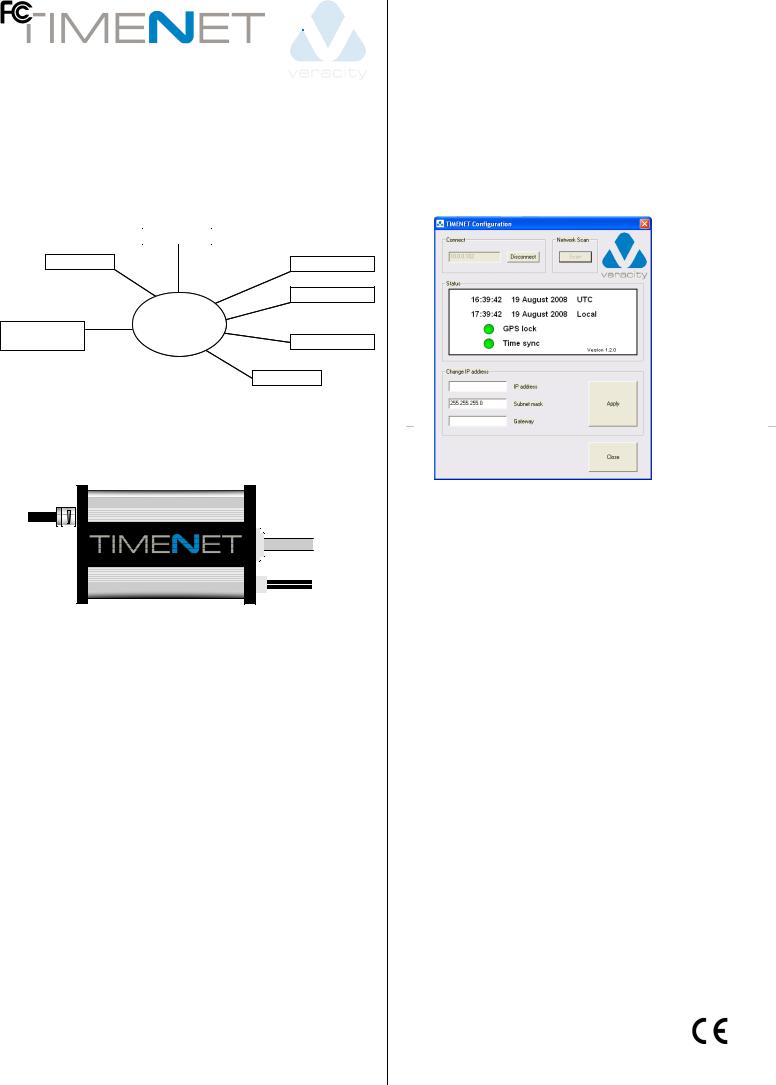
In the example shown a TIMENET unit is used to synchronise three DVRs, an Access Control system, and both Linux & Windows PCs.
Cable connection diagram
Reset socket
GPS antenna
Network cable
12V DC Power
Installation sequence
1) Mounting
 The TIMENET unit should only be installed indoors or in an appropriately rated enclosure.
The GPS antenna should be mounted on the inside of a window which has at least a partial view of the sky, although the greater the view of the sky, the faster the GPS lock (see separate antenna mounting instructions). If the TIMENET unit is to be located on a wall, then the supplied wall mounting tabs should be slid into the slots on the side of the case. Note : if these are not fitted already, the network end plate should be unscrewed and the black plastic collar removed first, before sliding in the wall mount tabs and reassembling. The unit should be securely mounted and should not be supported by the attached cables.
Connect the GPS antenna cable, ensuring that the cable connector is screwed on.
2) Network & power connection
 TIMENET should only be used with a Class II Isolated power supply.
Connect the network cable and the 12V DC power (also compatible with 10V-40V DC and 24V AC). The green LED will switch on immediately to indicate power. During boot-up, the LED will go off, on, then off again. After a minute or so, the green LED will blink with short pulses. This indicates normal running with no GPS signal lock. After a few minutes, assuming the GPS antenna has been properly mounted and connected, the green LED will switch to a long pulse, indicating GPS signal lock. Note : depending upon antenna position, it may take longer to lock onto the signal.
The amber LED indicates network activity.
3)Set-up and configuration
Copy the TIMENET Config.exe program from the TIMENET USB key onto a Windows PC and connect the PC to the same network as the TIMENET. The default IP address of the TIMENET unit is 192.168.42.7 - this is also printed on the serial number label on the underside of the unit. Configure the network settings of the PC to the same domain (e.g. 192.168.42.100).
Run the TIMENET Config program. The default IP address will automatically appear in the IP address field. You can also use the Scan feature to locate the TIMENET on the your local network if you are unsure of the IP address. Click on Connect. This will connect to the TIMENET device. (If the program cannot see the TIMENET, check your network connection and settings using the PING command).
The TIMENET program will show the dialogue as shown left. The UTC time will be shown, as well as the local time (as defined by the local setting of the Windows time zone). To change the IP address setting for your application, simply enter the IP address, Subnet mask and Gateway. Click on Apply to write the settings to TIMENET. This will automatically cause the TIMENET system to re-boot with the
new IP settings. This will take a couple of minutes. Be sure to reset the PC to the new IP domain before re-checking TIMENET operation. Note that the Time Sync LED on the dialogue above make take some time to turn from Red to Green, as this is a function of the NTP system, which requires good signal lock for a period before properly synchronising with the atomic time reference.
To reset TIMENET to its default IP address, use a paper clip to press the reset button (see connection diagram). TIMENET will re-boot with the default IP address.
Note that you can synchronise your Windows PC to TIMENET using the Internet Time tab of the Windows clock set up dialogue. Enter the TIMENET IP address in the server field. Click on Update Now, and check to see that the system synchronises properly. TIMENET is now acting as an accurate NTP server for your Windows PC.
Software & copyright notices
This manual and the Veracity TIMENET Config application are © Veracity 2007 & 2008.
TIMENET contains open source products released under GPL V2 / NTP license. The relevant products can be downloaded for free from the following locations, or be provided by Veracity UK Ltd for a fee, upon request to info@veracityuk.com
uClinux |
http://www.uclinux.org/ |
NTP Server |
http://www.ntp.org/ |
BusyBox |
http://www.busybox.net/ |
Windows is a Microsoft Trademark.
Manufacturer’s declaration of conformity
The manufacturer declares that the equipment enclosed with this certificate conforms with the essential protection requirements of the EMC Directive 89/336/EEC and has been designed and manufactured to the following specifications:
BS EN 55022:1998 Emissions (Radiated)
BS EN 55024:1998 Immunity
BS EN 61000-4-2:1995 Immunity to ESD
BS EN 61000-4-3:20002 Immunity to Radiated RF Fields (3V/m)
RoHS
TIMENET Manual version 1.3
 Loading...