

Page 1

CT9A03W23 F1
User Manual
Page 2

Important safety instructions
PLEASE READ AND SAVE THIS FOR FUTURE REFERENCE
Some of the following information may not apply to your particular product; however, as with any electronic product,
precautions should be observed during handling and use.
• Read these instructions.
• Keep these instructions.
• Heed all warnings.
• Follow all instructions.
• Do not use this apparatus near water.
• Clean only with dry cloth.
• Do not block any ventilation openings. Install in accordance with the manufacturer’s instructions.
• Do not install near any heat sources such as radiators, heat registers, stoves, or other apparatus (including
ampliers) that produce heat.
• Protect the power cord from being walked on or pinched particularly at plugs, convenience receptacles, and the
point where they exit from the apparatus.
• Only use attachments / accessories specied by the manufacturer.
• Unplug this apparatus during lightning storms or when unused for long periods of time.
• Refer all servicing to qualified service personnel. Servicing is required when the apparatus has been damaged in
any way, such as power-supply cord or plug is damaged, liquid has been spilled or objects have fallen into the
apparatus, the apparatus has been exposed to rain or moisture, does not operate normally, or has been dropped.
- 1 -
Page 3

ADDITIONAL SAFETY INFORMATION
• The AC adapter and apparatus shall not be exposed to dripping or splashing and no objects filled with liquids,
such as vases, shall be placed on the apparatus.
• Always leave sufficient space around the product for ventilation. Do not place product in or on a bed, rug, in a
bookcase or cabinet that may prevent air ow through vent openings.
• Do not place lighted candles, cigarettes, cigars, etc. on the product.
• Care should be taken so that objects do not fall into the product.
• Do not attempt to disassemble the cabinet. This product does not contain customer serviceable components.
• To prevent the risk of re or electric shock, do not expose this apparatus to rain or moisture.
• Do not play your headset at high volume. Hearing experts warn against extended high-volume play.
SAR Statement
The SAR limit of Europe is 2.0 W/kg. Laptop has also been tested against this SAR limit. The highest SAR value
reported under this standard during product certication for use at the body is 1.506 W/kg. This device was tested
for typical body-worn operations with the back of the handset kept 0 cm from the body. To maintain compliance
with RF exposure requirements, use accessories that maintain a 0cm separation distance between the user’s body
and the back of the handset. The use of belt clips, holsters and similar accessories should not contain metallic
components in its assembly. The use of accessories that do not satisfy these requirements may not comply with RF
exposure requirements, and should be avoided.
Accessory
The following accessories are included.
AC Ada pt er ..................................................................................................................................................................................................................x1
Ke yb oa rd ca se ..................................................................................................................................................................................................................x1
- 2 -
Page 4

Contents
Important safety instructions ....................... 1
Getting to know your tablet ......................... 4
Left side view ............................................. 4
Rear view ............................................. 5
Buttons ................................................................ 6
Tablet docking / undocking ............................. 6
Getting started .......................................... 7
Charging the battery .................................. 7
Turn your tablet ON .................................. 9
Navigating the Home Screen .......................... 11
Connections and setup ......................... 14
Headphones ............................................................ 14
USB .......................................................................14
MicroSD .................................................................14
Connect to a Wi-Fi network .................................. 15
Bluetooth ...............................................................16
Voice Search & Voice Actions ............................... 17
Google PlayTM ....................................................... 18
GoogleTM ............................................................... 19
Settings ................................................................ 20
Preinstalled apps ........................................ 21
Additional information ............................... 22
Troubleshooting ................................................ 22
Copyright and Trademark Notices ................ 23
Specifications ..................................................... 23
Basic operation .......................................... 17
Using the Touchscreen ...................................... 17
Google NowTM ........................................................ 17
- 3 -
Page 5
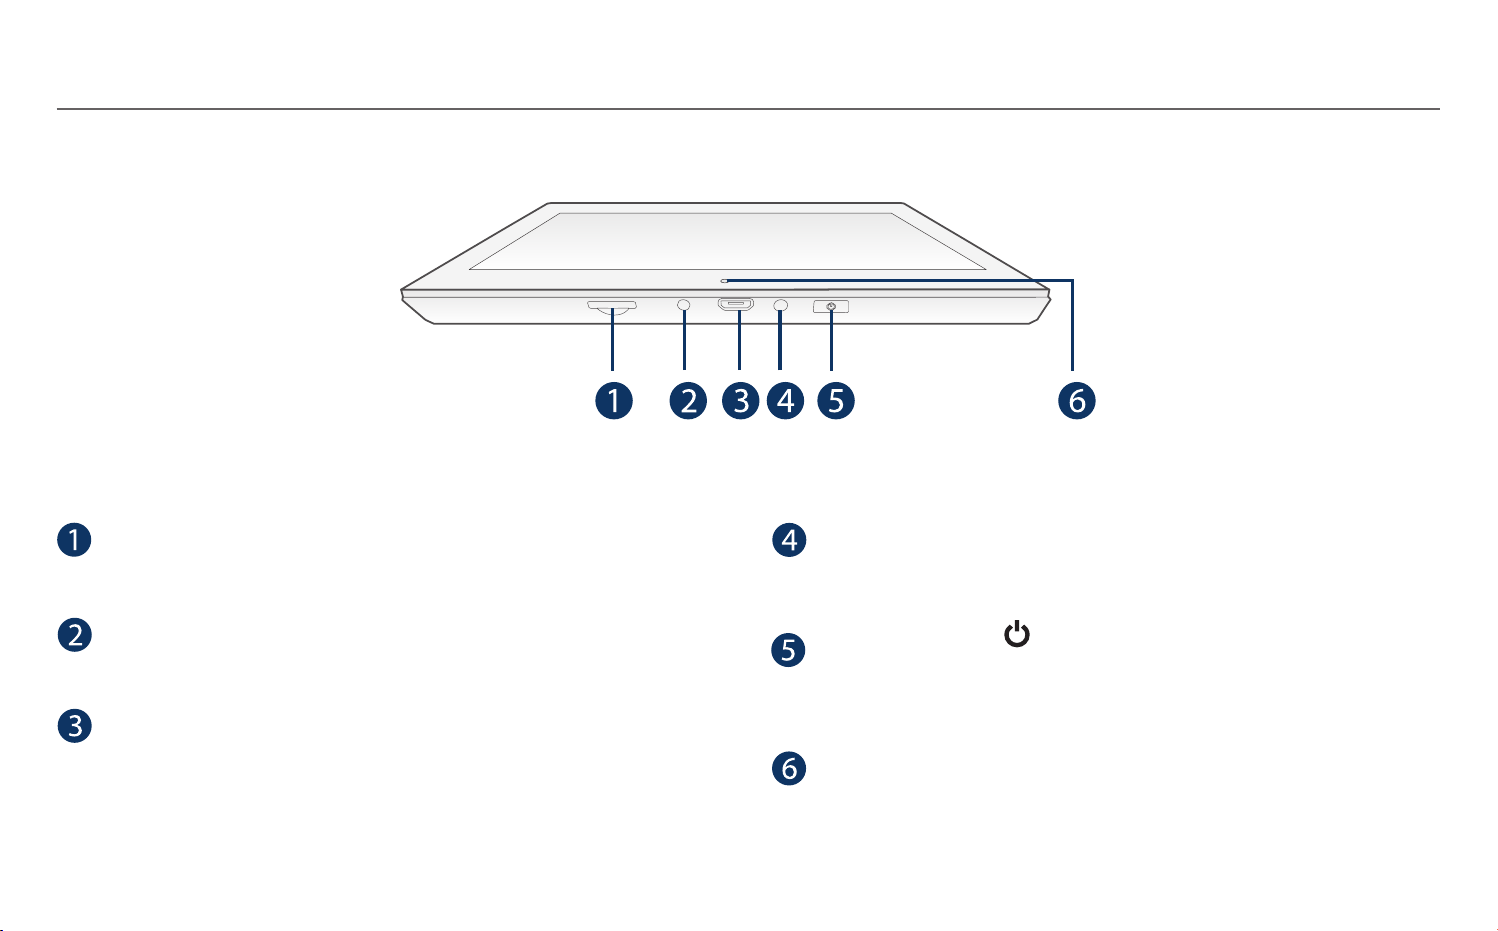
Getting to know your Tablet
Left side view
MicroSD card slot
Accepts microSD card (up to 128GB).
DC jack
Connect with 5V DC charger.
Micro-USB port
Connect to a PC or USB storage device;
Or use to charge the tablet's battery (for charging at
either OFF mode or Standby mode).
Headphone jack
Headphone connection for personal listening.
Power button
Press to enter standby/wake up mode, press and
hold to switch On/Off the unit.
Front camera
- 4 -
Page 6
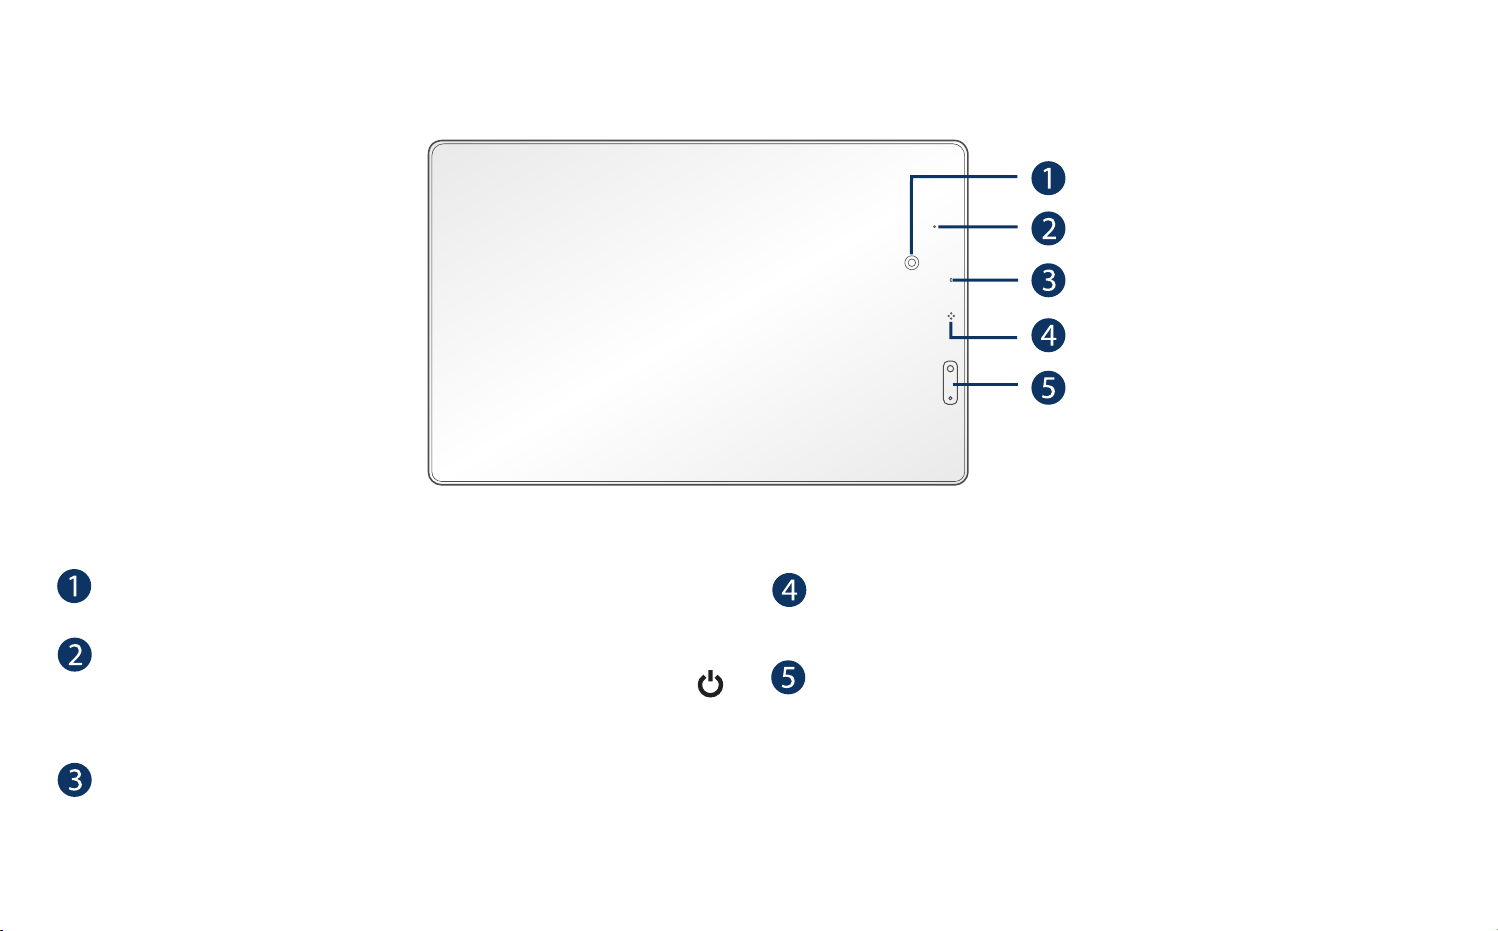
Rear view
Rear camera
Reset
Reset the tablet (then press and hold the Power
button for 4~5 seconds to turn on the unit).
Charging indicator
Blue (blinking): Charging
Blue: Fully charged
Microphone
For voice input.
Volume +/- button
Press to increase/decrease the volume.
- 5 -
Page 7
Buttons
Power button
Power the tablet On
Press and hold the Power button
turn on the tablet.
Power the tablet O
Press and hold the Power button until the" Power
off" message displays, then tap it and the tablet will be
powered o.
Sleep mode
for 4~5 seconds to
Tip: You can go to Settings -> Sound to adjust
volume settings.
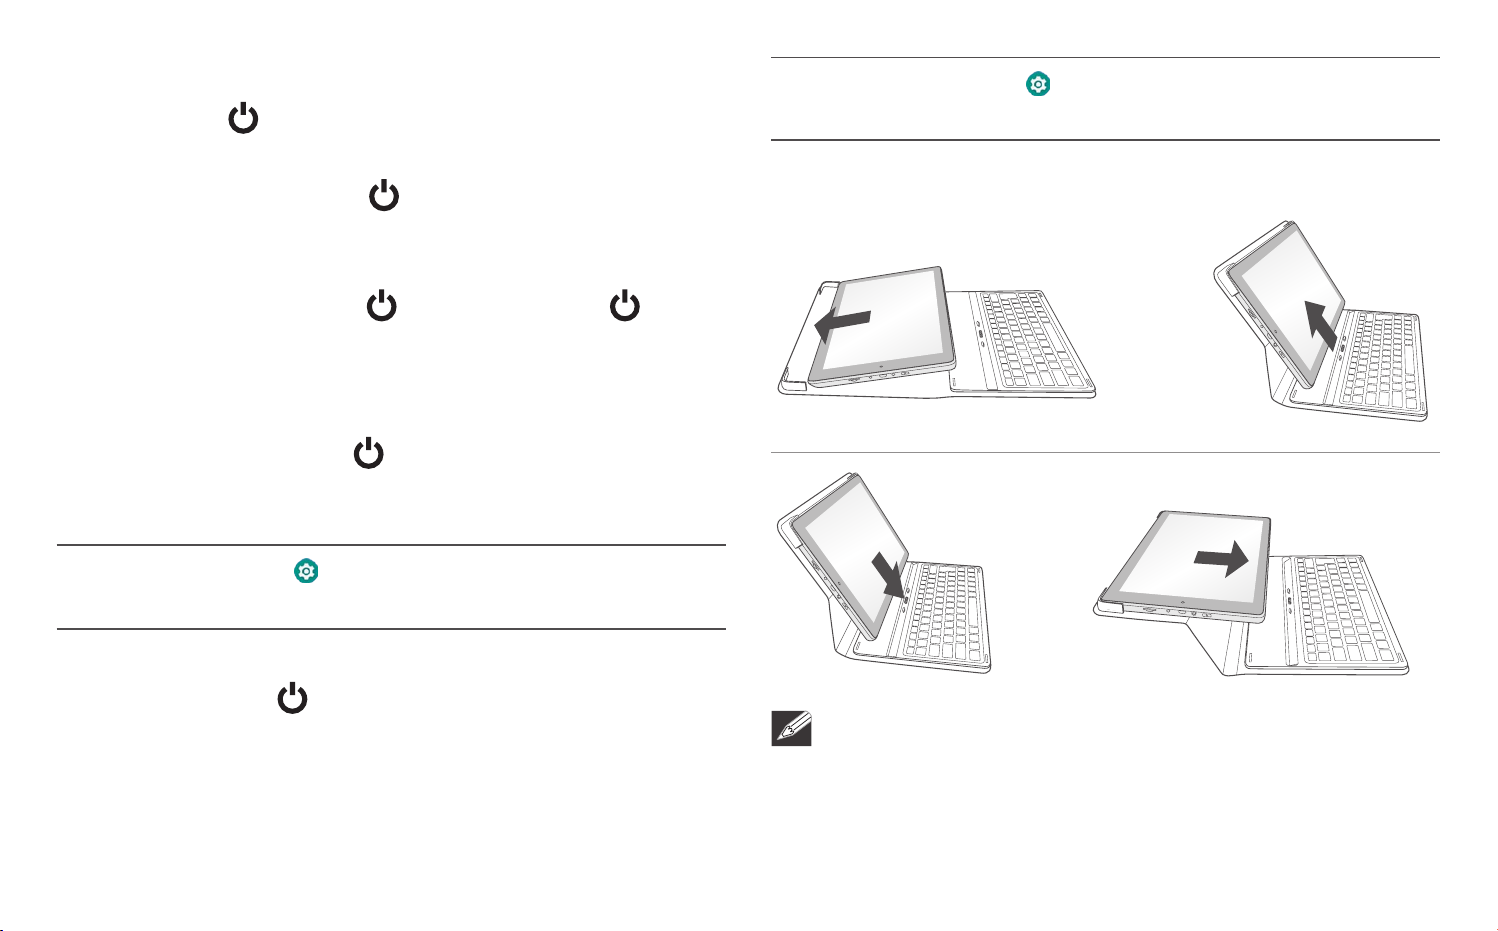
Tablet docking / undocking
Briefly press the Power
sleep mode. If you don’t operate for some time, the
tablet will enter sleep mode automatically.
Tip: You can go to Settings -> Display -> Sleep to
set the screen timeout.
Wake the tablet from Sleep mode
Press the Power
sleep mode.
Volume +/- buttons
Press the Volume +/- buttons to increase or decrease
the volume.
button to put the tablet in
button to wake the tablet from
NOTE
The keyboard connects to the tablet via the Connector.
When the connection is successful, the tablet will
automatically adjust its settings to use the keyboard.
- 6 -
Page 8
Getting started
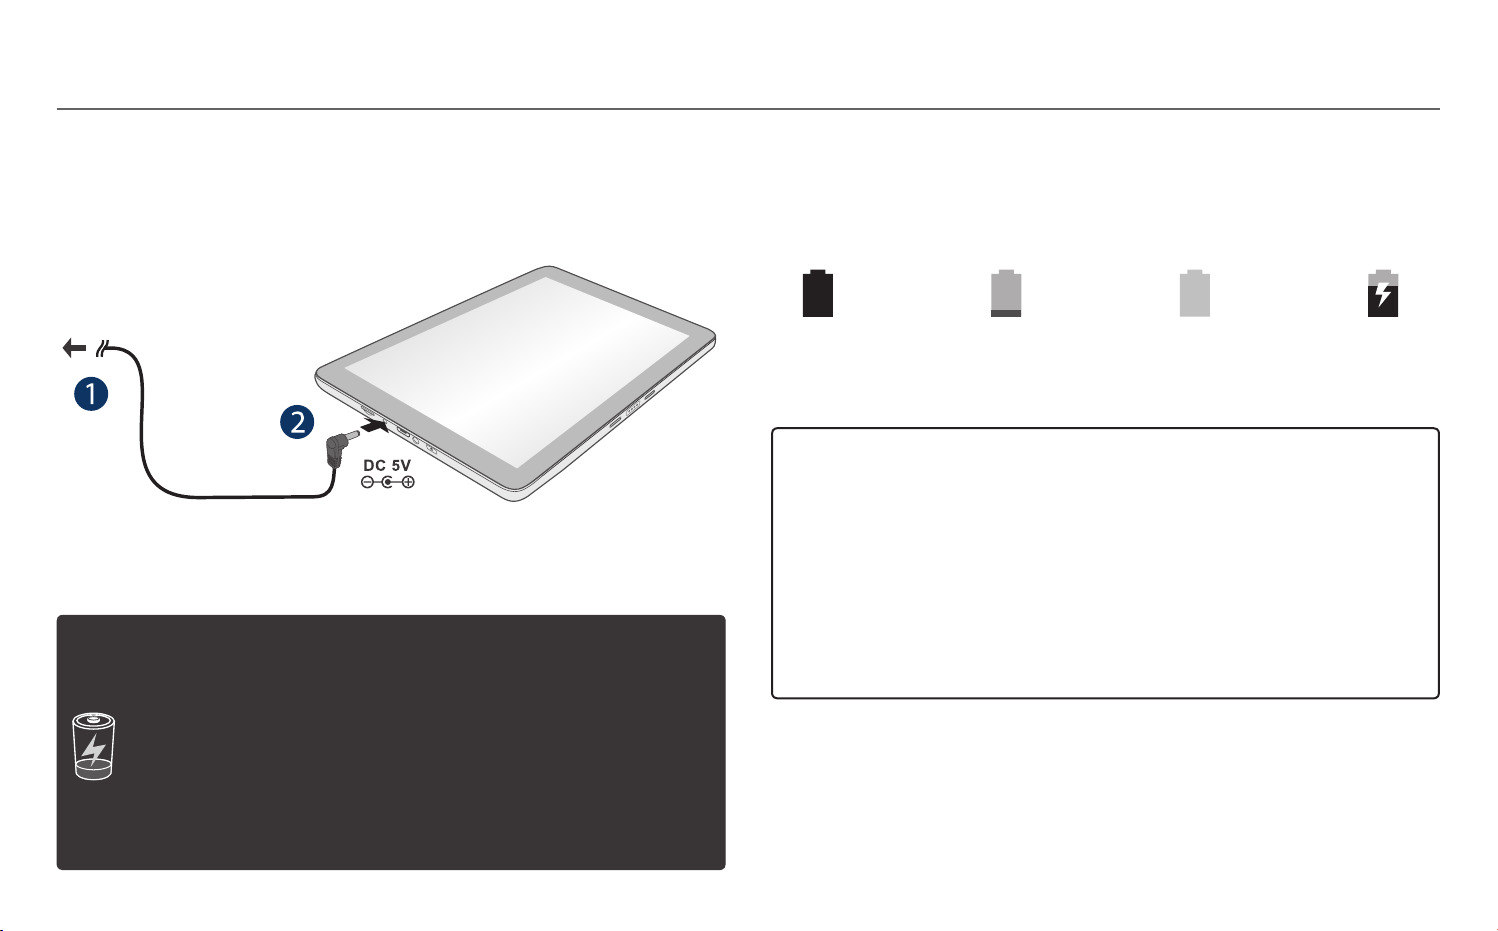
Charging the battery
Use ONLY the included AC Ada pter to ch arge the
battery.
To wall outlet
AC Adapter
(included)
IMPORTANT! Please Read.
We recommend fully charging you r tablet
before using it for the first time. For optimum
performance, please connect the provided AC
adapter to your tablet when it falls below 20%
charge.
Battery icon
The battery icon in the upper-right corner shows the
battery level or charging status.
Full
battery
Low
battery
Need to
be charged
Charging
Cha r gin g ti m e w i ll v a r y de pen d i ng on
remaining battery level. Charging from 0%,
should take approximately 4-5 hours. Use
ONLY the included AC adapter. You may not
be able to turn on your tablet for at least 20
minutes if the battery was fully drained.
- 7 -
Page 9

NOTE
In order to keep the battery working in best condition,
please pay attention to the following:
• The included AC adapter is for use with this unit only.
Do not use it with other equipment.
•
Please do not charge the battery in high temperatures.
• Do not w ait for the battery t o be fully deple ted
before charging again. Keep the battery charged as
needed.
• If tablet has not been used for a long period of time,
the battery might be in over discharge protection
mode and may take longer to charge.
Prolong the Battery Life
Here are some tips for how to prolong the life of the
battery:
• If you aren’t using Wi-Fi, go to Settings ->
Network & Internet -> Wi-Fi, turn it o.
• If you don’t nee d it, tur n off automat ic sync ing
for all apps: Settings -> Users & accounts ->
Automatically sync data. This means you need to
sync manually to collect messages, email, and other
recent information, and won’t receive notifications
when updates occur.
• Don’t leave the Maps or Navigation apps open on
the screen when you’re not using them.
• Turn down screen brightness and set a shorter
screen timeout: Settings -> Display.
- 8 -
Page 10
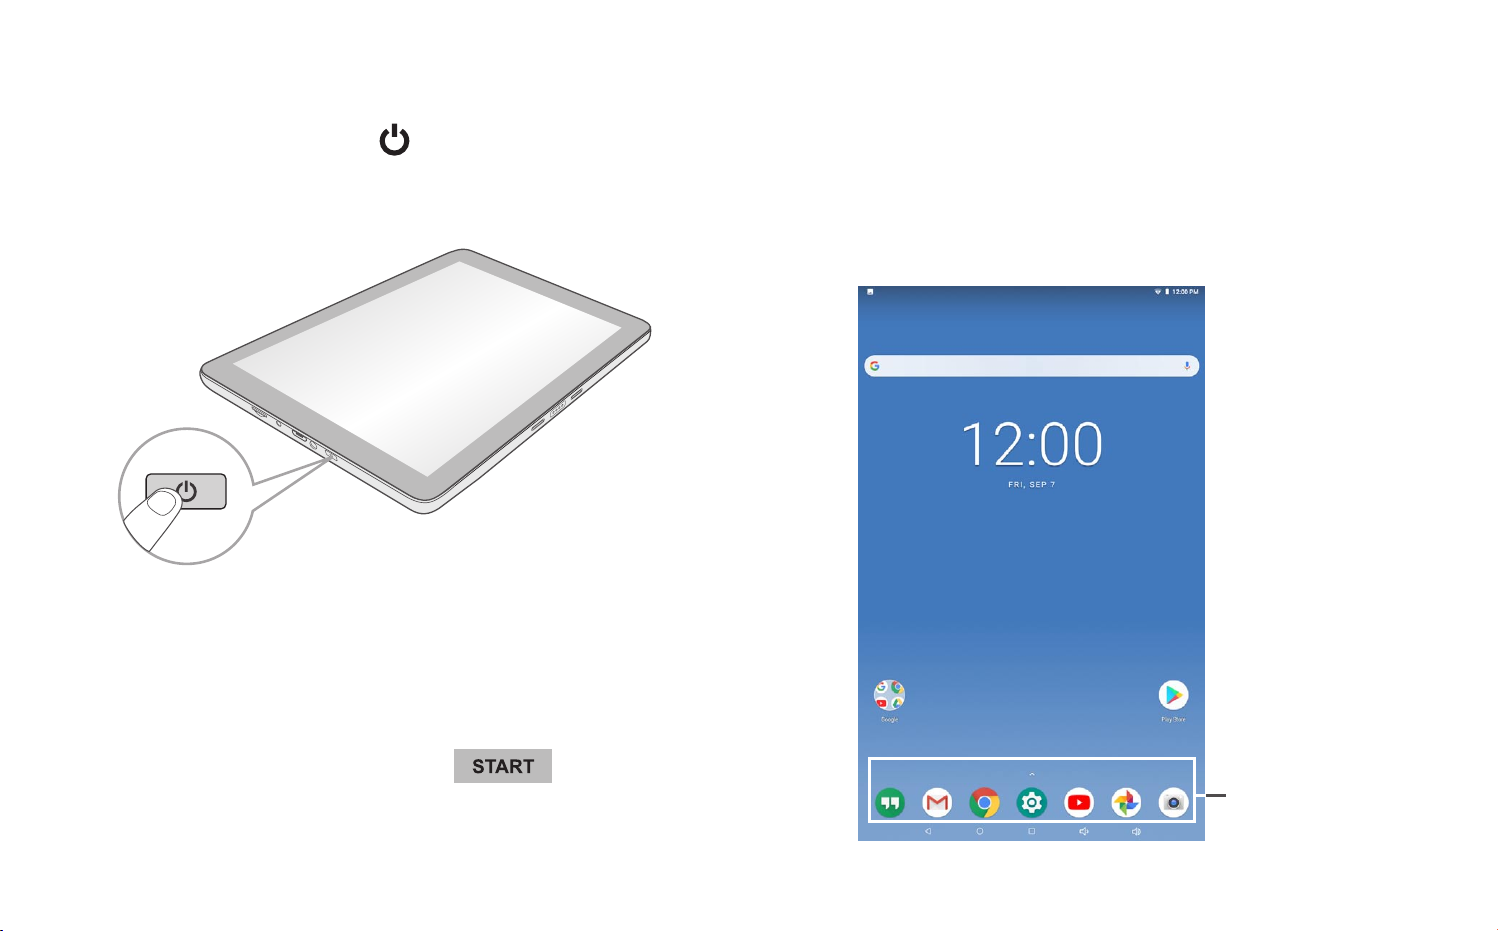
Turning your tablet ON
3. Then tap a network name to see more details or
connect to it, and enter a password if necessary.
Press and hold the Power button 4~5 seconds until
the Venturer logo appears.
Starting for the rst time
When using the tablet for the first time, you will be
required to setup the following:
When prompted, sign in using the email address and
password for your Google Account. If you don’t have
one yet, go ahead and create one.
4. Follow the onscreen instructions to setup the tablet.
1. Select the language, then tap .
2. Set the Wi-Fi.
Jumping Icons
and UP arrow
- 9 -
Page 11

5. The Jumping Icons will remind you to pull up the
ALL APPs menu.
6. Tap the UP arrow or swipe up from the bottom of
the screen to enter the ALL APPs menu.
In All Apps screen, you can:
• Move between screens: Slide up or down.
• Open an App: Tap its icon.
• Copy an App icon to the Home screen: Press and hold
the icon or widget icon slowly to drag it to the Home
screen.
• Get more apps: Tap the Google Play Store icon .
• View info about an App: Press and hold an App to
display the App Info menu, then tap the App Info icon
.
i
- 10 -
Page 12
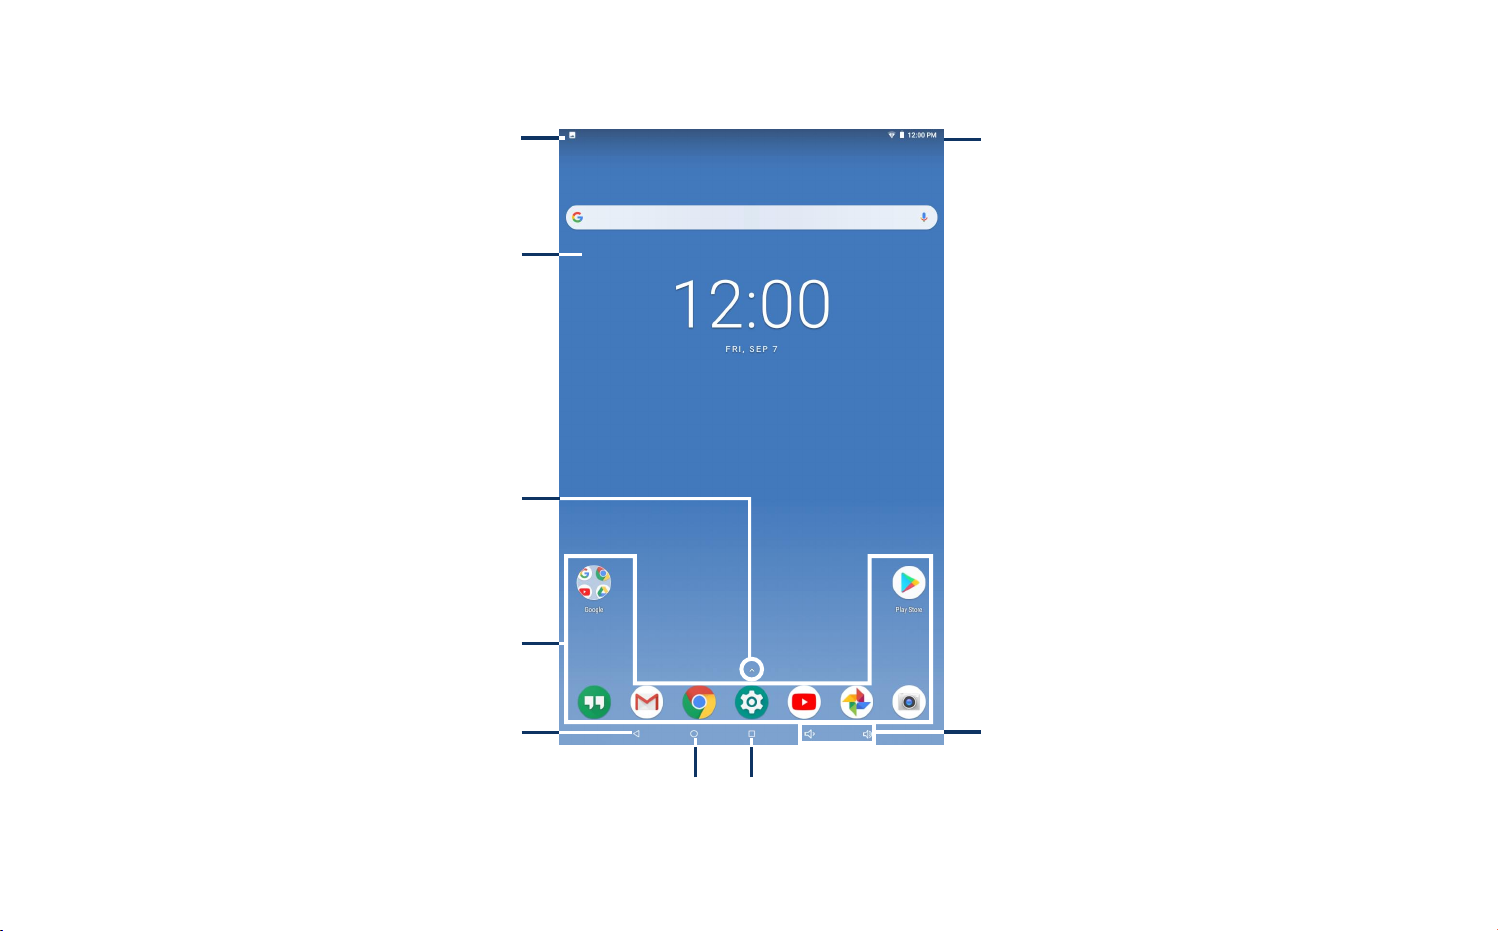
Navigating the Home Screen
Notification bar
Google Search
UP arrow
App icons
Status bar
TM
Back
Home
Volume-/+ icons
Recent Apps
- 11 -
Page 13
Notication & Status Bar
Some indicators that inform you about the status of
your tablet are shown at the top of the screen.
Notication & Status Icons
The below table lists some of the frequently used icons
in the Notication & Status bar:
Notication Shade
Notifications may come from the system, a game, an
application such as E-mail, or the music player.
When Notifications are available, related icons will
appear in the top left corner of the screen. To open
the Notication Shade, touch the Notication icon and
swipe your nger down. Some notifications allow you
to take specific actions by tapping icons within the
notication.
After you are finished with a notification, just slide
it away to the left or right. If you want to dismiss all
notications, tap "Clear All".
Status Bar & Quick Settings
The Status Bar in the top right corner shows various
indicators, including Wi-Fi connection and battery
status. To access "Quick Settings", touch the status bar
and swipe down. You can then adjust various settings
on the tablet by touching the corresponding square.
Item Description
Message Received new message.
Music
Wi-Fi Has a Wi-Fi Internet connection.
Bluetooth Bluetooth is on.
Play Store An update for an app is available.
Home Screen Icons
Back
Tap Back icon to return to the previous screen.
• The Back icon remains on the bottom of the screen
at all times, allowing you to navigate back to the
previous screen.
The Google Play Music app is running.
- 12 -
Page 14

• Once you go back to the Home screen, you can’t go
back any further in your history.
Home
Tap Home icon from anywhere on your tablet to
return to the Home screen.
Recent Apps
Tap Recent Apps icon to view recently used apps.
Tap an app to use it again.
You can slide down to see more apps. You can also slide
it away to the left or right.
Volume &
Tap Volume icon to increase volume.
Tap Volume icon to decrease volume.
Customizing the Home Screen
• From All Apps screen to Home screen: Swipe up
from bottom of the Home screen to enter All Apps
screen, press & hold an icon slowly to drag it to the
location of your choice. This makes it much easier to
change your Home screen layout.
• View widgets: Press & hold the screen on your Home
screen, the widgets icon will display, and then tap
it. Widgets are app information displays that can be
placed on your Home screen.
• Move apps or widgets: Press & hold an icon or
widget, slowly to drag it to the screen edge, the
screen will switch.
• Delete apps or widgets: Press & hold an icon or
widget, when the "X" icon appears at the top of the
screen, drag the icon or widget into it.
• Press & hold the screen on your Home screen, and
the wallpaper icon will display, tap it and choose a
wallpager.
- 13 -
Page 15

Connections and setup
Headphones
H ea d pho n es c an b e c onn e c te d to th e ta b let ’s
headphones jack.
To headphones jack
Headphones
(not included)
USB
The tablet can be connected to a USB storage device
to transfer mus ic, pictures and other files in both
directions.
MicroSD
To microSD
Card Slot
Insert the microSD card into the tablet’s microSD slot
until it clicks.
To check the storage of the microSD card, go to
Settings -> Storage.
Remove the microSD card by pushing in on the card's
edge. The card will pop out and can be removed.
NOTE
microSD Card
(not included)
NOTE
To enter the USB storage device, please go to Settings
-> Storage, and tap .
• You can use microSDTMcard and microSDHCTMcard (up
to 128GB, SD card not included).
• Never remove or insert micro SD card in On mode.
- 14 -
Page 16

Connect to a Wi-Fi network
1.
Go to
to open the Wi-Fi screen and then tap Off to turn it
on.
2. The device will scan Wi-Fi networks automatically
and display the available names.
• If the device finds a network that you connected
to previously, it will connect to it automatically.
Settings -> Network & Internet, tap Wi-Fi
4.
Alternatively, if your Wi-Fi router supports Wi-Fi
Protected Setup, you can go to the Advanced Wi-Fi
screen (tap Wi-Fi preferences and select Advanced)
and select WPS Push Button, then press the WPS
button on your router.
5. If your network does not broadcast its SSID, tap +
Add network and enter the Network SSID (name)
of the network. If necessary, enter security or other
network conguration details.
NOTE
You can tap the icon at the upper-right corner in the
Settings screen for advanced settings.
VPN (Virtual Private Network)
You can create a virtual private network (VPN) and
connect to your private network securely through a
public network, such as the internet. You must set a lock
screen PIN or password before you can use credential
storage.
Add VPN network and follow the instructions on the
screen.
3. Tap a network name to connect to it, and enter a
password if necessary.
- 15 -
Page 17
Bluetooth
You can use Bluetooth to communicate between the
unit and other Bluetooth devices, such as a smartphone.
3. Tap an available bluetooth device name to pair
with it and follow the instructions to complete the
pairing.
Receive Files
When the Bluetooth share icon is shown in
the Notification bar, touch and drag it to open the
Notification Shade. Tap the notification and follow the
instructions to complete the receiving.
Send Files
1. Go to All Apps -> Files.
2. Select a file you want to send, touch & hold it until
the Notification bar appears. Touch icon and
select Bluetooth, then follow the instructions to
complete the sending.
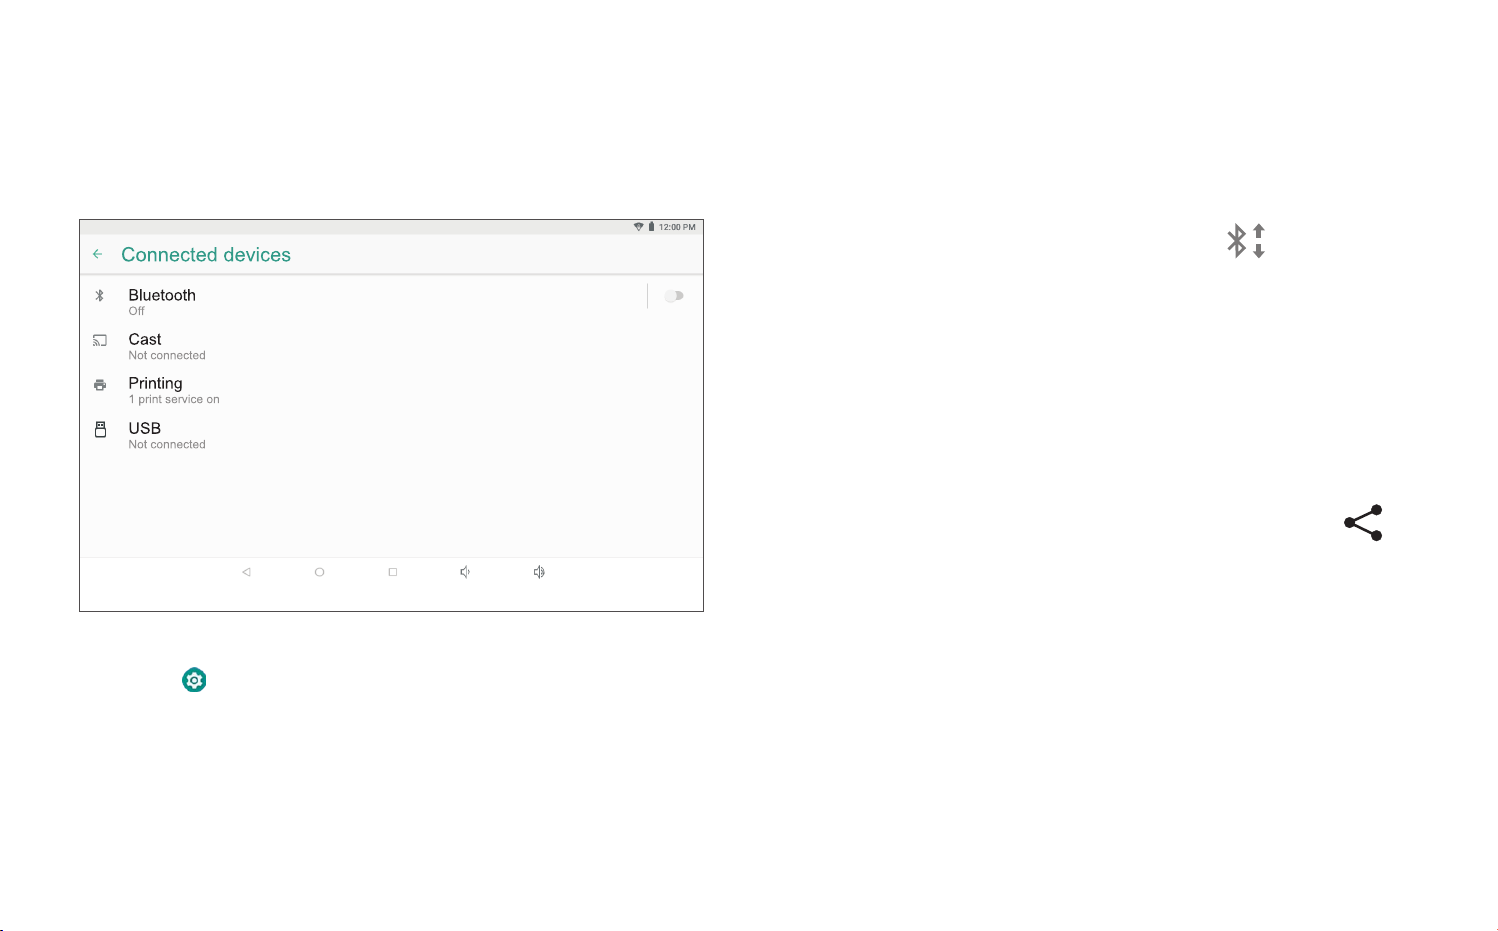
1. Go to Settings -> Connected devices, tap
Bluetooth to open the Bluetooth screen and then
tap O to turn it on.
2. It will scan automatically and display the available
bluetooth devices.
- 16 -
Page 18

Basic operation
Using the Touchscreen
Here are some basic procedures for interacting with the
touchscreen.
Tap
To select an ite m on the tou chsc reen,
lightly tap it.
Press & Hold
In some instances, touching the item
and holding your finger on it will
present other options or menus.
Drag or Swipe
While holding an item such as an icon,
it can sometimes be moved by dragging
it to another area or screen. You may also
be able to swipe your finger across a
screen or item to navigate or move it.
Zoom
By placing two fingers on the screen, you
can slide them apart to "Zoom In", or pinch
them together to "Zoom Out".
Google Now
To create a truly personalized experience, using your
location and personal Google account information,
use Google Now. Touch and Hold the Home icon,
and slide up to the Google Now icon. Follow the
instructions to setup your Google Now experience.
Voice Search & Voice Actions
Turn Voice Search or Voice Action On
You can initiate a Voice Search or Voice Action by
tappi ng the Mi crophone icon on to p of the Home
screen.
When you’re viewing the Google Now screen, you don’t
have to touch anything. Just say “Google.”
- 17 -
Page 19

NOTE
Google Play
To detect when you say "Google" to launch Voice
Search or Voice Actions, your tablet analyzes sound
picked up by your tablet's microphone in intervals of a
few seconds or less.
Using Voice Search
After tapping the microphone icon, just say whatever it
is you want Google to search for.
Using Voice Actions
There are many actions that the tablet can perform
using "Voice Actions". For example, you can send emails,
set alarms, play a song, or navigate to a website. Just
tap the Microphone icon, and say what you want the
tablet to do. As you speak, Voice Search analyzes your
speech and initiates the action.
If Voice Search doesn’t understand you, it lists a set of
possible meanings. Just tap the one you want.
In addition to the apps that come preinstalled on your
tablet, you can download Android apps and games,
music, movies, TV shows and magazines using the Google
Play Store app.
1. On the App menu, touch the Google Play Store icon.
2. To search for an item from the Google Play Store app,
touch the search icon in the upper right corner, and
then type a keyword to search.
3. Touch an available item to go to its details page.
From there you can install or download the item.
- 18 -
Page 20

Google
Settings
A Google Account lets you organize and access your
personal information from any computer or mobile
device.
Add an Account
You can use multiple Google Accounts and Microsoft
Exchange ActiveSync accounts on your tablet.
You may also be able to add other kinds of accounts,
depending on your apps. To add some accounts, you may
need to obtain details from your system administrator
about the service to which the account connects. For
example, you may need to know the account’s domain or
server address.
1. Go to Settings -> Use rs & Ac counts -> Add
account.
2. Tap the kind of account to add. And then follow the
on-screen instructions.
Settings let you configure the tablet, set app options,
add accounts, and change other preferences.
Networks & Internet
Wi-Fi — Enable or disable Wi-Fi, and connect to a
wireless network so that you can check email, search the
Web, or access social media websites.
Airplane mode — Enable or disable Airplane mode.
VPN — You can add, set up, and manage virtual private
networks (VPNs).
Connected devices
Bluetooth — Enable or disable Bluetooth.
Cast — Set preferences for Cast.
Printing — Enable or disable Print services.
USB — Set preferences for connected USB device.
Remove an Account
To remove a Google account, go to Settings ->
Users & Accounts -> Google [account-name], then
tap REMOVE ACCOUNT.
Apps & notifications
View the Recently opened apps and all apps, and set
preferences for apps.
To view information or uninstall an app, tap the relevant
app.
- 19 -
Page 21

Battery
Security & location
View battery status.
Display
MiraVisionTM — Display picture quality optimization.
Brightness level — Allows you to adjust the screen
brightness.
Wallpaper — To choose wallpaper.
Sleep — Allows you to set the amount of time before the
screen times out.
Advance — Allows you to set Auto-rotate screen, Font
size and Display size.
Sound
Allows you to set the Media volume, Alarm volume,
Notification volume and others.
Storage
Use the Security & location menu to configure how to
help secure your device and its data.
Users & accounts
Users — This menu displays the current users you've
created.
Add account — You can add an email account or another
type of account.
Automatically sync data — Let apps refresh data
automatically.
Google
Use this menu to manage your Google apps and account
settings.
View the total storage space and free space in the
device's internal storage. View a list of apps in use and the
storage capacity for photo & video, music & audio, games,
files, apps and system.
- 20 -
Page 22

System
Language & input — Set preferences for Language,
Keyboard & inputs, and Input assistance.
Date & time — Use to set how date, time, time zone and
time format will be displayed.
If the tablet connected with a Wi-Fi, you can also select
use network-provided time.
Set Automatic date & time to Off and then you can also
set your own data and time rather than obtaining the
current time from the network.
Reset options — Use to reset app preferecnes.
About tablet
Check System updates, Status, Legal information, etc.
Preinstalled apps
Your tablet comes with many apps preinstalled to allow
you to browse the web, send and receive email, and
access entertainment. Spend some time exploring these
apps to learn how your tablet can be most useful for you.
- 21 -
Page 23

Additional information
Troubleshooting
Tablet displays network or service error message
• When you are located in places with poor signal, your
tablet may lose its Wi-Fi connection. Try moving closer
to the Wi-Fi router.
Touch screen response is slow or incorrect
If the tablet’s touch screen response is incorrect, please
try the following:
• Remove any protective film on the touch screen. The
protective film may prevent the device recognition
input.
• Make sure that your fingers dry and clean before you
tap the touch screen.
• Restart the tablet to clear any temporary software
bugs.
Tablet is frozen or a serious error appears
• If the tablet is frozen or suspended, you may need to
close the app program or reset the tablet.
• If the tablet is frozen or slow to respond, press and
hold the power button for 8 seconds to reset the
tablet.
• If that doesn't work, insert a paper clip into the RESET
hole on the back of the tablet, then press and hold
the Power button for 4~5 seconds to turn on the
unit.
Tablet gets warm
• When usi ng for a long time, the tablet may be
warm. This is normal and will not affect the life or
performance of the unit.
Tablet can not show video of opposite side during skype
call
• The Wi-Fi signal is poor. Please move closer to your
wireless router, or disconnect other devices from your
wireless router, or increase bandwidth of internet
connection.
• Please check the Wi-Fi setting. It's recommended to
use an IEEE 802.11 b/g/n. certified Wi-Fi network.
Insucient storage
• We recommend to reserve at least 700MB of free
space in internal storage for APP download.
- 22 -
Page 24

Copyright and Trademark Notices
Environmental Considerations
Google, Android, Google Play, YouTube and other marks
are trademarks of Google LLC.
The Wi-Fi CERTIFIED Logo is a certification mark of the
Wi-Fi Alliance.
The Wi-Fi Protected Setup Mark is a mark of the Wi-Fi
Alliance.
The Bluetooth® word mark and logos are registered
trademarks owned by the Bluetooth SIG Inc. Other
trademarks and trade names are those of their respective
owners.
Specification
Power: DC IN 5V (operate with AC adapter)
The crossed-out garbage can symbol on your product
signies that it falls into the category of electric/electronic
equipment. Products of this type contain substances
that are potentially dangerous to the environment and
to human health. Therefore, you should not dispose of
the Venturer electronic device in a regular trash. As such,
the current European directives ask that this device be
collected:
- At places of distribution in the case of a purchase of a
similar electronic product.
- At locally created disposal areas (waste disposal centers,
sorted trash system, etc.)
Specications and external appearance are subject to
change without notice.
- 23 -
 Loading...