


Venmar SV09954RD, SV09957LM, SV09956WH, SV09953SS, SV09955EM INSTALLATION INSTRUCTIONS
...GLASS PANELS
INSTALLATION INSTRUCTIONS
APPLIES TO THE FOLLOWING RANGE HOOD SERIES
C700, CC700, CIC700, CIS700, IU600ES, IB700, IC700, IC700ES, IK700 AND IS700
Venmar Ventilation Inc., 550 Lemire Blvd.
Drummondville QC J2C 7W9
1-800-567-3855
www.venmar.ca
09530 Rev. 02

!WARNING
•IT IS RECOMMENDED TO WEAR SAFETY GLASSES AND GLOVES WHILE PREFORMING THESE INSTRUCTIONS.
•HANDLE GLASS PANEL WITH CARE.
•ALL TEMPERED GLASS CAN EXPERIENCE SPONTANEOUS BREAKAGE. IF BROKEN, TEMPERED GLASS FALLS
OUT OF IT’S OPENING IN INTERLOCKING CLUMPS. TEMPERED GLASS CAN, ON OCCASION, BREAK INTO LARGE SHARDS RATHER THAN THE CLASSIC TINY PIECE PATTERN.
• RISK OF ELECTRICAL SHOCK. BEFORE INSTALLING OR REPLACING THE GLASS PANEL, SWITCH POWER OFF AT SERVICE PANEL AND LOCK SERVICE DISCONNECTING MEANS TO PREVENT POWER FROM BEING SWITCHED ON ACCIDENTALLY.
CAUTION
AFTER A POWER FAILURE OR DURING THE RANGE HOOD POWER UP, A 5-SECOND BOOTING SEQUENCE IS EXECUTED. WAIT FOR THE CONTROL BACKLIGHTING TO TURN OFF BEFORE USE.
C700 SERIES
IF THE RANGE HOOD IS NOT INSTALLED YET, REFER TO STEP 4 OF THE HOOD INSTALLATION GUIDE. IF THE RANGE HOOD IS ALREADY INSTALLED, FOLLOW THESE STEPS:
Remove filters by pushing them towards the back of the hood and tilting them down. Set the filters aside.
Remove the bottom panel 10 retaining screws and set aside.
NOTE: Both light assemblies will have to be disconnected in order to remove the bottom
panel (see step ).
HO0181 |
SCREW |
LOCATIONS |
HO0174 |
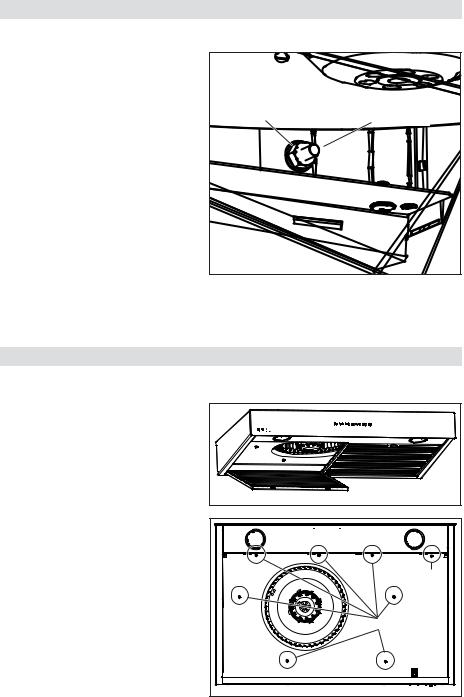
Slightly pull the bottom panel out. Press on tabs and pull to disconnect both light assemblies electrical harnesses from light connectors. Slide bottom panel out and set aside.
HO0176
- 2 -
C700 SERIES (CONT’D)
Carefully remove the new glass panel from its packaging. Remove new glass panel nuts (factory installed) from both studs and set aside.
If need be, remove current glass panel |
|
|
|
retaining nuts from both studs. Discard |
NUT |
GLASS PANEL STUD |
|
glass panel and nuts. |
|||
|
|
||
Insert new glass panel studs in hood |
|
|
|
front holes. |
|
|
|
While holding glass panel, pre-tighten |
|
|
|
previously removed nuts by hand. |
|
|
|
Ensure glass panel is flush with top of |
|
|
|
hood and centered from side-to-side. |
|
|
|
Then, using a 3/8" socket, tighten nuts |
|
|
|
completely. |
|
|
|
|
HD0440 |
|
Insert bottom panel in the back of the hood and reconnect each light assembly electrical harness to its light connector.
Secure bottom panel to the hood, using the 10 previously removed screws.
Reinstall baffle filters.
IU600ES SERIES
IF THE RANGE HOOD IS NOT INSTALLED YET, REFER TO STEP 4 OF THE HOOD INSTALLATION GUIDE. IF THE RANGE HOOD IS ALREADY INSTALLED, FOLLOW THESE STEPS:
Remove filters by pushing them towards the back of the hood and tilting them down. Set the filters aside.
FOR 30” WIDE HOODS:
Remove the 7 screws (A only) retaining the bottom panel, and set aside.
FOR 36” WIDE HOODS:
Remove the 8 screws (A and B) retaining the bottom panel and set aside.
HO0247 |
B |
A |
HO0246 |
Carefully remove the glass panel from its packaging. Remove new glass panel nuts (factory installed) from both studs and set aside.
- 3 -
 Loading...