

Page 1

Venmar Ventilation inc., 550 Lemire Blvd., Drummondville QC J2C 7W9 1-800-567-3855
Register your product online at: bnv.ca
For additional information - visit www.venmar.ca
MB0001
HOMEOWNER’S OPERATING INSTRUCTIONS
08817 rev. A
INSTALLER: LEAVE THIS GUIDE WITH HOMEOWNER.
HOMEOWNER: CARE INFORMATION ON PAGES 20 TO 22.
MODELS VJ10430SS & VJ10430WH
INTENDED FOR DOMESTIC COOKING ONLY
READ AND SAVE THESE INSTRUCTIONS
!
!
Page 2

2
READ ALL INSTRUCTIONS BEFORE USING THIS APPLIANCE.
When using an electric appliance, basic precautions should always be followed including the following:
WARNING (MICROWAVE OVEN)
TO REDUCE THE RISK OF FIRE, ELECTRIC SHOCK, INJURY TO PERSONS OR EXPOSURE TO EXCESSIVE
MICROWAVE ENERGY, OBSERVE THE FOLLOWING:
• Do not attempt to operate this microwave oven with the door open since open-door operation can result in
harmful exposure to microwave energy. It is important not to defeat or tamper with the safety interlocks.
• Do not place any object between the microwave oven front face and the door or allow soil or cleaner residue
to accumulate on sealing surfaces.
• Do not operate the microwave oven if it is damaged. It is particularly important that the microwave oven door
close properly and that there is no damage to the:
• Door (bent or dented)
• Hinges and latches (broken or loosened)
• Door seals and sealing surfaces
• This appliance must be grounded. Connect only to properly grounded outlets.
• Install or locate this appliance only in accordance with the installation instructions provided.
• Use this appliance only for its intended use as described in the manual. Do not use corrosive chemicals or
vapors in this appliance. This type of oven is specifi cally designed to heat, cook, or dry food. It is not designed
for industrial or laboratory use.
• As with any appliance, close supervision is necessary when used by children.
• Keep the power cord away from heated surfaces (including the back of the oven).
• Remove lids from baby food before heating. After heating baby food, stir well to distribute the heat evenly.
Always test temperature by tasting before feeding the baby. The glass jar or surface of the food may appear to
be cooler than the interior, which can be so hot as to burn the infant's mouth.
• Liquids, such as water, milk, coffee, or tea are able to be overheated beyond the boiling point without appearing
to be boiling. Visible bubbling or boiling when the container is removed from the microwave oven is not always
present. This COULD RESULT IN VERY HOT LIQUIDS SUDDENLY BOILING OVER WHEN THE CONTAINER
IS DISTURBED BY A SPOON OR OTHER UTENSILS, INSERTED INTO THE LIQUID.
a) Do not overheat liquids.
b) Stir the liquid both before and halfway through heating it.
c) Do not use straight-sided containers with narrow necks.
d) After heating, allow the container to stand in the microwave oven for a short time before removing the
container.
e) Use extreme care when inserting a spoon or other utensils into the container.
• Hot foods and steam can cause burns. Carefully remove container coverings, directing steam away from your
hands and face.
• Some products such as whole eggs and sealed containers (e.g.: closed jar) may explode if heated in this oven.
Remove seals and lids before use.
• Do not operate this appliance if it has a damaged power cord or plug, if it is not working properly, or if it has been
damaged or dropped. When the power plug or power cord is damaged, contact your nearest service center.
• Do not cover or block any of the openings on this appliance.
• Do not immerse the power cord or plug in water and do not operate the appliance with wet hands.
• Do not let the power cord hang over edge of table or counter.
• Do not pull on the power cord to unplug the unit. Do it by grasping the power cord plug.
• Do not try to preheat the microwave oven or operate it while empty.
• Do not defrost frozen beverages in narrow-necked bottles. The containers can break.
• Dishes, containers and the inside of the appliance may become hot. Handle with care.
• If the appliance generates a strange noise, a burning smell or smoke, unplug the power cord immediately and
contact your nearest service center.
• When cleaning the unit, it is recommended to wear safety glasses and gloves.
IMPORTANT SAFETY INSTRUCTIONS
!
Page 3

3
TO REDUCE THE RISK OF FIRE IN THE OVEN:
a) Do not overcook food. Watch appliance carefully if paper, plastic, or other combustible materials are placed
inside the oven to facilitate cooking.
b) Remove wire twist-ties from paper or plastic bags before placing bags in oven.
c) If materials inside the oven ignite, keep the oven door closed, turn the oven off, disconnect the power cord, or
shut off the power at the fuse or circuit breaker panel. If the door is opened, the fi re may spread.
d) Do not use the oven compartment for storage purposes. Do not leave paper products, cooking utensils, or
food in the oven when not in use.
CAUTION
• Keep the inside of the oven clean. Food particles or spattered oils stuck to the oven walls or fl oor can cause
paint damage and reduce the effi ciency of the oven.
• When cleaning surfaces of door and oven that comes together on closing the door, use only mild, nonabrasive
soaps or detergents applied with a sponge or soft cloth. Unplug the power cord before cleaning.
• Do not store this appliance outdoors. Do not use near water - for example, near a kitchen sink, in a wet
basement, or near a swimming pool or similar locations.
• Do not cook without the turntable in place on the oven fl oor. Food will not cook properly without the tray in place.
• Do not store anything directly on top of the appliance when it is in operation.
• Do not tamper with or make any adjustments or repairs to the door.
• Never try to repair the oven on your own. This appliance should be serviced only by qualifi ed service personnel.
Contact the nearest service center for examination, repair or adjustment.
WARNING (VENT FAN)
TO REDUCE THE RISK OF FIRE, ELECTRIC SHOCK OR INJURY TO PERSONS:
• Use this unit only in the manner intended by the manufacturer. If you have questions, contact the manufacturer
at the address or telephone number listed in the warranty.
• Installation work and electrical wiring must be done by qualifi ed personnel in accordance with all applicable
codes and standards, including fi re-rated construction codes and standards.
TO REDUCE THE RISK OF A RANGE TOP GREASE FIRE:
a) Never leave surface units unattended at high settings. Boilovers cause smoking and greasy spillovers that may
ignite. Heat oils slowly on low or medium settings.
b) Always turn vent fan ON when cooking at high heat or when fl ambeing food (i.e.: Crêpes Suzette, Cherries
Jubilee, Peppercorn Beef Flambé).
c) Clean ventilating fan frequently - Grease should not be allowed to accumulate on fan or fi lter.
d) Use proper pan size. Always use cookware appropriate for the size of the surface element.
e) The fan will operate automatically under certain conditions. Take care to prevent the starting and spreading of
accidental cooking fi res while the vent fan is in use.
TO REDUCE THE RISK OF INJURY TO PERSONS IN THE EVENT OF A RANGE TOP GREASE FIRE*:
1. SMOTHER FLAMES with a close-fi tting lid, cookie sheet or metal tray, then turn off the burner. BE CAREFUL
TO PREVENT BURNS. IF THE FLAMES DO NOT GO OUT IMMEDIATELY, EVACUATE AND CALL THE FIRE
DEPARTMENT.
2. NEVER PICK UP A FLAMING PAN — You may be burned.
3. DO NOT USE WATER, including wet dishcloths or towels — This could cause a violent steam explosion.
4. Use an extinguisher ONLY if:
A. You own a Class ABC extinguisher and you know how to operate it.
B. The fi re is small and contained in the area where it started.
C. The fi re department has been called.
D. You can fi ght the fi re with your back to an exit.
*Based on “Kitchen Fire Safety Tips” published by NFPA.
CAUTION
• For indoor use only.
• Use care when cleaning the grease fi lter. Corrosive cleaning agents, such as oven cleaners, may damage the fi lter.
• For general ventilating use only. Do not use to exhaust hazardous or explosive materials and vapors.
• To avoid motor bearing damage and noisy and/or unbalanced impellers, keep drywall spray, construction dust,
etc. off appliance.
!
Page 4

4
ABOUT THIS MANUAL/PRODUCT
The purpose of this guide is to show you how to operate your unit and do its maintenance. Please read completely
before using this appliance.
We welcome any suggestions you may have concerning this manual and/or the unit, and we would appreciate
hearing your comments on ways to better serve you. Please forward all correspondence to us at the address listed
in the warranty at the end of this manual.
This manual uses the following symbols to emphasize particular information:
NOTE: Indicates supplementary information needed to fully complete an instruction.
WARNING
Identifi es an instruction which, if not followed, might cause serious personal injuries
including possibility of death.
CAUTION
Denotes an instruction which, if not followed, may severely damage the unit and/or its
components.
!
TABLE OF CONTENTS
1. SETTING UP
YOUR MICROWAVE OVEN ......................5
1.1 Checking the Parts ....................................... 5
1.2 Setting up your Microwave Oven ...................5
1.3 Checking the Control Panel ...........................6
1.4 Setting the Time ............................................ 8
1.5 Demonstration Mode ....................................8
1.6 Child Lock .................................................... 8
2. USING YOUR MICROWAVE OVEN ..........8
2.1 Using the Kitchen Timer Button .................... 8
2.2 Using the One Minute+ Button ...................... 8
2.3 Using the More/Less Buttons ........................ 8
2.4 Using the Vent Button ...................................9
2.5 Using the Light Button ..................................9
2.6 Using the Sound Button ................................ 9
2.7 Using the Auto Cook Buttons ........................ 9
2.8 Using the Auto Defrost Button....................... 12
2.9 Using the Auto Reheat Button ....................... 13
2.10 Using the Soften/Melt Button ...................... 14
2.11 Microwave Cooking Times
& Power Levels ........................................... 14
3. COOKWARE GUIDE ................................. 16
Microwave-Safe Utensils ..................................... 16
4. COOKING GUIDE ......................................17
Microwaves .........................................................17
5. MICROWAVE OVEN CARE ....................... 20
5.1 Cleaning the Exterior .....................................20
5.2 Cleaning the Interior ...................................... 20
5.3 Cleaning the Door and Door Seals ................ 20
5.4 Cleaning the Turntable and Roller Ring ..........20
5.5 Cleaning the Grease Filter ............................. 20
5.6 Storing
& Repairing your Microwave Oven ................. 21
5.7 Replacing the Cooktop Light ......................... 21
5.8 Replacing the Oven light ...............................22
5.9 Replacing the Charcoal Filter .........................22
6. TROUBLESHOOTING ...............................23
Check these Points if your Microwave Oven... ..... 23
7. REPLACEMENT PARTS ...........................23
8. SPECIFICATIONS .....................................24
9. WARRANTY ............................................... 24
Page 5
5
1. SETTING UP YOUR MICROWAVE OVEN
Ensure to follow these instructions closely so that your new microwave oven works properly.
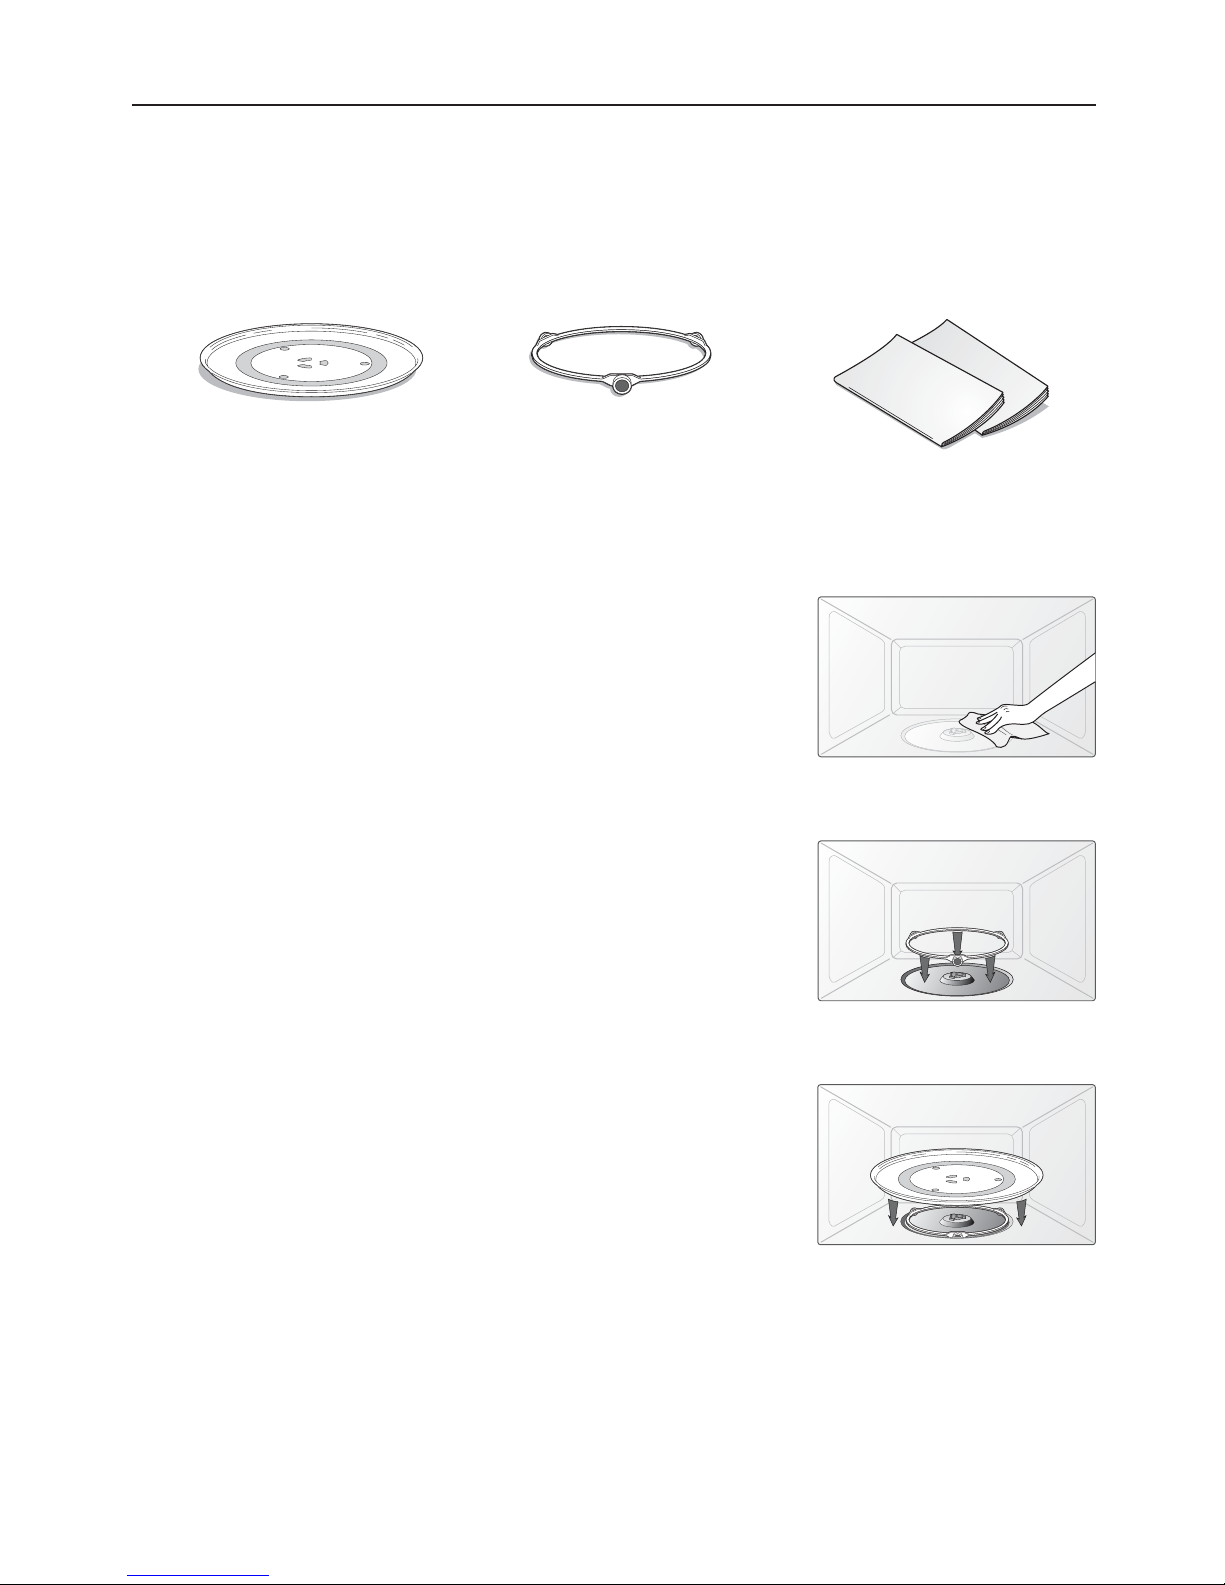
1.1 CHECKING THE PARTS
Ensure that the following items are included:
1.2 SETTING UP YOUR MICROWAVE OVEN
1. Open the door by pulling the handle on the right side of the door.
2. Wipe the inside of the oven with a damp cloth.
3. Install the pre-assembled ring into the indentation at the center of the
microwave oven.
4. Place the turntable securely in the center of the pre-assembled roller ring.
MA0001
MA0002
MA0007
MD0001
MO0001
MO0002
TURNTABLE ROLLER GUIDE RING
M
ANUALS
(USER & INSTALLATION)
Page 6

6
1. SETTING UP YOUR MICROWAVE OVEN (CONT’D)
1.3 CHECKING THE CONTROL PANEL
MC0001A
1
2
4
10
3
5
8
9
11
17
16
15
14
7
6
12
13
Page 7

7
DISPLAY
Displays the time when the microwave is not being used, as well as your selected
cook times and cooking functions.
A
UTO COOK
The Auto Cook buttons consist of frequently used items allowing you to select
them quickly and conveniently without having to select manual settings.
A
UTO DEFROST Press this button to defrost food according to its weight.
C
OOK Press this button to cook beverage, bacon, frozen dinner, frozen breakfast.
AUTO REHEAT Press this button to reheat dinner plates, casseroles, or pastas.
S
OFTEN MELT Press this button to soften or melt specifi c foods (listed beside the button).
NUMBERS
Press the number buttons to enter the cook time, power level, quantity or
weight.
M
ORE/LESS
The More/Less buttons allow you to adjust the pre-set cook times once you
have started cooking. They only work in the “Reheat”, “Auto Cooking”, “One
Minute+” and “Time Cook” modes.
P
OWER LEVEL Press this button to select a cooking power level.
P
AUSE/CANCEL Press this button to stop the oven or to clear all entries.
C
LOCK Press this button to set the time.
S
OUND ON/OFF
Press the Sound On/Off button to activate or deactivate all sounds (beeps) of
the microwave oven. The display will show either On or Off, according to the
selected setting. Press the START button to return to the clock display.
L
IGHT HI/LOW/OFF
Press the Light Hi/Low/Off button once for bright light, twice for night light, or
three times to turn the light completely off.
VENT HI/LOW/OFF
Press the Vent Hi/Low/Off button once for high fan, twice for low fan, or three
times to turn the fan off.
K
ITCHEN TIMER
This microwave allows you to use your microwave oven as a timer. Use the
Kitchen Timer button for timing up to 99 minutes, 99 seconds.
S
TAR T
Press this button to start a selected function or cycle. If you open the door after
the oven begins to cook, close the door and press the START button again.
ONE MINUTE+
This simplifi ed control saves you time, letting you quickly start cooking at 100%
power without the need to press the START button.
Refer to “Using your microwave oven” on pa
ges 8 to 15 for detailed information on the buttons described in the
table above.
1
2
3
4
5
6
7
8
9
10
11
12
13
16
17
15
14
Page 8

8
1. SETTING UP YOUR MICROWAVE OVEN (CONT’D)
1.4 SETTING THE TIME
Your microwave oven is equipped with a built-in clock. Set the clock when fi rst installing your microwave oven
and after a power failure. The time is displayed whenever the microwave oven is not being used.
1. Press the Clock button.
2. Enter the time using the number buttons.
3. Press the START button.
1.5 DEMONSTRATION MODE
Your microwave also comes with a demonstration mode, allowing you to see how your microwave operates
without the oven actually being heated.
ACTIVATING/DEACTIVATING
If you want to activate or deactivate the demonstration mode, press the 0 and 1 buttons at the same time.
The oven beeps whenever the demonstration mode is activated or deactivated.
1.6 CHILD LOCK
The Child Lock function allows you to lock the microwave buttons so that the microwave oven cannot be
operated accidentally. The oven operation can be locked at any time.
ACTIVATING/DEACTIVATING
If you want to activate or deactivate the child lock function, press the Start button for 3 seconds.
The display will show an L when the oven is locked.
2. USING YOUR MICROWAVE OVEN
Cooking has never been easier than with your new Venmar Jazz microwave oven.
The following section describes everything you need to know about using your microwave oven.
2.1 USING THE KITCHEN TIMER BUTTON
This microwave allows you to use your microwave oven as a timer. Use the Kitchen Timer for timing up to
99 minutes, 99 seconds.
1. Press the Kitchen Timer button.
2. Enter the time by using the number buttons.
3. Press the START button.
When the time is over, four beeps will sound and End is displayed.
2.2 USING THE ONE MINUTE+ BUTTON
This simplifi ed control saves you time, letting you quickly start cooking at 100% power without the need to
press the START button.
1. Press the One Minute+ button for each minute you wish the food to be cooked for. For example, press it
twice to cook it for two minutes. The time is displayed and the oven starts automatically.
2. Add minutes to a cooking program already in progress by pressing the One Minute+ button for every
additional minute you wish to add.
2.3 USING THE MORE/LESS BUTTONS
The More (9)/Less (1) buttons allow you to adjust the pre-set cook times. They only work for the “Reheat”,
“Auto Cooking”, “One Minute+” and “Time Cook” modes. Use the More (9)/Less (1) buttons only after you
have already begun cooking using one of these modes.
1. Use the More (9) button to add time to an automatic cooking procedure.
2. Use the Less (1) button to decrease the time of an automatic cooking procedure.
NOTE: Each time you press the More (9) button while cooking manually, the current cooking time increases
by 10 seconds. Press the Less (1) button to decrease it by 10 seconds.
Page 9

9
2. USING YOUR MICROWAVE OVEN (CONT’D)
2.4 USING THE VENT BUTTON
The vent removes steam and other vapors from the cooking surface. You can manually select the vent setting.
1. Press the Vent button once for a high fan speed.
2. Press the Vent button twice for a low fan speed.
3. Press the Vent button three times to turn the fan off.
NOTE: If the temperature becomes too hot around the microwave oven, the fan in the vent hood will
automatically turn on at the low setting to cool the oven. The fan will automatically turn off when the
oven has cooled down suffi ciently. This is an automated process and cannot be turned off.
2.5 USING THE LIGHT BUTTON
The Light button allows you to select a light setting for the cooking surface.
1. Press the Light button once for the bright light setting.
2. Press the Light button twice for the night light.
3. Press the Light button three times to turn the light completely off.
2.6 USING THE SOUND BUTTON
1. Press the Sound button, the display shows On.
2. Press the Sound button, the display shows Off.
3. Press the Start button, the display returns to the time of day.
2.7 USING THE AUTO COOK BUTTONS
The Auto Cook buttons consist of frequently used items allowing you to select these quickly and conveniently.
Use the More (9)/Less (1) buttons to set your temperature preference. If the food is not thoroughly cooked or
reheated when using the auto cook feature, complete the cooking process by selecting an additional power
level and cook time.
NOTE: Do not continuously use the Auto Cook buttons. The oven must cool for 5 minutes between uses or
the food will overcook.
POPCORN
The popcorn auto cook button is a feature that allows you to easily make popcorn (90/110 g bags of
commercially packaged microwave popcorn). Use only one package at a time. If you are using a microwave
popcorn popper, follow the manufacturer’s instructions.
Example: 110 g bag popcorn.
1. Press the Popcorn button once.
2. The oven will start automatically.
3. When the cook time is over, four beeps will sound and End will be displayed.
(Refer to the “AUTO COOK TABLE” on page
11.)
BAKED POTATO
The potato auto cook button is perfect for cooking potatoes at preset times and power levels. You can cook
up to 4 potatoes.
Example: Cooking 2 potatoes.
NOTE: Pierce the potatoes with a fork several times before putting them in the microwave oven.
1. Press the Baked Potato button twice.
2. The oven will start automatically.
3. When the cook time is over, four beeps will sound and End will be displayed.
4. Let the potatoes stand for 5 minutes.
(Refer to the “AUTO COOK TABLE” on page 11.)
NOTE: The cook times are based on medium-sized potatoes.
WARNING
Do not leave the microwave oven unattended while popcorn is being cooked.
!
Page 10

10
2. USING YOUR MICROWAVE OVEN (CONT’D)
2.7 USING THE AUTO COOK BUTTONS (CONT’D)
V
EGETABLES
The vegetables auto cook button lets you cook vegetables with preset times and cook powers.
Vegetables provide two preset categories (fresh and frozen) with a choice of 1 to 4 servings for each category.
Example: To cook 2 servings of Frozen Vegetables.
1. Press Vegetables button twice.
2. Enter the serving size (1 to 4) using the number button.
3. Press Start button.
4. When the cook time is over, four beeps will sound and End will be displayed.
(Refer to the “AUTO COOK TABLE” on page 11.)
PIZZA SLICE
The pizza slice auto cook button lets you reheat up to three medium-sized slices of pizza.
Example: To reheat 1 slice of pizza.
1. Press Pizza Slice button once.
2. The oven will start automatically.
3. When the cook time is over, four beeps will sound and End will be displayed.
(Refer to the “AUTO COOK TABLE” on page 11.)
COOK
The cook button provides four preset categories for cooking.
Example: To cook 250 g of frozen dinner.
1. Press Cook pad three times.
2. Press number pads to enter quantity, serving size or package weight.
3. Press Start button.
4. When the cook time is over, four beeps will sound and End will be displayed.
CATEGORY TIMES TO PRESS DISPLAY
B
EVERAGE Once Ac-1
B
ACON Twice Ac-2
FROZEN DINNER Three times Ac-3
F
ROZEN BREAKFAST Four times Ac-4
Page 11

11
2. USING YOUR MICROWAVE OVEN (CONT’D)
AUTO COOK TABLE
CATEGORY AMOUNT
TIMES
TO PRESS
INSTRUCTIONS
P
OPCORN
90 g
1 package
90 - 110 g
1 package
Once
Twice
Use only one microwave popcorn bag at a time.
Be careful when removing and opening the hot
bag from the oven. Let the oven cool for at least
5 minutes before using again.
B
AKED POTAT O
1 potato
2 potatoes
3 potatoes
4 potatoes
Once
Twice
Three times
Four times
Pierce each potato several times with a fork.
Place them on the turntable in a spoke-like
fashion. After cooking, let the potatoes stand
for 3-5 minutes. Let the oven cool for at
least 5 minutes before using it again. Use the
More (9) button when cooking larger potatoes to
add additional time.
V
EGETABLES
Fresh vegetables
Frozen vegetables
Once
Twice
Place 1 to 4 servings of fresh/frozen vegetables in
microwave-safe ceramic, glass or plastic dish and
add 2-4 Tbsp. water. Cover with lid or vented plastic
wrap during cooking and stir before standing. Let
oven cool for at least 5 minutes before using again.
Use More (9) pad when cooking dense vegetables
such as carrots or broccoli spears.
P
IZZA SLICE
1 slice
2 slices
3 slices
Once
Twice
Three times
Put 1 to 3 slices of pizza on a microwave-safe plate
with wide end of slice toward the outside edge of
the plate. Do not let slices overlap. Do not cover. Let
oven cool for at least 5 minutes before using again.
Use More (9) pad to increase reheat time for thick
crust pizza.
C
OOK
Beverage
(Ac-1)
Once
Use mug; do not cover. Place the beverage in the
oven. After heating, stir well. Let oven cool for at
least 5 minutes before using again.
NOTES: •
Reheat times based on an 225 ml cup
• Beverage heated with the beverage
feature may be very hot
• Remove container with care
Amount: 0.5 cup, 1 cup, 2 cups
Bacon
(Ac-2)
Twice
Place 2 paper towels on plate and arrange bacon
on towels, do not overlap. Cover with additional
paper towel. Remove paper towel immediately
after cooking. Let oven cool for at least 5 minutes
before using again. Use More (9)/Less (1) pads for
desired crispness.
Amount: 2 to 6 slices
Frozen dinner
(Ac-3)
Three times
Remove food from outer wrapping and follow box
instructions for covering and standing. Let oven
cool for at least 5 minutes before using again.
Amount: 250 to 450 g
Frozen breakfast
(Ac-4)
Four times
Follow package instructions for covering and
standing. Use this button for frozen sandwich,
breakfast, entree, etc. Let oven cool for at least 5
minutes before using again.
Amount: 120 to 250 g
Page 12

12
2. USING YOUR MICROWAVE OVEN (CONT’D)
2.8 USING THE AUTO DEFROST BUTTON
The defrost choices are preset in the oven. The defrost cycle provides you with the best defrosting method for
frozen foods, because the oven automatically sets the defrosting time according to the entered weight. For
added convenience, the auto defrost function beeps to remind you to check or turn over the food during the
defrost cycle.
1. Press the Auto Defrost button.
2. Use the number buttons to enter the weight (0.1 to 6.0 lb.).
3. Press the START button.
NOTE: After pressing the START button, the display counts down the defrosting time. The oven will beep
twice during the defrost cycle. At this time, open the door and turn the food as needed. Remove any
thawed portions, then return the frozen portions to the oven and press the START button to resume
the defrost cycle. The defrost cycle continues while the oven is beeping and only stops when the door
is opened.
DEFROSTING TIPS
When using auto defrost, the entered weight is the net weight in pounds and tenths of pounds (the weight of
the food minus the container).
Use the auto defrost cycle for raw food only. The auto defrost cycle gives best results when the food to
be thawed is a maximum of 0°F (-18°C) (taken directly from a true freezer). If food has been stored in a
refrigerator-freezer that does not maintain a temperature of 5°F (-15°C) or below, always program a lower
food weight (for a shorter defrosting time) to prevent actually cooking the food.
If the food is stored outside the freezer for up to 20 minutes, enter a lower food weight.
The shape of the package alters the defrosting time. Shallow rectangular packets defrost more quickly than
a thick block.
Separate the pieces as they begin to defrost. Separated pieces defrost more easily.
Shield areas of food with small pieces of foil if they start to become warm.
You can use small pieces of aluminum foil to shield foods such as chicken wings, leg tips, and fi sh tails, but
the foil must not touch the sides of the oven as foil causes arcing, which can damage the oven lining.
AUTO DEFROSTING TABLE
Follow the instructions below when defrosting different types of food.
CATEGORY PROCEDURE
STANDARD
AMOUNT
ROAST BEEF,
P
ORK
Start with the food placed fat side down. After each stage, turn
the food over and shield any warm portions with narrow strips
of aluminum foil.
2.5 - 6.0 lb.
S
TEAKS, CHOPS,
FISH
After each stage, rearrange the food. If there are any warm or
thawed portions of food, shield them with narrow, fl at pieces
of aluminum foil. Remove any pieces of food that are nearly
defrosted. Let stand, covered for 5 - 10 minutes.
0.5 - 3.0 lb.
G
ROUND MEAT
After each stage, remove any pieces of food that are nearly
defrosted. Let stand covered with foil for 5 - 10 minutes.
0.5 - 3.0 lb.
W
HOLE CHICKEN
Remove giblets before defrosting poultry. Start defrosting with
the breast side down. After the fi rst stage, turn the chicken over
and shield any warm portions with narrow strips of aluminum
foil. After the second stage, again shield any warm portions
with narrow strips of aluminum foil. Let stand, covered, for
30 - 60 minutes in the refrigerator.
2.5 - 6.0 lb.
C
HICKEN PIECES
After each stage, rearrange or remove any pieces of food that
are nearly defrosted. Let stand for 10 - 20 minutes.
0.5 - 3.0 lb.
B
READ
Arrange the rolls in a circle on kitchen paper in the middle of
the turntable.
Turn over halfway through the defrosting time.
0.1 - 2.0 lb.
Page 13

13
2 USING YOUR MICROWAVE OVEN (CONT’D)
2.9 USING THE AUTO REHEAT BUTTON
The Auto Reheat button provides three preset reheating categories.
Example: Reheating 3 servings of casserole.
1. Press the Auto Reheat button twice.
2. Use the number buttons to enter the quantity/servings.
3. Press the START button.
4. When the cook time is over, four beeps will sound and End will be displayed.
AUTO REHEATING TABLE
NOTE: The “right” temperature of the food varies from person to person. Use the More (9)/Less (1) buttons
to select your temperature preference.
Allow food to stand 1 to 5 minutes before serving.
CATEGORY TIMES TO PRESS DISPLAY
PLATE OF FOOD Once rh-1
C
ASSEROLE Twice rh-2
P
ASTA Three times rh-3
CATEGORY DIRECTIONS AMOUNT
PLATE OF FOOD
Use only pre-cooked, refrigerated foods. Cover the plate with
a vented plastic wrap or waxed paper tucked under the plate.
If the food is not as hot as you would like after using the reheat
function, continue heating using additional time and power.
Contents:
90-120 g meat, poultry or fi sh (up to 190 g with bone)
1/2 cup starch (potatoes, pasta, rice, etc.)
1/2 cup vegetables (about 90-120 g)
1 serving (1 plate)
CASSEROLE
Cover the plate with a lid or vented plastic wrap. If the food is
not as hot as you would like after using the reheat function,
continue heating using additional time and power. Stir the food
once before serving.
Contents:
90-120 g meat, poultry or fi sh (up to 190 g with bone)
1/2 cup starch (potatoes, pasta, rice, etc.)
1/2 cup vegetables (about 90-120 g)
1 to 4 servings
P
ASTA
Page 14

ITEM
AMOUNT
OR SERVINGS
REMARKS
M
ELT
CHOCOLATE
2 squares or 1 cup chips
• Place chocolate chips or square in a microwave-safe dish.
• Stir well at half time when the oven beeps, and re-start the
oven.
• Unless stirred, the chocolate keeps its shape even when
heating time is over.
S
OFTEN
C
REAM CHEESE
1 package (8 oz.) (250 g)
• Unwrap cream cheese and place on microwave-safe dish.
• Let stand 1-2 minutes.
M
ELT BUTTER
1 stick (1/4 lb.)
• Remove wrapping and cut butter in half vertically.
• Place butter in dish, cover with wax paper.
• Stir well after fi nishing and let stand 1-2 minutes.
2 sticks (1/2 lb.)
14
2. USING YOUR MICROWAVE OVEN (CONT’D)
2.10
USING THE SOFTEN/MELT BUTTON
Soften/Melt lets you soften or melt 3 categories of food: 1 cup of chocolate chips, 8 oz. (250 g) of cream
cheese and 1/4 lb. or 1/2 lb. of butter.
Example no. 1: To melt chocolate.
1. Press the
Soften/Melt button once.
2. Press the START button.
3. When the cook time is over, four beeps will sound and End will be displayed.
Example no. 2: To melt butter.
1. Press the
Soften/Melt button three times.
2. Use the number buttons to enter the quantity (no. 1 for 1/4 lb. or no. 2 for 1/2 lb.).
2. Press the START button.
3. When the cook time is over, four beeps will sound and End will be displayed.
SOFTEN/MELT CHART TABLE
2.11
MICROWAVE COOKING TIMES & POWER LEVELS
Your oven allows you to set two different cooking stages, each with their own time length and power level.
The power level lets you control the heating intensity from Warm (1) through to High (10).
COOKING AT HIGH POWER LEVELS
1. Use the number buttons to enter the cook time.
2. Press the START button.
3. When the cook time is over, four beeps will sound and End will be displayed.
NOTE: If you do not enter a power level, the microwave oven cooks at the High Power Level by default.
COOKING AT LOWER POWER LEVELS
Cooking at high power does not always give you the best results with foods that require slower cooking, such
as roasts, baked goods, or custards. Your oven has 9 additional power settings in addition to high.
1. Use the number buttons to enter the cook time.
2. Press the Power Level button.
3. Use the number buttons to enter the power level.
4. Press the START button.
5. When the cook time is over, four beeps will sound and End will be displayed.
CATEGORY TIMES TO PRESS DISPLAY
MELT CHOCOLATE Once st-1
SOFTEN CREAM CHEESE Twice st-2
MELT BUTTER Three times st-3
Page 15

15
2. USING YOUR MICROWAVE OVEN (CONT’D)
2.11
MICROWAVE COOKING TIMES & POWER LEVELS (CONT'D)
C
OOKING WITH MORE THAN ONE COOK CYCLE
For best results, some recipes call for one power level for a certain length of time, and another power level for
another length of time. Your oven can be set to change from one to another automatically.
1. Use the number buttons to enter the cook time.
2. Press the Power Level button.
3. Use the number buttons to enter the power level.
4. Use the number buttons to enter the second cook time.
5. Press the Power Level button.
6. Use the number buttons to enter the power level.
7. Press the START button.
8. When the cook time is over, four beeps will sound and End will be displayed.
POWER LEVELS
The 10 power levels allow you to choose the best power level for any food you may be cooking. The power
levels are listed below with examples of foods and liquids best cooked at each level, and the amount of
microwave power being used.
POWER
LEVEL
MICROWAVE
OUTPUT
USE
10 (High)
100%
Boiling water.
Cooking ground beef.
Making candy.
Cooking fresh fruit and vegetables.
Cooking fi sh and poultry.
Preheating browning dish.
Reheating beverages.
Bacon slices.
9
90%
Reheating meat slices quickly.
Sautéing onions, celery, and green pepper.
8
80%
Reheating all types of items (Dinner plate, pasta, meat, soup or
sauce, etc,).
Cooking scrambled eggs.
7
70%
Cooking breads and cereal products.
Cooking cheese dishes, veal.
Cooking cakes, muffi ns, brownies, cupcakes.
6
60% Cooking pasta.
5
50%
Cooking meats, whole poultry.
Heating custard.
Cooking whole chickens, turkey, spare ribs, rib roasts, sirloin roasts.
4
40%
Cooking less tender cuts of meat.
Reheating frozen convenience foods.
3
30%
Thawing meat, poultry, and seafood.
Cooking small quantities of food.
Finishing cooking casserole, stew, and some sauces.
2
20%
Softening butter and cream cheese.
Heating small amounts of food.
1
10%
Softening ice cream.
Raising yeast dough.
Page 16

16
3. COOKWARE GUIDE
To cook food in the microwave oven, the microwaves must be able to penetrate the food without being refl ected
or absorbed by the dish.
It is important to choose the correct cookware, therefore look for cookware that is marked microwave-safe.
The table below lists various types of cookware and indicates if and how they should be used in a microwave oven.
MICROWAVE-SAFE UTENSILS
If you are not sure whether an item is microwave-safe or not, you can perform the following simple test:
1. Fill 1 cup of a glass measuring cup with water and put it inside your oven next to the item to test.
2. Press the One Minute+ button once to heat them both for one minute at high power.
After the minute, the water should be warm and the item you are testing should be cool. If the dish is warm,
then it is absorbing microwave energy and is not microwave-safe.
COOKWARE ✓ AND/OR ✗ COMMENTS
A
LUMINUM FOIL
✓ ✗
Can be used in small quantities to protect areas against
overcooking. Arcing can occur if the foil is too close to the
oven wall or if too much foil is used.
B
ROWNING PLATE
✓
Do not preheat for more than eight minutes.
C
ERAMIC, PORCELAIN
AND STONEWARE
✓
Porcelain, pottery, glazed earthenware and bone china are
usually suitable, unless decorated with a metal trim.
D
ISPOSABLE POLYESTER
C
ARDBOARD
✓
Some frozen foods are packaged in these materials.
F
AST-FOOD PACKAGING
POLYSTYRENE
CUPS/CONTAINERS
✓
Can be used to warm food. Overheating may cause the
polystyrene to melt.
P
APER BAGS
OR NEWSPAPER
✗
May catch fi re.
R
ECYCLED PAPER OR
METAL TRIMS GLASSWARE
✗
May cause arcing.
G
LASSWARE
OVEN-TO-TABLE WARE
✓
Can be used, unless decorated with a metal trim.
F
INE GLASSWARE
✓
Can be used to warm foods or liquids. Delicate glass may
break or crack if heated suddenly.
G
LASS JARS
✓
Regular glass is too thin to be used in a microwave, and
can shatter.
M
ETAL
DISHES, UTENSILS
✗
May cause arcing or fi re.
F
REEZER BAG TWIST TIES
✗
P
APER
PLATES, CUPS, NAPKINS
AND KITCHEN PAPER
✓
For short cooking times and warming. Also to absorb
excess moisture.
R
ECYCLED PAPER
✗
Do not use recycled paper towels, which may contain
metal and may catch fi re or cause arcing.
Page 17

17
3. COOKWARE GUIDE (CONT’D)
✓ : Recommended ✓ ✗ : Use Caution ✗ : Unsafe
4. COOKING GUIDE
4.1 MICROWAVES
Microwave energy actually penetrates food, attracted and absorbed by the water, fat and sugar content. The
microwaves cause the molecules in the food to move rapidly and the rapid movement of these molecules
creates friction and the resulting heat cooks the food.
COOKING MEAT
Place the meat fat-side down on a microwave-safe roasting rack in a microwave-safe dish. Use narrow strips
of aluminum foil to shield any bone tips or thin pieces of meat. Check the temperature in several places before
letting the meat stand the recommended time.
The following temperatures are removal temperatures. The temperature of the food will rise during standing
time.
COOKWARE ✓ AND/OR ✗ COMMENTS
W
AX
OR GREASE-PROOF PAPER
✓
Can be used to retain moisture and prevent spattering.
P
LASTIC
CONTAINERS
✓
Can be used if heat-resistant thermoplastic. Some plastics
may warp or discolor at high temperatures. Do not use
melamine plastic.
C
LING FILM
✓
Can be used to retain moisture. Avoid wrapping the food
too tight. Take care when removing the fi lm as hot steam
will escape.
FREEZER BAGS
✓ ✗
Only if boilable or oven-proof. Should not be airtight. Prick
with a fork, if necessary.
T
HERMOMETER
✓
Use only those marked “Microwave-safe” and follow
the directions. Check the temperature in several places.
Conventional thermometers can be used once the food
has been removed from the oven.
S
TRAW, WICKER
AND
WOOD
✓ ✗
Use only for short-term heating, as these materials can be
fl ammable.
FOOD COOKING TIME/POWER LEVEL INSTRUCTIONS
R
OAST BEEF (BONELESS)
U
P TO 4 LB.
Cooking Time:
10-15 min./lb. for 145°F - Rare
12-17 min./lb. for 160°F - Medium
14-19 min./lb. for 170°F - Well Done
Place the roast fat-side down on
the roasting rack and cover with
wax paper. Turn over halfway
through the cooking process. Let
stand for 10 to 15 minutes.
Power Level:
High (10) for fi rst 5 minutes, then
Medium (5).
P
ORK
(BONELESS OR BONE-IN)
UP TO 4 LB.
Cooking Time:
15-20 min./lb. for 170°F - Well Done
Place the roast fat-side down on
the roasting rack and cover with
wax paper. Turn over halfway
through the cooking process. Let
stand for 10 to 15 minutes.
Power Level:
High (10) for fi rst 5 minutes, then
Medium (5).
Page 18

18
4. COOKING GUIDE (CONT’D)
*Expect a 10°F rise in temperature during standing time.
COOKING POULTRY
Place the poultry on a microwave-safe roasting rack in a microwave-safe dish and cover with wax paper to
prevent spattering. Use aluminum foil to shield the bone tips, thin pieces of meat, or areas that are starting to
overcook.
Check the temperature in several places before letting the poultry stand the recommended time.
FOOD REMOVE FROM OVEN AFTER STANDING (10 MIN.)*
B
EEF
Rare 135°F 145°F
Medium 150°F 160°F
Well done 160°F 170°F
PORK
Medium 150°F 160°F
Well done 160°F 170°F
POULTRY
Dark meat 170°F 180°F
Light meat 160°F 170°F
FOOD COOKING TIME/POWER LEVEL INSTRUCTIONS
WHOLE CHICKEN
UP TO 4 LB.
Cooking Time: 6-10 min./lb.
180°F dark meat
170°F light meat
Place the chicken breast-side
down on the roasting rack. Cover
with wax paper. Turn over half way
through cooking. Cook until the
juices run clear and the meat near
the bone is no longer pink. Let
stand for 5-10 minutes.
Power Level:
Medium High (7).
C
HICKEN PIECES
UP TO 2 LB.
Cooking Time: 6-10 min./lb.
180°F dark meat
170°F light meat
Place the chicken bone-side down
on the dish, with the thickest
portions towards the outside of the
dish. Cover with wax paper. Turn
over halfway through the cooking
process. Cook until the juices run
clear and the meat near the bone
is no longer pink. Let stand for
5-10 minutes.
Power Level:
Medium High (7).
Page 19

19
4. COOKING GUIDE (CONT’D)
COOKING SEAFOOD
Place the fi sh on a microwave-safe roasting rack in a microwave-safe dish. Use a tight cover to steam the fi sh.
A lighter cover of wax paper or paper towel will decrease steaming. Cook the fi sh until it fl akes easily with a
fork. Do not overcook fi sh; check it after the minimum cook time.
COOKING EGGS
COOKING VEGETABLES
Vegetables should be washed prior to cooking. Usually no extra water is needed. If dense vegetables such as
potatoes, carrots and green beans are being cooked, add about 1/4 cup water.
Small vegetables (sliced carrots, peas, lima beans, etc.) will cook faster than larger ones.
Whole vegetables, such as potatoes, acorn squash or corn on the cob should be arranged in a circle on the
turntable before cooking. They will cook more evenly if turned over halfway through the cook time.
Always place vegetables such as asparagus and broccoli with the stem pointing towards the edge of the dish
and the tips toward the center.
When cooking cut vegetables, always cover the dish with a lid or vented microwavable plastic wrap.
Whole, unpeeled vegetables such as potatoes, squash, eggplant, etc., should have their skins pierced in
several spots before cooking to prevent them from bursting. For a more even cooking result, stir or rearrange
whole vegetables halfway through the cook time.
Generally, the denser the food, the longer the standing time. (Standing time refers to the time necessary
for dense, large foods and vegetables to fi nish cooking after they come out of the oven.) A baked potato
can stand on the counter for fi ve minutes before cooking is completed, while a dish of peas can be served
immediately.
FOOD COOKING TIME/POWER LEVEL INSTRUCTIONS
TUNA STEAKS
AND SALMON STEAKS
UP TO 1.5 LB.
Cooking Time:
7-11 min./lb.
Arrange the steaks on a roasting
rack with the meaty portions
towards the outside of the rack.
Cover with wax paper. Turn them
over when the cooking time is
halfway through. Cook until the
fi sh fl akes easily with a fork. Let
stand for 3-5 minutes.
Power Level:
Medium-High (7).
F
ILLETS
UP TO 1.5 LB.
Cooking Time:
4-8 min./lb.
Arrange the fi llets in a baking dish,
tucking any thin pieces under.
Cover with wax paper. If the fi llets
are thicker than 1/2”, turn them
over when the cook time is halfway.
Cook until the fi sh fl akes easily with
a fork. Let stand for 2-3 minutes.
Power Level:
Medium-High (7).
S
HRIMPS
UP TO 1.5 LB.
Cooking Time:
4-6½ min./lb.
Arrange the shrimps in a baking
dish without overlapping or layering
them. Cover with wax paper. Cook
until fi rm and opaque, stirring 2 or
3 times. Let stand for 5 minutes.
Power Level:
Medium-High (7).
WARNING
Never cook eggs in their shells and never warm up hard-boiled eggs in their shells as
they can explode. Always pierce whole eggs to keep them from bursting.
!
Page 20

20
5. MICROWAVE OVEN CARE
Keeping your microwave oven clean improves its performance, wards off unnecessary repairs and lengthens its life.
5.1 CLEANING THE EXTERIOR
It’s best to clean spills on the outside of your microwave oven as they occur. Use a soft cloth and warm, soapy
water. Rinse and dry.
5.2 CLEANING THE INTERIOR
Clean the interior surfaces (oven cavity) of your microwave oven periodically to remove any splashes or
stains. To remove hardened food articles and remove smells, place 2 cups of water (add lemon juice for extra
freshness) in a four-cup measuring glass at High power for 5 minutes or until boiling. Let it stand in the oven
for one or two minutes.
5.3 CLEANING THE DOOR AND DOOR SEALS
Always ensure that the door seals are clean and that the door closes properly. Take particular care when
cleaning the door seals to ensure that no particles accumulate and prevent the door from closing correctly.
Wash the glass door with very mild soap and water. Be sure to use a soft cloth to avoid scratching.
NOTE: If steam accumulates inside or outside the oven door, wipe with a soft cloth. Steam can accumulate
when operating the oven at high humidity and in no way indicates microwave leakage.
5.4 CLEANING THE TURNTABLE AND ROLLER RING
Clean the roller ring periodically and wash the turntable as required. The turntable can safely be washed in
your dishwasher.
5.5 CLEANING THE GREASE FILTER
The grease fi lter should be removed and cleaned at least once a month.
1. Slide the fi lter to the left (A) using its ring, then pull down to remove (B).
WARNING
Do not get water into the vents. Never use abrasive products or chemical solvents.
WARNING
Ensure that the microwave oven has cooled down before cleaning it to avoid injury.
CAUTION
Remove the turntable from the oven for cleaning it and the oven. To prevent the tray
from breaking, handle it with care and do not put it in water immediately after cooking.
Wash the tray carefully in warm sudsy water or in the dishwasher.
WARNING
To avoid risk of personal injury or property damage, do not operate the microwave oven
hood without fi lter in place.
MO0003
MO0004
A
B
!!!
Page 21

21
5. MICROWAVE OVEN CARE (CONT’D)
2. Soak the grease fi lter in hot water and a mild detergent. Rinse well and shake to dry.
3. To return the fi lter to its position, slide it into the side slot, then push it
upwards and towards the oven center to lock it. Ensure it is well seated
in place.
5.6 STORING AND REPAIRING YOUR MICROWAVE OVEN
If you need to store your microwave oven for a short or extended period of time, choose a dust-free, dry
location. Dust and dampness may adversely affect the microwave parts.
Do not use the oven if the microwave oven is damaged, in particular when the door or door seals are
damaged. This could be a broken hinge, a worn out seal or distorted/bent casing.
Do not remove the oven from its casing.
This microwave oven is for home use only and is not intended for commercial use.
5.7 REPLACING THE COOKTOP LIGHT
1. Unplug the oven or turn off the power at the main power supply.
2. Open the cover by removing its retaining screw (C) and set screw aside.
3. Remove the defective bulb and replace with a 40-watt appliance bulb.
4. Close the bulb cover and secure with its retaining screw.
5. Turn the power back on or plug the power cord back and set the clock.
CAUTION
Do not use strong cleaning agents or put the grease fi lter in the microwave oven. The
aluminum will tarnish.
CAUTION
Do not repair, replace or service any part of your microwave oven yourself. Allow only a
qualifi ed service technician to perform repairs. If the oven is faulty and needs servicing,
or you are in doubt about its condition, unplug the oven from the power outlet and
contact your nearest service center.
MO0005
MO0006
MO0007
C
WARNING
In order to prevent the risk of personal injury, allow enough time for the lamp to cool down
before removing it.
!
Page 22

22
5. MICROWAVE OVEN CARE (CONT’D)
5.8 REPLACING THE OVEN LIGHT
1. Unplug the oven plug or turn off the power at the main
power supply.
2. Open the door.
3. Remove the 3 vent cover retaining screws.
4. Slide the vent grille to the left, then pull it straight out.
5. Remove the bulb cover by pushing on the hook (A) and
pulling up the lever (B).
6. Remove the defective bulb and replace with a 40-watt
appliance bulb.
7. Reinstall the bulb cover.
8. Reinstall the vent grille with its 3 retaining screws.
9. Turn the power back on or plug the power cord back and
set the clock.
5.9 REPLACING THE CHARCOAL FILTER
If your oven is vented to the inside, the charcoal fi lter should be replaced every 6 to 12 months or more often
if necessary.
NOTE: The charcoal fi lter cannot be cleaned.
1. Unplug the oven plug or turn off the power at the main power
supply.
2. Open the door.
3. Remove the 3 vent grille retaining screws.
4. Slide the vent grille to the left, then pull it straight out.
5. Slide the used fi lter out.
6. Slide a new charcoal fi lter into place.
7. Reinstall the vent grille with its 3 retaining screws and close the
door. Turn the power back on or plug the power cord back and
set the clock.
MO0009
MO0010
A.
B.
MO0008
PUSH
PULL UP
WARNING
In order to prevent the risk of personal injury,
allow enough time for the lamp to cool down
before removing it.
!
Page 23

23
6. TROUBLESHOOTING
CHECK THESE POINTS IF YOUR MICROWAVE OVEN…
7. REPLACEMENT PARTS
PROBLEM SOLUTION
D
ISPLAY
IS NOT WORKING.
Make sure the plug is properly connected to a grounded outlet.
If the wall outlet is controlled by a wall switch, make sure the wall switch is turned on.
Remove the plug from the outlet, wait ten seconds, and plug it in again.
Reset the circuit breaker or replace any blown fuses.
Plug a different appliance into the outlet. If the other appliance doesn’t work, call a qualifi ed
electrician to repair the wall outlet.
Plug the oven into a different outlet.
T
HE DISPLAY
IS WORKING,
BUT THE POWER
WON’T COME ON.
Make sure the door is closed securely.
Check if any packaging material or anything else is stuck in the door seal.
Check if the door is damaged.
Press Cancel twice and re-enter all cooking instructions.
IS THE POWER
GOING OFF
BEFORE THE
SET TIME HAS
ELAPSED?
If there was a power outage, the time indicator will display: 88:88.
If no power outage occurred, remove the plug from the outlet, wait ten seconds, and plug it
in again. Reset the clock and any cooking instructions.
Reset the circuit breaker or replace any blown fuses.
C
OOKS FOOD
TOO SLOWLY.
Make sure the oven has its own 20-amp circuit line. Operating another appliance on the
same circuit can cause a voltage drop. If necessary, move the oven to its own circuit.
HAS SPARKS
OR ARCING.
Remove any metallic utensils, cookware, or metal ties. If using foil, use only narrow strips
and allow at least one inch between the foil and the interior oven walls.
T
HE TURNTABLE
MAKES NOISE OR
BECOMES STUCK.
Clean the turntable, roller ring and oven fl oor.
Make sure the turntable and roller ring are positioned correctly.
C
AUSES TV
OR RADIO
INTERFERENCE.
This is similar to interference caused by other small appliances, such as hair dryers. Move
your microwave (or appliance) away from such appliances, such as your TV or radio.
MA0009
1 2
3
4
5
6
No. PART No. DESCRIPTION QTY.
1 08818 Turntable 1
2 08819 Roller guide ring 1
3 08821 Grease fi lter 1
4 08816 Installation guide 1
5 08817 User guide 1
6 08820 Charcoal fi lter 1
Page 24

24
8. SPECIFICATIONS
9. WARRANTY
MODEL NUMBERS
VJ10430SS or VJ10430WH
OVEN CAVITY
1.6 cu. ft.
C
ONTROLS
10 power levels, including defrost
T
IMER
99 minutes, 99 seconds
P
OWER SOURCE
120 VAC, 60 Hz
P
OWER CONSUMPTION
1500 Watts
M
ICROWAVE POWER OUTPUT
1000 Watts
O
VEN CAVITY DIMENSIONS
19 5/16” (W) x 9 5/8” (H) x 14 3/8” (D)
O
UTSIDE DIMENSIONS
29 7/8” (W) x 16 1/2” (H) x 15 1/16” (D)
S
HIPPING DIMENSIONS
33 3/8” (W) x 19 15/16” (H) x 19 13/32” (D)
N
ET WEIGHT
Stainless steel: 45.9 lb., White: 44.5 lb.
G
ROSS WEIGHT
Stainless steel: 53.4 lb., White: 52.0 lb.
VENMAR JAZZ MICROWAVE OVEN OVER THE RANGE
1-YEAR LIMITED WARRANTY
Venmar Ventilation inc. warrants to the original consumer purchaser of its products, that such products will
be free from defects in materials or workmanship for a period of one (1) year from date of original purchase.
This warranty includes in-home service for the rst 90 days and workshop service for the remaining warranty
time. THERE ARE NO OTHER WARRANTIES, EXPRESS OR IMPLIED, INCLUDING, BUT NOT LIMITED TO,
IMPLIED WARRANTIES OF MERCHANTABILITY OR FITNESS FOR A PARTICULAR PURPOSE. VENMAR
VENTILATION INC. WILL NOT BE HELD RESPONSIBLE FOR ANY CLAIMS OVER THE ORIGINAL PURCHASE
PRICE OF A VENMAR JAZZ MICROWAVE OVEN OVER THE RANGE, NOR HELD RESPONSIBLE FOR
SUBSEQUENT DAMAGE OR INCIDENT.
During the period stated above, Venmar Ventilation inc. will, at its option, repair or replace without charge
any product or part which is found to be defective under normal use and service. THIS WARRANTY DOES
NOT EXTEND TO ANY LIGHT BULBS, FILTERS, TURNTABLE AND ROLLER GUIDE RING. This warranty
does not cover a) normal maintenance and service b) any products or parts which have been subject to
misuse, negligence, accident, improper maintenance or repairs made by other than Venmar Ventilation inc.,
or c) a faulty installation or installation contrary to recommended installation instructions. The duration of any
implied warranty is limited to the 1-year period as speci ed for the express warranty. Some provinces do not
allow limitation on how long an implied warranty lasts, so the above limitation may not apply to you. VENMAR
VENTILATION INC.’S OBLIGATION TO REPAIR OR REPLACE AT VENMAR VENTILATION INC. OPTION,
SHALL BE THE PURCHASER’S SOLE AND EXCLUSIVE REMEDY UNDER THIS WARRANTY. VENMAR
VENTILATION INC. SHALL NOT BE LIABLE FOR INCIDENTAL, CONSEQUENTIAL OR SPECIAL DAMAGES
ARISING OUT OF OR IN CONNECTION WITH PRODUCT USE OR PERFORMANCE. SOME PROVINCES DO
NOT ALLOW THE EXCLUSION OR LIMITATION OF INCIDENTAL OR CONSEQUENTIAL DAMAGES, SO THE
ABOVE LIMITATION OR EXCLUSION MAY NOT APPLY TO YOU.
This warranty gives you speci c legal rights and you may also have other rights, which vary from one
province to another. This warranty supersedes all prior warranties. Warranty service is to be completed by
an authorized Service Center designated by Venmar Ventilation inc. Where applicable, in home service will
be made available only in areas where a contracted service provider offers service. If in home service is
not available, the product will be repaired or replaced, at Venmar Ventilation inc. discretion, by the nearest
authorized service provider. The unit removal and reinstallation works are under the customer responsibility,
and Venmar Ventilation inc. cannot be charged for them.
To contact Venmar Ventilation inc. warranty service call 1-800-567-3855 (in Canada). In order to qualify for a
warranty claim, the owner of a Venmar Jazz Microwave Oven Over The Range must have the model and serial
number along with a proof of the original purchase date. At the time of requesting service, describe the nature
of any defect in the product or part. In case of discrepancies between the English version of the warranty and
the French version, the English version will prevail.
Venmar Ventilation inc., 550 Lemire Blvd., Drummondville, Quebec CANADA J2C 7W9
Tel.: 1-800-567-3855 Fax: 819-475-2660
www.venmar.ca
 Loading...