

Page 1
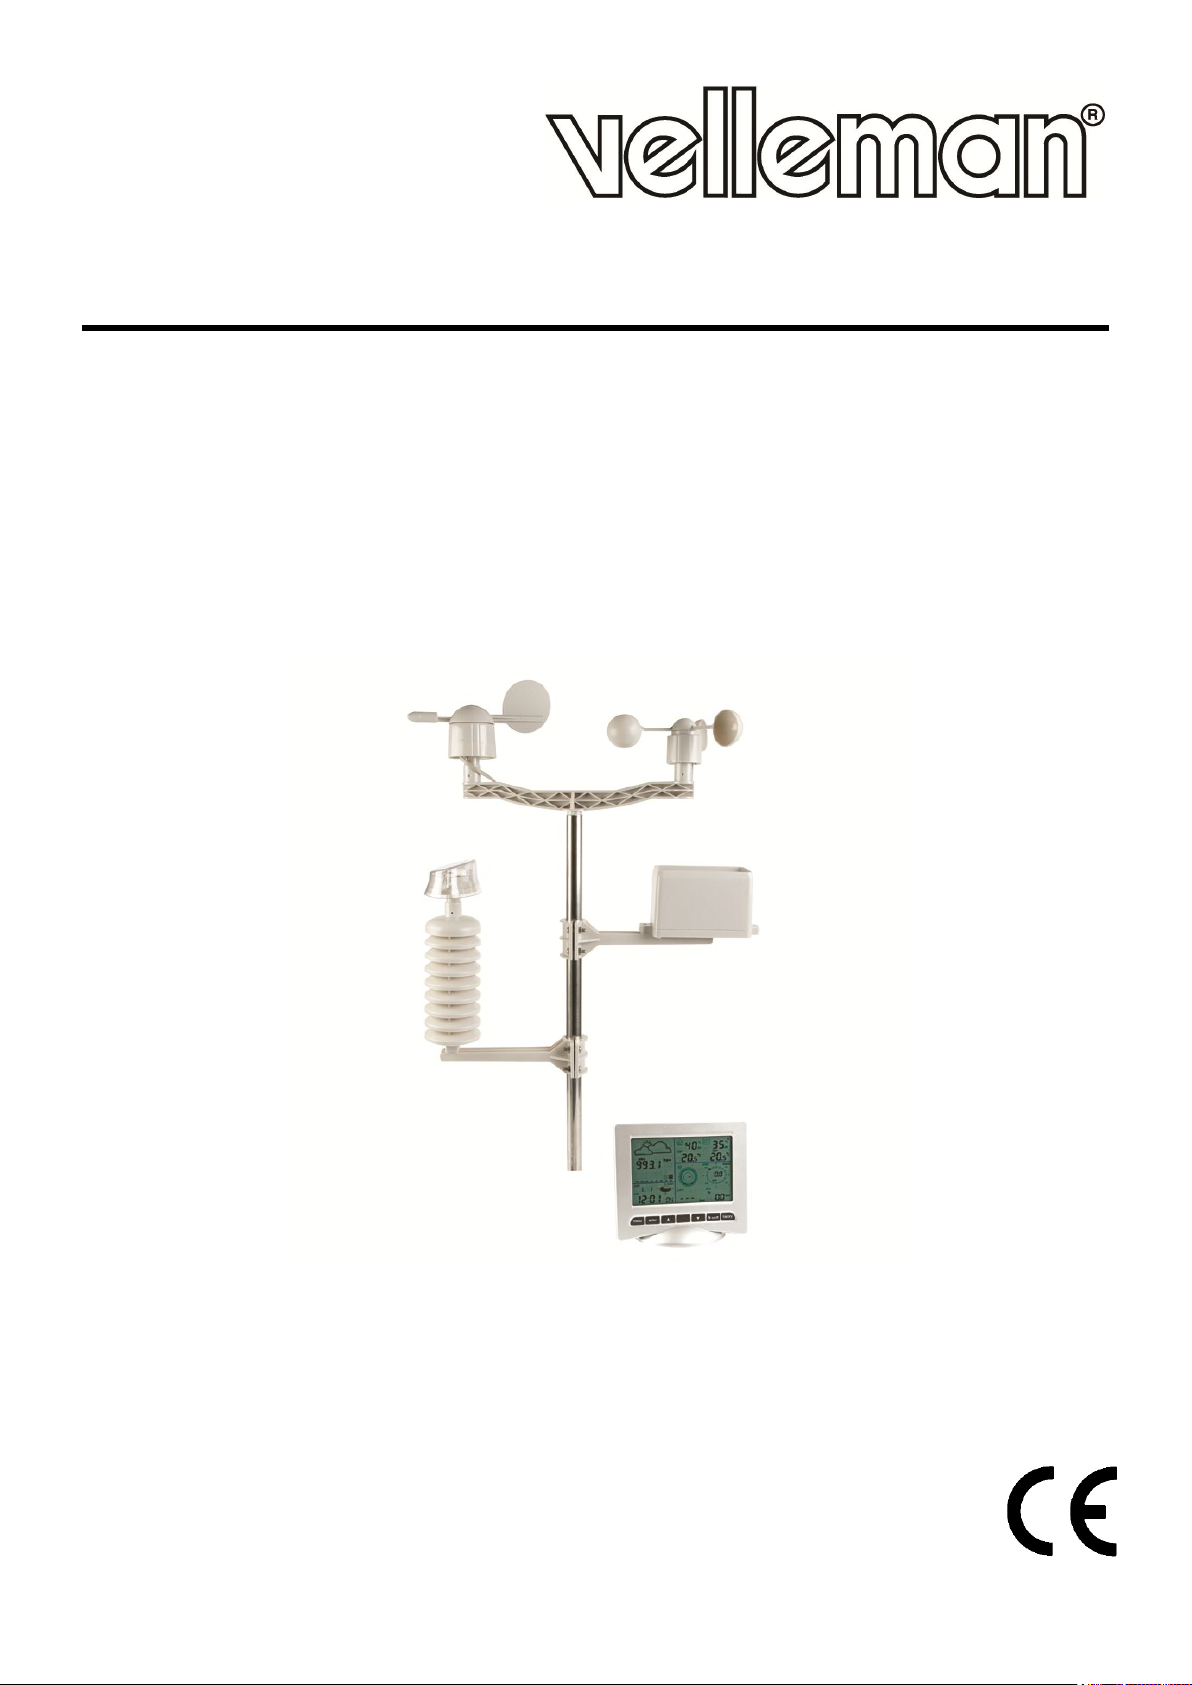
WS3080
WEATHER CENTRE WITH SOLAR TRANSMITTER AN D PC INTERFACE
WEERSTATION MET ZENDER OP ZONNE-ENERGIE EN PC-INTERFACE
STATION MÉTÉO AVEC ÉMETTEUR SOLAIRE ET INTERFACE PC
ESTACIÓN METEOROLÓGICA CON TRANSMISOR SOLAR E INTERFAZ PC
WETTERSTATION MIT SOLARSENDER UND PC-SCHNITTSTELLE
CENTRAL METEOROLÓGICA COM TRANSMISSOR SOLAR E INTERFACE PC
PROFESJONALNE CENTRUM POGODOWE Z NADAJNIKIEM SŁONECZNYM I
INTERFEJSEM PC
USER MANUAL 4
GEBRUIKERSHANDLEIDING 16
MODE D‘EMPLOI 28
MANUAL DEL USUARIO 39
BEDIENUNGSANLEITUNG 51
MANUAL DO UTILIZADOR 63
INSTRUKCJA OBSŁUGI 75
Page 2
WS3080
V. 01 – 21/06/2013 2 ©Velleman nv
Page 3
WS3080
V. 01 – 21/06/2013 3 ©Velleman nv
Page 4
WS3080
Keep this device away from children and unauthorized users.
Indoor use only. Keep the display away form rain, moisture, splashing and dripping liquids.
Keep this device away from dust and extreme heat.
Protect this device from shocks and abuse. Avoid brute force when operating the device.
USER MANUAL
1. Introduction
To all residents of the European Union
Important environmental information about this product
This symbol on the device or the package indicates that disposal of the device after its lifecycle could
harm the environment. Do not dispose of the unit (or batteries) as unsorted municipal waste; it
should be taken to a specialized company for recycling. This device should be returned to your
distributor or to a local recycling service. Respect the local environmental rules.
If in doubt, contact your local waste disposal authorities.
Thank you for choosing Velleman! Please read the manual thoroughly before bringing this device into service. If
the device was damaged in transit, don't install or use it and contact your dealer.
2. Safety Instructions
3. General Guidelines
Refer to the Velleman® Service and Quality Warranty on the last pages of this manual.
Familiarise yourself with the functions of the device before actually using it.
All modifications of the device are forbidden for safety reasons. Damage caused by user modifications to
the device is not covered by the warranty.
Only use the device for its intended purpose. Using the device in an unauthorised way will void the
warranty.
Damage caused by disregard of certain guidelines in this manual is not covered by the warranty and the
dealer will not accept responsibility for any ensuing defects or problems.
4. Features
solar-powered transmitter
rain gauge
PC connection through USB (software included)
all weather data from the base station and up to 4080 sets of weather data history banks with user
adjustable measuring intervals can be recorded and uploaded to your PC
indication of:
o wind speed: mph, m/s, km/h, knots, beaufort
o wind direction: on LCD compass
o time: radio-controlled trough WWVB, DCF
o UV index
o rainfall data: inches or mm, 1 hour/24 hours/one week/one month/total since last reset
o weather forecast: based on changing barometric pressure
o barometric pressure: Hg or hPa
o indoor temperature: °C, °F
o outdoor temperature: °C, °F
o wind chill temperature: °C, °F
o dew point temperature display: °C, °F
o indoor and outdoor humidity
weather alarms: temperature, humidity, wind chill, dew point, rainfall, wind speed, air pressure, storm
V. 01 – 21/06/2013 4 ©Velleman nv
Page 5
WS3080
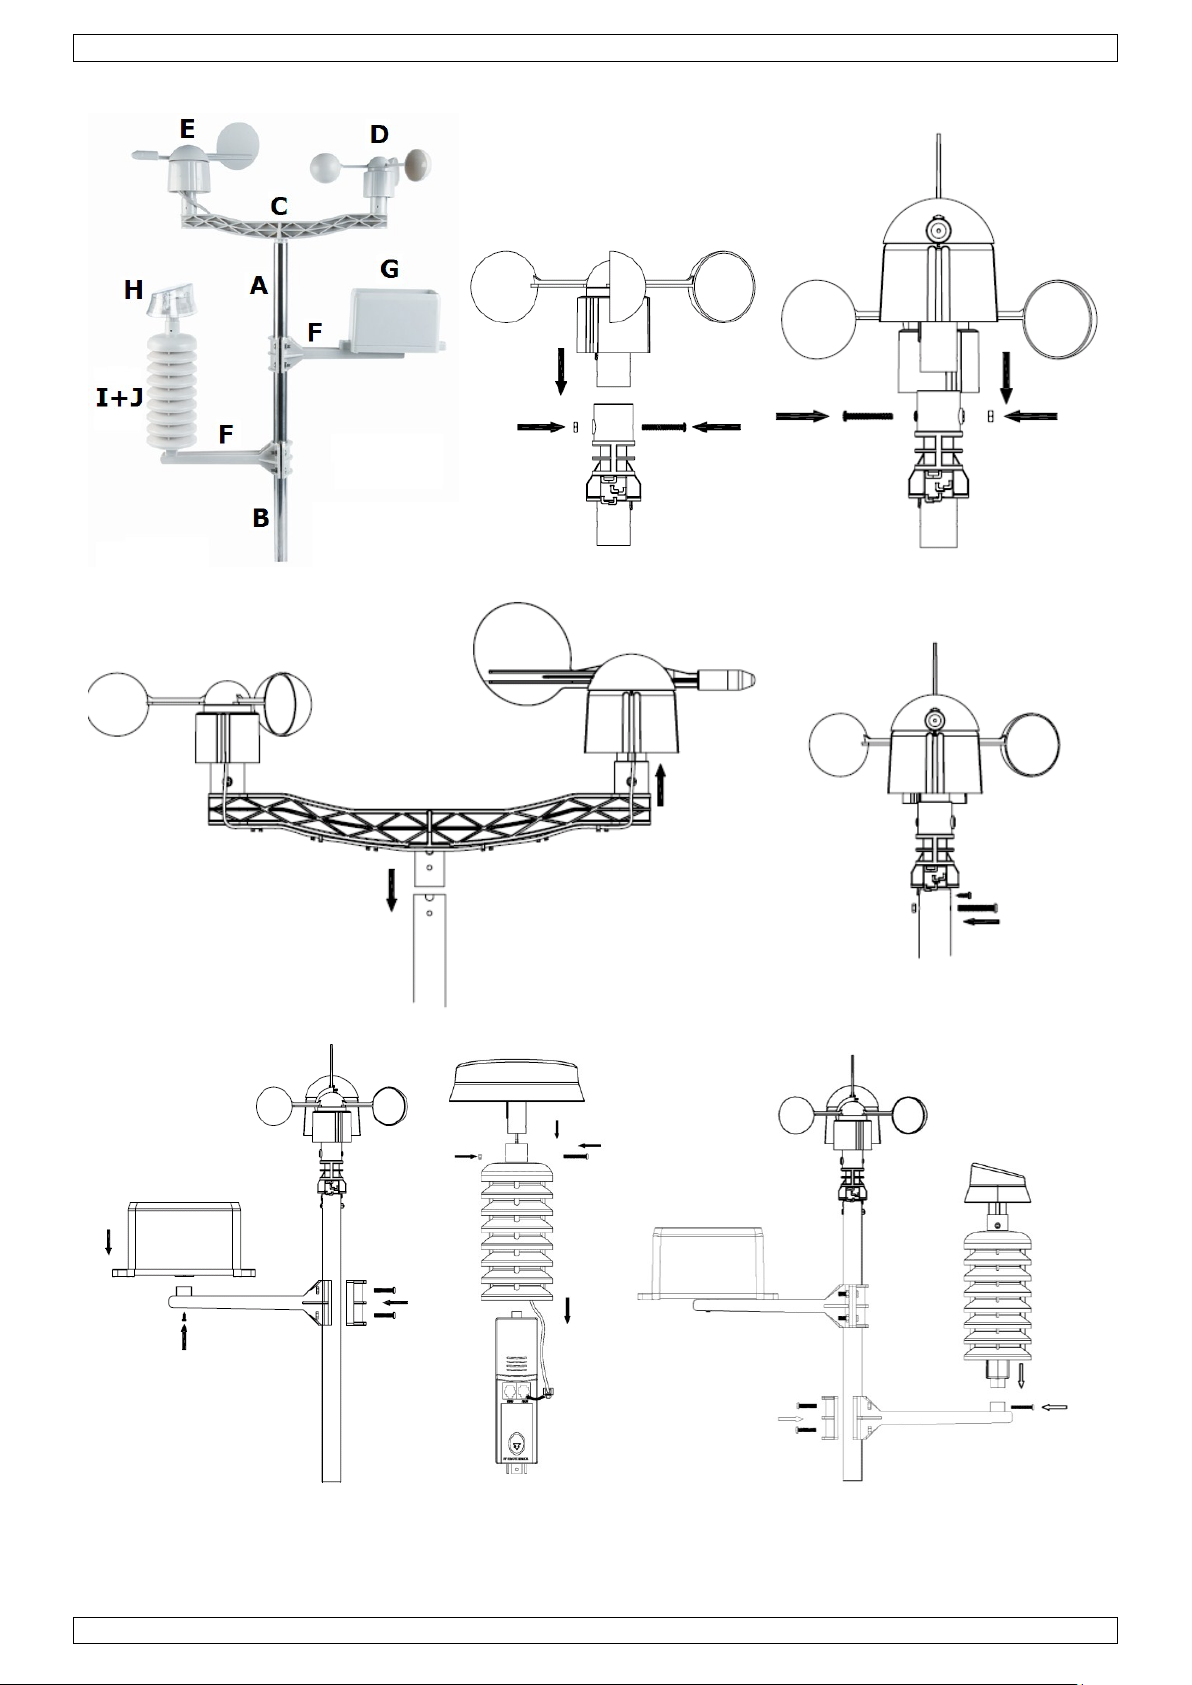
A
upper pole
F
side support
B
lower pole
G
rain sensor
C
top support
H
solar panel
D
anemometer
I
sensor shelter
E
wind vane + direction sensor
J
thermo-hygrometer (under shelter)
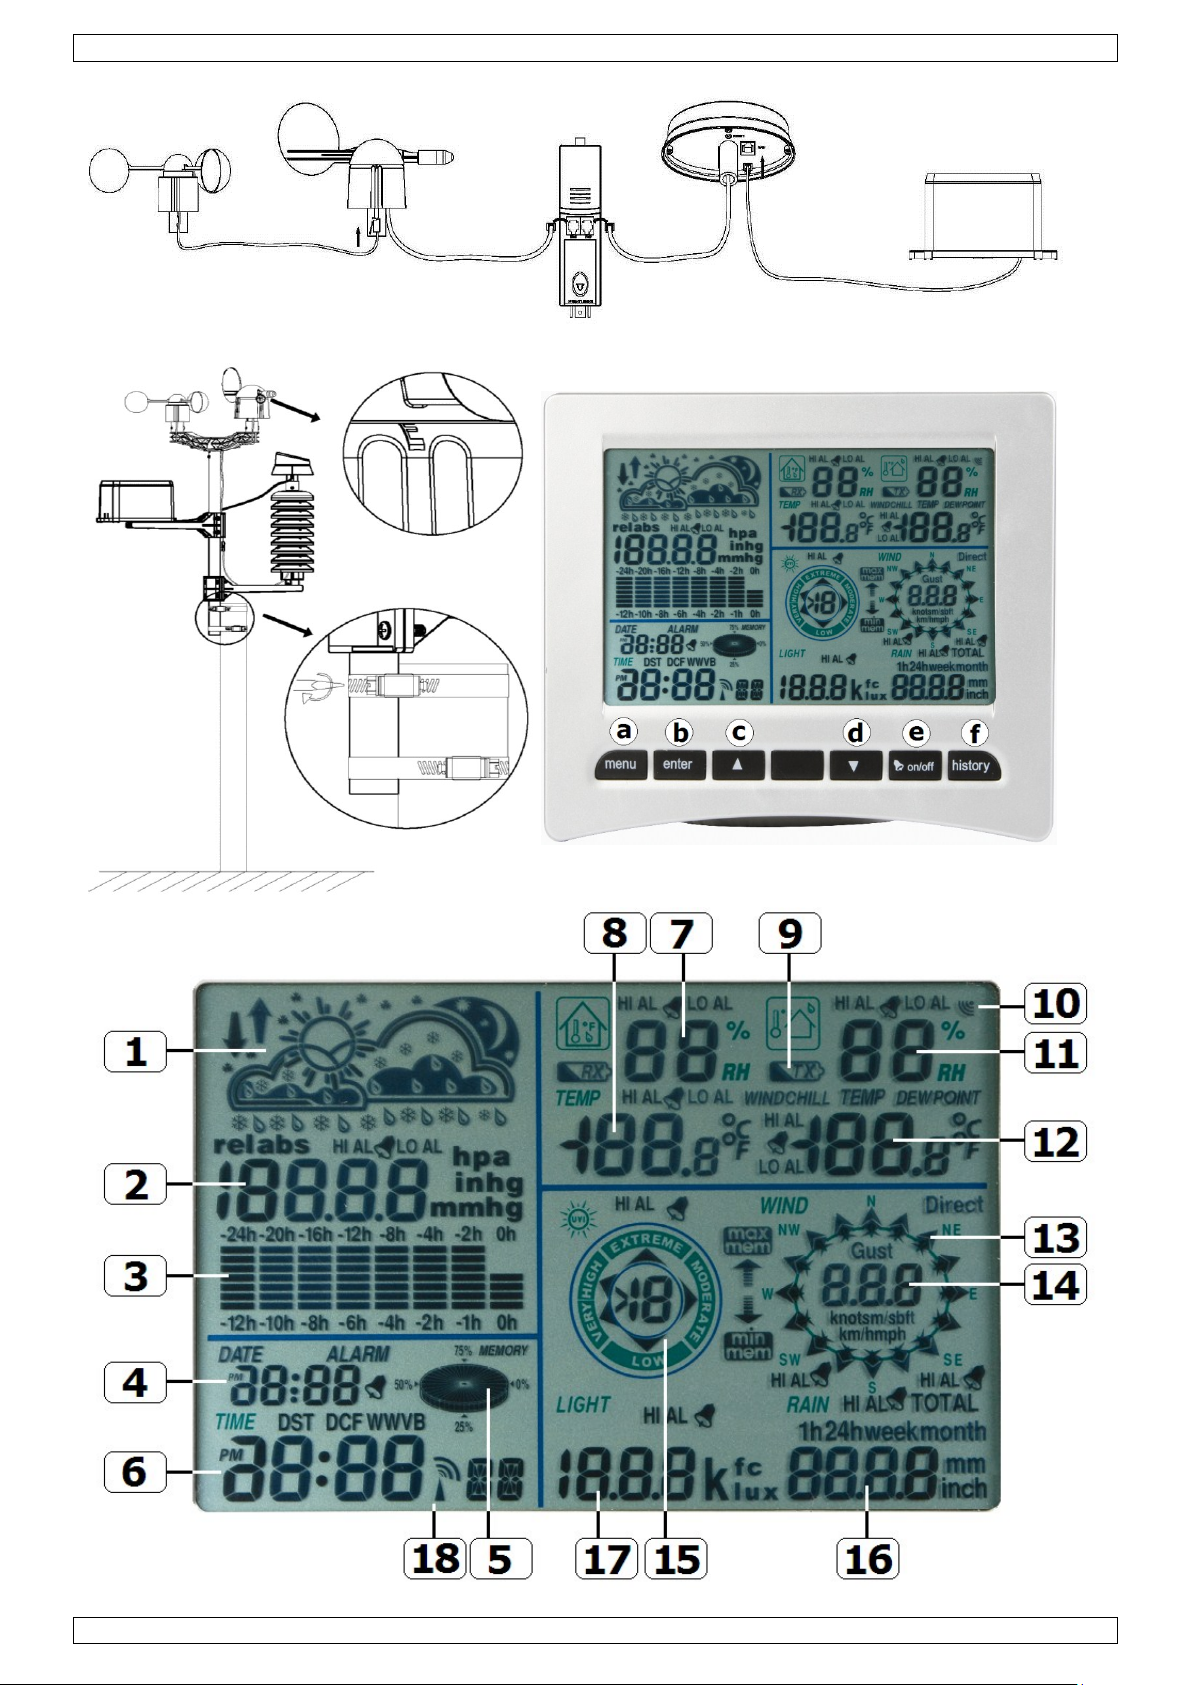
a
MENU button
d
DOWN button ()
b
ENTER button
e
ALARM ON/OFF button( )
c
UP button ()
f
HISTORY button
1
Weather forecast
10
Outdoor reception signal
2
Barometric pressure
11
Outdoor humidity
3
Barometric trend
12
Outdoor temperature
4
Date
13
Wind direction
5
Memory
14
Wind speed/gust
6
Time
15
UV index
7
Indoor humidity
16
Rainfall
8
Indoor temperature
17
Light intensity
9
transmitter low battery indicator
18
Radio Controlled Clock (RCC) indicator
synchronized instant reception
12 or 24 hour display
perpetual calendar
time zone setting
alarm clock
LED backlight
wall mount or standing free
5. Overview
Refer to the illustrations on page 2 and 3 of this manual.
6. Setting up the stations
1. Connect the lower pole [B] with the upper pole [A].
2. Place the anemometer [D] on the top support [C] and fix with a bolt and nut.
3. Place the wind vane [E] on the top support [C] and fix with a bolt and nut.
4. Place the top support [C] on top of the upper pole [A] and fix with a bolt and nut.
5. Mount a side support [F] on the pole [A+B] and place the rain sensor [G] on top. Secure it with a screw.
6. Mount the second side support [F] on the pole [A+B].
7. Place the solar panel [H] on top of the shelter [I] and secure it with a bolt and nut.
8. Make all necessary connections:
o Connect the anemometer [D] to the wind vane [E] phone jacket.
o Connect the wind vane [E] to the thermo-hygrometer [J] WIND phone jacket (left).
o Connect the rain sensor to the thermo-hygrometer [J] RAIN phone jacket (right).
9. Insert 2 x AA rechargeable batteries (incl.) into the thermo-hygrometer [J] respecting the polarity as
indicated inside the casing. Only use rechargeable batteries!
10. To ensure DCF reception, immediately insert 3 x AA batteries into the receiver respecting the polarity. Refer
to the section Initialization below for more information on DCF. Note that the receiver is located inside the
thermo-hygrometer
11. Slide the thermo-hygrometer [J] into the shelter [I].
12. Place the thermo-hygrometer [J] on top of the second side support [F] and secure it with a screw.
13. It is strongly recommended to test the station before mounting it outdoors.
14. Wait for the two stations to synchronize. This synchronisation may take a couple of minutes. Do not touch
any button during synchronisation. Once the synchronisation finishes, make sure that all components work
properly.
V. 01 – 21/06/2013 5 ©Velleman nv
Page 6
WS3080
MENU
Mode
Description
Time
LCD contrast
set LCD contrast 0~8 (default = 5)
Time zone
set applicable time zone:
-1 = GMT / 0 = GMT+1 / 1 = GMT+2 … (default = 0)
Time format
set time format 12h/24h (default = 12h)
Manual time
setting
set hour an minutes manually
Date
display mode
select the desired display mode:
day-month-seconds (default) / day-month-day of the week / alarm time
date/month format
select between DD-MM or MM-DD format (dM or Md)
year
set year
month/date
set month and date
alarm time
set the alarm time
Press the ALARM ON/OFF button to enable/disable the alarm. When enabled,
the alarm icon appears.
Pressure
history
graph scale
set the bar graph scale to 12h or 24h for pressure history
Pressure
pressure display
mode
select between relative (rel) or absolute (abs) pressure (default = absolute)
pressure unit
select pressure unit: hPa, mmHg or inHg (default = hPa)
relative pressure
set the relative pressure level (only when relative pressure display mode was
selected)
high alarm
set the high alarm level
Press the ALARM ON/OFF button to enable/disable the alarm. When enabled,
the alarm icon appears.
low alarm
set the low alarm level
Press the ALARM ON/OFF button to enable/disable the alarm. When enabled,
the alarm icon appears.
reset max
(both pressure [2] and max icon (between [14] and [15]) are flashing)
press and hold the ENTER button for ±3s to reset max value to current
measurement
reset min
(both pressure [2] and min icon (between [14] and [15]) are flashing)
press and hold the ENTER button for ±3s to reset min value to current
15. Once testing is completed, you can mount the station on an outdoor pole (not incl.) using the included
clamps. Choose a suitable mounting location for the receiver. Commonly, the communication between the
two stations can reach a distance of 100m in the open field, provided that there are no obstacles such as
buildings, trees, vehicles, high-voltage lines, etc. Radio interference such as from PCs, radios and television
sets can entirely cut off the communication. Take this into consideration when choosing a mounting
location.
Notes:
On the edges of the wind direction sensor [E] the direction is indicated (―N‖ = north, ―E‖ = east, ―S‖ =
south and ―W‖ = west). Make sure these inscriptions match the real wind direction. Use a compass (not
incl.) when installing the station to position the direction sensor correctly.
Make sure the solar panel is facing the sun to keep the transmitter batteries sufficiently charged.
7. Basic settings/operation
Use the MENU button [a] to scroll through the available menus. Use the ENTER button [b] to select a mode
or accept a value.
Change values with the [c] or [d] button
Notes:
Keep the [c] or [d] button pressed to increase setting speed.
Exit the menu setting at any time by pressing the HISTORY button [f] or simply wait 30s until the receiver
automatically returns to normal display.
When not in setup, press the HISTORY button [f] to switch on the backlight for ±10s.
All settings can also be made through the software (see §9 PC connection)
Refer to the table below for an overview of the menu and setting options.
V. 01 – 21/06/2013 6 ©Velleman nv
Page 7

WS3080
measurement
Weather
forecast
tendency
Refer to §8.2 for more information.
tendency
select tendency
pressure threshold
set threshold between 2 ~ 4 hPa (default = 2hPa)
storm threshold
set threshold between 3 ~ 9 hPa (default = 4hPa)
Indoor
humidity
high alarm
set the high alarm level
Press the ALARM ON/OFF button to enable/disable the alarm. When enabled,
the alarm icon appears.
low alarm
set the low alarm level
Press the ALARM ON/OFF button to enable/disable the alarm. When enabled,
the alarm icon appears.
reset max
(both indoor humidity [7] and max icon (between [14] and [15]) are
flashing)
press and hold the ENTER button for ±3s to reset max value to current
measurement
reset min
(both indoor humidity [7] and min icon (between [14] and [15]) are
flashing)
press and hold the ENTER button for ±3s to reset min value to current
measurement
Indoor
temperature
unit mode
select °C or °F
high alarm
set the high alarm level
Press the ALARM ON/OFF button to enable/disable the alarm. When enabled,
the alarm icon appears.
low alarm
set the low alarm level
Press the ALARM ON/OFF button to enable/disable the alarm. When enabled,
the alarm icon appears.
reset max
(both indoor temperature [8] and max icon (between [14] and [15]) are
flashing)
press and hold the ENTER button for ±3s to reset max value to current
measurement
reset min
(both indoor temperature [8] and min icon (between [14] and [15]) are
flashing)
press and hold the ENTER button for ±3s to reset min value to current
measurement
Outdoor
humidity
high alarm
set the high alarm level
Press the ALARM ON/OFF button to enable/disable the alarm. When enabled,
the alarm icon appears.
low alarm
set the low alarm level
Press the ALARM ON/OFF button to enable/disable the alarm. When enabled,
the alarm icon appears.
reset max
(both outdoor humidity [11] and max icon (between [14] and [15]) are
flashing)
press and hold the ENTER button for ±3s to reset max value to current
measurement
reset min
(both outdoor humidity [11] and min icon (between [14] and [15]) are
flashing)
press and hold the ENTER button for ±3s to reset min value to current
measurement
Outdoor
temperature
display mode
select whether to show outdoor temperature, wind chill or dew point on the
display [12]
unit mode
select °C or °F
high alarm
set the high alarm level
Press the ALARM ON/OFF button to enable/disable the alarm. When enabled,
the alarm icon appears.
low alarm
set the low alarm level
Press the ALARM ON/OFF button to enable/disable the alarm. When enabled,
V. 01 – 21/06/2013 7 ©Velleman nv
Page 8
WS3080
the alarm icon appears.
reset max
(both outdoor temperature [12] and max icon (between [14] and [15]) are
flashing)
press and hold the ENTER button for ±3s to reset max value to current
measurement
reset min
(both outdoor temperature [12] and min icon (between [14] and [15]) are
flashing)
press and hold the ENTER button for ±3s to reset min value to current
measurement
UV index
Refer to §8.2 for more information.
high alarm
set the high alarm level
Press the ALARM ON/OFF button to enable/disable the alarm. When enabled,
the alarm icon appears.
reset max
(both UV index [15] and max icon (between [14] and [15]) are flashing)
press and hold the ENTER button for ±3s to reset max value to current
measurement
Wind
wind speed
select between average or gust wind speed (default = average)
speed unit
select between km/h, mph, m/s, knots or bft (Beaufort) (default = mph)
high alarm
set the high alarm level
Press the ALARM ON/OFF button to enable/disable the alarm. When enabled,
the alarm icon appears.
direction alarm
set the wind direction alarm
Press the ALARM ON/OFF button to enable/disable the alarm. When enabled,
the alarm icon appears.
reset max
(both wind speed [14] and max icon (between [14] and [15]) are flashing)
press and hold the ENTER button for ±3s to reset max value to current
measurement
Light
light unit
select intensity unit between fc and lux
high alarm
set the high alarm level
Press the ALARM ON/OFF button to enable/disable the alarm. When enabled,
the alarm icon appears.
reset max
(both light intensity [17] and max icon (between [14] and [15]) are
flashing)
press and hold the ENTER button for ±3s to reset max value to current
measurement
Rain
display mode
select between 1h, 24h, 1 week, 1 month or total
unit
select between mm and inch (default = mm)
high alarm
set the high alarm level
Press the ALARM ON/OFF button to enable/disable the alarm. When enabled,
the alarm icon appears.
reset max
(both rain value [16] and max icon (between [14] and [15]) are flashing)
press and hold the ENTER button for ±3s to reset max value to current
measurement
reset total
(the rain value [16], TOTAL and CLE [4] are flashing)
press and hold the ENTER button for ±3s to reset TOTAL value to current
measurement
Use the HISTORY button [f] to enter the base station memory.
Note: the default interval for data memory is 30 minutes. This interval can only be changed via the
software (refer to the section PC connection).
Use the [d] button to scroll down through the memory, use the [c] to scroll up.
Note: when the end of the memory is reached, the base station returns to normal display.
To clear the complete memory, press the ENTER button [b]. The word CLE [4] and the memory indicator
[5] will start flashing. Press and hold the ENTER button [b] for ±3s to erase the memory.
Note: to save a copy of the memory on a PC, refer to the section PC connection.
V. 01 – 21/06/2013 8 ©Velleman nv
Page 9
WS3080
The thermo-hygrometer contains a receiver which receives a radio-signal from a radio
station located at Mainflingen near Frankfurt, Germany. This long-wave radio-signal
(DCF77, 77.5 kHz) is based on atomic clocks and contains time and date information.
For more information refer to www.ptb.de (PTB = Physikalisch-Technische
Bundesanstalt). The device automatically synchronizes with this master clock radiosignal.
Due to its nature, the radio-signal can be received indoors. However, it should be
noted that the signal is weakened by the presence of concrete and metal. Therefore
the clock must not be installed in concrete basements or inside metal cages. In large
concrete office buildings or apartments, the clock should be located near a window for
better reception. Also avoid installing the clock near strong magnetic fields or other
devices that generate a lot of electrical noise (e.g. engines).
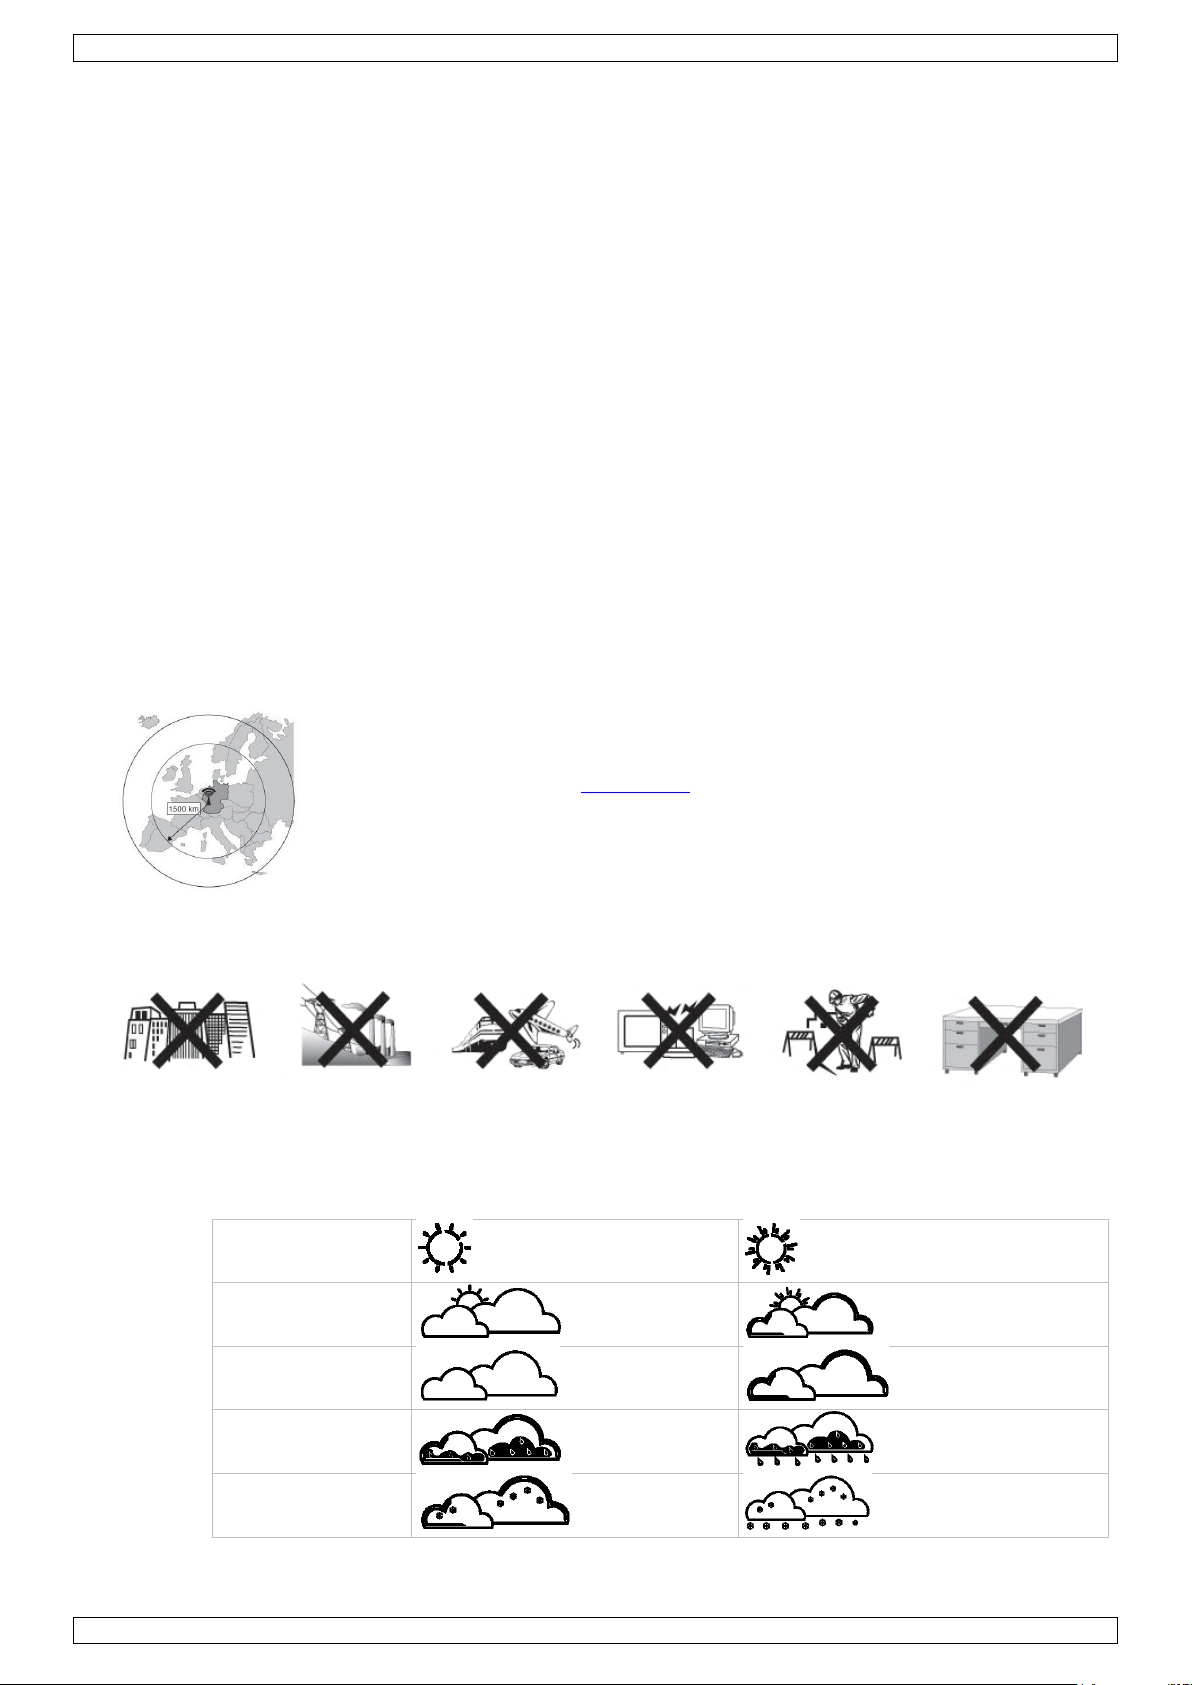
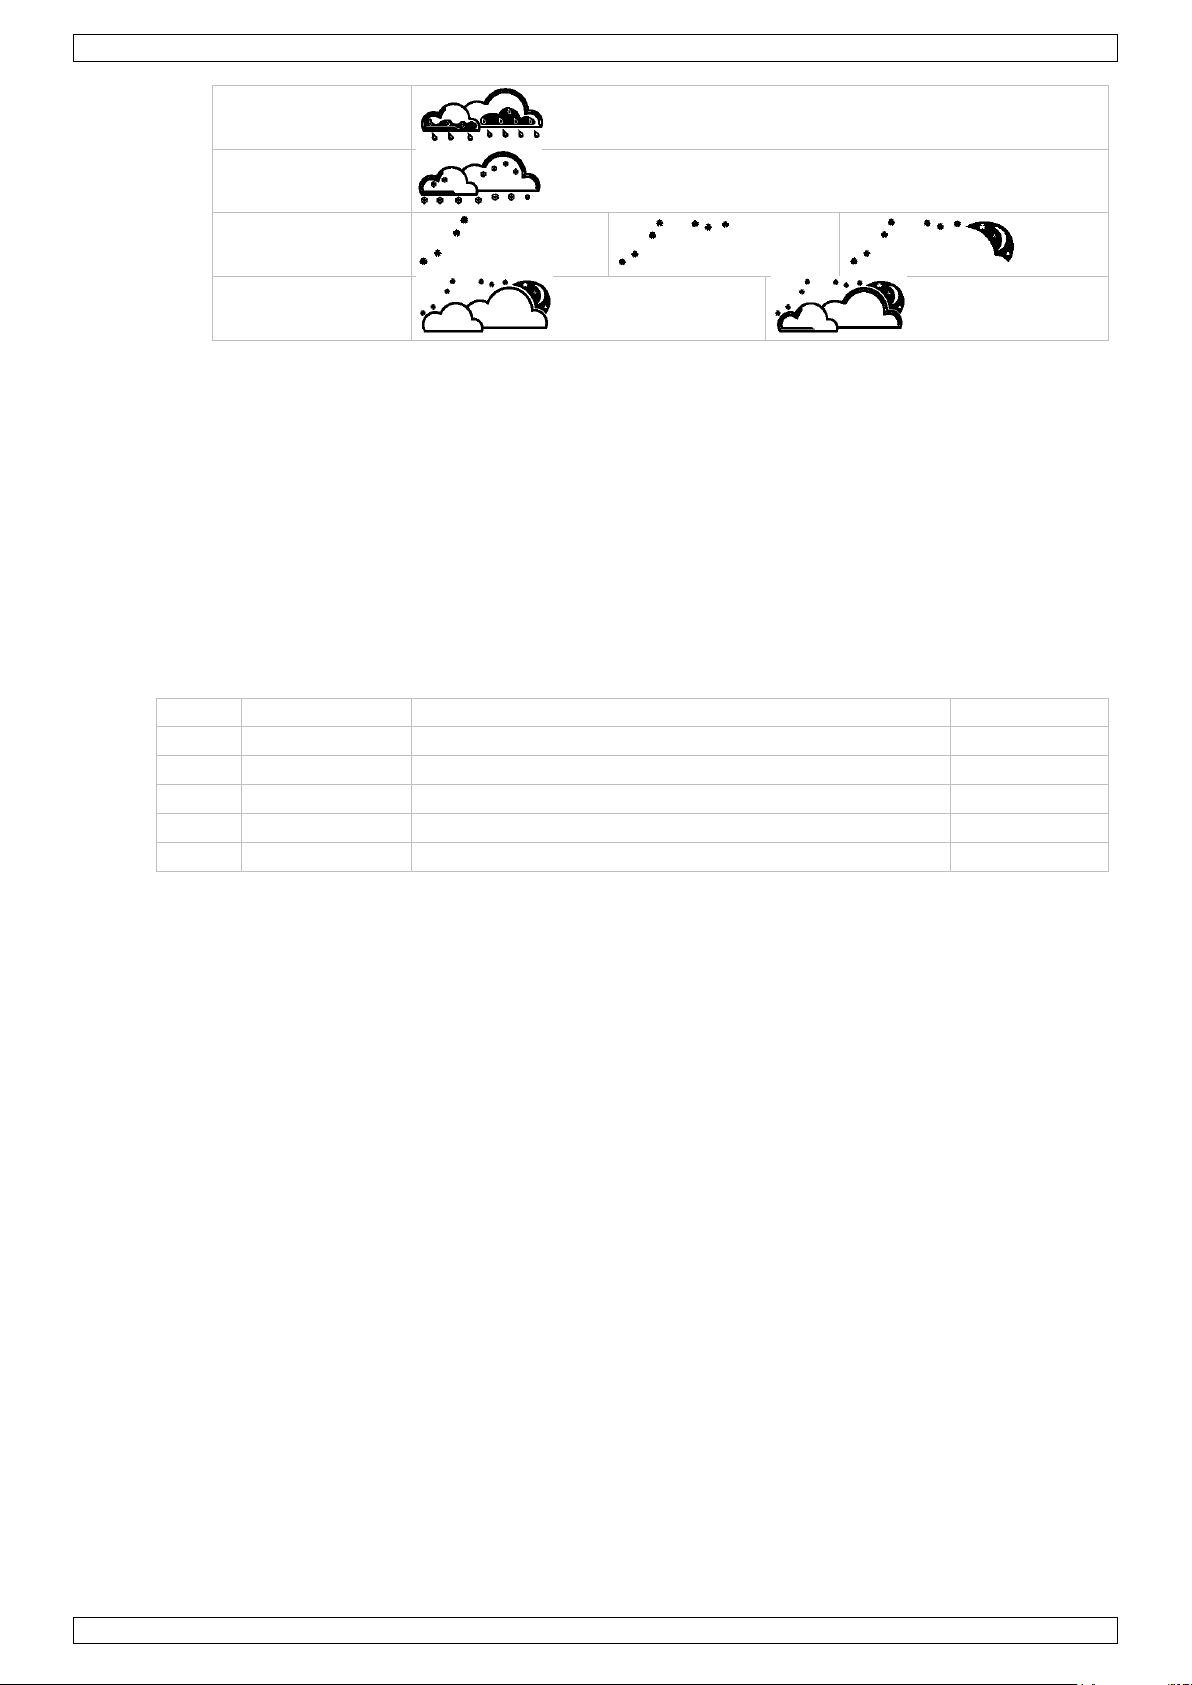
sunny
partly cloudy
cloudy
rainy
snow
8. Operational notes
8.1 Initialization
RF connection
When batteries are inserted into the base station, it enters RF receiving mode and tries to connect to the
sensor for 144s. When connection is established, it will receive data for temperature, humidity, wind speed
and rain each 48s, for light intensity each 60s. Do not press any key until outdoor data is displayed to
avoid interrupting the learning process.
If reception fails 8 times in a row, connection is lost and outdoor temperature [12] and humidity [11]
indicate ―----‖. The base station enters RF receiving mode again for 144s.
To force RF receiving state manually, press and hold the [d] button for ±4s.
DCF connection
When batteries are inserted into the thermo-hygrometer (sensor) it will first transmit weather data for 24s.
Then it will start looking for a DCF signal for about 5 minutes. If no signal is found, it will attempt again
every hour until it does. Meanwhile the time can be set manually (see §7).
Once a signal is received, the sensor transmits the signal to the base station and the time is updated; the
RCC indicator [18] is shown.
Notes:
When your time zone is not UTC+1:00 (GMT + 1:00) you should set the time manually to ensure the time
is updated correctly once DCF connection is established.
Best reception for DCF signals is between midnight and 6:00am.
DCF principle
8.2 Weather forecast tendency
Symbol overview
V. 01 – 21/06/2013 9 ©Velleman nv
Page 10
WS3080
storm
snowstorm
clear night
cloudy night
Index
intensity
description
code
0 ~ 2
low
no danger to average person
green
3 ~ 5
moderate
little risk of harm from unprotected exposure
yellow
6 ~ 7
extreme
high risk of harm from unprotected exposure
orange
8 ~ 10
high
very high risk of harm from unprotected exposure
red
11+
very high
extreme high risk of harm from unprotected exposure
violet
Pressure sensitivity setting
The pressure threshold for weather forecasting can be set from 2 ~ 4hPa (default 2hPa). Areas that experience
frequent changes in air pressure require a higher hPa setting compared to areas where the air pressure is more
stable. For example when 4hPa is selected there must be a fall or rise in air pressure of at least 4hPa to change
the weather forecast icon.
Storm threshold sensitivity setting
When a dramatic change in pressure is measured the weather icons (rain and clouds) will begin to flash
indicating a storm. Similar to the general pressure sensitivity setting it is possible to adjust the storm threshold
sensitivity form 3 ~ 9hPa (default 4hPa). When there is a pressure drop higher that the threshold over a period
of 3 hours, the storm forecasting will be activated. The clouds, rain icon and tendency arrows will flash for 3
hours indicating the storm warning feature has been activated.
8.3 UV index
Note: table based on average adult persons with pale skin and is for indication only. People with a sensitive
skin or children may already suffer from UV-related problems when exposed to even low UV intensities.
8.4 Reset to factory defaults
Press and hold the button [c] for ±20s to reset the base station to factory default settings.
Note that the memory is also cleared.
9. PC connection
The receiver can hold up to 4,080 weather data entries (with date and time) in its internal memory. This
memory is non-volatile (EEPROM) and will be preserved in case of a power failure (e.g. battery
replacement). When memory is full, the oldest data sets are overwritten.
It is possible to read, copy, store and print this memory data by connecting the receiver to a PC (not incl.)
running the appropriate software.
9.1 Minimum system requirements
operating system: Windows XP, Vista, 7, 8
web browser: Internet Explorer 6.0 or higher
processor: Pentium III, 500MHz
memory: 128MB (256MB recommended)
CD ROM drive + free USB port
9.2 Software installation
1. Place the included CD ROM into the reader of a suitable computer. Do not connect the receiver yet.
2. When the auto-run feature on the PC is enabled, follow the instructions on the screen. If not, open the
drive, locate the file setup.exe and double click it.
Note: make sure you are logged on to the system with an administrator account when installing or running
the software.
3. Select the installation language and click next.
V. 01 – 21/06/2013 10 ©Velleman nv
Page 11
WS3080
setup
(System – Setup)
system alarm settings
(System – Alarm)
display min. and max. history values
(System – Scope)
display history
(Record – History)
display graph data
(Record – Graph)
about EasyWeatherPlus
(Help – about EasyWeatherGraph)
4. Click next and select the destination folder (change directory when desired).
5. Click next and the software will be installed automatically.
6. Press OK to finish the installation process.
7. When required, restart the computer.
8. Plug the included USB cable into the USB port on the receiver (left side) and plug the other end into the
USB port of the computer.
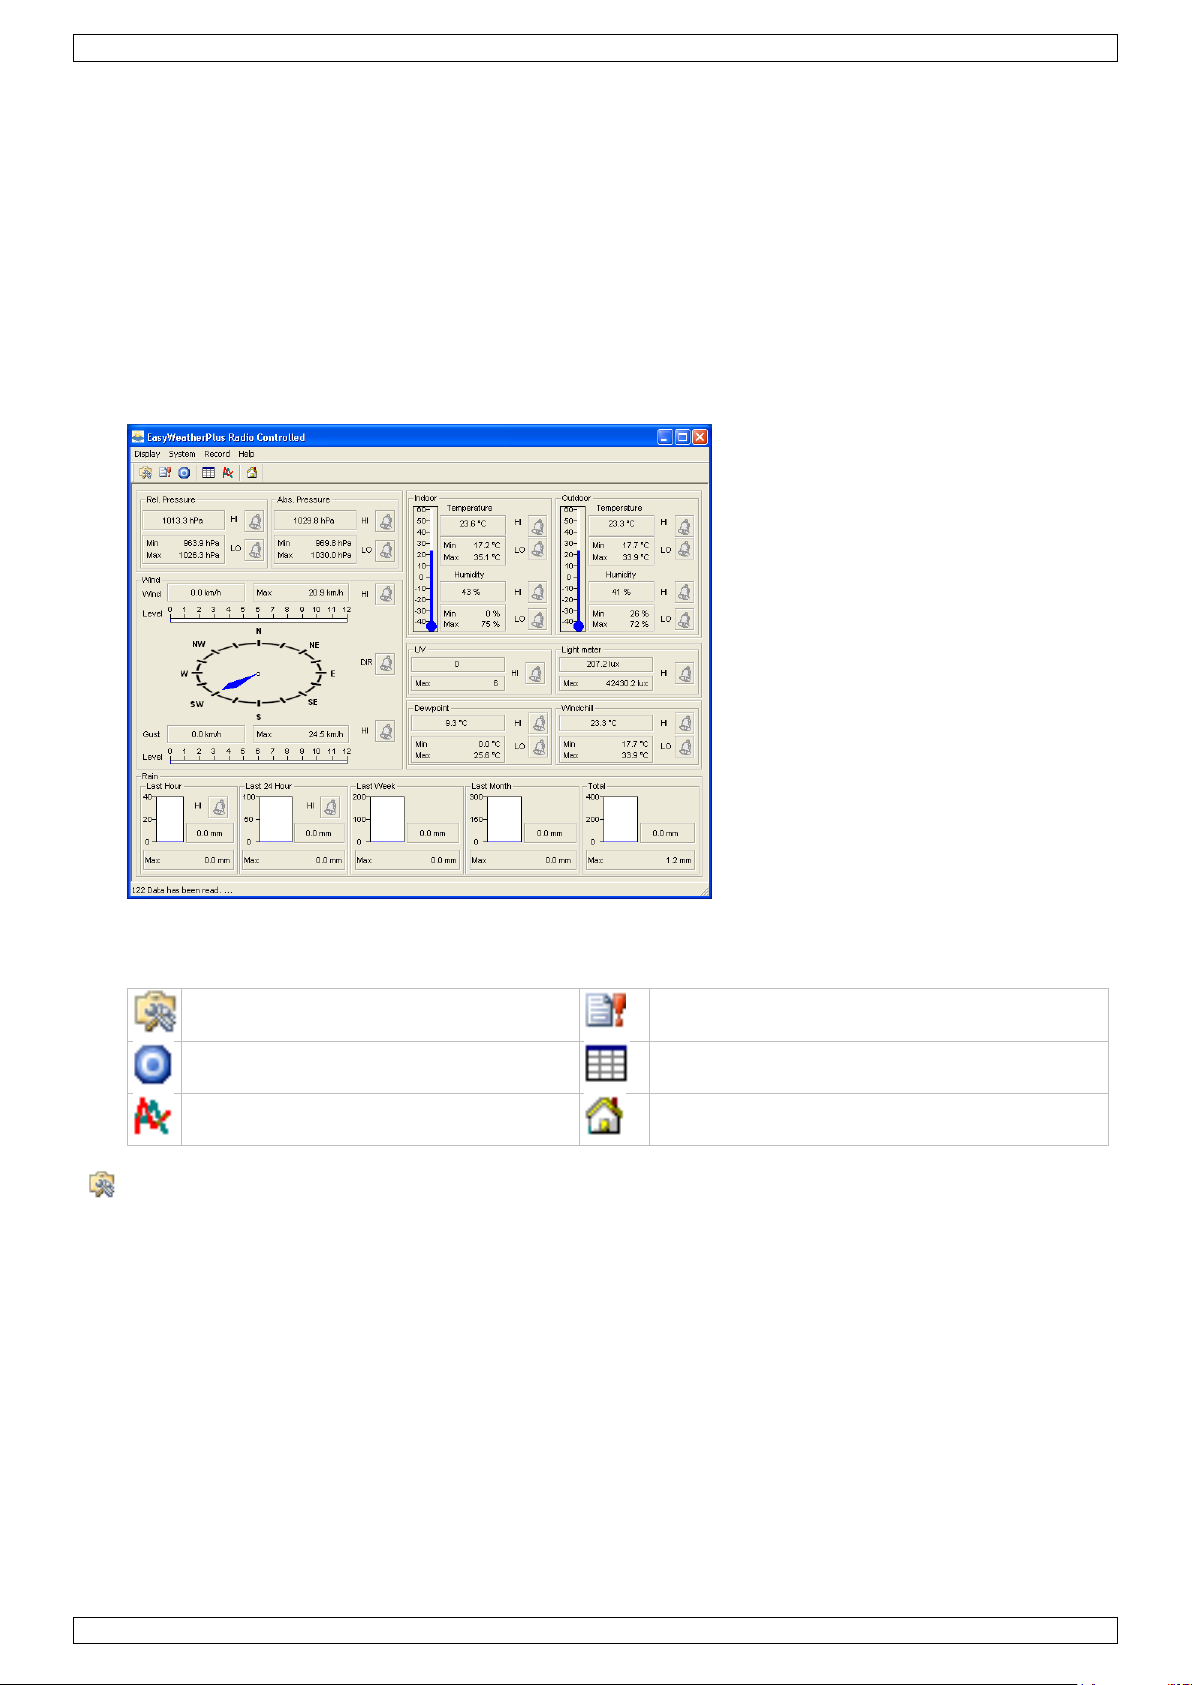
9.3 Software use
1. Prior to using the software, make sure the time set on the base station and the PC is the same. This to
avoid time discrepancies between actual recording time and the time shown on the PC.
2. To start the EasyWeatherPlus software, go to ―Start—All Programs—EasyWeahterPlus‖ and click on the
―EasyWeatherPlus‖ icon.
Note: run the program under an administrator account.
3. The computer starts to download all data on the weather station. This might take a few minutes to
complete. Do not attempt to change settings during this download or the data transfer will fail.
4. Set the interface language via the Display – Language option.
Setup
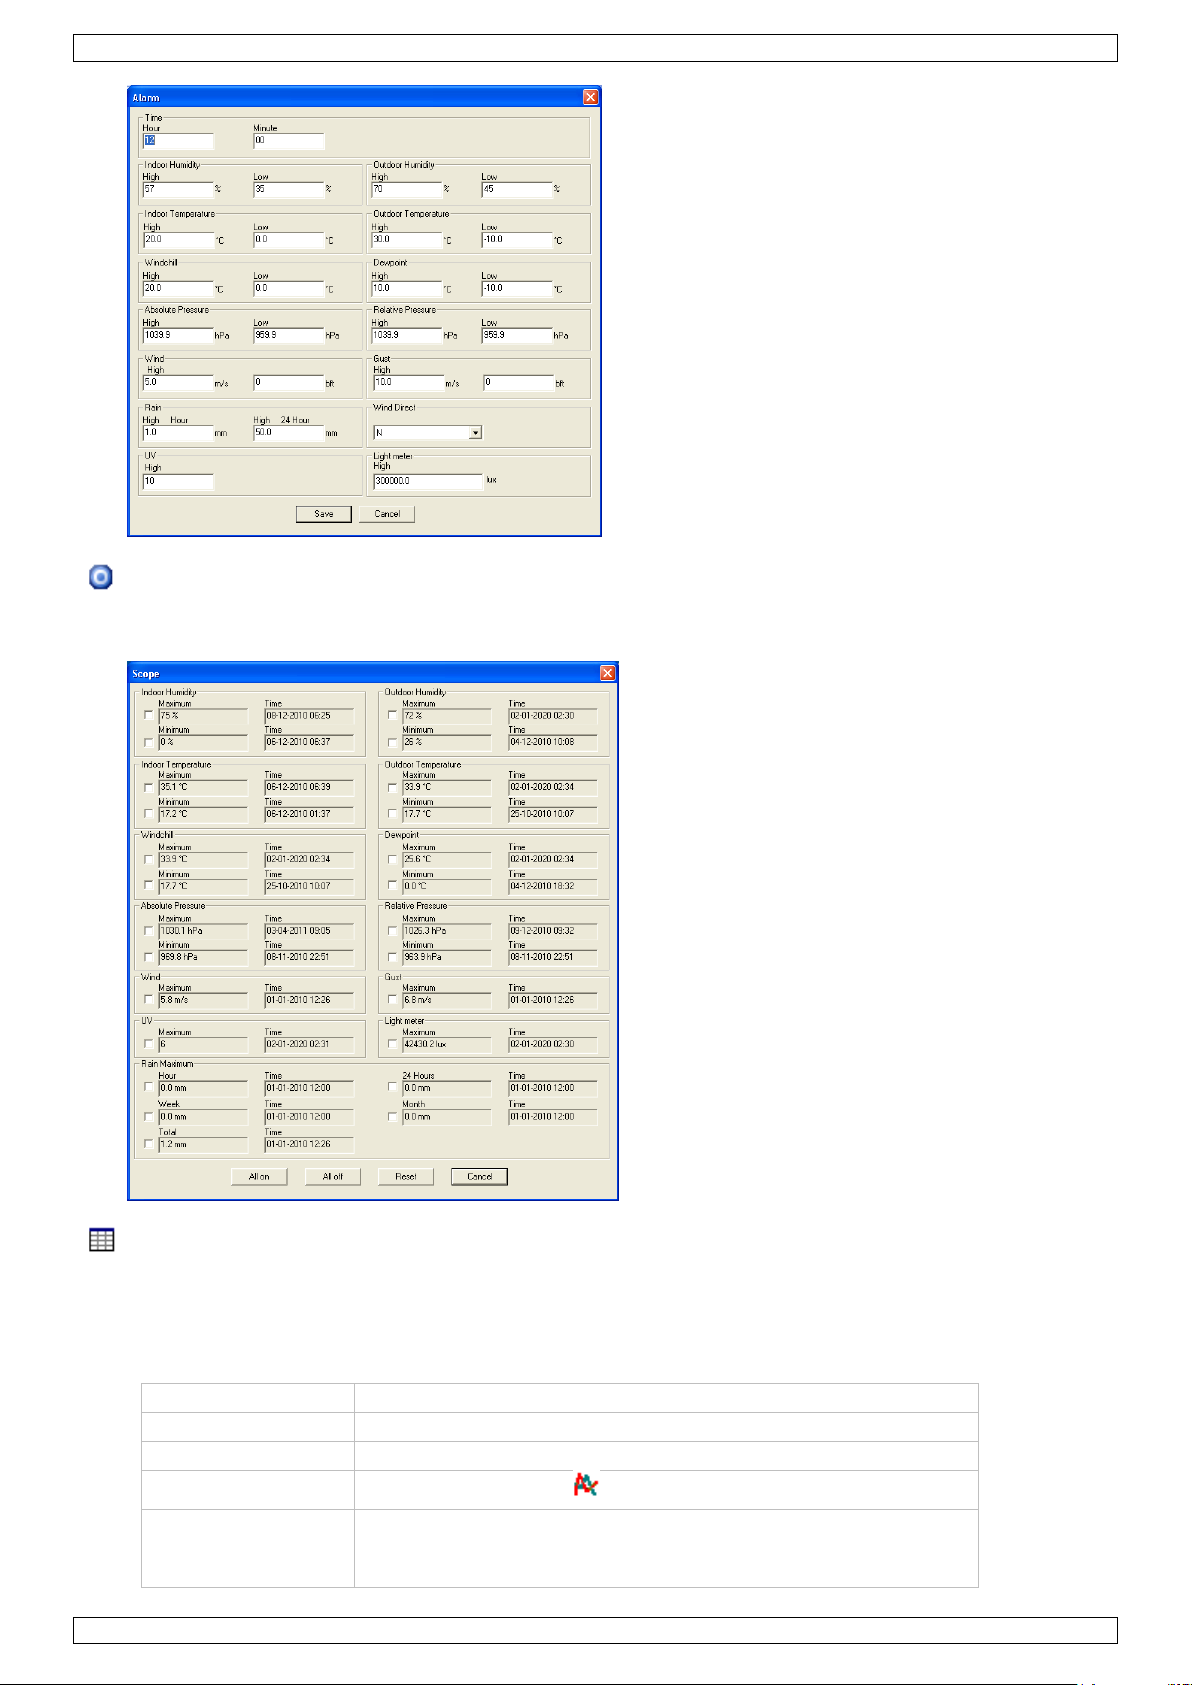
Use this menu to change the settings of the base station and enable the alarms.
When finished, click Save to send the data to the base station. It takes about 1 minute for the update to
take effect.
Note: the interval range = 5 ~ 240 minutes
V. 01 – 21/06/2013 11 ©Velleman nv
Page 12
WS3080
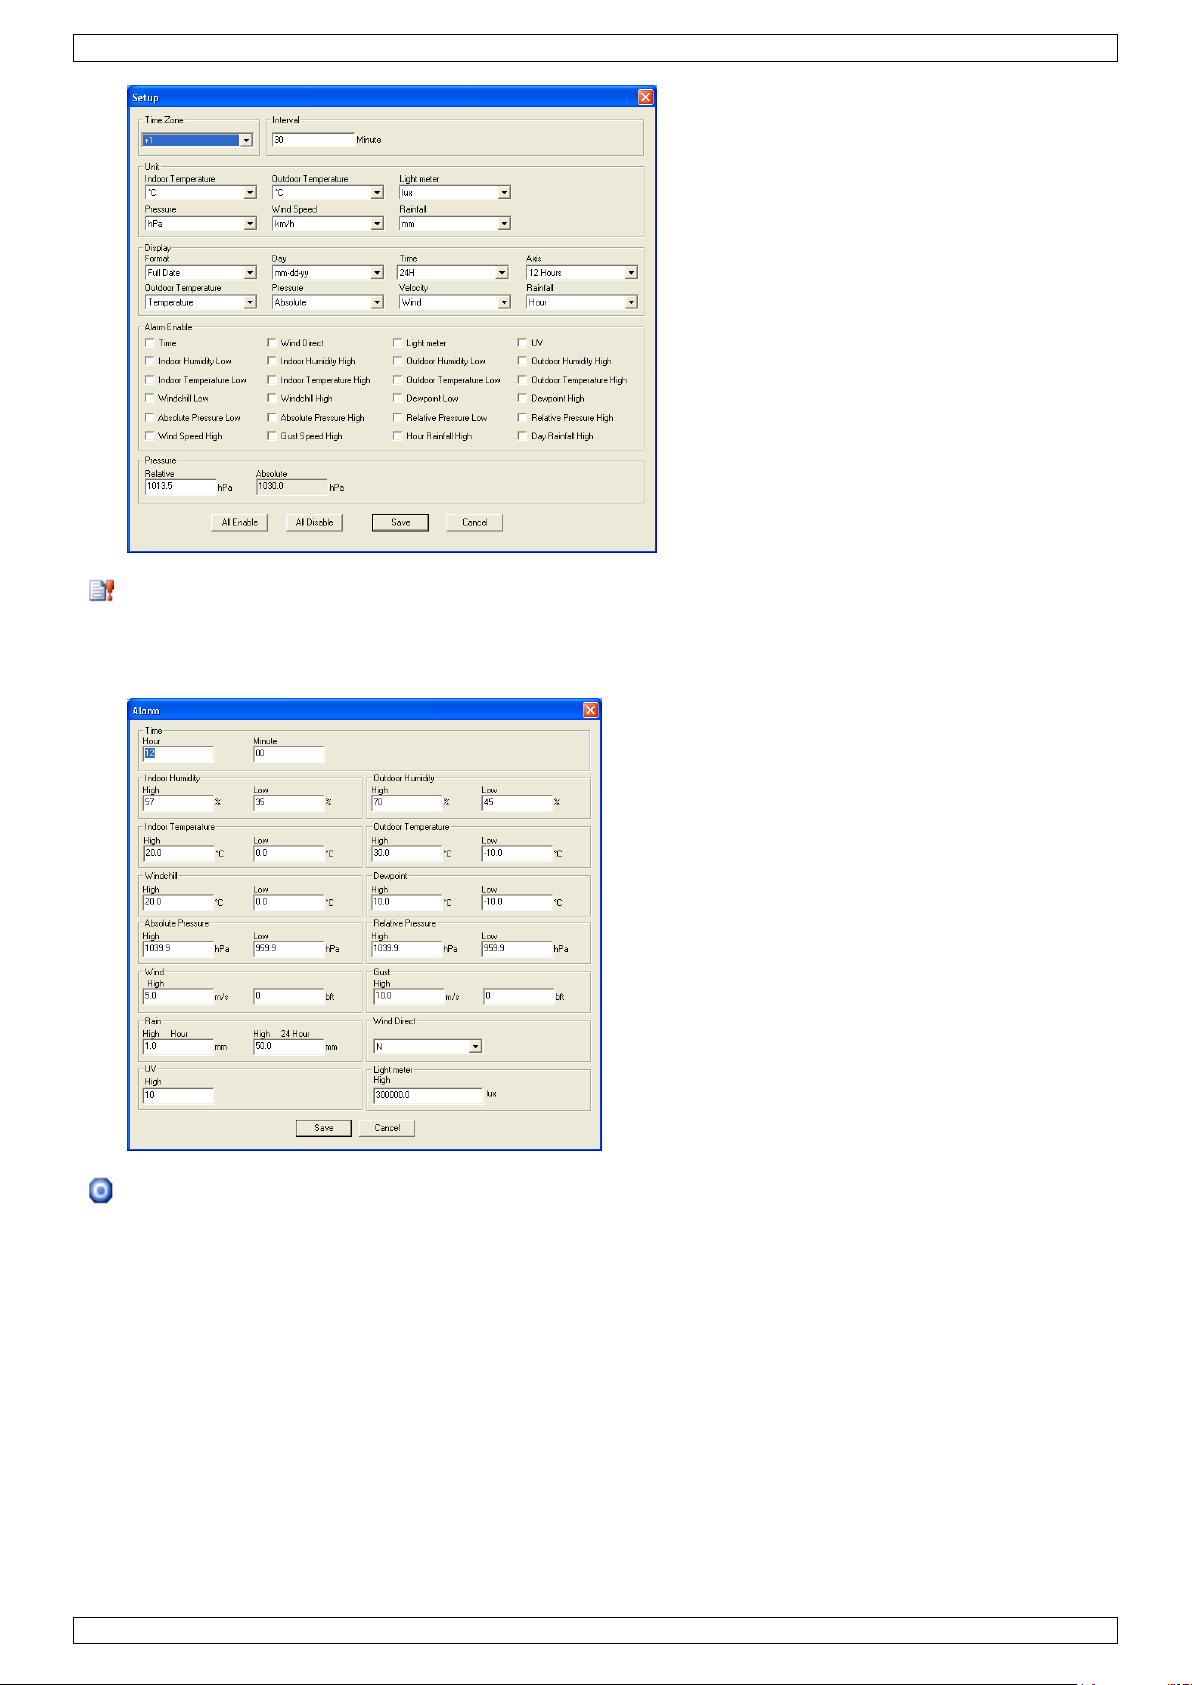
System alarm settings
Use this menu to set the alarm limits of the base station.
When finished, click Save to send the data to the base station. It takes about 1 minute for the update to
take effect.
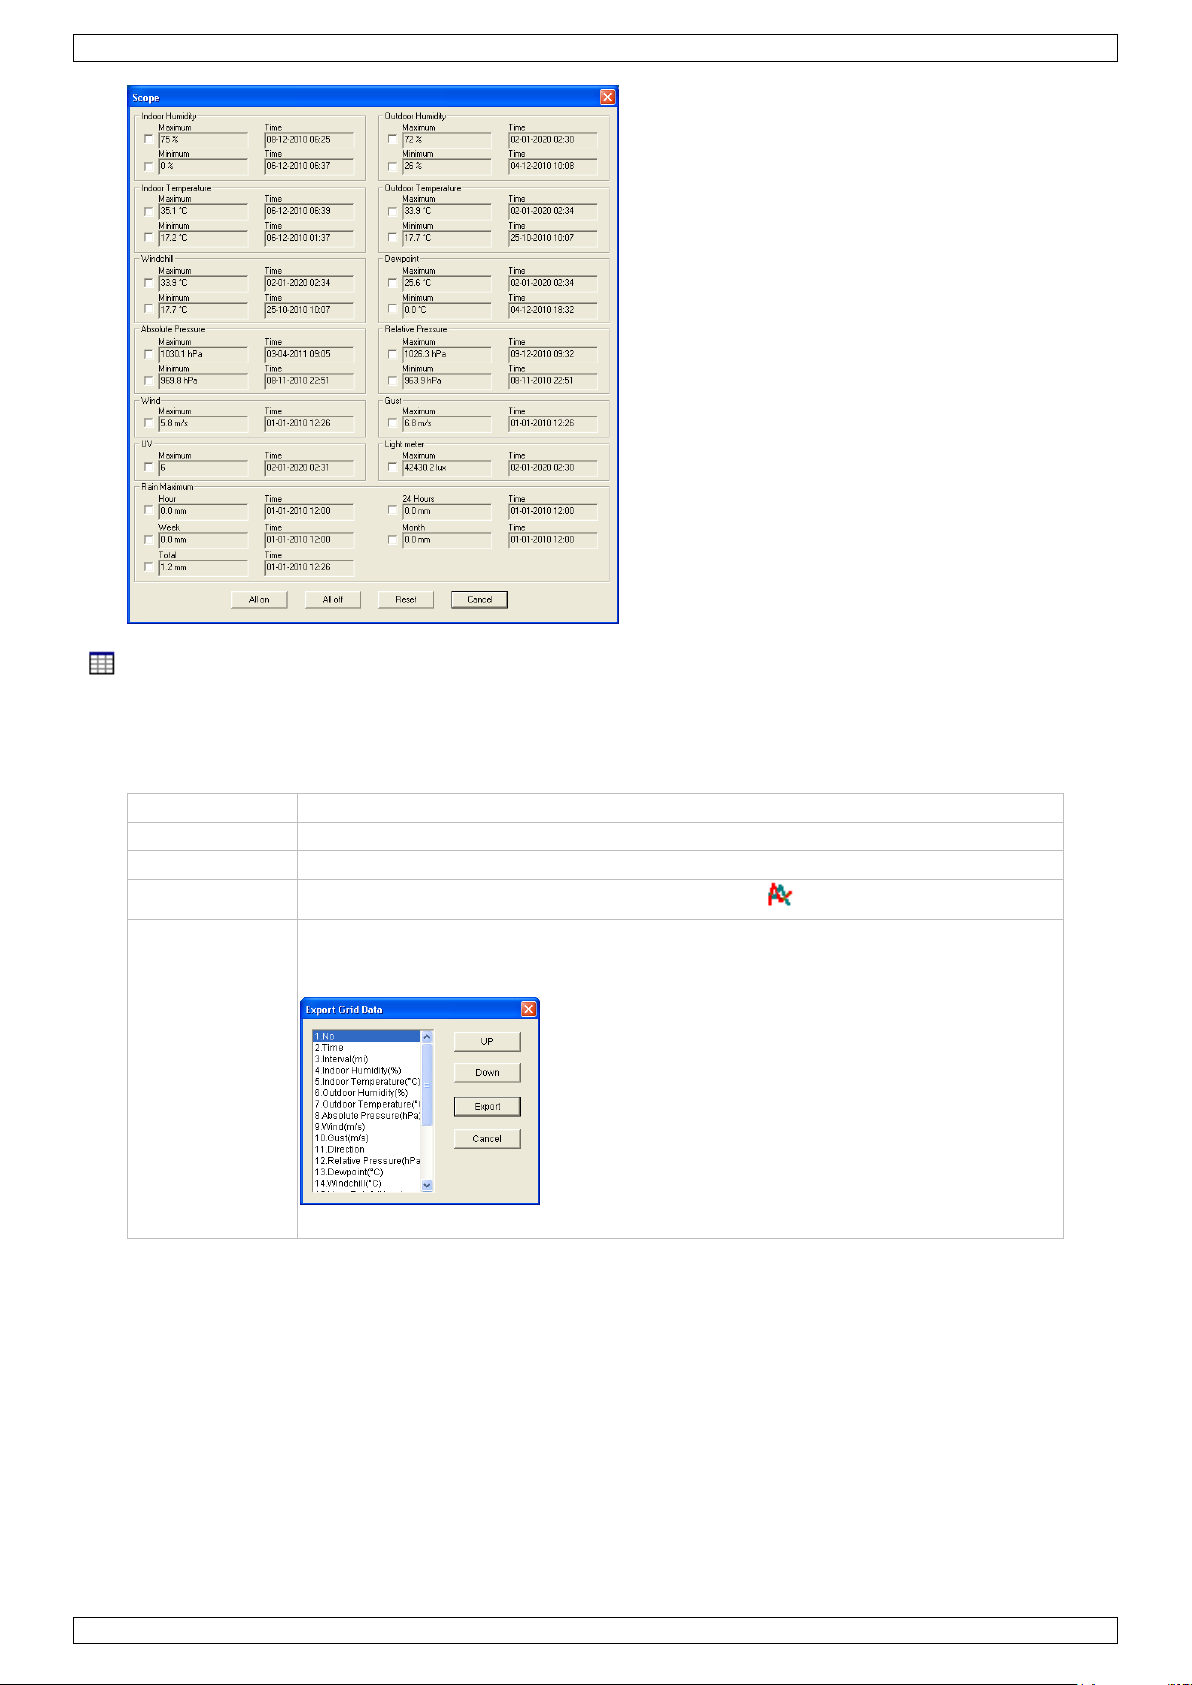
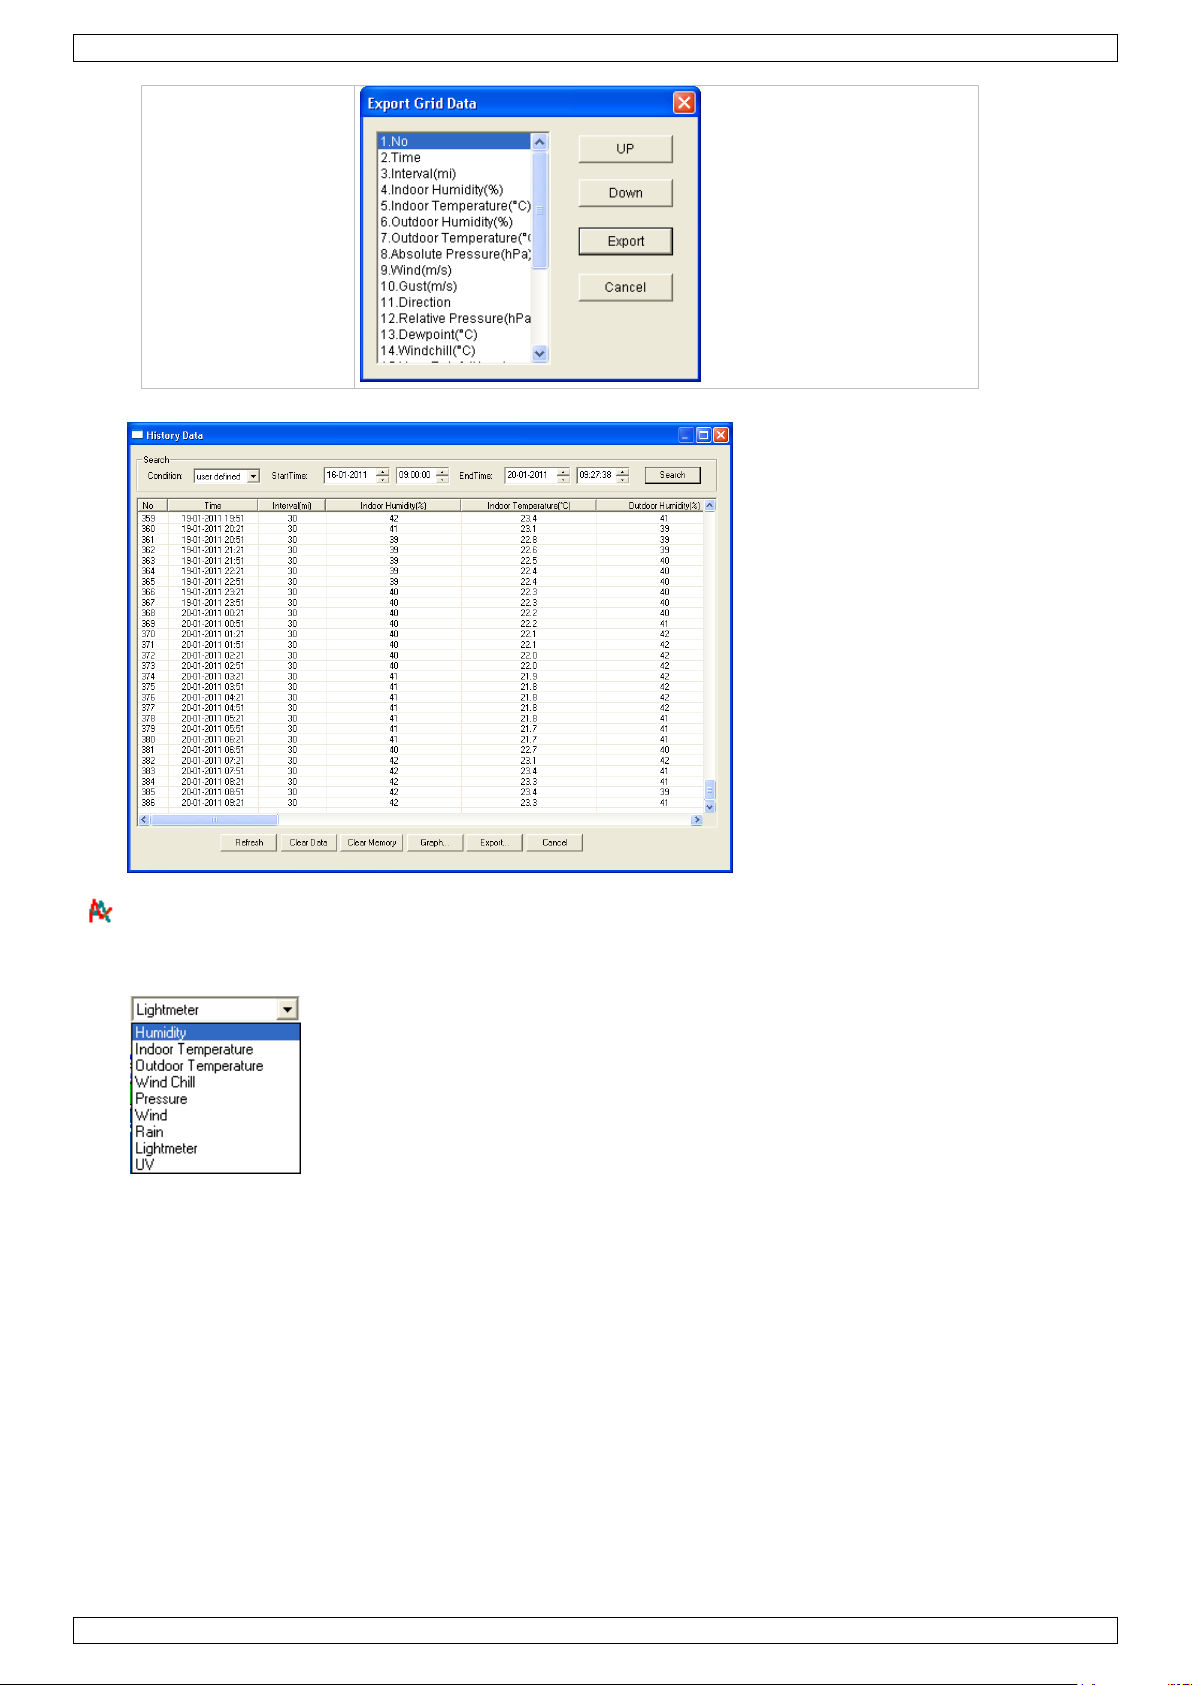
min. and max. history values
Use this menu to review and reset minimum and maximum measured values.
Select the desired data entries and click reset to clear the data on the base station. It takes about 1
minute for the update to take effect.
V. 01 – 21/06/2013 12 ©Velleman nv
Page 13
WS3080
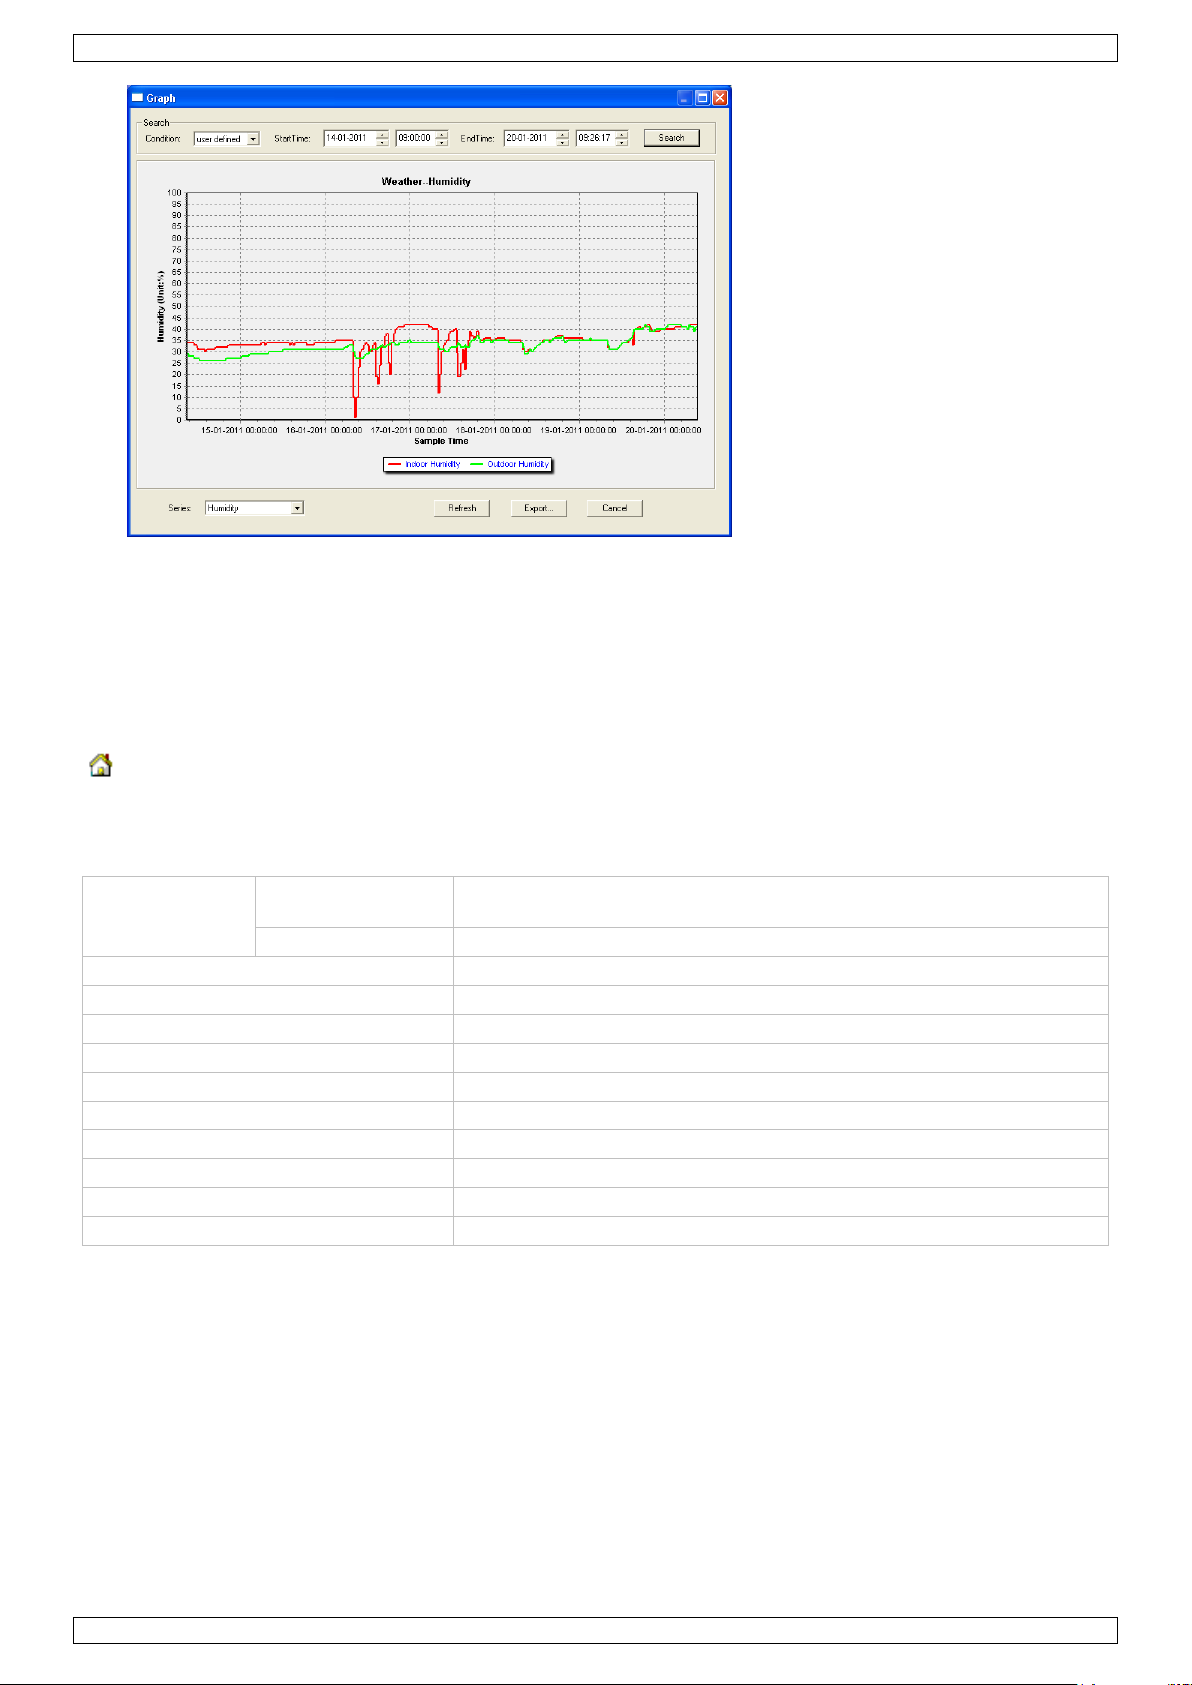
Refresh
update the history list
Clear data
remove history data from the PC
Clear memory
remove data from the base station (make sure it is saved first)
Graph
display a graphical representation of the data (see Display graph data below)
Export
export/save the data into a .cvs file
Select the desired data and the order in which it should appear, then click Export
and select a location to store the file.
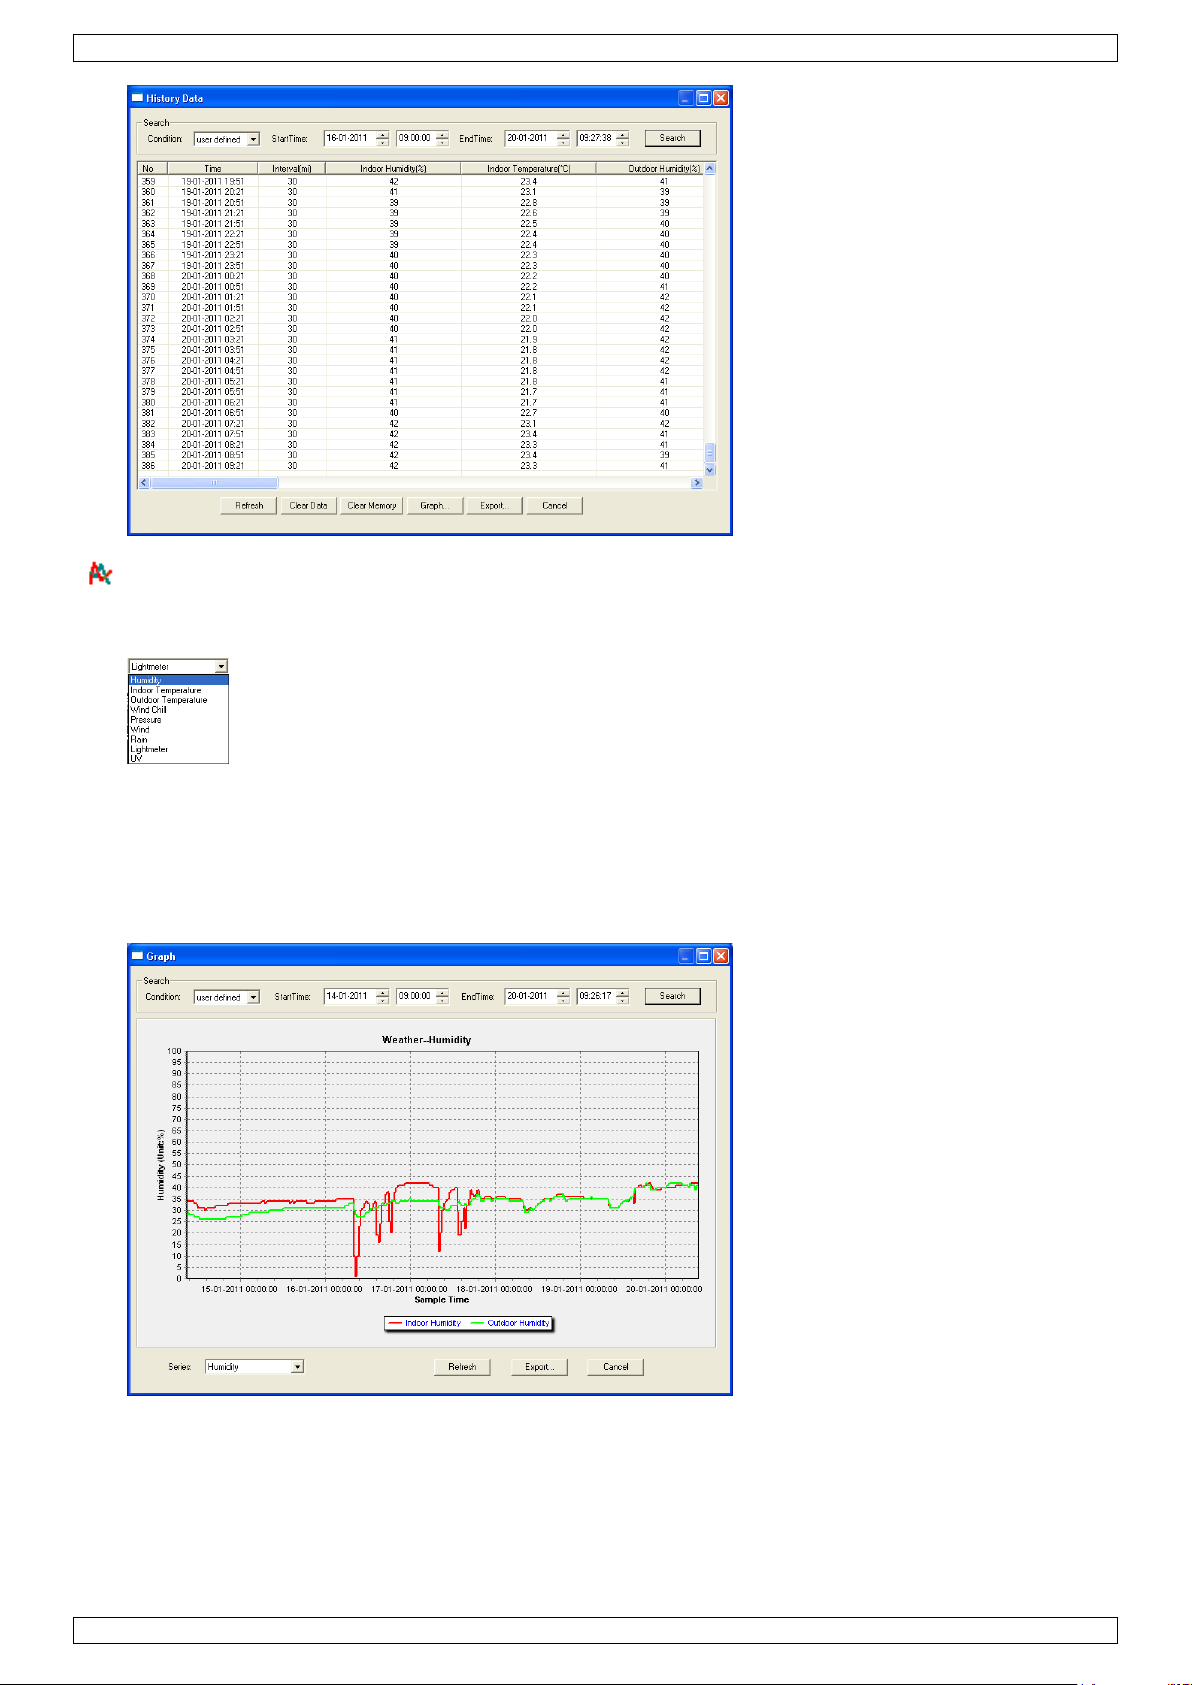
Display history
Use this menu to see the measurement history list.
Set the time interval (condition) in the upper left corner of the display (1 hour, 24 hours, a week, a month
or user defined). When user defined is selected, set the desired start and end time.
Click Search (upper right corner) to retrieve the data.
V. 01 – 21/06/2013 13 ©Velleman nv
Page 14
WS3080
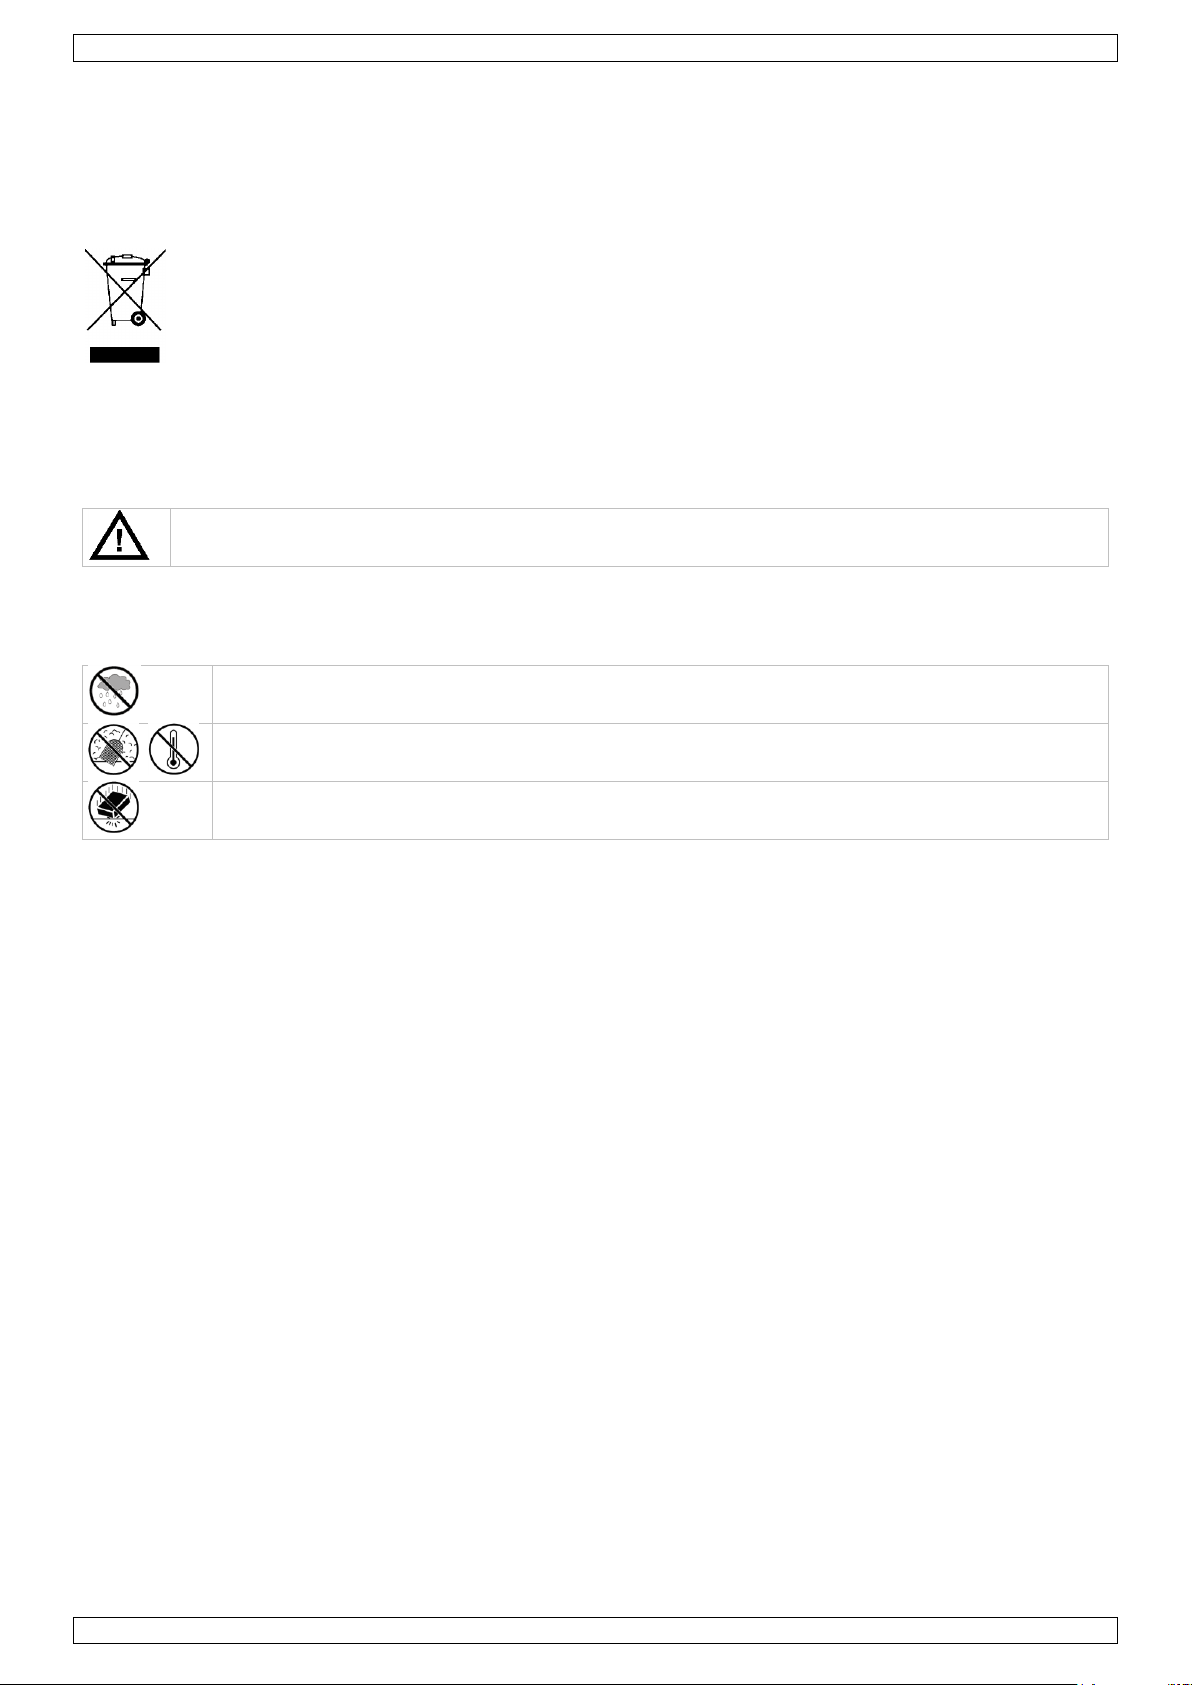
Display graph data
Use this menu to see a graphical representation of the selected data.
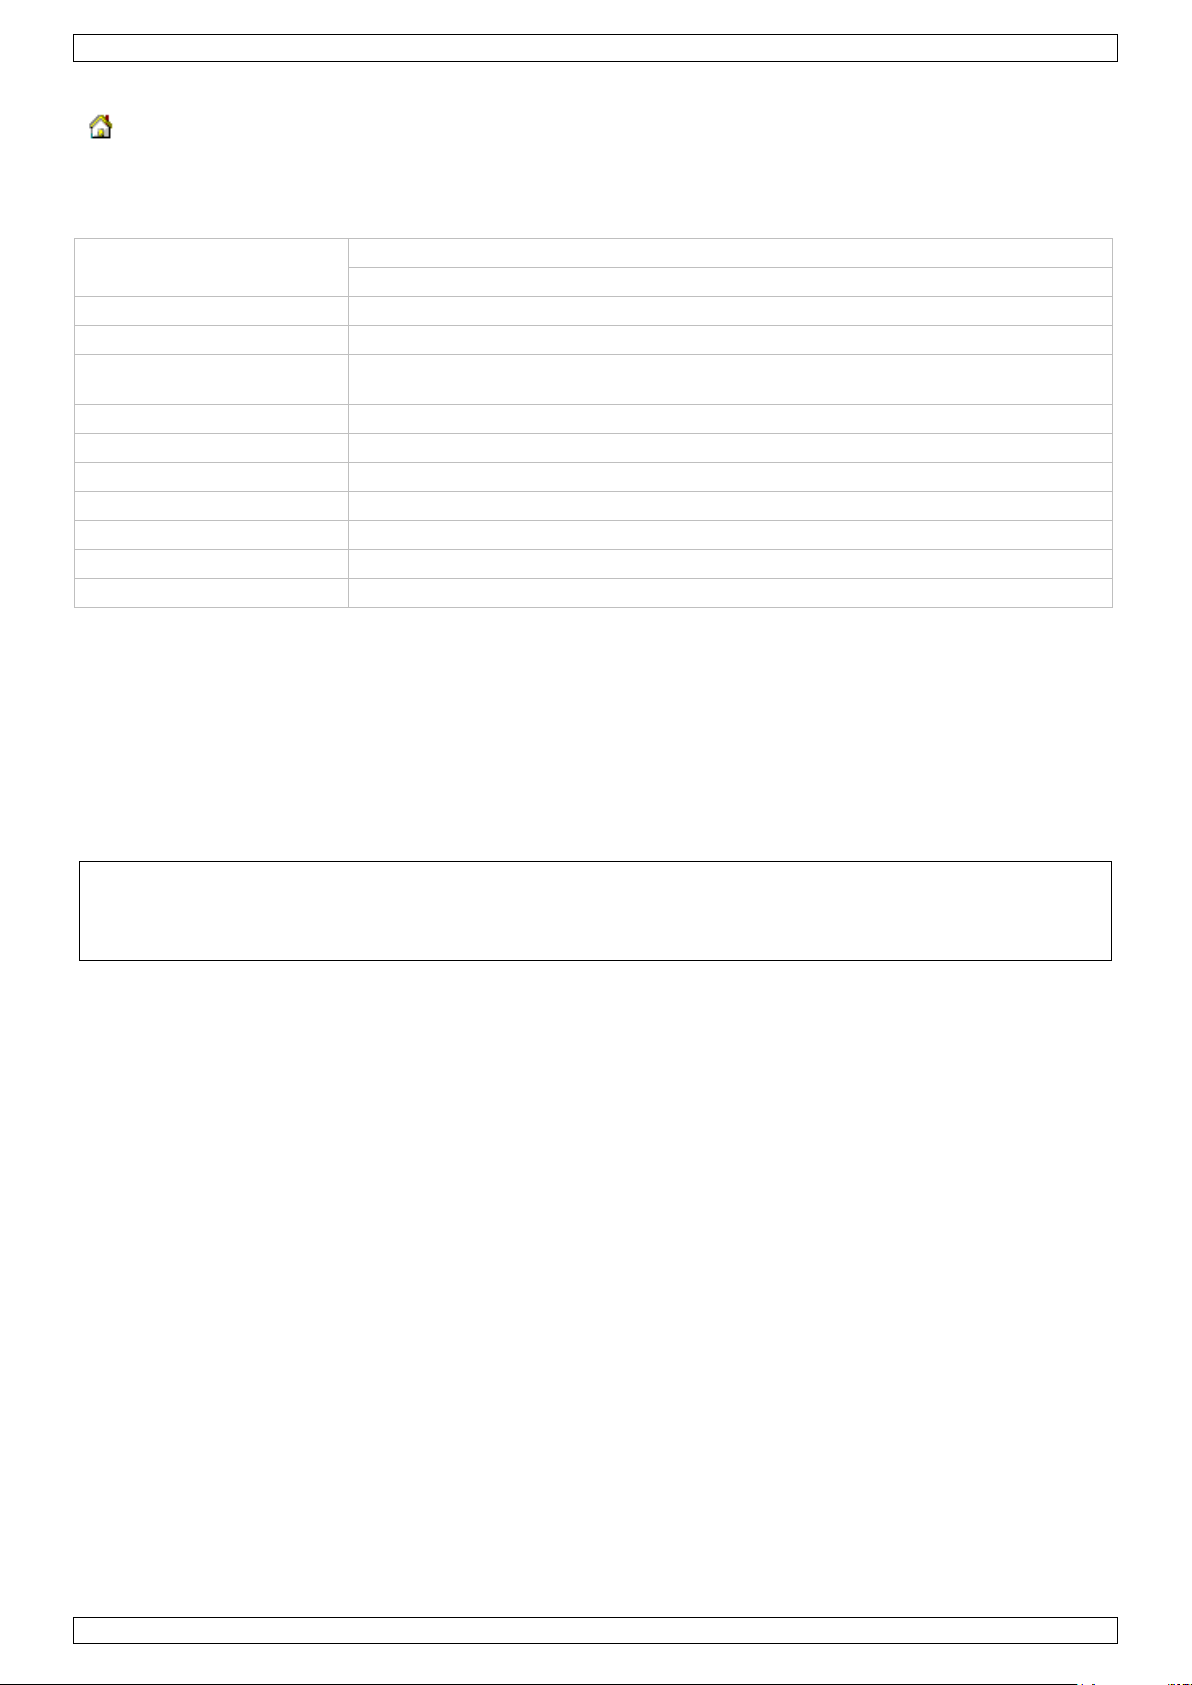
1. Select the desired data in the bottom left corner of the display (Series):
2. Set the time interval (condition) in the upper left corner of the display (1 hour, 24 hours, a week, a month
or user defined). When user defined is selected, set the desired start and end time.
3. Click Search (upper right corner) to retrieve the graph.
4. To zoom in on a section of the graph, select the area with the mouse pointer.
5. Click Refresh to update the graph.
6. Press Export to save the graph as a image file (.JPEG format).
Troubleshooting
If the graph function is not working properly, perform following steps:
1. Locate the folder containing ―EasyWeatherPlus.exe‖.
2. Create a text file (using notepad or WordPad) containing following line:
regsvr32 easyweatherplus.ocx
3. Save the file as reg_graph.bat.
V. 01 – 21/06/2013 14 ©Velleman nv
Page 15
WS3080
power supply
base station: 3 x 1.5V AA batteries (LR6C, not incl.), or 6V DC adaptor (not incl.)
transmitter: 2 x 1.5V AA rechargeable batteries (incl.)
dimensions (base station)
165 x 148 x 27mm
indoor temperature range
0°C~50°C
outdoor temperature
range²
-40°C~65°C
temperature accuracy
±1.0°C
humidity range
1%RH-99%
humidity accuracy
±5% under -20°C to 65°C & 20%-98%
wind speed range
0~50.0m/s
wind speed accuracy
±1m/s (wind speed <10m/s), ±10% (wind speed >10m/s)
rainfall range
0~99.999mm
rainfall accuracy
±1.5mm
4. Double click the file to re-initialize the graphical driver.
About EasyWeatherPlus
Use this option to see the release version of the EasyWeatherPlus software
10. Technical Specifications
Use this device with original accessories only. Velleman nv cannot be held responsible in the event
of damage or injury resulting from (incorrect) use of this device.
For more info concerning this product and the latest version of this manual, please visit our website
www.velleman.eu.
The information in this manual is subject to change without prior notice.
All registered trademarks and trade names are properties of their respective owners and are used
only for the clarification of the compatibility of our products with the products of the different
manufacturers. Windows, Windows XP, Windows 2000, Windows Vista, Windows Aero, Windows 7,
Windows 8, Windows Mobile, Windows Server are registered trademarks of Microsoft Corporation in
the United States and other countries.
© COPYRIGHT NOTICE
The copyright to this manual is owned by Velleman nv. All worldwide rights reserved. No part of this
manual may be copied, reproduced, translated or reduced to any electronic medium or otherwise without the
prior written consent of the copyright holder.
V. 01 – 21/06/2013 15 ©Velleman nv
Page 16
WS3080
Houd buiten het bereik van kinderen en onbevoegden.
Gebruik het toestel enkel binnenshuis. Bescherm tegen regen, vochtigheid en opspattende
vloeistoffen.
Bescherm tegen stof en extreme hitte.
Bescherm tegen schokken en vermijd brute kracht tijdens de bediening.
GEBRUIKERSHANDLEIDING
1. Inleiding
Aan alle ingezetenen van de Europese Unie
Belangrijke milieu-informatie betreffende dit product
Dit symbool op het toestel of de verpakking geeft aan dat, als het na zijn levenscyclus wordt
weggeworpen, dit toestel schade kan toebrengen aan het milieu. Gooi dit toestel (en eventuele
batterijen) niet bij het gewone huishoudelijke afval; het moet bij een gespecialiseerd bedrijf
terechtkomen voor recyclage. U moet dit toestel naar uw verdeler of naar een lokaal recyclagepunt
brengen. Respecteer de plaatselijke milieuwetgeving.
Hebt u vragen, contacteer dan de plaatselijke autoriteiten betreffend de verwijdering.
Dank u voor uw aankoop! Lees deze handleiding grondig voor u het toestel in gebruik neemt. Werd het toestel
beschadigd tijdens het transport, installeer het dan niet en raadpleeg uw dealer.
2. Veiligheidsinstructies
3. Algemene richtlijnen
Raadpleeg de Velleman® service- en kwaliteitsgarantie achteraan deze handleiding.
Leer eerst de functies van het toestel kennen voor u het gaat gebruiken.
Om veiligheidsredenen mag u geen wijzigingen aanbrengen. Schade door wijzigingen die de gebruiker heeft
aangebracht valt niet onder de garantie.
Gebruik het toestel enkel waarvoor het gemaakt is. Bij onoordeelkundig gebruik vervalt de garantie.
De garantie geldt niet voor schade door het negeren van bepaalde richtlijnen in deze handleiding en uw
dealer zal de verantwoordelijkheid afwijzen voor defecten of problemen die hier rechtstreeks verband mee
houden.
4. Eigenschappen
zender op zonne-energie
pluviometer
USB-poort voor aansluiting op pc (software meegeleverd)
opslag en uploaden naar pc van alle gegevens van het basisstation en tot 4080 gegevensbanken met
instelbare meetintervallen
weergave:
o windsnelheid: mph, m/s, km/h, knopen, beaufort
o windrichting: windroos op lcd-scherm
o tijd: radiogestuurd via WWVB-, DCF-signaal
o uv-index
o gegevens regenval: inch of mm, 1 uur/24 uur/1 week/1 maand/totaal sinds laatste reset
o weersvoorspelling: gebaseerd op wijzigingen in luchtdrukverloop
o luchtdruk: Hg of hPa
o temperatuur binnenshuis: °C, °F
o temperatuur buitenshuis: °C, °F
o verkillingsfactor: °C, °F
o dauwpunt: °C, °F
o vochtigheid binnen- en buitenshuis
alarm: temperatuur, vochtigheid, verkillingsfactor, dauwpunt, regenval, windsnelheid, luchtdruk, storm
V. 01 – 21/06/2013 16 ©Velleman nv
Page 17
WS3080
A
bovenste mast
F
zijdelingse houder
B
onderste mast
G
pluviometer
C
bovenste houder
H
zonnepaneel
D
anemometer
I
beschutting sensor
E
windvaan + richtingsensor
J
thermo-hygrometer (onder beschutting)
a
MENU
d
omlaag ()
b
ENTER
e
ALARM ON/OFF ( )
c
omhoog ()
f
HISTORY
1
weersvoorspelling
10
ontvangstsignaal zender
2
luchtdruk
11
vochtigheid buitenshuis
3
luchtdrukhistoriek
12
temperatuur buitenshuis
4
datum
13
windrichting
5
geheugen
14
Wind speed/gust
6
tijd
15
uv-index
7
vochtigheid binnenshuis
16
regenval
8
temperatuur binnenshuis
17
lichtsterkte
9
aanduiding zwakke batterij zender
18
aanduiding radiogestuurde klok (RCC)
gesynchroniseerde ontvangst
12/24 u tijdsweergave
eeuwige kalender
instelbare tijdzone
klok met alarm
achtergrondverlichting met led
muurmontage of vrijstaand gebruik
5. Omschrijving
Raadpleeg de figuren op pagina‘s 3 en 4 van deze handleiding.
6. Opstellen van de stations
1. Steek de onderste mast [B] in de bovenste mast [A].
2. Plaats de anemometer [D] op de houder [C] en bevestig met een bout en een moer.
3. Plaats de windvaan [E] op de houder [C] en bevestig met een bout en een moer.
4. Plaats de houder [C] bovenaan de bovenste mast [A] en bevestig met een bout en een moer.
5. Bevestig een zijdelingse houder [F] op elk van de masten [A+B] en plaats de pluviometer [G] op een van
de houders. Bevestig met een schroef.
6. Plaats het zonnepaneel [H] bovenaan de beschutting [I] en bevestig met een bout en een moer.
7. Bekabeling:
Verbind de anemometer [D] met de aansluiting op de windvaan [E]. Verbind de windvaan [E] met de
WIND-aansluiting op de thermo-hygrometer [J]. Verbind de pluviometer met de RAIN-aansluiting op de
thermo-hygrometer [J].
8. Plaats 2 herlaadbare AA-batterijen (meegeleverd) in de thermo-hygrometer [J] volgens de
polariteitaanduidingen. Gebruik enkel herlaadbare batterijen!
9. Plaats ook 3 AA-batterijen in de ontvanger volgens de polariteitaanduidingen. Raadpleeg §8.1 Initialisatie
voor meer informatie over het DCF-signaal. Merk op dat de ontvanger zich in de thermo-hygrometer
bevindt.
10. Schuif de thermo-hygrometer [J] in zijn beschutting [I].
11. Plaats de thermo-hygrometer [J] bovenaan de tweede houder [F] en bevestig met een schroef.
12. Het is aan te raden om het station te testen alvorens het te installeren.
13. Wacht tot de twee stations synchroniseren. Dit kan enkele minuten duren. Druk tijdens de
synchronisatieprocedure op geen enkele toets. Controleer na de synchronisatieprocedure of alle onderdelen
naar behoren functioneren.
14. Na de testprocedure kunt u het station met behulp van de meegeleverde klemmen op een mast (niet
meegeleverd) installeren. Kies een geschikte installatieplaats voor de ontvanger. Doorgaans bedraagt het
zendbereik ongeveer 100 m, op voorwaarde dat er zich geen obstakels zoals gebouwen, bomen of
V. 01 – 21/06/2013 17 ©Velleman nv
Page 18
WS3080
MENU
Functie
Omschrijving
Tijd
contrast lcd
stel het contrast van het scherm in van 0~8 (standaard = 5)
tijdzone
stel de toepasselijke tijdzone in:
-1 = GMT / 0 = GMT+1 / 1 = GMT+2 … (standaard = 0)
uurformaat
stel het uurformaat in (12/24 u, standaard = 12 u)
manuele instelling
stel het uur en de minuten handmatig in
Datum
weergave
kies de gewenste weergave:
dag-maand-seconden (standaard) / dag-maand-weekdag / uur alarm
formaat
datum/maand
kies tussen DD-MM of MM-DD (dM of Md)
jaar
stel het jaartal in
maand/datum
stel maand en datum in
uur alarm
stel het alarmuur in
schakel het alarm in of uit met ALARM ON/OFF; bij een ingeschakeld alarm
verschijnt
Luchtdrukhistoriek
grafiek
stel de grafiek in voor een historiek van de laatste 12 tot 24 u
Luchtdruk
weergave
luchtdruk
kies tussen de relatieve (rel) of de absolute (abs) luchtdruk (standaard =
absoluut)
eenheid luchtdruk
kies de eenheid (hPa, mmHg of inHg, standaard = hPa)
relatieve luchtdruk
stel de relatieve luchtdruk in (enkel bij geselecteerde relatieve luchtdruk)
alarm hoog
stel het hoog alarmniveau in
druk op ALARM ON/OFF om het alarm in/uit te schakelen; bij een
ingeschakeld alarm verschijnt
alarm laag
stel het laag alarmniveau in
druk op ALARM ON/OFF om het alarm in/uit te schakelen; bij een
ingeschakeld alarm verschijnt
max. resetten
(luchtdruk- [2] en max-icoon (tussen [14] en [15]) knipperen)
houd ENTER ingedrukt om de maximumwaarde te resetten
min. resetten
(luchtdruk- [2] en min-icoon (tussen [14] en [15]) knipperen)
houd ENTER ingedrukt om de minimumwaarde te resetten
Weersvoorspelling
raadpleeg §8.2 voor meer informatie
trend
kies trend
voertuigen tussen zender en ontvanger bevinden. Radio-interferentie afkomstig van pc‘s, radio- en
televisietoestellen kunnen het signaal volledig onderbreken.
Opmerkingen
Op de windvaan [E] staat de windrichting aangeduid (―N‖ = noord, ―E‖ = oost, ―S‖ = zuid en ―W‖ = west).
Zorg dat deze aanduidingen overeenkomen met de echte windrichting. Gebruik hiervoor een kompas (niet
meegeleverd).
Richt het zonnepaneel naar de zon toe zodat de batterijen keer op keer herladen worden.
7. Basisinstellingen
1. Scroll doorheen het menu met MENU [a], selecteer met ENTER [b].
2. Wijzig de waarde met [c] of [d].
Opmerkingen
Houd [c] of [d] ingedrukt om de waarde sneller te wijzigen.
Verlaat het menu met HISTORY [f] of wacht een 30-tal seconden tot de ontvanger automatisch het menu
verlaat.
Druk bij een normale weergave op HISTORY [f] om de achtergrondverlichting gedurende 10 seconden in te
schakelen
De ontvanger kunt u ook softwarematig instellen (zie: §9 Aansluiting op de pc).
Raadpleeg de tabel hieronder voor een overzicht van het menu en de instelopties.
V. 01 – 21/06/2013 18 ©Velleman nv
Page 19
WS3080
drempel luchtdruk
stel drempel in tussen 2 ~ 4 hPa (standaard = 2 hPa)
drempel storm
stel drempel in tussen 3 ~ 9 hPa (standaard = 4 hPa)
Vochtigheid
binnenshuis
alarm hoog
stel het hoog alarmniveau in
druk op ALARM ON/OFF om het alarm in/uit te schakelen; bij een
ingeschakeld alarm verschijnt
alarm laag
stel het laag alarmniveau in
druk op ALARM ON/OFF om het alarm in/uit te schakelen; bij een
ingeschakeld alarm verschijnt
max. resetten
(vochtigheid- [7] en max-icoon (tussen [14] en [15]) knipperen)
houd ENTER ingedrukt om de maximumwaarde te resetten
min. resetten
(vochtigheid- [7] en min-icoon (tussen [14] en [15]) knipperen)
houd ENTER ingedrukt om de minimumwaarde te resetten
Temperatuur
binnenshuis
eenheid
kies °C of °F
alarm hoog
stel het hoog alarmniveau in
druk op ALARM ON/OFF om het alarm in/uit te schakelen; bij een
ingeschakeld alarm verschijnt
alarm laag
stel het laag alarmniveau in
druk op ALARM ON/OFF om het alarm in/uit te schakelen; bij een
ingeschakeld alarm verschijnt
max. resetten
(temperatuur- [8] en max-icoon (tussen [14] en [15]) knipperen)
houd ENTER ingedrukt om de maximumwaarde te resetten
min. resetten
(temperatuur- [8] en min-icoon (tussen [14] en [15]) knipperen)
houd ENTER ingedrukt om de minimumwaarde te resetten
Vochtigheid
buitenshuis
alarm hoog
stel het hoog alarmniveau in
druk op ALARM ON/OFF om het alarm in/uit te schakelen; bij een
ingeschakeld alarm verschijnt
alarm laag
stel het laag alarmniveau in
druk op ALARM ON/OFF om het alarm in/uit te schakelen; bij een
ingeschakeld alarm verschijnt
max. resetten
(vochtigheid- [11] en max-icoon (tussen [14] en [15]) knipperen)
houd ENTER ingedrukt om de maximumwaarde te resetten
min. resetten
(vochtigheid- [11] en min-icoon (tussen [14] en [15]) knipperen)
houd ENTER ingedrukt om de minimumwaarde te resetten
Temperatuur
buitenshuis
weergave
kies voor een weergave van de temperatuur buitenshuis, verkillingsfactor of
dauwpunt [12]
eenheid
kies °C of °F
alarm hoog
stel het hoog alarmniveau in
druk op ALARM ON/OFF om het alarm in/uit te schakelen; bij een
ingeschakeld alarm verschijnt
alarm laag
stel het laag alarmniveau in
druk op ALARM ON/OFF om het alarm in/uit te schakelen; bij een
ingeschakeld alarm verschijnt
max. resetten
(temperatuur- [12] en max-icoon (tussen [14] en [15]) knipperen)
houd ENTER ingedrukt om de maximumwaarde te resetten
min. resetten
(temperatuur- [12] en min-icoon (tussen [14] en [15]) knipperen)
houd ENTER ingedrukt om de minimumwaarde te resetten
Uv-index
raadpleeg §8.2 voor meer informatie
alarm hoog
stel het hoog alarmniveau in
druk op ALARM ON/OFF om het alarm in/uit te schakelen; bij een
ingeschakeld alarm verschijnt
alarm laag
(Uv-index- [15] en max-icoon (tussen [14] en [15]) knipperen)
houd ENTER ingedrukt om de maximumwaarde te resetten
Wind
windsnelheid
kies tussen gemiddelde of windstootsnelheid (standaard = gemiddeld)
V. 01 – 21/06/2013 19 ©Velleman nv
Page 20

WS3080
eenheid
kies tussen km/h, mph, m/s, knots of bft (standaard = mph)
alarm hoog
stel het hoog alarmniveau in
druk op ALARM ON/OFF om het alarm in/uit te schakelen; bij een
ingeschakeld alarm verschijnt
alarmrichting
kies de alarmrichting
druk op ALARM ON/OFF om het alarm in/uit te schakelen; bij een
ingeschakeld alarm verschijnt
max. resetten
(windsnelheid- [14] en max-icoon (tussen [14] en [15]) knipperen)
houd ENTER ingedrukt om de maximumwaarde te resetten
Licht
eenheid
kies tussen fc en lux
alarm hoog
stel het hoog alarmniveau in
druk op ALARM ON/OFF om het alarm in/uit te schakelen; bij een
ingeschakeld alarm verschijnt
max. resetten
(lichtsterkte- [17] en max-icoon (tussen [14] en [15]) knipperen)
houd ENTER ingedrukt om de maximumwaarde te resetten
Regen
weergave
kies tussen 1 u, 24 u, 1 week, 1 maand en totaal
eenheid
kies tussen mm en inch (standaard = mm)
alarm hoog
stel het hoog alarmniveau in
druk op ALARM ON/OFF om het alarm in/uit te schakelen; bij een
ingeschakeld alarm verschijnt
max. resetten
(regenval- [16] en max-icoon (tussen [14] en [15]) knipperen)
houd ENTER ingedrukt om de maximumwaarde te resetten
alles resetten
(regenval [16], TOTAL en CLE [4] knipperen)
houd ENTER ingedrukt om de TOTAL-waarde te resetten
Druk op HISTORY [f] om de geheugeninhoud weer te geven.
Opmerking: Het station schrijft de gegevens om de 30 minuten naar het geheugen. Dit interval is enkel
instelbaar via de software (raadpleeg §9 Aansluiting op pc).
Scroll doorheen de geheugeninhoud met [d] en [c].
Opmerking: Het station keert op het einde van het geheugen terug naar de normale weergave.
Druk op ENTER [b] om de volledige inhoud van het geheugen te wissen. CLE [4] en het geheugenicoon [5]
knipperen. Houd ENTER [b] ingedrukt om te bevestigen.
Opmerking: Raadpleeg §9 Aansluiting op pc indien u de geheugeninhoud naar uw pc wenst te kopiëren.
8. Bijkomende informatie
8.1 8.1 Initialisatie
RF-aansluiting
Na het plaatsen van de batterijen zoekt het basisstation gedurende 144 seconden contact met de sensor.
Na contact ontvangt het om de 48 seconden de temperatuur-, vochtigheid-, wind- en regengegevens, en
om de 60 seconden de lichtsterkte. Druk niet op een toets zolang die gegevens op de display verschijnen.
Lukt het contact niet dan verschijnt ‗----‘ [11, 12] op de display en probeert het station opnieuw gedurende
144 seconden.
Houd [d] ingedrukt om het radiosignaal handmatig te zoeken.
DCF-aansluiting
Na het plaatsen van de batterijen zendt de thermo-hygrometer (sensor) gedurende 24 seconden de
weersgegevens uit.
Daarna zoekt hij gedurende een 5-tal minuten naar het DCF-signaal. Vindt hij geen signaal, dan begint hij
elk uur opnieuw te zoeken tot het signaal gevonden is. Ondertussen kunt u het uur handmatig instellen
(zie: §7).
Het ontvangen DCF-signaal wordt naar het basisstation verzonden en het uur wordt automatisch bijgesteld;
de RCC-aanduiding [18] verschijnt op de display.
Opmerkingen
Stel uw tijdzone handmatig in zodat de automatische bijstelling correct gebeurt.
Het station ontvangt het signaal het best tussen 00:00 u en 06:00 u.
V. 01 – 21/06/2013 20 ©Velleman nv
Page 21
WS3080
De WS3080 thermo-hygrometer bevat een ontvanger die de
radiografische signalen uitgezonden door de tijdseinzender in
Mainflingen kan ontvangen. Deze DCF77 langegolfsignalen (77,5 kHz)
bevatten tijd- en datuminformatie gebaseerd op atoomklokken. Voor
meer informatie, zie www.ptb.de (PTB = Physikalisch-Technische
Bundesanstalt).
Uw WS3080 zal bij ontvangst van het DCF-signaal de aangegeven tijd
automatisch met de atoomklok synchroniseren.
Het radiosignaal is gemakkelijk binnenshuis te ontvangen. De
ontvangst kan echter verzwakken indien er beton en metaal aanwezig
is. Het is daarom niet aan te raden om de klok te installeren in kelders
en binnenin een metalen kooi. De beste locatie om de klok op kantoor
of op een flat te installeren, is naast een raam.
Vermijd ook installatie in de buurt van magnetische velden of
apparaten die elektrische ruis voortbrengen (bv. een motor).
zonnig
wisselende bewolking
bewolkt
(kans op) regen
(kans op) sneeuw
storm
sneeuwstorm
heldere nacht
bewolkte nacht
Het DCF-signaal
8.2 Weersvoorspelling
Overzicht van de symbolen
Instelling luchtdrukgevoeligheid
De gevoeligheid kan ingesteld worden van 2 tot 4 hPa (standaard 2 hPa). Stel een lagere gevoeligheid (4 hPa)
in voor een gebied met een hoge veranderlijkheid van de luchtdruk, of een hogere gevoeligheid (2 hPa) in voor
een gebied met stabielere luchtdruk.
Instelling stormdrempel
Bij een drastische verandering van de luchtdruk zullen de weersymbolen (regen en wolken) knipperen om een
aankomend stormweer weer te geven. Net zoals de luchtdrukgevoeligheid is de stormdrempel instelbaar van 3
tot 9 hPa (standaard 4 hPa). Bij een dalende luchtdruk groter dan de ingestelde drempel zullen de wolk-,
regen- en trendsymbolen gedurende 3 uur knipperen om het stormalarm aan te duiden.
V. 01 – 21/06/2013 21 ©Velleman nv
Page 22

WS3080
uv-index
uv-intensiteit
omschrijving
code
0 ~ 2
zeer laag
vrijwel geen gevaar
groen
3 ~ 5
laag
weinig gevaar bij onbeschermde blootstelling
geel
6 ~ 7
matig
gevaar bij onbeschermde blootstelling
oranje
8 ~ 10
hoog
verhoogd risico bij onbeschermde blootstelling
rood
11+
zeer hoog
extreme verhoogd risico bij onbeschermde blootstelling
violet
8.3 8.3 Uv-index
Opmerking: De tabel hierboven geldt voor een licht huidtype en is enkel ter verduidelijking. Kinderen en
personen met een gevoelig huidtype kunnen al gevaar oplopen bij een lage uv-intensiteit.
8.4 8.4 Fabrieksinstellingen herstellen
Houd [c] lang ingedrukt om de fabrieksinstellingen te herstellen. Het geheugen wordt volledig gewist.
9. Aansluiting op pc
De ontvanger kan tot 4.080 gegevens (met datum en uur) in het geheugen opslaan. Dit geheugen is van
het type EEPROM en wordt niet gewist in geval van een stroomonderbreking (bv. bij het vervangen van de
batterijen). Bij een vol geheugen zullen de oudste gegevens overschreven worden.
De gegevens kunnen gelezen, gekopieerd, opgeslagen en afgedrukt worden door de ontvanger op uw pc
aan te sluiten.
9.1 Systeemvereisten
Besturingssysteem: Windows XP, Vista®, 7, 8
Webbrowser: Internet Explorer 6.0
CPU: Pentium® III, 500 MHz
Geheugen: 128 MB (256 MB aanbevolen)
Cd-romdrive + vrije USB-poort
9.2 Installatie van de software
1. Plaats de meegeleverde cd-rom in de cd-romdrive van uw pc. Sluit de ontvanger nog niet op de pc aan.
2. Dubbelklik eventueel op het bestand setup.exe en volg de instructies op het scherm.
Zorg dat u met een administratorwachtwoord op het systeem bent ingelogd.
3. Kies uw taal en klik op NEXT.
4. Klik op NEXT en kies de doelmap.
5. Klik op NEXT. De software wordt automatisch geïnstalleerd.
6. Klik op OK om de installatie te voltooien.
7. Herstart uw pc.
8. Sluit de ontvanger aan op uw pc met behulp van de meegeleverde USB-kabel.
9.3 Gebruik van de software
1. Zorg dat u eerst het juiste uur hebt ingesteld op zowel uw pc als op de ontvanger.
2. Ga naar Start > All Programs > EasyWeahterPlus om de software op te starten. Klik vervolgens op het
EasyWeatherPlus-icoon.
Opmerking: Zorg dat u met een administratorwachtwoord op het systeem bent ingelogd.
V. 01 – 21/06/2013 22 ©Velleman nv
Page 23
WS3080
configuratie
(System > Setup)
alarminstellingen weergeven
(System > Alarm)
minimum- en maximumwaarden weergeven
(System > Scope)
historiek weergeven
(Record > History)
grafiek weergeven
(Record > Graph)
info over EasyWeatherPlus weergeven
(Help > about EasyWeatherGraph)
3. De pc start met het downloaden van alle gegevens op het weerstation. Dit kan enkele minuten duren. Stel
het station niet in tijdens dit proces om gegevensverlies te vermijden.
4. Kies uw taal via Display > Language.
Setup
Wijzig alle instellingen van het basisstation en schakel alle alarmen in via dit menu.
Klik op SAVE om de wijzigingen op te slaan en ze naar het basisstation door te zenden.
Opmerking: Het intervalbereik bedraagt 5 tot 240 minuten.
Alarm
Stel alle alarmgegevens in via dit menu.
Klik op SAVE om de wijzigingen op te slaan en ze naar het basisstation door te zenden.
V. 01 – 21/06/2013 23 ©Velleman nv
Page 24
WS3080
REFRESH
lijst verversen
CLEAR DATA
gegevens uit pc wissen
CLEAR MEMORY
gegevens uit het station wissen (eerst bewaren)
GRAPH
grafiek weergeven (zie Graph hieronder)
EXPORT
gegevens in CSV-bestand exporteren/bewaren
kies de gegevens en de weergave, klik op EXPORT en kies de
doelmap
Scope
Raadpleeg en herstel alle minimum- en maximumwaarden.
Kies de gewenste gegevens en klik op RESET om ze te wissen.
History
Raadpleeg de historiek via dit menu.
1. Stel het interval linksboven in (1 uur, 24 uur, 1 week, 1 maand of user defined).
2. Klik op SEARCH (rechtsboven) om de gegevens op te vragen.
V. 01 – 21/06/2013 24 ©Velleman nv
Page 25
WS3080
Graph
Raadpleeg de grafische voorstelling van de gegevens via dit menu.
1. Kies de gegevens onderaan links (Series):
2. Stel het interval linksboven in (1 uur, 24 uur, 1 week, 1 maand of user defined).
3. Klik op SEARCH (rechtsboven) om de grafiek af te beelden.
4. Selecteer met de muis de zone die u wenst te vergroten.
5. Klik op REFRESH om de grafiek te verversen.
6. Klik op EXPORT om de grafiek als een JPEG-bestand op te slaan.
V. 01 – 21/06/2013 25 ©Velleman nv
Page 26
WS3080
voeding
basisstation
3x 1,5 V AA-batterijen (LR6C, niet meegelev.), of 6VDC-adapter (niet
meegelev.)
zender
2x herlaadbare 1,5 V AA-batterijen (meegelev.)
afmetingen (basisstation)
165 x 148 x 27 mm
bereik temperatuur binnenshuis
0°C ~ 50°C
bereik temperatuur buitenshuis
-40°C ~ 65°C
nauwkeurigheid temperatuurweergave
± 1,0°C
bereik vochtigheidsgraad
1% RH-99%
nauwkeurigheid vochtigheidsgraad
± 5% onder -20°C tot 65°C & 20%-98%
bereik windsnelheid
0 ~ 50,0 m/s
nauwkeurigheid windsnelheid
± 1 m/s (windsnelheid <10 m/s), ± 10% (windsnelheid >10 m/s)
bereik regenval
0 ~ 99,999 mm
nauwkeurigheid regenval
± 1,5 mm
Opmerking
Ga als volgt te werk indien de grafiek niet correct wordt afgebeeld:
1. Ga naar de map EasyWeatherPlus.exe.
2. Open een nieuw tekstbestand (met Notepad of WordPad) en typ:
regsvr32 easyweatherplus.ocx
3. Bewaar het bestand als reg_graph.bat.
4. Dubbelklik op de bestandsnaam om de grafische driver te herstellen.
About EasyWeatherPlus
Raadpleeg hier de versie van de software.
10. Technische specificaties
Gebruik dit toestel enkel met originele accessoires. Velleman nv is niet aansprakelijk voor schade of
kwetsuren bij (verkeerd) gebruik van dit toestel.
Voor meer informatie over dit product en de laatste versie van deze handleiding, zie
www.velleman.eu.
De informatie in deze handleiding kan te allen tijde worden gewijzigd zonder voorafgaande
kennisgeving.
Alle geregistreerde handelsmerken en handelsnamen zijn eigendom van hun respectieve bezitters,
en zijn enkel gebruikt als voorbeeld van de compatibiliteit tussen onze producten en de producten
van de verschillende fabrikanten. Windows, Windows XP, Windows 2000, Windows Vista, Windows
Aero, Windows 7, Windows 8, Windows Mobile, Windows Server zijn geregistreerde handelmerken
van Microsoft Corporation in de Verenigde Staten en andere landen.
V. 01 – 21/06/2013 26 ©Velleman nv
Page 27

WS3080
© AUTEURSRECHT
Velleman nv heeft het auteursrecht voor deze handleiding. Alle wereldwijde rechten voorbehouden.
Het is niet toegestaan om deze handleiding of gedeelten ervan over te nemen, te kopiëren, te vertalen, te
bewerken en op te slaan op een elektronisch medium zonder voorafgaande schriftelijke toestemming van de
rechthebbende.
V. 01 – 21/06/2013 27 ©Velleman nv
Page 28

WS3080
Garder hors de la portée des enfants et des personnes non autorisées.
Utiliser cet appareil uniquement à l'intérieur. Protéger de la pluie, de l‘humidité et des
projections d‘eau.
Protéger contre la poussière. Protéger contre la chaleur extrême.
Protéger contre les chocs et le traiter avec circonspection pendant l‘opération.
MODE D’EMPLOI
1. Introduction
Aux résidents de l'Union européenne
Des informations environnementales importantes concernant ce produit
Ce symbole sur l'appareil ou l'emballage indique que l‘élimination d‘un appareil en fin de vie peut
polluer l'environnement. Ne pas jeter un appareil électrique ou électronique (et des piles éventuelles)
parmi les déchets municipaux non sujets au tri sélectif ; une déchèterie traitera l‘appareil en question.
Renvoyer les équipements usagés à votre fournisseur ou à un service de recyclage local. Il convient de
respecter la réglementation locale relative à la protection de l‘environnement.
En cas de questions, contacter les autorités locales pour élimination.
Nous vous remercions de votre achat ! Lire la présente notice attentivement avant la mise en service de
l‘appareil. Si l‘appareil a été endommagé pendant le transport, ne pas l‘installer et consulter votre revendeur.
2. Consignes de sécurité
3. Directives générales
Se référer à la garantie de service et de qualité Velleman® en fin de cette notice.
Se familiariser avec le fonctionnement avant l‘emploi.
Toute modification est interdite pour des raisons de sécurité. Les dommages occasionnés par des
modifications par le client ne tombent pas sous la garantie.
N‘utiliser qu‘à sa fonction prévue. Un usage impropre annule d'office la garantie.
La garantie ne s‘applique pas aux dommages survenus en négligeant certaines directives de cette notice et
votre revendeur déclinera toute responsabilité pour les problèmes et les défauts qui en résultent.
4. Caractéristiques
émetteur solaire
pluviomètre
port USB pour connexion PC (logiciel inclus)
enregistrement et téléchargement vers PC de toutes les données de la station météo ainsi que jusqu‘à 4080
banques de données avec intervalles de mesure réglables
indications :
o vitesse du vent : mph, m/s, km/h, nœuds, beaufort
o direction du vent : rose des vents sur afficheur LCD
o heure radioguidée via signal WWVB, DCF
o indice UV
o données pluviosité : pouces ou mm, 1 heure/24 heures/1 semaine/1 mois/total depuis dernière remise
à zéro
o prévisions météo : basées sur les changements de pression barométrique
o pression barométrique : Hg ou hPa
o température intérieure : °C, °F
o température extérieure : °C, °F
o indice de refroidissement : °C, °F
o point de rosée : °C, °F
o humidité intérieure et extérieure
V. 01 – 21/06/2013 28 ©Velleman nv
Page 29

WS3080
A
mât supérieur
F
support latéral
B
mât inférieur
G
pluviomètre
C
support
H
panneau solaire
D
anémomètre
I
abri du capteur
E
girouette + capteur
J
thermo-hygromètre (sous abri)
a
MENU
d
bas ()
b
ENTER
e
ALARM ON/OFF ( )
c
haut ()
f
HISTORY
1
prévisions météo
10
signal de réception
2
pression atmosphérique
11
humidité extérieure
3
tendance atmosphérique
12
température extérieure
4
date
13
direction du vent
5
mémoire
14
vitesse du vent/rafale
6
heure
15
indice UV
7
humidité intérieure
16
pluviosité
8
température intérieure
17
intensité lumineuse
9
indication de pile faible de l‘émetteur
18
indication signal de radioguidage
alarmes : température, humidité, indice de refroidissement, point de rosée, pluviosité, vitesse du vent,
pression atmosphérique, tempête
réception synchronisée
affichage de l'heure au format 12 ou 24 h
calendrier perpétuel
fuseau horaire programmable
horloge avec alarme
rétro-éclairage à LED
montage mural ou pose libre
5. Description
Se référer aux illustrations en pages 3 et 4 de cette notice.
6. Mise en place des stations
Se référer aux illustrations en pages 3 et 4 de cette notice.
1. Insérer le mât inférieur [B] dans le mât supérieur [A].
2. Placer l‘anémomètre [D] sur le support [C] et le fixer à l‘aide d‘un boulon et d‘un écrou.
3. Placer la girouette [E] sur le support [C] et la fixer à l‘aide d‘un boulon et d‘un écrou.
4. Placer le support [C] sur le mât supérieur [A] et le fixer à l‘aide d‘un boulon et d‘un écrou.
5. Fixer le support latéral [F] sur le mât [A+B] et y placer le pluviomètre [G]. Fixer à l‘aide d‘une vis.
6. Fixer le support latéral [F] sur le mât [A+B].
7. Placer le panneau solaire [H] sur l‘abri [I] et le fixer à l‘aide d‘un boulon et d‘un écrou.
8. Connexion :
Connecter l‘anémomètre [D] à la girouette [E]. Connecter la girouette [E] à la prise WIND du thermo-
hygromètre [J]. Connecter le pluviomètre [G] à la prise RAIN du thermo-hygromètre [J].
9. Insérer 2 piles rechargeables de type R6 (incluses) dans le thermo-hygromètre [J] selon les indications de
polarité. N‘utiliser que des piles rechargeables !
10. Insérer 3 piles de type R6 dans le récepteur selon les indications de polarité. Se reporter au chapitre §8.1
Initialisation pour plus d‘information concernant le signal DCF. Remarque : le récepteur est logé dans le
thermo-hygromètre.
11. Insérer le thermo-hygromètre [J] à l‘intérieur de son abri [I].
12. Placer le thermo-hygromètre [J] sur le support latéral [F] et le fixer à l‘aide d‘une vis.
13. Il est conseillé de tester la station avant l‘installation en extérieur définitive.
14. Patienter jusqu‘à ce que les stations se synchronisent. Ceci peut durer quelques minutes. Éviter de
manipuler les stations pendant le processus de synchronisation.
V. 01 – 21/06/2013 29 ©Velleman nv
Page 30

WS3080
Menu
Fonction
Description
Heure
contraste LCD
régler le contraste de l‘afficheur de 0 à 8 (standard = 5)
fuseau horaire
sélectionner le fuseau horaire applicable :
-1 = GMT / 0 = GMT+1 / 1 = GMT+2 … (standard = 0)
format d‘affichage
sélectionner le format d‘affichage 12 h ou 24h (standard = 12 h)
configuration
manuelle
configuration manuelle de l‘heure
Date
format d‘affichage
sélectionner le format d‘affichage :
jour-mois-secondes (standard) / jour-mois-jour de la semaine / heure
d‘alarme
format date/mois
sélectionner le format DD-MM ou MM-DD (dM ou Md)
année
configurer l‘année
mois/date
configurer le mois et la date
heure d‘alarme
configurer l‘heure d‘alarme
enfoncer ALARM ON/OFF pour activer/désactiver l‘alarme ; s‘affiche lors
d‘une alarme activée
Historique
pression
échelle graphique
sélectionner l‘échelle du graphique (12 h ou 24 h)
Pression
affichage pression
sélectionner la pression relative (rel) or absolue (abs) pressure (standard =
absolue)
unité
sélectionner l‘unité : hPa, mmHg ou inHg (standard = hPa)
pression relative
sélectionner le niveau de pression relative (uniquement en mode de pression
relative)
alarme supérieure
configurer le niveau de l‘alarme supérieure
enfoncer ALARM ON/OFF pour activer/désactiver l‘alarme ; s‘affiche lors
d‘une alarme activée
alarme inférieure
configurer le niveau de l‘alarme inférieure
enfoncer ALARM ON/OFF pour activer/désactiver l‘alarme ; s‘affiche lors
d‘une alarme activée
remise à zéro max.
(les symboles de pression [2] et max (entre [14] et [15]) clignotent)
maintenir enfoncé ENTER pour remettre à zéro la valeur max.
remise à zéro min.
(les symboles de pression [2] et min (entre [14] et [15]) clignotent)
maintenir enfoncé ENTER pour remettre à zéro la valeur min.
Prévisions
météo
se reporter au chapitre §8.2 pour plus d‘information
tendance
sélectionner les prévisions
15. Une fois le test complété, monter la station sur un mât (non inclus) à l‘aide des colliers de serrage inclus.
Choisir un emplacement pour le récepteur en tenant compte du fait que la portée peut atteindre la distance
de 100 m pourvu qu‘il n‘y ait aucun obstacle (immeubles, arbres, véhicules, lignes à haute tension, etc.)
entre les 2 stations. Les ondes électromagnétiques provenant d‘ordinateurs, postes de radios et de
télévision peuvent également brouiller le signal de façon considérable.
Remarque :
Veiller à ce que les indications sur la girouette [E] (―N‖ = nord, ―E‖ = est, ―S‖ = sud et ―W‖ = ouest)
correspondent aux points cardinaux. Utiliser une boussole (non incluse) pour déterminer la direction.
Veiller à installer le panneau solaire de manière à ce qu‘il capte le plus de lumière possible afin de
suffisamment recharger les piles.
7. Configuration de base/emploi
1. Faire défiler le menu avec MENU [a] ; sélectionner une option ou confirmer une sélection avec ENTER [b].
2. Modifier une valeur avec [c] ou [d].
Remarque :
Maintenir enfoncé [c] ou [d] pour augmenter la vitesse de défilement des valeurs.
Quitter le menu avec HISTORY [f] ou patienter pendant 30 secondes jusqu‘à ce que le récepteur revienne
automatiquement au mode d‘affichage normal.
En mode d‘affichage normal, enfoncer HISTORY [f] pour activer le rétro-éclairage.
La station est également configurable à l‘aide du logiciel (voir : §9 Connexion à l‘ordinateur).
Se référer au tableau ci-dessous pour un aperçu du menu et des options :
V. 01 – 21/06/2013 30 ©Velleman nv
Page 31

WS3080
seuil de pression
configurer le seuil entre 2 et 4 hPa (standard = 2 hPa)
seuil de tempête
configurer le seuil entre 3 et 9 hPa (standard = 4 hPa)
Humidité
intérieure
alarme supérieure
configurer le niveau de l‘alarme supérieure
enfoncer ALARM ON/OFF pour activer/désactiver l‘alarme ; s‘affiche lors
d‘une alarme activée
alarme inférieure
configurer le niveau de l‘alarme inférieure
enfoncer ALARM ON/OFF pour activer/désactiver l‘alarme ; s‘affiche lors
d‘une alarme activée
remise à zéro max.
(les symboles d‘humidité [7] et max (entre [14] et [15]) clignotent)
maintenir enfoncé ENTER pour remettre à zéro la valeur max.
remise à zéro min.
(les symboles d‘humidité [7] et min (entre [14] et [15]) clignotent)
maintenir enfoncé ENTER pour remettre à zéro la valeur min.
Température
intérieure
unité
sélectionner l‘unité : °C ou °F
alarme supérieure
configurer le niveau de l‘alarme supérieure
enfoncer ALARM ON/OFF pour activer/désactiver l‘alarme ; s‘affiche lors
d‘une alarme activée
alarme inférieure
configurer le niveau de l‘alarme inférieure
enfoncer ALARM ON/OFF pour activer/désactiver l‘alarme ; s‘affiche lors
d‘une alarme activée
remise à zéro max.
(les symboles de température [8] et max (entre [14] et [15]) clignotent)
maintenir enfoncé ENTER pour remettre à zéro la valeur max.
remise à zéro min.
(les symboles de température [8] et min (entre [14] et [15]) clignotent)
maintenir enfoncé ENTER pour remettre à zéro la valeur min.
Humidité
extérieure
alarme supérieure
configurer le niveau de l‘alarme supérieure
enfoncer ALARM ON/OFF pour activer/désactiver l‘alarme ; s‘affiche lors
d‘une alarme activée
alarme inférieure
configurer le niveau de l‘alarme inférieure
enfoncer ALARM ON/OFF pour activer/désactiver l‘alarme ; s‘affiche lors
d‘une alarme activée
remise à zéro max.
(les symboles d‘humidité [11] et max (entre [14] et [15]) clignotent)
maintenir enfoncé ENTER pour remettre à zéro la valeur max.
remise à zéro min.
(les symboles d‘humidité [11] et min (entre [14] et [15]) clignotent)
maintenir enfoncé ENTER pour remettre à zéro la valeur min.
Température
extérieure
format d‘affichage
sélectionner les fonctions à afficher : température extérieure, indice de
refroidissement ou point de rosée [12]
unité
sélectionner l‘unité : °C ou °F
alarme supérieure
configurer le niveau de l‘alarme supérieure
enfoncer ALARM ON/OFF pour activer/désactiver l‘alarme ; s‘affiche lors
d‘une alarme activée
alarme inférieure
configurer le niveau de l‘alarme inférieure
enfoncer ALARM ON/OFF pour activer/désactiver l‘alarme ; s‘affiche lors
d‘une alarme activée
remise à zéro max.
(les symboles de température [12] et max (entre [14] et [15]) clignotent)
maintenir enfoncé ENTER pour remettre à zéro la valeur max.
remise à zéro min.
(les symboles de température [12] et min (entre [14] et [15]) clignotent)
maintenir enfoncé ENTER pour remettre à zéro la valeur min.
indice UV
se reporter au chapitre §8.2 pour plus d‘information
alarme supérieure
configurer le niveau de l‘alarme supérieure
enfoncer ALARM ON/OFF pour activer/désactiver l‘alarme ; s‘affiche lors
d‘une alarme activée
remise à zéro max.
(les symboles d‘indice UV [15] et max (entre [14] et [15]) clignotent)
maintenir enfoncé ENTER pour remettre à zéro la valeur max.
Vent
vitesse du vent
sélectionner entre vitesse moyenne ou rafale (standard = vitesse moyenne)
V. 01 – 21/06/2013 31 ©Velleman nv
Page 32

WS3080
unité
sélectionner l‘unité : km/h, mph, m/s, nœuds ou bft (standard = mph)
alarme supérieure
configurer le niveau de l‘alarme supérieure
enfoncer ALARM ON/OFF pour activer/désactiver l‘alarme ; s‘affiche lors
d‘une alarme activée
alarme direction
configurer l‘alarme de direction du vent
enfoncer ALARM ON/OFF pour activer/désactiver l‘alarme ; s‘affiche lors
d‘une alarme activée.
remise à zéro max.
(les symboles de vitesse du vent [14] et max (entre [14] et [15])
clignotent)
maintenir enfoncé ENTER pour remettre à zéro la valeur max.
Lumière
unité
sélectionner l‘unité : fc ou lux
alarme supérieure
configurer le niveau de l‘alarme supérieure
enfoncer ALARM ON/OFF pour activer/désactiver l‘alarme ; s‘affiche lors
d‘une alarme activée
remise à zéro max.
(les symboles d‘intensité lumineuse [17] et max (entre [14] et [15])
clignotent)
maintenir enfoncé ENTER pour remettre à zéro la valeur max.
Pluviosité
format d‘affichage
sélectionner entre 1 h, 24 h, 1 semaine, 1 mois ou totalité
unité
sélectionner l‘unité : mm ou pouces (standard = mm)
alarme supérieure
configurer le niveau de l‘alarme supérieure
enfoncer ALARM ON/OFF pour activer/désactiver l‘alarme ; s‘affiche lors
d‘une alarme activée
remise à zéro max.
(les symboles de pluviosité [16] et max (entre [14] et [15]) clignotent)
maintenir enfoncé ENTER pour remettre à zéro la valeur max.
remise à zéro
totale
(la pluviosité [16], TOTAL et CLE [4] clignotent)
maintenir enfoncé ENTER pour remettre à zéro les valeurs de pluviosité
Consulter la mémoire de la station avec HISTORY [f].
Remarque : La station mémorise les données toutes les 30 secondes. L‘intervalle du cycle de mémorisation
Faire défiler le contenu de la mémoire avec [d] ou [c].
Remarque : La station revient automatiquement à l‘affichage normal en fin de mémoire.
Enfoncer ENTER [b] pour effacer le contenu de la mémoire. CLE [4] et l‘indication de mémoire [5]
Remarque : Se reporter à §9 Connexion à l’ordinateur pour sauvegarder une copie de la mémoire.
8. Informations supplémentaires
8.1 Initialisation
Connexion RF
Dès l‘insertion des piles, la station entre en mode de réception RF et tente de se connecter au capteur
Après 8 tentatives de connexion consécutives ratées, la station affichera « ---- » [11, 12] et retentera de se
Maintenir enfoncé [d] pour forcer la réception RF de manière manuelle.
Connexion DCF
Dès l‘insertion des piles, le thermo-hygromètre transmet les données pendant 24 secondes.
Ensuite, il tente de se connecter au signal DCF pendant 5 minutes. S‘il ne trouve aucun signal, il retentera
Le signal reçu est transmit vers la station et l‘heure est automatiquement mise à jour. L‘indication de
Sélectionner manuellement votre fuseau horaire afin que l‘heure soit correctement mise à jour.
Le signal DCF est le plus puissant entre 00h00 et 06h00.
Le principe du signal DCF
ne peut être modifiée que par le logiciel voir : §9 Connexion à l’ordinateur).
clignotent. Maintenir enfoncé ENTER [b] pour confirmer.
pendant 144 secondes. Une fois la connexion établie, elle recevra les données de température, d‘humidité,
de vitesse du vent et de pluviosité toutes les 48 secondes, et les données de lumière toutes les
60 secondes. N‘enfoncer aucun bouton jusqu‘à ce que les données s‘affichent.
connecter pendant 144 secondes.
la recherche toutes les heures jusqu‘à ce qu‘il puisse se connecter. Entretemps, l‘heure peut être réglée de
façon manuelle (voir : §7).
réception [18] s‘affiche.
Remarque :
V. 01 – 21/06/2013 32 ©Velleman nv
Page 33

WS3080
Le thermo-hygromètre WS3080 capte un signal radio provenant de
la station centrale de Mainflingen en Allemagne. Cette grande onde
radio (DCF77 ; 77,5 kHz) transporte les données horaires d‘une
horloge atomique. Pour plus d‘information, consulter le site
www.ptb.de (PTB = Physikalisch-Technische Bundesanstalt).
La station WS3080 se synchronise automatiquement avec l‘horloge
de Mainflingen.
Ce signal radio est parfaitement captable à l‘intérieur d‘un immeuble.
Sa puissance sera cependant affaiblie par la présence de béton et de
métal. Il est donc préférable de ne pas monter l‘horloge dans des
caves ou dans un endroit sur-isolé. L‘endroit le plus approprié dans
un bureau ou un appartement en béton est près d‘une fenêtre.
Il est également déconseillé d‘installer l‘horloge à proximité d‘un
champ magnétique ou d‘un appareil générant un bruit électrique
(p.ex. un moteur).
ciel serein
nébulosité variable
ciel nuageux
risques d‘averse de pluie
risques d‘averse de neige
risques d‘orages
risques de neige forte
nuit dégagée
nuit nuageuse
indice UV
intensité UV
risque de brûlures de la peau
code
0 ~ 2
très bas
négligeable
vert
3 ~ 5
bas
lentement
jaune
6 ~ 7
faible
facilement
orange
8 ~ 10
haute
rapidement
rouge
8.2 Prévisions météo
Aperçu des symboles
Configuration du seuil de sensibilité à la pression atmosphérique
Le seuil de sensibilité est réglable de 2 à 4 hPa (standard 2 hPa). Une région sujette à de fréquentes
fluctuations de pression nécessite un réglage hPa plus sensible (2 hPa) comparé à une région où la pression est
plus stable (4 hPa).
Configuration du seuil de sensibilité à l’orage
Une importante fluctuation de la pression fera clignoter les symboles de prévision météo (pluie et nuages) afin
d‘annoncer l‘arrivé d‘un orage. Similairement au réglage du seuil de sensibilité à la pression atmosphérique, le
seuil de sensibilité à l‘orage est réglable de 3 à 9 hPa (standard 4 hPa). Une baisse de pression supérieure au
seuil de sensibilité instauré fera clignoter les symboles de nuages, de pluie et de tendance pendant 3 heures.
8.3 Indice UV
V. 01 – 21/06/2013 33 ©Velleman nv
Page 34

WS3080
11+
très haute
très rapidement
violet
Remarque : Le tableau ci-dessous affiche des valeurs valables pour un type de peau claire adulte non
protégée et n‘est qu‘une indication. Les enfants et personnes avec une peau sensible risquent des brûlures
dès l‘exposition à des rayons UV d‘une faible intensité.
8.4 Rétablissement de la configuration d’usine
Maintenir enfoncé [c] pendant une vingtaine de secondes pour rétablir la configuration d‘usine.
La mémoire sera entièrement effacée.
9. Connexion à l’ordinateur
Le récepteur peut mémoriser jusqu‘à 4.080 entrées de données (avec date et heure). La mémoire est de
type non volatile (EEPROM) et ne sera pas effacée en cas de coupure d‘alimentation (p.ex. lors du
remplacement des piles). En cas de mémoire pleine, les données les plus anciennes seront écrasées.
Les données peuvent être lues, copiées, sauvegardées et imprimées en connectant le récepteur à un
ordinateur.
9.1 Système requis de l’ordinateur
Système d‘exploitation : Windows XP, Vista®, 7, 8
Navigateur web : Internet Explorer 6.0
Processeur : Pentium® III, 500 MHz
Mémoire : 128 Mo (256 Mo conseillé)
Lecteur cédérom + port USB libre
9.2 Installation du logiciel
1. Insérer le cédérom inclus dans le lecteur. Ne pas encore connecter le récepteur.
2. Cliquer double sur le fichier setup.exe si nécessaire et suivre les instructions à l‘écran.
Remarque : Veiller à se connecter au système avec un compte d‘administrateur.
3. Sélectionner la langue d‘installation et cliquer sur NEXT.
4. Cliquer sur NEXT et sélectionner le dossier de destination.
5. Cliquer sur NEXT ; le logiciel est automatiquement installé.
6. Cliquer sur OK pour compléter l‘installation.
7. Redémarrer l‘ordinateur.
8. Connecter le récepteur à l‘ordinateur à l‘aide du câble USB inclus.
9.3 Emploi du logiciel
1. Avant d‘utiliser le logiciel, veiller à ce que l‘heure sur la station de base coïncide avec celle sur votre
ordinateur, ceci afin d‘éviter des erreurs d‘enregistrement.
2. Pour lancer le logiciel, aller vers Start > All Programs > EasyWeahterPlus et cliquer sur l‘icone
EasyWeatherPlus.
Remarque : Veiller à se connecter au système avec un compte d‘administrateur.
V. 01 – 21/06/2013 34 ©Velleman nv
Page 35

WS3080
configuration
(System > Setup)
affichage configuration d‘alarme
(System > Alarm)
affichage valeurs min. et max.
(System > Scope)
affichage historique
(Record > History)
affichage graphique
(Record > Graph)
concernant EasyWeatherPlus
(Help > about EasyWeatherGraph)
3. Le téléchargement des données se fait de manière automatique. Ceci peut durer quelques minutes. Ne pas
régler la station pendant le téléchargement afin d‘éviter toute perte de données.
4. Sélectionner la langue d‘interface via Display > Language.
Setup
Configurer la station et les alarmes depuis ce menu.
Cliquer sur SAVE pour sauvegarder les modifications et les transmettre à la station.
Remarque : La plage d‘intervalle est de 5 à 240 minutes.
Alarm
Configurer les données d‘alarme depuis ce menu.
Cliquer sur SAVE pour sauvegarder les modifications et les transmettre à la station.
V. 01 – 21/06/2013 35 ©Velleman nv
Page 36

WS3080
REFRESH
rafraîchissement de l‘historique
CLEAR DATA
effacement des données sur l‘ordinateur
CLEAR MEMORY
effacement des données sur la station (après sauvegarde préalable)
GRAPH
affichage du graphique (voir : Graph ci-dessous)
EXPORT
exportation/sauvegarde des données au format CSV
sélectionner les données et le format d‘affichage, cliquer sur EXPORT
et sélectionner le dossier de destination
Scope
Consulter et rétablir les valeurs minimales et maximales dans ce menu.
Sélectionner les entrées et cliquer sur RESET pour les effacer.
History
Consulter l‘historique depuis ce menu.
Configurer l‘intervalle en haut à gauche (1 heure, 24 heures, 1 semaine, 1 mois ou user defined).
Cliquer sur SEARCH (en haut à droite) pour appeler les données.
V. 01 – 21/06/2013 36 ©Velleman nv
Page 37

WS3080
Graph
Afficher une représentation graphique des données depuis ce menu.
1. Sélectionner les données en bas à gauche (Series) :
2. Configurer l‘intervalle en haut à gauche (1 heure, 24 heures, 1 semaine, 1 mois ou user defined).
3. Cliquer sur SEARCH (en haut à droite) pour afficher le graphique.
4. Sélectionner le champ à agrandir avec la souris.
5. Cliquer sur REFRESH pour rafraîchir le graphique.
6. Cliquer sur EXPORT pour sauvegarder le graphique au format JPEG.
Remarque
Procéder comme suit en cas d‘affichage erroné du graphique :
1. Aller vers le fichier EasyWeatherPlus.exe.
2. Ouvrir un nouveau fichier texte (avec Notepad ou WordPad) et taper :
regsvr32 easyweatherplus.ocx
V. 01 – 21/06/2013 37 ©Velleman nv
Page 38

WS3080
alimentation
station
3 piles de 1,5 V de type R6 (LR6C, non incl.), ou bloc secteur 6V (non
incl.)
émetteur
2 piles rechargeables de 1,5 V de type R6 (incl.)
dimensions (station)
165 x 148 x 27 mm
plage de température intérieure
0°C ~ 50°C
plage de température extérieure
-40°C ~ 65°C
précision d‘affichage de température
± 1,0°C
plage de taux d‘humidité
1% RH-99%
précision d‘affichage de taux d‘humidité
± 5% sous -20°C à 65°C & 20%-98%
plage de vitesse du vent
0 ~ 50,0 m/s
précision d‘affichage de vitesse du vent
± 1 m/s (vitesse du vent <10 m/s), ± 10% (vitesse du vent >10 m/s)
plage de pluviosité
0 ~ 99,999 mm
précision d‘affichage de pluviosité
± 1,5 mm
3. Sauvegarder le fichier sous reg_graph.bat.
4. Cliquer double sur le fichier pour réinitialiser le pilote graphique.
About EasyWeatherPlus
Consulter ici la version du logiciel EasyWeatherPlus.
10. Spécifications techniques
N’employer cet appareil qu’avec des accessoires d’origine. La SA Velleman ne peut, dans la mesure
conforme au droit applicable être tenue responsable des dommages ou lésions (directs ou indirects)
pouvant résulter de l’utilisation de cet appareil.
Pour plus d’information concernant cet article et la dernière version de cette notice, visiter notre
site web www.velleman.eu.
Toutes les informations présentées dans cette notice peuvent être modifiées sans notification
préalable.
Les marques déposées et les raisons sociales sont la propriété de leurs détenteurs respectifs, et
sont uniquement utilisées dans le but de démontrer la compatibilité entre nos articles et les articles
des fabricants. Windows, Windows XP, Windows 2000, Windows Vista, Windows Aero, Windows 7,
Windows 8, Windows Mobile, Windows Server sont des marques déposées de Microsoft Corporation
aux Etats-Unis et dans d'autres pays.
© DROITS D’AUTEUR
SA Velleman est l’ayant droit des droits d’auteur pour cette notice. Tous droits mondiaux réservés.
Toute reproduction, traduction, copie ou diffusion, intégrale ou partielle, du contenu de cette notice par quelque
procédé ou sur tout support électronique que ce soit est interdite sans l‘accord préalable écrit de l‘ayant droit.
V. 01 – 21/06/2013 38 ©Velleman nv
Page 39

WS3080
Mantenga el aparato lejos del alcance de personas no capacitadas y niños.
Utilice el aparato sólo en interiores. No exponga este equipo a lluvia, humedad ni a ningún tipo
de salpicadura o goteo.
No exponga este equipo a polvo. No exponga este equipo a temperaturas extremas.
No agite el aparato. Evite usar excesiva fuerza durante el manejo y la instalación.
MANUAL DEL USUARIO
1. Introducción
A los ciudadanos de la Unión Europea
Importantes informaciones sobre el medio ambiente concerniente a este producto
Este símbolo en este aparato o el embalaje indica que, si tira las muestras inservibles, podrían dañar
el medio ambiente.
No tire este aparato (ni las pilas, si las hubiera) en la basura doméstica; debe ir a una empresa
especializada en reciclaje. Devuelva este aparato a su distribuidor o a la unidad de reciclaje local.
Respete las leyes locales en relación con el medio ambiente.
Si tiene dudas, contacte con las autoridades locales para residuos.
¡Gracias por haber comprado el WS3080! Lea atentamente las instrucciones del manual antes de usarlo. Si el
aparato ha sufrido algún daño en el transporte no lo instale y póngase en contacto con su distribuidor.
2. Instrucciones de seguridad
3. Normas generales
Véase la Garantía de servicio y calidad Velleman ® al final de este manual del usuario.
Familiarícese con el funcionamiento del aparato antes de utilizarlo.
Por razones de seguridad, las modificaciones no autorizadas del aparato están prohibidas. Los daños
causados por modificaciones no autorizadas, no están cubiertos por la garantía.
Utilice sólo el aparato para las aplicaciones descritas en este manual. Su uso incorrecto anula la garantía
completamente.
Los daños causados por descuido de las instrucciones de seguridad de este manual invalidarán su garantía
y su distribuidor no será responsable de ningún daño u otros problemas resultantes.
4. Características
transmisor solar
pluviómetro
puerto USB para conexión PC (software incl.)
no sólo es posible grabar y cargar a PC todos los datos de la estación meteorológica sino también hasta
4080 posiciones de memoria con intervalos de medición ajustables
indicaciones:
o velocidad del viento: mph, m/s, km/h, nudos, Beaufort
o dirección del viento: rosa de los vientos en la pantalla LCD
o hora radiocontrolada por señal WWVB, DCF
o índice UV
o datos pluviosidad: pulgadas o mm, 1 hora/24 horas/1 semana/1 mes/total desde la última
reinicialización
o pronóstico del tiempo: se basa en los cambios en la presión atmosférica
o presión atmosférica: Hg o hPa
o temperatura interior: °C, °F
o temperatura exterior: °C, °F
o factor de enfriamiento: °C, °F
o punto de rocío: °C, °F
o humedad interior y exterior
V. 01 – 21/06/2013 39 ©Velleman nv
Page 40

WS3080
A
mástil superior
F
soporte lateral
B
mástil inferior
G
pluviómetro
C
soporte
H
placa solar
D
anemómetro
I
abrigo del sensor
E
veleta + sensor
J
termómetro/higrómetro (bajo abrigo)
a
MENU
d
hacia abajo ()
b
ENTER
e
ALARM ON/OFF ( )
c
hacia arriba ()
f
HISTORY
1
pronóstico del tiempo
10
señal de recepción
2
presión atmosférica
11
humedad exterior
3
tendencia atmosférica
12
temperatura exterior
4
fecha
13
dirección del viento
5
memoria
14
velocidad du viento/ráfaga
6
hora
15
índice UV
7
humedad interior
16
pluviosidad
8
temperatura interior
17
intensidad luminosa
9
indicación de pila baja del emisor
18
indicación reloj radiocontrolado (RCC)
alarmas: temperatura, humedad, factor de enfriamiento, punto de rocío, pluviosidad, velocidad del viento,
presión atmosférica, tormenta
recepción sincronizada
formato de 12 ó 24 horas seleccionable
calendario perpetuo
husos horarios regulables
reloj con alarma
iluminación con LED
instalación en pared o soporte para sobremesa
5. Descripción
Véase las figuras en la página 3 y 4 de este manual del usuario.
6. Montar las estaciones
Véase las figuras en la página 3 y 4 de este manual del usuario.
1. Introduzca el mástil inferior [B] en el mástil superior [A].
2. Ponga el anemómetro [D] en el soporte [C] y fíjelo con un tornillo y una tuerca.
3. Ponga la veleta [E] en el soporte [C] y fíjelo con un tornillo y una tuerca.
4. Ponga el soporte [C] en el mástil superior [A] y fíjelo con un tornillo y una tuerca.
5. Fije el soporte lateral [F] en el mástil [A+B] y ponga el pluviómetro [G]. Fije con un tornillo.
6. Fije el soporte lateral [F] en el mástil [A+B].
7. Ponga la placa solar [H] sobre el abrigo [I] y fíjelo con un tornillo y una tuerca.
8. Conexión:
Conecte el anemómetro [D] a la veleta [E]. Conecte la veleta [E] a la entrada WIND del
termómetro/higrómetro [J]. Conecte el pluviómetro [G] a la entrada RAIN del termómetro/higrómetro [J].
9. Introduzca 2 pilas recargables AA (incl.) en el termómetro/higrómetro [J]. Controle la polaridad. ¡Utilice
sólo pilas recargables!
10. Introduzca 3 pilas AA en el receptor. Controle la polaridad. Véase §8.1 Inicializar para más información
sobre la señal DCF. Observación: el receptor está en el termómetro/higrómetro.
11. Introduzca el termómetro/higrómetro [J] en el interior del abrigo [I].
12. Ponga el termómetro/higrómetro [J] en el soporte lateral [F] y fíjelo con un tornillo.
13. Pruebe la estación antes de instalarla en el exterior.
14. Espere hasta que las estaciones se sincronicen. Esto puede durar algunos minutos. Evite manipular los
aparatos durante el procedimiento de sincronización.
15. Después de que se haya terminado la prueba, monte la estación en un mástil (no incl.) con las cadenetas
incluidas. Seleccione un lugar para el receptor. Normalmente, el alcance es de 100m si no hay obstáculos
V. 01 – 21/06/2013 40 ©Velleman nv
Page 41

WS3080
Menú
Función
Descripción
Hora
contraste LCD
ajuste el contraste de la pantalla de 0 a 8 (estándar = 5)
huso horario
seleccione el huso horario aplicable:
-1 = GMT / 0 = GMT+1 / 1 = GMT+2 … (estándar = 0)
formato de
visualización
seleccione el formato de visualización 12 h o 24h (estándar = 12 h)
configuración
manual
configuración manual de la hora
Fecha
formato de
visualización
seleccione el formato de visualización:
día-mes-segundos (estándar) / día-mes-día de la semana / hora de la
alarma
formato fecha/mes
seleccione el formato DD-MM o MM-DD (dM o Md)
año
ajuste el año
mes/fecha
ajuste el mes y la fecha
hora de alarma
ajuste la hora de la alarma
pulse ALARM ON/OFF para activar/desactivar la alarma; se visualiza si
está activada una alarma
Resumen de
la presión
diagrama
seleccione el diagrama (12 h o 24 h)
Presión
visualización
presión
seleccione la presión relativa (rel) o absoluta (abs) (estándar = absoluta)
unité
seleccione la unidad: hPa, mmHg o inHg (estándar = hPa)
presión relativa
seleccione el nivel de presión relativa (sólo en el modo de presión relativa)
alarma superior
ajuste el nivel de la alarma superior
pulse ALARM ON/OFF para activar/desactivar la alarma; se visualiza si
está activada una alarma
alarma inferior
ajuste el nivel de la alarma inferior
pulse ALARM ON/OFF para activar/desactivar la alarma; se visualiza si
está activada una alarma
reinicialización
máx.
(el símbolo de presión [2] y el símbolo max (entre [14] y [15])
parpadean)
mantenga pulsado ENTER para reinicializar el valor máx.
reinicialización
mín.
(el símbolo de presión [2] y el símbolo min (entre [14] y [15]) parpadean)
mantenga pulsado ENTER para reinicializar el valor mín.
Pronóstico
del tiempo
véase §8.2 para más información
tendencia
seleccione las previsiones
umbral de presión
ajuste el umbral entre 2 y 4 hPa (estándar = 2 hPa)
umbral de
tormenta
ajuste el umbral entre 3 y 9 hPa (estándar = 4 hPa)
(edificios, árboles, vehículos, líneas de alta tensión, etc.) entre las 2 estaciones. Las ondas
electromagnéticas que vienen de ordenadores, radios y televisores también pueden causar interferencias.
Observación:
Asegúrese de que las indicaciones de la veleta [E] (―N‖ = norte, ―E‖ = este, ―S‖ = sur y ―W‖ = oeste)
coincidan con la dirección del viento. Utilice una brújula (no incl.) para determinar la dirección.
Instale la placa solar de manera que capte toda la luz posible para poder recargar suficientemente las pilas.
7. Configuración básica/funcionamiento
1. Desplácese por el menú con MENU [a]; Seleccione una opción o confirme una selección con ENTER [b].
2. Modifique un valor con [c] o [d].
Observación:
Mantenga pulsado [c] o [d] para aumentar la velocidad de desplazamiento hasta que el receptor
vuelva automáticamente al modo de visualización normal.
En el modo de visualización normal, pulse HISTORY [f] para activar la retroiluminación.
También es posible configurar el aparato con el software (véase: §9 Conexión al ordenador).
Véase la siguiente lista para un resumen del menú y las opciones:
V. 01 – 21/06/2013 41 ©Velleman nv
Page 42

WS3080
Humedad
interior
alarma superior
ajuste el nivel de la alarma superior
pulse ALARM ON/OFF para activar/desactivar la alarma; se visualiza si
está activada una alarma
alarma inferior
ajuste el nivel de la alarma inferior
pulse ALARM ON/OFF para activar/desactivar la alarma; se visualiza si
está activada una alarma
reinicialización
máx.
(el símbolo de humedad [7] y max (entre [14] y [15]) parpadean)
mantenga pulsado ENTER para reinicializar el valor máx.
reinicialización
mín.
(el símbolo de humedad [7] y min (entre [14] y [15]) parpadean)
mantenga pulsado ENTER para reinicializar el valor mín.
Temperatura
interior
unidad
seleccione la unidad: °C o °F
alarma superior
ajuste el nivel de la alarma superior
pulse ALARM ON/OFF para activar/desactivar la alarma; se visualiza si
está activada una alarma
alarma inferior
ajuste el nivel de la alarma inferior
pulse ALARM ON/OFF para activar/desactivar la alarma; se visualiza si
está activada una alarma
reinicialización
máx.
(el símbolo de temperatura [8] y max (entre [14] y [15]) parpadean)
mantenga pulsado ENTER para reinicializar el valor máx.
reinicialización
mín.
(el símbolo de temperatura [8] y min (entre [14] y [15]) parpadean)
mantenga pulsado ENTER para reinicializar el valor mín.
Humedita
exterior
alarma superior
ajuste el nivel de la alarma superior
pulse ALARM ON/OFF para activar/desactivar la alarma; se visualiza si
está activada una alarma
alarma inferior
ajuste el nivel de la alarma inferior
pulse ALARM ON/OFF para activar/desactivar la alarma; se visualiza si
está activada una alarma
reinicialización
máx.
(el símbolo de humedad [11] y max (entre [14] y [15]) parpadean)
mantenga pulsado ENTER para reinicializar el valor máx.
reinicialización
mín.
(les symboles d‘humidité [11] et min (entre [14] y [15]) parpadean)
mantenga pulsado ENTER para reinicializar el valor mín.
Temperatura
exterior
formato de
visualización
seleccione las funciones que quiere visualizar: temperatura exterior, factor
de enfriamiento o punto de rocío [12]
unidad
seleccione la unidad: °C o °F
alarma superior
ajuste el nivel de la alarma superior
pulse ALARM ON/OFF para activar/desactivar la alarma; se visualiza si
está activada una alarma
alarma inferior
ajuste el nivel de la alarma inferior
pulse ALARM ON/OFF para activar/desactivar la alarma; se visualiza si
está activada una alarma
reinicialización
máx.
(el símbolo de temperatura [12] y max (entre [14] y [15]) parpadean)
mantenga pulsado ENTER para reinicializar el valor máx.
reinicialización
mín.
(el símbolo de temperatura [12] y min (entre [14] y [15]) parpadean)
mantenga pulsado ENTER para reinicializar el valor mín.
índice UV
véase §8.2 para más información
alarma superior
ajuste el nivel de la alarma superior
pulse ALARM ON/OFF para activar/desactivar la alarma; se visualiza si
está activada una alarma
reinicialización
máx.
(el símbolo de índice UV [15] y max (entre [14] y [15]) parpadean)
mantenga pulsado ENTER para reinicializar el valor máx.
Viento
velocidad del
viento
seleccione entre velocidad media o ráfaga (estándar = velocidad media)
unidad
seleccione la unidad : km/h, mph, m/s, nudos o bft (estándar = mph)
V. 01 – 21/06/2013 42 ©Velleman nv
Page 43

WS3080
alarma superior
ajuste el nivel de la alarma superior
pulse ALARM ON/OFF para activar/desactivar la alarma; se visualiza si
está activada una alarma
alarma dirección
ajuste la alarma de dirección del viento
pulse ALARM ON/OFF para activar/desactivar la alarma; se visualiza si
está activada una alarma
reinicialización
máx.
(les symboles de vitesse du vent [14] et max (entre [14] y [15])
parpadean)
mantenga pulsado ENTER para reinicializar el valor máx.
Luz
unidad
seleccione la unidad: fc o lux
alarma superior
ajuste el nivel de la alarma superior
pulse ALARM ON/OFF para activar/desactivar la alarma; se visualiza si
está activada una alarma
reinicialización
máx.
(el símbolo de intensidad luminosa [17] y max (entre [14] y [15])
parpadean)
mantenga pulsado ENTER para reinicializar el valor máx.
Pluviosidad
formato de
visualización
seleccione entre 1 h, 24 h, 1 semana, 1 mes o total
unidad
seleccione la unidad : mm o pulgadas (estándar = mm)
alarma superior
ajuste el nivel de la alarma superior
pulse ALARM ON/OFF para activar/desactivar la alarma; se visualiza si
está activada una alarma
reinicialización
máx.
(les symboles de pluviosité [16] et max (entre [14] y [15]) parpadean)
mantenga pulsado ENTER para reinicializar el valor máx.
reinicialización
completa
(la pluviosidad [16], TOTAL y CLE [4] parpadean))
mantenga pulsado ENTER para reinicializar los valores de pluviosidad
Consulte la memoria de la estación con HISTORY [f].
Observación La estación guarda los datos cada 30 segundos. Sólo es posible modificar el intervalo del ciclo
Desplace el contenido de la memoria con [d] o [c].
Observación La estación vuelve automáticamente a la visualización normal al final de la memoria.
Pulse ENTER [b] para borrar el contenido de la memoria. CLE [4] y la indicación de memoria [5]
Observación Véase §9 Conexión al ordenador para guardar una copia de la memoria.
8. Información adicional
8.1 Inicializar
Conexión RF
Después de haber introducido las pilas, la estación entra en el modo de recepción RF e intenta conectarse al
Después de 8 intentos de conexión consecutivos fallados, la estación visualiza « ---- » [11, 12] y vuelve a
Mantenga pulsado [d] para forzar la recepción RF de manera manual.
Conexión DCF
Después de haber introducido las pilas, el termómetro/higrómetro transmite los datos durante
Luego, intente conectarse a la señal DCF durante 5 minutos. Si no encuentra una señal, vuelve a intentar a
La señal recibida se transmite a la estación y la hora se actualiza automáticamente. Se visualiza la
Seleccione manualmente el huso horario para que la hora se actualice correctamente.
de memorización con el software. Véase: §9 Conexión al ordenador.
parpadean). Mantenga pulsado ENTER [b] para confirmar.
sensor durante 144 segundos. Después de la conexión, recibe los datos en relación con la temperatura, la
humedad, la velocidad del viento y la pluviosidad cada 48 segundos, y los datos de luz cada 60 segundos.
No pulse ningún botón hasta que se visualicen los datos.
intentar de conectarse durante 144 segundos.
24 segundos.
buscarla cada hora hasta que pueda conectarse. Entretanto, es posible ajustar la hora de manera manual
(véase: §7).
indicación de recepción [18].
Observación
V. 01 – 21/06/2013 43 ©Velleman nv
Page 44

WS3080
La WS3080 recibe una señal radio de la estación central de
Mainflingen en Alemania. Esta gran onda radio (DCF77; 77,5 kHz)
transporta los datos horarios de un reloj atómico. Para más
información, véase la página web www.ptb.de (PTB = PhysikalischTechnische Bundesanstalt).
La WS3080 se sincroniza automáticamente con el reloj de
Mainflingen.
Es posible captar esta señal radio de forma perfecta en el interior de
un edificio. Sin embargo, su potencia se debilita a causa de hormigón
y metal. Por tanto, no monte el reloj en sótanos o un lugar
demasiado aislado. El lugar más adecuado en una oficina o un
apartamiento de hormigón es cerca de una ventana.
No instale el reloj cerca de un campo magnético o un aparato que
genera un ruido eléctrico (p.ej. un motor).
soleado
nubosidad variable
nublado
probabilidad de lluvia
probabilidad de nieve
tormenta
temporal de nieve
noche clara
noche nublada
índice UV
intensidad UV
descripción
código
La señal DCF es lo más potente entre 00h00 y 06h00.
El principio de la señal DCF
8.2 Pronóstico del tiempo
Resumen de los símbolos
Configurar la sensibilidad de la presión atmosférica
Es posible ajustar la sensibilidad de 2 a 4 hPa (estándar 2 hPa). Una región con frecuentes fluctuaciones de la
presión necesita un ajuste hPa más sensible (2 hPa) en comparación con una región donde la presión es más
estable (4 hPa).
Configurar el umbral de la tormenta
Una importante fluctuación de la presión hace parpadear los símbolos del pronóstico (lluvia y nubes) para
predecir la llegada de una tormenta. Igual que el ajuste de la sensibilidad de la presión atmosférica, es posible
ajustar el umbral de la tormenta de 3 a 9 hPa (estándar 4 hPa). Una bajada de la presión superior al umbral de
sensibilidad programado hace parpadear los símbolos de nubes, la lluvia y la tendencia durante 3 horas.
8.3 Índice UV
V. 01 – 21/06/2013 44 ©Velleman nv
Page 45

WS3080
0 ~ 2
baja
bajo riesgo de que la exposición al sol sin protección
resulte perjudicial para la salud
verde
3 ~ 5
moderada
riesgo moderado de que la exposición al sol sin protección
resulte perjudicial para la salud
amarillo
6 ~ 7
alta
alto riesgo de que la exposición al sol sin protección
resulte perjudicial para la salud
naranja
8 ~ 10
muy alta
riesgo muy alto de que la exposición al sol sin protección
resulte perjudicial para la salud
rojo
11+
extremadamente
alta
riesgo extremo de que la exposición al sol sin protección
resulte perjudicial para la salud
violeta
Observación la lista (véase arriba) de los valores valen para un tipo de piel clara adulta no protegida y
sólo es una indicación. Los niños y las personas con una piel sensible corren peligro de quemarse en cuanto
estén expuestos a los rayos UV de baja intensidad.
8.4 Restaurar los ajustes de fábrica
Mantenga pulsado [c] durante unos veinte segundos para restaurar los ajustes de fábrica.
La memoria se borra completamente.
9. Conexión al ordenador
El receptor puede memorizar hasta 4.080 entradas de datos (con fecha y hora). La memoria es del tipo no
volátil (EEPROM) y no se borra en caso de un apagón (p.ej. al reemplazar las pilas). En caso de memoria
llena, se sobre escriben los datos más viejos.
Es posible leer, copiar, guardar e imprimir los datos al conectar el receptor a un ordenador.
9.1 Exigencias mínimas del sistema
Sistema operativo: Windows XP, Vista®, 7, 8
Navegador web: Internet Explorer 6.0
Unidad central de proceso: Pentium® III, 500 MHz
Memoria: 128 MB (256MB recomendado)
Lector de CD-ROM + puerto USB libre
9.2 Instalar el software
1. Introduzca el CD-ROM incluido en el lector. Todavía no conecte el receptor.
2. Haga clic dos veces en el fichero setup.exe si fuera necesario y siga las instrucciones en la pantalla.
Observación Asegúrese de que se conecte al sistema con una cuenta de administrador.
Seleccione el idioma de instalación y haga clic en NEXT.
Haga clic en NEXT y seleccione la carpeta de destino.
Haga clic en NEXT; el software se instala automáticamente.
Haga clic en OK para completar la instalación.
Vuelva a iniciar el ordenador.
Conecte el receptor al ordenador con el cable USB incluido.
9.3 Usar el software
1. Antes de utilizar el software, asegúrese de que la hora en la estación de base coincida con la del ordenador,
para evitar errores de grabación.
2. Para ejecutar el software, seleccione Start > All Programs > EasyWeahterPlus y haga clic en el icono
EasyWeatherPlus.
Observación Asegúrese de que se conecte al sistema con una cuenta de administrador.
V. 01 – 21/06/2013 45 ©Velleman nv
Page 46

WS3080
configuración
(System > Setup)
visualizar la configuración de la alarma
(System > Alarm)
visualizar los valores mín. y máx.
(System > Scope)
visualizar el historial
(Record > History)
visualizar el gráfico
(Record > Graph)
acerca de EasyWeatherPlus
(Help > about EasyWeatherGraph)
3. Los datos están descargados automáticamente. Esto puede durar algunos minutos. No ajuste la estación
durante la descarga para evitar la pérdida de datos.
4. Seleccione el idioma de la interfaz por Display > Language.
Setup
Ajuste la estación y las alarmas por este menú.
Haga clic en SAVE para guardar las modificaciones y transmitirlas a la estación.
Observación El rango de intervalo es de 5 a 240 minutos.
Alarm
Ajuste los datos de alarma por este menú.
V. 01 – 21/06/2013 46 ©Velleman nv
Page 47

WS3080
REFRESH
actualizar el historial
CLEAR DATA
borrar los datos del ordenador
CLEAR MEMORY
borrar los datos de la estación (primero guardar)
GRAPH
visualizar el gráfico (véase abajo: Graph )
EXPORT
exportar/guardar datos en formato CSV
seleccione los datos y el formato de visualización, haga clic en
Haga clic en SAVE para guardar las modificaciones y transmitirlas a la estación.
Scope
Consulte y restaure los valores mín. y máx. en este menú.
Seleccione los datos y haga clic en RESET para borrarlos.
History
Consulte el historial por este menú.
Ajuste el intervalo de la parte superior izquierda (1 hora, 24 horas, 1 semana, 1 mes o user defined).
Haga clic en SEARCH (parte superior derecha) para recordar los datos.
V. 01 – 21/06/2013 47 ©Velleman nv
Page 48

WS3080
EXPORT y seleccione la carpeta de destino
Graph
Visualizar una representación gráfica de los datos por este menú.
1. Seleccione los datos de la parte inferior izquierda (Series) :
2. Ajuste el intervalo de la parte superior izquierda (1 hora, 24 horas, 1 semana, 1 mes o user defined).
3. Haga clic en SEARCH (parte superior derecha) para visualizar el gráfico.
4. Seleccione el campo que quiere ampliar con el ratón.
5. Haga clic en REFRESH para actualizar el gráfico.
6. Haga clic en EXPORT para guardar el gráfico en el formato JPEG.
V. 01 – 21/06/2013 48 ©Velleman nv
Page 49

WS3080
alimentación
estación
3 piles AA de 1,5 V (LR6C, no incl.), o adaptador de red de 6V (non
incl.)
emisor
2 piles recargables AA de 1,5 V (incl.)
dimensiones (estación)
165 x 148 x 27 mm
rango de temperatura interior
0°C ~ 50°C
rango de temperatura exterior
-40°C ~ 65°C
precisión de visualización de
temperatura
± 1,0°C
rango de humedad
1% RH-99%
precisión de visualización de humedad
± 5% bajo -20°C a 65°C & 20%-98%
rango de velocidad del viento
0 ~ 50,0 m/s
precisión de visualización de velocidad
del viento
± 1 m/s (velocidad del viento <10 m/s), ± 10% (velocidad del viento
>10 m/s)
rango de pluviosidad
0 ~ 99,999 mm
precisión de visualización pluviosidad
± 1,5 mm
Observación
Hago lo siguiente en caso de una visualización incorrecta del gráfico:
1. Entre en el fichero EasyWeatherPlus.exe.
2. Abra un nuevo fichero de texto (con Notepad o WordPad) e introduzca:
regsvr32 easyweatherplus.ocx
3. Guarde el fichero bajo reg_graph.bat.
4. Haga clic dos veces en el fichero para reinicializar el driver gráfico.
About EasyWeatherPlus
Consulte aquí la versión del software EasyWeatherPlus.
10. Especificaciones
Utilice este aparato sólo con los accesorios originales. Velleman NV no será responsable de daños ni
lesiones causados por un uso (indebido) de este aparato.
Para más información sobre este producto y la versión más reciente de este manual del usuario,
visite nuestra página www.velleman.eu.
Se pueden modificar las especificaciones y el contenido de este manual sin previo aviso.
Todas las marcas registradas y nombres comerciales son propiedad de sus respectivos dueños y se
utilizan sólo para aclarar la compatibilidad de nuestros productos con los de diferentes fabricantes.
Windows, Windows XP, Windows 2000, Windows Vista, Windows Aero, Windows 7, Windows 8,
Windows Mobile, Windows Server son marcas registradas de Microsoft Corporation en los Estados
Unidos y otros países.
V. 01 – 21/06/2013 49 ©Velleman nv
Page 50

WS3080
© DERECHOS DE AUTOR
Velleman NV dispone de los derechos de autor para este manual del usuario. Todos los derechos
mundiales reservados. Está estrictamente prohibido reproducir, traducir, copiar, editar y guardar este
manual del usuario o partes de ello sin previo permiso escrito del derecho habiente.
V. 01 – 21/06/2013 50 ©Velleman nv
Page 51

WS3080
Halten Sie Kinder und Unbefugte vom Gerät fern.
Verwenden Sie das Gerät nur im Innenbereich. Schützen Sie das Gerät vor Regen und Feuchte.
Setzen Sie das Gerät keiner Flüssigkeit wie z.B. Tropf- oder Spritzwasser, aus.
Schützen Sie das Gerät vor Staub. Schützen Sie das Gerät vor extremen Temperaturen.
Vermeiden Sie Erschütterungen. Vermeiden Sie rohe Gewalt während der Installation und
Bedienung des Gerätes.
BEDIENUNGSANLEITUNG
1. Einführung
An alle Einwohner der Europäischen Union
Wichtige Umweltinformationen über dieses Produkt
Dieses Symbol auf dem Produkt oder der Verpackung zeigt an, dass die Entsorgung dieses Produktes
nach seinem Lebenszyklus der Umwelt Schaden zufügen kann. Entsorgen Sie die Einheit (oder
verwendeten Batterien) nicht als unsortiertes Hausmüll; die Einheit oder verwendeten Batterien
müssen von einer spezialisierten Firma zwecks Recycling entsorgt werden. Diese Einheit muss an den
Händler oder ein örtliches Recycling-Unternehmen retourniert werden. Respektieren Sie die örtlichen
Umweltvorschriften.
Falls Zweifel bestehen, wenden Sie sich für Entsorgungsrichtlinien an Ihre örtliche Behörde.
Wir bedanken uns für den Kauf des WS3080! Lesen Sie diese Bedienungsanleitung vor Inbetriebnahme
sorgfältig durch. Überprüfen Sie, ob Transportschäden vorliegen. Sollte dies der Fall sein, verwenden Sie das
Gerät nicht und wenden Sie sich an Ihren Händler.
2. Sicherheitshinweise
3. Allgemeine Richtlinien
Siehe Velleman® Service- und Qualitätsgarantie am Ende dieser Bedienungsanleitung.
Nehmen Sie das Gerät erst in Betrieb, nachdem Sie sich mit seinen Funktionen vertraut gemacht haben.
Eigenmächtige Veränderungen sind aus Sicherheitsgründen verboten. Bei Schäden verursacht durch
eigenmächtige Änderungen erlischt der Garantieanspruch.
Verwenden Sie das Gerät nur für Anwendungen beschrieben in dieser Bedienungsanleitung sonst kann dies
zu Schäden am Produkt führen und erlischt der Garantieanspruch.
Bei Schäden, die durch Nichtbeachtung der Bedienungsanleitung verursacht werden, erlischt der
Garantieanspruch. Für daraus resultierende Folgeschäden übernimmt der Hersteller keine Haftung.
4. Eigenschaften
Solarsender
Pluviometer
USB-Port für Anschluss an PC (Software mitgeliefert)
alle Daten der Basisstation und bis 4080 Speicherplätze mit einstellbaren Messintervallen können
gespeichert und auf PC hochgeladen werden
Anzeige:
o Windgeschwindigkeit: mph, m/s, km/Std., Knoten, Beaufort
o Windrichtung: Windrose auf LCD-Display
o Uhrzeit: funkgesteuert über WWVB-, DCF-Signal
o UV-Index
o Daten Regenfall: Inch oder mm, 1 Std./24 Std./1 Woche/1 Monat/total seit letzter Rücksetzung
o Wettervorhersage: beruht auf Änderungen im Luftdruck
o Luftdruck: Hg oder hPa
o Innentemperatur: °C, °F
o Außentemperatur: °C, °F
o gefühlte Temperatur: °C, °F
o Taupunkt: °C, °F
o Innen- und Außenluftfeuchte
V. 01 – 21/06/2013 51 ©Velleman nv
Page 52

WS3080
A
der obere Mastteil
F
Seitenhalter
B
der untere Mastteil
G
Pluviometer
C
obere Halterung
H
Solarzellenplatte
D
Anemometer
I
Schutz für Sensor
E
Windfahne + Richtungssensor
J
Thermo-Hygrometer (geschützt)
a
MENU
d
nach unten ()
b
ENTER
e
ALARM ON/OFF ( )
c
nach oben ()
f
HISTORY
1
Wettervorhersage
10
Empfangssignal Sender
2
Luftdruck
11
Außenluftfeuchtigkeit
3
historischer Balkendiagramm für Luftdruck
12
Außentemperatur
4
Datum
13
Windrichtung
5
Speicher
14
Windgeschwindigkeit/Böen
6
Uhrzeit
15
UV-Index
7
Innenluftfeuchtigkeit
16
Regenfall
8
Innentemperatur
17
Lichtstärke
9
Lo-Bat-Anzeige Sender
18
Anzeige ferngesteuerte Uhr (RCC)
Alarm: Temperatur, Feuchtigkeit, gefühlte Temperatur, Regenfall, Windgeschwindigkeit, Luftdruck, Sturm
synchronisierter Empfang
12/24-Stunden-Anzeige
ewiger Kalender
einstellbare Zeitzone
Uhr mit Alarm
LED-Hintergrundbeleuchtung
Wandmontage oder eigenständiges Gerät
5. Beschreibung
Siehe Abbildungen, Seite 3 und 4 dieser Bedienungsanleitung.
6. Die Geräte installieren
1. Stecken Sie den unteren Mastteil [B] in den oberen Mastteil [A].
2. Befestigen Sie das Anemometer [D] an der Halterung [C] und befestigen Sie mit einem Bolzen und einer
Mutter.
3. Befestigen Sie die Windfahne [E] an der Halterung [C] und befestigen Sie mit einem Bolzen und einer
Mutter.
4. Befestigen Sie die Halterung [C] am oberen Teil des oberen Mastteils [A] und befestigen Sie mit einem
Bolzen und einer Mutter.
5. Befestigen Sie einen Seitenhalter [F] an beiden Masten [A+B] und befestigen Sie das Pluviometer [G] an
einer der Halterungen. Befestigen Sie mit einer Schraube.
6. Befestigen Sie die Solarzellenplatte [H] oben am Schutz [I] und befestigen Sie mit einem Bolzen und einer
Mutter.
7. Verdrahtung:
Verbinden Sie das Anemometer [D] mit dem Anschluss der Windfahne [E]. Verbinden Sie die Windfahne
[E] mit dem WIND-Anschluss des Thermo-Hygrometers [J]. Verbinden Sie das Pluviometer mit dem RAINAnschluss des Thermo-Hygrometers [J].
8. Legen Sie 2 wieder aufladbare AA-Batterien (mitgeliefert) in das Thermo-Hygrometer [J] ein. Beachten Sie
die Polarität. Verwenden Sie nur wieder aufladbare Batterien!
9. Legen Sie ebenfalls 3 AA-Batterien in den Empfänger ein. Beachten Sie die Polarität. Siehe §8.1
Initialisierung für mehr Informationen zum DCF-Signal. Bemerken Sie, dass der Empfänger sich in das
Thermo-Hygrometer befindet.
10. Schieben Sie das Thermo-Hygrometer [J] in den Schutz [I].
11. Befestigen Sie de Thermo-Hygrometer [J] oben an der zweiten Halterung [F] und befestigen Sie mit einer
Schraube.
12. Testen Sie die Station bevor Sie diese installieren.
V. 01 – 21/06/2013 52 ©Velleman nv
Page 53

WS3080
MENÜ
Funktion
Beschreibung
Uhrzeit
Kontrast LCD
stellen Sie den Kontrast des Bildschirms von 0~8 (Standard = 5)
ein
Zeitzone
stellen Sie die passende Zeitzone ein:
-1 = GMT / 0 = GMT+1 / 1 = GMT+2 … (Standard = 0)
Uhrzeitformat
stellen Sie das Uhrzeitformat ein (12/24 Std., Standard = 12 Std.)
manuelle Einstellung
stellen Sie die Uhrzeit und die Minuten manuell ein
Datum
Anzeige
wählen Sie de gewünschte Anzeige:
Tag-Monat-Sekunden (Standard) / Tag-Monat-Wochentag / Uhrzeit
Alarm
Format Datum/Monat
wählen Sie zwischen DD-MM oder MM-DD (dM oder Md)
Jahr
stellen Sie das Jahreszahl ein
Monat/Datum
stellen Sie den Monat und das Datum ein
Uhrzeit Alarm
stellen Sie den Alarm ein
Schalten Sie den Alarm mit ALARM ON/OFF ein oder aus; Ist der
Alarm eingeschaltet, so erscheint
LuftdruckÜbersicht
Grafik
stellen Sie die Grafik ein wenn Sie eine Übersicht der letzten 12 bis
24 Std. haben möchten
Luftdruck
Anzeige Luftdruck
wählen Sie zwischen dem relativen (rel) oder dem absoluten (abs)
Luftdruck (Standard = absolut)
Einheit Luftdruck
wählen Sie de Einheit aus (hPa, mmHg oder inHg, Standard = hPa)
relativer Luftdruck
stellen Sie den relativen Luftdruck ein (nur bei ausgewähltem
relativen Luftdruck)
Alarm hoch
stellen Sie das Alarmniveau hoch ein
drücken Sie auf ALARM ON/OFF um den Alarm ein-/auszuschalten;
Ist der Alarm eingeschaltet, so erscheint
Alarm niedrig
stellen Sie das Alarmniveau niedrig ein
drücken Sie auf ALARM ON/OFF um den Alarm ein-/auszuschalten;
Ist der Alarm eingeschaltet, so erscheint
Max. zurücksetzen
(Luftdruck- [2] und max-Symbol (zwischen [14] und [15])
blinken)
13. Warten Sie bis die zwei Geräte synchronisieren. Dies kann einige Minuten dauern. Drücken Sie während der
Synchronisierung auf keine Taste. Überprüfen Sie nach diesem Verfahren, ob alle Teile korrekt
funktionieren.
14. Nach dem Testverfahren können Sie die Station mit dem mitgelieferten Befestigungsmaterial am Mast
(nicht mitgeliefert) befestigen. Wählen Sie einen geeigneten Montageort für den Empfänger aus. In der
Regel beträgt der Sendebereich etwa 100 m, wenn es da keine Hindernisse wie z.B. Gebäude, Bäume oder
Fahrzeuge zwischen dem Sender und dem Empfänger gibt. Funkstörungen von PC, Rundfunkgeräte und
Fernseher können das Signal unterbrechen.
Bemerkungen
Auf der Windfahne [E] wird die Windrichtung angezeigt (―N‖ = Nord, ―E‖ = Osten, ―S‖ = Süden und ―W‖ =
Westen). Beachten Sie, dass diese Anzeigen mit der wirklichen Windrichtung übereinstimmen. Verwenden
Sie hierfür einen Kompass (nicht mitgeliefert).
Richten Sie die Solarzellenplatte auf die Sonne bis die Batterien immer wieder aufgeladen werden.
7. Grundeinstellungen/Anwendung
1. Scrollen Sie mit MENU [a] durch das Menü, wählen Sie mit ENTER [b].
2. Ändern Sie den Wert mit [c] oder [d].
Bemerkungen:
Halten Sie [c] oder [d] gedrückt, um den Wert schneller zu ändern.
Verlaat das Menü mit HISTORY [f] oder warten Sie etwa 30 Sekunden bis der Empfänger automatisch das
Menü verlasst.
Drücken Sie bei einer normalen Anzeige auf HISTORY [f] um die Hintergrundbeleuchtung 10 Sekunden
einzuschalten.
Der Empfänger können Sie auch über die Software einstellen (siehe §9 PC-Anschluss).
Siehe nachfolgende Liste für eine Übersicht des Menüs und die Optionen.
V. 01 – 21/06/2013 53 ©Velleman nv
Page 54

WS3080
halten Sie ENTER gedrückt, um den Maximum-Wert
zurückzusetzen
Min. zurücksetzen
(Luftdruck- [2] und min-Symbol (zwischen [14] und [15])
blinken)
halten Sie ENTER gedrückt, um den Minimum-Wert zurückzusetzen
Wettervorhersage
siehe §8.2 für mehr Information
Trend
wählen Sie den Trend aus
Schwelle Luftdruck
stellen Sie Schwelle zwischen 2 ~ 4 hPa (Standard = 2 hPa) ein
Schwelle Sturm
stellen Sie Schwelle zwischen 3 ~ 9 hPa (Standard = 4 hPa) ein
Innenluftfeuchtigkeit
Alarm hoch
stellen Sie das Alarmniveau hoch ein
drücken Sie auf ALARM ON/OFF um den Alarm ein-/auszuschalten;
Ist der Alarm eingeschaltet, so erscheint
Alarm niedrig
stellen Sie das Alarmniveau niedrig ein
drücken Sie auf ALARM ON/OFF um den Alarm ein-/auszuschalten;
Ist der Alarm eingeschaltet, so erscheint
Max. zurücksetzen
(Luftfeuchtigkeit- [7] und max-Symbol (zwischen [14] und [15])
blinken)
halten Sie ENTER gedrückt, um den Maximum-Wert
zurückzusetzen
Min. zurücksetzen
(Luftfeuchtigkeit- [7] und min-Symbol (zwischen [14] und [15])
blinken)
halten Sie ENTER gedrückt, um den Minimum-Wert zurückzusetzen
Innentemperatur
Einheit
wählen Sie °C oder °F aus
Alarm hoch
stellen Sie das Alarmniveau hoch ein
drücken Sie auf ALARM ON/OFF um den Alarm ein-/auszuschalten;
Ist der Alarm eingeschaltet, so erscheint
Alarm niedrig
stellen Sie das Alarmniveau niedrig ein
drücken Sie auf ALARM ON/OFF um den Alarm ein-/auszuschalten;
Ist der Alarm eingeschaltet, so erscheint
Max. zurücksetzen
(Temperatur- [8] und max-Symbol (zwischen [14] und [15])
blinken)
halten Sie ENTER gedrückt, um de Maximum-Wert zurückzusetzen
Min. zurücksetzen
(Temperatur- [8] en min-Symbol (zwischen [14] und [15])
blinken)
halten Sie ENTER gedrückt, um de Minimum-Wert zurückzusetzen
Außenluftfeuchtigkeit
Alarm hoch
stellen Sie das Alarmniveau hoch ein
drücken Sie auf ALARM ON/OFF um den Alarm ein-/auszuschalten;
Ist der Alarm eingeschaltet, so erscheint
Alarm niedrig
stellen Sie das Alarmniveau niedrig ein
drücken Sie auf ALARM ON/OFF um den Alarm ein-/auszuschalten;
Ist der Alarm eingeschaltet, so erscheint
Max. zurücksetzen
(Luftfeuchtigkeit- [11] und max-Symbol (zwischen [14] und [15])
blinken)
halten Sie ENTER gedrückt, um de Maximum-Wert zurückzusetzen
Min. zurücksetzen
(Luftfeuchtigkeit- [11] und min-Symbol (zwischen [14] und [15])
blinken)
halten Sie ENTER gedrückt, um de Minimum-Wert zurückzusetzen
Außentemperatur
Anzeige
wählen Sie für eine Anzeige der Außentemperatur, der gefühlten
Temperatur oder des Taupunkts [12]
Einheit
wählen Sie °C oder °F aus
Alarm hoch
stellen Sie das Alarmniveau hoch ein
drücken Sie auf ALARM ON/OFF um den Alarm ein-/auszuschalten;
Ist der Alarm eingeschaltet, so erscheint
Alarm niedrig
stellen Sie das Alarmniveau niedrig ein
drücken Sie auf ALARM ON/OFF um den Alarm ein-/auszuschalten;
Ist der Alarm eingeschaltet, so erscheint
V. 01 – 21/06/2013 54 ©Velleman nv
Page 55

WS3080
Max. zurücksetzen
(Temperatur- [12] und max-Symbol (zwischen [14] und [15])
blinken)
halten Sie ENTER gedrückt, um den Maximum-Wert zurückzusetzen
Min. zurücksetzen
(Temperatur- [12] und min-Symbol (zwischen [14] und [15])
blinken)
halten Sie ENTER gedrückt, um den Minimum-Wert zurückzusetzen
UV-Index
siehe §8.2 für mehr Information
Alarm hoch
stellen Sie das Alarmniveau hoch ein
drücken Sie auf ALARM ON/OFF um den Alarm ein-/auszuschalten;
Ist der Alarm eingeschaltet, so erscheint
Alarm niedrig
(UV-Index- [15] und max-Symbol (zwischen [14] und [15])
blinken)
halten Sie ENTER gedrückt, um den Maximum-Wert zurückzusetzen
Wind
Windgeschwindigkeit
wählen Sie zwischen der durchschnittlich oder
Windstoßgeschwindigkeit (Standard = durchschnittlich)
Einheit
wählen Sie zwischen km/h, mph, m/s, Knoten oder bft (Standard
= mph)
Alarm hoch
stellen Sie das Alarmniveau hoch ein
drücken Sie auf ALARM ON/OFF um den Alarm ein-/auszuschalten;
Ist der Alarm eingeschaltet, so erscheint
Alarmrichtung
wählen Sie die Alarmrichtung aus
drücken Sie auf ALARM ON/OFF um den Alarm ein-/auszuschalten;
Ist der Alarm eingeschaltet, so erscheint
Max. zurücksetzen
(Windgeschwindigkeit- [14] und max-Symbol (zwischen [14] und
[15]) blinken)
halten Sie ENTER gedrückt, um den Maximum-Wert zurückzusetzen
Licht
Einheit
wählen Sie zwischen fc und lux
Alarm hoch
stellen Sie das Alarmniveau hoch ein
drücken Sie auf ALARM ON/OFF um den Alarm ein-/auszuschalten;
Ist der Alarm eingeschaltet, so erscheint
Max. zurücksetzen
(Lichtstärke- [17] und max-Symbol (zwischen [14] und [15])
blinken)
halten Sie ENTER gedrückt, um de Maximum-Wert zurückzusetzen
Regen
Anzeige
wählen Sie zwischen 1 Std., 24 Std., 1 Woche, 1 Monat und
insgesamt
Einheit
wählen Sie zwischen mm und inch (Standard = mm)
Alarm hoch
stellen Sie das Alarmniveau hoch ein
drücken Sie auf ALARM ON/OFF um den Alarm ein-/auszuschalten;
Ist der Alarm eingeschaltet, so erscheint
Max. zurücksetzen
(Regenfall- [16] und max-Symbol (zwischen [14] und [15])
blinken)
halten Sie ENTER gedrückt, um de Maximum-Wert zurückzusetzen
alles zurücksetzen
(Regenfall [16], TOTAL und CLE [4] blinken)
halten Sie ENTER gedrückt, um de TOTAL-Wert zurückzusetzen
Drücken Sie auf HISTORY [f] um den Speicherinhalt anzuzeigen.
Bemerkung: Die Station speichert die Daten alle 30 Minuten. Das Intervall ist nur über die Software
einstellbar (siehe §9 PC-Anschluss).
Scrollen Sie mit [d] und [c] durch den Speicherinhalt.
Bemerkung: Die Station kehrt am Ende des Speichers zur normalen Anzeige zurück.
Drücken Sie auf ENTER [b] um den vollständigen Speicher zu löschen. CLE [4] und das Speichersymbol [5]
blinken. Halten Sie ENTER [b] gedrückt, um zu bestätigen.
Bemerkung: Siehe §9 PC-Anschluss wenn Sie den Speicherinhalt auf Ihren PC kopieren möchten.
8. Zusätzliche Informationen
8.1 Initialisieren
V. 01 – 21/06/2013 55 ©Velleman nv
Page 56

WS3080
Die WS3080 empfängt Radiosignale von der Atomuhr in Mainflingen.
Diese DCF77-Signale auf Langwelle (77,5 kHz) enthalten Zeit- und
Datuminformation basiert auf Atomuhren. Für mehr Information, siehe
www.ptb.de (PTB = Physikalisch- Technische Bundesanstalt).
Die WS3080 synchronisiert beim Empfang des DCF-Signal, die
angezeigte Uhrzeit automatisch mit der Atomuhr.
Das Radiosignal ist einfach im Innenbereich zu empfangen. Der
Empfang kann aber schwach werden wenn es Beton und Metall gibt.
Installieren Sie die Uhr deshalb weder in Kellern noch innerhalb eines
Metallkäfigs. Der beste Montageort im Büro oder Appartement, ist
neben einem Fenster. Vermeiden Sie denn auch eine Installation in
der Nähe von magnetischen Feldern oder Geräten, die ein elektrisches
Rauschen erzeugen (z.B. Motor).
sonnig
teilweise wolkig
bewölkt
Regen möglich
Schnee möglich
Sturm
RF-Anschluss
Nach dem Einlegen der Batterien sucht die Basisstation während 144 Sekunden Kontakt mit dem Sensor.
Nach Verbindung empfängt diese alle 48 Sekunden die Temperatur-, Luftfeuchtigkeit-, Wind- und
Regendaten, und alle 60 Sekunden die Lichtstärke. Drücken Sie keine Taste, solange die Daten nicht im
Display erscheinen.
Misslingt die Verbindung, dann erscheint ‗----‘ [11, 12] im Display und versucht die Station alle
144 Sekunden wieder.
Halten Sie [d] gedrückt, um das Funksignal manuell zu suchen.
DCF-Anschluss
Nach dem Einlegen der Batterien sendet das Thermo-Hygrometer (Sensor) während 24 Sekunden die
Wetterdaten.
Danach sucht es das DCF-Signal während etwa 5 Minuten. Findet das Gerät kein Signal, dann sucht es jede
Stunde wieder, bis es das Signal gefunden hat. Inzwischen können Sie die Uhrzeit manuell einstellen
(siehe: §7).
Das empfangene DCF-Signal wird zur Basisstation geschickt und die Uhrzeit wird automatisch geregelt; die
RCC-Anzeige [18] erscheint im Display.
Bemerkungen:
Stellen Sie Ihre Zeitzone manuell ein, so dass die automatische Regelung korrekt geschieht.
Die Station empfängt dast Signal am besten zwischen 00:00 Std. und 06:00 Std.
Das DCF-Signal
8.2 Wettervorhersage
Übersicht der Symbole
V. 01 – 21/06/2013 56 ©Velleman nv
Page 57

WS3080
Schneesturm
klare Nacht
Nacht: bewölkt
UVIndex
UV-Intensität
Schutzmaßnahmen
Code
0 ~ 2
schwach
nicht erforderlich
Grün
3 ~ 5
mittel
sehr empfehlenswert
Gelb
6 ~ 7
hoch
erforderlich
Orange
8 ~ 10
sehr hoch
unbedingt erforderlich
Rot
11+
extrem
ein Muss
Violett
Die Luftdruckempfindlichkeit
Die Empfindlichkeit kann von 2 bis 4 hPa (Standard 2 hPa) eingestellt werden. Stellen Sie eine niedrigere
Empfindlichkeit (4 hPa) ein für ein Gebiet wo der Luftdruck sich viel ändert. Stellen Sie eine höhere
Empfindlichkeit (2 hPa) ein für ein Gebiet mit einem stabileren Luftdruck.
Die Sturmschwelle einstellen
Bei einer drastischen Änderung des Luftdrucks blinken die Wettersymbole (Regen und Wolken) um ein
heraufziehendes Sturmwetter anzuzeigen. Genauso wie die Luftdruckempfindlichkeit ist die Sturmschwelle von
3 bis 9 hPa einstellbar (Standard 4 hPa). Bei einem abnehmenden Luftdruck größer als die eingestellte Schwelle
blinken die Wolken-, Regen- und Trendsymbole während 3 Stunden, um den Sturmalarm anzuzeigen.
8.3 UV-Index
Bemerkung: Die Liste (siehe oben) gilt für hellhäutige Menschen und dient nur zur Verdeutlichung. Kinder
und Personen mit einem empfindlichen Hauttyp können schon bei einer niedrigen UV-Intensität Gefahr
laufen.
8.4 Werkseinstellungen zurückstellen
Halten Sie [c] lang gedrückt, um die Werkseinstellungen zurückzusetzen. Der Speicher wird völlig gelöscht.
9. PC-Anschluss
Der Empfänger kann bis 4.080 Daten (mit Datum und Uhrzeit) speichern. Dieser Speicher ist vom Typ
EEPROM und wird bei Stromunterbrechung (z.B. Batteriewechsel) nicht gelöscht. Bei vollem Speicher
werden die ältesten Daten überschrieben.
Diese Daten können gelesen, kopiert, gespeichert und abgedruckt werden, indem Sie den Empfänger mit
dem PC verbinden.
9.1 Systemvoraussetzungen
Betriebssystem: Windows XP, Vista®, 7, 8
Webbrowser: Internet Explorer 6.0
Prozessor: Pentium® III, 500 MHz
Speicher: 128MB (256MB empfohlen)
CD-ROM-Laufwerk + freier USB-Port
9.2 Die Software installieren
Befestigen Sie die mitgelieferte CD-ROM in das CD-ROM-Laufwerk des PC. Verbinden Sie den Empfänger
noch nicht mit dem PC.
Klicken Sie eventuell zweimal auf setup.exe und befolgen Sie die Anweisungen im Bildschirm.
Bemerkung: Beachten Sie, dass Sie mit einem Administratorpasswort eingeloggt sind.
Wählen Sie Ihre Sprache und klicken Sie auf NEXT.
Klicken Sie auf NEXT und wählen Sie den Zielordner aus.
Klicken Sie auf NEXT. Die Software wird automatisch installiert.
Klicken Sie auf OK um die Installation zu beenden.
Starten Sie den Rechner neu.
Verbinden Sie den Empfänger über das mitgelieferte USB-Kabel mit dem PC.
V. 01 – 21/06/2013 57 ©Velleman nv
Page 58

WS3080
Konfiguration (System > Setup)
Alarmeinstellungen anzeigen
(System > Alarm)
Minimum- und Maximum-Werte anzeigen
(System > Scope)
Übersicht anzeigen
(Record > History)
Grafik anzeigen
(Record > Graph)
Information zu EasyWeatherPlus anzeigen
(Help > about EasyWeatherGraph)
9.3 Die Software verwenden
1. Beachten Sie, dass Sie zuerst die genaue Uhrzeit auf PC und Empfänger eingestellt haben.
2. Gehen Sie zu Start > All Programs > EasyWeahterPlus um die Software zu starten. Klicken Sie danach auf
das EasyWeatherPlus-Symbol.
Bemerkung: Beachten Sie, dass Sie mit einem Administratorpasswort eingeloggt sind.
3. Der PC startet mit dem Herunterladen aller Daten auf die Wetterstation. Dies kann einige Minuten dauern.
Stellen Sie die Station nicht während dieses Verfahrens ein, um Datenverlust zu vermeiden.
4. Wählen Sie die Sprache über Display > Language aus.
Setup
Ändern Sie alle Einstellungen der Basisstation und schalten Sie alle Alarme über dieses Menü ein.
Klicken Sie auf SAVE um die Änderungen zu speichern und diese zur Basisstation zu senden.
Bemerkung: Der Intervallbereich beträgt 5 bis 240 Minuten.
V. 01 – 21/06/2013 58 ©Velleman nv
Page 59

WS3080
Alarm
Stellen Sie alle Alarmdaten über dieses Menü ein.
Klicken Sie auf SAVE um die Änderungen zu speichern und diese zur Basisstation zu senden.
Scope
Überprüfen und setzen Sie alle Minimum- und Maximum-Werte zurück.
Wählen Sie die gewünschten Daten und klicken Sie auf RESET um diese zu löschen.
V. 01 – 21/06/2013 59 ©Velleman nv
Page 60

WS3080
REFRESH
die Liste aktualisieren
CLEAR DATA
die Daten im PC löschen
CLEAR MEMORY
die Daten der Station löschen (zuerst speichern)
GRAPH
Grafik anzeigen (siehe Graph unten)
EXPORT
Daten in CSV-Datei exportieren/speichern
wählen Sie die Daten und die Anzeige aus, klicken Sie auf EXPORT
und wählen Sie den Zielordner
History
Überprüfen Sie die Übersicht über dieses Menü.
Stellen Sie das Intervall links oben ein (1 Stunde, 24 Stunden, 1 Woche, 1 Monat oder user defined).
Klicken Sie auf SEARCH (rechts oben) um die Daten abzurufen.
V. 01 – 21/06/2013 60 ©Velleman nv
Page 61

WS3080
Graph
Überprüfen Sie die grafische Vorstellung der Daten über dieses Menü.
1. Wählen Sie die Daten unten links (Series) aus:
2. Stellen Sie das Intervall links oben ein (1 Stunde, 24 Stunden, 1 Woche, 1 Monat oder user defined).
3. Klicken Sie auf SEARCH (rechts oben) um die Grafik anzuzeigen.
4. Wählen Sie mit der Maus die Zone, die Sie vergrößern möchten, aus.
5. Klicken Sie auf REFRESH um die Grafik zu aktualisieren.
6. Klicken Sie auf EXPORT um die Grafik als eine JPEG-Datei zu speichern.
Bemerkung
Gehen Sie vor wie folgt, wenn die Grafik nicht korrekt angezeigt wird:
1. Gehen Sie zu EasyWeatherPlus.exe.
2. Öffnen Sie eine neue Textdatei (mit Notepad oder WordPad) und geben Sie ein:
regsvr32 easyweatherplus.ocx
V. 01 – 21/06/2013 61 ©Velleman nv
Page 62

WS3080
Stromversorgung
Basisstation
3x 1,5 V AA-Batterien (LR6C, nicht mitgeliefert), oder 6VDC-Netzteil
(nicht mitgeliefert)
Sender
2x wieder aufladbare 1,5 V AA-Batterien (mitgeliefert)
Abmessungen (Basisstation)
165 x 148 x 27 mm
Bereich Innentemperatur
0°C ~ 50°C
Bereich Außentemperatur
-40°C ~ 65°C
Genauigkeit Temperaturanzeige
± 1,0°C
Bereich Luftfeuchtigkeit
1% RH-99%
Genauigkeit Luftfeuchtigkeit
± 5% unter -20°C bis 65°C & 20%-98%
Bereich Windgeschwindigkeit
0 ~ 50,0 m/s
Genauigkeit Windgeschwindigkeit
± 1 m/s (Windgeschwindigkeit <10 m/s), ± 10%
(Windgeschwindigkeit >10 m/s)
Bereich Regenfall
0 ~ 99,999 mm
Genauigkeit Regenfall
± 1,5 mm
3. Speichern Sie die Datei als reg_graph.bat.
4. Klicken Sie zweimal auf den Dateinamen, um den grafischen Treiber zurückzusetzen.
About EasyWeatherPlus
Überprüfen Sie hier die Version der Software.
10. Technische Daten
Verwenden Sie dieses Gerät nur mit originellen Zubehörteilen. Velleman NV übernimmt keine
Haftung für Schaden oder Verletzungen bei (falscher) Anwendung dieses Gerätes.
Für mehr Informationen zu diesem Produkt und die neueste Version dieser Bedienungsanleitung,
siehe www.velleman.eu.
Alle Änderungen ohne vorherige Ankündigung vorbehalten.
Alle eingetragenen Warenzeichen und Handelsnamen sind Eigentum Ihrer jeweiligen Inhaber und
dienen nur zur Verdeutlichung der Kompatibilität unserer Produkte mit den Produkten
verschiedener Hersteller. Windows, Windows XP, Windows 2000, Windows Vista, Windows Aero,
Windows 7, Windows 8, Windows Mobile, Windows Server sind eingetragene Warenzeichen von
Microsoft Corporation in den VS und anderen Ländern.
© URHEBERRECHT
Velleman NV besitzt das Urheberrecht für diese Bedienungsanleitung. Alle weltweiten Rechte
vorbehalten. Ohne vorherige schriftliche Genehmigung des Urhebers ist es nicht gestattet, diese
Bedienungsanleitung ganz oder in Teilen zu reproduzieren, zu kopieren, zu übersetzen, zu bearbeiten oder zu
speichern.
V. 01 – 21/06/2013 62 ©Velleman nv
Page 63

WS3080
Mantenha o aparelho fora do alcance de crianças e pessoas não qualificadas.
Usar apenas em interiores. Mantenha o aparelho protegido da chuva, humidade, gotas ou
salpicos.
Não exponha o equipamento ao pó nem a temperaturas extremas.
Proteja o aparelho de quedas e má utilização. Evite usar força excessiva ao utilizar o aparelho.
MANUAL DO UTILIZADOR
1. Introdução
Aos cidadãos da União Europeia
Importantes informações sobre o meio ambiente no que respeita a este produto
Este símbolo no aparelho ou na embalagem indica que, enquanto desperdícios, poderão causar danos
no meio ambiente. Não deite o aparelho (nem as pilhas, se as houver) no lixo doméstico; dirija-se a
uma empresa especializada em reciclagem. Devolva o aparelho ao seu distribuidor ou ao posto de
reciclagem local. Respeite a legislação local relativa ao meio ambiente.
Em caso de dúvidas, contacte com as autoridades locais para os resíduos.
Agradecemos o facto de ter adquirido este aparelho. Leia atentamente as instruções do manual antes de o
usar. Caso o aparelho tenha sofrido algum dano durante o transporte não o instale e entre em contacto com o
seu distribuidor.
2. Instruções de segurança
3. Normas gerais
Consulte a Garantia de serviço e qualidade Velleman® na parte final deste manual do utilizador.
Familiarize-se com o funcionamento do aparelho antes de o utilizar.
Por razões de segurança, estão proíbidas quaisquer modificações do aparelho desde que não autorizadas.
Os danos provocados por modificações não autorizadas, não estão cobertos pela garantia.
Utilize o aparelho apenas para as aplicações descritas neste manual. Uma utilização incorrecta anula a
garantia completamente.
Danos causados pelo não cumprimento das normas de segurança referidas neste manual anulam a garantia
e o seu distribuidor não será responsável por qualquer danos ou outros problemas daí resultantes.
4. Características
transmissor a luz solar
pluviómetro
ligação ao PC via USB (software incluído).
todos os dados meteorológicos da estação base e até 4080 conjuntos de dados do histórico com intervalos
de medição definidos pelo utilizador podem ser gravados no seu PC.
indicação de:
o velocidade do vento: mph, m/s, km/h, nós, beaufort
o direcção do vento: bússola LCD
o hora: radio-controlada através de WWVB, DCF
o índice UV
o dados da precipitação: polegadas ou mm, 1 hora/24 horas/uma semana/um mês/total desde a última
reinicialização
o previsão meteorológica: baseada na alteração da pressão barométrica.
o pressão barométrica: Hg or hPa
o temperatura interior: °C, °F
o temperatura exterior: °C, °F
o temperatura dos ventos frios: °C, °F
o temperatura do ponto de orvalho: °C, °F
o humidade interior e exterior
V. 01 – 21/06/2013 63 ©Velleman nv
Page 64

WS3080
A
poste superior
F
suporte lateral
B
poste inferior
G
sensor de precipitação
C
suporte superior
H
painel solar
D
anemómetro
I
protecção do sensor
E
cata-vento + sensor de direcção
J
termo-higrómetro (sob protecção)
a
botão MENU
d
botão DOWN ()
b
botão ENTER
e
botão ALARM ON/OFF( )
) c
botão UP ()
f
botão HISTORY
1
Previsão meteorológica
10
Sinal de recepção exterior
2
Pressão barométrica
11
Humidade exterior
3
Tendência barométrica
12
Temperatura exterior
4
Data
13
Direcção do vento
5
Memória
14
Velocidade do vento/rajadas
6
Hora
15
Índice UV
7
Humidade interior
16
Precipitação
8
Temperatura interior
17
Intensidade da luz
9
indicação de pilha fraca
18
Indicador para o Relógio Radio Controlado (RCC)
alarmes meteorológicos: temperatura, humidade,ventos frios, ponto de orvalho, precipitação,
velocidade do vento, pressão do ar, tempestade
recepção sincronizada instantâneamente
formato 12 ou 24 horas
calendário perpétuo
definir fuso horário
relógio com alarme
luz de fundo LED
para montar na parede ou pousar
5. Descrição
Consulte as ilustrações da página 2 e 3 deste manual.
6. Utilização
1. Ligue a poste de baixo [B] ao poste de cima [A].
2. Coloque o anemómetro [D] no suporte de cima [C] e fixe com porca e parafuso.
3. Coloque o cata-vento [E] na parte de cima do suporte [C] e fixe com porca e parafuso.
4. Coloque o suporte de cima [C] no topo do poste inferior[A] e fixe com porca e parafuso.
5. Monte um suporte lateral [F] no poste [A+B] e coloque o sensor de precipitação [G] na parte de cima. Fixe
com um parafuso.
6. Monte o outro suporte lateral [F] no poste [A+B].
7. Coloque o painel solar [H] no topo da protecção [I] e fixe-o com porca e parafuso.
8. Faça todas as ligações necessárias.
o Ligue o anemómetro [D] à entrada do cata-vento [E].
o Ligue o cata-vento [E] ao termo-higrómetro[J] através da entrada WIND (esquerda).
o Ligue o sensor de precipitação ao termo-higrómetro [J] através da entrada RAIN (direita).
9. Insira 2 pilhas recarregáveis AA (incl.) no termo-higrómetro [J] respeitando a indicação de polaridade.
Utilize apenas pilhas recarregáveis!
10. Para garantir a recepção DCF, introduza de imediato 3 pilhas AA no receptor, respeitando a polaridade.
Consulte a secção Inicialização, mais abaixo, para mais informação sobre o DCF. O receptor encontra-se
dentro do termo-higrómetro
11. Faça deslizar o termo-higrómetro [J] para a protecção [I].
12. Coloque o termo-higrómetro [J] no topo do segundo suporte lateral [F] a fixe com um parafuso.
13. É altamente recomendado testar a estação antes de a instalar no exterior.
V. 01 – 21/06/2013 64 ©Velleman nv
Page 65

WS3080
MENU
Modo
Descrição
Hora
Contraste do LCD
ajuste o contraste do LCD de 0~8 (por defeito = 5)
Fuso horário
Seleccione o fuso horário aplicável:
-1 = GMT / 0 = GMT+1 / 1 = GMT+2 … (por defeito = 0)
Formato da hora
escolha o formato da hora 12h/24h (por defeito = 12h)
Acertar a hora
manualmente
acertar as horas e os minutos manualmente
Data
Modo mostrar data
Seleccione o modo desejado:
dia-mês-segundos (por defeito) / dia-mês-dia da semana / alarme
formato data/mês
escolha entre o formato DD-MM ou MM-DD (dM ou Md)
ano
acertar ano
mês/data
acertar mês e data
alarme
programar o alarme
Pressione o botão ALARM ON/OFF para ligar/desligar o alarme. Se estiver
ligado, o ícone de alarme aparece.
Histórico da
pressão
escala gráfica
definir a escala do gráfico de barras para 12h ou 24h para um histórico da
pressão
Pressão
Modo mostrar
pressão
escolha entre pressão relativa (rel) ou absoluta (abs) (por defeito =
absoluta)
unidade de
pressão
seleccione a unidade de pressão: hPa, mmHg ou inHg (por defeito = hPa)
pressão relativa
escolha o nível de pressão relativa (apenas se o modo mostrar pressão
relativa tiver sido previamente seleccionado)
alarme alto
defina o nível do alarme alto
Pressione o botão ALARM ON/OFF para ligar/desligar o alarme. Se estiver
ligado, o ícone de alarme aparece.
alarme baixo
defina o nível do alarme baixo
Pressione o botão ALARM ON/OFF para ligar/desligar o alarme. Se estiver
ligado, o ícone de alarme aparece.
apagar máx.
os ícones da pressão [2] e máx (entre [14] e [15]) ficam intermitentes)
14. Aguarde até as duas estações estarem sincronizadas. A sincronização pode demorar alguns minutos. Não
toque em nenhum botão durante a sincronização. Uma vez terminada a sincronização, verifique se todos os
componentes funcionam correctamente.
15. Logo que o teste esteja concluído, pode montar a estação num poste exterior (não incl.) usando os
grampos incluídos. Escolha um local de instalação apropriado para o receptor. Normalmente, a comunicação
entre as duas estações pode alcançar uma distância de 100m em espaço aberto, considerando que não
existem obstáculos tais como edifícios, árvores, veículos, cabos de alta-voltagem, etc. A rádio interferência
de PCs, rádios e televisores pode quebrar por completo a comunicação. Tenha isto em consideração ao
escolher o local de montagem.
Notas:
Nas extremidades do sensor de direcção do vento [E] a direcção é indicada através de(―N‖ = norte, ―E‖ =
este, ―S‖ = sul e ―W‖ = oeste). Confirme se estas inscrições correspondem à real direcção do vento. Utilize
uma bússola (não incl.) ao instalar a estação para posicionar o sensor de direcção correctamente.
Verifique se o painel solar está virado para o sol de modo a que as pilhas do transmissor estejam sempre
suficientemente carregadas.
7. Configuração/Utilização básica
Use o botão MENU [a] para se deslocar pelos menus disponíveis. Use o botão ENTER [b] para seleccionar
um modo ou aceitar um valor.
Altere os valores com os botões [c] ou [d]
Notas:
Mantenha o botão [c] ou [d] pressionado para aumentar a velocidade.
Saia do menu de configuração a qualquer momento pressionando o botão HISTORY [f] ou aguarde
simplesmente 30seg até que o receptor volte automaticamente ao ecrã normal.
Se não estiver a fazer configurações, pressione o botão HISTORY [f] para ligar a luz de fundo ±10seg.
Todas as configurações podem ser feitas também através do software (ver §9 Ligação ao PC )
Consulte a tabela abaixo para observação do menu e das opções de configuração.
V. 01 – 21/06/2013 65 ©Velleman nv
Page 66

WS3080
Mantenha o botão ENTER pressionado durante ±3seg para apatar o valor
máx. e indicar o valor actual
apagar o valor mín
os ícones da pressão [2] e mín (entre [14] e [15]) ficam intermitentes)
mantenha o botão ENTER pressionado durante ±3s para apagar o valor
mín e indicar o valor actual
Tendência da
previsão
meteorológica
Consulte §8.2 para mais informação.
tendência
seleccionar tendência
limiar da pressão
defina o limiar entre 2 ~ 4 hPa (por defeito = 2hPa)
limiar de
tempestade
defina o limiar entre 3 ~ 9 hPa (por defeito = 4hPa)
Humidade
interna
alarme para alta
definir o nível do alarme para alta
Pressione o botão ALARM ON/OFF para ligar/desligar o alarme. Se estiver
ligado, o ícone de alarme aparece.
alarme para baixa
definir o nível do alarme para baixa
Pressione o botão ALARM ON/OFF para ligar/desligar o alarme. Se estiver
ligado, o ícone de alarme aparece.
apagar valor máx
os ícones para humidade interior [7] e máx (entre [14] e [15]) ficam
intermitentes)
mantenha o botão ENTER pressionado durante ±3seg para apagar o valor
máx. e mostar a medição actual.
apagar valor mín.
os ícones para humidade interior [7] e mín (entre [14] e [15]) ficam
intermitentes)
mantenha o botão ENTER pressionado durante ±3seg para apagar o valor
mín. e mostar a medição actual.
Temperatura
interios
modo unidade
seleccione °C ou °F
alarme para alta
definir nível do alarme para alta
Pressione o botão ALARM ON/OFF para ligar/desligar o alarme. Se estiver
ligado, o ícone de alarme aparece.
alarme para baixa
definir nível do alarme pra baixa
Pressione o botão ALARM ON/OFF para ligar/desligar o alarme. Se estiver
ligado, o ícone de alarme aparece.
apagar valor máx.
os ícones para temperatura interior [8] e máx (entre [14] e [15]) ficam
intermitentes)
mantenha o botão ENTER pressionado durante ±3seg para apagar o valor
máx. e mostar a medição actual.
apagar valor mín.
os ícones para temperatura interior [8] e mín (entre [14] e [15]) ficam
intermitentes)
mantenha o botão ENTER pressionado durante ±3seg para apagar o valor
mín. e mostar a medição actual.
Humidade
exterior
alarme para valor
alto
definir nível do alarme para valor alto
Pressione o botão ALARM ON/OFF para ligar/desligar o alarme. Se estiver
ligado, o ícone de alarme aparece.
alarme para valor
baixo
definir nível do alarme para valor baixo
Pressione o botão ALARM ON/OFF para ligar/desligar o alarme. Se estiver
ligado, o ícone de alarme aparece.
apagar valor máx.
os ícones para humidade exterior [11] e máx (entre [14] e [15]) ficam
intermitentes)
mantenha o botão ENTER pressionado durante ±3seg para apagar o valor
máx. e mostar a medição actual.
apagar valor mín
os ícones para humidade exteriro [11] e mín (entre [14] e [15]) ficam
intermitentes)
mantenha o botão ENTER pressionado durante ±3seg para apagar o valor
mín. e mostar a medição actual.
Temperatura
exterior
modo
escolha se pretende visualizar a temperatura exterior, ventos frios ou
ponto de orvalho no ecrã [12]
modo unidade
seleccione °C ou °F
alarme para valor
definir nível de alarme para valor alto
V. 01 – 21/06/2013 66 ©Velleman nv
Page 67

WS3080
alto
Pressione o botão ALARM ON/OFF para ligar/desligar o alarme. Se estiver
ligado, o ícone de alarme aparece.
alarme para valor
baixo
definir nível do alarme para valor baixo
Pressione o botão ALARM ON/OFF para ligar/desligar o alarme. Se estiver
ligado, o ícone de alarme aparece.
apagar valor máx.
os ícones para temperatura exterior [12] e máx (entre [14] e [15]) ficam
intermitentes)
mantenha o botão ENTER pressionado durante ±3seg para apagar o valor
máx. e mostar a medição actual.
apagar valor mín
os ícones para temperatura exterior [12] e mín (entre [14] e [15])
ficam intermitentes)
mantenha o botão ENTER pressionado durante ±3seg para apagar o valor
mín. e mostar a medição actual.
indíce UV
Consulte §8.2 para mais informação.
alarme para valor
alto
definir nível do alarme para valor alto
Pressione o botão ALARM ON/OFF para ligar/desligar o alarme. Se estiver
ligado, o ícone de alarme aparece.
apagar valor máx.
os ícones do indíce UV [15] e máx (entre [14] e [15]) ficam
intermitentes)
mantenha o botão ENTER pressionado durante ±3seg para apagar o valor
máx. e mostar a medição actual.
Vento
velocidade do
vento
seleccione entre velocidade média ou rajadas (por defeito = média)
unidade de
velocidade
seleccione entre km/h, mph, m/s, nós ou bft (Beaufort) (por defeito =
mph)
alarme para valor
alto
definir nível do alarme para valor alto
Pressione o botão ALARM ON/OFF para ligar/desligar o alarme. Se estiver
ligado, o ícone de alarme aparece.
alarme para
direcção
definir alarme para direcção do vento
Pressione o botão ALARM ON/OFF para ligar/desligar o alarme. Se estiver
ligado, o ícone de alarme aparece.
apagar valor máx.
os ícones para velocidade do vento [14] e máx (entre [14] e [15]) ficam
intermitentes)
mantenha o botão ENTER pressionado durante ±3seg para apagar o valor
máx. e mostar a medição actual.
Luz
unidade de luz
seleccione a unidade de intensidade de luz entre fc e lux
alarme para valor
alto
programar alarme para valor alto
Pressione o botão ALARM ON/OFF para ligar/desligar o alarme. Se estiver
ligado, o ícone de alarme aparece.
apagar valor máx.
os ícones para intensidade de luz [17] e máx (entre [14] e [15]) ficam
intermitentes)
mantenha o botão ENTER pressionado durante ±3seg para apagar o valor
máx. e mostar a medição actual.
Precipitação
modo
seleccione entre 1h, 24h, 1 semana, 1 mês ou total
unidade
seleccione entre mm e polegadas (por defeito = mm)
alarme para valor
alto
programar alarme para valor alto
Pressione o botão ALARM ON/OFF para ligar/desligar o alarme. Se estiver
ligado, o ícone de alarme aparece.
apagar valor máx.
os ícones para valor da precipitação [16] e máx (entre [14] e [15])
ficam intermitentes)
mantenha o botão ENTER pressionado durante ±3seg para apagar o valor
máx. e mostar a medição actual.
apagar valor total
o valor da precipitação [16], TOTAL e CLE [4] ficam intermitentes)
mantenha o botão ENTER pressionado durante ±3seg para apagar o valor
TOTAL e mostar a medição actual.
V. 01 – 21/06/2013 67 ©Velleman nv
Page 68

WS3080
O termo-higrómetro contem um receptor que recebo um sinal-rádio de uma estação de
rádio localizda em Mainflingen perto de Frankfurt, na Alemanha. Este sinal-rádio ondalarga (DCF77, 77.5 kHz) é baseada em relógios atómicos e contem informação relativa
à hora e data. Para mais informação consultewww.ptb.de (PTB = PhysikalischTechnische Bundesanstalt). O dispositivo é sincronizado automaticamente com este
principal relógio de rádio-sinal.
Devido à sua natureza, o rádio -sinal pode ser recebido em espaços interiores. No
entanto, é importante referir que o sinal fica enfraquecido na presença de cimento e
metal Por essa razão, o relógio não deverá ser instalado em caves de cimento ou no
interior de estruturas em metal. Em grandes edíficios em cimento com escritórios ou
apartamentos, o relógio deve ficar perto de uma janela para melhor recepção. Evite
também instalar o relógio perto de fortes campos magnéticos ou outros dispositivos
que gerem muito ruído eléctrico (por ex. motores).
sol
Use o botão HISTORY [f] para aceder à memória da estação base.
Nota: o intervalo por defeito para a memória de dados é de 30 minutos. Este intervalo só pode ser alterado
através do software (consulte a secção ligação ao PC ).
Use o botão [d] para andar para baixo, e use o [c] andar para cima.
Nota: ao chegar ao final da memória, a estação base volta ao ecrã principal.
Para limpar toda a memória, pressione ENTER [b]. A palavra CLE [4] e o indicador da memória [5] ficam
intermitentes. Mantenha o botão ENTER pressionado [b] durante ±3s para limpar a memória.
Nota: para fazer uma cópia da memória para o PC, consulte a secção ligação ao PC .
8. Notas de funcionamento
8.1 Inicialização
Ligação RF
Ao introduzir as pilhas na estação base, esta entra no modo de recepção RF e tenta fazer a ligação ao
sensor durante 144 seg. Quando se estabelece a ligação, esta receberá dados relativos à temperatura,
humidade, velocidade do vento e precipitação a cada 48 seg; para a intensidade de luz a cada 60 seg.
Nãopressione qualquer tecla até os dados exteriores sempre exibidos para evitar a interrupção do
processo.
Se a recepção falhar durante 8 vezes seguidas, perde-se a ligação e a temperatura [12] e humidade
exteriores [11] indicam ―----‖. A estação base entra de novo no modo de recepção RF durante 144 seg.
Para forçar a recepção RF manualmente, mantenha pressionado o botão [d] durante ±4seg.
Ligação DCF
Ao inserir as pilhas no termo-higrómetro (sensor) este irá primeiro transmitir dados meteorológicos durante
24 seg.
Em seguida começa a procurar sinal DCF durante cerca de 5 minutos. Se não encontrar qualquer sinal,
tentará de novo de hora a hora, até conseguir. Entretanto, as horas poderão ser acertadas
manualmente(ver §7).
Uma vez recebido o sinal, o sensor transmite o sinal à estação base e a hora será actualizada: o indicador
RCC[18] é exibido.
Notas:
Quando o seu fuso horárionão é UTC+1:00 (GMT + 1:00) deve acertar a hora manualmente para garantir
que esta será devidamente actualizada logo que a ligação DCF seja estabelecida.
O período de melhor recepção de sinais DCF é entre a meia-noite e as 6:00am.
Princípio DCF
8.2 Tendência da previsão meteorológica
Símbolos
V. 01 – 21/06/2013 68 ©Velleman nv
Page 69

WS3080
parcialmente
nublado
nublado
chuvoso
neve
tempestade
tempestade de neve
noite clara
noite nublada
índice
intensidade
descrição
código
0 ~ 2
baixo
sem perigo para a maioria das pessoas
verde
3 ~ 5
moderado
risco problemas de saúde relacionados com a exposição
sem protecção.
amarelo
6 ~ 7
extremo
risco elevado problemas de saúde relacionados com a
exposição sem protecção.
laranja
8 ~ 10
alto
risco muito elevado problemas de saúde relacionados com
a exposição sem protecção.
vermelho
11+
muito alto
risco extremamente elevado de problemas de saúde
relacionados com a exposição sem protecção.
violeta
Definir a sensibilidade da pressão
O limiar da pressão para previsão meteorológica pode ser definida entre 2 ~ 4hPa (por defeito 2hPa). Áreas
que registem alterações frequentes da pressão do ar requerem um hPa mais elevado se comparadas com zonas
onde a pressão do ar é mais esetável. Por exemplo quando se escolha 4hPa deve exister um aumento ou
decréscimo da pressão do ar de pelo menos 4hPa para que haja mudança do ícone de previsão meteorológica.
Definir a sensibilidade do limiar de tempestade
Sempre que é registada uma alteração dramática da pressão, os ícones (chuva e núvens) começam a piscar
indicando tempestade. Do mesmo modo que é possível definir a sensibilidade à pressão, também é possível
definir a sensibilidade para o limiar de tempestade de 3 ~ 9hPa (por defeito 4hPa). Sempre que existe uma
queda da pressão superior ao limiar definido por um período de 3 horas, a previsão de tempestade é activada.
Os ícones de núvens e de chuva e as setas de tendência ficam intermitentes durante 3 horas indicando que o
alerte de tempestade foi activado.
8.3 índice UV
Nota: tabela baseada numa média de pessoas adultas de pele clara e apenas para mera indicação. Pessoas
com a pele sensível e crianças podem sofrer de problemas relacionados com a exposição aos raios UV, mesmo
se expostas a intensidades muito baixas.
8.4 Restaurar as definições de fábrica
Mantenha o botão pressionado [c] durante ±20s para restaurar as definições de fábrica da estação base.
Tenha em conta que a memória também será limpa.
9. Ligação ao PC
O receptor suporta até 4,080 entradas de dados meteorológicos (com data e hora) na memória interna.
Esta é uma memória não volátil (EEPROM) e será preservada em caso de falha de energia (por ex.
substituição das pilhas). Quando a memória está cheia, os novos dados será gravados por cima dos dados
mais antigos.
V. 01 – 21/06/2013 69 ©Velleman nv
Page 70

WS3080
configuração
(System – Setup)
definições do sistema de alarme
(System – Alarm)
mostrar histórico dos valores mín e máx
(System – Scope)
mostrar histórico
(Record – History)
É possível ler, copiar, guardar e imprimeir os dados da memória ligando o receptor a um PC (não incl.) que
tenha o software necessário instalado.
9.1 Requisitos mínimos do sistema
sistema operativo: Windows XP, Vista, 7, 8
navegador: Internet Explorer 6.0 ou superior
processador: Pentium III, 500MHz
memória: 128MB (256MB recomendado)
drive CD ROM + porta USB disponível
9.2 Intalação do software
1. Coloque o CD ROM incluído no drive de leitura de uma computador apropriado. Não ligue ainda o receptor.
2. Se a função de execução automática do PC estiver activa, siga as instruções exibidas no ecrã. Caso
contrário, abra a drive, localize o ficheiro setup.exe e faça duplo clique em cima do ficheiro.
Nota: confirme se entrou no sistema através de uma conta administrador para instalar ou executar o
software.
3. Seleccione o idioma de instalação e clique em seguinte.
4. Clique em seguinte seleccione a pasta de destino (mude de directório se assim desejar)
5. Clique em seguinte e o software será instalado automaticamente.
6. Pressione OK para finalizar o processo de instalação.
7. Quando lhe for solicitado, reinicie o computador.
8. Introduza o cabo USB fornecido na porta USB do receptor (lado esquerdo) e ligue a outra extremidade à
porta USB do computador.
9.3 Utilizar o software
1. Antes de utilizar o software, confirme se a hora da estação base coincide com a hora do PC. Isto para evitar
discrepâncias de tempo entre a hora da gravação e a hora exibida no PC-
2. Para iniciar o software EasyWeatherPlus,vá a ―Start—All Programs—EasyWeahterPlus‖ e clique no ícone do
―EasyWeatherPlus‖.
Nota: execute o programa através de uma conta administrador.
3. O computador começa a descarregar todos os dados para a estação meteorológica. Pode demorar alguns
minutos até estar concluído. Não tente alterar as definições durante este download ou a transferência dos
dados falhará.
4. Pode definir o idioma do interface através da opção Display – Language
V. 01 – 21/06/2013 70 ©Velleman nv
Page 71

WS3080
mostrar gráfico de dados
(Record – Graph)
acerca do EasyWeatherPlus
(Help – about EasyWeatherGraph)
Configuração
Use este menu para alterar as definições da estação base e para activar os alarmes.
Quando terminar, clique emSave para enviar os dados para a estação base. É necessário cerca de 1 minuto
para que a actualização produza efeito.
Nota: amplitude do intervalo = 5 ~ 240 minutos
Definiçõe do sistema de alarme
Use este menu para configurar os parâmetros do alarme da estação base.
Quando terminar, clique emSave para enviar os dados para a estação base. É necessário cerca de 1 minuto
para que a actualização produza efeito.
valores mín e máx do histórico
Use este menu para rever e apagar os valores mínimos e máximos medidos.
Seleccione as entradas de dados pretendidas e clique emreset para apagar os dados da estação base. É
necessário cerca de 1 minuto para que a actualização produza efeito.
V. 01 – 21/06/2013 71 ©Velleman nv
Page 72

WS3080
Actualização
actualizar o histórico
Limpar dados
remover o histórico de dados do PC
Limpar a
memória
remover dados da estaçao base (confirme se foram gravados primeiro)
Gráfico
crie uma representação gráfica dos dados (ver Mostrar gráfico de dados
abaixo)
Exportar
exportar/salvar os dados para um ficheiro .cvs
Seleccione os dados que pretende e a ordem sob a qual devem ser exibidos, depois
clique em Export e seleccione a localização para guardar o ficheiro.
Mostrar histórico
Use este menu para aceder ao histórico das medições em formato de lista.
Determine o período de tempo (condição) no canto superior esquerdo do ecrã (1 hora, 24 horas, uma
semana, um mês ou a definir pelo utilizador). Se seleccionar "a definir pelo utilizador" indique a hora de
início e a hora de fim.
Clique em Search (canto superior direito) para retrieve os dados.
V. 01 – 21/06/2013 72 ©Velleman nv
Page 73

WS3080
Mostrar gráfico de dados
Use este menu para ver uma representação gráfica dos dados seleccionados.
1. Seleccione os dados pretendidos no canto inferior esquerdo do monitor (Series):
2. Determine o intervalo de tempo (condição) no canto superior esquerdo do ecrã (1 hora, 24 horas, uma
semana, um mês ou a definir pelo utilizador). Se seleccionar "a definir pelo utilizador" indique a hora de
início e a hora de fim.
3. Clique Search (canto direito superior) para recuperar o gráfico.
4. Para aplicar o zoom a uma secção do gráfico, seleccione a área com o ponteiro do rato.
5. Clique em Refresh para actualizar o gráfico.
6. Pressione Export para salvar o gráfico como um ficheiro de imagem (.JPEG format).
Resolução de problemas
Se a função gráfica não estiver a funcionar correctamente, siga os seguintes passos:
1. Localize a pasta que contem o―EasyWeatherPlus.exe‖.
2. Crie um ficheiro de texto(usando o notepad ou o WordPad)contento o seguinte:
regsvr32 easyweatherplus.ocx
3. Salve o ficheiro como reg_graph.bat.
V. 01 – 21/06/2013 73 ©Velleman nv
Page 74

WS3080
alimentação
estação base: pilhas 3 x 1.5V AA (LR6C, não incl.), ou adaptador 6V DC (não
incl.)
transmissor: pilhas recarregáveis (incl.) 2 x 1.5V AA
dimensões (estação base)
165 x 148 x 27mm
amplitude da temperatura
interior
0°C~50°C
amplitude da temperatura
exterior
-40°C~65°C
precisão da temperatura
±C
amplitude da humidade
1%RH-99%
precisão da humidade
±5% menos de -20°C até 65°C & 20%-98%
amplitude da velocidade do
vento
0~50.0m/s
precisão da velocidade do
vento
±1m/s (velocidade do vento<10m/s), ±10% (velocidade do vento>10m/s)
amplitude da precipitação
0~99.999mm
precisão da precipitação
±1.5mm
4. Faça duplo clique no ficheiro para iniciar a driver gráfica.
Sobre o EasyWeatherPlus
Escolha esta opção para ver a versão disponível do software EasyWeatherPlus.
10. Especificações
Utilize este aparelho apenas com acessórios originais. A Velleman NV não será responsável por
quaisquer danos ou lesões causados pelo uso (indevido) do aparelho.
Para mais informação sobre este produto e para aceder à versão mais recente deste manual do
utilizador, visite a nossa página www.velleman.eu.
Podem alterar-se as especificações e o conteúdo deste manual sem aviso prévio.
Todas as marcas registadas e designações comerciais são propriedade dos seus respectivos donos e
são usadas apenas para clarificar a compatibilidade dos nossos produtos relativamente aos
produtos dos diferentes fabricantes. Windows, Windows XP, Windows 2000, Windows Vista,
Windows Aero, Windows 7, Windows 8, Windows Mobile, Windows Server são marcas da Microsoft
Corporation registadas tanto nos Estados Unidos como em outros países. iPad, iPod, iPod touch,
iPhone, Mac, iMac, MacBook, PowerBook, Power Mac, Mac OS são marcas da Apple Inc., registadas
nos U.S. e em outros países.
© DIREITOS DE AUTOR
A Velleman NV detem os direitos de autor deste manual do utilizador. Todos os direitos mundiais
reservados. É estrictamente proíbido reproduzir, traduzir, copiar, editar e gravar este manual do utilizador ou
partes deste sem prévia autorização escrita por parte da detentora dos direitos.
V. 01 – 21/06/2013 74 ©Velleman nv
Page 75

WS3080
Chronić urządzenie przed dziećmi i nieupoważnionymi użytkownikami.
Wyłącznie do użytku wewnątrz pomieszczeń. Chronić wyświetlacz przed deszczem, wilgocią,
rozpryskami i ściekającymi cieczami.
Chronić urządzenie przed zbyt wysoką temperaturą i pyłem.
Chronić urządzenie przed wstrząsami i użytkować wyłącznie zgodnie z przeznaczeniem. Podczas
obsługi urządzenia unikać stosowania siły.
INSTRUKCJA OBSŁUGI
1. Wstęp
Przeznaczona dla mieszkańców Unii Europejskiej.
Ważne informacje dotyczące środowiska.
Ten symbol umieszczony na urządzeniu bądź opakowaniu wskazuje, że wyrzucenie produktu może być
szkodliwe dla środowiska. Nie wyrzucaj urządzenia lub baterii do zbiorczego śmietnika, tylko do
specjalnie przeznaczonych do tego pojemników na urządzenia elektroniczne lub skontaktuj się z firmą
zajmującą się recyklingiem. Urządzenie możesz oddać dystrybutorowi lub firmie zajmującej się
recyklingiem. Postępuj zgodnie z zasadami bezpieczeństwa dotyczącymi środowiska.
Jeśli masz wątpliwości skontaktuj się z firmą zajmującą się utylizacją odpadów.
Dziękujemy za wybór produktu firmy Velleman! Prosimy o dokładne zapoznanie się z instrukcją obsługi przed
użyciem. Jeśli urządzenie zostało uszkodzone podczas transportu, prosimy o nie korzystanie z niego i
skontaktowanie się ze sprzedawcą.
2. Instrukcje bezpieczeństwa
3. Informacje ogólne
Proszę zapoznać się z informacjami w części Velleman® usługi i gwarancja jakości na końcu niniejszej
instrukcji.
Przed rozpoczęciem pracy z urządzeniem należy zapoznać się z jego funkcjami.
Wprowadzanie zmian w urządzeniu jest zabronione ze względów bezpieczeństwa. Należy pamiętać, że
uszkodzenia spowodowane przez zmiany wprowadzone przez użytkownika nie są objęte gwarancją.
Urządzenie należy używać jedynie zgodnie z przeznaczeniem. Używanie urządzenia niezgodnie z
przeznaczeniem spowoduje unieważnienie gwarancji.
Gwarancja nie obejmuje uszkodzeń spowodowanych w wyniku nieprzestrzegania niniejszej instrukcji, a
sprzedawca nie ponosi odpowiedzialności za wynikłe uszkodzenia lub problemy.
4. Funkcje
nadajnik zasilany energią słoneczną
przyrząd do pomiaru deszczu
Połączenie z komputerem poprzez USB (oprogramowanie w zestawie)
wszystkie dane pogodowe ze stacji bazowej oraz do 4080 wpisów z historii danych pogodowych wraz z
odstępami czasu między pomiarami regulowanymi przez użytkownika można zapisać i wgrać do komputera
stacja wyświetla:
o prędkość wiatru: mph, m/s, km/h, węzły, skala Beauforta
o kierunek wiatru: kompas na ekranie LCD
o czas: radiowo kontrolowany przez WWVB, DCF
o indeks UV
o opady deszczu: cale lub mm, 1 godzina /24 godziny / jeden tydzień / jeden miesiąc / suma od
ostatniego wyzerowania
o prognozę pogody: w oparciu o zmiany ciśnienia atmosferycznego
o ciśnienie atmosferyczne: Hg lub hPa
o temperaturę w pomieszczeniu: °C, °F
o temperaturę na zewnątrz: °C, °F
o temperaturę odczuwalną: °C, °F
V. 01 – 21/06/2013 75 ©Velleman nv
Page 76

WS3080
A
górny biegun
F
podpora boczna
B
dolny biegun
G
czujnik deszczu
C
podpora górna
H
panel słoneczny
D
anemometr
I
osłona czujnika
E
wiatrowskaz + czujnik kierunku
J
termohigrometr (pod osłoną)
a
przycisk MENU
d
przycisk DOWN ()
b
przycisk ENTER
e
przycisk ALARM ON/OFF( )
c
przycisk UP ()
f
przycisk HISTORY
1
Prognoza pogody
10
Odbiór sygnału zewnętrznego
2
Ciśnienie atmosferyczne
11
Wilgotność zewnętrzna
3
Tendencja barometryczna
12
Temperatura zewnętrzna
4
Data
13
Kierunek wiatru
5
Pamięć
14
Prędkość wiatru/porywu wiatru
6
Czas
15
indeks UV
7
Wilgotność w pomieszczeniu
16
Opady deszczu
8
Temperatura w pomieszczeniu
17
Natężenie światła
9
wskaźnik niskiego poziomu naładowania
baterii nadajnika
18
wskaźnik zegara kontrolowanego radiowo (RCC)
o temperaturę punktu rosy: °C, °F
o wewnętrzną i zewnętrzną wilgotność
alarmy pogodowe: temperatury, wilgotności, temperatury odczuwalnej, temperatury punktu rosy,
opadów, prędkości wiatru, ciśnienia powietrza, burzy
zsynchronizowany odbiór ciągły
wyświetlany 12 lub 24-godzinny
kalendarz ciągły
ustawianie strefy czasowej
budzik
podświetlanie LED
do montażu na ścianie lub postawienia
5. Przegląd
Por. rysunki na stronie 2-3 niniejszej instrukcji.
6. Obsługa urządzenia
1. Połączyć dolny biegun [B] z górnym [A].
2. Umieścić anemometr [D] na górnej podporze [C] i przykręcić za pomocą śruby i nakrętki.
3. Umieścić wiatrowskaz [E] na górnej podporze [C] i przykręcić za pomocą śruby i nakrętki.
4. Umieścić górną podporę [C] na górze dolnego bieguna [A] i przykręcić za pomocą śruby i nakrętki.
5. Zamontować boczną podporę [F] na biegunie [A+B], a na górze umieścić czujnik deszczu [G]. Zabezpieczyć
za pomocą śruby.
6. Zamontować drugą boczną podporę [F] na biegunie [A+B].
7. Na górze osłony [I] umieścić panel słoneczny [H] i zabezpieczyć za pomocą śruby i nakrętki.
8. Dokonać wszelkich niezbędnych podłączeń:
o Podłączyć anemometr [D] do osłony wiatrowskazu [E].
o Podłączyć wiatrowskaz [E] do osłony termohigrometru WIND [J] (lewej).
o Podłączyć czujnik deszczu do osłony termogigrometru [J] RAIN (prawej).
9. Włożyć 2 akumulatory AA (wyp. standardowe) do termohigrometru [J] zgodnie z biegunowością oznaczoną
na obudowie. Używać wyłącznie akumulatorów!
10. Aby zapewnić odbiór sygnału DCF, niezwłocznie włożyć 3 baterie AA do odbiornika zgodnie z biegunowością.
Aby uzyskać więcej informacji o sygnale DCF należy odwołać się do rozdziału Uruchamianie poniżej.
Odbiornik znajduje się wewnątrz termohigrometru
11. Wsunąć termohigrometr [J] do osłony [I].
V. 01 – 21/06/2013 76 ©Velleman nv
Page 77

WS3080
MENU
Tryb
Opis
Czas
kontrast LCD
ustawianie kontrastu LCD 0~8 (domyślnie = 5)
Strefa czasowa
ustawianie strefy czasowej:
-1 = GMT / 0 = GMT+1 / 1 = GMT+2 … (domyślnie = 0)
Format czasu
ustawianie formatu czasu 12h/24h (domyślnie = 12h)
Ręczne ustawienie
czasu
ręczne ustawianie godziny i minuty
Data
tryb wyświetlacza
wybór trybu wyświetlania:
dzień-miesiąc-sekundy (domyślne) / dzień-miesiąc-dzień tygodnia / czas
alarmu
format
daty/miesiąca
wybrór formatu między DD-MM a MM-DD (dM lub Md)
rok
ustawianie roku
miesiąc/data
ustawianie miesiąca i daty
czas alarmu
ustawianie czasu alarmu
Wcisnąć przycisk wł./wył. alarmu (ALARM ON/OFF), aby
uaktywnić/dezaktywować alarm. Po włączeniu pojawi się ikonka alarmu.
Historia
ciśnienia
wykres
ustawianie dla historii ciśnienia skali wykresu na 12h lub 24h
Ciśnienie
tryb wyświetlania
ciśnienia
wybór między ciśnieniem względnym (rel) a bezwzględnym (abs)
(domyślnie = bezwzględne)
jednostka ciśnienia
wybór jednostki ciśnienia: hPa, mmHg lub inHg (domyślnie = hPa)
ciśnienie względne
ustawianie poziomu ciśnienia względnego (tylko wtedy, kiedy wybrano tryb
wyświetlania ciśnienia względnego)
alarm dla wysokich
wartości
ustawianie poziomu alarmu wysokich wartości
Wcisnąć przycisk wł./wył. alarmu (ALARM ON/OFF), aby
uaktywnić/dezaktywować alarm. Po włączeniu pojawi się ikonka alarmu.
12. Na górze drugiej podpory bocznej [F] umieścić termohigrometr [J] i zabezpieczyć za pomocą śruby.
13. Zaleca się przetestowanie stacji przed jej montażem na zewnątrz.
14. Poczekać, aż obie stacje się zsynchronizują. Synchronizacja może trwać kilka minut. W czasie
synchronizacji nie dotykać żadnych przycisków. Po zakończeniu synchronizacji upewnić się, że wszystkie
elementy działają prawidłowo.
15. Po zakończeniu testowania można zamontować stację na biegunie zewnętrznym (brak w zestawie) za
pomocą załączonych zacisków. Wybrać odpowiednie miejsce montażu odbiornika. Zazwyczaj, komunikacja
między obiema stacjami może zajść na odległości 100 m na otwartym terenie, pod warunkiem, że nie
występują żadne przeszkody tj. budynki, drzewa, pojazdy, linie wysokiego napięcia itp. Zakłócenia radiowe
pochodzące np. z komputerów, radia i odbiorników telewizyjnych mogą całkowicie uniemożliwić
komunikację. Należy to wziąć pod uwagę przy wyborze miejsca montażu.
Uwagi:
Na krawędziach czujnika kierunku wiatru [E] oznaczono kierunek (―N‖ = północ, ―E‖ = wschód, ―S‖ =
południe, a ―W‖ = zachód). Należy się upewnić, że te oznaczenia odpowiadają rzeczywistemu kierunkowi
wiatru. Do montażu stacji i ustawienia prawidłowej pozycji czujnika kierunku używać kompasu (brak w
zestawie).
Upewnić się, że panel słoneczny jest ustawiony w kierunku słońca, aby zapewnić odpowiednie naładowanie
baterii nadajnika.
7. Podstawowe ustawienia/obsługa
Dostępne menu można przeglądać za pomocą przycisku MENU [a] . Wybierać tryb i akceptować wartość za
pomocą przycisku ENTER [b] .
Zmieniać wartości za pomocą przycisku [c] lub [d]
Uwagi:
Przytrzymać wciśnięty przycisk [c] lub [d] , aby zwiększyć prędkość ustawiania.
Z ustawień menu można w każdym momencie wyjść wciskając przycisk HISTORY [f] lub po prostu
poczekać 30 sekund, aż odbiornik automatycznie powróci do normalnego trybu.
Będąc poza menu ustawień, nacisnąć przycisk HISTORY [f] , aby włączyć podświetlenie na ±10 sekund.
Wszystkich zmian w ustawieniach można dokonać również w oprogramowaniu (patrz Połączenie z
komputerem §9)
W celu sprawdzenia opcji menu i ustawień należy skorzystać z poniższej tabeli.
V. 01 – 21/06/2013 77 ©Velleman nv
Page 78
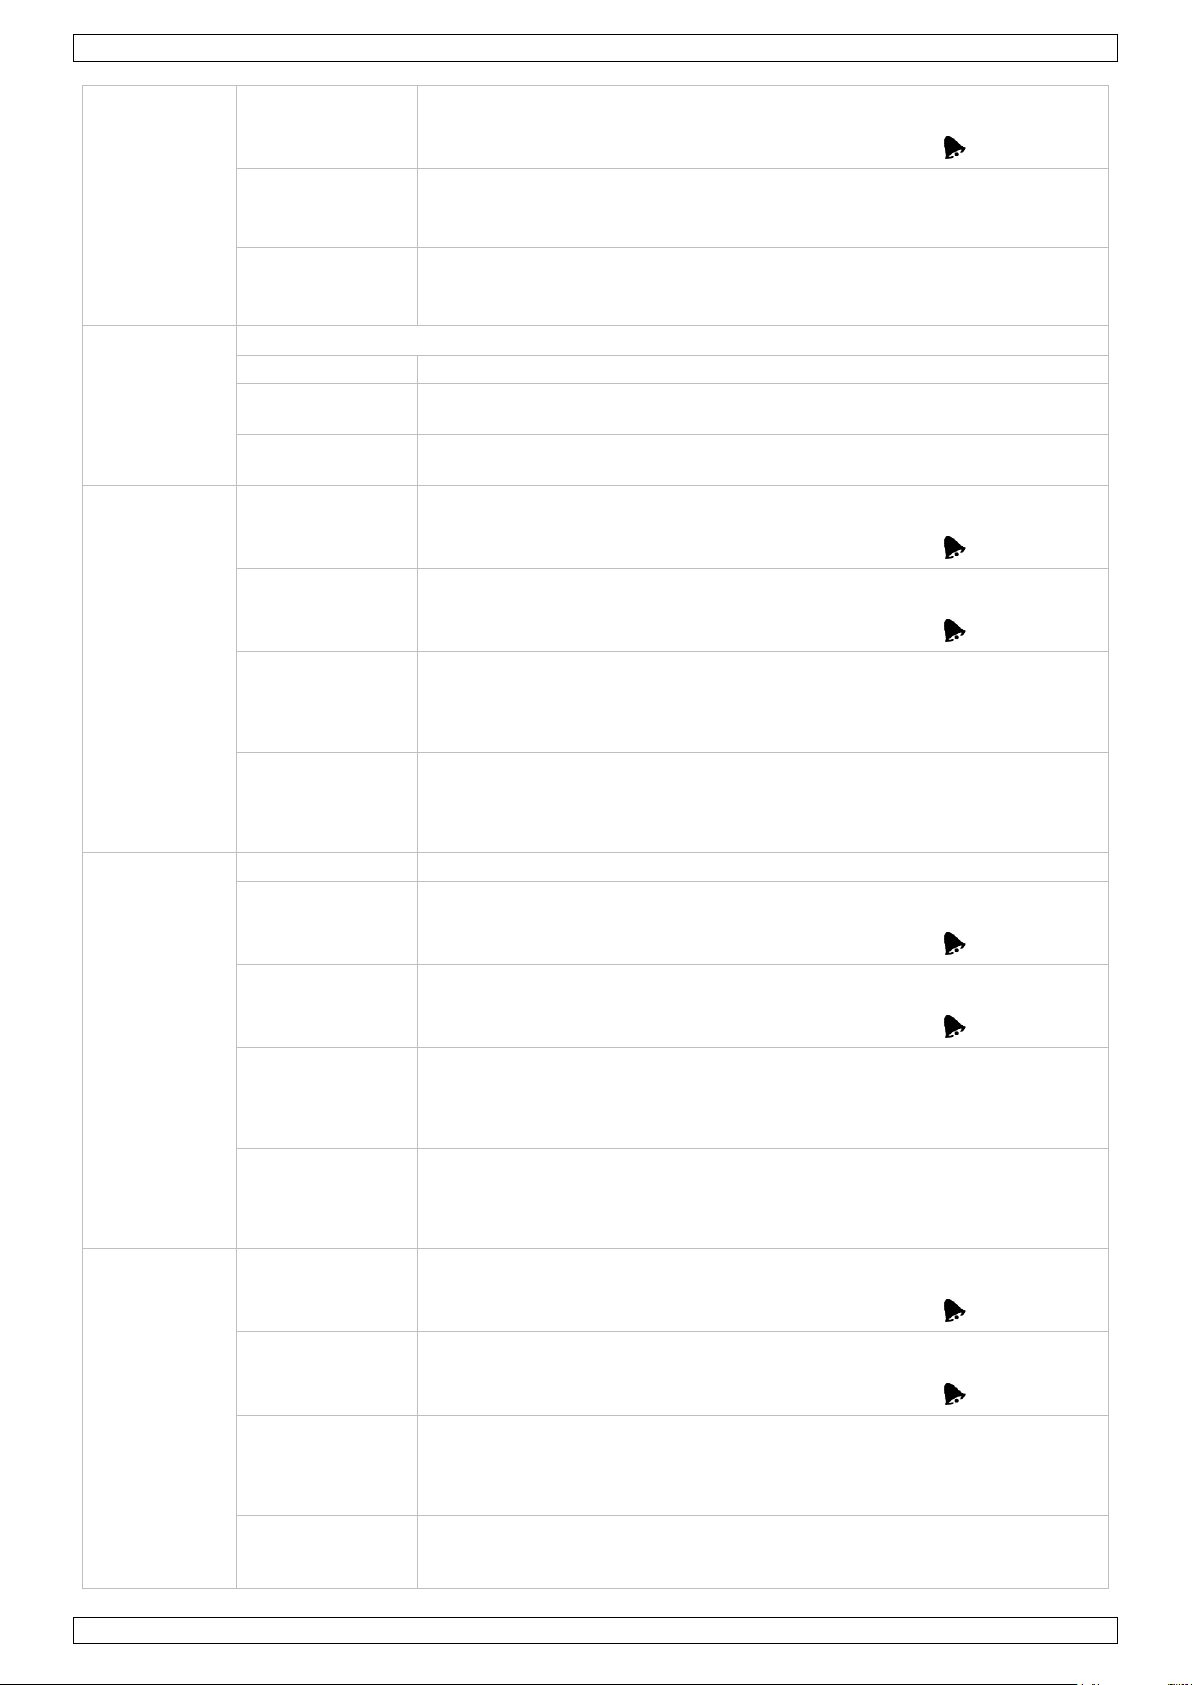
WS3080
alarm dla niskich
wartości
ustawianie poziomu alarmu niskich wartości
Wcisnąć przycisk wł./wył. alarmu (ALARM ON/OFF), aby
uaktywnić/dezaktywować alarm. Po włączeniu pojawi się ikonka alarmu.
resetowanie
wartości
maksymalnych
(miga ikonka ciśnienia [2] oraz wartości maks. (między [14] a [15])
nacisnąć i przytrzymać przez ±3 sekundy przycisk ENTER, aby zresetować
wartość maksymalną dla aktualnej wielkości
resetowanie
wartości
minimalnych
(miga ikonka ciśnienia [2] oraz wartości min. (między [14] a [15])
nacisnąć i przytrzymać przez ±3 sekundy przycisk ENTER, aby zresetować
wartość minimalną dla aktualnej wielkości
Tendencja
prognozy
pogody
Aby uzyskać więcej informacji należy odwołać się do §8.2.
tendencja
wybrór tendencji
wartość progowa
ciśnienia
ustawianie wartości progowej w zakresie 2 ~ 4 hPa (domyślnie = 2hPa)
wartość progowa
burzy
ustawianie wartości progowej w zakresie 3 ~ 9 hPa (domyślnie = 4hPa)
Wilgotność w
pomieszczeniu
alarm dla wysokich
wartości
ustawianie poziomu alarmu wysokich wartości
Wcisnąć przycisk wł./wył. alarmu (ALARM ON/OFF), aby
uaktywnić/dezaktywować alarm. Po włączeniu pojawi się ikonka alarmu.
alarm dla niskich
wartości
ustawianie poziomu alarmu niskich wartości
Wcisnąć przycisk wł./wył. alarmu (ALARM ON/OFF), aby
uaktywnić/dezaktywować alarm. Po włączeniu pojawi się ikonka alarmu.
resetowanie
wartości
maksymalnych
(miga ikonka wilgotności wewnętrznej [7] i wartości maksymalnej
(między [14] a [15])
nacisnąć i przytrzymać przez ±3 sekundy przycisk ENTER, aby zresetować
wartość maksymalną dla aktualnej wielkości
resetowanie
wartości
minimalnych
(miga ikonka wilgotności wewnętrznej [7] i wartości minimalnej
(między [14] a [15])
nacisnąć i przytrzymać przez ±3 sekundy przycisk ENTER, aby zresetować
wartość minimalną dla aktualnej wielkości
Temperatura
w
pomieszczeniu
tryb jednostki
wybrać °C lub °F
alarm dla wysokich
wartości
ustawianie poziomu alarmu wysokich wartości
Wcisnąć przycisk wł./wył. alarmu (ALARM ON/OFF), aby
uaktywnić/dezaktywować alarm. Po włączeniu pojawi się ikonka alarmu.
alarm dla niskich
wartości
ustawianie poziomu alarmu niskich wartości
Wcisnąć przycisk wł./wył. alarmu (ALARM ON/OFF), aby
uaktywnić/dezaktywować alarm. Po włączeniu pojawi się ikonka alarmu.
resetowanie
wartości
maksymalnych
(miga ikonka temperatury w pomieszczeniu [8] i wartości
maksymalnej (między [14] a [15])
nacisnąć i przytrzymać przez ±3 sekundy przycisk ENTER, aby zresetować
wartość maksymalną dla aktualnej wielkości
resetowanie
wartości
minimalnych
(miga ikonka temperatury w pomieszczeniu [8] i wartości minimalnej
(między [14] a [15])
nacisnąć i przytrzymać przez ±3 sekundy przycisk ENTER, aby zresetować
wartość minimalną dla aktualnej wielkości
Wilgotność
zewnętrzna
alarm dla wysokich
wartości
ustawianie poziomu alarmu wysokich wartości
Wcisnąć przycisk wł./wył. alarmu (ALARM ON/OFF), aby
uaktywnić/dezaktywować alarm. Po włączeniu pojawi się ikonka alarmu.
alarm dla niskich
wartości
ustawianie poziomu alarmu niskich wartości
Wcisnąć przycisk wł./wył. alarmu (ALARM ON/OFF), aby
uaktywnić/dezaktywować alarm. Po włączeniu pojawi się ikonka alarmu.
resetowanie
wartości
maksymalnych
(miga ikonka wilgotności zewnętrznej [11] i wartości maksymalnej
(między [14] a [15]).
nacisnąć i przytrzymać przez ±3 sekundy przycisk ENTER, aby zresetować
wartość maksymalną dla aktualnej wielkości
resetowanie
wartości
minimalnych
(miga ikonka wilgotności zewnętrznej [11] a wartością minimalną
(między [14] a [15])
nacisnąć i przytrzymać przez ±3 sekundy przycisk ENTER, aby zresetować
V. 01 – 21/06/2013 78 ©Velleman nv
Page 79

WS3080
wartość minimalną dla aktualnej wielkości
Temperatura
zewnętrzna
tryb wyświetlania
wybrać wyświetlanie temperatury zewnętrznej, odczuwalnej lub punktu
rosy na wyświetlaczu [12]
tryb jednostki
wybrać °C lub °F
alarm dla wysokich
wartości
ustawianie poziomu alarmu wysokich wartości
Wcisnąć przycisk wł./wył. alarmu (ALARM ON/OFF), aby
uaktywnić/dezaktywować alarm. Po włączeniu pojawi się ikonka alarmu.
alarm dla niskich
wartości
ustawianie poziomu alarmu niskich wartości
Wcisnąć przycisk wł./wył. alarmu (ALARM ON/OFF), aby
uaktywnić/dezaktywować alarm. Po włączeniu pojawi się ikonka alarmu.
resetowanie
wartości
maksymalnych
(miga ikonka temperatury zewnętrznej [12] i wartości maksymalnej
(między [14] a [15])
nacisnąć i przytrzymać przez ±3 sekundy przycisk ENTER, aby zresetować
wartość maksymalną dla aktualnej wielkości
resetowanie
wartości
minimalnych
(miga ikonka temperatury zewnętrznej [12] i wartości minimalnej
(między [14] a [15])
nacisnąć i przytrzymać przez ±3 sekundy przycisk ENTER, aby zresetować
wartość minimalną dla aktualnej wielkości
indeks UV
Aby uzyskać więcej informacji należy odwołać się do §8.2.
alarm dla wysokich
wartości
ustawianie poziomu alarmu wysokich wartości
Wcisnąć przycisk wł./wył. alarmu (ALARM ON/OFF), aby
uaktywnić/dezaktywować alarm. Po włączeniu pojawi się ikonka alarmu.
resetowanie
wartości
maksymalnych
(miga ikonka indeksu UV [15] i wartości maksymalnej (między [14] a
[15])
nacisnąć i przytrzymać przez ±3 sekundy przycisk ENTER, aby zresetować
wartość maksymalną dla aktualnej wielkości
Wiatr
prędkość wiatru
wybór między wartością średnią a prędkością porywu wiatru (domyślnie =
wartość średnia)
jednostka
prędkości
wybór spośród km/h, mph, m/s, węzłami lub bft (skalą Beauforta)
(domyślnie = mph)
alarm dla wysokich
wartości
ustawić poziom alarmu wysokich wartości
Wcisnąć przycisk wł./wył. alarmu (ALARM ON/OFF), aby
uaktywnić/dezaktywować alarm. Po włączeniu pojawi się ikonka alarmu.
alarm kierunku
ustawianie alarmu kierunku wiatru
Wcisnąć przycisk wł./wył. alarmu (ALARM ON/OFF), aby
uaktywnić/dezaktywować alarm. Po włączeniu pojawi się ikonka alarmu.
resetowanie
wartości
maksymalnych
(miga ikonka prędkości wiatru [14] i wartości maksymalnej (między
[14] a [15])
nacisnąć i przytrzymać przez ±3 sekundy przycisk ENTER, aby zresetować
wartość maksymalną dla aktualnej wielkości
Światło
jednostka światła
wybrać jednostkę natężenia między fc a lux
alarm dla wysokich
wartości
ustawianie poziomu alarmu wysokich wartości
Wcisnąć przycisk wł./wył. alarmu (ALARM ON/OFF), aby
uaktywnić/dezaktywować alarm. Po włączeniu pojawi się ikonka alarmu.
resetowanie
wartości
maksymalnych
(miga ikonka natężenia światła [17] i wartości maksymalnej (między
[14] a [15])
nacisnąć i przytrzymać przez ±3 sekundy przycisk ENTER, aby zresetować
wartość maksymalną dla aktualnej wielkości
Deszcz
tryb wyświetlania
wybór między 1h, 24h, tygodniem, miesiącem lub wartością całkowitą
jednostka
wybór między mm a calami (domyślnie = mm)
alarm dla wysokich
wartości
ustawianie poziomu alarmu wysokich wartości
Wcisnąć przycisk wł./wył. alarmu (ALARM ON/OFF), aby
uaktywnić/dezaktywować alarm. Po włączeniu pojawi się ikonka alarmu.
resetowanie
wartości
maksymalnych
(miga ikonka wartości deszczu [16] i wartości maksymalnej (między
[14] a [15])
nacisnąć i przytrzymać przez ±3 sekundy przycisk ENTER, aby zresetować
wartość maksymalną dla aktualnej wielkości
V. 01 – 21/06/2013 79 ©Velleman nv
Page 80

WS3080
resetowanie
wartości całkowitej
(migają ikonki wielkości opadów deszczu [16], TOTAL i CLE [4] )
nacisnąć i przytrzymać przez ±3 sekundy przycisk ENTER, aby zresetować
wartość całkowitą (TOTAL) dla aktualnej wielkości.
Termohigrometr wyposażono w odbiornik służący do odbioru sygnału radiowego ze
stacji radiowej w Mainflingen, w pobliżu Frankfurtu (Niemcy). Sygnał radiowy
nadawany w paśmie fal długich (DCF77, 77.5 kHz), zawierające dane dotyczące daty i
godziny, jest zsynchronizowany z zegarem atomowym. Aby uzyskać więcej informacji
należy odwołać się do www.ptb.de (PTB = Physikalisch-Technische Bundesanstalt).
Urządzenie automatycznie synchronizuje się z sygnałem radiowym zegara głównego.
Ze względu na jego właściwości sygnał radiowy można odbierać również wewnątrz
pomieszczeń, ale należy pamiętać, że metal i beton powodują osłabienie sygnału. Ze
względu na powyższe zegara nie należy instalować w betonowych piwnicach ani
wewnątrz metalowych konstrukcji. W dużych, betonowych budynkach biurowych lub
mieszkalnych zegar należy umieścić w pobliżu okna w celu zapewnienia lepszego
odbioru sygnału. Zegara nie należy instalować w pobliżu silnych pól magnetycznych ani
innych urządzeń wytwarzających szumy elektryczne (np. silników).
Wejść w pamięć stacji bazowej za pomocą przycisku HISTORY [f] .
Uwaga: domyślny odstęp czasu zapisu danych w pamięci wynosi 30 minut. Odstęp ten można zmienić tylko
za pomocą oprogramowania (patrz rozdział Połączenie z komputerem).
Użyć przycisku [d] , aby przewijać zawartość pamięci w dół, a przycisku [c] , aby przewijać ją w górę.
Uwaga: po dotarciu do końca pamięci, stacja bazowa powróci do trybu normalnego.
Aby wyczyścić zapełnioną pamięć, nacisnąć przycisk ENTER [b]. Słowo CLE [4] oraz wskaźnik pamięci [5]
zaczną migać. Wcisnąć i przytrzymać przez ±3 sekundy przycisk ENTER [b] , aby wyczyścić pamięć.
Uwaga: aby zapisać kopię pamięci na komputerze – por. rozdział Połączenie z komputerem.
8. Uwagi dotyczące obsługi
8.1 Uruchamianie
Złącze RF
Po włożeniu baterii do stacji bazowej, przechodzi ona w tryb odbioru fal radiowych i przez 144 sekundy
próbuje połączyć się z czujnikiem. Po nawiązaniu połączenia, pobiera dane o temperaturze, wilgotności,
prędkości wiatru i deszczu co 48 sekund, a o natężeniu światła co 60 sekund. Nie wciskać żadnego
przycisku dopóki nie wyświetlą się dane z zewnątrz, aby uniknąć przerwania procesu nauki.
Jeśli odbiór nie powiedzie się 8 razy z rzędu, połączenie zostanie przerwane, a temperatura[12] i
wilgotność [11] zewnętrzna wskażą ―----‖. Stacja bazowa wejdzie ponownie w tryb odbioru fal radiowych
na 144 sekundy.
Aby ręcznie wymusić tryb odbioru fal radiowych należy wcisnąć i przytrzymać przez ±4 sekundy przycisk
[d] .
Podłączenie sygnału DCF
Po włożeniu baterii do termohigrometru (czujnika) najpierw, przez 24 sekundy, będzie on przekazywał dane
pogodowe.
Następnie przez około 5 minut będzie poszukiwał sygnału DCF. Jeśli sygnał nie zostanie odnaleziony,
termohigrometr będzie próbował ponownie co godzinę, aż znajdzie sygnał. W międzyczasie można ręcznie
ustawić czas (patrz §7).
Po odebraniu sygnału, czujnik przekaże go do stacji bazowej i czas zostanie zaktualizowany; pokaże się
wskaźnik RCC [18] .
Uwagi:
Jeśli Państwa strefa czasowa jest inna niż UTC+1:00 (GMT + 1:00), czas należy ustawić ręcznie, aby
zapewnić jego prawidłową aktualizację po nawiązaniu połączenia z sygnałem DCF.
Najlepszy czas na odbiór sygnałów DCF przypada między północą a godz. 6 rano.
Zasada działania sygnału DCF
V. 01 – 21/06/2013 80 ©Velleman nv
Page 81

WS3080
słonecznie
częściowe
zachmurzenie
zachmurzenie
deszczowo
śnieg
burza
burza śnieżna
bezchmurna noc
pochmurna noc
Indeks
natężenie
opis
kod
0 ~ 2
niskie
brak niebezpieczeństwa dla osób
zielony
3 ~ 5
umiarkowane
niewielkie ryzyko obrażeń w wyniku narażenia bez
ochrony
żółty
6 ~ 7
ekstremalne
wysokie ryzyko obrażeń w wyniku narażenia bez ochrony
pomarańczowy
8 ~ 10
wysokie
bardzo wysokie ryzyko obrażeń w wyniku narażenia bez
ochrony
czerwony
11+
bardzo wysokie
ekstremalnie wysokie ryzyko obrażeń w wyniku narażenia
bez ochrony
fioletowy
8.2 Tendencja prognozy pogody
Wykaz symboli
Ustawienie czułości ciśnienia
Wartość progową ciśnienia dla prognozowania pogody można ustawić w zakresie 2 ~ 4hPa (domyślnie 2hPa).
Obszary o często zmieniającym się ciśnieniu powietrza wymagają wyższego ustawienia hPa niż obszary, na
których ciśnienie powietrza jest bardziej stabilne. Na przykład, jeśli wybrano 4hPa, musi wystąpić spadek lub
wzrost ciśnienia powietrza o co najmniej 4hPa, aby zmienić ikonkę prognozy pogody.
Ustawienie czułości wartości progowej burzy
Jeśli pomiar wykaże nagłą zmianę ciśnienia, ikonki pogody (deszczu i chmur) zaczną migać wskazując na
wystąpienie burzy. Podobnie jak przy ustawianiu ogólnej czułości ciśnienia, można wyregulować czułość
wartości progowej burzy w zakresie 3 ~ 9hPa (domyślnie 4hPa). Jeśli spadek ciśnienia w przeciągu 3 godzin
jest wyższy od wartości progowej, prognozowanie burzy zostanie włączone. Ikonka chmur, deszczu i strzałka
tendencji będą migać przez 3 godziny wskazując, że włączona została funkcja ostrzegania przed burzą.
8.3 indeks UV
Uwaga: dane w tabeli oparte są badaniach przeprowadzonych na przeciętnych osobach dorosłych o jasnej
cerze i mają wyłącznie charakter orientacyjny. Ludzie o wrażliwej skórze lub dzieci mogą mieć problemy
związane z promieniowaniem UV nawet po wystawieniu na działanie promieniowania UV o niskim natężeniu.
8.4 Powrót do ustawień fabrycznych
Wcisnąć i przytrzymać przez ±20 sekund przycisk [c] , aby zresetować stację bazową do ustawień
fabrycznych.
Należy pamiętać, że czyszczona jest również pamięć.
V. 01 – 21/06/2013 81 ©Velleman nv
Page 82

WS3080
9. Połączenie z komputerem
Odbiornik może pomieścić do 4080 wpisów danych pogodowych (z datą i czasem) w swojej pamięci
wewnętrznej. Jest to pamięć nieulotna (EEPROM) i zostanie zachowana w przypadku awarii zasilania (np.
wymiany baterii). Kiedy pamięć jest pełna, najstarsze zapisy danych są zastępowane.
Dane z pamięci można odczytać, kopiować, przechowywać i drukować podłączając odbiornik do komputera
(brak w zestawie) z odpowiednim oprogramowaniem.
9.1 Minimalne wymagania systemowe
system operacyjny: Windows XP, Vista, 7, 8
przeglądarka internetowa: Internet Explorer 6.0 lub nowszy
procesor: Pentium III, 500MHz
pamięć: 128MB (zalecana 256MB)
napęd CD ROM + wolny port USB
9.2 Instalacja oprogramowania
1. Włożyć załączoną płytę CD ROM do czytnika komputera. Nie podłączać jeszcze odbiornika.
2. Po włączeniu funkcji autouruchamiania na komputerze, postępować zgodnie z instrukcjami podanymi na
ekranie. Jeśli funkcja autouruchamiania się nie włączy, otworzyć napęd, znaleźć plik setup.exe i kliknąć w
niego dwa razy.
Uwaga: przy instalacji i uruchamianiu oprogramowania upewnić się, że są Państwo zalogowani do systemu
na koncie administratora.
3. Wybrać język instalacji i kliknąć przycisk „dalej‖.
4. Kliknąć „dalej‖ i wybrać folder zapisu (w razie potrzeby zmienić go).
5. Kliknąć „dalej‖, oprogramowanie zainstaluje się automatycznie.
6. Nacisnąć OK, aby zakończyć proces instalacji.
7. W razie potrzeby ponownie uruchomić komputer.
8. Włożyć dołączony kabel zasilania USB do gniazdka USB na odbiorniku (lewy bok), a drugi koniec do
gniazdka USB komputera.
9.3 Używanie oprogramowania
1. Przed rozpoczęciem użytkowania oprogramowania upewnić się, że czas ustawiony w stacji bazowej i
komputerze jest taki sam. Pomoże to uniknąć niezgodności w czasie między rzeczywistym czasem zapisu, a
czasem wyświetlanym w komputerze.
2. Aby uruchomić oprogramowanie EasyWeatherPlus przejść do „Start-Wszystkie programy-EasyWeahterPlus‖
i kliknąć w ikonkę ―EasyWeatherPlus‖.
Uwaga: uruchomić program na koncie administratora.
3. Komputer rozpocznie pobieranie wszystkich danych ze stacji pogodowej. Może to trwać kilka minut. Nie
zmieniać ustawień w czasie pobierania, gdyż w przeciwnym razie transmisja danych nie powiedzie się.
4. Ustawić język interfejsu w opcji Display - Language
V. 01 – 21/06/2013 82 ©Velleman nv
Page 83

WS3080
setup
(System – Setup)
ustawienia alarmu systemu
(System – Alarm)
wyświetlanie min. i maks. wartości z historii
(System – Scope)
wyświetlanie historii
(Record – History)
wyświetlanie wykresów
(Record – Graph)
o programie EasyWeatherPlus
(Help – about EasyWeatherGraph)
Ustawienia
W tym menu można zmienić ustawienia stacji bazowej oraz włączyć alarmy.
Po zakończeniu, kliknąć Zapisz , aby wysłać dane do stacji bazowej. Aktualizacja zakończy się po ok. 1
minucie.
Uwaga: zakres odstępów czasu = 5 ~ 240 minut
Ustawienia alarmu systemu
W menu tym można ustawić limity alarmu dla stacji bazowej.
Po zakończeniu, kliknąć Save , aby wysłać dane do stacji bazowej. Aktualizacja zakończy się po ok. 1
minucie.
min. i maks. wartości historii
W tym menu można przeglądać i resetować minimalne i maksymalne zmierzone wartości.
V. 01 – 21/06/2013 83 ©Velleman nv
Page 84

WS3080
Refresh
aktualizuje listę historii
Clear data
usuwa dane historii z komputera
Clear memory
usuwa dane ze stacji bazowej (najpierw należy upewnić się, czy zostały zapisane)
Graph
wyświetla graficzne przedstawienie danych (por. Display graph data poniżej)
Export
wysyła/zapisuje dane do pliku.cvs
Wybrać dane i kolejność, w jakiej mają się wyświetlać, następnie kliknąć Export i
wybrać miejsce przechowywania pliku.
Wybrać żądane rekordy danych i kliknąć reset , aby wyczyścić dane w stacji bazowej. Aktualizacja
zakończy się po ok. 1 minucie.
Historia
W tym menu można zobaczyć listę historii pomiarów.
Ustawić odstęp czasu (warunek) w lewym górnym rogu wyświetlacza (1 godzina, 24 godziny, tydzień,
miesiąc lub zdefiniowany przez użytkownika). Jeśli wybrano odstęp czasu zdefiniowany przez użytkownika,
ustawić czas rozpoczęcia i zakończenia.
Kliknąć Search (prawy górny róg), aby wyszukać dane.
V. 01 – 21/06/2013 84 ©Velleman nv
Page 85

WS3080
Display graph data
W tym menu można zobaczyć graficzne przedstawienie wybranych danych.
1. Wybrać dane w lewym dolnym rogu wyświetlacza (seria):
2. Ustawić odstęp czasu (warunek) w lewym górnym rogu wyświetlacza (1 godzina, 24 godziny, tydzień,
miesiąc lub zdefiniowany przez użytkownika). Jeśli wybrano odstęp czasu zdefiniowany przez użytkownika,
ustawić czas rozpoczęcia i zakończenia.
3. Kliknąć Search (prawy górny róg), aby wyszukać wykres.
4. Aby powiększyć część wykresu, wybrać obszar za pomocą myszki.
5. Kliknąć Refresh , aby zaktualizować wykres.
6. Nacisnąć Export , aby zapisać wykres jako plik obrazu (format .JPEG).
Wykrywanie i usuwanie usterek
Jeśli funkcja wykresu nie działa prawidłowo, postępować według poniższych kroków:
1. Znaleźć folder zawierający plik ―EasyWeatherPlus.exe‖.
2. Utworzyć plik tekstowy (używając notatnika lub programu WordPad) zawierający następujący wiersz:
regsvr32 easyweatherplus.ocx
3. Zapisać plik jako reg_graph.bat.
V. 01 – 21/06/2013 85 ©Velleman nv
Page 86

WS3080
zasilanie
stacja bazowa: 3 baterie 1.5V AA (LR6C, brak w zestawie) lub zasilacz 6V DC
(brak w zestawie)
nadajnik: 2 akumulatory 1.5V AA (brak w zestawie)
wymiary (stacja bazowa)
165 x 148 x 27mm
zakres temperatury w
pomieszczeniu
0°C~50°C
zakres temperatury
zewnętrznej²
-40°C~65°C
dokładność temperatury
±1,0°C
zakres wilgotności
1%RH-99%
dokładność wilgotności
±5% poniżej -20°C do 65°C & 20%-98%
zakres prędkości wiatru
0~50,0m/s
dokładność prędkości
wiatru
±1m/s (prędkość wiatru <10m/s), ±10% (prędkość wiatru >10m/s)
zakres opadów
0~99,999mm
dokładność opadów
±1,5mm
4. Kliknąć dwa razy w plik, aby ponownie uruchomić sterownik graficzny.
About EasyWeatherPlus
W tej opcji można zobaczyć wersję wydawczą oprogramowania EasyWeatherPlus
10. Specyfikacja techniczna
Używaj tylko oryginalnych akcesoriów. Velleman NV nie może być pociągnięty do odpowiedzialności
w przypadku uszkodzenia lub szkody wynikały z (błędne) korzystanie z tego urządzenia.
Aby uzyskać więcej informacji dotyczących tego produktu i najnowsza wersja tej instrukcji, odwiedź
naszą stronę internetową www.velleman.eu.
Informacje zawarte w niniejszej instrukcji obsługi mogą ulec zmianie bez wcześniejszego
powiadomienia.
Wszystkie zarejestrowane znaki i nazwy handlowe sa wlasnoscia odnosnych podmiotów i sa
stosowane wylacznie w celu okreslenia kompatybilnosci naszych produktów z produktami innych
producentów. Windows, Windows XP, Windows 2000, Windows Vista, Windows Aero, Windows 7,
Windows 8, Windows Mobile oraz Windows Server to zarejestrowane znaki handlowe firmy
Microsoft Corporation w Stanach Zjednoczonych i innych krajach.
© INFORMACJA O PRAWACH WŁASNOŚCI
Instrukcja ta jest własnością firmy Velleman NV i jest chroniona prawami autorskimi. Wszystkie
prawa są zastrzeżone na całym świecie. Żadna część tej instrukcji nie może być kopiowana,
przedrukowywana, tłumaczona lub konwertowana na wszelkie nośniki elektronicznych lub w inny sposób, bez
uprzedniej pisemnej zgody właściciela praw autorskich.
V. 01 – 21/06/2013 86 ©Velleman nv
Page 87

R&TTE Declaration of Conformity
R&TTE Verklaring van overeenstemming
Déclaration de conformité R&TTE
R&TTE Konformitätserklärung
Declaración de conformidad R&TTE
Declaração de conformidade R&TTE
R&TTE Deklaracja zgodności
We / wij / nous / Wir / Nostros / Nós / My
Velleman NV
Legen Heirweg, 33
9890 Gavere (België)
Declare on our own responsibility that the finished product(s) :
Verklaren op eigen verantwoordelijkheid dat het afgewerkte product :
Déclarons sous notre propre responsabilité que le produit fini :
Erklären voll verantwortlich dass nachfolgendes Produkt :
Declaramos bajo nuestra sola responsabilidad que el producto mencionado a continuación :
Declaramos a nossa responsabilidade relativamente ao produto abaixo mencionado:
Deklarujemy z pełną odpowiedzialnością, iż następujące produkty
Brand / merk / marque / Marke / marca / marca / marka :
VELLEMAN
Trade name / handelsnaam / denomination commerciale / Markenname / denominación commercial /
Designação comercial / Nazwa produktu :
WEATHER CENTRE WITH PC INTERFACE
WEERSTATION MET PC AANSLUITING
STATION METEO AVEC CONNECION PC
WETTERSTATION MIT PC-ANSCHLUSS
ESTACIÓN METEOROLÓGICA Y CONEXIÓN PC
Type or model / type of model / type ou modèle / Typ oder Modell / tipo o modelo / Tipo ou modelo / Typu
lub modelu:
WS3080 & WS3080/xxx (spare sensors)
constituting the subject of this declaration, conforms with the essential requirements and other relevant stipulations
of the R&TTE Directive (1999/5/EC).
Page 88

die het voorwerp uitmaakt van deze verklaring, voldoet aan de essentiële vereisten en andere relevante bepalingen
van de R&TTE Richtlijn (1999/5/EC).
faisant l’objet de la présente déclaration, satisfait aux exigences essentielles et toute autre stipulation pertinente de
la directive R&TTE Directive (1999/5/EC).
auf das sich diese Erklärung bezieht, den grundlegenden Anforderungen und anderen relevanten Vereinbarungen
der R&TTE-Richtlinie (1999/5/EC) entspricht.
cumple los requisitos esenciales y las otras estipulaciones relevantes de la Directiva R&TTE (1999/5/EC).
cumpre com os requisitos essenciais e quaisquer outras disposições relevantes as Directiva R&TTE (1999/5/EC).
stanowiącym przedmiot niniejszej deklaracji jest zgodny z zasadniczymi wymaganiami oraz pozostałymi
stosownymi postanowieniami R&TTE (1999/5/EC).
The product conforms to the following norm(s) and/or one or several other normative documents:
Het product voldoet aan de volgende norm(en) en/of meerdere andere normgevende documenten:
Le produit est conforme à la norme suivante / aux normes suivantes et/ou à plusieurs autres documents normatifs:
Das Produkt entspricht den folgenden Normen und/oder anderen normativen Dokumenten:
Es conforme a la(s) siguiente(s) norma(s) y/o a uno o varios otros documentos normativos:
Este produto está conforme a normas a seguir indicadas:
Produkt jest zgodny z następującymi standardami:
EN 301 489-3 V1.4.1:2002
EN301 489-1 V1.8.1: 2008
EN300 220-2 V2.1.2 (2007-06)
EN300 220-1 V2.1.1: 2006
EN 50371: 2002
EN 60950-1: 2006+A11: 2009
Technical data are available and can be obtained from :
Les données techniques sont disponibles et peuvent être obtenues chez :
Technische gegevens zijn beschikbaar en kunnen worden aangevraagd bij :
Die technische Dokumentation zu den oben gennanten Produkten wird geführt bei:
Los datos técnicos están disponibles y pueden ser solicitados a:
Os dados técnicos estão disponíveis e podem ser solicitados a:
Dane techniczne są dostępne i zostaną udostępnione na życzenie:
Velleman NV
Legen Heirweg, 33
9890 Gavere (België)
Place and date of issue / Plaats en datum van uitgifte / Place et date d’émission / Ort und Datum der Ausstellung /
Lugar y fecha de emisión / Local e data de emissão / Miejsce i data sporządzenia:
Gavere, December 7th 2010
Authorised signatory for the company / Bevoegde ondertekenaar voor de firma / Signataire autorisé(e) de la
société / bevollmächtigte Person/ Responsable de la empresa / Responsável da empresa / Osoba upoważniona do
podpisu w imieniu firmy:
Vince Van Balberghe - Quality Manager
Page 89

Velleman® Service and Quality Warranty
Since its foundation in 1972, Velleman® acquired extensive experience in the
electronics world and currently distributes its products in over 85 countries.
All our products fulfil strict quality requirements and legal stipulations in the EU.
In order to ensure the quality, our products regularly go through an extra quality
check, both by an internal quality department and by specialized external
organisations. If, all precautionary measures notwithstanding, problems should
occur, please make appeal to our warranty (see guarantee conditions).
General Warranty Conditions Concerning Consumer Products
(for EU):
• All consumer products are subject to a 24-month warranty on production flaws
and defective material as from the original date of purchase.
• Velleman® can decide to replace an article with an equivalent article, or to
refund the retail value totally or partially when the complaint is valid and a free
repair or replacement of the article is impossible, or if the expenses are out of
proportion.
You will be delivered a replacing article or a refund at the value of 100% of the
purchase price in case of a flaw occurred in the first year after the date of
purchase and delivery, or a replacing article at 50% of the purchase price or a
refund at the value of 50% of the retail value in case of a flaw occurred in the
second year after the date of purchase and delivery.
• Not covered by warranty:
- all direct or indirect damage caused after delivery to the article (e.g. by
oxidation, shocks, falls, dust, dirt, humidity...), and by the article, as well as its
contents (e.g. data loss), compensation for loss of profits;
- consumable goods, parts or accessories that are subject to an aging process
during normal use, such as batteries (rechargeable, non-rechargeable, built-in or
replaceable), lamps, rubber parts, drive belts... (unlimited list);
- flaws resulting from fire, water damage, lightning, accident, natural disaster,
etc.…;
- flaws caused deliberately, negligently or resulting from improper handling,
negligent maintenance, abusive use or use contrary to the manufacturer’s
instructions;
- damage caused by a commercial, professional or collective use of the article
(the warranty validity will be reduced to six (6) months when the article is used
professionally);
- damage resulting from an inappropriate packing and shipping of the article;
- all damage caused by modification, repair or alteration performed by a third
party without written permission by Velleman®.
• Articles to be repaired must be delivered to your Velleman® dealer, solidly
packed (preferably in the original packaging), and be completed with the original
receipt of purchase and a clear flaw description.
• Hint: In order to save on cost and time, please reread the manual and check if
the flaw is caused by obvious causes prior to presenting the article for repair.
Note that returning a non-defective article can also involve handling costs.
• Repairs occurring after warranty expiration are subject to shipping costs.
• The above conditions are without prejudice to all commercial warranties.
The above enumeration is subject to modification according to the
article (see article’s manual).
Velleman® service- en kwaliteitsgarantie
Velleman® heeft sinds zijn oprichting in 1972 een ruime ervaring opgebouwd in
de elektronicawereld en verdeelt op dit moment producten in meer dan 85
landen. Al onze producten beantwoorden aan strikte kwaliteitseisen en aan de
wettelijke bepalingen geldig in de EU. Om de kwaliteit te waarborgen, ondergaan
onze producten op regelmatige tijdstippen een extra kwaliteitscontrole, zowel
door onze eigen kwaliteitsafdeling als door externe gespecialiseerde organisaties.
Mocht er ondanks deze voorzorgen toch een probleem optreden, dan kunt u
steeds een beroep doen op onze waarborg (zie waarborgvoorwaarden).
Algemene waarborgvoorwaarden consumentengoederen
(voor Europese Unie):
• Op alle consumentengoederen geldt een garantieperiode van 24 maanden op
productie- en materiaalfouten en dit vanaf de oorspronkelijke aankoopdatum.
• Indien de klacht gegrond is en een gratis reparatie of vervanging van een
artikel onmogelijk is of indien de kosten hiervoor buiten verhouding zijn, kan
Velleman® beslissen het desbetreffende artikel te vervangen door een
gelijkwaardig artikel of de aankoopsom van het artikel gedeeltelijk of volledig
terug te betalen. In dat geval krijgt u een vervangend product of terugbetaling
ter waarde van 100% van de aankoopsom bij ontdekking van een gebrek tot één
jaar na aankoop en levering, of een vervangend product tegen 50% van de
kostprijs of terugbetaling van 50 % bij ontdekking na één jaar tot 2 jaar.
• Valt niet onder waarborg:
- alle rechtstreekse of onrechtstreekse schade na de levering veroorzaakt aan
het toestel (bv. door oxidatie, schokken, val, stof, vuil, vocht...), en door het
toestel, alsook zijn inhoud (bv. verlies van data), vergoeding voor eventuele
winstderving.
- verbruiksgoederen, onderdelen of hulpstukken die onderhevig zijn aan
veroudering door normaal gebruik zoals bv. batterijen (zowel oplaadbare als
niet-oplaadbare, ingebouwd of vervangbaar), lampen, rubberen onderdelen,
aandrijfriemen... (onbeperkte lijst).
- defecten ten gevolge van brand, waterschade, bliksem, ongevallen,
natuurrampen, enz.
- defecten veroorzaakt door opzet, nalatigheid of door een onoordeelkundige
behandeling, slecht onderhoud of abnormaal gebruik of gebruik van het toestel
strijdig met de voorschriften van de fabrikant.
- schade ten gevolge van een commercieel, professioneel of collectief gebruik
van het apparaat (bij professioneel gebruik wordt de garantieperiode herleid tot
6 maand).
- schade veroorzaakt door onvoldoende bescherming bij transport van het
apparaat.
- alle schade door wijzigingen, reparaties of modificaties uitgevoerd door derden
zonder toestemming van Velleman®.
• Toestellen dienen ter reparatie aangeboden te worden bij uw Velleman®-
verdeler. Het toestel dient vergezeld te zijn van het oorspronkelijke
aankoopbewijs. Zorg voor een degelijke verpakking (bij voorkeur de originele
verpakking) en voeg een duidelijke foutomschrijving bij.
• Tip: alvorens het toestel voor reparatie aan te bieden, kijk nog eens na of er
geen voor de hand liggende reden is waarom het toestel niet naar behoren werkt
(zie handleiding). Op deze wijze kunt u kosten en tijd besparen. Denk eraan dat
er ook voor niet-defecte toestellen een kost voor controle aangerekend kan
worden.
• Bij reparaties buiten de waarborgperiode zullen transportkosten aangerekend
worden.
• Elke commerciële garantie laat deze rechten onverminderd.
Bovenstaande opsomming kan eventueel aangepast worden naargelang
de aard van het product (zie handleiding van het betreffende product).
Garantie de service et de qualité Velleman®
Depuis 1972, Velleman® a gagné une vaste expérience dans le secteur de
l’électronique et est actuellement distributeur dans plus de 85 pays.
Tous nos produits répondent à des exigences de qualité rigoureuses et à des
dispositions légales en vigueur dans l’UE. Afin de garantir la qualité, nous
soumettons régulièrement nos produits à des contrôles de qualité
supplémentaires, tant par notre propre service qualité que par un service qualité
externe. Dans le cas improbable d’un défaut malgré toutes les précautions, il est
possible d’invoquer notre garantie (voir les conditions de garantie).
Conditions générales concernant la garantie sur les produits
grand public (pour l’UE) :
• tout produit grand public est garanti 24 mois contre tout vice de production ou
de matériaux à dater du jour d’acquisition effective ;
• si la plainte est justifiée et que la réparation ou le remplacement d’un article
est jugé impossible, ou lorsque les coûts s’avèrent disproportionnés, Velleman®
s’autorise à remplacer ledit article par un article équivalent ou à rembourser la
totalité ou une partie du prix d’achat. Le cas échéant, il vous sera consenti un
article de remplacement ou le remboursement complet du prix d’achat lors d’un
défaut dans un délai de 1 an après l’achat et la livraison, ou un article de
remplacement moyennant 50% du prix d’achat ou le remboursement de 50% du
prix d’achat lors d’un défaut après 1 à 2 ans.
• sont par conséquent exclus :
- tout dommage direct ou indirect survenu à l’article après livraison (p.ex.
dommage lié à l’oxydation, choc, chute, poussière, sable, impureté…) et
provoqué par l’appareil, ainsi que son contenu (p.ex. perte de données) et une
indemnisation éventuelle pour perte de revenus ;
- toute pièce ou accessoire nécessitant un remplacement causé par un usage
normal comme p.ex. piles (rechargeables comme non rechargeables, intégrées
ou remplaçables), ampoules, pièces en caoutchouc, courroies… (liste illimitée) ;
- tout dommage qui résulte d’un incendie, de la foudre, d’un accident, d’une
catastrophe naturelle, etc. ;
- out dommage provoqué par une négligence, volontaire ou non, une utilisation
ou un entretien incorrect, ou une utilisation de l’appareil contraire aux
prescriptions du fabricant ;
- tout dommage à cause d’une utilisation commerciale, professionnelle ou
collective de l’appareil (la période de garantie sera réduite à 6 mois lors d’une
utilisation professionnelle) ;
- tout dommage à l’appareil qui résulte d’une utilisation incorrecte ou différente
que celle pour laquelle il a été initialement prévu comme décrit dans la notice ;
- tout dommage engendré par un retour de l’appareil emballé dans un
conditionnement non ou insuffisamment protégé.
- toute réparation ou modification effectuée par une tierce personne sans
l’autorisation explicite de SA Velleman® ; - frais de transport de et vers
Velleman® si l’appareil n’est plus couvert sous la garantie.
• toute réparation sera fournie par l’endroit de l’achat. L’appareil doit
nécessairement être accompagné du bon d’achat d’origine et être dûment
conditionné (de préférence dans l’emballage d’origine avec mention du défaut) ;
• tuyau : il est conseillé de consulter la notice et de contrôler câbles, piles, etc.
avant de retourner l’appareil. Un appareil retourné jugé défectueux qui s’avère
en bon état de marche pourra faire l’objet d’une note de frais à charge du
consommateur ;
• une réparation effectuée en-dehors de la période de garantie fera l’objet de
frais de transport ;
• toute garantie commerciale ne porte pas atteinte aux conditions
susmentionnées.
La liste susmentionnée peut être sujette à une complémentation selon le
type de l’article et être mentionnée dans la notice d’emploi.
Garantía de servicio y calidad Velleman®
Desde su fundación en 1972 Velleman® ha adquirido una amplia experiencia
como distribuidor en el sector de la electrónica en más de 85 países. Todos
nuestros productos responden a normas de calidad rigurosas y disposiciones
legales vigentes en la UE. Para garantizar la calidad, sometemos nuestros
productos regularmente a controles de calidad adicionales, tanto a través de
nuestro propio servicio de calidad como de un servicio de calidad externo. En el
caso improbable de que surgieran problemas a pesar de todas las precauciones,
es posible recurrir a nuestra garantía (véase las condiciones de garantía).
Condiciones generales referentes a la garantía sobre
productos de venta al público (para la Unión Europea):
• Todos los productos de venta al público tienen un período de garantía de 24
meses contra errores de producción o errores en materiales desde la adquisición
original;
• Si la queja está fundada y si la reparación o sustitución de un artículo no es
posible, o si los gastos son desproporcionados, Velleman® autoriza reemplazar
el artículo por un artículo equivalente o reembolsar la totalidad o una parte del
precio de compra. En este caso, usted recibirá un artículo de recambio o el
reembolso completo del precio de compra si encuentra algún fallo hasta un año
después de la compra y entrega, o un artículo de recambio al 50% del precio de
compra o el reembolso del 50% del precio de compra si encuentra un fallo
después de 1 año y hasta los 2 años después de la compra y entrega.
Por consiguiente, están excluidos entre otras cosas:
- todos los daños causados directa o indirectamente al aparato (p.ej. por
oxidación, choques, caída,...) y a su contenido (p.ej. pérdida de datos) después
de la entrega y causados por el aparato, y cualquier indemnización por posible
pérdida de ganancias;
- partes o accesorios, que estén expuestos al desgaste causado por un uso
normal, como por ejemplo baterías (tanto recargables como no recargables,
incorporadas o reemplazables), bombillas, partes de goma, etc. (lista ilimitada);
- defectos causados por un incendio, daños causados por el agua, rayos,
accidentes, catástrofes naturales, etc.;
- defectos causados a conciencia, descuido o por malos tratos, un mantenimiento
inapropiado o un uso anormal del aparato contrario a las instrucciones del
fabricante;
- daños causados por un uso comercial, profesional o colectivo del aparato (el
período de garantía se reducirá a 6 meses con uso profesional);
- daños causados por un uso incorrecto o un uso ajeno al que está previsto el
producto inicialmente como está descrito en el manual del usuario;
- daños causados por una protección insuficiente al transportar el aparato.
- daños causados por reparaciones o modificaciones efectuadas por una tercera
persona sin la autorización explícita de Velleman®;
- se calcula gastos de transporte de y a Velleman® si el aparato ya no está
cubierto por la garantía.
• Cualquier artículo que tenga que ser reparado tendrá que ser devuelto a su
distribuidor Velleman®. Devuelva el aparato con la factura de compra original y
transpórtelo en un embalaje sólido (preferentemente el embalaje original).
Incluya también una buena descripción del fallo;
• Consejo: Lea el manual del usuario y controle los cables, las pilas, etc. antes
de devolver el aparato. Si no se encuentra un defecto en el artículo los gastos
podrían correr a cargo del cliente;
• Los gastos de transporte correrán a carga del cliente para una reparación
efectuada fuera del período de garantía.
• Cualquier gesto comercial no disminuye estos derechos.
La lista previamente mencionada puede ser adaptada según el tipo de
artículo (véase el manual del usuario del artículo en cuestión).
Page 90

Velleman® Service- und Qualitätsgarantie
Seit der Gründung in 1972 hat Velleman® sehr viel Erfahrung als Verteiler in der
Elektronikwelt in über 85 Ländern aufgebaut.
Alle Produkte entsprechen den strengen Qualitätsforderungen und gesetzlichen
Anforderungen in der EU. Um die Qualität zu gewährleisten werden unsere
Produkte regelmäßig einer zusätzlichen Qualitätskontrolle unterworfen, sowohl
von unserer eigenen Qualitätsabteilung als auch von externen spezialisierten
Organisationen. Sollten, trotz aller Vorsichtsmaßnahmen, Probleme auftreten,
nehmen Sie bitte die Garantie in Anspruch (siehe Garantiebedingungen).
Allgemeine Garantiebedingungen in Bezug auf Konsumgüter
(für die Europäische Union):
• Alle Produkte haben für Material- oder Herstellungsfehler eine Garantieperiode
von 24 Monaten ab Verkaufsdatum.
• Wenn die Klage berechtigt ist und falls eine kostenlose Reparatur oder ein
Austausch des Gerätes unmöglich ist, oder wenn die Kosten dafür
unverhältnismäßig sind, kann Velleman® sich darüber entscheiden, dieses
Produkt durch ein gleiches Produkt zu ersetzen oder die Kaufsumme ganz oder
teilweise zurückzuzahlen. In diesem Fall erhalten Sie ein Ersatzprodukt oder eine
Rückzahlung im Werte von 100% der Kaufsumme im Falle eines Defektes bis zu
1 Jahr nach Kauf oder Lieferung, oder Sie bekommen ein Ersatzprodukt im Werte
von 50% der Kaufsumme oder eine Rückzahlung im Werte von 50 % im Falle
eines Defektes im zweiten Jahr.
• Von der Garantie ausgeschlossen sind:
- alle direkten oder indirekten Schäden, die nach Lieferung am Gerät und durch
das Gerät verursacht werden (z.B. Oxidation, Stöße, Fall, Staub, Schmutz,
Feuchtigkeit, ...), sowie auch der Inhalt (z.B. Datenverlust), Entschädigung für
eventuellen Gewinnausfall.
- Verbrauchsgüter, Teile oder Zubehörteile, die durch normalen Gebrauch dem
Verschleiß ausgesetzt sind, wie z.B. Batterien (nicht nur aufladbare, sondern
auch nicht aufladbare, eingebaute oder ersetzbare), Lampen, Gummiteile,
Treibriemen, usw. (unbeschränkte Liste).
- Schäden verursacht durch Brandschaden, Wasserschaden, Blitz, Unfälle,
Naturkatastrophen, usw.
- Schäden verursacht durch absichtliche, nachlässige oder unsachgemäße
Anwendung, schlechte Wartung, zweckentfremdete Anwendung oder
Nichtbeachtung von Benutzerhinweisen in der Bedienungsanleitung.
- Schäden infolge einer kommerziellen, professionellen oder kollektiven
Anwendung des Gerätes (bei gewerblicher Anwendung wird die Garantieperiode
auf 6 Monate zurückgeführt).
- Schäden verursacht durch eine unsachgemäße Verpackung und
unsachgemäßen Transport des Gerätes.
- alle Schäden verursacht durch unautorisierte Änderungen, Reparaturen oder
Modifikationen, die von einem Dritten ohne Erlaubnis von Velleman®
vorgenommen werden.
• Im Fall einer Reparatur, wenden Sie sich an Ihren Velleman®-Verteiler. Legen
Sie das Produkt ordnungsgemäß verpackt (vorzugsweise die Originalverpackung)
und mit dem Original-Kaufbeleg vor. Fügen Sie eine deutliche
Fehlerbeschreibung hinzu.
• Hinweis: Um Kosten und Zeit zu sparen, lesen Sie die Bedienungsanleitung
nochmals und überprüfen Sie, ob es keinen auf de Hand liegenden Grund gibt,
ehe Sie das Gerät zur Reparatur zurückschicken. Stellt sich bei der Überprüfung
des Gerätes heraus, dass kein Geräteschaden vorliegt, könnte dem Kunden eine
Untersuchungspauschale berechnet.
• Für Reparaturen nach Ablauf der Garantiefrist werden Transportkosten
berechnet.
• Jede kommerzielle Garantie lässt diese Rechte unberührt.
Die oben stehende Aufzählung kann eventuell angepasst werden gemäß
der Art des Produktes (siehe Bedienungsanleitung des Gerätes).
Velleman ® usługi i gwarancja jakości
Od czasu założenia w 1972, Velleman® zdobył bogate doświadczenie w
dziedzinie światowej elektroniki. Obecnie firma dystrybuuje swoje produkty w
ponad 85 krajach.
Wszystkie nasze produkty spełniają surowe wymagania jakościowe oraz
wypełniają normy i dyrektywy obowiązujące w krajach UE. W celu zapewnienia
najwyższej jakości naszych produktów, przechodzą one regularne oraz
dodatkowo wyrywkowe badania kontroli jakości, zarówno naszego wewnętrznego
działu jakości jak również wyspecjalizowanych firm zewnętrznych. Pomimo
dołożenia wszelkich starań czasem mogą pojawić się problemy techniczne,
prosimy odwołać się do gwarancji (patrz warunki gwarancji).
Ogólne Warunki dotyczące gwarancji:
• Wszystkie produkty konsumenckie podlegają 24-miesięcznej gwarancji na
wady produkcyjne i materiałowe od daty zakupu.
• W przypadku, gdy usterka jest niemożliwa do usunięcia lub koszt usunięcia jest
nadmiernie wysoki Velleman ® może zdecydować o wymianie artykułu na nowy,
wolny od wad lub zwrócić zapłaconą kwotę. Zwrot gotówki może jednak nastąpić
z uwzględnieniem poniższych warunków:
- zwrot 100% ceny zakupu w przypadku, gdy wada wystąpiła w ciągu pierwszego
roku od daty zakupu i dostawy
- wymiana wadliwego artykułu na nowy, wolny od wad z odpłatnością 50% ceny
detalicznej lub zwrot 50% kwoty ceny nabycia w przypadku gdy wada wystąpiła
w drugim roku od daty zakupu i dostawy.
• Produkt nie podlega naprawie gwarancyjnej:
- gdy wszystkie bezpośrednie lub pośrednie szkody spowodowane są działaniem
czynników środowiskowych lub losowych (np. przez utlenianie, wstrząsy, upadki,
kurz, brud, ...), wilgotności;
- gwarant nie ponosi odpowiedzialności za szkody wynikających z utraty danych;
- produkty konsumenckie, części zamienne lub akcesoria podatne na process
starzenia, wynikającego z normalnego użytkowania, np: baterie (ładowalne,
nieładowalne, wbudowane lub wymienne),
elementy napędowe... (nieograniczona lista);
- usterka wynika z działania pożaru, zalania wszelkimi cieczami, uderzenia
pioruna, upadku lub klęski żywiołowej, itp.;
- usterka wynika z zaniedbań eksploatacyjnych tj. umyślne bądź nieumyślne
zaniechanie czyszczenia, konserwacji, wymiany materiałów ekspolatacyjnych,
niedbalstwa lub z niewłaściwego obchodzenia się lub niezgodnego użytkowania z
instrukcją producenta;
- szkody wynikające z nadmiernego użytkowania gdy nie jest do tego celu
przeznaczony tj. działalność komerycjna, zawodowa lub wspólne użytkowanie
przez wiele osób - okres obowiązywania gwarancji zostanie obniżony do 6
(sześć) miesięcy;
- Szkody wynikające ze źle zabezpieczonej wysyłki produktu;
- Wszelkie szkody spowodowane przez nieautoryzowaną naprawę, modyfikację,
przeróbkę produktu przez osoby trzecie jak również bez pisemnej zgody firmy
Velleman ®.
• Uszkodzony produkt musi zostać dostarczony do sprzedawcy ® Velleman,
solidnie zapakowany (najlepiej w oryginalnym opakowaniu), wraz z
wyposażeniem z jakim produkt został sprzedany. W przypadku wysyłki towaru w
opakowaniu innym niż oryginalnym ryzyko usterki produktu oraz tego skutki
przechodzą na właściciela produktu. Wraz z niesprawnym produktem należy
dołączyć jasny i szczegółowy opis jego usterki, wady;
• Wskazówka: Aby zaoszczędzić na kosztach i czasie, proszę szczegółowo
zapoznać się z instrukcja obsługi; czy przyczyną wady są okoliczności techniczne
czy też wynikaja wyłącznie z nieznajomości obsługi produktu. W przypadku
wysyłki sprawnego produktu do serwisu nabywca może zostać obciążony kosztmi
obsługi oraz transportu.
żarówki, paski napędowe, gumowe
• W przypadku napraw pogwarancyjnych lub odpłatnych klient ponosi dodatkowo
koszt wysyłki produktu do i z serwisu.
wymienione wyżej warunki są bez uszczerbku dla wszystkich komercyjnych
gwarancji.
Powyższe postanowienia mogą podlegać modyfikacji w zależności od
wyrobu (patrz art obsługi).
Garantia de serviço e de qualidade Velleman®
Desde a sua fundação em 1972 Velleman® tem adquirido uma amplia
experiencia no sector da eletrónica com uma distribuição em mais de 85 países.
Todos os nossos produtos respondem a exigências rigorosas e a disposições
legais em vigor na UE. Para garantir a qualidade, submetemos regularmente os
nossos produtos a controles de qualidade suplementares, com o nosso próprio
serviço qualidade como um serviço de qualidade externo. No caso improvável de
um defeito mesmo com as nossas precauções, é possível invocar a nossa
garantia. (ver as condições de garantia).
Condições gerais com respeito a garantia sobre os produtos
grande público (para a UE):
• qualquer produto grande público é garantido 24 mês contra qualquer vício de
produção ou materiais a partir da data de aquisição efectiva;
• no caso da reclamação ser justificada e que a reparação ou substituição de um
artigo é impossível, ou quando os custo são desproporcionados, Velleman®
autoriza-se a substituir o dito artigo por um artigo equivalente ou a devolver a
totalidade ou parte do preço de compra. Em outro caso, será consentido um
artigo de substituição ou devolução completa do preço de compra no caso de um
defeito no prazo de 1 ano depois da data de compra e entrega, ou um artigo de
substituição pagando o valor de 50% do preço de compra ou devolução de 50%
do preço de compra para defeitos depois de 1 a 2 anos.
• estão por consequência excluídos:
- todos os danos directos ou indirectos depois da entrega do artigo (p.ex. danos
ligados a oxidação, choques, quedas, poeiras, areias, impurezas…) e provocado
pelo aparelho, como o seu conteúdo (p.ex. perca de dados) e uma indemnização
eventual por perca de receitas;
- consumíveis, peças ou acessórios sujeitos a desgaste causado por um uso
normal, como p.ex. pilhas (recarregáveis, não recarregáveis, incorporadas ou
substituíveis), lâmpadas, peças em borracha correias… (lista ilimitada);
- todos os danos que resultem de um incêndio, raios, de um acidente, de una
catastrophe natural, etc.;
- danos provocados por negligencia, voluntária ou não, uma utilização ou
manutenção incorrecta, ou uma utilização do aparelho contrária as prescrições
do fabricante;
- todos os danos por causa de uma utilização comercial, profissional ou colectiva
do aparelho ( o período de garantia será reduzido a 6 meses para uma utilização
profissional);
- todos os danos no aparelho resultando de uma utilização incorrecta ou
diferente daquela inicialmente prevista e descrita no manual de utilização;
- todos os danos depois de uma devolução não embalada ou mal protegida ao
nível do acondicionamento.
- todas as reparações ou modificações efectuadas por terceiros sem a
autorização de SA Velleman®;
- despesas de transporte de e para Velleman® se o aparelho não estiver coberto
pela garantia.
• qualquer reparação será fornecida pelo local de compra. O aparelho será
obrigatoriamente acompanhado do talão ou factura de origem e bem
acondicionado (de preferência dentro da embalagem de origem com indicação do
defeito ou avaria);
• dica: aconselha-mos a consulta do manual e controlar cabos, pilhas, etc. antes
de devolver o aparelho. Um aparelho devolvido que estiver em bom estado será
cobrado despesas a cargo do consumidor;
• uma reparação efectuada fora da garantia, será cobrado despesas de
transporte;
• qualquer garantia comercial não prevalece as condições aqui mencionadas.
A lista pode ser sujeita a um complemento conforme o tipo de artigo e
estar mencionada no manual de utilização.
Legen Heirweg 33, 9890 Gavere, Belgium
Imported by Velleman nv
Made in PRC
www.velleman.eu
 Loading...