

Page 1
WS1060
WIRELESS WEATHER STATION, DCF CLOCK, OUTDOOR SENSOR
DRAADLOOS WEERSTATION MET DCF-KLOK EN BUITENSENSOR
STATION MÉTÉO SANS FIL, HORLOGE DCF ET CAPTEUR EXTERNE
ESTACIÓN METEOROLÓGICA INALÁMBRICA CON RELOJ DCF Y
SENSOR EXTERIOR
DRAHTLOSE WETTERSTATION MIT DCF-UHR UND AUßENSENSOR
ESTAÇÃO METEOROLÓGICA SEM FIO, RELÓGIO DCF, SENSOR
EXTERNO
BEZPRZEWODOWA STACJA POGODOWA, ZEGAR DCF, CZUJNIK
ZEWNĘTRZNY
USER MANUAL 4
GEBRUIKERSHANDLEIDING 14
NOTICE D’EMPLOI 24
MANUAL DEL USUARIO 34
BEDIENUNGSANLEITUNG 44
MANUAL DO UTILIZADOR 54
INSTRUKCJA OBSŁUGI 64
Page 2
WS1060
Base station – Basistation – Station de base –
Estación de base – Basisstation
Outdoor unit – Buitenstation –
Station extérieure – Unidad exterior –
Außengerät
G
H I
J
V. 02 – 26/04/2013 2 ©Velleman nv
Page 3

WS1060
M
O
P
Q
R
S
T
V. 02 – 26/04/2013 3 ©Velleman nv
Page 4
WS1060
Keep this device away from children and unauthorized users.
Indoor use only. Keep the display away from rain, moisture, splashing and dripping liquids.
Keep this device away from dust and extreme temperatures.
Protect this device from shocks and abuse. Avoid brute force when operating the device.
USER MANUAL
1. Introduction
To all residents of the European Union
Important environmental information about this product
This symbol on the device or the package indicates that disposal of the device after its lifecycle could
harm the environment. Do not dispose of the unit (or batteries) as unsorted municipal waste; it
should be taken to a specialized company for recycling. This device should be returned to your
distributor or to a local recycling service. Respect the local environmental rules.
If in doubt, contact your local waste disposal authorities.
Thank you for choosing Velleman! Please read the manual thoroughly before bringing this device into service. If
the device was damaged in transit, don't install or use it and contact your dealer.
2. Safety Instructions
3. General Guidelines
Refer to the Velleman® Service and Quality Warranty on the last pages of this manual.
Familiarise yourself with the functions of the device before actually using it.
All modifications of the device are forbidden for safety reasons. Damage caused by user modifications to
the device is not covered by the warranty.
Only use the device for its intended purpose. Using the device in an unauthorised way will void the
warranty.
Damage caused by disregard of certain guidelines in this manual is not covered by the warranty and the
dealer will not accept responsibility for any ensuing defects or problems.
Keep this manual for future reference.
4. Features
indoor temperature and humidity measuring
outdoor temperature and humidity RF reception
wind chill, wind direction and rainfall RF reception
°C/°F unit selectable
rainfall data (inches or millimetres): 1 hour, 24 hours, one week, one month, and total since last reset
all minimum and maximum values along with time and date of their recordings
wind speed (mph, m/s, km/h, knots, Beaufort)
wind direction display with 8 directions
weather alarm modes for: temperature, humidity, wind chill, dew point, rainfall, wind speed
receive and display the radio controlled time and date
12 or 24-hour time display
perpetual calendar
time zone setting
time alarm
LED backlight
wall hanging or free standing
synchronized instant reception
V. 02 – 26/04/2013 4 ©Velleman nv
Page 5

WS1060
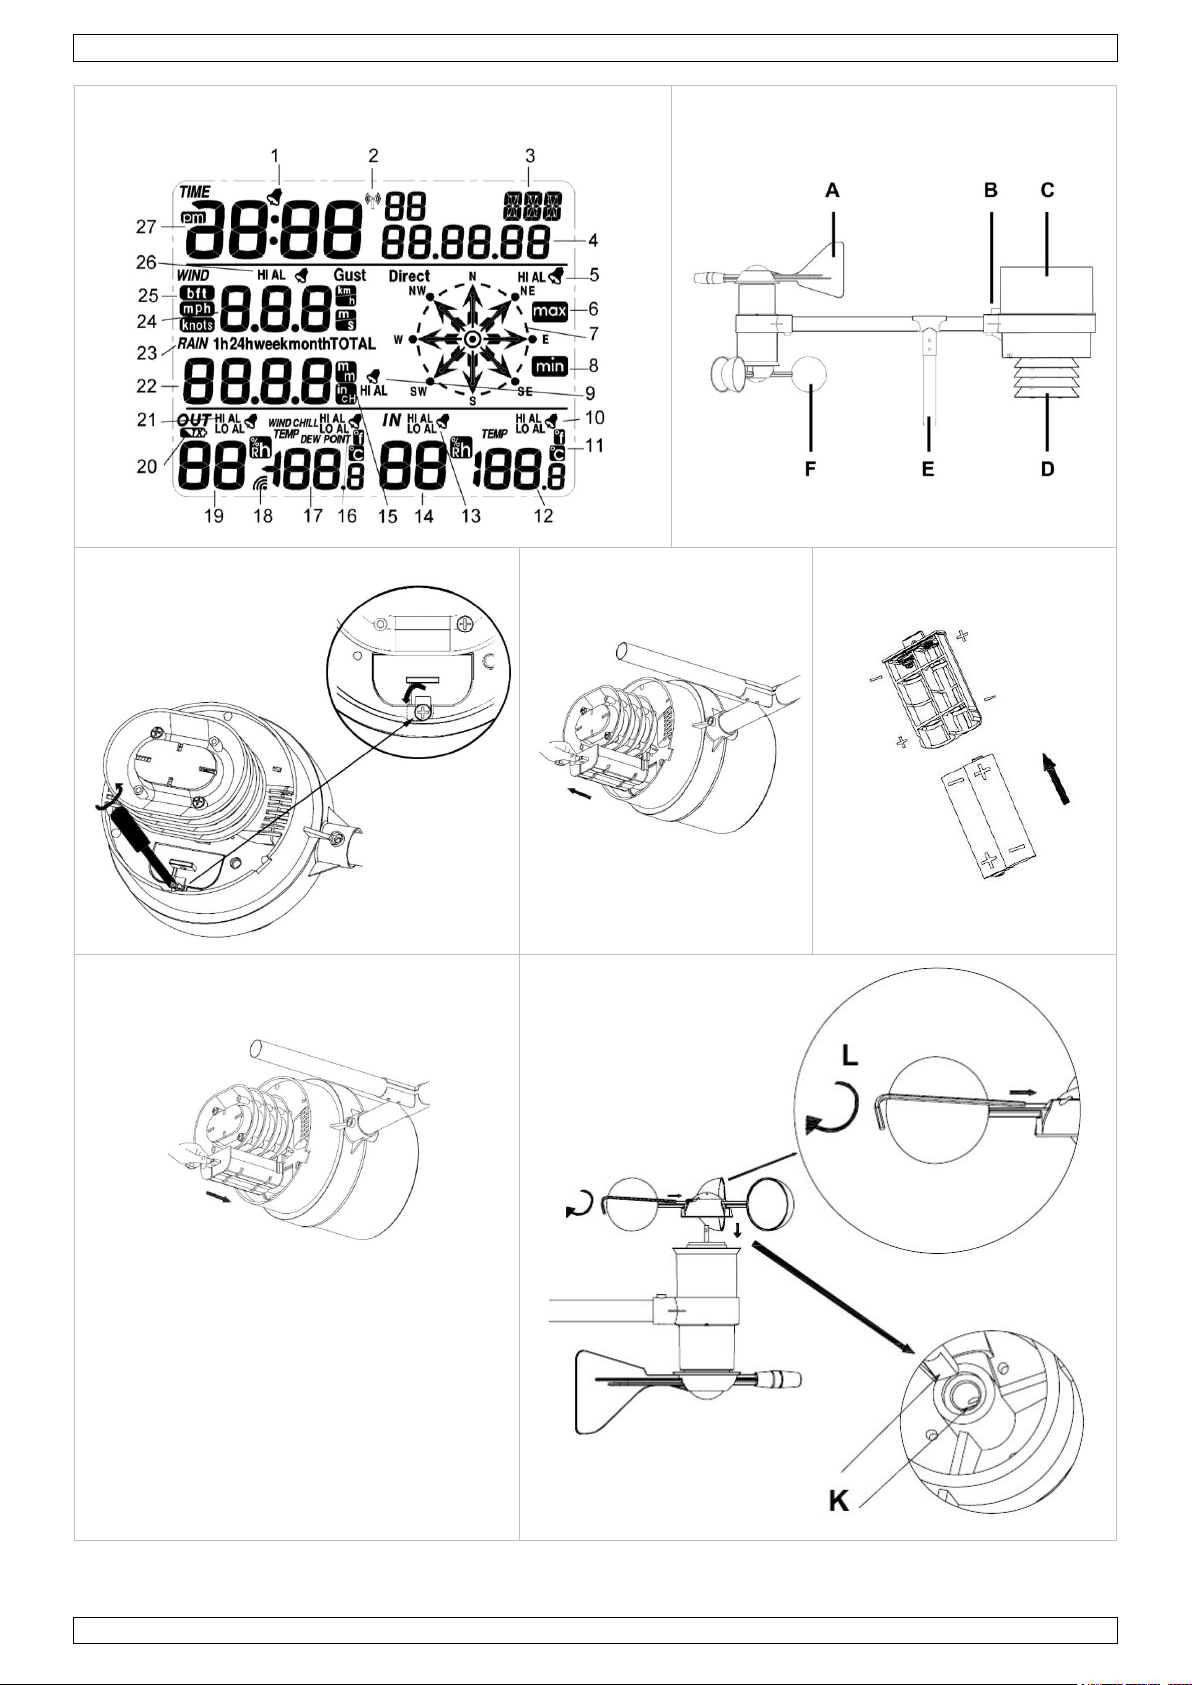
1
Time alarm enabled
15
Rainfall unit: mm or inch
2
RCC signal reception
16
Outdoor temperature alarm high/low enabled
3
Day of the week
17
Outdoor temperature
4
Date
18
Outdoor signal reception
5
Wind direction alarm enabled
19
Outdoor humidity
6
Maximum measurements are displayed
20
Outdoor transmitter battery low
7
Wind direction
21
Outdoor humidity alarm high/low enabled
8
Minimum measurements are displayed
22
Rainfall
9
Rainfall high alarm enabled
23
Rainfall period: 1h, 24h, week, month, or total
10
Indoor temperature alarm high/low enabled
24
Wind speed
11
Temperature unit: °C or °F
25
Wind speed unit: bft, mph, knots, km/h, m/s
12
Indoor temperature
26
Wind speed high alarm enabled
13
Indoor humidity alarm high/low enabled
27
Time
14
Indoor humidity
A
Wind direction sensor
D
Thermo-hygrometer (shielded) and transmitter unit
B
Bubble level
E
Shaft
C
Rain collector
F
Anemometer
Do not puncture batteries or throw them in fire as they may explode. Do not attempt to recharge nonrechargeable batteries (alkaline). Dispose of batteries in accordance with local regulations. Keep
batteries away from children.
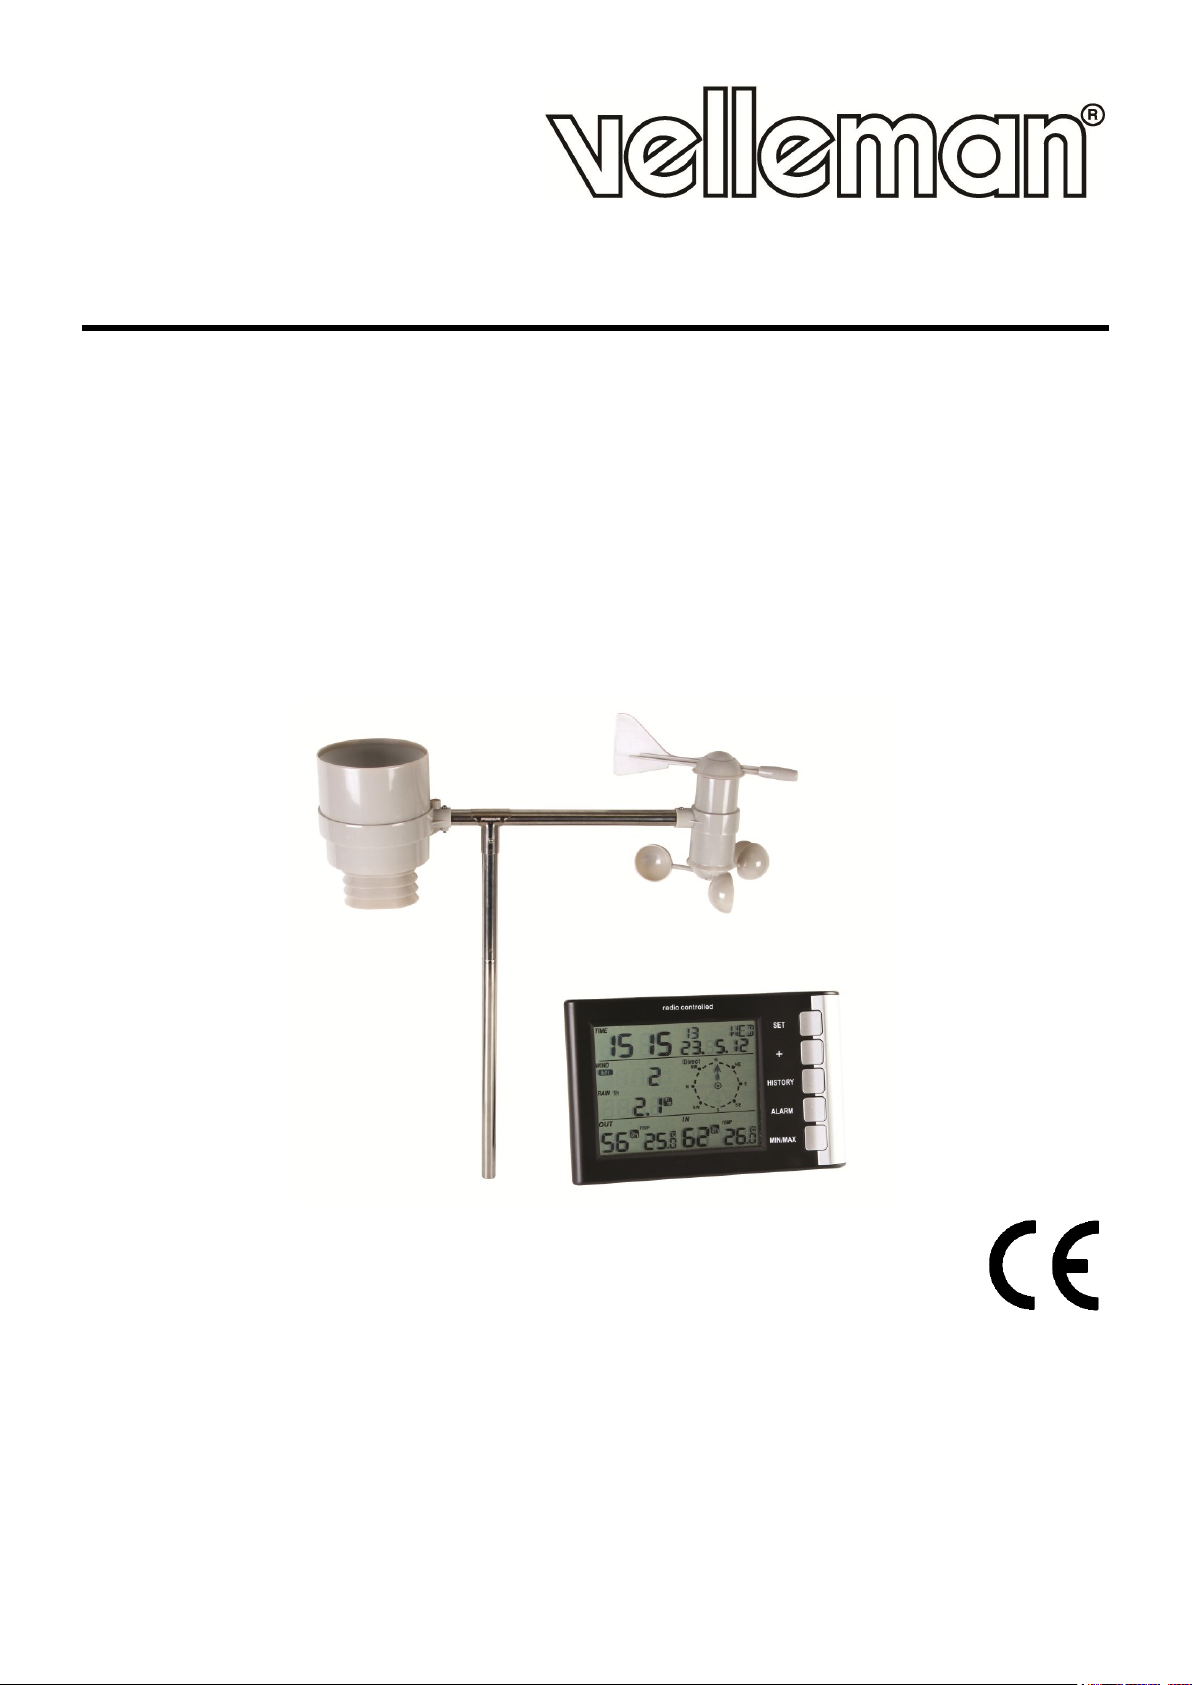
set includes:
o receiver
o 4 outdoor sensors: thermo-hygrometer, wind speed sensor, wind direction sensor, and rain sensor.
5. Overview
Refer to the illustrations on page 2-3 of this manual.
Base station display
Outdoor unit
6. Installation
Refer to the illustrations on page 2-3 of this manual.
6.1 Assembly
The thermo-hygrometer, rain collector, and wind direction sensor are already mounted on the shaft. You just
need to attach the wind cups for the anemometer.
1. Push the wind cups onto the anemometer’s steel shaft [K].
2. Use an Allen key (incl.) to tighten the screw on the side of the wind cups [L].
3. Spin the wind cups and make sure they can move freely. If the movement is hindered, the wind speed
measurements will be incorrect.
6.2 Initialising the weather station
Before installing the weather station in its final location, you must install batteries in the outdoor unit and base
station, and let the devices initialise and synchronise. This makes sure that the communication between
outdoor unit and base station is working correctly. Poor communication can often be improved by changing the
location.
Battery guidelines
Use only batteries of the correct size and voltage.
Remove the batteries from the indoor and outdoor units if the device will not be used for a long time. Old
batteries can begin to leak and damage the device.
Respect the polarity when inserting batteries. The wrong polarity can damage the device.
Alkaline batteries have a typical operating temperature range of -20°C~+54°C. Do not use the device
outside this temperature range.
V. 02 – 26/04/2013 5 ©Velleman nv
Page 6
WS1060
Installing batteries in the outdoor unit
1. At the bottom side of the rain collector, loosen the screw and slide the metal catch sideways to free the
battery compartment [G].
2. Pull out the battery compartment [H].
3. Insert 2 x AA 1.5V LR6 batteries according to the polarity markings in the compartment [I].
4. Push the battery compartment back into the rain collector base [J].
The LED located at the back of the rain collector lights during 4 seconds. If not, check if the batteries are
inserted properly.
5. Slide the metal catch back in position to secure the battery compartment, and fasten the catch with the
screw.
Installing batteries in the base station
1. Open the battery compartment cover at the back of the base station.
2. Insert 3 x AA 1.5V LR6 batteries according to the polarity markings in the compartment.
All segments on the LCD display light up during 2 seconds. If not, check if the batteries are inserted
properly.
3. Close the battery compartment cover.
4. At this moment, do not press any buttons yet.
Allow the device to initialise and synchronise with the outdoor unit first.
If necessary, remove the batteries from the indoor unit and wait for at least 10 seconds before you put
them back in.
5. Wait until both indoor and outdoor temperatures appear on the display before you continue.
The transmitter sends weather data to the base station every 48 seconds.
Radio-controlled clock signal reception
After inserting batteries, the transmitter in the outdoor unit sends weather data to the base station, and then
scans for the DCF radio-controlled clock (RCC) signal to set the date and time automatically. When the DCF
signal is detected, the LED at the back of the rain collector flashes 5 times, then lights during 20 seconds. The
transmitter sends the date and time information to the base station. The display will show the RCC icon .
If the DCF signal is poor and reception is not possible, the transmitter stops searching after 1 minute, and
returns to normal operating mode (= transmitting weather data to the base station). The transmitter retries
once every two hours to receive the DCF signal. If it cannot find the DCF signal, or if the last signal was
received more than 12 hours ago, the RCC icon will disappear from the display.
Note: The best time for DCF signal reception is at night between midnight and 6:00am, when there is less
atmospheric interference.
During DCF signal reception, the transmitter does not send weather data to the base station. DCF signal
reception lasts max. 5 minutes.
Note: if it is not possible to receive the DCF signal, you can set the date and time manually. See 7.2 Units,
date and time. However, when the transmitter receives the DCF signal, it will overwrite your manual date and
time settings.
6.3 Installation
Note: Assemble the weather station and make sure that the communication between outdoor unit and base
station is working correctly before you install the weather station into its final location. Problems with radio
transmission can usually be solved by changing the location.
When choosing a suitable location for outdoor unit and base station, take the following into account:
Radio communication between transmitter and base station can reach up to 100m (330ft) in the open field,
provided that there are no interfering obstacles such as buildings, trees, vehicles, high voltage lines…
Radio interference from PC screens, radios, or TV sets can disturb or even entirely cut off radio
communication.
Shelters such as trees, hedges, walls… can influence the measurements. Choose an open area where the
elements can reach the sensors from all sides.
For accurate wind speed measurements, keep the device away from buildings, trees, or other obstructions.
For accurate temperature measurements, keep the device away from heat sources such as buildings, the
ground, and direct sunlight without proper shielding in hot weather environments.
For accurate humidity measurements, keep the device away from the ground, grass, or other sources of
humidity.
V. 02 – 26/04/2013 6 ©Velleman nv
Page 7

WS1060
Setting
Display
Description
Wind
(nothing)
Display the wind speed.
Gust
Display the gust speed.
Rainfall
1h
Display the rainfall in the last hour.
24h
Display the rainfall in the last 24 hours.
week
Display the rainfall in the last week.
month
Display the rainfall in the last month.
TOTAL
Display the total rainfall since the last reset.
Note: when the total rainfall quantity is displayed, you can reset it by
pressing and holding SET for 2 seconds.
Temperature
TEMP
Display the outdoor temperature.
WIND CHILL
Display the outdoor wind chill.
DEW POINT
Display the outdoor dew point.
Setting
Description
LCD brightness
Adjust the brightness of the LCD display from 0 to 8.
Time zone
Select your time zone, from -12 to +12.
In Europe, 0 = GMT+1; 1 = GMT+2; -1 = GMT.
Install the weather station as follows:
1. Make sure the outdoor unit is fully assembled and batteries are installed in outdoor unit and base station.
2. Place the outdoor unit and base station in the locations where you want them, and check if the
communication is working.
o If yes, continue with the next step.
o If no, change the location of the outdoor unit and/or base station until proper communication is
established.
3. Use the adjustable hoops (incl.) to attach the shaft of the outdoor unit to a mast [M]. Before you tighten
the screws, check if the weather station is positioned well, as described below.
4. On the edge of the wind direction sensor, there are markers [N] representing the north (N), east (E), south
(S), and west (W). Use a compass (not incl.) to position the device so that the markers correspond with
your real location: the N marker must be directed north, the E marker east… If you do not position the
sensor correctly, the wind direction measurement will be incorrect.
5. Use the bubble level [B] on the rain collector to position the device perfectly level.
6. Fix the device in its final position by tightening the screws on the adjustable hoops [M].
7. Configuring the base station
The base station has five keys for easy operation: SET, +, HISTORY, ALARM, and MIN/MAX.
Press SET to scroll through settings.
Press the + key to increase values, or the MIN/MAX key to decrease values.
Press and hold the + or MIN/MAX keys for 2 seconds to increase/decrease in larger steps.
The setting procedure will end automatically after 30 seconds if you press no keys; or you can exit the
setting procedure at any time by pressing HISTORY.
7.1 Quick display mode
You can quickly change the information that is displayed on the LCD screen of the base station. Indicators on
the display show which information is currently shown. Select the information to display as follows:
1. From normal mode, press SET.
The station is now in quick display mode.
2. Press SET to confirm the current setting and go to the next; use the + or MIN/MAX keys to change the
values.
3. To return to normal mode, press HISTORY.
7.2 Units, date and time
To specify units and date/time settings, proceed as follows:
1. From normal mode, press and hold SET for 2 seconds.
The station is now in settings mode.
2. Press SET to confirm the current setting and go to the next; use the + or MIN/MAX keys to change the
values.
V. 02 – 26/04/2013 7 ©Velleman nv
Page 8

WS1060
Setting
Description
Time format
Choose between 12h or 24h formats for displaying the time [27].
Time
If the DCF signal cannot be detected, you can set the current time (hours/minutes)
manually.
Date format
Choose between day-month-year (DM) or month-day-year (MD) formats for displaying
the date [4].
Date
If the DCF signal cannot be detected, you can set the current date manually.
Wind speed unit
Choose to display the wind speed / gust speed in km/h, m/s, bft (Beaufort), mph, or
knots. The corresponding indicator [25] appears on the display.
Wind direction
Adjust the wind direction.
Rainfall unit
Choose to display the rainfall in mm or inches. The corresponding indicator [15] appears
on the display.
Temperature unit
Choose to display the temperature in degrees Celsius or Fahrenheit. The corresponding
indicator [11] appears on the display.
3. To return to normal mode, press HISTORY.
7.3 History mode
In history mode you can display measurements from the past 24 hours.
Displaying history data
1. From normal mode, press HISTORY.
The station is now in history mode. The display shows HIS [3].
2. In history mode, press MIN/MAX repeatedly to go back in 3-hour steps.
3. To return to normal mode, press HISTORY.
Resetting the history data
1. From normal mode, press HISTORY.
The station is now in history mode. The display shows HIS [3].
2. Press SET.
The word CLEAR flashes on the display.
o To reset the history data, press and hold SET for 2 seconds.
o To exit without resetting the history data, press HISTORY to return to normal mode.
7.4 Setting alarms
You can program the base station to trigger an alarm at a specific time or for specific indoor or outdoor weather
conditions. When an alarm is triggered, the alarm sounds for 120 seconds. The corresponding display indicator
flashes until the alarm condition is no longer met.
Press any key to mute the alarm.
When the alarm condition is no longer met, the display stops flashing. However, the alarm is still enabled,
and will go off again if the alarm threshold is crossed. If you no longer want the alarm to go off, you must
disable it in the alarm menu.
If the alarm condition is met again within 3 hours since the last alarm, the display indicator will flash, but
the alarm will not sound. This feature prevents repeated triggering for the same alarm condition.
You can define:
alarms for high conditions: the alarms goes off when the measured value exceeds the alarm threshold, for
example if the wind speed exceeds 20 m/s.
alarms for low conditions: the alarm goes off when the measured value drops below the alarm threshold,
for example if the outdoor temperature drops below -5°C.
To set up, enable, or disable alarms, proceed as follows:
1. From normal mode, press ALARM.
The station is now in high alarm mode, where you can set the alarms for high conditions (see the overview
in the table below). The display shows HIAL [4] and the current high alarm values. If an alarm value is not
set, the display shows “– –“.
2. Press ALARM again to go to low alarm mode, where you can set the alarms for low conditions (see the
overview in the table below). The display shows LOAL [4] and the current low alarm values. If an alarm
value is not set, the display shows “– –“.
3. Press SET to scroll through alarm settings.
4. Press the + or MIN/MAX keys to set the values.
V. 02 – 26/04/2013 8 ©Velleman nv
Page 9
WS1060
High alarm
Description
Time alarm
Set the time (hours:minutes) when you want the alarm to go off.
Note: you can also set the time alarm via low alarms settings.
Wind speed
Set the wind speed threshold value (0~50m/s). The alarm goes off when the wind speed
is higher than the specified value.
Gust speed
Set the gust speed threshold value (0~50m/s). The alarm goes off when the gust speed
is higher than the specified value.
Wind direction
Set the wind direction. The alarm goes off when the wind comes from the specified
direction.
1 hour rainfall
Set the value of rainfall in 1 hour (0~999.9mm). The alarm goes off when there is more
rain in 1 hour than the specified value.
24 hour rainfall
Set the value of rainfall in 24 hours (0~999.9mm). The alarm goes off when there is
more rain in 24 hours than the specified value.
Outdoor humidity
Set the outdoor humidity value (1%~99%). The alarm goes off when the outdoor
humidity is higher than the specified value.
Outdoor
temperature
Set the outdoor temperature value (-40°C~+60°C). The alarm goes off when the
outdoor temperature is higher than the specified value.
Wind chill
Set the wind chill value (-40°C~+60°C). The alarm goes off when the wind chill
temperature is higher than the specified value.
Dew point
Set the dew point value (-40°C~+60°C). The alarm goes off when the dew point
temperature is higher than the specified value.
Indoor humidity
Set the indoor humidity value (1%~99%). The alarm goes off when the indoor humidity
is higher than the specified value.
Indoor temperature
Set the indoor temperature value (-9.9°C~+60°C). The alarm goes off when the indoor
temperature is higher than the specified value.
Low alarm
Description
Outdoor humidity
Set the outdoor humidity value (1%~99%). The alarm goes off when the outdoor
humidity is lower than the specified value.
Outdoor
temperature
Set the outdoor temperature value (-40°C~+60°C). The alarm goes off when the
outdoor temperature is lower than the specified value.
Wind chill
Set the wind chill value (-40°C~+60°C). The alarm goes off when the wind chill
temperature is lower than the specified value.
Dew point
Set the dew point value (-40°C~+60°C). The alarm goes off when the dew point
temperature is lower than the specified value.
Indoor humidity
Set the indoor humidity value (1%~99%). The alarm goes off when the indoor humidity
is lower than the specified value.
Indoor temperature
Set the indoor temperature value (-9.9C~+60°C). The alarm goes off when the indoor
temperature is lower than the specified value.
5. Press ALARM to enable/disable the alarm. If the alarm is enabled, the corresponding alarm indicator and
HI AL (or LO AL for a low alarm) appear on the display.
6. Press SET to confirm the current setting and go to the next.
7. To return to normal mode, press HISTORY.
High alarm settings
Low alarm settings
7.5 Minimum and maximum
The weather station keeps track of minimum and maximum measurements for each weather condition (since
the last reset), together with the time and date when they were recorded.
Displaying minimum and maximum measurements
To display minimum and maximum measurements, proceed as follows:
1. From normal mode, press MIN/MAX.
The station is now in maximum mode. The displays shows the maximum indicator [6].
2. Press + repeatedly to display the maximum values for: wind speed, gust speed, 1 hour rainfall, 24 hour
rainfall, weekly rainfall, monthly rainfall, outdoor humidity, outdoor temperature, wind chill temperature,
dew point, indoor humidity, indoor temperature.
3. Press MIN/MAX to go to minimum mode. The displays shows the minimum indicator [8].
V. 02 – 26/04/2013 9 ©Velleman nv
Page 10
WS1060
Problem
Possible Cause
Solution
Transmission problem
Distance between the two units is too long
Reduce distance
Shielding materials between two units
(thick wall, steel…)
Find a different mounting location
Interference from other sources
Eliminate interference sources
Data on LCD is
illegible
No data reception
Find a different mounting location
Low batteries
Replace batteries
Incorrect data
Low batteries
Replace batteries
Incorrect settings
Reprogram the weather station
4. Press + repeatedly to display the minimum values for: outdoor humidity, outdoor temperature, wind chill
temperature, dew point, indoor humidity, indoor temperature.
5. Press HISTORY to return to normal mode.
Resetting a minimum or maximum
To reset a minimum or maximum:
1. Enter minimum or maximum reading mode and press + to display the value that you want to reset.
2. Press and hold SET for 3 seconds.
3. Repeat for any other minimum or maximum value that you want to reset.
4. Press HISTORY to return to normal mode.
8. Resetting
To reset the weather station to the factory defaults, press and hold the + key for 20 seconds.
9. Troubleshooting
10. Calibration
For accurate measurements, you can calibrate wind speed, temperature, humidity, and rainfall measurements
using calibration tools (not incl.).
To enter calibration mode, proceed as follows:
1. From normal mode, press and hold HISTORY for 8 seconds.
The station is now in calibration mode. The wind factor digits on the display flash.
2. Press SET to go to the next setting; use the + or MIN/MAX keys to change the values.
3. To exit the calibration mode, press HISTORY.
See below for a description of each calibration setting.
Wind speed calibration
The default wind speed calibration setting is 1.0. The adjustment factor ranges from 0.75 to 1.25. You can set it
in 0.01 increments.
Wind speed is the most sensitive to installation constraints. The following factors influence wind speed
measurement:
the location of the weather station: proximity of buildings, trees, or other obstructions
the wear of the moving parts of the anemometer.
To calibrate the wind speed, we recommend using a calibrated wind meter (not incl.) and a constant-speed,
high-speed fan (not incl.).
Temperature calibration
You can calibrate indoor and outdoor temperature measurements.
The following factors influence temperature measurement:
proximity of heat sources, such as buildings, the ground…
installation in direct sunlight without proper shielding in hot weather environments.
To calibrate the temperature, we recommend using a mercury or alcohol thermometer (not incl.). Do not use
bi-metal (dial) or other digital thermometers, as they have their own error margin. Do not use a local weather
station in your area (difference in location, timing of updates, and possible calibration errors).
To calibrate the temperature, proceed as follows:
1. Place the temperature sensor in a shaded, controlled environment.
2. Place the thermometer right next to it.
V. 02 – 26/04/2013 10 ©Velleman nv
Page 11
WS1060
3. Allow the installation to stabilise for 48 hours.
4. Compare the temperature reading on the display to the temperature reading on the thermometer, and
adjust the setting in calibration mode to match the thermometer.
Humidity calibration
The hygrometer sensor’s accuracy is ±5%. You can improve the accuracy by calibrating indoor and outdoor
humidity measurements.
Humidity measurements can drift over time. The proximity of humidity sources such as the ground, grass…
influence the measurement.
We recommend using a sling psychrometer (not incl.) or commercially available humidity calibration kits (not
incl.) to measure humidity. Adjust the setting in calibration mode to match the measurement.
Rainfall calibration
The default rainfall calibration setting is 1.0. The adjustment factor ranges from 0.75 to 1.25.
We recommend using a tube type rain gauge (not incl.), with an aperture of at least 10 cm (4”). Any smaller
and the readings may not be accurate. Do not use rainfall readings from weather reports on radio, TV,
newspapers, or even your neighbour’s weather station (difference in location).
To calibrate the rainfall measurement, proceed as follows:
1. Place the tube rain gauge right next to the rain collector of the weather station.
2. Compare the totals of three storms.
3. Based on this, develop an average for how far off the readings are.
Total rainfall calibration
To calibrate the total rainfall value, keep in mind that the factor is applied to the running total, not to individual
tips of the bucket in the rain collector.
You can adjust the total rainfall in 0.3 mm steps.
The total rainfall measurement works as follows:
1. The rain collector is calibrated at the factory so that the bucket tips over (and records rainfall) for every
0.3 mm (0.01”) of rain.
2. The total number of times the bucket tips over (since the last reset) is counted and multiplied by 0.3 to get
a total in mm. (For a reading in inches, a conversion factor is applied.)
3. The calibration factor is then applied to this total.
11. Cleaning and maintenance
11.1 Replacing batteries
Replacing batteries in the base station When the display becomes difficult to read, replace the batteries. See Installing batteries in the base
station.
Caution: When you remove the batteries from the base station, you lose all previous weather data and alarm
settings.
Replacing batteries in the outdoor unit
When the battery level in the transmitter is low, the display will show . In that case, replace the
transmitter batteries as soon as possible. See Installing batteries in the outdoor unit.
Note: Take into account that the low battery indicator only works correctly within an outdoor temperature
range of 10~35°C. Outside this temperature range, the low battery indicator may show even if the batteries
are still good.
When you replace the batteries in the transmitter, the transmitter will resynchronise with the indoor station
within the next 3 hours. All previous weather data and alarm value settings are maintained.
However, if you want the devices to synchronise faster, you can remove the batteries from the indoor station
and replace them after 10 seconds.
Caution: In this case you lose all previous weather data and alarm settings.
V. 02 – 26/04/2013 11 ©Velleman nv
Page 12
WS1060
Outdoor data
Transmission distance
100 m (330 ft) in open field
Frequency
868 MHz
Measuring interval thermo-hygro
sensor
48 seconds
Temperature
Range
-40°C~+65°C (-40°F~+149°F)
Accuracy
±1°C
Resolution
0.1°C
Relative humidity
Range
1%~99%
Accuracy
±5%
Rain volume
Range
0~999.9mm (displays – – if out of range)
Accuracy
±10%
Resolution
0.3 mm (if rain volume < 1000 mm); 1 mm (if rain volume > 1000 mm)
Wind speed
Range
0~180 km/h (0~110 mph) (displays – – if out of range)
Accuracy
±1 m/s (wind speed < 10 m/s); ±10% (wind speed > 10 m/s)
Indoor data
Measuring interval (temperature
and humidity)
30 seconds
Temperature
Range
-9.9°C~+60°C (14°F~+149°F) (displays – – if out of range)
Resolution
0.1°C
Relative humidity
Range
1%~99%
Accuracy
±1%
11.2 Replacing the sensors
Refer to the illustrations on page 2-3 of this manual.
Replacing the rain collector and thermo-hygro sensor
To replace the rain collector and thermo-hygro sensor, proceed as follows:
1. Loosen the three screws [O] at the bottom of the rain collector.
2. Remove the rain collector from the base [P].
3. Loosen the 4 screws of the sensor cover and remove the cover [Q].
4. Unplug the data cable [R].
5. Loosen the screw [S] that fixes the sensor unit and pull it gently off the shaft.
6. Slide the new sensor unit on the shaft and fix it with the screw.
7. Reconnect the data cable.
8. Replace the sensor cover and fix it with the screws.
9. Place the new rain collector on the base.
10. Fix the rain collector to the base using the three screws at the bottom.
11. Use the bubble level [B] on the rain collector to check if the device is still perfectly level. If necessary,
adjust the position.
Replacing the wind sensor
To replace the wind sensor, proceed as follows:
1. Unplug the data cable: see Replacing the rain collector and thermo-hygro sensor for instructions.
2. Loosen the screw [T] that fixes the sensor unit and pull it gently off the shaft.
3. Slide the new sensor unit on the shaft and fix it with the screw.
4. Reconnect the data cable.
5. On the edge of the wind direction sensor, there are markers [N] representing the north (N), east (E),
south (S), and west (W). Use a compass (not incl.) to position the device so that the markers correspond
with your real location: the N marker must be directed north, the E marker east… If you do not position the
sensor correctly, the wind direction measurement will be incorrect.
6. Use the bubble level [B] on the rain collector to position the device perfectly level. If necessary, adjust the
position.
12. Technical Specifications
V. 02 – 26/04/2013 12 ©Velleman nv
Page 13
WS1060
Power consumption
Outdoor sensor
2 x AA 1.5V LR6 alkaline batteries (not incl.)
Base station
3 x AA 1.5V LR6 alkaline batteries (not incl.)
Estimated battery life
12 months for base station
24 months for thermo-hygro sensor
Note: this is only an estimation that you can use as a guideline. Actual
battery life depends on several factors, such as ambient temperature.
Use this device with original accessories only. Velleman nv cannot be held responsible in the event
of damage or injury resulted from (incorrect) use of this device.
For more info concerning this product and the latest version of this manual, please visit our website
www.velleman.eu.
The information in this manual is subject to change without prior notice.
© COPYRIGHT NOTICE
The copyright to this manual is owned by Velleman nv. All worldwide rights reserved.
No part of this manual or may be copied, reproduced, translated or reduced to any electronic medium or
otherwise without the prior written consent of the copyright holder.
V. 02 – 26/04/2013 13 ©Velleman nv
Page 14
WS1060
Houd buiten het bereik van kinderen en onbevoegden.
Gebruik het toestel enkel binnenshuis. Bescherm tegen regen, vochtigheid en opspattende
vloeistoffen.
Bescherm tegen stof en extreme temperaturen.
Bescherm tegen schokken. Vermijd brute kracht tijdens de bediening.
GEBRUIKERSHANDLEIDING
1. Inleiding
Aan alle ingezetenen van de Europese Unie
Belangrijke milieu-informatie betreffende dit product
Dit symbool op het toestel of de verpakking geeft aan dat, als het na zijn levenscyclus wordt
weggeworpen, dit toestel schade kan toebrengen aan het milieu. Gooi dit toestel (en eventuele
batterijen) niet bij het gewone huishoudelijke afval; het moet bij een gespecialiseerd bedrijf
terechtkomen voor recyclage. U moet dit toestel naar uw verdeler of naar een lokaal recyclagepunt
brengen. Respecteer de plaatselijke milieuwetgeving.
Hebt u vragen, contacteer dan de plaatselijke autoriteiten betreffend de verwijdering.
Dank u voor uw aankoop! Lees deze handleiding grondig voor u het toestel in gebruik neemt. Werd het toestel
beschadigd tijdens het transport, installeer het dan niet en raadpleeg uw dealer.
2. Veiligheidsinstructies
3. Algemene richtlijnen
Raadpleeg de Velleman® service- en kwaliteitsgarantie achteraan deze handleiding.
Leer eerst de functies van het toestel kennen voor u het gaat gebruiken.
Om veiligheidsredenen mag u geen wijzigingen aanbrengen. Schade door wijzigingen die de gebruiker heeft
aangebracht valt niet onder de garantie.
Gebruik het toestel enkel waarvoor het gemaakt is. Bij onoordeelkundig gebruik vervalt de garantie.
De garantie geldt niet voor schade door het negeren van bepaalde richtlijnen in deze handleiding en uw
dealer zal de verantwoordelijkheid afwijzen voor defecten of problemen die hier rechtstreeks verband mee
houden.
Bewaar deze handleiding voor verdere raadpleging.
4. Eigenschappen
meting binnentemperatuur en vochtigheidsgraad
buitentemperatuur en -luchtvochtigheid via RF
gevoelstemperatuur, windrichting en neerslag via RF
temperatuurweergave in °C/°F
regenval in mm en inch: uur, dag, week, maand en totaal sinds laatste reset
weergave min./maximumwaarden met tijdstip & datum van registratie
windsnelheid (mph, m/s, km/h, knopen of Beaufort)
weergave windrichting (8 windrichtingen)
alarmmodi voor: temperatuur, vochtigheid, gevoelstemperatuur, dauwpunt, regenval, windsnelheid
ontvangst en weergave radiogestuurde tijd & datum
12/24u displayformaat
eeuwige kalender
instelbare tijdzone
alarm
LED achtergrondverlichting
muurmontage of vrijstaand
V. 02 – 26/04/2013 14 ©Velleman nv
Page 15

WS1060
1
Icoon alarm ingesteld
15
Eenheid neerslag: mm of inch
2
Ontvangst RCC-signaal
16
Hoog/laag alarm buitentemperatuur ingesteld
3
Dag van de week
17
Buitentemperatuur
4
Datum
18
Ontvangst buitensignaal
5
Alarm windrichting ingesteld
19
Vochtigheidsgraad buitenshuis
6
Weergave maximumwaarden
20
Indicator batterij-leeg van de buitenzender
7
Windrichting
21
Hoog/laag alarm vochtigheidsgraad ingesteld
8
Weergave minimumwaarden
22
Neerslag
9
Alarm bij hoge regenval ingesteld
23
Neerslagperiode: 1u, 24u, week, maand, of
totaal
10
Hoog/laag alarm binnentemperatuur ingesteld
24
Windsnelheid
11
Temperatuureenheid: °C of °F
25
Eenheid windsnelheid: bft, mph, knopen, km/h,
m/s
12
Binnentemperatuur
26
Hoog alarm windsnelheid ingesteld
13
Hoog/laag alarm vochtigheidsgraad ingesteld
27
Tijd
14
Vochtigheidsgraad binnenshuis
A
Windrichtingsensor
D
Thermo-hygrometer (afgeschermd) en zendereenheid
B
Waterpas
E
Metalen stang
C
Regencollector
F
Anemometer
U mag batterijen nooit doorboren of in het vuur gooien. Herlaad geen alkalinebatterijen. Gooi
batterijen weg volgens de plaatselijke milieuwetgeving. Houd batterijen uit het bereik van kinderen.
gesynchroniseerde en directe dataontvangst
inhoud:
o ontvanger
o 4 buitensensoren: thermo-hygrosensor, anemometer, windrichtingmeter en neerslagmeter.
5. Omschrijving
Raadpleeg de afbeeldingen op pagina 2-3 van deze handleiding.
Display basisstation
Buitenstation
6. Installatie
Raadpleeg de afbeeldingen op pagina 2-3 van deze handleiding.
6.1 Montage
De thermo-hygrometer, regen- en windrichtingmeter zijn al gemonteerd op de metalen stang. Bevestig de
windcups voor de anemometer.
1. Plaats de windcups op de metalen stang van de anemometer [K].
2. Gebruik een inbussleutel (meegelev.) om de moer aan de zijkant van de windcups vast te schroeven [L].
3. Draai aan de windcups en zorg ervoor dat ze vrij kunnen bewegen. Als de windcups niet vrij kunnen
bewegen, dan zal de gemeten waarde van de windsnelheid niet correct zijn.
6.2 Het weerstation opstarten
Alvorens het weerstation op de definitieve plaats te installeren, plaats batterijen in het buiten- en basisstation.
Activeer en synchroniseer de toestellen om een goede communicatie tussen het buiten- en basisstation te
garanderen. Vaak kan een slechte communicatie verholpen worden door het weerstation te verplaatsen.
Richtlijnen voor batterij
Gebruik enkel batterijen van het juiste formaat en met de juiste spanning.
Verwijder de batterijen uit de binnen- en buitenstations als het toestel gedurende een langere tijd niet
gebruik wordt. Oude batterijen kunnen lekken en het toestel beschadigen.
V. 02 – 26/04/2013 15 ©Velleman nv
Page 16
WS1060
Respecteer de polariteit bij het plaatsen van de batterijen. Een verkeerde polariteit kan het toestel
beschadigen.
Alkalinebatterijen hebben een typisch operationeel temperatuurbereik tussen -20°C~+54°C. Gebruik het
toestel niet buiten dit temperatuurbereik.
Batterijen plaatsen in het buitenstation
1. Aan de achterzijde van de regencollector, draai de schroef los en schuif het metalen plaatje opzij om het
batterijvak te openen [G].
2. Trek het batterijvakje uit de houder [H].
3. Plaats 2 x AA 1.5V LR6 batterijen conform de polariteitsymbolen aangegeven binnenin het batterijvak [I].
4. Plaats het batterijvakje terug in de houder van de regencollector [J]. De led aan de achterzijde van de
regencollector licht op gedurende 4 seconden. Zo niet, controleer of de batterijen correct geplaatst zijn.
5. Schuif het metalen plaatje terug op zijn plaats om het batterijvak te sluiten en zet het plaatje vast met de
schroef.
Batterijen plaatsen in het basisstation
1. Open het batterijdeksel aan de onderzijde van het basisstation.
2. Plaats 3 x AA 1.5V LR6 batterijen conform de polariteitsymbolen aangegeven binnenin het batterijvak.
Alle segmenten op het LCD-scherm lichten op gedurende 2 seconden. Zo niet, controleer of alle batterijen
correct geplaatst zijn.
3. Sluit het batterijdeksel.
4. Druk momenteel nog op geen enkele toets.
Laat het toestel eerst opstarten en synchroniseren met het buitenstation.
Indien nodig, verwijder de batterijen uit het binnenstation en wacht minstens 10 seconden alvorens ze
opnieuw te plaatsen.
5. Wacht totdat zowel binnen- als buitentemperatuur verschijnen op het scherm alvorens verder te gaan.
Om de 48 seconden stuurt de zender weersinformatie naar het basisstation.
Radiogestuurde klok via DCF-ontvangst
Na het plaatsen van batterijen stuurt de zender in het buitenstation weersinformatie naar het basisstation en
zoekt vervolgens naar het DCF-tijdssignaal (RCC) om de datum en tijd automatisch in te stellen. Bij het
ontvangen van het DCF-signaal knippert de led aan de achterzijde van de regencollector 5 keer en licht daarna
gedurende 20 seconden op. De zender stuurt de tijdsgegevens naar het basisstation. Op het scherm verschijnt
het RCC-icoontje .
Wanneer er een zwak of geen DCF-signaal gevonden is, dan stopt de zender met zoeken na 1 minuut en keert
terug naar een normale werkingsmodus (= weersinformatie doorsturen naar het basisstation). De zender zoekt
opnieuw om de twee uur naar het DCF-signaal. Als de zender het DCF-signaal niet kan vinden of de laatste
signaalontvangst meer dan 12u geleden is, dan verdwijnt het RCC-icoon van het scherm.
Opmerking: Het beste tijdstip voor DCF-ontvangst is 's nachts tussen middernacht en 6u 's morgens want dan
is er minder atmosferische storing.
Bij de ontvangst van een DCF-signaal, stuurt de zender geen weersinformatie naar het basisstation. Een DCF-
ontvangst duurt maximum 5 minuten.
Opmerking: Indien er geen DCF-signaal is, kunnen de datum en het uur manueel ingesteld worden. Zie
7.2 Eenheden, datum en tijd. De manuele tijdsinstellingen worden overschreven wanneer de zender het
DCF-signaal ontvangt.
6.3 Installatie
Opmerking: Alvorens het weerstation definitief te installeren, plaats batterijen in het buiten- en basisstation.
Activeer en synchroniseer de toestellen om een goede communicatie tussen het buiten- en basisstation te
garanderen. Vaak kan een slechte communicatie verholpen worden door het weerstation te verplaatsen.
Bij het kiezen van een geschikte installatieplaats voor het buiten- en binnenstation moeten onderstaande
punten in acht genomen worden:
De communicatie tussen zender en basisstation heeft een bereik tot 100m in open veld zonder obstakels
zoals gebouwen, bomen, voertuigen, hoogspanningsmasten, enz.
Radio-interferentie van bijvoorbeeld pc's, radio- en tv-toestellen kan de onderlinge communicatie volledig
verstoren.
Beschutting zoals bomen, schuttingen, muren kunnen de metingen beïnvloeden. Kies een open veld waar
de weerselementen de sensoren goed kunnen bereiken vanuit alle hoeken.
Voor nauwkeurige windsnelheidsmetingen, houd het toestel buiten bereik van gebouwen, bomen of andere
obstakels.
V. 02 – 26/04/2013 16 ©Velleman nv
Page 17

WS1060
Instelling
Weergave
Omschrijving
Wind
(niets)
Weergave van de windsnelheid.
Gust
Weergave van de snelheid van een windstoot.
Neerslag
1h
Weergave van de hoeveelheid neerslag het afgelopen uur.
24h
Weergave van de hoeveelheid neerslag de afgelopen 24u.
week
Weergave van de hoeveel neerslag de afgelopen week.
month
Weergave van de hoeveelheid neerslag de afgelopen maand.
TOTAL
Weergave van de hoeveelheid neerslag sinds de laatste reset.
Opmerking: de weergave van de totale hoeveelheid neerslag kan gereset
worden door SET ingedrukt te houden gedurende 2 seconden.
Temperatuur
TEMP
Weergave van de buitentemperatuur.
WIND CHILL
Weergave van de gevoelstemperatuur.
DEW POINT
Weergave van het dauwpunt.
Voor nauwkeurige temperatuurmetingen, houd het toestel buiten bereik van warmtebronnen zoals
gebouwen of de grond, en vermijd directe blootstelling aan zonlicht zonder voldoende afscherming.
Voor nauwkeurige vochtmetingen, houd het toestel buiten bereik van de grond, gras of andere vochtige
plaatsen.
Installeer het weerstation als volgt:
1. Zorg ervoor dat het buitenstation volledig gemonteerd is en dat er batterijen geplaatst zijn in het buiten- en
basisstation.
2. Plaats het buiten- en basisstation op de gewenste installatieplaats en controleer of er een goede
communicatie is.
o Is dit het geval, ga verder met de volgende stap.
o Is dit niet het geval, verander de installatieplaats van het buiten- en/of basisstation totdat er goede
communicatie is.
3. Gebruik de verstelbare bevestigingsringen (meegelev.) om het buitenstation te monteren op een mast [M].
Alvorens de schroeven vast te draaien, controleer of het weerstation correct geïnstalleerd is, zoals
beschreven hieronder.
4. Op de windrichtingsensor staan markeringen [N] die het noorden (N), oosten (E), zuiden (S) en het
westen (W) weergeven. Gebruik een kompas (niet meegelev.) om het toestel te plaatsen zodat dat de
markeringen overeenstemmen met de werkelijke installatieplaats: de N-markering moet noordwaarts
gericht zijn, de E-markering oostwaarts, enz. Indien de sensor niet correct staat, dan zal de gemeten
windrichting niet correct zijn.
5. Gebruik de waterpas [B] op de regencollector om het toestel perfect waterpas te plaatsen.
6. Plaats het toestel op de definitieve plaats door de schroeven vast te draaien op de verstelbare
bevestigingsringen [M].
7. Het basisstation programmeren
Het basisstation is voorzien van 5 toetsen voor een gemakkelijke bediening: SET, +, HISTORY, ALARM, en
MIN/MAX.
Druk op SET om door de instellingen te scrollen.
Druk op + om waarden te verhogen, of druk op MIN/MAX om de waarden te verlagen.
Houd + of MIN/MAX ingedrukt gedurende 2 seconden om met grotere intervallen te verhogen/verlagen.
De instellingprocedure stopt automatisch na 30 seconden als er niet op een toets wordt gedrukt of u kunt
de instellingsprocedure verlaten wanneer u dat wilt door op HISTORY te drukken.
7.1 Snelle weergavemodus
De informatie op het LCD-scherm van het basisstation kan snel gewijzigd worden. De indicatoren op het scherm
duiden aan welke informatie momenteel wordt weergegeven. Selecteer de weer te geven informatie als volgt:
1. In de normale weergavemodus, druk op SET.
Het station is nu in snelle weergavemodus.
2. Druk op SET om de huidige instelling te bevestigen en om naar de volgende instelling te gaan; druk op + of
MIN/MAX om de waarden te wijzigen.
3. Om terug te keren naar de normale weergavemodus, druk op HISTORY.
V. 02 – 26/04/2013 17 ©Velleman nv
Page 18
WS1060
Instelling
Omschrijving
LCD-helderheid
Stel de helderheid van het LCD-scherm in tussen 0 en 8.
Tijdszone
Selecteer uw tijdszone, van -12 tot +12.
In Europa, 0 = GMT+1; 1 = GMT+2; -1 = GMT.
Tijdsformaat
Selecteer tussen 12/24u-formaat voor de weergave van de tijd [27].
Tijd
Kan er geen DCF-signaal gedetecteerd worden, dan kunt u de huidige tijd manueel
instellen (uren/minuten).
Formaat datum
Kies tussen de formaten dag-maand-jaar (DM) of maand-dag-jaar (MD) om de datum
weer te geven [4].
Datum
Kan er geen DCF-signaal gedetecteerd worden, dan kunt u de huidige datum manueel
instellen.
Eenheid
windsnelheid
Selecteer om de windsnelheid/snelheid van een windstoot weer te geven in km/u, m/s,
bft (Beaufort), mph, of knopen. De overeenstemmende indicator [25] verschijnt op het
scherm.
Windrichting
Stel de windrichting in.
Neerslageenheid
Selecteer om de neerslag weer te geven in mm of inches. De overeenstemmende
indicator [15] verschijnt op het scherm.
Temperatuureenheid
Selecteer om de temperatuur weer te geven in Celsius of Fahrenheit. De
overeenstemmende indicator [11] verschijnt op het scherm.
7.2 Eenheden, datum en tijd
Ga als volgt te werk om eenheden, datum en tijd in te stellen:
1. In normale weergavemodus, houd SET ingedrukt gedurende 2 seconden.
Het station is nu in instellingsmodus.
2. Druk op SET om de huidige instelling te bevestigen en om naar de volgende instelling te gaan; druk op + of
MIN/MAX om de waarden te wijzigen.
3. Om terug te keren naar de normale weergavemodus, druk op HISTORY.
7.3 Historiekmodus
In historiekmodus worden metingen van de voorbije 24u weergegeven.
Historiek weergeven
1. In normale weergavemodus, druk op HISTORY.
Het station is nu in historiekmodus. Op het scherm verschijnt HIS [3].
2. In historiekmodus, druk meermaals op MIN/MAX om terug te keren in intervallen van 3u.
3. Om terug te keren naar de normale weergavemodus, druk op HISTORY.
Historiek resetten
1. In normale weergavemodus, druk op HISTORY.
Het station is nu in historiekmodus. Op het scherm verschijnt er HIS [3].
2. Druk op SET.
Het woord CLEAR knippert op het scherm.
o Om de historiek te resetten, houd SET ingedrukt gedurende 2 seconden.
o Om de historiek te verlaten zonder te resetten, druk op HISTORY om naar de normale weergavemodus
terug te keren.
7.4 Alarmen instellen
Het basisstation kan ingesteld worden om een alarm te triggeren op een bepaald tijdstip of bij bepaalde
weersomstandigheden binnen of buiten. Waneer een bepaald alarmpeil bereikt wordt, gaat het alarm af
gedurende 120 seconden. Het overeenkomstige icoontje zal knipperen tot het alarmpeil niet langer bereikt is.
Druk op een willekeurige toets om het alarmsignaal af te zetten.
Wanneer het alarmpeil niet langer bereikt wordt, stopt het scherm met knipperen. Hoewel het alarmsignaal
uitgeschakeld is, is het alarm nog steeds actief en het zal opnieuw afgaan wanneer het alarmpeil
overschreden wordt. Deactiveer het alarm via het alarmmenu om het alarm helemaal uit te schakelen.
Wanneer een bepaald alarmpeil bereikt wordt binnen de 3 uren na het afgaan van het laatste alarm, zal het
icoontje knipperen maar gaat het alarm niet af. Deze functie voorkomt herhaaldelijke triggering voor
dezelfde weersomstandigheid.
V. 02 – 26/04/2013 18 ©Velleman nv
Page 19
WS1060
Hoog alarm
Omschrijving
Alarmtijd
Stel de gewenste alarmtijd in (uren: minuten).
Opmerking: De alarmtijd kan eveneens ingesteld worden via LO alarminstellingen.
Windsnelheid
Stel de drempelwaarde in voor de windsnelheid (0~50m/s). Het alarm gaat af wanneer
de windsnelheid hoger is dan de ingestelde waarde.
Snelheid van een
windstoot
Stel de drempelwaarde in de windstootsnelheid (0~50m/s). Het alarm gaat af wanneer
de snelheid van een windstoot hoger is dan de ingestelde waarde.
Windrichting
Stel de windrichting in. Het alarm gaat af wanneer de wind komt van de ingestelde
windrichting.
1u neerslag
Stel de waarde in van 1u neerslag (0~999.9mm). Het alarm gaat af waneer er meer
neerslag valt in 1u dan de ingestelde waarde.
24u neerslag
Stel de waarde in van 24u neerslag (0~999.9mm). Het alarm gaat af wanneer er meer
neerslag valt in 24u dan de ingestelde waarde.
Vochtigheid buiten
Stel de waarde in voor vochtigheid buitenshuis (1%~99%). Het alarm gaat af wanneer
de vochtigheid buitenshuis hoger is dan de ingestelde waarde.
Buitentemperatuur
Stel de waarde in van de buitentemperatuur (-40°C~+60°C). Het alarm gaat af wanneer
de buitentemperatuur hoger is dan de ingestelde waarde.
Gevoelstemperatuur
Stel de waarde in van de gevoelstemperatuur (-40°C~+60°C). Het alarm gaat af
wanneer de gevoelstemperatuur hoger is dan de ingestelde waarde.
Dauwpunt
Stel de waarde in van het dauwpunt (-40°C~+60°C). Het alarm gaat af wanneer de
temperatuur van het dauwpunt hoger is dan de ingestelde waarde.
Vochtigheid binnen
Stel de waarde in voor vochtigheid binnenshuis (1%~99%). Het alarm gaat af wanneer
de vochtigheid binnenshuis hoger is dan de ingestelde waarde.
Binnentemperatuur
Stel de waarde in van de binnentemperatuur (-9.9°C~+60°C). Het alarm gaat af
wanneer de binnentemperatuur hoger is dan de ingestelde waarde.
Laag alarm
Omschrijving
Vochtigheid buiten
Stel de waarde in voor vochtigheid buitenshuis (1%~99%). Het alarm gaat af wanneer
de vochtigheid buitenshuis lager is dan de ingestelde waarde.
Buitentemperatuur
Stel de waarde in van de buitentemperatuur (-40°C~+60°C). Het alarm gaat af wanneer
de buitentemperatuur lager is dan de ingestelde waarde.
Gevoelstemperatuur
Stel de waarde in van de gevoelstemperatuur (-40°C~+60°C). Het alarm gaat af
wanneer de gevoelstemperatuur lager is dan de ingestelde waarde.
Dauwpunt
Stel de waarde in van het dauwpunt (-40°C~+60°C). Het alarm gaat af wanneer het
alarm van het dauwpunt lager is dan de ingestelde waarde.
Onderstaande alarmen zijn instelbaar:
hoge alarmpeilen: het alarm gaat af wanneer de gemeten waarde het alarmpeil overschrijdt, bijvoorbeeld
als de windsnelheid groter wordt dan 20 m/s.
lage alarmpeilen: het alarm gaat af wanneer de gemeten waarde onder het alarmpeil zakt, bijvoorbeeld als
de buitentemperatuur lager wordt dan -5°C.
Ga als volgt te werk om een alarm in te stellen, in te schakelen of uit te schakelen:
1. In normale modus, druk op ALARM.
Het station is nu in hoog-alarmmodus om de hoge alarmpeilen in te stellen (zie overzicht in de
onderstaande tabel). Op het scherm verschijnt HIAL [4] en de huidige hoge alarmwaarden. Is er een
alarmwaarde niet ingesteld, dan verschijnt er “– –“ op het scherm.
2. Druk nogmaals op ALARM om over te schakelen naar laag-alarmmodus. Op het scherm verschijnt LOAL [4]
en de huidige lage alarmwaarden. Is er een alarmwaarde niet ingesteld, dan verschijnt er “– –“ op het
scherm.
3. Druk op SET om door de alarminstellingen te scrollen.
4. Druk op + of MIN/MAX om de waarden in te stellen.
5. Druk op ALARM om het alarm te activeren/deactiveren. Is het alarm geactiveerd, dan verschijnt het
overeenstemmende alarmicoontje en verschijnt er "HI AL" (of LO AL bij laag alarm) op het scherm.
6. Druk op SET om de huidige instelling te bevestigen en om naar de volgende instelling te gaan.
7. Om terug te keren naar de normale weergavemodus, druk op HISTORY.
Hoge alarmpeilen (HI)
Lage alarmpeilen (LO)
V. 02 – 26/04/2013 19 ©Velleman nv
Page 20
WS1060
Laag alarm
Omschrijving
Vochtigheid binnen
Stel de waarde in voor vochtigheid binnenshuis (1%~99%). Het alarm gaat af wanneer
de vochtigheid binnenshuis lager is dan de ingestelde waarde.
Binnentemperatuur
Stel de waarde in van de binnentemperatuur (-9.9C~+60°C). Het alarm gaat af wanneer
de binnentemperatuur lager is dan de ingestelde waarde.
Probleem
Mogelijke oorzaak
Oplossing
Ontvangstprobleem
Afstand tussen twee stations is te groot
Verkort de afstand tussen de twee
stations
Isolerend materiaal tussen twee stations
(dikke muur, staal…)
Kies een andere montageplaats
Interferentie van andere bronnen
Schakel de interferentiebron uit
Data op de LCD is niet
leesbaar
Geen dataontvangst
Kies een andere montageplaats
Zwakke batterijen
Vervang de batterijen
Foute data
Zwakke batterijen
Vervang de batterijen
Verkeerde instelling
Herprogrammeer het station
7.5 Minimum en maximum
Het weerstation houdt de minimum- en maximumwaarden bij voor alle weersomstandigheden (sinds de laatste
reset), samen met het tijdstip en datum van registratie.
Minimum- en maximumwaarden weergeven
Volg onderstaande stappen om minimum- en maximumwaarden weer te geven:
1. In normale weergavemodus, druk op MIN/MAX.
Het station is nu in maximummodus. Het scherm toont de maximumindicator [6].
2. Druk meermaals op + om de maximumwaarden weer te geven voor: windsnelheid, 1u neerslag, 24u
neerslag, wekelijkse neerslag, maandelijkse neerslag, vochtigheid buiten, buitentemperatuur,
gevoelstemperatuur, dauwpunt, vochtigheid binnen, binnentemperatuur.
3. Druk op MIN/MAX om over te schakelen naar minimummodus. Het scherm toont de minimumindicator [8].
4. Druk meermaals op + om de minimumwaarden weer te geven voor: vochtigheid buiten, buitentemperatuur,
gevoelstemperatuur, dauwpunt, vochtigheid binnen, binnentemperatuur.
5. Druk op HISTORY om terug te keren naar de normale weergavemodus.
Minimum- of maximumwaarden resetten
Om een minimum- of maximumwaarde te resetten:
1. Ga in minimum- en maximummodus en druk op + om de waarde die u wilt resetten weer te geven.
2. Houd SET ingedrukt gedurende 3 seconden.
3. Herhaal deze stappen voor andere minimum- of maximumwaarden die u wilt resetten.
4. Druk op HISTORY om terug te keren naar de normale weergavemodus.
8. Resetten
Om het weerstation terug te zetten naar de fabrieksinstellingen, houd + ingedrukt gedurende 20 seconden.
9. Problemen en oplossingen
10. Kalibreren
Voor nauwkeurige metingen kunnen windsnelheid, temperatuur, vochtigheid en neerslagmetingen gekalibreerd
worden met kalibreerapparaten (niet meegeleverd).
Om de kalibreermodus weer te geven:
1. In normale weergavemodus, houd HISTORY ingedrukt gedurende 8 seconden.
Het station is nu in kalibreermodus. De cijfers van de windfactor knipperen op het scherm.
2. Druk op SET om naar de volgende instelling te gaan; druk op + of MIN/MAX om de waarden te wijzigen.
3. Om de kalibreermodus te verlaten, druk op HISTORY.
Hieronder worden alle kalibreerinstellingen beschreven.
V. 02 – 26/04/2013 20 ©Velleman nv
Page 21

WS1060
Windsnelheid kalibreren
De standaard kalibratiewaarde voor windsnelheid is 1.0. De aanpassingsfactor varieert tussen 0.75 en 1.25 en
kan ingesteld worden in intervallen van 0.01.
Windsnelheid is het meest gevoelig voor ongunstige installatieomgevingen. De onderstaande factoren
beïnvloeden de windsnelheidsmeting:
de installatieplaats van het weerstation: de nabijheid van gebouwen, bomen of andere obstakels
slijtage op de bewegende onderdelen van de anemometer.
Om de windsnelheidsmeting te kalibreren, is het aangeraden om een gekalibreerde windmeter (niet
meegeleverd) te gebruiken en een ventilator met contante en hoge ventilatiesnelheid (niet meegeleverd).
Temperatuur kalibreren
Het is mogelijk om binnen- en buitentemperatuurmetingen te kalibreren.
De onderstaande factoren beïnvloeden de temperatuurmeting:
de nabijheid van warmtebronnen zoals gebouwen, de grond, enz.
directe blootstelling aan zonlicht zonder voldoende afscherming.
Om de temperatuur te kalibreren, is het aangeraden om een kwik- of alcoholthermometer (niet meegeleverd)
te gebruiken. Gebruik geen bimetaal- of digitale thermometer omdat die hun eigen foutmarge hebben. Gebruik
geen plaatselijk weerstation in uw omgeving (verschillende installatieplaats, tijdstippen van updates, en
eventuele kalibreerfouten).
Ga als volgt te werk om de temperatuurmeting te kalibreren:
1. Plaats de temperatuursensor in een gecontroleerde omgeving in de schaduw.
2. Plaats de thermometer er vlak naast.
3. Laat de installatie stabiliseren gedurende 48u.
4. Vergelijk de temperatuuruitlezing op het scherm met deze op de thermometer en regel de instelling in
kalibreermodus om te matchen met de thermometer.
Vochtigheid kalibreren
De sensor van de hygrometer heeft een nauwkeurigheid van ±5%. De nauwkeurigheid kan verhoogd worden
door het kalibreren van vochtigheidsmetingen binnen- en buitenshuis.
Vochtigheidsmetingen kunnen afwijken na een bepaalde tijd. De nabijheid van bronnen met hoge vochtigheid
zoals de grond, gras, enz. beïnvloedt de meting.
Het is aangeraden om een slingerpsychrometer (niet meegeleverd) te gebruiken of een kalibreerkit (in de
handel verkrijgbaar, niet meegeleverd) om de vochtigheidsgraad te meten. Regel de instelling in
kalibreermodus om de matchen met de meting.
Neerslag kalibreren
De standaard kalibratiewaarde voor neerslag is 1.0. De aanpassingsfactor varieert tussen 0.75 en 1.25.
Het is aangeraden om een regenmeter van het buistype (niet meegelev.) te gebruiken met een opening van
minstens 10 cm (4”). Een kleinere opening zou kunnen leiden tot onnauwkeurige uitlezingen. Gebruik geen
uitlezingen van weerbulletins van op de radio, tv, krant of weerstation van uw buren (verschillende
installatieplaatsen).
Om de neerslagmeting te kalibreren, gaat u als volgt te werk:
1. Plaats de buis vlak naast de regencollector van het weerstation.
2. Vergelijk de totalen van drie stormen.
3. Op basis van dit resultaat, bereken de gemiddelde afwijking.
Totale neerslag kalibreren
Om de waarde van de totale neerslag te kalibreren, moet u er rekening mee houden dat de factor van
toepassing is op het huidige totaal en niet op de individuele kantelingen van de opvangbakjes in de
regencollector.
De waarde van de totale neerslag kan aangepast worden in stappen van 0.3 mm.
De meting van de totale neerslagmeting gaat als volgt:
1. De regencollector is standaard gekalibreerd zodat de opvangbakjes omkiepen (en neerslag registreren) per
0.3 mm (0.01”) regen.
2. Het totaal aantal keren dat de opvangbakjes omkiepen (sinds de laatste reset) wordt geteld en
vermenigvuldigd met 0.3 voor een totaalweergave in mm. (Voor een uitlezing in inch, wordt een
conversiefactor gebruikt.)
3. De kalibreerfactor wordt toegepast op dit totaal.
V. 02 – 26/04/2013 21 ©Velleman nv
Page 22
WS1060
11. Reiniging en onderhoud
11.1 Batterijen vervangen
Batterijen vervangen in het basisstation Vervang de batterijen wanneer het scherm moeilijk leesbaar wordt. Zie Batterijen plaatsen in het
basisstation.
Opgelet: Bij het verwijderen van de batterijen uit het basisstation, worden alle vorige gegevens en
alarminstellingen gewist.
Batterijen vervangen in het buitenstation
Wanneer de batterijen in de zender bijna leeg zijn, verschijnt het icoontje op het scherm. In dit geval,
vervang de batterijen van de zender zo snel mogelijk. Zie Batterijen plaatsen in het buitenstation.
Opmerking: De lage batterij-indicator functioneert enkel correct bij een temperatuurbereik van 10~35°C.
Buiten dit temperatuurbereik kan de lage batterij-indicator oplichten zelfs al zijn de batterijen nog goed.
Bij het vervangen van de batterijen in de zender, zal de zender opnieuw synchroniseren met het binnenstation
binnen de 3 volgende uren. Alle vorige gegevens en alarminstellingen worden behouden.
Indien u de toestellen sneller wilt synchroniseren, kan u de batterijen verwijderen uit het binnenstation en ze
na 10 seconden terugplaatsen.
Opgelet: In dit geval worden alle vorige gegevens en alarminstellingen gewist.
11.2 De sensoren vervangen
Raadpleeg de afbeeldingen op pagina 2-3 van deze handleiding.
De regencollector en thermo-hygrosensor vervangen
Ga als volgt te werk om de regencollector en thermo-hygrosensor te vervangen:
1. Draai de drie schroeven [O] los aan de onderkant van de regencollector.
2. Neem de regencollector van de basis [P].
3. Draai de 4 schroeven van het sensordeksel los en verwijder het deksel [Q].
4. Ontkoppel de datakabel [R].
5. Draai de schroef [S] los die de sensorunit vasthoudt en trek de unit voorzichtig los van de metalen stang.
6. Schuif de nieuwe sensorunit op de stang en bevestig met de schroef.
7. Sluit de datakabel opnieuw aan.
8. Plaats het sensordeksel terug en zet het vast met de schroeven.
9. Zet de nieuwe regencollector op de basis.
10. Bevestig de regencollector op de basis met de drie schroeven aan de onderkant.
11. Controleer of het toestel nog steeds loodrecht staat met de waterpas [B]. Indien nodig, pas de positie aan.
Windsensor vervangen
Volg onderstaande stappen om de windsensor te vervangen:
1. Ontkoppel de datakabel: zie De regencollector en thermo-hygrosensor vervangen voor instructies.
2. Draai de schroef [T] los die de sensorunit vasthoudt en trek de unit voorzichtig los van de metalen stang.
3. Schuif de nieuwe sensorunit op de stang en bevestig met de schroef.
4. Sluit de datakabel opnieuw aan.
5. Op de windrichtingsensor staan markeringen [N] die het noorden (N), oosten (E), zuiden (S) en het
westen (W) weergeven. Gebruik een kompas (niet meegeleverd) om het toestel te plaatsen zodat dat de
markeringen overeenstemmen met de werkelijke installatieplaats: de N-markering moet noordwaarts
gericht zijn, de E-markering oostwaarts, enz. Indien de sensor niet correct staat, dan zal de gemeten
windrichting niet correct zijn.
6. Controleer of het toestel nog steeds loodrecht staat met de waterpas [B]. Indien nodig, pas de positie aan.
V. 02 – 26/04/2013 22 ©Velleman nv
Page 23

WS1060
Buitenstation
Zendbereik
100 m in open veld
Zendfrequentie
868 MHz
meetinterval thermo-hygro sensor
48 seconden
temperatuur
bereik
-40°C~+65°C
nauwkeurigheid
±1°C
resolutie
0.1°C
relatieve
vochtigheid
bereik
1%~99%
nauwkeurigheid
±5%
neerslagvolume
bereik
0~999.9mm (– – wordt afgebeeld wanneer buiten bereik)
nauwkeurigheid
±10%
resolutie
0.3 mm (indien neerslagvolume < 1000 mm);
1 mm (indien neerslagvolume > 1000 mm)
windsnelheid
bereik
0~180 km/h (– – wordt afgebeeld wanneer buiten bereik)
nauwkeurigheid
±1 m/s (windsnelheid < 10 m/s); ±10% (windsnelheid > 10 m/s)
Binnenstation
meetinterval (temperatuur en
vochtigheid)
30 seconden
Temperatuur
bereik
-9.9°C~+60°C (– – wordt afgebeeld wanneer buiten bereik)
resolutie
0.1°C
relatieve
vochtigheid
bereik
1%~99%
nauwkeurigheid
±1%
Verbruik
Buitensensor
2 x AA 1.5V LR6 alkalinebatterijen (niet meegelev.)
Basisstation
3 x AA 1.5V LR6 alkalinebatterijen (niet meegelev.)
Geschatte batterijduur
12 maanden voor het basisstation
24 maanden voor de thermo-hygrosensor
Opmerking: dit is een schatting en is enkel bruikbaar als richtlijn. De
werkelijke batterijduur is afhankelijk van verschillende factoren zoals de
omgevingstemperatuur.
12. Technische specificaties
Gebruik dit toestel enkel met originele accessoires. Velleman nv is niet aansprakelijk voor schade of
kwetsuren bij (verkeerd) gebruik van dit toestel.
Voor meer informatie over dit product en de laatste versie van deze handleiding, zie
www.velleman.eu.
De informatie in deze handleiding kan te allen tijde worden gewijzigd zonder voorafgaande
kennisgeving.
© AUTEURSRECHT
Velleman nv heeft het auteursrecht voor deze handleiding. Alle wereldwijde rechten voorbehouden.
Het is niet toegestaan om deze handleiding of gedeelten ervan over te nemen, te kopiëren, te vertalen, te
bewerken en op te slaan op een elektronisch medium zonder voorafgaande schriftelijke toestemming van de
rechthebbende.
V. 02 – 26/04/2013 23 ©Velleman nv
Page 24

WS1060
Garder hors de la portée des enfants et des personnes non autorisées.
Utiliser cet appareil uniquement à l'intérieur. Protéger de la pluie, de l’humidité et des
projections d’eau.
Protéger contre la poussière. Protéger contre la chaleur extrême.
Protéger contre les chocs et le traiter avec circonspection pendant l’opération.
NOTICE D’EMPLOI
1. Introduction
Aux résidents de l'Union européenne
Des informations environnementales importantes concernant ce produit
Ce symbole sur l'appareil ou l'emballage indique que l’élimination d’un appareil en fin de vie peut
polluer l'environnement. Ne pas jeter un appareil électrique ou électronique (et des piles éventuelles)
parmi les déchets municipaux non sujets au tri sélectif ; une déchèterie traitera l’appareil en question.
Renvoyer les équipements usagés à votre fournisseur ou à un service de recyclage local. Il convient de
respecter la réglementation locale relative à la protection de l’environnement.
En cas de questions, contacter les autorités locales pour élimination.
Nous vous remercions de votre achat ! Lire la présente notice attentivement avant la mise en service de
l’appareil. Si l’appareil a été endommagé pendant le transport, ne pas l’installer et consulter votre revendeur.
2. Consignes de sécurité
3. Directives générales
Se référer à la garantie de service et de qualité Velleman® en fin de notice.
Se familiariser avec le fonctionnement avant l’emploi.
Toute modification est interdite pour des raisons de sécurité. Les dommages occasionnés par des
modifications par le client ne tombent pas sous la garantie.
N’utiliser qu’à sa fonction prévue. Un usage impropre annule d'office la garantie.
La garantie ne s’applique pas aux dommages survenus en négligeant certaines directives de cette notice et
votre revendeur déclinera toute responsabilité pour les problèmes et les défauts qui en résultent.
Garder cette notice pour toute référence ultérieure.
4. Caractéristiques
mesure de température intérieure et taux d'humidité
température et humidité extérieures avec RF
refroidissement éolien, direction éolienne et pluviosité avec RF
affichage de température en °C/°F
pluviosité en mm ou en pouces : heure, jour, semaine, mois et au total depuis la dernière réinitialisation
affichage des valeurs min./max. avec indication de l'heure et la date de leur enregistrement
vitesse du vent (mph, m/s, km/h, noeuds et Beaufort)
affichage de la direction du vent (8 directions)
modes d'alarmes météo : température, humidité, refroidissement éolien, point de rosée, pluviosité, vitesse
du vent
réception et affichage d'heure et date radioguidées
affichage 12/24h
calendrier perpétuel
fuseau horaire programmable
alarme
rétro-éclairage à LED
montage mural ou pose libre
V. 02 – 26/04/2013 24 ©Velleman nv
Page 25

WS1060
1
Icône de l'alarme
15
Unité de la pluviosité : mm ou inch
2
Réception du signal RCC
16
Alarme haute/basse de la température
extérieure activée
3
Jour de la semaine
17
Température extérieure
4
Date
18
Réception du signal extérieur
5
Alarme de la direction de vent activée
19
Taux d'humidité extérieur
6
Affichage des valeurs maximales
20
Indicateur de piles faibles (transmetteur
extérieur)
7
Direction du vent
21
Alarme haute/basse du taux d'humidité activée
8
Affichage des valeurs minimales
22
Pluviosité
9
Alarme haute de la pluviosité
23
Période de la pluviosité : 1h, 24h, semaine,
mois, ou en total
10
Alarme haute/basse de la température intérieure
24
Vitesse éolienne
11
Unité de température : °C ou °F
25
Unité de vitesse éolienne : bft, mph, noeuds,
km/h, m/s
12
Température intérieure
26
Alarme haute vitesse éolienne activée
13
Alarme haute/basse du taux d'humidité
intérieure activée
27
Heure
14
Taux d'humidité intérieur
A
Capteur de direction du vent
D
Thermo-hygromètre (protégé) et transmetteur
B
Nivelle
E
Tige
C
Collecteur de pluie
F
Anémomètre
Ne jamais perforer les piles et ne pas les jeter au feu. Ne jamais recharger des piles alcalines. Se
débarrasser des piles en respectant la réglementation locale relative à la protection de
l’environnement. Garder les piles hors de la portée des enfants.
réception de données synchronisée et immédiate
contenu :
o récepteur
o 4 capteurs externes : capteur thermo/hygro, anémomètre, capteur éolien et pluviomètre.
5. Description
Se référer aux illustrations en page 2-3 de cette notice.
Afficheur de la station de base
Station extérieure
6. Installation
Se référer aux illustrations en page 2-3 de cette notice.
6.1 Assemblage
Le thermo-hygromètre, collecteur de pluie et le capteur de direction du vent sont déjà montés sur la tige.
Attachez les godets pour l'anémomètre.
1. Fixez les godets sur la tige en acier de l'anémomètre [K].
2. Utilisez une clé Allen (incl.) pour serrer la vis du côté du godet [L].
3. Assurez-vous que les godets tournent librement et que ses mouvements ne sont pas gênés sinon le
mesurage de la vitesse éolienne sera incorrect.
6.2 Initialiser la station météorologique
Avant d'installer la station météo de manière définitive, placez des piles dans la station extérieure et la station
de base. Initialisez et synchronisez les appareils pour assurer une bonne communication entre la station
extérieure et la station de base. On peut souvent régler une mauvaise communication en changeant
l'emplacement.
Consignes relatives aux piles
N'utilisez que des piles du format et du voltage recommandé.
V. 02 – 26/04/2013 25 ©Velleman nv
Page 26

WS1060
Retirez les piles des stations si l'appareil n'est pas utilisé durant une longue durée. Des piles usées peuvent
fuir et endommager l'appareil.
Respectez la polarité des piles. Une inversion de polarité peut endommager l'appareil.
Des piles alcalines ont une plage de température opérationnelle de -20°C~+54°C. N'utilisez pas l'appareil
en dehors de cette plage de température.
Installer des piles dans la station extérieure
1. Desserrez la vis en bas du collecteur de pluie et déplacez la plaquette métallique pour ouvrir le logement
des piles [G].
2. Extrayez le logement des piles [H].
3. Insérez 2 piles de 1.5V du type LR6/AA en respectant la polarité indiquée dans le logement [I].
4. Remettez le logement des piles dans le poste de base [J]. La LED au dos du collecteur de pluie s'allume
pendant 4 secondes. Sinon, vérifiez si les piles ont été correctement installées.
5. Replacez la plaquette métallique pour sécuriser le logement des piles et serrez la plaquette avec la vis.
Installer des piles dans la station de base
1. Ouvrez le couvercle du logement des piles au dos de la station de base.
2. Insérez 3 piles de 1.5V du type LR6/AA en respectant la polarité indiquée dans le logement. Tous les
segments sur l'afficheur LCD s'allument durant 2 secondes. Sinon, vérifiez si les piles ont été correctement
installées.
3. Refermez le couvercle du logement des piles.
4. Pour l'instant, n'appuyez sur aucun bouton.
Laissez d'abord initialiser et synchroniser l'appareil avec la station extérieure.
Si nécessaire, retirez les piles de la station extérieure et patientiez au moins 10 secondes avant de les
remettre.
5. Patientez jusqu'à ce que les températures intérieures et extérieures s'affichent à l'écran avant de continuer.
Le transmetteur envoie des données météorologiques vers la station de base toutes les 48 secondes.
Affichage de l'heure DCF radiopiloté
Après l'installation des piles, le transmetteur dans la station extérieure envoie des données météorologiques
vers la station de base et recherche le signal DCF radiopiloté (RCC) pour régler la date et l'heure
automatiquement. Quand le signal DCF est détecté, la LED au dos du collecteur de pluie clignote 5 fois, et puis
s'allume durant 20 secondes. Le transmetteur envoie la date et l'heure vers la station de base. L'icône RCC
s'affiche.
Si le signal DCF est faible et l'appareil ne reçoit pas de signal DCF, le transmetteur arrêtera la recherche après
1 minute et reviendra au mode de fonctionnement normal (= transmettre des données météorologiques vers la
station de base). Le transmetteur réessaie de recevoir le signal DCF toutes les deux heures. Si le transmetteur
ne trouve pas le signal DCF, ou si le dernier signal a été reçu depuis plus de 12 heures, l'icône RCC
disparaîtra de l'afficheur.
Remarque : Le meilleur moment pour la réception du signal DCF est la nuit entre minuit et 06h du matin parce
que il y a moins d'interférences atmosphériques.
Durant la réception du signal DCF, le transmetteur n'envoie pas de données météorologiques vers la station de
base. La réception du signal DCF dure 5 minutes au maximum.
Remarque : Si l'appareil ne reçoit pas de signal RCF, il est possible de régler la date et l'heure manuellement.
Consultez 7.2 Unités, date et l'heure. Le réglage manuel de l'heure sera écrasé après la réception du
signal DCF.
6.3 Installation
Remarque : Assemblez la station météo et assurez-vous que la communication entre la station extérieure et la
station de base fonctionne correctement avant d'installer la station météo de manière définitive. On peut
souvent régler une mauvaise communication en changeant l'emplacement.
Pour choisir l'emplacement d'installation des stations, les points suivants doivent être pris en compte :
La distance de transmission entre le transmetteur et la station de base est d'environ 100 m (330 ft) en
champ libre, à condition que le signal ne soit pas perturbé par la proximité directe d'immeubles, d’arbres,
de véhicules, de lignes à haute tension, etc.
Les interférences radio produites par les écrans d'ordinateur, radios ou téléviseurs peuvent, dans les cas
extrêmes, stopper la communication radio.
La proximité directe d'arbres, bosquets, murs peut influencer les valeurs mesurées. Choisissez un champ
libre pour que les éléments puissent atteindre les capteurs sans entraves.
V. 02 – 26/04/2013 26 ©Velleman nv
Page 27

WS1060
Réglage
Affichage
Description
Vent
(rien)
Affichage de la vitesse éolienne.
Gust
Affichage de la vitesse de bourrasque.
Pluviosité
1h
Affichage de la pluviosité de la dernière heure passée.
24h
Affichage de la pluviosité au cours des 24 heurs passées.
week
Affichage de la pluviosité au cours de la semaine passée.
month
Affichage de la pluviosité au cours du mois passé.
TOTAL
Affichage du volume total de la pluviosité depuis la dernière remise à zéro.
Remarque : le volume total de la pluviosité affiché peut être remis à zéro
en maintenant enfoncé le bouton SET pendant 2 secondes.
Température
TEMP
Affichage de la température extérieure.
WIND CHILL
Affichage de la température du refroidissement éolien.
DEW POINT
Affichage du point de rosée extérieure.
Pour des mesures de vitesse du vent précises, évitez la proximité directe d'immeubles, arbres ou autres
obstructions.
Pour des mesures de température précises, évitez la proximité directe des sources de chaleurs telles que
des immeubles, le sol et le rayonnement direct du soleil sans protection suffisante.
Pour des mesures d'humidité précises, évitez la proximité directe du sol, de l'herbe ou d'autres sources
d'humidité.
Installez la station météo comme suit :
1. Assurez-vous que la station extérieure soit assemblée complètement et que des piles soient installées dans
la station de base et extérieure.
2. Installez la station de base et la station extérieure dans l'endroit souhaité, et vérifiez la transmission.
o Si la transmission est bonne, passez à l'étape suivante.
o Si la transmission est faible, changez l'emplacement de la station de base extérieure et/ou la station de
base jusqu'à ce qu'une bonne transmission soit établie.
3. Utilisez les anneaux de fixation ajustables (incl.) pour attacher la tige de la station extérieure au mât [M].
Avant de serrer les vis, vérifiez que la station météo soit bien positionnée, comme décrit ci-dessous.
4. Sur le capteur de direction du vent, il y a des indicateurs [N] représentant le nord (N), l'est (E), le sud (S),
et l'ouest (W). Utilisez une boussole (not incl.) pour positionner l'appareil pour que les indicateurs
correspondent à votre emplacement géographique : l'indicateur N doit être orienté vers le nord, l'indicateur
E vers l'est, etc. Il faut positionner le capteur correctement sinon, la mesure de direction du vent sera
incorrecte.
5. Utilisez la nivelle [B] sur le collecteur de pluie pour positionner l'appareil en position parfaitement
horizontale.
6. Fixez l'appareil de manière définitive en serrant les vis sur les anneaux de fixation [M].
7. Configurer la station de base
La station de base est équipée de cinq boutons pour une opération facile : SET, +, HISTORY, ALARM, et
MIN/MAX.
Appuyez sur SET pour naviguer dans les réglages.
Appuyez sur + pour augmenter les valeurs, ou sur MIN/MAX pour réduire les valeurs.
Appuyez et maintenez enfoncé le bouton + ou MIN/MAX pendant 2 secondes pour un défilement plus
rapide.
La procédure de réglage s'arrêtera automatiquement après 30 secondes si aucun bouton n'est appuyé ; ou
vous pouvez quitter la procédure de réglage quand vous le souhaitez en appuyant sur HISTORY.
7.1 Mode d'affichage rapide
Il est possible d'ajuster rapidement l'information visualisée sur l'afficheur LCD de la station de base. Les
indicateurs sur l'afficheur visualisent quelle information est actuellement affichée. Sélectionnez l'information à
visualiser comme suit :
1. En mode d'affichage normal, appuyez sur SET.
La station est désormais en mode d'affichage rapide.
2. Appuyez sur SET pour confirmer le réglage actuel et pour accéder au prochain niveau de paramétrage ;
appuyez sur + ou MIN/MAX pour ajuster les valeurs.
3. Pour revenir au mode d'affichage normal, appuyez sur HISTORY.
V. 02 – 26/04/2013 27 ©Velleman nv
Page 28

WS1060
Réglage
Description
Luminosité de
l'afficheur LCD
Ajustez la luminosité de l'afficheur LCD entre 0 et 8.
Zone d'horaire
Sélectionnez votre zone d'horaire, de -12 à +12.
En Europe, 0 = GMT+1 ; 1 = GMT+2 ; -1 = GMT.
Format d'horaire
Sélectionnez entre les formats 12h ou 24h pour afficher l'heure [27].
L'heure
Si le signal DCF ne peut pas être détecté, l'heure actuelle (heures/minutes) peut être
réglée manuellement.
Format de date
Sélectionnez entre les formats jour-mois-année (DM) ou mois-jour-année (MD) pour
afficher la date [4].
Date
Si le signal DCF ne peut pas être détecté, la date actuelle peut être réglée
manuellement.
Unité de vitesse du
vent
Sélectionnez pour afficher la vitesse du vent/bourrasque en km/h, m/s, bft (Beaufort),
mph, ou nœuds. L'indicateur correspondant [25] apparaît sur l'afficheur.
Direction du vent
Ajustez la direction du vent.
Unite des
precipitations
Sélectionnez l'affichage de la pluviosité en mm ou en pouces. L'indicateur correspondant
[15] apparaît sur l'afficheur.
Unité de la
température
Sélectionnez l'affichage de la température en degrés Celsius ou Fahrenheit. L'indicateur
correspondant [11] apparaît sur l'afficheur.
7.2 Unités, date et l'heure
Procédez comme suit pour spécifier des unités, réglages de temps/d'heure :
1. En mode normal, appuyez en maintenez enfoncé SET pendant 2 secondes.
La station est actuellement en mode de réglage.
2. Appuyez sur SET pour confirmer le réglage actuel et pour accéder au prochain niveau de paramétrage ;
appuyez sur les boutons + ou MIN/MAX pour ajuster les valeurs.
3. Pour revenir au mode d'affichage normal, appuyez sur HISTORY.
7.3 Mode historique
En mode historique, les mesures des 24 heures passées sont affichées.
Afficher l'historique
1. En mode d'affichage normal, appuyez sur HISTORY.
La station est désormais en mode historique. L'afficheur visualise HIS [3].
2. En mode historique, appuyez plusieurs fois sur MIN/MAX pour retourner avec des intervalles de 3 heures.
3. Pour revenir au mode d'affichage normal, appuyez sur HISTORY.
Remettre l'historique à zéro
1. En mode d'affichage normal, appuyez sur HISTORY.
La station est désormais en mode historique. L'afficheur visualise HIS [3].
2. Appuyez sur SET.
Le mot CLEAR clignote sur l'afficheur.
o Pour remettre l'historique à zéro, appuyez et maintenez enfoncé SET pendant 2 secondes.
o Pour quitter sans remettre l'historique à zéro, appuyez sur HISTORY pour revenir au mode d'affichage
normal.
7.4 Régler les alarmes
La station de base peut être programmée pour déclencher une alarme à un certain temps ou pour des
conditions météo intérieures ou extérieures spécifiques. Quand une alarme est déclenchée, l'alarme sonne
pendant 120 secondes. L'indicateur correspondant clignote jusqu'à ce que le deuil d’alarme ne soit plus
dépassé.
Appuyez sur un bouton quelconque pour assourdir l'alarme.
Si les conditions météo se sont stabilisées, l'afficheur ne clignote plus. Bien que l'alarme reste activée, et
s'enclenchera à nouveau si le seuil d'alarme est dépassé à nouveau. Désactivez l'alarme depuis le menu
d'alarme pour que l'alarme ne s'enclenche plus.
Si une condition météo est déclenchée dans les 3 heures après le dernier déclenchement d'alarme,
l'indicateur sur l'afficheur clignotera mais l'alarme ne sonnera pas. Cette caractéristique évite le
déclenchement répétitif pour la même condition météo.
V. 02 – 26/04/2013 28 ©Velleman nv
Page 29

WS1060
Alarme haute
Description
Alarme avec heure
Réglez l'heure d'alarme souhaitée (heures:minutes) pour que l'alarme s'enclenche.
Remarque : L'heure d'alarme peut aussi être réglée par les réglages d'alarme basse.
Vitesse éolienne
Réglez le seuil de la vitesse du vent (0~50m/s). L'alarme s'enclenche quand la vitesse
éolienne dépasse le seuil spécifié.
Vitesse bourrasque
Réglez le seuil de la vitesse bourrasque (0~50m/s). L'alarme s'enclenche quand la
vitesse bourrasque dépasse le seuil spécifié.
Direction du vent
Réglez la direction du vent. L'alarme s'enclenche quand le vent vient de la direction
spécifiée.
Pluviosité (1h)
Réglez le seuil de la pluviosité en 1 heure (0~999.9mm). L'alarme s'enclenche quand le
volume de pluviosité en une heure dépasse le seuil spécifié.
Pluviosité (24h)
Réglez le seuil de la pluviosité en 24 heures (0~999.9mm). L'alarme s'enclenche quand
le volume de de la pluviosité en 24 heures dépasse le seuil spécifié.
Humidité extérieure
Réglez le seuil de l'humidité extérieure (1%~99%). L'alarme s'enclenche si l'humidité
extérieure dépasse le seuil spécifié.
Température
extérieure
Réglez le seuil de la température extérieure (-40°C~+60°C). L'alarme s'enclenche quand
la température extérieure dépasse le seuil spécifié.
Refroidissement
éolien
Réglez le seuil de la température du refroidissement éolien (-40°C~+60°C). L'alarme
s'enclenche quand la température du refroidissement éolien dépasse le seuil spécifié.
Point de rosée
Réglez le seuil de la température du point de rosée (-40°C~+60°C). L'alarme
s'enclenche quand la température du point de rosée dépasse le seuil spécifié.
Humidité intérieure
Réglez le seuil de la température intérieure (1%~99%). L'alarme s'enclenche quand
l'humidité intérieure dépasse le seuil spécifié.
Température
intérieure
Réglez le seuil de la température intérieure (-9.9°C~+60°C). L'alarme s'enclenche
quand la température intérieure dépasse le seuil spécifié.
Alarme basse
Description
Humidité extérieure
Réglez le seuil d'humidité extérieure (1%~99%). L'alarme s'enclenche quand l'humidité
extérieure est inférieure au seuil spécifié.
Température
extérieure
Réglez le seuil de la température extérieure (-40°C~+60°C). L'alarme s'enclenche quand
la température extérieure est inférieure au seuil spécifié.
Refroidissement
éolien
Réglez le seuil de la température du refroidissement éolien (-40°C~+60°C). L'alarme
s'enclenche quand la température du refroidissement éolien est inférieure au seuil
spécifié.
Point de rosée
Réglez le seuil de la température du point de rosée (-40°C~+60°C). L'alarme
s'enclenche quand la température du point de rosée est inférieure au seuil spécifié.
Les alarmes suivantes sont définissables :
mode d'alarme haute : L'alarme s'enclenche quand la valeur mesurée dépasse le seuil d'alarme, par
exemple si la vitesse du vent dépasse 20 m/s.
mode d'alarme basse : L'alarme s'enclenche quand la valeur mesurée tombe en dessous le seuil d'alarme,
par exemple si la température extérieure tombe en dessous -5°C.
Pour régler, activer ou désactiver les alarmes, procédez comme suit :
1. En mode d'affichage normal, appuyez sur ALARM.
La station est désormais en mode d'alarme haute pour régler les valeurs d'alarme haute (consultez la table
ci-après). L'afficheur visualise HIAL [4] et les valeurs d'alarme haute actuelles. Si une valeur d'alarme n'est
pas réglée, il apparaît “– –“ sur l'afficheur.
2. Appuyez de nouveau sur ALARM pour passer en mode d'alarme basse pour régler les valeurs d'alarme
basse (consultez la table ci-après). L'afficheur LOAL [4] et les valeurs d'alarme basse actuelles. Si une
valeur d'alarme n'est pas réglée, il apparaît “– –“ sur l'afficheur.
3. Appuyez sur SET pour naviguer dans les réglages d'alarme.
4. Appuyez sur les boutons + ou MIN/MAX pour régler les valeurs.
5. Appuyez sur ALARM pour active/désactiver l'alarme. Si l'alarme a été activée, l'indicateur d'alarme
correspondant et HI AL (ou LO AL pour une alarme basse) apparaît sur l'afficheur.
6. Appuyez sur SET pour confirmer le réglage actuel et pour accéder au prochain niveau de paramétrage.
7. Pour revenir au mode d'affichage normal, appuyez sur HISTORY.
Réglages des seuils d'alarme haute (HI)
Réglage des seuils d'alarme basse (LO)
V. 02 – 26/04/2013 29 ©Velleman nv
Page 30

WS1060
Alarme basse
Description
Humidité intérieure
Réglez le seuil de l'humidité intérieure (1%~99%). L'alarme s'enclenche quand
l'humidité intérieure est inférieure au seuil spécifié.
Température
intérieure
Réglez le seuil de la température intérieure (-9.9C~+60°C). L'alarme s'enclenche quand
la température intérieure est inférieure au seuil spécifié.
Problème
Cause possible
Solution
Problème de
transmission
Distance trop grande entre deux unités
Réduire la distance
Matériau isolant entre les deux unités (mur
épais, acier…)
Changer l’endroit de montage
Interférence d’une autre source
Éliminer les sources d’interférence
Données illisibles
Pas de réception de données
Changer l’endroit de montage
Piles faibles
Remplacer les piles
Données incorrectes
Piles faibles
Remplacer les piles
Paramétrage incorrect
Reprogrammer la station météo
7.5 Minimum et maximum
La station météo enregistre les valeurs min/max pour chaque condition météo (depuis la dernière mise à zéro),
ainsi que l'heure et la date d'enregistrement.
Affichage des valeurs min/max.
Pour afficher les valeurs min/max, procédez comme suit :
1. En mode d'affichage normal, appuyez sur MIN/MAX.
La station est désormais en mode d'affichage max. L'afficheur visualise l'indicateur maximum [6].
2. Appuyez plusieurs fois sur + pour afficher les valeurs maximum de : vitesse éolienne, vitesse bourrasque,
1h de pluviosité, 24h de pluviosité, pluviosité hebdomadaire, mensuelle, humidité extérieure, température
extérieure, température du refroidissement éolien, point de rosée, humidité intérieure, température
intérieure.
3. Appuyez sur MIN/MAX pour passer en mode d'affichage minimum. L'afficheur visualise l'indicateur
minimum [8].
4. Appuyez plusieurs fois sur + pour afficher les valeurs minium de : humidité extérieure, température
extérieure, température du refroidissement éolien, point de rosée, humidité intérieure, température
intérieure.
5. Appuyez sur HISTORY pour revenir au mode d'affichage normal.
Remise à zéro des valeurs min/max.
Pour remettre les valeurs min/max à zéro :
1. Accédez au mode d'affichage min/max et appuyez sur + pour afficher la valeur que vous souhaitez remettre
à zéro.
2. Appuyez et maintenez enfoncé SET pendant 3 secondes.
3. Répétez cette procédure pour toute autre valeur min/max. que vous souhaitez remettre à zéro.
4. Appuyez sur HISTORY pour revenir au mode d'affichage normal.
8. Remise à zéro
Pour rétablir les valeurs par défaut de la station météo, appuyez en maintenez enfoncé le bouton + pendant
20 secondes.
9. Problèmes et solutions
10. Calibrage
Pour des mesures précises, la vitesse éolienne, température, humidité et le volume de la pluviosité peuvent
être calibrées avec des outils de calibrage (not incl.).
Pour accéder au mode de calibrage, procédez comme suit :
1. En mode d'affichage normal, appuyez en maintenez enfoncé HISTORY pendant 8 secondes.
La station est désormais en mode de calibrage. Les digits du facteur éolien clignotent sur l'afficheur.
2. Appuyez sur SET pour accéder au prochain niveau de paramétrage ; appuyez sur les boutons + ou
MIN/MAX pour ajuster les valeurs.
3. Pour quitter le mode de calibrage, appuyez sur HISTORY.
V. 02 – 26/04/2013 30 ©Velleman nv
Page 31

WS1060
Vous trouverez ci-après une description détaillée de chaque réglage de calibrage.
Calibrer la vitesse éolienne
La valeur par défaut pour le calibrage de la vitesse éolienne est réglée sur 1.0. Le facteur d'ajustement varie
entre 0.75 et 1.25 et peut être réglé par des incréments de 0.01.
La vitesse éolienne est très sensible aux contraintes d'installation. La vitesse éolienne est influencée par :
l'emplacement de la station météo : la proximité directe d'immeubles, arbres ou autres obstacles
L'usure des pièces mobiles de l'anémomètre.
Pour calibrer la vitesse éolienne, il est recommandé d'utiliser un anémomètre calibré (not incl.) et un
ventilateur à haute vitesse constante (not incl.).
Calibrer la température
Les mesures des températures intérieures et extérieures peuvent être calibrées.
Les facteurs suivants influencent le mesurage de température :
proximité de sources de chaleur, comme des immeubles, le sol, etc.
le rayonnement direct du soleil sans protection suffisante.
Pour calibrer la température, il est recommandé d'utiliser un thermomètre à mercure ou un thermomètre à
alcool (not incl.). N'utilisez pas un thermomètre à cadran ou autres types de thermomètres digitaux puisqu'ils
comportent leurs propres marges d'erreurs. N'utilisez pas une station météo locale dans votre environnement
(emplacements différents, heure d'actualisation différente, et des erreurs de calibrage éventuelles).
Pour calibrer la température, procédez comme suit :
1. Placez le capteur de température dans un environnement ombreux et contrôlé.
2. Placez le thermomètre juste à côté du capteur.
3. Laissez l'installation se stabiliser pendant 48 heures.
4. Comparez l'affichage de la température sur l'afficheur à l'affichage sur le thermomètre, et ajustez le réglage
en mode de calibrage pour correspondre au thermomètre.
Calibrer l'humidité
Le sonde du hygromètre à une précision de ±5%.La précision peut être augmentée en calibrant les mesures
d'humidité intérieure et extérieure.
Les mesures d'humidité peuvent dévier après un certain temps. La proximité directe de sources d'humidité
comme le sol, l'herbe influencent le mesurage.
Il est recommandé d'utiliser un psychromètre fronde (not incl.) ou un kit de calibrage (non incl., disponible en
vente) pour mesurer l'humidité. Ajustez le réglage en mode de calibrage pour correspondre au mesurage.
Calibrer le volume de la pluviosité
La valeur par défaut pour le calibrage du volume de la pluviosité est réglée sur 1.0. Le facteur d'ajustement
varie entre 0.75 et 1.25.
Il est recommandé d'utiliser un pluviomètre type tube (not incl.), avec une aperture d'au moins de 10 cm (4”).
Une aperture plus petite pourrait causer un affichage imprécis. N'utilisez pas l'affichage de la pluviosité des
bulletins météo sur la radio, TV, journaux, ou même des stations météo des voisins (emplacements différents).
Pour calibrer le mesurage de la pluviosité, procédez comme suit :
1. Placez le tube juste à côté du collecteur de pluie de la station météo.
2. Comparez les totaux de trois tempêtes.
3. Basé sur ce résultat, calculez la moyenne des différences entre les affichages.
Calibrer le volume total de la pluviosité
Pour calibrer le volume total de la pluviosité, tenez en compte que le facteur s'applique sur le total actuel et non
pas sur les renversements individuels du collecteur de pluie.
La valeur du volume total de la pluviosité peut être ajustée en incréments de 0.3 mm.
Pour mesurer le volume total de la pluviosité, procédez comme suit :
1. Le collecteur de pluie est calibré en usine de sorte que le récipient de pluie renverse (et enregistre) l'eau
par 0.3mm (0.01") de pluie.
2. Le nombre total des fois que le récipient se renverse (depuis la dernière mise à zéro) est compté et
multiplié par 0.3 pour obtenir un total en mm. (Pur un affichage en pouces, un facteur de conversion est
appliqué).
3. Le facteur de calibrage est ensuite appliqué sur ce total.
V. 02 – 26/04/2013 31 ©Velleman nv
Page 32

WS1060
11. Nettoyage et entretien
11.1 Remplacer des piles
Remplacer des piles dans la station de base Lorsque l'afficheur devient difficile à lire, remplacez les piles. Voir Installer des piles dans la station de
base.
Attention : En retirant les piles de la station de base, toutes les informations météo et les réglages d'alarme
précédents seront perdus.
Remplacer des piles dans la station extérieure
Lorsque les piles dans le transmetteur sont faibles, l'afficheur visualise l'icône . Dans ce cas, remplacez les
piles du transmetteur aussitôt que possible. Voir Installer des piles dans la station extérieure.
Remarque : L'indicateur de pile faible fonctionne correctement dans une plage de 10~35°C. En dehors de
cette plage de température, l'indicateur de pile faible peut apparaître même si les piles sont bonnes.
En remplaçant les piles du transmetteur, celui-ci va se resynchroniser avec la station intérieure dans les
3 prochaines heures. Toutes les informations météo et les réglages des valeurs d'alarme précédents sont
maintenus.
Si vous souhaitez synchroniser les appareils plus rapidement, vous pouvez retirer les piles de la station
intérieure et remplacer les piles après 10 secondes.
Attention : Dans ce cas, toutes les informations météo et réglages d'alarmes précédents seront perdus.
11.2 Remplacer les capteurs
Se référer aux illustrations à la page 2-3 de cette notice.
Remplacer le collecteur de pluie et le capteur thermo-hygro
Pour remplacer le collecteur de pluie et le capteur thermo-hygro, procédez comme suit :
1. Desserrez les 3 vis [O] en bas du collecteur de pluie.
2. Enlevez le collecteur de pluie de la base [P].
3. Desserrez les 4 vis du couvercle du capteur et enlevez le couvercle [Q].
4. Déconnectez le câble de données [R].
5. Desserrez les vis [S] qui fixent le capteur et retirez prudemment de la tige.
6. Glissez le nouveau capteur sur la tige et fixez-le avec la vis.
7. Reconnectez le câble de données.
8. Replacez le couvercle du capteur et fixez-le avec les vis.
9. Placez le nouveau collecteur de pluie sur la base.
10. Fixez le collecteur de pluie sur la base avec les trois vis en bas du capteur.
11. Utilisez la nivelle [B] sur le collecteur de pluie pour vérifier si l'appareil est toujours en position
parfaitement horizontale. Si nécessaire, ajustez la position.
Remplacer le capteur de vent
Pour remplacer le capteur de vent, procédez comme suit :
1. Déconnectez le câble de données : voir Remplacer le collecteur de pluie et le capteur thermo-hygro
pour des instructions.
2. Desserrez la vis [T] qui fixe le capteur et retirez-le prudemment de la tige.
3. Glissez le nouveau capteur sur la tige et fixez-le avec la vis.
4. Reconnectez le câble de données.
5. Sur le capteur de direction du vent, il y a des indicateurs [N] représentant le nord (N), l'est (E), le sud (S),
et l'ouest (W). Utilisez une boussole (not incl.) pour positionner l'appareil pour que les indicateurs
correspondent à votre emplacement géographique : l'indicateur N doit être orienté vers le nord, l'indicateur
E vers l'est, etc. Il faut positionner le capteur correctement sinon, la mesure de direction du vent sera
incorrecte.
6. Utilisez la nivelle [B] sur le collecteur de pluie pour positionner l'appareil en position parfaitement
horizontale.
V. 02 – 26/04/2013 32 ©Velleman nv
Page 33

WS1060
Station extérieure
portée de transmission
100 m en terrain ouvert
fréquence de transmission
868 MHz
intervalle de mesure thermohygrométrique
48 secondes
température
plage
-40°C~+65°C
précision
±1°C
résolution
0.1°C
taux d’humidité
relative
plage
1%~99%
précision
±5%
volume de la
pluviosité
plage
0~999.9mm (– – s’affiche si hors plage)
précision
±10%
résolution
0.3 mm (volume < 1000 mm) ; 1 mm (volume > 1000 mm)
vitesse éolienne
plage
0~180 km/h (– – s’affiche si hors plage)
précision
±1 m/s (vitesse éolienne < 10 m/s) ; ±10% (vitesse éolienne > 10 m/s)
Station intérieure
intervalle de mesure température
et humidité
30 secondes
température
plage
-9.9°C~+60°C (– – s’affiche si hors plage)
résolution
0.1°C
taux d’humidité
relative
plage
1%~99%
précision
±1%
Consommation
capteur extérieur
2 piles alcalines 1.5V type LR6 (non incl.)
station de base
3 piles alcalines 1.5V type LR6 (non incl.)
durée de vie des piles estimée
12 mois pour la station de base
24 mois pour le capteur thermo-hygro
Remarque : Ceci est une estimation et ne peut qu'être utilisée comme
directive. La durée de vie des piles actuelle dépend de plusieurs facteurs
comme la température ambiante.
12. Spécifications techniques
N’employer cet appareil qu’avec des accessoires d’origine. SA Velleman ne sera aucunement
responsable de dommages ou lésions survenus à un usage (incorrect) de cet appareil.
Pour plus d’information concernant cet article et la dernière version de cette notice, visiter notre
site web www.velleman.eu.
Toutes les informations présentées dans cette notice peuvent être modifiées sans notification
préalable.
© DROITS D’AUTEUR
SA Velleman est l’ayant droit des droits d’auteur pour cette notice. Tous droits mondiaux réservés.
Toute reproduction, traduction, copie ou diffusion, intégrale ou partielle, du contenu de cette notice par quelque
procédé ou sur tout support électronique que se soit est interdite sans l’accord préalable écrit de l’ayant droit.
V. 02 – 26/04/2013 33 ©Velleman nv
Page 34

WS1060
Mantenga el aparato lejos del alcance de personas no capacitadas y niños.
Utilice el aparato sólo en interiores. No exponga este equipo a lluvia, humedad ni a ningún
tipo de salpicadura o goteo.
No exponga este equipo a polvo. No exponga este equipo a temperaturas extremas.
No agite el aparato. Evite usar excesiva fuerza durante el manejo y la instalación.
MANUAL DEL USUARIO
1. Introducción
A los ciudadanos de la Unión Europea
Importantes informaciones sobre el medio ambiente concerniente a este producto
Este símbolo en este aparato o el embalaje indica que, si tira las muestras inservibles, podrían dañar
el medio ambiente.
No tire este aparato (ni las pilas, si las hubiera) en la basura doméstica; debe ir a una empresa
especializada en reciclaje. Devuelva este aparato a su distribuidor o a la unidad de reciclaje local.
Respete las leyes locales en relación con el medio ambiente.
Si tiene dudas, contacte con las autoridades locales para residuos.
¡Gracias por haber comprado la WS1060! Lea atentamente las instrucciones del manual antes de usarla. Si el
aparato ha sufrido algún daño en el transporte no lo instale y póngase en contacto con su distribuidor.
2. Instrucciones de seguridad
3. Normas generales
Véase la Garantía de servicio y calidad Velleman ® al final de este manual del usuario.
Familiarícese con el funcionamiento del aparato antes de utilizarlo.
Por razones de seguridad, las modificaciones no autorizadas del aparato están prohibidas. Los daños
causados por modificaciones no autorizadas, no están cubiertos por la garantía.
Utilice sólo el aparato para las aplicaciones descritas en este manual. Su uso incorrecto anula la garantía
completamente.
Los daños causados por descuido de las instrucciones de seguridad de este manual invalidarán su garantía
y su distribuidor no será responsable de ningún daño u otros problemas resultantes.
Guarde este manual del usuario para cuando necesite consultarlo.
4. Características
medición de la temperatura interior y la humedad
temperatura y humedad exteriores por el sensor exterior
factor de enfriamiento, dirección del viento y precipitaciones por el sensor exterior
visualización de la temperatura en °C o °F
datos en relación con la pluviosidad (mm y pulgadas): 1 hora, día, semana, mes y total desde la última
reinicialización
grabación de todos los valores mín. y máx. con la hora y la fecha de la grabación
velocidad del viento (mph, km/h, m/h, nudos o Beaufort)
visualización de la dirección del viento (8 direcciones)
modos de alarma para: la temperatura, la humedad, el factor de enfriamiento, el punto de rocío, la
pluviosidad, la velocidad del viento
recepción automática de la hora y fecha
formato de 12 ó 24 horas seleccionable
calendario perpetuo
huso horario ajustable
alarma
retroiluminación con LEDs
V. 02 – 26/04/2013 34 ©Velleman nv
Page 35

WS1060
1
alarma del reloj activada
15
unidad de lluvia: mm o pulgadas
2
recepción de la señal RCC
16
alarma de temperatura exterior alta/baja
activada
3
día de la semana
17
temperatura exterior
4
fecha
18
recepción de la señal exterior
5
alarma de dirección del viento activada
19
humedad exterior
6
los valores máx.
20
pila baja del transmisor exterior
7
dirección del viento
21
alarma de humedad exterior alta/baja activada
8
dos valores mín.
22
precipitación
9
alarma de precipitaciones elevadas activada
23
período de lluvia: 1h, 24h, semana, mes o total
10
alarma de temperatura interior alta/baja
activada
24
velocidad del viento
11
unidad de temperatura: °C o °F
25
unidad de la velocidad del viento: bft, mph,
nudos, km/h, m/s
12
temperatura interior
26
alarma de la velocidad del viento activada
13
alarma de humedad interior alta/baja activada
27
hora
14
humedad interior
A
sensor de dirección del viento
D
termómetro-higrómetro (protegido) y transmisor
B
nivel
E
mástil
C
colector de lluvia
F
anemómetro
Nunca perfore las pilas y no las eche al fuego. Nunca recargue pilas alcalinas. Respete las leyes
locales en relación con el medio ambiente al tirar las pilas. Mantenga las pilas lejos del alcance de
niños.
instalación en pared o soporte para sobremesa
recepción instantánea sincronizada
incluye:
o receptor
o 4 sensores exteriores: termómetro/higrómetro, anemómetro, veleta y pluviómetro.
5. Descripción
Véase las figuras en la página 2-3 de este manual del usuario.
Pantalla de la estación de base
Unidad exterior
6. Instalación
Véase las figuras en la página 2-3 de este manual del usuario.
6.1 Montaje
El termómetro-higrómetro, el colector de lluvia y el sensor de dirección del viento ya están fijados al mástil.
Tendrá sólo que fijar las cazoletas del anemómetro.
1. Fije las cazoletas al mástil de acero del anemómetro [K].
2. Utilice una llave Allen (incl.) para atornillar el tornillo del lateral de la cazoleta [L].
3. Gire las cazoletas y asegúrese de que puedan mover libremente. Las mediciones de velocidad del viento no
serán correctas si no pueden girar libremente.
6.2 Inicializar la estación meteorológica
Introduzca las pilas en la unidad exterior y la estación de base. Deje que se inicialicen y se sincronicen y
controle si todo funcione correctamente antes de colocarlas en su sitio definitivo. Instale la estación
meteorológica en otro sitio si parecen tener problemas con la transmisión.
Las pilas
Utilice sólo pilas del mismo tipo.
Quite las pilas de la unidad interior y exterior si no va a utilizarlos durante un largo período de tiempo. Pilas
agotadas pueden tener fugas y dañar el aparato.
V. 02 – 26/04/2013 35 ©Velleman nv
Page 36

WS1060
Respete la polaridad al introducir las pilas. Una polaridad incorrecta podría dañar el aparato.
Pilas alcalinas tienen una temperatura de funcionamiento típ. entre -20°C y +54°C. No utilice el aparato al
sobrepasar este rango.
Introducir las pilas en la unidad exterior
1. En la parte inferior del colector de lluvia, desatornille el tornillo y deslice el cierre de metal hacia el lado
para destapar el compartimiento de pilas [G].
2. Saque el compartimiento de pilas [H].
3. Introduzca 2 x pila AA LR6 de 1.5V. Respete la polaridad. [I].
4. Vuelva a poner el compartimiento de pilas en el colector de lluvia [J].
El LED de la parte trasera del colector de lluvia se ilumina unos 4 segundos. Si no fuera el caso, controle si
las pilas han sido introducidas correctamente.
5. Vuelva a poner el cierre de metal en su posición para fijar el compartimiento de pilas y fije con un tornillo.
Introducir las pilas en la estación de base
1. Abra la tapa del compartimiento de pilas de la parte trasera de la estación de base.
2. Introduzca 3 x pila AA LR6 de 1.5V. Respete la polaridad.
Todos los segmentos de la pantalla LCD se iluminan durante 2 segundos. Si no fuera el caso, controle si las
pilas han sido introducidas correctamente.
3. Vuelva a cerrar la tapa del compartimiento de pilas.
4. Todavía no está permitido pulsar un botón.
Deje que el aparato se inicialice y se sincronice con la unidad exterior.
Si fuera necesario, quite las pilas de la estación de base y espere al menos 10 segundos antes de volver a
introducirlas.
5. Espere hasta que la temperatura interior y la temperatura exterior aparezcan en la pantalla antes de
continuar.
El transmisor envía los datos meteorológicos cada 48 segundos.
Recepción de la señal del reloj radiocontrolado
Después de haber introducido las pilas, el transmisor enviará datos meteorológicos a la estación de base y
luego buscará la señal DCF del reloj radiocontrolado (RCC) para ajustar la fecha y la hora automáticamente. Al
detectar la señal DCF, el LED de la parte trasera del colector de lluvia parpadeará 5 veces. Luego, se ilumina
durante 20 segundos. El transmisor envía los datos y la hora exacta a la estación de base. La pantalla visualiza
el icono .
En caso de una señal DCF débil y si la recepción no es posible, el transmisor terminará la búsqueda después de
1 minuto y volverá al modo de funcionamiento normal (= transmitir datos meteorológicos a la estación de
base). El transmisor tratará de conseguir la señal de RCC una vez cada dos horas. El icono no se muestra
en la pantalla si no es captada ninguna señal DCF o si ha recibido la última señal hace más de 12 horas.
Observación: La mejor condición para la recepción de la señal DCF es por la noche, entre la medianoche y las
6:00am cuando hay menos interferencias atmosféricas.
El transmisor no envía datos meteorológicos a la estación de base durante la recepción de la señal DCF. La
recepción de la señal DCF puede tardarse máx. 5 minutos.
Observación: La fecha y la hora pueden ajustarse manualmente si el aparato no es capaz de recibir ninguna
señal DCF. Véase 7.2 Unidades de medición, fecha y reloj. Sin embargo, el transmisor reemplazará los
datos y la hora ajustados manualmente por la hora y los datos recibidos.
6.3 Instalación
Observación: Instale la estación meteorológica y asegúrese de que la transmisión entre la unidad exterior y la
estación de base funcione correctamente antes de montar la estación meteorológica en su sitio definitivo.
Ponga el aparato en otro lugar en caso de problemas con la transmisión.
Tenga en cuenta lo siguiente al elegir un lugar de montaje adecuado para la unid exterior y la estación de base:
La comunicación vía radio entre el transmisor y la estación de base puede alcanzar máx. 100m (330ft) al
aire libre, siempre que no hayan obstáculos (p.ej. edificios, árboles, vehículos, líneas de alta tensión, etc.)
Interferencias causadas por pantallas del ordenador, radios o televisores podrían perturbar o incluso romper
completamente la comunicación.
Coloque el aparato en un área abierta, lejos del alcance árboles, setos, paredes, etc. para que no puedan
influir las mediciones.
Para obtener mediciones de la velocidad del viento precisas, mantenga el aparato lejos del alcance de
edificios, árboles u otros obstáculos.
V. 02 – 26/04/2013 36 ©Velleman nv
Page 37

WS1060
Ajuste
Pantalla
Descripción
Viento
(nada)
Visualización de la velocidad del viento.
Gust
Visualización de la velocidad de ráfaga de viento.
Precipitación
1h
Visualización de las precipitaciones en la última hora.
24h
Visualización de las precipitaciones en las últimas 24 horas.
week
Visualización de las precipitaciones en la última semana.
month
Visualización de las precipitaciones en el último mes.
TOTAL
Visualización de todas las precipitaciones desde la última reinicialización.
Observación: Es posible reinicializar la cantidad total de lluvia si está
visualizada al mantener pulsada la tecla SET durante 2 segundos.
Temperatura
TEMP
Visualización de la temperatura exterior.
WIND CHILL
Visualización del factor de enfriamiento del viento.
DEW POINT
Visualización de la temperatura del punto de rocío.
Para obtener mediciones de temperatura precisas, mantenga el aparato lejos del alcance de fuentes de
calor como p.ej. edificios, la tierra y la luz del sol directa sin protección apropiada en ambientes calurosos.
Para obtener mediciones de humedad precisas, mantenga el aparato lejos del alcance de la tierra, hierba u
otras fuentes de humedad.
Instale la estación meteorológica de la siguiente manera:
1. Asegúrese de que la unidad exterior esté completamente montada y de que hayas introducido las pilas
tanto en la unidad exterior como en la unidad interior.
2. Ponga la unidad exterior y la estación de base en el lugar deseado y controle si la comunicación funciona.
o Si todo funciona, continúe con el siguiente paso.
o Si no fuera el caso, busque otro lugar para la unidad exterior y/o la estación de base hasta que todo
funcione correctamente.
3. Utilice los aros ajustables (incl.) para fijar el mástil de la unidad exterior [M]. Controle si la estación
meteorológica está posicionada correctamente antes de apretar los tornillos (véase abajo).
4. En el borde del sensor de dirección del viento encontrará cuatro letras “N”, “E”, “S” y “W”, que le indican la
dirección del viento, las cuales se corresponden con Norte, Este, Sur y Oeste [N]. Utilice una brújula (no
incl.) para ajustar el sensor de dirección de viento de modo que las direcciones en el sensor hagan juego
con su verdadera posición: asegúrese de que la letra “N” apunte al norte, la letra “E” al este, etc. para que
las lecturas sean correctas.
5. Utilice el nivel [B] del colector de lluvia para nivelar el aparato.
6. Fije el aparato en su sitio al apretar los tornillos en los aros ajustables [M].
7. Configurar la estación de base
La estación de base está equipada con 5 teclas para un fácil manejo: SET, +, HISTORY, ALARM, y MIN/MAX.
Pulse SET para desplazarse por los ajustes.
Pulse la tecla + para aumentar los valores. Pulse la tecla MIN/MAX para disminuir los valores.
Mantenga pulsada la tecla + o la tecla MIN/MAX durante 2 segundos para que el valor aumente/disminuya
más rápida.
Pulse HISTORY para salir del modo de configuración. Si no pulse ninguna tecla, la estación de base saldrá
automáticamente del modo al cabo de 30 segundos.
7.1 Modo de visualización rápida
Es posible seleccionar la información que quiere visualizar en la pantalla LCD de la estación de base. Los iconos
muestran la información seleccionada. Seleccione la información deseada de la siguiente manera:
1. En el modo normal, pulse SET.
Ahora, la estación está en el modo de visualización rápida.
2. Pulse SET para confirmar el ajuste actual y para ir al ajuste siguiente. Utilice la tecla + o la tecla MIN/MAX
para modificar los valores.
3. Para volver al modo normal, pulse HISTORY.
7.2 Unidades de medición, fecha y reloj
Configurar las unidades de medición y los ajustes de fecha/hora:
1. En el modo normal, mantenga pulsada SET durante 2 segundos.
Ahora, la estación está en el modo de configuración.
2. Pulse SET para confirmar el ajuste actual y para ir al siguiente ajuste. Utilice la tecla + o la tecla MIN/MAX
para modificar los valores.
V. 02 – 26/04/2013 37 ©Velleman nv
Page 38

WS1060
Ajuste
Descripción
brillo de la pantalla
LCD
Ajuste el brillo de la pantalla LCD de 0 a 8.
Huso horario
Seleccione su huso horario, de -12 a +12.
En Europa, 0 = GMT+1; 1 = GMT+2; -1 = GMT.
Formato de hora
Seleccione entre el formato de 12 ó 24 horas para visualizar la hora [27].
Hora
Es posible introducir la hora (horas/minutos) manualmente si el aparato no detecta la
señal DCF.
Formato de fecha
Seleccione entre el formato de día-mes-año (DM) o mes-día-año (MD) para visualizar la
fecha [4].
Fecha
Es posible introducir la fecha manualmente si el aparato no detecta la señal DCF.
Velocidad del viento
Seleccione entre la velocidad del viento/velocidad de ráfaga de viento en km/h
(kilómetros por hora), m/s (metros por segundo), bft (Beaufort), mph (millas por hora)
o knots (nudos). El icono correspondiente [25] aparece en la pantalla.
Dirección del viento
Ajuste la dirección del viento.
Precipitación
Seleccione entre mm o pulgadas. El icono correspondiente [15] aparece en la pantalla.
Temperatura
Seleccione entre °C y °F. El icono correspondiente [11] aparece en la pantalla.
3. Pulse HISTORY para volver al modo normal.
7.3 Modo HISTORY
En el modo de historial de datos, es posible visualizar las mediciones de las últimas 24 horas.
Visualizar el historial de datos
1. En el modo normal, pulse HISTORY.
Ahora, la estación está en el modo HISTORY. La pantalla visualizar HIS [3].
2. En el modo HISTORY, pulse MIN/MAX varias veces para volver en pasos de 3 horas.
3. Para volver al modo normal, pulse HISTORY.
Reinicializar el historial de datos
1. En el modo normal, pulse HISTORY.
Ahora, la estación está en el modo HISTORY. La pantalla visualizar HIS [3].
2. Pulse SET.
La palabra CLEAR parpadea.
o Para borrar el historial de datos, mantenga pulsada la tecla SET durante 2 segundos.
o Para salir y volver al modo normal sin reinicializar los datos, pulse HISTORY.
7.4 Ajustar las alarmas
Es posible programar una alarma de tiempo o una alarma meteorológica para avisar de ciertas condiciones
meteorológicas. Una vez activada, la alarma sonará durante 120 segundos. El icono correspondiente parpadea
hasta que se termine la condición meteorológica para la que ha introducido una alarma.
Pulse cualquier tecla para silenciar la alarma.
La pantalla deje de parpadear en cuanto se termine la condición meteorológica para la que ha introducido
una alarma. Sin embargo, la alarma queda activada y se activa de nuevo en cuanto se cumplan los criterios
introducidos. Desactive la alarma completamente en el menú de alarmas.
El icono parpadeará pero la alarma sonará si una condición meteorológica vuelve a ocurrirse dentro de las
3 horas desde la última alarma. Esta función evita una activación repetida para la misma condición
meteorológica.
Se puede ajustar:
Una alarma para una condición meteorológica elevada: La alarma suena si el valor medido sobrepasa el
umbral de alarma. Por ejemplo en cuanto la velocidad del viento sobrepase 20 m/s.
Una alarma para una condición meteorológica baja: La alarma suena si el valor medido cae por debajo del
umbral de alarma. Por ejemplo en cuanto la temperatura exterior cae por debajo de -5°C.
Ajustar, activar o desactivar la alarma:
1. En el modo normal, pulse ALARM.
Ahora, la estación está en el modo de alarma para condiciones meteorológicas altas (véase el resumen a
continuación). La pantalla muestra HIAL [4] y los valores actuales. Si no ha introducido un valor de alarma
específico, la pantalla muestra “– –“.
V. 02 – 26/04/2013 38 ©Velleman nv
Page 39

WS1060
Alarma para condiciones
meteorológicas altas
Descripción
Alarma de hora
Introduzca una hora (horas:minutos) si quiere activar la alarma.
Observación: también es posible ajustar la alarma de hora con los ajustes de
alarma para condiciones meteorológicas bajas.
Velocidad del viento
Introduzca el valor umbral para la velocidad del viento (0~50m/s). La alarma
suena si la velocidad del viento sobrepasa el valor introducido.
Velocidad de ráfaga de
viento
Introduzca el valor umbral para la velocidad de ráfaga de viento (0~50m/s). La
alarma suena si la velocidad de ráfaga de viento sobrepasa el valor introducido.
Dirección del viento
Introduzca el valor umbral para la dirección del viento. La alarma suena si el
viento viene de una dirección específica.
Cantidad de lluvia caída en
1 hora
Introduzca el valor umbral para la cantidad de lluvia caída en 1 hora
(0~999.9mm). La alarma suena si la cantidad de lluvia caída en 1 hora
sobrepasa el valor umbral introducido.
Cantidad de lluvia caída en
24 horas
Introduzca el valor umbral para la cantidad de lluvia caída en 24 horas
(0~999.9mm). La alarma suena si la cantidad de lluvia caída en 24 horas
sobrepasa el valor umbral introducido.
Humedad exterior
Introduzca el valor umbral para la humedad exterior (1%~99%). La alarma
suena si la humedad exterior sobrepasa el valor umbral introducido.
Temperatura exterior
Introduzca el valor umbral para la temperatura exterior (-40°C~+60°C). La
alarma suena si la temperatura exterior sobrepasa el valor umbral introducido.
Factor de enfriamiento
Introduzca el valor umbral para el factor de enfriamiento (-40°C~+60°C). La
alarma suena si la temperatura del factor de enfriamiento sobrepasa el valor
umbral introducido.
Punto de rocío
Introduzca el valor umbral para el punto de rocío (-40°C~+60°C). La alarma
suena si la temperatura del punto de rocío sobrepasa el valor umbral
introducido.
Humedad interior
Introduzca el valor umbral para la humedad interior (1%~99%). La alarma
suena si la humedad interior sobrepasa el valor umbral introducido.
Temperatura interior
Introduzca el valor umbral para la temperatura interior (-40°C~+60°C). La
alarma suena si la temperatura interior sobrepasa el valor umbral introducido.
Alarma para condiciones
meteorológicas bajas
Descripción
Humedad exterior
Introduzca el valor umbral para la humedad exterior (1%~99%). La alarma
suena si la cantidad exterior cae por debajo del valor umbral introducido.
Temperatura exterior
Introduzca el valor umbral para la temperatura exterior (-40°C~+60°C). La
alarma suena si la temperatura exterior cae por debajo del valor umbral
introducido.
Factor de enfriamiento
Introduzca el valor umbral para el factor de enfriamiento (-40°C~+60°C). La
alarma suena si la temperatura del factor de enfriamiento cae por debajo del
valor umbral introducido.
Punto de rocío
Introduzca el valor umbral para el punto de rocío (-40°C~+60°C). La alarma
suena si la temperatura del punto de rocío cae por debajo del valor umbral
introducido.
Humedad interior
Introduzca el valor umbral para la humedad interior (1%~99%). La alarma
suena si la humedad interior cae por debajo del valor umbral introducido.
2. Vuelva a pulsar ALARM para entrar el modo de alarma para condiciones meteorológicas bajas (véase el
resumen a continuación). La pantalla muestra LOAL [4] y los valores actuales de alarma baja. Si no ha
introducido un valor de alarma específico, la pantalla muestra “– –“.
3. Pulse SET para desplazarse por los ajustes de alarma.
4. Pulse la tecla + o la tecla MIN/MAX para ajustar los valores.
5. Pulse ALARM para activar/desactivar la alarma. Si la alarma está activada, el icono correspondiente y
HI AL (o LO AL para una alarma baja) se visualiza en la pantalla.
6. Pulse SET para confirmar el ajuste y para ir al ajuste siguiente.
7. Para volver al modo normal, pulse HISTORY.
Ajustar la alarma de valores altos (HI)
Ajustar la alarma de valores bajos (LO)
V. 02 – 26/04/2013 39 ©Velleman nv
Page 40

WS1060
Alarma para condiciones
meteorológicas bajas
Descripción
Temperatura interior
Introduzca el valor umbral para la temperatura interior (-40°C~+60°C). La
alarma suena si la temperatura interior cae por debajo del valor umbral
introducido.
Problema
Causa posible
Solución
Problema de
transmisión
Distancia demasiado grande entre ambos
aparatos
Disminuya la distancia
Material aislante entre ambos aparatos
(pared gruesa, acero…)
Seleccione otro lugar de montaje
Interferencias de otra fuente
Elimina las fuentes de interferencia
Datos ilegibles
No hay una recepción de datos
Seleccione otro lugar de montaje
Pilas bajas
Reemplace las pilas
Datos incorrectos
Pilas bajas
Reemplace las pilas
Ajuste incorrecto
Reprograme la estación meteorológica
7.5 Mediciones mínimas y máximas
La estación meteorológica registra las mediciones mín. y máx. para cada condición meteorológica (desde hace
la última reinicialización), la hora y la fecha en que fueron realizadas.
Visualizar las mediciones mín. y máx.
Para visualizar las mediciones mín. y máx., haga lo siguiente:
1. En el modo normal, pulse MIN/MAX.
Ahora la estación está en el modo de mediciones máximas. La pantalla muestra el icono para las
mediciones máximas [6].
2. Pulse + varias veces para visualizar los valores máximos para: la velocidad del viento, la velocidad de
ráfaga de viento, la cantidad de lluvia caída en 1 hora, la cantidad de lluvia caída en 24 horas, la cantidad
semanal de lluvia, la cantidad mensual de lluvia, la humedad exterior, la temperatura exterior, el factor de
enfriamiento, el punto de rocío, la humedad interior, la temperatura interior.
3. Pulse MIN/MAX para entrar en el modo de mediciones mínimas. La pantalla muestra el icono para las
mediciones mínimas [8].
4. Pulse la tecla + varias veces para visualizar los valores mínimos para: la humedad exterior, la temperatura
exterior, el factor de enfriamiento, el punto de rocío, la humedad interior, la temperatura interior.
5. Pulse HISTORY para volver al modo normal.
Reinicializar las mediciones mínimas y máximas
Para reinicializar las mediciones:
1. Entre en el modo de mediciones mínimas o máximas y Pulse la tecla + para visualizar el valor que quiere
reinicializar.
2. Mantenga pulsada SET durante 3 segundos.
3. Repita estos pasos para cualquier otro valor que quiere reinicializar.
4. Pulse HISTORY para volver al modo normal.
8. Reinicialización
Para restablecer los ajustes de fábrica, mantenga pulsada la tecla + durante 20 segundos.
9. Solución a problemas
10. Calibración
Para obtener mediciones exactas, calibre la velocidad del tiempo, la temperatura, la humedad y las mediciones
de lluvia con una herramienta de calibración (no incl.).
Para entrar en el modo de calibración:
1. En el modo normal, mantenga pulsado HISTORY durante 8 segundos.
Ahora la estación está en el modo de calibración. Los dígitos del factor de viento parpadean.
2. Pulse SET para ir al siguiente ajuste. Utilice la tecla + o la tecla MIN/MAX para modificar los valores.
3. Para salir del modo de calibración, pulse HISTORY.
Véase a continuación para más información sobre cada ajuste de calibración.
V. 02 – 26/04/2013 40 ©Velleman nv
Page 41

WS1060
Calibrar la velocidad del viento
El ajuste por defecto de la velocidad del viento es 1.0. El factor de ajuste oscila de 0.75 a 1.25. Puede
aumentar o disminuirlo en incrementos de 0.01.
El lugar de instalación del anemómetro es muy importante. Los siguientes factores influyen la medición de la
velocidad del viento:
El lugar de instalación de la estación meteorológica: cerca de edificios, árboles u otros obstáculos
El desgaste de los partes móviles del anemómetro.
Para calibrar la velocidad del viento, utilice un anemómetro calibrado (no incl.) y un ventilador de velocidad
constante, de alta velocidad (no incl.).
Calibrar la temperatura
Puede calibrar la temperatura interior y exterior.
Los siguientes factores influyen la medición de temperatura:
La proximidad de fuentes de calor, como edificios, la tierra, etc.
La exposición a la luz del sol directa sin protección adecuada en ambientes calurosos.
Para calibrar la temperatura, utilice un termómetro de mercurio o un termómetro de alcohol (no incl.). No
utilice un termómetro bimetálico (cuadrante) u otros termómetro digitales, porque tienen su propio margen de
error. No utilice una estación meteorológica local en su (diferencia en locación, tiempo o actualización y errores
de calibración posibles).
Para calibrar la temperatura, haga lo siguiente:
1. Ponga el sensor de temperatura en un sitio sombreado.
2. Ponga el termómetro al lado.
3. Deje que se estabilice durante 48 horas.
4. Compare la medición del sensor de temperatura con la del termómetro y modifique el valor en el modo de
calibración.
Calibrar la humedad
La precisión del sensor del higrómetro es de ±5%. Puede mejorar la precisión al calibrar las mediciones de
humedad interior y exterior.
Es posible que las mediciones de humedad se desvíen a lo largo del tiempo. La proximidad de fuentes de
humedad como la tierra, la hierba, etc. influye las mediciones.
Utilice un psicómetro giratorio (no incl.) o un juego disponible en el mercado para calibrar la humedad (no
incl.). Modifique el valor en el modo de calibración.
Calibrar la lluvia
El ajuste de calibración por defecto de la lluvia es de 1.0. El factor de ajuste varía de 0.75 a 1.25.
Utilice un pluviómetro del tipo tubo (no incl.), con una abertura de mín. 10 cm (4”). Un pluviómetro más
estrecho podría causar mediciones menos exactas. No utilice datos de boletines meteorológicos de radio,
televisión, periódicos. Tampoco utilice la estación meteorológica de los vecinos (otro sitio).
Para calibrar las mediciones de lluvia, haga lo siguiente:
1. Coloque el pluviómetro del tipo tubo al lado del colector de lluvia de la estación meteorológica.
2. Compare los totales de tres tormentas.
3. Calcule la declinación promedia basado en estos datos.
Calibrar la lluvia total
Para calibrar la cantidad de lluvia total, tenga en cuenta que el factor se aplica al total y no a la es aplicado a la
cantidad de vasos medida individualmente.
Ajuste el valor de la lluvia total en pasos de 0.3mm.
Para medir la lluvia total haga lo siguiente:
1. El colector de lluvia ha sido calibrado en la fábrica. Por tanto, el pequeño vaso se vacía (y registra la
cantidad de) cada vez que contenga 0.3 mm (0.01”) de lluvia.
2. El número total de veces que el vaso se vacía (desde hace la última reinicialización) se suma y se multiplica
por 0.3 para obtener un total en mm. (se aplica un factor de conversión para una lectura en pulgadas.)
3. Luego, el factor de calibración se aplica al total.
V. 02 – 26/04/2013 41 ©Velleman nv
Page 42

WS1060
11. Limpieza y mantenimiento
11.1 Reemplazar las pilas
Reemplazar las pilas de la estación de base Reemplace las pilas si resulta difícil leer la pantalla. Véase Introducir las pilas en la estación de base. ¡Ojo! Todos los datos meteorológicos y los ajustes de alarma se pierden al quitar las pilas de la estación de
base.
Reemplazar las pilas de la unidad exterior
La pantalla visualiza si el nivel de las pilas del transmisor está bajo. En este caso, reemplace las pilas
cuanto antes. Véase Introducir las pilas en la unidad exterior.
Observación: Tenga en cuenta que el indicador de batería baja sólo funciona correctamente dentro de un
rango de temperatura de 10~35°C. Es posible que el indicador de batería baja no funcione correctamente fuera
de este rango e indica que las pilas están agotadas aunque no es el caso.
El transmisor se sincroniza de nuevo con la estación de base dentro de las tres horas siguientes después de
haber reemplazado las pilas. Todos los datos meteorológicos y ajustes de alarma se mantienen.
Sin embargo, si quiere que los aparatos se sincronicen más rápido, quite las pilas de la estación de base y
reemplácelas después de 10 segundos.
¡Ojo! En este caso, perderá todos los datos meteorológicos y ajustes de alarma.
11.2 Reemplazar los sensores
Véase las figuras en la página 2-3 de este manual del usuario.
Reemplazar el colector de lluvia y el termómetro/higrómetro
Para reemplazar el colector de lluvia y el termómetro/higrómetro, haga lo siguiente:
1. Desatornille los tres tornillos [O] de la parte inferior del colector de lluvia.
2. Saque el colector de lluvia de la base [P].
3. Desatornille los cuatro tornillos de la tapa y quítela [Q].
4. Desconecte el cable de datos [R].
5. Desatornille el tornillo [S] que fija el sensor al mástil.
6. Fije el nuevo sensor al mástil y vuelva a atornillar el tornillo.
7. Vuelva a conectar el cable de datos.
8. Reemplace la tapa del sensor y fíjela con los tornillos.
9. Coloque el nuevo colector de lluvia en la base.
10. Fije el colector de lluvia con los tres tornillos de la parte inferior a la base.
11. Utilice el nivel [B] del colector de lluvia para controlar si el aparato todavía está correctamente nivelado. Si
fuera necesario, ajuste la posición.
Reemplazar el sensor de viento
Para reemplazar el sensor de viento, haga lo siguiente:
1. Desconecte el cable de datos: véase Reemplazar el colector de lluvia y el termómetro/higrómetro.
2. Desatornille el tornillo [T] que fija el sensor al mástil.
3. Fije el nuevo sensor al mástil y vuelva a atornillar el tornillo.
4. Vuelva a conectar el cable de datos.
5. En el borde del sensor de dirección del viento encontrará cuatro letras “N”, “E”, “S” y “W”, que le indican la
dirección del viento, las cuales se corresponden con Norte, Este, Sur y Oeste [N]. Utilice una brújula (no
incl.) para ajustar el sensor de dirección de viento de modo que las direcciones en el sensor hagan juego
con su verdadera posición: asegúrese de que la letra “N” apunte al norte, la letra “E” al este, etc. para que
las lecturas sean correctas.
6. Utilice el nivel [B] del colector de lluvia para controlar si el aparato todavía está correctamente nivelado. Si
fuera necesario, ajuste la posición.
V. 02 – 26/04/2013 42 ©Velleman nv
Page 43

WS1060
Datos exteriores
alcance de la transmisión
100 m en campo abierto
frecuencia
868 MHz
Intervalo de medición del
termómetro/higrómetro
48 segundos
temperatura
alcance
-40°C~+65°C
precisión
±1°C
resolución
0.1°C
humedad relativa
alcance
1%~99%
precisión
±5%
Cantidad de lluvia
alcance
0~999.9mm (– – se visualiza si fuera del alcance)
precisión
±10%
resolución
0.3 mm (cantidad de la lluvia < 1000 mm);
1 mm (cantidad de la lluvia > 1000 mm)
Velocidad de viento
alcance
0~180 km/h (– – se visualiza si fuera del alcance)
precisión
±1 m/s (velocidad de viento < 10 m/s);
±10% (velocidad de viento > 10 m/s)
Datos interiores
Intervalo de medición
(temperatura y humedad)
30 segundos
temperatura
alcance
-9.9°C~+60°C (– – se visualiza si fuera del alcance)
resolución
0.1°C
humedad relativa
alcance
1%~99%
precisión
±1%
Consumo
Sensor exterior
2 pilas alcalinas AA de 1.5V (no incl.)
Estación de base
3 pilas alcalinas AA de 1.5V (no incl.)
Duración de vida estimada
12 meses para la estación de base
24 meses para el termómetro/higrómetro
Observación: Esto sólo sirve de directriz. La duración de vida efectiva
depende de diferentes factores (p.ej. temperatura ambiente).
12. Especificaciones
Utilice este aparato sólo con los accesorios originales. Velleman NV no será responsable de daños ni
lesiones causados por un uso (indebido) de este aparato.
Para más información sobre este producto y la versión más reciente de este manual del usuario,
visite nuestra página www.velleman.eu.
Se pueden modificar las especificaciones y el contenido de este manual sin previo aviso.
© DERECHOS DE AUTOR
Velleman NV dispone de los derechos de autor para este manual del usuario. Todos los derechos
mundiales reservados.
Está estrictamente prohibido reproducir, traducir, copiar, editar y guardar este manual del usuario o partes de
ello sin previo permiso escrito del derecho habiente.
V. 02 – 26/04/2013 43 ©Velleman nv
Page 44

WS1060
Halten Sie Kinder und Unbefugte vom Gerät fern.
Verwenden Sie das Gerät nur im Innenbereich. Schützen Sie das Gerät vor Regen und
Feuchte.
Schützen Sie das Gerät vor Staub. Schützen Sie das Gerät vor extremen Temperaturen.
Vermeiden Sie Erschütterungen. Vermeiden Sie rohe Gewalt während der Installation und
Bedienung des Gerätes.
BEDIENUNGSANLEITUNG
1. Einführung
An alle Einwohner der Europäischen Union
Wichtige Umweltinformationen über dieses Produkt
Dieses Symbol auf dem Produkt oder der Verpackung zeigt an, dass die Entsorgung dieses Produktes
nach seinem Lebenszyklus der Umwelt Schaden zufügen kann. Entsorgen Sie die Einheit (oder
verwendeten Batterien) nicht als unsortiertes Hausmüll; die Einheit oder verwendeten Batterien
müssen von einer spezialisierten Firma zwecks Recycling entsorgt werden. Diese Einheit muss an den
Händler oder ein örtliches Recycling-Unternehmen retourniert werden. Respektieren Sie die örtlichen
Umweltvorschriften.
Falls Zweifel bestehen, wenden Sie sich für Entsorgungsrichtlinien an Ihre örtliche Behörde.
Wir bedanken uns für den Kauf des WS1060! Lesen Sie diese Bedienungsanleitung vor Inbetriebnahme
sorgfältig durch. Überprüfen Sie, ob Transportschäden vorliegen. Sollte dies der Fall sein, verwenden Sie das
Gerät nicht und wenden Sie sich an Ihren Händler.
2. Sicherheitshinweise
3. Allgemeine Richtlinien
Siehe Velleman® Service- und Qualitätsgarantie am Ende dieser Bedienungsanleitung.
Nehmen Sie das Gerät erst in Betrieb, nachdem Sie sich mit seinen Funktionen vertraut gemacht haben.
Eigenmächtige Veränderungen sind aus Sicherheitsgründen verboten. Bei Schäden verursacht durch
eigenmächtige Änderungen erlischt der Garantieanspruch.
Verwenden Sie das Gerät nur für Anwendungen beschrieben in dieser Bedienungsanleitung sonst kann dies
zu Schäden am Produkt führen und erlischt der Garantieanspruch.
Bei Schäden, die durch Nichtbeachtung der Bedienungsanleitung verursacht werden, erlischt der
Garantieanspruch. Für daraus resultierende Folgeschäden übernimmt der Hersteller keine Haftung.
Bewahren Sie diese Bedienungsanleitung für künftige Einsichtnahme auf.
4. Eigenschaften
Messung der Innentemperatur und der Feuchte
Außentemperatur und -Feuchtigkeit über den Außensensor
gefühlte Temperatur, Windrichtung und Regenfall über den Außensensor
Temperaturanzeige in °C/°F
Regenfalldaten (mm oder Inch): 1 Stunde, Tag, Woche, Monat und Total seit der letzten Rücksetzung
Aufzeichnung aller Mindest- und Höchstwerte mit Aufnahmezeit und -Datum
Windstärke (mph, km/s, m/s, Knoten oder Beaufort)
Anzeige der Windrichtung (8 Richtungen)
Alarmmodi für: Temperatur, Feuchte, gefühlte Temperatur, Taupunkt, Regenfall, Windgeschwindigkeit
funkgesteuerte Zeit- und Datumsempfang
12/24-Stunden-Anzeige
ewiger Kalender
Zeitzoneneinstellung
Alarm
LED-Hintergrundbeleuchtung
V. 02 – 26/04/2013 44 ©Velleman nv
Page 45

WS1060
1
Alarm für die Uhr ist eingeschaltet
15
Regenfalleinheit: mm oder inch
2
RCC- Empfangssignal
16
Alarm für Min./Max.-Außentemperatur ist
eingeschaltet
3
Wochentag
17
Außentemperatur
4
Datum
18
Außensignal wird empfangen
5
Alarm für die Windrichtung ist eingeschaltet
19
Außenluftfeuchte
6
Anzeige der Max.-Werte
20
Anzeige von « Batterie leer » für den
Außensensor
7
Windrichtung
21
Alarm für die Min./Max.-Außenluftfeuchte ist
eingeschaltet
8
Anzeige der Min.-Werte
22
Regenfall
9
Alarm für hohen Regenfall ist eingeschaltet
23
Regenfallperiode: 1 Stunde, 24 Stunden,
Woche, Monat oder Total
10
Alarm für Min./Max.-Innentemperatur ist
eingeschaltet
24
Windgeschwindigkeit
11
Temperatureinheit: °C oder °F
25
Einheit der Windgeschwindigkeit: bft, mph,
Knoten, km/h, m/s
12
Innentemperatur
26
Alarm für hohe Windgeschwindigkeit ist
eingeschaltet
13
Alarm für Min./Max.-Innenluftfeuchte ist
eingeschaltet
27
Uhrzeit
14
Innenluftfeuchte
A
Windrichtungssensor
D
Thermo-/Hygrometer (geschützt) und Sender
B
Wasserwaage
E
Mast
C
Regensensor
F
Anemometer
als Wand- oder als Tischuhr einsetzbar
synchronisierter und direkter Empfang
Lieferumfang:
o Empfänger
o 4 Außensensoren: Thermo-/Hygrometer, Anemometer, Windfahne und Pluviometer
5. Umschreibung
Siehe Abbildungen, Seite 2-3 dieser Bedienungsanleitung.
Display der Basisstation
Außensensor
6. Installation
Siehe Abbildungen, Seite 2-3 dieser Bedienungsanleitung.
6.1 Montage
Das Thermo-/Hygrometer, der Regensensor und der Windrichtungssensor sind schon montiert. Sie brauchen
nur die Halbkugelschalen für das Anemometer zu befestigen.
1. Befestigen Sie die Halbkugelschalen am des Anemometers [K].
2. Verwenden Sie einen Sechskantschlüssel (mitgeliefert), um die Schraube an der Seite der
Halbkugelschale [L] zu schrauben.
3. Drehen Sie die Halbkugelschalen und beachten Sie, dass diese problemlos bewegen können. Können die
Halbkugelschalen nicht bewegen, dann sind die Windgeschwindigkeitsmessungen falsch.
6.2 Die Wetterstation einstellen
Legen Sie die Batterien zuerst in den Außensensor und anschließend die Batterien in die Basisstation ein, bevor
Sie den endgültigen Standort auswählen. Jetzt startet die Synchronisation zwischen der Basisstation und dem
Außensensor. Wählen Sie einen anderen Installationsort aus, wenn es eine schlechte Kommunikation gibt.
V. 02 – 26/04/2013 45 ©Velleman nv
Page 46

WS1060
Durchbohren Sie nie die Batterien und werfen Sie diese nicht ins Feuer. Laden Sie keine
Alkalibatterien auf. Respektieren Sie die örtlichen Umweltvorschriften beim Entsorgen der Batterien.
Halten Sie die Batterien von Kindern fern.
Die Batterien
Verwenden Sie nur Batterien des gleichen Typs.
Entfernen Sie die Batterien bei längerem Nichtgebrauch aus dem Gerät. Alte Batterien können auslaufen
und das Gerät beschädigen.
Beachten Sie beim Einlegen der Batterien die richtige Polarität. Eine falsche Polarität könnte das Gerät
beschädigen.
Alkalinebatterien haben einen typischen Bereich von -20°C~+54°C. Verwenden Sie das Gerät nicht
außerhalb dieses Temperaturbereichs.
Die Batterien in den Außensensor einlegen
1. Lockern Sie die Schraube auf der Unterseite des Regensensors und schieben Sie den Metallverschluss
seitwärts, um das Batteriefach [G] zu befreien.
2. Nehmen Sie das Batteriefach [H] heraus.
3. Legen Sie 2 x AA 1.5V LR6-Batterien ein. Achten Sie hierbei auf die richtige Polarität (siehe Markierung im
Batteriefach) [I].
4. Verschließen Sie das Batteriefach [J] wieder.
Die LED auf der Rückseite des Regensensors leuchtet 4 Sekunden. Ist dies nicht der Fall, so überprüfen Sie,
ob die Batterien polungsrichtig eingelegt worden sind.
5. Setzen Sie den Metallverschluss zurück, um das Batteriefach zu sichern und schrauben Sie die Schraube
wieder fest.
Die Batterien in die Basisstation einlegen
1. Öffnen Sie den Batteriefachdeckel auf der Rückseite der Basisstation.
2. Legen Sie 3 x AA 1.5V LR6-Batterien polungsrichtig ein.
Alle Segmente im LCD-Display leuchten 2 Sekunden. Ist dies nicht der Fall, so überprüfen Sie, ob die
Batterien polungsrichtig eingelegt worden sind.
3. Schließen Sie den Batteriefachdeckel wieder.
4. Drücken Sie nun noch keine Tasten.
Lassen Sie das Gerät zuerst nach dem Signal des Außensensors suchen und beginnen zu synchronisieren.
Wenn nötig, entfernen Sie die Batterien aus der Basisstation und warten Sie mindestens 10 Sekunden,
bevor Sie diese wieder einlegen.
5. Warten Sie bis die Innen- und die Außentemperatur im Display erscheint, ehe Sie fortfahren.
Der Sender sendet alle 48 Sekunden Wetterdaten zur Basisstation.
Funkgesteuerter Signalempfang
Nachdem Sie die Batterien eingelegt haben, startet der Sender mit der Übertragung der Wetterdaten zur
Basisstation, und sucht dann das DCF-Signal der funkgesteuerten Uhr (RCC), um das Datum und die Uhrzeit
automatisch einzustellen. Wird das DCF-Signal detektiert, dann blinkt die LED auf der Rückseite des
Regensensors 5 Mal und leuchtet danach 20 Sekunden. Der Sender sendet das richtige Datum und die richtige
Uhrzeit zur Basisstation. Im Display erscheint die RCC-Ikone .
Ist das DCF-Signal schwach und ist der Empfang unmöglich, dann stoppt der Sender nach 1 Minute zu suchen,
und kehrt zum normalen Betriebsmodus zurück (= Wetterdaten zur Basisstation senden). Der Sender führt alle
zwei Stunden eine erneute Suche nach dem DCF-Signal durch. Falls kein DCF-Signal empfangen werden kann
oder wenn das Signal schon über 12 Stunden alt, dann verschwindet die RCC-Ikone .
Bemerkung: Die automatische Synchronisation erfolgt jeden Tag zwischen Mitternacht und 6:00 Uhr weil die
atmosphärische Störungen nachts meist geringer sind.
Während des DCF-Signalempfangs, sendet der Sender keine Wetterdaten zur Basisstation. Die Suche nach dem
DCF-Signal kann max. 5 Minuten dauern.
Bemerkung: Falls kein DCF-Empfang möglich ist, dann können Sie das Datum und die Uhrzeit manuell
einstellen. Siehe 7.2 Maßeinheit, Datum und Uhrzeit. Ist der Signalempfang aber erfolgreich, dann werden
die manuell eingestellte Zeit und das Datum überschrieben.
V. 02 – 26/04/2013 46 ©Velleman nv
Page 47

WS1060
Einstellung
Display
Beschreibung
Wind
(nichts)
Anzeige der Windgeschwindigkeit.
Gust
Anzeige der Böengeschwindigkeit.
6.3 Installation
Bemerkung: Montieren Sie die Wetterstation und beachten Sie, dass die Kommunikation zwischen
Außensensor und Basisstation korrekt funktioniert, bevor Sie die Wetterstation installieren. Probleme mit RadioEmpfang können normalerweise gelöst werden wenn Sie einen anderen Montageort auswählen.
Bei der Auswahl des geeigneten Installationsorts für den Außensensor und die Basisstation, beachten Sie
folgendes:
Die Reichweite der Übertragung der Funksignale zwischen Außensensor und Basisstation beträgt unter
optimalen Bedingungen bis zu 100m (330ft) im freien Feld, wenn keine Hindernisse wie z.B. Gebäude,
Bäume, Fahrzeuge, Hochspannungsleitungen, usw. die Funkübertragung behindern.
Computerbildschirme, Funkgeräte oder Fernsehgeräte können ebenfalls Störungen verursachen oder die
Funkverbindung völlig unmöglich machen.
Bäume, Sträucher, Mauern, usw. können die Messungen beeinflussen. Der Montageort muss frei liegen, so
dass der Windgeschwindigkeits- und Windrichtungssensor korrekte Werte anzeigen können.
Für genaue Windgeschwindigkeitsmessungen, installieren Sie das Gerät entfernt von Gebäuden, Bäumen
oder anderen Hindernissen.
Für genaue Temperaturmessungen halten Sie ausreichen Abstand zu Heizkörpern und wählen Sie als
Aufstellort eine Stelle, die keinem direkten Sonnenlicht ausgesetzt ist.
Für genaue Luftfeuchtigkeitsmessungen, installieren Sie das Gerät entfernt von Erde, Gras oder anderen
Feuchtigkeitsquellen.
Gegen Sie zur Montage der Wetterstation wie folgt vor:
1. Beachten Sie, dass der Außensensor völlig montiert ist und, dass die Batterien in den Außensensor und die
Basisstation eingelegt sind.
2. Installieren Sie den Außensensor und die Basisstation an dem gewünschten Aufstellort und überprüfen Sie,
ob die Kommunikation funktioniert.
o Funktioniert alles, dann führen Sie zum nächsten Schritt durch.
o Funktioniert nicht alles, so ändern Sie den Aufstellort des Außensensors und/oder der Basisstation bis
alles richtig funktioniert.
3. Verwenden Sie die verstellbaren Ringe (mitgeliefert) um den Außensensor am Mast zu befestigen [M].
Stellen Sie sicher, dass die Wetterstation gut installiert ist, bevor Sie die Schrauben festschrauben (siehe
unten).
4. An der Kante des Windrichtungssensors, befinden sich Markierungen [N] für die Himmelsrichtungen
(N = Norden, E = Osten, S = Süden und W = Westen). Die korrekte Himmelsrichtung lässt sich mit einem
Kompass (nicht mitgeliefert) ermitteln: Beachten Sie, dass die N-Markierung genau nach Norden zeigt, die
E-Markierung nach Osten, usw. Installieren Sie den Sensor falsch, dann sind die Windrichtungsmessungen
auch nicht genau.
5. Verwenden Sie die Wasserwaage [B] des Regensensors, um das Gerät perfekt zu nivellieren.
6. Installieren Sie das Gerät an der gewünschten Montagestelle, indem Sie die Schrauben an den verstellbaren
Ringen festschrauben [M].
7. Die Basisstation konfigurieren
Die Basisstation verfügt über fünf einfach bedienbare Tasten: SET, +, HISTORY, ALARM, und MIN./MAX.
Drücken Sie SET, um durch die Einstellungen zu scrollen.
Drücken Sie die +-Taste, um die Werte zu erhöhen oder drücken Sie die MIN./MAX.-Taste, um die Werte zu
verringern.
Halten Sie + oder MIN./MAX. 2 Sekunden gedrückt, um schneller zu erhöhen/verringern.
Wird innerhalb 30 Sekunden keine Taste betätigt, so wird der Einstellvorgang automatisch abgeschlossen.
Sie können den Einstellmodus ebenfalls jederzeit verlassen, indem Sie HISTORY drücken.
7.1 Schnelle Anzeige-Modus
Sie können die Informationen, die Sie im Display der Basisstation angezeigt werden, schnell ändern. Die Ikonen
zeigen die gewünschte Information an. Wählen Sie die gewünschte Information aus wie folgt:
1. Im normalen Modus, drücken Sie SET.
das Gerät befindet sich nun im Modus Modus « schnelle Anzeige ».
2. Drücken Sie SET, um die aktuelle Einstellung zu bestätigen und zur nächsten Einstellung zu gehen.
Verwenden Sie die +-Taste oder die MIN./MAX.-Taste um die Werte zu ändern.
V. 02 – 26/04/2013 47 ©Velleman nv
Page 48

WS1060
Einstellung
Display
Beschreibung
Regenfall
1h
Anzeige der Regenmenge der letzten Stunde.
24h
Anzeige der Regenmenge der letzten 24 Stunden.
week
Anzeige der Regenmenge der letzten Woche.
month
Anzeige der Regenmenge des letzten Monats.
TOTAL
Anzeige der Gesamtregenmenge seit der letzten Rücksetzung.
Bemerkung: Wird die Gesamtregenmenge angezeigt, dann können Sie
die Daten zurückstellen, indem Sie SET 2 Sekunden gedrückt halten.
Temperatur
TEMP
Anzeige der Außentemperatur.
WIND CHILL
Anzeige der gefühlten Temperatur.
DEW POINT
Anzeige des Taupunkts.
Einstellung
Beschreibung
Helligkeit des LCDDisplays
Regeln Sie die Helligkeit des LCD–Displays von 0 bis 8.
Zeitzone
Wählen Sie die Zeitzone von -12 bis +12 aus.
In Europa, 0 = GMT+1; 1 = GMT+2; -1 = GMT.
Zeitformat
Wählen Sie zwischen der 12-Stunden- oder dem 24-Stunden-Anzeige [27].
Uhrzeit
Kann das DCF-Signal nicht empfangen werden, so stellen Sie die Uhr manuell
(Stunden/Minuten) ein.
Datumformat
Wählen Sie zwischen Tag-Monat-Jahr (DM) oder Monat-Tag-Jahr (MD) um das
Datum [4] anzuzeigen.
Datum
Kann das DCF-Signal nicht empfangen werden, so stellen Sie das Datum manuell ein.
Windgeschwindigkeit
Wählen Sie für die Anzeige der Windgeschwindigkeit / Böengeschwindigkeit zwischen
km/h, m/s, bft (Beaufort), mph, oder knots (Knoten). Die entsprechende Ikone [25]
erscheint im Display.
Windrichtung
Regeln Sie die Windrichtung.
Regenfall
Wählen Sie für die Anzeige des Regenfalls zwischen mm oder Inch. Die entsprechende
Ikone [15] erscheint im Display.
Temperatur
Wählen Sie für die Anzeige der zwischen °C oder °F. Die entsprechende Ikone [11]
erscheint im Display.
3. Um zum normalen Modus zurückzukehren, drücken Sie HISTORY.
7.2 Maßeinheit, Datum und Uhrzeit
Gehen Sie wie folgt vor:
1. Im normalen Modus, halten Sie SET 2 Sekunden gedrückt.
Die Wetterstation befindet sich nun im Einstellmodus.
2. Drücken Sie SET um die aktuelle Einstellung zu bestätigen und zur nächsten Einstellung zu gehen.
Verwenden Sie die +-Taste oder die MIN./MAX.-Taste um die Werte zu ändern.
3. Um zum normalen Modus zurückzukehren, drücken Sie HISTORY.
7.3 History-Modus
Im History-Modus werden die Messungen der letzten 24 Stunden angezeigt.
Die Messdaten anzeigen
1. Im normalen Modus, drücken Sie HISTORY.
Die Wetterstation befindet sich nun im History-Modus. Im Display wird HIS [3] angezeigt.
2. Im History-Modus, drücken Sie MIN./MAX. wiederholt um in Schritten von 3 Stunden zurückzukehren.
3. Um zum normalen Modus zurückzukehren, drücken Sie HISTORY.
Die Wetterdaten-Historie löschen
1. Im normalen Modus, drücken Sie HISTORY.
Die Wetterstation befindet sich nun im History-Modus. Im Display wird HIS [3] angezeigt.
2. Drücken Sie SET.
Das Wort CLEAR blinkt im Display.
o Um die History-Daten zu löschen, drücken Sie und halten Sie SET 2 Sekunden gedrückt.
o Um den Modus zu verlassen, ohne die Wetterdaten-Historie zu löschen, drücken Sie HISTORY. So
kehren Sie zum normalen Modus zurück.
V. 02 – 26/04/2013 48 ©Velleman nv
Page 49

WS1060
Hoch-Alarm
Beschreibung
Zeitalarm
Stellen Sie die Uhrzeit (Stunden:Minuten) für einen Alarm ein.
Bemerkung: Der Zeitalarm kann auch im Niedrig-Alarmmodus eingestellt werden.
Windgeschwindigkeit
Stellen Sie den Schwellenwert für die Windgeschwindigkeit (0~50m/s) ein. Der Alarm
ertönt wenn die Windgeschwindigkeit den eingestellten Wert überschreitet.
Böengeschwindigkeit
Stellen Sie den Schwellenwert für die Böengeschwindigkeit (0~50m/s) ein. Der Alarm
ertönt wenn der eingestellten Schwellenwert überschreitet wird.
Windrichtung
Stellen Sie den Alarm für die Windrichtung ein. Der Alarm ertönt wenn der Wind aus
einer bestimmten Richtung kommt.
Regenfall 1 Stunde
Stellen Sie den Schwellenwert für den Regenfall in 1 Stunde ein (0~999.9mm). Der
Alarm ertönt wenn der eingestellten Schwellenwert überschreitet wird.
Regenfall 24
Stunden
Stellen Sie den Schwellenwert für den Regenfall in 24 Stunden ein (0~999.9mm). Der
Alarm ertönt wenn der eingestellten Schwellenwert überschreitet wird.
Außenluftfeuchte
Stellen Sie den Schwellenwert für die Außenluftfeuchte ein (1%~99%). Der Alarm ertönt
wenn der eingestellten Schwellenwert überschreitet wird.
Außentemperatur
Stellen Sie den Schwellenwert für die Außentemperatur ein (-40°C~+60°C). Der Alarm
ertönt wenn der eingestellten Schwellenwert überschreitet wird.
Gefühlte Temperatur
Stellen Sie den Schwellenwert für die gefühlte Temperatur ein (-40°C~+60°C). Der
Alarm ertönt der eingestellten Schwellenwert überschreitet wird.
Taupunkt
Stellen Sie den Schwellenwert für den Taupunkt ein (-40°C~+60°C). Der Alarm ertönt
der eingestellten Schwellenwert überschreitet wird.
Innenluftfeuchte
Stellen Sie den Schwellenwert für die Innenluftfeuchte ein (1%~99%). Der Alarm ertönt
wenn der eingestellten Schwellenwert überschreitet wird.
Innentemperatur
Stellen Sie den Schwellenwert für die Innentemperatur ein (-9.9°C~+60°C). Der Alarm
ertönt wenn der eingestellten Schwellenwert überschreitet wird.
7.4 Alarmeinstellmodus
Die Basisstation kann so programmiert werden, um beim Eintritt bestimmter Wetterbedingungen ein
Warnsignal zu geben. Erreichen die Bedingungen für einen Alarm, dann ertönt ein akustisches Signal für
120 Sekunden. Die entsprechende Ikone blinkt bis die bestimmte Wetterbedingung endet.
Drücken Sie eine beliebige Taste, um das akustische Signal stummzuschalten.
Ist die Wetterbedingung vorbei, dann hört das Display auf zu blinken. Der Alarm ist aber noch immer
eingeschaltet und ertönt wieder sobald der Alarmschwellenwert überschreitet wird. Das Ausschalten erfolgt
im Alarm-Menü.
Erreicht ein Wert die Bedingungen für einen Alarm innerhalb einer Zeitspanne von 3 Stunden wieder, dann
blinkt die Ikone auch wieder. Das akustische Signal ertönt aber nicht. Diese Eigenschaft vermeidet eine
wiederholte Einschaltung für dieselbe Wetterbedingung.
Mögliche Einstellungen:
Alarm für Wetterbedingung HOCH: Der Alarms wird eingeschaltet wenn der gemessene Wert den
Alarmschwellenwert überschreitet. Zum Beispiel: die Windgeschwindigkeit überschreitet 20 m/s.
Alarm für Wetterbedingung NIEDRIG: Der Alarms wird eingeschaltet wenn der gemessene Wert den
Alarmschwellenwert unterschreitet. Zum Beispiel: die Windgeschwindigkeit unter -5°C absinkt.
Einen Alarm einstellen, einschalten oder ausschalten:
1. Im normalen Modus, drücken Sie ALARM.
Die Wetterstation befindet sich nun im HOCH-Alarmmodus. Stellen Sie hier die hohen Alarmwerte ein (siehe
Liste unten). Im Display erscheint HIAL [4] und die aktuellen hohen Alarmwerte. Haben Sie einen
Alarmwert nicht eingestellt, dann zeigt das Display “– –“ an.
2. Drücken Sie ALARM erneut, um in den niedrigen Alarmmodus zu gelangen. Stellen Sie hier die niedrigen
Alarmwerte ein (siehe Liste unten). Im Display erscheint LOAL [4] und die aktuellen niedrigen Alarmwerte.
Haben Sie einen Alarmwert nicht eingestellt, dann zeigt das Display “– –“ an.
3. Drücken Sie SET um durch die Alarmeinstellungen zu scrollen.
4. Drücken Sie die +-Taste oder die MIN./MAX.-Taste um die Werte einzustellen.
5. Drücken Sie ALARM um den Alarm ein-/auszuschalten. Ist der Alarm eingeschaltet, dann erscheint die
entsprechende Alarmikone und HI AL (oder LO AL für einen NIEDRIG-Alarm) im Display.
6. Drücken Sie SET um die aktuelle Einstellung zu bestätigen und zur nächsten Einstellung zu gehen.
7. Um zum normalen Modus zurückzukehren, drücken Sie HISTORY.
Einstellung der hohen Alarmwerte (HI)
V. 02 – 26/04/2013 49 ©Velleman nv
Page 50

WS1060
Low Alarm
Description
Außenluftfeuchte
Stellen Sie den Schwellenwert für die Außenluftfeuchte ein (1%~99%). Der Alarm ertönt
wenn der eingestellten Schwellenwert unterschreitet wird.
Außentemperatur
Stellen Sie den Schwellenwert für die Außentemperatur ein (-40°C~+60°C). Der Alarm
ertönt wenn der eingestellten Schwellenwert unterschreitet wird.
Gefühlte
Temperatur
Stellen Sie den Schwellenwert für die gefühlte Temperatur ein (-40°C~+60°C). Der
Alarm ertönt wenn der eingestellten Schwellenwert unterschreitet wird.
Taupunkt
Stellen Sie den Schwellenwert für den Taupunkt ein (-40°C~+60°C). Der Alarm ertönt
wenn der eingestellten Schwellenwert unterschreitet wird.
Innenluftfeuchte
Stellen Sie den Schwellenwert für die Innenluftfeuchte ein (1%~99%). Der Alarm ertönt
wenn der eingestellten Schwellenwert unterschreitet wird.
Innentemperatur
Stellen Sie den Schwellenwert für die Innentemperatur ein (-9.9C~+60°C). Der Alarm
ertönt wenn der eingestellten Schwellenwert unterschreitet wird.
Problem
Mögliche Ursache
Lösung
Probleme mit dem
Empfang
Der Abstand zwischen den 2 Geräten
ist zu groß
Verkürzen Sie den Abstand zwischen den
2 Geräten
Abschirmende Materialien zwischen
den 2 Geräten (dicke Wand, Stahl…)
Verändern Sie den Aufstellungsort
Störung anderer Geräte
Schalten Sie die Störungen aus
Daten im LCD-Display
sind nicht lesbar
Kein Datenempfang
Verändern Sie den Aufstellungsort
Schwache Batterien
Setzen Sie neue Batterien ein
Falsche Daten
Schwache Batterien
Setzen Sie neue Batterien ein
Falsche Einstellung
Programmieren Sie die Wetterstation aufs
Neue
Einstellung der niedrigen Alarmwerte (LO)
7.5 MIN./MAX.-Messungen
Die Wetterstation speichert die Mindest- und Höchstmessungen für jede Wetterbedingung (seit der letzten
Rücksetzung), die Zeit und das Datum der Aufzeichnung.
Die Min. und Max-Messungen anzeigen
Gehen Sie wie folgt vor:
1. Im normalen Modus, drücken Sie MIN./MAX.
Die Wetterstation befindet sich nun im MAX.-Modus. Die entsprechende MAX-Ikone [6] erscheint im
Display.
2. Drücken Sie + wiederholt, um die Höchstwerte anzuzeigen: Windgeschwindigkeit, Böengeschwindigkeit,
1-Stunde-Regenfall, 24-Stunden-Regenfall, wöchentlicher Regenfall, monatlicher Regenfall,
Außenluftfeuchte, Außentemperatur, gefühlte Temperatur, Taupunkt, Innenluftfeuchte, Innentemperatur.
3. Drücken Sie MIN./MAX. um in den MIN.-Modus zu gelangen. Die entsprechende MIN.-Ikone [8] erscheint
im Display.
4. Drücken Sie + wiederholt, um die Mindestwerte anzuzeigen: Außenluftfeuchte, Außentemperatur, gefühlte
Temperatur, Taupunkt, Innenluftfeuchte, Innentemperatur.
5. Drücken Sie HISTORY um zum normalen Modus zurückzukehren.
MIN./MAX. zurücksetzen
Gehen Sie wie folgt vor:
1. Drücken Sie die +-Taste im MIN-. oder MAX.-Modus, um den Wert, den Sie zurücksetzen möchten,
anzuzeigen.
2. Halten Sie SET 3 Sekunden gedrückt.
3. Wiederholen Sie dies, für alle Werte, die Sie zurücksetzen möchten.
4. Drücken Sie HISTORY um zum normalen Modus zurückzukehren.
8. Rücksetzung
Um die Wetterstation auf Werkseinstellungen zurückzustellen, halten Sie die+-Taste 20 Sekunden gedrückt.
9. Behebung von Störungen
V. 02 – 26/04/2013 50 ©Velleman nv
Page 51

WS1060
10. Kalibrierung
Für genaue Messungen kalibrieren Sie die Windgeschwindigkeits-, Temperatur-, Feuchtigkeits- und
Regenfallmessungen mit Kalibrierwerkzeugen (nicht mitgeliefert).
Um in den Kalibriermodus zu gelangen, gehen Sie wie folgt vor:
1. Im normalen Modus, halten Sie die HISTORY-Taste 8 Sekunden gedrückt.
Die Wetterstation befindet sich nun im Kalibriermodus. Die Windfaktor-Ziffer blinken.
2. Drücken Sie SET, um zur nächsten Einstellung zu gehen. Verwenden Sie die +-Taste oder die MIN./MAX.-
Taste um die Werte zu ändern.
3. Um den Kalibriermodus zu verlassen, drücken Sie HISTORY.
Siehe unten für eine Beschreibung jedes Kalibrierwerkzeuges.
Die Windgeschwindigkeit kalibrieren
Die Standard-Kalibriereinstellung für die Windgeschwindigkeit ist 1.0. Der Anpassungsfaktor reicht von 0.75 bis
1.25. Eine Anpassung in Schritten von 0.01 ist möglich.
Der Aufstellort für das Anemometer ist sehr wichtig. Folgende Faktoren beeinflussen die
Windgeschwindigkeitsmessungen:
Aufstellort der Wetterstation: die Nähe von Gebäuden, Bäumen oder anderen Hindernissen
Verschleiß der bewegenden Teile des Anemometers.
Verwenden Sie ein kalibriertes Anemometer, um die Windgeschwindigkeit zu kalibrieren (nicht mitgeliefert) und
einen Lüfter mit konstanter Drehzahl, mit hoher Geschwindigkeit (nicht mitgeliefert).
Die Temperatur kalibrieren
Die Innen- und Außentemperaturmessungen können ebenfalls kalibriert werden.
Folgende Faktoren beeinflussen die Temperaturmessungen:
Die Nahe von Hitzequellen wie z.B. Gebäuden, Erde, usw.
Die Installation in direktem Sonnenlicht ohne geeigneten Schutz.
Verwenden Sie ein Quecksilber- oder ein Alkoholthermometer, um die Temperatur zu kalibrieren (nicht
mitgeliefert). Verwenden Sie weder Bimetall- noch digitale Thermometer, weil diese eine eigene Fehlermarge
haben. Gebrauchen Sie keine lokale Wetterstation (diese haben einen unterschiedlichen Aufstellort, einen
anderen Aktualisierungszeitpunkt und mögliche Kalibrierungsfehler).
Um die Temperatur zu kalibrieren, gehen Sie wie folgt vor:
1. Installieren Sie den Temperatursensor an einem Ort im Schatten.
2. Installieren Sie das Thermometer genau daneben.
3. Lassen Sie 48 Stunden kalibrieren.
4. Vergleichen Sie die Temperaturanzeige des Displays mit der Temperaturanzeige des Thermometers und
regeln Sie den Wert im Kalibriermodus so, dass beide Temperaturmessungen übereinstimmen.
Die Feuchtigkeit kalibrieren
Die Genauigkeit des Hygrometersensors ist ±5%. Erhöhen Sie die Genauigkeit, indem Sie die Innen- und
Außenluftfeuchtemessungen kalibrieren.
Feuchtigkeitsmessungen können im Laufe der Zeit abweichen. Die Nahe von Feuchtigkeitsquelen, wie z.B. Erde,
Gras, usw. beeinflussen die Messungen.
Verwenden Sie ein Schleuder-Psychrometer (nicht mitgeliefert) oder einen im Handel verfügbaren Kalibriersatz
(nicht mitgeliefert), um die Feuchtigkeit zu messen. regeln Sie den Wert im Kalibriermodus so, dass beide
Messungen übereinstimmen.
Den Regenfall kalibrieren
Die Standard-Kalibriereinstellung für den Regenfall ist 1.0. Der Anpassungsfaktor reicht von 0.75 bis 1.25.
Verwenden Sie ein Niederschlagsmesser, Rohrtyp (nicht mitgeliefert) mit einer Öffnung von min. 10 cm (4”).
Mit einem schmäleren Gerät könnten die Anzeigen ungenau sein. Verwenden Sie keine Regenfallwerte von
Wettervorhersagen von Radio, TV, Zeitungen oder der Wetterstation des Nachbars (andere Orte).
Um den Regenfall zu kalibrieren, gehen Sie wie folgt vor:
1. Installieren Sie den Niederschlagsmesser (Rohrtyp) neben dem Regensensor der Wetterstation.
2. Vergleichen Sie die Gesamtwerte von drei Stürmen.
3. Berechnen Sie die durchschnittliche Abweichung auf Basis dieser Daten.
V. 02 – 26/04/2013 51 ©Velleman nv
Page 52

WS1060
Den Gesamtregenfall kalibrieren
Beachten Sie beim Kalibrieren der Gesamtregenfallwerte, dass der Faktor auf den Gesamtwert zutrifft und nicht
auf die individuell gemessenen Mengen anwendbar ist.
Regeln Sie den Gesamtregenfall in Schritten von 0.3mm.
Für die Gesamtregenfallmessungen gehen Sie wie folgt vor:
1. Der Regensensor ist im Werk kalibriert worden, so dass das kleine Fass jedes Mal leerläuft (und die
Regenfallmenge registriert) wenn es 0.3 mm (0.01”) Regen enthält.
2. Jedes Mal, wenn das Fass leerläuft (seit der letzten Rücksetzung) wird dies registriert und dann multipliziert
mit 0.3, um die Gesamtmenge in mm zu bekommen. (Möchten Sie die Gesamtmenge in Inches, so wird ein
Umrechnungsfaktor verwendet.)
3. Der Umrechnungsfaktor gilt dann für diese Gesamtmenge.
11. Reinigung und Wartung
11.1 Einen Batteriewechsel durchführen
Die Batterien der Basisstation ersetzen Lässt sich das Display schwer lesen, so führen Sie einen Batteriewechsel durch. Siehe Die Batterien in die
Basisstation einlegen.
Achtung: Entfernen Sie die Batterien aus der Basisstation, so verlieren Sie alle vorherigen Wetterdaten und
Alarmeinstellungen.
Die Batterien des Außensensors ersetzen
Ist der Batteriepegel vom Sender niedrig, dann zeigt das Display an. In diesem Fall, ersetzen Sie den
Sender möglichst schnell. Siehe Die Batterien in den Außensensor einlegen.
Bemerkung: Beachten Sie, dass die Lo-Bat-Anzeige nur bei einer Außentemperaturbereich von 10~35°C
korrekt funktioniert. Außer diesem Temperaturbereich könnte die Lo-Bat-Anzeige nicht korrekt funktionieren
und eine schwache Batterie anzeigen, auch wenn diese noch gut sind.
Ersetzen Sie die Batterien im Sender, so wird innerhalb der nächsten drei Stunden eine neue Synchronisierung
durchgeführt. Alle Wetterdaten und eingestellten Alarmwerte bleiben behalten.
Möchten Sie aber, dass die Geräte schneller synchronisieren, so entfernen Sie die Batterien aus der Basisstation
und legen Sie nach 10 Sekunden neue ein.
Achtung: In diesem Fall verlieren Sie alle Wetterdaten und eingestellten Alarmwerte.
11.2 Die Sensoren ersetzen
Siehe Abbildungen, Seite 2-3 dieser Bedienungsanleitung.
Den Regensensor und das Thermo-/Hygrometer ersetzen
Um den Regensensor und das Thermo-/Hygrometer zu ersetzen, gehen Sie wie folgt vor:
1. Lockern Sie die drei Schrauben [O] der Unterseite des Regensensors.
2. Entfernen Sie den Regensensor von der Basis [P].
3. Lockern Sie die vier Schrauben des Deckels und entfernen Sie ihn [Q].
4. Trennen Sie das Datenkabel [R].
5. Lockern Sie die Schraube [S], die den Fühler mit dem Mast verbindet.
6. Befestigen Sie den neuen Sensor am Mast und schrauben Sie die Schraube wieder fest.
7. Schließen Sie das Datenkabel wieder an.
8. Setzen Sie den Deckel wieder auf und schrauben Sie wieder fest.
9. Befestigen Sie den neuen Regensensor wieder an der Basis.
10. Befestigen Sie den Regensensor mit den drei Schrauben der Unterseite an der Basis.
11. Verwenden Sie die Wasserwaage [B] des Regensensors, um zu überprüfen, ob das Gerät noch immer
perfekt nivelliert ist. Wenn nötig, regeln Sie die Position.
Den Windmesser ersetzen
Um den Windsensor zu ersetzen, gehen Sie wie folgt vor:
1. Trennen Sie das Datenkabel: siehe Den Regensensor und das Thermo-/Hygrometer ersetzen.
2. Lockern Sie die Schraube [T] die den Fühler mit dem Mast verbindet.
3. Befestigen Sie den neuen Sensor am Mast und schrauben Sie die Schraube wieder fest.
4. Schließen Sie das Datenkabel wieder an.
V. 02 – 26/04/2013 52 ©Velleman nv
Page 53

WS1060
Außendaten
Reichweite
100 m im Freifeld
Übertragungsfrequenz
868 MHz
Messintervall für das Thermo/Hygrometer
48 Sek.
Temperatur
Bereich
-40°C~+65°C
Genauigkeit
±1°C
Auflösung
0.1°C
Relative Luftfeuchte
Bereich
1%~99%
Genauigkeit
±5%
Regenmenge
Bereich
0~999.9mm (– – erscheint wenn außer Reichweite)
Genauigkeit
±10%
Auflösung
0.3 mm (Regenmenge < 1000 mm); 1 mm (Regenmenge > 1000 mm)
Windgeschwindigkeit
Bereich
0~180 km/h (– – erscheint wenn außer Reichweite)
Genauigkeit
±1 m/s (Windgeschwindigkeit < 10 m/s);
±10% (Windgeschwindigkeit > 10 m/s)
Innendaten
Messintervall (Temperatur und
Feuchte)
30 Sek.
Temperatur
Bereich
-9.9°C~+60°C (– – erscheint wenn außer Reichweite)
Auflösung
0.1°C
Relative Luftfeuchte
Bereich
1%~99%
Genauigkeit
±1%
Stromverbrauch
Außensensor
2 x 1.5V AA-Alkalinebatterien (nicht mitgeliefert)
Basisstation
3 x 1.5V AA-Alkalinebatterien (nicht mitgeliefert)
geschätzte Batterielebensdauer
12 Monate für die Basisstation
24 Monate für das Thermo-/Hygrometer
Bemerkung: Dies ist nur eine Schätzung, die Sie als Richtlinie verwenden
können. Die eigentliche Batterielebensdauer hängt von verschiedenen
Faktoren ab (z.B. Umgebungstemperatur).
5. An der Kante des Windrichtungssensors, befinden sich Markierungen [N] für die Himmelsrichtungen
(N = Norden, E = Osten, S = Süden und W = Westen). Die korrekte Himmelsrichtung lässt sich mit einem
Kompass (nicht mitgeliefert) ermitteln: Beachten Sie, dass die N-Markierung genau nach Norden zeigt, die
E-Markierung nach Osten, usw. Installieren Sie den Sensor falsch, dann sind die Windrichtungsmessungen
auch nicht genau.
6. Verwenden Sie die Wasserwaage [B] des Regensensors, um zu überprüfen, ob das Gerät noch immer
perfekt nivelliert ist. Wenn nötig, regeln Sie die Position.
12. Technische Daten
Verwenden Sie dieses Gerät nur mit originellen Zubehörteilen. Velleman NV übernimmt keine
Haftung für Schaden oder Verletzungen bei (falscher) Anwendung dieses Gerätes. Für mehr
Informationen zu diesem Produkt und die neueste Version dieser Bedienungsanleitung, siehe
www.velleman.eu. Alle Änderungen ohne vorherige Ankündigung vorbehalten.
© URHEBERRECHT
Velleman NV besitzt das Urheberrecht für diese Bedienungsanleitung. Alle weltweiten Rechte
vorbehalten.
Ohne vorherige schriftliche Genehmigung des Urhebers ist es nicht gestattet, diese Bedienungsanleitung ganz
oder in Teilen zu reproduzieren, zu kopieren, zu übersetzen, zu bearbeiten oder zu speichern.
V. 02 – 26/04/2013 53 ©Velleman nv
Page 54

WS1060
Mantenha o aparelho fora do alcance de crianças e pessoas não qualificadas.
Usar apenas em espaços interiores. Mantenha o aparelho afastado da chuva, humidade,
gotas e salpicos.
Não exponha o equipamento ao pó nem a temperaturas extremas.
Proteja o aparelho de quedas e má utilização. Evite usar força excessiva ao utilizar o
aparelho.
MANUAL DO UTILIZADOR
1. Introdução
Aos cidadãos da União Europeia
Importantes informações sobre o meio ambiente no que respeita a este produto
Este símbolo no aparelho ou na embalagem indica que, enquanto desperdícios, poderão causar danos
no meio ambiente. Não deite o aparelho (nem as pilhas, se as houver) no lixo doméstico; dirija-se a
uma empresa especializada em reciclagem. Devolva o aparelho ao seu distribuidor ou ao posto de
reciclagem local. Respeite a legislação local relativa ao meio ambiente.
Em caso de dúvidas, contacte com as autoridades locais para os resíduos.
Agradecemos o facto de ter adquirido este aparelho. Leia atentamente as instruções do manual antes de o
usar. Caso o aparelho tenha sofrido algum dano durante o transporte não o instale e entre em contacto com o
seu distribuidor.
2. Instruções de segurança
3. Normas gerais
Consulte a Garantia de serviço e qualidade Velleman® na parte final deste manual do utilizador.
Familiarize-se com o funcionamento do aparelho antes de o utilizar.
Por razões de segurança, estão proíbidas quaisquer modificações do aparelho desde que não autorizadas.
Os danos provocados por modificações não autorizadas, não estão cobertos pela garantia.
Utilize o aparelho apenas para as aplicações descritas neste manual. Uma utilização incorrecta anula a
garantia completamente.
Danos causados pelo não cumprimento das normas de segurança referidas neste manual anulam a garantia
e o seu distribuidor não será responsável por qualquer danos ou outros problemas daí resultantes.
Guarde este manual para que o possa consultar sempre que necessário.
4. Características
medição da temperatura e humidade interiores
recepção RF da temperatura e humidade exteriores
recepção RF de ventos frios, da direcção do vento e da precipitação
opção °C/°F
dados da precipitação (polegadas ou milimetros): em 1 hora, 24 horas, uma semana, um mês, e o total
desde a última reinicialização.
todos os valores mínimos e máximos indicando a data e hora do registo.
velocidade do vento (mph, m/s, km/h, knots, Beaufort)
indicação da direcção do vento com 8 opções de direcção
alarmer meteorológicos para: temperatura, humidade, ventos frios, ponto de orvalho, precipitação,
velocidade do vento.
recebe e exibe a hora e data controladas via rádio.
indicação da hora em formato 12 ou 24 horas
calendário perpétuo
definir fuso horário
alarme
luz de fundo LED
V. 02 – 26/04/2013 54 ©Velleman nv
Page 55

WS1060
1
Alarme activado
15
Unidade de precipitação mm ou polegadas
2
recepção de sinal RCC
16
Alarme para a temperatura exterior (alta/baixa)
activado
3
Dia da semana
17
Temperatura exterior
4
Data
18
Recepção de sinal exterior
5
Alarme para direcção do vento activado
19
Humidade exterior
6
Indicação das medições máximas
20
Transmissor exterior com bateria fraca
7
Direcção do vento
21
Alarme para humidade exterior (alta/baixa)
activado.
8
Indicação das medições máximas
22
Precipitação
9
Alarme para precipitação elevada activado
23
Período de precipitação: 1h, 24h, semana, mês,
ou total
10
Alarme para a temperatura interior (alta/baixa)
activado
24
Velocidade do vento
11
Unidade de medição da temperatura: °C ou °F
25
Unidade de medição da velocidade do vento:
bft, mph, nós, km/h, m/s
12
Temperatura interior
26
Alarme para a velocidade do vento activado
13
Alarme para a humidade interior (alta/baixa)
activado
27
Hora
14
Humidade interior
A
Sensor de direcção do vento
D
Termo-higrómetro (com protecção) e unidade de
transmissão
B
Nível de bolha
E
Eixo
C
Colector de precipitação
F
Anemómetro
para pendurar na parede ou pousar
recepção instantânea sincronizada
inclui:
o receptor
o 4 sensores exteriores: termo-higrómetro, sensor de velocidade do vento, sensor de direcção do vento e
sensor de precipitação.
5. Descrição
Consulte as imagens da página 2-3 deste manual.
Ecrã da estação base
Unidade exterior
6. Instalação
Consulte as imagens da página2-3 deste manual.
6.1 Montagem
O termo-higrómetro, colector de precipitação, e sensor de direcção do vento já vêm instalados no aparelho. Só
tem de fixar as conchas catavento ao anemómetro.
1. Empurre as conchas catavanto em direcção ao eixo em aço [K].
2. Utilize uma chave Allen (incl.) para apertar os parafusos na parte lateral das conchas catavento [L].
3. Rode as conchas catavento e confirme se se movem com facilidade. Se o movimento estiver condicionado a
medição da velocidade do vento será incorrecta.
6.2 Inicializar a estação meteorológica
Antes de instalar a estação meteorológica no seu local definitivo, deve colocar pilhas na unidade exterior e na
base, e deixar que os dispositivos sejam incializados e sincronizados. Confirme se a comunicação entre a
unidade exterior e a base da estação está a funcionar correctamente. Uma comunicação deficiente pode muitas
vezes ser melhorada com uma mudança de localização.
V. 02 – 26/04/2013 55 ©Velleman nv
Page 56

WS1060
Nunca perfure as pilhas nem jogá-las no fogo, pois elas podem explodir. Não tente recarregar pilhas
não recarregáveis (alcalino). Descarte as baterias de acordo com as regulamentações locais.
Mantenha as pilhas fora do alcance das crianças.
Intruções relativas às pilhas
Utilize apenas pilhas com o tamanho e a voltagem correctos.
Retire as pilhas das unidades interior e exterior se o aparelho não vai ser utilizado durante um longo
período de tempo. As pilhas velhas podem derramar e danificar o aparelho.
Repeite a polaridade ao introduzir as pilhas. A polaridade trocada pode danificar o aparelho.
As pilhas alcalinas têm uma amplitude de temperatura de funcionamento de -20°C~+54°C. Não utilize o
aparelho se a temperatura estiver fora destes parâmetros.
Instalar as pilhas na unidade exterior
1. Na parte de baixo do colector de precipitação, desaperte o parafuso e faça deslizar as partes metálicas para
libertar o compartimento das pilhas [G].
2. Retire para fora o compartimento das pilhas [H].
3. Introduza as pilhas 2 x AA 1.5V LR6 respeitando as indicações de polaridade no compartimento [I].
4. Coloque o compartimento das pilhas novamente na base do colector de precipitação [J].
O LED na parte de trás do colector de precipitação acende durante 4 segundos. Caso contrário, verifique se
introduziu as pilhas correctamente.
5. Faça deslizar as partes metálicas para o seu devido lugar para fixar o compartimento das pilhas, e aperte
novamente o parafuso.
Instalar as pilhas na estação base
1. Abra a tampa do compartimento das pilhas na parte de trás da estação base.
2. Insira as pilhas 3 x AA 1.5V LR6 respeitando as marcas de polaridade existentes no compartimento.
Todos os segmentos do monitor LCD acendem durante 2 segundos. Caso contrário, verifique se introduziu
as pilhas correctamente.
3. Feche a tampa do compartimento das pilhas.
4. Nesta altura, ainda não deve pressionar qualquer botão.
Primeiro, deve deixar que o dispositivo seja inicializado e faça a sincronização com a unidade exterior.
Caso seja necessário, retire as pilhas da unidade interior e aguarde pelo menos 10 segundos até as voltar a
introduzir.
5. Aguarde até que as temperaturas interior e exterior apareçam no visor antes de continuar.
O transmissor envia dados meteorológicos para a estação base a cada 48 segundos.
Relógio controlado através da recepção de sinal-rádio.
Após introduzir as pilhas, o trasmissor da unidade exterior envia dados meteorológicos para a estação base, e
em seguida procura o sinal relógio controlado por DCF para acertar a data e a hota automaticamente. Quando o
sinal DCF é detectado, o LCD na parte de trás do colector de precipitação pisca 5 vezes e depois fica ligado
durante 20 segundos. O transmissor envia a informação da data e hora para a estação base. No ecrã aparece o
ícone RCC. .
Se o sinal DCF for muito fraco e a recepção não for possível, o transmissor deixa de procurar após 1 minutos, e
volta ao modo normal (= enviar dados meteorológicos para a estação base). O transmissor volta a tentar uma
vez a cada duas horas receber o sinal DCF. Caso não consiga encontrar o sinal DCF, ou se o último sinal foi
recebido há mais de 12 horas atrás, o ícone RCC desaparece do ecrã.
Nota: A melhor altura para recepção do sinal DCF é à noite entre a meia-noite e as 06:00am, visto existir
menos interferência atmosférica.
Durante a recepção do sinal DCF, o transmissor não envia dados meteorológicos para a estação base. A
recepção do sinal DCF duran no máx. 5 minutos.
Nota: caso não seja possível receber o sinal DCF, pode acertar a data e a hora manualmente. Ver 7.2
Unidades, data e hora No entanto, quando o transmissor receber o sinal DCF substituirá os dados que foram
introduzidos manualmente.
6.3 Instalação
Nota: Monte a estação meteorológica e confirme se a comunicação entre a unidade exterior e a estação base
funciona correctamente antes de instalar a estação meteorológica no seu local definitivo. Os problemas com a
transmissão via rádio podem ser normalmente resolvidos mudando a localização.
Ao escolher o local adequado para a unidade exterior e para a estação base, tenha em conta o seguinte:
V. 02 – 26/04/2013 56 ©Velleman nv
Page 57

WS1060
Configuração
Display
Descrição
Vento
(nada)
Mostrar velocidade do vento
Rajada
Mostrar velocidade da rajada
Precipitação
1h
Mostrar precipitação da última hora
24h
Mostrar precipitação das últimas 24 horas.
semana
Mostrar precipitação da última semana.
mês
Mostrar precipitação do último mês.
TOTAL
Mostrar a precipitação total desde a última reinicialização.
Nota: quando é apresentada a quantidade de precipitação total, pode
apagar o valor pressionando SET durante 2 segundos.
Temperatura
TEMP
Mostrar a temperatura exterior.
A comunicação via rádio entre o transmissor e a estação base pode ter um alcance até 100m (330ft) em
campo aberto, considerando que não existem obstáculos tais como edifícios, árvores, veículos, cabos de
alta voltagem...
A interferência dia ecrás de PC, rádios ou aparelhos de TV podem perturbar ou mesmo interromper a rádio-
comunicação.
Obstáculos como árvores, muros, paredes... podem influenciar as medições. Escolha uma área aberta onde
os elementos possam alcançar os sensores por todos os lados.
Para medir a velocidade do vento com precisão, mantenha o aparelho afastado de edifícios, árvores e
outros obstáculos.
Para medir a temperatura com precisão, mantenha o aparelho afastado de fontes de calor tais como
edifícios, chão, e luz solar directa sem protecção em zonas de tempo quentes.
Para medir a humidade com precisão, mantenha o aparelho afastado do chão, erva, ou outras fontes de
humidade.
Instale a estação meteorológica do seguinte modo:
1. Certifique-se de que a unidade exterior está completamente montada e que estão introduzidas as pilhas na
unidade exterior e na estação base.
2. Coloque a unidade exterior e a estação base nos sítios onde as pretende instalar e depois verifique se a
comunicação está a funcionar.
o Caso esteja, siga para o passo seguinte.
o Caso não esteja, mude a localização da unidade exterior e/ou estação base até que a comunicação
funcione correctamente.
3. Utilize os reguladores (incl.) para fixar o eixo da unidade exterior ao poste [M]. Antes de apertar os
parafusos, verifique se a estação meteorológica está bem posicionada, conforme indicado a seguir.
4. No topo do sensor de direcção do vento, exitem marcas [N] representando o norte (N), este (E), sul (S), e
oeste (W). Utilize uma bússola (não incl.) para posicionar o dispositivo de forma a que as marcas
correspondam à localização real. a marca N deve estar direccionada para norte, a marca E para este... Se
não posicionar o sensor correctamente, a medição da direcção do vento será incorrecta.
5. Use o nível de bolha [B] no colector de precipitação para nivelar perfeitamente o dispositivo.
6. Fixe o dispositivo na sua posição definitiva apertando os parafusos dos reguladores [M].
7. Configurar a estação base
A estação base tem cinco teclas para fácil utilização: SET, +, HISTORY, ALARM, e MIN/MAX.
Pressione SET para para aceder às várias definições.
Pressione a tecla + para aumentar os valores, ou a tecla MIN/MAX para diminuir os valores.
Mantenha pressionadas as teclas + ou MIN/MAX durante 2 segundos para aumentar aumentar/diminuar a
passos largos.
O processo de configuração termina automaticamente após 30 segundos sem pressionar qualquer tecla;
pode sair do processo de configuração a qualquer momento pressionando HISTORY.
7.1 Modo de visualização rápida
Pode alterar rapidamente a informação que é exibida no ecrã LCD da estação base. Os indicadores no ecrã
informam qual a informação que está a ser exibida no momento. Seleccione a informação a ser exibida
procedendo da seguinte forma:
1. No modo normal, pressione SET.
A estação estã agora no modo de visualização rápida.
2. Pressione SET para confirmar a configuração e avance para a seguintes; use as teclas + ou MIN/MAX para
alterar os valores.
V. 02 – 26/04/2013 57 ©Velleman nv
Page 58

WS1060
Configuração
Display
Descrição
WIND CHILL
Mostrar a temperatura do vento.
DEW POINT
Mostrar o ponto de orvalho exterior.
Configuração
Descrição
Brilho LCD
Regule o brilho do ecrã do LCD de 0 a 8.
Fuso horário
Seleccione o seu fuso horário de -12 a +12.
Na Europa, 0 = GMT+1; 1 = GMT+2; -1 = GMT.
Formato da hora
Opte entre o formato 12h ou 24h para exibição da hora [27].
Hora
Se o sinal DCF não for detectado, pode acertar a hora (horas/minutos) manualmente.
Formato da data
Pode optar entre os formatos dia-mês-ano (DM) ou mês-dia-ano(MD) para exibição da
data [4].
Data
Se o sinal DCF não for detectado, pode acertar a data manualmente.
Unidade de
velocidade do vento
Para visualizar a velocidade do vento / rajadas de vento em km/h, m/s, bft (Beaufort),
mph ou nós. O indicador correspondente [25] aparece no ecrã.
Direcção do vento
Ajustar a direcção do vento.
Unidade de
precipitação
Opte entre a apresentação da precipitação em mm ou polegadas. O indicador
correpondente [15] aparece no ecrã.
Unidade de
temperatura
Opte por apresentar a temperatura em graus Celsius ou Fahrenheit. O indicador
correspondente [11] aparece no ecrã.
3. Para voltar ao modo normal, pressione HISTORY.
7.2 Unidades, data e hora
Para especificar as unidades e configurações da data/hora, proceda do seguinte modo:
1. No modo normal, pressione SET durante 2 segundos.
A estação está agora no modo de configuração.
2. Pressione SET para confirmar as configurações actuais ou avance para o próximo; utilize a tecla
3. Para voltar ao modo normal pressione HISTORY.
7.3 Modo histórico
No modo histórico pode visualizar as medições das últimas 24 horas.
Exibir histórico de dados
1. No modo normal, pressione HISTORY.
A estação está agora no modo histórico. No ecrã aparece HIS [3].
2. No modo histórico, pressione MIN/MAX repetidamente para retroceder em intervalos de 3 horas.
3. Para voltar ao modo normal pressione HISTORY.
Limpar o histórico de dados
1. No modo normal, pressione HISTORY.
A estação está agora no modo histórico. No ecrã aparece HIS [3].
2. Pressione SET.
A palavra CLEAR pisca no ecrã.
o Para limpar o histórico de dados, pressione SET durante 2 segundos.
o Para sair sem limpar o histórico de dados, pressione HISTORY para voltar ao modo normal.
7.4 Programar alarmes
Pode programar a estação base para disparar um alarme a uma determinada hora ou para determinadas
condições meteorológicas interiores ou exteriores. Quando um alarme dispara, o alarme toca durante 120
segundos. O indicador correspondente pisca no ecrã até que a condição que disparou o alarme deixe de se
verificar.
Pressione qualquer tecla para desligar o som do alarme.
Quando a condição que fez disparar o alarme deixa de se verificar, o indicador no ecrã deixa de piscar. No
entanto, o alarme continua activo, e disparará novamente se as condições definidas se verificarem
novamente. Se não pretende que o alarme volte a disparar, deve desactivá-lo no menu alarme.
Se a condição que disparou o alarme se verificar novamente nas 3 horas após o último alarme, o indicador
no ecrã ficará a piscar mas o alarme não tocará. Esta função evita a repetição do alarme para uma mesma
ocorrência.
Pode definir:
V. 02 – 26/04/2013 58 ©Velleman nv
Page 59

WS1060
Alarme alto
Descrição
Alarme temporizado
Defina a hora (horas:minutos) em que pretende que o alarme dispare.
Nota: também pode programar o alarme temporizado através das definições de alarme
baixo.
Velocidade do vento
Defina o limite da velocidade do vento (0~50m/s) O alarme dispara sempre que a
velocidade do vento for superior ao valor especificado.
Velocidade das
rajadas de vento
Defina o limite da velocidade das rajadas de vento (0~50m/s) O alarme dispara sempre
que a velocidade das rajadas de vento for superior ao valor especificado.
Direcção do vento
Defina a direcção do vento O alarme dispara quando o vento vier da direcção
especificada.
Precipitação em 1
hora
Defina o valor para a precipitação em 1 hora (0~999.9mm) O alarme dispara sempre
que a precipitação verificada no período de 1 hora for superior ao valor especificado.
Precipitação em 24
horas
Defina o valor para a precipitação em 24 horas (0~999.9mm) O alarme dispara sempre
que a precipitação verificada no período de 24 horas for superior ao valor especificado.
Humidade exterior
Defina o valor para a humidade exterior (1%~99%). O alarme dispara sempre que a
humidade exterior for superior ao valor especificado.
Temperatura
exterior
Defina o valor para a temperatura exterior (-40°C~+60°C). O alarme dispara sempre
que a temperatura exterior for superior ao valor especificado.
Ventos frios
Defina o valor para os ventos frios (-40°C~+60°C). O alarme dispara sempre que a
temperatura dos ventos frios for superior ao valor especificado.
Ponto de orvalho
Defina o valor do ponto de orvalho (-40°C~+60°C). O alarme dispara sempre que a
temperatura do ponto de orvalho for superior ao valor especificado.
Humidade interior
Defina o valor para a humidade interior (1%~99%). O alarme dispara sempre que a
humidade interior for superior ao valor especificado.
Temperatura
interior
Defina um valor para a temperatura interior (-9.9°C~+60°C). O alarme desliga sempre
que a temperatura interior é superior ao valor especificado.
Alarme baixo
Descrição
Humidade exterior
Defina uma valor para a humidade exterior (1%~99%). O alarme desliga sempre que a
humidade exterior é inferior ao valor especificado.
Temperatura
exterior
Defina um valor para a temperatura exterior (-40°C~+60°C). O alarme desliga sempre
que a temperatura exterior é inferior ao valor especificado.
Ventos frios
Defina um valor para os ventos frios (-40°C~+60°C). O alarme desliga sempre que a
temperatura dos ventos frio s é inferior ao valor especificado.
Ponto de orvalho
Defina um valor para o ponto de orvalho (-40°C~+60°C). O alarme desliga sempre que
a temperatura do ponto de orvalho é inferior ao valor especificado.
Humidade interior
Defina um valor para a humidade interior (1%~99%). O alarme desliga sempre que a
humidade interior é inferior ao valor especificado.
alarmes para valores elevados: os alarmes diaparam quando os valores medidos excedem o limite definido,
por exemplo, se a velocidade do vento excede os 20 m/s.
alarmes para valores baixos: o alarme dispara quando o valor medido é inferior ao limite definido, por
exemplo, se a temperatura exterior desce abaixo dos -5° C.
Para programar, activar, ou desactivar alarmes, proceda da seguinte forma:
1. Para o modo normal, pressione ALARM.
A estação está agora no modo alarme alto, onde pode programar os alarmes para a ocorrência de valores
altos (veja a tabela abaixo). No ecrã aparece HIAL [4] e os valores altos definidos para o alarme. Se não
for definido um valor para o alarme, no ecrã aparece "- -".
2. Pressione ALARM novamente para aceder ao modo alarme baixo, onde pode programar os alarmes para a
ocorrência de valores baixos (ver a tabela abaixo). No ecrã aparece LOAL [4] e os valores baixos definidos
para o alarme. Se não for definido um valor para o alarme, no ecrã aparece "- -".
3. Pressione SET para aceder às várias definições de alarme.
4. Pressione + ou as teclas MIN/MAX para definir os valores.
5. Pressione ALARM para activar/desactivar o alarme. Se o alarme estiver activo, o indicador de alarme
correspondente e HI AL (ou LO AL para um alarme baixo) aparece no ecrã.
6. Pressione SET para confirmar a definição e avançar para a próxima.
7. Para voltar ao modo normal, pressione HISTORY.
Definições para alarme alto
Definições para alarme baixo
V. 02 – 26/04/2013 59 ©Velleman nv
Page 60

WS1060
Alarme baixo
Descrição
Temperatura
interior
Defina um valor para a temperatura interior (-9.9C~+60°C). O alarme desliga sempre
que a temperatura interior é inferior ao valor especificado.
Problema
Causa possível
Solução
Problemas de
transmissão
A distância entre as duas unidades é
demasiado grande.
Reduzir a distância
Materias de blindagem entre duas
unidades (parede espessa, aço...)
Procure um local de montagem diferente
Interferência de outras fontes
Eliminar fontes de interferência
Os dados no LCD são
ilegíveis
Sem recepção de dados
Procure um local de montagem diferente
Pilhas fracas
Susbituir as pilhas
Dados incorrectos
Pilhas fracas
Susbituir as pilhas
Definições incorrectas
Reprograme a estação meteorológica
7.5 Mínimos e máximos
A estação meteorológica guarda o registo das medições mínimas e máximas para cada condição meteorológica
(desde a última reinicialização), indicando a hora e a data em que foram gravadas.
Mostrar medições mínimas e máximas
Para ver as medições mínimas e máximas, proceda da seguinte forma:
1. No modo normal, pressione MIN/MAX
A estação está agora no modo máximo O visor mostra o indicador máximo [6].
2. Pressione + repetidamente para ver os valores máximos para: velocidade do vento, velocidade das rajadas,
precipitação em 1 hora, precipitação em 24 horas, precipitação semanal, precipitação mensal, temperatura
exterior, tempratura dos ventos frios, ponto de orvalho, humidade interior e temperatura interior.
3. Pressione MIN/MAX para entrar no modo mínimo. O visor mostra o indicador mínimo [8].
4. Pressione + repetidamente para ver os valores mínimos para: humidade exterior, temperatura exterior,
temperatura dos ventos frios, ponto de orvalho, humidade interior, temperatura interior.
5. Pressione HISTORY para voltar ao modo normal.
Apagar um valor mínimo ou máximo
Para apagar um valor mínimo ou máximo:
1. Entre no modo leitura mínimo ou máximo e pressione + para mostrar o valor que pretende apagar.
2. Pressione SET durante 3 segundos.
3. Repita para qualquer outro valor mínimo ou máximo que pretenda apagar.
4. Pressione HISTORY para voltar ao modo normal.
8. Reiniciar
Para restaurar as configurações de fábrica da estação meteorológica, mantenha a tecla + pressionada durante
20 segundos.
9. Resolução de problemas
10. Calibragem
Para medições mais precisas, pode calibrar a medição da velocidade do bento, temperatura, humidade, e
precipitação, usando as ferramentas de calibragem (não incl.).
Para entrar no modo de calibragem, proceda da seguinte forma:
1. Para o modo normal, pressione HISTORY durante 8 segundos.
A estação está agora no modo de calibragem. Os dígitos relativos ao factor ventos piscam no ecrã.
2. Pressione SET para ir para a configuração seguinte; use o + ou as teclas MIN/MAX para alterar os valores.
3. Para sair do modo de calibragem, pressione HISTORY.
Consulte abaixo para informação sobre cada tipo de calibragem
Calibragem da velocidade do vento
A calibragem por defeito da velocidade do vento é 1.0. O factor de ajuste varia de 0.75 até 1.25. Pode fazer a
definição em aumentos de 0.01.
V. 02 – 26/04/2013 60 ©Velleman nv
Page 61

WS1060
A velocidade do vento é a mais sensível às restrições da instalação. Os seguintes factores influenciam a
medição da velocidade do vento:
a localização da estação meteorológica: proximidade de edifícios, árvores ou outros obstáculos
o desgaste das partes móveis do anemómetro.
Para calibrar a velocidade do vento, recomendamos a utilização de um medidor de vento calibrado (não incl.) e
uma ventoínha de velocidade constante, alta velocidade (não incl.).
Calibragem da temperatura
Pode calibrar as medições da temperatura interior e exterior.
Os seguintes factores influenciam a medição da temperatura:
proximidade de fontes de calor, tais como edifícios, o chão…
a instalação sob a luz do sol sem devida protecção em ambientes de tempo quente.
Para calibrar a temperatura, recomendamos a utilização de um termómetro de álcool ou mercúrio (não incl.).
Não utilize qualquer tipo de termómetros digitais visto que estes têm a sua própria margem de erro. Não utilize
uma estação meteorológica local na sua área (diferença na localização, altura das actualizações e possíveis
erros de calibragem).
Para calibrar a temperatura, proceda da seguinte forma:
1. Colocar o sensor de temperatura num ambiente protegido e controlado.
2. Coloque o termómetro mesmo ao lado.
3. Deixe a instalação estabilizar durante 48 horas.
4. Compare a temperatura indicada no visor com a temperatura indicada pelo termómetro, e ajuste a
calibragem de modo a coincidir com o termómetro.
Calibragem da humidade
A precisão do sensor do higrómetro é de ±5%. Pode aumentar a precisão ao calibrar as medições de humidade
interior e exterior.
As medições da humidade podem variar com o tempo. A proximidade de fontes de humidade tais como o chão,
erva... influenciam a medição.
Recomendamos a utilização de um psicómetro (não incl.) ou de um dos kits de calibragem da humidade
disponíveis no mercado (não incl.) para a medição da humidade. Ajuste as definições no modo de calibragem
para fazer coincidir as medições.
Calibragem da precipitação
A calibragem por defeito da precipitação é de 1.0. O factor de ajuste varia entre 0.75 e 1.25.
Recomendamos a utilização de um tubo de pluviómetro (não incl.) com uma abertura de pelo menos 10cm
(4"). No caso de ser mais pequeno as leituras podem não ser precisas. Não use as leituras da precipitação
dadas pelas meteorologia da rádio, TV, jornais ou mesmo pela estação meteorológica de um vizinho (diferente
localização).
Para calibrar a medição da precipitação, proceda da seguinte forma:
1. Coloque o tubo do pluviómetro junto ao colector de precipitação da estação meteorológica.
2. Compare os totais da três tempestades.
3. Com base nisto, faça uma média para tentar apurar o desfazamento das leituras.
Calibragem da precipitação total
Para calibrar o valor da precipitação total, tenha em mente que o factor é aplicado ao total e não aos parciais
do balde do colector de precipitação.
Pode ajustar a precipitação total em passos de 0.3 mm.
A medição da precipitação total funciona da seguinte forma:
1. O colector de precipitação é calibrado de fábrica pelo que o depósito se esvazia (e regista a quantidade) a
cada 0.3mm (0.01") de chuva.
2. O número total de vezes que o balde se esvazia (desde a última reinicialização) é somado e multiplicado
por 0.3 para apurar o total em mm. (para uma leitura em polegadas, é aplicado um factor de conversão.)
3. É então aplicado o factor de calibragem a este total.
V. 02 – 26/04/2013 61 ©Velleman nv
Page 62

WS1060
Dados do exterior
Alcance de transmissão
100 m (330 ft) em campo aberto
Frequência
868 MHz
11. Limpeza e manutenção
11.1 Substituição das pilhas
Substituir as pilhas da estação base Quando o visor começa a ter uma imagem difícil de ler, substitua as pilhas. Ver Instalar as pilhas na estação
base.
Atenção: Quando retira as pilhas da estação base, perde todos os dados meteorológicos anteriores e a
configurações dos alarmes.
Substituir as pilhas da unidade exterior
Quando o nível das pilhas do transmissor é baixo, o visor indica . Neste caso, substitua as pilhas do
transmissor o mais rápido possível. Ver Instalar as pilhas na unidade exterior.
Nota: Tenha em conta que o indicador de pilha fraca só funciona correctamente dentro de uma amplitude de
temperatura de 10~35°C. Fora desta amplitude de temperatura, o indicador de pilha fraca pode ficar activo
mesmo que as pilhas estejam boas.
Quando substitui as pilhas do transmissor, o transmissor fará a resincronização com a estação interior dentro
das 3 horas seguintes. Todos os dados meteorológicos anteriores e progamação de alarmes se mantêm.
No entanto, se pretende que a sincronização dos dispositivos seja mais rápida, pode retirar as pilhas da estação
interior e voltar a colocá-las após 10 segundos.
Atenção: Neste caso perdem-se todos os dados meteorológicos anteriores e programações de alarmes.
11.2 Substituir os sensores
Observe as figuras da página 2-3 do manual.
Substituir o colector de precipitação e o sensor do termo-higrómetro
Para substituir o colector de precipitação e o sensor do termo-higrómetro, proceda da seguinte forma:
1. Desaperte os três parafusos [O] na parte de baixo do colector de precipitação.
2. Retire o colector de precipitação da base [P].
3. Desaperte os 4 parafusos da cobertura do sensor e retire-a[Q].
4. Desligue o cabo de dados [R].
5. Desaperte o parafuso [S] que fixa o sensor e retire-o cuidadosamente do poste.
6. Fixe o novo sensor ao poste e aperte o parafuso.
7. Volte a ligar o cabo de dados.
8. Substitua a cobertura do sensor e fixe-a com os parafusos.
9. Coloque o novo colector de precipitação na base.
10. Fixe o colector de precipitação à base usando os três parafusos na parte de baixo.
11. Use o nível de bolha [B] no colector de precipitação para verificar se o dispositivo continua correctamente
nivelado. Se necessário, ajuste a posição.
Substituir o sensor de vento
Para substituir o sensor de vento proceda da seguinte forma:
1. Desligue o cabo de dados: ver Substituir o colector de precipitação e o sensor do termo-higrómetro para
mais instruções.
2. Desaperte o parafuso [T] que fixa o sensor e retire-o cuidadosamente do poste.
3. Fixe o novo sensor ao poste e aperte o parafuso.
4. Volte a ligar o cabo de dados.
5. No topo do sensor de direcção do vento estão uns símbolos [N] representando o norte (N), este (E), sul
(S), e oeste(W). Utilize uma bússola (não incl.) para posicionar o dispositivo para que os símbolos
correspondam à direcção real. o símbolo N deve estar orientado para norte, o símbolo E para este... Se não
direccionar o sensor correctamente, a medição da direcção do vento será incorrecta.
6. Use o nível de bolha [B] no colector de precipitação para nivelar o dispositivo correctamente. Se
necessário, ajuste a posição.
12. Especificações
V. 02 – 26/04/2013 62 ©Velleman nv
Page 63

WS1060
Intervalo de medição do termohigrómetro
48 segundos
Temperatura
Amplitude
-40°C~+65°C (-40°F~+149°F)
Precisão
±1°C
Resolução
0.1°C
Humidade relativa
Amplitude
1%~99%
Precisão
±5%
Volume da
precipitação
Amplitude
0~999.9mm (exibe – – se estiver fora dos limites)
Precisão
±10%
Resolução
0.3 mm (volume de precipitação < 1000 mm); 1 mm (volume de
precipitação > 1000 mm)
Velocidade do
vento
Amplitude
0~180 km/h (0~110 mph) (exibe – – se estiver fora dos limites)
Precisão
±1 m/s (velocidade do vento< 10 m/s); ±10% (velocidade do vento >
10 m/s)
Dados do interior
Intervalo de medição
(temperatura e humidade)
30 segundos
Temperatura
Amplitude
-9.9°C~+60°C (14°F~+149°F) (exibe – – se estiver fora dos limites)
Resolução
0.1°C
Humidade relativa
Amplitude
1%~99%
Precisão
±1%
Consumo
Sensor exterior
2 pilhas alcalinas AA 1.5V LR6 (não incl.)
Estação base
3 pilhas alcalinas AA 1.5V LR6 (não incl.)
Duração estimada das pilhas
12 meses para a estação base
24 meses para o termo-higrómetro
Nota: isto é apenas uma estimativa que pode usar como orientação. O
tempo de duração das pilhas depende de vários factores como a temperatura
ambiente.
Utilize este aparelho apenas com acessórios originais. A Velleman NV não será responsável por
quaisquer danos ou lesões causados pelo uso (indevido) do aparelho.
Para mais informação sobre este produto e para aceder à versão mais recente deste manual do
utilizador, visite a nossa página www.velleman.eu.
Podem alterar-se as especificações e o conteúdo deste manual sem aviso prévio.
© DIREITOS DE AUTOR
A Velleman NV detem os direitos de autor deste manual do utilizador. Todos os direitos mundiais
reservados.
É estrictamente proíbido reproduzir, traduzir, copiar, editar e gravar este manual do utilizador ou partes deste
sem prévia autorização escrita por parte da detentora dos direitos.
V. 02 – 26/04/2013 63 ©Velleman nv
Page 64

WS1060
Chronić urządzenie przed dziećmi i nieupoważnionymi użytkownikami.
Wyłącznie do użytku wewnątrz pomieszczeń. Chronić urządzenie przed deszczem,
wilgocią, rozpryskami i ściekającymi cieczami.
Chronić urządzenie przed zbyt wysoką temperaturą i pyłem.
Chronić urządzenie przed wstrząsami i użytkować wyłącznie zgodnie z przeznaczeniem.
Podczas obsługi urządzenia unikać stosowania siły.
INSTRUKCJA OBSŁUGI
1. Wstęp
Przeznaczona dla mieszkańców Unii Europejskiej.
Ważne informacje dotyczące środowiska.
Ten symbol umieszczony na urządzeniu bądź opakowaniu wskazuje, że wyrzucenie produktu może być
szkodliwe dla środowiska. Nie wyrzucaj urządzenia lub baterii do zbiorczego śmietnika, tylko do
specjalnie przeznaczonych do tego pojemników na urządzenia elektroniczne lub skontaktuj się z firmą
zajmującą się recyklingiem. Urządzenie możesz oddać dystrybutorowi lub firmie zajmującej się
recyklingiem. Postępuj zgodnie z zasadami bezpieczeństwa dotyczącymi środowiska.
Jeśli masz wątpliwości skontaktuj się z firmą zajmującą się utylizacją odpadów.
Dziękujemy za wybór produktu firmy Velleman! Prosimy o dokładne zapoznanie się z instrukcją obsługi przed
użyciem. Jeśli urządzenie zostało uszkodzone podczas transportu, prosimy o nie korzystanie z niego i
skontaktowanie się ze sprzedawcą.
2. Instrukcje bezpieczeństwa
3. Informacje ogólne
Proszę zapoznać się z informacjami w części Velleman® usługi i gwarancja jakości na końcu niniejszej
instrukcji.
Przed rozpoczęciem pracy z urządzeniem należy zapoznać się z jego funkcjami.
Wprowadzanie zmian w urządzeniu jest zabronione ze względów bezpieczeństwa. Należy pamiętać, że
uszkodzenia spowodowane przez zmiany wprowadzone przez użytkownika nie są objęte gwarancją.
Urządzenie należy używać jedynie zgodnie z przeznaczeniem. Używanie urządzenia niezgodnie z
przeznaczeniem spowoduje unieważnienie gwarancji.
Gwarancja nie obejmuje uszkodzeń spowodowanych w wyniku nieprzestrzegania niniejszej instrukcji, a
sprzedawca nie ponosi odpowiedzialności za wynikłe uszkodzenia lub problemy.
Zachowaj daną instrukcję na przyszłość.
4. Funkcje
pomiar temperatury i wilgotności w pomieszczeniu
odbiór temperatury i wilgotności zewnętrznej za pomocą fal radiowych
odbiór temperatury odczuwalnej, kierunku wiatru i opadów deszczu za pomocą fal radiowych
jednostki do wyboru: °C/°F
dane o opadach deszczu (wielkość w calach lub milimetrach): 1 godzina, 24 godziny, tydzień, miesiąc i czas
całkowity od ostatniego resetowania
wszystkie wartości minimalne i maksymalne z czasem i datą ich rejestracji
prędkość wiatru (mph, m/s, km/h, węzły, skala Beauforta)
informacja o kierunku wiatru z 8 możliwymi kierunkami
alarmy pogodowe dla: temperatury, wilgotności, odczuwalnej temperatury, punktu rosy, opadów deszczu,
prędkości wiatru
odbiór i wyświetlanie czasu i daty, kontrolowane radiowo
wyświetlany czas 12 lub 24-godzinny
kalendarz ciągły
ustawianie strefy czasowej
V. 02 – 26/04/2013 64 ©Velleman nv
Page 65

WS1060
1
Alarm czasowy włączony
15
Jednostka wielkości opadów deszczu: mm lub
cal
2
odbiór sygnału zegara synchronizowanego
radiowo (RCC)
16
Alarm wysokiej/niskiej temperatury zewnętrznej
włączony
3
Dzień tygodnia
17
Temperatura zewnętrzna
4
Data
18
Odbiór sygnału zewnętrznego
5
Alarm kierunku wiatru włączony
19
Wilgotność zewnętrzna
6
Wyświetlono maksymalne zmierzone wartości
20
Niski poziom baterii nadajnika zewnętrznego
7
Kierunek wiatru
21
Alarm wysokiej/niskiej wilgotności zewnętrznej
włączony
8
Wyświetlono minimalne zmierzone wartości
22
Opady deszczu
9
Alarm wysokich opadów deszczu włączony
23
Okres opadów deszczu:1h, 24h, tydzień,
miesiąc lub całkowity
10
Alarm wysokiej/niskiej wilgotności w
pomieszczeniu włączony
24
Prędkość wiatru
11
Jednostka temperatury: °C lub °F
25
Jednostka prędkości wiatru: bft, mph, węzły,
km/h, m/s
12
Temperatura w pomieszczeniu
26
Alarm dużej prędkości wiatru włączony
13
Alarm wysokiej/niskiej wilgotności w
pomieszczeniu włączony
27
Czas
14
Wilgotność w pomieszczeniu
A
Czujnik kierunku wiatru
D
Termohigrometr (osłonięty) i jednostka nadajnika
B
Poziomica
E
Tulejka
C
Kolektor deszczu
F
Anemometr
alarm czasowy
podświetlanie LED
do powieszenia na ścianie lub postawienia
zsynchronizowany odbiór ciągły
zestaw zawiera:
o odbiornik
o 4 czujniki zewnętrzne: termohigrometr, czujnik prędkości wiatru, czujnik kierunku wiatru i czujnik
deszczu.
5. Przegląd
Por. rysunki na stronie 2-3 niniejszej instrukcji.
Wyświetlacz stacji bazowej
Jednostka zewnętrzna
6. Montaż
Por. rysunki na stronie 2-3 niniejszej instrukcji.
6.1 Montaż
Termohigrometr, kolektor deszczu i czujnik kierunku wiatru zamontowano na tulejce. Wystarczy nałożyć czasze
anemometru.
1. Nałożyć czasze na stalową tulejkę anemometru [K].
2. Do wkręcenia śrub z boku czasz użyć klucza imbusowego (w zestawie) [L].
3. Zakręcić czaszami i upewnić się, że mogą się swobodnie poruszać. Jeśli ich ruch będzie utrudniony, pomiary
prędkości wiatru będą niepoprawne.
6.2 Uruchamianie stacji pogodowej
Przed montażem stacji pogodowej w jej docelowym miejscu należy zamontować baterie w jednostce
zewnętrznej i stacji bazowej oraz poczekać, aż urządzenia się uruchomią i zsynchronizują. Zapewni to właściwą
komunikację między jednostką zewnętrzną a stacją bazową. Niewłaściwą komunikację można często naprawić
zmieniając miejsce lokalizacji urządzenia.
V. 02 – 26/04/2013 65 ©Velleman nv
Page 66

WS1060
Nie przebijać i nie wrzucać baterii do ognia ponieważ mogą one eksplodować. Utylizować baterie
zgodnie z lokalnymi przepisami. Nie ładować baterii, które nie są akumulatorkami (alkaliczne).
Trzymać baterie z dala od dzieci.
Informacje dot. baterii
Należy stosować wyłącznie baterie o właściwym rozmiarze i napięciu.
Jeśli urządzenie nie będzie używane przez dłuższy okres czasu, należy wyjąć baterie z jednostki
wewnętrznej i zewnętrznej. Stare baterie mogą cieknąć i uszkodzić urządzenie.
Należy stosować wyłącznie baterie o właściwym rozmiarze i napięciu. Jeśli urządzenie nie będzie używane
przez dłuższy okres czasu, należy wyjąć baterie z jednostki wewnętrznej i zewnętrznej.
Typowa temperatura robocza baterii alkalicznych wynosi -20°C~+54°C. Nie należy stosować urządzenia
poza tym zakresem temperatur.
Montaż baterii w jednostce zewnętrznej
1. Odkręcić śrubę w dolnej części kolektora deszczu i zsunąć metalowy zatrzask na boki w celu otwarcia
gniazda baterii[G].
2. Wyciągnąć gniazdo baterii [H].
3. Włożyć 2 baterie AA 1.5V LR6 zgodnie z oznaczeniami biegunowości w gnieździe [I].
4. Włożyć gniazdo z powrotem do podstawy kolektora deszczu[J].
Dioda LED umieszczona z tyłu kolektora zapali się na 4 sekundy. Jeśli nie, należy sprawdzić, czy baterie
zostały prawidłowo włożone.
5. Aby przymocować gniazdo, wsunąć z powrotem metalowy zatrzask i przykręcić go śrubą.
Montaż baterii w stacji bazowej
1. Otworzyć pokrywę gniazda baterii z tyłu stacji bazowej.
2. Włożyć 3 baterie AA 1.5V LR6 zgodnie z oznaczeniami biegunowości na gnieździe.
Wszystkie segmenty na wyświetlaczu LED zapalą się na 2 sekundy. Jeśli nie, należy sprawdzić, czy baterie
zostały prawidłowo włożone.
3. Zamknąć pokrywę gniazda baterii.
4. W tym momencie nie naciskać żadnych przycisków.
Poczekać aż urządzenie się uruchomi i zsynchronizuje z jednostką zewnętrzną.
W razie potrzeby wyjąć baterie z jednostki wewnętrznej i poczekać przynajmniej 10 sekund przed ich
powtórnym włożeniem.
5. Przed przystąpieniem do kolejnych czynności poczekać, aż na wyświetlaczu pojawi się wskazanie
temperatury w pomieszczeniu i na zewnętrz.
Nadajnik wysyła informacje o pogodzie do stacji bazowej co 48 sekund.
Odbiór sygnału zegara synchronizowanego radiowo
Po włożeniu baterii nadajnik w jednostce zewnętrznej wyśle do stacji bazowej informacje o pogodzie, a
następnie rozpocznie wyszukiwanie sygnału DCF zegara radiowego (RCC), aby automatycznie ustawić datę i
czas. Po wykryciu sygnału DCF dioda LED umieszczona z tyłu kolektora deszczu zaświeci się 5 razy, a następnie
będzie świecić przez 20 sekund. Nadajnik wyśle informacje o dacie i czasie do stacji bazowej. Na wyświetlaczu
pojawi się ikonka RCC .
Jeśli sygnał DCF jest słaby i jego odbiór nie jest możliwy, po 1 minucie nadajnik przerwie poszukiwania i
powróci do normalnego trybu pracy (= nadawanie danych o pogodzie do stacji bazowej). Nadajnik będzie
próbował odebrać sygnał DCF co dwie godziny. Jeśli nie odnajdzie sygnału lub jeśli ostatni sygnał odebrał ponad
12 godzin temu, ikonka RCC na wyświetlaczu zniknie.
Uwaga: Najlepszy czas na odbiór sygnału DCF przypada w nocy, między północą a godz. 6 rano, kiedy
występuje najmniej zakłóceń atmosferycznych.
W trakcie odbioru sygnału DCF nadajnik nie wysyła danych o pogodzie do stacji bazowej. Odbiór sygnału DCF
trwa maks. 5 minut.
Uwaga: jeśli odbiór sygnału DCF nie jest możliwy, datę i czas można ustawić ręcznie. Por. 7.2 Jednostki,
data i czas. Jednak kiedy nadajnik odbierze sygnał DCF, zastąpi on ustawienia daty i czasu wprowadzone
ręcznie.
6.3 Montaż
Uwaga: Przed umieszczeniem stacji pogodowej w jej miejscu docelowym należy ją zmontować i upewnić się,
czy komunikacja między jednostką zewnętrzną a stacją bazową jest prawidłowa. Problemy z transmisją radiową
można zazwyczaj rozwiązać zmieniając lokalizację urządzenia.
Przy wyborze odpowiedniego miejsca montażu jednostki zewnętrznej i stacji bazowej należy wziąć pod uwagę
poniższe:
V. 02 – 26/04/2013 66 ©Velleman nv
Page 67

WS1060
Ustawienia
Wyświetlacz
Opis
Wiatr
(nic)
Wyświetl prędkość wiatru.
Poryw wiatru
Wyświetl prędkość porywu wiatru.
Opady deszczu
1h
Wyświetl opady deszczu w ostatniej godzinie.
24h
Wyświetl opady deszczu w ostatnich 24 godzinach.
tydzień
Wyświetl opady deszczu w ostatnim tygodniu.
miesiąc
Wyświetl opady deszczu w ostatnim miesiącu.
CAŁKOWITE
Wyświetl całkowite opady deszczu od ostatniego resetowania.
Uwaga: po wyświetleniu całkowitej ilości opadów deszczu można ją
zresetować wciskając przycisk SET i przytrzymując go przez 2 sekundy.
Komunikacja radiowa między nadajnikiem a stacją bazową może zachodzić na odległości do 100 m (330
stóp) na otwartym terenie, pod warunkiem że nie występują żadne przeszkody ją uniemożliwiające tj.
budynki, drzewa, pojazdy, linie wysokiego napięcia itp.
Zakłócenia radiowe pochodzące z ekranów komputerów, odbiorników radiowych i telewizyjnych mogą
przeszkodzić w komunikacji radiowej lub nawet ją uniemożliwić.
Osłony tj. drzewa, żywopłoty, ściany itd. mogą wpłynąć na wyniki pomiarów. Należy wybrać teren otwarty,
tak aby czujniki były otwarte na warunki atmosferyczne z każdej strony.
W celu dokładnego pomiaru prędkości wiatru należy trzymać urządzenie z dala od budynków, drzew i
innych przeszkód.
W celu dokładnego pomiaru temperatury należy trzymać urządzenie z dala od źródeł ciepła takich jak
budynki, grunt, oraz chronić je przed bezpośrednim oddziaływaniem promieni słonecznych bez użycia
odpowiedniej osłony w gorącym klimacie.
W celu dokładnego pomiaru wilgotności należy trzymać urządzenie z dala od gruntu, trawy lub innych
źródeł wilgoci.
Zamontować stację pogodową wg następujących wskazówek:
1. Należy się upewnić, że jednostka zewnętrzna została w pełni zamontowana i że zarówno ona, jak stacja
bazowa, zostały zaopatrzone w baterie.
2. Jednostkę zewnętrzną i stację bazową umieścić w żądanych miejscach, sprawdzić czy mogą się swobodnie
komunikować.
o Jeśli tak, przejść do następnego kroku.
o Jeśli nie, zmieniać lokalizację jednostki zewnętrznej i/lub stacji bazowej aż do uzyskania prawidłowej
komunikacji.
3. Zastosować obręcze regulujące (w zestawie), aby przymocować tulejkę jednostki zewnętrznej do masztu
[M]. Przed dokręceniem śrub, sprawdzić czy stację pogodową zamontowano we właściwej pozycji, jak
opisano poniżej.
4. Na krawędzi czujnika kierunku wiatru umieszczono wskaźniki [N] oznaczające północ (N), wschód (E),
południe (S) i zachód (W). Użyć kompasu (brak w zestawie) do ustawienia urządzenia tak, aby wskaźniki
odpowiadały rzeczywistemu położeniu: wskaźnik N musi wskazywać północ, wskaźnik E wschód itd. W
przypadku zamontowania urządzenia w niewłaściwej pozycji, pomiar kierunku wiatru będzie błędny.
5. Aby pozycja urządzenia była doskonale równa, użyć poziomicy [B] umieszczonej na kolektorze deszczu.
6. Zamocować urządzenie w miejscu docelowym poprzez dokręcenie śrub na obręczach regulujących [M].
7. Konfiguracja stacji bazowej
Stacja posiada pięć przycisków do łatwej obsługi: SET, +, HISTORY, ALARM oraz MIN/MAX.
Nacisnąć SET, aby przeglądać ustawienia.
Nacisnąć przycisk + aby zwiększyć wartości, lub przycisk MIN/MAX, aby zmniejszyć wartości.
Nacisnąć i przytrzymać przycisk + lub MIN/MAX przez 2 sekundy, aby przyspieszyć
zwiększanie/zmniejszanie wartości.
Procedura ustawień zakończy się automatycznie po upływie 30 sekund, jeśli żaden przycisk nie zostanie
wciśnięty; z ustawień można w każdym momencie wyjść wciskając przycisk HISTORY.
7.1 Tryb szybkiego wyświetlania
Informacje wyświetlane na ekranie LCD stacji bazowej można szybko zmienić. Wskaźniki na wyświetlaczu
pokazują, jakie informacje są obecnie wyświetlane. Wyświetlane informacje można wybrać następująco:
1. W trybie normalnym nacisnąć SET.
Stacja przejdzie do trybu szybkiego wyświetlania.
2. Nacisnąć SET, aby potwierdzić aktualne ustawienia i przejść do następnego; użyć przycisków + lub
MIN/MAX, aby zmienić wartości.
V. 02 – 26/04/2013 67 ©Velleman nv
Page 68

WS1060
Ustawienia
Wyświetlacz
Opis
Temperatura
TEMP
Wyświetl temperaturę zewnętrzną.
TEMPERATURA
ODCZUWALNA
Wyświetl odczuwalną temperaturę zewnętrzną.
PUNKT ROSY
Wyświetl zewnętrzny punkt rosy.
Ustawienie
Opis
jasność LCD
Ustawianie jasności wyświetlacza LCD w skali od 0 do 8.
Strefa czasowa
Wybór strefy czasowej, od -12 do +12.
W Europie 0 = GMT+1; 1 = GMT+2; -1 = GMT.
Format czasu
Wybrać między formatem 12, a 24-godzinnym wyświetlania czasu [27].
Czas
Jeśli nie można wykryć sygnału DCF, aktualny czas (godziny/minuty) można ustawić
ręcznie.
Format daty
Wybrać między formatem dzień-miesiąc- rok (DM) a miesiąc-dzień-rok (MD)
wyświetlania daty [4].
Data
Jeśli nie można wykryć sygnału DCF, aktualną datę można ustawić ręcznie.
Jednostka prędkości
wiatru
Wybór jednostki wyświetlania prędkości wiatru/ porywu wiatru: km/h, m/s, bft (skala
Beauforta), mph lub węzły. Odpowiedni wskaźnik pojawi się na wyświetlaczu [25].
Kierunek wiatru
Dostosowanie kierunku wiatru.
Jednostka opadów
deszczu
Wybór wyświetlania wielkości opadów deszczu w mm lub calach. Odpowiedni wskaźnik
pojawi się na wyświetlaczu [15].
Jednostka
temperatury
Wybór jednostki wyświetlania temperatury - stopnie Celsjusza albo Fahrenheita.
Odpowiedni wskaźnik pojawi się na wyświetlaczu [11].
3. Aby wrócić do trybu normalnego, nacisnąć przycisk HISTORY.
7.2 Jednostki, data i czas
Aby określić jednostki oraz ustawienia daty/czasu, należy postępować następująco:
1. W trybie normalnym nacisnąć przycisk SET i przytrzymać go przez 2 sekundy.
Stacja przejdzie w tryb ustawień.
2. Nacisnąć SET, aby potwierdzić aktualne ustawienie i przejść do następnego; użyć przycisków + lub
MIN/MAX, aby zmienić wartości.
3. Aby wrócić do trybu normalnego, nacisnąć przycisk HISTORY.
7.3 Tryb historii
W trybie historii można wyświetlić pomiary z ostatnich 24 godzin.
Wyświetlanie danych historii
1. W trybie normalnym nacisnąć przycisk HISTORY.
2. W trybie historii kilkakrotnie wciskać przycisk MIN/MAX aby cofać się w 3-godzinnych odstępach.
3. Aby wrócić do trybu normalnego, nacisnąć przycisk HISTORY.
Resetowanie danych historii
1. W trybie normalnym nacisnąć przycisk HISTORY.
2. Nacisnąć SET.
7.4 Ustawienia alarmów
Stację bazową można zaprogramować, aby włączała alarm w określonym czasie lub przy konkretnych
warunkach pogodowych, w pomieszczeniu lub na zewnątrz. Po włączeniu alarmu, sygnał trwa przez 120
sekund. Odpowiedni wskaźnik na wyświetlaczu miga do momentu ustąpienia warunków, które wywołały alarm.
Nacisnąć dowolny przycisk, aby wyłączyć alarm.
Jeśli warunki, które wywołały alarm ustąpią, wyświetlacz przestanie migać. Jednak alarm jest wciąż
Stacja przejdzie do trybu historii. Na wyświetlaczu pojawi się napis HIS [3].
Stacja przejdzie do trybu historii. Na wyświetlaczu pojawi się napis HIS [3].
Na wyświetlaczu miga napis CLEAR.
o Aby zresetować dane historii nacisnąć przycisk SET i przytrzymać go przez 2 sekundy.
o Aby wyjść z trybu i powrócić do trybu normalnego, nie resetując danych historii, nacisnąć przycisk
HISTORY.
aktywny i włączy się ponownie, kiedy wartość progowa zostanie przekroczona. Jeśli włączenie alarmu nie
jest pożądane, należy dezaktywować go w menu alarmu.
V. 02 – 26/04/2013 68 ©Velleman nv
Page 69

WS1060
Alarm dla
wysokich wartości
Opis
Alarm czasowy
Ustawić czas (godziny:minuty) aktywacji alarmu.
Uwaga: alarm czasowy można ustawić również w ustawieniach alarmów niskich
wartości.
Prędkość wiatru
Ustawianie wartości progowej prędkości wiatru (0~50m/s). Alarm włączy się, kiedy
prędkość wiatru będzie większa niż ustawiona wartość.
Prędkość porywu
wiatru
Ustawić wartość progową prędkości porywu wiatru (0~50m/s). Alarm włączy się, kiedy
prędkość porywu wiatru będzie większa niż określona wartość.
Kierunek wiatru
Ustawianie kierunku wiatru. Alarm włączy się, kiedy wiatr nadejdzie z określonego
kierunku.
1 godzina opadów
deszczu
Ustawianie wielkości opadów deszczu w ciągu 1 godziny (0~999,9mm). Alarm włączy
się, kiedy w ciągu 1 godziny spadnie więcej deszczu niż określona wartość.
24 godziny opadów
deszczu
Ustawianie wielkości opadów deszczu w ciągu 24 godzin (0~999,9mm). Alarm włączy
się, kiedy w ciągu 24 godzin spadnie więcej deszczu niż określona wartość.
Wilgotność
zewnętrzna
Ustawianie wartości wilgotności zewnętrznej (1%~99%). Alarm włączy się jeśli
wilgotność na zewnątrz będzie wyższa niż określona wartość.
Temperatura
zewnętrzna
Ustawianie wartości temperatury zewnętrznej (-40°C~+60°C). Alarm włączy się, jeśli
temperatura zewnętrzna będzie wyższa niż określona wartość.
Temperatura
odczuwalna
Ustawianie wartości temperatury odczuwalnej (-40°C~+60°C). Alarm włączy się, jeśli
temperatura odczuwalna będzie wyższa niż określona wartość.
Punkt rosy
Ustawianie wartości punktu rosy (-40°C~+60°C). Alarm włączy się, jeśli temperatura
punktu rosy będzie wyższa niż określona wartość.
Wilgotność w
pomieszczeniu
Ustawianie wartości wilgotności w pomieszczeniu (1%~99%). Alarm włączy się, jeśli
wilgotność w pomieszczeniu będzie wyższa niż określona wartość.
Temperatura w
pomieszczeniu
Ustawianie wartości temperatury w pomieszczeniu (-9.9°C~+60°C). Alarm włączy się,
jeśli temperatura w pomieszczeniu będzie wyższa niż określona wartość.
Alarm dla niskich
wartości
Opis
Wilgotność
zewnętrzna
Ustawianie wartości wilgotności zewnętrznej (1%~99%). Alarm włączy się, jeśli
wilgotność zewnętrzna będzie niższa niż określona wartość.
Temperatura
zewnętrzna
Ustawianie wartości temperatury zewnętrznej (-40°C~+60°C). Alarm włączy się, jeśli
temperatura zewnętrzna będzie niższa niż określona wartość.
Jeśli w przeciągu 3 godzin od ostatniego alarmu znowu pojawią się warunki go wywołujące, wskaźnik na
wyświetlaczu zacznie migać, ale alarm nie wyda dźwięku. Ta funkcja zapobiega ponownemu włączeniu
alarmu dla tych samych warunków.
Można określić:
alarmy dla wysokich wartości: alarm włączy się, kiedy zmierzona wartość przekroczy wartość progową
alarmu, np. jeśli prędkość wiatru przekroczy 20 m/s.
alarmy dla niskich wartości: alarm włączy się, kiedy zmierzona wartość spadnie poniżej wartości progowej
alarmu, np. jeśli temperatura zewnętrzna spadnie poniżej -5°C.
Aby ustawić, włączyć lub wyłączyć alarmy, postępować jak opisano poniżej:
1. W trybie normalnym, nacisnąć przycisk ALARM.
Stacja przejdzie do trybu alarmu dla wysokich wartości, gdzie można ustawić tego typu alarmy (por.
zestawienie w tabeli poniżej). Na wyświetlaczu pojawi się napis HIAL [4] oraz aktualne wartości progowe
alarmu. Jeśli wartość alarmu nie została ustawiona, wyświetlacz pokaże “– –“.
2. Ponownie nacisnąć ALARM, aby przejść do trybu alarmu niskich wartości, gdzie można ustawić tego typu
alarmy (por. zestawienie w tabeli poniżej). Na wyświetlaczu pojawi się napis LOAL [4] oraz aktualne
wartości progowe alarmu. Jeśli wartość alarmu nie została ustawiona, wyświetlacz pokaże “– –“.
3. Nacisnąć SET, aby przeglądać ustawienia alarmu.
4. Użyć przycisków + i MIN/MAX, aby ustawić wartości.
5. Nacisnąć ALARM, aby włączyć/wyłączyć alarm. Jeśli alarm jest włączony, na wyświetlaczu pojawi się
odpowiedni wskaźnik alarmu oraz napis HI AL (lub LO AL dla alarmu niskich wartości).
6. Nacisnąć SET, aby potwierdzić aktualne ustawienia i przejść dalej.
7. Aby wrócić do trybu normalnego, nacisnąć przycisk HISTORY.
Ustawienia alarmu dla wysokich wartości
Ustawienia alarmu dla niskich wartości
V. 02 – 26/04/2013 69 ©Velleman nv
Page 70

WS1060
Alarm dla niskich
wartości
Opis
Temperatura
odczuwalna
Ustawianie wartości temperatury odczuwalnej (-40°C~+60°C). Alarm włączy się, jeśli
temperatura odczuwalna będzie niższa niż określona wartość.
Punkt rosy
Ustawianie wartości punktu rosy (-40°C~+60°C). Alarm włączy się, jeśli temperatura
punktu rosy będzie niższa niż określona wartość.
Wilgotność w
pomieszczeniu
Ustawianie wartości wilgotności w pomieszczeniu (1%~99%). Alarm włączy się, jeśli
wilgotność w pomieszczeniu będzie niższa niż określona wartość.
Temperatura w
pomieszczeniu
Ustawianie wartości temperatury w pomieszczeniu (-9.9°C~+60°C). Alarm włączy się,
jeśli temperatura w pomieszczeniu będzie niższa niż określona wartość.
Usterka
Możliwa przyczyna
Rozwiązanie
Problem z transmisją
danych
Odległość między dwiema jednostkami jest
zbyt duża
Zmniejszyć odległość
Materiały osłonowe między dwiema
jednostkami (gruba ściana, stal itp.)
Znaleźć inne miejsce montażu
Zakłócenia z innych źródeł
Wyeliminować źródła zakłóceń
Dane na wyświetlaczu
LCD są nieczytelne
Brak odbioru danych
Znaleźć inne miejsce montażu
Niski poziom baterii
Wymienić baterie
Błędne dane
Niski poziom baterii
Wymienić baterie
Nieprawidłowe ustawienia
Ponownie zaprogramować stację
pogodową
7.5 Minimum i maksimum
Stacja pogodowa zapamiętuje minimalne i maksymalne zmierzone wartości dla każdego parametru pogody (od
momentu ostatniego resetowania), wraz z czasem i datą ich rejestracji.
Wyświetlanie wartości minimalnych i maksymalnych
Aby wyświetlić minimalne i maksymalne zmierzone wartości, należy postępować jak opisano poniżej:
1. W trybie normalnym, nacisnąć przycisk MIN/MAX.
Stacja przejdzie do trybu wartości maksymalnych. Na wyświetlaczu pokazuje się wskaźnik wartości
maksymalnych [6].
2. Kilkakrotnie wcisnąć +, aby wyświetlić maksymalne wartości dla: prędkości wiatru, prędkości porywu
wiatru, opadów deszczu w przeciągu 1 godziny, 24 godzin, tygodnia, miesiąca, wilgotności zewnętrznej,
temperatury zewnętrznej, odczuwalnej, punktu rosy, wilgotności i temperatury w pomieszczeniu.
3. Nacisnąć MIN/MAX, aby przejść do trybu wartości minimalnych. Na wyświetlaczu pokazuje się wskaźnik
wartości minimalnych [8].
4. Kilkakrotnie wcisnąć +, aby wyświetlić minimalne wartości dla: wilgotności i temperatury zewnętrznej,
temperatury odczuwalnej, punktu rosy, wilgotności i temperatury w pomieszczeniu.
5. Nacisnąć HISTORY, aby powrócić do trybu normalnego.
Resetowanie wartości minimalnych lub maksymalnych
Aby zresetować wartości minimalne lub maksymalne:
1. Wprowadzić tryb odczytu wartości minimalnych lub maksymalnych i naciskać + do momentu wyświetlenia
wartości przeznaczonej do zresetowania.
2. Wcisnąć przycisk SET i przytrzymać go przez 3 sekundy.
3. Powtórzyć czynność dla każdej następnej wartości minimalnej lub maksymalnej przeznaczonej do
zresetowania.
4. Nacisnąć HISTORY, aby powrócić do trybu normalnego.
8. Powrót do ustawień domyślnych
Aby zresetować stację pogodową do ustawień fabrycznych, należy nacisnąć i przytrzymać przycisk + przez 20
sekund.
9. Wykrywanie i usuwanie usterek
10. Wzorcowanie
W celu uzyskania dokładnych pomiarów, można przeprowadzić wzorcowanie prędkości wiatru, temperatury,
wilgotności oraz pomiarów opadów deszczu przy pomocy narzędzi do wzorcowania (brak w zestawie).
V. 02 – 26/04/2013 70 ©Velleman nv
Page 71

WS1060
Aby wejść w tryb wzorcowania, należy postępować jak opisano poniżej:
1. W trybie normalnym nacisnąć przycisk HISTORY i przytrzymać go przez 8 sekund.
Stacja przejdzie do trybu wzorcowania. Wskaźniki wiatru na wyświetlaczu zaczną migać.
2. Nacisnąć SET, aby przejść do następnego ustawienia; użyć przycisku + lub MIN/MAX, aby zmienić wartości.
3. Aby wyjść z trybu wzorcowania, nacisnąć HISTORY.
Poniżej znajduje się opis każdego ustawienia wzorcowania.
Wzorcowanie prędkości wiatru
Ustawienie domyślne dla wzorcowania prędkości wiatru to 1.0. Regulacja w zakresie od 0,75 do 1,25.
Ustawianie stopniowe co 0,01.
Prędkość wiatru jest najbardziej wrażliwa na ograniczenia wynikające z miejsca montażu. Na pomiar prędkości
wiatru mają wpływ następujące czynniki:
lokalizacja stacji pogodowej: bliskość budynków, drzew lub innych przeszkód
zużycie ruchomych części anemometru.
Do wzorcowania prędkości wiatru zaleca się użycie skalibrowanego wiatromierza (brak w zestawie) oraz
wentylatora szybkobieżnego o stałej prędkości obrotowej (brak w zestawie).
Wzorcowanie temperatury
Można dokonać wzorcowania pomiarów temperatury w pomieszczeniu i na zewnątrz.
Na pomiar temperatury mają wpływ następujące czynniki:
bliskość źródeł gorąca, np. budynków, ziemi itp.
montaż w miejscu narażonym na działanie bezpośrednich promieni słonecznych bez odpowiedniej osłony w
upale.
Do wzorcowania temperatury zaleca się zastosowanie termometru rtęciowego lub alkoholowego (brak w
zestawie). Nie stosować termometrów bimetalicznych (tarczowych) lub innych termometrów cyfrowych, gdyż
mają one własny margines błędu. Nie stosować miejscowej stacji pogodowej na własnym obszarze (inna
lokalizacja, synchronizacja aktualizacji i możliwe błędy wzorcowania).
Aby dokonać wzorcowania temperatury, należy postępować następująco:
1. Umieścić czujnik temperatury w osłoniętym, chronionym miejscu.
2. Tuż obok niego umieścić termometr.
3. Poczekać 48 godzin aż urządzenie się ustabilizuje.
4. Porównać odczyt temperatury na wyświetlaczu z odczytem na termometrze i dopasować ustawienie
wzorcowania do termometru.
Wzorcowanie wilgotności
Dokładność czujnika higrometru wynosi ±5%. Dokładność można zwiększyć dokonując wzorcowania pomiarów
wilgotności w pomieszczeniu i na zewnątrz.
Pomiary wilgotności mogą ulec rozstrojeniu wraz z upływem czasu. Na pomiar ma wpływ bliskość źródeł wilgoci
tj. ziemi, trawy itp.
Do pomiaru wilgotności zaleca się użycie psychrometru (brak w zestawie) lub dostępnego na rynku zestawu do
wzorcowania wilgotności (brak w zestawie). Dopasować ustawienie wzorcowania do zmierzonej wartości.
Wzorcowanie opadów deszczu
Ustawienie domyślne dla wzorcowania opadów deszczu to 1,0. Regulacja w zakresie od 0,75 do 1,25.
Zaleca się zastosowanie narzędzia do pomiaru deszczu w kształcie rurki (brak w zestawie) z otworem co
najmniej 10 cm (4”). Przy mniejszym otworze odczyty mogą być niedokładne. Nie należy używać odczytów
opadów deszczu z prognoz pogody prezentowanych w radiu, telewizji, gazetach lub nawet stacji pogodowej
sąsiada (inna lokalizacja).
Aby dokonać wzorcowania pomiaru opadów deszczu należy postępować jak opisano poniżej:
1. Umieścić przyrząd do pomiaru deszczu tuż obok kolektora deszczu stacji pogodowej.
2. Porównać całkowite wyniki po trzech burzach.
3. Na ich podstawie, określić średnią wartość błędu odczytów.
Wzorcowanie całkowitych opadów deszczu
Aby dokonać wzorcowania wartości całkowitej opadów deszczu należy wziąć pod uwagę fakt, że czynnik ten
odnosi się do bieżącej wartości całkowitej, a nie do poszczególnych przechyleń pojemnika w kolektorze deszczu.
Całkowitą wartość opadów deszczu można wyregulować w stopniach co 0,3 mm.
Pomiar całkowitego opadu deszczu zachodzi następująco:
V. 02 – 26/04/2013 71 ©Velleman nv
Page 72

WS1060
1. Kolektor deszczu został skalibrowany w fabryce w ten sposób, że pojemnik przechyla się (i powoduje zapis
wielkości opadów) co 0,3 mm (0.01”) zebranego deszczu.
2. Całkowita liczba przechyleń pojemnika (od momentu ostatniego resetowania) jest podliczana i mnożona
przez 0,3 aby uzyskać całkowitą wartość w mm. (Odczyt w calach uzyskiwany jest po przemnożeniu przez
współczynnik).
3. Współczynnik wzorcowania jest następnie dodawany do wartości całkowitej.
11. Czyszczenie i konserwacja
11.1 Wymiana baterii
Wymiana baterii w stacji bazowej
Kiedy wyświetlacz staje się nieczytelny, należy wymienić baterie. Por. Montaż baterii w stacji bazowej.
Uwaga: Po wyjęciu baterii ze stacji bazowej utracone zostaną wszystkie wcześniejsze dane o pogodzie oraz
ustawienia alarmu.
Wymiana baterii w jednostce zewnętrznej
Jeśli poziom baterii w nadajniku jest niski, na wyświetlaczu pokaże się . W takim wypadku należy jak
najszybciej wymienić baterie w nadajniku. Por. Montaż baterii w jednostce zewnętrznej.
Uwaga: Należy wziąć pod uwagę fakt, że wskaźnik niskiego poziomu baterii działa prawidłowo tylko przy
temperaturze zewnętrznej wynoszącej 10~35°C. Poza tym zakresem temperatur wskaźnik niskiego poziomu
baterii może się uaktywnić nawet, jeśli baterie są nadal dobre.
Po wymianie baterii w nadajniku, w przeciągu następnych 3 godzin nastąpi jego ponowna synchronizacja ze
stacją w pomieszczeniu. Zachowane zostaną wszystkie wcześniejsze dane o pogodzie oraz ustawienia alarmu.
Aby jednak synchronizacja nastąpiła szybciej, można wyjąć baterie ze stacji w pomieszczeniu i włożyć je
ponownie po 10 sekundach.
Uwaga: Wówczas wszystkie wcześniejsze dane o pogodzie i ustawienia alarmu zostaną utracone.
11.2 Wymiana czujników
Por. rysunki na stronie 2-3 niniejszej instrukcji.
Wymiana kolektora deszczu i czujnika termohigrometru
Aby wymienić kolektor deszczu i czujnik termohigrometru należy postępować następująco:
1. Odkręcić trzy śruby [O] na dnie kolektora.
2. Zdjąć kolektor z podstawy [P].
3. Odkręcić 4 śruby pokrywy czujnika i zdjąć pokrywę [Q].
4. Odłączyć kabel komunikacyjny [R].
5. Odkręcić śrubę [S] , która unieruchamia jednostkę czujnika i delikatnie zsunąć go z tulejki.
6. Wsunąć nowy czujnik na tulejkę i zamocować go za pomocą śruby.
7. Ponownie podłączyć kabel komunikacyjny.
8. Założyć pokrywę czujnika i przykręcić ją śrubami.
9. Umieścić nowy kolektor deszczu na podstawie.
10. Przymocować kolektor do podstawy za pomocą trzech śrub na dnie.
11. Dokładnie wypoziomować kolektor za pomocą poziomicy [B] umieszczonej na kolektorze deszczu. W razie
potrzeby, wyregulować pozycję.
Wymiana czujnika wiatru
Aby wymienić czujnik wiatru należy postępować następująco:
1. Odłączyć kabel komunikacyjny: por. Wymiana kolektora deszczu i czujnika termohigrometru.
2. Odkręcić śrubę [T] mocującą czujnik i delikatnie zsunąć go z tulejki.
3. Wsunąć nowy czujnik na tulejkę i zamocować go za pomocą śruby.
4. Ponownie podłączyć kabel komunikacyjny.
5. Na krawędzi czujnika kierunku wiatru znajdują się oznaczenia [N] kierunków świata: północy (N), wschodu
(E), południa (S) i zachodu (W). Użyć kompasu (brak w zestawie) do ustawienia urządzenia tak, aby
wskaźniki odpowiadały rzeczywistemu położeniu: wskaźnik N musi wskazywać północ, wskaźnik E wschód
itd. W przypadku zamontowania urządzenia w niewłaściwej pozycji, pomiar kierunku wiatru będzie błędny.
6. Aby pozycja urządzenia była doskonale równa, użyć poziomicy [B] umieszczonej na kolektorze deszczu. W
razie potrzeby, wyregulować pozycję.
V. 02 – 26/04/2013 72 ©Velleman nv
Page 73

WS1060
Dane zewnętrzne
Odległość nadajnika
100 m (330 ft) na otwartym terenie
Częstotliwość
868 MHz
Odstępy pomiędzy pomiarami
czujnika termohigrometru
48 sekund
Temperatura
Zakres
-40°C~+65°C (-40°F~+149°F)
Dokładność
±1°C
Rozdzielczość
0.1°C
Wilgotność
względna
Zakres
1%~99%
Dokładność
±5%
Wielkość opadów
Zakres
0~999,9mm (przy przekroczeniu zakresu wyświetla się – –)
Dokładność
±10%
Rozdzielczość
0,3 mm (przy wielkości opadów < 1000 mm); 1 mm (przy wielkości opadów
> 1000 mm)
Prędkość wiatru
Zakres
0~180 km/h (0~110 mph) (przy przekroczeniu zakresu wyświetla się – –)
Dokładność
±1 m/s (przy prędkości wiatru < 10 m/s); ±10% (przy prędkości wiatru >
10 m/s)
Dane w pomieszczeniu
Odstępy pomiędzy pomiarami
(temperatury i wilgotności)
30 sekund
Temperatura
Zakres
-9,9°C~+60°C (14°F~+149°F) (przy przekroczeniu zakresu wyświetla się –
–)
Rozdzielczość
0.1°C
Wilgotność
względna
Zakres
1%~99%
Dokładność
±1%
Zużycie mocy
Czujnik zewnętrzny
2 baterie alkaliczne AA 1.5V LR6 (brak w zestawie)
Stacja bazowa
3 baterie alkaliczne AA 1.5V LR6 (brak w zestawie)
Szacunkowa żywotność baterii
12 miesięcy dla stacji bazowej
24 miesiące dla czujnika termohigrometru
Uwaga: jest to okres szacunkowy, który należy traktować jedynie jako
wskazówkę. Rzeczywista żywotność baterii zależy od wielu czynników, np.
temperatury otoczenia.
12. Specyfikacja techniczna
Używaj tylko oryginalnych akcesoriów. Firma Velleman nv nie ponosi odpowiedzialności w
przypadku uszkodzeń lub obrażeń ciała powstałych w wyniku (nieprawidłowej) obsługi urządzenia.
Aby uzyskać więcej informacji dotyczących tego produktu i najnowsza wersja tej instrukcji, odwiedź
naszą stronę internetową www.velleman.eu.
Informacje zawarte w niniejszej instrukcji obsługi mogą ulec zmianie bez wcześniejszego
powiadomienia.
© INFORMACJA O PRAWACH WŁASNOŚCI
Instrukcja ta jest własnością firmy Velleman NV i jest chroniona prawami autorskimi. Wszystkie
prawa są zastrzeżone na całym świecie.
Żadna część tej instrukcji nie może być kopiowana, przedrukowywana, tłumaczona lub konwertowana na
wszelkie nośniki elektronicznych lub w inny sposób, bez uprzedniej pisemnej zgody właściciela praw autorskich.
V. 02 – 26/04/2013 73 ©Velleman nv
Page 74

Velleman® Service and Quality Warranty
Since its foundation in 1972, Velleman® acquired extensive experience in the
electronics world and currently distributes its products in over 85 countries.
All our products fulfil strict quality requirements and legal stipulations in the EU.
In order to ensure the quality, our products regularly go through an extra quality
check, both by an internal quality department and by specialized external
organisations. If, all precautionary measures notwithstanding, problems should
occur, please make appeal to our warranty (see guarantee conditions).
General Warranty Conditions Concerning Consumer Products
(for EU):
• All consumer products are subject to a 24-month warranty on production flaws
and defective material as from the original date of purchase.
• Velleman® can decide to replace an article with an equivalent article, or to
refund the retail value totally or partially when the complaint is valid and a free
repair or replacement of the article is impossible, or if the expenses are out of
proportion.
You will be delivered a replacing article or a refund at the value of 100% of the
purchase price in case of a flaw occurred in the first year after the date of
purchase and delivery, or a replacing article at 50% of the purchase price or a
refund at the value of 50% of the retail value in case of a flaw occurred in the
second year after the date of purchase and delivery.
• Not covered by warranty:
- all direct or indirect damage caused after delivery to the article (e.g. by
oxidation, shocks, falls, dust, dirt, humidity...), and by the article, as well as its
contents (e.g. data loss), compensation for loss of profits;
- consumable goods, parts or accessories that are subject to an aging process
during normal use, such as batteries (rechargeable, non-rechargeable, built-in or
replaceable), lamps, rubber parts, drive belts... (unlimited list);
- flaws resulting from fire, water damage, lightning, accident, natural disaster,
etc.…;
- flaws caused deliberately, negligently or resulting from improper handling,
negligent maintenance, abusive use or use contrary to the manufacturer’s
instructions;
- damage caused by a commercial, professional or collective use of the article
(the warranty validity will be reduced to six (6) months when the article is used
professionally);
- damage resulting from an inappropriate packing and shipping of the article;
- all damage caused by modification, repair or alteration performed by a third
party without written permission by Velleman®.
• Articles to be repaired must be delivered to your Velleman® dealer, solidly
packed (preferably in the original packaging), and be completed with the original
receipt of purchase and a clear flaw description.
• Hint: In order to save on cost and time, please reread the manual and check if
the flaw is caused by obvious causes prior to presenting the article for repair.
Note that returning a non-defective article can also involve handling costs.
• Repairs occurring after warranty expiration are subject to shipping costs.
• The above conditions are without prejudice to all commercial warranties.
The above enumeration is subject to modification according to the
article (see article’s manual).
Velleman® service- en kwaliteitsgarantie
Velleman® heeft sinds zijn oprichting in 1972 een ruime ervaring opgebouwd in
de elektronicawereld en verdeelt op dit moment producten in meer dan 85
landen. Al onze producten beantwoorden aan strikte kwaliteitseisen en aan de
wettelijke bepalingen geldig in de EU. Om de kwaliteit te waarborgen, ondergaan
onze producten op regelmatige tijdstippen een extra kwaliteitscontrole, zowel
door onze eigen kwaliteitsafdeling als door externe gespecialiseerde organisaties.
Mocht er ondanks deze voorzorgen toch een probleem optreden, dan kunt u
steeds een beroep doen op onze waarborg (zie waarborgvoorwaarden).
Algemene waarborgvoorwaarden consumentengoederen
(voor Europese Unie):
• Op alle consumentengoederen geldt een garantieperiode van 24 maanden op
productie- en materiaalfouten en dit vanaf de oorspronkelijke aankoopdatum.
• Indien de klacht gegrond is en een gratis reparatie of vervanging van een
artikel onmogelijk is of indien de kosten hiervoor buiten verhouding zijn, kan
Velleman® beslissen het desbetreffende artikel te vervangen door een
gelijkwaardig artikel of de aankoopsom van het artikel gedeeltelijk of volledig
terug te betalen. In dat geval krijgt u een vervangend product of terugbetaling
ter waarde van 100% van de aankoopsom bij ontdekking van een gebrek tot één
jaar na aankoop en levering, of een vervangend product tegen 50% van de
kostprijs of terugbetaling van 50 % bij ontdekking na één jaar tot 2 jaar.
• Valt niet onder waarborg:
- alle rechtstreekse of onrechtstreekse schade na de levering veroorzaakt aan
het toestel (bv. door oxidatie, schokken, val, stof, vuil, vocht...), en door het
toestel, alsook zijn inhoud (bv. verlies van data), vergoeding voor eventuele
winstderving.
- verbruiksgoederen, onderdelen of hulpstukken die onderhevig zijn aan
veroudering door normaal gebruik zoals bv. batterijen (zowel oplaadbare als
niet-oplaadbare, ingebouwd of vervangbaar), lampen, rubberen onderdelen,
aandrijfriemen... (onbeperkte lijst).
- defecten ten gevolge van brand, waterschade, bliksem, ongevallen,
natuurrampen, enz.
- defecten veroorzaakt door opzet, nalatigheid of door een onoordeelkundige
behandeling, slecht onderhoud of abnormaal gebruik of gebruik van het toestel
strijdig met de voorschriften van de fabrikant.
- schade ten gevolge van een commercieel, professioneel of collectief gebruik
van het apparaat (bij professioneel gebruik wordt de garantieperiode herleid tot
6 maand).
- schade veroorzaakt door onvoldoende bescherming bij transport van het
apparaat.
- alle schade door wijzigingen, reparaties of modificaties uitgevoerd door derden
zonder toestemming van Velleman®.
• Toestellen dienen ter reparatie aangeboden te worden bij uw Velleman®-
verdeler. Het toestel dient vergezeld te zijn van het oorspronkelijke
aankoopbewijs. Zorg voor een degelijke verpakking (bij voorkeur de originele
verpakking) en voeg een duidelijke foutomschrijving bij.
• Tip: alvorens het toestel voor reparatie aan te bieden, kijk nog eens na of er
geen voor de hand liggende reden is waarom het toestel niet naar behoren werkt
(zie handleiding). Op deze wijze kunt u kosten en tijd besparen. Denk eraan dat
er ook voor niet-defecte toestellen een kost voor controle aangerekend kan
worden.
• Bij reparaties buiten de waarborgperiode zullen transportkosten aangerekend
worden.
• Elke commerciële garantie laat deze rechten onverminderd.
Bovenstaande opsomming kan eventueel aangepast worden naargelang
de aard van het product (zie handleiding van het betreffende product).
Garantie de service et de qualité Velleman®
Depuis 1972, Velleman® a gagné une vaste expérience dans le secteur de
l’électronique et est actuellement distributeur dans plus de 85 pays.
Tous nos produits répondent à des exigences de qualité rigoureuses et à des
dispositions légales en vigueur dans l’UE. Afin de garantir la qualité, nous
soumettons régulièrement nos produits à des contrôles de qualité
supplémentaires, tant par notre propre service qualité que par un service qualité
externe. Dans le cas improbable d’un défaut malgré toutes les précautions, il est
possible d’invoquer notre garantie (voir les conditions de garantie).
Conditions générales concernant la garantie sur les produits
grand public (pour l’UE) :
• tout produit grand public est garanti 24 mois contre tout vice de production ou
de matériaux à dater du jour d’acquisition effective ;
• si la plainte est justifiée et que la réparation ou le remplacement d’un article
est jugé impossible, ou lorsque les coûts s’avèrent disproportionnés, Velleman®
s’autorise à remplacer ledit article par un article équivalent ou à rembourser la
totalité ou une partie du prix d’achat. Le cas échéant, il vous sera consenti un
article de remplacement ou le remboursement complet du prix d’achat lors d’un
défaut dans un délai de 1 an après l’achat et la livraison, ou un article de
remplacement moyennant 50% du prix d’achat ou le remboursement de 50% du
prix d’achat lors d’un défaut après 1 à 2 ans.
• sont par conséquent exclus :
- tout dommage direct ou indirect survenu à l’article après livraison (p.ex.
dommage lié à l’oxydation, choc, chute, poussière, sable, impureté…) et
provoqué par l’appareil, ainsi que son contenu (p.ex. perte de données) et une
indemnisation éventuelle pour perte de revenus ;
- toute pièce ou accessoire nécessitant un remplacement causé par un usage
normal comme p.ex. piles (rechargeables comme non rechargeables, intégrées
ou remplaçables), ampoules, pièces en caoutchouc, courroies… (liste illimitée) ;
- tout dommage qui résulte d’un incendie, de la foudre, d’un accident, d’une
catastrophe naturelle, etc. ;
- out dommage provoqué par une négligence, volontaire ou non, une utilisation
ou un entretien incorrect, ou une utilisation de l’appareil contraire aux
prescriptions du fabricant ;
- tout dommage à cause d’une utilisation commerciale, professionnelle ou
collective de l’appareil (la période de garantie sera réduite à 6 mois lors d’une
utilisation professionnelle) ;
- tout dommage à l’appareil qui résulte d’une utilisation incorrecte ou différente
que celle pour laquelle il a été initialement prévu comme décrit dans la notice ;
- tout dommage engendré par un retour de l’appareil emballé dans un
conditionnement non ou insuffisamment protégé.
- toute réparation ou modification effectuée par une tierce personne sans
l’autorisation explicite de SA Velleman® ; - frais de transport de et vers
Velleman® si l’appareil n’est plus couvert sous la garantie.
• toute réparation sera fournie par l’endroit de l’achat. L’appareil doit
nécessairement être accompagné du bon d’achat d’origine et être dûment
conditionné (de préférence dans l’emballage d’origine avec mention du défaut) ;
• tuyau : il est conseillé de consulter la notice et de contrôler câbles, piles, etc.
avant de retourner l’appareil. Un appareil retourné jugé défectueux qui s’avère
en bon état de marche pourra faire l’objet d’une note de frais à charge du
consommateur ;
• une réparation effectuée en-dehors de la période de garantie fera l’objet de
frais de transport ;
• toute garantie commerciale ne porte pas atteinte aux conditions
susmentionnées.
La liste susmentionnée peut être sujette à une complémentation selon le
type de l’article et être mentionnée dans la notice d’emploi.
Garantía de servicio y calidad Velleman®
Desde su fundación en 1972 Velleman® ha adquirido una amplia experiencia
como distribuidor en el sector de la electrónica en más de 85 países. Todos
nuestros productos responden a normas de calidad rigurosas y disposiciones
legales vigentes en la UE. Para garantizar la calidad, sometemos nuestros
productos regularmente a controles de calidad adicionales, tanto a través de
nuestro propio servicio de calidad como de un servicio de calidad externo. En el
caso improbable de que surgieran problemas a pesar de todas las precauciones,
es posible recurrir a nuestra garantía (véase las condiciones de garantía).
Condiciones generales referentes a la garantía sobre
productos de venta al público (para la Unión Europea):
• Todos los productos de venta al público tienen un período de garantía de 24
meses contra errores de producción o errores en materiales desde la adquisición
original;
• Si la queja está fundada y si la reparación o sustitución de un artículo no es
posible, o si los gastos son desproporcionados, Velleman® autoriza reemplazar
el artículo por un artículo equivalente o reembolsar la totalidad o una parte del
precio de compra. En este caso, usted recibirá un artículo de recambio o el
reembolso completo del precio de compra si encuentra algún fallo hasta un año
después de la compra y entrega, o un artículo de recambio al 50% del precio de
compra o el reembolso del 50% del precio de compra si encuentra un fallo
después de 1 año y hasta los 2 años después de la compra y entrega.
Por consiguiente, están excluidos entre otras cosas:
- todos los daños causados directa o indirectamente al aparato (p.ej. por
oxidación, choques, caída,...) y a su contenido (p.ej. pérdida de datos) después
de la entrega y causados por el aparato, y cualquier indemnización por posible
pérdida de ganancias;
- partes o accesorios, que estén expuestos al desgaste causado por un uso
normal, como por ejemplo baterías (tanto recargables como no recargables,
incorporadas o reemplazables), bombillas, partes de goma, etc. (lista ilimitada);
- defectos causados por un incendio, daños causados por el agua, rayos,
accidentes, catástrofes naturales, etc.;
- defectos causados a conciencia, descuido o por malos tratos, un mantenimiento
inapropiado o un uso anormal del aparato contrario a las instrucciones del
fabricante;
- daños causados por un uso comercial, profesional o colectivo del aparato (el
período de garantía se reducirá a 6 meses con uso profesional);
- daños causados por un uso incorrecto o un uso ajeno al que está previsto el
producto inicialmente como está descrito en el manual del usuario;
- daños causados por una protección insuficiente al transportar el aparato.
- daños causados por reparaciones o modificaciones efectuadas por una tercera
persona sin la autorización explícita de Velleman®;
- se calcula gastos de transporte de y a Velleman® si el aparato ya no está
cubierto por la garantía.
• Cualquier artículo que tenga que ser reparado tendrá que ser devuelto a su
distribuidor Velleman®. Devuelva el aparato con la factura de compra original y
transpórtelo en un embalaje sólido (preferentemente el embalaje original).
Incluya también una buena descripción del fallo;
• Consejo: Lea el manual del usuario y controle los cables, las pilas, etc. antes
de devolver el aparato. Si no se encuentra un defecto en el artículo los gastos
podrían correr a cargo del cliente;
• Los gastos de transporte correrán a carga del cliente para una reparación
efectuada fuera del período de garantía.
• Cualquier gesto comercial no disminuye estos derechos.
La lista previamente mencionada puede ser adaptada según el tipo de
artículo (véase el manual del usuario del artículo en cuestión).
Page 75

Velleman® Service- und Qualitätsgarantie
Seit der Gründung in 1972 hat Velleman® sehr viel Erfahrung als Verteiler in der
Elektronikwelt in über 85 Ländern aufgebaut.
Alle Produkte entsprechen den strengen Qualitätsforderungen und gesetzlichen
Anforderungen in der EU. Um die Qualität zu gewährleisten werden unsere
Produkte regelmäßig einer zusätzlichen Qualitätskontrolle unterworfen, sowohl
von unserer eigenen Qualitätsabteilung als auch von externen spezialisierten
Organisationen. Sollten, trotz aller Vorsichtsmaßnahmen, Probleme auftreten,
nehmen Sie bitte die Garantie in Anspruch (siehe Garantiebedingungen).
Allgemeine Garantiebedingungen in Bezug auf Konsumgüter
(für die Europäische Union):
• Alle Produkte haben für Material- oder Herstellungsfehler eine Garantieperiode
von 24 Monaten ab Verkaufsdatum.
• Wenn die Klage berechtigt ist und falls eine kostenlose Reparatur oder ein
Austausch des Gerätes unmöglich ist, oder wenn die Kosten dafür
unverhältnismäßig sind, kann Velleman® sich darüber entscheiden, dieses
Produkt durch ein gleiches Produkt zu ersetzen oder die Kaufsumme ganz oder
teilweise zurückzuzahlen. In diesem Fall erhalten Sie ein Ersatzprodukt oder eine
Rückzahlung im Werte von 100% der Kaufsumme im Falle eines Defektes bis zu
1 Jahr nach Kauf oder Lieferung, oder Sie bekommen ein Ersatzprodukt im Werte
von 50% der Kaufsumme oder eine Rückzahlung im Werte von 50 % im Falle
eines Defektes im zweiten Jahr.
• Von der Garantie ausgeschlossen sind:
- alle direkten oder indirekten Schäden, die nach Lieferung am Gerät und durch
das Gerät verursacht werden (z.B. Oxidation, Stöße, Fall, Staub, Schmutz,
Feuchtigkeit, ...), sowie auch der Inhalt (z.B. Datenverlust), Entschädigung für
eventuellen Gewinnausfall.
- Verbrauchsgüter, Teile oder Zubehörteile, die durch normalen Gebrauch dem
Verschleiß ausgesetzt sind, wie z.B. Batterien (nicht nur aufladbare, sondern
auch nicht aufladbare, eingebaute oder ersetzbare), Lampen, Gummiteile,
Treibriemen, usw. (unbeschränkte Liste).
- Schäden verursacht durch Brandschaden, Wasserschaden, Blitz, Unfälle,
Naturkatastrophen, usw.
- Schäden verursacht durch absichtliche, nachlässige oder unsachgemäße
Anwendung, schlechte Wartung, zweckentfremdete Anwendung oder
Nichtbeachtung von Benutzerhinweisen in der Bedienungsanleitung.
- Schäden infolge einer kommerziellen, professionellen oder kollektiven
Anwendung des Gerätes (bei gewerblicher Anwendung wird die Garantieperiode
auf 6 Monate zurückgeführt).
- Schäden verursacht durch eine unsachgemäße Verpackung und
unsachgemäßen Transport des Gerätes.
- alle Schäden verursacht durch unautorisierte Änderungen, Reparaturen oder
Modifikationen, die von einem Dritten ohne Erlaubnis von Velleman®
vorgenommen werden.
• Im Fall einer Reparatur, wenden Sie sich an Ihren Velleman®-Verteiler. Legen
Sie das Produkt ordnungsgemäß verpackt (vorzugsweise die Originalverpackung)
und mit dem Original-Kaufbeleg vor. Fügen Sie eine deutliche
Fehlerbeschreibung hinzu.
• Hinweis: Um Kosten und Zeit zu sparen, lesen Sie die Bedienungsanleitung
nochmals und überprüfen Sie, ob es keinen auf de Hand liegenden Grund gibt,
ehe Sie das Gerät zur Reparatur zurückschicken. Stellt sich bei der Überprüfung
des Gerätes heraus, dass kein Geräteschaden vorliegt, könnte dem Kunden eine
Untersuchungspauschale berechnet.
• Für Reparaturen nach Ablauf der Garantiefrist werden Transportkosten
berechnet.
• Jede kommerzielle Garantie lässt diese Rechte unberührt.
Die oben stehende Aufzählung kann eventuell angepasst werden gemäß
der Art des Produktes (siehe Bedienungsanleitung des Gerätes).
Velleman ® usługi i gwarancja jakości
Od czasu założenia w 1972, Velleman® zdobył bogate doświadczenie w
dziedzinie światowej elektroniki. Obecnie firma dystrybuuje swoje produkty w
ponad 85 krajach.
Wszystkie nasze produkty spełniają surowe wymagania jakościowe oraz
wypełniają normy i dyrektywy obowiązujące w krajach UE. W celu zapewnienia
najwyższej jakości naszych produktów, przechodzą one regularne oraz
dodatkowo wyrywkowe badania kontroli jakości, zarówno naszego wewnętrznego
działu jakości jak również wyspecjalizowanych firm zewnętrznych. Pomimo
dołożenia wszelkich starań czasem mogą pojawić się problemy techniczne,
prosimy odwołać się do gwarancji (patrz warunki gwarancji).
Ogólne Warunki dotyczące gwarancji:
• Wszystkie produkty konsumenckie podlegają 24-miesięcznej gwarancji na
wady produkcyjne i materiałowe od daty zakupu.
• W przypadku, gdy usterka jest niemożliwa do usunięcia lub koszt usunięcia jest
nadmiernie wysoki Velleman ® może zdecydować o wymianie artykułu na nowy,
wolny od wad lub zwrócić zapłaconą kwotę. Zwrot gotówki może jednak nastąpić
z uwzględnieniem poniższych warunków:
- zwrot 100% ceny zakupu w przypadku, gdy wada wystąpiła w ciągu pierwszego
roku od daty zakupu i dostawy
- wymiana wadliwego artykułu na nowy, wolny od wad z odpłatnością 50% ceny
detalicznej lub zwrot 50% kwoty ceny nabycia w przypadku gdy wada wystąpiła
w drugim roku od daty zakupu i dostawy.
• Produkt nie podlega naprawie gwarancyjnej:
- gdy wszystkie bezpośrednie lub pośrednie szkody spowodowane są działaniem
czynników środowiskowych lub losowych (np. przez utlenianie, wstrząsy, upadki,
kurz, brud, ...), wilgotności;
- gwarant nie ponosi odpowiedzialności za szkody wynikających z utraty danych;
- produkty konsumenckie, części zamienne lub akcesoria podatne na process
starzenia, wynikającego z normalnego użytkowania, np: baterie (ładowalne,
nieładowalne, wbudowane lub wymienne),
elementy napędowe... (nieograniczona lista);
- usterka wynika z działania pożaru, zalania wszelkimi cieczami, uderzenia
pioruna, upadku lub klęski żywiołowej, itp.;
- usterka wynika z zaniedbań eksploatacyjnych tj. umyślne bądź nieumyślne
zaniechanie czyszczenia, konserwacji, wymiany materiałów ekspolatacyjnych,
niedbalstwa lub z niewłaściwego obchodzenia się lub niezgodnego użytkowania z
instrukcją producenta;
- szkody wynikające z nadmiernego użytkowania gdy nie jest do tego celu
przeznaczony tj. działalność komerycjna, zawodowa lub wspólne użytkowanie
przez wiele osób - okres obowiązywania gwarancji zostanie obniżony do 6
(sześć) miesięcy;
- Szkody wynikające ze źle zabezpieczonej wysyłki produktu;
- Wszelkie szkody spowodowane przez nieautoryzowaną naprawę, modyfikację,
przeróbkę produktu przez osoby trzecie jak również bez pisemnej zgody firmy
Velleman ®.
• Uszkodzony produkt musi zostać dostarczony do sprzedawcy ® Velleman,
solidnie zapakowany (najlepiej w oryginalnym opakowaniu), wraz z
wyposażeniem z jakim produkt został sprzedany. W przypadku wysyłki towaru w
opakowaniu innym niż oryginalnym ryzyko usterki produktu oraz tego skutki
przechodzą na właściciela produktu. Wraz z niesprawnym produktem należy
dołączyć jasny i szczegółowy opis jego usterki, wady;
• Wskazówka: Aby zaoszczędzić na kosztach i czasie, proszę szczegółowo
zapoznać się z instrukcja obsługi; czy przyczyną wady są okoliczności techniczne
czy też wynikaja wyłącznie z nieznajomości obsługi produktu. W przypadku
wysyłki sprawnego produktu do serwisu nabywca może zostać obciążony kosztmi
obsługi oraz transportu.
żarówki, paski napędowe, gumowe
• W przypadku napraw pogwarancyjnych lub odpłatnych klient ponosi dodatkowo
koszt wysyłki produktu do i z serwisu.
wymienione wyżej warunki są bez uszczerbku dla wszystkich komercyjnych
gwarancji.
Powyższe postanowienia mogą podlegać modyfikacji w zależności od
wyrobu (patrz art obsługi).
Garantia de serviço e de qualidade Velleman®
Desde a sua fundação em 1972 Velleman® tem adquirido uma amplia
experiencia no sector da eletrónica com uma distribuição em mais de 85 países.
Todos os nossos produtos respondem a exigências rigorosas e a disposições
legais em vigor na UE. Para garantir a qualidade, submetemos regularmente os
nossos produtos a controles de qualidade suplementares, com o nosso próprio
serviço qualidade como um serviço de qualidade externo. No caso improvável de
um defeito mesmo com as nossas precauções, é possível invocar a nossa
garantia. (ver as condições de garantia).
Condições gerais com respeito a garantia sobre os produtos
grande público (para a UE):
• qualquer produto grande público é garantido 24 mês contra qualquer vício de
produção ou materiais a partir da data de aquisição efectiva;
• no caso da reclamação ser justificada e que a reparação ou substituição de um
artigo é impossível, ou quando os custo são desproporcionados, Velleman®
autoriza-se a substituir o dito artigo por um artigo equivalente ou a devolver a
totalidade ou parte do preço de compra. Em outro caso, será consentido um
artigo de substituição ou devolução completa do preço de compra no caso de um
defeito no prazo de 1 ano depois da data de compra e entrega, ou um artigo de
substituição pagando o valor de 50% do preço de compra ou devolução de 50%
do preço de compra para defeitos depois de 1 a 2 anos.
• estão por consequência excluídos:
- todos os danos directos ou indirectos depois da entrega do artigo (p.ex. danos
ligados a oxidação, choques, quedas, poeiras, areias, impurezas…) e provocado
pelo aparelho, como o seu conteúdo (p.ex. perca de dados) e uma indemnização
eventual por perca de receitas;
- consumíveis, peças ou acessórios sujeitos a desgaste causado por um uso
normal, como p.ex. pilhas (recarregáveis, não recarregáveis, incorporadas ou
substituíveis), lâmpadas, peças em borracha correias… (lista ilimitada);
- todos os danos que resultem de um incêndio, raios, de um acidente, de una
catastrophe natural, etc.;
- danos provocados por negligencia, voluntária ou não, uma utilização ou
manutenção incorrecta, ou uma utilização do aparelho contrária as prescrições
do fabricante;
- todos os danos por causa de uma utilização comercial, profissional ou colectiva
do aparelho ( o período de garantia será reduzido a 6 meses para uma utilização
profissional);
- todos os danos no aparelho resultando de uma utilização incorrecta ou
diferente daquela inicialmente prevista e descrita no manual de utilização;
- todos os danos depois de uma devolução não embalada ou mal protegida ao
nível do acondicionamento.
- todas as reparações ou modificações efectuadas por terceiros sem a
autorização de SA Velleman®;
- despesas de transporte de e para Velleman® se o aparelho não estiver coberto
pela garantia.
• qualquer reparação será fornecida pelo local de compra. O aparelho será
obrigatoriamente acompanhado do talão ou factura de origem e bem
acondicionado (de preferência dentro da embalagem de origem com indicação do
defeito ou avaria);
• dica: aconselha-mos a consulta do manual e controlar cabos, pilhas, etc. antes
de devolver o aparelho. Um aparelho devolvido que estiver em bom estado será
cobrado despesas a cargo do consumidor;
• uma reparação efectuada fora da garantia, será cobrado despesas de
transporte;
• qualquer garantia comercial não prevalece as condições aqui mencionadas.
A lista pode ser sujeita a um complemento conforme o tipo de artigo e
estar mencionada no manual de utilização.
Legen Heirweg 33, 9890 Gavere, Belgium
Imported by Velleman nv
Made in PRC
www.velleman.eu
Page 76

a
R&
TT
E Dec
laration of Con
f
orm
ity
R&TTE Verklaring van overeenstemming
We / wij / nous / Wir / Nostros
Vell
eman NV
Declare on our own respon
sibility that the finished product(s)
:
a
VELLEMAN
Trade name / ha
nde
lsnaa
m / denomination commerciale / Markenname / denominació
n
Wireless weather s
tation, DCF clock, ou
tdoo
r sensor
Type or mode
l / type of m
ode
l / type ou modè
le / Typ
oder M
ode
ll / tipo o mode
lo:
WS1060
constituting the subject of this declaration, c
onfo
rms with the essential requ
irements and
Déclaration de conformité R&TTE
R&TTE Konformitätserklärung
Declaración de conformidad R&TTE
Legen Heirweg, 33
9890 Gavere (België)
Verklaren op eigen verantwoordelijkheid dat het afgewerkte product :
Déclarons sous notre propre responsabilité que le produit fini :
Erklären voll verantwortlich dass nachfolgendes Produkt:
Declaramos bajo nuestra sola responsabilidad que el producto mencionado
continuación:
Brand / merk / marque / Marke / marca:
commercial:
Draadloos weerstation, DCF klok, buitensensor
Station météo, horologe DCF, émetteur extérieure
Wetterstation, DCF-uhr, Außensender
Estación meteorológica, reloj DCF, sensor exterior
other relevant stipulations of the R&TTE Directive (1999/5/EC).
die het voorwerp uitmaakt van deze verklaring, voldoet aan de essentiële vereisten en
andere relevante bepalingen van de R&TTE Richtlijn (1999/5/EC).
faisant l’objet de la présente déclaration, satisfait aux exigences essentielles et toute
autre stipulation pertinente de la directive R&TTE Directive (1999/5/EC).
auf das sich diese Erklärung bezieht, den grundlegenden Anforderungen und anderen
relevanten Vereinbarungen der R&TTE-Richtlinie (1999/5/EC) entspricht.
Cumple con los requisitos esenciales y las otras estipulaciones relevantes de la
Directiva
Page 77

The product conforms to the following norm(s) and/o
r one or several other normat
ive
documents:
EMC :
EN 301 489-3 V1.4.1
LV
D:
EN 60950-1:2006
R&TTE:
EN 300 220-2 V2.1.2 (2007-06)
Technical data are available and can be o
btained from :
Vell
eman NV
Place and date of issue / Plaats en datum van uitgifte / Place et date d’émission / Ort und
Gavere, 20/01/2012
Authorised signatory for the compan
y / Bevoegde ondertekenaar voor de firma
/
Vince Van Balberghe -
Qua
lity Manager
Het product voldoet aan de volgende norm(en) en/of meerdere andere normgevende
documenten:
Le produit est conforme à la norme suivante / aux normes suivantes et/ou à plusieurs
autres documents normatifs:
Das Produkt entspricht den folgenden Normen und/oder anderen normativen
Dokumenten:
Es conforme a la(s) siguiente(s) norma(s) y/o a uno o varios otros documentos
normativos:
EN 50371:2002
Les données techniques sont disponibles et peuvent être obtenues chez :
Technische gegevens zijn beschikbaar en kunnen worden aangevraagd bij :
Die technische Dokumentation zu den oben gennanten Produkten wird geführt bei:
Los datos técnicos están disponibles y pueden ser solicitados a:
Legen Heirweg, 33
9890 Gavere (België)
Datum der Ausstellung / Lugar y fecha de emisión:
Signataire autorisé(e) de la société / bevollmächtigte Person/ Responsable de la
empresa:
 Loading...