

Page 1
WIFIR3
WIRELESS-N WIFI REPEATER FOR WLAN – WPS
WIRELESS-N WIFI REPEATER VOOR WLAN – WPS
REPETIDOR WIRELESS-N WIFI PARA WLAN – WPS
WIRELESS-N WIFI REPEATER FÜR WLAN – WPS
REPETIDOR WIRELESS-N WIFI PARA WLAN – WPS
Z FUNKCJĄ WPS
USER MANUAL 3
RÉPÉTEUR WIRELESS-N WIFI POUR WLAN – WPS
BEZPRZEWODOWY (WIRELESS-N) WZMACNIACZ SIECI WLAN
GEBRUIKERSHANDLEIDING 20
MODE D'EMPLOI 38
MANUAL DEL USUARIO 57
BEDIENUNGSANLEITUNG 76
MANUAL DO UTILIZADOR 95
INSTRUKCJA OBSŁUGI 114
Page 2

WIFIR3
V. 01 – 22/08/2013 2 ©Velleman nv
Page 3
WIFIR3
Risk of electroshock when opening the cover. Touching
parts.
USER MANUAL
1. Introduction To all residents of the European Uni on
Important environmental information about this pr oduct
This sym b o l o n the device or t he package indi cates that
disposal of the device after its lifecycl e could harm t h e
environment. Do not dispose of the unit (or batteries) as
unsorted municipal waste; it should be taken to a
specialized company for recycl ing . This device should be
returned to your distributor or to a local recycling service. Respect
the local environmental rules.
If in doubt, contact your local waste disposal authorities.
Thank you for choosing Velleman! Please read the manual thoroughly
before bringing this dev ice in t o s ervice. I f the device was damaged in
transit, don't install or use it and contact your dealer.
2. Safety Instructions
Keep this device away from children and unauthorized
users.
live wires can cau se life-threatening electroshocks. Do not
open th e housin g your s elf. Hav e the devi ce rep ai red by
qualified personnel.
There a r e no user-servi c eable parts in s i de th e d evice.
Refer to an auth orized dealer for service an d/or spare
3. General Guidelines
Refer to the Velleman® Ser vic e and Quality Warranty on the last
pages of this manual.
• Indoor use only. Keep this device away from rain, moisture,
splashing and dripping liquids.
• Keep this devic e away from d ust and extrem e heat.
• Protect this device from shocks and abuse. Avoid brute force when
operating the device.
V. 01 – 22/08/2013 3 ©Velleman nv
Page 4

WIFIR3
1
Power indicator
5
WPS button
2
Wireless ind icat or
6
Reset button
3
WPS indicato r
7
RJ45 network port
4
LAN indicato r
• Familiarise yourself with the functions of the device before actually
using it.
• All modification s of the devic e are forbidd en for safety reas ons.
• Only use the device for i ts intended p urpose. Usin g the dev ice in
an unauthorised way will void the warranty.
• Damage caused by disregard of certain guidelines in this manual
is not covered by the warranty and the dealer will not accept
responsibility for any ensuing defects or problems.
4. Features
• with WPS function
• improves wireless cover ag e in all WLAN net w or k s
• supports Wireless Repeater mode and Standard AP mode
• WLAN 802.11n (Draft 2.0) for wireless high-speed access
• downward compatible with 802.11g (54 Mbit/s) and 802.11b
standard (11 Mbit/s)
• supports 2.4 GHz WLAN networks
• maximum WLAN security with WPA2, WPA and WEP (128/64)
• software wiz ar d f or simple setup v ia Win d ow s or Mac
• antennas integrated
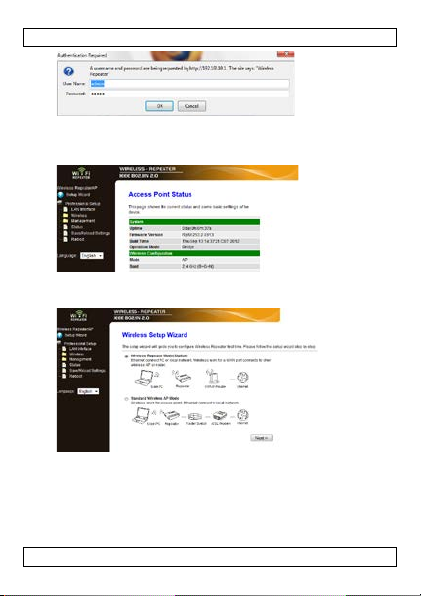
5. Overview
Refer to the illustrations on page 2 of this manual.
6. Choose an appropriate location
• The easi est pla ce to configure the repeater is nea r your
router/computer.
• Once setup is done, you can install the repeater on its final
location.
• For best performance, it is recomm ended to inst al l the r ep eater
half-way between your router and the wireless computer with the
weakest reception.
V. 01 – 22/08/2013 4 ©Velleman nv
Page 5

WIFIR3
Wireless repeater
Note : Plug
You can change the repeater’s plug orientation so t he repeater fi ts
into any space.
Refer to the illustrations on page 2 of this manual.
• Gently press the button next to the plug [A] and pull the plug to
detach it.
• Place the plug back in the socket in t he desir ed orientation and
turn it until it sn aps in to place.
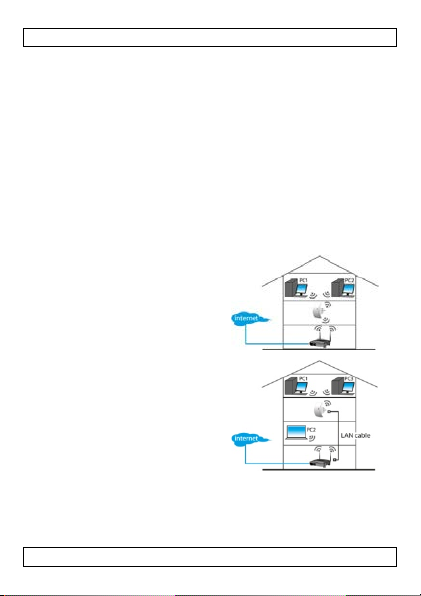
Note: Wireless repeater or acces s poi nt
You can set up the repe a ter as a wireless repe ater or as a wireless
access point.
For wireless repeat er mode, you
need a WI FI AP/R outer in ternet
access.
Wireless access point
To use the device as a wireless
access point mode, you need
broadband router internet access.
Connect the repeater to the
router/switch with the included
RJ-45 network cable.
7. Setup
During setup, you will:
• connect your router to the repeater
• connect the repeater to your computer
You can connect your router to the repeater:
• Manually (see section below)
• Using WPS (see secti on 9)
V. 01 – 22/08/2013 5 ©Velleman nv
Page 6
WIFIR3
7.1 Connect your router to the r epeater
During setup, it is recommended to use a wired connection with the
included RJ-45 network cable.
Once setup is done, you can use the repeater through Wi-Fi.
To connect the router, you need to
• configure network settings on your computer
• configure the r epeater in the web management to ol
• reset your computer’s network settings
• connect the repeater to your computer
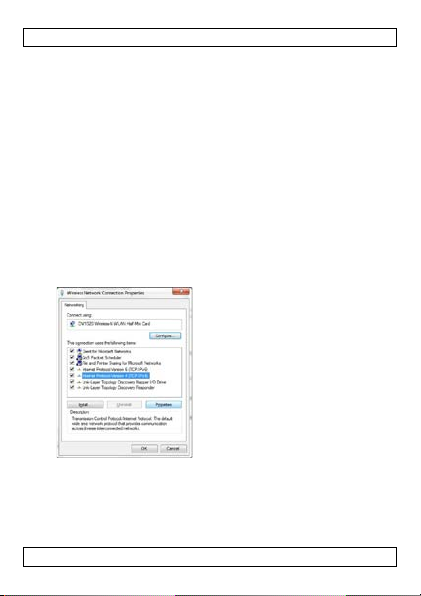
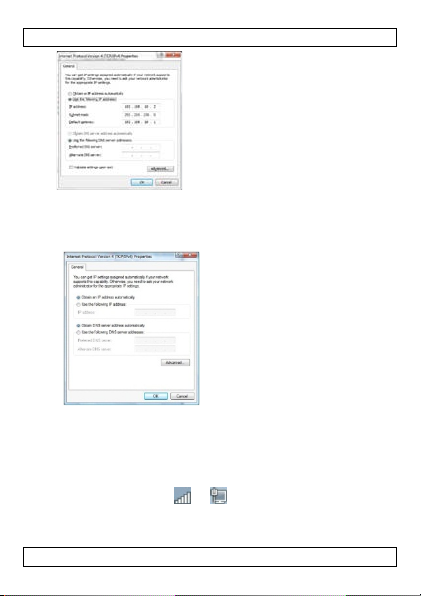
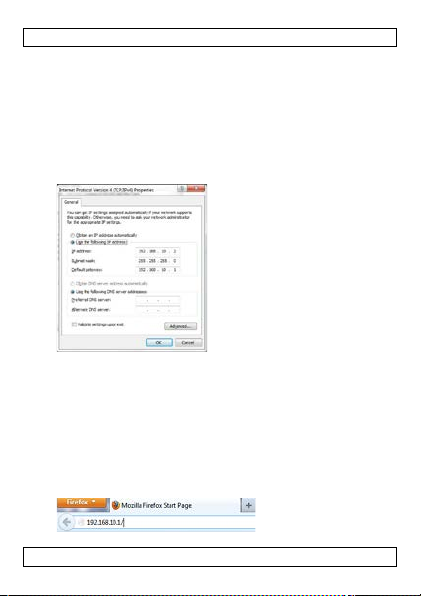
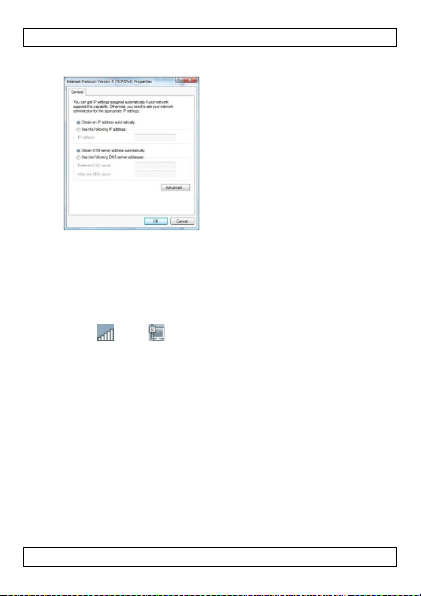
7.2 Configure network s ettings o n yo ur computer
The repeate r has a fi xed IP a d dress. T o be able t o access the
repeater during setup, you first need to configure your computer’s
network settings as follows:
1. On your computer, click the Start button and choose
Control Panel > Network & Sharing Center.
2. In the list of networks, click on your network and then click the
Properties button.
3. In the list, select Internet Protocol Version 4 (TCP/IPv4),
then click the Properties button.
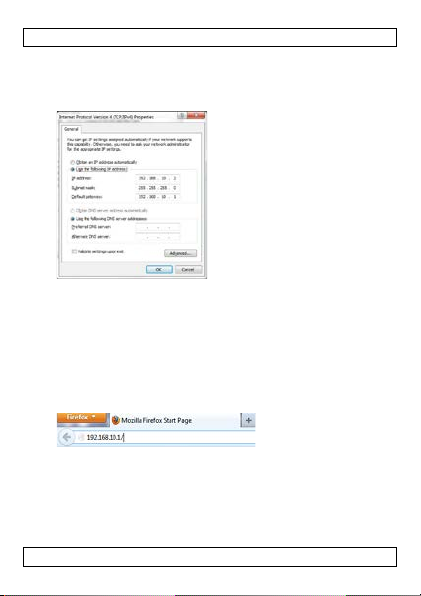
4. In the P r operti es window, select Use the Following
IP Address.
o In the IP Address box, type 192.168.10.x where ‘x’ is a
number from 2 to 254.
V. 01 – 22/08/2013 6 ©Velleman nv
Page 7
WIFIR3
o In Subnet Mask, type 255.255.255.0.
o In Default Gateway, type the IP Address of your wireless
router (default address is 192.168.10.1).
5. Click OK to con firm.
You can now access the repeater from your computer.
7.3 Configure the repeater in the web management tool
1. Plug the repeater to a wall socket.
2. Connect your computer and the repeater with the included RJ-45
network cable.
3. Log on to your computer.
4. Open your web browser and type the address
http:// 192.168.10.1.
This will open the configuration page of the repeater.
If the page does not op en, reset the repeat er (see section 12)
and retry.
V. 01 – 22/08/2013 7 ©Velleman nv
Page 8
WIFIR3
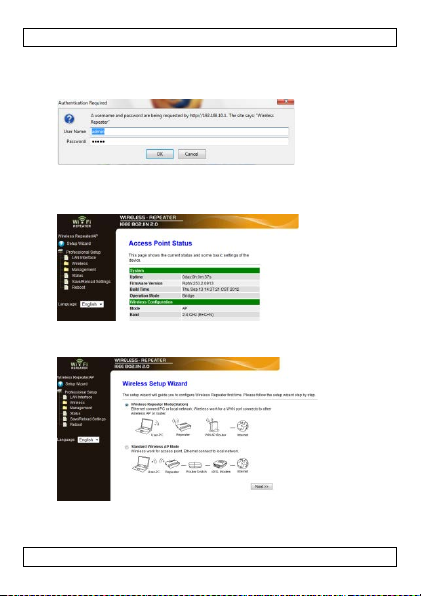
5. Type the user name and password.
The default user name and password is admin.
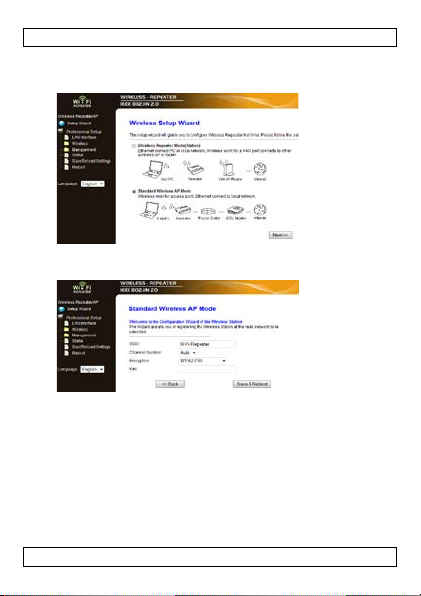
6. In the menu on the left, click Setup Wizard.
7. Select Wireless Repeater Mode (Station) and click Next.
V. 01 – 22/08/2013 8 ©Velleman nv
Page 9
WIFIR3
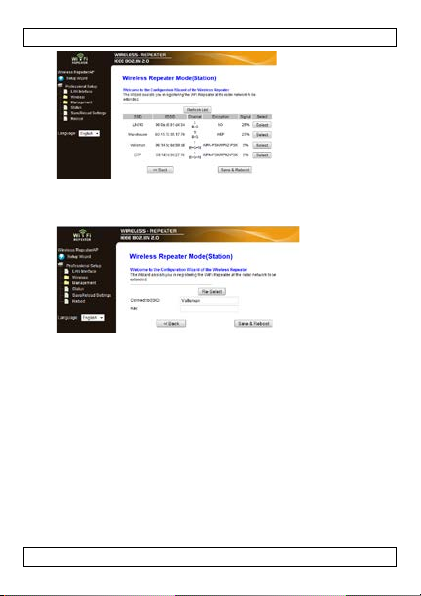
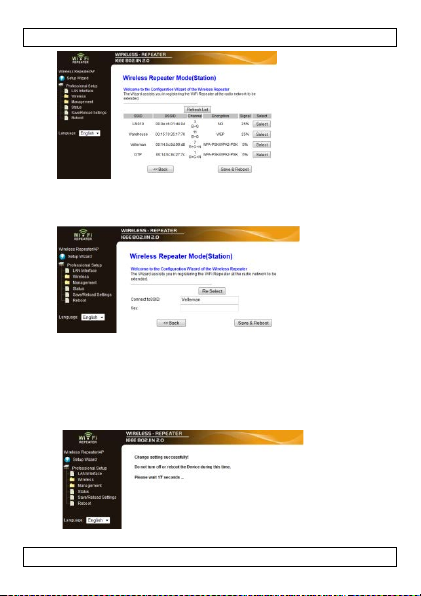
8. The name of your network is listed in the SSID column.
Click the button Select next to your wireless network.
9. In the Key field, type your network security key.
o This key is the same key as the key of your router.
o Leave the other settings unchanged.
o You will need the network name (SSID) in the next steps.
Copy it or n ote it dow n on a piece of p aper. Th e name is case
sensitive.
o When done, click Save and Reboot.
V. 01 – 22/08/2013 9 ©Velleman nv
Page 10
WIFIR3
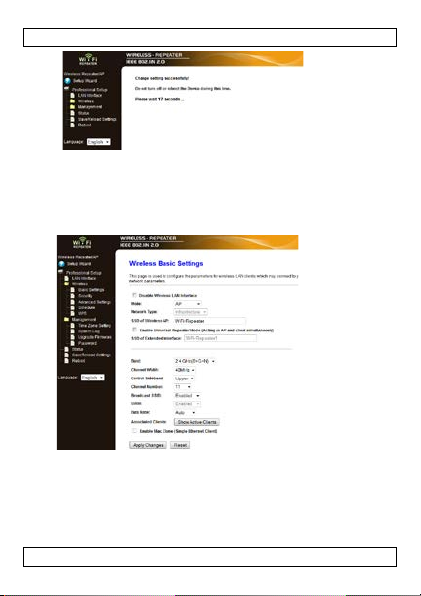
10. Wait until th e repeater has r ebooted.
Now you need to m a ke sure t he SSID (net w o r k name) i s s et
correctly in the Wireless Basic Sett ing s of th e tool.
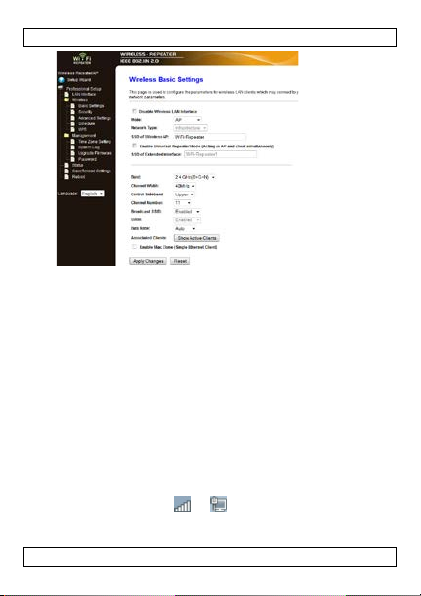
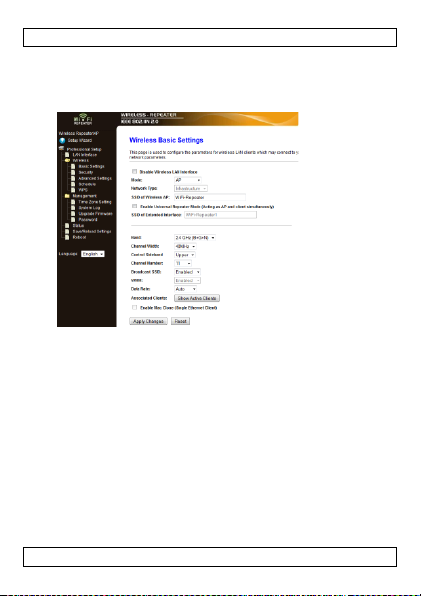
11. In the menu, click the folder Wireless, then click Basic
Settings.
12. Check if the network name is correct. The name is used in two
fields:
o SSID of Wireless AP
o SSID of Extended Interface
V. 01 – 22/08/2013 10 ©Velleman nv
Page 11

WIFIR3
If not , enter or p a s te the correct name in both fields.
13. Click Apply Changes.
You can now
o close t he web m anagem ent tool.
o reset network settings on your computer to default.
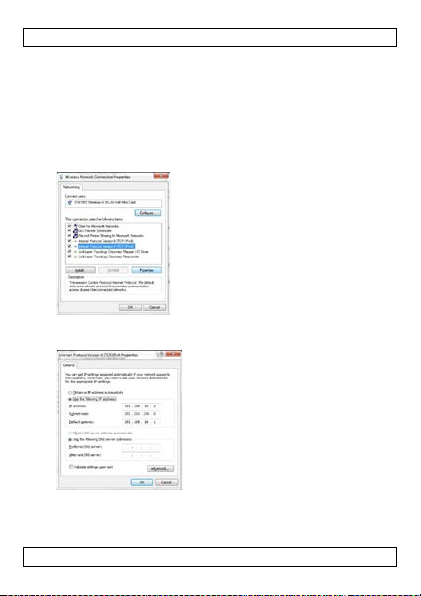
7.4 Reset your computer’s network s ettings
1. On your computer, click the Start button and choose
Control Panel > Network & Sharing Center.
2. In the list of networks, click on your network and then click the
Properties button.
3. In the list, select Internet Protocol Version 4 (TCP/IPv4),
then click the Properties button.
V. 01 – 22/08/2013 11 ©Velleman nv
Page 12
WIFIR3
4. In the P r operti es window, select:
o Obtain an IP address automatic all y.
o Obtain DNS serv er ad dress au tomatically .
5. Click OK to con firm.
You can now connect the repeater to your computer.
8. Connect the repeater to your computer
To connect a comp uter to the repeater, proceed as follows:
1. Log on to your computer.
2. Click the network icon or at the bottom right of your
screen. A list of networks appears.
3. Select t he repeater network from the list and then click
Connect.
V. 01 – 22/08/2013 12 ©Velleman nv
.
Page 13

WIFIR3
4. If required, type the network password and click OK t o c on firm.
You will see a confirmation message when you are connected to
the network.
Note: wired connection
You can also connect the repeater to your computer with an RJ45
networ k cabl e.
9. Connect the repeater usi ng WPS
WPS is an automated way of connecting wirel ess devices.
The repeater supports WPS. If y ou r rout er support s WPS, it will have
a WPS button
Note: WPS may change network security key on router
On some wireless router brands, pressing the WPS button changes
the router’s existing network security key. This means you would
have to r eset all network security key on the devices you are already
using. If you want to avoid this, connect the repeater manually (see
section 7 Setup above).
To connect your router to the repeater using WPS:
1. Plug the repeater to a wall socket.
2. Make sure the r epeater is set to Wirel ess Repeater Mode in the
configurat ion tool (see se ction 7.3 above).
3. On your router, press and hold the WPS button (check your
router’s manual to know how long you need to press the
button).
4. On the repeater, press and hold the WPS button for 7 to 10
seconds.
The router and the repeater will connect automatically. You can
now connect your computer to the repeater: see section 8
above.
10. Set up the device as a wireless access point
To set up the device as a wireless access point, you n eed to perform
the following steps:
10.1 Configure network settings
• Configure the network settings on your computer as described in
section 7.2.
V. 01 – 22/08/2013 13 ©Velleman nv
Page 14
WIFIR3
10.2 Configure the access point in the web management tool
1. Perform steps 1 to 6 as described in section 7.3.
2. Select S tandard Wireless AP mode and click Next.
3. If you want, you can select an Encryption type and enter a
network security key.
4. Click Save and Reboot.
5. Wait until the repeater has rebooted.
Now you need to m a ke sure t he SSID (net w o r k name) i s s et
correctly in the Wireless Basic Sett ing s of th e tool.
6. In the menu, click the folder Wireless, then Basic Settings.
V. 01 – 22/08/2013 14 ©Velleman nv
Page 15
WIFIR3
7. Verify if th e network name i s c o r r ec t. Th e name is u s ed in two
fields:
o SSID of Wireless AP
o SSID of Extended Interface
If not , enter or p a s te the correct name in both fields.
8. Click Apply Changes.
You can now close the web management tool.
10.3 Reset you r computers network settings
• Reset your computer’s network setting s as described in section
7.4.
10.4 Connect the wireless access point to your computer
To connect a computer to the wireless acc ess, proceed as follows:
1. Log on to your computer.
2. Click the network icon or located at the bottom right of
your screen. A list of networks appears.
V. 01 – 22/08/2013 15 ©Velleman nv
Page 16
WIFIR3
LAN Interface
switched off.
Mode
Supports AP and Repeater modes
AP
Main Service Set Id entifier . T his is the name
of your wireless network.
Interface
repeater simultaneously)
Band
Supports 11B/11G/11N mixed modes.
3. Select t he repeater network from the list and then click
Connect.
4. If required, type the network password and click OK t o c on firm.
You will see a conf irmation messag e when y o u are connected to
the network.
11. Web Management Tool Wireless basic settings
In you r web brow s er , open t he web ma nagem ent tool a nd select
Wireless > Basic Settings.
The page contains various settings, including:
Disable Wireless
If this option is selected, wireless network is
SSID of Wireless
SSID of Extended
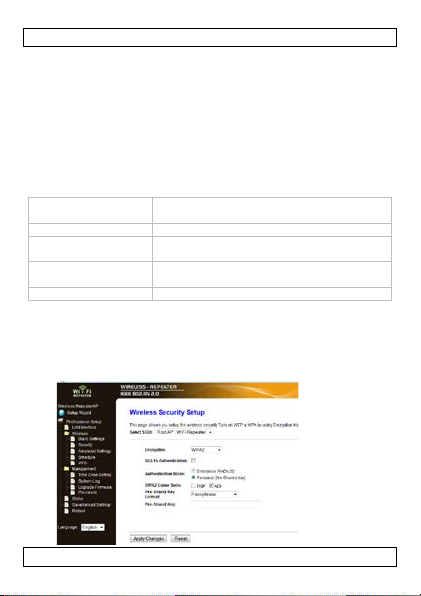
Wireless security settings
Set up the wireless security and encryption to prevent unauthorised
access and monitoring. Support ed encryption methods are:
64/128-bit WEP, WPA, and WPA2.
1. Log on to the webtool and select Wireless > Security.
Univ er s al Repeat er Mode (acting as AP and
V. 01 – 22/08/2013 16 ©Velleman nv
Page 17
WIFIR3
password of y ou r XXXX router.
2. In Select SSID, you can select:
Root Client–XXXX
Repeater AP –
WiFi-Repeater1
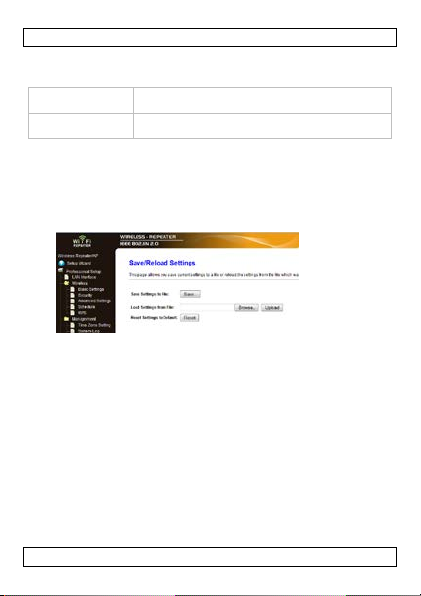
Reset, backup and restore
You can back up the settings of the repeater for security reasons .
Also, if you us e the devi c e i n diff erent s etting s , you can easily s ave
and reload the differ ent settings.
1. Log on to the management tool and s elect
Save/Reload Settings.
The passw ord of the repeater is the sam e a s the
Select this option to set up a password for the
WiFi repeater.
• To make a backup file of the current settings, click the Save
button and choose a location for the settings file. You can save as
many setting files as you need.
• To upload previously saved setting s, cl ick t h e Browse button and
select the saved settings file on y our computer. Next, click the
Upload button to load the settings. The current settings will be
replaced with the settings in the file that you loaded.
• To remove all the configuration settings you have made and reset
the device to the factory defaults, click the Reset button.
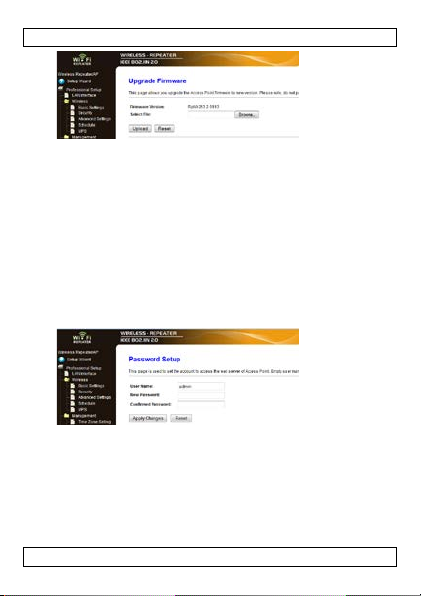
Firmware upgrade
To upgrade the firmware of your repeater, proceed as follows:
1. Download the new firmware from our website t o your computer.
2. Log on to the management tool and choose
Management > Upgrade Firmware.
V. 01 – 22/08/2013 17 ©Velleman nv
Page 18
WIFIR3
3. Click the Browse button and select the downloaded firmware
file on your computer.
4. Click Upload. The upgrade procedure starts automatically.
Caution: Upgrading may take several minutes to complet e. Never
interrupt the upgrade process by closing the web browser or
disconnecting your computer from the router. The repeater may
become unusable if you do. Interrupting the upgrade process will
void the warranty.
Changing the password
The default password for the web management tool is “admin”. For
security purposes, we strongly recommend that you modify the
password.
1. In the management tool, choose Management > Password.
2. Type a user name in User Name.
3. Type a password in New Password, and type it again it in
Confirmed Password.
4. Click Apply Changes to confirm .
If you want to keep the original password, click Reset.
V. 01 – 22/08/2013 18 ©Velleman nv
Page 19

WIFIR3
networking standards
10/100 Mbps
frequency range
2.4 - 2.485 GHz
wireless transfer rates
11/54/150/270/300 Mbps
12. Reset
If necessary, you can reset th e repeater with a needle. Press and
hold the reset button for 10 seconds.
This will reset all the settings to factory defaults.
13. Power outage
If a p ower outa g e o c c urs, r emove both th e r o uter and the repeater
from their wall sockets and reconnect them.
14. Technical Specifications
wireless standards IEEE 802.11n / IEEE 802.11g / IEEE 802.11b
power supply 230 Vac 50 Hz
Use this device with original accessories only. Velleman nv
cannot be held responsible i n the event of damage or injury
resulting from (incorrect) use of this device. For more info
concerning this produc t and the latest version of this manual,
please visit our website www.velleman.eu. The information in
this manual is subjec t to c hange without prior notice.
Windows, Win dow s XP, Windows 2 000, Windows V is t a, Windows
Aero, Windows 7 , Win d ow s 8 , Windows Mobile, Wind ow s Server are
registered trademarks of Microsoft Corporation in the United States
and other countries.
© COPYRIGHT NOTICE
The copyright to this manual is owned by Velleman nv. All
worldwide rights reserved. No part of this manual may be copied,
reprodu ced, tr a nslat ed or reduced to any elec tron i c medium or
otherwise without the prior written consent of the copyright holder.
V. 01 – 22/08/2013 19 ©Velleman nv
Page 20
WIFIR3
Elektrocutiegevaar bij het openen van het toestel. Raak
elektroschokken t e vermij den. Om veiligheidsredenen mag
vakman.
Er zijn geen doo r de gebr uiker v er vangbare onderdelen in
GEBRUIKERSHANDLEIDING
1. Inleiding Aan alle ingezetenen van de Euro pes e U ni e
Belangrijke milieu-informatie betreffende dit product
Dit symbool op het toestel of de verpakking geeft aan dat,
als het n a z i jn leven s c yclus wordt weggeworpen, dit t oeste l
schade kan toeb rengen aan het milieu. Gooi dit toestel ( en
eventuele bat terij en) niet bij het gewon e huisho udelij ke
afval; h et moet b i j een g es peci ali seerd bedrij f
terecht komen voor recyclage. U m o et dit to es tel naar uw verdeler of
naar een loka al r ec yclagepunt bren g en. Respecteer de pl a atselij ke
milieuwetgeving.
Hebt u vragen, contacteer dan de plaatselijke autoriteiten
betreffende de verwijdering.
Dank u voor uw aankoop! Lees deze handleiding grondig voor u het
toestel in gebr uik neemt. W er d het toes tel be schadig d tijdens het
transport, installeer het dan niet en raadpleeg uw dealer.
2. Veiligheidsinstructies
Houd dit toestel buiten het bereik van kinderen en
onbevoegden.
geen kabels aan die onder stroom staan, om dodelijke
u geen wijzigingen aanbrengen aan het toestel. Laat het
onderhoud van het toestel over aan een gesc hoold e
dit toestel. Voor onderh ou d en /of reserv eon derdelen,
contacteer u w dealer.
3. Algemene richtlijnen
Raadpleeg de Velleman® service- en kwaliteitsgarantie
achteraan deze handleiding.
• Gebruik het toestel enkel binnenshuis. Bescherm het toestel
tegen regen, v o c htigh eid en op s patt ende vloeistof fen.
V. 01 – 22/08/2013 20 ©Velleman nv
Page 21

WIFIR3
1
Voedingsled
5
WPS-knop
3
WPS-indicator
7
RJ45-netwerkpoort
4
LAN-indicator
• Bescher m dit t o es tel tegen st o f en ext r eme temp eratu r en.
• Bescher m teg en schokken. V ermijd brute kracht tijden s d e
bediening.
• Leer eerst de functies van het toestel kennen voor u het gaat
gebruiken.
• Om veilig heids redenen mag u geen wi j zigingen aanbreng en.
• Gebruik het t o es tel enkel waarvoor h et gem aa kt is. De garan tie
vervalt automatisch bij ongeoorloofd gebruik.
• De garantie geldt niet voor s c hade do or het negeren van bepaald e
richtlijnen in deze handleiding en uw dealer zal de
verant woord eli jkhe i d afwij z en voor d efect en of problemen die h i er
rechtstreeks verband mee houden.
4. Eigenschappen
• met WPS-functie
• verhoogt het draadlo ze bereik van alle WLAN-netwerken
• ondersteunt de 'Wireless Repeater'- en de 'Standard AP'- modus
• WLAN 802.11n (Draft 2.0) voor een snelle toegang tot draadloos
internet
• neerwaarts compatibel met de normen 802.11g (54 Mbit/s) en
802.11b (11 Mbit/s)
• ondersteunt 2.4 GHz WLAN-netwerken
• max. WLAN-beveiliging met WP2, WPA en WEP (128/64)
• eenvoudige co nfigu r atie met Windows of Mac dankzij de s oftware
wizard
• ingebouwde antennes
5. Omschrijving
Raadpleeg de afbeeldingen op pagina 2 van deze handleiding.
2 Indicator draadloze
verbinding
6. Kies een geschikte installatieplaats
• De beste p laats om de repeater te con figureren is d i c htbij uw
router/computer.
V. 01 – 22/08/2013 21 ©Velleman nv
6 Resetknop
Page 22
WIFIR3
• Na de configuratie, kunt u de repeater op zijn definitieve plaats
installeren.
• Voor de b es te resu l taten , insta l leer d e r epeate r halverwege uw
router en de draadloz e c o mputer met het minst goed e bereik .
Opmerking : Stekker
U kunt de stek ker van d e repeater zowel horiz ontaal al s verticaal
bevesti gen zodat de repeat er i n elke r uimte p ast.
Raadpleeg de afbeeldingen op pagina 2 van deze handleiding.
• Houd de knop [A ] i ngedrukt en t r ek aan de s tekker om los te
koppelen.
• Steek d e stekk er o p nieuw in het toestel , kies de gewenste positie
en draai tot het vastklikt.
Opmerkin g: Draa dloze repeater of draadloos toegangspunt
U kunt de repeater instellen als een draadloze repeater o f als een
draadloos toegangspunt.
Draadloze repeater
Om het toestel al s een draadloze
repeat er te gebr uiken, hebt u een
WiFi/routertoegangspunt nodig.
Draadloos toegangspunt
Om het toestel al s een draadlo o s
toegangspunt te gebruiken, hebt u
een toegangspunt via
breedbandrouter nodig.
Verbin d de repeater m et de
router/s witc h via de meegeleverde
RJ45-netwerkkabel.
7. Configuratie
Tijdens de configuratie moet u:
• uw rou ter met d e r ep eater v er bind en
• de repeater m et uw computer verbinden
V. 01 – 22/08/2013 22 ©Velleman nv
Page 23

WIFIR3
U kunt uw rou ter met d e r epeater verbin d en:
• Handmatig (zie onder)
• Met de W PS-knop (zie 9)
7.1 Uw router met de repeater v erbinden
Gebruik tijd ens de con figura tie, een bekabelde verbin d i ng met de
meegeleverde R J45 -netwerkkabel.
Na de configuratie, kunt u de repeat er via W iFi gebruiken .
Om de rou ter te ver bind en, mo et u
• de netwerkinstellingen op uw computer configureren
• de repeater in het ven s ter "web manag ement t o ol" configureren
• de netwerkinstellingen van uw computer terugzetten
• De repea ter met uw comput er verbinden
7.2 De netwerkinstellingen op uw computer configureren
De repea ter heeft een vast IP-adres. Om toeg a ng tot de repeater te
krijg en tijdens de con figura tie, moet u eer s t de netwerk instel l ingen
van uw computer configureren.
1. Op uw computer, klik op Start en s electeer
Control Panel > Network & Sharing Center.
2. In de netwerklijst , klik eers t op uw netwerk en daarna op
Properties.
V. 01 – 22/08/2013 23 ©Velleman nv
Page 24
WIFIR3
3. In de l i j st, selecteer Internet Protocol Version 4 (TCP/IPv4)
en klik d aar na op Properties.
4. In h et venster " Pr o perties", s elect eer Use the Following
IP Address.
o Geef in het IP-adresveld, 192.168.10.x in waarbij 'x' een
cijfer tussen 2 en 254 kan zijn.
o Geef in het veld SubnetMask, 255.255.255.0 in.
o Geef in het veld Defaul t Gateway, het IP-adres van uw
draadloze router in (standaardadres is 192.168.10.1).
5. Klik op OK om te b evest i g en.
U hebt nu toegang tot d e r epeat er via uw c o mputer .
7.3 De repeater in het venster " web management too l"
configureren
1. Steek d e repeater in een stopcontac t.
2. Verbin d uw com p uter met de repeater via de meegeleverde
RJ45-netwerkkabel.
3. Log in op uw computer.
4. Open uw w ebbrowser en geef het volgende adr es in
http:// 192.168.10.1.
V. 01 – 22/08/2013 24 ©Velleman nv
Page 25
WIFIR3
Het configuratiescherm van de rep eater v er schijnt.
Opent h et scherm niet, reset dan de r epeat er (z ie 12) en
probeer opnieuw.
5. Geef de g eb r uikersnaam en wachtwoor d in.
De standaard gebruikersnaam en wachtwoord is admin.
6. Klik op Setup Wiz ard in het menu links.
7. Selecteer Wireless Repeater Mode (Station) en klik op Next.
V. 01 – 22/08/2013 25 ©Velleman nv
Page 26
WIFIR3
8. De naam van uw netwerk verschijnt in de kolom SSID.
Klik op de knop Select naast uw draadloos netwerk.
9. In het veld Key, geef uw netwerksleutel in.
o Deze is dezelfde als de sleutel van uw router.
o Laat de o verig e instel l i ngen ongewijzigd.
o In de volgende stappen hebt u de netwerknaam (SSID) nodig.
Kopiee r of noteer d eze. De naam is hoofdlettergevoelig.
o Klik daarna op Save and Reboot.
V. 01 – 22/08/2013 26 ©Velleman nv
Page 27
WIFIR3
10. Wacht tot de repeater opnieuw is opgestart.
Zorg ervoor dat de netwerknaam (SSID ) corr ect is in g esteld in
het venster Wireless Basic Settings.
11. In het menu, klik op Wireless, daarna op Basic Settings.
12. Contro leer of de netwerknaa m corr ec t is. D e naam wor d t in tw ee
velden gebruikt:
o SSID of Wireless AP (netwe r knaam v an het draa d loos
toegangspunt)
o SSI D of Exten d ed Interface (n etwerknaam van de u itgebreide
interface)
Is dit niet h et geval, g eef de correcte naam in of kopieer en
plak ze in beid e velden.
13. Klik op Apply Changes.
U kunt nu
o het venster "w eb management tool" sl uiten .
V. 01 – 22/08/2013 27 ©Velleman nv
Page 28
WIFIR3
o de netwerkinst ellingen op uw computer terugzetten naar de
fabrieksinstellingen
7.4 De netwerkingstellingen van uw computer terugzetten
1. Op uw computer, klik op Start en s electeer
Control Panel > Network & Sharing Center.
2. In de netwerklijst , klik eers t op uw netwerk en daarna op
Properties.
3. In de l i j st, selecteer Internet Protocol Version 4 (TCP/IPv4)
en klik d aar na op Properties.
4. In h et venster " Pr o perties", s elect eer:
o Obtain an IP address automatic all y.
V. 01 – 22/08/2013 28 ©Velleman nv
Page 29
WIFIR3
o Obtain DNS serv er ad d ress automatically .
5. Klik op OK om te b evestigen.
U kunt nu de r ep eater met uw computer verbind en.
8. De repeater met uw com puter verbinden
Om een computer met de repeat er te verbinden , gaat u al s volgt te
werk:
1. Log in op uw computer.
2. Klik op of op (rechtsonder) . Een lijs t met n etwerken
verschijnt.
3. Selecteer het WIFIR3-netwerk en klik op Connect.
4. Indien nodig, geef het wachtwoord van het netwerk in en klik op
OK om te bevestigen.
Er vers c hijnt een bevestigingsbericht wanneer u met h et
netwerk verbonden bent.
Opmerking - verbi nding vi a kabel
U kunt de repeater ook met uw c o mputer verbin d en via e en RJ45 netwerkkabel.
9. De repeater verbinden via WPS
WPS kan automatisch een verbinding maken tussen draadloze
toestellen.
De repea ter on d er s teun t WPS. A ls uw router de WPS-functie
ondersteunt, dan is deze voorzien van een WPS-knop.
V. 01 – 22/08/2013 29 ©Velleman nv
.
Page 30

WIFIR3
Opmerking: WPS kan de netwerksleutel op de router
veranderen.
Er zijn bepaalde merken wa ar bij de bestaan de netwerksleutel van de
draadloze router verandert bij het indrukken van de WPS-knop. Dit
beteken t dat u alle netwerksleutels op de r eeds gebruikte toestell en,
moet resetten. Verbind de r epeater hand matig (z ie 7 Setup
hierboven), om dit t e vermij d en.
Om uw r outer met de repeater te verbi nden vi a WPS:
1. Steek d e repeater in een stopcontac t.
2. Zorg ervoor dat de repeater in "Wireless R ep eater Mode" is
ingesteld in de configuratiepagina (zie 7.3 hierboven).
3. Op uw router, houd de WPS-knop ingedrukt (raadpleeg de
handleiding van uw router om te weten hoe lang u de knop moet
indrukken).
4. Op de repeater, houd de WPS-knop ingedrukt gedurende 7 tot
10 seconden.
De rout er z al aut omatisch verbinding mak en met de repeater. U
kunt nu uw c omputer met de repeater v er bind en: zie 8
hierboven.
10. Het toestel als een draadloos toegangspunt instellen
Om het toestel al s een draadlo o s toegan gspun t in te stellen , moet u
10.1 De netwerkinstellingen configur eren
• De netwerkinstellingen op uw computer configureren (zie 7.2).
10.2 Het toegangspunt in het venster "web management
tool" configureren
1. Voer de stappen 1 tot 6 uit zoa ls beschreven in 7.3.
V. 01 – 22/08/2013 30 ©Velleman nv
Page 31

WIFIR3
2. Selecteer "S tandard Wirel es s AP mode" en kli k op Next.
3. Indi en nodig kunt u een encry ptiety pe selecteren en een
netwerksleu tel ingeven.
4. Klik op Save and Reboot.
5. Wacht tot de rep eater op nieuw is o pgest art.
Zorg ervoor dat de netwerkn aam (SSID) correct is i ngesteld in
het venster "Wireles s Basic Settings".
6. In het menu, klik op Wireless, en daarna op Basic Settings.
V. 01 – 22/08/2013 31 ©Velleman nv
Page 32

WIFIR3
7. Controleer of de net w er knaam c orrect is. D e naam wor d t in twee
velden gebruikt:
o SSID of Wireless AP (netwe r knaam v an het draa d loos
toegangspunt)
o SSI D of Exten d ed Interface (n etwerknaam van de u itgebreide
interface)
Is dit niet h et geval, g eef de correcte naam in of kopieer en
plak ze in beid e velden.
8. Klik op Apply changes.
U kunt nu het venster "web management tool" sluiten.
10.3 De netwerkinstellingen van uw co m puter resetten
• Reset d e netwerkinstellin gen van uw com p uter zoal s besch r even
in 7.4.
V. 01 – 22/08/2013 32 ©Velleman nv
Page 33

WIFIR3
Disable Wireless
Het dra a d l oos net werk is uitgesc hakeld.
Mode
Ondersteunt de AP- en Repeater -modus
SSID of Wireless
Main Service S et Identifier. Dit is d e n aam
Interface
modus gelijktijdig)
Band
Ondersteunt 11B/11G/11N gemengde modi.
10.4 Het draadloos toegan gspunt met uw com puter
verbinden
Om een computer met het draadl oos toegangs punt te verbinden,
gaat u als volgt te werk:
1. Log in op uw computer.
2. Klik op of op (rechtsonder) . Een lijs t met n etwerken
verschijnt.
3. Selecteer het W IFI3-netwerk uit d e lij st en klik daarna op
Connect.
4. Indien nodig, geef het wachtwoord van het netwerk in en klik op
OK om te bevestigen.
Er vers c hijnt een bevestigingsbericht wanneer u met h et
netwerk verbo nden bent.
11. Web Management Tool Basisinstellingen voor de draadloze verbinding
Open het venster "Web M anagem ent Tool" en s electeer Wireless >
Basic Settings.
Het scher m geeft de vo lgende instel l ingen weer:
LAN Interface
AP
SSID of Extended
Beveiligingsinstellingen voor de draadloze verbinding
Config ureer d e b eveiligings i nstel li ngen en de encryptie, om een
onrechtmatige toeg ang en c ontrole te vermijden . De ond er steu nde
encryp tiemethodes zijn:
64/128-bit WEP, WPA, en WPA2.
1. Open het venster "web m anagement to ol" en select eer Wireless
> Security.
van uw draadloos netwerk.
Univ er s al Repeat er Mode (AP- en Repe ater-
V. 01 – 22/08/2013 33 ©Velleman nv
Page 34

WIFIR3
Root Client–XXXX
De repea ter en d e XXXX -router hebben
WiFi-Repeater1
WiFi-rep eater in te stell en.
2. Bij Select SSID, ku nt u het volgend e s electeren:
Repeater AP –
Terugzetten, een back-up m ak en en herstellen
Om veilig heids redenen ku nt u een b a c k-up maken van de
instelli ngen van de repeater. U k unt de instellingen ook g emakkelijk
opslaan en herstellen wanneer u verschillende instellingen gebruikt.
1. Open het venster "web m a nagem ent tool" en selecteer
Save/Reload Settings.
V. 01 – 22/08/2013 34 ©Velleman nv
hetzelf de wachtwoor d.
Kies deze opt ie om een wachtw oord voor de
Page 35

WIFIR3
• Om een bac k-up van de huidige instellingen te maken, klik op
Save en kies een locatie voor het instellingenbestand. U kunt
zoveel bestanden opslaan als u wilt.
• Om opgeslagen instellingen te uploaden, klik op Browse en
select eer het bestand met de opgesl a gen in s tellin gen. Klik
vervolgens op Upload om de instellingen te uploaden. De huidige
instellingen worden vervangen door de instellingen van het
geüploade bestand.
• Om alle i nstell i ngen te verwijderen en het toeste l naar
fabrieksinstellingen terug te zetten, klik op Reset .
De firmware actualiseren
Om de fir mware v an uw rep eater t e actua liser en, gaat u als vol g t te
werk:
1. Download de nieuwe firmw are van o nze website op uw
computer.
2. Open het venster "web m a nagem ent tool" en selecteer
Management > Upgrade Firmware.
3. Klik op Browse en selecteer het bestand met d e gedownload e
firmware.
4. Klik op Upload. De upgrade start automatisch.
Opgelet: De upgrade kan enkele minuten duren. Onderbreek de
upgrade nooit doo r de webbrows er te sluit en of uw computer van
de rout er los te koppel en. De r ep eater zo u hier d o or onbr uikbaar
worden. Onderb reekt u het upgradepr oces , dan vervalt de garantie.
Het paswoord veranderen
Het standaard wachtwoord is "admin". Verander het wachtwoord om
veiligheidsredenen.
1. In h et venster " web mana gemen t tool ", klik op Management >
Password.
V. 01 – 22/08/2013 35 ©Velleman nv
Page 36

WIFIR3
normen voor d r aadloze
netwerken
frequentiebereik
2.4 - 2.485 GHz
overdrachtsnelheid
voeding
230 Vac 50 Hz
2. Geef in het veld User Name een gebruikersnaam in.
3. Geef in het veld New Password een wachtwoord in, en herhaal
dit paswoord in het veld Confirmed Password.
4. Klik op Appl y Changes om te bevestig en.
Wilt u het standaard wachtwoord niet veranderen, dan klikt u op
Reset.
12. Reset
Indi en nodig , kunt u d e r epeater r esett en met e en naald. Houd de
resetknop gedurend e 10 seconden ingedru kt.
Hierdoor worden alle instellingen n aar d e f abrieksinstellingen
teruggezet.
13. Stroomuitval
Bij stroomu itval, koppel zowel de router als de repeat er los en sluit
ze vervolgens opnieuw aan.
14. Technische specificaties
netwerknormen 10/100 Mbps
draadloze
Gebruik dit toestel enkel met o riginele access oires. Velleman
nv is niet aansprakelijk voor schade of kwetsuren bij
(verkeerd) gebruik van dit toestel. Voor meer informatie over
V. 01 – 22/08/2013 36 ©Velleman nv
IEEE 802.11n / IEEE 802.11g / IEEE 802.11b
11/54/150/270/300 Mbps
Page 37

WIFIR3
dit product en de laatste versie van deze handleiding, zie
www.velleman.eu. De informatie in deze handleiding kan te
allen tijde worden gewijzigd zonder voora f gaande
kennisgeving.
Windows, Win dow s XP, Windows 2 000, Windows V is t a, Windows
Aero, Windows 7 , Win d ow s 8 , Windows Mobile, Wind ow s Server zijn
geregi s treerde handelsm er ken van Microsoft Corporation in de
Verenig de St aten en in andere l anden .
© AUTEURSRECHT
Velleman nv heeft het auteur srecht voor deze handleiding.
Alle wereldwijde rechten vo orbehouden. Het is niet toegestaan
om deze h andleiding of gedee l ten ervan over te nemen , te kopiëren,
te vert alen, te bewerken en op te slaan o p een elektro nisch m edium
zonder voorafgaande schr i ftelijke toes temming v an de
rechthebbende.
V. 01 – 22/08/2013 37 ©Velleman nv
Page 38

WIFIR3
Risque d’électrocution lors de l’ouv er ture du boît ier.
même.
Confier la rép ar ation de l'app areil à du person n el qualifi é.
Il n’y a aucune pièce réparable par l’utilisateur.
MODE D'EMPLOI
1. Introduction Aux résidents de l'Union européenne
Informations envir onnementales importantes concernant ce
produit
Ce symbole su r l'appareil ou l'emballage indique que
l'éliminati on d'un appar eil en f in de vie peut polluer
l'environnement. Ne pas jeter un appareil électrique ou
électr onique (et des piles éventu elles) parmi les déchets
municipaux non sujets au tri sélectif; une déchèterie
traitera l'ap pareil en ques tion. Renvoyer cet appareil à votr e
fournisseur ou à un service de recyclage local. Il convient de
respec ter la réglementation locale relative à l a prot ec tion de
l'environnement.
En cas de questions, contacter les autorités locales pour
élimination.
Nous vous remercions de votre achat ! Lire le présen t mode d 'emploi
attentivemen t avant la mis e en s erv ice de l'appareil. Si l'app areil a
été endommag é penda nt le transport, ne pas i nstal l er et cons ult er
votre r evend eur.
2. Consignes de sécurité
Garder l'app a r eil hors de la por tée des enfan ts et des
personnes non autorisées.
Toucher un câble sous tension peut causer des
électrochocs mortels. Ne jam ais ouv rir l e boîti er soi -
Comman der des p i èces d e rechange éven tuelles chez
votre r evend eur.
3. Directives générales
Se référer à la garantie de service et de qual ité Velleman® en
fin de notice.
V. 01 – 22/08/2013 38 ©Velleman nv
Page 39

WIFIR3
d'alimentation
2
Indicateur de
6
Bouton de
3
Indicateur WPS
7
Port de réseau RJ45
• Utiliser cet appareil uniquement à l'intérieur. Protéger de la
pluie, de l’humidité et des p r o jectio ns d’eau.
• Protéger cet appar eil c o ntre l a pouss i ère et la chaleu r extrême.
• Protéger l’appareil des chocs. Traiter l'appareil avec circon spection
pendant l’opération.
• Se familiariser avec le fon c t ion nement de l'appareil avan t d e
l'utiliser.
• Il est interdit de modifier l' appareil pour d es raisons de sécu r ité.
• N’utiliser vot r e lumineux qu’à sa fonction prévue. Un usage
impropre annule d'office la garantie.
• Les dommages occasionnés par des modifications à l'apparei l par
le clien t, ne tombent p a s s ous la g arantie et vot r e reven deur
déclinera toute resp o nsabilité po ur les p roblèmes et l es défaut s
qui en résultent.
4. Caractéristiques
• avec fonction WPS
• augmen te la portée sans fil d e tous les réseaux WLA N
• suppor te le mode 'Wireless Repeater' et l e mode 'St a ndard AP'
• WLAN 802.11n (Draft 2.0) pour un accès sans fil à grande vitesse
• rétrocompatible avec les normes 802.11g (54 Mbit/s) et 802.11b
(11 Mbit/s)
• suppor te réseaux WLAN de 2.4 GHz
• protection WLAN max. avec WPA2, WPA et WEP (128/64)
• installation f acile avec Wind ow s ou Mac grâc e à l' ass istant logiciel
• antennes incorporées
5. Description
Se référer aux i ll ustrat ions en page 2 de ce mo d e d'emp l oi.
1
Indicateur
5 Bouton WPS
connexion sans fil
4 Indicateur de
connexion sans fil
(LAN)
V. 01 – 22/08/2013 39 ©Velleman nv
réinitialisation
Page 40

WIFIR3
répéteur sans fil, vou s a vez bes o in
Point d'accès sans fil
6. Choisir un em placement a pproprié
• Le meill eur emplacem ent pou r c o nfigu r er le rép éteur es t à
proximité de votre routeur/ordinateur.
• Après la c o nfigu r ation , i nstal ler le r épéteu r à s o n emplacem ent
définitif.
• Pour obtenir l es meilleurs rés ultats, installer le rép éteur à mi-
chemin entre votre routeur Wi-Fi et l'ordin a teur avec la r éceptio n
Wi-Fi la plus faible.
Remarque : Fiche
Il est possible de positionner la fiche ve rt ic alement comme
horizontalement afin de pouvoir utiliser le répéteur dans n'importe
quel endroit.
Se référer aux i ll ustrat ions en page 2 de ce mode d 'emploi.
• Maintenir enfoncé le bouton [A] et tirer sur la fiche pour
déconnecter l'appareil.
• Rebrancher la fiche sur la prise dans la position souhaitée et
tourner jusqu'au déclic.
Remarque : Répéteur sans fil ou point d'accès sans fil
Il est possible de configurer le répéteur comme répéteur san s fil ou
comme un point d'accès sans fil.
Répéteur sans fil
Pour utiliser l'appareil c omme un
d'un point d'accès à Internet Wi-
Fi/routeur.
Pour utiliser l'appareil c omme un
point d'accès sans fil, vous avez
besoin d'un point d'accès depuis un
routeur à large bande.
Connecter le répét eur au routeur
sans fil/commutateur avec l e câble
réseau
RJ45 incl.
V. 01 – 22/08/2013 40 ©Velleman nv
Page 41

WIFIR3
7. Configuration
Pendant la configuration :
• connecter vot re routeur au r épéteu r
• connecter le répéteu r à votre ordinateur
Connecter vo tre rout eur au répét eur :
• Manuellement (voir ci-dessous)
• Avec le bouton WPS (v oir 9)
7.1 Connecter votre routeur a u répéteur
Pendant la configuration, utiliser une connexion filaire avec le câble
réseau RJ45 (incl.).
Après la configu r ation, il est p os sible d'util iser le répéteur depuis Wi Fi.
Pour connecter le routeur,
• configurer les réglages réseau sur votre ordinateur
• config urer le répéteur dans l a fenêt r e "web m anagem ent tool"
• réinitialis er les réglages r éseau de votr e o r d i nateu r
• connecter le répéteu r à votre ordinateur
7.2 Configurer les réglages réseau sur vo tr e ordinateur
Le répét eur est doté d'u ne adres se IP fixe. Pour accéder au répéteur
durant la configuration, config urer les r églages rés eau de v o tre
ordinateur comme suit :
1. Sur votre ordinateur, cliquer sur Start et sélectionner
Control Panel > Network & Sharing Center.
2. Dans la li s te de réseau x, cliqu er s ur vot r e réseau et sé lec tion ner
Properties.
V. 01 – 22/08/2013 41 ©Velleman nv
Page 42

WIFIR3
3. Dans la liste, cliquer sur Internet Protocol Version 4
(TCP/IPv4) et sélectionner Properties.
4. Dans la fenêtre "Prop er ties", sélectionner Use the Following
IP Address.
o Dans le champ IP Address , saisir 192.168.10.x. "x" est un
chiffre variant de 2 à 254.
o Dans le champ Subnet Mask, saisir 255.255.255.0.
o Dans le champ Default Gateway, saisir l'adres s e IP de v otre
routeur sans fil (adresse par défaut est 192.168.10.1).
5. Cliquer sur OK pour confirmer.
V. 01 – 22/08/2013 42 ©Velleman nv
Page 43

WIFIR3
Maintenant, i l es t poss i b le d'accéder au répéteur depuis votre
ordinateur.
7.3 Configurer le répéteur dans l a fenêtre "web
management tool"
1. Brancher le répéteu r s ur une prise mu rale.
2. Connecter vo tre ordinateu r et le répéteur avec le câ ble r és eau
Rj45 (incl.).
3. Connectez-vous à votre ordinateur.
4. Ouvrir votre navigateur web et saisir l'adr esse
http:// 192.168.10.1.
La page de configuration du répéteur s'affiche.
Si la page ne s'ouvre pa s, réinitialiser le répét eu r (v oir 12) et
réessayer.
5. Saisir l'identifiant.
L'identifiant par défaut est admin.
V. 01 – 22/08/2013 43 ©Velleman nv
Page 44

WIFIR3
6. Cliquer sur Setup Wizard (menu à gauche).
7. Sélectionner Wireless Repeater Mode (Station) et cliquer sur
.
8. Le nom de votre réseau s'affiche dans la colonne SSID.
Cliquer sur Select à côté de votre réseau sans fil.
V. 01 – 22/08/2013 44 ©Velleman nv
Page 45

WIFIR3
9. Dans le champ Key , saisir vot r e c l é réseau.
o Cette clé est identiq ue à celle de vot re routeur.
o Ne pas changer les aut r es régl a g es.
o Dans les étapes suivantes, vous avez besoin du nom du réseau
sans fil (SSID).
Copier ou noter celui-ci. Ce nom est sensible à la casse.
o Ensuite, cliquer sur Save and Reboot.
10. Attendre jusqu'à ce que le r épéteur soit r edémar r é.
S'assurer que le nom du réseau sans fil (SSID) saisi dans la
fenêtre Wireless Basic Settings soit correct.
11. Dans le menu, cliquer sur Wireless et sélectionner Basic
Settings.
V. 01 – 22/08/2013 45 ©Velleman nv
Page 46

WIFIR3
12. Vérifier si le n om d u réseau soit correct. Le nom est utilisé dans
deux champs :
o SSID of Wireless AP
o SSID of Extended Interface
Si ce n'est pas le cas, saisir ou copier et coller le nom correct
dans les deux champs.
13. Cliquer sur Apply changes.
Maintenant , il est p ossible de
o fermer l a fenêtre "web management tool"
o réinitialis er les réglages r éseau su r votre o r dinateur.
7.4 Réinitialiser l es réglages réseau de votre o rdinateur
1. Sur votre ordinateur, cliquer sur Start et sélect ionner
Control Panel > Network & Sharing Center.
2. Dans la liste des réseaux, cliquer sur v otre rés eau et
sélectionner Properties.
V. 01 – 22/08/2013 46 ©Velleman nv
Page 47

WIFIR3
3. Dans la liste, cliquer sur Internet Protocol Version 4
(TCP/IPv4) et sélectionner Properties.
4. Dans la fenêtre "Prop er ties", sélection ner :
o Obtain an IP address automatic all y.
V. 01 – 22/08/2013 47 ©Velleman nv
Page 48

WIFIR3
o Obtain DNS server address automati cal ly .
5. Cliquer sur OK pour confirmer.
Maintenant, i l es t poss i b le de con nect er le rép éteur à vo tre
ordinateur.
8. Connecter le répéteur à votre ordinateur
Pour connecter un ordinateur au répéteur, procéder comme suit :
1. Connectez-vous à votre ordinateur.
2. Cliquer sur l'icone ou (partie inf ér ieure d r oite de votre
écran). Une liste de réseaux s'affich e.
3. Sélectionner le résea u du répéteur et cliquer sur Connect.
4. Si nécessair e, s aisir le mot d e p a s se du r és eau et c li q uer sur OK
pour confirmer.
Un message de confirmation s' aff ich e lorsque vous êtes connecté
au réseau.
Remarque - connexion par câble
Il est également poss i b le de con nect er le rép éteur à vo tre ordinateur
avec un c â b l e réseau RJ45.
9. Connecter le répéteur avec WPS
WPS est une fon c tionnalité per mettant la c onnexion de p ér iphéri q ues
à votre réseau sans fil.
Le répét eur support e WP S. Si votre ro uteur s upport e la fon c tion
WPS, celui-ci sera doté d'un bouton-WPS.
V. 01 – 22/08/2013 48 ©Velleman nv
.
Page 49

WIFIR3
Remarque : WPS peut chan ger la clé réseau sur le routeur.
En appuyant sur le bouton WPS, la clé réseau existante change sur
certaines mar q ues de r o uteurs sans fil. Cela sign ifie que t o utes l es
clés réseau su r les appareils ut ilisés doiven t êtr e réinitialisées. Pour
éviter c ela, connecter le r ép éteur manuellement (voir 7 Setup cidessus).
Pour con necter votre routeu r au répéteur a vec WPS :
1. Brancher le répéteu r s ur une prise mu rale.
2. S'assur er que l e répéteur soit régl é s ur "Wir eless Repeat er
Mode" dans la page de configuration (voir 7.3 ci-dessus).
3. Sur votre routeur, maintenir enfoncé le bouton WPS (consulter
le mode d'emploi de vo tre rout eur pour savoir combien de t emps
le bouton doit être enfoncé).
4. Sur le répéteur, maintenir enfoncé le bouton WPS pendant 7 à
10 secondes.
Le routeur et le r épéteur s e connecteront automatiquement.
Maintenant, il est possible de connecter votre ordinateur au
répéteur : voir 8 ci-dessus.
10. Configurer l'appareil comme un point d'accès sans fil
Pour configurer l'appareil comme un point d'accès sans fil, procéder
comme suit :
10.1 Configurer les réglages r éseau
• Configurer les réglages réseau sur votre ord inateur (voir 7.2).
10.2 Configurer le point d'accès dans l a fenêtre "web
management tool'
1. Suivre les éta p es de 1 à 6 décrit es d a ns 7.3.
V. 01 – 22/08/2013 49 ©Velleman nv
Page 50

WIFIR3
2. Sélectionner "Standard Wireless AP mod e" et cliquer s ur Next.
3. Si nécessair e, s élect i onner un typ e d e c r yptag e et saisir une clé
réseau.
4. Cliquer sur Save and Reboot.
5. Attendre jusqu'à ce que l e r épéteu r s oir redémarré.
S'assurer que le nom du réseau (SSID) soit correct dans la
fenêtr e "Wireless B as i c Settin g s".
6. Dans le menu, cliquer sur Wiresless, puis sur Basic Settings.
V. 01 – 22/08/2013 50 ©Velleman nv
Page 51

WIFIR3
7. Vérifier si le nom du réseau soit c orrect. Le nom est utilis é dans
deux champs :
o SSID of Wireless AP
o SSID of Extended Interface
Si ce n'est pas le cas, saisir ou copier et coller le nom correct
dans les deux champs.
8. Cliquer sur Apply Changes.
Maintenant, i l es t poss i b le de fer mer la fenêtre "web
management tool".
10.3 Réinitialiser les r églages réseau de votre ordinateur
• Pour réin i tial i s er les r ég l ages réseau de votre o r dinateur, voir 7.4.
10.4 Connecter le point d'accès sans fil à votre ordinateur
Pour connecter un ordinateur au point d'accès sans fil, procéder
comme suit :
1. Connectez-vous à votre ordinateur.
V. 01 – 22/08/2013 51 ©Velleman nv
Page 52

WIFIR3
LAN Interface
Mode
Suppo r te le mode "AP" et le mod e répéteur
AP
votre r éseau sans fil .
SSID of Extended
Interface
Univ er s al Repeat er Mode (mode AP et m o d e
répéteur simultanément )
Band
Supporte les modes mixés 11B/11G/11N.
2. Cliquer sur l'icone ou (partie inf ér ieure d r oite de votre
écran). Une liste de réseaux s'affich e.
3. Sélectionner le résea u du répéteur et cliquer sur Connect.
4. Si nécessair e, s aisir le mot d e p a s se du r és eau et c li q uer sur OK
pour confirmer.
Un message de confirmation s'af f ich e lorsque vous êtes connecté
au réseau.
11. Web Management Tool Réglages de base pour la connexion sans fil
Ouvrir la fenêtre "web management tool" et sélectionner Wireless >
Basic Settings.
La fenêtre affiche l es r églages suivants :
Disable Wireless
Le réseau sans fil est désactivé.
SSID of Wireless
Réglages de sécurité pour l a connexion sans fil
Config urer les r églages de s éc urité et le cryp tage po ur évit er tout
accès et surveillance non autorisé s. M éth odes de cryptage supportés
:
64/128-bit WEP, WPA, et WPA2.
1. Ouvrir la fenêtre "web management tool" et sélectionner
Wireless > Securité.
Main Service Set Id entifier . C'est le nom d e
V. 01 – 22/08/2013 52 ©Velleman nv
Page 53

WIFIR3
Root Client–XXXX
Le répét eur et l e r o uteur XXXX o nt le même mot
WiFi-Repeater1
passe pou r le répéteur Wi-Fi.
2. Dans le champ Select SSID, il est pos s i ble d e s électionner :
Repeater AP –
Réinitialisation, sauvegarde et rétablissement
Pour des r aisons de sécu r i té, il es t possib le de faire un e s a uveg ar de
des réglages d u répéteur. Il est également poss i b l e de sauvegarder
et de rétablir les réglages facilement si l'appareil es t utilisé avec
différents réglages.
1. Ouvrir la fenêtre "web management tool" et sélectionner
Save/Reload Settings.
V. 01 – 22/08/2013 53 ©Velleman nv
de passe.
Sélectionner cette option pour saisir un mot de
Page 54

WIFIR3
• Pour fai re une s a uvegarde des r églages actuel s, cliquer sur Save
et sélec tionner un emplacement p o ur le fichier. Il est p ossible de
sauvegarder aut ant de r ég lages qu e so u haité.
• Pour téléverser les r ég lages sauveg ardés, cliquer sur Browse et
sélect io nner l e fichier avec les rég l ages sau vegar dés. Pui s, cliquer
sur Upload pour télév erser les régl ages. Le s réglag es actu el s sont
remplacés par les réglages du fichier té l éversé.
• Pour effacer tous les réglages et rétablir les r églages par défaut,
cliquer sur Reset .
Actualiser le firmware
Pour act ualiser le fir mware du répéteur, suivre les étapes suivantes :
1. Téléch ar ger le n ouveau firm ware du r épéteur de notre page web
vers votre ordinateur.
2. Ouvrir la fenêtre "web management tool" et sélectionner
Management > Upgrade Firmware.
3. Cliquer sur Browse et sélectionner le fichier av ec le firm ware
téléchargé.
4. Cliquer sur Upload. L'actualisation démarre automatiquement.
Attention : L'actualisation peut durer quelques minutes. Ne jamais
interrompre le processus d'actualisation en fer mant le
navigateur web ou en déconnectant l'ordinateur du routeur. Il est
possible que le répéteur devienn e i nutilisable. Interromp r e
l'actua li sation annulera la garantie.
Modifier le mot de passe
Le mot de passe p ar défaut est "ad min" . P our des r a isons de
sécurité, mod if ier le mot de passe.
1. Dans la fenêtre "web m anagement tool", s électionner
Management > Password.
V. 01 – 22/08/2013 54 ©Velleman nv
Page 55

WIFIR3
sans fil
plage d e fréquence
2.4 - 2.485 GHz
vitesse de transmission
sans fil
alimentation
230 Vca 50 Hz
2. Saisir le nom d 'u tilisateur dan s le champ User Name.
3. Saisir un mot de passe dans le champ New Password, et
répéter le mot d e passe d ans le champ Confirmed Password.
4. Cliquer sur Apply Changes pour confirmer.
Si vous souh ait ez g arder le mot de passe original, cliquer su r
Reset.
12. Réinitialisation
Si nécessair e, il est pos s i b le de réinitialiser le rép éteur av ec une
aiguille. Maintenir enfon c é le bouton de réinitialis at ion pendant 10
secondes.
Tous les réglages ser o nt réini tial i s és par défaut.
13. Panne de courant
En cas d e panne de c o uran t, déconnecter le routeur et le répéteur et
reconnecter.
14. Spécifications techniques
normes pour réseaux
normes de réseau 10/100 Mbps
N'employer cet appareil qu'avec des accessoires d'origine. La
SA Velleman ne peut, dans l a mesure conforme au droit
applicable être tenue responsable des dommages ou lésions
V. 01 – 22/08/2013 55 ©Velleman nv
IEEE 802.11n / IEEE 802.11g / IEEE 802.11b
11/54/150/270/300 Mbps
Page 56

WIFIR3
(directs ou indirects) pouvant résulter de l’utilisation de cet
appareil. Pour plus d'information concernant cet article et la
dernière version de cette notice, consulter notre site
www.velleman.eu. Les s péc ifications et le contenu de cette
notice peuvent être modifiés sans avis préalable.
Windows, Win dow s XP, Windows 2 000, Windows V ista, W ind ows
Aero, Windows 7 , Win d ow s 8 , Windows Mobile, Wind ow s Server sont
des marques commercial es de Microsoft Co rp oration, enregistrées
aux Etats-Unis et dans d'autres pays.
© DROITS D’AUTEUR
SA Velleman est l’ayant droit des droits d’auteur pour cette
notice. Tous droits mondiaux réservés. Toute reproduction,
traduction, copie ou diffusion, intégrale ou partielle, du contenu de
cette no tice pa r q uelque proc édé ou sur tout support électroniqu e
que ce soit est interdite sans l’accord pr éal abl e écr it d e l’ayant droit.
V. 01 – 22/08/2013 56 ©Velleman nv
Page 57

WIFIR3
riesgo de descargas eléctricas al abrir la caja . Pued e suf rir
conectado a la red eléctrica. No abra ni desmonte la caja.
La reparación debe llev ar la a cabo u n técnico c u al ificado.
MANUAL DEL USUARIO
1. Introducción A los ciudadanos de la Unión Europea
Importantes inform a ciones sobre el medio ambiente
concerniente a este pro duc to
Este símbolo en este aparato o el embalaj e indic a que, si
tira las muestras inservib les, podrían dañar el medio
ambiente. No tire este aparato (ni las pil as , s i las hu b iera)
en la basura doméstica; debe ir a u na empresa
especializada en reciclaje. D evuelva es te aparato a su
distribuidor o a la unidad de r eciclaje loca l. Respete las ley es locales
en relación con el medio ambiente.
Si tiene dudas, contacte con las autoridades locales par a
residuos.
¡Gracia s p o r elegir Velleman! Lea atentamen te las instru c c iones d el
manual an tes de usar el aparato. Si el aparato ha suf r i d o al g ún daño
en el transporte no lo instale y póngase en contacto con su
distribuidor.
2. Instrucciones de seguridad
Mantenga el aparato lejos del alcance de per sonas n o
capacitadas y niños.
una peligrosa descarga eléct r i ca al tocar un cab l e
El usuario no habrá de efectuar el mantenimiento de
ninguna pieza. Contacte con su distribuidor si necesita
piezas de recambio.
3. Normas generales
Véase la Garantía de servicio y calidad Velleman® al final de
este manual del usuario.
• Utilice el aparato sólo en interiores. No exponga este equipo a
lluvia, humedad ni a ningún tipo de salpicadura o goteo.
• No expon g a este e q uipo a polvo n i temperatura s extrema s.
V. 01 – 22/08/2013 57 ©Velleman nv
Page 58

WIFIR3
1
tecla POWER
5
botón WPS
3
indicador WPS
7
Puerto RJ45
4
indicador LAN
• No agite el aparato. Evit e usar excesiva fu er za dur an te el man ejo
y la instalación .
• Familiaríc ese con el funcionamiento d el aparato ant es de utilizar lo.
• Por razones de seguridad, las modificaciones no autoriz ad as del
aparato están prohibidas.
• Utilice sólo el aparato para las aplicaci on es de scritas en este
manual. Su uso incorrecto anula la garantía completamente.
• Los daños causados por descuido de l as instru cciones de
seguridad de este manual invalidarán su garantía y su distribuidor
no será responsable de ningún daño u otros problemas
resultantes.
4. Características
• con función WPS
• aument a la c o bertur a i nalámb rica de todas la s r edes WLAN
• soporta el mod o 'Wireless Repeater' y el m odo 'Standard AP'
• WLAN 802.11n (Draft 2 .0) para un a cc eso inalámbrico de alta
velocidad
• compatibilidad descendente con 802.11g (54 Mbit/s) y 802.11b
estándar (11 Mbit/s)
• soporta redes WLAN de 2.4 GHz
• protección WLAN máx. con WPA2, WPA y WEP (128/64)
• fácil configur ación con Windows o Mac gracias al asistente de
configuración
• antenas incorpo radas
5. Descripción
Véase las figuras en la página 2 de es t e manua l d el usuar io .
2 Indicador de conexión
inalámbrica
6. Seleccione un lugar adecuado
• Seleccione un lugar cerca del router/ordenador para configurar el
repetidor.
V. 01 – 22/08/2013 58 ©Velleman nv
6 B ot ón de
reinicialización (reset)
Page 59

WIFIR3
Para este modo n ecesitará acceso a
Para este modo n ecesitará acceso a
Conect e el aparato al router/sw itch
• Después de haberlo configurado, puede instalarlo en el lugar
deseado.
• Para un funcionamiento correcto, instale el repetidor a medio
camino entre el router y el ordenador inalámbrico con la recepción
más débil.
Observación: clavija
Es posible fijar l a c lavija tanto de m anera ver tical como de m anera
horizontal para que encaje en cualquier sitio.
Véase las figuras en la página 2 de es t e manua l d el usuar io .
• Mantenga p ulsado [A] y t ir e de la clav ija para desconectarl a.
• Vuelva a p oner la clavija en la posición dese ada y gíre l a hasta q ue
se encaje.
Observación: Modo repetidor inalámbrico o modo AP
inalámbrico
Puede config urar el apar at o como repetidor inalám br ico o AP
inalámbrico.
Modo repetidor inalámbrico
internet por A P WiFi/Router.
Modo AP inalámbrico
internet por router de banda ancha.
con el cable RJ-45 incluido
.
7. Configuración
Durante la configuración:
• conectará el r o uter al repetidor
V. 01 – 22/08/2013 59 ©Velleman nv
Page 60

WIFIR3
• conectará el r epetid o r al ordenador
Puede c o nectar el r o uter al r epetidor:
• de manera manual (v éase abajo)
• con WPS (véase 9)
7.1 Conectar el router a l repetidor
Se recomienda u tilizar el cable RJ-45 inclu id o p ara configur ar el
aparato.
Luego, puede utilizar el repetidor Wi-Fi.
Para conec tar el rou ter necesitará:
• ajustar la configuración de red (network settings)
• config urar el repetidor con la herramienta de ges tión web (Web
Management Tool)
• reinicializar la configu ración de red d el ordenador
• conectar el repetidor a l o r denador
7.2 Ajustar la confi gur ación de red (network settings)
El repeti dor ti ene una d irección IP fija. Para poder acceder al
repetidor durante la configuración, primero, necesita ajustar la
configuración de red de la forma siguiente:
1. En el ordenador, haga clic en Inicio (Start) y seleccione
Panel de Control (Control Panel) > Ver estado y tareas de
red (Network & Sharing Center).
2. En la lista de redes, haga clic en su red y, luego, haga clic en
Properties.
V. 01 – 22/08/2013 60 ©Velleman nv
Page 61

WIFIR3
3. En la lista, sele cc ione Internet Protocol Version 4
(TCP/IPv4) y haga clic en Properties.
4. Seleccione Us e the Following IP Address.
o Introduzca 192.168.10.x en el espacio junto a IP Address. ‘x’
es un número de 2 a 254.
o Introduzca la máscara de subred 255.255.255.0 en el espacio
junto a Subnet Mask.
o Introduzca la dirección IP del router inalámbrico en el espacio
junto a Default Gateway (la dirección por defecto es
192.168.10.1).
5. Haga clic en OK para con firmar.
V. 01 – 22/08/2013 61 ©Velleman nv
Page 62

WIFIR3
Ahora, puede acceder al repetid o r desde el ord enador.
7.3 Configurar el repetidor con la herram i enta de gestió n
web (Web Management Tool)
1. Enchufe el rep etidor a una toma de corriente.
2. Conéctelo al PC con el cable RJ4 5.
3. Inicie una sesión en el PC.
4. Abra el navegador e introduzca
http:// 192.168.10.1.
La ventana d e login (inicio de sesión) se visu aliza.
Si la página no s e abre, reinici alice el repeti d or (v éase 12) y
vuelva a intentar.
V. 01 – 22/08/2013 62 ©Velleman nv
Page 63

WIFIR3
5. Introduzca el nombre de usuario y la contraseña.
(El nombre de usuario y la contraseña por defecto: admin.)
6. En el menú de la izquierda, haga clic en Setup Wizard.
7. Seleccione Wireless Repeater Mode ( Station) y haga clic en
Next.
V. 01 – 22/08/2013 63 ©Velleman nv
Page 64

WIFIR3
8. El nombre de su red se visualiza en la columna SSID.
Haga clic en Select junto a su red inalámbrica.
9. Int r oduzca la c l ave de seguridad de red en el espacio j unto a
Key.
o Esta clav e es la misma que l a d el r o u ter.
o No cambie los otros ajustes.
o Necesitará e l nombre de red (SSID) más adelante.
¡Apúntelo! El nombre es sensible a mayúsculas.
o Luego, haga clic en Save and Reboot.
V. 01 – 22/08/2013 64 ©Velleman nv
Page 65

WIFIR3
10. Espere hasta q ue el rep etidor s e haya r ei nicializado.
Asegúrese de que haya introducido el SSID (nombre de red)
correcto.
11. En el menú, haga clic en Wireless y luego en Basic Settings.
12. Controle si h a in troducid o el n ombre de red correcto. E l n ombre
se utiliza en dos campos:
o SSID of Wireless AP
o SSID of Extended Interface
Si no fuera el caso, introduz ca el nombre correcto en am b os
V. 01 – 22/08/2013 65 ©Velleman nv
Page 66

WIFIR3
campos.
13. Haga clic en Apply C hanges.
Ahora, puede
o cerrar la herramienta de gest ión web (Web M anagem ent Tool).
o restablecer los ajustes de fábrica.
7.4 Restablecer los ajustes de fábrica.
1. En el ordenador, haga clic en Start y seleccione
Panel de Control (Control Panel) > Ver estado y tareas de
red (Network & Sharing Center).
2. En la lista de redes, haga clic en su red y, luego, haga clic en
Properties.
3. En la lista, sele cc ione Internet Protocol Version 4
(TCP/IPv4), y haga clic en Properties.
V. 01 – 22/08/2013 66 ©Velleman nv
Page 67

WIFIR3
4. Seleccione:
o Obtain an IP address automatical ly.
o Obtain DNS serv er ad d ress automatically .
5. Haga clic en OK para con firmar.
Ahora, p uede co nectar el repetidor al ordena dor.
8. Conectar el repetidor al ordenador
Para conec tar un o r d enador al r epetidor, proceda de la forma
siguiente:
1. Inicie una sesión en el PC.
2. Haga clic en o (parte inferio r derecha de la pantalla).
Una lista de red es se visualiz a.
3. Selecc io ne la red del repetidor y ha g a c li c en Connect.
V. 01 – 22/08/2013 67 ©Velleman nv
.
Page 68

WIFIR3
4. Si fuera necesario, intr od uzca la c ontras eña de la red y hag a c lic
en OK para confirmar.
Un men s aje de confir mación aparec er á s i está conectado a la
red.
Observación – conexión con cable
También es posible conectar el repetidor al ordenador con el cable de
red RJ45.
9. Conectar el repetidor con WPS
WPS es una manera automát ica par a c o n ec tar aparatos inalámbricos .
El repetidor soporta WPS. Si el router soporta W PS, esta rá equipado
con un botón WPS.
Nota: es posible que la función WPS cambie la clave de
seguridad del router.
En el caso de algunas marcas de routers, l a clave d e seguridad se
cambia al pulsar el botón WPS. Esto quiere decir que deberá
reinicializar to das las claves de seguridad de tod o s los apar atos que
ya está utilizan d o . Para ev itar esto , c onecte el repetidor de maner a
manual (véase 7 Setup).
Para conec tar el rou ter al repetidor con WPS:
1. Enchufe el rep etidor a una toma de corriente.
2. Asegúr ese de que el repetidor esté en el mod o Repetidor
Inalám b r i c o (véase 7.3).
3. En el router, mantenga pulsado el botón WPS (consulte el
manual del usuario del router para saber cuánto tiempo).
4. En el repetidor, mantenga pulsado el botón WPS durante 7 y 10
segundos.
El router y el rep etidor s e conectarán automáticamente . Ahora,
puede conectar el ord enador al repetidor: véase8.
10. Configurar el aparato como punto de acces o inalámbrico
Para configurar el apara t o c omo AP inalámbrico, siga los sig uiente s
pasos:
10.1 Ajustar la configuración de red (network s ettings)
• Ajuste la configuración de red como se indica en 7.2.
V. 01 – 22/08/2013 68 ©Velleman nv
Page 69

WIFIR3
10.2 Configure el AP inalámbrico con la herramienta de
gestión web (Web Management Tool).
1. Siga los pasos de 1 a 6 como se indica en 7.3.
2. Selecc io ne St a ndard Wireles s AP mode y haga clic en Next.
3. Si fuera neces a r io, sel eccion e un tipo de encriptación e
introduzca una clave de seguridad de red.
4. Haga clic en Save and Reboot.
5. Espere h as ta qu e el repetidor se haya r ei nicializado.
Asegúrese de que haya introducido el SSID (nombre de red)
correcto.
6. En el menú, haga clic en Wireless y luego en Basic Settings.
V. 01 – 22/08/2013 69 ©Velleman nv
Page 70

WIFIR3
7. Controle si ha introducido el nombre de red correcto. El nomb re
se utiliza en dos campos:
o SSID of Wireless AP
o SSID of Extended Interface
Si no fuera el caso, introduz ca el nombre correcto en am b os
campos.
8. Haga clic en Apply Ch anges.
Ahora, p uede cer rar la h erramienta de gestión web (Web
Management Tool).
10.3 Restablecer los ajustes de fábrica.
• Restablezca los ajustes de fábrica como se indica en 7.4.
10.4 Conectar el AP inalámbrico al ordenador
Para conec tar un o r d enador al ac ceso inalámb r ic o, proceda de la
forma siguiente:
1. Inicie una sesión en el PC.
V. 01 – 22/08/2013 70 ©Velleman nv
Page 71

WIFIR3
LAN Interface
Mode
Soporte el m od o « A P » y el modo
Interface
repetidor sim ultáneamente)
Band
Soporte los modos mezclados11B/11G/11N.
2. Haga clic en o (parte inferio r derecha de la pantalla).
Una lista de redes se visualiza.
3. Selecc io ne la red del repetidor y ha g a c li c en Connect.
4. Si fuera necesario, intr od uzca la c ontras eña de la red y hag a c lic
en OK para confirmar.
Un men s aje de confir mación aparec er á s i está conectado a la
red.
11. Web Management Tool (herramienta de gestión we b) Configuración básica de la conexión inalámbrica
En el navegador de int ernet , abra Web Management T o ol y
seleccione Wireless > Basic Settings.
La págin a i n c l u ye vari o s aj ustes
Disable Wireless
La red ina lámbric a está desactivada.
SSID of Wireless
AP
SSID of Extended
Configuración de seguridad para la conexión inalámbrica
Configure los ajustes de seguridad y la encriptación para evitar un
acceso y la vigilan cia no autorizados. M étod os de encript ación
soportados:
64/128-bit WEP, WPA, y WPA2.
1. Abra la ventan a Web Management Too l y selec c ione Wireless >
Security.
Repetidor.
Identificador de conjunto de serv icio . E s el
nombre de su red inalámbrica.
Universal R epeater Mod e (m od o AP y modo
V. 01 – 22/08/2013 71 ©Velleman nv
Page 72

WIFIR3
Root Client–XXXX
El repetidor y el router XXX X tienen la mism a
WiFi-Repeater1
contraseña p ara el repetid or WiF i.
2. En el espacio junto a Select SSID, puede selecc ionar:
Repeater AP –
Reinicialización, copia de seguridad y restauración
Por raz ones de s eguridad, es posible hacer una cop ia de seguridad
de los ajustes del repetidor. También es posible guardar y restaurar
los ajustes fácilmente si utiliza el apar ato con dif e rent es ajustes.
1. Abra la ventana W eb Ma nagement Tool y seleccione
Save/Reload Settings.
V. 01 – 22/08/2013 72 ©Velleman nv
contraseña.
Seleccione esta opción para introducir una
Page 73

WIFIR3
• Para rea lizar un a c o p ia de segur i dad de la config uración a ctual,
haga clic en Save y seleccion e un a u bic ación para el f ich ero. Se
pueden guardar tantos ficheros como se desee.
• Para subir un fichero guardado, haga clic en Browse seleccione
el fichero con la configuración guardada. Luego, haga clic en
Upload para subir la configuración. La configuración actual se
sustituirá por la con figuración del ficher o c arg ado.
• Para borrar todos los ajustes y restabl ecer los ajustes de fábrica,
haga clic Reset.
Actualizar el firmware
Para actualizar el firm w ar e del rep etidor, p r o ceda d e la forma
siguiente:
1. Descargue el nu evo firmware de nuest ra pági na web a l PC.
2. Abra la ventana W eb Ma nagement Tool y seleccione
Management > Upgrade Firmware.
3. Haga clic en Browse y seleccione el fichero c on el firmware que
ha descargado.
4. Haga clic en Upload. El procedimiento de actual i z ación se
iniciar á automáti camente.
Cuidado: Puede tardar algunos minutos. Nunca interrumpa el
procedimiento de actualización al cerrar el navegador o al
desconectar el PC del r outer . Es posib le que el repetidor se vuelva
inservible. Interrumpir la act ualiz ac i ón invalidará la g arantía.
Cambiar la contraseña
La contraseña por defecto es « admin ». Por razones de seguridad,
modifique la contraseñ a.
1. En la v entana Web Management T o o l, selec cione Management
> Password.
V. 01 – 22/08/2013 73 ©Velleman nv
Page 74

WIFIR3
inalámbricas
rango de frecuencia s
2.4 - 2.485 GHz
inalámbrica
2. Introduzca el nombre de usuario en el espacio junto a User
Name.
3. Introduzca la contraseña en el espacio junto a New Password y
vuelva a introducirla en el espacio junto a Confirmed
Password.
4. Haga clic en Apply Ch anges para conf ir mar.
Si quiere guardar la contraseña original, haga clic en Reset.
12. Reinicialización
Si fuera necesario puede reinicializar el aparato con una aguja.
Mantenga pulsado el botón de función durante 10 segundos.
Esto restablecerá los ajustes de fábr ica .
13. Interrupción del suministro eléctrico
En caso de interrupción del suministro elé ctrico, quit e el router y el
repetidor de la red eléctric a y vuelva a conectarlos.
14. Especificaciones
normas p ar a redes
normas de red 10/100 Mbps
velocidad de
transmisión
alimentación 230 Vac 50 Hz
Utilice este aparato sólo con los accesorios originales.
Velleman NV no será responsable de daños ni l esiones
V. 01 – 22/08/2013 74 ©Velleman nv
IEEE 802.11n / IEEE 802.11g / IEEE 802.11b
11/54/150/270/300 Mbps
Page 75

WIFIR3
causados por un uso (indebido) de este aparato. Para más
información sobre este producto y la versión más reciente de
este manual del usuario, visite nuestra página
www.velleman.eu. Se pueden modificar las especificaciones y
el contenido de este manual sin previo aviso.
Windows, Win dow s XP, Windows 2000, Windows Vista, Windows
Aero, Windows 7 , Win d ow s 8 , Windows Mobile, Wind ow s Server son
marcas registradas de Microsof t Corpor ation en los Estados Unidos y
otros países.
© DERECHOS DE AUTOR
Velleman NV dispone de l os derechos de autor para este
manual del usuario. Todos los derechos mundiales
reservados. Está estrictamente prohibido reproducir, traducir,
copiar, ed itar y g uardar este manu al d el usuar i o o partes d e ello sin
previo p er miso escrit o d el der echo habiente.
V. 01 – 22/08/2013 75 ©Velleman nv
Page 76

WIFIR3
Stromschlaggefahr beim Öffnen des Gehäuses. Das
darf nur von einer Fachkraft durchgeführt werden.
Es gibt keine z u wartenden Te i l e. Best ellen Sie event uelle
BEDIENUNGSANLEITUNG
1. Einführung An alle Einwohner der Europäischen Union
Wichtige Umweltinformationen über dieses Produkt
Dieses Symbol auf dem Produkt oder der Verpackung zeigt
an, dass die Entsorgung dieses Produktes nach seinem
Lebenszyklus der Umwelt Schaden zufügen kann.
Entsorgen Sie die Einheit (o der ver wend eten Bat terien )
nicht als unsortiertes Hausmüll; die Einheit oder
verwen d eten Batterien müssen v on einer sp ezial i s ierten F i r ma
zwecks Recycling entsorgt werden. Diese Einheit muss an den
Händler oder ein ör t lic hes Recyclin g-Unternehmen retourniert
werden. Resp ektier en Sie die örtlic hen U mweltvorschr i ften.
Falls Zweifel bestehen, wenden Sie sich für
Entsorgungsrichtlini en an Ihre örtliche Behörde.
Vielen Dank, dass Sie sich für Velleman entschieden haben! Lesen
Sie diese Bedi enung s anleitung vor Inbetriebnahme sorgfältig durch.
Überpr üfen S ie, ob Transportschäden vorl iegen. Sollte dies der Fall
sein, verwenden Sie das Gerät nicht und wenden Sie sich an Ihren
Händler.
2. Sicherheitshinweise
Halten Sie Kinder und Unbefugte vom Ger ät fern.
Berühren von unter Spannung stehenden Leitungen
könnte zu lebensgefährlichen elektrischen Schlägen
führen. Öffnen Sie das Gehäuse nie selber. Die Reparation
Ersatzteile bei Ihrem Fachhändler.
3. Allgemeine Richtlinien
Siehe Velleman® Service- und Qualitätsgarantie am End e dieser
Bedienungsanleitung.
V. 01 – 22/08/2013 76 ©Velleman nv
Page 77

WIFIR3
1
Power-Taste
5
WPS-Taste
Verbindung
(Rücksetzung)
3
WPS-Anzeige
7
RJ45-Anschluss
4
LAN-Anzeige
• Verwenden Sie das Gerät nur im Innenbereich. Schützen Sie
das Gerät vor R egen und Feuch te. Setzen Sie das Ger ä t keiner
Flüssigkeit wie z.B. Tropf- oder Spritzw asser, aus.
• Schützen Sie das Gerät vor extremen Temperaturen und Staub.
• Vermeiden Si e Erschütterungen. Verm ei den Si e r o he Gew al t
während der Installation und Bedienung des Gerätes.
• Nehmen Sie das Gerät e r s t in Bet rieb, nachdem Sie sich mit
seinen Funktionen vertraut gemacht haben.
• Eigenmächtige Veränderungen sind aus Sicherheitsgründen
verboten.
• Verwenden Sie das Gerät nur für Anwendungen beschrieben in
dieser Bedienungsanleitung sonst kann dies zu Schäden am
Produkt führen und erlischt der Garantieanspruch.
• Bei Schäden, die durch Nichtbeachtung der Bedienungsanleitung
verurs ac ht werden, erlisch t der Garantieanspruch. Für daraus
resultierende Folgeschäden übernimmt der H ersteller keine
Haftung.
4. Eigenschaften
• mit WPS-Funktion
• erhöht die drahtlose Reich weite aller WL AN-Netzwerke
• unterstütz t den 'Wir eless R epeat er'- und den 'Standard AP'-Modus
• WLAN 802.11n (Draft 2.0) für einen drahtlosen
Hochgeschwindigkeitszugriff
• abwärtskompatibel mit 802.11g (54 Mbit/s) und 802.11b Standard
(11 Mbit/s)
• unterstützt 2.4 GHz WLAN-Netzwerke
• max. WLAN-Schutz mit WPA2, WPA und WEP (128/64)
• einfache Konfiguration mit Windows oder Mac dank des Setup-
Assistenten
• eingebaute Antennen
5. Beschreibung
Siehe Abbildungen , Seite 2 d ieser Bed ienungsanleitung.
2 Anzeige der drahtlosen
V. 01 – 22/08/2013 77 ©Velleman nv
6 Reset-Taste
Page 78

WIFIR3
Wireless Access Point
6. Wählen Sie einen geeigneten Installationsort aus.
• Installieren Sie den Repeater in der Nähe des Routers/P C für eine
einfache Konfiguration.
• Nachdem Sie das Gerät konfiguriert haben, können Sie es am
gewünschten Ort installieren.
• Für ein korrektes F unkt io nieren , i nstal l ieren S ie den Repeat er auf
halbem Wege zwi s c hen d em Router und dem dr ahtlosen Rechner
mit dem schlechtesten Empfang.
Bemerkung: Stecker
Sie können den Stecker sowohl horizontal als auch vertikal
befesti gen, damit er ü berall passt.
Siehe Abbildungen , Seite 2 d ieser Bed ienungsanleitung.
• Drücken Sie [A] und ziehen Sie den Stecker zum Trennen.
• Steck en Sie den Stecker i n das Gerät, wählen Sie die gewüns c hte
Position und drehen Sie bis er einrastet
Bemerkung: Wireless-Repeater-Modus oder Wireless-APModus
Sie können das Gerät als Wireless Repe ater o der a ls Wireless Access
Point konfigurieren.
Wireless Repeater
Für den Wi r eless -Repeater-Modus
brauchen Sie einen WIFI
AP/Router-Internetzugangspunkt.
Für den AP-Modus brauchen Sie
einen Zugangspunkt über
Breitband-Router.
Verbin d en Sie den Rep eater über
das mit geliefer te
RJ-45-Kabel mit dem
Router/Switch.
V. 01 – 22/08/2013 78 ©Velleman nv
Page 79

WIFIR3
7. Konfiguration
Während der Konfiguration, werden Sie:
• den Router mit dem Rep eater v er bind en
• den Rep eater mit dem PC verbinden
Es gibt zwei Mög lichkeiten , um den R outer mi t dem Repeater zu
verbinden:
• manuell (siehe unten)
• über WPS (s iehe 9)
7.1 Den Router mit dem PC ver binden
Verbin d en Sie den Rep eater über das m itgeliefert e RJ45-Kabel mit
dem PC während der Konfiguration.
Nach der Konfiguration können Sie den Repeater über Wi-Fi
verwenden.
Um den Router zu verbinden, müssen Sie
• die Netzwerkeinstellun g en des P C konfigurieren
• den Rep eater m i t dem Web Management Tool konfigu r ieren
• die PC-Netzwerkeinstellungen zurücksetzen
• den Rep eater m i t dem PC v erbinden
7.2 Die Netzwerkeinstellungen konfigurieren
Der Rep eater hat eine feste IP-Adr es se. Um während der
Konfiguration Zugriff auf den Repeater zu haben, müssen Sie zuerst
die Netzwerkeinstellun g en konfiguri eren wie folgt:
1. Auf dem PC, klicken Sie auf Start und wählen Sie
Contr ol Panel > Network & Sharing Center aus.
2. In der Netzwerkliste, klicken Sie zuerst auf Ihr Netzwerk und
dann auf Properties.
V. 01 – 22/08/2013 79 ©Velleman nv
Page 80

WIFIR3
3. In der Li s te, wählen Sie Internet Protocol Version 4
(TCP/IPv4) aus und klicken Sie dann auf Properties.
4. Im Properties-Fenster, wählen Sie Use the Following
IP Address aus.
o Geben S i e b ei IP Address (IP-Addresse) 192.168.10.x ein. ‘x’
ist eine Nummer zwischen 2 und 254.
o Tragen Sie bei Subnet Mask (Subnetzmaske) 255.255.255.0
ein.
o Geben S i e b ei Default Gateway (Standard-Gatew ay) die IP-
Adresse des drahtlosen Routers ein (Die Standard-Adresse ist
192.168.10.1).
5. Klicken Sie auf OK um zu bestätigen.
V. 01 – 22/08/2013 80 ©Velleman nv
Page 81

WIFIR3
Sie können den Repeater nun mit dem PC verbinden.
7.3 den Repeater mit dem Web Management Tool
konfigurieren
1. Steck en Sie den Repeater in e ine Steckdos e.
2. Verbin d en Sie ihn über d as mitgelief er te RJ45-Kabel mit dem
PC.
3. Start en Sie den PC.
4. Öffnen Sie den Internetbrowser und geben Sie
http:// 192.168.10.1 in die Adresszeile ein.
Es öffnet sic h die Konfigurations s ei te des Repeaters.
Öffnet sich d ie Seite nicht , s o s etzen Sie den Repeat er auf
Werkseinstellungen zurück (siehe 12) und versuchen Sie es aufs
Neue.
V. 01 – 22/08/2013 81 ©Velleman nv
Page 82

WIFIR3
5. Geben S i e d en Benu tzernamen u nd das Pas s wort ei n.
Der Standard-Benutzername und Passwort ist admin.
6. Im linken Menü klicken Sie auf Setup Wizard.
7. Wählen SieWireless Repeater Mode (Station) aus und klicken
Sie auf Next.
V. 01 – 22/08/2013 82 ©Velleman nv
Page 83

WIFIR3
8. Die Liste mit den drah tlosen Netzwer ken ersc heint in der SSID-
Spalte.
Wählen Sie Ihr drahtloses Netz werk mit Select aus.
9. Tragen Sie den Netzw er kschlüssel in das Feld Key ein.
o Dieser Netzwer kschlüssel i s t ders elbe wie der
Netzwerkschlüssel I h res Routers .
o Ändern Sie die anderen Einstellungen unter keiner Bedingung.
o Sie brauchen den Netzwerknamen (SSID) in den nächsten
Schritten.
Notier en Sie si ch den Netzwer knamen. Der Name ist
empfindlich für Großbuchstaben.
o Klicken Sie danach auf Save and Reboot.
V. 01 – 22/08/2013 83 ©Velleman nv
Page 84

WIFIR3
10. Warten Sie während d er Repeater neu start et.
Vergewissern Sie sich nun davon, dass Sie den korrekten
Netzwe rknam en (SSID) eing egeben haben .
11. Im Menü, klicken Sie auf Wireless und danach auf Basic
Settings.
12. Überprüfen Sie, ob der Netzwerkname ko r rekt i s t. Der Name
wird in z wei Feld ern verw endet :
o SSID of Wireless AP
o SSID of Extended Interface
Ist dies nicht der Fall, dann tragen Sie den korrekten Namen in
V. 01 – 22/08/2013 84 ©Velleman nv
Page 85

WIFIR3
beide F el der ein.
13. Klicken Sie au f Apply Changes.
Nun können Sie
o das Web Management Tool -Fenster s c hließen.
o die Einstellungen zurücksetzen
7.4 Die Einstellungen zurücksetzen
1. Auf dem PC, klicken Sie auf Start und wählen Sie
Control Panel > Network & Sharing Center aus.
2. In der Netzwerkliste, klicken Sie zuerst auf Ihr Netzwerk und
dann auf Properties.
3. In der Li s te, wählen Sie Internet Protocol Version 4
(TCP/IPv4) aus und klicken Sie dann auf Properties.
V. 01 – 22/08/2013 85 ©Velleman nv
Page 86

WIFIR3
4. Im Properties-Fenster, wählen Sie:
o Obtain an IP address automatic all y.
o Obtain DNS serv er ad d ress automatically .
5. Klicken Sie auf OK um zu bestätigen.
Sie können den Repeater nun mit dem PC verbinden.
8. Den Repeater mit dem Computer verbinden
Gehen Sie wie folgt vor:
1. Start en Sie den Co mputer
2. Klicken Sie auf die Ikone oder (rechts unten im
Bildschirm). Eine Liste mit Netzwerken erschein t .
3. Wählen Sie das R ep eater -Netzwerk aus und klicken Sie auf
Connect.
V. 01 – 22/08/2013 86 ©Velleman nv
.
Page 87

WIFIR3
4. Wenn nö tig, geben Sie d as Passwort des Netzwerks und klicken
Sie auf OK um zu bestätigen.
Es erscheint eine Bestätigungsmeldung wenn Sie mit dem
Netzwerk verbunden sind.
Bemerkung – Verbindung über Kabel
Sie können den Repeater auch über ein RJ45-Kabel mit dem PC
verbinden.
9. Der Repeater über WPS anschließen
WPS eine automatische Art und Wei s e, um drahtlo s e Gerät e z u
verbinden.
Der Repeater unterstützt WPS. Unterstützt Ihren Computer WPS,
dann hat er eine WPS-Taste.
Bemerkung: WPS kann den Netzwerkschlüssel des Routers
ändern
Drücken Sie d ie WPS-Taste, dann ändert sich den aktuellen
Netzwerkschlüssel von einigen Marken von drahtlosen Routers. Dies
bedeutet, das s Sie alle Netzwerksc hlüssel von al len Ger äten, d ie Sie
verwenden, auf Werkseinstellungen zurücksetzen müssen. Um dies
zu vermeiden, müss en Sie den Repeater manuell an s c hließen (siehe
7 Setup).
Der Rout er über W PS mit d em Repeater v er bind en:
1. Steck en Sie den Repeater in e iner Stec kdos e.
2. Beacht en Sie, dass de r Repeater sich i m Wireless-Repeater-
Modus befindet (siehe 7.3).
3. Halten Sie die W PS -Taste au f dem Router gedrückt (les en Sie
die Bedienungsanleitung des Routers, um zu wissen, wie lange
Sie die Taste dr ücken müssen ).
4. Halten Sie die W PS -Taste des Rep eaters etwa 7 bis 10 Sekun den
gedrückt.
Die Verbi ndung zwischen d em Repeater und dem Router wi r d
automatisch hergestellt. Verbinden Sie den Computer nun mit
dem Repeater: s iehe 8.
10. Den Wireless-AP-Modus einstellen
Um den Wi r eless-AP-Modus einzustellen, geh en Sie wie folgt vor:
V. 01 – 22/08/2013 87 ©Velleman nv
Page 88

WIFIR3
10.1 Den Netzwerkeinstellungen konfigurieren
• Konfigurieren Sie die Netzwerkeinstellun g en wie be s c hrieb en in
7.2.
10.2 Konfigurieren Sie den Zugangspunkt im Web
Management Tool.
1. Führen Sie Schritte 1 bis 6 durch (siehe 7.3.
2. Wählen Sie Standard Wireless AP mode und klicken Sie auf
Next.
3. Wenn nötig, wählen Sie einen Verschlüsselungstyp und geben
Sie ein en Versc hlüsselungs c o de ein.
4. Klicken Sie auf Save and Reboot.
V. 01 – 22/08/2013 88 ©Velleman nv
Page 89

WIFIR3
5. Warten Sie wäh rend der Repeater neu start et.
Vergewissern Sie sich nun davon, dass Sie den korrekten
Netzwe rknam en (SSID) eing egeben haben .
6. Im Menü, klicken Sie auf Wireless und danach auf Basic
Settings.
7. Überpr üfen S ie, ob der Netzwerknam e korr ekt ist. D er Name
wird in z wei Feld ern verw endet :
o SSID of Wireless AP
o SSID of Extended Interface
Ist dies nicht der Fall, dann tragen Sie den korrekten Namen in
beide F el der ein.
8. Klicken Sie auf Apply Changes.
Nun können Sie das Web Management Tool-Fenster s c hließen.
10.3 Die Einstellungen zurücksetzen
• Setzen Sie die Einstellungen zurück (siehe 7.4).
V. 01 – 22/08/2013 89 ©Velleman nv
Page 90

WIFIR3
Disable Wireless
Das drahtlose Netzwerk ist ausge sch altet.
Mode
Unterstützt den AP- und Repeater-Modus
SSID of Wireless
Dienstsatzidentifizi erung. Dies ist d er Name
Interface
Repeater-Modus gleichzeitig)
Band
Unterstützt 11B/11G/11N gemischte Modi.
10.4 Den drahtlosen Zugangspunkt mit dem Computer
verbinden
Um den Computer mit dem drahtlosen AP zu verbinden, gehen Sie
wie folgt vor:
1. Start en Sie den PC.
2. Klicken Sie auf die Ikone oder (rechts unten im
Bildschirm). Eine Liste mit Netzwerken erschein t .
3. Wählen Sie das R ep eater -Netzwerk aus und klicken Sie auf
Connect.
4. Wenn nö tig, geben Sie d as Passwort des Netzwerks und klicken
Sie auf OK um zu bestätigen.
Es erscheint eine Bestätigungsmeldung wenn Sie mit dem
Netzwerk verbunden sind.
11. Web Management Tool Basiseinstellungen für die drahtlose Verbindung
Öffnen Sie im Internetbrowser d a s Fenst er Web Management T o ol
und klicken Sie auf Wireless > Basic Settings.
Die Seite enthält ver s c hiedene Ein s tellungen.
LAN Interface
AP
SSID of Extended
Sicherheitseinstellungen für die drahtlose Verbindung
Konfigurieren Sie die drahtlose Sicherheitseinstellungen und die
Verschlüsselung, um einen unberechtigten Zugriff und Überwachung
zu vermeiden. Die Unterstützte Verschlüsselungsmethoden sind:
64/128-bit WEP, WPA und WPA2.
1. Öffnen Sie das Management T o ol-Fenster und wählen Sie
Wireless > Security aus.
des drah tlosen Netzw er kes.
Univ er s al Repeat er-Modus (AP- und
V. 01 – 22/08/2013 90 ©Velleman nv
Page 91

WIFIR3
Root Client–XXXX
Der Rep eater und der X XXX-Router haben
möchten.
2. Bei Select SSID, können Sie Nachfolgendes auswählen:
Repeater AP –
WiFi-Repeater1
Rücksetzen, eine Sicherungsk opie machen und
Wiederherstellen
Aus Sicherheitsgründen können Sie die Einstellungen des Repeaters
sichern. Sie können die Einstellungen auch einfach speichern und
wieder herst el len wen n Sie ver schiedene E i nstell ungen für das Gerät
verwenden.
1. Öffnen Sie das M anagement Tool-Fenster und wählen Sie
Save/Reload Settings aus.
V. 01 – 22/08/2013 91 ©Velleman nv
dasselbe Passwort.
Wählen Sie diese Option aus, wenn Sie ein
Passwort für den WiFi-Repeat er ei nstellen
Page 92

WIFIR3
• Um eine Sicherungskopie von den aktuellen Einstellungen zu
machen, klicken Sie auf Save und wählen Sie eine Position für
die Datei aus. S ie kön nen so v iele Dateien sp eichern wie Sie
möchten.
• Um gespeicherte Einstellungen hochzuladen, klicken Sie auf
Browse und wählen Sie die Datei mit den gespeicherten
Einstellungen aus. Klicken Sie nun auf Upload um die
Einstellungen hochzuladen. Die in der Datei gespeicherten
Einstellungen ersetzen nun die aktuellen Einstellungen.
• Um alle Einstellungen zu löschen und das Gerät auf
Werkseinstellungen zurückzusetzen, klicken Sie auf Reset.
Die Firmware aktualisieren
Um die Firmwar e des Repeater s zu akt ualisieren, gehen Sie wie fol g t
vor:
1. Laden Sie die neue Firmwar e von unserer W eb s i te auf Ihr en
Computer herunter.
2. Öffnen Sie das Management T o ol-Fenster und klicken Sie auf
Management > Upgrade Firmware.
3. Klicken Sie auf Browse und wählen Sie die Datei m it der
heruntergeladenen Firmware aus.
4. Klicken Sie auf Upload. Das Upgrade s t ar tet au t o matisch.
V. 01 – 22/08/2013 92 ©Velleman nv
Page 93

WIFIR3
Achtung: Das Upgrade kann einige Minuten dauern. Unterbrechen
Sie die Aktualisierung nie dem Sie den Browser s c hließen ode r
den PC vo m Router trennen. Der Repeater kö nnte hi er durch
unbrauchbar werden. Unterbrechen Sie den Aktualisierungsvorgang,
so erlischt der Garantieanspruch.
Das Passwort ändern
Das Stan dard-Passwort ist « admin » . Ä n dern S ie das Passwort aus
Sicherheitsgründen.
1. Im Management Tool-Fenster, kli c ken Sie auf Management >
Password.
2. Geben Sie einen Benutzernamen in das Feld User Name ein.
3. Geben S i e ein Passwort in das Feld New Password ein und
geben Si e es in d as F el d Confirmed Password wieder ein.
4. Klicken Sie auf Apply Changes um zu bestätigen.
Möchten Sie das Standard-Passwort nicht ändern, dann klicken
Sie auf Reset.
12. Rücksetzung
Wenn nötig, können Sie den Repeater mit ein er Nadel auf die
ursprünglichen Werkseinstellungen zurücksetzen. Halten Sie die
Reset-Taste 10 Sekunden gedrückt.
Hierdurch wird das Gerät auf die ursprünglichen Werkseinstellungen
zurückgesetzt.
13. Stromausfall
Bei Stromausfall, trennen Sie den Router und den R epeat er vom Net z
und stecken Sie dies e danach wieder i n die S teckdose.
V. 01 – 22/08/2013 93 ©Velleman nv
Page 94

WIFIR3
Netzwerke
802.11b
Netzwerk-Normen
10/100 Mbps
Frequenzbereich
2.4 - 2.485 GHz
14. Technische Daten
Normen für drahtlose
IEEE 802.11n / IEEE 802.11g / IEEE
drahtlose
Übertragungsgeschwindigkeit
Netzteil 230 Vac 50 Hz
Verwenden Sie dieses Gerät nur mit originellen Zubehörteilen.
Velleman NV übernimmt keine Haftung für Schaden oder
Verletzungen bei (falscher) Anwendung dies es Gerätes. Für
mehr Informationen zu diesem Produkt und die neueste
Version dieser Bedienungsanleitung, siehe ww w.velleman.eu.
Alle Änderungen ohne vorheri ge Ank ündigung vorbehal ten.
Windows, Win dow s XP, Windows 2 000, Windows V is t a, Windows
Aero, Windows 7 , Win d ow s 8 , Windows Mobile, Windows Server sind
eingetragene Warenzeichen von Microsoft Corporation in den VS und
anderen Ländern.
© URHEBERRECHT
Velleman NV besitzt das U rheberrecht für diese
Bedienungsanleitung. All e weltweiten Rechte vorbehalten.
Ohne vorherige schriftliche Genehmigung des Urhebers ist es nicht
gestattet, diese Bedienungsanleitung ganz oder in Teilen zu
reproduzieren, zu kopieren, zu übersetzen, zu bearbeiten oder zu
speichern.
11/54/150/270/300 Mbps
V. 01 – 22/08/2013 94 ©Velleman nv
Page 95

WIFIR3
Risco de choque eléctrico ao tentar abrir o aparelho.
pessoal qualificador se forem n ecessárias reparações.
MANUAL DO UTILIZADOR
1. Introdução Aos cidadãos da União Europeia
Importantes informações sobre o meio ambiente no que
respeita a este produto
Este símbolo no aparelho ou na embalagem indica que,
enquanto desperdícios, poderão causar danos no meio
ambiente. Não deite o aparelho (nem as pilhas, s e as
houver) no lixo d oméstico ; dirija-se a uma empresa
especializada em reciclagem. D evolva o apar el ho ao seu
distribuidor ou ao posto de r eciclagem local. Respeite a l eg islação
local relativ a ao m eio ambient e.
Em caso de dúvidas, contacte com as autoridades locais para
os resíduos.
Agradecemos o facto de ter adquirido este aparel ho. Le ia
atentam en te as ins truçõ es d o manual an tes de u s ar o aparelho. Cas o
o aparelho tenha sofrido algum dano durante o transporte não o
instale e entre em contacto com o seu distribuidor.
2. Instruções de segurança
Mantenh a o aparelho fora do alcan c e d e c rianças e
pessoas não qualificadas.
Tocar em cabos ligados à corrente pode pr ov ocar choques
eléctric os mortai s . Não tente abrir o aparelho. Rec or ra a
O utilizador não t erá de fazer a manutençã o d as p eças.
Contacte o seu distribuidor caso n ecessit e de peças de
substituição.
3. Normas gerais
Consulte a Garantia de serviço e qualidade Velleman® na parte
final deste manu al do utilizador.
• Usar apenas em interiores. Proteger o apar el h o contr a a c huva
e humidade ou qualquer tipo de salpicos ou gotas.
• Não exponha o equipamento ao pó nem a temp eratur as extrem as .
V. 01 – 22/08/2013 95 ©Velleman nv
Page 96

WIFIR3
1
Indicador de corrente
5
botão WPS
3
indicador WPS
7
porta de r ede RJ45
4
indicador LAN
• Proteja o ap arelho de quedas e má ut il iz ação. E vite usar força
excessiva ao ut ilizar o apare lho.
• Familiarize-se com o fun c ion amento do ap arelho ant es d e o
utilizar.
• Por razões de segurança, estão proíbidas quaisquer modificações
do aparelho desde que não autorizadas.
• Utilize o aparelho apenas p ara as ap l icações d es critas neste
manual. Uma util iz ação incorrec t a an ula a garantia
completamente.
• Danos causados pelo não cumprimento das normas de segurança
referid as neste m anual anu lam a garantia e o seu distrib uidor não
será responsável por qualquer danos ou outros problemas daí
resultantes.
4. Características
• com função WPS
• melhora a cobertura wireless em t odas as r edes WLAN
• suporta o modo W ireless Repeater e o mod o S tandardn AP
• WLAN 802.11n (Draft 2.0) para acesso wireless de grande
velocidade
• compatibilidade descendente com 802.11g (54 Mbit/s) e 802.11b
standard (11 Mbit/s)
• suporta redes 2.4 GHz WLAN
• máxima segurança WLAN com WPA2, WPA e WEP (128/64)
• softwar e d e configuraçã o p ara fácil i nstalação via Windows ou Mac
• antenas incorpo radas
5. Descrição
Ver as fig uras da página 2 d este manual do ut il iz ador.
2 indicador wireless 6 B ot ão d e
6. Escolha uma localização apropr i ada
• O melhor local para configu rar o repetidor é próximo do s eu
router/computador.
V. 01 – 22/08/2013 96 ©Velleman nv
reinicialização
Page 97

WIFIR3
• Logo que a configuração esteja concluída, pode in stalar o
repetidor na sua localiz ação definitiva.
• Para um melho r d es empenho, r ec o mend a-se a instalação do
repetidor a meio caminho en t re o router e o c omputador w ireless
que tiver a r ecepç ão mais fraca.
Nota: Ficha
Pode alterar a or ientação d a fich a d o r epetidor p ara que este caiba
em qualquer espaço.
Ver as fig uras da página 2 d este manual do ut il iz ador.
• Pression e s uavem ente o botão junto à fixa [A] e puxe a f i c h a para
a retirar.
• Volte a colocar a ficha na t omada na orienta ç ão p retendi da e rod e
até ficar no devido lugar.
Nota: repetidor wireless ou ponto de ac esso
Pode configurar o repetidor como repetidor wir eless ou como pon to
de acesso wireless.
Repetidor wireless
Para o modo repetidor wir eless,
necess i ta de um WIFI AP/Router
para acesso à inter net.
Ponto de acesso wireless
Para utilizar o dispositivo n o m od o
ponto de acesso wireless, necessit a
de um router banda larga de
acesso à i nternet.
Ligue o repetidor ao
router/interruptor usando o cabo
de rede incluído
RJ-45
7. Setup
Durant e a c onfigur ação, d everá:
• ligar o router ao repetidor
V. 01 – 22/08/2013 97 ©Velleman nv
Page 98

WIFIR3
• ligue o repetidor ao seu computador
Pode ligar o router ao repetidor:
• Manualmente (ver mais abaixo)
• Atrav és de WPS (ver secção 9)
7.1 Ligar o router ao repetidor
Durante a instalação recomenda-se a utiliz ação de uma lig ação por
fios usando o cabo de rede R J-45 incluído.
Logo que a inst alação estej a con c lu ída, pode utilizar o repet id or via
Wi-Fi.
Para ligar o router, n ecessi ta de
• configurar as definições d e r ede no s eu computad o r
• config urar o repetido r na fer r amenta de gestão web
• apagar as definições de rede do seu computador
• ligar o repetidor ao seu com p utador
7.2 Configurar as definições de rede no seu computador
O repet idor tem um end ereço de IP fixo . Para ser ca p az de aced er ao
repetidor durante a configuração, nec ess ita de primeiro configurar as
definiç ões de rede no seu comp utado r , d a segui nte forma:
1. No seu comput ador, cliqu e n o b ot ão Start e escolha
Control Panel > Network & Sharing Center.
2. Na list a de redes , cliqu e na sua rede e depois cl i q ue no b o tão
Properties
V. 01 – 22/08/2013 98 ©Velleman nv
Page 99

WIFIR3
3. Na lista, selec c ione Internet Protocol Version 4
(TCP/IPv4),e depois clique no botão Properties .
4. Na jane la Properties , s elecci one Usar o endereço de IP
seguinte.
o Na caixaIP Address , digite 192.168.10.x em que ‘x’ é um
número de 2 a 254.
o Em Subnet Mask, digite 255.255.255.0.
o Em Default Gateway, digite o IP Address do seu router s em
fios (o endereço por defeito é 192.168.10.1).
5. Clique em OK para confirmar.
V. 01 – 22/08/2013 99 ©Velleman nv
Page 100

WIFIR3
Pode agora aced er ao seu repetido r a partir do compu t ador.
7.3 Configure o repetidor atr a vés da ferramenta de gestão
web
1. Ligue o repetidor a uma tomada de corrente na parede.
2. Ligue o seu com p utador e o repeti dor atr a vés do c abo de rede
RJ-45 inclu ído.
3. Faça log on no seu computador.
4. Abra o seu web br owser e d i g i te o endereç o
http:// 192.168.10.1.
Isto abrirá a página de configuração do repetidor.
Se a página não abrir, r ei nicie o rep etidor (ver secção 12) e
tente novamente.
5. Digite o nome de utilizador e a password.
O nome de utilizador e passwor d por defeito são admin.
V. 01 – 22/08/2013 100 ©Velleman nv
 Loading...