

Page 1
P
SUS
SUSGENOMABE
B
S
D
S
T
D
S
F
R
E
A
A
A
S
B
L
R
T
1
S
R
T
0
X
9
X
4
+
8
+
O
U
O
CUS
U
B TO
B NAA
A
DAPTA
A
DAPTA
U
B- AU
VG
VI AD
R DVI
EUR U
OR US
DVI-A
2
PTER
DAPTE
B VER
A DVI
DAPTE
920X1
R 1920
DVI 1
1920X
1920
80 + A
1080
20X10
1080 +
1080
UDIO
AUDI
0 + A
AUDIO
AUDI
DIO
ER MAN
BRUIKE
TICE D’
NUAL D
DIENUN
UAL
SHAND
MPLOI
EL USUA
GSANLEI
EIDING
IO
UNG
20
38
56
7
3
Page 2
PCUSBVGA2
© COPYRIGHT NOTICE
The copyright to this manual is owned by Velleman nv. All worldwide rights reserved.
No part of this manual or may be copied, reproduced, translated or reduced to any electronic medium or
otherwise without the prior written consent of the copyright holder.
© AUTEURSRECHT
Velleman nv heeft het auteursrecht voor deze handleiding. Alle wereldwijde rechten voorbehouden.
Het is niet toegestaan om deze handleiding of gedeelten ervan over te nemen, te kopiëren, te vertalen, te
bewerken en op te slaan op een elektronisch medium zonder voorafgaande schriftelijke toestemming van de
rechthebbende.
© DROITS D’AUTEUR
SA Velleman est l’ayant droit des droits d’auteur pour cette notice. Tous droits mondiaux réservés.
Toute reproduction, traduction, copie ou diffusion, intégrale ou partielle, du contenu de cette notice par quelque
procédé ou sur tout support électronique que se soit est interdite sans l’accord préalable écrit de l’ayant droit.
© DERECHOS DE AUTOR
Velleman NV dispone de los derechos de autor para este manual del usuario. Todos los derechos
mundiales reservados.
Está estrictamente prohibido reproducir, traducir, copiar, editar y guardar este manual del usuario o partes de
ello sin previo permiso escrito del derecho habiente.
© URHEBERRECHT
Velleman NV besitzt das Urheberrecht für diese Bedienungsanleitung. Alle weltweiten Rechte
vorbehalten.
Ohne vorherige schriftliche Genehmigung des Urhebers ist es nicht gestattet, diese Bedienungsanleitung ganz
oder in Teilen zu reproduzieren, zu kopieren, zu übersetzen, zu bearbeiten oder zu speichern.
V. 02 – 26/04/2012 2 ©Velleman nv
Page 3

.
oIm
e
.3.
.
S
t
u
n
n
m
s
p
k
t
e
e
o
o
h
i
a
e
e
a
m
m
e
G
o
w
U
E
t
h
n
t
a
n
e
n
t
s
e
y
e
i
S
s
s
t
e
r
s
r
f
t
e
t
D
n
t
r
c
a
o
c
t
l
d
d
a
t
s
r
i
w
e
e
y
a
l
t
e
,
G
P
e
t
o
.
e
o
e
d
y
e
a
t
F
a
d
o
U
e
)
o
a
n
t
c
t
o
e
o
d
e
u
a
e
e
m
t
A
e
a
e
m
t
o
m
H
R
v
r
o
u
w
c
a
u
i
f
s
a
o
m
s
n
e
y
e
d
b
u
u
b
d
t
s
t
o
b
d
r
L
d
o
w
t
a
q
o
n
2
i
n
h
s
n
a
n
l
/
r
r
h
CUSBVGA
2
1
Introd
T
all reside
portant e
Th
ank you for
th
device wa
2
Safety
This
har
shou
distri
If in
Kee
Ris
elec
Ther
spar
ction
ts of the
vironmen
symbol on t
the enviro
ld be taken
butor or to
doubt, co
choosing V
damaged i
Instruc
the device
of electro
roshocks. D
are no us
parts.
uropean U
al informa
e device o
ment. Do n
o a speciali
local recy
tact your l
lleman! Ple
transit, d
ions
away from
hock when
o not open
r-serviceab
Us
ion
ion about
the packag
ot dispose
zed compan
ling service
ocal waste
se read th
not install
hildren and
opening th
he housing
e parts insi
r ma
his produ
e indicates
f the unit (
y for recycli
Respect th
disposal a
manual th
r use it an
unauthoris
cover. To
yourself. H
e the devic
ual
t
hat disposa
r batteries)
ng. This de
local envi
uthorities.
roughly bef
contact yo
d users.
ching live
ve the devi
. Refer to
l of the devi
as unsorte
ice should
onmental r
re bringing
r dealer.
ires can ca
e repaired
n authorize
ce after its l
municipal
e returned
les.
this device
se life-thre
y qualified
d dealer for
ifecycle cou
aste; it
o your
into service
tening
personnel.
service and
d
. If
or
Gener
Re
fer to the V
•
Familiaris
All modific
•
the device
Only use t
•
warranty.
Damage c
•
dealer will
Keep this
•
Nor Velle
•
indirect) –
Ind
put
The
vent
fabri
or use onl
bjects filled
ousing mig
lation. Plac
cs…
l Guidel
lleman®
Keep thi
opening
front of
Protect t
yourself wi
ations of th
is not cove
he device fo
used by di
not accept
anual for
an nv nor i
of any natu
. Keep this
with liquid
ht heat up
the device
nes
ervice an
device aw
are clear a
he opening
his device f
th the funct
device are
ed by the
r its intend
regard of c
esponsibilit
uture refere
s dealers c
re (financia
device awa
on top of or
uring usag
on a flat he
Quality W
y from dus
all times.
.
om shocks
ons of the
forbidden f
arranty.
d purpose.
rtain guidel
for any en
nce.
n be held r
, physical…
form rain,
close to th
. Keep mini
at resistant
rranty on
and extre
or sufficien
nd abuse.
evice befor
r safety re
sing the d
ines in this
suing defec
sponsible f
arising fro
moisture, s
device.
mum distan
surface, do
the last pag
e temperat
air circulat
void brute
actually u
sons. Dam
vice in an u
anual is n
s or proble
r any dama
the posse
plashing an
ces around
not place th
es of this m
res. Make
on, leave a
orce when
ing it.
ge caused
nauthorised
t covered b
s.
ge (extraor
sion, use o
dripping li
he device f
e device on
anual.
ure the ve
least 1” (±
perating th
y user mod
way will vo
y the warra
inary, incid
failure of t
uids. Neve
r sufficient
carpets,
tilation
.5 cm) in
device.
fications to
id the
ty and the
ental or
is product.
4
Featur
Th
e PCUSBV
U
B 2.0 port
de
vice comes
ckage conte
Pa
(±1m20)
4f
V.
02 – 26/04/2
s
A2 USB dis
n a comput
ith 2 adap
nt: USB to
SB 2.0 cabl
012
play adapto
r, without
ors to conn
VI adapter
e, DVI to V
r enables y
he need of
ct either a
quick start
A adapter,
u to connec
n extra vid
VGA or an
guide, CR-
DVI to HDM
3
t an additio
eo card. Th
DMI displa
OM with us
I adapter, 3
al display,
standard o
.
r guide an
.5mm stere
CD, or proj
utput port i
installatio
to RCA ad
ector to a f
DVI, but t
software,
pter.
©Vellema
ee
e
nv
Page 4

PCUSBVGA2
• display modes:
o can easily mirror the main display
o extend left, right, above, or below
o can be rotated left, right, or upside-down
o DVI, VGA and HDMI support
• audio modes:
o 2.1 Channel Audio Output
o microphone support
o mixed output RCAx2 (left and right track) interface
• USB 2.0 powered: ultra low power
• lossless compression
• for CRT, LCD, projector displays
• supports: Windows Vista Aero, XP and Vista 32bit
• standard and widescreen ratio aspects
• high performance DDR memory
• uses a virtual driver
• completely silent operation
• onboard power and status indicator LED
• portable, making it easy for travel.
5. System Requirements
DisplayLink software is available for PCs running one of the following Windows® operating systems:
• Windows 7 (32-bit or 64-bit)
• Windows Vista with Service Pack 1 or 2 (32-bit or 64-bit)
• Windows XP Home or Professional (including Tablet edition) with Service Pack 2 or 3
• Windows 2000 with Service Pack 4.
Notes:
• 64-bit editions of XP are not supported. No Windows Server editions are supported.
• Mac OS X support can be found at http://www.displaylink.com/mac
• Linux support can be found at http://libdlo.freedesktop.org/wiki/ or http://www.displaylink.org
Supported Languages
The following languages are supported in DisplayLink software, on all supported operating systems:
Arabic / Bahasa Indonesian / Bulgarian / Chinese (Traditional) / Chinese (Simplified) / Croatian / Czech /
Danish / Dutch / English / Finnish / French / Greek / Korean / German / Hungarian / Italian / Japanese /
Norwegian / Polish / Portuguese / Russian / Slovak / Slovenian / Spanish / Swedish / Turkish
Note: The default language is English.
Windows Vista/Windows 7
For Windows Vista/Windows 7 the Windows Experience Index (WEI) is a useful measure of hardware level.
The WEI is accessible from Computer > Properties, or from Control Panel > System.
The recommended hardware requirements for the PC are:
• WEI score of at least 3 in the ‘Graphics; Desktop performance for Windows Aero’ category
• overall WEI score of at least 3 as recommended by Microsoft
• at least one free USB 2.0 port
• 30 MB of free disk space
• computer screen, if it is not inte g r a t e d.
Windows XP
• for 1-2 displays, business usage, productivity target. This may not provide full frame rate DVD playback at
full screen:
1.2GHz Single Core CPU, 512MB memory
• for 3 displays where 1 could run DVD video while also targeting productivity and business apps. Supports
only 1 image of DVD resolution at full screen:
1.6GHz CPU, 1GB memory
• for 6 displays where 1 display can run full screen DVD video:
1.8GHz Core Duo, 1GB memory
• at least one free USB 2.0 port, 30 MB of free disk space
V. 02 – 26/04/2012 4 ©Velleman nv
Page 5
PCUSBVGA2
• computer screen, if it is not inte grated
• network access for software downloads, or access to a CD-ROM drive.
Graphics Card Support (Windows Vista/Windows 7)
In Windows Vista and Windows 7, DisplayLink software interacts closely with the primary graphics card.
DisplayLink supports and tests a single graphics card (GPU) installed in a PC from all major GPU brands (Intel,
ATI, NVidia and Via).
The following GPU configurations may exhibit compatibility issues on Windows Vista and Windows 7 in certain
circumstances:
• Switchable Graphics (ATI/Intel)
• Switchable Graphics (ATI/ATI)
• Switchable Graphics (NVIDIA/Intel)
• NVIDIA SLI in SLI mode.
Other GPU configurations, including the following, are currently unsupported and will not function on
Windows 7/Windows Vista:
• Hybrid Graphics
• Hybrid SLI
• Hybrid Crossfire
• Crossfire
• SLI not in SLI mode
• multiple WDDM 1.1 graphics drivers active at once.
Graphics Card Support (Windows XP)
All graphics cards are supported on Windows XP.
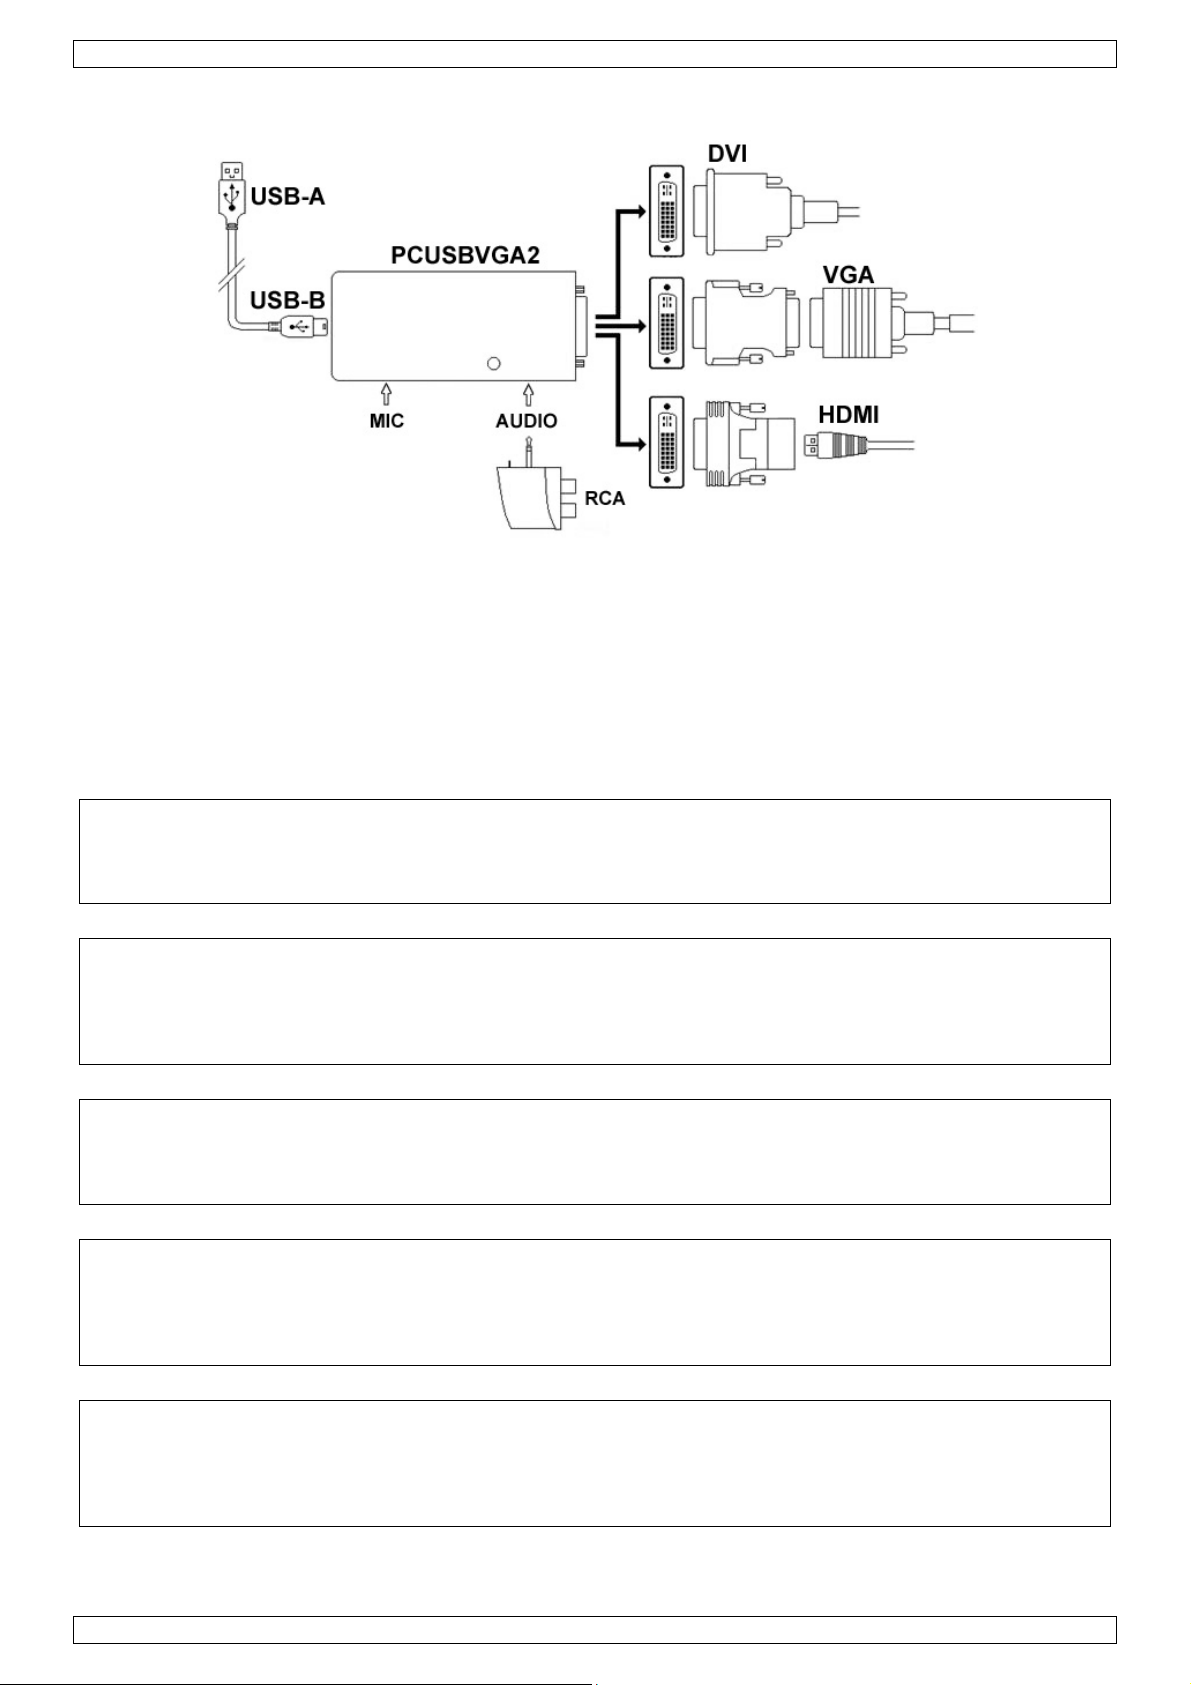
6. Hardware Connection
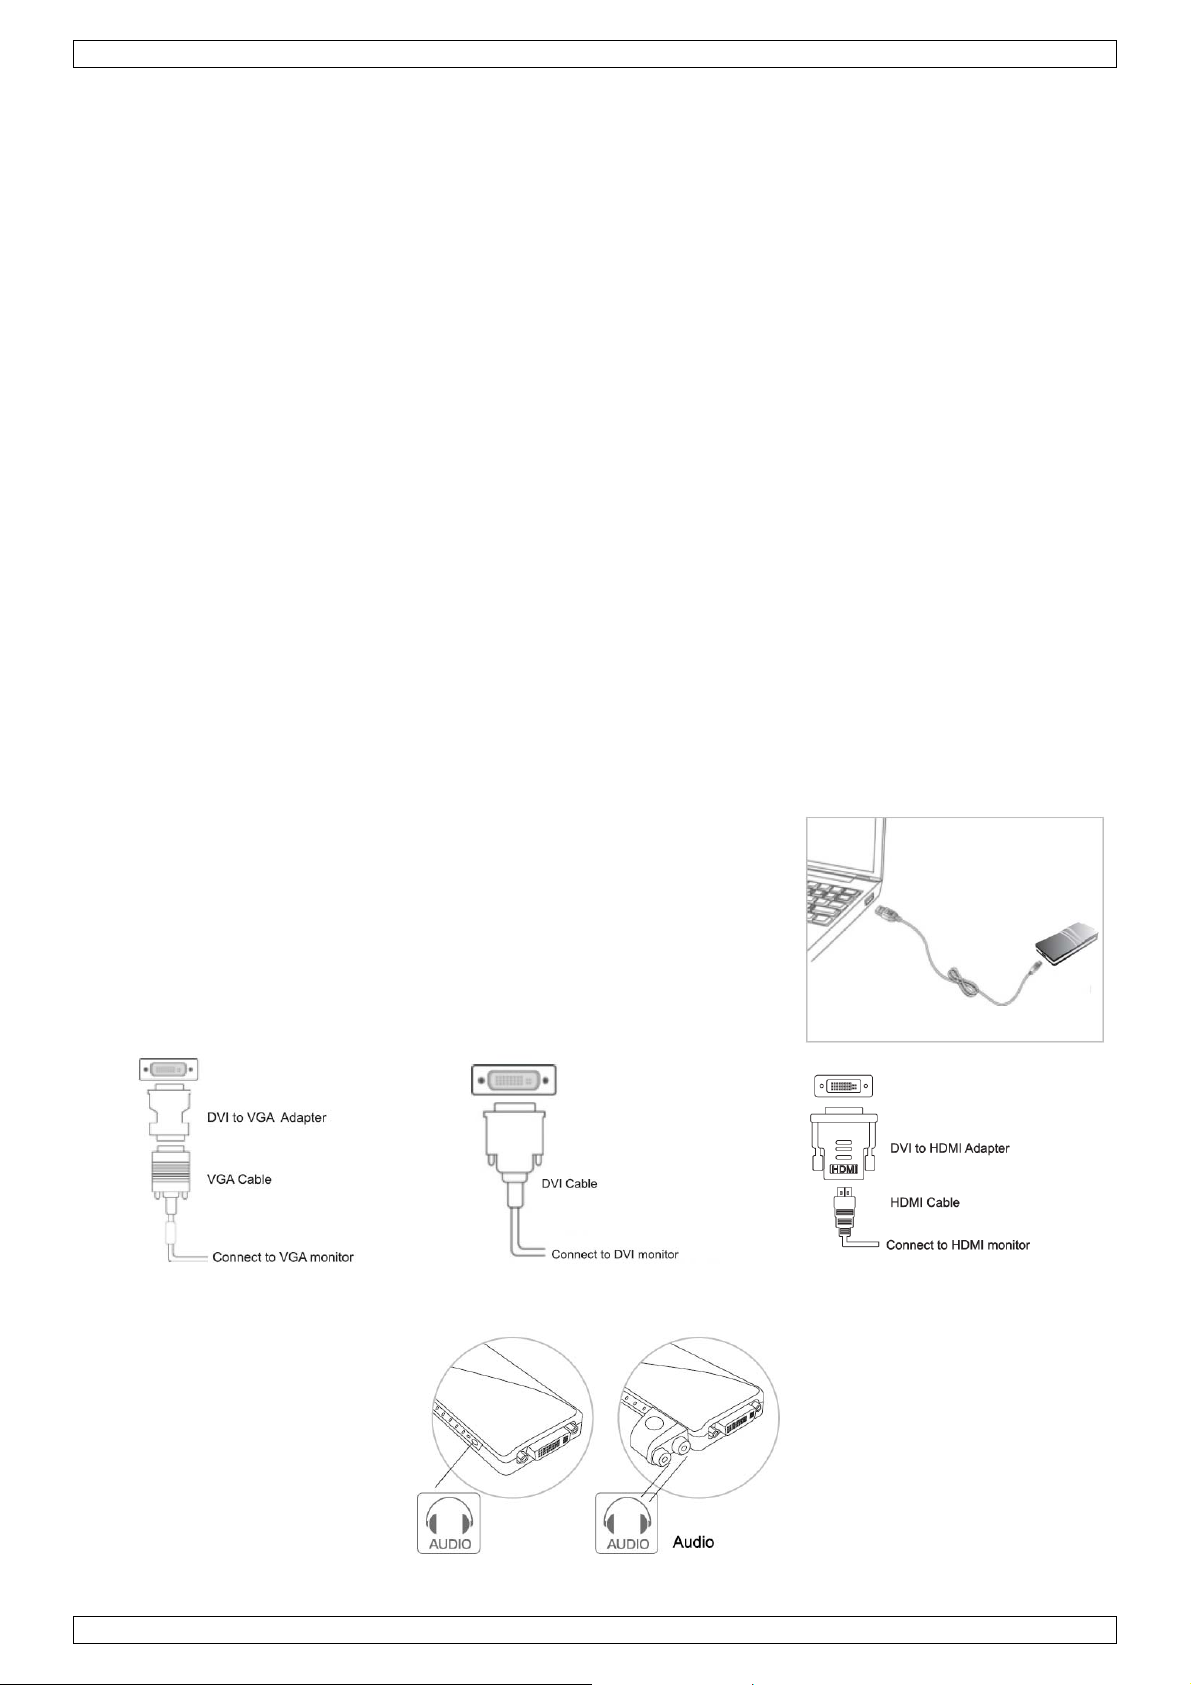
Connecting the Adapter to Your Computer and Display
1. Connect the smaller end of the USB cable to the adapter.
2. Then connect the other end of the USB cable to a USB 2.0 port on
your computer.
3. If your display is not yet connected to the adapter, make the
connection and power on your display.
Connections to CRT, LCD, TV, projector, speaker…
VGA connection via
DVI to VGA adapter
V. 02 – 26/04/2012 5 ©Velleman nv
DVI connection
Audio connection
HDMI connection via
DVI to HDMI adapter
Page 6
PCUSBVGA2
7. Installing the Software
Note: If you already have V3.x, R4.1 or R4.2 DisplayLink software installed, you must uninstall it using
Windows’ Add/Remove Programs before installing this release.
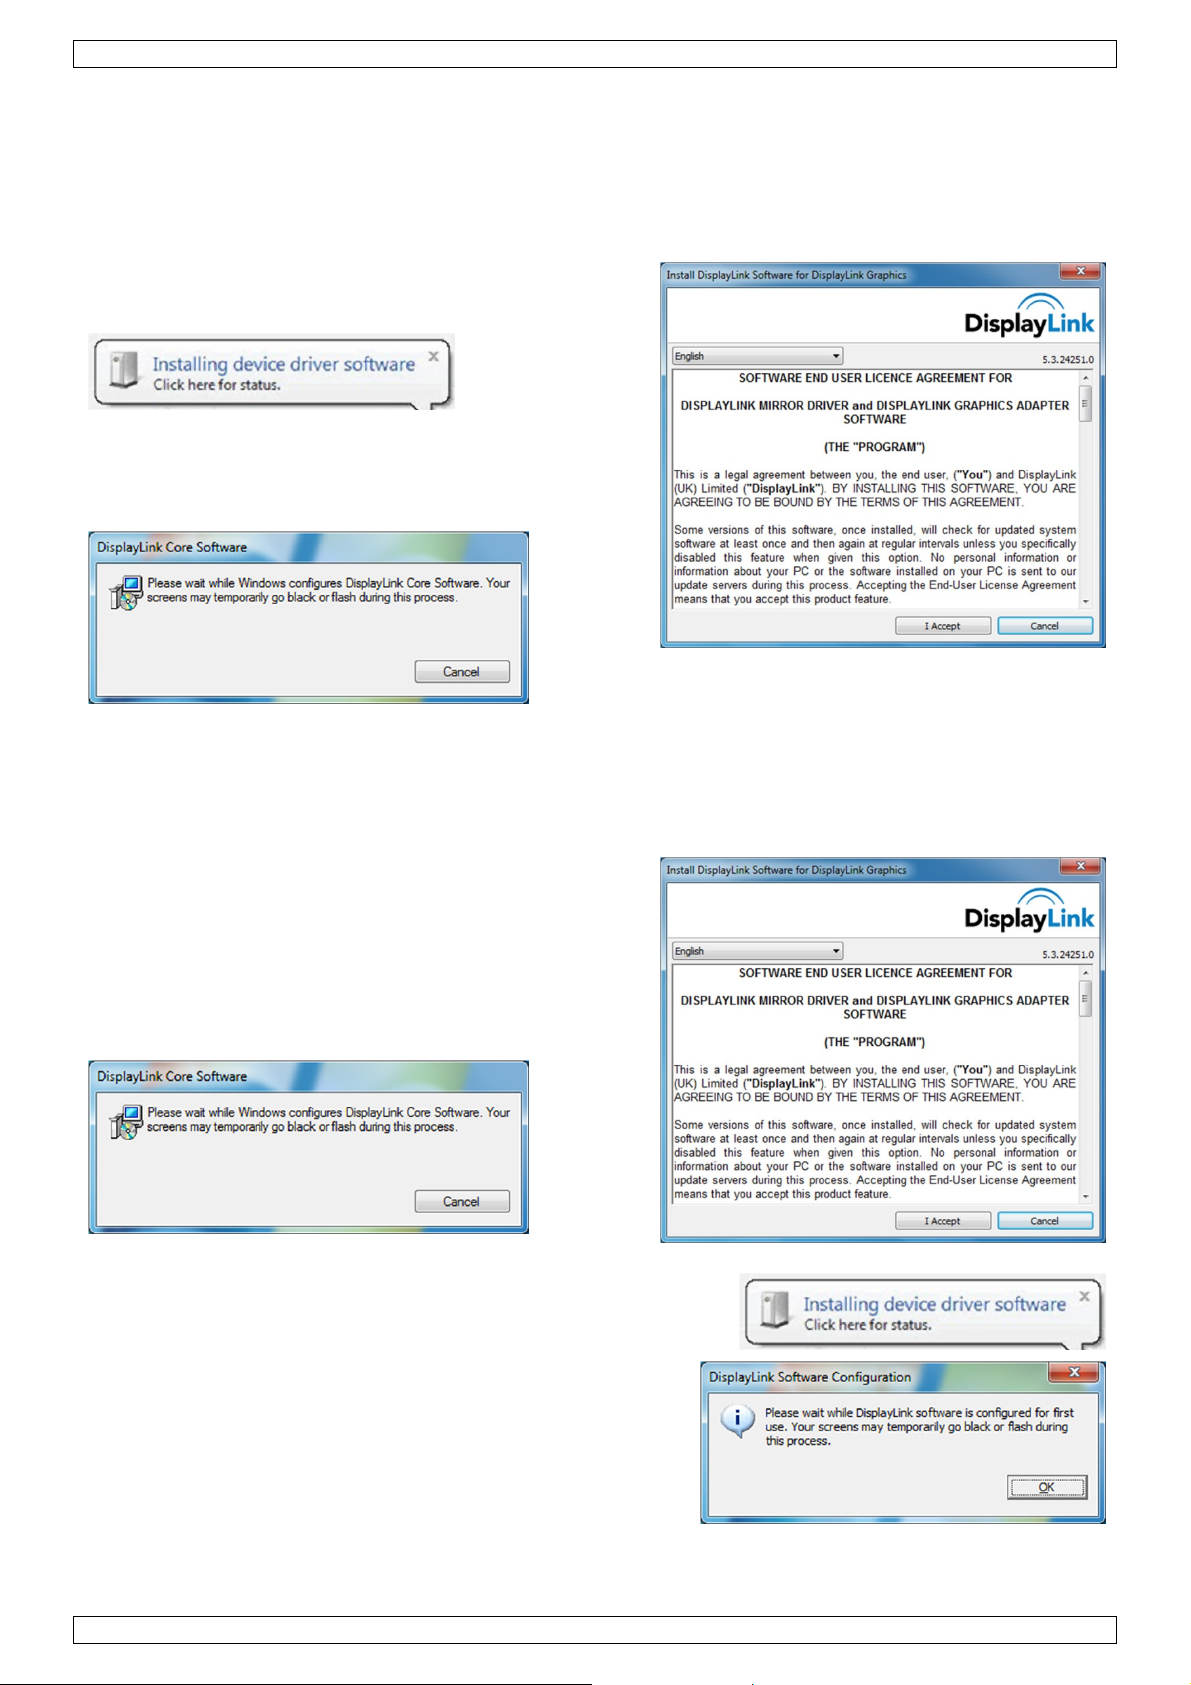
7.1. Installing the Software Using Windows 7 Update
The preferred method of installation is using Windows 7’s update facility.
1. Connect your display via the adapter and the USB cable
to your PC. Windows detects the new hardware and
automatically downloads the driver.
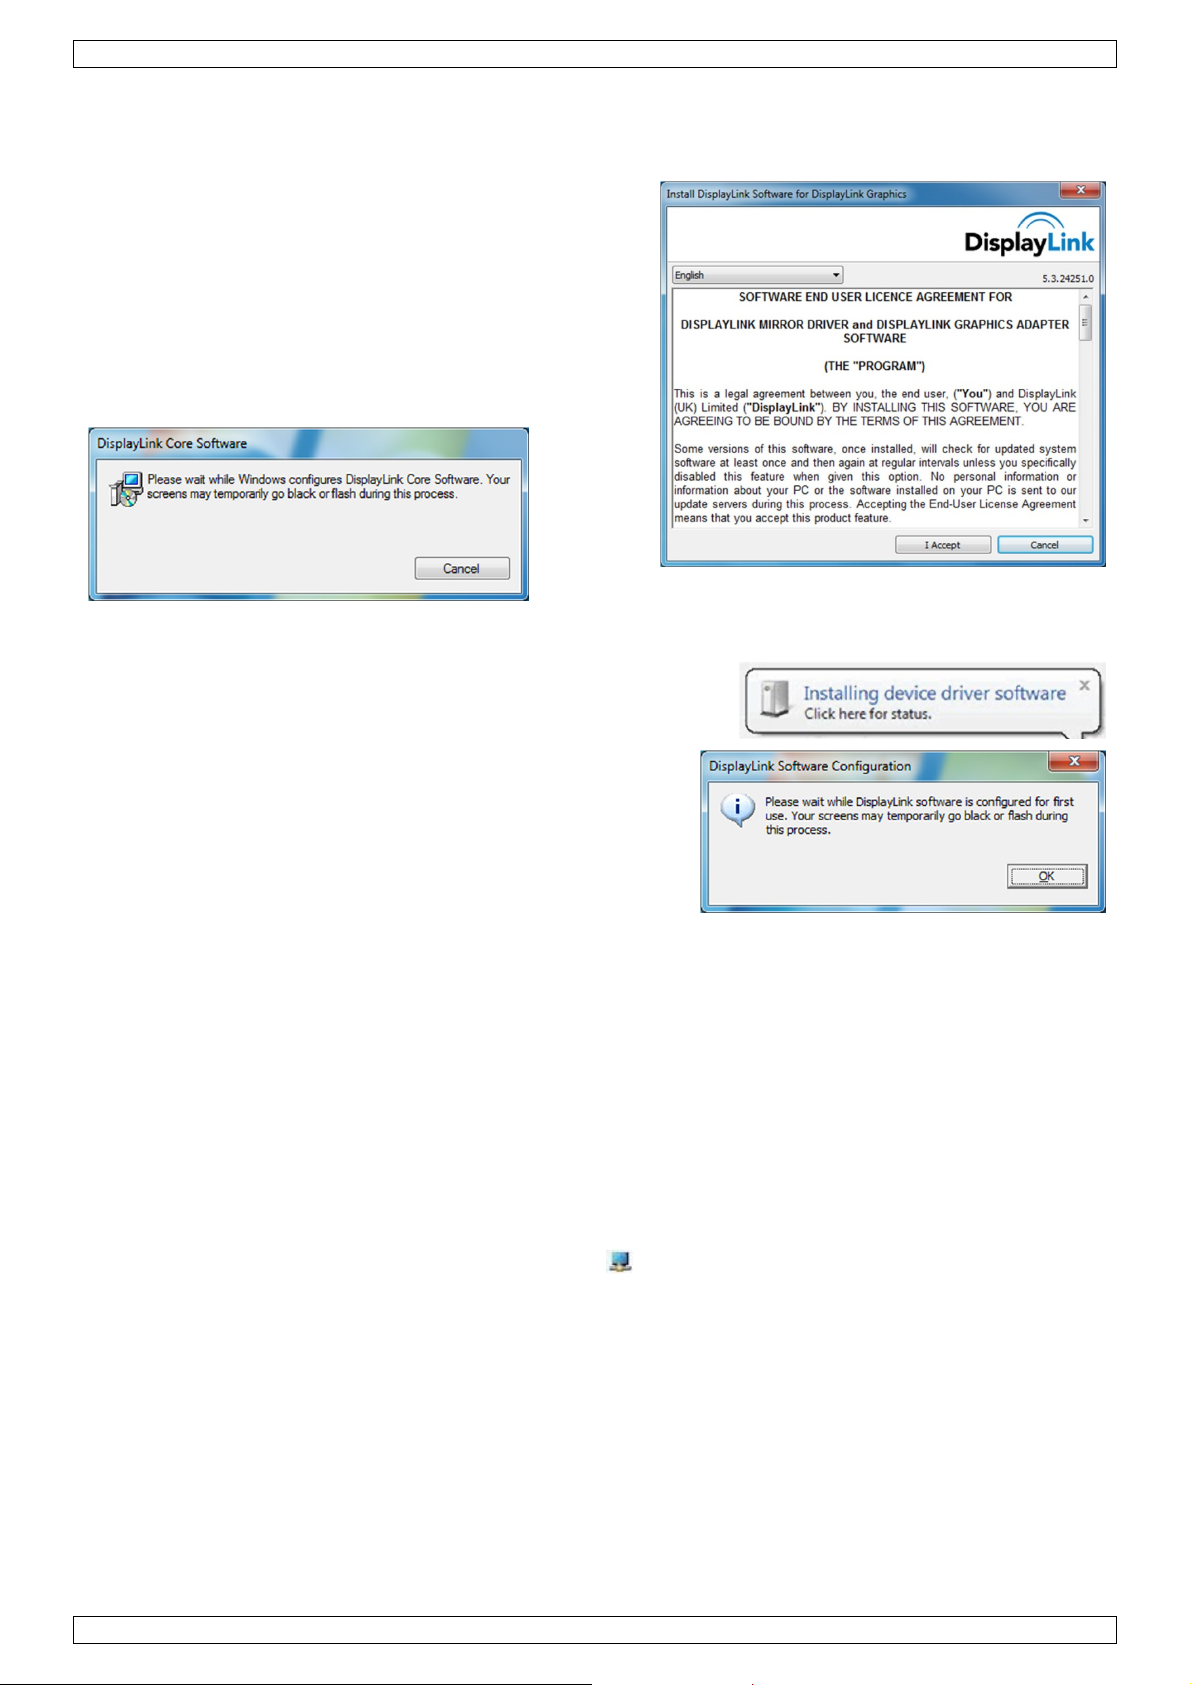
2. Once downloaded, the installation software will run. The
DisplayLink software end user licence agreement window
opens.
3. Click I Accept. The DisplayLink Core software is
installed.
Note: The display may flash or go black during installation.
7.2. Installing the Software on Windows 7/Vista/XP/2000
Alternatively you may install the software from a website download or CD-ROM.
Important! Install the software before you connect a device via the adapter to your PC.
1. When auto-play is enabled, the installation program
starts automatically from the CD-ROM. If not, locate and
double click Setup.exe on the CD-ROM. The Windows User
Account Control window opens (if enabled in the OS).
2. Click Yes. The DisplayLink software end user licence
agreement window opens.
3. Click I Accept. DisplayLink Core software and
DisplayLink Graphics are installed. No message will appear
at the end of the installation process.
Note: The display may flash or go black during installation.
4. Connect the adapter via the USB cable to your PC. The
“Installing device driver” message appears.
5. Click Yes. DisplayLink automatically installs the device.
The DisplayLink software end user licence agreement
window opens (see above).
6. Click I Accept. The DisplayLink Graphics software is
installed. No message will appear at the end of the
installation process.
Note: On some machines you may need to reboot before
you can use the adapter.
V. 02 – 26/04/2012 6 ©Velleman nv
Page 7

PCUSBVGA2
8. Using the DisplayLink Software
8.1. Windows 7 – Configuring the Display
In Windows 7 you can configure a display using Windows Display Properties (WDP). WDP provides a simple
method to attach, rotate, duplicate or extend displays as well as modify the display resolution.
Opening WDP
There are several ways to open WDP. Either:
• Right-click on the desktop and select Screen Resolution from the menu.
• Choose Start > Devices and Printers and double-click the DisplayLink Device icon.
• Right-click the DisplayLink icon and click Advanced.
Configuring the Display
1. Open WDP.
2. Set the display options. Refer to the table below for details on each option.
Menu Submenu Description
Display Use the dropdown list to select a display to be configured.
Resolution Use the dropdown list and slider to choose a resolution.
Landscape Sets the display to landscape mode.
Portrait Sets the display to portrait mode.
Orientation
Multiple
displays
Landscape (flipped) Sets the display to upside-down landscape mode.
Portrait (flipped) Sets the display to upside-down portrait mode.
Duplicates these displays Reproduces the primary display on the secondary display.
Extend these displays Extends the primary display onto the secondary display.
Shows Desktop only on 1
Shows Desktop only on 2
The desktop appears on the display marked 1. The display
marked 2 becomes blank.
The desktop appears on the display marked 2. The display
marked 1 becomes blank.
V. 02 – 26/04/2012 7 ©Velleman nv
Page 8
PCUSBVGA2
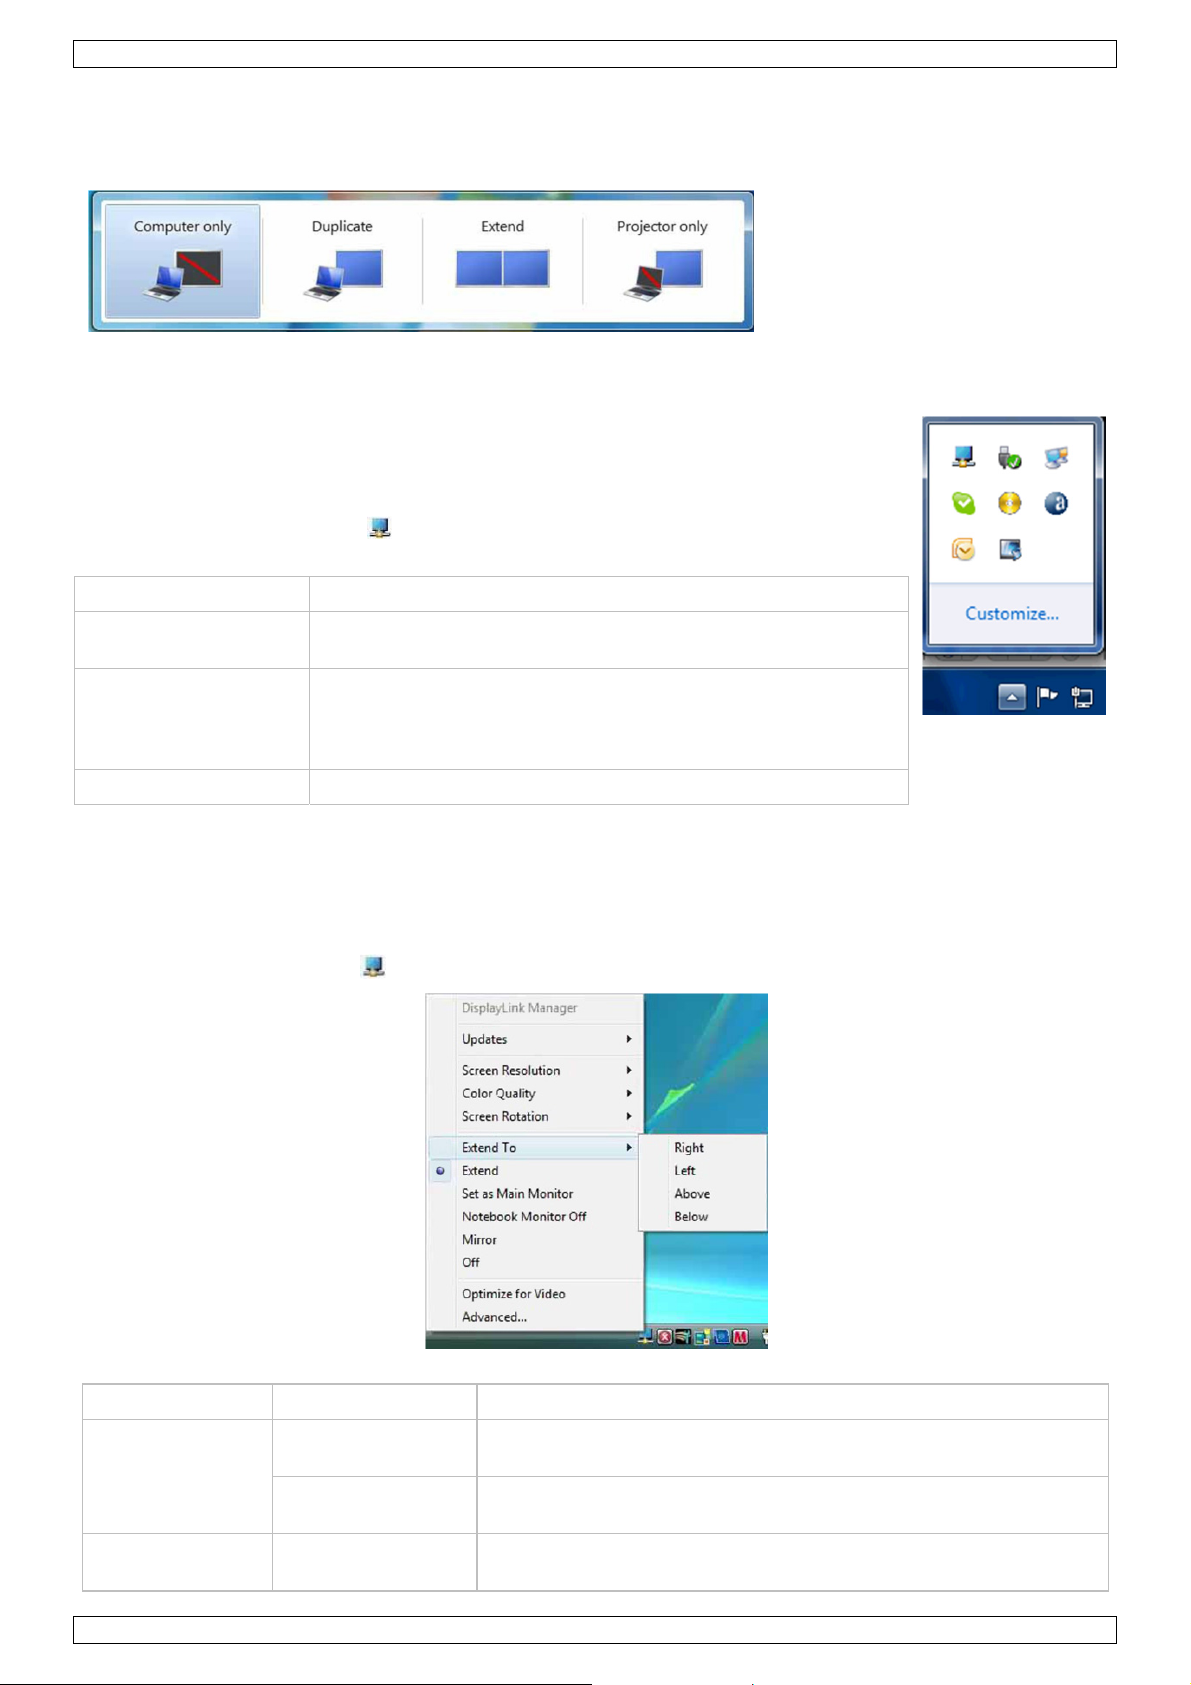
Selecting the Display Mode
To control the behaviour of an attached display, you can use the key combination Windows Logo+P to display a
menu (and cycle through it) to switch display modes.
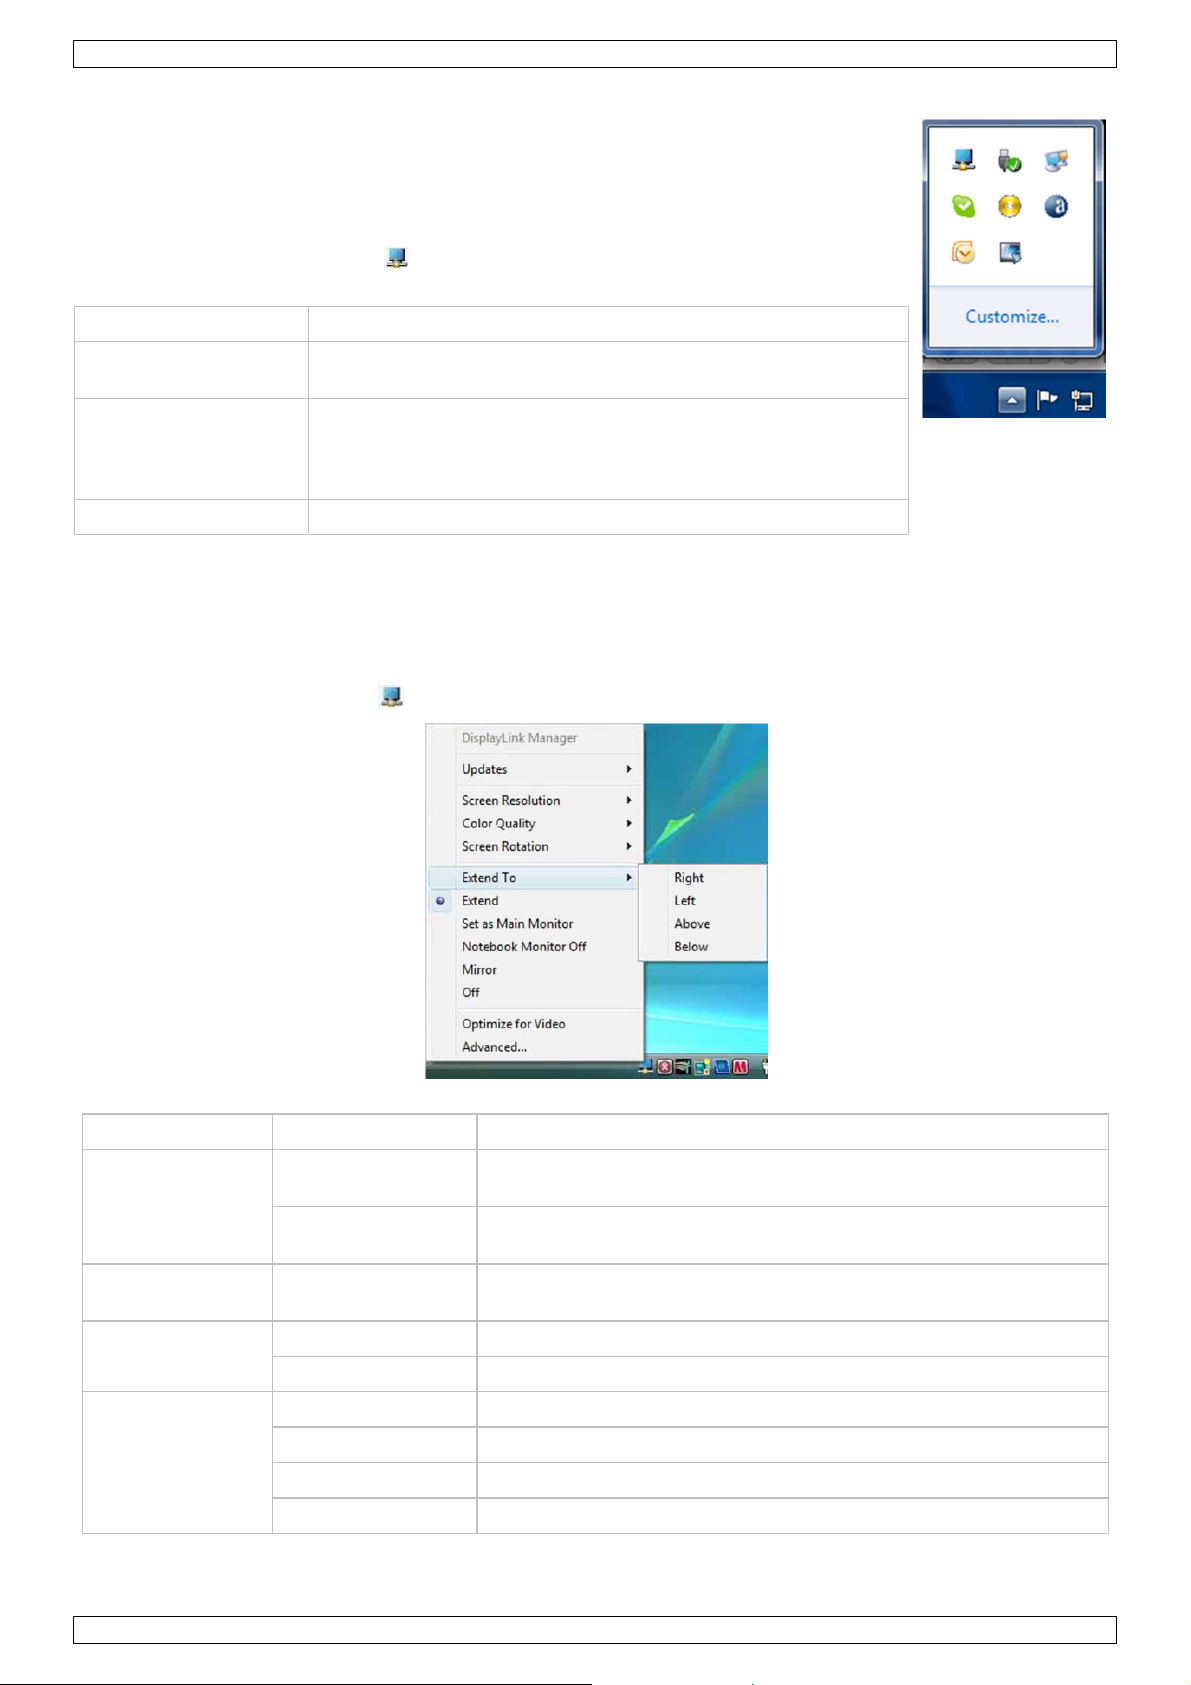
1. Press Windows Logo+P. The following menu appears:
2. Click one of the options. The displays update to reflect your choice.
The DisplayLink Application Icon
You can configure the behaviour of the adapter through the DisplayLink icon in the
taskbar, if present.
To show the DisplayLink Manager menu:
1. From the taskbar, click the Show hidden icons arrow to show all available icons.
2. Click the DisplayLink icon .
A menu appears with several options, as described in the following table.
Menu Description
Check for updates
Optimize for Video
Advanced Opens the Windows Display Properties (WDP)
Connects to the Windows Updater, checks for newer versions
and downloads them, if available.
Select this option for better movie playback performance on
the display attached to the adapter. Only select this option
when playing back video content. Note: Text may appear less
clear when enabled.
8.2. Windows Vista/XP/2000 – Configuring the Display
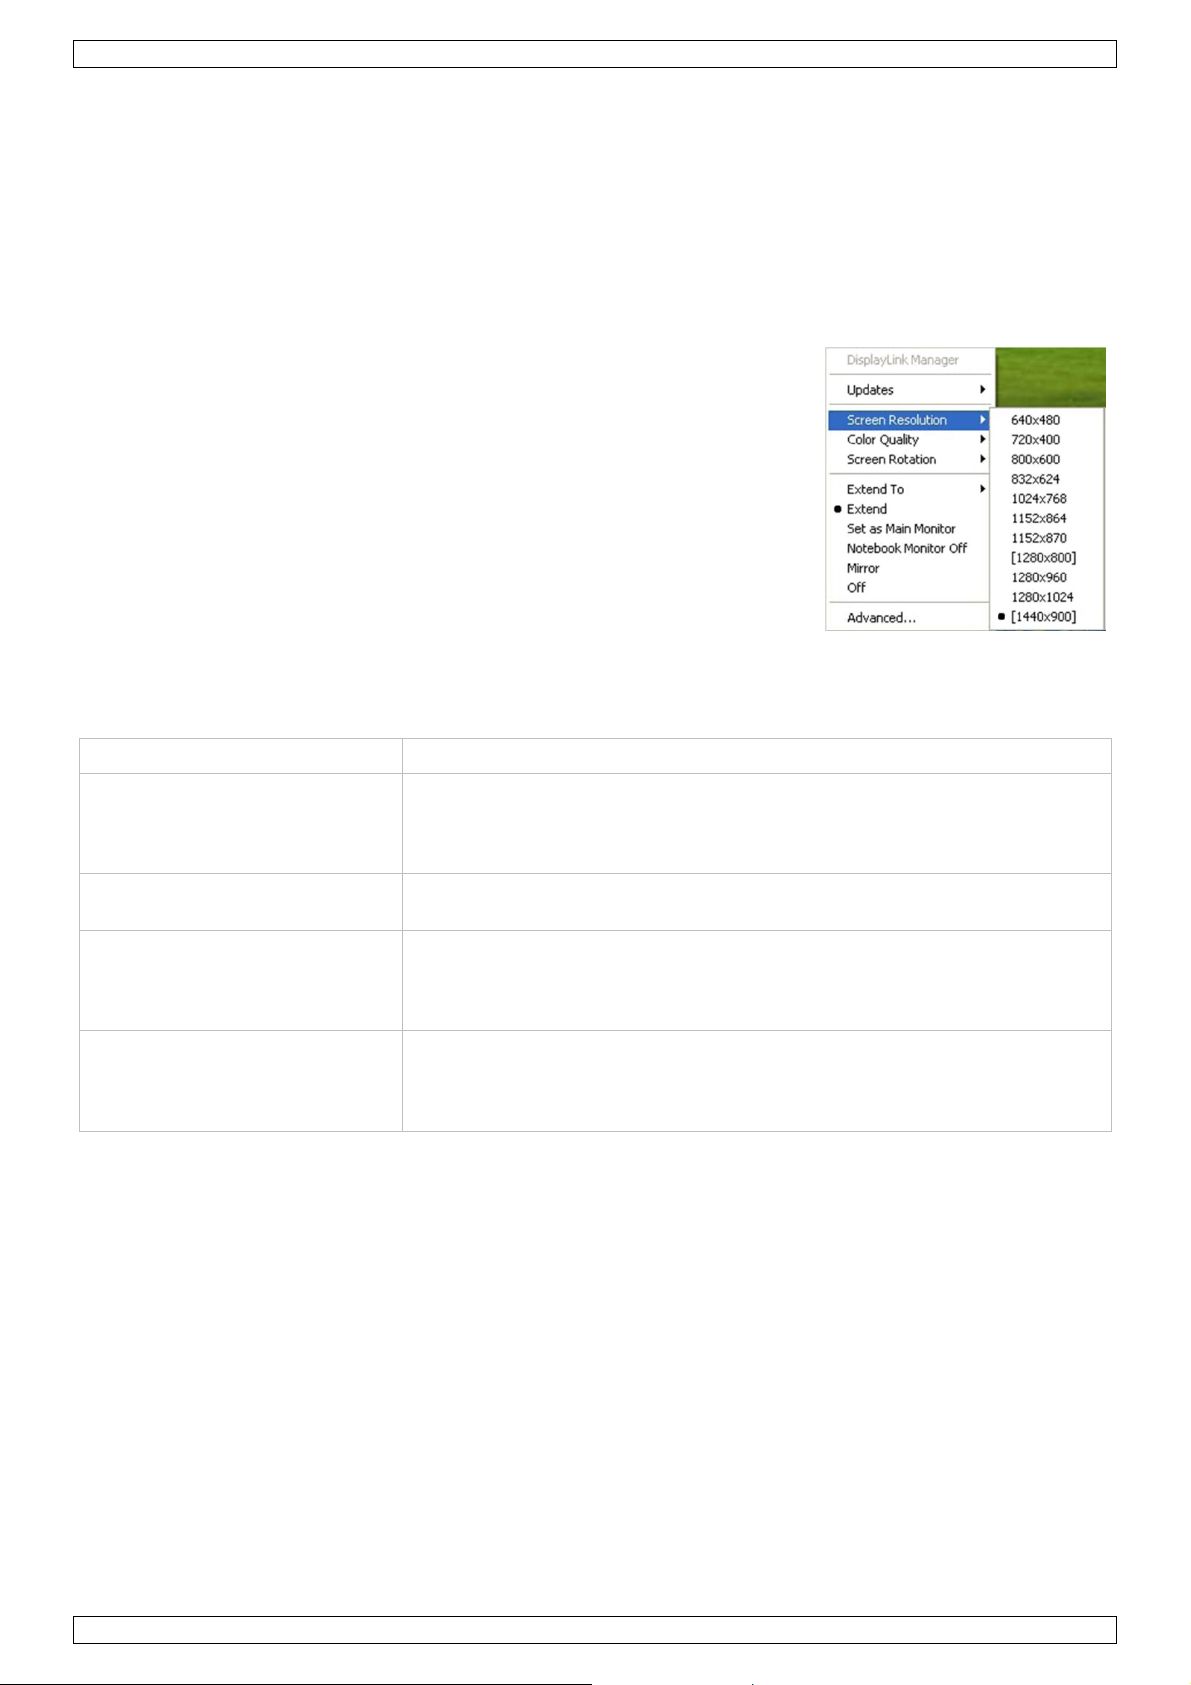
The DisplayLink Manager Menu
When devices are attached, the DisplayLink icon appears in the taskbar. This gives you access to the
DisplayLink Manager menu. To use the DisplayLink Manager menu:
1. Click the DisplayLink icon on the taskbar. The menu appears as shown below:
2. Select an option from the menu, using the following table for the options available.
Menu option Submenu option Description
Check Now
Updates
Configure
Screen Resolution
V. 02 – 26/04/2012 8 ©Velleman nv
Displays a list of available resolutions. Some resolutions may be
Connects to the Update Server to check for newer driver versions
and downloads them, if available.
Opens the Update Options window where you can configure
automatic updates.
enclosed in brackets [ ]. Please see Inferred Modes.
Page 9

PCUSBVGA2
Menu option Submenu option Description
Colour Quality
Medium (16-bit) Changes the colour depth of the extending display to 16 bits.
Highest (32-bit) Changes the colour depth of the extending display to 32 bits.
Normal No rotation is applied to the display connected to the adapter
Rotated Left Rotates the extended or mirrored display by 270°.
Screen Rotation
Rotated Right Rotates the extended or mirrored display by 90°.
Upside-Down Rotates the extended or mirrored display by 180°.
Right Extends the desktop to the right of the primary display.
Left Extends the desktop to the left of the primary display.
Extend To
Above Extends the desktop above the prim ary display.
Below Extends the desktop below the primary display.
Extend Extends your desktop onto the secondary display.
Set as Main Monitor Sets the secondary display as the primary display.
Notebook Monitor
Off
Mirror
Switches off the display of an attached notebook and sets the
display attached to the adapter as the primary display.
Copies what is on the primary display and reproduces it on the
secondary display.
Off Switches off the secondary display.
Optimize for Video
(Windows Vista and
Windows 7 only)
Configures the secondary display for optimum full-screen video
performance output. Note: Text may appear less clear.
Advanced Opens the Display Settings window.
Setting the Display in Extended Mode Using the DisplayLink Menu
In extended mode, the Windows desktop extends to the display attached to the adapter. The extra desktop
area is a great productivity aid, allowing more applications or documents to be visible at a time.
1. Click on the DisplayLink icon .
2. Select Extend.
The desktop is now extended in the direction it was the last time the display was in this mode. For more
control, use the Extend To submenu and select one of the options to extend the desktop to the
left/right/above/below the primary display.
Setting the Display in Mirrored Mode Using the DisplayLink Menu
In mirrored mode, the display connected to the adaptor duplicates what is on the primary display.
1. Click on the DisplayLink icon .
2. Select Mirror.
The resolution, colour depth and refresh rate of the primary display are replicated on the display connected to
the adapter.
If the display connected to the adapter supports a lower resolution than the primary display, then the primary
display will have its resolution changed automatically to ensure the whole picture fits on the external display. If
the display connected to the adapter is larger than the primary display, the image will be letterboxed to keep
the aspect ratio correct.
V. 02 – 26/04/2012 9 ©Velleman nv
Page 10

PCUSBVGA2
Configuring the Display Using the Display Settings Window
1. Right-click the desktop.
2. Click Personalize.
3. Click Display Settings. The Display Settings window opens.
4. Select the display that you want to configure. Its mode, resolution, colour quality and position can all be
controlled from here.
Setting the Display in Extended Mode Using Windows Display Settings
1. Select the Extend the desktop onto this monitor checkbox (1 in figure above).
2. Arrange the screen resolution using the Resolution slide bar (2).
3. Select the colour quality from the Colors drop-down list (3).
4. In the drag area (4), drag the display icons to match the real physical position of the displays.
5. Click OK to save your changes.
For more detailed settings, including the refresh rate, click the Advanced Settings button, then choose the
Adapter tab, then click the List all modes button. All valid combinations of resolution, colour quality and
refresh rate are listed. For CRT screens, it is best to use a high refresh rate so as to avoid discomfort due to
flicker. Flat panel screens do not flicker, so a low refresh rate is adequate.
Setting the Display in Mirrored Mode Using Windows Display Settings
1. Uncheck the Extend the desktop onto this monitor checkbox (1 in figure above).
2. Click Apply.
Note: The resolution of the primary and secondary displays may be changed to a lower resolution. In mirrored
mode, the system forces both displays to use the same resolution, which may not be the maximum resolution
of the display.
Note: This mode is NOT recommended for using the display connected to the adapter as the primary laptop
display, because the laptop is unlikely to provide the optimum resolution for the connected display. Refer to
Setting the Display as the Primary Display.
Setting the Display as the Primary Display Using Windows Display Settings
To use the attached display as the primary display:
1. Select the This is my main monitor checkbox (1 in figure above).
2. Click Apply.
Note: On some PCs and laptops it is necessary to disable the primary display. The reason for this is that many
primary graphics card drivers tend to make the laptop display primary if it is enabled. The only workaround for
this is to disable the laptop display to allow another display to be the primary display. To do this:
1. Select the This is my main monitor checkbox (1 in figure above) of the secondary display.
2. Select the primary display (display 1).
V. 02 – 26/04/2012 10 ©Velleman nv
Page 11

PCUSBVGA2
3. Uncheck the Extend the desktop onto this monitor checkbox (1 in figure above).
4. Click Apply.
The connected display stays the primary display when the PC enters hibernate or suspend mode or is rebooted.
If the connected display is detached, the other display becomes the primary display again.
Setting the Display as the Primary Display Using the DisplayLink Menu
1. From the taskbar, click on the DisplayLink icon .
2. Select Set as Main Monitor.
Setting a Laptop Lid to Do Nothing (Upon Close)
It is possible to work conveniently with a laptop with the lid closed and with the attached display as primary
display, with an external keyboard and mouse. For this, you need to set the laptop to ‘do nothing’ when you
close the lid.
To set a laptop to do nothing when closing the lid:
1. Select Start > Control Panel > Power Options.
2. Select Choose what closing the lid does.
3. From When I close the lid, select Do nothing from the On battery and Plugged in drop down list.
8.3. DisplayLink Software Update
In Windows 7, the DisplayLink software connects to the Microsoft Windows update site to obtain the latest
DisplayLink driver. On selecting Check for updates, the DisplayLink software connects to Windows Update,
downloads and installs the latest software.
Automatic Updates
DisplayLink Automatic Updates is supported on Windows 2000/XP and Vista. The automatic update mechanism
ensures that the adapter has the most up-to-date drivers and software, providing you with increased
performance and stability.
You can disable this feature during installation by clearing the Automatically check for updates checkbox
(bottom left).
Using the Updates Wizard
By default, automatic updates are configured to check for updated software when you plug in the adapter, or
when you resume or start your PC, every seven days. When newer software is available, the Updates Wizard
launches.
V. 02 – 26/04/2012 11 ©Velleman nv
Page 12
PCUSBVGA2
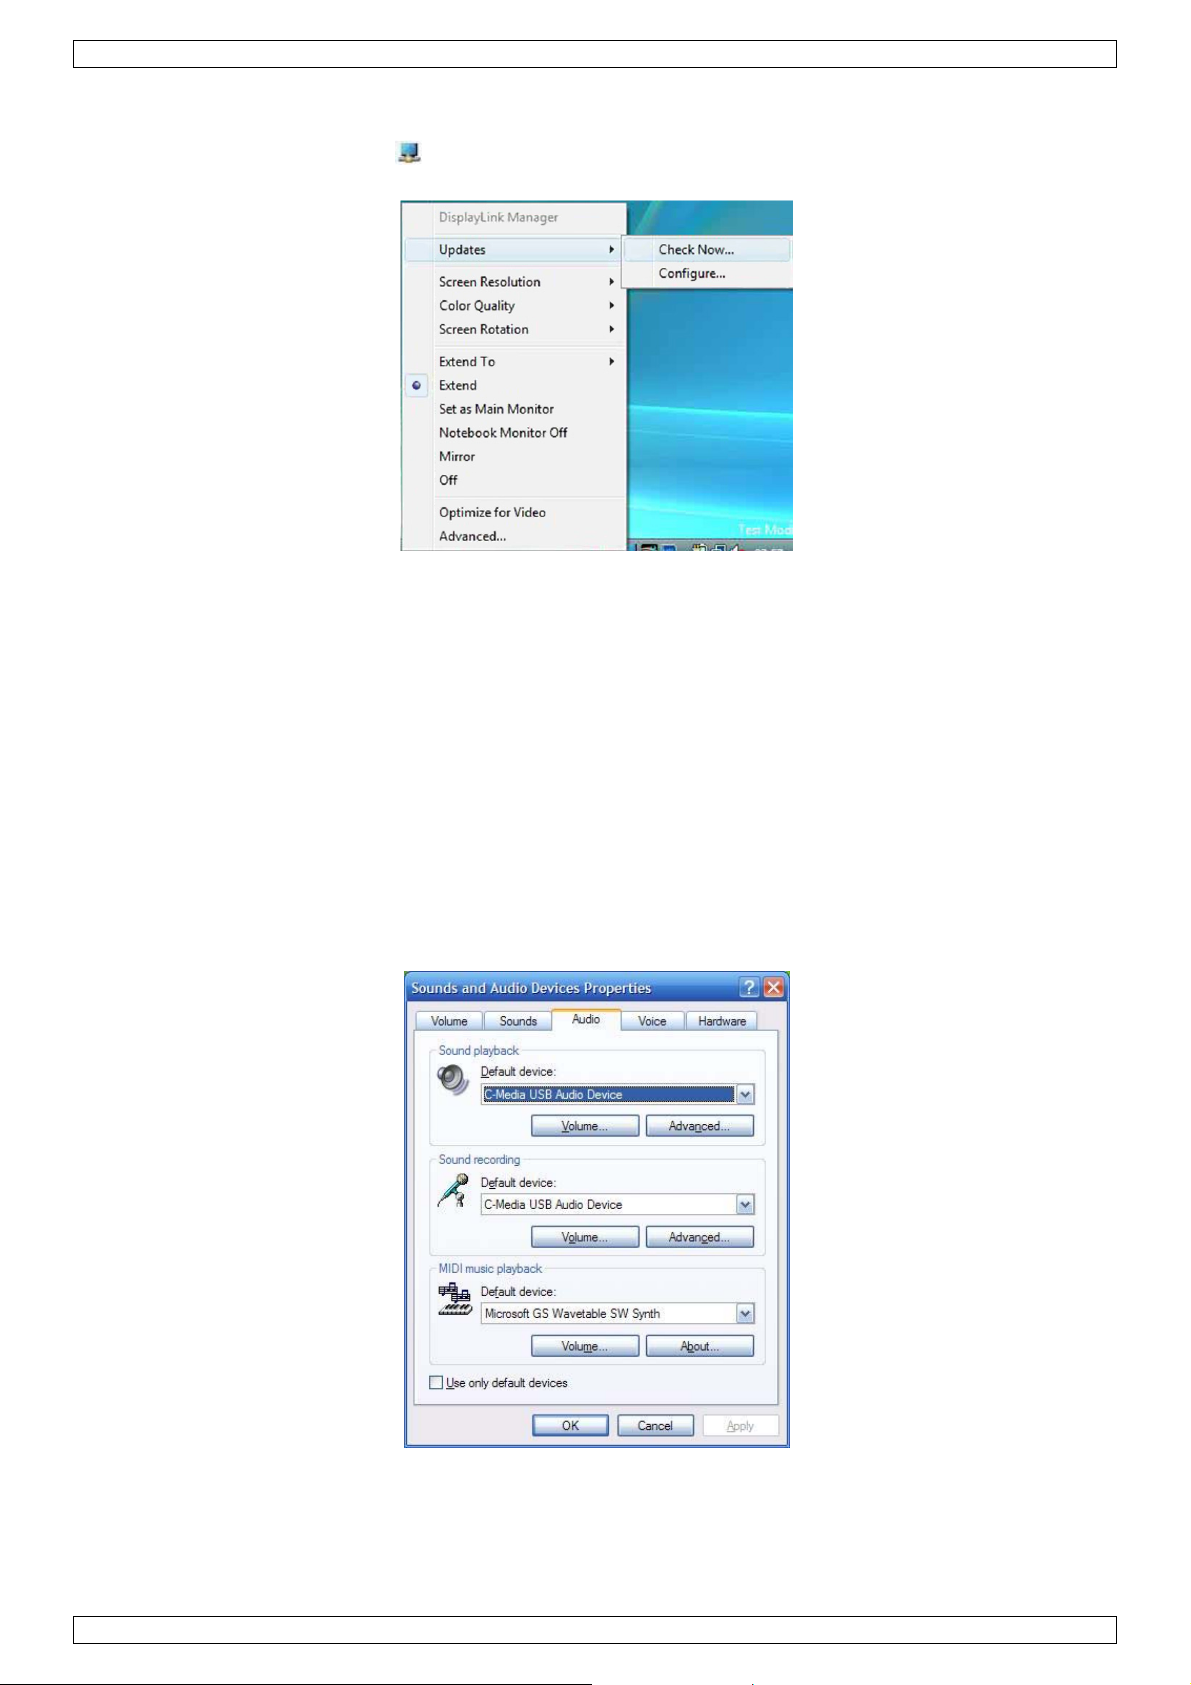
Manual Updates
To update the software manually:
1. Click on the DisplayLink icon . The DisplayLink menu opens.
2. Select Updates > Check Now.
If you have the most recent software, a dialog box appears. Otherwise the Choose updates to install dialog
opens.
8.4. Audio Configuration
Before using a speaker or microphone connected to the adapter, you have to correctly configure your
application to use USB (Multimedia) Audio Device, i.e., the audio components of the adapter.
When the adapter is connected to your computer, the audio devices are automatically installed (they will be
named USB Audio Device). This may override Windows default audio settings. The most obvious effect is that
your original music playback will be re-directed to the speaker connected to the adapter. However, you may
want to use your original sound card for music playback and use the adapter’s audio ports for playing a movie
via media player software (such as Windows Media Player, Real Player, WinDVD, PowerDVD, etc.). In such
cases you need to manually configure the required audio device for each application.
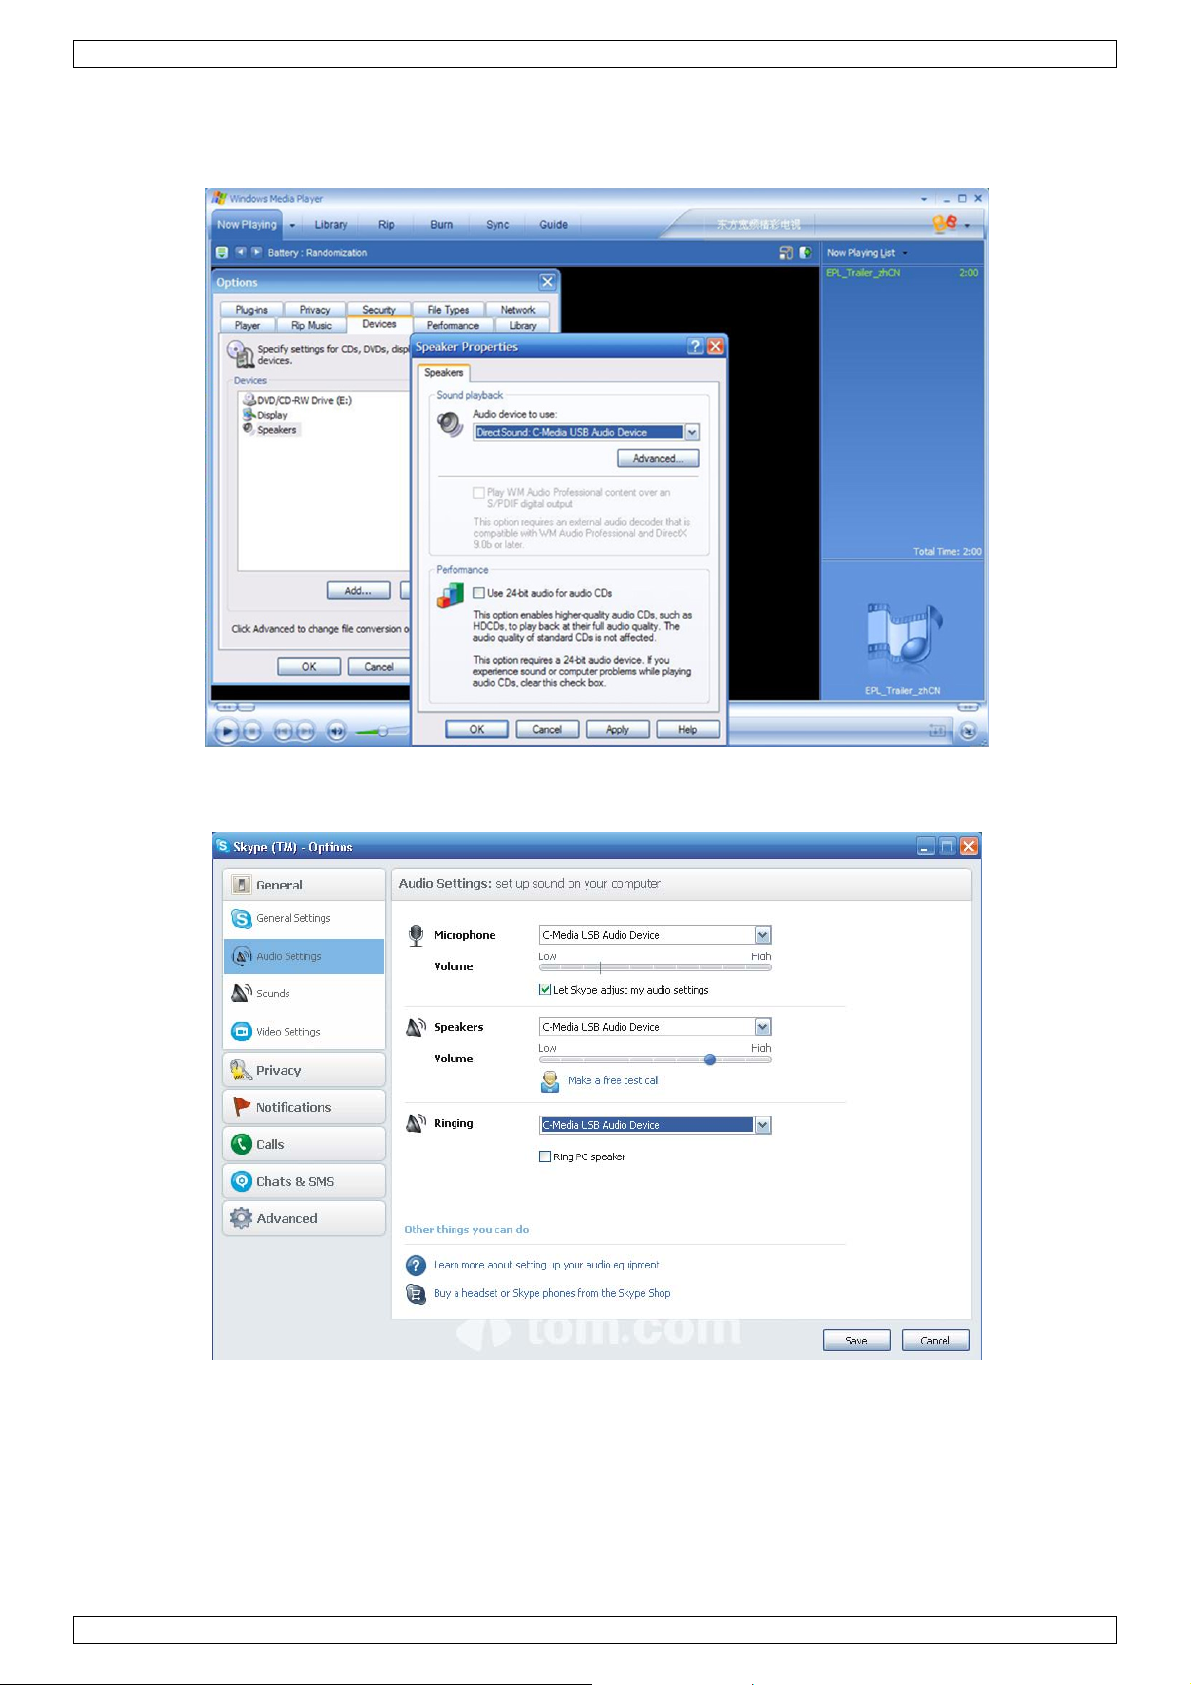
Configuring Windows Audio Device
To specify a sound device for music playback in Windows, open Control Panel and double-click the sound or
audio icon. Then select a desired device in the Playback section. If you want to use your original sound card
for music playback, make sure to select it instead of the USB Audio Device.
V. 02 – 26/04/2012 12 ©Velleman nv
Page 13
PCUSBVGA2
Configuring Application Audio Device
To play a movie via media player software using headphones or speakers connected to the adapter, make sure
the media player software (such as Windows Media Player, Real Player, WinDVD, PowerDVD…) is configured to
use the USB Audio Devices as the audio in and out devices.
To chat via instant messaging software using headphones or a microphone connected to the adapter, make
sure the instant messaging software (such as MSN messenger, Yahoo messenger or Skype) is configured to use
USB Audio Device as the audio in and out devices.
8.5. Uninstalling the DisplayLink Software
The method for uninstalling differs slightly depending on your operating system.
To uninstall the adapter in Windows:
1. From the Start menu, select Control Panel.
2. From the Programs item, click Uninstall program.
V. 02 – 26/04/2012 13 ©Velleman nv
Page 14
PCUSBVGA2
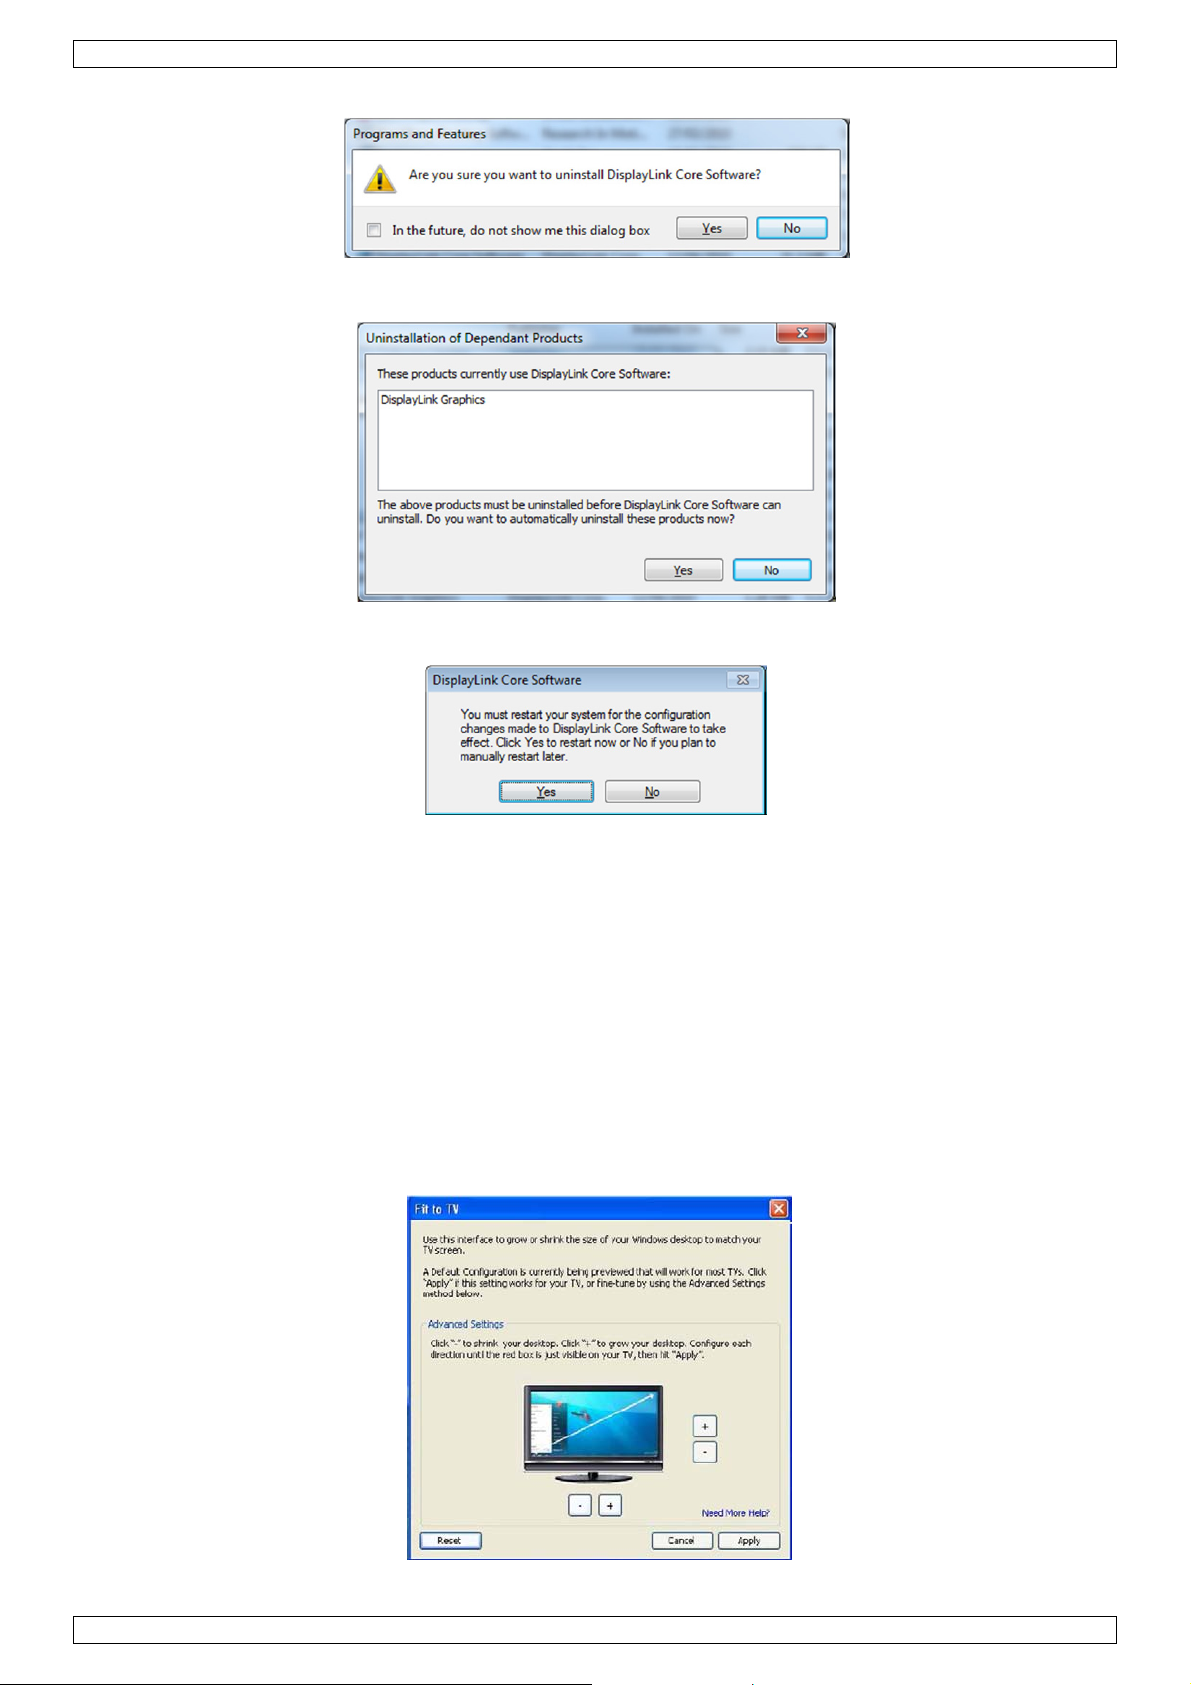
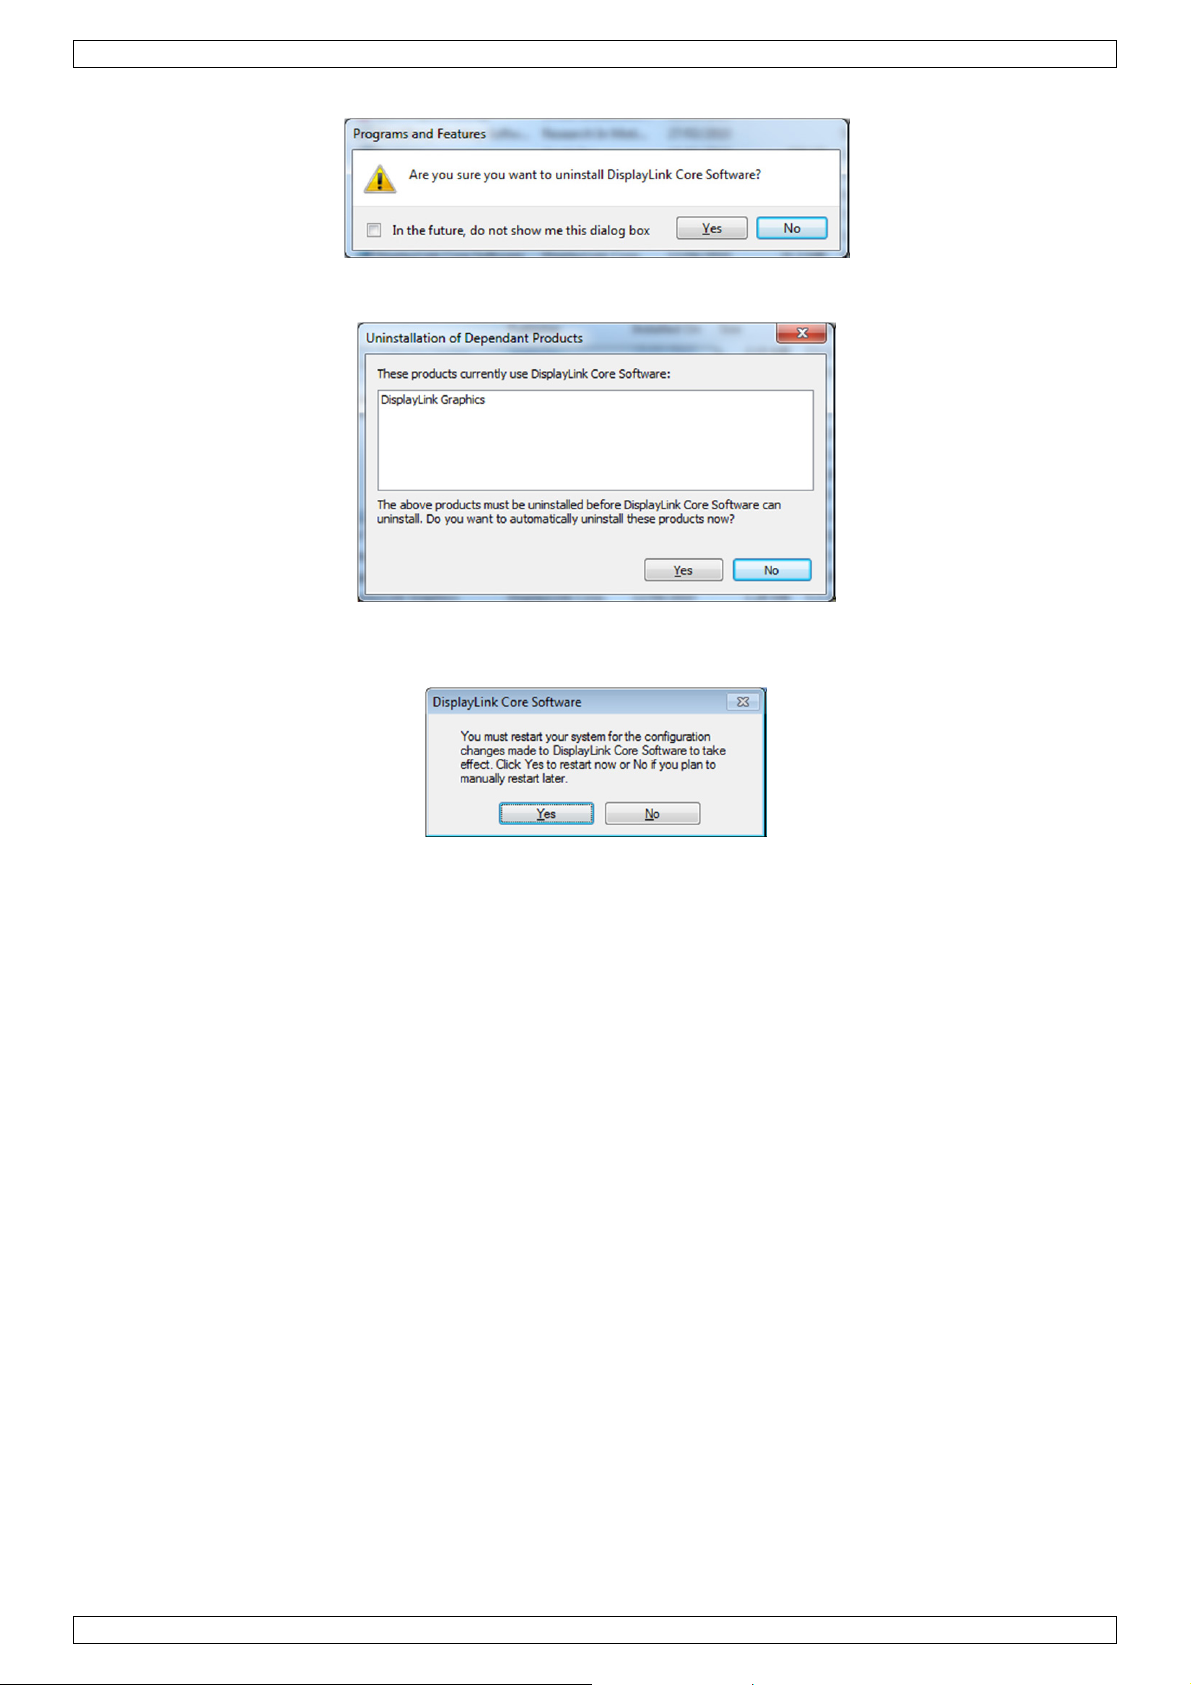
3. Double-click DisplayLink Core software. A Windows confirmation dialog opens (if enabled).
4. Click Yes.
A message may appear to state which software packages will also be uninstalled.
5. Click Yes to uninstall the packages that use DisplayLink Core Software.
The uninstaller automatically uninstalls the software. Once uninstalled, you will be prompted to reboot.
6. Click Yes to complete the uninstallation.
8.6. Fit to TV
Why Do I Need Fit to TV?
If you use your adapter to connect to a TV, the entire Windows desktop may not be available. This is because
TVs can use overscan, which prevents the edges of the image to be visible. When showing a Windows desktop,
overscan can hide the task bar and icons.
Fit to TV can be used to reduce the size of the Windows desktop so that it fits on the TV screen.
Note: Fit to TV only works in extended mode. In mirrored mode, the screen connected to the adapter will
change to extended mode and will be placed above the primary display in Windows Display Properties. Fit to TV
does not support rotated modes.
Configuration
1. To configure Fit to TV, choose the option from the DisplayLink menu. The following window appears:
V. 02 – 26/04/2012 14 ©Velleman nv
Page 15

PCUSBVGA2
You will see a red border on the DisplayLink screen. The red border shows the size of the new Windows
desktop.
2. Use the “+” and “–” buttons in the Fit to TV window to change the size of the red border until it fits on the
TV screen.
Note: You can finetune by holding down the CTRL key and clicking the “+” and “–” buttons.
3. Once the red border is at the edges of the TV screen, click Apply to resize the Windows desktop.
8.7. Additional Information
The following section provides additional information on the use of the DisplayLink software.
DirectX 10 Game Support
This software release contains support for some DirectX 10 games on Windows 7. To improve the gaming
experience, it is recommended that:
• anti-aliasing (AA) settings are turned OFF
• locking to vsync is turned ON.
These options are usually configurable within the DirectX 10 game.
To play 3D games on a display connected via the adapter with reasonable performance, the system specs must
meet the game’s recommended hardware specification, not just the minimum specification.
Monitor Calibration
Monitors can be calibrated with applications that use the Display Data Channel Command Interface (DDC/CI).
Both monitor and application must support DDC/CI for this to work. An example of such an application is
ScreenWhite.
DDC/CI is not supported on displays with integrated DisplayLink technology, for example mini monitors.
Media Playback
In Windows 7, Vista and XP (in extended mode), the adapter can display media files and DVDs using the
following media players:
• Windows Media Player 11 (www.microsoft.com/windows/windowsmedia/default.mspx)
• WinDVD 8 (www.intervideo.com)
• PowerDVD 7 (www.cyberlink.com)
• RealPlayer 11 (www.real.com).
The adapter can display media files and DVDs using most media players. Media playback in mirrored mode (XP)
or in Basic mode (Vista and Windows 7) is not recommended.
Using Multiple Adapters
The software supports up to six displays simultaneously connected via 6 adapters. It is also possible that
different sets of displays are used at different times, for example two in the office and two at home. The
software saves each screen’s display profile separately. This allows for four different physical positionings or
different resolutions of connected displays in the office and the home.
Standby and Hibernate, Shut Down and Restart
If the PC to which the adapter is connected, is placed into standby or hibernate mode, the display goes blank.
When the PC is powered up again (and unlocked if necessary) the connected display returns to the same mode
as it was before standby or hibernation.
If the PC is shut down, restarted and the user has logged in, again the connected display returns to the same
mode as it was before shutdown.
Adapters with Multiple Users
The adapter works with multiple users on the PC. The mode settings are saved for each user so they can use
their own desktop configuration.
Disconnecting the Adapter
If the adapter is powered off or the USB cable is disconnected from the computer, the display goes blank. All
windows and icons move to the primary display.
On reconnection or powering up of the adapter, the display returns to the same mode as it was before
disconnection. However, the windows and icons that were moved to the primary display will not be moved back
automatically to the secondary display.
V. 02 – 26/04/2012 15 ©Velleman nv
Page 16
PCUSBVGA2
Supported Screen Modes
There are three components that make up the screen mode:
• Resolution: the number of pixels displayed on screen horizontally and vertically.
• Colour quality: the number of different colours that can be shown on the screen at the same time.
• Refresh rate: the speed at which the entire screen is rescanned. Higher refresh rates reduce flicker.
Some screens advertise the supported modes through the VGA or DVI connector. If this is the case, the adapter
identifies the supported modes from the screen. If the screen does not advertise the supported modes, the
adapter software chooses a set of common screen modes for the screen.
Inferred Modes
Some modes in the DisplayLink menu are shown between brackets [ ]. This
occurs when you connect a display with a preferred resolution that is higher
than the maximum supported resolution of the adapter.
In this case, the preferred resolution of the display cannot be supported.
However, the DisplayLink software makes available lower resolutions of the
same aspect ratio that you can try with the display. Modes between brackets
[ ] indicate that these modes are not advertised by the display, but have been
made available by the DisplayLink software for you to try.
Because these are inferred modes from the preferred mode of the display,
they are not guaranteed to work with the display.
Error Messages
DisplayLink Graphics software occasionally displays user messages in a bubble in the notification area. The
table below lists the user messages and their description.
Message Description
Insufficient system resources
exist to complete the requested
service
The requested allocation size was
too large
Incompatible Display Driver
The system cannot write to the
specified device
Further Support
http://www.displaylink.com/support
This can occur when entering extended mode with low system resources.
The PC does not have enough memory to start an extended display. Close
any unused applications. The situation may also be improved by rebooting
the PC.
This can occur if trying to mirror a primary display with a resolution above
2300x1700 (4:3) or 2600x1500 (16:9).
This message will appear if the primary graphics card drivers installed are
not WDDM compatible. Windows 7 is not designed to operate without WDDM
drivers. Download and install the latest Windows 7 (WDDM) drivers for your
primary graphics card.
This warning may be displayed in Windows XP after changing the display
mode several times (e.g. extended/dock mode) from the DisplayLink
software. If this happens, detach and reattach the device to restore normal
operation.
9. Troubleshooting
Minor issues can generally be resolved by:
• unplugging and re-plugging the display
• changing the display mode via the DisplayLink software
• or changing the display mode via Windows Display Properties.
On Windows 7/Vista WDDM (Aero and Basic)
DisplayLink software works closely with the graphics card and there may be interoperability issues with some
graphics cards. If this happens:
1. Upgrade to the latest graphics drivers.
2. Upgrade to the latest DisplayLink software.
3. Report the issue via your support channel.
4. If necessary, boot in Safe Mode and use Windows' Backup and Restore Centre to recover.
V. 02 – 26/04/2012 16 ©Velleman nv
Page 17

PCUSBVGA2
10. Mac OS User Guide
This guide applies to Mac software version 1.0 and higher.
What Is the Mac driver?
The Mac driver is designed for MAC OS 10.4 (Tiger), 10.5 (Leopard) and 10.6 (Snow Leopard) to enable you to
add an additional display to your Mac using DisplayLink technology. This software enables you to run your
adapters on any Intel-based desktop or laptop Mac, allowing you to connect up to 4 additional displays via USB.
Important note: PowerPC-based Macintosh computers such as late model iMacs, PowerBooks and Power Macs
are currently not supported.
What Else Do I Need to Use This Driver?
Apart from an Intel-based Mac running the latest versions of Mac OS 10.4, 10.5, or 10.6, you will need an
adapter. One adapter is required for each additional display that you wish to connect to your Mac.
Setup Guide – Installing/Uninstalling the Mac Driver
1. To run the Mac installer, double-click the Mac
DriverInstaller image.
2. Select Software Installer to begin installing the Mac
driver on your Mac. This will require a restart once
completed.
3. Select User Guide to view the user guide.
4. Select Software Uninstaller to uninstall the Mac driver
from your Mac. This will require a restart once completed.
Connecting Displays to Your Mac
Once you have installed the Mac driver, simply plug in your adapter(s) via USB and connect each display to an
adapter. You can now connect up to 4 additional displays. Examples of setups are given below:
Example 1: adding two displays to a MacBook Pro. The MacBook Pro connects to two displays via USB cables
using adapters. The displays connect to the adapters via standard VGA/DVI cables.
Example 2: adding three displays to a MacBook Air. The MacBook Air connects to a standard powered USB
hub. Three displays are connected to the USB hub via adapters. The displays connect to the adapters via
standard VGA/DVI cables.
V. 02 – 26/04/2012 17 ©Velleman nv
Page 18
PCUSBVGA2
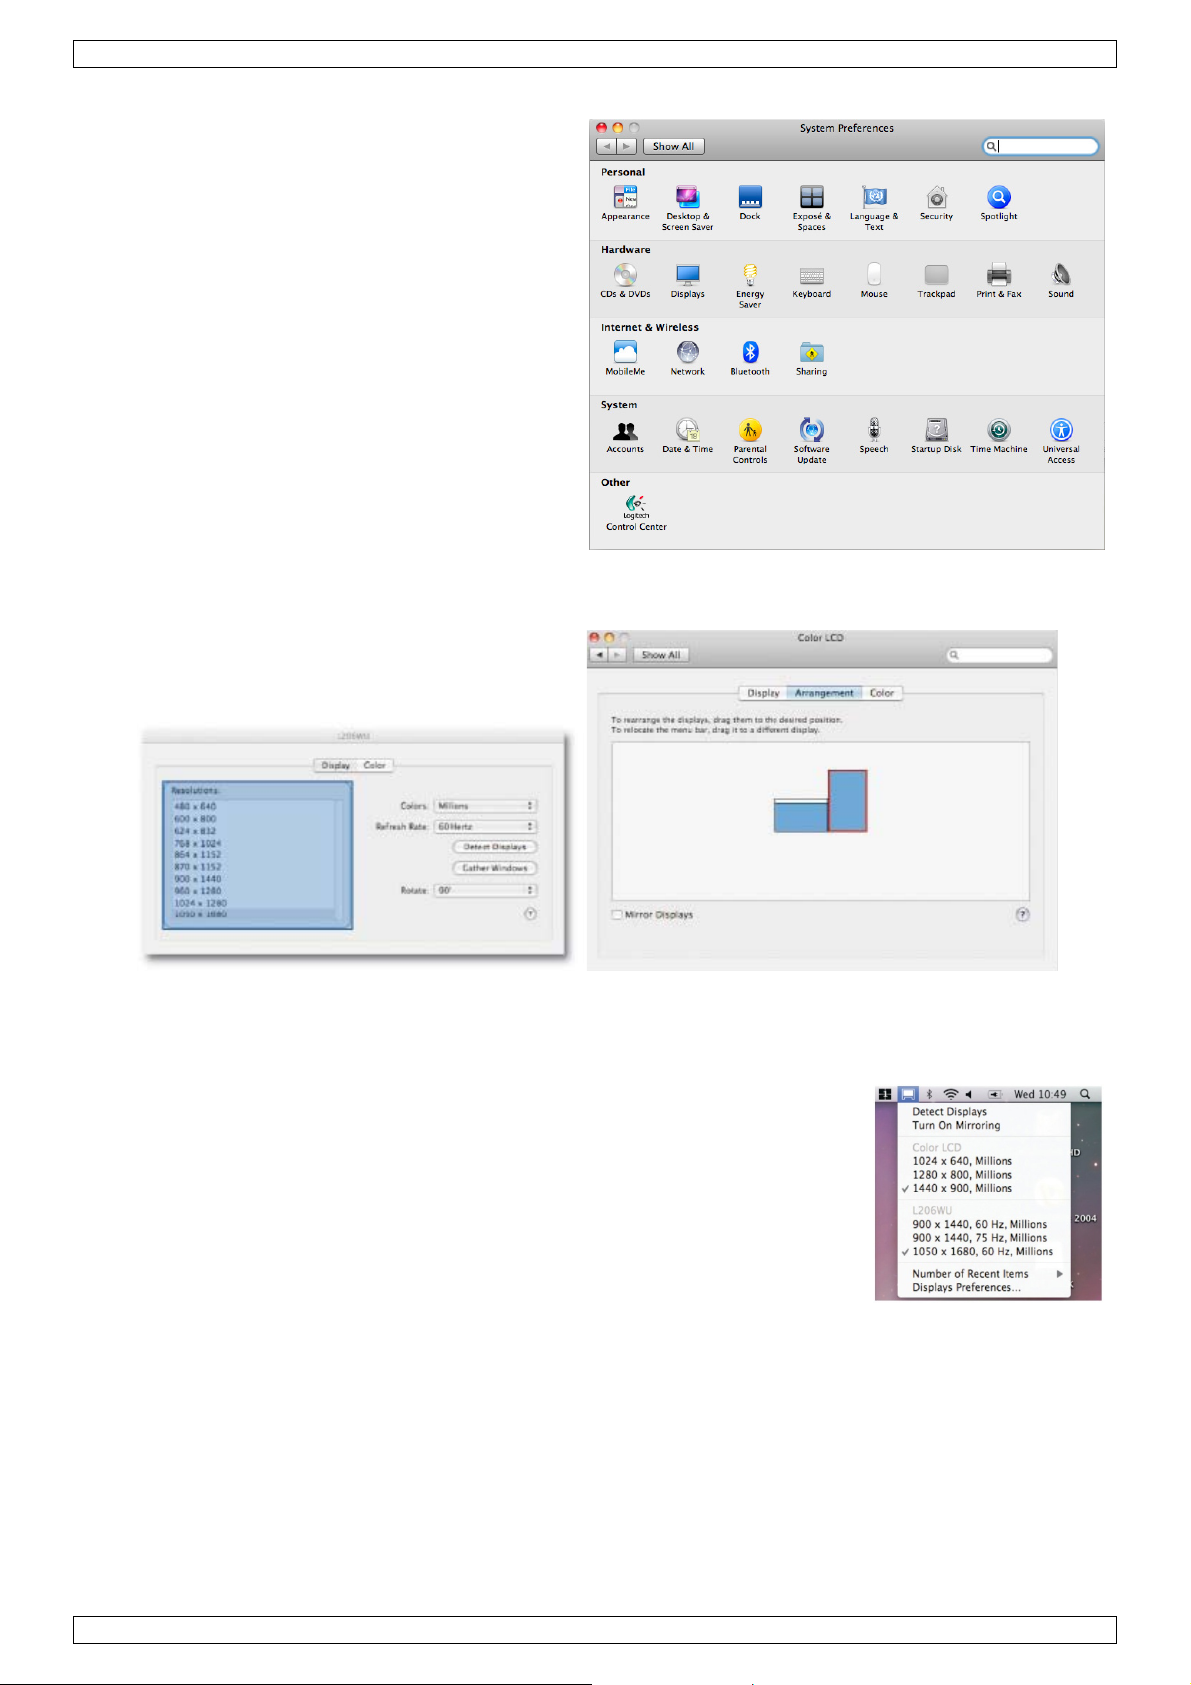
Managing Multiple Displays
• When attaching a display with unknown
software, the display will by default be
extended to the right of the primary display.
• To configure the settings for each of your
attached displays, select Displays from the
System Preferences window on each of your
attached displays.
• It is possible to use the Gather Windows
button to bring all the display preferences
windows onto the primary display.
Display Preferences
Display resolution
Rotating a display
Display positions
Display in mirrored mode
Display in extended mode
Using both extended and mirrored displays
Changing the primary display
Configuring Displays from the Menu Bar
If you have checked Show displays in menu bar in the Display Preferences panel, you can configure
displays by clicking the display icon in the menu bar.
This menu allows you to perform the following actions:
• Detect all displays connected to the Mac.
• Turn display mirroring on/off.
• Set the resolution of primary and secondary display(s).
• Open the Display Preferences panel.
V. 02 – 26/04/2012 18 ©Velleman nv
Page 19
PCUSBVGA2
11. Technical Specifications
resolution up to 1600x1200 or 1920x1080 Digital (@60Hz 32-bit)
available USB 2.0 port
system requirements
operating system: Windows 2000 SP4, XP SP2, Vista 32/64bit with Aero support,
Windows 7 32/64bit
1 x USB to DVI adapter
1 x quick start guide
1 x CR-ROM with user guide and installation software
package contents
power consumption 5V
dimensions 106 x 48 x 18mm
capacity up to 6 simultaneous displays
Use this device with original accessories only. Velleman nv cannot be held responsible in the event
of damage or injury resulted from (incorrect) use of this device.
For more info concerning this product and the latest version of this user manual, please visit our
website www.velleman.eu.
The information in this manual is subject to change without prior notice.
All registered trademarks and trade names are properties of their respective owners and are used only for the
clarification of the compatibility of our products with the products of the different manufacturers.
Windows XP, Windows 2000, Windows Vista, Windows Aero, Windows 7, Windows Server are registered
trademarks of Microsoft Corporation in the United States and other countries. Mac, Mac OS, iMac, PowerBook,
Power Mac are trademarks of Apple Inc., registered in the U.S. and other countries.
1 x 4ft (±1m20) USB 2.0 cable
1 x DVI to VGA adapter
1 x DVI to HDMI adapter
1 x 3.5mm stereo to RCA adapter
V. 02 – 26/04/2012 19 ©Velleman nv
Page 20
.
aBeDa
.3.
n
e
m
y
h
g
t
w
d
e
d
k
d
h
j
r
r
e
d
k
e
V
h
e
e
e
l
a
r
o
t
r
v
n
r
e
a
d
)
t
m
m
n
o
o
i
s
i
e
p
r
f
h
n
e
t
r
h
a
k
t
i
e
t
n
f
o
o
s
o
e
d
d
a
P
e
t
e
e
t
e
a
g
n
n
b
d
e
s
e
u
m
a
e
o
e
r
n
n
a
r
a
e
.
b
e
t
t
o
h
a
r
a
g
e
b
j
e
.
j
e
n
e
e
a
e
e
d
d
e
j
w
y
v
e
c
e
d
k
a
o
d
t
k
i
h
h
n
v
e
s
o
w
e
c
i
e
t
o
t
j
n
g
a
d
t
u
n
e
e
,
1
Inleidi
A
n alle ing
langrijke
nk u voor u
be
schadigd tij
2
Veiligh
Dit s
wegg
batte
terec
bren
Heb
Hou
Ele
om
gesc
zetenen v
ilieu-info
mbool op h
eworpen, di
rijen) niet b
tkomen vo
en. Respec
u vragen,
aankoop!
ens het tra
idsinst
buiten het
trocutiege
odelijke ele
oold perso
G
n de Euro
matie bet
et toestel o
t toestel sc
ij het gewo
r recyclag
eer de plaa
contactee
Lees deze
nsport, inst
ucties
bereik van
aar bij het
ktroshocks
eel.
bruik
ese Unie
effende di
de verpakk
ade kan to
e huishoud
. U moet di
selijke mili
dan de pl
andleiding
lleer het da
inderen en
openen va
e vermijde
CUSBVGA
rsha
product
ing geeft aa
brengen aa
lijke afval;
toestel naa
uwetgeving
atselijke
rondig voo
n niet en ra
onbevoegd
het toestel
. Open de
2
dleidi
n dat, als h
het milieu
het moet bi
r uw verdel
.
utoriteite
u het toest
dpleeg uw
n.
Raak geen
ehuizing ni
ng
t na zijn le
Gooi dit to
een gespe
r of naar e
betreffen
l in gebrui
dealer.
kabels aan
t zelf en la
enscyclus
stel (en ev
ialiseerd be
n lokaal re
e de verw
neemt. W
die onder s
t reparaties
ordt
ntuele
drijf
yclagepunt
jdering.
rd het toest
room staan
over aan
el
Algem
Ra
adpleeg de
•
Leer eerst
•
Om veilig
aangebrac
•
Gebruik h
•
De garanti
dealer zal
houden.
•
Bewaar d
•
Noch Vell
incidentee
gebruik of
Er zi
rese
Geb
vloei
Bij g
goe
op (
n geen doo
veonderdel
uik het toes
stoffen. Pla
bruik kan
e ventilatie.
amerbreed
ne rich
elleman®
Bescher
verstopt
object.
Bescher
de functies
eidsredene
ht valt niet
t toestel en
e geldt niet
de verantw
ze handleid
man nv noc
of onrecht
falen van d
de gebruik
n, contacte
tel enkel b
ts geen obj
e behuizing
Plaats het
tapijt, text
lijnen
service- e
tegen sto
geraken. V
tegen sch
van het toe
mag u gee
nder de ga
kel waarvo
voor schad
ordelijkhei
ng voor ver
h zijn verde
treeks) – v
t product.
er vervang
er uw deale
nnenshuis
cten gevul
opwarmen.
oestel op e
iel…
kwaliteit
en extrem
orzie een r
kken. Ver
tel kennen
n wijziginge
rantie.
r het gema
door het n
afwijzen v
ere raadpl
lers kunnen
n welke aa
are onderd
r.
. Bescherm
met vloeis
Houd vold
n effen en
garantie
temperatu
imte van m
ijd brute kr
voor u het
n aanbreng
kt is. Bij on
geren van
or defecten
ging.
aansprakeli
d dan ook (
len in dit to
egen regen
of op of na
ende ruimt
ittebestend
chteraan d
en. Zorg da
instens 2,5
cht tijdens
aat gebruik
n. Schade
oordeelkun
epaalde ric
of problem
k gesteld
financieel, f
estel. Voor
, vochtighei
st het toes
rondom he
ig oppervla
ze handleid
t de verluc
cm tussen
de bedienin
en.
oor wijzigi
ig gebruik
htlijnen in d
n die hier r
orden voor
sisch…) vo
nderhoud
en opspat
el.
t toestel vri
. Plaats het
ng.
tingsopenin
et toestel e
g.
gen die de
ervalt de g
eze handlei
chtstreeks
schade (bui
rtvloeiend
f
ende
voor een
toestel noo
en niet
elk ander
ebruiker h
rantie.
ing en uw
verband m
engewoon,
it het bezit
it
eft
e
V.
02 – 26/04/2
012
20
©Vellema
nv
Page 21

PCUSBVGA2
4. Eigenschappen
Met de PCUSBVGA2 USB schermadapter sluit u een extra display, lcd-scherm of projector via een vrije USB
2.0-poort aan op uw computer zonder videokaart. De standaard uitgangspoort is DVI, maar het apparaat wordt
geleverd met twee adapters voor een VGA- of HDMI-scherm.
Inhoud: USB naar DVI adapter, beknopte handleiding, CD-ROM met uitgebreide handleiding en software, USBkabel 2.0 (±1m20), DVI naar VGA adapter, DVI naar HDMI adapter, 3.5mm stereo naar RCA adapter.
• beeldmodi:
o kan het hoofdscherm gemakkelijk spiegelen
o uitbreiden links, rechts, boven of onder
o kan naar links, rechts of ondersteboven worden gedraaid
o ondersteunt DVI, VGA en HDMI
• audiomodi:
o 2.1-kanaals audio-uitgang
o microfoonaansluiting
o interface met gemengde uitgang RCAx2 (linker- en rechterspoor)
• voeding via USB 2.0: zeer laag verbruik
• verliesloze compressie
• voor CRT, LCD, projector displays
• ondersteunt: Windows Vista Aero, XP en Vista 32-bits
• standaard en breedbeeld beeldformaten
• DDR-geheugen met hoog prestatievermogen
• gebruikt een virtuele driver
• volledig geluidloze werking
• ingebouwd spannings- en statusled
• draagbaar, gemakkelijk voor onderweg.
5. Systeemvereisten
De DisplayLink-software is beschikbaar voor PCs met één van de volgende Windows® besturingssystemen:
• Windows 7 (32-bit of 64-bit)
• Windows Vista met SP 1 of 2 (32-bit of 64-bit)
• Windows XP Home of Professional (incl. Tabletversie) met SP 2 of 3
• Windows 2000 met SP 4.
Opmerkingen:
• 64-bit XP versies alsook Windows Server versies worden niet ondersteund.
• Voor Mac OS, zie http://www.displaylink.com/mac
• Voor Linux, http://libdlo.freedesktop.org/wiki/ of http://www.displaylink.org.
Ondersteunde talen
De volgende talen worden ondersteund in DisplayLink software onder alle ondersteunde besturingssystemen:
Arabisch/ Indonesisch / Bulgaars / Chinees (traditioneel) / Chinees (vereenvoudigd) / Kroatisch / Tsjechisch /
Deens / Nederlands / Engels / Fins / Frans / Grieks / Koreaans / Duits / Hongaars / Italiaans / Japans / Noors /
Pools / Portugees / Russisch / Slowaaks / Sloveens / Spaans / Zweeds / Turks
Opmerking: De standaardtaal is Engels.
Windows Vista/Windows 7
Voor Windows Vista/Windows 7 is de Windows Experience Index (WEI) een handige tool die de snelheid van
hardware meet. De WEI is toegankelijk via Computer > Properties, of via Control Panel > System.
De aanbevolen vereisten voor de PC zijn:
• WEI-score van minimum 3 in ‘Graphics; desktop performance for Windows Aero’ categorie
• totale WEI-score van minimum 3 zoals aanbevolen door Microsoft
• minimum 1 vrije USB 2.0-poort
• 30 MB vrije ruimte op de harde schijf
• computerscherm, indien niet ingebouwd.
V. 02 – 26/04/2012 21 ©Velleman nv
Page 22

PCUSBVGA2
Windows XP
• voor 1-2 schermen, commercieel gebruik, verhoogde productiviteit. Mogelijks is er hierdoor geen volledige
framesnelheid bij het afspelen van DVD op volledig scherm:
1.2GHz Single Core CPU, 512MB geheugen
• voor 3 schermen waarbij 1 scherm DVD video kan afspelen en tevens zorgen voor verhoogde productiviteit
en commerciële toepassingen. Ondersteunt slechts 1 videobeeld met DVD-resolutie op volledi g scherm:
1.6GHz CPU, 1GB geheugen
• voor 6 schermen waarbij 1 scherm DVD video op volledig scherm kan afspelen:
1.8GHz Core Duo, 1GB geheugen
• minimum 1 vrije USB 2.0 poort, 30 MB vrije ruimte op de harde schijf
• computerscherm, indien niet ingebouwd
• netwerkaansluiting om software te downloaden, of toegang tot een CD-ROM drive.
Grafische kaarten (Windows Vista/Windows 7)
In Windows Vista en Windows 7 werkt de DisplayLink-software nauw samen met de primaire grafische kaart.
DisplayLink ondersteunt en test op de pc één enkele grafische kaart (GPU) van alle voornaamste GPU-merken
(Intel, ATI, NVidia en Via).
De volgende GPU-configuraties zouden compatibiliteitsproblemen kunnen veroorzaken in Windows Vista en
Windows 7:
• Verwisselbare graphics (ATI/Intel)
• Verwisselbare graphics (ATI/ATI)
• Verwisselbare graphics (NVIDIA/Intel)
• NVIDIA SLI in SLI-modus.
Andere GPU-configuraties, waaronder onderstaande, worden momenteel niet ondersteund en functioneren niet
in Windows 7/Vista:
• Hybrid Graphics
• Hybrid SLI
• Hybrid Crossfire
• Crossfire
• SLI niet in SLI-modus
• meerdere WDDM 1.1 grafische drivers zijn gelijktijdig geactiveerd.
Grafische kaarten (Windows XP)
Alle grafische kaarten worden ondersteund op Windows XP.
6. Hardwareaansluiting
Adapter aansluiten op computer en scherm
1. Verbind het smallere uiteinde van de USB-kabel met de adapter.
2. Verbind vervolgens het andere uiteinde van de USB-kabel met een
USB 2.0-poort op uw computer.
3. Als uw scherm nog niet is verbonden is met de adapter, maak de
verbinding en schakel uw scherm in.
Verbind met CRT, LCD, TV, projector, luidspreker, etc.
VGA-verbinding via
DVI naar VGA adapter
V. 02 – 26/04/2012 22 ©Velleman nv
DVI-verbinding
HDMI-verbinding via
DVI naar HDMI adapter
Page 23

PCUSBVGA2
audio-verbinding
7. De software installeren
Opmerking: Indien u de DisplayLink-software V3.x, R4.1 of R4.2 reeds installeerde, dan moet u deze
verwijderen met de Windows Add/Remove Programs functie, alvorens deze versie te installeren.
7.1. De software installeren met Windows 7 Update
De aangewezen installatiewijze is de update-functie van Windows 7.
1. Sluit de display via de adapter en de USB-kabel aan
op de PC. Windows herkent de nieuwe hardware en
download de driver automatisch.
2. Na het downloaden start de installatie. Het venster
met de gebruikersovereenkomst van de DisplayLinksoftware verschijnt.
3. Klik op I Accept. De DisplayLink Core-software wordt
geïnstalleerd.
Opmerking: Het is mogelijk dat het scherm begint te
knipperen of zwart wordt tijdens het installeren.
V. 02 – 26/04/2012 23 ©Velleman nv
Page 24
PCUSBVGA2
7.2. De software installeren op Windows 7/Vista/XP/2000
Desgewenst kunt u de software installeren via een download van een website of via CD-ROM.
Belangrijk! Installeer de software vooraleer u een apparaat op uw PC aansluit via de adapter.
1. Als autoplay geactiveerd is in het OS, start de
installatie automatisch vanop de CD-ROM. Indien niet,
zoek het bestand Setup.exe op de CD-ROM en dubbelklik
erop. Het venster Windows User Account Control wordt
geopend (indien geactiveerd in de OS).
2. Klik Yes. Het venster met de
gebruikersovereenkomst van de DisplayLink-software
verschijnt.
3. Klik op I Accept. De DisplayLink Core-software en
DisplayLink Graphics worden geïnstalleerd. Er verschijnt
geen melding aan het einde van het installatieproces.
Opmerking: Het is mogelijk dat het scherm begint te
knipperen of zwart wordt tijdens het installeren.
4. Sluit de adapter via de USB-kabel aan op uw PC. Het
bericht over het installeren van de driver verschijnt.
5. Klik op Yes. DisplayLink installeert het apparaat
automatisch. Het venster met de gebruikersovereenkomst
van de DisplayLink-software verschijnt (zie boven).
6. Klik op I Accept. De DisplayLink USB Graphics-
software wordt geïnstalleerd. Er verschijnt geen melding
aan het einde van het installatieproces.
Opmerking: Bij bepaalde toestellen is het nodig om te
herstarten alvorens u de adapter kan gebruiken.
8. De DisplayLink-software gebruiken
8.1. Windows 7 – het scherm instellen
In Windows 7 kunt u een scherm instellen d.m.v. Windows Display Properties (WDP, schermeigenschappen).
WDP voorziet een eenvoudige methode, niet enkel om schermen te verbinden, draaien, verdubbelen of uit te
breiden maar ook om de schermresolutie aan te passen.
WDP openen
Er bestaan verschillende manieren om het venster WDP te openen. Ofwel:
• Klik met de rechtermuisknop op het bureaublad en selecteer Screen Resolution uit het menu.
• Selecteer Start > Devices and Printers en dubbelklik op de DisplayLink Device-icoon.
• Klik met de rechtermuisknop op de DisplayLink-icoon en klik op Advanced.
V. 02 – 26/04/2012 24 ©Velleman nv
Page 25

PCUSBVGA2
Het scherm instellen
1. Open WDP.
2. Stel de schermopties in. Zie onderstaande tabel voor meer details over elke optie.
Menu Submenu Beschrijving
Display Selecteer het in te stellen scherm in het uitrolmenu.
Resolution
Kies de resolutie met behulp van het uitrolmenu en de
schuifindex.
Landscape Zet het scherm in landschapsmodus.
Portrait Zet het scherm in portretmodus.
Landscape (flipped) Zet het scherm in omgekeerde landschapsmodus.
Orientation
Portrait (flipped) Zet het scherm in omgekeerde portretmodus.
Duplicates these displays Het hoofdscherm wordt op het tweede scherm weergegeven.
Extend these displays Het hoofdscherm breidt zich uit naar het tweede scherm.
Multiple
Shows Desktop only on 1
displays
Shows Desktop only on 2
Het bureaublad verschijnt op scherm nummer 1. Scherm
nummer 2 is zwart.
Het bureaublad verschijnt op scherm nummer 2. Scherm
nummer 1 is zwart.
Een schermmodus kiezen
Om de werking van een aangesloten scherm te beheersen, kunt u de toetsencombinatie Windows Logo+P
gebruiken om een menu weer te geven (en erdoor te lopen) en de schermmodus te wijzigen.
1. Druk Windows Logo+P. Het volgende menu verschijnt.
2. Klik op één van de opties. De schermen passen zich aan volgens uw keuze.
V. 02 – 26/04/2012 25 ©Velleman nv
Page 26
PCUSBVGA2
De DisplayLink-icoon
Het is mogelijk om de werking van de adapter in te stellen via de DisplayLink-icoon op
de taakbalk.
Om het DisplayLink Manager-menu weer te geven:
• In de taakbalk, klik op de pijl Show hidden icons om alle beschikbare iconen te
tonen.
• Klik op de DisplayLink-icoon .
Er verschijnt een menu met meerdere opties. Zie de tabel hieronder.
Menu Beschrijving
Check for updates
Optimize for Video
Advanced Opent het venster WDP (schermeigenschappen)
Maakt een verbinding met de Windows Updater, controleert
op recentere versies en downloadt deze, indien nodig.
Selecteer deze optie voor betere afspeelkwaliteit op het scherm
dat via de adapter is verbonden. Selecteer deze optie enkel bij
het afspelen van video-inhoud. Opmerking: Het is mogelijk
dat tekst minder duidelijk verschijnt.
8.2. Windows Vista/XP/2000 – het scherm instellen
Het DisplayLink Manager menu
De DisplayLink-icoon verschijnt in de taakbalk bij het aansluiten van een apparaat. Hierdoor krijgt u toegang
tot het DisplayLink Manager menu. Om het DisplayLink Manager menu te gebruiken:
1. Klik op de DisplayLink-icoon in de taakbalk. Het volgende menu verschijnt.
2. Selecteer één van de beschikbare opties. Zie de lijst hieronder.
Menu Submenu Beschrijving
Check Now
Updates
Configure
Screen Resolution
Colour Quality
Screen Rotation
V. 02 – 26/04/2012 26 ©Velleman nv
Toont een lijst met beschikbare resoluties. Bepaalde resoluties
Medium (16-bit) Verandert de kleurdiepte van het uitgebreide scherm naar 16 bits.
Highest (32-bit) Verandert de kleurdiepte van het uitgebreide scherm naar 32 bits.
Normal Geen rotatie van het scherm verbonden via de adapter
Rotated Left Draait het uitgebreide of gespiegelde scherm met 270°.
Rotated Right Draait het uitgebreide of gespiegelde scherm met 90°.
Upside-Down Draait het uitgebreide of gespiegelde scherm met 180°.
Maakt een verbinding met de Update Server om te controleren op
nieuwere versies en downloadt deze, indien beschikbaar.
Opent het venster met updateopties waar u automatisch updates
kunt instellen.
kunnen tussen haakjes [ ] staan. Zie hoofdstuk Afgeleide modi.
Page 27
PCUSBVGA2
Menu Submenu Beschrijving
Right Breidt het bureaublad uit rechts van het hoofdscherm.
Extend To
Left Breidt het bureaublad uit links van het hoofdscherm.
Above Breidt het bureaublad uit bovenaan het hoofdscherm.
Below Breidt het bureaublad uit onderaan het hoofdscherm.
Extend Breidt het bureaublad uit naar uit tweede scherm.
Set as Main Monitor Stelt het tweede scherm in als hoofdscherm.
Notebook Monitor
Off
Mirror
Schakelt het scherm van een verbonden notebook uit en gebruikt
het scherm verbonden via de adapter als hoofdscherm.
Kopieert de inhoud van het hoofdscherm en geeft die weer op het
tweede scherm.
Off Schakelt het tweede scherm uit.
Optimize for Video
(enkel Windows 7
en Vista)
Configureert het tweede scherm voor een optimale videoprestatie op
een volledig scherm. Opmerking: Het is mogelijk dat de tekst
minder duidelijk verschijnt.
Advanced Opent het venster Display Settings (scherminstellingen).
Het scherm in uitgebreide modus zetten via het DisplayLink menu
In de uitgebreide modus breidt het Windows bureaublad zich uit naar het scherm verbonden met de adapter.
Dankzij de extra ruimte kunt u meerdere applicaties of documenten tegelijkertijd bekijken.
1. Klik op de DisplayLink-icoon .
2. Selecteer Extend.
Het bureaublad is nu uitgebreid in dezelfde richting als de laatste keer. Voor meer controle, kies het Extend to
submenu en selecteer één van de opties om het bureaublad uit te breiden links/rechts/boven/onder het
hoofdscherm.
Het scherm in spiegelmodus zetten via het DisplayLink menu
In spiegelmodus toont het scherm dat verbonden is met de adapter hetzelfde beeld als het hoofdscherm.
1. Klik op de DisplayLink-icoon .
2. Selecteer Mirror.
De resolutie, kleurdiepte en vernieuwingsfrequentie van het hoofdscherm worden gekopieerd naar het scherm
dat verbonden is met de adapter.
Het hoofdscherm past zijn eigen resolutie automatisch aan indien het scherm dat verbonden is met de adapter
een lagere resolutie ondersteunt. Zo wordt ervoor gezorgd dat het volledige beeld past op het tweede scherm.
Wanneer het scherm dat verbonden is met de adapter een groter formaat heeft dan het hoofdscherm, dan zal
het beeld in “brievenbusformaat” verschijnen (met zwarte balken) om de beeldverhouding te behouden.
Het scherm instellen met behulp van het Display Settings venster (schermeigenschappen)
1. Klik met de rechtermuisknop op het bureaublad.
2. Klik op Personalize (personaliseren).
V. 02 – 26/04/2012 27 ©Velleman nv
Page 28

PCUSBVGA2
3. Klik op Display Settings (scherminstellingen). Het venster Display Settings wordt geopend.
4. Selecteer het scherm dat u wilt instellen. De modus, resolutie, kleurkwaliteit en positie kunnen van hieruit
worden ingesteld.
Het scherm in uitgebreide modus zetten met behulp van het Display Settings venster
(schermeigenschappen)
1. Vink Extend the desktop onto this monitor aan (zie 1 in figuur hierboven).
2. Regel de schermresolutie met de schuifbalk Resolution (2).
3. Selecteer de kleurkwaliteit vanuit het uitrolmenu Colors (3).
4. Versleep de schermiconen zodat ze de werkelijke positie van de schermen weerspiegelen in het
sleepgebied (4).
5. Klik op OK om uw aanpassingen op te slaan.
Voor meer gedetailleerde instellingen, inclusief de vernieuwingsfrequentie, klik op de knop Advanced
Settings, vervolgens op de Adapter tab, en dan op de knop List all modes. Alle geldige combinaties van
resolutie, kleurkwaliteit en vernieuwingsfrequentie worden opgesomd in een lijst. Voor CRT-schermen is het
beter om een hoge vernieuwingsfrequentie te gebruiken om hinder door flikkering te voorkomen. Flatscreens
flikkeren niet en dus is een lage vernieuwingsfrequentie voldoende.
Het scherm in spiegelmodus zetten met behulp van het Display Settings venster
(schermeigenschappen)
1. Vink Extend the desktop onto this monitor af (zie 1 in figuur hierboven).
2. Klik op Apply.
Opmerking: De resolutie van het hoofdscherm en het tweede scherm worden eventueel ingesteld op een
lagere resolutie. In spiegelmodus zorgt het systeem er immers voor dat beide schermen dezelfde resolutie
gebruiken. Die resolutie kan afwijken van de maximale resolutie van het scherm.
Opmerking: Deze modus is NIET aangewezen als u het scherm verbonden via de adapter wilt gebruiken als
hoofdscherm voor een laptop, omdat de laptop waarschijnlijk niet de optimale resolutie voor het verbonden
scherm ondersteunt. Zie ook Het scherm instellen als hoofdscherm.
Het scherm instellen als hoofdscherm met behulp van het Display Settings venster
(schermeigenschappen)
Om het scherm verbonden via de adapter in te stellen als hoofdscherm:
1. Vink This is my main monitor aan (zie 1 in bovenstaande figuur).
2. Klik op Apply.
V. 02 – 26/04/2012 28 ©Velleman nv
Page 29

PCUSBVGA2
Opmerking: Voor bepaalde PC’s en laptops is het nodig om het hoofdscherm uit te schakelen. De reden
hiervoor is dat vele primaire grafische-kaartdrivers geneigd zijn om het scherm van de laptop automatisch als
hoofdscherm in te stellen indien het ingeschakeld is. Om dit te verhelpen schakelt u het scherm van de laptop
uit zodat een ander scherm als hoofdscherm kan ingesteld worden. Om dit te doen:
1. Vink This is my main monitor aan (zie 1 in bovenstaande figuur) voor het scherm verbonden via de
adapter.
2. Selecteer het hoofdscherm (scherm 1).
3. Vink Extend the desktop onto this monitor af (zie 1 in bovenstaande figuur).
4. Klik op Apply.
Het scherm verbonden via de adapter blijft het hoofdscherm indien de PC in sluimermodus of stand-by staat of
indien de PC herstart wordt. Als het scherm verbonden via de adapter wordt losgekoppeld, dan wordt het
andere scherm opnieuw het hoofdscherm.
Het scherm instellen als hoofdscherm via het DisplayLink menu
1. Klik op de DisplayLink-icoon op de taakbalk.
2. Selecteer Set as Main Monitor.
Laptop instellen om niets te doen bij het dichtklappen
Het is mogelijk om praktisch met een laptop te werken als die dichtgeklapt is, met het scherm verbonden via
de adapter als hoofdscherm, en met een extern toetsenbord en een externe muis. Hiervoor moet u de laptop
instellen om ‘niets’ te doen bij het dichtklappen.
Om een laptop in te stellen om niets te doen bij het bij het dichtklappen:
1. Selecteer Start > Control Panel > Power Options.
2. Selecteer Choose what closing the lid does.
3. In When I close the lid, kies Do nothing uit het uitrolmenu On battery and Plugged in.
8.3. De DisplayLink-software updaten
In het geval van Windows 7 maakt de DisplayLink-software verbinding met de Microsoft Windows update site
om de laatste versie van de DisplayLink-driver te verkrijgen. Selecteer Check for updates om een verbinding
te maken met de webpagina en de laatste softwareversie te downloaden en te installeren.
Automatisch updaten
Het automatisch updaten van DisplayLink is ondersteund op Windows 2000/XP en Vista. Het automatische
updatemechanisme zorgt voor de meeste recente drivers en software voor de adapter, zodat prestaties en
stabiliteit optimaal zijn.
Het is mogelijk om deze functie te deactiveren tijdens de installatie door het afvinken van Automatically
check for updates (links onderaan).
De update wizard gebruiken
Standaard is de automatische update geactiveerd. Wekelijks wordt naar de meest recente software gezocht na
het aansluiten van een adapter of na het opstarten van uw PC. Wanneer een nieuwe softwareversie beschikbaar
is, start de update wizard.
V. 02 – 26/04/2012 29 ©Velleman nv
Page 30

PCUSBVGA2
Handmatige updates
Om de software handmatig te updaten:
1. Klik op de DisplayLink-icoon . Het DisplayLink menu wordt geopend.
2. Selecteer Updates > Check Now.
Indien u de laatste softwareversie heeft, verschijnt een dialoogvenster. Zoniet wordt het venster Choose
updates to install geopend.
8.4. Geluidsinstellingen
Alvorens luidsprekers of een microfoon te gebruiken via de adapter, moet u uw applicaties correct instellen voor
het gebruik van het USB-geluidsapparaten, d.w.z. de audiocomponenten van de adapter.
Wanneer de adapter aangesloten is op uw computer, worden de geluidsapparaten automatisch geïnstalleerd (ze
krijgen de naam USB Audio Device). Hierdoor kunnen de standaard geluidsinstellingen in Windows
overschreven worden. Bijgevolg wordt uw muziek afgespeeld via de speakers verbonden met de adapter. Maar
misschien wilt u de originele geluidskaart gebruiken voor muziek, en de geluidspoort van de adapter om een
film af te spelen met behulp van media player software (zoals Windows Media Player, Real Player, WinDVD,
PowerDVD, etc.). In dat geval moet u de nodige geluidsapparaten manueel instellen voor elke applicatie.
Het Windows geluidssysteem instellen
Om een audioapparaat in te stellen voor het afspelen van muziek in Windows, opent u het Control Panel en
dubbelklikt op de geluidsicoon. Daarna selecteert u het gewenste apparaat in het gedeelte Playback. Indien u
uw oorspronkelijke geluidskaart wil gebruiken voor het afspelen van muziek, selecteer die dan in plaats van het
USB-geluidsapparaat (USB Audio Device).
V. 02 – 26/04/2012 30 ©Velleman nv
Page 31

PCUSBVGA2
Het geluidssysteem voor applicaties instellen
Om een film af te spelen via media player software met een hoofdtelefoon of speakers aangesloten via de
adapter, moet u controleren of de media player software (zoals Windows Media Player, Real Player, WinDVD,
PowerDVD, enz.) ingesteld is om het USB-geluidsapparaat (USB Audio Device) te gebruiken.
Om te chatten met de 'instant messaging'-software (expresberichten) met behulp van een hoofdtelefoon en
microfoon aangesloten via de adapter, moet u de chatsoftware, (zoals MSN messenger, Yahoo messenger of
Skype) ingestellen om het USB-geluidsapparaat (USB Audio Device) te gebrui ken.
8.5. De DisplayLink-software verwijderen
De werkwijze om de software te verwijderen verschilt lichtjes afhankelijk van uw besturingssysteem.
De adapter verwijderen in Windows:
1. Selecteer Start en vervolgens Control Panel.
2. In Programs, klik op Uninstall program.
V. 02 – 26/04/2012 31 ©Velleman nv
Page 32
PCUSBVGA2
3. Dubbelklik op DisplayLink Core software. Een confirmatiescherm wordt geopend (indien geactiveerd).
4. Klik op Yes.
Het is mogelijk dat er een bericht verschijnt met softwarepakketten die ook zullen worden verwijderd.
5. Klik op Yes om de pakketten te verwijderen die DisplayLink Core-software gebruiken.
Het programma verwijdert de software automatisch. Daarna vraagt het systeem u om de PC opnieuw op te
starten.
6. Klik op Yes om het verwijderen te voltooien.
8.6. Fit to TV
Waarom heb ik 'Fit to TV' nodig?
Indien u de adapter gebruikt om een tv aan te sluiten, is het mogelijk dat een deel van het bureaublad niet
zichtbaar is. Dit gebeurt omdat televisies de functie 'overscan' toepassen om de randen van een beeld te
verbergen. Bij het weergeven van een Windows desktop kan overscan zo iconen en taakbalk verbergen.
Gebruik 'Fit to TV' om het formaat van de Windows desktop te verkleinen zodat die volledig op het tv-scherm
past.
Opmerking: 'Fit to TV' werkt enkel in uitgebreide modus. Als het scherm verbonden via de adapter in
spiegelmodus staat, zal het automatisch aangepast worden naar uitgebreide modus en boven het hoofdscherm
geplaatst worden in het Display Properties venster (schermeigenschappen). 'Fit to TV' ondersteunt geen
gedraaide modi.
V. 02 – 26/04/2012 32 ©Velleman nv
Page 33

PCUSBVGA2
Instellen
1. Om 'Fit to TV' in te stellen, selecteer de optie in het DisplayLink menu. Het volgende scherm verschijnt:
U zal een rode rand zien op het DisplayLink-scherm. De rode rand toont het formaat van het nieuwe Windows
bureaublad.
2. Gebruik de “+” en “–” knoppen in het 'Fit to TV' venster om het formaat van de rode rand te veranderen
totdat het bureaublad past op het tv-scherm.
Opmerking: Fijne instelling van de rand kan door de CTRL-toets ingedrukt te houden terwijl u op de “+” en “–”
knoppen klikt.
3. Als de rode rand binnen de randen van het tv-scherm valt, klik op Apply om het Windows bureaublad aan
te passen.
8.7. Bijkomende informatie
Hier vindt u bijkomende informatie over het gebruik van de DisplayLink software.
Ondersteuning voor DirectX 10 games
Deze softwareversie biedt ondersteuning voor bepaalde DirectX 10 games in Windows 7. Om de ervaring
tijdens het gamen te verbeteren:
• deactiveer de anti-aliasinginstellingen (AA)
• activeer de functie 'Locking to vsync'.
Deze opties zijn doorgaans instelbaar in de DirectX 10 game.
Om 3D games met redelijke kwaliteit te kunnen spelen op een scherm verbonden met de adapter, moeten de
systeemeigenschappen voldoen aan de aanbevolen hardwarevereisten, niet enkel de minimumvereisten.
Schermkalibrering
Schermen kunnen gekalibreerd worden met applicaties die de 'Display Data Channel Command'-interface
gebruiken (DDC/CI). Zowel het scherm als de applicatie moeten hiervoor DDC/CI ondersteunen. Een voorbeeld
van zo een applicatie is ScreenWhite.
DDC/CI wordt niet ondersteund op schermen met geïntegreerde DisplayLink-technologie, bijvoorbeeld
minischermen.
Media afspelen
In Windows 7, Vista en Windows XP (in uitgebreide modus) kan de adapter mediabestanden en DVD's
weergeven met de volgende mediaspelers:
• Windows Media Player 11 (http://www.microsoft.com/windows/windowsmedia/default.mspx)
• WinDVD 8 (www.intervideo.com)
• PowerDVD 7 (www.cyberlink.com)
• RealPlayer 11 (www.real.com).
De adapter kan mediabestanden en DVD's weergeven met de meeste mediaspelers. Het is niet aanbevolen om
media af te spelen in spiegelmodus (XP) of in basismodus (Vista en Windows 7).
Meerdere adapters gebruiken
De software ondersteunt tot 6 gelijktijdig verbonden schermen via 6 adapters. Het kan ook dat verschillende
sets schermen gebruikt worden op verschillende tijdstippen, bijvoorbeeld twee schermen op kantoor en twee
andere thuis. De software bewaart elk schermprofiel afzonderlijk en ondersteunt hierdoor vier verschillende
fysieke posities of resoluties voor de schermen op kantoor en thuis.
V. 02 – 26/04/2012 33 ©Velleman nv
Page 34

PCUSBVGA2
Stand-by en sluimermodus, afsluiten en herstarten
Het scherm verbonden via de adapter wordt zwart als u de PC in stand-by of sluimermodus zet. Wanneer u de
PC opnieuw opstart (en ontgrendelt indien nodig), keert het aangesloten scherm terug in dezelfde modus als
voor stand-by of sluimermodus.
Als de PC uitgezet en herstart wordt en de gebruiker ingelogd heeft, ook dan keert het aangesloten scherm
terug in dezelfde modus als voor het uitzetten.
Adapters en meerdere gebruikers
De adapter functioneert met meerdere PC-gebruikers. De persoonlijke instellingen van elke gebruiker worden
opgeslagen zodat eenieder zijn of haar eigen configuratie kan gebruiken.
De adapter loskoppelen
Het scherm wordt zwart als de adapter of de USB-kabel losgekoppeld wordt van de computer. Alle vensters en
iconen verschuiven naar het hoofdscherm.
Bij het heraansluiten of inschakelen van de adapter keert het tweede scherm terug in dezelfde modus als voor
het loskoppelen. Opgelet: vensters en iconen die naar het hoofdscherm verschoven werden, worden niet
teruggeplaatst naar het tweede scherm.
Ondersteunde schermmodi
De schermmodus bestaat uit drie onderdelen:
• Resolutie: het aantal pixels dat horizontaal en verticaal wordt weergegeven op het scherm
• Kleurkwaliteit: het aantal verschillende kleuren dat gelijktijdig kan weergegeven worden op het scherm
• Vernieuwingsfrequentie: de snelheid waarbij het volledige scherm opnieuw gescand wordt. Hogere
vernieuwingsfrequenties beperken flikkering.
Bepaalde schermen geven de ondersteunde modi door via de VGA- of DVI-connector. Indien dit het geval is,
identificeert de adapter de modi die het scherm ondersteunt. Indien het scherm de ondersteunde modi niet
doorgeeft, selecteert de software van adapter enkele standaardmodi voor het scherm.
Afgeleide modi
Bepaalde modi in het DisplayLink-menu worden weergegeven tussen haakjes
[ ]. Dit gebeurt als u een scherm aansluit met een voorkeurresolutie die
groter is dan de maximale ondersteunde resolutie van de adapter.
In dit geval wordt de voorkeurresolutie van het scherm niet ondersteund. De
DisplayLink-software stelt dan lagere resoluties ter beschikking met dezelfde
beeldverhouding. Modi tussen haakjes [ ] betekenen dat deze modi niet door
het scherm werden doorgegeven maar toch door de DisplayLink-software
beschikbaar zijn gemaakt om te proberen.
Omdat deze modi afgeleid zijn van de voorkeurmodus van het scherm, is het
niet zeker dat deze zullen functioneren met het scherm.
Foutmeldingen
De DisplayLink-software geeft af en toe gebruikersberichten weer in het berichtvak. Hieronder een lijst met de
gebruikersberichten en beschrijving.
Bericht Beschrijving
Onvoldoende systeembronnen om
de gevraagde service uit te
voeren
Dit bericht kan verschijnen als u een scherm in uitgebreide modus zet
wanneer het systeem te weinig resources heeft. De PC heeft onvoldoende
geheugen om een uitgebreid scherm te activeren. Sluit alle niet gebruikte
applicaties. De situatie zou kunnen verbeteren bij het herstarten van de PC.
Toegekend formaat is te groot Dit bericht verschijnt bij het spiegelen van een hoofdscherm met een
resolutie hoger dan 2300x1700 (4:3) of 2600x1500 (16:9).
Dit bericht verschijnt als de driver van de primaire grafische kaart niet
Incompatibele scherm driver
compatibel is met WDDM. Windows 7 is niet ontworpen om zonder WDDM
driver te functioneren. Download en installeer de laatste Windows 7
(WDDM) driver voor uw primaire grafische kaart.
Dit bericht kan verschijnen in Windows XP na het meermaals wijzigen van
Het systeem heeft geen toegang
tot het geselecteerde apparaat
de schermmodus (bv. uitgebreide/docking modus) vanuit de DisplayLink-
software. Als dit gebeurt, koppel het toestel los en sluit het opnieuw aan om
de normale werking te herstellen.
V. 02 – 26/04/2012 34 ©Velleman nv
Page 35

PCUSBVGA2
Voor meer ondersteuning
http://www.displaylink.com/support
9. Problemen en oplossingen
Kleine problemen kunnen meestal opgelost worden door:
• het scherm los te koppelen en opnieuw aan te sluiten
• de schermmodus aan te passen via de DisplayLink-software
• of de schermmodus te veranderen via Windows Display Properties (schermeigenschappen).
In Windows 7/Vista WDDM (Aero en Basic)
De DisplayLink-software werkt nauw samen met de grafische kaart en hierdoor kunnen er
compatibiliteitsproblemen ontstaan met bepaalde grafische kaarten. Als dit gebeurt:
1. Installeer de meest recente grafische drivers.
2. Installeer de meest recente DisplayLink-versie.
3. Meld het probleem via uw kanaal voor technische ondersteuning.
4. Indien nodig, start op in veilige modus (Safe Mode) en gebruik de Windows functies voor back-
up/terugplaatsen om de situatie te herstellen.
10. Mac OS gebruikshandleiding
Deze handleiding is van toepassing op Mac-software versie 1.0 en hoger.
Wat is de Mac driver?
De Mac driver is ontworpen voor MAC OS 10.4 (Tiger), 10.5 (Leopard) en 10.6 (Snow Leopard) om een extra
scherm via DisplayLink-technologie te kunnen aansluiten op uw Mac. Met deze software kunnen uw adapters
gebruikt worden met elke Intel-gebaseerde desktop of laptop Mac, waardoor u tot 4 extra schermen kunt
aansluiten via USB.
Belangrijke opmerking: Macintosh computers met PowerPC-processor (bijv. recente modellen van iMac,
PowerBook en Power Mac) worden niet ondersteund.
Wat is nog vereist om deze driver te gebruiker?
Behalve een Intel-gebasserde Mac met de laatste Mac OS versie 10.4, 10.5 of 10.6, is er ook een adapter
nodig. Er is één adapter nodig per scherm dat u wenst aan te sluiten op uw Mac.
Installatiegids – de Mac driver installeren/verwijderen
1. Dubbelklik op de Mac Driver Installer.
2. Selecteer Software Installer om de installatie van de
Mac driver te starten. Herstart de computer nadat de
installatie voltooid is.
3. Selecteer User Guide om de gebruikshandleiding te
openen.
4. Selecteer Software Uninstaller om de Mac driver te
verwijderen van uw Mac. Herstart de computer na het
verwijderen.
V. 02 – 26/04/2012 35 ©Velleman nv
Page 36

PCUSBVGA2
Schermen aansluiten op uw Mac
Na de installatie van de Mac driver, sluit uw adapter(s) aan via USB en verbind elk scherm met een adapter.
U kunt nu tot 4 extra schermen aansluiten. Enkele voorbeelden hieronder:
Voorbeeld 1: twee schermen verbinden met een MacBook Pro. Verbindt de MacBook Pro met de twee
schermen met USB-kabels en twee adapters. Koppel de schermen aan de adapters via standaard VGA/DVIkabels.
Voorbeeld 2: drie schermen verbinden met een MacBook Air. Verbindt de MacBook Air met een standaard
USB-hub. Koppel de drie schermen aan de hub via adapters. Koppel de schermen aan de adapters via
standaard VGA/DVI-kabels.
Meerdere schermen aansturen
• Het scherm breidt automatisch uit naar rechts
van het hoofdscherm bij het aansluiten van een
scherm dat de software niet herkent.
• Om de schermen in te stellen, open System
Preferences en kies Displays op elk scherm.
• Gebruik de Gather Windows knop om alle
Display Preferences vensters op het
hoofdscherm te plaatsen.
Schermvoorkeuren
Schermresolutie
Scherm draaien
Schermpositie
Spiegelen
Uitbreiden
Gebruik van zowel uitgebreide als gespiegelde
schermen
Het hoofdscherm kiezen
V. 02 – 26/04/2012 36 ©Velleman nv
Page 37

PCUSBVGA2
Schermen instellen via de menubalk
Als de optie Show displays in menu bar aangevinkt is in het Display Preferences paneel, kunt u schermen
instellen via de schermicoon in de menubalk.
Via dit menu kunt u:
• alle schermen verbonden met de Mac detecteren
• spiegelen in- en uitschakelen
• de resolutie instellen van hoofdscherm en extra scherm(en)
• het Display Preferences paneel openen.
11. Technische specificaties
resolutie tot 1600x1200 of 1920x1080 Digital (@60Hz 32-bits)
vrije USB 2.0-poort
systeemvereisten
inhoud
verbruik 5V
afmetingen 106 x 48 x 18mm
capaciteit tot 6 schermen tegelijk
Gebruik dit toestel enkel met originele accessoires. Velleman nv is niet aansprakelijk voor schade of
kwetsuren bij (verkeerd) gebruik van dit toestel. Voor meer informatie omtrent dit product en de
meest recente versie van deze handleiding, zie www.velleman.eu.
De informatie in deze handleiding kan te allen tijde worden gewijzigd zonder voorafgaande
kennisgeving.
Alle geregistreerde handelsmerken en handelsnamen zijn eigendom van hun respectievelijke bezitters, en zijn
enkel gebruikt als voorbeeld van de compatibiliteit tussen onze producten en de producten van de verschillende
fabrikanten.
Windows XP, Windows 2000, Windows Vista, Windows Aero, Windows 7, Windows Server zijn geregistreerde
handelmerken van Microsoft Corporation in de Verenigde Staten en andere landen. Mac, Mac OS, iMac,
PowerBook, Power Mac zijn handelsmerken van Apple Inc., geregistreerd in de V.S. en andere landen.
Besturingsysteem: Windows 2000 SP4, XP SP2, Vista 32/64-bit met Aero-
ondersteuning, Windows 7 32/64-bit
1 x USB naar DVI adapter
1 x beknopte handleiding
1 x CR-ROM met handleiding en software installatie
1 x USB 2.0 kabel (1m20)
1 x DVI naar VGA adapter
1 x DVI naar HDMI adapter
1 x 3.5mm stereo jack naar RCA adapter
V. 02 – 26/04/2012 37 ©Velleman nv
Page 38

.
uDeNo
p
.3.
.
apro
o
u
s
t
y
m
v
e
a
m
a
gn
a
ide
h
tpr
evepla
v
r
d
o
q
e
t
a
o
n
é
d
I
p
n
o
n
u
é
t
v
t
c
o
e
v
e
u
é
e
é
o
r
i
t
q
n
o
o
e
u
o
a
n
o
a
a
d
n
u
t
c
m
e
o
c
m
o
b
e
é
s
e
e
é
u
a
P
c
a
n
s
r
u
s
v
r
r
’
b
n
é
o
e
r
o
u
m
é
t
a
o
G
D
m
e
e
e
c
u
r
c
t
o
o
î
r
P
n
c
r
e
n
e
e
n
o
t
c
e
s
e
M
p
o
é
c
e
é
e
u
h
u
e
i
m
l
e
r
n
f
e
e
t
c
m
n
s
s
f
e
e
m
’
a
q
m
c
m
q
e
e
e
l
r
e
n
f
g
t
t
r
u
t
c
t
p
a
f
U
r
n
e
o
t
e
t
o
CUSBVGA
2
1
Introd
A
x résident
s informa
us vous re
l’a
pareil. Si l’
2
Consi
ions envir
Ce s
er l'environ
pollu
par
Ren
de r
En c
G
R
ré
paration.
n’y a aucun
Il
c
ction
de l'Unio
mbole sur l
i les déchet
oyer les éq
specter la r
s de ques
ercions de
ppareil a é
es de s
rder hors d
sque d’éle
s électroch
ez votre re
europée
nnementa
'appareil ou
ement. Ne
s municipau
ipements u
glementati
ions, cont
otre achat
é endomm
écurité
e la portée
trocution
cs mortels.
pièce mai
endeur.
Noti
ne
les import
l'emballage
pas jeter u
x non sujet
sagés à vot
n locale rel
cter les a
! Lire la pré
gé pendant
es enfants
lors de l’ou
Ne pas ouv
tenable pa
e d’e
ntes conc
indique qu
appareil él
au tri séle
e fournisse
ative à la p
torités lo
ente notice
le transpor
et des pers
erture du b
ir pas le bo
l’utilisateu
ploi
rnant ce
l’éliminati
ctrique ou
tif ; une dé
r ou à un s
otection de
ales pour
attentivem
, ne pas l’in
nnes non a
îtier. Touc
tier et cons
. Command
roduit
n d’un appa
lectronique
hèterie trai
rvice de re
l’environne
liminatio
nt avant la
staller et co
torisées.
er un câble
lter un per
r des pièce
reil en fin d
(et des pile
era l’appar
yclage loca
ent.
.
mise en se
nsulter votr
sous tensio
onnel quali
s de rechan
vie peut
s éventuell
il en questi
. Il convien
vice de
revendeur
peut caus
ié pour tou
e éventuell
s)
n.
.
r
e
es
Directi
Se
référer à la
•
Se familia
•
Toute mo
modificati
•
N’utiliser
•
La garanti
votre reve
Garder ce
•
Ni Vellem
•
imprévus
l’utilisatio
U
iliser cet ap
ojections d’
boîtier cha
L
ntilation ad
cer l’appar
es gén
Garantie d
Protéger
ventilati
tout aut
Protéger
iser avec le
ification est
ns par le cl
u’à sa fonc
ne s’appli
ndeur décli
te notice p
n nv ni ses
u indirects,
ou le dysf
pareil uniq
au. Ne jam
ffe pendan
quate. Pla
il sur une
rales
e service
contre la p
n ne soient
e objet.
contre les
fonctionne
interdite p
ent ne tom
ion prévue.
ue pas aux
era toute r
ur toute réf
distributeur
quelles qu
nctionneme
ement à l'
ais placer d
l’usage. Li
er l’appareil
oquette, u
t de qualit
ussière. Pr
pas bloqué
hocs et le t
ent avant l
ur des rais
ent pas so
Un usage i
dommages
sponsabilit
rence ultér
ne peuven
soient la n
nt de ce pr
intérieur.
objet conte
érer l’espa
sur une su
tapis, du t
Vellema
téger contr
s. Laisser u
aiter avec c
’emploi.
ns de sécur
s la garanti
propre ann
survenus e
pour les pr
ieure.
être tenus
ture (finan
duit.
rotéger de l
ant un liqu
e autour de
face plate e
xtile…
® en fin de
la chaleur
ne distance
irconspectio
té. Les do
.
ule d'office l
négligeant
blèmes et
responsabl
ière, corpo
a pluie, de l
de sur l’app
l’appareil a
t résistante
cette notic
extrême. V
de minimu
n pendant l
mages occ
a garantie.
certaines di
es défauts
s des dom
elle, etc.),
’humidité e
areil.
in de garan
à la chaleu
.
iller à ce q
2,5 cm en
opération.
sionnés par
rectives de
ui en résul
ages exce
ausés par l
des
ir une
. Éviter de
e les fentes
re l’apparei
des
ette notice
ent.
tionnels,
possession
de
l et
et
,
4
Caract
L'
daptateur d
jecteur ad
dé
faut est DV
ntenu: ada
C
(±
1m20), ada
V.
02 – 26/04/2
ristiqu
'affichage a
itionnel à v
, mais l'app
tateur USB
ptateur DVI
012
s
format US
tre ordinat
reil est livr
vers DVI, g
vers VGA,
B PCUSBV
ur par un p
avec deux
ide rapide,
daptateur
A2 vous p
ort USB 2.0
adaptateur
CR-ROM av
VI vers HD
38
rmet de co
libre sans c
pour un af
c mode d'
I, adaptat
necter un
arte graphi
icheur VGA
mploi et log
ur stéréo d
oniteur, af
ue. Le port
ou HDMI.
iciel, câble
3.5mm ve
icheur LCD
de sortie pa
SB 2.0
s RCA.
©Vellema
u
r
nv
Page 39

PCUSBVGA2
• modes d'affichage :
o permet d'inverser l'image principale facilement
o étendre vers la gauche, la droite, le haut ou le bas
o peut être tourné à gauche, à droite et à l'envers
o supporte DVI, VGA et HDMI
• modes audio :
o sortie audio 2.1 canaux
o entrée de microphone
o interface avec sortie mixte RCAx2 (piste de gauche et de droite)
• alimentation par USB 2.0 : consommation très faible
• compression sans pertes
• pour des afficheurs CRT, LCD, projecteurs
• supporte : Windows Vista Aero, XP et Vista 32 bits
• formats d'image standard et widescreen
• mémoire DDR de haute performance
• utilise un driver virtuel
• fonctionnement complètement insonore
• LED d'état et de tension
• portable, facile à emporter en voyage.
5. Système requis
Le logiciel DisplayLink convient aux ordinateurs avec un des systèmes d'exploitation suivants :
• Windows 7 (32/64 bits)
• Windows Vista avec Service Pack 1 ou 2 (32/64 bits)
• Windows XP Home ou Professional (Windows XP Édition Tablet incl.) avec Service Pack 2 ou 3
• Windows 2000 avec Service Pack 4.
Remarques :
• Les versions de XP en 64 bits ni les éditions de Windows Server ne sont pas supportées.
• Pour le support Mac OS, veuillez voir sur http://www.displaylink.com/mac
• Pour le support Linux, veuillez voir sur http://libdlo.freedesktop.org/wiki/ ou http://www.displaylink.org
Langues supportées
Les langues suivantes sont supportées par tous les systèmes d'exploitation supportés :
arabe / indonésien / bulgare / chinois (traditionnel) / chinois (simplifié) / croate / tchèque / danois /
néerlandais / anglais / finnois / français / grec / coréen / allemand / hongrois / italien / japonais / norvégien /
polonais / portugais / russe / slovaque / slovène / espagnol / suédois / turc
Remarque : Le langage standard est l'anglais.
Windows Vista / Windows 7
Pour Windows Vista/Windows 7, l'indice de performance (WEI) est un moyen pratique pour mesurer la capacité
de la configuration matérielle. Sélectionnez Computer > Properties, ou sélectionnez Control Panel >
System.
Les prérequis recommandés pour l'ordinateur sont :
• L'indice de performance doit au moins être 3 dans la catégorie ‘Graphics; Desktop performance for Windows
Aero’
• L'indice de performance totale doit au moins être 3 comme recommandé par Microsoft
• Au moins 1 port USB 2.0 libre
• 30 Mo d'espace libre sur le disque dur
• Afficheur d'ordinateur, si l'afficheur n'est pas intégré.
Windows XP
• Pour 1-2 écrans, usage commercial, productivité élevée. En plein écran, la vitesse d'image maximale durant
la lecture de DVD ne peut pas être assurée:
processeur CPU de 1.2 GHz d'un seul noyau (simple core), mémoire de 512Mo.
• Pour 3 écrans dont 1 peut lire un DVD en format vidéo et fournir en même temps une productivité élevée et
des applications commerciales. Ne supportera que 1 vidéo avec résolution de DVD en plein écran :
CPU de 1.6GHz, mémoire de 1Go.
V. 02 – 26/04/2012 39 ©Velleman nv
Page 40

PCUSBVGA2
• Pour 6 écrans dont 1 peut lire DVD en format vidéo en plein écran :
Core Duo 1.8GHz, mémoire de 1Go.
• Au moins 1 port USB 2.0, 30 Mo d'espace disque disponible.
• Afficheur d'ordinateur, si l'afficheur n'est pas intégré.
• Accès au réseau pour télécharger du logiciel, ou accès au lecteur de CD-ROM.
Cartes graphiques (Windows Vista/Windows 7)
Le logiciel DisplayLink ne fonctionne qu'avec des cartes graphiques primaires. Displ ayLink supporte et teste la
carte graphique (GPU) installée sur un pc de tous les fabricants de marques importantes GPU (Intel, ATI, NVidia
et Via)
Les configurations GPU suivantes peuvent causer des problèmes de compatibilité sur Windows 7 et Vista :
• Switchable Graphics (ATI/Intel)
• Switchable Graphics (ATI/ATI)
• Switchable Graphics (NVIDIA/Intel)
• NVIDIA SLI en mode SLI.
Autres configurations GPU, parmi les suivantes, ne sont pas supportées et ne fonctionnent pas sous
Windows 7/Vista :
• Hybrid Graphics
• Hybrid SLI
• Hybrid Crossfire
• Crossfire
• SLI pas en mode SLI
• Plusieurs cartes graphiques 1.1 sont activées simultanément.
Cartes graphiques (Windows XP)
Toutes les cartes graphiques sont supportées sous Windows XP.
6. Connexion du matériel informatique
Connecter l'adaptateur à l'ordinateur et à l'afficheur
1. Connectez l'extrémité la plus étroite du câble USB à l'adaptateur.
2. Ensuite, connectez l'autre extrémité du câble USB à un port USB
2.0 de l'ordinateur.
3. Si votre afficheur n'est pas encore connecté à l'adaptateur, faîtes
la connexion et activez l'afficheur.
Connectez au CRT, LCD, TV, projecteur, haut-parleur, etc.
connexion VGA via
adaptateur DVI vers VGA
V. 02 – 26/04/2012 40 ©Velleman nv
connexion DVI
connexion HDMI via
adaptateur DVI vers HDMI
Page 41
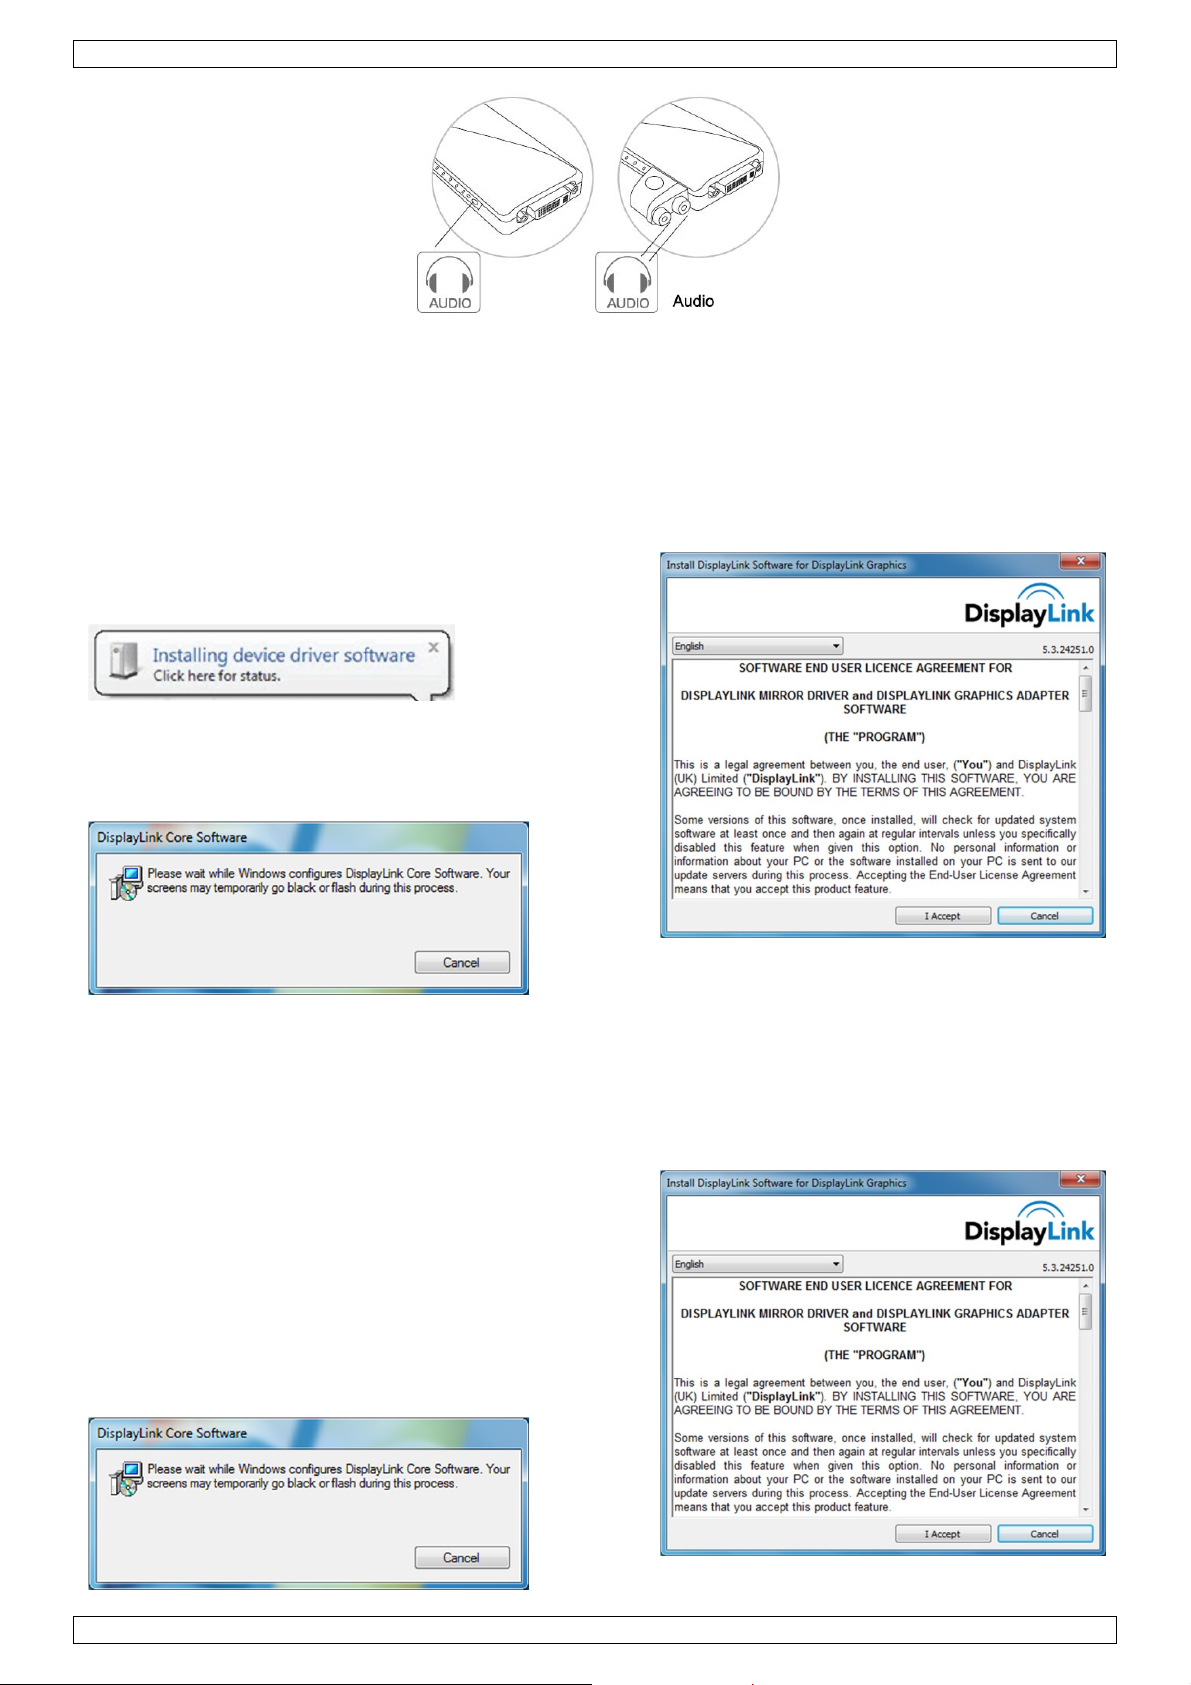
PCUSBVGA2
connexion audio
7. Installer le logiciel
Remarque : Si le logiciel DisplayLink v3.x, R4.1 ou R4.2 a été installé, désinstallez-le avec la fonction Windows
Add/Remove Programs avant d'installer ce logiciel.
7.1. Installer le logiciel sous Windows 7 Update
La méthode préférée pour l'installation est la facilité 'Windows Update'.
1. Connectez votre appareil USB avec le câble USB à
l'ordinateur. Windows reconnaît le nouveau hardware et
télécharge le pilote automatiquement.
2. L'installation démarre après avoir téléchargé le logiciel.
La fenêtre du logiciel DisplayLink s'affiche avec le contrat de
licence utilisateur s'ouvre.
3. Cliquez sur I Accept. Le logiciel DisplayLink Core
s'installe.
Remarque : Il est possible que l'écran clignote ou devient
noir durant l’installation.
7.2. Installer le logiciel sous Windows 7/Vista/XP/2000
Il est également possible d'installer le logiciel par téléchargement ou d'un CD-ROM.
Important ! Ne connectez pas un appareil DisplayLink à l'ordinateur avant d'avoir installé le logiciel.
1. Si l'option Autorun est activée dans le système
d'exploitation, l'installation est lancée automatiquement
depuis le CD-ROM. Sinon, recherchez le fichier Setup.exe
sur le CD-ROM et double-cliquez sur Setup.exe. La fenêtre
"Windows User Account Control" s'ouvre (si activée dans le
système d'exploitation).
2. Cliquez sur Yes. La fenêtre du logiciel DisplayLink avec
le contrat de licence utilisateur s'affiche.
3. Cliquez sur I Accept. Le logiciel DisplayLink Core et
'DisplayLink Graphics' s'installent sans notification que
l'installation est co mp lète.
V. 02 – 26/04/2012 41 ©Velleman nv
Page 42
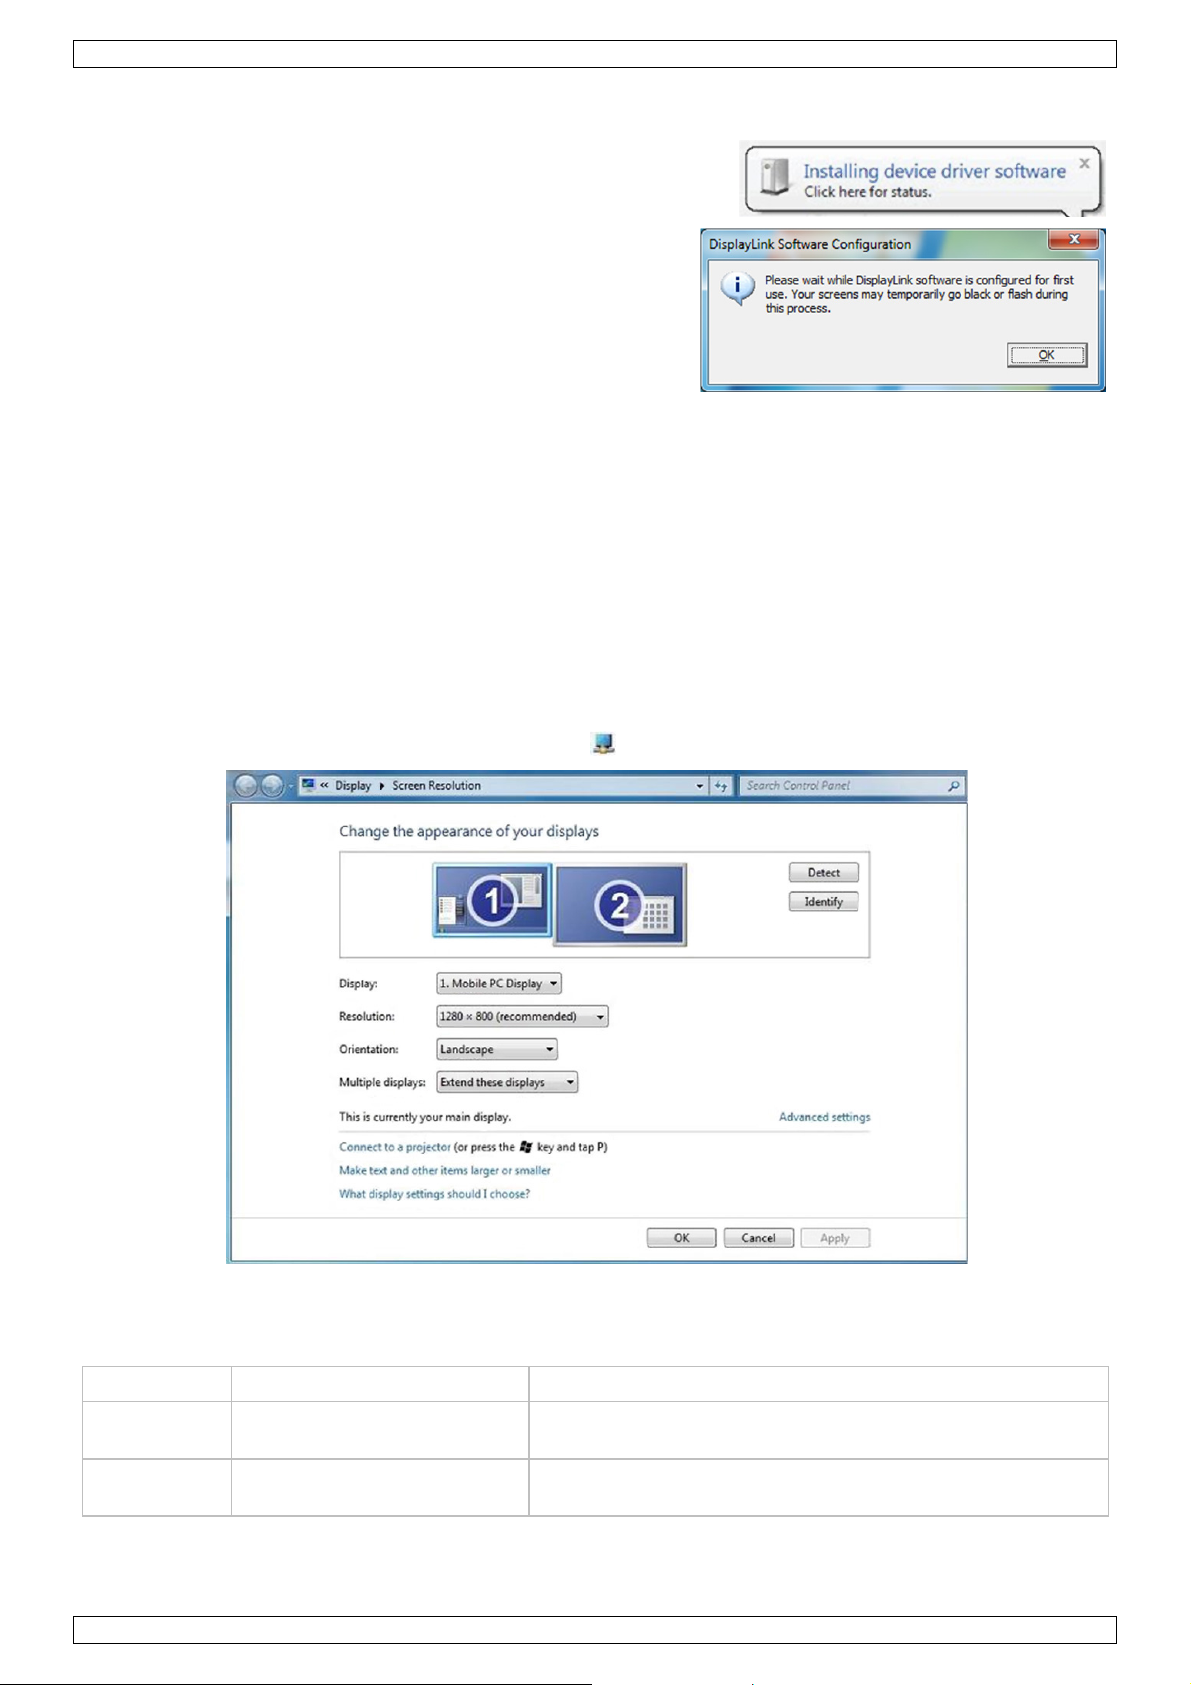
PCUSBVGA2
Remarque : Il est possible que l'écran clignote ou devient
noir durant l'installation.
4. Connectez l'adaptateur à votre ordinateur avec le câble
USB. La fenêtre pour installer le pilote de l'appareil
s'affiche:
5. Cliquez sur Yes. DisplayLink installe l'appareil
automatiquement. La fenêtre du logiciel DisplayLink avec le
contrat de licence utilisateur s'affiche (voir ci-dessus).
6. Cliquez sur I Accept. Le logiciel DisplayLink s'installe
sans notification que l'installation est complète.
Remarque : Parfois, il est nécessaire de réinitialiser avant
d'utiliser l'adaptateur.
8. Utiliser le logiciel DisplayLink
8.1. Windows 7 – Regler l'afficheur
Sous Windows 7, il est possible de régler un afficheur en utilisant 'Windows Display Properties' (WDP/propriétés
d'affichage). WDP offre une méthode pour attacher, roter, copier ou étendre des écrans ainsi que de modifier la
résolution de l'écran.
Ouvrir WDP
Il existe plusieurs manières pour ouvrir la fenêtre WDP. A savoir :
• Cliquez avec le bouton droit sur le bureau de votre ordinateur et sélectionnez Screen Resolution dans le
menu.
• Sélectionnez Start > Devices and Printers – double-cliquez sur l'icône DisplayLink Device.
• Cliquez avec le bouton droit sur l'icône DisplayLink – cliquez sur Advanced.
Régler l'afficheur
1. Ouvrez WDP.
2. Réglez les options de l'afficheur. Consultez la table ci-dessous pour voir les détails:
Menu Sous-menu Description
Display
Resolution
V. 02 – 26/04/2012 42 ©Velleman nv
Utilisez le menu à déroulement vertical pour sélectionner un
afficheur à configurer.
Utilisez le menu à déroulement vertical et la barre de
défilement pour choisir une résolution.
Page 43

PCUSBVGA2
Menu Sous-menu Description
Landscape Réglage de l'afficheur en mode paysage.
Portrait Réglage de l'afficheur en mode portrait.
Orientation
Landscape (flipped) Réglage de l'afficheur en mode paysage inversé.
Portrait (flipped) Réglage de l'afficheur en mode portrait inversé.
Duplicates these displays Reproduit l'afficheur principal sur l'afficheur secondaire.
Extend these displays Etend l'afficheur principal vers l'afficheur secondaire.
Multiple
Shows Desktop only on 1
displays
Shows Desktop only on 2
Le bureau apparait sur l'afficheur marqué par 1. L'afficheur
marqué par 2 n'affiche plus aucune image.
Le bureau apparait sur l'afficheur marqué par 2. L'afficheur
marqué par 1 n'affiche plus aucune image.
Sélectionner un mode d'affichage
Pour contrôler le fonctionnement d'un afficheur connecté, utilisez la combinaison de touches Windows + P pour
afficher un menu (et de parcourir dans le menu) et d'ajuster le mode d'affichage.
1. Appuyez sur Windows + P et le menu suivant apparait.
2. Cliquez sur une des options. Les afficheurs s'ajustent en fonction de la sélection.
L'icône DisplayLink
Il est possible de configurer le fonctionnement de l'adaptateur avec l'icône' DisplayLink'
dans la barre des tâches.
Pour afficher le menu DisplayLink Manager :
1. Depuis la barre des tâches, cliquez sur la flèche Show hidden icons pour afficher
tous les icônes disponibles.
2. Cliquez sur l'icône DisplayLink .
Un menu apparaît avec plusieurs options. Veuillez voir la table suivante.
Menu Description
Check for updates
Se connecte à Windows Updater, recherche des versions plus
récentes et les télécharge si serait nécessaire.
Sélectionnez cette option pour une meilleure qualité de lecture
Optimize for Video
à l'écran connecté par l'adaptateur. Sélectionnez cette option
uniquement s'il est possible de lire une vidéo. Remarque : Il
se peut que le texte apparaisse moins clair.
Advanced Ouvrez la fenêtre Windows Display Properties (WDP)
V. 02 – 26/04/2012 43 ©Velleman nv
Page 44

PCUSBVGA2
8.2. Windows Vista/XP/2000 – Paramétrer l'afficheur
Le menu DisplayLink Manager
L'icône DisplayLink apparaît dans la barre des tâches après avoir ajouté un appareil. Cela vous donne accès au
menu DisplayLink manager. Pour utiliser le menu DisplayLink Manager:
1. Cliquez sur l'icône DisplayLink dans la barre des tâches. Le menu suivant s'affiche.
2. Sélectionnez une des options disponibles. Veuillez voir la table suivante.
Menu Sous-menu Description
Check Now
Updates
Configure
Screen Resolution
Colour Quality
Screen Rotation
Extend To
Extend Extension de votre bureau vers l'afficheur secondaire.
Affiche une liste de résolutions disponibles. Certaines résolutions
Medium (16-bit) Ajuste la profondeur de couleur de l'afficheur secondaire vers 16
Highest (32-bit) Ajuste la profondeur de couleur de l'afficheur secondaire vers 32
Normal Pas de rotation de l'afficheur connecté par l'adaptateur
Rotated Left Rotation de l'afficheur secondaire ou miroité avec 270°.
Rotated Right Rotation de l'afficheur secondaire ou miroité avec 90°.
Upside-Down Rotation de l'afficheur secondaire ou miroité avec 180°.
Right Extension de l'afficheur vers le droit de l'afficheur principal.
Left Extension de l'afficheur vers la gauche de l'afficheur principal.
Above Extension de l'afficheur en haut de l'afficheur principal.
Below Extension de l'afficheur en bas de l'afficheur principal.
Se connecte au Update Server, recherche les versions les plus
récentes et le télécharge s'il serait nécessaire.
Ouvre la fenêtre d'options pour configurer les actualisations
automatiquement.
peuvent être inclus par [ ]. Consultez le chapitre Modes dérivés.
bits.
bits
Set as Main Monitor Règle l'afficheur secondaire comme afficheur principal.
Notebook Monitor
Off
Mirror
Off Désactivation de l'afficheur secondaire.
Optimize for Video
(seulement Vista et
Windows 7)
Advanced Ouvre la fenêtre Display Properties (Propriétés d'affichage).
V. 02 – 26/04/2012 44 ©Velleman nv
Désactivation l'afficheur d'un ordinateur ajouté et utiliser l'afficheur
ajouté comme afficheur principal avec l'adaptateur.
Reproduction du contenu de la'afficheur principal et l'affiche sur
l'afficheur secondaire.
Configuration de l'afficheur secondaire pour une performance de
lecture de vidéo optimale à plein écran. Remarque : Il se peut que
le texte apparaisse moins clair.
Page 45

PCUSBVGA2
Mettre l'afficheur en Mode Extension en utilisant le menu DisplayLink
En mode extension, le bureau Windows s'étend vers un afficheur ajouté à l'adaptateur. Ce mode permet de
visualiser plusieurs applications ou documents simultanément.
1. Cliquez sur l'icône DisplayLink .
2. Sélectionnez Extend.
A présent, l'appareil est étendu dans la même direction que la dernière fois. Pour plus de contrôle, sélectionnez
le sous-menu Extend to et sélectionnez une des options pour étendre le bureau vers le gauche/droit/haut/bas
de l'afficheur principal.
Mettre l'afficheur en Mode Miroir en utilisant le menu DisplayLink
En mode miroir, l'afficheur connecté à l’adaptateur reproduit le même contenu de l'afficheur principal.
1. Cliquez sur l'icône DisplayLink .
2. Sélectionnez Mirror.
La résolution, profondeur de couleur et la fréquence de rafraîchissement de l'afficheur principal sont reproduites
sur l'afficheur connecté à l’adaptateur.
L'afficheur principal ajustera sa résolution automatiquement si l'afficheur connecté à l’adaptateur supporte une
résolution moins élevé e. Ainsi l'image complèt e s'arrange sur l'afficheur secondaire. Si l'afficheur connecté à
l’adaptateur supporte une résolution plus élevée que celle de l'afficheur principal, l'image sera en format
d'affichage letterboxé (barres noires) pour maintenir le format d'image correct.
Configurer l’afficheur en utilisant la fenêtre Display Properties (Propriétés d'affichage)
1. Cliquez avec le bouton droit sur le bureau.
2. Cliquez sur Personalize (individualiser).
3. Cliquez sur Display Settings. La fenêtre Display Settings s'ouvre.
4. Sélectionnez l'afficheur que vous souhaitez configurer. Il est possible de configurer le mode, la résolution,
la qualité de couleur et la position.
Mettre l'afficheur en Mode Extension en utilisant la fenêtre Display Properties (propriétés
d'affichage)
1. Marquez la case Extend the desktop onto this monitor (1 sur image ci-dessous).
2. Ajustez la résolution d'affichage avec la barre de défilement horizontale Resolution (2).
3. Sélectionnez la qualité de couleur dans le menu à déroulement vertical Colors (3).
4. Ajustez la position des icônes pour réfléter la position actuelle des afficheurs en sélectionnant la zone (4).
5. Cliquez sur OK pour mémoriser vos ajustements.
Pour paramétrer plus en détail, y compris la fréquence de rafraîchissement, cliquez sur la touche Advanced
Settings, puis sur l'onglet Adapter et ensuite sur la touche List all modes. La liste inclut toutes les
combinaisons valables pour la résolution, qualité de couleur et la fréquence de rafraîchissement. Pour des
afficheurs CRT, utilisez une fréquence de rafraîchissement élevée pour éviter une image scintillante. Les écrans
plats ne scintillent pas et peuvent sélectionner une fréquence de rafraîchissement plus basse.
V. 02 – 26/04/2012 45 ©Velleman nv
Page 46

PCUSBVGA2
Mettre l'afficheur en Mode Miroir en utilisant la fenêtre Display Properties (propriétés d'affichage)
1. Désélectionnez Extend the desktop onto this monitor (1 sur l'image ci-dessus).
2. Cliquez sur Apply.
Remarque : Il est possible de diminuer la résolution de l'afficheur principal et l'afficheur DisplayLink. En mode
miroir, assurez-vous que les deux afficheurs ont la même résolution. Il se pourrait que cette résolution diffère
de la résolution maximale de l'afficheur.
Remarque : N'utilisez pas ce mode si vous utilisez l'afficheur connecté à l'adaptateur comme afficheur principal
d'ordinateur portable parce que l'ordinateur portable ne peut pas offrir la résolution optimale. Veuillez voir
Configurer l'afficheur comme afficheur principal.
Mettre l'afficheur comme afficheur principal en utilisant la fenêtre Display Properties (propriétés
d'affichage)
Pour configurer l'afficheur connecté à l'adaptateur comme afficheur principal :
1. Marquez la case This is my main monitor (1 sur l'image ci-dessus).
2. Cliquez sur Apply.
Remarque : Pour certains ordinateurs, il est nécessaire de désactiver l'afficheur principal parce que, s'il serait
possible, beaucoup de pilotes de cartes graphiques primaires tendent à rendre l'afficheur de l'ordinateur
portable principal si activé. Par conséquent, désactivez l'afficheur de l'ordinateur portable pour configurer un
autre afficheur comme afficheur principal. Pour faire cela :
1. Cochez la case This is my main monitor (1 sur l'image ci-dessus) pour l'afficheur connecté à
l'adaptateur.
2. Sélectionnez l'afficheur principal (afficheur1).
3. Désélectionnez Uncheck the Extend the desktop onto this monitor (1 sur l'image ci-dessus).
4. Cliquez sur Apply.
L'afficheur connecté à l'adaptateur reste principal si l'ordinateur entre en mode veille, stand-by ou est
redémarré. Si l'afficheur connecté à l'adaptateur est déconnecté, l'afficheur principal redevient principal.
Configurer l'afficheur comme afficheur principal avec le menu DisplayLink
1. Cliquez sur l'icône DisplayLink depuis la barre des tâches.
2. Sélectionnez Set as Main Monitor.
Désactiver l'afficheur d'un ordinateur portable (en le rabattant)
Il est possible d'utiliser un ordinateur portable de façon pratique en éteignant l'ordi nateur portable, de
configurer l'afficheur connecté à l'adaptateur comme principal, un clavier externe et une souris. Pour celai,
désactivez l'ordinateur portable.
Configurer un ordinateur portable à ne rien faire :
1. Sélectionnez Start > Control Panel > Power Options.
2. Sélectionnez Choose what closing the lid does.
3. Pour When I close the lid, selectionnez Do nothing depuis la liste de déroulement vertical On battery
and Plugged in.
8.3. Actualiser le logiciel DisplayLink
Dans le cas de Windows 7, le logiciel DisplayLink se met en connexion avec le page web de Microsoft Windows
Update pour obtenir la dernière version du pilote DisplayLink. Sélectionnez Check for updates, pour se
connecter à la page web, télécharger et installer la dernière version du logiciel.
Actualisation automatique
L'actualisation automatique de DisplayLink est est supporté par Windows 2000/XP et Vista. Le mécanisme
d'actualisation automatique assure que les versions de pilotes et logiciels les plus récentes sont disponibles.
V. 02 – 26/04/2012 46 ©Velleman nv
Page 47
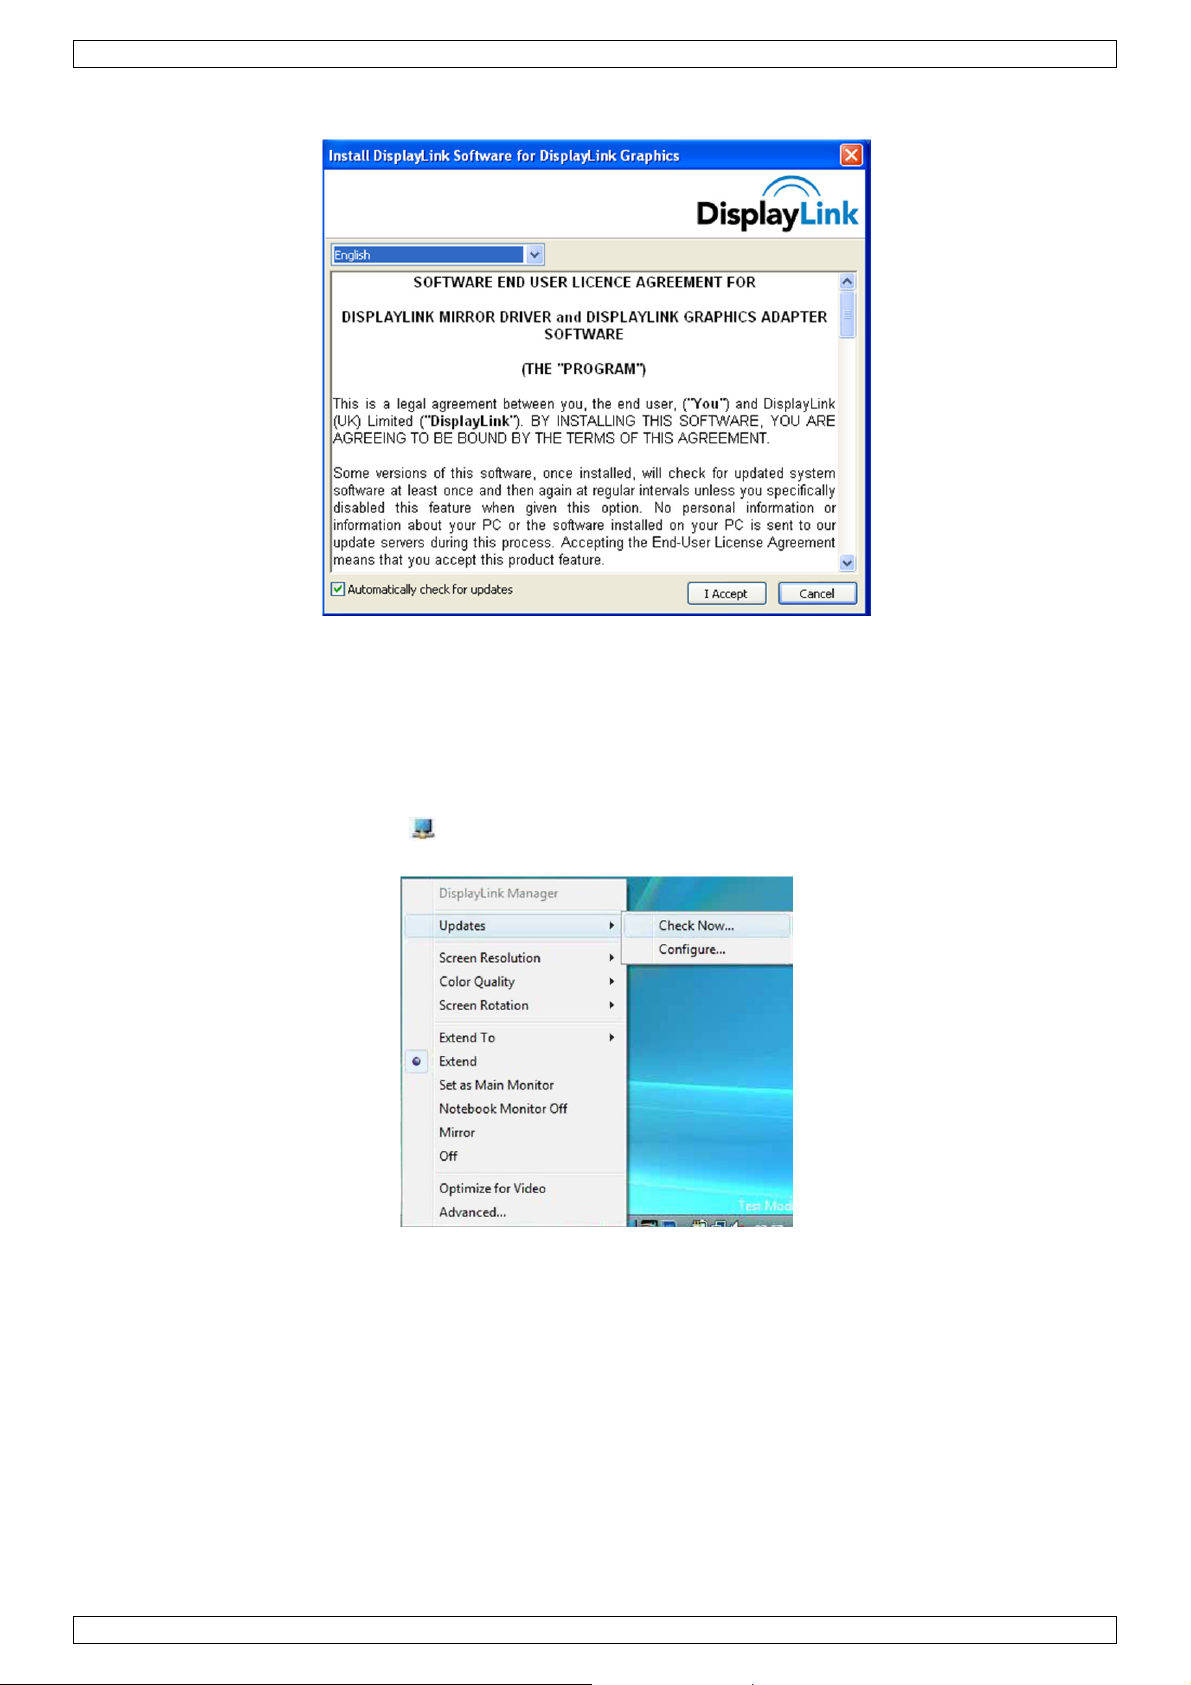
PCUSBVGA2
Il est possible de désactiver cette option durant l'installation en désélectionnant Automatically check for
updates (en bas à gauche).
Utiliser l’assistant pour l'actualisation
Par défaut, l'actualisation automatique est activée. Chaque semaine, le logiciel ou les actualisations les plus
récentes sont recherchés après la connexion d'un adaptateur ou ordinateur. L’assistant pour l’actualisation sera
activé si une nouvelle version du logiciel est disponible.
Actualiser manuellement
Pour actualiser le logiciel manuellement :
1. Cliquez sur l'icône DisplayLink . Le menu s'ouvre.
2. Sélectionnez Updates > Check Now.
Si vous disposez de la version du logiciel la plus récente, une fenêtre de dialogue s'ouvre. Sinon, la fenêtre
Choose updates to install apparaît.
8.4. Configurer le son
Avant d'utiliser les haut-parleurs/microphone connectés à l'adaptateur, configurez les applications pour l'usage
des appareils audio USB (Multimédia), c.-a.d. les composants audio de l'adapt ateur de manière correcte.
Si l'adaptateur est connecté à votre ordinatuer, les appareils audio (USB(Multimédia) Audio Device) s'installent
automatiquement (nommés USB Audio Device) et pourraient écraser les réglages audio dans Windows. Par
conséquent, la musique sera lue par des haut-parleurs connectés à l'adaptateur. Si toutefois vous souhaitez
utiliser la carte sonore originelle pour la lecture de musique et le port audio de l'adaptateur pour la lecture de
vidéos avec le logiciel 'Media Player' (comme p.ex. Windows media Player, real Player, WinDVD, PowerDVD,
etc.). Dans ce cas, configurez l'appareil audio manuellement pour chaque application.
V. 02 – 26/04/2012 47 ©Velleman nv
Page 48
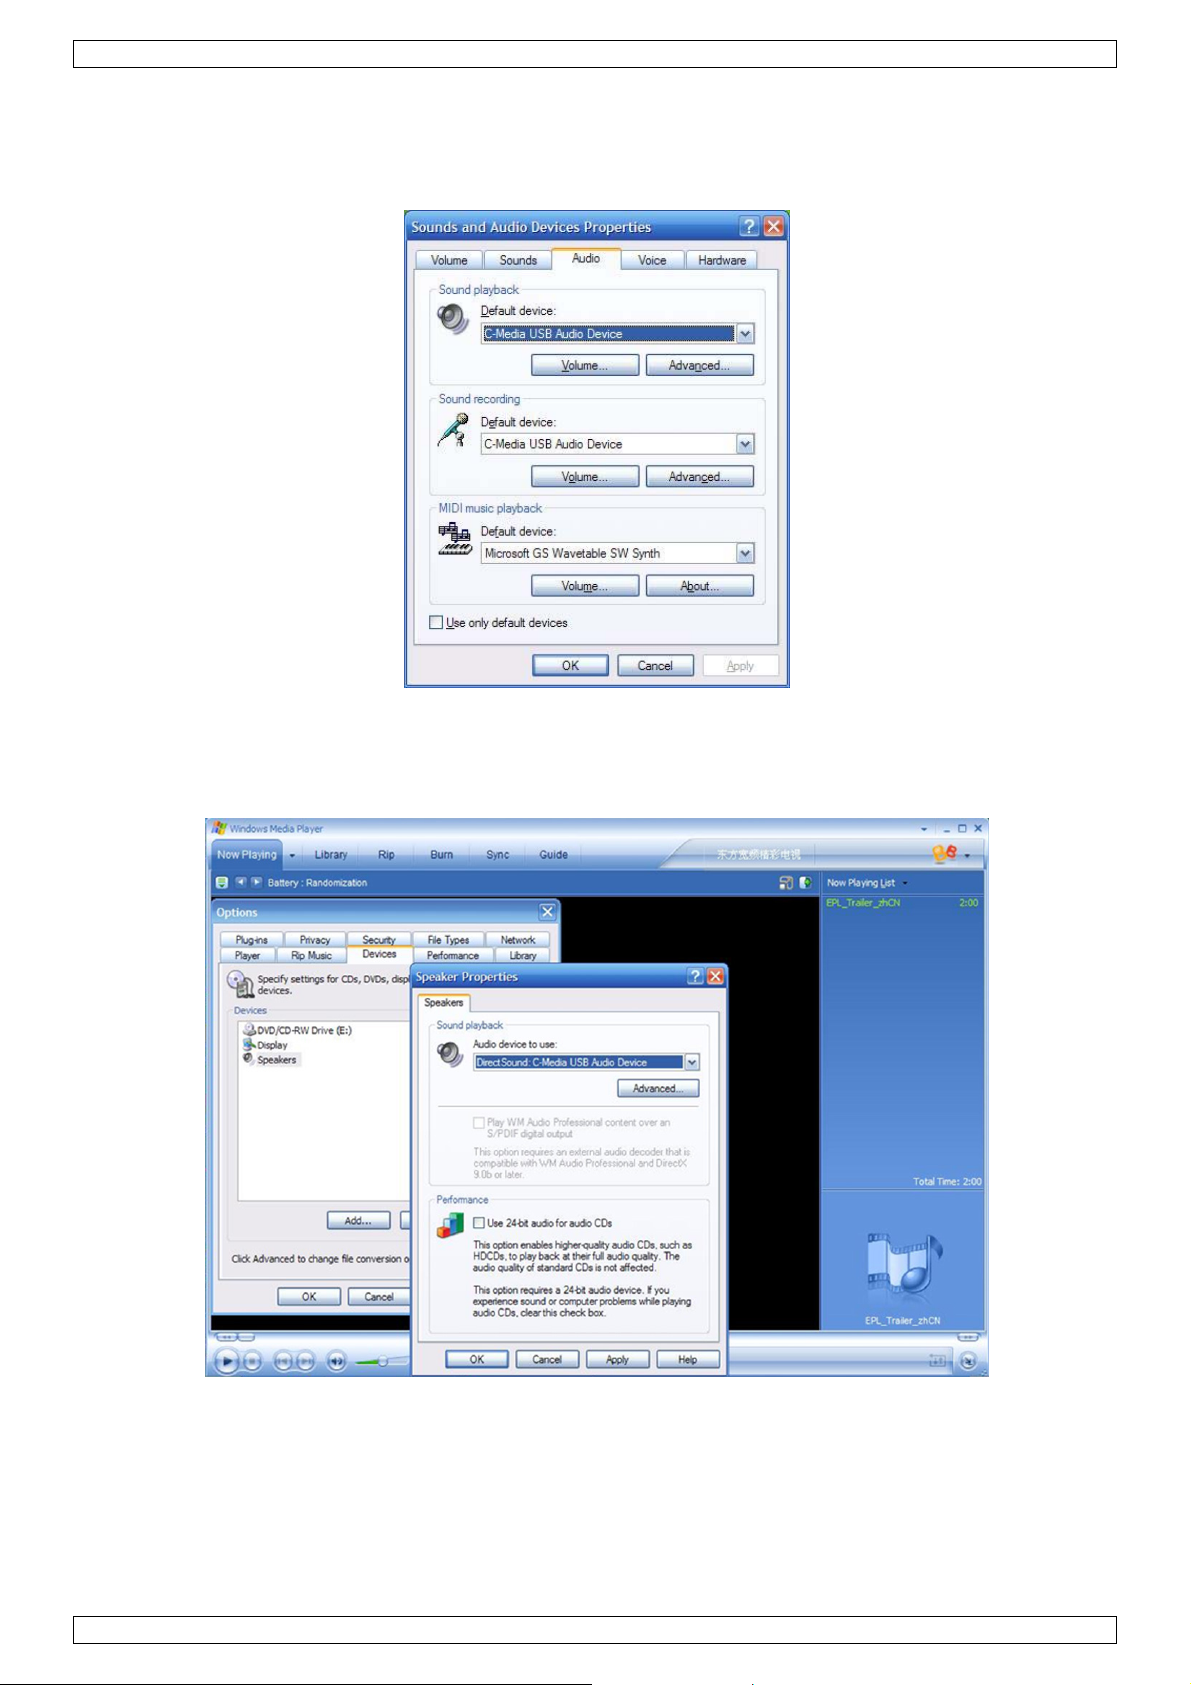
PCUSBVGA2
Configurer le système audio de Windows
Pour configurer un appareil audio pour la lecture de musique dans Windows, ouvrez Control Panel et doublecliquez sur l'icône audio. Ensuite, sélectionnez l'appareil souhaité en Playback. Si vous souhaitez utiliser la
carte sonore originelle pour la lecture de musique, assurez-vous de la sélectionner cela au lieu de l'appareil
audio USB (USB Audio Device).
Configurer le système audio pour des applications
Pour la lecture d'une vidéo avec le logiciel Media Player et avec le casque d'écoute ou haut-parleurs connectés à
l'adaptateur, assurez-vous que le logiciel Media Player (comme Windows Media Player, Real Player, WinDVD,
PowerDVD, etc.) a été configuré pour utiliser l'appareil audio USB.
V. 02 – 26/04/2012 48 ©Velleman nv
Page 49

PCUSBVGA2
Pour chatter avec le logiciel 'Instant Messenger' utilisant un casque d'coute et un microphone connectés à
l'adaptateur, assurez-vous que le logiciel de chat (comme p.ex. MSN Messenger, Yahoo Messenger ou Skype)
de configurer pour utiliser l'appareil audio USB.
8.5. Désinstaller le logiciel DisplayLink
La méthode de désinstallation peut différer un peu. Cela dépend de votre système d'exploitation.
Pour désinstaller l'adaptateur sous Windows :
1. Sélectionnez le menu Start et ensuite Control Panel.
2. Dans le sous-menu Programs, cliquez sur Uninstall program.
3. Double-cliquez sur DisplayLink Core software. Une fenêtre de confirmation s'ouvre (si activée) :
4. Cliquez sur Yes.
Il est possible qu'il s'affiche un message avec les progiciels qui seront également désinstallés.
V. 02 – 26/04/2012 49 ©Velleman nv
Page 50
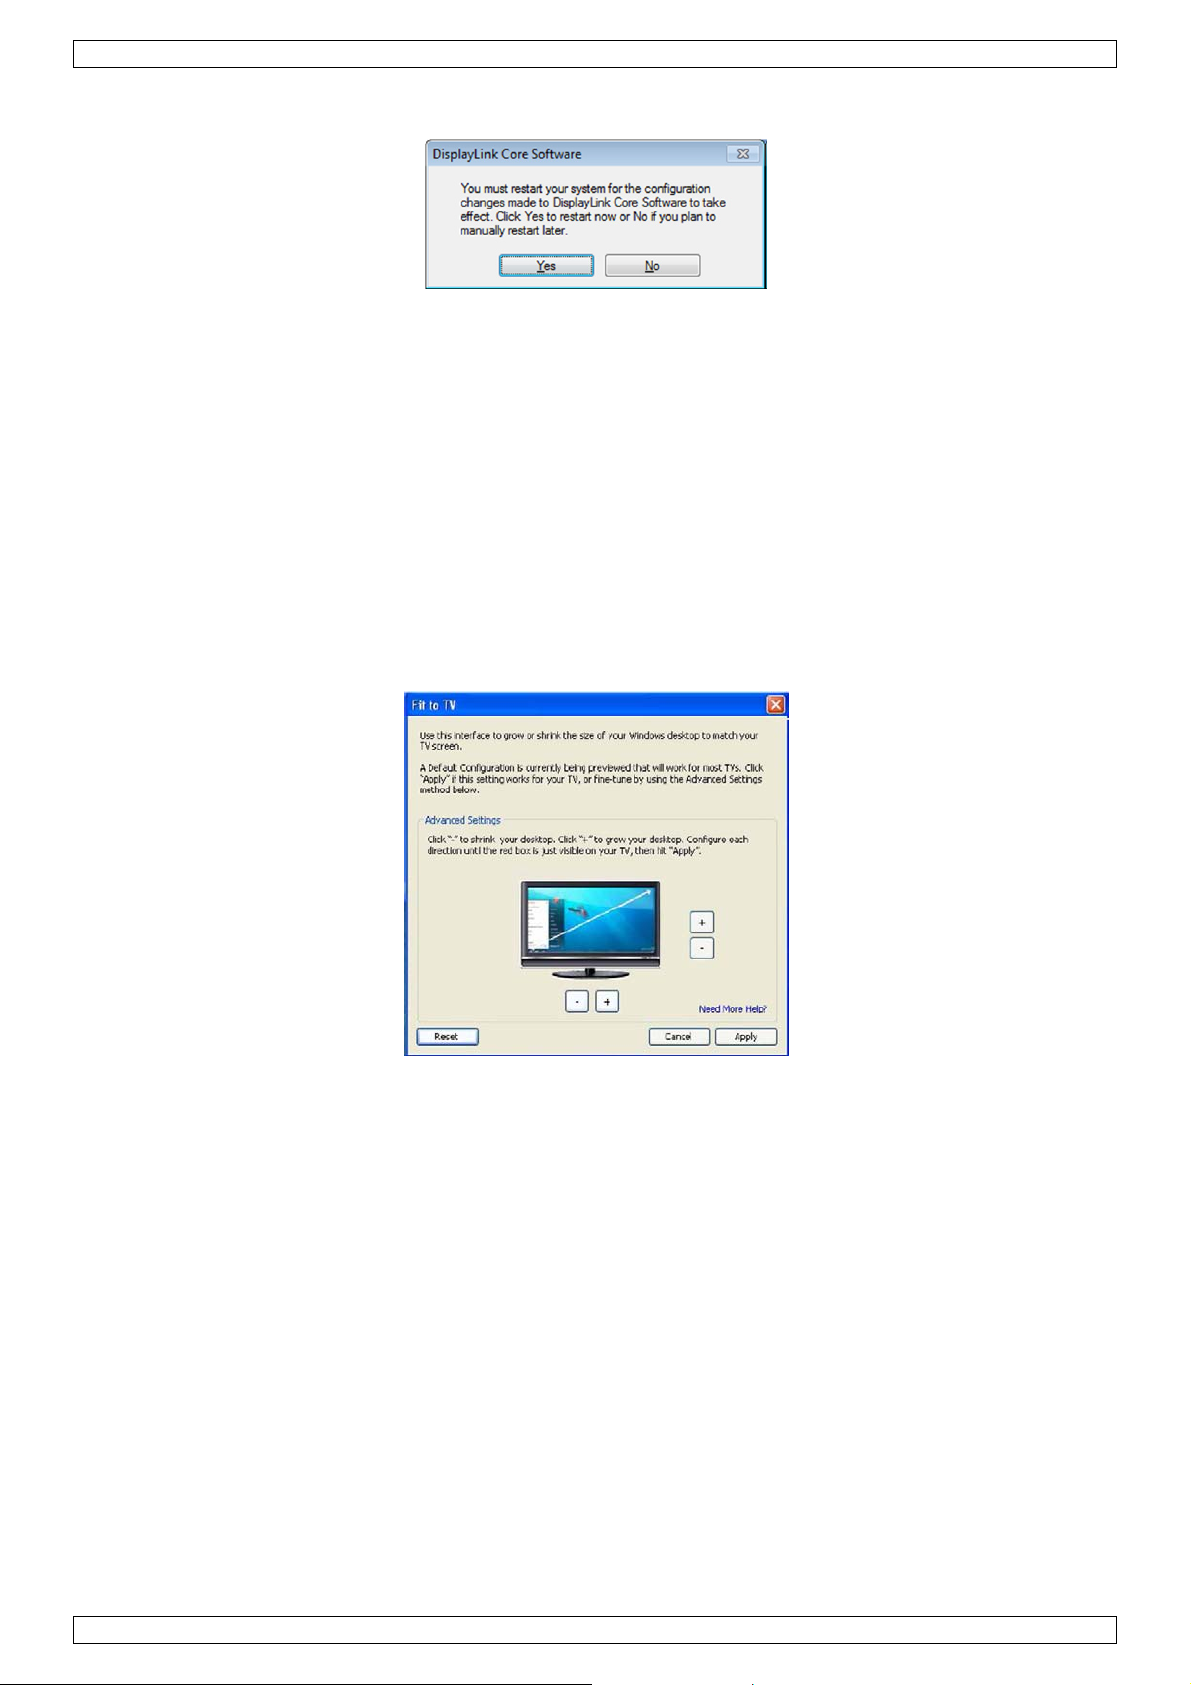
PCUSBVGA2
5. Cliquez sur Yes pour désinstaller les progiciels du logiciel DisplayLink Core.
Le logiciel se désinstalle automatiquement. Après la désinstallation, il est obligatoire de réinitaliser.
6. Cliquez sur Yes pour terminer la désinstallation.
8.6. Fit to TV
Pourquoi ai-je besoin de « Fit to TV »?
Si vous utilisez l'adaptateur pour connecter un téléviseur, il est possible que seulement une partie du bureau
s'affiche parce que les téléviseurs utilisent la fonction « overscan ». En utilisant cette fonction, il se peut que les
bords des afficheurs restent invisibles et que les icônes et la barre des tâches restent cachés.
Utilisez « Fit to TV » pour réduire le format du bureau sur l'afficheur du téléviseur.
Remarque : « Fit to TV » ne fonctionne qu'en mode extension. L'afficheur connecté à l'adaptateur passera
automatiquement en mode extension et sera mis en haut de l'afficheur de l'ordinateur portable dans la fenêtre
Display Properties (caractéristiques d'affichage) en sélectionnant le mode miroir. « Fit to TV » ne supporte pas
de modes rotatifs.
Configurer
1. Pour configurer « Fit to TV », sélectionnez l'option dans le menu DisplayLink. La fenêtre suivante apparaît :
Un cadre rouge s'affichera à l'afficheur DisplayLink. Le bord rouge montre le format du nouveau bureau de
Windows.
2. Utilisez « + » et « – » dans le fenêtre « Fit to TV » pour modifier le format du bord rouge jusqu'à ce que le
bord cadre dans l'afficheur du téléviseur.
Remarque : Il est possible de réaliser un réglage fin en enfonçant la touche CTRL et en cliquant sur « + » et
« – » en même temps.
3. Quand le bord rouge coïncide avec les bords de l'afficheur du téléviseur, cliquez sur Apply pour
redimensionner le bureau.
8.7. Information additionnelle
Information additionnelle sur l'emploi du logiciel du logiciel DisplayLink.
Support pour jeux DirectX 10
Cette version du logiciel inclut du support pour certains jeux DirectX 10 de Windows 7. Pour améliorer
l'expérience durant le jeu :
• désactivez les ajustements Antialiasing (AA)
• activez la fonction « Locking to vsync »
Normalement, il est possible de configurer ces options pendant le jeu.
Pour jouer des jeux 3D avec un rendement suffisant sur un afficheur DisplayLink, assurez-vous que les
spécifications du système coïncident avec celles du hardware recommandées et non seulement les
spécifications minimales.
V. 02 – 26/04/2012 50 ©Velleman nv
Page 51

PCUSBVGA2
Calibrer l'afficheur
Il est possible de calibrer l'afficheur avec des applications utilisant l'interface « Display Data Channel
Command » (DDC/CI). L'afficheur comme l'application doivent supporter DDC/CI pour fonctionner. Un exemple
pour une application supportée est ScreenWhite.
DDC/CI n'est pas supporté sur des afficheurs avec la technologie DisplayLink. Par exemple des afficheurs mini.
Lire Média
Dans Windows 7, Vista et Windows XP (mode extension), l'adaptateur peut lire des fichiers et DVD avec les
lecteurs suivants :
• Windows Media Player 11 (http://www.microsoft.com/windows/windowsmedia/default.mspx)
• WinDVD 8 (www.intervideo.com)
• PowerDVD 7 (www.cyberlink.com)
• RealPlayer 11 (www.real.com)
L'adaptateur peut lire des fichiers et DVD avec la majorité des lecteurs. La lecture en mode miroir (XP) ou le
mode base (Vista et Windows 7) n'est pas recommandée.
Utiliser plusieurs adaptateurs
Le logiciel supporte jusqu'à 6 afficheurs connectés simultanément par 6 adaptateurs. Il est également possible
d'utiliser plusieurs types d'afficheurs différents à des différents moments. Par exemple, deux au bureau et deux
à la maison. Le logiciel sauvegarde chaque profil d'afficheur séparément. Cela permet des différentes positions
physiques ou des différentes résolutions des afficheurs connectés à la maison ou au bureau.
Mode Standby et mode Veille, éteindre et réactiver
L'afficheur connecté à l'adaptateur n'affichera plus aucune image si le PC est mis en mode standby ou en mode
veille. L'afficheur connecté redémarra dans le même mode qu'avant l'extension après que le PC a été éteint,
redémarré et s'est connecté au système.
Adaptateurs et plusieurs utilisateurs
L'adaptateur fonctionne avec plusieurs utilisateurs sur le PC. Les ajustements personnels de chaque utilisateur
sont sauvegardés pour que chacun puisse utiliser sa propre configuration.
Déconnecter l'adaptateur
L'afficheur n'affiche plus d'image si l'adaptateur USB est déconnecté de l'ordinateur. Chaque fenêtre et icône se
déplacent vers l'afficheur primaire.
En reconnectant ou activant l'adaptateur, l'afficheur se met dans le même mode qu'avant la déconnexion.
Attention: les fenêtres et les icônes qui s'affichaient antérieurement à l'écran ne seront plus replacés.
Modes d'afficheur supportés
Le mode d'afficheur consiste en trois composants:
• Résolution : le nombre de pixels affichés horizontalement et verticalement à l'afficheur.
• Qualité de couleur : Le nombre des différentes couleurs affichées simultanément à l'afficheur.
• Fréquence : La vitesse avec laquelle est balayé l'afficheur de nouveau. Une fréquence d'actualisation des
images plus élevée réduira le scintillement.
Certains afficheurs affichent les modes supportés par le connecteur VGA ou DVI. Si c'est le cas, l'adaptateur
identifie les modes supportés de l'afficheur. Si l'afficheur n'affiche pas les modes supportés, le logiciel de
l'adaptateur sélectionne un des modes standard pour l'afficheur.
Modes dérivés
Certains modes dans le menu DisplayLink s'affichent avec [ ]. Cela se fait si la
connexion d'un afficheur avec un mode préféré a une résolution plus élevée
que la résolution maximale supportée par l'adaptateur.
Dans ce cas, la résolution préférée de l'afficheur n'est pas supportée. Le
logiciel DisplayLink met des résolutions plus basses avec le même rapport
d'aspect à la disposition. Les modes entre crochets [ ] indiquent que
l'afficheur n'a pas mentionné ces modes mais ont toutefois été mis a mis à la
disposition par le logiciel DisplayLink pour les essayer.
Puisque ces modes dérivés proviennent des modes préférés de l'afficheur, il
n'est pas garanti qu'ils fonctionnent avec l'afficheur.
V. 02 – 26/04/2012 51 ©Velleman nv
Page 52

PCUSBVGA2
Messages d'erreur
Parfois le logiciel DisplayLink Graphics affiche des messages d'utilisation dans la zone de notification. Veuillez
consulter la liste suivante pour voir tous les messages possibles et la description.
Message Description
Insuffisamment de ressources de
système pour effectuer le service
demandé
Format d'assignation demandé
trop grand
Pilote de l'afficheur incompatible
Le système ne peut pas accéder à
l'appareil indiq u é
Pour plus de support, veuillez voir
http://www.displaylink.com/support
Ce message apparaît en entrant en mode extension avec des ressources de
système basses. L'ordinateur n'a pas assez de mémoire pour activer un
afficheur étendu. Fermez toute application non utilisée. Il est également
possible d'améliorer la situation en redémarrant le PC.
Ce message apparaît en essayant de miroiter l'afficheur primaire avec une
résolution de plus de 2300x1700 (4:3) ou 2600x1500 (16:9).
Ce message apparaît si le pilote primaire de la carte graphique n'est pas
compatible avec WDDM. Windows 7 n'a pas été conçu pour fonctionner sans
pilote WDDM. Téléchargez et installez la version du pilote de Windows 7
(WDDM) la plus récente pour la carte graphique primaire.
Ce message apparaît dans Windows XP après avoir modifié le mode
d'affichage plusieurs fois (p.ex. mode Extension/Dock) depuis le logiciel
DisplayLink. Si c'est le cas, déconnectez l'appareil et ensuite reconnectez le
pour restaurer un fonctionnement normal.
9. Solution aux problèmes
En général, les petits problèmes peuvent être résolus comme suit :
• Déconnectez et reconnectez l'afficheur,
• Modifiez le mode d'affichage par le logiciel DisplayLink,
• Modifiez le mode d'affichage par « Windows Display Properties ».
Dans Windows 7/Vista WDDM (Aero et Basic)
Le logiciel DisplayLink fonctionne étroitement avec la carte graphique. Cela pourrait causer des problèmes de
compatibilité avec certaines cartes graphiques. Si c'est le cas :
1. Essayez de télécharger le pilote le plus récent.
2. Essayez de téléchargez le logiciel DisplayLink le plus récent.
3. Rapportez le problème via votre canal de support.
4. S'il serait nécessaire, démarrez en mode sécurisé (Safe Mode) et utilisez les fonctions « Windows' Backup
and Restore Center » pour récupérer.
10. Manuel d'utilisation Mac OS
Ce manuel s'applique au logiciel de Mac, version 1.0 et supérieur.
Qu'est le pilote de Mac ?
Le pilote de Mac a été conçu pour MAC OS 10.4 (Tiger), 10.5 (Leopard) et 10.6 (Snow Leopard) et pour ajouter
un afficheur additionnel avec la technologie DisplayLink. Ce logiciel permet d'utiliser vos adaptateurs
DisplayLink sur n'importe quel bureau basé sur Intel ou sur n'importe quel ordinateur portable de Mac. Il est
possible de connecter jusqu'à 4 afficheurs additionnels via le port USB.
Remarque importante : Les ordinateurs de Macintosh basés sur PowerPC (p.ex. les derniers modèles d'iMac,
PowerBook et PowerMac) ne sont pas supportés.
De quoi d'autre avez-vous besoin pour utiliser ce pilote?
Non seulement avez-vous besoin d'un ordinateur Mac basé sur Intel qui est équipé des dernières versions de
Mac OS 10.4, 10.5 ó 10.6, mais également d'un adaptateur DisplayLink. Un adaptateur est nécessaire pour
chaque afficheur additionnel que vous souhaitez connecter à l'ordinateur Macintosh.
V. 02 – 26/04/2012 52 ©Velleman nv
Page 53

PCUSBVGA2
Guide d'installation - installer/désinstaller le pilote de Mac
1. Pour initier l'installateur de Mac, double-cliquez sur l'image
Mac Driver Installer.
2. Sélectionnez Software Installer pour initialiser
l'installation du pilote de Mac en utilisant un installateur de
MAC. Réinitialisez le PC après l'installation.
3. Sélectionnez User Guide pour afficher le guide
d'utilisation.
4. Sélectionnez Software Uninstaller pour désinstaller le
pilote de votre Mac. Réinitialisez le PC après la désinstallation.
Connecter un afficheur à l'ordinateur Mac
Après l'installation du pilote de Mac, connectez vos adaptateurs au port USB et connectez chaque afficheur à un
adaptateur. Il est possible de connecter jusqu'à 4 afficheurs additionnels. Veuillez voir les exemples suivants :
Exemple 1 : Connectez deux afficheurs au MacBook Pro. Connectez le MacBook Pro aux deux afficheurs en
utilisant des câbles USB et deux adaptateurs. Connecter les afficheurs aux adaptateurs avec des câbles
standard VGA/DVI.
Exemple 2 : Connectez trois afficheurs au MacBook Air. Connectez le MacBook Air à un port USB standard. Des
adaptateurs sont utilisés pour connecter les trois afficheurs au port USB. Connectez les afficheurs aux
adaptateurs avec des câbles VGA/DVI standard.
V. 02 – 26/04/2012 53 ©Velleman nv
Page 54

PCUSBVGA2
Gérer plusieurs afficheurs
• L'afficheur s'étend automatiquement à droit de
l'afficheur principal en connectant un afficheur
que le logiciel ne reconnaît pas.
• D'abord, sélectionnez System Preferences et
ensuite Displays pour configurer les afficheurs.
• Utilisez la touche Gather Windows pour
afficher toutes les fenêtres System
Preferences à l'afficheur principal.
Préférences de l'afficheur
Résolutions
Tourner
Position
Miroiter
Etendre
Utiliser des afficheurs miroités comme des
afficheurs étendus
Modifier l'afficheur principal
Configurer des afficheurs depuis la barre de menu
Après avoir sélectionné l'option Show displays in menu bar dans le panneau Display Preferences, il est
possible de configurer des afficheurs en cliquant sur l'icône dans la barre de menu.
Le menu vous permet de:
• Détecter tous les afficheurs connectés au Mac.
• Activer/désactiver miroiter.
• Régler la résolution de l'afficheur primaire et secondaire(s).
• Ouvrir le panneau Display Preferences.
V. 02 – 26/04/2012 54 ©Velleman nv
Page 55

PCUSBVGA2
11. Spécifications techniques
résolution jusqu'à 1600x1200 ou 1920x1080 Digital (@60Hz 32 bits)
port USB 2.0 libre
système requis
Système d'exploitation : Windows 2000 SP4, XP SP2, Vista 32/64 bits avec
support Aero, Windows 7 32/64 bits
1x USB vers adaptateur DVI
1x Notice d'emploi
1x CR-ROM avec notice d'emploi et installation de logiciel
contenu
consommation 5V
dimensions 106 x 48 x 18mm
capacité jusqu'à 6 afficheurs simultanément
N’employer cet appareil qu’avec des accessoires d’origine. SA Velleman ne sera aucunement
responsable de dommages ou lésions survenus à un usage (incorrect) de cet appareil.
Pour plus d’information concernant cet article et la version la plus récente de cette notice, visitez
notre site web www.velleman.eu.
Toutes les informations présentées dans cette notice peuvent être modifiées sans notification
préalable.
Les marques déposées et les raisons sociales sont la propriété de leurs détenteurs respectifs, et sont
uniquement utilisées dans le but de démontrer la compatibilité entre nos articles et les articles des fabricants.
Windows XP, Windows 2000, Windows Vista, Windows Aero, Windows 7, Windows Server sont des marques
déposées de Microsoft Corporation aux Etats-Unis et dans d'autres pays. Mac, Mac OS, iMac, PowerBook, Power
Mac sont des marques d'Apple Inc., déposées aux États-Unis et dans d'autres pays.
1x câble USB 2.0 (1m20)
1x DVI vers adaptateur VGA
1x DVI vers adaptateur HDMI
1x jack stéréo 3.5mm vers adaptateur RCA
V. 02 – 26/04/2012 55 ©Velleman nv
Page 56

.
lIm
.3.
u
a
e
e
e
a
s
c
t
s
r
o
s
c
a
i
a
s
n
e
e
p
o
m
b
t
a
U
o
p
e
a
n
d
c
o
o
b
d
o
t
u
a
a
v
n
s
n
d
o
M
p
o
e
e
e
c
S
r
e
t
a
u
p
e
e
j
d
u
s
a
t
d
u
i
d
a
e
P
a
m
o
a
e
r
e
o
b
e
m
.
e
i
t
n
n
u
ú
n
p
f
u
o
u
s
c
c
n
e
n
u
e
e
u
e
l
r
u
b
s
s
n
e
o
e
s
e
a
o
u
a
d
a
p
e
a
p
o
e
a
a
e
o
o
a
a
d
t
m
e
u
a
D
o
r
p
s
u
e
r
s
o
m
t
ó
s
a
á
n
e
n
a
r
p
í
í
CUSBVGA
2
1
Introd
A
os ciudad
portantes
¡G
racias por h
el
aparato ha
2
Instru
Este
el m
una
recic
Si ti
Man
Rie
toca
pers
El u
nece
cción
nos de la
informaci
símbolo en
dio ambien
mpresa es
laje local. R
ne dudas,
ber compr
ufrido algú
ciones
enga el apa
go de des
un cable c
nal titulad
uario no ha
sita piezas
nión Euro
nes sobre
este aparat
te. No tire
ecializada
spete las l
contacte
do el PCU
daño en el
e segu
rato lejos d
argas eléc
nectado a l
.
rá de efect
e recambio
anu
ea
el medio a
o el embal
ste aparato
n reciclaje.
yes locales
on las aut
BVGA2! Le
transporte
idad
l alcance d
ricas al ab
red eléctri
ar el mant
.
l del
biente c
aje indica q
(ni las pilas
Devuelva e
en relación
ridades lo
atentame
no lo instal
personas
ir la caja P
ca. No abra
nimiento d
suari
ncernient
e, si tira la
, si las hubi
te aparato
on el medi
ales para
te las instr
y póngase
o capacitad
ede sufrir u
la caja uste
ninguna pi
a este pr
muestras i
ra) en la b
su distribu
ambiente.
residuos.
cciones del
en contacto
s y niños.
na peligros
mismo y
eza. Contac
ducto
nservibles,
sura domé
idor o a la
manual ant
con su dist
descarga e
eje reparar
e con su di
odrían dañ
tica; debe i
nidad de
s de usarlo
ibuidor.
léctrica al
el aparato
tribuidor si
r
a
. Si
or
Norma
Vé
ase la Gara
•
Familiaríc
•
Por razon
causados
•
Utilice sól
completa
•
Los daños
y su distri
Guarde es
•
Ni Vellem
•
indirectos,
producto.
Utili
salpi
La c
vent
apar
e el aparat
cadura o go
ja se calien
lación adec
to en una
gener
tía de ser
No expo
Asegúre
2,5cm e
No agite
se con el fu
s de seguri
or modifica
el aparato
ente.
causados p
uidor no se
e manual d
n nv ni sus
sea cual se
sólo en in
eo. Nunca
ta durante
ada. Instal
lfombra, te
les
icio y cali
ga este eq
e de que lo
tre el apar
el aparato.
ncionamien
ad, las mo
ciones no a
para las apl
r descuido
rá responsa
el usuario p
distribuidor
a la índole (
teriores. N
onga un o
l uso. Liber
el aparato
ido, etc.
ad Velle
ipo a polvo
orificios d
to y cualqu
Evite usar e
o del apara
ificaciones
torizadas,
caciones de
e las instr
ble de ning
ra cuando
s serán res
financiera,
exponga
jeto con líq
el espacio
en una sup
an® al fina
No expong
ventilación
er otro obje
xcesiva fue
o antes de
o autorizad
o están cu
scritas en e
cciones de
n daño u ot
ecesite co
onsables d
ísica, etc.),
ste equipo
ido en el a
alrededor d
rficie plana
de este m
a este equi
no estén bl
to.
za durante
tilizarlo.
as del apar
iertos por l
te manual.
eguridad d
ros problem
sultarlo.
los daños
ausados p
lluvia, hu
arato.
l aparato p
y resistent
nual del us
o a temper
queados.
l manejo y
to están pr
garantía.
Su uso inco
este manu
as resultant
extraordina
r la posesió
edad ni a n
ara garanza
al calor. N
ario.
turas extre
eje una dis
la instalaci
hibidas. Lo
rrecto anul
al invalidar
es.
ios, ocasio
n, el uso o
ingún tipo d
r una
ponga el
as.
ancia de m
n.
daños
la garantía
n su garant
ales o
l fallo de es
e
n.
a
te
V.
02 – 26/04/2
012
56
©Vellema
nv
Page 57

PCUSBVGA2
4. Características
El PCUSBVGA2 le permite conectar un monitor, una pantalla LCD o un proyector adicional a un ordenador por
un puerto USB 2.0 libre, sin necesidad de tarjetas gráficas adicionales. El puerto de salida es DVI, pero el
aparato se entrega con 2 adaptadores para conectar un monitor VGA o HDMI.
Incluye: adaptador USB a DVI, guía rápida, CR-ROM con manual del usuario y software de instalación, cable
USB 2.0 de 4ft (±1m20), adaptador DVI a VGA, adaptador DVI a HDMI, conector estéreo de 3.5mm a
adaptador RCA.
• modos de visualización:
o refleja fácilmente la pantalla principal
o extender hacia la izquierda, derecha, arriba o abajo
o rotar hacia la izquierda, derecha o boca abajo
o soporte DVI, VGA y HDMI
• modos de audio:
o salida de audio de 2.1 canales
o conexión de micrófono
o interfaz con salida mezclada: 2x RCA (pista izquierda y derecha)
• alimentación por USB 2.0: consumo muy bajo
o compresión sin pérdida
o para pantallas CRT, LCD, proyector
• suporta: Windows Vista Aero, XP y Vista 32 bits
• pantalla ancha y estándar
• memoria DDR de alto rendimiento
• incluye un driver virtual
• funcionamiento completamente silencioso
• LED de estado y LED ON/OFF incorporados
• portátil, fácil de utilizar de camino a algún sitio
5. Exigencias del sistema
El software « DisplayLink » es apto para ordenadores con los siguientes sistemas operativos:
• Windows 7 (32-bit o 64-bit)
• Windows Vista con Service Pack 1 ó 2 (32-bit o 64-bit)
• Windows XP Home o Professional (Tablet Edition incl.) con Service Pack 2 ó 3
• Windows Server 2003, 2008 y 2008 R2
• Windows 2000 con Service Pack 4
Observaciones:
• No son aptas las versiones 64-bit de Windows XP, ni las versiones de Windows Server.
• Para Mac OS X, véase http://www.displaylink.com/mac
• Para Linux, véase http://libdlo.freedesktop.org/wiki/ o http://www.displaylink.org
Idiomas disponibles
Están soportados los siguientes idiomas en todos los sistemas operativos:
Árabe / indonesio Bahasa / búlgaro / chino (Tradicional) / chino (simplificado) / croata / checo / danés /
neerlandés / inglés / finlandés / francés / griego / coreano / alemán / húngaro / italiano / japonés / noruego /
polaco / portugués / ruso / eslovaco / esloveno / español / sueco / turco
Observación: Idiomas no soportados cambian al inglés.
Windows 7 / Vista
El índice de experiencia de Windows
porque mide la capacidad de la configuración del software y el hardware del equipo. Seleccione Computer >
Properties (Propiedades) o seleccione Control Panel (Panel de Control) > System (sistema).
Requisitos recomendados para el hardware:
• Puntuación WEI de mín. 3 en « Graphics » (gráficos), el cual evalúa el desempeño del escritorio para
trabajar con Windows Aero.
• Puntuación total de WEI de mín. 3 (como Microsoft recomienda).
• Por lo menos un puerto USB 2.0
• 30 megabytes (MB) de espacio disponible en el disco duro.
• Pantalla de ordenador, si no está incl.
(Windows Experience Index, WEI) es una pauta general del rendimiento
V. 02 – 26/04/2012 57 ©Velleman nv
Page 58

PCUSBVGA2
Windows XP
• Para 1-2 monitores, uso comercial, objetivos de productividad. En pantalla completa, no se puede
garantizar la velocidad de fotogramas máx. durante la reproducción del DVD:
1.2GHz CPU de un sólo núcleo
• Para 3 pantallas, de las cuales 1 puede reproducir un DVD en formato de vídeo enfocando al mismo tiempo
la productividad y aplicaciones comerciales. Soporta sólo 1 vídeo con una resolución de DVD en pantalla
completa:
1.6GHz CPU, memoria 1GB
• Para 6 pantallas de las cuales 1 puede reproducir un DVD en formato de vídeo en pantalla completa:
1.8GHz Core Duo, memoria 1GB
• Por lo menos un puerto USB 2.0, 30 megabytes (MB) de espacio disponible en el disco duro.
• Pantalla de ordenador, si no está incl.
• Acceso a la red para la descarga de software o acceso a un lector de CD-ROM.
Tarjetas gráficas (Windows Vista/Windows 7)
El software « DisplayLink » funciona solamente con tarjetas gráficas primarias. « DisplayLink » soporta y
prueba la tarjeta gráfica (GPU), instalada en el PC de todos los fabricantes importantes (Intel, ATI, NVidia y
Via)
Las siguientes configuraciones GPU pueden causar problemas de compatibilidad en Windows 7 y Vista:
• Switchable Graphics (ATI/Intel)
• Switchable Graphics (ATI/ATI)
• Switchable Graphics (NVIDIA/Intel)
• NVIDIA SLI en el modo SLI
Otras configuraciones GPU, las siguientes incluidas, no están soportadas y no funcionan en Windows 7/Vista:
• Hybrid Graphics
• Hybrid SLI
• Hybrid Crossfire
• Crossfire
• SLI not en el modo SLI
• Múltiple WDDM 1.1 driver gráfico de repente activo
(Single Core), memoria 512MB.
Tarjetas gráficas (Windows XP)
Todas las tarjetas gráficas están soportadas en Windows XP.
6. Conectar el hardware
Conectar el adaptador al ordenador y el monitor
1. Introduzca el extremo pequeño del cable USB en el adaptador.
2. Luego, conecte el otro extremo del cable USB a un puerto USB 2.0
del ordenador.
3. Si el monitor todavía no está conectado al adaptador, haga la
conexión y active el monitor.
Conexiones a CRT, LCD, TV, Proyector, Altavoz, USB, etc.
conexión VGA por adaptador
DVI a VGA
V. 02 – 26/04/2012 58 ©Velleman nv
conexión DVI
conexión HDMI por adaptador DVI
a HDMI
Page 59

PCUSBVGA2
conexión Audio
7. Instalar el software
Observación: Si ha instalado el software « DisplayLink » v3.x, R4.1 o R4.2, desinstálelo utilizando la función
« Add/Remove Programs » de Windows, antes de instalar este software.
7.1. Instalar el software con « Windows 7 Update »
El método preferido es « Windows 7 Update ».
1. Conecte el monitor al ordenador con el adaptador y el
cable USB. Windows detecta el nuevo hardware y descarga
el driver automáticamente.
2. La instalación empieza después de haber descargado el
software. La ventana del software « DisplayLink » con el
contrato de licencia para el usuario final (End User License
Agreement) se visualiza.
3. Haga clic en I Accept (aceptar). El software
« DisplayLink Core » se instala.
Observación: Es posible que la pantalla parpadee o se
vuelva negro durante la instalación.
7.2. Instalar el software en Windows 7/Vista/XP/2000
También es posible instalar el software a través de una descarga del web (Website-Download) o un CD-ROM.
¡Importante! Instale el software antes de conectar un dispositivo con el adaptador al ordenador.
1. El programa de instalación empieza automáticamente
si está activada la función « auto-play » (reproducción
automática). Si no fuera el caso, localice Setup.exe en el
CD-ROM y haga clic dos veces. La ventana con el control de
cuentas de usuario (User Account Control) de Windows se
visualiza (si esta función está activada el el sistema
operativo).
2. Haga clic en Yes (sí). La ventana con el control de
cuentas de usuario (User Account Control) de Windows se
visualiza.
3. Haga clic en I Accept (aceptar). El software
« DisplayLink Core » y « DisplayLink Graphics » se instalan.
No aparece ningún mensaje al terminar el procedimiento de
instalación.
V. 02 – 26/04/2012 59 ©Velleman nv
Page 60
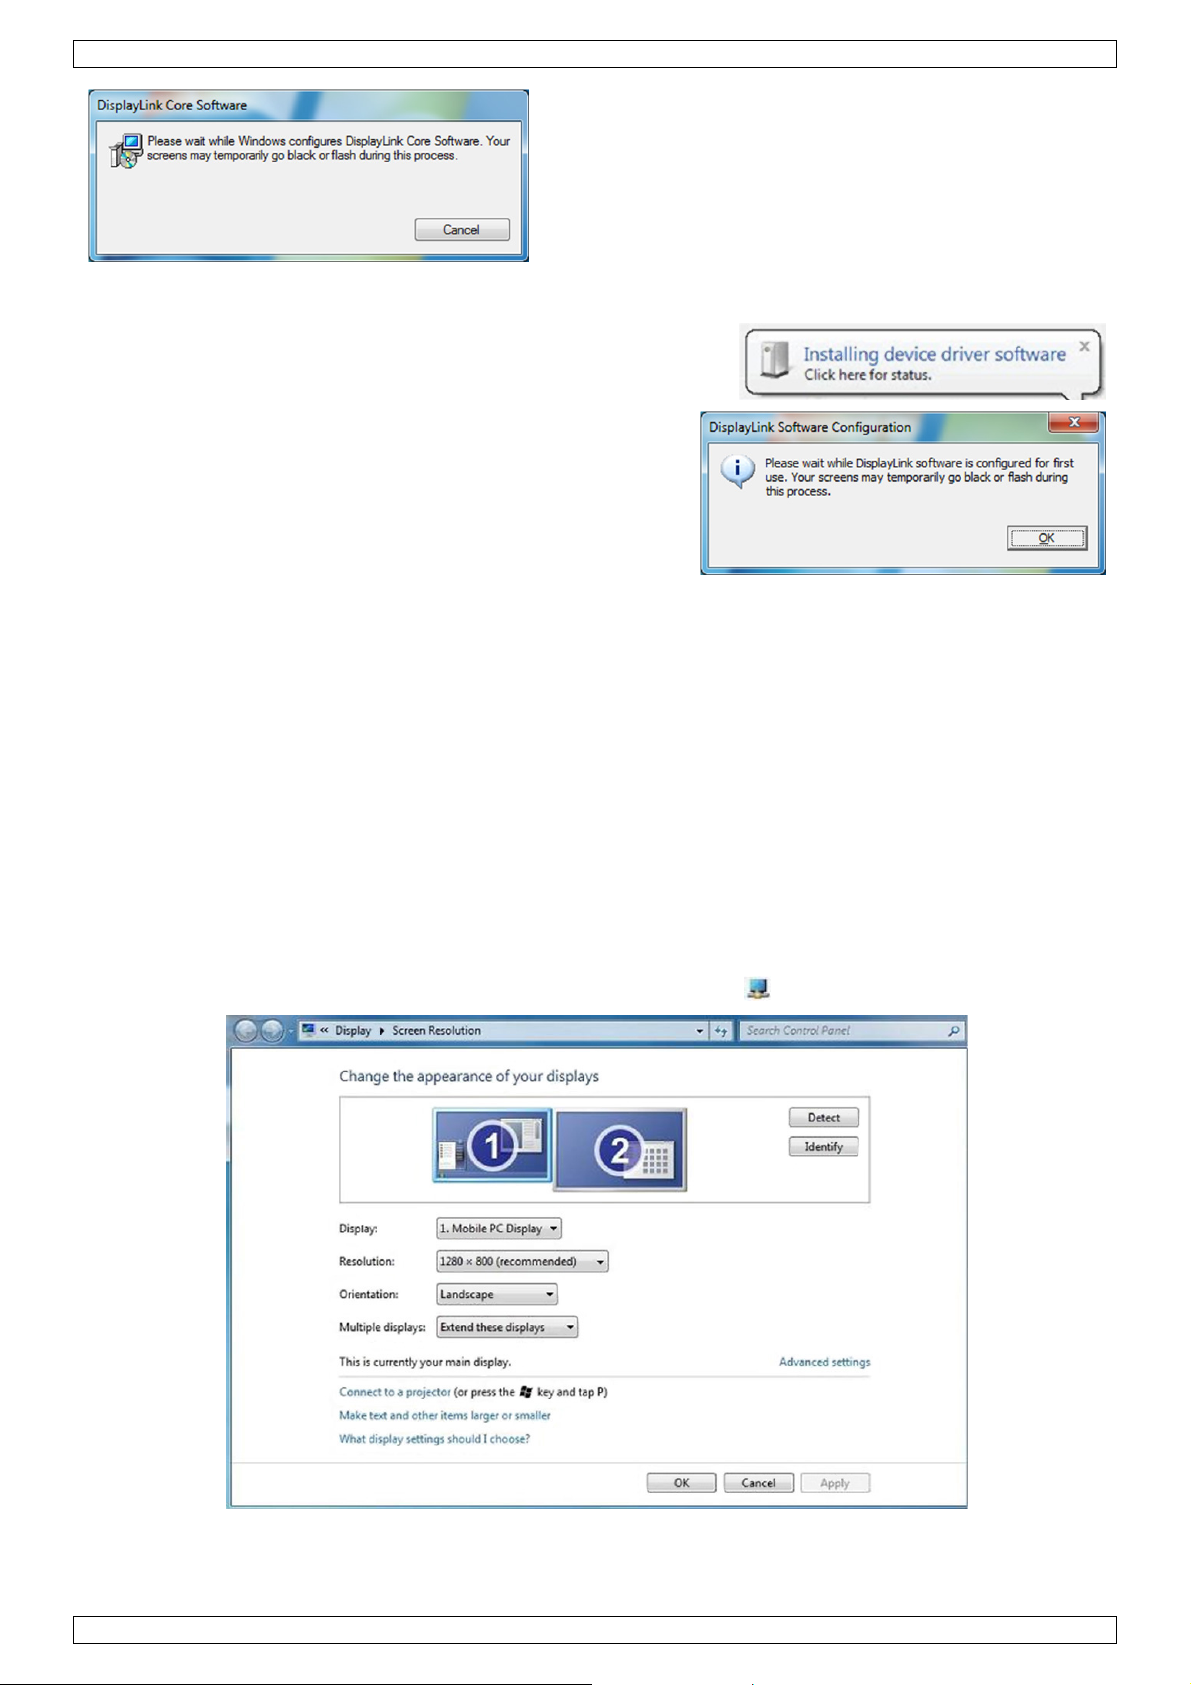
PCUSBVGA2
Observación: Es posible que la pantalla parpadee o se
vuelva negro durante la instalación.
4. Conecte el adaptador al PC con el cable USB. La
ventana para instalar el driver del aparato (Installing device
driver) aparece en la pantalla.
5. Haga clic en Yes (sí). « DisplayLink » instala el aparato
automáticamente. La ventana con el control de cuentas de
usuario (User Account Control) de Windows se visualiza
(véase arriba).
6. Haga clic en I Accept (aceptar). El software «
DisplayLink USB Graphics » se instala. No aparece ningún
mensaje al terminar el procedimiento de instalación.
Observación: A veces, sólo puede utilizar el aparato
después de haber reiniciado el PC.
8. Utilizar el software « DisplayLink »
8.1. Windows 7 – Ajustar la pantalla
Es posible configurar un monitor en Windows 7, utilizando « Windows Display Properties » (WDP/
propiedades de pantalla). WDP ofrece un método sencillo, no sólo para conectar, girar, duplicar o extender
pantallas sino también para modificar la resolución de la pantalla.
Abrir WDP
Hay diferentes maneras para abrir la ventana WDP:
• Haga clic con el botón derecho del ratón en un sector vacío del escritorio y seleccione « Screen
Resolution » (resolución de pantalla).
• Seleccione Start > Devices and Printers (Dispositivos e impresoras) y haga clic dos veces en el icono
« DisplayLink Device ».
• Haga clic con el botón derecho del ratón en el icono « DisplayLink » y seleccione Advanced.
V. 02 – 26/04/2012 60 ©Velleman nv
Page 61
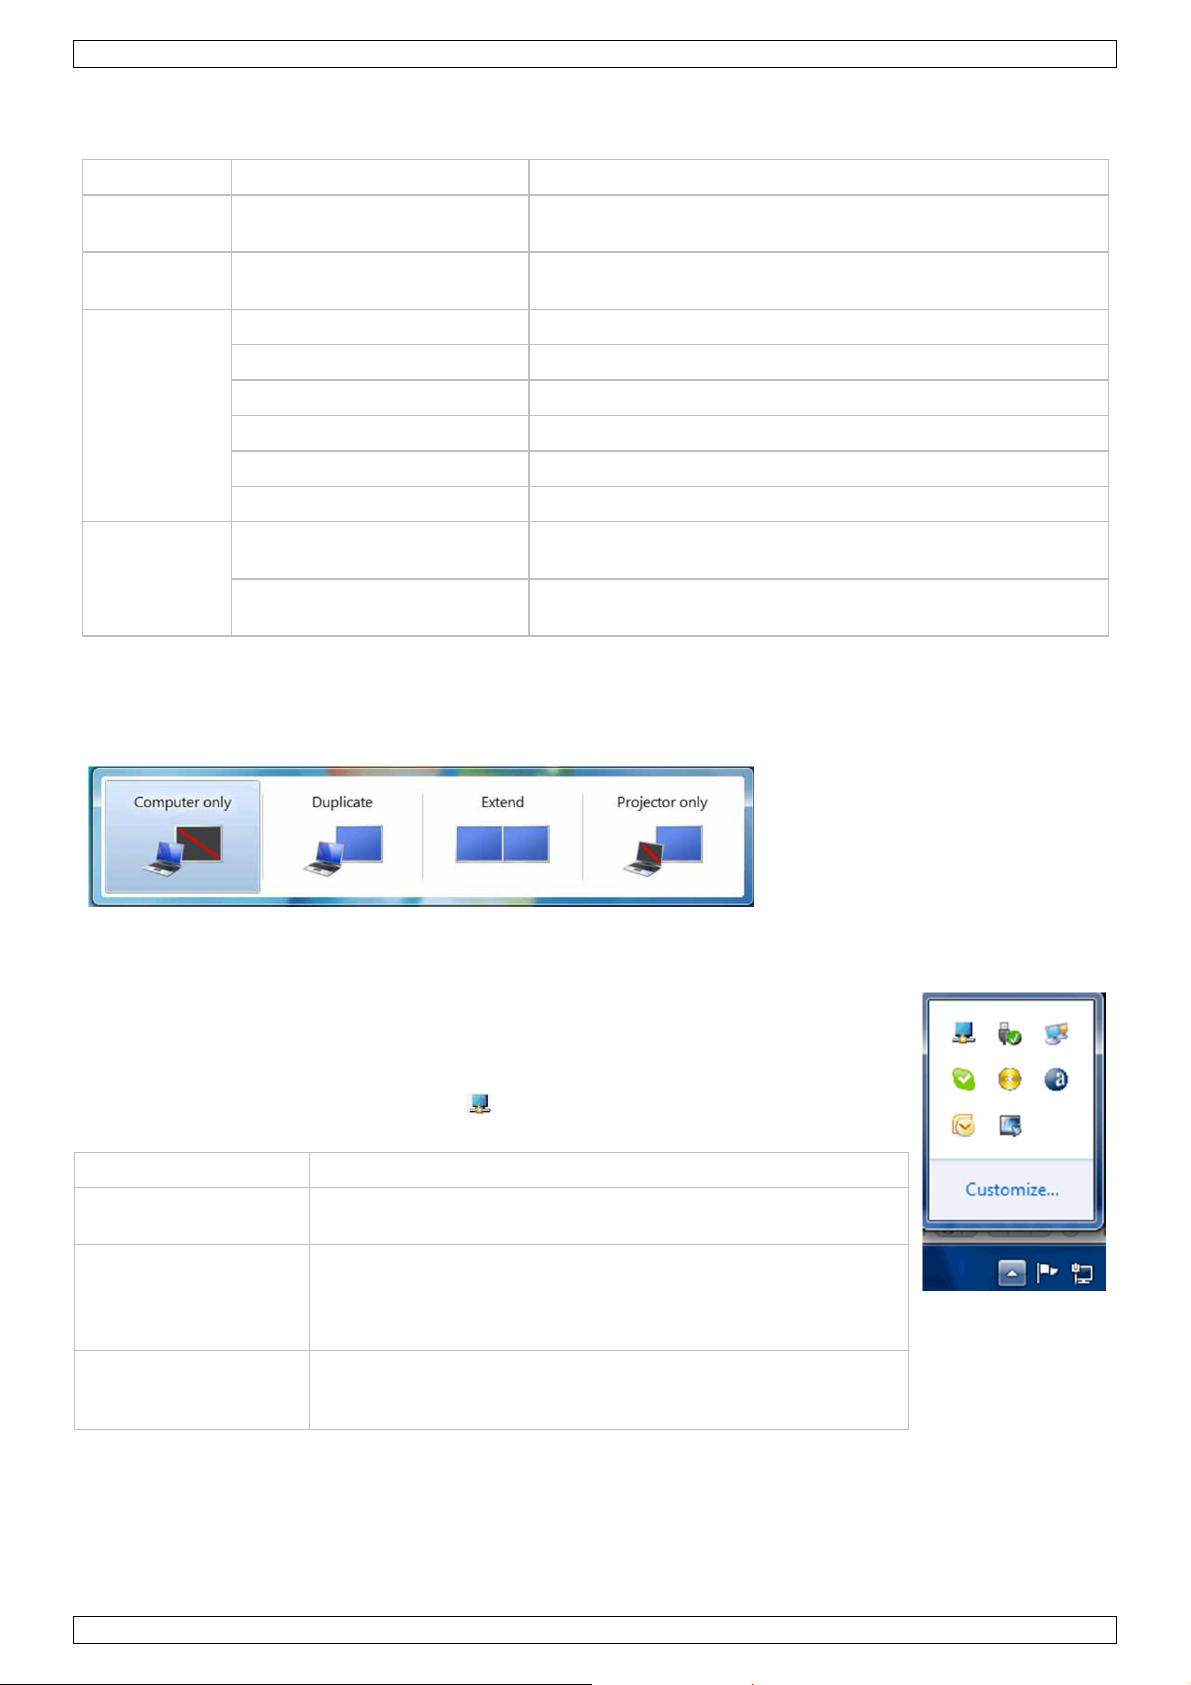
PCUSBVGA2
Ajustar la pantalla
1. Abra WDP.
2. Ajuste las opciones de la pantalla. Véase la siguiente lista para ver los detalles.
Menú Submenú Descripción
Pantalla
Resolución
- Utilice la lista desplegable para seleccionar la pantalla que
quiere configurar
- Utilice la lista desplegable y seleccione una resolución con la
barra deslizante.
Vertical Pone la pantalla en modo vertical
Horizontal Pone la pantalla en modo horizontal.
Vertical (boca abajo) Pone la pantalla en modo vertical y boca abajo.
Orientación
Horizontal (boca abajo) Pone la pantalla en modo horizontal y boca abajo
Duplicar estas pantallas Reproduce la pantalla principal en la pantalla secundaria.
Extender estas pantallas Extiende la pantalla principal a la pantalla secundaria.
Pantallas
múltiples
Visualizar escritorio sólo en
pantalla 1
Visualizar escritorio sólo en
pantalla 2
El escritorio aparece en la pantalla con el número 1. La
pantalla con el número 2 queda en blanco.
El escritorio aparece en la pantalla con el número 2. La
pantalla con el número 1 queda en blanco.
Seleccionar el modo de visualización
Para controlar el comportamiento de una pantalla conectada, es posible utilizar la tecla Windows Logo+P para
visualizar un menú y seleccionar el modo deseado.
1. Pulse Windows Logo+P. El siguiente menú aparece:
2. Haga clic en una de las opciones. La opción seleccionada se visualiza en azul.
El icono « DisplayLink »
Es posible configurar el comportamiento del adaptador con el icono « DisplayLink » de la
barra de tareas (si está disponible).
Para visualizar el menú « DisplayLink Manager »:
1. En la barra de tareas, haga clic en la flecha, para visualizar los iconos escondidos.
2. Haga clic en el icono « DisplayLink » .
Aparece un menú con diferentes opciones. Véase la lista siguiente.
Menú Descripción
controlar las
actualizaciones
Se conecta a « Windows Update », busca las versiones más
recientes y las descarga si fuera necesario.
Seleccione esta opción si quiere una mejor calidad de
Optimizar para vídeo
reproducción.
Seleccione sólo esta opción si es posible reproducir un vídeo.
Observación: Un texto puede ser menos legible.
Avanzado
(configuración
Para abrir la ventana « Windows Display Properties »
(WDP)
avanzada)
V. 02 – 26/04/2012 61 ©Velleman nv
Page 62

PCUSBVGA2
8.2. Windows Vista/XP/2000 – Ajustar la pantalla
El menú « DisplayLink manager »
Un icono aparece en la barra de tareas al añadir un aparato. Esto le permite acceder al menú « DisplayLink
manager ». Para utilizar el menú:
1. Haga clic en el icono « DisplayLink » de la barra de tareas. El siguiente menú se visualiza:
2. Seleccione una de las opciones disponibles. Véase la lista siguiente.
Menú Submenú Descripción
Controlar ahora
Actualizaciones
Configurar
Resolución de
pantalla
Calidad del color
Rotación de la
pantalla
Extender a
Extender Extiende el escritorio a la pantalla secundaria.
Visualiza una lista con las resoluciones disponibles. Es posible que
Media (16-bit) Modifica la profundidad de color de la pantalla secundaria a 16 bit
Máx. (32-bit) Modifica la profundidad de color de la pantalla secundaria a 32 bit
Normal No rotación
girar a la izquierda Hace que la pantalla gire unos 270 grados.
girar a la derecha Hace que la pantalla gire unos 90 grados.
boca abajo Hace que la pantalla gire unos 180 grados.
Derecha Extiende la imagen a la derecha de la pantalla principal.
Izquierda Extiende la imagen a la izquierda de la pantalla principal.
Arriba Extiende la imagen a la pantalla encima de la pantalla principal.
Abajo Extiende la imagen a la pantalla debajo de la pantalla principal.
Se conecta a « Windows Update », busca las versiones más
recientes y las descarga si fuera necesario.
Abre la ventana con las opciones de actualización para configurar las
actualizaciones de manera automática.
algunas resoluciones estén equipados con [ ]. Véase, Modos
derivados.
Establecer como
monitor principal
Monitor del
ordenador portátil
desactivado
Reflejar Copia el contenido de la pantalla principal a la pantalla secundaria.
Desactivar Desactiva la pantalla secundaria.
Optimizar para
vídeo
(sólo Vista y
Windows 7)
V. 02 – 26/04/2012 62 ©Velleman nv
Establece la pantalla secundaria como pantalla principal.
Desactiva la pantalla de un ordenador portátil conectado y hace que
la pantalla DisplayLink vuelva la pantalla principal .
Seleccione esta opción si quiere una mejor calidad de reproducción.
Nota: Un texto puede ser menos legible.
Page 63

PCUSBVGA2
Menú Submenú Descripción
Avanzado
Para abrir la ventana « Windows Display Properties » (WDP)
(configuración
avanzada)
Poner la pantalla en el Modo Extendido con el menú « DisplayLink »
En el modo extendido, la visualización se extiende por una o más pantallas adicionales. Este modo le permite
realizar tareas múltiples más eficazmente sin traslapar ventanas.
1. Haga clic en el icono « DisplayLink » .
2. Seleccione « Extend ».
La pantalla se extiende en la misma dirección que la última vez. Para más control, utilice el submenú y
seleccione una de las opciones y lo pone la pantalla a la izquierda/derecha/encima/debajo de la pantalla
principal.
Poner la pantalla en el Modo Espejo con el « DisplayLink »
En el modo de espejo, la pantalla conectada al adaptador copia lo que está en la pantalla principal.
1. Haga clic en el icono « DisplayLink » .
2. Seleccione « Mirror ».
La resolución, la profundidad de color y la frecuencia de fotogramas de la pantalla principal se copian en la
pantalla conectada al adaptador.
La pantalla primaria modifica su resolución automáticamente si la pantalla conectada al adaptador soporta una
resolución menos elevada. Así se asegura que la imagen completa encaje en la pantalla externa. Si la pantalla
conectada al adaptador soporta una resolución más elevada que la de la pantalla primaria, se añaden barras
negras en la parte superior e inferior de la imagen (formato de buzón) para que las imágenes se muestren
correctamente, sin recortarlas ni alargarlas.
Ajustar la pantalla con « Windows Display Settings » (Ajustes de pantalla de Windows)
1. Haga clic con el botón derecho del ratón en el escritorio.
2. Haga clic en « Personalize » (individualizar).
3. Haga clic en « Display Settings » (Ajustes de la pantalla). La ventana « Display Settings » se abre.
4. Seleccione la pantalla que quiere configurar. Es posible configurar el modo, la resolución, la calidad de
color y la posición.
V. 02 – 26/04/2012 63 ©Velleman nv
Page 64

PCUSBVGA2
Poner la pantalla en el Modo Extendido con « Windows Display Settings » (Ajustes de pantalla de
Windows)
1. Marque la casilla « Extend the desktop onto this monitor » (véase n° 1 en la figura de arriba).
2. Ajuste la resolución con la barra deslizante. (2)
3. Seleccione la calidad de color en el menú desplegable « Colors ». (3).
4. Ajuste la posición con respecto a los otros monitores en el escritorio extendido (4).
5. Haga clic en OK para guardar los ajustes.
Para configuraciones más detalladas, incluyendo la frecuencia, haga clic en « Advanced Settings », luego en
« Adapter » y « List all modes ». La lista incluye todas las combinaciones válidas con respecto a la
resolución, la calidad de color y la frecuencia de fotogramas. Para monitores CRT, utilice una frecuencia elevada
para evitar que parpadeen. Pantallas planas no parpadean. Por consiguiente, puede seleccionar una frecuencia
más baja.
Poner la pantalla en el Modo Espejo con « Windows Display Settings » (Ajustes de pantalla de
Windows)
1. Desmarque « Extend the desktop onto this monitor » (véase n° 1 en la figura de arriba).
2. Haga clic en « Apply ».
Observación: Es posible disminuir la resolución de la pantalla primaria y la pantalla « DisplayLink ». En el
modo de espejo, asegúrese de que ambas pantallas tengan la misma resolución. Es posible que esta resolución
no sea la resolución máxima de la pantalla.
Observación: NO utilice este modo si utiliza la pantalla conectada al adaptador como pantalla principal de
ordenador portátil, porque es poco probable que pueda ofrecer la resolución óptima. Véase, Establecer la
pantalla como pantalla principal.
Establecer la pantalla como pantalla principal con « Windows Display Settings » (Ajustes de
pantalla de Windows)
Para utilizar la pantalla conectada como pantalla primaria:
1. Marque la casilla « This is my main monitor » (véase n° 1 en la figura de arriba).
2. Haga clic en « Apply ».
Observación: En algunos ordenadores de escritorio y ordenadores portátiles, es necesario desactivar la
pantalla principal porque, si fuera posible, muchos drivers de tarjetas gráficas primarios intentan hacer de la
pantalla del ordenador portátil la pantalla principal. Por consiguiente, desactive la pantalla del ordenador
portátil para que otra pantalla pueda volverse pantalla primaria. Haga lo siguiente:
1. Marque la casilla « This is my main monitor » en la pantalla secundaria (véase n° 1 de la figura).
2. Seleccione la pantalla principal (Display 1).
3. Desmarque « Extend the desktop onto this monitor » (véase n° 1 de la figura).
4. Haga clic en « Apply ».
La pantalla conectada quede la pantalla primaria si el PC entra en el modo hibernar o si está reiniciado. La
pantalla principal se vuelve de nuevo la pantalla primaria al desconectar la pantalla conectada.
Establecer la pantalla como pantalla principal con el menú « DisplayLink »
1. Haga clic en el icono « DisplayLink » de la barra de tareas.
2. Seleccione « Set as Main Monitor ».
Establecer la pantalla del ordenador portátil de tal manera que no se pasa nada al cerrarla
Es posible trabajar cómodamente con un ordenador portátil cuya pantalla está cerrada y al utilizar una pantalla
conectada como pantalla primaria, un teclado externo y un ratón. Para obtener esto, seleccione « When I
close the lid » y « do nothing ».
Establecer el ordenador portátil de tal manera que no hace nada:
1. Seleccione Start > Control Panel > Power Options.
2. Seleccione Choose what closing the lid does.
3. Seleccione When I close the lid, y Do nothing en la lista desplegable On battery and Plugged in.
8.3. Actualizar el software « DisplayLink »
En el caso de Windows 7, el software « DisplayLink » se conecta a la página web con las actualizaciones de
Microsoft para obtener la última versión del driver « DisplayLink ». Seleccione « Check for updates », para
conectarse a la página web, descargar e instalar el software más reciente.
V. 02 – 26/04/2012 64 ©Velleman nv
Page 65

PCUSBVGA2
Actualización automática
La actualización automática de « DisplayLink » es una característica típica de mantenimiento y está soportada
por Windows 2000/XP y Vista. El mecanismo de actualización automática asegura que siempre están
disponibles los drivers y el software más recientes.
Es posible desactivar esta opción durante la instalación al desmarcar la casilla « Automatically check for
updates » (en la parte inferior izquierda).
Utilizar el « Updates Wizard » (asistente para la actualización)
Por defecto, está activada la actualización automática. Cada 7 días, busca el software o las actualizaciones más
recientes al conectar el adaptador o al iniciar el PC. Se activa el « Updates Wizard » si está disponible una
nueva versión del software.
Actualización manual
Para actualizar el software de manera manual:
1. Haga clic en el icono « DisplayLink » . El menú se abre.
2. Seleccione Updates > Check Now.
Si tiene el último software, se abre el cuadro de diálogo. Si no es el caso, aparece « Choose updates to
install ».
8.4. Configurar el sonido
Antes de utilizar un altavoz o micrófono conectado al adaptador, configure la aplicación para utilizar un aparato
de audio USB (Multimedia), es decir, los componentes de audio del adaptador de manera correcta.
El aparato de audio (USB (Multimedia) Audio Device) se instala automáticamente y se podrían sobre-escribir los
ajustes de audio por defecto de Windows al conectar el adaptador a su ordenador. Por consiguiente, la música
se reproducirá por el altavoz conectado al adaptador. Sin embargo, es posible que quiera utilizar la tarjeta de
audio original para reproducir música y los puertos de audio del adaptador para reproducir películas con el
V. 02 – 26/04/2012 65 ©Velleman nv
Page 66
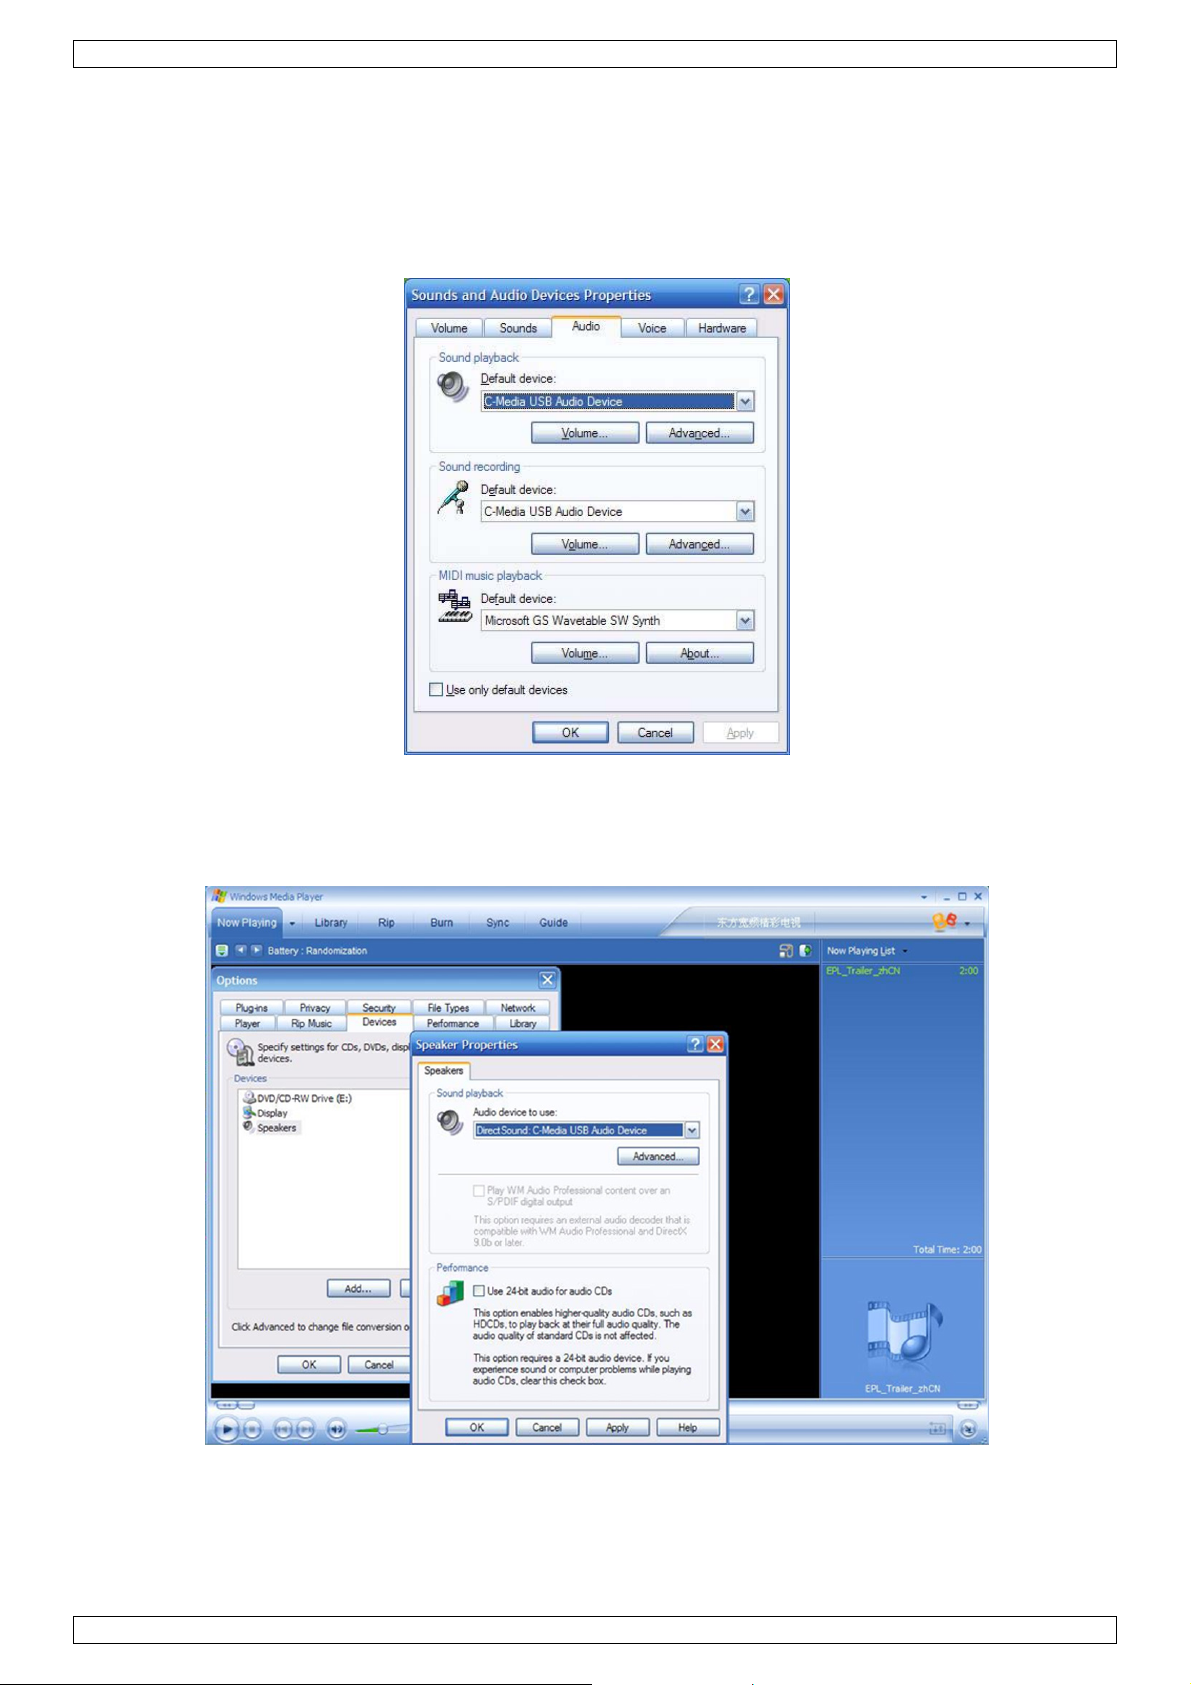
PCUSBVGA2
software « Media Player » (p.ej. Windows Media Player, Real Player, WinDVD, PowerDVD, etc.). En este caso,
configure el aparato de audio manualmente para cada aplicación.
Configurar el sistema de audio de Windows
Para especificar un aparato de audio para la reproducción de música en Windows, abra el panel de control y
haga clic dos veces en el icono « sound » o « audio ». Luego, seleccione el aparato deseado en « playback ».
Si quiere utilizar la tarjeta de audio original para reproducir música, asegúrese de que la seleccione en lugar de
« USB Audio Device ».
Configurar el sistema de audio para aplicaciones
Para reproducir una película con el software Media Player y al utilizar auriculares o altavoces conectados al
adaptador, asegúrese de que el software Media Player (p.ej. Windows Media Player, Real Player, WinDVD,
PowerDVD etc.) esté configurado para utilizar el USB Audio Device como aparato de audio.
V. 02 – 26/04/2012 66 ©Velleman nv
Page 67
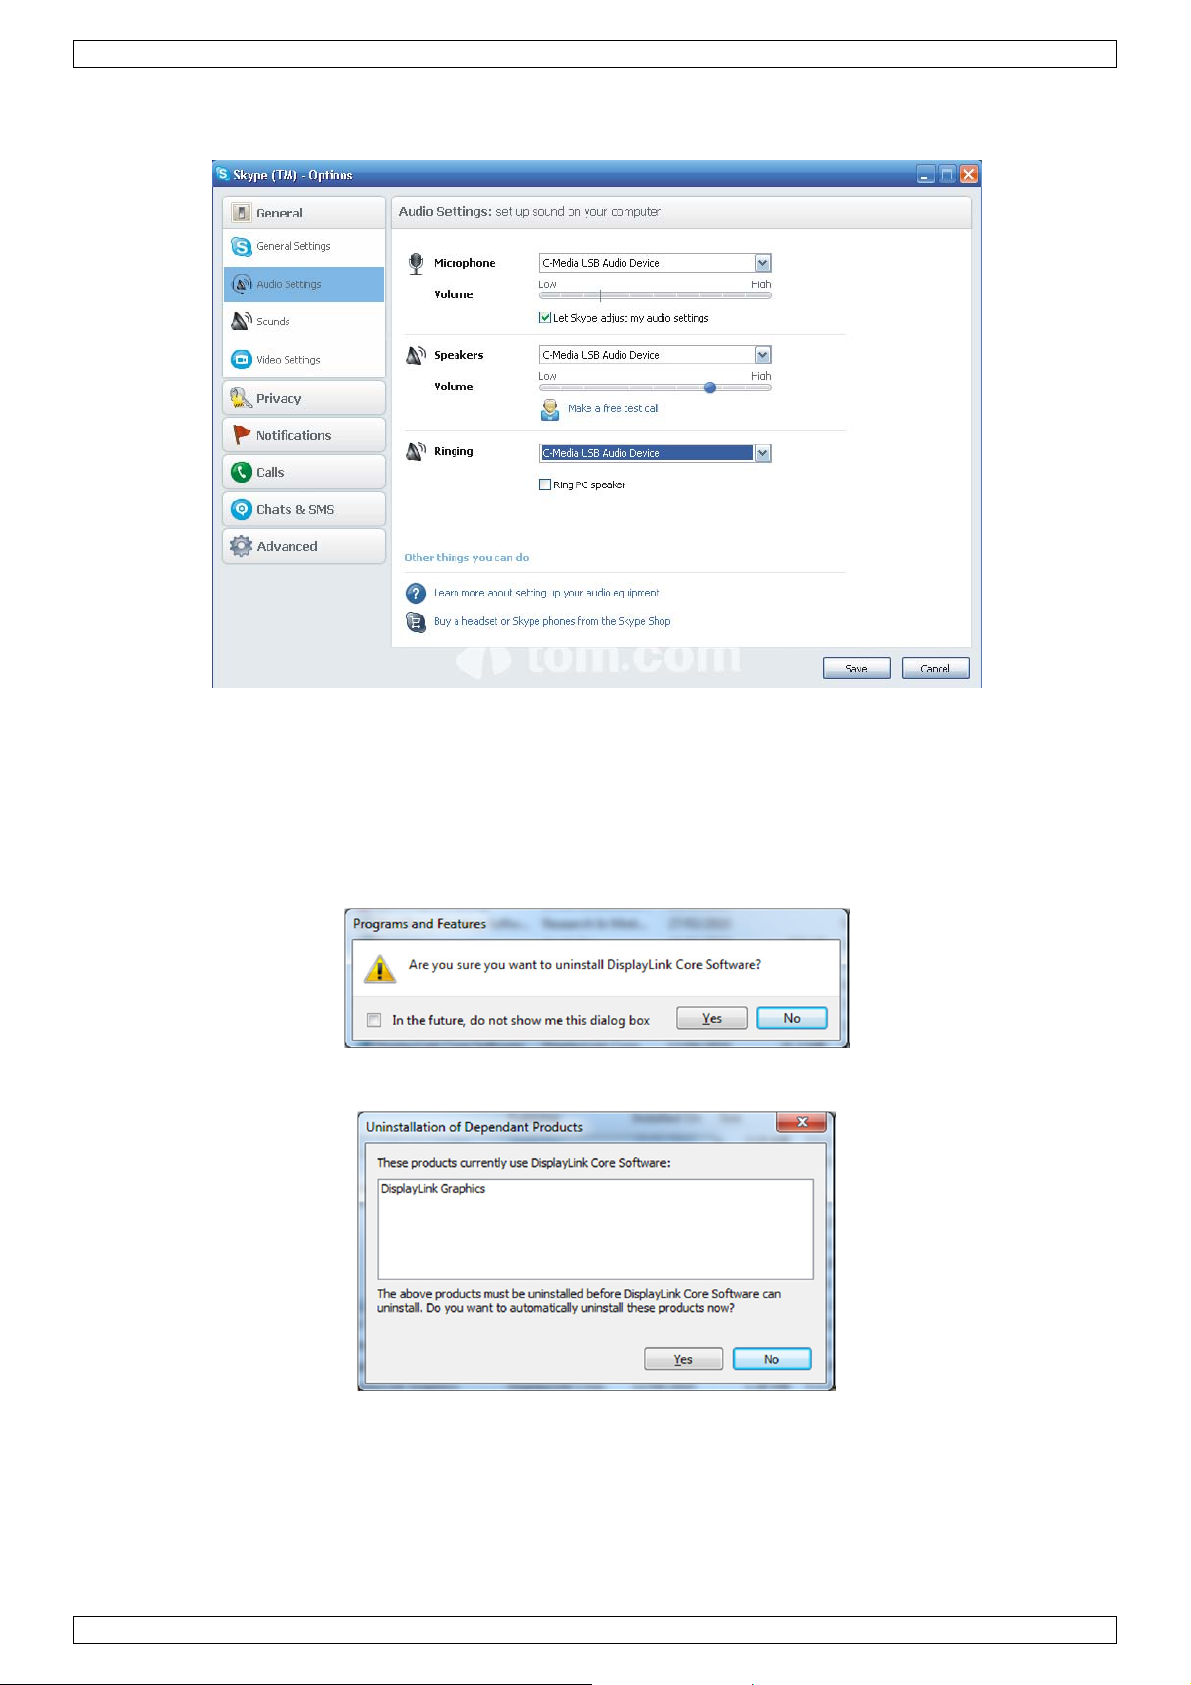
PCUSBVGA2
Para chatear con el software « instant messaging » utilizando los auriculares y el micrófono conectados al
adaptador, asegúrese de que el software « instant messaging », (p.ej. MSN messenger, Yahoo messenger o
Skype) esté configurado para utilizar el USB Audio Device como aparato de audio.
8.5. Desinstalar el software « DisplayLink »
El método de desinstalación puede diferir un poco. Eso depende de su sistema operativo.
Desinstalar el adaptador en Windows:
1. Seleccione « Start menu » y luego « Control Panel ».
2. Haga clic en « Uninstall program ».
3. Haga clic dos veces en « DisplayLink Core software ». Se abre una ventana de confirmación (si está
activada).
4. Haga clic en Yes (sí).
Es posible que se visualice un mensaje con los paquetes de software que se desinstalarán también.
V. 02 – 26/04/2012 67 ©Velleman nv
Page 68

PCUSBVGA2
5. Haga clic en Yes (sí) para desinstalar los paquetes del software « DisplayLink Core ».
El software se desinstala automáticamente. Después de que se haya terminado la desinstalación, es obligatorio
reiniciar el PC.
6. Haga clic en Yes (sí) para terminar la desinstalación.
8.6. Fit to TV
¿Por qué necesito « Fit to TV »?
Si conecta su adatador a un televisor, es posible que no estén disponibles todas las pantallas de Windows
porque los televisores utilizan la función « overscan ». Esta función puede causar que no sean visibles los
bordes de la pantalla y que así estén escondidos los iconos y la barra de tareas.
Utilice « Fit to TV » para reducir el tamaño del escritorio en la pantalla del televisor.
Observación: « Fit to TV » sólo funciona en el modo extendido. La pantalla conectada pasa automáticamente
al modo extendido y se establece por encima de la pantalla del ordenador portátil en « Windows Display
Properties » al seleccionar el modo de espejo. « Fit to TV » no soporta modos girados.
Configuración
1. Para configurar « Fit to TV », seleccione la opción en DisplayLink GUI. La siguiente ventana aparece:
Se visualiza también un cuadro rojo en la pantalla « DisplayLink ». El borde rojo muestra el formato del nuevo
escritorio de Windows.
2. Utilice « + » y « - » en « Fit to TV GUI » para modificar el tamaño del borde rojo hasta que encaje en la
pantalla del televisor.
Observación: Es posible realizar un ajuste fino al mantener pulsada la tecla CTRL (control) y al hacer clic
simultáneamente en « + » y « - ».
3. En cuanto el borde rojo coincida con los bordes de la pantalla del televisor, haga clic en « Apply » para
redimensionar el escritorio.
8.7. Información adicional
Información adicional sobre el uso del software « DisplayLink »
Soporte para juegos DirectX 10
Esta versión del software incluye soporte para algunos juegos DirectX 10 de Windows 7. Para mejorar la
experiencia durante el juego:
• desactive los ajustes Antialiasing (AA)
• active la función « Locking to vsync »
Normalmente, es posible configurar estas opciones en el juego DirectX 10.
Para jugar juegos 3D con un rendimiento suficiente en una pantalla « DisplayLink », asegúrese de que las
especificaciones del sistema coincidan con las especificaciones del hardware recomendadas y no sólo con las
especificaciones mínimas.
V. 02 – 26/04/2012 68 ©Velleman nv
Page 69

PCUSBVGA2
Calibrar la pantalla
Es posible calibrar la pantalla con aplicaciones que utilizan la interfaz « Display Data Channel Command »
(DDC/CI). Tanto la pantalla como la aplicación deben soportar DDC/CI para funcionar. Un ejemplo para una
aplicación soportada es ScreenWhite.
No se soporta DDC/CI en pantallas que incluyan la tecnología « DisplayLink ». Por ejemplo, mini pantallas.
Reproducir media
En Windows 7, Vista y Windows XP (modo extendido), el adaptador « USB Graphics » puede reproducir ficheros
y DVDs utilizando los siguientes reproductores:
• Windows Media Player 11 http://www.microsoft.com/windows/windowsmedia/default.mspx)
• WinDVD 8 (www.intervideo.com)
• PowerDVD 7 (www.cyberlink.com)
• RealPlayer 11 (www.real.com)
El adaptador puede reproducir ficheros y DVDs utilizando la mayoría de los reproductores. No se recomienda la
reproducción en el modo de espejo (XP) o el modo Básico (Vista y Windows 7).
Utilizar varios adaptadores
El software soporta hasta 6 pantallas conectadas simultáneamente por USB. También es posible utilizar
diferentes tipos de pantallas en diferentes momentos. Por ejemplo, dos en la oficina y dos en casa. El software
almacena cada perfil de pantalla por separado. Esto posibilita diferentes posici ones físicas o diferentes
resoluciones, de las pantallas conectadas en casa o la oficina.
Modo « Standby » y modo « hibernar », apagar y reactivar
La pantalla se pone en blanco al poner el PC, conectado al adaptador, en el modo « standby » o el modo de
hibernación. Si vuelve a activar (y desbloquear si fuera necesario) el PC, la pantalla conectada se activa en el
mismo modo que antes del modo « standby » o el modo « hibernar ».
La pantalla conectada se activa de nuevo en el mismo modo que antes del apagado después de haber sido
apagado, reactivado y después de haber accedido al sistema.
Adaptadores con varios usuarios
El adaptador funciona con varios usuarios en un PC. Los ajustes personales de cada usuario se almacenan, para
que cada uno pueda utilizar su propia configuración
Desconectar el adaptador
La pantalla se pone en blanco si el adaptador está desactivado o si se quita el cable USB del ordenador. Cada
ventana e icono se mueve a la pantalla primaria.
Al volver a conectar el adaptador, la pantalla se activa en el mismo modo que antes de la desconexión. Sin
embargo, no regresan las ventanas ni los iconos, que se visualizaban antes.
Modos de pantalla soportados
El modo de pantalla consta de tres componentes:
• Resolución: el número de píxeles visualizados horizontalmente y verticalmente en la pantalla.
• Calidad de color: El número de diferentes colores visualizados simultáneamente en la pantalla.
• Frecuencia: La velocidad con la que se explora la pantalla completa. Una frecuencia de actualización de las
imágenes más elevada disminuye el parpadeo.
Algunas pantallas visualizan los modos soportados por el conector VGA o DVI. Si es el caso, el adaptador
identifica los modos soportados de la pantalla. Si la pantalla no visualiza los modos soportados, el software del
adaptador selecciona unos modos estándar para la pantalla.
V. 02 – 26/04/2012 69 ©Velleman nv
Page 70

PCUSBVGA2
Modos derivados
Algunos modos de la interfaz gráfica de usuario (GUI) « DisplayLink » se
visualizan con [ ]. Esto ocurre si la conexión de una pantalla con un modo
preferido tiene una resolución más elevada que la resolución máxima
soportada del adaptador.
En este caso, no se soporta la resolución preferido de la pantalla. No
obstante, se añaden resoluciones más bajas y con la misma relación de
aspecto para testarlas. Modos entre corchetes [ ] indican que la pantalla no
ha mencionado estos modos. Sin embargo, el software « DisplayLink » los ha
puesto a la disposición para probarlos.
Porque estos modos derivados provienen de lo modos preferidos de la
pantalla, no se garantiza que funcionan con la pantalla.
Mensajes der error
A veces, el software « DisplayLink Graphics » visualiza mensajes de usuario en el área de notificación. Véase la
siguiente lista para todos los mensajes posibles y la descripción.
Mensajes Descripción
Insuficientes recursos del sistema
para efectuar el servicio pedido
Tamaño de asignación solicitado
demasiado grande
Driver del display incompatible
El sistema no puede obtener
acceso al aparato indicado
Para más información, consulte
http://www.displaylink.com/support
Este mensaje aparece al entrar en el modo extendido con recursos del
sistema bajos. El ordenador no tiene suficiente memoria para activar una
pantalla extendida. Cierre cualquier aplicación no utilizada. También es
posible mejorar la situación al reiniciar el PC.
Este mensaje aparece al intentar reflejar la pantalla primaria con una
resolución de más de 2300x1700 (4:3) o 2600x1500 (16:9).
Este mensaje aparece si el driver primario de la tarjeta gráfica no es
compatible con WDDM. Windows 7 no ha sido diseñado para funcionar sin
driver WDDM. Descargue e instale el driver de Windows 7 (WDDM) más
reciente para la tarjeta gráfica primaria.
Este mensaje aparece en Windows XP después de haber modificado el modo
de visualización varias veces (p.ej. Modo Extendido/Modo Dock) desde la
interfaz gráfica de usuario (GUI) « DisplayLink ». Si es el caso, desconecte
el aparato y luego vuelva a conectarlo para restaurar un funcionamiento
normal.
9. Solución de problemas
Por lo general, es posible solucionar problemas pequeñas:
• Al desconectar la pantalla y al volver a conectarla
• Al modificar el modo de visualización por la GUI « DisplayLink »
• Al modificar el modo de visualización por « Windows Display Properties ».
En Windows 7/Vista WDDM (Aero y Basic)
El software « DisplayLink » trabaja estrechamente con la tarjeta gráfica. Esto podría causar problemas de
compatibilidad con algunas tarjetas gráficas. Si es el caso:
1. Intente descargar el driver más reciente
2. Intente descargar el software « DisplayLink » más reciente.
3. Informe al canal de soporte del problema.
4. Si fuera necesario, arranque en modo seguro (Safe Mode) y utilice « Windows' Backup and Restore
Center » (centro de copias de seguridad y restauración) para recuperar.
V. 02 – 26/04/2012 70 ©Velleman nv
Page 71

PCUSBVGA2
10. Manual del usuario Mac OS
Este manual se aplica al software de Mac, versión 1.0 y superior.
¿Qué es el driver de Mac?
El driver de Mac ha sido diseñado para MAC OS 10.4 (Tiger), 10.5 (Leopard) y 10.6 (Snow Leopar d) y para
poder añadir una pantalla adicional mediante la tecnología « DisplayLink ». Este software le permite iniciar sus
adaptadores en cualquier escritorio basado en Intel o en cualquier ordenador portátil de Mac. Es posible
conectar hasta 4 pantallas adicionales a través del puerto USB.
Observación importante: Los ordenadores de Macintosh basados en PowerPC (p.ej. los últimos modelos de
iMac, PowerBook y PowerMac) no están soportados.
¿Qué más necesita para utilizar este driver?
No sólo necesita un ordenador Mac basado en Intel que está equipado con las últimas versiones de Mac OS
10.4, 10.5 ó 10.6, sino también un adaptador. Se requiere un adaptador para cada pantalla adicional que
quiere conectar al ordenador Macintosh.
Configuración – instalar/desinstalar el driver de Mac
1. Para iniciar el instalador de Mac, haga clic dos veces en
la imagen « Mac DriverInstaller ».
2. Seleccione « Software Installer » para iniciar la
instalación del driver de Mac utilizando un instalador de MAC
estándar. Reinicie el PC después de que se haya terminado la
instalación.
3. Seleccione « User Guide » para visualizar la guía de
usuario.
4. Seleccione « Software Uninstaller » para desinstalar el
driver de Macintosh. Reinicie el PC después de que se haya
terminado la desinstalación.
Conectar una pantalla al ordenador Mac
Después de haber instalado el driver de Macintosh, conecte su(s) adaptador(es) al puerto USB y conecte cada
pantalla a un adaptador. Es posible conectar hasta 4 pantallas adicionales. Véase los siguientes ejemplos:
Ejemplo 1: Conectar dos pantallas al MacBook Pro. Conecte el MacBook Pro a dos pantallas utilizando cables
USB y dos adaptadores. Se utilizan cables estándar VGA/DVI para conectar las pantallas a los adaptadores.
Ejemplo 2: Conectar tres pantallas al MacBook Air. Conecte el MacBook Air a un HUB USB estándar. Se utilizan
adaptadores para conectar las tres pantallas al HUB USB. Se utilizan cables VGA/DVI estándar para conectar las
pantallas a los adaptadores.
V. 02 – 26/04/2012 71 ©Velleman nv
Page 72

PCUSBVGA2
Manejar varias pantallas
• La pantalla se extiende automáticamente a la
derecha de la pantalla principal al conectar una
pantalla que el software no reconoce.
• Primero, seleccione « System Preferences »
y luego « Displays » para configurar cada
pantalla conectada por USB.
• Es posible utilizar la tecla « Gather
Windows » para visualizar todas las ventanas
con las preferencias en la pantalla principal.
Display preferences (Preferencias de la
pantalla)
Display resolutions (resoluciones)
Rotating a display (girar)
Position of displays (posición)
Display positions (visualizar las posiciones)
Display to mirror mode (clonar)
Display to extend (extender)
Using both extended and mirrored displays (utilizar
tanto pantallas clonadas como pantallas
extendidas)
Changing the main display (modificar la pantalla
principal)
Configurar las pantallas desde la barra de menú
Si ha marcado la casilla « Show displays in menu bar » en la ventana « Display Preferences » podrá
configurar pantallas haciendo clic en el ícono de monitor de la barra de menú.
El siguiente menú se abre:
• Detectar todas las pantallas conectadas al Mac.
• Activar/desactivar el modo Espejo.
• Ajustar la resolución de la(s) pantalla(s) primaria(s) y secundaria(s).
• Abrir « Display Preferences ».
V. 02 – 26/04/2012 72 ©Velleman nv
Page 73

PCUSBVGA2
11. Especificaciones
resolución hasta 1600x1200 ó 1920x1080 Digital (@60Hz 32-bit)
puerto USB 2.0 libre
exigencias del sistema
sistema operativo: Windows® 2000 SP4, XP SP2, Vista 32/64-bit con soporte
Aero, 7 32/64Bit
1x adaptador USB a DVI
1x guía rápida
1x CR-ROM con manual del usuario y software
Incluye
Consumo 5V
dimensiones 106 x 48 x 18mm
Capacidad es posible conectar hasta 6 pantallas simultáneamente
Utilice este aparato sólo con los accesorios originales. Velleman NV no será responsable de daños ni
lesiones causados por un uso (indebido) de este aparato. Para más información sobre este
producto, visite nuestra página web www.velleman.eu. Se pueden modificar las especificaciones y
el contenido de este manual sin previo aviso.
Todas las marcas registradas y nombres comerciales son propiedad de sus respectivos dueños y se utilizan sólo
para aclarar la compatibilidad de nuestros productos con los de diferentes fabricantes.
Windows XP, Windows 2000, Windows Vista, Windows Aero, Windows 7, Windows Server son marcas
registradas de Microsoft Corporation en los Estados Unidos y otros países. Mac, Mac OS, iMac, PowerBook,
Power Mac son marcas comerciales de Apple Inc., registradas en EE.UU. y otros países.
1x cable USB 2.0 (±1m20)
1x adaptador DVI a VGA
1x adaptador DVI a HDMI
1x conector estéreo de 3.5mm a RCA
V. 02 – 26/04/2012 73 ©Velleman nv
Page 74

.
nWiFa
rGe
.
.
e
r
o
w
e
e
s
c
h
e
u
e
w
e
A
ü
r
a
h
h
n
e
n
l
c
E
m
u
e
t
t
e
w
e
e
n
d
e
k
a
h
e
n
n
e
n
t
e
k
h
r
e
o
a
e
e
b
e
t
r
e
e
C
r
h
f
Ö
g
e
T
u
k
e
G
d
d
m
t
r
h
A
h
u
d
s
P
u
P
r
e
e
E
!
ä
r
e
G
l
n
n
e
n
e
n
u
s
r
e
e
e
o
k
f
n
g
ü
m
c
e
d
a
n
n
c
n
c
e
t
u
m
e
.
b
s
w
n
d
E
h
g
e
n
n
i
ü
z
G
t
T
r
w
a
u
u
a
s
r
D
e
r
s
S
e
r
o
w
e
e
c
n
e
s
r
e
s
t
B
t
t
n
e
n
ü
e
e
n
a
o
f
S
a
n
e
e
n
n
e
,
1
Einfüh
A
alle Einw
chtige Um
lls Zweifel
Wi
r bedanken
so
gfältig dur
rät nicht un
2
Sicher
Dies
nach
verw
müs
Händ
Umw
Halt
ung
hner der
eltinfor
s Symbol a
seinem Leb
ndeten Ba
en von eine
ler oder ein
eltvorschrif
bestehen,
uns für den
h. Überprüf
d wenden S
eitshin
n Sie Kinde
B
uropäisch
ationen ü
f dem Prod
nszyklus d
terien) nich
r spezialisie
örtliches R
en.
wenden Si
Kauf des P
n Sie, ob T
ie sich an I
eise
r und Unbe
edien
n Union
er dieses
ukt oder de
r Umwelt S
als unsorti
ten Firma z
cycling-Unt
sich für
USBVGA2
ansportsch
ren Händle
ugte vom G
CUSBVGA
ngsa
rodukt
Verpackun
chaden zuf
rtes Haus
wecks Recy
rnehmen r
ntsorgung
Lesen Sie
den vorlieg
.
rät fern.
2
leitu
zeigt an,
gen kann.
üll; die Ein
ling entsor
tourniert w
srichtlinie
iese Bedie
en. Sollte d
g
ass die Ent
ntsorgen Si
eit oder ve
t werden.
rden. Resp
an Ihre ö
ungsanleitu
es der Fall
orgung die
e die Einhei
wendeten
iese Einhei
ktieren Sie
tliche Beh
ng vor Inbe
ein, verwe
es Produkt
(oder
atterien
muss an d
die örtliche
rde.
riebnahme
den Sie das
s
n
3
Allgem
Si
he Vellem
•
Nehmen S
•
Eigenmäc
eigenmäc
•
Verwende
zu Schäde
Bei Schäd
•
Garantiea
Bewahren
•
Weder Vel
•
irgendwel
haftbar ge
Stro
Leit
selb
Es gi
Ver
Stell
Bei
gen
Obe
mschlagg
ngen könnt
r und lasse
bt keine zu
enden Sie
n Sie kein
nwendung
gend Raum
fläche. Inst
eine Ric
n® Servic
Schütze
Beachte
Entfernu
Vermeid
Bedienu
ie das Gerä
tige Veränd
tige Änderu
Sie das G
n am Produ
n, die durc
spruch. Fü
Sie diese B
eman nv n
her Art (fin
macht werd
fahr beim
zu lebens
Sie das G
wartenden
as Gerät n
mit Flüssig
ann das G
rund dem
llieren Sie
tlinien
- und Qua
Sie das Ge
Sie, dass
ng von 2.5c
n Sie Ersch
g des Gerä
erst in Bet
erungen sin
ngen erlisc
rät nur für
t führen un
Nichtbeac
daraus res
dienungsan
ch die Hän
nziell, phy
n.
ffnen des
efährlichen
rät nur von
eile. Bestel
r im Inne
eit befüllte
häuse aufh
erät gibt. I
as Gerät ni
litätsgara
rät vor Sta
ie Lüftungs
zwischen
ütterungen.
es.
ieb, nachde
d aus Siche
t der Garan
nwendung
d erlischt d
tung der B
ltierende F
leitung für
ler können
isch, usw.),
ehäuses. D
elektrische
Fachleuten
en Sie eve
bereich. S
Gegenstä
izen. Sorge
stallieren S
auf Teppi
tie am End
b. Schützen
chlitze nich
dem Gerät
Vermeiden
m Sie sich
heitsgründ
tieanspruch
n beschrie
r Garantiea
dienungsan
lgeschäden
ünftige Ein
ür außerge
die durch B
s Berühren
Schlägen f
reparieren.
tuelle Ersat
hützen Sie
de auf das
n Sie dafür,
ie das Gerä
h(boden),
dieser Bed
Sie das Ge
blockiert
nd jedem
Sie rohe Ge
it seinen F
n verboten.
en in dieser
nspruch.
leitung ver
übernimmt
ichtnahme
öhnliche, z
esitz, Gebra
von unter
hren. Öffn
teile bei Ih
das Gerät v
erät.
dass es für
auf einer e
extilien, us
ienungsanl
ät vor extr
erden. Bea
nderen Geg
walt währe
nktionen v
Bei Schäde
Bedienung
rsacht werd
der Herstell
uf.
ufällige ode
uch oder D
pannung st
n Sie das G
em Fachhä
r Regen un
eine gute L
benen, hitz
.
itung.
men Temp
hten Sie ei
enstand.
d der Instal
rtraut gem
n verursach
anleitung s
en, erlischt
er keine Ha
indirekte
fekt verurs
henden
ehäuse nich
dler.
d Feuchte.
ftung
beständige
raturen.
e minimale
lation und
cht haben.
t durch
nst kann di
der
tung.
chäden
cht werden
t
s
V.
02 – 26/04/2
012
74
©Vellema
nv
Page 75

PCUSBVGA2
4. Eigenschaften
Der PCUSBVGA2 ermöglicht es, einen zusätzlichen Bildschirm, LCD oder Projektor, ohne zusätzliche
Grafikkarte, über USB 2.0 an einen Computer anzuschließen. Ausgangsport ist DVI, aber das Gerät wird mit 2
Adaptern geliefert, damit Sie einen VGA- oder einen HDMI-Bildschirm anschließen können.
Lieferumfang: USB- auf DVI-Adapter, Schnelleinstieg, CR-ROM mit Bedienungsanleitung und InstallationsSoftware, 4ft USB 2.0-Kabel (±1m20), DVI- auf VGA-Adapter, DVI- auf VHDMI-Adapter, 3.5mm Stereo- auf
Cinch-Adapter.
• Anzeigemodus:
o kann den Hauptbildschirm einfach spiegeln
o nach links, rechts, oben oder unter erweitern
o links, rechts oder kopfüber drehen
o DVI-, VGA- und HDMI-Unterstützung
• Audio-Modi:
o 2.1-Kanal Audio-Ausgang
o Mikrofonanschluss
o Schnittstelle mit gemischtem Ausgang: RCAx2 (linke und rechte Spur)
• Stromversorgung über USB 2.0: sehr niedriger Stromverbrauch
o Kompression ohne Verlust
o für CRT-, LCD-Display, Projektor
• unterstützt: Windows Vista Aero, XP und Vista 32bit
• Standard- und Breitbildformat
• leistungsstarker DDR-Speicher
• verfügt über einen virtuellen Treiber
• funktioniert völlig geräuschlos
• eingebaute ON/OFF- und Status-LED
• tragbar, einfach unterwegs zu verwenden
5. Systemanforderungen
Die DisplayLink-Software ist für PCs mit einer der folgenden Windows-Betriebssysteme geeignet:
• Windows 7 (32-bit oder 64-bit)
• Windows Vista mit Service Pack 1 oder 2 (32-bit oder 64-bit)
• Windows XP Home oder Professional (inklusive Tablet Edition) mit Service Pack 2 oder 3
• Windows Server 2003, 2008 und 2008 R2
• Windows 2000 mit Service Pack 4
Bemerkungen:
• Weder 64-bit Versionen von Windows XP noch Windows Server Versionen sind nicht geeignet.
• Bitte besuchen Sie die Seite http://www.displaylink.com/mac für Mac OS X-Unterstützung
• Bitte besuchen Sie die Seite http://libdlo.freedesktop.org/wiki/ oder http://www.displaylink.org für Linux-
Unterstützung
Verfügbare Sprachen
Die folgenden Sprachen werden auf allen Betriebssystemen unterstützt:
Arabisch / Bahasa Indonesisch / Bulgarisch / Chinesisch (Traditional) / Chinesisch (Vereinfacht) / Kroatisch /
Tschechisch / Dänisch / Niederländisch / English / Finnisch / Französisch / Griechisch / Koreanisch / Deutsch /
Ungarisch / Italienisch / Japanisch / Norwegisch / Polnisch / Portugiesisch / Russisch / Slowakisch / Slowenisch
/ Spanisch / Schwedisch / Türkisch
Bemerkung: Nicht unterstützte Sprachen wechseln zu Englisch.
Windows 7 / Vista
Für Windows 7/Vista ist der Windows Experience Index (WEI) ein gutes Ausmaß an Hardware. Der WEI ist
erreichbar über Computer > Properties (Eigenschaften) oder über Control Panel (Systemsteuerung) >
System.
Die empfohlenen Hardware-Voraussetzungen sind:
• WEI-Score von mindestens 3 in der Grafik ; Desktop für die Windows Aero-Kategorie.
• Insgesamt einen WEI-Score von mindestens 3, wie von Microsoft empfohlen.
• USB 2.0-Port
• 30 Megabytes (MB) freien Festplattenspeicherplatz.
• Computer-Bildschirm, wenn nicht integriert.
V. 02 – 26/04/2012 75 ©Velleman nv
Page 76
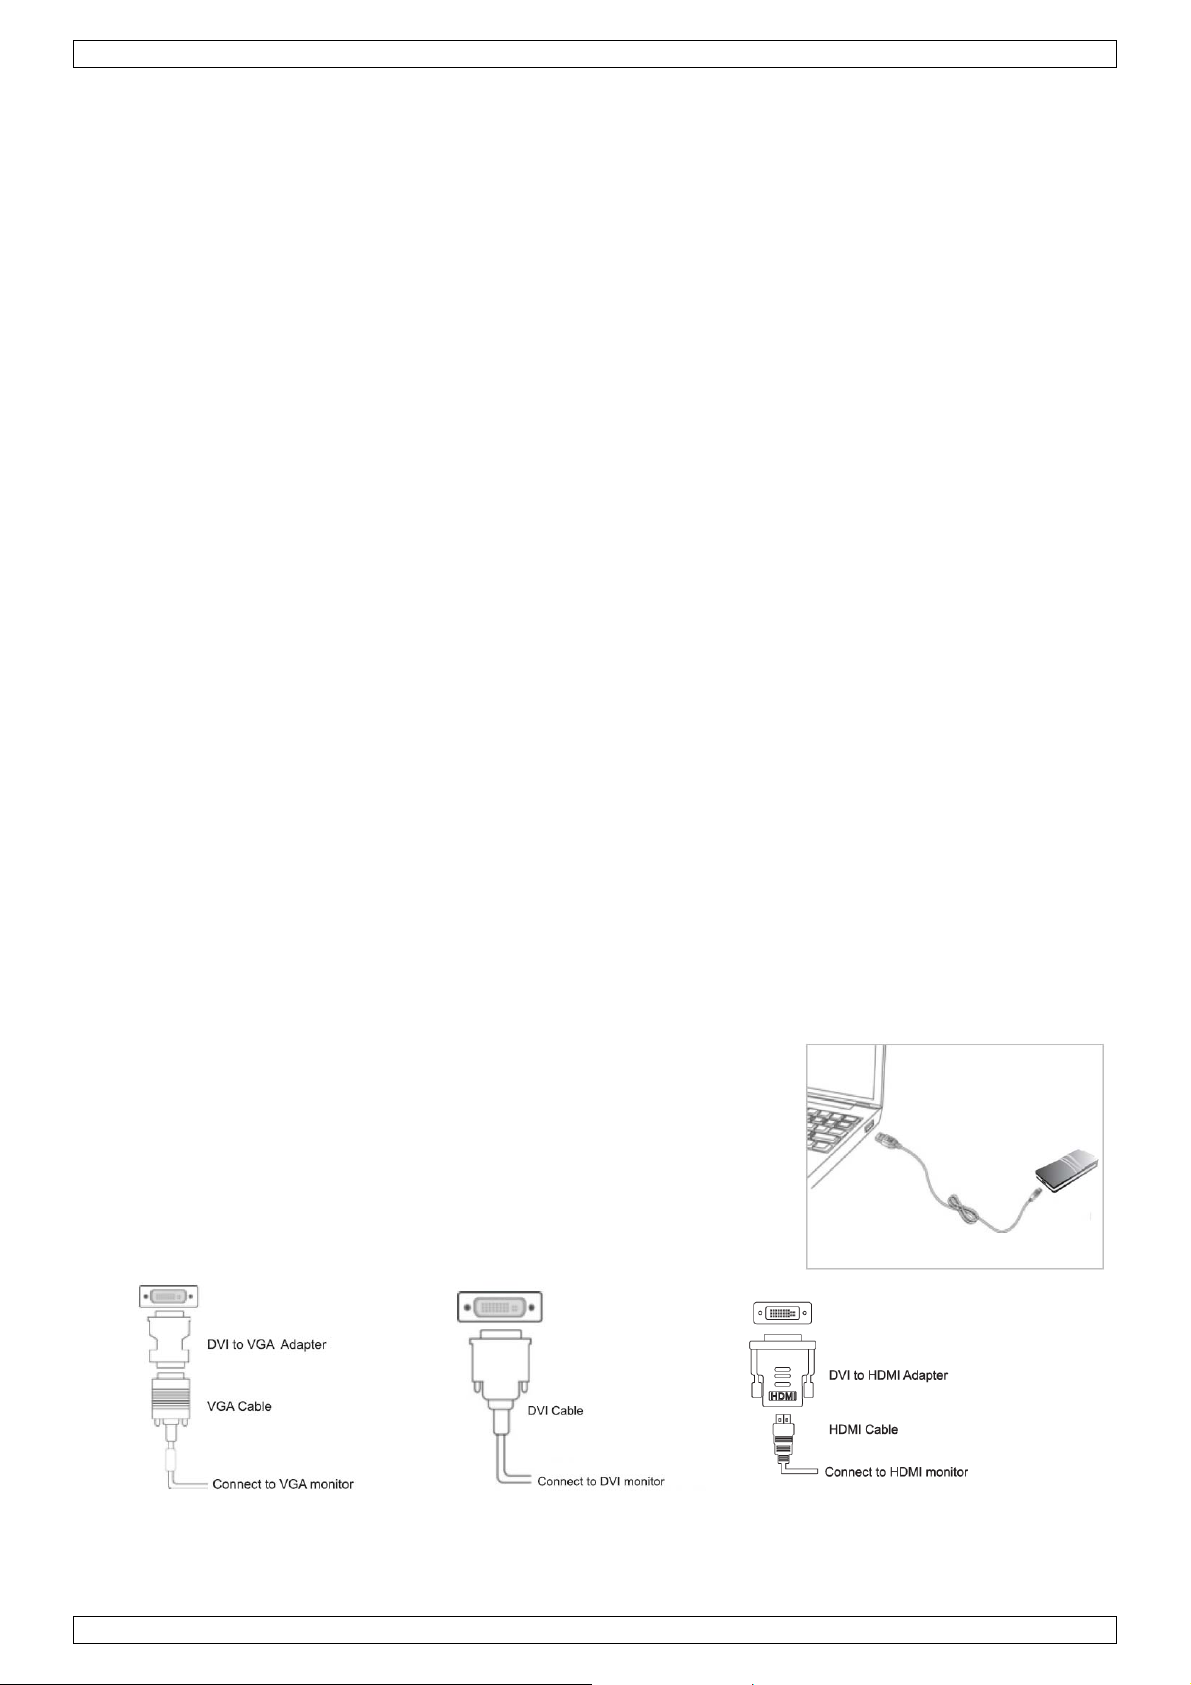
PCUSBVGA2
Windows XP
• Für 1-2 Monitore, geschäftliche Nutzung, Produktivitätsziel. Dies kann nicht die volle Bildrate der D VDWiedergabe im Vollbildmodus gewährleisten:
1.2GHz Single Core CPU, 512MB-Speicher.
• Für 3 Monitore, wovon 1 DVD Video abspielen kann während gezielt die Produktivität und BusinessAnwendungen laufen. Unterstützt nur 1 Video mit DVD-Auflösung in Vollbild:
1.6GHz CPU, 1GB-Speicher
• Für 6 Bildschirme, wovon einen 1 DVD Video in Vollbild abspielen kann:
1.8GHz Core Duo, 1GB-Speicher
• USB 2.0-Port, 30 Megabytes (MB) freien Festplattenspeicherplatz.
• Computer-Bildschirm, wenn nicht integriert.
• Internetzugang für Software-Downloads oder Zugang zu einem CD-Rom-Laufwerk.
Grafikkarten (Windows Vista/Windows 7)
Bei Windows Vista und Windows 7 funktioniert die DisplayLink-Software nur mit primären Grafikkarten.
DisplayLink fördert und testet eine Single Grafikkarte (GPU), welche in einem PC von allen großen Anbietern
installiert ist. (Intel, ATI, NVIDIA und Via).
Die folgenden GPU-Konfigurationen können Kompatibilitätsprobleme bei Windows 7 und Vista verursachen:
• Switchable Graphics (ATI/Intel)
• Switchable Graphics (ATI/ATI)
• Switchable Graphics (NVIDIA/Intel)
• NVIDIA SLI in SLI-Modus
Andere GPU-Konfigurationen, inklusive den folgenden, werden nicht unterstützt und funktionieren auf Windows
7/Vista nicht:
• Hybrid Graphics
• Hybrid SLI
• Hybrid Crossfire
• Crossfire
• SLI not in SLI-Modus
• Mehrfach WDDM 1.1 Grafik-Treiber auf einmal aktiv
Grafikkarten (Windows XP)
Alle Grafikkarten werden von Windows XP unterstützt
6. Hardware-Anschluss
Verbinden Sie den Adapter mit dem Computer und dem Bildschirm
1. Verbinden Sie den schmaleren Anschluss des USB-Kabels mit dem
Adapter.
2. Verbinden Sie danach den anderen Anschluss des USB-Kabels mit
einem freien USB 2.0-Port des Computers.
3. Ist der Bildschirm noch nicht mit dem Adapter verbunden, so
schließen Sie ihn an und schalten Sie den Bildschirm ein.
Verbinden Sie mit CRT, LCD, TV, Projektor, Lautsprecher, USB, usw.
VGA-Anschluss über DVI- auf
VGA-Adapter
V. 02 – 26/04/2012 76 ©Velleman nv
DVI-Anschluss
HDMI-Anschluss über DVI- auf
HDMI-Adapter
Page 77

PCUSBVGA2
Audio-Anschluss
7. Die Software installieren
Bemerkung: Wenn Sie v3.x, R4.1 oder R4.2 DisplayLink-Software schon installiert haben, müssen Sie diese
deinstallieren, indem Sie die Windows-Funktion « Add/Remove Programs » (Programme
hinzufügen/entfernen) nutzen, bevor Sie diese Version installieren
7.1. Die Software mit « Windows 7 Update » installieren
Die bevorzugte Methode für die Installation ist « Windows 7 Update ».
1. Verbinden Sie das Display über den Adapter und das
USB-Kabel mit Ihrem PC. Windows erkennt die neue
Hardware und lädt automatisch den Treiber herunter.
2. Einmal heruntergeladen läuft die Installation. Das
DisplayLink-Software-Fenster mit den
Geschäftsbedingungen öffnet sich (end user licence
agreement).
3. Klicken Sie I Accept (akzeptieren). Die DisplayLink
Core-Software wird installiert.
Bemerkung: Das Bild könnte während der Installation
flimmern oder schwarz werden.
V. 02 – 26/04/2012 77 ©Velleman nv
Page 78

PCUSBVGA2
7.2. Die Software auf Windows 7/Vista/XP/2000 installieren
Alternativ können Sie die Software über einen Website-Download oder über CD-Rom installieren.
Wichtig! Schließen Sie kein Gerät über den Adapter an Ihren PC an, bevor Sie die Software installiert haben.
1. Ist die Funktion « auto-play » eingeschaltet, dann
startet das Installationsprogramm automatisch from the
CD-ROM. Ist dies nicht der Fall, so doppelklicken Sie auf
Setup.exe (CD-ROM). Das Windows Benutzer Account
Kontroll-Fenster öffnet sich (if enabled in the OS).
2. Klicken Sie Yes (ja). Das DisplayLink-Software-Fenster
mit den Geschäftsbedingungen öffnet sich end user licence
agreement).
3. Klicken Sie I Accept (akzeptieren). DisplayLink Core-
Software und DisplayLink Graphics wird installiert. Es
erscheint keine Benachrichtigung der Beendung der
Installation.
Bemerkung: Das Bild könnte während der Installation
flimmern oder schwarz werden.
4. Connect the adapter via the USB cable to your PC.
Schließen Sie den Adapater über das USB-Kabel an Ihren
PC an. Das Fenster zum Installieren des Geräte-Treibers
(Installing device driver) öffnet sich.
5. Klicken Sie Yes (ja). DisplayLink installiert das Gerät
automatisch. Das DisplayLink-Software-Fenster mit den
Geschäftsbedingungen öffnet sich (siehe oben).
6. Klicken Sie I Accept (akzeptieren). Die DisplayLink
USB Graphics-Software wird installiert, jedoch ohne
Benachrichtigung der Beendung der Installation.
Bemerkung: Manche PC müssen neu gestartet werden, um
das installierte DisplayLink-Gerät verwenden zu können.
8. Anwendung der DisplayLink-Software
8.1. Windows 7 – Das Display einstellen
In Windows 7 können Sie ein DisplayLink-Gerät durch den Gebrauch von Windows Display Properties
(WDP/Windows Anzeige-Eigenschaften) konfigurieren. WDP bietet eine einfache Methode zum Anschließen,
Drehen, Duplizieren oder Erweitern von Bildschirmen, sowie das Modifizieren der Bildschirmauflösung.
WDP öffnen
Es gibt mehrere Möglichkeiten, um das WDP-Fenster zu öffnen:
• Rechtsklicken Sie auf den Desktop. Klicken Sie im Untermenü auf Screen Resolution
(Bildschirmauflösung).
• Über Start menu (Startmenü) > Devices and Printers (Geräte und Drucker) – Doppelklicken Sie auf die
DisplayLink-Gerät-Ikone.
• Rechtsklicken Sie auf die DisplayLink-Ikone - Klicken Sie auf Advanced (Erweiterte Konfiguration).
V. 02 – 26/04/2012 78 ©Velleman nv
Page 79

PCUSBVGA2
Den Bildschirm einstellen
1. Öffnen Sie WDP.
2. Stellen Sie die Bildschirm-Optionen ein. Siehe folgende Tabelle.
Menü Untermenü Beschreibung
Bildschirm
Auflösung
- Verwenden Sie das Aufklappmenü, und wählen Sie den
Bildschirm, den Sie konfigurieren möchten, aus.
- Verwenden Sie das Aufklappmenü und den Schieber
und wählen Sie eine Auflösung aus.
Querformat Setzt die Anzeige auf die Landschaft-Ansicht.
Hochformat Setzt die Anzeige auf Foto- Ansicht.
Querformat (gedreht) Hiermit wird das Display auf den Kopf im Querformat gesetzt.
Ausrichtung
Hochformat (gedreht) Hiermit wird das Display auf den Kopf im Hochformat gesetzt.
Anzeige duplizieren Bringt die Hauptanzeige auf 2 Bildschirme.
Anzeige vergrößern Erweitert die Hauptanzeige auf die sekundäre Anzeige.
Benutzeroberfläche auf 1
Bildschirm
Der Desktop erscheint auf dem 1. Display. Display Nr. 2 bleibt
leer.
Mehrfachanzeige
Benutzeroberfläche auf 2
Bildschirmen
Der Desktop erscheint auf dem 2. Display. Display Nr. 1 bleibt
leer.
Den Anzeigemodus auswählen
Um das Verhalten eines angeschlossenen Displays zu kontrollieren, ist es auch möglich die Windows-Taste
und P zu betätigen, um das Menü, wo man in den gewünschten Modus wechseln kann, anzuzeigen
1. Drücken Sie die Windows-Taste und P. Das folgende Menü erscheint:
2. Wählen Sie eine der Optionen aus. Die ausgewählte Option leuchtet blau.
V. 02 – 26/04/2012 79 ©Velleman nv
Page 80

PCUSBVGA2
Die DisplayLink-Ikone
Sie können das Verhalten des Adapters über die DisplayLink-Ikone, die in der Taskleiste
angezeigt wird, konfigurieren.
Das DisplayLink Manager-Menü anzeigen:
1. Klicken Sie in der Taskleiste auf den Pfeil, der die versteckten Ikonen anzeigt.
2. Klicken Sie auf die DisplayLink-Ikone .
Es erscheint ein Menü mit verschiedenen Optionen, die in der nachfolgenden Tabelle
beschrieben werden.
Menü Beschreibung
Update-Kontrolle
Video-Optimierung
Erweiterte
Konfigurationen
Verbindet mit Windows Update, sucht neuste Updates und lädt
sie herunter wenn es nötig ist.
Wählen Sie diese Option, um eine bessere Filmqualität zu
bekommen.
Wählen Sie diese Option nur wenn das Abspielen eines Videos
möglich ist.
Bemerkung: Text könnte unklarer werden
Öffnet das WDP-Fenster (Windows Anzeige-Eigenschaften)
8.2. Windows Vista/XP/2000 – Das Display einstellen
The DisplayLink Manager Menu
Wenn ein Gerät hinzugefügt wird, erscheint eine Ikone in der Taskleiste. Das gibt Ihnen Zugang zum
DisplayLink Manager-Menü:
1. Klicken Sie auf die DisplayLink-Ikone in der Taskleiste. Das nachfolgende Menü erscheint:
2. Wählen Sie eine Option aus. Verwenden Sie die folgende Tabelle für verfügbare Optionen.
Menü Untermenü Beschreibung
Jetzt prüfen
Updates
Konfigurieren
Bildschirmauflösung
Farbqualität
Bildschirmdrehung
V. 02 – 26/04/2012 80 ©Velleman nv
Zeigt eine Liste von verfügbaren Auflösungen. Einige Auflösungen
Medium (16-bit) Wechselt die Farbqualität vom Bildschirm in 16 bit
Max. (32-bit) Wechselt die Farbqualität vom Bildschirm in 32 bit
Normal Keine Drehung verwendet
Links drehen Dreht das Bild um 270 Grad.
Rechts drehen Dreht das Bild um 90 Grad.
kopfüber Dreht das Bild um 180 Grad.
Verbindet zum Update-Server, prüft ob neue Versionen verfügbar
sind und lädt sie herunter wenn es nötig ist.
Öffnet das Update-Optionen-Fenster, wo Sie automatische Updates
konfigurieren können.
können [ ] haben. Siehe bitte Abgeleiteter Modus.
Page 81
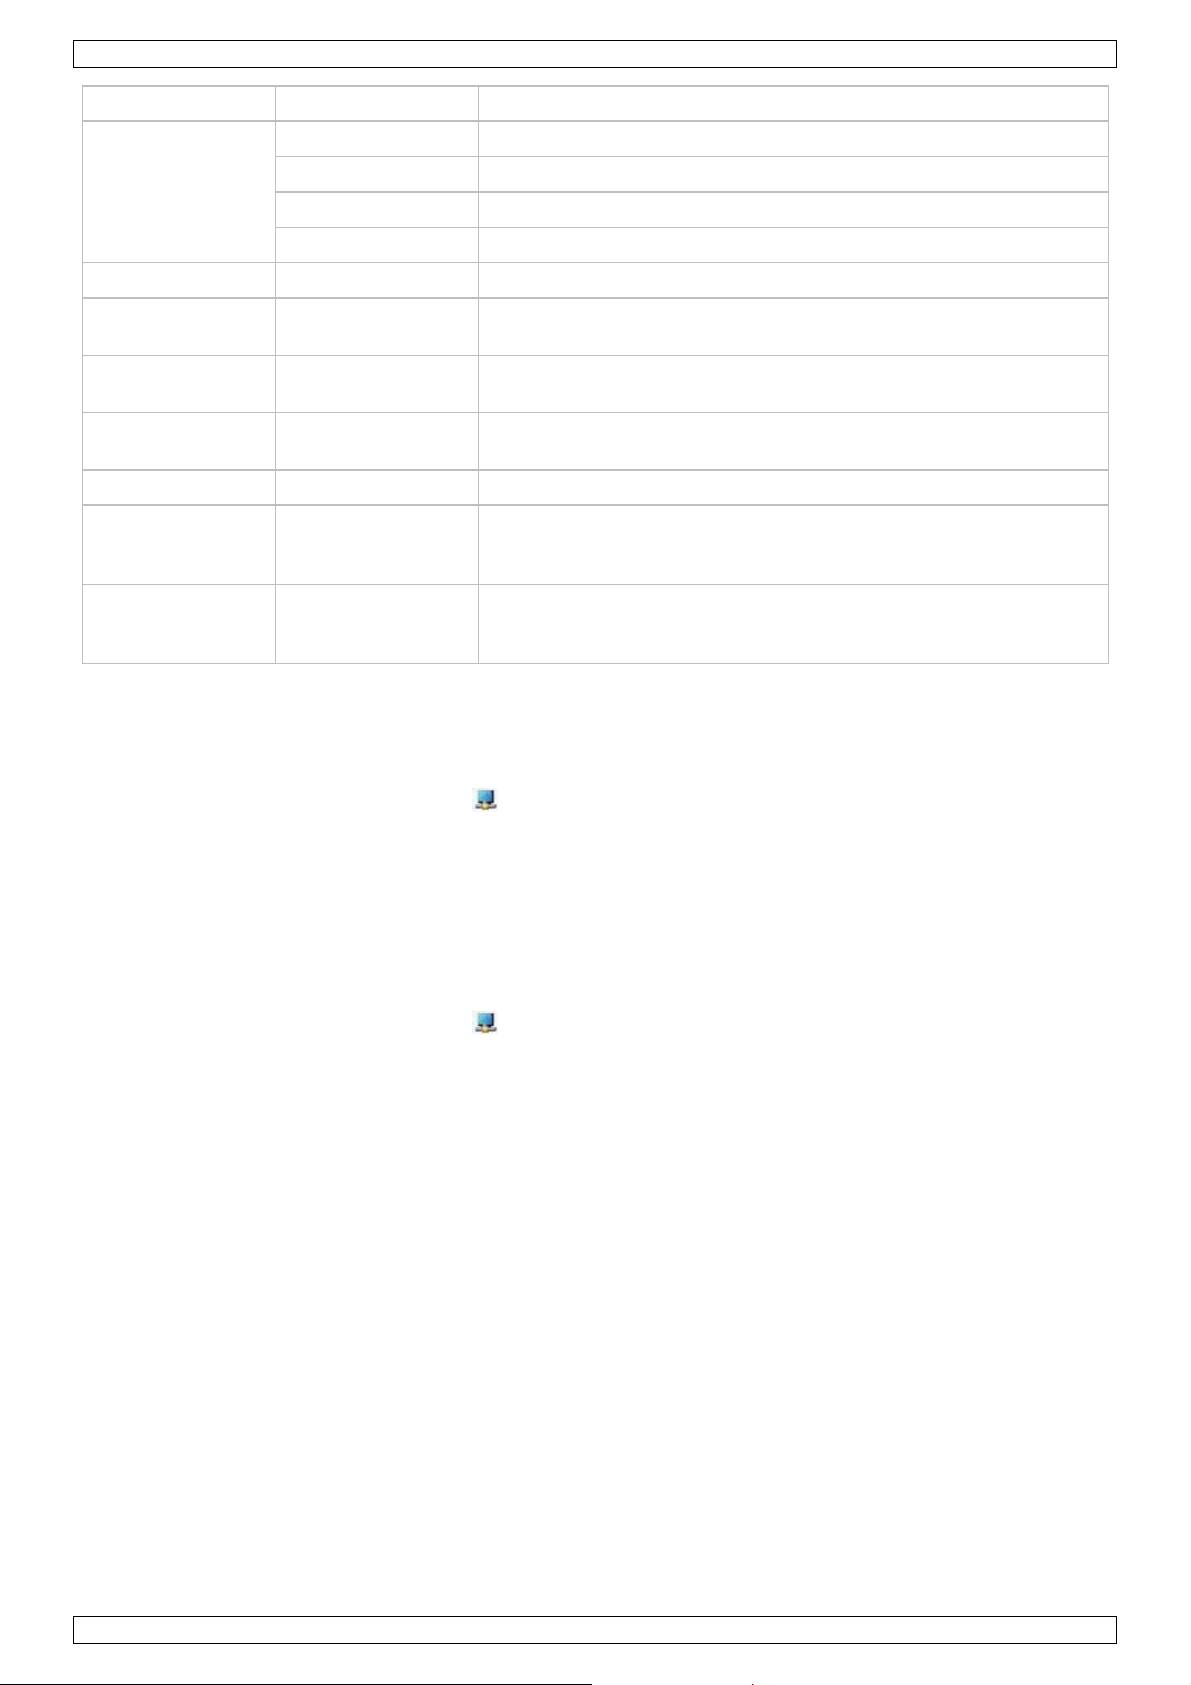
PCUSBVGA2
Menü Untermenü Beschreibung
Rechts Erweitert das Bild nach rechts.
Erweitern auf
Links Erweitert das Bild nach links.
Oben Erweitert das Bild nach oben.
Unten Erweitert das Bild nach unten.
Erweitern Erweitert Ihre Arbeitsoberfläche auf den sekundären Bildschirm.
Als Hauptbildschirm
Setzt den sekundären Bildschirm als Hauptbildschirm.
einstellen
NotebookBildschirm aus
Spiegeln
Schaltet den Bildschirm eines angeschlossenen Notebooks aus und
macht den DisplayLink-Bildschirm zum Hauptdisplay
Kopiert die Anzeige des Hauptbildschirms und bringt es auf einen
zweiten Bildschirm.
Aus Den zweiten Bildschirm ausschalten.
Optimieren für
Video (Nur Vista
und Windows 7)
Advanced
Wählen Sie diese Option für eine bessere Videoqualität auf den
Bildschirm. Bemerkung: Text könnte unklarer werden.
Öffnet das WDP-Fenster (Windows Anzeige-Eigenschaften)
(Erweiterte
Konfigurationen)
Den Bildschirm über das DisplayLink-Menü in Erweiterten Modus setzen
Im Erweiterten Modus bildet der Bildschirm, der mit dem Adapter verbunden ist, ein Teil der verlängerten
Arbeitsoberfläche. Die zusätzliche Bildschirmumgebung ist eine gute Produktivitätshilfe, welche die Sichtbarkeit
von mehr Anwendungen oder Dokumenten auf einmal erlaubt
1. Klicken Sie auf die DisplayLink-Ikone .
2. Wählen Sie Extend (Erweitert) aus.
Das Gerät wird jetzt in dieselbe Richtung wie voriges Mal erweitert. Für mehr Kontrolle, verwenden Sie das
Extend To-Untermenü und wählen Sie eine der Optionen aus. Dies stellt das Gerät in den Erweiterten Modus
und rechts/links/oben/unten des Hauptmonitors.
Den Bildschirm über das DisplayLink-Menü in Gespiegelten Modus setzen
Im Gespiegelten Modus wird der Inhalt des Hauptmonitors kopiert und auf ein verbundenes DisplayLink-Display
dupliziert.
1. Klicken Sie auf die DisplayLink-Ikone .
2. Wählen Sie Mirror (Spiegeln) aus.
Die Auflösung, die Farbtiefe und die Frequenz des Hauptbildschirmes werden mit dem Bildschirm, der mit dem
Adapter verbunden ist, abgeglichen.
If the display connected to the adapter supports a lower resolution than the primary display, then the primary
display will have its resolution changed automatically to ensure the whole picture fits on the external display. If
the display connected to the adapter is larger than the primary display, the image will be letterboxed to keep
the aspect ratio correct.
Wenn der Monitor, verbunden mit dem Adapter, eine niedrigere Auflösung unterstützt als die des primären
Bildschirms, wird die primäre Graphikkarte seine Auflösung automatisch ändern, um sicherzustellen, dass das
ganze Bild auf den externen Bildschirm passt. Unterstützt der mit dem Adapter verbundene Bildschirm eine
höhere Auflösung als die des Hauptbildschirmes, dann wird das Bild mit schwarzen Balken am unteren und
oberen Ende versehen (Letterboxing), sodass die Bilder korrekt und weder abgeschnitten noch gestreckt
angezeigt werden.
Den Bildschirm über die Bildschirmeinstellungen (Display Settings) einstellen
1. Rechtsklicken Sie auf den Desktop.
2. Klicken Sie Personalize (individualisieren).
V. 02 – 26/04/2012 81 ©Velleman nv
Page 82

PCUSBVGA2
3. Klicken Sie auf Display Settings (Bildschirmeinstellungen). Das Display Settings-Fenster öffnet sich.
4. Wählen Sie den Bildschirm, den Sie konfigurieren möchten, aus. Sie können hier Den Modus, die
Auflösung, die Farbqualität und die Position kontrollieren.
Den Bildschirm über die Windows-Bildschirmeinstellungen in Erweiterten Modus setzen
1. Markieren Sie das Kästchen Extend the desktop onto this monitor (die Arbeitsoberfläche auf diesen
Monitor erweitern) (1, in Abb.).
2. Stellen Sie die Bildschirmauflösung mit dem Auflösungsschieber ein. (2).
3. Wählen Sie die Farbqualität über das Aufklappmenü « Colors » aus. (3).
4. Stellen Sie die Position mit Berücksichtigung der anderen Bildschirme im erweiterten Modus ein. (4).
5. Klicken Sie auf OK, um die Einstellungen zu speichern.
Für mehr detaillierte Modus-Einstellungen, einschließlich der Bildwiederholfrequenz, klicken Sie auf die
Advanced Settings-Taste (Erweiterte Einstellungen), anschließend auf Adapter und dann auf die List all
modes-Taste (Liste aller Modi). Alle gültigen Kombinationen der Auflösung, Farbqualität und Frequenz werden
hier verzeichnet. Für CRT-Bildschirme ist es besser, eine hohe Frequenz zu benutzen, um flackern zu
vermeiden. Flachbildschirme flackern nicht und erlauben eine niedrigere Frequenz.
Den Bildschirm über die Windows-Bildschirmeinstellungen in gespiegelten Modus setzen
1. Entmarkieren Sie das Kästchen Extend the desktop onto this monitor (die Arbeitsoberfläche auf diesen
Monitor erweitern) (1, in Abb.).
2. Klicken Sie auf Apply (Anwenden).
Bemerkung: Die Bildschirmauflösung des primären Bildschirms und des DisplayLink-Bildschirms kann zu einer
niedrigeren Auflösung geändert werden. Im Gespiegelten Modus müssen beide Bildschirme dieselbe Auflösung
haben. Es sollte aber nicht die höchste sein.
Bemerkung: Dieser Modus wird NICHT empfohlen, wenn Sie den DisplayLink-Bildschirm als primären LaptopBildschirm benutzen, weil dieser nicht die optimale Bildschirmauflösung zur Verfügung stellt. Siehe Das
DisplayLink-Bildschirm als Hauptbildschirm einstellen.
Den Bildschirm über die Windows-Bildschirmeinstellungen als Hauptbildschirm einstellen
Das angeschlossene Display als Hauptbildschirm verwenden:
1. Markieren Sie This is my main monitor (Dies ist mein Hauptbildschirm) (1, in Abb.).
2. Klicken Sie auf Apply (Anwenden).
Bemerkung: Auf einigen PCs und Laptops ist es notwendig, den Hauptbildschirm auszuschalten (Entmarkieren
Sie das Kästchen Extend the desktop onto this monitor (Erweitern Sie die Arbeitsfläche auf diesen Monitor)
für den Hauptmonitor). Der Grund dafür ist, dass viele primäre Graphikkarten-Treiber dazu neigen, den LaptopBildschirm primär zu machen wenn es möglich ist. Die einzige provisorische Lösung ist, den Laptop zu
unterdrücken und den anderen zu erlauben primär zu werden.
V. 02 – 26/04/2012 82 ©Velleman nv
Page 83

PCUSBVGA2
Tun Sie dazu dies:
1. Markieren Sie This is my main monitor (Dies ist mein Hauptbildschirm) (1, in Abb.) auf dem zweiten
Bildschirm.
2. Wählen Sie den primären Bildschirm aus (Bildschirm 1).
3. Entmarkieren Sie das Kästchen Extend the desktop onto this monitor (1, in Abb.).
4. Klicken Sie auf Apply.
Der angeschlossene Bildschirm bleibt primär wenn der PC in den Ruhezustand gewechselt und neu gestartet
wird. Wird der angeschlossene Bildschirm getrennt, so wird der Hauptbildschirm automatisch wieder primär.
Den Bildschirm über das DisplayLink-Menü als Hauptbildschirm einstellen
1. Klicken Sie in der Taskleiste auf die DisplayLink-Ikone .
2. Wählen Sie Set as Main Monitor (als Hauptmonitor einstellen) aus.
Den Laptop-Bildschirm einstellen, nichts zu tun
Es ist möglich, bequem mit dem Laptop zu arbeiten, indem Sie lid closed to ‘do nothing’ anklicken. Stellen
Sie den angeschlossenen Bildschirm als Hauptbildschirm ein und desaktivieren Sie das Hauptbildschirm. Der
Laptop-Bildschirm kann geschlossen werden und Sie können mit dem angeschlossenen Bildschirm, einer
externen Tastatur und Maus arbeiten.
Den Laptop einstellen, nichts zu tun:
1. Wählen Sie Start menu (Startmenü) > Control Panel (Systemsteuerung) > Power Options (EnergieOptionen) aus.
2. Wählen Sie Choose what closing the lid does (Wählen was beim Schließen passieren soll) aus.
3. Von When I close the lid, select Do nothing, von On battery und Plugged in-Liste.
8.3. DisplayLink Software-Update
Bei Windows 7 verbindet sich die DisplayLink-Software mit der Windows-Aktualisierungsseite von Microsoft, um
den aktuellsten DisplayLink-Treiber zu erhalten. Wählen Sie Check for updates (Nach Updates suchen) aus,
dann verbindet sich die DisplayLink-Software mit der Windows-Aktualisierung, lädt sie herunter und installiert
sie.
Automatische Updates
Die automatischen Updates von DisplayLink ist eine Wartungseigenschaft, die von Windows 2000/XP und Vista
unterstützt wird. Der automatische Update-Mechanismus stellt sicher, dass immer die aktuellsten Treiber und
Software verfügbar ist.
Sie können diese Funktion während der Installation deaktivieren, indem Sie das Kästchen Automatically
check for updates (Automatisch nach Updates überprüfen) entmarkieren (links unten).
Benutzung des Updates Wizard
Standardmäßig ist das automatische Update konfiguriert, dass nach aktualisierter Software, dass nach dem
Einstecken des USB Graphics Adapters oder beim Starten des PCs, alle 7 Tage nach Updates sucht. Wenn
neuere Software verfügbar ist, startet das Updates Wizard.
V. 02 – 26/04/2012 83 ©Velleman nv
Page 84

PCUSBVGA2
Manuelle Updates
Die Software manuell aktualisieren:
1. Klicken Sie auf die DisplayLink-Ikone . Das DisplayLink-Menü öffnet sich.
2. Wählen Sie Updates > Check Now aus.
Wenn Sie die neueste Software haben, öffnet sich ein Dialogfenster. Andernfalls öffnet sich das Fenster Choose
updates to install (Wählen Sie Updates zum Installieren).
8.4. Audio-Konfiguration
Konfigurieren Sie die Anwendung, um ein USB (Multimedia) Audio-Gerät, d.h, die Audio-Komponenten des
Adapters, bevor Sie die mit dem Adapter verbundenen Lautsprecher/das Mikrofon verwenden.
Ist der Adapter an den Computer angeschlossen, dann wird das Musikgerät (USB (Multimedia) Audi o Device)
automatisch installiert und können die Standard Windows Audio-Einstellungen überschrieben werden. Die Musik
wird über die Lautsprecher, die mit dem Adapter verbunden sind, wiedergegeben. Es ist aber möglich, dass Sie
die originelle Soundkarte für die Musikwiedergabe und die Audio-Anschlüsse vom Adapter für das Abspielen von
Filmen über Media Player-Software (z.B. Windows Media Player, Real Player, WinDVD, PowerDVD, usw.)
verwenden möchten. Ist dies der Fall, dann müssen Sie das Audio-Gerät für jede Anwendung manuell
konfigurieren.
Das Windows Audio-System konfigurieren
Um ein Audio-Gerät für die Wiedergabe von Musik in Windows zu spezifizieren, öffnen Sie Control Panel und
doppelklicken Sie die Ikone « sound » oder « audio ». Wählen Sie danach das gewünschte Gerät aus in
« sound playback ». Möchten Sie die originelle Soundkarte für Musikwiedergabe verwenden, so beachten Sie,
dass Sie diese statt USB Audio Device auswählen.
V. 02 – 26/04/2012 84 ©Velleman nv
Page 85

PCUSBVGA2
Das Audio-System für Anwendungen konfigurieren
Um einen Film über die Mediaplayer-Software und den mit dem Adapter verbundenen Kopfhörer oder
Lautsprecher zu verwenden, beachten Sie, dass die Mediaplayer-Software (z.B. Windows Media Player, Real
Player, WinDVD, PowerDVD, usw. ) konfiguriert ist, um das USB Audio Device als Audiogerät zu verwenden.
Um über die Instant Messaging-Software mit einem Kopfhörer und einem Mikrofon, verbunden mit dem
Adapter, zu chatten, beachten Sie, dass die Instant Messaging-Software, (z.B. MSN messenger, Yahoo
messenger oder Skype) konfiguriert ist, um das USB Audio Device als Audiogerät zu verwenden.
8.5. Die DisplayLink Graphic-Software deinstallieren
Die Methode zur Deinstallation unterscheidet sich geringfügig je nach Betriebssystem.
Den Adapter in Windows deinstallieren:
1. Wählen Sie Control Panel im Startmenü.
2. Wählen Sie Programs (Programme) und klicken Sie auf Uninstall program (Programm deinstallieren).
V. 02 – 26/04/2012 85 ©Velleman nv
Page 86

PCUSBVGA2
3. Doppelklicken Sie auf DisplayLink Core software. Ein Bestätigungsfenster öffnet sich (wenn aktiv).
4. Klicken Sie auf Yes.
Es kann eine Meldung erscheinen, um anzuzeigen, welche Software-Pakete ebenfalls deinstalliert werden.
5. Klicken Sie auf Yes, um die Pakete der DisplayLink Core-Software zu deinstallieren.
Die Software wird automatisch deinstalliert. Einmal deinstalliert, werden sie aufgefordert den PC neu zu starten.
6. Klicken Sie auf Yes, um die Deinstallation abzuschließen.
8.6. Fit to TV
Warum brauche Ich « Fit to TV »?
Wenn Sie den Adatpert an ein Fernsehgerät anschließen, sind alle Windows-Bildschirme nicht benutzbar. Dies
liegt daran, dass Fernseher Overscan benutzen, der verhindert, dass die Ränder des Bildes sichtbar sind. Wenn
eine Arbeitsoberfläche angezeigt wird, verhindert Overscan, dass die Ränder des Bildschirms sichtbar sind,
welche die Taskleiste und Ikonen verstecken können.
Fit für TV kann genutzt werden, um die Größe des Windows-Desktop auf dem Fernseh-Bildschirm zu verringern
Bemerkung: Fit to TV funktioniert nur im Erweiterten Modus. Wenn Sie die Option im gespiegelten Modus
auswählen, wechselt der Bildschirm in den Erweiterten Modus und wird über den Laptop-Bildschirm in den
Windows Display Properties (Windows Bildschirm Eigenschaften) platziert. Fit to TV unterstützt keine gedrehten
Modi.
V. 02 – 26/04/2012 86 ©Velleman nv
Page 87

PCUSBVGA2
Konfiguration
1. Um Fit to TV zu konfigurieren, wählen Sie die Option aus der DisplayLink-GUI. Das folgende Fenster öffnet
sich:
Ein roter Rahmen erscheint im DisplayLink-Bildschirm. Der rote Rahmen zeigt Ihnen die Größe des neuen
Windows-Desktops.
2. Benutzen Sie « + » und « - » auf der Fit to TV GUI, um die Größe des roten Rahmens zu ändern, bis es auf
den Fernsehbildschirm passt.
Bemerkung: Eine feinere Konfiguration der Größe kann erreicht werden, indem Sie die CTRL-Taste (Control)
gedrückt halten und dabei “+“ und “-“ drücken.
3. Sobald der rote Rahmen die Ränder des Fernsehschirms erreicht, klicken Sie auf Apply, um die WindowsArbeitsfläche in der Größe anzupassen.
8.7. Zusätzliche Informationen
Der folgende Abschnitt liefert zusätzliche Informationen über die Verwendung der DisplayLink-Software.
DirectX 10 Game-Hilfe
Diese Software-Version enthält Hilfe für einige DirectX 10-Spiele auf Windows 7. Zur Verbesserung der
Spielerfahrung, empfiehlt es sich:
• Die Antialiasing-Einstellungen (AA) auszuschalten
• Locking auf vsync einzuschalten
Diese Optionen sind in der Regel innerhalb der DirectX 10-Spiele konfigurierbar.
Um 3D-Spiele mit ausreichender Leistung auf einem DisplayLink-Bildschirm zu spielen, muss das Spiel die
empfohlenen Hardware-Spezifikationen besitzen, nicht nur das Minimum.
Den Bildschirm kalibrieren
Bildschirme können mit Anwendungen, die das Display Data Channel Command Interface (DDC / CI)
verwenden, kalibriert werden. Sowohl der Bildschirm als auch die Anwendung müssen DDC / CI unterstützen,
um zu arbeiten. Ein Beispiel für eine Anwendung, die unterstützt wird, ist ScreenWhite.
DDC / CI wird nicht auf Displays mit integrierten DisplayLink-Technologie unterstützt, zum Beispiel MiniBildschirme.
Media-Wiedergabe
Auf Windows 7, Vista und Windows XP (im erweiterten Modus), kann der DisplayLink USB-Adapter Mediadateien
und DVDs über die folgenden Mediaplayer wiedergeben:
• Windows Media Player 11 http://www.microsoft.com/windows/windowsmedia/default.mspx)
• WinDVD 8 (www.intervideo.com)
• PowerDVD 7 (www.cyberlink.com)
• RealPlayer 11 (www.real.com)
Der Adapter kann Mediadateien und DVDs, die die meisten Mediaplayer verwenden, wiedergeben. MediaWiedergabe im Gespiegelten Modus (XP) oder im Basis-Modus (Vista und Windows 7) wird nicht empfohlen.
V. 02 – 26/04/2012 87 ©Velleman nv
Page 88

PCUSBVGA2
Mehrere Adapter verwenden
Die Software unterstützt bis zu sechs gleichzeitig über USB angeschlossene Bildschirme. Es ist auch möglich,
dass verschiedene Arten von Bildschirmen zu unterschiedlichen Zeiten genutzt werden, zum Beispiel, zwei im
Büro und zwei zu Hause. Die Software speichert jedes D isplay-Profil getrennt. Dies ermöglicht verschiedene
physikalische Positionierungen oder verschiedenen Auflösungen von angeschlossenen Monitoren im Büro und zu
Hause.
Standby- und Ruhestand-Modus, herunterfahren und neu starten
Wenn der PC, der mit dem Adapter verbunden ist, in den Standby-oder Ruhezustand-Modus versetzt wird, ist
der Bildschirm leer. Wenn der PC wieder aktiviert wird (und freigeschaltet wenn nötig), geht der
angeschlossene Monitor in den gleichen Modus wie vor dem Standby- oder Ruhezustand.
Wird der PC heruntergefahren, neu gestartet und loggen Sie wieder ein, so kehrt der angeschlossene Bildschirm
in den gleichen Modus wie vor dem Herunterfahren.
Adapter mit mehreren Benutzern
Der Adapter funktioniert mit mehreren Benutzern auf dem PC. Die Modus-Einstellungen werden für jeden
Benutzer gespeichert, so dass jeder seine eigene Desktop-Konfiguration verwenden kann.
Den Adapter trennen
Wenn der Adapter ausgeschaltet ist oder wenn das USB-Kabel vom Computer getrennt wurde, wird der
Bildschirm dunkel. Alle Fenster und Ikonen springen zum Hauptbildschirm.
Bei Wiederverbindung oder Einschaltung des USB Graphics-Adapter, schaltet das Display auf den gleichen
Modus wie es vor der Trennung war. Allerdings werden Fenster und Ikonen, die vorher auf dem Bildschirm
waren, nicht wieder verschoben.
Unterstützte Bildschirmmodi
Es gibt drei Komponenten, die den Bildschirm-Modus bilden:
• Auflösung: Die Anzahl der Pixel auf dem Bildschirm horizontal und vertikal.
• Farbqualität: Die Anzahl der verschiedenen Farben auf dem Bildschirm, die gleichzeitig angezeigt werden.
• Frequenz: Die Geschwindigkeit, bei der der gesamte Bildschirm gescannt wird. Eine höhere
Bildwiederholfrequenz verringert Flimmern.
Einige Monitore geben die unterstützten Modi über den VGA-oder DVI-Anschluss bekannt. Wenn dies der Fall
ist, identifiziert der USB Graphics-Adapter die unterstützten Modi vom Monitor. Wenn der Monitor die
unterstützten Modi nicht bekannt gibt, wählt die DisplayLink-Software eine Reihe von gemeinsamen BildschirmModi für den Monitor aus.
Abgeleiteter Modus
Einige Modi in der DisplayLink-GUI werden mit [ ] angezeigt. Dies geschieht,
wenn der Anschluss eines Monitors mit einem bevorzugten Modus höher ist,
als die maximal unterstützte Auflösung des Adapters.
In diesem Fall kann die bevorzugte Auflösung des Monitors nicht unterstützt
werden. Allerdings fügen wir niedrigere Auflösungen des gleichen
Seitenverhältnisses auf dem Monitor hinzu, die ausprobiert werden können.
Modi in eckigen Klammern [ ] bedeuten, dass diese Modi nicht vom Monitor
gemeldet sind, aber von der Displaylink-Software zur Verfügung gestellt
worden sind, um diese auszuprobieren. Da diese abgeleiteten Modi von dem
bevorzugten Modus des Monitors sind, ist es nicht gewährleistet, dass diese
mit dem Bildschirm arbeiten.
Fehlermeldungen
Die DisplayLink Graphics-Software zeigt Benutzer gelegentlich Nachrichten im Infobereich. Die folgende Tabelle
listet die Nachrichten und deren Beschreibung.
Meldung Beschreibung
Nicht genügend
Systemressourcen, um den
angeforderten Dienst auszuführen
Dies kann auftreten, wenn der Eintritt in den Erweiterten Modus mit
niedrigen System-Ressourcen erfolgt. Der PC hat nicht genügend Speicher,
um einen erweiterten Bildschirm zu starten. Schließen Sie alle nicht
verwendeten Anwendungen. Die Situation kann auch durch einen Neustart
des PC verbessert werden.
Die angeforderte
Zuordnungsgröße war zu groß
V. 02 – 26/04/2012 88 ©Velleman nv
Dies kann auftreten, wenn man versucht, den Hauptbildschirm mit einer
Auflösung über 2300x1700 (4:3) oder 2600x1500 (16:9) zu spiegeln.
Page 89

PCUSBVGA2
Diese Meldung erscheint, wenn der primäre Grafikkarten-Treiber nicht
Inkompatibler Display-Treiber
Das System kann nicht auf das
angegebene Gerät zugreifen
Für weitere Hilfe, bitte besuchen Sie
http://www.displaylink.com/support
WDDM kompatibel ist. Windows 7 ist nicht darauf ausgelegt, ohne WDDMTreiber zu arbeiten. Laden Sie den neuesten Windows 7 (WDDM)-Treiber für
Ihre primäre Grafikkarte herunter und installieren Sie ihn.
Diese Warnung kann in Windows XP nach dem Ändern des Display-Modus
mehrmals (z.B. Erweitert / Dock-Modus) aus dem DisplayLink-GUI angezeigt
werden. Wenn dies geschieht, trennen und verbinden Sie das Gerät erneut,
um in den Betrieb zurückzukehren.
9. Problemlösung
Kleinere Probleme können in der Regel gelöst werden, indem Sie:
• das Display trennen und wieder einstecken
• den Anzeigemodus über die DisplayLink-GUI ändern
• den Anzeigemodus über die Windows Display Properties ändern
Bei Windows 7/Vista WDDM (Aero und Basic)
Die DisplayLink-Software arbeitet eng mit der Grafikkarte zusammen und deswegen kann es
Kompatibilitätsprobleme mit einigen Grafikkarten geben. Wenn dies passiert:
1. Versuchen Sie, die neuesten Grafiktreiber herunterzuladen.
2. Versuchen Sie, die neuste DisplayLink-Software herunterzuladen.
3. Berichten Sie dem Hilfe -Kanal Ihr Problem.
4. Wenn nötig, starten Sie im abgesicherten Modus und verwenden Sie das Windows Backup and Restore
Center (Sichern und Wiederherstellen) zur Wiederherstellung.
10. Bedienungsanleitung Mac OS
Diese Bedienungsanleitung gilt für die Mac Softwareversion 1.0 und höher.
Was ist der Mac-Driver?
Der Mac-Driver wurde für Mac OS 10.4 (Tiger), 10.5 (Leopard) und 10.6 (Snow Leopard) entworfen, damit Sie
einen zusätzlichen Bildschirm über die DisplayLink-Technologie an den Mac anschließen können. Mit dieser
Software können Sie Ihre Displaylink-Geräte auf jeder Intel-basierten Arbeitsoberfläche oder Laptop von Mac
starten. Es können bis zu 4 zusätzliche Bildschirme über den USB-Port angeschlossen werden.
Wichtige Bemerkung: Power PC-basierte Macintosh-Modelle (z.B. die neuesten Modelle von iMac, PowerBook
und PowerMacs) werden nicht unterstützt.
Was brauchen Sie noch, um den Treiber zu verwenden?
Sie benötigen nicht nur einen Intel-basierten Mac-Computer, der über die neuesten Versionen von Mac OS
10.4, 10.5 oder 10.6 verfügt, sondern Sie brauchen ebenfalls ein Displaylink-Gerät. Sie brauchen ein
Displaylink-Gerät für jeden zusätzlichen Bildschirm, den Sie am Mac anschließen möchten.
Konfiguration – den Mac-Treiber installieren/deinstallieren
1. Um den Mac-Installer zu starten, doppelklicken Sie auf
Mac DriverInstaller.
2. Wählen Sie Software Installer aus, um die Installation
des Mac-Treibers über einen Standard Mac-Installer zu
starten. Starten Sie den PC nach Beendung der Installation
neu.
3. Wählen Sie User Guide aus, wenn Sie die
Bedienungsanleitung sehen möchten.
4. Wählen Sie Software Uninstaller aus, um den MacTreiber zu deinstallieren. Starten Sie den PC nach Beendung
der Deinstallation neu.
V. 02 – 26/04/2012 89 ©Velleman nv
Page 90

PCUSBVGA2
Bildschirme an den Mac-Computer anschließen
Nach Installation des Mac-Treibers, verbinden Sie den (die) Adapter über USB und verbinden Sie jedes Display
mit einem Adapter. Es können bis zu 4 zusätzliche Bildschirme angeschlossen werden. Beispiele:
Beispiel 1: Zwei Bildschirme mit dem MacBook Pro verbinden. Der MacBook Pro wird über USB-Kabel und
Adapter mit zwei Bildschirmen verbunden. Bildschirme werden über Standard VGA/DVI-Kabel mit den Adaptern
verbunden.
Beispiel 2: Drei Bildschirme mit dem MacBook Air verbinden. Der MacBook Air wird mit einem Standard USBNetzknoten verbunden. Die drei Bildschirme werden über Adapter mit dem USB-Netzknoten verbunden.
Bildschirme werden über Standard VGA/DVI-Kabel mit den Adaptern verbunden.
Mehrere Bildschirme verwalten
• Schließen Sie einen Bildschirm mit unbekannter
Software an, so erweitert der Bildschirm nach
rechts vom Hauptbildschirm.
• Um die Einstellungen für jeden über USB
angeschlossenen Bildschirm zu konfigurieren,
wählen Sie ‘System Preferences’ und dann
‘Displays’ aus.
• Verwenden Sie die ‘Gather Windows’-Taste,
um alle ‘Display Preferences’-Fenster im
Hauptdisplay anzuzeigen.
Systemeinstellungen (Display preferences)
Display resolutions (Auflösungen)
Rotating a display (Drehen)
Position of displays (Position)
Display positions (Position anzeigen)
Display to mirror mode (Spiegeln)
Display to extend (Erweitern)
Using both extended and mirrored displays (Sowohl
erweiterte als auch gespiegelte Bildschirme
verwenden)
Changing the main display (Den Hauptbildschirm
ändern)
V. 02 – 26/04/2012 90 ©Velleman nv
Page 91
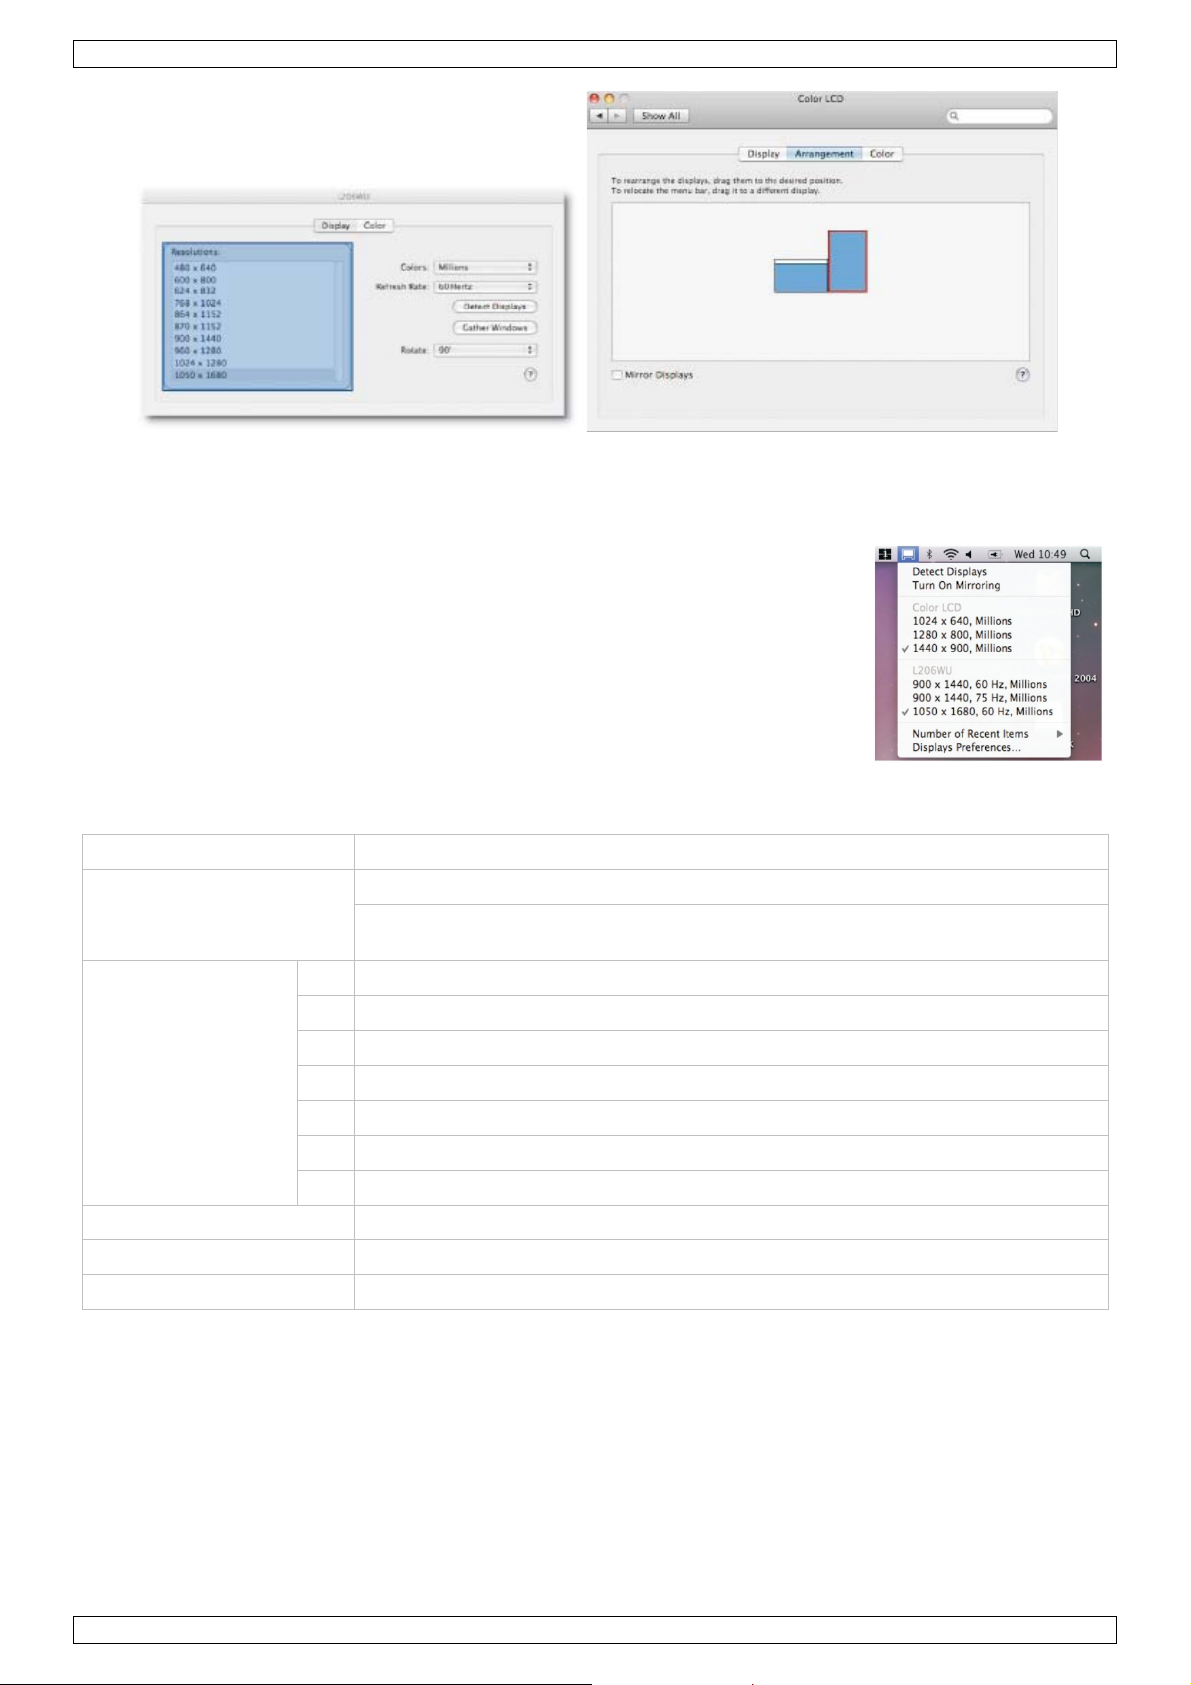
PCUSBVGA2
Configuring Displays from the Menu Bar
If you have checked Show displays in menu bar in the Display Preferences panel, you can configure
displays by clicking the display icon in the menu bar.
This menu allows you to perform the following actions:
• Detect all displays connected to the Mac.
• Turn display mirroring on/off.
• Set the resolution of primary and secondary display(s).
• Open the Display Preferences panel.
11. Technische Daten
Auflösung bis 1600x1200 oder 1920x1080 Digital (@60Hz 32-bit)
freier USB 2.0-Port
Systemanforderungen
Lieferumfang
Stromverbrauch 5V
Abmessungen 106 x 48 x 18mm
Kapazität bis zu 6 Bildschirme zugleich
Verwenden Sie dieses Gerät nur mit originellen Zubehörteilen. Velleman NV übernimmt keine
Haftung für Schaden oder Verletzungen bei (falscher) Anwendung dieses Gerätes.
Für mehr Informationen zu diesem Produkt und die neueste Version dieser Bedienungsanleitung,
siehe www.velleman.eu.
Alle Änderungen ohne vorherige Ankündigung vorbehalten.
Alle eingetragenen Warenzeichen und Handelsnamen sind Eigentum Ihrer jeweiligen Inhaber und dienen nur
zur Verdeutlichung der Kompatibilität unserer Produkte mit den Produkten verschiedener Hersteller.
Windows XP, Windows 2000, Windows Vista, Windows Aero, Windows 7, Windows Server sind eingetragene
Warenzeichen von Microsoft Corporation in den VS und anderen Ländern. Mac, Mac OS, iMac, PowerBook,
Power Mac sind Warenzeichen von Apple Inc., eingetragen in den USA und anderen Ländern.
Betriebssystem: Windows® 2000 SP4, XP SP2, Vista 32/64-bit mit Aero-
Unterstützung, 7 32/64-bit
1x USB- auf DVI-Adapter
1x Schnelleinstieg
1x CR-ROM mit Bedienungsanleitung und Software
1x USB 2.0-Kabel (±1m20)
1x DVI- auf VGA-Adapter
1x DVI- auf HDMI-Adapter
1x 3.5mm Stereo- auf Cinch-Adapter
V. 02 – 26/04/2012 91 ©Velleman nv
Page 92
Velleman® Service and Quality Warranty
Since its foundation in 1972, Velleman® acquired extensive
experience in the electronics world and currently distributes its
products in over 85 countries.
All our products fulfil strict quality requirements and legal stipulations
in the EU. In order to ensure the quality, our products regularly go
through an extra quality check, both by an internal quality
department and by specialized external organisations. If, all
precautionary measures notwithstanding, problems should occur,
please make appeal to our warranty (see guarantee conditions).
General Warranty Conditions Concerning Consumer Products
(for EU):
• All consumer products are subject to a 24-month warranty on
production flaws and defective material as from the original date of
purchase.
• Velleman® can decide to replace an article with an equivalent
article, or to refund the retail value totally or partially when the
complaint is valid and a free repair or replacement of the article is
impossible, or if the expenses are out of proportion.
You will be delivered a replacing article or a refund at the value of
100% of the purchase price in case of a flaw occurred in the first
year after the date of purchase and delivery, or a replacing article at
50% of the purchase price or a refund at the value of 50% of the
retail value in case of a flaw occurred in the second year after the
date of purchase and delivery.
• Not covered by warranty:
- all direct or indirect damage caused after delivery to the article
(e.g. by oxidation, shocks, falls, dust, dirt, humidity...), and by the
article, as well as its contents (e.g. data loss), compensation for loss
of profits;
- consumable goods, parts or accessories that are subject to an aging
process during normal use, such as batteries (rechargeable, nonrechargeable, built-in or replaceable), lamps, rub ber parts, drive
belts... (unlimited list);
- flaws resulting from fire, water damage, lightning, accident, natural
disaster, etc.…;
- flaws caused deliberately, negligently or resulting from improper
handling, negligent maintenance, abusive use or use contrary to the
manufacturer’s instructions;
- damage caused by a commercial, professional or collective use of
the article (the warranty validity will be reduced to six (6) months
when the article is used professionally);
- damage resulting from an inappropriate packing and shipping of the
article;
- all damage caused by modification, repair or alteration performed
by a third party without written permission by Velleman®.
• Articles to be repaired must be delivered to your Velleman® dealer,
solidly packed (preferably in the original packaging), and be
completed with the original receipt of purchase and a clear flaw
description.
• Hint: In order to save on cost and time, please reread the manual
and check if the flaw is caused by obvious causes prior to presenting
the article for repair. Note that returning a non-defective article can
also involve handling costs.
• Repairs occurring after warranty expiration are subject to shipping
costs.
• The above conditions are without prejudice to all commercial
warranties.
The above enumeration is subject to modification according to
the article (see article’s manual).
Velleman® service- en kwaliteitsgarantie
Velleman® heeft sinds zijn oprichting in 1972 een ruime ervaring
opgebouwd in de elektronicawereld en verdeelt op dit moment
producten in meer dan 85 landen. Al onze producten beantwoorden
aan strikte kwaliteitseisen en aan de wettelijke bepalingen geldig in
de EU. Om de kwaliteit te waarborgen, ondergaan onze producten op
regelmatige tijd stippen een extra kwaliteitscont role, zowel door onze
eigen kwaliteitsafdeling als door externe gespecialiseer de
organisaties. Mocht er ondanks deze voorzorgen toch een probleem
optreden, dan kunt u steeds een beroep doen op onze waarborg (zie
waarborgvoorwaarden).
Algemene waarborgvoorwaarden consumentengoederen
(voor Europese Unie):
• Op alle consumentengoederen geldt een garantieperiode van 24
maanden op productie- en materiaalfouten en dit vanaf de
oorspronkelijke aankoopdatum.
• Indien de klacht gegrond is en een gratis reparatie of vervanging
van een artikel onmogelijk is of indien de kosten hiervoor buiten
verhouding zijn, kan Velleman® beslissen het desbetreffende artikel
te vervangen door een gelijkwaardig artikel of de aankoopsom van
het artikel gedeeltelijk of volledig terug te betalen. In dat geval krijgt
u een vervangend product of terugbetaling ter waarde van 100% van
de aankoopsom bij ontdekking van een gebrek tot één jaar na
aankoop en levering, of een vervangend product tegen 50% van de
kostprijs of terugbetaling van 50 % bij ontdekking na één jaar tot 2
jaar.
• Valt niet onder waarborg:
- alle rechtstreekse of onrechtstreekse schade na de levering
veroorzaakt aan het toestel (bv. door oxidatie, schokken, val, stof,
vuil, vocht...), en door het toestel, alsook zijn inhoud (bv. verlies van
data), vergoeding voor eventuele winstderving.
- verbruiksgoederen, onderdelen of hulpstukken die onderhevig zijn
aan veroudering door normaal gebruik zoals bv. batterijen (zowel
oplaadbare als niet-oplaadbare, ingebouwd of vervangbaar), lampen,
rubberen onderdelen, aandrijfriemen... (onbep erkte lijst).
- defecten ten gevolge van brand, waterschade, bliksem, ongevallen,
natuurrampen, enz.
- defecten veroorzaakt door opzet, nalatigheid of door een
onoordeelkundige behandeling, slecht onderhoud of abnormaal
gebruik of gebruik van het toestel strijdig met de voorschriften van
de fabrikant.
- schade ten gevolge van een commercieel, prof essioneel of collectief
gebruik van het apparaat (bij professioneel gebruik wordt de
garantieperiode herleid tot 6 maand).
- schade veroorzaakt door onvoldoende bescherming bij transport
van het apparaat.
- alle schade door wijzigingen, reparaties of modificaties uitgevoerd
door derden zonder toestemming van Velleman®.
• Toestellen dienen ter reparatie aangeboden te worden bij uw
Velleman®-verdeler. Het toestel dient vergezeld te zijn van het
oorspronkelijke aankoopbewijs. Zorg voor een degelijke verpakking
(bij voorkeur de originele verpakking) en voeg een duidel ijke
foutomschrijving bij.
• Tip: alvorens het toestel voor reparatie aan te bieden, kijk nog
eens na of er geen voor de hand liggende reden is waarom het
toestel niet naar behoren werkt (zie handleiding). Op deze wijze kunt
u kosten en tijd besparen. Denk eraan dat er ook voor niet-defecte
toestellen een kost voor controle aangerekend kan worden.
• Bij reparaties buiten de waarborgperiode zullen transportkosten
aangerekend worden.
• Elke commerciële garantie laat deze rechten onverminderd.
Bovenstaande opsomming kan eventueel aangepast worden
naargelang de aard van het product (zie handleiding van het
betreffende product).
Garantie de service et de qualité Velleman®
Depuis 1972, Velleman® a gagné une vaste expérience dans le
secteur de l’électronique et est actuellement distributeur dans plus de
85 pays.
Tous nos produits répondent à des exigences de qualité rigoureuses
et à des dispositions légales en vigueur dans l’UE. Afin de garantir la
qualité, nous soumettons régulièrement nos produits à des c ontrôles
de qualité supplémentaires, tant par notre propre service qualité que
par un service qualité externe. Dans le cas improbable d’un défaut
malgré toutes les précautions, il est possible d’invoquer notre
garantie (voir les conditions de garantie).
Conditions générales concernant la garantie sur les produits
grand public (pour l’UE) :
• tout produit grand public est garanti 24 mois contre tout vice de
production ou de matériaux à dater du jour d’acquisition effective ;
• si la plainte est justifiée et que la réparation ou le remplacement
d’un article est jugé impossible, ou lorsque les coûts s’avèrent
disproportionnés, Velleman® s’autorise à remplacer ledit article par
un article équivalent ou à rembourser la totalité ou une partie du prix
d’achat. Le cas échéant, il vous sera consenti un article de
remplacement ou le remboursement complet du prix d’achat lors
d’un défaut dans un délai de 1 an après l’achat et la livraison, ou un
article de remplacement moyennant 50% du prix d’achat ou le
remboursement de 50% du prix d’achat lors d’un défaut après 1 à 2
ans.
• sont par conséquent exclus :
- tout dommage direct ou indirect survenu à l’article après livraison
(p.ex. dommage lié à l’oxydation, choc, chute, poussière, sable,
impureté…) et provoqué par l’appareil, ainsi que son contenu (p.ex.
perte de données) et une indemnisation éventuelle pour perte de
revenus ;
- toute pièce ou accessoire nécessitant un remplacement causé par
un usage normal comme p.ex. piles (rechargeables comme non
rechargeables, intégrées ou remplaçables), ampoules, pièces en
caoutchouc, courroies… (liste illimitée) ;
- tout dommage qui résulte d’un incendie, de la foudre, d’un
accident, d’une catastrophe naturelle, etc. ;
- out dommage provoqué par une négligence, volontaire ou non, une
utilisation ou un entretien incorrect, ou une utilisation de l’appareil
contraire aux prescriptions du fabricant ;
- tout dommage à cause d’une utilisation commerciale,
professionnelle ou collective de l’appareil (la période de garantie ser a
réduite à 6 mois lors d’une utilisation professionnelle) ;
- tout dommage à l’appareil qui résulte d’une utilisation incorrecte ou
différente que celle pour laquelle il a été initialeme nt prévu comme
décrit dans la notice ;
- tout dommage engendré par un retour de l’appareil emballé dans
un conditionnement non ou insuffisamment protégé.
- toute réparation ou modification effectuée par une tierce personne
sans l’autorisation explicite de SA Velleman® ; - frais de transport de
et vers Velleman® si l’appareil n’est plus couvert sous la garantie.
• toute réparation sera fournie par l’endroit de l’achat. L’appareil doit
nécessairement être accompagné du bon d’achat d’origine et être
dûment conditionné (de préférence dans l’emballage d’origine avec
mention du défaut) ;
• tuyau : il est conseillé de consulter la notice et de contrôler câbles,
piles, etc. avant de retourner l’appareil. Un appareil retourné jugé
défectueux qui s’avère en bon état de marche pourra faire l’objet
d’une note de frais à charge du consommateur ;
• une réparation effectuée en-dehors de la période de garantie fera
l’objet de frais de transport ;
• toute garantie commerciale ne porte pas atteinte aux conditions
susmentionnées.
La liste susmentionnée peut être sujette à une
complémentation selon le type de l’article et être mentionnée
dans la notice d’emploi.
Page 93

Garantía de servicio y calidad Velleman®
Desde su fundación en 1972 Velleman® ha adquirido una amplia
experiencia como distribuidor en el sector de la electrónica en más de
85 países. Todos nuestros productos responden a normas de calidad
rigurosas y disposiciones legales vigentes en la UE. Para garantizar la
calidad, sometemos nuestros productos regularmente a controles de
calidad adicionales, tanto a través de nuestro propio servicio de
calidad como de un servicio de calidad externo. En el caso
improbable de que surgieran problemas a pesar de todas las
precauciones, es posible recurrir a nuestra garantía (véase las
condiciones de garantía).
Condiciones generales referentes a la garantía sobre
productos de venta al público (para la Unión Europea):
• Todos los productos de venta al público tienen un período de
garantía de 24 meses contra errores de producción o errores en
materiales desde la adquisición original;
• Si la queja está fundada y si la reparación o sustitución de un
artículo no es posible, o si los gastos son desproporcionados,
Velleman® autoriza reemplazar el artículo por un artículo equivalente
o reembolsar la totalidad o una parte del precio de compra. En este
caso, usted recibirá un artículo de recambio o el reembolso completo
del precio de compra si encuentra algún fallo hasta un año después
de la compra y entrega, o un artículo de recambio al 50% del precio
de compra o el reembolso del 50% del precio de compra si encuentra
un fallo después de 1 año y hasta los 2 años después de la compra y
entrega.
Por consiguiente, están excluidos entre otras cosas:
- todos los daños causados directa o indirectamente al aparato (p.ej.
por oxidación, choques, caída,...) y a su contenido (p.ej. pérdida de
datos) después de la entrega y causados por el aparato, y cualquier
indemnización por posible pérdida de ganancias;
- partes o accesorios, que estén expuestos al desgaste causad o por
un uso normal, como por ejemplo baterías (tanto recargables como
no recargables, incorporadas o reemplazables), bombillas, partes de
goma, etc. (lista ilimitada);
- defectos causados por un incendio, daños causados por el agua,
rayos, accidentes, catástrofes naturales, etc.;
- defectos causados a conciencia, descuido o por malos tratos, un
mantenimiento inapropiado o un uso anormal del aparato contrario a
las instrucciones del fabricante;
- daños causados por un uso comercial, profesional o colectivo del
aparato (el período de garantía se reducirá a 6 meses con uso
profesional);
- daños causados por un uso incorrecto o un uso ajeno al que está
previsto el producto inicialmente como está descrito en el manual del
usuario;
- daños causados por una protección insuficiente al transportar el
aparato.
- daños causados por reparaciones o modificaciones efectuadas por
una tercera persona sin la autorización explícita de Velleman®;
- se calcula gastos de transporte de y a Velleman® si el aparato ya
no está cubierto por la garantía.
• Cualquier artículo que tenga que ser reparado tendrá que ser
devuelto a su distribuidor Velleman®. Devuelva el aparato con la
factura de compra original y transpórtelo en un embalaje sólido
(preferentemente el embalaje original). Incluya también una buena
descripción del fallo;
• Consejo: Lea el manual del usuario y controle los cables, las pilas,
etc. antes de devolver el aparato. Si no se encuentra un defecto en el
artículo los gastos podrían correr a cargo del cliente;
• Los gastos de transporte correrán a carga del cliente para una
reparación efectuada fuera del período de garantía.
• Cualquier gesto comercial no disminuye estos derechos.
La lista previamente mencionada puede ser adaptada según el
tipo de artículo (véase el manual del usuario del artículo en
cuestión).
Velleman® Service- und Qualitätsgarantie
Seit der Gründung in 1972 hat Velleman® sehr viel Erfahrung als
Verteiler in der Elektronikwelt in über 85 Ländern aufgebaut.
Alle Produkte entsprechen den strengen Qualitätsforderungen und
gesetzlichen Anforderungen in der EU. Um die Qualität zu
gewährleisten werden unsere Produkte regelmäßig einer zusätzlichen
Qualitätskontrolle unterworfen, sowohl von unserer eigenen
Qualitätsabteilung als auch von externen spezialisierten
Organisationen. Sollten, trotz aller Vorsichtsmaßnahmen, Probleme
auftreten, nehmen Sie bitte die Garantie in Anspruch (siehe
Garantiebedingungen).
Allgemeine Garantiebedingungen in Bezug auf Konsumgüter
(für die Europäische Union):
• Alle Produkte haben für Material- oder Herstellungsfehler eine
Garantieperiode von 24 Monaten ab Verkaufsdatum.
• Wenn die Klage berechtigt ist und falls eine kostenlose Reparatur
oder ein Austausch des Gerätes unmöglich ist, oder wenn die Kosten
dafür unverhältnismäßig sind, kann Velleman® sich darüber
entscheiden, dieses Produkt durch ein gleiches Produkt zu ersetzen
oder die Kaufsumme ganz oder teilweise zurückzuzahlen. In diesem
Fall erhalten Sie ein Ersatzprodukt oder eine Rückzahlung im Werte
von 100% der Kaufsumme im Falle eines Defektes bis zu 1 Jahr nach
Kauf oder Lieferung, oder Sie bekommen ein Ersatzprodukt im Werte
von 50% der Kaufsumme oder eine Rückzahlung im Werte von 50 %
im Falle eines Defektes im zweiten Jahr.
• Von der Garantie ausgeschlossen sind:
- alle direkten oder indirekten Schäden, die na ch Lieferung am Gerät
und durch das Gerät verursacht werden (z.B. Oxidation, Stöße, Fall,
Staub, Schmutz, Feuchtigkeit, ...), sowie auch der Inhalt (z.B.
Datenverlust), Entschädigung für eventuellen Gewinnausfall.
- Verbrauchsgüter, Teile oder Zubehörteile, die durch normalen
Gebrauch dem Verschleiß ausgesetzt sind, wie z.B. Batterien (nicht
nur aufladbare, sondern auch nicht aufladbare, eingebaute oder
ersetzbare), Lampen, Gummiteile, Treibriemen, usw. (unbeschränkte
Liste).
- Schäden verursacht durch Brandschaden, Wasserschaden, Blitz,
Unfälle, Naturkatastrophen, usw.
- Schäden verursacht durch absichtliche, nachlässige oder
unsachgemäße Anwendung, schlechte Wartung, zweckentfremdet e
Anwendung oder Nichtbeachtung von Benutzerhinweisen in der
Bedienungsanleitung.
- Schäden infolge einer kommerziellen, professionellen oder
kollektiven Anwendung des Gerätes (bei gewerblicher Anwendung
wird die Garantieperiode auf 6 Monate zurückgeführt).
- Schäden verursacht durch eine unsachgemäße Verpackung und
unsachgemäßen Transport des Gerätes.
- alle Schäden verursacht durch unautorisierte Änderungen,
Reparaturen oder Modifikationen, die von einem Dritten ohne
Erlaubnis von Velleman® vorgenommen werden.
• Im Fall einer Reparatur, wenden Sie sich an Ihren Velleman®Verteiler. Legen Sie das Produkt ordnungsgemäß verpackt
(vorzugsweise die Originalverpackung) und mit dem OriginalKaufbeleg vor. Fügen Sie eine deutliche Fehlerbeschreibung hinzu.
• Hinweis: Um Kosten und Zeit zu sparen, lesen Sie d ie
Bedienungsanleitung nochmals und überprüfen Sie, ob es keinen auf
de Hand liegenden Grund gibt, ehe Sie das Gerät zur Reparatur
zurückschicken. Stellt sich bei der Überprüfung des Gerätes heraus,
dass kein Geräteschaden vorliegt, könnte dem Kunden eine
Untersuchungspauschale berechnet.
• Für Reparaturen nach Ablauf der Garantiefrist werden
Transportkosten berechnet.
• Jede kommerzielle Garantie lässt diese Rechte unberührt.
Die oben stehende Aufzählung kann eventuell angepasst
werden gemäß der Art des Produktes (siehe
Bedienungsanleitung des Gerätes).
 Loading...