

Page 1

PCUSBVGA
USB 2.0 UNIVERSAL MULTI-DISPLAY ADAPTOR (HIGH DEFINITION)
UNIVERSELE USB 2.0 MULTIDISPLAY-ADAPTER (HD)
ADAPTATEUR USB 2.0 MULTI-ÉCRANS UNIVERSEL (HD)
ADAPTADOR USB 2.0 MULTIPANTALLAS UNIVERSAL (HD)
UNIVERSELLER USB 2.0 MULTIDISPLAY-ADAPTER (HD)
USER MANUAL 3
GEBRUIKERSHANDLEIDING 12
NOTICE D’EMPLOI 21
MANUAL DEL USUARIO 30
BEDIENUNGSANLEITUNG 39
Page 2

PCUSBVGA
A ‘mini-B’ USB port
B female DVI port
C status LED
A mini-B USB-poort
B vrouwelijke DVI-poort
C statusled
A port USB type mini-B
B port DVI femelle
C DEL d’état
A Mini-B USB-Puerto
B DVI-Buchse
C Status-LED
A puerto USB tipo mini-B
B puerto DVI hembra
C LED de estado
Figure 1
19/02/2009 © 2008 Velleman Components nv
2
Page 3

PCUSBVGA
User manual
1. Introduction
To all residents of the European Union
Important environmental information about this product
This symbol on the device or the package indicates that disposal of the device after its
lifecycle could harm the environment. Do not dispose of the unit (or batteries) as
unsorted municipal waste; it should be taken to a specialized company for recycling. This
device should be returned to your distributor or to a local recycling service. Respect the
local environmental rules.
If in doubt, contact your local waste disposal authorities.
Thank you for choosing Velleman! Please read the manual thoroughly before bringing this device into
service. If the device was damaged in transit, do not install or use it and contact your dealer. Damage
caused by disregard of certain guidelines in this manual is not covered by the warranty and the
dealer will not accept responsibility for any ensuing defects or problems.
This USB display adaptor enables to connect an additional monitor, LCD or projector through a free
USB 2.0 port on a computer, without the need of an extra video card. Output port is DVI, but the
device comes with 2 adaptors to connect either a VGA or a HDMI monitor.
2. Safety Instructions
Keep this device away from children and unauthorized users.
Keep this device away from rain, moisture, splashing and
dripping liquids.
3. General Guidelines
Refer to the Velleman® Service and Quality Warranty on the last pages of this manual.
• Protect this device from shocks and abuse. Avoid brute force when operating the device.
• Protect the device against extreme heat, dust and moisture.
• Familiarise yourself with the functions of the device before actually using it.
• All modifications of the device are forbidden for safety reasons.
• Only use the device for its intended purpose. Using the device in an unauthorised way will void the
warranty.
• Damage caused by disregard of certain guidelines in this manual is not covered by the warranty and
the dealer will not accept responsibility for any ensuing defects or problems.
4. Features
• Video output with DVI Connecter
• supports VGA/HDMI video output via DVI-VGA/DVI-HDMI adapter
• supported functions: primary - extended – mirrored
• easily connect an additional monitor using a USB 2.0 cable
• easy to install and use
• add up to s6 (Mac: 4) convertors simultaneous to a desktop or notebook PC with minimal
configuration and without an additional graphics card
• resolution of up to 1600x1200 at 32 bit colour
• USB bus powered, no external power supply needed
• contents:
1x USB to DVI adaptor | 1x male DVI-I - female HDMI adaptor | 1x male DVI-I - female VGA
(15p) adaptor | 1x CD-ROM with multilingual user guide and installation software | 1x 4ft (1m20)
USB 2.0 Cable
• system requirements:
CPU: 1.2GHz clock or higher, Intel Pentium/Celeron family or AMD K6/Athlon/Duron family or
compatible processor | RAM: at least 256MB | USB: at least USB 2.0 | disk space: at least 30MB |
OS: Windows 2000 (SP4), XP (SP2) 32-bit, Vista™ 32/64-bit, Mac OS X v10.4 or v10.5 | monitor:
Super VGA (800x600) or higher resolution | to play DVD via adaptor: dual core CPU @ 2.0GHz and
resolution 800x600 with 16-bit colour
19/02/2009 © 2008 Velleman Components nv
3
Page 4

PCUSBVGA
5. Windows driver installation
• Before connecting the device to the PC, drivers must be installed. Close all applications before
continuing.
• Place the included CD-ROM in the CD-reader. Note: only insert the disc in a loader that supports
mini-CD ROMs (8cm/3.15”).
• When auto-play is enabled, the installation program starts automatically. If not, locate and double
click Setup.exe on the CD-ROM.
NOTICE:
→ Windows Vista: the User Account Control dialog box pops up when attempting to install a
program. Enter an administrator password or click ‘Allow’ to start the installation.
→ Windows 2000: Make sure all necessary Service Packs are present on the system.
• In the opening screen (see below), click on the applicable operating system.
• A window with the user licence agreement pops up (see above). Read it through and click on ‘I
accept’ to continue installation.
• The system needs to be rebooted to finalize the installation. Click ‘Yes’ when the reboot prompt
appears.
6. Adaptor installation
• Refer to the illustrations on page 2 of this manual.
• Plug the type B-connector (smaller) of the included USB cable into the ‘mini-B’ USB port [A] of the
PCUSBVGA. Plug the USB type A-connector (larger) into a free USB 2.0 port of the computer.
NOTICE:
→ The USB port must be type USB 2.0 or higher
• Connect the DVI port [B] of the PCUSBVGA to a monitor. If the monitor has a DVI connector, use
a normal DVI cable (not incl.). To connect to an analogue VGA or HDMI monitor, use the
appropriate adaptor (included).
• Switch on the monitor; the status LED [C] lights up. Windows will automatically finalize the
installation and the monitor will become active.
NOTICE:
→ Windows Vista: it is possible that the screen remains blank. In this case, reboot the system
again.
→ During installation, the added screen might flicker a couple of times. Th is is normal
behaviour.
→ There might be some delay before a first image is seen on the added screen.
→ Windows Vista Aero interface: the USB adaptor is not compatible with the Vista aero
interface. The interface is disabled and a warning that the colour scheme has been changed
is given. Unplug or uninstall the USB adaptor to automatically re-enable the Aero interface.
19/02/2009 © 2008 Velleman Components nv
4
Page 5

PCUSBVGA
7. Windows operation
• The connected monitor can be used in 3 modes:
• extended mode
• mirror mode
• primary mode
7.1 extended mode (default)
• The added monitor screen is available as extra desktop workspace. Open windows can be moved
around (dragged and dropped) across main and added screen thus facilitating multi p le task
management.
NOTICE:
→ Some applications may not support extended desktops and will remain on the primary
screen.
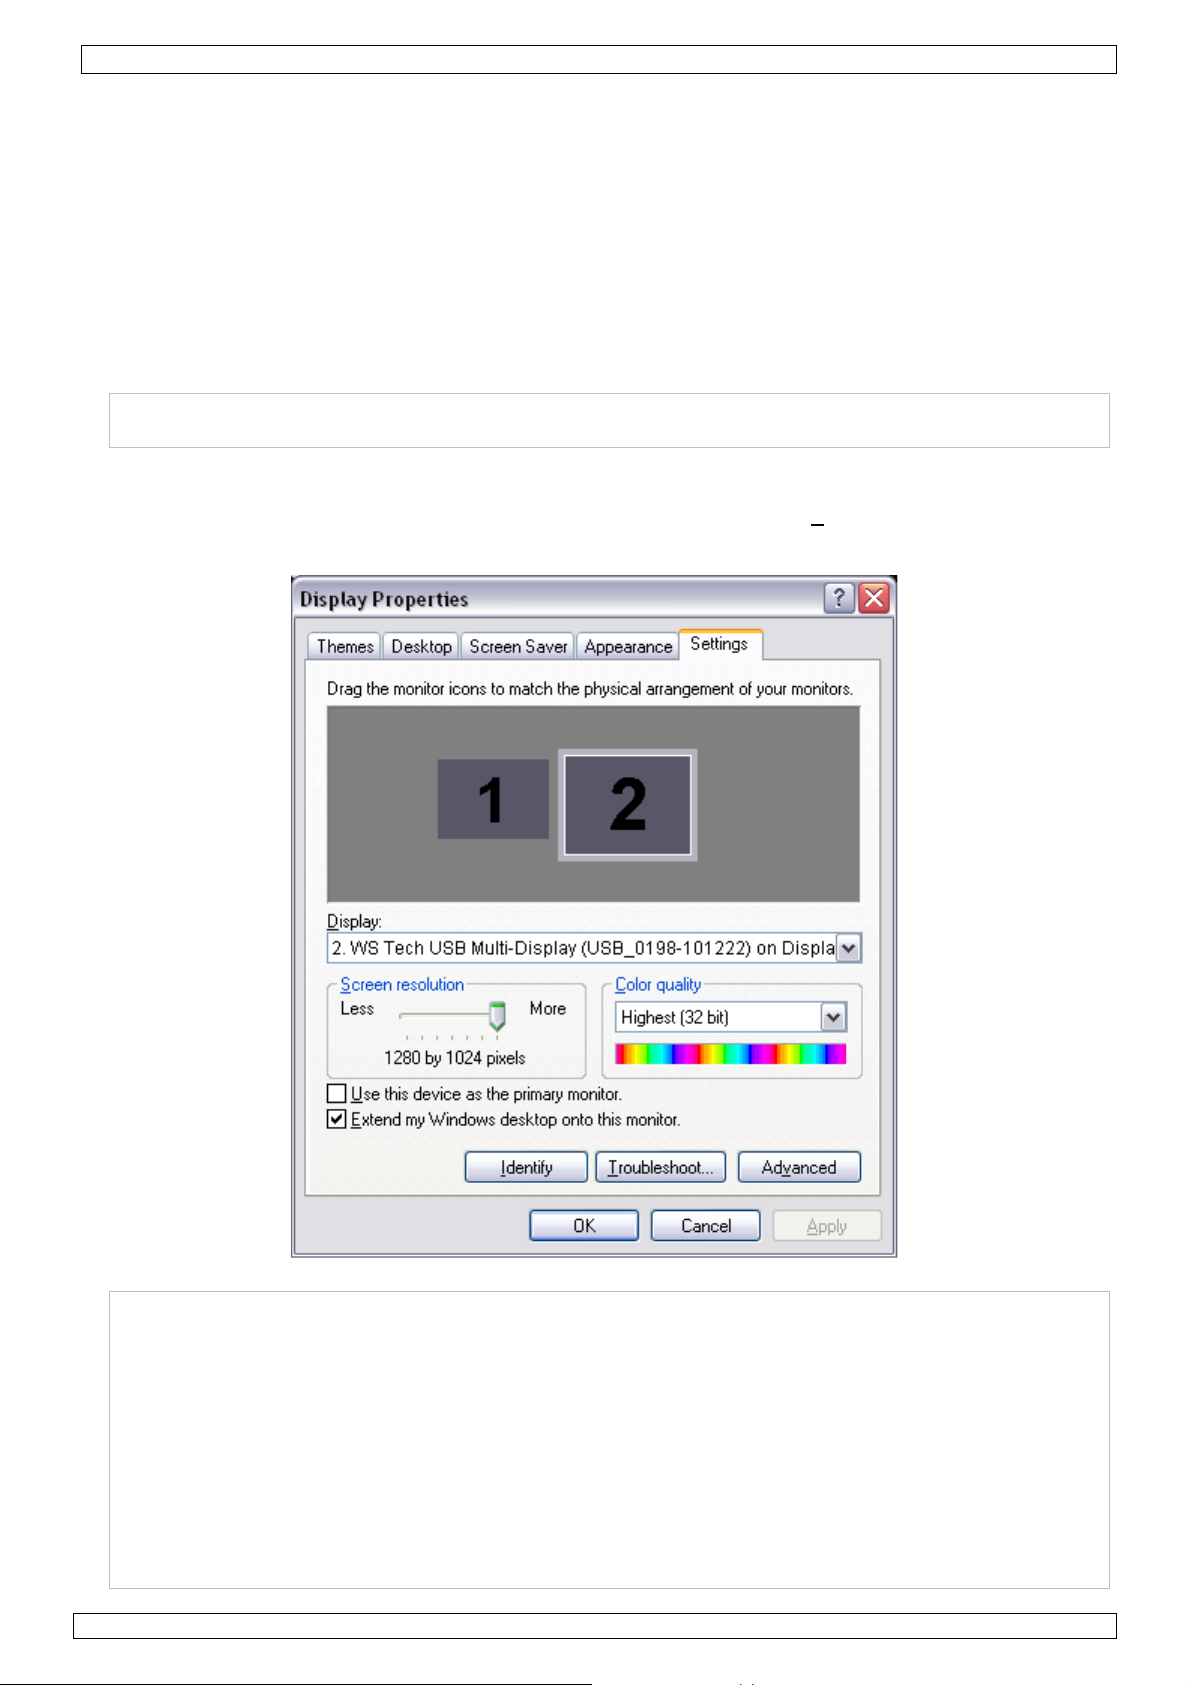
• This is the default setting for the adaptor. Go to the display settings of the operating system. Right
click anywhere on the desktop, select ‘Properties’ and select ‘settings’.
• Select the DisplayLink Graphics Adapter from the drop-down menu and check the ‘extend
desktop onto this monitor’ box (see below). Set the physical appearance by dragging the
monitor icons to the proper location and close the window.
NOTICE:
→ Name and number of the display depends on the local setup. Look for the ‘DisplayLink
Graphics’-string in the name.
→ When trying to open an application that was previously closed wh ile displayed on the
extended screen, it might attempt to re-open on the extended screen, even when that screen
is switched off. To avoid this, consider dragging the applications to the primary monitor
before closing, especially when extended screens are used only sporadically.
→ When going in standby or hibernate mode, all open windows are moved to the primary
monitor. When returning to normal operation, the open windows are not moved back to
extended monitor. Login screens will always show up on the primary monitor.
→ Windows Vista: it is advised to run video or DVD playback applications on the primary
monitor to ensure playback performance.
19/02/2009 © 2008 Velleman Components nv
5
Page 6

PCUSBVGA
7.2 mirror mode
• The added monitor screen shows an exact copy of the main display. The settings are initially the
same as from the primary screen, but can manually be changed.
• To enable mirror mode, go to the display settings of the operating system. Right click anywh ere on
the desktop, select ‘Properties’ and select ‘settings’.
• Select the DisplayLink Graphics Adapter from the drop-down menu and uncheck the ‘extend
desktop onto this monitor’ box (see below). Close the window.
NOTICE:
→ Name and number of the display depends on the local setup. Look for the ‘DisplayLink
Graphics’-string in the name.
→ Settings of the add-on monitor (e.g. resolution, colour, refresh rate) are default taken over
from the primary display but can be changed manually (see below). However, they are
limited to the highest settings of the primary display. E.g. if the primary monitors’ resolution
is limited to 1024x768, then every add-on monitor will be limited to this resolution, even if it
can handle higher resolutions.
→ It is recommended that the resolution of the primary monitor is adjusted to match the default
resolution of the add-on monitor.
7.3 primary mode
• The added monitor will become the primary monitor and will show all inf ormation when the
computer enters hibernate or suspend mode or during reboot.
• To enable primary mode, go to the display settings of the operating system. Right click anywhere
on the desktop, select ‘Properties’ and select ‘settings’.
• Select the DisplayLink Graphics Adapter from the drop-down menu and check the ‘Use this
device as primary monitor’ box (see below). Close the window.
19/02/2009 © 2008 Velleman Components nv
6
Page 7

PCUSBVGA
NOTICE:
→ Name and number of the display depends on the local setup. Look for the ‘DisplayLink
Graphics’-string in the name.
→ For some computers or laptops, it might also be required to re-configure the previous main
display. Select the adaptor of the previous main display from the drop-down menu and
uncheck the ‘extend desktop onto this monitor’ box.
8. Additional information
8.1 setting screen mode
• There are 3 components that define screen mode:
• Resolution: refers to the number of distinct pixels that can be displayed on the screen, both
horizontally and vertically.
• Colour depth: the number of bits used to represent the colour of each pixel (bits per pixel or
bpp). Higher color depth gives a broader range of distinct colors.
• Refresh rate: the number of times the image is drawn in a second (Hz). Higher frequencies
reduce flicker.
• Some monitors advertise their supported modes through the video connector. In this case, the
USB adaptor gets the supported modes from the monitor. If the monitor doesn’t advertise its
supported modes the USB adaptor mode chooses a set of common modes (see table below).
resolution refresh rates
(16 bit)
640 x 480 60 72 75 60 72 75
800 x 600 56 60 72 75 85 56 60 72 75 85
1024 x 768 60 75 85 60 75 85
1280 x 960 60 85 60 85
1280 x 1024 60 75 85 60 75
1360 x 768 60 60
refresh rate
(32 bit)
resolution refresh rates
(16 bit)
refresh rate
(32 bit)
1366 x 768 60 60
1368 x 768 60 60
1400 x 1050 60 75 85 60 75 85
1440 x 900 60 60
1600 x 1200 60 60
1680 x 1050 59 60 59 60
NOTICE:
→ Interlaced modes are not supported.
19/02/2009 © 2008 Velleman Components nv
7
Page 8

PCUSBVGA
• The actual resolutions and refresh rates available to the user are a compromise between the USB
display adaptor, the primary + add-on monitor and the primary video card + drivers. This to
ensure that the monitor can not be set to an unsupported mode and thus avoiding damage to the
monitor.
• To manually configure resolution, colour depth and refresh rate, go to the display settings of the
operating system. Right click anywhere on the desktop, select ‘Properties’ and select ‘settings’.
• To set the screen resolution, move the slider left or right (see image above). To set the colour
depth (quality), select the desired value from the drop-down menu (see image above).
• To change the refresh rate, click on ‘Advanced’ (see image above) and go to the monitor tab (see
image below – window and tab-titles depend on local settings), and select the desired refresh rate
from the drop-down menu.
• Click ‘OK’ to close the window(s).
8.2 Multiple adaptors
• Up to 6 adaptors can be connected simultaneously to a single computer – provided that enough
free USB 2.0 ports are available.
NOTICE:
→ Only 2 adaptors are supported under Windows Vista in XDDM mode! (see §8.3)
• First install one adaptor as described in §6, and when this installat ion is completed, simply plug in
more adaptors.
8.3 Vista XDDM mode
• XDDM refers to Windows XP Device Driver Model. It is a video card driver mode that provides an
XP-like interface. It is used in some Vista operating systems as opposed to WDDM (Windows
Device Driver Model). It does not support the Vista Aero interface.
• In this mode, only one extended and one mirrored screen are supported. Only the first connected
adaptor can be set to extended mode, the second is forced to use mirrored mode.
• To verify the local setting, right-click ‘Computer’ on the desktop and select ‘Device Manager’.
Expand the ‘Display adaptor’ item.
19/02/2009 © 2008 Velleman Components nv
8
Page 9

PCUSBVGA
8.4 Uninstall the adaptor and driver
• Open the ‘Control panel’ and double-click on Programs and features (Vista) or Add or remove
programs (XP/2000).
• Select the WS Tech USB Multi-display and click ‘uninstall’ or ‘remove’.
• Click ‘Yes’ to confirm removal. A number of DOS windows will pop up during removal.
• Click ‘Yes’ to restart the computer and unplug the adaptor.
9. MAC OS
Introduction
• This procedure is applicable for MAC software versions 1.0 or higher.
• The Mac driver is designed for Mac OS X v10.4 (Tiger) and Mac OS X v10.5 (Leopard) and enables
to add up to 4 extra monitors to an Intel based Mac using DisplayLink technology. For every
additional monitor, a PCUSBVGA is required.
NOTICE:
→ Power PC Macintosh computers e.g. latest models iMacs, PowerBooks and PowerMacs are
currently not supported.
Install/uninstall driver
• To run the MAC installer, double-click the MAC Driv erinstaller image. This will mount the MAC
Driverinstaller.
• Select ‘Software installer’ to start installing the MAC driver. Once completed, the system requires a
reboot.
• Select ‘User Guide’ to view the user guide.
• Select ‘Software Uninstaller’ to remove the driver. Reboot is required.
Connect displays
• After installing the driver, simply plug in the USB video adaptor in a free USB2.0 port and connect
a display to port of the USB video adaptor.
Managing multiple displays
• When attaching a new display, it will default extend to the right of the main display. To configure
the settings for each of the added monitors, select ‘Displays’ from the ‘System Preferences’ menu.
This will open a preference window for each of the attached displays in which the displays can be
configured. Use the ‘Gathering Windows’ button to bring all ‘Display Preferences’ windows onto
the main display.
Configuring displays from the Menu Bar
• If the ‘Show displays in Menu bar’-box in the ‘Display Preferences’ window is checked, the displays
can be configured using the display icon in the menu bar.
19/02/2009 © 2008 Velleman Components nv
9
Page 10

PCUSBVGA
10. Troubleshooting
Q1: add-on monitor remains blank
• Power LED on monitor is green: check whether the computer is not in standby or hibernate mode.
Always allow a few moments for the monitor to initialize. Should this take too lon g (e.g. more than
2 minutes) try to reboot the computer.
• Power LED on monitor is red: check whether all physical connections are properly made. If this is
the case and the problem remains, uninstall the driver, u nplug the adaptor and reinstall the driver.
Q2: add-on monitor is flickering
• This is usually due to a low refresh rate.
• In mirror mode, increase the refresh rate of the main monitor. This will also increase the refresh
rate on the add-on monitor.
• In extended mode, increase the refresh rate of the add-on monitor.
Q3: Windows Media player messes up extended monitor in full screen mode
• This problem usually occurs under Windows XP SP1 and can be solved by upgrading to Service
Pack 2 (SP2).
Q4: playback video motion is not smooth in full screen mode
• Try to reduce the resolution of the monitor
• Use the adapter in extended mode
• Terminate other CPU-time consuming applications.
• Use a media player that requires less DirectX support.
• Drag the media-player to the add-on screen and close it. Restart the player. It should open on the
add-on screen. Try playing the media file again.
• Reduce the hardware acceleration level of the primary display (not the add-on monitor) and
restart the media player. Go to the display settings of the operating system. Right click anywhere
on the desktop, select ‘Properties’ and select ‘settings’. Select ‘Advanced’, tab ‘Troubleshoot’ and
move the slider to the left.
• When using both extended and mirrored screens, disable the extended screens.
Q5: In extended mode, a black border is shown around the desktop of the add-on monitor
• The resolution of the add-on monitor is set higher than the resolution of the primary monitor.
When possible, set the same resolution on both monitors.
19/02/2009 © 2008 Velleman Components nv
10
Page 11

PCUSBVGA
11. Technical specifications
USB specification 2.0 compliant
humidity 20-80% RH (non condensing)
video resolution max. 1600x1200
operating temperature 50 ~ 122°F (10 ~ 50°C)
storage temperature 32 ~ 158°F (0 ~ 70°C)
power supply 5V through USB port
input port USB 2.0 Type mini-B
output port female DVI-I
adaptors 1x male DVI-I - female VGA (15p)
1x male DVI-I - female HDMI
dimensions 90 x 45 x 18mm (3.5" x 1.8" x 0.7")
Use this device with original accessories only. Velleman nv cannot be held responsible in
the event of damage or injury resulted from (incorrect) use of this device.
For more info concerning this product, please visit our website www.velleman.eu.
The information in this manual is subject to change without prior notice.
© COPYRIGHT NOTICE
The copyright to this manual is owned by Velleman Components nv. All worldwide rights reserved.
No part of this manual or the described software may be copied, reproduced, translated or reduced to any electronic medium
or otherwise without the prior written co nsent of the copyright holder.
19/02/2009 © 2008 Velleman Components nv
11
Page 12

PCUSBVGA
GEBRUIKERSHANDLEIDING
1. Inleiding
Aan alle ingezetenen van de Europese Unie
Belangrijke milieu-informatie betreffende dit product
Dit symbool op het toestel of de verpakking geeft aan dat, als het na zijn levenscyclus
wordt weggeworpen, dit toestel schade kan toebrengen aan het milieu. Gooi dit toestel (en
eventuele batterijen) niet bij het gewone huishoudelijke afval; het moet bij een
gespecialiseerd bedrijf terechtkomen voor recyclage. U moet dit toestel naar uw verdeler of
naar een lokaal recyclagepunt brengen. Respecteer de plaatselijke milieuwetgeving.
Hebt u vragen, contacteer dan de plaatselijke autoriteiten betreffende de verwijdering.
Dank u voor uw aankoop! Lees deze handleiding grondig voor u het toestel in gebruik neemt. Werd
het toestel beschadigd tijdens het transport, installeer het dan niet en raadpleeg uw dealer.
Met deze adapter sluit u een extra monitor lcd-scherm of projector via een vrije USB 2.0-poort aan
uw computer zonder videokaart. Geleverd met twee adapters voor VGA- en HDMI™-monitor.
2. Veiligheidsinstructies
Houd buiten het bereik van kinderen en onbevoegden.
Bescherm tegen regen, vochtigheid, extreme temperaturen,
stof en opspattende vloeistoffen.
3. Algemene richtlijnen
Raadpleeg de Velleman® service- en kwaliteitsgarantie achteraan deze handleiding.
• Bescherm dit toestel tegen schokken. Vermijd brute kracht tijdens de bediening.
• Leer eerst de functies van het toestel kennen voor u het gaat gebruiken.
• Om veiligheidsredenen mag u geen wijzigingen aanbrengen.
• Gebruik het toestel enkel waarvoor het gemaakt is. Bij onoordeelkundig gebruik vervalt de
garantie.
• De garantie geldt niet voor schade door het negeren van bepaalde richtlijnen in deze handleiding
en uw dealer zal de verantwoordelijkheid afwijzen voor defecten of problemen die hier
rechtstreeks verband mee houden.
4. Eigenschappen
• video-uitgang met DVI-connector
• ondersteunt VGA/HDMI™ video-uitgang via DVI-VGA/DVI-HDMI™-adapter
• ondersteunde functies: hoofdmonitor - extra monitor - kopie
• gemakkelijke aansluiting van extra monitor via USB 2.0-kabel
• gemakkelijk te installeren en te gebruiken
• gelijktijdige aansluiting tot 6 (Mac: 4) adapters aan uw draagbare of desktopcomputer met
minimale configuratie en zonder extra videokaart
• resolutie tot 1600x1200 @ 32-bit kleuren
• voeding via USB-bus, geen externe voeding vereist
• inhoud:
1 x adapter USB naar DVI | 1 x adapter mannelijke DVI-I naar vrouwelijke HDMI™ | 1 x adapter
mannelijke DVI-I naar vrouwelijke VGA (15p) | 1 x cd-rom met meertalige handleiding en
installatiesoftware | 1 x USB 2.0-kabel (1,2 m)
• systeemvereisten:
microprocessor: 1,2 GHz of hoger, Intel® Pentium®/Celeron™ of AMD-K6™/Athlon™/Duron™ of
compatibele processor | RAM: 256 MB of meer | USB: USB 2.0 of hoger | vrije hardeschijfruimte:
30 MB of meer | besturingssysteem: Windows 2000 (SP4), XP (SP2) 32-bit, Vista™ 32/64-bit, Mac
OS X v10.4 of v10.5 | monitor: Super VGA (800x600) of hoger | afspelen van dvd via adapter:
multikernprocessor @ 2,0 GHz, resolutie 800x600 met 16-bit kleuren
19/02/2009 © 2008 Velleman Components nv
12
Page 13

PCUSBVGA
5. Installatie van het stuurprogramma in Windows
• Alvorens de adapter aan de pc te koppelen, moet u de stuurprogramma’s installeren. Sluit hiervoor
eerst alle applicaties.
• Plaats de meegeleverde cd-rom in de cd-romdrive. Opmerking: plaats de cd-rom enkel in een
drive die mini-cd-roms (8 cm) aanvaardt.
• Het stuurprogramma wordt automatisch opgestart. Indien niet, klik op Setup.exe op de cd-rom.
OPMERKING:
→ Windows Vista™: Tijdens het installeren van het programma verschijnt een User Account
Control-venster. Geef een paswoord in of klik op Allow om de installatie te starten.
→ Windows 2000: Zorg dat alle nodige Service Packs in het systeem aanwezig zijn.
• Klik in het startvenster (zie hieronder) op uw best uringssysteem.
• Er verschijnt een venster met de licentieovereenkomst (zie hierboven). Lees aandachtig door en
klik op I accept om verder te gaan.
• Klik op Yes om uw computer te herstarten en om de installatie te voltooien.
6. Installatie van de adapter
• Raadpleeg de figuren op pagina 2 van deze handleiding.
• Plug de kleinere stekker (type B) van de meegeleverde USB-kabel in de mini-B-poort [A] van de
PCUSBVGA. Plug de grotere stekker (type A) in een vrije USB 2.0-poort van uw computer.
OPMERKING:
→ Gebruik enkel een USB-poort type USB 2.0 of hoger.
• Koppel de DVI-poort [B] van de PCUSBVGA aan een monitor. Gebruik een normale DVI-kabel
(niet meegeleverd) indien de monitor uitgerust is met een DVI-aansluiting. Gebruik de gepaste
adapter met een VGA- of HDMI™-monitor.
• Schakel de monitor in; de statusled [C] licht op. Windows voltooit automatisch de installatie. De
monitor is nu klaar voor gebruik.
OPMERKING:
→ Windows Vista™: Herstart uw computer indien de monitor een blank scherm weergeeft.
→ Tijdens de installatie kan de monitor enkele keren flikkeren. Dit is normaal.
→ Het is mogelijk dat het beeld op de extra monitor enige vertraging oploopt.
→ Windows Vista™ Aero: De USB-adapter is niet compatibel met Vista™ Aero. De interface is
uitgeschakeld en u krijgt een waarschuwingsbericht dat het kleurenpatroon gewijzigd is.
Ontkoppel of verwijder de USB-adapter om Vista™ Aero automatisch in te schakelen.
19/02/2009 © 2008 Velleman Components nv
13
Page 14
PCUSBVGA
7. Gebruik onder Windows
• U kunt de aangesloten monitor op drie manieren gebruiken:
• Extended
• Mirror
• Primary
7.1 Extended (standaardinstelling)
• Gebruik de aangesloten monitor als een extra werkblad. U kunt geopende vensters van en naar de
hoofdmonitor en de aangesloten monitor slepen wat het werken met verscheidene programma’s
vergemakkelijkt.
OPMERKING:
→ Sommige applicaties kunnen niet naar de aangesloten monitor verplaatst worden en blijven
op de hoofdmonitor actief.
• Dit is de standaardinstelling van de adapter. Ga naar de scherminstellingen van het besturings-
systeem: klik met de rechtermuisknop op het bureaublad, selecteer Properties en Settings.
• Selecteer DisplayLink Graphics Adapter uit het uitrolmenu en vink E
desktop onto this monitor aan (zie hieronder). Sleep de iconen naar de gewenste locatie en
sluit het venster.
xtend my Windows
OPMERKING:
→ De naam en het nummer van de monitor hangen af van de instellingen. Zoek de
DisplayLink Graphics-string in de naam.
→ Bij het openen van een applicatie die voorheen op de aangesloten monitor geopend stond, is
het mogelijk dat de applicatie op de aangesloten monitor tracht te verschijnen, ook al is die
monitor uitgeschakeld. Om dit te vermijden, denk eraan om een geopende applicatie eerst
naar de hoofdmonitor te slepen alvorens deze te sluiten, zeker indien u de aangesloten
monitor sporadisch gebruikt.
→ Wanneer de schermbeveiliging op de aangesloten monitor inschakelt, worden alle geopende
applicaties naar de hoofdmonitor verplaatst. De applicaties keren echter niet naar de
hoofdmonitor terug. Het inlogvenster verschijnt altijd op de hoofdmonitor.
→ Windows Vista™: Voor de beste resultaten is het aan te raden om videobestanden en dvd’s
op de hoofdmonitor af te spelen.
19/02/2009 © 2008 Velleman Components nv
14
Page 15

PCUSBVGA
7.2 Mirror
• De aangesloten monitor is een exacte kopie van de hoofdmonitor. De instellingen zijn aanvankelijk
identiek maar kunnen handmatig gewijzigd worden.
• Ga naar de scherminstellingen van het besturingssysteem: klik met de rechtermuisknop op het
bureaublad, selecteer Properties en Settings.
• Selecteer DisplayLink Graphics Adapter uit het uitrolmenu en vink E
xtend my Windows
desktop onto this monitor uit (zie hieronder). Sluit het venster.
OPMERKING:
→ De naam en het nummer van de monitor hangen af van de instellingen. Zoek de
DisplayLink Graphics-string in de naam.
→ De instellingen van de aangesloten monitor (bv. resolutie, kleurinstellingen, enz.) worden
standaard van de hoofdmonitor overgenomen maar kunnen handmatig gewijzigd worden (zie
hieronder). De instellingen zijn echter afhankelijk van die van de hoofdmonitor. Voorbeeld:
De hoofdmonitor heeft een resolutie van 1024x768, de resolutie van de aangesloten monitor
zal maximaal 1024x768 bedragen, ook al kan de aangesloten monitor een hogere resolutie
aan.
→ Het is aan te raden om de resolutie op beide monitors identiek in te stellen.
7.3 Primary
• De aangesloten monitor wordt nu de hoofdmonitor en geeft alle hoofdinformatie weer.
• Ga naar de scherminstellingen van het besturings-systeem: klik met de rechtermuisknop op het
bureaublad, selecteer Properties en Settings.
• Selecteer DisplayLink Graphics Adapter uit het uitrolmenu en vink Use this device as
primary monitor aan (zie hieronder). Sluit het venster.
19/02/2009 © 2008 Velleman Components nv
15
Page 16

PCUSBVGA
OPMERKING:
→ De naam en het nummer van de monitor hangen af van de instellingen. Zoek de
DisplayLink Graphics-string in de naam.
→ Op sommige computers of laptops moet u de hoofdmonitor opnieuw configureren. Selecteer
DisplayLink Graphics Adapter uit het uitrolmenu en vink Extend my Windows desktop
onto this monitor uit.
8. Extra informatie
8.1 Instellen van de monitor
• Stel de monitor aan de hand van:
• resolutie: Aantal afgebeelde pixels, zowel horizontaal als verticaal.
• kleurdiepte: Aantal bits gebruikt om de pixelkleur te bepalen (bits per pixel). Kies een meer
kleurdiepte voor een breder kleurenpalet.
• opfrissnelheid: Aantal keren dat een beeld per seconde afgebeeld wordt in Hz. Kies een hogere
frequentie om flikkering te vermijden.
• Sommige monitors sturen hun instellingen naar de aangesloten adapter door via de videostekker.
Indien niet, dan zal de adapter een van onderstaande gebruikelijke instellingen kiezen.
resolutie opfrissnelheid
(16 bits)
opfrissnelheid
(32 bits)
640 x 480 60 72 75 60 72 75
800 x 600 56 60 72 75 85 56 60 72 75 85
1024 x 768 60 75 85 60 75 85
1280 x 960 60 85 60 85
1280 x 1024 60 75 85 60 75
1360 x 768 60 60
resolutie opfrissnelheid
(16 bits)
opfrissnelheid
(32 bits)
1366 x 768 60 60
1368 x 768 60 60
1400 x 1050 60 75 85 60 75 85
1440 x 900 60 60
1600 x 1200 60 60
1680 x 1050 59 60 59 60
OPMERKING:
→ Interlacing wordt niet ondersteund.
19/02/2009 © 2008 Velleman Components nv
16
Page 17

PCUSBVGA
• De beschikbare resolutie en opfrissnelheid zijn een compromis tussen de USB-adapter, de
hoofdmonitor en de aangesloten monitor, de videokaart en de stuurprogramma’s, dit om
beschadiging aan de monitor wegens incompatibele instelling te vermijden.
• Handmatige instelling van de resolutie, kleurdiepte en opfrissnelheid: Ga naar de
scherminstellingen van het besturingssysteem en klik met de rechtermuisknop op het bureaublad.
Selecteer Properties en Settings. Stel de resolutie in met de schuifknop (zie hierboven).
Selecteer een kleurdiepte uit het uitrolmenu (zie hierboven). Stel de opfrissnelheid in door op
Advanced te klikken (zie hierboven). Klik daarna op de tab Monitor (zie hieronder – werkelijke
vormgeving kan afwijken van de afbeelding) en selecteer de gewenste snelheid uit het uitrolmenu.
• Klok op OK om het venster te sluiten.
8.2 Simultaan gebruik van meerdere adapters
• U kunt simultaan tot 6 adapters aan een enkele computer aansluiten (afhankeli jk van het aantal
vrije USB-poorten).
OPMERKING:
→ XDDM onder Windows Vista™ ondersteunt enkel 2 adapters! (zie §8.3)
• Installeer eerst een adapter zoals beschreven onder §6. Koppel na de installatie alle andere
adapters.
8.3 XDDM onder Windows Vista™
• XDDM (XP Device Driver Model) is een stuurprogramma voor videokaarten met een interface
zoals die in Windows XP. Het wordt soms gebruikt onder Vista™ in tegenstelling tot WDDM
(Windows Device Driver Model). Het stuurprogramma ondersteunt Vista™ Aero niet.
• In deze opstelling worden enkel een ‘extended’ (eerste adapter) en een ‘mirror’ monitor (tweede
adapter) ondersteund.
• Klik met de rechtermuisknop op Computer en selecteer Device Manager. Rol Display adaptor
uit.
19/02/2009 © 2008 Velleman Components nv
17
Page 18

PCUSBVGA
8.4 Verwijderen van de adapter en het stuurprogramma
• Open Control Panel en dubbelklik op Programs and features (Vista™) of Add or remove
programs (XP/2000).
• Selecteer WS Tech USB Multi-Display en klik op Uninstall of Remove.
• Klik op Yes om te verwijderen. Er verschijnen enkele DOS-vensters.
• Klik op Yes om uw computer te herstarten. Verwijder de adapter.
9. Gebruik onder Mac
Inleiding
• Volgende uitleg is geldig voor Mac versie 1.0 of hoger.
• Het stuurprogramma voor Mac-gebruikers is bestemd voor Mac OS X v10.4 (Tiger) en Mac OS X
v10.5 (Leopard), en laat toe tot 4 extra monitors aan een Mac met Intel
via DisplayLink™. Voor elke aangesloten monitor heeft u een PCUSBVGA nodig.
OPMERKING:
→ Een Power Macintosh, bv. de laatste iMac, PowerBook of PowerMac, wordt niet ondersteund.
Installeren en verwijderen van het stuurprogramma
• Dubbelklik op DisplayLink Installer om het installatieprogramma te starten.
®
-processor aan te sluiten
• Klik op DisplayLink Software Installer om de installatie te starten. Herstart de computer na de
installatie.
• Klik op User Guide om de handleiding te openen.
• Klik op Software Uninstaller om het stuurprogramma te verwijderen. Herstart de computer.
Aansluiten van een monitor
• Na de installatie van het stuurprogramma kunt u de adapter in een vrije USB-poort schuiven. Sluit
de monitor aan de USB-poort van de adapter.
Beheer van meerdere monitors
• De aangesloten monitor wordt automatisch een extensie rechts van de hoofdmonitor. Configureer
de aangesloten monitor via Displays uit het menu System Preferences. U kunt elke aangesloten
monitor in een afzonderlijk venster instellen. Klik op Gathering Windows om alle Display
Preferences-vensters op de hoofdmonitor weer te geven.
Instellen van een monitor via de menubalk
• Vink Show displays in menu bar aan in het Display Preferences-venster om de monitors in te
stellen via de icoon in de menubalk.
19/02/2009 © 2008 Velleman Components nv
18
Page 19

PCUSBVGA
10. Problemen en oplossingen
1: De aangesloten monitor geeft geen beeld weer.
• De voedingsled op de monitor licht groen op: Controleer of de computer in sluimerstand staat. De
monitor heeft enkele ogenblikken tijd nodig om te initialiseren. Herstart uw computer indien dit te
lang duurt (bv. langer dan 2 minuten).
• De voedingsled op de monitor licht rood op: Controleer of alle aansluitingen correct zijn
uitgevoerd. Verwijder het stuurprogramma, ontkoppel de adapter en herinstalleer het
stuurprogramma indien de monitor nog steeds geen beeld weergeeft.
2: De aangesloten monitor geeft een flikkerend beeld.
• De opfrissnelheid is te laag ingesteld.
• Verhoog de opfrissnelheid van de hoofdmonitor in mirror-opstelling. Zo wordt de opfrissnelheid
van de aangesloten monitor ook verhoogd.
• Verhoog de opfrissnelheid van de aangesloten monitor in extended-opstelling.
3: Windows Media Player in full screen functioneert niet op de aangesloten monitor.
• Dit probleem komt vaak voor onder Windows XP SP1. Voer een upgrade uit van het Service Pack 2
(SP2).
4: Afgespeeld videobestand hapert.
• Verlaag de resolutie van de monitor.
• Gebruik de adapter in extended-opstelling.
• Sluit alle andere applicaties.
• Gebruik een mediaspeler die minder DirectX vereist.
• Sleep de mediaspeler naar de aangesloten monitor. Sluit en herstart de speler. De speler zou
onmiddellijk op de aangesloten monitor moeten verschijnen. Herstart het videobestand.
• Verminder de hardwareversnelling van de hoofdmonitor (niet die van de aangesloten monitor) en
herstart de mediaspeler. Ga naar de scherminstellingen van het besturingssysteem en klik met de
rechtermuisknop op het bureaublad. Selecteer Properties, Settings en Advanced. Klik op
Troubleshoot en schuif de knop naar links (zie hieronder).
• Schakel de monitors in extended-opstelling uit.
5: Er verschijnt een zwarte rand rondom het bureaublad van de aangesloten monit or in
extended-opstelling.
• De resolutie van de aangesloten monitor staat hoger ingesteld dan die van de hoofdmonitor.
Gebruik dezelfde resolutie voor beide monitors.
19/02/2009 © 2008 Velleman Components nv
19
Page 20

PCUSBVGA
11. Technische specificaties
USB-compatibiliteit USB 2.0
vochtigheidsgraad 20-80 % RH (niet-condenserend)
videoresolutie max. 1600x1200
werktemperatuur 10 ~ 50°C
opslagtemperatuur 0 ~ 70°C
voeding 5 V via USB-poort
ingangspoort USB 2.0 type mini-B
uitgangspoort vrouwelijke DVI-I
adapters 1 x mannelijke DVI-I naar vrouwelijke VGA (15p)
1 x mannelijke DVI-I naar vrouwelijke HDMI™
afmetingen 90 x 45 x 18 mm
Gebruik dit toestel enkel met originele accessoires. Velleman Components nv is niet
aansprakelijk voor schade of kwetsuren bij (verkeerd) gebruik van dit toestel. Voor meer
informatie over dit product, zie www.velleman.eu. De informatie in deze handleiding kan
te allen tijde worden gewijzigd zonder voorafgaande kennisgeving.
© AUTEURSRECHT
Velleman Components nv heeft het auteursrecht voor deze handleiding.
Alle wereldwijde rechten voorbehouden. Het is niet toegestaan om deze handleiding of gedeelten
ervan over te nemen, te kopiëren, te vertalen, te bewerken en op te slaan op een elektronisch
medium zonder voorafgaande schriftelijke toestemming van de rechthebbende.
19/02/2009 © 2008 Velleman Components nv
20
Page 21

PCUSBVGA
NOTICE D’EMPLOI
1. Introduction
Aux résidents de l'Union européenne
Des informations environnementales importantes concernant ce produit
Ce symbole sur l'appareil ou l'emballage indique que l’élimination d’un appareil en fin de
vie peut polluer l'environnement. Ne pas jeter un appareil électrique ou électronique (et
des piles éventuelles) parmi les déchets municipaux non sujets au tri sélectif ; une
déchèterie traitera l’appareil en question. Renvoyer les équipements usagés à votre
fournisseur ou à un service de recyclage local. Il convient de respecter la réglementation
locale relative à la protection de l’environnement.
En cas de questions, contacter les autorités locales pour élimination.
Nous vous remercions de votre achat ! Lire la présente notice attentivement avant la mise en
service de l’appareil. Si l’appareil a été endommagé pendant le transport, ne pas l’installer et
consulter votre revendeur.
Cet adaptateur au format USB vous permet d’ajouter un projecteur ou écran LCD à votre ordinateur
sans carte vidéo. Livré avec deux adaptateurs pour écran VGA ou HDMI™.
2. Consignes de sécurité
Garder hors de la portée des enfants et des personnes non
autorisées.
Protéger contre la pluie, l’humidité, les températures
extrêmes, la poussière et les projections d’eau.
3. Directives générales
Se référer à la Garantie de service et de qualité Velleman® en fin de cette notice.
• Protéger contre les chocs et le traiter avec circonspection pendant l’opération.
• Se familiariser avec le fonctionnement avant l’emploi.
• Toute modification est interdite pour des raisons de sécurité.
• N’utiliser qu’à sa fonction prévue. Tout autre usage peut causer des courts-circuits, des brûlures,
des électrochocs, etc. Un usage impropre annule d'office la garantie.
• La garantie ne s’applique pas aux dommages survenus en négligeant certaines directives de cette
notice et votre revendeur déclinera toute responsabilité pour les problèmes et les défauts qui en
résultent.
4. Caractéristiques
• sortie vidéo avec connexion DVI
• compatible avec les sorties vidéo VGA/HDMI™ via l’adaptateur DVI-VGA/DVI-HDMI™
• configurations : moniteur principal – moniteur d’extension – moniteur en miroir
• connexion d’un moniteur d’extension à l’aide d’un câble USB 2.0
• facile à installer et à utiliser
• possibilité d’extension jusqu’à 6 (Mac : 4) adaptateurs à un seul ordinateur portable ou de bureau
avec un minimum de configuration et sans carte graphique supplémentaire
• résolution jusqu’à 1600x1200 @ profondeur de couleurs 32 bit
• alimentation depuis bus USB, ne nécessite aucune alimentation externe
• contenu :
1 x adaptateur USB vers DVI | 1 x adaptateur DVI-I mâle vers HDMI™ femelle | 1 x adaptateur
DVI-I mâle vers VGA femelle (15p) | notice d'emploi multilingue et logiciel d'installation sur
cédérom | 1 x câble USB 2.0 (1,2 m)
• système requis :
microprocesseur : 1,2 GHz ou plus, Intel® Pentium®/Celeron™ ou AMD-K6™/Athlon™/Duron™ ou
équivalent | RAM : 256 Mo ou plus | USB : USB 2.0 ou plus | espace disque dur libre : 30 Mo ou
plus | système d'exploitation : Windows 2000 (SP4), XP (SP2) 32-bit, Vista™ 32/64-bit, Mac OS X
v10.4 ou v10.5 | moniteur : Super VGA (800x600) ou plus | lecture de DVD via adaptateur :
microprocesseur double-cœurs @ 2.0GHz, résolution 800x600 avec profondeur de couleurs 16 bit
19/02/2009 © 2008 Velleman Components nv
21
Page 22

PCUSBVGA
5. Installation du pilote sous Wind ows
• Installer le pilote avant de connecter l’adaptateur à l’ordinateur. Fermer toutes les applications.
• Insérer le cédérom dans le lecteur. Remarque : n’insérer le cédérom que dans un lecteur pouvant
lire des mini-cédéroms (8 cm).
• L’installation est automatiquement lancée ou cliquer double sur Setup.exe sur le cédérom.
REMARQUE :
→ Windows Vista™ : Une fenêtre User Account Control apparaît lors de l’installation du
pilote. Saisir un mot de passe ou cliquer sur Allow pour démarrer l’installation.
→ Windows 2000 : S’assurer que les Service Packs nécessaires sont installés.
• Cliquer sur votre système d’exploitation dans la fenêtre d’accueil (voir ci-dessous).
• Une fenêtre contenant un accord de licence d’utilisateur surgit (voir ci-dessus). Cliquer sur I
accept pour procéder.
• Enfin, cliquer sur Yes pour redémarrer l’ordinateur et finaliser l’installation du pilote.
6. Installation de l’adaptateur
• Se référer aux illustrations à la page 2 de cette notice.
• Insérer la petite fiche USB type B du câble USB inclus dans le port USB type mini-B [A] du
PCUSBVGA. Insérer la grande fiche USB type A dans un port USB libre de l’ordinateur.
REMARQUE :
→ N’utiliser qu’un port USB 2.0 ou plus.
• Raccorder le port DVI [B] du PCUSBVGA à un moniteur. Utiliser un câble DVI normal (non inclus)
avec un moniteur muni d’une connexion DVI ; utiliser l’adaptateur dédié (inclus) avec un moniteur
VGA ou HDMI™.
• Allumer le moniteur. La DEL d’état [C] s’allume. Windows terminera automatiquement
l’installation du moniteur.
REMARQUE :
→ Windows Vista™ : Redémarrer l’ordinateur au cas où le moniteur n’afficherait aucune
image.
→ L’image scintille pendant l’installation. C eci est normal.
→ Il se peut que le moniteur d’extension n’affiche l’image après un court délai.
→ Windows Vista™ Aero : L’adaptateur USB n’est pas compatible avec Vista™ Aero.
L’interface sera désactivée et la palette de couleurs modifiée. Déconnecter ou désinstaller
l’adaptateur USB pour rétablir automatiquement Vista™ Aero.
19/02/2009 © 2008 Velleman Components nv
22
Page 23

PCUSBVGA
7. Emploi sous Windows
• Le moniteur ajouté peut être utilisé suivant trois modes :
• moniteur d’extension
• moniteur en miroir
• moniteur principal
7.1 Moniteur d’extension (par défaut)
• Le moniteur ajouté s’utilise en mode d’extens ion du bureau. Les applications peuvent être glissées
et déposées entre les deux moniteurs facilitant l’utilisati on simultanée de plusieurs applications.
REMARQUE :
→ Certaines applications ne sont pas compatibles avec ce mode d’extension et s’afficheront
toujours sur le moniteur principal.
• Configuration par défaut. Accéder à la configuration du système d’exploitation : cliquer avec le
bouton droit sur le bureau, sélectionner Properties et Settings.
• Sélectionner DisplayLink Graphics Adapter dans le menu à déroulement vertical et cocher la
case Extend my desktop onto this monitor (voir ci-dessous). Configurer les icônes et fermer la
fenêtre.
REMARQUE :
→ Nom et numéro du moniteur dépendant de la configuration locale. Voir la chaine de
caractères DisplayLink Graphics dans le nom.
→ Il se peut que, en essayant d’ouvrir une application précédemment affichée sur le moniteur
d’extension, elle s’ouvre sur le moniteur d’extension, même lorsque celui-ci est éteint. Penser
donc à déplacer l’application vers le moniteur principal avant de l’éteindre.
→ Lorsque le moniteur d’extension se met en veille, toute application affichée sur celui-ci sera
déplacée vers le moniteur principal. Les applications ne seront ensuite plus déplacées vers le
moniteur d’extension. La page de connexion sera toujours affichée sur le moniteur principal.
→ Windows Vista™ : Il est conseillé de jouer des fichiers vidéo sur le moniteur principal pour
les meilleurs résultats.
19/02/2009 © 2008 Velleman Components nv
23
Page 24

PCUSBVGA
7.2 Moniteur en miroir
• Le moniteur ajouté fonctionne en miroir du moniteur principal. Les configurations sont identiques à
celles du moniteur principal mais peuvent être modifiées.
• Accéder à la configuration du système d’exploitation : cliquer avec le bouton droit sur le bureau,
sélectionner Properties et Settings.
• Sélectionner DisplayLink Graphics Adapter dans le menu à déroulement vertical et décocher la
case Extend my desktop onto this monitor (voir ci-dessous). Fermer la fenêtre.
REMARQUE :
→ Nom et numéro du moniteur dépendant de la configuration locale. Voir la chaine de
caractères DisplayLink Graphics dans le nom.
→ Les configurations sont identiques à celles du moniteur principal mais peuvent être modif iées
(voir ci-dessous). Elles sont cependant limitées en fonction de la résolution maximale du
moniteur principal. Exemple : résolution du moniteur principal = 1024x768, résolution du
moniteur ajouté = limitée à 1024x768, même si ce dernier accepte une résolution plus
élevée.
→ Il est conseillé de configurer la résolution du moniteur ajouté par rapport à celle du moniteur
principal.
7.3 Moniteur principal
• Le moniteur ajouté est utilisé comme moniteur principal et aff ich era toute information lors d’un
redémarrage de l’ordinateur.
• Accéder à la configuration du système d’exploitation : cliquer avec le bouton droit sur le bureau,
sélectionner Properties et Settings.
• Sélectionner DisplayLink Graphics Adapter dans le menu à déroulement vertical et cocher la
case Extend my desktop onto this monitor (voir ci-dessous). Fermer la fenêtre.
19/02/2009 © 2008 Velleman Components nv
24
Page 25

PCUSBVGA
REMARQUE :
→ Nom et numéro du moniteur dépendant de la configuration locale. Voir la chaine de
caractères DisplayLink Graphics dans le nom.
→ Certains ordinateurs requièrent une reconfiguration du moniteur principal. Sélectionner
DisplayLink Graphics Adapter dans le menu à déroulement vertical et décocher la case
Extend my desktop onto this monitor.
8. Information supplémentaire
8.1 Configuration du moniteur
• Un moniteur se configure sur 3 niveaux :
• résolution : Nombre de pixels affichés, horizontalement comme verticalement.
• profondeur de couleur : Nombre de bits utilisés pour composer une couleur (bits par pixel).
Une profondeur plus importante offre une palette de couleurs plus élaborée.
• fréquence de rafraîchissement : Nombre d rafraîchissements de l’écran par seconde (Hz).
Une fréquence plus élevée atténue l’effet de scintillement.
• Certains moniteurs envoient leur configuration à l’adaptateur connecté via le connecteur vidéo. Si
le moniteur ne dispose pas de cette fonction, l’adaptateur sélectionnera une des configurations cidessous.
résolution rafraîch.
(16 bit)
rafraîch.
(32 bit)
640 x 480 60 72 75 60 72 75
800 x 600 56 60 72 75 85 56 60 72 75 85
1024 x 768 60 75 85 60 75 85
1280 x 960 60 85 60 85
1280 x 1024 60 75 85 60 75
1360 x 768 60 60
résolution rafraîch.
(16 bit)
1366 x 768 60 60
1368 x 768 60 60
1400 x 1050 60 75 85 60 75 85
1440 x 900 60 60
1600 x 1200 60 60
1680 x 1050 59 60 59 60
rafraîch.
(32 bit)
REMARQUE :
→ Les modes d’entrelacement ne sont pas supportés.
19/02/2009 © 2008 Velleman Components nv
25
Page 26

PCUSBVGA
• La résolution et la fréquence de rafraîchissement disponibles sont un compromis entre l’adaptateur
USB, les moniteurs principal et d’extension, les cartes graphiques et les pilotes afin d’éviter tout
dommage dû à une configuration incompatible.
• Configuration manuelle de la résolution, la profon deur de couleur et de la fréquence de
rafraîchissement : Accéder à la configuration du système d’exploitation : cliquer avec le bouton
droit sur le bureau, sélectionner Properties et Settings. Régler la résolution en déplaçant la
glissière (voir ci-dessus). Sélectionner une profondeur de couleur du menu à déroulement vertical
(voir ci-dessus). Cliquer sur Advanced pour configurer la fréquence de rafraîchissement (voir cidessus) et ouvrir l’onglet Monitor (voir ci-dessous – la disposition de la fenêtre peut varier de
l'illustration). Sélectionner la fréquence du menu à déroulement vertical.
• Cliquer sur OK pour fermer la fenêtre.
8.2 Utilisation simultanée de plusieurs adaptateurs
• Il est possible d’interconnecter jusqu’à 6 (Mac : 4) adaptateurs à un seul ordinateur (selon les
ports USB disponibles).
REMARQUE :
→ XDDM sous Windows Vista™ ne supporte que 2 adaptateurs simultanément ! (voir §8.3)
• Installer le premier adaptateur comme décrit au paragraphe §6. Ensuite, connecter simplement les
autres adaptateurs.
8.3 XDDM sous Windows Vista™
• XDDM (XP Device Driver Model) est un pilote pour cartes graphiques utilisant une interface
équivalente à celle sous Windows XP. Il est utilisé dans certains systèmes sous Vista™,
contrairement au pilote WDDM (Windows Device Driver Model). Le pilote n’est pas compatible
avec Vista™ Aero.
• Cette configuration ne supporte qu’un moniteur d’extension (premier adaptateur) et un moniteur
en miroir (second adaptateur).
• Cliquer avec le bouton droit sur Computer et sélectionner Device Manager. Dérouler Display
adaptor.
19/02/2009 © 2008 Velleman Components nv
26
Page 27

PCUSBVGA
8.4 Désinstallation de l’adaptateur et du pilote
• Ouvrir Control panel et cliquer double sur Programs and features (Vista™) ou sur Add or
remove programs (XP/2000).
• Sélectionner WS Tech USB Multi-Display et cliquer sur Uninstall ou sur Remove.
• Cliquer sur Yes pour confirmer. Des fenêtres DOS apparaissent pendant la désinstallation.
• Cliquer sur Yes pour redémarrer l’ordinateur. Retirer l’adaptateur.
9. Emploi sous Mac
Introduction
• Le texte ci-dessous ne s’applique qu’au système Mac version 1.0 ou plus.
• Le pilote pour utilisateurs Mac est destiné aux Mac OS X v10. 4 (Tiger) et Mac OS X v10.5
(Leopard), et permet de connecter jusqu’à 4 monteurs supplémentaires à un Mac équipé d’un
microprocesseur Intel
nécessite un PCUSBVGA.
REMARQUE :
→ Les ordinateurs Power Macintosh (iMac, PowerBook et PowerMac) ne sont pas compatibles.
Installation et désinstallation du pilote
• Cliquer double sur DisplayLink Installer pour démarrer le logiciel d’installation.
®
en utilisant DisplayLink. Chaque connexion d’un moniteur supplémentaire
• Cliquer sur DisplayLink Software Installer pour démarrer l’installation. Redémarrer l’ordinateur
une fois l’installation terminée.
• Cliquer sur User Guide pour accéder à la notice d’emploi.
• Cliquer sur Software Uninstaller pour désinstaller le pilote. Redémarrer l’ordinateur.
Raccordement d’un moniteur
• Après avoir le pilote, connecter l’adaptateur USB à un port USB libre. Connecter ensuit e le
moniteur au port de l’adaptateur.
Gestion de plusieurs moniteurs
• Le moniteur ajouté est automatiquement considéré comme extension à la droite du moniteur
principal. Cliquer sur Displays dans le menu System Preferences pour configurer chaque
moniteur d’extension. Cliquer sur Gathering Windows pour déplacer toutes les fenêtres Display
Preferences vers le moniteur principal.
Configuration d’un moniteur depuis la barre de menu
• Cocher la case Show displays in menu bar dans la fenêtre Display Preferences pour
configurer un moniteur depuis l’icône dans la barre de menu.
19/02/2009 © 2008 Velleman Components nv
27
Page 28

PCUSBVGA
10. Problèmes et solutions
1 : Le moniteur ajouté n’affiche aucune image.
• La DEL d’alimentation du moniteur s’allume en vert : S’assurer que le moniteur ne soit pas en
veille. Le moniteur nécessite un bref délai d’initialisation avant qu’il n’affiche l’image. Redémarrer
votre ordinateur au cas où ce délai se prolongerai (p.ex. plus de 2 minutes).
• La DEL d’alimentation du moniteur s’allume en rouge : S’assurer que tous les raccordements
soient dûment effectués. Désinstaller le pilote, retirer l’ adaptateur du port et réinstaller le pilote au
ca où le problème persiste.
2 : Le moniteur ajouté affiche une image scintillante.
• Fréquence de rafraîchissement trop basse.
• Augmenter la fréquence de rafraîchissement du moniteur principal en mode miroir. La fréquence
du moniteur en miroir augmentera automatiquement.
• Augmenter la fréquence de rafraîchissement du moniteur d’extension.
3 : Le lecteur Windows Media ne fonctionne pas sur le moniteur d’extension en mode plein
écran
• Ce problème se présente souvent sous Windows XP SP1. Effectuer une mise à jour du Service Pack
2 (SP2).
4 : Lecture d’un fichier vidéo non fluide en mode plein écran.
• Diminuer la résolution du moniteur.
• Utiliser l’adaptateur en mode d’extension.
• Fermer toute autre application.
• Utiliser un lecteur média nécessitant moins de support DirectX.
• Déplacer le lecteur média vers le moniteur d’extension. Fermer et rouvrir le lecteur. Le lecteur
s’affiche sur le moniteur d’extension. Redémarrer la lecture.
• Réduire l’accélération matérielle du moniteur principal (non celle du moniteur ajouté) et
redémarrer le lecteur média. Accéder à la configuration du système d’exploitation : cliquer avec le
bouton droit sur le bureau, sélectionner Properties et Settings. Cliquer sur Advanced, ouvrir sur
l’onglet Troubleshoot et déplacer la glissière vers la gauche.
• Éteindre tous les moniteurs en mode d’extension.
5 : Apparition d’un cadre noir autour du bureau du moniteur ajouté en mode d’extension.
• La résolution du moniteur ajouté est plus élevée que celle du moniteur principal. Choisir la même
résolution sur les deux moniteurs.
19/02/2009 © 2008 Velleman Components nv
28
Page 29

PCUSBVGA
11. Spécifications techniques
compatibilité USB USB 2.0
taux d’humidité 20-80 % RH (sans condensation)
résolution vidéo max. 1600x1200
température de service 10 ~ 50°C
température de stockage 0 ~ 70°C
alimentation 5 V depuis port USB
port d’entrée USB 2.0 type mini-B
port de sortie DVI-I femelle
adaptateurs 1 x DVI-I mâle vers VGA femelle (15p)
1 x DVI-I mâle vers HDMI™ femelle
dimensions 90 x 45 x 18 mm
N’employer cet appareil qu’avec des accessoires d’origine. SA Velleman Components ne
sera aucunement responsable de dommages ou lésions survenus à un usage (incorrect)
de cet appareil. Pour plus d’information concernant cet article, visitez notre site web
www.velleman.eu. Toutes les informations présentées dans cette notice peuvent être
modifiées sans notification préalable.
© DROITS D’AUTEUR
SA Velleman Components est l’ayant droit des droits d’auteur pour cette notice.
Tous droits mondiaux réservés. Toute reproduction, traduction, copie ou diffusion, intégrale ou
partielle, du contenu de cette notice par quelque procédé ou sur tout support électronique que se
soit est interdite sans l’accord préalable écrit de l’ayant droit.
19/02/2009 © 2008 Velleman Components nv
29
Page 30

PCUSBVGA
MANUAL DEL USUARIO
1. Introducción
A los ciudadanos de la Unión Europea
Importantes informaciones sobre el medio ambiente concerniente a este producto
Este símbolo en este aparato o el embalaje indica que, si tira las muestras inservibles,
podrían dañar el medio ambiente. No tire este aparato (ni las pilas, si las hubiera) en la
basura doméstica; debe ir a una empresa especializada en reciclaje. Devuelva este
aparato a su distribuidor o a la unidad de reciclaje local. Respete las leyes locales en
relación con el medio ambiente.
Si tiene dudas, contacte con las autoridades locales para residuos.
¡Gracias por haber comprado el PCUSBVGA! Lea atentamente las instrucciones del manual antes de
usarlo. Si el aparato ha sufrido algún daño en el transporte no lo instale y póngase en contacto con
su distribuidor.
Este adaptador en formato USB le permite añadir un proyector o una pantalla LCD al ordenador sin
tarjeta de vídeo. Se entrega con dos adaptadores para pantalla VGA o HDMI™.
2. Instrucciones de seguridad
Mantenga el aparato lejos del alcance de personas no
capacitadas y niños.
No exponga este equipo a lluvia, humedad, temperaturas
extremas, polvo ni a ningún tipo de salpicadura o goteo.
3. Normas generales
Véase la Garantía de servicio y calidad Velleman® al final de este manual del usuario.
• No agite el aparato. Evite usar excesiva fuerza durante el manejo y la instalación.
• Familiarícese con el funcionamiento del aparato antes de utilizarlo.
• Por razones de seguridad, las modificaciones no autorizadas del aparato están prohibidas.
• Utilice sólo el aparato para las aplicaciones descritas en este manual. Su uso incorrecto anula la
garantía completamente.
• Los daños causados por descuido de las instrucciones de seguridad de este manual invalidarán su
garantía y su distribuidor no será responsable de ningún daño u otros problemas resultantes.
4. Características
• salida de vídeo con conexión DVI
• compatible con las salidas de vídeo VGA/HDMI por adaptador DVI-VGA/DVI-HDMI ™
• ajustes: monitor principal - monitor adicional - monitor en espejo
• fácil conexión de un monitor adicional por un cable USB 2.0
• fácil de instalar y utilizar
• es posible conectar hasta 6 (Mac: 4) adaptadores a un solo ordenador portátil o un ordenador de
mesa con un mínimo de configuración y sin tarjeta gráfica adicional
• resolución hasta 1600x1200 @ profundidad de colores 32 bit
• alimentación por bus USB, no necesita ningún adaptador AC
• incluye:
1 x adaptador USB a DVI | 1 x adaptador DVI-I macho a HDMI™ hembra | 1 x adaptador DVI-I
macho a VGA hembra (15p) | manual del usuario políglota y software de instalación en CD-ROM |
1 x cable USB 2.0 (1,2 m)
• exigencias del sistema:
microprocesador: 1,2 GHz o superior, Intel® Pentium®/Celeron™ o AMD-K6™/Athlon™/Duron™ o
equivalente | RAM : 256 MB o superior | USB : USB 2.0 o superior | espacio disco duro libre:
30 MB o superior | sistema operativo: Windows 2000 (SP4), XP (SP2) 32-bit, Vista™ 32/64-bit,
Mac OS X v10.4 o v10.5 | monitor : Super VGA (800x600) o superior | reproducción DVD por
adaptador: microprocesador doble núcleo @ 2.0GHz, resolución 800x600 con colores 16 bits
19/02/2009 © 2008 Velleman Components nv
30
Page 31

PCUSBVGA
5. Instalar el driver bajo Windows
• Instale el driver antes de conectar el adaptador al ordenador. Cierre todas las aplicaciones.
• Introduzca el CD-ROM en el lector. Nota: introduzca el CD-ROM sólo en un lector que puede leer
los mini- CD-ROMs (8 cm).
• La instalación se ejecuta automáticamente o haga clic dos veces en Setup.exe en el CD-ROM.
NOTA:
→ Windows Vista™: Una pantalla User Account Control aparece durante la instalación del
driver. Introduzca una contraseña o haga clic en Allow para activar la instalación.
→ Windows 2000: Asegúrese de que los Service Packs necesarios estén instalados.
• En la pantalla de entrada, haga clic en el sistema operativo (véase abajo).
• Una pantalla con el acuerdo de licencia del usuario aparece (véase a continuación). Haga clic en I
accept para continuar.
• Luego, haga clic en Yes para reinicializar el ordenador y terminar la instalación del driver.
6. Instalar el adaptador
• Véase las figuras en la página Error! Bookmark not defined. de este manual del usuario.
• Introduzca el pequeño ordenador USB tipo B del cable USB incl. en el puerto USB tipo mini-B [A]
del PCUSBVGA. Introduzca el gran conector USB tipo A en un puerto USB libre del ordenador.
NOTA:
→ Utilice sólo un puerto USB 2.0 o superior.
• Conecte el puerto DVI [B] del PCUSBVGA a un monitor. Utilice un cable DVI normal (no incl.) con
un monitor equipado con una conexión DVI; utilice el adaptador adecuado (incl.) con un monitor
VGA o HDMI™.
• Active el monitor. El LED de estado [C] se ilumina. Windows terminará automáticamente la
instalación del monitor.
NOTA:
→ Windows Vista™: Vuelva a iniciar el ordenador el ordenador si el monitor no visualiza
ninguna imagen.
→ La imagen parpadea durante la instalación. Esto es normal.
→ Es posible que el monitor adicional visualice la imagen sólo después de algún tiempo.
→ Windows Vista™ Aero: El adaptador USB no sea compatible con Vista™ Aero. La interfaz se
desactivará y se ha modificado la paleta de colores. Desconecte o desinstale el adaptador
USB para restablecer automáticamente Vista™ Aero.
19/02/2009 © 2008 Velleman Components nv
31
Page 32

PCUSBVGA
7. Uso bajo Windows
• Hay tres maneras para utilizar el monitor conectado:
• monitor adicional
• monitor en espejo
• monitor principal
7.1 Monitor adicional (por defecto)
• El monitor conectado se utiliza en el modo de espacio de trabajo adicional. Es posible arrastrar y
soltar las aplicaciones entre los dos monitores facilitando el uso simultán eo de v arias aplicacion es.
NOTA:
→ Algunas aplicaciones no son compatibles con el monitor adicional y se visualizarán siempre
en el monitor principal.
• Configuración por defecto. Entrar a la configuración del sistema operativo: haga clic en el
escritorio con el botón derecho, seleccione Properties y Settings.
• Seleccione DisplayLink Graphics Adapter en el menú desplegable y marque el cajetín Extend
my desktop onto this monitor (véase abajo). Configure los iconos y cierre la pantalla.
NOTA:
→ El nombre y el número del monitor dependen de la configuración local. Véase la cadena de
caracteres DisplayLink Graphics en el nombre.
→ Al intentar de abrir una aplicación anteriormente visualizada en el monitor adicional, es
posible que se abra en el monitor adicional, incluso si esto está desactivado. Por tanto,
desplace la aplicación hacia el monitor principal antes de desactivarlo.
→ Cualquier aplicación visualizada en el monitor adicional se desplaza al monitor principal si el
monitor adicional se pone en el modo de espera (standby). Luego, ya no se desplazan las
aplicaciones hacia el monitor conectado. La ventana de conexión siempre se visualizará en
el monitor principal.
→ Windows Vista™: Reproduzca los ficheros de vídeo y los DVD en el monitor principal para
obtener los mejores resultados.
19/02/2009 © 2008 Velleman Components nv
32
Page 33

PCUSBVGA
7.2 Monitor en espejo
• El monitor adicional es una copia exacta del monitor principal. Tiene los mismos ajustes que los
del monitor principal pero es posible modificarlos.
• Entre en la configuración del sistema operativo: haga clic en el escritorio con el botón derecho,
seleccione Properties y Settings.
• Seleccione DisplayLink Graphics Adapter en el menú desplegable y marque el cajetín Extend
my desktop onto this monitor (véase abajo). Cierra la pantalla.
NOTA:
→ El nombre y el número del monitor dependen de la configuración local. Véase la cadena de
caracteres DisplayLink Graphics en el nombre.
→ Tiene las mismas configuraciones que las del monitor principal pero es posible modificarlas
(véase abajo). Sin embargo, dependen de la resolución máx. del monitor principal. Ejemplo:
resolución del monitor principal = 1024x768, resolución del monitor conectado = limitada a
1024x768, incluso si acepta una resolución más elevada.
→ configure la misma resolución para ambos monitores.
7.3 Monitor principal
• El monitor conectado se utiliza ahora como monitor principal y visualizará todas las informacion es.
• Entre en la configuración del sistema operativo: haga clic con el botón derecho en el escritorio,
seleccione Properties et Settings.
• Seleccione DisplayLink Graphics Adapter en el menú desplegable y marque el cajetín Extend
my desktop onto this monitor (véase abajo). Cierre la pantalla.
19/02/2009 © 2008 Velleman Components nv
33
Page 34

PCUSBVGA
NOTA:
→ El nombre y el número del monitor dependen de la configuración local. Véase la cadena de
caracteres DisplayLink Graphics en el nombre.
→ Algunos ordenadores requieren una reconfiguración del monitor principal. Seleccione
DisplayLink Graphics Adapter en el menú desplegable y marque el cajetín Extend my
desktop onto this monitor.
8. Información adicional
8.1 Configuración del monitor
• Un monitor se configura en 3 niveles:
• resolución: Número de píxeles visualizados, tanto horizontalmente como verticalmente.
• profundidad de color: Número de bits utilizados para componer un color (bits por píxel). Una
profundidad de color más importante ofrece una paleta de colores más extensa.
• frecuencia de actualización de las imágenes: Número de actualizaciones de la pantalla por
segundo (Hz). Una frecuencia más elevada disminuye el efecto de parpadeo.
• Algunos monitores envían su configuración por el conector de vídeo al adaptador conectado. Si el
monitor no tiene esta función, el adaptador selecciona una de las siguientes configuraciones.
resolución actualización
(16 bit)
actualización
(32 bit)
640 x 480 60 72 75 60 72 75
800 x 600 56 60 72 75 85 56 60 72 75 85
1024 x 768 60 75 85 60 75 85
1280 x 960 60 85 60 85
1280 x 1024 60 75 85 60 75
1360 x 768 60 60
resolución actualización
(16 bit)
1366 x 768 60 60
1368 x 768 60 60
1400 x 1050 60 75 85 60 75 85
1440 x 900 60 60
1600 x 1200 60 60
1680 x 1050 59 60 59 60
actualización
(32 bit)
NOTA:
→ No están soportados los modos de entrelazado.
19/02/2009 © 2008 Velleman Components nv
34
Page 35

PCUSBVGA
• La resolución y la frecuencia de actualización disponibles son un compromiso entre el adaptador
USB, el monitor principal y el monitor adicional, las tarjetas gráficas y los drivers para evitar
cualquier daño causado por una configuración incompatible.
• Configuración manual de la resolución, la profundidad de color y la frecu encia de actualización:
Entre en la configuración del sistema operativo: haga clic con el botón derecho en el escritorio,
seleccione Properties et Settings. Ajuste la resolución al desplazar el conmutador deslizante
(véase abajo). Seleccione una profundidad de color en el menú desplegable (véase arriba). Haga
clic en Advanced para configurar la frecuencia de actualización (véase arriba) y abra la pestaña
Monitor (véase abajo – es posible que el producto actual difiera de la imagen). Seleccione la
frecuencia en el menú desplegable.
• Haga clic en OK para cerrar la ventana.
8.2 Uso simultáneo de varios adaptadores
• Es posible interconectar hasta 6 (Mac: 4) adaptadores a un solo ordenador (según los puertos USB
disponibles).
NOTA:
→ ¡XDDM bajo Windows Vista™ sólo soporta 2 adaptadores simultáneamente! (véase §8.3)
• Instale el primer adaptador. Véase §6. Luego, conecte sencillamente los otros adaptadores.
8.3 XDDM bajo Windows Vista™
• XDDM (XP Device Driver Model) es un driver para tarjetas gráficas que utilizan una interfaz
equivalente a la bajo Windows XP. Se utiliza en algunos sistemas bajo Vista™, contrariamente al
driver WDDM (Windows Device Driver Model). El driver no está compatible con Vista™ Aero.
• Esta configuración soporta sólo un monitor adicional (primer adaptador) y un monitor en espejo
(segundo adaptador).
• Haga clic con el botón derecho en Computer y seleccione Device Manager. Despliegue Display
adaptor.
19/02/2009 © 2008 Velleman Components nv
35
Page 36

PCUSBVGA
8.4 Desinstalar el adaptador y el driver
• Abra Control panel y haga clic dos veces en Programs and featur es (Vista™) o Add or
remove programs (XP/2000).
• Seleccione WS Tech USB Multi-Display y haga clic en Uninstall o Remove.
• Haga clic en Yes para confirmar. Aparecen ventanas DOS durante la desinstalación.
• Haga clic en Yes para volver a iniciar el ordenador. Quite el adaptador.
9. Uso bajo Mac
Introducción
• El texto a continuación se aplica sólo al sistema Mac versión 1.0 o superior.
• El driver para usuarios Mac es para Mac OS X v10.4 (Tiger) y Mac OS X v10.5 (Leopard), y permite
conectar hasta 4 monitores adicionales a un Mac equipado con un microprocesador Intel
utilizando DisplayLink. Cada conexión de un monitor adiciona l necesita un PCUSBVGA.
NOTA:
→ Los ordenadores Power Macintosh (iMac, PowerBook y PowerMac) no son compatibles.
Instalar y desinstalar el driver
• Haga clic dos veces en DisplayLink Installer para iniciar el software de instalación.
®
• Haga clic en DisplayLink Software Installer para empezar la instalación. Vuelva a iniciar el
ordenador después de que se haya terminado la instalación.
• Haga clic en User Guide para entrar en el manual del usuario.
• Haga clic en Software Uninstaller para desinstalar el driver. Vuelva a iniciar el ordenador.
Conectar un monitor
• Después de haber instalado el driver, conecte el adaptador USB a un puerto USB libre. Luego,
conecte el monitor al puerto del adaptador.
Dirigir varios monitores
• El monitor conectado se considera automáticamente como extensión a la derecha del monitor
principal. Haga clic en Displays en el menú System Preferences para configurar cada monitor
adicional. Haga clic en Gathering Windows para desplazar todas las ventanas Display
Preferences al monitor principal.
Configurar un monitor desde la barra del menú
• Marque el cajetín Show displays in menu bar en la ventana Display Preferences para
configurar un monitor desde el icono en la barra del menú.
19/02/2009 © 2008 Velleman Components nv
36
Page 37

PCUSBVGA
10. Solución de problemas
1: El monitor conectado no visualiza ninguna imagen.
• El LED de alimentación del monitor se ilumina (verde): Asegúrese de que el monitor no esté en el
modo de espera. El monitor necesita un breve tiempo de inicialización an tes de que visualice la
imagen. Vuelva a iniciar el ordenador si este tiempo se prolonga (p.ej. más de 2 minutos).
• El LED de alimentación del monitor se ilumina (rojo): Asegúrese de que todas las conexiones
estén efectuadas de manera correcta. Desinstale el driver, quite el adaptador del puerto y vuelva a
instalar el driver si el problema persiste.
2: El monitor conectado visualiza una imagen parpadeante.
• Frecuencia de actualización demasiado baja.
• Aumente la frecuencia de actualización del monitor principal en el modo espejo. La frecuencia del
monitor en espejo aumentará automáticamente.
• Aumente la frecuencia de actualización del monitor adicional.
3: El lector Windows Media no funciona en el monitor adicional en el modo pantalla
completa
• Este problema se presenta a menudo bajo Windows XP SP1. Efectúe una actualización de Service
Pack 2 (SP2).
4: Reproducción de un fichero de vídeo no fluido en el modo pantalla completa.
• Disminuya la resolución del monitor.
• Utilice el adaptador en modo extended.
• Cierre cualquier otra aplicación.
• Utilice un lector media player que necesita menos soporte DirectX.
• Desplace el lector media player hacia el monitor adicional. Cierre y vuelva a abrir el lector. El
lector se visualiza en el monitor adicional. Vuelva a iniciar la reproducción.
• Disminuya la aceleración hardware del monitor principal (no la del monitor conectado) y vuelva a
iniciar el lector media player. Entre en la configuración del sistema operativo: haga clic con el
botón derecho en el escritorio, seleccione Properties et Settings. Haga clic en Advanced, abra
la pestaña Troubleshoot y desplace el conmutador deslizante hacia la izquierda.
• Desactive todos los monitores en el modo extended.
5: Aparece un marco negro alrededor del escritorio del monitor conectado en el modo
extended.
• La resolución del monitor conectado es más elevada que la del monitor principal. Elija la mis ma
resolución en los dos monitores.
19/02/2009 © 2008 Velleman Components nv
37
Page 38

PCUSBVGA
11. Especificaciones
compatibilidad USB USB 2.0
humedad 20-80 % RH (sin condensado)
resolución vídeo máx. 1600x1200
temperatura de funcionamiento 10 ~ 50°C
temperatura de almacenamiento 0 ~ 70°C
alimentación 5 V desde puerto USB
puerto de entrada USB 2.0 tipo mini-B
puerto de salida DVI-I hembra
adaptadores 1 x DVI-I macho a VGA hembra (15p)
1 x DVI-I macho a HDMI™ hembra
dimensiones 90 x 45 x 18 mm
Utilice este aparato sólo con los accesorios origin ales. Velleman NV no será responsable
de daños ni lesiones causados por un uso (indebido) de este aparato. Para más
información sobre este producto, visite nuestra página web www.velleman.eu
modificar las especificaciones y el contenido de este manual sin previo aviso.
© DERECHOS DE AUTOR
Velleman NV dispone de los derechos de autor para este manual del usu ario.
Todos los derechos mundiales reservados. Está estrictamente prohibido reproducir, traducir, copiar,
editar y guardar este manual del usuario o partes de ello sin previo permiso escrito del derecho
habiente.
. Se pueden
19/02/2009 © 2008 Velleman Components nv
38
Page 39

PCUSBVGA
BEDIENUNGSANLEITUNG
1. Einführung
An alle Einwohner der Europäischen Union
Wichtige Umweltinformationen über dieses Produkt
Dieses Symbol auf dem Produkt oder der Verpackung zeigt an, dass die Entsorgung dieses
Produktes nach seinem Lebenszyklus der Umwelt Schaden zufügen kann. Entsorgen Sie
die Einheit (oder verwendeten Batterien) nicht als unsortiertes Hausmüll; die Einheit oder
verwendeten Batterien müssen von einer spezialisierten Firma zwecks Recycling entsorgt
werden. Diese Einheit muss an den Händler oder ein örtliches Recycling-Unternehmen
retourniert werden. Respektieren Sie die örtlichen Umweltvorschriften.
Falls Zweifel bestehen, wenden Sie sich für Entsorgungsrichtlinien an Ihre örtliche
Behörde.
Wir bedanken uns für den Kauf des PCUSBVGA! Lesen Sie diese Bedienungsanleitung vor
Inbetriebnahme sorgfältig durch. Überprüfen Sie, ob Transportschäden vorliegen. Sollte dies der Fall
sein, verwenden Sie das Gerät nicht und wenden Sie sich an Ihren Händler.
Mit diesem Adapter verbinden Sie einen zusätzlichen Monitor, ein LCD-Display oder einen Projektor
über freien USB 2.0-Port mit Ihrem Computer ohne Grafikkarte. Lieferung mit zwei Adaptern für
VGA- und HDMI™-Monitor.
2. Sicherheitshinweise
Halten Sie Kinder und Unbefugte vom Gerät fern.
Schützen Sie das Gerät vor Regen und Feuchte, Staub und
extremen Temperaturen. Setzen Sie das Gerät keiner
Flüssigkeit wie z.B. Tropf- oder Spritzwasser, aus.
3. Allgemeine Richtlinien
Siehe Velleman® Service- und Qualitätsgarantie am Ende dieser Bedienungsanleitung.
• Vermeiden Sie Erschütterungen. Vermeiden Sie rohe Gewalt während der Installation und Bedi enung des
Gerätes.
• Nehmen Sie das Gerät erst in Betrieb, nachdem Sie sich mit seinen Funktionen vertraut gemacht
haben.
• Eigenmächtige Veränderungen sind aus Sicherheitsgründen verboten.
• Verwenden Sie das Gerät nur für Anwendungen beschrieben in dieser Bedienungsanleitung sonst
kann dies zu Schäden am Produkt führen und erlischt der Garantieanspruch.
• Bei Schäden, die durch Nichtbeachtung der Bedienungsanleitung verursacht werden, erlischt der
Garantieanspruch. Für daraus resultierende Folgeschäden übernimmt der Hersteller keine Haftung.
4. Eigenschaften
• Video-Ausgang mit DVI-Anschluss
• unterstützt VGA/HDMI™ Video-Ausgang über DVI-VGA/DVI-HDMI™-Adapter
• unterstützte Funktionen: Hauptmonitor - zusätzlicher Monitor – Kopie (gespiegelter Monitor)
• einfacher Anschluss eines zusätzlichen Monitors über USB 2.0-Kabel
• einfach zu installieren und zu verwenden
• gleichzeitiger Anschluss bis zu 6 (Mac: 4) Adapter an das Notebook oder den Tischcomputer mit
geringer Konfiguration und ohne zusätzliche Grafikkarte
• Auflösung bis zu 1600x1200 @ 32-Bit Farben
• Stromversorgung über USB-Bus, braucht keinen AC-Adapter
• Lieferumfang:
1 x Adapter USB auf DVI | 1 x Adapter DVI-I-Stecker auf HDMI™-Buchse | 1 x Adapter DVI-IStecker auf VGA-Buchse (15p) | 1 x mehrsprachige Bedienungsanleitung und Installationssoftware
auf CD-ROM | 1 x USB 2.0-Kabel (1,2 m)
• Systemanforderungen:
Mikroprozessor: 1,2 GHz oder höher, Intel® Pentium®/Celeron™ oder AMD-K6™/Athlon™/Duron™
oder kompatibeler Prozessor | RAM: 256 MB oder höher | USB: USB 2.0 oder höher | freier
Speicherplatz: 30 MB oder höher | Betriebssystem: Windows 2000 (SP4), XP (SP2) 32-bit, Vista™
32/64-bit, Mac OS X v10.4 oder v10.5 | Monitor: Super VGA (800x600) oder höher | Wiedergeben
19/02/2009 © 2008 Velleman Components nv
39
Page 40

PCUSBVGA
von DVD über Adapter: Mikroprozessor mit zwei Kernen @ 2,0 GHz, Auflösung 800x600 mit 16-bit
Farben
5. Windows Treiber installieren
• Ehe Sie den Adapter mit dem PC verbinden, müssen Sie die Treiber installieren. Schließen Sie
hierfür zuerst alle Anwendungen ab.
• Legen Sie das mitgelieferte CD-ROM in das CD-ROM-Laufwerk ein. Bemerkung: Legen Sie das
CD-ROM nur in ein Laufwerk, das Mini-CD-ROMs (8 cm) akzeptiert, ein.
• Der Treiber wird automatisch gestartet. Wenn dies nicht der Fall ist , klicken Sie auf Setup.exe im
CD-ROM.
BEMERKUNG:
→ Windows Vista™: Während der Installation des Programms erscheint ein User Account
Control-Fenster. Geben Sie ein Kennwort ein oder klicken Sie auf Allow um die Installation
zu starten.
→ Windows 2000: Beachten Sie, dass alle notwendigen Service Packs im System anwesend
sind.
• Klicken Sie im Startbildschirm (siehe unten) auf Betriebssystem.
• Es erscheint ein Fenster mit dem Lizenzvertrag (siehe oben). Lesen Sie diese sorgfaltig durch und
klicken Sie auf I accept um weiterzugehen.
• Klicken Sie auf Yes um den Computer wieder zu starten und die Installation zu beenden.
6. Den Adapter installieren
• Siehe die Abbildungen Seite 2 der Bedienungsanleitung.
• Stecken Sie den kleineren Stecker (Typ B) des mitgelieferten USB-Kabel in den Mini-B-Port [A]
des PCUSBVGA ein. Stecken Sie den größeren Stecker (Typ A) in einen freien USB 2.0-Port des
Computers ein.
BEMERKUNG:
→ Verwenden Sie nur einen USB-Port Typ USB 2.0 oder höher.
• Verbinden Sie den DVI-Port [B] des PCUSBVGA mit einem Monitor. Verwenden Sie ein normales
DVI-Kabel (nicht mitgeliefert) wenn der Monitor über einen DVI-Anschluss verfügt. Verwenden Sie
den geeigneten Adapter mit einem VGA- oder HDMI™-Monitor.
• Schalten Sie den Monitor ein; die Status-LED [C] leuchtet. Windows vollendet automatisch die
Installation. Der Monitor ist nun gebrauchsfertig.
BEMERKUNG:
→ Windows Vista™: Starten Sie den Computer wieder wenn der Monitor einen leeren Schirm
anzeigt.
→ Während der Installation kann der Monitor einige Male flimmern. Dies ist normal.
→ Es ist möglich, dass das Bild auf dem zusätzlichen Monitor einige Verzögerung hat.
19/02/2009 © 2008 Velleman Components nv
40
Page 41

PCUSBVGA
→ Windows Vista™ Aero: Der USB-Adapter ist nicht mit Vista™ Aero kompatibel. Die
Schnittstelle ist ausgeschaltet und Sie bekommen eine Warnung, dass die
Farbzusammenstellung sich geändert hat. Trennen oder deinstallieren Sie den USB-Adapter
um Vista™ Aero automatisch einzuschalten.
7. Anwendung unter Windows
• Sie können den angeschlossenen Monitor auf drei Weisen verwenden:
• Extended
• Mirror
• Primary
7.1 Extended (Standardeinstellung)
• Verwenden Sie den angeschlossenen Monitor als eine zusätzliche Arbeitsoberfläche. Sie können
geöffnete Fenster von und zum Hauptmonitor und zum angeschlossenen Monitor schleppen. Dies
erleichtert das Arbeiten mit verschiedenen Programmen.
BEMERKUNG:
→ Manche Anwendungen können nicht zum angeschlossenen Monitor geschleppt werden und
bleiben im Hauptmonitor aktiv.
• Dies ist die Standardeinstellung des Adapters. Gehen Sie zu den Bildschirmeinstellungen des
Betriebssystems: klicken Sie mit der rechten Maustaste auf die Arbeitsoberfläche, wählen Sie
Properties und Settings aus.
• Wählen Sie DisplayLink Graphics Adapter im Aufklappmenü aus und kreuzen Sie E
Windows desktop onto this Monitor an (siehe unten). Schleppen Sie die Ikonen zum
gewünschten Platz und schließen Sie das Fenster.
xtend my
BEMERKUNG:
→ Der Name und die Nummer des Monitors hängen von den Einstellungen ab. Suchen Sie den
DisplayLink Graphics-String im Namen.
→ Beim Öffnen einer Anwendung, die früher auf dem angeschlossenen Monitor geöffnet stand,
ist es möglich, dass die Anwendung versucht, auf dem angeschlossenen Monitor zu
erscheinen, auch wenn der Monitor ausgeschaltet ist. Um dies zu vermeiden, schleppen Sie
eine geöffnete Anwendung zuerst zum Hauptmonitor ehe Sie diese schließen, besonders
wenn Sie den angeschlossenen Monitor sporadisch verwenden.
19/02/2009 © 2008 Velleman Components nv
41
Page 42

PCUSBVGA
→ Ist der Standby-Modus bzw. Ruhezustand im angeschlossenen Monitor eingeschaltet, so
werden alle geöffneten Anwendungen zum Hauptmonitor versetzt. Die Anwendungen kehren
aber nicht zum Hauptmonitor zurück. Das Login-Fenster erscheint immer im Hauptmonitor.
→ Windows Vista™: Für die besten Ergebnisse raten wir, Videodateien und DVDs im
Hauptmonitor abzuspielen.
7.2 Mirror
• Der angeschlossene Monitor ist eine exakte Kopie des Hauptmonitors. Die Einstellungen sind
anfangs identisch aber können manuell geändert werden.
• Gehen Sie zu den Bildschirmeinstellungen des Betriebssystems: klicken Sie mit der rechten
Maustaste auf die Arbeitsoberfläche, wählen Sie Properties und Settings aus.
• Wählen Sie DisplayLink Graphics Adapter im Aufklappmenü aus und kreuzen Sie E
xtend my
Windows desktop onto this Monitor an (siehe unten). Schließen Sie das Fenster.
BEMERKUNG:
→ Der Name und die Nummer des Monitors hängen von den Einstellungen ab. Suchen Sie den
DisplayLink Graphics-String im Namen.
→ Die Einstellungen des angeschlossenen Monitors (z.B. Auflösung, Farbeinstellungen, usw.)
werden Standard vom Hauptmonitor übernommen aber können manuell geändert werden
(siehe unten). Die Einstellungen hängen aber von denen des Hauptmonitors ab. Beispiel: Der
Hauptmonitor hat eine Auflösung von 1024x768, die Auflösung des angeschlossenen Monitors
beträgt max. 1024x768, auch wenn der angeschlossene Monitor einer höheren Auflösung
gewachsen ist.
→ Stellen Sie die Auflösung auf beiden Bildschirmen identisch ein.
7.3 Primary
• Der angeschlossene Monitor wird nun der Hauptmonitor und zeigt alle Hauptinformationen an.
• Gehen Sie zu den Bildschirmeinstellungen des Betriebssystems: klicken Sie mit der rechten
Maustaste auf die Arbeitsoberfläche, wählen Sie Properties und Settings aus.
• Wählen Sie DisplayLink Graphics Adapter im Aufklappmenü aus und kreuzen Sie E
xtend my
Windows desktop onto this Monitor an (siehe unten). Schließen Sie das Fenster.
19/02/2009 © 2008 Velleman Components nv
42
Page 43

PCUSBVGA
BEMERKUNG:
→ Der Name und die Nummer des Monitors hängen von den Einstellungen ab. Suchen Sie den
DisplayLink Graphics-String im Namen.
→ Der Hauptmonitor mancher Computer oder Laptops müssen wieder konfiguriert werden.
Wählen Sie DisplayLink Graphics Adapter im Aufklappmenü aus und kreuzen Sie Extend
my Windows desktop onto this Monitor an.
8. Zusätzliche Informationen
8.1 Den Monitor einstellen
• Stellen Sie den Monitor ein anhand:
• Auflösung: Anzahl dargestellte Pixels, sowohl horizontal als auch vertikal.
• Farbtiefe: Anzahl Bits verwendet, um die Pixelfarbe zu bestimmen (Bits per Pixel). Wählen Sie
mehr Farbtiefe für eine umfangreichere Farbenpalette.
• Bildwiederholfrequenz: Anzahl Male, dass ein Bild per Sekunde in Hz dargestellt wird. Wählen
Sie eine höhere Frequenz um zu vermeiden, dass das Bild flimmert.
• Manche Bildschirme senden Ihre Einstellungen über den Videostecker zum angeschlossenen
Adapter. Wenn dies nicht der Fall ist, so wählt der Adapter eine der folgenden üblichen
Einstellungen.
Auflösu
ng
640 x
480
800 x
600
1024 x
768
1280 x
960
Bildwiederholfreq
uenz
(16 Bits)
Bildwiederholfreq
uenz
(32 bits)
Auflösu
60 72 75 60 72 75 1366 x
56 60 72 75 85 56 60 72 75 85 1368 x
60 75 85 60 75 85 1400 x
1050
60 85 60 85 1440 x
ng
768
768
900
Bildwiederholfreq
uenz (16 Bits)
Bildwiederholfreq
uenz (32 Bits)
60 60
60 60
60 75 85 60 75 85
60 60
19/02/2009 © 2008 Velleman Components nv
43
Page 44

PCUSBVGA
1280 x
1024
1360 x
768
60 75 85 60 75 1600 x
1200
60 60 1680 x
59 60 59 60
1050
60 60
BEMERKUNG:
→ Interlacing (Verflechtung) wird nicht unterstützt.
• Die verfügbare Auflösung und Bildwiederholfrequenz sind ein Kompromiss zwischen dem USB-
Adapter, dem Hauptmonitor und dem angeschlossenen Monitor, der Videokarte und den Treibern,
um Beschädigungen am Monitor verursacht durch inkompatible Einstellungen zu vermeiden.
• Manuelle Einstellung der Auflösung, Farbtiefe und Bildwiederholfrequenz: Gehen Sie zu den
Bildschirmeinstellungen des Betriebssystems und klicken Sie mit der rechten Maustaste auf die
Benutzeroberfläche. Wählen Sie Properties und Settings. Stellen Sie die Auflösung mit dem
Schiebeschalter (siehe oben) ein. Wählen Sie eine Farbtiefe im Aufklappmenü aus (siehe oben).
Stellen Sie die Bildwiederholfrequenz ein, indem Sie Advanced klicken (siehe oben). Klicken Sie
danach auf Monitor (siehe unten – das tatsächliche Produkt kann vom dargestellten Bild
abweichen) und wählen Sie die gewünschte Geschwindigkeit im Aufklappmenü aus.
• Klicken Sie auf OK um das Fenster zu schließen.
8.2 Simultane Anwendung mehrerer Adapter
• Sie können bis zu 6 Adapter simultan mit einem einzigen Computer verbinden (abhängig von den
freien USB-Anschlüssen).
BEMERKUNG:
→ XDDM unter Windows Vista™ unterstützt nur 2 Adapter! (siehe §8.3)
• Installieren Sie zuerst einen Adapter (siehe §6). Verbinden Sie alle anderen Adapter nach der
Installation.
19/02/2009 © 2008 Velleman Components nv
44
Page 45

PCUSBVGA
8.3 XDDM unter Windows Vista™
• XDDM (XP Device Driver Model) ist ein Treiber für Videokarten mit einer Schnittstelle wie diese in
Windows XP. Wird manchmal unter Vista™ verwendet in im Gegensatz zu WDDM (Windows
Device Driver Model). Der Treiber unterstützt Vista™ Aero nicht.
• In diesem Modus werden nur einen ‘Extended’ Monitor (ersten Adapter) und einen ‘Mirror’ Monitor
(zweiten Adapter) unterstützt.
• Klicken Sie mit der rechten Maustaste auf Computer und wählen Sie Device Manager. Klappen
Sie Display adaptor auf.
8.4 Den Adapter und den Treiber entfernen
• Öffnen Sie Control Panel und klicken Sie zwei Mal auf Programs and features (Vista™) oder
Add or remove programs (XP/2000).
• Wählen Sie WS Tech USB Multi-Display aus und klicken Sie auf Uninstall oder Remove.
• Klicken Sie auf Yes um zu entfernen. Es erscheinen nur DOS-Fenster.
• Klicken Sie auf Yes um den Computer neu zu starten. Entfernen Sie den Adapter.
9. Anwendung unter Mac
Einführung
• Dieses Verfahren gilt für die Mac Version 1.0 oder höher.
• Der Treiber für Mac-Benutzer eignet sich für Mac OS X v10.4 (Tiger) und Mac OS X v10.5
(Leopard), und erlaubt es, 4 zusätzliche Monitoren über DisplayLink™an einen Mac mit Intel
Prozessor anzuschließen. Für jeden angeschlossenen Monitor brauchen Sie einen PCUSBVGA.
®
-
BEMERKUNG:
→ Einen Power Macintosh, z.B. letzte iMac, PowerBook oder PowerMac, wird nicht unterstützt.
Die Treiber installieren und deinstallieren
• Klicken Sie zwei Mal auf DisplayLink Installer um das Installationsprogramm zu starten.
• Klicken Sie auf DisplayLink Software Installer um die Installation zu starten. Starten Sie den
Computer nach der Installation wieder.
• Klicken Sie auf User Guide um die Bedienungsanleitung zu öffnen.
• Klicken Sie auf Software Uninstaller um den Treiber zu deinstallieren. Starten Sie den Computer
wieder.
Einen Monitor anschließen
• Nach der Installation des Treibers können Sie den Adapter in einen freien USB-Port schieben.
Schließen Sie den Monitor an den USB-Port des Adapters an.
Mehrere Bildschirme verwalten
• Der angeschlossene Bildschirm wird automatisch eine Extension rechts vom Hauptmonitor.
Konfigurieren Sie den angeschlossenen Monitor über Displays im Menü System Preference s. Sie
können jeden angeschlossenen Monitor in einem separaten Fenster einstellen. Klicken Sie auf
Gathering Windows um alle Display Preferences-Fenster im Hauptmonitor anzuzeigen.
19/02/2009 © 2008 Velleman Components nv
45
Page 46

PCUSBVGA
Einen Monitor über die Menüleiste einstellen
• Kreuzen Sie Show displays in menu bar im Display Preferences-Fenster an, um die Monitoren
über die Ikone in der Menüleiste einzustellen.
10. Problemlösung
1: Der angeschlossene Monitor zeigt kein Bild an.
• Die Stomversorgungs-LED vom Monitor leuchtet grün: Überprüfen Sie, ob der Computer im
Stanby-Modus bzw. Ruhezustand steht. Der Monitor braucht ein bisschen Zeit, um zu starten.
Starten Sie den Computer wieder wenn dies zu lange dauert (z.B. länger als 2 Minuten).
• Die Stomversorgungs-LED vom Monitor leuchtet rot: Überprüfen Sie, ob alle Anschlüsse korrekt
ausgeführt worden sind. Deinstallieren Sie den Treiber, trenn en Sie den Adapter und installieren
Sie den Treiber wieder wenn der Monitor immer noch kein Bild anzeigt.
2: Der angeschlossene Monitor zeigt ein flimmerndes Bild an.
• Die Bildwiederholfrequenz wurde zu niedrig eingestellt.
• Erhöhen Sie die Bildwiederholfrequenz des Hauptmonitors im Mirror-Modus. So wird die
Bildwiederholfrequenz des angeschlossenen Monitors auch erhöht.
• Erhöhen Sie die Bildwiederholfrequenz des angeschlossenen Monitors im Extended-Modus.
3: Windows Media Player in Full Screen funktioniert nicht im angeschlossenen Monitor.
• Dieses Problem kommt oft unter Windows XP SP1 vor. Führen Sie ein Upgrade von Service Pack 2
(SP2) durch.
4: Die abgespielte Videodatei hapert.
• Verringern Sie die Auflösung des Monitors.
• Verwenden Sie den Adapter im Extended-Modus.
• Schließen Sie alle anderen Anwendungen.
• Verwenden Sie ein Media Player, die weniger DirectX braucht.
• Schleppen Sie das Media Player zum angeschlossenen Monitor. Schließen Sie ab und starten Sie
den Spieler wieder. Normalerweise erscheint der Spieler sofort auf dem angeschlossenen Monitor.
Starten Sie die Videodatei wieder.
• Verringern Sie die Hardwarebeschleunigung des Hauptmonitors (nicht die des angeschlossenen
Monitors) und starten Sie wieder das Media Player. Gehen Sie zu den Bildschirmeinstellungen des
Betriebssystems und klicken Sie mit der rechten Maustaste auf die Benutzeroberfläche. Wählen Sie
Properties, Settings und Advanced. Klicken Sie auf Troubleshoot und schieben Sie die Taste
nach links (siehe unten).
• Schalten Sie die Monitoren im Extended-Modus ab.
5: Es erscheint einen schwarzen Rand rund um die Benutzeroberfläche des
angeschlossenen Monitors im extended-Modus.
• Die Auflösung des angeschlossenen Monitors steht höher eingestellt als die des Hauptmonitors.
Verwenden Sie dieselbe Auflösung für beide Bildschirme.
19/02/2009 © 2008 Velleman Components nv
46
Page 47

PCUSBVGA
11. Technische Daten
USB-Kompatibilität USB 2.0
Feuchtigkeit 20-80% RH (nicht-kondensierend)
Video-Auflösung max. 1600x1200
Betriebstemperatur 10 ~ 50°C
Lagertemperatur 0 ~ 70°C
Stromversorgung 5 V via USB-Port
Eingangsport USB 2.0 Typ Mini-B
Ausgangsport DVI-I-Buchse
Adapter 1 x DVI-I-Stecker auf VGA-Buchse (15p)
1 x DVI-I-Stecker auf HDMI™-Buchse
Abmessungen 90 x 45 x 18 mm
Verwenden Sie dieses Gerät nur mit originellen Zubehörteilen. Velleman NV übernimmt
keine Haftung für Schaden oder Verletzungen bei (falscher) Anwendung dieses Gerät es.
Für mehr Informationen zu diesem Produkt, siehe www.velleman.eu
ohne vorherige Ankündigung vorbehalten.
© URHEBERRECHT
Velleman Components NV besitzt das Urheberrecht für diese Bedienungsanleitung.
Alle weltweiten Rechte vorbehalten.
Ohne vorherige schriftliche Genehmigung des Urhebers ist es nicht gestattet, diese
Bedienungsanleitung ganz oder in Teilen zu reproduzieren, zu kopieren, zu übersetzen, zu
bearbeiten oder zu speichern.
. Alle Änderungen
19/02/2009 © 2008 Velleman Components nv
47
Page 48

Velleman® Service and Quality Warranty
Velleman® has over 35 years of experience in the electronics
world and distributes its products in more than 85 countries.
All our products fulfil strict quality requirements and legal
stipulations in the EU. In order to ensure the quality, our
products regularly go through an extra quality check, both by an
internal quality department and by specialized external
organisations. If, all precautionary measures notwithstanding,
problems should occur, please make appeal to our warranty (see
guarantee conditions).
General Warranty Conditions Concerning Consumer
Products (for EU):
• All consumer products are subject to a 24-month warranty on
production flaws and defective material as from the original date
of purchase.
• Velleman® can decide to replace an article with an equivalent
article, or to refund the retail value totally or partially when the
complaint is valid and a free repair or replacement of the article
is impossible, or if the expenses are out of proportion.
You will be delivered a replacing article or a refund at the value
of 100% of the purchase price in case of a flaw occurred in the
first year after the date of purchase and delivery, or a replacing
article at 50% of the purchase price or a refund at the value of
50% of the retail value in case of a flaw occurred in the second
year after the date of purchase and delivery.
• Not covered by warranty:
- all direct or indirect damage caused after delivery to the article
(e.g. by oxidation, shocks, falls, dust, dirt, humidity...), and by
the article, as well as its contents (e.g. data loss), compensation
for loss of profits;
- frequently replaced consumable goods, parts or accessories
such as batteries, lamps, rubber parts, drive belts... (unlimited
list);
- flaws resulting from fire, water damage, lightning, accident,
natural disaster, etc. …;
- flaws caused deliberately, negligently or resulting from
improper handling, negligent maintenance, abusive use or use
contrary to the manufacturer’s instructions;
- damage caused by a commercial, professional or collective use
of the article (the warranty validity will be reduced to six (6)
months when the article is used professionally);
- damage resulting from an inappropriate packing and shipping of
the article;
- all damage caused by modification, repair or alteration
performed by a third party without written permission by
Velleman®.
• Articles to be repaired must be delivered to your Velleman®
dealer, solidly packed (preferably in the original packaging), and
be completed with the original receipt of purchase and a clear
flaw description.
• Hint: In order to save on cost and time, please reread the
manual and check if the flaw is caused by obvious causes prior to
presenting the article for repair. Note that returning a nondefective article can also involve handling costs.
• Repairs occurring after warranty expiration are subject to
shipping costs.
• The above conditions are without prejudice to all commercial
warranties.
The above enumeration is subject to modification
according to the article (see article’s manual).
Velleman® service- en kwaliteitsgarantie
Velleman® heeft ruim 35 jaar ervaring in de elektronicawereld
en verdeelt in meer dan 85 landen.
Al onze producten beantwoorden aan strikte kwaliteitseisen en
aan de wettelijke bepalingen geldig in de EU. Om de kwaliteit te
waarborgen,
ondergaan onze producten op regelmatige tijdstippen een extra
kwaliteitscontrole, zowel door onze eigen kwaliteitsafdeling als
door externe gespecialiseerde organisaties. Mocht er ondanks
deze voorzorgen toch een probleem optreden, dan kunt u steeds
een beroep doen op onze waarborg (zie waarborgvoorwaarden).
Algemene waarborgvoorwaarden consumentengoederen
(voor Europese Unie):
• Op alle consumentengoederen geldt een garantieperiode van
24 maanden op productie- en materiaalfouten en dit vanaf de
oorspronkelijke aankoopdatum.
• Indien de klacht gegrond is en een gratis reparatie of
vervanging van een artikel onmogelijk is of indien de kosten
hiervoor buiten verhouding zijn, kan Velleman® beslissen het
desbetreffende artikel te vervangen door een gelijkwaardig
artikel of de aankoopsom van het artikel gedeeltelijk of volledig
terug te betalen. In dat geval krijgt u een vervangend product of
terugbetaling ter waarde van 100% van de aankoopsom bij
ontdekking van een gebrek tot één jaar na aankoop en levering,
of een vervangend product tegen 50% van de kostprijs of
terugbetaling van 50 % bij ontdekking na één jaar tot 2 jaar.
• Valt niet onder waarborg:
- alle rechtstreekse of onrechtstreekse schade na de levering
veroorzaakt aan het toestel (bv. door oxidatie, schokken, val,
stof, vuil, vocht...), en door het toestel, alsook zijn inhoud (bv.
verlies van data), vergoeding voor eventuele winstderving.
- verbruiksgoederen, onderdelen of hulpstukken die regelmatig
dienen te worden vervangen, zoals bv. batterijen, lampen,
rubberen onderdelen, aandrijfriemen... (onbeperkte lijst).
- defecten ten gevolge van brand, waterschade, bliksem,
ongevallen, natuurrampen, enz.
- defecten veroorzaakt door opzet, nalatigheid of door een
onoordeelkundige behandeling, slecht onderhoud of abnormaal
gebruik of gebruik van het toestel strijdig met de voorschriften
van de fabrikant.
- schade ten gevolge van een commercieel, professioneel of
collectief gebruik van het apparaat (bij professioneel gebruik
wordt de garantieperiode herleid tot 6 maand).
- schade veroorzaakt door onvoldoende bescherming bij
transport van het apparaat.
- alle schade door wijzigingen, reparaties of modificaties
uitgevoerd door derden zonder toestemming van Velleman®.
• Toestellen dienen ter reparatie aangeboden te worden bij uw
Velleman®-verdeler. Het toestel dient vergezeld te zijn van het
oorspronkelijke aankoopbewijs. Zorg voor een degelijke
verpakking (bij voorkeur de originele verpakking) en voeg een
duidelijke foutomschrijving bij.
• Tip: alvorens het toestel voor reparatie aan te bieden, kijk nog
eens na of er geen voor de hand liggende reden is waarom het
toestel niet naar behoren werkt (zie handleiding). Op deze wijze
kunt u kosten en tijd besparen. Denk eraan dat er ook voor nietdefecte toestellen een kost voor controle aangerekend kan
worden.
• Bij reparaties buiten de waarborgperiode zullen transportkosten
aangerekend worden.
• Elke commerciële garantie laat deze rechten onverminderd.
Bovenstaande opsomming kan eventueel aangepast
worden naargelang de aard van het product (zie
handleiding van het betreffende product).
Garantie de service et de qualité Velleman®
Velleman® jouit d’une expérience de plus de 35 ans dans le
monde de l’électronique avec une distribution dans plus de 85
pays.
Tous nos produits répondent à des exigences de qualité
rigoureuses et à des dispositions légales en vigueur dans l’UE.
Afin de garantir la qualité, nous soumettons régulièrement nos
produits à des contrôles de qualité supplémentaires, tant par
notre propre service qualité que par un service qualité externe.
Dans le cas improbable d’un défaut malgré toutes les
précautions, il est possible d’invoquer notre garantie (voir les
conditions de garantie).
Conditions générales concernant la garantie sur les
produits grand public (pour l’UE) :
• tout produit grand public est garanti 24 mois contre tout vice
de production ou de matériaux à dater du jour d’acquisition
effective ;
• si la plainte est justifiée et que la réparation ou le
remplacement d’un article est jugé impossible, ou lorsque les
coûts s’avèrent disproportionnés, Velleman® s’autorise à
remplacer ledit article par un article équivalent ou à rembourser
la totalité ou une partie du prix d’achat. Le cas échéant, il vous
sera consenti un article de remplacement ou le remboursement
complet du prix d’achat lors d’un défaut dans un délai de 1 an
après l’achat et la livraison, ou un article de remplacement
moyennant 50% du prix d’achat ou le remboursement de 50%
du prix d’achat lors d’un défaut après 1 à 2 ans.
• sont par conséquent exclus :
- tout dommage direct ou indirect survenu à l’article après
livraison (p.ex. dommage lié à l’oxydation, choc, chute,
poussière, sable, impureté…) et provoqué par l’appareil, ainsi que
son contenu (p.ex. perte de données) et une indemnisation
éventuelle pour perte de revenus ;
- tout bien de consommation ou accessoire, ou pièce qui
nécessite un remplacement régulier comme p.ex. piles,
ampoules, pièces en caoutchouc, courroies… (liste illimitée) ;
- tout dommage qui résulte d’un incendie, de la foudre, d’un
accident, d’une catastrophe naturelle, etc. ;
- out dommage provoqué par une négligence, volontaire ou non,
une utilisation ou un entretien incorrects, ou une utilisation de
Page 49

l’appareil contraire aux prescriptions du fabricant ;
- tout dommage à cause d’une utilisation commerciale,
professionnelle ou collective de l’appareil (la période de garantie
sera réduite à 6 mois lors d’une utilisation professionnelle) ;
- tout dommage à l’appareil qui résulte d’une utilisation
incorrecte ou différente que celle pour laquelle il a été
initialement prévu comme décrit dans la notice ;
- tout dommage engendré par un retour de l’appareil emballé
dans un conditionnement non ou insuffisamment protégé.
- toute réparation ou modification effectuée par une tierce
personne sans l’autorisation explicite de SA Velleman® ; - frais
de transport de et vers Velleman® si l’appareil n’est plus couvert
sous la garantie.
• toute réparation sera fournie par l’endroit de l’achat. L’appareil
doit nécessairement être accompagné du bon d’achat d’origine et
être dûment conditionné (de préférence dans l’emballage
d’origine avec mention du défaut) ;
• tuyau : il est conseillé de consulter la notice et de contrôler
câbles, piles, etc. avant de retourner l’appareil. Un appareil
retourné jugé défectueux qui s’avère en bon état de marche
pourra faire l’objet d’une note de frais à charge du
consommateur ;
• une réparation effectuée en-dehors de la période de garantie
fera l’objet de frais de transport ;
• toute garantie commerciale ne porte pas atteinte aux conditions
susmentionnées.
La liste susmentionnée peut être sujette à une
complémentation selon le type de l’article et être
mentionnée dans la notice d’emploi.
Velleman® Service- und Qualitätsgarantie
Velleman® hat gut 35 Jahre Erfahrung in der Elektronikwelt und
vertreibt seine Produkte in über 85 Ländern.
Alle Produkte entsprechen den strengen Qualitätsforderungen
und gesetzlichen Anforderungen in der EU. Um die Qualität zu
gewährleisten werden unsere Produkte regelmäßig einer
zusätzlichen Qualitätskontrolle unterworfen, sowohl von unserer
eigenen Qualitätsabteilung als auch von externen spezialisierten
Organisationen. Sollten, trotz aller Vorsichtsmaßnahmen,
Probleme auftreten, nehmen Sie bitte die Garantie in Anspruch
(siehe Garantiebedingungen).
Allgemeine Garantiebedingungen in Bezug auf
Konsumgüter (für die Europäische Union):
• Alle Produkte haben für Material- oder Herstellungsfehler eine
Garantieperiode von 24 Monaten ab Verkaufsdatum.
• Wenn die Klage berechtigt ist und falls eine kostenlose
Reparatur oder ein Austausch des Gerätes unmöglicht ist, oder
wenn die Kosten dafür unverhältnismäßig sind, kann Velleman®
sich darüber entscheiden, dieses Produkt durch ein gleiches
Produkt zu ersetzen oder die Kaufsumme ganz oder teilweise
zurückzuzahlen. In diesem Fall erhalten Sie ein Ersatzprodukt
oder eine Rückzahlung im Werte von 100% der Kaufsumme im
Falle eines Defektes bis zu 1 Jahr nach Kauf oder Lieferung, oder
Sie bekommen ein Ersatzprodukt im Werte von 50% der
Kaufsumme oder eine Rückzahlung im Werte von 50 % im Falle
eines Defektes im zweiten Jahr.
• Von der Garantie ausgeschlossen sind:
- alle direkten oder indirekten Schäden, die nach Lieferung am
Gerät und durch das Gerät verursacht werden (z.B. Oxidation,
Stöße, Fall, Staub, Schmutz, Feuchtigkeit, ...), sowie auch der
Inhalt (z.B. Datenverlust), Entschädigung für eventuellen
Gewinnausfall.
- Verbrauchsgüter, Teile oder Zubehörteile, die regelmäßig
ausgewechselt werden, wie z.B. Batterien, Lampen, Gummiteile,
Treibriemen, usw. (unbeschränkte Liste).
- Schäden verursacht durch Brandschaden, Wasserschaden, Blitz,
Unfälle, Naturkatastrophen, usw.
- Schäden verursacht durch absichtliche, nachlässige oder
unsachgemäße Anwendung, schlechte Wartung,
zweckentfremdete Anwendung oder Nichtbeachtung von
Benutzerhinweisen in der Bedienungsanleitung.
- Schäden infolge einer kommerziellen, professionellen oder
kollektiven Anwendung des Gerätes (bei gewerblicher
Anwendung wird die Garantieperiode auf 6 Monate
zurückgeführt).
- Schäden verursacht durch eine unsachgemäße Verpackung und
unsachgemäßen Transport des Gerätes.
- alle Schäden verursacht durch unautorisierte Änderungen,
Reparaturen oder Modifikationen, die von einem Dritten ohne
Erlaubnis von Velleman® vorgenommen werden.
• Im Fall einer Reparatur, wenden Sie sich an Ihren Velleman®-
Verteiler. Legen Sie das Produkt ordnungsgemäß verpackt
(vorzugsweise die Originalverpackung) und mit dem OriginalKaufbeleg vor. Fügen Sie eine deutliche Fehlerumschreibung
hinzu.
• Hinweis: Um Kosten und Zeit zu sparen, lesen Sie die
Bedienungsanleitung nochmals und überprüfen Sie, ob es keinen
auf de Hand liegenden Grund gibt, ehe Sie das Gerät zur
Reparatur zurückschicken. Stellt sich bei der Überprüfung des
Geräts heraus, dass kein Geräteschaden vorliegt, könnte dem
Kunden eine Untersuchungspauschale berechnet.
• Für Reparaturen nach Ablauf der Garantiefrist werden
Transportkosten berechnet.
• Jede kommerzielle Garantie lässt diese Rechte unberührt.
Die oben stehende Aufzählung kann eventuell angepasst
werden gemäß der Art des Produktes (siehe
Bedienungsanleitung des Gerätes).
Garantía de servicio y calidad Velleman®
Velleman® disfruta de una experiencia de más de 35 años en el
mundo de la electrónica con una distribución en más de 85
países.
Todos nuestros productos responden a normas de calidad
rigurosas y disposiciones legales vigentes en la UE. Para
garantizar la calidad, sometimos nuestros productos
regularme nte a controles de calidad adicionales, tanto por
nuestro propio servicio de calidad como por un servicio de calidad
externo. En el caso improbable de que surgieran problemas a
pesar de todas las precauciones, es posible apelar a nuestra
garantía (véase las condiciones de garantía).
Condiciones generales referentes a la garantía sobre
productos de venta al público (para la Unión Europea):
• Todos los productos de venta al público tienen un período de
garantía de 24 meses contra errores de producción o errores en
materiales desde la adquisición original;
• Si la queja está fundada y si la reparación o la sustitución de un
artículo es imposible, o si los gastos son desproporcionados,
Velleman® autoriza reemplazar el artículo por un artículo
equivalente o reembolsar la totalidad o una parte del precio de
compra. En este caso, recibirá un artículo de recambio o el
reembolso completo del precio de compra al descubrir un defecto
hasta un año después de la compra y la entrega, o un artículo de
recambio al 50% del precio de compra o la sustitución de un
50% del precio de compra al descubrir un defecto después de 1 a
2 años.
Por consiguiente, están excluidos entre otras cosas:
- todos los daños causados directamente o indirectamente al
aparato y su contenido después de la entrega (p.ej. por
oxidación, choques, caída,...) y causados por el aparato, al igual
que el contenido (p.ej. pérdida de datos) y una indemnización
eventual para falta de ganancias;
- partes o accesorios que deban ser reemplazados regularmente,
como por ejemplo baterías, lámparas, partes de goma, ... (lista
ilimitada)
- defectos causados por un incendio, daños causados por el agua,
rayos, accidentes, catástrofes naturales, etc. ;
- defectos causados a conciencia , descuido o por malos tratos,
un mantenimiento inapropiado o un uso anormal del aparato
contrario a las instrucciones del fabricante;
- daños causados por un uso comercial, profesional o colectivo
del aparato (el período de garantía se reducirá a 6 meses con uso
profesional) ;
- daños causados por un uso incorrecto o un uso ajeno al que est
está previsto el producto inicialmente como está descrito en el
manual del usuario ;
- daños causados por una protección insuficiente al transportar el
aparato.
- daños causados por reparaciones o modificaciones efectuadas
por una tercera persona sin la autorización explicita de SA
Velleman® ;
- se calcula gastos de transporte de y a Velleman® si el aparato
ya no está cubierto por la garantía.
• Cualquier reparación se efectuará por el lugar de compra.
Devuelva el aparato con la factura de compra original y
transpórtelo en un embalaje sólido (preferentemente el embalaje
original). Incluya también una buena descripción del defecto ;
• Consejo: Lea el manual del usuario y controle los cables, las
pilas, etc. antes de devolver el aparato. Si no se encuentra un
defecto en el artículo los gastos podrían correr a cargo del
cliente;
• Los gastos de transporte correrán a carga del cliente para una
reparación efectuada fuera del periode de garantía.
• Cualquier gesto comercial no disminuye estos derechos.
La lista previamente mencionada puede ser adaptada
según el tipo de artículo (véase el manual del usuario del
artículo en cuestión)
 Loading...