

Page 1
PCUSBVC3
USB VIDEO + STEREO SOUND CAPTURE UNIT
VIDEO + STEREOGELUID CAPTURE STICK MET USB-AANSLUITING
CONVERTISSEUR VIDÉO + SON STÉRÉO SUR PORT USB
UNIDAD DE CAPTURA VÍDEO + SONIDO ESTÉREO CON CONEXIÓN USB
VIDEO + SOUND CAPTURE STICK MIT USB-ANSCHLUSS
USER MANUAL 2
GEBRUIKERSHANDLEIDING 8
NOTICE D‟EMPLOI 14
MANUAL DEL USUARIO 20
BEDIENUNGSANLEITUNG 26
Page 2

PCUSBVC3
Keep the device away from children and unauthorised users.
DO NOT disassemble or open the cover. There are no user-serviceable parts inside the device. Refer
to an authorized dealer for service and/or spare parts.
Indoor use only. Keep this device away form rain, moisture, splashing and dripping liquids.
Keep this device away from dust and extreme heat.
Protect this device from shocks and abuse. Avoid brute force when operating the device.
User manual
1. Introduction
To all residents of the European Union
Important environmental information about this product
This symbol on the device or the package indicates that disposal of the device after its lifecycle could
harm the environment. Do not dispose of the unit (or batteries) as unsorted municipal waste; it
should be taken to a specialized company for recycling. This device should be returned to your
distributor or to a local recycling service. Respect the local environmental rules.
If in doubt, contact your local waste disposal authorities.
Thank you for choosing Velleman! Please read the manual thoroughly before bringing this device into service. If
the device was damaged in transit, do not install or use it and contact your dealer.
Package contents:
USB 2.0 video adapter
USB 2.0 cable, length ± 70cm
Printed quick installation guide; full user manual on CD-ROM
DVD with drivers and Arcsoft ShowBiz 3.5
2. Safety Instructions
3. General Guidelines
Refer to the Velleman® Service and Quality Warranty on the last pages of this manual.
Familiarise yourself with the functions of the device before actually using it.
All modifications of the device are forbidden for safety reasons. Damage caused by user modifications to
the device is not covered by the warranty.
Only use the device for its intended purpose. Using the device in an unauthorised way will void the
warranty.
Damage caused by disregard of certain guidelines in this manual is not covered by the warranty and the
dealer will not accept responsibility for any ensuing defects or problems.
Do not use the device to perform illegal activities.
4. Features
easy-to-use software included: Arcsoft ShowBiz 3.5
powered by USB 2.0 port, no additional power supply needed
brightness, contrast, hue and saturation control
very small size, easy to carry
snapshot button
plug-and-play
supports writing using most popular DVD formats (DVD+/-R/RW, DVD+/-VR, DVD-Video...)
full screen for previewing video programs
transfer video files to iPod, iPod touch, Apple TV, PSP, PS3, XBOX, Mobile phone
support HD video file input
supports almost all audio and image file formats
upload video to YouTube
V. 01 – 07/05/2013 2 ©Velleman nv
Page 3
PCUSBVC3
CPU
Pentium 4 CPU or higher
Operating System
Microsoft® Windows®2000/XP/Vista/Windows 7
memory
RAM 512 MB or higher
hard disk
1Gb for software, minimum 4Gb for recording
display resolution
1024 x 768 or higher
sound card
Windows® compatible sound card (used for playback)
graphics card
DirectX 9.0C compatible
USB
USB 2.0 compliant port
IMPORTANT NOTES:
Install the drivers and software prior to making any hardware connections!
Make sure you have administrator rights on your computer system when installing drivers
and software.
Disable all antivirus software during software installation.
Refer to §5 for the minimum system requirements.
5. System requirements
6. Driver installation
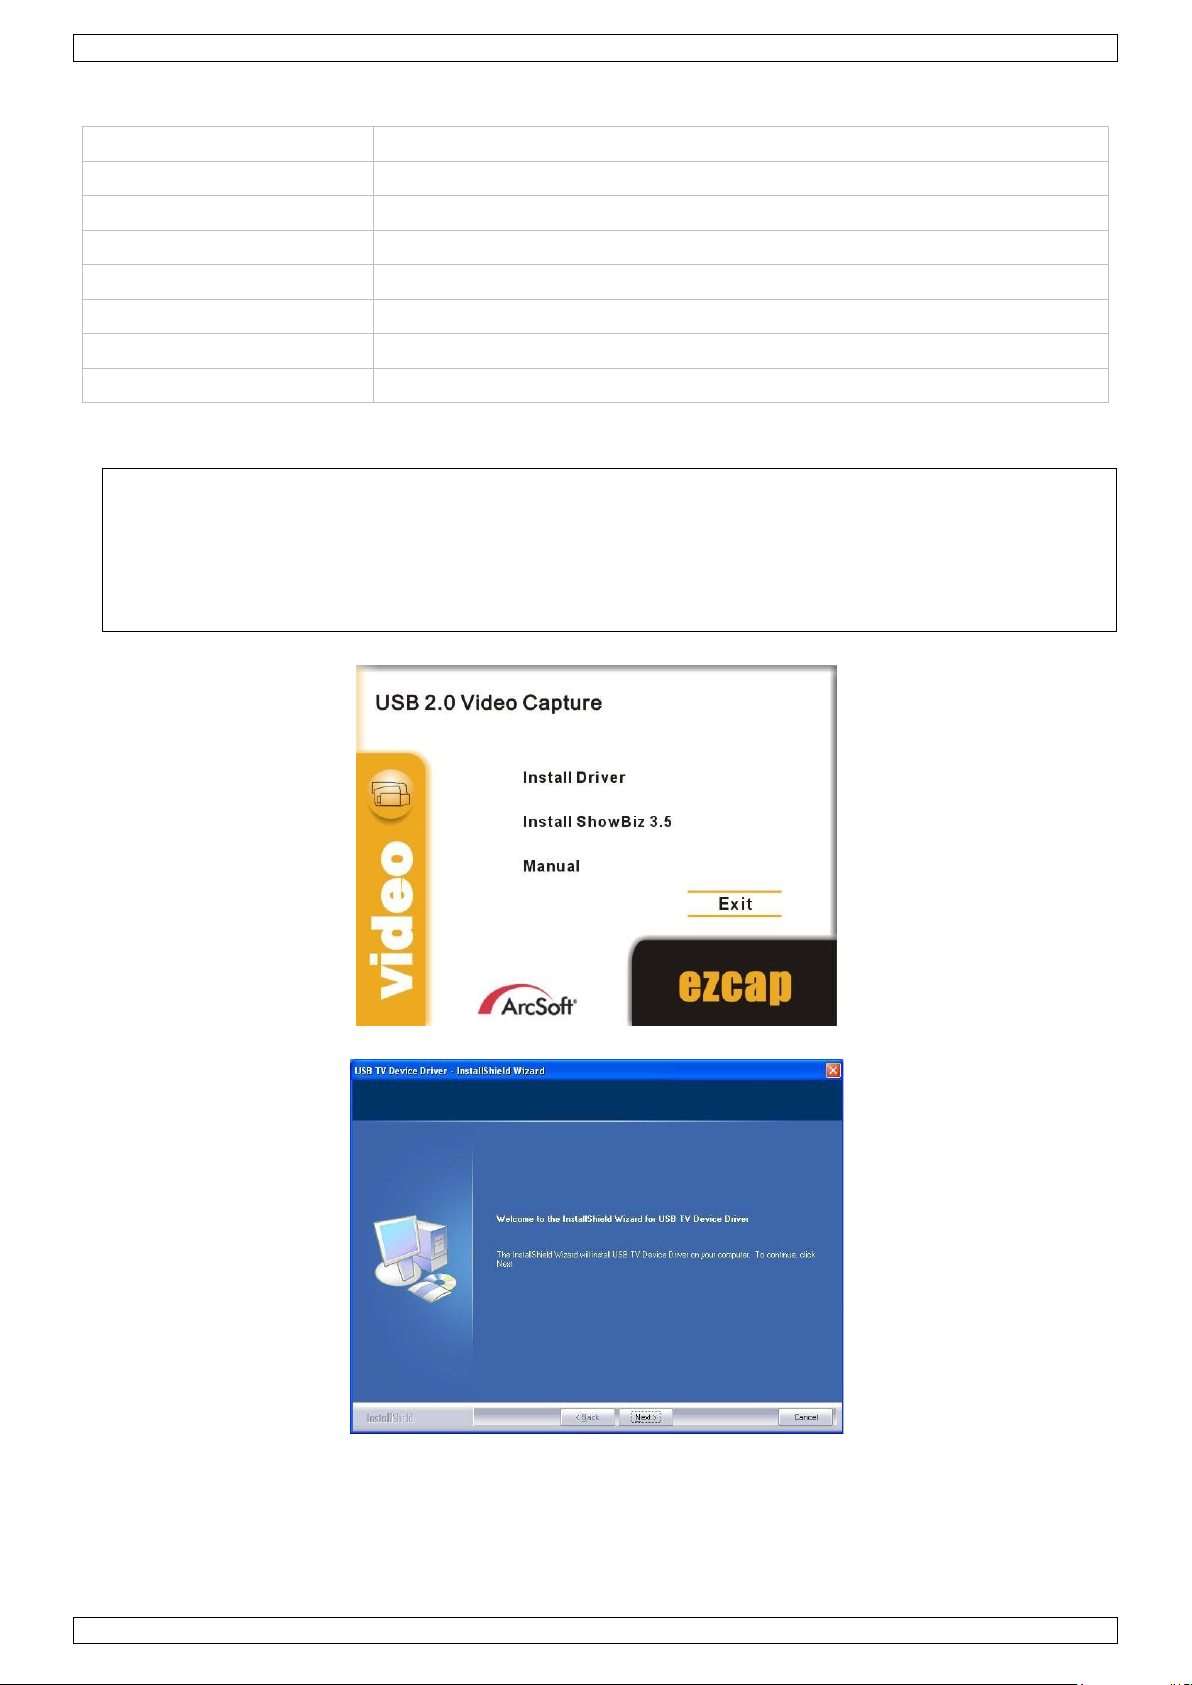
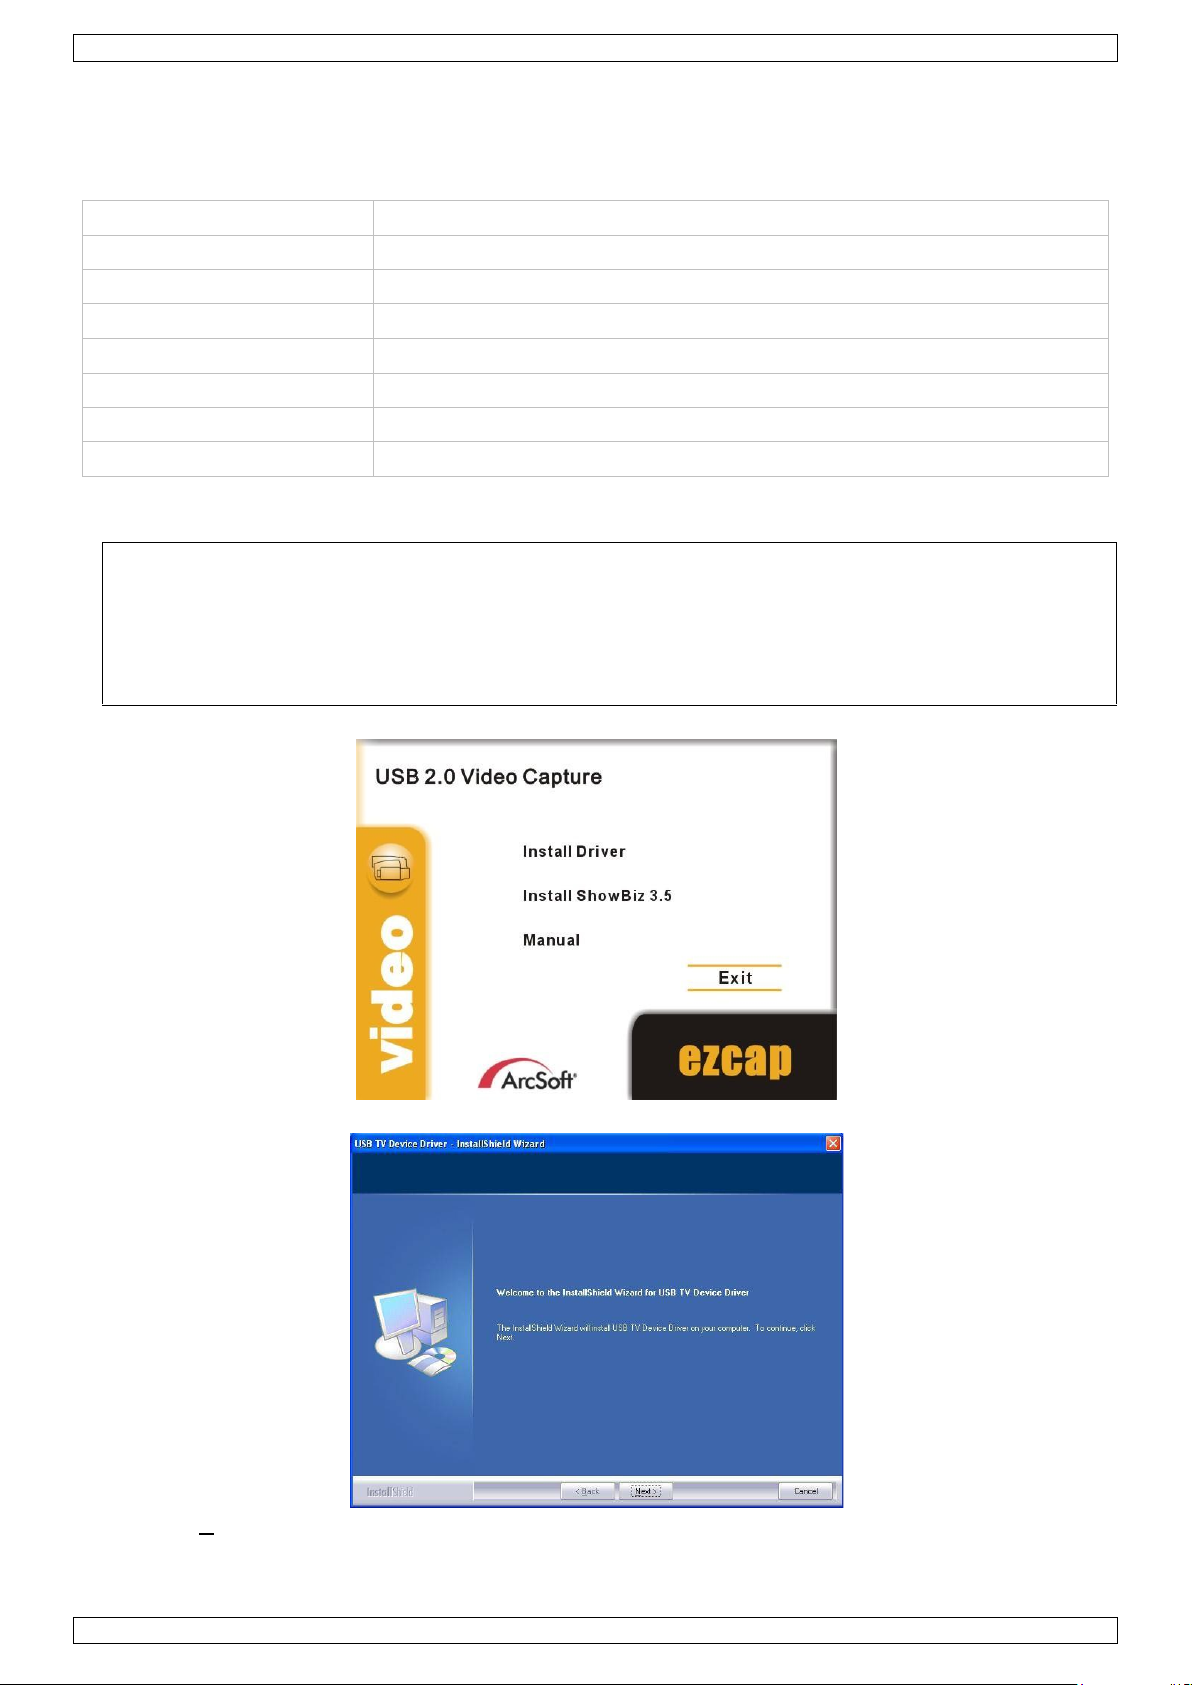
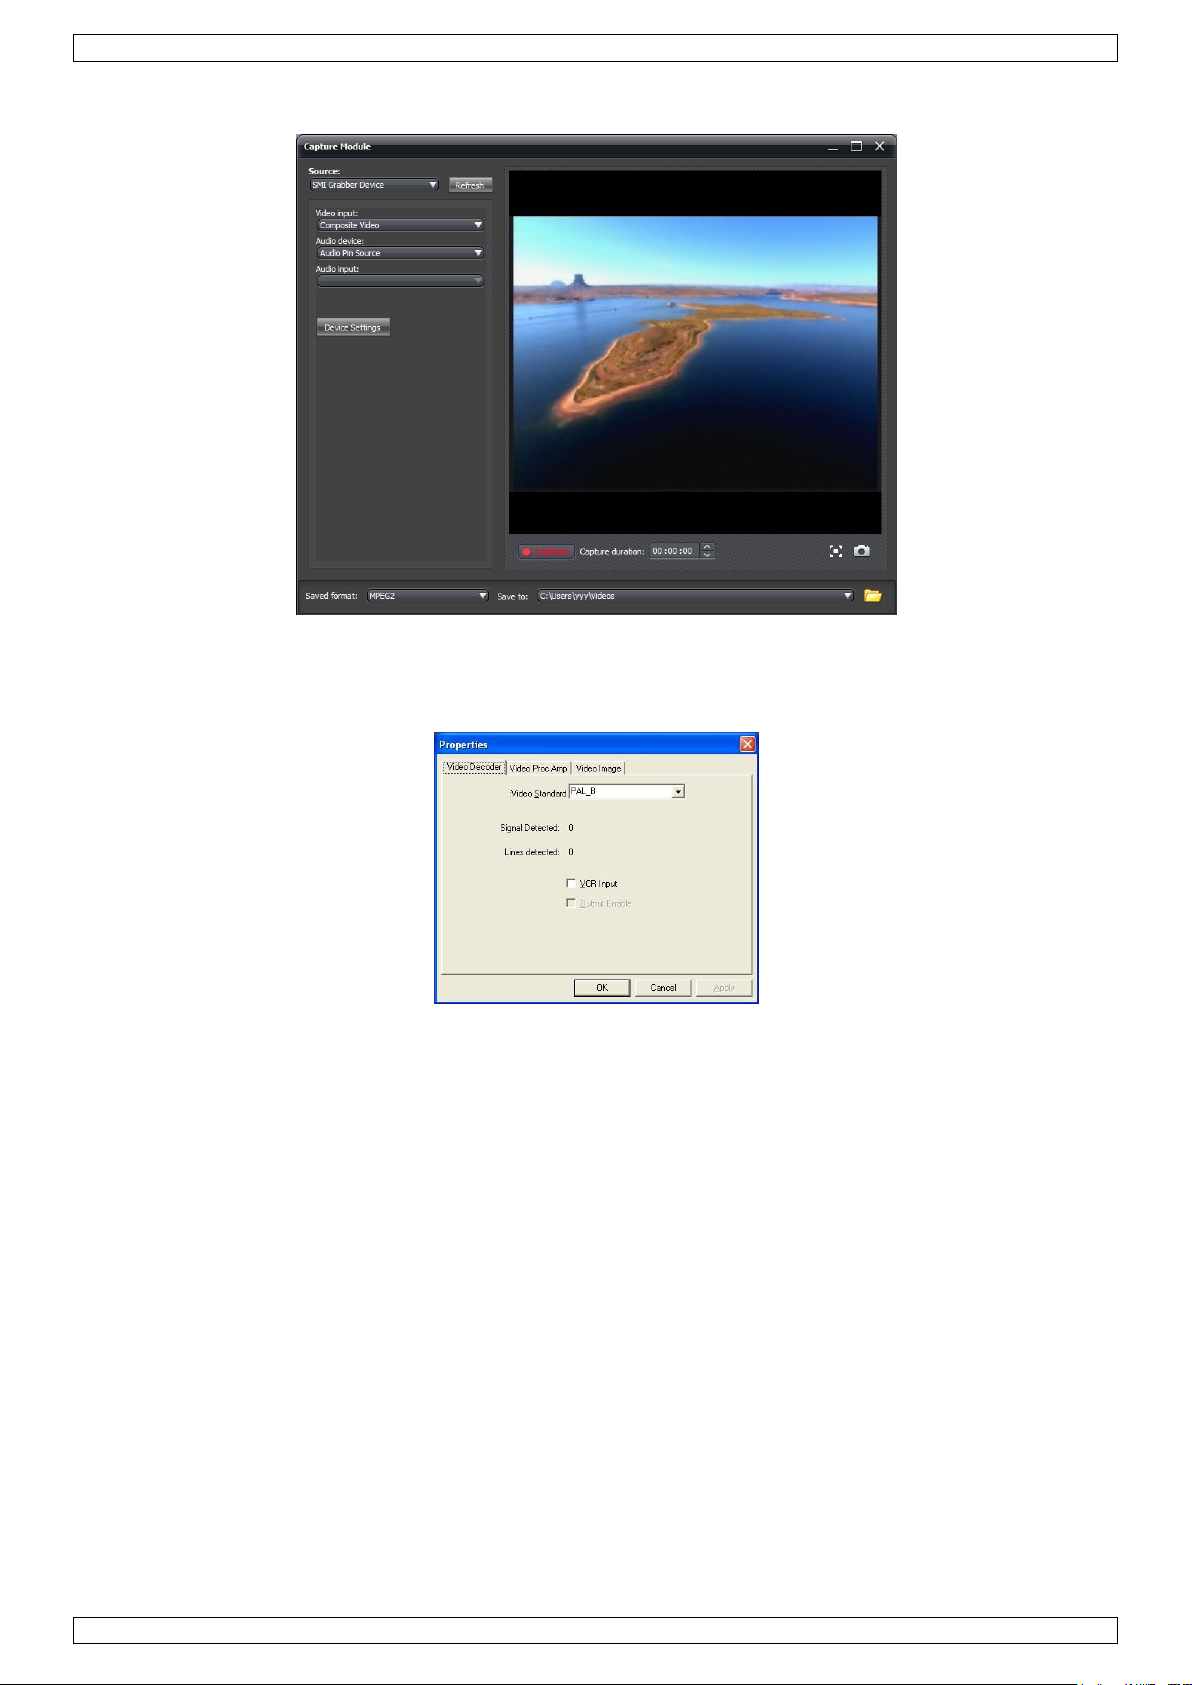
Insert the VELLEMAN© CD-ROM into your CD-ROM drive. A window will appear:
Click [Install Driver].
Click [Next >].
V. 01 – 07/05/2013 3 ©Velleman nv
Page 4
PCUSBVC3
[1] not included.
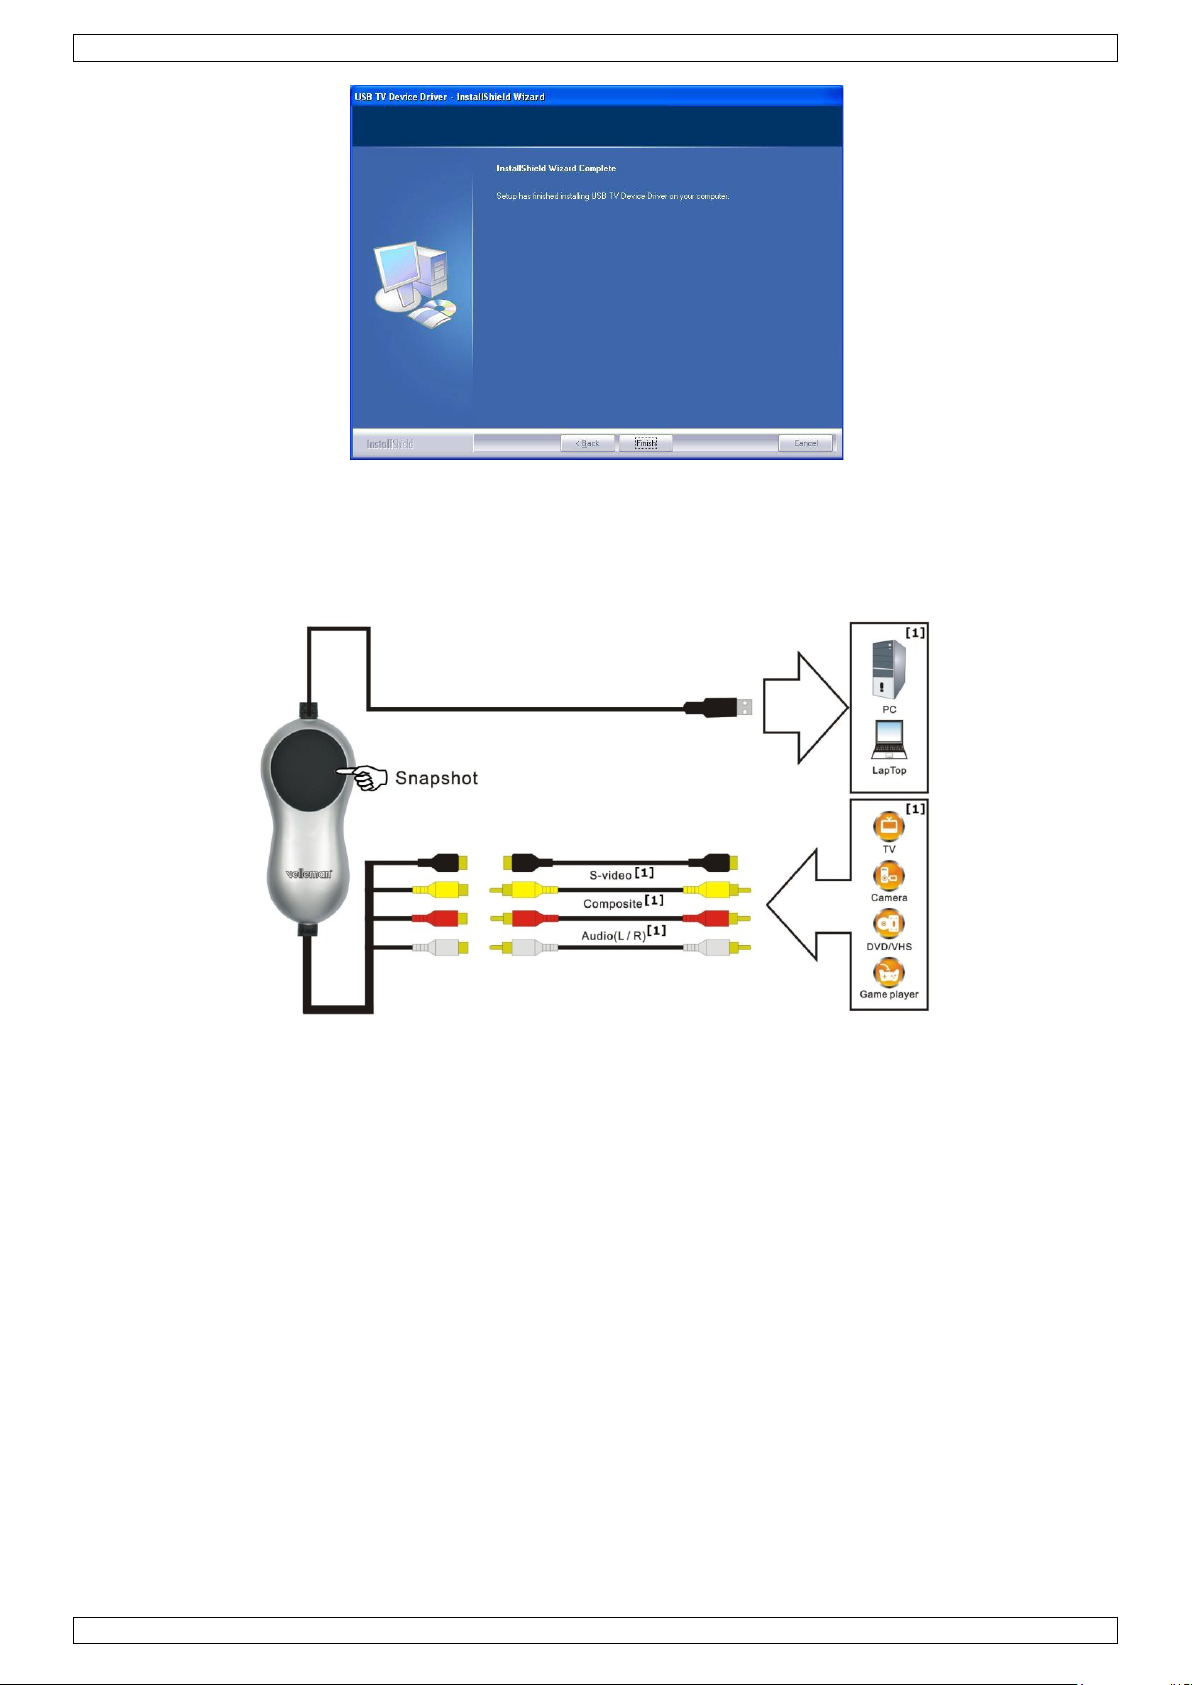
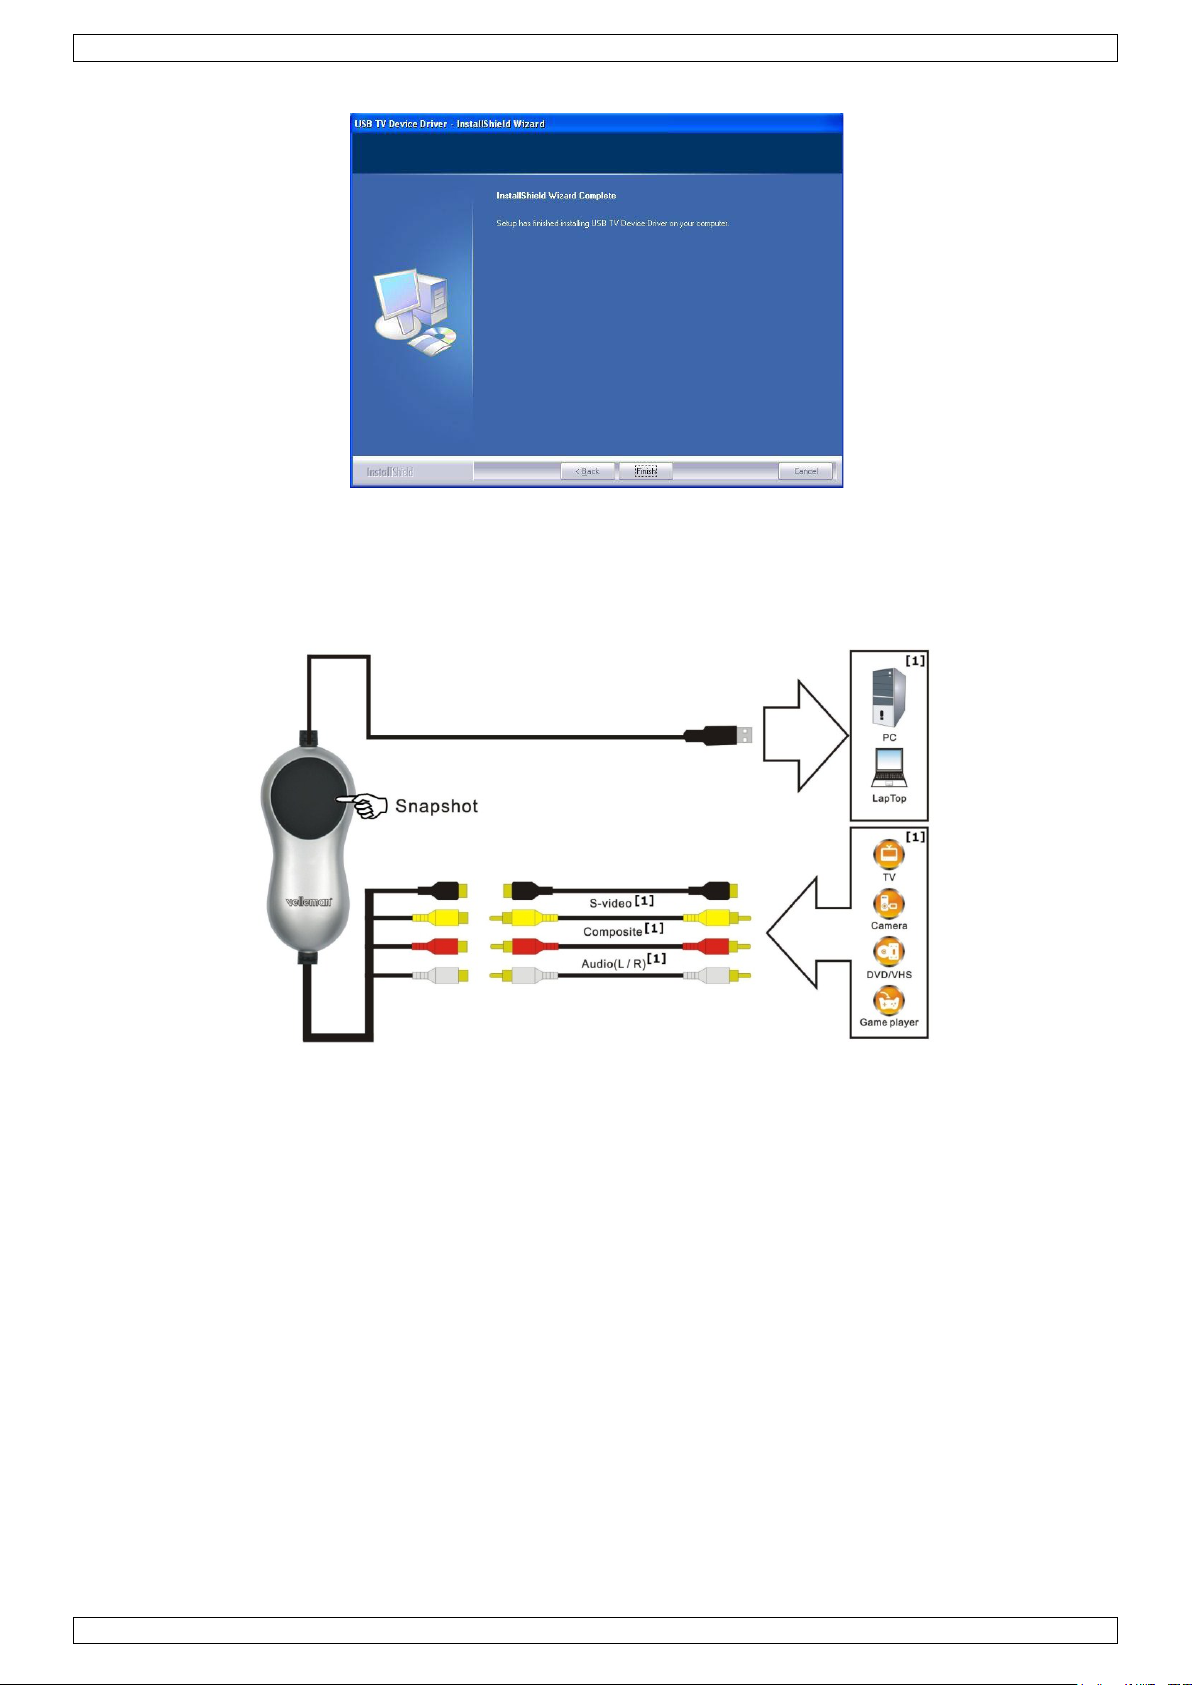
Click [Finish] to finalize driver installation.
The system will now ask to restart the computer. Select [Yes, I want to restart my computer now].
Connect the PCUSBVC3 to your video source (not incl., e.g. TV, camera, DVD...). Note that you must
connect the device to an S-video or Composite/audio output! Refer to the user manual of your video
source to locate signal output connectors.
Connect the USB-connector of the PCUSBVC3 to a free USB port on your computer. Note: for signal
integrity, it is not recommended to connect through a HUB.
The system detects the new hardware on the USB port and a message box pops up. Select [No, not this
time] and click [Next >].
Select [Install software automatically] and click [Next >]. Follow the instructions on the screen.
A window might pop up stating that the SMI GRABBER Device did not pass Windows logo testing; select
[continue anyway].
Click [Finish] to complete driver installation.
If any other components are found, please repeat the above procedure until the [Found new hardware:
Your hardware is installed and configured for use]-window appears.
Verify whether the drivers are installed correctly. Right click on [My computer] and click left to select
[Properties].
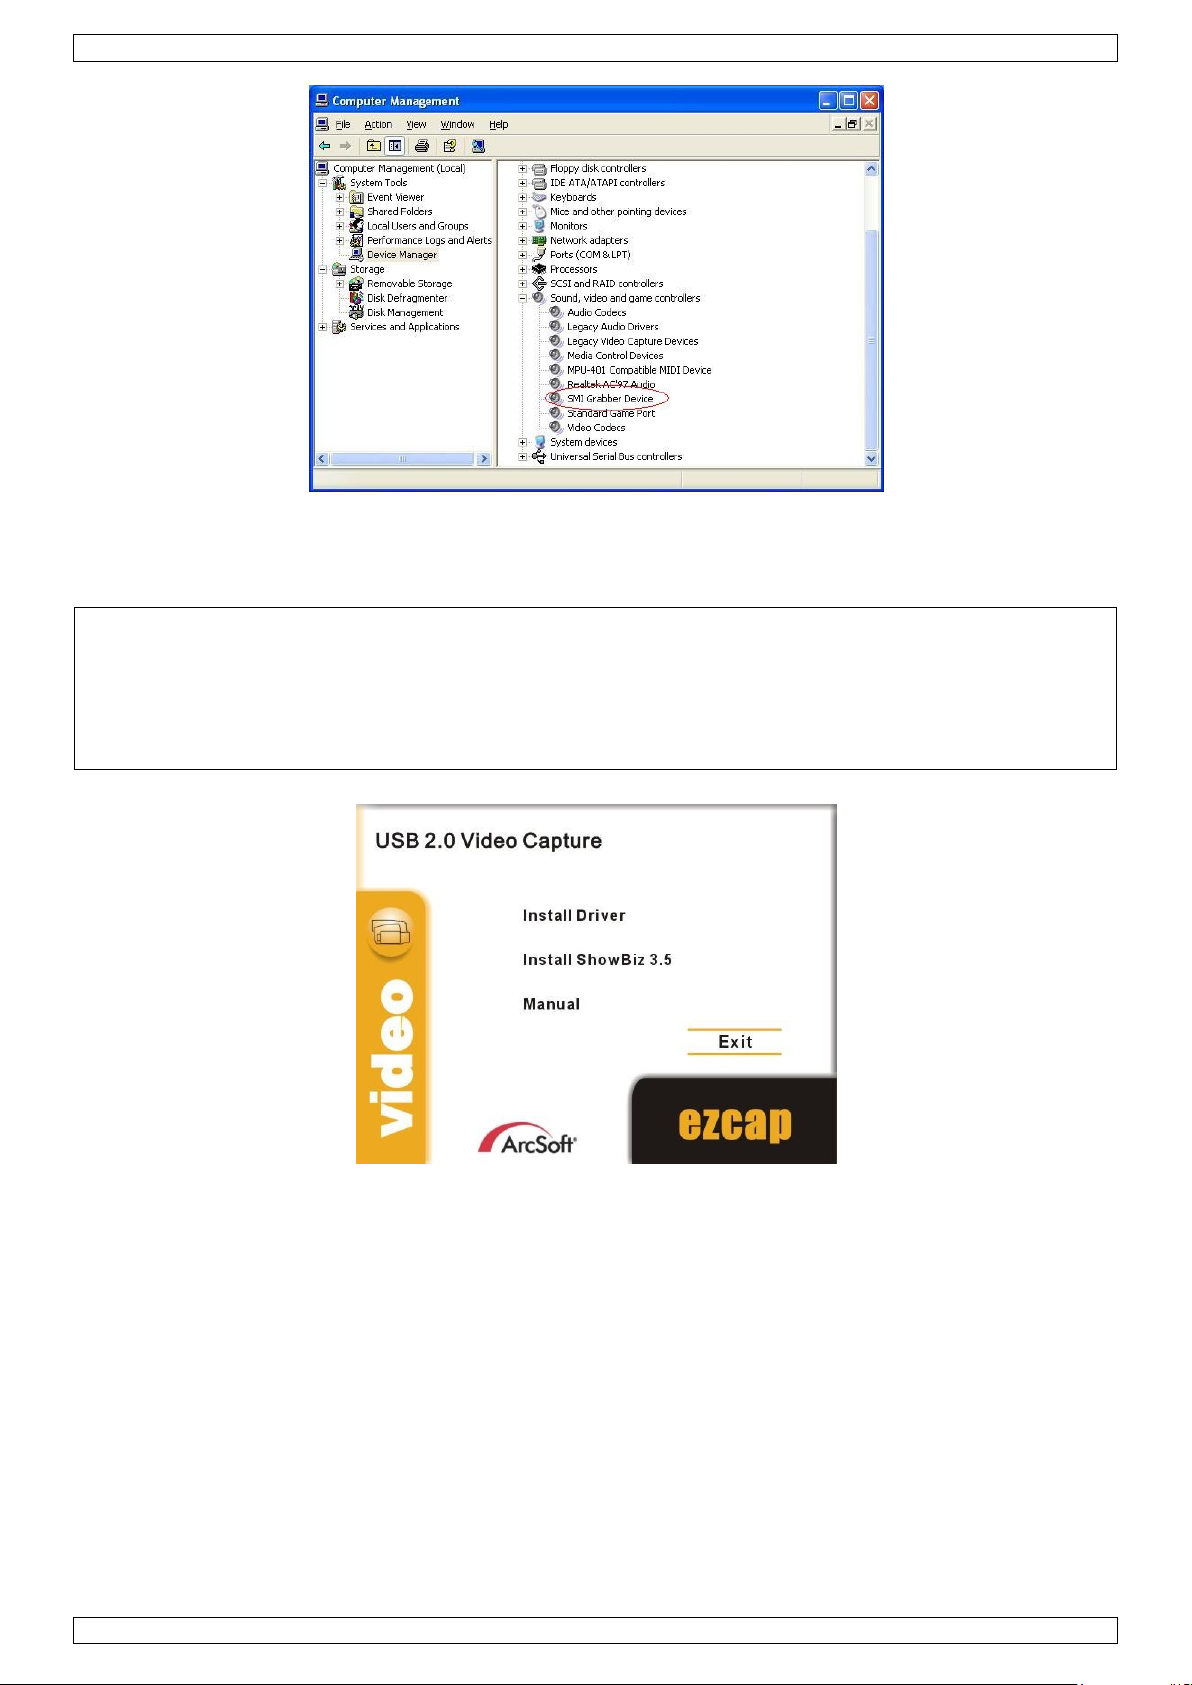
Go to the [Hardware] tab and select [Device manager].
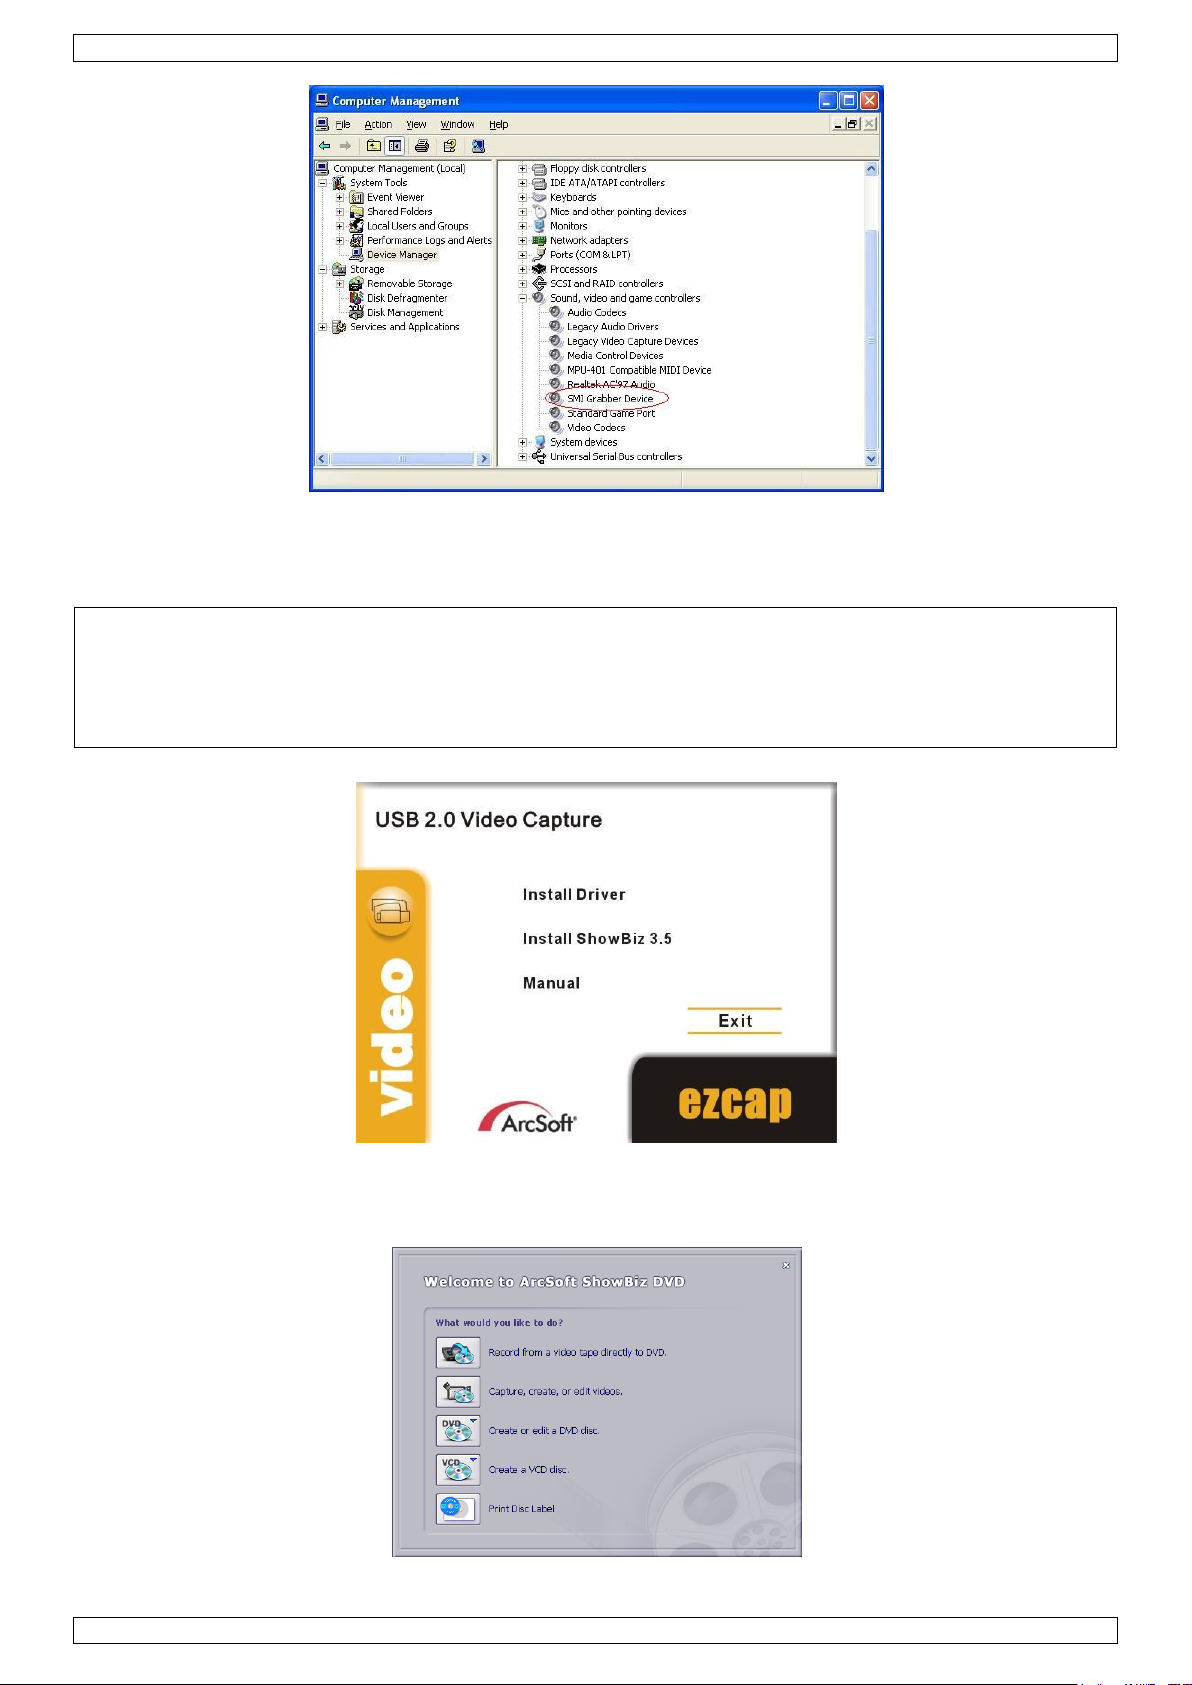
Go to the [Sound, video and game controllers].
Locate the [SMI GRABBER Device]. If no exclamation marks (yellow triangles) are shown in front of the
device names, the installation was successful. Otherwise, remove the driver, disconnect and reconnect the
PCUSBVC3 to re-install the driver.
V. 01 – 07/05/2013 4 ©Velleman nv
Page 5
PCUSBVC3
IMPORTANT NOTES:
Install the drivers and software prior to making any hardware connections!
Make sure you have administrator rights on your computer system when installing drivers and
software.
Disable all antivirus software during software installation.
Refer to §5 for the minimum system requirements.
If you want to see the version of the driver, right click on it and select [properties]. Select the [Driver]
tab.
7. Software installation and configuration
Insert the VELLEMAN© CD-ROM into your CD-ROM drive. A window will appear:
Click [Install ShowBiz 3.5] and follow the instructions on the screen. Select your preferred installation
language. The licence key is printed on the CD-ROM sleeve. Make sure to keep the keys for future
reference.
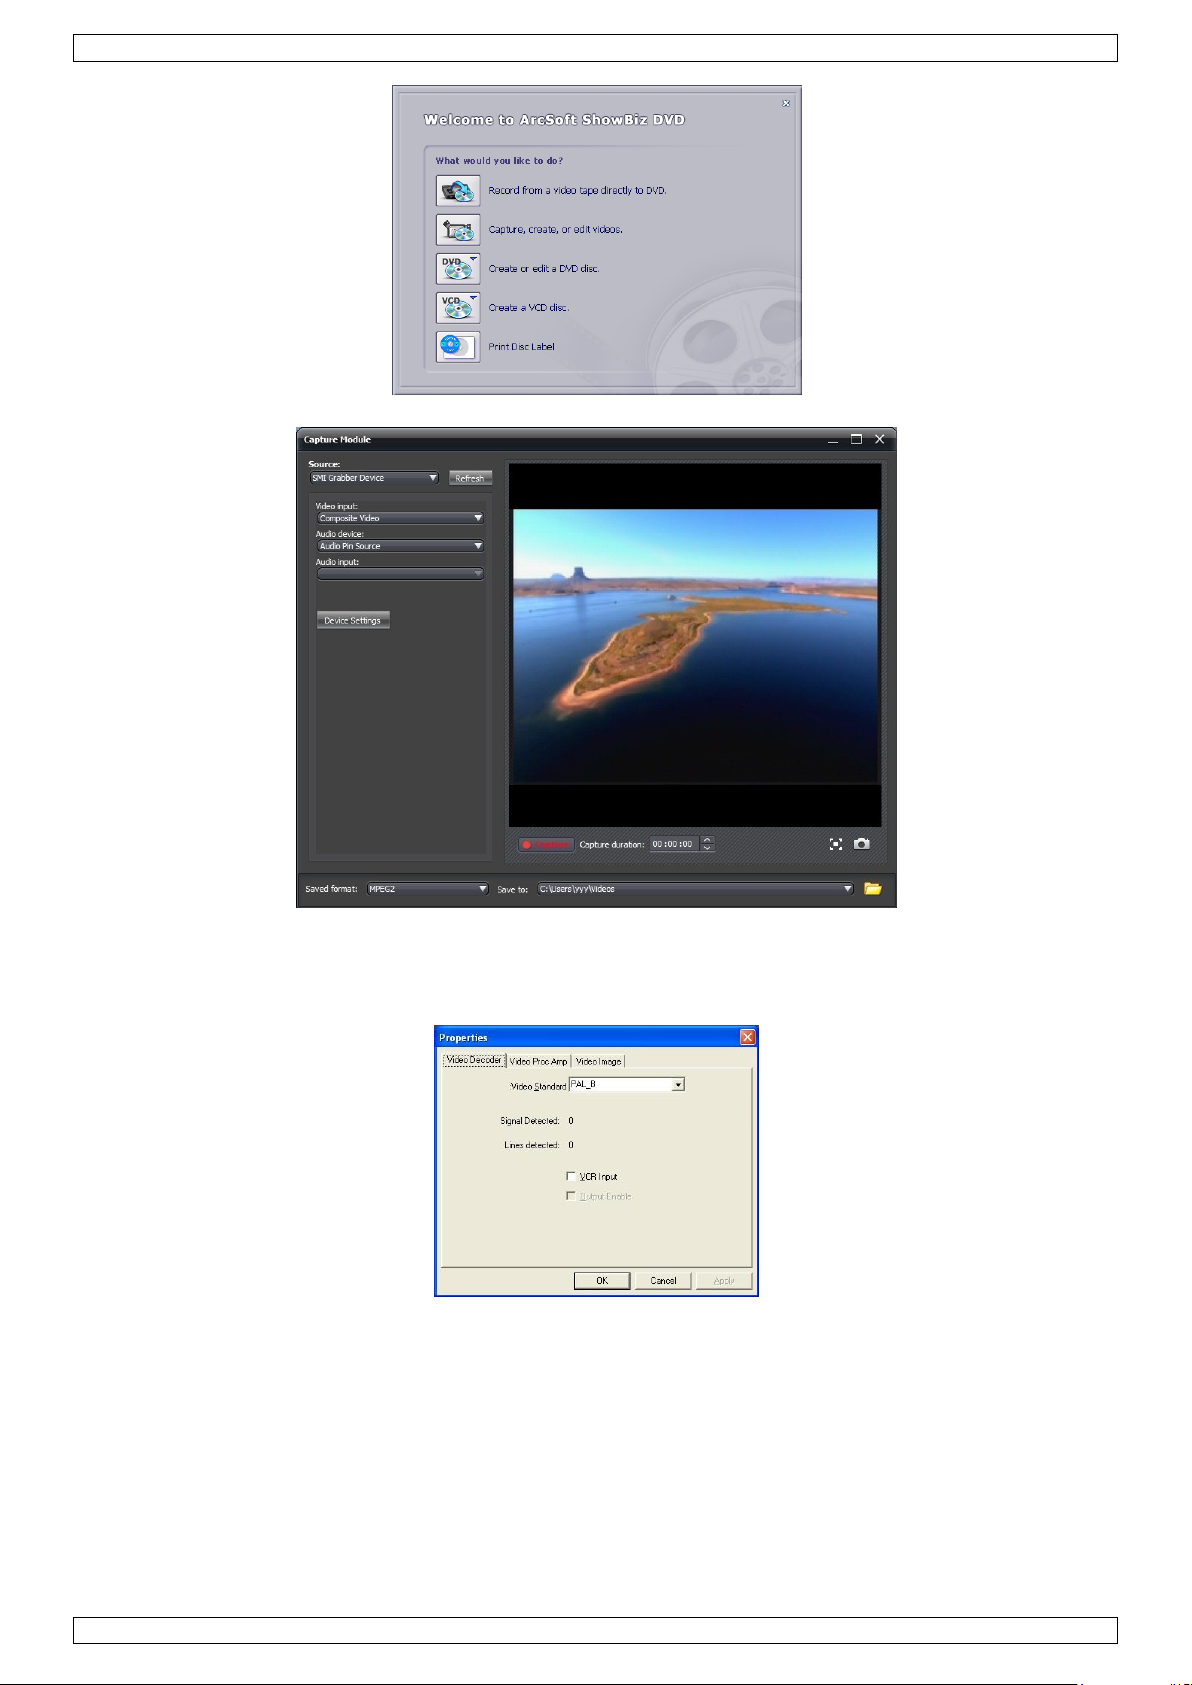
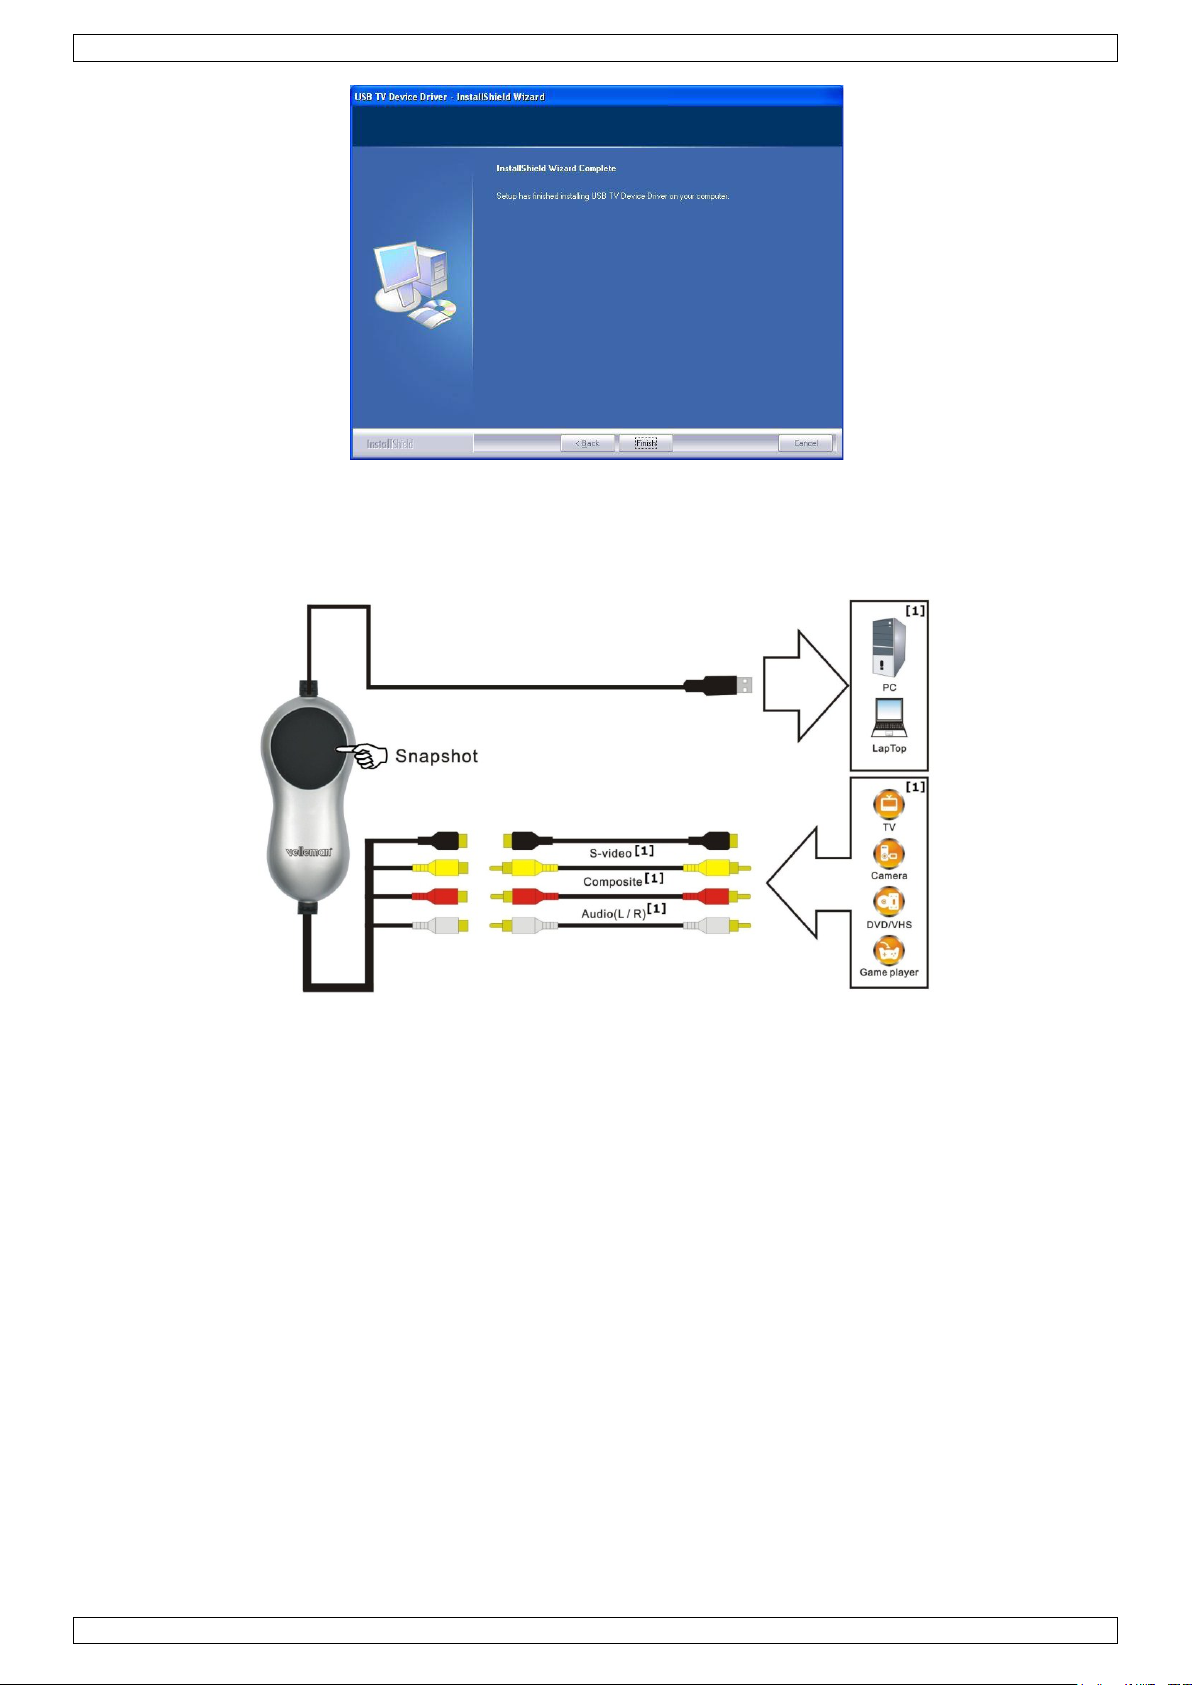
When installation is finished, start the software by double-clicking on the “Showbiz 3.5” icon on your
desktop. The following screen is shown:
V. 01 – 07/05/2013 5 ©Velleman nv
Page 6
PCUSBVC3
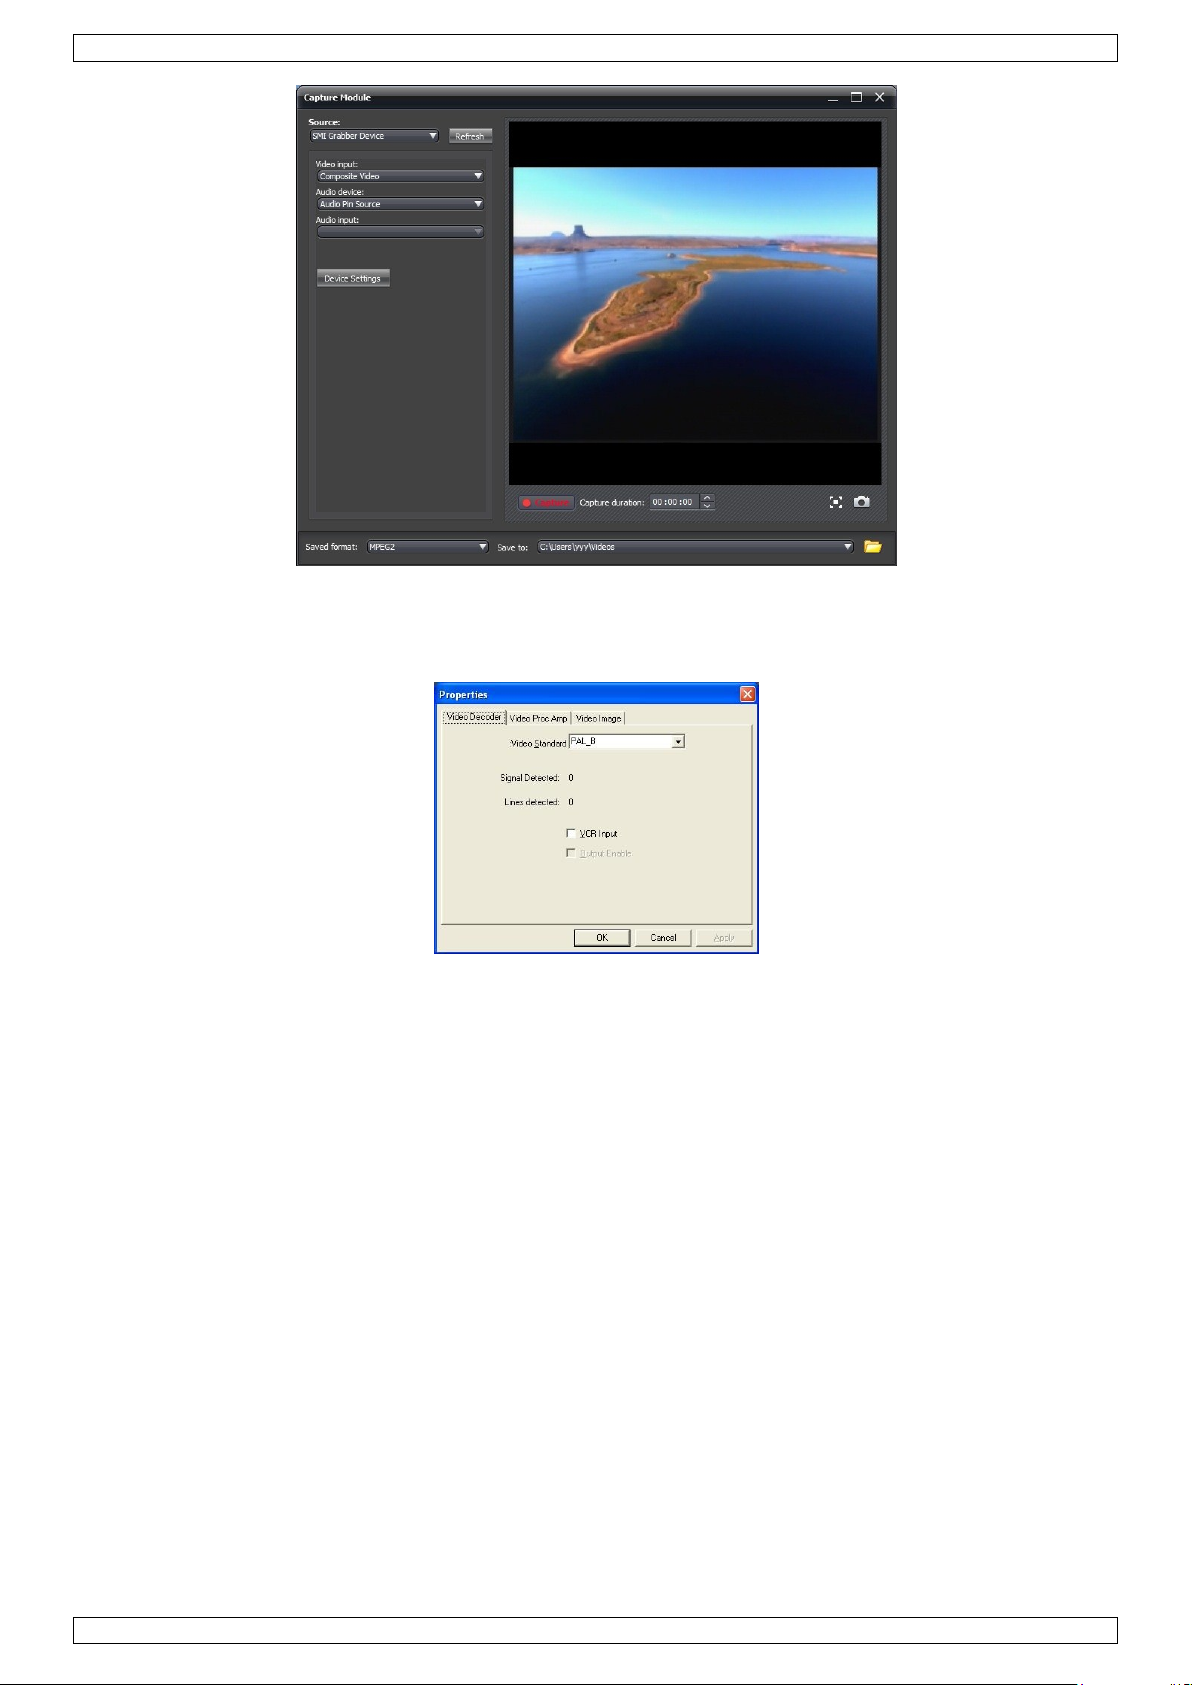
Make sure the PCUSBVC3 device is properly connected and select [Capture, create, or edit videos].
Set [Source] to SMI Grabber Device.
Set [Audio device] to USB Pin Source.
Set [Video input] to Composite or S-Video depending on the used connection.
Click on [Device setting] to set the applicable video standard (NTSC_M, PAL-B).
Explanation on how to use your software can be found on the included CD-ROM (under directory
\Document\Manual).
8. Troubleshooting
Hardware connection issues.
The PCUSBVC3 comes with and female S-video and 3 female RCA connectors. Most video sources will also
have female connectors. Male-male RCA cables or a male-male S-Video cable is not included and must be
purchased separately. Note however that these cables often are included when buying a new video source
(e.g. TV, Video...).
In case your video source only comes with a SCART output, you must purchase an adaptor with a SCART
connector on one end and three RCA connectors on the other.
V. 01 – 07/05/2013 6 ©Velleman nv
Page 7

PCUSBVC3
complies with USB 2.0
supports NTSC, PAL
video input
1 x RCA composite, 1 x S-Video
audio input
stereo RCA
resolution
NTSC
720 x 480 @ 30fps
PAL
720 x 576 @ 25fps
system requirements
USB 2.0 compliant port
operating system
Microsoft® Windows®2000/XP/Vista/Windows 7
CPU
Pentium 4 or higher
hard disk space
1Gb for software, minimum 4Gb for recording
DVD
standard DVD player or recorder
memory
512Mb minimum
display resolution
1024 x 768 or higher
sound card
Windows® compatible sound card (used for playback)
graphics card
DirectX 9.0C compatible
Device did not pass Windows logo testing
This message can safely be ignored as it will not cause problems with other software. Basically it means
that Microsoft did not test the software itself.
Duration of recording
The PCUSBVC3 is a real-time capture device. This means that e.g. it will take 3 hours to capture or
transfer a 3-hour recording.
Size of recording
Recording size depends on the chosen format and image size. To decrease overall file size, select a different
format or reduce the image size. Note that this will also decrease image quality.
E.g. in AVI format (no compression) 10 minutes of recording uses about 1GB. In MPEG format this is about
200MB; in WMV about 30MB.
Transferring audio only to PC
This is not possible with the PCUSBVC3.
9. Technical specifications
Use this device with original accessories only. Velleman nv cannot be held responsible in the event
of damage or injury resulted from (incorrect) use of this device.
For more info concerning this product and the latest version of this user manual, please visit our
website www.velleman.eu.
The information in this manual is subject to change without prior notice.
© COPYRIGHT NOTICE
The copyright to this manual is owned by Velleman nv. All worldwide rights reserved.
No part of this manual or may be copied, reproduced, translated or reduced to any electronic medium or
otherwise without the prior written consent of the copyright holder.
The included software is copyright protected by the respective owners.
V. 01 – 07/05/2013 7 ©Velleman nv
Page 8

PCUSBVC3
Houd buiten het bereik van kinderen en onbevoegden.
Er zijn geen door de gebruiker vervangbare onderdelen in dit toestel. Voor onderhoud of
reserveonderdelen, contacteer uw dealer.
Gebruik het toestel enkel binnenshuis. Bescherm tegen regen, vochtigheid en opspattende
vloeistoffen.
Bescherm tegen stof en extreme hitte.
Bescherm tegen schokken en vermijd brute kracht tijdens de bediening.
Gebruikershandleiding
1. Inleiding
Aan alle ingezetenen van de Europese Unie
Belangrijke milieu-informatie betreffende dit product
Dit symbool op het toestel of de verpakking geeft aan dat, als het na zijn levenscyclus wordt
weggeworpen, dit toestel schade kan toebrengen aan het milieu. Gooi dit toestel (en eventuele
batterijen) niet bij het gewone huishoudelijke afval; het moet bij een gespecialiseerd bedrijf
terechtkomen voor recyclage. U moet dit toestel naar uw verdeler of naar een lokaal recyclagepunt
brengen. Respecteer de plaatselijke milieuwetgeving.
Hebt u vragen, contacteer dan de plaatselijke autoriteiten betreffende de verwijdering.
Dank u voor uw aankoop! Lees deze handleiding grondig voor u het toestel in gebruik neemt. Werd het toestel
beschadigd tijdens het transport, installeer het dan niet en raadpleeg uw dealer.
Inhoud:
USB 2.0-videoadapter
USB 2.0-kabel, lengte ± 70 cm
gebruikershandleiding
dvd met drivers, Arcsoft ShowBiz 3.5
2. Veiligheidsinstructies
3. Algemene richtlijnen
Raadpleeg de Velleman® service- en kwaliteitsgarantie achteraan deze handleiding.
Leer eerst de functies van het toestel kennen voor u het gaat gebruiken.
Om veiligheidsredenen mag u geen wijzigingen aanbrengen. Schade door wijzigingen die de gebruiker heeft
aangebracht valt niet onder de garantie.
Gebruik het toestel enkel waarvoor het gemaakt is. Bij onoordeelkundig gebruik vervalt de garantie.
De garantie geldt niet voor schade door het negeren van bepaalde richtlijnen in deze handleiding en uw
dealer zal de verantwoordelijkheid afwijzen voor defecten of problemen die hier rechtstreeks verband mee
houden.
Gebruik dit toestel niet voor illegale opnames.
4. Eigenschappen
gebruikersvriendelijke software: Arcsoft ShowBiz 3.5
voeding via USB 2.0-poort, geen extra voeding vereist
regelbare helderheid, contrast, kleurschakering en intensiteit
zeer klein, overal meeneembaar
snapshotknop
plug-and-play
ondersteunt schrijffunctie (DVD+/-R/RW, DVD+/-VR, DVD-Video...)
scherm met voorvertoning van videoprogramma's
overdracht videobestanden naar iPod, iPod touch, Apple TV, PSP, PS3, XBOX, GSM
ondersteunt input HD video bestand
V. 01 – 07/05/2013 8 ©Velleman nv
Page 9
PCUSBVC3
CPU
Pentium 4 of hoger
besturingssysteem
Microsoft® Windows® 2000/XP/Vista/Windows 7
geheugen
512 MB RAM of hoger
harddisk
1 GB voor software, minimaal 4 GB voor opnames
resolutie display
1024 x 768 of hoger
geluidskaart
Windows®-compatibele geluidskaart (enkel voor weergave)
grafische kaart
DirectX 9.0C-compatibel
USB
USB 2.0 poort
BELANGRIJKE OPMERKINGEN
Installeer de drivers en de software voor u de hardware gaat aansluiten!
Zorg bij het installeren van drivers en software dat u administratieve rechten hebt op de te
gebruiken computer.
Schakel alle antivirussoftware uit voor de software gaat installeren.
Raadpleeg §5 voor de minimale systeemvereisten.
ondersteunt praktisch alle verscheidene audio- en beeldformaten
opladen video naar YouTube
5. Systeemvereisten
6. De driver installeren
Plaats de VELLEMAN© cd-rom in de cd-romdrive. Het volgende venster verschijnt:
Klik op [Install driver].
Klik op [Next >].
V. 01 – 07/05/2013 9 ©Velleman nv
Page 10

PCUSBVC3
[1] niet meegeleverd
Klik op [Finish] om de installatie te voltooien.
Herstart uw computer door op [Yes, I want to restart my computer now] te klikken.
Sluit de PCUSBVC3 aan op de S-video- of composiet-/audio-uitgang van de videobron (bv. tv-toestel,
camera, dvd-speler). Raadpleeg bij twijfel de handleiding van de videobron.
Steek de USB-stekker van de PCUSBVC3 in een vrije USB-poort van uw computer. Om signaalverlies te
vermijden, is het niet aan te raden de PCUSBVC3 via een hub aan te sluiten.
Uw computer vindt nieuwe hardware op de USB-poort. Selecteer [No, not this time] en klik vervolgens op
[Next >].
Selecteer [Install software automatically] en klik op [Next >]. Volg de instructies op het scherm.
Klik op [continue anyway] wanneer een venster verschijnt met het bericht dat SMI GRABBER Device de
Windows Logo-test niet heeft doorstaan.
Selecteer [Finish] om de installatie van de driver te voltooien.
Herhaal de bovenstaande procedure indien de computer verdere hardware vindt tot het venster [Found
new hardware: Your hardware is installed and configured for use] verschijnt.
Ga na of alle drivers correct werden geïnstalleerd. Klik met de rechtermuisknop op [My computer] en klik
vervolgens op [Properties].
Ga naar [Hardware] en selecteer [Device manager].
Ga naar [Sound, video and game controllers].
Controleer of er voor [SMI GRABBER Device] een gele driehoek met uitroepteken staat. Indien niet, dan
werd de driver correct geïnstalleerd. Indien wel, verwijder de driver, ontkoppel de PCUSBVC3 van de
computer en installeer de driver opnieuw.
V. 01 – 07/05/2013 10 ©Velleman nv
Page 11

PCUSBVC3
BELANGRIJKE OPMERKINGEN
Installeer de drivers en de software voor u de hardware gaat aansluiten!
Zorg bij het installeren van drivers en software dat u administratieve rechten hebt op de te
gebruiken computer.
Schakel alle antivirussoftware uit voor de software gaat installeren.
Raadpleeg §5 voor de minimale systeemvereisten.
Klik met de rechtermuisknop op [properties] en selecteer [Driver] om de driverversie te controleren.
7. De software installeren en configureren
Plaats de VELLEMAN© cd-rom in de cd-romdrive. Het volgende venster verschijnt:
Klik op [Install ShowBiz 3.5] en volg de instructies op het scherm. Selecteer de gewenste taal. Het
licentienummer staat vermeld op de hoes van de cd-rom. Bewaar deze nummers op een veilige plaats.
Start de software na de voltooiing van de installatie door te dubbelklikken op „Showbiz 3.5‟ op het
bureaublad. Het volgende venster verschijnt:
Sluit de PCUSBVC3 correct aan op de computer en selecteer [Capture, create, or edit videos].
V. 01 – 07/05/2013 11 ©Velleman nv
Page 12
PCUSBVC3
Stel [Source] in op SMI Grabber Device.
Stel [Audio device] in op USB Pin Source.
Stel [Video input] in op Composite of S-Video naargelang de gebruikte verbinding.
Klik vervolgens op [Device setting] om de videostandaard te selecteren (NTSC_M, PAL-B).
Raadpleeg de meegeleverde cd-rom (onder \Document\Manual) voor meer uitleg over het gebruik van
de software.
8. Problemen en oplossingen
Probleem bij het aansluiten van de hardware
De PCUSBVC3 is uitgerust met een vrouwelijke S-video-stekker en drie vrouwelijke RCA-stekkers. De
meeste videoapparaten zijn ook uitgerust met vrouwelijke stekkers. Mannelijke naar mannelijke
adapterstekkers zijn niet meegeleverd maar afzonderlijk verkrijgbaar. Nieuwe apparatuur wordt ook
geleverd met dergelijke adapterstekkers (bv. tv-toestel, videorecorder).
Voor een apparaat dat enkel uitgerust is met een scartaansluiting heeft u een adapter nodig met een
scartstekker en 3 x RCA-stekkers.
De hardware heeft de Windows Logo-test niet doorstaan
U mag dit bericht gerust negeren. Dit bericht geeft enkel aan dat Microsoft® de software niet zelf heeft
getest.
Opnameduur
De PCUSBVC3 is een real-time opnameapparaat. Het kopiëren van een opname van 3 uur zal dus 3 uur in
beslag nemen.
Grootte van het opnamebestand
De grootte van het bestand hangt af van het geselecteerde formaat en de beeldgrootte. U kunt de grootte
van het bestand beperken door een ander formaat te kiezen of de beeldgrootte te verkleinen. Merk op dat
dit de kwaliteit van het beeld zal beïnvloeden.
Voorbeeld: Een opname van 10 minuten in AVI-formaat (geen compressie) neemt 1 GB in beslag, dezelfde
opname in MPEG-formaat neemt ongeveer 200 MB in beslag, in WMV-formaat ongeveer 30 MB.
Kopiëren van audio naar uw pc
U kunt met de PCUSBVC3 geen afzonderlijke audiosignalen kopiëren.
V. 01 – 07/05/2013 12 ©Velleman nv
Page 13

PCUSBVC3
ondersteunt USB 2.0
ondersteunt NTSC, PAL
video-ingang
1 x RCA composiet, 1 x S-Video
audio-ingang
stereo RCA
resolutie
NTSC
720 x 480 @ 30 fps
PAL
720 x 576 @ 25 fps
systeemvereisten
USB 2.0-poort
besturingssysteem
Microsoft® Windows® 2000/XP/Vista/Windows 7
CPU
Pentium 4 of hoger
vrije hardeschijfruimte
1 GB voor software, minimaal 4 GB voor opname
dvd
standaard dvd-speler of -recorder
geheugen
minimaal 512 MB
schermresolutie
1024 x 768 of hoger
geluidskaart
Windows®-compatibele geluidskaart (enkel voor weergave)
grafische kaart
compatibel DirectX 9.0C
9. Technische specificaties
Gebruik dit toestel enkel met originele accessoires. Velleman nv is niet aansprakelijk voor schade of
kwetsuren bij (verkeerd) gebruik van dit toestel.
Voor meer informatie omtrent dit product en de meest recente versie van deze handleiding, zie
www.velleman.eu.
De informatie in deze handleiding kan te allen tijde worden gewijzigd zonder voorafgaande
kennisgeving.
© AUTEURSRECHT
Velleman nv heeft het auteursrecht voor deze handleiding. Alle wereldwijde rechten voorbehouden. Het
is niet toegestaan om deze handleiding of gedeelten ervan over te nemen, te kopiëren, te vertalen, te
bewerken en op te slaan op een elektronisch medium zonder voorafgaande schriftelijke toestemming van de
rechthebbende.
De meegeleverde software is auteursrechterlijk beschermd door de respectievelijke eigenaars.
V. 01 – 07/05/2013 13 ©Velleman nv
Page 14

PCUSBVC3
Garder hors de la portée des enfants et des personnes non autorisées.
Il n‟y a aucune pièce maintenable par l‟utilisateur. Commander des pièces de rechange éventuelles
chez votre revendeur.
Utiliser cet appareil uniquement à l'intérieur. Protéger de la pluie, de l‟humidité et des
projections d‟eau.
Protéger contre la poussière. Protéger contre la chaleur extrême.
Protéger contre les chocs et le traiter avec circonspection pendant l‟opération.
Notice d’emploi
1. Introduction
Aux résidents de l'Union européenne
Des informations environnementales importantes concernant ce produit
Ce symbole sur l'appareil ou l'emballage indique que l‟élimination d‟un appareil en fin de vie peut
polluer l'environnement. Ne pas jeter un appareil électrique ou électronique (et des piles éventuelles)
parmi les déchets municipaux non sujets au tri sélectif ; une déchèterie traitera l‟appareil en question.
Renvoyer les équipements usagés à votre fournisseur ou à un service de recyclage local. Il convient
de respecter la réglementation locale relative à la protection de l‟environnement.
En cas de questions, contacter les autorités locales pour élimination.
Nous vous remercions de votre achat ! Lire la présente notice attentivement avant la mise en service de
l‟appareil. Si l‟appareil a été endommagé pendant le transport, ne pas l‟installer et consulter votre revendeur.
Contenu:
adaptateur vidéo USB 2.0
câble USB 2.0, longueur ± 70 cm
notice d'emploi
DVD avec pilotes, Arcsoft ShowBiz 3.5
2. Consignes de sécurité
3. Directives générales
Se référer à la garantie de service et de qualité Velleman® à la fin de cette notice.
Se familiariser avec le fonctionnement avant l‟emploi.
Toute modification est interdite pour des raisons de sécurité. Les dommages occasionnés par des
modifications par le client ne tombent pas sous la garantie.
N‟utiliser qu‟à sa fonction prévue. Un usage impropre annule d'office la garantie.
La garantie ne s‟applique pas aux dommages survenus en négligeant certaines directives de cette notice et
votre revendeur déclinera toute responsabilité pour les problèmes et les défauts qui en résultent.
Ne pas utiliser ce convertisseur pour des enregistrements illégaux.
4. Caractéristiques
livré avec logiciel convivial : Arcsoft ShowBiz 3.5
alimenté par port 2.0, ne nécessite aucune alimentation supplémentaire
clarté, contraste, nuance et intensité réglables
dimensions très réduites, haute portabilité
bouton de capture d‟écran
plug-and-play
fonction d'écriture (DVD+/-R/RW, DVD+/-VR, DVD-Video...)
écran pour programmes vidéo préparatoires
transfert des enregistrements vidéo vers iPod, iPod touch, Apple TV, PSP, PS3, XBOX, GSM
supporte l'entrée des enregistrements HD vidéo
supporte quasiment toute lecture de plusieurs formats audio et image
téléchargement vidéo sur YouTube
V. 01 – 07/05/2013 14 ©Velleman nv
Page 15

PCUSBVC3
microprocesseur
Pentium 4 ou plus
système d‟exploitation
Microsoft® Windows® 2000/XP/Vista/Windows 7
mémoire
512 Mo RAM ou plus
disque dur
1 Go pour le logiciel, minimum 4 Go pour l‟enregistrement
résolution de l‟écran
1024 x 768 ou plus
carte son
carte son compatible Windows® (pour lecture uniquement)
carte graphique
carte graphique compatible DirectX 9.0C
USB
port compatible USB 2.0
REMARQUE IMPORTANTE :
Installer les pilotes et le logiciel avant d’effectuer les connexions du périphérique !
Veiller à obtenir des droits d’administrateur sur l’ordinateur d’installation.
Désactiver tout antivirus pendant l’installation du logiciel.
Lire les informations concernant le système requis sous le chapitre §5.
5. Système requis
6. Installation des pilotes
Insérer le cédérom VELLEMAN© dans le lecteur cédérom de l‟ordinateur. La fenêtre suivante apparaît :
Cliquer sur [Install driver].
Cliquer sur [Next >].
V. 01 – 07/05/2013 15 ©Velleman nv
Page 16

PCUSBVC3
[1] non inclus
Cliquer sur [Finish] pour compléter l‟installation.
Redémarrer votre ordinateur en sélectionnant [Yes, I want to restart my computer now].
Connecter le PCUSBVC3 à la source vidéo (p.ex. téléviseur, caméscope, lecteur DVD...). Toujours
connecter le convertisseur à la sortie S-vidéo ou composite/audio ! Consulter la notice de l‟appareil audio en
question en cas de doute.
Insérer la fiche USB du PCUSBVC3 dans un port USB libre de votre ordinateur. Il n‟est cependant pas
conseillé de connecter le convertisseur à un hub.
Le système trouve automatiquement le nouveau périphérique connecté au port USB. Un message apparaît.
Sélectionner [No, not this time] et cliquer sur [Next >].
Sélectionner [Install software automatically] et cliquer ensuite sur [Next >]. Suivre les instructions à
l‟écran.
Cliquer sur [continue anyway] lorsqu‟un message s‟affiche expliquant que l‟SMI GRABBER Device n‟a
pas passé le test Windows Logo.
Cliquer sur [Finish] pour compléter l‟installation du pilote.
Répéter cette procédure pour tout autre composant à installer jusqu‟à ce que le message [Found new
hardware: Your hardware is installed and configured for use] apparaisse.
Vérifier l‟installation des pilotes en cliquant avec le bouton droit de la souris sur [My computer] et en
sélectionnant ensuite [Properties].
Ouvrir l‟onglet [Hardware] et sélectionner [Device manager].
Cliquer sur [Sound, video and game controllers].
Les pilotes [SMI GRABBER Device] sont dûment installés lorsqu‟ils n‟affichent pas de triangle jaune. Dans
le cas contraire, désinstaller le pilote concerné, déconnecter et ensuite reconnecter le PCUSBVC3 pour
réinstaller le pilote.
V. 01 – 07/05/2013 16 ©Velleman nv
Page 17

PCUSBVC3
REMARQUE IMPORTANTE :
Installer les pilotes et le logiciel avant d’effectuer les connexions du périphérique !
Veiller à obtenir des droits d’administrateur sur l’ordinateur d’installation.
Désactiver tout antivirus pendant l’installation du logiciel.
Lire les informations concernant le système requis sous le chapitre §5.
Cliquer avec le bouton droit de la souris sur le pilote et sélectionner [properties] et ensuite l‟onglet
[Driver] pour vérifier la version.
7. Installation et configuration du logiciel
Insérer le cédérom VELLEMAN© dans le lecteur de l‟ordinateur. La fenêtre suivante apparaît :
Cliquer sur [Install ShowBiz 3.5] et suivre les instructions à l‟écran. Sélectionner la langue. Le numéro de
licence est mentionné sur la jaquette du cédérom. Conserver ce numéro pour toute référence ultérieure.
Une fois l‟installation complétée, lancer le logiciel en double cliquant sur l‟icône « Showbiz 3.5 » qui se
trouve sur le bureau de l‟ordinateur. La fenêtre suivante apparaît :
V. 01 – 07/05/2013 17 ©Velleman nv
Page 18

PCUSBVC3
Veiller à ce que le PCUSBVC3 soit proprement connecté et sélectionner [Capture, create, or edit
videos].
Régler [Source] sur SMI Grabber Device.
Régler [Audio device] sur USB Pin Source.
Régler [Video input] sur Composite ou S-Video en fonction de la connexion utilisée.
Cliquer sur [Device setting] pour sélectionner le standard vidéo (NTSC_M, PAL-B).
Consulter le fichier sous le répertoire \Document\Manual sur le cédérom pour plus d‟informations
concernant l‟utilisation du logiciel.
8. Problèmes et solutions
Problème de connexion du périphérique
Le PCUSBVC3 est équipé d‟une fiche S-vidéo femelle et de trois fiches RCA femelles. La plupart des
appareils vidéo sont également équipés de fiches femelles. L‟adaptateur RCA mâle-mâle ou S-Vidéo mâle-
mâle requis à l‟interconnexion n‟est pas inclus mais peut être acheté séparément. Toutefois, beaucoup
d‟appareils vidéo (p.ex. téléviseur, enregistreur) incluent un câble adaptateur.
Utiliser un câble adaptateur à fiche péritel pour un appareil équipé d‟une connexion péritel uniquement.
Le périphérique n’a pas passé le test Windows Logo
Ignorer ce message puisqu‟il n‟influence en aucun cas le bon fonctionnement du logiciel. Ce message
indique uniquement que le logiciel n‟a pas été testé par Microsoft®-même.
Durée d’enregistrement
Le PCUSBVC3 est un convertisseur à temps réel. Exemple : un enregistrement de 3 heures aura une durée
de transfert de 3 heures.
Taille de l’enregistrement
La taille du fichier dépend du format et de la taille de l‟image sélectionnés. Pour réduire la taille générale du
fichier, sélectionner un format moindre ou une taille de l‟image inférieure. Ceci réduira également la qualité
de l‟image.
Exemple : un enregistrement de 10 minutes occupe environ 1 Go au format AVI (aucune compression),
environ 200 Mo au format MPEG et environ 30 Mo au format WMV.
V. 01 – 07/05/2013 18 ©Velleman nv
Page 19

PCUSBVC3
supporte USB 2.0
supporte NTSC, PAL
entrée vidéo
1 x RCA composite, 1 x S-Vidéo
entrée audio
RCA stéréo
résolution
NTSC
720 x 480 @ 30 images/s
PAL
720 x 576 @ 25 images/s
système requis
port USB 2.0
système d'exploitation
Microsoft® Windows® 2000/XP/Vista/Windows 7
microprocesseur
Pentium 4 ou plus
espace requis
1 Go pour le logiciel, minimum 4 Go pour l'enregistrement
DVD
lecteur ou enregistreur DVD standard
mémoire
minimum 512 Mo
résolution de l'image
1024 x 768 ou plus
carte son
carte son compatible Windows® (uniquement pour lecture)
carte graphique
carte graphique compatible DirectX 9.0C
Transfert audio
Le PCUSBVC3 ne permet pas l‟enregistrement de signaux audio séparés.
9. Technical specifications
N’employer cet appareil qu’avec des accessoires d’origine. SA Velleman ne sera aucunement
responsable de dommages ou lésions survenus à un usage (incorrect) de cet appareil.
Pour plus d’information concernant cet article et la version la plus récente de cette notice, visitez
notre site web www.velleman.eu.
Toutes les informations présentées dans cette notice peuvent être modifiées sans notification
préalable.
© DROITS D’AUTEUR
SA Velleman est l’ayant droit des droits d’auteur pour cette notice. Tous droits mondiaux réservés.
Toute reproduction, traduction, copie ou diffusion, intégrale ou partielle, du contenu de cette notice par quelque
procédé ou sur tout support électronique que se soit est interdite sans l‟accord préalable écrit de l‟ayant droit.
Les logiciels inclus sont protégés par le droit d‟auteur de la part des possesseurs respectifs.
V. 01 – 07/05/2013 19 ©Velleman nv
Page 20
PCUSBVC3
Mantenga el aparato lejos del alcance de personas no capacitadas y niños.
El usuario no habrá de efectuar el mantenimiento de ninguna pieza. Contacte con su distribuidor si
necesita piezas de recambio.
Utilice el aparato sólo en interiores. No exponga este equipo a lluvia, humedad ni a ningún
tipo de salpicadura o goteo.
No exponga este equipo a polvo. No exponga este equipo a temperaturas extremas.
No agite el aparato. Evite usar excesiva fuerza durante el manejo y la instalación.
Manual del usuario
1. Introducción
A los ciudadanos de la Unión Europea
Importantes informaciones sobre el medio ambiente concerniente a este producto
Este símbolo en este aparato o el embalaje indica que, si tira las muestras inservibles, podrían dañar
el medio ambiente. No tire este aparato (ni las pilas, si las hubiera) en la basura doméstica; debe ir
a una empresa especializada en reciclaje. Devuelva este aparato a su distribuidor o a la unidad de
reciclaje local. Respete las leyes locales en relación con el medio ambiente.
Si tiene dudas, contacte con las autoridades locales para residuos.
¡Gracias por haber comprado la PCUSBVC3! Lea atentamente las instrucciones del manual antes de usarla. Si
el aparato ha sufrido algún daño en el transporte no lo instale y póngase en contacto con su distribuidor.
Incluye:
adaptador de vídeo USB 2.0
cable USB 2.0, longitud ± 70cm
manual del usuario
DVD con drivers, Arcsoft ShowBiz 3.5
2. Instrucciones de seguridad
3. Normas generales
Véase la Garantía de servicio y calidad Velleman ® al final de este manual del usuario.
Familiarícese con el funcionamiento del aparato antes de utilizarlo.
Por razones de seguridad, las modificaciones no autorizadas del aparato están prohibidas. Los daños
causados por modificaciones no autorizadas, no están cubiertos por la garantía.
Utilice sólo el aparato para las aplicaciones descritas en este manual. Su uso incorrecto anula la garantía
completamente.
Los daños causados por descuido de las instrucciones de seguridad de este manual invalidarán su garantía
y su distribuidor no será responsable de ningún daño u otros problemas resultantes.
No utilice este convertidor para grabaciones ilegales.
4. Características
se entrega con software fácil de utilizar: Arcsoft ShowBiz 3.5
alimentada por puerto 2.0, no necesita una alimentación adicional
brillo, contraste, matiz e intensidad ajustables
pequeña, fácil a llevar consigo
botón de captura de la pantalla
plug-and-play
función de escritura (DVD+/-R/RW, DVD+/-VR, DVD-Video...)
pantalla completa para una vista previa de programas de vídeo
transmisión de ficheros de vídeo a iPod, iPod touch, Apple TV, PSP, PS3, XBOX, móvil
soporta la entrada de ficheros de vídeo de alta definición
soporta casi cualquier formato de audio e imagen
es posible subir el vídeo a YouTube
V. 01 – 07/05/2013 20 ©Velleman nv
Page 21

PCUSBVC3
CPU (unidad central de proceso)
Pentium 4 o más reciente
sistema operativo
Microsoft® Windows® 2000/XP/Vista/Windows 7
memoria
512 MB RAM o más reciente
disco duro
1 GB para el software, mín. 4 GB para la grabación
resolución de la imagen
1024 x 768 o más reciente
tarjeta de sonido
tarjeta de sonido compatible Windows® (sólo para lectura)
tarjeta gráfica
tarjeta gráfica compatible DirectX 9.0C
USB
puerto compatible USB 2.0
OBSERVACIÓN IMPORTANTE:
¡Instale los drivers y el software antes de conectar el hardware!
Asegúrese de que obtenga los derechos de administrador para el ordenador utilizado.
Desactive cualquier antivirus software durante la instalación del software.
Lea las informaciones sobre la exigencias del sistema en capítulo §5.
5. Exigencias del sistema
6. Instalar los drivers
Introduzca el CD VELLEMAN© en el reproductor de CD del ordenador. Aparece la siguiente pantalla:
Haga clic en [Install driver].
V. 01 – 07/05/2013 21 ©Velleman nv
Page 22
PCUSBVC3
[1] non inclus
Haga clic en [Next >].
Haga clic en [Finish] para completar la instalación.
Reinicie el ordenador al seleccionar [Yes, I want to restart my computer now].
Conecte el PCUSBVC3 a la fuente de vídeo (p.ej. televisor, videocámara reproductor DVD...). ¡Conecte
siempre el convertidor a la salida S-vídeo o compuesto/audio! Véase el manual del usuario del aparato de
audio en cuestión en caso de duda.
Introduzca el conector USB de la PCUSBVC3 en un puerto USB libre del ordenador. Sin embargo, no
conecte el convertidor a un hub para evitar una pérdida de señal.
El sistema encuentra automáticamente el nuevo aparato conectado al puerto USB. Aparece un mensaje.
Seleccione [No, not this time] y haga clic en [Next >].
Seleccione [Install software automatically] y haga clic en [Next >]. Siga las instrucciones en la
pantalla.
Haga clic en [continue anyway] si aparece una pantalla con el mensaje SMI GRABBER Device no ha
pasado el test Windows Logo.
Haga clic en [Finish] para completar la instalación del driver.
Repita este procedimiento para instalar otro hardware hasta que aparezca el mensaje [Found new
hardware: Your hardware is installed and configured for use].
Controle la instalación de los drivers al hacer clic en [My computer] con el botón derecho del ratón y al
seleccionar luego [Properties].
Abra la pestaña [Hardware] y seleccione [Device manager].
Haga clic en [Sound, video and game controllers].
Los drivers [SMI GRABBER Device] han sido instalados de manera correcta si no se visualiza un triángulo
amarillo con signo de exclamación. Si aparece un triángulo amarillo, desinstale el driver, desconecte la
PCUSBVC3 y vuelva a instalar el driver.
V. 01 – 07/05/2013 22 ©Velleman nv
Page 23
PCUSBVC3
OBSERVACIÓN IMPORTANTE:
¡Instale los drivers y el software antes de conectar el hardware!
Asegúrese de que obtenga los derechos de administrador para el ordenador utilizado.
Desactive cualquier antivirus software durante la instalación del software.
Lea las informaciones sobre la exigencias del sistema en capítulo §5.
Haga clic con el botón derecho del ratón en el driver y seleccione [properties] y luego la pestaña [Driver]
para controlar la versión.
7. Instalar y configurar el software
Introduzca el CD VELLEMAN© en el reproductor de CD del ordenador. Aparece la siguiente pantalla:
Haga clic en [Install ShowBiz 3.5] y siga las instrucciones en la pantalla. Seleccione el idioma. El número
de licencia está en el embalaje del CD-ROM. Guarde este número para cuando necesite consultarlo.
Después de haber completado la instalación, ejecute el software al hacer clic dos veces en el icono
« Showbiz 3.5 » que está en el escritorio del ordenador. Aparece la siguiente pantalla:
V. 01 – 07/05/2013 23 ©Velleman nv
Page 24
PCUSBVC3
Asegúrese de que la PCUSBVC3 esté conectado correctamente y seleccione [Capture, create, or edit
videos].
Ponga [Source] en SMI Grabber Device.
Ponga [Audio device] en USB Pin Source.
Ponga [Video input] en Composite o S-Vídeo. Esto depende de la conexión utilizada.
Haga clic en [Device setting] para seleccionar el estándar de vídeo (NTSC_M, PAL-B).
Para más informaciones sobre el uso del software, haga clic en el fichero bajo el directorio
\Document\Manual del CD-ROM.
8. Solución de problemas
Problema de conexión del software
La PCUSBVC3 está equipada con un conector S-vídeo hembra y tres conectores RCA hembras. La mayoría
de los aparatos de vídeo también están equipados con conectores hembra. El adaptador RCA macho-macho
o S-Vídeo macho-macho no está incluido pero está disponible por separado. Sin embargo, muchos aparatos
de vídeo (p.ej. televisor, videograbadora) incluyen un cable de adaptador.
Para un aparato que sólo está equipado con una conexión SCART necesita un cable adaptador a 3 x
conector SCART.
El hardware no ha pasado el test Windows Logo
Ignore este mensaje porque no influye en ningún caso el buen funcionamiento del software. Este mensaje
indica sólo que el software no ha sido probado por Microsoft® mismo.
Duración de la grabación
La PCUSBVC3 es un convertidor en tiempo real. Ejemplo: copiar una grabación de 3 horas durará 3 horas.
Tamaño de la grabación
El tamaño del fichero depende del formato y el tamaño de la imagen seleccionados. Para disminuir el
tamaño general del fichero, seleccione un formato más pequeño o un tamaño de la imagen inferior. Esto
disminuirá también la calidad de la imagen.
Ejemplo: una grabación de 10 minutos ocupa aproximadamente 1 GB en el formato AVI (ninguna
compresión), aproximadamente 200 MB en el formato MPEG y aproximadamente 30 MB en el formato
WMV.
V. 01 – 07/05/2013 24 ©Velleman nv
Page 25

PCUSBVC3
soporta USB 2.0
soporta NTSC, PAL
entrada de vídeo
1 x RCA compuesto, 1 x S-Vídeo
entrada de audio
RCA estéreo
resolución
NTSC
720 x 480 @ 30 imágenes/s
PAL
720 x 576 @ 25 imágenes /s
exigencias del
sistema
puerto USB 2.0
sistema operativo
Microsoft® Windows® 2000/XP/Vista/Windows 7
CPU (unidad central de
proceso)
Pentium 4 o más reciente
espacio libre en el disco
duro
1Gb para el software, mín. 4Gb para la grabación
DVD
lector o grabadora DVD estándar
memoria
mín. 512 MB
resolución de la imagen
1024 x 768 o más reciente
tarjeta de sonido
tarjeta de sonido compatible Windows® (sólo para lectura)
tarjeta gráfica
tarjeta gráfica compatible DirectX 9.0C
Copiar audio al PC
La PCUSBVC3 no permite la grabación de señales de audio separadas.
9. Especificaciones
Utilice este aparato sólo con los accesorios originales. Velleman NV no será responsable de daños ni
lesiones causados por un uso (indebido) de este aparato.
Para más información sobre este producto y la versión más reciente de este manual del usuario,
visite nuestra página www.velleman.eu.
Se pueden modificar las especificaciones y el contenido de este manual sin previo aviso.
© DERECHOS DE AUTOR
Velleman NV dispone de los derechos de autor para este manual del usuario. Todos los derechos
mundiales reservados. Está estrictamente prohibido reproducir, traducir, copiar, editar y guardar este manual
del usuario o partes de ello sin previo permiso escrito del derecho habiente.
El software incluido está protegido por el derecho de autor de los propietarios respectivos.
V. 01 – 07/05/2013 25 ©Velleman nv
Page 26

PCUSBVC3
Halten Sie Kinder und Unbefugte vom Gerät fern.
Es gibt keine zu wartenden Teile. Bestellen Sie eventuelle Ersatzteile bei Ihrem Fachhändler.
Verwenden Sie das Gerät nur im Innenbereich. Schützen Sie das Gerät vor Regen und
Feuchte. Setzen Sie das Gerät keiner Flüssigkeit wie z.B. Tropf- oder Spritzwasser, aus.
Schützen Sie das Gerät vor Staub. Schützen Sie das Gerät vor extremen Temperaturen.
Vermeiden Sie Erschütterungen. Vermeiden Sie rohe Gewalt während der Installation und
Bedienung des Gerätes.
Bedienungsanleitung
1. Einführung
An alle Einwohner der Europäischen Union
Wichtige Umweltinformationen über dieses Produkt
Dieses Symbol auf dem Produkt oder der Verpackung zeigt an, dass die Entsorgung dieses Produktes
nach seinem Lebenszyklus der Umwelt Schaden zufügen kann. Entsorgen Sie die Einheit (oder
verwendeten Batterien) nicht als unsortiertes Hausmüll; die Einheit oder verwendeten Batterien
müssen von einer spezialisierten Firma zwecks Recycling entsorgt werden. Diese Einheit muss an den
Händler oder ein örtliches Recycling-Unternehmen retourniert werden. Respektieren Sie die örtlichen
Umweltvorschriften.
Falls Zweifel bestehen, wenden Sie sich für Entsorgungsrichtlinien an Ihre örtliche Behörde.
Wir bedanken uns für den Kauf des PCUSBVC3! Lesen Sie diese Bedienungsanleitung vor Inbetriebnahme
sorgfältig durch. Überprüfen Sie, ob Transportschäden vorliegen.
Lieferumfang:
USB 2.0 Videoadapter
USB 2.0-Kabel, Länge ± 70 cm
Bedienungsanleitung
DVD mit Treibern, Arcsoft ShowBiz 3.5
2. Sicherheitshinweise
3. Allgemeine Richtlinien
Siehe Velleman® Service- und Qualitätsgarantie am Ende dieser Bedienungsanleitung.
Nehmen Sie das Gerät erst in Betrieb, nachdem Sie sich mit seinen Funktionen vertraut gemacht haben.
Eigenmächtige Veränderungen sind aus Sicherheitsgründen verboten. Bei Schäden verursacht durch
eigenmächtige Änderungen erlischt der Garantieanspruch.
Verwenden Sie das Gerät nur für Anwendungen beschrieben in dieser Bedienungsanleitung sonst kann dies
zu Schäden am Produkt führen und erlischt der Garantieanspruch.
Bei Schäden, die durch Nichtbeachtung der Bedienungsanleitung verursacht werden, erlischt der
Garantieanspruch. Für daraus resultierende Folgeschäden übernimmt der Hersteller keine Haftung.
Verwenden Sie das Gerät nicht für illegale Aufnahmen.
4. Eigenschaften
Lieferung mit benutzerfreundlicher Software: Arcsoft ShowBiz 3.5
Stromversorgung über USB 2.0-Port, braucht keine zusätzliche Stromversorgung
Helligkeit, Kontrast, Farbton und Intensität regelbar
sehr klein, einfach mitzunehmen
Schnappschusstaste
Plug-and-Play
unterstützt Schreibfunktion (DVD+/-R/RW, DVD+/-VR, DVD-Video...)
Vollbild für eine Vorschau der Videoprogramme
Übertragung von Videodateien auf iPod, iPod touch, Apple TV, PSP, PS3, XBOX, Mobiltelefon
unterstützt die Eingabe von HD-Videodateien
unterstützt fast alle Audio- und Bildformate
V. 01 – 07/05/2013 26 ©Velleman nv
Page 27

PCUSBVC3
CPU (Zentraleinheit)
Pentium 4 oder höher
Betriebssystem
Microsoft® Windows® 2000/XP/Vista/Windows 7
Speicher
512 MB RAM oder höher
freier Speicherplatz
1GB für Software, min. 4GB für Aufnahme
Auflösung display
1024 x 768 oder höher
Soundkarte
Windows®-kompatible Soundkarte (nur für Wiedergabe)
Grafikkarte
kompatibel DirectX 9.0C
USB
USB 2.0 kompatibler Port
WICHTIGE BEMERKUNGEN
Installieren Sie die Treiber und die Software, ehe Sie die Hardware anschließen!
Beachten Sie bei der Installation der Treiber und der Software, dass Sie die Administrativen
Rechte auf dem zu verwenden Computer haben.
Schalten Sie alle Antivirussoftware aus, ehe Sie die Software installieren.
Siehe §5 für die min. Systemanforderungen.
das Video kann auf YouTube hochgeladen werden
5. Systemanforderungen
6. Die Treiber installieren
Legen Sie das VELLEMAN© CD-ROM in das CD-ROM-Laufwerk. Nachfolgendes Fenster erscheint im
Display:
Klicken Sie auf [Install driver].
Klicken Sie auf [Next >].
V. 01 – 07/05/2013 27 ©Velleman nv
Page 28
PCUSBVC3
[1] niet meegeleverd
Klicken Sie auf [Finish] um die Installation zu beenden.
Starten Sie den Computer neu, indem Sie [Yes, I want to restart my computer now] klicken.
Verbinden Sie den PCUSBVC3 mit dem S-video- oder Komposit-/Audio-Ausgang der Videoquelle (z.B.
Fernseher, Kamera, DVD-Spieler). Siehe die Bedienungsanleitung der Videoquelle im Zweifelsfall.
Stecken Sie den USB-Stecker des PCUSBVC3 in einen freien USB-Port des Computers. Um Signalverlust zu
vermeiden, schließen Sie den PCUSBVC3 nicht über einen Netzknoten an.
Ihr Computer findet neue Hardware auf dem USB-Port. Wählen Sie [No, not this time] aus und klicken Sie
danach auf [Next >].
Wählen Sie [Install software automatically] aus und klicken Sie auf [Next >]. Befolgen Sie die
Anweisungen im Bildschirm.
Klicken Sie auf [continue anyway] wenn ein Fenster mit der Nachricht, dass SMI GRABBER Device den
Windows Logo-Test nicht überstanden hat, erscheint.
Wählen Sie [Finish] um die Installation des Treibers zu beenden.
Wiederholen Sie oben stehendes Verfahren, wenn der Computer weitere Hardware findet bis das Fenster
[Found new hardware: Your hardware is installed and configured for use] erscheint.
Überprüfen Sie, ob alle Treiber korrekt installiert sind. Klicken Sie mit der rechten Maustaste auf [My
computer] und klicken Sie danach auf [Properties].
Gehen Sie zu [Hardware] und wählen Sie [Device manager].
Gehen Sie zu [Sound, video and game controllers].
Überprüfen Sie, ob da vor [SMI GRABBER Device] ein gelbes Dreieck mit Ausrufezeichen steht. Wenn
nicht, dann sind die Treiber korrekt installiert worden. Gibt es ein gelbes Dreieck, entfernen Sie den Treiber,
trennen Sie dien PCUSBVC3 des Computers und installieren Sie den Treiber wieder.
V. 01 – 07/05/2013 28 ©Velleman nv
Page 29

PCUSBVC3
WICHTIGE BEMERKUNGEN
Installieren Sie die Treiber und die Software, ehe Sie die Hardware anschließen!
Beachten Sie bei der Installation der Treiber und der Software, dass Sie die Administrativen
Rechte auf dem zu verwenden Computer haben.
Schalten Sie alle Antivirussoftware aus, ehe Sie die Software installieren.
Siehe §5 für die min. Systemanforderungen.
Klicken Sie mit der rechten Maustaste auf [properties] und wählen Sie [Driver] um die Treiberversion zu
überprüfen.
7. Die Software installieren und konfigurieren
Legen Sie das VELLEMAN© CD-ROM in das CD-ROM-Laufwerk. Nachfolgendes Fenster erscheint im
Display:
Klicken Sie auf [Install ShowBiz 3.5] und befolgen Sie die Anweisungen im Bildschirm. Wählen Sie die
gewünschte Sprache aus. Die Lizenznummer steht auf der Hülle des CD-Roms. Bewahren Sie diese Nummer
für künftige Einsichtnahme auf.
Starten Sie die Software nach der Beendung der Installation, indem Sie „Showbiz 3.5‟ auf der
Arbeitsoberfläche zwei Mal klicken. Nachfolgendes Fenster erscheint im Display:
V. 01 – 07/05/2013 29 ©Velleman nv
Page 30

PCUSBVC3
Verbinden Sie den PCUSBVC3 korrekt mit dem Computer und wählen Sie [Capture, create, or edit
videos].
Stellen Sie [Source] auf SMI Grabber Device.
Stellen Sie [Audio device] auf USB Pin Source.
Stellen Sie [Video input] auf Composite oder S-Video. Dies hängt vom verwendeten Anschluss ab.
Klicken Sie danach auf [Device setting] um den Videostandard auszuwählen (NTSC_M, PAL-B).
Siehe das mitgelieferte CD-ROM (unter \Document\Manual) für mehr Information über die Anwendung
der Software.
8. Problemlösung
Problem beim Anschließen der Hardware
Der PCUSBVC3 verfügt über eine S-video-Buchse und drei RCA-Buchsen. Die meisten Videogeräte verfügt
auch über Buchsen. Stecker-Stecker RCA-Kabel oder Stecker-Stecker S-Video Kabel sind nicht mitgeliefert,
sondern diese sind separat erhältlich. Neue Geräte werden meistens mit diesen Kabeln geliefert (z.B.
Fernseher, Videorecorder).
Verfügt ein Gerät nur über einen SCART-Anschluss, so brauchen Sie einen Adapter mit SCART-Stecker und
3 x RCA-Stecker.
V. 01 – 07/05/2013 30 ©Velleman nv
Page 31

PCUSBVC3
unterstützt USB 2.0
unterstützt NTSC, PAL
Video-Eingang
1 x RCA komposit, 1 x S-Video
Audio-Eingang
Stereo RCA
Auflösung
NTSC
720 x 480 @ 30 fps
PAL
720 x 576 @ 25 fps
Systemanforderung
en
USB 2.0-Port
Betriebssystem
Microsoft® Windows® 2000/XP/Vista/Windows 7
CPU (Zentraleinheit)
Pentium 4 oder höher
freier Speicherplatz
1GB für Software, min. 4GB für Aufnahme
DVD
Standard DVD-Spieler oder -Rekorder
Speicher
min. 512 MB
Bildschirmauflösung
1024 x 768 oder höher
Soundkarte
Windows®-kompatible Soundkarte (nur für Wiedergabe)
Grafikkarte
compatibel DirectX 9.0C
Die Hardware hat den Windows Logo-test nicht überstanden
Ignorieren Sie diese Nachricht. Diese Nachrricht zeigt nur an, das Microsoft® die Software nicht selber
getestet hat.
Aufnahmedauer
Der PCUSBVC3 ist ein Echtzeit-Aufnahmegerät. Das Kopieren einer Aufnahme von 3 Stunden dauert also 3
Stunden.
Größe der Aufnahmedatei
Die Dateigröße hängt vom gewählten Format und der Bildgröße ab. Sie können die Dateigröße beschränken,
indem Sie ein anderes Format auszuwählen oder die Bildgröße zu verkleinern. Bemerken Sie, dass die
Bildqualität beeinflussen wird.
Beispiel: eine Aufnahme von 10 Minuten in AVI-Format (keine Kompression) nimmt 1 GB ein, dieselbe
Aufnahme in MPEG-Format nimmt etwa 200 MB ein, im WMV-Format etwa 30 MB.
Audio auf PC kopieren
Sie können mit dem PCUSBVC3 keine separate Audiosignale kopieren.
9. Technische Daten
Verwenden Sie dieses Gerät nur mit originellen Zubehörteilen. Velleman NV übernimmt keine
Haftung für Schaden oder Verletzungen bei (falscher) Anwendung dieses Gerätes.
Für mehr Informationen zu diesem Produkt und die neueste Version dieser Bedienungsanleitung,
siehe www.velleman.eu.
Alle Änderungen ohne vorherige Ankündigung vorbehalten.
© URHEBERRECHT
Velleman NV besitzt das Urheberrecht für diese Bedienungsanleitung. Alle weltweiten Rechte
vorbehalten. ohne vorherige schriftliche Genehmigung des Urhebers ist es nicht gestattet, diese
Bedienungsanleitung ganz oder in Teilen zu reproduzieren, zu kopieren, zu übersetzen, zu bearbeiten oder zu
speichern. Die mitgelieferte Software ist von den entsprechenden Eigentümern urheberrechtlich geschützt.
V. 01 – 07/05/2013 31 ©Velleman nv
Page 32

Velleman® Service and Quality Warranty
Since its foundation in 1972, Velleman® acquired extensive
experience in the electronics world and currently distributes its
products in over 85 countries.
All our products fulfil strict quality requirements and legal stipulations
in the EU. In order to ensure the quality, our products regularly go
through an extra quality check, both by an internal quality
department and by specialized external organisations. If, all
precautionary measures notwithstanding, problems should occur,
please make appeal to our warranty (see guarantee conditions).
General Warranty Conditions Concerning Consumer Products
(for EU):
• All consumer products are subject to a 24-month warranty on
production flaws and defective material as from the original date of
purchase.
• Velleman® can decide to replace an article with an equivalent
article, or to refund the retail value totally or partially when the
complaint is valid and a free repair or replacement of the article is
impossible, or if the expenses are out of proportion.
You will be delivered a replacing article or a refund at the value of
100% of the purchase price in case of a flaw occurred in the first
year after the date of purchase and delivery, or a replacing article at
50% of the purchase price or a refund at the value of 50% of the
retail value in case of a flaw occurred in the second year after the
date of purchase and delivery.
• Not covered by warranty:
- all direct or indirect damage caused after delivery to the article
(e.g. by oxidation, shocks, falls, dust, dirt, humidity...), and by the
article, as well as its contents (e.g. data loss), compensation for loss
of profits;
- consumable goods, parts or accessories that are subject to an aging
process during normal use, such as batteries (rechargeable, nonrechargeable, built-in or replaceable), lamps, rub ber parts, drive
belts... (unlimited list);
- flaws resulting from fire, water damage, lightning, accident, natural
disaster, etc.…;
- flaws caused deliberately, negligently or resulting from improper
handling, negligent maintenance, abusive use or use contrary to the
manufacturer’s instructions;
- damage caused by a commercial, professional or collective use of
the article (the warranty validity will be reduced to six (6) months
when the article is used professionally);
- damage resulting from an inappropriate packing and shipping of the
article;
- all damage caused by modification, repair or alteration performed
by a third party without written permission by Velleman®.
• Articles to be repaired must be delivered to your Velleman® dealer,
solidly packed (preferably in the original packaging), and be
completed with the original receipt of purchase and a clear flaw
description.
• Hint: In order to save on cost and time, please reread the manual
and check if the flaw is caused by obvious causes prior to presenting
the article for repair. Note that returning a non-defective article can
also involve handling costs.
• Repairs occurring after warranty expiration are subject to shipping
costs.
• The above conditions are without prejudice to all commercial
warranties.
The above enumeration is subject to modification according to
the article (see article’s manual).
Velleman® service- en kwaliteitsgarantie
Velleman® heeft sinds zijn oprichting in 1972 een ruime ervaring
opgebouwd in de elektronicawereld en verdeelt op dit moment
producten in meer dan 85 landen. Al onze producten beantwoorden
aan strikte kwaliteitseisen en aan de wettelijke bepalingen geldig in
de EU. Om de kwaliteit te waarborgen, ondergaan onze producten op
regelmatige tijd stippen een extra kwaliteitscontrole, zowel door onze
eigen kwaliteitsafdeling als door externe gespecialiseer de
organisaties. Mocht er ondanks deze voorzorgen toch een probleem
optreden, dan kunt u steeds een beroep doen op onze waarborg (zie
waarborgvoorwaarden).
Algemene waarborgvoorwaarden consumentengoederen
(voor Europese Unie):
• Op alle consumentengoederen geldt een garantieperiode van 24
maanden op productie- en materiaalfouten en dit vanaf de
oorspronkelijke aankoopdatum.
• Indien de klacht gegrond is en een gratis reparatie of vervanging
van een artikel onmogelijk is of indien de kosten hiervoor buiten
verhouding zijn, kan Velleman® beslissen het desbetreffende artikel
te vervangen door een gelijkwaardig artikel of de aankoopsom van
het artikel gedeeltelijk of volledig terug te betalen. In dat geval krijgt
u een vervangend product of terugbetaling ter waarde van 100% van
de aankoopsom bij ontdekking van een gebrek tot één jaar na
aankoop en levering, of een vervangend product tegen 50% van de
kostprijs of terugbetaling van 50 % bij ontdekking na één jaar tot 2
jaar.
• Valt niet onder waarborg:
- alle rechtstreekse of onrechtstreekse schade na de levering
veroorzaakt aan het toestel (bv. door oxidatie, schokken, val, stof,
vuil, vocht...), en door het toestel, alsook zijn inhoud (bv. verlies van
data), vergoeding voor eventuele winstderving.
- verbruiksgoederen, onderdelen of hulpstukken die onderhevig zijn
aan veroudering door normaal gebruik zoals bv. batterijen (zowel
oplaadbare als niet-oplaadbare, ingebouwd of vervangbaar), lampen,
rubberen onderdelen, aandrijfriemen... (onbep erkte lijst).
- defecten ten gevolge van brand, waterschade, bliksem, ongevallen,
natuurrampen, enz.
- defecten veroorzaakt door opzet, nalatigheid of door een
onoordeelkundige behandeling, slecht onderhoud of abnormaal
gebruik of gebruik van het toestel strijdig met de voorschriften van
de fabrikant.
- schade ten gevolge van een commercieel, prof essioneel of collectief
gebruik van het apparaat (bij professioneel gebruik wordt de
garantieperiode herleid tot 6 maand).
- schade veroorzaakt door onvoldoende bescherming bij transport
van het apparaat.
- alle schade door wijzigingen, reparaties of modificaties uitgevoerd
door derden zonder toestemming van Velleman®.
• Toestellen dienen ter reparatie aangeboden te worden bij uw
Velleman®-verdeler. Het toestel dient vergezeld te zijn van het
oorspronkelijke aankoopbewijs. Zorg voor een degelijke verpakking
(bij voorkeur de originele verpakking) en voeg een duidel ijke
foutomschrijving bij.
• Tip: alvorens het toestel voor reparatie aan te bieden, kijk nog
eens na of er geen voor de hand liggende reden is waarom het
toestel niet naar behoren werkt (zie handleiding). Op deze wijze kunt
u kosten en tijd besparen. Denk eraan dat er ook voor niet-defecte
toestellen een kost voor controle aangerekend kan worden.
• Bij reparaties buiten de waarborgperiode zullen transportkosten
aangerekend worden.
• Elke commerciële garantie laat deze rechten onverminderd.
Bovenstaande opsomming kan eventueel aangepast worden
naargelang de aard van het product (zie handleiding van het
betreffende product).
Garantie de service et de qualité Velleman®
Depuis 1972, Velleman® a gagné une vaste expérience dans le
secteur de l’électronique et est actuellement distributeur dans plus de
85 pays.
Tous nos produits répondent à des exigences de qualité rigoureuses
et à des dispositions légales en vigueur dans l’UE. Afin de garantir la
qualité, nous soumettons régulièrement nos produits à des c ontrôles
de qualité supplémentaires, tant par notre propre service qualité que
par un service qualité externe. Dans le cas improbable d’un défaut
malgré toutes les précautions, il est possible d’invoquer notre
garantie (voir les conditions de garantie).
Conditions générales concernant la garantie sur les produits
grand public (pour l’UE) :
• tout produit grand public est garanti 24 mois contre tout vice de
production ou de matériaux à dater du jour d’acquisition effective ;
• si la plainte est justifiée et que la réparation ou le remplacement
d’un article est jugé impossible, ou lorsque les coûts s’avèrent
disproportionnés, Velleman® s’autorise à remplacer ledit article par
un article équivalent ou à rembourser la totalité ou une partie du prix
d’achat. Le cas échéant, il vous sera consenti un article de
remplacement ou le remboursement complet du prix d’achat lors
d’un défaut dans un délai de 1 an après l’achat et la livraison, ou un
article de remplacement moyennant 50% du prix d’achat ou le
remboursement de 50% du prix d’achat lors d’un défaut après 1 à 2
ans.
• sont par conséquent exclus :
- tout dommage direct ou indirect survenu à l’article après livraison
(p.ex. dommage lié à l’oxydation, choc, chute, poussière, sable,
impureté…) et provoqué par l’appareil, ainsi que son contenu (p.ex.
perte de données) et une indemnisation éventuelle pour perte de
revenus ;
- toute pièce ou accessoire nécessitant un remplacement causé par
un usage normal comme p.ex. piles (rechargeables comme non
rechargeables, intégrées ou remplaçables), ampoules, pièces en
caoutchouc, courroies… (liste illimitée) ;
- tout dommage qui résulte d’un incendie, de la foudre, d’un
accident, d’une catastrophe naturelle, etc. ;
- out dommage provoqué par une négligence, volontaire ou non, une
utilisation ou un entretien incorrect, ou une utilisation de l’appareil
contraire aux prescriptions du fabricant ;
- tout dommage à cause d’une utilisation commerciale,
professionnelle ou collective de l’appareil (la période de garantie ser a
réduite à 6 mois lors d’une utilisation professionnelle) ;
- tout dommage à l’appareil qui résulte d’une utilisation incorrecte ou
différente que celle pour laquelle il a été initialeme nt prévu comme
décrit dans la notice ;
- tout dommage engendré par un retour de l’appareil emballé dans
un conditionnement non ou insuffisamment protégé.
- toute réparation ou modification effectuée par une tierce personne
sans l’autorisation explicite de SA Velleman® ; - frais de transport de
et vers Velleman® si l’appareil n’est plus couvert sous la garantie.
• toute réparation sera fournie par l’endroit de l’achat. L’appareil doit
nécessairement être accompagné du bon d’achat d’origine et être
dûment conditionné (de préférence dans l’emballage d’origine avec
mention du défaut) ;
• tuyau : il est conseillé de consulter la notice et de contrôler câbles,
piles, etc. avant de retourner l’appareil. Un appareil retourné jugé
défectueux qui s’avère en bon état de marche pourra faire l’objet
d’une note de frais à charge du consommateur ;
• une réparation effectuée en-dehors de la période de garantie fera
l’objet de frais de transport ;
• toute garantie commerciale ne porte pas atteinte aux conditions
susmentionnées.
La liste susmentionnée peut être sujette à une
complémentation selon le type de l’article et être mentionnée
dans la notice d’emploi.
Page 33

Garantía de servicio y calidad Velleman®
Desde su fundación en 1972 Velleman® ha adquirido una amplia
experiencia como distribuidor en el sector de la electrónica en más de
85 países. Todos nuestros productos responden a normas de calidad
rigurosas y disposiciones legales vigentes en la UE. Para garantizar la
calidad, sometemos nuestros productos regularmente a controles de
calidad adicionales, tanto a través de nuestro propio servicio de
calidad como de un servicio de calidad externo. En el caso
improbable de que surgieran problemas a pesar de todas las
precauciones, es posible recurrir a nuestra garantía (véase las
condiciones de garantía).
Condiciones generales referentes a la garantía sobre
productos de venta al público (para la Unión Europea):
• Todos los productos de venta al público tienen un período de
garantía de 24 meses contra errores de producción o errores en
materiales desde la adquisición original;
• Si la queja está fundada y si la reparación o sustitución de un
artículo no es posible, o si los gastos son desproporcionados,
Velleman® autoriza reemplazar el artículo por un artículo equivalente
o reembolsar la totalidad o una parte del precio de compra. En este
caso, usted recibirá un artículo de recambio o el reembolso completo
del precio de compra si encuentra algún fallo hasta un año después
de la compra y entrega, o un artículo de recambio al 50% del precio
de compra o el reembolso del 50% del precio de compra si encuentra
un fallo después de 1 año y hasta los 2 años después de la compra y
entrega.
Por consiguiente, están excluidos entre otras cosas:
- todos los daños causados directa o indirectamente al aparato (p.ej.
por oxidación, choques, caída,...) y a su contenido (p.ej. pérdida de
datos) después de la entrega y causados por el aparato, y cualquier
indemnización por posible pérdida de ganancias ;
- partes o accesorios, que estén expuestos al desgaste causad o por
un uso normal, como por ejemplo baterías (tanto recargables como
no recargables, incorporadas o reemplazables), bombillas, partes de
goma, etc. (lista ilimitada);
- defectos causados por un incendio, daños causados por el agua,
rayos, accidentes, catástrofes naturales, etc.;
- defectos causados a conciencia, descuido o por malos tratos, un
mantenimiento inapropiado o un uso anormal del aparato contrario a
las instrucciones del fabricante;
- daños causados por un uso comercial, profesional o colectivo del
aparato (el período de garantía se reducirá a 6 meses con uso
profesional);
- daños causados por un uso incorrecto o un uso ajeno al que está
previsto el producto inicialmente como está descrito en el manual del
usuario;
- daños causados por una protección insuficiente al transportar el
aparato.
- daños causados por reparaciones o modificaciones efectuadas por
una tercera persona sin la autorización explícita de Velleman®;
- se calcula gastos de transporte de y a Velleman® si el aparato ya
no está cubierto por la garantía.
• Cualquier artículo que tenga que ser reparado tendrá que ser
devuelto a su distribuidor Velleman®. Devuelva el aparato con la
factura de compra original y transpórtelo en un embalaje sólido
(preferentemente el embalaje original). Incluya también una buena
descripción del fallo;
• Consejo: Lea el manual del usuario y controle los cables, las pilas,
etc. antes de devolver el aparato. Si no se encuentra un defecto en el
artículo los gastos podrían correr a cargo del cliente;
• Los gastos de transporte correrán a carga del cliente para una
reparación efectuada fuera del período de garantía.
• Cualquier gesto comercial no disminuye estos derechos.
La lista previamente mencionada puede ser adaptada según el
tipo de artículo (véase el manual del usuario del artículo en
cuestión).
Velleman® Service- und Qualitätsgarantie
Seit der Gründung in 1972 hat Velleman® sehr viel Erfahrung als
Verteiler in der Elektronikwelt in über 85 Ländern aufgebaut.
Alle Produkte entsprechen den strengen Qualitätsforderungen und
gesetzlichen Anforderungen in der EU. Um die Qualität zu
gewährleisten werden unsere Produkte regelmäßig einer zusätzlichen
Qualitätskontrolle unterworfen, sowohl von unserer eigenen
Qualitätsabteilung als auch von externen spezialisierten
Organisationen. Sollten, trotz aller Vorsichtsmaßnahmen, Probleme
auftreten, nehmen Sie bitte die Garantie in Anspruch (siehe
Garantiebedingungen).
Allgemeine Garantiebedingungen in Bezug auf Konsumgüter
(für die Europäische Union):
• Alle Produkte haben für Material- oder Herstellungsfehler eine
Garantieperiode von 24 Monaten ab Verkaufsdatum.
• Wenn die Klage berechtigt ist und falls eine kostenlose Reparatur
oder ein Austausch des Gerätes unmöglich ist, oder wenn die Kosten
dafür unverhältnismäßig sind, kann Velleman® sich darüber
entscheiden, dieses Produkt durch ein gleiches Produkt zu ersetzen
oder die Kaufsumme ganz oder teilweise zurückzuzahlen. In diesem
Fall erhalten Sie ein Ersatzprodukt oder eine Rückzahlung im Werte
von 100% der Kaufsumme im Falle eines Defektes bis zu 1 Jahr nach
Kauf oder Lieferung, oder Sie bekommen ein Ersatzprodukt im Werte
von 50% der Kaufsumme oder eine Rückzahlung im Werte von 50 %
im Falle eines Defektes im zweiten Jahr.
• Von der Garantie ausgeschlossen sind:
- alle direkten oder indirekten Schäden, die na ch Lieferung am Gerät
und durch das Gerät verursacht werden (z.B. Oxidation, Stöße, Fall,
Staub, Schmutz, Feuchtigkeit, ...), sowie auch der Inhalt (z.B.
Datenverlust), Entschädigung für eventuellen Gewinnausfall.
- Verbrauchsgüter, Teile oder Zubehörteile, die durch normalen
Gebrauch dem Verschleiß ausgesetzt sind, wie z.B. Batterien (nicht
nur aufladbare, sondern auch nicht aufladbare, eingebaute oder
ersetzbare), Lampen, Gummiteile, Treibriemen, usw. (unbeschränkte
Liste).
- Schäden verursacht durch Brandschaden, Wasserschaden, Blitz,
Unfälle, Naturkatastrophen, usw.
- Schäden verursacht durch absichtliche, nachlässige oder
unsachgemäße Anwendung, schlechte Wartung, zweckentfremdet e
Anwendung oder Nichtbeachtung von Benutzerhinweisen in der
Bedienungsanleitung.
- Schäden infolge einer kommerziellen, professionellen oder
kollektiven Anwendung des Gerätes (bei gewerblicher Anwendung
wird die Garantieperiode auf 6 Monate zurückgeführt).
- Schäden verursacht durch eine unsachgemäße Verpackung und
unsachgemäßen Transport des Gerätes.
- alle Schäden verursacht durch unautorisierte Änderungen,
Reparaturen oder Modifikationen, die von einem Dritten ohne
Erlaubnis von Velleman® vorgenommen werden.
• Im Fall einer Reparatur, wenden Sie sich an Ihren Velleman®Verteiler. Legen Sie das Produkt ordnungsgemäß verpackt
(vorzugsweise die Originalverpackung) und mit dem OriginalKaufbeleg vor. Fügen Sie eine deutliche Fehlerbeschreibung hinzu.
• Hinweis: Um Kosten und Zeit zu sparen, lesen Sie d ie
Bedienungsanleitung nochmals und überprüfen Sie, ob es keinen auf
de Hand liegenden Grund gibt, ehe Sie das Gerät zur Reparatur
zurückschicken. Stellt sich bei der Überprüfung des Gerätes heraus,
dass kein Geräteschaden vorliegt, könnte dem Kunden eine
Untersuchungspauschale berechnet.
• Für Reparaturen nach Ablauf der Garantiefrist werden
Transportkosten berechnet.
• Jede kommerzielle Garantie lässt diese Rechte unberührt.
Die oben stehende Aufzählung kann eventuell angepasst
werden gemäß der Art des Produktes (siehe
Bedienungsanleitung des Gerätes).
Legen Heirweg 33, 9890 Gavere, Belgium
Imported by Velleman nv
Made in PRC
www.velleman.eu
 Loading...