

Page 1
PCTV2
MINI PC - ANDROID 4. 2 - DUAL CORE
RIKOMAGIC MK802IIIS
USER MANUAL 3
GEBRUIKERSHANDLEIDING 28
MODE D'EMPLOI 53
MANUAL DEL USUAR IO 78
BEDIENUNGSANLEITUNG 103
MANUAL DO UTILIZADOR 128
Page 2
PCTV2
V. 02 – 12/09/2013 2 ©Velleman nv
Page 3
PCTV2
USER MANUAL
1. Introduction
To all residents of th e European Union
Important environmental information about this product
This symbol on the device or the packa g e indi cat es tha t
disposal of the device after its lifecycle could harm the
environment. Do not dispose of the unit (or batteries) as
unsorted muni c i pal waste; it sho uld be taken to a
specialized company for rec ycling. This device should be
returned to your distributor or to a local recycling service. Respect
the local environmental rules.
If in doubt, contact your local waste disposal authorities.
Thank you for choosing Velleman! Please read the manual thoroughly
before bringing this device into service. If the device was damaged in
transit, don't install or use it and contact your dealer.
2. General Guidelines
Refer to the Velleman® Service and Quality Warranty on the last
pages of thi s m anua l.
• Indoor use only. Keep this device away from rain, moisture,
splashing and dripping liquids.
• Keep this device away from dust and extreme heat.
• Protect this device from shocks and abuse. Avoid brute force when
operating the device.
• Familiarise yourself with the functions of the device before actually
using it.
• All modifications of the device are forbidden for safety reasons.
• Only use the device for its intended purpose. Using the device in
an unauthorise d way will void the w a rr anty.
• Damage caused by disregard of certain guidelines in this manual
is not covered by the warranty and the dealer will not accept
responsibility for any ensuing defects or problems.
• Do not disconnect the device during formatting or upgrading.
Disconnecting the device m ay cause syste m erro rs.
• Clean the device with a dry, lint-free cloth. Do not use alcohol or
solvents.
V. 02 – 12/09/2013 3 ©Velleman nv
Page 4
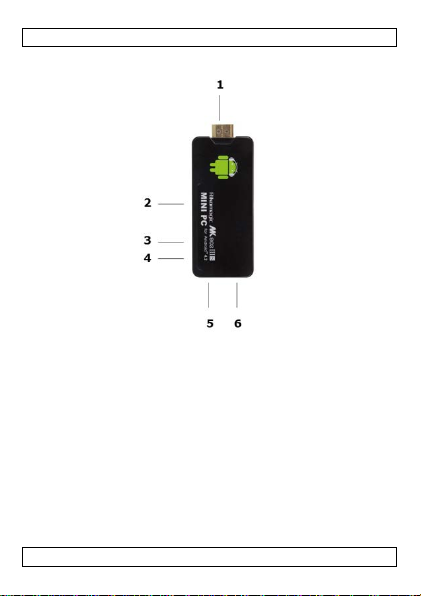
PCTV2
1
4
2
reset button
5
micro USB power port
3
micro SD port
6
USB port
2
Reset button
Press to reset the device.
3
Micro SD port
Expand the memory of the device with a
power port
power cable to your TV for charging.
6
USB port
Connect any USB device to this port
3. Overview
Refer to the illustrations on page 2 of this manua l.
HDMI po rt
4. Connecting the device
The device has the following ports and buttons:
1 HDMI po rt Plug the HDMI port of the device directly to
the HDMI port of your TV, monitor or
beamer, no cable needed.
USB OTG port
4 USB port Use the USB OTG port to connect the device
5 Micro USB
5. Start using t he device
To start using the device:
1. Connect the device on the HDMI port of your TV, monitor or
beamer.
2. (For TV only): Use your TV remote control to select the mini
computer as the HDMI source (as you would do wi t h a no ther
HDMI source).
The start screen of the mini computer will appear.
6. Shutting down the de v i ce
To shut down the device:
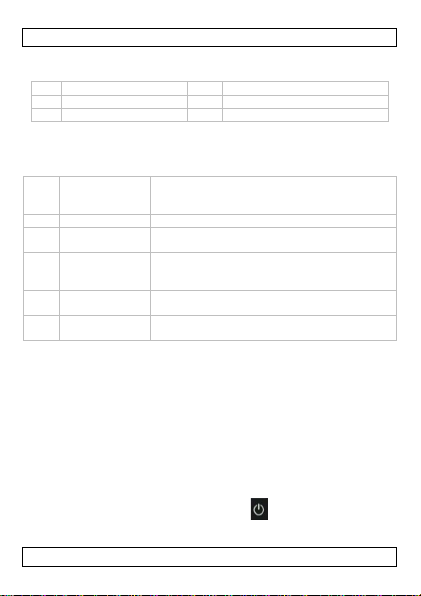
1. In the toolbar at the bottom, click the button and p re ss OK.
2. Wait until the d ev i ce ha s s hut down to disconnect it.
V. 02 – 12/09/2013 4 ©Velleman nv
micro SD card (m a x. 32 G B)
to your pc (for example for data tr a nsfer) or
any USB device (mouse, keyboard…).
Connect the d e vi c e wi th the included to U SB
(mouse, keyboard…).
Page 5

PCTV2
icon or a file.
Right button
Back or Cancel
7. Mouse
To use the mini computer, you at least need a USB mouse (not
included).
Use the mouse controls as follows:
Left button • OK
Scroll wheel • Use the scroll wheel to move left to right (on the
8. Keyboard
• If you do not connect an external keyboard, the device will
automatically show the software keyboard.
• If you connect an external keybo a rd, the sof tw are keyb o ard wil l
not be shown.
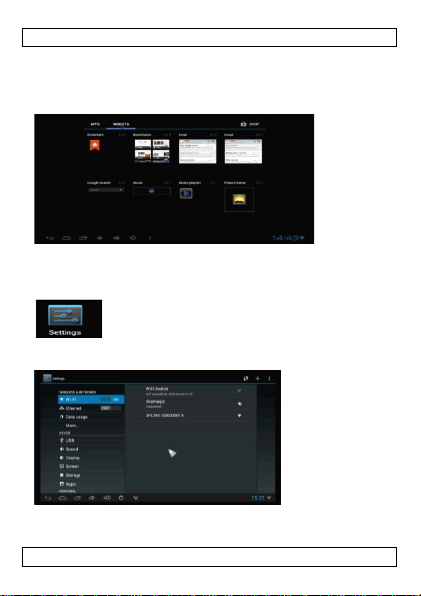
9. The home screen
The device displays the followi ng sc re e n during startup .
• Press and hold t he l ef t mouse button to d rag an
•
desktop) or up a nd d own (in settings,
browser…).
• Press and hold the scroll wheel to display file
properties.
When done, t he ho me screen appe a rs. The home screen contains
several pages on which you can add, move or remove icons, apps
and widget s. You can browse thro ugh the home pag e s us i ng t he
scroll wheel.
V. 02 – 12/09/2013 5 ©Velleman nv
Page 6
PCTV2
Click the apps icon in the upper right corner of
Displays t he ap ps that are current l y running
Decrease volume
Increase volume
Shut down the d ev i ce
Icons
Move an icon on the desktop
Click and hold the icon and drag it to the position you want.
You can also mo v e an icon to another p age of the home scree n.
Delete an icon on the desktop
Click and hold the icon you want to delete and drag it to the x
symbol in the upper middle of the home screen.
Changing the desktop wallpaper
1. Press and hold the cursor on the deskt op pap er.
2. Choose fro m w hich source you want to use a wallpaper (Gallery,
Live Wallpaper or Wallpaper).
3. Click the wallpaper you want to set and click the Set wallpaper
button to confirm.
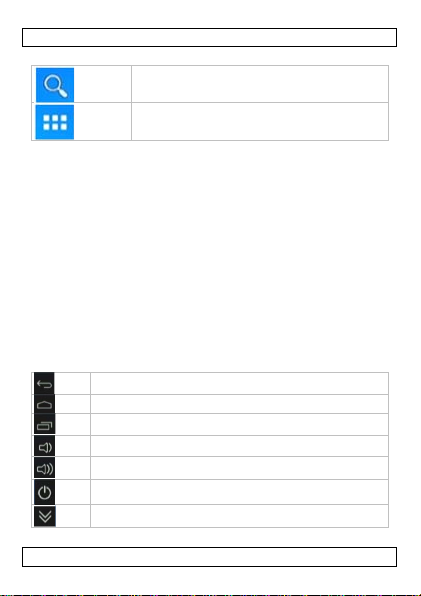
9.2 Toolbar
The device's toolbar is always visible. It contains the following icons:
V. 02 – 12/09/2013 6 ©Velleman nv
Click this icon in the upper left corner of the
home screen to start searching the i nternet.
the home screen to display all apps available on
the device.
Back
Home
Hides the toolbar (or keyboard)
Page 7

PCTV2
the device.
9.3 Status bar
The status bar is located on the bottom right of the screen.
Depending on your situation, it can display various items:
USB connection, download status, time, signal strength….
Click the status bar to enlarge it. C lick an i co n to access the f uncti o n
directly in the Settings.
9.4 Apps
If the apps a re li st e d o n multiple pages, yo u ca n b ro w s e through the
pages using the scroll wheel.
To start an app
Click the app you want to us e.
To add an app to the ho me sc reen
Press and hold t he app icon.
The home screen will appear.
Release the icon where you want it to be.
Click the apps icon in the upper right corner of
the home screen to display all apps available on
9.5 Widgets
Click the apps icon in the uppe r r ight corner of the hom e sc re en.
In the apps overview, open the Widgets tab.
To start a widget
Click the widget you want to use.
V. 02 – 12/09/2013 7 ©Velleman nv
Page 8
PCTV2
To add a widget to the home screen.
Press and hold t he w id get icon.
The home screen will appear.
Release the icon where you want it to be.
10. Settings
To access settings, click the Settings icon (on the desktop or in the
app list).
WIFI Setting
Ethernet
Settings > Ethernet
V. 02 – 12/09/2013 8 ©Velleman nv
Page 9

PCTV2
You can connect the device to a wi red network (Ether ne t ) using a
UBS LAN adapter. To enable ethernet:
• Click Use Ethernet.
Data usag e
Settings > Data usage
Shows the data usage of every app.
Portable ho tspot
Settings > More > Portable hotspot
If your device i s co nne cted to an ethernet co nnection, you c a n use
your device as a wireless a ccess po i nt.
• Click Set up Wi-Fi hotspot, enter the appropriate settings and click
Save to confirm.
PPPoE
Settings > More > PPPoE
If you need PPPoE (Point-to-Point Protocol over Ethernet), you can
enter these settings as follows:
• Click PPPoE account to enter your a ccount d et a ils.
USB
Settings > USB
You can connect the device to your co mp ut er to copy files between
both.
Use the included micro USB to USB cable to connect the device to
your computer.
Make sure the device is connect to yo ur HDMI d isp l ay.
• Click Connect to PC.
You can now copy files from your computer to the device or viceversa.
Sound
Settings > Sound
The available settings are: volume, vibration and sound devices (if
connected).
Display
Settings > Display
The Display option allows setting the font size.
V. 02 – 12/09/2013 9 ©Velleman nv
Page 10

PCTV2
Screen
Settings > Screen
The possible options are:
• Screen scale: slid e t he b utton to increase o r reduc e the screen
scale
• Output int e rface (default i s HDMI).
• HDMI mode: allows setting resolution depending on the resolution
on your TV. The device detects the most appropriate resolution.
Storage
Settings > Storage
Shows the disk size of various typ e s of data a nd the amo unt of sp ace
left.
You can also unmounts or erase a n SD ca r d.
The Android system partitions are not shown in this window.
Apps
Settings > Apps
Allows managing the apps installed on the device and on the SD
card.
The apps are grouped in several lists: Downloaded - On SD card -
Running – All. Cli ck a li s t na m e t o open it.
Click the app to open its detail window.
Depending on the type of app, the available functions are:
• Force stop
• Uninstall
• Uninstall updates
• Move to SD card
• Clear data
• Clear cache
• Clear defaults
The Settings icon in the upper r ight corner opens more options:
• Sort by size
• Reset app preferences
Security
Settings > Security
Contains settings for:
V. 02 – 12/09/2013 10 ©Velleman nv
Page 11
PCTV2
• Installing apps from unknown sour c e s
• Installing certificates.
Note: The Device Administrator option has no function on this device.
Langua ge & input
Settings > Language & input
Contains settings for:
• user display language
• spell checker (click the butto n for more options)
• personal dictionary
• keyboard input settings
• Android keyboard setti ng s (click the b utt o n for more
options). These options are re l a t e t o i np ut la nguage, autocorrection, key sound and vib ra tio n, et c.
• mouse pointer speed: slide the button to increase or reduce
pointer speed
Backup & reset
Settings > Backup & Reset
• Back up my data: allows backing up app lica t ion dat a and set ti ng s
to a Google account. You can also set options for Automatic
restore.
• Factory data reset: Erases all da t a on your de vice, including your
account data. Data on the SD card can be erased as well.
Accounts
Settings > Accounts
Allows adding an account and managing existing accounts.
1. Click Add account, then select Google.
o To add an existing account, click the button Existing and follow
the instructi ons on the screen.
o To create a new account, click the button New and follow the
instructions on the screen.
10.2 Date & time
Settings > Date & time
Contains settings for:
• automatic date and time setting
V. 02 – 12/09/2013 11 ©Velleman nv
Page 12
PCTV2
• manual date and time setting
• time zone
• time and date format
10.3 Accessibility
Settings > Accessibilit y
Contains settings for:
• Talkback (turn spoken f eedb a ck o n or off)
• Text-to-speech output
• Web accessibility
10.4 Developer options
Settings > Developer options
Contains useful options for developing.
USB debugging: Select thi s option to set debug mode when
exchanging data between t he d ev i ce a nd yo ur co m puter.
10.5 About device
Settings > About device
Displays data relating to
• system updates
• system status (battery, net wo rk… )
• model number, android version…
11. File management
The Explorer allows viewing and working with files on your device.
V. 02 – 12/09/2013 12 ©Velleman nv
Page 13

PCTV2
Name
Function
Home
returns to the upper level
LevelUp
goes up one level in the file structure
up menu.
Back
Returns to the previous location in the file
Next
Goes to the next location in the file explorer
Exit
Closes the file explorer
To open the explorer:
1. Click the Explorer icon on the home screen.
The Explorer opens.
2. Click a media source (Internal Flash, SD card…) to view its
contents.
• In the Explorer, you can copy, delete, move, paste, rename and
share files and folders.
• To do so, press a nd ho ld the item you want unt i l the menu pops
up and select the action you wa nt.
• For example, click Internal flash to view the device's internal disk.
Buttons
The buttons in the Explorer are:
Multi Use this button to select multiple files or folders.
Editor The editor contains the same options as the pop-
12. Installing an app
You can install an app:
• From Google Play, using your Google account, or any other
website supplying Android apps.
• From a local disk (for example a m emo ry stick on which yo u
downloaded an app)
Google Play
1. Login to Google Play and download the app you want.
2. After download, the device will ask if you want to install the app.
V. 02 – 12/09/2013 13 ©Velleman nv
Click the Multi button.
Click the files or folders you want.
To deselect, click the Multi button again.
explorer history
history
Page 14

PCTV2
Local installation
Connect the minicomputer to the external drive containing the app.
In the file explorer, browse to the app and click it to start
installation.
Uninstall an app
To uninstall a n app :
1. Open the Settings and click App s.
2. Click the app you want to uninstall.
3. Click the button Uninstall and click OK to confirm.
13. Airplay/DLNA
While the mini computer is connected to a wireless broadband
module, you can also use it to
14. Remote control
You can remot e control the mini-c from your Android phone or
tablet:
• Download and install the MK802 remote control app from Google
Play on your phone or tablet.
• You can now use yo ur phone as a remote fo r t he m ini computer.
• The app uses your wireless network to control the mini computer.
15. System recovery/update
If some cases, you may need to upda t e the device t o the l atest
firmware. For example:
• The device runs very slowly or cra shes of t e n.
• The device ca nno t f i nd or connect to the wireless network.
• After installing an app, the de vice stops and do es not rest art.
• When starting, the device o nly sho ws t he st art screen.
• The device cannot read the SD card.
Before you start
Make sure yo u ha ve t he f ol lowing at hand:
• the included micro USB to USB cable
• a tiny metal point (for example a needle).
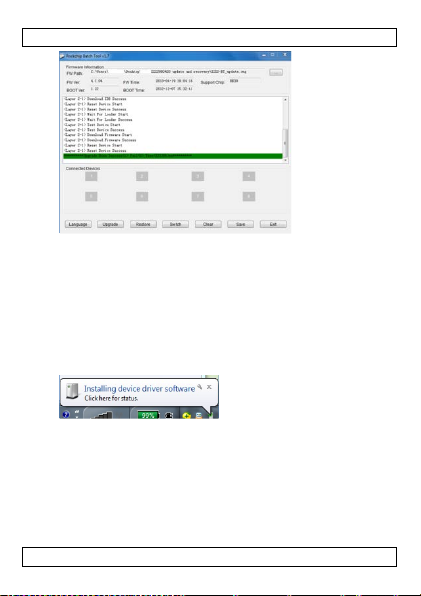
To download the latest firmware:
V. 02 – 12/09/2013 14 ©Velleman nv
Page 15
PCTV2
1. On your computer, go to www.rikomagic.com and download the
recovery / update softw are fo r your devi ce.
2. Make sure to download the correct version for your devi ce:
Rikomagic MK 802 II IS.
3. Decompress the downloaded file.
4. In the decompressed folder, decompress the file Batch Tool
1.5.zip (version numb er ma y vary) .
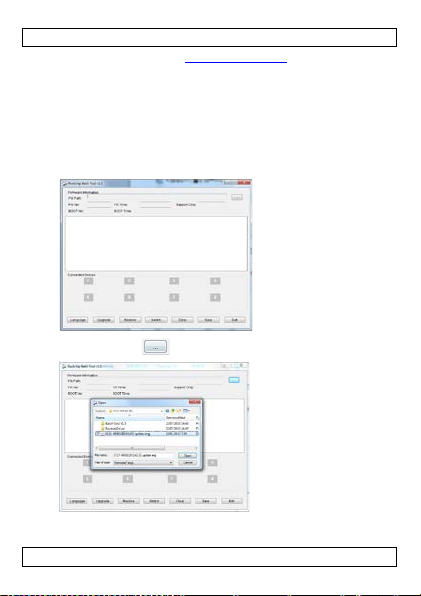
15.2 Load ing the image file
1. Launch the file RKBatchTool.exe.
2. Click the button .
3. Select the .img file and click Open.
The tool loads the firmware.
V. 02 – 12/09/2013 15 ©Velleman nv
Page 16
PCTV2
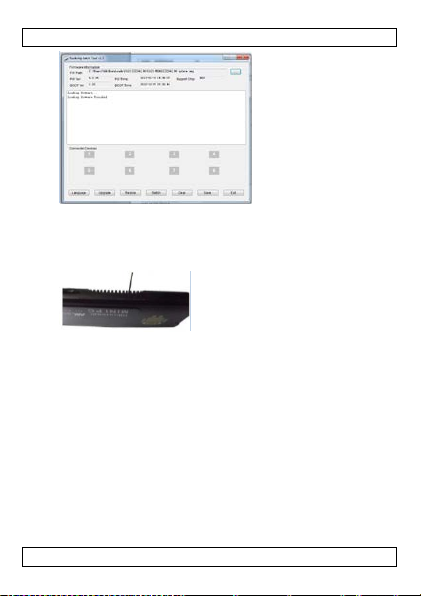
15.3 Connecting the device
1. Connect the cable to a USB port of your computer.
2. Use the needle to gently press and hold the reset button on the
device, as shown.
3. While holding the needle, plug the micro USB cable to the USB
OTG port of the device.
4. Remove the needle after 3 to 5 seconds.
The next steps depend on the operating system you are using. The
manual describes the steps for Windows XP (next section) and
Windows 7 (page 19).
15.4 Windows XP
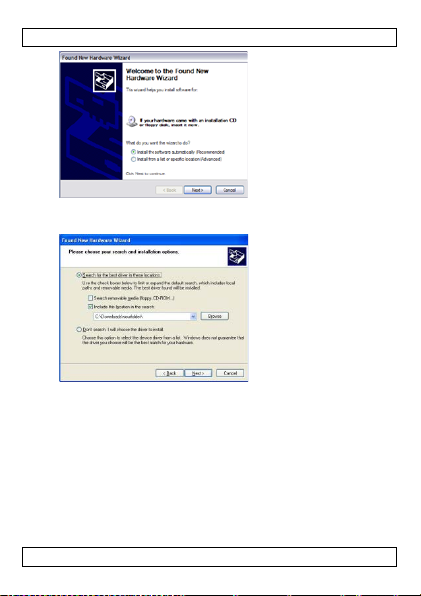
On your computer, the following window will open:
V. 02 – 12/09/2013 16 ©Velleman nv
Page 17
PCTV2
1. Select Install from a list or specific location and click Next.
2. Click the button Browse and select the folder cont a ining the
driver.
Click Next.
The driver starts installing.
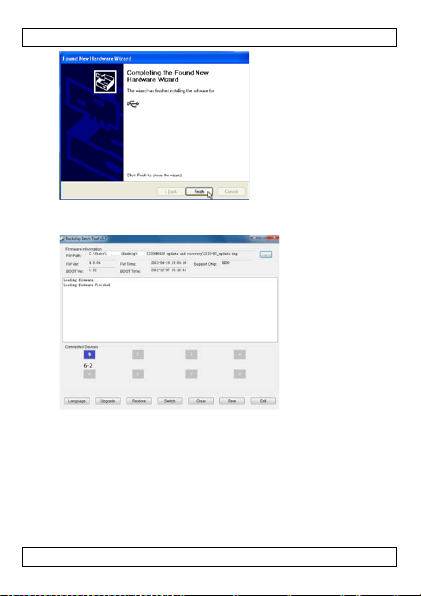
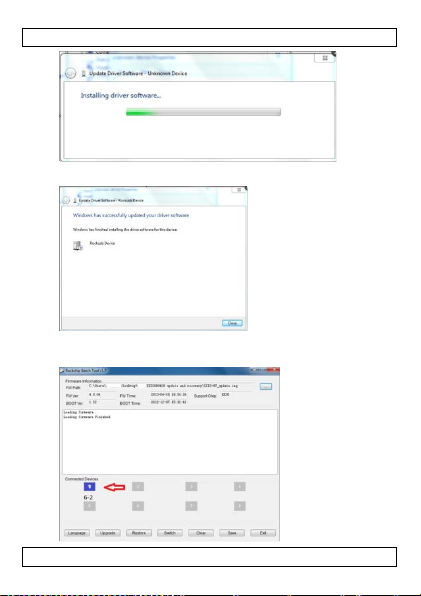
3. When installation is finished, the following window appears.
V. 02 – 12/09/2013 17 ©Velleman nv
Page 18
PCTV2
4. Click Finish.
5. In the Batch To o l, the colour of the Co nne ct e d devices changes.
6. Click the button Upgrade.
The upgrade takes about 3 minutes. D o no t disconnect the
device during upgrade.
When the installation is successful, the following window
appears:
V. 02 – 12/09/2013 18 ©Velleman nv
Page 19
PCTV2
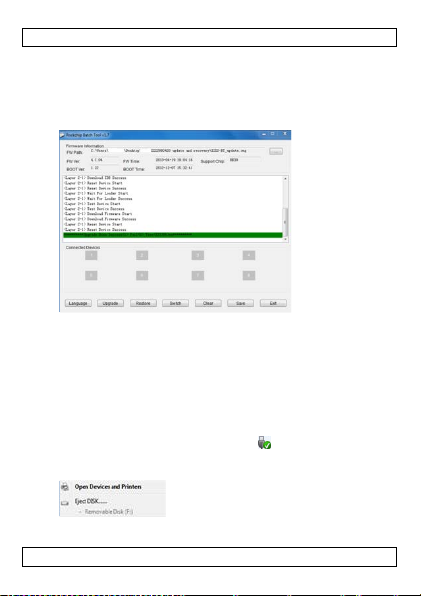
7. Click Exit.
If necessary, safely remove the device before unplugg i ng it (see
section Safely remove the device from your computer below).
Note
When running the device for the first time after a firmware update,
the device may run low or take more time to start.
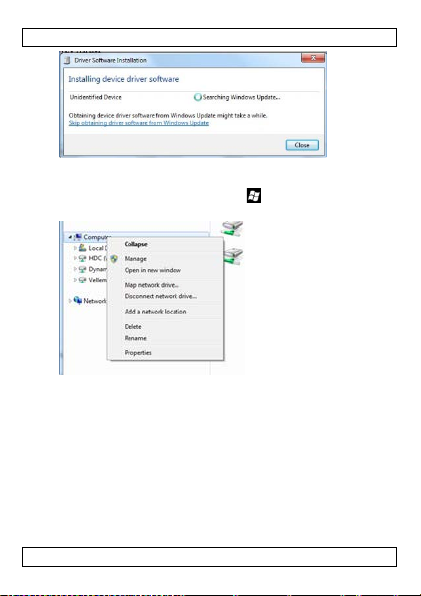
15.5 Windows 7
1. On your computer, the following notification will appear:
2. Click this notification.
The following message appears.
V. 02 – 12/09/2013 19 ©Velleman nv
Page 20
PCTV2
3. Click the link Skip obtaining driver software from Windows
Update.
4. Open My computer (key combination + e).
5. Right-click Computer and select Manage.
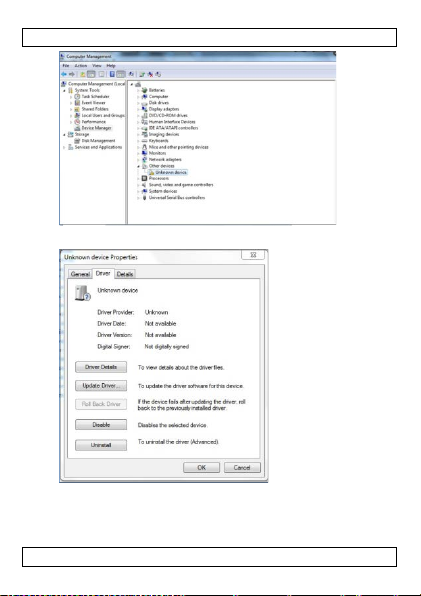
6. Open Device Manager > Other device.
V. 02 – 12/09/2013 20 ©Velleman nv
Page 21
PCTV2
7. Double-click Unknown device.
8. Click the button Update Driver.
V. 02 – 12/09/2013 21 ©Velleman nv
Page 22
PCTV2
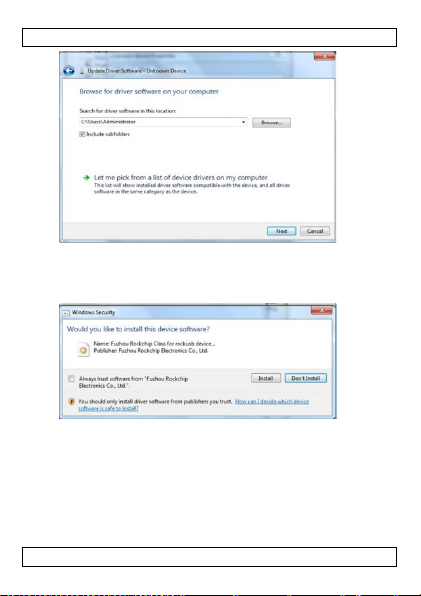
9. Click the button Browse and sel ect the correct drive r.
o If your computer is 32bit, select x86--win7
o If your computer it is WIN7 64bit, choose x64--win7
10. Click Next.
11. Click Next.
The driver starts installing.
V. 02 – 12/09/2013 22 ©Velleman nv
Page 23
PCTV2
12. When installation is finished, the following window appears.
13. Click Close.
14. In the Batch Tool, the col o ur of the C o nne ct e d devices chang e s.
V. 02 – 12/09/2013 23 ©Velleman nv
Page 24
PCTV2
15. Click the button Upgrade.
The upgrade takes about 3 minutes. D o no t di sc o nne ct the
device during upgrade.
When the installation is successful, the following window
appears:
16. Click Exit.
If necessary, safely remove the device before unplugg i ng it (see
section Safely remove the device from your computer below).
Note
When running the device for the first time after a firmware update,
the device may run low or take more time to start.
15.6 Safely remove the device from your computer
To safely remove the device:
1. Click the icon Safely Remove Hardware in the notification
area at the right of the taskbar and click the device that you
want to remove.
V. 02 – 12/09/2013 24 ©Velleman nv
Page 25
PCTV2
CPU
RK3066 dual co re
GPU
quad core 2D / 3D / OpenG L ES2.0 (MALI-400) /
OS
Android 4.2
main frequency
Cortex-A9, up to 1.6 GHz
memory
4 GB
expandable
microSD (max. 32 GB)
web browser
built-in
video format
WMV / ASF / MP4 / 3GP / 3G2M 4V / AVI / MJ P EG
720x480 D1 30 fps
audio format
MP3 / WMA / APE / FLAC / AAC / OGG / AC3 /
picture format
max. 8000 x 8000 JP EG BM P GIF P N G
Flash
supports Flash 11.1
power port; LED (blue)
accessories
HDMI male/female 12 cm extension cable, USB
2. Windows will display a notification telling you it's safe to remove
the device.
3. Unplug the device from the USB port.
16. Technic al Specificatio ns
OpenVG1.1
RAM 1GB DDR3
memory
/ RV10 / DivX / VC-1 / MPEG-2 / MPEG-4 / H.263
/ H.264 / 1280x720P H D 30 fps, 1080P /
WAV
Wi-Fi 802.11 b/g/n
ports HDMI (male), microSD slot, USB host x 2, USB
power cable, manual, microUSB to USB female
power adapter compatible with any USB power 5V 1A to 5V 2A
dimensions 90 x 40 x 13 mm
Use this device with original accessories only. Velleman nv
cannot be held responsible in the event of damage or injury
resulting from (incorre ct) use of this device. For more info
concerning this pr odu ct and the latest version of this ma nual,
V. 02 – 12/09/2013 25 ©Velleman nv
OTG adapter
(optional)
Page 26

PCTV2
please visit our website ww w.velleman.eu. The information in
this manual is subject to change without prior noti ce.
Android is a trademark of Google Inc.
© COPYRIGHT NOTICE
The copyright to this manual is owned by Velleman nv. All
worldwide rights reserved. No part of this manual may be copied,
reproduced, translated or reduced to any electronic medi um or
otherwise without the prior written cons ent of the copy right holder.
V. 02 – 12/09/2013 26 ©Velleman nv
Page 27

PCTV2
V. 02 – 12/09/2013 27 ©Velleman nv
Page 28

PCTV2
GEBRUIKERSHANDLEIDING
1. Inleiding
Aan alle ingezetenen van de Europese Unie
Belangrij ke milieu-informatie betreffende dit product
Dit symbool op het toestel of de verpakking geeft aan dat,
als het na zijn levenscyclus wordt weggew o rpen, dit to est el
schade kan toebrengen aan het milieu. Gooi dit toestel (en
eventuele batterijen) niet bij het gewone huishoudeli jke
afval; het moet bij een gespecialiseerd bedrijf
terechtkomen voor recyclage. U moet dit toestel naar uw verdel er of
naar een lokaal recyclagepunt brengen. Respecteer d e plaat selij ke
milieuwetgeving.
Hebt u vragen, contacteer dan de plaatselijke autoriteiten
betreffende de verwijdering.
Dank u voor uw aankoop! Lees deze handleiding grondig voor u het
toestel in gebruik neemt. Werd het toestel beschadigd tijdens het
transport, installeer het dan niet en raadpleeg uw dealer.
2. Algemene richtlijnen
Raadpleeg de Velleman® service- en kwaliteitsgarantie
achteraan deze handleiding.
• Gebruik het to estel enkel binnenshuis. Bescherm het toestel
tegen regen, vochtigheid en opspattende vloeistoffen.
• Bescherm dit toestel tegen stof en extreme temperaturen.
• Bescherm tegen schokken. Vermijd brute kracht tijd ens d e
bediening.
• Leer eerst de functies van het toestel kennen voor u het g a a t
gebruiken.
• Om veilighei dsredenen mag u g ee n w i j zigingen aanbre ngen.
• Gebruik het toestel enkel waarvoor het gemaakt is. De garantie
vervalt automatisch bij ongeoorloofd gebruik.
• De garantie geldt niet voor schade door het negeren van bepaalde
richtlijne n i n d ez e ha ndleiding en uw d e al er z al d e
verantwoordelijkheid afwijzen voor defecten of problemen die hier
rechtstreeks verband mee houden.
• Koppel het toestel niet los tijdens het formatteren of bijwerken
van de software. Dit kan systeem fouten veroorzaken.
V. 02 – 12/09/2013 28 ©Velleman nv
Page 29

PCTV2
1
HDMI-poort
4
USB OTG-poort
2
resetknop
5
micro USB-voedingspoort
3
micro SD-poort
6
USB-poort
1
HDMI-poort
Verbind de HDMI-poort van het toestel
32 GB).
4
USB-poort
Gebruik de USB OTG-poort om het toestel
5
Micro USB-
U kunt het toestel met de meegeleverde
toestel aansluiten (muis, toetsenbord...).
• Maak het toestel geregeld schoon met een droge, niet pluizende
doek. Gebruik geen alcohol of oplosmiddelen.
3. Omschrijving
Raadpleeg de afbeeldingen op pagina 2 van deze handleiding.
4. Het toes tel aansluiten
Het toestel heeft de volgende poorten en knoppen
rechtstreeks met de HDMI-poort van uw
televisietoestel, monitor of beamer (een
2 Resetknop Gebruik deze knop om het toestel te
3 micro SD-
poort
voedingspoort
6 USB-poort Op deze poort kunt u eender welk USB-
5. Aan de s lag
Om het toestel in gebruik te nemen:
1. Verbind het toestel met de HDMI-poort van uw televisietoestel,
monitor of beamer.
2. (Alleen voor TV): Gebruik de afstandsbediening van uw
televisietoestel om de minicomputer als HDMI-bron in te stellen
V. 02 – 12/09/2013 29 ©Velleman nv
kabel is niet noodzakelijk).
resetten.
U kunt het geheugen van het toe stel
uitbreiden met een micro SD-kaart (max.
te verbinden met uw pc (bijvoorbeeld om
gegevens te kopiëren) of met een ander
USB-toestel (muis, toetsenbord...).
USB-voedingskabel verbinden met uw
televisietoestel om het op te laden
Page 30
PCTV2
icoon of een bestand te slepen.
Rechtermuisknop
Terug of annule ren
(zoals u met ee n a ndere HDMI bron zou doen).
Het opstartscherm van d e mi nicomp ut er ve rschi j nt .
6. Het toes tel afsluiten
Om het toestel af te sluiten:
1. In de toolbar onderaan, klik op de knop en klik op druk OK.
2. Koppel het toestel pas los als het volledig afgesloten is.
7. Muis
Om de minicomputer te gebruiken, hebt u een USB-muis nodig (niet
meegeleverd).
Gebruik de muisknoppen a ls volgt:
Linkermuisknop • OK
Muiswiel
8. Toetsenbord
• Als u geen extern toetsenbord aansluit, toont het toestel
automatisch het softwaretoetsenbord.
• Als u een toetsenbord aansluit, wordt het softwaretoetsenbord
niet getoond.
9. Het startscherm
Bij het opstarten geeft het toestel het volgende scherm weer.
V. 02 – 12/09/2013 30 ©Velleman nv
• Houd de linkermuisknop ingedrukt om een
•
• Gebruik het m ui sw i e l om van links naar
rechts te bladeren (op het bureaublad) of
van boven naa r beneden (in de i nstellingen,
browser...).
• Houd het muiswiel ingedrukt om de
kenmerken van een bestand weer te geven.
Page 31

PCTV2
Klik op de het app-pictogram in het startscherm
Hierna verschijnt het startscherm. Het startscherm bestaat uit
meerdere pagina's waar u symbolen, applicaties en widg et s kunt aan
toevoegen, verplaatsen of verwijderen. M et het muiswiel kunt u door
de pagina's bladeren.
Pictogrammen
Een pictogram op het bureaublad verplaatsen
Klik op het pictogram, houd he t i ng ed r ukt e n sleep het naar de
gewenste positie.
U kunt evenee ns e en pictogram naa r ee n a ndere pagina van he t
startscherm slepen.
Een pictogram van het bureaublad verwijderen
Klik op het pictogram dat u wilt verwijderen, houd het ingedrukt en
sleep het naar het x-symbool b o ve na a n i n he t m i d den van het
startscherm.
De bureaublada chtergrond wijzigen
1. Houd de cursor ingedrukt op de bureaubladachtergrond
2. Kies de bron van de achtergrond (Gallery, Live Wallpaper of
Wallpaper).
3. Klik op de gewenste achtergrond en klik op de knop "Set
wallpaper" om te bevestigen.
V. 02 – 12/09/2013 31 ©Velleman nv
Klik op dit pictogram in het startscherm
linksboven, om op internet te zoeken.
rechtsboven, om alle beschikbare apps op het
toestel weer te geven.
Page 32

PCTV2
De geopende apps weergeven
Volume verlagen
Volume verhogen
Het toestel uitschakelen
Klik op het app-pictogram in het startscherm
9.2 Werkbalk
De werkbalk van het toestel is altijd zichtbaar. Deze geeft de
volgende pictogrammen weer:
Terug
Home
De werkbalk (of toetsenbord) verbergen
9.3 Statusbalk
De statusbalk bevindt zich rechtsboven in het scherm.
Afhankeli j k v a n uw si tuatie, kunnen verschillende i tems worden
weergegeven:
USB-verbind ing, downloadstatus, uur, s ignaalsterkte, ...
Klik op de statusbalk om deze te vergroten. Klik op een pictogram
om de functie rechtstreeks in de Instellingen te openen.
9.4 Apps
rechtsboven, om alle beschikbare apps op het
Worden de apps op verschillende pagina's weergegeven, dan kunt u
door de pagina's bladeren met het muiswiel.
Een app starten
Klik op de app die u wilt gebruiken.
V. 02 – 12/09/2013 32 ©Velleman nv
toestel weer te geven.
Page 33

PCTV2
Een app aan het startscherm toevoegen
Houd het app-pictogram ingedrukt.
Het startscherm verschijnt.
Laat het pictogr am los op de gewenste plaats.
9.5 Widgets
Klik op het app-pictogram in het start scherm recht sboven.
In de apps-lijst, open de widgets-tab.
Een widget openen
Klik op de widget die u wilt gebruik en.
Een widget aan het startscherm toevoegen.
Houd het widget-pictogram ingedrukt.
Het startscherm verschijnt.
Laat het pictogr am los op de gewenste plaats.
10. Instellingen
Klik op het instellingenpictogram om naar instellingen te gaan (op
het bureaublad of in de apps-lijst).
V. 02 – 12/09/2013 33 ©Velleman nv
Page 34

PCTV2
Wi-Fi-instelling
Ethernet
Instelling e n > Et he rne t
U kunt het toestel op een bekabeld netwerk (Ethernet) aansluiten
met een USB LAN-adapter. Ethernet activeren
• Klik op Use Ethernet.
Data usage gebruiken (gegevensgebruik)
Instelling e n > D at a usa ge
Geeft het gegevensgebruik van elke app weer.
Mobiel toegangspunt
Instellingen > Meer > Mobiel toegangspunt
Wanneer uw t o e st e l vi a e en e t he rne t a ansluiting verbonden is, da n
kunt u uw toes t el als d ra adloos toegang spunt gebruiken.
• Klik op Wi-Fi-toegangspunt configureren, kies de geschikte
PPPoE
Instellingen > Meer > PPPoE
Wanneer u PPPoE (Point-to-Point Protocol over Ethernet) nodig hebt,
dan kunt u de ze i nstellingen al s volgt ingeven:
• Klik op PPPoE-account, om de details v an uw a ccount i n t e g ev en.
V. 02 – 12/09/2013 34 ©Velleman nv
instellingen en klik op Save om te bevestigen.
Page 35

PCTV2
USB
Instellingen > USB
U kunt het toes t el op uw computer a a nsl uiten om besta nden te
kopiëren toestel en pc.
Gebruik de meegeleverde micro USB/USB-kabel om het toestel op
uw computer a a n t e sluiten.
Zorg ervoor dat het toestel met uw HMDI-monitor verbonden is.
• Klik op Connect to PC.
Nu kunt u besta nden van uw comp ut e r na a r het toestel kopiër en
en omgekeerd.
Sound (Geluid)
Instellingen > Geluid
De beschikbare instellingen zijn: volume, trillen en geluidstoestellen
(indien aangesloten).
Display
Instellingen > Display
Met de optie Display, kunt u de lettergrootte instellen.
Scherm
Instelling e n > Sc her m
De mogelijke opties zijn:
• Schermgrootte: verschuif de knop om de schermgrootte te
vergroten of verkleinen
• Uitgangsinterface (standaard is HDMI).
• HDMI-modus: Dit stelt u in staat om de resolutie in te stellen,
afhankelijk van de resolutie van uw tv. Het toestel detecteert de
meest geschikte resolutie.
Opslag
Instellingen > Opslag
Geeft de schijfgroo t te van verschil l ende gegevenstypes en de
beschikbare schijfruimte weer.
U kunt ook een SD-kaart verwijderen of wissen.
De Android-systeempartities worden niet in dit venster weergegeven.
Apps
Instellingen > Apps
Dit stelt u in staat om de geïnstalleerde apps op het toestel en op de
SD-kaart te beheren.
V. 02 – 12/09/2013 35 ©Velleman nv
Page 36

PCTV2
De apps zijn in verschillende lijsten onderverdeeld: Gedownload - Op
SD-kaart - Geopend - Alle. Klik op een lijstnaam o m deze te op enen.
Klik op de app om het detailvenster te openen.
Afhankelijk van het type app, zijn de beschikbare functies:
• Geforceerd stoppen
• De-installeren
• Updates de-installeren
• Naar SD-kaart verplaatsen
• Data wissen
• Cache leegmaken
• Standaard wissen
Het instellingenpictogram rec ht sb o ven kunt u meer opt ie s
openen:
• Sorteren op grootte
• App-voorkeuren resetten
Beveiliging
Instellingen > Beveiliging
Bevat instellingen voor:
• Apps van onb e ke nde bronnen insta l leren
• Certificaten installeren.
Opmerking: De optie Device Administrator heeft geen functie op di t
toestel.
Taal & invoer
Instellingen > Taal & toetsenbord
Bevat instellingen voor:
• taal van de gebruiker
• spellingscontrole (klik op de knop voor meer opties)
• persoonlijk woordenboek
• instellingen toetsenbord
• Instellingen voor het Android-toetsen b ord (klik op de knop
voor meer opties). Deze opties zijn gerelateerd aan de invoertaal,
autocorrectie, geluid toetsenbord en trillingen, enz.
V. 02 – 12/09/2013 36 ©Velleman nv
Page 37

PCTV2
• aanwijssnel he i d van de muis: v er schuif de knop om d e
aanwijssnelheid te verhogen of te verlagen.
Back-up maken en opnieuw instellen
Instellingen > Back-up maken en opnieuw instell e n
• Back-up maken van m i j n g eg e ve ns: dit stelt u in staa t om een
back-up te maken van de gegevens en instellingen van een app
voor een Google-account. U kunt ook opties instellen voor
Automatisch herstellen.
• Fabrieksinstellingen terugzetten: Wist alle gegevens op uw
toestel, inclusief uw acco untgegevens. De gegevens op de SDkaart kunnen eveneens worden gewist.
Accounts
Instelling e n > Ac co unts
Hierbij kunt u e e n a ccount toevoegen en bestaand e a cc o unt s
beheren.
1. Klik op Account toevoegen, selecteer daarna Google.
o Om een bestaande account toe te voegen, klik op de knop
Existing en volg de instructies op het scherm .
o Om een nieuwe account te maken, klik op de knop New en volg
de instructies op het scherm.
10.2 Datum & tijd
Instellingen > Datum & tijd
Bevat instellingen voor:
• automatische datum- en tijdsinstelling
• manuele da tum- en tijdsinstelling
• tijdzone
• formaat datum en tijd
10.3 Toegankelijkheid
Instellingen > Toegankelijkheid
Bevat instellingen voor:
• Terugspraak (schakelt de gesproken feedback in of uit)
• Tekst-naar-spraak-uitgang
• Webtoegankelijkheid
10.4 Ontwikkelaarsopties
Instellingen > Ontwikkelaarsopties
Bevat praktische optie s voo r het o ntwikke le n.
V. 02 – 12/09/2013 37 ©Velleman nv
Page 38

PCTV2
USB-foutopsporing: Selecteer deze optie om de foutopsporingsmodus
in te stellen bij het uitwisselen van gegevens tussen het toestel en
uw computer .
10.5 Over het toestel
Instellingen > Over het toestel
Geeft gegevens weer die betrekking hebben tot
• systeemupdates
• systeemstatus (batt eri j, net wer k, ... )
• modelnummer, Androidversie, ...
11. Bestandsbeheer
Via de verkenner (Explorer), kunt u bestanden op uw toestel
bekijken en bewerken.
De verkenner (Explorer) openen:
1. Klik op het Explorer-pictogram op het startscherm.
Explorer wordt geopend.
2. Klik op een mediabron (Internal Flash, SD-kaart, …) om de
inhoud te be kijken.
• In de Verkenner, kunt u bestanden en mappen kopiëren,
verwijderen, verplaatsen, plakken, hernoem en en d elen.
• Als u dit wilt do e n, ho ud het gewenste it em ingedrukt tot het
menu verschijnt en selecteer de actie die u wilt uitvoeren
• Bijvoorbeeld, klik op Internal flash, om de interne schijf van het
toestel te zien.
V. 02 – 12/09/2013 38 ©Velleman nv
Page 39

PCTV2
Naam
Functie
Home
Terugkeren naar het bovenliggende niveau
LevelUp
Eén niveau hoger de bestandsstructuur
Multi
Meerdere bestanden of mappen selecteren
deselecteren.
Editor
De editor bevat dezelfde opties als in het pop-up
geschiedenis van de best and sve rken ner
Exit
De bestandsverkenner sluiten
Knoppen
De knoppen i n d e Ver kenner zijn:
Klik op de knop Multi.
Klik op het gewenste bestand of de gewenste
map.
Klik nogm a al s op d e knop Multi, om te
Back Terugkeren naar de vorige locatie in de
Next Naar de volgende locatie in de geschiedenis van
12. E en ap p install eren
Om een app te installeren:
• Vanaf Google Play, met uw Google-account, of eender welke
website die Android-apps aanbiedt.
• Vanaf een lokale schijf (bijvoorbeeld een geheugenkaart wa aro p u
een app hebt gedownload)
Google Play
1. Ga naar Google Play en download de gewenste app.
2. Na het downloaden wordt u gevraagd of u de app wilt
installeren.
Lokale installat ie
Sluit de minicomputer aan op het externe toestel met de app.
In de bestandsverkenner, zoek de app en klik erop deze om de
installatie te starten.
Een app verwijderen
Om een app te verwijderen:
1. Open de Instellingen en klik op Apps.
2. Klik op de app die u wilt installeren.
V. 02 – 12/09/2013 39 ©Velleman nv
menu.
de bestandsverkenner
Page 40

PCTV2
3. Klik op de knop Uninstall en klik op OK om te bevestigen.
13. Airplay/DLNA
Terwijl de minicomputer aangesloten is op een draadloze
breedbandmodule, kunt u deze eveneens geb ruiken als:
14. Afstandsbediening
U kunt de mini co m puter vanop afstand aansturen m e t uw Androidtelefoon of tablet:
• Download en installeer de MK802-afstandsbediening-app op uw
telefoon of tablet via Google Play.
• U kunt nu uw telefoon gebruiken als afstandsbediening voor de
minicomputer.
• De app gebruikt uw draadloos netwerk om de minicomputer aan
te sturen.
15. Systeemherstel/-update
In sommige gevallen moet u de laatste firmwareversie downloaden.
Bijvoorbeeld:
• Het toestel functioneert heel traag of crasht vaak.
• Het toestel vindt het draadloos netwerk niet of kan geen
verbinding maken.
• Na de installatie van een app, stopt het toestel en herstart niet.
• Bij het opstarten, geeft het toestel enkel het startscherm weer.
• Het toestel kan de SD-kaart niet lezen.
Voor u begint
Zorg ervoor dat u het volgende bij de hand hebt:
• de meegeleverde micro USB/USB-kabel
• een fijne metalen punt (bijvoorbeeld een naald).
Om de laatste firmware te downloaden:
1. Op uw computer, ga naar www.rikomagic.com en download de
herstel- / updatesoftware voor uw toestel.
2. Download de correcte versie voor uw toestel: Rikom ag ic M K802
IIIS.
3. Pak het gedownloade bestand uit.
4. In de uitgepakte map, pak het bestand Batch Tool 1.5.zip uit
(versienummer kan variëren).
V. 02 – 12/09/2013 40 ©Velleman nv
Page 41

PCTV2
15.2 Het beeldbestand opladen
1. Voer het bestand RKBatchTool.exe uit.
2. Klik op de knop .
3. Selecteer het .img-bestand en klik op Open.
De firmware wordt opgeladen.
V. 02 – 12/09/2013 41 ©Velleman nv
Page 42

PCTV2
15.3 Het toestel aansluit en
1. Sluit de kabel aan op een USB-poort van uw computer.
2. Gebruik de naald om de resetknop op het toetstel voorzichtig
ingedrukt t e ho uden (zie afb.).
3. Terwijl u de naald vasthoudt, sluit de micro USB-kabel aan op de
USB OTG-poort van het toestel.
4. Verwijder de naald na 3 à 5 seconden.
De volgend e st ap pen hangen af va n he t g eb r ui kte
besturingssysteem . D e handl eid i ng b eschri jft d e stapp en voo r
Windows XP (volgend hoofdstuk) en Windows 7 (pagina 18).
15.4 Windows XP
Op uw computer verschijnt het vo lg e nd e venste r:
V. 02 – 12/09/2013 42 ©Velleman nv
Page 43

PCTV2
1. Selecteer Install from a list or specific location en klik op
Next.
2. Klik op de knop Browse en selecteer de map met de driver.
Klik op Next.
De installatie van de driver begint.
3. Na de installatie, verschijnt het volgende venster:
V. 02 – 12/09/2013 43 ©Velleman nv
Page 44

PCTV2
4. Klik op Finish.
5. In de tool Batch, verandert de kleur van de aange sl oten
toestellen.
6. Klik op de knop Upgrade.
De upgrade duurt ongeveer 3 minuten. Schakel het toestel niet
uit tijdens de upgrade.
Na een geslaagde installatie, verschijnt het volgende venster:
V. 02 – 12/09/2013 44 ©Velleman nv
Page 45

PCTV2
7. Klik op Exit.
Verwijder indien nodig het toestel veilig uit het toestel voor u het
ontkoppelt (zie Het toestel veilig van de computer loskoppelen
hieronder).
Opmerking
Wanneer u het toestel voor de eerste keer gebruikt na een firmwareupdate, ka n he t to e stel trager functi o ne re n o f kan het opstarten
langer duren.
15.5 Windows 7
1. Op uw comput e r, v er schijnt het volg e nde bericht:
2. Klik op dit bericht.
Het volgende venster verschijnt:
V. 02 – 12/09/2013 45 ©Velleman nv
Page 46

PCTV2
3. Klik op de link Skip obtaining driver software from
Windows Update.
4. Open Mijn computer (toetsencombinatie +e).
5. Klik met de rechtermuisknop op Computer en selecteer Beheer.
6. Apparaatbeheer openen > Ander apparaat.
V. 02 – 12/09/2013 46 ©Velleman nv
Page 47

PCTV2
7. Dubbelklik op Onbeken d A pparaat.
8. Klik op de knop Update Driver.
V. 02 – 12/09/2013 47 ©Velleman nv
Page 48

PCTV2
9. Klik op de knop Browse en selecteer de correcte driver.
o Is uw computer 32-bits, selecteer dan x86--win7
o Is uw computer WIN7 64-bits, selecteer dan x64--win7
10. Klik op Next.
11. Klik op Next.
De installatie van de driver begint.
V. 02 – 12/09/2013 48 ©Velleman nv
Page 49

PCTV2
12. Na de installatie, verschijnt het volgende scherm:
13. Klik op Close.
14. In de tool Batch, verand e rt d e kl e ur v an de aangesloten
toestellen.
V. 02 – 12/09/2013 49 ©Velleman nv
Page 50

PCTV2
15. Klik op de knop Upgrade.
De upgrade duurt ongeveer 3 minuten. Schakel het toestel niet
uit tijdens de upgrade.
Na een geslaagde installatie, verschijnt het volgende scherm:
16. Klik op Exit.
Verwijder indien nodig het toestel veilig uit het toestel voor u het
ontkoppelt (zie Het toestel veilig van de computer loskoppelen
hieronder).
V. 02 – 12/09/2013 50 ©Velleman nv
Page 51

PCTV2
CPU
RK306 dubbelkern
OpenVG1.1
hoofdfrequentie
Cortex-A9, tot 1.6 GHz
RAM
1GB DDR3
geheugen
4 GB
geheugen
WAV
Wi-Fi
802.11 b/g/n
Flash
ondersteunt Flash 11.1
Opmerking
Wanneer u het toestel voor de eerste keer gebruikt na een firmwareupdate, ka n he t to e stel trager functi o ne re n o f kan het opstarten
langer duren.
15.6 Het toestel veilig van de computer loskoppelen
Het toestel veilig van de computer loskoppelen:
1. Klik op het pictogram "Safely Remove Hardware" (hardware
veilig verwijderen) in het systeemvak (rechts in de taakbalk) en
klik op het toestel dat u wilt verwijderen.
2. Windows geeft een melding weer dat u het toestel veilig kunt
verwijderen.
3. Ontkoppel het toestel van de USB-poort.
16. Technische specificaties
GPU quad core 2D / 3D / OpenG L ES2.0 (MALI-400) /
OS Android 4.2
uitbreidbaar
webbrowser ingebouwd
videoformaat WMV / ASF / MP4 / 3GP / 3G2M4V / AVI / MJ P EG
audioformaat MP3 / WMA / APE / FLAC / AAC / OGG / AC3 /
beeldformaat m ax . 8000 x 80 00 JPEG BMP GIF PNG
V. 02 – 12/09/2013 51 ©Velleman nv
microSD (ma x. 32 G B)
/ RV10 / DivX / VC-1 / MPEG-2 / MPEG-4 / H.263
/ H.264 / 1280x720P H D 30 fps, 1080P /
720x480 D1 30 fps
Page 52

PCTV2
poorten
HDMI (mannelijk), microSD-sleuf, USB host1A naar 5V 2A (niet meegelev.)
afmetingen
90 x 40 x 13 mm
accessoires HMDI-kabel 12 cm (mannelijk/vrouwelijk),
voedingsadapter compatibel met eender welke USB-adapter, 5V
Gebruik dit to estel enkel me t ori ginele acce ssoires. Vell eman
nv is niet aansprakelijk voor schade of kwetsuren bij
(verkeerd) gebruik van dit toestel. Voor meer informatie over
dit product en de laatste versie van deze handleiding, zie
www.velleman.eu. De informatie in deze handleiding kan te
allen tijde worden gewijzigd zonder voorafgaande
kennisgeving.
Android is een handelsmerk van Google Inc.
© AUTEURSRECHT
Velleman nv heeft het aut eursrecht voor deze handle i ding.
Alle wereldwijde rechten voorbehouden. Het is niet toegestaan
om deze handleiding of gedeelten ervan over te nemen, te kopiëren,
te vertalen, te bewerken en op te slaan op een elektronisch medium
zonder voorafgaande schriftelijke toestemming van de
rechthebbende.
poort x 2, USB-voedingspoort; LED (blauw)
USB-voedings kabel, gebruikershandleidin g,
adapter microUSB naar USB (vrouwelijk)
V. 02 – 12/09/2013 52 ©Velleman nv
Page 53

PCTV2
MODE D'EMPLO I
1. Introduction
Aux résidents de l'Uni on européenne
Informations envir onnementales importantes concernant ce
produit
Ce symbole sur l'appareil ou l'emballage indique que
l'élimination d'un appare il en fin de vie peut polluer
l'environnement. Ne pas jeter un appareil électrique o u
électronique (et des piles éventuelles) parmi les déchets
municipa ux no n s uj e t s a u tri sélectif; une déchèterie
traitera l'appareil en qu estion. Renvoyer cet appareil à votre
fournisseur ou à un service de re cycla ge local. Il convient de
respecter la réglementation locale relative à la protection de
l'environnement.
En cas de questions, contacter les autorités locales pour
élimination.
Nous vous remercions de votre achat ! Lire le présent mode d'emploi
attentivement avant la mise en service de l'appareil. Si l'appa reil a
été endommagé pendant le transport, ne pas installer et consulter
votre revendeur.
2. Directives générales
Se référer à la garantie de service et de qualité Velleman® en
fin de ce mode d'emploi.
• Utiliser cet appareil uniquement à l'intérieur. Protéger de la
pluie, de l’humidité et des projections d’eau.
• Protéger cet appareil contre la poussière et la chaleur extrême.
• Protéger l’appareil des chocs. Traiter l'appareil avec circonspection
pendant l’opération.
• Se familiariser avec le fonctionnement de l'appareil avant de
l'utiliser.
• Il est interdit de modifier l'appareil pour des raisons de sécurité.
• N’utiliser votre lumineux qu’à sa fonctio n p ré vue . Un usa ge
impropre annule d'office la garantie.
• Les dommages occasionnés par des modifications à l'appareil par
le client, ne tombent pas sous la garantie et votre revendeur
déclinera toute responsabilité pour les problèmes et les défauts
qui en résult ent.
V. 02 – 12/09/2013 53 ©Velleman nv
Page 54

PCTV2
1
Port HDMI
4
port USB OTG
2
bouton de
5
port d'alimentation micro USB
3
Port micro SD
6
Port USB
1
port HDMI
Brancher directement le port HDMI de
2
Bouton de
Appuyer le bouton pour initialiser l'appareil.
une carte micro SD (max. 32 G o).
4
Port USB
Utiliser le port USB OTG pour connecter
appareil USB (souris, clavier...).
5
Port
Connecter l'appareil avec le câble inclus à
• Ne pas déconnecter l'appareil en cours de formatage ou de mise à
jour. Ceci peut causer des erreurs de système.
• Essuyer l’appareil avec un chif f o n sec non pe lucheu x. Éviter
l’usage d’alcool et de solvants.
3. Description
Se référer aux illustrations en page 2 de ce mode d'emploi.
réinitialisation
4. Connexion de l'appareil
L'appareil est équipé des bout o ns et p o rts suivant s :
l'appareil sur le port de votre télévision,
moniteur ou projecteur, sans câble.
réinitialisation
3 p ort micro SD Augmenter la mémoire de l'appareil avec
l'appareil à votre ordinateur (par exemple
pour transférer des données ) ou tout autre
d'alimentation
micro USB
6 Port USB Connecter tout appareil USB (souris,
5. Première utilisation
Pour utiliser l'appareil :
1. Connecter l'appareil au port HDMI de votre télévision, moniteur
ou projecteur.
2. (Télévision seulement:) La commande à distance pour
sélectionner le mini-ordinateur comme source HDMI (comme
V. 02 – 12/09/2013 54 ©Velleman nv
votre télévision pour le charger.
clavier...) à ce port.
Page 55

PCTV2
icone ou un fichier.
Molette de
• Utiliser la molette pour vous déplacer de gauche
vous le feriez pour toute autre source HDMI).
L'écran de démarrage du mini-ordinateur s'affiche.
6. Eteindre l'appareil
Pour éteindre l'appareil :
1. Dans la barre d'outils en bas de l'écran, cliquer sur le bouton
et appuyer sur OK.
2. Attendre jusqu'à ce que l'appareil soit éteint pour le
déconnecter.
7. Souris
Pour utiliser le mini-ordinateur, il vous faut a u m o i ns une s o uris USB
(non incluse) .
Utiliser les contrôles de la souris comme suit :
Bouton de
gauche
Bouton de
droite
défilement
8. Clavier
• Si vous ne connectez pas de clavi er e xte rne, l'appareil affichera un
clavier électronique.
• Si vous connectez un clavier externe, l'appareil n'affichera pas le
clavier électronique.
9. L'écran d'accueil
Lors du démarrage, l'appareil affiche l'écran suivant :
V. 02 – 12/09/2013 55 ©Velleman nv
• OK
• Maintenir le bouton enfoncé pour glisser un
• Retour ou Annuler
à droite (sur le bureau) ou de haut en bas (dans
les paramètres, browser...).
• Maintenir la molette enfoncée pour afficher les
propriétés d'un fichier.
Page 56

PCTV2
Cliquer sur l'icone d'application en haut à droite
Une fois terminé, l'écran d'accueil s'affiche. L'écran d'accueil contient
plusieurs pages sur lesquelles vous pouvez ajouter, déplacer ou
supprimer des icones, d es appl ica tio ns et des w idgets. Il est possible
de naviguer dans les pages d'accueil avec la molette de défilement.
Icônes
Déplacer un icone sur le bureau
Cliquer et maintenir le clic sur l'icone et déposer le à l'emplacement
souhaité.
Il est également possible de déplacer un icone vers une autre page
de l'écran d'accueil.
Supprimer un icone sur le bureau
Cliquer et maintenir le clic sur l'icone à supprimer et déposer le vers
le symbole X dans la partie centrale de l'écran d'accueil.
Modifier le fond d'écran
1. Maintenir l e cur se ur e nf oncé sur le fond d ' é cr a n.
2. Choisir à partir de quelle source vous souhaitez utiliser un fond
d'écran (Gallery, Live Wallpaper ou Wallpaper).
3. Cliquer sur l e f o nd d' é cr a n que vous souhait e z ins t a l l e r e t cliquer
sur le bouton Set wallpaper pour confirmer.
9.2 Barre d'outils
La barre d'outils de l'appareil est toujours visible. Celle-ci contient les
icones suivants :
V. 02 – 12/09/2013 56 ©Velleman nv
Cliquer sur cet icone en haut à g a uc he de l'écran
d'accueil po ur c her c he r sur Internet.
de l'écran d'accueil pour afficher toutes les
applications disponibles.
Page 57

PCTV2
Retour
Accueil
Affiche les applications qui sont actuellement en cours
Diminuer le volume
Augmenter le volume
Eteindre l'appareil
Masquer la barre d'outils (ou le clavier)
9.3 Barre d'état
La barre d'état s'affiche en bas à droite de l'écran.
Selon votre situation, différents éléments peuvent êt re affichés :
connexion USB, état du tél éc ha rgement, heure, p ui s sa nce du signal,
...
Cliquer sur la barre d'état pour l'agrandir. Cliquer sur un icone pour
accéder directement à une fonction dans les Paramètres.
9.4 Applications
Si les applications s'affichent sur plusieurs pages, il est possible de
naviguer dans les pages avec la molette de défilement.
Démarrer une appl i cat i on
Cliquer sur l'application que vous souhaitez utiliser.
Ajouter une ap plicatio n à l'écran d'ac cueil.
Cliquer et maintenir le clic sur l'icone d'application.
L'écran d'accueil s'affi chera.
V. 02 – 12/09/2013 57 ©Velleman nv
Cliquer sur l'icone d'application en haut à droite
de l'écran d'accueil pour afficher toutes les
applications disponibles.
Page 58

PCTV2
Déposer l'icone à l'emplacement souhaité.
9.5 Widgets
Cliquer sur l'icone d'application en haut à droite de l'écran.
Dans la liste d'applications, ouvrir l'onglet Widgets.
Démarrer un widget
Cliquer sur le widget que vous souhaitez utiliser.
Ajouter un widget à l'écran d'accueil.
Cliquer et maintenir le clic sur l'icone du widget.
L'écran d'accueil s'affi chera.
Déposer l'icone à l'emplacement souhaité.
10. Réglages
Pour accéder aux paramètres, cliquer sur l' i cone P ara m èt res (sur l e
bureau ou dans la liste d'applications).
V. 02 – 12/09/2013 58 ©Velleman nv
Page 59

PCTV2
Paramètres Wi-Fi
Ethernet
Paramètres > Ethernet
Il est possible de connecter l'appareil à un réseau filaire (Ethernet)
avec un adapt a teur USB LAN. Po ur a ctiver Ethernet :
• Cliquer sur Use Et hernet.
Utilisation des données
Paramètres > Utilisation des données
Permet d'afficher l'utilisation des données de chaque application.
Point d'accès mobile
Paramètres > Plus > Point d'accès mobile
Si votre appareil est connecté à un réseau Ethernet, il est possible
d'utiliser votre appareil comme point d'accès mobile sans fil.
• Cliquer sur Set Up Wi-Fi hotspot, saisir les paramètres appropriés
et cliquer sur Save pour confirmer.
PPPoE
Paramètres > Plus > PPPoE
Si vous avez besoin de PPPoE (Point-to-Point Protocol over Ethernet),
saisir les paramètres comme suit :
• Cliquer sur PPPoE account po ur sai sir les dét ail s de vot re comp t e.
USB
Paramètres > USB
Il est possible de connecter l'appareil à votre ordinateur pour copier
des fichiers entre eux.
V. 02 – 12/09/2013 59 ©Velleman nv
Page 60

PCTV2
Utiliser le câble micro USB/USB inclus pour connecter l'appareil à
votre ordinateur.
S'assurer que l'appareil soit connecté à votre moniteur HDMI.
• Cliquer sur Connect to PC.
Maintenant, il est possible de copier des fichiers depuis votre
ordinateur vers l'app areil et vice versa.
Son
Paramètres > Son
Les paramètres disponibles sont : volume, vibration et appareils
sonores (si connectés).
Display
Paramètres > Display
L'option Display permet de régler la taille de la police .
Ecran
Paramètres > Ecran
Les options possibles so nt :
• Echelle d'affichage : glisser le bouton pour augmente r ou réduire
l'échelle d'affichage.
• Interface de sortie (HDMI par défaut).
• mode HMDI : permet de régler la résolution en fonction de la
résolution de votre TV. L'appareil détecte la résolution la plus
appropriée.
Stockage
Paramètres > Stockage
Affiche la taille de disque de plusieurs types de données et l'espace
libre.
Il est également possible de désinstaller ou effacer une carte SD.
Les partitions du système Android ne sont pas affichées dans cette
fenêtre.
Apps (Applications)
Paramètres > Apps
Permet de gérer les applications installées sur l'appareil et sur la
carte SD.
Les applications sont regroupées dans plusieurs listes : Téléchargées
- Sur carte SD - En cours - Toutes. Cliquer sur un nom de la liste
pour l'ouvrir.
Cliquer sur l'application pour ouvrir la fenêtre de détails.
V. 02 – 12/09/2013 60 ©Velleman nv
Page 61

PCTV2
En fonction du type d'application, les fonctions disponibles sont :
• Arrêt forcé
• Désinstaller
• Désinstaller des mises à jour
• Déplacer vers la carte SD
• Effacer les données
• Effacer cache
• Effacer les paramètres par défaut
L'icone des paramètres en haut à droite permet d'ouvrir plus
d'options :
• Tri par taille
• Réinitialiser les préférences des applications
Sécurité
Paramètres > Sécurité
Contient des paramètre s pour :
• Installer des applications depuis des sources inconnues
• Installer des certificats.
Remarque : L'option Device Administrator n'a pas de fonction sur cet
appareil.
Langue & saisie
Paramètres > Langue & saisie
Contient des paramètre s pour :
• la langue d'affichage
• correcteur orthographique (cliquer sur le bouton pour plus
d'options)
• dictionnaire personnel
• paramètres du clavier
• paramètres du clavier Android (cliquer sur le bouton pour
plus d'options). Ces options sont relatives à la langue de saisie,
l'autocorrection, le son du clavier et vibration, etc.
• vitesse du pointeur de la souris : glisser le bouton pour augmenter
ou diminuer la vitesse d u p oi nt e ur.
V. 02 – 12/09/2013 61 ©Velleman nv
Page 62

PCTV2
Sauvegarde & réinitialisation
Paramètres > Sauvegarde & Réinitialisation
• Sauvegarder mes données : permet de sauvegarder les données
d'application et les paramètres d'un compte Google. Il est
également possible de régler l'option pour restaurer
automatiquement.
• Réinitialiser les valeurs d'usine : permet de supprimer toutes les
données sur votre appare ils, y comp ri s les do nnées d e vot re
compte. Les données sur la carte SD peuvent également être
supprimées.
Comptes
Paramètres > Comptes
Permet d'ajouter un compte et de gérer des comptes existants.
1. Cliquer sur Add account, puis sélectionner Google.
o Pour ajouter un compte existant, cliquer sur le bouton Existing
et suivre les instructions à l'écra n.
o Pour créer un no uve au compte, cliquer sur le bouton New et
suivre les instructions à l'é cran.
10.2 Date & heure
Paramètres > Date & heure
Contient des paramètre s pour :
• configura t io n a utomatique de l a da t e et de l'heure
• configura t io n manuelle de la da t e et d e l' he ure
• fuseau horair e
• affichage de la date et de l'heure
10.3 Accessibilité
Paramètres > Accessib ilit é
Contient des paramètre s pour :
• Lecture vocale (activer o u désa ct i ver la lect ure voca l e)
• Sortie de la synthèse vocale (TT S)
• Accessibilité Web
10.4 Options du développeur
Paramètres > Options du développeur
Contient des paramètre s pratiques pour le dévelo ppement .
V. 02 – 12/09/2013 62 ©Velleman nv
Page 63

PCTV2
Débogage USB : Sélectionner cette option pour activer le mode
débogage lors de l'échange de données entre l'appareil et votre
ordinateur.
10.5 A propos de l'appareil
Paramètres > A propos de l'appareil
Affiche le s do nnée s portant sur
• mises à jour du système
• état du système (batterie, réseau, ...)
• numéro du modèle, version Android, ...
11. Gestion des fichiers
L'explorateur (Explorer) permet de visualiser et de gérer les fichiers
sur votre appareil.
Pour ouvrir l'explorateur (Explorer) :
1. Cliquer sur l'icone de l'Explorateur sur l'écran d'accueil.
L'Explorateur s'ouvre.
2. Cliquer sur une s o u r ce m é dia (Internal Flash, carte SD, .. . ) p o ur
visualiser le contenu.
• L'Explorateur vous permet de copier, supprimer, dépl acer, coller,
renommer et partager des fichiers et des dossiers.
• Pour cela, maintenir le clic sur l'élément souhaité jusqu'à ce que le
menu s'affiche et sélectionner l'action souhaitée.
• Par exemple, cliquer sur Internal flash pour voir le disque interne
de l'ap pareil.
V. 02 – 12/09/2013 63 ©Velleman nv
Page 64

PCTV2
Nom
Fonction
Home
Revenir au niveau supérieur
LevelUp
Monter un niv ea u dans la structure du fichier
Multi
Utiliser ce bouton pour sélectionner plusieurs
bouton Multi
Editor
L'éditeur contient les mêmes options comme
l'historique de l'explorateur du fichier.
Exit
Fermer l'explorateur du fic hier.
Boutons
Les boutons dans l'Explorateur sont :
fichiers ou dossiers.
Cliquer sur l e b o uton Multi.
Cliquer sur les fichiers ou dossiers souhaités.
Pour désél ec t io nne r, appuyer à nouv ea u sur le
Back Revenir à l'emplacement précédent dans
Next Accéder à l'emplacement suivant dans l'historique
12. Installe r une application
Il est possible d'installer une application :
• Depuis Google Play, avec votre compte Google, ou tout autre site
web fournissant des applications Android.
• Depuis un disque local (par exemple une carte de mémoire sur
laquelle l'application est téléchargée)
Google Play
1. Se connecteur à Google Play et télécharger l'application
souhaitée.
2. Après le téléchargement, l'appareil vous dema ndera si vous
souhaitez installer l'application.
Installation locale
Connecter le mini-ordinat e ur a u d i sq ue e xt e rne contenant
l'application.
Dans l'explorateur du fichier, recherc he r l'application et cliquer pour
démarrer l'installation.
Désinstaller une application
Pour désinstaller une application :
V. 02 – 12/09/2013 64 ©Velleman nv
dans le menu co nt e xtuel.
de l'explorateur du fichier.
Page 65

PCTV2
1. Ouvrir les Paramètres et cliquer sur App s.
2. Cliquer sur l'application que vous souhaitez désinstaller.
3. Cliquer sur le bouton Uninstall et cliquer sur OK pour confirmer.
13. Airplay/DLNA
Avec le mini-ordinateur connecté à un module large b a nde sa ns fi l, il
est également possible de l'utiliser comme
14. Télécommande
Il est possible de contrôler à distance le mini-ordinateur depuis votre
téléphone Android ou tablette :
• Télécharger et installer l'application de contrôle à distance MK802
depuis Google Play sur votre téléphone ou tablette.
• Maintenant, il est possib le d'utiliser votre téléphone comme
télécommande pour le mini-ordinateur.
• L'application utilise votre réseau sans fil pour contrôler le mini-
ordinateur.
15. Restauration/mise à jour du système
Dans certains cas, il peut parf ois être nécessai re de télécharger la
plus récente mise à jour sur votre appareil. Par exemple :
• L'appareil fonctionne très lentement ou tombe fréquemment en
panne.
• L'appareil ne détecte pas ou n'établit pas de connexion avec le
réseau sans fil.
• Après l'installation d'une application, l'appareil s'arrête et ne
redémarre pas.
• Lors du démarrage, l'appareil n'affiche que l'écran d'accueil.
• L'appareil ne peut pas lire la carte SD.
Avant de commencer
S'assurer d'avoir sous la mai n les élém ents sui vant s :
• le câble micro USB/USB inclus
• une pointe métallique fine (par exemple une aiguille).
Pour télécharger la plus récente mise à jour :
1. Sur votre ordinateur, aller au site w eb www.rikomagic.com et
télécharger le logiciel de restauration/mise à jour pour votre
appareil.
V. 02 – 12/09/2013 65 ©Velleman nv
Page 66

PCTV2
2. Télécharger la version correcte pour votre appareil : Rikomagic
MK802 IIIS.
3. Décompresser le fichier téléchargé.
4. Dans le fichier décompressé, décompresser le fichier Batch Tool
1.5.zip (la version peut varier).
15.2 Charger le fichier image
1. Lancer le fichier RKBatchTool.exe.
2. Cliquer sur le bouton .
3. Sélectionner le fichier .img et cliquer sur Open.
La mise à jour se charge.
V. 02 – 12/09/2013 66 ©Velleman nv
Page 67

PCTV2
15.3 Connexion de l'appareil
1. Connecter le câble à un port USB de votre ordinateur.
2. Utiliser l'aiguille pour maintenir enfoncé le bouton de
réinitialisation de l'appareil, comme illustré.
3. En maintenant l'aiguille, connecter le câble micro USB au port
USB OTG de l'a ppareil .
4. Retirer l'aiguille après 3 à 5 secondes.
Les étapes suivantes dépendent du système d'expl oit atio n utilisé. Le
mode d'emploi décrit les étapes pour Windows XP (section suivante)
et Windows 7 (page 18).
15.4 Windows XP
Sur votre ordinateur, la fenêtre suivante s'affi che :
V. 02 – 12/09/2013 67 ©Velleman nv
Page 68

PCTV2
1. Sélectionner Install from a list or specific location et cliquer
sur Next.
2. Cliquer sur le bouton Browse et sélectionner le dossier contenant
le pilote.
Cliquer sur Next.
Le pilote s'installe.
3. Après l'installation, la fenêtre suivante s'affiche :
V. 02 – 12/09/2013 68 ©Velleman nv
Page 69

PCTV2
4. Cliquer sur Finish.
5. Dans l'outil Batch, la couleur des appareils connectés change.
6. Cliquer sur le bouton Upgrade.
La mise à jour dure environ 3 minutes. Ne pas déconnecter
l'appareil durant la mise à jour.
Après une inst allation réussie, la fenêtre suivante s'affiche :
V. 02 – 12/09/2013 69 ©Velleman nv
Page 70

PCTV2
7. Cliquer sur Exit.
Si nécessaire, retirer l'appareil en toute sécurité avant de le
déconnecter (voir Déconnecter l'apparei l de votre ordinateur en
toute sécurité ci-dessous).
Remarque
Lorsque l'appareil fonctionne pour la première fois après la mise à
jour, il est possible que l'appareil fonctionne plus lentement ou
nécessite plus de temps pour démarrer.
15.5 Windows 7
1. Sur votre ordinateur, la notification suivante s'affiche :
2. Cliquer sur cette notification.
Le message suivant apparaît.
V. 02 – 12/09/2013 70 ©Velleman nv
Page 71

PCTV2
3. Cliquer sur le lien Skip obtaining driver software from
Windows Update.
4. Ouvrir Mon ordinateur (combinaison de touches + e).
5. Cliquer avec le bouton droit de la souris sur Ordinateur et
sélectionner Gestion.
6. Ouvrir Gestionnaire de périphériques > Autre périphérique.
V. 02 – 12/09/2013 71 ©Velleman nv
Page 72

PCTV2
7. Double-cliquer sur App a re i l inco nnu.
8. Cliquer sur le bouton Update Driver.
V. 02 – 12/09/2013 72 ©Velleman nv
Page 73

PCTV2
9. Cliquer sur le bouton Browse et sélectionner le pilote correcte.
o Si votre ordinateur est 32 bits, sélectionner x86--win7
o Si votre ordinateur est WIN7 64 bits, sélectionner x64--win7
10. Cliquer sur Next.
11. Cliquer sur Next.
Le pilote s'installe.
V. 02 – 12/09/2013 73 ©Velleman nv
Page 74

PCTV2
12. Après l'installation, la fenêtre suivante s'affiche :
13. Cliquer sur Close.
14. Dans l'outil Batch, la couleur des appareils connectés change.
V. 02 – 12/09/2013 74 ©Velleman nv
Page 75

PCTV2
15. Cliquer sur le bouton Upgrade.
La mise à jour dure environ 3 minutes. Ne pas déconnecter
l'appareil durant la mise à jour.
Après une installation réussie, la fenêtre suivante s'affiche :
16. Cliquer sur Exit.
Si nécessaire, retirer l'appareil en toute sécurité avant de le
déconnecter (voir Déconnecter l'appareil de votre ordinateur en
toute sécurité ci-dessous).
Remarque
Lorsque l'appareil fonctionne pour la première fois après la mise à
jour, il est possible que l'appareil fonctionne plus lentement ou
nécessite plus de tem ps pour démarrer.
15.6 Déconnecter l'appareil de votre ordinateur en toute
sécurité
Déconnecter l'appareil en toute sécurité :
1. Cliquer sur le symbole "Safely Remove Hardware" ( retirer l e
matériel en toute sécurité) dans la zone de notification (à droite
de la barre de tâches) et cliquer sur l'appareil à déconnecter.
V. 02 – 12/09/2013 75 ©Velleman nv
Page 76

PCTV2
CPU
RK3066 double cœur
GPU
quad core 2D / 3D / OpenG L ES2.0 (MALIOS
Android 4.2
fréquence principale
Cortex-A9, jusqu'à 1.6 GHz
mémoire
4 Go
mémoire extensible
microSD (ma x. 32 G o)
navigateur web
incorporé
format vidéo
WMV / ASF / MP4 / 3GP / 3G 2M 4V / AVI /
format audio
MP3 / WMA / APE / FLAC / AAC / OGG / AC3 /
format d'image
max. 8000 x 8000 JP EG BM P GIF P N G
Wi-Fi
802.11 b/g/n
Flash
supporte Flash 11.1
2, port d'alimentation USB; LED (bleue)
accessoires
câble HDMI de 12 cm (mâle/femelle),
2. Windows affichera une noti f i ca t io n i nd iquant que l'app a r eil p e ut
être déconnecté en toute sécurité.
3. Déconnecter l'appareil du port USB.
16. Spécificat ions techniqu es
400) / OpenVG1. 1
RAM 1Go DDR3
MJPEG / RV10 / DivX / VC-1 / MPEG-2 /
MPEG-4 / H.263 / H.264 / 1280x720P HD 30
fps, 1080P / 720x48 0 D1 30 f ps
WAV
ports HDMI (mâle), port microSD, port USB host x
câble d'alimentation USB, mode d'emploi,
adaptateur réseau compatible avec tout adaptateur USB de 5V
dimensions 90 x 40 x 13 mm
N'employer cet appareil qu'avec des accessoires d'origine. La
SA Velleman ne peut, dan s la mesure conforme au droit
applicable être tenue responsable des dommages ou lésions
(directs ou indirects) pouvant résulter de l’utilisation de cet
appareil. Pour p lus d'information concernant cet article et la
dernière version de ce mode d'emploi, consulter notre site
V. 02 – 12/09/2013 76 ©Velleman nv
adaptateur microUSB vers USB (femelle)
1A à 5V 2A (non incl.)
Page 77

PCTV2
www.velleman.eu. Les spécifications et le contenu de ce
mode d'emploi peuv ent être modifiés sans avis préalable.
Android est une marque de Google Inc.
© DROITS D’AUTEUR
SA Velleman est l’ayant droit des droits d’auteur pour ce
mode d'emploi. Tous droits mondiaux réservés. Toute
reproduction, traduction, copie ou diffusion , intégrale ou partielle, du
contenu de ce mode d'emploi par quelque procédé ou s ur tout
support électronique que ce soit est interdite sans l’accord préalabl e
écrit de l’ayant droit.
V. 02 – 12/09/2013 77 ©Velleman nv
Page 78

PCTV2
MANUAL DEL USUARIO
1. Introducción
A los ciudadanos de la Un i ón Europea
Importantes informaciones sobre el medio ambiente
concernie n te a este producto
Este símbolo en este aparato o el embalaje indica que, si
tira las muestras inse rvibles, podrían dañar el medio
ambiente. No tire este aparato (ni las pilas, si las hubiera)
en la basura doméstica; debe ir a una empresa
especializada en reciclaje. Devuelva este aparato a su
distribuidor o a la unidad de reciclaje local. Respete las leyes locales
en relación con el medio ambiente.
Si tiene dudas, contacte con las autoridades locales para
residuos.
¡Gracias por elegir Velleman! Lea atentamente las instrucciones del
manual antes de usar el aparato. Si el aparato ha sufrido algún daño
en el transporte no lo instale y póngase en contacto con su
distribuidor.
2. Normas generale s
Véase la Garantía de servicio y calidad Velleman® al final de
este manual d el us uar i o .
• Utilice el aparato sólo en interiores. No exponga este equipo a
lluvia, hum edad ni a ningún tip o d e salpicadura o gote o.
• No exponga este equipo a polvo ni temperaturas extremas.
• No agite el aparato. Evite usar excesiva fuerza durante el manejo
y la instalación.
• Familiarícese con el funcionamiento del aparato antes de utilizarlo.
• Por razones de seguridad, las modificaciones no autorizadas del
aparato están prohibidas.
• Utilice sólo el aparato para las aplicaciones descritas en este
manual. Su uso incorrecto anula la garantía completamente.
• Los daños causados por descuido de las instrucciones de
seguridad d e es t e m a nua l i nv a l idarán su garantía y su d i stribuidor
no será responsable de ningún daño u otros pr oblemas
resultantes.
• No desconecte el aparato mientras es tá formateando o
actualizando. Esto pod ría causar e rror es en el sistema.
V. 02 – 12/09/2013 78 ©Velleman nv
Page 79

PCTV2
1
puerto HDMI
4
puerto USB OTG
2
botón de
5
puerto micro USB
3
puerto micro SD
6
puerto USB
1
puerto HDMI
Conecte el puerto HDMI del aparato
SD
tarjeta micro SD (máx. 32 GB).
4
puerto USB
Utilice el adaptador incl. para conectar el
teclado, etc.).
5
puerto micro
Conecte el aparato con el cable USB incl. al
puerto (ratón, teclado, etc.).
• Limpie el ap a ra t o r eg ul a r m e nt e co n un paño húmedo si n p el usa s.
No utilice alcohol ni disolventes.
3. Descripción
Véase las figuras en la página 2 de este manual del usuario.
reinicialización (re set)
4. Conectar el aparato
El aparato está equipado con los siguientes puertos y botones:
directamente al puerto HDMI del televisor,
el monitor o el proyector. No se necesita un
cable.
2 Botón de
reinicialización
(reset)
3 puerto mic ro
Pulse este botón para reinicializar el
aparato.
Amplíe la memoria del aparato con una
aparato al PC (p.ej. para la transmisión de
datos) o a cualquier aparato USB (ratón,
USB
6 puerto USB Conecte cualquier aparato USB a este
5. Puesta en funcionamiento
Para empezar a utilizar el aparato:
1. Conecte el aparato al puerto HDMI del televisor, el monitor o el
proyector.
2. (Sólo para el TV) Utilice el mando a distancia del TV para
seleccionar el mini ordenador como fuente HDMI (como haría
V. 02 – 12/09/2013 79 ©Velleman nv
televisor para cargarlo.
Page 80

PCTV2
arrastrar un icono o un fichero.
Rueda de
• Utilice la rueda de desplazamiento para
con otra fuente HDMI).
La pantalla de inicio del aparato se visualizará.
6. Desactivar el aparato
Para desactivar el aparato:
1. En la barra de herramientas de la parte inferior, haga clic en
y luego en puls ar OK.
2. Espere hasta que el aparato se haya desactivado antes de
desconectarlo.
7. Ratón
Para poder utilizar el aparato, necesitará por lo menos un ratón USB
(no incl.).
Utilice el ratón de la siguiente manera:
Botón
izquierdo
Botón derecho • Volver o Cancelar
• OK
• Manten ga pulsado el botón izquierdo para
desplazamiento
8. Teclado
• Si no conecta un teclado externo, el aparato visualizará
automáticamente el teclado del software.
• Si conecte un teclado externo, el aparato no visualizará
automáticamente el teclado del software.
9. La pantalla de inicio
El aparato visualiza la siguiente pantalla durante la puesta en
marcha.
V. 02 – 12/09/2013 80 ©Velleman nv
desplazarse de la izquierda a la derecha
(escritorio) o hacia arriba o hacia abajo
(configuración, navegador, etc.).
• Manten ga pulsada la rueda de despl azamiento
para visualizar las propiedades de un fichero.
Page 81

PCTV2
búsqueda en internet.
Haga clic en este icono de la parte superior
Luego, la pantalla de inicio se visualiza. La pantalla de inic io incluye
varias páginas. Aquí, es posible añadir, desplazar o borrar iconos,
apps y widgets. Utilice la rueda de desplazamiento para navegar por
las páginas.
Iconos
Desplaza r un i cono
Mantenga pulsado un icono. Luego, arrastre este icono hacia la
posición deseada.
Es posible trasladar un icono hacia otra página de la pantalla de
inicio.
Eliminar un icono
Mantenga pulsado el icono que quiere eliminar y arrástrelo hacia el
símbolo X de la parte central superior de la pantalla de inici o.
Cambiar el fondo de pantal la
1. Mantenga pulsado el cursor en el fondo de pantalla.
2. Seleccione la fuente que quiere utilizar (Gallery, Live Wallpaper
o Wallpaper).
3. Haga clic en el fondo de pantalla deseado y luego haga clic en «
Set wallpaper » para confirmar.
9.2 Barra de herramient as
La barra de herramientas siempre es visible. Incluye los siguient es
iconos:
V. 02 – 12/09/2013 81 ©Velleman nv
Haga clic en este icono de la parte superior
izquierda de la pantalla de inicio para empezar la
derecha de la pantalla de inic io para visualizar
todas las apps disponibles.
Page 82

PCTV2
Volver
Ir a la pantalla de inicio
Visualizar las apps activas
Bajar el volumen
Subir el volumen
Desactivar el aparato
Ocultar la barra de herramie ntas (o el teclado)
9.3 Barra de estado
La barra de estado está en la parte inferior derecha de la pantalla.
La información visualizada varía según su situación.
Conexión USB, estado de descarga, hora,
Haga clic en la barra de estado para ampliarla. Haga clic en un icono
para acceder inmediatamente a la función (ajustes).
9.4 Apps
Si hay varias páginas, navegue por las páginas con la rueda de
desplazamiento.
Iniciar una ap p
Haga clic en la app deseada.
Añadir una app a la pant al la de inicio
Mantenga pulsado el icono.
La pantalla de inicio aparece.
Suelte el icono en el lugar deseado.
V. 02 – 12/09/2013 82 ©Velleman nv
Haga clic en el icono de las apps (parte superior
derecha) para visualizar todas las apps
disponibles.
Page 83

PCTV2
9.5 Widgets
Haga clic en el icono de los apps (parte superior derecha).
Abra « Widgets » en la lista de apps.
Iniciar un widget
Haga clic en el widget deseado.
Añadir un wi d get a la pant al la de inici o
Mantenga pulsado el icono.
La pantalla de inicio aparece.
Suelte el icono en el lugar deseado.
10. Ajustes
Para acceder a los ajustes, haga clic en el icono de los ajustes
(escritorio o lista de apps).
V. 02 – 12/09/2013 83 ©Velleman nv
Page 84

PCTV2
Ajuste WIFI
Ethernet
Settings > Ethernet
Es posible co ne ctar el aparato a una re d cableado (Et her net) con un
adaptador USB LAN. Activar Ethernet
• Haga clic en « Use Ethernet ».
Uso de datos
Settings > Data usage
Visualiza el uso de datos de cada app.
Hotspot (acceso a Internet inalámbrico)
Settings > More > Portable hotspot
Si el aparato está conectado a Ethernet, puede utilizarlo como punto
de acceso inalámbrico.
• Haga clic en « Set up Wi-Fi hotspot », seleccione los ajustes
adecuados y haga clic en « Save » para confirmar.
PPPoE
Settings > More > PPPoE
Si necesita PPPoE (Point-to-Point Protocol over Ethernet o Protocolo
Punto a Punto s obre Ethernet), p roceda de la siguient e m a ne ra :
• Haga clic en PPPoE para introd ucir sus detalles de cuenta.
USB
Settings > USB
Puede conectar el aparato a su ordenador para copiar ficheros.
Conecte el aparato al ordenador con el cable micro USB incluido.
Asegúrese de que el aparato esté conectado a la pantalla HDMI.
V. 02 – 12/09/2013 84 ©Velleman nv
Page 85

PCTV2
• Haga clic en « Connect to PC ».
Ahora, puede copiar ficheros del ordenador al aparato y viceversa.
Sonidos
Settings > Sound
Las funciones disponibles: volumen, vibración y aparatos de audio (si
hubiera alg uno conectado).
Visualización
Settings > Display
Es posible ajustar el tamaño de letra.
Pantalla
Settings > Screen
Opciones:
• Escala de la pantalla: Deslice el botón para subir o reducir la
escala de la pantalla.
• Interfaz de sa lida (por defecto HDMI).
• modo HDMI: Permite ajustar la resolución (depende de la
resolución del televisor). El aparato detecta automáticamente la
resolución más adecuada.
Almacenamiento
Settings > Storage
Visualiza el tamaño del disco duro de varios tipos de datos y el
espacio de disco libre.
También es posible desinstalar o eliminar una tarjeta SD.
Las particiones del sistem a And roid no se vi sualiza n en esta pantalla.
Apps (Aplicaciones)
Settings > Apps
Permite gestionar las apps instaladas en el aparato y la tarjeta SD.
Las apps están agrupada s en vari a s listas: D o wnloa ded - On SD card
- Running – All. Haga cl i c en la lista deseada p ar a abrirl a.
Haga clic en la app para visualizar más detalles.
Dependiendo del tipo de app, están disponibles diferentes listas:
• Forzar el cierre
• Desinstalar
• Desinstalar actualizaciones
• Mover a la tarjet a SD
• Eliminar datos
• Eliminar la memoria cache
V. 02 – 12/09/2013 85 ©Velleman nv
Page 86

PCTV2
• Eliminar los ajustes por defecto
Haga clic en (parte superior derecha) para más opciones:
• Ordenar por tamaño
• Restablecer los ajustes
Seguridad
Settings > Security
Incluye:
• Instalación de apps de fuentes desconocidas
• Instalación de certificados
Nota: La aplicación “Device Administrator” no es aplicable.
Idioma & Entrada
Settings > Language & input
Incluye:
• idioma de usuario
• controlador de ortografía (haga clic en para más opciones)
• diccionario personal
• Ajustes de teclado
• Ajustes de teclado para Android (haga clic en para más
opciones). Estas opciones están relacionados con el idioma, la
corrección automática, el sonido de las teclas y la vibración, etc.
• Velocidad del punter o ratón: Mueva el botón para aumentar o
bajar la velocidad.
Copia de seguridad & Reinicialización
Settings > Backup & Reset
• Back up my data: Permite hacer una copia de seguridad de los
datos y los ajustes en una cuent a G oogle. Tambié n puede ajustar
las opciones de la función « Automatic restore » (restauración
automática).
• Restablecer los ajustes de fábrica Elimina todos los datos, incluso
los datos de su cuenta. También es posible eliminar los datos de la
tarjeta SD.
V. 02 – 12/09/2013 86 ©Velleman nv
Page 87

PCTV2
Cuentas
Settings > Accounts
Permite aña dir una cuenta y ge st ionar cuentas existentes.
1. Haga clic en « Add account ». Luego, seleccione « Google ».
o Para añadir una cuenta existe nt e , haga clic en « Exist ing » y
siga las instrucciones en la pantalla.
o Para crear una nueva cuenta, haga clic en « New » y siga las
instrucciones en la pantalla.
10.2 Fecha & hora
Settings > Date & time
Opciones:
• ajuste automático de la fecha y la hora
• ajuste manual de la fecha y la hora
• huso horario
• formato de la hora y la fecha
10.3 Accesibilidad
Settings > Accessibilit y
Opciones:
• Talkback (activar o desactivar el feedback hablado)
• salida Text-to-speech
• accesibilidad a la web
10.4 Opciones para desarrolladores
Settings > Developer options
Incluye opciones útiles para desarrolladores.
Depuración USB: Seleccione esta opción para ajustar el modo de
depuración al intercambiar datos entre el aparato y el PC.
10.5 Sobre el aparato
Settings > About device
Incluye
• actualizaciones del sistema
• estado del sistema (pila, red, etc.)
• número del modelo, versión android, etc.
V. 02 – 12/09/2013 87 ©Velleman nv
Page 88

PCTV2
Nombre
Función
Subir de nivel
subir un nivel e n l a estructura del fi che ro
Multi
Utilice este botón para seleccionar varios ficheros
11. Administración de archivos
El explorador permite visualizar y trabajar con archivos en el
aparato.
Para abrir el explorador:
1. Haga clic en el icono del Explorador en la pantalla de inicio.
El explorador se abre.
2. Haga clic en una f ue nt e de informació n (Flash interno, tarjeta
SD, etc.) para visualizar el contenido.
• En el Explorador, puede copiar, eliminar, desplazar, pegar,
cambiar el nombre y compartir ficheros y archivos.
• Mantenga pulsado el ítem deseado hasta que el menú aparezca y
seleccione la acción deseada.
• Por ejemplo: haga clic en « Internal flash » para ver el disco
interno del aparato.
Botones
Los botones disponibles son:
Pantalla de
inicio
V. 02 – 12/09/2013 88 ©Velleman nv
volver a la pantalla principal
o archivos.
Haga clic en e l b o tó n « M ulti ».
Haga clic en los ficheros o archivos deseados.
Page 89

PCTV2
Para cancelar la selecció n, vuel va a hacer cl i c en
Volver
Volver a la posición anterior en el historial
Siguiente
Ir a la siguiente posición del historial
Exit
Cerrar el explorador de archivos
Editor El editor incluye las mismas opciones que el
12. I nstalar una app
Hay varias posibilidades:
• Google Play o cualquier otra página web con apps para Android:
utilice su cuenta Google
• disco local: por ejemplo, una memoria USB que incluye la app
descargada)
Google Play
1. Inicie una sesión en Google Play y descargue la app deseada.
2. Después de haberla cargada, el aparato preguntará si quiere
instalar la app.
Instalación local
Conecte el aparato al disco duro externo que incluye la app.
En el explorador de archivos, busque la app y haga clic en ella para
iniciarla.
desinstalar la app
Para desinstalar la app:
1. Abra « Settings » y haga clic en « Apps ».
2. Haga clic en la app que quiere desinstalar.
3. Haga clic en el botón « Uninstall » y haga clic en « OK » para
confirmar.
13. Airplay/DLNA
Mientras el aparato esté conectado a un módulo inalámbrico de
banda ancha, puede utiliz a rl o ta m bién como
14. Mando a distancia
Puede mandar a distancia el aparato con su teléfono móvil Android o
tablet.
V. 02 – 12/09/2013 89 ©Velleman nv
el botón « Multi ».
menú emergente.
Page 90

PCTV2
• Descargue e instale la app MK802 (Google Play) en su teléfono
móvil Android o tablet.
• Ahora, puede utilizar su teléfono móvil para mandar el aparato a
distancia.
• La app utiliza la red inalámbrica para controlar el aparato.
15. Recuperación del sistema/actualización
En algunos casos, es necesario actualizar el firmware del aparato.
Por ejemplo:
• El aparato es muy lento o se cuelg a regularment e.
• El aparato no p uede encontrar la re d o no puede conecta rs e.
• Después de haber instalad o una app, el ap ara t o se desact i va y no
se reinicia.
• Al activarse, el aparato sólo visualiza la pantalla de inicio.
• El aparato no puede leer la tarjeta SD.
Antes de empezar
Asegúrese de que tenga lo siguiente:
• el cable micro USB a USB (incl.)
• Un objeto af il ado (p.ej. una ag uj a).
Para descargar el firmware más reciente:
1. En el ordenador, visite www.rikomagic.com y descargue el
software de recuperación / actualización.
2. Asegúrese de que descargue la versión correcta: Rikomagic
MK802 IIIS.
3. Descomprima el archivo d escargado.
4. En el archivo descomprimido, descomprima el fichero Batch Tool
1.5.zip (el número de la versión puede variar).
15.2 Carga el archivo de imagen
1. Inicie el fichero RKBatchTool.exe.
V. 02 – 12/09/2013 90 ©Velleman nv
Page 91

PCTV2
2. Haga clic en el botón .
3. Seleccione el fichero .img y haga clic en « Open ».
El firmware se carga.
V. 02 – 12/09/2013 91 ©Velleman nv
Page 92

PCTV2
15.3 Conectar el aparato
1. Conecte el cable a un puerto USB del ordenador.
2. Utilice la aguja para mantener pulsado cuidadosamente el botón
de reinicialización del aparato (véase fig.).
3. Conecte el cable micro USB al puerto USB OTG del aparato al
mantener p ul sa d o la aguja.
4. Saque la aguja después de 3 a 5 segundos.
Los pasos siguientes dependen del sistem a operati vo que utili za. El
manual describe los pasos para Windows XP (siguiente capítulo) y
Windows 7 (página 18).
15.4 Windows XP
En el ordenador, la siguiente pantalla se visualiza:
V. 02 – 12/09/2013 92 ©Velleman nv
Page 93

PCTV2
1. Seleccione Install from a list or specific location y haga clic
en « Next ».
2. Haga clic en « Browse » y seleccione el archi vo con el dri ver.
Haga clic en « Next ».
El driver empieza a instalarlo.
3. Después de la instalación, la siguiente pantalla se visualiza:
V. 02 – 12/09/2013 93 ©Velleman nv
Page 94

PCTV2
4. Haga clic en « Finish ».
5. En el Batch Tool, el color de los aparatos conectados cambia.
6. Haga clic en « Upgrade ».
La actualización tardará unos 3 minutos. No desconecte el
aparato durante la actualización.
Después de una instalación correcta, la siguiente pantalla
aparece:
V. 02 – 12/09/2013 94 ©Velleman nv
Page 95

PCTV2
7. Haga clic en « Exit ».
Si fuera necesario, utilice la función « quitar hardware con
seguridad » (véase Quitar el dispositivo de forma segura).
Observación
El aparato puede tardar en activarse o ser lento al utilizarlo por
primera vez después de la actu a lización del firmware.
15.5 Windows 7
1. La siguiente notificación aparece en la pantalla:
2. Haga clic en esta notificación.
El siguiente mensaje aparece:
V. 02 – 12/09/2013 95 ©Velleman nv
Page 96

PCTV2
3. Haga clic en Skip obtaini ng driver software from Windows
Update.
4. Abra « My computer » (combinación de teclas + e).
5. Haga clic con el botón derecho del ratón en « Computer » y
seleccione « Manage ».
6. Abra Device Manager > Other device.
V. 02 – 12/09/2013 96 ©Velleman nv
Page 97

PCTV2
7. Haga clic dos veces en « Unknown devi ce ».
8. Haga clic ces en « Update Driver ».
V. 02 – 12/09/2013 97 ©Velleman nv
Page 98

PCTV2
9. Haga clic en « Browse » y seleccione el dri ver correcto.
o Si tiene un ordenador de 32 bits, seleccione x86--win7
o Si tiene un ordenador WIN7 de 64 bits, seleccione x64--win7
10. Haga clic en « Next ».
11. Haga clic en « Next ».
El driver empieza a instalar.
V. 02 – 12/09/2013 98 ©Velleman nv
Page 99

PCTV2
12. La siguiente pantalla se visualiza después de la instalación.
13. Haga clic en « Close ».
14. En el Batch Tool, el color de los aparatos conectados cambia.
V. 02 – 12/09/2013 99 ©Velleman nv
Page 100

PCTV2
15. Haga clic en « Upgrade ».
La actualización tardará unos 3 minutos. No desconecte el
aparato durante la actualización.
Después de una instalació n cor rect a, la siguiente pantalla
aparece:
16. Haga clic en « Exit ».
Si fuera necesario, utilice la función « quitar hardware con
seguridad » (véase Quitar e l d ispositivo de forma segura below).
Observación
El aparato puede tardar en activarse o ser lento al utilizarlo por
primera vez después de la actu a lización del firmware.
15.6 Quitar el dispositivo de forma segura
Para quitar el aparato de forma segura:
1. Haga clic en el icono Safely Remove Hardware (quitar
hardware de forma segura) en el área de notificación situada a
la derecha de la barra de tareas y haga clic en el aparato que
quiere quitar.
V. 02 – 12/09/2013 100 ©Velleman nv
 Loading...