

Velleman CARSFM2 User Manual

CARSFM2
CAR FM TRANSMITTER
DRAADLOZE FM-ZENDER
ÉMETTEUR FM SANS FIL
EMISOR FM INALÁMBRICO
DRAHTLOSER FM-SENDER
USER MANUAL 3
GEBRUIKERSHANDLEIDING 8
NOTICE D’EMPLOI 13
MANUAL DEL USUARIO 18
BEDIENUNGSANLEITUNG 24
CARSFM2 Rev. 02
e 1
A car plug A sigarettenplug
B display B display
C SD card slot C poort voor SD-kaart
D USB connector D USB-aansluiting
E mini jack (2.5mm) E mini jackaansluiting (2,5 mm)
A fiche allume-cigare A conector mechero
B afficheur B pantalla
C port pour carte SD C conexión para tarjeta SD
D prise USB D conexión USB
E mini-prise jack (2,5 mm) E mini jack (2.5mm)
A Zigarettenanzünderstecker A spina per accendisigari
B Display B display
C Anschluss für SD-Karte C slot per SD card
D USB-Anschluss D connettore USB
E Mini Jackanschluss (2,5 mm) E presa jack (2,5mm)
23/12/2010 2 ©Velleman nv
CARSFM2 Rev. 02
USER MANUAL
1. Introduction
To all residents of the European Union
Important environmental information about this product
This symbol on the device or the package indicates that disposal of the device
after its lifecycle could harm the environment. Do not dispose of the unit
(or batteries) as unsorted municipal waste; it should be taken to a
specialized company for recycling. This device should be returned to
your distributor or to a local recycling service.
Respect the local environmental rules.
If in doubt, contact your local waste disposal authorities.
Thank you for choosing Velleman! Please read the manual thoroughly before
bringing this device into service. If the device was damaged in transit, don't
install or use it and contact your dealer.
2. Safety Instructions
Keep the device away from children and unauthorised users.
For indoor use only. Keep this device away from rain, moisture, splashing
and dripping liquids
3. General Guidelines
Refer to the Velleman® Service and Quality Warranty on the last pages of
this manual.
• Protect this device from shocks and abuse. Avoid brute force when operating
the device.
• Protect the device against extreme heat and dust.
• Familiarise yourself with the functions of the device before actually using it.
• All modifications of the device are forbidden for safety reasons.
• Only use the device for its intended purpose. Using the device in an
unauthorised way will void the warranty.
• Damage caused by disregard of certain guidelines in this manual is not
covered by the warranty and the dealer will not accept responsibility for any
ensuing defects or problems.
• Note that damage caused by user modifications to the device is not covered by
the warranty.
4. Features
• with auto search function: automatically searches for the best frequency
• supports RDS (Radio Data System)
• transmits on all FM freq (87.6-107.9MHz)
• memorizes up to 7 FM freq
• powers on & off automatically
• plug & play
• standard USB port, SD slot & 2.5mm stereo input
• 3.5mm cable included for use with MP3, CD & DVD players
• reads MP3 & WMA files (no DRM files)
• plays defined folder
23/12/2010 3 ©Velleman nv
CARSFM2 Rev. 02
-
• scroll through folders
• displays FM freq/remaining playback time
• 5-level depth, max 20 directories
• remote control
o fast forward & rewind: 2x, 5x, 10x
o repeat defined section
o bookmarking
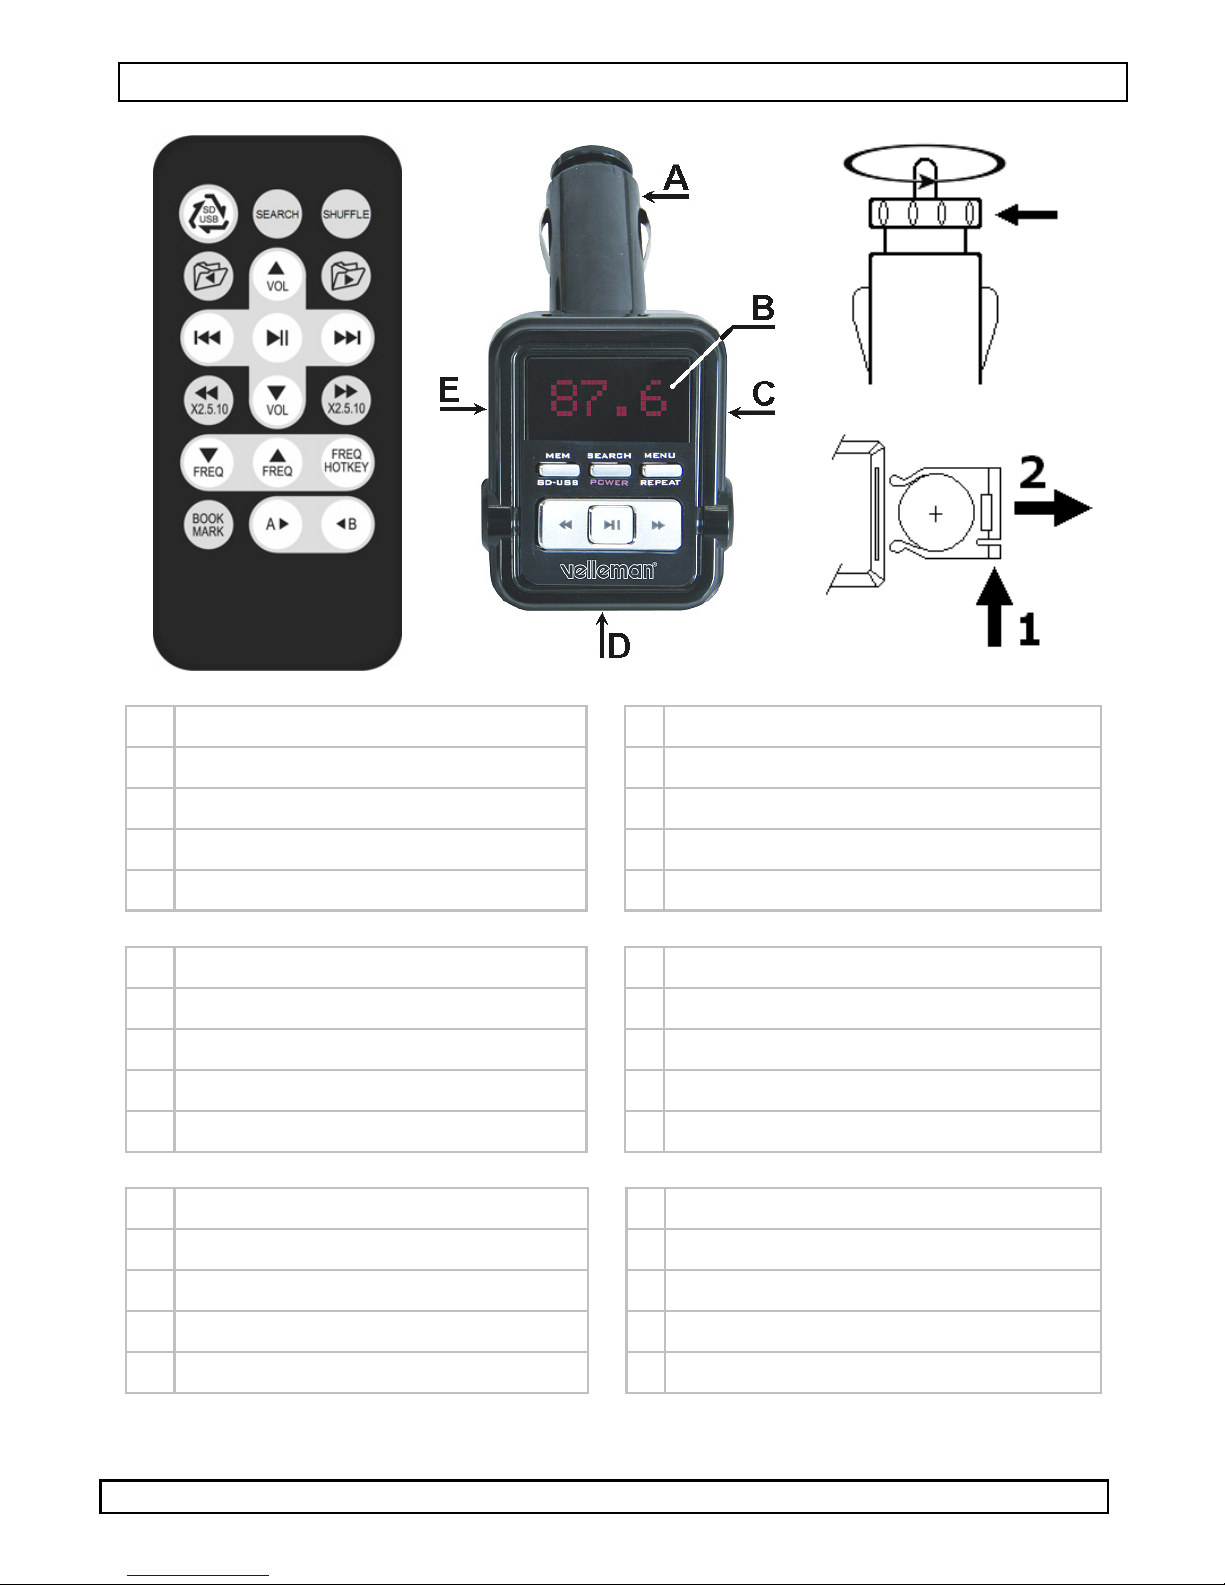
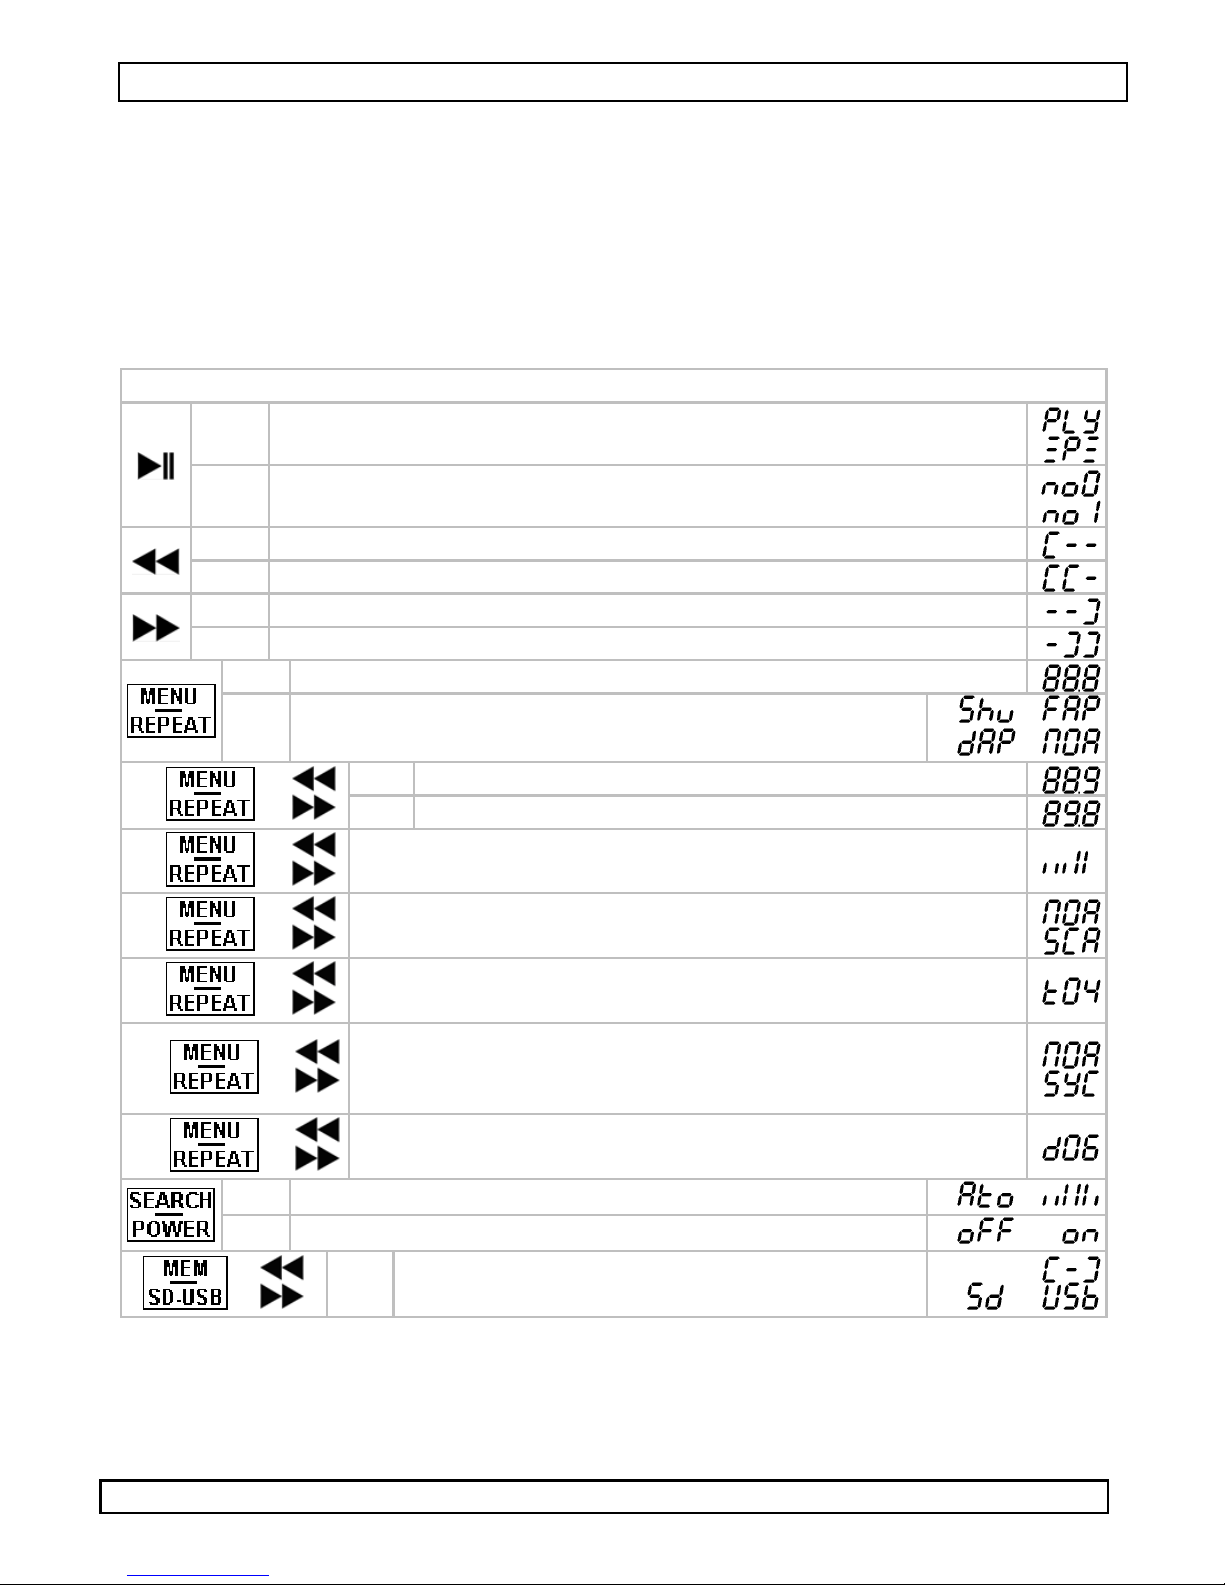
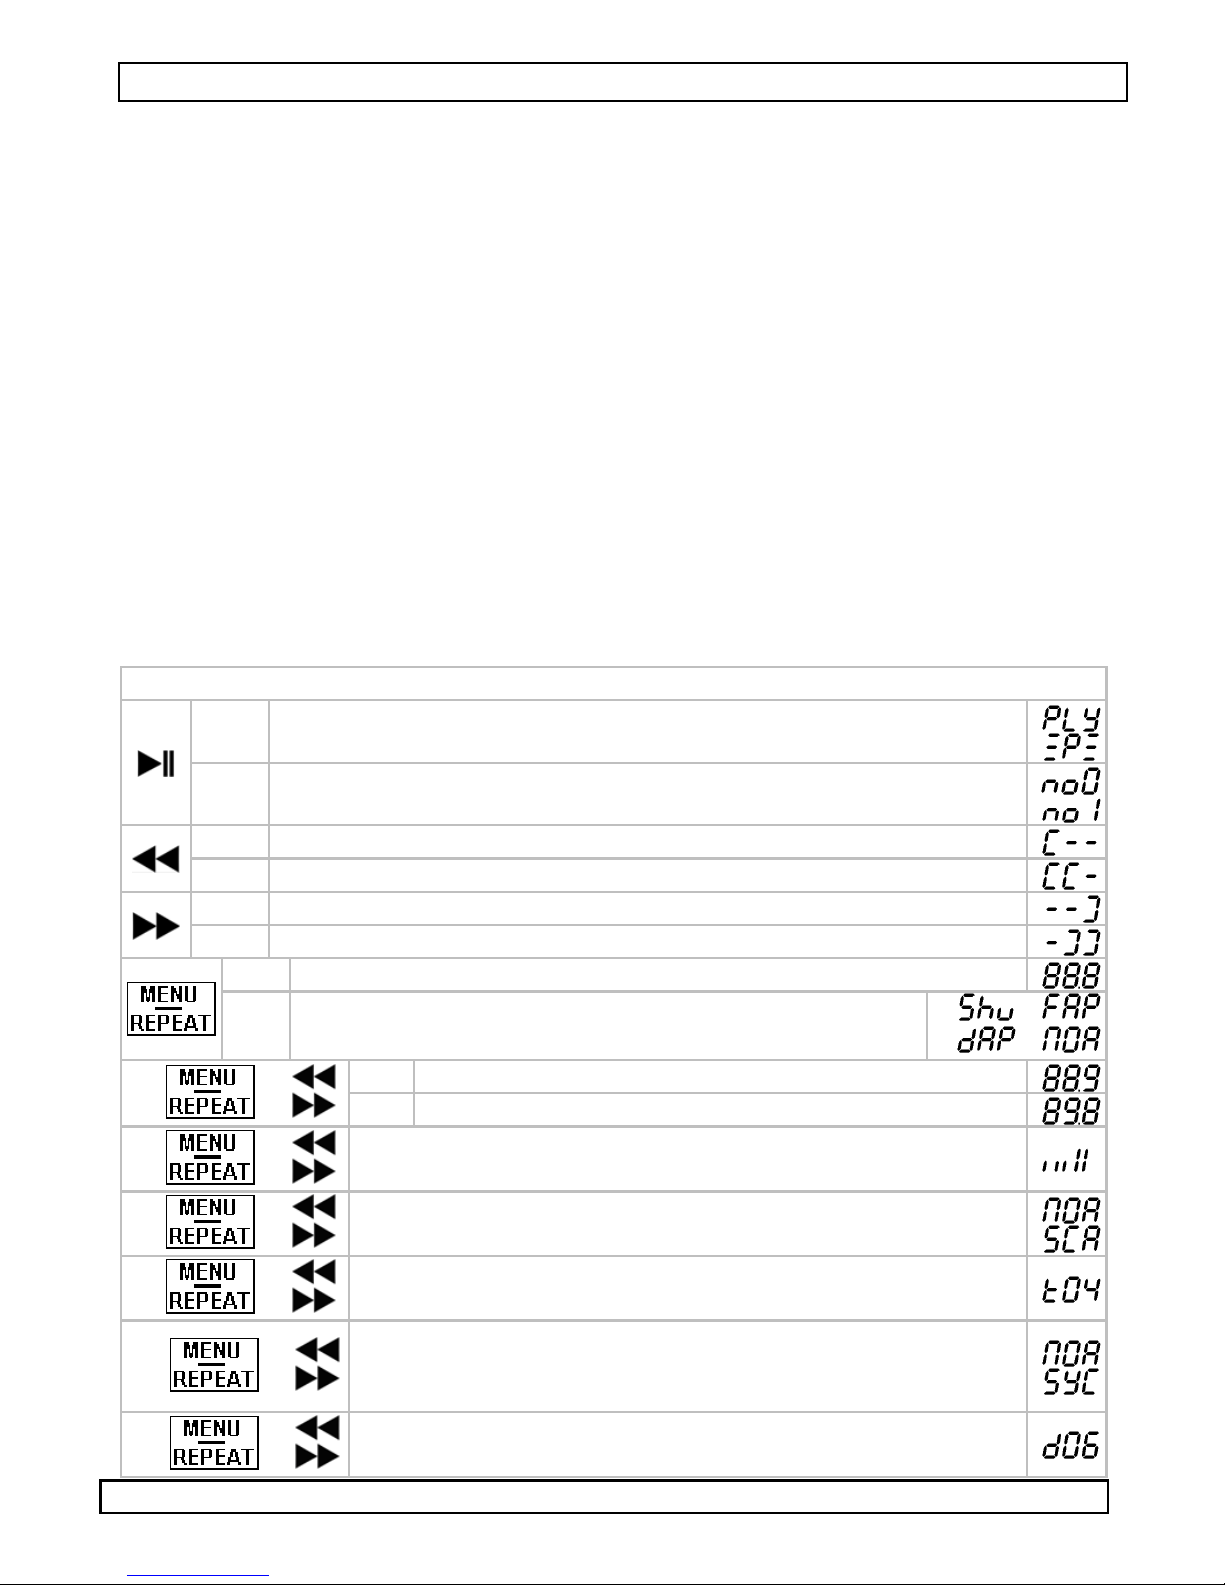
5. Overview
Refer to the image at page 2 of this manual.
audio transmitter
1x
±2s display: frequency and remaining time
1x play previous track
±2s move to previous directory
1x play next track
±2s move to next directory
play – pause
Menu mode: store frequency, set stored frequency
1x change transmitting frequency
±2s
Shuffle - repeat current track –
repeat current directory - normal mode
1x +
2x +
3x +
4x +
5x +
6x +
1x start auto search (search empty channel)
±2s Power on/off
+
-
-
1x move to next frequency (step 0.1MHz)
±2s move to next frequency (step 1.0MHz)
volume up/down
select RDS display mode (normal or scrolling)
Select interval time in normal RDS mode (2~6s)
start RDS auto sync after auto search is finished
- NOR: manual frequency matching
- SYC: start auto synchronization
change waiting time between end of auto search and
start play-back (6~12s)
-
-
change between USB and SD-card input
±2s
23/12/2010 4 ©Velleman nv
CARSFM2 Rev. 02
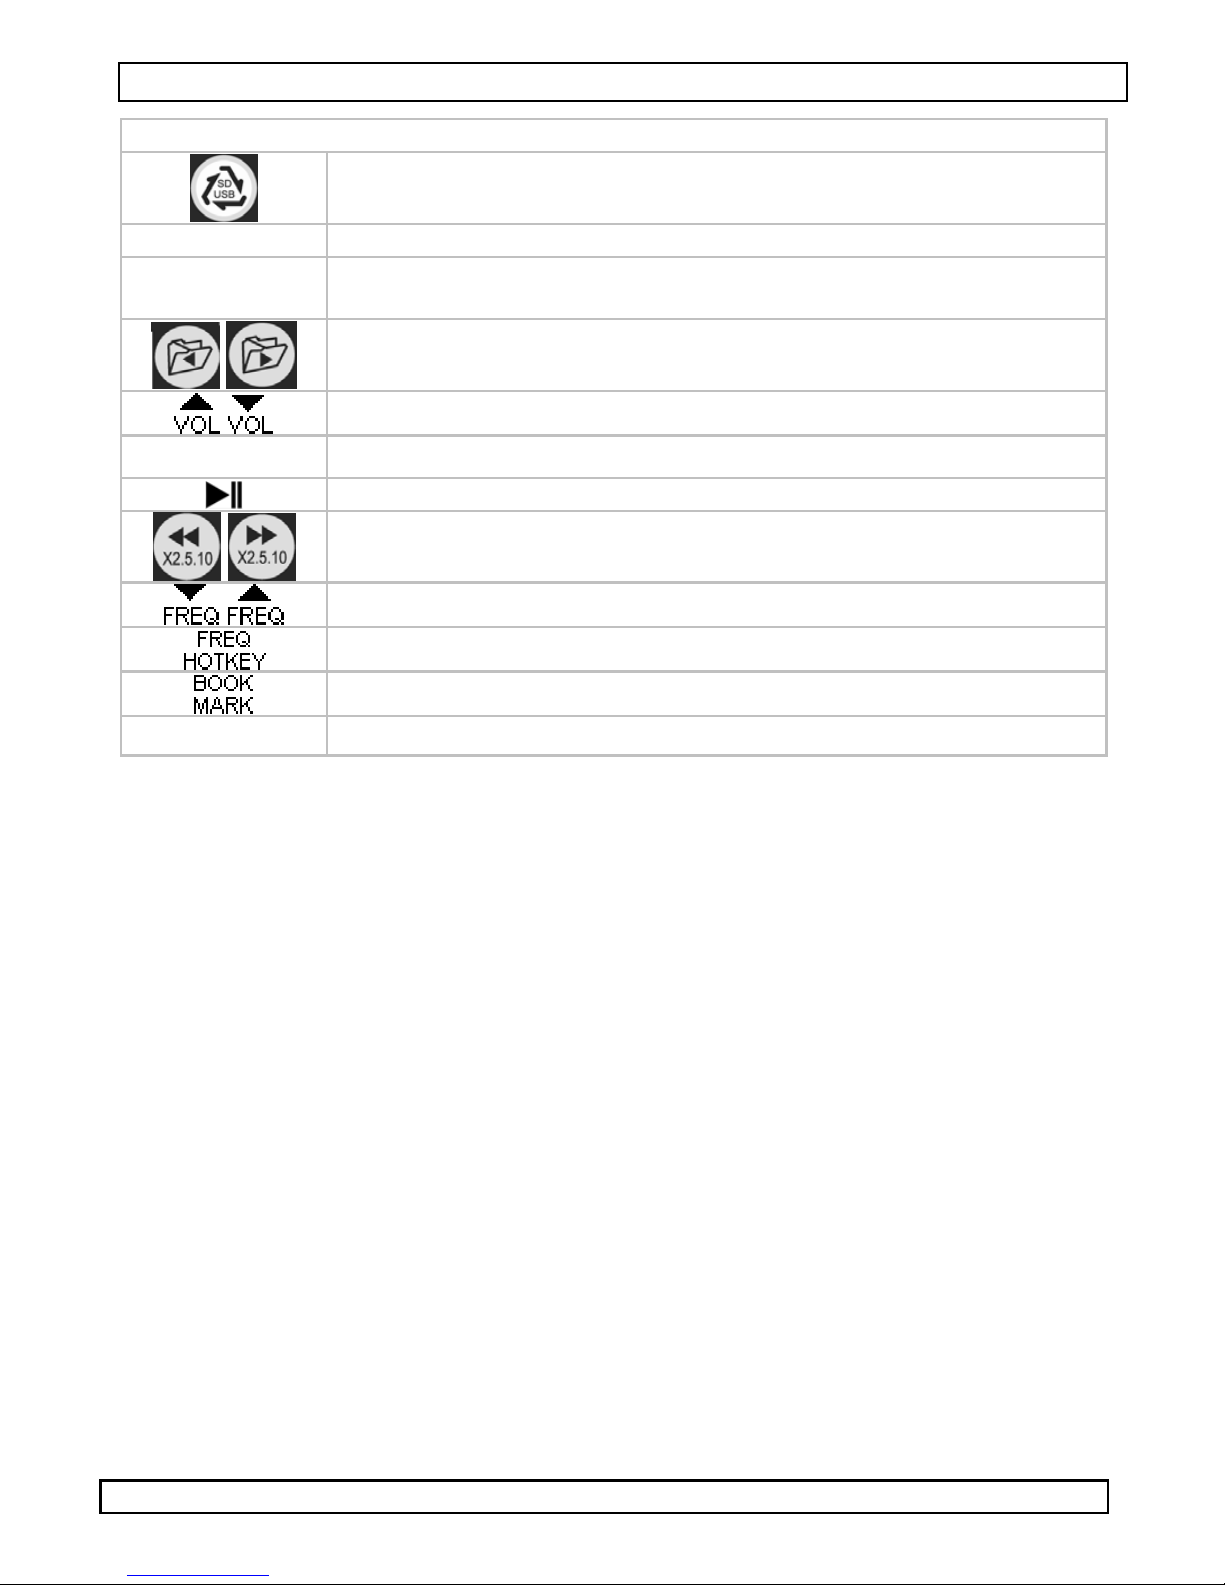
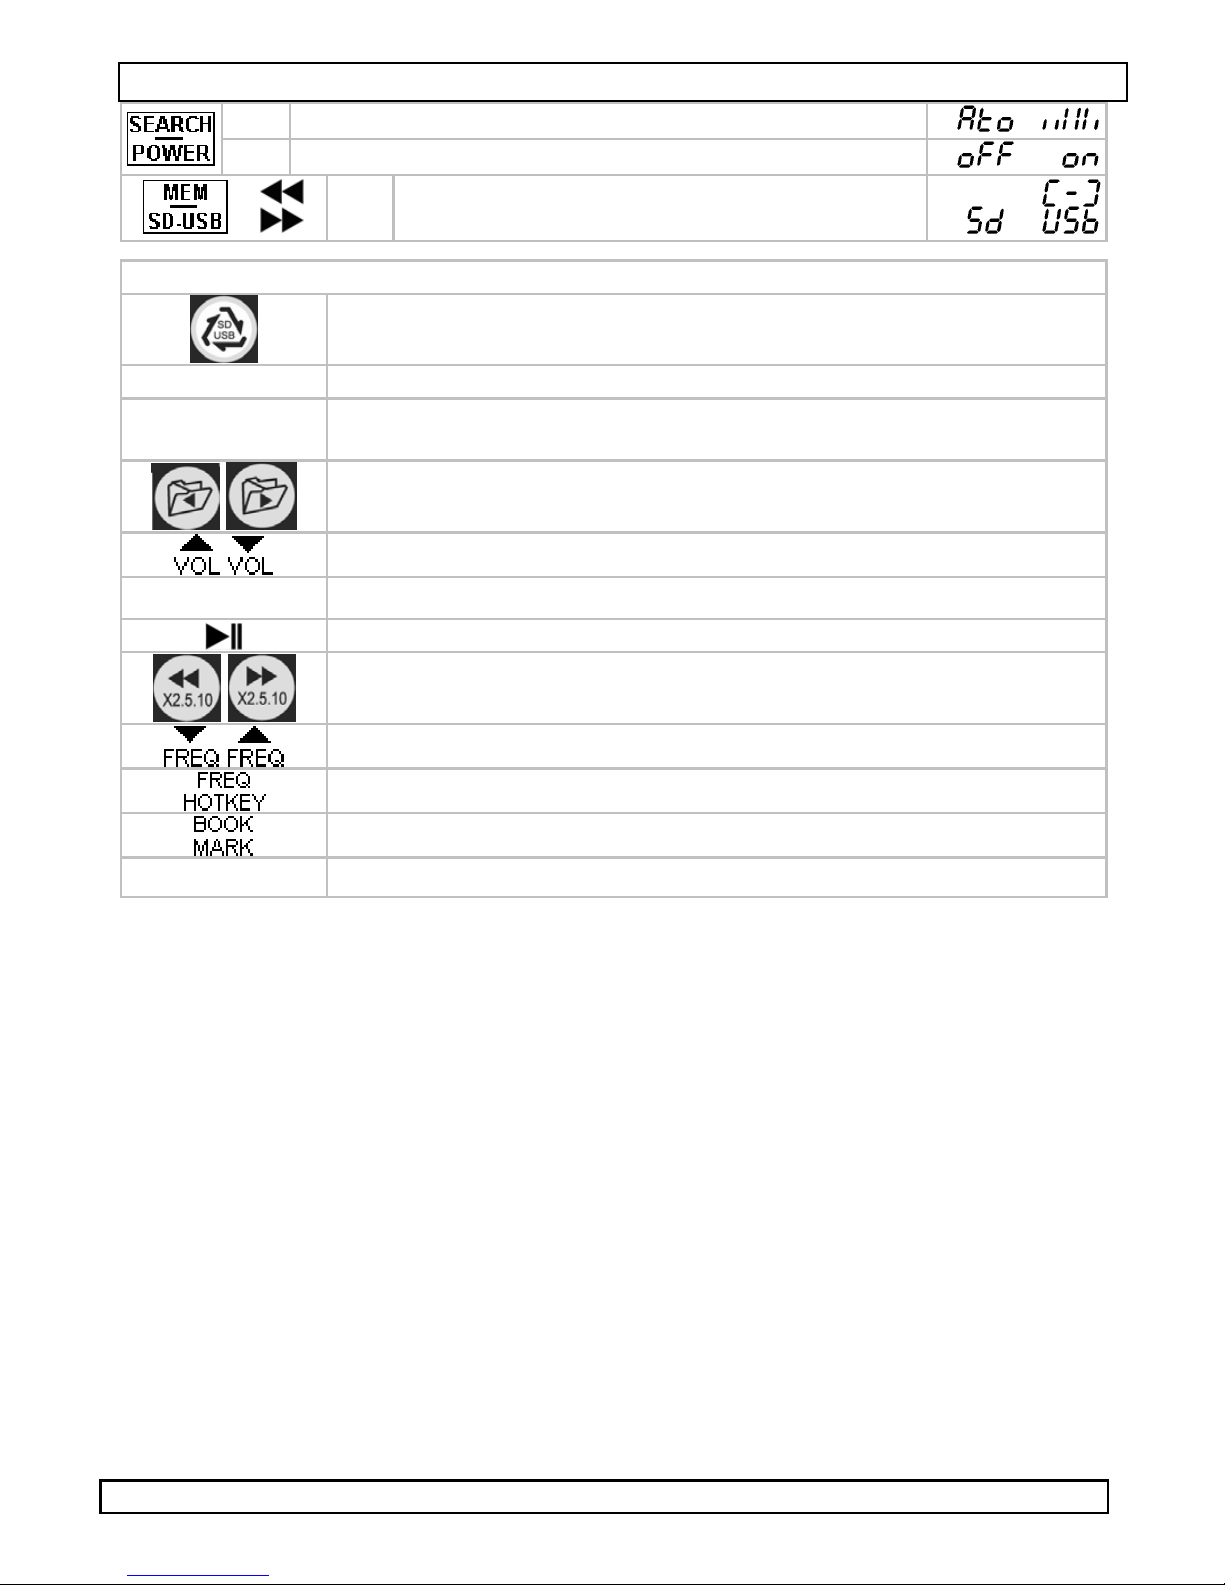
remote control
switch between SD and USB
SEARCH start auto search function
SHUFFLE
Select shuffle - repeat current track – repeat current directory normal mode
move to previous or next folder
volume up or down
skip to previous or next track
play or pause
fast reverse or fast forward, speed x2, x5 or x10
move to previous or next frequency
A B
jump to stored frequency
set a bookmark
set boundaries for repeat section
6. Installation and operation
Refer to §5 for display indications.
Power
• Start the cars’ engine and plug the car plug [A] into the 12VDC car cigar
lighter socket. Starting the car with the transmitter plugged in might
blow the fuse.
• The transmitter starts automatically. If not, verify the condition of the fuse
inside the plug [A] (see §8).
Manually switch power on or off by pressing and holding the POWER button
for ±2s.
Note: when no audio signal is detected for 1 hour, power is switched off.
Set frequency
• Auto-search: Switch on the car radio and press the SEARCH button to
automatically get the best quality frequency.
After auto-search is completed, the transmitter waits a certain time to allow
the user to set the same frequency on the radio. To change this time-out,
press the MENU/REPEAT button briefly 6 times and use the
set it between 2 and 6seconds.
• Manual search: Switch on the car radio and search for a free frequency on
the FM-band. Set the same frequency on the transmitter by pressing the
MENU/REPEAT button once followed by the
MENU/REPEAT button again to store the setting.
• Set the same frequency on the car radio, either manual or via the RDS auto
synchronization function. This function enables automatic synchronization of
the radio frequency with the transmitters’ frequency after the auto search
function.
or button. Press the
or button to
23/12/2010 5 ©Velleman nv
CARSFM2 Rev. 02
Note: this feature only works when supported by the car radio!
Briefly press the MENU/REPEAT button 5 times. Use the
select sync mode.
Music input
• There are 3 ways to provide music files to the transmitter (see §7: file
organization):
1. using an SD-card. Slide the SD-card in the SD-card slot [C] (pins facing
down).
2. via a USB device. Connect the USB device to the USB connector [D].
3. through the 2.5mm mini jack. Plug the 2.5mm plug into the mini jack [E].
• Press and hold the MEM/SD-USB button for ±2s to switch between SD and
USB input.
Playback
• Set the volume on the transmitter to an average level. Press the
MENU/REPEAT button twice followed by the
the volume control on the radio to get the best signal quality.
• Press the
press the
button, to toggle between pause and play mode. In play mode,
or buttons to skip to previous or next track. Press and hold
or buttons (7 levels). Use
or button to
or for ±2s to skip to previous or next folder (see §7: file organization).
• In playback mode, press and hold the
transmitter display between frequency or remaining play time.
• In playback mode, pressing and holding the MENU/REPEAT button for ±2s will
scroll through playback modes:
1x Shuffle mode
2x Repeat current track
3x Repeat current directory
4x Normal playback mode
• 7 frequencies can be stored for quick access. First select the desired
frequency, than press the MEM/SD-USB button. Use the
select a memory address (1~7).
• To recall a stored frequency, press the MEM/SD-USB button repeatedly until
the desired frequencies is shown on the display.
RDS
• For music tracks that are provided through the USB-port and that contain an
ID3-tag, a car radio with RDS (Radio Data System) functionality will show the
track information on its display.
• Briefly press the MENU/REPEAT button 3 times. Use the
select the RDS display method and press the MENU/REPEAT button again.
NOR: display shows 8 characters
SCR: display scrolls with 1s interval
• Briefly press the MENU/REPEAT button 4 times. Use the
select the interval time under normal RDS display mode (2~6s) and press the
MENU/REPEAT button again.
Remote control
• Refer to the overview under §5 for key functions.
• Use the fast reverse () or fast forward () buttons to scroll back or forward
through the current track at increased speed (2x, 5x or 10x).
• To recall a stored frequency, press the FREQ HOTKEY button repeatedly until
the desired frequencies is shown on the display.
• To repeat only a certain section of a track, press the A button at the desired
starting point and press the B button at the desired end point. The section
between A en B will be repeated until the B button is pressed again.
button for ±2s to switch the
or buttons to
or button to
or button to
23/12/2010 6 ©Velleman nv
CARSFM2 Rev. 02
• When pressing the BOOKMARK key before switching off the device, playback
will resume at the bookmarked point.
It is not recommended to use the USB port as power supply
for other USB devices.
Keep the transmitter away from strong magnetic fields.
7. File organization
• Music files must be mp3 or WMA format to enable playback through the
transmitter. Other files will not be recognized. The storage media size is
limited to 32Gb (FAT32) for USB, 16Gb for SD, max. 1999 files, in 20
directories, 5 levels deep.
• To shorten lookup-time, create a directory on the storage media named:
MP3. Create max. 20 subdirectories under the MP3 directory e.g. per type of
music (rock, classic, pop…).
• At start up, the transmitter will look on the storage media for this folder.
When it is present, all files under that folder will be played and fast moving
between directories is enabled. When the MP3 directory does not exist, all
files on the storage media will be played in order of appearance.
8. Replace fuse
• To replace the fuse, unscrew the tip of the plug. Turn the ring (see arrow)
counter clockwise.
• Remove and re-insert a fuse of the same type (5x20mm fast, 0.5A).
• Place the metal tip on the fuse and screw the ring back in place.
9. Battery
• The remote control uses 1 battery type 3V lithium CR2025 battery (included).
• To (re)place the battery, press on the side of the battery cover [1] and pull
[2] to slide it open.
• Insert the battery with the right polarity (‘+’ facing back of remote control)
and close the battery compartment by pushing it back into the housing until it
snaps into place.
WARNING: handle batteries with care, observe warnings on
battery casing. Dispose of batteries in accordance with local
regulations. Keep batteries away from children.
10. Technical Specification
transmit frequencies 87.6 – 107.9 MHz (205 channels)
modulation FM (F3E)
supported capacity up to 16GB (SDHC), 32GB USB
overload protection 0.5A / 250V fast fuse, Ø5 x 20mm (FF0.5A)
power
supply
dimensions
input 12VDC (car cigar lighter plug)
USB port 5VDC/300mA
remote control 3V lithium CR2025, incl.
FM transmitter 45 x 55 x 95 mm
remote control 86 x 40 x 6mm
cable 2.5 -3.5mm jack M-M 250mm
23/12/2010 7 ©Velleman nv

CARSFM2 Rev. 02
g
Use this device with original accessories only. Velleman nv cannot be
held responsible in the event of damage or injury resulted from
(incorrect) use of this device. For more info concerning this product,
please visit our website www.velleman.eu. The information in this
manual is subject to change without prior notice.
© COPYRIGHT NOTICE
This manual is copyrighted. The copyright to this manual is owned by
Velleman nv. All worldwide rights reserved. No part of this manual may be
copied, reproduced, translated or reduced to any electronic medium or otherwise
without the prior written consent of the copyright holder.
GEBRUIKERSHANDLEIDING
1. Inleiding
Aan alle ingezetenen van de Europese Unie
Belangrijke milieu-informatie betreffende dit product
Dit symbool op het toestel of de verpakking geeft aan dat, als het na
zijn levenscyclus wordt weggeworpen, dit toestel schade kan
toebrengen aan het milieu. Gooi dit toestel (en eventuele batterijen)
niet bij het gewone huishoudelijke afval; het moet bij een
gespecialiseerd bedrijf terechtkomen voor recyclage. U moet dit toestel
naar uw verdeler of naar een lokaal recyclagepunt brengen. Respecteer
de plaatselijke milieuwetgeving.
Hebt u vragen, contacteer dan de plaatselijke autoriteiten betreffende de
verwijdering.
Dank u voor uw aankoop! Lees deze handleiding grondig voor u het toestel in
gebruik neemt. Werd het toestel beschadigd tijdens het transport, installeer het
dan niet en raadpleeg uw dealer.
2. Veiligheidsinstructies
Houd buiten het bereik van kinderen en onbevoegden.
Enkel voor
extreme temperaturen en opspattende vloeistoffen.
ebruik binnenshuis. Bescherm tegen regen, vochtigheid, stof,
3. Algemene richtlijnen
Raadpleeg de Velleman® service- en kwaliteitsgarantie achteraan deze
handleiding.
• Bescherm tegen schokken en vermijd brute kracht tijdens de bediening.
• Leer eerst de functies van het toestel kennen voor u het gaat gebruiken.
• Om veiligheidsredenen mag u geen wijzigingen aanbrengen.
• Gebruik het toestel enkel waarvoor het gemaakt is. Bij onoordeelkundig
gebruik vervalt de garantie.
• De garantie geldt niet voor schade door het negeren van bepaalde richtlijnen
in deze handleiding en uw dealer zal de verantwoordelijkheid afwijzen voor
defecten of problemen die hier rechtstreeks verband mee houden.
• Schade door wijzigingen die de gebruiker heeft aangebracht valt niet onder de
garantie.
23/12/2010 8 ©Velleman nv
CARSFM2 Rev. 02
4. Eigenschappen
• auto search: zoekt automatisch naar de beste frequentie
• gebruikt RDS (Radio Data System)
• zendt uit op alle FM-frequenties (87,6 ~ 107,9 MHz)
• geheugen voor 7 FM -frequenties
• automatische in- en uitschakeling
• plug-and-play
• standaard USB-poort, SD-slot en stereo-ingang van 2,5 mm
• geleverd met 3,5 mm-kabel voor gebruik met mp3-, cd- en dvd-spelers
• leest mp3- en WMA-bestanden af (niet compatibel met DRM-bestanden)
• afspelen van een geselecteerde map
• scroll through folders
• weergave: FM-frequentie/resterende afspeelduur
• 5 niveaus, maximaal 20 directories
• afstandsbediening
o door-/terugspoelen: 2x, 5x, 10x
o afspelen van een selectie
o bladwijzerfunctie
5. Omschrijving
Raadpleeg de figuur op pagina 2 van deze handleiding.
zender
1x
±2s display: frequentie/resterende afspeelduur
1x afspelen vorig nummer
±2s ga naar vorige directory
1x afspelen volgend nummer
±2s ga naar volgende directory
1x +
2x +
3x +
afspelen – pauzeren
menu: frequentie opslaan, selecteer opgeslagen frequentie
1x wijzig zendfrequentie
±2s
shuffle – herhaal huidig nummer –
herhaal huidige directory – normale modus
-
-
1x ga naar volgende frequentie (stap 0,1 MHz)
±2s ga naar volgende frequentie (stap 1,0 MHz)
volume hoger/lager
selecteer RDS-weergave (normaal of scrollend)
4x +
5x +
6x +
23/12/2010 9 ©Velleman nv
selecteer intervalduur normale RDS-weergave (2 ~ 6 s)
start RDS-synchronisatie na automatische zoekfunctie
- NOR: handmatige synchronisatie frequentie
- SYC: start automatische synchronisatie
wijzig wachttijd tussen einde automatische zoekfunctie
en start afspelen (6 ~ 12 s)
CARSFM2 Rev. 02
1x start automatische zoekfunctie (zoek leeg kanaal)
±2s in-/uitschakelen
+
afstandsbediening
SEARCH start automatische zoekfunctie
SHUFFLE
±2s USB <> SD-kaart
selecteer USB <> SD-kaart
selecteer shuffle – herhaal huidig nummer – herhaal huidige
directory – normale modus
ga naar vorige/volgende map
volume hoger/lager
ga naar vorig/volgend nummer
afspelen/pauzeren
terugspoelen/doorspoelen, x2, x5 of x10
-
-
-
A B
ga naar vorige/volgende frequentie
ga naar opgeslagen frequentie
maak een bladwijzer
bepaal begin- en eindpunt van de lus
6. Installatie en gebruik
Raadpleeg §5 voor de displayweergave.
In- en uitschakelen
• Start de wagen en plug daarna de zender [A] in de 12VDC-
sigarettenuitgang. Start de wagen nooit indien de zender aan de
sigarettenuitgang gekoppeld is: dit kan de zekering doen doorslaan.
• De zender wordt automatisch ingeschakeld. Indien niet, controleer de
zekering binnenin de plug [A] (zie §8).
Houd POWER gedurende 2 seconden ingedrukt om de zender in en uit te
schakelen.
Opmerking: De zender schakelt automatisch uit indien er gedurende 1 uur
geen audiosignaal opgevangen wordt.
Instellen van de frequentie
• Automatische zoekfunctie: Schakel de autoradio in en druk op SEARCH om
de best beschikbare frequentie op te vangen.
Na de automatische zoekactie hebt u even de tijd om dezelfde frequentie in te
stellen als deze op de autoradio. Druk zesmaal op MENU/REPEAT en bepaal
de insteltijd (2 ~ 6 s) met
• Handmatige zoekfunctie: Schakel de autoradio in en zoek een onbezette
FM-frequentie. Stel diezelfde frequentie in op de zender door eenmaal op
of .
23/12/2010 10 ©Velleman nv
CARSFM2 Rev. 02
MENU/REPEAT te drukken, gevolgd door of . Druk opnieuw op
MENU/REPEAT om de frequentie in het geheugen op te slaan.
• Selecteer handmatig of automatisch dezelfde frequentie op de autoradio. De
RDS-functie synchroniseert automatisch de frequentie van de zender op die
van de autoradio.
Opmerking: Beschikbaarheid RDS is afhankelijk van het autoradiomodel!
Druk vijfmaal kort op MENU/REPEAT. Selecteer de synchronisatiefunctie met
of .
Muziekbron
• U kunt op 3 manieren via de zender naar muziek luisteren:
1. via een SD-kaart. Plaats een SD-kaart in het kaartslot [C] (pinnetjes naar
onder gericht).
2. via een USB-apparaat. Koppel een USB-apparaat aan de USB-aansluiting
[D].
3. via de 2,5 mm mini jackaansluiting. Plug 2,5 mm-plug in de miniatuur
jackaansluiting [E].
• Houd MEM/SD-USB gedurende 2 seconden ingedrukt om te schakelen tussen
SD-kaart en USB-ingang.
Afspelen van muziek
• Regel het volume van de zender. Druk tweemaal op MENU/REPEAT gevolgd
door
de beste resultaten.
• Druk op
afspelen op
of (7 niveaus). Gebruik de volumeregeling van de autoradio voor
om het bestand af te spelen of te pauzeren. Druk tijdens het
of om naar het vorige/volgende bestand te springen. Houd
of gedurende ± 2 s ingedrukt om de vorige/volgende subdirectory te
selecteren (zie §7 De bestanden indelen).
• Houd tijdens het afspelen
de resterende afspeelduur op de display weer te geven.
• Houd MENU/REPEAT gedurende 2 seconden ingedrukt en scroll door de
afspeelmogelijkheden:
1x shuffle
2x herhaal huidig nummer
3x herhaal huidige directory
4x normale afspeelweergave
• U kunt tot 7 frequenties in het geheugen opslaan. Selecteer eerst de
gewenste frequentie en druk dan op MEM/SD-USB. Selecteer het gewenste
voorkeuzenummer met
• Vraag een opgeslagen frequentie op door op MEM/SD-USB te drukken tot de
gewenste frequentie op de display weergegeven wordt.
RDS
• Met muziekbestanden die op een USB-medium opgeslagen zijn en die
voorzien zijn van een ID3-tag kunt u de RDS-functie (Radio Data System).
• Druk driemaal op MENU/REPEAT. Selecteer de RDS-functie met of en
druk opnieuw op MENU/REPEAT.
NOR: display geeft 8 karakters weer
SCR: display scrollt de info
• Druk viermaal kort op MENU/REPEAT. Selecteer de scrollsnelheid (2 ~ 6 s)
of en druk opnieuw op MENU/REPEAT.
met
De afstandsbediening
• Raadpleeg §5 voor de verschillende functies.
• Spoel terug of door met
gedurende ± 2 s ingedrukt om de frequentie of
of (1~7).
of (snelheid 2x, 5x of 10x).
23/12/2010 11 ©Velleman nv
 Loading...