

Page 1
USER MANUAL
CAMCOLMS
DIGITAL MICROSCOPE
DIGITALES MIKROSKOP
DIGITALE MICROSCOOP
MICROSCOPE NUMÉRIQUE
MICROSCOPIO DIGITAL
GEBRUIKERSHANDLEIDING
NOTICE D’EMPLOI
MANUAL DEL USUARIO
BEDIENUNGSANLEITUNG
Page 2

2
CAMCOLMS – DIGITAL MICROSCOPE
1. Introduction
To all residents of the European Union
Important environmental information about this product
This symbol on the device or the package indicates that disposal of the device after its lifecycle could harm the
environment. Do not dispose of the unit (or batteries) as unsorted municipal waste; it should be taken to a
specialized company for recycling. This device should be returned to your distributor or to a local recycling
service. Respect the local environmental rules.
If in doubt, contact your local waste disposal authorities.
Thank you for choosing Velleman! Please read the manual thoroughly before bringing this device into service. If the device was
damaged in transit, do not install or use it and contact your dealer.
2. System Requirements
• Pentium® MMX™ 200MHz with 32MB RAM or higher
• Windows® 98/ME/2000/XP/Vista
• free USB 2.0 or USB 1.1 port
• DirectX® 8.0 or higher
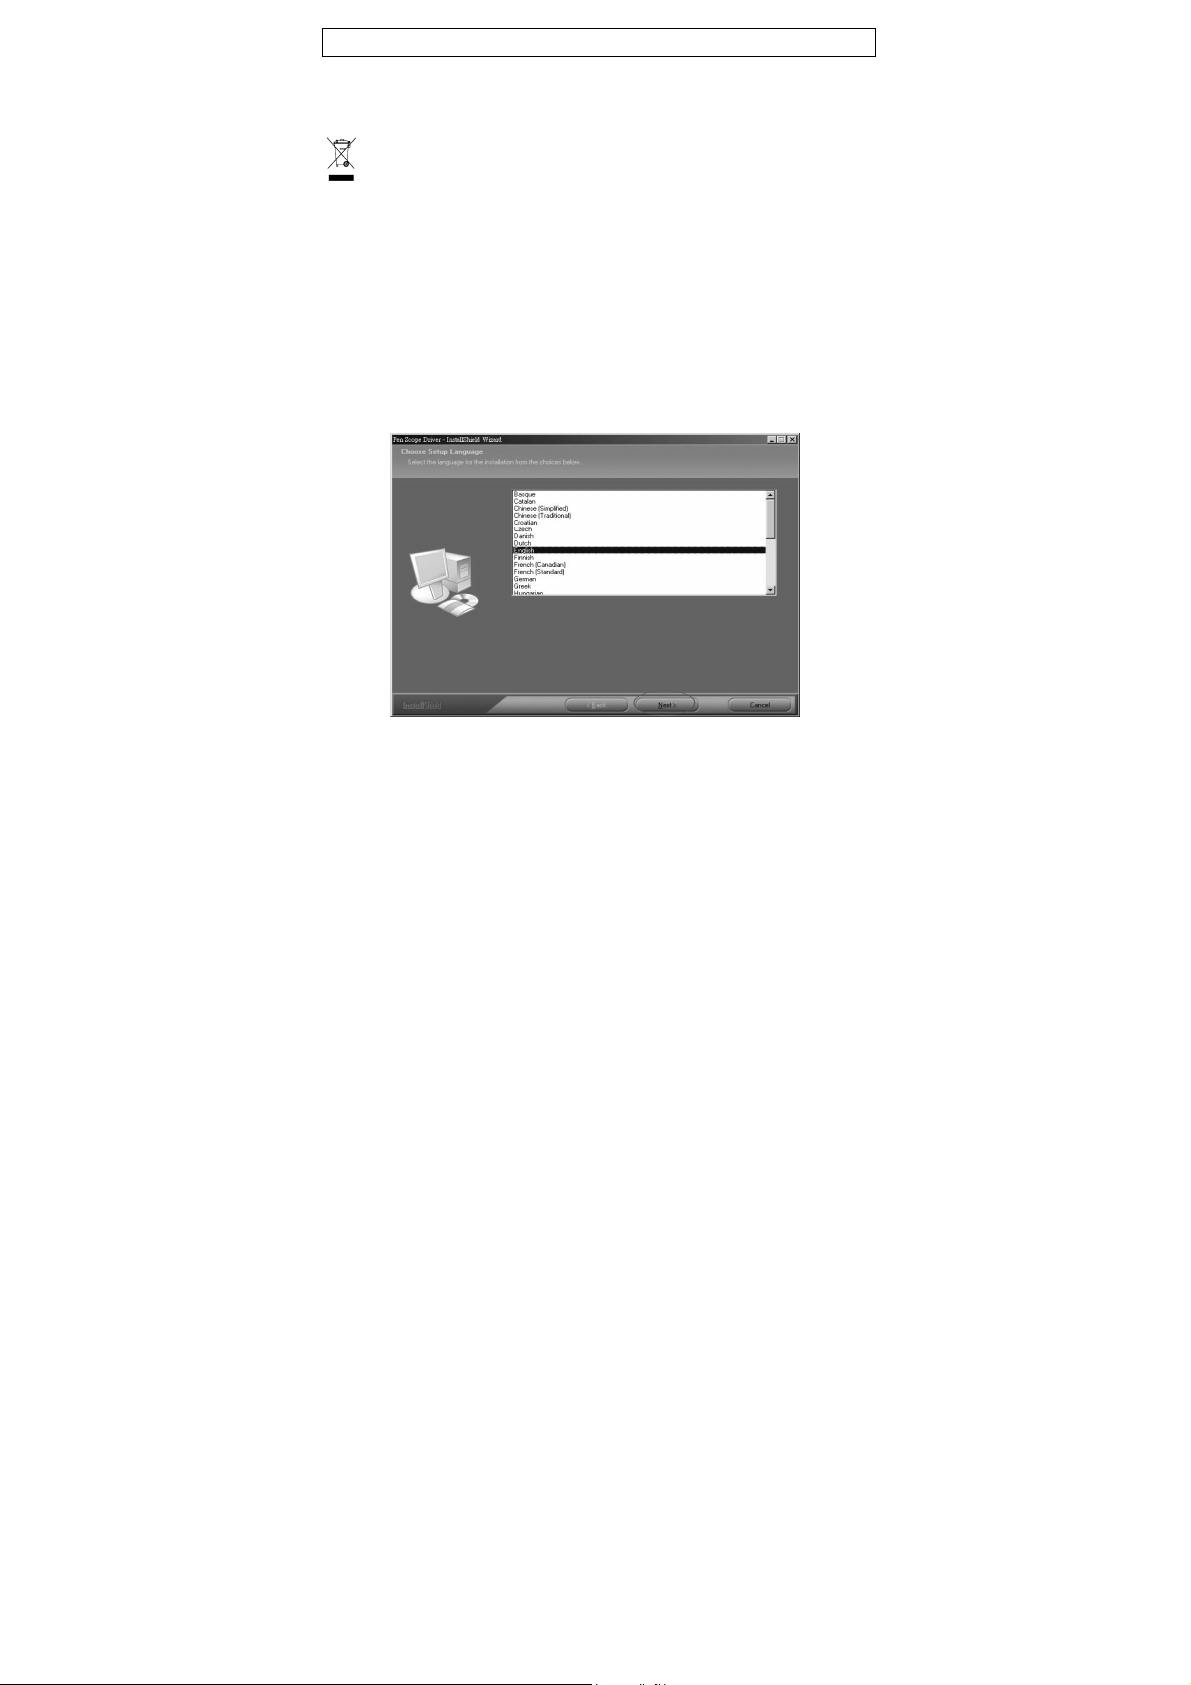
3. Installing the Driver
• Make sure the microscope is not connected to the computer. Insert the included CD-ROM into the CD-ROM drive of
your computer. Select your language and click [Next].
CAMCOLMS VELLEMAN
Page 3

3
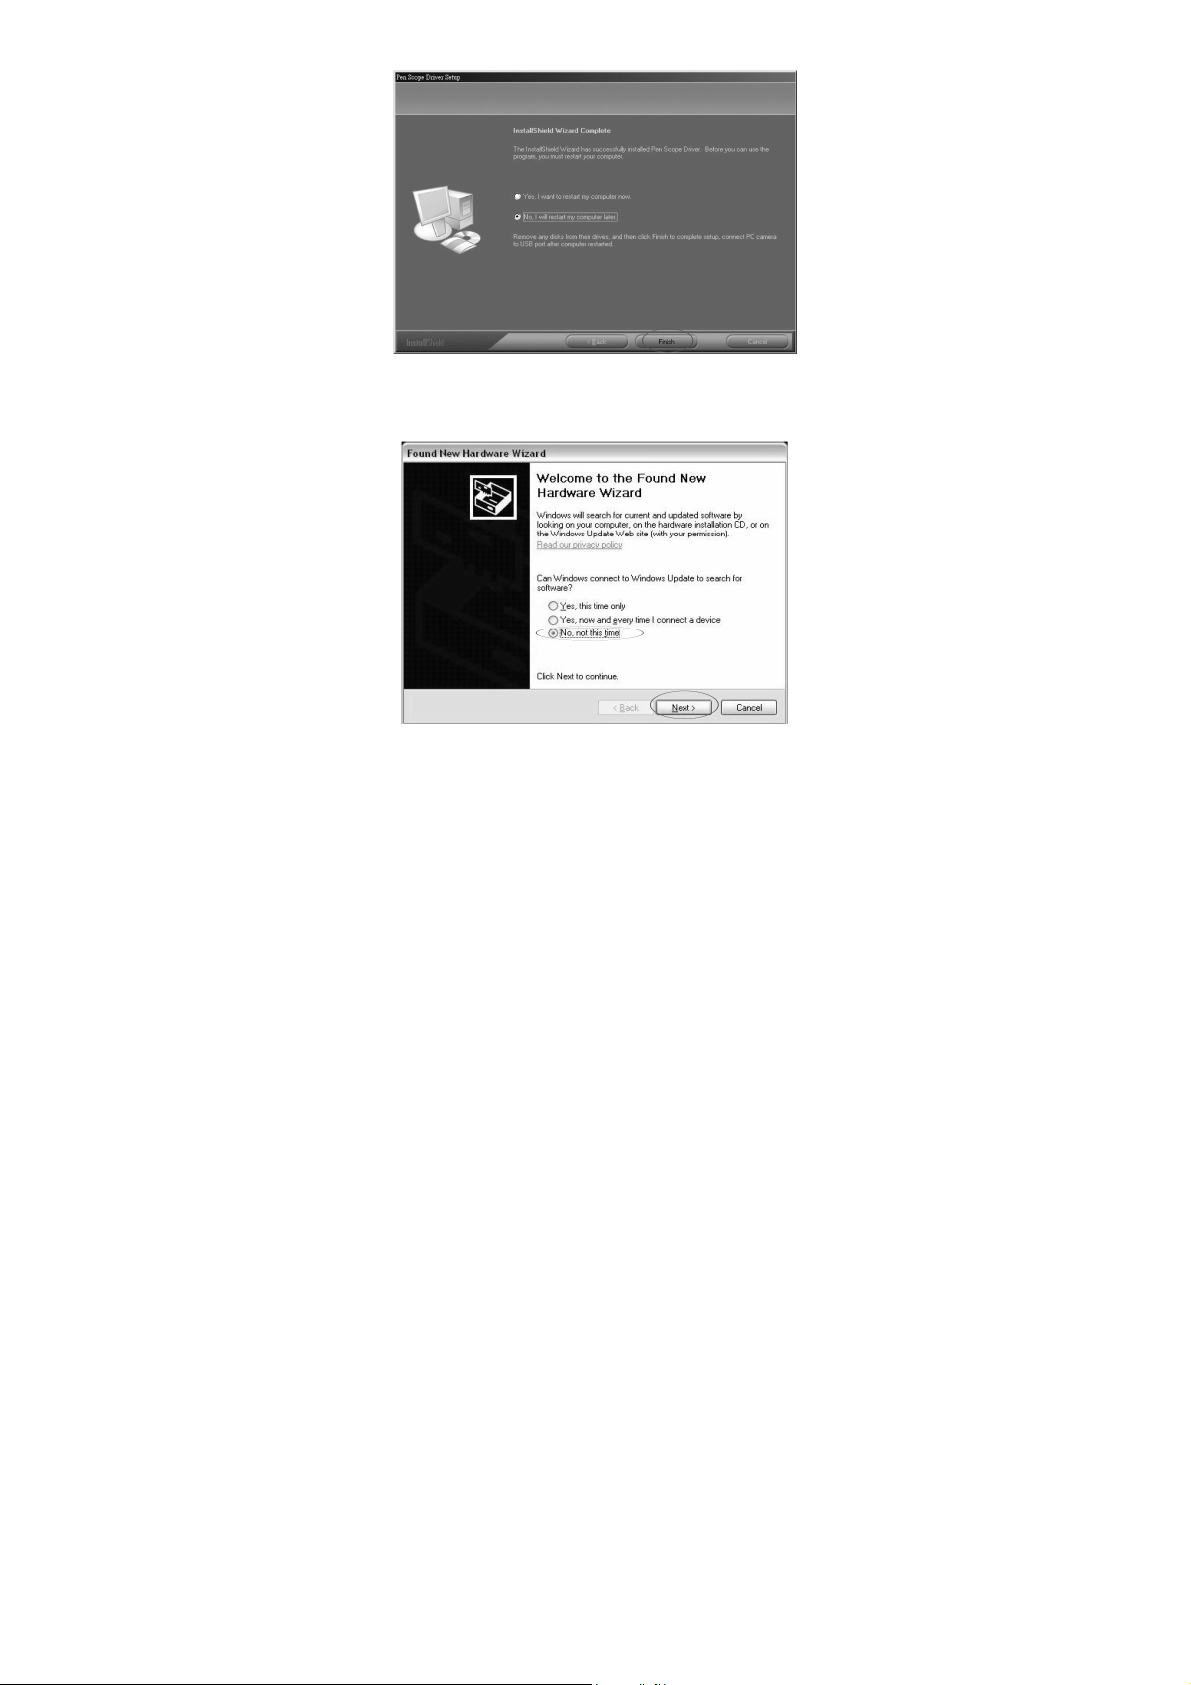
• Click [Next]. After the driver installation is completed, you will be asked to restart your computer. This is not necessary
but recommended.
4. Installing the Microscope
• Connect the microscope to the computer through a USB port. A wizard will pop up. Choose not to search for software
and click [Next].
CAMCOLMS VELLEMAN
Page 4
4
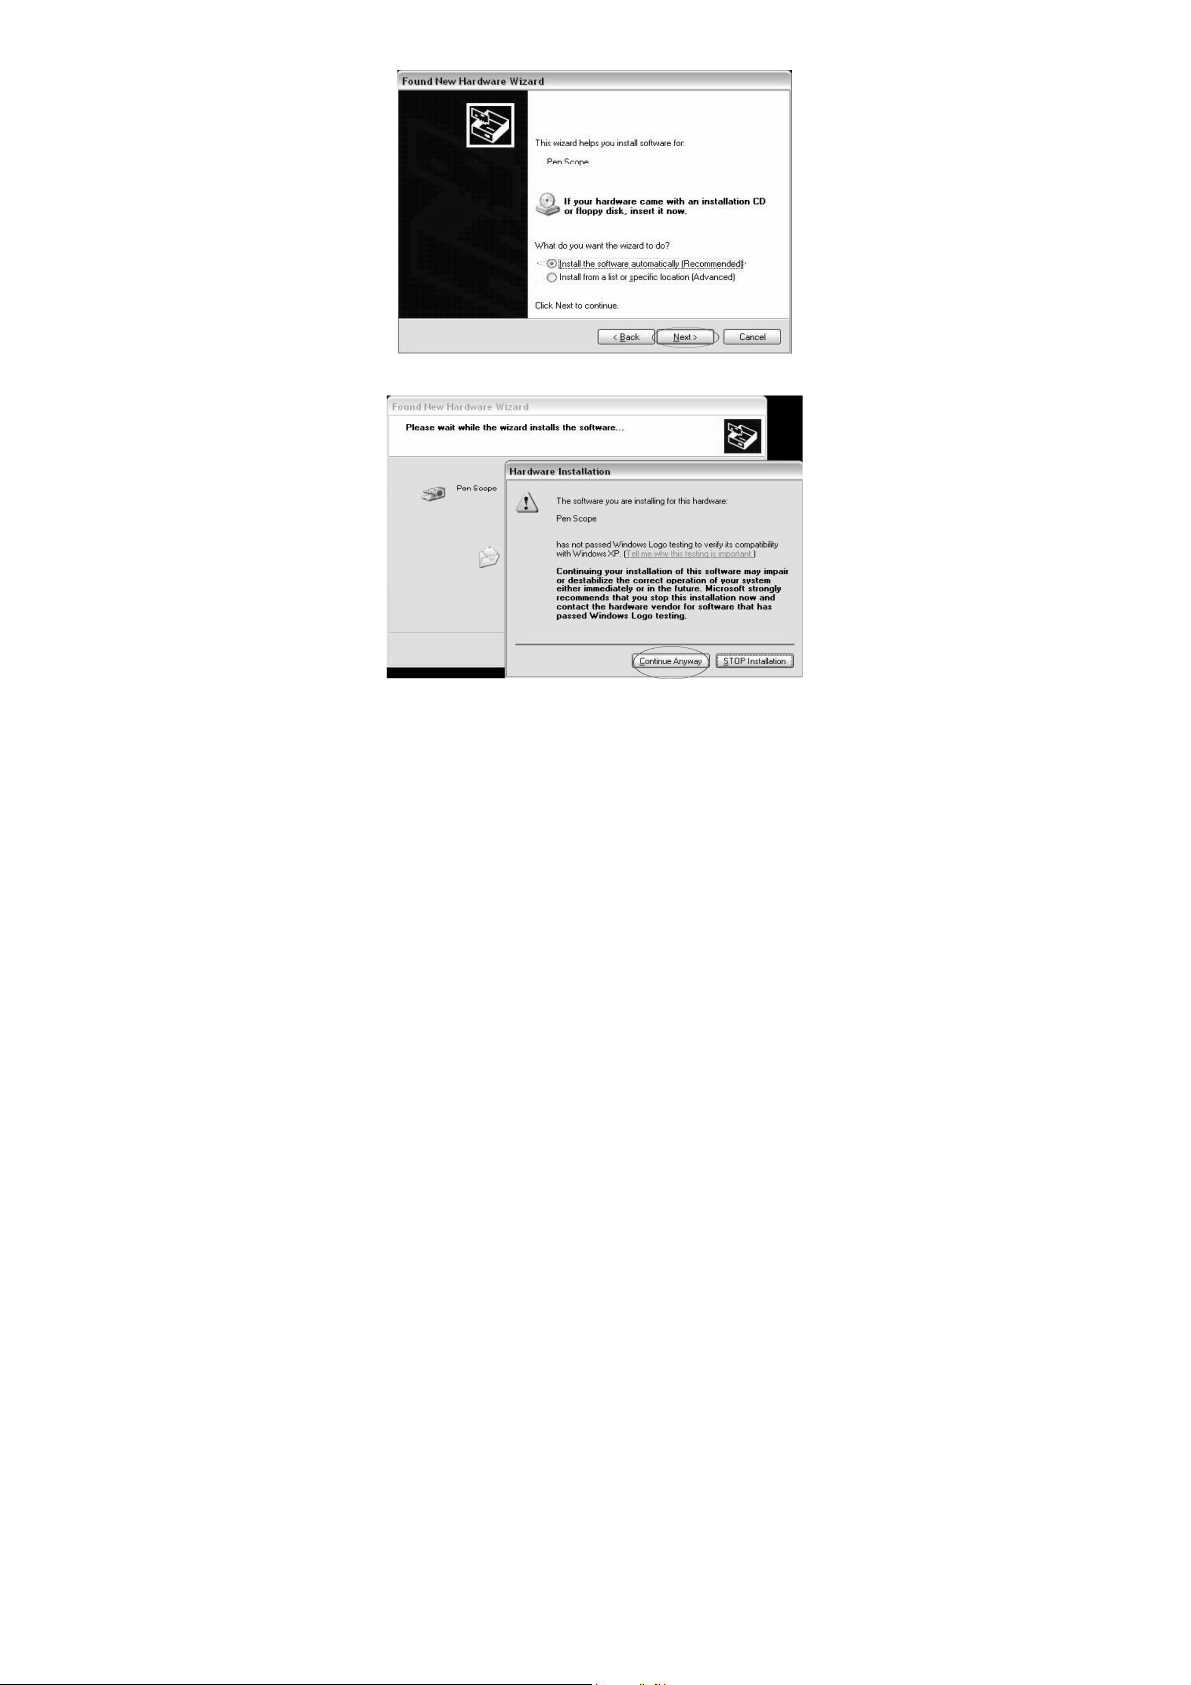
• Your computer automatically finds the connected microscope. Click [Install the software automatically
(Recommended)] and click [Next] to continue the installation.
• Wait for the installation procedure to complete. Click [Continue Anyway] when following window pops up.
CAMCOLMS VELLEMAN
Page 5

5
• Click [Finish] to complete your installation. Note that the microscope must only be connected to the USB port at time of
installation. The computer will not recognize the microscope when connected to a different USB port.
5. Operating Instructions
• Place the microscope perpendicularly with and near the object to be viewed. Turn the adjustment wheel slowly to obtain
as clear an image as possible.
CAMCOLMS VELLEMAN
Page 6
6
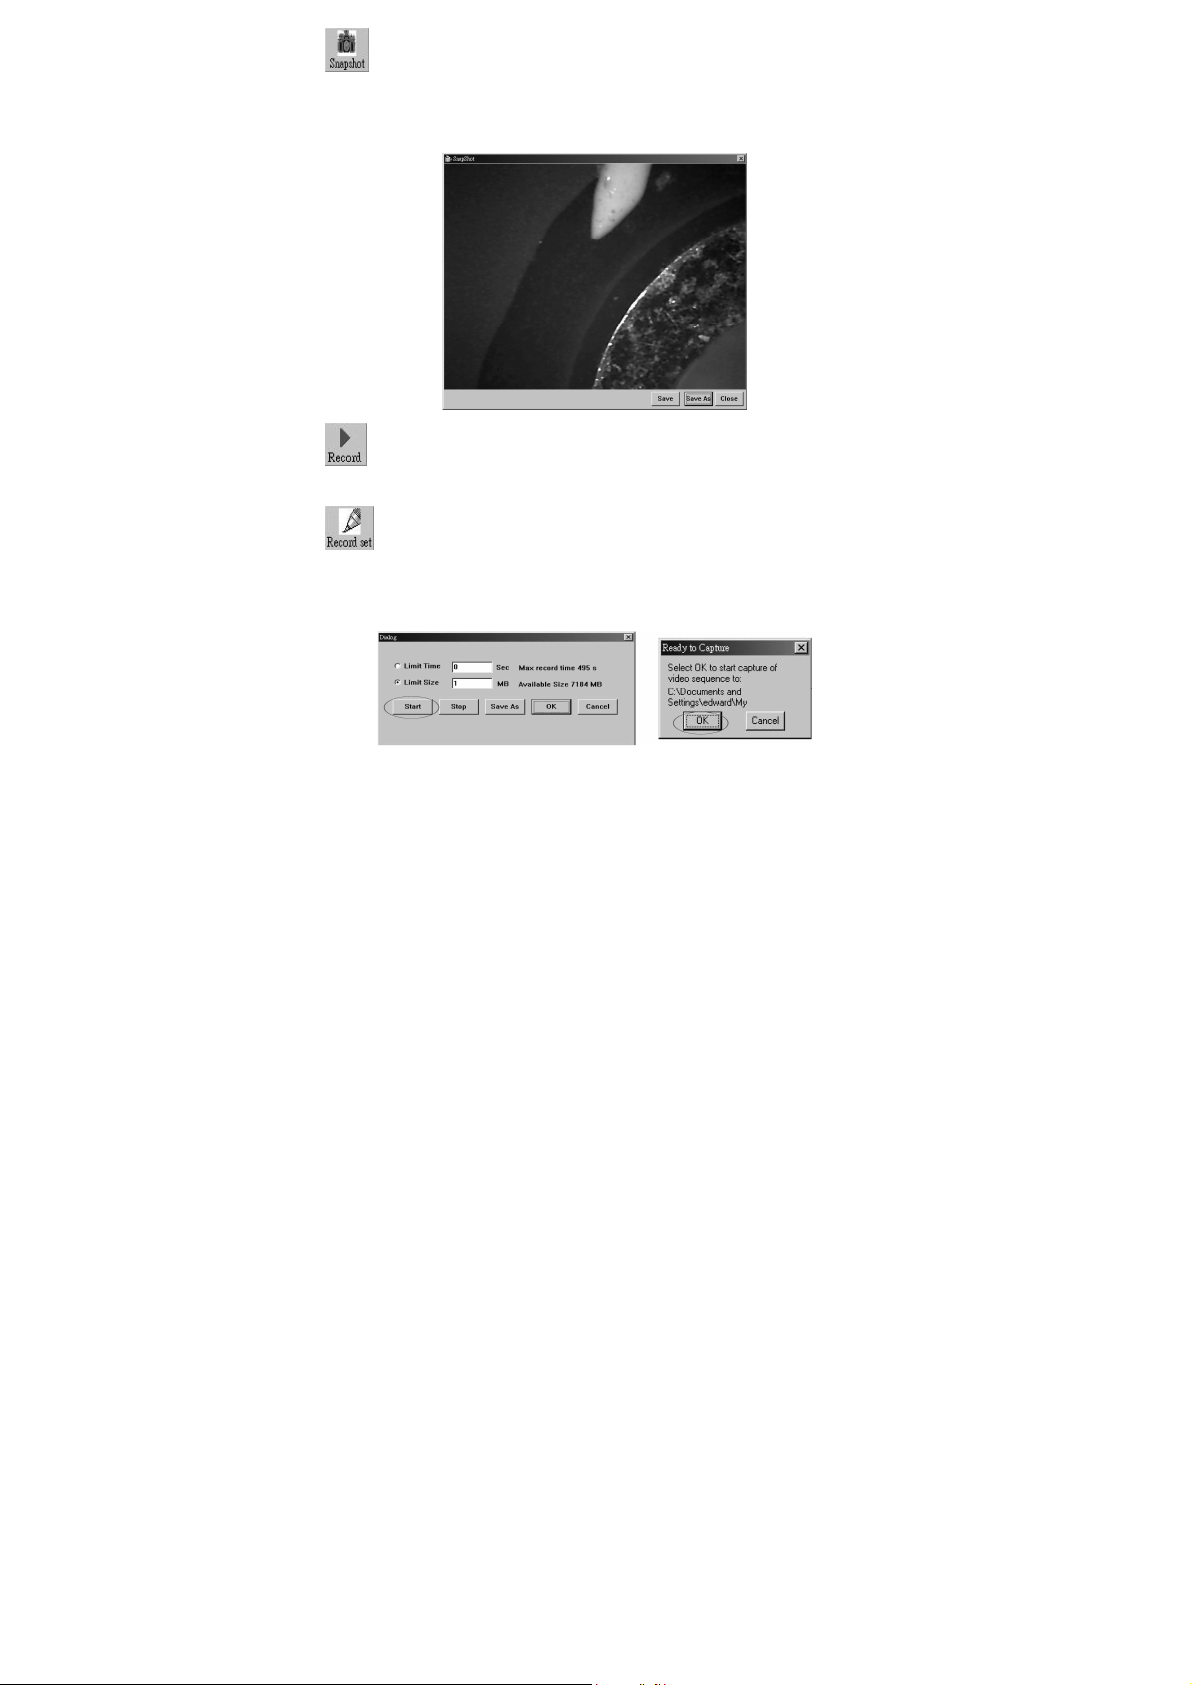
Click [Snapshot] to capture the screen. This screen capture can be saved as a JPEG or BMP file (JPG default). To do so,
click [Save]. The file will be stored automatically in [My Documents\PEN SCOPE\SNAPSHOT] according to the following
format: 070517001.JPG (07 = year, 05 = month, 17 = day, 001 = snapshot number, JPG = file format). Click [Save As] to
configure the file name.
Click [Record] to make a recording.
Click [Record Set] to make a recording according to your own specifications. Set the recording time and file size limit, click
[Start] and [OK] to start recording. Click [Save As] to save the recording. The file will be stored automatically in
[My Documents\PEN SCOPE\RECORDING] according to the following format: 070517001.AVI (07 = year, 05 = month, 17
= day, 001 = recording number, AVI = file format).
CAMCOLMS VELLEMAN
Page 7
7
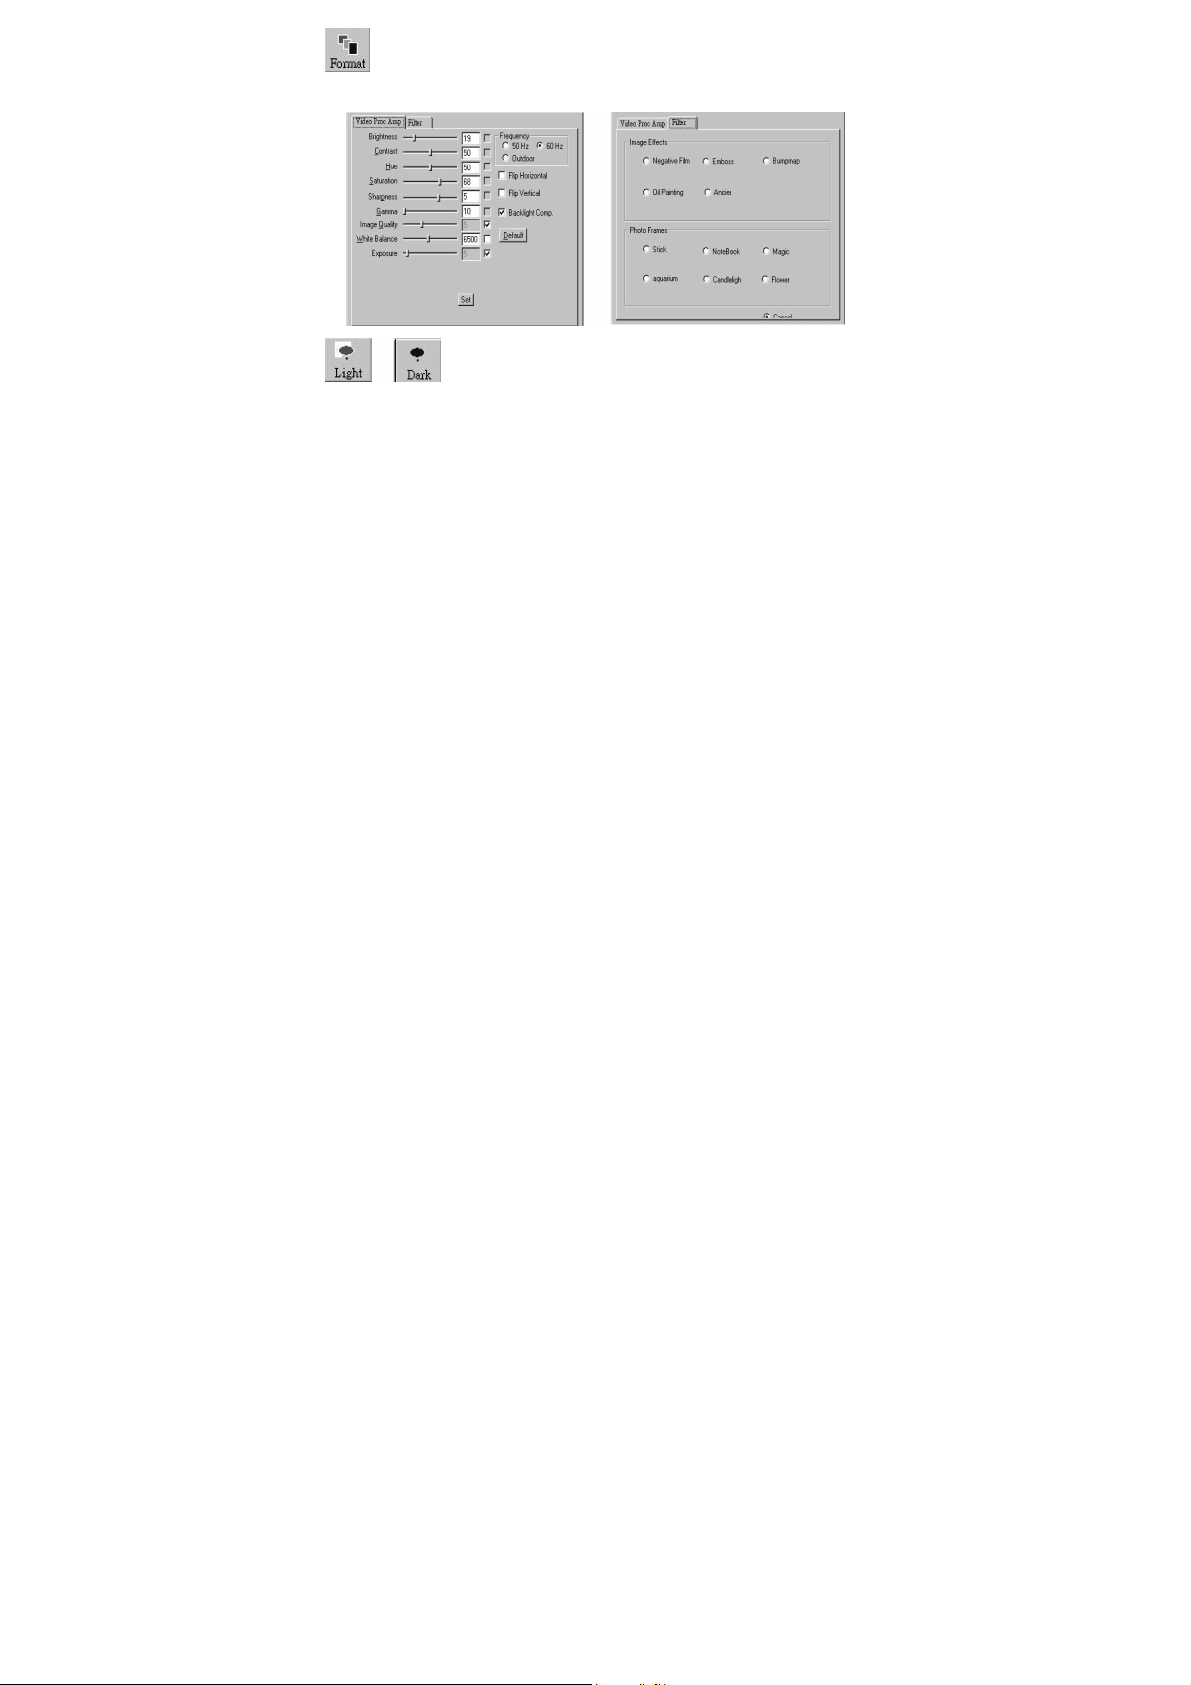
Click [Format] to configure your screen settings or to add effects.
Click [Light] or [Dark] to switch the microscope on or off.
6. Technical Specifications
Image Sensor CMOS
Number of Pixels 300,000
Effective Pixels 645 (H) x 485 (V)
Input Interface USB 1.1 or 2.0
Magnification Rate 50x / 200x
Min. Illumination 10 ~ 20 lux / F2.8 – 5,600K
S/N Ratio 42dB
Cable Length 1.2m
White Balance auto
White Balance Range 2,800 ~ 11,000K
Iris Aperture AES
Shutter 1/30 ~ 1/15,750 sec
Picture Format JPEG / BMP
Power Consumption 65 ~ 100mA
Dimensions Ø 38 x 165mm
Weight 128g
Use this device with original accessories only. Velleman nv cannot be held responsible in the event of damage,
injury or data loss resulted from (incorrect) use of this device.
For more info concerning this product, please visit our website www.velleman.eu.
The information in this manual is subject to change without prior notice.
CAMCOLMS VELLEMAN
Page 8
8
CAMCOLMS – DIGITALE MICROSCOOP
1. Inleiding
Aan alle ingezetenen van de Europese Unie
Belangrijke milieu-informatie betreffende dit product
Dit symbool op het toestel of de verpakking geeft aan dat, als het na zijn levenscyclus wordt weggeworpen, dit
toestel schade kan toebrengen aan het milieu. Gooi dit toestel (en eventuele batterijen) niet bij het gewone
huishoudelijke afval; het moet bij een gespecialiseerd bedrijf terechtkomen voor recyclage. U moet dit toestel
naar uw verdeler of naar een lokaal recyclagepunt brengen. Respecteer de plaatselijke milieuwetgeving.
Hebt u vragen, contacteer dan de plaatselijke autoriteiten inzake verwijdering.
Dank u voor uw aankoop! Lees deze handleiding grondig voor u het toestel in gebruik neemt. Werd het toestel beschadigd
tijdens het transport, installeer het dan niet en raadpleeg uw dealer.
2. Systeemvereisten
• Pentium® MMX™ 200 MHz met 32 MB RAM of hoger
• Windows® 98/ME/2000/XP/Vista
• vrije usb-poort (1.1 of 2.0)
• DirectX® 8.0 of hoger
3. Installatie van de driver
• Ontkoppel de microscoop van de computer. Plaats de meegeleverde cd-rom in de cd-romdrive. Kies uw taal en klik op
[Next].
CAMCOLMS VELLEMAN
Page 9
9
• Klik op [Next]. Na de installatieprocedure wordt u gevraagd of u de computer wenst te herstarten. Dit is niet verplicht
maar wel aan te raden.
4. Installatie van de microscoop
• Koppel de microscoop aan de computer via een usb-poort. Er verschijnt een wizard. Kies ervoor geen software-update
uit te voeren en klik op [Next].
CAMCOLMS VELLEMAN
Page 10

10
• De computer herkent de microscoop automatisch. Klik op [Install the software automatically (Recommended)] en klik
op [Next] om verder te gaan met de installatie.
• Onderbeek de installatieprocedure niet. Bij het verschijnen van dit venster klikt u op [Continue Anyway].
CAMCOLMS VELLEMAN
Page 11

11
• Klik op [Finish] om de installatie te vervolledigen. Let op: koppel de microscoop steeds in de usb-poort die u hebt
gebruikt tijdens de installatie. De computer herkent de microscoop niet indien u hem met een andere poort koppelt.
5. Gebruiksinstructies
• Plaats de microscoop loodrecht en dicht bij het voorwerp. Draai zachtjes aan het instelwiel om een zo helder mogelijk
beeld te verkrijgen.
CAMCOLMS VELLEMAN
Page 12

12
Klik op [Snapshot] om een beeld vast te leggen. Deze momentopname kan opgeslagen worden als een JPEG- of BMPbestand (JPG standaard). Klik hiervoor op [Save]. Het bestand wordt automatisch opgeslagen in [My Documents\PEN
SCOPE\SNAPSHOT] volgens dit formaat: 070517001.JPG (07 = jaar, 05 = maand, 17 = dag, 001 = nummer, JPG =
bestandformaat). Klik op [Save As] om zelf een bestandsnaam in te geven.
Klik op [Record] om de beelden als een filmpje op te nemen.
Klik op [Record Set] om de beelden als een filmpje op te nemen volgens eigen instellingen. Bepaal de opnameduur en de
toegelaten bestandsgrootte, klik op [Start] en op [OK] om de opname te starten. Klik op [Save As] om de opname op te
slaan. Het bestand wordt automatisch opgeslagen in [My Documents\PEN SCOPE\RECORDING] volgens dit formaat:
070517001.AVI (07 = jaar, 05 = maand, 17 = dag, 001 = nummer, AVI = bestandformaat).
CAMCOLMS VELLEMAN
Page 13

13
Klik op [Format] om uw scherminstellingen te configureren of om effecten toe te voegen.
Klik op [Light] of op [Dark] om de microscoop in of uit te schakelen.
6. Technische specificaties
Opneemelement CMOS
Aantal pixels 300.000
Effectieve pixels 645 (H) x 485 (V)
Interface USB 1.1 of 2.0
Vergroting 50x / 200x
Min. verlichting 10 ~ 20 lux / F2,8 – 5.600 K
S/R-verhouding 42 dB
Kabellengte 1,2 m
Witbalans automatisch
Bereik witbalans 2.800 ~ 11.000 K
Apertuur AES
Sluiter 1/30 ~ 1/15.750 sec.
Beeldformaat JPEG / BMP
Verbruik 65 ~ 100 mA
Afmetingen Ø 38 x 165 mm
Gewicht 128 g
Gebruik dit toestel enkel met originele accessoires. Velleman nv is niet aansprakelijk voor schade, kwetsuren of
verlies van data bij (verkeerd) gebruik van dit toestel.
Voor meer informatie omtrent dit product, zie www.velleman.eu.
De informatie in deze handleiding kan te allen tijde worden gewijzigd zonder voorafgaande kennisgeving.
CAMCOLMS VELLEMAN
Page 14

14
CAMCOLMS – MICROSCOPE NUMÉRIQUE
1. Introduction
Aux résidents de l'Union européenne
Des informations environnementales importantes concernant ce produit
Ce symbole sur l'appareil ou l'emballage indique que l’élimination d’un appareil en fin de vie peut polluer
l'environnement. Ne pas jeter un appareil électrique ou électronique (et des piles éventuelles) parmi les déchets
municipaux non sujets au tri sélectif ; une déchèterie traitera l’appareil en question. Renvoyer les équipements
usagés à votre fournisseur ou à un service de recyclage local. Il convient de respecter la réglementation locale
relative à la protection de l’environnement.
En cas de questions, contacter les autorités locales pour élimination.
Nous vous remercions de votre achat ! Lire la présente notice attentivement avant la mise en service de l’appareil. Si
l’appareil a été endommagé pendant le transport, ne pas l’installer et consulter votre revendeur.
2. Système requis
• Pentium® MMX™ 200 MHz avec 32 Mo de mémoire RAM ou plus
• Windows® 98/ME/2000/XP/Vista
• port USB 2.0 ou USB 1.1 libre
• DirectX® 8.0 ou plus
3. Installation du pilote
• Débrancher le microscope de l’ordinateur. Insérer le cédérom dans le lecteur de votre ordinateur. Sélectionner la langue
et cliquer sur [Next].
CAMCOLMS VELLEMAN
Page 15

15
• Cliquer sur [Next]. Une fois la procédure d’installation terminée, un redémarrage de l’ordinateur n’est pas nécessaire
mais recommandé.
4. Installation du microscope
• Brancher le microscope à un port USB de votre ordinateur. Un assistant apparaît. Choisir de ne pas effectuer de
recherche de logiciel et cliquer sur [Next].
CAMCOLMS VELLEMAN
Page 16

16
• L’ordinateur reconnaît automatiquement le microscope connecté. Cliquer sur [Install the software automatically
(Recommended)] et cliquer sur [Next] pour poursuivre la procédure d’installation.
• Ne pas interrompre la procédure d’installation. Cliquer sur [Continue Anyway] lorsque cette fenêtre apparaît.
CAMCOLMS VELLEMAN
Page 17

17
• Terminer l’installation en cliquant sur [Finish]. Attention : ne brancher le microscope que sur le port d’installation.
L’ordinateur ne reconnaîtra pas le microscope lorsqu’il est branché sur un autre port USB.
5. Instructions d’utilisation
• Porter le microscope près de l’objet à inspecter et le tenir de façon perpendiculaire par rapport à l’objet. Tourner
lentement la roue de mise au point afin d’obtenir une image nette.
CAMCOLMS VELLEMAN
Page 18

18
Cliquer sur [Snapshot] pour effectuer une capture d’écran. Cette capture d’écran peut être sauvegardée comme un fichier
JPEG ou BMP (JPG par défaut) en cliquant sur [Save]. Le fichier sera automatiquement sauvegardée dans
[My Documents\PEN SCOPE\SNAPSHOT] et aura le format suivant : 070517001.JPG (07 = année, 05 = mois, 17 = jour,
001 = numéro de capture, JPG = format du fichier). Cliquer sur [Save As] pour configurer le nom du fichier.
Cliquer sur [Record] pour effectuer un enregistrement.
Cliquer sur [Record Set] pour effectuer un enregistrement selon vos propres spécifications. Configurer la durée de
l’enregistrement et la taille maximale du fichier, cliquer sur [Start] et sur [OK] pour démarrer l’enregistrement. Cliquer sur
[Save As] pour sauvegarder l’enregistrement. Le fichier sera automatiquement sauvegardée dans [My Documents\PEN
SCOPE\RECORDING] et aura le format suivant : 070517001.AVI (07 = année, 05 = mois, 17 = jour, 001 = numéro de
capture, AVI = format du fichier).
CAMCOLMS VELLEMAN
Page 19

19
Cliquer sur [Format] pour configurer les valeurs d’écran et pour éditer votre capture d’écran.
Cliquer sur [Light] ou sur [Dark] pour éteindre ou pour allumer le microscope.
6. Spécifications techniques
Capteur CMOS
Nombre de pixels 300.000
Pixels effectifs 645 (H) x 485 (V)
Interface USB 1.1 ou 2.0
Grandissement 50x / 200x
Éclairement min. 10 ~ 20 lux / F2,8 – 5.600 K
Rapport S/B 42 dB
Longueur du câble 1,2 m
Balance des blancs automatique
Gamme de balance des blancs 2.800 ~ 11.000 K
Ouverture AES
Obturateur 1/30 ~ 1/15.750 sec
Format de l’image JPEG / BMP
Consommation 65 ~ 100 mA
Dimensions Ø 38 x 165 mm
Poids 128 g
N’employer cet appareil qu’avec des accessoires d’origine. SA Velleman ne sera aucunement responsable de
dommages, lésions ou perte de données survenus à un usage (incorrect) de cet appareil.
Pour plus d’information concernant cet article, visitez notre site web www.velleman.eu.
Toutes les informations présentées dans cette notice peuvent être modifiées sans notification préalable.
CAMCOLMS VELLEMAN
Page 20

20
CAMCOLMS – MICROSCOPIO DIGITAL
1. Introducción
A los ciudadanos de la Unión Europea
Importantes informaciones sobre el medio ambiente concerniente a este producto
Este símbolo en este aparato o el embalaje indica que, si tira las muestras inservibles, podrían dañar el medio
ambiente.
No tire este aparato (ni las pilas, si las hubiera) en la basura doméstica; debe ir a una empresa especializada en
reciclaje. Devuelva este aparato a su distribuidor o a la unidad de reciclaje local.
Respete las leyes locales en relación con el medio ambiente.
Si tiene dudas, contacte con las autoridades locales para residuos.
¡Gracias por haber comprado el CAMCOLMS! Lea atentamente las instrucciones del manual antes de usarlo. Si el aparato
ha sufrido algún daño en el transporte no lo instale y póngase en contacto con su distribuidor.
2. Exigencias del sistema
• Pentium® MMX™ 200 MHz con 32 MB de memoria RAM o superior
• Windows® 98/ME/2000/XP/Vista
• puerto USB 2.0 o USB 1.1 libre
• DirectX® 8.0 o superior
3. Instalar el driver
• Desconecte el microscopio del ordenador. Introduzca el CD-ROM en el lector del ordenador. Seleccione el idioma y
haga click en [Next].
CAMCOLMS VELLEMAN
Page 21

21
• Haga click en [Next]. Después de haber terminado la instalación y reinicialice el ordenador. No es necesario pero
recomendado.
4. Instalar el microscopio
• Conecte el microscopio a un puerto USB del ordenador. Un asistente aparece. Seleccione ‘no efectuar una búsqueda
de software’ y haga click en [Next].
CAMCOLMS VELLEMAN
Page 22

22
• El ordenador reconoce automáticamente el microscopio conectado. Haga click en [Install the software automatically
(Recommended)] y haga click en [Next] para seguir el procedimiento de instalación.
• No interrumpa el procedimiento de instalación. Haga click en [Continue Anyway] si aparece esta pantalla.
CAMCOLMS VELLEMAN
Page 23

23
• Termine la instalación al hacer click en [Finish]. ¡Ojo!: Conecte el microscopio sólo al puerto de instalación. El
ordenador no reconocerá el microscopio si está conectado a otro puerto USB.
5. Instrucciones de uso
• Ponga el microscopio cerca del objeto que quiere inspeccionar y manténgalo de manera perpendicular con respecto al
objeto. Gire lentamente la rueda de ajuste para obtener una imagen nítida.
CAMCOLMS VELLEMAN
Page 24

24
Haga click en [Snapshot] para efectuar una captura de la pantalla. Es posible guardar esta captura de pantalla como
fichero JPEG o BMP (JPG por defecto) al hacer click en [Save]. El fichero se guardará automáticamente en
[My Documents\PEN SCOPE\SNAPSHOT] y tendrá el formato siguiente: 070517001.JPG (07 = año, 05 = mes, 17 = día,
001 = número de captura, JPG = formato del fichero). Haga click en [Save As] para ajustar el nombre del fichero.
Haga click en [Record] para efectuar una grabación.
Haga click en [Record Set] para efectuar una grabación según sus propias especificaciones. Ajuste la duración de la
grabación y el tamaño máx. del fichero, haga click en [Start] y en [OK] para activar la grabación. Haga click en [Save As]
para guardar la grabación. El fichero se guardará automáticamente en [My Documents\PEN SCOPE\RECORDING] y
tendrá el formato siguiente: 070517001.AVI (07 = año, 05 = mes, 17 = día, 001 = número de captura, AVI = formato de
fichero).
CAMCOLMS VELLEMAN
Page 25

25
Haga click en [Format] para ajustar los valores de pantalla y para editar la captura de pantalla.
Haga click en [Light] o [Dark] para desactivar o activar el microscopio.
6. Especificaciones
Sensor CMOS
Número de píxeles 300.000
Píxeles efectivos 645 (H) x 485 (V)
Interfaz USB 1.1 ó 2.0
Ampliación 50x / 200x
Iluminación mínima 10 ~ 20 lux / F2,8 – 5.600K
Relación señal / ruido 42dB
Longitud del cable 1,2m
Balance des blancos automático
Rango balance de blancos 2.800 ~ 11.000K
Iris AES
Shutter 1/30 ~ 1/15.750 seg.
Formato de la imagen JPEG / BMP
Consumo 65 ~ 100mA
Dimensiones Ø 38 x 165mm
Peso 128 g
Utilice este aparato sólo con los accesorios originales. Velleman Spain SL no será responsable de daños ni
lesiones causados por un uso (indebido) de este aparato.
Para más información sobre este producto, visite nuestra página web www.velleman.eu.
Se pueden modificar las especificaciones y el contenido de este manual sin previo aviso.
CAMCOLMS VELLEMAN
Page 26

26
CAMCOLMS – DIGITALES MIKROSKOP
1. Einführung
An alle Einwohner der Europäischen Union
Wichtige Umweltinformationen über dieses Produkt
Dieses Symbol auf dem Produkt oder der Verpackung zeigt an, dass die Entsorgung dieses Produktes nach seinem
Lebenszyklus der Umwelt Schaden zufügen kann.
Entsorgen Sie die Einheit (oder verwendeten Batterien) nicht als unsortiertes Hausmüll; die Einheit oder
verwendeten Batterien müssen von einer spezialisierten Firma zwecks Recycling entsorgt werden.
Diese Einheit muss an den Händler oder ein örtliches Recycling-Unternehmen retourniert werden.
Respektieren Sie die örtlichen Umweltvorschriften.
Falls Zweifel bestehen, wenden Sie sich für Entsorgungsrichtlinien an Ihre örtliche Behörde.
Wir bedanken uns für den Kauf des CAMCOLMS! Lesen Sie diese Bedienungsanleitung vor Inbetriebnahme sorgfältig
durch. Überprüfen Sie, ob Transportschäden vorliegen. Sollte dies der Fall sein, verwenden Sie das Gerät nicht und
wenden Sie sich an Ihren Händler.
2. Systemvoraussetzungen
• Pentium® MMX™ 200 MHz mit 32 MB RAM oder höher
• Windows® 98/ME/2000/XP/Vista
• freier USB-Port (1.1 oder 2.0)
• DirectX® 8.0 oder höher
3. Den Treiber installieren
• Trennen Sie das Mikroskop vom Computer. Legen Sie das mitgeliefert CD-ROM in das CD-ROM-Laufwerk. Wählen Sie
die Sprache en klicken Sie auf [Next].
CAMCOLMS VELLEMAN
Page 27

27
• Klicken Sie auf [Next]. Nach dem Installationsverfahren wird gefragt, ob Sie den Computer neu starten möchten. Dies ist
nicht verpflichtet aber wohl empfohlen.
4. Das Mikroskop installieren
• Verbinden Sie das Mikroskop über einen USB-Port mit dem Computer. Es erscheint einen Wizard. Wählen Sie dafür,
dass Sie kein Software-Update ausführen möchten und klicken Sie auf [Next].
CAMCOLMS VELLEMAN
Page 28

28
• Der Computer erkennt das Mikroskop automatisch. Klicken Sie auf [Install the software automatically
(Recommended)] und klicken Sie auf [Next] um mit der Installation weiter zu gehen.
• Unterbrechen Sie das Installationsverfahren nicht. Wenn folgendes Fenster erscheint, klicken Sie auf [Continue
Anyway].
CAMCOLMS VELLEMAN
Page 29

29
• Klicken Sie auf [Finish] um die Installation zu beenden. Achtung: Verbinden Sie das Mikroskop immer mit dem USB-
Port, den Sie während der Installation verwendet haben. Der Computer erkennt das Mikroskop nicht wenn Sie es mit
einem anderen Port verbinden.
5. Bedienungsanleitung
• Stellen Sie das Mikroskop senkrecht und dicht beim Gegenstand. Drehen Sie den Regulierungsrad vorsichtig, um so ein
möglichst helles Bild zu bekommen.
CAMCOLMS VELLEMAN
Page 30

30
Klicken Sie auf [Snapshot] um ein Bild festzulegen. Diese Momentaufnahme kann als eine JPEG- oder BMP-Datei (JPG
Standard) gespeichert werden. Klicken Sie hierfür auf [Save]. Die Datei wird automatisch in [My Documents\PEN
SCOPE\SNAPSHOT] gemäß diesem Format gespeichert: 070517001.JPG (07 = Jahr, 05 = Monat, 17 = Tag, 001 =
Nummer, JPG = Dateiformat). Klicken Sie auf [Save As] um selber einen Dateinamen einzugeben.
Klicken Sie auf [Record] um die Bilder als Film aufzunehmen.
Klicken Sie auf [Record Set] um die Bilder gemäß eigenen Einstellungen als Film aufzunehmen. Bestimmen Sie die
Aufnahmedauer und die erlaubte Dateigröße, klicken Sie auf [Start] und auf [OK] um die Aufnahme zu starten. Klicken Sie
auf [Save As] um die Aufnahme zu speichern. Die Datei wird automatisch in [My Documents\PEN SCOPE\RECORDING]
gemäß diesem Format gespeichert: 070517001.AVI (07 = Jahr, 05 = Monat, 17 = Tag, 001 = Nummer, AVI = Dateiformat).
CAMCOLMS VELLEMAN
Page 31

31
Klicken Sie auf [Format] um die Schirmeinstellungen zu konfigurieren oder Effekte hinzuzufügen.
Klicken Sie auf [Light] oder auf [Dark] um das Mikroskop ein- oder auszuschalten.
6. Technische Daten
Aufnahme-Element CMOS
Anzahl der Pixel 300.000
Pixelanzahl 645 (H) x 485 (V)
Schnittstelle USB 1.1 oder 2.0
Vergrößerung 50x / 200x
Mindestbeleuchtung 10 ~ 20lux / F2,8 – 5.600K
Signal-/Rauschabstand 42dB
Kabellänge 1,2m
Weißabgleich automatisch
Bereich Weißabgleich 2.800 ~ 11.000 K
Blende AES
Shutter 1/30 ~ 1/15.750 Sek.
Bildformat JPEG / BMP
Verbrauch 65 ~ 100mA
Abmessungen Ø 38 x 165mm
Gewicht 128 g
Verwenden Sie dieses Gerät nur mit originellen Zubehörteilen. Velleman NV übernimmt keine Haftung für Schaden
oder Verletzungen bei (falscher) Anwendung dieses Gerätes.
Für mehr Informationen zu diesem Produkt, siehe www.velleman.eu.
Alle Änderungen ohne vorherige Ankündigung vorbehalten.
CAMCOLMS VELLEMAN
 Loading...