


International Language Index
ENGLISH ____________________________________________________ 3
ITALIANO ____________________________________________________ 14
DEUTSCH ____________________________________________________ 25
FRANCAIS ____________________________________________________ 36
ESPANOL ____________________________________________________ 47

Introduction
Thankyou for purchasing the Veho MUVI micro DV camcorder.
At Veho we like to do things differently. We supply products that make a statement and stand out from the crowd. Boring is bad and run of the mill is not in our dictionary. All our products are manufactured to the highest standard and conform to worldwide safety standards.
The MUVI unique micro design enables digital video recording in situations where it may not be possible to use standard camcorders.
Coupled with the extreme sports mounting kit the MUVI will allow the user to capture high quality digital video and sound footage hands free.
English

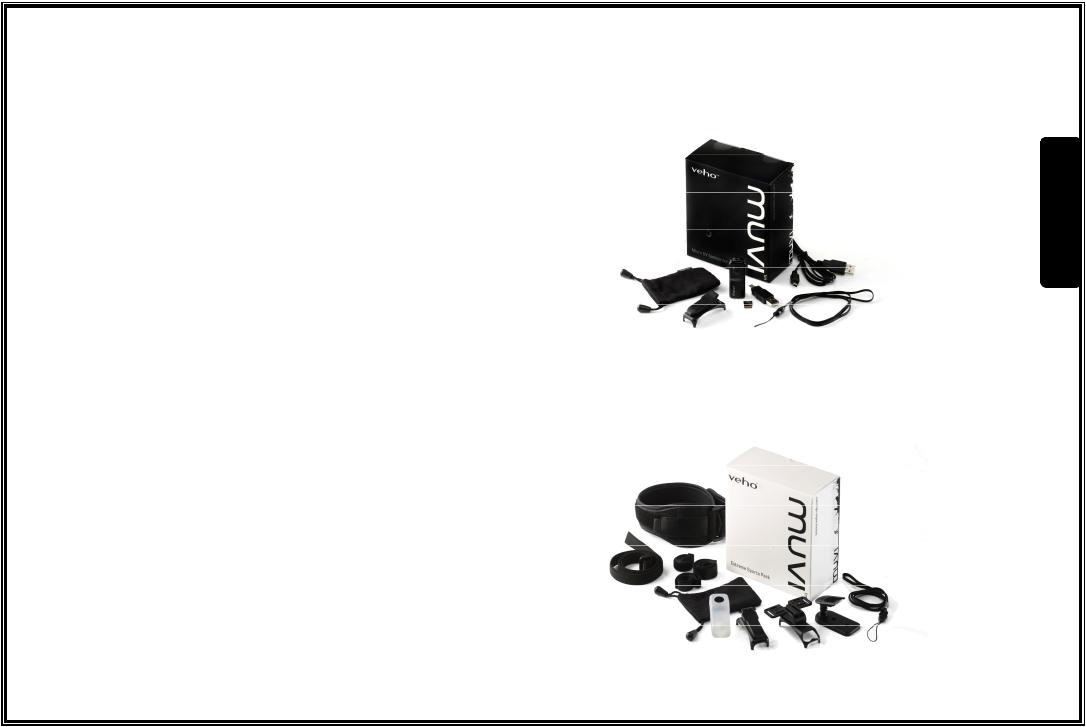
MUVI micro DV Product Contents
1 x veho MUVI micro DV camcorder
1 x micro SD card
1 x USB Cable
1 x MUVI webcam software
1 x MUVI spring mounting clip
1 x MUVI neck chain
1 x MUVI carrying pouch
1 x MUVI users manual
MUVI micro DV Extreme sports Product Contents
1 x MUVI additional spring mounting clip
1 x mounting bracket for bike/helmet
1 x magnetic mounting bracket for wall
1 x MUVI silicon protective sleeve
1 x MUVI arm strap
1 x MUVI head/helmet strap
1 x mounting bracket velcro
2 x mounting bracket screws
3 x mounting bracket straps
English
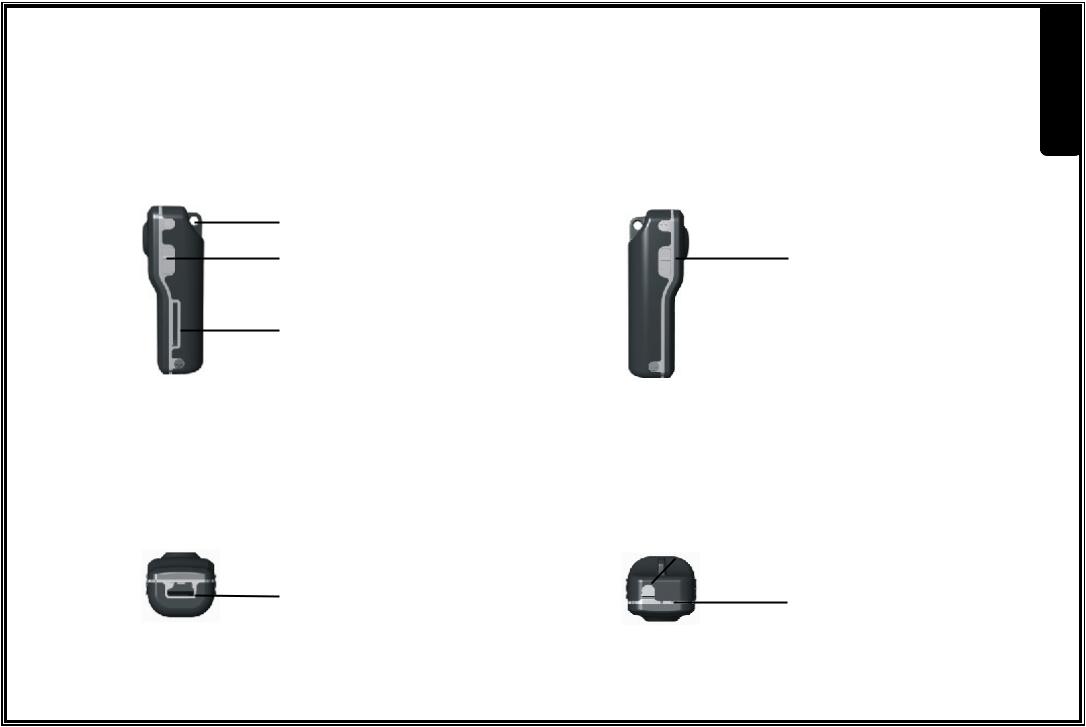
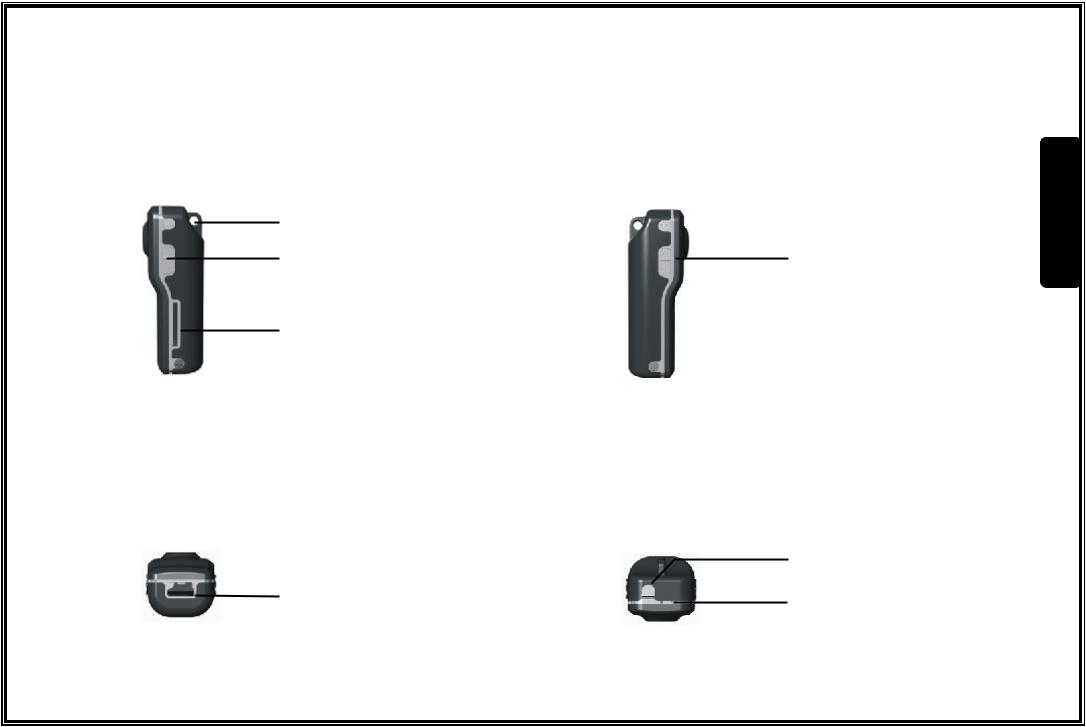
Veho MUVI Overview
hanging ring |
|
sound |
power |
activation |
switch |
switch
micro SD card slot
|
|
|
|
record |
|
|
|
|
|
|
|
|
|
|
mini USB |
|
|
|
LED |
jack |
|
|
indicator |
|
|
|
|
|
|
|
|
|
|
|
English

Veho MUVI Operation
1.Charge your Veho MUVI by connecting the USB cable to your PC/Mac/Notebook or using an (optional) Veho USB Adapter and the mini USB jack on the base of the MUVI. While charging the MUVI LED indicator will display red. Once fully charged the red LED indicator will turn off.
2.Insert the micro SD card into the slot on the right side of the MUVI.
3.Power the MUVI on by the switch on the left hand side of the MUVI. If no micro SD card has been inserted then the LED indicator will flash green quickly. While the MUVI remains well charged the indicator remains solid blue. When the MUVI becomes low on charge the Indicator flashes blue slowly.
4.If the MUVI has good charge but has not been used in 2 minutes it will switch to standby mode. If the MUVI has low charge and has not been used in 2 minutes it will power off completely.
5.To record manually once MUVI is powered on press the record button on top of MUVI. The LED indicator will switch from solid blue to green and flash slowly. If the MUVI is in standby mode then press record once to re-activate (LED shows blue) and record again to start recording (LED flashes green slowly). Press record button to stop recording and the MUVI footage will be saved to SD card as *.avi file.
6.If the LED is solid green then the micro SD card is full and you will need to move your MUVI footage to a PC or connect to PC to delete footage.
English

Veho MUVI Operation (cont)
7.To use sound activation mode move sound activation switch on right hand side MUVI to on and power switch on left hand side to on. When MUVI recognizes sound of more than 65 decibels it starts recording. If MUVI recognizes no further sound greater than 65 decibel for 2 minutes it will save MUVI files and enter standby mode. When in standby if sound of greater than 65 decibels is recognized again the MUVI will enter recording mode again.
8.To transfer MUVI footage to your PC connect via USB mini jack to PC USB port. Ensure power is on and sound activation is off. The MUVI will be recognized as a USB mass storage drive. Drill into the drive and view/move/copy/delete the MUVI footage as you please.
Important Information
1.If while in recording mode the power button is switched to off, the MUVI footage for that recording session will not be saved.
2.During long recording sessions the MUVI will automatically save a file of 800mb every 30 minutes of recording.
3.While connected to the PC the LED indicator will show red for charge but the MUVI is also capable of record, standby and file transfer operations.
English

LED Indicator Quick Reference
LED Indicator Colour |
Indicator Activity |
MUVI Activity Mode |
|
|
|
|
|
|
Solid ON |
Power On |
|
|
|
|
|
Blue |
No Light |
Standby/Power Off |
|
|
|
||
(Power Indicator) |
Flash Slowly |
Low Battery |
|
|
|||
|
|
|
|
|
Flash Fast |
Copy Data |
|
|
|
|
|
|
Solid ON |
SD Card Full |
|
Green |
|
|
|
Flash Slowly |
Recording |
||
(Record Indicator) |
|
|
|
Flash Fast |
No SD Card |
||
|
|||
|
|
|
|
Red |
Solid ON |
Charging |
|
|
|
||
(Power Indicator) |
No Light |
Fully Charged |
|
|
|||
|
|
|
English

Setting MUVI Pro Date and Time
Software Installation
1.Insert disc and select 'Driver installation'
2.Select 'Create Desktop Shortcut' or 'Add to Start Menu' - must select one or both otherwise you can't access MD Playback and Set Time
3.Select 'English', then next for all options until final window and then select 'Install' and then 'Finish'
Setting Date and Time
1.With Muvi Pro connected Double click 'Set Time' short cut on desktop or select from Start Menu
2.'Update Time' box appears.
3.Select browse and choose removable disk (Muvi Pro)
4.Select update and following message should appear:
Device Time update completely, please disconnect from PC and restart the device immediately in order to synchronize the time with the computer.
Time is synched with the computer's time.
English
Using the MUVI as a Webcam/PC Camera
As well as micro recording device it is possible to use the MUVI micro DV camcorder as a webcam/PC camera. Please use the following instructions.
1.Install the MUVI camera drivers from the software CD supplied.
2.Connect the MUVI to the PC using the USB cable provided.
3.Switch MUVI power switch to on and sound activation switch to on.
4.The PC will recognize the MUVI as a PC camera now.
English

MUVI Specifications
Pixels |
2 Mega Pixels Color CMOS |
|
|
Viewing Angle |
72 degrees |
|
|
Minimum Illumination |
1 lux (min) |
|
|
Battery Capacity |
260mAH |
|
|
Usage Time (full charge) |
3 hours |
|
|
Standby Time (sound trigger) |
250 hours |
|
|
Operating Temp Limit |
-10º to 60º C |
|
|
Store Temp Limit |
-10º to 70º C |
|
|
Operating Humidity |
15-85%RH |
|
|
Memory Medium |
Micro SD Card |
|
|
SD Capability |
Max 8Gb Micro SD |
|
|
|
Video decode using motion JPEG, |
Video function and Format |
Recording to AVI format |
|
VGA (640x480 @ up to 30fps) |
USB Support |
USB 1.1/2.0 |
|
|
Storage Consumption |
45mins/1Gb |
|
|
Charge Time |
2 hours |
|
|
Weight |
50 grams (approx) |
|
|
Dimensions |
55x28x20mm (approx) |
|
|
English

Safety Approval Information
Your Veho MUVI meets the requirements of FCC and CE, and is granted the FCC and CE certification.
It is authorized to bear the FCC and CE mark.
This product has been tested and found to comply with the limits for a Class B digital device, pursuant to Part 15 of the FCC rules. These limits are designed to provide reasonable protection against harmful interference in a residential installation.
This product complies with standards including Low Voltage Device Directive 73/23/EEC;
EMC Directive 89/336/EEC and R&TTE Directive1999/5/EC. It passed the subject tests by the authority concerned and is authorized to bear CE mark.
English

Customer Support
To contact Veho for technical support and software downloads please visit our support page here :
http://www.veho-uk.com/support.aspx
For non technical questions about the MUVI please email Veho on :
MUVI@veho-uk.com
For general information about other Veho products visit : www.veho-uk.com
For general questions about other Veho products email Veho on : info@veho-uk.com
English

Introduzione
Grazie per aver acquistato la Veho MUVI micro DV camcorder.
Alla Veho amiamo fare le cose in maniera diversa. Forniamo prodotti che non si confondono tra la folla. La noia non la concepiamo e le cose ordinarie non sono nel nostro stile. Tutti i nostri prodotti sono fabbricati secondo gli standard più elevati e sono conformi agli standard di sicurezza mondiali.
L'esclusivo design della micro MUVI consente la registrazione video digitale in situazioni in cui non potrebbe essere possibile utilizzare le camcorder standard.
Grazie al kit di montaggio da sport estremo la MUVI consente all'utente di acquisire filmati video digitali e con audio di alta qualità senza mani.
Italiano
Contenuto del prodotto MUVI micro DV
1 x veho MUVI micro DV camcorder
1 x scheda micro SD
1 x caricatore MUVI
1 x cavo USB
1 x software per webcam MUVI
1 x gancio di montaggio a molle MUVI
1 x tracolla MUVI
1 x tasca da trasporto MUVI
1 x manuale dell'utente MUVI
MUVI micro DV Extreme sports Product Contents
1 x gancio da montaggio a molle aggiuntivo MUVI
1 x staffa da montaggio per bici /casco
1 x staffa da montaggio magnetica per parete
1 x fodero protettivo in silicone MUVI
1 x strap per braccio MUVI
1 x strap per la testa/casco MUVI
1 x velcro per staffa da montaggio
2 x viti per staffa da montaggio
3 x strap per staffa da montaggio
Italiano
Panoramica su Veho MUVI
anello di aggancio
interruttore di attivazione
slot scheda SD
jack mini USB
interruttore di accensione
pulsante di registrazione
indicatore LED
Italiano

Funzionamento di Veho MUVI |
|
||
1. |
Caricate Veho MUVI collegando il caricatore di alimentazione mini USB o il cavo USB al PC e il |
|
|
|
jack mini USB sulla base di MUVI. Mentre è in carica l'indicatore LED su MUVI si illumina di |
|
|
|
|
||
|
rosso. Una volta caricata completamente il LED si spegne. |
Italiano |
|
2. |
Inserite la scheda micro SD nello slot sul lato destro di MUVI. |
||
|
|||
3. |
Accendete MUVI premendo l'interruttore sul lato sinistro di MUVI. Se non è stata inserita |
|
|
|
alcuna scheda micro SD l'indicatore LED verde lampeggerà rapidamente. Mentre MUVI resta |
|
|
|
ben carica l'indicatore rimane blu. Quando MUVI comincia a scaricarsi l'indicatore blu |
|
|
|
lampeggia lentamente. |
|
|
4. |
Se MUVI è stata caricata perfettamente ma non viene utilizzata per 2 minuti passerà alla |
|
|
|
modalità standby. Se invece è scarica e non viene utilizzata per 2 minuti si spegne |
|
|
|
completamente. |
|
|
5. |
Per procedere alla registrazione manuale una volta che MUVI è accesa, premete il pulsante di |
|
|
|
registrazione sulla parte superiore. L'indicatore LED passerà dal blu fisso al verde |
|
|
|
lampeggiante, con un ritmo lento. Se MUVI si trova in modalità standby, premete il pulsante |
|
|
|
di registrazione una volta per riattivarla (il LED è blu) e avviare di nuovo la registrazione (il |
|
|
|
LED diventa verde e lampeggia lentamente). Premete il pulsante di registrazione per |
|
|
|
interrompere la registrazione e il filmato verrà salvato nella scheda SD come file *.avi. |
|
|
6. |
Se il LED è verde fisso la scheda micro SD è piena e dovrete spostare il vostro filmato su un |
|
|
|
PC o collegarvi al PC per eliminarlo. |
|
|
 Loading...