

Veho Muvi VCC-005-MUVI-HD10 Quick Start Manual
HD Camcorder
Quick start guide
1. Introduction
Thank you for purchasing the Veho Muvi HD Camcorder. Its small size,
integrated design and easy to use functions mean that you can record
and photograph anytime, anywhere using high-definition and dynamic
photography, so that you can share your videos and photos with your
family members and friends.
This manual covers detailed instructions on use, operation, installation
and technical specifications of the Muvi HD Camcorder. Please read this
manual carefully before use and retain for future reference.
Product Certification: As certified by such authoritative organizations as FCC and CE, this
product complies with the recommended standards and thus guarantees the user’s safety.
ENGLISH

2. Tour of your Muvi HD
1 Status Indicator (green)
2 Power Indicator (red)
3 TFT Display Screen
4 Up
5 Menu
6 Ok/Shutter
7 Left
8 Down
9 Tripod Socket
10 Record
11 VOX Switch
12 Playback
13 Reset
14 Right
15 microSD Card Slot
16 Self-timer Indicator
17 Lens
18 AV Output Interface
19 Microphone
20 Power Switch
21 Mini USB Port
22 HDMI Port
23 Lanyard Hole
1
2
3
4
5
6
7
8
9
10
11
12
13
14
15
16
18
19
20
21
22
23
17
ENGLISH

3. Getting started 4. Muvi settings
Charging the Muvi HD
Before using please ensure that the battery is fully charged. Charge the
Muvi HD via the power supply or USB cable. The red power indicator will
flash slowly whilst charging and then will turn solid red, with the battery
icon displayed on the TFT screen, when it is fully charged.
Formatting your microSD Card
Use a high-speed microSD card only and format it in the Muvi HD before
using. If the microSD card has been used on other devices, reformat it in
the Muvi HD before operating.
Setting the date/time
In preview mode, touch [M] to enter
the selection menu. Use [>] to shift
to the setup menu , then [-] to
select the option ‘Date/Time’ and
then press [Ok/Shutter]. The current
cursor position is indicated by the
yellow number. Use [<] or [>] to move
the cursor and press [Ok/Shutter] to
select each number, this number will turn red. Then use the [+] or [-] to
change the number, move the cursor to and finally press [Ok/Shutter].
To access the setting menu touch [M] in preview mode, use [>] to shift to
the setup menu , press [Ok/Shutter] to set the selected option, and
then touch [M] to exit the menu. Touch [+] and [-] to move the cursor up
and down, touch [<] and [>] to move the cursor left and right, and then
press [Ok/Shutter] to confirm the option for the current menu.
Beep Turn the key tone on or off
Self Timer LED Turn the front LED indicator on or off
Time Display Turn the date and time stamp on or off
Loop Record Turn on to continually overwrite files when the
memory becomes full
Auto Standby Set the power down function for when there is no
activity for 30s, 1m, 5m or Off
TV Standard Set NTSC or PAL, depending on your area
Note: Disconnect the AV cable before changing the TV system
Format Format the microSD card and Muvi HD
Note: Formatting will delete all files, including protected ones
Default Restore factory setting to default
Language Set the language
Frequency Set the light source frequency, 50Hz or 60Hz
depending on your area, in order to avoid the TFT
screen flickering in preview mode or video mode.
Exposure Set the exposure control to automatic, centred,
average or spot
ENGLISH

5. Record and play
Video Settings
To access the Video setting menu
touch [M] in preview mode, press [Ok/
Shutter] to set the selected option,
and then touch [M] to exit the menu.
Touch [+] and [-] to move the cursor
up and down, touch [<] and [>] to
move the cursor left and right, and
then press [Ok/Shutter] to confirm the option for the current menu.
Resolution Choose between 1080p at 30fps, 960fps at 30fps, 720p
at 60fps, 720p at 30fps or WVGA at 60fps
Bit Rate Choose between 16 Mbit/s or 6 Mbit/s in 1080p mode, or
between 8 Mbit/s or 4 Mbit/s in all other resolution modes.
Capture Mode Choose between recording video and audio or audio only
Video in Manual Mode
Switch on camcorder and select ‘Off’ on the
VOX switch.
In preview mode, press [Record] to start
recording, the red indicator will go out and the green indicator will flash.
The Muvi HD is now recording. To stop recording press [Record] again and
the video will be saved as a ‘*.MOV’ file.
During recording the video recording icon and other useful icons, such
as video recording resolution, battery power, microSD card capacity
(available capacity is displayed as a ‘%’) , video recording time and focus,
will be displayed on the screen.
Zoom To adjust the zoom during recording use the [+] and [-]
Please note that the zoom function is not available in 1080p mode.
Video in Voice-activated
Mode
Switch on camcorder and select ‘On’ on the
VOX switch.
In preview mode, the camcorder will start recording when the external
sound goes beyond 65dB. The red indicator will go out and the green
indicator will flash.
The camcorder will auto stop and return to the preview mode if the
external sound remains under 65dB for 2 minutes. Back in preview mode,
the camcorder will start recording again if the external sound goes
beyond 65dB. To turn the camcorder off in voice-activated mode, firstly
turn the VOX switch to ‘Off’ so that the data will be auto saved.
Note: In the event of low battery power or the microSD card is full the camcorder
will auto save the file in use.
VOX OFFON
VOX OFFON
ENGLISH
Bit Rate
Camcorder
16M
1080P
Capture Mode

6. Click and view
Using your Muvi HD as a camera to
take high-definition photos is simple.
Firstly, ensure you set the desired
image resolution. Touch [M] to enter
the setup menu, use [>] to move
the cursor to select the option
‘Resolution’ and press [Ok/Shutter].
There are three resolution modes:
3M Photo resolution (2048x1536)
5M Photo resolution (2560x1920)
8M Photo resolution (3200x2400)
Photos in Single Shot Mode
1. Touch [M] to enter the setup menu, use [>] to move the cursor to .
2. Select the option ‘Single Shot’ and press [Ok/Shutter], then exit setup
menu.
3. In preview mode, press [Shutter] to take a photo.
4. You will hear a ‘click’ sound when a photo has been successfully
captured and the red indicator will flash once.
Photos in Treble Shot Mode
1. Touch [M] to enter the setup menu, use [>] to move the cursor to .
2. Select the option ‘Treble Shot’ and press [Ok/Shutter], then exit setup menu.
3. In preview mode, press [Shutter] to take three photos in quick succession.
4. You will hear three ‘click’ sounds in a row when each photo has been
successfully captured.
ENGLISH
Playing back
Touch [Playback] and press [Ok/
Shutter] to select ‘Record’ option. Use
[-] to enter the thumbnail preview
mode. You can use [M] to delete or
protect files in this mode.
Delete Will delete the current file
Delete All Will delete all audio or video files that are not protected
Protect Lock files to protect them. The icon will appear on
the upper left corner of each protected file, repeat this
operation to unprotect the protected files. Protected files
can only be deleted by reformatting the SD Card.
When viewing video files use the following keys to execute operations:
[+] Increase volume
[-] Reduce volume
[<] Press once to rewind in slow motion (1/4 speed), press twice to rewind
at 2x speed
[>] Press once to fast forward in slow motion (1/4 speed), press twice to
fast forward at 2x speed
Pause, retouch to resume
[Ok/Shutter] After touching [<] or [>], you can press this key to resume
regular playing

ENGLISH
When viewing photo files you can touch the following keys to execute
operations:
[+] Zoom in
[-] Preview thumbnails or zoom out
[<] Select the left photo, or move photo up or left in zoom-in mode
[>] Select the right photo, or move photo down or right in zoom-in mode
Exit the photo menu
[M] To execute the following operations:
Delete Will delete the current file
Delete All Will delete all photo files that are not protected
Protect Lock files to protect them. The icon will appear on
the upper left corner of each protected file, repeat this
operation to unprotect the protected files. Protected
files can only be deleted by reformatting the SD Card
Auto Play Auto plays the photo files as a slideshow.
DPOF When viewing a photo file if you touch [M] to enter the
setup menu and select the option ‘DPOF’, the icon will
appear on the upper left corner of this file
Printing your photos
DPOF (Digital Print Order Format) allows captured images on the microSD
Card to be printed, together with information of the number of copies.
Insert the microSD card into a DPOF compatible printer to print the
photos as ordered.
Note: DPOF printing requires a microSD card with preset DPOF information to work
correctly. Some DPOF compatible printers may fail to print the photos based on the
specific settings, if this happens refer to your printers user manual.
Photos in Continuous Mode
Use this mode if you want to make timelapse videos using your video
editing software (not included).
1. Touch [M] to enter the setup menu, use [>] to move the cursor to .
2. Select the option ‘Continuous’ and press [Ok/Shutter]. Select 1, 2, 3,
5, 10, 20, 30 or 60 and press [Ok/Shutter] to set the camera to take a
picture every 1 second, 2 seconds, 3 seconds etc. then exit setup menu.
3. In preview mode, press [Shutter] to start taking pictures at the interval
that you have set.
4. You will see a count down on the screen before each picture and hear
a ‘click’ sound when a photo has been successfully captured and the red
indicator will flash once.
5. To stop taking pictures press the [Ok/Shutter] button in the interval
between each photo being captured.
Photos in Self-timer Mode
Touch [M] to enter the setup menu, use [>] to move the cursor to ,
select the option ‘Self-timer’, and press [Ok/Shutter] to set the delay
time as 5 secs or 10 secs. Touch [M] to exit the setup menu. Press
[Shutter], and the camcorder will start the timer and take a photo at the
end of the delay time.
Viewing your photos
Touch [Playback] and press
[Ok/Shutter] to select ‘Capture’
option. Use [-] to preview the photo
file thumbnails, touch the direction
keys to select a file and then press
[Ok/Shutter] to view.

ENGLISH
7. Voice recording 8. Other functions
To use your Muvi HD to record audio only touch [M] to enter the setup
menu, select the option ‘Capture Mode’, press [Ok/Shutter]. Use [<] or
[>] to select , press [Ok/Shutter] to confirm your selection, and finally
touch [M] to exit the setup menu. Press [Ok/Shutter] to start recording,
the red indicator will go out, the green indicator will flash and the voice
recording icon will be displayed on screen.
Playing back
To listen to your audio recording use [<] or [>] to select an audio file and
press [Ok/Shutter] to play. When playing, you can use [+] and [-] to adjust
the volume and to pause or play the file.
Turn off the LCD screen
To turn off the LCD screen press and hold the Record button. To turn the
screen back on press and hold the Record button again. Please note that
when the screen is off all other functions are disabled. Therefore if you
want to record with the screen off you will need to start recording first
and then turn off the LCD screen. To stop the recording you will need to
turn the screen back on first and then press the Record button to stop.
Locking the touch sensitive controls
To lock the touch sensitive controls press and hold the [Ok/Shutter]
button for approximately 5 seconds. All of the touch sensitive controls
will flash together. This means the controls are now locked. To unlock
the controls press and hold the [Ok/Shutter] button until the controls
flash together again. The controls will be unlocked.

9. Go remote
The supplied remote
control allows
your Muvi HD to be
remotely operated.
Changing the remote battery
The Muvi HD remote has a replaceable standard 3V CR2032 battery. To
replace the battery you need to unscrew the four screws on the back
of the remote, remove the back and take out the battery. When putting
the new battery in please ensure that the battery is face (positive side)
up. Please also ensure that the rubber gasket that lines the inside of the
remote is not removed and stays in position when you replace the back
of the remote.
Installation
Record
Shutter
Stop
Velcro
Clip
Pairing your Muvi HD and Remote
Follow the steps below to pair the remote control with your Muvi HD
before use:
Next, press both [Record] and [Stop] on the
remote control within 3 secs to finish the
remote control pairing process.
Note: The remote control range is approx 5 meters.
Start with the Muvi HD turned
off. Press and hold [Ok/Shutter]
then turn the power switch to
‘On’, finally release [Ok/Shutter]
when the Muvi HD is on.
Record
Stop

ENGLISH
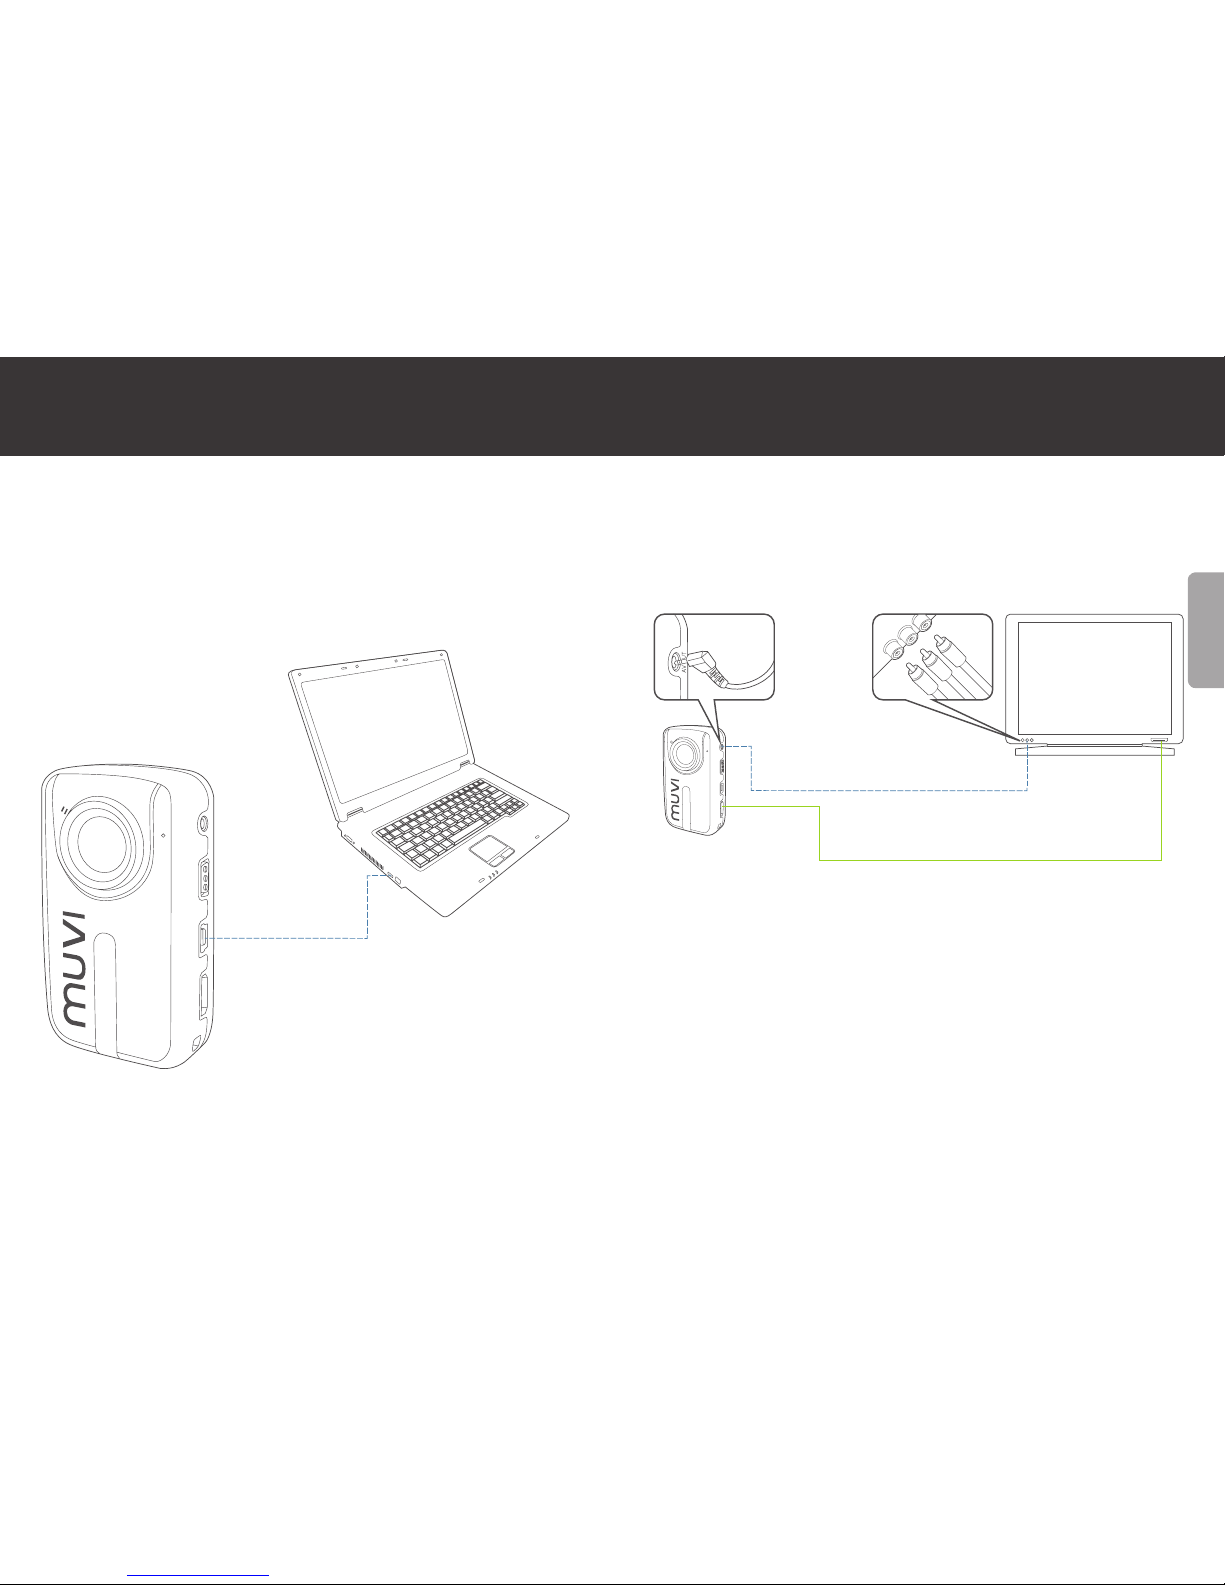
Using the USB Cable
Transfer and share your videos and photos from your Muvi HD to your
computer via the supplied USB cable. Use your preferred media player on
your computer to play your files.
10. Store and share
Note: Turn off the Muvi HD before inserting or unplugging the USB cable.
HDMI Cable and AV Cable
Use the HDMI cable or AV cable to connect the Muvi HD to a TV or
monitor with an HDMI port.
After connecting the Muvi HD to the monitor via the HDMI cable, select the input
source for the monitor to display the Muvi HD files.
Card reader
You could also use a card reader that is compatible with a microSD Card.
Remove the card and insert it into a card reader and transfer required
files.
AV Port
on Muvi HD
HDMI Port
on Muvi HD
HDMI Port
on TV
AV Port
on TV
AV Cable
HDMI Cable
TV/Monitor

11. Specifications 12. Muvi HD Accessories
In the event you need to contact Veho for support
or troubleshooting for your Muvi HD Camcorder
www.veho-world.com/main/support.aspx
Technical Support
Pebble Portable Battery
Pack (VCC-A007-PBP)
Universal Pole/Bar
Mount (VCC-A017-UPM)
MUVI 8GB microSD Card
(VCC-MSD-8GBS)
Mino microSD USB
Card Reader (VSD-003)
Duopod (Monopod and
Tripod Kit)
(VCC-A019-MP)
Flatboard Mount
(VCC-A015-FBM)
ENGLISH
Angle 160 degrees
Record time Up to 3 hours continous recording
Cmos lens 5 Mega pixels
Resolution Full HD 1080p
Frame rate 30fps (1080p or 720p)
60fps (960p, 720p or WVGA)
Battery 1400mah Lithion rechargeable
Digital zoom 3x (when using 720p resolution)
Wireless remote range 5 metres
Screen 1.5” LCD Bright colour
Camera ISO range 400 ISO
Minimum focal aperature 2.5
Maximum focal aperature 2.5
Minimum focal length 2.5cm
Maximum focal length Endless

1. Introduction
Nous vous remercions pour votre achat du caméscope Muvi HD de
Veho. Son petit format, sa conception intégrée et ses fonctions simples
d’utilisation vous permettent de filmer et de prendre des photos à tout
moment, n’importe où. La photo est dynamique, de haute définition,
vous pouvez donc partager vos images et vos vidéos avec votre famille
et vos amis.
Ce manuel propose des instructions détaillées concernant l’utilisation,
le fonctionnement, l’installation et les caractéristiques techniques du
caméscope Muvi HD. Veuillez le lire attentivement avant toute
utilisation et le conserver pour vous y reporter à l’avenir.
FRANÇAIS

2. Vue d’ensemble de votre Muvi HD
1 Voyant de fonctionnement
(vert)
2 Voyant d’alimentation (rouge)
3 Écran TFT
4 Haut
5 Menu
6 OK/Obturateur
7 Gauche
8 Bas
9 Emplacement trépied
10 Enregistrement
11 Commutateur VOX
12 Lecture
13 Réinitialisation
14 Droite
15 Emplacement pour carte
microSD
16 Voyant du retardateur
17 Objectif
18 Interface de sortie AV
19 Microphone
20 Bouton d’alimentation
21 Mini-port USB
22 Port HDMI
23 Orifice pour cordon
1
2
3
4
5
6
7
8
9
10
11
12
13
14
15
16
18
19
20
21
22
23
17
FRANÇAIS

3. Mise en route 4. Paramètres du Muvi
Charge du Muvi HD
Avant d’utiliser l’appareil, vérifiez que la batterie est chargée au maximum.
Chargez le Muvi HD à l’aide de l’alimentation ou du câble USB. Le voyant
d’alimentation rouge clignote lentement pendant la charge puis s’allume
en rouge en continu, l’icône de la batterie s’affiche sur l’écran TFT
lorsque la pleine charge est atteinte.
Formatage de votre carte microSD
Utilisez uniquement une carte microSD haut débit et formatez-la dans
le Muvi HD avant utilisation. Si la carte microSD a été employée dans
d’autres appareils, reformatez-la dans le Muvi HD avant utilisation.
Réglage de la date et
de l’heure
En mode de prévisualisation, appuyez
sur [M] pour entrer dans le menu
de sélection. Appuyez sur [>] pour
accéder au menu de configuration ,
puis sur [-] pour sélectionner l’option
Date/Time ; appuyez ensuite sur le
bouton [OK/Obturateur]. La position actuelle du curseur est signalée par
le chiffre jaune. Utilisez les touches [<] ou [>] pour déplacer le curseur
et appuyez sur le bouton [OK/Obturateur] pour sélectionner chaque
chiffre, qui s’affiche alors en rouge. Utilisez ensuite les touches [+] ou [-]
pour modifier le chiffre, déplacez le curseur sur , puis appuyez sur [OK/
Obturateur].
Pour accéder au menu de configuration, appuyez sur [M] en mode de
prévisualisation, puis sur [>] pour passer au menu de configuration ,
appuyez ensuite sur [OK/Obturateur] pour choisir l’option adaptée et
appuyez sur [M] pour quitter le menu. Appuyez sur les touches [+] et
[-] pour remonter ou descendre le curseur, appuyez sur [<] et [>] pour
déplacer le curseur à gauche et à droite, puis appuyez sur
[OK/Obturateur] pour confirmer l’option du menu actuel.
Beep (Bip) Active ou désactive la tonalité des touches
Self Timer LED Tournez la lumière sur le devant du caméscope sous
ou hors tension
Time Display Tournez la date et l’heure sur ou hors
Loop Record Activez-le pour toujours écraser les fichiers quand la
mémoire est pleine
Auto Standby Règle la fonction de veille en cas d’inactivité pendant
(Arrêt auto) 30 secondes, 1 minute, 5 minutes ou la désactive
TV Standard Règle le format NTSC ou PAL, en fonction de votre région
(Format de sortie TV) Remarque : débranchez le câble AV avant de changer de
système télévisé.
Format Formate la carte microSD et le Muvi HD
Remarque : le formatage supprimera tous les fichiers, y compris
les fichiers protégés.
Default (Par défaut) Rétablit les paramètres d’usine par défaut
Language (Langue) Définit la langue
Frequency (Fréquence) Règle la fréquence de la source lumineuse, à 50 Hz
ou 60 Hz en fonction de votre région ; cela évite que
l’écran TFT ne scintille en mode prévisualisation ou vidéo.
Exposure Réglez le contrôle de l’exposition à ‘automatic’,
‘centred’, ‘average’ ou ‘spot’
FRANÇAIS

5. Filmer et lire une vidéo
Video Settings
Pour accéder au menu de
configuration, appuyez sur [M] en
mode de prévisualisation, appuyez
ensuite sur [OK/Obturateur] pour
choisir l’option adaptée et appuyez
sur [M] pour quitter le menu. Appuyez
sur les touches [+] et [-] pour
remonter ou descendre le curseur, appuyez sur [<] et [>] pour déplacer
le curseur à gauche et à droite, puis appuyez sur [OK/Obturateur] pour
confirmer l’option du menu actuel.
Resolution Choisissez entre 1080p à 30fps, 960fps à 30fps, 720p à
60fps, 720p à 30fps ou WVGA à 60fps
Bit Rate Choisissez entre 16 Mbit/s ou 6 Mbit/s en mode 1080p,
ou entre 8 Mbit/s ou 4 Mbit/s dans tous les modes de
résolution d’autres.
Capture Mode Choisissez entre l’enregistrement vidéo et audio ou audio
uniquement
Vidéo en mode manuel
Allumez le caméscope et choisissez Off sur
le commutateur VOX.
En mode de prévisualisation, appuyez sur
[Enregistrement] pour démarrer l’enregistrement, le voyant rouge
s’éteint et le voyant vert se met à clignoter. Le Muvi HD démarre
l’enregistrement. Pour arrêter l’enregistrement, appuyez à nouveau sur
[Enregistrement], la vidéo sera enregistrée au format *.MOV.
Lors de l’enregistrement, l’icône d’enregistrement et d’autres icônes
utiles, comme celle de la résolution d’enregistrement de la vidéo, de
la puissance de la batterie, de la capacité de la carte microSD (capacité
disponible affichée en %), de l’heure d’enregistrement vidéo et de la mise
au point seront affichées à l’écran.
Zoom Pour régler le zoom pendant l’enregistrement, utilisez les
touches [+] et [-]
S’il vous plaît noter que la fonction de zoom n’est pas disponible en
mode 1080p.
Vidéo en mode activé
par la voix
Allumez le caméscope et choisissez On sur
le commutateur VOX.
En mode de prévisualisation, le caméscope démarre l’enregistrement
lorsque le son externe dépasse 65 dB. Le voyant rouge s’éteint et le
voyant vert se met à clignoter.
Le caméscope s’éteint automatiquement et revient en mode de
prévisualisation lorsque que le son externe reste inférieur à 65 dB
pendant deux minutes. De retour en mode de prévisualisation, le
caméscope démarre à nouveau l’enregistrement si le son externe dépasse
65 dB. Pour éteindre le caméscope en mode activé par la voix, basculez
d’abord le commutateur VOX sur Off de manière à ce que les données
soient automatiquement enregistrées.
Remarque : si les batteries sont peu chargées ou si la carte microSD est pleine, le
caméscope enregistre automatiquement le fichier en cours d’utilisation.
VOX OFFON
VOX OFFON
FRANÇAIS
Bit Rate
Camcorder
16M
1080P
Capture Mode

6. Cliquer, afficher
FRANÇAIS
Lecture
Appuyez sur [Lecture], puis sur [OK/
Obturateur] pour sélectionner
l’option d’enregistrement. Utilisez
la touche [-] pour entrer en mode
de prévisualisation des miniatures.
Vous pouvez appuyer sur la touche
[M] pour supprimer ou protéger des
fichiers dans ce mode.
Delete (Effacer) Efface le fichier actuel
Delete All Efface tous les fichiers audio ou vidéo qui ne sont pas
(Effacer tout) protégés
Protect Verrouille les fichiers pour les protéger. L’icône
(Protéger) apparaît dans le coin supérieur gauche de chaque fichier
protégé ; répétez cette opération pour ôter la protection
des fichiers protégés. Les fichiers protégés ne peuvent être
effacés que par un reformatage de la carte SD.
Lors de la visualisation des fichiers vidéo, utilisez les touches suivantes
pour exécuter des opérations :
[+] Augmenter le volume
[-] Réduire le volume
[<] Appuyez une fois pour rembobiner en mouvement lent (1/4 de
vitesse), appuyez deux fois pour revenir en arrière à une vitesse 2x
[>] Appuyez une fois pour avancer rapidement dans le mouvement lent
(1/4 de vitesse), appuyez deux fois pour une avance rapide à vitesse 2x
Mise en pause, appuyez à nouveau dessus pour reprendre la lecture
[OK/Obturateur] Après avoir appuyé sur [<] ou sur [>], vous pouvez appuyer
sur cette touche pour reprendre une lecture normale
Il est très facile d’utiliser votre
Muvi HD à la manière d’un appareil
photo pour prendre des photos en
haute définition. Choisissez d’abord
la résolution souhaitée pour l’image.
Appuyez sur [M] pour entrer dans le
menu de configuration, utilisez [>] pour
déplacer le curseur sur , choisissez
l’option Resolution et appuyez sur
[OK/Obturateur]. Il existe trois modes
de résolution :
Résolution photo 3M (2048x1536)
Résolution photo 5M (2560x1920)
Résolution photo 8M (3200x2400)
Photos en mode Single Shot
1. Appuyez sur [M] pour entrer dans le menu de configuration, utilisez [>]
pour déplacer le curseur sur .
2. Sélectionnez l’option ‘Single Shot’ et appuyez sur [Ok/Obturateur], puis
quitter le menu de configuration.
3. En mode de prévisualisation, appuyez sur [Obturateur] pour prendre
une photo.
4. Lors d’une prise de vue réussie, vous entendrez un déclic; le voyant
rouge clignote une fois.

Photos en mode Treble Shot
1. Appuyez sur [M] pour entrer dans le menu de configuration, utilisez [>]
pour déplacer le curseur sur .
2. Sélectionnez l’option ‘Treble Shot’ et appuyez sur [Ok/Obturateur],
puis quitter le menu de configuration.
3. En mode de prévisualisation, appuyez sur [Obturateur] pour prendre
trois photos en succession rapide.
4. Vous entendrez trois ‘cliquez’ sons dans une rangée où chaque photo a
été capturé avec succès.
Photos en Continuous Mode
Utilisez ce mode si vous voulez faire des vidéos timelapse l’aide de votre
logiciel de montage vidéo (non inclus).
1. Appuyez sur [M] pour entrer dans le menu de configuration, utilisez [>]
pour déplacer le curseur sur .
2. Sélectionnez l’option ‘Continuous’ et appuyez sur [Ok/Obturateur].
Choisir 1, 2, 3, 5, 10, 20, 30 ou 60 et appuyez sur [Ok/Obturateur]
pour régler la caméra pour prendre une photo toutes les 1 seconde, 2
secondes, 3 secondes, etc, puis quitter le menu de configuration de sortie.
3. En mode de prévisualisation, appuyez sur [Obturateur] pour commencer
à prendre des photos à l’intervalle que vous avez défini.
4. Vous verrez un compte à rebours sur l’écran avant chaque image. Lors
d’une prise de vue réussie, vous entendrez un déclic ; le voyant rouge
clignote une fois.
5. Pour arrêter de prendre des photos sur la touche [Ok/Obturateur]
bouton dans l’intervalle entre chaque photo d’être capturé.
Photos en mode
retardateur
Appuyez sur [M] pour entrer dans
le menu de configuration, utilisez
[>] pour déplacer le curseur sur ,
choisissez l’option Self-timer,
puis appuyez sur [OK/Obturateur]
pour définir le réglage sur 5 ou
10 secondes. Appuyez sur [M] pour quitter le menu de configuration.
Appuyez sur [Obturateur], le caméscope démarre le minuteur et prend la
photo à la fin du délai imparti.

FRANÇAIS
Remarque : pour fonctionner correctement, l’impression DPOF nécessite une carte
microSD avec des informations DPOF prédéfinies. Certaines imprimantes compatibles
DPOF risquent de ne pas pouvoir imprimer des photos qui contiennent certains
paramètres spécifiques. Dans ce cas, consultez le manuel utilisateur de votre
imprimante.
Visualisation des photos
Appuyez sur [Lecture], puis sur [OK/Obturateur] pour sélectionner l’option
Capture. Appuyez sur [-] pour prévisualiser les miniatures des photos,
appuyez sur les touches de direction pour sélectionner un fichier, puis
sur [OK/Obturateur] pour afficher la photo. Lors de la visualisation
des fichiers photo, utilisez les touches suivantes pour exécuter des
opérations :
[+] Zoom avant
[-] Prévisualisation des miniatures ou zoom arrière
[<] Sélectionne la photo de gauche ou déplace la photo vers le haut ou
la gauche en mode zoom avant
[>] Sélectionne la photo de droite ou déplace la photo vers le bas ou la
droite en mode zoom avant
Ferme le menu de la photo
[M] Pour exécuter les opérations suivantes :
Delete (Effacer) Efface le fichier actuel
Delete All Efface tous les fichiers photo qui ne sont pas protégés
(Effacer tout)
Protect Verrouille les fichiers pour les protéger. L’icône
(Protéger) apparaît dans le coin supérieur gauche de chaque fichier
protégé ; répétez cette opération pour ôter la protection
des fichiers protégés. Les fichiers protégés ne peuvent
être effacés que par un reformatage de la carte SD.
Auto Play Fait automatiquement défiler les fichiers photos sous
(Lecture auto) forme de diaporama.
DPOF Lors de la visualisation d’un fichier photo, si vous appuyez
sur [M] pour entrer dans le menu de configuration et
sélectionner l’option DPOF, l’icône apparaît dans le
coin supérieur gauche de ce fichier
Impression des photos
Le mode DPOF (Format de commande d’impression numérique) permet
d’imprimer les images enregistrées sur la carte microSD avec des
informations concernant le nombre d’exemplaires voulu. Insérez la carte
microSD dans une imprimante compatible DPOF afin d’imprimer les photos
telles qu’elles ont été commandées.

8. Autres fonctions
Éteignez l’écran LCD
Pour désactiver la presse écran LCD et maintenez enfoncé le bouton
d’enregistrement. Pour réactiver l’écran sur la presse et maintenez
enfoncé le bouton d’enregistrement. S’il vous plaît noter que lorsque
l’écran est éteint toutes les autres fonctions sont désactivées. Par
conséquent, si vous voulez enregistrer avec l’écran désactiver, vous aurez
besoin pour démarrer l’enregistrement d’abord, puis d’éteindre l’écran
LCD. Pour arrêter l’enregistrement, vous devrez réactiver l’écran en
premier et puis appuyez sur le bouton Enregistrer pour arrêter.
Verrouillage des commandes tactiles
Pour verrouiller la touche de contrôle sensibles appuyez et maintenez
le bouton [OK/Obturateur] pendant environ 5 secondes. Toutes les
commandes tactiles se met à clignoter ensemble. Cela signifie que les
contrôles sont maintenant verrouillées. Pour déverrouiller les commandes
appuyez et maintenez le bouton [OK/Obturateur] jusqu’à ce que les
contrôles clignote à nouveau ensemble. Les contrôles seront débloqués.
7. Enregistrement vocal
Pour utiliser votre Muvi HD afin d’enregistrer du son, appuyez simplement
sur [M] pour ouvrir le menu de configuration, sélectionnez l’option
Capture Mode, puis appuyez sur [OK/Obturateur]. Appuyez sur [<] ou sur
[>] pour sélectionner , puis sur [OK/Obturateur] pour confirmer votre
choix et sur [M] pour quitter le menu de configuration. Appuyez sur
[OK/Obturateur] pour lancer l’enregistrement, le voyant rouge s’éteint,
le voyant vert se met à clignoter et l’icône de l’enregistrement vocal
apparaît à l’écran.
Lecture
Pour écouter votre enregistrement audio, appuyez sur [<] ou sur [>] pour
sélectionner un fichier audio et appuyez sur [OK/Obturateur] pour lire le
fichier. Lors de la diffusion, vous pouvez utiliser les touches [+] et [-] pour
régler le volume et pour faire une pause ou relancer la lecture.

FRANÇAIS
9. À distance
La télécommande fournie
permet d’actionner votre
Muvi HD à distance.
Installation
Enregistrer
Obturateur
Arrêt
Velcro
Clip
Associer votre Muvi HD et la télécommande
Avant toute utilisation, suivez les étapes ci-dessous pour associer la
télécommande à votre Muvi HD :
Appuyez ensuite à la fois sur les touches
[Enregistrer] et [Arrêt] de la télécommande
dans les 3 secondes pour terminer la
procédure d’association de la télécommande.
Remarque : la portée de la télécommande est
d’environ 5 mètres.
Éteignez le Muvi HD. Maintenez la
touche [OK/Obturateur] enfoncée,
puis basculez le commutateur
d’alimentation sur On et relâchez
la touche [OK/Obturateur] une
fois le Muvi HD allumé.
Enregistrer
Arrêt
Modification de la pile de la télécommande
Le Muvi HD à distance a un remplaçable 3V batterie standard CR2032. Pour
remplacer la pile vous avez besoin de dévisser les quatre vis sur le dos de
la télécommande, retirez le dos et retirer la pile. Lors de la remise de la
nouvelle batterie en s’il vous plaît faire en sorte que la batterie est face
(côté positif) vers le haut. S’il vous plaît également veiller à ce que le joint
en caoutchouc qui tapisse l’intérieur de la télécommande n’est pas supprimé
et reste en position lorsque vous remplacez le dos de la télécommande.
À l’aide du câble USB
Vous pouvez transférer vos photos et vos vidéos entre votre Muvi HD et
votre ordinateur grâce au câble USB fourni. Utilisez votre lecteur média
préféré sur votre ordinateur pour lire vos fichiers.
10. Conserver et partager
Remarque : éteignez le Muvi HD avant d’insérer ou de débrancher le câble USB.
FRANÇAIS
Câble HDMI et câble AV
Utilisez le câble HDMI ou le câble AV pour brancher le Muvi HD à un
téléviseur ou à un écran équipé d’un port HDMI.
Une fois le Muvi HD branché à l’écran par le câble HDMI, choisissez la source d’entrée
pour afficher les fichiers Muvi HD.
Lecteur de carte
Vous pouvez également utiliser un lecteur de cartes compatible avec une
carte microSD. Retirez la carte et insérez-la dans un lecteur de cartes,
puis transférez les fichiers voulus.
AV Port
on Muvi HD
HDMI Port
on Muvi HD
HDMI Port
on TV
AV Port
on TV
AV Cable
HDMI Cable
TV/Monitor
 Loading...