

Page 1
TENT PITCHING INSTRUCTIONS –
LAUDER
Locate pole sleeves on roof section of flysheet and insert the curved roof poles
corresponding upright poles to the roof poles
On both sides of the tent, locate the ends of each pole into the corresponding ring & pin
Tighten all the tensions straps at the base of the poles.
Locate the front pegging points and pull away from rear (this is easier if a second person
holds the steel pole in an upright position). When fully tensioned away from the rear,
Insert the fibreglass poles into the front and rear pole sleeves and locate the ends onto the pins on the steel pole
Peg out the remaining poles and pegging points using pin pegs at the ba
pegs ensuring that guy line fabric attachment points are evenly tensioned.
Open out inner tent inside flysheet and position doorways to correspond with the living area
by attaching toggles of inner tent through rings on inside of flysheet
The inner attachments are colour coded to match the clips on the roof of the flysheet
It is advisable to remove the inner when taking down the t
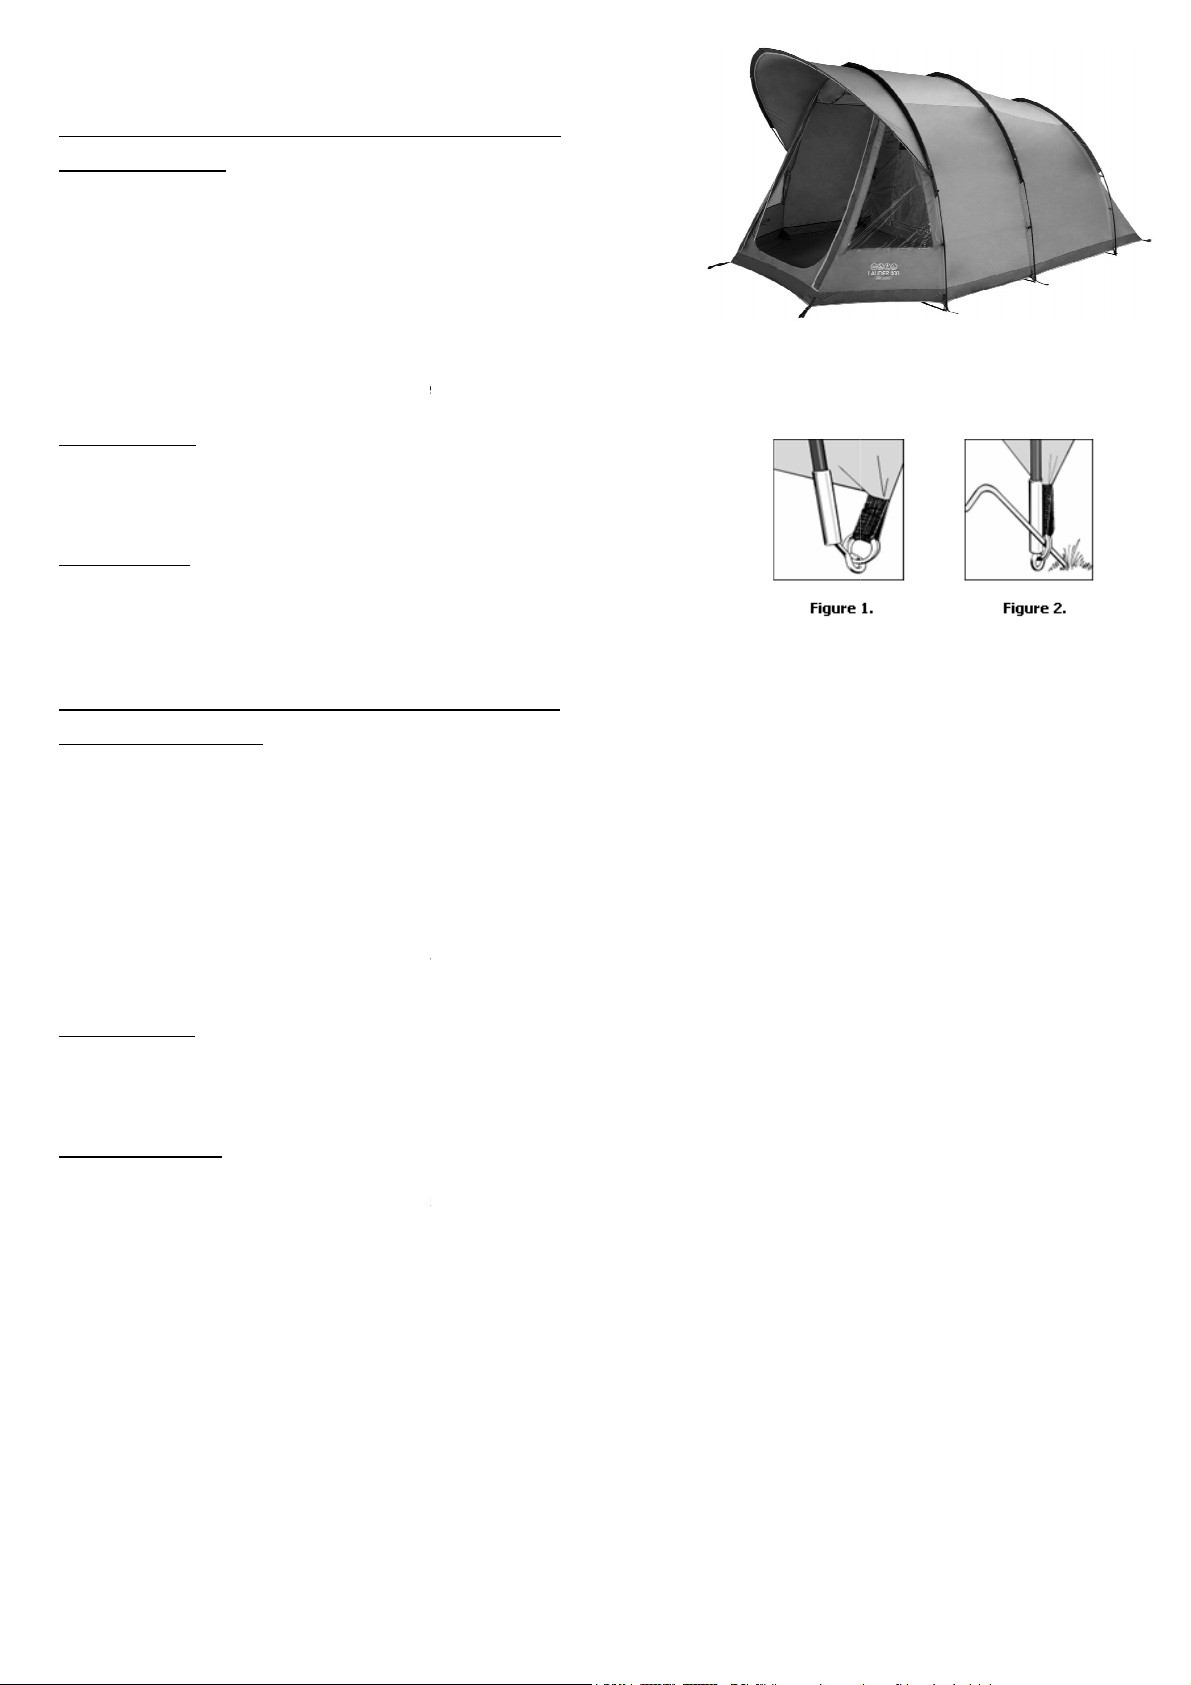
orresponding metal pin (figure 1
Peg the corners of the tent through the metal rings using pin
Pegs should be positioned at a 45 degree angle to ensure maximum grip
……………………………………………………………………………………………………
LAUDER
Gestängekanäle an der Dachsektion des Außenzelts und stecken Sie die gebogenen Dachstangen ein.
Stecken Sie die zu den Dachstangen zugehörigen Senkrechtstangen ein.
Auf beiden Seiten des Zelts: Befestigen Sie die Enden aller Stangen im zugehörigen Rin
Alle Spanngurte unten an den Stangen fest anziehen.
Halterungsklemmen an den Stangen.
ie vorderen Befestigungspunkte und ziehen Sie von hinten (das ist leichter, wenn eine zweite Person die Stahlstange in aufrec
Wenn das Zelt von hinten voll gespannt ist, setzen Sie die Klammern ein.
die vorderen und hinteren Stangenhüllen ein und fixieren Sie die Enden auf den Steckstiften der Stahlstange
Übrige Stangen und Verankerungspunkte mithilfe der Stiftheringe unten an den Stangen fixieren.
ALLE Abspannleinen mit Stiftheringen fixieren, wobei darauf zu achten ist, dass die Befestigungspunkte der Abspannleinen an d
Legen Sie die Innenzelte im Außenzelt aus und richten Sie die Eingä
Die Aufhängung des Innenzelts erfolgt, indem die Knebel des Innenzelts durch die auf der Innenseite des Außenzelts befindlich
Die Innenhalterungen sind farbcodiert und farblich au
Es ist ratsam, das Innenzelt zu lösen, wenn Sie das Zelt bei Nässe abbauen.
Vorbaustange am dazu passenden Metallstift
Stecken Sie die Ecken des Zelts durch die Metallringe, indem Sie die Arretierstifte benutzen.
Die Heringe sollten in einem Winkel von 45 Grad platziert werden, um maximalen Halt zu erzielen.
………………………………
……………………………………………………………………
f die auf dem Dach des Außenzelts befindlichen Klemmen abgestimmt.
………………………………………………………………………………………………………………
FLYSHEET FIRST PITCHING:
• Open out flysheet and position in required direction
•
• Insert the
•
•
• Attach all flysheet pole clips onto poles
• Lay the flysheet and poles on the ground
• Securely peg out the rear corners of the tent
•
•
• The groundsheet should be flat and wrinkle free
•
• Peg out ALL guy lines using pin-
INNER ATTACHMENT:
•
• Suspend the inner
•
• Do the rear first and work forward
•
RING & PIN SYSTEM:
• Locate one end of pole onto the c
•
•
TENT PITCHING INSTRUCTIONS –
MIT AUßENZELTAUFBAU ZUERST:
• Außenzelt auslegen und korrekt ausrichten.
• Finden Sie die
•
•
•
• Befestigen Sie alle Außenzelt-
• Außenzelt und Stangen auf dem Boden auslegen.
• Stecken Sie die hinteren Ecken des Zelts fest aus.
• Fixieren Sie d
• Setzen Sie die Fiberglasstangen in
• Die Bodenplane sollte glatt und knitterfrei sein.
•
•
festgezogen sind.
INNENBEFESTIGUNG:
•
•
•
• Beginnen Sie hinten und arbeiten Sie sich nach vorn.
•
RING-UND-STIFT-SYSTEM:
• Fixieren Sie ein Ende der
•
•
…………………………………………………………
400/500 (UK)
insert pegs.
se of poles
ent when wet.
)
-pegs (figure 2)
………………………………
400/500 (DE)
g- & Stift-System.
nge so aus, dass sie in den Wohnbereich führen.
hter Position hält).
er Plane gleichmäßig
en Ringe gesteckt werden.
Page 2

TENT PITCHING INSTRUCTIONS – LAUDER 400/500 (FR)
MONTAGE EN COMMENÇANT PAR LE DOUBLE TOIT:
• Déferler le double toit et orienter dans le sens requis
• Passer les mâts courbes du toit par les manches correspondantes du double toit
• Introduire les mâts verticaux aux mâts du toit
• Des deux côtés de la tente, joindre les bouts de chaque mât à l'anneau et la cheville correspondants
• Reserrer toutes les sangles de tension en bas de chaque mât
• Attacher aux mâts tous les crochets des mâts du double toit
• Etaler par terre le double toit et ses mâts
• Attacher et sécuriser les coins arrière de la tente
• Localiser les points de fixation avant et tirer depuis l'arrière (c'est plus simple si une deuxième personne tient l'arceau d'acier en position droite). Lorsqu'il est
maintenu bien tendu depuis l'arrière, insérer les chevilles.
• Insérer les arceaux en fibre de verre dans les fourreaux des arceaux avant et arrière, puis fixer les extrémités aux piquets, sur l'arceau en acier
• Le tapis de sol devrait être à plat et sans plis
• Planter le reste des piquets, en utilisant les points de piquetage en bas des mâts
• Planter tous les cordes d'ancrage avec des piquets, en s'assurant que les points d'attache soient sous tension égale
ATTACHER LA TENTE ANTÉRIEURE:
• Déferler la tente intérieure sous le double toit et orienter les portes selon le compartiment
• Faire pendre la tente intérieure en attachant les crochets de celle-ci aux anneaux intérieurs du double toit
• Les attaches intérieures sont codifiées par couleurs pour faciliter les connections du double toit
• Commencer par derrière et travailler vers l'avant
• Il est recommandé de retirer l'intérieur, en cas d'humidité, lorsque l'on démonte la tente.
• Système de fixation Ring & Pin
• Placer une extrémité de l'arceau de la porche sur la cheville de métal
• Fixer les coins de la tente aux anneaux de métal, à l'aide de chevilles de fixation
• Les piquets doivent se planter à un angle de 45 degrés pour le maximum de prise
SYSTÈME DE FIXATION RING & PIN:
• Placer une extrémité de l'arceau de la porche sur la cheville de métal
• Fixer les coins de la tente aux anneaux de métal, à l'aide de chevilles de fixation
• Les piquets doivent se planter à un angle de 45 degrés pour le maximum de prise
…………………………………………………………………………………………………………………………………………………………………………………………………………
TENT PITCHING INSTRUCTIONS – LAUDER 400/500 (IT)
PRIMO MONTAGGIO DEL TELO ESTERNO:
• Aprire il telo esterno e posizionarlo nella direzione richiesta
• Fissare i manicotti dei paletti sul tetto del telo esterno ed inserire i paletti del tetto curvi
• Inserire i corrispondenti paletti verticali nei paletti del tetto
• Su entrambi i lati della tenda fissare le estremità di ciascun paletto al corrispondente anello e perno
• Tirare le cinghie da tensione alla base dei paletti
• Attaccare tutte le clip dei paletti del telo esterno ai paletti
• Collocare il telo esterno ed i paletti sul terreno
• Fissare saldamente gli angoli posteriori della tenda
• Posizionare i punti di ancoraggio anteriore e tirare verso il davanti (è più semplice se un'altra persona tiene il palo in acciaio in posizione verticale).
Raggiunta la tensione desiderata, inserire i paletti.
• Inserire i pali in fibra di vetro nelle guaine anteriori e posteriori e posizionare le estremità sui paletti sul palo in acciaio
• Il telo impermeabile dovrebbe essere piatto e privo di grinze
• Picchettare i rimanenti paletti e punti di aggancio usando i picchetti di fissaggio alla base dei paletti
• Picchettare TUTTI gli stralli usando i picchetti di fissaggio e assicurandosi che i punti di aggancio in tessuto degli stralli siano uniformemente sottoposti a
tensione
FISSAGGIO INTERNO:
• Aprire le tende interne all'interno del telo esterno e posizionare le entrate in modo da farle corrispondere con la zona giorno
• Appendere l'interno fissando le olivette della tenda interna mediante gli anelli all'interno del telo esterno
• I fissaggi interni sono codificati a seconda del colore in modo da abbinarsi alle clip sul tetto del telo esterno
• Iniziare con la parte posteriore e poi procedere verso quella anteriore
• È consigliabile rimuovere l'interno se umido quando si smonta la tenda.
• Sistema anello con paletto
• Collocare il palo terminale del portico in corrispondenza della relativa punta metallica
• Fissare gli angoli della tenda attraverso gli anelli metallici usando i paletti.
• I picchetti devono essere posizionati a 45 gradi per assicurare la massima presa
SISTEMA ANELLO CON PALETTO:
• Collocare il palo terminale del portico in corrispondenza della relativa punta metallica
• Fissare gli angoli della tenda attraverso gli anelli metallici usando i paletti.
• I picchetti devono essere posizionati a 45 gradi per assicurare la massima presa
…………………………………………………………………………………………………………………………………………………………………………………………………………
Page 3

TENT PITCHING INSTRUCTIONS – LAUDER 400/500 (NL)
BUITENTENT VOOR HET EERST OPZETTEN:
• Open de buitenkant en positioneer in de gewenste richting
• Lokaliseer de stoksleuven op het dak van de buitentent en plaats de gebogen dakstokken er doorheen
• Plaats de overeenkomende rechtopstaande stokken tegen de dak stokken
• Plaats aan beide kanten van de tent de uiteinde van de stokken in de overeenkomende ring &pin
• Span alle spanbanden aan de basis van de stokken strak.
• Bevestig alle buitentent stok clips aan de stokken
• Leg de buitentent en stokken op de grond
• Pin de hoeken van de tent stevig vast
• Pak de voorste haring punten en trek ze weg van de achterkant (dit is makkelijker als een tweede persoon de stalen paal rechtop vast houdt). Als het doek
strak staat, plaats dan de haringen.
• Plaats de glasvezel palen in de voorste en achterste stoksleuven en leidt de uiteinden naar de pinnen op de stalen stok
• Het grondzeil zou recht en zonder kreukels moeten zijn
• Zet de overgebleven stokken en haringpunten vast met pin haringen aan de basis van de stokken
• Zet ALLE spanbanden vast met pin haringen zodat de druk op de bevestigingspunten overal gelijk is.
BINNENTENT BEVESTIGING:
• Open de binnentent binnen de buitentent en positioneer de deuren zodat deze overeenkomen met het leefgedeelte
• Hang de binnentent op door de knevels van de binnentent te bevestigen aan de binnenkant van de buitentent
• De binnenste bevestigingen hebben een kleur die overeenkomt met klemmen aan het dak van de buitentent
• Begin achteraan en werk naar voren
• Het is aan te raden om de binnentent te verwijderen wanneer u de tent opruimt als deze nat is.
• Ring & Pin Systeem
• Bevestig een kant van de deur stok aan de overeenkomende metalen pin
• Zet de hoeken van de tent vast doormiddel van de metalen ring met de pin haringen.
• Pinnen dienen in een hoek van 45 graden met de grond te staan voor maximale grip.
RING & PIN SYSTEEM:
• Bevestig een kant van de deur stok aan de overeenkomende metalen pin
• Zet de hoeken van de tent vast doormiddel van de metalen ring met de pin haringen.
• Pinnen dienen in een hoek van 45 graden met de grond te staan voor maximale grip
…………………………………………………………………………………………………………………………………………………………………………………………………………
TENT PITCHING INSTRUCTIONS – LAUDER 400/500 (CZ)
STAVĚNÍ TROPIKA POPRVÉ:
• Otevřete tropiko a umístěte jej v požadovaném směru
• Najděte odpovídající tunýlky na střešní části tropika a vsuňte zakřivené střešní tyčky
• Spojte odpovídající vzpřímené tyče se střešními tyčemi
• Na obou stranách stanu napíchněte konce každé tyče na odpovídající čep
• Zatáhněte všechny stahovatelné popruhy na opěrném bodu tyček
• Připněte všechny svorky tropika na tyče
• Rozložte tropiko a tyčky na zem
• Bezpečně připevněte do zadních rohů stanu
• Vyhledejte přední vykolíkované body z přední strany (toto je jednodušší, pokud druhá osoba drží ocelovou tyč ve svislé poloze). Jakmile bude úplně napnutý
od zadní části, vložte kolíky.
• Vložte sklolaminátové tyče do předních a zadních tunýlků a konce tyčí napíchněte na ocelové čepy
• Podlážka by měla být rovná a bez ohybů
• Zakolíkujte zbývající tyčky do fixačních bodů pomocí kolíků na spodní části tyček
• Přikolíkujte VŠECHNY napínací šňůry pomocí kolíků a ujistěte se, že připojovací body napínacích šňer jsou rovnoměrně napnuty
VNITŘNÍ PŘÍSLUŠENSTVÍ:
• Roztáhněte vnitřní stan vevnitř tropika a umístěte vchody tak, aby korespondovaly s obývací částí.
• Zavěšte vnitřek stanu připnutím kolíčků vnitřního stanu za kroužky na vnitřní straně tropika.
• Vnitřní příslušenství má stejnou barvu jako svorky na střeše tropika
• Nejdříve udělejte zadní část, poté postupujte dopředu.
• Doporučuje se vyndat vnitřní ložnici když je stan vlhký
• Systém kroužku a kolíku
• Vyhledejte jeden konece tyčí a příslušné čepy
• Zajistěte rohy stanu pomocí kolíků tak, že je prostrčíte skrz kovové kroužky.
• Kolíky by měly být umístěny v úhlu 45 stupňů, aby byla zajištěna maximální pevnost
SYSTÉM KROUŽKU A KOLÍKU:
• Vyhledejte jeden konece tyčí a příslušné čepy
• Zajistěte rohy stanu pomocí kolíků tak, že je prostrčíte skrz kovové kroužky.
• Kolíky by měly být umístěny v úhlu 45 stupňů, aby byla zajištěna maximální pevnost
…………………………………………………………………………………………………………………………………………………………………………………………………………
 Loading...