

Page 1

User’s Guide
ValleylabTM FT10
FT Series Energy Platform
For use with software version 1.1x
Part Number: PT00016328
Page 2

Preface
Preface
This guide and the equipment it describes are for use only by qualified medical
professionals trained in the particular technique and surgical procedure to be performed.
It is intended as a guide for using the Covidien Valleylab FT10 FT Series Energy Platform
only. Additional technical information, such as circuit diagrams, component part lists,
descriptions, calibration instructions, component-replacement instructions, and softwareupdate instructions, is available in the Valleylab FT10 FT Series Energy Platform Service
Manual.
The latest version of the FT10 service manual is available at www.BioMedConnect.com.
Call these numbers to request a hardcopy of the service manual
• USA and Canada: 1-800-255-8522 Option 2
• International: 1-303-476-7996
Equipment covered in this manual
Valleylab FT10 FT Series Energy Platform (VLFT10GEN) with software version 1.1x
ii Valleylab FT10 Energy Platform User’s Guide
Page 3

Limited Warranty
Covidien warrants the covered product listed below to be free from defects in material and
workmanship for normal use and service for the period(s) set forth below. Covidien’s
obligation under this warranty is limited to the repair or replacement, at its sole option, of
any product, or part thereof, which has been returned to it (or its authorized distributor)
within the applicable time period shown below after delivery of the product to the original
purchaser, and which examination discloses, to Covidien’s satisfaction, that the product is
defective. This limited warranty does not apply to any product, or part thereof, which has
been repaired or altered in a way so as, in Covidien’s judgment, to affect its stability or
reliability, or which has been subjected to misuse, neglect, or accident.
The warranty period for this Covidien product is as follows:
Valleylab™ FT10 FT Series Energy Platform One year from date of shipping
Limited Warranty
Notwithstanding any other provision herein or in any other document or communication,
Covidien’s liability with respect to this limited warranty and the products sold hereunder
shall be limited to the aggregate purchase price for the products sold to the customer. This
limited warranty is non-transferable and runs only to the original purchaser of the covered
product(s). There are no warranties which extend beyond the terms hereof. Covidien
disclaims any liability hereunder or elsewhere in connection with the sale of products and
for any form of indirect, tort, or consequential damages.
This limited warranty and the rights and obligations hereunder shall be construed under
and governed by the laws of the State of Colorado, USA. The sole forum for resolving
disputes arising under or relating in any way to this limited warranty is the District Court
of the County of Boulder, State of Colorado, USA.
Covidien reserves the right to make changes in covered products built or sold by it at any
time without incurring any obligation to make the same or similar changes to equipment
previously built or sold by it.
THE OBLIGATION TO REPAIR OR REPLACE A DEFECTIVE OR NONPERFORMING PRODUCT
IS THE SOLE REMEDY OF THE CUSTOMER UNDER THIS LIMITED WARRANTY. EXCEPT AS
EXPRESSLY PROVIDED HEREIN, COVIDIEN DISCLAIMS ALL OTHER WARRANTIES,
WHETHER EXPRESS OR IMPLIED, ORAL OR WRITTEN, WITH RESPECT TO
PRODUCTS, INCLUDING WITHOUT LIMITATION ALL IMPLIED WARRANTIES,
WARRANTIES OF MERCHANTABILITY OR FITNESS FOR A PARTICULAR PURPOSE.
Valleylab FT10 Energy Platform User’s Guide iii
Page 4

Software License
Software License
Customer hereby acknowledges that Covidien LP and or its affiliates (collectively called
“COVIDIEN” herein) owns the entire right, title, and interest in and to the Software, as
mat be installed in the Products or Equipment addressed herein or provided separately
(“Software”) (including all of the computer code, source and object, comprising the
Software and all components and elements thereof), and all associated manuals,
drawings, technical information and Documentation (collectively, the “Documentation”),
including, without limitation, all patent, copyright, trademark, trade secret and other
intellectual property or proprietary rights (“Intellectual Property Rights”) in and to the
Software and all components and elements thereof all of which shall remain the sole and
exclusive property of Covidien. The amount paid by the Customer for the Products and/or
Equipment incorporating the Software includes as a portion of that amount, a license fee
granting Customer only the rights set forth in this Software License. This Software
License will be superseded by any express Software agreement between Covidien and
Customer The use of term “Product” herein includes Products and/or Equipment as
applicable.
1. Single User License Grant: COVIDIEN grants to Customer a limited, nonexclusive,
non-sublicensable, nontransferable and revocable license to use the Software, exclusively
at location identified by Customer on the order form as the ship-to location of the
Products, solely in machine-readable object code form, and only on a single central
processing unit embedded in the Products as provided by COVIDIEN under this
agreement, and solely for the Customer’s internal business purpose in the operation of
the Products provided by COVIDIEN under this agreement. Notwithstanding anything to
the contrary contained in this Agreement, the Software is licensed to be used on only
one computing device or Product, and a valid license must be obtained under this
Agreement for each computing device or Product with which the Software is used or in
which the Software is embedded.
2. Restrictions on Use: Except to the extent expressly authorized in these Software
License Terms or by law, Customer shall not and shall not cause any third part to; (i)
decompile, disassemble, or reverse engineer the Software; (ii) modify or create any
derivative works (including, without limitation, translations, transformations, adaptations
or other recast or altered versions) of or based on the Software, or alter the Software in
any way; (iii) merge the Software with any other software or product not supplied by
Covidien; (iv) use, copy, sell, sublicense, lease, rent, loan, assign, convey or otherwise
transfer the Software except as expressly authorized by this Agreement; (v) distribute,
disclose or allow use of the Software, in any format, through any timesharing service,
service bureau, network or by any other means, to or by third parties; (vi) remove or
modify any copyright, confidential or proprietary markings, legends or restrictions that
are in the Software originally supplied to Customer; or (vii) violate any obligations with
regard to Covidien’s Confidential Information (as defined below). To the extent that
Customer is expressly permitted by applicable mandatory law to undertake any of the
activities listed in the preceding sentence, Customer will not exercise those rights unless
and until Customer has given Covidien not less than 30 days’ prior written notice of
Customer’s intent to exercise any such rights unless an order of a government agency of
competent jurisdiction will not so allow. This License will terminate immediately upon
notice from Covidien if Customer fails to comply with any provision of this License or any
agreement.
iv Valleylab FT10 Energy Platform User’s Guide
Page 5

3. Reservation of Rights: Notwithstanding anything to the contrary contained in this
Agreement, or any order form, purchase order or agreement between the parties, all
rights not expressly granted by Covidien to Customer are reserved to and retained by
Covidien and Covidien expressly is not selling, assigning or otherwise transferring to
Customer, and Customer is not purchasing or otherwise acquiring or obtaining, any of
Covidien’s Intellectual Property Rights or other rights in or to the Software or
Documentation.
4. Confidentiality: Customer agrees that the Software and the Documentation, and all
components and elements of the Software and Documentation, including, without
limitation, the specific design and structure of individual programs, constitutes
confidential information and trade secrets of Covidien (the “Confidential Information”).
Customer agrees not to disclose, provide, or otherwise make available such Confidential
Information, including, without limitation, any trade secrets or copyrighted material, in
any form to any third party. Customer agrees that it will make the Software available only
to those employees, contractors, or consultants of Customer with a specific need to
know, who are obligated to comply with the restrictions contained in these Software
License Terms and to maintain secrecy of the Software and all other Confidential
Information and are properly trained in its use. Customer is responsible for the
compliance of all users of the Software and Products with these obligations and shall
cause all users of the Software and Products to comply with these obligations. Customer
acknowledges that the Software embodies proprietary trade secrets of Covidien
including, without limitation, technical and non-technical information regarding the
Software and the development and manufacture of the same. Customer hereby agrees
to maintain the confidentiality of such trade secrets using at least as great a degree of
care as Customer uses to maintain the confidentiality of its own most confidential
information. Customer shall communicate these obligations to those employees and
agents of Customer who come into contact with the Software, and shall use its best
efforts to ensure their compliance with all confidentiality obligations applicable to
Customer.
5. Change Orders: Covidien shall have the right, at any time during the Term, by written
request to Customer (an “Update Notice”), to require that Customer return the Products
and Software to Covidien for such periods of time as are required by Covidien (“Update
Periods”) or to allow Covidien to access the Software at the Customer’s location for the
purpose of enabling Covidien to incorporate Software revisions, updates or modifications
from time to time. Upon receipt of an Update Notice, Customer shall return the
requested Products and Software to Covidien at Covidien’s cost and expense, or work
with Covidien to find a suitable time for Covidien to access the Software at the
Customer’s location. Customer acknowledges and agrees that during Update Periods, if
the Software must be returned to Covidien, the Products and Software will be
unavailable to Customer and in Covidien’s possession. Covidien will use reasonable
commercial efforts to perform the revisions, updates or modifications and to return the
revised, updated or modified Products and Software to Customer as soon as is reasonably
practicable.
6. Software License Term: The term of the Software license granted under this
Software License shall be for the commercial life of the associated Product or Equipment.
Software License
7. Limited Warranty: Covidien represents and warrants to Customer that the Software
will perform substantially as described in Covidien's then current Documentation for such
Valleylab FT10 Energy Platform User’s Guide v
Page 6

Software License
Software and the remaining warranty, or extended warranty, if any, applicable to the
Product or Equipment with which such Software was delivered. If Customer notifies
Covidien of defects during the applicable warranty period, and those defects are verified
by Covidien, as Customer’s sole and exclusive remedy, Covidien will replace the defective
Software or, at its option, terminate this Software License and refund to Customer the
amount paid by Customer to Covidien for the Software (if provided separately from a
Product) or for the Product in which the defective Software is installed (if embedded within
a Product). Customer’s remedy for breach of this limited warranty shall be limited to the
foregoing replacement or refund and shall not encompass any other damages. No dealer,
distributor, agent or employee of Covidien is authorized to make any modification or
addition to the warranty and remedies stated herein.
Notwithstanding these limited warranty provisions, all of Covidien’s obligations with
respect to such warranties shall be contingent on Customer’s use of the Software in
accordance with this Agreement and in accordance with Covidien’s instructions as
provided by Covidien in the Documentation provided by Covidien, as such instructions
may be amended, supplemented, or modified by Covidien, in its sole discretion, from time
to time. Covidien shall have no warranty obligations with respect to any failures of the
Software that are the result of accident, abuse, misapplication, extreme power surge or
extreme electromagnetic field, or any other cause outside of Covidien’s control.
This limited warranty does not apply to any damages, malfunctions, or non-conformities
caused to or by; (i) Customer’s use of Software in violation of these Software License Terms
or in a manner inconsistent with any Documentation or instructions provided by Covidien;
(ii) use of non-Covidien furnished equipment, software, or facilities with its equipment or
Products; (iii) Customer’s failure to follow Covidien’s installation, operation, repair or
maintenance instructions; (iv) Customer’s failure to permit Covidien timely access, remote
or otherwise, to Products; (v) failure to implement all features, revisions, modifications,
updates, patches, “bug fixes”, or new versions of or to the Software provided by Covidien
under this Agreement or otherwise; (vi) Products with there original manufacturer’s serial
numbers altered, defaced or deleted; (vii) Products that been altered, serviced or modified
by a party other than Covidien; or (viii) Software that has been subjected to abnormal
physical or electrical stress, misuse, negligence or accident by Customer or a third party.
8. Export Laws: THESE SOFTWARE TERMS ARE EXPRESSLY MADE SUBJECT TO ANY AND
ALL LAWS, REGULATIONS, ORDERS, OR OTHER RESTRICTIONS WITH RESPECT TO THE
EXPORT FROM THE UNITED STATES OF AMERICA OF THE SOFTWARE. BUYER SHALL NOT
EXPORT OR RE-EXPORT THE SOFTWARE (I) WITHOUT FULL COMPLIANCE WITH SUCH
LAWS, REGULATIONS, ORDERS AND OTHER RESTRICTIONS, INCLUDING, WITHOUT
LIMITATION, OBTAINING ALL NECESSARY APPROVAL FROM ALL REQUIRED
GOVERNMENTAL AGENCIES AND (II) WITHOUT THE PRIOR WRITTEN CONSENT OF
COVIDIEN.
9. U.S. Government Rights. The Software is a “commercial item” developed exclusively
at private expense, consisting of “commercial computer software” and “commercial
computer software Documentation” as such terms are defined or used in the applicable
U.S. acquisition regulations. The Software is licensed hereunder (i) only as a commercial
item and (ii) with only those rights as are granted to all other customers pursuant to the
terms and conditions of this License. Customer shall not use, duplicate, or disclose the
Software in any way not specifically permitted by this License. Nothing in this License
requires Covidien to produce or furnish technical data for or to Customer.
vi Valleylab FT10 Energy Platform User’s Guide
Page 7

10. Survival. Sections 2, 3, 4, 8, 9 and this Section 10 shall survive the termination or
expiration of these Software License Terms.
Software License
Valleylab FT10 Energy Platform User’s Guide vii
Page 8

Page 9

Contents
Preface . . . . . . . . . . . . . . . . . . . . . . . . . . . . . . . . . . . . . . . . . . . . . . . ii
Limited Warranty . . . . . . . . . . . . . . . . . . . . . . . . . . . . . . . . . . . . . . .iii
Software License . . . . . . . . . . . . . . . . . . . . . . . . . . . . . . . . . . . . . . .iv
Chapter 1. Overview and General Features
The Valleylab FT10 Energy Platform. . . . . . . . . . . . . . . . . . . . . . 1-2
Introduction. . . . . . . . . . . . . . . . . . . . . . . . . . . . . . . . . . . . . 1-2
Front Panel. . . . . . . . . . . . . . . . . . . . . . . . . . . . . . . . . . . . . . 1-3
Rear Panel . . . . . . . . . . . . . . . . . . . . . . . . . . . . . . . . . . . . . . 1-4
Modes & Settings. . . . . . . . . . . . . . . . . . . . . . . . . . . . . . . . . 1-5
System Conventions . . . . . . . . . . . . . . . . . . . . . . . . . . . . . . . . . . 1-13
The Touchscreen . . . . . . . . . . . . . . . . . . . . . . . . . . . . . . . . 1-13
System Buttons . . . . . . . . . . . . . . . . . . . . . . . . . . . . . . . . . 1-15
Interface Conventions . . . . . . . . . . . . . . . . . . . . . . . . . . . . 1-16
Chapter 2. Warnings and Precautions for Patient and
Operating Room Safety
Conventions Used in this Guide . . . . . . . . . . . . . . . . . . . . . . . . . 2-1
General Warnings and Precautions. . . . . . . . . . . . . . . . . . . . . . . 2-2
Fire/Explosion Hazards . . . . . . . . . . . . . . . . . . . . . . . . . . . . 2-2
System Setup Warnings and Precautions. . . . . . . . . . . . . . 2-3
Warnings and Precautions for the Energy Platform . . . . . 2-6
Warnings and Precautions for Active Instruments . . . . . . 2-7
Warnings for Implanted Electronic Devices (IEDs). . . . . . . 2-8
Post Surgery Safety Issues . . . . . . . . . . . . . . . . . . . . . . . . . 2-8
Warnings and Precautions for Monopolar Procedures . . . . . . . 2-9
Warnings and Precautions for Patient Return Electrodes 2-10
Inadvertent Radio Frequency (RF) Burns . . . . . . . . . . . . . 2-11
Warnings and Cautions for Laparoscopic Procedures . . . . . . . 2-12
Warnings and Precautions for Bipolar Procedures . . . . . . . . . 2-13
Warnings and Precautions for LigaSure Procedures . . . . . . . . 2-13
Warnings and Precautions for Bipolar Resection . . . . . . 2-14
Servicing . . . . . . . . . . . . . . . . . . . . . . . . . . . . . . . . . . . . . . . . . . . 2-14
Shunt Cords . . . . . . . . . . . . . . . . . . . . . . . . . . . . . . . . . . . . . . . . 2-15
Conductive Fluid In the Surgical Site . . . . . . . . . . . . . . . . . . . . 2-15
Valleylab FT10 Energy Platform User’s Guide ix
Page 10

Chapter 3. System Setup
Setup. . . . . . . . . . . . . . . . . . . . . . . . . . . . . . . . . . . . . . . . . . . . . . . 3-2
Unpacking the System. . . . . . . . . . . . . . . . . . . . . . . . . . . . . 3-2
Before Starting the System . . . . . . . . . . . . . . . . . . . . . . . . . 3-2
Turning On the VLFT10GEN . . . . . . . . . . . . . . . . . . . . . . . . 3-3
Turning Off the VLFT10GEN (Normal Power-off) . . . . . . . 3-3
System Functions . . . . . . . . . . . . . . . . . . . . . . . . . . . . . . . . . . . . . 3-4
On/Off . . . . . . . . . . . . . . . . . . . . . . . . . . . . . . . . . . . . . . . . . 3-4
Restore . . . . . . . . . . . . . . . . . . . . . . . . . . . . . . . . . . . . . . . . . 3-4
Audio Volume . . . . . . . . . . . . . . . . . . . . . . . . . . . . . . . . . . . 3-5
Language Selection Menu . . . . . . . . . . . . . . . . . . . . . . . . . 3-5
Service and Settings . . . . . . . . . . . . . . . . . . . . . . . . . . . . . . . . . . . 3-6
Logs . . . . . . . . . . . . . . . . . . . . . . . . . . . . . . . . . . . . . . . . . . . 3-7
DEMO Mode . . . . . . . . . . . . . . . . . . . . . . . . . . . . . . . . . . . . 3-8
System Menu . . . . . . . . . . . . . . . . . . . . . . . . . . . . . . . . . . . . 3-9
Service Menu . . . . . . . . . . . . . . . . . . . . . . . . . . . . . . . . . . . 3-11
Chapter 4. Monopolar
Front Panel Monopolar Features . . . . . . . . . . . . . . . . . . . . . . . . 4-2
Rear Panel Monopolar Features . . . . . . . . . . . . . . . . . . . . . . . . . 4-3
Monopolar Quick Setup Instructions . . . . . . . . . . . . . . . . . . . . . 4-4
Monopolar Function Overview . . . . . . . . . . . . . . . . . . . . . . . . . . 4-5
Monopolar Power Output Modes . . . . . . . . . . . . . . . . . . . 4-5
Foot Pedal. . . . . . . . . . . . . . . . . . . . . . . . . . . . . . . . . . . . . . . . . . . 4-5
Monopolar Foot-Pedal Activation . . . . . . . . . . . . . . . . . . . 4-6
Return Electrodes – REM Contact Quality Monitoring System . 4-7
Patient Return Electrode Considerations. . . . . . . . . . . . . . 4-7
How the REM System Works. . . . . . . . . . . . . . . . . . . . . . . . 4-7
Patient Return Electrode Setup . . . . . . . . . . . . . . . . . . . . . 4-8
Monopolar Electrodes . . . . . . . . . . . . . . . . . . . . . . . . . . . . . . . . 4-10
Standard Monopolar Mode Functionality . . . . . . . . . . . . 4-11
VALLEYLAB Mode Functionality. . . . . . . . . . . . . . . . . . . . 4-12
Using a VALLEYLAB-Mode Instrument. . . . . . . . . . . . . . . 4-14
After Surgery . . . . . . . . . . . . . . . . . . . . . . . . . . . . . . . . . . . . . . . 4-15
Disconnect the instruments . . . . . . . . . . . . . . . . . . . . . . . 4-15
x Valleylab FT10 Energy Platform User’s Guide
Page 11

Chapter 5. Bipolar
Front Panel Bipolar Features . . . . . . . . . . . . . . . . . . . . . . . . . . . . 5-2
Rear Panel Bipolar Features. . . . . . . . . . . . . . . . . . . . . . . . . . . . . 5-3
Bipolar Quick Setup Instructions . . . . . . . . . . . . . . . . . . . . . . . . . 5-3
Bipolar Function Overview . . . . . . . . . . . . . . . . . . . . . . . . . . . . . 5-4
Bipolar Power Output Modes. . . . . . . . . . . . . . . . . . . . . . . 5-4
Bipolar Default Settings . . . . . . . . . . . . . . . . . . . . . . . . . . . 5-4
Foot Pedal. . . . . . . . . . . . . . . . . . . . . . . . . . . . . . . . . . . . . . . . . . . 5-5
Virtual Ammeter . . . . . . . . . . . . . . . . . . . . . . . . . . . . . . . . . . . . . 5-5
Setting the Ammeter. . . . . . . . . . . . . . . . . . . . . . . . . . . . . . 5-5
Auto Bipolar Function . . . . . . . . . . . . . . . . . . . . . . . . . . . . . . . . . 5-6
Enable/Disable Auto Bipolar. . . . . . . . . . . . . . . . . . . . . . . . 5-7
Auto Bipolar Activation Impedance. . . . . . . . . . . . . . . . . . 5-7
Setting the Auto Bipolar Activation Delay . . . . . . . . . . . . 5-8
Shutting Down Bipolar Functions . . . . . . . . . . . . . . . . . . . . . . . . 5-9
After Surgery . . . . . . . . . . . . . . . . . . . . . . . . . . . . . . . . . . . . . . . . 5-9
Disconnect the instruments . . . . . . . . . . . . . . . . . . . . . . . . 5-9
Chapter 6. LigaSure
Front Panel LigaSure Features. . . . . . . . . . . . . . . . . . . . . . . . . . . 6-2
Rear Panel LigaSure Features . . . . . . . . . . . . . . . . . . . . . . . . . . . 6-2
LigaSure Quick Setup Instructions. . . . . . . . . . . . . . . . . . . . . . . . 6-3
LigaSure Function Overview . . . . . . . . . . . . . . . . . . . . . . . . . . . . 6-4
LigaSure Default Settings . . . . . . . . . . . . . . . . . . . . . . . . . . 6-5
LigaSure/Bipolar Receptacle . . . . . . . . . . . . . . . . . . . . . . . . 6-5
Foot Pedal . . . . . . . . . . . . . . . . . . . . . . . . . . . . . . . . . . . . . . 6-6
LigaSure Instruments . . . . . . . . . . . . . . . . . . . . . . . . . . . . . . . . . . 6-6
Reusable-Instrument Assembly. . . . . . . . . . . . . . . . . . . . . . 6-6
Connecting LigaSure Instruments to the Energy Platform 6-6
Activating the LigaSure Instrument . . . . . . . . . . . . . . . . . . . . . 6-10
Alert Situations . . . . . . . . . . . . . . . . . . . . . . . . . . . . . . . . . 6-10
After Surgery . . . . . . . . . . . . . . . . . . . . . . . . . . . . . . . . . . . . . . . 6-12
Disconnect the instruments . . . . . . . . . . . . . . . . . . . . . . . 6-12
Chapter 7. Bipolar Resection
Front Panel Bipolar Resection Features . . . . . . . . . . . . . . . . . . . 7-2
Rear Panel Bipolar Resection Features . . . . . . . . . . . . . . . . . . . . 7-2
Bipolar Resection Function Overview . . . . . . . . . . . . . . . . . . . . . 7-3
LigaSure/Bipolar Receptacle . . . . . . . . . . . . . . . . . . . . . . . . 7-3
Bipolar Resection Default Settings. . . . . . . . . . . . . . . . . . . 7-4
Foot Pedal . . . . . . . . . . . . . . . . . . . . . . . . . . . . . . . . . . . . . . 7-5
Valleylab FT10 Energy Platform User’s Guide xi
Page 12

Connecting Bipolar Resection Instruments to the Energy
Platform . . . . . . . . . . . . . . . . . . . . . . . . . . . . . . . . . . . . . . . . 7-6
Bipolar Resection Settings . . . . . . . . . . . . . . . . . . . . . . . . . . . . . . 7-7
Changing the Energy-Delivery Setting. . . . . . . . . . . . . . . . 7-7
Activating a Bipolar Resection Instrument . . . . . . . . . . . . . . . . . 7-7
Incorrect Foot-Pedal Error. . . . . . . . . . . . . . . . . . . . . . . . . . 7-7
After Surgery . . . . . . . . . . . . . . . . . . . . . . . . . . . . . . . . . . . . . . . . 7-8
Disconnect the Instruments . . . . . . . . . . . . . . . . . . . . . . . . 7-8
Chapter 8. Troubleshooting
General Troubleshooting Guidelines . . . . . . . . . . . . . . . . . . . . . 8-2
REM Alarms . . . . . . . . . . . . . . . . . . . . . . . . . . . . . . . . . . . . . . . . . 8-2
Correcting a REM-Alarm Condition . . . . . . . . . . . . . . . . . . 8-2
Correcting Malfunctions . . . . . . . . . . . . . . . . . . . . . . . . . . . . . . . 8-3
System Alarms . . . . . . . . . . . . . . . . . . . . . . . . . . . . . . . . . . . 8-9
Chapter 9. Maintenance and Repair
Responsibility of the Manufacturer . . . . . . . . . . . . . . . . . . . . . . 9-2
Routine Maintenance and Periodic Safety Checks. . . . . . . . . . . 9-2
Cleaning . . . . . . . . . . . . . . . . . . . . . . . . . . . . . . . . . . . . . . . . . . . . 9-3
Product Service. . . . . . . . . . . . . . . . . . . . . . . . . . . . . . . . . . . . . . . 9-3
Returning the Energy Platform for Service . . . . . . . . . . . . 9-4
Software Updates. . . . . . . . . . . . . . . . . . . . . . . . . . . . . . . . . . . . . 9-5
Updating Energy Platform Software . . . . . . . . . . . . . . . . . 9-5
Service Manual Copies and Updates . . . . . . . . . . . . . . . . . . . . . . 9-6
Covidien Technical Service. . . . . . . . . . . . . . . . . . . . . . . . . . . . . . 9-6
Training/Education. . . . . . . . . . . . . . . . . . . . . . . . . . . . . . . . . . . . 9-7
Chapter 10. Technical Specifications
VLFT10GEN Specifications . . . . . . . . . . . . . . . . . . . . . . . . . . . . . 10-2
General. . . . . . . . . . . . . . . . . . . . . . . . . . . . . . . . . . . . . . . . 10-2
Dimensions and Weight . . . . . . . . . . . . . . . . . . . . . . . . . . 10-2
Environmental Parameters . . . . . . . . . . . . . . . . . . . . . . . . 10-3
Input Power . . . . . . . . . . . . . . . . . . . . . . . . . . . . . . . . . . . . 10-3
Power Cord Specifications. . . . . . . . . . . . . . . . . . . . . . . . . 10-4
Backup Power . . . . . . . . . . . . . . . . . . . . . . . . . . . . . . . . . . 10-4
Equipotential Ground Connection . . . . . . . . . . . . . . . . . . 10-4
EKG Blanking and Smoke Evacuation . . . . . . . . . . . . . . . 10-4
Internal Memory . . . . . . . . . . . . . . . . . . . . . . . . . . . . . . . . 10-5
Duty Cycle . . . . . . . . . . . . . . . . . . . . . . . . . . . . . . . . . . . . . 10-5
Leakage . . . . . . . . . . . . . . . . . . . . . . . . . . . . . . . . . . . . . . . 10-5
Radio Frequency Identification (RFID) . . . . . . . . . . . . . . . 10-6
xii Valleylab FT10 Energy Platform User’s Guide
Page 13

Wireless Fidelity (WiFi) . . . . . . . . . . . . . . . . . . . . . . . . . . . 10-7
Ethernet . . . . . . . . . . . . . . . . . . . . . . . . . . . . . . . . . . . . . . . 10-8
Symbols Used . . . . . . . . . . . . . . . . . . . . . . . . . . . . . . . . . . . . . . . 10-9
Standards and IEC Classifications . . . . . . . . . . . . . . . . . . . . . . 10-11
Class I Equipment (IEC 60601-1) . . . . . . . . . . . . . . . . . . . 10-11
Type CF Equipment/Defibrillator Proof
(IEC 60601-1, IEC 60601-2-2, and ANSI/AAMI HF18) . . . 10-11
IP21 Liquid Ingress/Spillage
(IEC 60601-1 and IEC 60601-2-2) . . . . . . . . . . . . . . . . . . . 10-12
Voltage Transients – Energy Platform Mains Transfer
(IEC 60601-1, IEC 60601-2-2, and ANSI/AAMI HF18) . . . 10-12
CISPR 11 Class A . . . . . . . . . . . . . . . . . . . . . . . . . . . . . . . . 10-12
Electromagnetic Compatibility
(IEC 60601-1-2 and IEC 60601-2-2) . . . . . . . . . . . . . . . . . 10-12
Cables Used for EMC Compliance Testing . . . . . . . . . . . 10-18
Return Electrode Monitor (REM) . . . . . . . . . . . . . . . . . . 10-19
Auto Bipolar . . . . . . . . . . . . . . . . . . . . . . . . . . . . . . . . . . 10-20
Audio Tones. . . . . . . . . . . . . . . . . . . . . . . . . . . . . . . . . . . 10-21
Energy Output Characteristics. . . . . . . . . . . . . . . . . . . . . . . . . 10-23
Output Waveforms . . . . . . . . . . . . . . . . . . . . . . . . . . . . . 10-24
Output Power vs. Resistance Graphs. . . . . . . . . . . . . . . . . . . . 10-25
Monopolar Graphs . . . . . . . . . . . . . . . . . . . . . . . . . . . . . 10-25
Bipolar Graphs . . . . . . . . . . . . . . . . . . . . . . . . . . . . . . . . . 10-34
Valleylab FT10 Energy Platform User’s Guide xiii
Page 14

Page 15

Chapter 1
Overview and General Features
This chapter provides an overview of the features and functions of the Valleylab
FT10 FT Series Energy Platform.
Precaution
Read the instructions, warnings, and precautions provided with this energy platform and
associated accessories before using. Specific instructions for electrosurgical instruments are not
included in this manual.
Valleylab FT10 Energy Platform User’s Guide 1-1
Page 16

The Valleylab FT10 Energy Platform
The Valleylab FT10 Energy Platform
Introduction
The Valleylab FT10 FT Series Energy Platform (VLFT10GEN) provides RF energy for
monopolar and bipolar surgical applications, and tissue-fusion and vessel-sealing
applications. It features a touchscreen divided into four sections for viewing and user input
of settings and options available for any application. The energy platform automatically
detects coded handsets and configures the energy platform accordingly. Safety and
diagnostic functionality include automatic fail-safe functions.
The VLFT10GEN, applied parts (patient return electrodes and active instruments) are
designed to work as a system. Covidien offers a selection of patient return electrodes and
active instruments that are fully compatible with this energy platform.
• Refer to each instrument’s instructions for use (IFU) for indications, warnings, and
specific contraindications.
• When considering other manufacturers’ patient return electrodes and/or active
instruments, customers should seek detailed user instructions and warning
information from the manufacturer.
The generator is intended for use in general surgery and such surgical specialties as
urologic, vascular, thoracic, plastic, gynecologic, reconstructive, and colorectal surgery.
Indications for Use
The Valleylab FT10 is a high frequency electrosurgical generator intended for use with
monopolar and bipolar accessories for cutting and coagulating tissue. When used with
compatible sealing devices, it is indicated for sealing vessels up to and including 7 mm,
tissue bundles, and lymphatics.
The generator can also be used with compatible resectoscopes for endoscopically
controlled removal or coagulation of tissue using 0.9% NaCl solution as the irrigation
medium.
The tissue fusion function has not been shown to be effective for tubal sterilization or
tubal coagulation for sterilization procedures. Do not use this function for these
procedures.
Contraindications
None known.
1-2 Valleylab FT10 Energy Platform User’s Guide
Page 17
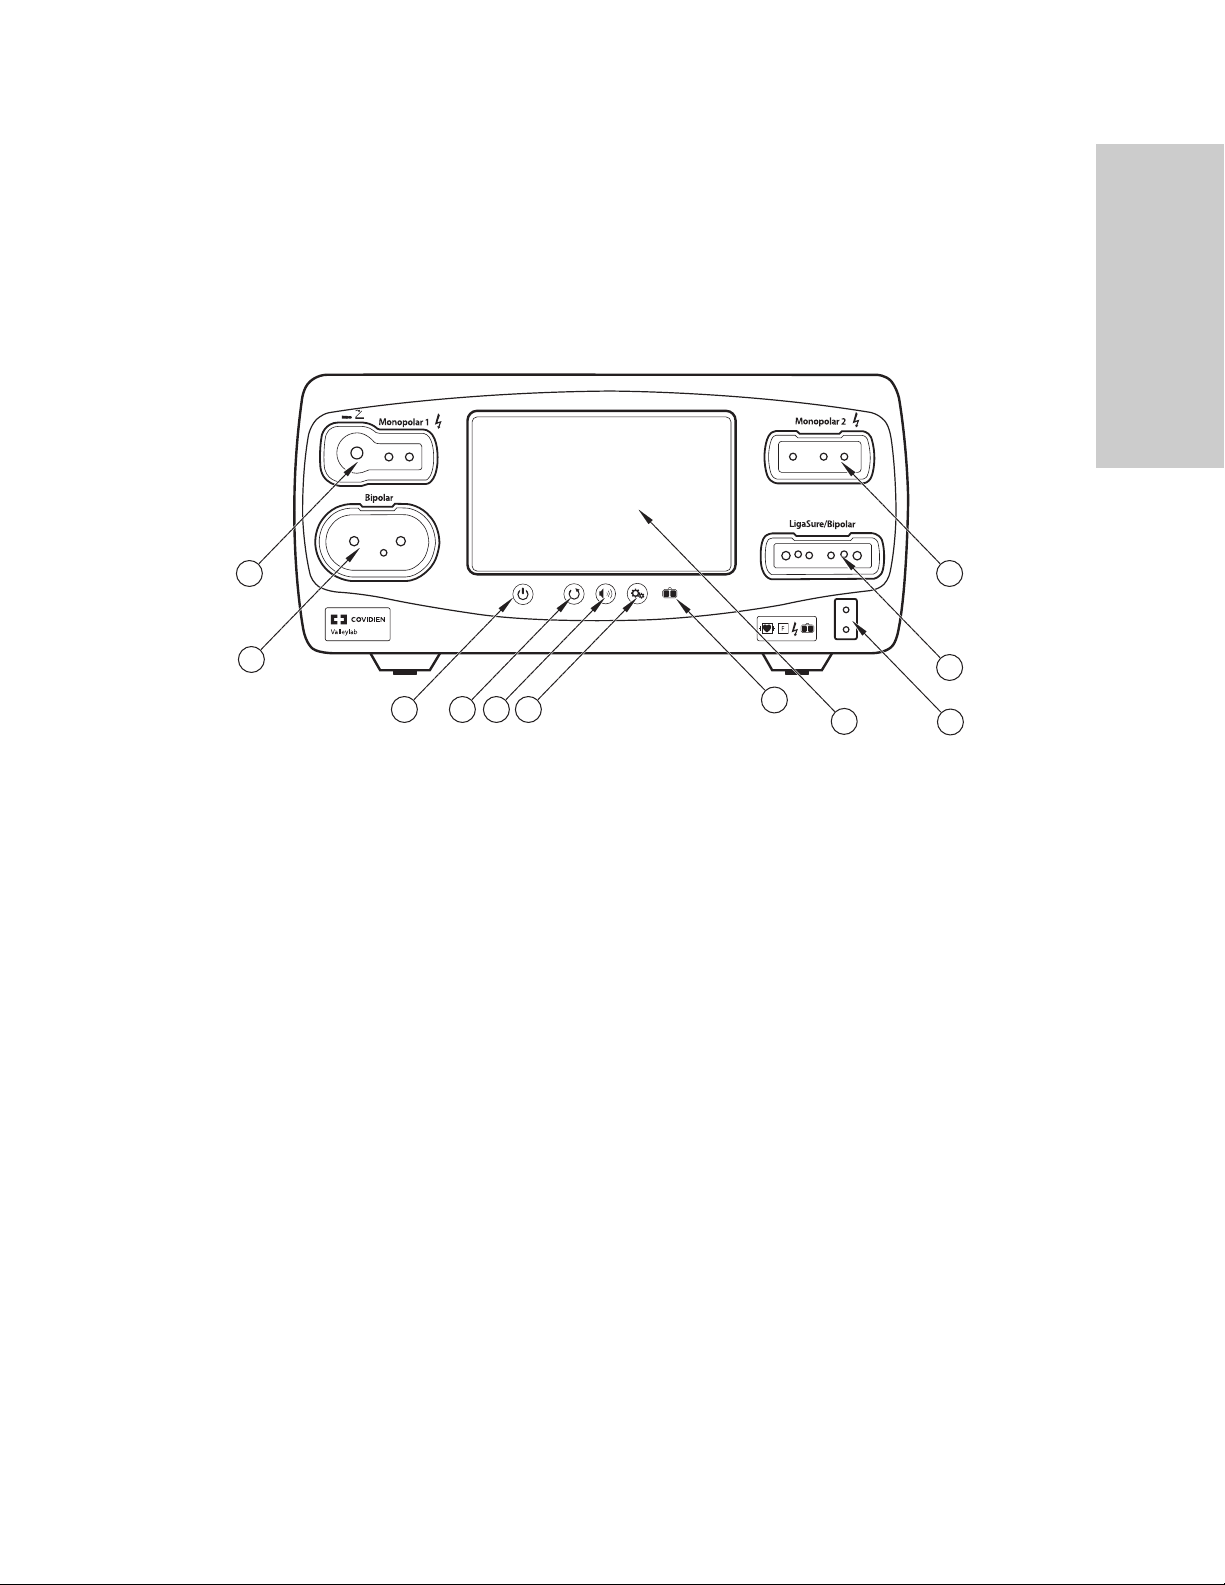
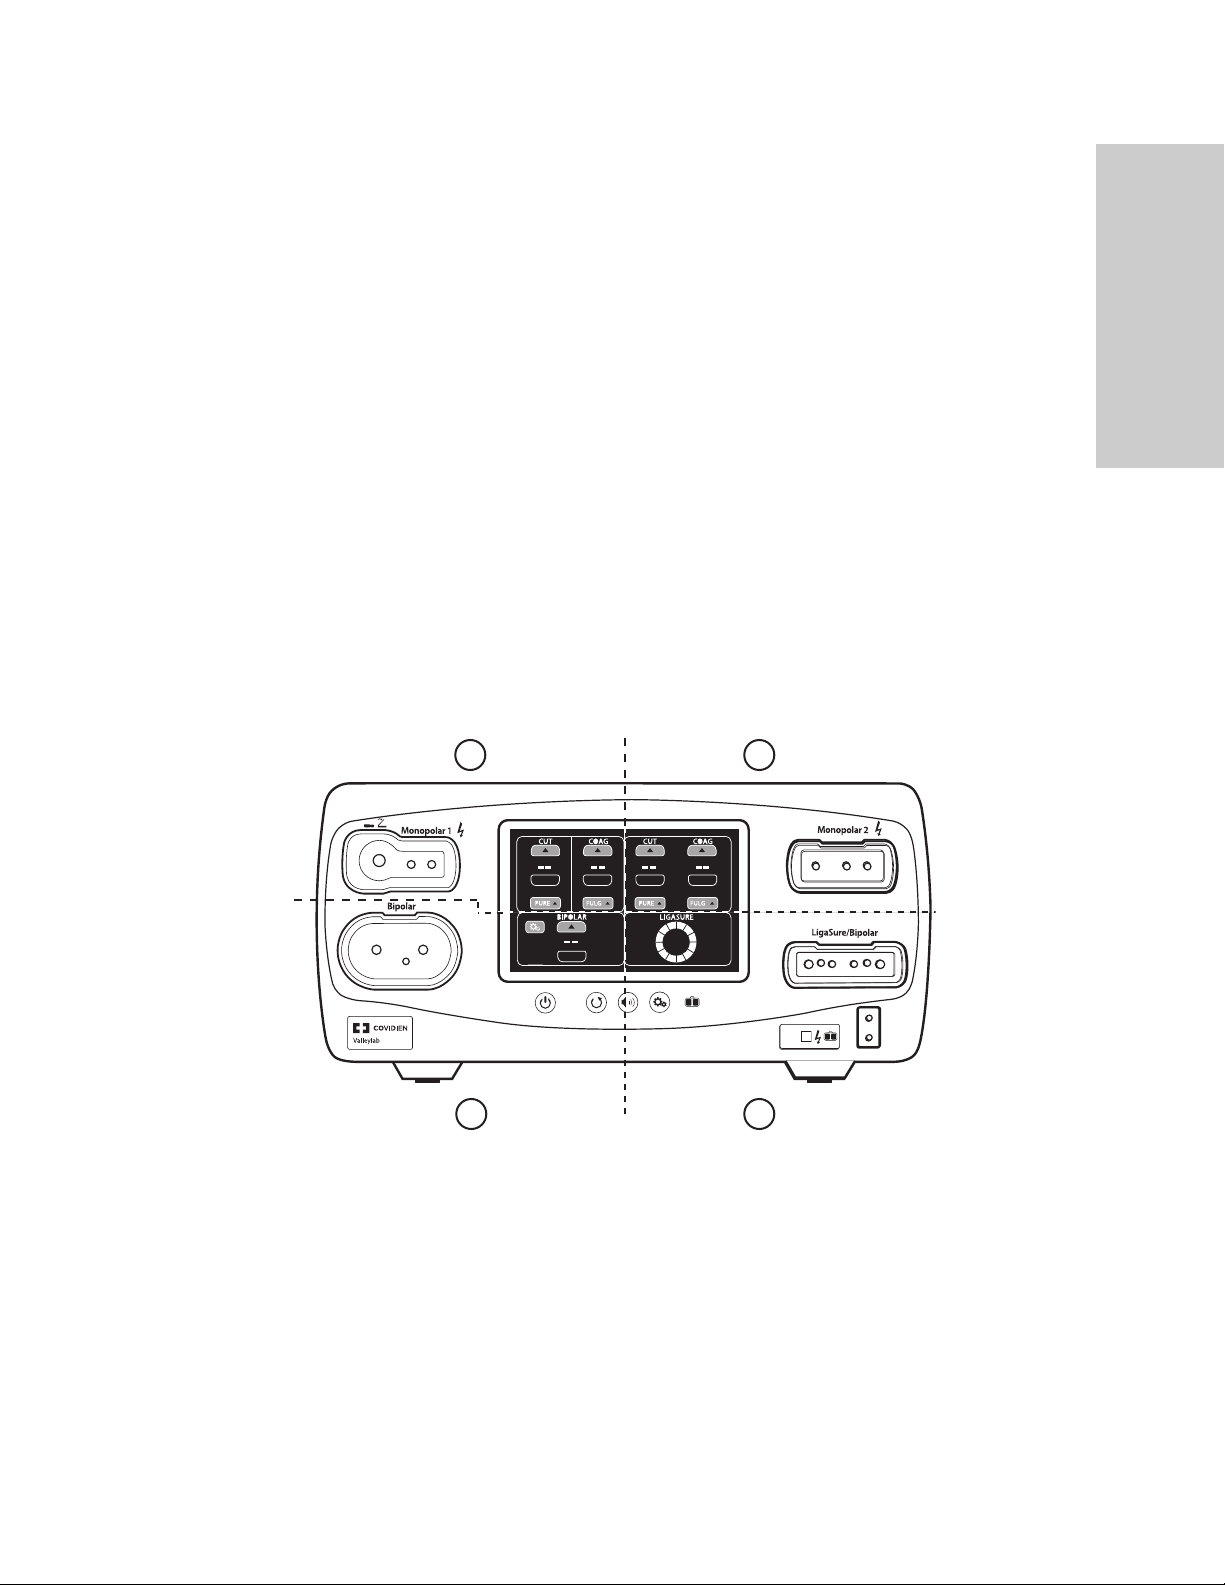
Front Panel
The Valleylab FT10 Energy Platform
Overview and General Features
10
FT10
11
1
2
4
3
On/Off button
ཱ Restore Settings button
ི Audio Volume control button
ཱི Service/Settings button
ུ REM (Return Electrode Monitoring) indicator
ཱུ Interface touchscreen
ྲྀ REM patient return electrode receptacle
ཷ LigaSure™/Bipolar receptacle
ླྀ Monopolar 2 instrument receptacle
ཹ Monopolar 1 Universal Foot Pedal Port (UFP) receptacle
ེ Bipolar instrument receptacle
9
8
5
6
7
Valleylab FT10 Energy Platform User’s Guide 1-3
Page 18
The Valleylab FT10 Energy Platform
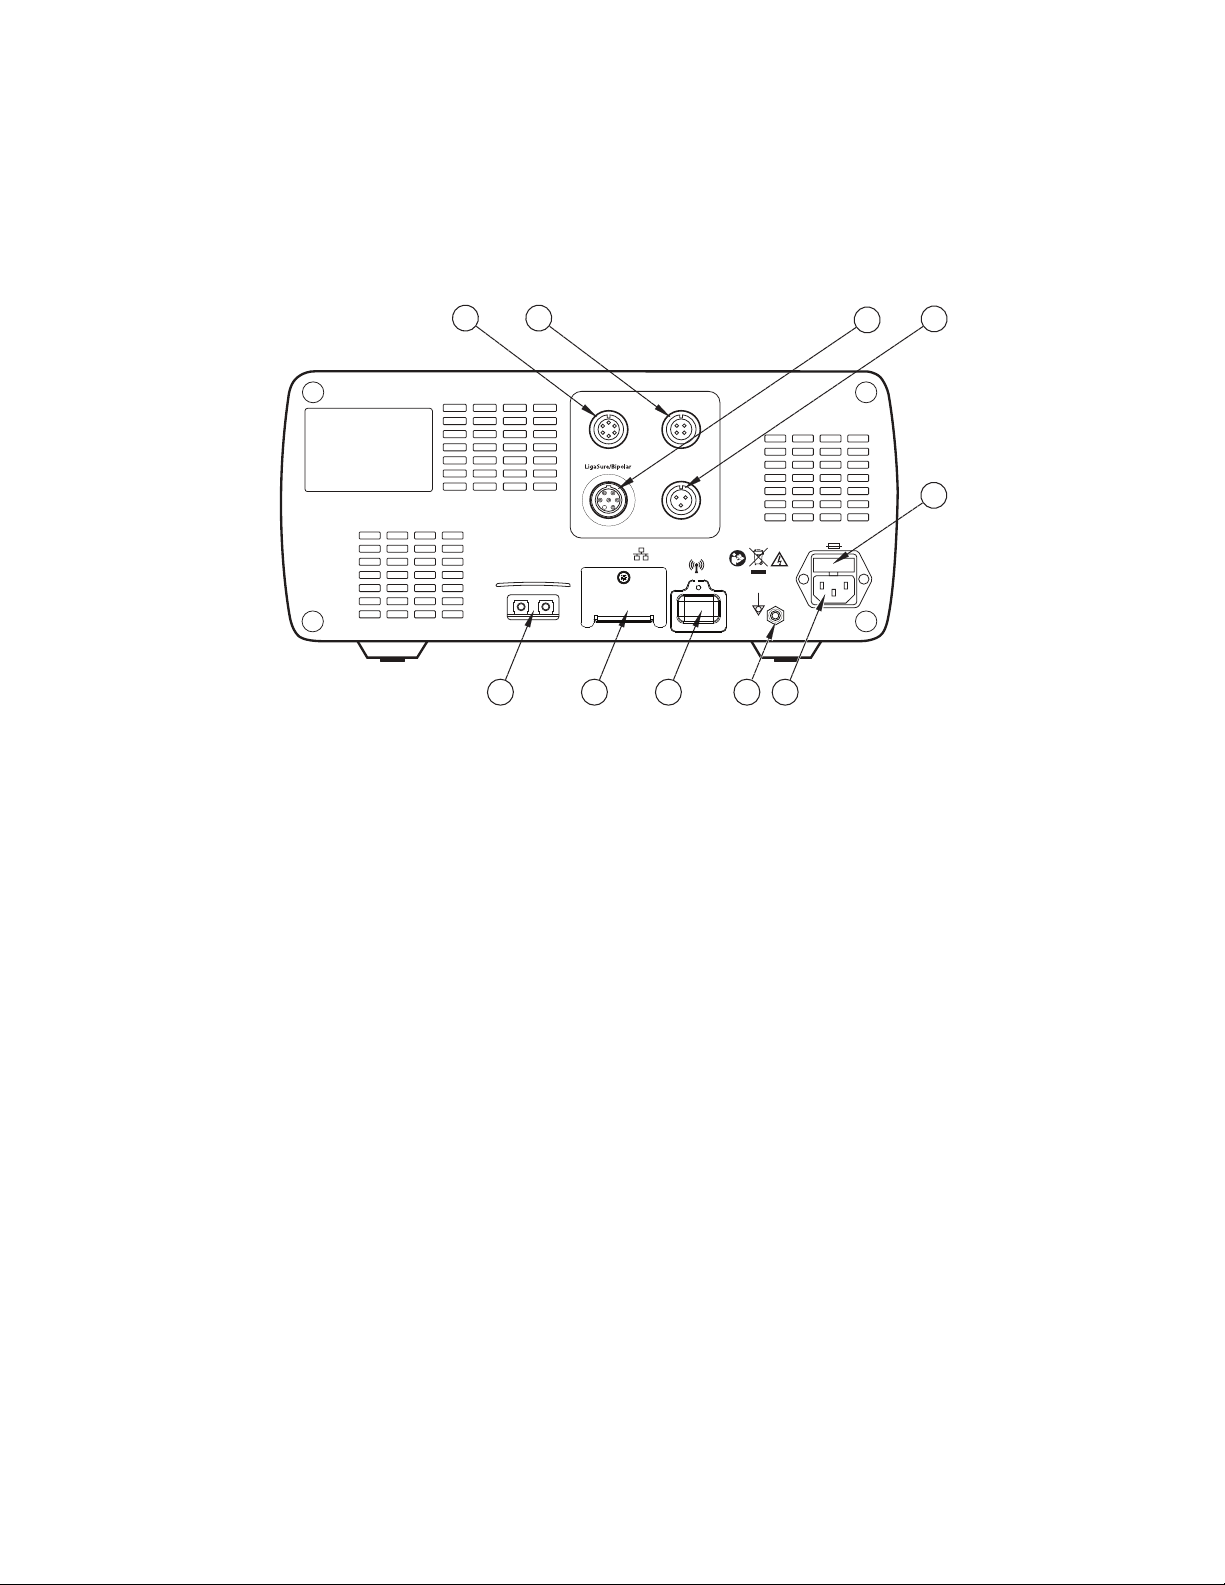
Rear Panel
1
2
Monopolar 2 Monopolar 1
Bipolar
3
4
5
Warning: Risk of Fire.
Replace Fuse as Marked
250V, F10.0A (100-127Vac)
250V, F6.3A (220-240Vac)
Monopolar1Monopolar
2
Avertissement: Risque du feu.
Remplacez les fusibles
comme marqués.
250V, F10.0A (100-127Vac)
250V, F6.3A (220-240Vac)
10
89
6
7
Monopolar 2 foot-pedal receptacle (requires included adapter to connect standard
four-pin monopolar foot pedal)
ཱ Monopolar 1 foot-pedal receptacle
ི LigaSure/Bipolar foot-pedal receptacle (requires included adapter to connect Bipolar
Resection foot pedal)
ཱི Bipolar foot-pedal receptacle
ུ Fuse drawer
ཱུ Power cord receptacle
ྲྀ Equipotential grounding lug
ཷ WiFi antenna (Covered. For service only.)
ླྀ Ethernet receptacle (Covered. For service only.)
ཹ Interlink cable receptacles for EKG blanking and smoke-evacuation control
1-4 Valleylab FT10 Energy Platform User’s Guide
Page 19

The Valleylab FT10 Energy Platform
Modes & Settings
The VLFT10GEN provides the following modes and settings for a variety of surgical
procedures:
Monopolar modes Power-Setting Ranges Peak Voltage
CUT
- PURE Off, 1–300 W 1287 V
- BLEND Off, 1–200 W 2178 V
VALLEYLAB 5–85 W 2783 V
COAG
Overview and General Features
- SOFT Off, 1–120 W 264 V
- FULGURATE Off, 1–120 W 3449 V
- SPRAY Off, 1–120 W 3933 V
Bipolar effects
LOW Off, 1–15 W 133 V
MEDIUM 16–40 W 214 V
HIGH 45–95 W 462 V
LigaSure (tissue fusion) No power settings 244 V
Bipolar Resection effect
CUT 1–6 742 V
COAG 1–6 318 V
Valleylab FT10 Energy Platform User’s Guide 1-5
Page 20
The Valleylab FT10 Energy Platform
Monopolar Modes
The system produces six modes of monopolar power output.
Precaution
To provide expected functionality from a hand piece, proper insertion is required. Refer to the
alignment dots below the receptacles for proper insertion orientation.
CUT Modes
PURE CUT provides a clean, precise cut in any tissue with little or no hemostasis.
BLEND CUT is a conventional blended waveform that provides slower cutting with
simultaneous hemostasis.
VALLEYLAB Mode
VALLEYLAB mode is a unique combination of hemostasis and dissection that allows the
user to slow down for more hemostasis and speed up for faster dissection. Thermal spread
is equal to or less than CUT or BLEND modes.
COAG Modes
SOFT desiccates tissue at a relatively slower rate with deeper thermal penetration. It is
typically performed with a ball electrode.
FULGURATE coagulates tissue by sparking from the active electrode, through air, to the
patient tissue.
SPRAY delivers wider fulguration; penetration is shallower and the affected tissue area is
larger than with the FULGURATE mode.
Compatible Monopolar Instruments & Devices
The following Covidien catalog numbers for monopolar surgical instruments, return
electrodes, foot pedals, and adapters are fully compatible with the VLFT10GEN.
UFP-Receptacle Adapter (connect only to Monopolar 1)
E05021 Monopolar Adapter
E050212 Monopolar Adapter
Instruments (connect only to Monopolar 2 receptacle)
FT3000DB Force TriVerse™ Electrosurgical Device
FT3000 Force TriVerse Electrosurgical Device
1-6 Valleylab FT10 Energy Platform User’s Guide
Page 21
The Valleylab FT10 Energy Platform
Instruments (connect to either Monopolar 1 or Monopolar 2)
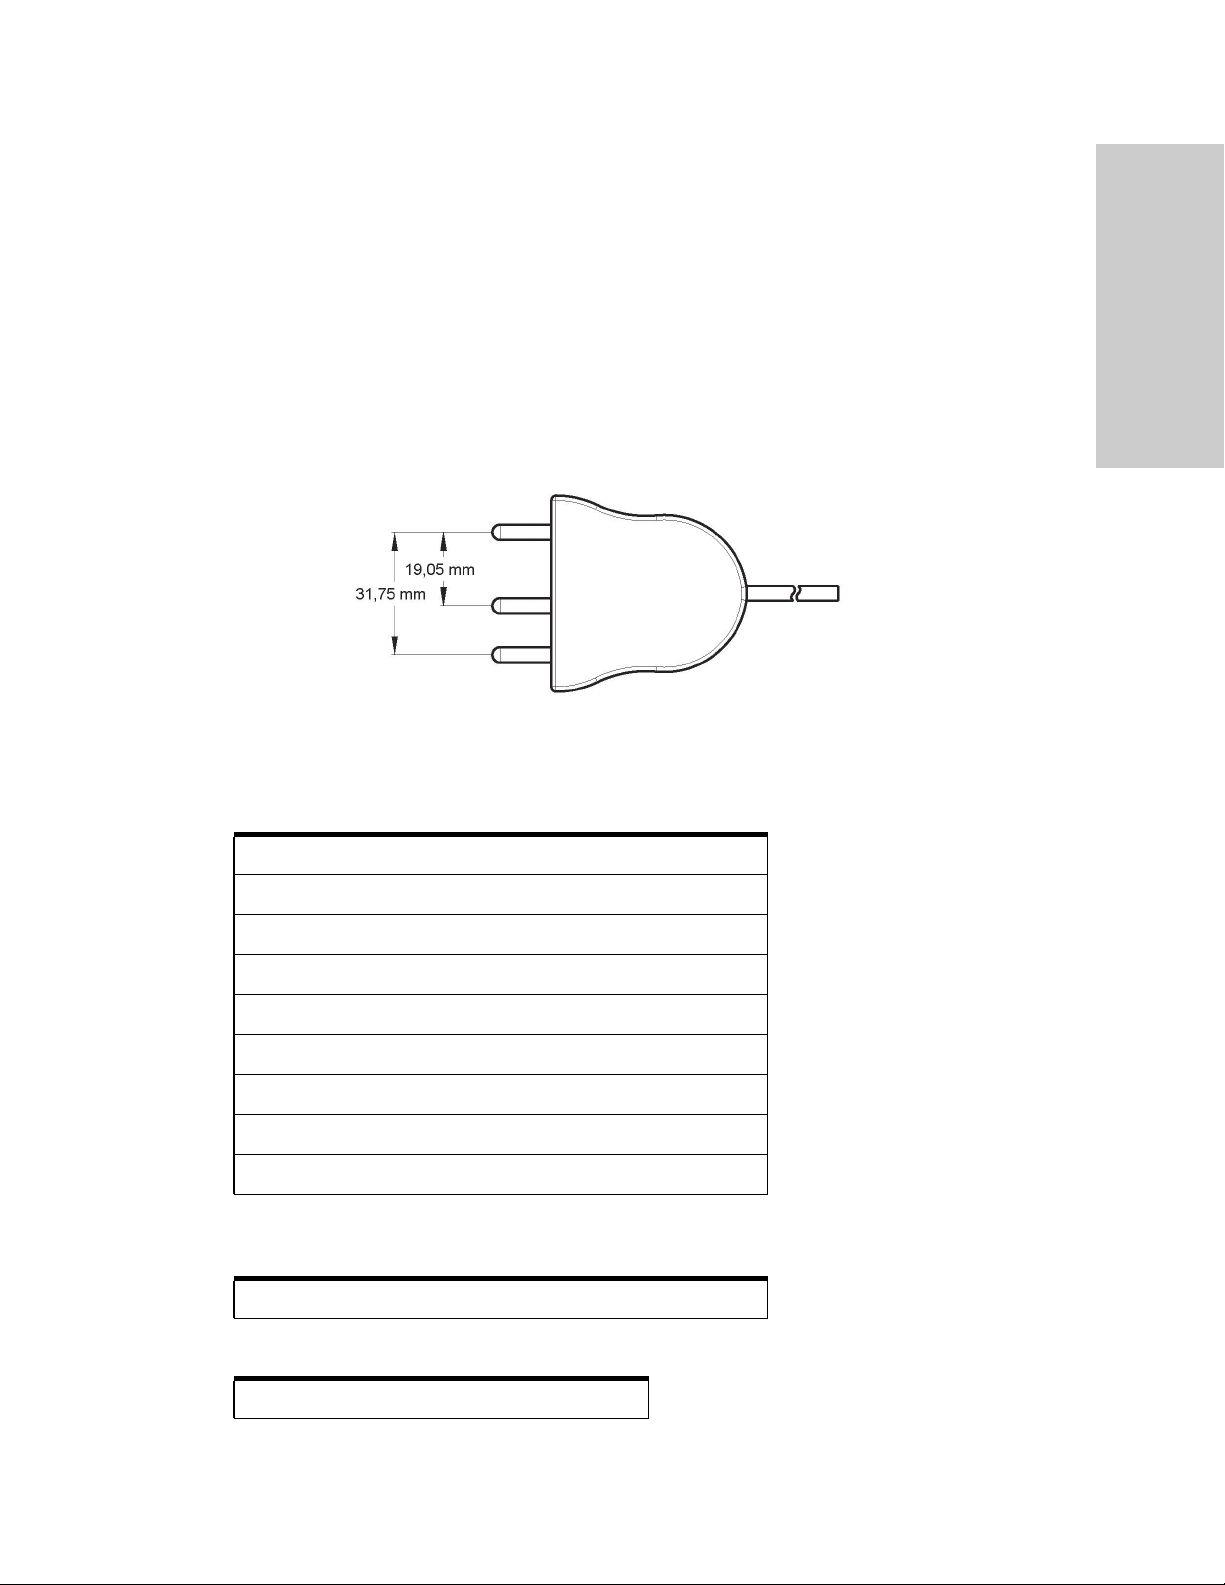
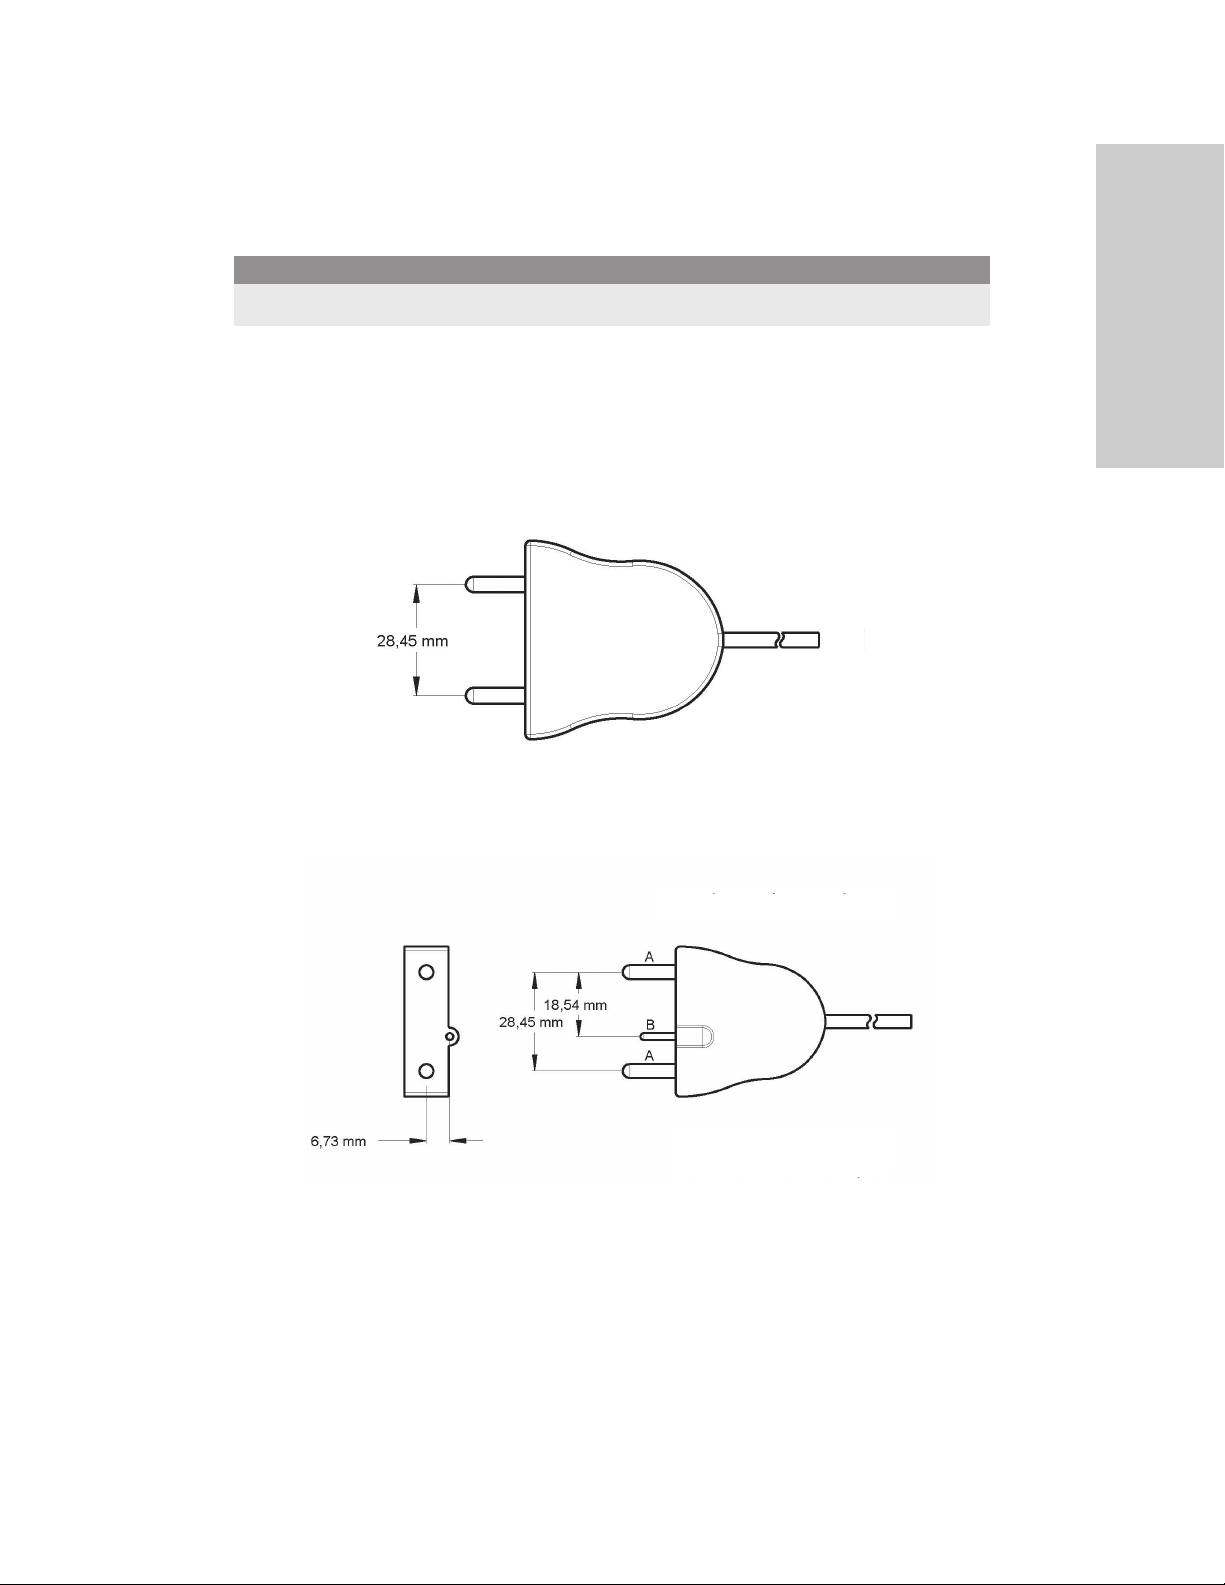
This generator is designed for use with Covidien monopolar instruments. However,
monopolar instruments are compatible with the VLFT10GEN if they have a connector
that matches the following figure and are rated for peak voltages of at least 3933 V.
Monopolar
Overview and General Features
Utilizes 4 mm banana pins
Return Electrodes (Monitoring)
E0560 Valleylab REM™ Patient Return Electrode Cord
E7507 REM Polyhesive™ Adult Patient Return Electrode
E7507DB REM Polyhesive Adult Patient Return Electrode
E7508 REM Polyhesive Adult Cordless Patient Return Electrode
E7509 REM Polyhesive Adult Cordless Patient Return Electrode
E7509B REM Polyhesive Adult Cordless Patient Return Electrode
E7510-25 REM Polyhesive Infant Patient Return Electrode
E7510-25DB REM Polyhesive Infant Patient Return Electrode
E7512 REM Polyhesive Neonatal Patient Return Electrode
Return Electrodes (Non-Monitoring, for use in DEMO mode only. Not for clinical
use.)
E7506 Non-REM Polyhesive Patient Return Electrode
REM Connector
E0507B Valleylab Multiple Return/S Cord Adapter
Valleylab FT10 Energy Platform User’s Guide 1-7
Page 22

The Valleylab FT10 Energy Platform
Foot Pedals
FT6003 ForceTriad Three-Pedal Footswitch (Monopolar 2 only)
E6008 Valleylab Monopolar Footswitch (Monopolar 1, Monopolar 2 with adapter)
E6008B Valleylab Monopolar Footswitch (Monopolar 1, Monopolar 2 with adapter)
1017577 6-Pin to 4-Pin Monopolar Footswitch Adapter (Monopolar 2 only)
Bipolar Effects
Selection of Bipolar effects and power settings is dependent on surgeon preferences,
tissue characteristics, accessories selection, and the intended clinical application.
LOW effect is for power selections of 1–15 watts. It delivers low-voltage output for
precision and fine control of the amount of desiccation typically used with small-surface
area instruments.
MEDIUM effect is for power selections of 16–40 watts. It is a conventional bipolar output
typically used with medium surface-area electrodes.
HIGH effect is for power selections 45–95 watts. Power remains constant over a wide
range of tissue types and may be used for large electrodes.
Effect
Setting
LOW 1—15 watts • Small surface-area instruments
MEDIUM 16—40 watts • Medium surface-area instruments
HIGH 45—95 watts
Power Setting
Range
(5 watt increments)
Optimized Instrumentation
• Micro-tip forceps (0.4—2.2 mm)
• Micro-tip forceps (1.0—2.2 mm)
• Small paddle lap forceps
• Bipolar scissors
• Large surface-area instruments
• Large paddle lap forceps
Auto Bipolar
The Auto Bipolar feature senses tissue impedance between the two bipolar electrodes,
then uses the impedance information to automatically start or stop bipolar RF energy
delivery. Optionally, the user may select a timed activation delay for auto start and RF
activation.
Note: When using Auto Bipolar, the tissue in the grasp of the bipolar device must have an
impedance less than 2200 Ω. The activation impedance safety feature will not deliver RF
power to the tissue if it is not within the specified range. This is a factory-set value that
cannot be reset by the user.
1-8 Valleylab FT10 Energy Platform User’s Guide
Page 23
The Valleylab FT10 Energy Platform
Precaution
Do not use the FT0501 ForceTriad Bipolar Adapter with Auto Bipolar on the VLFT10GEN.
Compatible Bipolar Instruments & Devices
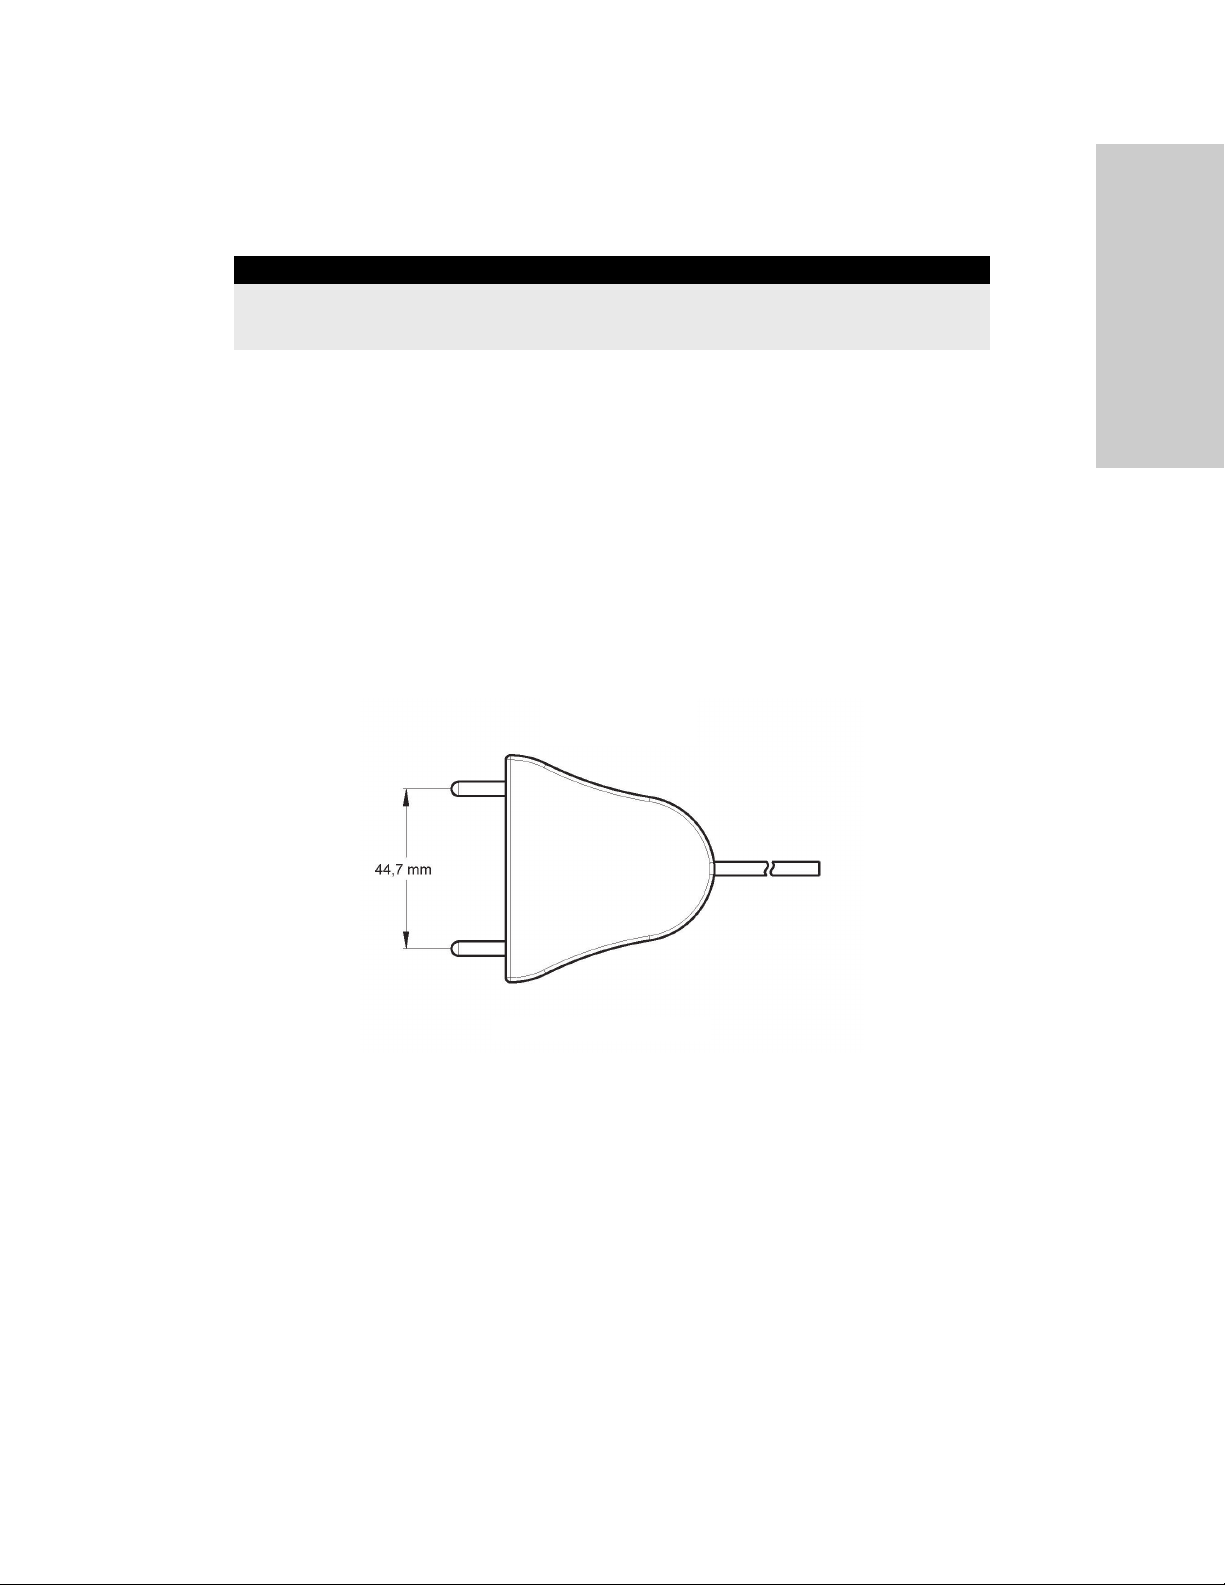
The VLFT10GEN is designed for use with Covidien bipolar instruments. However, other
bipolar instruments are compatible with the FT10 if their connectors match the following
illustration and are rated for peak voltages of at least 531 V.
Bipolar
Overview and General Features
Utilizes 4 mm banana pins
Bipolar with Switching
A. Utilizes 4 mm banana pins
B. Utilizes 2 mm banana pins
Valleylab FT10 Energy Platform User’s Guide 1-9
Page 24

The Valleylab FT10 Energy Platform
The following Covidien catalog numbers for bipolar foot pedals are fully compatible with
the VLFT10GEN.
Foot Pedals
E6009 Valleylab Bipolar Standard Footswitch
E6009B Valleylab Bipolar Standard Footswitch
E6019 Valleylab Bipolar Dome Footswitch
Bipolar Resection
Bipolar Resection configures the LigaSure/Bipolar receptacle to use bipolar-resection
resectoscopes.
Accessories
FT0021S ForceTriad Bipolar Resection Cord
FT0022W ForceTriad Bipolar Resection Cord
FT6009 ForceTriad FT Series Bipolar Resection Footswitch (with adapter)
1060355 Valleylab TR Bipolar Resection Footswitch Adapter
Effect-Settings Reference Chart
Effect Setting Initiation Current
Setting (amps)
1 1.8 80 25
2 1.8 120 50
3 2.1 120 75
4 2.4 120 100
5 2.4 160 125
6 2.4 200 150
CUT (watts) COAG (volts)
LigaSure
LigaSure tissue fusion can be used on arteries, veins, pulmonary vasculature, and
lymphatics—up to and including 7 mm in diameter—and tissue bundles. When used with
compatible instruments, the system provides precise energy delivery and electrode
pressure to vessels for a controlled time period to achieve a complete and permanent
fusion of the vessel lumen. The system has been designed to produce minimal sticking,
charring, and thermal spread to adjacent tissue.
1-10 Valleylab FT10 Energy Platform User’s Guide
Page 25
The Valleylab FT10 Energy Platform
Warning
The tissue fusion function has not been shown to be effective for tubal sterilization or tubal
coagulation for sterilization procedures. Do not use this function for these procedures.
LigaSure Instruments
The LigaSure instruments that complete the VLFT10GEN tissue-fusion system include
reusable and single-use instruments for open and laparoscopic procedures. Each reusable
instrument requires a corresponding single-use electrode. The LigaSure function is only
available when using compatible instruments.
Compatible LigaSure Instruments & Devices
This generator is designed for use with Covidien LigaSure instruments that have a
connector that matches the following figures and are rated for peak voltages of at least
244 V. However, it does not recognize all LigaSure instruments. Please refer to the cover
of the instructions for use to confirm if a specific LigaSure catalog number is compatible
with the VLFT10GEN.
Overview and General Features
LigaSure
Utilizes 4 mm banana pins
Valleylab FT10 Energy Platform User’s Guide 1-11
Page 26

The Valleylab FT10 Energy Platform
LigaSure with Switching
A. Utilizes 4 mm banana pins
B. Utilizes 2 mm banana pins
The following LigaSure foot pedal is fully compatible with the VLFT10GEN.
Foot Pedal
LS0300 Tissue Fusion Footswitch, Purple
Connection to External Systems
The VLFT10GEN can be connected to an external system. For example, connections can
be made to enable smoke evacuation or EKG blanking during monopolar activation, or
provide argon-enhanced coagulation. There are two external system receptacles on the
back of the VLFT10GEN that can signal RF activation–one that is associated with the
Monopolar 1 receptacle (labeled Monopolar 1) and one with the Monopolar 2 receptacle
(labeled Monopolar 2). Refer to the external system user’s guide for detailed instructions
regarding how to connect it to the generator.
External Systems Compatible with the FT10 Energy Platform
SEA3730 RapidVac™ Smoke Evacuator Interlink Cable
SE3690 RapidVac Smoke Evacuator
Force™ Argon II-20 Argon Gas Delivery Unit II
Warning
The use of any external system connected to the VLFT10GEN should be evaluated by qualified
personnel.
1-12 Valleylab FT10 Energy Platform User’s Guide
Page 27
System Conventions
The Touchscreen
The VLFT10GEN features a user-friendly touchscreen interface to control system functions.
The touchscreen is divided into quadrants; each of the four sections is associated with an
adjacent instrument receptacle.
• Quadrant 1—Settings entered in the touchscreen control an instrument attached to
the Monopolar 1 receptacle.
• Quadrant 2—Settings entered in the touchscreen control an instrument attached to
the Monopolar 2 receptacle.
• Quadrant 3—Settings entered in the touchscreen control an instrument attached to
the Bipolar receptacle.
• Quadrant 4—The touchscreen displays instrument-specific options and activation of
LigaSure and Bipolar Resection devices.
System Conventions
Overview and General Features
1 2
FT10
34
Valleylab FT10 Energy Platform User’s Guide 1-13
Page 28
System Conventions
Generator States
The appearance of touchscreen components indicates one of the three states of the
system.
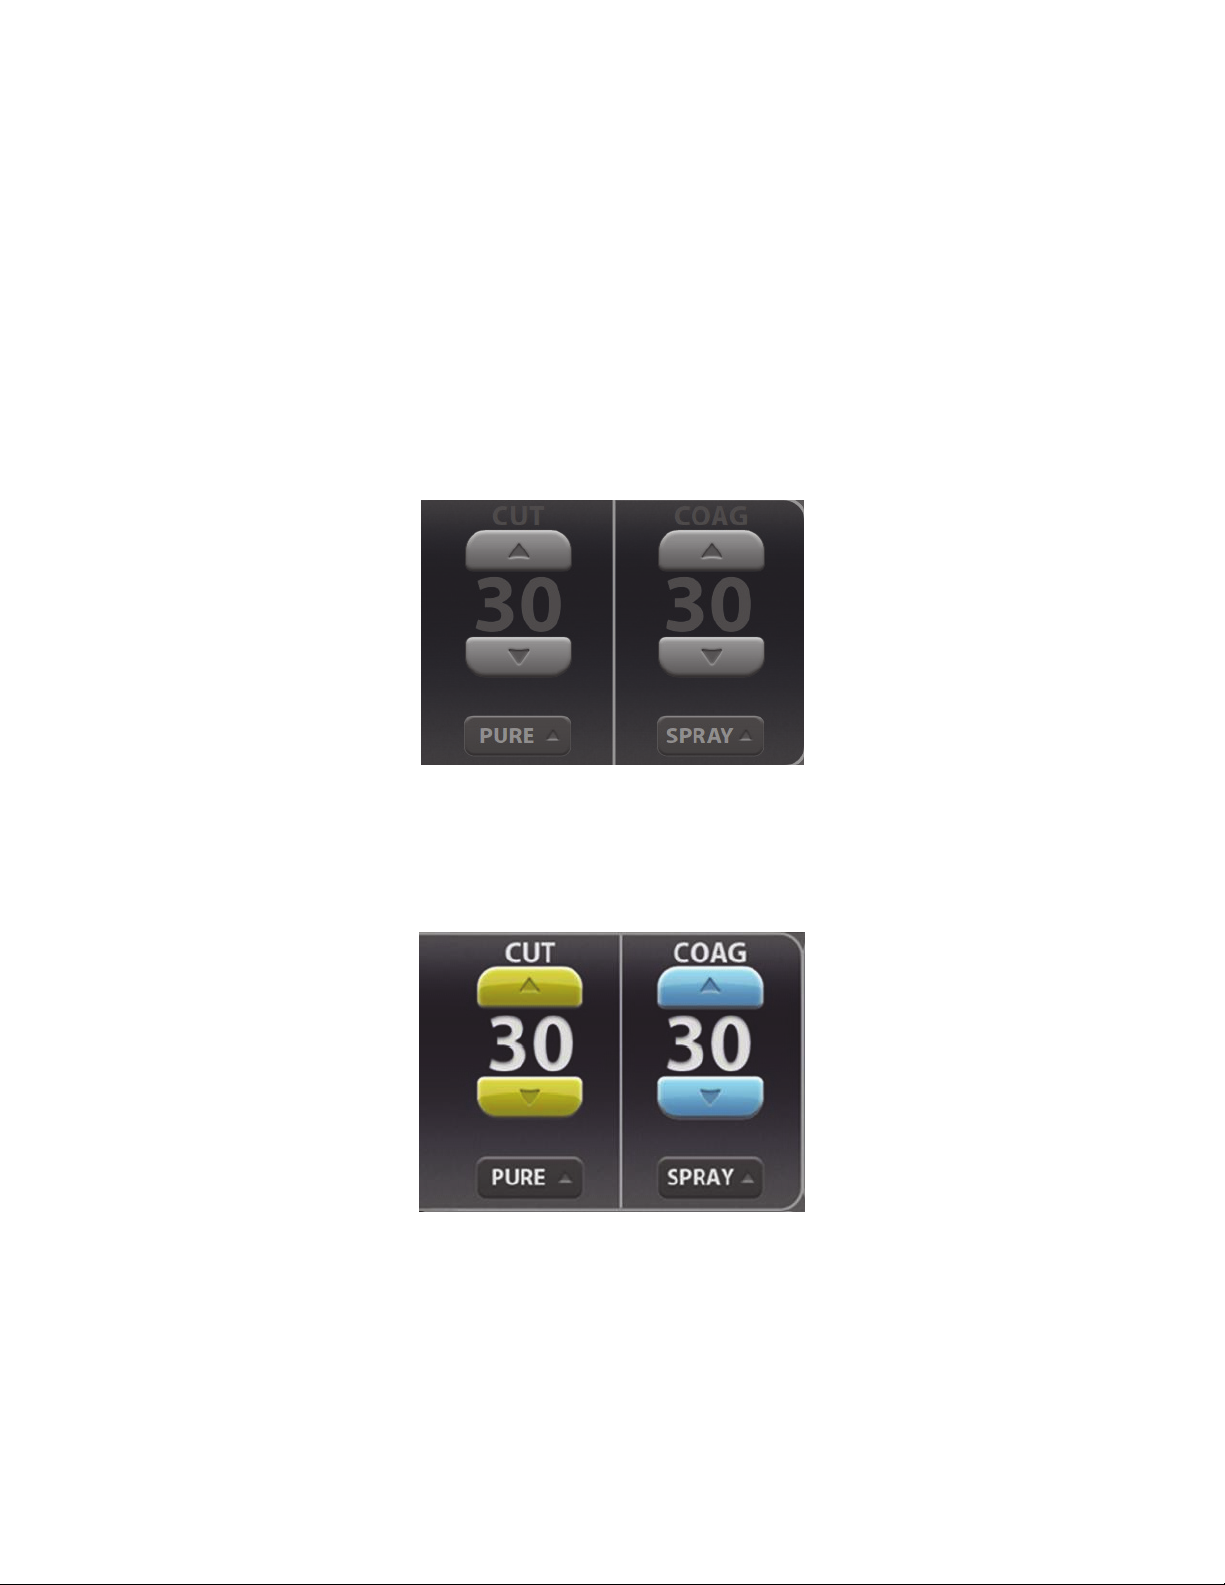
Edit
When the system is powered on and no instrument is attached, the instrument controls in
the monopolar and bipolar sections can be preset. The following illustration shows
monopolar controls edited prior to inserting an instrument.
Inserted
The controls change from the edit stage’s flat gray to a brightly illuminated color when an
instrument is inserted into the associated receptacle. The following illustration shows the
monopolar controls when a two-button pencil is inserted.
1-14 Valleylab FT10 Energy Platform User’s Guide
Page 29
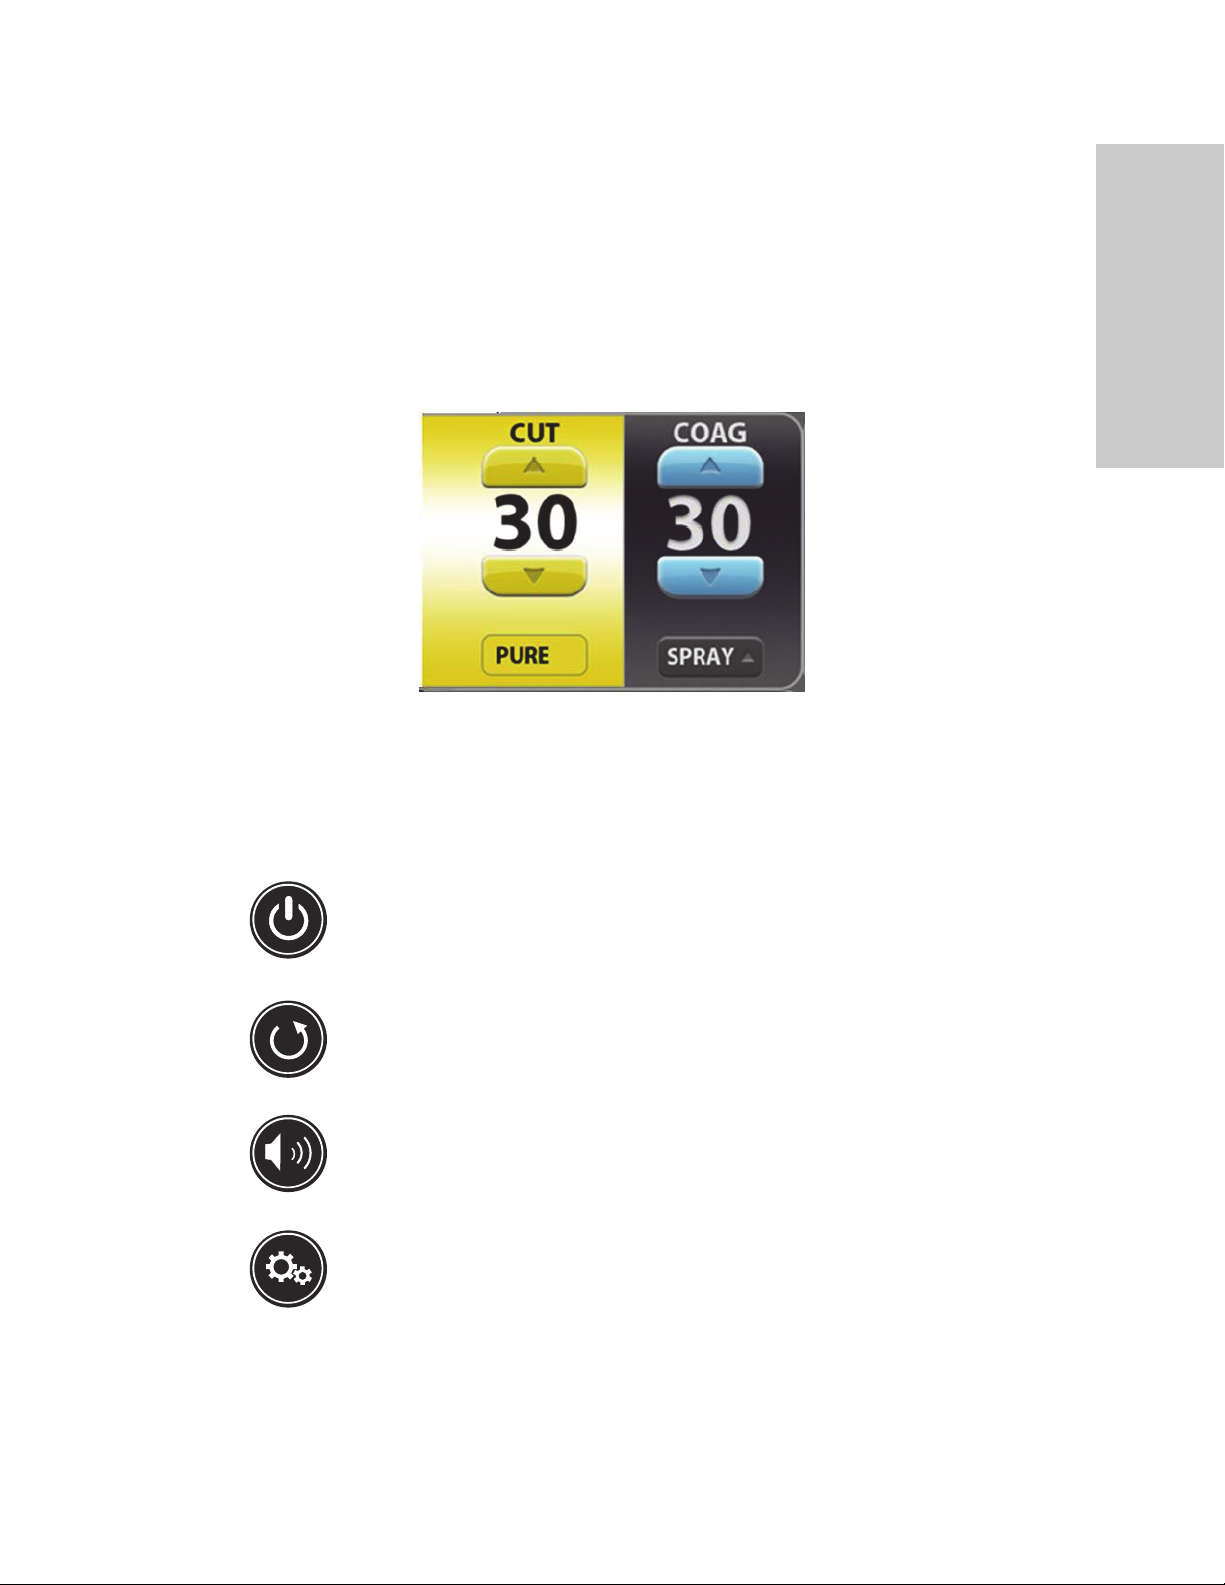
Activation
The black background illuminates brightly when the instrument is activated. The following
illustration shows the two-button pencil is currently delivering energy for PURE CUT. The
mode controls are locked during activation preventing any change in the mode. Power
settings can be changed during activation.
System Conventions
Overview and General Features
System Buttons
There are four buttons on the energy platform’s front panel:
Turns system power on and off. To turn power on, hold
On/Off
Restore Settings
Audio Volume Displays the volume pop-up menu to adjust sound levels.
Service/Settings Displays the service/settings menu.
the button for 0.25 seconds To turn off, hold the button
for 1 second. To reset a non-responsive system, hold for 10
seconds.
Restores settings from the last time the system was
powered down using the On/Off button.
Valleylab FT10 Energy Platform User’s Guide 1-15
Page 30
System Conventions
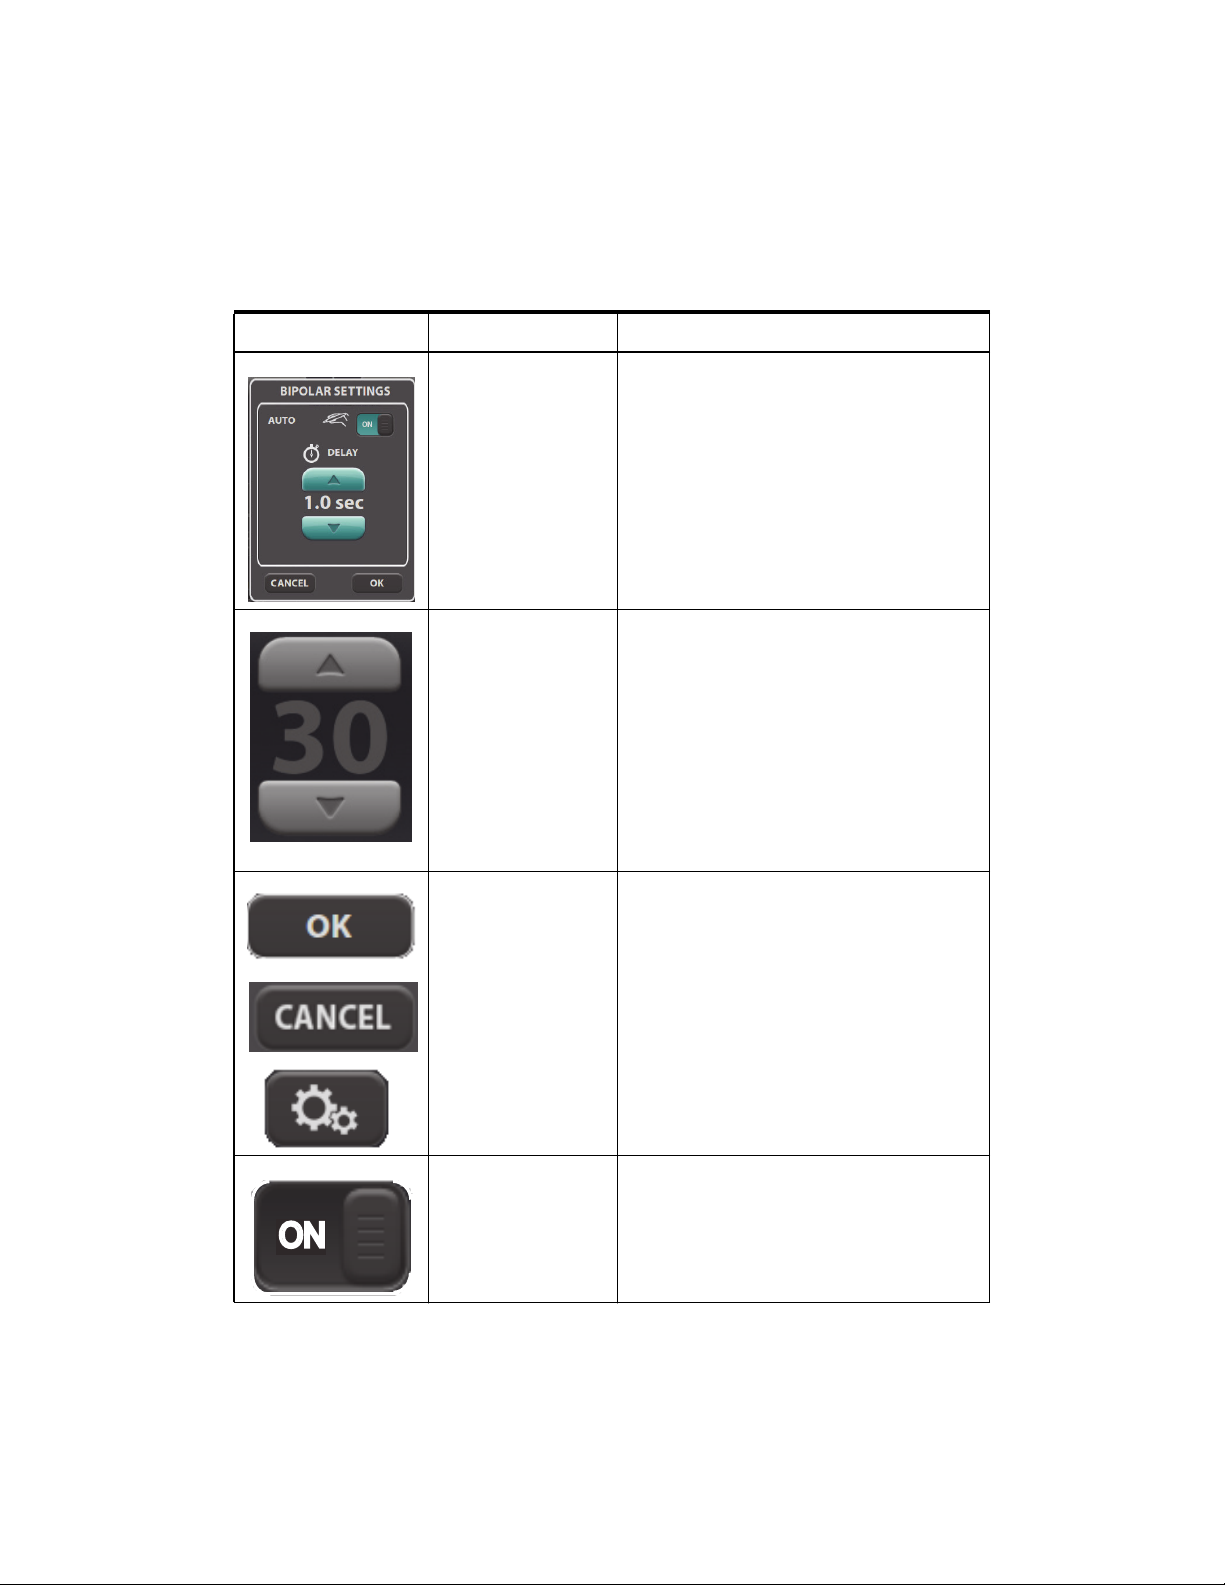
Interface Conventions
Interface Element Name Description
Pop-up window/
menu
Up/Down arrows Up and down arrows indicate additional
Software Buttons Options and confirmations are represented by
Pop-up windows and menus appear on screen
when user input is needed or requested. Popups close if the user touches anywhere
outside of the pop-up window.
values or selections are available for the
current setting.
For numeric values, press the up or down
arrow to increase or decrease the displayed
value. When the value is at its maximum or
minimum available setting, the appropriate
arrow button becomes inactive.
Menu selections (such as the up arrow on
PURE) presents other available settings.
virtual buttons on the touchscreen. Touch onscreen buttons to select preference.
Toggle Switches Touch the virtual toggle switches to enable
(ON) or disable (OFF) options or functions.
ON
1-16 Valleylab FT10 Energy Platform User’s Guide
Page 31

Chapter 2
Warnings and Precautions for Patient and
Operating Room Safety
The safe and effective use of electrosurgery depends to a large degree upon
factors solely under the control of the operator. There is no substitute for a
properly trained and vigilant surgical team. It is important that the operating
instructions supplied with this or any electrosurgical equipment be read,
understood, and followed.
Electrosurgery has been used safely in millions of procedures. Before starting any
surgical procedure, the surgeon should be trained in the particular technique and
surgical procedure to be performed, should be familiar with the medical literature
related to the procedure and potential complications, and should be familiar with
the risks versus the benefits of utilizing electrosurgery in the procedure.
Conventions Used in this Guide
Warning
Indicates a hazardous situation which, if not avoided, could result in death or serious injury.
Precaution
Indicates a hazardous situation which, if not avoided, may result in minor or moderate injury.
Notice
Indicates a hazard which may result in product damage.
Important
Indicates an operating tip or maintenance suggestion.
Valleylab FT10 Energy Platform User’s Guide 2-1
Page 32

General Warnings and Precautions
General Warnings and Precautions
Fire/Explosion Hazards
Warning
Danger - Explosion Hazard Do not use electrosurgery in the presence of flammable anesthetics
or oxidizing gases (such as nitrous oxide (N
solvents (such as ether or alcohol).
Fire Hazard Do not place active instruments near or in contact with flammable materials (such
as gauze or surgical drapes). Electrosurgical instruments that are activated or hot from use can
cause a fire. When not in use, place electrosurgical instruments in a safety holster or safely away
from patients, the surgical team, and flammable materials.
Sparking and heating associated with electrosurgery can be an ignition source. Keep gauze and
sponges wet. Keep electrosurgical electrodes away from flammable materials and oxygen (O
enriched environments.
O and oxygen) or in close proximity of to volatile
2
)
2
Use of electrosurgery in O
to reduce the O
If possible, stop supplemental oxygen at least one minute before and during use of electrosurgery.
The use of non-flammable agents is recommended for cleaning and disinfecting wherever possible.
If flammable agents are used, do not activate the energy platform until flammable vapors from
skin-preparation solutions and tinctures have dissipated.
There is a risk of pooling of flammable solutions under the patient or in body depressions, such as
the umbilicus, and in body cavities, such as the vagina. Any fluid pooled in these areas should
removed before activating the energy platform.
Avoid the accumulation of naturally occurring flammable gases that may accumulate in body
cavities such as the bowel.
Prevent the accumulation of flammable or oxidizing gases or vapors under surgical drapes or near
the surgical site.
Tissue buildup (eschar) on the tip of an active electrode may create embers that pose a fire hazard,
especially in oxygen-enriched environments. Keep the electrode clean and free of all debris.
Facial and other body hair is flammable. Water soluble surgical lubricating jelly may be used to
cover hair close to the surgical site to decrease flammability.
Verify that all anesthesia circuit connections are leak free before and during use of electrosurgery.
Fire Hazard During Oropharyngeal Surgery
Verify endotracheal tubes are leak free and that the cuff seals properly to prevent oxygen leaks.
concentration at the surgical site.
2
rich environments increases the risk of fire. Therefore, take measures
2
If an uncuffed tube is in use, pack the throat with wet sponges around the uncuffed tube, and be
sure to keep sponges wet throughout the procedure.
Question the need for 100% O
If necessary, scavenge excess O
Do not attempt to recharge the generator’s lithium battery. This can cause the battery to explode.
during oropharyngeal or head and neck surgery.
2
with separate suction.
2
2-2 Valleylab FT10 Energy Platform User’s Guide
Page 33

General Warnings and Precautions
System Setup Warnings and Precautions
Warning
Electric Shock Hazard Connect the system power cord to a properly grounded power receptacle.
Do not use power plug adapters.
Electric Shock Hazard When taking measurements or troubleshooting the system, take
appropriate precautions, such as using isolated tools and equipment, using the “one hand rule,”
etc.
Electric Shock Hazard Do not touch any exposed wiring or conductive surfaces while the system
is disassembled and energized. Never wear a grounding strap when working on an energized
system.
Warnings and Precautions for
Patient and Operating Room
Electric Shock Hazard To allow stored energy to dissipate after power is disconnected, wait at
least 5 minutes before replacing parts.
Position the generator where it can be easily unplugged in an emergency.
Fire Hazard Do not plug into a power strip or extension cord.
Patient Safety Use the energy platform only if the power-on self-test has been completed as
described in this manual, otherwise inaccurate power outputs may result.
Hazardous Electrical Output This equipment is for use only by trained, licensed physicians. Do
not use electrosurgical equipment unless properly trained to use it in the specific procedure being
undertaken. Use of this equipment without such training can result in serious, unintended patient
injury, including bowel perforation and unintended, irreversible tissue necrosis.
Do not touch the patient while touching a connector or fuse contact at the same time.
Simultaneous contact can cause electric shock or burns.
Do not wrap the instrument cords or patient-return-electrode cords around metal objects. This may
induce currents (capacitive coupling) that could lead to shocks, fires, or injury to the patient or
surgical team.
Electric Shock Hazard Do not connect wet instruments to the energy platform. Ensure that all
instruments and adapters are correctly connected and that no metal is exposed at any connection
points.
Confirm proper power settings before proceeding with surgery. If the proper power settings are
not known, set the power to a low setting and cautiously increase the power until the desired
effect is achieved. If increased power settings are requested, check the patient return electrode and
all instrument connections before major power-setting adjustments.
Safety
Contact between the active electrode and any metal will greatly increase current flow and can
result in unintended surgical effect.
Valleylab FT10 Energy Platform User’s Guide 2-3
Page 34

General Warnings and Precautions
Warning
While using electrosurgery, the user and patient should not be allowed to come into direct contact
with grounded metal objects (e.g., surgical-table frame, instrument table, etc.). If this is not
possible during certain procedures (e.g., those in which noninsulated head frames are used), use
extreme caution to maximize patient safety:
• Use the lowest power setting that achieves the desired effect.
• Place the patient return electrode as close to the surgical site as possible.
• Place dry gauze between the patient and the grounded object if possible.
• Continually monitor the contact point(s).
• Do not use metal needle monitoring electrodes.
Precaution
Read the instructions, warnings, and precautions provided with this energy platform and
associated accessories before using. Specific instructions for electrosurgical instruments are not
included in this manual.
Read the instructions, warnings, and precautions provided with electrosurgical instruments before
using. Specific instructions for electrosurgical instruments are not included in this manual.
Always use the lowest power setting that achieves the desired surgical effect. The active electrode
should be utilized only for the minimum time necessary in order to lessen the possibility of
unintended burn injury. Accidental and unintended burn injury has occurred during procedures in
small surgical fields and on small appendages. Pediatric applications and/or procedures performed
on small anatomic structures may require reduced power settings. The higher the current flow and
the longer the current is applied, the greater the possibility of unintended thermal damage to
tissue, especially during use on small structures.
For surgical procedures where the current could flow through delicate parts of the body, the use
of bipolar techniques may be desirable in order to avoid unwanted coagulation.
Connect only Covidien-approved devices. Using devices from other manufacturers may cause
equipment malfunction or patient injury.
Examine all instruments and connections to the system before using. Improper connection may
result in arcs, sparks, instrument malfunction, or unintended surgical effects.
Do not operate the generator for clinical use while cables are connected to the utility WiFi
receptacle or Ethernet receptacles on the back of the generator. This may cause a system error that
would halt the procedure and require restarting the generator.
Do not turn the activation tone down to an inaudible level. The activation tone alerts the surgical
team when the energy platform is delivering RF energy.
When using a smoke evacuator in conjunction with the VLFT10GEN, set the system volume control
at a level that ensures the activation tones can be heard.
A non-functioning VLFT10GEN may cause an interruption of surgery. A backup system should be
available for use.
2-4 Valleylab FT10 Energy Platform User’s Guide
Page 35

General Warnings and Precautions
Precaution
Inadvertent activation may occur while installing, removing, or bending electrodes. Ensure that the
instrument cord is not connected to the VLFT10GEN or that the system is off.
Leads connected to the patient should be positioned in such a way that contact with the patient
or other leads is avoided because the capacitance between the electrode cable and the patient may
result in some local high current densities.
Studies have shown that smoke generated during electrosurgical procedures can be potentially
harmful to patients and the surgical team. These studies recommend adequately ventilating the
smoke by using a surgical-smoke evacuator or other means.
1. U.S. Department of Health and Human Services. National Institute for Occupational Safety and
Health (NIOSH). Control of Smoke from Laser/Electric Surgical Procedures. HAZARD CONTROLS,
Publication No. 96-128, September, 1996
Notice
Connect the power cord to a properly grounded power receptacle having the correct voltage.
Otherwise, product damage may result.
1
Warnings and Precautions for
Patient and Operating Room
Safety
The VLFT10GEN requires special precautions regarding EMC and needs to be installed and put into
service according to the EMC information provided in the Valleylab FT10 Energy Platform Service
Manual.
Portable and mobile RF communications equipment can affect the VLFT10GEN. Refer to the EMC
information provided in the Valleylab FT10 Energy Platform Service Manual.
The system should not be used adjacent to or stacked with equipment other than specified in the
Valleylab FT10 Energy Platform User Guide and Service Manual. If adjacent or stacked use is
necessary, the system should be observed to verify normal operation in the configuration in which
it will be used.
The system intentionally applies RF energy for diagnosis or treatment during activation. Observe
other electronic medical equipment in the vicinity during the system activation for any possible
adverse electromagnetic effects. Ensure adequate separation of electronic medical equipment
based on observed reactions.
The use of accessories, other than specified in the Valleylab FT10 Energy Platform User Guide and
Service Manual, may result in increased emissions or decreased immunity of the system.
Calibration must be performed on a non-conductive surface. Do not use antistatic bench-top mats.
When performed on a conductive surface, calibration values may not be accurate.
After completing calibration, the system will reboot to the clinical screen to save the values or abort
the calibration.
Important
The VLFT10GEN is intended for use in a hospital environment.
Valleylab FT10 Energy Platform User’s Guide 2-5
Page 36

General Warnings and Precautions
Important
If required by local codes, connect the energy platform to the hospital potential equalization system
with an equipotential cable.
The operator of the generator may be as far away from the generator as 2 feet (direct product
interaction), 5 feet (inside the sterile field), and 13 feet (across the room working with other
equipment).
RFID and WiFi function may be interfered with by other equipment even if that other equipment
complies with CISPR emission requirements.
Log files are maintained when the system is powered down. The time when the system was
powered down or experiences a total loss of power is also logged.
When log files reach capacity, the earliest log is deleted to make room for the newest log.
Warnings and Precautions for the Energy Platform
Warning
Each instrument receptacle on this energy platform is designed to accept only one instrument at a
time. Follow the instructions provided with electrosurgical instruments for proper connection and
use.
Failure of the generator could result in an unintended increase of output power or activation.
The use of any external system connected to the VLFT10GEN should be evaluated by qualified
personnel.
Precaution
Do not stack equipment on top of the energy platform or place the energy platform on top of
electrical equipment. This is an unstable configuration and does not allow for adequate cooling.
Provide at least 4” to 6“ (10 to 15 cm) of unobstructed space round the top and sides of the
generator to ensure proper cooling.
Provide as much distance as possible between the energy platform and other electronic equipment
(such as monitors). Do not cross or bundle cords from electronic devices. This energy platform may
cause interference with other electronic equipment.
The use of monitoring systems that incorporate high-frequency current-limiting devices is
recommended to reduce interference with the monitoring device.
The system contains electrostatic-sensitive components. When repairing the system, work at a
static-control workstation. Wear a grounding strap when handling electrostatic-sensitive
components, except when working on an energized system. Handle Printed Circuit Board
Assemblies (PCBA) by their non-conductive edges. Use an antistatic container for transport of
electrostatic-sensitive components and PCBAs.
2-6 Valleylab FT10 Energy Platform User’s Guide
Page 37

General Warnings and Precautions
Notice
Make no modifications to the energy platform. Any modifications to the system will void the
warranty.
When testing RF equipment, follow these test procedures. Keep test leads to the minimum length
usable; lead inductance and stray capacitance can adversely affect readings. Carefully select
suitable ground points to avoid ground loop error in measurements.
The accuracy of most RF instruments is approximately 1%–5% of full scale. Using uncompensated
scope probes causes large errors when measuring high-voltage RF waveforms.
Warnings and Precautions for Active Instruments
Warnings and Precautions for
Patient and Operating Room
Warning
Energy applied to an electrosurgical instrument can convert liquids to steam. The thermal energy
of steam may cause unintended injury in close proximity to the tip of the instrument. Care should
be taken in surgical procedures occurring in confined spaces in anticipation of this possibility.
Do not activate the energy platform in an open-circuit condition. To reduce the chances of
unintended burns, activate the energy platform only when the active electrode is near or touching
the target tissue.
Use the lowest power setting that achieves the desired surgical effect and use a low-voltage
waveform (PURE CUT, BLEND, or Valleylab mode) to lessen the potential for the creation of
capacitive currents.
If energy delivery from the generator cannot be stopped, disconnect the handpiece or power cord.
Do not activate the instrument when not in contact with target tissue as this may cause injuries
due to capacitive coupling.
The surface of the active electrode may remain hot enough to cause burns after the RF current is
deactivated.
Keep the active electrodes clear. Build-up of eschar may reduce the instrument's effectiveness. Do
not activate the instrument while cleaning. Injury to operating room personnel may result.
Precaution
Read the instructions, warnings, and precautions provided with electrosurgical instruments before
using. Specific instructions for electrosurgical instruments are not included in this manual.
Safety
Inspect instruments and cords—especially for laparoscopic/endoscopic instruments—for breaks,
cracks, nicks, and other damage before every use. If damaged, do not use. Damaged instruments
or cords may result in injury or electrical shock to the patient or surgical team.
Valleylab FT10 Energy Platform User’s Guide 2-7
Page 38

General Warnings and Precautions
Precaution
Use only instruments that can withstand the maximum output (peak) voltage for each output
mode as listed in Chapter 10, Technical Specifications. Using an instrument with a voltage rating
that is lower than the maximum output voltage may result in injury to the patient or the operator,
or damage to the instrument.
Information on voltage ratings for non-Covidien instruments should be obtained from the
instrument’s manufacturer.
Notice
All Covidien instruments have voltage ratings that are greater than the maximum output voltages
in the VLFT10GEN and are thus fully compatible.
Inspect instrument plugs for wear before every use. Worn plugs may result in a loose or stuck
connection to the generator.
Warnings for Implanted Electronic Devices (IEDs)
IEDs include, but are not limited to, pacemakers, neurostimulators, implantable
cardioverter defibrillators (ICDs), ventricular assist devices (VAD), spinal cord stimulators,
cochlear implants, infusion pumps, and bone growth stimulators.
Warning
Use the system with caution in the presence of internal or external pacemakers or other implanted
devices. Interference produced by electrosurgical equipment can cause a pacemaker or other
device to enter an unsafe mode or permanently damage the device. Consult the device
manufacturer or responsible hospital department for further information when use is planned in
patients with implanted medical devices.
Post Surgery Safety Issues
Warning
Shock Hazard Before cleaning or servicing the unit, disconnect the power plug from the power
outlet in order to completely isolate the generator from mains power.
Notice
Do not clean the energy platform with abrasive cleaning or disinfectant compounds, solvents, or
other materials that could scratch the panels or damage the energy platform.
2-8 Valleylab FT10 Energy Platform User’s Guide
Page 39

Warnings and Precautions for Monopolar Procedures
Warnings and Precautions for Monopolar
Procedures
Warning
Simultaneously activating suction/irrigation and electrosurgical current may result in increased
arcing at the electrode tip, burns to unintended tissues, or shocks and burns to the surgical team.
Power output of a two- or three-button pencil (CUT and COAG selections) can change during use
when another foot pedal is pressed.
Some surgeons may elect to “buzz the hemostat” during surgical procedures. It is not
recommended, and the hazards of such a practice probably cannot be eliminated. Burns to the
surgeon’s hands are possible. To minimize the risk take these precautions:
• Do not buzz the hemostat with a needle electrode.
• Do not lean on the patient, the table, or the retractors while buzzing the hemostat.
Warnings and Precautions for
Patient and Operating Room
Safety
• Activate CUT rather than COAG. CUT has a lower voltage than COAG.
• Firmly grasp as much of the hemostat as possible before activating the energy platform. This
disperses the current over a larger area and minimizes the current concentration at the finger
tips.
• Buzz the hemostat below hand level (as close as possible to the patient) to reduce the
opportunity for current to follow alternate paths through the surgeon’s hands.
• Use the lowest power setting possible for the minimum time necessary to achieve hemostasis.
• Activate the energy platform after the instrument makes contact with the hemostat. Do not
arc to the hemostat.
• When using a coated- or nonstick-blade electrode, place the edge of the electrode against the
hemostat or other metal instrument.
DEMO mode delivers monopolar energy without the use of a patient return electrode, and is
intended for demonstration purposes only. Chance of burns to the patient significantly increase
when DEMO mode is used for clinical procedures.
Precaution
To provide expected functionality from a hand piece, proper insertion is required. Refer to the
orientation drawing near the receptacles for proper insertion orientation.
Valleylab FT10 Energy Platform User’s Guide 2-9
Page 40

Warnings and Precautions for Monopolar Procedures
Warnings and Precautions for Patient Return Electrodes
Warning
It is not possible to foresee what combination of current and duty cycle may be safely used in every
situation—for example, when higher currents and/or longer duty cycles are used on procedures
such as tissue lesioning, tissue ablation, tissue vaporization; and procedures where conductive fluid
is introduced into the surgical site. Under these conditions a greater risk may exist that the heating
under a fully applied return electrode may be high enough to injure the patient.
When using a Covidien energy platform or a patient return electrode during these types of surgical
procedures, the user should seek written guidance in the form of detailed user instructions from
the manufacturer of the active accessory regarding the currents and duty cycles that can be
expected. In some instances, the application of additional patient return electrodes may help
mitigate the increased risk.
Do not attempt to use patient return electrodes that disable the Return Electrode Monitoring (REM)
system. The VLFT10GEN REM system will function correctly only with contact quality monitoring
(CQM) split-style patient return electrodes. Other patient-return-electrode products may cause
patient injury or product damage.
The safe use of monopolar electrosurgery requires proper placement of the patient return
electrode. To avoid electrosurgical burns beneath the patient return electrode, follow all directions
provided with the product.
Do not cut a patient return electrode to reduce its size. Patient burns due to high current density
may result.
To avoid patient burns, ensure that the patient return electrode makes firm and complete contact
with the skin. Always check the patient return electrode periodically, after the patient is
repositioned, and during procedures involving long periods of activation.
Use of duty cycles greater than 25% (10 seconds active followed by 30 seconds inactive) will
increase the risk that heat build-up under a return electrode may be high enough to injure the
patient. Do not continuously activate for longer than one minute.
Apparent low-power output at the normal operating settings may indicate faulty application of the
return electrode. Verify the return electrode is correctly placed and attached to the patient as
described in the electrode’s instructions for use. Verify the connection between the electrode and
the generator.
Use of a non-REM return electrode while in DEMO mode does not monitor the quality of pad
contact with the patient. No warning will be issued from the generator when a non-REM return
electrode’s pad-to-patient contact degrades when in DEMO mode.
Precaution
Covidien REM Polyhesive patient return electrodes are recommended for use with the FT10. Return
electrodes from other manufacturers may not provide proper impedance to work correctly with the
energy platform.
2-10 Valleylab FT10 Energy Platform User’s Guide
Page 41

Warnings and Precautions for Monopolar Procedures
Important
A statement of compatibility from the CQM patient return electrode manufacturer should be
obtained prior to the use of a non-Covidien CQM patient return electrode.
A patient return electrode is not necessary in bipolar or LigaSure procedures.
Inadvertent Radio Frequency (RF) Burns
Warning
Electrodes and probes used with monitoring, stimulation, and imaging devices (or similar
equipment) can provide a path for high frequency current even if the electrodes or probes are
isolated at 50 –60 Hz, insulated, and/or battery operated.
Do not use needles as monitoring electrodes during electrosurgical procedures. Inadvertent
electrosurgical burns may result.
Warnings and Precautions for
Patient and Operating Room
Safety
To reduce the risk of an inadvertent electrosurgical burn at the monitoring electrode or probe site,
place the electrode and/or probe as far away as possible from the electrosurgical site and/or patient
return electrode. Protective impedances (resistors or RF inductors) installed in the monitoring leads
may reduce the risk of such burns. Consult the hospital biomedical engineer for further
information.
In some circumstances, the potential exists for alternate site burns at points of skin contact (e.g.,
between the arm and the side of the body). This occurs when electrosurgical current seeks a path
to the patient return electrode that includes the skin-to-skin contact point. Current passing
through small skin-to-skin contact points is concentrated and may cause a burn. This is true for
ground referenced and isolated output electrosurgical energy systems.
To reduce the potential for alternate site burns, do one or more of the following:
• Avoid skin-to-skin contact points, such as fingers touching leg or knee touching knee when
positioning the patient.
• Place insulation, such as dry gauze or towel, between contact points to ensure that contact
does not occur.
• Position the patient return electrode to provide a direct current route between the surgical site
and the return electrode which avoids skin-to-skin contact areas.
• In addition, place patient return electrodes according to the manufacturer’s instructions.
Valleylab FT10 Energy Platform User’s Guide 2-11
Page 42

Warnings and Cautions for Laparoscopic Procedures
Warnings and Cautions for Laparoscopic
Procedures
Warning
For laparoscopic procedures, be alert to these potential hazards:
• Laparoscopic surgery may result in gas embolism due to insufflation of gas in the abdomen.
• The electrode tip or LigaSure jaws may remain hot enough to cause burns after the
electrosurgical current is deactivated.
• Inadvertent activation or movement of the activated instrument electrode or jaws outside of
the field of vision may result in injury to the patient.
• Localized burns to the patient or physician may result from electrical currents carried through
conductive objects (such as other instrument, cannulas, or scopes). Electrical current may be
generated in conductive objects through direct contact with the active electrode or jaws,
capacitative coupling, or by the active instrument (electrode or cable) being in close proximity
to the conductive object. Localized burns to the patient or physician may occur.
• Do not use hybrid trocars that have a non-conductive locking anchor placed over a conductive
sleeve. For the operative channel, use all-metal or all-plastic systems. At no time should
electrical energy pass through hybrid systems. Capacitive coupling of RF current may cause
unintended burns.
• When using laparoscopic instrumentation with metal cannulas, the potential exists for burns
to the abdominal wall due to direct electrode contact or capacitive coupling of RF current. This
is most likely to occur in instances where the energy platform is activated for extended periods
at high power levels inducing high current levels in the cannula.
• Carefully insert and withdraw LigaSure instruments from cannulas to avoid possible damage to
the devices and/or injury to the patient.
• Ensure that the insulation of single-use and reusable laparoscopic instrumentation is intact and
uncompromised. Compromised insulation may lead to inadvertent metal-to-metal sparking
and neuromuscular stimulation and/or inadvertent sparking to adjacent tissue.
• Do not activate the LigaSure function in an open-circuit condition. Activate the energy platform
only when the instrument is near or in direct contact with the target tissue to reduce the
possibility of unintended burns.
Covidien recommends against the use of laparoscopic surgery on pregnant patients.
2-12 Valleylab FT10 Energy Platform User’s Guide
Page 43

Warnings and Precautions for Bipolar Procedures
Warnings and Precautions for Bipolar Procedures
Warning
Use of different Covidien cord models or cords from other manufacturers may not achieve proper
electrical output for this device, thereby failing to produce the desired clinical effect. For example,
Auto Bipolar activation/deactivation settings may not work properly using cords other than those
specified by Covidien.
In the Auto Bipolar setting, activation may occur with contact of any material. When not in use,
place electrosurgical instruments in a safety holster or safely away from patients, the surgical team,
and flammable materials
Precaution
Bipolar instruments must be connected to the bipolar instrument receptacle only. Improper
connection may result in inadvertent system activation.
Do not use the FT0501 ForceTriad™ Bipolar Adapter with Auto Bipolar on the VLFT10GEN.
Bipolar forceps should not be set down while Autobipolar is active. Contact with any material may
cause activation. Turn off Autobipolar before releasing an instrument.
Warnings and Precautions for LigaSure Procedures
Warning
LigaSure instruments are intended for use only with compatible Covidien generators and energy
platforms. See the front cover of the instrument’s instructions for a list of compatible generators.
Use of these instruments with other generators may not result in electrical output that they were
designed for, and may not result in the desired clinical effect.
The tissue fusion function has not been shown to be effective for tubal sterilization or tubal
coagulation for sterilization procedures. Do not use this function for these procedures.
Warnings and Precautions for
Patient and Operating Room
Safety
Tissue fusion requires the application of RF energy and pressure from the instrument. Ensure
grasping pressure is maintained until the seal cycle is complete.Tissue to be sealed must be firmly
grasped between the instrument jaw electrodes. Tissue in the jaw hinge or outside the instrument
jaw may not be sealed even if thermal blanching occurs.
If the seal-cycle-complete tone has not sounded, an optimal seal may not have been achieved.
Reactivate the RF energy until a seal-cycle-complete tone is heard.
Do not activate the energy platform in LigaSure until the tissue-fusion instrument has been applied
with the proper pressure. Do not release the pressure on the tissue until the end tone has sounded.
Activating the energy platform under these conditions may result in an improper seal and may
increase thermal spread to tissue outside the surgical site.
Valleylab FT10 Energy Platform User’s Guide 2-13
Page 44

Servicing
Warning
Fluid in the body cavity should be kept to a minimum during treatment. Conductive fluids (e.g.,
blood or saline) in direct contact with, or in close proximity to, the instrument may carry electrical
current or heat, which may cause unintended burns to the patient. Aspirate fluid from around the
instrument jaws before activating the instrument.
Do not attempt to seal or cut over clips or staples as incomplete seals may be formed.
Precaution
Energy-based devices, such as electrosurgical pencils or ultrasonic scalpels, that are associated with
thermal spread should not be used to transect seals.
Warnings and Precautions for Bipolar Resection
Warning
Bipolar Resection mode is intended to be used only with compatible resectoscopes for
endoscopically controlled removal (resection) or coagulation of tissue using 0.9% NaCI solution
(saline) as the irrigation medium
Precaution
Bipolar Resection mode is supported only if a Covidien-specified Bipolar Resection instrument is
connected to the LigaSure/Bipolar receptacle with a Covidien Bipolar Resection cord. In addition,
Bipolar Resection mode can be activated only with the Covidien Bipolar Resection foot pedal
connected to the LigaSure/Bipolar foot-pedal receptacle. See the cords IFU listed in Accessories on
page 1-10 for the list of supported Bipolar Resection instruments and cords.
Servicing
Warning
Electric Shock Hazard Do not remove the energy platform cover. Contact qualified personnel for
service.
Do not dispose of electrical appliances as unsorted municipal waste. Use separate
collection facilities.
Electrical appliances that are incorrectly disposed in dumps or landfills can leach
dangerous substances causing contamination of soil and groundwater, and
damaging the environment.
Contact your local government, or point of sale for information regarding the
collection of waste electrical appliances
2-14 Valleylab FT10 Energy Platform User’s Guide
Page 45

Notice
Refer to this system’s service manual for maintenance recommendations, and function and outputpower verification procedures.
Do not spray cleaning fluids directly on the generator as damage to the generator may occur.
The latest version of the Valleylab FT10 Energy Platform Service Manual is available at
www.BioMedConnect.com.
Call these numbers to request a hardcopy of the service manual
• USA and Canada: 1-800-255-8522 Option 2
• International: 1-303-476-7996
Shunt Cords
Shunt Cords
Patient and Operating Room
Safety
Warnings and Precautions for
Warning
Some surgical instruments (e.g., colonoscopes) may allow substantial leakage current that could
burn the surgeon. If the instrument manufacturer recommends the use of a shunt cord (s-cord) to
direct the current back to the energy platform, an E0507-B adaptor must also be used. To avoid a
REM alarm, a REM Polyhesive patient return electrode with the E0507-B adaptor must be used.
Conductive Fluid In the Surgical Site
Warning
When this energy platform is used in monopolar procedures where conductive fluid (including, but
not limited to saline or lactated Ringer’s) is introduced into the surgical site for distention or to
conduct RF current, higher than normal currents (greater than one amp) may be produced. In this
situation, use one or more adult-size return electrode. Do not use return electrodes labeled for
children, infants, babies, neonatal use, or pediatric use.
Use of duty cycles greater than 25% (10 seconds active followed by 30 seconds inactive) will
increase the risk that heat build-up under a return electrode may be high enough to injure the
patient. Do not continuously activate for longer than one minute.
Valleylab FT10 Energy Platform User’s Guide 2-15
Page 46

Page 47

Chapter 3
System Setup
This chapter describes how to set up the energy platform, turn it on, and configure
system settings.
Precaution
Read the instructions, warnings, and precautions provided with this energy platform and
associated accessories before using. Specific instructions for electrosurgical instruments are not
included in this manual.
Valleylab FT10 Energy Platform User’s Guide 3-1
Page 48

Setup
Setup
Unpacking the System
Carefully unpack the contents of the shipping container. The container contains the
following items:
• Valleylab FT10 FT Series Energy Platform
• Power cord
• First-time setup guide
• Quick reference card
• User’s guide
• DVD with user’s guide translations and service manual
• Ethernet cable
• Monopolar foot-pedal adapter
• Bipolar Resection foot-pedal adapter
Before Starting the System
Important
The VLFT10GEN is intended for use in a hospital environment.
The operator of the generator may be as far away from the generator as 2 ft. (60 cm) [direct
product interaction], 5 ft. (1.5 m) [inside the sterile field], and 13 ft. (4 m) [across the room working
with other equipment].
1. Verify the system is off and the power cord is unplugged.
2. Place the energy platform on a flat, stable surface such as a table, platform, boom
system, or Valleylab Universal Generator Cart (VLFTCRT). Refer to the procedures for
the local institution or local codes.
3. If necessary, connect the equipotential grounding lug to a ground source.
4. Plug the system power cord into the rear panel receptacle.
5. Plug the system power cord into a grounded power receptacle. The On/Off button
illuminates yellow.
Precaution
Do not plug the system power cord into a power strip or extension cord.
3-2 Valleylab FT10 Energy Platform User’s Guide
Page 49

Turning On the VLFT10GEN
1. Turn on the system by depressing the On/Off button on the front panel. Observe the
following during the power-on self-test (POST):
• The Covidien logo appears on screen.
• A status bar indicates authentication activity.
• The system revision code appears.
• A tone sounds upon completion of the power-on self-test (POST).
• The REM (Return Electrode Monitoring) indicator appears on the touchscreen: red
if a REM-alarm condition exists; green if no REM-alarm condition.
• If the system does not pass the power-on self-test and an error code is displayed,
refer to Correcting a REM-Alarm Condition on page 8-2.
2. If the self-test is not successful, an alarm tone sounds. An error screen appears on the
touchscreen. Note the information on the display and refer to Chapter 8,
Troubleshooting
Setup
Warning
Patient Safety Use the energy platform only if the power-on self-test has been completed as
described in this manual, otherwise inaccurate power outputs may result.
3. Required for initial start up—The generator must be set up using the Valleylab
Exchange Remote Software System. For instructions, refer to the First-Time Setup
Guide and the Valleylab Exchange Remote Software System User’s Guide.
These documents are available online at
www.covidien.com/valleylabexchange.
Turning Off the VLFT10GEN (Normal Power-off)
1. Turn off the system by depressing the On/Off button (illuminated green) on the front
panel for at least 1 second. Observe the following during the power-off:
• The system exits the screen.
• The screen displays the power-down sequence.
• Once the power-down is complete, the screen turns off and the On/Off button
illuminates yellow.
• Power-down is complete.
2. If the system was powered up but non-responsive, press and hold the On/Off button
for at least 10 seconds and observe the following:
System Setup
• The screen turns off and the On/Off button illuminates yellow.
• Power-down is complete.
Valleylab FT10 Energy Platform User’s Guide 3-3
Page 50

System Functions
System Functions
The VLFT10GEN system functions are accessed from buttons on the front panel: On/Off,
Restore, Audio Volume, and Service and Settings.
On/Off
When the system is plugged into a power source, the On/Off button appears yellow. Turn
on power to the energy platform by pressing and holding the On/Off button for 0.25
seconds. After a successful power-on self-test, the On/Off button illuminates green. A
tone sounds to signal a successful system power up.
Press and hold the button for 1 second to turn power off. The button illuminates yellow
when the system is powered down. If a system is non-responsive, holding the button for
10 seconds will power down the system.
Restore
Select the restore button on the front panel to reset the system to the settings in use when
the system was last powered down using the On/Off button. Accepting the prompt in the
dialog box will reset all quadrants to their last setting. All modes and values are reset with
the exception of volume and Auto Bipolar setting.
Touch OK and the touchscreen will display the last settings entered into each of the
quadrants prior to shutting off the system.
3-4 Valleylab FT10 Energy Platform User’s Guide
Page 51

Audio Volume
The VLFT10GEN has five levels of audio volume. Press the audio-volume button on the
front panel to view the volume-select menu.
System Functions
The factory setting is as shown with the volume set at it’s highest level. Adjust the volume
using the + or - buttons. Dismiss the dialog box by touching the screen outside of the
volume menu.
Language Selection Menu
The Language Selection menu presents 25 buttons; each labeled with a language available
for all software screens and options in the software interface. To change the language,
select the button labeled with the desired language. The software interface changes the
non-service windows to the selected language after the language button is selected. Some
service screens are not translated.
System Setup
Valleylab FT10 Energy Platform User’s Guide 3-5
Page 52

Service and Settings
Service and Settings
The Service and Settings menu is accessed by pressing the gears button on the front panel.
The Service and Settings menu displays the generator serial number, IP address (if
connected to the network), software version number, and contact information for the
Covidien Service Center.
It provides available options for
• Viewing logs
– Events Log
– Error Log
– Error Histogram
• Enabling DEMO Mode
• Selecting system settings
– System Config
– Diagnostics
– Network
– Time Zone
– Calibration Info
• Accessing system service functions
– Qualified service personnel can access service functions from a password-protected
menu. Refer to the Valleylab FT10 Energy Platform Service Manual for service
instructions.
• Selecting a language
3-6 Valleylab FT10 Energy Platform User’s Guide
Page 53

Logs
The LOGS button displays the LOGS menu with three options.
1. Touch the LOGS button to view the Logs menu:
• EVENTS—A detailed display of all user actions and generator events on the
VLFT10GEN
• ERROR—A display of all recorded system errors with details
• ERROR HISTOGRAM—A summary of how often an error has occurred
2. Touch entries to view available details:
• EVENTS—Touch an event entry to view details. Touch BACK to return to the
EVENTS screen.
• ERROR LOG—Touch an error to view its details in the Error Details dialog box. Touch
the SHOW EVENTS button to view related events in the Events log entries. Touch
BACK to return to the Error Log screen.
Service and Settings
• ERROR HISTROGRAM—Entries in the Error Histogram dialog box are not linked to
other logs.
Important
Log files are maintained when the system is powered down. The time when the system was
powered down or experiences a total loss of power is also logged.
When log files reach capacity, the earliest log is deleted to make room for the newest log.
System Setup
Valleylab FT10 Energy Platform User’s Guide 3-7
Page 54

Service and Settings
DEMO Mode
DEMO mode is used for demonstration of the generator and accessories only. DEMO
mode enables monopolar activation through an attached instrument without the use of a
REM patient return electrode. When the monopolar surgery is performed clinically, the
required return electrode provides a safe path for the current introduced to the patient’s
body.
Warning
DEMO mode delivers monopolar energy without the use of a patient return electrode, and is
intended for demonstration purposes only. Chance of burns to the patient significantly increase
when DEMO mode is used for clinical procedures.
The use of a non-REM return electrode while in DEMO mode will prevent the generator from
warning the user if the return electrode is peeling.
Enable DEMO Mode
1. Touch DEMO MODE in the Service and Settings screen.
2. Click the Enable DEMO MODE button to place the monopolar quadrant in DEMO
mode. A reminder is posted: “NOT FOR CLINICAL USE.”
3. Touch the screen anywhere outside the EXIT DEMO MODE BUTTON to temporarily
remove the message, allowing full access to the controls.
4. Proceed with any practice or demonstration scenarios. While in DEMO mode, the REM
alarm is deactivated, but RF power is still delivered.
Note: The energy platform does not sense instrument type while in DEMO mode. The
appropriate mode setting must be selected manually for the connected instrument.
3-8 Valleylab FT10 Energy Platform User’s Guide
Page 55

Warning
Use of a non-REM return electrode while in DEMO mode does not monitor the quality of pad
contact with the patient. Therefore, no warning will be issued from the generator when pad-topatient contact degrades.
5. Touch EXIT DEMO to close DEMO mode and return to the functional monopolar
screen. This will enable REM.
System Menu
The System button accesses settings for
• System Config
• Diagnostics
• Network
Service and Settings
• Time Zone
• Calibration Info
System Configuration
System Configuration displays the hardware, software, and firmware components of the
VLFT10GEN. This information is for reference only. No changes to the configuration can
be performed from this screen.
Diagnostics
• Instrument Bar Code Reader—Insert a Covidien device with a scannable bar code.
When the SCAN button is touched, the bar-code reader displays the current view from
the reader’s camera to verify it is working properly.
• Self Test—Runs the same system test as the power-on self-test when the system is
turned on. Current power and mode settings in each quadrant will be lost as the
system is reset to run the power-on self-test. These settings can be retrieved by
pressing the Restore Settings button on the front panel. If the self-test is successful, a
tone sounds.
System Setup
Valleylab FT10 Energy Platform User’s Guide 3-9
Page 56

Service and Settings
Network
The Network button allows the technician to select a network connection to the Valleylab
Exchange server for service operations. There are 4 ways to connect to the IT network:
• Wired Point-to-Point
• Wired Automatic
• Wired Manual
• Wireless
Wired Point-to-Point
This selection allows the generator to communicate directly with another computer
through an Ethernet cable that is connected from the generator to the computer.
Wired Automatic
This selection allows the generator to communicate on the IT network through an
Ethernet cable that is connected from the generator to a router or the facility’s DHCP
server. The generator is automatically assigned an IP address by the facility’s DHCP server.
Wired Manual
This selection allows the generator to communicate on the IT network through an
Ethernet cable that is connected from the generator to a router or the facility’s DHCP
server. The technician can manually set a static IP address, network mask, and default
gateway address.
Wireless
This selection allows a wireless connection from the generator to a router or to a DHCP
server via a WiFi access point broadcasting a non-hidden SSID. The technician selects
which SSID to connect to and enters a WPA2 password to enable the connection. The
generator is automatically assigned an IP address by the facility’s DHCP server.
Time Zone
Select a region from the drop-down menu to set the time zone used by the system clock.
The time and date are originally set during the initial connection to Valleylab Exchange (see
page 3-3).
Calibration Info
Calibration Info displays all of the energy calibration values stored in the VLFT10GEN. This
information is for reference only. No changes to the calibration values can be performed
from this screen.
3-10 Valleylab FT10 Energy Platform User’s Guide
Page 57

Service Menu
Items in the Covidien Service menu are specifically for qualified service personnel and are
password protected. The password is 423213. The Service Menu button accesses settings
for
• RF Output Test
• Touchscreen Calibration
• Energy Calibration
• Country Setup
• RFID Antenna Control
RF Output Test
Service and Settings
The RF Output Test Screen is used to test the RF output of the generator. It allows a
technician to output RF in a specified mode, to a specified energy channel, at a specified
power level. While RF is output, the RF Output Test Screen displays the internal sensor
readings of average power, RMS voltage, RMS current, impedance magnitude, impedance
phase angle, REM impedance magnitude, and REM impedance phase angle.
Touchscreen Calibration
The Touchscreen Calibration screen allows the technician to calibrate the touchscreen. See
the Valleylab FT10 Energy Platform Service Manual for more information.
Energy Calibration
The Energy Calibration screen allows the technician to calibrate the RF output. See the
Valleylab FT10 Energy Platform Service Manual for more information.
Country Setup
The Country Setup screen allows the technician to identify in which country the generator
is set up to operate. If this is the first time using the generator, the country code needs to
be selected before the LigaSure/Bipolar energy channel will function. See the First Time
Setup Guide for instructions on how to set the country code.
RFID Antenna Control
System Setup
The RFID Antenna Control screen allows the technician to manually initiate an RFID scan
of an instrument connected to the LigaSure receptacle.
Valleylab FT10 Energy Platform User’s Guide 3-11
Page 58

Page 59

Chapter 4
Monopolar
This chapter describes the Monopolar function of the VLFT10GEN.
Precaution
Read the instructions, warnings, and precautions provided with this energy platform and
associated accessories before using. Specific instructions for electrosurgical instruments are not
included in this manual.
Valleylab FT10 Energy Platform User’s Guide 4-1
Page 60

Front Panel Monopolar Features
Front Panel Monopolar Features
2
1
FT10
Monopolar 1 Universal Foot Pedal Port (UFP) receptacle
ཱ Monopolar 1 touchscreen quadrant
ི Monopolar 2 touchscreen quadrant
ཱི Monopolar 2 instrument receptacle
3
4
6
5
ུ REM Patient return electrode receptacle
ཱུ Return electrode monitoring (REM) indicator
4-2 Valleylab FT10 Energy Platform User’s Guide
Page 61

Rear Panel Monopolar Features
Rear Panel Monopolar Features
Monopolar1Monopolar
3
2
Monopolar 2 Monopolar 1
Bipolar
Warning: Risk of Fire.
Replace Fuse as Marked
250V, F10.0A (100-127Vac)
250V, F6.3A (220-240Vac)
2
Avertissement: Risque du feu.
Remplacez les fusibles
comme marqués.
250V, F10.0A (100-127Vac)
250V, F6.3A (220-240Vac)
4
1
Monopolar 2 foot-pedal receptacle (requires adapter to connect standard four-pin
monopolar foot pedal)
ཱ Monopolar 1 foot-pedal receptacle
ི Interlink cable receptacle for EKG smoke-evacuation control devices
ཱི Power cord receptacle
Valleylab FT10 Energy Platform User’s Guide 4-3
Monopolar
Page 62

Monopolar Quick Setup Instructions
Monopolar Quick Setup Instructions
If familiar with the VLFT10GEN, follow this abbreviated procedure to set up the system for
monopolar surgery.
If more detailed instructions are required, refer to the following sections in this chapter for
detailed instructions.
1. Plug the system power cord into the rear panel receptacle.
2. Plug the system power cord into a grounded power outlet.
Important
Do not plug the system power cord into a power strip or extension cord.
3. Turn on the energy platform and verify that the power-on self-test is successfully
completed.
4. If using a foot pedal, connect it to a monopolar foot-pedal receptacle on the rear
panel. The Monopolar 2 receptacle requires an adapter to connect a standard 4-pin
monopolar foot pedal.
Warning
Use only Covidien foot pedals. Use of other manufacturer’s foot pedals is not recommended;
unexpected output may occur.
5. Apply the patient return electrode to the patient and connect it to the patient return
electrode receptacle on the generator’s front panel.
6. Connect the instrument to the appropriate instrument receptacle on the front panel.
Align the connector pins with the dots below each Monopolar receptacle to ensure full
functionality of the instrument. Inserting an instrument into the Monopolar 1
receptacle will require additional force.
7. Verify or change the mode and power settings in the corresponding quadrant of the
touchscreen.
4-4 Valleylab FT10 Energy Platform User’s Guide
Page 63

Monopolar Function Overview
Monopolar Function Overview
Monopolar Power Output Modes
The monopolar energy channels can be configured to these modes: PURE CUT, BLEND,
VALLEYLAB, SOFT, FULGURATE, and SPRAY.
Warning
Electric Shock Hazard
• Do not connect wet instruments to the system.
• Ensure that all instruments and adapters are correctly connected and that no metal is exposed
at any connection point.
Connect instruments to the proper receptacle. Improper connection may result in inadvertent
instrument activation or other potentially hazardous conditions. Follow the instructions provided
with electrosurgical instruments for proper connection and use.
Each instrument receptacle on this energy platform is designed to accept only one instrument at a
time. Follow the instructions provided with electrosurgical instruments for proper connection and
use.
Precaution
Read the instructions, warnings, and precautions provided with electrosurgical instruments before
use. Specific instructions are not included in this manual.
Inspect instruments and cords—especially for laparoscopic/endoscopic instruments—for breaks,
cracks, nicks, and other damage before every use. If damaged, do not use. Damaged instruments
or cords may result in injury or electrical shock to the patient or surgical team.
Important
Avoid switching rapidly between CUT and COAG with the monopolar handpiece controls as this
may cause the generator to temporarily ignore the handpiece control. Release the handpiece
control momentarily and then press it again to rectify this situation.
Foot Pedal
Monopolar foot pedals connect to the rear panel and correspond to either the Monopolar
1 or Monopolar 2 receptacles on the front panel.
Monopolar
Standard foot-pedal devices attached to the Monopolar 1 Universal Foot Pedal Port
receptacle on the front panel can be controlled with a Covidien foot pedal attached to the
Monopolar 1 foot-pedal receptacle on the back panel.
Valleylab FT10 Energy Platform User’s Guide 4-5
Page 64

Foot Pedal
Precaution
Connect only Covidien foot pedals. Using foot pedals from other manufacturers may cause
equipment malfunction or patient injury. See the list of compatible Covidien foot pedals on page 1-
8.
Monopolar Foot-Pedal Activation
All devices attached to the Monopolar 1 or Monopolar 2 receptacle—whether
handswitching or foot-pedal-activated accessories—can be controlled with a foot pedal.
Standard monopolar foot pedals can be set up using compatible accessories:
• Pedal-activated instrument
• Two- or three-pedal foot pedal
• Foot-pedal adapter 1017577 for Monopolar 2 (shown below)
Setup:
1. Plug the two-pedal foot-pedal connector into the Monopolar 1 foot-pedal receptacle
on the rear panel.
2. Plug a two-button pencil into the Monopolar 1 receptacle, or plug a pedal-activated
instrument cord into the Universal Foot Pedal Port (UFP) portion of the Monopolar 1
receptacle (identified by a blue ring). A UFP adapter is required for UFP-instrument
connectors that have a plug diameter less than 4 mm.
3. Attach a FT6003 three-pedal foot pedal or standard foot pedal with 6-pin-to-4-pin
adapter 1017577 to the Monopolar 2 foot-pedal receptacle on the back panel.
Important
CUT and COAG foot-pedal activation is also available at this point for Force TriVerse™ instruments
controlled by a two-pedal foot pedal.
4. Plug the two-button pencil or a Force TriVerse instrument into the Monopolar 2
receptacle.
5. Select settings for the procedure.
6. Step on the appropriate pedal to deliver monopolar power.
4-6 Valleylab FT10 Energy Platform User’s Guide
Page 65

Return Electrodes – REM Contact Quality Monitoring System
Return Electrodes – REM Contact Quality
Monitoring System
Notice
Only contact-quality-monitoring-system patient return electrodes can be used with the
VLFT10GEN.
Patient Return Electrode Considerations
Warning
It is not possible to foresee what combination of current and duty cycle may be safely used in every
situation—for example, when higher currents and/or longer duty cycles are used on procedures
such as tissue lesioning, tissue ablation, tissue vaporization; and procedures where conductive fluid
is introduced into the surgical site. Under these conditions a greater risk may exist that the heating
under a fully applied return electrode may be high enough to injure the patient.
When using a Covidien energy platform or a patient return electrode during these types of surgical
procedures, the user should seek written guidance in the form of detailed user instructions from
the manufacturer of the active accessory regarding the currents and duty cycles that can be
expected. In some instances, the application of additional patient return electrodes may help
mitigate the increased risk.
During monopolar electrosurgery, a patient return electrode is always required to safely
recover the current that flows through the patient’s body and return it to the energy
platform. A reduction in surface area contact or poor conductivity between the patient
and the return electrode can cause the current to become concentrated, potentially
resulting in burns at the return-electrode site.
During a surgical procedure, the amount of current delivered in a given time determines
the amount of heating that occurs under the return electrode. REM Polyhesive patient
return electrodes are designed for use during conventional electrosurgical procedures and
duty cycles (on time compared to off time). Users should consult Chapter 10, Technical
Specifications for the recommended maximum duty cycle specifications.
How the REM System Works
The VLFT10GEN uses the REM contact-quality monitoring system to monitor the quality of
electrical contact between the patient return electrode and the patient. The REM system
is designed to reduce the risk of burns at the return electrode site. A non-REM return
electrode is not to be used with the VLFT10GEN.
Monopolar
The REM system continuously measures the resistance at the return electrode site and
compares it to a standard range of safe resistance (between 5 Ω and 135 Ω), thus
eliminating intermittent false alarms that could result from small changes in resistance.
The REM system also adapts to individual patients by measuring the initial contact
resistance between the patient and the patient return electrode and lowering the baseline
resistance if the contact resistance drops.
Valleylab FT10 Energy Platform User’s Guide 4-7
Page 66

Return Electrodes – REM Contact Quality Monitoring System
A REM alarm sounds and the system stops producing output power when either of the
following occurs:
• The measured resistance is below 5 Ω or above 135 Ω, the limits of the standard range
of safe resistance.
• An increase in contact resistance is greater than 40% from the baseline measurement.
Patient Return Electrode Setup
The REM icon appears on the main screen each time the FT10 system is
started. When the power-on self-test is complete, the icon remains if a
REM return electrode is not connected to the energy platform or
incorrectly attached to a patient. The icon is removed when the return
electrode is correctly attached to the system and patient.
1
2
REM icon
ཱ REM LED indicator
A REM indicator, located below the touchscreen also displays the status of the return
electrode by illuminating red when not connected or improperly applied to the patient.
The REM indicator illuminates green when the system senses that the patient return
electrode is properly connected to the energy platform and patient.
Warning
The safe use of monopolar electrosurgery requires proper placement of the patient return
electrode. To avoid electrosurgical burns beneath the patient return electrode, follow all directions
on the product package and the instructions for use for proper return electrode placement and use.
4-8 Valleylab FT10 Energy Platform User’s Guide
Page 67

Return Electrodes – REM Contact Quality Monitoring System
Warning
Do not cut a patient return electrode to reduce its size. Patient burns due to high-current density
may result.
1. Select a well vascularized, convex area in close proximity to the surgical site for
electrode application. Avoid scar tissue, bony prominences, excessive adipose tissue,
and areas where fluid may pool.
2. The patient return electrode site should be free of excessive hair. Remove hair from the
selected application site in accordance with the policies and procedures of your facility.
3. Clean and dry the application site as needed. The application site must be free of oils,
lotions, and other topically applied products to ensure secure contact between the
patient’s skin and the return electrode.
4. Remove the return electrode from its pouch.
5. Remove the liner from the electrode and apply it to the patient.
6. Turn on the generator and allow it to complete the self test.
7. Insert the return-electrode connector into the REM patient return electrode receptacle
on the front panel. See page 4-2 for the receptacle location.
Monopolar
Valleylab FT10 Energy Platform User’s Guide 4-9
Page 68

Monopolar Electrodes
REM Alarm (Visual and Audible)
If the REM system senses an alarm condition during the activation of an instrument, RF
power delivery stops. An error message is displayed on the touchscreen and two audible
warnings sound. The indicator below the screen illuminates red.
When the alarm condition has been corrected, the error message closes and the REM LED
illuminates green.
For instructions to correct REM alarms, refer to Chapter 8, Troubleshooting and the
troubleshooting flow chart in the REM Polyhesive patient return electrode instructions for
use.
Monopolar Electrodes
Connect a monopolar instrument to the Monopolar 1 or Monopolar 2 instrument
receptacle on the front of the energy platform. See the Covidien instrument’s instructions
for use for recommendations on which receptacle to use.
The Monopolar 1 UFP receptacle, identified by a blue ring, accepts connectors of various
sizes when coupled with the E05021 and E050212 UFP adapters. UFP connectors can vary
in diameter from 3 mm to 8 mm plugs. UFP plugs with diameters less than 4 mm require
an adapter to connect to the Monopolar 1 UFP receptacle.
If a two-button instrument is connected to the energy platform, proceed to the Standard
Monopolar Mode Functionality section that follows.
If a VALLEYLAB-mode enabled three-button instrument is connected to the energy
platform, proceed to VALLEYLAB Mode Functionality on page 4-12.
4-10 Valleylab FT10 Energy Platform User’s Guide
Page 69

Monopolar Electrodes
Standard Monopolar Mode Functionality
Monopolar settings can be selected for an instrument by three methods:
• User Input - Modes and power levels are selected before attaching the instrument.
• Automatic - Settings are selected by the system when an attached instrument is
identified. Most Automatic settings override Preset settings.
• Restore Settings - Using the Restore Settings button to reset the system to the
settings in use when the system was last powered down.
User Input Instrument Settings
Monopolar settings can be preset on the main screen of the energy platform before or
after inserting an instrument. The settings will be in effect when the instrument is attached
to the Monopolar 2 receptacle unless the FT10 detects an instrument type that includes
automatic settings.
1. Place the energy platform in the edit state (power on, no instrument attached).
2. Manually select a mode and power-output level for a monopolar instrument from the
touch screen.
3. Attach an instrument to the monopolar receptacle that corresponds to the edited
quadrant (left for Monopolar 1 and right for Monopolar 2). Inserting an instrument
into the Monopolar 1 receptacle will require additional force.
The pre-set settings are active for the attached instrument only if the instrument does
not include automatic settings.
Automatic Settings for a Recognized Instrument
Some Covidien instruments compatible with the FT10 have an identification that is
recognized by the system when attached to the Monopolar 2 receptacle. The energy
platform automatically sets the default mode and power level assigned to the instrument.
These settings are displayed on screen. Settings can be changed prior to activation.
Note: Inserting a monopolar instrument that is not recognized by the system will result in
the existing settings for a two-button pencil. If the settings have been manually changed
prior to insertion or the Restore Settings button was used, those settings remain in effect.
Monopolar
Valleylab FT10 Energy Platform User’s Guide 4-11
Page 70

Monopolar Electrodes
Monopolar Default Settings
Monopolar Instrument Default
Two-button Pencil
Force TriVerse
PURE CUT (CUT mode) and FULGURATE (COAG mode)
Power setting defaults to disabled (--)
PURE CUT, VALLEYLAB, COAG
Power setting is 1 power bar
CUT mode is on (enabled)
Restore to the Last Settings Used
Use the Restore button to enter the settings when the system was last powered down.
The Restore button can be used prior to and after insertion of the instrument.
1. Press the Restore button. A dialog box appears indicating the current settings will be
replaced with those from the last time the energy platform was powered down.
All quadrants are populated with previous settings for each.
2. Press OK to confirm the use of the last settings
Inserting an instrument highlights the corresponding quadrant.
VALLEYLAB Mode Functionality
Covidien instruments featuring the VALLEYLAB mode—a unique combination of
hemostasis and dissection—are specialty devices providing output control from the sterile
field. Some have a sliding power control on the instrument that enables direct adjustments
to power output during surgery.
These output modes, if available on the instrument, are selected at the handset with the
following buttons:
• The yellow CUT button enables a cutting function.
• The clear VALLEYLAB button enables a hemostasis function while providing dissection.
• The blue COAG button enables a coagulation function.
If available on the instrument, a dual slider control adjusts power output in all available
modes.
Note: Monopolar 1 does not support VALLEYLAB mode and Force TriVerse.
Note: When a Force TriVerse instrument is inserted, the screen changes from the default
two-button instrument display to the Force TriVerse edit state in which the screen
brightens and controls are highlighted.
4-12 Valleylab FT10 Energy Platform User’s Guide
Page 71

Monopolar Electrodes
When an instrument with VALLEYLAB-mode capability is attached to the Monopolar 2
receptacle, the energy platform detects the instrument type and changes the screen from
the default two-button to the corresponding screen.
Force TriVerse Screen
2
Power bar indicator
ཱ Slider position indicator
ི CUT mode ON/OFF switch
ཱི CUT mode power indicator (watts)
1
3
4
5
6
ུ VALLEYLAB mode power indicator (watts)
ཱུ COAG mode power indicator (watts)
Power Bars—The five power bars represent the range of power available for the
instrument attached to the energy platform receptacle. The system automatically identifies
the instrument and selects the default power-bar setting. The power bars represent power
available to the instrument and can be set independently from the slider bars indicated in
the slider-position indicator. Power bars can only be changed at the touchscreen interface
on the energy platform.
Note: Refer to the individual instrument instructions for power-bar output in watts.
ON/OFF Switch for CUT—Enable or disable CUT. CUT will not be available from the
yellow button on the instrument when disabled on the touchscreen.
Slider Position (if available on the instrument)—The energy platform detects the
position of the instrument’s slider switch, and the slider position indicator displays this
position. Slider position can only be changed by the instrument user in the sterile field.
Valleylab FT10 Energy Platform User’s Guide 4-13
Monopolar
Page 72

Monopolar Electrodes
Using a VALLEYLAB-Mode Instrument
1. Select the desired power level by touching the up and down arrows on the power-
The power-selecting slider, if available on the instrument, increases and decreases power output.
Verify the slider position prior to activation.
2. Activate power output by pressing the desired button on the instrument.
output mode. A brief double tone sounds. Power output is displayed in watts. The
power level cannot be changed during instrument activation.
Warning
• Activate the CUT mode by pressing the yellow button on the electrosurgical
instrument. The CUT display illuminates yellow and a tone sounds for the duration
of the activation.
Note: CUT mode is not available when disabled on the touchscreen with the ON/
OFF switch.
• Activate the VALLEYLAB mode by pressing the clear button on the electrosurgical
instrument. The VALLEYLAB display illuminates white and a tone sounds for the
duration of the activation. VALLEYLAB mode can also be activated with the middle
(white) pedal of the FT6003 Three-Pedal Footswitch.
• Activate the COAG mode by pressing the blue button on the electrosurgical
instrument. The COAG display illuminates blue and a tone sounds for the duration
of the activation.
3. If the instrument has a slider, the power output can be changed while in the sterile field
by adjusting the slider position on the electrosurgical instrument. A double tone will
sound when slider position is changed. Slider position cannot be changed while RF
energy is being delivered.
CUT Mode Disable (Force TriVerse only)
Power output can be disabled in the CUT mode using the ON/OFF switch.
1. Disable the CUT mode by touching the screen ON/OFF selector below CUT. The power
level is grayed out when disabled.
2. Enable the CUT mode by touching the ON/OFF switch below CUT on the screen. The
CUT box will display the power setting of the instrument slider position. The CUT mode
is also re-enabled when the energy platform is restarted.
4-14 Valleylab FT10 Energy Platform User’s Guide
Page 73

After Surgery
Disconnect the instruments
1. Turn off the energy platform.
2. Disconnect all instruments from the front panel.
3. Dispose of the instrument according to the procedures for your institution.
4. Disconnect and store any foot pedals used.
5. Disconnect the power plug from the wall receptacle by pulling the plug, not the cable.
After Surgery
Valleylab FT10 Energy Platform User’s Guide 4-15
Monopolar
Page 74

Page 75

Chapter 5
Bipolar
This chapter describes the Bipolar function of the VLFT10GEN.
Precaution
Read the instructions, warnings, and precautions provided with this energy platform and
associated accessories before using. Specific instructions for electrosurgical instruments are not
included in this manual.
Valleylab FT10 Energy Platform User’s Guide 5-1
Page 76

Front Panel Bipolar Features
Front Panel Bipolar Features
FT10
1
3
Bipolar receptacle
ཱ Bipolar touchscreen quadrant
ི Bipolar settings button
2
5-2 Valleylab FT10 Energy Platform User’s Guide
Page 77

Rear Panel Bipolar Features
Rear Panel Bipolar Features
Monopolar 2 Monopolar 1
Monopolar1Monopolar
2
Bipolar foot-pedal receptacle
ཱ Power cord receptacle
Bipolar
Bipolar
1
Warning: Risk of Fire.
Replace Fuse as Marked
250V, F10.0A (100-127Vac)
250V, F6.3A (220-240Vac)
Avertissement: Risque du feu.
Remplacez les fusibles
comme marqués.
250V, F10.0A (100-127Vac)
250V, F6.3A (220-240Vac)
2
Bipolar Quick Setup Instructions
If you are familiar with the VLFT10GEN, follow this abbreviated procedure to set up the
system for bipolar surgery.
If you are not familiar with the VLFT10GEN, refer to the following sections in this chapter
for detailed instructions.
1. Plug the system power cord into the rear panel receptacle.
2. Plug the system power cord into a grounded wall receptacle.
Important
Do not plug the system power cord into a power strip or extension cord.
3. Turn on the system and verify that the power-on self-test successfully completes.
4. If using a foot pedal, connect it to the Bipolar foot-pedal receptacle on the rear panel.
Warning
Use only Covidien foot pedals. Use of other manufacturer’s foot pedals is not recommended;
unexpected output may occur.
5. Connect the instrument to the Bipolar instrument receptacle on the front panel.
6. Verify or change the mode and power settings.
Valleylab FT10 Energy Platform User’s Guide 5-3
Page 78

Bipolar Function Overview
Bipolar Function Overview
Delicate tissue requires less energy to desiccate. The VLFT10GEN provides low-voltage,
continuous current for faster dessication without sparking.
The possibility of sparking increases as desiccated tissue becomes more resistant to energy
flow. The system protects against sparking by limiting the bipolar voltage at relatively high
levels of tissue impedance.
Bipolar Power Output Modes
The VLFT10GEN produces one Bipolar mode with three possible effects: LOW (1-15 watts),
MEDIUM (15–40 watts), and HIGH (45-95 watts).
Warning
Electric Shock Hazard
• Do not connect wet instruments to the energy platform.
• Ensure that all instruments and adapters are correctly connected and that no metal is exposed
at any connection point.
Connect instruments to the proper receptacle. Improper connection may result in inadvertent
instrument activation or other potentially hazardous conditions. Follow the instructions provided
with electrosurgical instruments for proper connection and use.
The instrument receptacles on this system are designed to accept only one instrument at a time.
Precaution
Read the instructions, warnings, and precautions provided with electrosurgical instruments before
use. Specific instructions are not included in this manual.
Inspect instruments and cords—especially for laparoscopic/endoscopic instruments—for breaks,
cracks, nicks, and other damage before every use. If damaged, do not use. Damaged instruments
or cords may result in injury or electrical shock to the patient or surgical team.
Bipolar Default Settings
Output Default
Bipolar • LOW effect
• Power—disabled (--)
• Ammeter—off
5-4 Valleylab FT10 Energy Platform User’s Guide
Page 79

Foot Pedal
Foot Pedal
The VLFT10GEN in Bipolar mode can accommodate a three-pin, single-pedal bipolar foot
pedal.
If pedal activation is to be used with a bipolar instrument, attach the bipolar foot-pedal
connector to the Bipolar foot-pedal receptacle on the rear panel.
Warning
Use only Covidien foot pedals. Use of other manufacturer’s foot pedals is not recommended;
unexpected output may occur.
Virtual Ammeter
The virtual ammeter on the bipolar quadrant displays the current delivered during bipolarinstrument activation. The ammeter registers current between 1 and 1,000 milliamps. An
audio tone sounds to indicate increases and decreases in current delivery.
Setting the Ammeter
To setup the ammeter to display during Bipolar procedures:
1. Access Bipolar settings by touching the settings button in the Bipolar quadrant. The
Bipolar Settings window appears with the ammeter default setting OFF.
Bipolar
Valleylab FT10 Energy Platform User’s Guide 5-5
Page 80

Auto Bipolar Function
2. Touch the ammeter ON/OFF switch to enable the visual ammeter and audio ammeter
tones for Bipolar procedures.
3. Touch OK to close the ammeter settings window and retain any changes. The visual
ammeter is added to the Bipolar screen and the audio and visual feedback is in use
during Bipolar activation.
Ammeter settings are retained in the Bipolar quadrant until the system is powered
down.
Auto Bipolar Function
The VLFT10GEN is equipped with an Auto Bipolar feature that configures the system for
automatic activation and cessation of bipolar energy.
Auto Bipolar must be enabled in the feature menu before the Auto Bipolar function can
be used as the default setting is OFF.
5-6 Valleylab FT10 Energy Platform User’s Guide
Page 81

Auto Bipolar Function
Enable/Disable Auto Bipolar
1. Access Bipolar settings by touching the settings button in the Bipolar quadrant. The
Bipolar settings appear with the default Auto Bipolar setting OFF
2. Touch the AUTO ON/OFF switch.
3. A confirmation screen appears over the Bipolar quadrant. Touch Yes to enable, or No
to reject.
When confirmed, the Bipolar settings reappear with Auto Bipolar set to ON.
Important
When Auto Bipolar is turned ON, the ammeter setting option disappears. If the ammeter was ON
before, it will automatically be turned OFF.
4. Set the Auto Bipolar activation delay and touch OK. The Bipolar quadrant shows the
Auto Bipolar symbol and the delay time (if greater than 0 seconds) to indicate that
Auto Bipolar is ON.
Bipolar
Auto Bipolar Activation Impedance
The impedance of the tissue grasped by the bipolar device must be within a factory-set
range of up to 2200 Ω to activate. If impedance during activation increases to greater than
4000 Ω, RF energy will deactivate. The activation impedance range is a safety feature that
prevents power delivery if the grasped tissue is not within the anticipated range.
Tissues such as scar tissue, moles, and others with low blood flow are likely to have
impedance greater than 2200 Ω. While grasping high-impedance tissue, the Valleylab
FT10 will not activate regardless of customer-set preferences.
Valleylab FT10 Energy Platform User’s Guide 5-7
Page 82

Auto Bipolar Function
Use of different Covidien cord models or cords from other manufacturers may not achieve proper
electrical output for this device, thereby failing to produce the desired clinical effect. For example,
Auto Bipolar activation/deactivation settings may not work properly using cords other than those
specified by Covidien.
Setting the Auto Bipolar Activation Delay
Specify a delay between the instrument’s initial contact with tissue and delivery of bipolar
energy.
1. When Auto Bipolar is ON, access the activation delay settings by touching the settings
2. Use the up or down arrows to set the activation delay time (in seconds). Delay
Warning
button in the Bipolar quadrant
selections are 0.0 (default), 0.5, 1.0, 1.5, 2.0, and 2.5 sec.
3. Touch OK to close the window and save the delay setting. If the delay selected is
greater than 0.0 seconds, the delay time will be displayed in the bipolar quadrant.
Precaution
Do not use the FT0501 ForceTriad Bipolar Adapter with Auto Bipolar on the VLFT10GEN.
Important
The tines of the bipolar instrument must be removed from the tissue between each Auto Bipolar
activation.
5-8 Valleylab FT10 Energy Platform User’s Guide
Page 83

Shutting Down Bipolar Functions
Shutting Down Bipolar Functions
The Auto Bipolar settings can be exited quickly to change non-setting controls in response
to the surgeon’s needs. Any of the following actions closes the window and reopens it
with the last saved settings.
• Touch the screen outside the settings window
• Activate RF energy by an instrument
• Select Cancel
• Select a system control
• Time out after 10 seconds
• Activate any mode
• Connect a bipolar instrument
• Remove a bipolar instrument
When an instrument is unplugged from the Bipolar receptacle, the display reverts to the
last set values.
After Surgery
Bipolar
Disconnect the instruments
1. Turn off the energy platform.
2. Disconnect all instruments from the front panel.
3. Dispose of the instrument according to the procedures for your institution.
4. Disconnect and store any foot pedals used.
5. Disconnect the power plug from the wall receptacle by pulling the plug, not the cable.
Valleylab FT10 Energy Platform User’s Guide 5-9
Page 84

Page 85

Chapter 6
LigaSure
This chapter describes how to set up and operate the LigaSure tissue-fusion
function of the VLFT10GEN.
Precaution
Read the instructions, warnings, and precautions provided with this energy platform and
associated accessories before using. Specific instructions for electrosurgical instruments are not
included in this manual.
Valleylab FT10 Energy Platform User’s Guide 6-1
Page 86

Front Panel LigaSure Features
Front Panel LigaSure Features
3
FT10
1
4
2
LigaSure quadrant
ཱ LigaSure/Bipolar receptacle
ི Monopolar 2 quadrant (for LigaSure dual-plug instruments)
ཱི Monopolar 2 receptacle (for LigaSure dual-plug instruments)
Rear Panel LigaSure Features
1
Monopolar 2 Monopolar 1
Bipolar
Warning: Risk of Fire.
Replace Fuse as Marked
250V, F10.0A (100-127Vac)
250V, F6.3A (220-240Vac)
Monopolar1Monopolar
2
Avertissement: Risque du feu.
Remplacez les fusibles
comme marqués.
250V, F10.0A (100-127Vac)
250V, F6.3A (220-240Vac)
2
LigaSure/Bipolar foot-pedal receptacle
ཱ Power cord receptacle
6-2 Valleylab FT10 Energy Platform User’s Guide
Page 87

LigaSure Quick Setup Instructions
LigaSure Quick Setup Instructions
If you are familiar with the VLFT10GEN, follow this abbreviated procedure to setup the
system for LigaSure tissue fusion.
The following instructions are for a single-plug instrument, which covers most LigaSure
devices. For devices that have two plugs and provide both LigaSure and monopolar
functionality, see Connecting Dual-Plug LigaSure Instruments on page 6-8.
If you are not familiar with the VLFT10GEN, refer to the following sections in this chapter
for detailed instructions.
1. Plug the system power cord into the rear panel receptacle.
2. Plug the system power cord into a grounded wall receptacle.
Important
Do not plug the system power cord into a power strip or extension cord.
LigaSure
3. Turn on the system and verify that the power-on self-test has successfully completed.
4. If using a foot pedal, connect it to the LigaSure/Bipolar foot-pedal receptacle on the
rear panel.
5. Connect the instrument to the LigaSure/Bipolar instrument receptacle on the front
panel.
Valleylab FT10 Energy Platform User’s Guide 6-3
Page 88

LigaSure Function Overview
LigaSure Function Overview
LigaSure tissue fusion can be used on arteries, veins, and lymphatics, up to and including,
7 mm in diameter and tissue bundles. This system provides precise energy delivery and
electrode pressure to tissues for a controlled time period to achieve a complete and
permanent fusion of tissues and vessel lumens. The system has been designed to produce
minimal sticking, charring, or thermal spread to adjacent tissue.
There are no editable parameters in the LigaSure quadrant.
During instrument activation, the progress wheel in the LigaSure display control panel
illuminates, and a tone sounds for the duration of energy delivery.
Some instruments cause the hand-activation ON/OFF switch to appear on the control
panel when the instrument is recognized.
Important
If using an instrument that causes the hand-activation button to appear on the LigaSure control
panel, see Hand-Activation ON/OFF Switch on page 6-9.
6-4 Valleylab FT10 Energy Platform User’s Guide
Page 89

LigaSure Default Settings
Output or Instrument Default
LigaSure Handswitching—enabled (On)
LF5544 Pistol Grip • MONOPOLAR mode—VALLEYLAB
– 15 W
LF5637 and LF5644 • MONOPOLAR mode—VALLEYLAB
• Monopolar power
LigaSure Function Overview
– CUT—15 W
– VALLEYLAB—15 W
– COAG—15 W
LigaSure/Bipolar Receptacle
The LigaSure/Bipolar receptacle is located adjacent to the lower-right quadrant of the
screen. This receptacle accepts LigaSure instruments and can read bar codes on the RFID
chip or the LigaSure connector.
Warning
Electric Shock Hazard
• Do not connect wet instruments to the energy platform.
• Ensure that all instruments are correctly connected and that no metal is exposed at any
connection point.
Connect instruments to the proper receptacle. Improper connection may result in inadvertent
instrument activation or other potentially hazardous conditions. Follow the instructions provided
with LigaSure instruments for proper connection and use.
Each instrument receptacle on the energy platform is designed to accept only one instrument at a
time. Follow the instructions provided with electrosurgical instruments for proper connection and
use.
LigaSure
Precaution
Read the instructions, warnings, and precautions provided with LigaSure instruments before use.
Specific instructions are not included in this manual.
Inspect instruments and cords—especially for laparoscopic/endoscopic instruments—for breaks,
cracks, nicks, and other damage before every use. If damaged, do not use. Damaged instruments
or cords may result in injury or electrical shock to the patient or surgical team.
Valleylab FT10 Energy Platform User’s Guide 6-5
Page 90

LigaSure Instruments
Foot Pedal
A single-pedal LigaSure foot pedal can be used when the energy platform is using the
LigaSure quadrant.
LigaSure Instruments
Reusable-Instrument Assembly
To prepare the reusable LigaSure instruments for use in a procedure, refer to the following
steps for the general preparation. To find detailed directions for each instrument, refer to
the individual instrument instructions that accompany the instrument electrode.
1. Slip the base of the disposable electrode’s white shaft onto the retaining post on the
instrument ring handle.
2. Attach the body of the electrode shaft to the instrument handle. The white shaft of
the electrode must be completely flush with the reusable-instrument shaft.
3. Attach each electrode to the appropriate instrument jaw, matching electrode curvature
to jaw curvature. Insert the proximal pin first. Verify that there is no gap between the
electrode and the instrument jaw.
Important
Bent or broken electrode pins will not function properly and may result in an alert situation. In this
case, the electrode must be discarded.
4. Gently rachet the instrument closed on a folded 4"x 4" gauze pad to ensure the
electrodes are properly seated in the instrument jaws.
Connecting LigaSure Instruments to the Energy Platform
Connect the LigaSure instrument’s purple connector to the LigaSure/Bipolar receptacle on
the front panel of the VLFT10GEN. The system detects and sets the appropriate settings.
Other than the handswitching ON/OFF switch, there are no editable settings in the
LigaSure quadrant.
6-6 Valleylab FT10 Energy Platform User’s Guide
Page 91
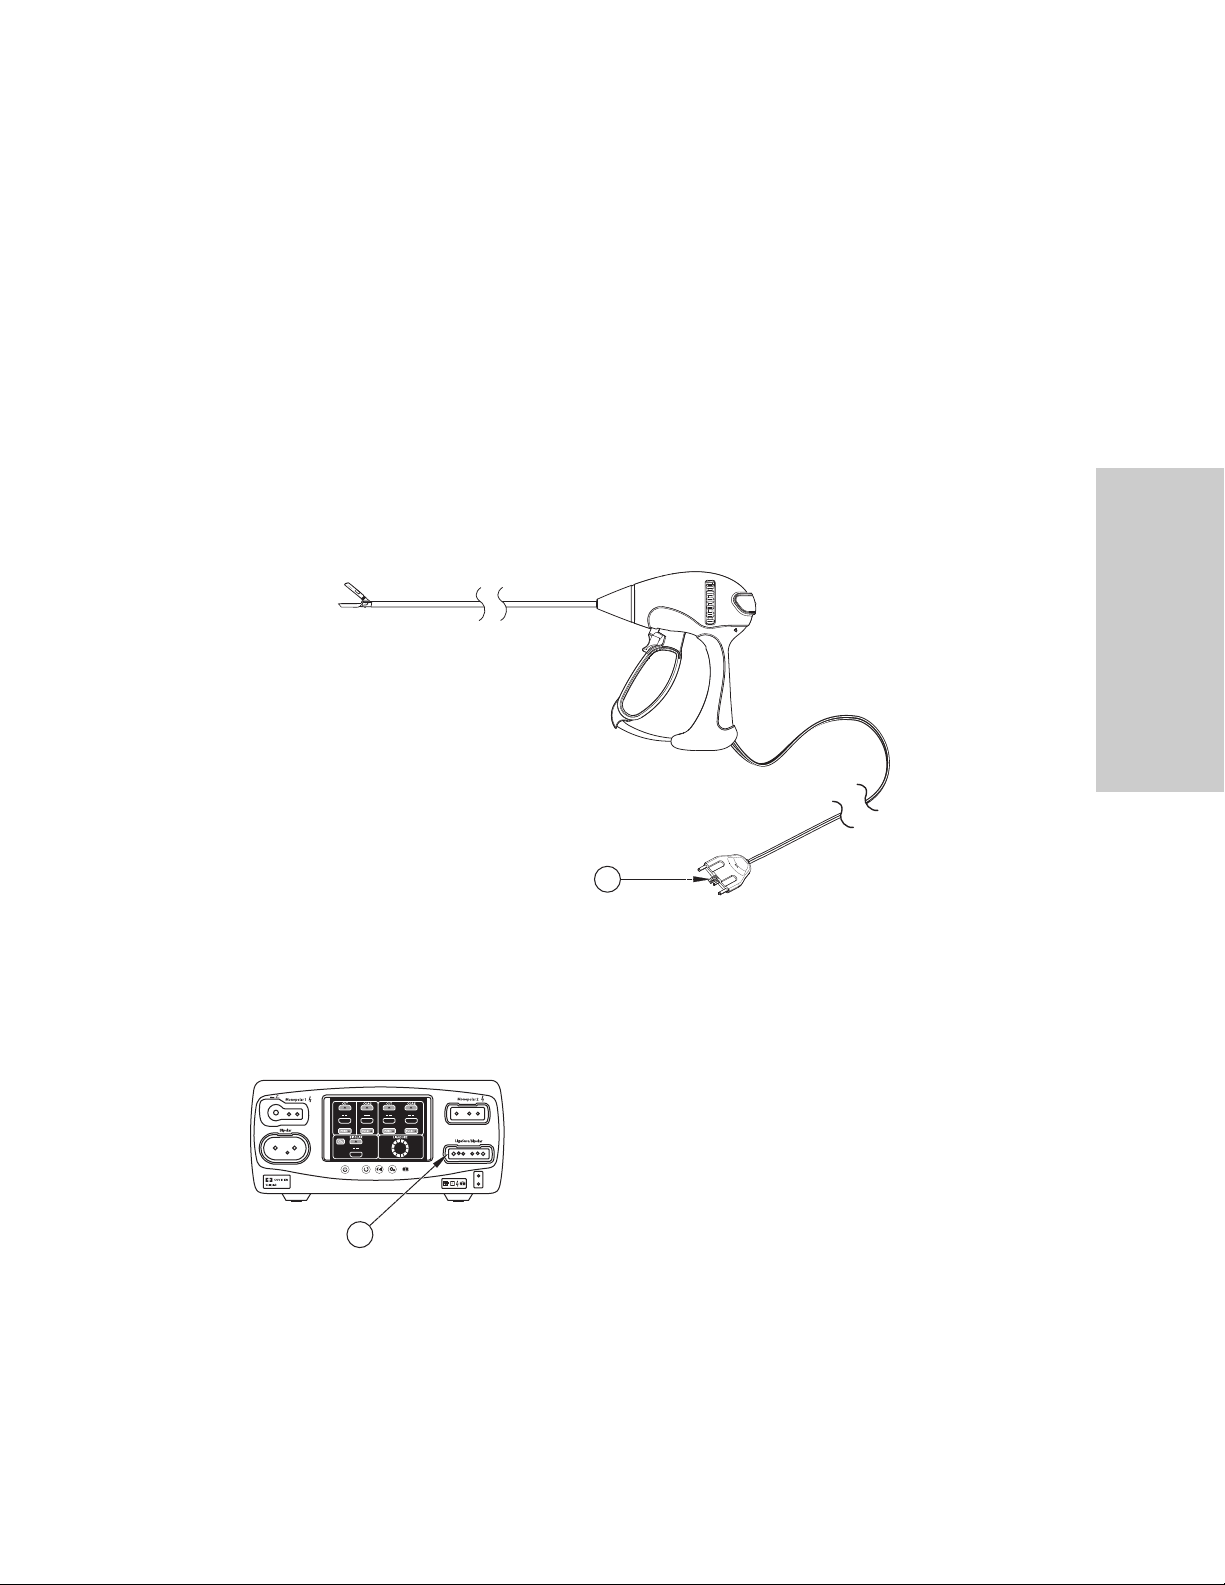
If applicable, refer to the following sections:
• Hand-Activation ON/OFF Switch on page 6-9
• Invalid Instrument on page 6-9
Connecting Single-Plug LigaSure Instruments
There are multiple instrument designs, but the general LigaSure-instrument connection
process is the same for LigaSure instruments with a single purple LigaSure connector. For
devices that have two plugs and provide both LigaSure and monopolar functionality, see
Connecting Dual-Plug LigaSure Instruments on page 6-8.
Setup for LigaSure Instruments with a Single Connector
LigaSure Instruments
LigaSure
1
LigaSure purple connector
Setup
1. With the bar code on the purple connector (1) facing up, firmly insert it into the
LigaSure/Bipolar receptacle (2) on the energy platform front panel.
FT10
2
ཱ LigaSure/Bipolar receptacle
2. The energy platform detects the instrument type and selects the intensity setting. The
settings cannot be changed.
Valleylab FT10 Energy Platform User’s Guide 6-7
Page 92

LigaSure Instruments
Connecting Dual-Plug LigaSure Instruments
6
5
7
4
2
3
1
LigaSure connector (purple)
ཱ LigaSure/Bipolar instrument receptacle
ི Monopolar connector (blue)
ཱི Monopolar 2 instrument receptacle
ུ LigaSure touchscreen quadrant
ཱུ Monopolar 2 touchscreen quadrant
ྲྀ REM patient return electrode
Setup
1. With the bar code on the purple LigaSure connector (1) facing up, firmly insert it into
the LigaSure/Bipolar receptacle (2) next to the LigaSure touchscreen quadrant (5).
2. With the bar code on the blue Monopolar connector (3) facing up, firmly insert it into
the Monopolar 2 receptacle (4) next to the Monopolar 2 quadrant (6).
The energy platform reads the information from the two connectors and sets the
power output accordingly:
• LigaSure – Power output is selected automatically and cannot be changed from
the LigaSure touchscreen.
• Monopolar – Power output is set to the default values and can be edited in the
Monopolar 2 quadrant.
.
6-8 Valleylab FT10 Energy Platform User’s Guide
Page 93

Hand-Activation ON/OFF Switch
Some LigaSure instruments cause the hand-activation icon to appear in the lower left
corner of the LigaSure control panel. The hand-activation switch toggles between the ON
and OFF setting.
For example, the LF1212 Curved, Small Jaw, Open Sealer/Divider, is a LigaSure instrument
that can be used with hand-activation on or off. When hand-activation is off, a foot pedal
is used to initiate energy delivery.
1
LigaSure Instruments
LigaSure
Hand activation enabled
In this example, the enabled hand activation appears in the lower-left corner of the
LigaSure quadrant. Touching the ON/OFF switch turns off the hand activation, requiring
the use of a foot pedal.
Invalid Instrument
If the VLFT10GEN does not recognize the attached instrument, a pop-up will display the
words “INVALID INSTRUMENT.” Refer to the following steps to resolve the issue.
1. Confirm that a LigaSure instrument is in use.
2. Reconnect the instrument using firm pressure to insert the instrument into the
LigaSure/Bipolar instrument receptacle.
3. If “INVALID INSTRUMENT” continues to appear in the status bar, use a new LigaSure
instrument or electrode.
Valleylab FT10 Energy Platform User’s Guide 6-9
Page 94

Activating the LigaSure Instrument
Activating the LigaSure Instrument
1. Fully grasp the target tissue in accordance with the LigaSure instrument’s IFU.
2. Activate the LigaSure instrument either by pressing and holding the activation button
on the instrument or by depressing the foot pedal. During instrument activation, the
LigaSure quadrant of the display illuminates purple and rotates clockwise, and an
activation tone sounds for the duration of energy delivery.
3. When the end tone sounds, release the activation button or foot pedal. In the case of
an alert condition, refer to the following section.
4. Inspect the vessel or tissue prior to cutting by releasing the tissue from between the
instrument jaws.
Alert Situations
A four-pulsed tone will sound when an alert condition occurs, and the LigaSure quadrant
will display an alert message with a list of corrective actions. When an alert condition
occurs, energy delivery is interrupted, but is available immediately after correcting the alert
condition.
Incomplete Seal Cycle - Interrupted
The seal cycle was interrupted before completion. The handswitch or foot pedal was
released before the end tone activated.
If this message appears the user should
1. Release the foot pedal or handswitch button.
2. Open the instrument jaws and inspect for a successful seal.
3. If the seal is incomplete, regrasp the tissue (with the jaws in the same position or
overlapping the first seal, if possible).
4. Reactivate the seal cycle.
6-10 Valleylab FT10 Energy Platform User’s Guide
Page 95

Activating the LigaSure Instrument
Incomplete Seal Cycle - Short
The generator detected a short circuit between the LigaSure jaws—possibly due to contact
with a metal object or excess fluid around the surgical site.
If this message appears the user should
1. Release the foot pedal or handswitch button.
2. Check for metal clips or staples.
3. Reposition the instrument to avoid contact with metal.
4. Remove excess fluids from the surgical site.
5. Reactivate the seal cycle.
Incomplete Seal Cycle - Open Circuit
The LigaSure jaws were not fully closed or the grasped tissue was too thin.
If this message appears, the user should
LigaSure
1. Release the foot pedal or activation button.
2. Open the instrument jaws and inspect for a successful seal.
3. Clean and dry the LigaSure jaws.
4. If possible, regrasp thicker tissue.
5. Fully close the instrument jaws.
6. Reactivate the seal cycle.
Valleylab FT10 Energy Platform User’s Guide 6-11
Page 96

After Surgery
Incomplete Seal Cycle - Time Out
Additional time and energy are needed to complete the seal cycle.
If this message appears, the user should
1. Release the foot pedal or activation button.
2. Open the instrument jaws and inspect for a successful seal.
3. Remove excess fluids from the surgical site.
4. Clean and dry the LigaSure jaws.
5. Regrasp the tissue.
6. Reactivate the seal cycle.
After Surgery
Disconnect the instruments
1. Turn off the energy platform.
2. Disconnect all instrument cords from the front panel.
• If the instrument is single-use only (disposable), dispose of it according to the
procedures for your institution.
• If the instrument is reusable, clean and sterilize it according to the manufacturer’s
instructions for use.
3. Disconnect and clean the foot pedal (if used) according to the instructions for use.
4. Disconnect the power plug from the wall receptacle by pulling the plug, not the cable.
6-12 Valleylab FT10 Energy Platform User’s Guide
Page 97

Chapter 7
Bipolar Resection
This chapter describes how to set up and operate the Bipolar Resection application on the
energy platform.
For information about setting up and using the Bipolar Resection application, refer to
these documents:
• This chapter.
• ForceTriad Bipolar Resection Footswitch Instructions for Use (FT6009) - Instructions for
the only foot pedal that supports Bipolar Resection mode.
• ForceTriad Bipolar Resection Cord Instructions for Use (FT0021S or FT0022W) -
Instructions for the two types of cords supported for use with supported Bipolar
Resection instruments. Also contains a list of supported Bipolar Resection instruments.
Precaution
Read the instructions, warnings, and precautions provided with this energy platform and
associated accessories before using. Specific instructions for electrosurgical instruments are not
included in this manual.
Valleylab FT10 Energy Platform User’s Guide 7-1
Page 98

Front Panel Bipolar Resection Features
Front Panel Bipolar Resection Features
FT10
21
LigaSure/Bipolar receptacle
ཱ Bipolar Resection quadrant (appears upon insertion of Bipolar Resection instrument)
Rear Panel Bipolar Resection Features
1
Monopolar 2 Monopolar 1
Bipolar
Warning: Risk of Fire.
Replace Fuse as Marked
250V, F10.0A (100-127Vac)
250V, F6.3A (220-240Vac)
Monopolar1Monopolar
2
Avertissement: Risque du feu.
Remplacez les fusibles
comme marqués.
250V, F10.0A (100-127Vac)
250V, F6.3A (220-240Vac)
2
LigaSure/Bipolar foot-pedal receptacle
ཱ Power cord receptacle
7-2 Valleylab FT10 Energy Platform User’s Guide
Page 99

Bipolar Resection Function Overview
Bipolar Resection Function Overview
Certain urology and gynecology procedures use resection electrodes in a saline
environment requiring high bipolar-power outputs to obtain resection and hemostasis
performance.
Bipolar Resection function provides two different effect modes:
• CUT effect for resection, activated by the yellow (left) foot pedal
• COAG effect for desiccation, activated by the blue (right) foot pedal
When a compatible Bipolar Resection cord is plugged into the LigaSure/Bipolar receptacle
on the front panel, the Bipolar Resection screen appears in the LigaSure quadrant.
The Bipolar Resection screen has controls for both CUT and COAG modes. The effect
setting may be adjusted for either mode from 1 to 6—1 being the minimum effect for the
selected mode. During instrument activation, the Bipolar Resection screen illuminates
brightly as yellow for CUT and blue for COAG. A tone sounds for the duration of energy
delivery.
LigaSure/Bipolar Receptacle
The LigaSure/Bipolar receptacle accepts both LigaSure and Bipolar Resection instruments.
The connector recognizes codes from an instrument’s RFID chip or bar codes printed on
the connector.
Bipolar Resection
Valleylab FT10 Energy Platform User’s Guide 7-3
Page 100

Bipolar Resection Function Overview
Bipolar Resection Default Settings
Output or Instrument Default
Bipolar Resection • CUT effect—1
Warning
Electric Shock Hazard
• Do not connect wet instruments to the energy platform.
• Ensure that all instruments are correctly connected and that no metal is exposed at any
connection point.
Connect instruments to the proper receptacle. Improper connection may result in inadvertent
instrument activation or other potentially hazardous conditions. Follow the instructions provided
with Bipolar Resection instruments for proper connection and use.
• COAG effect—1
The instrument receptacles on this system are designed to accept only one instrument at a time.
Precaution
Read the instructions, warnings, and precautions provided with Bipolar Resection instruments
before use. Instrument instructions are not included in this manual.
Inspect instruments and cords—especially for laparoscopic/endoscopic instruments—for breaks,
cracks, nicks, and other damage before every use. If damaged, do not use. Damaged instruments
or cords may result in injury or electrical shock to the patient or surgical team.
7-4 Valleylab FT10 Energy Platform User’s Guide
 Loading...