


MANISWISS CORDLESS
GB
Translation from original instructions
4
D
Übersetzung der Originalanweisungen
7
F
Traductions à partir des instructions d'origine
10
I
Istruzioni originali
13
E
Traducción de las instrucciones originales
16
NL
Vertaling van de originele instructies
19
PT
Tradução das instruções originais
22
FI
Alkuperäisen käyttöohjeen käännös
25
HU
Az eredeti utasítások fordítása
28
CS
Překlad originálních pokynů
31
RO
Traducerea instrucţiunilor originale
34
PL
Tłumaczenie oryginalnej instrukcji
37
HR
Prijevodi po originalnim uputama
40
SLO
Prevod izvirnih navodil
43
GR
μεταφράσεις από τις αρχικές οδηγίες
46
TR
Orijinal talimatların çevirisi
49
UK
Переклад з оригінальних інструкцій
52
RU
Перевод с оригинальных инструкций
55
SA
58
ZH
翻译自原文说明
61
IR
66
00060557-07/13
INSTRUCTIONS FOR USE
BEDIENUNGSANLEITUNG
MODE D’EMPLOI
ISTRUZIONI PER L’USO
MODO DE EMPLEO
GEBRUIKSAANWIJZING
INSTRUÇÕES DE FUNCIONAMENTO
VAROITUKSET
HASZANÁLATI UTASÍTÁS
NÁVOD K POUŽITÍ
INSTRUCŢIUNI DE FOLOSIRE
UPUTE ZA UPORABU
NAVODILA ZA UPORABO
KULLANMA TALIMATI
Distributed by Ligo Electric SA - 6853 Ligornetto - Switzerland
Valera is a registered trademark of Ligo Electric S.A. - Switzerland
ManiSwiss Professional Set
Mod. 651.01
Mod. 651.02
ManiSwiss Cordless Set
Èqf§{ ÉZ¼ÀÅY°̿Z» d/Y·YÁ °Ë|a
Guarantee card
Garantiekarte
Carte de garantie
Certificato di garanzia
Tarjeta de garantià
Garantiekarte
Certificado de garantia
Takuutodistus
Certificat de garanţie
Záruční list
Garancialevél
Karta Gwarancyijna
Garancijska karta
Garancijski list
Garanti sertificası
Stamp and signature of delear
Stempel und Unterschrift des Händlers
Cachet et signature du commerçant
Timbro e firma del rivenditore
Sello y firma del proveedor
Stempel en handtekening van de handelaar
Carimbo e firma do revendedor
Myyjän leima ja allekirjoitus
Eladó pecsétje és aláírása
razítko a podpis prodejce
Tampila i semnãtura vãnzãtorului
Pieczeç i podpis sprzedawcyù
Pečat I potpis distributera
Žigin podpis prodajalca
Satıcının mühür ve imzası
ΖϧΎϤο ϪϣΎϧ
ϩΎηϭήϓ ϱΎπϣ ϭ ήϬϣ
ϪϓήΣ ϧίϮϣ ϦϴηΎϣ ϪϋϮϤΠϣ
ΔϴϠλϷ ΕΎϤϴϠόΘϟ Ϧϣ ΔϤΟήΗ
Ligo Electric SA - 6853 Ligornetto - Switzerland
1 3
2 4
6
7
8
9
10
13
17
14
16
15
18
19
20
21
22
7
5
11
12
5
651.01
651.02
23
1
651.01
651.01
23
45
Mod. Nr.
Date of purchase
Kaufdatum
Date d’achat
Data d’acquisto
Fecha de adquisición
Datum aankoop
Data de compra
Ostopäivämäärä
Eladás dátuma
Datum prodeje
Data cumpãrãrii
Data zakupu
Datum kupnje
Datum nakupa
Satın alma tarihi
Name and full address of purchaser
Name und vollständige Anschrift des Käufers
Nom et adresse completè de l’acheteur
Nome e indirizzo completo dell’acquirente
Nombre y dirección completa del comprador
Naam en adres van de consument
Nome e endereço do cliente
Ostajan nimi ja täydellinen osoite
Vevo˝ neve éstelies cime
Jméno a adresa záhaznika
Numele i adresa completa˘ a compãrãtorului
Nazwisko oraz pelny adres kupuj
ą
cego
Ime i adresa kupca
Ime in naslov kupca
Alıcının tam ismi ve adresi
έΪϳήΧ ϞϣΎϛ ϲϧΎθϧ ϭ ϡΎϧ
ΪϳήΧ ΦϳέΎΗ
OPERATING INSTRUCTIONS
Read these operating carefully and keep them safe for future reference. They contain important information on the safe and
correct use of your appliance.
Available also on www.valera.com
WARNINGS
•Important: In order to guarantee additional protection, it is
recommended that a differential breaker with an intervention
current not greater than 30 mA is installed in the electrical system
which feeds the device. For further information, contact a qualified
electrician.
•Make sure the unit is perfectly dry before using it.
•WARNING: Do not use this appliance near bathtubs, shower,
basins or other vessels containing water.
•This appliance can be used by children of 8 years and over, and
by persons with limited physical, sensory or mental abilities or
who lack the relevant experience and knowledge, if they are
suitably supervised or have been instructed in safe appliance use
and made aware of the associated risks.
•Do not allow children to play with the appliance.
•Children must not perform cleaning and maintenance procedures
unless supervised.
•When the appliance is used in a bathroom, unplug it after use
since the proximity of water presents a hazard even when the
appliance is switched off.
•If the supply cord is damaged, it must be replaced by the
manufacturer, its service agent or a similarly qualified person in
order to avoid a hazard.
•Only connect the appliance to an AC mains supply. Make sure that the mains voltage corresponds to that specified on the
appliance itself.
•Never immerse the appliance in water or any other liquid.
•Do not place the appliance where it could fall into water or any other liquid.
•Never attempt to retrieve an appliance that has fallen into water. Pull the plug out of the mains power socket first.
•Always switch the appliance off after use, and pull the plug out of the mains socket. Do not pull the plug out of the socket by
pulling on the cable, and never remove the plug with wet hands.
•Do not wind the mains cable around the appliance. Periodically check the appliance for damage.
•Always unwind the cable to its full length before using the appliance, in order to avoid the cable overheating.
• If the supply cord is damaged, it must be replaced by the manufacturer, its service agent or a similarly qualified person in order
to avoid a hazard.
• Do not leave packaging materials (plastic bags, cardboard box, etc.) within the reach of children since they represent a potential
hazard.
•This appliance is designed exclusively for manicure and pedicure. All other uses are considered improper and are potentially
dangerous. The manufacturer cannot be held responsible for damage or injury deriving from improper or incorrect use
English
4
•The appliance comes equipped with a NiMH battery. To
safeguard the environment, do not dispose of the battery
along with household refuse, but deliver it to a disposal point
for batteries.
•Have the battery removed by qualified technical personnel
or by the treatment and recycling centre.
•Do not expose the battery to liquid, moisture or high
humidity.
• Keep the battery away from magnetic fields, sources of heat
and naked flames.
• Risk of cuts and abrasions. Do not use a damaged appliance.
Replace it immediately.
•Consult your doctor before using the appliance if you are a
pacemaker user
•Do not use the appliance on wounded, irritated or diseased
skin
Important!
•Clean and disinfect all accessories after use.
OPERATING INSTRUCTION
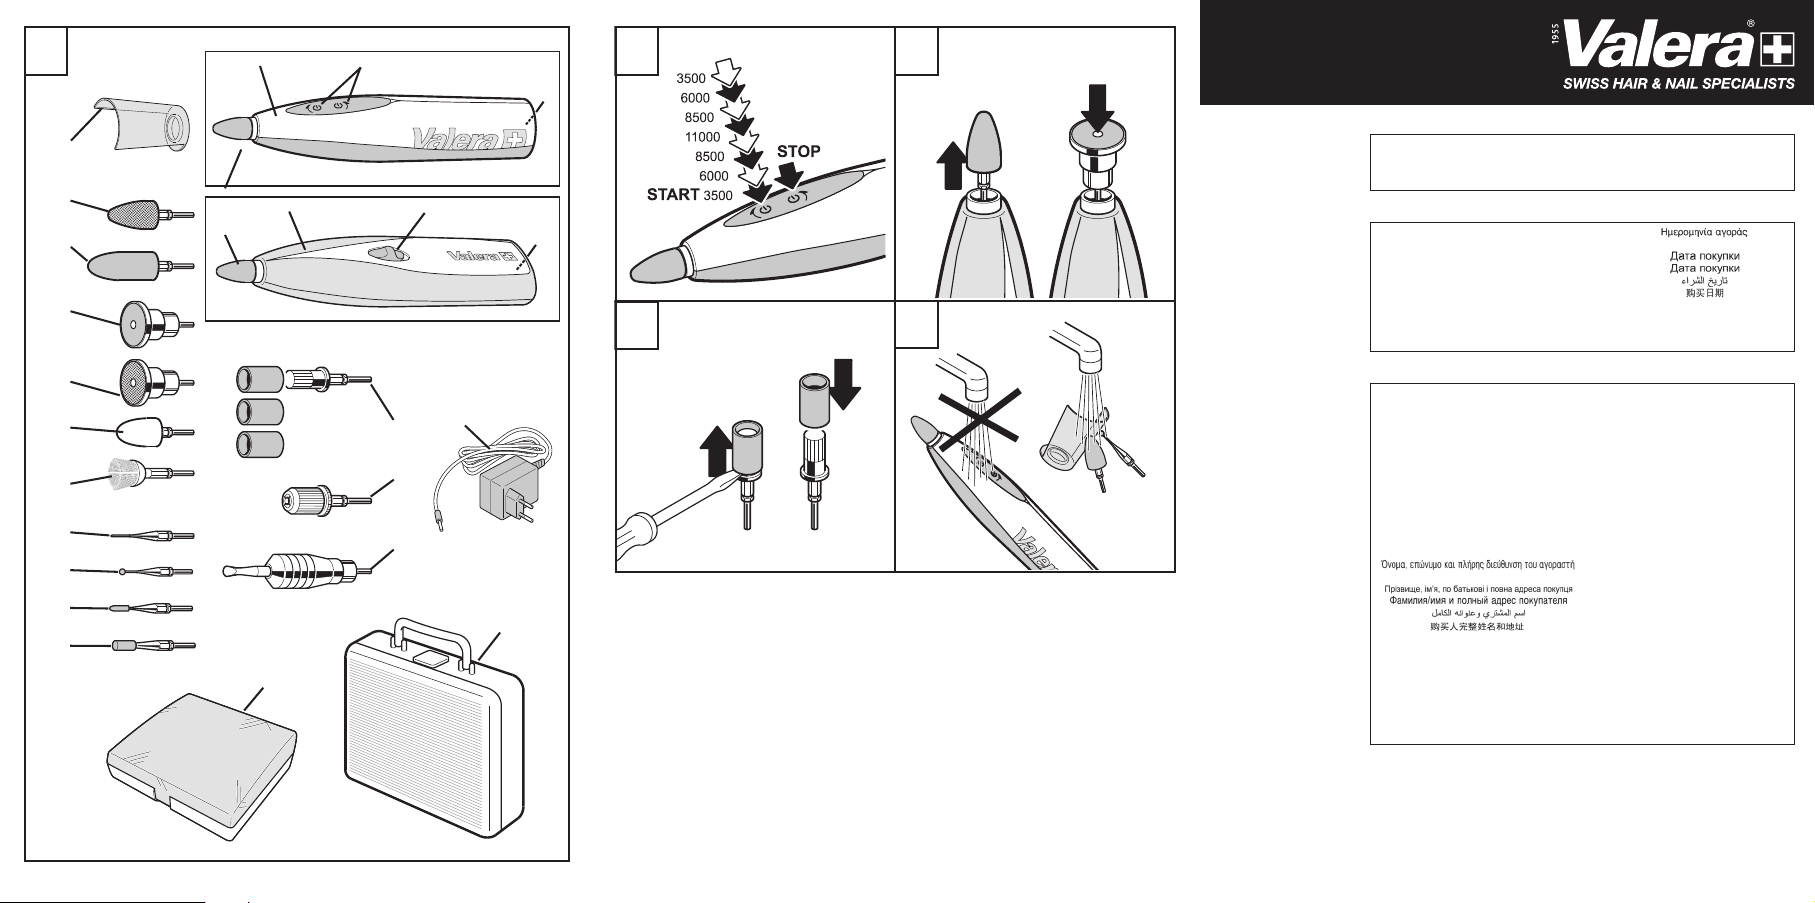
PARTS
1 Maniswiss Professional (651.01)
2 Maniswiss Cordless (651.02)
3 Model 651.01: on / direction of rotation / speed selection
/ off buttons
4 Model 651.02: on / off switch
5 Socket for transformer
6 Clear guard (Model 651.01 only)
7 Fine sapphire cone
8 Coarse sapphire cone
9 Long sapphire cone (Model 651.01 only)
10 Fine sapphire disc
11 Coarse sapphire disc (Model 651.01 only)
12 Felt cone
13 Brush (Model 651.01 only)
14 Needle tip grinder (Model 651.01 only)
15 Ball tip sapphire grinder
16 Flame tip grinder
17 Cylindrical tip grinder
18 Coarse, medium and fine sanding rings and holder (model
651.01 only)
19 Spindle for other accessories (model 651.01 only)
20 Cuticle tool (model 651.01 only)
21 Transformer
22 Aluminium case (model 651.01 only)
23 Case (model 651.02 only)
SUPPLY MAINS POWER
Connect the transformer (21, fig.1) to the appliance by
inserting its plug into the socket on the appliance
(5, fig.1). Plug the transformer into the mains socket.
SWITCHING ON AND OFF
Model 651.01: Press one of the two buttons (3, fig.1)
depending on the desired direction of rotation.
The appliance starts rotating at 3500 rpm. Press the same
button again to increase speed to 6000, 8500 and 11000 rpm.
Keep pressing the same button to reduce speed to 8500, 6000
and 3500 rpm again (fig.2).
Press the other button (3, fig.1) to switch the appliance off.
Model 651.02: Move the switch (4, fig.1) to switch the
appliance on and off. You can choose between two rotation
speeds: 4500 and 6000 rpm.
CHARGING THE BATTERY
(model 651.02 only)
•Charge the battery for 12 hours before using the appliance
for the first time and whenever the battery runs flat from use.
•Switch the appliance off at the switch (4, fig.1). The battery
only recharges when the appliance of switched off.
• Connect the transformer (21, fig.1) to the appliance by inserting
its plug into the socket on the appliance (5, fig.1).
•Plug the transformer into the mains socket.
•Recharge the battery whenever you notice a drop in power
from the appliance.
• When the battery is fully charged, the appliance can be used
for 60 minutes disconnected from the mains electricity
supply
•The appliance can function both on mains power and in
cordless mode using the rechargeable battery.
•If the appliance fails to function on mains power when the
battery is completely discharged, switch it off, charge the
battery for about five minutes, then switch it back on again
using mains power.
FITTING AND REMOVING ACCESSORIES
•Only fit or remove accessories with the appliance switched
off.
•Pull the accessory to remove it from the appliance.
To fit an accessory, push it all the way into its seat (fig.3).
•Model 651.01: Push the sanding rings over their holder. If
necessary, use a suitable tool to remove them (fig.4).
USEFUL HINTS
- Always use clean and properly disinfected accessories.
- Make sure that your skin is clean and dry. Avoid washing
hands or feet immediately before beginning the treatment.
SHORTENING NAILS
Use the fine sapphire cone (10, fig.1). Regular care helps
keep your nails strong.
By abandoning scissors and nail cutters you will be able to
shorten your nails to a more precise length and avoid ingrown
nails.
INGROWING NAILS
Use the needle tip grinder (14, fig.1) or flame tip grinder (16,
fig.1) to treat and prevent ingrown nails. Proceed in small
steps, and with great care. Maintain a steady hand.
CORNS AND CALLUSES
Use the fine sapphire cone (7, fig.1) to remove hard skin from
corns and calluses.
Finish the treatment with the ball tip sapphire grinder (15, fig.1).
HARD SKIN AND CALLOSITIES
Pass the coarse sapphire cone (8, fig.1) over the area to be
treated. Repeat until the hard skin or callosity has been
eliminated. On larger areas use the long sapphire cone (9,
fig.1).
SKIN AROUND THE NAILS
To remove dead skin from around the nails, especially the nails
of the feet, use the flame tip grinder
(16, fig.1).
5
SURFACE OF NAILS
Use the cylindrical grinder (17, fig.1) to grind down thick nails
on the feet. To smooth the surface of nails and eliminate
ridges, use the felt cone (12, fig.1).
CUTICLE SKIN
Treat cuticle skin only when damp.
To push back cuticle skin, use the cuticle tool
(20, fig.1) (model 651.01 only). The tip does not rotate but
performs a forward-backward motion.
POLISHING NAILS
To polish both natural and artificial nails, use the brush (13,
fig.1) (model 651.01 only).
TREATING ARTIFICIAL NAILS
To shorten and shape artificial nails, use the sanding rings on
the relevant holder (18, fig.1) (model 651.01 only).
USING ACCESSORIES FROM OTHER
APPLIANCES
To use accessories from other appliances, use the spindle(19,
fig.1) (model 651.01 only).
PROTECTION AGAINST NAIL DUST
To protect yourself against nail dust during treatments, use the
clear guard (6, fig.1) (model 651.01 only).
CLEANING AND MAINTENANCE
Clean the appliance after every use.
•Switch the appliance off and disconnect it from the mains
supply before performing any maintenance or changing any
parts
•After every use, remove the accessory and clear guard (if
used) (6, fig.1).
•Clean used accessories in denatured alcohol using a brush
or sterilise them in boiling water or in a suitable steriliser.
•CAUTION! Never immerse the appliance in water or let it get
completely wet. Only the accessories and the clear guard
are washable in water (fig.5).
• Use a soft cloth to clean the body of the appliance. Dampen
the cloth slightly to remove stubborn dirt. Never use solvents
or abrasives!
DISPOSAL
•Dispose of the appliance in compliance with applicable
environmental standards.
GUARANTEE
VALERA guarantees the appliance you have bought at
following conditions:
1. The guarantee conditions for this appliance are as defined
by our dealer in the country of sale. In Switzerland and in
the countries subject to the European directive 44/99/CE
the guarantee period is 24 months for domestic use and 12
months for professional or similar use. The guarantee
period starts from the date of purchase as stated on the
present guarantee card regularly filled out and stamped by
the dealer or on the sale’s invoice.
2. The guarantee is applicable only against submission of the
present guarantee card or the sale’s invoice.
3. The guarantee covers the elimination of all defects arisen
during the guarantee period resulting from proven faults in
material or workmanship. The elimination of the defects
will be made either by repairing the appliance or
exchanging it. The guarantee does not cover any damage
arising from incorrect connection to the power supply,
improper use, breakage, normal wear and non-compliance
with the Instructions for Use.
4. All other claims of any nature, including those for eventual
damages outside of the appliance, are excluded, unless
our liability is legally mandatory.
5. The guarantee service is carried out free of charge; it does
not affect the expiry date of the guarantee.
6. The guarantee becomes void if repairs are undertaken by
unauthorized persons.
For UK only: this guarantee in no way affects your rights under
statutory law.
In case of defect, please return the appliance well packed and
together with the guarantee card regularly dated and stamped
to one of our Valera Service Centres or to the dealer who will
send it to the official importer for the guarantee service.
6
VALERA is a registered trade mark
of Ligo Electric S.A. - Switzerland
The symbol on the product or on its packaging indicates
that this product may not be treated as household waste.
Instead it shall be handed over to the applicable collection point
for the recycling of electrical and electronic equipment. By
ensuring this product is disposed of correctly, you will help
prevent potential negative consequences for the environment
and human health, which could otherwise be caused by
inappropriate waste handling of this product. For more detailed
information about recycling of this product, please contact
your local city office, your household waste disposal service
or the shop where you purchased the product.
This appliance conforms to European Directives
2004/108/EC, 2009/125/EC, 2006/95/EC
and Regulation (EC) No. 1275/2008.
GEBRAUCHSANWEISUNGEN
Die vorliegenden Gebrauchsanweisungen sind aufmerksam durchzulesen und sorgfältig aufzubewahren. Sie enthalten
wertvolle Empfehlungen und Hinweise zur Sicherheit und Nutzung des Geräts.
Verfügbar auch auf www.valera.com
SICHERHEITSHINWEISE
•Wichtig: Als zusätzlicher Schutz wird die Installation einer Fehler-
stromschutzeinrichtung (RCD) mit einem Bemessungauslösestrom
von nicht mehr als 30 mA im Badezimmerstromkreis empfohlen.
Lassen Sie sich von Ihrem Elektroinstallateur beraten.
•Stellen Sie sicher, dass das Gerät völlig trocken ist, bevor Sie es
benutzen.
•ACHTUNG: Benutzen Sie dieses Gerät nicht in der Nähe von
Badewannen, Waschbecken oder sonstigen mit Wasser
gefüllten Behältern.
•Diese Geräte können von Kindern ab 8 Jahren sowie von Personen
mit reduzierten physischen, sensorischen oder mentalen Fähigkeiten
oder Mangel an Erfahrung und/oder Wissen benutzt werden, wenn sie
beaufsichtigt oder bzgl. des sicheren Gebrauchs des Gerätes
unterwiesen wurden und die daraus resultierenden Gefahren
verstanden haben.
•Kinder dürfen nicht mit dem Gerät spielen.
•Reinigung und Wartung dürfen nicht durch Kinder durchgeführt
werden, es sei denn sie sind beaufsichtigt.
•Wenn der Haartrockner in einem Badezimmer verwendet wird, ist nach
Gebrauch der Stecker zu ziehen, da die Nähe von Wasser eine Gefahr
darstellt, auch wenn der Trockner ausgeschaltet ist.
•Wenn die Anschlussleitung dieses Gerates beschadigt wird, muss sie
durch den Hersteller oder seinen Kundendienst oder eine ahnlich
qualifizierte Person ersetzt werden, um Gefahrdungen zu vermeiden.
•Schließen Sie das Gerät nur an Wechselstrom an und stellen Sie sicher, dass die Netzspannung den Angaben am Gerät
entspricht.
•Tauchen Sie das Gerät niemals in Wasser oder sonstige Flüssigkeiten ein.
•Stellen Sie das Gerät nicht an einen Ort, von dem es in Wasser oder in eine sonstige Flüssigkeit fallen könnte.
•Versuchen Sie nicht, ein in das Wasser gefallenes Elektrogerät herauszuholen: Ziehen Sie sofort den Stecker aus der
Steckdose.
• Nach dem Gebrauch muss das Gerät stets ausgeschaltet und der Stecker aus der Steckdose gezogen werden. Ziehen Sie den Stecker
nicht am Netzkabel und niemals mit nassen Händen aus der Steckdose
•Wickeln Sie niemals das Kabel um das Gerät. Kontrollieren Sie regelmäßig, ob das Kabel beschädigt ist.
•Um eine gefährliche Überhitzung zu vermeiden, das Stromkabel ganz aufwickeln.
Deutsch
7
• Wenn das Kabel beschädigt ist, muss es vom Hersteller oder
von dessen Kundendienst oder jedenfalls von einer Person
mit ähnlicher Qualifikation ersetzt werden, um jedes Risiko
auszuschließen.
• Die Verpackungselemente des Geräts (Plastikbeutel, Kartons
usw.) dürfen nicht in Reichweite von Kindern aufbewahrt
werden, da sie eine potentielle Gefahrenquelle darstellen.
• Dieses Gerät ist nur für Maniküre und Pediküre ausgelegt. Jede
andere Verwendung gilt als zweckwidrig und ist daher als
gefährlich einzustufen. Der Hersteller haftet nicht für
eventuelle Schäden, die auf eine zweckwidrige oder
fehlerhafte Verwendung zurückzuführen sind.
•Das Gerät ist mit einer NiMH-Batterie ausgestattet. Die
verbrauchte Batterie nicht in den Hausmüll geben, sondern
umweltgerecht entsorgen (Altbatterien-Sammelstelle).
•Die Batterie von einem Fachmann oder bei einem
Behandlungs- und Verwertungszentrum entfernen lassen.
•Die Batterie nicht übermäßiger Feuchtigkeit aussetzen oder
mit Flüssigkeiten in Kontakt bringen.
• Die Batterie in einem angemessenen Sicherheitsabstand von
Magnetfeldern, Wärmequellen und offenen Flammen halten.
•Gefahr von Kratz- oder Schnittverletzungen. Wenn ein
Zubehörteil beschädigt ist, darf es nicht mehr benutzt
werden, ersetzen Sie es sofort.
•Personen mit Pacemaker müssen vor der Verwendung des
Geräts ihren Arzt befragen.
• Bei Hautverletzungen, -reizungen oder -krankheiten darf das
Gerät nicht verwendet werden.
Wichtig
•Nach jedem Gebrauch müssen die benutzten Zubehörteile
gereinigt und desinfiziert werden.
GEBRAUCH
GERÄTETEILE
1 Maniswiss Professional (651.01)
2 Maniswiss Cordless (651.02)
3 Mod. 651.01: Tasten ¬Ein / Drehrichtung / Drehzahlstufe
/ Aus
4 Mod. 651.02: Wahlschalter ¬Ein / Aus
5 Anschlussbuchse für Transformator
6 Transparente Schutzabdeckung (nur Mod. 651.01)
7 Saphirkegel feinkörnig
8 Saphirkegel grobkörnig
9 Saphirkegel lang (nur Mod. 651.01)
10 Saphirscheibe feinkörnig
11 Saphirscheibe grobkörnig (nur Mod. 651.01)
12 Filzkegel
13 Bürste (nur Mod. 651.01)
14 Nadelfräser (nur Mod. 651.01)
15 Runder Saphirfräser
16 Flammenfräser
17 Zylinderfräser
18 Schleifkappenträger und grob-, mittel- und feinkörnige
Schleifkappen (Mod. 651.01)
19 Spindel für den Aufsatz weiterer Zubehörteile
(nur Mod. 651.01)
20 Nagelhautrimmer (nur Mod. 651.01)
21 Transformator
22 Aluminiumkoffer (nur Mod. 651.01)
23 Schatulle (nur Mod. 651.02)
NETZANSCHLUSS
Um den Transformator (Abb. 1 - Pos. 21) am Gerät
anzuschließen, den Stecker in die dafür vorgesehene Buchse
am Gerät (Abb. 1 - Pos. 5) stecken. Den Transformator an der
Netzsteckdose anschließen.
EIN- UND AUSSCHALTEN
Modell 651.01: Je nach gewünschter Drehrichtung eine der
zwei Tasten (Abb. 1 - Pos. 3) drücken. Das Gerät startet mit
3500 Umdrehungen/Minute. Durch darauf folgende
Betätigungen derselben Taste wird die Drehzahl jeweils auf
6000, 8500 und 11000 Umdr./Min. erhöht, und dann wieder
auf 8500, 6000 und 3500 Umdr./Min. verringert (Abb. 2).
Um das Gerät auszuschalten, die andere Taste (Abb. 1 - Pos. 3)
drücken.
Modell 651.02: Das Gerät wird mit dem Schalter (Abb. 1 -
Pos. 4) ein- und ausgeschaltet. Es können zwei verschiedene
Drehzahlstufen gewählt werden: 4500 und 6000
Umdrehungen/Minute.
AUFLADEN DES AKKUS (Mod. 651.02)
• Bevor das Gerät zum ersten Mal benutzt wird, und anschließend
jedes Mal, wenn er nach dem Gebrauch leer ist, muss der Akku
12 Stunden lang aufgeladen werden.
•Das Gerät mit dem Schalter (Abb. 1 - Pos. 4) ausschalten.
Der Akku kann nur geladen werden, wenn das Gerät
ausgeschaltet ist.
•Um den Transformator (Abb. 1 - Pos. 21) am Gerät
anzuschließen, den Stecker in die hierzu vorgesehene
Buchse am Gerät (Abb. 1 - Pos. 5) stecken.
•Den Transformator an der Netzsteckdose anschließen.
•Den Akku erst aufladen, wenn die Leistung des Geräts
merklich nachgelassen hat.
•Mit vollständig aufgeladenem Akku kann das Gerät ohne
Anschluss am Stromnetz 60 Minuten lang betrieben werden.
•Das Gerät funktioniert sowohl mit Netzbetrieb als auch mit
schnurlosem Akku-Betrieb.
•Sollte das Gerät mit vollständig entladenem Akku nach
Anschluss der Netzversorgung nicht funktionieren, das Gerät
ausschalten, den Akku etwa fünf Minuten lang aufladen und
anschließend das am Stromnetz angeschlossene Gerät
wieder einschalten.
ABNEHMEN UND AUFSETZEN DES
ZUBEHÖRS
•Diese Vorgänge dürfen nur bei ausgeschaltetem Gerät
ausgeführt werden.
•Das Zubehör durch Ziehen vom Gerät abnehmen. Zum
Aufsetzen des gewünschten Zubehörs wird es bis zum
Anschlag in seinen Sitz gedrückt (Abb. 3).
•Modell 651.01: Die Schleifkappen werden durch Eindrücken
auf den Schleifkappenträger gesetzt. Zum Entfernen eventuell
mit einem Werkzeug nachhelfen (Abb. 4).
TIPPS ZUM GEBRAUCH
- Nur sauberes und desinfiziertes Zubehör benutzen.
- Die Haut muss trocken sein. Hände oder Füße nicht kurz vor
der Behandlung waschen.
NÄGEL KÜRZEN
Die feinkörnige Saphirscheibe benutzen (Abb. 1 - Pos. 10).
Durch regelmäßige Pflege werden die Nägel gestärkt.
Durch endgültigen Verzicht auf Nagelscheren und Pinzetten
können Sie präziser arbeiten und das Einwachsen der Nägel
vermeiden.
EINGEWACHSENE NÄGEL
Zur Vorbeugung eingewachsener Nägel den Nadelfräser (Abb.
1 - Pos. 14) oder den Flammenfräser (Abb. 1 - Pos. 16)
benutzen. Stufenweise sehr vorsichtig und mit ruhiger Hand
vorgehen.
8
SCHWIELEN UND HÜHNERAUGEN
Den feinkörnigen Saphirkegel (Abb. 1 - Pos. 7) benutzen und
an den Stellen mit Schwielen oder Hühneraugen die harte Haut
entfernen.
Die Arbeit mit dem runden Saphirfräser (Abb. 1 - Pos. 15)
abschließen.
HORNHAUT UND HAUTVERHÄRTUNGEN
Mit dem grobkörnigen Saphirkegel (Abb. 1 - Pos. 8) über die
ganze zu behandelnde Stelle fahren. Den Vorgang mehrmals
wiederholen, bis Hornhaut und Hautverhärtungen vollständig
verschwunden sind. Für eine großflächige Behandlung den
langen Saphirkegel (Abb. 1 - Pos. 9) benutzen.
HAUT UM DIE NÄGEL
Die abgestorbene Haut um die Nägel, vor allem an den Füßen,
mit dem Flammenfräser (Abb. 1 - Pos. 16) entfernen.
NAGELOBERFLÄCHE
Den Zylinderfräser (Abb. 1 - Pos. 17) benutzen, um
Verdickungen der Fußnägel zu reduzieren. Mit dem Filzkegel
(Abb. 1 - Pos. 12) die Nageloberfläche glätten und
Unebenheiten abtragen.
HAUT AUF DEM NAGELHALBMOND
Diese Behandlung wird an der feuchten Haut durchgeführt.
Den Halbmond mit dem Nagelhautrimmer (Abb. 1 - Pos. 20)
von dem Häutchen befreien (nur Mod. 651.01). Der Aufsatz
dreht sich nicht, sondern bewegt sich vor-/rückwärts.
NÄGEL POLIEREN
Zum Polieren sowohl natürlicher als auch künstlicher Nägel die
Bürste (Abb. 1 - Pos. 13) benutzen (nur Mod. 651.01).
PFLEGE KÜNSTLICHER NÄGEL
Zum Kürzen und Modellieren künstlicher Nägel die
Schleifkappen benutzen, die auf den hierfür vorgesehenen
Träger (Abb.1 - Pos.18) aufgesetzt werden (nur Mod. 651.01).
VERWENDUNG VON ZUBEHÖR
ANDERER GERÄTE
Um das Zubehör anderer Geräte benutzen zu können, die
Spindel (Abb. 1 - Pos. 19) verwenden (nur Mod. 651.01).
SCHUTZ VOR NAGELSTAUB
Zum Schutz vor dem Staub, der während der Nagelpflege
entsteht, die spezielle transparente Schutzabdeckung
benutzen (Abb. 1 - Pos. 6) (nur Mod. 651.01)
REINIGUNG UND WARTUNG
Das Gerät muss nach jedem Gebrauch gereinigt und gewartet
werden.
•Wartungseingriffe und Teileersatz dürfen ausschließlich am
AUSGESCHALTETEN und von der Stromversorgung
getrennten Gerät vorgenommen werden.
•Nach jedem Gebrauch das Zubehör und die eventuelle
transparente Schutzabdeckung (Abb. 1 - Pos. 6) abnehmen.
•Das benutzte Zubehör mit denaturiertem Alkohol und einer
Bürste säubern oder in kochend heißem Wasser oder mit
speziellen Sterilisiergeräten sterilisieren.
•ACHTUNG: Das Gerät selbst niemals in Wasser eintauchen
oder nass machen. Nur das Zubehör und die transparente
Schutzabdeckung können mit Wasser gewaschen werden
(Abb. 5).
•Das Gerätegehäuse mit einem weichen, eventuell leicht
angefeuchteten Tuch säubern. Unter keinen Umständen
Lösemittel oder Scheuermittel verwenden!
GARANTIEBEDINGUNGEN
VALERA leistet für dieses Gerät – zusätzlich zu der gesetzlichen
Gewährleistung des Händlers aus Kaufvertrag – dem
Endabnehmer gegenüber eine Garantie zu nachstehenden
Bedingungen:
1. Für dieses Gerät gelten die Garantiebedingungen unseres
Händlers im Verkaufsland. In der Schweiz und in den
Ländern, wo die europäische Verordnung 44/99/CE gilt,
beträgt die Garantiezeit 24 Monate bei privatem Gebrauch
und 12 Monate bei gewerblichem oder einem solchen
gleichzusetzenden Gebrauch. Die Garantiezeit beginnt am
Kauftag des Gerätes, der durch die ausgefüllte Garantiekarte
oder einen sonstigen Kaufbeleg nachzuweisen ist.
2. Die Garantie wird nur bei Vorlage der Garantiekarte oder
eines Kaufbeleges geleistet.
3. Die Garantieleistung umfasst die Behebung aller innerhalb
der Garantiezeit auftretenden Mängel des Gerätes, die
nachweislich auf Material- oder Fertigungsfehlern beruhen.
Die Behebung der Mängel kann nach unserer Wahl durch
Instandsetzung oder durch Umtausch des Gerätes erfolgen.
Nicht unter Garantie fallen Mängel oder Schäden, die durch
nicht vorschriftsmässigen elektrischen Anschluss, durch
unsachgemässe Handhabung sowie durch Nichtbeachtung
der Gebrauchsanleitung entstanden sind.
4. Weitere Ansprüche irgendwelcher Art, insbesondere solche
auf Ersatz ausserhalb des Gerätes entstandener Schäden,
sind – soweit die Haftung nicht zwingend gesetzlich
angeordnet ist – ausgeschlossen.
5. Die Garantieleistungen werden ohne Berechnung
durchgeführt; sie bewirken weder eine Verlängerung noch
einen Neubeginn der Garantiezeit.
6. Diese Garantie erlischt bei Eingriff nicht autorisierter Stellen.
Sollten Sie die Garantie in Anspruch nehmen müssen, dann
senden Sie bitte das defekte Gerät gut verpackt an eine unserer
autorisierten Service-Stellen. Vergessen Sie nicht, unbedingt
die Garantiekarte und/oder den Kaufbeleg beizufügen, da ohne
diese keine Garantieleistung erfolgen kann.
Das Symbol auf dem Produkt oder seiner Verpackung
weist darauf hin, dass dieses Produkt nicht als normaler
Haushaltsabfall zu behandeln ist, sondern an einem
Sammelpunkt für das Recycling von elektrischen und
elektronischen Geräten abgegeben werden muss. Durch Ihren
Beitrag zum korrekten Entsorgen dieses Produktes schützen
Sie die Umwelt und die Gesundheit Ihrer Mitmenschen. Umwelt
und Gesundheit werden durch falsches Entsorgen gefährdet.
Weitere Informationen über das Recycling dieses Produkts
erhalten Sie von Ihrem Rathaus, Ihrer Müllabfuhr oder dem
Geschäft, in dem Sie das Produkt gekauft haben.
VALERA ist eine eingetragene Schutzmarke
der Ligo Electric S.A. - Schweiz
9
Dieses Gerät erfüllt die Bestimmungen
der europäischen Richtlinien 2004/108/EG,
2009/125/EG, 2006/95/EG und der Verordnung
(EG) Nr. 1275/2008.
ENTSORGUNG
•Das Gerät ist gemäß den geltenden Umweltschutz-
bestimmungen zu entsorgen.
MODE D'EMPLOI
Lire attentivement ce mode d'emploi et le conserver soigneusement. Il contient des conseils importants pour la sécurité et
l'utilisation de l'appareil.
Disponible aussi sur www.valera.com
CONSIGNES DE SÉCURITÉ
•Important: Pour garantir une protection supplémentaire, il est
conseillé d’installer dans l’installation électrique alimentant
l’appareil un interrupteur différentiel avec un courant d’intervention
ne dépassant pas 30 mA. Contactez votre électricien de confiance
pour tout renseignement complémentaire.
•Vérifier que l’appareil soit complètement sec avant de l’utiliser
•ATTENTION: ne pas utiliser cet appareil à proximité de
baignoires, de lavabos ou autres récipients contenant de
l'eau.
•Il est requit un âge minimum de 8 ans pour l’utilisation de cet
appareil. L’utilisation de cet appareil par des personnes aux
capacités physiques, sensorielles ou mentales réduites est
fortement déconseillée à moins qu’elles soient surveillées ou
qu’elles aient été instruites correctement quant à l’utilisation de
l’appareil de la part de tiers
•Cet appareil doit être tenu hors de portée des enfants.
•Les opérations de nettoyage et d'entretien ne doivent pas être
effectuées par des enfants non surveillés.
•En cas d’utilisation du sèche-cheveux dans une salle d’eau,
toujours le débrancher après l’emploi à cause des risques liés à
la proximité de l’eau, même si l’appareil est éteint.
•N’utilisez pas votre appareil s’il présente une anomalie, s’il est
tombé, ou si le cordon d’alimentation est endommagé. Et, ne
tentez pas de réparer un appareil électrique par vous même, mais
confiez-le à un réparateur agréé.
•Brancher le set professionnel uniquement sur du courant alternatif et contrôler que la tension du secteur correspond à celle
qui est indiquée sur l’appareil.
•Ne pas immerger l’appareil dans l’eau ni dans d’autres liquides.
•Ne pas poser l’appareil dans un lieu où il risque de tomber dans l’eau ou dans d’autres liquides.
•Si l’appareil tombe dans l’eau, ne pas essayer de le récupérer : débrancher immédiatement la prise.
• Après usage, ne pas oublier d’éteindre l’appareil et détacher la prise. Ne pas extraire la fiche de la prise en tirant sur le cordon
et ne pas exécuter cette opération avec les mains mouillées.
•Ne pas enrouler le cordon autour de l’appareil. Contrôler régulièrement l’état du cordon.
•Pour éviter les surchauffes dangereuses, il est recommandé de dérouler le cordon sur toute sa longueur.
Français
10
•Si le cordon d’alimentation est endommagé, il doit être
remplacé par le fabricant, son service après-vente ou par un
technicien qualifié afin d'éviter tout danger.
•Cet appareil a été conçu uniquement pour les soins de
manucure et de pédicure. Toute autre utilisation doit être
considérée comme impropre ou dangereuse. Le fabricant ne
peut être tenu pour responsable des dommages dérivants
d'un usage impropre ou erroné.
•La tondeuse est dotée d'une batterie NiMH. Procédez à
l'élimination de la batterie selon la loi antipollution, en utilisant
les conteneurs sélectifs prévus à cet effet.
•Demander à des techniciens qualifiés de déposer la batterie
ou s’adresser à un centre de traitement/récupération.
•Ne pas laisser la batterie dans un endroit humide ou en
contact avec des substances liquides.
•Tenir la batterie à l’écart de champs magnétiques, sources
de chaleur et flammes libres.
•Danger de griffure ou de coupure. Si un accessoire est
détérioré ne pas l’utiliser : le remplacer immédiatement.
• Les porteurs de stimulateur cardiaque doivent consulter leur
médecin avant d'utiliser l'appareil.
• Ne pas utiliser l’appareil en cas de blessure, d’irritation ou de
maladies de peau.
Important
•Après chaque utilisation nettoyer et désinfecter les
accessoires.
MODE D’EMPLOI
COMPOSANTS
1 Maniswiss Professional (651.01)
2 Maniswiss Cordless (651.02)
3 Mod. 651.01: touche de mise en marche / sens de
rotation / sélection des vitesses /arrêt
4 Mod. 651.02: sélecteur mise en marche / arrêt
5 Prise d’alimentation
6 Protection transparente (uniquement pour Mod.
651.01)
7 Cône saphir fin
8 Cône saphir grossier
9 Cône saphir long (uniquement mod. 651.01)
10 Disque saphir fin
11 Disque saphir grossier (uniquement mod. 651.01)
12 Cône feutre
13 Brosse (uniquement pour Mod. 651.01)
14 Fraise pointue (uniquement pour Mod. 651.01)
15 Fraise saphir ronde
16 Fraise flamme
17 Fraise cylindrique
18 Support et meules grossière, moyenne et fine
(uniquement mod. 651.01)
19 Mandrin pour montage des autres accessoires
(uniquement pour Mod. 651.01)
20 Coupe cuticules (uniquement pour Mod. 651.01)
21 Transformateur
22 Valise en aluminium (uniquement pour Mod. 651.01)
23 Coffret (uniquement pour Mod. 651.02)
ALIMENTATION SECTEUR
Brancher le transformateur (fig.1 - rif. 21) à l’appareil en
enfilant la fiche dans la prise de l’appareil (fig.1 - rif.5).
Brancher le transformateur à la prise de courant.
MISE EN MARCHE ET ARRÊT
Modèle 651.01: appuyer sur une des deux touches (fig.1 -
réf.3) en fonction du sens de rotation souhaité. L’appareil
démarre sur 3500 tours/minute. En appuyant à nouveau sur
la même touche, on peut modifier la vitesse de rotation et
l’augmenter à 6000, 8500 et 11000 tours/minute, ou la
ralentir à 8500, 6000 et 3500 tours/minute (fig.2).
Pour l’éteindre, appuyer sur l’autre touche (fig.1 - réf.3).
Modèle 651.02: Pour mettre l’appareil en marche ou
l’arrêter, appuyer sur l’interrupteur (fig.1 - réf.4). Il est
possible de sélectionner deux vitesses de rotation : 4500 et
6000 tours/minute.
CHARGE DE LA BATTERIE (Mod. 651.02)
• Avant d’utiliser l’appareil pour la première fois ou quand il est
déchargé, charger la batterie pendant 12 heures.
•Pour éteindre l’appareil, appuyer sur l’interrupteur (fig.1 -
réf.4). Éteindre l’appareil avant de charger la batterie.
•Brancher le transformateur (fig. 1 – réf. 21) en enfilant la
fiche dans la prise de l’appareil (fig.1 - réf.5).
•Brancher le transformateur à la prise de courant.
•Ne recharger la batterie que si la puissance de l’appareil
baisse nettement.
•Quand la batterie est complètement chargée, l'appareil peut
fonctionner pendant 60 minutes sans être connecté au secteur.
•L’appareil peut fonctionner sur le secteur ou sans fil.
•Quand la batterie est complètement déchargée, si l’appareil
ne fonctionne pas sur le secteur, l’éteindre, recharger la
batterie pendant cinq minutes environ et rallumer l’appareil
après l’avoir connecté sur le secteur.
DÉMONTAGE ET MONTAGE
DES ACCESSOIRES
•Éteindre l'appareil pour exécuter cette opération.
•Démonter l’accessoire en tirant dessus. Pour le monter, le
pousser à fond dans son siège (fig.3).
•Modèle 651,01: les meules sont enclenchées sur le support
par pression. S’aider d’un outil pour le démontage (fig.4).
MODE D'EMPLOI
- Il est recommandé d’utiliser des accessoires propres et
désinfectés.
- La peau doit être sèche. Ne pas se laver les pieds ou les
mains juste avant les soins.
COUPE ONGLES
Utiliser le disque saphir fin (fig. 1 - pos. 10).
Pour renforcer les ongles, les soigner régulièrement.
Pour prévenir les ongles incarnés, renoncer aux ciseaux et
aux pinces et utiliser des instruments plus précis.
ONGLES INCARNÉS
Utiliser la fraise pointue (fig.1 - pos.14) ou la fraise
flamme (fig.1 - pos.16) pour soigner et prévenir les ongles
incarnés. Procéder par degré, avec délicatesse, en tenant les
instruments fermement.
CALES ET OEIL DE PERDRIX
Utiliser le cône saphir fin (fig.1 - pos.7), ôter la peau morte
dans la zone des cales ou de l’oeil de perdrix.
Terminer avec la fraise saphir ronde (fig. 1 - pos. 15).
DURILLONS ET CALLOSITÉS
Passer le cône saphir grossier (fig.1 - pos. 8) sur toute la
surface à traiter et répéter l’opération plusieurs fois jusqu’à
disparition complète des cales ou des durillons. Pour les zones
très étendues, utiliser le cône saphir long (fig. 1 - pos. 9).
CUTICULES
Pour ôter les peaux mortes autour des ongles, surtout aux
pieds, utiliser la fraise flamme (fig.1 - pos.16).
11
SURFACE DES ONGLES
Utiliser la fraise cylindrique (fig.1 - pos.17) pour réduire
l’épaisseur des ongles de pieds. Pour les lisser et éliminer les
aspérités, utiliser le cône feutre (fig.1 - pos.12).
PEAUX SUR LA LUNULE
Opérer sur la peau humide.
Pour libérer le pourtour des ongles de leur cuticule, utiliser le
coupe cuticule (fig. 1 - pos. 20) (uniquement mod. 651.01).
La pointe ne tourne pas mais exécute un mouvement avant
arrière.
POLISSAGE DES ONGLES
Pour polir le pourtour des ongles naturels ou ar tificiels, utiliser
la brosse (fig. 1 - pos. 13) (uniquement
mod. 651.01).
TRAITEMENT DES ONGLES ARTIFICIELS
Pour raccourcir et façonner les ongles artificiels, utiliser les
meules montées sur le support spécial (fig. 1 - pos. 18)
(uniquement mod.651.01).
UTILISATION DES ACCESSOIRES
D’AUTRES APPAREILS
Pour monter les accessoires d’autres appareils, utiliser le
mandrin spécial (fig. 1 - pos. 19) (uniquement
mod. 651.01).
PROTECTION CONTRE LA POUSSIÈRE
D’ONGLES
Utiliser la protection transparente spéciale pour se protéger
de la poussière produite par les soins des ongles (fig. 1 - pos.
6) (uniquement mod.651.01).
NETTOYAGE ET ENTRETIEN
Après chaque utilisation, nettoyer et effectuer l'entretien des
accessoires.
•Éteindre l’appareil avant d’exécuter toute opération
d’entretien ou de changement d’outil et le mettre hors
tension.
• Après chaque utilisation, enlever l’accessoire et la protection
en plastique transparente (fig.1 - pos.6).
• Nettoyer les accessoires utilisés avec de l’alcool dénaturé et
une brosse ou les stériliser avec de l’eau bouillante ou des
appareils de stérilisation spéciaux.
•ATTENTION: ne pas plonger l’appareil dans l’eau ou dans
d’autres liquides ni le mouiller. Seuls les accessoires et la
protection transparente sont lavables à l’eau (fig.5).
•Nettoyer le corps de l’appareil avec un chiffon souple,
légèrement humide. N’utiliser ni solvants ni abrasifs !
MISE AU REBUT
•L’appareil doit être mis au rebut conformément aux normes
de protection de l’environnement.
GARANTIE
VALERA garantit l’appareil que vous venez d’acheter aux
conditions suivantes:
1. Les conditions de garantie applicables sont celles qui sont
définies par notre distributeur officiel dans le pays d'achat.
En Suisse et dans les pays où la directive européenne
44/99/CE est en vigueur, la période couverte par la garantie
est de 24 mois pour un usage domestique et de 12 mois
pour un usage professionnel ou assimilé. La période de
garantie commence à courir à compter de la date d'achat
de ’l'appareil. La date d'achat est la date qui figure sur le
présent certificat de garantie dûment rempli et portant de
cachet du vendeur ou sur la facture d'achat.
2. La garantie n’est applicable que sous présentation de ce
certificat de garantie ou du document d’achat.
3. La garantie couvre l’élimination de tous les défauts s’étant
vérifiés lors de la période de garantie dérivant de défauts
de matériaux ou de fabrication prouvés. L’élimination des
défauts de l’appareil peut s’effectuer soit en le réparant soit
en le remplaçant. La garantie ne couvre pas les défauts ni
les dommages provoqués par un branchement au réseau
électrique non conforme aux normes, par un usage
incorrect du produit et par le non-respect des Normes
d’Utilisation.
4. Toute autre revendication, de quelque nature que ce soit,
est exclue, en particulier celle concernant le
remboursement d’éventuels dommages en dehors de
l’appareil, à l’exception de l’éventuelle responsabilité
expressément définie par les lois en vigueur.
5. Le service de garantie est réalisé gratuitement. Il ne
représente pas une prolongation ni un nouveau départ de
la période de garantie.
6. La garantie échoit si l’appareil est altéré ou réparé par des
personnes non autorisées.
En cas de panne, renvoyer l’appareil correctement emballé
avec le certificat de garantie correctement daté et timbré par
le vendeur à l’un de nos Centres d’Assistance agréés ou au
magasin d’achat qui l’enverra à l’importateur officiel pour la
réparation sous garantie.
Le symbole sur le produit ou son emballage indique que
ce produit ne peut être traité comme déchet ménager. Il doit
être remis au point de collecte prèvu à cet effet (collecte et
recyclage du matériel électrique et électronique). En procédant
à la mise à la casse réglementaire de l’appareil, nous
préservons l’environnement et notre sécurité, s’assurant ainsi
que le déchets seront traités dans des conditions appropriées.
Pour obtenir plus de détails sur le recyclage de ce produit,
veuillez prendre contact avec les services de votre commune
ou le magasin où vous avez effectué l’achat.
VALERA est une marque enregistrée par
Ligo Electric S.A. - Suisse
12
Cet appareil est conforme aux directives européennes
2004/108/CE, 2009/125/CE, 2006/95/CE
et au règlement (CE) N. 1275/2008.
ISTRUZIONI PER L’USO
Leggere con attenzione le presenti istruzioni per l’uso e conservarle con cura. Esse contengono preziosi consigli relativi alla
sicurezza ed all’uso dell’apparecchio.
Disponibili anche su www.valera.com
AVVERTENZE DI SICUREZZA
•Importante:
Per garantire una protezione supplementare, si consiglia
di installare nell’impianto elettrico con il quale viene alimentato
l’apparecchio un interruttore differenziale con una corrente di
intervento non superiore a 30 mA. Per maggiori informazioni
rivolgersi all’elettrotecnico di fiducia.
•
Assicurarsi che l’apparecchio sia perfettamente asciutto prima di
utilizzarlo
•
ATTENZIONE: Non utilizzare questo apparecchio in prossimità di
vasche da bagno, lavelli o altri recipienti che contengano acqua.
•Il presente apparecchio
può essere utilizzato dai bambini a partire
da 8 anni di età e da persone dalle ridotte capacità fisiche, sensoriali
o mentali, oppure con mancanza di esperienza e di conoscenza se si
trovano sotto adeguata sorveglianza, oppure se sono stati istruiti
circa l’uso dell’apparecchio in modo sicuro e se si rendono conto
dei pericoli correlati.
•
I bambini non devono giocare con l’apparecchio.
•
Le operazioni di pulizia e di manutenzione non devono essere
effettuate dai bambini senza sorveglianza.
•Se si utilizza l’asciugacapelli in locali da bagno, è necessario
scollegarlo dall’alimentatore dopo l’uso poiché la vicinanza
con l’acqua può rappresentare un pericolo anche quando
l’asciugacapelli è spento.
•Non utilizzate il vostro apparecchio se presenta un’anomalia, se
è caduto o se il cordone è danneggiato. Non cercate di riparare un
apparecchio elettrico da soli, ma rivolgetevi ad un tecnico
autorizzato.
•Collegare l’apparecchio solo a corrente alternata e controllare che la tensione di rete corrisponda a quella indicata
sull’apparecchio.
•Non immergere mai l’apparecchio nell’acqua o in altri liquidi.
•Non appoggiare l’apparecchio in un luogo da cui potrebbe cadere nell’acqua o in altro liquido.
•Non cercare di recuperare un apparecchio elettrico caduto nell’acqua: staccare subito la spina dalla presa di corrente.
•Dopo l’uso spegnere sempre l’apparecchio e staccare la spina dalla presa di corrente. Non estrarre la spina dalla presa di
corrente tirando il cavo e non eseguire questa operazione se si hanno le mani bagnate.
•Non avvolgere mai il cordone intorno all’apparecchio. Periodicamente controllare che il cavo non sia danneggiato.
Italiano
13
•Per evitare un surriscaldamento pericoloso, si raccomanda
di svolgere il cavo di alimentazione per tutta la sua lunghezza.
•Se il cavo è danneggiato, esso deve essere sostituito dal
costruttore,o dal suo servizio assistenza tecnica o comunque
da una persona con qualifica similare, in modo da prevenire
ogni rischio.
• Questo apparecchio è stato progettato solo per la manicure e la
pedicure. Ogni altro uso è da considerarsi improprio, quindi
pericoloso. Il costruttore non può essere considerato responsabile
per eventuali danni derivanti da uso improprio o erroneo.
•L’apparecchio è munito di una batteria NiMH. Nel rispetto
dell’ambiente, raccomandiamo di non smaltire la batteria
esausta nei rifiuti domestici, ma di consegnarla ad un
apposito centro di raccolta.
•Far rimuovere la batteria da personale tecnico qualificato o
dal centro di trattamento/recupero.
•Non esporre la batteria ad eccessiva umidità o al contatto
con sostanze liquide.
• Tenere la batteria a debita distanza da campi magnetici, fonti
di calore e fiamme libere.
•Pericolo di graffi o tagli. Se un accessorio è danneggiato non
utilizzarlo ma sostituirlo immediatamente.
•Se si è portatori di pacemaker, consultare prima dell’utilizzo
il proprio medico.
• Non utilizzare l’apparecchio in presenza di ferite, irritazioni o
malattie della pelle.
Importante
•Dopo ogni utilizzo eseguire la pulizia e disinfezione degli
accessori usati.
MODALITÀ D’USO
COMPONENTI
1 Maniswiss Professional (651.01)
2 Maniswiss Cordless (651.02)
3 Mod. 651.01: pulsanti accensione / senso di rotazione /
selezione velocità / spegnimento
4 Mod. 651.02: selettore accensione / spegnimento
5 Presa per alimentatore
6 Protezione trasparente (solo per Mod. 651.01)
7 Cono in zaffiro grana fine
8 Cono in zaffiro grana grossa
9 Cono in zaffiro lungo (solo Mod. 651.01)
10 Disco in zaffiro grana fine
11 Disco in zaffiro grana grossa (solo Mod. 651.01)
12 Cono in feltro
13 Spazzola (solo per Mod. 651.01)
14 Fresa ad ago (solo per Mod. 651.01)
15 Fresa in zaffiro rotonda
16 Fresa fiamma
17 Fresa cilindrica
18 Supporto e tubi smerigliatori grana grossa, media e fine
(Mod. 651.01)
19 Mandrino per montaggio altri accessori (solo per Mod.
651.01)
20 Scalzapellicine (solo per Mod. 651.01)
21 Trasformatore
22 Valigetta alluminio (solo per Mod. 651.01)
23 Cofanetto (solo per Mod. 651.02)
ALIMENTAZIONE DI RETE
Collegare il trasformatore (fig.1 - rif. 21) con l’apparecchio
infilando la spina nella relativa presa dell’apparecchio (fig.1 - rif.5).
Collegare il trasformatore alla presa di corrente.
ACCENSIONE E SPEGNIMENTO
Modello 651.01: Premere uno dei due pulsanti
(fig.1 - rif.3) a seconda del senso di rotazione desiderato.
L’apparecchio si avvia a 3500 giri/minuto. Pressioni
successive dello stesso pulsante variano la velocità di
rotazione alzandola a 6000, 8500 e 11000 giri/minuto, quindi
rallentandola a 8500, 6000 e 3500 giri/minuto (fig.2).
Per spegnerlo premere l’altro tasto (fig.1 - rif.3).
Modello 651.02: L’accensione e lo spegnimento
dell’apparecchio avviene agendo sull’interruttore
(fig.1 - rif.4). È possibile selezionare due diverse velocità di
rotazione: 4500 e 6000 giri/minuto.
RICARICA DELLA BATTERIA (Mod. 651.02)
•Prima di utilizzare l’apparecchio la prima volta e
successivamente quando si scarica dopo l’utilizzo caricare
la batteria per 12 ore.
•Spegnere l’apparecchio con l’interruttore (fig.1 - rif.4). Il
caricamento della batteria è possibile solo ad apparecchio
spento.
•Collegare il trasformatore (fig.1 - rif.21) con l’apparecchio
infilando la spina nella relativa presa dell’apparecchio (fig.1
- rif.5).
•Collegare il trasformatore alla presa di corrente.
•Ricaricare la batteria solo quando si nota una netta
diminuzione di potenza dell’apparecchio.
•A batteria completamente carica, l’apparecchio può essere
usato per 60 minuti senza collegamento alla rete elettrica.
•L’apparecchio può funzionare sia con alimentazione di rete
che in modalità cordless (senza cavo).
•
Se l’apparecchio, a batteria completamente scarica, non dovesse
funzionare con l’alimentazione dalla rete, spegnere l’apparecchio,
caricare la batteria per cinque minuti circa e riaccendere
l’apparecchio collegato alla rete.
SMONTAGGIO E MONTAGGIO
DEGLI ACCESSORI
• Eseguire questa operazione sempre ad apparecchio spento.
•Smontare l’accessorio dall’apparecchio tirandolo. Per
montarlo, spingerlo nella sua sede fino in fondo (fig.3).
• Modello 651.01: I tubi smerigliatori sono inseriti a pressione
sul supporto. Aiutarsi eventualmente con un attrezzo per il
loro smontaggio (fig.4).
CONSIGLI PER L’USO
- Si raccomanda di usare gli accessori puliti e disinfettati.
- La pelle deve essere asciutta. Non lavare i piedi o le mani
giusto prima di eseguire il lavoro.
ACCORCIARE LE UNGHIE
Utilizzare il disco in zaffiro grana fine (fig.1 - pos.10). Una
cura regolare le renderà più robuste.
Rinunciando definitivamente a forbici e pinzette potete agire
con più precisione e prevenire quindi le unghie incarnate.
UNGHIE INCARNITE
Utilizzare la fresa ad ago (fig.1 - pos.14) o la fresa a fiamma
(fig.1 - pos.16) per curare e prevenire le unghie incarnate.
Procedere per gradi, con delicatezza, con la mano ben ferma.
CALLI E OCCHI DI PERNICE
Utilizzare il cono in zaffiro a grana fine (fig.1 - pos.7)
rimuovere la pelle dura dalle zone dove eliminare calli o occhi
di pernice.
Finire il lavoro con la fresa in zaffiro rotonda (fig.1 - pos.15).
DURONI E CALLOSITÀ
Passare il cono in zaffiro a grana grossa (fig.1 - pos.8) su tutta
14
la superficie da curare e ripetere l’operazione più volte fino alla
completa scomparsa di callosità o duroni. Per aree particolrmente
estese utilizzare il cono in zaffiro lungo (fig.1 - pos.9)
PELLE ATTORNO ALLE UNGHIE
Per rimuovere la pelle morta attorno alle unghie,
particolarmente quelle dei piedi, utilizzare la fresa a fiamma
(fig.1 - pos.16).
SUPERFICIE DELLE UNGHIE
Utilizzare la fresa cilindrica (fig.1 - pos.17) per ridurre la
superficie troppo spessa delle unghie dei piedi. Per lisciare la
superficie delle stesse ed eliminarne le asperità utilizzare il
cono in feltro (fig.1 - pos.12).
PELLE SULLA MEZZALUNA
DELLE UNGHIE
Questo lavoro va fatto sulla pelle umida.
Per liberare la mezzaluna dalla pellicina, utilizzare lo
scalzapellicine (fig.1 - pos.20) (solo mod.651.01). La punta non
ruota ma esegue un movimento avanti-indietro.
LUCIDATURE DELLE UNGHIE
Per lucidare sia le unghie naturali che quelle artificiali, utilizzare
la spazzola (fig.1 - pos.13) (solo mod.651.01).
TRATTAMENTO UNGHIE ARTIFICIALI
Per accorciare e modellare le unghie artificiali, utilizzare i tubi
smerigliatori montati sull’apposito supporto
(fig.1 - pos.18) (solo mod.651.01).
IMPIEGO ACCESSORI DI ALTRI
APPARECCHI
Per montare accessori di altri apparecchi utilizzare l’apposito
mandrino (fig.1 - pos.19) (solo mod.651.01).
PROTEZIONE CONTRO LA POLVERE
DELLE UNGHIE
Per ripararsi dalla polvere che si produce durante il trattamento
delle unghie, utilizzare l’apposita protezione trasparente (fig.1
- pos.6) (solo mod.651.01)
PULIZIA E MANUTENZIONE
Eseguire la pulizia e la manutenzione dopo ogni utilizzo.
•Qualsiasi operazione di manutenzione o sostituzione va
eseguita ad apparecchio SPENTO e scollegato
dall’alimentazione.
• Dopo ogni uso, togliere l’accessorio e l’eventuale protezione
di plastica trasparente (fig.1 - pos.6).
• Pulire gli accessori utilizzati con alcool denaturato e spazzola
oppure sterilizzarli in acqua bollente o con appositi
apparecchi sterilizzatori.
•ATTENZIONE: Non immergere o bagnare con acqua
l’apparecchio completo. Solo gli accessori e la protezione
trasparente sono lavabili con acqua (fig.5).
•Pulire il corpo dell’apparecchio con un panno morbido,
eventualmente leggermente umido. Non utilizzare in nessun
caso solventi o detergenti abrasivi!
SMALTIMENTO
• L’apparecchio andrà smaltito nel rispetto delle norme di tutela
dell’ambiente.
GARANZIA
VALERA garantisce l’apparecchio da Voi acquistato alle
seguenti condizioni:
1. Sono valide le condizioni di garanzia stabilite dal nostro
distributore ufficiale nel paese di acquisto. In Svizzera e nei
paesi dove è in vigore la direttiva europea 44/99/CE il
periodo di garanzia è di 24 mesi per un uso domestico e
di 12 mesi per un uso professionale o analogo. Il periodo
di garanzia parte dalla data di acquisto dell’apparecchio.
Come data di acquisto fa stato la data risultante o dal
presente certificato di garanzia debitamente compilato e
timbrato dal venditore o dal documento di acquisto.
2. La garanzia è applicabile solo dietro presentazione del
presente certificato di garanzia o del documento di
acquisto.
3. La garanzia copre l’eliminazione di tutti quei difetti insorti
durante il periodo di garanzia dovuti a comprovati difetti di
materiali o di fabbricazione. L’eliminazione dei difetti
dell’apparecchio può avvenire o riparandolo o sostituendo
il prodotto stesso. La garanzia non copre difetti o danni
causati da allacciamento alla rete elettrica non conforme
alle norme, da uso improprio del prodotto come anche da
non osservanza delle Norme d’Uso.
4. È esclusa ogni altra rivendicazione di qualsiasi natura, in
particolare di risarcimento di eventuali danni al di fuori
dell’apparecchio, eccettuata la eventuale responsabilità
espressamente stabilita dalle leggi vigenti.
5. Il servizio di garanzia viene eseguito senza addebito; esso
non costituisce un prolungamento o un nuovo inizio del
periodo di garanzia.
6. La garanzia decade se l’apparecchio viene manomesso o
riparato da persone non autorizzate.
In caso di guasto, ritornate l’apparecchio ben imballato e con
il certificato di garanzia regolarmente datato e timbrato dal
venditore a uno dei nostri Centri Assistenza autorizzati o al
Vostro negoziante che provvederà a inviarlo all’importatore
ufficiale per la riparazione in garanzia.
15
Il simbolo sul prodotto o sulla confezione indica che il
prodotto non deve essere considerato come un normale rifiuto
domestico, ma deve essere portato nel punto di raccolta
appropriato per il riciclaggio di apparecchiature elettriche ed
elettroniche. Provvedendo a smaltire questo prodotto in modo
appropriato, si contribuisce a evitare potenziali conseguenze
negative per l’ambiente e per la salute, che potrebbero derivare
da uno smaltimento inadeguato del prodotto.
Per informazioni più dettagliate sul riciclaggio di questo
prodotto, contattare l’ufficio comunale, il servizio locale di
smaltimento rifiuti o il negozio in cui è stato acquistato il
prodotto.
VALERA è un marchio registrato della
Ligo Electric S.A. - Svizzera
Questo apparecchio è conforme alle direttive europee
2004/108/CE, 2009/125/CE, 2006/95/CE
ed al regolamento (CE) N. 1275/2008.
INSTRUCCIONES DE USO
Lea con atención estas instrucciones y consérvelas cuidadosamente, ya que contienen información impor tante sobre la
seguridad y el uso del aparato.
Disponibles también en www.valera.com
CONSEJOS DE SEGURIDAD
•Importante: para garantizar una protección suplementaria, se
aconseja colocar en la instalación eléctrica de alimentación del
aparato, un interruptor diferencial con una corriente de intervención
que no supere los 30 mA. Para mayores informaciones, dirigirse al
electrotécnico de confianza.
•Antes de usar el aparato, controle que esté bien seco.
•ATENCIÓN: no utilizar este aparato cerca de bañeras, lavabos u
otros recipientes que contengan agua.
•Este aparato puede ser utilizado por niños a partir de los 8 años de
edad y también por personas con capacidades físicas, sensoriales o
mentales reducidas, o carentes de experiencia y de conocimiento,
siempre que lo hagan bajo las instrucciones y la vigilancia de una
persona que les haya explicado el modo de uso del aparato y los
peligros que puede implicar.
•Los niños no deben jugar con el aparato.
•La limpieza y el mantenimiento no deben ser efectuados por los niños
sin vigilancia.
•Cuando el secador de pelo se utiliza en el baño, desenchúfelo
después de terminar. La proximidad con el agua es una fuente de
peligro, incluso cuando el secador está apagado.
•No utilice el aparato si presenta alguna anomalia, si se ha caído,
si el cable de alimentación está dañado. Y, no intente reparar un
aparato eléctrico usted mismo, confielo a un reparador oficial.
•Conecte el aparato sólo a redes de corriente alterna y asegúrese de que la tensión de red sea compatible con la indicada en
el aparato.
•No sumerja el aparato en agua ni otros líquidos.
•No apoye el aparato en superficies desde donde pueda caerse dentro del agua u otros líquidos.
•Si el aparato se cae en el agua, no intente recuperarlo: desconecte el enchufe de la toma de corriente.
•Apague el aparato al terminar de utilizarlo y desconecte su enchufe de la toma de corriente. No tire del cable para extraer el
enchufe de la toma de corriente, ni desconecte el aparato con las manos mojadas.
•No enrolle el cable alrededor del aparato. Controle periódicamente el cable y asegúrese de que no esté dañado.
•Para evitar un sobrecalentamiento peligroso del aparato, se recomienda desenrollar completamente el cable de alimentación.
• Si el cable está dañado, debe ser sustituido por el fabricante, por el servicio de asistencia técnica o por un técnico autorizado
para garantizar la seguridad.
16
Español
•Este aparato ha sido proyectado exclusivamente para la
manicura y la pedicura. Todo otro uso debe considerarse
impropio y, por consiguiente, peligroso. El fabricante declina
toda responsabilidad por daños derivados de un uso
impropio o incorrecto.
•El aparato está provisto de una batería NiMH. Para respetar
el ambiente recomendamos no tirar la batería agotada junto
con los desechos domésticos; en cambio, debe ser
entregada en un centro receptor específico.
•Hacer retirar la batería a personal técnico calificado o al
centro de tratamiento/recuperación.
• No exponer la batería a humedad excesiva o al contacto con
sustancias líquidas.
•Mantener la batería a la debida distancia de campos
magnéticos, fuentes de calor y llamas libres.
•Peligro de arañazos o cor tes. No utilice los accesorios si
están dañados, sustitúyalos inmediatamente.
•Si lleva un marcapasos, consulte con su médico antes de
usar el aparato.
•No utilice el aparato si tiene alguna herida, irritación o
enfermedad de la piel.
Importante
•Limpie y desinfecte los accesorios después de cada uso.
MODALIDAD DE USO
COMPONENTES
1 Maniswiss Professional (651.01)
2 Maniswiss Cordless (651.02)
3 Mod. 651.01: teclas de encendido / sentido de rotación
/ selección de velocidad / apagado
4 Mod. 651.02: selector de encendido / apagado
5 Toma de alimentación
6 Protección transparente (sólo para Mod. 651.01)
7 Cono de zafiro de grano fino
8 Cono de zafiro de grano grueso
9 Cono de zafiro largo (sólo para Mod. 651.01)
10 Disco de zafiro de grano fino
11 Disco de zafiro de grano grueso (sólo para
Mod. 651.01)
12 Cono de fieltro
13 Cepillo (sólo para Mod. 651.01)
14 Fresa de aguja (sólo para Mod. 651.01)
15 Fresa de zafiro redonda
16 Fresa llama
17 Fresa cilíndrica
18 Soporte y cilindros esmeriladores de grano grueso,
medio y fino (Mod. 651.01)
19 Mandril para montar otros accesorios (sólo para Mod.
651.01)
20 Cortacutículas (sólo para Mod. 651.01)
21 Alimentador
22 Maletín de aluminio (sólo para Mod. 651.01)
23 Estuche (sólo para Mod. 651.02)
ALIMENTACIÓN DE RED
Enchufe la clavija del alimentador (21, fig. 1) en la toma del
aparato (5, fig. 1). Conecte el alimentador a la toma de corriente.
ENCENDIDO Y APAGADO
Modelo 651.01: Pulse una de las dos teclas (3fig. 1) según el
sentido de rotación deseado. El aparato se enciende a 3500
rpm. Pulse en secuencia la misma tecla para aumentar la
velocidad de rotación a 6000, 8500 y 11000 rpm y reducirla
a 8500, 6000 y 3500 rpm de forma cíclica (fig. 2).
Para apagar el aparato, pulse la otra tecla (3, fig. 1).
Modelo 651.02: El aparato posee un interruptor de
encendido y apagado (4, fig. 1). Dispone de dos velocidades
de rotación: 4500 y 6000 rpm.
RECARGA DE LA BATERÍA (Mod. 651.02)
• Antes de utilizar el aparato por primera vez y siempre que se
descargue con el uso, cargue la batería durante 12 horas.
•Apague el aparato con el interruptor (4, fig. 1). Para cargar
la batería, el aparato debe estar apagado.
•Enchufe la clavija del alimentador (21, fig. 1) en la toma del
aparato (5, fig. 1).
•Conecte el alimentador a la toma de corriente.
•Recargue la batería sólo cuando la potencia del aparato se
reduzca sensiblemente.
•Con la batería completamente cargada, el aparato puede
utilizarse durante 60 minutos sin conectarlo a la red eléctrica.
•El aparato puede funcionar con alimentación de red o sin
cable.
•Si el aparato, con la batería completamente cargada, no
funciona con la corriente de red, apáguelo, cargue la batería
durante cinco minutos y vuelva encenderlo conectado a la red.
DESMONTAJE Y MONTAJE
DE LOS ACCESORIOS
•Efectúe esta operación siempre con el aparato apagado.
• Tire del accesorio para desmontarlo. Para volverlo a montar,
introdúzcalo en la sede y presione a fondo (fig. 3).
•Modelo 651.01: Los cilindros esmeriladores encajan a
presión en el soporte. Si es necesario, utilice una
herramienta para desmontarlos (fig. 4).
CONSEJOS DE USO
- Se recomienda utilizar accesorios limpios y esterilizados.
- La piel debe estar seca. No se lave los pies ni las manos
antes de iniciar el tratamiento.
ACORTAR LAS UÑAS
Utilice el disco de zafiro de grano fino (10, fig. 1). Cuide sus
uñas con regularidad para fortalecerlas.
Renunciando definitivamente a las tijeras y los cortaúñas,
podrá trabajar con precisión y prevenir las uñas encarnadas.
UÑAS ENCARNADAS
Utilice la fresa de aguja (14, fig. 1) o la fresa llama (16, fig.
1) para tratar y prevenir las uñas encarnadas. Proceda
gradualmente, con delicadeza y mano firme.
CALLOS Y OJOS DE GALLO
Utilice el cono de zafiro de grano fino (7, fig. 1) para eliminar
la piel muerta de los callos y los ojos de gallo.
Para terminar el tratamiento, utilice la fresa de zafiro redonda
(15, fig. 1).
DUREZAS Y CALLOSIDADES
Pase el cono de zafiro con grano grueso (8, fig. 1) sobre la
superficie a tratar y repita la operación varias veces hasta que
la dureza o callosidad desaparezca. En las zonas
particularmente amplias, utilice el cono de zafiro largo
(9, fig. 1).
PIEL ALREDEDOR DE LAS UÑAS
Para eliminar la piel muerta alrededor de las uñas,
especialmente en los pies, utilice la fresa llama
(16, fig. 1).
17
SUPERFICIE DE LAS UÑAS
Utilice la fresa cilíndrica (17, fig. 1) para reducir el grosor
excesivo de las uñas de los pies. Para alisar la superficie y
eliminar las asperezas, utilice el cono de fieltro (12, fig. 1).
CUTÍCULA DE LAS UÑAS
Para eliminar la cutícula, la piel debe estar húmeda.
Utilice el cortacutículas (20, fig. 1) (sólo para mod.651.01).
La punta no gira, se desplaza adelante y atrás.
PULIR LAS UÑAS
Para pulir las uñas naturales y artificiales, utilice el cepillo (13,
fig. 1) (sólo para mod.651.01).
TRATAMIENTO DE UÑAS ARTIFICIALES
Para acortar y perfilar las uñas ar tificiales, utilice los cilindros
esmeriladores con el soporte (18, fig. 1) (sólo para
mod.651.01).
USO DE LOS ACCESORIOS
DE OTROS APARATOS
Si desea acoplar los accesorios de otros aparatos, utilice el
mandril (19, fig. 1). (sólo para mod.651.01).
PROTECCIÓN CONTRA EL POLVO
DE UÑAS
Utilice el protector transparente (6, fig. 1) (sólo para
mod.651.01) para protegerse del polvo que se desprende al
limar las uñas.
LIMPIEZA Y MANTENIMIENTO
Efectúe la limpieza y el mantenimiento después de cada uso.
• Todas las operaciones de mantenimiento o sustitución deben
realizarse con el aparato apagado y desconectado de la toma
de corriente.
•Después de cada uso, desmonte el accesorio y,
eventualmente, la protección de plástico transparente (6, fig
1).
• Limpie los accesorios utilizados con alcohol desnaturalizado
o esterilícelos con agua hirviendo o en un aparato
esterilizador.
•ATENCIÓN: No sumerja ni moje con agua el aparato. Sólo
se pueden lavar con agua los accesorios y la protección
transparente (fig. 5).
•Limpie la super ficie del aparato con un paño suave,
ligeramente húmedo. ¡No utilice disolventes ni detergente
abrasivos!
ELIMINACIÓN
•Respete las normas de protección del medio ambiente para
la eliminación del aparato.
GARANTÍA
VALERA garantiza el aparato que Ud. ha comprado bajo las
siguientes condiciones:
1. Son válidas las condiciones de garantía establecidas por
nuestro distribuidor oficial en el país de compra. En Suiza y
en los países en los que está en vigor la directiva europea
44/99/CE, el periodo de garatía es de 24 meses para uso
doméstico y de 12 meses para uso profesional o análogo. El
periodo de garantía inicia a partir de la fecha de compra del
equipo. Como fecha de compra se entiende la fecha del
certificado de garantía debidamente rellenado y sellado o la
fecha del documento de compra.
2. La garantía se aplica únicamente presentando este cer tificado
de garantía o el documento de compra.
3. La garantía cubre la eliminación de todos aquellos defectos
que han surgido durante el período de vigencia de la garantía,
ocasionados por defectos comprobados de materiales o de
fabricación. Los defectos del aparato se pueden eliminar
efectuando la reparación o sustituyendo el producto. La
garantía no cubre defectos o daños causados por la conexión
a la red eléctrica no conforme con las normas, por el uso
impropio del producto o por la inobservancia de las Normas de
Uso.
4.
No se incluye ningún otro tipo de reivindicación, en particular
indemnizaciones de posibles daños que no formen parte del
aparato, con excepción de la eventual responsabilidad
establecida expresamente por las leyes vigentes.
5. El servicio de garantía se efectúa sin cargo y no constituye un
prolongamiento o un nuevo inicio del período de garantía.
6. La garantía decae si el aparato se ha alterado, ha sido reparado
por personas no autorizadas.
En caso de avería, se debe entregar el aparato bien embalado y con
el certificado de garantía regularmente fechado y sellado por el
vendedor, a uno de nuestros Centros de Asistencia autorizados o
al vendedor, quien se encargará de remitirlo al importador oficial
para efectuar la reparación de la garantía.
Como consumidor de este artículo, goza Vd. de los derechos que
le reconoce la Ley de Garantías en la Venta de Bienes de Consumo
23/2003 (B.O.E. 11-07-03), en las condiciones que la misma
establece. Recuerde que la fecha acreditada mediante el
documento de compra, inicia el período de dos años previsto en
la Ley.
18
El símbolo en el producto o en su embalaje indica que
este producto no se puede tratar como desperdicios normales
de hogar. El producto con este indicativo se debe entregar en
el punto de recolección de equipos eléctricos y electrónicos
para reciclaje. Al asegurarse de que este producto se desecha
correctamente, usted ayudara a evitar posibles consecuencias
negativas para el medio ambiente y la salud publica, lo cual
podría ocurrir si este producto no se recicla de forma
adecuada. Para obtener información mas detallada sobre el
reciclaje de este producto, póngase en contacto con la
administración publica de su ciudad, servicio de desechos del
hogar o bien con la tienda o distribuidor donde lo compró.
VALERA es una marca registrada de
Ligo Electric S.A. - Suiza
Este aparato es conforme a las directivas europeas
2004/108/CE, 2009/125/CE, 2006/95/CE
y al reglamento (CE) N. 1275/2008.

GEBRUIKSAANWIJZING
Lees deze gebruiksaanwijzing zorgvuldig en bewaar hem goed. Deze bevat waardevolle adviezen met betrekking tot de
veiligheid en het gebruik van het apparaat.
Ook beschikbaar op www.valera.com
VEILIGHEIDSVOORSCHRIFTEN
•Belangrijk: om extra veiligheid te verzekeren, wordt aangeraden om
in de elektrische installatie die zorgt voor de stroomtoevoer van het
toestel een differentieelschakelaar te installeren met een
onderbrekingsstroom die niet hoger is dan 30 mA. Voor meer
informatie hieromtrent, neem contact op met uw vertrouwde
elektricien.
•Controleer voor gebruik van het apparaat of het goed droog is.
•LET OP: gebruik dit apparaat niet in de buurt van badkuipen,
wastafels of andere houders met water.
•Dit apparaat mag worden gebruikt door kinderen vanaf 8 jaar en
door personen met beperkte lichamelijke, zintuiglijke of geestelijke
vermogens of met weinig ervaring en/of kennis, mits deze
personen onder passend toezicht staan of geïnstrueerd zijn over
het gebruik van het apparaat en ze zich bewust zijn van de
bijbehorende gevaren.
•Kinderen mogen niet met het apparaat spelen.
•De reiniging en het onderhoud mogen niet zonder toezicht door
kinderen worden uitgevoerd.
•Als de haardroger in een badkamer wordt gebruikt, moet de
stekker na het gebruik uit het stopcontact worden gehaald,
aangezien de aanwezigheid van water ook een gevaar kann
vormen als de haardroger uitgeschakeld is.
•Gebruik uw haardroger niet als hij gevallen is of als het elektrisch
snoer beschadigd is. Probeer nooit zelf een elektrisch toestel te
herstellen, maar wend u steeds tot een erkend hersteller.
•Sluit het apparaat aan op wisselstroom en controleer of de netspanning overeenkomt met de spanning die op het apparaat
staat aangegeven.
•Dompel het apparaat nooit onder in water of andere vloeistoffen.
• Leg het apparaat nooit op een plek waar het gemakkelijk in water of andere vloeistoffen kan vallen.
• Probeer nooit een elektrisch apparaat dat in het water is gevallen, eruit te halen: trek meteen de stekker uit het stopcontact.
•Schakel het apparaat na gebruik altijd uit en haal de stekker uit het stopcontact. Trek de stekker nooit aan de kabel uit het
stopcontact en voer deze handeling niet uit met natte handen.
•Wikkel het snoer nooit rond het apparaat. Controleer regelmatig of de kabel niet beschadigd is.
• Om gevaar voor oververhitting te voorkomen, raden wij u aan de voedingskabel over de gehele lengte uit te rollen.
•Als de kabel beschadigd is, moet hij vervangen worden door de fabrikant,of door de technische dienst of in ieder geval door
een persoon met gelijkwaardige kwalificaties, om elk risico te voorkomen.
19
Nederlands
•Dit apparaat is uitsluitend ontworpen voor de manicure en
de pedicure. Ieder ander gebruik is oneigenlijk, en dus
gevaarlijk. De fabrikant kan niet aansprakelijk gesteld worden
voor eventuele schade die het gevolg is van oneigenlijk of
onjuist gebruik.
• Het apparaat is uitgerust met een NiMH batterij. In het belang
van het milieu adviseren wij om de lege batterij niet via het
gewone huishoudelijk afval af te danken, maar om deze naar
een speciaal afvalverzamelcentrum te brengen.
•Laat de batterij door gekwalificeerd technisch personeel of door
een verwerkings- of recyclecentrum verwijderen.
• Stel de batterij niet bloot aan vocht en laat hem niet in contact
komen met vloeistoffen.
•Houd de batterij op voldoende afstand van magnetische
velden, warmtebronnen en open vuur.
•Gevaar voor schrammen of sneetjes. Indien een accessoire
beschadigd is mag u het niet gebruiken maar dient u het
onmiddellijk te vervangen.
•Indien u een pacemaker heeft, uw huisarts raadplegen
voordat u dit apparaat in gebruik neemt.
•Gebruik het apparaat niet als u wondjes of een geïrriteerde
huid of een huidziekte hebt.
Belangrijk
•Maak, na elk gebruik, de gebruikte accessoires schoon en
desinfecteer ze.
GEBRUIKSVOORSCHRIFTEN
COMPONENTEN
1 Maniswiss Professional (651.01)
2 Maniswiss Cordless (651.02)
3 Mod. 651.01: knoppen voor inschakeling / draairichting
/ snelheidskeuze / uitschakeling
4 Mod. 651.02: keuzeknop inschakeling/uitschakeling
5 Stopcontact voor stroomvoorzieningstoestel
6 Doorzichtige beschermkap (alleen voor Mod. 651.01)
7 Saffierkegel, fijnkorrelig
8 Saffierkegel, grofkorrelig
9 Lange saffierkegel (alleen Mod. 651.01)
10 Saffierschijf, fijnkorrelig
11 Saffierschijf, grofkorrelig (alleen Mod. 651.01)
12 Kegel van vilt
13 Borsteltje (alleen voor Mod. 651.01)
14 Naaldfrees (alleen voor Mod. 651.01)
15 Frees van rond saffier
16 Vlamfrees
17 Cilindrische frees
18 Steun en polijstpijpjes grof-, middel- en fijnkorrelig
(Mod. 651.01)
19 Opzetstuk voor de montage van andere accessoires
(alleen voor Mod. 651.01)
20 Eeltverwijderaar (alleen voor Mod. 651.01)
21 Oplader
22 Aluminium koffertje (alleen voor Mod. 651.01)
23 Doosje (alleen voor Mod. 651.02)
NETVOEDING
Sluit de oplader (fig.1 - rif. 21) aan op het apparaat door de
stekker in het bij het apparaat horende stopcontact (afb.1 -
rif.5) te steken. Steek de stekker van de oplader in het
stopcontact.
INSCHAKELEN EN UITSCHAKELEN
Model 651.01: Druk op een van de twee knoppen (afb.1 -
ref.3) afhankelijk van de gewenste draairichting. Het apparaat
start op 3500 toeren/minuut. Door weer op dezelfde knop te
drukken wordt de draaisnelheid verhoogd tot 6000, 8500 en
11000 toeren/minuut, en vervolgens verlaagd tot 8500, 6000
en 3500 toeren/minuut (afb.2).
Om het apparaat uit te schakelen de andere toets indrukken
(afb.1 - ref.3).
Model 651.02: Het in- en uitschakelen van het apparaat gebeurt
met de schakelaar (afb.1 - ref.4). U kunt twee verschillende
draaisnelheden kiezen: 4500 en 6000 toeren/minuut.
OPLADEN VAN DE BATTERIJ
(Mod. 651.02)
•Voordat u het apparaat voor de eerste keer in gebruik neemt
en vervolgens wanneer de batterij na gebruik leeg is, de
batterij gedurende 12 uur opladen.
•Het apparaat uitschakelen met de schakelaar (afb.1 - ref.4).
De batterij kan alleen worden opgeladen wanneer het
apparaat is uitgeschakeld.
•Sluit de oplader (afb.1 - ref.21) aan op het apparaat door de
stekker in het bijbehorende stopcontact van het apparaat
(afb.1 - ref.5) te steken.
•Steek de stekker van de oplader in het stopcontact.
• Laad de batterij aleen op wanneer duidelijk is gebleken dat de
capaciteit van het apparaat verminderd is.
• Bij een volledig opgeladen batterij is het apparaat in staat om
maximaal 60 minuten zonder netvoeding te functioneren.
•Het apparaat kan zowel op de netvoeding werken als in de
modaliteit cordless (zonder kabel).
•Indien bij een volstrekt lege batterij het apparaat ook niet op
netvoeding wil werken, het apparaat uitschakelen, de batterij
ongeveer vijf minuten opladen en na aansluiting op het
elektriciteitsnet het apparaat weer inschakelen.
DEMONTAGE EN MONTAGE
VAN DE ACCESSOIRES
• Verricht deze handeling altijd als het apparaat uitgeschakeld is.
•Demonteer het accessoire door het van het apparaat te
trekken. Om het te monteren, drukt u het helemaal in de
zitting (afb.3).
•Model 651.01: De polijstpijpjes zitten onder druk op de
drager. Gebruik eventueel een gereedschap om ze te
demonteren (afb.4).
ADVIEZEN VOOR HET GEBRUIK
- Wij adviseren u schoongemaakte en gedesinfecteerde
accessoires te gebruiken.
- De huid moet droog zijn. Was uw voeten of handen niet direct
voordat u het apparaat gebruikt.
NAGELS KORTER MAKEN
Gebruik de schijf van fijnkorrelig saffier (afb.1 - pos.10). Een
regelmatige verzorging zal de nagels sterker maken.
Door scharen en pincette definitief op te geven kunt u preciezer
te werk gaan en ingegroeide nagels voorkomen.
INGEGROEIDE NAGELS
Gebruik de naaldfrees (afb.1 - pos.14) of de vlamfrees (afb.1
- pos.16) om uw nagels te verzorgen en om te voorkomen dat
ze ingroeien. Ga geleidelijk te werk, voorzichtig, met vaste
hand.
EELT EN EKSTEROGEN
Gebruik de fijnkorrelige saffierkegel (afb.1 - pos.7) om de
harde huid van de gebieden te verwijderen waar u eelt of
eksterogen weg wilt halen.
Maak het werk af met de ronde saffierfrees (afb.1 - pos.15).
20

EELTPLEKKEN EN EELTVORMING
Strijk met de grofkorrelige saffierkegel (afb.1 - pos.8) over
het gehele oppervlak dat u wilt behandelen en herhaal deze
handeling meerdere keren totdat alle eeltvorming of eeltplekken
verdwenen zijn. Voor bijzonder grote gebieden kunt u de lange
saffierkegel (afb.1 - pos.9) gebruiken.)
HUID ROND DE NAGELS
Om de dode huid rond de nagels te verwijderen, in het
bijzonder die van de tenen, gebruikt u de vlamfrees (afb.1 -
pos.16).
OPPERVLAK VAN DE NAGELS
Gebruik de cilindrische frees (afb.1 - pos.17) om het te dikke
oppervlak van de nagels van de tenen te verminderen. Om het
oppervlak van de nagels gladder te maken en oneffenheden te
verwijderen kunt u de vilten kegel (afb.1 - pos.12) gebruiken.
HUID OP DE HALVE MAAN VAN DE NAGELS
Deze handeling moet uitgevoerd worden op een vochtige huid.
Om de halve maan te ontdoen van het velletje kunt u het
bokkenpootje (afb.1 - pos.20) gebruiken (alleen mod.651.01).
De punt draait niet maar maakt een heen en weer gaande
beweging.
DE NAGELS GLANZEND MAKEN
Om zowel natuurlijke nagels als kunstnagels glad te maken,
gebruikt u het borsteltje (afb.1 - pos.13) (alleen mod. 651.01).
BEHANDELING VAN KUNSTNAGELS
Om kunstnagels korter te maken en te modelleren gebruikt u
de polijstaccessoires die op dedaarvoor bedoelde steun
(afb.1 - pos.18) gemonteerd zijn (alleen mod.651.01).
GEBRUIK VAN ACCESSOIRES
VAN ANDERE APPARATEN
Om accessoires van andere apparaten te monteren gebruikt u
het daarvoor bedoelde opzetstuk (afb.1 - pos.19) (alleen
mod.651.01).
BESCHERMING TEGEN HET STOF VAN
DE NAGELS
Om u te beschermen tegen het stof dat veroorzaakt wordt
tijdens de behandeling van de nagels, gebruikt u dedaarvoor
bedoelde doorzichtige beschermkap
(afb.1 - pos.6) (alleen mod.651.01)
REINIGING EN ONDERHOUD
Na ieder gebruik reinigen en onderhoud uitvoeren.
•Iedere willekeurige onderhouds- of vervangingshandeling
mag alleen uitgevoerd worden bij een UITGESCHAKELD en
van de oplader losgekoppeld apparaat.
•Verwijder, na elk gebruik, het accessoire en de eventuele
beschermkap van doorzichtig kunststof (afb.1 - pos.6).
• Maak de gebruikte accessoires schoon met gedenaturiseerde
alcohol en een borsteltje of steriliseer ze in kokend water of
met speciale sterilisatieapparatuur.
•LET OP: Het volledige apparaat nooit onderdompelen of nat
maken met water. Alleen de accessoires en de doorzichtige
beschermkap kunnen met water gewassen worden (afb.5).
•De behuizing van het apparaat met een zachte en eventueel
licht vochtige doek reinigen. Nooit oplosmiddelen of
schuurmiddelen gebruiken!
AFVALVERWERKING
•Het apparaat moet als afval verwerkt worden volgens de
geldende voorschriften ter bescherming van het milieu.
GARANTIE
Valera biedt volgende garantievoorwaarden:
1. Van toepassing zijn de garantievoorwaarden die door onze
officiële distributeur in het land van aankoop zijn
vastgesteld. In Zwitserland en in de landen waar de
Europese richtlijn 44/99/CE van kracht is, geldt een
garantieperiode van 24 maanden bij huishoudelijk gebruik
en van 12 maanden bij professioneel of soortgelijk gebruik.
De garantieperiode loopt vanaf de aankoopdatum van het
apparaat. De aankoopdatum is de datum die staat op dit
volledig ingevulde en door de verkoper gestempelde
garantiebewijs of op de aankoopbon.
2. De garantie is enkel van toepassing na voorlegging van het
certificaat of het bewijs van aankoop.
3. De garantie dekt het verwijderen van bewezen materiaal- of
fabricagefouten, tijdens de garantieperiode. Dit kan gebeuren
door reparatie of vervanging van het toestel. De garantie is
niet van toepassing in geval van schade door aansluiting op
een netwerk dat niet aan de officiële normen voldoet, noch
in geval van niet naleven van de gebruiksaanwijzing.
4. Elke andere schadeclaim van welke aard dan ook is
uitgesloten, in het bijzonder terugbetaling van schade
veroorzaakt door externe factoren, buiten degenen die
uitdrukkelijk bepaald zijn door de van kracht zijnde
wetgeving.
5. De garantie-service is gratis. Deze vertegenwoordigt geen
enkele verlenging noch vernieuwing van de garantie periode.
6. De garantie vervalt indien het toestel vervalst is of
gerepareerd werd door een niet erkende persoon.
In geval van defect, gelieve het toestel behoorlijk verpakt,
samen met het garantiebewijs (gedateerd en voorzien van de
stempel van de verkoper) terug te sturen naar één van de
officiële Service Centra, of te bezorgen aan de winkel waar het
toestel werd aangekocht. Zij zullen het nodige doen om uw
toestel onder garantie te laten herstellen.
21
Valera is een geregistreerd handelsmerk
van Ligo Electric SA
Het symbool op het product of op de verpakking wijst
erop dat dit product niet als huisafval mag worden behandeld. Het
moet echter naar een plaats worden gebracht waar elektrische en
elektronische apparatuur wordt gerecycled. Als u ervoor zorgt dat
dit product op de correcte manier wordt verwijderd, voorkomt u
mogelijk voor mens en milieu negatieve gevolgen die zich zouden
kunnen voordoen in geval van verkeerde afvalbehandeling. Voor
meer details in verband met het recyclen van dit product, neemt
u het best contact op met de gemeentelijke instanties, het bedrijf
of de dienst belast met het verwijderen van huishoudafval of de
winkel waar u het product hebt gekocht.
Dit apparaat voldoet aan de Europese richtlijnen
2004/108/EG, 2009/125/EG, 2006/95/EG
en aan de verordening (EG) nr. 1275/2008.
 Loading...