

Page 1
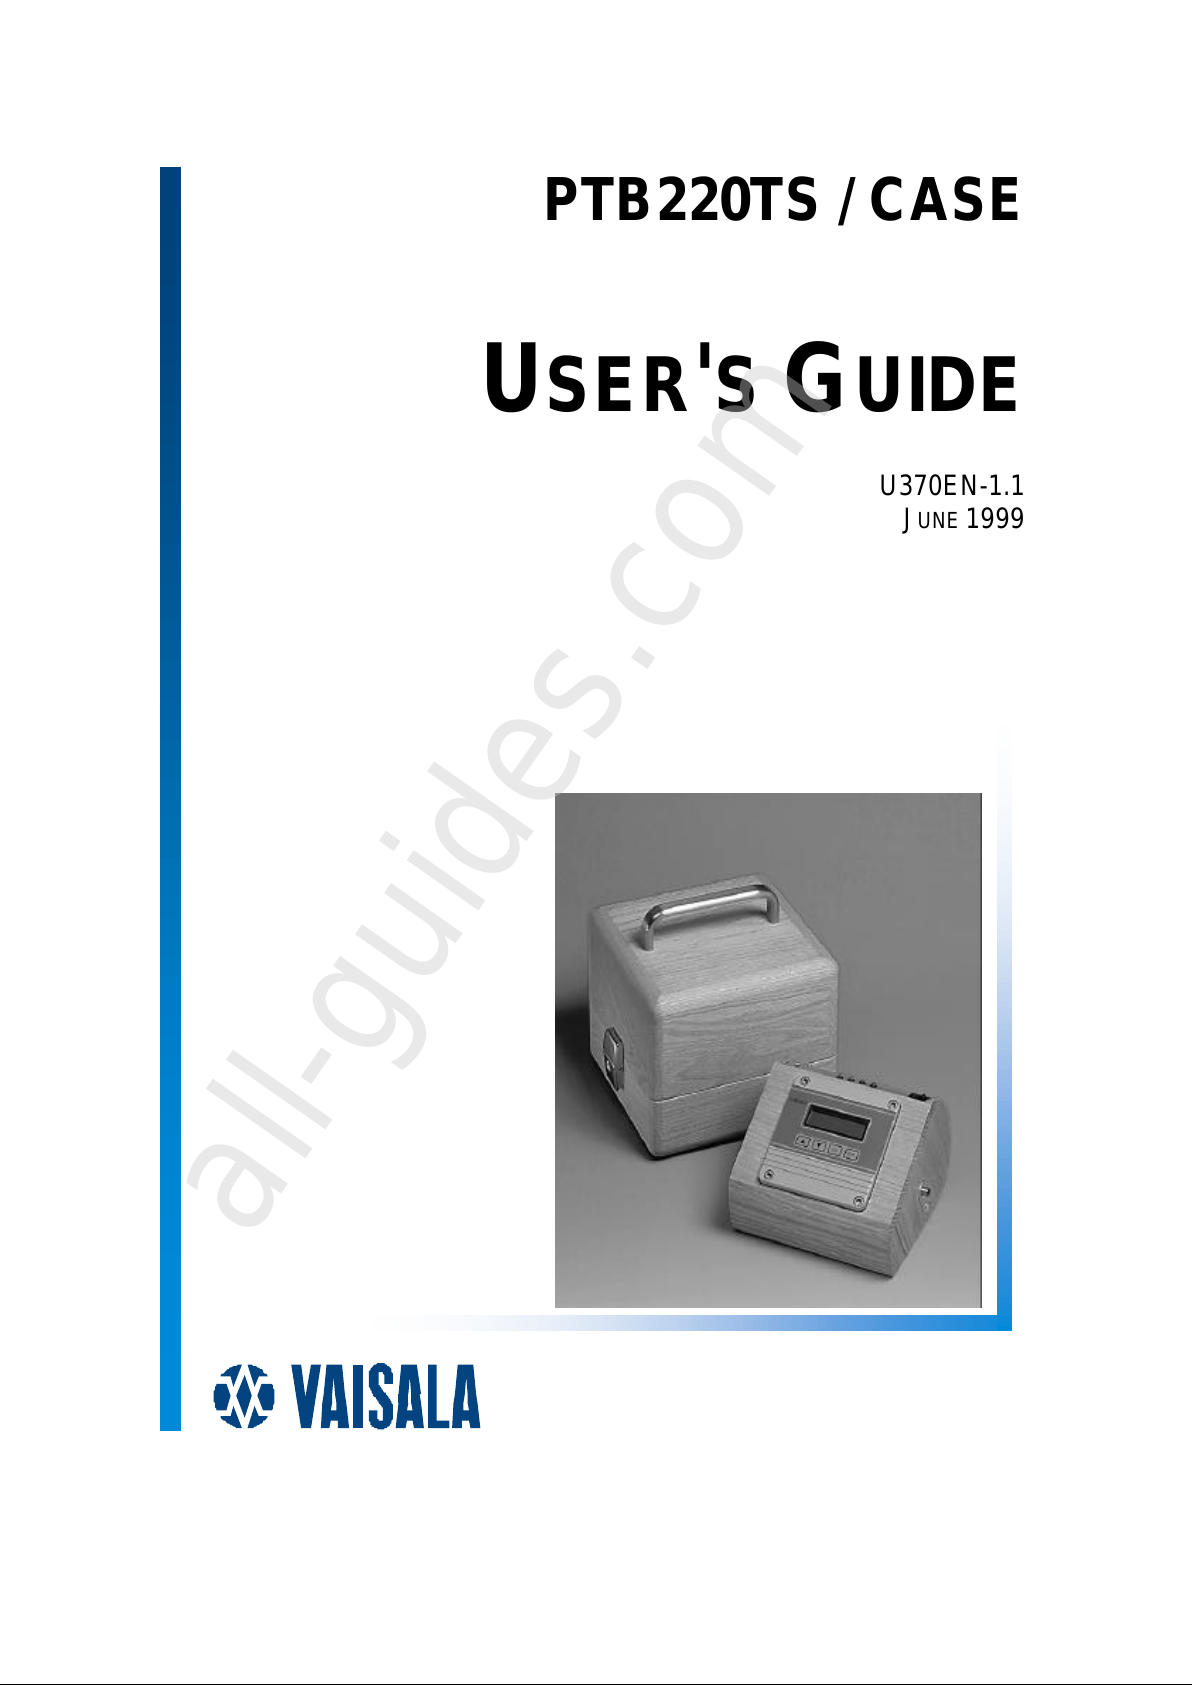
PTB220TS / CASE
USER'S GUIDE
U370EN-1.1
JUNE 1999
All manuals and user guides at all-guides.com
all-guides.com
Page 2

PUBLISHED BY
PUBLISHED BY
© Vaisala
1999
No part of this manual may be reproduced in any form or
by any means, electronic or mechanical (including
photocopying), nor may its contents be communicated to a
third party without prior written permission of the
copyright holder.
All manuals and user guides at all-guides.com
Page 3
Table of contents
PRODUCT DESCRIPTION................................................................................ 1
OPERATION ................................................................................................ 2
Operating voltage.................................................................... 2
Tilting frame............................................................................ 3
Battery..................................................................................... 3
RS232...................................................................................... 3
RS485...................................................................................... 4
LED Indicators......................................................................... 4
ASSEMBLING THE CASE AND AN EXISTING BAROMETER ........................... 5
TECHNICAL DATA........................................................................................... 7
Electronics............................................................................... 7
Electromagnetic compatibility................................................. 7
Battery..................................................................................... 7
Housing ................................................................................... 7
Accessories............................................................................. 7
All manuals and user guides at all-guides.com
Page 4
USER'S GUIDE___________________________________________________________________________
1 __________________________________________________________________________ U370EN-1.1
PRODUCT DESCRIPTION
The PTB220TS and a PTB220AxB2Ax barometer (order specified) are
assembled together at factory to become a Transfer/travelling standard.
It is also possible to assemble the customer's existing PTB220
barometer and separately ordered wooden case (PTB220CASE); see the
instructions on page 5. Please note, that there are certain requirements
for the PTB220 barometer to be compatible with the case. The
barometer should have the following features:
− 1, 2 or 3 pressure transducers
− class A accuracy
− local display
− RS232/485 serial interface
This guide gives the basic operating instructions of the PTB220TS. It
does not, however, replace the operating manual of the PTB220 series
digital barometers. For detailed operation instructions and descriptions
refer to the User's Guide of the PTB220.
The PTB220TS includes the following parts
• a wooden (oak) carrying case
• wide and comfortable carrying handle
• two key locks
• a space reserved for small parts and documents in the case lid
• tilting frame where the barometer is mounted for table-top use
• incorporated sealed lead acid battery (YUASA NP0.8-12)
• power cord for recharging from car cigarette lighter socket
• DC plug for a local mains adaptor cord
• pressure connectors: for 1/8" tubing and a 5 mm connector
• 9-pin sub D-connector (male)
• 6 pin 5 mm screw-terminal bus (female)
All manuals and user guides at all-guides.com
Page 5
USER'S GUIDE___________________________________________________________________________
U370EN-1.1___________________________________________________________________________2
OPERATION
Remove the PTB220TS from the package and connect a wall adapter to
recharge the battery. Switch the power on. The barometer is now ready
for use. For detailed operation instructions and descriptions refer to the
User's Guide of the PTB220 series digital barometers.
NOTE
The pressure port is closed, if the pressure connector is detached. For
measurement, the connector MUST be on place.
Operating voltage
DC voltage of 10...25 VDC is required to operate the barometer. A
power cord with a suitable plug-in connector is supplied with the
PTB220TS for use with a local power source. It is very important to
observe the polarity of the DC supply voltage.
NOTE
Negative terminal is in the center.
If the wall adapter is used, the barometer will operate from the mains
and at the same time recharge the internal lead battery of the
PTB220TS. If no adapter is used the PTB220 barometer will operate
using the internal lead battery.
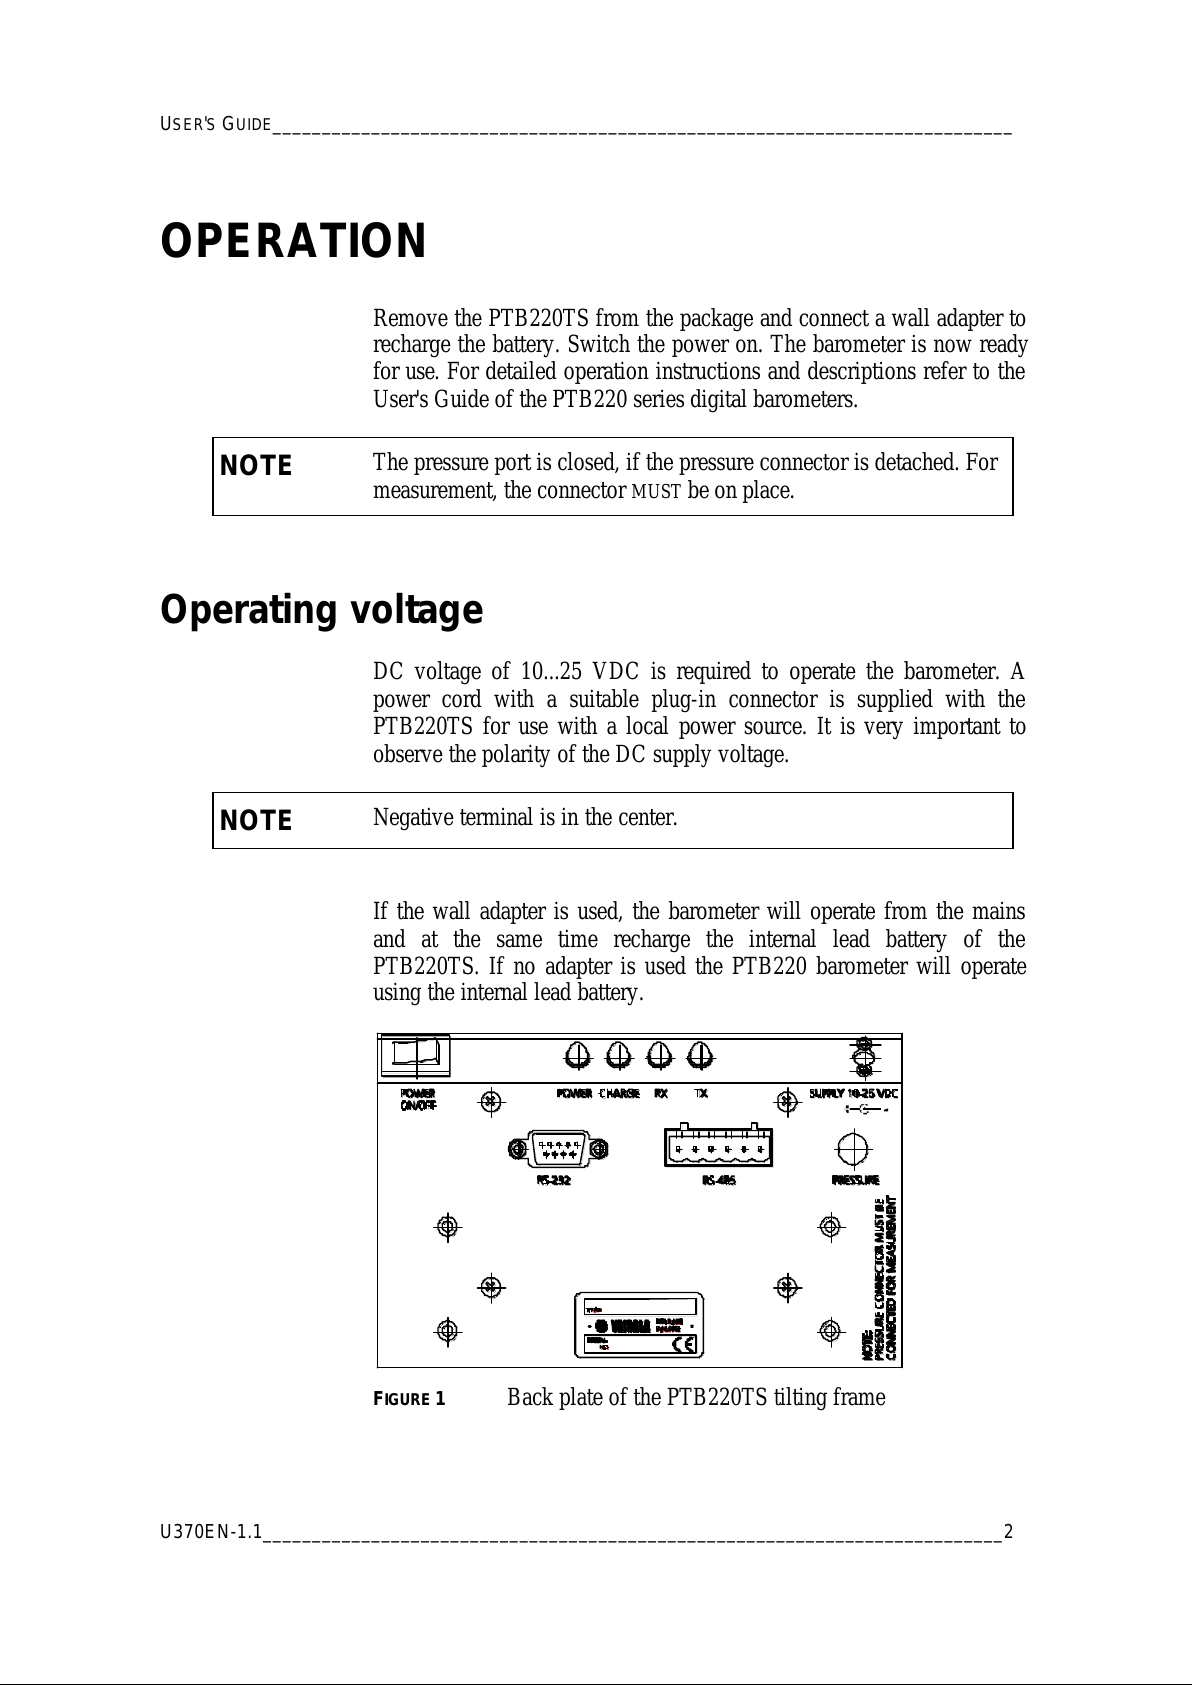
FIGURE 1 Back plate of the PTB220TS tilting frame
All manuals and user guides at all-guides.com
Page 6
OPERATION_____________________________________________________________________________
VAISALA ______________________________________________________________________________3
Tilting frame
The barometer is mounted in a separate wooden case, tilting frame. It
can be set to three different positions: horizontal, ~20° and ~40°. For a
tabletop use, the tilting frame can be removed from the case by lifting
upwards.
NOTE
The pressure connector has to be removed before closing the wooden
carrying case.
Battery
The battery gives a twelve-hour service period. The period is even
longer if the back light is not used. Recharging lasts about 12 hours and
is therefore typically done overnight.
Manufacturer: YUASA
Type: NP 0.8-12
NOTE
To prolong the battery lifetime it is recommended to recharge the
battery when not in use.
RS232
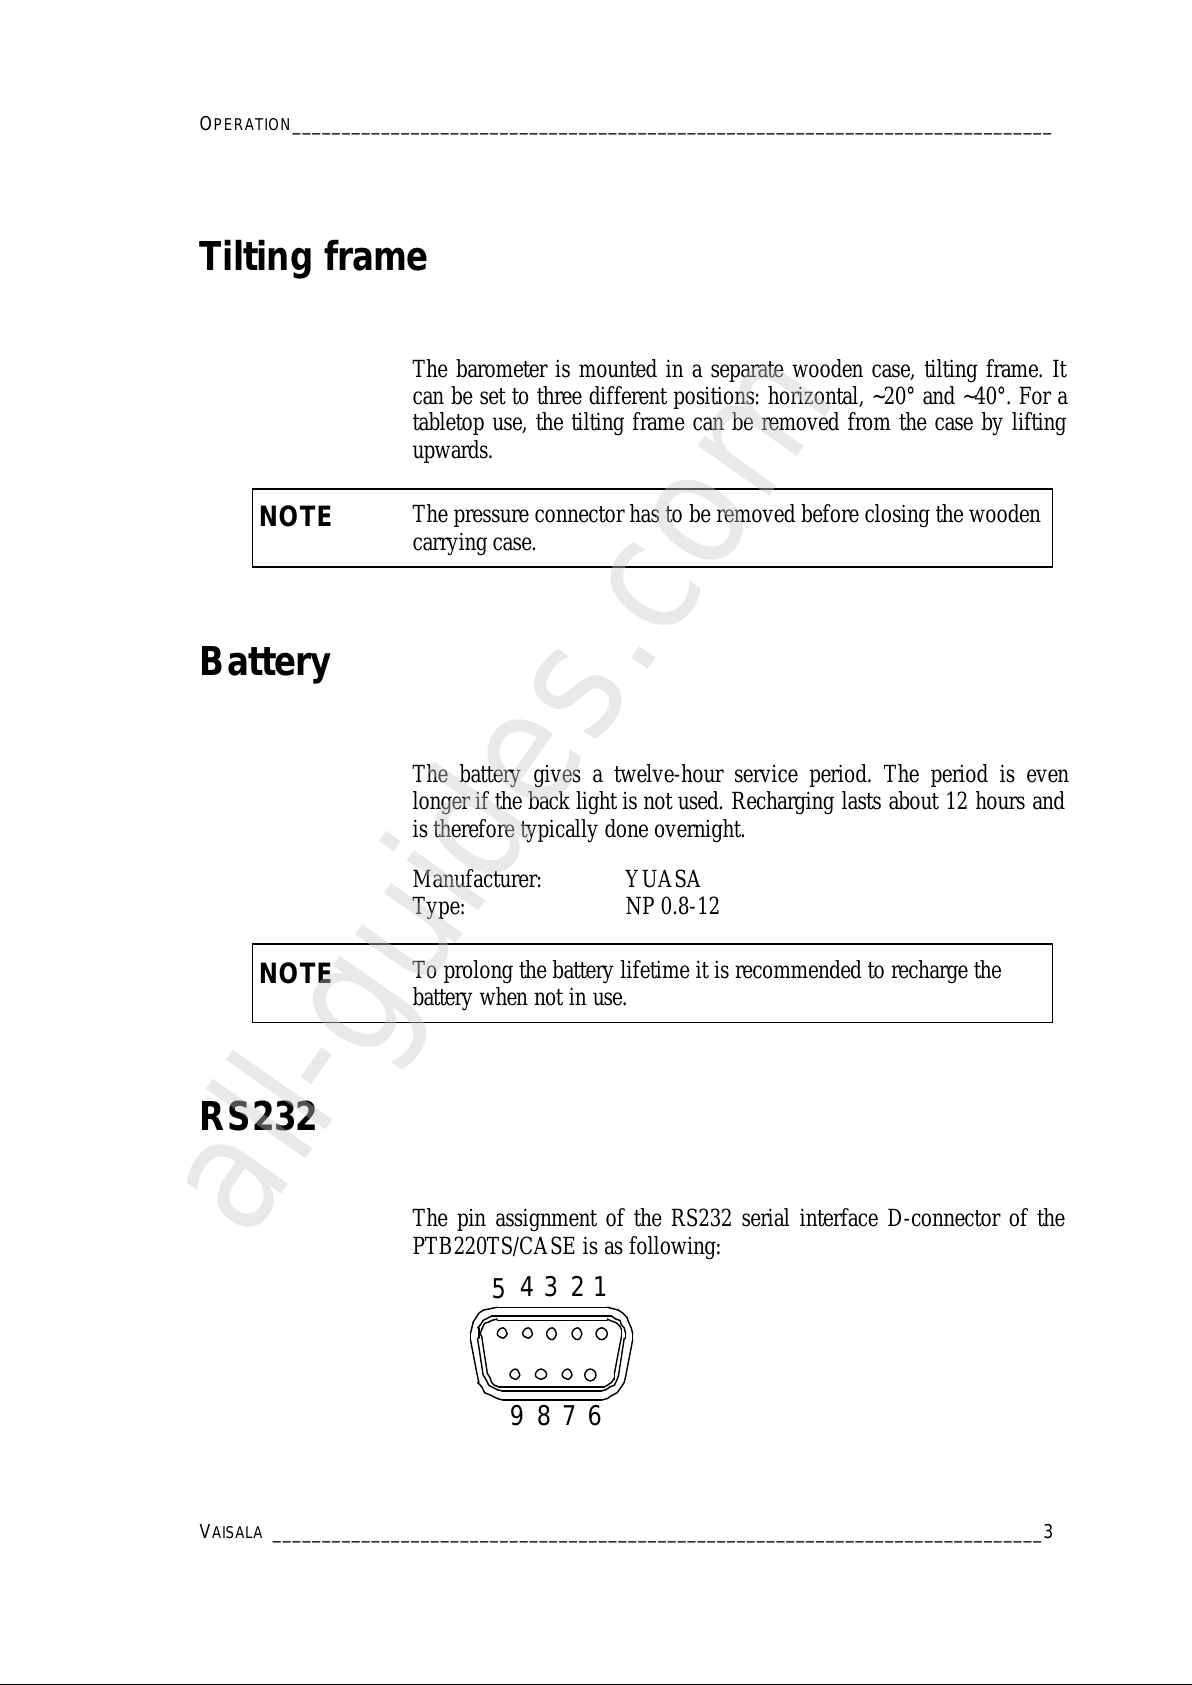
The pin assignment of the RS232 serial interface D-connector of the
PTB220TS/CASE is as following:
1234
5
6789
All manuals and user guides at all-guides.com
all-guides.com
Page 7
USER'S GUIDE___________________________________________________________________________
U370EN-1.1___________________________________________________________________________4
PIN SIGNAL
1 not used
2 TX
3 RX
4 not used
5 ground for RS 232
6 not used
7 not used
8 not used
9 not used
RS485
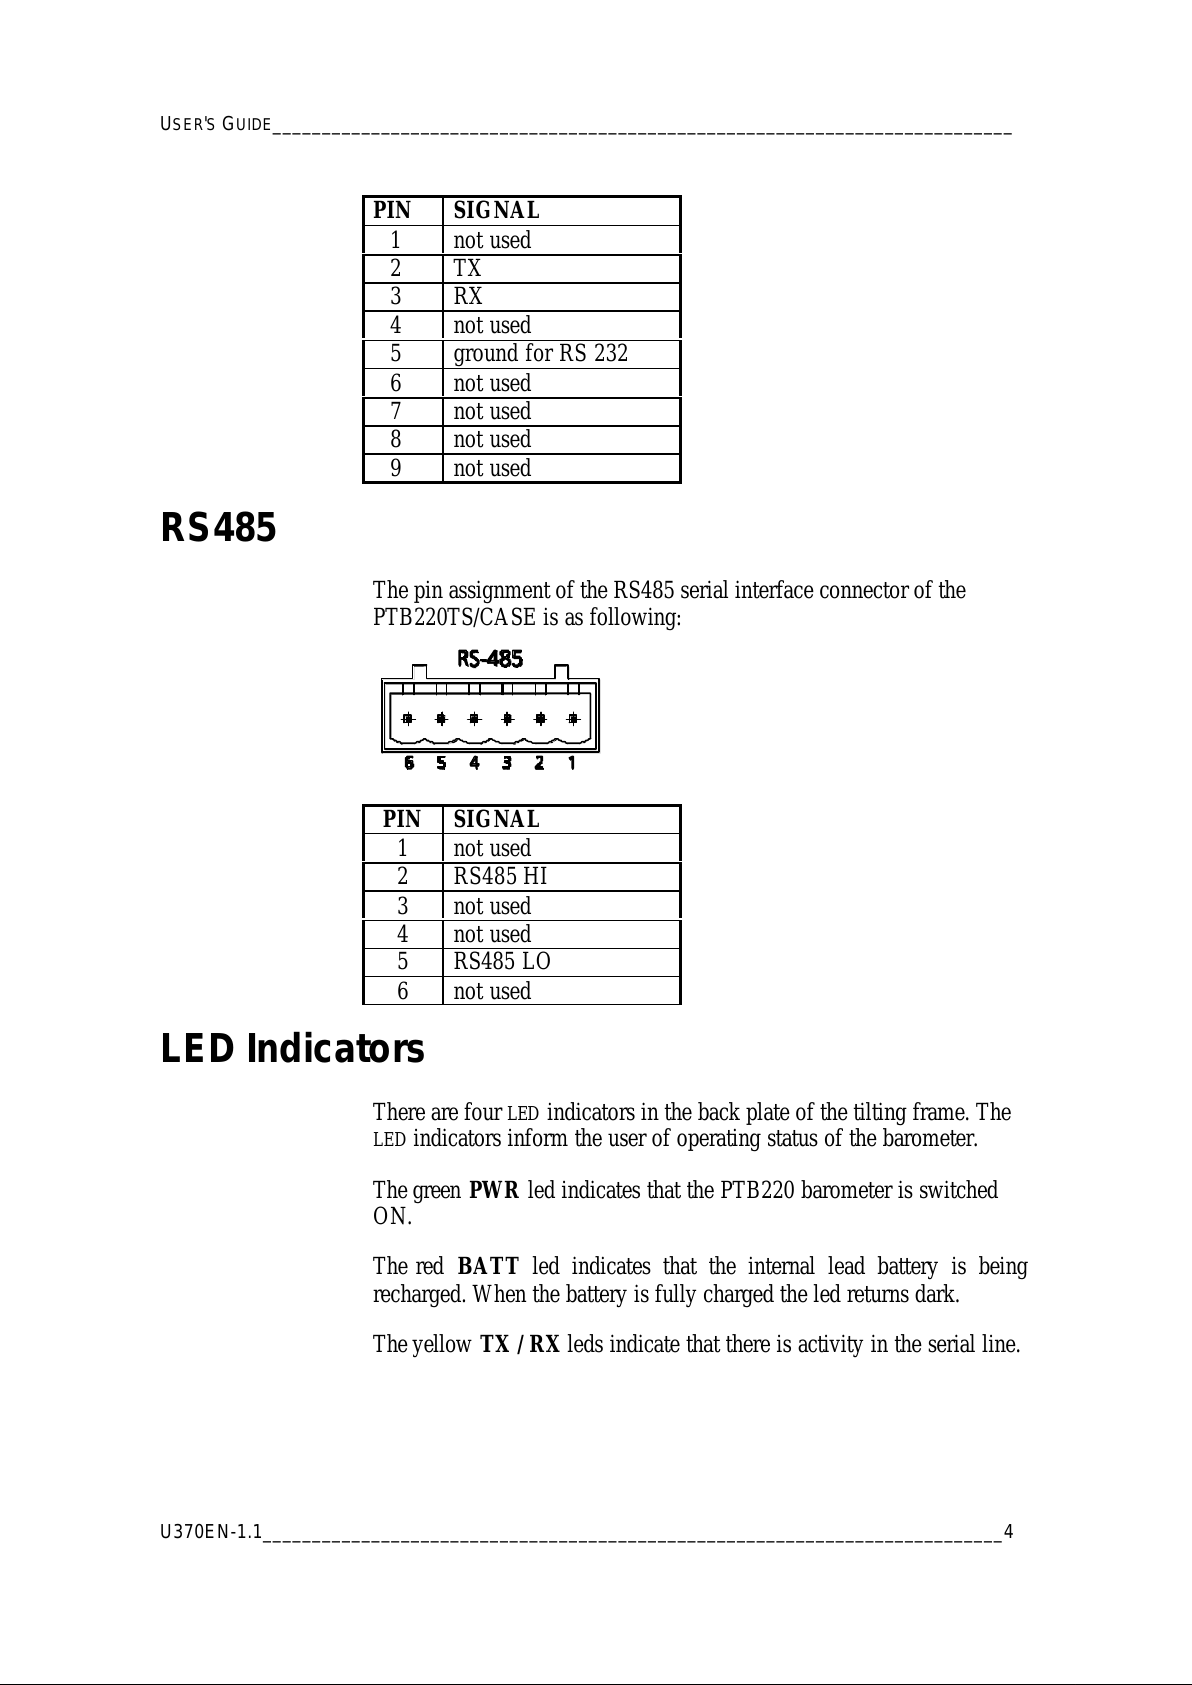
The pin assignment of the RS485 serial interface connector of the
PTB220TS/CASE is as following:
PIN SIGNAL
1 not used
2 RS485 HI
3 not used
4 not used
5 RS485 LO
6 not used
LED Indicators
There are four LED indicators in the back plate of the tilting frame. The
LED indicators inform the user of operating status of the barometer.
The green PWR led indicates that the PTB220 barometer is switched
ON.
The red BATT led indicates that the internal lead battery is being
recharged. When the battery is fully charged the led returns dark.
The yellow TX / RX leds indicate that there is activity in the serial line.
All manuals and user guides at all-guides.com
Page 8
ASSEMBLING THE CASE AND AN EXISTING BAROMETER_________________________________________
VAISALA ______________________________________________________________________________5
ASSEMBLING THE CASE AND AN
EXISTING BAROMETER
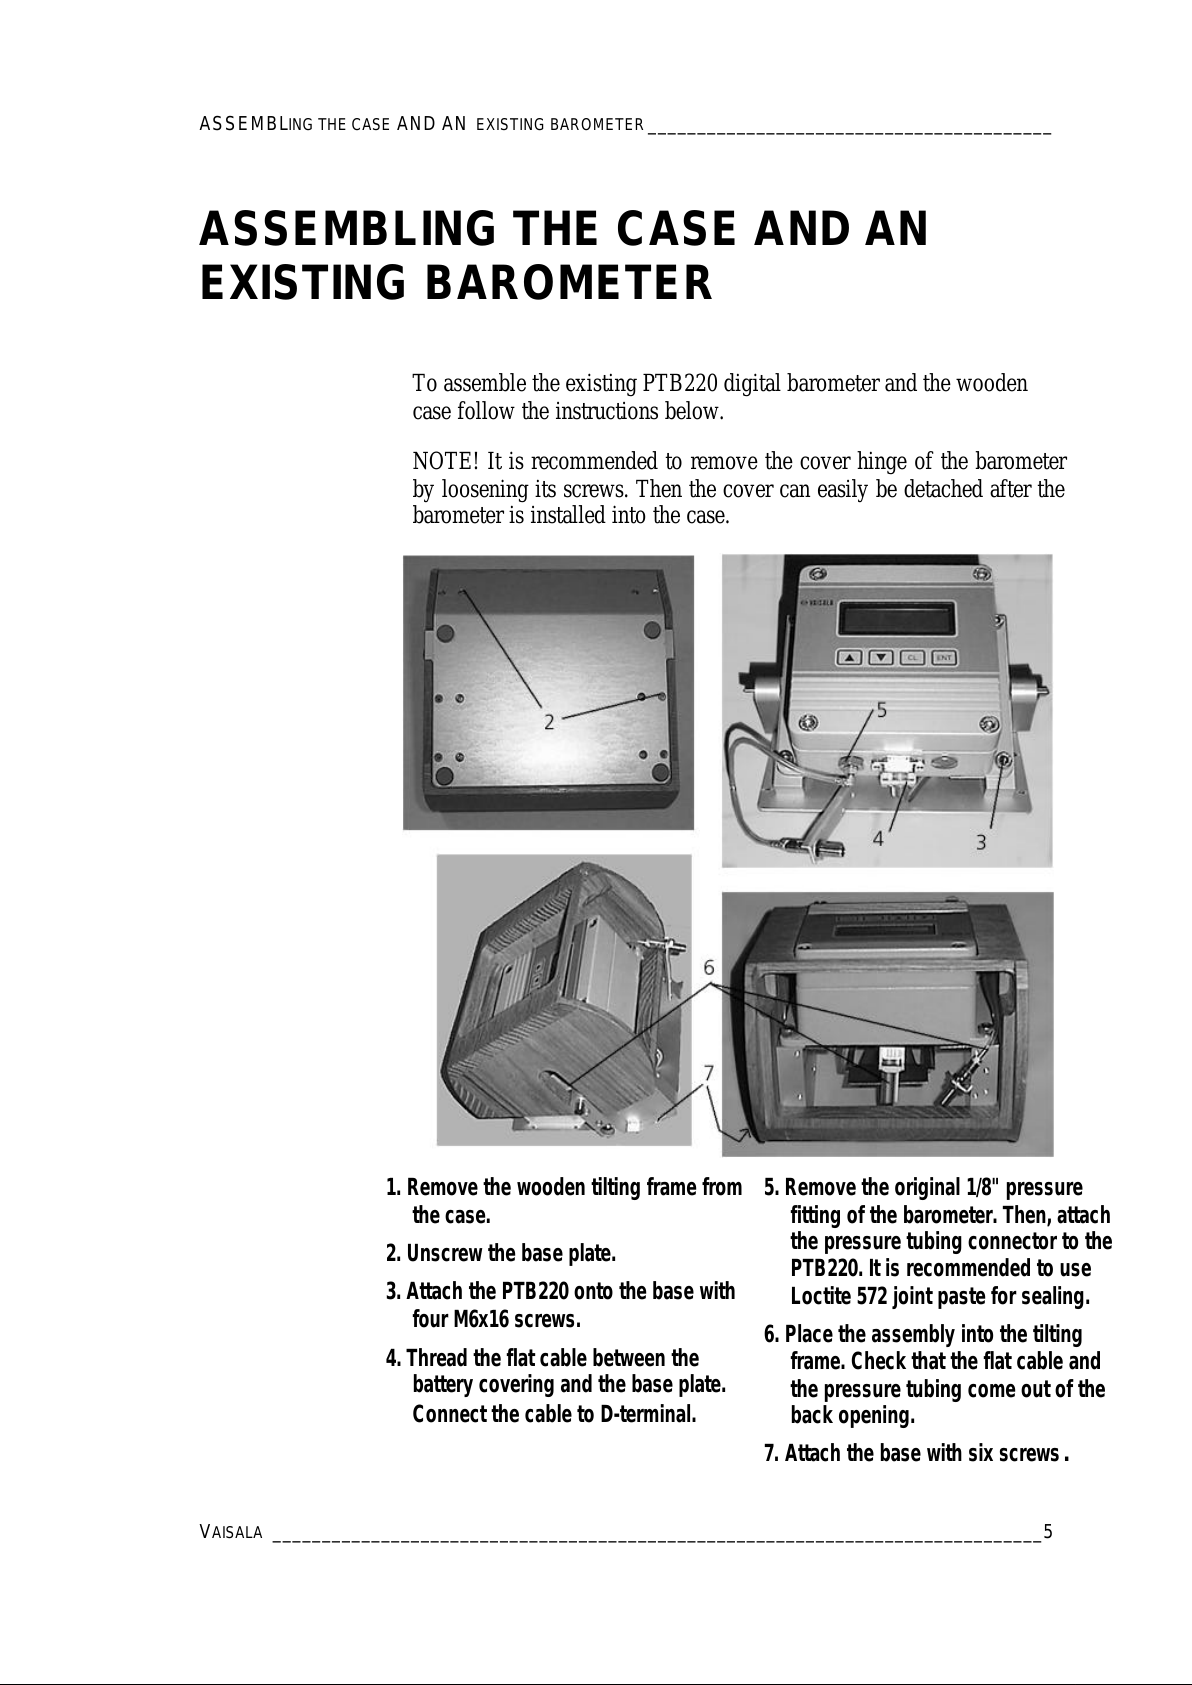
To assemble the existing PTB220 digital barometer and the wooden
case follow the instructions below.
NOTE! It is recommended to remove the cover hinge of the barometer
by loosening its screws. Then the cover can easily be detached after the
barometer is installed into the case.
1. Remove the wooden tilting frame from
the case.
2. Unscrew the base plate.
3. Attach the PTB220 onto the base with
four M6x16 screws.
4. Thread the flat cable between the
battery covering and the base plate.
Connect the cable to D-terminal.
5. Remove the original 1/8" pressure
fitting of the barometer. Then, attach
the pressure tubing connector to the
PTB220. It is recommended to use
Loctite 572 joint paste for sealing.
6. Place the assembly into the tilting
frame. Check that the flat cable and
the pressure tubing come out of the
back opening.
7. Attach the base with six screws.
All manuals and user guides at all-guides.com
Page 9
TECHNICAL DATA_________________________________________________________________________
6 __________________________________________________________________________ U370EN-1.1
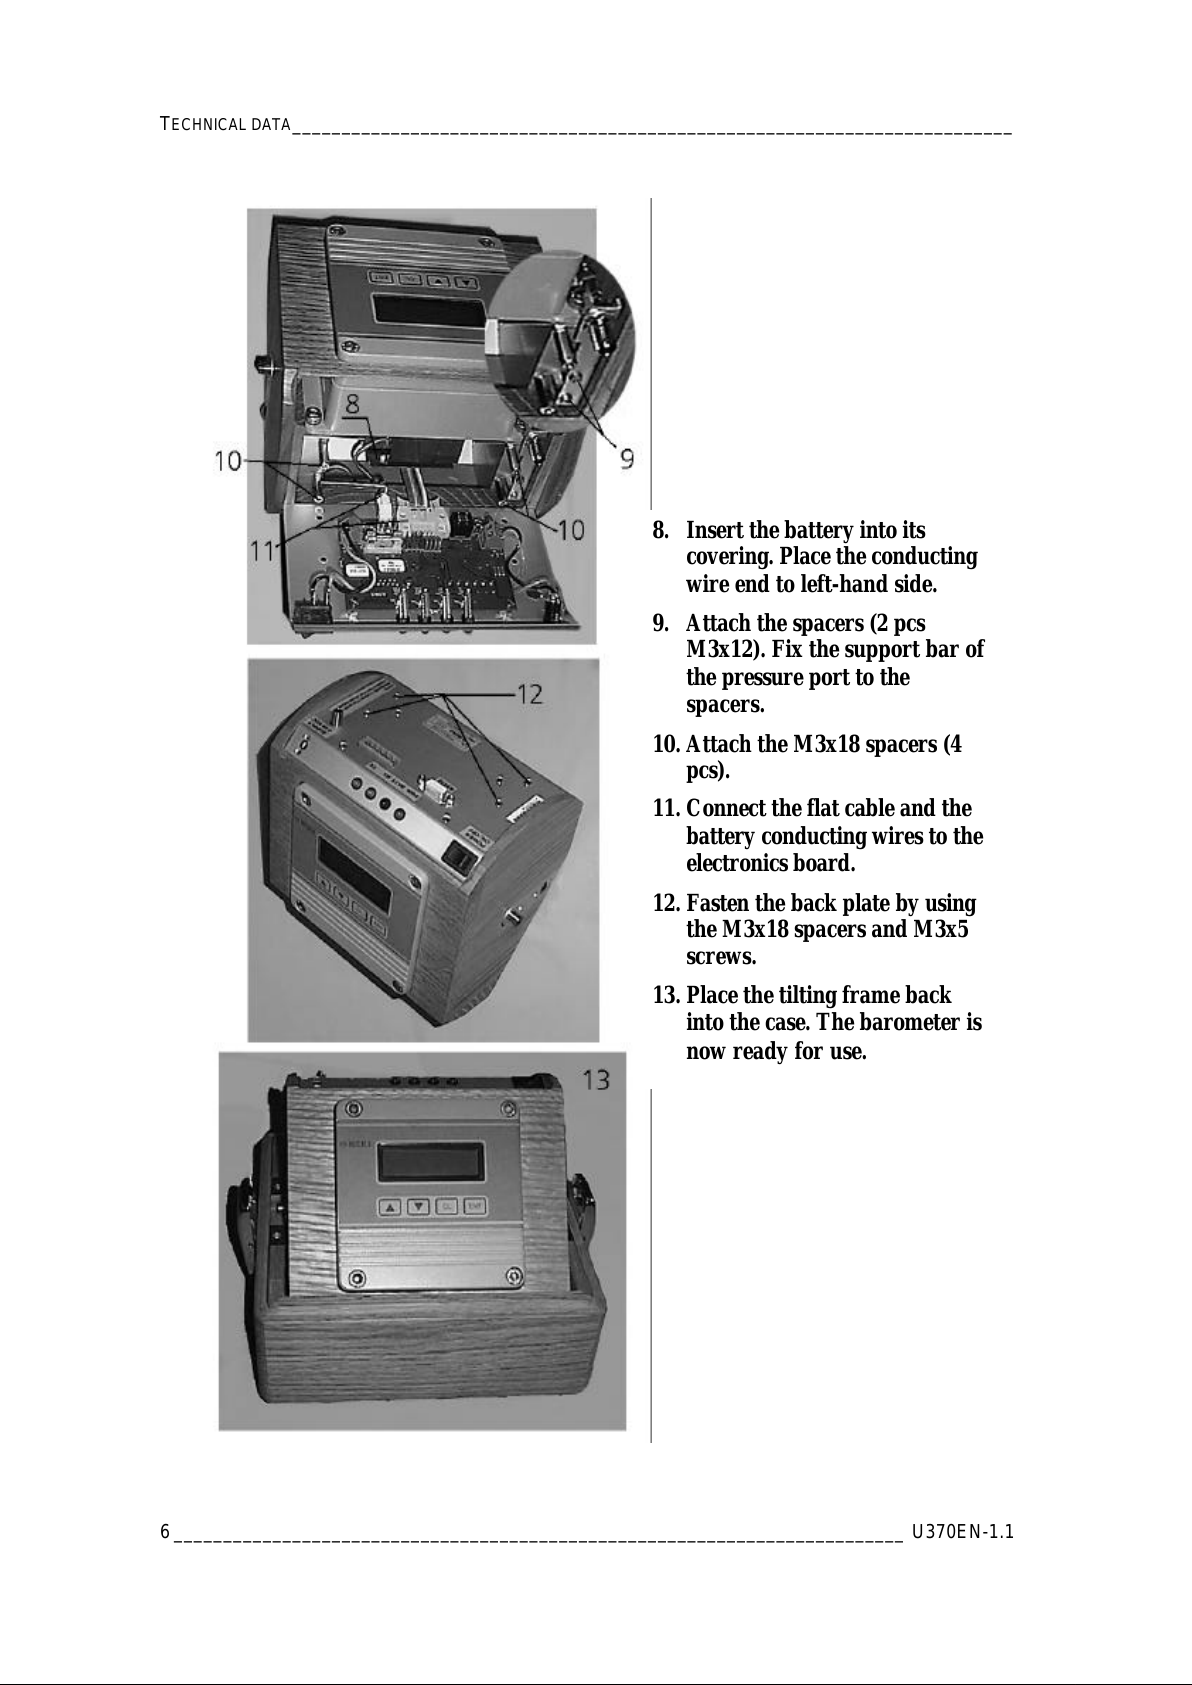
8. Insert the battery into its
covering. Place the conducting
wire end to left-hand side.
9. Attach the spacers (2 pcs
M3x12). Fix the support bar of
the pressure port to the
spacers.
10. Attach the M3x18 spacers (4
pcs).
11. Connect the flat cable and the
battery conducting wires to the
electronics board.
12. Fasten the back plate by using
the M3x18 spacers and M3x5
screws.
13. Place the tilting frame back
into the case. The barometer is
now ready for use.
All manuals and user guides at all-guides.com
Page 10
ASSEMBLING THE CASE AND AN EXISTING BAROMETER_________________________________________
VAISALA ______________________________________________________________________________7
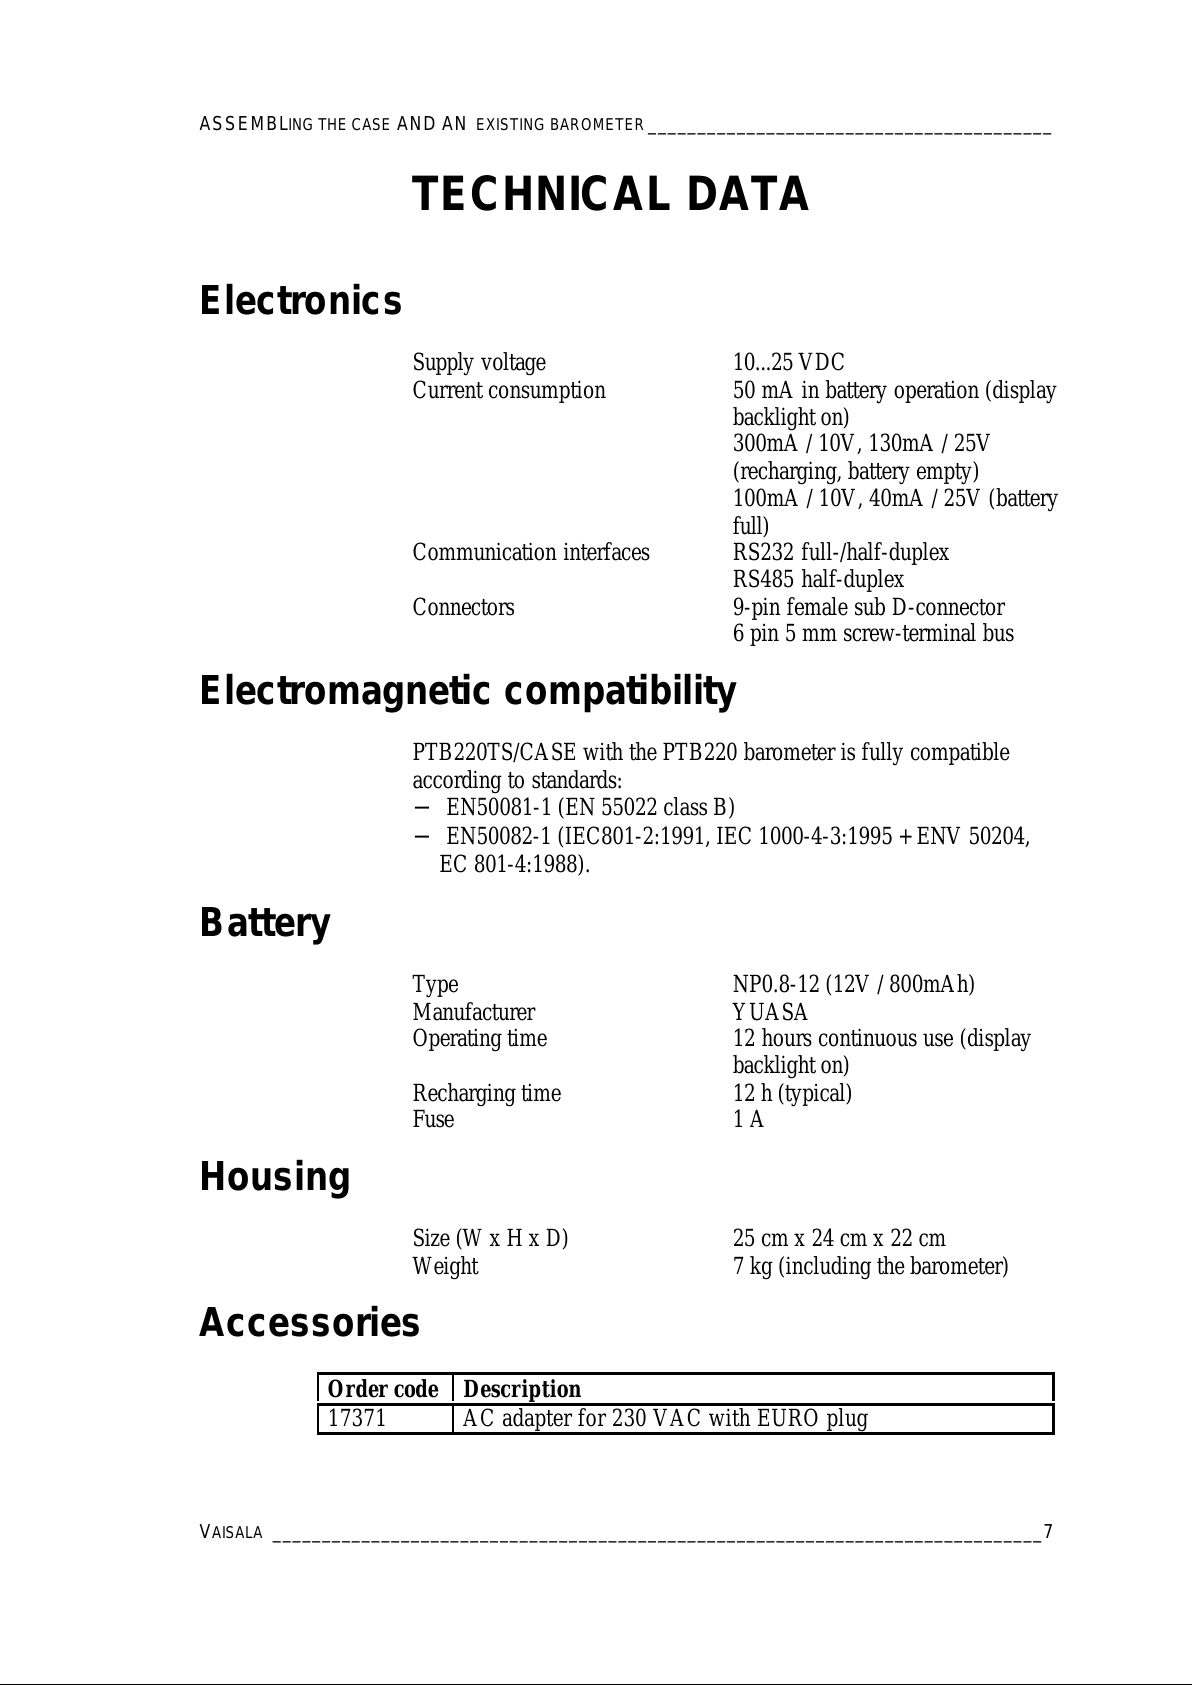
TECHNICAL DATA
Electronics
Supply voltage 10...25 VDC
Current consumption 50 mA in battery operation (display
backlight on)
300mA / 10V, 130mA / 25V
(recharging, battery empty)
100mA / 10V, 40mA / 25V (battery
full)
Communication interfaces RS232 full-/half-duplex
RS485 half-duplex
Connectors 9-pin female sub D-connector
6 pin 5 mm screw-terminal bus
Electromagnetic compatibility
PTB220TS/CASE with the PTB220 barometer is fully compatible
according to standards:
− EN50081-1 (EN 55022 class B)
− EN50082-1 (IEC801-2:1991, IEC 1000-4-3:1995 + ENV 50204,
EC 801-4:1988).
Battery
Type NP0.8-12 (12V / 800mAh)
Manufacturer YUASA
Operating time 12 hours continuous use (display
backlight on)
Recharging time 12 h (typical)
Fuse 1 A
Housing
Size (W x H x D) 25 cm x 24 cm x 22 cm
Weight 7 kg (including the barometer)
Accessories
Order code Description
17371 AC adapter for 230 VAC with EURO plug
All manuals and user guides at all-guides.com
 Loading...