

Us robotics USR9002 Quick Installation Guide for Windows 95B (OSR2), 98, NT 4.0, 2000, Me, XP (or later), Linux, and Macintosh Operating Systems
Page 1
ADSL USB/Ethernet Modem
Quick Installation Guide for
Windows 95B (OSR2), 98, NT 4.0, 2000, Me, XP (or
later), Linux, and Macintosh Operating Systems *
English
Model 9002
* USB is not supported in Windows 95 and NT 4.0
Part Number R24.0265.00
0
Page 2

Table of Contents
Installation Overview & System Requirements .............................1
What You Need Before You Begin........................................... 1
Computer Requirements......................................................... 1
Power Requirements .............................................................. 2
Should You Connect via Ethernet or USB?.....................................3
Windows Installation .................................................................... 4
Step 1. Connect Microfilters (If Necessary)............................. 4
Connect Microfilters to Telephone Devices ......................4
Step 2. Install the ADSL USB/Ethernet Modem ......................4
Step 3. Connect the Cables ....................................................7
Connect the Power Adapter ............................................. 7
Connect the Telephone Cable .......................................... 7
Connect the Ethernet or USB Cable.................................. 8
Ethernet........................................................................... 8
USB.................................................................................. 9
Establish a Dial-up Con nection ....................................................... ........ 11
Macintosh OS 8.6 - 9.x Installation (USB Only)............................12
Step 1: Install the Drivers....................................................... 12
Step 2: Connecting the Cables................................................ 14
Step 3: Configuring the Modem .............................................14
Step 4: Configuring the Operating System............................. 15
Operating the Modem............................................................. 19
Linux Installation (USB Only)........................................................20
Step 1: Compile and Install the Modem Driver ....................... 20
Step 2: Configuring the Modem Parameters .......................... 22
Step 3: Set Up the ADSL USB/Ethernet Modem for Use......... 23
PPPoE Interface ............................................................... 23
PPPoA Interface ............................................................... 25
Modem Status ........................................................................26
Troubleshooting............................................................................27
Troubleshooting Checklist ......................................................27
Troubleshooting Tips.............................................................. 28
Technical Support .........................................................................34
Regulatory Information .................................................................35
U.S. Robotics Corporation Limited Warranty.................................39
1
2
Page 3

U.S. Robotics Corporation
935 National Parkway
Schaumburg, Illinois
60173-5157
USA
No part of this documentation may be reproduced in any form or by any means or used to make any
derivative work (such as a translation, transformation, or adaptation) without written permission from
U.S. Robotics Corporation. U.S. Robotics Corporation reserves the right to revise this documentation
and to make changes in the products and/or content of this document from time to time without obligation to provide notification of such revision or change. U.S. Robotics Corpo ration provides this documentation without warranty of any kind, either implied or expressed, including, but not limited to,
implied warranties of merchantability and fitness for a particular purpose. If there is any software on
removable media described in this documentation, it is furnished unde r a license agreement included
with the product as a separate document, in the hard copy documentation, or on the removable media
in a directory file named LICEN SE.TXT or !LICENSE.TXT. If you are unable to locate a copy, please contact U.S. Robotics and a copy will be provided to you.
UNITED STATES GOVERN MENT LEGEND If you are a United States government agency, then this documentation and the software describ ed herein are provided to you subject to the following:
All technical data and computer software are commercial in nature and developed solely at private
expense. Software is delivered as “Comm ercial Computer Software” as defined in DFAR S 252.2277014 (Ju ne 1995) o r as a “com mercial it em” as defi ned in FAR 2 .101(a) a nd as such is provide d with only
such rights as are provided in U.S. Robotics standard commercial license for the Software. Technical
data is provided with limited rights only as provided in DFAR 252.227-7015 (Nov 1995) or FAR 52.22714 (June 1987) whichever is applicable. You agree not to remove or deface any portion of any legend
provided on any licensed program or docu mentation contained in, or delivered to you in conjunction
with, this Quick Installation Guide.
Copyright © 2002 U.S. Roboti cs Corporation. All rights reserved. U.S. Robotics and the U.S. Robotics
logo are registered trademarks of U.S. Robotics Corporation. Oth er product names are for identification purposes only and may be trademarks of their respectiv e companies. Product specifications subject to change without notice.
1
2
Page 4
For current product support and contact information, go to the following Web
site:
http://www.usr.com/broadbandsupport
Thank you for purchasing the U.S. Robotics SureConnect ADSL USB/Ethernet
Modem, Model 9002. The following instructions will walk you through the
installation of the modem and the U.S. Robotics SureConnect ADSL Utility. After
the installation is complete, you will have installed the following items:
• U.S. Robotics SureConnect ADSL USB/Ethernet Modem
• U.S. Robotics SureConnect ADSL Utility
It is important that you have your serial number written down for
future reference. If you ever need to call our Technical Support
department, you will need this number to receive assistance. You
can find your 12-character serial number on a bar code sticker
located on the bottom of the modem and also on the box. You will
also need your model number; it is noted below.
Write your serial number in the space provided below.
9002
Serial Number Model Number
Installation Overview & System Requirements
Wh at You N eed Bef ore You Begin
• ADSL and Internet service from your local telephone company or
Internet Service Provider (ISP) or access to an ADSL DSLAM (Digital
Subscriber Line Access Multiplexer).
• A microfilter may be required for each telephone device (telephones,
answering machines, and fax machines) that shares the same phone
line as the ADSL signal. Make sure there isn’t a microfilter installed
between the ADSL modem and the telephone wall jack, unless your
microfilter has a connection for both the telephone and the DSL
device.
• Your user name and password if they were assigned by your ISP.
Computer Requirements
Minimum System Requirements – Ethe rnet Port
• Pentium or faster compatible CPU
• Any computer with an Ethernet 10/100 RJ-45 interface
•32 MB RAM
• 10 MB hard disk space
• Internet Explorer or N etscape Navigator 4.0 or later Web browser
• A host computer running Windows 95 (With Service Pack 2 installed),
98, NT 4.0, 2000, Me, XP (or later), Linux, or a Macintosh OS 8.6 - 9.x
computer
• Any operating system that supports an Ethernet connection with an IP
stack
• SureConnect Installation CD-ROM requires Windows 95, 98, Me,
NT4.0, 2000, or XP. Computers running Windows 95 or NT 4.0 are
required to have Internet Explorer 4.0 or later installed. After Internet
Explorer is installed, Netscape Navigator can be used.
Minimum System Requirements –US B Port
• Pentium 200 MHz or faster compatible CPU
• Host PC with Universal Serial Bus (USB) support
• A host computer running Windows 98, 2000, Me, XP (or later), Macintosh OS 8.6 - 9.x, or Linux
•32 MB RAM
• 10 MB hard disk space
• Internet Explorer or N etscape Navigator 4.0 or later Web browser
• SureConnect Installation CD-ROM requires Windows 98, Me, 2000,
XP, Linux or Macintosh OS 8.6 - 9.x
Power Requirements
The U.S. Robotics SureConnect ADSL USB/Ethernet Modem obtains power from
the included AC power adapter. Be sure to only use the included power adapter
when operating this device. The power adapter must be connected in order for
the modem to function properly.
If you are installing the U.S. Robotics SureConnect ADSL USB/Ethernet Modem
and have a PC running Windows 95 or NT 4.0, you will have to install the modem
using the Ethernet option.
Windows 95 and Windows NT 4.0 Users
Be sure that your computer is on and you have your operating system CD-ROM readily available. If you are installing via the USB port, be sure to install the software first.
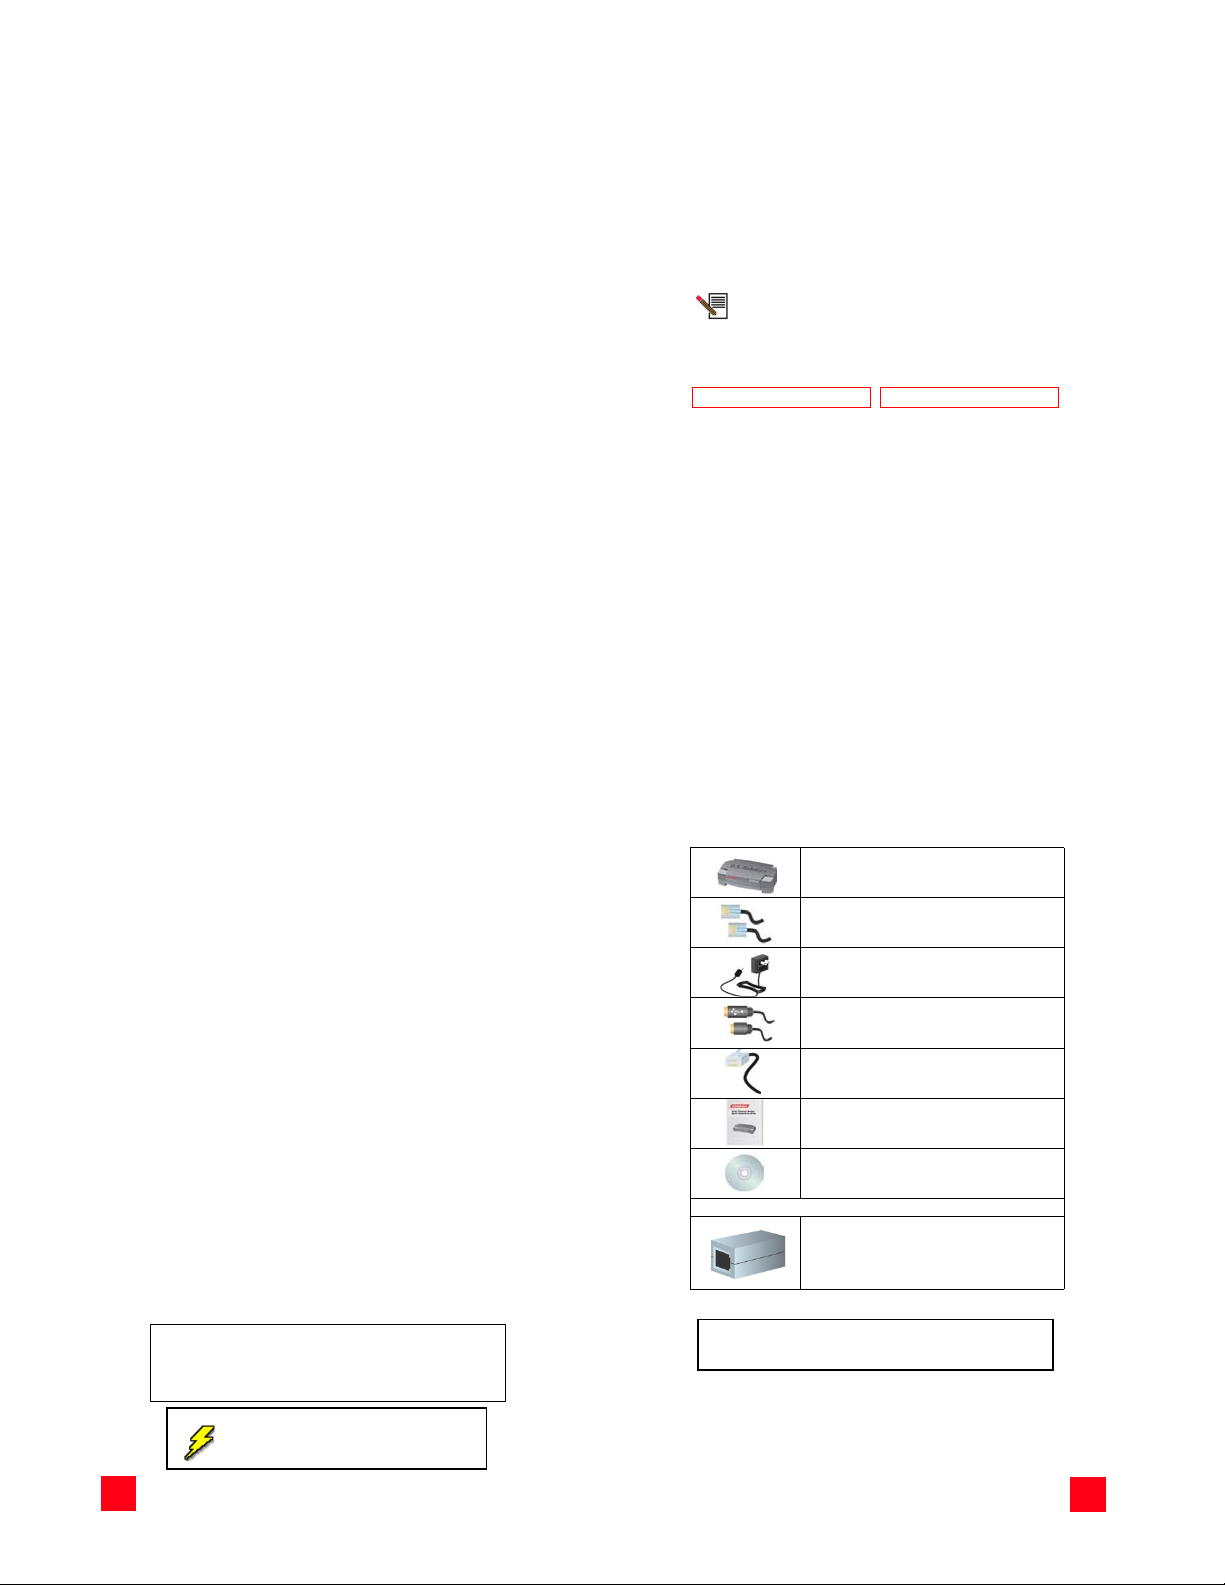
This U.S. Robotics SureConnect ADSL USB/Ethernet Modem package includes
the following it ems:
U.S. Robotics SureConnect ADSL
USB/Ethernet Modem
Model 9002
RJ-11 Phone Cord
(4 wire)(26 AWG)
AC Power Adapter
USB Cable
(3 ft/1.5 m)
Ethernet Cable
(6 ft/1.8 m)
Quick Installation Guide
U.S. Robotics SureConnect Installation CD-ROM
with User Guide
1
Optional Components
In some models there may be a microfilter included in the
box, or a microfilter may be supplied by your ISP. Check
with your ISP to see if a microfilter is needed. If you are
required to install a microfilter, the next section discusses
installation.
Inform your dealer if there are any incorrect, missing, or damaged parts.
Refer to the installation instructions specific to your operating system in this
Quick Installation Guide.
Macintosh and Linux Users
Should You Connect via Ethernet or USB?
The U.S. Robotics ADSL USB/Ethernet Modem gives you the option to connect
through a USB or an Ethernet port. Selecting how to connect your modem is
mostly a matter of preference and also depends on what ports are available on
your computer.
2
2
3
3
Page 5
Windows Installation
Step 1. Connect Microfilters (If Necessary)
If there are no microfilters included in your package and your ISP did not provide
any, skip to Step 2 of these installation instructions.
If microfilters are required, install one on each telephone device (telephones,
answering machines, and fax machines) that shares the same phone line as the
ADSL signal.
A microfilter is a small device used to lessen the amount of interference between
ADSL signals and telephone signals. Microfilters only need to be used if the
ADSL modem and a telephone device are sharing the same phone line. If
microfilters are not used, you may experience background noise on your
telephone while data is being transmitted. Data transmissions may experience
interruption by telephone calls if a microfilter is not used.
Connect Microfilters to Telephone Devices
To install the microfilter, plug the phone into the microfilter, and then plug the
microfilter into the telephone wall jack. Do not install a microfilter on the cable
that connects your modem to the telephone jack unless your microfilter has a
connection for both the telephone and the ADSL device.
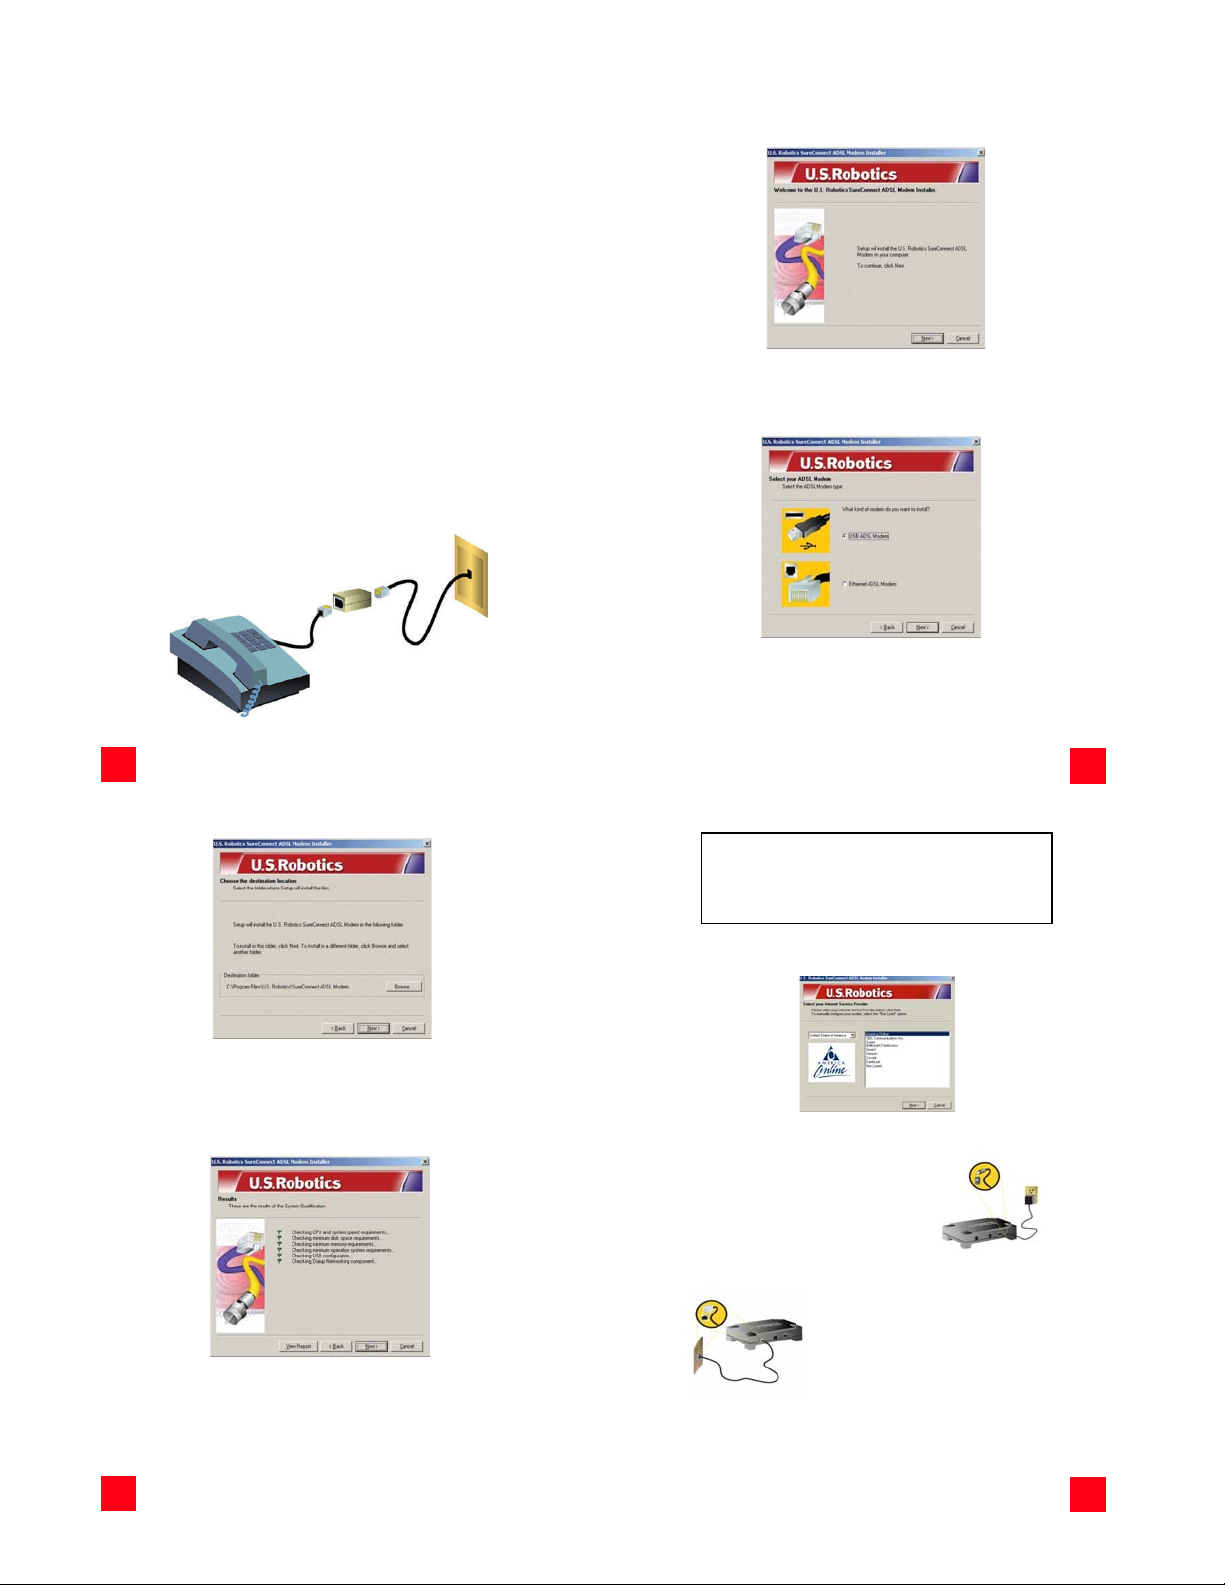
Step 2. Install the ADSL USB/Ethernet Modem
To install the U.S. Robotics SureConnect ADSL USB/Ethernet Modem, insert the
Installation CD-ROM into the CD-ROM drive of your computer. If the installation
does not start automa tically, go to your desktop and double-click My Computer,
double-click the drive letter associated with your CD-ROM drive, and then
double-click Setup.
The U.S. Robotics SureConnect ADSL USB/Ethernet Modem Installer Welcome
window will display; cl ick Next to continue installing the U.S. Robotics
SureConnect ADSL USB/Ethernet Modem.
• Select the connection type (USB or Ethernet) you will be utilizing to
connect the modem to your computer; click Next. If you are running
Windows 95 or NT 4.0 you wil l not have the option to select. In those
operating systems you must connect via Ethernet.
• You will then be prompted to select a location to install the files. If
you would like to change the default location, click Browse to select a
new folder. If you accept the default location, click Next.
4
4
• A qualification test will run to verify that your system meets the minimum requirements for installation. The Results screen will display
those items in your configuration that passed with a green flag and
the ones that failed with a red flag. If your system passed the qualification, click Next and the necessary files will be copied to your system.
5
Some Windows 95 users may require a necessary Windows component (Winsock 2) to be installed at this time. Click Next to launch the installation of this
component, and follow the on-screen instructions. Once the installation is complete, you will need to restart the U.S. Robotics
Modem installation.
For USB Users Only: The necessary files will be copied to your system. Select
your Internet Service Provider (ISP) from the list and click Next.
Windows 95
SureConnect ADSL USB/Ethernet
Step 3. Connect the Cables
Connect the Power Adapter
Be sure to only use the included power supply.
Connect the power adapter cord to the “10VDC”
jack at the rear of the modem. Connect the
power adapter to a standard wall outlet. Click
Next.
Connect the Telephone Cable
Connect one end of the included telephone cable to
the telephone port on the back of your modem
labeled “ADSL” and connect the other end into the
telephone jack. Click Next.
5
If you are notified that your system has failed the qualification test, click the
View Report button to identify which com ponent(s) failed. Once you have
identified which component(s) failed, refer to the “Troubleshooting” section of
this Quick Installation Guide for further instructions.
6
6
7
7
Page 6

Connect the Ethernet or USB Cable
Follow the instructions below for the connection type (Ethernet or USB) you
selected in Step 2.
Ethernet
• Insert one end of the Ethernet
cable to the “ENET” port on the
back of the U.S. Robotics SureCon-
nect ADSL USB/Ethernet Modem.
Connect the other end of the Ethernet cable to the Ethernet port on
your computer’s 10/100 network
interface card.
• The modem will begin an initialization sequence. This may take a minute.
• The installation of the U.S. Robotics SureConnect ADSL USB/Ethernet
Modem is complete. Click Finish, and remove the CD-ROM from the
CD-ROM drive of your computer.
Some Internet Service Providers require additional software be installed for optimum performance. If your ISP
requires additional software, it will be installed when you
click Finish.
The Registration screen displays once you have established a connection. You
can test your connection by registering your modem. Click Yes to register your
modem, and you will be brought to the U.S. Robotics Web site.
USB
• If you have chosen to connect via the USB port, insert the rectangular
end of the included USB cable into the USB port of the computer, and
the square end of the cable into the port labeled “USB” on the U.S.
Robotics SureConnect ADSL USB/Ethernet Modem.
• The Found New Hardware Wizard will display, and the new hardware
will begin to install. Follow the New Hardware Wizard’s on-screen
instructions to complete the installation of the hardware. If the New
Hardware Wizard does no t display, refer to the “Troubleshooting” sec tion of this Quick Installation Guide.
Windows XP
A software installation warning will display stating that the software you are installing has not passed the Windows logo testing.
Click the Continue Anyway button.
Windows 2000 and Me
A Digital Signature Not Found screen may appear. Click Yes to continue with the installation.
Windows XP, 2000, & Me
If you r ISP gave you soft ware to in stall, do so at thi s time. Be sure to
read and follow all of the installation instructions provided. Once the
software is installed, you may need to establish a dial-up connection
in order to access the Internet. If your ISP gave you software to
install, a user name and password should have also been assigned.
8
8
Windows XP
A Found New Hardwa re Wizard screen for both t
will display. Select the
Next.
Windows 2000
A screen will confirm wh en each device has been installed . Click Finish to
continue to install the software required to operate the modem.
• After the modem is detected, you will need to restart your computer.
Select Yes, I would like to restart my computer now then click Finish.
Windows XP, 2000
Install Software Automatically option and clic k
he Loader and the Adapter
U.S. Robotics has thoroughly tested this driver in conjunction with the support
hardware and has verified compatibility with Windows XP, 2000, & Me.
9
9
If your ISP gave you software to install, do so at this time. Be sure
to read and follow all of the installation instructions provided. Once
the software is installed, you may need to establish a dial-up
connection in order to access the Internet. If your ISP gave you
software to install, a user name and password should have also
been assigned.
Some Internet Service Providers require additional software be installed for optimum performance. If your ISP
requires additional software, it will be installed when you
click Finish.
• After restart, a window will display confirming that the modem driver
has been installed, click Next.
• The installation of the U.S. Robotics SureConnect ADSL USB/Ethernet
Modem is complete. Click Finish and remove the CD-ROM from the
CD-ROM drive of your computer.
10
10
Establish a Dial-up Connection
Double-click th e dial-up networking icon that has just been created. It
will be located on your desktop. If the networking icon is not available
on your desktop, follow the instructions below for your operating
system in order to locate the networking icon.
11
11
Page 7

Windows 2000
Windows 98 and
Windows Me
Windows XP Click Start, click Control Panel, and then double-click Network Connections.
1. Look for your ISP’s dial-up connection icon and double-click it.
2. In the Dial-up Connection screen,
enter your user name and password. Your ISP should have supplied your user name and password
to you. The Save password option
remembers your password so you
won’t have to enter it every time
you initiate your dial-up connection.
The characters in the Dial text field are the VPI/VCI values. The VPI/VCI values
will automatically display and you should not need to change them unless
instructed to do so by yo ur ISP.
Click Start, select Settings, and then double-click
Network and Dial Up Connections.
Double-click My Computer and then double-click Dial Up
Networking.
3. Click the Dial button to initiate yo ur connection.
The Registration screen displays once you have established a connection. You
can test your connection by registering your modem. Click Yes to register your
modem, and you will be brought to the U.S. Robotics Web site.
Macintosh OS 8.6 - 9.x Installation (USB Only)
Step 1: Install the Drivers
1. Insert the Installation CD-ROM into the CD-ROM drive of the Macintosh.
2. The Macintosh will recognize the CD-ROM and place an icon
called Combo ADSL 1.0 on the desktop. Doub le-click the
Combo ADSL 1.0 icon.
3. A window will display; if you are using ADSL Annex A, which works over a
standard telephone line, double-click USRxx9002 (POTS) ADSL Modem. If
you are using ADSL Annex B, which works over an ISDN line, double-click
USR029002 (ISDN) ADSL Modem.
4. The Installation window will display; click the Install button.
5. A prompt will display to remind you to plug in the USB cable when the computer restarts; click OK.
6. Once the modem has been installed, you will need to restart your computer; click Restart.
12
Step 2: Connecting the Cables
Connect the USB Cable
1. Plug the flat end of the provided USB cable into an available USB port on
your Macintosh.
2. Plug the square end of the USB cable into the port of the modem labeled
USB.
Connect the Telephone Cable
1. Plug one end of the provided RJ-11 telephone cable into the telephone jack
or the ADSL splitter box provided by your Internet Service Provider.
2. Plug the other end of the RJ-11 telephone cable into the ADSL port of the
U.S. Robotics SureConnect ADSL USB/Ethernet Modem.
Once you have connected both the USB and the RJ-11, your Macintosh will detect
the modem and load the installed software. This will enable you to use your new
high-speed U.S. Robotics SureConnect ADSL USB/Ethernet Modem.
12
Step 3: Configuring the Modem
In most cases, you will not have to change the ADSL-specific configuration
parameters for your modem. Your ISP will have customized the software so that
the modem installs with the defaults required for connecting to their own
equipment. If the ADSL parameters need to be changed, they can be changed on
the Configuration page of U.S. Robotics Monitor.
U.S. Robotics Monitor
Each parameter setting is specific to your ISP's network configuration; therefore,
either keep the default settings or obtain alternate settings from your ISP. The
settings that can be changed on the Configuration page of U.S. Robotics Monitor
are:
• ATM Channel VPI
• ATM Channel VCI
•Encapsulation Type
•ADSL Standard
1. To access the U.S. Robotics Monitor, go to the Desktop
and double-click the USR ADSL Modem icon.
2. The U.S. Robotics Monitor will display; click the Configuration tab.
13
The value that you choose for Encapsulation Type will determine whether your
modem is exposed to the operating system as a network-type device or as a
modem-type device. The choices that begin with PPP will cause the operating
system to view your modem as a modem-type device, and the remaining options
will cause the operating system to view your modem as an Ethernet-type device.
If you change any settings on the Configuration page of the
U.S. Robotics Monitor, click Save Changes. You must then
restart the computer to apply the changes.
Step 4: Configuring the Operating System
Once the modem has been properly configured, the Macintosh OS 8.6 -9.x
operating system must also be configured so that it knows how to properly
communicate with your modem's software. You should configure the system
software based on whether your ISP expects your modem to communicate as an
Ethernet device or as a "regular" modem.
13
14
14
15
15
Page 8

The Encapsulation Type you selected will dictate which components need to be
configured. Use the table below to help you identify which components you will
need to configure, and how you will need to configure them, depending on your
Encapsulation and Connection Type.
Remote
Communica-
Encapsulation Type TCP/IP
Bridged LLC SNAP X - Ethernet
Bridged VC MUX X - Ethernet
Routed LLC SNAP X - Ethernet
Routed VC MUX X - Ethernet
PPPoA LLC X X Modem PPP
PPPoA VC X X Modem PPP
PPPoE LLC X X Modem PPP
PPPoE VC X X Modem PPP
Configuring TCP/IP
The most commonly used language, or protocol, used to communicate over the
Internet is called TCP/IP (T ransmission Control Protocol / Internet Protocol).
1. Go to the Control Panels submenu of the Apple menu. Click TCP/IP in the
menu to display the Connect Via pull-down menu. The TCP/IP screen will
display.
2. From the Connect Via pull-down menu , click ADSL USB Modem for Ethernet Mode or select PPP for Modem Mode.
3. Select Using DHCP Server from the Configure pull-down menu for Ethernet
Mode and Using PPP Server for PPP Mode. If your ISP requires you to use
a specific IP address, select Manually from the Configure pull-down menu,
and then enter the IP Address provided by your ISP.
4. Once you have selected the above options, close the window by clicking
the small square in the upper-left corner, then click Save.
Access
Most ISPs will offer DHCP (Dynamic Host Configuration Protocol) as their IP Address. DHCP will automatically set up the
proper IP Address when your connection is established.
tion Mode
Connect
Via
ADSL USB
Manually, Using Boot Server , Using
Modem
DHCP Server, Using RARP Server
ADSL USB
Manually, Using Boot Server , Using
Modem
DHCP Server, Using RARP Server
ADSL USB
Manually, Using Boot Server , Using
Modem
DHCP Server, Using RARP Server
ADSL USB
Manually, Using Boot Server , Using
Modem
DHCP Server, Using RARP Server
Manually, Using PPP Server, Using
BootP Server, Using DHCP Server
Manually, Using PPP Server, Using
BootP Server, Using DHCP Server
Manually, Using PPP Server, Using
BootP Server or Using DHCP Server
Manually, Using PPP Server, Using
BootP Server or Using DHCP Server
Configure
Remote Access
When the Macintosh operating system is configured for Modem mode, it actually
views your ADSL modem as a "regular" modem. This does not affect the
performance of your high-speed Internet connection; however, it does affect the
way you configure the operating system to complete the connection setup.
Because the operating system thinks that you have a "regular" modem attached
to your computer, you must configure the Apple Remote Access Dialer
application to connect to the Internet.
1. Go to the Control Panels submenu of the Apple menu.
2. Click the Remote Access icon on the Control Panels menu.
16
3. Click the Options button to access the Remote Access options dialog box.
In the Options dialog box, click the Protocol tab and select the following
Protocol options:
16
• Connect automatically when starting TCP/IP applications.
• Use TCP header compression
4. Click OK to save the options and return to the Remote Access Options dialog box.
5. With the current window open, go to the Remote Access menu located at
the top of the screen and click Modem. You can only access this menu if
you are in the Remote Access window. The Modem screen will display.
Select the following options:
• Select ADSL USB Modem from the Connect Via: pull-down menu.
• Select ADSL USB Modem in the Modem: pull-down menu.
• Confirm the Sound option is set to On.
• Confirm the Dialing option is set to Tone.
17
It is critical that these settings be correct in order for the U.S.
Robotics SureConnect ADSL USB/Ethernet Modem to work
correctly.
Once you have selected the above options, close the window by clicking the
small square in the upper-left corner, then click Save. This will return you to the
Remote Access setup screen.
6. Enter the following information in the Remote Access screen:
• Select the Registered User option.
• Enter your user name and password as provided by your ISP.
• Enter a numeric value of "1" in the Number box. The driver does not
dial the number "1," but the dialer needs to see a number there in
order for the dialing process to work.
Once you have verified that all of the information is correct, click the square in
the upper-left corner, then click Save to save the configuration.
Operating the Modem
Your system should now be ready to connect to the Internet. If you have not
already done so, make sure that you have properly configured your ADSL
settings and Macintosh system software.
Ethernet Mode
If you are configured to operate in Ethernet mode, you should already be
connected to the Internet. Open your Web browser to confirm proper network
operation.
17
18
18
19
19
Page 9

Modem Mode - PPPoE or PPPoA
As mentioned previously, when configured to operate in Modem mode, the
system software expects you to dial a phone number to connect to your Internet
provider. Because you are connecting via ADSL, no dialing actually takes place;
you just have to go through the steps of dialing to get connected to the Internet.
1. To connect to your ADSL provider, select Remote Access from the Control
Panels menu. Your Remote Access parameters should have already been
configured.
2. Complete any missing information on the main Remote Access setup page,
then click the Connect button. The status portion of the window will give
you feedback as to whether or not the connection is progressing successfully.
3. Once the status indicates that the connection is complete, you may proceed with opening your Web browser and surfing the Web!
Linux Installation (USB Only)
Step 1: Compile and Install the Modem Driver
The following installation supports the encapsulations listed below.
• RFC1483 (LAN driver)
• RFC2516 (PPP Over Ethernet)
• RFC2364 (PPP Over ATM)
The package that you have contains the driver source codes and some script files
for compiling, installing, and using the U.S. Robotics SureConnect ADSL USB/
Ethernet Modem. The driver will be installed as an Ethernet driver and the
interface name will be called ADIModem.
This driver should work with 2.4.x and 2.5.x kernels with USB and
hot plug support installed. For instance, it should work with other
distributions of Linux, such as Red Hat 7.x, Mandrake 8.x, Suse
7.x, and Slackware 8.x.
1. Log on as root.
2. Create a new directory.
3. Copy the tarball file 9002_Linux.tgz into the new directory.
4. Unzip the tarball file.
The figure below shows how to create the USR_USB directory, and copy the file
9002_Linux.tgz into that directory from the CD-ROM drive and then unzip the
file. This is assuming you have already mounted the CD-ROM into
/mnt/cdrom directory.
The commands are as follows:
cd /usr
mkdir USR_USB
cd USR_USB
cp /mnt/cdrom/Linux/
tar xvzf 9002_Linux.tgz
5. Run ./inst_mod KernelSrcDirectory. KernelSrcDirectory is the directory
where this script can find the kernel source codes. This directory is normally under the /usr/src directory.
If the kernel source code is not installed by default with
your Linux distribution, you have to install it first. Refer
to your distribution manuals for more information.
For instance, under RedHat 7.2, the source directory is /usr/src/linux-2.4.7-10,
the install command is then:
9002_Linux.tgz
USR_USB/./inst_mod linux-2.4.7-10
The following figure shows how to compile the driver under RedHat 7.2.
20
20
DSP firmware files will be located in the /etc/analog directory. Each time you plug in in the USB cable, the kernel will
call the application in /etc/hotplug/usb/adiusbadsl to set
up your modem.
At this point, you have built the driver that supports RFC1483 (LAN) and also
RFC2516 (PPPoE).
Step 2: Configuring the Modem Parameters
/etc/analog/usradslpots.conf
/etc/analog/usradslisdn.conf
There are a number of parameters that the modem needs to have configured in
order to initiate a connection when the USB cable is plugged in. These
parameters are stored in a configuration file. In order for the modem to be
operational, these values must be modified in the file using an editor such as
pico, vi, or joe.
Setting the VPI/VCI and Encapsulation Type Parameters
VPI and VCI values are used to identify your Virtual Path Connection (VP) and
your Virtual Circuit Connection (VC). Your ISP should have provided you with VPI,
VCI, and Encapsulation-type parameters. The VPI/VCI values are in hexadecimal
format, an example is below:
VPI=00000008
VCI=00000023
22
21
Whenever you change anything in the adiusbadsl.conf or
usradslisdn.conf file, unplug the USB cable from the
modem, and then plug it back in. This will reset the modem
to use the new values.
Encapsulation Type
Encapsulation is a technique used by layered protocols where the data set is
wrapped in a protocol header. This technique helps to bridge different networks.
When a protocol data unit (PDU) is sent, a layer will add header information to
that unit from the layer above. For example, a packet contains a protocol header
from the physical layer. Then the network layer (IP) adds a protocol header.
Finally, the transport layer (TCP) adds a protocol header, followed by the
application protocol data.
The encapsulation type depends on the type of interface your ISP provides to
you. Your ISP should be able to provide you with the appropriate values for their
system.
Example: Encapsulation = 00000006 (PPPoA-VC)
Step 3: Set Up the ADSL USB/Ethernet Modem for Use
PPPoE Interface
After completing the first two steps, you will have built the driver that supports
RFC1483 (LAN) and also RFC2516 (PPPoE).
Since this package supports PPPoE encapsulation, you can
use any PPPoE client software that you choose. An example
of a PPPoE client is Roaring Penguin, which you can get from
http://www.roaring penguin.com. You will not need to
change anything in the package to be able to use PPPoE. You
will just need to install the LAN driver and the desired PPPoE
client software.
As soon as you install the package on your system, you can connect the
U.S. Robotics SureConnect ADSL USB/Ethernet Modem to your computer using
the included USB cable. Once the modem is connected, the driver and module
will be loaded automatically.
When the modem is detected, the PWR LED on the front left panel of the modem,
will begin to blink. The driver will create an Ethernet interface called ADIModem.
Although the interface is created, it is not yet configured. To confirm the
interface has been created, run the following command:
ifconfig -a
21
23
22
23
Page 10

A list will display all interfaces on your system. Locate the ADIModem interface.
Once the interface is located, you can configure it using either one of the
following methods:
•DHCP
• Static IP Address
Configure Interface Using DHCP
1. Confirm that your server provides a DHCP server.
2. If it does, then run the following script:
USR_USB/ADI_PPPOE/./godhcp
3. To confirm the interface is operational and it has an IP address assigned,
run the following script:
ifconfig
Configure Interface Using a Static IP Address
1. Run the following script to configure the interface using a Static IP
Address:
✔ USR_USB/ADI_PPPOE/./gostatic ADIModem IPAddress Netmask
✔ route add default gw ipaddress (this is the gateway provided by your
ISP)
✔ pico/etc/resolv.conf
namesaver ipaddress (insert your DNS Address as provided by your
ISP)
2. Run the following command to confirm the interface is operational and an
IP address has been assigned:
ifconfig
Once the interface is properly configured, you can start sending and receiving
data.
Whenever you unplug the USB cable, you need to run one of
the above scripts. If you want to bring down the interface and
bring it back up, run the USR_USB/ADI_PPPOE/./stopip. Use
one of the above script files to configure the interface again.
PPPoA Interface
1. After you have built the driver, run the following script:
USR_USB/./inst_pppoa
2. The script will compile, build, and install the P PPoA module. Upon completion, the script will copy the needed scripts and configuration files into the
/usr/sbin and /etc/ppp directories.
3. If you are using ADSL Annex A, confirm that the VPI/VCI and Encapsulation
type parameters located in the /etc/analog/usradslpots.conf are the
same as the ones provided to you by your ISP. If you are using ADSL Annex
B, which works over an ISDN line, confirm that the VPI/VCI and Encapsulation type parameters located in the /etc/analog/usradslisdn.conf are the
same as the ones provided to you by your ISP.
4. Plug the USB cable into the modem and computer.
5. Modify the user name and password in pap-secrets, chap-secrets, and
options files in /etc/ppp directory with the values provided by your ISP.
For example, the format of the pap_secrets and chap_secrets files:
*Secrets for authentication using CHAP
*Client server secret IP address
ISP username * ISP password *
In the Options file, you need to change the user “**********” with the
username provided by your ISP.
6. Go into /usr/sbin directory and run the following script:
ADI_PPP_Go
7. Once the script has completed, run ifconfig and confirm that you are connected to your provider. PPP will create an interface called “ppp0” whenever it connects to a server.
24
8. To disconnect from the server, run ADI_PPP_Stop at the same directory
and PPP will disconnect from the server.
The graphic below shows the U.S. Robotics SureConnect ADSL USB/Ethernet
Modem connected to an ISP. The ADIModem interface is loaded (local IP
192.168.60.30), and the ppp0 interface is up and running with an IP address
(80.11.157.151) and a gateway (80.11.157.1).
24
Modem Status
To view various statistics about the modem and the connection, run the
following script:
USR_USB/ADI_PPPOE/./showstat
The statistical information will be available through ADIModem in /proc
directory.
This feature is available as soon as you plug the USB cable in.
Troubleshooting
25
Troubleshooting Checklist
To help diagnose the problem, use the checklist below.
✔ Confirm that you have secured the power adapter to the modem and
to an active wall outlet. The “PWR” LED should be illuminated.
✔ Confirm that you have secured the telephone cable to the telephone
jack and to the modem. The “ADSL” LED should be illuminated.
✔ If you connected using a USB cable, confirm that you have secured the
USB cable to the “USB” port on the back of the modem and to the
“USB port on your computer. If you connected using an Ethernet
cable, confirm that you have secured the Ethernet cable to the “ENET”
port on the modem and to the “ENET” port on your computer. The
“ENET” or the “USB” LED should be illuminated.
✔ Have you contacted your Internet Service Provider to order ADSL ser-
vice to your home? If you have yet to con tact your ISP, you must do
so, as the modem will be inoperable without acquiring proper service
from an ISP.
✔ Verify that you are installing your ADSL equipment AFTER the “Service
Completion Date” given to you when you ordered your ADS L Internet
Service. If you have yet to contact your ISP, you must do so, as the
modem will be inoperable without acquiring proper service from an
ISP.
✔ Confirm that you do not have a microfilter installed on the RJ-11 cable
that connects your modem to the telephone wall jack. If you do,
remove it.
✔ If you w ere give n softwar e by your ISP to in stall, yo u need to install i t.
✔ If your ISP did not give you any software to install, you will need to
connect using the dial-up connection on the desktop.
✔ (For Windows Users Only) Run a test using the U.S. Robotics Sure-
Connect ADSL Utility to identify any possible problems. For more
information about how to run a test, refer to the “U.S. Robotics SureConnect ADSL Utility” section of this Quick Installation Guide.
Status LEDs
The U.S. Robotics SureConnect AD SL U SB/ Eth ern et M ode m h as f our LED s on the
front of the modem. The first from the left is the “PWR” LED, the second is the
data transfer “ENET” LED, the third is the “USB,” and the last is the “ADSL” LED.
The operational status of the modem is indicated by the LED condition s listed
below.
25
26
26
27
27
Page 11

On Green
PWR
Off No power is detected.
On Green
ENET
Flashing Green Data traffic is flowing.
Off
On Green
USB
Flashing Green Data traffic is flowing.
Off
On Green A DSL link has been established.
Flashing Green A DSL link is being negotiated.
ADSL
Off The DSL link has failed.
Power is being received from the power supply in the wall
jack.
A physical connection between the modem and the computer, through the Ethernet cable, has been established
and detected.
A physical connection between the modem and the computer, through the Ethernet cable, has not been established.
A physical connection between the modem and the computer, through the USB cable, has been established and
detected.
A physical connection between the modem and the computer, through the USB cable, has not been established.
Troubleshooting Tips
Windows Only
None of the LEDs are illuminated when the ADSL modem is powered on.
Check the connection of the power adapter to the modem and to the wall
outlet. Confirm that you are using the power adapter that was included
with your U.S. Robotics SureConnect ADSL USB/Ethernet Modem.
When I plugged in my modem using a USB connection, the New Hardware Wizard
did not display.
• Review the Troubleshooting Checklist at the beginning of this section.
• If a second USB port is available on your computer, try connecting the
USB cable into that USB port.
• If the USB device is not recognized, check the computer
manufacturer’s documentation.
I ran a test using the U.S. Robotics SureConnect ADSL Utility, and the Modem
test failed.
The Modem test will fail if the computer is unable to communicate with the
modem or if the modem does not successfully complete the self-test. Take
the following steps to ensure your computer can communicate with the
modem:
• Confirm that you have secured the Ethernet cable to the “ENET” port
on the modem and to the network interface card. The “ENET” LED
should be illuminated or confirm that you have secured the USB cable
to the USB port. The USB LED should be illuminated.
• Confirm that you are using the power adapter that came with the
U.S. Robotics ADSL USB/Ethernet Modem and that it is securely
plugged into a wall outlet and the modem.
• If you are connecting via Ethernet, confirm the network interface card
(NIC) did acquire an IP address. Restart the computer and then run the
test again.
• If the Modem test still fails, contact your ISP to verify the operational
status of the modem.
I ran a test using the U.S. Robotics SureConnect ADSL Utility, and the Line test
failed.
The modem is unable to communicate with the telephone company. In
technical terms, the modem was not able to confirm a physical connection
to the Digital Sub scriber Line Access Multiplexer (DS LAM) located in the
telephone company’s central office.
• Confirm that the telephone cable is securely plugged into the modem
and to an active telephone jack.
• Confirm that you do not have a microfilter installed on the RJ-11 cable
that connects your modem to the telephone jack. If you do, remove it.
• Reset the telephone line by unplugging all devices that share that
phone number from their respective telephone jacks. Once they are all
unplugged, plug them back in.
• If the line test still fails, call your ISP to ensure the ADSL line is properly
configured.
I ran a test using the U.S. Robotics SureConnect ADSL Utility, and the Internet
Connection Test failed.
The modem was able to connect to the telephone company but was unable
to reach the ISP. There may be a problem connecting to the Gateway or to
the Domain Name Service (DNS) maintained by the ISP.
• Try disconnecting the dial-up connection and dialing it again. If the
test still fails, call your ISP for assistance.
• If you are using a firewall, confirm that the SureConnect Utility has
permission to access the Internet.
• If you have a router between the modem and the computer, this
version of SureConnect will not detect the modem. In order for
SureConnect to detect the modem and display its status, the modem
must be connected directly to the computer. The modem will still
function properly; however, the SureConnect Utility cannot be used.
You may safely delete the SureConnect Utility shortcut from your
Startup folder or use Add/Remove Programs to uninstall the
SureConnect Utility.
28
When I complete my installation, the Test tab of the U.S. Robotics SureConnect
ADSL Utility displays and I can’t surf the Internet.
Click the Test button in the Test tab to initiate a test on the modem. The
cause of the failure will be identified in the lower half of the screen.
The Registration screen did not display.
The Registration screen will only display if a connection to the Internet has
been established. If your ISP gave you software to install, do so at this time.
Be sure to read and follow all of the installation instructions provided. Once
the software is installed, you may need to establish a dial-up connection in
order to access the Internet. If your ISP gave you software to install, they
should have assigned you a user name and password as well.
How do I uninstall the modem?
Windows XP
1. Click the Start button and then click Control Panel.
2. Double-click Add/Remove Programs.
3. The Install/Uninstall tab will display all the programs you currently
have installed. Locate and select the U.S. Robotics SureConnect ADSL
Modem. You may have to scroll down to locate this program.
4. Click the Add/Remove button.
5. The Modify, Reinstall or Uninstall screen will display. Click the
Uninstall option and then click Next.
6. If you installed the modem via the USB port, unplug the USB cable from
the computer and the modem, click Next.
Windows 98 and 2000
1. Click Start, select Settings, and click Control Panel.
2. Double-click the Add/Remove Programs.
3. The Add/Remove Programs screen will display all the programs you
currently have installed. Locate and select the U.S. Robotics
SureConnect ADSL Modem. You may have to scroll down to locate t his
program.
4. Click Change/Remove in Windows 2000 or Add/Remove in Windows
98.
5. The Modify, Reinstall or Uninstall screen will display. Click the
Uninstall option and then click Next.
6. Click Yes to confirm the uninstallation.
7. If you installed the modem via the USB port, unplug the USB cable from
the computer and the modem, click Next.
8. Click Finish to complete the uninsta llation.
Windows NT
1. Click the Start button and select Settings, then click Control Panel.
2. Double-click the Add/Remove Program icon.
28
3. The Add/Remove Programs screen will display all the programs you
currently have installed. Locate and select the U.S. Robotics
SureConnect ADSL Modem. You may have to scr oll down to locate this
program.
4. Click the Add/Remove button.
5. The Modify, Reinstall or Uninstall screen will display. Click the
Uninstall option and then click Next.
Windows 95
1. Click Start, select Settings, and click Control Panel.
2. Double-click Add/Remove Programs icon.
3. On the Install/Uninstall tab, select U.S. Robotics SureConnect ADSL
Modem. You may have to scroll down to locate thi s program.
4. Click the Remove button.
5. The Modify, Reinstall or Uninstall screen will display. Click Uninstall
and select Yes if asked to confirm the uninstall.
My computer failed the system qualification test.
The setup verifies that your computer has the minimum system requirements for several resources including hard drive space, RAM, operating
system level, and processor speed.
If any of these resources are under the required value, the Results screen
will identify which resources did not meet the requirement. In the case of a
resource being under the required value, update your computer to the
recommended resource level. Refer to your computer’s documentation for
instructions on how to upgrade your system.
I can’t connect to the Internet.
• Review the Troubleshooting Checklist at the beginning of this section.
• Open up the U.S. Robotics SureConnect ADSL Utility by clicking the
icon on the task bar. Go to the Test tab and run a test on the modem
in order to identify the cause of failure.
• Verify that you have entered your correct user name and password for
your DSL service provider.
• Make sure that your TCP/IP property settings match the information
supplied by your ISP. Most ISPs require that the computer obtain an IP
address directly from the provider using DHCP.
Call your ISPs help desk for further information on their connection and
registration.
29
29
30
30
31
31
Page 12

I password protected my SureConnection lock and I don’t remember my
password.
You will need to uninstall the SureConnect Utility and re install it in order to
deactivate the password. Once you reinstall the SureConnect Utility, there
will be no password activated. Refer to the uninstallation instructions
located on the Installation CD-ROM or by clicking the Help button in the
SureConnect Utility.
When I complete my installation, the Test tab of the U.S. Robotics SureConnect
ADSL Utility displays and states that the modem test failed but I can still surf the
Internet.
If you have a router between the modem and the computer, this version of
SureConnect wil l not d etect the mo dem. I n orde r for SureConnect to det ect
the modem and display its status, the modem must be connected directly
to the computer. The modem will still function properly; however, the
SureConnect Utility cannot be used. You may safely delete the SureConnect
Utility shortcut from your Startup folder or use Add/Remove Programs to
uninstall the SureConnect Utility.
The modem installed properly, the “PWR” LED is on, the phone line is connected,
but the “ADSL” LED is off or keeps flashing.
• Review the Troubleshooting Checklist at the beginning of this section.
• Go to the U.S. Robotics SureConnect ADSL Utility Moni tor tab and
press the Reset button once. The modem will re-establish the
connection; this may take a moment.
• Open the U.S. Robotics SureConnect ADSL Utility by clicking the icon
on the task bar. Go to the Test tab and run a test on the modem in
order to identify the cause of the failure.
•Call your ISP.
Macintosh and Linux
I installed the modem on a Macintosh and I need to connect using PPP, but the
only choice I have for connecting in the Modem configuration is “Internal
Modem.”
Most likely, your mode m is not properly installed.
I installed the modem on a Macintosh and have followed the instructions for
installing the software and the hardware; however, when I plug the modem in,
nothing happens.
• This could be one of a number of things. First, try to run the Uninstall
script. If you are using ADSL Annex A, which works over a standard
telephone line, do uble-click USRxx9002 (POTS) ADSL Modem. If you
are using ADSL Annex B, which works over an ISDN line, double-click
USR029002 (ISDN) ADSL Modem.
• Your corresponding window will display. Select Uninstall and click
the Uninstall button located in the lower-right corner of the screen.
• Once the modem is uninstalled, remove the cables and restart the
installation process from the beginning. If that does not work, you
should contact your ISP.
I installed the modem on a Macintosh and want to make sure that I’m getting the
throughput that I should expect from this ADSL connection. How can I get this
information?
Open the USR ADSL Modem from the desktop and click the Statistics tab.
This will display information such as: how much data is being transmitted,
how many errors have been encountered, and the line speed at which you
are connected.
How can I verify my modem's installation on a Macintosh?
Before proceeding with Configuration, you should verify that your modem
has been successfully identified by the operating system and that the
modem has successfully connected to your ADSL provider.
1. Go to the Desktop and double-click the USR ADSL Modem icon.
2. Go to the Operation page of the U.S. Robotics Monitor screen. If the
screen shows ADSL / Modem status as "Modem is operational," then
the modem has been successfully identified by the operating system
and has connected to the DSLAM (Digital Subscriber Line Access
Multiplexer) in the Central Office (CO).
How do I uninstall the modem on a Macintosh?
1. If you are using ADSL Annex A, which works over a standard telephone
line, double-click USRxx9002 (POTS) ADSL Modem. If you are using
ADSL Annex B, which works over an ISDN line, double-click
USR029002 (ISDN) ADSL Modem.
2. Your corresponding window will display. Select the Uninstall option
and click the Uninstall button located in the lower-right corner of the
screen.
3. Once the modem is uninstalled, remove the cables.
How do I disable the modem driver on a Linux system?
Unplug the USB cable from the computer and run the following command to
remove the driver.
rmmod adiusbadsl
32
While trying to surf the Internet, I received a “Page Not Found” or similar error.
Your computer may not have acquired an IP address from your provider’s
DHCP server when you established the connection. Disconnect your dial-up
connection, and then reconnect it to force a new request. If you are still
receiving an error, restart the computer.
The ADSL LED is flashing or is not illuminated.
Make sure that the RJ-11 cable is properly connected in the “ADSL” port on
the rear of the modem and in the phone wall jack in your home. The “ADSL”
LED on the front of the modem should be illuminated.
32
Tec hnica l Suppo rt
• Go to the Support section of the U.S. Robotics Web site at
www.usr.com/broadbandsupport. Many of the most common
difficulties users experience have been addressed in the FAQ and
Troubleshooting Web pages for your specific product.
• If you can’t connect to the Internet, contact your ISP for assistance.
For current support contact information, go to the following Web site:
http://www.usr.com/broadbandsupport
Regulatory Information
33
Manufacturer’s Declarations of Conformity
FCC Declaration of Conformity
We declare under our sole responsibility that the U.S. Robotics SureConnect ADSL USB/Ethernet
Modem to which this declaration r elates, is in conformity with the following standard s or other
normative documents:
ANSI C63.4-1992 Methods of measurement
Federal Communications Commission 47 CFR Part 15, subpart B
1) 15.107 (e) Class B Conducted Limits
2) 15.109 (g) Class B Radiated Emissions Limit s
FCC Class B Statement
This device complies with Part 15 of the FCC Rules. Operation is subject to the following two conditions:
a) this device may not cause harmful electromagnetic interference, and
b) this device must accept any interference receiv ed including interference that may caus e
undesired operations.
Radio and Television Interfere nce
Note: This equipment has been tested and found to comply with the limits for a Class B digital device,
pursuant to Part 15 of the FCC Rule s. These limits are designed to pr ovide reasonable protection against
harmful interference in a residential installation. This equipment generates and uses radio frequency
energy and, if not installed and used in accordance with the instructions, may cause interference to
radio communications. However, there is no guar antee that interference will not occur in a particular
installation. If this equipment does cause interference to radio or television reception, which can be
determined by turning the equipment off and on, the user is encouraged to try to correct the
interference by one or more of the following measures:
• Reo rient or relocate the receiving antenna or cable input device .
• I ncrease the separation between the equipment and receiver.
• C onnect the equipment into an outlet on a circuit different from that to which the receiver
is connected.
• C onsult the dealer or an experienced radio/TV technician for help.
The user may find the following information prepared by the Federal Communications Commission
helpful:
Consult the dealer or an experien ced radio/TV technician for help.
Telephone Interference Bull etin
This document is available on the Internet through the FCC Consumer Information Bureau Home Page
at http://www.fcc.gov/cib. Under Consumer Information Directory>Telephone>Miscellaneous
Telephone Information, select Interference to Telephones.
Caution: Changes or modifications not expressly approved by the party respo nsible for compliance
could void the user’s authority to operate this equi pment.
In order to maintain compliance with the limits of a Class B digital device, U.S. Robotics requires that
you use a quality interface cable when conne cting to this device. Suggested cable type is 90-ohm USB
cable for the USB port, and standard telephone cable for t he RJ-11 port. The telco cable needs to be
connected with a minimum 26AWG telephone cable.
UL Listing/C-UL Listing
This information technology equipment is UL Listed and C-UL Listed for the us es described in the User
Guide.
FCC Part 68 Registration
Customer Information
This equipment complies with Part 68 of the FCC r ules and the requirements adopted by the ACTA. On
the bottom of this equipment is a label that contains, among other information, a product identifier in
the format US: AAAEQ##TXXXX. If requested, this number must be provided to the telephone company.
This equipment uses the followin g Universal Service Order Code (USOC) jacks: RJ-11.
33
34
34
35
35
Page 13

A plug and jack used to connect this equipment to the premises wiring and telephone network must
comply with the applicable FCC Part 68 rules and requirements adopted by the ACTA. A compliant
telephone cord modular plug is provided with this product. It is designed to be connected to a
compatible modular jack that is also compliant. See this document for details.
The REN is used to determine the number of devices that may be connected to a telephone line.
Excessive RENs on a telephone li ne may result in the devices not ringi ng in response to an incoming call.
In most but not all are as, the sum of RENs should not e xceed five (5.0). To be certain of the number of
devices that may be connected to a line, as determined by the total RENs, contact the local telephone
company. For products approved after July 23, 2001, the REN for this product is part of the product
identifier that has the format US: AAAEQ##TXXXX. The digits represented by ## are the REN without a
decimal point (e.g., 03 is a REN of 0. 3).
If this equipment, U.S. Robotics ADSL USB/Ethernet Modem, causes harm to the telephone network,
the telephone company will notify you in advance that temporary discontinuance of service may be
required. But if advance notic e is not practical, the telephone company will notify the customer as soon
as possible. Also, you will be advised of your right to file a complaint with the FCC if you bel ieve it is
necessary.
The telephone company may make changes in it s facilities, equipment, operations or procedures that
could affect the operation of the equipment. If this happ ens the telephone company will provide
advance notice in order for you to make necessary modifications to maintain uninterrupted service.
If trouble is experienced with this equipment, for r epair or warranty information, please contact:
USR - Walnut
528 Spanish Lane
Walnut, CA 91789
If the equipment is causing harm to the telephone network, the telephone company may request that
you disconnect the eq uipment until the problem is resol ved.
There are no serviceable parts in this equipment.
If your home has specially wired alarm equipment connected to the telephone line, ensure the
installation of this equipment does not disable your alarm equipment. If you have questions about
what will disable alarm equipm ent, consult your telephone company or a qualified installer.
For Canadian Modem Users
Utilisateurs de modems au Canada
Industry Canada (IC)
This digital apparatus does not exceed the Class B limits for radio noise emissions from digital
apparatus set out in the interference-causing equipment standard entitled Digital Apparatus, ICES-003
of Industry Canada.
Le présent appareil numérique n’émet pas de bruits radio-électriques dépassant les limites applicab les
aux appareils numériques de la classe B prescrites dens le Règlement sur le brouillage radioélectrique
édicté par l’Industrie. NMB-003
Customer Information
Notice: This equipment meets the applicable Industry Canada Terminal Equipment Techni cal
Specifications. This is confirm ed by the registration number. The abbreviation , IC, before the
registration number signifies that registration was performed based on a Declaration of Conformity
indicating that Industry Canada technical specifications were met. It does not imply that Industry
Canada approved the equipment.
Notice: The Ringer Equivalence Number (REN) for this terminal equipment is 0.1B. The REN assigned
to each terminal equipment provides an indication of the maximum number of terminals allowed to be
connected to a telephone interface. The termination on a interface may consist of any combination of
devices subject only to the requirement that th e sum of the Ringer Equivalence Numbers of all the
devices does not exceed five.
AVIS : Le nombre équivalent de s onneries (REN) affecté à chaque terminal indique le nombre maxi mal
36
de terminaux qui peuvent être branchés à une interface télé phonique. L’équipement terminal d’une
interface peut comporter toute combinaison d’appareils, à la condition unique que le nombre
équivalent total des sonn eries de tous les appareils ne dép asse pas 5. Le nombre équivalent de s
sonneries se trouve sur la base du modem.
AVIS: L’étiquette d’Industrie Canada (IC) permet d’identifier le matériel homologué. Cette
homologation signifie que le matériel est conforme à certaines normes de protection, d’exploitation et
de sécurité des réseaux de télécommunications, comme le prescrivent les documents qui portent sur
les exigences techniques relatives à l’équipement terminal. Cependant, le Ministère ne garantit pas que
l’appareil fonctionnera à la satisfaction de l’utilisateur.
Avant d’installer ce matériel, l’util isateur doit s’assurer qu’il est permis de le raccorder aux installations
de l’entreprise locale de télécommunication . Le matériel doit également être installé selon une
méthode de raccordement autorisée. Dans ce rtains cas, le câblage intérieur de la compagnie étant
associé à une ligne individuelle, le service individuel peut être étendu au moyen d’un connecteur
certifié (rallonge téléphon ique). L’abonné ne doit pas oublier que la conform ité aux conditions
susmentionnées n’empêchera peut-être pas la dégr adation du service dans certains cas. À l’heure
actuelle, les compagnies de téléphone n’autorisent pas les utilisateurs à raccorder leur appareil au jack
sauf dans des circonstances préci ses énoncées dans les contrats et tarifs de ces compagnies.
Les réparations de matériel homologué doivent être coordonnées par un représentant désigné par le
fournisseur. L’entreprise de télécommunications peut demander à l’utilisateur de débrancher un
appareil à la suite de réparations ou de modifications effectuées par l’utilisateur ou à cau se d’un
mauvais fonctionnement de l’appareil.
AVIS: L’étiquette d’Industrie Canada identifie le matériel homologué. Cette étiquette certifie que le
matériel est conforme aux normes de protection, d’exploitation et de sécurité des réseaux de
télécommunications, c omme le prescrivent les documents concernant les exigences technique s
relatives au matériel terminal. Le Ministère n’assure toutefois pas que le matériel fonctionnera à la
satisfaction de l’utilisateur.Avant d’installer ce matériel, l’utilisateur doit s’assurer qu’il est permis de
le raccorder aux installati ons de l’entreprise locale de télécommuni cation. Le matériel doit également
être installé en suivant une méthode acceptée de raccordement. L’abonné ne doit pas oublier qu’il est
possible que la conformité au x conditions énoncées ci-dessus n’empêche pas la dégradation du s ervice
dans certaines situations.Les réparations de matériel homologué doivent être coordonnées par un
représentant désigné par le fournisseur. L’entreprise de télécommunications peut demander à
l’utilisateur de débrancher un appareil à la suite de ré parations ou de modifications effectuées par
l’utilisateur ou à cause de mauvais fonctionneme nt.Canadian Modem Users, your warranty and repair
centre is:
Product Specifications for U.S. Robotics SureConnect USB/Ethernet Modem
Standard Conformance
Basic ADSL
Standards and Specifications
• Ana log Devices 6484/6480 Eagle ADSL Chipset
• S upports full-rate G.DMT (ITU-T G.992.1)and T1.413 Issue 2 ADSL:up to 8 Mbps
downstream and up to 1 Mbps upstream
• S upports G.Lite (ITU-T G.992.2) ADSL: up to 1.5 Mbps downstream and up to 512 Kbps
upstream
• Supports DSL handshaking (ITU-T G.994.1)
• M ulti-DSLAM interoperability including A lcatel, Globespan,Texas Instrument s, and Analog
Devices-based DSLAMs (results available upon request)
Transport Protocols:
• RFC 2364 PPP over ATM
• RFC 2684 (formerly RFC - 1483) Multi-protocol over ATM (Bridged and Routed)
• RFC 2516 - PPP over Ethernet (drivers included, no third-party client needed)
• Local loop to central office at up to 18,000 feet (5400 meters) when coexisting with plain
old telephone service (POTS)
U.S. Robotics
Unit - 100
13751 Mayfield Place
Richmond, B.C. Canada V6V 2G9
37
ATM Attributes:
• AAL Type: AAL 5
• AT M Service Class: UBR
• Virtual Circuit Support: 1 PVC
•DSL Auto-provisioning & ILMI v4.0
• End-to-end loopback:OAM
Data Rate:
G.DMT: 8 Mbps (downstream), 1 Mbps (upstream)
G.Lite: 1.5 Mbps (downstream), 512 Kbps (upstream)
Media Type: Simultaneous data/voice (can coexist with HPNA)
Service Provider: Digital Subscriber Line Access Multiplexer (D SLAM)
Media Connection:
• ( 2) RJ-45 10/100 Ethernet ports
• (1) U SB 1.1 compliant port
•ADSL port (RJ-11)
• C onsole port (RS-232)
•AC into power supply
Ethernet cable connection to computer, RJ-11 connection to ADSL provider
Computer Requirements: Host Interface: Network Interface Card 10/100 (RJ-45)
Minimum System Requirements - USB Port
• Pentium 200 MHz or faster compatible CPU
• H ost PC with Universal Serial Bus (USB ) support
•32 MB RAM
•10 MB hard disk space
• U .S. Robotics SureConnect Installation CD-ROM requires W indows 98, Windows Me,
Windows 2000, Windows XP, Mac OS 8.6 - 9.x, or Linux
Minimum System Requirements - Ethernet Port
• Pentium or faster compatible CPU
• Any computer with Ethernet 10/100 RJ-45 int erface
•32 MB RAM
•10 MB hard disk space
• Any operating system that supports an Ethernet connec tion with an IP stack
• SureConnect Installation CD-ROM requires Windows 95, Windows 98, Windows Me,
Windows NT 4.0, Windows 2000, or Windows XP
Minimum System Requirements - ADSL Network
ADSL and Internet service fro m your local telephone company or Internet Service Provider (ISP)
Physical Characteristics:
•LEDs/Indicators:
•Power
•ADSL
•USB
•Ethernet
Dimensions:
• Lengt h 4.3 in. (10.9 cm)
•Width 7.1 in. (18.0 cm)
• Height 1.7 in. (4.3 cm)
• W eight:8.2 oz (0.25 kg)
Power Consumption: Input: 120 V AC 60 Hz, Outpu t: 19 AC DC 510 MA
Environmental
• Op erating Temperature Conditions: 32 - 122 °F (0 - 50 °C)
• Operating Humidity: 5% to 90% non-condensing
36
38
U.S. Robotics Corporation Limited Warranty
37
HARDWARE: U.S. Robotics warrants to the end user (“Customer”) that this hardware product will be
free from defects in workmanship and mater ials, under normal use and service, for the following length
of time from the da te of purchase from U.S. Rob otics or its authorized reseller :
Two (2) Years
U.S. Robotics’s sole obligation under this express warranty shall be, at U.S. Robotics option and
expense, to repair the defective product or part , deliver to Customer an equivalent product or part to
replace the defective item, or if neither of the t wo foregoing options is reasonably available, U.S.
Robotics may, in its sole discretion, refund to Customer the purchase price paid for the defective
product. All products that are rep laced will become the property of U.S. Robo tics. Replacement
products may be new or reconditioned.
U.S. Robotics warra nts any replaced or repaired product or part for ninety (9 0) days from shipment, or
the remainder of the initial warr anty period, whichever is longer.
SOFTWARE: U.S. Robotics warrants to Customer that each softw are program licensed from it will
perform in substantial conformance to its program specifications, for a period of ninety (90) days from
the date of purchase from U.S. Robotics or its authorized reseller. U.S. Robotics warrants the media
containing software against failure during the warranty period. No updates are provided. U.S. Robotics
sole obligation under this express warranty shall be, at U.S. Robotics’s option and expense, to refund
the purchase price paid by Customer for any defecti ve software product, or to replace any defective
media with software which substantially conforms to applicable U.S. Robotics published specifications.
Customer assumes responsibility fo r the selection of the appropriate applications program and
associated reference materials. U.S. Robotics makes no warranty or representation that its software
products will meet Customer’s requirements or work in combination w ith any hardware or applications
software products provided by third parties, that the operation of the software products will be
uninterrupted or error free, or that all defects in th e software products will be corrected. For any thirdparty products listed in the U.S. Robotics software product documentation or specifications as being
compatible, U.S. Robotics will make reasonable efforts to provide compatibility, except where the non
compatibility is caused by a “bug ” or defect in the third party’s product or from use of the sof tware
product not in accordance with U.S. Robotics published specifications or User Guide.
THIS U.S. ROBOTICS PRODUCT MAY INCLUDE OR BE BUNDLED WITH THIRD-PARTY SOFTWARE, THE USE
OF WHICH IS GOVERNED BY A SEPARATE END-USER LICENSE AGREEMENT. THIS U.S. ROBOTICS
WARRANTY DOES NOT APPLY TO SUCH THIRD-PARTY SOFTWARE. FOR THE APPLICABLE WARRANTY,
PLEASE REFER TO THE END-USER LICENSE AGREEMENT GOVERNING THE USE OF SUCH SOFTWARE.
U.S. Robotics shall not be responsible for any software, firmware, information, or memory data of
Customer contained in, stored on, or integrated wit h any products returned to U.S. Robotics for repair,
whether under warrant y or not.
OBTAINING WARRANTY SERVICE: Custom er must contact a U.S. Robotics Corporate Service Center or
an Authorized U.S. Robotics Service Center within the applicable warranty period to obtain warranty
service authorization. Dated proof of purchase from U.S. Robotics or its authorized reseller may be
required. Products returned to U.S. Robotics Co rporate Service Center must be pre-authorized by U.S.
Robotics with a Service Repair Order (SRO) numbe r marked on the outside of the package, and sent
prepaid and packaged appropriately for s afe shipment, and it is recommended that they be insured o r
sent by a method that provides for tracking of the package. The repaired or replaced item will be
shipped to Customer, at U.S. Robotics’s expense, not later than thirty (30) days after U.S. Robotics
receives the defective product. Return the product to:
In the United States:
USR-Walnut
528 Spanish Lane
Walnut, CA 91789
In Canada:
U.S. Robotics
Unit - 100
13751 Mayfield Place
Richmond, B.C. Canada V6V 2G9
39
38
39
Page 14

WARRANTIES EXCLUSIVE: IF A U.S. ROBOTICS PRODUCT DOES NOT OPERATE AS WARRANTED ABOVE,
CUSTOMER’S SOLE REMEDY FOR BREACH OF THAT WARRANTY SHALL BE REPAIR, REPLACEMENT, OR
REFUND OF THE PURCHASE PRICE PAID, AT U.S. ROBOTICS’S OPTION. TO TH E FULL EXTENT ALLOWED
BY LAW, THE FOREGOING WARRANTIES AND REMEDIES ARE EXCLUSIVE AND ARE IN LIEU OF ALL OTHER
WARRANTIES, TERMS, OR CONDITIONS, EXPRESS OR IMPLIED, EITHER IN FACT OR BY OPERATION OF
LAW, STATUTORY OR OTHERWISE, INCLUDING WARRANTIES, TERMS, OR CONDITIONS OF
MERCHANTABILITY, FITNESS FOR A PARTICULAR PURPOSE, SATISFACTORY QUALITY,
CORRESPONDENCE WITH DESCRIPTION, AND NON-INFRINGEMENT, ALL OF WHICH ARE EXPRESSLY
DISCLAIMED. U.S. ROBOTICS NEITHER ASSUMES NOR AUTHORIZES ANY OTHER PERSON TO ASSUME
FOR IT ANY OTHER LIABILITY IN CONNECTION WITH THE SALE, INSTALLATION, MAINTENANCE OR USE
OF ITS PRODUCTS. U.S. ROBOTICS SHALL NOT BE LIABLE UNDER THIS WARRANTY IF ITS TESTING AND
EXAMINATION DISCLOSE THAT THE ALLEGED DEFECT OR MALFUNCTION IN THE PRODUCT DOES NOT
EXIST OR WAS CAUSED BY CUSTOMER’S OR ANY THIRD PERSON’S MISUSE, NEGLECT, IMPROPER
INSTALLATION OR TESTING, UNAUTHORIZED ATTEMPTS TO OPEN, REPAIR OR MODIFY THE PRODUCT,
OR ANY OTHER CAUSE BEYOND THE RANGE OF THE INTENDED USE, OR BY ACCIDENT, FIRE, LIGHTNING,
OTHER HAZARDS, OR ACTS OF GOD.
LIM ITAT ION OF LI ABI LITY : TO THE F ULL EXTE NT A LLO WED B Y LA W, U. S. R OBOT ICS ALSO EXC LUD ES FO R
ITSELF AND ITS SUPPLIERS ANY LIABILITY, WHETHER BASED IN CONTRACT OR TORT (INCLUDING
NEGLIGENCE), FOR INCI DENTAL, CONSEQUENTIAL, IND IRECT, SPECIAL, OR PUNITIVE DAMAGES OF ANY
KIND, OR FOR LOSS OF REVENUE OR PROFITS, LOSS OF BUSINESS, LOSS OF INFORMATION OR DATA,
OR OTHER FINANCIAL LOSS ARISING OUT OF OR IN CONNECTION WITH THE SALE, INSTALLATION,
MAINTENANCE, USE, PERFORMANCE, FAILURE, OR INTERRUPTION OF ITS PRODUCTS, EVEN IF U.S.
ROBOTICS OR ITS AUTHORIZED RESELLER HAS BEEN ADVISED OF THE POSSIBILITY OF SUCH DAMAGES,
AND LIMITS ITS LIABILITY TO REPAIR, REPLACEMENT, OR REFUND OF THE PURCHASE PRICE PAID, AT
U.S. ROBOTICS’S OPTION. THIS DISCLAIMER OF LIABILITY FOR DAMAGES WILL NOT BE AFFECTED IF ANY
REMEDY PROVIDED HEREIN SHALL FAIL OF ITS ESSENTIAL PURPOSE.
DISCLAIMER: Some countries, states, or provinces do not allow the exclusion or limitation of implied
warranties or the limitation of inc idental or consequential damages for certain prod ucts supplied to
consumers, or the limitation of liability for personal injury, so the above limitations and exclusions may
be limited in their application to you. When the implied warranties are not allowed to be excluded in
their entirety, they will be limited to the duration of the applicable written warranty. This warranty gives
you specific legal rights which may vary de pending on local law.
GOVERNING LAW: This Limited Warranty shall be governed by the laws of the State of Illinois, U.S.A.
excluding its conflicts of laws principles and excluding the United Nations Convention on Contracts for
the International Sale of Goods.
Manufacturer’s Disclai mer Statement
The information in this document is subject to change without notice and does not represent a
commitment on the part of the vendor. No warranty or representation, either expressed or implied, is
made with respect to the quality, accuracy or fitness for any particular purpose of this document. The
manufacturer reserves the right to make changes to the content of this document and/or the products
associated with it a t any time without obligati on to notify any person or or ganization of such changes.
In no event will the m anufacturer be liable for direct, ind irect, special, incidental or con sequential
damages arising out of the u se or inability to use this product or do cumentation, even if advised of the
possibility of such damages. This document contains materials protected by copyright. All rights are
reserved. No part of this manual may be reproduced or transmitted in any form, by any means or for any
purpose without expressed written consent of its authors. Product names appearing in this document
are mentioned for identification purchases only. All trademarks, product names or brand names
appearing in this document are property of their re spective owners.
40
40
Page 15

0
Printed in XXXXXXXXXXXXXXXXXXXX
1
 Loading...