

Page 1

56K Serial Controller Faxmodem
Quick Installation Guide
Guide d'installation rapide
R24.0782.00
rev 1.1 10/09
Introduction
Package Contents
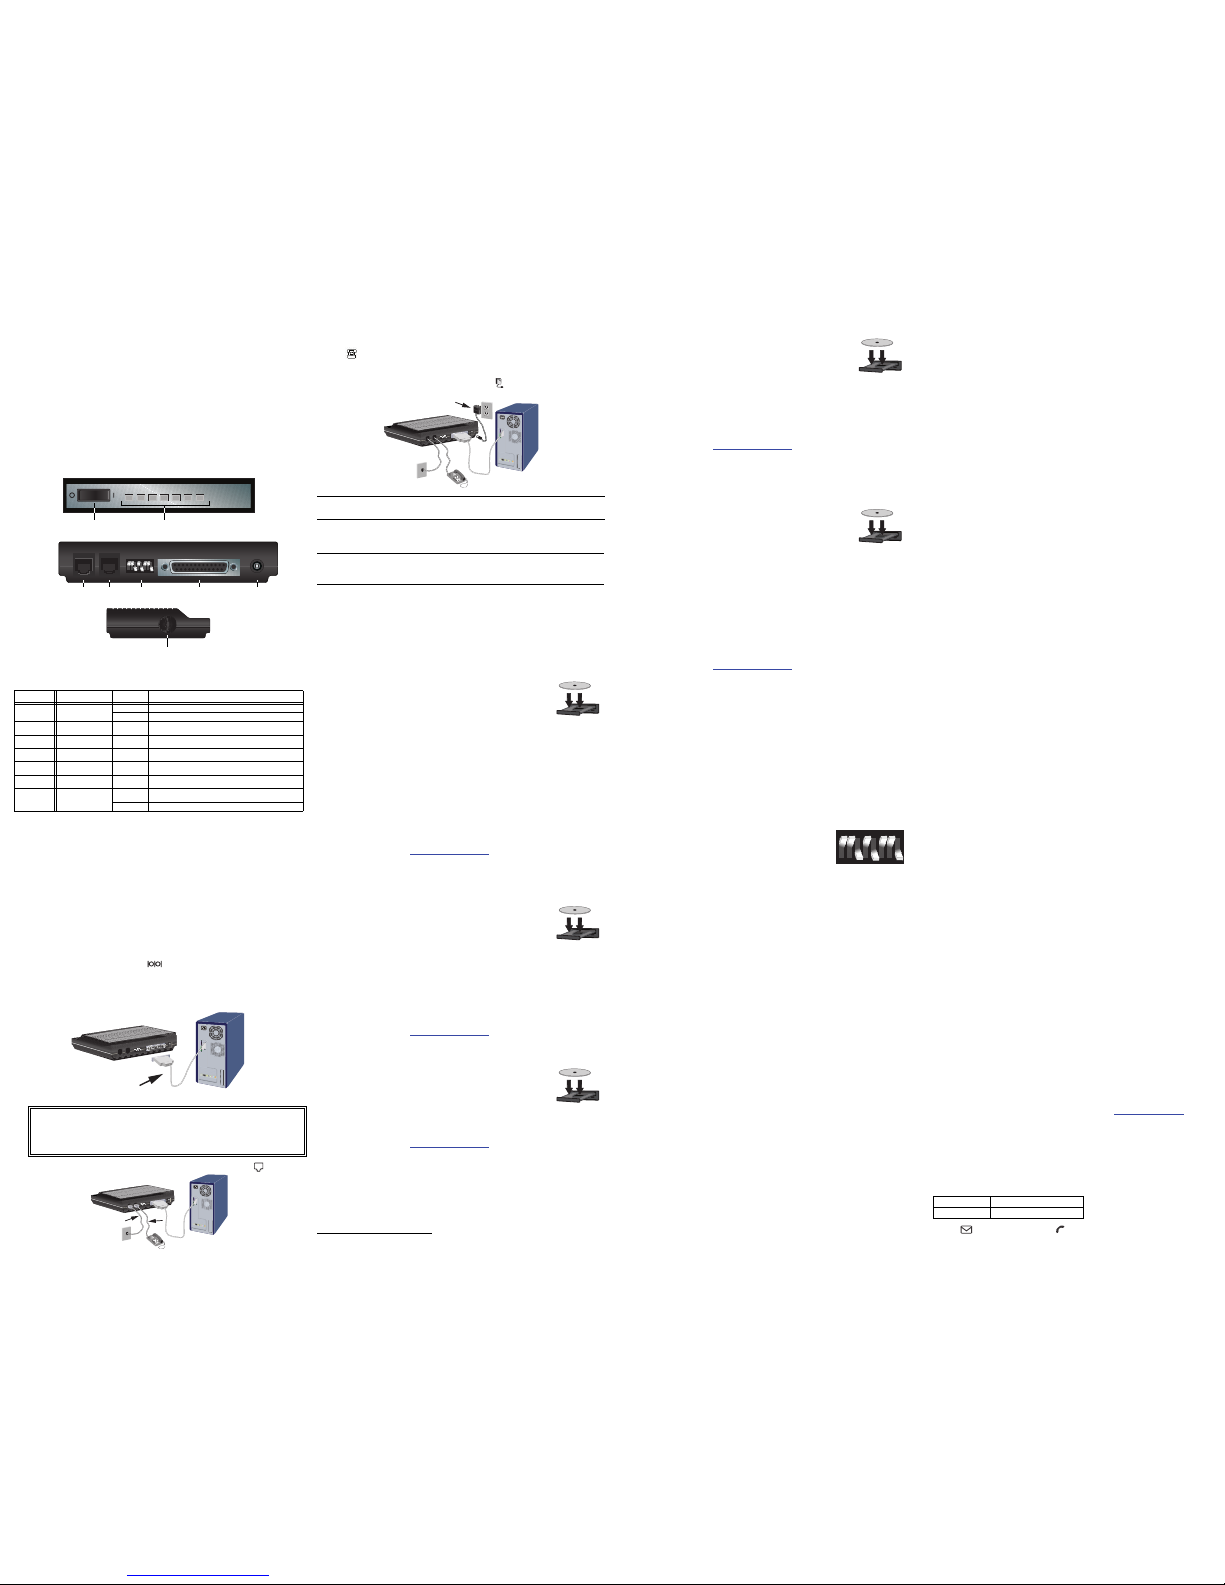
Physical Features
LEDs
For more detail on the LEDs, see the User Guide on the USRobotics Installation CD-ROM.
System Requirements
Installation
Step One: Prepare for Installation
1. Uninstall all other modems that are installed on your computer. For instructions, refer to the documentation for your previous modem.
2. Unplug all telephone and power cords connected to your previous modem(s).
3. Shut down your computer and power it off.
4. Locate the serial port on the back of your computer. To find the serial port, look for a port labeled
COM, MODEM, RS-232, , or SERIAL. Do not use the AUX, GAME, LPT, or PARAL-
LEL ports.
Step Two: Connect the Modem to the Computer
Connect one end of the serial modem cable to modem and the other end to your computer’s serial port.
Step Three: Connect the Modem to an Analogue Telephone Line
1. Plug one end of the telephone cord into the jack on the modem.
2. Plug the other end into an analogue telephone wall jack.
3. To connect a telephone through the modem, plug the telephone’s cord into the modem’s jack.
Step Four: Power Up the Modem
1. Plug the power adapter into the jack on the modem and the other end into an electrical outlet.
2. Turn on the modem using the power switch on the front of the modem. The CS LED should light.
3. Turn on your computer.
Step Five: Install the Modem Drivers
Windows Vista, XP and 2000
You must be logged in as an administrator in order to properly install the new modem.
When you turn your computer on, Windows automatically detects the modem and installs a generic
driver.
1. Insert the USRobotics Installation CD-ROM to install the USRobotics driver.
If the CD doesn't start automatically, start it manually as follows:
A. Windows Vista: Click Windows Start > Computer.
Windows XP: Click Windows Start > My Computer.
Windows 2000: On the desktop, double-click My Computer.
B. Double-click the CD drive.
2. If the Auto Play window appears, click Run autorun.exe. If prompted by
User Account Control, click Continue.
3. If prompted, select your preferred language. If asked to read the license agreement, read the agreement and click Yes.
4. Click Install Modem, and follow the on-screen instructions to install the driver for the modem. If
prompted, click OK.
Windows Vista: If prompted by Windows Security, click Install.
1
Windows XP: If a Software or Hardware Installation warning appears, click Continue
Anyway.
1
Windows 2000: If a Digital Signature Not Found window appears, click Yes.
1
Congratulations. You have successfully completed the installation procedure. Please register
your 56K Serial Controller Faxmodem at
www.usr.com/productreg/
.
Windows Me
You must be logged in as an administrator in order to properly install the new modem.
When you turn your computer on, Windows automatically detects the modem and installs a generic
driver.
1. Insert the USRobotics Installation CD-ROM to install the USRobotics driver.
2. If prompted, select your preferred language. If asked to read the license agreement, read the agreement and click Yes.
3. Click Windows Start > Settings > Control Panel.
4. Double-click System.
5. On the Device Manager tab, double click Modem to expand the entry.
6. Double-click the Sportster V.90 56K Serial Controller Faxmodem.
7. On the Driver tab, click Update Driver.
8. Select Automatic search for a better driver (Recommended) and click Next.
9. Click Finish to complete the installation.
Congratulations. You have successfully completed the installation procedure. Please register
your 56K Serial Controller Faxmodem at
www.usr.com/productreg/
.
Windows 98
1. Turn on your computer. The Found New Hardware Wizard will detect your modem.
2. Insert the USRobotics Installation CD-ROM to install the USRobotics driver.
3. In the Found New Hardware Wizard, click Next.
4. Select Search for best driver for your device (Recommended) and click
Next.
5. Select CD-ROM drive and click Next.
6. Click Next, then click Finish to complete the installation.
Congratulations. You have successfully completed the installation procedure. Please register
your 56K Serial Controller Faxmodem at
www.usr.com/productreg/
.
Windows 95B
1. Turn on your computer. The Update Device Driver Wizard or Found New Hardware Wizard will
detect your modem.
2. Insert the USRobotics Installation CD-ROM to install the USRobotics driver.
3. In the Update Device Driver Wizard or Found New Hardware Wizard, click
Next and follow the on-screen instructions.
If the Update Device Driver Wizard or New Hardware Found window does
not immediately detect the correct modem, perform the following steps:
A. Select Driver from disk provided by manufacturer and click OK.
B. Type
D:\ and click OK, where D is the drive letter assigned to your CD-
ROM drive.
C. Click OK to continue the installation.
D. If prompted, click Finish to complete the installation.
Congratulations. You have successfully completed the installation procedure. Please register
your 56K Serial Controller Faxmodem at
www.usr.com/productreg/
.
Windows NT 4.0
You must be logged in as an administrator in order to properly install the new modem.
When you turn your computer on, Windows automatically detects the modem and installs a generic
driver. You will need to update it with the USRobotics driver to support full V.92 features and the additional software tools for your modem.
1. Insert the USRobotics Installation CD-ROM to install the USRobotics driver.
2. If prompted, select your preferred language. If asked to read the license agreement, read the agreement and click Yes.
3. Click Windows Start > Settings > Control Panel.
4. Double-click Modems.
5. Click Add. When the Install New Modem screen appears, click Next to have
Windows detect a standard modem.
6. Click Change.
7. Click Have Disk. Type
D:\ and click OK, where D is the drive letter assigned to your CD-ROM
drive.
8. Select U.S. Robotics 56K FAX EXT and click OK.
9. Click Next.
10. Click Finish to complete the installation. When you see the Modems Properties tab, you will see
the COM port that is assigned to your modem.
11. Click Close. If the System Setti ngs Change window appears, click Yes to restart your computer.
Congratulations. You have successfully completed the installation procedure. Please register
your 56K Serial Controller Faxmodem at
www.usr.com/productreg/
.
Additional Software Tools (optional)
To see the additional software tools for your modem, select Software on the USRobotics Installation
CD-ROM.
Troubleshooting
General
This procedure addresses a number of symptoms that you might experience with your modem:
1. Verify that the cables are connected correctly. This includes all cables connecting the telephone line,
the modem, and your computer.
2. Refer to the LED descriptions and then check the LEDs on the modem to make sure you are
receiving power and that are no errors.
3. If possible, test your modem with a different phone cord and/or wall jack. .
4. Make sure you are not using a Null Modem cable or adapter.
5. Make sure the DIP switches on the back of your modem are set correctly. DIP switches 3, 5, and 8
should be in the on (down) position.
6. Shut down and restart your computer.
7. If you still have trouble with the modem, follow these steps to determine whether it was installed
correctly:
Windows Vista
1. Click Windows Start > Control Panel.
2. Click Hardware and Sound.
3. Click Phone and Modem Options and then click the Modems tab.
You s houl d see U.S. Robotics 56K FAX EXT PnP and a COM port setting. If you do not see
a description of your modem, repeat the installation procedure.
4. On the Modems tab, select the description of your new modem and click Properties.
5. Click the Diagnostics tab and then click the Query Modem button.
If you see a series of commands and responses from the modem, the installation was successful.
If you do not see a description of your modem the installation was not successful; repe at the
installation procedure.
Windows XP
1. Click Windows Start > Control Panel.
2. Click Phone and Modem Options and then click the Modems tab.
You s houl d see U.S. Robotics 56K FAX EXT PnP and a COM port setting. If you do not see
a description of your modem, repeat the installation procedure.
3. Highlight the description of your new modem, and click Properties.
4. Click the Diagnostics tab and then click the Query Modem button.
If you see a series of commands and responses from the modem, the installation was successful.
If you do not see a description of your modem the installation was not successful; repe at the
installation procedure.
Windows 2000
1. Click Windows Start > Settings > Control Panel.
2. Double-click the Phone and Modem Options icon.
3. Click the Modems tab.
Make sure that U.S. Robotics 56K FAX EXT is selected. If you do not see a description of
your modem, repeat the installation procedure.
4. Click the Properties button.
5. Click the Diagnostics tab.
6. Click the Query Modem button.
If you see a series of commands and responses from the modem, the installation was successful.
If you do not see a description of your modem the installation was not successful; repe at the
installation procedure.
Windows Me, 98, 95B
1. Click Windows Start > Settings > Control Panel.
2. Double-click the Modems icon.
In the Modems Properties screen, you should see U.S. Robotics 56K FAX EXT. If you do
not see a description of your modem, repeat the installation procedure.
Click the Diagnostics tab. Make sure that the correct COM port (modem) is selected.
3. Click the More Info button.
If you see a series of commands and responses from the modem, the installation was successful.
If you do not see a description of your modem the installation was not successful; repeat the
installation procedure.
Windows NT 4.0:
1. Click Windows Start > Programs > Accessories > HyperTerminal.
2. Click Cancel in the New Connection Wizard.
3. Click File > Properties and very that U.S. Robotics 56K FAX EXT selected.
4. In the HyperTerminal window, type AT and press ENTER.
If AT is displayed in the HyperTerminal window as you type and OK is displayed after you press
ENTER, the installation was successful.
If AT is not displayed as you type and OK is not displayed after you press ENTER, the
installation was not successful; repeat the installation procedure.
My computer isn’t recognizing the modem.
Solution:
You may be using a COM port that is either already in use or not configured correctly. For the modem
to work properly, it must be plugged into an enabled serial port which is assigned to a free COM port.
Most computers have two serial ports assigned to COM 1 and COM 2 respectively.
Windows Vista:
1. Click Windows Start > Control Panel > Hardware and Sound.
2. Double-click Phone and Modem Options and click the Modems tab.
Look for a listed modem and check which COM port it is using. If a previous modem is already
using the available COM port, use another COM port or uninstall the modem that was installed
previously. See your previous modem’s manual for uninstallation instructions.
3. Click Windows Start
> Control Panel > System and Maintenance > Device Manager.
4. Look under Ports (CO M and LPT).
If the COM port that your modem is using has yellow exclamation points or red “A” over it,
your COM ports may not be configured correctly or you may be plug ging your modem in to a
disabled serial port. If this is the case, you may need to contact your computer manufacturer for
information on enabling and correctly configuring your COM por ts.
Windows XP
1. Click Windows Start > Control Panel.
2. Double-click Phone and Modem Options and click the Modems tab.
Look for a listed modem and check which COM port it is using. If a previous modem is already
using the available COM port, use another COM port or uninstall the modem that was installed
previously. See your previous modem’s manual for uninstallation instructions.
3. Click Windows Start > Control Panel.
4. Double-click System and select the Hardware tab.
5. Click the Device Manager button.
6. Look under Ports (CO M and LPT).
If the COM port that your modem is using has yellow exclamation points or red “A” over it,
your COM ports may not be configured correctly or you may be plug ging your modem in to a
disabled serial port. If this is the case, you may need to contact your computer manufacturer for
information on enabling and correctly configuring your COM por ts.
Windows 2000:
1. Click Windows Start > Settings > Control Panel.
2. Double-click Phone and Modem Options and click the Modems tab.
Look for a listed modem and check which COM port it is using. If a previous modem is already
using the available COM port, use another COM port or uninstall the modem that was installed
previously. See your previous modem’s manual for uninstallation instructions.
3. Click Windows Start > Settings > Control Panel.
4. Double-click System and select the Hardware tab.
5. Click the Device Manager button.
6. Look under Ports (CO M and LPT).
If the COM port that your modem is using has yellow exclamation points or red “A” over it,
your COM ports may not be configured correctly or you may be plug ging your modem in to a
disabled serial port. If this is the case, you may need to contact your computer manufacturer for
information on enabling and correctly configuring your COM por ts.
Windows Me, 98 and 95B:
1. Click Windows Start > Settings > Control Panel, and then double-click Modems. If you have
Windows Me and you do not see this icon, be sure to select View All Control Panel Options.
2. Look for a listed modem and click the Diagnostics tab to find out which COM port it is using.
If a previous modem is already using the available COM port, use another COM port or
uninstall the modem that was installed previously. See your previous modem’s manual for
uninstallation instructions.
3. Click Windows Start > Settings > Control Panel.
4. Double-click System and select the Device Manager tab.
5. Expand Ports (CO M and LPT).
If the COM port that your modem is using has yellow exclamation points or red “A” over it,
your COM ports may not be configured correctly or you may be plug ging your modem in to a
disabled serial port. If this is the case, you may need to contact your computer manufacturer for
information on enabling and correctly configuring your COM por ts.
Windows NT 4.0:
1. Click Windows Start > Settings > Control Panel. Double-click Ports.
2. Make sure the port you are plugging the modem into appears in the list. If it does not, the por t
needs to be added, and possibly enabled in the BIOS. Consult your Windows NT 4.0 manual
for information about adding ports. After you add or enable the port, follow the instructions in
this guide for your operating system.
Additional Information
For regulatory and warranty information, see the User Guide on the USRobotics Installation CD-
ROM.
For operation and configuration information, see the User Guide on the USRobotics Installation CD-
ROM. The User Guide contains detailed information on the use and configuration of your modem.
For expanded troubleshooting and additional information:
1. See the User Guideon the USRobotics Installation CD-ROM.
2. Go to the Support section of the USRobotics Web site at
www.usr.com/support/
.
Many of the most common difficulties that customers experience have been addressed in the FAQ
and Troubleshooting Web pages for your modem. The Support pages also contain information on
the latest firmware and may contain documentation updates.
Submit your technical support question using an online form, or contact the USRobotics Technical
Support Department.
Support
You can contact the USRobotics Technical Support Department. To receive assistance, you need your
serial number.
y USRobotics 56K Serial Controller
Faxmodem
y USRobotics Installation CD-ROM
y Telephone cable y Power adapter
y Quick Installation Guide
LED Name State Condition
AA
Auto Answer On Answering a call
Blinking Incoming call
CD
Carrier Detect On Receiving carrier signal from remote modem
RD
Received Data Blinking Sending or passing data with remote modem
SD
Send Data On Receiving a DTR signal from computer
TR
Terminal Ready On DTR override is on
CS
Clear to Send On Modem is on and ready to send data
ARQ/FAX
Error Control O n Successfully established an error control connection
Blinking Transmitting data to remote modem
y Windows Vista™, Windows®XP, 2000, Me, 98, 95B or NT
4.0
y CD-ROM drive
y 500 MHz Processor or higher y 128 MB RAM
y 56K Compatible analogue telephone line y RS-232 Serial modem cable
V.92
OFF ON
AA
CD
RDSDTR
CS ARQ/FAX
Power switch
LEDs
12345678
Line to
wall jack
Line to
telephone
DIP
switches
Serial Port
Power
jack
Volume d ial
1 2 3 4 5 6 7 8
Caution:T he 56K Serial Controller Faxmodem must be plugged in to an analogue phone
line only. Plugging your 56K Serial Controller Faxmodem in to a digital phone line
may damage the modem.
Most office phones are wired through digital lines. Be sure you know what type of
line you h9ave.
Note:This product is intended to have power supplied by a Listed Direct Plug-in Power Adapter
marked Class 2 and rated 9V AC, 1000 mA.
Note:If the power LED does not light, the modem may not be turned on. Make sure that the
power supply is connected between the modem and the electrical outlet.
1 USRobotics has throughly tested this driver in conjunction with the supported hardware and has verified its com-
patibility with Windows Vista, XP and 2000.
1
2
3
4
5
6 7
8
1 2 3 4 5 6 7 8
12345678
OFF
ON
Model Number Serial Number
5686G
www.usr.com/emailsupport (888) 428-9450
Page 2
Printed in Xxxxx.
56K Serial Controller Faxmodem
Guide d'installation rapide
Introduction
Contenu de la boîte
Caractéristiques matérielles
Voyants DEL
Pour plus de détails sur les voyants DEL, consultez le User Guide on the USRobotics Installation CD-
ROM.
Configuration minimale requise
Installation
Etape 1 : préparation à l'installation
3. Désinstallez tous les autres modems présents sur votre ordinateur. Pour obtenir des instructions,
reportez-vous à la documentation de votre modem précédent.
4. Débranchez tous les téléphones et cordons d'alimentation connectés à vos précédent(s) m odem(s).
5. Arrêtez votre ordinateur et mettez-le hors tension.
6. Identif iez le port série se tr ouvant à l'ar rière de vot re ordinat eur. Pour le tro uver, recherch ez un port
avec la mention COM, MODEM, RS-232, ou SERIAL. N'utilisez pas les ports AUX,
GAME, LPT ou PARALLEL.
Etape 2 : connexion du modem à l'ordinateur.
Connectez l'une des extrémités du câble série pour modem au modem, puis l'autre extrémité au port
série de votre ordinateur.
Etape 3 : connexion du modem à une ligne téléphonique analogique.
1. Branchez l'une des extrémités du cordon téléphonique dans la prise téléphonique du modem.
2. Branchez l'autre extrémité sur une prise téléphonique analogique murale.
3. Pour connecter un téléphone via le modem, branchez le cordon du téléphone sur la prise télépho-
nique du modem.
Etape 4 : mise sous tension du modem
1. Branchez l'une des extrémités de l'adaptateur secteur dans la prise du modem et l'autre extrémité
dans une prise électrique.
2. Allumez le modem en appuyant sur l'interrupteur d'alimentation s e trouvant sur la face avant du
modem.
Le voyant DEL CS devrait s'allumer.
Remarque : ce produit doit être alimenté par un bloc d'alimentation électrique à brancher agréé de
9 Vca, 1 000 mA et de Classe 2.
3. Allumez votre ordinateur.
Etape 5 : installation des pilotes de modem
Windows Vista, XP et 2000
Vous devez être connecté en tant qu'administrateur pour installer correctement le nouveau modem.
Lorsque vou s allumez votr e ordinateur, Windows détecte automatiquement le modem e t installe un
pilote générique.
1. Insérez le CD-ROM d'installation USRobotics pour installer le pilote
USRobotics. Si le CD ne se lance pas automatiquement, démarrez-le
manuellement comme suit:
A. Windows Vista : cliquez sur Démarr er > Ordinateur.
Windows XP : cliquez sur Démarre r > Poste de travail.
Windows 2000 : à partir du bureau, double-cliquez sur Poste de
travail.
B. Double-cliquez sur le lecteur de CD.
2. Si la fenêtre Exécution automatique apparaît, cliquez sur Exécuter autorun.exe. Si le contrôle de
compte d'utilisateur vous le demande, cliquez sur Continuer.
3. Si le programme vous le demande, sélectionnez votre langue. Si vous êtes invité à consulter l'accord
de licence, veuillez le lire et cliquer sur Yes (Oui).
4. Cliquez sur Install Modem (Installer le modem) et suivez les instructions à l'écran pour installer le
pilote du modem. Si le programme vous le demande, cliquez sur OK.
Windows Vista: si la sécurité Windows vous le demande, cliquez sur Installer.
2
Windows XP : si un message d'installation logicielle ou matérielle s'affiche, cliquez sur
Continuer.
1
Windows 2000 : si un message indiquant que la signature numérique est introuvable, cliquez
sur
Oui.
1
Congratulations. La procédure d'installation est terminée. Veuillez enregistrer votre 56K Serial
Controller Faxmodem à l'adresse
www.usr.com/productreg/
.
Windows Me
Vous devez être connecté en tant qu'administrateur pour installer correctement le nouveau modem.
Lorsque vou s allumez votr e ordinateur, Windows détecte automatiquement le modem e t installe un
pilote générique.
1. Insérez le CD-ROM d'installation USRobotics pour installer le pilote
USRobotics.
2. Si le programme vous le demande, sélectionnez votre langue préférée. Si vous
êtes invité à consulter l'accord de licence, veuillez le lire et cliquer sur Yes
(Oui).
3. Cliquez sur Démarrer > Paramèt res > Panneau de configuration.
4. Double-cliquez sur Système.
5. Dans l'onglet Gestionnaire de périphériques, cliquez deux fois sur Modem pour développer
l'arborescence.
6. Cliquez deux fois sur Sportster V.90 56K Serial Controller Faxmodem.
7. Dans l'onglet Pilote, cliquez sur Mettre à jour le pilote.
8. Sélectionnez Recherche automatique d'un meilleur pilote (recommandé) et cliquez sur Suiv-
ant.
9. Pour achever le processus d'installation, cliquez sur Termi ne r.
Congratulations. La procédure d'installation est terminée. Veuillez enregistrer votre 56K Serial
Controller Faxmodem à l'adresse
www.usr.com/productreg/
.
Windows 98
1. Allumez votre ordinateur. L'Assistant Ajout de nouveau matériel détecté détectera le modem.
2. Insérez le CD-ROM d'installation USRobotics pour installer le pilote USRobotics.
3. Dans l'Assistant Ajout de nouveau matériel détecté, cliquez sur Suivant.
4. Sélectionnez Rechercher le meilleur pilote pour votre périphérique
(Recommandé) et cliquez sur Suivant.
5. Sélectionnez le lecteur CD-ROM et cliquez sur Suivant.
6. Cliquez sur Suivant, puis sur Term i ne r pour achever le processus d'installation.
Congratulations. La procédure d'installation est terminée. Veuillez enregistrer votre 56K Serial
Controller Faxmodem à l'adresse
www.usr.com/productreg/
.
Windows 95B
1. Allumez votre ordinateur. L'Assistant Mise à jour de pilote de périphérique ou l'Assistant Ajout de
nouveau matériel détecté détectera votre modem.
2. Insérez le CD-ROM d'installation USRobotics pour installer le pilote USRobotics.
3. Dans l'Assistant Mise à jour de pilote de périphérique ou l'Assistant Ajout de
nouveau matériel détecté, cliquez sur Suivant et suivez les instructions à
l'écran.
Si l'Assistant Mise à jour de pilote de périphérique ou l'Assistant Ajout de
nouveau matériel détecté ne détecte pas immédiatement le bon modem,
procédez de la façon suivante :
A. Sélectionnez Disquette fournie, puis cliquez sur OK.
B. Saisissez D:\ (D représentant votre lecteur de CD-ROM), et cliquez sur OK.
C. Cliquez sur OK pour poursuivre l'installation.
D. Si vous y êtes invité, cliquez sur Term in er pour achever l'installation.
Congratulations. La procédure d'installation est terminée. Veuillez enregistrer votre 56K Serial
Controller Faxmodem à l'adresse
www.usr.com/productreg/
.
Windows NT 4.0
Vous devez être connecté en tant qu'administrateur pour installer correctement le nouveau modem.
Lorsque vous allumez votre ordinateur, Windows détecte automatiquement le modem et installe un
pilote générique. Vous devrez le mettre à jour avec le pilote USRobotics pour qu'il prenne en charge les
fonctionnalités V.92 complètes et les outils logiciels supplémentaires liés à votre modem.
1. Insérez le CD-ROM d'installation USRobotics pour installer le pilote
USRobotics.
2. Si le programme vous le demande, sélectionnez votre langue préférée. Si vous
êtes invité à consulter l'accord de licence, veuillez le lire et cliquer sur Yes
(Oui).
3. Cliquez sur Démarrer > Paramètres > Panneau de configuration.
4. Double-cliquez sur Modems.
5. Cliquez sur Ajouter. Lorsque l'écran Installer un nouveau modem apparaît, cliquez sur Suivant
pour que Windows détecte le modem standard.
6. Cliquez sur Modifier.
7. Cliquez sur Disquette fournie. Saisissez D:\ (D représentant votre lecteur de CD-ROM), et
cliquez sur OK.
8. Sélectionnez U.S. Robotics 56K FAX EXT et cliquez sur OK.
9. Cliquez sur Suivant.
10. Pour achever le processus d'installation, cliquez sur Te rm in er . Lorsque l'onglet Propriétés
Modems apparaîtra, vous saurez quel port COM est attribué à votre modem.
11. Cliquez sur Fermer. Si la fenêt re Modification des paramètres système apparaît à l'écran, cliquez
sur Oui pour redémarrer votre ordinateur.
Congratulations. La procédure d'installation est terminée. Veuillez enregistrer votre 56K Serial
Controller Faxmodem à l'adresse
www.usr.com/productreg/
.
Outils logiciels supplémentaires (facultatif)
Pour voir les outils logiciels supplémentaires de votre modem, sélectionnez Software (Logiciel) sur le
CD-ROM d'installation USRobotics.
Dépannage
Caractéristiques générales
Cette procédure permet de résoudre certains problèmes que vous pourriez rencontrer avec votre
modem :
1. Vérifiez que les câbles sont bien connectés. Il s'agit notamment de tous les câbles raccordant la lign e
téléphonique, le modem et votre ordinateur.
2. Reportez-vous aux descriptions des voyants DEL, puis observez les voyants DEL du modem pour
vous assurer que l'appareil est sous tension et qu'aucune erreur ne s'est produite.
3. Si possible, testez votre modem avec un cordon téléphonique et/ou une prise téléphonique murale
différents. .
4. Vérifiez que vous n'utilisez pas un câble ou un adaptateur Null Modem.
5. Assurez-vous que les commutateurs DIP situés à l'arrière de votre
modem sont bien positionnés. Les commutateurs DIP 3, 5 et 8 doivent
être en position basse (ON).
6. Eteignez votre ordinateur, puis rallumez-le.
7. Si vous rencontrez toujours des problèmes avec le modem, effectuez
les étapes suivantes pour déterminer si celui-ci a été installé
correctement :
Windows Vista
1. Cliquez sur Démarrer > Panneau de configuration.
2. Cliquez sur Matériel et audio.
3. Cliquez sur Options de modems et téléphonie, puis sur l'onglet Modems.
Vous devez voir U.S. Robotics 56K FAX EXT PnP et un paramètre d e port COM. Si vo us ne
voyez pas de description de votre modem, recommencez la procédure d'installation.
4. Sur l'onglet Modems, sélectionnez la description de votre nouveau modem et cliquez sur Pro-
priétés.
5. Cliquez sur l'onglet Diagnostics, puis sur le bouton Interroger le modem.
Si vous voyez une série de commandes et de réponses du modem, l'installation a réussi.
Dans le cas contraire, elle a échoué ; recommencez la procédure d'installation.
Windows XP
1. Cliquez sur Démarrer > Panneau de configuration.
2. Cliquez sur Options de modems et téléphonie, puis sur l'onglet Modems.
Vous devez voir U.S. Robotics 56K FAX EXT PnP et un paramètre d e port COM. Si vo us ne
voyez pas de description de votre modem, recommencez la procédure d'installation.
3. Mettez en surbrillance la description de votre nouveau modem, puis cliquez sur Propriétés.
4. Cliquez sur l'onglet Diagnostics, puis sur le bouton Interroger le modem.
Si vous voyez une série de commandes et de réponses du modem, l'installation a réussi.
Dans le cas contraire, elle a échoué ; recommencez la procédure d'installation.
Windows 2000
1. Cliquez sur Démarrer > Paramè tres > Panneau de configuration.
2. Double-cliquez sur l'icône Options de modems et téléphonie.
3. Cliquez sur l'onglet Modems.
Assurez-vous que l'U.S. Robotics 56K FAX EXT est sélectionné. Si vous ne voyez pas de
description de votre modem, recommencez la procédure d'installation.
4. Cliquez sur le bouton Propriétés.
5. Cliquez sur l’onglet Diagnostics.
6. Cliquez sur le bouton Interroger le modem.
Si vous voyez une série de commandes et de réponses du modem, l'installation a réussi.
Dans le cas contraire, elle a échoué ; recommencez la procédure d'installation.
Windows Me, 98, 95B
1. Cliquez sur Démarrer > Paramètres > Panneau de configuration.
2. Double-cliquez sur l'icône Modems.
Dans la fenêtre Propriétés Modems, vous deve z voir U.S. Robotics 56K FAX EXT. Si vous
ne voyez pas de description de votre modem, recommencez la procédure d'installation.
Cliquez sur l’onglet Diagnostics. Assurez-vous que le bon port COM (modem) est sélectionné.
3. Cliquez sur le bouton Informations complémentaires.
Si vous voyez une série de commandes et de réponses du modem, l'installation a réussi.
Dans le cas contraire, elle a échoué ; recommencez la procédure d'installation.
Windows NT 4.0 :
1. Cliquez sur Démarrer > Programmes > Accessoires > HyperTerminal > HyperTerminal.
2. Cliquez sur Annuler dans l'Assistant Nouvelle connexion.
3. Cliquez sur Fichier > Propriétés et vérifiez que l'U.S. Robotics 56K FAX EXT est sélectionné.
4. Dans la fenêtre HyperTerminal, tapez AT et appuyez sur Entrée.
Si AT s'affiche dans la fenêtre HyperTerminal à mesure que vous tapez et que OK s'affiche
lorsque vous avez appuyé sur Entrée, l'installation a réussi.
Si AT ne s'affiche pas quand vous tapez et si OK ne s'affiche pas lorsque vous avez appuyé sur
Entrée, l'installation a échoué ; recommencez la procédure d'installation.
Mon ordinateur ne reconnaît pas le modem.
Solution :
Il est possible que votre port COM soit déjà utilisé ou ne soit pas correctement configuré. Pour fonctionner correctement, votre modem doit être branché dans un port série actif attribué à un port COM
disponible. La plupart des ordinateurs sont dotés de deux ports série, attribués aux por ts COM 1 et 2.
Windows Vista:
1. Cliquez sur Démarrer > Panneau de configuration > Matériel et audio.
2. Double-cliquez sur Options de modems et téléphonie, puis cliquez sur l'onglet Modems.
Recherchez un modem répertorié, et vérifiez le port COM qu'il utilise. Si un autre modem utilise
déjà le port COM, utilisez un autre port COM ou désinstallez le modem précédemment installé.
Reportez-vous au manuel de votre ancien modem pour obtenir les instructions de
désinstallation.
3. Cliquez sur Démarrer
> Panneau de configuration > Système et Maintenance > Ges-
tionnaire de périphériques.
4. Allez à la section Ports (COM & LPT).
Si le port COM que votre modem utilise comporte des points d'exclamation jaunes
ou des « A » rouges, il est possible que vos ports COM ne soient pas configurés correctement
ou que vous ayez connecté votre modem à un port série désactivé.
Si c'est le cas, vous devrez peut-être contacter le fabricant de votre ordinateur
pour savoir comment activer et configurer correctement vos ports COM.
Windows XP
1. Cliquez sur Démarrer > Panneau de configuration.
2. Double-cliquez sur Options de modems et téléphonie, puis cliquez sur l'onglet Modems.
Recherchez un modem répertorié, et vérifiez le port COM qu'il utilise. Si un autre modem utilise
déjà le port COM, utilisez un autre port COM ou désinstallez le modem précédemment installé.
Reportez-vous au manuel de votre ancien modem pour obtenir les instructions de
désinstallation.
3. Cliquez sur Démarrer > Panneau de configuration .
4. Double-cliquez sur Système et sélectionnez l'onglet Matériel.
5. Cliquez sur le bouton Gestionnaire de périphériques.
6. Allez à la section Ports (COM & LPT).
Si le port COM que votre modem utilise comporte des points d'exclamation jaunes
ou des « A » rouges, il est possible que vos ports COM ne soient pas configurés correctement
ou que vous ayez connecté votre modem à un port série désactivé.
Si c'est le cas, vous devrez peut-être contacter le fabricant de votre ordinateur
pour savoir comment activer et configurer correctement vos ports COM.
Windows 2000:
1. Cliquez sur Démarrer > Paramètres > Panneau de configuration.
2. Double-cliquez sur Options de modems et téléphonie, puis cliquez sur l'onglet Modems.
Recherchez un modem répertorié, et vérifiez le port COM qu'il utilise. Si un autre modem utilise
déjà le port COM, utilisez un autre port COM ou désinstallez le modem précédemment installé.
Reportez-vous au manuel de votre ancien modem pour obtenir les instructions de
désinstallation.
3. Cliquez sur Démarrer > Paramètres > Panneau de configuration.
4. Double-cliquez sur Système et sélectionnez l'onglet Matériel.
5. Cliquez sur le bouton Gestionnaire de périphériques.
6. Allez à la section Ports (COM & LPT).
Si le port COM que votre modem utilise comporte des points d'exclamation jaunes
ou des « A » rouges, il est possible que vos ports COM ne soient pas configurés correctement
ou que vous ayez connecté votre modem à un port série désactivé.
Si c'est le cas, vous devrez peut-être contacter le fabricant de votre ordinateur
pour savoir comment activer et configurer correctement vos ports COM.
Windows Me, 98 et 95B :
1. Cliquez sur Démarrer > Paramè tres > Panneau de configuration, puis double-cliquez sur
Modems. Si vous utilisez Windows Me et que vous ne voyez pas cette icône, assurez-vous de
sélectionner Afficher toutes les options du Panneau de configuration.
2. Recherchez un modem répertorié et cliquez sur l'onglet Diagnostics pour déterminer le port
COM qu'il utilise.
Si un autre modem utilise déjà le port COM, utilisez un autre port COM ou désinstallez le
modem précédemment installé. Reportez-vous au manuel de votre ancien modem pour obtenir
les instructions de désinstallation.
3. Cliquez sur Démarrer > Paramètres > Panneau de configuration.
4. Double-cliquez sur Système et sélectionnez l'onglet Gestionnaire de périphériques.
5. Développez Ports (COM et LPT).
Si le port COM que votre modem utilise comporte des points d'exclamation jaunes
ou des « A » rouges, il est possible que vos ports COM ne soient pas configurés correctement
ou que vous ayez connecté votre modem à un port série désactivé.
Si c'est le cas, vous devrez peut-être contacter le fabricant de votre ordinateur
pour savoir comment activer et configurer correctement vos ports COM.
Windows NT 4.0 :
1. Cliquez sur Démarrer > Paramè tres > Panneau de configuration. Double-cliquez sur
Ports.
2. Assurez-vous que le port dans lequel est branché le modem figure dans la liste. Si
ce n'est pas le cas, le port doit être ajouté et éventuellement activé dans le BIOS. Consultez votre
manuel Windows NT 4.0 pour obtenir plus d'informations sur l'ajout de ports. Une fois le port
ajouté ou activé, suivez les instructions contenues dans ce guide pour votre système d'exploitation. .
Informations complémentaires
Pour plus de renseignements sur les mentions légales et la garantie, reportez-vous au guide de l'uti-
lisateur proposé sur le USRobotics Installation CD-ROM.
Pour obtenir plus d'informations sur l'utilisation et la configuration, reportez-vous au guide de
l'utilisateur proposé sur le CD-ROM d'installation USRobotics. Le guide de l'utilisateur contient des
informations détaillées sur l'utilisation et la configuration de votre modem.
Pour obtenir des informations complètes sur le dépannage et des précisions supplémentaires :
1. Reportez-vous au guide de l'utilisateur proposé sur le CD-ROM d'installation USRobotics.
2. Accédez à la section Support du site Web USRobotics à l'adresse
www.usr.com/support/
.
Vous trouverez des réponses à la plupart des problèmes rencontrés par les clients dans les pages
Web FAQ et Dépannage consacrées à votre modem. Les pages d'assistance contiennent également
des informations sur les microcodes les plus récents et les mises à jour de documentat ion.
Posez votre question à l'assistance technique à l'aide du formulaire en ligne ou contactez le service
d'assistance technique d'USRobotics.
Assistance
Vous pouvez contacter le service d'assistance technique d'USRobotics. Pour recevoir de l'assistance,
vous devez disposer de votre numéro de série.
y USRobotics 56K Serial Controller
Faxmodem
y CD-ROM d'installation USRobotics
y Cordon téléphonique y Adaptateur secteur
y Guide d'installation rapide
Voyant DEL Nom Etat Condition
AA
Réponse automatique
Allumé Répondre à un appel
Clignotant Appel entrant
CD
Détection de porteuse
Allumé Réception du signal de porteuse du modem distant
RD
Données reçues Clignotant Envoi ou transfert de données via le modem distant
SD
Envoi de données Allumé Réception d'un signal DTR d'un ordinateur
TR
Terminal de données prêt
Allumé Le forçage DTR est activé
CS
Prêt à émettre Allumé Le modem est allumé et est prêt à envoyer des données
ARQ/FAX
Correction des
erreurs
Allumé Une connexion sous correction des erreurs a bien été
établie
Clignotant Transmission de données au modem distant
y Windows Vista™, Windows®XP, 2000, Me, 98, 95B ou
NT 4.0
y Lecteur CD-ROM
y Processeur 500MHz ou supérieur y 128 Mo de RAM
y Ligne téléphonique analogique compatible 56K y Câble série RS-232 pour modem
Caution:le 56K Se rial Controller Faxmodem ne peut être branché que sur une ligne télépho-
nique analogique. Si vous le branchez sur une ligne téléphonique numérique, votre
56K Serial Controller Faxmodem peut être endommagé.
La plupart des téléphones d'entreprises fonctionnent avec des lignes numériques.
Vérifiez bien le type de ligne dont vous disposez.
V.92
OFF ON
AA
CD
RDSDTR
CS ARQ/FAX
Interrupteur d'alimentation
Voyants D EL
12345678
Ligne vers prise télé-
phonique murale
Ligne vers
téléphone
Commutateurs
DIP
Port série
Prise
d'alimentation
Bouton de volume
1 2 3 4 5 6 7 8
1 2 3 4 5 6 7 8
Remarque : ce produit doit être alimenté par un bloc d'alimentation électrique à brancher agréé
de 9 Vca, 1 000 mA et de Classe 2.
Remarque : si le voyant DEL d'alimentation ne s'allume pas, il se peut que le modem soit éteint.
Assurez-vous que l'adaptateur secteur est correctement branché entre le modem et la prise
électrique.
2 USRobotics a procédé à des tests complets sur ce pilote associé au matériel pris en charge et s'est assuré de la
compatibilité avec Windows Vista, XP et 2000.
1
2
3
4
5
6
7 8
12345678
OFF
ON
Numéro de modèle Numéro de série
5686G
www.usr.com/emailsupport (888) 428-9450
 Loading...