

Page 1

AM-77 Reference Class
Dual-Mono Pre-Main Amplifier
Owner’s Manual
Page 2
2
Page 3

FCC Declaration of Conformity - United States only
This device complies with Part 15 of the FCC rules. Operation is subject to the following two conditions: (1) This device may not cause
harmful interference, and (2) this device must accept any interference received, including interference that may cause undesired operation.
FCC WARNING:
Changes or modifications to this unit not expressly approved by the party responsible for compliance could void the user's authority to
operate the equipment.
NOTE:
This equipment has been tested and found to comply with the limits for a Class B digital device, pursuant to Part 15 of the FCC Rules.
These limits are designed to provide reasonable protection against harmful interference in a residential installation. This equipment
generates, uses, and can radiate radio frequency energy and, if not installed and used in accordance with the instructions, may cause
harmful interference to radio communications. However, there is no guarantee that interference will not occur in a particular installation.
If this equipment does cause harmful interference to radio or television reception, which can be determined by turning the equipment off
and on, the user is encouraged to try to correct the interference by one or more of the following measures:
- Reorient or relocate the receiving antenna.
- Increase the separation between the equipment and receiver.
- Connect the equipment into an outlet on a circuit different from that to which the receiver is connected.
- Consult the dealer or an experienced radio/TV technician for help.
Canadian Notice (Avis Canadien)
Class B Equipment
This Class B digital apparatus meets all requirements of the Canadian Interference-Causing Equipment Regulations.
Cet appareil numérique de la classe B respecte toutes les exigences du Règlement sur le matériel brouilleur du Canada.
3
Page 4
This products complies with the EMC Directive (89/336/EEC) and the Low Voltage Directive (73/23/EEC) issued by the Commission
of the European Community.
Compliance with these directives implies conformity to the following European Norms (in parentheses are the equivalent international
standards and regulations):
o EN55022 (CISPR 22) - Electromagnetic Interference
o EN55024 (IEC61000-4-2, 3, 4, 5, 6, 8, 11) - Electromagnetic Immunity
o EN61000-3-2 (IEC61000-3-2) - Power Line Harmonics
o EN61000-3-3 (IEC61000-3-3) - Power Line Flicker
o EN60950 (IEC60950) - Product Safety
4
Page 5

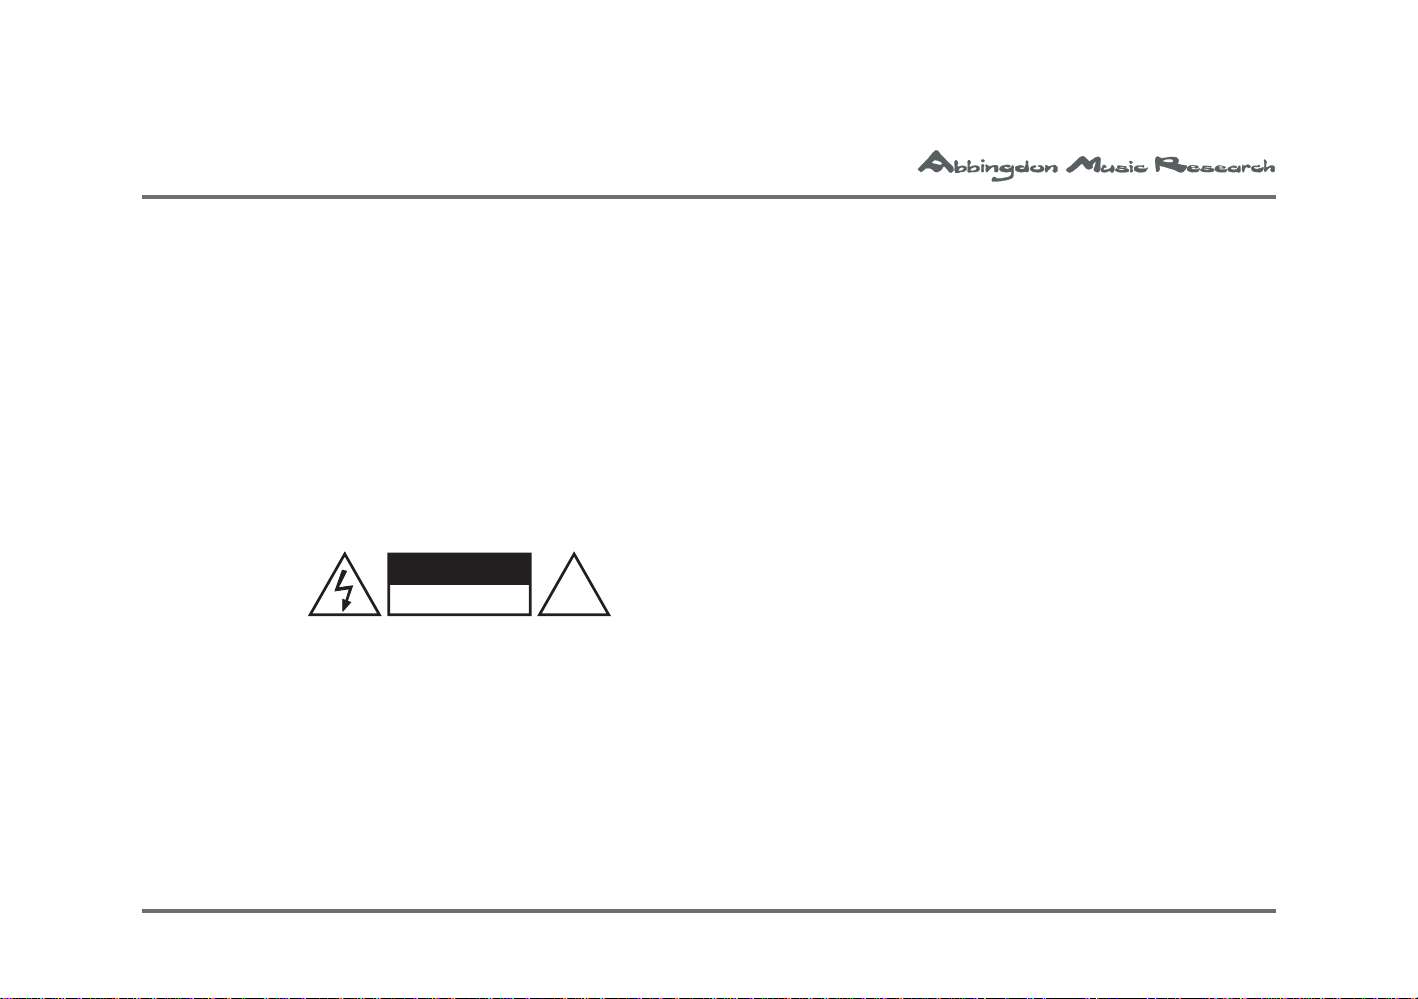
WARNINGS
The exclamation point within an equilateral triangle is intended to alert the user to the presence of important
operating and maintenance (servicing) instructions in the literature accompanying this component.
!
This component weighs over 40 kilograms. Do not place this component on an unstable cart, stand, tripod,
bracket or table as the component may fall causing serious injury to a child or adult and serious damage to the
unit. An appliance and cart combination should be moved with care. Quick stops, excessive force and uneven
surfaces may cause the component and cart combination to overturn.
Any mounting of the device on a wall or ceiling should follow the manufacturer’s instructions and should use a
mounting accessory recommended by the manufacturer.
Read and follow all the safety and operating instructions before connecting or using this component.
All warnings on the component and in its operating instructions should be adhered to.
Retain this Owner’s Manual for future reference.
Do not use this unit near water; for example, near a bath tub, washbowl, kitchen sink, laundry tub, in a wet
basement or near a swimming pool.
Unplug the component from the wall outlet before cleaning. Never use benzine, thinner or other solvents for
cleaning; use only a soft damp cloth.
5
Page 6
Care should be taken so that objects do not fall, and liquids are not spilled into the enclosure through any
openings.
This component should be serviced only by qualified AMR service personnel when:
A. The power cable or the power input socket has been damaged;
B. Objects have fallen, or liquid has been spilled into the component;
C. The component has been exposed to rain or liquids of any kind;
D. The component does not appear to operate normally or exhibits a marked change in performance;
E. The component has been dropped or the enclosure has been damaged.
DO NOT ATTEMPT SERVICING OF THIS UNIT-YOURSELF. REFER SERVICING
TO QUALIFIED AMR SERVICE PERSONNEL
Upon completion of any servicing or repairs, request the service point’s assurance that only AMR Authorised
Replacement Parts with the same characteristics as the original parts have been used, and that the routine
safety checks have been performed to guarantee that the component is in a safe operating condition.
REPLACEMENT WITH UNAUTHORIZED PARTS MAY RESULT IN FIRE,
ELECTRIC SHOCK OR OTHER HAZARDS
6
Page 7
Precautions
CAUTION
RISK OF ELECTRIC SHOCK
DO NOT OPEN
This equipment has been tested and found to comply with the limits set out in the EMC Directive using a
connection cable shorter than 3 metres.
On power sources
The mains power cable should be routed so that it is not likely to be walked on or pinched, especially near the
plug or back panel receptacle. The component should not be disconnected from the AC power source as long as
it is connected to the wall outlet, even if the component itself has been turned off.
If this component is not going to be used for a long time, be sure to disconnect the component from the wall
outlet. To disconnect the AC power cable, grasp the plug itself; never pull the cable.
!
On placement
With a total of 2 thermionic electron valves, the AM-77 may become warm during operation. This is normal.
Given this, it is imperative that the AM-77 when installed, its location or position DOES NOT interfere with its
proper ventilation.
For example, it should not be situated on a bed, sofa, rug or similar surface that may block the top or bottom
ventilation openings; or placed in a built-in installation, such as a bookcase or cabinet, that may impede the flow
of air through its top and bottom ventilation openings.
Do not place the component in a location near heat sources, or in a place subject to direct sunlight, excessive
dust, or mechanical shock. Do not place the component in an inclined position. It is designed to be operated in a
7
Page 8

horizontal position only . Do not place heavy objects on the component.
Keep the component away from equipment with strong magnets, such as microwave ovens or large loudspeakers.
T o prevent fire or shock hazard, do not place vessels filled with liquids, such as vases, on the component.
Touch-Sensitive Buttons
On the front fascia of this AMR component are touch-sensitive buttons. Due to the wide variance of climes
around the world, instances may arise where to activate a button:
- the touching finger may be required to be in contact with both the button and the front fascia to register;
- the touching finger may have to touch the chassis to discharge any static electricity prior to button selection.
Running-In
AMR estimates that the AM-77 may take between 300-500 operating hours for all of the internal components to
be fully-broken in. Please anticipate the sonic performance of the AM-77 to settle only after it has been used for
this approximate length of time.
Stand-By
Please note that the solid state section needs to find its equilibrium and due to the (unavoidable) use of electrolytic capacitors (and an effect called soakage) around 24-48 hours of ‘standby’ (or operation) are required to
stabilise performance. Therefore, ‘standby’ does not shut down the solid-state sections, only the valves.
8
Page 9
Content s
WARNINGS 5
Section 1 - Unpacking and Setup 11
1a. Unpacking 12
1b. Setup
Section 2 - Component Overview 15
2a. Start-Up
Section 3 - Advanced Features 25
3a. Labeling of Inputs and Setting Level Offset 2 5
3b. Setting Fixed Input Level 28
3c. OptiMains® Protection for Excessive Under/Over-Voltages 30
3d. OptiProtect® Speaker Overload Protection 31
9
Page 10

Section 4 - System Configurations 33
4a. OptiOperation® Different System Configurations 33
4b. Switching and Connection Diagrams for Different Modes 41
Section 5 - Additional Connectivity 53
5a. Input for iPod/other portable music players 53
5b. ‘HiFi/Pro’ Switches for Balanced XLR inputs 54
5c. RS232 ‘Options’ Connector 55
Section 6 - Technical Features 57
Appendix - Troubleshooting & Maintanence 58
Troubleshooting 58
Maintenance 58
Specifications 59
10
Page 11
--
Section 1 - Unpacking and Setup
-
+
+
_
_
~
-
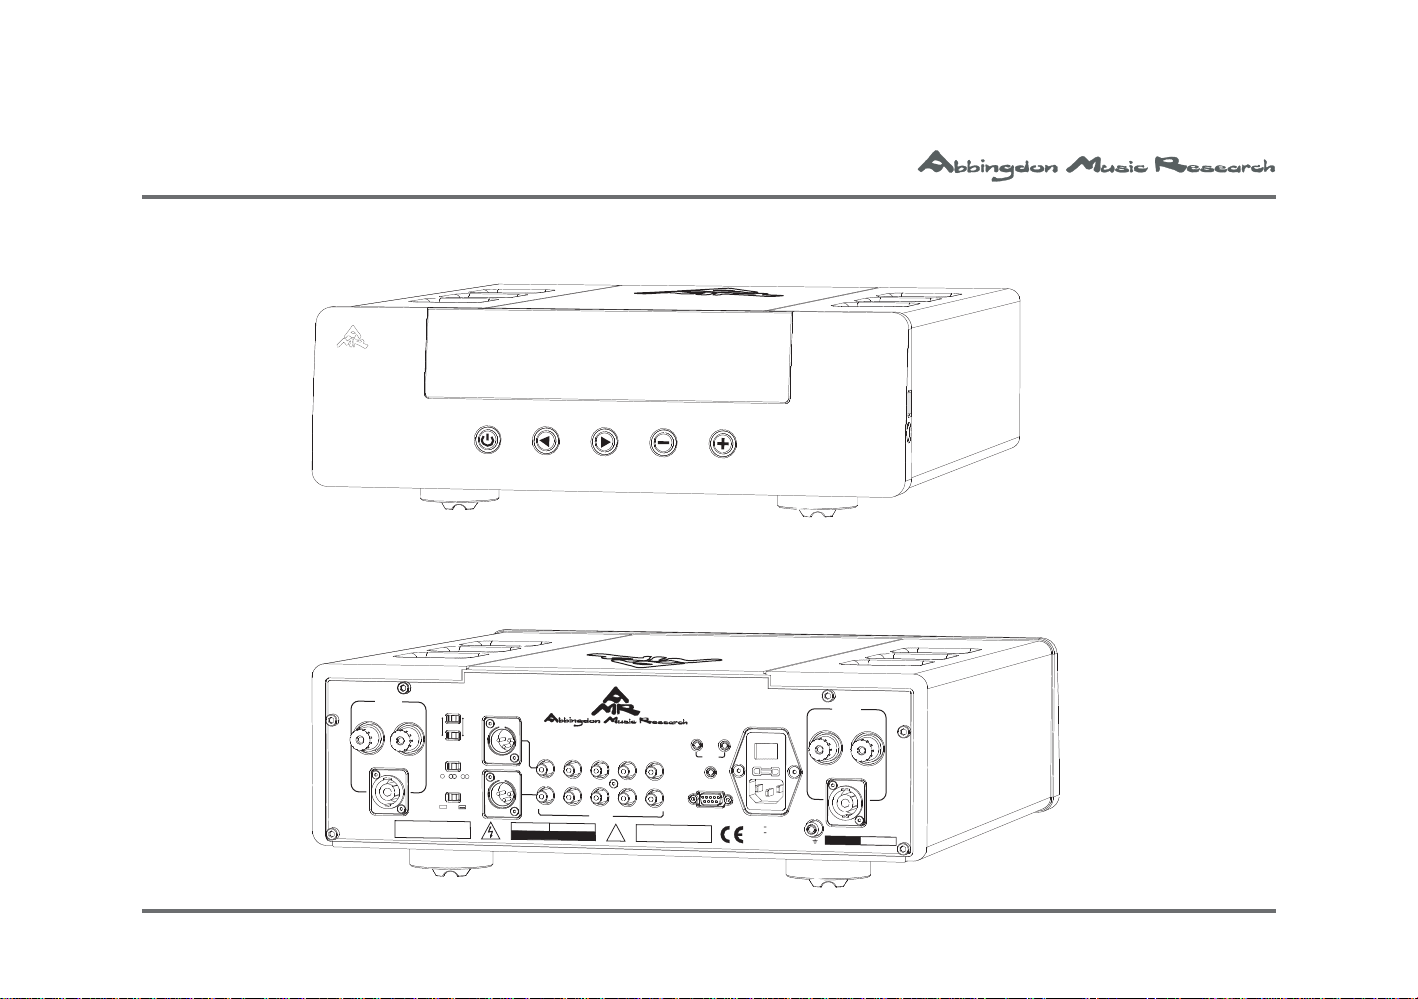
Figure 1.1 - Front Panel of the AM-77
DUAL MONO AMPLIFIER AM 77
Figure 1.2 - Rear Panel of the AM-77
Speaker
Output
HiFi
R
Under normal operation set all switches to
the default position Please refer to
() .
bold
the instruction manual for further details
Balanced
Input
Pro
Mode
M
L
R
M
M
Power
Int
Amp
Amp
,
.
Dual Mono Amplifier AM 77
Designed and Engineered in Great Britain
1
2
CAUTION ATTENTION
RISK OF ELECTRIC SHOCK
RISQUE DE CHOC ELECTRIQUE
DO NOT OPEN
NE PAS OUVRIR
3
Inputs
4
No User Serviceable Components Inside.
Dealer or Distributor Any modifications to
!
this equipment will void all warranties
5
L
R
For service contact your Authorised
,
.
In
IR Link
Option
.
Power
On
Off
Out
Sync
AC IN
90V 135V
190V
260V
SERIAL
Speaker
Output
L
N
O.
11
Page 12

Thank you for purchasing this AMR reference class component.
We hope you derive as much pleasure from using this component as we have enjoyed making it for you.
1a. Unpacking
This section refers to the unpacking of the AM-77 and its subsequent setup.
Upon unpacking, please find:
Please that check
all contents are
present
12
i. AM-77 Reference Class Dual-Mono Pre-Main Amplifier.
ii. RC-77 Remote Commander (with 2 x AAA batteries).
iii. PC-77 OptiLink® Reference mains power cable.
iv. IC-77 OptiLink® Reference interconnect cable (XLR-type).
v. Synchronisation (3.5mm jack) cable (for linking-up multiple AM-77s).
vi. AM-77 Owner’s Manual.
vii. Quick-Start Card.
viii. AMR Warranty Card.
ix. AMR Test Disk.
x. Aluminium professional flightcase.
Please ensure that all items are present. Should an item be missing, please contact your AMR distributor/dealer .
Page 13
Default pre-main
~
-
L
R
Speaker CableSpeaker Cable
Interconnect Cable
100 1000 10000
FrequencyHz()
50
60
70
80
90
100
O
utp
ut
dB()
Speaker LSpeaker R
Interconnect Cable
100 1000 10000
FrequencyHz()
50
60
70
80
90
100
Outp
utdB(
)
CD 77-
-
+
+
_
_
~
-
AM 77-
mode: the AM-77
as an integrated
amplifier
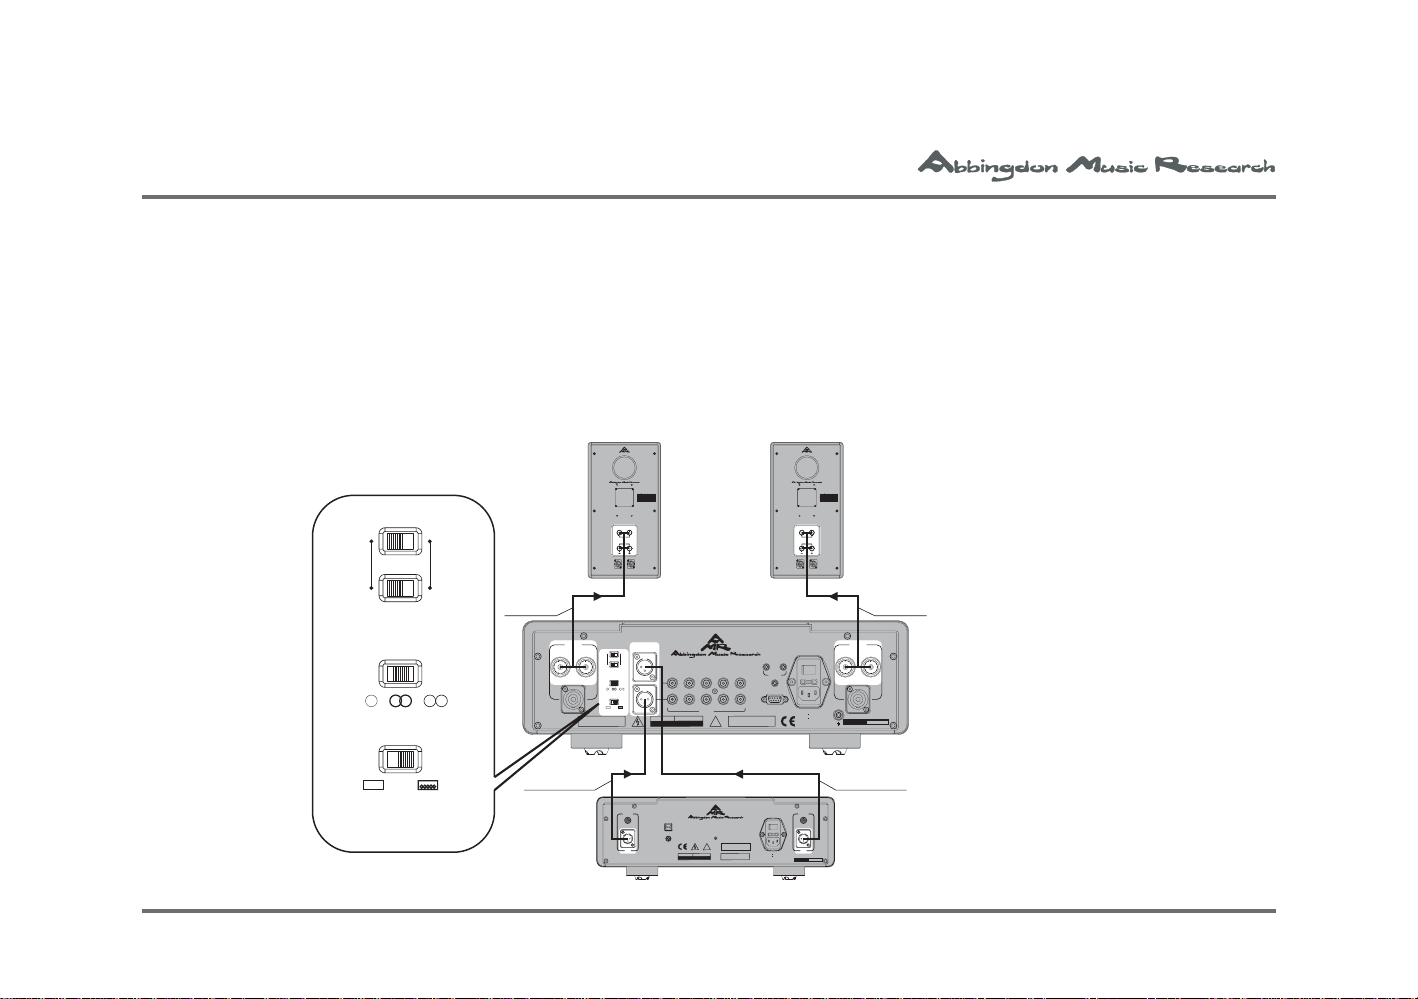
1b. Setup
Pre-Main Stereo Amplifier Connection
The following diagrams illustrate the standard connection of the AM-77 in pre-main stereo amplifier mode. This
is the default factory setting and is suitable for the majority of audio systems. Figure 1.3 depicts the use of
standard banana/spade speaker connectors while figure 1.4 illustrates the use of Speakon connectors.
5
4
NoUser Serviceable ComponentsInside.
Forservice contactyour Authorised
Dealeror Distributor Anymodifications to
thisequipment will voidall warranties
CLASS1
LASERPRODUCT
NoUserServiceable Components Inside.
,
Forservice contact your Authorised
.
DealerorDistributor Anymodificationsto
thisequipmentwill void allwarranties
Sensitivity:
87dB
Impedance:
8Ohms
HF
dB()
ut
ContPowerHanding. :
150W
LevelAdjustment
utp
O
PeakProgHanding:.
600W
Resistor
FrequencyResponse:
()seegraph
FrequencyHz()
LS77Professional Monitor
-
DesignedandEngineered in Great Britain
HF
LF
IN OUT
Speaker
Output
Power
On
Off
In
Out
Sync
L
IR Link
R
Option
,
.
.
Power
On
Off
ACIN
90V 135V
260V
190V
.
SERIAL
LR
AC IN
90V 135V
260V
190V
Analog
Outputs
O.
N
SERIAL
O.
N
13
Sensitivity:
87dB
)
Impedance:
8Ohms
HF
utdB(
ContPowerHanding. :
150W
LevelAdjustment
Outp
PeakProgHanding:.
600W
Resistor
FrequencyResponse:
()seegraph
FrequencyHz()
LS77Professional Monitor
-
DesignedandEngineered in Great Britain
Speaker
Output
HF
LF
IN OUT
Balanced
Input
Pro
HiFi
M
Power
Amp
,
Undernormal operation setall switches to
bold
() .
thedefault positionPlease refer to
theinstruction manual forfurther details
Mode
L
R
M
M
Int
Amp
.
Designedand Engineered in Great Britain
1
CAUTION ATTENTION
RISQUEDE CHOC ELECTRIQUE
RISKOF ELECTRICSHOCK
NEPAS OUVRIR
DONOT OPEN
Dual Mono Amplifier AM 77
2
AM 77-
Analog
Outputs
R L
Designedand Engineered in GreatBritain
USBInput
IRLink
CAUTION ATTENTION
RISQUEDE CHOC ELECTRIQUE
RISKOF ELECTRIC SHOCK
DONOT OPEN
CD 77-
3
Inputs
!
CompactDisk Processor CD77
!
NEPAS OUVRIR
Mode
Pro
Warning: ensure
no speaker
HiFi
connector is in
contact with the
chassis to cause
M
M
M
a short-circuit!
Power
Amp
Int
Amp
Page 14
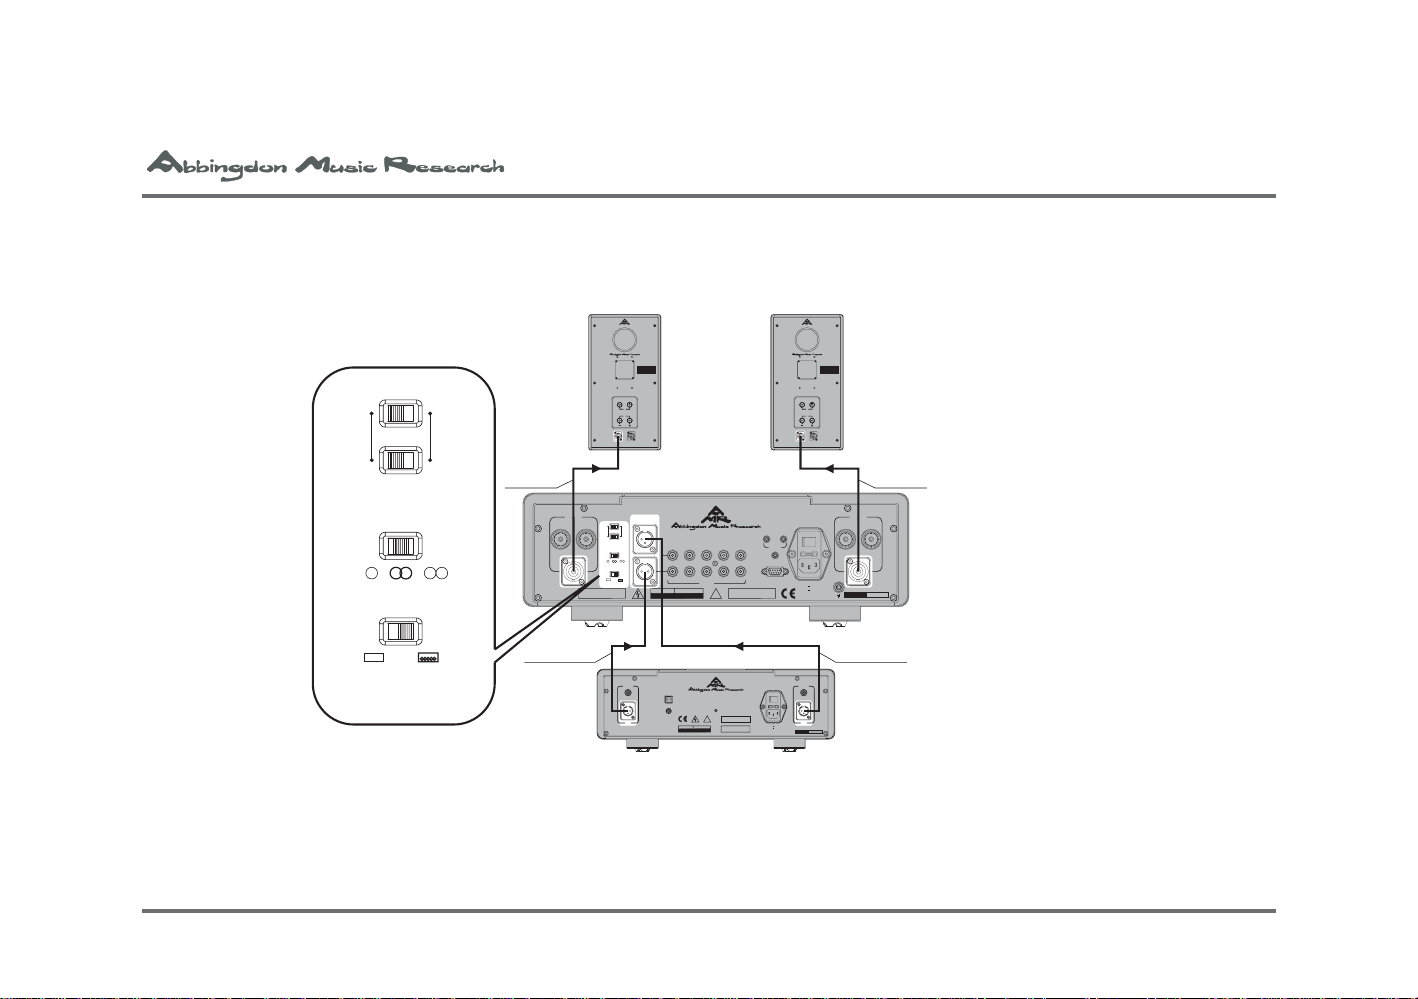
Figure 1.3 - System connection using banana plug/spade connector equipped speaker cables
~
-
CD 77-
L
R
Speaker CableSpeaker Cable
Interconnect Cable
100 1000 10000
FrequencyHz()
50
60
70
80
90
100
Out
pu
tdB(
)
100 1000 10000
FrequencyHz()
50
60
70
80
90
100
O
utpu
tdB()
Speaker LSpeaker R
-
+
+
_
_
~
-
AM 77-
Interconnect Cable
AMR recom-
mends the
sonically supe-
rior Speakon
HiFi
Pro
Sensitivity:
87dB
)
Impedance:
8Ohms
HF
tdB(
ContPowerHanding. :
150W
pu
LevelAdjustment
Out
PeakProgHanding:.
600W
Resistor
FrequencyResponse:
()seegraph
FrequencyHz()
LS77Professional Monitor
-
DesignedandEngineered in Great Britain
HF
LF
IN OUT
Sensitivity:
87dB
Impedance:
8Ohms
HF
tdB()
ContPowerHanding. :
150W
LevelAdjustment
utpu
O
PeakProgHanding:.
600W
Resistor
FrequencyResponse:
()seegraph
FrequencyHz()
LS77Professional Monitor
-
DesignedandEngineered in Great Britain
HF
LF
IN OUT
connectors
Speaker
Mode
Output
M
Int
Amp
M
M
Power
Amp
Figure 1.4 - System connection using Speakon connector equipped speaker cables
i. Connect the respective spade/banana/Speakon connectors of the speaker cables to the AM-77.
ii. Connect the source/s via the respective left and right XLR or RCA connectors to Inputs 1-5.
iii. Connect the IEC of the PC-77 mains power cable to the AM-77 and the socket to a mains source.
14
Balanced
Input
Pro
HiFi
M
Power
Amp
,
Undernormal operation setall switches to
bold
() .
thedefault positionPlease refer to
theinstruction manual forfurther details
Mode
L
R
M
M
Int
Amp
.
Designeda nd Engineered in Great Britain
1
CAUTION ATTENTION
RISQUEDE CHOC ELECTRIQUE
RISKOF ELECTRICSHOCK
NEPAS OUVRIR
DONOT OPEN
Dual Mono Amplifier AM 77
2
AM 77-
Analog
Outputs
R L
Designedand Engineered in GreatBritain
USBInput
IRLink
CAUTION ATTENTION
RISQUEDE CHOC ELECTRIQUE
RISKOF ELECTRIC SHOCK
DONOT OPEN
CD 77-
3
Inputs
!
CompactDisk Processor CD77
!
NEPAS OUVRIR
5
4
NoUser Serviceable ComponentsInside.
Forservice contactyour Authorised
Dealeror Distributor Anymodifications to
thisequipment will voidall warranties
CLASS1
LASERPRODUCT
NoUserServiceable Components Inside.
,
Forservice contact your Authorised
.
DealerorDistributor Anymodificationsto
thisequipmentwill void allwarranties
In
Out
Sync
L
IR Link
R
Option
,
.
.
Power
On
Off
ACIN
90V 135V
260V
190V
.
Speaker
Output
Power
On
Off
LR
AC IN
90V 135V
260V
190V
Analog
Outputs
SERIAL
O.
N
SERIAL
O.
N
Page 15
--
The plastic
protective film
covering the
display may be
removed
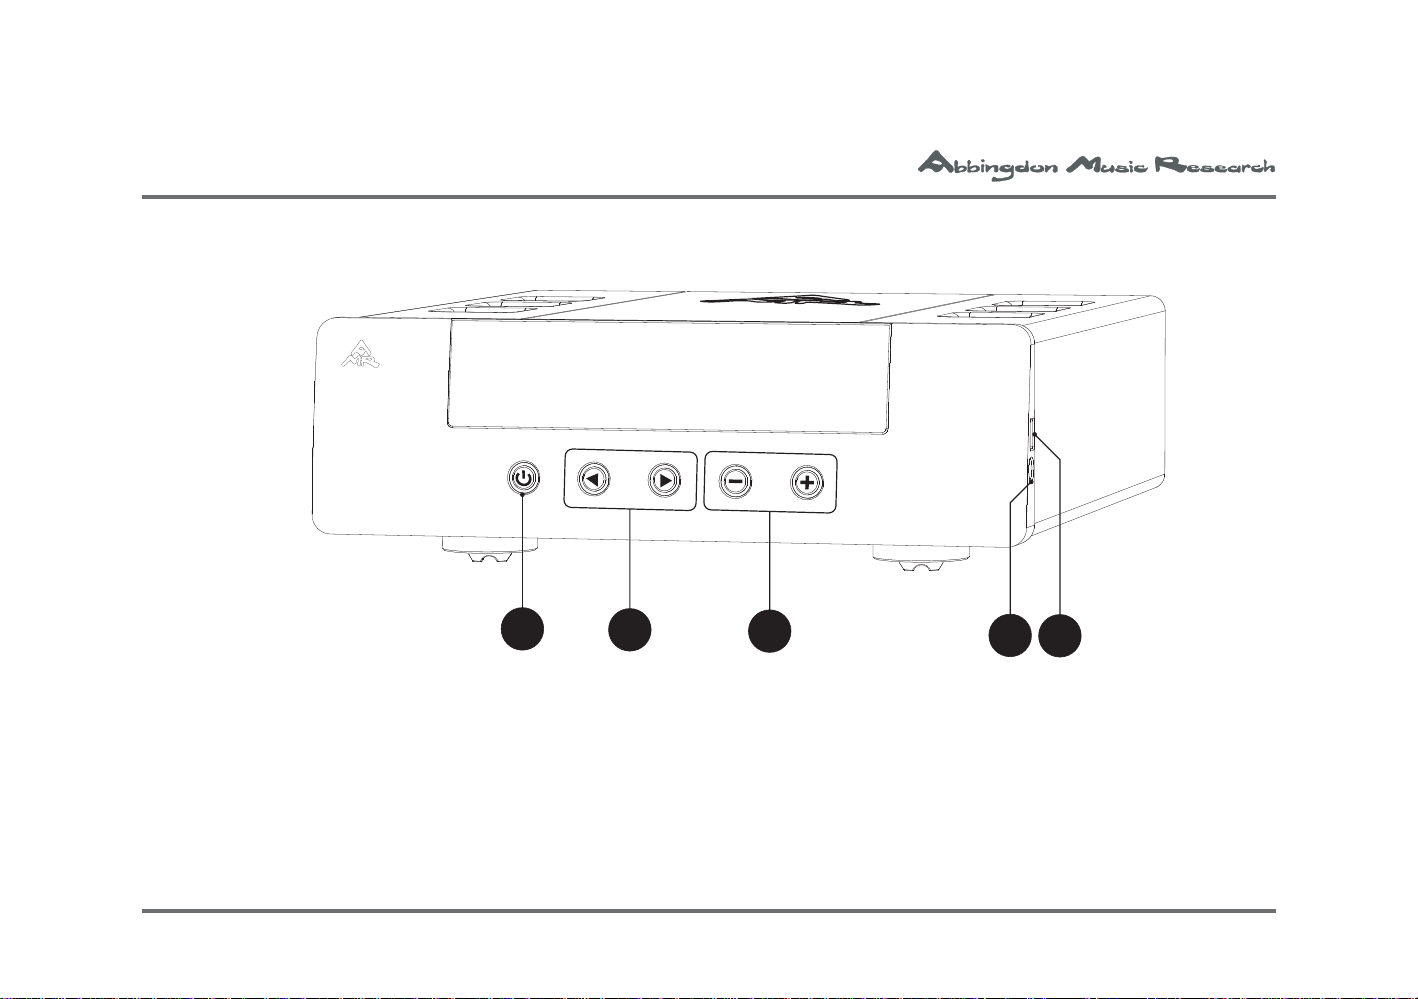
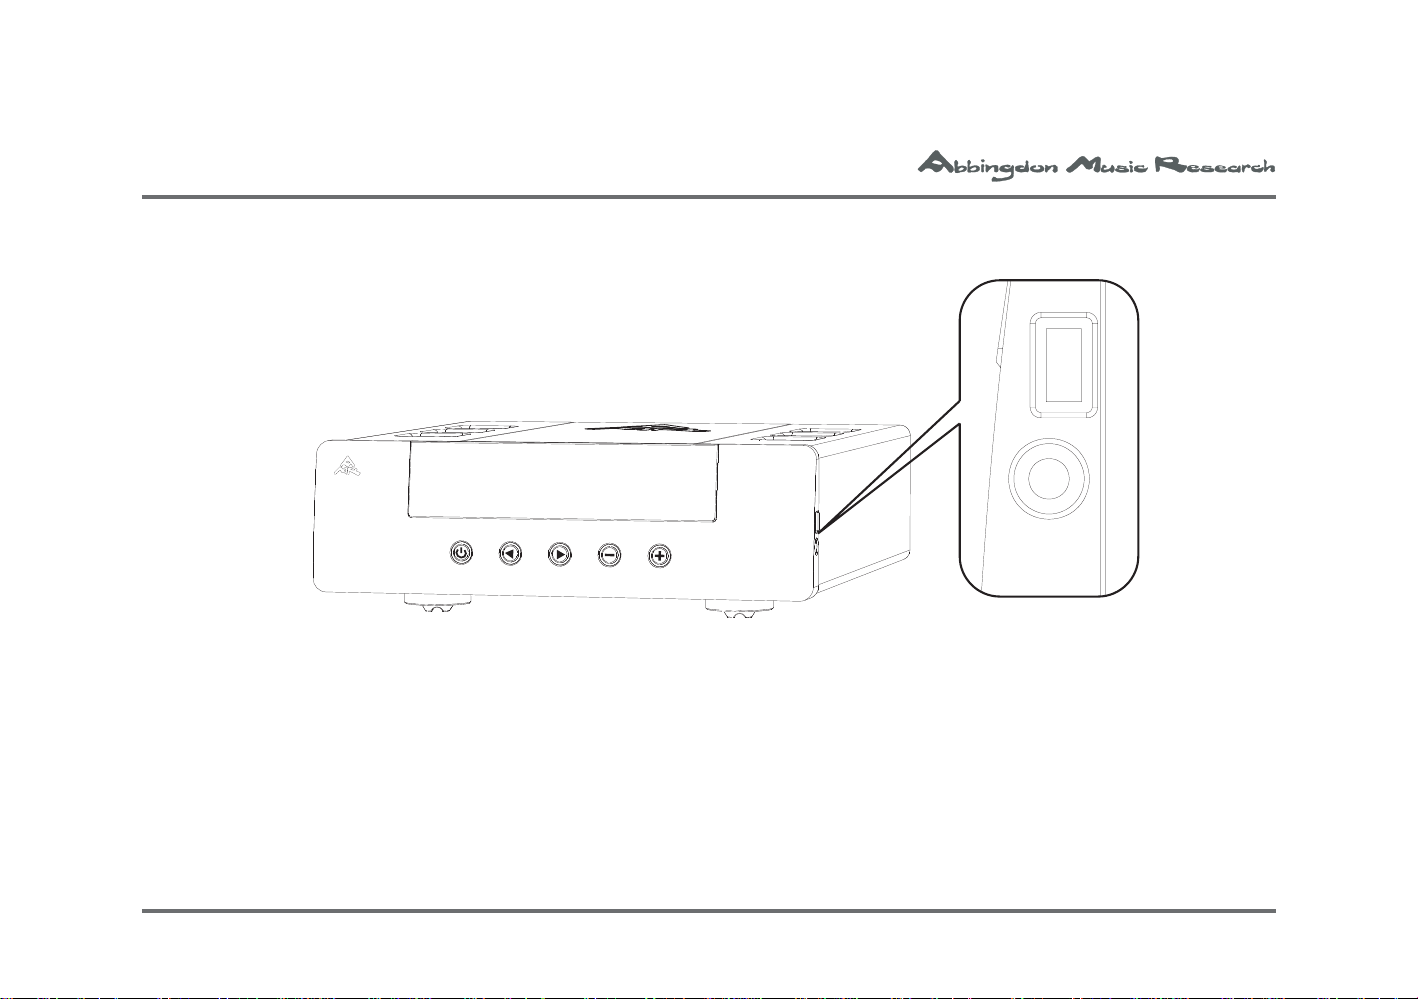
Section 2 - Component Overview
Figure 2.1 - AM-77 Front Fascia
DUAL MONO AMPLIFIER AM 77
F1
F2
F3
F4
F5
F1. STANDBY switch: to place the AM-77 in active or standby mode.
F2. SOURCE selection buttons: to select between the 5 different inputs.
F3. VOLUME buttons: to adjust the volume level.
F4. iPod 3.5 Input Connector: for the connection of an iPod or similar portable music device.
F5. iPod USB charging connector: for re-charging an iPod or similar portable music device.
15
Page 16
Warning: en-
-
+
+
_
_
~
-
sure no
speaker connector is in
contact with
the chassis
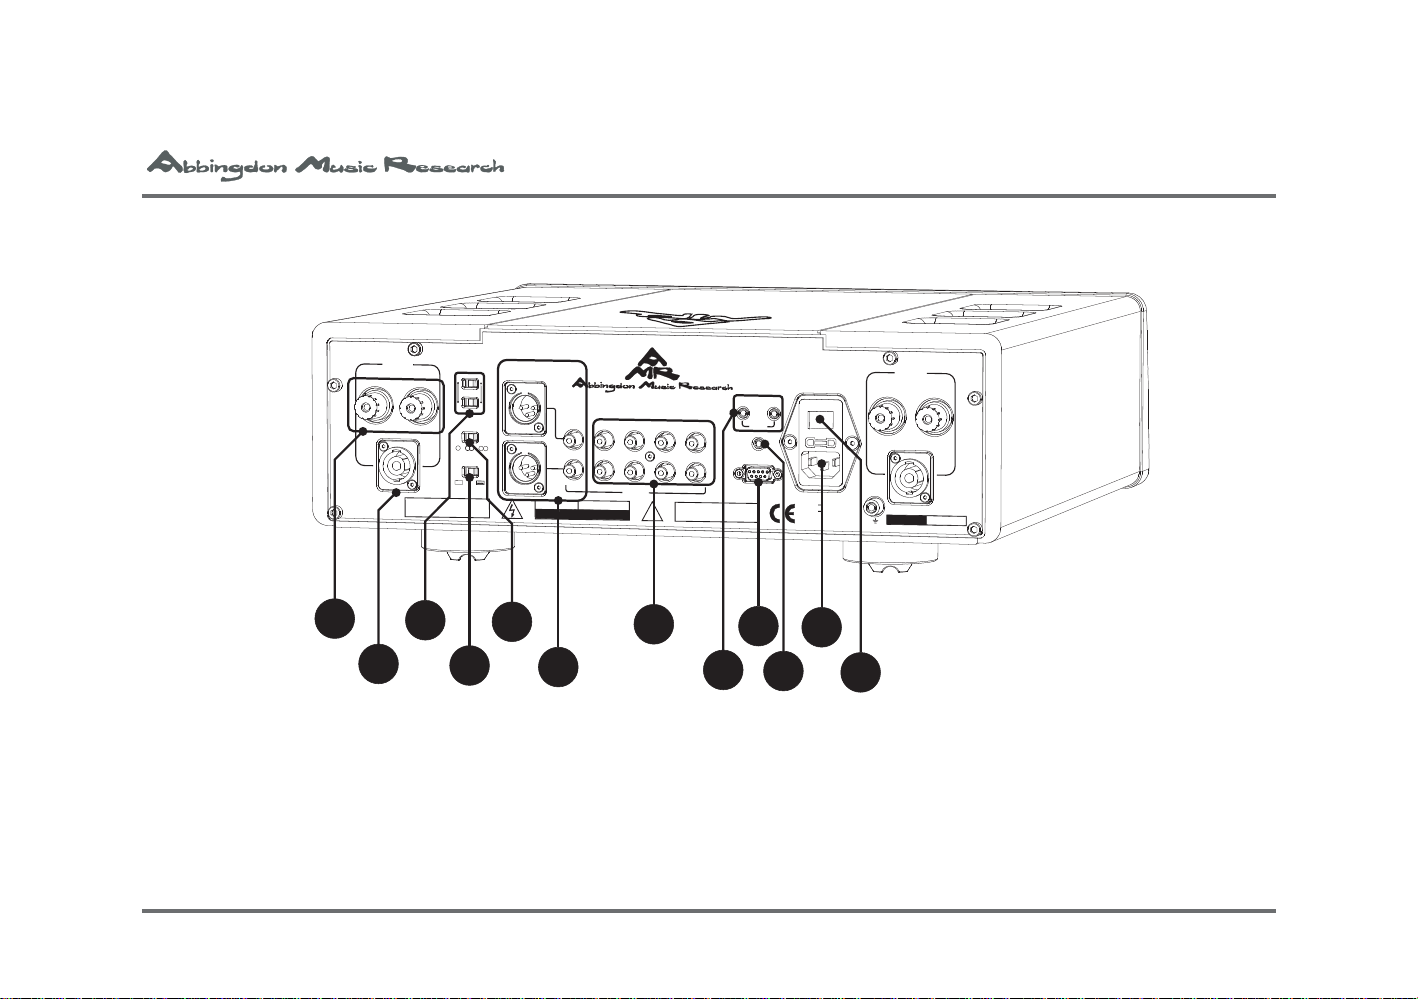
Figure 2.2 - AM-77 Rear Panel
Speaker
Output
R
Under normal operation set all switches to
the default position Please refer to
the instruction manual for further details
HiFi
() .
bold
Power
,
Balanced
Input
Pro
Mode
M
L
R
M
M
Int
Amp
Amp
.
1
CAUTION ATTENTION
RISK OF ELECTRIC SHOCK
DO NOT OPEN
Dual Mono Amplifier AM 77
Designed and Engineered in Great Britain
2
3
4
Inputs
RISQUE DE CHOC ELECTRIQUE
NE PAS OUVRIR
No User Serviceable Components Inside.
Dealer or Distributor Any modifications to
!
this equipment will void all warranties
5
L
R
For service contact your Authorised
,
.
Speaker
SERIAL
Output
L
N
O.
Power
On
90V 135V
190V
AC IN
Off
260V
In
Out
Sync
IR Link
Option
.
R1
R2
R3
R4
R5
R6
R7
R8
R9
R9
R10
R11
R12
R1. SPADE/BANANA outputs: for connection of standard termination speaker cables.
R2. SPEAKON outputs: for connection of Speakon terminated speaker cables.
R3. HIFI/PRO switch: to allow for a source with transformer balanced output*.
R4. INT/POWER Amp switch: to alternate between Pre-Main and Power Amplification setings*.
R5. MODE switch: to alternate between Stereo/Monoblock/Bi-Amplification settings*.
R6. INPUT 1: shared XLR and RCA input, for signal input of source equipment.
16
Page 17

R7. INPUTS 2-5: RCA inputs, for signal input of source equipment.
R8. SYNC connectors: for connection of more than one AM-77*.
R9. RS232 option connector: to facilitate future upgrades*.
R10. Infra-Red Link: for connection of a wireline remote control.
R11. IEC power connector: for the connection of a PC-77 mains power cable to the AM-77.
R12. POWER Switch: to switch on mains electricity to the AM-77.
In the majority of audio systems, the AM-77 is most likely to be operated as a Pre-Main Amplifier: please inspect
the rear panel of the AM-77 to verify that the default settings (in bold) to enable the AM-77 to operate in this
mode are as follows:
1. HIFI/PRO switches are set to ‘HiFi’ (left position)
2. MODE switch is set to ‘LR’ (middle position)
3. INT/POWER switch is set to ‘Int’ (right position)
* Please refer to Sections 3 - 5 for a more detail explanation.
17
Page 18
-
Amplifier
CD Processor
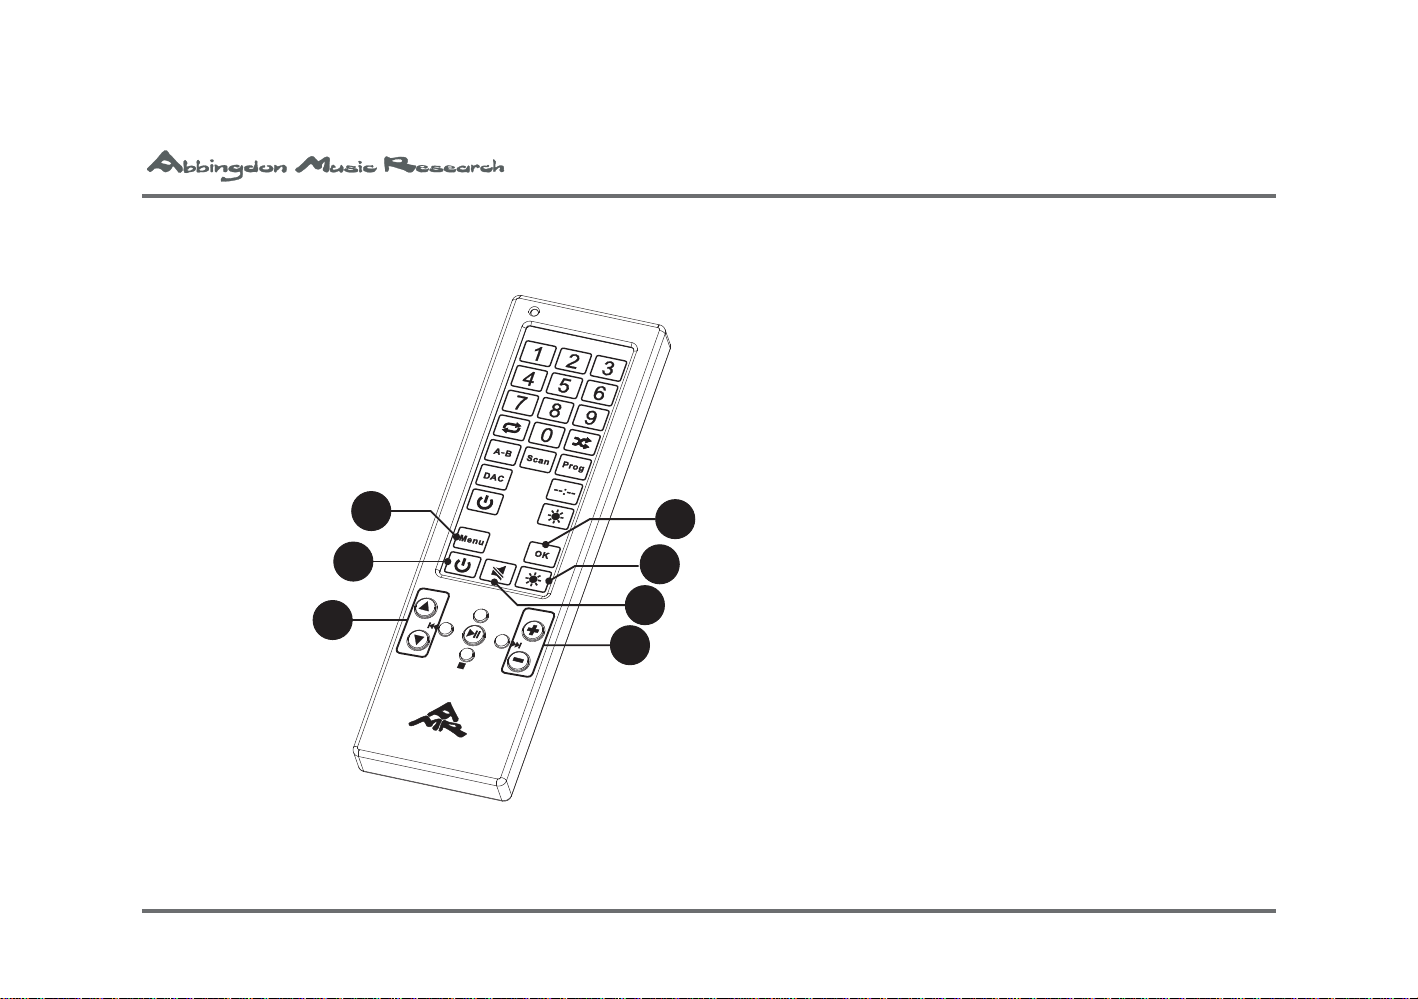
Figure 2.3 - RC-77 Remote Control
RC1
RC2
RC3
IN
REMOTE COMMANDER
kHz
VOL
RC
77
RC4
RC6
RC5
RC7
RC1. MENU button: to enter Advanced Features mode*.
RC2. STANDBY button: to place the AM-77 in active or
standby mode.
RC3. SOURCE selection buttons: to select between the 5
different inputs.
RC4. VOLUME buttons: to adjust the volume level.
RC5. MUTE button: to Mute (temporarily turn off sound)
the AM-77.
RC6. BRIGHTNESS button: to adjust brightness levels*.
RC7. OK button: to be used in Advanced Features mode*.
* Please refer to Section 3 - Advanced Features section for more details
RC-77: battery installation
To install the 2 x AAA batteries, using a Philips screwdriver,
remove the four screws at the four corners of the rear battery
compartment.
Install the 2 x AAA batteries in the correct direction according
to the baseplate inside the battery compartment.
Replace the battery compartment and the four cover screws.
18
Page 19
2a. Start-Up
1. Power On/Off
Press the ‘POWER’ rocker switch (R12) at the rear of the AMP to switch on mains power to the AM-77.
Once powered
OFF: always wait
30 seconds
before switching
on again
To switch the mains power OFF, press again and release. Always WAIT at least 30 seconds before switching
ON again. This is to enable the OptiMains® circuit to shutdown properly.
The display will light up to indicate the unit is switched on and ready for use. This should take just under 1 minute
as the OptiMains® circuit is verifying and the AM-77 is warming up.
The display should flash the message:
Optimising Supply
Voltage
The display will look like this:
Warming Up
45 s
The display will then show the remaining warm-up time.
19
Page 20

Once the system check is complete and the OptiMains®circuitry has completed its initiation process, the AM77 is ready for operation.
2. Standby
After start-up, pressing the STANDBY button (F1) on either the front fascia or the RC-77 (RC2), the AM-77
will switch to ST ANDBY mode.
Standby
3. Source Selection
From either the front fascia of the AM-77 (F2) or the RC-77 (RC3), select the desired source input for playback.
CD Player -36dB
With PLAY selected from a connected source such as a CD-77, playback is attained.
20
Page 21

Beware: pro-
longed listening
at high volume
levels is likely to
damage your
hearing
4. V olume Adjustment
From either the front fascia of the AM-77 (F3) or the RC-77 (RC4), select the desired volume.
While adjusting volume levels, there is an audible “click” from AM-77 and the speakers. This is the normal
operation of the relays within the OptiLevel® direct path precision volume control.
5. Rear Inputs
At the rear of the AM-77, there are 5 inputs for the connection of source components such as the CD-77
compact disk processor or a vinyl source.
Input 1 (R6) is of most consequence because first, while all 5 inputs can be connected via RCA only , Input 1 also
allows for the optional connection of XLR connectors.
Second, in other configurations where the AM-77 is used in single-channel mode, all other inputs are defeated.
Signal input is allowed only through the LEFT channel (white) of Input 1: via XLR or RCA (Please refer to
Section 4 - System Configurations for a detailed explanation).
6. Speakon Outputs
At the rear of the AM-77 are Speakon female connectors (R2) to allow speaker cables terminated with Speakon
male connectors to be connected to the AM-77.
21
Page 22

7. Synch Connectors
At the rear of the AM-77 are Synchronisation ‘In’ and ‘Out’ connection points (R8). This is for the linking of
multiple AM-77s for alternative system configurations. Please refer to Section 4 - System Configurations for
a detailed explanation.
8. Mode switch
At the rear of the AM-77 the ‘Mode’ switch (R5) allows for the AM-77 to alternate between Stereo/Monoblock/Bi-Amplifier modes. Please refer to Section 4 - System Configurations for a detailed explanation.
9. Int/Power switch
At the rear of the AM-77, the ‘Int/Power’ switch (R4) enables the AM-77 to alternate between pre-main or
power amplification modes. Please refer to Section 4 - System Configurations for a detailed explanation.
10. HiFi/Pro switch
At the rear of the AM-77, the ‘HiFi/Pro’ switch (R3) allows for a source with a transformer balanced output to
be connected to the AM-77. Please refer to Section 5 - Additional Connectivity for a detailed explanation.
11. RS232 option connector
At the rear of the AM-77, the RS232 connector (R9) allows the AM-77 to be upgraded. Please refer to Section
5 - Additional Connectivity for a detailed explanation.
22
Page 23

12. Menu (RC-77 only)
The MENU button (RC1) will enter the Advanced Menu system of the AM-77. Please refer to Section 3 Advanced Features for a detailed explanation.
13. OK (RC-77 only)
The OK button on (RC7) the RC-77 is for the confirmation of a desired selection within the Advanced Menu
system of the AM-77. Please refer to Section 3 - Advanced Features for a detailed explanation.
14. Mute (RC-77 only)
The MUTE button (RC5) will disengage the volume of the AM-77 and re-engage the volume if it is pressed
again.
15. Brightness (RC-77 only)
The BRIGHTNESS button (RC6) will adjust the display’s brightness at the front fascia of the AM-77. There are
4 different brightness settings including display off.
With its own isolated power supply, with the display ON or OFF, there is no sonic impact upon the AM-77.
23
Page 24

24
Page 25

Section 3 - Advanced Features
The following section provides instructions to access the AM-77’s advanced features.
3a. Labeling of Inputs and Setting Level Offset
With the AM-77, in one process, it is possible to label each of the 5 inputs with a corresponding source and to set
the respective level offset. This function is recommended only after ALL desired sources have been connected
to the AM-77.
A list of available labels is shown overleaf in chronological order .
The main advantage of setting the level offset is that the volume level will change in real-time, so that the user
may adjust the offset without the need for additional equipment. By using this function and selecting the desired
level offset, one may ‘match’ the volume level of all inputs so that when switching between sources, the volume
remains the same, thereby avoiding undesirable and potentially equipment-damaging noise levels.
For example:
Input 1 CD Player (2V output) Offset: 0dB
Input 2 LP (1V output) Offset: +6dB
Input 3 SACD Player (4V output) Offset: -6dB
25
Page 26

List of available inputs:
All types of
sources
accomodated
1. Input X (
default
2. Aux I
3. Aux II
4. Aux III
5. CD Processor
6. D/A Processor
7. DVD Player
8. DVD Recorder
9. HD Recorder
10.HDTV
11.Home Theatre
12.iPod
13.LCD TV
14.Media Center
)
15. MP3 Player
16. PC Audio
17. Phono Stage
18. Plasma TV
19. Pre-Amplifier
20. SACD Player
21. Tape Deck
22. Television
23. Tuner
24. Turntable
25. Uni Player
26. Video Player
27. Home Theatre Direct
26
Page 27

The following steps outline the procedure to label all the inputs and set the respective level offset.
The AM-77’s default labelling of its inputs starts from ‘Input 1’ and runs through to ‘Input 5’:
i. Press ‘MENU’ (RC1) on the RC-77.
ii. The display will flash ‘Labelling Input 1’.
iii. The 2
nd
line of the display will commence with the first from a list of input labels (please see the
previous page for a list of input labels).
iv. Scroll using the ‘+/- buttons’ of the Volume (RC4).
iv. At the desired label, press ‘OK’ (RC7) to store the new label for that specific input.
v. The display will flash ‘Level Offset’. On the RC-77, using ‘+/-’ volume buttons, select the desired
level, press ‘OK’ (RC7) to confirm.
vi. The display will move onto ‘Labelling Input 2’.
vi. Repeat this process for the other inputs.
vii. One the last input, Input 5 has been programmed, press ‘OK’.
viii. Normal operation will resume at Input 5. If this is not the desired input, use SOURCE (F2) or (RC3)
to select the input of choice to resume listening.
27
Page 28

3b. Setting Fixed Input Level
When using the AM-77 as part of a home theatre system with an external processor controlling the overall
system volume, it is possible to program one of the five input sources to have a fixed level of Input such as for
a home theatre system of either 0.775V (0dbu) or 1.55V (+6dBu). This allows the 2-Channel music system to be
seamlessly integrated into a high performance multi-channel home cinema system.
- Go to Section 3a and follow the instructions to select the last label:
Home Theatre
Direct
- Simultaneously press ‘-’ volume on the front fascia of the AM-77 and ‘OK’ on the RC-77.
28
Page 29

- Having entered the ‘Fixed Input’ menu, now select:
HTD mode:
always use an
external pre-amp
as this mode will
switch the AM-
77 to full volume!
Fixed Input 1.55V = +6dBu
or
Fixed Input 0.775V = 0dBu
Warning! By selecting Home Theater Direct mode, the volume of the amplifier will be switched to full.
Hence if it is used incorrectly, it will damage the connecting speakers. AMR assumes no responsibility for
any speaker damage arising from the use of the AM-77.
29
Page 30

Sometimes there
are excessive
mains fluctua-
tions
3c. OptiMains® Protection for Excessive Under/Over-Voltages
The AM-77 is fitted with the OptiMains® system to condition and adjust the incoming mains supply for best
operation under all normal mains conditions (including situations that will cause audible problems without Opti-
Mains®).
In almost every country throughout the world, instances do arise where fluctuations in the main electricity
exceeds that of a correctly operating mains supply and any electrical item/product is no longer properly served.
In the case of extreme power surges, brown outs or other exceptional/unexpected conditions that exceed the
safety margins, the OptiMains® system automatically will switch off the mains power to the internal parts of
equipment to prevent any damage from occuring.
If the display reads:
...OptiMains®
will detect and
protect
30
AC Voltage Outside
Operating Range!
Power OFF your AMR component and wait at least 5 minutes. If and when the mains electricity has been
deemed to have returned to normal (such as during a brown out and the lights have dimmed but have returned to
normal brightness) then power up your AMR component as per the manual’s instructions.
Page 31

3d. OptiProtect® Speaker Overload Protection
Within OptiProtect® the AM-77 has an in-built speaker protection circuit. Unlike common protection systems
which are in series with the speaker output and where the music signal always passes through the protection
circuit, the AMR speaker protection system acts as a crowbar circuit shorting across the output - hence it is
separate from the audio circuitry and does not affect the sound quality unless it is engaged.
This is mainly a final safeguard against equipment failure and/or extreme levels of over-driving the amplifier and
speakers. When the display shows:
If there are any
questions, please
contact your
nearest AMR
distributor/dealer
Speaker Protection
Engaged!
This indicates that the AM-77 has detected an output condition that could potentially damage the speakers
connected to it.
Normally switching the AM-77 of f, waiting 20 seconds and switching it back on will reset the protection circuit
if the cause was for example, excessive signal levels. In the extremely rare event that an internal malfunction of
the AM-77 is the cause for the protection circuit to engage, the protection will re-engage on switch-on, indicating
the need for the AM-77 to be serviced.
31
Page 32

32
Page 33

It is assumed all
prior sections
have been read &
understood with
all requisite
connections
made
Six different
modes
Section 4 - System Configurations
4a. OptiOperation® Different System Configurations
In keeping with AMR’s philosophy that ‘no one sound fits all’ the AM-77 is also adaptable to suit virtually any
system configuration: able to operate at one end, as a pre-main stereo amplifier and at the other, as a singlechannel power amplifier. In pre-main amplifier mode, the AM-77 will use both the pre- and power amplification
sections: the AM-77 controls volume level and input selection controls. In power amplification mode, the AM-77
wil require an external, separate pre-amplifier to handle volume and input selection duties.
The following section describes alternative configurations for the AM-77 beyond the factory default: pre-main
stereo amplifier setting. With diverse system permutations in mind, the AM-77 has built-in, six OptiOperation®
modes to seamlessly integrate it into virtually any audio system configuration:
Mode I. Pre-Main Stereo amplifier mode (default)
Mode II. Pre-Main Monoblock amplifier mode
Mode III. Pre-Main Bi-amplifier mode (horizontal biamping)
Mode IV. Power amplifier Stereo mode
Mode V. Power amplifier Monoblock mode
Mode VI. Power Bi-amplifier mode (horizontal biamping)
Supreme adapt-
ability
The combination of synchronising multiple AM-77s together in practical terms is limited only by room size and
cost. This approach allows for systems at the core, comprising of any number of AM-77s to be constructed to
any level of complexity.
33
Page 34

In short, the AM-77’ s flexibility is limited only to that of the imagination. For example, one may employ:
- -
- -
+
+
+
+
+
+
+
+
_
_
_
_
_
_
_
_
~
~
~
~
- -
- -
AM-77 AM-77
AM-77 AM-77
- 3xAM-77s synchronised along with a high-quality digital crossover to drive a fully-active 3-way
speaker system to the highest possible level of sound reproduction or;
- 3xAM-77s synchronised for a multi-channel surround sound system or;
- 2xAM-77s synchronised in monoblock or bi-amplification mode to drive suitably-equipped speakers.
Figure 4.0 - Connection of more than one AM-77
Before an
alternative
configuration is
selected, AL-
WAYS ensure
Speaker
Output
R R
HiFi
Power
Amp
,
Undernormal operation setall switches to
() .
bold
thedefault positionPlease refer to
theinstruction manual forfurther details
Balanced
Input
Pro
Mode
L
R
M
M
M
Int
Amp
.
Dual Mono Amplifier AM 77 Dual Mono Amplifier AM 77
Designedand Engineered in Great Britain
1
2
Inputs
CAUTION ATTENTION
RISQUEDE CHOC ELECTRIQUE
RISKOF ELECTRICSHOCK
NEPAS OUVRIR
DONOT OPEN
3
4
!
5
L
R
NoUser Serviceable ComponentsInside.
,
Forservice contactyour Authorised
.
Dealeror Distributor Anymodifications to
thisequipment will voidall warranties
In
Out
Sync
IR Link
Option
.
Speaker
Output
Power
On
Off
L L
AC IN
90V 135V
260V
190V
O.
N
SERIAL
Speaker
Output
Undernormal operation setall switches to
thedefault positionPlease refer to
theinstruction manual forfurther details
() .
bold
Balanced
Input
Pro
HiFi
Mode
L
R
M
M
Power
Int
Amp
Amp
,
.
M
Designedand Engineered in Great Britain
1
CAUTION ATTENTION
RISQUEDE CHOC ELECTRIQUE
RISKOF ELECTRICSHOCK
NEPAS OUVRIR
DONOT OPEN
3
4
2
Inputs
!
5
L
R
NoUser Serviceable ComponentsInside.
,
Forservice contactyour Authorised
.
Dealeror Distributor Anymodifications to
thisequipment will voidall warranties
Speaker
Output
Power
On
Off
In
Out
Sync
IR Link
Option
AC IN
90V 135V
260V
190V
.
O.
N
SERIAL
the AM-77 is
switched OFF
34
Speaker
Output
Pro
HiFi
Mode
R R
L
R
M
M
M
Int
Power
Amp
Amp
,
Undernormal operation setall switches to
() .
bold
thedefault positionPlease refer to
.
theinstruction manual forfurther details
Balanced
Input
Dual Mono Amplifier AM 77 Dual Mono Amplifier AM 77
Designedand Engineered in Great Britain
1
2
Inputs
CAUTION ATTENTION
RISQUEDE CHOC ELECTRIQUE
RISKOF ELECTRICSHOCK
NEPAS OUVRIR
DONOT OPEN
3
4
!
5
L
R
NoUser Serviceable ComponentsInside.
,
Forservice contactyour Authorised
.
Dealeror Distributor Anymodifications to
thisequipment will voidall warranties
In
Out
Sync
IR Link
Option
.
Speaker
Output
Power
On
Off
L L
AC IN
90V 135V
260V
190V
O.
N
SERIAL
Speaker
Output
Pro
HiFi
Mode
L
R
M
M
M
Power
Int
Amp
Amp
,
Undernormal operation setall switches to
() .
bold
thedefault positionPlease refer to
.
theinstruction manual forfurther details
Balanced
Input
CAUTION ATTENTION
RISKOF ELECTRICSHOCK
Designedand Engineered in Great Britain
1
RISQUEDE CHOC ELECTRIQUE
NEPAS OUVRIR
DONOT OPEN
Speaker
Output
Power
On
Off
In
Out
5
3
2
Inputs
4
!
L
R
NoUser Serviceable ComponentsInside.
,
Forservice contactyour Authorised
.
Dealeror Distributor Anymodifications to
thisequipment will voidall warranties
Sync
IR Link
Option
AC IN
90V 135V
260V
190V
.
O.
N
SERIAL
Page 35

The following pages provide an outline of the theoretical wiring system behind each of the six different configurations with a brief accompanying summary
Figure 4.1 - Mode I: Pre-Main Stereo
Pre
L
Amp
(L)
Power
Amp
(L)
Left
Speaker
• Standard system with AM-77 as the only
amplifier.
Pre
R
Amp
(R)
Power
Amp
(R)
1st AM-77
Right
Speaker
35
Page 36

Figure 4.2 - Mode II: Pre-Main Monoblock
Pre
L
Amp
(L)
Power
Amp
(L)
Power
Amp
(R)
• Need 2 or more AM-77s.
• Drive low impedance speakers that only have
one set of terminal connections.
1st AM-77
Left
Speaker
• ~600W/2Ohm RMS and ~300W/1Ohm RMS
without current clipping. This is best suited
to drive very low impedance speakers
Pre
R
Amp
(L)
Power
Amp
(L)
Power
Amp
(R)
2nd AM-77
Right
Speaker
(Apogee Diva et al).
36
Page 37

Figure 4.3 - Mode III: Pre-Main Bi-Amplifier
Pre
L
Amp
(L)
Power
Amp
(L)
• Need 2 or more AM-77s.
Power
Amp
(R)
• Drive speakers that have more than one set
of terminal connections with improved per-
1st AM-77
Left
Speaker
formance and dynamic range.
• Virtually all the power supply power is available to the low frequency channel with impproved channel separation.
Pre
R
Amp
(L)
Power
Amp
(L)
Power
Amp
(R)
2nd AM-77
Right
Speaker
37
Page 38

Figure 4.4 - Mode IV: Power Stereo
L
(L)
Power
Amp
(L)
Left
Speaker
• Same as Mode I, except the Pre-Amplifier
sec tion has been bypassed.
• A separate pre-amplifier is needed to control
the volume.
38
R
(R)
Power
Amp
(R)
1st AM-77
Right
Speaker
Page 39

Figure 4.5 - Mode V: Power Monoblock
L
(L)
Power
Amp
(L)
• Same as Mode II, except the Pre-Amplifier
Power
Amp
(R)
1st AM-77
R
(L)
Power
Amp
(L)
Power
Amp
(R)
2nd AM-77
Left
Speaker
Right
Speaker
• A separate pre-amplifier is needed to control
section has been bypassed.
the volume.
39
Page 40

Figure 4.6 - Mode VI: Power Bi-Amplifier
L
(L)
Power
Amp
(L)
• Same as Mode III, except the Pre-Amplifier
Power
Amp
(R)
1st AM-77
R
(L)
Power
Amp
(L)
Power
Amp
(R)
2nd AM-77
Left
Speaker
Right
Speaker
• A separate pre-amplifier is needed to control
section has been bypassed.
the volume.
40
Page 41

4b. Switching and Connection Diagrams for Different Modes
~
-
L
R
Speaker CableSpeaker Cable
Interconnect Cable
100 1000 10000
FrequencyHz()
50
60
70
80
90
100
O
utpu
t
dB()
Speaker LSpeaker R
Interconnect Cable
100 1000 10000
FrequencyHz()
50
60
70
80
90
100
OutputdB()
CD 77-
-
+
+
_
_
~
-
AM 77-
The following is a description of the switch settings and connections required to engage the various modes.
Figure 4.7 - Mode I: Pre-Main Stereo amplifier (default)
The default
factory setting
HiFi
Pro
Sensitivity:
87dB
Impedance:
8Ohms
HF
ContPowerHanding. :
150W
LevelAdjustment
OutputdB()
PeakProgHanding:.
600W
Resistor
FrequencyResponse:
()seegraph
FrequencyHz()
LS77Professional Monitor-
DesignedandEngineeredin GreatBritain
HF
LF
IN OUT
Sensitivity:
87dB
Impedance:
8Ohms
HF
dB()
t
ContPowerHanding. :
150W
LevelAdjustment
utpu
O
PeakProgHanding:.
600W
Resistor
FrequencyResponse:
()seegraph
FrequencyHz()
LS77Professional Monitor-
DesignedandEngineeredin GreatBritain
HF
LF
IN OUT
Speaker
Mode
M
M
M
Output
HiFi
Power
Amp
,
Undernormal operation setall switches to
bold
() .
thedefault positionPleaserefer to
theinstruction manual forfurther details
Balanced
Input
Pro
Mode
L
R
M
M
M
Int
Amp
.
Designedand Engineered in Great Britain
1
CAUTION ATTENTION
RISQUEDE CHOC ELECTRIQUE
RISKOF ELECTRICSHOCK
NEPAS OUVRIR
DONOT OPEN
Dual Mono Amplifier AM 77
2
Inputs
3
4
!
5
L
R
NoUser Serviceable ComponentsInside.
,
Forservice contactyour Authorised
.
Dealeror Distributor Anymodifications to
thisequipment will voidall warranties
In
Out
Sync
IRLink
Option
.
Speaker
Output
Power
On
Off
LR
ACIN
90V 135V
260V
190V
O.
N
SERIAL
AM 77-
Amp
Int
Amp
Power
This is the factory default setting: the connection for which has been described in detail in Section 1 - Unpacking and Setup. We have illustrated the default switch positions here for ease of reference to re-configure from
an alternative system setup back to the pre-main stereo amplifier mode.
Analog
Outputs
R L
CompactDisk Processor CD77
Designedand Engineered in GreatBritain
USBInput
IRLink
!
CAUTION ATTENTION
RISQUEDE CHOC ELECTRIQUE
RISKOFELECTRIC SHOCK
NEPAS OUVRIR
DONOT OPEN
CLASS1
LASERPRODUCT
NoUserServiceable Components Inside.
,
Forservicecontact yourAuthorised
DealerorDistributor Anymodificationsto
thisequipmentwill void allwarranties
Power
On
Off
ACIN
90V 135V
260V
190V
.
.
CD 77-
Analog
Outputs
SERIALNO.
41
Page 42

Figure 4.8 - Mode II: Pre-Main Monoblock amplifiers
HiFi
Pro
Mode
Int
Amp
Power
Amp
L
R
M
M
Analog
Outputs
Analog
Outputs
R L
USBInput
IRLink
Power
On
Off
90V 135V
190V
260V
~
ACIN
CLASS1
LASERPRODUCT
NoUserServiceable Components Inside.
,
.
.
Forservice contact your Authorised
DealerorDistributor Anymodificationsto
thisequipmentwill void allwarranties
CAUTION ATTENTION
RISKOF ELECTRIC SHOCK
DONOT OPEN
RISQUEDE CHOC ELECTRIQUE
NEPAS OUVRIR
!
SERIAL
N
O.
Designedand Engineered in GreatBritain
CompactDisk Processor CD77
-
CD 77-CD 77-
Speaker Cable
Interconnect Cable
AM-77: MasterAM-77: Master
Interconnect Cable
HF
LF
DesignedandEngineered in Great Britain
LS77Professional Monitor
-
Sensitivity:
FrequencyResponse:
PeakProgHanding:.
ContPowerHanding. :
Impedance:
87dB
8Ohms
150W
600W
()seegraph
IN OUT
100 1000 10000
FrequencyHz()FrequencyHz()
50
60
70
80
90
100
OutputdB()OutputdB()
HF
LevelAdjustment
Resistor
Speake
rR
Speake
rR
AM-77: SlaveAM-77: Slave
HF
LF
DesignedandEngineered in Great Britain
LS77Professional Monitor
-
Sensitivity:
FrequencyResponse:
PeakProgHanding:.
ContPowerHanding. :
Impedance:
87dB
8Ohms
150W
600W
()seegraph
IN OUT
100 1000 10000
FrequencyHz()FrequencyHz()
50
60
70
80
90
100
Ou
tputd
B
(
)Ou
tputd
B
(
)
HF
LevelAdjustment
Resistor
Speaker
L
Speaker
L
Power
On
Off
Sync
Balanced
Input
Designedand Engineered in Great Britain
Dual Mono Amplifier AM 77
-
+
+
_
_
90V 135V
190V
260V
~
AC IN
Speaker
Output
Speaker
Output
LR
IR Link
L
R
1
5
4
3
2
Inputs
NoUser Serviceable ComponentsInside.
,
.
.
Forservice contactyour Authorised
Dealeror Distributor Anymodifications to
thisequipment will voidall warranties
CAUTION ATTENTION
RISKOF ELECTRICSHOCK
DONOT OPEN
RISQUEDE CHOC ELECTRIQUE
NEPAS OUVRIR
!
,
() .
.
Undernormal operation setall switches to
thedefault positionPlease refer to
theinstruction manual forfurther details
bold
HiFi
Pro
Mode
Int
Amp
Power
Amp
-
Option
SERIAL
N
O.
L
R
M
In
Out
Speaker Cable
Synchronisation Cable
Power
On
Off
Sync
Balanced
Input
Designedand Engineered in Great Britain
Dual Mono Amplifier AM 77
-
+
+
_
_
90V 135V
190V
260V
~
AC IN
Speaker
Output
Speaker
Output
LR
IR Link
L
R
1
5
4
3
2
Inputs
NoUser Serviceable ComponentsInside.
,
.
.
Forservice contactyour Authorised
Dealeror Distributor Anymodifications to
thisequipment will voidall warranties
CAUTION ATTENTION
RISKOF ELECTRICSHOCK
DONOT OPEN
RISQUEDE CHOC ELECTRIQUE
NEPAS OUVRIR
!
,
() .
.
Undernormal operation setall switches to
thedefault positionPlease refer to
theinstruction manual forfurther details
bold
HiFi
Pro
Mode
Int
Amp
Power
Amp
-
Option
SERIAL
N
O.
L
R
M
M
In
Out
M
M
M
M
42
Page 43

Note: This function requires at least 2 x AM-77 synchronised pre-main amplifiers.
i. Power OFF via the ‘POWER’ (R12) mains switch at the rear of both AM-77s.
ii. Connect the cable from the ‘Sync Out’ connector (R8) of the ‘master’ amplifier to the ‘Sync In’
connector (R8) of the ‘slave’ amplifier. The amplifier with the cable connected to ‘Sync In’ becomes
‘slaved’ to the other and will automatically follow the ‘master’ AM-77.
iii Using a small flat blade screwdriver, move the ‘MODE’ switch (R5) to the left to select ‘M’.
iv. Using a small flat blade screwdriver, move the ‘INT/POWER AMP’ switch (R4) to the right to select
‘INT AMP’.
v. Repeat this process for the other AM-77.
vi. Power both AM-77s back on via the ‘POWER’ switch (R12).
43
Page 44

Figure 4.8 - Mode III: Pre-Main Bi-amplifier (horizontal bi-amping)
Analog
Outputs
Analog
Outputs
R L
USBInput
IRLink
Power
On
Off
90V 135V
190V
260V
~
ACIN
CLASS1
LASERPRODUCT
NoUserServiceable ComponentsInside.
,
.
.
Forservice contact your Authorised
DealerorDistributor Anymodificationsto
thisequipmentwill voidallwarranties
CAUTION ATTENTION
RISKOF ELECTRIC SHOCK
DONOT OPEN
RISQUEDE CHOC ELECTRIQUE
NEPAS OUVRIR
!
SERIAL
N
O.
Designedand Engineered in GreatBritain
CompactDisk Processor CD77
-
HiFi
Pro
Mode
Int
Amp
Power
Amp
L
R
M
M
CD Player
Speaker Cable
Interconnect Cable
Power
On
Off
Sync
Balanced
Input
Designed and Engineered in Great Britain
Dual Mono Amplifier AM 77
-
+
+
_
_
90V 135V
190V
260V
~
AC IN
Speaker
Output
Speaker
Output
LR
IR Link
L
R
1
5
4
3
2
Inputs
NoUser Serviceable ComponentsInside.
,
.
.
Forservice contactyour Authorised
Dealeror Distributor Anymodifications to
thisequipment will voidall warranties
CAUTION ATTENTION
RISKOF ELECTRICSHOCK
DO NOT OPEN
RISQUE DE CHOC ELECTRIQUE
NE PAS OUVRIR
!
,
() .
.
Undernormal operation setall switchesto
thedefault positionPlease refer to
theinstruction manual forfurther details
bold
HiFi
Pro
Mode
Int
Amp
Power
Amp
-
Option
SERIAL
N
O.
L
R
M
M
In
Out
Interconnect Cable
Speake
rR
Speake
rR
Power
On
Off
Sync
Balanced
Input
Designed and Engineered in Great Britain
Dual Mono Amplifier AM 77
-
+
+
_
_
90V 135V
190V
260V
~
AC IN
Speaker
Output
Speaker
Output
LR
IR Link
L
R
1
5
4
3
2
Inputs
NoUser Serviceable ComponentsInside.
,
.
.
Forservice contactyour Authorised
Dealeror Distributor Anymodifications to
thisequipment will voidall warranties
CAUTION ATTENTION
RISKOF ELECTRICSHOCK
DO NOT OPEN
RISQUE DE CHOC ELECTRIQUE
NE PAS OUVRIR
!
,
() .
.
Undernormal operation setall switchesto
thedefault positionPlease refer to
theinstruction manual forfurther details
bold
HiFi
Pro
Mode
Int
Amp
Power
Amp
-
Option
SERIAL
N
O.
L
R
M
M
In
Out
Speaker
L
Speaker
L
Speaker Cable
HF
LF
DesignedandEngineered in Great Britain
LS77Professional Monitor
-
Sensitivity:
FrequencyResponse:
PeakProgHanding:.
ContPowerHanding. :
Impedance:
87dB
8Ohms
150W
600W
()seegraph
IN OUT
100 1000 10000
FrequencyHz()Frequency Hz()
50
60
70
80
90
100
O
utput
d
B
(
)O
utput
d
B
(
)
HF
LevelAdjustment
Resistor
HF
LF
DesignedandEngineered in Great Britain
LS77Professional Monitor
-
Sensitivity:
FrequencyResponse:
PeakProgHanding:.
ContPowerHanding. :
Impedance:
87dB
8Ohms
150W
600W
()seegraph
IN OUT
100 1000 10000
FrequencyHz()Frequency Hz()
50
60
70
80
90
100
OutputdB()OutputdB()
HF
LevelAdjustment
Resistor
Synchronisation Cable
Speaker CableSpeaker Cable
AM-77: MasterAM-77: Master AM-77: SlaveAM-77: Slave
M
M
M
44
Page 45

Note: This function requires at least 2 x AM-77 synchronised pre-main amplifiers.
i. Power OFF via the ‘POWER’ (R12) mains switch at the rear of both AM-77s.
ii. Connect the cable from the ‘Sync Out’ connector (R8) of the ‘master’ amplifier to the ‘Sync In’
connector (R8) of the ‘slave’ amplifier. The amplifier with the cable connected to ‘Sync In’ becomes
‘slaved’ to the other and will automatically follow the ‘master’ AM-77.
iii. Using a small flat blade screwdriver, move the ‘MODE’ switch (R5) to the right to select ‘MM’.
iv. Using a small flat blade screwdriver, move the ‘INT/POWER AMP’ switch (R4) to the right to select
‘INT AMP’.
v. Repeat this process for the other AM-77
vi. Power both AM-77s back on via the ‘POWER’ switch (R12).
45
Page 46

Figure 4.9 - Mode IV: Power Stereo amplifier
L
R
Speaker CableSpeaker Cable
Interconnect Cable
-
+
+
_
_
~
-
Interconnect Cable
AM 77-
100 1000 10000
FrequencyHz()
50
60
70
80
90
100
OutputdB()
Speaker LSpeaker R
100 1000 10000
FrequencyHz()
50
60
70
80
90
100
O
utputdB()
Pre-amplifier
Pre-amplifier
5
L
R
,
Forservice contact your Authorised
.
Sensitivity:
87dB
Impedance:
8Ohms
HF
ContPower Handing. :
150W
LevelAdjustment
OutputdB()
PeakProg Handing:.
600W
Resistor
FrequencyResponse:
()seegraph
FrequencyHz()
LS77 Professional Monitor
-
DesignedandEngineered inGreatBritain
HF
LF
IN OUT
Speaker
Power
On
Out
In
Sync
IR Link
Option
AC IN
90V 135V
190V
.
Analog
Outputs
Output
Off
LR
260V
SERIAL
O.
N
Sensitivity:
87dB
Impedance:
8Ohms
HF
ContPower Handing. :
150W
LevelAdjustment
utputdB()
O
PeakProg Handing:.
600W
Resistor
FrequencyResponse:
()seegraph
FrequencyHz()
HiFi
Mode
M
Power
Amp
M
Int
Amp
Pro
M
Speaker
Output
HiFi
Mode
M
Power
Amp
,
Undernormal operation set all switches to
bold
() .
thedefault position Please refer to
theinstruction manual for further details
LS77 Professional Monitor
-
DesignedandEngineered inGreatBritain
IN OUT
L
R
M
Int
Amp
.
HF
LF
Pro
M
Balanced
Input
CAUTION ATTENTION
RISK OF ELECTRIC SHOCK
DO NOT OPEN
Analog
Outputs
Dual Mono Amplifier AM 77
Designed and Engineered in Great Britain
3
2
1
Inputs
RISQUE DE CHOC ELECTRIQUE
!
NE PAS OUVRIR
AM 77-
4
NoUser Serviceable Components Inside.
Dealeror Distributor Any modifications to
thisequipment will void all warranties
R
L
46
Page 47

i. Power OFF via the ‘POWER’ (R12) switch at the rear of the AM-77.
ii. Connect the desired separate pre-amplifier to the AM-77 via the Balanced or RCA female connector
of Input 1 (R6).
iii. Using a small flat blade screwdriver, move the ‘MODE’ switch (R5) to the centre to select ‘L R’.
iv. Using a small flat blade screwdriver, move the ‘INT/POWER AMP’ switch (R4) to the left to select
‘POWER AMP’.
v. Power the AM-77 back on via the ‘POWER’ switch (R12).
47
Page 48

Figure 4.9 - Mode V: Power Monoblock amplifier
HiFi
Pro
Mode
Int
Amp
Power
Amp
L
R
M
M
Speaker Cable
Interconnect Cable
Power
On
Off
Sync
Balanced
Input
Designed and Engineered in Great Britain
Dual Mono Amplifier AM 77
-
+
+
_
_
90V 135V
190V
260V
~
AC IN
Speaker
Output
Speaker
Output
LR
IR Link
L
R
1
5
4
3
2
Inputs
NoUser Serviceable ComponentsInside.
,
.
.
Forservice contactyour Authorised
Dealeror Distributor Anymodifications to
thisequipment will voidall warranties
CAUTION ATTENTION
RISKOF ELECTRICSHOCK
DO NOT OPEN
RISQUE DE CHOC ELECTRIQUE
NE PAS OUVRIR
!
,
() .
.
Undernormal operation setall switchesto
thedefault positionPlease refer to
theinstruction manual forfurther details
bold
HiFi
Pro
Mode
Int
Amp
Power
Amp
-
Option
SERIAL
N
O.
L
R
M
In
Out
Interconnect Cable
Power
On
Off
Sync
Balanced
Input
Designed and Engineered in Great Britain
Dual Mono Amplifier AM 77
-
+
+
_
_
90V 135V
190V
260V
~
AC IN
Speaker
Output
Speaker
Output
LR
IR Link
L
R
1
5
4
3
2
Inputs
NoUser Serviceable ComponentsInside.
,
.
.
Forservice contactyour Authorised
Dealeror Distributor Anymodifications to
thisequipment will voidall warranties
CAUTION ATTENTION
RISKOF ELECTRICSHOCK
DO NOT OPEN
RISQUE DE CHOC ELECTRIQUE
NE PAS OUVRIR
!
,
() .
.
Undernormal operation setall switchesto
thedefault positionPlease refer to
theinstruction manual forfurther details
bold
HiFi
Pro
Mode
Int
Amp
Power
Amp
-
Option
SERIAL
N
O.
L
R
M
M
In
Out
Speaker Cable
AM-77: MasterAM-77: Master AM-77: SlaveAM-77: Slave
Pre-amplifier
Analog
Outputs
Analog
Outputs
RL
Pre-amplifier
Speake
rR
Speake
rR
Speaker
L
Speaker
L
HF
LF
DesignedandEngineered in Great Britain
LS77Professional Monitor
-
Sensitivity:
FrequencyResponse:
PeakProgHanding:.
ContPowerHanding. :
Impedance:
87dB
8Ohms
150W
600W
()seegraph
IN OUT
100 1000 10000
FrequencyHz()Frequency Hz()
50
60
70
80
90
100
Outpu
td
B
(
)
Outpu
td
B
(
)
HF
LevelAdjustment
Resistor
HF
LF
DesignedandEngineered in Great Britain
LS77Professional Monitor
-
Sensitivity:
FrequencyResponse:
PeakProgHanding:.
ContPowerHanding. :
Impedance:
87dB
8Ohms
150W
600W
()seegraph
IN OUT
100 1000 10000
FrequencyHz()Frequency Hz()
50
60
70
80
90
100
OutputdB()OutputdB()
HF
LevelAdjustment
Resistor
M
M
M
M
48
Page 49

Note: This function requires at least 2 x AM-77 synchronised pre-main amplifiers.
i. Power OFF via the ‘POWER’ (R12) switch at the rear of both AM-77s.
ii. Using a small flat blade screwdriver, move the ‘MODE’ switch (R5) to the left to select ‘M’.
iii. Using a small flat blade screwdriver, move the ‘INT/POWER AMP’ switch (R4) to the left to select
‘POWER AMP’.
iv. Repeat this process for the other AM-77.
v. Power ON both AM-77s via the respective ‘POWER’ switch (R12).
49
Page 50

Figure 5.0 - Mode VI: Power Bi-amplifier mode
HiFi
Pro
Mode
L
R
M
M
Speaker Cable
Interconnect Cable
Power
On
Off
Sync
Balanced
Input
Designed and Engineered in Great Britain
Dual Mono Amplifier AM 77
-
+
+
_
_
90V 135V
190V
260V
~
AC IN
Speaker
Output
Speaker
Output
LR
IR Link
L
R
1
5
4
3
2
Inputs
NoUser Serviceable ComponentsInside.
,
.
.
Forservice contactyour Authorised
Dealeror Distributor Any modifications to
thisequipment will voidall warranties
CAUTION ATTENTION
RISKOF ELECTRIC SHOCK
DO NOT OPEN
RISQUE DE CHOC ELECTRIQUE
NE PAS OUVRIR
!
,
() .
.
Undernormal operation set all switches to
thedefault position Please refer to
theinstruction manual forfurther details
bold
HiFi
Pro
Mode
Int
Amp
Power
Amp
-
Option
SERIALNO.
L
R
M
M
In
Out
Interconnect Cable
Power
On
Off
Sync
Balanced
Input
Designed and Engineered in Great Britain
Dual Mono Amplifier AM 77
-
+
+
_
_
90V 135V
190V
260V
~
AC IN
Speaker
Output
Speaker
Output
LR
IR Link
L
R
1
5
4
3
2
Inputs
NoUser Serviceable ComponentsInside.
,
.
.
Forservice contactyour Authorised
Dealeror Distributor Any modifications to
thisequipment will voidall warranties
CAUTION ATTENTION
RISKOF ELECTRIC SHOCK
DO NOT OPEN
RISQUE DE CHOC ELECTRIQUE
NE PAS OUVRIR
!
,
() .
.
Undernormal operation set all switches to
thedefault position Please refer to
theinstruction manual forfurther details
bold
HiFi
Pro
Mode
Int
Amp
Power
Amp
-
Option
SERIALNO.
L
R
M
In
Out
Speaker Cable
Int
Amp
Power
Amp
AM-77: MasterAM-77: Master AM-77: SlaveAM-77: Slave
Speake
rR
Speake
rR
Speaker
L
Speaker
L
HF
LF
DesignedandEngineered in Great Britain
LS77Professional Monitor
-
Sensitivity:
FrequencyResponse:
PeakProg Handing:.
ContPower Handing. :
Impedance:
87dB
8Ohms
150W
600W
()seegraph
IN OUT
100 1000 10000
FrequencyHz()FrequencyHz()
50
60
70
80
90
100
Out
pu
tdB(
)
Out
pu
tdB(
)
HF
LevelAdjustment
Resistor
HF
LF
DesignedandEngineered in Great Britain
LS77Professional Monitor
-
Sensitivity:
FrequencyResponse:
PeakProg Handing:.
ContPower Handing. :
Impedance:
87dB
8Ohms
150W
600W
()seegraph
IN OUT
100 1000 10000
FrequencyHz()FrequencyHz()
50
60
70
80
90
100
OutputdB()OutputdB()
HF
LevelAdjustment
Resistor
Speaker CableSpeaker Cable
Pre-amplifier
Analog
Outputs
Analog
Outputs
RL
Pre-amplifier
M
M
M
M
50
Page 51

Note: This function requires at least 2 x AM-77 synchronised pre-main amplifiers.
i. Power OFF via the ‘POWER’ (R12) switch at the rear of both AM-77s.
ii. Using a small flat blade screwdriver, move the ‘MODE’ switch (R5) to the right to select ‘MM’.
iii. Using a small flat blade screwdriver, move the ‘INT/POWER AMP’ switch (R4) to the left to select
‘POWER AMP’.
iv. Repeat this process for the other AM-77.
v. Power ON both AM-77s via the respective ‘POWER’ switch (R12).
51
Page 52

52
Page 53
--
When the 3.5mm
jack is used,
disconnect the
RCA connecion
to Input 4 at the
rear of the AM-77
Section 5 - Additional Connectivity
5a. Input for iPod/other portable music players
DC5V 0 5A.
Input 4
DUAL MONOAMPLIFIER AM 77
On the front right-side panel, there is a 3.5mm jack (F4). This is for the connection of an iPod or any other
portable music device for music playback through this medium.
To select this source, change selection to Input 4 (disconnect any RCA connection to Input 4 at the rear).
The USB connection (F5) is purely for supplying power to the iPod/other portable music device. It serves no
other function.
53
Page 54

5b. ‘HiFi/Pro’ Switches for Balanced XLR inputs
L
R
-
+
+
_
_
~
-
AM 77-
‘Pro’ switch is for
the few pre-
amplifiers that
have floating
transformer
balanced outputs
54
HiFi
Mode
M
Pro
Speaker
Output
M
M
Undernormal operation set all switches to
thedefault position Please referto
theinstruction manualfor further details
bold
() .
Balanced
Input
Pro
HiFi
Mode
L
R
M
M
M
Int
Power
Amp
Amp
,
.
Designed and Engineered in Great Britain
1
CAUTION ATTENTION
RISQUE DE CHOC ELECTRIQUE
RISKOF ELECTRIC SHOCK
NE PAS OUVRIR
DO NOT OPEN
Dual Mono Amplifier AM 77
3
4
2
Inputs
!
5
NoUser ServiceableComponents Inside.
,
Forservice contact your Authorised
Dealeror Distributor Any modifications to
thisequipment willvoid all warranties
On
Out
In
Sync
L
IR Link
R
Option
190V
.
.
Power
90V 135V
Speaker
Output
Off
LR
AC IN
260V
SERIALNO.
AM 77-
Power
Amp
For the majority of sources, the HiFi/Pro switch (R3) is best left in the ‘HiFi’ position. However, if the source has
Int
Amp
a pro-audio style transformer balanced output, the HiFi/Pro switch needs to be set to ‘Pro’.
A transformer balanced output uses a floating secondary from an audio transformer: unlike electronic balanced
outputs of any description, the signal is NOT referenced to ground (Pin 1). For such (rather rare) equipment, the
‘Pro’ switch is engaged to short-scircuit Pins 1 & 3, thus establishing the ground connection.
Page 55

For future
-
+
+
_
_
~
-
upgrades
5c. RS232 ‘Options’ Connector
Speaker
Output
Under normal operation set all switches to
the default position Please refer to
the instruction manual for further details
HiFi
() .
bold
Balanced
Input
Pro
Mode
L
R
M
M
M
Power
Int
Amp
Amp
,
.
Dual Mono Amplifier AM 77
Designed and Engineered in Great Britain
1
2
CAUTION ATTENTION
RISQUE DE CHOC ELECTRIQUE
RISK OF ELECTRIC SHOCK
NE PAS OUVRIR
DO NOT OPEN
Inputs
3
4
!
5
L
R
No User Serviceable Components Inside.
,
For service contact your Authorised
.
Dealer or Distributor Any modifications to
this equipment will void all warranties
In
IR Link
Option
.
Power
On
Off
Out
Sync
AC IN
90V 135V
260V
190V
The RS232 ‘Options’ connector port (R9) is for upgrading the functionality of the AM-77 in future. Contact your
local AMR distributor/dealer for more detailed instructions.
Speaker
Output
LR
SERIALNO.
Option
55
Page 56

56
Page 57

Section 6 - Technical Features
The following section provides a brief explanation of the most salient technical features of the AM-77.
Circuit ‘X’® is AMR’s unique circuit: with NOS thermionic electron valves for voltage gain with a patentpending error-cancellation circuit for the Class A matched bipolar output power devices.
OptiGain® inherently outperforms all conventional types of volume controls. At low as well at high volumes,
the dynamic range is virtually unhindered to preserve every bit of minuscule information in the signal.
OptiOperation® modes offer unrivalled functionality and flexibility: one or more AM-77s can be synchronised
to deliver the optimum level of quality and can be seamlessly integrated into home theatre setups.
OptiPower® supply circuit is completely free of regulators. This is an essential pre-cursor for subsequent
thermionic electron valve circuits operating with no negative feedback.
OptiMains® is truly one of a kind as it will detect, monitor and adjust if necessary, the incoming voltage to
ensure the correct voltage is always supplied to the relevant internal sub-sections.
OptiTrans®power supply transformers are advanced double C-Core types which sonically outclass traditional
EI and toroidal transformers.
OptiSeal® is the galvanic sealing of functional sections in the transformer and includes the use of separate
transformer windings to ensure that noise from one section does not contaminate adjacent sections in a full dualmono audio circuit design.
For a more detailed explanation of these and other features, please go to: www.amr-audio.co.uk
57
Page 58

Appendix - Troubleshooting
Figure A.1 Troubleshooting Guide
Symptom Possible cause Solution
With power ON • poor/no power plug connection • insert the power plug firmly into the AC
no power is registered at mains power point
• blown fuse at mains plug • check and change mains plug fuse
No sound • incorrect audio cable connections • connect the sources to the AM-77 correctly
• incorrect amplifier operation • make sure that the input selector on the AM-77 is set to
the desired source
Strange ‘blast’ sound • check speaker connectors are not • adjust fitting between speaker and chassis connectors
in contact with the chassis and and terminal. Ensure no contact between chassis and
spade terminals (no ‘short circuiting’)
Remote control does • remote control batteries have • replace 2 x AAA batteries
not work expired
• object obscuring remote sensor on • remove any objects directly in front of the AM-77
the AM-77, no ‘line of sight’
A ‘humming’ sound • loose cable connections • re-attach the loose cables correctly
can be heard
58
Front switches ‘jump’/ • static electricity • ‘Touch’ the chassis prior to pressing a sensor to dis
enter Standby charge. Then press the desired sensor
Other problems • go to the Contents section and re-trace the procedure
or contact your nearest AMR distributor/dealer
Page 59

Specifications
Figure S.1 - Specifications Table
Inputs: 5 x RC A
1 x XLR Bal. shared with 1 RCA
1 x iPod® shared with 1 RCA
V olume Control: -71dB – 0dB in 1dB steps + Mute
Input Sensitivity (IHF 2.83V Out)/Impedance: < 0.05V / > 20KOhm
Power Output (see Notes)
IHF Dynamic Power: 270 watts per channel at 4 or 8 ohm (stereo mode)
330 watts per channel at 8 ohm (monoblock mode)
480 watts per channel at 2 or 4 ohm (monoblock mode)
FTC: 180 watts per channel at 4 or 8 ohm (stereo mode)
220 watts per channel at 8 ohm (monoblock mode)
320 watts per channel at 2 or 4 ohm (monoblock mode)
Output impedance: 0.5 ohm, 20 - 20,000 Hz
Frequency Response (-1dB): 10Hz - 50kHz
Signal-to-noise ratio 'A' weighted: >100 dB
Operational Modes: Pre-Main amplifier mode
Power amplifier mode
59
Page 60

...continued
Monoblock option
An unlimited number of AM-77s can synchronised
Thermionic Electron V alves 5687/6900 (NOS): amplification stage
Power Transformer: 1200 VA Custom Double C-Core
Power consumption: Standby: 50 W
Power on: 95 W
at rated output (4R): 1000 W
Power Supply Capacitance: 96,000uF in total
Rated voltage: 90 V-135V & 190V -260V AC
Colour: Champagne or Titanium
Dimensions: 17.9in W by 6.2in H by 18.3in D
46cm W by 16cm H by 47cm D
62 cm W by 30cm H by 78cm D (shipped)
Weight: AM-77: 75 lbs/ 34 kg
Shipped: 121 lbs/ 55 kg
60
Information and specifications subject to change without notice.
Page 61

Notes
At AMR we feel that the IHF standard represents the best available rigidly mandated and standardised, musically relevant measurements
applicable today (in preference to DIN45500 among others) despite their formidable age and our wish for something more up-to-date, while
the FTC mandated standard is applicable under like-for-like ‘fair trade descriptions’ requirements in the USA (but we feel what is fair in the USA
is still fair elsewhere) to make sure that one maker’s advertised ‘watt’ is like-for-like equal to that of another. As a result we feature IHF-based
specifications and measurements where possible and FTC where mandated/appropriate.
i. FTC: Federal Trade Commission (USA)
Federal Trade Commission: a US-based trade standard body whose standardised measurement procedures (2000 revision) we apply where we
would be required to do so under US Law, even though we are UK-based. Past the FTC ruling (originally from 1974, updated in 2003) derived
rating there is a secondary power rating, the IHF ‘Dynamic Power’ (also defined in the mid 70’s) which is the maximum power the amplifier
can put out for a burst 20ms long, or in other words for a short musical peak. An amplifier that can deliver 200W for 20ms but 50W
continuously will have a FTC Power Rating of 50W but an IHF Dynamic Power Rating of 200W. An amplifier that can deliver 200W for 2ms
but 150W continuously will have a FTC Power Rating of 150W but an IHF Dynamic Power Rating of 200W. However, the available
undistorted peak output with music signals is actually the same for both Amplifiers.
ii. IHF: Institute of High Fidelity
Institute of High Fidelity: a US-based standard body (now incorporated into the International Electrotechnical Commission) whose standardised
measurements we usually apply. The Federal Trade Commission defines the information about an amplifier that a US manufacturer (or
distributor) must provide. FTC ratings derive from test data, and state an amplifier’s continuous average output capability into a defined load
across a defined frequency range (usually 20Hz - 20kHz, but any range can be used as long as it is stated). Also, the amplifier is tested with ‘both
channels driven’ (placing maximum strain on the power supply), so the test demonstrates its capacity in real-world conditions. This allows likefor-like comparison of amplifiers that use FTC ratings. For that reason, you won’t find any published FTC ratings for an amplifier’s output into
a 2 Ohm load.
Abbingdon Music Research is a subsidiary of the Abbingdon Global Group
22 Notting Hill Gate; London; W11 3JE; United Kingdom;
T el: +44 (0) 870 420 5505; Fax: +44 (0) 700 596 1065
61
 Loading...