

Page 1
Model #TV984
Instruction Manual
Manual de Instrucciones
www.bebesounds.com
Flat Panel Video & Sound Monitor
Monitor de Video de Pantalla Plana y Sonido
Page 2

TABLE OF CONTENTS
Introduction...............................................................................................................................................................................3
Instructions................................................................................................................................................................................5
Special Features.....................................................................................................................................................................7
Important Safety Instructions...........................................................................................................................................9
Care and Cleaning................................................................................................................................................................9
Troubleshooting....................................................................................................................................................................10
Technical Specifications...................................................................................................................................................12
Limited Product Warranty................................................................................................................................................13
Also Available from BébéSounds
®
...............................................................................................................................14
En Español..............................................................................................................................................................................16
2
Page 3

INTRODUCTION
Thank you for purchasing our BébéSounds®Flat Panel Video and Sound Monitor. This monitor
will enable you to see and hear your baby from another room. The extra large 5.5" color
display gives you an ultra clear, sharp picture. And its slim, lightweight design allows it to be
placed or mounted almost anywhere in your home
This monitor operates on a frequency of 900 MHz. It will not interfere with 2.4 GHz phones,
wireless routers, microwaves, or other 2.4 GHz equipment. Please note, however, that there
may be interference with cordless telephones that operate on a frequency of 900 MHz.
Please read all the instructions carefully before operating this monitor and save this manual
for future reference.
If you have any questions, please call the BébéSounds®Help Desk toll free at 1-888-232-6476
Mon-Fri from 9:00AM-5:00PM EST.
WARNING: This monitor is not intended to replace adult supervision of children. All children
should be monitored at all times by responsible adults.
This product is not a toy. Do not allow children to play with it. Keep out of reach of children.
Contents:
1 Receiver
1 Camera
2 AC adapters
1 Audio/Video cable
3 Mounting screws and anchors
1 Mounting template
3
Page 4
4
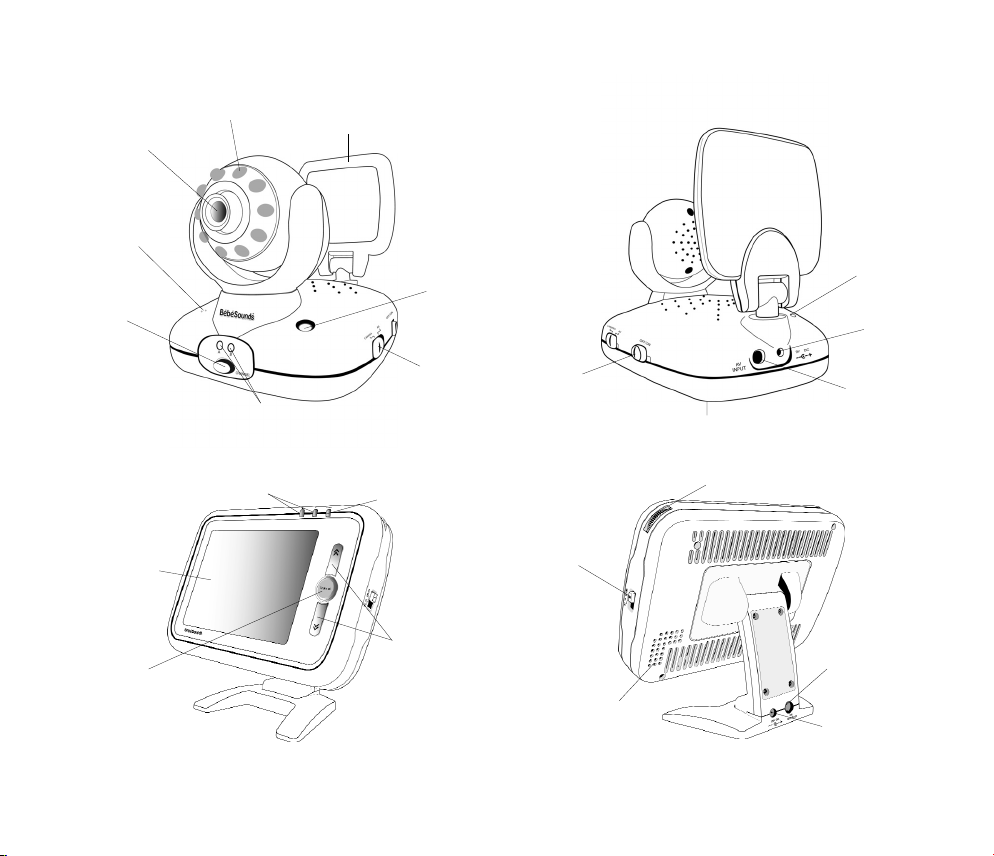
fig.2
fig.1
Power Switch
Battery Compartment
AV
Input Jack
AC
Adapter Jack
Light Sensor
Camera Lens
Microphone
Channel
Indicator Lights
Channel
Selection Button
Power
Indicator Light
Camera/AV
Switch
Directional Antenna
Channel
Indicator Lights
Channel
Selection Button
Auto Scan
Indicator Light
5.5"
Color LCD
Brightness,
Color and Contrast
Control
fig.3
fig.4
Volume
Control
Power/LCD
Power Switch
AC Adapter
Jack
AV Output
Jack
Speaker
Infrared Sensors
Page 5

INSTRUCTIONS
Camera
You can power the camera with an AC adapter or batteries. For long periods of non-use,
we suggest removing the batteries and unplugging the AC adapter.
For AC power, insert the small AC adapter (labeled “Camera”) into the jack marked “9V DC”
and plug the adapter into an electrical outlet.
When using an AC adapter, we suggest you also keep batteries in at all times as the camera
will automatically convert from AC to battery power during a power outage. However, if you do
not keep batteries in the units, it will operate on just AC power.
For battery power, the camera requires six AA alkaline or rechargeable batteries. Rechargeable
batteries can be used, however, batteries will NOT be recharged in the camera by plugging in
the AC adapter. If you are using rechargeable batteries, they will have to be removed and
recharged by an external charger.
Remove the battery cover. Insert six AA alkaline or rechargeable batteries (not included)
matching positive (+) to positive (+) and negative (-) to negative (-) and replace the battery cover.
The battery life is approximately six to eight hours. Replace the batteries in the camera when
the Power Indicator Light turns orange.
Receiver
The receiver only works with an AC adapter. Insert the large AC adapter (labeled “Receiver”)
into the jack marked “12V DC” and plug the adapter into an electrical outlet. For long periods
of non-use, we suggest unplugging the AC adapter.
5
Page 6

Using Your Monitor
1. Turn the camera and receiver on by sliding the Power switches to the ON positions.
The green Power Indicator on the camera will light up when it is on. One of the Channel
Indicators on the monitor will light up when it is on.
2. Make sure the switch on the camera is set to “camera.”
3. Rotate the camera head so it faces your baby. To install the camera on the wall, use the
mounting screws and anchors with the mounting template provided.
4. Tilt the receiver to the desired viewing position. To install the receiver on the wall, use the
mounting screw and anchor provided.
5. For daytime vision, place the camera up to ten feet from your baby making sure it is out
of reach.
6. For nighttime vision, place the camera no more than six feet from your baby making sure
it is out of reach. The camera has a built-in light sensor which will automatically turn on the
night vision feature when there is no light detected. Remember, when using the infrared
night vision, the image will only be in black and white.
7. Select the channel that gives you the best reception. Make sure both units are on the
same channel.
8. If you have two cameras, you can monitor two different rooms. Set one camera to channel
A and one to channel B. Change the channel on the receiver to determine which room
you want to monitor. You can also set the receiver to automatically scan between the two
cameras. Please refer to the Automatic Channel Scan section on page 7.
9. Use the up and down buttons on the right side of the receiver to adjust the brightness.
To adjust the contrast and color, please refer to the Brightness, Contrast, and Color
Adjustment section on page 7.
10.Turn the volume dial on the top right corner of the receiver to the desired level.
6
Page 7

SPECIAL FEATURES
Receiver LCD Power Option
You can turn the screen of the receiver off and still maintain the sound monitor function.
To use this function, slide the switch on the receiver to the LCD OFF position. The use of
this feature will allow you to still hear your baby.
Automatic Infrared Night Vision
The infrared night vision function is designed to allow the camera to pick up images even
when the room is dark. Using the built-in light sensor, the camera will automatically convert
to night vision when the level of light is low. Remember, when using infrared night vision,
the image will be in black and white.
Automatic Channel Scan
Your monitor can operate with two cameras. The Automatic Channel Scan function lets you
automatically scan between both channels if two cameras are being used at the same time.
(Please call us at 1-800-430-0222 to find out where you can purchase an additional camera.)
To activate this feature, set one camera to channel A and the other to channel B. Turn on the
Automatic Channel Scan function by pressing the Channel Selection button on the receiver
until the Auto Scan Indicator lights up. When this feature is on, the receiver will scan through
the two channels automatically. It will stop at each channel and display the image and monitor
the sounds from each camera for approximately five seconds. To deactivate the auto scan
feature, press the Channel Selection button again.
Brightness, Contrast, and Color Adjustment
You can adjust the brightness, contrast, and color of the picture on your screen. When you
turn on your receiver, it automatically defaults to the Brightness Control mode and you can
adjust the brightness of the picture simply by using the up and down buttons. If you want
7
Page 8

to adjust the contrast or the color of the picture, please follow the instructions below.
Contrast Control: To adjust the contrast of the picture, turn the receiver off. Then, while
holding down the up button on the receiver, turn the receiver back on. Release the button
and use the up and down buttons to adjust the contrast as necessary.
Color Control: To adjust the color of the picture, turn the receiver off. Then, while holding
down the down button on the receiver, turn the receiver back on. Release the button and
use the up and down buttons to adjust the color as necessary.
Brightness Control: To revert to Brightness Control, simply turn the receiver off and then on
again without depressing any buttons. Once the receiver is back on, you may use the up
and down buttons to adjust the brightness.
Audio/Visual Output Link
This feature allows you to monitor your baby on your television. Connect the receiver to
your own television with the cable provided. Connect the black end of the AV cable to the
AV output jack on the receiver and the other end to the AV input jacks on your television,
DVD player or VCR. If your television has a picture-in-picture feature, you can use this to
monitor your baby while watching television. If you connect the cable to your VCR, you can
also record your baby.
Audio/Visual Input Link
This feature allows you to watch a DVD or VHS on your receiver. Connect the camera to your
own DVD player or VCR with the cable provided. Connect the black end of the AV cable to the
AV input jack on the camera and the other end to the AV output jacks on your DVD player or
VCR. Slide the switch on the right side of the camera to “AV.”
8
Page 9

IMPORTANT SAFETY INSTRUCTIONS
1. You can use alkaline or rechargeable batteries in the camera, but do not mix them.
2. Do not mix old and new batteries.
3. Use only AA batteries or the AC adapters provided.
4. Always allow for proper ventilation for both the camera and receiver.
5. Do not place this monitor where it can get wet such as near bathtubs, sinks, or swimming pools.
6. Do not place this monitor near sources of heat such as radiators, stoves, or other appliances.
7. Keep adapter cords and all units out of reach of children.
8. Avoid direct sunlight. If you are operating the unit outside, keep it in the shade.
9. This monitor uses public airwaves to transmit signals. The receiver may pick up signals or
interference from other nursery monitors in your area. Your monitor may even be picked
up by other households. To protect your privacy, make sure both units are turned off when
not in use. If you experience interference, change the channel on both units.
CARE AND CLEANING
Disconnect all units and remove all batteries before cleaning. Clean the exterior of all units
with a soft, dry or slightly damp cloth. Do not spray with cleaning products or solvents. Do
not submerge in water or any other liquid.
During long periods of non-use, remove all batteries from their compartments and unplug
the AC adapters.
9
Page 10

TROUBLESHOOTING
Problem Possible Cause Solution
There is no reception.
There is sound but there
is no picture display.
The picture is not clear.
One of the units is not on.
The camera and receiver
are on different channels.
The camera is set to “AV”.
Batteries are low or improperly
installed in the camera.
AC adapters are not connected or
electrical outlet is out of order.
The wrong AC adapters are being
used.
The LCD switch on the receiver is
in the OFF position.
Batteries are low or improperly
installed.
The picture needs to be adjusted.
The camera is too far from your
baby.
Make sure both units are on.
Make sure both units are on
the same channel.
Make sure the camera is set
to “camera”.
Check or replace batteries.
Check connections or change to
another electrical outlet.
Be sure to use the AC adapter
labeled “Receiver” with the
receiver and the AC adapter
labeled “Camera” with the camera.
Make sure the LCD switch is set
to ON.
Check or replace batteries.
Adjust the brightness, contrast,
and/or color. Refer to page 7.
Place camera up to 10 feet from
your baby. In night vision mode,
place it no more than 6 feet away.
10
Page 11

Problem Possible Cause Solution
The picture is in
black and white.
The sound on the
receiver is weak.
There is static, distortion,
interference, etc.
There is feedback
(squealing noises).
Camera is on automatic night
vision due to low light conditions.
The volume is too low.
The units are too far apart.
Batteries are low or improperly
installed.
AC adapters are not connected or
electrical outlet is out of order.
There may be be interference
from other electrical equipment.
The receiver is out of range from
the camera.
Units are on different channels.
The camera and receiver are too
close to each other.
Volume is too high.
If it should not be on night vision,
make sure that the light sensor on
the camera is not being blocked.
Increase volume level.
Bring units closer together.
Check or replace batteries.
Check connections or change
to another electrical outlet.
Change the channel on both units.
Bring units closer together.
Make sure both units are on the
same channel.
Move them farther apart.
Decrease volume level on receiver.
11
Page 12

TECHNICAL SPECIFICATIONS
No. of Channels: 2
Power Supply: 6 AA batteries or 9V AC adapter for camera.
12V AC adapter for receiver.
Frequencies: Channel A: 909 MHz, Channel B: 921 MHz
Display: 5.5" color TFT LCD
This device complies with Part 15 of the FCC Rules. Operation is subject to the following two conditions: (1) This device may
not cause harmful interference, and (2) This device must accept any interference received, including interference that may cause
undesired operation.
This equipment has been tested and found to comply with the limits for Class B Digital Device, pursuant to Part 15 of the FCC Rules.
These limits are designed to provide reasonable protection against harmful interference in a residential installation. This equipment
generates and can radiate radio frequency energy and, if not installed and used in accordance with the instructions, may cause harmful interference to radio communications. However, there is no guarantee that interference will not occur in a particular installation. If
this equipment does cause harmful interference to radio or television reception, which can be determined by turning the equipment
off and on, the user is encouraged to try to correct the interference by one or more of the following measures:
• Reorient or relocate the receiving antenna.
• Increase the separation between the equipment and receiver.
• Connect the equipment into an outlet on a circuit different from that to which the receiver is connected.
• Consult the dealer or an experienced radio/TV technician for help.
Any changes or modifications not expressly approved by the party responsible for compliance may void the user's authority to operate
the equipment.
12
Page 13

LIMITED PRODUCT WARRANTY
Register your product warranty online at www.bebesounds.com.
Unisar Inc., the distributor of the BébéSounds®Flat Panel & Sound Monitor, warrants
to the original owner of this product that this product is free from defects in materials and
workmanship for a period of one (1) year from the date of the original purchase. If this product
fails to function properly when used as directed under normal conditions within the 1-year
period, Unisar Inc. will either repair or replace the product, at its option, free of charge, when
it is returned in its original packaging, postage prepaid, with proof of purchase. Unisar Inc.
will bear the cost of repairing or replacing the product and shipping it back to you within the
United States. Repair or replacement of the defective item is subject to verification of the
malfunction or defect when delivered to:
Unisar®Service Center
15 West 36th Street
New York, NY 10018
NOTE: The warrantor expressly disclaims liability for incidental, consequential, or special damages of any nature. This warranty does not cover 1) A defect that has been caused by repair or
modification by any person other than a Unisar®technician; 2) A defect caused by negligence,
accident, or misuse of the product; 3) A defect caused by incorrect installation of and/or
defective batteries; 4) Battery life; 5) A defect caused by the use of any adapter not provided
by the warrantor; or 6) Damage resulting from improper operation.
LEGAL RIGHTS VARY FROM STATE TO STATE.
NOTE: This warranty is valid only for products sold in the United States. If you have purchased
this product outside of the United States, please see your local retailer or distributor for service.
If you have any questions, please call the BébéSounds®Help Desk toll free at 1-888-232-6476
Mon-Fri from 9:00AM-5:00PM EST.
13
Page 14

-
14
Call 1-800-430-0222
to find the store nearest you.
Extra Camera Unit
Expand your Flat Panel Video & Sound
Monitor! With an extra camera, you
can monitor an additional room. Includes
AC adapter.
NasalClear®Aspirator
Clears stuffy noses FAST!™Safely and quickly
clear your baby’s nasal congestion with this
battery operated aspirator. Gentle enough to
use on a newborn baby. Comes apart for
easy and thorough cleaning.
ALSO AVAILABLE FROM …
Page 15

Call 1-800-430-0222
to find the store nearest you.
15
AlwaysClean™Pacifier
Closes when dropped!™Unique shield
automatically closes when the pacifier is
dropped keeping it sanitary for your baby.
Silicone orthodontic nipple. 0-6 months.
5-Second 3-Way Flexible Thermometer
Fast, easy, and accurate! Get an accurate
temperature reading in just 5 seconds. And
the flexible tip provides your child with maximum comfort. Recalls the last temperature
reading. Measures in Fahrenheit and Celsius.
Page 16

16
ÍNDICE DE CONTENIDOS
Introducción.............................................................................................................................................................................17
Instrucciones..........................................................................................................................................................................19
Funciones Especiales........................................................................................................................................................21
Instrucciones de Seguridad Importantes................................................................................................................23
Cuidados y Limpieza.........................................................................................................................................................24
Solución de Problemas....................................................................................................................................................25
Especificaciones Técnicas...............................................................................................................................................27
Garantía Limitada del Producto...................................................................................................................................28
También Disponibles de BébéSounds
®
...................................................................................................................30
Page 17

INTRODUCCIÓN
Gracias por comprar nuestro Monitor de Video de Pantalla Plana y Sonido de BébéSounds®.
Este monitor le permitirá que vea y escuche a su bebé desde otra habitación. La pantalla
color extra grande de 5.5" le brinda una imagen ultra clara y definida. Y su diseño estilizado y
súper-liviano permite que se pueda colocar o montar en casi cualquier parte de su casa.
Este monitor funciona a una frecuencia de 900 MHz. No interferirá con los teléfonos de 2.4
GHz, enrutadores inalámbricos, microondas, u otro equipo de 2.4 GHz. Por favor note, sin
embargo, que puede haber interferencia con los teléfonos inalámbricos que funcionan en
una frecuencia de 900 MHz.
Por favor lea todas las instrucciones detenidamente antes de operar este monitor y guarde
este manual para futuras consultas.
Si usted tiene alguna pregunta, por favor llame al Departamento de Atención al Cliente de
BébéSounds® al 1-888-232-6476 de lunes a viernes de 9:00-17:00 (hora del este).
ADVERTENCIA: Este monitor no tiene el propósito de reemplazar la supervisión de los niños
de parte de los adultos. Todos los niños deben ser monitoreados en todo momento por
adultos responsables.
Este producto no es un juguete. No permita que los niños jueguen con él. Mantener lejos del
alcance de los niños.
Contenidos:
1 Receptor
1 Cámara
2 Adaptadores de CA
1 Cable de audio/video
3 Tornillos de montura y anclas
1 Plantilla de montura
17
Page 18

18
fig.2
fig.1
Interruptor de
Energía
Compartimiento de la Batería
Conector de
Entrada AV
Enchufe del
Adaptador de CA
Sensor Ligero
Lente de la Cámara
Micrófono
Luces Indicadoras
del Canal
Botón de Selección
del Canal
Luz Indicadora
de Energía
Cámara/Interruptor
AV
Antena Direccional
Luces Indicadoras
del Canal
Botón de Selección
del Canal
Luz Indicadora de
Autoexploración
Pantalla LCD a
Colores de 5.5"
Control del Brillo,
Color, y Contraste
fig.3
fig.4
Control de Volumen
Interruptor de
Energía LCD
Enchufe del
Adaptador de CA
Conector de
Salida AV
Parlante
Sensores Infrarroja
Page 19

INSTRUCCIONES
La Cámara
Usted puede suministrar energía tanto a la cámara con un adaptador de CA o baterías. Para
largos períodos sin uso, le sugerimos retirar las baterías y desconectar los adaptadores de CA.
Para alimentación AC, inserte el pequeño adaptador AC (marcado con la etiqueta “Camera”)
en el enchufe marcado “9V DC” y conecte el adaptador en un tomacorriente eléctrico.
Cuando use un adaptador de CA, le sugerimos que también mantenga las baterías en todo
momento debido a que las unidades convertirán la energía de CA a energía de baterías
durante un apagón. Sin embargo, si no mantiene las baterías en las unidades, el monitor sólo
funcionará con energía de CA.
Para energía de la batería, la cámara requiere seis baterías alcalinas o recargables AA. Las
baterías recargables pueden usarse en la cámara, sin embargo, las baterías no se recargarán
en la cámara cuando se use el adaptador de CA. Si está usando baterías recargables, tendrán
que retirarse y recargarse por un cargador externo.
Retire las tapas de las baterías con un destornillador. Inserte seis baterías alcalinas o recargables AA (no incluidas) en la cámara que corresponden a positivo (+) con positivo (+) y
negativo (-) con negativo (-). Reemplace las tapas de las baterías.
La vida de la batería es de aproximadamente seis a ocho horas. Reemplace las baterías en la
cámara cuando el indicador de energía se torne de color naranja.
El Receptor
El receptor sólo funciona con un adaptador CA. Inserte el adaptador CA grande (marcado
con la etiqueta “Receiver”) en el enchufe marcado “12V DC” y conecte el adaptador en un
tomacorriente eléctrico. Para largos períodos sin uso, le sugerimos desconectar el adaptador
de CA.
19
Page 20

Usando su Monitor
1. Encienda la cámara y el receptor deslizando los interruptores de Encendido hacia las
posiciones de encendido. El Indicador de Encendido verde de la cámara se iluminará
cuando esté encendido. Uno de los Indicadores de Canal del monitor se iluminará cuando
esté encendido.
2. Asegúrese que el interruptor en la cámara se fije a “camera”.
3. Gire la cabeza de la cámara de manera que mire hacia su bebé. Instale la cámara en la
pared, use los tornillos de montura y las anclas con la plantilla de montura proporcionada.
4. Incline el receptor a la posición de visión deseada. Instale el receptor en la pared, use los
tornillos de montura y las anclas proporcionada.
5. Para una visión diurna, sitúe la cámara hasta diez pies de su bebé para asegurarse que
sea inalcanzable.
6. Para una visión nocturna, sitúe la cámara a no más de seis pies de su bebé para asegu-
rarse que sea inalcanzable. La cámara tiene un sensor de luz incorporado que activará
automáticamente la función de visión nocturna cuando no se detecte luz. Recuerde que
cuando se use la visión nocturna infrarroja, la imagen sólo se verá en blanco y negro.
7. Seleccione el canal que le dé la mejor recepción. Asegúrese que ambas unidades estén
en el mismo canal.
8. Si tiene dos cámaras, podrá monitorear dos habitaciones diferentes. Sitúe una cámara
en el canal A y la otra en el canal B. Cambie el canal en el receptor para determinar
qué habitación desea monitorear. También podrá configurar el receptor para que realice
la exploración automáticamente entre las dos cámaras. Por favor consulte la sección
Autoexploración de Canales en la página 21.
9. Use los botones abajo y arriba en el costado derecho del receptor para ajustar el brillo.
Para ajustar el contraste y el color, por favor consulte la sección de Ajuste de Brillo,
Contraste y Color en la página 22.
20
Page 21

10. Gire la perilla de volumen situada en la esquina superior derecha del receptor hasta el
nivel deseado.
FUNCTIONES ESPECIALES
Opción de Energía de la Pantalla LCD del Receptor
Usted puede apagar la pantalla del receptor y todavía mantener la función de monitoreo
de sonido. Para usar esta función, deslice el interruptor de energía de la pantalla LCD en
el receptor a la posición de apagado. El uso de esta función le permitirá seguir oyendo a
su bebé.
Visión Nocturna Infrarroja Automática
La función de visión nocturna infrarroja está diseñada para permitir que la cámara capture
imágenes incluso cuando una habitación está oscura. Mediante el uso del sensor de luz
incorporado, la cámara cambiará a visión nocturna automáticamente cuando el nivel de la luz
esté bajo. Recuerde que cuando use la visión nocturna infrarroja, la imagen se verá en blanco
y negro.
Autoexploración de Canales
Su monitor puede funcionar con dos cámaras. La función Autoexploración de Canales le
permite explorar automáticamente entre ambos canales si se están usando dos cámaras al
mismo tiempo. (Por favor llámenos al 1-800-430-0222 para averiguar sobre dónde puede
comprar una cámara adicional.) Para activar esta función, fije una cámara al canal A y la otra al
canal B. Active la función Autoexploración de Canales al presionar el botón de selección del
canal en el receptor hasta que se encienda el indicador verde Autoexploración. Cuando esta
función esté activada, el receptor explorará los dos canales automáticamente. Se detendrá en
cada canal y mostrará la imagen y monitoreará los sonidos de cada cámara durante aproximadamente cinco segundos. Para desactivar la función Autoexploración, presione el botón de
selección del canal otra vez.
21
Page 22

Ajuste de Brillo, Contraste y Color
Usted puede ajustar el brillo, el contraste y el color de la imagen en su pantalla. Cuando
enciende su receptor, automáticamente entrará al modo de Control del Brillo, en el cual usted
puede ajustar el brillo de la imagen al simplemente utilizar los botones de abajo y arriba. Si
desea ajustar el contraste o el color de la imagen, siga las siguientes instrucciones.
Control del Contraste
Para ajustar el contraste de la imagen, apague el receptor. Luego, mientras que aprieta el
botón de abajo en el receptor, vuelva a encender el receptor. Suelte el botón y utilice el botón
de abajo o arriba para ajustar el contraste según sea necesario.
Control del Color
Para ajustar el color de la imagen, apague el receptor. Luego, mientras que aprieta el botón
de arriba en el receptor, vuelva a encender el receptor. Suelte el botón y utilice el botón de
abajo o arriba para ajustar el color según sea necesario.
Control del Brillo
Para regresar al Control del Brillo, simplemente apague el receptor y vuelva a encenderlo sin
presionar ninguno de los botones. Una vez que el receptor está encendido, puede usar los
botones de abajo y arriba para ajustar el brillo.
Enlace de Salida de Audio y Video
Esta función le permite vigilar a su bebé por medio de una televisión. Conecte el receptor a
su propia televisión con el cable proporcionado. Conecte el extremo negro del cable AV al
conector de salida AV en el receptor y el otro extremo a los conectores de entrada AV a su
televisión, reproductor de DVD o videograbadora. Si su televisión tiene la función “picture-inpicture”, podrá usar esta para vigilar a su bebé mientras mira la televisión. Si conecta el cable
a su videograbadora, también podrá grabar un video de su bebé.
22
Page 23

Enlace de Entrada de Audio y Video
Esta función le permite ver un DVD o cassette de VHS en su receptor. Conecte la cámara a
su propio reproductor de DVD o videograbadora con el cable proporcionado. Conecte el
extremo negro del cable AV al conector de entrada AV en la cámara y el otro extremo a los
conectores de salida AV en su reproductor de DVD o videograbadora. Deslice el interruptor
al lado derecho de la cámara a “AV.”
INSTRUCCIONES DE SEGURIDAD IMPORTANTES
1. Usted puede usar baterías alcalinas o recargables en la cámara. No mezcle las baterías
alcalinas con las recargables.
2. No mezcle baterías nuevas y viejas.
3. Use solamente baterías AA o los adaptadores de CA suministrados.
4. Siempre coloque tanto la cámara como el receptor en usa area con ventilación apropiada.
5. No coloque este monitor donde pueda humedecerse como por ejemplo tinas de baño,
sumideros, o piscinas.
6. No instale este monitor cerca de fuentes de calor tales como radiadores, estufas u otros
aparatos.
7. Mantenga los cables del adaptador y todas las unidades lejos del alcance de los niños.
8. Evite la luz directa del sol. Si está operando la unidad afuera, manténgala a la sombra.
9. Este monitor usa ondas de radio públicas para transmitir señales. El receptor puede captar
señales o interferencia de otros monitores para cuartos de bebés en su área. Incluso su
monitor puede ser captado por los de otras casas. Para proteger su privacidad, asegúrese
que ambas unidades estén apagadas cuando no lo use. Si experimenta interferencia,
cambie el canal en ambas unidades.
23
Page 24

CUIDADOS Y LIMPIEZA
Desconecte todas las unidades y retire todas las baterías antes de limpiarlo. Limpie la
superficie exterior de las unidades con un trapo seco suave o ligeramente húmedo. No rociar
con productos de limpieza o solventes. No sumerja en agua o en ningún otro líquido.
Durante largos períodos sin uso, retire todas las baterías de sus compartimientos y
desconecte los adaptadores de CA.
24
Page 25

SOLUCIÓN DE PROBLEMAS
Problema Causa Posible Solutión
No hay recepción.
Hay sonido pero no se
muestra la fotografía.
La imagen no es clara.
Una de las unidades no está
encendida.
La cámara y el receptor están en
canales diferentes.
La cámara esta fijada en “AV”.
Las baterías están bajas o
incorrectamente instaladas.
Los adaptadores de CA no están
conectados o el tomacorriente
eléctrico está fuera de orden.
Se están usando adaptadores
equivocados.
El interruptor de la pantalla LCD
en el receptor está en la posición
de apagado.
Las baterías están bajas o
incorrectamente instaladas.
La imagen necesita ser ajustada.
Asegúrese que ambas unidades
estén encendidas.
Asegúrese que ambas unidades
estén en el mismo canal.
Asegúrese que la cámara se fije
a “camera.”
Verifique o cambie las baterías.
Verifique las conexiones o cambie
a otro tomacorriente eléctrico.
Asegúrese de estar el adaptador
AC con la etiqueta “Receiver”
con el receptor y el adaptador AC
con la etiqueta “Camera” con
la cámara.
Asegúrese que el interruptor de la
pantalla LCD esté encendido.
Verifique o cambie las baterías.
Ajuste el brillo, el contraste y/o el
color. Consulte la página 22.
25
Page 26

26
Problema Causa Posible Solutión
La imagen está en
blanco y negro.
Hay una recepción muy débil.
Hay estática, distorsión,
interferencia, etc.
Hay “feedback”
(sonidos chirriantes).
La cámara está demasiado lejos de
su bebé.
La cámara está en visión nocturna
automática debido a las condiciones
de luz débil.
El volumen es demasiado bajo.
Las unidades están demasiado
apartadas.
Las baterías están bajas o
incorrectamente instaladas.
Los adaptadores de CA no están
conectados o el tomacorriente
eléctrico está fuera de orden.
Puede haber interferencia de otro
equipo eléctrico.
El receptor está sin alcance de
la cámara.
Las unidades están en canales
diferentes.
La cámara y el receptor están muy
cerca de cada uno.
El volumen está muy alto.
Coloque la cámara hasta a 10 pies
de su bebé. En modo de visión
nocturna, colóquela a no más de 6
pies de distancia.
Si no debe estar en visión nocturna,
asegúrese que el sensor de luz en
la cámara no esté siendo bloqueado.
Incremente el nivel del volumen.
Junte y acerque más las unidades.
Verifique o cambie las baterías.
Verifique las conexiones o cambie a
otro tomacorriente eléctrico.
Cambie el canal en ambas
unidades.
Junte y acerque más las unidades.
Asegúrese que ambas unidades
estén en el mismo canal.
Muévalos más lejos.
Reduzca el nivel del volumen del
receptor.
Page 27

27
ESPECIFICACIONES TÉCNICAS
Nº de Canales: 2
Fuente de Alimentación: 6 baterías AA o un adaptador de CA/CC para la cámara.
12V adaptador de CA/CC para el receptor.
Frecuencias: Canal A: 909 MHz, Canal B: 921 MHz
Pantalla: Pantalla LCD TFT a colores 5.5"
Este dispositivo cumple la Parte 15 del reglamento de la Comisión Federal de Comunicaciones (FCC). Su funcionamiento está sujeto
a las siguientes dos condiciones: (1) este dispositivo no debe causar interferencia perjudicial, y (2) este dispositivo debe aceptar
cualquier interferencia que reciba, incluso aquella interferencia que pueda provocar un funcionamiento no deseado.
Este equipo ha sido sometido a pruebas y cumple los límites de un dispositivo digital Clase B, conforme a la Parte 15 de las normas
de la FCC. Estos límites se diseñaron para establecer una protección razonable contra la interferencia perjudicial en una instalación
residencial. Este equipo genera, usa y puede irradiar energía de radiofrecuencia y, si no se instala y usa de acuerdo con las instrucciones, puede provocar interferencia perjudicial para las comunicaciones por radio. Sin embargo, no existe garantía de que no se
producirá interferencia en una instalación en particular. Si este equipo provoca interferencia perjudicial en la recepción de señales de
radio o de televisión, lo que puede comprobarse encendiendo y apagando el equipo, se insta a que el usuario corrija la interferencia
mediante una o más de las siguientes medidas:
• Vuelva a orientar la antena receptora o colóquela en otro lugar.
• Aumente la distancia entre el equipo y el receptor.
• Conecte el equipo a un tomacorriente de un circuito distinto al que está conectado el receptor.
• Solicite ayuda al distribuidor o a un técnico especialista en radio/televisión.
Los cambios o modificaciones a esta unidad, que la parte responsable del cumplimiento no apruebe en forma expresa, anularán la
autoridad del usuario de operar el equipo.
Page 28

GARANTÍA LIMITADA DEL PRODUCTO
Registre la garantía de su producto en línea en www.bebesounds.com.
Unisar Inc., el distribuidor del Monitor de Video de Pantalla Plana y Sonido de BébéSounds®,
le garantiza al propietario original de este producto que este producto está libre de defectos
en materiales y mano de obra por un período de un (1) año a partir de la fecha de compra
original. Si este producto no funciona correctamente cuando se lo use de acuerdo con las
instrucciones bajo condiciones normales dentro del período de un año, Unisar Inc. o bien
reparará o reemplazará el producto, a su opción, sin cargo alguno, cuando sea devuelto en
su envase original, franqueo postal prepago, con prueba de compra. Unisar Inc. afrontará el
costo de reparar o reemplazar el producto y enviarlo de vuelta a usted dentro de los Estados
Unidos. La reparación o reemplazo del artículo defectuoso está sujeta a verificación del mal
funcionamiento o defecto cuando sea entregado a:
Unisar®Service Center
15 West 36th Street
New York, NY 10018
NOTA: El garante expresamente renuncia a toda responsabilidad por los daños incidentales,
indirectos o especiales de cualquier naturaleza. Esta garantía no cubre: 1) Un defecto que
haya sido causado por reparación o modificación de cualquier persona que no fuese un
técnico de Unisar®; 2) Un defecto causado por negligencia, accidente o mal uso del producto;
3) Un defecto causado por instalación incorrecta de y/o baterías defectuosas; 4) Vida de las
baterías; 5) Un defecto causado por el uso de cualquier adaptador no suministrado por el
garante; o 6) Daño resultante de operación incorrecta.
LOS DERECHOS LEGALES VARÍAN DE UN ESTADO A OTRO.
28
Page 29

29
NOTA: Esta garantía es válida sólo para productos vendidos en los Estados Unidos. Si
usted compró este producto fuera de los Estados Unidos, sírvase visitar al concesionario o
distribuidor más cercano para obtener servicio.
Si usted tiene alguna pregunta, por favor llame al Departamento de Atención al Cliente de
BébéSounds®al 1-888-232-6476 de lunes a viernes de 9:00-17:00 (hora del este).
Page 30

30
Unidad con Cámara Adicional
¡Amplíe su Monitor de Video de Pantalla Plana
y Sonido! Con una cámara extra, usted puede
monitorear una habitación adicional. Incluye un
adaptador de CA.
Aspirador NasalClear
®
¡Despeja narices taponadas RÁPIDAMENTE!
Despeje con seguridad y rapidez la congestión
nasal de su bebé con este aspirador operado
a batería. Suficientemente suave como para
usarlo en un bebé recién nacido. Se desarma
para una limpieza fácil y a fondo.
Llame al 1-800-430-0222
para la tienda más cercana.
TAMBIÉN DISPONIBLES DE ...
Page 31

31
Pacificador AlwaysClean™
¡Se cierra al dejarlo caer! Su escudo único se
cierra automáticamente cuando el chupete se
deja caer manteniéndolo limpio para su bebé.
Pezón ortodóncico de siliconas. De 0 a 6
meses y para + de 6 meses.
Termómetro Flexible de 5 Segundos y 3 Vías
¡Rápido, fácil y preciso! Obtiene una lectura de
temperatura precisa en apenas 5 segundos. Y
la punta flexible le ofrece a su hijo a máxima
comodidad. Recuerda la última medición de
temperatura. Mide en grados Fahrenheit y
Celsius.
Llame al 1-800-430-0222
para la tienda más cercana.
Page 32

Unique Products for
You and Your Baby
Visit www.bebesounds.com
Productos Únicos para
Usted y Su Bebé
Visite www.bebesounds.com
15 West 36th Street, New York, NY 10018 1-800-233-1196
©2007 Listro Associates Made in China
 Loading...