


OpenScape Desk Phone CP200/CP205
OpenScape Voice
OpenScape 4000
User Guide SIP
A31003-C1000-U100-6-7619

Our Quality and Environmental Management Systems are implemented according to the requirements of the ISO9001 and ISO14001 standards and are certified by an external certification company.
Copyright © Unify Software and Solutions GmbH & Co. KG 11/2017 Mies-van-der-Rohe-Str. 6, 80807 Munich/Germany
All rights reserved.
Reference No.: A31003-C1000-U100-6-7619
The information provided in this document contains merely general descriptions or characteristics of performance which in case of actual use do not always apply as described or which may change as a result of further development of the products.
An obligation to provide the respective characteristics shall only exist if expressly agreed in the terms of contract.
Availability and technical specifications are subject to change without notice.
Unify, OpenScape, OpenStage and HiPath are registered trademarks of Unify Software and Solutions GmbH & Co. KG. All other company, brand, product and service names are trademarks or registered trademarks of their respective holders.
unify.com

Important information |
3 |
Important information
|
For safety reasons, the telephone should only be supplied with power: |
7 |
• using the original power supply unit. |
• over a LAN with PoE (Power over Ethernet), which complies with the IEEE |
|
|
802.3af standard. |
|
|
7 |
Never open the telephone. Should you encounter any problems, consult your ad- |
ministrator. |
|
|
|
7 |
Use only original accessories. |
The use of other accessories is hazardous and will render the warranty, extended |
|
|
manufacturer's liability and the CE and other markings invalid. |
|
|
Trademarks
The device conforms to the EU Directive as attested by the CE marking. The CE Declaration of Conformity and, where applicable, other existing declarations of conformity as well as further information on regulations that restrict the usage of substances in products or affect the declaration of substances used in products can be found in the Unify Expert WIKI at http://wiki.unify.com/
http://wiki.unify.com in the section "Declarations of Conformity".
The adjacent symbol indicates that any electrical and electronic products installed and sold in countries of the European Union to which the WEEE2 Directive 2012/19/ EU applies should be disposed of separately from the municipal waste stream in appropriate collection systems.
Information concerning the proper disposal of your Unify product in the business-to- business market segment is available from your local sales representative in Unify or partner sales.
Care and cleaning instructions
•Never spray the phone with liquids as the penetrating fluids can lead to malfunctions or may damage the device.
•Do not use substances such as alcohol, chemicals, solvents or scouring agents, as these substances can lead to surface damage.
•Clean the phone with a soft and slightly damp cloth.
Online documentation
This document along with additional information is available online at: http://www.unify.com/ Support.
Technical notes, current information about firmware updates, frequently asked questions and lots more can be found on the Internet at: http://wiki.unify.com/.
Software update
During a software update, the phone must not be disconnected from the power supply unit and/or the LAN. An update action is indicated by messages on the display and/or by flashing LEDs.

4 |
Important information |
Location of the telephone
•The telephone may only be operated using the LAN cabling internally in the building. The device should be connected to the IP infrastructure using a shielded LAN cable: Cat-5 for 100 Mb/s or Cat-6 for 1000 Mb/s. Make sure in the building installation that this cable shielding is earthed.
•The telephone is designed for operation in a protected environment within a temperature range of 5 °C to 40 °C.
•Do not install the telephone in a room where large quantities of dust accumulate; this can considerably reduce the service life of the telephone.
•Do not expose the telephone to direct sunlight or any other source of heat, as this is liable to damage the electronic components and the casing.
•Do not install the telephone in bathrooms or shower rooms.
Product-oriented environmental protection
Unify is committed in terms of its product strategy to bringing environmentally friendly products to market, taking account of the entire product life cycle. Unify strives to acquire the relevant environmental labels for its products in the event that the environmental label programs permit qualification for individual Unify products.
ENERGY STAR is a U.S. Environmental Protection Agency voluntary program that helps businesses and individuals save money and protect our climate through superior energy efficiency.
Products that earn the ENERGY STAR prevent greenhouse gas emissions by meeting strict energy efficiency criteria or requirements set by the U.S. Environmental Protection Agency.
Unify is an ENERGY STAR partner participating in the ENERGY STAR program for Enterprise Servers and Telephony.
The Unify product OpenScape DeskPhone CP200 has earned the ENERGY STAR.
Learn more at energystar.gov.
The OpenScape DeskPhone CP200 (SIP), OpenScape DeskPhone CP400 (SIP) and OpenScape DeskPhone CP600 (SIP) telephones have been awarded with the BLAUE ANGEL label in Germany.
The proprietor of this environmental label is the German Federal Ministry for the Environment, Nature Protection and Reactor Safety.
VoIP Telephones with the BLUE ANGEL fulfill high standards in regard of energy efficiency, environmental friendly use of materials and a sustainable repair and recycling concept.
Further information in regard of the environmental compatibility of the products can be found here
http://www.unify.com/de/about/green-enterprise.aspx
http://www.blauer-engel.de/en/products_brands/search_products/produkt- typ.php?id=559
Special setting instructions for energy-efficient use of telephones can be found on page 131.

Contents |
5 |
Contents
Important information . . . . . . . . . . . . . . . . . . . . . . . . . . . . . . . . . 3
Trademarks . . . . . . . . . . . . . . . . . . . . . . . . . . . . . . . . . . . . . . . . . . . . . . . . . . . . . . . . . . . . . . . . . 3 Care and cleaning instructions . . . . . . . . . . . . . . . . . . . . . . . . . . . . . . . . . . . . . . . . . . . . . . . . . . 3 Online documentation . . . . . . . . . . . . . . . . . . . . . . . . . . . . . . . . . . . . . . . . . . . . . . . . . . . . . . . . . 3 Software update . . . . . . . . . . . . . . . . . . . . . . . . . . . . . . . . . . . . . . . . . . . . . . . . . . . . . . . . . . . . . 3 Location of the telephone . . . . . . . . . . . . . . . . . . . . . . . . . . . . . . . . . . . . . . . . . . . . . . . . . . . . . . . 4 Product-oriented environmental protection . . . . . . . . . . . . . . . . . . . . . . . . . . . . . . . . . . . . . . . . . 4
General information . . . . . . . . . . . . . . . . . . . . . . . . . . . . . . . . . 10
About this manual . . . . . . . . . . . . . . . . . . . . . . . . . . . . . . . . . . . . . . . . . . . . . . . . . . . . . . . . . . . 10 Icons used in the manual . . . . . . . . . . . . . . . . . . . . . . . . . . . . . . . . . . . . . . . . . . . . . . . . . . . . 10 Service . . . . . . . . . . . . . . . . . . . . . . . . . . . . . . . . . . . . . . . . . . . . . . . . . . . . . . . . . . . . . . . . . . . . 11 Intended use . . . . . . . . . . . . . . . . . . . . . . . . . . . . . . . . . . . . . . . . . . . . . . . . . . . . . . . . . . . . . . . 11 Telephone type . . . . . . . . . . . . . . . . . . . . . . . . . . . . . . . . . . . . . . . . . . . . . . . . . . . . . . . . . . . . . 11 Speakerphone quality and display legibility . . . . . . . . . . . . . . . . . . . . . . . . . . . . . . . . . . . . . . . 11
Remote configuration for cloud service providers . . . . . . . . . . 12
From factory defaults to operational telephone. . . . . . . . . . . . . . . . . . . . . . . . . . . . . . . . . . . . . 12 Starting up the telephone. . . . . . . . . . . . . . . . . . . . . . . . . . . . . . . . . . . . . . . . . . . . . . . . . . . . 12 Canceling the Remote configuration . . . . . . . . . . . . . . . . . . . . . . . . . . . . . . . . . . . . . . . . . . . 13
Getting to know the OpenScape Desk Phone CP200/CP205 . 14
The user interface of your telephone . . . . . . . . . . . . . . . . . . . . . . . . . . . . . . . . . . . . . . . . . . . . . 14 Navigation keys . . . . . . . . . . . . . . . . . . . . . . . . . . . . . . . . . . . . . . . . . . . . . . . . . . . . . . . . . . . 16 Programmable function keys . . . . . . . . . . . . . . . . . . . . . . . . . . . . . . . . . . . . . . . . . . . . . . . . . 17 Dialpad. . . . . . . . . . . . . . . . . . . . . . . . . . . . . . . . . . . . . . . . . . . . . . . . . . . . . . . . . . . . . . . . . . 18 Display . . . . . . . . . . . . . . . . . . . . . . . . . . . . . . . . . . . . . . . . . . . . . . . . . . . . . . . . . . . . . . . . . . . . 20 Idle mode . . . . . . . . . . . . . . . . . . . . . . . . . . . . . . . . . . . . . . . . . . . . . . . . . . . . . . . . . . . . . . . . 20 Displays on the status line for adjusting the volume . . . . . . . . . . . . . . . . . . . . . . . . . . . . . . . 21 Context-dependent displays . . . . . . . . . . . . . . . . . . . . . . . . . . . . . . . . . . . . . . . . . . . . . . . . . 22 Voicemail . . . . . . . . . . . . . . . . . . . . . . . . . . . . . . . . . . . . . . . . . . . . . . . . . . . . . . . . . . . . . . . . 23 Call logging . . . . . . . . . . . . . . . . . . . . . . . . . . . . . . . . . . . . . . . . . . . . . . . . . . . . . . . . . . . . . . . . . 24 Additional notes on Call logging. . . . . . . . . . . . . . . . . . . . . . . . . . . . . . . . . . . . . . . . . . . . . . . 24 Settings . . . . . . . . . . . . . . . . . . . . . . . . . . . . . . . . . . . . . . . . . . . . . . . . . . . . . . . . . . . . . . . . . . . . 25 Phonebooks . . . . . . . . . . . . . . . . . . . . . . . . . . . . . . . . . . . . . . . . . . . . . . . . . . . . . . . . . . . . . . . 25 User settings . . . . . . . . . . . . . . . . . . . . . . . . . . . . . . . . . . . . . . . . . . . . . . . . . . . . . . . . . . . . . 26 Control and monitoring function . . . . . . . . . . . . . . . . . . . . . . . . . . . . . . . . . . . . . . . . . . . . . . . . 27 Ports on the underside of the phone . . . . . . . . . . . . . . . . . . . . . . . . . . . . . . . . . . . . . . . . . . . . . . 28 Using network ports more efficiently . . . . . . . . . . . . . . . . . . . . . . . . . . . . . . . . . . . . . . . . . . . 28
Telephone settings. . . . . . . . . . . . . . . . . . . . . . . . . . . . . . . . . . 29
Display contrast. . . . . . . . . . . . . . . . . . . . . . . . . . . . . . . . . . . . . . . . . . . . . . . . . . . . . . . . . . . . . 29 Volumes . . . . . . . . . . . . . . . . . . . . . . . . . . . . . . . . . . . . . . . . . . . . . . . . . . . . . . . . . . . . . . . . . . 29 Key click . . . . . . . . . . . . . . . . . . . . . . . . . . . . . . . . . . . . . . . . . . . . . . . . . . . . . . . . . . . . . . . . . . 30 Settings that impact energy efficiency. . . . . . . . . . . . . . . . . . . . . . . . . . . . . . . . . . . . . . . . . . . . . 31

6 |
Contents |
Making calls . . . . . . . . . . . . . . . . . . . . . . . . . . . . . . . . . . . . . . . 32
Incoming calls . . . . . . . . . . . . . . . . . . . . . . . . . . . . . . . . . . . . . . . . . . . . . . . . . . . . . . . . . . . . . 32 Answering a call via the handset . . . . . . . . . . . . . . . . . . . . . . . . . . . . . . . . . . . . . . . . . . . . . . 32 Answering a call via the loudspeaker (speakerphone mode) . . . . . . . . . . . . . . . . . . . . . . . . 32 Answering a call via the headset . . . . . . . . . . . . . . . . . . . . . . . . . . . . . . . . . . . . . . . . . . . . . . 33 Rejecting a call. . . . . . . . . . . . . . . . . . . . . . . . . . . . . . . . . . . . . . . . . . . . . . . . . . . . . . . . . . . . 33 Deflecting a call . . . . . . . . . . . . . . . . . . . . . . . . . . . . . . . . . . . . . . . . . . . . . . . . . . . . . . . . . . . 33 Responding to a callback. . . . . . . . . . . . . . . . . . . . . . . . . . . . . . . . . . . . . . . . . . . . . . . . . . . . 34
Making calls . . . . . . . . . . . . . . . . . . . . . . . . . . . . . . . . . . . . . . . . . . . . . . . . . . . . . . . . . . . . . . . 34 Off-hook dialing . . . . . . . . . . . . . . . . . . . . . . . . . . . . . . . . . . . . . . . . . . . . . . . . . . . . . . . . . . . 34 On-hook dialing . . . . . . . . . . . . . . . . . . . . . . . . . . . . . . . . . . . . . . . . . . . . . . . . . . . . . . . . . . . 35 Dialing with the selected dialing key . . . . . . . . . . . . . . . . . . . . . . . . . . . . . . . . . . . . . . . . . . . 35 Redialing via the function key . . . . . . . . . . . . . . . . . . . . . . . . . . . . . . . . . . . . . . . . . . . . . . . . 35 Calling back a missed call . . . . . . . . . . . . . . . . . . . . . . . . . . . . . . . . . . . . . . . . . . . . . . . . . . . 36 Requesting callback . . . . . . . . . . . . . . . . . . . . . . . . . . . . . . . . . . . . . . . . . . . . . . . . . . . . . . . 37 Using autodial delay. . . . . . . . . . . . . . . . . . . . . . . . . . . . . . . . . . . . . . . . . . . . . . . . . . . . . . . . 37
During a call . . . . . . . . . . . . . . . . . . . . . . . . . . . . . . . . . . . . . . . . . . . . . . . . . . . . . . . . . . . . . . . . 38 Activating/deactivating the microphone . . . . . . . . . . . . . . . . . . . . . . . . . . . . . . . . . . . . . . . . . 38 Changing the volume . . . . . . . . . . . . . . . . . . . . . . . . . . . . . . . . . . . . . . . . . . . . . . . . . . . . . . . 38 Switching from handset to speakerphone mode . . . . . . . . . . . . . . . . . . . . . . . . . . . . . . . . . . 38 Switching from speakerphone mode to the handset . . . . . . . . . . . . . . . . . . . . . . . . . . . . . . . 39 Open listening . . . . . . . . . . . . . . . . . . . . . . . . . . . . . . . . . . . . . . . . . . . . . . . . . . . . . . . . . . . . 39 Consulting a second party . . . . . . . . . . . . . . . . . . . . . . . . . . . . . . . . . . . . . . . . . . . . . . . . . . . 39 Switching to the held party (alternating). . . . . . . . . . . . . . . . . . . . . . . . . . . . . . . . . . . . . . . . . 40 Conference . . . . . . . . . . . . . . . . . . . . . . . . . . . . . . . . . . . . . . . . . . . . . . . . . . . . . . . . . . . . . . 40 Putting on hold and retrieving alternately or simultaneously . . . . . . . . . . . . . . . . . . . . . . . . . 41 Connecting parties . . . . . . . . . . . . . . . . . . . . . . . . . . . . . . . . . . . . . . . . . . . . . . . . . . . . . . . . . 42 Placing a call on hold . . . . . . . . . . . . . . . . . . . . . . . . . . . . . . . . . . . . . . . . . . . . . . . . . . . . . . . 42 Call waiting (second call) . . . . . . . . . . . . . . . . . . . . . . . . . . . . . . . . . . . . . . . . . . . . . . . . . . . 43 Transferring a call . . . . . . . . . . . . . . . . . . . . . . . . . . . . . . . . . . . . . . . . . . . . . . . . . . . . . . . . . 45 Ending a call . . . . . . . . . . . . . . . . . . . . . . . . . . . . . . . . . . . . . . . . . . . . . . . . . . . . . . . . . . . . . 46
Configuring call forwarding . . . . . . . . . . . . . . . . . . . . . . . . . . . . . . . . . . . . . . . . . . . . . . . . . . . . 46 Setting alerts . . . . . . . . . . . . . . . . . . . . . . . . . . . . . . . . . . . . . . . . . . . . . . . . . . . . . . . . . . . . . 47 Phonebooks and Konversationen . . . . . . . . . . . . . . . . . . . . . . . . . . . . . . . . . . . . . . . . . . . . . . . 48 Personal phonebook . . . . . . . . . . . . . . . . . . . . . . . . . . . . . . . . . . . . . . . . . . . . . . . . . . . . . . . 48 Deleting all contacts. . . . . . . . . . . . . . . . . . . . . . . . . . . . . . . . . . . . . . . . . . . . . . . . . . . . . . . . 49 Corporate directory . . . . . . . . . . . . . . . . . . . . . . . . . . . . . . . . . . . . . . . . . . . . . . . . . . . . . . . . 50 Listening to voicemail . . . . . . . . . . . . . . . . . . . . . . . . . . . . . . . . . . . . . . . . . . . . . . . . . . . . . . . . . 53
Programmable keys . . . . . . . . . . . . . . . . . . . . . . . . . . . . . . . . . 54
List of available functions . . . . . . . . . . . . . . . . . . . . . . . . . . . . . . . . . . . . . . . . . . . . . . . . . . . . . . 54 Programming a key . . . . . . . . . . . . . . . . . . . . . . . . . . . . . . . . . . . . . . . . . . . . . . . . . . . . . . . . . . . 55 Initiating programming . . . . . . . . . . . . . . . . . . . . . . . . . . . . . . . . . . . . . . . . . . . . . . . . . . . . . . 55 Beginning programming. . . . . . . . . . . . . . . . . . . . . . . . . . . . . . . . . . . . . . . . . . . . . . . . . . . . . 56 Programming enhanced functions . . . . . . . . . . . . . . . . . . . . . . . . . . . . . . . . . . . . . . . . . . . . . . 56 Repertory dialing . . . . . . . . . . . . . . . . . . . . . . . . . . . . . . . . . . . . . . . . . . . . . . . . . . . . . . . . . . 56 Konversationen . . . . . . . . . . . . . . . . . . . . . . . . . . . . . . . . . . . . . . . . . . . . . . . . . . . . . . . . . . . 57 Configuring a fixed forwarding key. . . . . . . . . . . . . . . . . . . . . . . . . . . . . . . . . . . . . . . . . . . . . 58 Configuring a variable call forwarding key . . . . . . . . . . . . . . . . . . . . . . . . . . . . . . . . . . . . . . . 59 Using programmed keys . . . . . . . . . . . . . . . . . . . . . . . . . . . . . . . . . . . . . . . . . . . . . . . . . . . . . . . 60 Example 1: Calling saved number . . . . . . . . . . . . . . . . . . . . . . . . . . . . . . . . . . . . . . . . . . . . . 60 Example 2: Activating/deactivating Call waiting. . . . . . . . . . . . . . . . . . . . . . . . . . . . . . . . . . . 60 Example 3: Immediate ring . . . . . . . . . . . . . . . . . . . . . . . . . . . . . . . . . . . . . . . . . . . . . . . . . . 60 Resetting programmed keys . . . . . . . . . . . . . . . . . . . . . . . . . . . . . . . . . . . . . . . . . . . . . . . . . . . . 61

Contents |
7 |
Making calls in the team . . . . . . . . . . . . . . . . . . . . . . . . . . . . . 62
Group call . . . . . . . . . . . . . . . . . . . . . . . . . . . . . . . . . . . . . . . . . . . . . . . . . . . . . . . . . . . . . . . . . 62 Picking up a group call with the call pickup key . . . . . . . . . . . . . . . . . . . . . . . . . . . . . . . . . . . 63 Picking up a group call immediately via the pop-up menu. . . . . . . . . . . . . . . . . . . . . . . . . . . 63 Picking up a group call. . . . . . . . . . . . . . . . . . . . . . . . . . . . . . . . . . . . . . . . . . . . . . . . . . . . . . 63 Ignoring a group call . . . . . . . . . . . . . . . . . . . . . . . . . . . . . . . . . . . . . . . . . . . . . . . . . . . . . . . 63
Direct station selection keys . . . . . . . . . . . . . . . . . . . . . . . . . . . . . . . . . . . . . . . . . . . . . . . . . . . . 64 Calling a subscriber directly . . . . . . . . . . . . . . . . . . . . . . . . . . . . . . . . . . . . . . . . . . . . . . . . . . 64 Call pickup . . . . . . . . . . . . . . . . . . . . . . . . . . . . . . . . . . . . . . . . . . . . . . . . . . . . . . . . . . . . . . . 64 Deflecting a call to a DSS subscriber. . . . . . . . . . . . . . . . . . . . . . . . . . . . . . . . . . . . . . . . . . . 65 LED display on DSS keys . . . . . . . . . . . . . . . . . . . . . . . . . . . . . . . . . . . . . . . . . . . . . . . . . . . 65
MultiLine . . . . . . . . . . . . . . . . . . . . . . . . . . . . . . . . . . . . . . . . . . . . . . . . . . . . . . . . . . . . . . . . . . . 66 Line/trunk keys. . . . . . . . . . . . . . . . . . . . . . . . . . . . . . . . . . . . . . . . . . . . . . . . . . . . . . . . . . . . 66 Incoming calls . . . . . . . . . . . . . . . . . . . . . . . . . . . . . . . . . . . . . . . . . . . . . . . . . . . . . . . . . . . . 67 Making calls . . . . . . . . . . . . . . . . . . . . . . . . . . . . . . . . . . . . . . . . . . . . . . . . . . . . . . . . . . . . . . 68 During calls . . . . . . . . . . . . . . . . . . . . . . . . . . . . . . . . . . . . . . . . . . . . . . . . . . . . . . . . . . . . . . 69 Settings for MultiLine (keyset) . . . . . . . . . . . . . . . . . . . . . . . . . . . . . . . . . . . . . . . . . . . . . . . . 72 Rollover for a line . . . . . . . . . . . . . . . . . . . . . . . . . . . . . . . . . . . . . . . . . . . . . . . . . . . . . . . . . . 74
Making calls in an executive/secretary team. . . . . . . . . . . . . . . . . . . . . . . . . . . . . . . . . . . . . . . 75
Mobility function . . . . . . . . . . . . . . . . . . . . . . . . . . . . . . . . . . . 76
Logging on to another telephone . . . . . . . . . . . . . . . . . . . . . . . . . . . . . . . . . . . . . . . . . . . . . . 76 Ending the mobility function on a telephone (log off) . . . . . . . . . . . . . . . . . . . . . . . . . . . . . . . 76
Privacy/security . . . . . . . . . . . . . . . . . . . . . . . . . . . . . . . . . . . . 77
Do not disturb . . . . . . . . . . . . . . . . . . . . . . . . . . . . . . . . . . . . . . . . . . . . . . . . . . . . . . . . . . . . . . 77 Enabling do not disturb via a key . . . . . . . . . . . . . . . . . . . . . . . . . . . . . . . . . . . . . . . . . . . . . . 77 Enabling do not disturb via the idle menu . . . . . . . . . . . . . . . . . . . . . . . . . . . . . . . . . . . . . . . 77 Allowing "Do not disturb" . . . . . . . . . . . . . . . . . . . . . . . . . . . . . . . . . . . . . . . . . . . . . . . . . . . . 78 Security . . . . . . . . . . . . . . . . . . . . . . . . . . . . . . . . . . . . . . . . . . . . . . . . . . . . . . . . . . . . . . . . . . . . 79 User password . . . . . . . . . . . . . . . . . . . . . . . . . . . . . . . . . . . . . . . . . . . . . . . . . . . . . . . . . . . . 79 Locking the phone . . . . . . . . . . . . . . . . . . . . . . . . . . . . . . . . . . . . . . . . . . . . . . . . . . . . . . . . . 82
Other settings and functions . . . . . . . . . . . . . . . . . . . . . . . . . |
84 |
Audio settings . . . . . . . . . . . . . . . . . . . . . . . . . . . . . . . . . . . . . . . . . . . . . . . . . . . . . . . . . . . . . . 84 Room character . . . . . . . . . . . . . . . . . . . . . . . . . . . . . . . . . . . . . . . . . . . . . . . . . . . . . . . . . . . 84 Ringer . . . . . . . . . . . . . . . . . . . . . . . . . . . . . . . . . . . . . . . . . . . . . . . . . . . . . . . . . . . . . . . . . . 84 Pattern melody. . . . . . . . . . . . . . . . . . . . . . . . . . . . . . . . . . . . . . . . . . . . . . . . . . . . . . . . . . . . 85 Pattern sequence. . . . . . . . . . . . . . . . . . . . . . . . . . . . . . . . . . . . . . . . . . . . . . . . . . . . . . . . . . 85 Opening listening mode . . . . . . . . . . . . . . . . . . . . . . . . . . . . . . . . . . . . . . . . . . . . . . . . . . . . . 86 Setting headset port use . . . . . . . . . . . . . . . . . . . . . . . . . . . . . . . . . . . . . . . . . . . . . . . . . . . . 86 Special ringers . . . . . . . . . . . . . . . . . . . . . . . . . . . . . . . . . . . . . . . . . . . . . . . . . . . . . . . . . . . . 87 Activating/deactivating the ringer . . . . . . . . . . . . . . . . . . . . . . . . . . . . . . . . . . . . . . . . . . . . . . 88 Tone and indication with an unsecured voice connection . . . . . . . . . . . . . . . . . . . . . . . . . . . 88
Display language. . . . . . . . . . . . . . . . . . . . . . . . . . . . . . . . . . . . . . . . . . . . . . . . . . . . . . . . . . . . 89 Time display format. . . . . . . . . . . . . . . . . . . . . . . . . . . . . . . . . . . . . . . . . . . . . . . . . . . . . . . . . . 90 Date display format . . . . . . . . . . . . . . . . . . . . . . . . . . . . . . . . . . . . . . . . . . . . . . . . . . . . . . . . . . . 91 Country-specific settings . . . . . . . . . . . . . . . . . . . . . . . . . . . . . . . . . . . . . . . . . . . . . . . . . . . . . . . 92 Setting daylight saving time . . . . . . . . . . . . . . . . . . . . . . . . . . . . . . . . . . . . . . . . . . . . . . . . . . . 92
Setting the difference between daylight saving and standard time . . . . . . . . . . . . . . . . . . . . 93 Automatic daylight saving time . . . . . . . . . . . . . . . . . . . . . . . . . . . . . . . . . . . . . . . . . . . . . . . . . . 94 Setting the date and time . . . . . . . . . . . . . . . . . . . . . . . . . . . . . . . . . . . . . . . . . . . . . . . . . . . . . . 95 Setting the time . . . . . . . . . . . . . . . . . . . . . . . . . . . . . . . . . . . . . . . . . . . . . . . . . . . . . . . . . . . 95 Setting the date . . . . . . . . . . . . . . . . . . . . . . . . . . . . . . . . . . . . . . . . . . . . . . . . . . . . . . . . . . . 95

8 |
Contents |
Network information . . . . . . . . . . . . . . . . . . . . . . . . . . . . . . . . . . . . . . . . . . . . . . . . . . . . . . . . . . 96 Resetting user data . . . . . . . . . . . . . . . . . . . . . . . . . . . . . . . . . . . . . . . . . . . . . . . . . . . . . . . . . . . 97 Initiating the reset. . . . . . . . . . . . . . . . . . . . . . . . . . . . . . . . . . . . . . . . . . . . . . . . . . . . . . . . . . 97 Programming call forwarding . . . . . . . . . . . . . . . . . . . . . . . . . . . . . . . . . . . . . . . . . . . . . . . . . . . 98 Standard call forwarding . . . . . . . . . . . . . . . . . . . . . . . . . . . . . . . . . . . . . . . . . . . . . . . . . . . . 98 Using call forwarding . . . . . . . . . . . . . . . . . . . . . . . . . . . . . . . . . . . . . . . . . . . . . . . . . . . . . . . 98 Activating or deactivating immediate call forwarding . . . . . . . . . . . . . . . . . . . . . . . . . . . . . . . 99 Saving destination phone numbers for call forwarding . . . . . . . . . . . . . . . . . . . . . . . . . . . . 100 Copying and pasting destination phone numbers . . . . . . . . . . . . . . . . . . . . . . . . . . . . . . . . 101 Assigning a destination phone number for call forwarding . . . . . . . . . . . . . . . . . . . . . . . . . 102 Activating/deactivating call forwarding . . . . . . . . . . . . . . . . . . . . . . . . . . . . . . . . . . . . . . . . . 103 Defining the ring duration before call forwarding on no reply. . . . . . . . . . . . . . . . . . . . . . . . 104 Call forwarding chain . . . . . . . . . . . . . . . . . . . . . . . . . . . . . . . . . . . . . . . . . . . . . . . . . . . . . . 104 Call forwarding by call type . . . . . . . . . . . . . . . . . . . . . . . . . . . . . . . . . . . . . . . . . . . . . . . . . 105 CTI calls . . . . . . . . . . . . . . . . . . . . . . . . . . . . . . . . . . . . . . . . . . . . . . . . . . . . . . . . . . . . . . . . . . 106 Beep on auto-answer. . . . . . . . . . . . . . . . . . . . . . . . . . . . . . . . . . . . . . . . . . . . . . . . . . . . . . 106 Beep on auto-reconnect. . . . . . . . . . . . . . . . . . . . . . . . . . . . . . . . . . . . . . . . . . . . . . . . . . . . 107 Activating and deactivating the hold reminder tone . . . . . . . . . . . . . . . . . . . . . . . . . . . . . . . . . 108 Setting the hold reminder time . . . . . . . . . . . . . . . . . . . . . . . . . . . . . . . . . . . . . . . . . . . . . . . . 108 Activating/deactivating Hold and hang-up. . . . . . . . . . . . . . . . . . . . . . . . . . . . . . . . . . . . . . . . . 109 Music on hold . . . . . . . . . . . . . . . . . . . . . . . . . . . . . . . . . . . . . . . . . . . . . . . . . . . . . . . . . . . . . . 110 Allowing call joining . . . . . . . . . . . . . . . . . . . . . . . . . . . . . . . . . . . . . . . . . . . . . . . . . . . . . . . . . 110 Permitting call deflection . . . . . . . . . . . . . . . . . . . . . . . . . . . . . . . . . . . . . . . . . . . . . . . . . . . . . . 111 Allowing call waiting . . . . . . . . . . . . . . . . . . . . . . . . . . . . . . . . . . . . . . . . . . . . . . . . . . . . . . . . . 112 Connecting subscribers by hanging up . . . . . . . . . . . . . . . . . . . . . . . . . . . . . . . . . . . . . . . . . . . 113 Allowing call transfer . . . . . . . . . . . . . . . . . . . . . . . . . . . . . . . . . . . . . . . . . . . . . . . . . . . . . . . . 113 Settings for autodial delay. . . . . . . . . . . . . . . . . . . . . . . . . . . . . . . . . . . . . . . . . . . . . . . . . . . . . 114 Allowing Busy when dialling . . . . . . . . . . . . . . . . . . . . . . . . . . . . . . . . . . . . . . . . . . . . . . . . . . . 115 Allowing Transfer on ring . . . . . . . . . . . . . . . . . . . . . . . . . . . . . . . . . . . . . . . . . . . . . . . . . . . . 115 Activating/deactivating immediate dialing . . . . . . . . . . . . . . . . . . . . . . . . . . . . . . . . . . . . . . . . . 116 Permitting a callback . . . . . . . . . . . . . . . . . . . . . . . . . . . . . . . . . . . . . . . . . . . . . . . . . . . . . . . . . 117 Allowing a conference . . . . . . . . . . . . . . . . . . . . . . . . . . . . . . . . . . . . . . . . . . . . . . . . . . . . . . . 117 Allowing joining in a conference . . . . . . . . . . . . . . . . . . . . . . . . . . . . . . . . . . . . . . . . . . . . . . . . 118 Call logging . . . . . . . . . . . . . . . . . . . . . . . . . . . . . . . . . . . . . . . . . . . . . . . . . . . . . . . . . . . . . . . . 119 Dialing an entry . . . . . . . . . . . . . . . . . . . . . . . . . . . . . . . . . . . . . . . . . . . . . . . . . . . . . . . . . . 119 Deleting all entries . . . . . . . . . . . . . . . . . . . . . . . . . . . . . . . . . . . . . . . . . . . . . . . . . . . . . . . . 119 Call logging – activating/deactivating. . . . . . . . . . . . . . . . . . . . . . . . . . . . . . . . . . . . . . . . . . 120 Call recording . . . . . . . . . . . . . . . . . . . . . . . . . . . . . . . . . . . . . . . . . . . . . . . . . . . . . . . . . . . . . . 122 Recording modes. . . . . . . . . . . . . . . . . . . . . . . . . . . . . . . . . . . . . . . . . . . . . . . . . . . . . . . . . 122 Explanations of recording . . . . . . . . . . . . . . . . . . . . . . . . . . . . . . . . . . . . . . . . . . . . . . . . . . 123 Recording calls . . . . . . . . . . . . . . . . . . . . . . . . . . . . . . . . . . . . . . . . . . . . . . . . . . . . . . . . . . 124 Diagnostic data . . . . . . . . . . . . . . . . . . . . . . . . . . . . . . . . . . . . . . . . . . . . . . . . . . . . . . . . . . . . . 129 Individual settings that impact energy efficiency . . . . . . . . . . . . . . . . . . . . . . . . . . . . . . . . . . . 131

Contents |
9 |
Web interface (WBM). . . . . . . . . . . . . . . . . . . . . . . . . . . . . . . 132
General . . . . . . . . . . . . . . . . . . . . . . . . . . . . . . . . . . . . . . . . . . . . . . . . . . . . . . . . . . . . . . . . . . 132 Launching the web interface . . . . . . . . . . . . . . . . . . . . . . . . . . . . . . . . . . . . . . . . . . . . . . . . . . . 132 Administrator Settings . . . . . . . . . . . . . . . . . . . . . . . . . . . . . . . . . . . . . . . . . . . . . . . . . . . . . 132 User Pages . . . . . . . . . . . . . . . . . . . . . . . . . . . . . . . . . . . . . . . . . . . . . . . . . . . . . . . . . . . . . 133 User menu . . . . . . . . . . . . . . . . . . . . . . . . . . . . . . . . . . . . . . . . . . . . . . . . . . . . . . . . . . . . . . 134
Fixing problems . . . . . . . . . . . . . . . . . . . . . . . . . . . . . . . . . . . 137
Caring for your telephone . . . . . . . . . . . . . . . . . . . . . . . . . . . . . . . . . . . . . . . . . . . . . . . . . . . . 137 Troubleshooting . . . . . . . . . . . . . . . . . . . . . . . . . . . . . . . . . . . . . . . . . . . . . . . . . . . . . . . . . . . . 137 Contact partner in case of problems . . . . . . . . . . . . . . . . . . . . . . . . . . . . . . . . . . . . . . . . . . . . . 137 Labeling keys . . . . . . . . . . . . . . . . . . . . . . . . . . . . . . . . . . . . . . . . . . . . . . . . . . . . . . . . . . . . . 138
Repair and recycling concept, extending performance capability 139
Recycling and disposal of equipment in the OpenScape Desk Phone family. . . . . . . . . . . . . 139 Repair reliability and spare part supply . . . . . . . . . . . . . . . . . . . . . . . . . . . . . . . . . . . . . . . . . . 140 Extending performance capability . . . . . . . . . . . . . . . . . . . . . . . . . . . . . . . . . . . . . . . . . . . . . . 140
Local user menu . . . . . . . . . . . . . . . . . . . . . . . . . . . . . . . . . . 141
Opening the user menu on the phone. . . . . . . . . . . . . . . . . . . . . . . . . . . . . . . . . . . . . . . . . . . . 141 User menu display . . . . . . . . . . . . . . . . . . . . . . . . . . . . . . . . . . . . . . . . . . . . . . . . . . . . . . . . . 141 Key functions . . . . . . . . . . . . . . . . . . . . . . . . . . . . . . . . . . . . . . . . . . . . . . . . . . . . . . . . . . . . 150
Special features for operation on an OpenScape 4000 . . . . . 152
Passively supported functions. . . . . . . . . . . . . . . . . . . . . . . . . . . . . . . . . . . . . . . . . . . . . . . . . 152 Unsupported functions . . . . . . . . . . . . . . . . . . . . . . . . . . . . . . . . . . . . . . . . . . . . . . . . . . . . . . . 152
Index . . . . . . . . . . . . . . . . . . . . . . . . . . . . . . . . . . . . . . . . . . . 153
10 |
General information |
General information
About this manual
This document contains general descriptions of the technical options, which may not always be available in individual cases. The required features must therefore be individually defined in the terms of the contract.
If a particular function on your phone is not available to you as described, this may be due to one of the following reasons:
•The function is not configured for you and your telephone. Please contact your system administrator.
•Your communication platform does not feature this function. Please contact your Unify sales partner for information on how to upgrade.
Your telephone can be operated on an OpenScape 4000 telephone system. Individual telephone features may deviate on an OpenScape 4000 from those described.
This icon in a section heading indicates that the feature is not available on an OpenScape 4000 telephone system.
Other special features in relation to operation on an OpenScape 4000 can be found on page 152.
This User Guide is intended to help you familiarize yourself with the OpenScape Desk Phone CP200/CP205 and all of its functions. It contains important information on the safe and proper operation of the
OpenScape Desk Phone CP200/CP205. These instructions should be strictly complied with to avoid operating errors and ensure optimum use of your multifunctional telephone in the network.
This User Guide should be read and followed by every person installing, operating or programming the OpenScape Desk Phone CP200/CP205.
For your own protection, please read the section dealing with safety in detail. Follow the safety instructions carefully in order to avoid endangering yourself or other persons and to prevent damage to the unit.
This User Guide is designed to be simple and easy to understand, providing clear step-by-step instructions for operating the
OpenScape Desk Phone CP200/CP205.
Icons used in the manual
Settings
Operations and settings that can be made both at the phone and over the web interface are indicated by an icon and page reference.
V z
refers to an operation or setting performed directly on the phone refers to an operation or setting performed via the web interface
General information |
11 |
Service
The service department of Unify Software and Solutions GmbH & Co. KG can only help you if you experience problems or defects with the phone itself. Should you have any questions regarding operation, your specialist retailer or network administrator will gladly help you.
For queries regarding connection of the telephone, please contact your network provider.
If you experience problems or defects with the phone, please dial the service number for your country.
Intended use
The OpenScape Desk Phone CP200/CP205 phone is a desktop unit designed for voice transmission and for connection to the LAN. It can also be used as a workstation device. Any other use is regarded as unintended.
Telephone type
The identification details (exact product designation and serial number) of your telephone can be found on the nameplate on the underside of the base unit. Specific details concerning your communication platform can be obtained from your administrator.
Please have this information ready when you contact our service department regarding faults or problems with the product.
Speakerphone quality and display legibility
•To ensure good speakerphone quality, the area in front of the telephone (front right) should be kept clear. The optimum distance is approx. 50 cm.
•Proceed as follows to optimize display legibility:
–Turn the phone to tilt the display to ensure you have a frontal view of the display and avoid light reflections.
–Adjust the contrast as required page 29.

12
© Enter PIN... |
|
Q |
|
|
j |
© 123456789 |
Q |
_ |
|
|
|
Remote configuration for cloud service providers
From factory defaults to operational telephone
This section describes the remote configuration process, from the initial factory defaults to the operational telephone. If your telephone is already operational, please continue reading from Section "Getting to know the
OpenScape Desk Phone CP200/CP205 ( page 14)".
You can start up your new OpenScape Desk Phone CP200/CP205 yourself using a remote maintenance function. The prerequisites for this are:
•The administrator has provided you with a PIN for the initial start-up
•You have a LAN connection with access to the Internet
•You have a new OpenScape Desk Phone CP200/CP205 that you want to start up using the remote maintenance function
Starting up the telephone
Connect the telephone to the LAN. If the power is not supplied by the LAN cable, connect a power supply if appropriate (the power supply is not needed with PoE). The telephone should now boot.
The telephone recognizes based on the stated conditions that a remote configuration is to be performed and starts this process.
Entering the Deployment PIN
The first time you start up the telephone, it will automatically check the remote configuration requirements. If the requirements are fulfilled,
you will be prompted to enter the Deployment PIN (cloud PIN).
Enter the PIN you received from your Fachpersonal. Only numeric characters are accepted.
Confirm with the Softkey shown.

13
Asking redirect server...
Configuring phone...
Deployment done
Cancel Q _
"
Abort deployment
Confirmed Q _
"
Deployment aborted
Starting the remote configuration
Once you have entered a valid PIN, the remote configuration of your telephone starts automatically. You are shown the following messages on the display:
The configuration is concluded and the telephone is operational with the required settings. You can now make calls.
New operating system software may be downloaded and installed during the remote configuration. If this happens, reboot the telephone following the configuration.
Canceling the Remote configuration
You can stop the process in order to continue the configuration manually before entering the PIN or after entering an invalid PIN.
1.The remote configuration is concluded once you enter a valid PIN. The process can no longer be canceled at this stage.
2.If an error still occurs even though a correct PIN has been entered, you can repeat the remote configuration by simply restarting the telephone.
3.You can likewise repeat the process following a cancellation by restarting the telephone, assuming you have not already started the manual configuration.
Press the Softkey.
The following message is displayed:
Press the Softkey shown to confirm that the process is to be canceled. The following message is displayed:
The telephone is set to the factory defaults at this time and has to be configured manually by you or your administrator or the remote configuration repeated by restarting the telephone.
14
Getting to know the
OpenScape Desk Phone CP200/CP205
The following sections describe the most frequently used controls and displays.
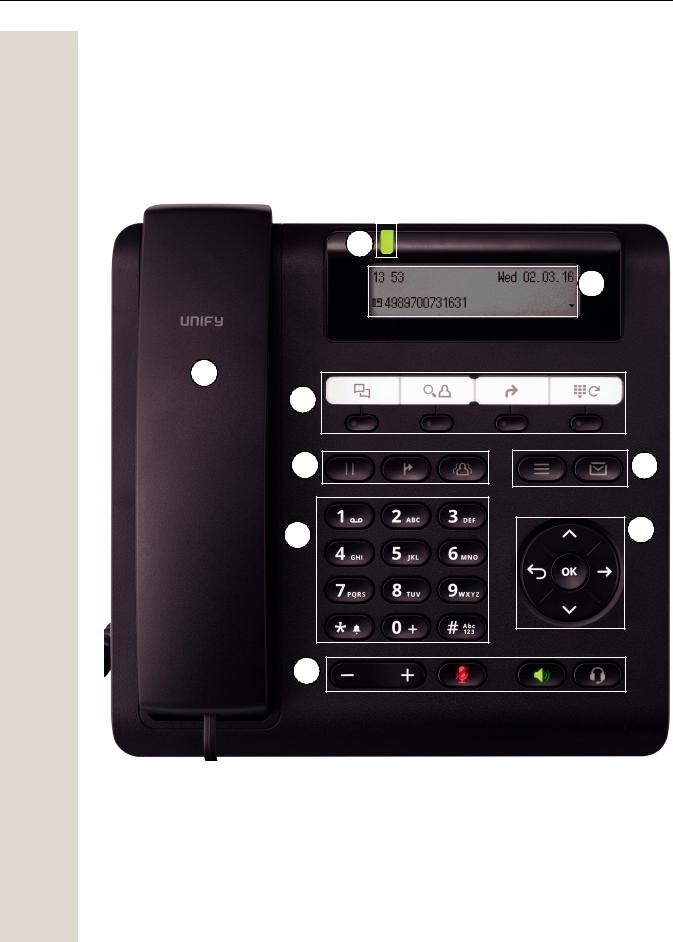
The user interface of your telephone
8
2
1
7
5
6
3
3
4

15
1
2
3
4
5
6
7
8
You can make and receive calls as normal using the handset.
The display provides intuitive support for telephone operation (two lines with up to 33
characters each).
The function keys (cannot be reprogrammed) allow you to call up the following frequent-
ly used functions during a call:
Â: Provides access to the call log with lists of missed calls, dialed calls, received calls
and forwarded calls and allows voicemails to be managed.
@: Provides access to the user menu for locally controlling the phone settings.
:: Activates/deactivates the speakerphone function.
.: Activates/deactivates the headset function.
": Increases/decreases the speaker/headset volume page 21.
;: Activates/deactivates the microphone. This function is useful to prevent the other
party from listening in under certain circumstances, for example when consulting with
someone else in the room or in case of annoying background noise.
You can use the navigation keys to navigate conveniently through the various phone
functions, applications and configuration menus.
The function keys (can be reprogrammed by the administrator via the WBM) allow you
to call up the following frequently used functions during a call:
Ã: Transfer a call to another subscriber.
Á: Enable access to the conference functions.
Ä: Hold or retrieve the active call.
The dialpad can be used to enter phone numbers and write text.
You can customize your telephone by assigning phone numbers and functions to the
programmable keys.
Preset default values:
•Conversations (caller list)
•Phonebook
•Forwarding
•Redial
Incoming calls and new voicemails are visually signaled via the LED de notificação.

16
Navigation keys
This control allows you to move between input fields and navigate in lists and menus. You use the Z button to confirm options and launch functions:
Key |
Functions when key is pressed |
|
|
|
In lists and menus: |
|
• One level back |
^ |
Entry selected: |
|
• Cancel action |
|
In input fields: |
|
• Delete character to the left of the cursor |
|
|
μ |
In lists and menus: |
• Scroll up |
|
|
Press and hold: Skip to the start of the list/menu |
|
|
€ |
In lists and menus: |
• Scroll down |
|
|
Press and hold: Skip to the end of the list/menu |
|
|
Z |
Entry selected: |
• Perform action |
|
|
• Confirm your selection |
|
|

17
Programmable function keys
Your OpenScape Desk Phone CP200/CP205 has four fixed function keys (with LED), which you can reprogram with different functions or phone numbers at any time.
The icons represent the following functions:
•Conversations
•Phonebook
•Forwarding
•Redial x
Depending on how they are programmed, you can use the keys as follows:
•Function keys page 55
•Selected dialing keys page 56
A function can be programed for each key as well as a phone number at the second level. The status of a function is shown by the LED display for the corresponding function key.
Line and direct station selection (DSS) keys can only be programmed by the administrator via the program/service menu.


 You will find information on the labeling of the function keys on page 138
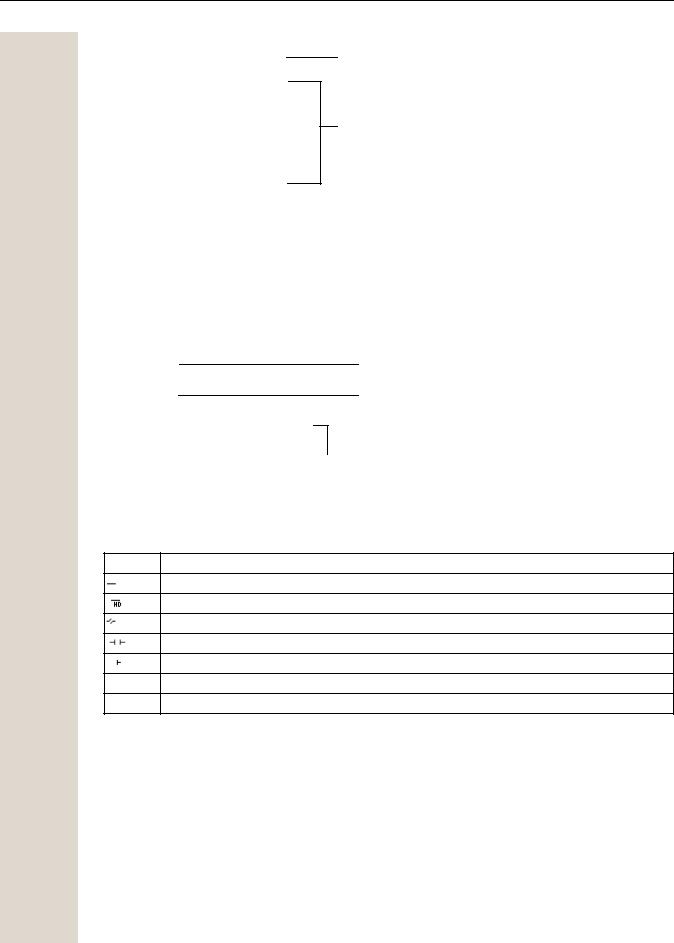
Meaning of LED displays on function keys
|
LED |
Meaning of function key |
|
|
|
_ |
Off |
The function is deactivated. |
¤ |
Lights up green/ |
The function is activated. |
|
red |
|
|
|
|
Some of the programmable keys on multi-line phones can be set up as trunk or line keys page 66.
18
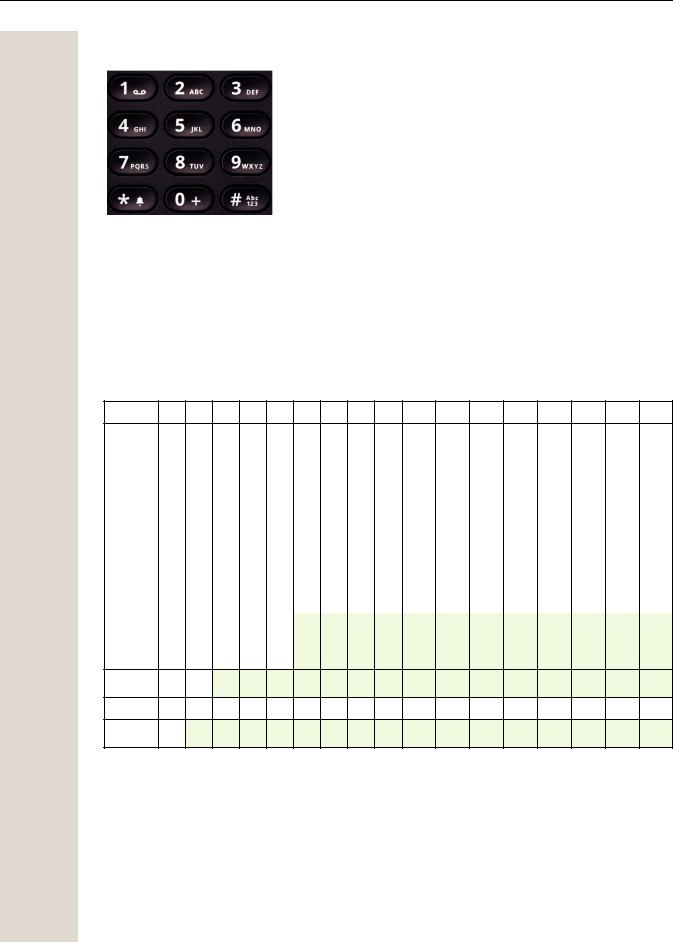
Dialpad
You can only use the digits 1 to 9 and 0 as well as the * and # characters when dialing a number. To delete digits press ^.
In situations where text input is possible, for example when entering the user password, you can also use the dial keys to enter text in addition to the digits and special characters mentioned. To do this, press the numerical keys repeatedly.
Example: To enter the letter "h", press the number 4 key on the keypad twice. When entering text, all characters available for the key pressed and the character selected are briefly displayed.
Character overview (depends on the current language setting)
Key |
1x |
2x |
3x |
4x |
5x |
6x |
7x |
8x |
9x |
10x |
11x |
12x |
13x |
14x |
15x |
16x |
17x |
11 |
1 |
2 |
; |
= |
$ |
\ |
& |
[ |
] |
{ |
} |
% |
|
|
|
|
|
|
|
|
|
|
|||||||||||||
2 |
a |
b |
c |
2 |
ä |
|
|
|
|
|
|
|
|
|
|
|
|
3 |
d |
e |
f |
3 |
|
|
|
|
|
|
|
|
|
|
|
|
|
4 |
g |
h |
i |
4 |
|
|
|
|
|
|
|
|
|
|
|
|
|
5 |
j |
k |
l |
5 |
|
|
|
|
|
|
|
|
|
|
|
|
|
6 |
m |
n |
o |
6 |
ö |
|
|
|
|
|
|
|
|
|
|
|
|
7 |
p |
q |
r |
s |
7 |
ß |
|
|
|
|
|
|
|
|
|
|
|
8 |
t |
u |
v |
8 |
ü |
|
|
|
|
|
|
|
|
|
|
|
|
9 |
w |
x |
y |
z |
9 |
|
|
|
|
|
|
|
|
|
|
|
|
00 +
*3 |
. * |
1 |
# , ? ! ’ “ + - |
( |
) @ / |
: |
_ |
|
#4
1Special characters (not in 123 mode)
2Space
3Extended character
4Toggle between uppercase and lowercase and number entry

19
Multi-function keys
Key |
Function during text input |
Function when held down |
|
|
|
|
|
* |
Type special characters |
• 2 seconds: Ringer off |
|
• 3 seconds: Beep rather than ringtone |
|||
|
|
||
|
|
|
|
# |
Switch between uppercase |
|
|
and lowercase text and num- |
Activate the telephone lock page 82 |
||
|
ber entry |
|
|
1 |
Type special characters (not in |
Call answering machine |
|
|
123 mode). |
|
Alphabetic labeling of dial keys is also useful when entering vanity numbers (letters associated with the phone number's digits as indicated on the telephone spell a name, e.g. 0700 - PATTERN = 0700 - 687837).
Text editor
Additional options are available in the text editor. This is used when programming a forwarding destination, for example. In this way, you can, for example, move the cursor freely and copy or insert text.
You can select further editor functions via the Navigationstasten and confirm each one using Z:
•OK: Applies changes and closes the editor
•Delete: Deletes characters from right to left
•Cancel: Discards changes and exits the editor
•Mode (# can also be used here to switch):
–123: Digits only
–ABC: Uppercase letters only
–Abc: First letter in uppercase, subsequent letters in lowercase
–abc: Lowercase letters only
•Move cursor left: Moves the cursor to the left
•Move cursor right: Moves the cursor to the right
•Copy: Copies the entire content to the clipboard
•Paste: Inserts the entire content from the clipboard at the cursor position

20
Display
Your OpenScape Desk Phone CP200/CP205 comes with a black-and-white LCD display. Adjust the contrast to suit your needs ( page 29).
Idle mode
If there are no calls taking place or settings being made, your OpenScape Desk Phone CP200/ CP205 is in idle mode.
Press the Âbutton to go back, for example, to the idle display from a call list ( page 23). The idle display can be accessed again from the Program/Service menu ( page 25) with the @key. You can also configure a "Show phone display" key for both of these instances (see page 55) in order to access the idle mode screen again.
Example:
|
|
|
|
|
|
|
|
Time |
|
|
|
|
|
|
|
|
|||
|
|
|
|
|
|
|
|
|
|
|
|
|
|
|
|
|
|
|
|
10:59 |
|
Wed 08 01.14 |
|
|
|
Date |
|||
|
|
|
|
||||||
B |
f |
|
|
|
|
||||
|
|
|
|
|
|
|
|
Open the idle menu |
|
|
|
|
|
|
|
|
|
||
|
|
|
|
|
|
|
|
Own phone number |
|
|
|
|
|
|
|
|
|
||
|
|
|
|
|
|
|
|
|
Status icon |
|
|
|
|
|
|
|
|
|
|
Idle menu
The idle menu opens when you press € or Z Navigationstasten page 16 in idle mode. You can call up various functions here. Entries may vary.
The idle menu may contain the following entries:
•Redial x?
•Ringer off?
•Do not disturb on?
•Mobile logon?
•Cancel callbacks?
•Directed pickup
•Back?
21
Icons in the idle display
In the first line, the time, weekday and date are displayed in addition to icons for different situations and options:
Icon |
Meaning |
|
|
|
The ringer is deactivated. |
|
|
|
The ringer is set to a beep. |
|
|
|
The phone lock is activated. |
|
|
|
The "Do not disturb" function is activated. |
|
|
|
A mobile user is logged on to the telephone. |
|
|
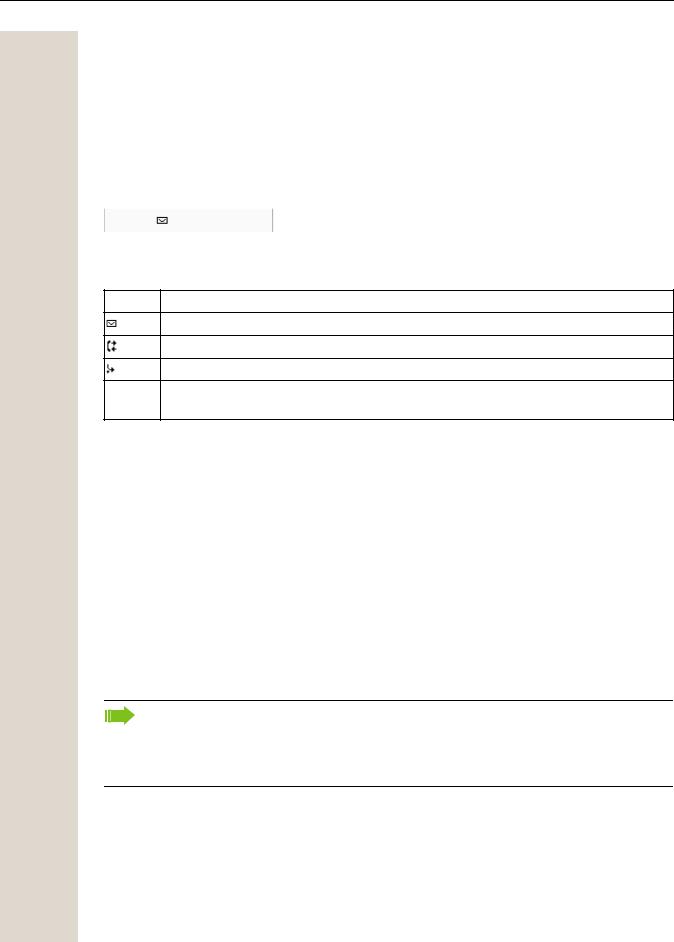
Your attention will be drawn to events in the second line:
Icon |
Meaning |
|
|
|
You received new voice messages. |
|
|
|
New entries have been added to the call lists. |
|
|
|
Local call forwarding is active. |
BAn advisory icon in front of own phone number (replaced, for example, by call forwarding or Mobility icon).
Displays on the status line for adjusting the volume
When you adjust the ringer, handset and speaker volume using the " key, you will see the following displays in the status line:
Display |
Meaning |
|
|
|
Ringer volume in 10 levels |
|
|
|
Ringer volume in 10 levels when the ringer is switched off |
|
|
|
Handset or speaker volume in 10 levels |
|
|
22
Context-dependent displays
Depending on the situation at hand, the display on your OpenScape Desk Phone CP200/CP205 displays different content, to which you can respond intuitively.
Information on current events
The following icons appear centered on the display when your phone is idle and draw your attention to current properties or events.
Example: You missed two calls in your absence.
02
You have two new voice messages that you can open by pressing the È key page 24. Icons for events
Icon Meaning
You received new voice messages.
New entries have been added to the call lists.
Local call forwarding is active.
BA status icon in front of your own phone number (replaced, for example, by call forwarding or Mobility icon).
Context menus
If an arrow appears beside an entry in the second line, a context menu is available whose options you can select using the Navigationstasten μ or € ( page 16). The range of functions available is situation-specific.
Consultation? |
|
|
|
|
First menu entry |
Start conference? |
|
|
|
(selected on callup) |
|
|
|
|
|
||
Hold? |
|
|
Other menu options |
||
|
|
|
|
|
|
Blind transfer call? |
|
|
(hidden) |
||
|
|
||||
Disconnect? |
|
|
|
||
Directed pickup? |
|
|
|
|
|
Press the È button to go back, for example, to the telephony interface from a call list ( page 23). The telephony interface can be accessed again from the Program/Service menu ( page 25) with the @ key. However, you can set up a "Show phone display" key for both of these instances (see page 55) in order to access the telephony interface screen again.
Idle display context menu
You receive the following functions (if activated) by pressing the Z or € keys. The current function is displayed in the second display line. The other functions are hidden and can be selected using the Navigationstasten € or μ.
23
Redial x 1234
Ringer off
Do not disturb off
Mobile logon
Cancel callbacks
Directed pickup
First entry (selected when you call up the menu, if you have already dialed a phone number)
Other menu options (hidden)
Functions during a call
In many operating situations you are offered appropriate functions or advisories in the second line of the display. Other available functions remain hidden and can be selected using the Navigationstasten € or μ.
Example: You set up a consultation call. The second line displays the first of three dependent functions. Search for the appropriate function and confirm this with Z.
012345|
Dial
Redial x Retrieve held call
First display line
Second display line (current option)
Other possible menu options (hid-  den)
den)
The menu with the functions closes automatically after you have executed an action. To delete info-only messages, press the ^ key.
Icons during a call
Icon Meaning
The call is active.
High-quality voice connection (G.722).
The call has been disconnected.
You have placed the call on hold (e.g. consultation hold).
Your call partner has placed the call on hold.
{The voice connection is secure.
}The voice connection is not secure.
Voicemail
If configured (contact the relevant administrator), this provides you with access to your mailbox system e.g. HiPath Xpressions.
If your system is appropriately configured, activating this function opens the menu for voicemail page 53.

24
Call logging
The following call lists are stored under Call logging and can be accessed via the preset "Conversations" function key ( page 17):
•Missed (x): Missed calls
•Dialled (x): Dialed calls (with or without connection)
•Received (x): Answered calls
•Forwarded (x): Forwarded calls
The number of missed calls and unchecked calls is shown on the idle display. Missed calls are not saved and displayed if Call logging is disabled page 120.
Call logging function must be activated in order to display call lists page 120. Call logging must also be activated for the customary last number redial function. If Call logging is not activated, the message "Key function unavailable" is shown when you press the function key.
Each call list may contain up to 30 entries. Once this limit is reached, the oldest entry in the list is overwritten. Multiple calls from the same number are only listed once.
The following data is saved, for example, for missed calls:
•Phone number/name depending on available data.
•Number of call attempts.
•The time of the last call attempt for each listed caller, in relation to the current day, otherwise the date of the last call attempt.
The administrator may have made special settings for missed calls. To indicate new missed calls,
•the LED on the function key flashes or
•the LED de notificação lights up or
•the LED on the function key flashes and the LED de notificação illuminates
•you also receive a message on the display
Entries can only be saved if the caller ID is displayed as a name, number or both. If the caller ID is not transferred, the call is saved as "Unknown".
You can delete all the entries in the respective call list page 119. After selecting an entry, you can dial it immediately by confirming page 119.
Additional notes on Call logging
•Missed calls are not signaled if Call logging is disabled page 120.
•If missed calls for this connection were answered by other subscribers, these calls are not listed in the Missed (x) list or are marked with a checkmark in accordance with the Call logging setting page 121.
•Forwarded calls of all types are logged under "Forwarded (x)" and not as "Missed (x)". This is regardless of how the parameter for missed calls is defined.

25
Settings
Press the @ key to open the Settings menu.
•User
•Admin
User
Setting options are provided here that allow you to adapt the telephone to your individual requirements.
Admin
Once the admin password has been entered, this menu is available to the relevant administrator. You can use the Navigationstasten to navigate through the menus as described on page 16.
Phonebooks
Press the function key _ under Phonebooks to open the phonebooks. This menu contains the following entries:
Personal
You can create your own local phonebook under Personal containing up to 100 entries page 48. The data for a subscriber includes the last name, first name and phone number.
Corporate phonebook
If you have the option of using a corporate directory, you can use the phonebook function key and the ^ key to find subscribers page 50. As a prerequisite for this, your administrator must have set up the appropriate access. You can configure a separate function key for opening the corporate directory.

26
User settings
In the User menu (see page 141), settings options are provided that allow you to adapt the telephone to your individual requirements.
Select a menu using the Navigationstasten:
•"Date and time" page 95
•"Audio" page 84
•"Configuration" e.g. page 78 or page 111
•"Phone" page 29
•"Locality" page 89
•"Security" page 79 or page 82
•"Network information" page 96
•"Diagnostic information" page 129
•"Reset" page 97
If you are in one of these menus or submenus, depending on the situation, you have the following options to leave the menus:
•Save & exit (If you have made a setting and want to keep it)
•Exit (discard changes) (If you have made a setting that you do not want to use after all or if you do not want to set any of the options)
•Back (If you want to leave the main menu or submenu)
•Press and hold the € key to access the option to leave the current menu level.
•You exit the menu by pressing the @ key and return to idle mode page 20.
Interrupting editing in the menu
You can interrupt editing in the menu, for example to call someone or to answer a call. Pressing the @ key takes you back to the point in the menu from which you exited.
This is only possible for a limited period, however, which is defined by the administrator using the inactivity timeout setting. If the configured time expires, you need to re-enter your password when opening the menu and manually go to the required point in the menu.
Interrupting editing:
•By pressing the Å key, you interrupt editing, leave the menu and return to idle mode page 20.
•If you receive a call during editing and answer it, you automatically change to the call view (see also page 23).
To go back to editing mode in the menu, press the @ key again.

27
Network information
Information about the IP address or name that was assigned to the phone in the network and therefore the HTML address of the web interface.
V View information on the phone page 96.
Contact your administrator for further information on the network information values listed here.
Diagnostic information
VProvides information on all of the important settings of the telephone. Can provide valuable help in support situations page 129.
Reset phone
VPersonal settings made via the telephone menu or the web interface can be reset to factory settings page 97.
Control and monitoring function
A control or monitoring function can be activated on your phone for service purposes by remote maintenance.
Control function
Your administrator has the option to activate and deactivate features of the phone via remote maintenance. During maintenance, the handset, microphone, loudspeaker and headset are deactivated. You are additionally informed on the display that the control function is active.
Monitoring function
In order to detect malfunctioning of a phone, for example, your administrator can install a monitoring function. You can use your phone as normal during monitoring. However you will first be informed about the operation with a message on the display and prompted to allow monitoring.
If your administrator has activated a function on your phone, which continuously transmits operating data to a server, you will see the flashing  icon in the upper display line.
Activating a diagnostic call
In the event of connection problems with a specific destination, the administrator may ask you to enter an activation code before the number of the subscriber, which can be used to initiate tracing of the call data on the phone. The activation code, which must be provided to you by the administrator and which comprises a leading asterisk, followed by three digits and the hash sign as the terminating character, must be entered before the actual phone number. At the end of the call, the call-related data is sent for further analysis to the DLS server, which then passes it to the "OpenScape Voice Trace Manager".
28
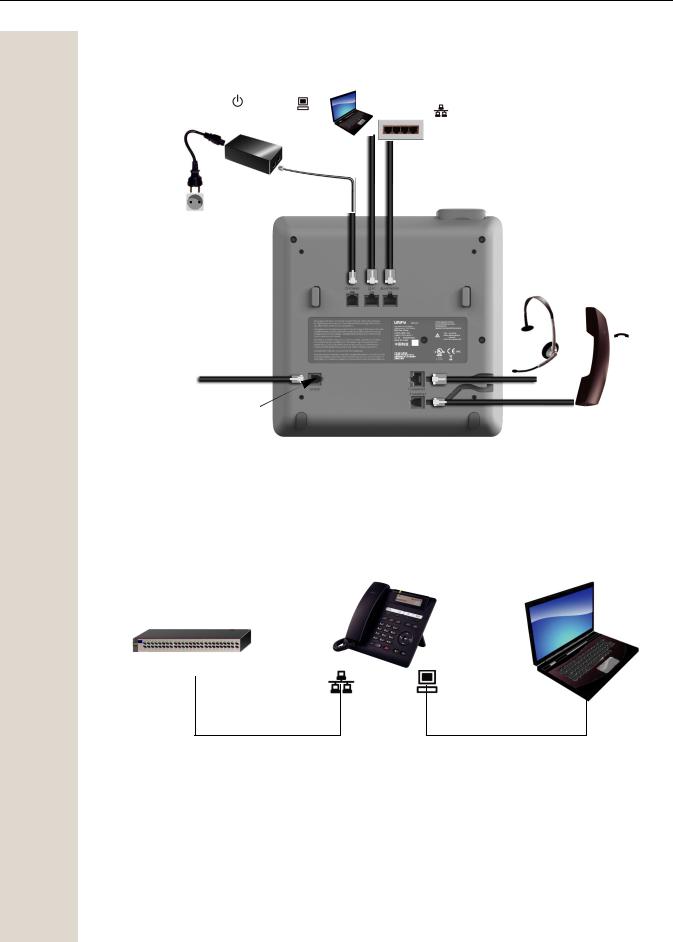
Ports on the underside of the phone
Power supply unit |
PC |
|
|
||
(if necessary) |
|
|
|
|
Network switch |
|
|
|
|
||
|
|
|
|
|
|
|
|
|
|
|
|
|
|
|
|
|
|
Country-specific cable
Headset
Handset
Service interface
Using network ports more efficiently
The OpenScape Desk Phone CP200/CP205 has a built-in Ethernet switch. This means that you can also connect a PC with a LAN port to the LAN directly via the phone. The option for connecting the telephone and PC must first be activated on the telephone by your administrator.
Network switch |
OpenScape Desk Phone CP200/CP205 |
PC |
Using this connection option saves one network port for each switch used and allows shorter network cables to be used when arranged correctly.

29
Telephone settings
Display contrast
The display has multiple contrast levels that you can set according to your light conditions.
zYou can also configure this setting via the (LED de notificação) WEB-Oberfläche page 132.
@Press the key shown.
User |
|
Select and confirm the option shown. |
|
if nec. j |
Enter and confirm the user password. |
|
|
Select and confirm the option shown. |
Phone? |
|
|
|
|
Select and confirm the option shown. |
|
|
|
Display ? |
f |
|
|
|
Select and confirm the option shown. |
|
|
|
Contrast: = |
f |
|
|
|
|
|
μ or € |
Set and confirm the contrast. |
|
|
Select and confirm the option shown. |
Save & exit |
l |
|
|
|
|
|
Volumes |
|
Use this selection to set the following volumes in 10 levels: |
|
• Loudspeaker |
|
• Ringer |
|
• Handset |
|
• Headset |
|
• Handsfree |
|
• Rollover |
|
Example: Handset |
@ Press the key shown. |
|
|
Select and confirm the option shown. |
User |
|
|
|
if nec. j |
Enter and confirm the user password. |
|
Select and confirm the option shown. |
Audio |
|
|
Select and confirm the option shown. |
|
|
Volumes? |
|
|
|

30
Handset |
f |
μ or €
Save & exit |
l |
z
@
User
if nec. j
Phone
Key click
Volume
Medium
Keys
Keypad only
or
All keys
Save & exit
Select and confirm the option shown.
Set and confirm the volume.
Select and confirm the option shown.
Key click
You can select here whether a tone should be heard when a key is pressed. You can also decide whether this should apply for all keys or only those on the keypad. In addition, you can adjust the tone volume or disable the tone.
You can also configure this setting via the WEB-Oberfläche page 132.
Press the key shown.
Select and confirm the option shown.
Enter and confirm the User password.
Select and confirm the option shown.
Select and confirm the option shown.
Setting the volume for Key click
Select and confirm the option shown.
For instance, select and confirm a medium volume setting. You can choose between the following three options:
•Low
•High
•Off (no click)
Key selection
Select and confirm the option shown.
Select and confirm if only the keys for entering characters are to be affected.
Select and confirm the option shown.
Confirm the option shown.
 Loading...