

Page 1

EXAI 7248
SERIES
OWNER'S
MANUAL
Page 2
CH04_Contents.fm 1 ページ 2004年1月13日 火曜日 午後2時35分
Contents
Welcome/Features 2
Controls and Functions 3
Terms Used in this Manual 4
Getting Started 5
Installing the Phone 5
A. Choose the Best Location 5
B. Install the Rechargeable Battery Pack into the Handset 6
C. Connect the Base Unit and Charge the Handset 7
D. Mount the Base Unit on a Wall 8
Installing the Beltclip 9
Headset Installation 10
Basic Setup 11
Activating AutoTalk 11
Activating Caller ID on Call Waiting 11
Entering Your Area Code 12
Choosing the Dialing Mode 13
Setting the Language 13
Selecting the Ring Tone and Volume 14
Basics 15
Using Your Phone 15
Making and Receiving Calls 15
Adjusting the Earpiece Volume 16
Tone Dialing Switch-over 17
Traveling Out-of-Range 17
Selecting a Different Channel 17
Find Handset 18
Using Call Waiting 18
RocketDial 19
RocketDial 19
Using the Speed Dial Memory 20
Caller ID Features 25
The Integrated Answering Device 29
Additional Information 50
Storing the RocketDial 19
Using the Speed Dial Memory 20
Storing Names and Numbers in Speed Dial Memory 20
Storing Caller ID messages in Speed Memory Locations 23
Making Calls from Speed Dial Memory 24
Caller ID and CIDCW (Caller ID on Call Waiting) 25
When the Telephone Rings 25
Viewing the Caller ID Message List 26
Deleting Information from the Caller ID List 27
Making a Call from the Caller ID List 28
The Integrated Answering Device 29
Turning the Answering System On/Off 30
Setting Up Your Answering System 31
Using Your Answering System 40
Remote Operation 45
Changing the Digital Security Code 50
Note on Power Sources 51
General Information 53
Troubleshooting 54
Liquid Damage 57
Precautions & Warranty 58
I.C. Notice 60
Index 61
Remote Operation Card
[1]
www.uniden.com
Page 3
EXAI7248.book 2 ページ 2004年1月1
2日 月曜日 午後5時13分
Welcome
Features
Congratulations on your purchase of the Uniden cordless telephon
phone is designed and engineered to exacting standards f
performance.
Note:Illustrations in this manual are used for explanatio
illustrations in this manual may differ from the actual uni
cordless phone may vary.
As an Energy Star Partner, Uniden has determined that this product or product
models meets the Energy Star
Energy Star
• 2.4GHz Extended Range Technology
• 3 Line Backlit Display
• Caller ID and Caller ID on Call Waiting
• Integrated Telephone Answering Device
(ITAD)
• Trilingual Voice Prompts (English, French
or Spanish Support)
• 10 Number Memory Dialing
• One touch RocketDial®
Be sure to visit our web site: www.uniden.com
Uniden® and RocketDial® are registered trademarks of Uniden Ameri
AutoTalk, AutoStandby, UltraClear Plus, Random Code, and Au
Uniden America Corporation.
is a U.S. registered mark.
guidelines for energy efficiency.
or reliability, long life, and outstanding
n purposes. Some
• Last Number Redial
• English, French or Spanish Support
• Pulse/Tone Dialing
•Find Handset
• Earpiece Volume Control
•Ringer Volume Control
• Hearing Aid Compatible
• 20 Channel Autoscan
toSecure are trademarks of
e and answering system. This
t. The color of your
ca Corporation.
www.uniden.com
[2]
Page 4
EXAI7248.book 3 ページ 2004年1月1
2日 月曜日 午後5時13分
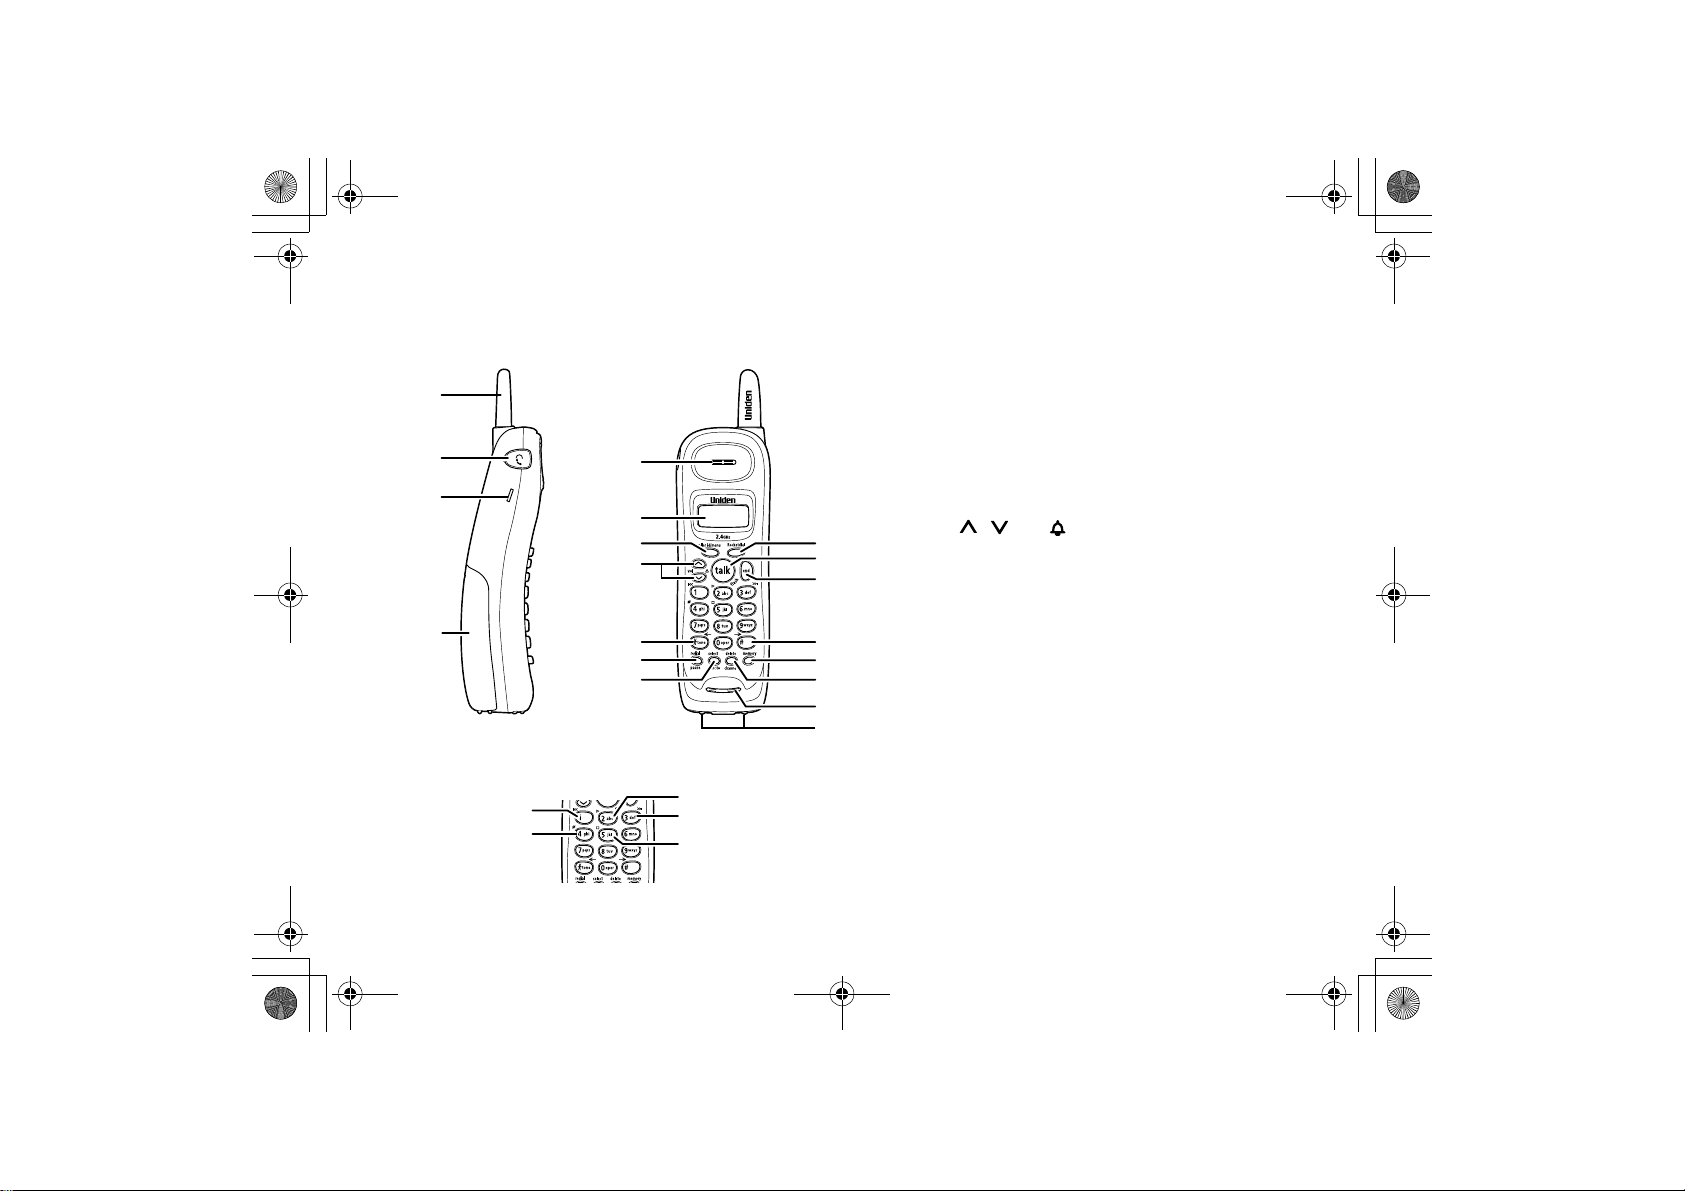
Controls and Functions
1
2
3
4
Retrieve TAD message
with Handset Remote keys
Repeat
Delete
5
6
7
8
9
10
11
Play
Skip
Stop
12
13
14
15
16
17
18
19
1. Handset antenna
2. Jack for optional headset
3. Beltclip hole
4. Handset battery compartment
5. Handset earpiece
6. LCD display
7. caller id/menu key (pages 11 and 25)
8. / /vol/ (earpiece volume, ringer
volume and scroll) key (pages 11, 14 and
16)
/tone/←
9.
*
(pages 17 and 20)
key (left cursor) key
10. redial/pause key (pages 16 and 22)
11. select/remote key (pages 11 and 48)
12. Rocketdial key (page 19)
13. talk/flash key (pages 15 and 18)
14. end key (pages 15 and 16)
15. #/→ (right cursor) key (page 20)
16. memory key (page 20)
17. delete/channel key (pages 17, 20 and 27)
18. Handset microphone and ringer speaker
19. Handset charging contacts
CONTROLS & FUNCTIONS
[3] CONTROLS & FUNCTIONS
www.uniden.com
Page 5
EXAI7248.book 4 ページ 2004年1月1
20
23
24
25
26
27
28
2日 月曜日 午後5時13分
Terms Used in this Manual
• Standby Mode - The handset may be sitting in or off the ba
not been pressed and there is no dial tone.
• Talk Mode - The handset is off the base and the
• CID - Caller ID
• CIDCW - Caller ID on Call Waiting
• RocketDial - One touch speed dial
talk/flash key has been pressed, enabling a dial tone.
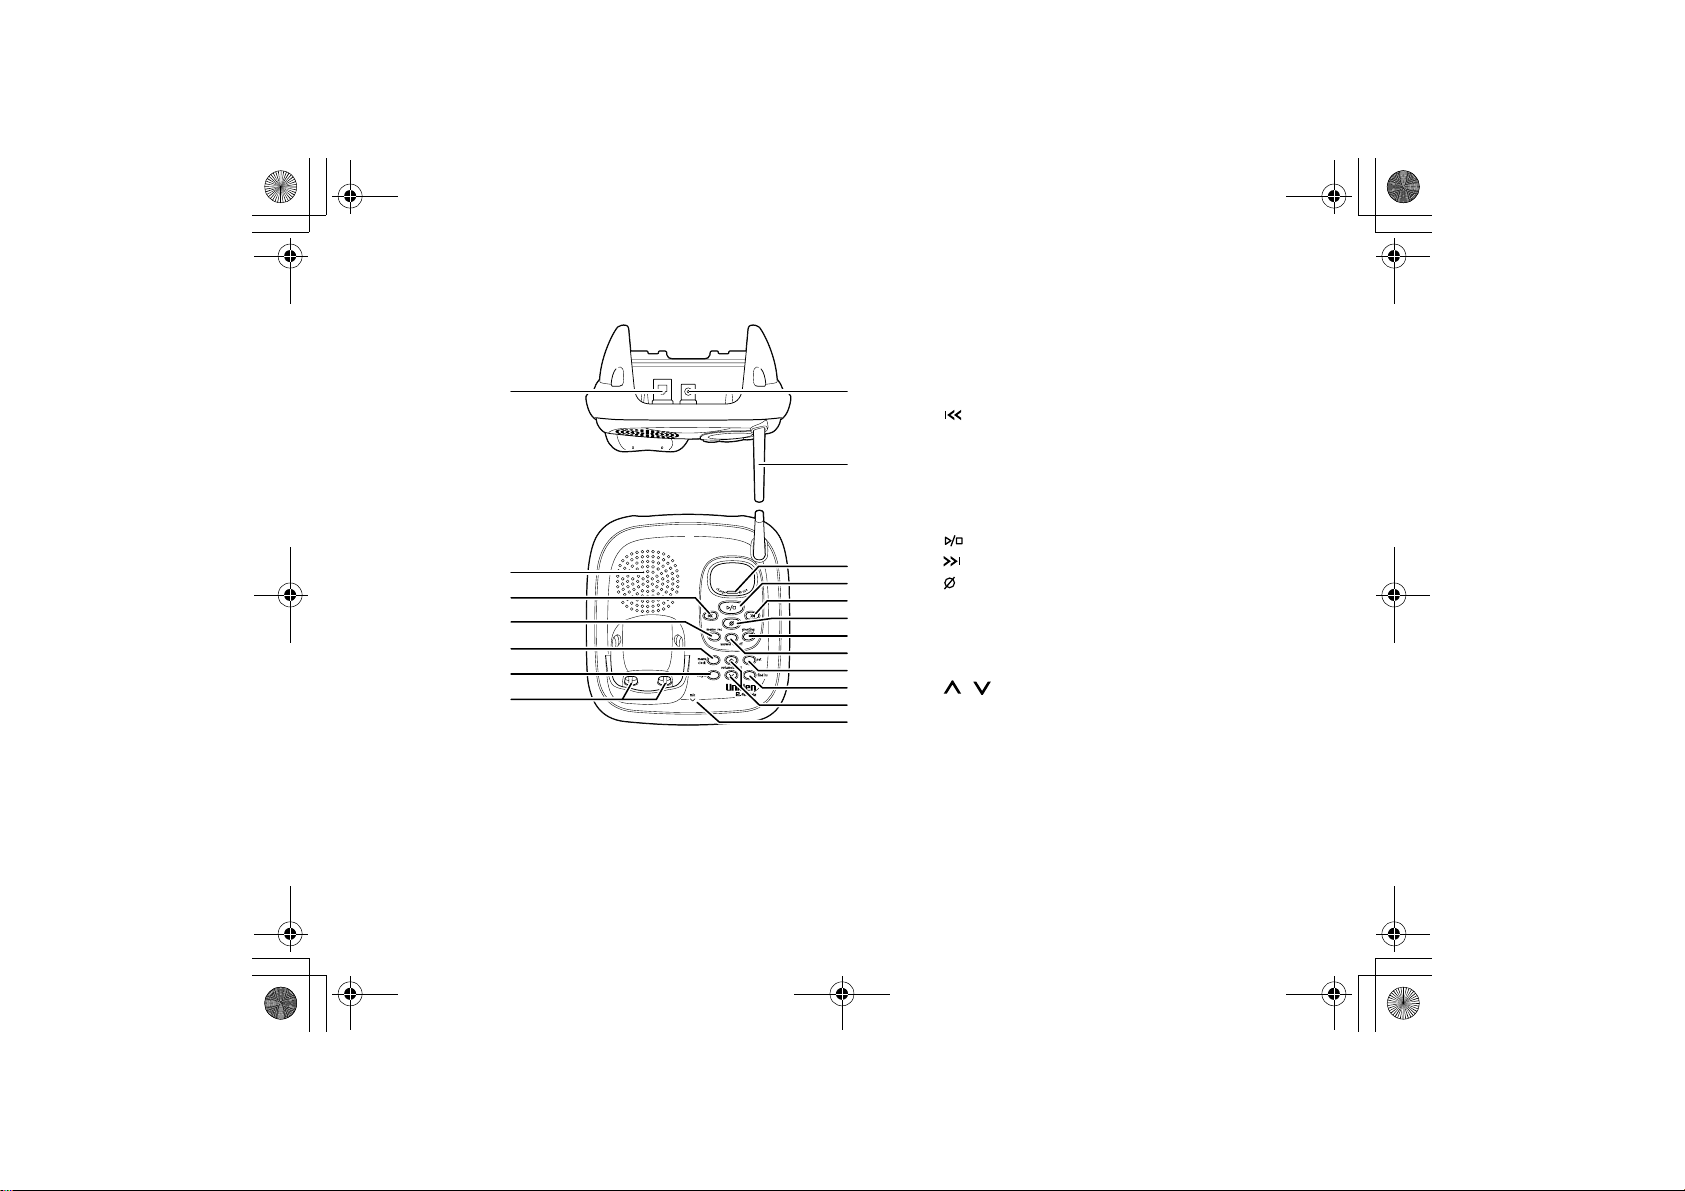
20. Telephone line jack
21. DC IN 9V jack
22. Base antenna
21
23. Base speaker
24. (repeat/rewind) key (page 41)
25. memo rec (record) key (page 44)
26. menu/clock key (pages 31 and 32)
22
27. ringer key (page 39)
28. Base charging contacts
29. charge in use LED
30. (play/stop) key (pages 39 and 40)
31. (skip/fast forward) key (page 42)
29
32. (delete) key (page 43)
30
31
33. greeting key (page 38)
32
34. answer on/off key (page 30)
33
35. set key (page 31)
34
36. find hs (handset) key (pages 18 and 50)
35
36
37. / /volume/select keys (pages 31 and 39)
37
38. mic (microphone)
38
se, but is NOT in use. The
talk/flash key has
CONTROLS & FUNCTIONS
www.uniden.com
CONTROLS & FUNCTIONS [ 4 ]
Page 6
EXAI7248.book 5 ページ 2004年1月1
Installing the Phone
note
If your home has
specially wired alarm
equipment connected to
the telephone line, be
sure that installing the
system does not disable
your alarm equipment.
If you have questions
about what will disable
your alarm equipment,
contact your telephone
company or a qualified
installer.
Do the following steps:
A. Choose the Best Location
B. Install the Rechargeable Battery Pack into the Handset
C. Connect the Base Unit and Charge the Handset
D. Mount the Base Unit on a Wall
A. Choose the Best Location
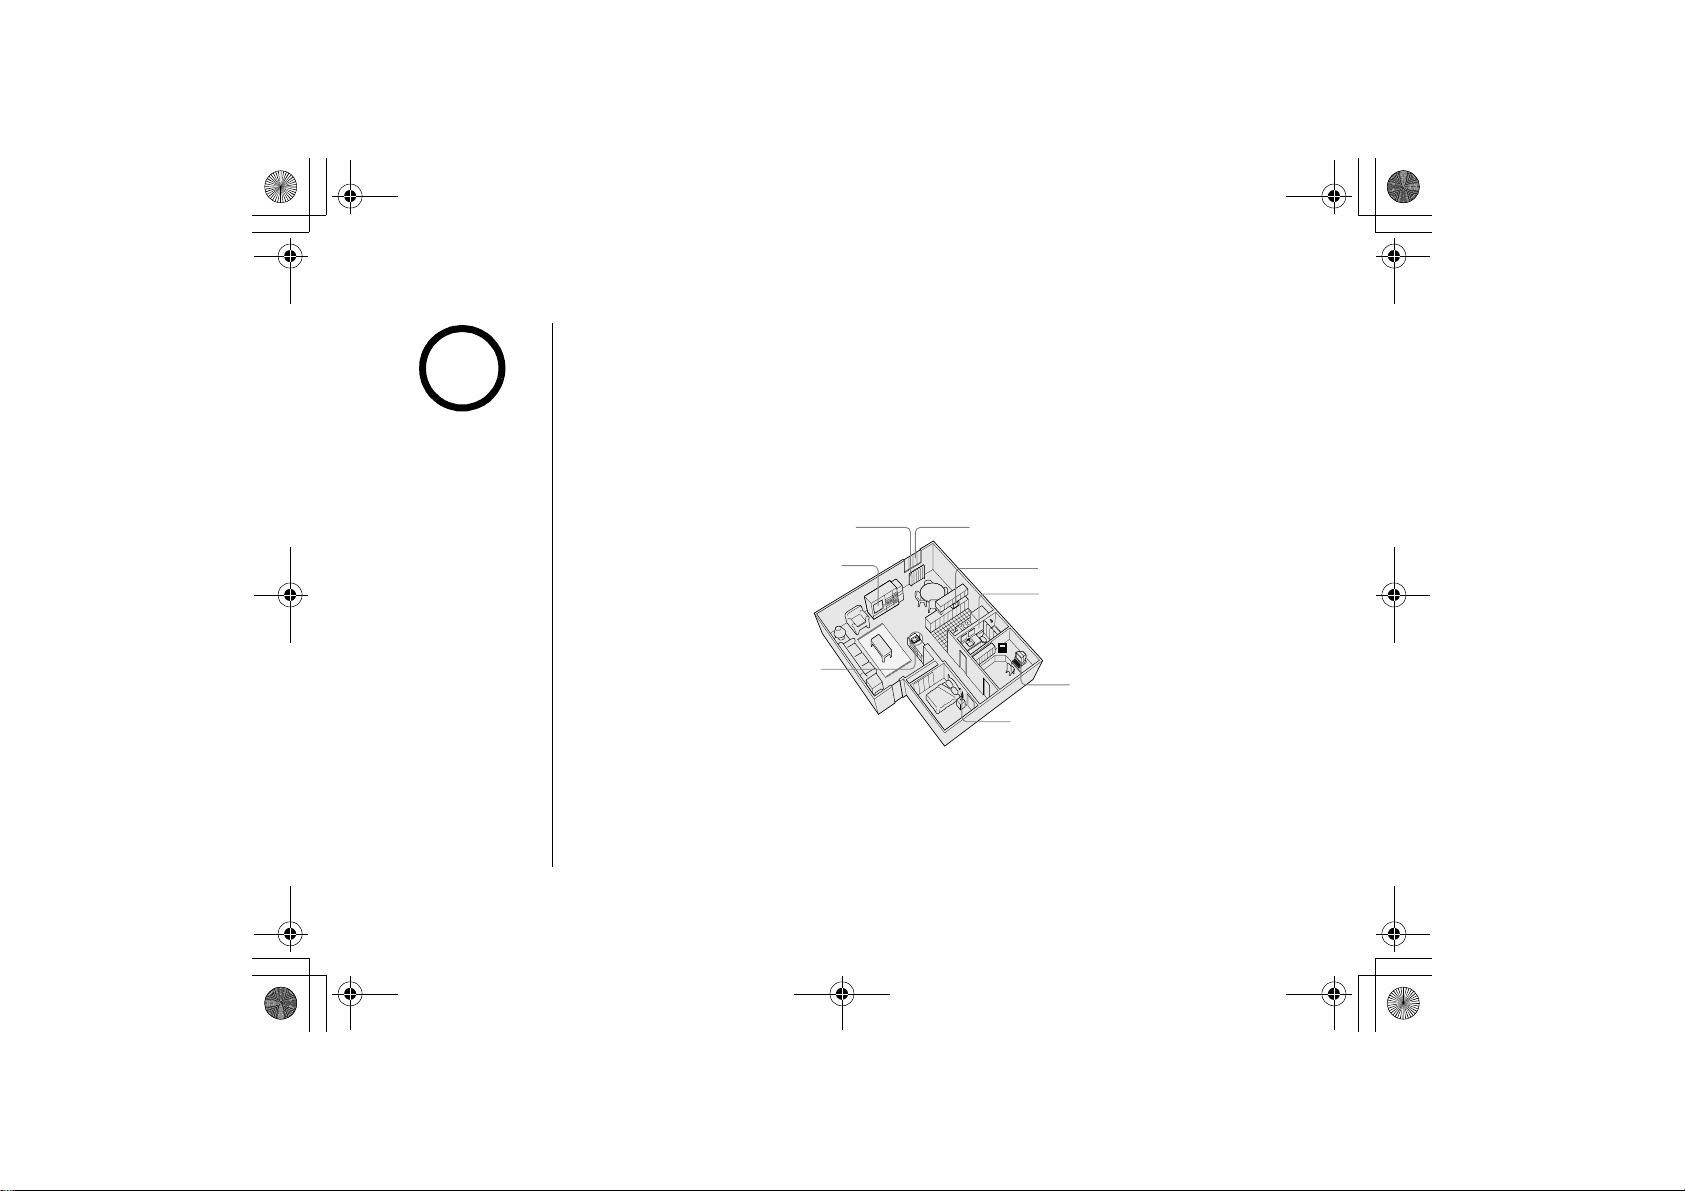
When choosing a location for your new phone, here are some importan
consider:
Avoid heat sources, such as radiators,
air ducts, and sunlight
Avoid television sets and other
electronic equipment
Choose a central location
2日 月曜日 午後5時13分
GETTING STARTED
t guidelines you should
Avoid noise sources such as a window by
a street with heavy traffic
Avoid microwave ovens
Avoid excessive moisture,
extremely low temperatures, dust,
mechanical vibration, or shock
Avoid personal computers
Avoid other cordless telephones
• The location should be close to both a phone jack and a co
• The base and handset should be kept away from sources of elec
• The base can be placed on a desk, tabletop, or mounted on
• There should be enough space to fully extend the antenna.
[5] GETTING STARTED
which is not connected to a switch).
ntinuous power outlet (one
trical noise such as motors,
microwave ovens, and fluorescent lighting.
a standard wall plate.
www.uniden.com
Page 7
EXAI7248.book 6 ページ 2004年1月1
2日 月曜日 午後5時13分
B. Install the Rechargeable Battery Pack into the Handset
The handset is powered by a rechargeable battery pack. The
battery recharges automatically when the handset is placed in
the base unit.
GETTING STARTED
!
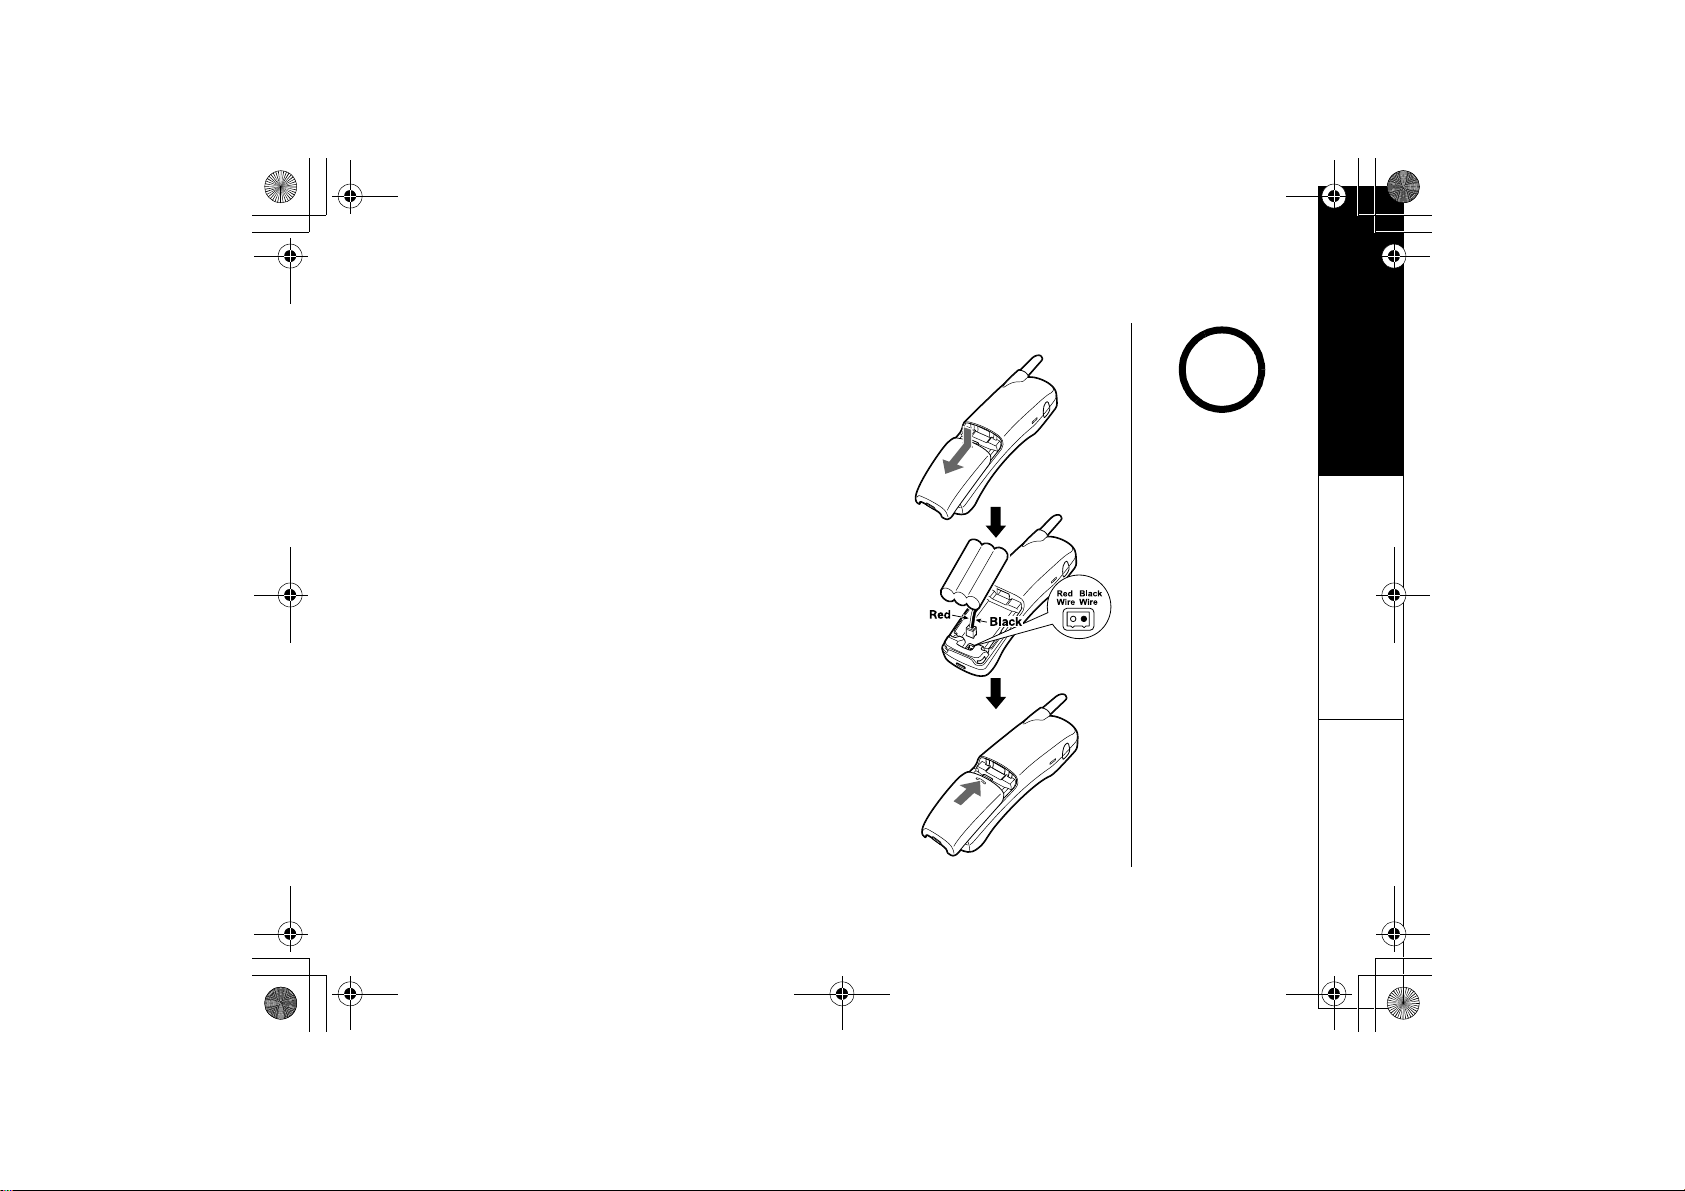
1) Press down on the handset battery case cover (use the
finger indention for a better grip) and slide the cover
downward to remove.
2) Plug the battery pack connector (red & black wires) into the
jack inside the battery compartment.
(The connector notches fit into the grooves of the jack only
one way.) Match the wire colors to the polarity label in th
battery compartment, connect the battery and listen for a
click to insure connection.
3) Make sure you have a good connection by slightly pulling on
the battery wires. If the connection is secure, the battery
jack will remain in place.
4) Place the battery case cover back in the handset by sliding
it upwards until it clicks into place.
www.uniden.com
•Use only the Uniden
(BT-905)
rechargeable battery
pack supplied with
your cordless
telephone.
e
•Replacement batteries
are also available
through the Uniden
Parts Department at
(800) 554-3988,
Monday through Friday
from 8:00 a.m. to 5:00
p.m. or online at
www.uniden.com
GETTING STARTED [6]
Page 8
EXAI7248.book 7 ページ 2004年1月1
C. Connect the Base Unit and Charge the Handset
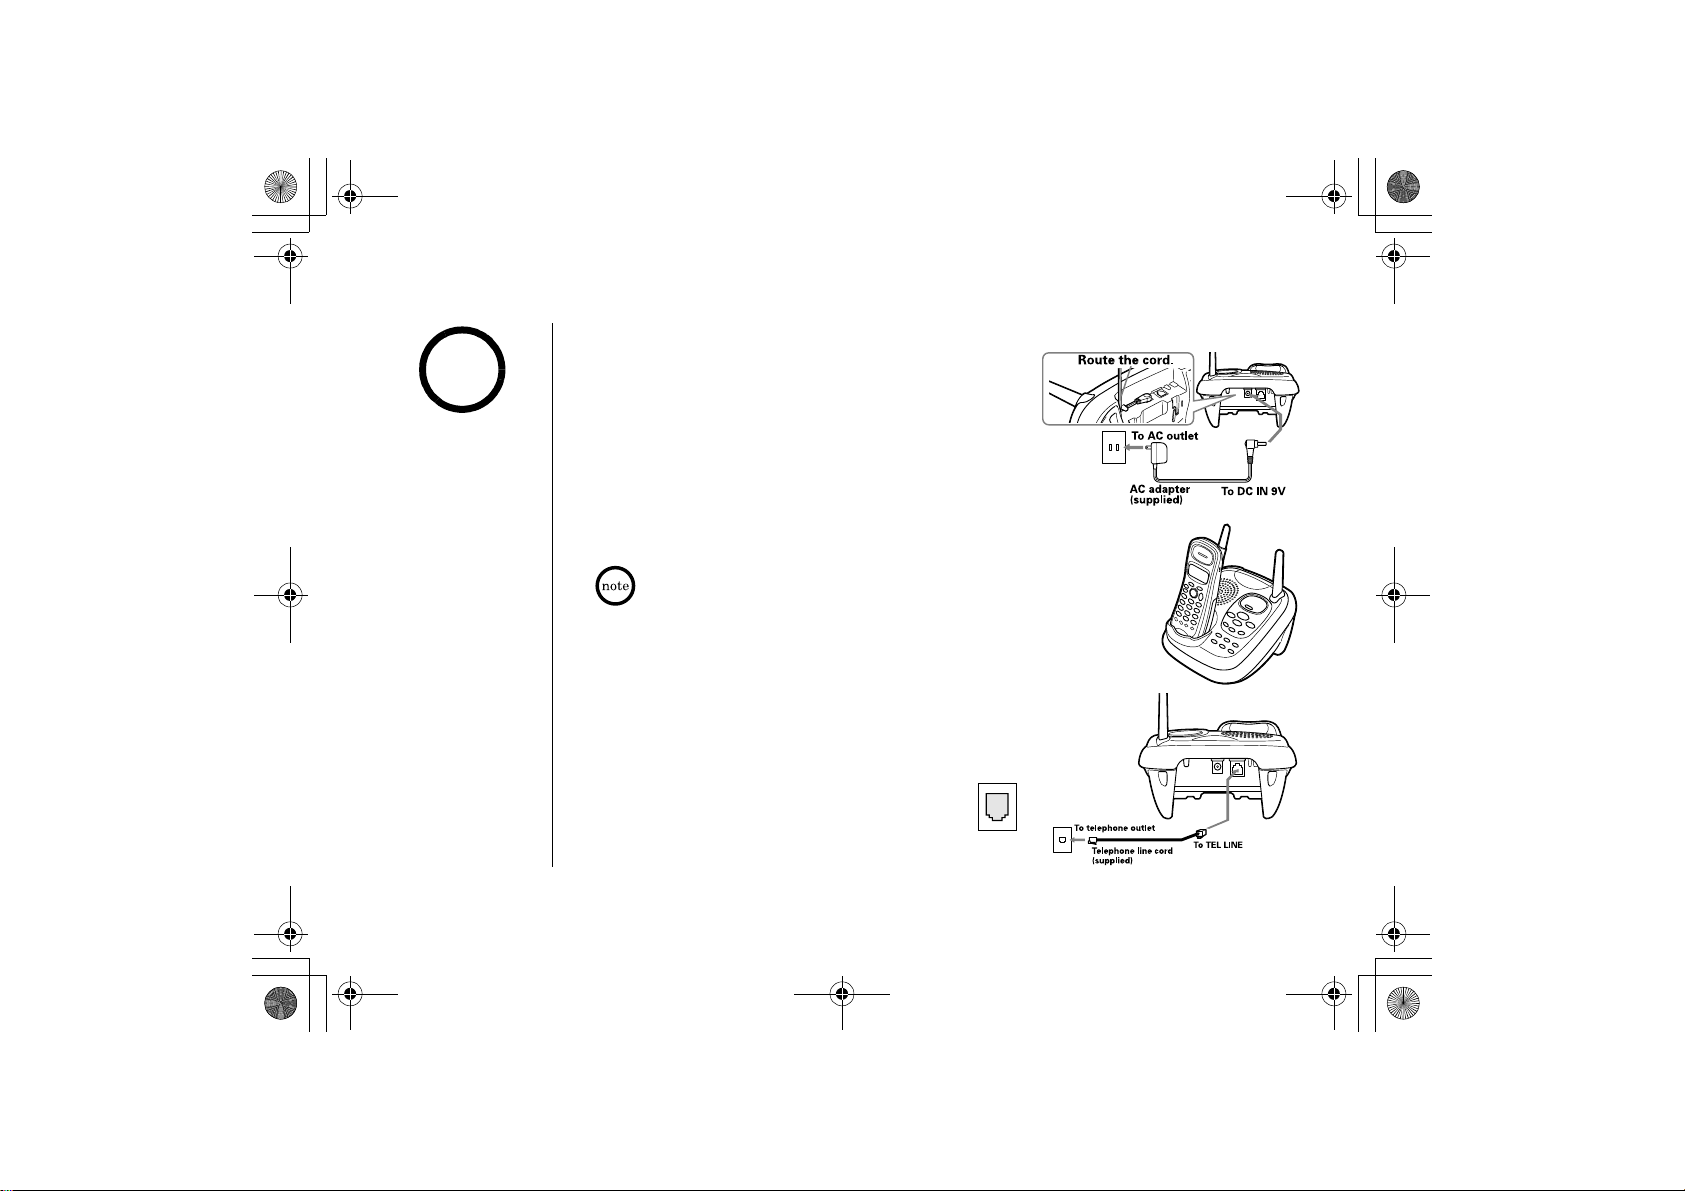
1) Connect the AC adapter to the
!
•Use only the supplied
AD-314 AC adapter.
Do not use any other
AC adapter.
•Do not place the power
cord where it creates a
trip hazard or where it
could become chafed
and create a fire or
electrical hazard.
standard 120V AC wall outlet.
2) Place the handset in the base unit with the keypad
facing forward.
3) Make sure the charge in use
If the LED does not illuminate, check to see that the
AC adapter is plugged in and the handset makes good
contact with the base charging contacts.
• Connect the AC adapter to a continuous power su
• Place the base unit close to the AC outlet so tha
4) Charge your handset at least 15-20 hours before
plugging into the phone line.
5) Once the handset battery pack is fully
charged, connect the telephone line cord to
the TEL LINE
If your telephone outlet isn't modular,
contact your telephone company for
assistance.
2日 月曜日 午後5時13分
LED illuminates.
the AC adapter easily.
jack and a telephone outlet.
GETTING STARTED
DC IN 9V jack and to a
pply.
t you can unplug
[7] GETTING STARTED
Modular
www.uniden.com
Page 9
EXAI7248.book 8 ページ 2004年1月1
2日 月曜日 午後5時13分
D. Mount the Base Unit on a Wall
Standard wall plate mounting
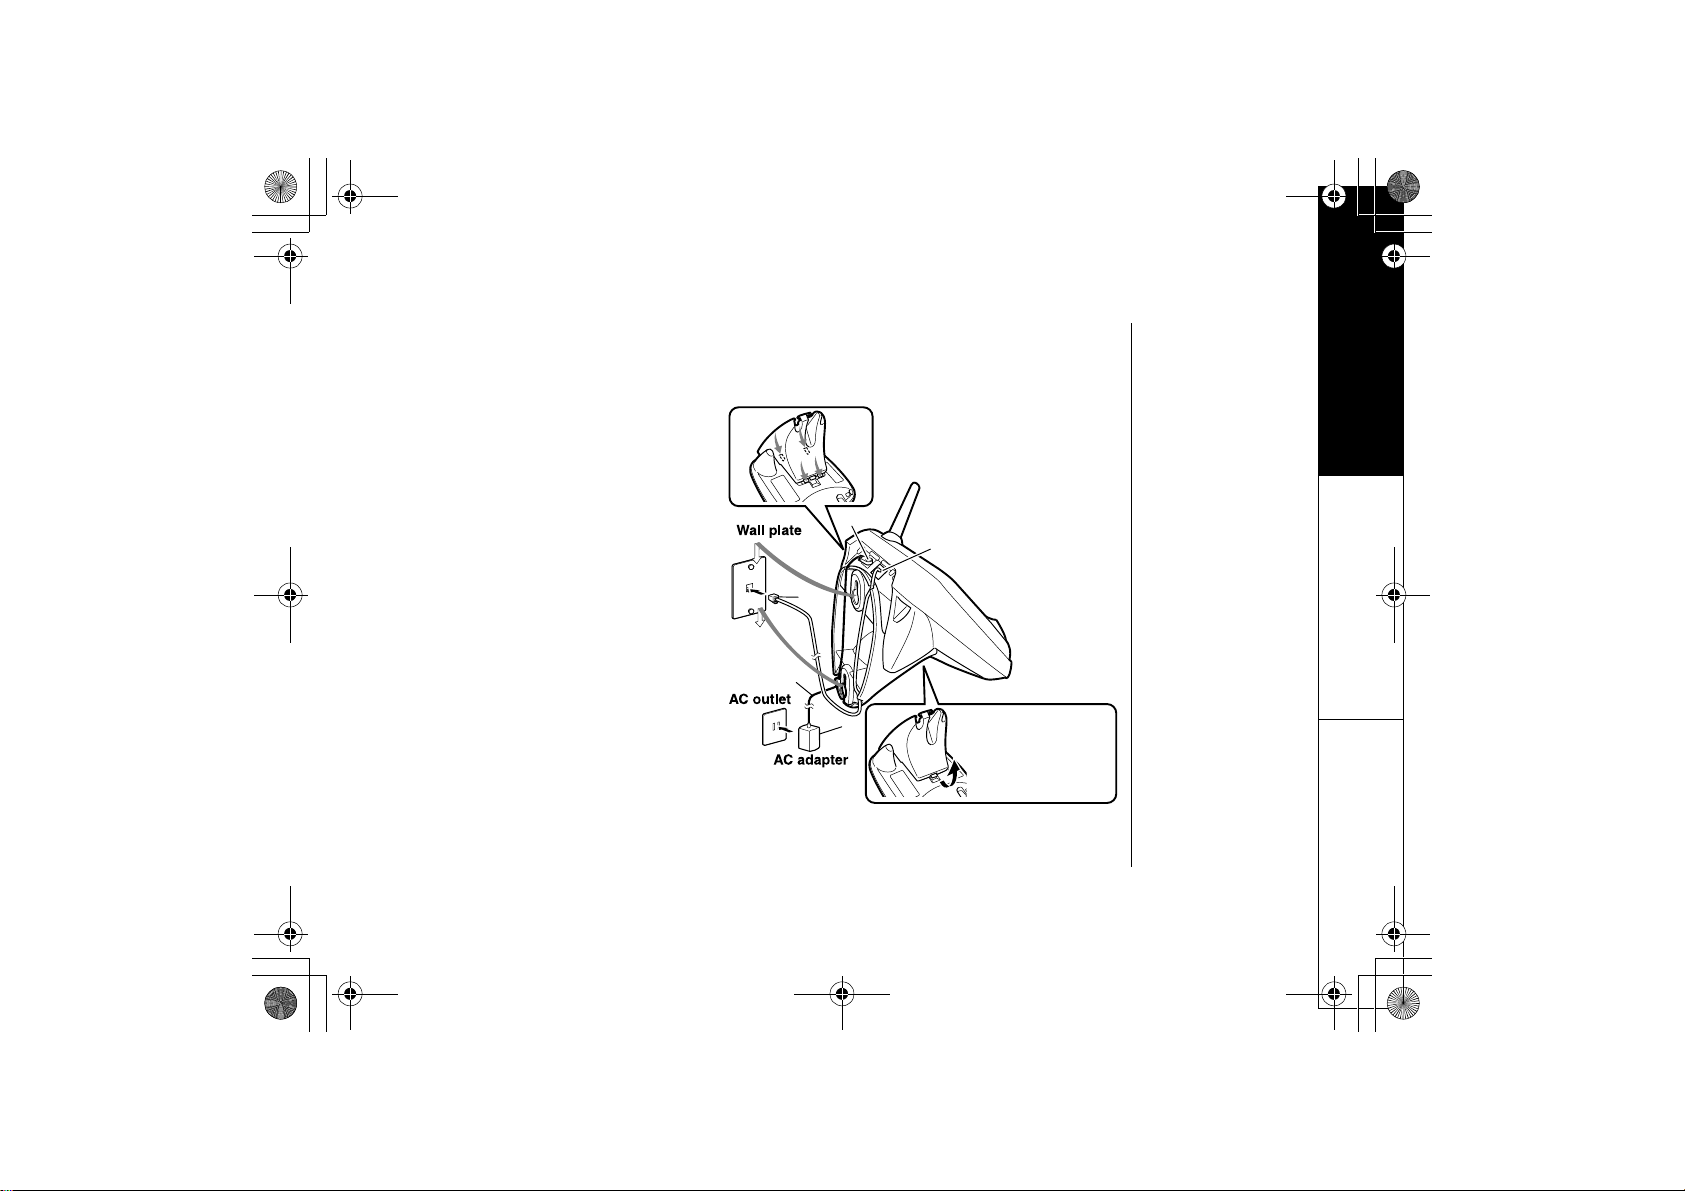
This phone can be mounted on any standard wall plate.
1) Locate the base unit on the wall
mount adapter as shown and slide
the wall mount adapter into the
notches on the base bottom.
2) Plug the AC adapter to the
jack.
3) Route the AC adapter cord through
the molded wiring channel as shown.
4) Plug the AC adapter into a standard
120V AC wall outlet.
5) Plug the telephone line cord into the
TEL LINE jack. Route the cord
through the molded wiring channel
as shown.
6) Plug the telephone line cord into the
telephone outlet.
7) Align the mounting slots on the base
with the mounting posts on the wall.
Then push in and down until the
phone is firmly seated.
DC IN 9V
GETTING STARTED
1
2
5
7
6
7
3
4
To remove, push up
a tab on the wall
mount adapter as
shown.
www.uniden.com
GETTING STARTED [8]
Page 10
EXAI7248.book 9 ページ 2004年1月1
Direct wall mounting
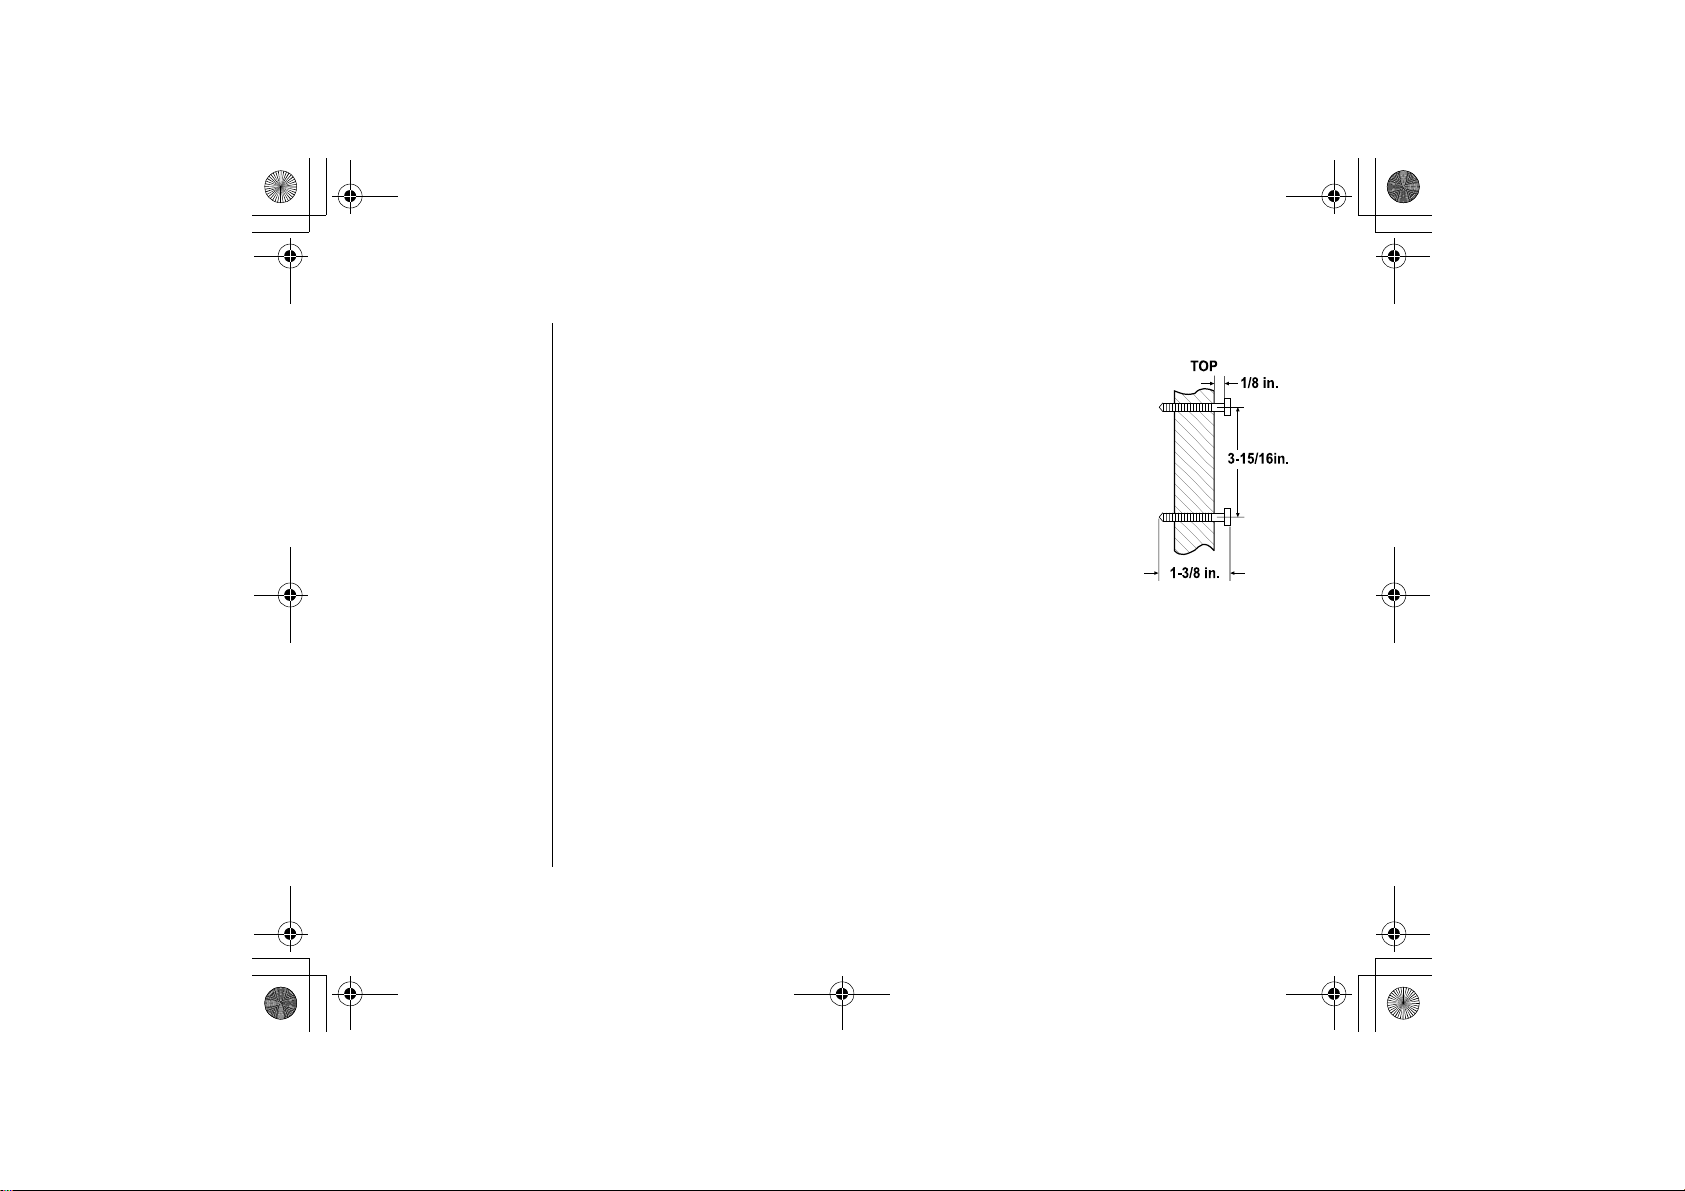
If you don't have a standard wall plate, you can mount your ph
directly to the wall. Before doing this, consider the following:
• Avoid electrical cables, pipes, or other items behind the mounting
location that could cause a hazard when inserting screws in
wall.
• Try to mount your phone within 5 feet of a working phone j
avoid excessive cord lengths.
• Make sure the wall material is capable of supporting the wei
the base and handset.
• Use #10 screws (minimum length of 1-3/8 inches) with an
devices suitable for the wall material where the base unit will be
placed.
2日 月曜日 午後5時13分
GETTING STARTED
one
to the
ack to
ght of
choring
1) Insert two mounting screws into the wall, (with their appr
2) Refer to step 1 through 7 on page 8 to mount the telephone.
Installing the Beltclip
To attach the beltclip
Insert the beltclip into the holes on each side of the handset. Press d
To remove the beltclip
Pull both sides of the beltclip to release the tabs from the holes.
[9] GETTING STARTED
15/16 inches apart. Allow about 1/8 of an inch between the wa
opriate anchoring device), 3-
mounting the phone.
ll and screw heads for
own until it clicks.
www.uniden.com
Page 11
EXAI7248.book 10 ページ 2004年1月12日
月曜日 午後5時13分
Headset Installation
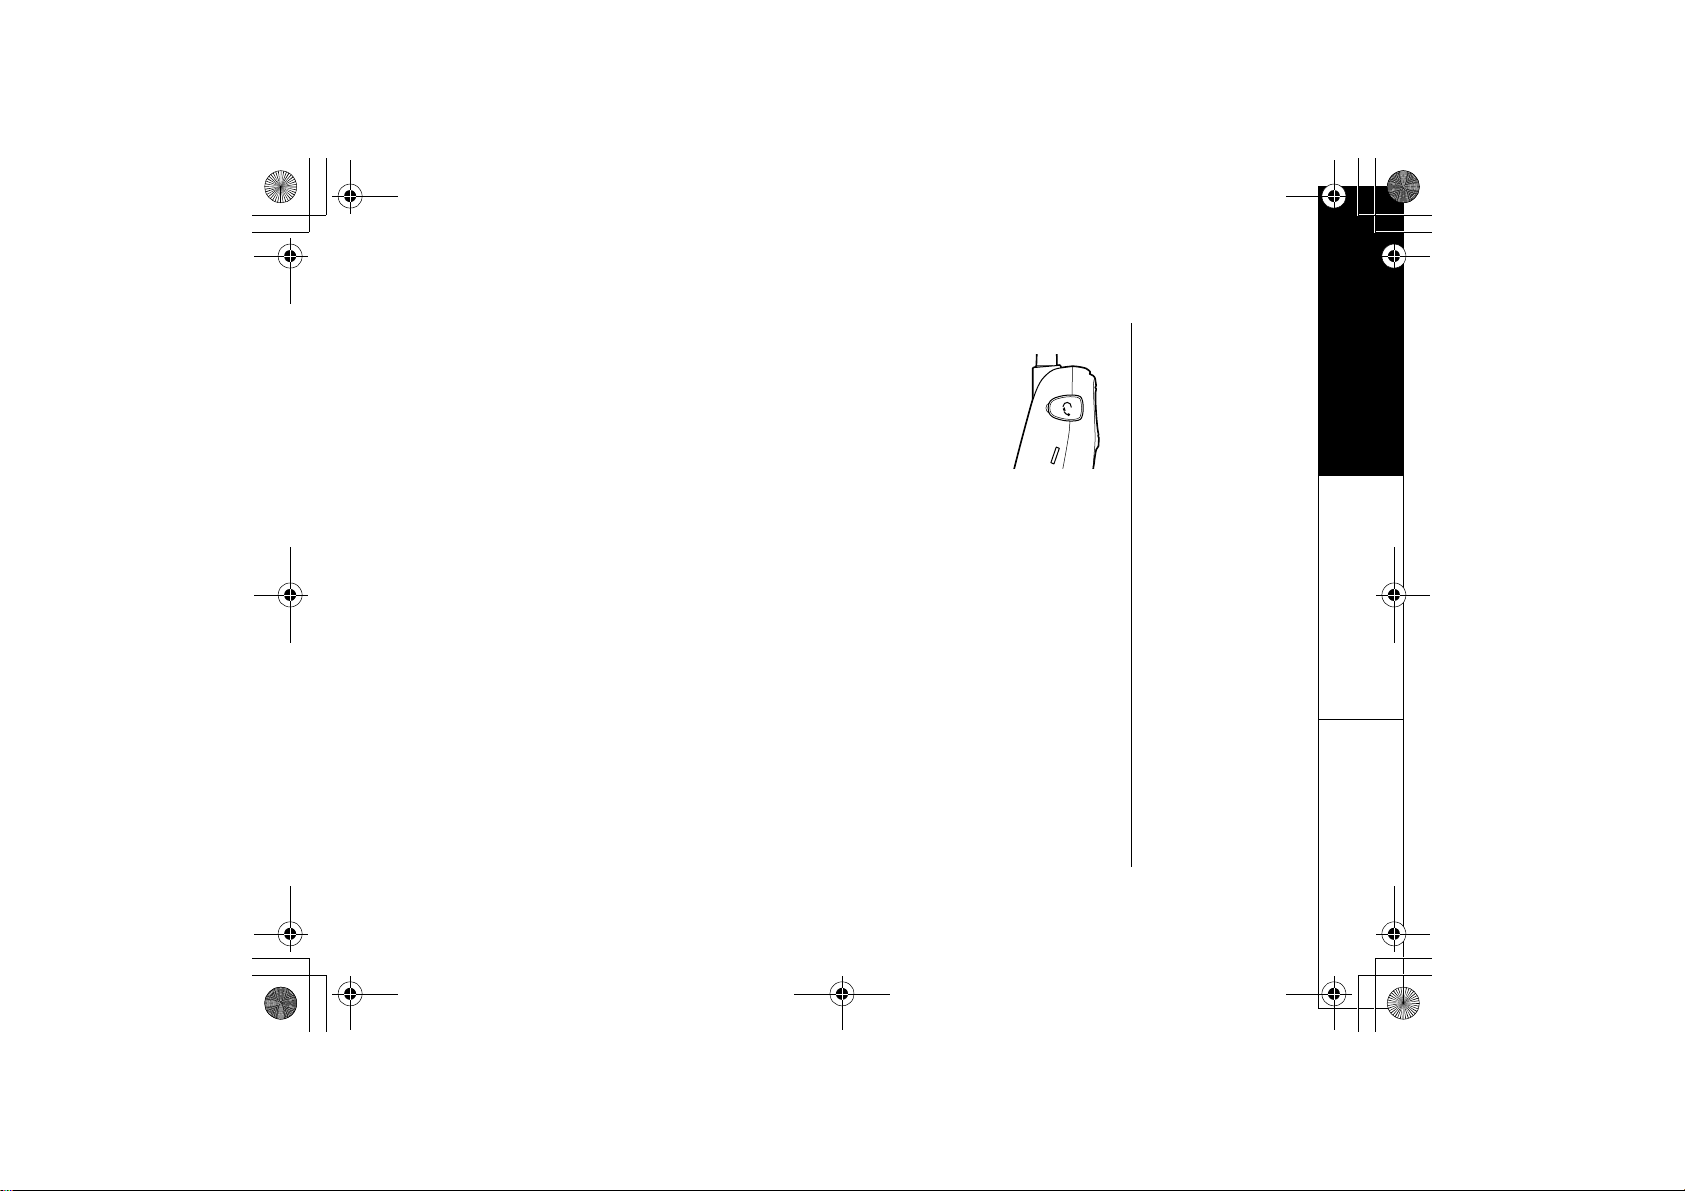
Your phone may be used with an optional headset, the Uniden
To use this feature, insert the headset plug into the headset jack.
Your phone is ready for hands-free conversations.
(Headset may be purchased by calling the Uniden Parts Department or
visiting the web site. See page 53.)
GETTING STARTED
HS910.
www.uniden.com
GETTING STARTED [10]
Page 12
EXAI7248.book 11 ページ 2004年1月12日
Basic Setup
There are five basic options that you will need to set up: AutoT
Waiting), Area Code, Dial Mode and Language.
Activating AutoTalk
AutoTalk allows you to answer the phone simply by removing th
do not have to press any keys.
月曜日 午後5時13分
GETTING STARTED
alk, CIDCW (Caller ID on Call
e handset from the base. You
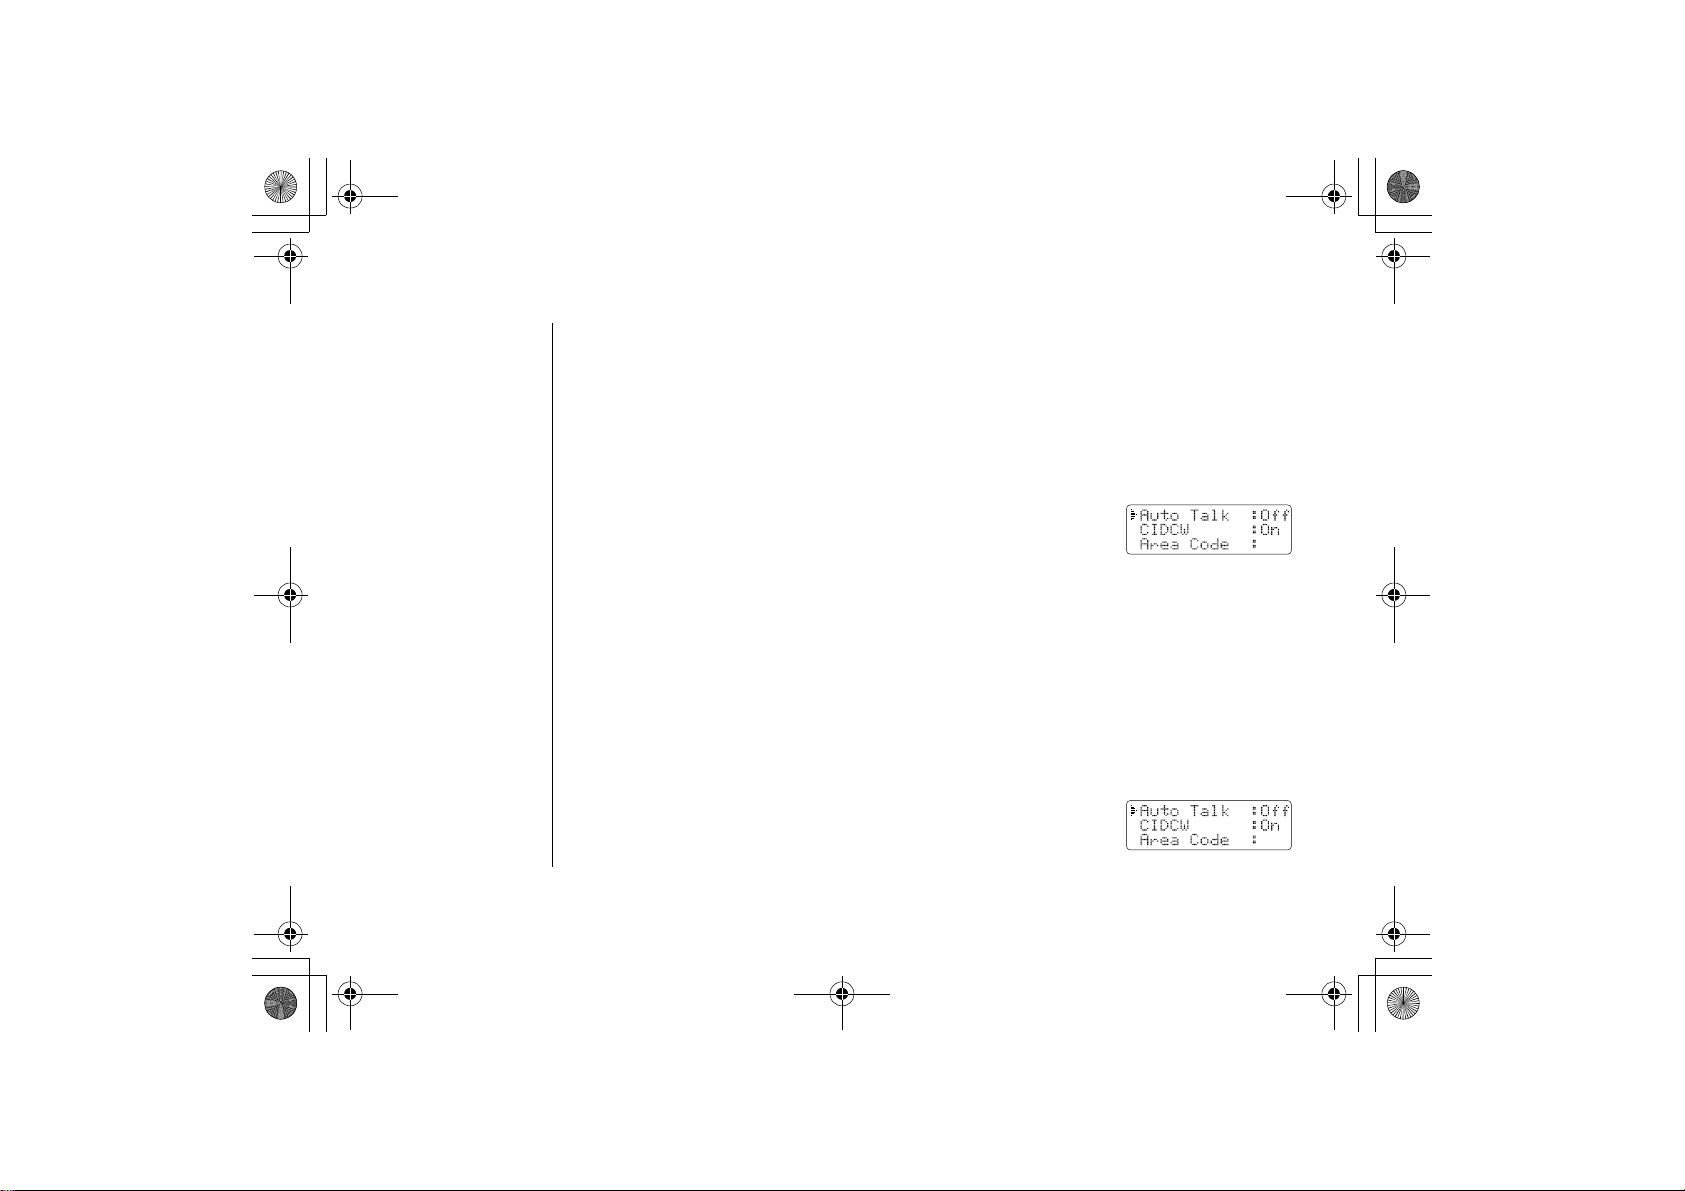
1) When the phone is in standby mode, press and hold the caller id/
menu
2) Press the
3) Press the
Activating Caller ID on Call Waiting
Caller ID allows you to see the name and number of the calling
phone. Caller ID on Call Waiting (CIDCW) lets you see th
comes in when you are on the line.
You must subscribe to Caller ID service throug
feature.
1) When the phone is in standby mode, press and hold the caller id/
menu
[11] GETTING STARTED
key. The following screen appears.
select/remote
end key to complete the setting. The handset returns to standb
key. The following screen appears.
key to turn AutoTalk on.
party before you answer the
e name and number of a call that
h your local telephone provider to use this
y mode.
www.uniden.com
Page 13
EXAI7248.book 12 ページ 2004年1月12日
月曜日 午後5時13分
GETTING STARTED
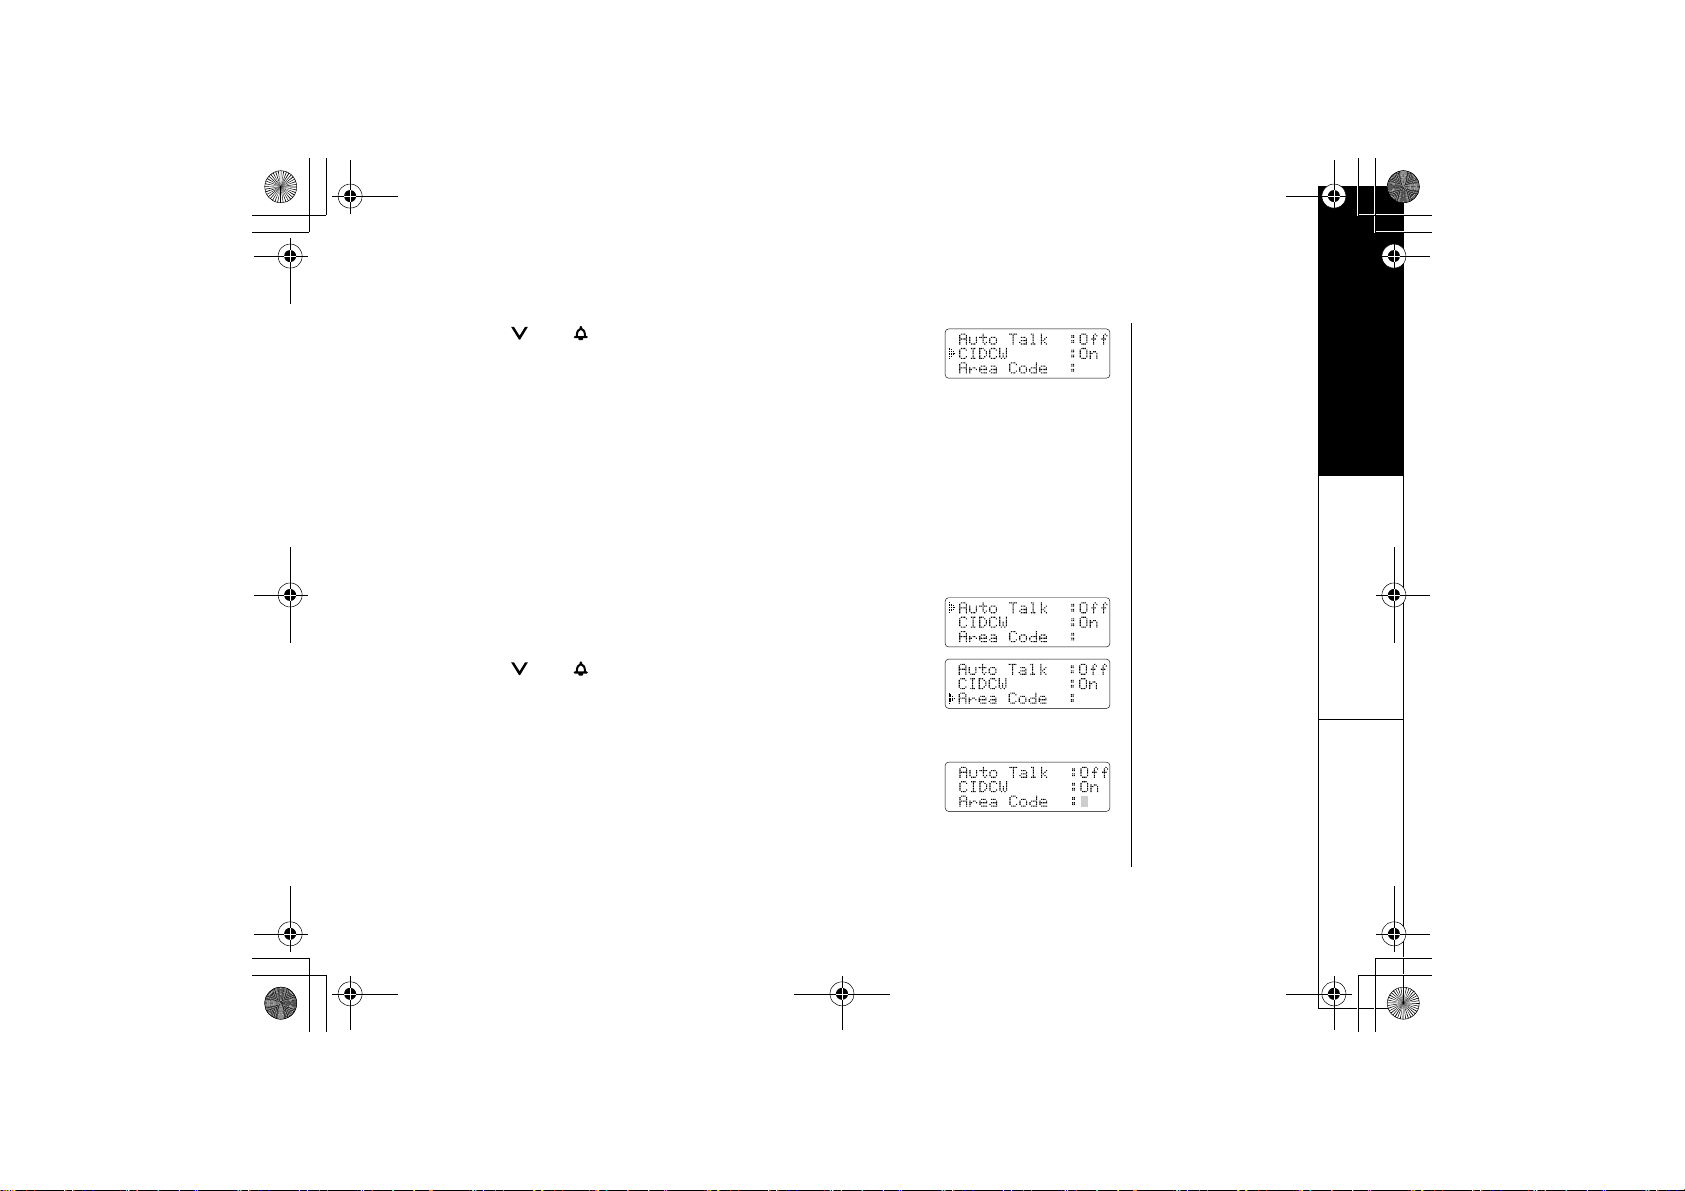
2) Press the
/vol/
3) Press the select/remote
key to select
CIDCW
.
key to toggle and turn on Caller ID on Call
Waiting.
4) Press the
end key and return the handset to the base unit to complete th
handset returns to standby mode.
Entering Your Area Code
If you enter a 3-digit area code number in the
appear in Caller ID messages. Do not program this option if your c
dialing. When reviewing Caller ID messages, you will see only th
calls received from outside your local area
1) When the phone is in standby mode, press and hold the
menu key. The following screen appears.
2) Press the
3) Press the
/vol/
select/remote
key twice to select
key. If an area code was already stored,
the phone will display it.
4) Use the number keys
make an error, use the
5) Press the
select/remote
(0 - 9) to enter the 3-digit area code. If you
delete/channel
key. A confirmation tone sounds.
Area Code
option, your local area code does not
e local seven digit number. For
code, you will see a full 10-digit number.
caller id/
Area Code
.
key to backspace.
e setting. The
alling area requires 10-digit
www.uniden.com
GETTING STARTED [12]
Page 14
EXAI7248.book 13 ページ 2004年1月12日
月曜日 午後5時13分
GETTING STARTED
note
•If you are not sure of
your dialing system,
make a trial call. If the
call connects, leave
the setting as is.
Otherwise, set for
pulse dialing.
•If your phone system
requires pulse dialing
and you need to send
DTMF tones during a
call, you can
temporarily switch
over to tone dialing.
(Refer to “Tone Dialing
Switch-over” on
page 17.)
6) Press the
end key to complete the setting. The handset returns to standby m
Choosing the Dialing Mode
Most phone systems use tone dialing. However some phone sys
still use pulse dialing. Your Uniden phone supports both tone a
setting is tone dialing. If your phone system uses pulse dialing,
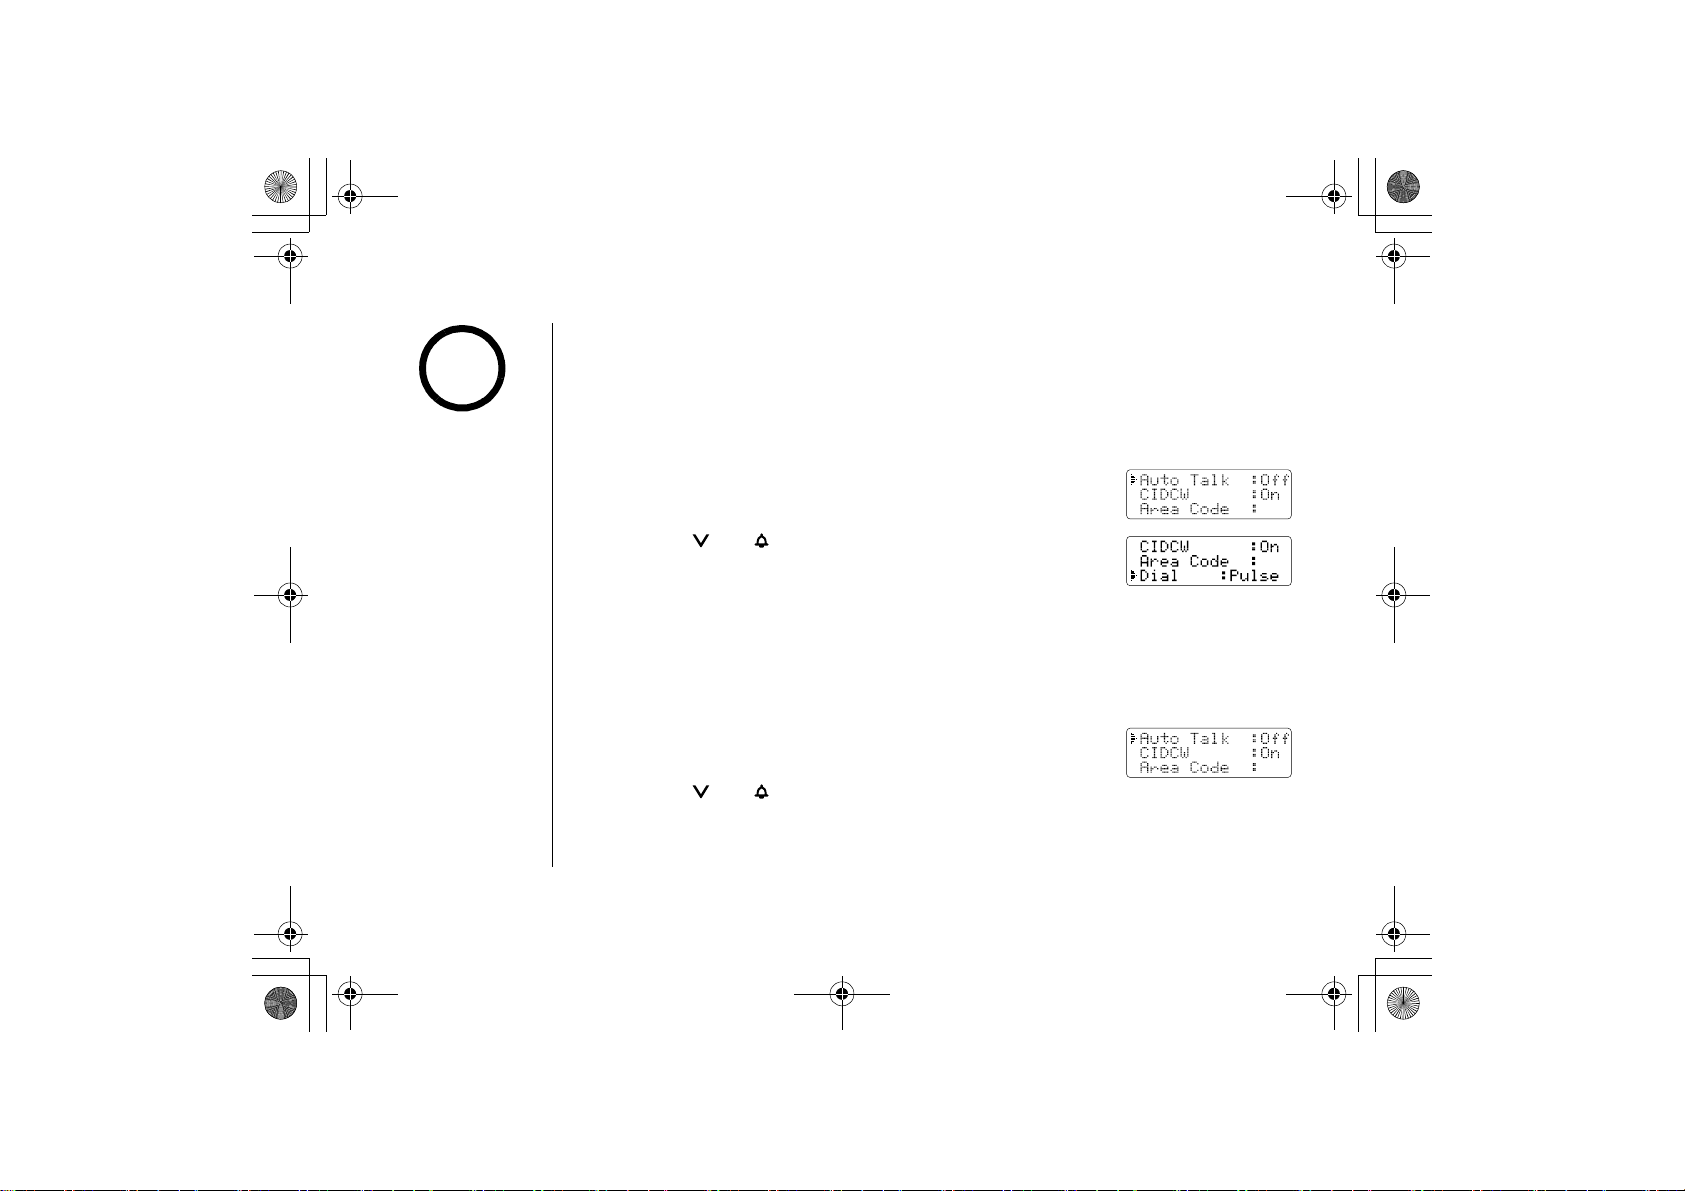
change the dialing mode:
1) When the phone is in standby mode, press and hold the call
key. The following screen appears.
menu
2) Press the /
3) Press the
4) Press the
vol/ key three times to select
select/remote
key to set the phone to pulse dialing.
Dial
.
end key to complete the setting. The handset returns to
standby mode.
tems (such as in rural areas)
nd pulse dialing. The default
follow the steps below to
er id/
Setting the Language
There are three languages to choose from; English, French and Spani
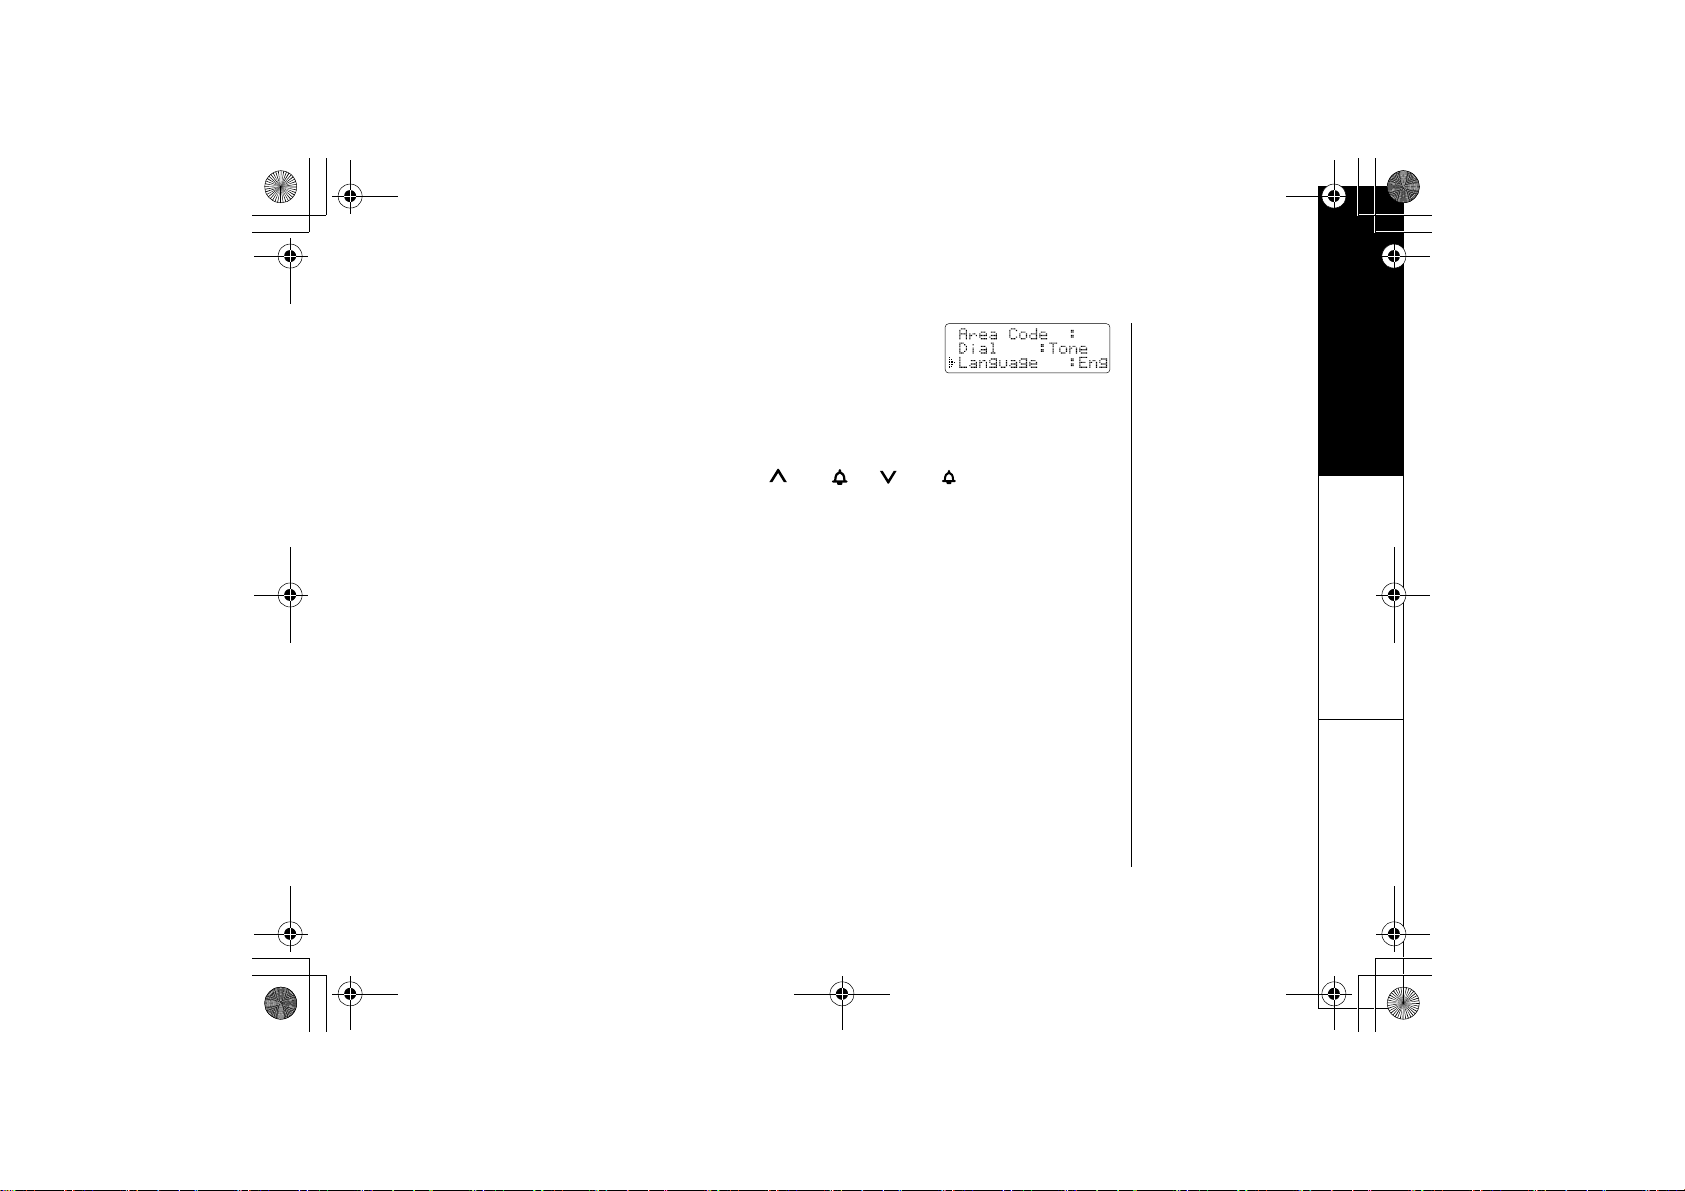
1) When the phone is in standby mode, press and hold the call
key. The following screen appears.
menu
2) Press the /
vol/ key four times to select
Language
er id/
.
ode.
sh.
[13] GETTING STARTED
www.uniden.com
Page 15
EXAI7248.book 14 ページ 2004年1月12日
月曜日 午後5時13分
GETTING STARTED
3) Press the
select/remote
4) Press the end
key to complete the setting. The handset returns to
key to select
Eng, Fr.
or
Esp.
standby mode.
Selecting the Ring Tone and Volume
Your phone has five different
1) With the phone in standby mode, press the
2) The phone will sound the different ring tones at different volume
3) When the phone sounds the ring tone and volume you wish to us
ringer tone/volume combinations you can choose from.
/vol/
or /vol/
key.
s.
e, press the end
key.
www.uniden.com
GETTING STARTED [14]
Page 16
EXAI7248.book 15 ページ 2004年1月12日
Using Your Phone
Making and Receiving Calls
Making a call
1) Remove the handset from the base.
2) Press the
3) Listen for the dial tone.
4) Dial the number.
OR
1) Remove the handset from the base.
2) Dial the number.
3) Press the talk/flash
Receiving a call
1) Remove the handset from the base. (If AutoTalk is on, the ph
answer the call when you pick it up.)
2) Press the
note
Refer to page 11
"Basic Setup" to turn on
the AutoTalk feature if
desired.
OR
1) If the handset is off the base, press the
on.)
Hanging up
Press the end
月曜日 午後5時13分
talk/flash
talk/flash
key or return the handset to the base.
key.
key.
key.
talk/flash
BASICS
one will automatically
key or any number key. (AutoTalk is
[15] BASICS
www.uniden.com
Page 17

EXAI7248.book 16 ページ 2004年1月12日
Redialing the last dialed number
1) Remove the handset from the base.
2) Press the talk/flash
3) Listen for the dial tone.
4) Press the redial/pause
OR
1) Remove the handset from the base.
2) Press the
3) Press the
redial/pause
talk/flash key.
key.
key.
key.
月曜日 午後5時13分
Adjusting the Earpiece Volume
To change the earpiece volume, press the
/vol/
key during a call.
Temporarily Mute Ringer
If the handset is off the base while an incoming call is ringing,
simply press the
The ringer will sound with the next incoming call.
www.uniden.com
end key to temporarily mute the incoming ring.
or /vol/
BASICS
BASICS [16]
Page 18
EXAI7248.book 17 ページ 2004年1月12日
Tone Dialing Switch-over
note
The UltraClear PlusTM
true compander circuitry
virtually eliminates
background noise. This
innovative technology,
together with 20
different channels,
provides you with the
best possible reception
during all your
conversations.
If your telephone company requires pulse dialing, you can switc
over to tone dialing after the call connects. This feature is useful
when you need tone dialing to use any automated menu system
such as telephone bank tellers,
customer support menus, etc.
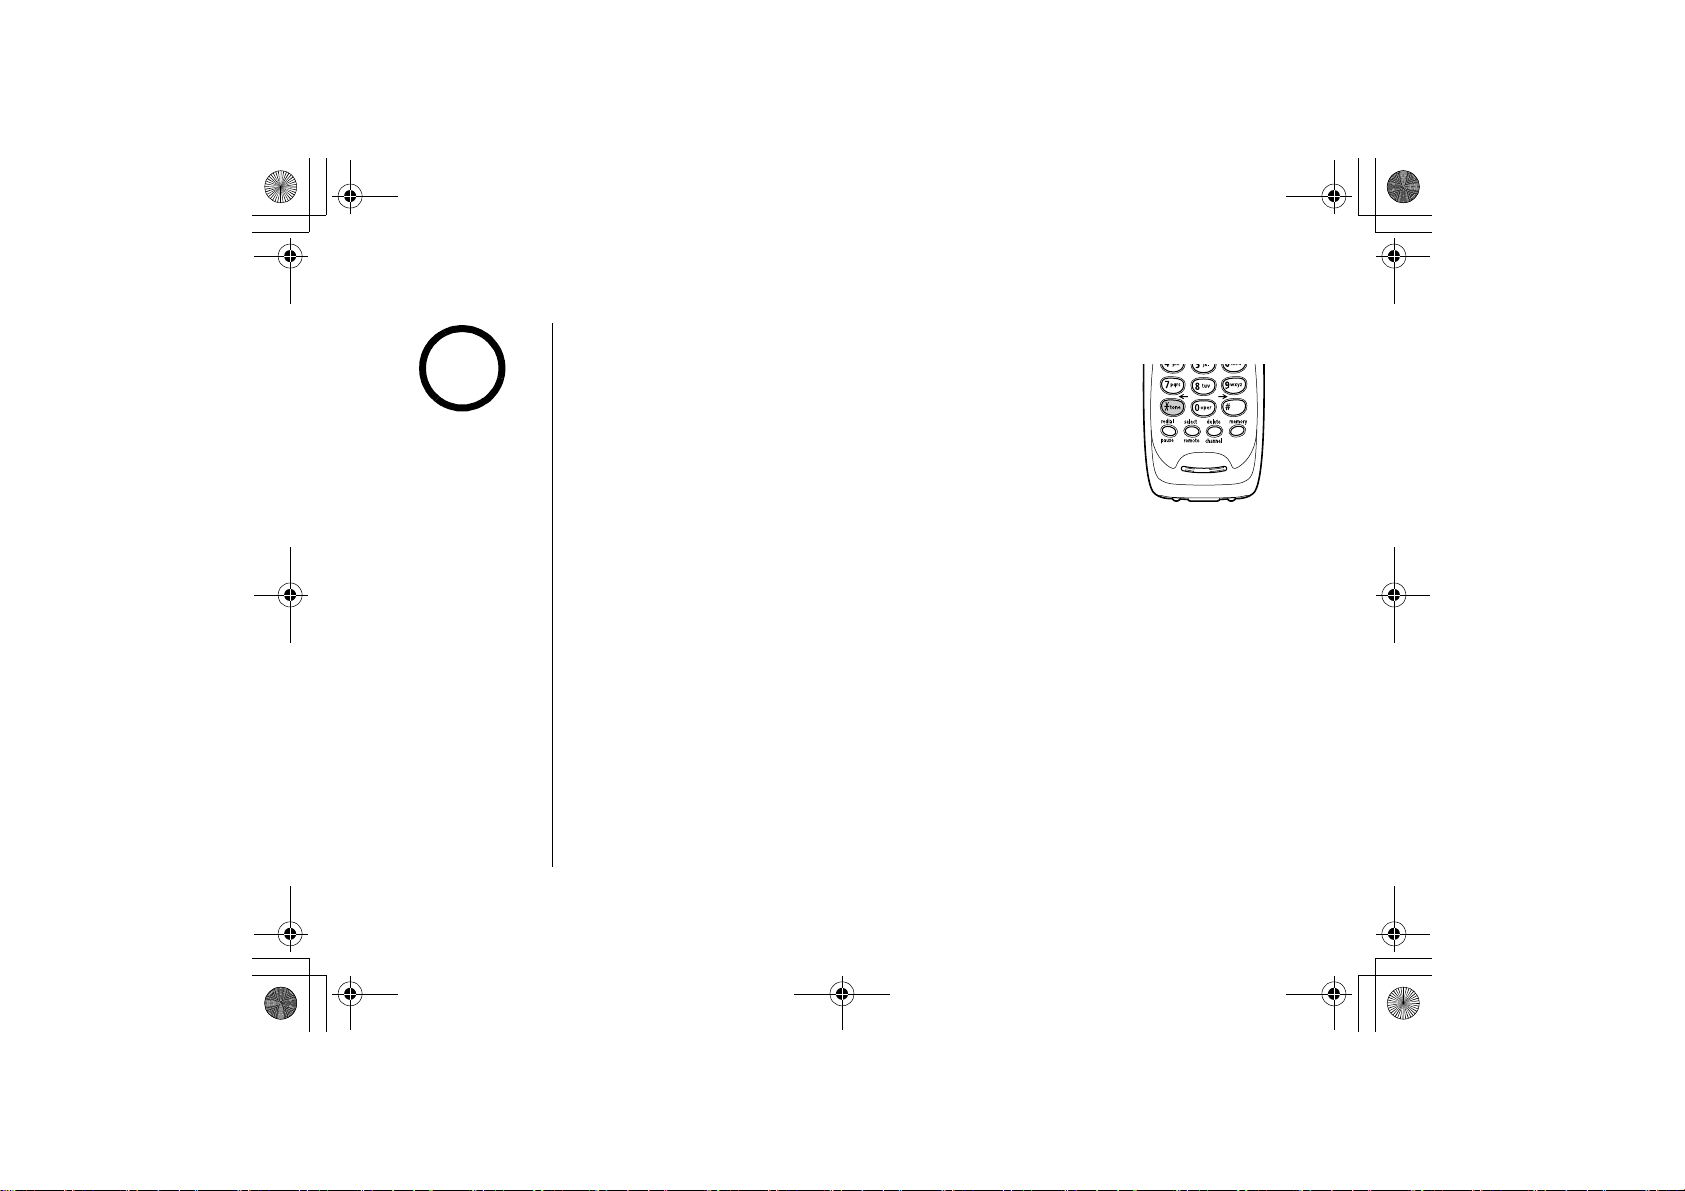
If your phone is set to pulse dialing mode, make your call
normally. Once your call connects, press the
digits you enter from then on wi
this particular call ends, the phone automatically returns to pulse di
Traveling Out-of-Range
During a call, as you begin to move your handset too far from y
increases. If you pass the range limits of the base unit, your call will t
minute.
Selecting a Different Channel
If you encounter interference while using your phone, you can
channel for clear operation. While using your phone, press the
appears on the display, indicating the phone is changing to anot
information on interference, refer to "Precautions" on pag
月曜日 午後5時13分
telephone prescription refills,
ll be sent as tone digits. When
/tone/←
*
h-
s,
key. Any
aling mode.
our base unit, noise
erminate within one
manually change the phone´s
delete/channel
her channel. For more
e 59.
key.
Scanning
BASICS
[17] BASICS
www.uniden.com
Page 19
EXAI7248.book 18 ページ 2004年1月12日
月曜日 午後5時13分
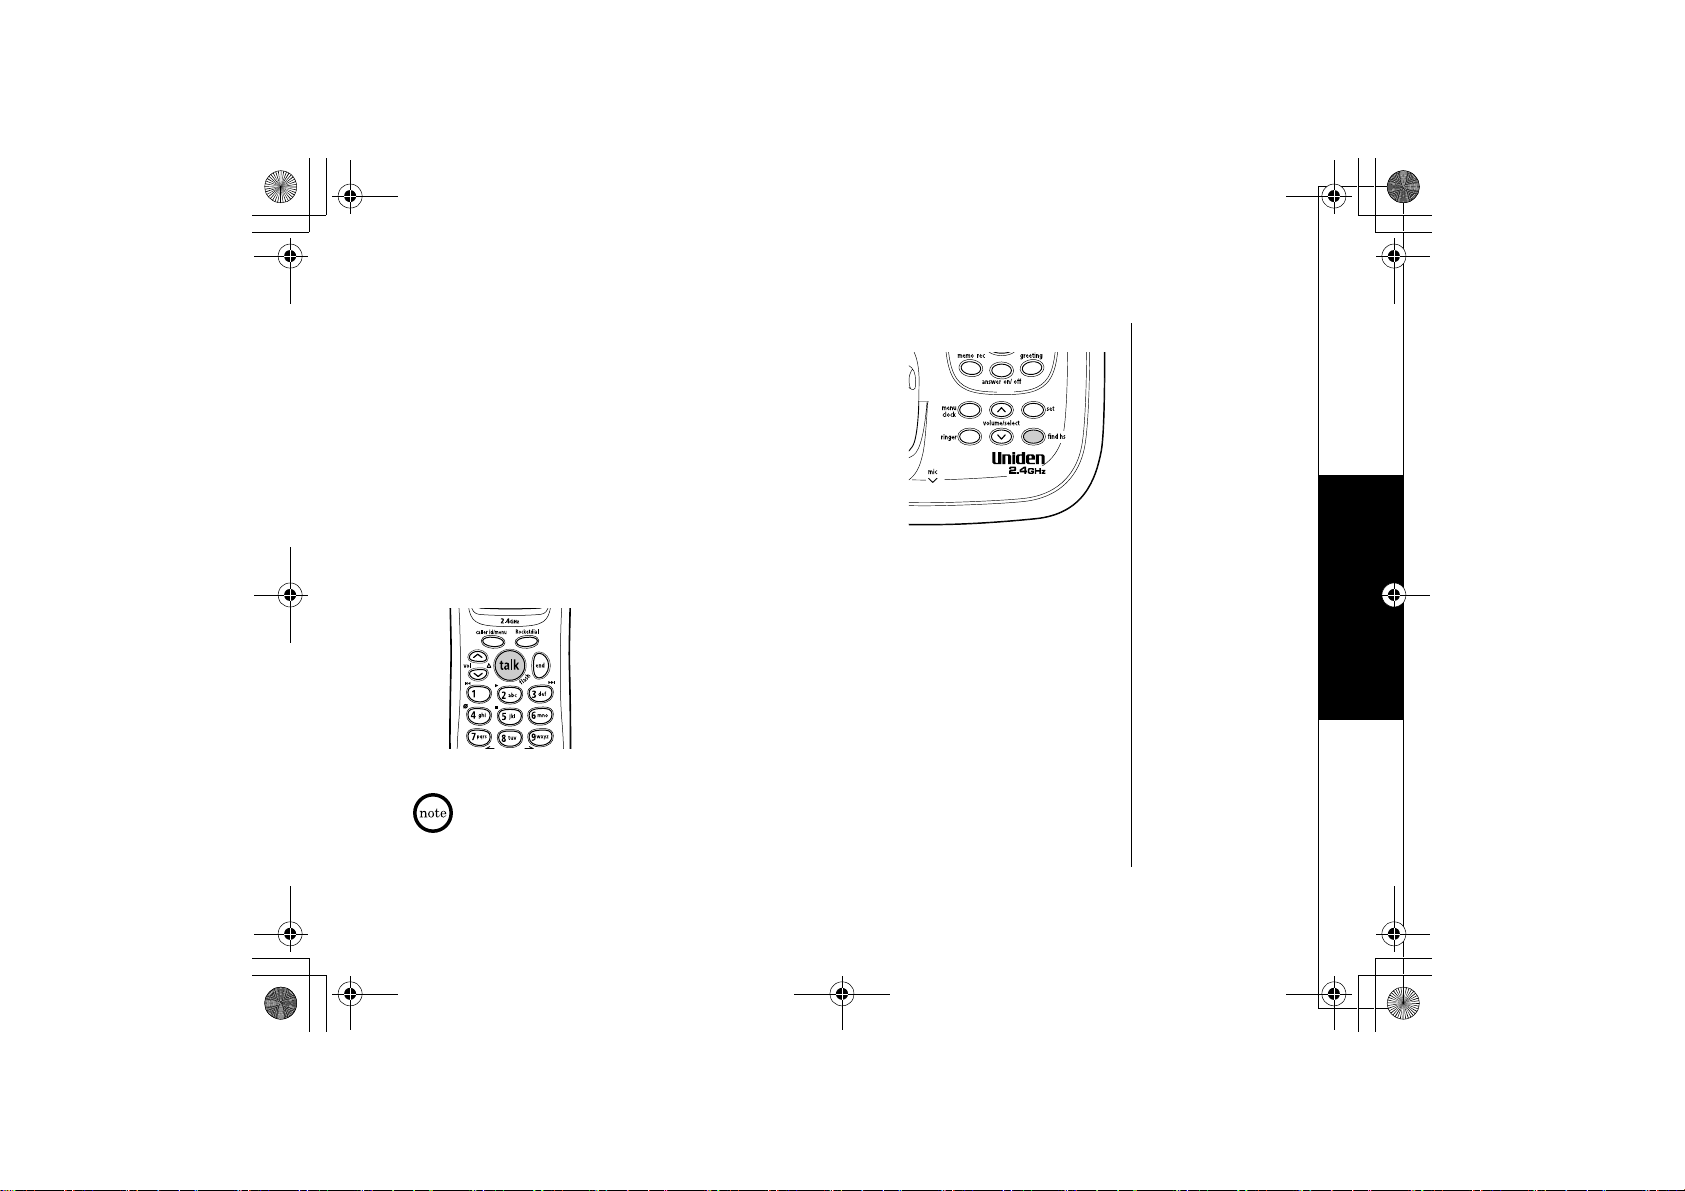
Find Handset
To locate the handset, press the find hs
handset beeps for 60 seconds.
Paging is canceled when pressing any handset key, the
key on the base or the handset is returned to the base.
Paging is also canceled when the phone receives an incoming
call.
key on the base. The
Using Call Waiting
If you have Call Waiting service, you can receive calls while on
the line.
find hs
BASICS
You must subscribe through your local telephone company
service.
www.uniden.com
1) If a call comes in while you are on the phone, you will h
call waiting tone. If you have
CIDCW activated, you will see
the name and number of the incoming caller.
2) Press the
talk/flash key to accept the waiting call. After a
short pause, you will hear the new caller.
3) To return to the original caller, press the
talk/flash
key again.
to receive Call Waiting
ear a
BASICS [18]
Page 20
EXAI7248.book 19 ページ 2004年1月12日
RocketDial
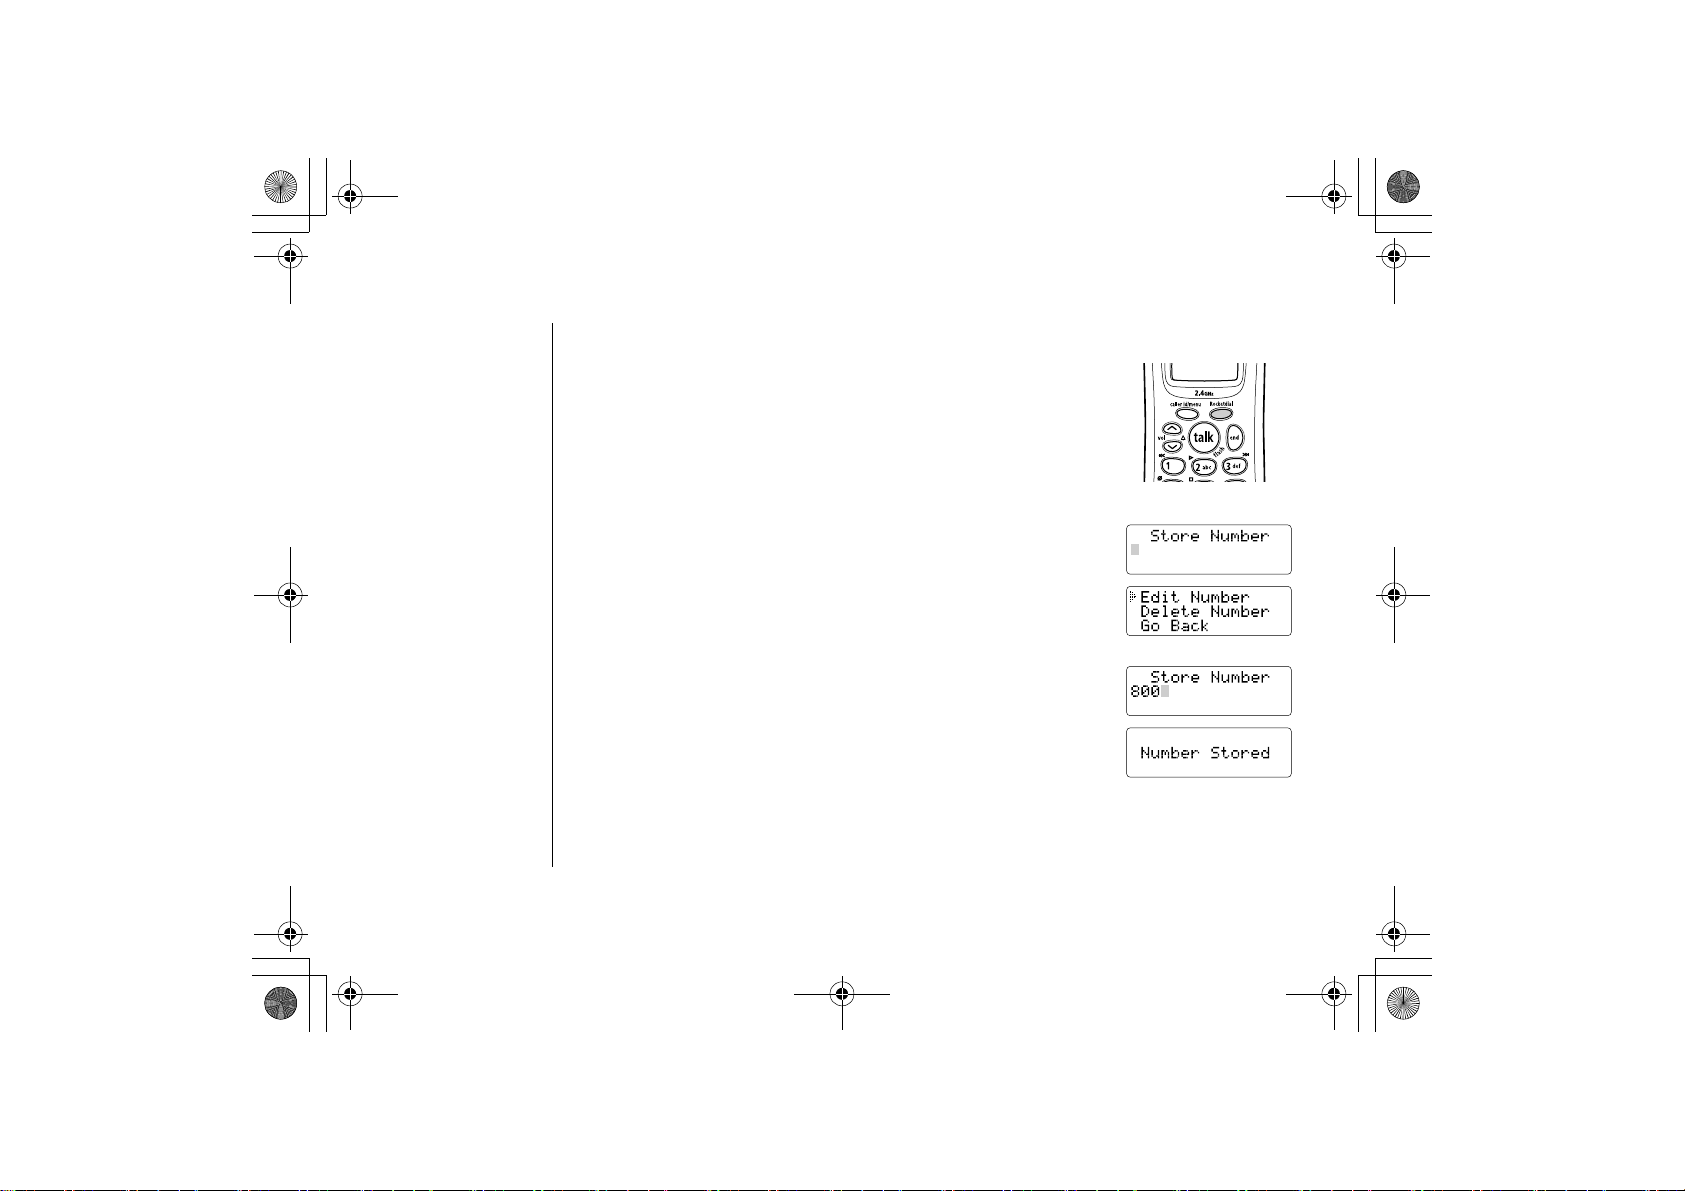
RocketDial is a one-touch speed dial key. Store your most
important or most frequently called number as your RocketDial
number. Then, simply press the Rocketdial
will automatically dial the number.
Storing the RocketDial
1) When the phone is in standby mode, press and hold the
Rocketdial
月曜日 午後5時13分
key, and your phone
key. The following display appears.
[19] ROCKETDIAL
If the RocketDial number is already programmed, the Edit screen
appears. You can select
erase this entry or select
to edit this entry, select
Go Back
to return to the standby mode.
Delete
Edit
2) Store the number by following step 6 under “Storing Name
Numbers in Speed Dial Memory” on page 20.
3) Press the
select/remote
You hear a confirmation tone, and
key.
Number Stored
appears.
Memory storage is complete.
to
s and
ROCKETDIAL
www.uniden.com
Page 21
EXAI7248.book 20 ページ 2004年1月12日
月曜日 午後5時13分
Using the Speed Dial Memory
The speed dial memory allows you to store up to 10 names and
can dial these numbers with just a few key presses.
numbers in the handset. You
USING THE SPEED DIAL MEMORY
note
The speed dial memory is not limited to phone numbers. You can store
digits) that you need to enter once your call connects. This is
For example, you can save your bank account number to speed dial m
your bank's telephone teller service and are pr
press the memory
Then press the
key and the speed dial number where you stored your account n
select/remote
key.
ompted to enter your account number, simply
Storing Names and Numbers in Speed Dial Memory
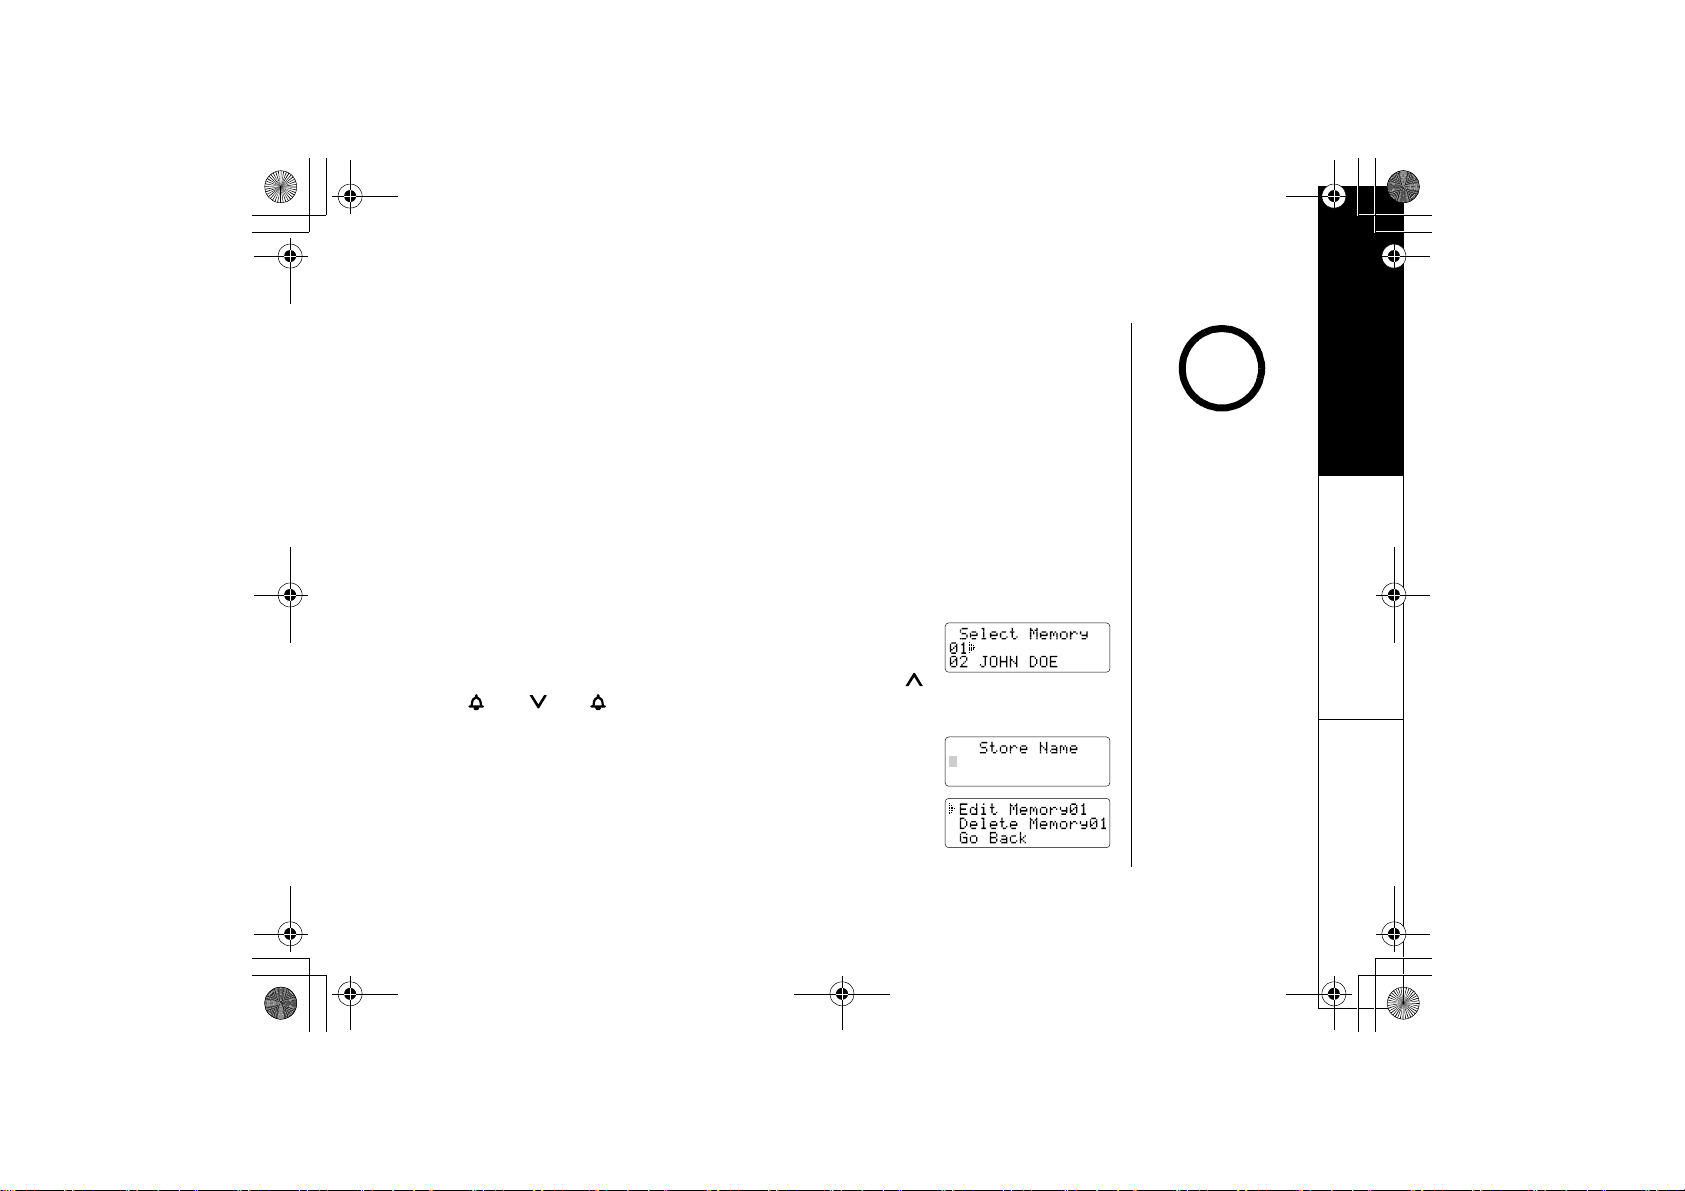
1) With the phone in standby mode, press the
2) Enter
0-9 to select the speed dial number where you would like to
memory
store this entry. You can also scroll through the list with the
vol/
3)
Store Name
and /vol/
appears and a cursor flashes indicating that the
keys. Press the select/remote
display is ready for the name to be entered.
If the selected speed dial number is already assigned, the Edit
screen appears. You can select
Delete
to erase this entry, or select
Edit
to edit this entry, select
Go Back
speed dial number.
www.uniden.com
key.
key twice.
to choose another
referred to as Chain Dialing.
any number (up to 20
emory. When you call
umber.
When editing the speed
dial memory, you must
press a key within 30
seconds or the phone
will return to standby
mode. If you return the
handset to the base, the
phone will return to
standby mode also.
/
USING THE SPEED DIAL MEMORY [2
0]
Page 22
EXAI7248.book 21 ページ 2004年1月12日
月曜日 午後5時13分
USING THE SPEED DIAL MEMORY
note
If the next character
uses the same number
key, you must press the
key to move the
#/→
cursor over. Otherwise
the next time you press
the number key, it
changes the character
that was previously set.
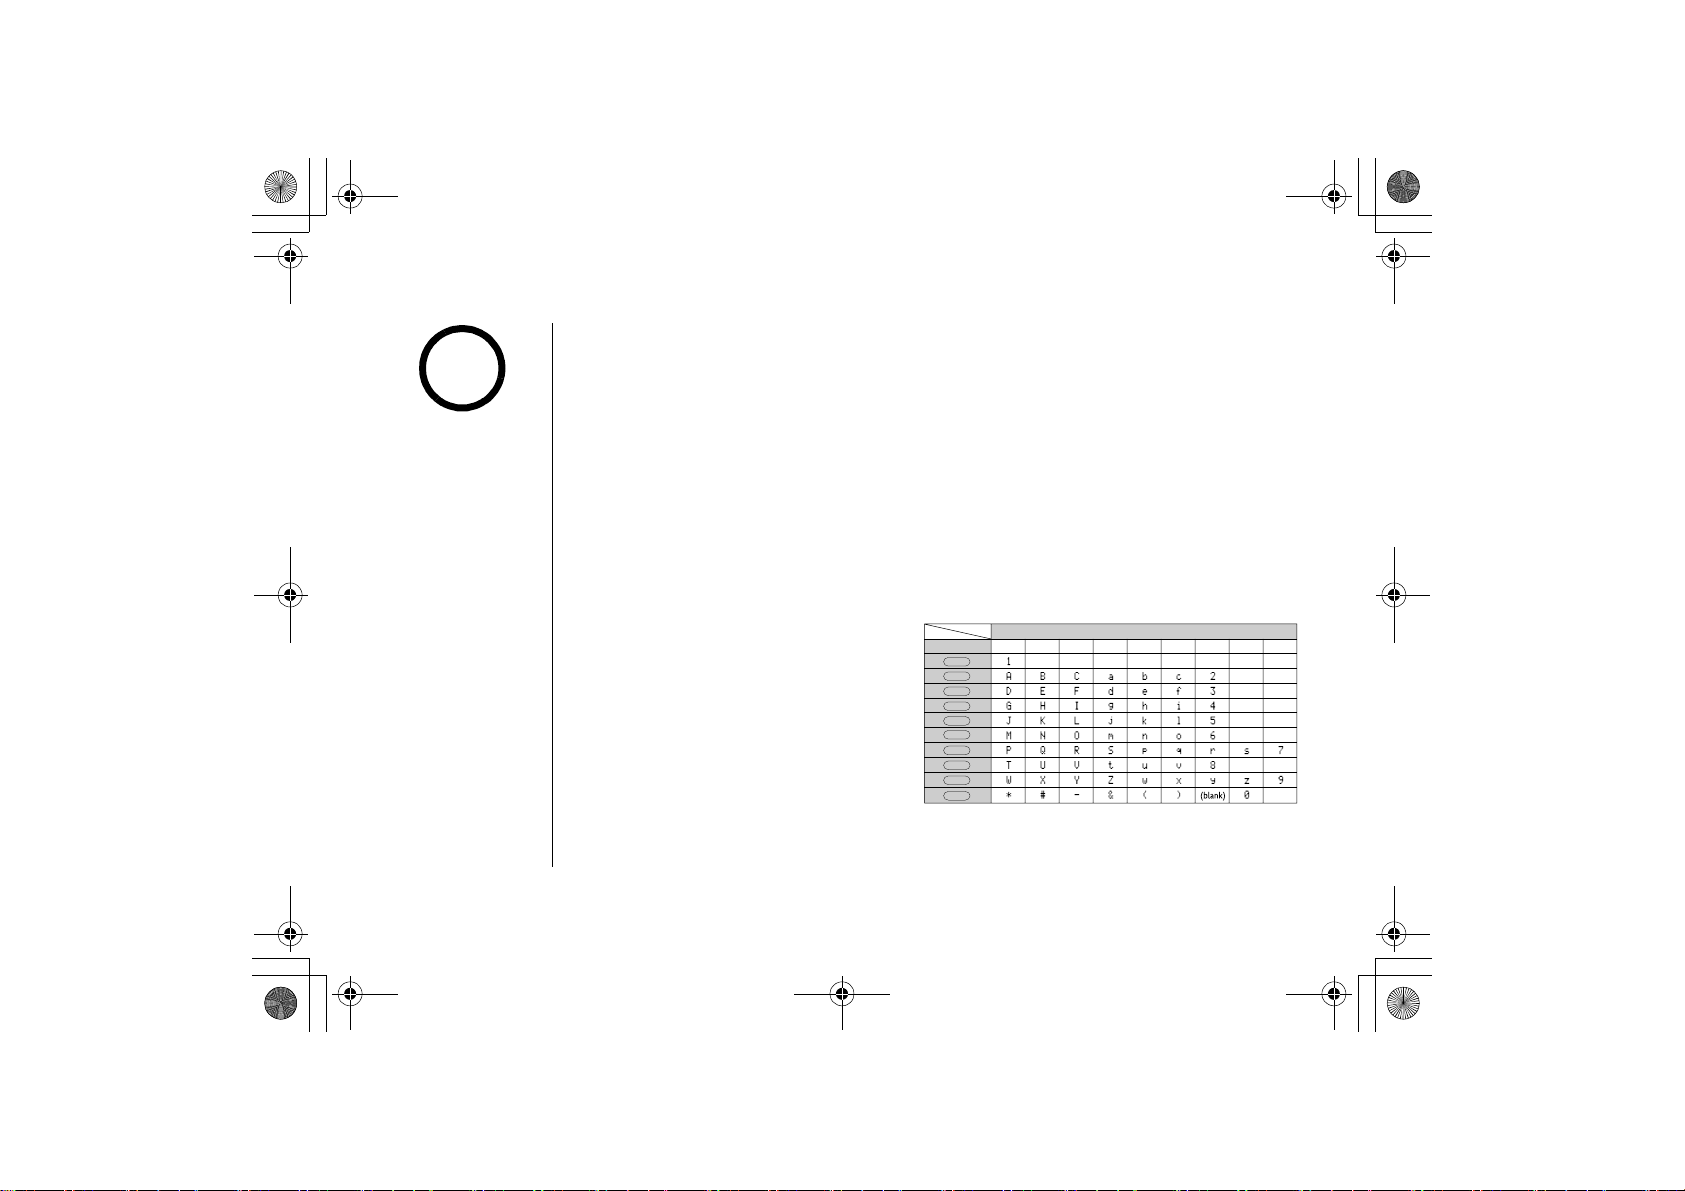
4) Enter a name according to the instructions below, then press
name is required, go to step 5.
• The name can be up to 13 characters.
•Use the #/
•Use the delete/channel
• Press and hold the
→ and
/tone/←
*
delete/channel
Refer to the letters on the number ke
keys to move the cursor to the desired location.
key to delete characters as needed.
key to delete all the characters.
ys to select the desired characters.
With each press of a numeric key, the displayed character appears
Upper case letters first, lower case letters next and finall
y the number corresponding to
the key.
If you make a mistake while entering a name
Use the*/tone/←
Press the
delete/channel
character. To delete all characters, press and hold the delet
For example, to enter Movies
1) Press
6. Then press the
move the cursor to the right.
2) Press
3) Press
4) Press
5) Press
6) Press
6 six times.
8 six times.
4 six times.
3 five times.
7 eight times.
or #/→ key to move the cursor to the incorrect character.
key to erase the wrong character. Then enter the correct
.
#/→
key to
keys 1 2 3
1
2
abc
3
def
4
ghi
5
jkl
6
mno
7
pqrs
8
tuv
9
wxyz
oper
0
the select/remote
in the following order:
e/channel key.
Number of times key is pressed
4 5 6 7 8
key. If no
9
[21] USING THE SPEED DIAL MEMOR
Y
www.uniden.com
Page 23

EXAI7248.book 22 ページ 2004年1月12日
5)
Store Number
is displayed. The cursor flashes indicating that the
display is ready for the number to be entered.
月曜日 午後5時13分
USING THE SPEED DIAL MEMORY
6) Use the keypad to enter the phone number; each number can
up to 20 digits.
If you need the phone to pause during the dialing sequence
the redial/pause
key to insert a two-second delay between the
numbers. You can enter multiple pauses to increase the de
Each pause counts as a digit. The display shows a
P
pause.
When storing numbers into memory, if the handset is i
than 30 seconds, it will beep rapidly, and the ph
7) Press the
memory key. You will hear a confirmation tone, and the
one will return to standby mode.
following screen appears.
Memory storage is complete.
After about 2 seconds, the following screen displays all the speed
dial memory entries.
8) Press the
end key to exit memory setup mode. The phone returns
to standby.
www.uniden.com
be
, press
lay.
for every
dle (i.e., no key is pressed) for more
USING THE SPEED DIAL MEMORY [2
USING THE SPEED
DIAL MEMORY
2]
Page 24
EXAI7248.book 23 ページ 2004年1月12日
Storing Caller ID messages in Speed Memory Locations
note
Messages (Caller ID names/numbers) shown in the Caller ID list
dialing. For instructions on viewing the Caller ID Message list, see pag
月曜日 午後5時13分
USING THE SPEED DIAL MEMORY
can be stored in memory
e 26.
You cannot store a
Caller ID message if no
phone number appears
in the message.
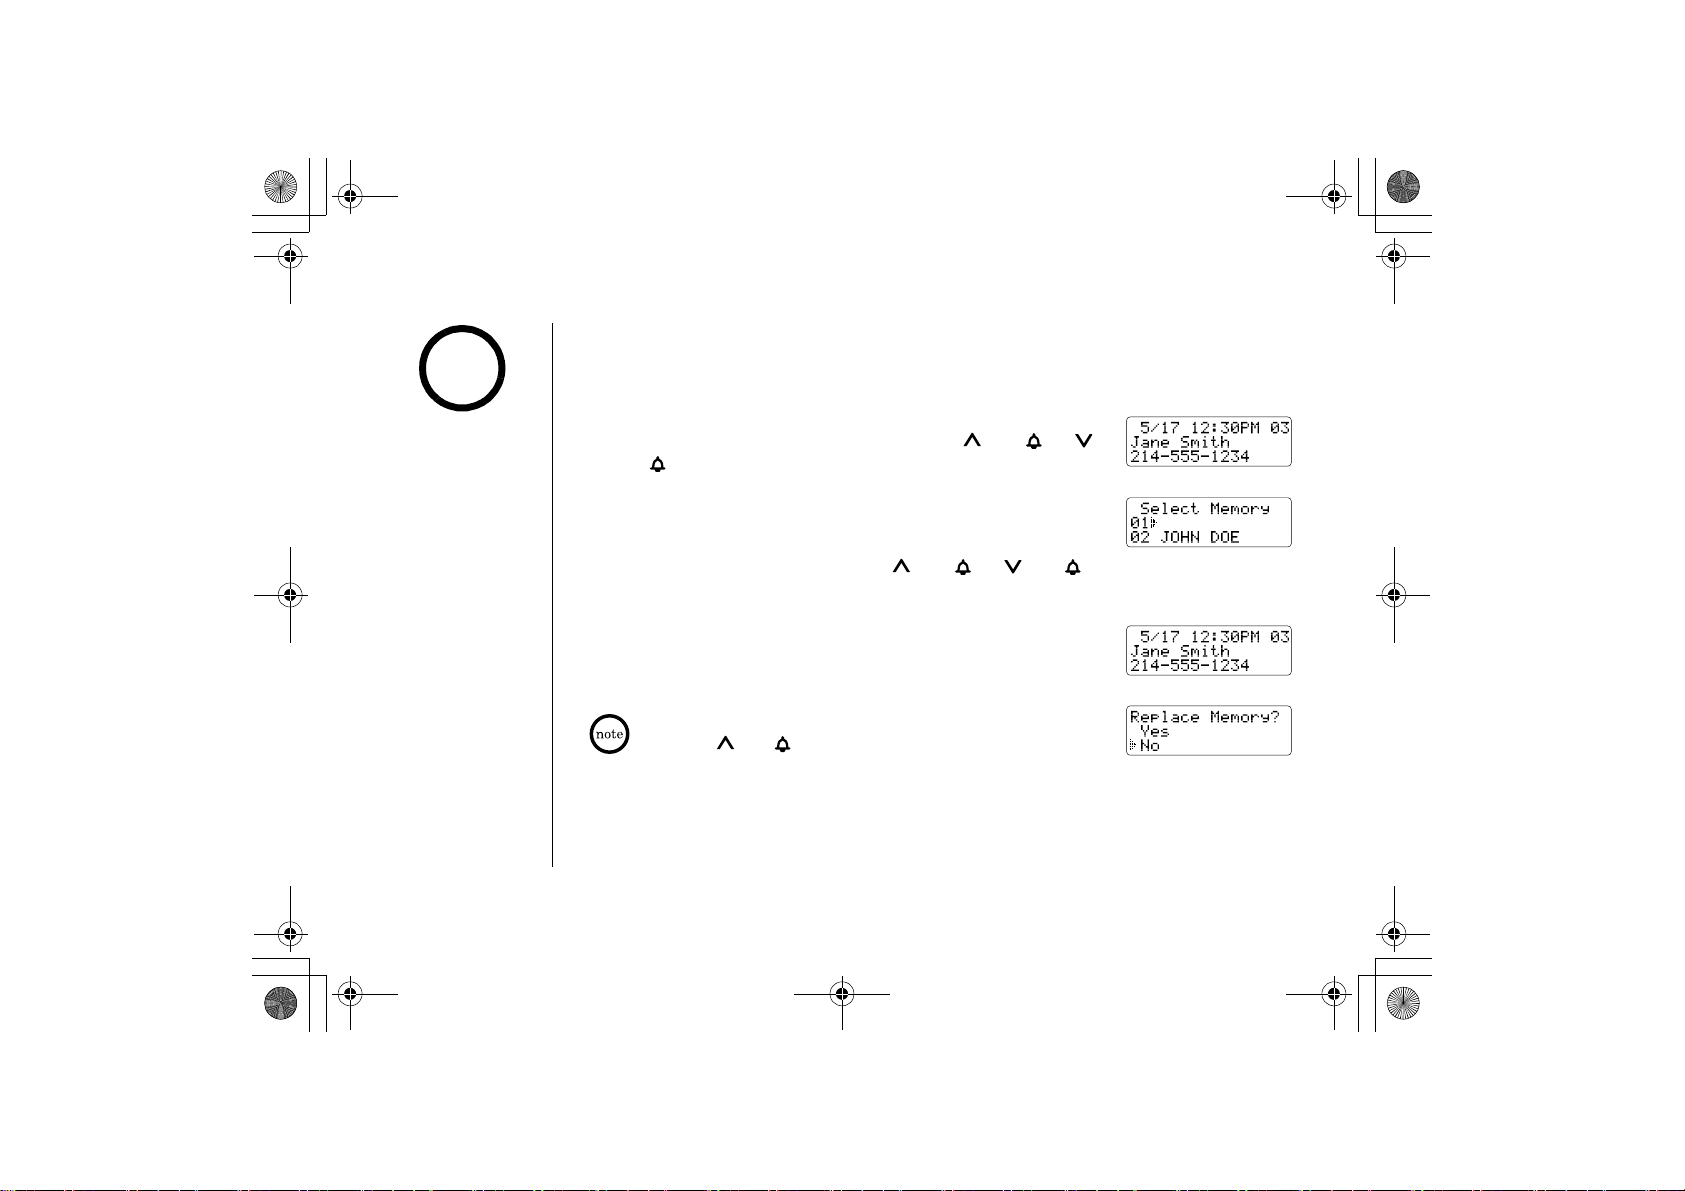
1) Press the caller id/menu
stored from the Caller ID list by pressing the
vol/ key.
2) Press the memory
3) Enter a number (
0 - 9) or press the
location to be stored.
4) Press the
select/remote
the number is stored in memory. The display returns to the Caller
ID list.
If a message has already been stored in the selected
number location, a confirmation screen is displayed.
Press the
key to overwrite. The display returns to the Caller ID list.
[23] USING THE SPEED DIAL MEMOR
/vol/
key. Select the phone number to be
/vol/
key.
/vol/
or /vol/
key. You hear a confirmation tone, and
Yes
key to select
Y
. Press the select/remote
or /
key to select the memory
memory
www.uniden.com
Page 25
EXAI7248.book 24 ページ 2004年1月12日
月曜日 午後5時13分
Making Calls from Speed Dial Memory
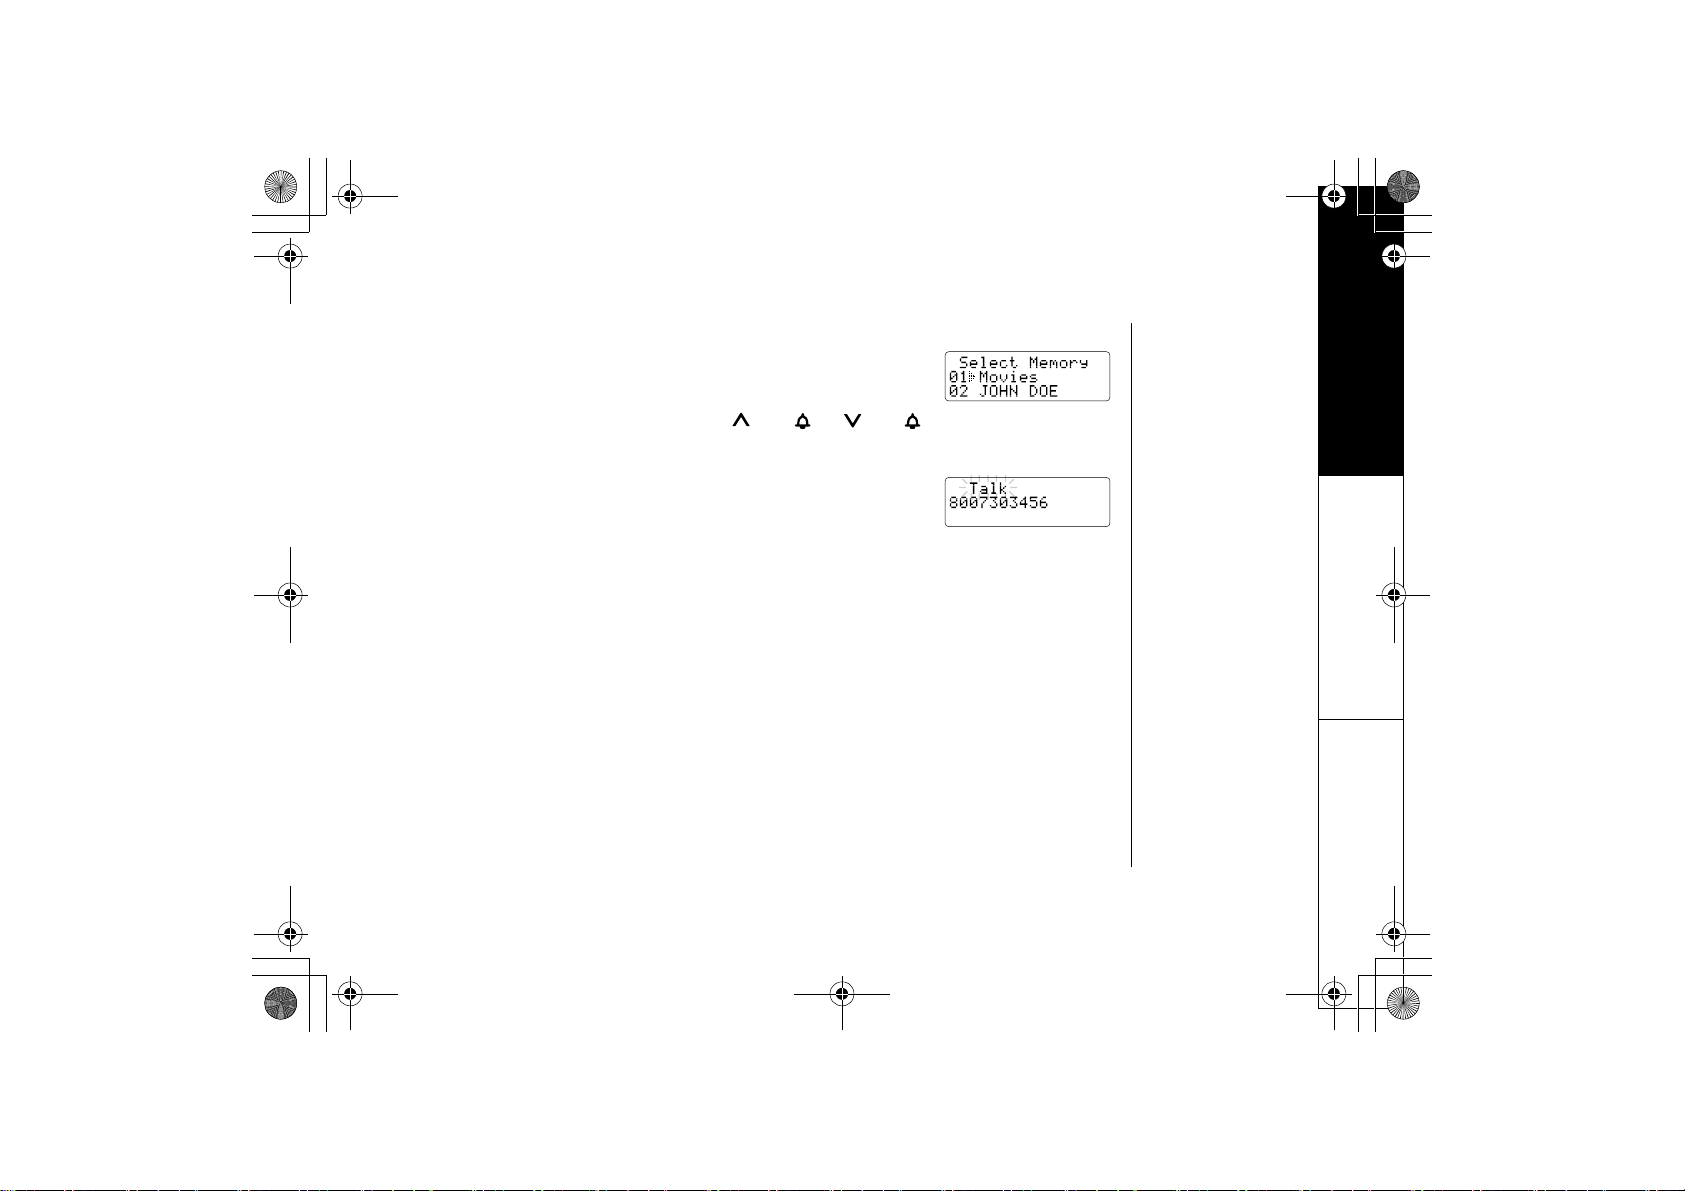
1) Press the
memory
speed dial number.
key. The handset displays your programmed
USING THE SPEED DIAL MEMORY
2) Enter the number (0
9), or press the
-
/vol/
key to select the speed dial number you would like to dial.
3) Press the
talk/flash
key.
Talk
and the number selected appear on
the display. Then the displayed number is dialed.
To cancel speed dialing
Press the end
Also, if the handset is idle (e.g., no key is
standby mode.
www.uniden.com
key to cancel speed dialing. The handset returns to standby mo
pressed) for 30 seconds, the phone returns to
or /vol/
USING THE SPEED DIAL MEMORY [2
de.
USING THE SPEED
DIAL MEMORY
4]
Page 26
EXAI7248.book 25 ページ 2004年1月12日
Caller ID and CIDCW (Caller ID on Call Waiting)
note
•If you answer a call
before the Caller ID
message is received
(for example, before
the second ring), the
Caller ID message will
not appear.
•When the call is
received via a
telephone company
that does not offer
Caller ID service, the
caller´s phone number
and name do not
appear. (This includes
international calls.)
•When the call is via a
private branch
exchange (PBX), the
caller´s phone number
and name may not
appear.
You must subscribe to Caller ID service through your local t
this feature.
name, phone number, date and time of call. With
hear a Call Waiting tone while you are on a call, and the Call
the waiting call, press the
Additionally, you can dial a number stored in the Caller ID list or
dial list.
When the Telephone Rings
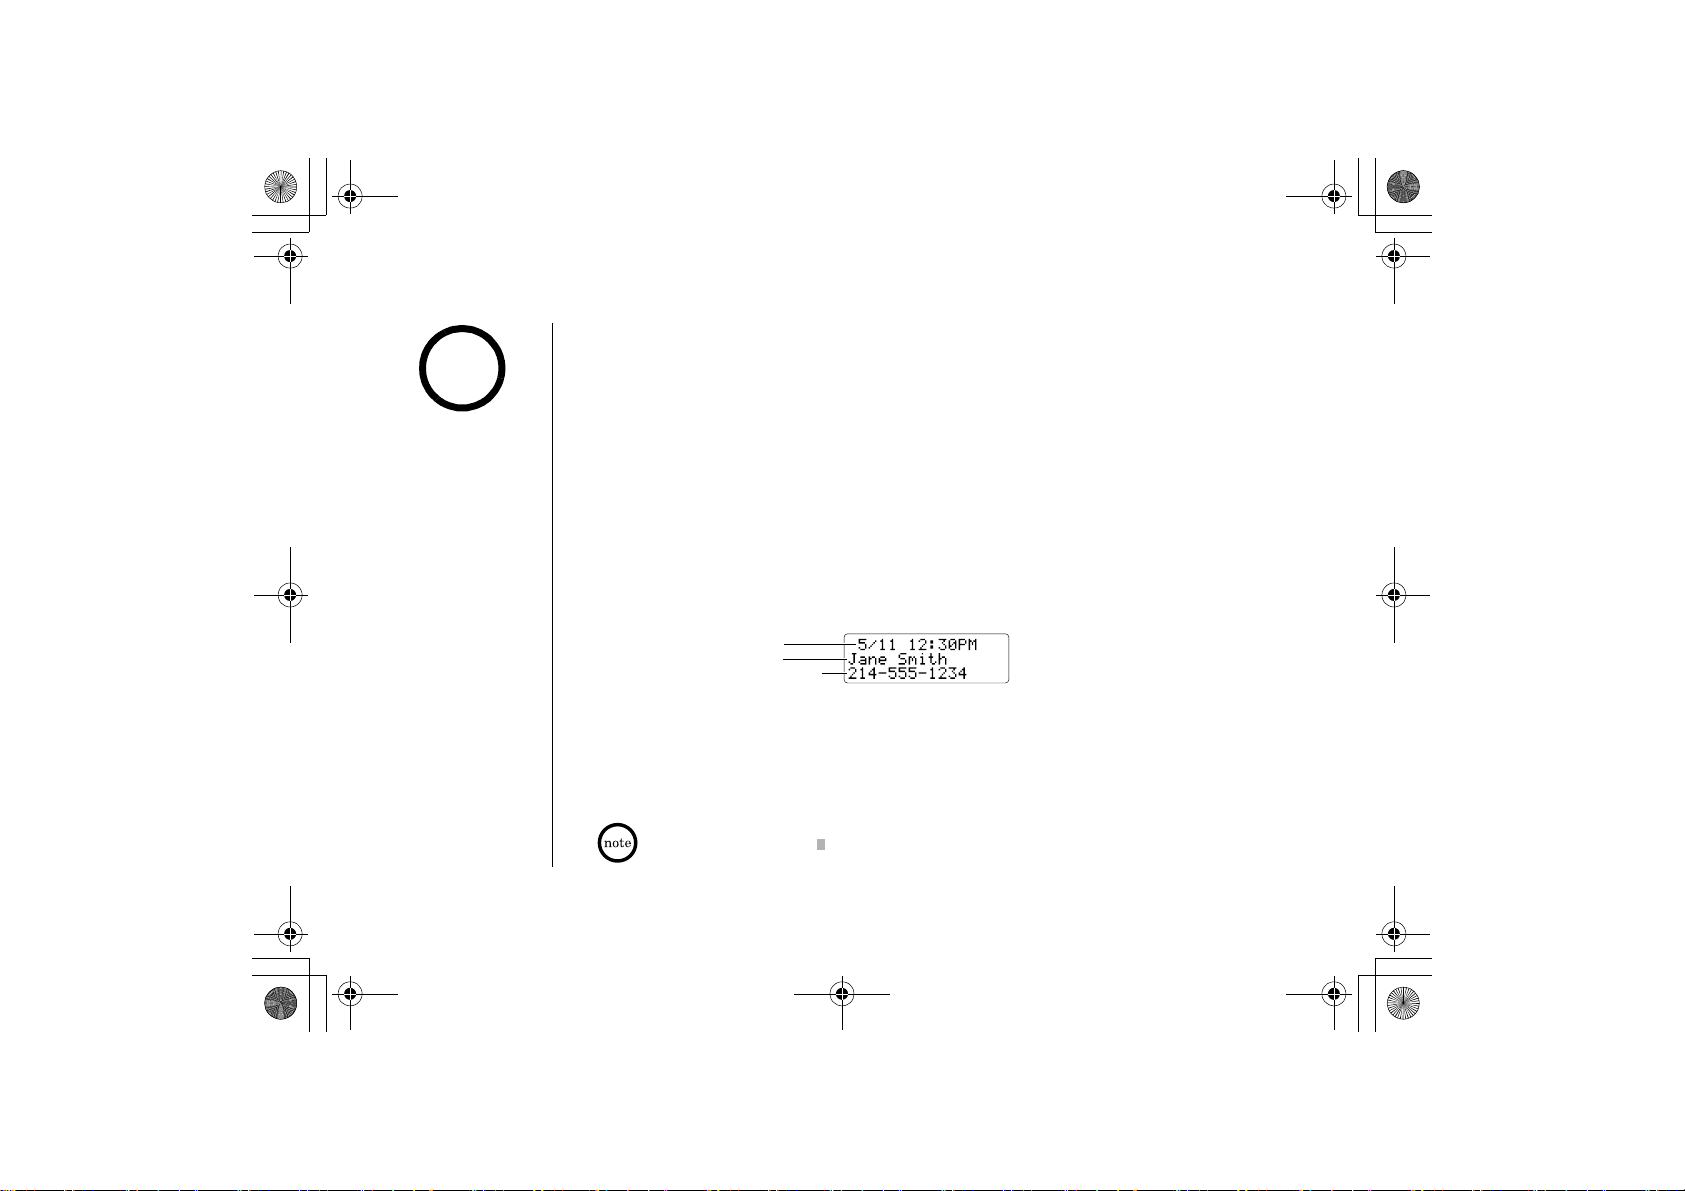
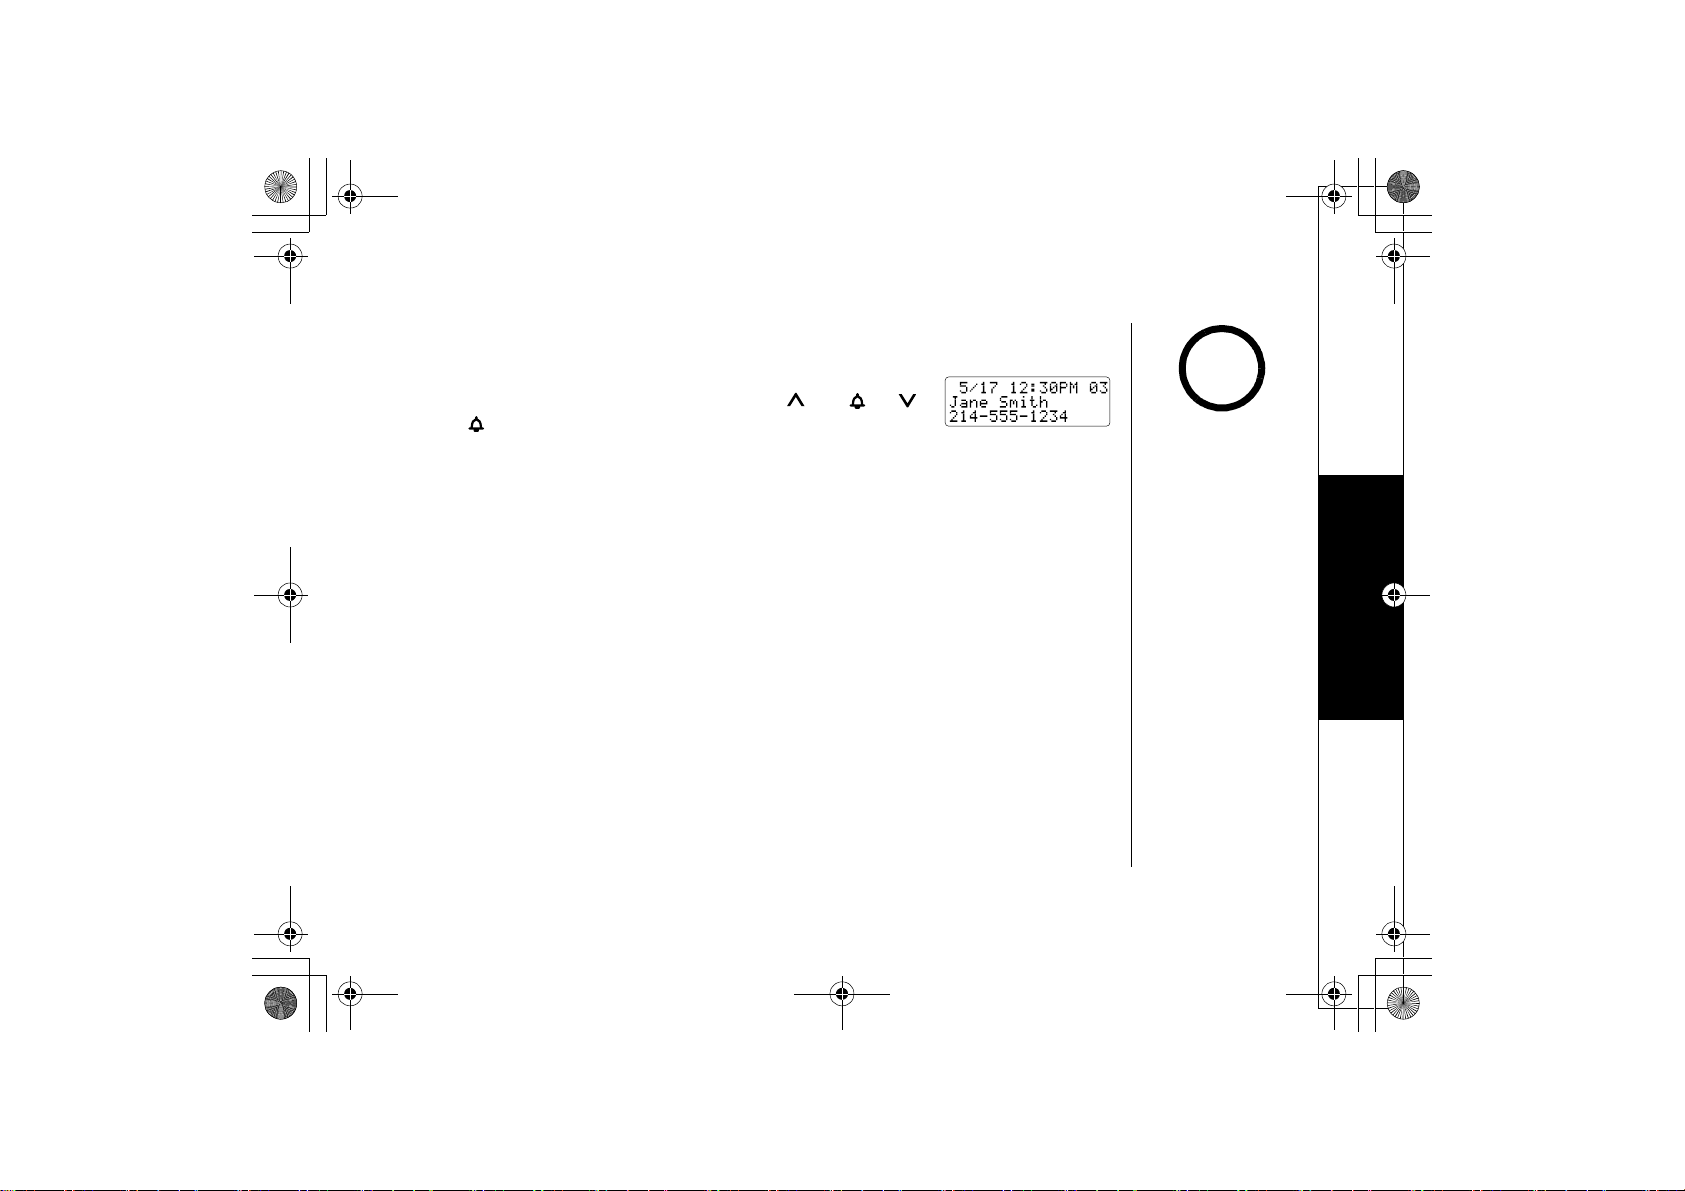
When the Caller ID message is received, the display shows the
with the date and time. The incoming call information is stored in
Caller ID service includes the caller´s name, the caller´s nam
15 letters).
You may receive any one of the following messages:
When invalid data is received
When a private name is received
When a private number is received
When a unknown name is received
When a unknown number is received
月曜日 午後5時13分
elephone provider to use
When the telephone rings, the Caller ID feature allows you to
CIDCW (Caller ID on Call Waiting), you will
er ID data is displayed. To accept
talk/flash
key (see page 18).
save data to your Memory
caller´s phone number along
the Caller ID record. If the
e appears on the display (up to
The date and
time received
Caller's name
Caller's phone number
Incomplete Data
Private Name
Private Number
Unknown Name
Unknown Number
view the caller’s
CALLER ID FEATURES
[25] CALLER ID FEATURES
Data errors appear as ¨ ¨.
www.uniden.com
Page 27
EXAI7248.book 26 ページ 2004年1月12日
月曜日 午後5時13分
Viewing the Caller ID Message List
The Caller ID list stores information for up to 30 incoming calls
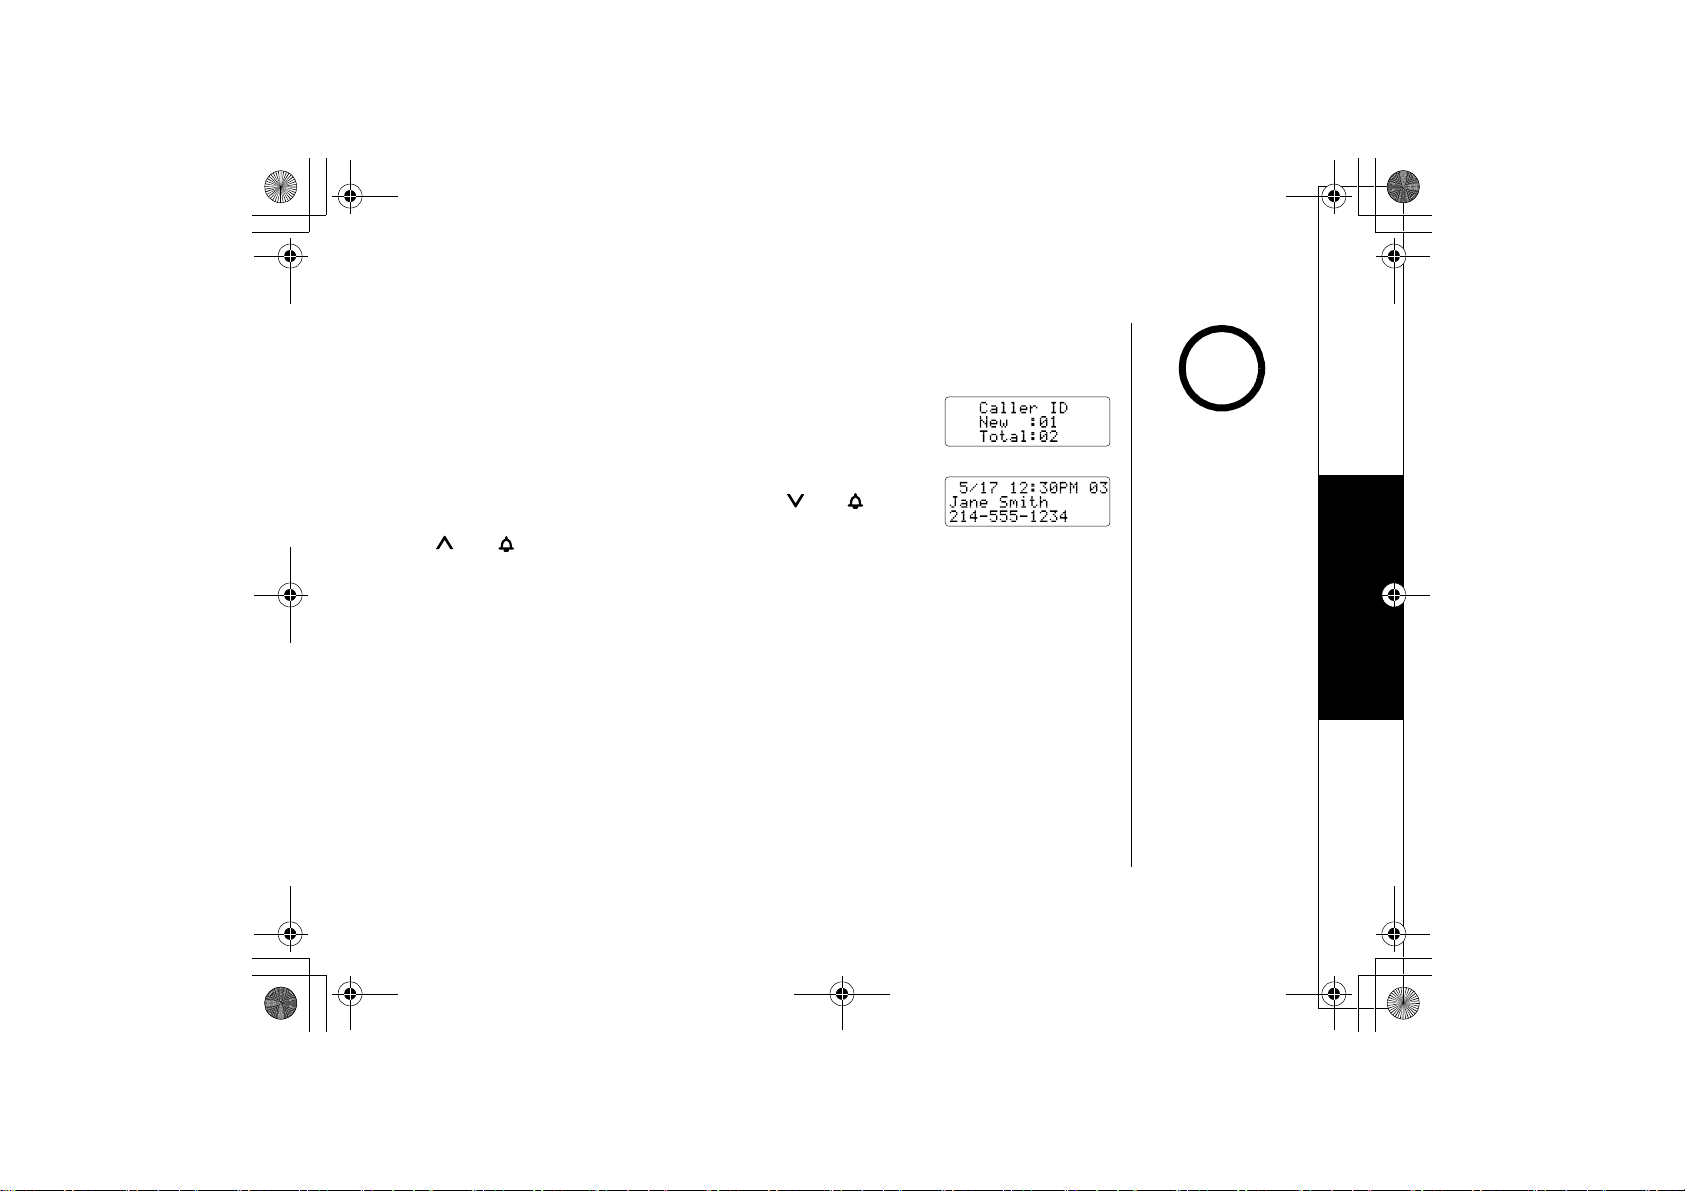
1) With the phone in standby mode, press the
The summary screen appears. The screen shows the number
messages and total messages.
2) To view the Caller ID messages in historical order (from new to
old or from old to new), repeatedly press the
scroll through the messages from the latest to the earliest,
/vol/
3) Press the
key to scroll back through the messages.
end key to return to standby mode.
caller id/menu
/vol/
- even unanswered calls.
key.
of new
key to
or the
note
•In Caller ID operation,
if no key is pressed for
more than 30 seconds,
an error tone sounds
and the telephone
returns to standby
mode.
•Each message can be
up to 15 characters for
the name and 15 digits
for the phone number.
•The number of calls
from the same Caller ID
appears next to the
received time. Once
you view the new
message, the number
will be cleared and
disappear.
CALLER ID FEATURES
www.uniden.com
CALLER ID FEATURES [26]
Page 28
EXAI7248.book 27 ページ 2004年1月12日
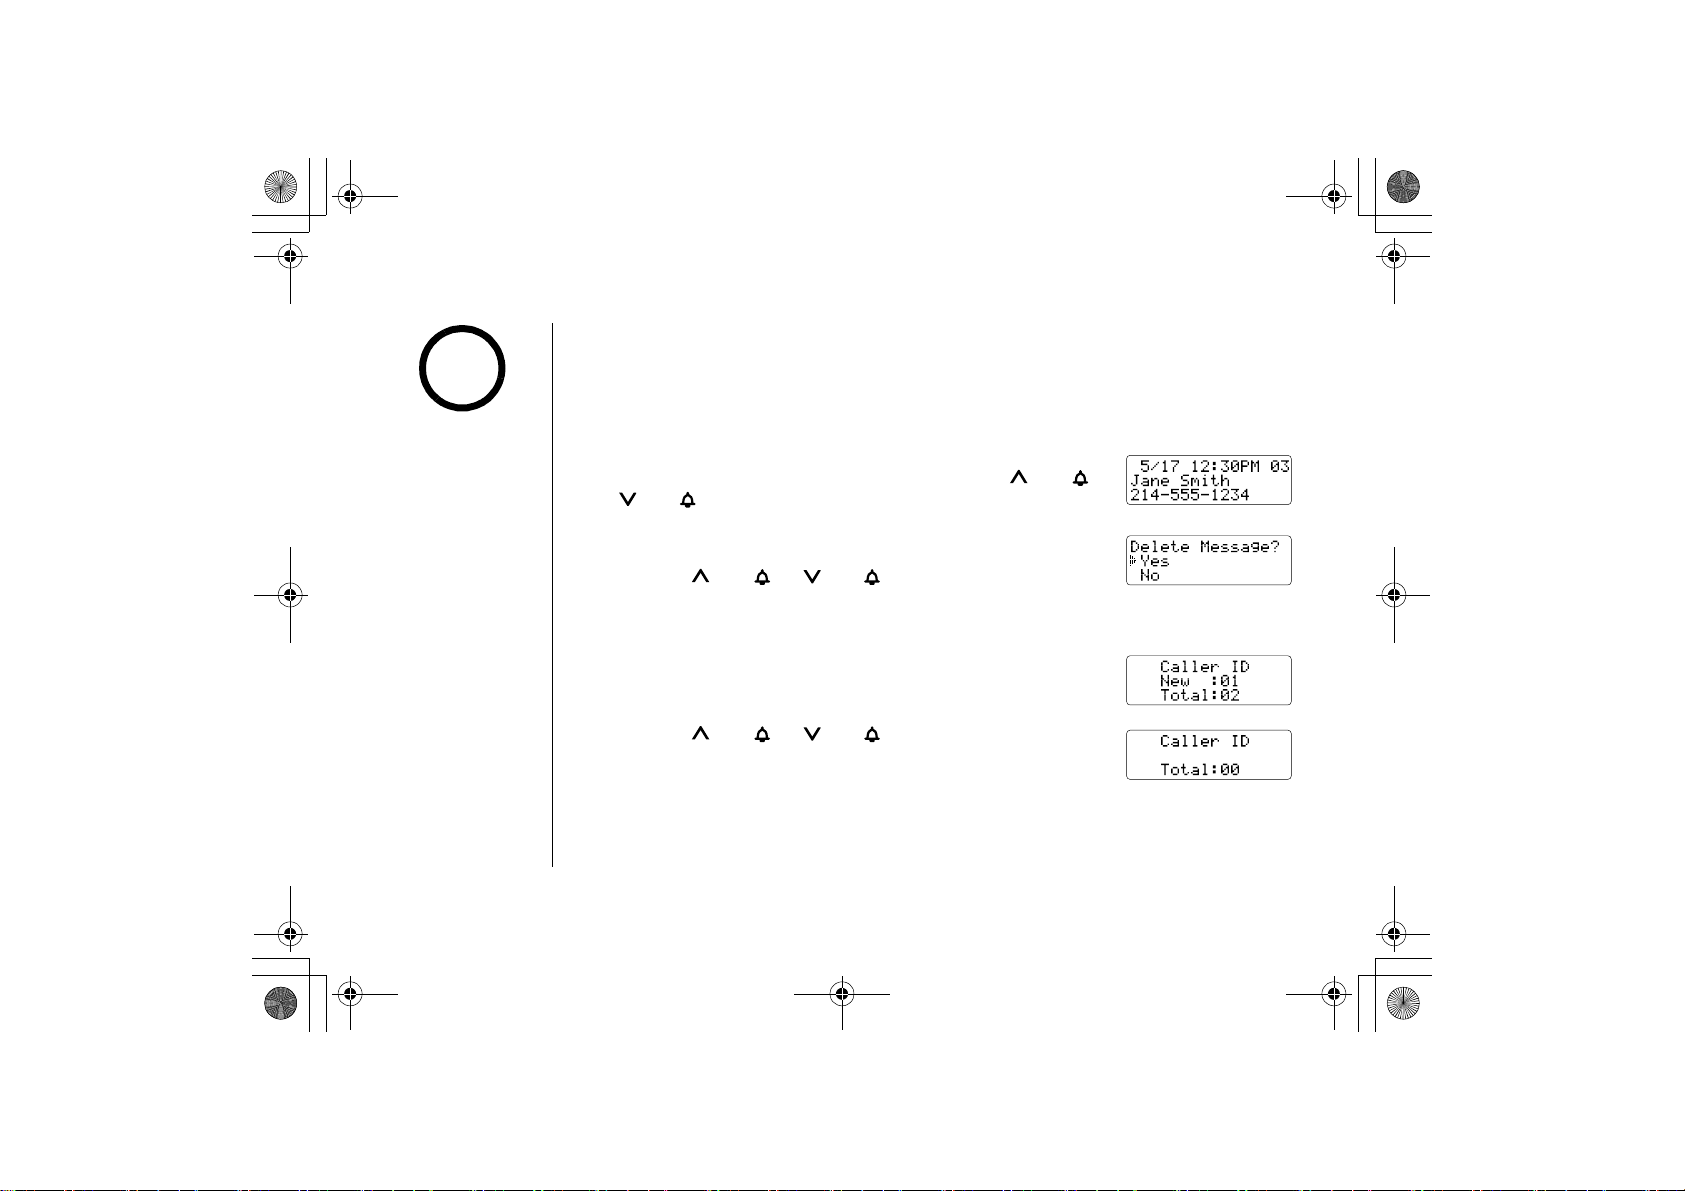
Deleting Information from the Caller ID List
note
The cordless phone stores up to 30 Caller ID names/numbers. If
Caller ID, the oldest one in the list is automa
deleted manually.
月曜日 午後5時13分
the phone receives the 31st
tically deleted. Caller ID data can also be
•While using the
All?
or
Message?
key is pressed for more
than 30 seconds, an
error tone sounds, and
the handset returns to
standby mode.
•If you get an incoming
call or page, the
deleting operation is
canceled, and you can
answer the call or
page.
Delete
Delete
screen, if no
Deleting a Caller ID Message
1) Press the
to be deleted from the Caller ID list by pressing the
/vol/ key.
2) Press the
3) Press the
press the
Deleting all Caller ID names/numbers
1) With the phone in standby mode, press the
2) Press the
3) Press the
press the
You hear a confirmation tone and all stored Caller ID messa
deleted.
[27] CALLER ID FEATURES
caller id/menu
delete/channel
/vol/ or
select/remote
delete/channel
/vol/
or /vol/
select/remote
key in standby mode. Find the message
/vol/
key.
/vol/
key to select
Yes
, and then
key.
caller id/menu
key.
key.
key to select
Yes
, and then
key.
ges are
or
CALLER ID FEATURES
www.uniden.com
Page 29
EXAI7248.book 28 ページ 2004年1月12日
月曜日 午後5時13分
Making a Call from the Caller ID List
You can place a call from the Caller ID list.
1) Press the caller id/menu
number that you want to dial by pressing the
vol/ key.
2) To have the phone dial a "
phone dial the stored area code before the displayed Caller
3) Press the
talk/flash
key in standby mode. Select the phone
1
" before the displayed Caller ID number, press
key. The displayed phone number dials automatically.
/vol/
or /
ID number, press
1. To have the
3.
note
You cannot make a call
from the Caller ID list if
your cordless phone is
connected to a private
branch exchange (PBX).
CALLER ID FEATURES
www.uniden.com
CALLER ID FEATURES [28]
Page 30
EXAI7248.book 29 ページ 2004年1月12日
The Integrated Answering Device
The cordless phone has a built-in answering system that answe
You can also use your answering system to record a conversation, leav
message, or to announce a special outgoing message to callers
phone.
Features
• Digital Tapeless Recording
• Retrieve Messages Using Handset
• Up to 13 Minutes of Recording Time
• Call Screening
• Personal or Pre-recorded Outgoing
Message
• Voice Prompts
(English, French or Spanish)
Digital Tapeless Recording allows you to quic
choose. You will never have to worry about
improperly.
The Integrated Answering System is easy and convenient to use
of the instructions carefully.
月曜日 午後5時13分
rs and records incoming calls.
e a voice memo
when you're away from your
• Time and Day Announcement
• Remote Message Retrieval
• Toll Saver
• Conversation Recording
•Voice Memo
• Selectable Ringer Options
(High, Low or Off)
kly review, save, or delete any messages you
a tape wearing out, jamming, or resetting
, but please read
through all
ANSWERING DEVICE
THE INTEGRATED
[29] THE INTEGRATED ANSWERING
DEVICE
www.uniden.com
Page 31
EXAI7248.book 30 ページ 2004年1月12日
月曜日 午後5時13分
Turning the Answering System On/Off
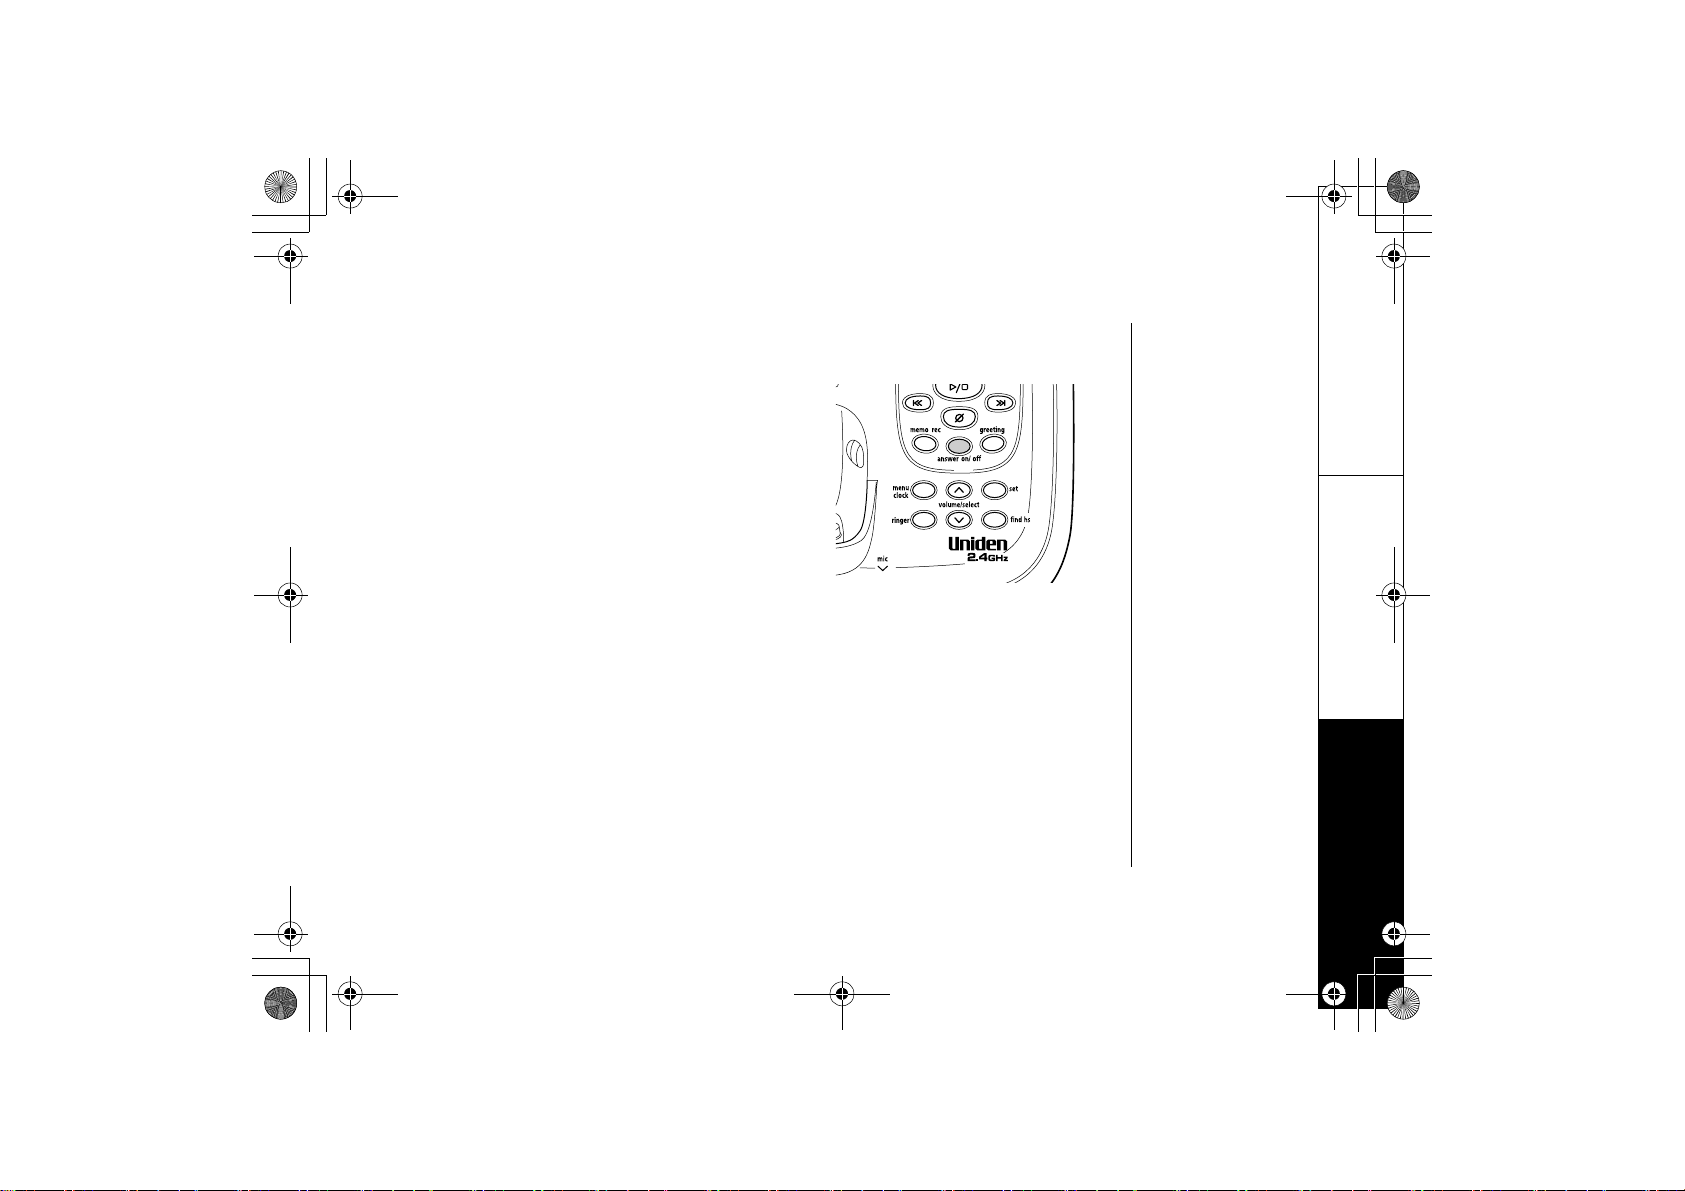
1) To turn the answering system on, press the
on/off key. The system will announce "Answering
system is on." The current greeting message will
be played, and you hear a confirmation tone. The
message counter displays the number of messages
stored in memory. If the display flashes, there are
new messages waiting for you.
2) To turn the answering system off, press the
on/off key again. After the announcement
“Answering system is off,” the message counter
display will no longer be illuminated. To turn the
answering system back on, press the
off key.
www.uniden.com
answer
answer
answer on/
THE INTEGRATED ANSWERING DEV
ICE [30]
ANSWERING DEVICE
THE INTEGRATED
Page 32
EXAI7248.book 31 ページ 2004年1月12日
Setting Up Your Answering System
note
•For your convenience,
voice prompts will
guide you through the
menu mode.
•After the setting, press
the (play/stop)
key to exit the menu
mode, or the menu/
clock key to move to
the next menu option.
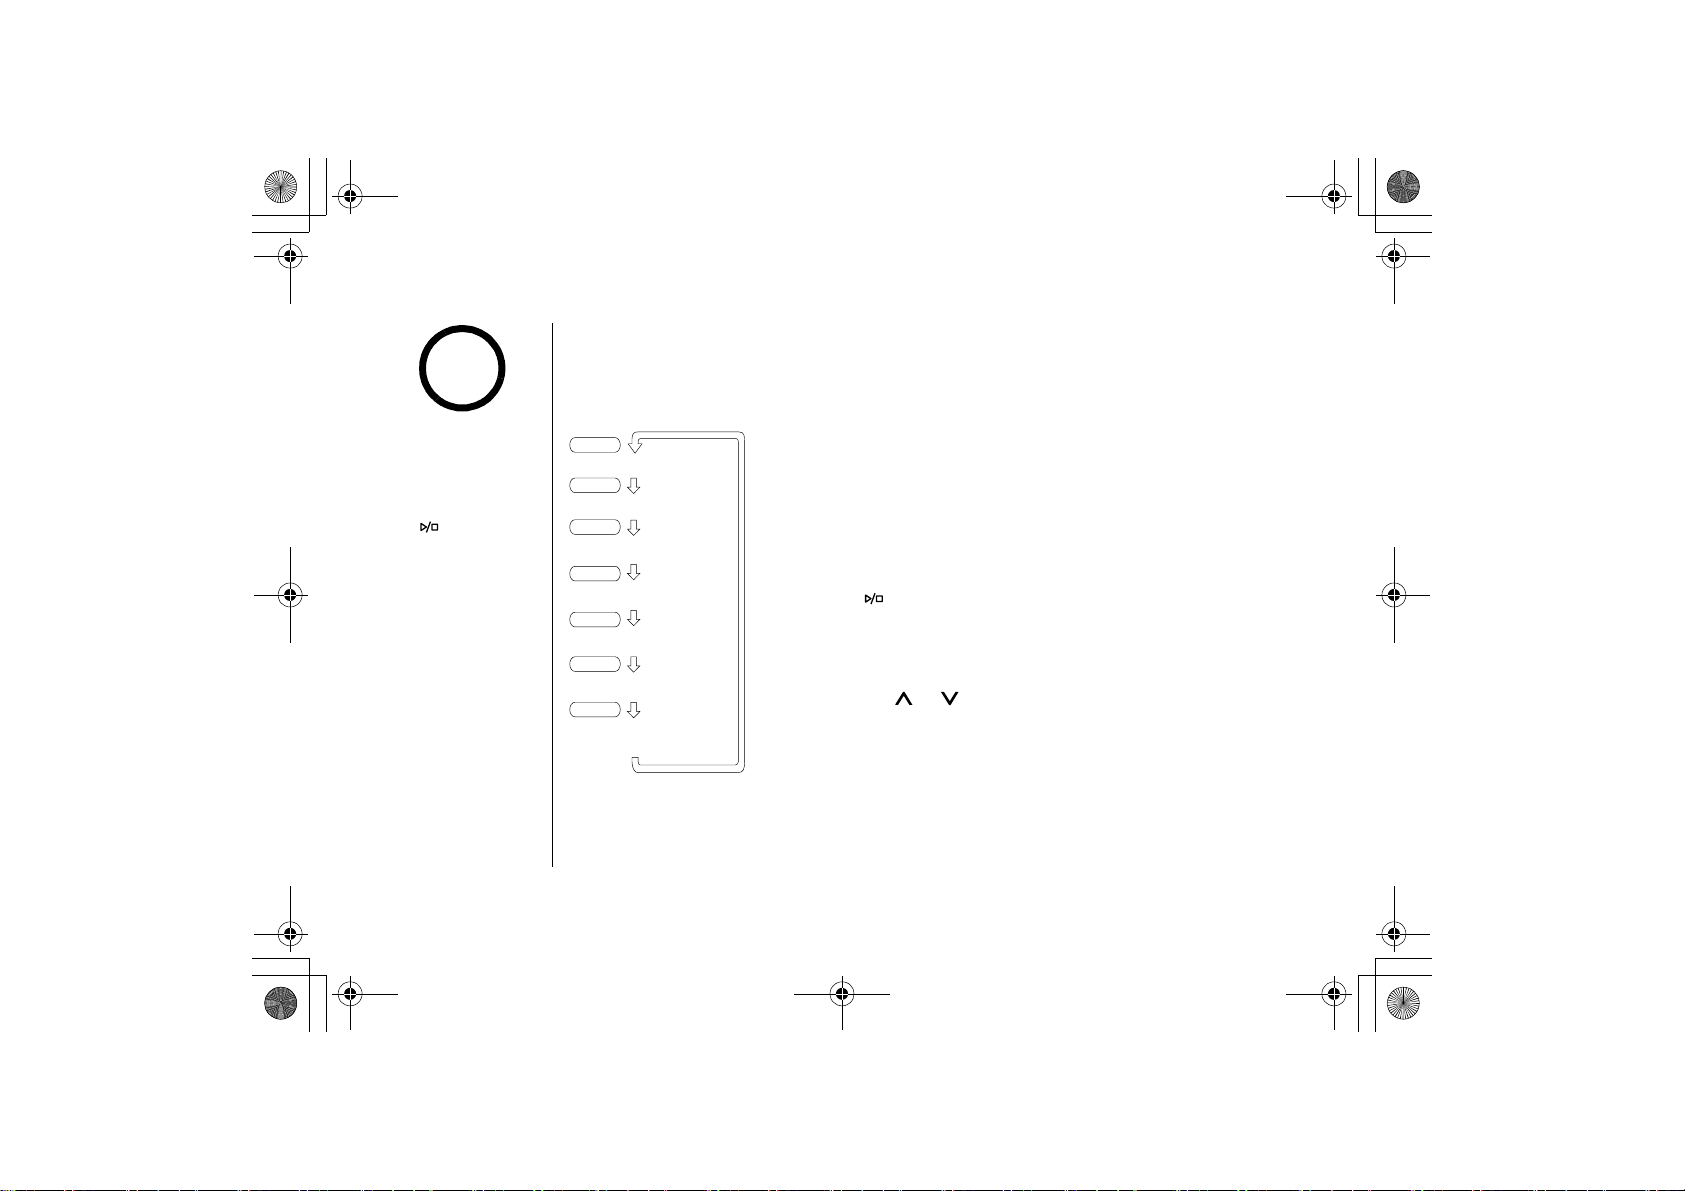
Answering System Settings
To set the following six functions you must enter the menu mo
menu/clock
"Time"
menu/clock
"Security Code"
menu/clock
"Ring Time"
menu/clock
"Record Time"
menu/clock
"Message Alert"
menu/clock
"Language"
menu/clock
Return to standby
with tone sounds.
月曜日 午後5時13分
• To scroll through the menu options, repeatedly press
the menu/clock
returns to standby after the last menu option. You
hear a confirmation tone to indicate standby mode.
• If any of the following occurs during menu setup, the
system returns to standby; you will have to start over
with the procedure you were performing.
-The talk/flash
-The (play/stop) key is pressed
-10 seconds elapse without a key press
-An incoming call is received
• If the system remains idle for about five seconds after
the announcement, the system returns to standby.
Once the or
idle time is extended to 10 seconds.
de.
key in standby mode. The system
key is pressed
/volume/select
key is pressed, the
ANSWERING DEVICE
THE INTEGRATED
[31] THE INTEGRATED ANSWERING
DEVICE
www.uniden.com
Page 33
EXAI7248.book 32 ページ 2004年1月12日
月曜日 午後5時13分
Setting the Time
The clock on the cordless phone’s answering sy
base. Follow these steps to set the clock to the correct time.
stem starts when power is supplied to the
note
www.uniden.com
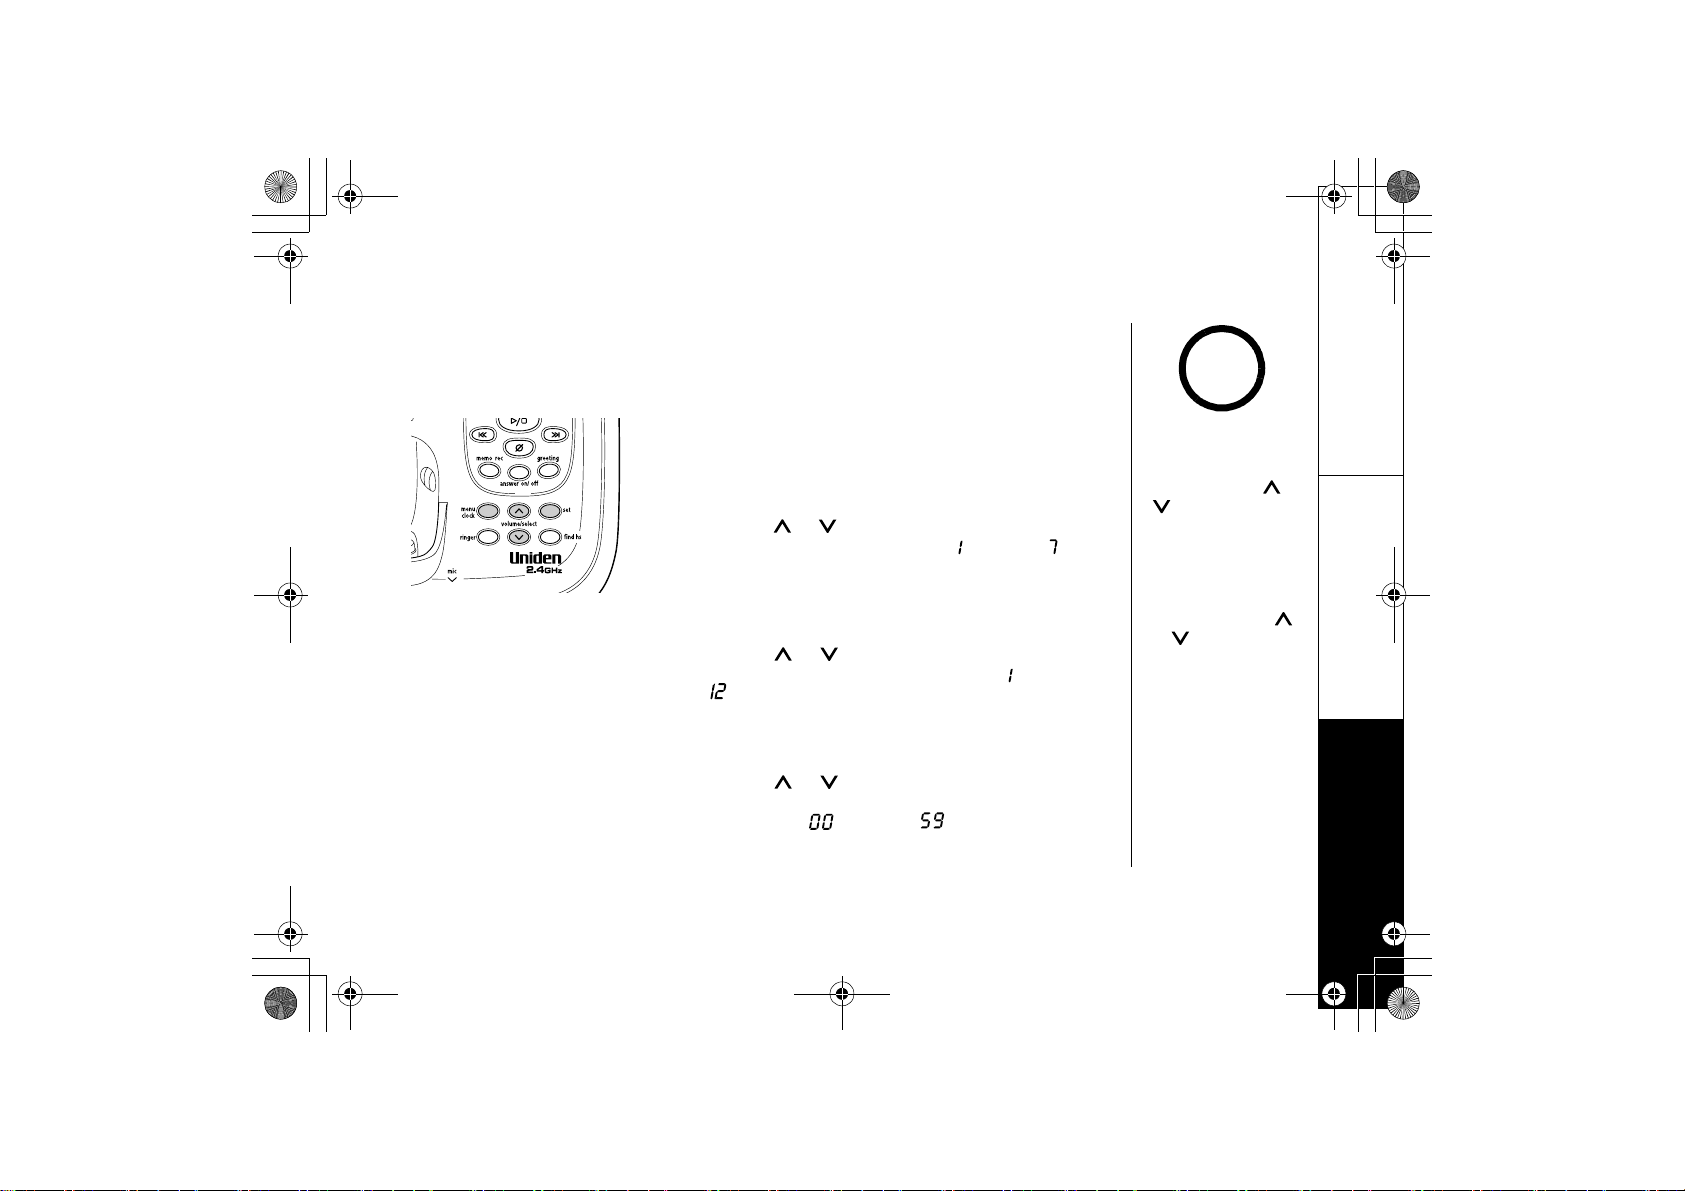
1) With the phone in standby mode, press the
menu/
clock key.
The system announces “Time,” the current time and the
guidance for setting the time.
2) Press the or
/volume/select
key until the correct
day is announced. The numbers [ ] through [ ] are
displayed on the base.
3) Press the
4) Press the or
set key to select the day.
/volume/select
key until you hear
the correct hour setting. The numbers [ ] through
[ ] are displayed on the base.
5) Press the
6) Press the or
set key to select the hour.
/volume/select
key until you hear
the correct minute setting.
The numbers [ ] through [ ] are displayed on the
base.
THE INTEGRATED ANSWERING DEV
•Normally, the system
will return to standby
if it remains idle for 10
seconds after the or
/volume/select
key is pressed. For
setting the time,
however, the idle time
is extended to two
minutes.
•Press and hold the
/volume/select
or
key to quickly scroll
through the numbers
on the display.
ICE [32]
ANSWERING DEVICE
THE INTEGRATED
Page 34
EXAI7248.book 33 ページ 2004年1月12日
月曜日 午後5時13分
note
The PIN code is set to
"80" when you purchase
the cordless phone.
7) Press the
8) Press the or
set key to select the minute.
/volume/select
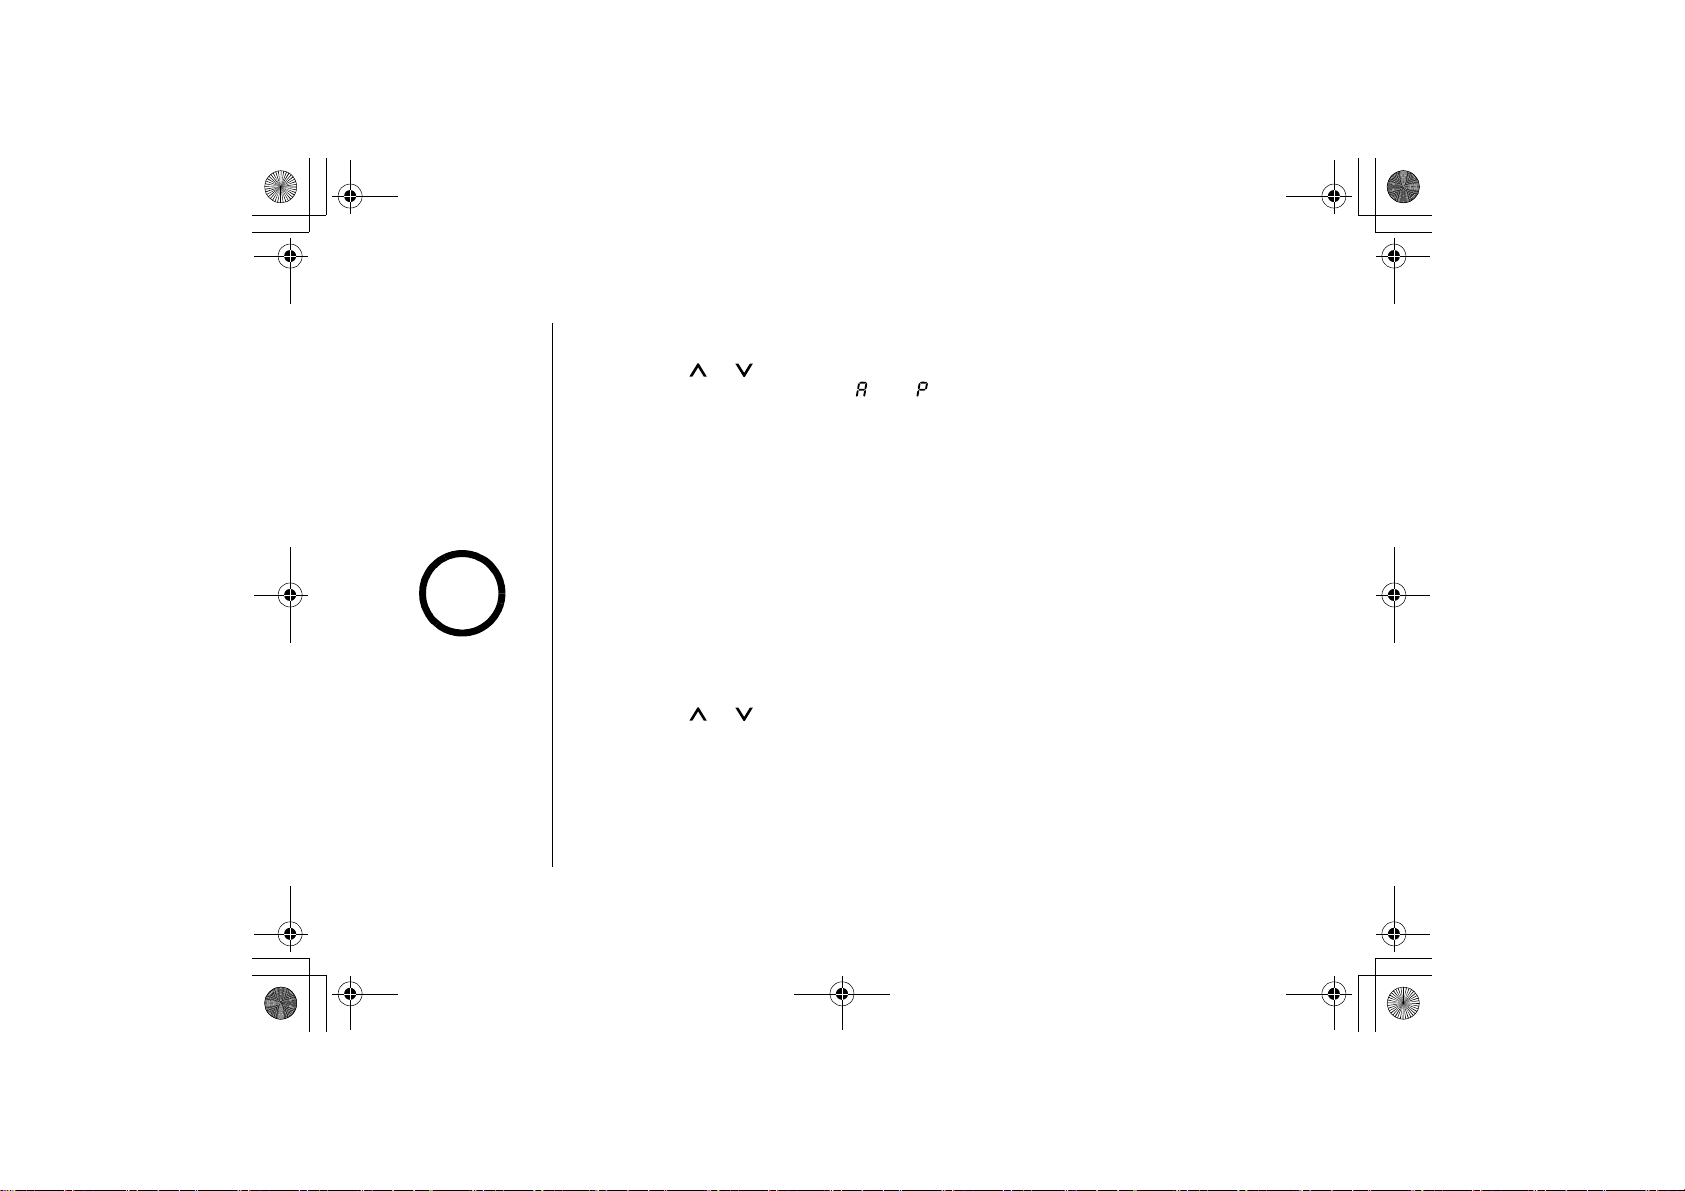
key until you hear the correct AM or PM setting.
The message counter displays [ ] or [ ].
9) Press the set key to select the AM/PM setting.
You hear a confirmation tone. Then the announcement "Tim
announced for your review. After a few seconds, the system announ
e" and the day and time are
ces “To set security code,
press menu again.”
Setting a Personal Security Code (PIN)
To play your messages from a remote location, you need to enter a two
Identification Number (PIN) code (01-99). To
1) With the phone in standby mode, press the
The system announces "Security code," and the current PIN cod
displayed on the base. Then the system announces the guidance f
2) Press the or
3) Press the
set key to select the PIN code. You hear a confirmation tone, then th
/volume/select
key until the desired number appears.
announcement "Security code" followed by the new PIN c
system announces “To set ring time, press menu again.”
select a PIN, perform the following steps:
menu/clock
key twice.
e is announced as it is
or setting the PIN code.
ode. After a few seconds, the
-digit Personal
e
ANSWERING DEVICE
THE INTEGRATED
[33] THE INTEGRATED ANSWERING
DEVICE
www.uniden.com
Page 35
EXAI7248.book 34 ページ 2004年1月12日
月曜日 午後5時13分
Setting the Ring Time
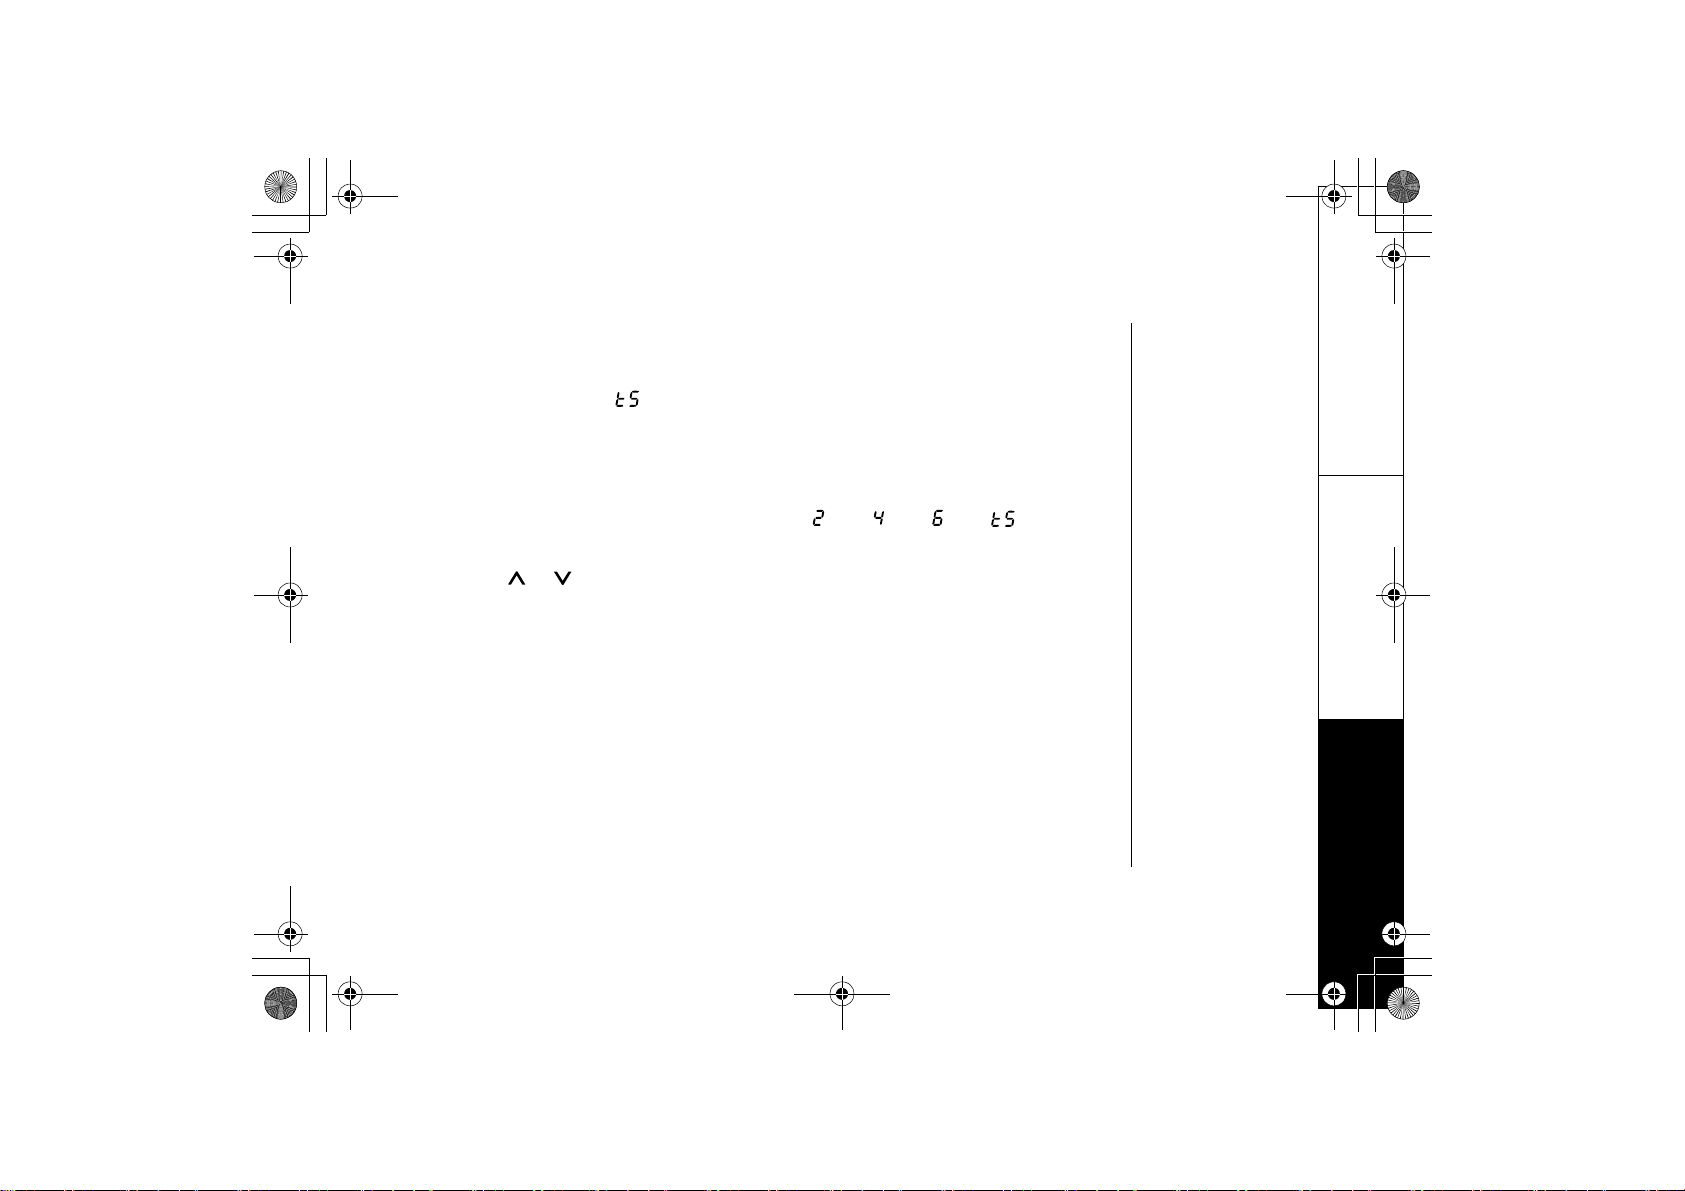
The ring time setting allows you to set the
answering system plays the outgoing message. You can set the ring tim
four, or six rings. Setting [ ] (Toll Saver), the answering system
you have new messages, and after four rings if there are none. This w
distance call to check your messages, you can ha
charges.
number of rings the caller hears before your
ng up after the second ring to avoid billing
e to answer after two,
picks up after two rings if
ay, if you make a long
1) With the phone in standby mode, press the
menu/clock
You hear "Ring time" and the current ring time ([ ] 2, [
and it is displayed on the base. Then you
2) Press the or
3) Press the
set key to select the new ring time. You hear a confirmation
/volume/select
key until the desired ring time appears.
hear the guidance for setting the ring time.
announcement "Ring time" followed by the new ring time. After
announces "To set record time, press menu again."
www.uniden.com
key three times.
] 4, [ ] 6, [ ] Toll saver),
tone, then the
a few seconds, the system
THE INTEGRATED ANSWERING DEV
ICE [34]
ANSWERING DEVICE
THE INTEGRATED
Page 36
EXAI7248.book 35 ページ 2004年1月12日
Selecting the Message Record Time
note
After setting the
Announce only feature,
you may want to change
your outgoing message
not to prompt the caller
to leave a message.
However, the
prerecorded message
changes automatically.
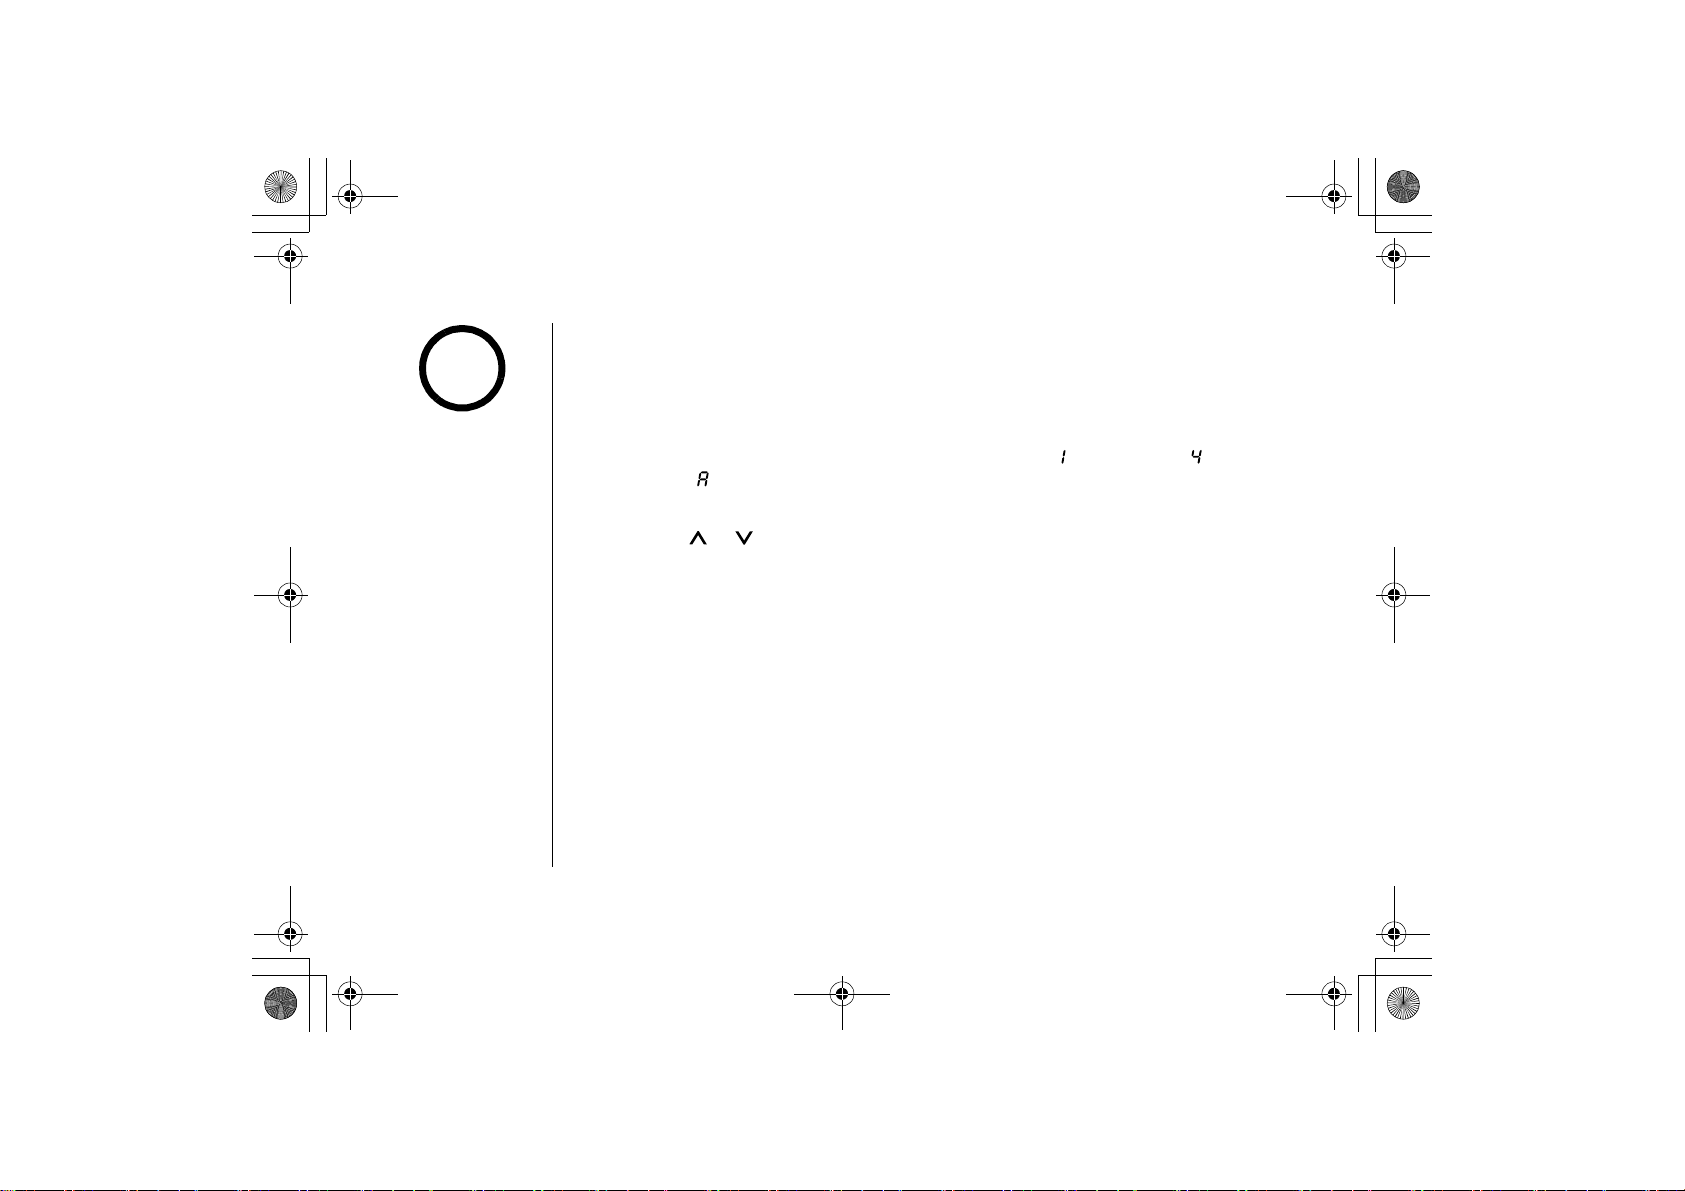
You have three record time options. The optio
duration for recording the incoming messages. "Announce onl
preset greeting or your personal greeting but prevents the caller fr
1) With the phone in standby mode, press the
You hear "Record time" and the current recording time ([ ] one m
minutes, [ ] Announce only, No recording), and it is di
Then you hear the guidance for setting the record time.
2) Press the or
3) Press the
announcement "Record time" followed by the new recording time. After a f
system announces "To set message alert, press menu again."
▼ Announce only feature
The announce only feature plays a prerecorded outgoing messa
caller to leave a message. To set "Announce only," follow the s
Your system comes with a prerecorded announce
take your call. Please call again.“
月曜日 午後5時13分
ns "One minute" or "Four minutes" set the
y" answers the call with the
om leaving a message.
menu/clock
key four times.
splayed on the base.
/volume/select
key until the desired time appears.
set key to select the new recording time. You hear a confir
ge, and will not allow the
teps above.
only greeting; “Hello, no one is available to
inute, [ ] four
mation tone, then the
ew seconds, the
ANSWERING DEVICE
THE INTEGRATED
To scroll between the prerecorded message or your own person
key when the outgoing message is played. If you want to use y
omit the prompt "to leave a message" from y
outgoing message (Greeting)" on page 38.
[35] THE INTEGRATED ANSWERING
DEVICE
al greeting, press the
greeting
our own greeting or want to
our greeting, refer to "Recording a personal
www.uniden.com
Page 37
EXAI7248.book 36 ページ 2004年1月12日
月曜日 午後5時13分
Setting the Message Alert Tone
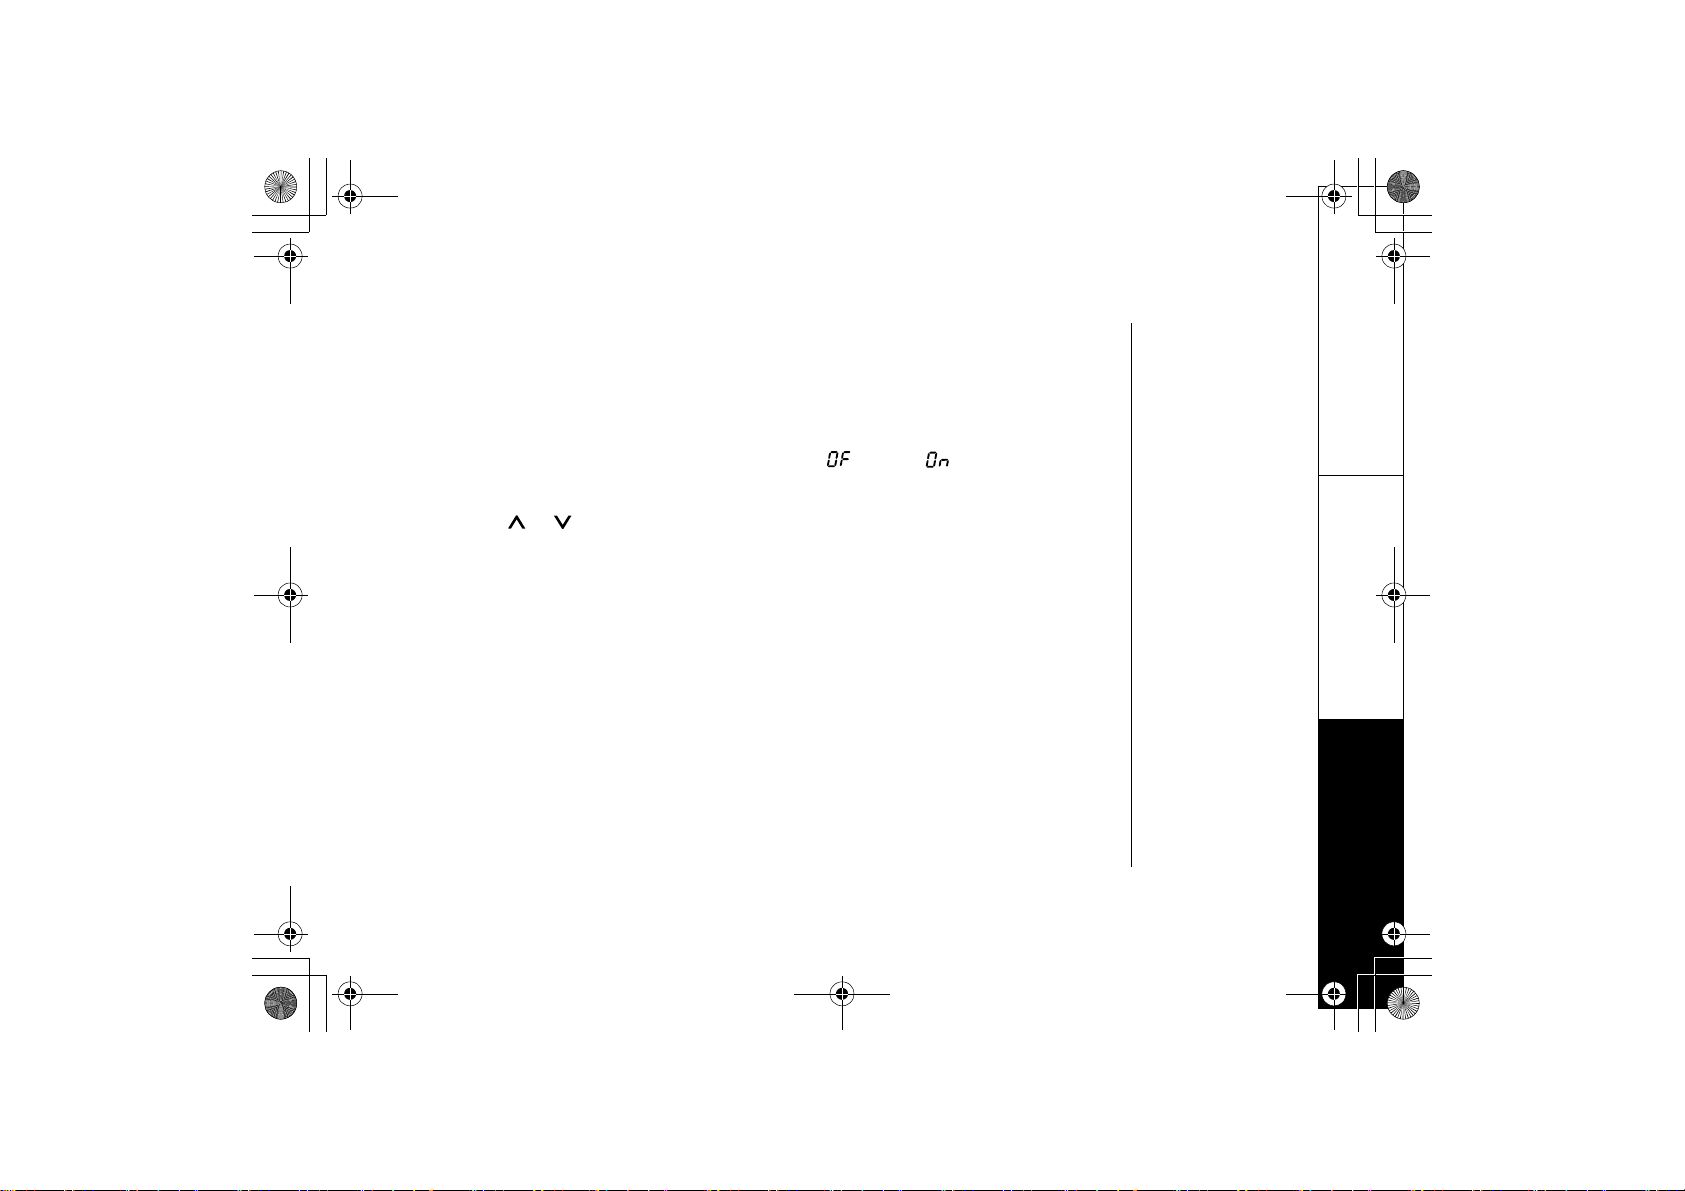
Message Alert feature lets you know you have new messages by
tone. If you set the Message Alert to on when a new message is recei
sound every 15 seconds.
sounding a short beeping
ved, the alert tone will
1) With the phone in standby mode, press the
menu/clock
You hear "Message alert" and the current setting ([ ] Off or [
displayed on the base. Then you hear the guidance for sett
2) Press the or
3) Press the
set key to select the new setting. You hear a confirmation tone, then
/volume/select
key to make your selection.
announcement "Message alert" followed by the current sett
few seconds, the system announces "To set language, press menu
When the first new message is received, the alert tone wil
You can also turn off the Message Alert tone by pressing any
will deactivate until another new message is received.
Turning Message Alert tone off when you’re away from your phone:
When all new messages
are played back using the remote
the Message Alert tone will automatically deactivate. The ton
messages are played back.
www.uniden.com
THE INTEGRATED ANSWERING DEV
key five times.
] On), and it is
ing the Message Alert Tone.
the
ing you have selected. After a
again."
l begin to sound.
key on the base unit. The tone
playback feature (see page 45,)
e will not deactivate until all
ICE [36]
ANSWERING DEVICE
THE INTEGRATED
Page 38
EXAI7248.book 37 ページ 2004年1月12日
Selecting the Language
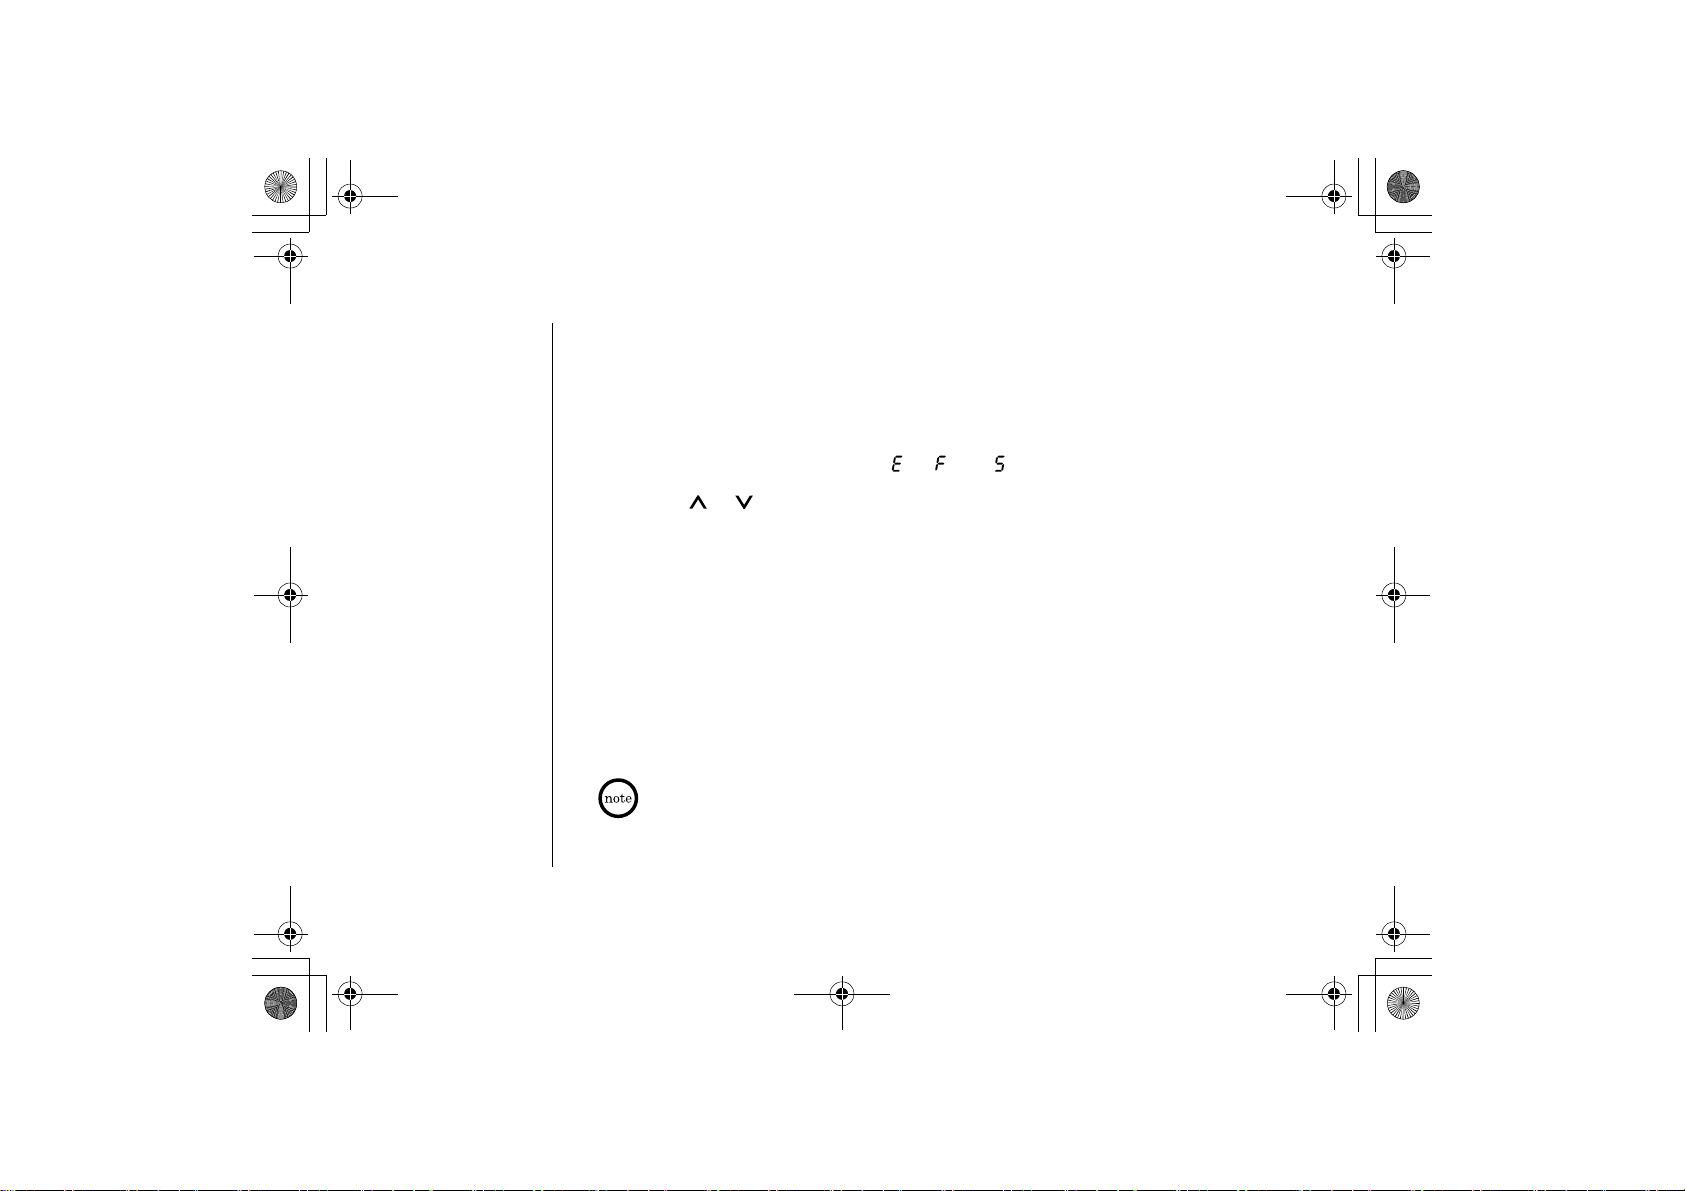
The answering system voice announcements can be heard in En
To choose the language of the answering system voice announcement
月曜日 午後5時13分
glish, French or Spanish.
s:
1) With the phone in standby mode, press the
You hear the announcement "Language, English" followed by the
the language. The current setting ([ ], [ ] or [ ]) appears on the bas
2) Press the or
3) Press the
set key. A confirmation tone is heard along with the setting in
selected.
Setting Your Outgoing Message (Greeting)
When you receive a call, the answering system automatically play
your own greeting.
▼Preset message
The following message is prerecorded:
"Hello, no one is available to take your call. Please leav
See “Selecting the Message Record Time” on page 3
feature.
[37] THE INTEGRATED ANSWERING
/volume/select
DEVICE
menu/clock
key six times.
voice prompts for setting
key to select the desired language.
s either a preset message or
e a message after the tone."
5 on how to set the announce only
www.uniden.com
e.
the language
ANSWERING DEVICE
THE INTEGRATED
Page 39
EXAI7248.book 38 ページ 2004年1月12日
月曜日 午後5時13分
▼Recording a personal outgoing message (Greeting)
1) Press and hold the
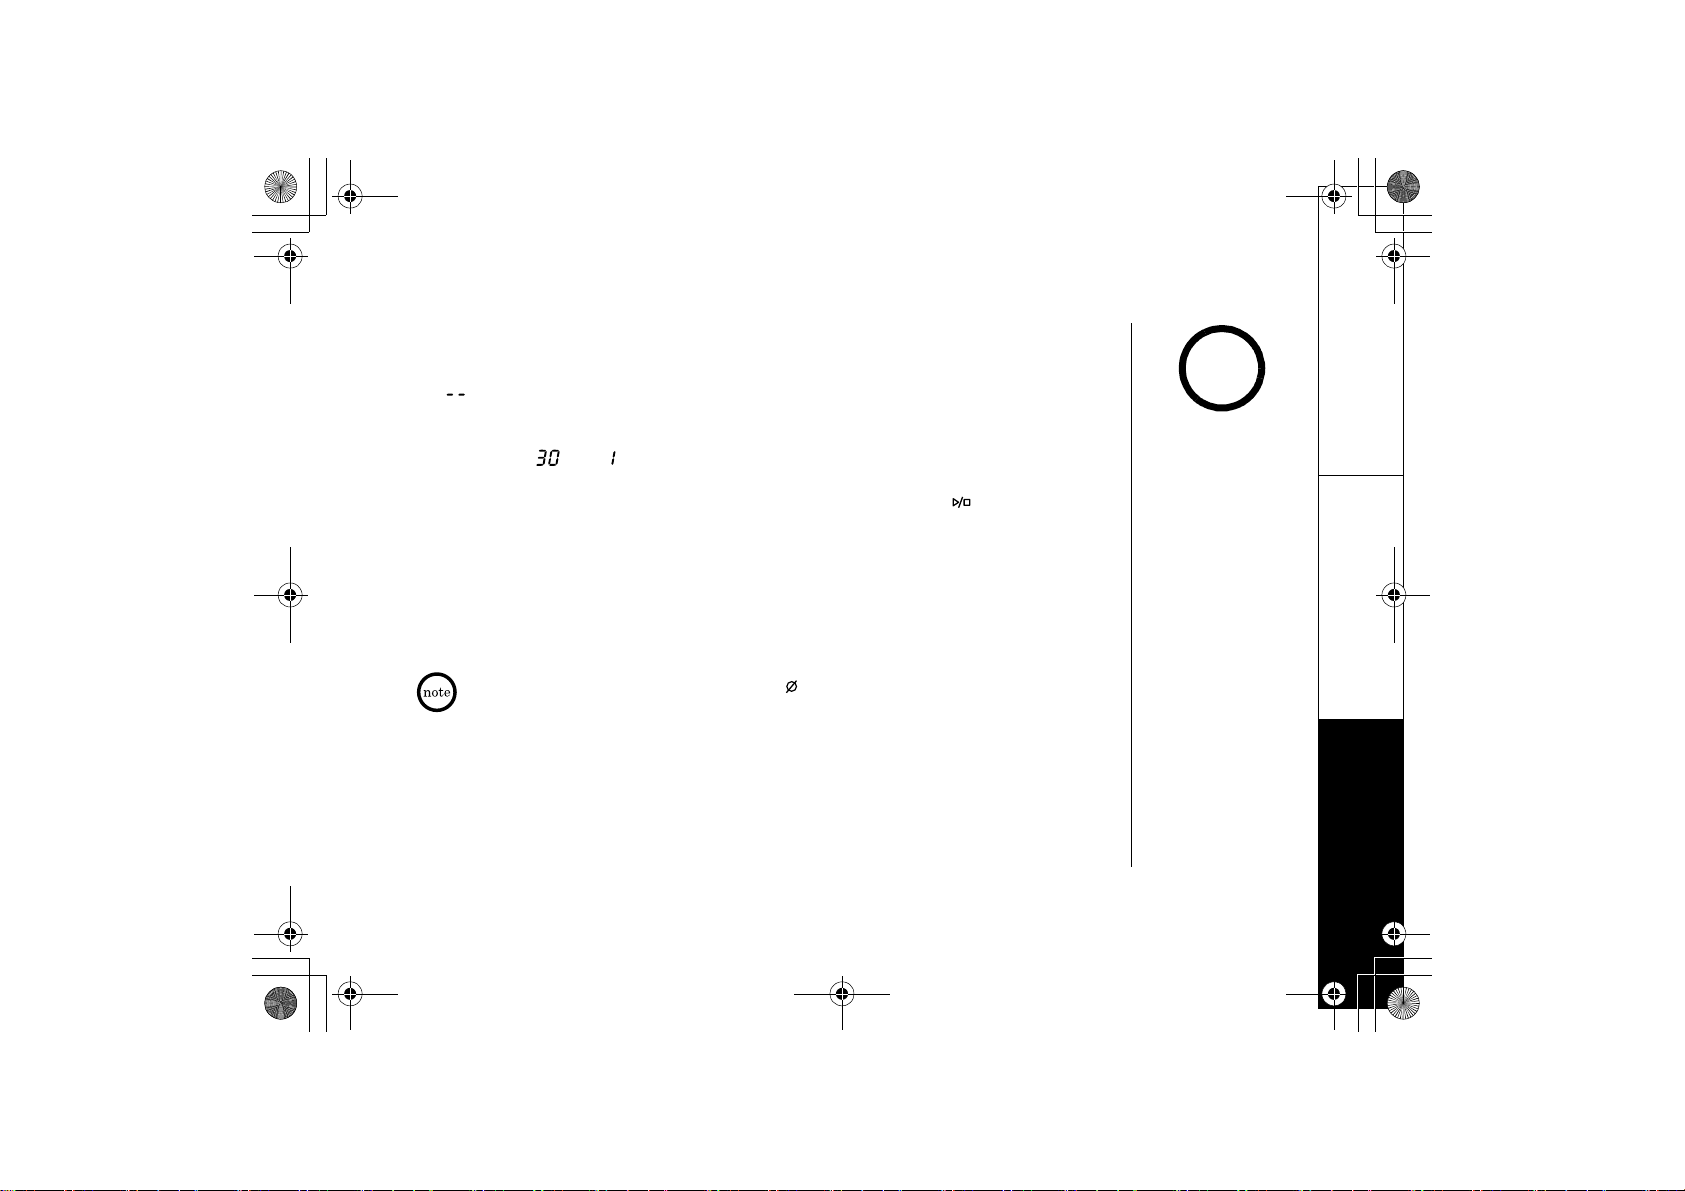
You hear the announcement
[ ] flashes on the message counter.
greeting key in standby mode.
"
Record greeting" and a confirmation tone.
note
2) Start recording your message. You have 30 seconds, and the mess
count down [ ] to [ ] every second.
3) When you are finished recording your greeting, press the
key. You hear a confirmation tone, and then your greeting plays bac
▼Choosing between the two outgoing messages
With the phone in standby mode, press the
greeting
while the outgoing message is played. This sw
the personal greeting. After finishing playing back the messag
heard.
To delete the personal Greeting, press the (delete) k
the system announces "Greeting has been delete
www.uniden.com
key. Then press the
itches between the prerecorded greeting and
d."
THE INTEGRATED ANSWERING DEV
age counter starts to
greeting
, (play/stop) or
set
k for you.
greeting
key again
e, a confirmation tone is
ey during the announcement and
•Your greeting must be
more than 2 seconds
and less than 30
seconds to record.
•Position yourself as
near to the base’s
microphone as possible
and speak clearly when
recording your
outgoing message.
ICE [38]
ANSWERING DEVICE
THE INTEGRATED
Page 40
EXAI7248.book 39 ページ 2004年1月12日
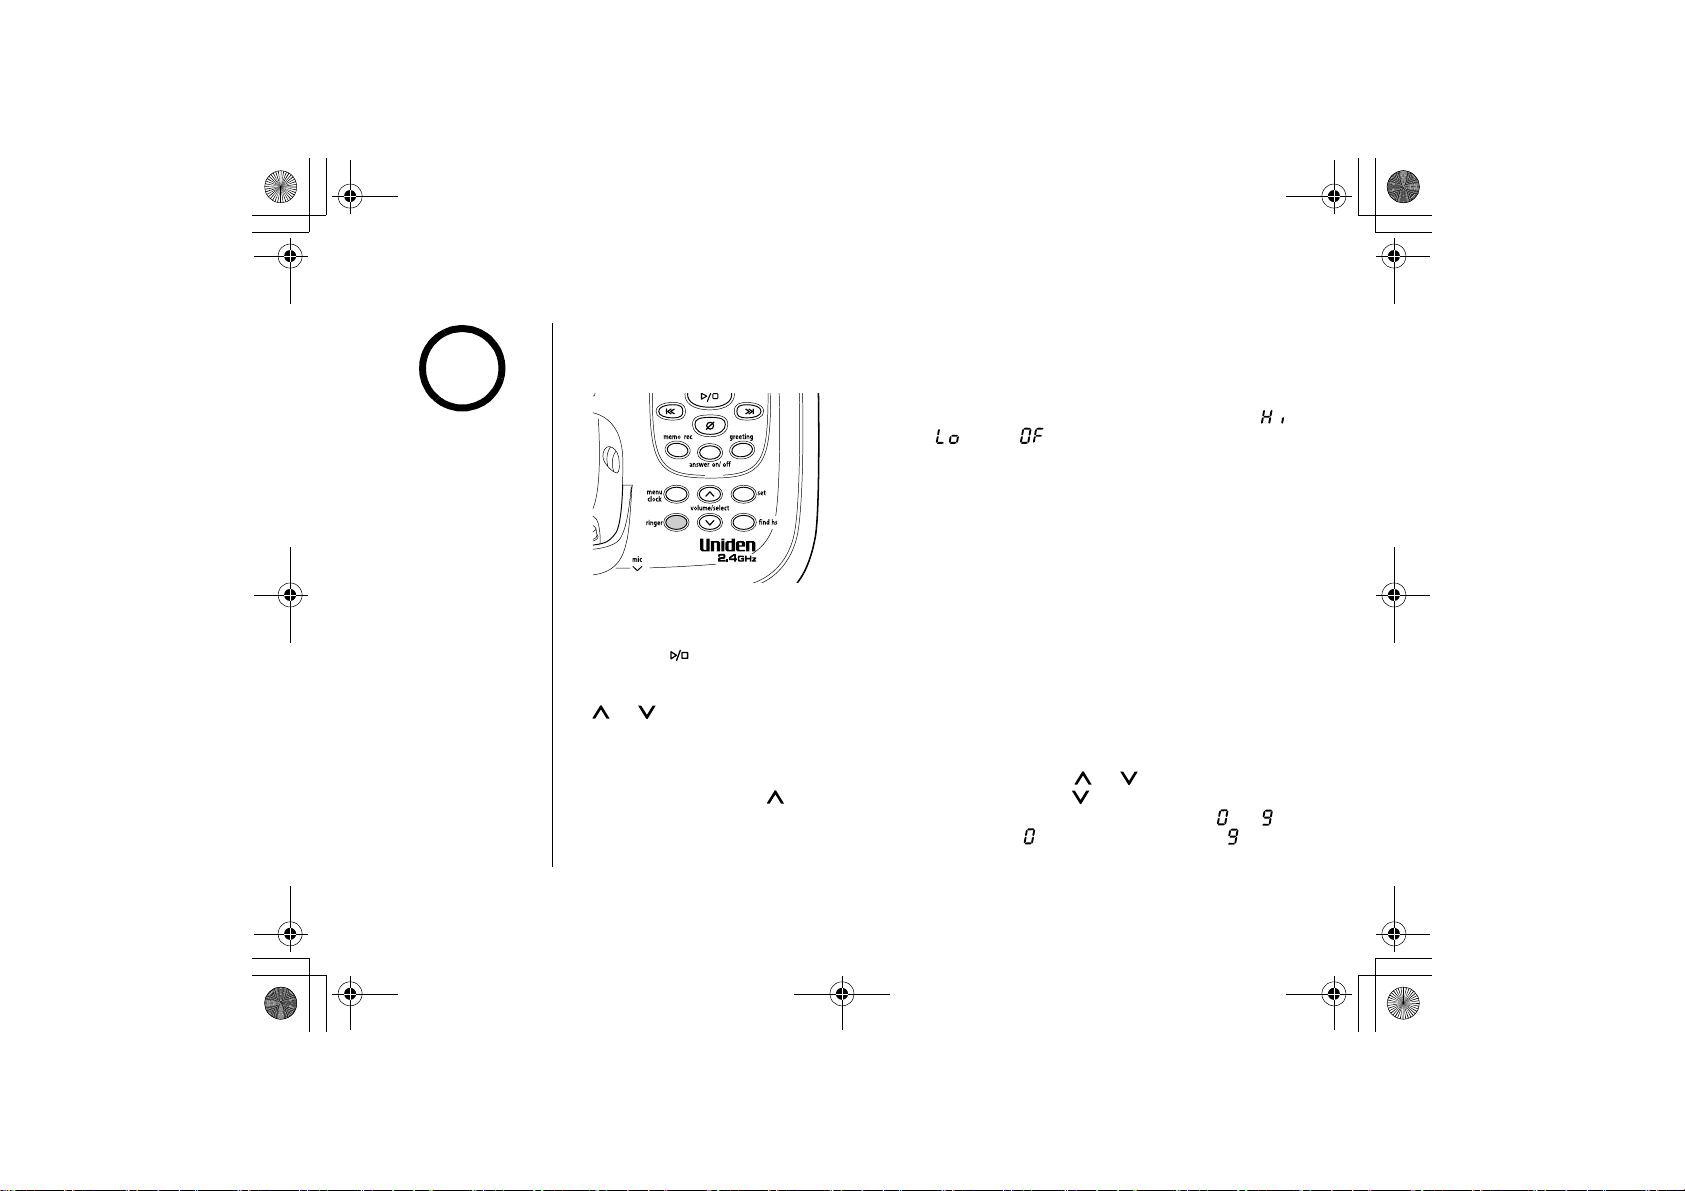
Setting the Base Ringer Volume
You will hear three ringer options. One allows you to turn the ringer
note
Although you have set
the base ringer to off,
you will still hear the
ringer from the handset
on the base if its ringer
is on.
levels. You can change the ringer volume while in standby mode
Temporarily Mute the Base Ringer and Call Screen
Press the (play/stop) key to temporarily mute the incoming
ringer will sound with the next incoming call. To
ringer key. To hear the answering machine and screen this call, pr
the
or /volume/select
Adjusting the Speaker Volume Level
You can adjust the volume of the base speaker by pressing the
on the base. Press the
softer while the base speaker is being used except for menu
are displayed on the base indicating the volu
the loudest.
月曜日 午後5時13分
key.
/volume/select
off. The other two are volume
or the incoming call is ringing.
key.
1) Press the
ringer
You hear the ringer at the current volume level ([ ]
high, [ ] low, [ ] off) (if you set the base ringer
volume to off,
"
Ringer off " is announced) and it is
displayed on the base.
2) Press the
ringer key repeatedly until the desired ringer
option appears.
3) The system displays the new ringer volume.
ring and call screen. The
turn the ringer back on for this call, press
ess the
or /volume/select
key for louder or the
/volume/select
key for
mode. The numbers [ ] -[ ]
me levels. [ ] being the softest and [ ] being
key
ANSWERING DEVICE
THE INTEGRATED
[39] THE INTEGRATED ANSWERING
DEVICE
www.uniden.com
Page 41
CH14 Answering.fm 40 ページ 2004年1
月13日 火曜日 午後1時14分
Using Your Answering System
The message counter displays the number of messages stored in
flashes, new messages are waiting for you. The flashing num
messages, not total messages. The cordless phone plays the new m
new messages are played, you can play the old messages.
When the answering system is full, [ ] is displaye
announces "No remaining time." You should dele
record new messages. (Refer to “Deleting a Messag
Playing Your Messages
te some messages so that the system can
memory. If the display
ber represents the number of new
essages first; after all the
d on the base, and the system
e” on page 43.)
www.uniden.com
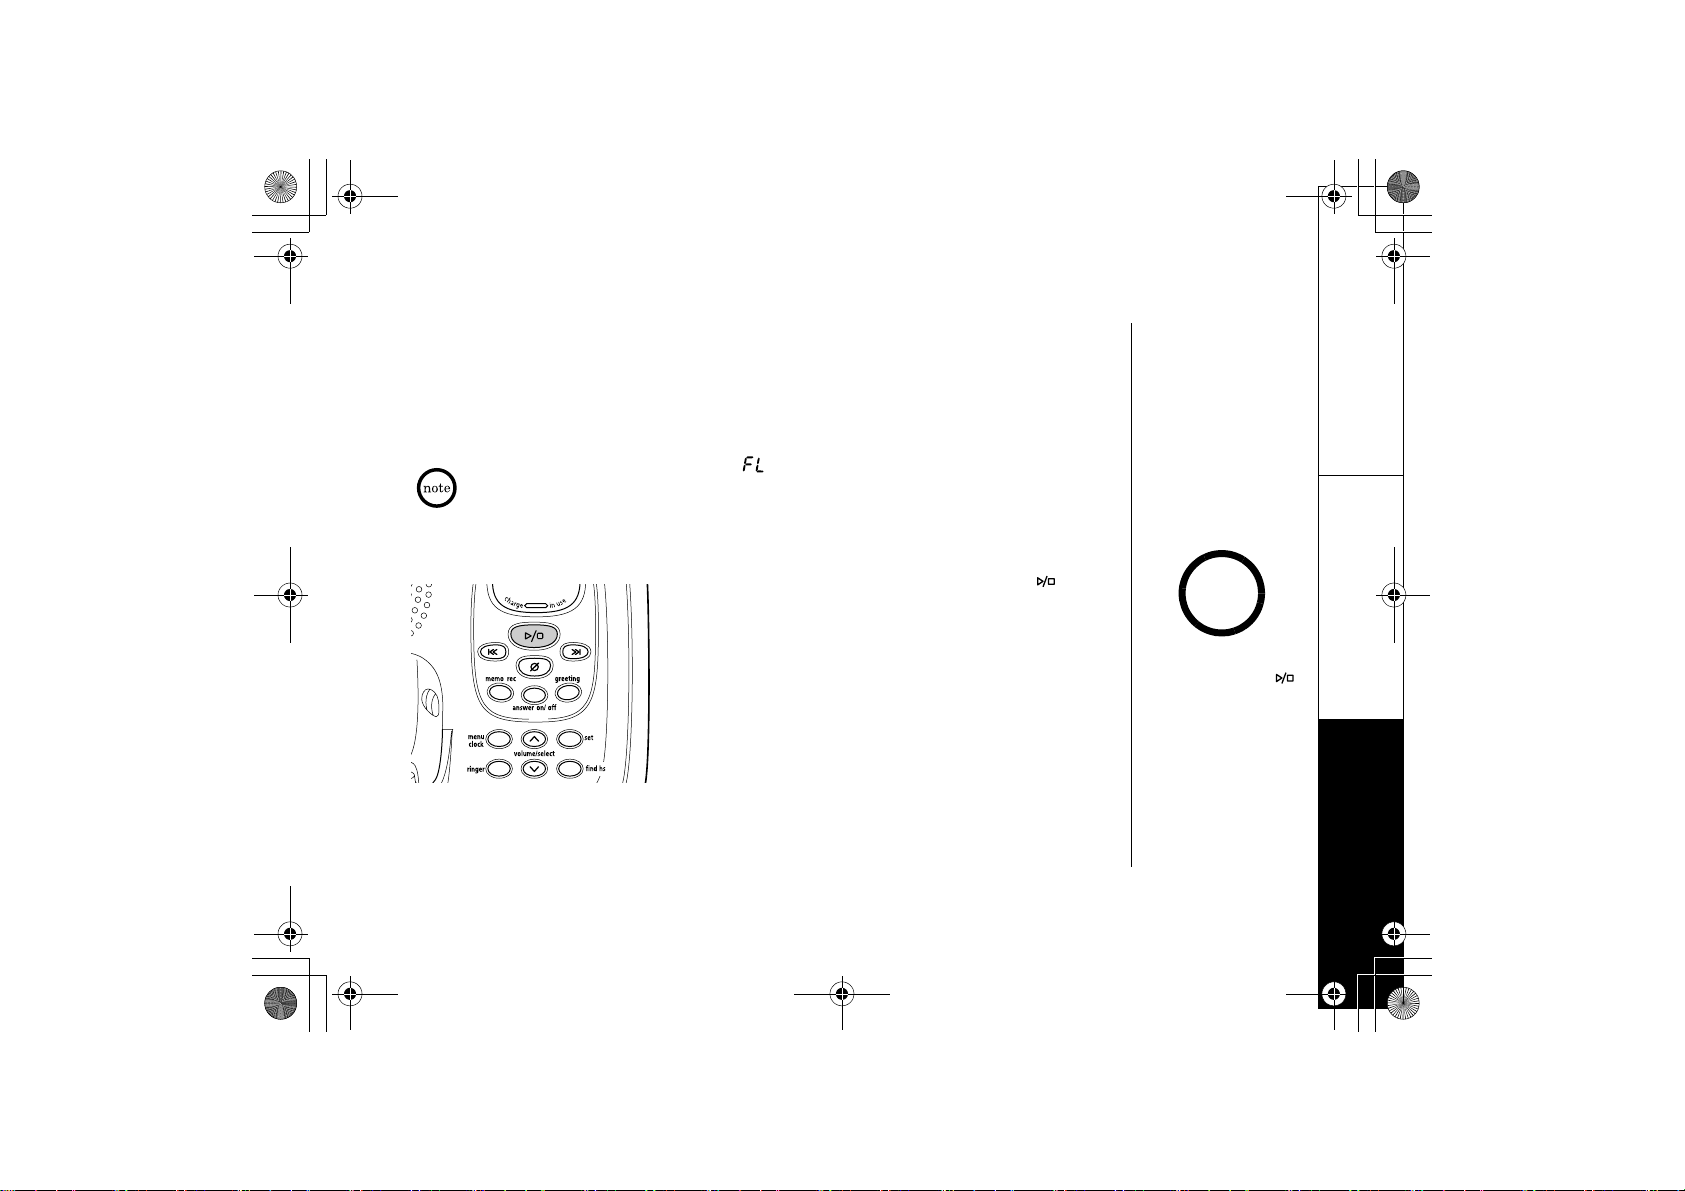
1) With the phone in standby mode, press the (play/
stop) key. The system announces the number of new
and old messages. The LED displays the number of new
messages, and the number flashes. The day and time
that each message was received is announced after the
message is played. The message counter displays the
number of current messages stored.
2) When all new messages have been played, you hear a
confirmation tone and an announcement “End of
messages.” The system returns to standby.
THE INTEGRATED ANSWERING DEVI
hint
To stop playing your
messages, press the
(play/stop) key again at
any time.
CE [40]
ANSWERING DEVICE
THE INTEGRATED
Page 42
EXAI7248.book 41 ページ 2004年1月12日
月曜日 午後5時13分
3) After you have reviewed your new messages,
the (play/stop) key again. Once you have
old message. The old messages will be played in the order in w
you can play your old messages by pressing
listened to a new message, it becomes an
hich they were received.
Reviewing Messages using Handset
1) With the phone in standby mode, press the
AnsweringMachine op eration
appears on the display. The answering system announces
select/remote
the current time and the number of messages stored in the mem
2) You hear "To play incoming message, press two. For help,
You hear intermittent beeps.
3) Press the
/2 key and you can review your messages. When you are finished, h
exit the system.
key on the handset.
ory.
press zero."
Repeating a Message
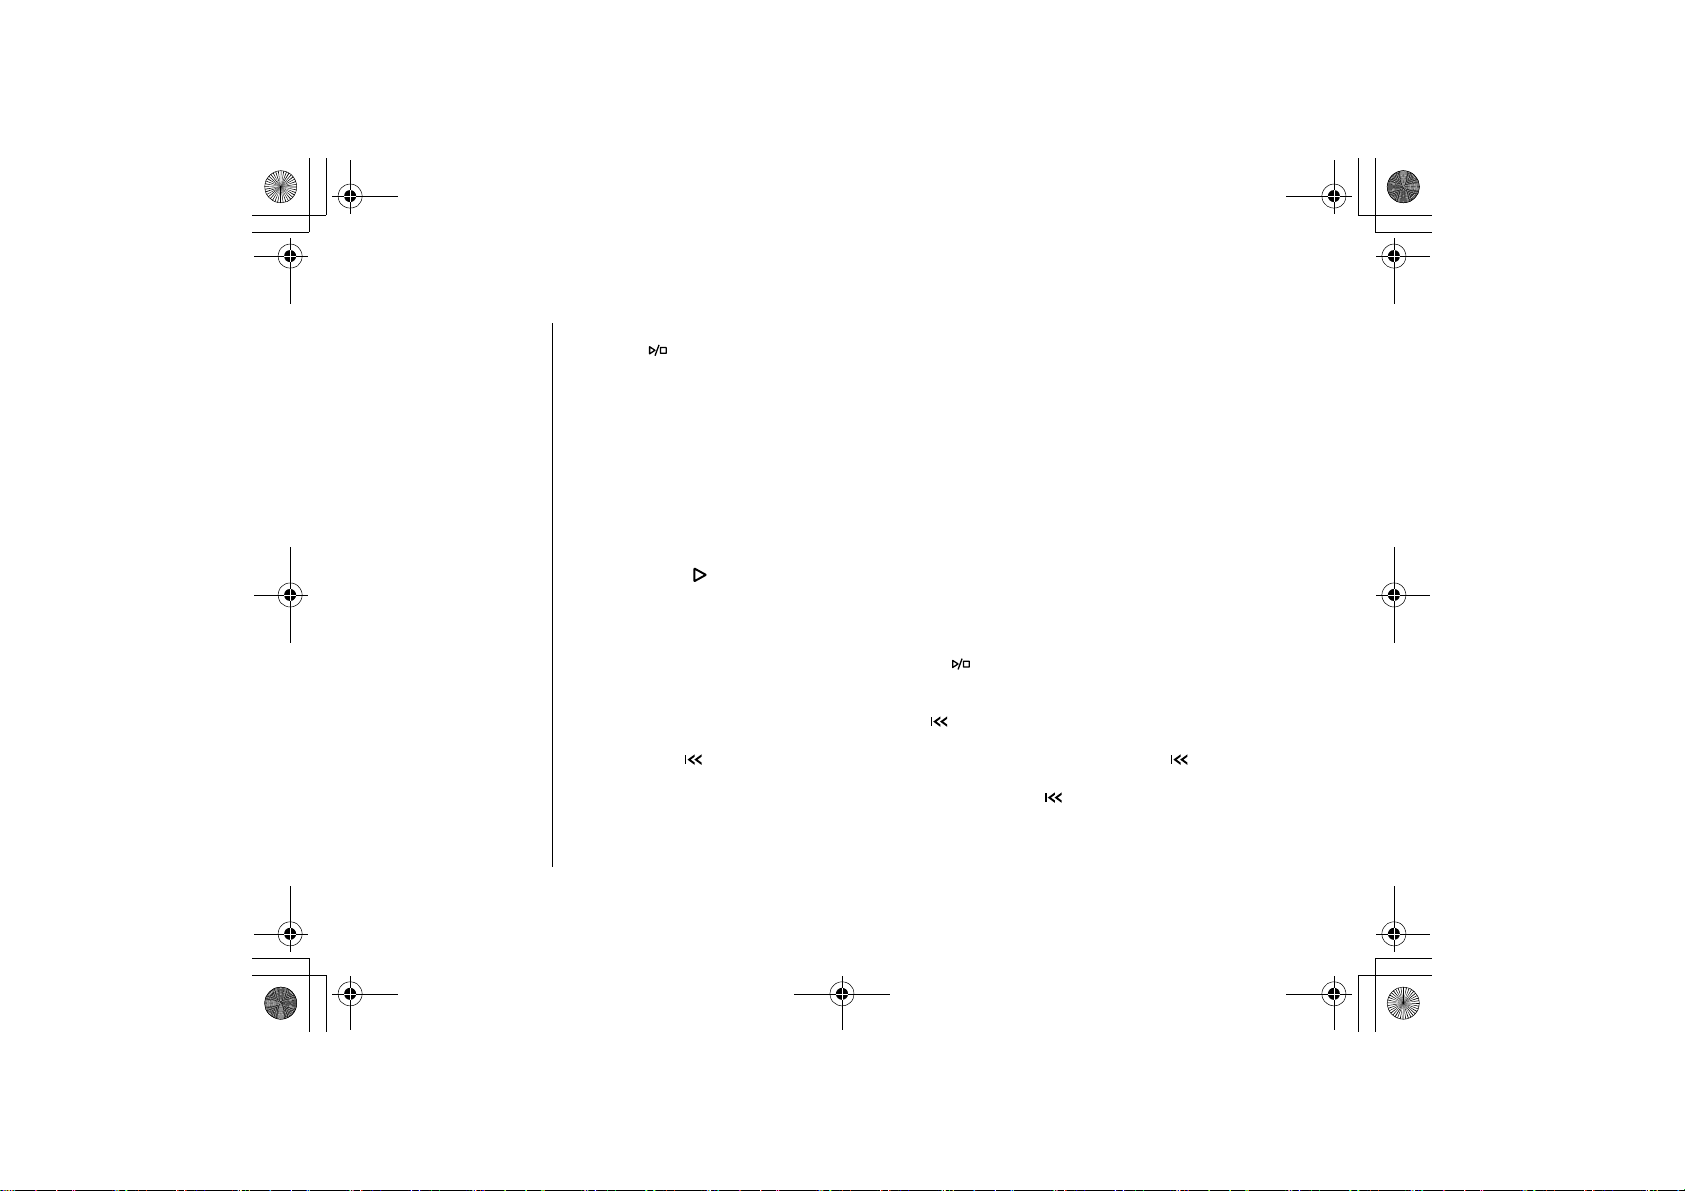
1) With the phone in standby mode, press the (play/stop) k
The number of stored messages are announced.
2) To repeat the current message, press the (repeat/rew) key after a few
beginning the message. To quickly scroll backwards through a m
hold the (repeat/rew) key. To repeat the previous message,
key within a few seconds (about 4 seconds during remote
begins playing. If you have several messages, press the (repeat/rew
until you return to the message you want to replay. If the current me
message, the system plays back from the beginning of the current m
back into the old message group).
ey to review your messages.
essage, press and
press the (repeat/rew)
operation) after a message
ssage is the first new
essage (it does not go
Remote
ang up to
seconds of
) key repeatedly
ANSWERING DEVICE
THE INTEGRATED
[41] THE INTEGRATED ANSWERING
DEVICE
www.uniden.com
Page 43
EXAI7248.book 42 ページ 2004年1月12日
月曜日 午後5時13分
3) Press the (play/stop) key at any time to stop reviewing
messages and return to
standby.
Skipping a Message
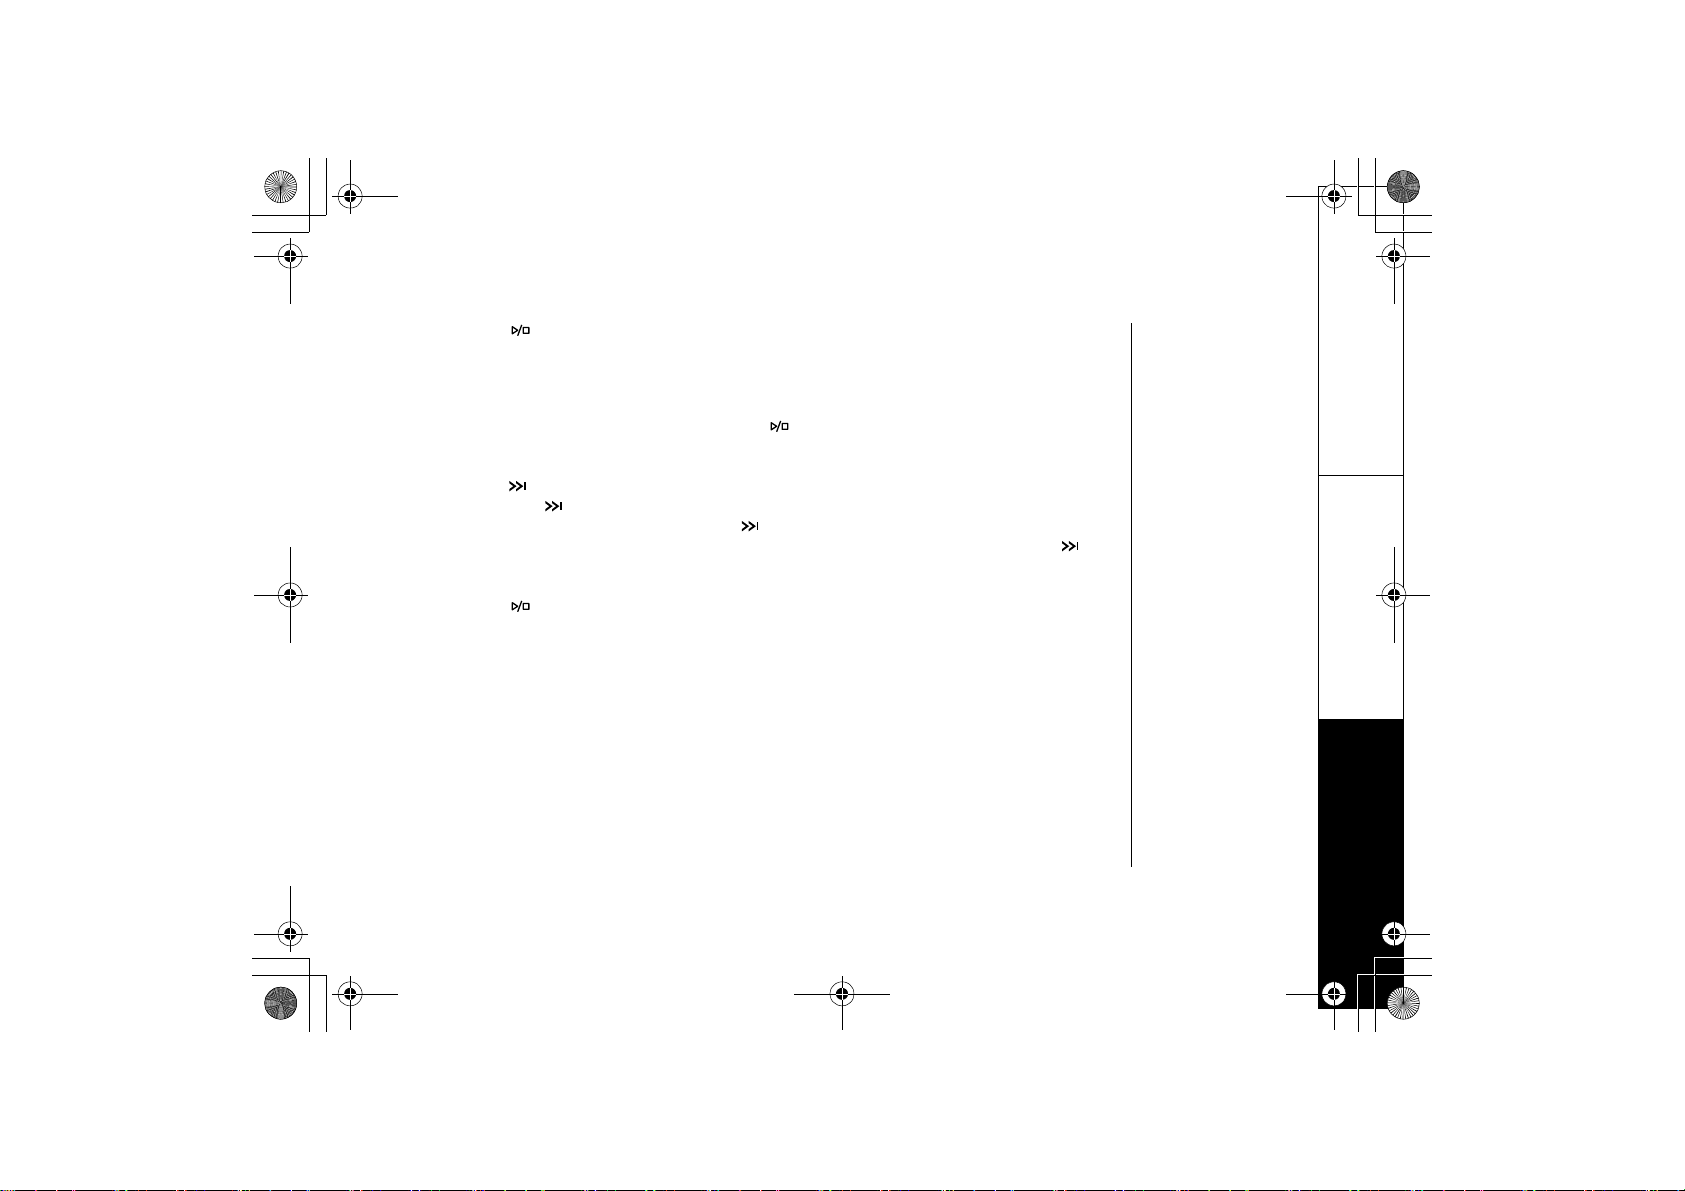
1) With the phone in standby mode, press the (play/stop) k
The number of messages is announced.
2) Press the (skip/ff) key at anytime to skip to the next message.
Each time the (skip/ff) key is pressed, the system scans
If you have several messages, press the (skip/ff) key repeatedly
you want to play. To quickly scroll forward through a messa
(skip/ff) key.
3) Press the (play/stop) key at any time to stop reviewing your m
standby. The message counter shows the number of messag
ey to review your messages.
forward one message.
ge, press and hold the
es stored in memory.
to find the message
essages and return to
ANSWERING DEVICE
THE INTEGRATED
www.uniden.com
THE INTEGRATED ANSWERING DEV
ICE [42]
Page 44
EXAI7248.book 43 ページ 2004年1月12日
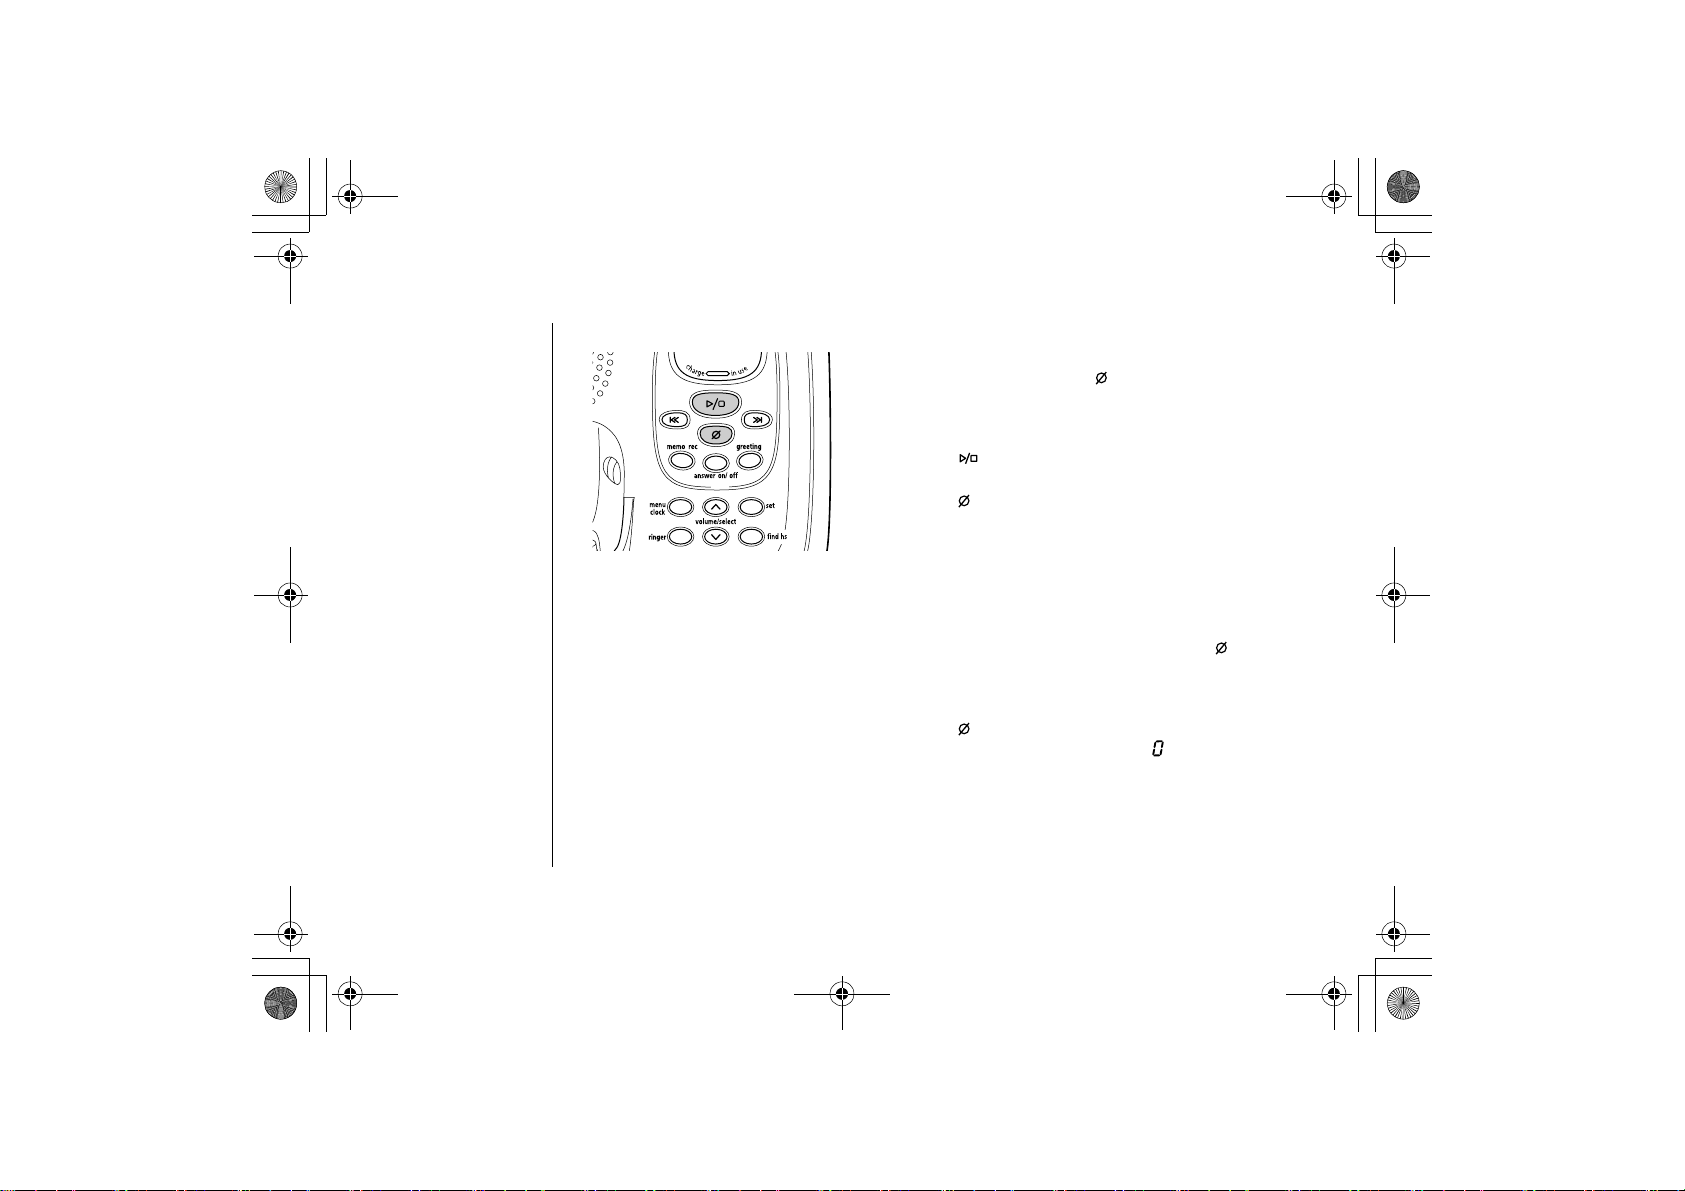
Deleting a Message
月曜日 午後5時13分
To maintain maximum record time, delete the old
messages. When you press the (delete) key, you are
permanently deleting the message. Once deleted, the
message cannot be replayed.
1) Press the (play/stop) key to review your messages.
2) Press the (delete) key anytime during the message
to delete.
3) You hear a confirmation tone and the message is
deleted.
You can also delete all the messages.
1) With the phone in standby mode, press the (delete)
key. You hear an announcement “To delete all
messages, press delete again.”
When you try to delete all messages without first listening to your n
several short beeps followed by an announcement “Please playbac
protects you from accidentally erasin
[43] THE INTEGRATED ANSWERING
DEVICE
2) Press the (delete) key again.
You hear a confirmation tone and [ ] is displayed on
the base. All the messages are deleted.
ew messages, you hear
k all messages.” This
g messages you have not yet reviewed.
www.uniden.com
ANSWERING DEVICE
THE INTEGRATED
Page 45

EXAI7248.book 44 ページ 2004年1月12日
Voice Memo
The voice memo function allows you to record messages as
shorts as two seconds and
月曜日 午後5時13分
as long as four minutes.
note
1) With the phone in standby mode, press and hold the
memo rec
key.
You hear an announcement “Record memo message”
and a tone. [ ] flashes on the message counter.
2) Start your recording.
3) When you have finished, press the (play/stop),
memo rec
or set key to stop recording. You hear a
confirmation tone, and the system returns to standby.
Recording a Conversation
You can record up to 10 minutes of conversation while you are us
conversation that lasts less than two seconds will not be reco
1) During a conversation from the handset, press and hold the
The unit begins recording with a confirmation tone and [
message counter.
A beep that can be heard by both parties sounds during r
If you receive a call waiting tone while recording a co
key to accept the waiting call. The recording featur
The original call is put on hold.
2) To stop recording, press the (play/stop) or
You hear a confirmation tone.
www.uniden.com
memo rec key.
THE INTEGRATED ANSWERING DEV
ing your phone. Any
rded.
memo rec key.
] flashes on the
ecording.
nversation, press the
e continues recording the new call.
talk/flash
•The voice memo
recorded is completely
independent of the
greeting message.
•The voice memo
messages are recorded
as incoming messages.
•When the answering
system is full, [ ]
appears on the
message counter, and
recording is
terminated.
•A recorded
conversation is treated
as a incoming message
and will be added to
the stored messages.
•When recording a
conversation, all
dialing features except
for using call waiting
(see page 18) are
disabled.
Stop recording if you
need to enable any
other handset keys.
ICE [44]
ANSWERING DEVICE
THE INTEGRATED
Page 46
EXAI7248.book 45 ページ 2004年1月12日
Remote Operation
tip
For your convenience
remote operation cards
are provided for you to
use while away from
home (located in the
back of this manual).
You can operate your answering system from a remote location
home, or from another room using a handset). Use this functi
messages, to play or delete message. When using any touch-ton
record a new greeting message.
Remote Access away from Home
You can operate your answering system from a remote location
telephone.
1) Call your telephone number.
月曜日 午後5時13分
(when you are away from
on to check for recorded
e telephone, you can even
using any touch-tone
2) During the greeting message, press
note
3) The answering system announces the current time and the
memory. Then you hear "To play incoming messages, pres
Once you enter the
remote access menu,
you must enter a
command within 15
seconds, or the
answering system
automatically hangs up
and returns to standby.
[45] THE INTEGRATED ANSWERING
For help, press one zero."
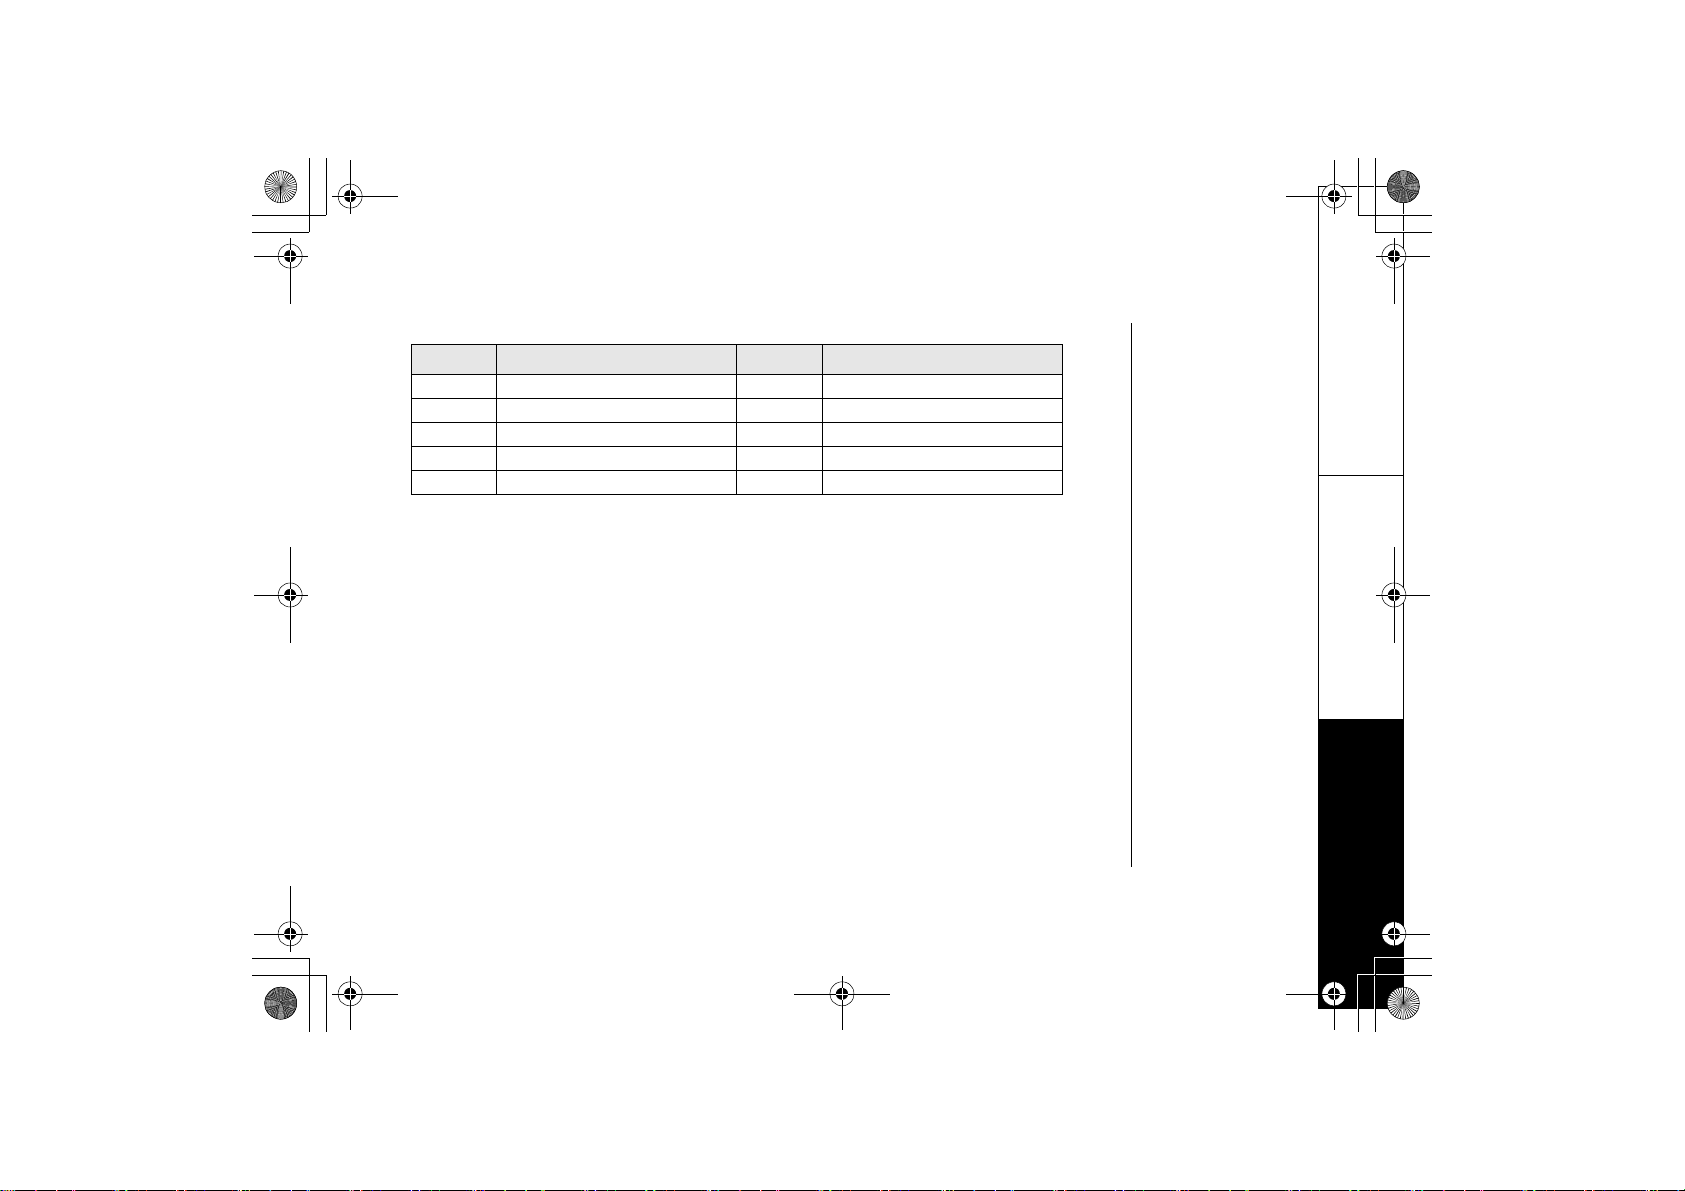
4) You may continue to listen to the voice prompts, or you may s
following chart:
DEVICE
0 and enter your PIN code (see page 33).
number of messages stored in
s zero two.
elect a command from the
www.uniden.com
ANSWERING DEVICE
THE INTEGRATED
Page 47
EXAI7248.book 46 ページ 2004年1月12日
月曜日 午後5時13分
Command
0
then
0
then
0
then
0
then
0
then
Repeat a Message
1
Play Incoming Messages
2
Skip a Message
3
Delete a Message
4
Stop Operation
5
Function
Command
0
then
0
then
0
then
0
then
1
then
Answering System On
6
Memo Record/Stop*
7
Greeting Message Record/Stop*
8
Answering System Off
9
Voice Prompts
0
*For Memo Record and Greeting Message Record function, the fi
corresponding command, it starts the Recording function. If you wa
recording, enter the command again.
5) After all of the voice prompts have been pl
ayed, you hear intermittent beeps indicating
that the system is in the command waiting mode. You may enter an
time from the chart.
6) When you are finished, hang up to exit the system. The answerin
returns to standby.
www.uniden.com
THE INTEGRATED ANSWERING DEV
Function
rst time you enter the
nt to stop the
other command at this
g system automatically
ICE [46]
ANSWERING DEVICE
THE INTEGRATED
Page 48
EXAI7248.book 47 ページ 2004年1月12日
Turn on the Answering System Remotely
If you have forgotten to turn on your answering system, you ca
any touch-tone telephone.
1) Call your telephone number.
月曜日 午後5時13分
n turn it on remotely from
2) Wait ten rings until the system answers. You hear intermitten
3) Press 0 and then enter your PIN code. The answering system an
messages stored in memory. You hear "To play incoming
help, press one zero."
4) Press 0 then
6 to turn the answering system on. You hear the outgoing message an
confirmation tone.
5) Hang up the phone; subsequent calls will be answered by the s
[47] THE INTEGRATED ANSWERING
DEVICE
t beeps.
nounces the number of
messages, press zero two. For
d a
ystem.
www.uniden.com
ANSWERING DEVICE
THE INTEGRATED
Page 49
EXAI7248.book 48 ページ 2004年1月12日
月曜日 午後5時13分
Remote Access with the Handset
You can operate your answering system from another room using a ha
ndset.
•If you press the
standby.
• If the answering system does not answer withi
phone will return to standby.
• The base's keypad is disabled during remote operation.
• If you receive a call, the remote operation is canceled
• During the remote operation
• If you have new messages and old messages, only th
you have reviewed your new messages, you can pl
/2 key again.
1) With the phone in standby mode, press the
AnsweringMachine op eration
end key before the answering system answers, the phone wil
n five seconds, you hear beeps and the
[--] appears on the base.
ay your old messages by pressing the
select/remote
appears on the display. The answering system announces
the current time and the number of messages stored in the
2) You hear "To play incoming message, press two. For help, pr
You hear intermittent beeps.
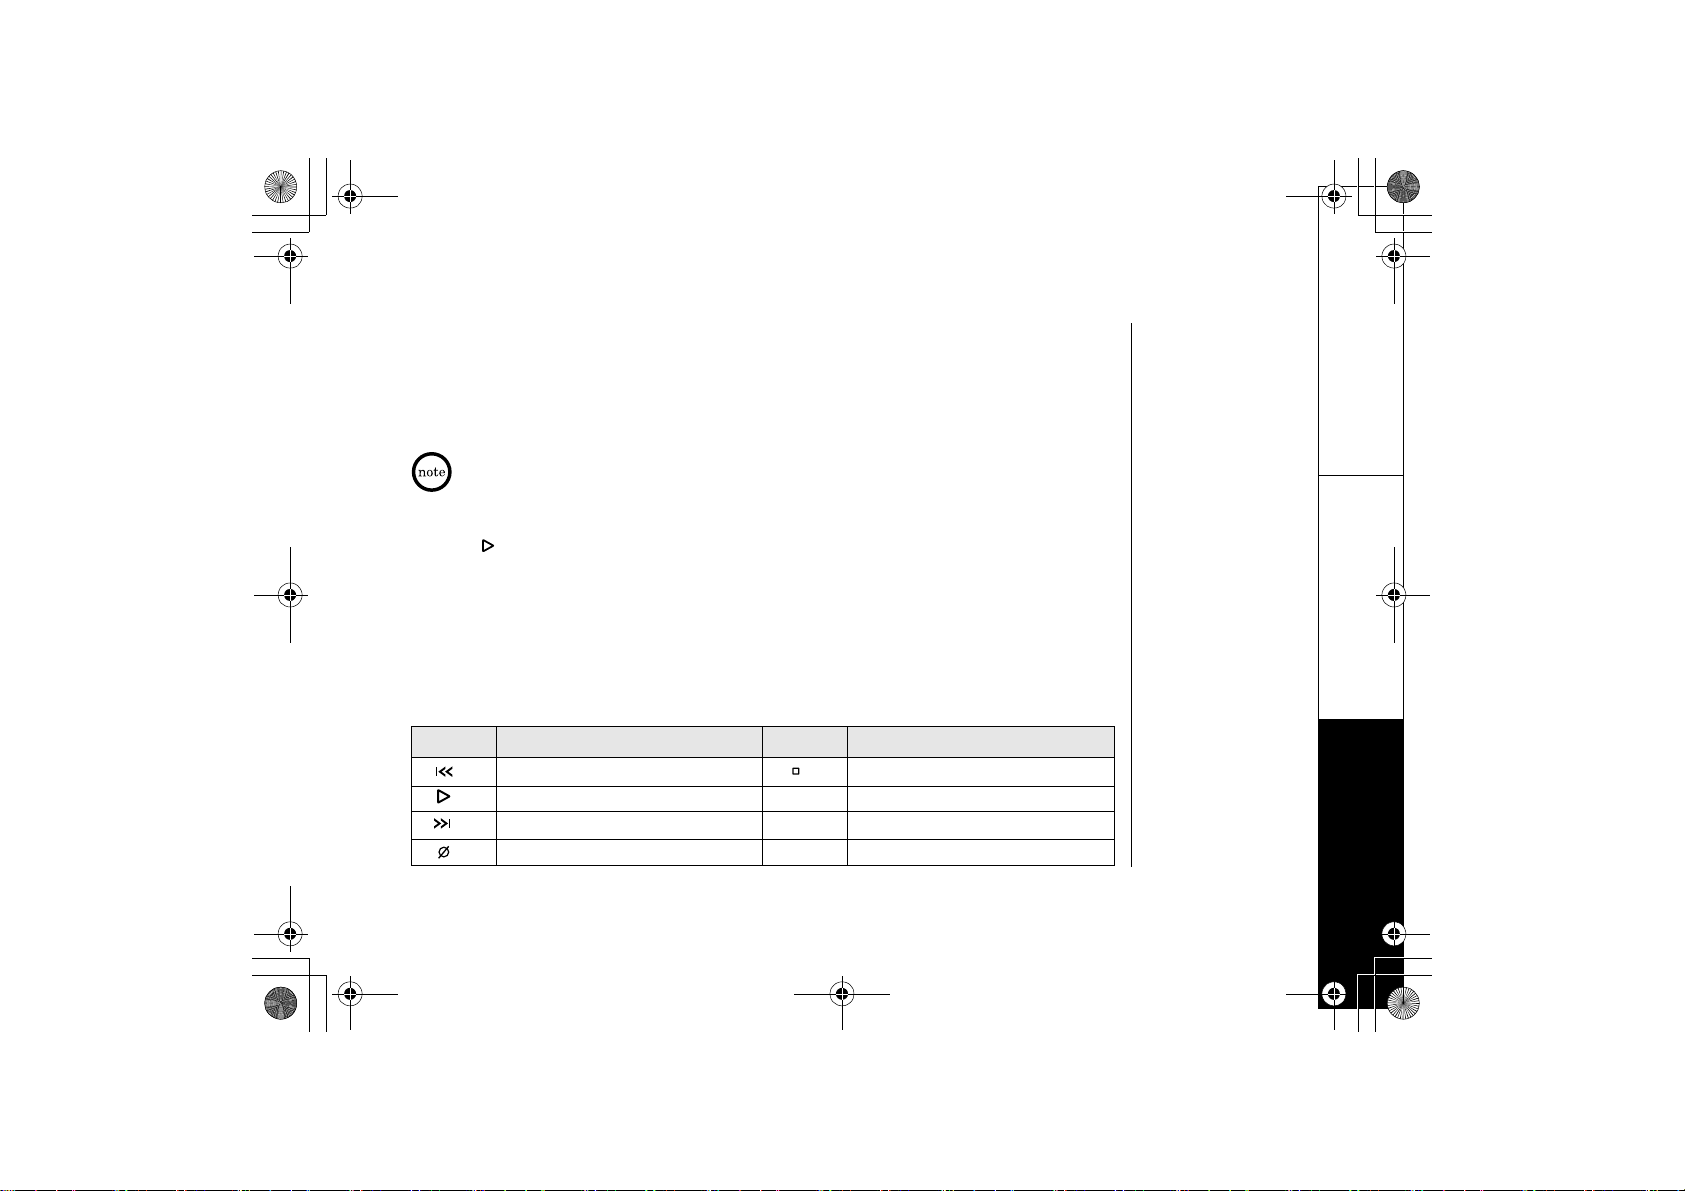
3) Enter a command within 15 seconds. You may select a comman
Command
Repeat a Message
/1
Play Incoming Messages
/2
Skip a Message
/3
Delete a Message
/4
www.uniden.com
Function
Command
/5
6 Answering System On
9 Answering System Off
0 Voice Prompts
THE INTEGRATED ANSWERING DEV
l return to
.
e new messages will be played. After
key on the handset.
Remote
memory.
ess zero."
d from the following chart:
Function
Stop Operation
ICE [48]
ANSWERING DEVICE
THE INTEGRATED
Page 50
EXAI7248.book 49 ページ 2004年1月12日
月曜日 午後5時13分
4) After the command has finished, you hear intermittent beeps
indicating that the system is
in the command waiting mode. You may enter another command at
chart above.
5) When you are finished, hang up to exit the system. The answerin
returns to standby.
this time from the
g system automatically
ANSWERING DEVICE
THE INTEGRATED
[49] THE INTEGRATED ANSWERING
DEVICE
www.uniden.com
Page 51
EXAI7248.book 50 ページ 2004年1月12日
月曜日 午後5時13分
Changing the Digital Security Code
To protect you against misbilled calls which might result from your
other equipment, the cordless phone provides AutoSecure
when the handset is in the base) and
Random Code
one of over 262,000 digital security codes for the handset and base.
If the handset battery pack is completely discharged or the ba
security code will be lost. If this happens, a new security code is se
the battery pack is charged. In the rare situation that you s
is using the same security code, you can change the code.
1) Remove the handset from the base unit. Press and hold th
2) While holding the
find hs key, place the handset in the base unit and leave the han
the base for more than 3 seconds. A new random security cod
TM
TM
(which electrically locks your phone
digital security which automatically selects
ttery pack is removed, the digital
uspect another cordless telephone
phone being activated by
t automatically the next time
e find hs key on the base.
e is set.
dset in
INFORMATION
ADDITIONAL
www.uniden.com
ADDITIONAL INFORMATION [50]
Page 52
EXAI7248.book 51 ページ 2004年1月12日
月曜日 午後5時13分
Note on Power Sources
Low battery alert
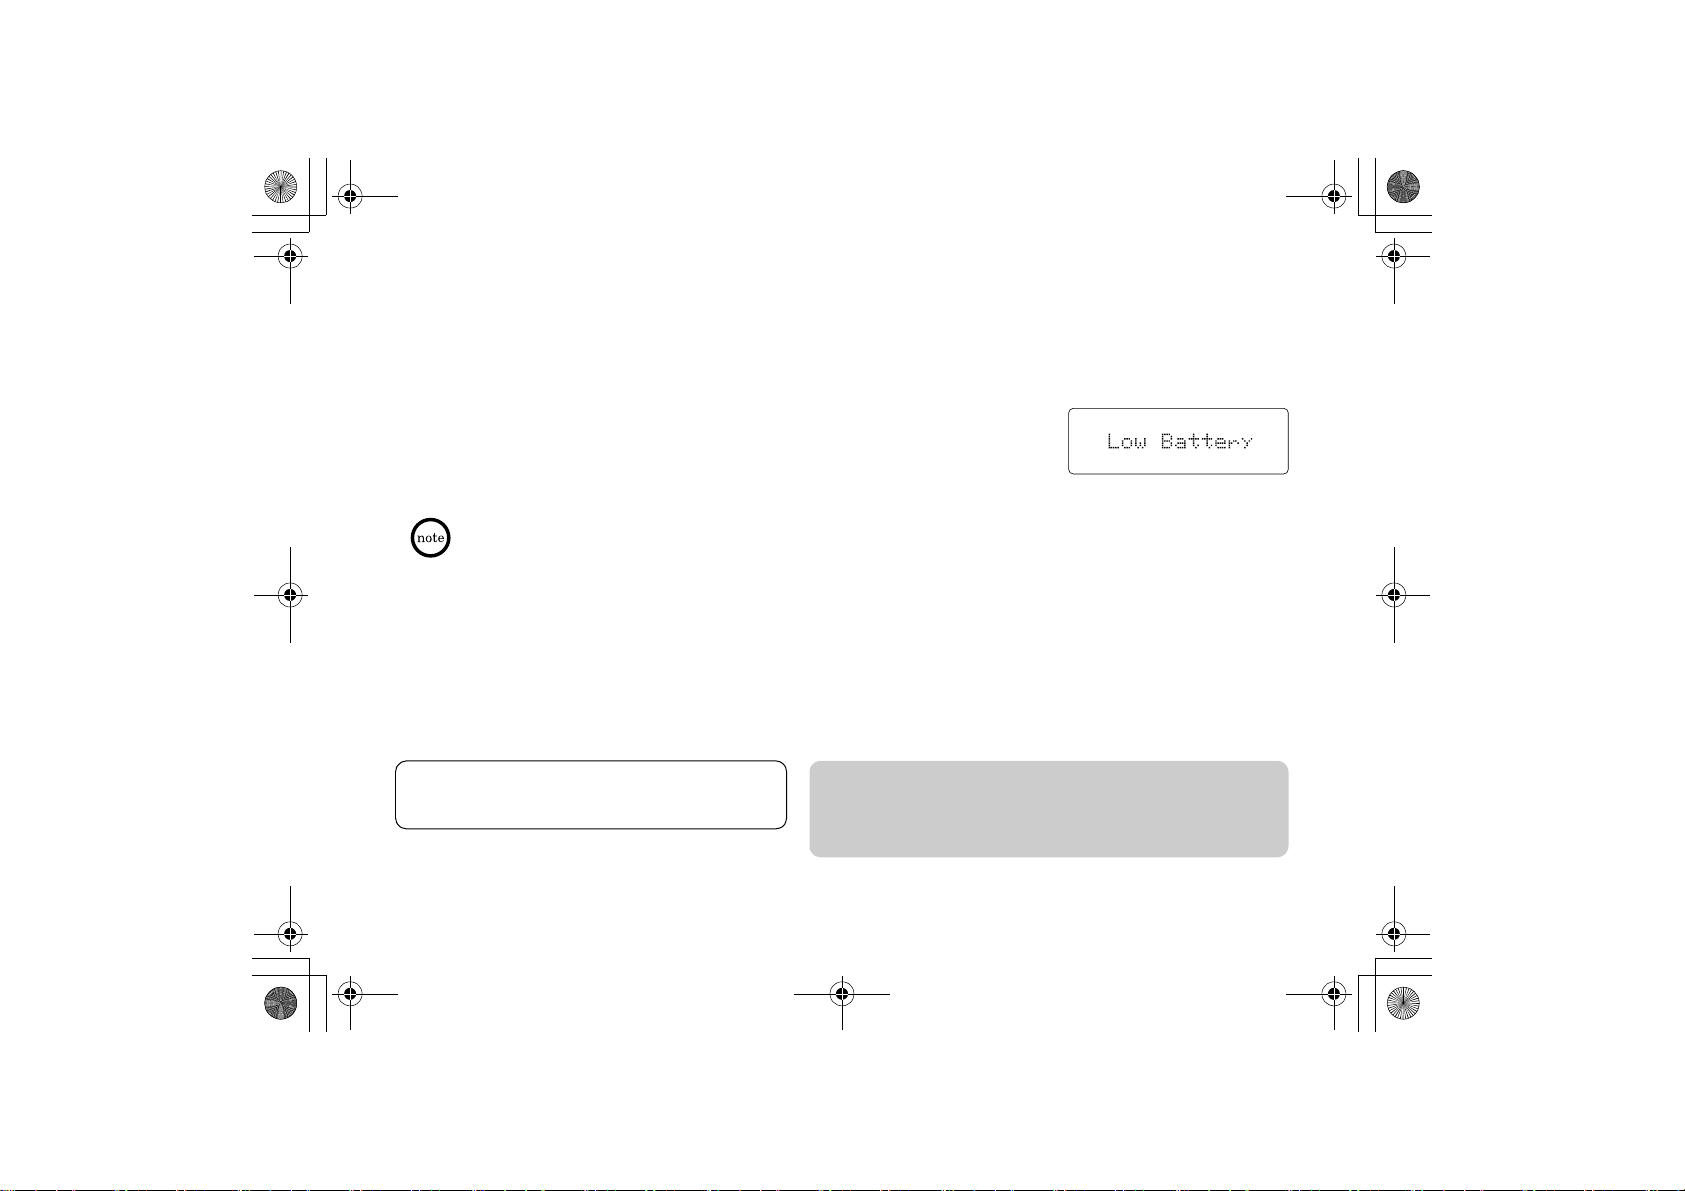
When the battery pack is very low and needs to be charged, th
programmed to eliminate functions in order to save power. If th
use,
Low Battery
If the phone is in use,
conversation as quickly as possible and return the handset
charging.
appears on the LCD and none of the keys will operate.
Low Battery
flashes and the handset beeps. Complete your
e phone is
e phone is not in
to the base unit for
INFORMATION
ADDITIONAL
Information stored in the phone's memory will be re
the battery pack is removed. This includes all setup
programming, and the CID list.
information, last number dialed, speed dial memory, Roc
Even when the battery pack is not being used, it will gr
performance, be sure to return the handse
t to the base unit after a telephone call.
Battery replacement and handling
When the operating time becomes short even after a
With normal usage, your battery should last about one y
Parts Department for a replacement battery.
Warning
: To avoid the risk of personal injury or property damage from fire or elec
battery model and Uniden adapter model specifically designated
Power Failure
During the period that the power is off, you will not
be able to make or receive calls with the telephon
[51] ADDITIONAL INFORMATION
battery is recharged, please replace the battery.
• Use only the specified Uniden battery pack (BT-905).
• Do not remove the battery from the handset to charg
e.
• Never throw the battery into a fire, disassemble it,
• Do not remove or damage the battery casing.
tained for 30 minutes after
ketDial
adually discharge over a long period of time. For optimum
ear. Please contact your place of purchase or the Uniden
trical shock, only use the Uniden
for this product.
Caution
e it.
or heat it.
www.uniden.com
Page 53
EXAI7248.book 52 ページ 2004年1月12日
月曜日 午後5時13分
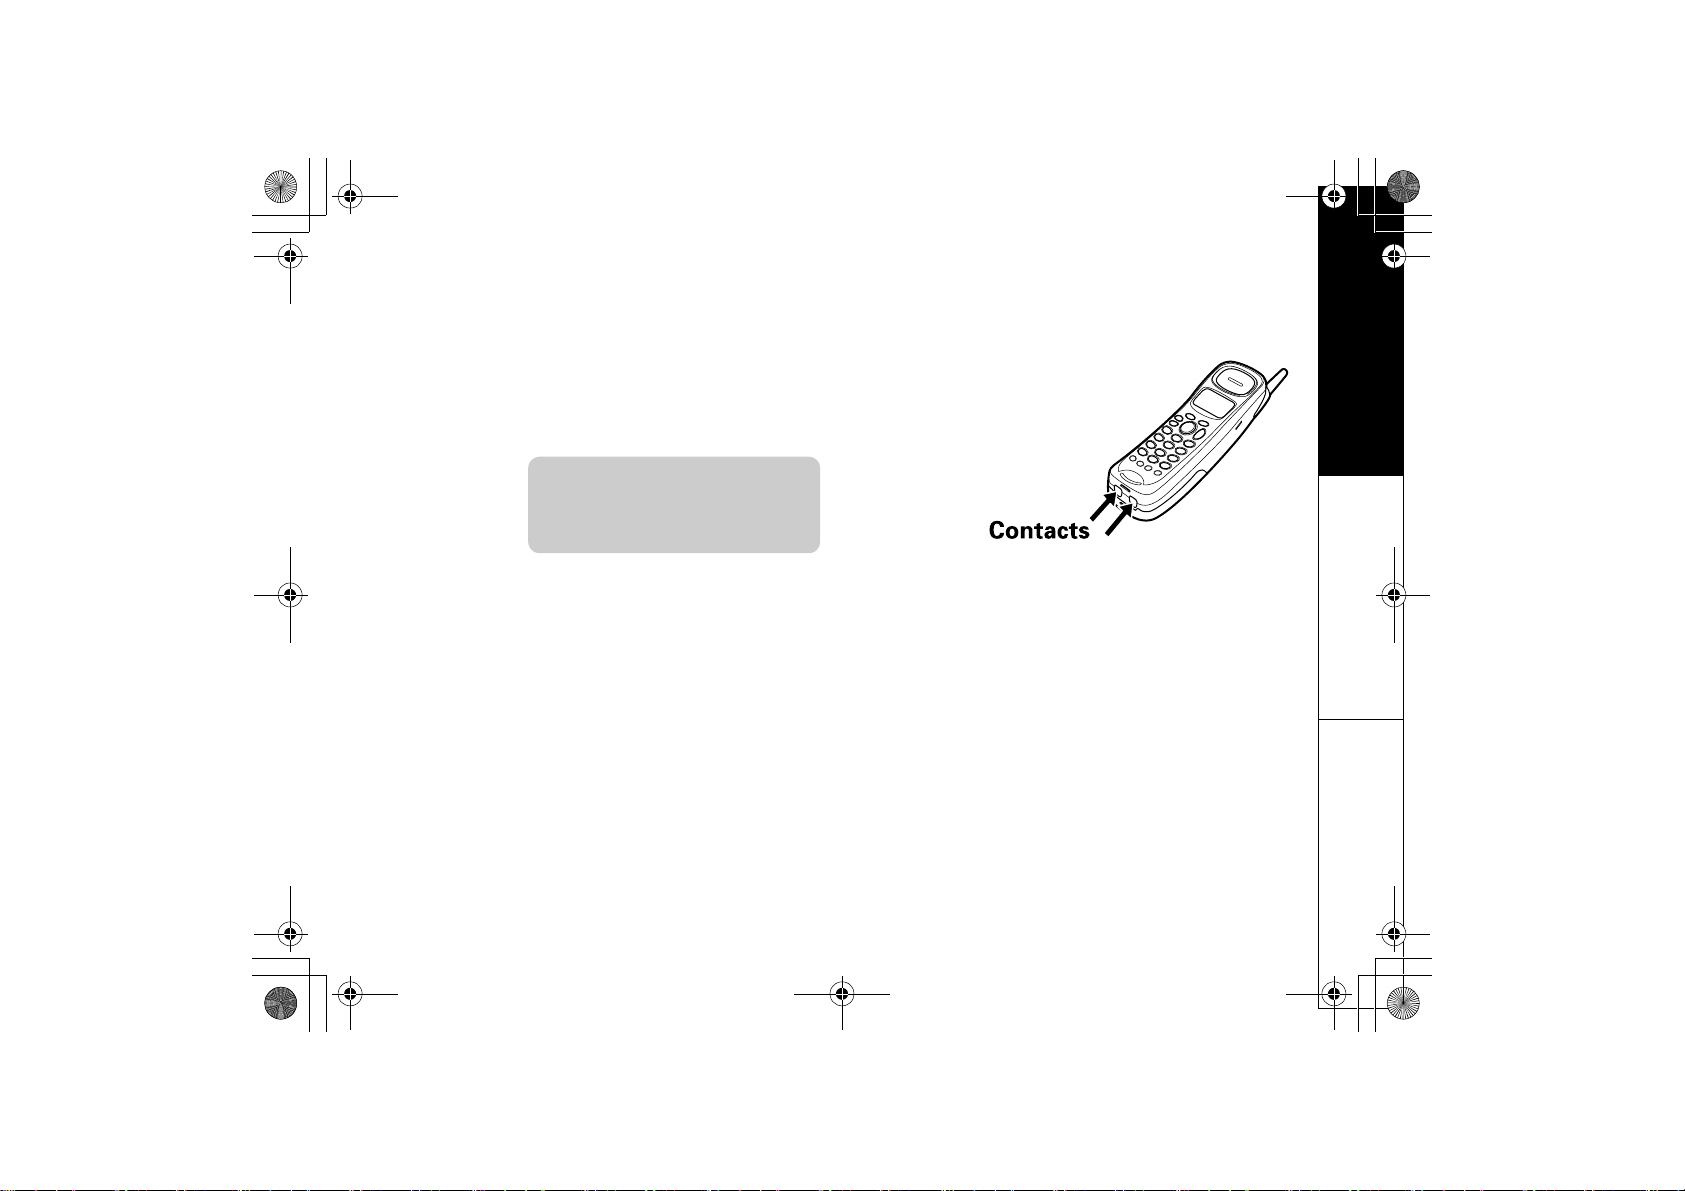
Cleaning the battery charging contacts
To maintain a good charge, clean the charging contacts on the
once a month.
Dampen a cloth with plain water. Gently rub the damp cloth ov
charging contacts until all visible dirt is removed. Dry the contacts
thoroughly before returning the handset to the base.
handset
er the
INFORMATION
ADDITIONAL
Do not use paint thinner, benzene,
alcohol, or other chemical products.
Doing so may discolor the surface of
the telephone and damage the finish.
www.uniden.com
Caution
ADDITIONAL INFORMATION [52]
Page 54
EXAI7248.book 53 ページ 2004年1月12日
月曜日 午後5時13分
General Information
The phone complies with FCC Parts 15 and 68.
Operating temperature: -10°C to +50°C (+14°F to +122°F)
AC Adapter Information
AC Adapter part number: AD-314
Input Voltage:
Output Voltage:
Battery Information
Battery part number: BT-905
Capacity:
Frequency
120V AC 60Hz
9V DC 350 mA
600 mAh, 3.6V
924.516925 - 926.704425 MHz
2,405.155942 - 2,411.718441 MHz
INFORMATION
ADDITIONAL
• To avoid damage to the phone use only Uniden
• If the handset is left off of the base, the actu
time the handset is off the base.
Recharge your phone on a regular basis by returning the hands
AD-314 and BT-905 with your phone.
al Talk mode duration will be reduced respective to the am
et to the base after each phone call.
When the operating time becomes short, even after the battery is rechar
With normal usage, the battery should last about one year.
A replacement Uniden adapter and battery may be purchased at
Parts Department (800) 554-3988. Hours are from 8:00 a.m.
can also be reached on the web at www.uniden.com. Specifica
your local Uniden dealer or by contacting the Uniden
to 5:00 p.m. Central Time, Monday through Friday. We
tions, features, and availability of optional accessories
are all subject to change without prior notice.
[53] ADDITIONAL INFORMATION
ount of
ged, please replace the battery.
www.uniden.com
Page 55
EXAI7248.book 54 ページ 2004年1月12日
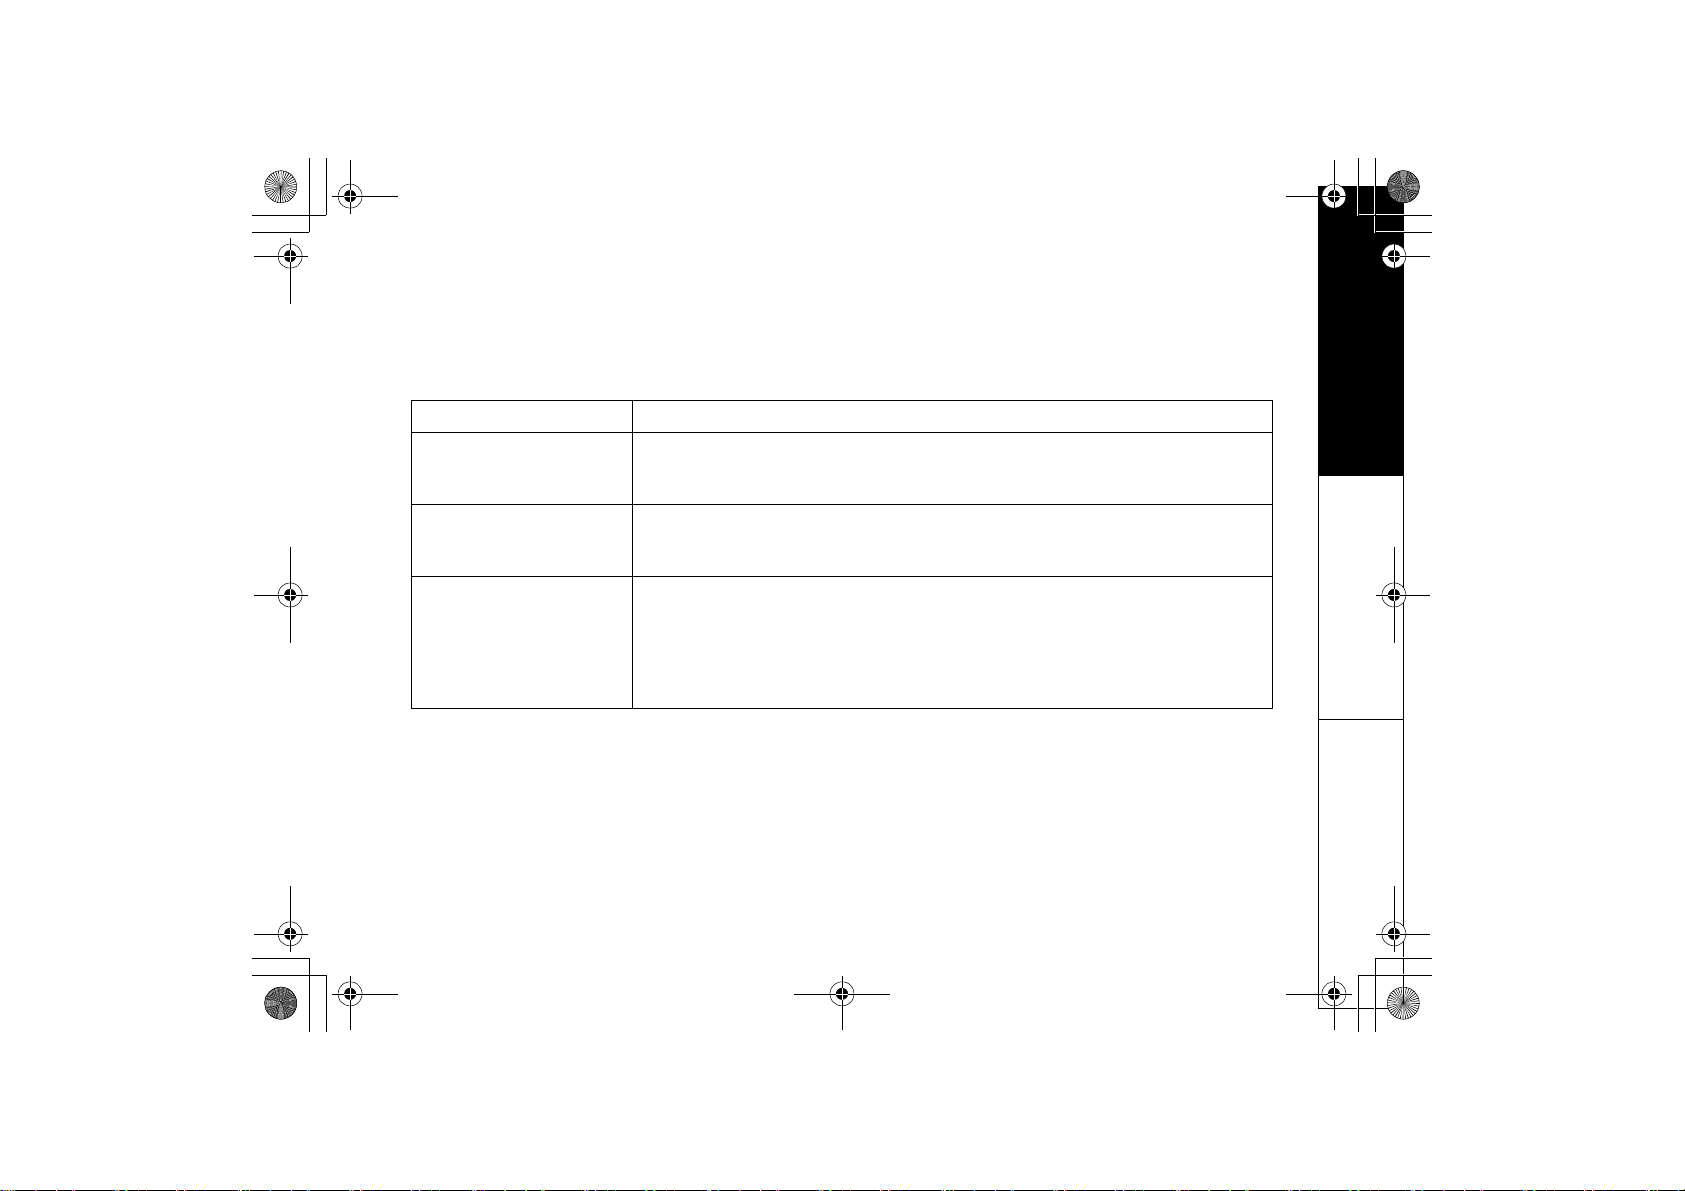
Troubleshooting
If your phone is not performing to your expe
月曜日 午後5時13分
ctations, please try these simple steps first.
INFORMATION
ADDITIONAL
Symptom
charge in use
The
illuminate when the handset is
placed in the base.
The audio sounds weak and/or
scratchy.
Can't make or receive calls. • Check both ends of th
www.uniden.com
LED won't
• Make sure the AC adapter is plugged into the base and w
• Make sure the handset is properly seated in the ba
• Make sure the charging contacts on the handset are clean.
• Move the handset and/or base away from metal objects or a
• Press the
• Make sure that the handset is not too far from the base.
• Make sure the AC adapter is plugged into the base an
• Disconnect the AC adapter for a few minutes. The
• Change the digital security code (see page 50).
• Make sure that the handset is not too far from the base
• Check the dialing mode used by your telephone comp
delete/channel
e telephone line cord.
Suggestion
all outlet.
se.
ppliances and try again.
key in the Talk mode to help eliminate background noise.
d wall outlet.
n reconnect it.
.
any.
ADDITIONAL INFORMATION [54]
Page 56
EXAI7248.book 55 ページ 2004年1月12日
月曜日 午後5時13分
INFORMATION
ADDITIONAL
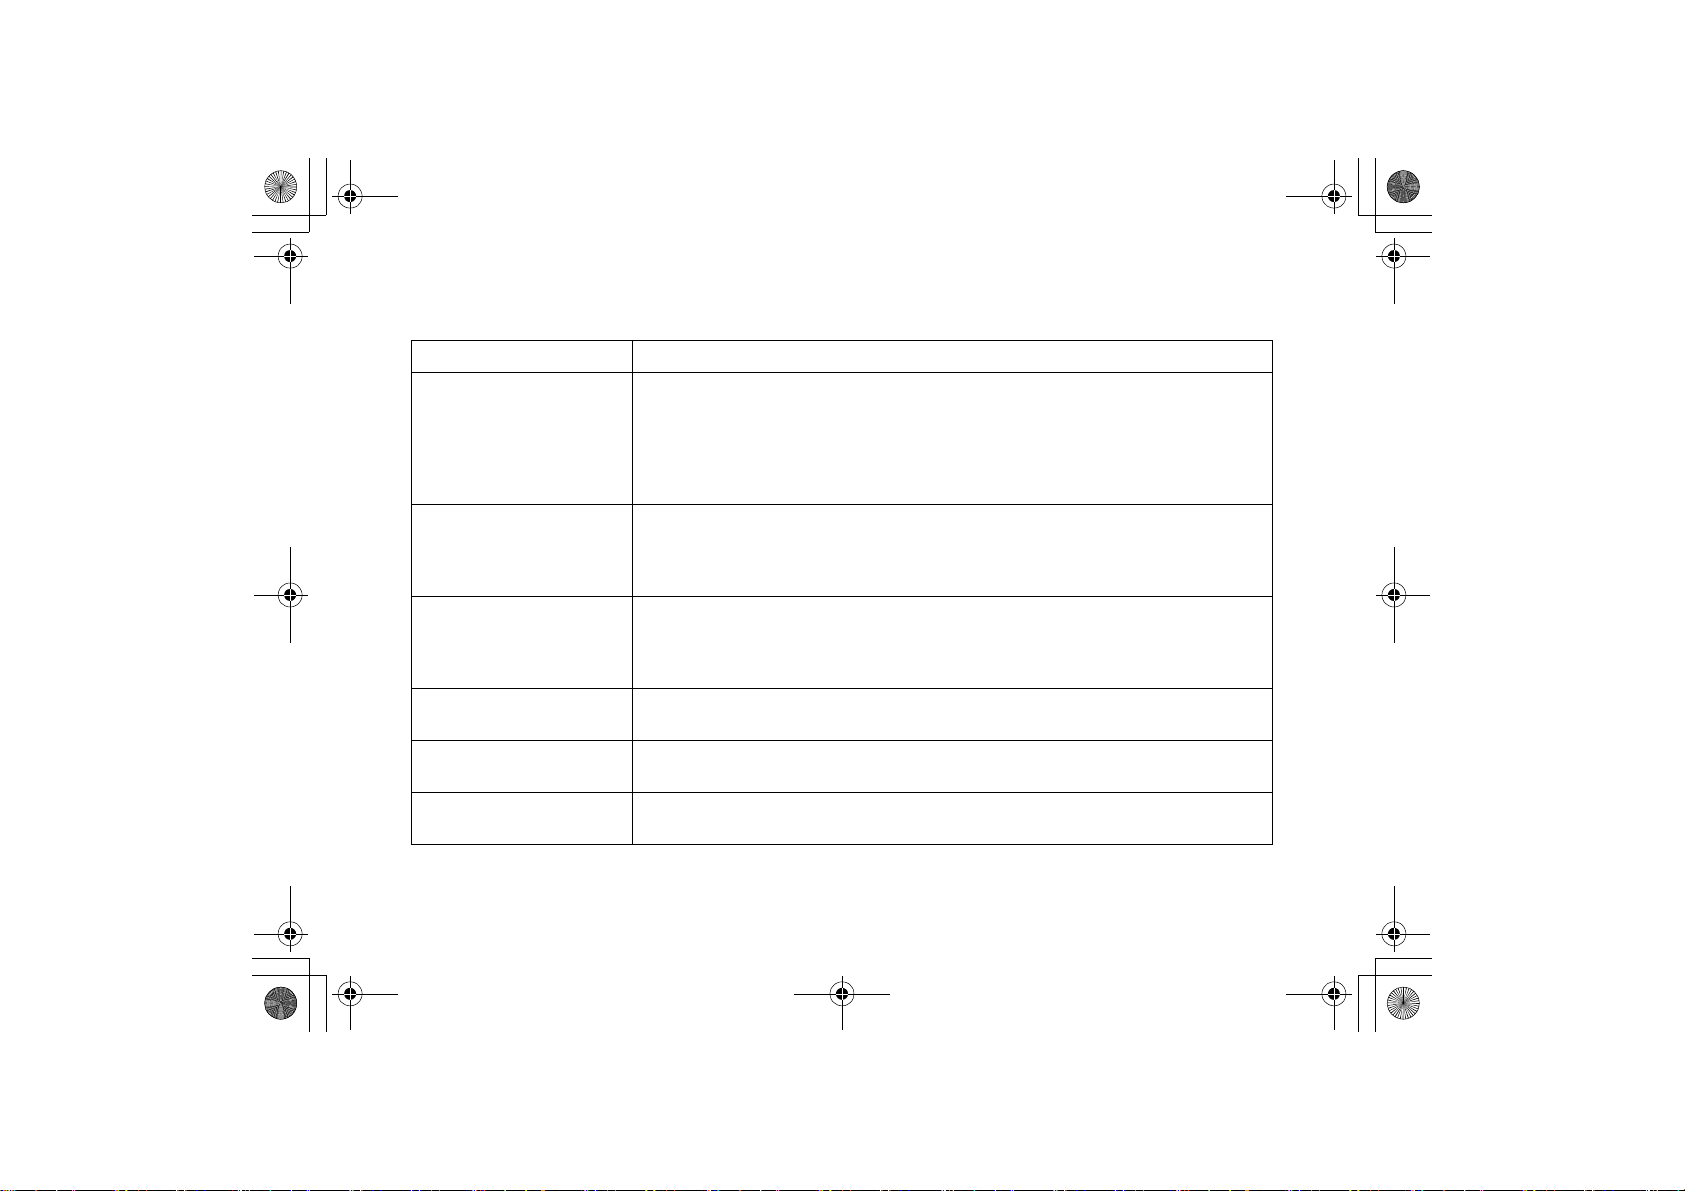
Symptom
The handset doesn't ring or
receive a page.
• The battery pack may be weak. Charge the battery for 15-
• The handset may be too far from the base unit.
• Place the base unit away from appliances or metal objects.
• Change the digital security code (see page 50).
• Check the battery pack to ensure there is a secure conn
• Make sure ringer volume isn't set to turned "off."
Severe noise interference. • Keep the handset awa
microphones, alarm systems, intercoms, room monito
appliances.
• Move the base to another location or turn off the sou
The Caller ID does not display. • The call was answer
• The call was placed through a switchboard.
• Charge the handset.
• Your Caller ID service may not be active; contact your local
The answering system does not
work.
The answering system does not
record any messages.
• Make sure the AC adapter is plugged into wall outlet.
• Make sure the answering system is turned on.
• Set the record time to either the one minute or four minute o
• The memory may be full. Delete some or all of the saved m
Messages are incomplete. • The incoming m
• The memory may be full. Delete some or all of the saved me
[55] ADDITIONAL INFORMATION
Suggestion
20 hours.
ection.
y from microwave ovens, computers, remote control toys, wirele
rs, fluorescent lights, and electrical
rce of interference.
ed before the second ring.
telephone service provider.
ption.
essages.
essages may be too long. Remind callers to leave a brief messag
ssages.
www.uniden.com
ss
e.
Page 57
EXAI7248.book 56 ページ 2004年1月12日
月曜日 午後5時13分
INFORMATION
ADDITIONAL
Symptom
After a power failure, the
• Record your personal outgoing message again. The default m
outgoing message is deleted.
No sound on the base unit
• Adjust the speaker volume on the base unit.
speaker during call monitoring
or message playback.
Cannot access remote call-in
features from another touchtone
phone.
• Make sure you're using the correct PIN code.
• Make sure that the touch-tone phone you're using c
seconds. If it cannot, you may have to use another phone t
If you still have a problem. • Call our customer hotline at
Suggestion
essage should remain.
an transmit the tone for at least two
o access your messages.
1-800-297-1023.
ADDITIONAL INFORMATION
www.uniden.com
ADDITIONAL INFORMATION [56]
Page 58
EXAI7248.book 57 ページ 2004年1月12日
月曜日 午後5時13分
Liquid Damage
Moisture and liquid can damage your cordless phone. In case of acci
Case
If the handset or base is exposed to
moisture or liquid, but only affects the
exterior plastic housing.
If moisture or liquid has entered the
plastic housing (i.e., liquid can be heard
in the phone or liquid has entered the
handset battery compartment or vent
openings on the base).
Wipe off the liquid, and use as normal.
Handset:
1.Remove the battery cover and leave it off for ventilation
2.Remove the battery pack by disconnecting
3.Leave the battery cover off and the battery pack discon
4.Once the handset is completely dry, reconnect the battery pac
5.Recharge the handset’s battery pack for 20 hours before u
Base:
1.Disconnect the AC adapter from the base unit, cutting off e
2.Disconnect the telephone cord from the base unit.
3.Let dry for at least 3 days.
IMPORTANT:
avoid charge interruption.
CAUTION:
DO NOT use a microwave oven to speed up the drying process.
damage to the handset, base and the microwave oven.
After following these steps, if your cordless telephone does n
You must
dental submersion, please follow these steps.
Action
nected for at least 3 days
k and the battery cover.
sing again.
lectrical power.
unplug the telephone line while recharging the bat
This will cause permanent
ot work, please send to:
Uniden America Corporation
Parts and Service Division
4700 Amon Carter Blvd.
Ft. Worth, TX 76155
1-800-554-3988, Monday through Friday
8 a.m. to 5 p.m. CST
tery pack to
INFORMATION
ADDITIONAL
[57] ADDITIONAL INFORMATION
www.uniden.com
Page 59
EXAI7248.book 58 ページ 2004年1月12日
Precautions!
Before you read anything else, please o
Warn ing!
Uniden America Corporation DOES N
waterproof. To reduce the risk of fire,
unit, DO NOT expose this unit to rain
Rechargeable Nickel-Metal-Hydride Battery Warni
•This equipme nt contains a recharg
•Cadmium is a chemical known to th
•The rechargeable nickel-cadmium ba
may explode if disposed of in a fire.
short-circui t the battery.
Do not
•
•Do not charge t he rechargeable n
equipment in any charger other t
battery as specified in the owne
Using another charger may damag
explod e.
Rechargeable Nickel-Cadmium
Batteries Must Be Recycled or
Disposed of Properly
•Uniden voluntarily participates in an
and recycle nickel-cadmium batterie
when taken out of service within the
The RBRC® program provides a conven
nickel-cadmium batteries into the trash
which is illegal in some areas.
•Through the RBRC® program, Uni
the used battery at local retailers
batteries. You may also contact y
information on where to return th
BATTERY for information on Ni-Cd b
Uniden's involvement in this program
protecting our environment and conse
•RBRC® is a reg istered trademark
Corporation.
The exclamation point within an equi
intended to alert the user to the presen
operating and maintenance (servicin
the literature accompanying the ap
Uniden works to reduce lead content in
product and accessories.
The cords on this products and/or acc
WAR NIN G:
chemical known to the State of C
reproductive harm.
Wash hands after handling
bserve the following:
OT represent this unit to be
electrica l shock, or da mage to the
or moisture.
eable nickel-cadmium battery.
e State of California to cause cancer.
ttery contained in this equi pment
ickel-cadmium battery used in t his
han the one designed to charge this
r’s manual.
e the battery or cause the ba ttery to
RBRC® industry program to collect
s at the end of their useful life,
United States.
ient alternative to placing used
or municipal waste stream,
den makes it easy for you to drop off
of replacement nickel-cadmium
our local recycling center for
e used battery. Please call 1-800-8-
attery recycling in your area.
is part of its commitment to
rving natural resources.
of the Rechargeable Battery Recycling
lateral triangle is
ce of important
g) instructions in
pliance.
our PVC coated cords in ou r
alifornia to cause birth defects or othe
essories contain lead, a
.
ng
r
月曜日 午後5時13分
Important Safety Instructions
When using your telephone equipme
should always be followed to reduce t
injury to persons:
1. Read and unde rstand all inst ru
2. Follow all warnings and instru
3. Unplug this product from the
cloth for cleaning without liquid or
4. Do not use this product near water;
bowl, kitchen sink or laundry tub, in
swimming pool.
5. Do not pl ace this p roduct on an u
The telep hone may fall, causing se
6. Slots and openings in the cabinet a
provided for v entilation. To prote
these ope nings must n ot be bloc
never be placed near or over a radiator
should not be pl aced in a built -in insta
ventilation is provided.
7. This product should be operat
indicated on the marking label. If you a
supply to your home, consult your de
8. Do not allow anything to rest on t
product where the cord will be dama
9. Do not overload wall outlets and ex
the risk of fire or electrical shoc
10.Never push objects of any kind i
slots, as they may touch dangerous volta
that c ould resu lt in a risk of fire or ele
any kind on the product.
11. To reduce the risk of el ectric
Take it to qualified service personnel w
required. Opening or removing covers ma
voltages or other risks. Incorrect reasse
when the appliance is subseque ntly
12.Unplug this product from the wall outl
qualified service personnel under t
A. When the power supply cord is
B. If liquid has been spilled into
C. If the product ha s been exposed to rai
D. If the product does not operate nor
operating instructions. (Adjust only
covered by the operating instructio
other co ntrols may re sult in dama
extensive repair work by a qualifi
E. If the product has been dropped o
F. If the product exhibits a distin
13.Do not use the telephone to report
leak.
Additional Battery Safety Precautions
To reduce the risk of fi re or injury
Caution!
read and follow these instructions:
nt, these basic safety precautions
he risk of fire, electrical shock, and
ctions.
ctions marked on the product.
wall outlet before cleaning. Use a dry
aerosol cleaners.
for example, near a bathtub, wash
a wet basement, or near a
nstable ca rt, stand, or table.
rious damage to the uni t.
nd the back or bottom are
ct the product from overhe ating,
ked or cov ered. This p roduct should
or heat register. This product
llation unle ss proper
ed only from the type of power source
re not sure of the type of power
aler or local power company.
he power cord. Do not locate this
ged by persons walking on it.
tension cords, as this can result in
k.
nto this product through cabinet
ge points or short out parts
ctric shock. Nev er spill li quid of
shock, do not disa ssemble thi s product
hen service or repair work is
y expose you to dangerous
mbly can cause electric shock
used.
et and refer servicing to
he following conditions:
damaged or frayed.
the product.
n or water.
mally when following the
those controls that are
ns. Improper adjustment of
ge and will often requi re
ed technician.)
r the cabinet has been damaged.
ct change in performance.
a gas leak in the vicinity of the
to persons by t he battery,
1. Use only the Uniden battery pack sp
2. Do not di spose of the battery pa ck
Check the nickel-cadmium battery d
instructions.
3. Do not open or mutilate the bat
corrosive a nd may cause damage
if swallowed.
4. Exercise care in handling the ba
with conducting materials such as ring
battery or conductor may overheat an
5. Charge the battery pack provided wi
product only in accordance with the
specified in the owner’s manual prov
6. Observe proper polarity orientation be
battery c harger.
Important Electrical Considerations
Unplug all electrical appliances when
approaching. Lightning can pass th
damage any device connected to it
The FCC Wants You To Know
Changes or modifications to this prod
Uniden, or oper ation of this product
the owner’s manual, could void you
Your telephone compiles with Par
request, provide the FCC registrat
telephone company. Both numbers a
.
Note:
This device c omplies wi th Part 15 of t
to the follow ing two cond itions: (1)
interference, and (2) This device mu
including inter ference that may ca
communications may not be ensure
Range
Your new phone is designed to achi
transmitting and receiving accordi
forth by the FCC. We have rated th
distance with the qualification th
environment in which the teleph
and it would be impossible to include a
Maximum Range rating of this phone is
comparison against other range claims
SAVE THESE INSTRUCTIONS!
You must not connect your phone to
• coin-o perated syst ems
• most electronic key telep hone syst
ecified in the owner’s manual.
in a fire. T he cell may e xplode.
isposal package insert for disposal
tery pack. Released elec trolyte is
to the ey es or skin . It may be tox ic
ttery in order not to short the battery
s, bracelets, and keys. The
d cause burns.
th or identified for use with this
instructions and limitations
ided for this product.
tween the battery pack and
you know an electrical sto rm is
rough your household wiring and
. This phone is no exception.
uct not expressly approved by
in any way other than as detailed by
r authority to operate this product.
t 68 of FCC Rules. You must, upon
ion number and the REN to your
re on the base unit.
he FCC rul es. Operation is subject
This device ma y not cause harmful
st accept any interference received,
use undesired o peration. Pri vacy of
d when using this phone.
eve the maximum possible range by
ng to the highest specifications set
is phone to operate at a maximum
at the range depends upon the
one is used. Many factors limit range,
ll the variables in our rating. The
meant to be used as a means of
.
INFORMATION
ADDITIONAL
:
ems
www.uniden.com
ADDITIONAL INFORMATION [58]
Page 60
EXAI7248.book 59 ページ 2004年1月12日
Telephone Line Problems
The FCC has granted the telephone
service in the event that your phon
line. Also, the telephone company
services which may affect the ope
telephone company must give ad
actions to allow you time for making ne
uninterrupted service.
If you are having trouble with your te
disconnect your phone to determine
you determine that it is the cause, y
the trouble has been corrected.
Radio Interference
Radio interference may occasionally
cordless hand set, or clicki ng noise
caused by external sources such a
fluorescent lighting, or electrical
If these noises continue and are t
your home to see what appliances may be
In addition, we recommend that the ba
that also powers a major appliance be
interference. Be certain that antenna
In the unlikely event that you consis
distracting transmissions on your phon
signals from another cordless telepho
If you canno t eliminate th is type of i
a different channel.
Finally, it should be noted that som
frequencies tha t may cause i nterfe
To minimize or prevent such inter
telephone should not be placed n
If interference is experienced, m
away from the TV or VCR will often redu
More than One Cordless Telephone
If you want to use more than one cor
must operate on different channels
select a channel that provides the c
Cordless Telephone Privacy
Cordless telephones are radio device
handset and base of your cordless t
of radio waves which are broadcast
inherent physical properties of radi
received by radio receiving device
telephone unit. Consequently, an
telephone may not be private.
company the right to disconnect
e causes problems on the telephone
may make changes in facilities and
ration of your unit. However, your
equate notice in writing prior to such
cessary arrangements to continue
lephone service, you must first
if it is the cause of your problem. If
ou must leave it disconnected until
cause buzzing and humming in your
s in the base. This interferenc e is
s TV, refrigerator, vacuum cleaner,
storm. Your unit is NOT DEFECTIVE.
oo distracting, please check around
causing the problem.
se not be plugged into a circuit
cause of the potential for
on the unit is fully extended.
tently hear other voices or
e, you may be receiving radio
ne or other source of interference.
nterference, you need to change to
e cordless telephones operate at
rence to nearby T Vs and VCRs.
ference, the base of the cordless
ear or on top of a TV or VCR.
oving the cordless telephone farther
ce or eliminate the interference.
dless telephone in your home, they
. Press the delete/channel key to
learest communication.
s. Communications between the
elephone are accomplished by means
over the open airways. Because of the
o waves, your communications can be
s other than your own cordless
y communications using your cordless
月曜日 午後5時13分
Installation Considerations
Selecting a Location
Before choosing a location for your n
guidelines you should consider:
• The location should be close to bo
power ou tlet. (A co ntinuous pow er out
not have a switch to interrupt its pow
• Keep the base and handset away fro
as motors or fluorescent lighting.
• The base can be placed on a desk or t
telephone wall plate.
• You should charge your new phon
the installation or using the handset.
Telephone Line Outlets
There are two types of phone outlet
Modular Jack
Most phone equipment available now
fitted with a molded plastic connec
If you do not have modular phone
company for information about th
Hardwired Jack
Some equipment is wired directly to
installations require a modular jack con
not difficult; however, you should c
or a telephone supply store for ad
converter for your particular situa
Connecting the Telephone Cords
Consider these safety guidelines befo
Caution!
• Never install telephone wiring du
• Never touch uninsulated telephon
telephone line has been disconnected.
• Use caution when installing or modify
Applying Power to the Base
This phone requires an AC outlet, w
and the included AC adapter. To re
phone is placed on a desk or table
relief notch on the ba ck of the ba
NOTE: Place the power cord so that
where it could become chafed and cr
electrical hazards.
ew phone, there are some important
th a phone jack and continuous
let is an AC outlet w hich does
er.)
m sources of electrical noise such
abletop or mounted on a standard
e for 15-20 hours before completing
s:
uses modular jacks. Phone cords are
tor which plugs into this type of jack.
jacks, contact your local telephone
eir installation.
a phone jack, and these types of
verter. This type of installation is
ontact your Uniden telephone dealer
vice about the proper adapter or
tion.
re connecting the telephone cords:
ring a lightning storm.
e wires or terminals unless the
ing telephone lines.
ithout a switch to interrupt power,
lieve strain on the DC plug when t he
, wrap the power cord around the strain
se.
it does not create a trip hazard, or
eate a fire or other
One Year Limited Warranty
Evidence of original purchase is
Important:
WARRANTOR: UNIDEN A MERICA CORP
ELEMENTS OF WARRANTY: Uniden w
retail owner, this Uniden Product t
craftsmanship with only the limit
WARRANTY DURATION: This warranty to
and be of no further effect 12 month
sale. The warra nty is inva lid if the Pr
damaged or not maintained as reason
altered, or used as part of a ny con
configurations not sold by Uniden,
(D) serviced or repaired by so meo
service center for a defect or ma
used in any conjunction with equi
not manufactured by Uniden, or (F) ins
other than as detailed by the owner’s ma
STATEMENT OF REMEDY: In the ev
to this warranty at any time while this warr
will either, at its option, repair or replac
to you without charge for parts, servic
shipping and handling) incurred by w
connection with the performance of
option, may replace the unit with a n
WARRANTY SET FORTH ABOVE IS TH
PERTAINING TO THE PRODUCT AND I
OTHER WARRANTIES OF ANY NATU
IMPLIED OR ARISING BY OPERATI
LIMITED TO ANY IMPLIED WARRAN
FOR A PARTICULAR PURPOSE. THIS
PROVIDE FOR THE REIMBURSEMEN
CONSEQUENTIAL DAMAGES. So me states d
limitat ion of incidental or co nsequentia
or exclusion may not apply to you.
LEGAL REMEDIES: This warranty gi
may also have other rights which
is void outside the United States of Am
PROCEDURE FOR OBTAINING PERFORM
following the instructions in the own
Product is defec tive, pack the Produc
packaging). The Product should in
originally packaged wi th the Produc
purchase and a note describing th
it. The Product should be shipped freigh
warrantor at:
Uniden America Corporation
Parts and Service Division
4700 Amon Carter Blvd. Fort Worth, TX
(800) 297-1023, 8 a.m. to 5 p.m. CST
or visit our website at
ations or exclusions set out below.
lfunction covered by this warranty, (E)
ent that the product does not conform
RE WHATSOEVER, WHETHER EXPRESS,
ON OF LAW, INCLUDING, BUT NOT
vary from state to stat e. This warranty
www.uniden.com
required for warranty service.
ORATION (“Uniden”)
arrants, for one year, to the original
o be free from defects in materials and
the original user shall terminate
s after the date of original retail
oduct is (A)
able or necessary, (B) modified,
version kits, subassemblies, or any
(C) improperly installed,
ne other than an authorized Uniden
pment or parts or as part of any system
talled or programmed by anyone
nual for this product.
anty is in effect, warrantor
e the defective unit and return it
e, or any other cost (except
arrantor or its representatives in
this warranty. Warrantor, at its
ew or refurbished unit. THE LIMITED
E SOLE AND ENTIRE WARRANTY
S IN LIEU OF AND EXCLUDES ALL
TIES OF MERCHANTABILITY OR FITNESS
WARRANTY DOES NOT COVER OR
T OR PAYMENT OF INCIDENTAL OR
o not allow this exclusion or
l damages so the above limitat ion
ves you specific legal rights, and you
erica and Canada.
ANCE OF WARRANTY: If, after
er’s manual you are certain that the
t carefully (p referably in it s original
clude all parts and accessories
t. Include ev idence of origina l
e defect that has caused you to return
t prepaid, by traceable means, to
, Monday through Friday
76155
INFORMATION
ADDITIONAL
[59] ADDITIONAL INFORMATION
www.uniden.com
Page 61
EXAI7248.book 60 ページ 2004年1月12日
I.C. Notice
TERMINAL EQUIPMENT
NOTICE:
This equipment meets the applicable Industry Canada Terminal Equipm
confirmed by the registration number. The abbreviation, IC,
registration was performed based on a Declaration of Conformity in
specifications were met. It does not imply that Industry Can
月曜日 午後5時13分
before the registration number signifies that
ent Technical Specifications. This is
dicating that Industry Canada technical
ada approved the equipment.
INFORMATION
ADDITIONAL
NOTICE: The Ringer Equivalence Number (REN) for this terminal equipm
REN assigned to each terminal equipment provides an indication o
allowed to be connected to a telephone interface.
combination of devices subject only to the requirement that the s
all the devices does not exceed five.
The termination on an interface may consist of any
RADIO EQUIPMENT
The term “IC:” before the radio certification number only signifi
met.
Operation is subject to the following two conditions: (1) this device m
must accept any interference, including interference that may
operation of the device. “Privacy of communications may not be ensur
www.uniden.com
cause undesired
ent is marked on the equipment itself. The
f the maximum number of terminals
um of the Ringer Equivalence Numbers of
es that Industry Canada technical specifications were
ay not cause interference, and (2) this device
ed when using this telephone”.
ADDITIONAL INFORMATION [60]
Page 62
EXAI7248.book 61 ページ 2004年1月12日
月曜日 午後5時13分
INFORMATION
ADDITIONAL
Index
A
AC adapter information . . . . . . . 53
Announce only feature . . . . . . . 35
Answering system
Deleting a message . . . . . . . . 43
Playing a message . . . . . . . . 40
Recording a conversation . . . . 44
Remote access . . . . . . . . . . . 45
Repeating a message . . . . . . . 41
Skipping a message . . . . . . . . 42
Turning on/off . . . . . . . . . . . 30
B
Basic setup . . . . . . . . . . . . . . 11
Battery pack
Information . . . . . . . . . . . . . 53
Installing . . . . . . . . . . . . . . . 6
Preparing and charging . . . . . . 6
Replacement and handling . . . 51
Beltclip installation . . . . . . . . . . 9
C
Call waiting . . . . . . . . . . . . . . 18
Caller ID service . . . . . . . . . . . 25
Call waiting . . . . . . . . . . . . . 18
Deleting . . . . . . . . . . . . . . . 27
Making a call . . . . . . . . . . . . 28
Viewing . . . . . . . . . . . . . . . 26
Channel . . . . . . . . . . . . . . . . .17
Charging the battery pack . . . . . .7
Cleaning contacts . . . . . . . . . . .52
Clock . . . . . . . . . . . . . . . . . . . 32
Connect the base unit . . . . . . . . .7
Controls and functions . . . . . . . . .3
D
Dial mode . . . . . . . . . . . . . . . . 13
Digital security code . . . . . . . . .50
E, F, G, H, I, J, K, L
Earpiece volume . . . . . . . . . . . .16
Find Handset . . . . . . . . . . . . . . 18
General information . . . . . . . . . 53
Greeting . . . . . . . . . . . . . . . . .37
Headset installation . . . . . . . . . 10
I.C. Notice . . . . . . . . . . . . . . . 60
Installing the phone . . . . . . . . . .5
Interference . . . . . . . . . . . . . .59
Liquid damage . . . . . . . . . . . . .57
M, N, O, P, Q
Making a call . . . . . . . . . . . . . .15
Menu mode . . . . . . . . . . . . . . .31
Message alert . . . . . . . . . . . . . .36
Outgoing message . . . . . . . . . . . 37
Personal security code (PIN code) 33
Precautions . . . . . . . . . . . . . . .58
R
Receiving a call . . . . . . . . . . . .15
Record time . . . . . . . . . . . . . . 35
Redial . . . . . . . . . . . . . . . . . . 16
Remote access . . . . . . . . . . . . 45
Ring time . . . . . . . . . . . . . . . . 34
Ringer tone . . . . . . . . . . . . . . 14
Ringer volume (Base) . . . . . . . . 39
RocketDial . . . . . . . . . . . . . . . 19
S
Speed dial memory
Making calls from speed dial
memory . . . . . . . . . . . . . . 24
Storing names and numbers in
speed dial memory . . . . . . . 20
T, U
Technical information . . . . . . . . 53
Tone dialing switch-over . . . . . . 17
Traveling out-of-range . . . . . . . 17
Troubleshooting . . . . . . . . . . . 54
V, W, X, Y, Z
Voice Memo . . . . . . . . . . . . . . 44
Volume control
Base . . . . . . . . . . . . . . . . . . 39
Handset . . . . . . . . . . . . 14, 16
Wall mounting . . . . . . . . . . . . . . 8
Warranty . . . . . . . . . . . . . . . . 59
[61] ADDITIONAL INFORMATION
www.uniden.com
Page 63
EXAI7248.book 62 ページ 2004年1月12日
Memo
月曜日 午後5時13分
www.uniden.com
[62]
Page 64
EXAI7248.book 63 ページ 2004年1月12日
Memo
月曜日 午後5時13分
[63]
www.uniden.com
Page 65

EXAI7248.book 64 ページ 2004年1月12日
月曜日 午後5時13分
Remote Operation Card
REMOTE OPERATION CARD
Remote access away from home
1. Call your phone number from a
touch-tone phone.
2. During the outgoing message,
press 0 and enter your PIN
code. The answering system
announces the number of
messages stored in memory
and the voice prompts. The
phone stands by for you to
enter a command.
3. To quit, hang up the phone.
REMOTE OPERATION CARD
Remote access away from home
1. Call your phone number from a
touch-tone phone.
2. During the outgoing message,
press 0 and enter your PIN
code. The answering system
announces the number of
messages stored in memory
and the voice prompts. The
phone stands by for you to
enter a command.
3. To quit, hang up the phone.
C U T
C U T
Turn on the answering system remotely
1. Call your phone and let it ring
10 times until it answers.
2. Press 0 and enter your PIN
code.
3. Press 0 then 5 to stop
the announcement.
4. Press 0 then 6 to turn the
answering system on.
C U T
C U T
Turn on the answering system remotely
1. Call your phone and let it ring
10 times until it answers.
2. Press 0 and enter your PIN
code.
3. Press 0 then 5 to stop
the announcement.
4. Press 0 then 6 to turn the
answering system on.
Memory
Location
1*
2
3
4
5
Memory
Location
1*
2
3
4
5
C U T
C U T
MEMORY LOCATION MEMO
Name
C U T
C U T
Phone Number
MEMORY LOCATION MEMO
Name
Phone Number
Page 66
EXAI7248.book 65 ページ 2004年1月12日
月曜日 午後5時13分
Remote Operation Card
Memory
Location
6
7
8
9
10
Memory
Location
6
7
8
9
10
C U T
C U T
MEMORY LOCATION MEMO
Name
C U T
C U T
Phone Number
MEMORY LOCATION MEMO
Name
Phone Number
C U T
C U T
Task
Repeat a Message
Play Incoming Messages
Skip a Message
Delete a Message
Stop Operation
Answering System On
Memo Record/Stop
Greeting Message Record/Stop
Answer System Off
Voice Prompts
C U T
C U T
Task
Repeat a Message
Play Incoming Messages
Skip a Message
Delete a Message
Stop Operation
Answering System On
Memo Record/Stop
Greeting Message Record/Stop
Answer System Off
Voice Prompts
Key
0 1
0 2
0 3
0 4
0 5
0 6
0 7
0 8
0 9
1 0
Key
0 1
0 2
0 3
0 4
0 5
0 6
0 7
0 8
0 9
1 0
Page 67

EXAI7248.book 66 ページ 2004年1月12日
月曜日 午後5時13分
At Uniden, we'll take care of you!
If you need any assistance with this product, please call our Cu
or visit our web site at
www.uniden.com
PLEASE DO NOT RETURN THIS PRODUCT TO THE PLACE OF PURCHA
Our Uniden representatives will be happy to help you with an
the operation of this unit, available accessories, or any other related m
Thank you for purchasing a Uniden product.
Hours: M-F 8:00 AM to 5:00 PM CST.
Accessibility
?
For information on the accessibility features of this product, please
1-800-874-9314 (V/TTY)
May be covered under one or more of the following
4,523,058 4,595,795 4,797,916 5,381,460
5,491,745 5,493,605 5,533,010 5,574,727
5,660,269 5,661,780 5,663,981 5,671,248
5,732,355 5,754,407 5,758,289 5,768,345
5,801,466 5,825,161 5,864,619 5,893,034
5,929,598 5,930,720 5,960,358 5,987,330
6,125,277 6,253,088 6,314,278 6,418,
209
stomer Hotline at
y matters regarding
U.S. patents:
5,426,690 5,434,905
5,581,598 5,650,790
5,696,471 5,717,312
5,787,356 5,794,152
5,912,968 5,915,227
6,044,281 6,070,082
1-800-297-1023
SE.
atters.
call
Page 68

FOR
ACCESSORIES,
GO ONLINE @
WWW.UNIDEN.COM
THANK YOU FOR BUYING A UNIDEN PRODUCT.
REGISTER ONLINE TODAY!
©2004 Uniden America Corporation, Fort Worth, Texas. Contains additional foreign articles. Custom manufactured in China.
UPZZ01035BZ
 Loading...