

Page 1

UBCD996T
Owner's Manual
OWNER'S MANUAL
Page 2

Precautions
Before you use this scanner, please read and observe the following.
EARPHONE WARNING!
Be sure to use only a monaural earphone or 32 stereo headset. Use of an
W
incorrect earphone or stereo headset might be potentially hazardous to your
hearing. The output of the phone jack is monaural, but you will hear it in both
headphones of a stereo headset.
Set the volume to a comfortable audio level coming from the speaker before
plugging in the monaural earphone or a stereo headset of the proper impedance
(32 ). Otherwise, you might experience some discomfort or possible hearing
W
damage if the volume suddenly becomes too loud because of the volume control or
squelch control setting. This might be particularly true of the type of earphone that is
placed in the ear canal.
WARNING!
Uniden represent this unit to be waterproof. To reduce the risk of fire or
electrical shock, expose this unit to rain or moisture.
Astro , DPL , Digital Private Line , Motorola , PL , PRIVACY PLUS , Private Line ,
SMARTNET , and SMARTZONE are registered trademarks of Motorola, Inc.
LTR is a registered trademark of E.F. Johnson Co.
EDACS is a registered trademark of M/A-COM Private Radio Systems Inc.
does not
do not
®® ® ®® ® ®
®®
®
®
Other trademarks used throughout this manual are the property of their respective
holders.
2
Page 3

Power Related Issues
Important:
during the time the memory is accessed for programming or auto store.
Notes:
!
If when you connect the AC adapter the is , the scanner
may not power on. Should this occur, simply turn the control , then again.
!
If the scanner loses power (as when you turn off your car’s ignition with the
scanner’s power switch on), it can lose some system settings such as display
color and backlight. To ensure that such settings persist, either change the setting
using the scanner’s menu or power the scanner off then back on using the power
switch after making such setting changes.
!
When you turn off the scanner using the power switch, the scanner remembers
the last settings and mode. When you turn power back on, it resumes the previous
mode.
To prevent memory from being corrupted, do not unplug the AC adapter
[VOL] /Power Switch ON
OFF ON
3
Page 4

Table of Contents
Precautions ...................................................................................................................................2
Power Related Issues ................................................................................................................3
Introduction .................................................................................................................................11
Feature Highlights ......................................................................................................................12
General .....................................................................................................................................12
GPS ..........................................................................................................................................14
Search ......................................................................................................................................15
Auto Store .................................................................................................................................15
Priority ......................................................................................................................................15
PC Control and Cloning ............................................................................................................15
Memory Storage Limits ...............................................................................................................16
Search Lockout Limits ................................................................................................................17
About This Manual ......................................................................................................................17
Using the Scroll Control [FUNC] ...............................................................................................17
How the Scanner’s Controls Are Represented in This Manual ................................................18
Entering Text Within A Menu Option .........................................................................................18
A Short User’s Guide to Assist the First-Time Scanner Enthusiast and Glossary ...............19
Understanding Scanning and the UBCD996T ..........................................................................21
Understanding the Scanner’s Memory .......................................................................................21
Understanding Quick Keys .........................................................................................................21
What is Scanning? ......................................................................................................................22
What is Searching? ....................................................................................................................22
What is CTCSS/DCS? ................................................................................................................22
Conventional Scanning ...............................................................................................................23
Simplex Operation ......................................................................................................................23
Repeater Operation ....................................................................................................................24
What is Trunk Tracking? .............................................................................................................24
Trunked Scanning ......................................................................................................................25
Types of Trunking Systems ........................................................................................................25
Motorola Trunking .....................................................................................................................25
EDACS Trunking ......................................................................................................................26
LTR Trunking ............................................................................................................................27
Startup Configuration ..................................................................................................................28
Setup/Operation .......................................................................................................................28
Multi-Site Trunking ......................................................................................................................28
I-Call (Motorola/EDACS) ............................................................................................................29
Where To Get More Information .................................................................................................29
Information On The Internet .....................................................................................................29
4
Page 5

Included With Your Scanner ......................................................................................................30
Setting Up Your Scanner ............................................................................................................31
Base Station ...............................................................................................................................31
Setting Up an Audio Recording Device or Computer Recording ................................................33
Vehicle Installation ......................................................................................................................33
Mounting Using the Bracket .....................................................................................................33
Mounting Using the DIN-E Sleeve ............................................................................................34
Removing the Scanner from the DIN-E Sleeve ........................................................................36
Mounting Using ISO Technique ................................................................................................36
Removing the Display Sticker ...................................................................................................37
Connecting an Optional Antenna ................................................................................................37
Connecting an Earphone/Headphone ........................................................................................37
Connecting an Extension Speaker .............................................................................................38
Controls, Keys, and Functions ..................................................................................................39
A Look At The Display ................................................................................................................44
Operation .....................................................................................................................................45
Turning On the Scanner and Setting the Squelch ......................................................................45
Startup Key Operation ................................................................................................................45
Conventional ............................................................................................................................45
Trunked ....................................................................................................................................45
Search Range ..........................................................................................................................45
Scanning Systems ......................................................................................................................46
Selecting Systems to Scan .........................................................................................................47
Selecting System Channel Groups .............................................................................................47
Locking/Unlocking Systems ........................................................................................................48
Locking/Unlocking Channels ......................................................................................................48
ID Scan/ID Search Mode ............................................................................................................48
Holding On a System ..................................................................................................................49
Holding On a Channel ................................................................................................................49
Quickly Storing an ID During ID Search .....................................................................................49
Quick-Storing Channels or Talk Group ID’s (TGID) ....................................................................49
Trunking Activity Indicators .........................................................................................................50
Toggling the Display Mode .........................................................................................................51
Optimizing P25 Performance .....................................................................................................52
Conventional System ...............................................................................................................52
Trunked System .......................................................................................................................52
Using the Menu ...........................................................................................................................54
Programming General Settings .................................................................................................55
Setting and Using the Backlight ..................................................................................................55
Setting the Dimmer ...................................................................................................................55
Setting the Backlight Color .......................................................................................................56
Adjusting the Key Beep ..............................................................................................................56
Setting the Audio AGC ................................................................................................................56
Setting the Display Orientation ...................................................................................................57
Adjusting the Display Contrast ...................................................................................................57
5
Page 6

Setting the GPS Format .............................................................................................................57
Setting the Position Format ......................................................................................................57
Setting the Time Format ...........................................................................................................58
Setting the Time Zone ..............................................................................................................58
Setting the Distance Units ........................................................................................................58
Setting the Serial Port Speed .....................................................................................................58
Displaying Scanner Information ..................................................................................................59
Viewing Memory Used .............................................................................................................59
Viewing the Firmware Version and Electronic Serial Number ..................................................59
Initializing the Scanner’s Memory ...............................................................................................59
Connecting Your Scanner to a Personal Computer ....................................................................60
Volume/Squelch with PC Control .............................................................................................60
Wired Cloning .............................................................................................................................60
Programming Your Scanner ......................................................................................................62
System Settings .......................................................................................................................63
System Options ........................................................................................................................63
Site Settings .............................................................................................................................65
Channel Settings ......................................................................................................................66
Programming Conventional Systems .........................................................................................66
Programming Trunked Radio Systems .......................................................................................67
Programming System Settings ...................................................................................................67
Editing the System Name .........................................................................................................67
Specifying the Correct System Type ........................................................................................68
Programming System Options .................................................................................................68
Programming Sites .....................................................................................................................76
Programming Channel Groups ...................................................................................................83
Setting Up a Channel Group ....................................................................................................83
Editing a Channel Group Name ...............................................................................................83
Setting the Group Quick Key ....................................................................................................84
Editing Channels ......................................................................................................................84
Locking Out Channel Groups ...................................................................................................84
Deleting Channel Groups .........................................................................................................85
Programming Channels ..............................................................................................................85
Creating a Channel ..................................................................................................................85
Editing the Channel Name (Alpha Tag) ....................................................................................85
Editing Frequencies ..................................................................................................................86
Editing the Talk Group ID .........................................................................................................86
Setting the Audio Type .............................................................................................................87
Selecting CTCSS/DCS Tones ..................................................................................................87
Quick CTCSS/DCS Save .........................................................................................................88
Setting Channel Modulation Method ........................................................................................88
Setting Channel Attenuation .....................................................................................................89
Setting Channel Priority ............................................................................................................89
Setting Channel Alert ................................................................................................................90
Set Record ..................................................................................................................................90
6
Page 7

Searching and Storing ................................................................................................................92
Service Search ...........................................................................................................................92
Quick Search ..............................................................................................................................93
Custom Search ...........................................................................................................................93
Editing a Custom Search Range ................................................................................................94
Search With Scan .......................................................................................................................95
Set Delay Time ...........................................................................................................................96
Set Attenuator .............................................................................................................................97
Set Record ..................................................................................................................................97
Assigning a Search Range to a Search Key ..............................................................................97
Saving a Found Channel (Quick Save) ......................................................................................97
Auto Search and Store ...............................................................................................................98
Selecting a System ...................................................................................................................98
Conventional Search and Store ................................................................................................98
Trunked Search and Store .......................................................................................................99
Using the Close Call Feature ...................................................................................................100
Setting Close Call Options ........................................................................................................100
Close Call Hits ..........................................................................................................................102
Close Call Hits with Scan .........................................................................................................102
Search and Close Call Options ................................................................................................104
Managing Locked-Out Frequencies .......................................................................................104
Unlocking All Frequencies ......................................................................................................105
Reviewing Locked-Out Frequencies ......................................................................................105
Searching for Subaudible Tones ............................................................................................105
Screening Out Broadcast Sources .........................................................................................105
Finding Repeater Output Frequencies ...................................................................................106
Setting the Maximum Auto Store Value ..................................................................................107
Setting the Modulation Type ..................................................................................................107
Setting Attenuation .................................................................................................................108
Setting Data Skip ....................................................................................................................108
Setting the Delay Time ...........................................................................................................109
Setting the Search Frequency Step ........................................................................................109
Setting Record ........................................................................................................................109
Adjust P25 Level ....................................................................................................................109
Priority Scan .............................................................................................................................110
Fire Tone-Out .............................................................................................................................114
Setting Tone-Out Standby .........................................................................................................11 4
Setting Up Tone-Out .................................................................................................................114
Tone-Out Multi-Channel Monitoring ..........................................................................................116
Location-Based (GPS) Scanning .............................................................................................117
GPS Compatibility .....................................................................................................................117
Connecting Your Scanner to a GPS Device .............................................................................117
Initial GPS Operation ................................................................................................................117
Non-Radio Location Based GPS Features ..............................................................................119
Setting the Options ...................................................................................................................120
Deleting a Location ...................................................................................................................121
For POI Only ..........................................................................................................................121
GPS Display Mode ...................................................................................................................122
GPS Review Location Mode .....................................................................................................123
7
Page 8

Care and Maintenance ..............................................................................................................125
General Use .............................................................................................................................125
Location ....................................................................................................................................125
Cleaning ...................................................................................................................................125
Birdies .......................................................................................................................................125
Troubleshooting ........................................................................................................................126
Specifications ............................................................................................................................129
Reference ...................................................................................................................................132
Preset Fleet Maps ...................................................................................................................132
User Defined Fleet Maps ..........................................................................................................134
Type I Programming Information ...........................................................................................134
Size Code Restrictions ..........................................................................................................135
Preprogrammed Systems with Quick Keys ............................................................................137
CTCSS Frequencies .................................................................................................................138
DCS Codes ...............................................................................................................................138
Index ...........................................................................................................................................140
One-Year Limited Warranty ......................................................................................................144
8
Page 9

This page is intentionally blank.
9
Page 10

This page is intentionally blank.
10
Page 11
Introduction
Your UBCD996T scanner is a state-of-the-art scanner radio with Trunk Tracker IV™
and automatic scanning capabilities. You can store in the dynamic memory
conventional frequencies such as police, fire/emergency, marine, air, amateur, and
other communications. You can store and scan services that use Trunked Radio
Systems and so much more. You can use the scanner’s Scroll Control to quickly
select channels and frequencies, and you can automatically program channels in a
system using the Auto Store feature. Use your scanner to monitor:
!
Analog and digital trunked public safety systems (unencrypted only)
!
Police and fire departments (including rescue and paramedics)
!
Business/Industrial radio and utilities
!
Marine and amateur (ham radio) bands
!
Air band
!
Railroad
!
UHF CB Radio
!
CB Radio
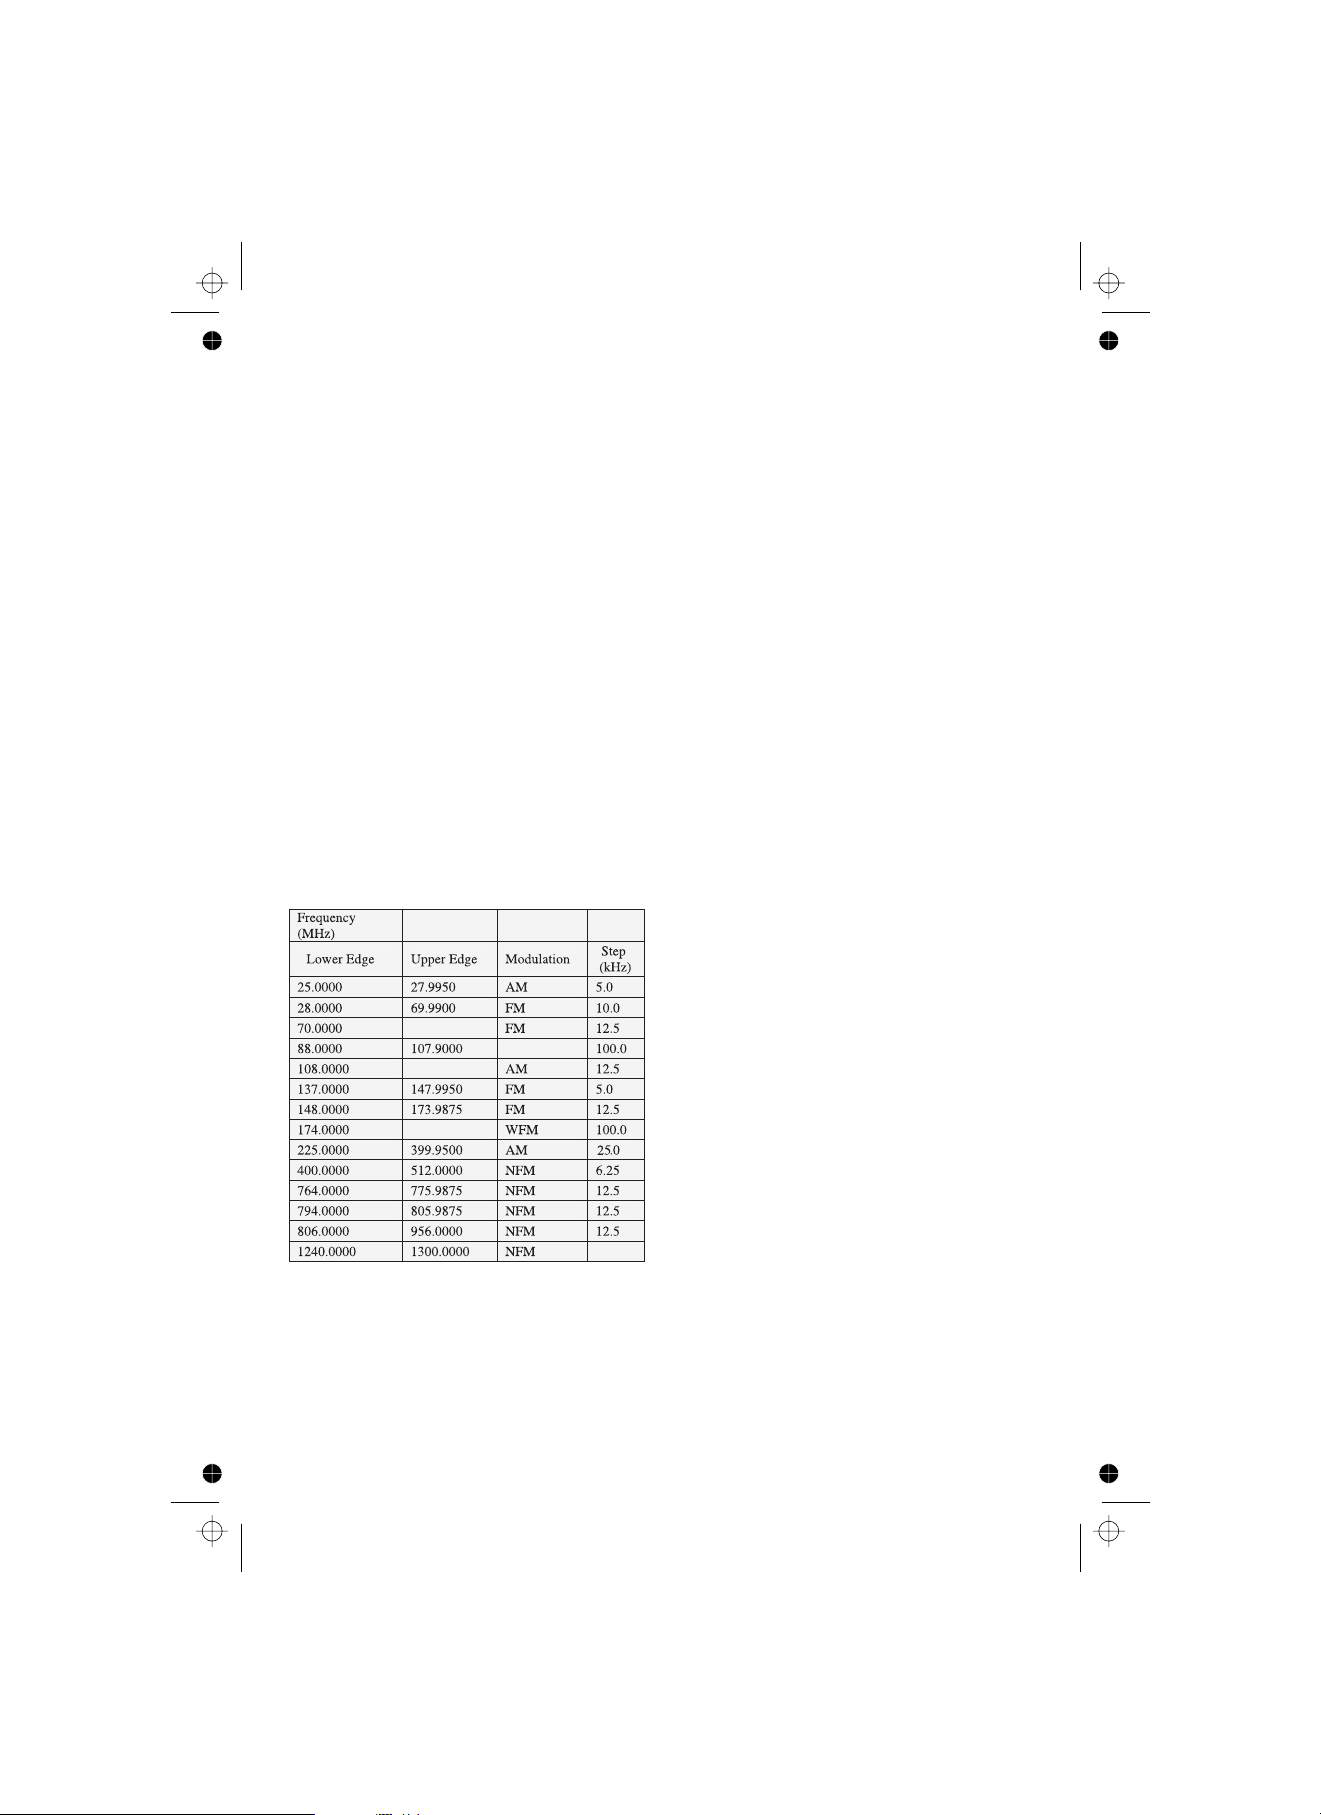
Your scanner can monitor the following bands
87.9875
FMB
136.9875
224.9000
12.5
The scanner’s frequency coverage is not continuous.
Note:
11
Page 12

Feature Highlights
General
Close Call™ RF Capture Technology
tune to nearby radio transmissions. See “ Using the Close Call Feature” on Page100
for more information.
— Lets the scanner detect and automatically
Close Call Do-Not-Disturb
checks whenever the scanner is not receiving audio in another mode. This
eliminates the annoying breaks in conversation while still allowing for Close Call
functionality.
Close Call Temporary Store
includes them when scanning.
Dynamically Allocated Channel Memory
organized so that it more closely matches how radio systems actually work, making
it easier to program and use your scanner and determine how much memory you
have used and how much you have left.
Preprogrammed Systems
local systems (for Australian and NZ Emergency Services for example) as a
complementary start.
100 Quick Keys
groups by using the keypad. This makes it easy to listen to or quickly lock out those
systems or groups you don’t want to scan.
9 Service Searches
Air, CB Radio, UHF CB Radio, Racing, TV Broadcast, and FM Broadcast searches,
to make it easy to search and scan for specific transmissions.
“Soft” Search Keys
— You can set the scanner so you can quickly select systems and
- frequencies are preset in separate Police, Marine, Railroad,
— Lets you quickly search specified ranges.
— When set, the scanner makes periodic Close Call
— Temporarily saves the last 10 Close Call hits and
— Your scanner’s 6,000 channels are
— Your UBCD996T may come pre-programmed with
Channel Lockout
while scanning. If you lock out a system or group, any channels belonging to that
system or group are also locked out.
Frequency Lockout
locked out + 250 temporarily locked out). The scanner skips locked-out frequencies
while using the Close Call™ feature or while searching.
CTCSS and DCS Squelch Modes
the tone code you select.
Analog and Digital Audio AGC
between different radio systems.
— You can lock out any system, group, frequency, or channel
— You can lock out up to 500 frequencies (250 permanently
— Prevent interference from stations not using
— Helps automatically balance the volume level
12
Page 13

Fire Tone-Out Standby
— Lets you set the scanner to alert you if a two-tone
sequential page is transmitted. You can set up to 10 settings (transmit frequency,
tone frequencies) then select one for standby monitoring. Up to ten tone-outs on the
same RF setting can be scanned at one time.
Broadcast Screen
— Sets the scanner to ignore Close Call™ or search hits on
known broadcast frequencies including common pager frequencies.
Custom Screen
— Lets you input up to 10 frequency ranges that the scanner will
ignore during Close Call™ or search operation.
Scan/Search Delay
— The scanner pauses at the end of a transmission to wait for
a reply. You can set the delay time for each system you scan, and while searching
and using the Close Call™ feature.
Attenuator
Repeater Reverse
— Reduces the input strength of strong signals by about 20 dB.
— Automatically switches to the input frequency on a
conventional repeater system.
Channel Alert
— Alerts you when there is activity on any channel you specify using
your choice of nine unique alert tones.
Memory Check
Search with Scan Operation
— Lets you see at a glance how much total memory is left.
— Lets you include selected service searches or
custom search ranges during normal scan operation.
Custom Alerts
— For each alert in the scanner (such as channel alert, Close Call
alert, emergency alert), you can select from 9 different tone patterns and also set the
alert volume level independently from the main volume level.
Automatic Channel Step
— Accepts frequencies on any valid channel step, even if
it does not fall within the band plan’s default step.
Frequency Step
— Lets you select a frequency step (5, 6.25, 7.5, 8.33, 10, 12.5,15,
20, 25, 50 or 100 kHz) for manual mode and search mode.
Text Tagging
— You can name each system, group, channel, talk group ID, custom
search range, and custom search range, using up to 16 characters per name.
Data Skip
— Allows your scanner to skip unwanted data transmissions and reduces
the affect of birdies.
Duplicate Frequency Alert
— Alerts you if you try to enter a duplicate name or
frequency already stored in a system.
13
Page 14

Memory Backup
frequencies you programmed in its memory.
— If power is lost or disconnected, the scanner retains the
Temporary Lockout
frequency. The lockout is cleared when you turn power off, then back on so you
don’t have to remember to unlock the channels later.
Startup Configuration
scanner.
Single-Handed Function Control Operation
Control to enable the Function mode. It reverts to normal mode in about 3 seconds
from your last press if no other action occurs.
Record Out Jack
signal control, you can record live audio of designated channels.
Display and Keypad Backlight
dim light using two color options and six light levels plus off.
Vehicle Power Connection (Orange Wire)
dimmer circuit to also dim the scanner’s display with the vehicle’s dimmer control.
Trunk Tracker IV™ Operation
Motorola, Motorola Astro 25 (APCO 25), EDACS, EDACS SCAT, and LTR trunked
radio systems, including systems in VHF, UHF, 700 MHz, 800 MHz, and 900 MHz
bands. The scanner can scan both conventional and trunked systems at the same
time.
— Makes it easy to temporarily lock out a system, channel, or
— Lets you easily manage multiple configurations for your
— You can tap the Function/Scroll
— Using the appropriate cable and audio recording device with
— Makes the display and keypad easy to see in
— Lets you connect to your vehicle’s
— Follows unencrypted conversations on analog
Multi-Site Trunking
more efficiently use the scanner’s memory and more easily select sites to monitor.
Control Channel Only Scanning
system, you can set it so it scans using only control channel data. You do not have
to program voice channel frequencies into memory in this mode as long as all
possible control channels are programmed.
Adaptive Digital Threshold
APCO 25 systems.
— Lets you share system channels across multiple sites to
— If the scanner is set to scan a Motorola
— Automatically sets the digital decode threshold for
GPS
Location Based Scanning
automatically enable and disable systems based on the Location Information
(longitude, latitude, Range) that you provide.
GPS Non-Radio Based Features
Intersections, Speed Alerts, and Points of Interest that you program into the scanner.
GPS Display Mode
— Lets you display extended GPS information such as
— If you connect a GPS unit to the scanner it can
— The scanner alerts you to Dangerous
14
Page 15

Distance to a POI, Direction to a POI, Time to a POI, Speed, Position, and more.
Search
Service Search
preprogrammed frequencies.
— Lets you quickly select and search the scanner’s
Custom Search
search any of these ranges simultaneously.
CTCSS/DCS Search
on any channel or during a search. The scanner can identify up to 50 CTCSS tones
and 104 DCS codes.
Quick Search
searching a conventional system.
— Lets you program up to 10 custom search ranges. You can
— Lets the scanner search for CTCSS or DCS tones or codes
— Lets you search from the currently-tuned frequency if you are
Auto Store
Frequency AutoStore
selected conventional system.
Talk Group ID AutoStore
channel group you select.
— Automatically stores all active frequencies into the
— Automatically stores all new talk group ID’s into a
Priority
Priority Scan
important conventional channel(s) while monitoring transmissions on other channels.
Priority Plus
— Priority channels let you keep track of activity on your most
— You can set the scanner so it scans only the priority channels.
PC Control and Cloning
PC Control
your personal computer, and control the scanner using a computer. This helps you
find frequencies listed on the Internet and load them into the scanner. Free PC
control and programming software will be available at the UBCD996T web page at
www.uniden.com.au (for Australia) or www.uniden.co.nz (for New Zealand).
Clone Mode
scanner’s memory, menu settings, and other parameters from one UBCD996T
scanner to another UBCD996T scanner.
— You can transfer programming data to and from your scanner and
— You can clone all programmed data, including the contents of the
15
Page 16
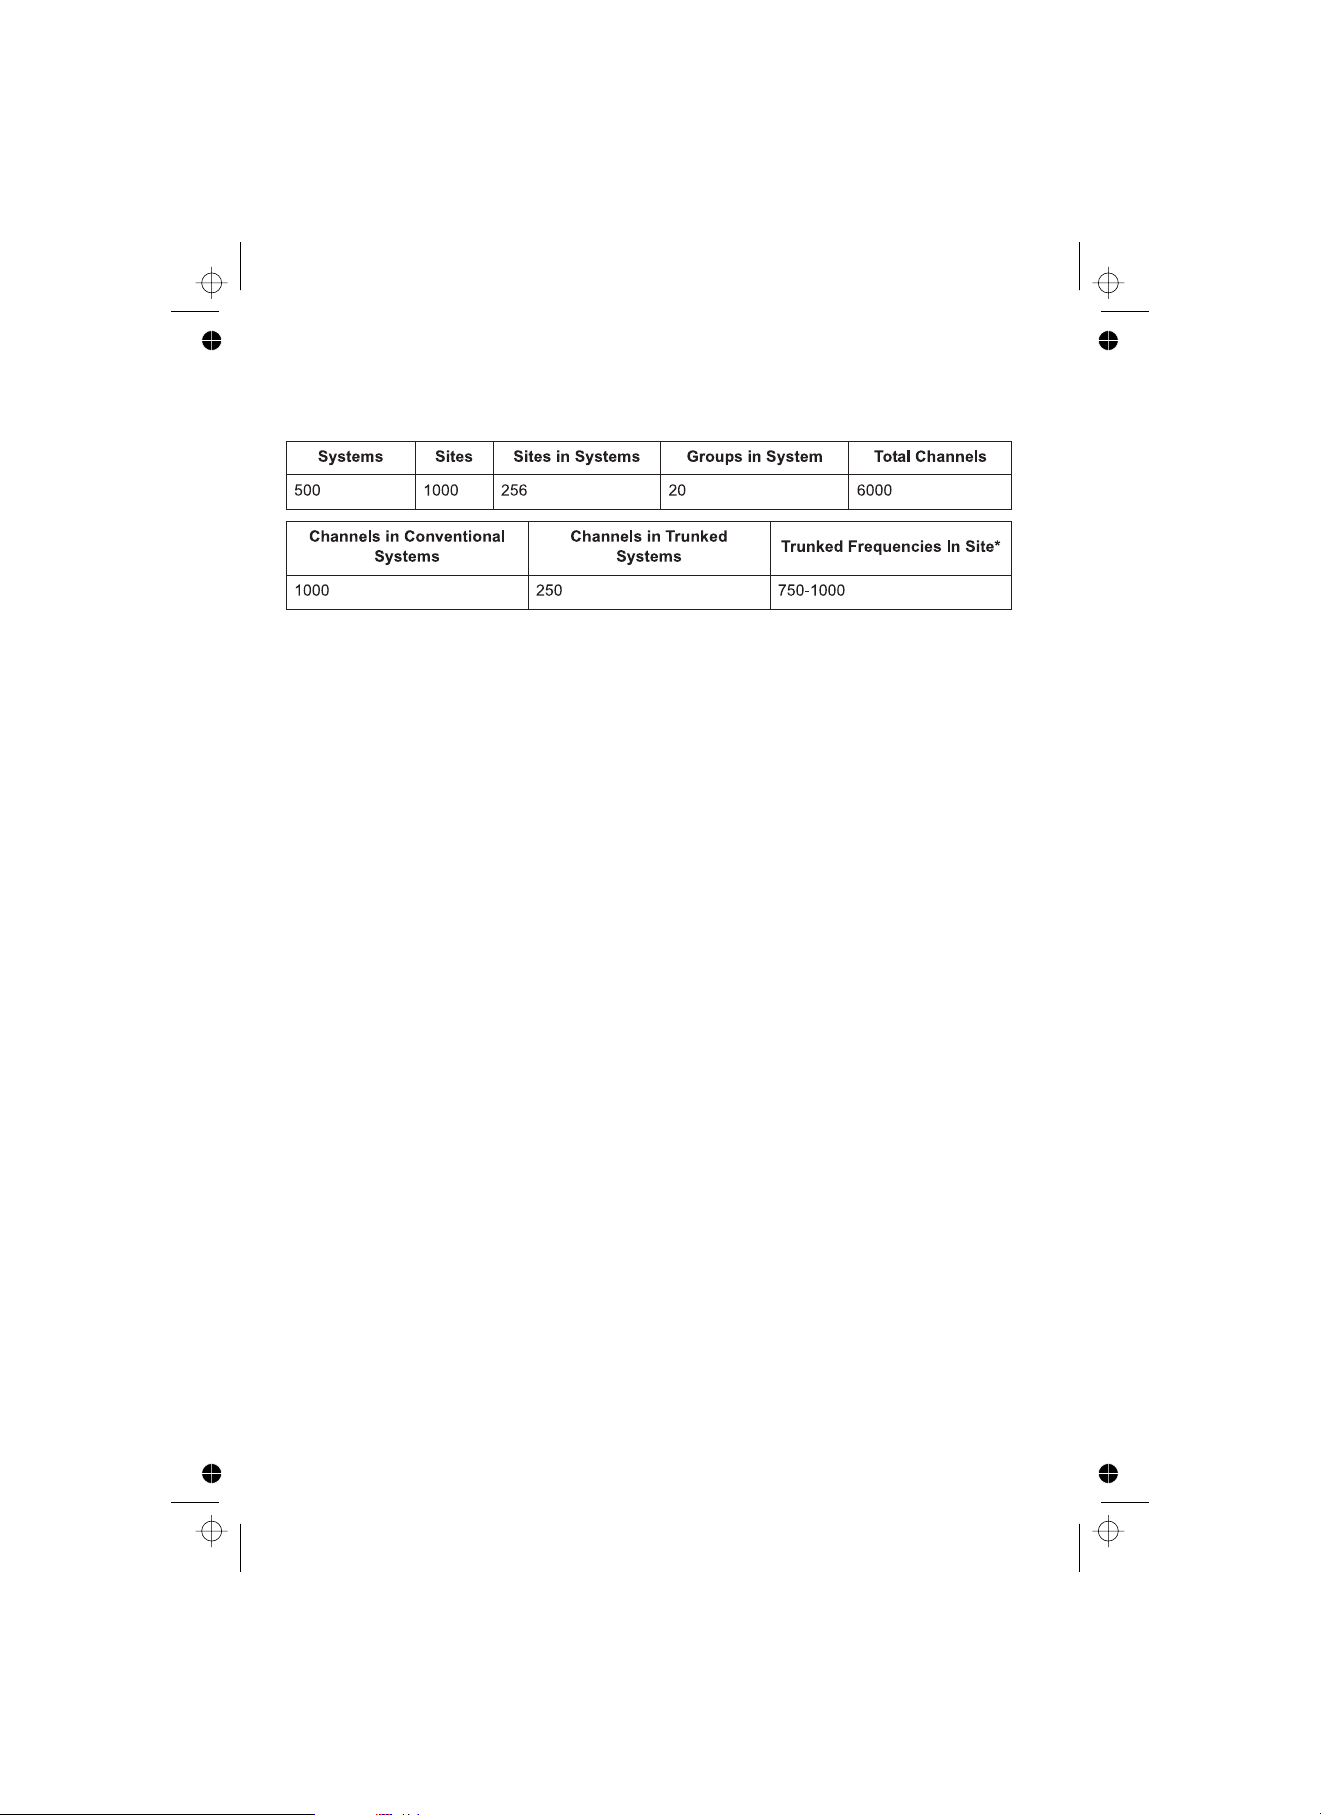
Memory Storage Limits
* depending on the number of TGID in the system.
16
Page 17
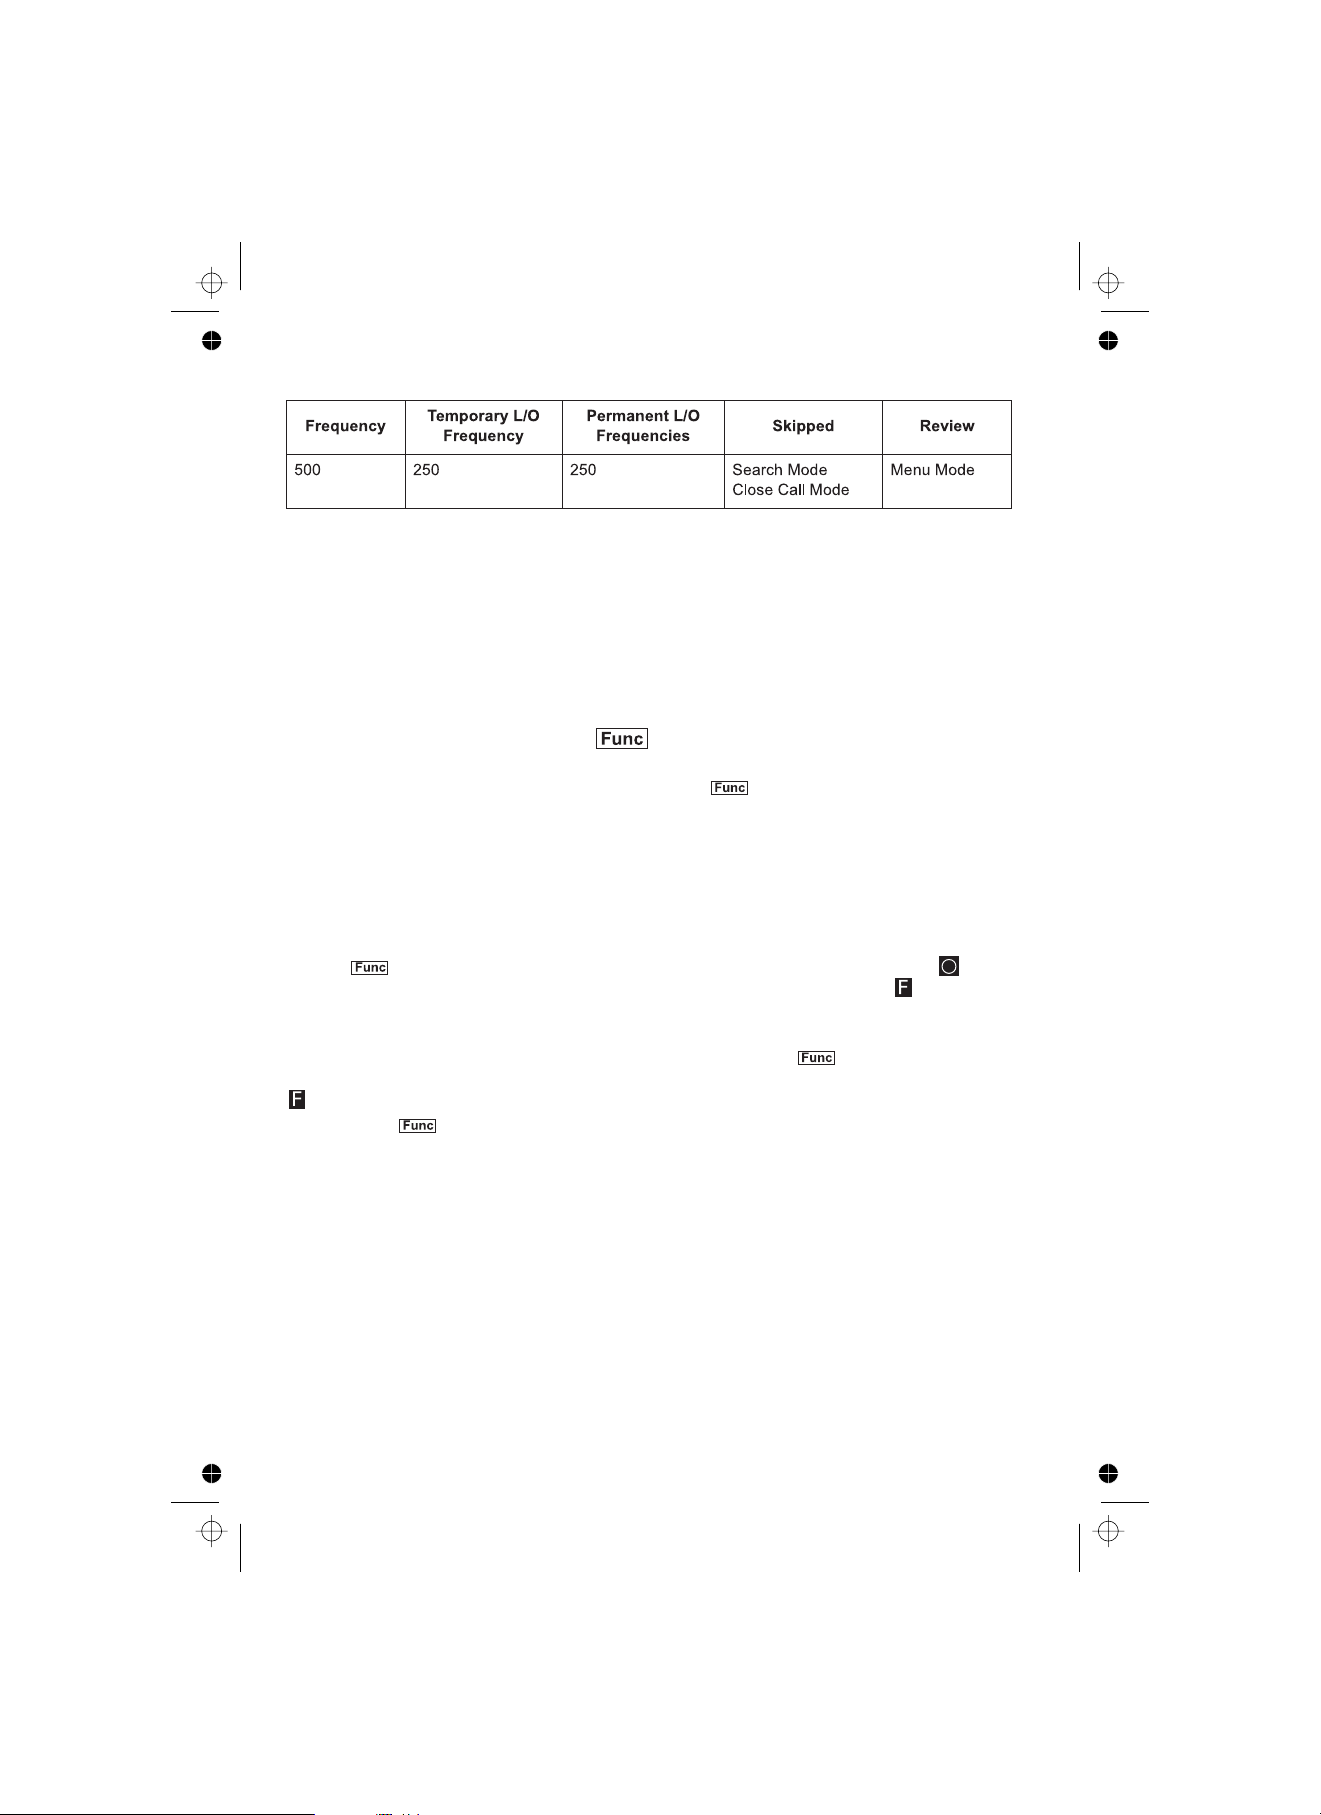
Search Lockout Limits
About This Manual
The screen displays used in this manual are representations of what might appear
when you use your scanner. Since what you see depends on the frequencies and
user IDs for your area and the settings you select, you might notice some
differences between what is in this manual and what appears on your scanner.
To get the most from this manual, review the contents to become familiar with the
basic functions available.
Using the Scroll Control
The Scroll Control, a dual purpose control, also lets you switch to secondary function
operations. When used in this manner, you see in this manual. Located
prominently on the right of the UBCD996T’s front panel, the knob/switch lets you
easily control channel selection, plus Normal and Function Modes, as well as how
most of the information appears on the display.
To adjust menu settings, change channels in Hold mode, and resume
scanning: Scroll Control
Simply turn the .
To use tap the . This action is written in shorthand as
which is fully explained in the next section. When you tap the control appears
and remains in the upper left corner of the display for 3 seconds. During this time,
press any button to access the button’s second function. Or, press and hold the
Scroll Control for 2 seconds. The scanner beeps, and the function is “latched”
so that is does not return to normal mode until you tap the Scroll Control again.
flashes at approximately 1 second intervals.
If you select while scanning, the UBCD996T continues to scan, but holds on
the current system until the function operation is cancelled.
Scroll Control
17
Page 18

How the Scanner’s Controls Are Represented in This
Manual
To help navigate the scanner’s menus, the steps shown in this manual show the
displays you see and the keys you press or control you operate to get a desired
result. We use a form of shorthand symbols to save space.
The following example shows you how to use the scanner’s menu to edit an existing
system name. It shows you the key to press in brackets to select a menu
option and the option you see on the LCD in Boldface Courier type (
System
Scroll Control
Scroll Control
Name
) when you press . It also instructs you to turn the
.
(shown as ) to view a series of choices then or the
(the shorthand action shown as to a choice such as
[MENU]
enter
[MENU]
Program
press tap
Edit
[MENU]
Select the system
Edit Name
Program System
Then, edit the system name.
Entering Text Within A Menu Option
To enter a letter, turn the Scroll Control ( ) until the letter, numeral or other
character you want appears. To move the cursor to the left, press . To move the
cursor to the right, press .
To clear a character, press [.No] [.No]
times.
To accept an entry, press or tap the or press .
To cancel an entry, press .
6/>
twice. To clear all characters, press three
Scroll Control [E ]
[MENU]
</4
YES
18
Page 19

A Short User’s Guide to Assist the First-Time
Scanner Enthusiast and Glossary
Welcome to the family of Uniden scanner users. You have just unpacked your
Uniden UBCD996T scanner. You are anxious to scan and hear something so you
rotate the control and wait a moment as the opening Message and
Copyright screens confirm the model information.
Then, if you live in a residential area, you probably hear nothing or very little. Why?
The reason is simple. The programmable UBCD996T does not instinctively know
where you are and what you wish to listen to.
Take a few minutes to assist in the ‘educating your scanner’ process so you can
enjoy listening for the first time and feel good about your purchase.
Before proceeding, first follow the steps on Page 45 to set the volume and the
squelch levels. Once set correctly, these settings let you listen at a comfortable level
and let the scanner provide a signal whose strength is sufficient to be heard clearly.
Always be sure to connect the provided antenna.
Uniden has made it easy for you to start scanning. We have preprogrammed the
UBCD996T with local systems (for Australia and New Zealand Emergency
Services). Simply press [SCAN] to start scanning.
Finally, you may decide to program the scanner yourself. To correctly program the
UBCD996T scanner begin on Page 62. The two programming steps are
[VOL/POWER]
1. Plan the system
2. Program the system based on the plan.
To provide you with useful sized worksheets and instructions to complete them, we
have established links at our company website.
Visit, to see a list of helpful forms. But first, visit
http://www.uniden.com/scanners
http://www.radioreference.com
want to scan. If you register and pay a small fee, you can download a ready-to-use
formatted PDF complete with the data from your selected system.
Otherwise, you can print the blank worksheet on our web page as you would any
other web based page.
The programming data of a large metropolitan area may consist of many pages
depending on how extensive the area’s Public Service System Talkgroups are. Don’t
and locate the system nearest your location that you
19
Page 20

be overwhelmed. Begin by choosing the Talkgroups of interest to you. Begin by
transferring the data from the Radio Reference website to the worksheets you obtain
from the Uniden website and from there, to the scanner.
You can visit one of the Radio Reference forums and potentially learn of someone in
your immediate area who has programmed the same model scanner in your area.
Then, by using the Clone feature or by exchanging files that you each have
transferred to a computer using the Uniden Advanced Scanner Director (UASD)
software you can install the programmed data into your scanner. Once you have
either programmed or selected the option that lets you start experiencing scanning,
spend the next few minutes learning the basics of trunk tracking for an even more
complete listening appreciation.
20
Page 21

Understanding Scanning and the UBCD996T
This section provides you with additional background on how scanning works and
how your scanner provides that feature. You don’t really need to know all of this to
use your scanner, but some further background knowledge will help you get the
most from your UBCD996T.
Understanding the Scanner’s Memory
Your scanner’s memory is organized in an architecture called
Channel
than the bank/channel architecture used by traditional scanners. Dynamic Allocated
design matches how radio systems actually work much more closely, making it
easier to program and use your scanner and determine how much memory you
have used and how much you have left.
Instead of being organized into separate banks and channels, your scanner’s
memory is contained in a . You simply use as much memory as you need in the
pool to store as many frequencies, and talk group ID’s as desired. No memory space
is wasted, and you can tell at a glance how much memory you have used and how
much remains.
With a traditional scanner, when you program it to track a trunked system, you must
first program the frequencies. Since you can only program one trunking system per
bank in a traditional scanner, if there were (for example) 30 frequencies, the
remaining channels in the bank are not used and therefore wasted. Also, since some
trunked systems might have hundreds of talk groups, you would have had to enter
those types of systems into multiple banks in order to monitor and track all the ID’s.
memory. This type of memory is organized differently and more efficiently
pool
Dynamic Allocated
Understanding Quick Keys
Traditional “Banked” scanners let you select and deselect banks by pressing a single
digit on the keypad. The UBCD996T uses a similar method to turn on and off
scanning sites and systems. When you program a system or site, you assign a quick
key (System/Site Quick Key, or SQK) from 0 to 99. You can use the same quick key
for multiple systems, so that the systems are turned on and off together. To turn a
system/site on or off, just press the digit corresponding to the assigned SQK. For
two-digit SQK’s, first press , then enter the two-digit SQK.
The UBCD996T lets you assign another quick key to a group of channels within a
system. This group quick key (GQK) can be from 0-9. To turn on and off channel
groups, you press while the scanner is scanning the system containing the
channels, then press the GQK within 2 seconds. Systems can have up to 20
channel groups, and multiple channel groups can be assigned to the same GQK.
[.No]
21
Page 22

What is Scanning?
Unlike standard AM or FM radio stations, most two-way communications do not
transmit continuously. Your UBCD996T scans programmed channels until it finds an
active frequency, then stops on that frequency and remains on that channel as long
as the transmission continues. When the transmission ends, the scanning cycle
resumes until the scanner receives another transmission.
What is Searching?
The UBCD996T can search each of its 9 service search ranges and up to 10 custom
search ranges to find active frequencies. This is different from scanning because
you are searching for frequencies that have not been programmed into the
scanner’s channels. You set the upper and the lower values of the range and then
the scanner searches for any active frequency within the limits you specify. When
the scanner finds an active frequency, it stops on that frequency as long as the
transmission lasts. If you think the frequency is interesting, you can program it into
the scanner’s memory. If not, you can continue to search.
What is CTCSS/DCS?
Your scanner can monitor systems using a Continuous Tone Coded Squelch System
(CTCSS) and Digital Coded Squelch (DCS) system, which allow squelch to open
only when the tone you have programmed with a specific frequency is received
along with a transmission.
CTCSS and DCS are sub-audible tone signaling systems sometimes referred to as
PL or DPL (Motorola’s trademarked terms for Private Line and Digital Private Line
respectively). CTCSS and DCS are used only for FM signals and are usually
associated with both amateur and commercial two-way frequencies. These systems
make use of a special sub-audible tone that accompanies a transmitted signal.
CTCSS and DCS are used for many purposes. In many cases, CTCSS and DCS
are used to restrict access to a commercial repeater, so that only those units which
transmit the correct tone along with their signal can “talk” to the repeater.
CTCSS and DCS are also used in areas that receive interference where there are
several stations with output frequencies close to each other. When this occurs, you
might hear multiple communications on the same frequency. The stations might
even interfere with each other to the point where it is impossible to clearly receive
any of the stations. A scanner, such as your UBCD996T, equipped with CTCSS and
DCS, can code each received frequency with a specific sub-audible CTCSS or DCS
frequency or code. Then, when you receive multiple signals, you only hear the
transmission with the CTCSS or DCS tone you programmed. If you do not receive
the correct tone with a signal, the scanner’s squelch remains closed and you hear
nothing.
The tables showing the available CTCSS frequencies and DCS codes are found in
the Reference Section on Page 138 of this manual.
22
Page 23

Conventional Scanning
Conventional scanning is a relatively simple concept. Each group of users in a
conventional system is assigned a single frequency (for simplex systems) or two
frequencies (for repeater systems). Any time one of them transmits, their
transmission always goes out on the same frequency. Up until the late 1980s, this
was the primary way that radio systems operated.
Even today, there are many 2-way radio users who operate using a conventional
system:
!
Aircraft
!
Amateur radio
!
UHF/PRS
!
Broadcast AM/FM/TV stations
Many business radio users
!
When you want to store a conventional system, all you need to know is the
frequencies they operate on. When you are scanning a conventional system, the
scanner stops very briefly on each channel to see if there is activity. If there isn’t, the
scanner quickly moves to the next channel. If there is, then the scanner pauses on
the transmission until it is over.
Simplex Operation
Simplex systems use a single frequency for both transmit and receive. Most radios
using this type of operation are limited to line-of-sight operation. This type of radio is
frequently used at construction job sites, and with inexpensive consumer radios
such as UHF/PRS radios. The range is typically 1-12 kms, depending upon the
terrain and many other factors.
23
Page 24

Repeater Operation
Repeater systems use two frequencies: one transmits from the radio to a central
repeater; the other transmits from the repeater to other radios in the system. With a
repeater-based system, the repeater is located on top of a tall building or on a radio
tower that provides great visibility to the area of operation. When a user transmits
(on an input frequency), the signal is picked up by the repeater and retransmitted
(on an output frequency). The user’s radios always listen for activity on the output
frequency and transmit on the input frequency. Since the repeater is located very
high, there is a very large line of sight.
Typical repeater systems provide coverage out to about a 40kms radius from the
repeater location.
What is Trunk Tracking?
Your UBCD996T is designed to track the following types of trunking systems.
!
Motorola Astro 25 (APCO 25) trunking systems.
!
Motorola Type I, Type II, Type IIi hybrid, SMARTNET, and PRIVACYPLUS analog
trunking systems, which are extensively used in 800 MHz communication
systems.
!
LTR trunking systems
!
EDACS SCAT trunking systems
!
EDACS trunking systems
When tracking these types of systems, you might want to remember that your
scanner can track more than one trunking system at a time and scan conventional
and trunked systems at the same time.
Conventional scanning is a simple concept. You enter a frequency used by someone
you want to monitor into your scanner’s memory. For example, the police in your
area might transmit on 460.500 MHz, the fire department on 154.445 MHz, the
highway department on 37.900 MHz, etc. So when your scanner stops on a
frequency, you usually know who it is, and more importantly, you can stop on a
channel and listen to an entire conversation. This type of scanning is easy and fun.
However, as the demand for public communications has increased, many public
radio users do not have enough frequencies to meet their needs, creating a serious
problem. Trunking radio systems help solve this problem.
24
Page 25

Trunked Scanning
While conventional scanning worked great while there were only a few groups
wanting to use the frequencies, with the advent of smaller, lower-cost radios more
and more agencies and businesses wanted to take advantage of the utility of 2-way
radio. As a result, the bands that were used most became full, so new users were
not able to take advantage of the technology as quickly as they wanted.
Trunking solved this frequency shortage by allowing multiple groups to use the same
set of frequencies in a very efficient way. While each type of trunking system
operates a little differently (see the next few sections), they all work on the same
basic premise: even in a system with a lot of users, only a few users are ever
transmitting at any one time.
Instead of being assigned a frequency, as with conventional systems, each group is
assigned a talk group ID. A central computer controls the frequency each group
operates on. This frequency selection is made each time a user transmits. So, while
on a conventional system queries, replies, and follow-ups are all on a single
frequency, they could each be on completely different frequencies on a trunked
system. This semi-random frequency assignment made monitoring such a system
impossible prior to Uniden’s invention of the TrunkTracker scanner.
Not only does your UBCD996T scan channels like a conventional scanner, it actually
follows the users of a trunked radio system. Once you know and program a talk
group’s ID (TGID), you won’t miss any of the action.
If you are a new scanner enthusiast, you might want to read the first part of this
manual and use your scanner in conventional mode before you begin trunk tracking.
Understanding scanning fundamentals and terminology will make trunk tracking
much easier. If you are already an experienced scanner operator, you can review
the programming worksheets and their associated pages in the Reference Section
of this manual.
Types of Trunking Systems
Trunking systems divide a few frequencies among many different users, but the way
that each system does this is slightly different. This section describes some of the
technical data behind Motorola, EDACS, and LTR trunked radio systems.
Motorola Trunking
While there are different types of Motorola trunking systems, they all use the same
basic trunking method. The system consists of one control channel (or as many as 4
per system but only one is active at any one time), plus one or more voice channels
(typically 10, 20, or 28 total channels). When a user presses Push To Talk (PTT) to
transmit, their radio first sends the person’s talk group information to the control
channel. The computer then assigns that talk group to a specific voice channel and
transmits that data over the control channel. All radios in that talk group switch over
25
Page 26

to the assigned voice channel and the user can begin speaking. This all typically
takes place in about a second...the person transmitting hears a beep from their radio
when the channel is assigned. Then it is OK to start talking.
The systems in use are:
Motorola Type I — the radios send the radio ID, the fleet and subfleet talk group ID
to the control channel each time they transmit. To program a Type I system, you
need to know the system’s . The most common fleet maps are included in
fleet map
the Reference section in this manual. You can also find fleet map resources on the
web such as at .
http://www.radioreference.com
Motorola Type II
— the radios only send the radio ID and radio channel code to the
control channel. The central computer keeps a database of radio ID’s and which talk
group is assigned to which channel code for each radio, so with this system the
user’s radio sends only about / the data as a Type I system with each transmission.
13
Type II systems do not use Fleet-subfleet talk groups; instead they use a 5-digit ID
for each talk group.
Type IIi Hybrid
— these systems support a mix of both Type I and Type II users.
Like Type I systems, you must know the system’s fleet map to ensure proper
tracking.
Motorola ASTRO 25 (APCO 25)
— these radios are similar to Type II systems, but
send only the radio ID and radio channel code to the control channel, transmitting
voice in digital form.
EDACS Trunking
EDACS trunking works in much the same way as Motorola trunking with a couple of
major differences. In an EDACS system, each frequency used by the system is
assigned a Logical Channel Number (LCN) so that less data needs to be transmitted
by the control channel. Talk groups are assigned in an Agency-Fleet-Subfleet (AFS)
hierarchy.There is one variation of EDACS called SCAT that your UBCD996T can
monitor.
Logical Channel Numbers — each frequency used by the system is assigned an
LCN. This information is programmed into each user radio. When a user presses
PTT, their radio sends their AFS information to the control channel. The computer
then assigns that talk group to a channel and sends the LCN so that all other radios
in that talk group will switch to the correct channel. To program an EDACS system in
your scanner, you will need to know both the frequencies used by the system and
the LCN for each frequency.
Agency-Fleet-Subfleet
— talk group ID’s for EDACS systems are assigned in a
way that makes it easy to see at a glance the affiliation of the user. Each radio is
assigned a 2-digit agency identifier from 00 — 15. For example, 01 might be used by
the police, 02 by the ambulance service, 03 by the fire department, and so on. Each
26
Page 27

agency is then subdivided up to 16 times to provide fleet identification, and then 8
more times to identify subfleets.
For example, the complete AFS for the Police Department West District’s dispatch
channel might be 01-062. 01 identifies the agency as the police department, 06
identifies the fleet as the West district, and 2 identifies the subfleet as the dispatch
channel. While these assignments are somewhat arbitrary and vary from system to
system, there are many resources on the web for finding the assignments for most
systems. Because of the logical hierarchy of the AFS system, your UBCD996T lets
you assign wildcard ID’s that let you, for example, use only one ID memory to
identify all units in either an agency or a fleet.
EDACS SCAT
single channel and alternate control data with analog voice traffic. While your
UBCD996T cannot track ID’s in this system, it can eliminate the control data so that
all you hear is the voice transmissions when you monitor this type of system.
— (Single Channel Autonomous Trunking) systems operate on a
LTR Trunking
LTR (Logic Trunked Radio) systems are trunking systems used primarily by
business or private communications service providers, such as taxicabs, delivery
trucks, and repair services. These systems encode all control information as digital
sub audible data that accompanies each transmission, so there is no separate
control channel. Users on an LTR system are assigned to specific talk groups, which
are identified by the radio as six digit numbers.
These numbers are in the form AHHUUU, where:
A = Area code (0 or 1)
H = Home repeater (01 through 20)
U = User ID (000 through 254)
When the scanner receives a transmission on a channel set to the LTR mode, it first
decodes the LTR data included with the transmission. In the ID search mode, the
scanner stops on the transmission and displays the talk group ID on the display. In
the ID scan mode, the scanner only stops on the transmission if the LTR data
matches a talk group ID that you have stored in the talk group ID list and have not
locked out. LTR systems are frequently programmed so that each radio has a
unique user ID.
27
Page 28
Startup Configuration
Setup/Operation
The Startup Configuration option lets you quickly and automatically lock and unlock
systems based on your desired configuration. Simply hold down a number button
while powering on the scanner or while the opening screens are displayed. Systems
assigned to that number are automatically unlocked and systems assigned to other
numbers are automatically locked. Systems that are not assigned to any startup
configuration are left unchanged.
You could use this feature to give you quick, single-press Quick Key access to your
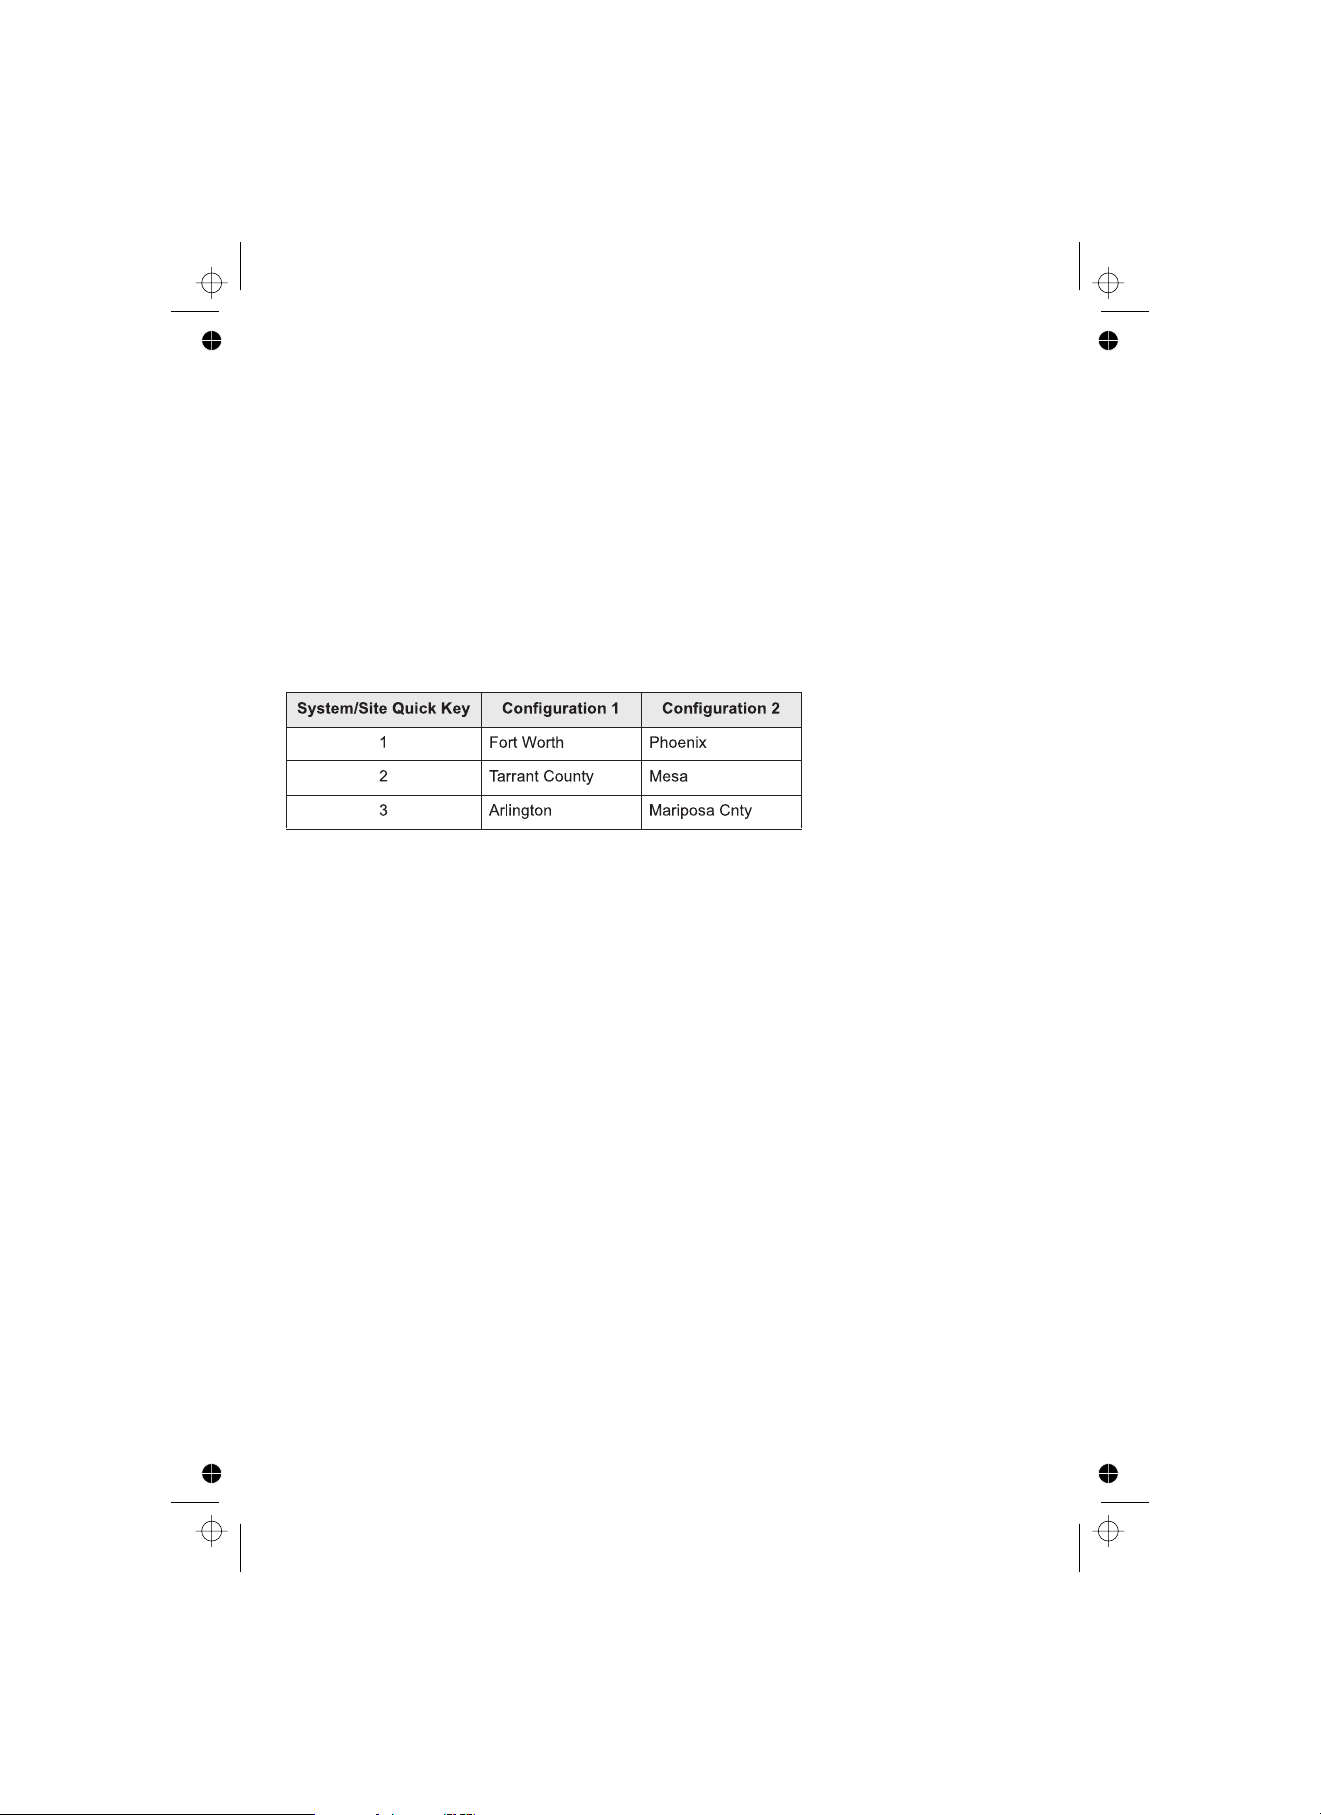
favorite systems even when you travel to other locations. For example, if you
program your scanner as follows:
When you are in the Fort Worth area, press while turning on the scanner. System
Quick Keys , , and then allow you to select between the local systems.
When you travel to the Phoenix area, hold while turning on the scanner. Now, the
Fort Worth systems are locked out and System Quick Keys , , and allow
selection between the Phoenix-area systems.
[1] [2] [3]
[1]
[2]
[1] [2] [3]
Multi-Site Trunking
Some systems covering a very large geographic area use multiple antenna sites that
each operate on different frequencies, but that use the same Talk Group ID’s for
traffic. When programming such a system, you program each site’s frequencies and
other settings into the system, then program the channels into channel groups within
that system. Each site can have its own quick key, so you can turn each individual
site on or off while you scan. Since all sites share all the channels within the system,
multi-site trunking is much more efficient than programming each site as a separate
system.
28
Page 29

I-Call (Motorola/EDACS)
I-calls are direct unit-to-unit transmissions that are not heard by other system users.
Your UBCD996T can receive I-call transmissions. See “Setting I-Call (Motorola and
EDACS Systems Only)” on Page 72 for more information about monitoring I-call
transmissions.
Where To Get More Information
By itself, this manual only provides part of what you need to know to have fun
scanning — how to program and use the scanner. Other sources provide additional
information.
Information On The Internet
The Internet is the best source for current frequencies and information about
scanning. Many web sites are dedicated to providing lists of frequencies for your
area. Many have built-in database search engines to assist you.
Make a list of the agencies you want to listen to, then look up the frequencies and
systems used by those agencies. Here are a few useful sites:
!
http://www.radioreference.com
supported radio system information.
!
For Australia visit www.uniden.com.au, select any scanner product then click on
"Scanner Frequency".
* — the Internet’s premier source for user-
!
For New Zealand visit www.uniden.co.nz, select any scanner product then click
on "Scanner Frequency".
* - This web site is not affiliated with Uniden Australia Pty Ltd or Uniden NZ Ltd.
For more information about Uniden and our products, visit www.uniden.com.au
(Australia) or www.uniden.co.nz (New Zealand).
29
Page 30
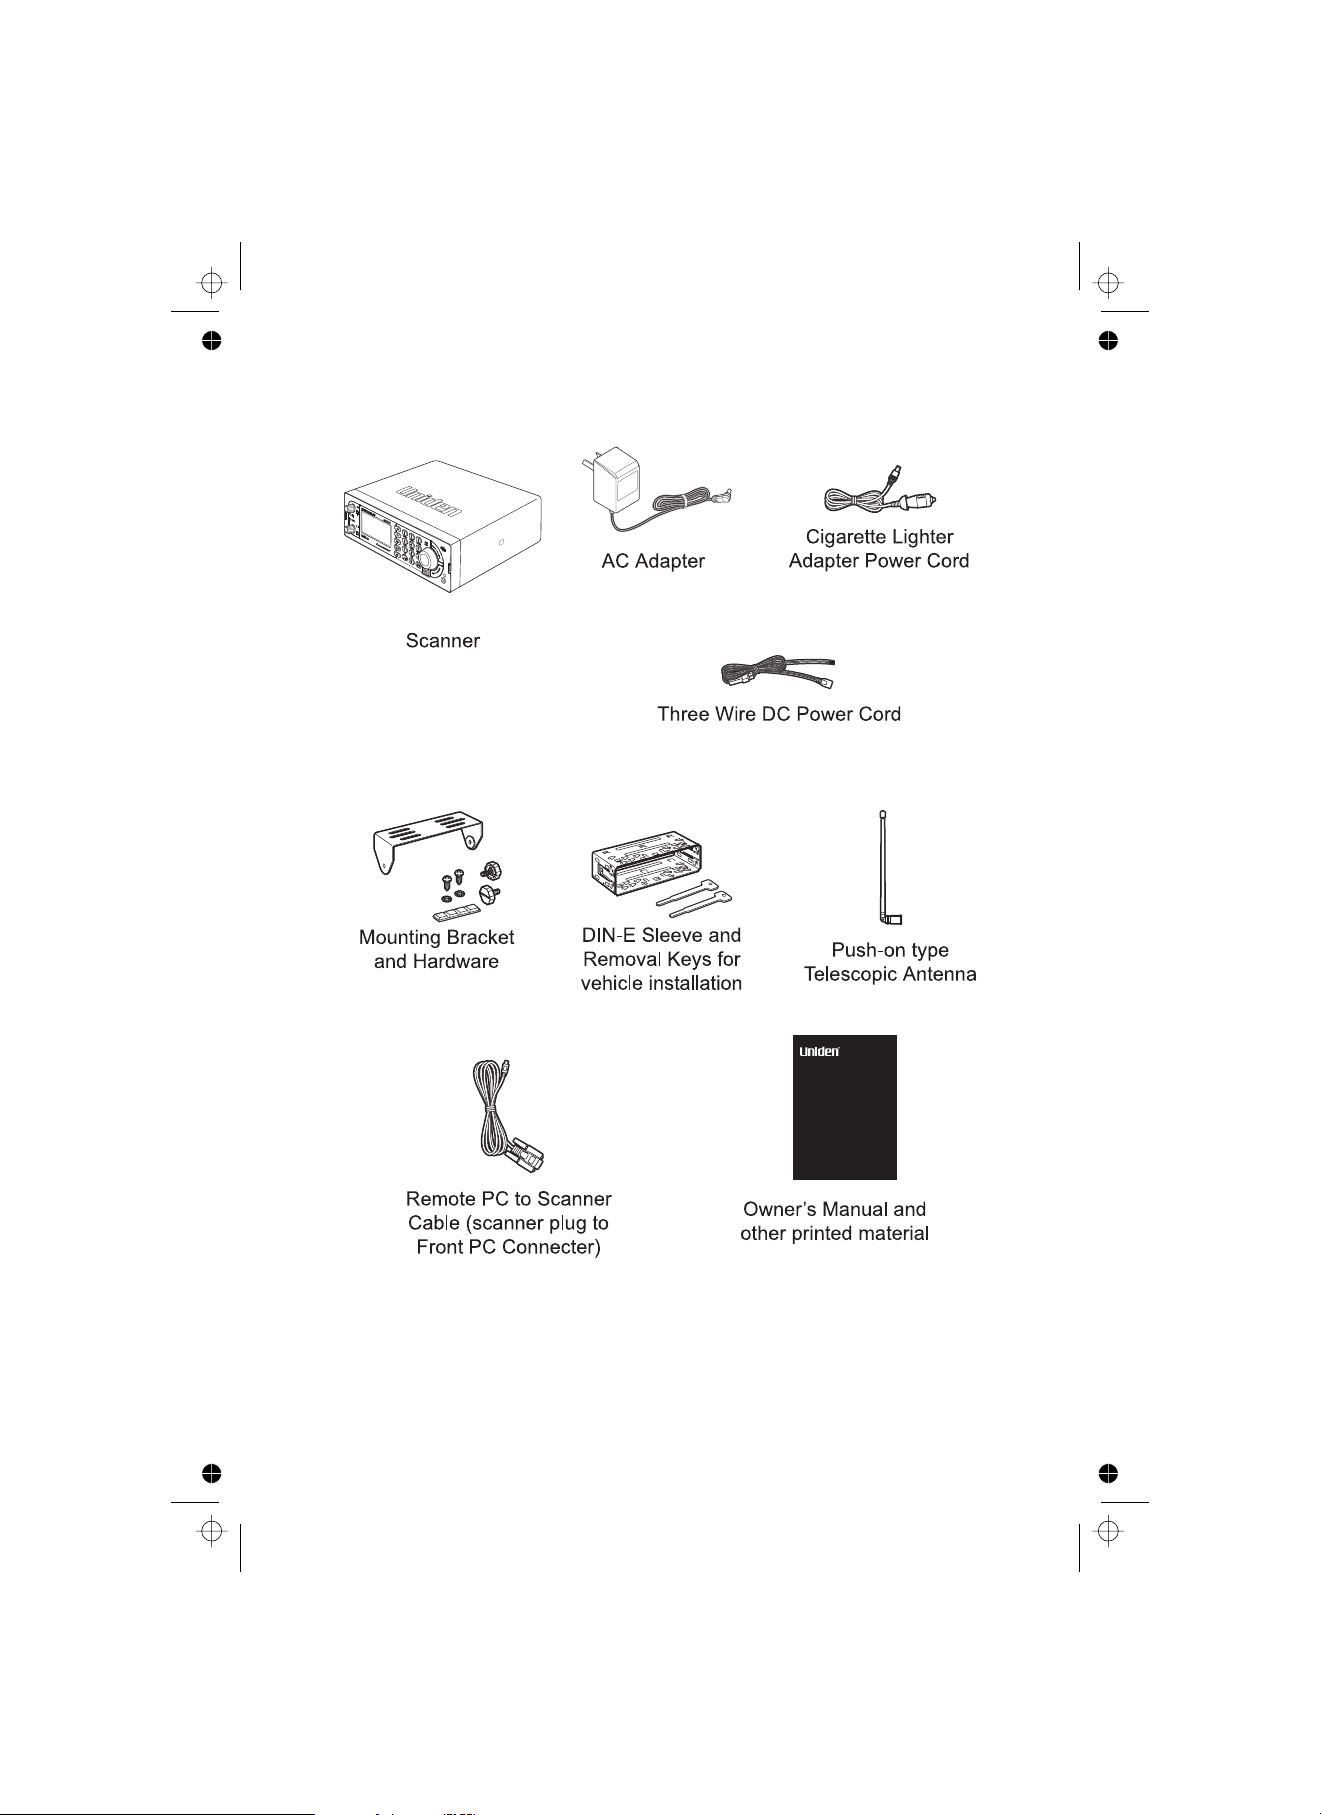
Included With Your Scanner
(P/N AAD-996S)
UBCD996T
UBCD996T
Owner'sManual
OWNER'S MANUAL
If any of these items are missing or damaged, immediately contact your place
of purchase.
30
Page 31

Setting Up Your Scanner
These guidelines will help you install and set up your new scanner:
The UBCD996T can be placed on a convenient surface in your home as a base
station, and connected to a standard outlet that supplies 240VAC, 50Hz. You must
use either the supplied antenna or an electrically correct outdoor antenna, properly
and safely mounted at your chosen site.
The scanner is also designed to accommodate the DIN-E and ISO-DIN automotive
mounting configurations. A DIN-E sleeve is supplied.
The unit can also be placed above or beneath the dash of your vehicle using the
supplied bracket and mounting hardware.
!
If your scanner receives interference or electrical noise, move the scanner or its
antenna away from the source.
!
To improve the scanner’s reception, use an optional external antenna designed
for multi-band coverage. (You can purchase this type of antenna at a local
electronics store). If the optional antenna has no cable, use 50-75 coaxial
cable for lead-in. A mating plug might be necessary for the optional antennas.
W
!
Use an optional mono earphone or mono headset with proper impedance (32 )
for private listening. Read the precautions on the inside front cover of this Owners
Manual.
!
Do not use the scanner in high-moisture environments such as the kitchen or
bathroom.
!
Avoid placing the scanner in direct sunlight or near heating elements or vents.
W
Base Station
This is the simplest approach to let you get started quickly. Decide on a location that
is convenient to a nearby wall outlet, has desk space to let you complete your
programming worksheets, will safely allow the indoor antenna to be extended, or
near a window to use an outdoor antenna.
31
Page 32

UBCD996T
MOUNTING WOOD SCREWS
To secure the radio, by means of the mounting bracket, to a surface, follow the steps
below:
1. Attach the four protective rubber feet to the mounting bracket when you casually
use the scanner on a flat surface. Should you desire to permanently mount the
scanner, remove the feet and use wood screws through the bracket as described
in Steps 2 and 3.
2. Use the bracket as a template to mark positions for the two mounting screws.
3. At the marked positions, drill holes slightly smaller than the screws.
4. Align the bracket with the threaded holes on the sides of the radio case so the
bracket is beneath the radio. Secure the bracket using the two threaded knobs.
Never overtighten the knobs.
Once the radio is positioned, connect it to a source of AC power using the supplied
13.8V, 700 mA
AC adapter. Insert the barrel of the AC adapter to the jack on the
rear, upper right side of the radio marked .
32
Page 33

WARNING!
Use only the Uniden-supplied AC adapter with this scanner.
Insert the connector of the supplied indoor telescoping antenna to the
Connector
and apply moderate pressure to secure it.
BNC Antenna
Setting Up an Audio Recording Device or Computer
Recording
It is best if you plan ahead when you initiate the basic setup of the scanner if you
include the components to record incoming reception. You need only an audio
recording device which can be control by a Voice Operated module (VOX) either
externally or from within the unit and the correct connecting cable.
REC
The jack on the rear apron provides a constant-level audio output which is not
affected by the setting of the volume control. Use a mono or stereo cable that ends
in a 3.5mm plug for the scanner. The recorder might have its own requirements as to
the proper plug Check the recorder’s instructions to be sure.
Connect the cable to an external or internal VOX control so that the recorder
activates when audio is present.
You can also connect the cable to the appropriate input jack on your PC so that with
controlling software, you can record to your hard disc.
In order for the function to operate, you must set the channel to record. You must
also set the system’s record option to either , which will record all
channels regardless of any channel’s setting, or which only lets
recording occur if you have selected record for that channel. Which you choose will
depend on various factors.
All Channel
Marked Channel
Vehicle Installation
You can mount your scanner in your vehicle, using either the supplied bracket or the
supplied DIN-E sleeve.
Mounting Using the Bracket
With the bracket removed from the radio, use the holes in the bracket as a template
to initially mark the location you plan to use in your vehicle. Be absolutely certain of
what might be behind the mounting surface before making any holes, be it above, or
below, or in front of your dash, armrest console, or other location. If you drill
carelessly, expensive damage can result. If in doubt, consult your vehicle dealer’s
service department or a qualified professional installer.
33
Page 34

Important: AVOID AIRBAG DEPLOYMENT ZONES. Ignoring this installation
concern may result in bodily harm and the inability of the airbag to perform properly.
UBCD996T
1. Using appropriate screws or other hardware, secure the bracket.
2. Insert the scanner and insert the bracket knobs to lock the scanner in position.
3. Attach the Cigarette Lighter Power Cord to the rear of the scanner and plug the
adapter end into a dash mounted 12V DC socket.
4. Attach a suitable mounted mobile antenna to the antenna jack on the back of the
scanner.
Mounting Using the DIN-E Sleeve
If you are unsure about how to install your scanner in your vehicle using the DIN-E
sleeve, consult your automobile manufacturer, dealer, or a qualified installer. Before
installing, confirm that your scanner fits in the desired mounting area and you have
all the necessary materials to complete the task. Your scanner requires a 2-1/8 x 71/5 x 5-5/16 inch (53 x 183 x 135 mm) mounting area. Allow an additional 2-3/8 inch
(60 mm) space behind the unit for connectors and wires.
34
Page 35

1. Remove the bracket if previously attached.
2. Remove the four Philips screws on the rear that secure the outer metal case and
pull off the case with care.
3. Install the DIN sleeve into the opening in your dashboard, lip facing out.
4. Push out the top and bottom tabs to hold the sleeve firmly in place.
5. Before inserting the scanner in the sleeve, attach the cable from the previously
mounted antenna. Attach the DC Power leads. RED goes to a positive (+)
connection on your fuse block while BLACK connects to the vehicles chassis
ground (-).
6. Connect the ORANGE lead to one side of the headlamp switch so that when you
activate the headlights, the scanners LCD backlight dimmer level changes color
and intensity. Be sure all the connections are routed away from any potentially
pinching or slicing sheet metal.
7. Slowly slide the scanner into the sleeve until it locks in place.
8. To remove the unit, see “ Removing the Scanner from the DIN-E Sleeve” on
Page36” .
if you plan to connect a GPS unit or external speaker at a later time, expect to
Note:
remove the unit for ease of making those connections.
35
Page 36

Removing the Scanner from the DIN-E Sleeve
If you plan to connect other devices or wires to the radio, such as a GPS unit, at a
later time, you should plan to remove the scanner from the DIN-E sleeve. This is
easily done using the provided Removal Keys. Refer to the illustration that shows
the removal key(s), on Page 30 .
Fully insert both Removal Keys straight into the slots on the left and the right edges
of the radio’s dress panel. You cannot remove the radio if only one key is available.
Press in fully and the radio will unlock from the sleeve making withdrawal from the
sleeve possible. Store the keys in a safe place for future use.
Mounting Using ISO Technique
Some vehicles can take advantage of another approach to mounting a radio in a
vehicle, called the ISO technique. However, this technique requires a very detailed
and thorough knowledge of the technique. Therefore, we strongly suggest that if you
have any doubt about your experience and abilities, please consult with a
professional installer who is familiar with the ISO approach to radio installation.
To begin the process, it is first necessary to remove the scanner's outer metal sleeve
from the inner chassis. Unthread the four screws in the rear of the unit. Slide the
cover toward the rear and off. Once the sleeve is removed, you will see threaded,
metric machine screw holes on either side of the chassis cabinet. Uniden does not
supply these screws. Their diameter, length, and screw type should be chosen by a
qualified installer based on the internal vehicle bracket which will be used in
securing the scanner chassis.
36
Page 37

Once the original radio is removed from the vehicle dash and the fit of the scanner is
correct, be sure to connect all the power, audio, antenna, and any other cables or
wires, to the scanner before the scanner is secured.
The following illustration is a typical example of the ISO technique and the general
side mounting screw holes often encountered. It does not actually represent your
vehicle or your vehicle’s mounting bracket. Only a professional installer will be able
to determine the best and correct approach.
Removing the Display Sticker
Before you use the scanner for the first time, remove the protective plastic film over
the display.
Connecting an Optional Antenna
The scanner’s BNC connector makes it easy to connect a variety of optional
antennas, including an external mobile antenna or outdoor base station antenna.
Note:
Always use 50- or 75-ohm, RG-58, or RG-8, BNC terminated coaxial cable to
connect an outdoor antenna. If the antenna is over 50 feet from the scanner, use
RG-8 low-loss dielectric coaxial cable. Cable loss increases with higher frequency.
Connecting an Earphone/Headphone
For private listening, you can plug a / -inch (3.5 mm) mini-plug earphone or
headphones (not supplied) into the headphone jack on the front of your scanner.
This automatically disconnects the internal speaker. See “Earphone Warning” at the
front of the manual for important information about using an earphone/headphone.
18
37
Page 38

WARNING!
Never connect anything other than the recommended amplified extension
speaker to the scanner’s headphone jack. Damage to the scanner might occur.
Connecting an Extension Speaker
In a noisy area, an optional amplified extension speaker, positioned in the right
place, might provide more comfortable listening. Plug the speaker cable’s / -inch
(3.5-mm) mini-plug into your scanner’s back-panel .
Ext. Sp. Jack
WARNING!
Never connect any part of the headphone jack to the antenna jack or connect the
radio to an installation where the antenna and audio connection are grounded.
This might also damage the scanner.
18
38
Page 39

Close Call
LED
Controls, Keys, and Functions
U
SRVC
Earphone
jack
Alert LED
Remote
Interface
Jack
Each of the knobs and keys on the UBCD996T produce several different actions
depending upon how you activate them. You can, for example, rotate the knobs as
well as press them to achieve a different action. Some keys provide one action when
briefly pressed while pressing and holding a key gives a different result.
Finally, many controls and keys behave differently depending on the mode your
radio is in when you use the key or control. Carefully examine the following table to
separate those actions.
“Press” means press and release briefly. “Press and hold” means press and
Note:
hold down for at least 2-seconds. “ + Press” means the
Control
to put the scanner into Function mode then press the key under discussion.
Tap or Press Scroll
39
Page 40

+ Press
40
Page 41

[SRVC]
All Opens Service Search Select menu
Press
41
Page 42

42
Page 43

SRVC
SRVC
43
Page 44

A Look At The Display
The display has indicators that show the scanner’s current operating status. The
display information helps you understand how your scanner operates.
The LCD screens shown here are only a few of many that you will see while in
different modes. The ones we show here are more common and will assist you to
get started.
1. Group Quick Key
2. Site Quick Key
3. Channel group Name
4. System Name
5. Hold indicator
6. Signal Strength indicator
7. Close Call enabled
8. Talk group ID Number
9. Talk group Frequency
10. System Type (M, C, E, L)
11. Modulation Type (Narrowband FM
shown)
12. Attenuation enabled
13. Priority ON
14. CTCSS or DCS Indicator
44
Page 45

Operation
Turning On the Scanner and Setting the Squelch
To turn the scanner on, rotate clockwise. Turn the knob to a comfortable
sound level.
[VOL]
Rotate the squelch control clockwise until you either hear a broadcast or noise
just stops. The control is now set for strong signals. If you desire to hear a weaker
signal, turn it counter clockwise from that point until you hear background noise once
more.
[SQ]
Startup Key Operation
You can setup a Startup Key Configuration so that the scanner can change the
lockout for each system or each site by pressing an assigned key while you power
up the scanner or an opening screen is displayed. Navigate to Set Startup Key there
are differences in the menu structure for Trunked and Conventional systems.
Conventional
[MENU]
Select the conventional system
Edit Sys Option
Set Startup Key
Trunked
[MENU]
Select the trunked system
Edit Site
Select the site
Set Startup Key
Program System
for each system.
Program System
for each system or site.
Search Range
[MENU]
Edit Service
Select a Service Range
Search with Scan
Set Startup Key
OR
Search for…
45
Page 46

[MENU]
Edit Custom
Select a Custom Range
Search with Scan
Set Startup Key
Assign all the systems/sites that you want to scan at the same time. You can use
one key to for each. In additional, you can assign the same startup key to the
next system or site so that system or site is unlocked at power up. To change a
Startup key back to unassigned, enter .
[0] [9]
Search for…
[.No]
Scanning Systems
To begin scanning preprogrammed or programmed systems, press
[SCAN/SEARCH]
and activated quick-key groups and any searches unlocked for search with scan.
To enable or disable systems or sites for scanning, press the site/system’s
System/Site Quick Key while scanning.
Notes:
!
If no systems are programmed, or all systems are locked out,
appears. Program a system or select a system to scan.
Scan
!
When scanning multiple systems, the UBCD996T scans systems according to
the assigned quick key. Systems assigned to quick key 1 is scanned first, then 2,
3, 4, etc. Systems not assigned to a quick key are scanned last, then unlocked
searches. Within a quick key, systems are scanned in the order they were
assigned.
. The UBCD996T scans all unlocked systems in all programmed
Nothing to
!
Within a system, channels are scanned according to the assigned channel group,
with the same priority as described above for systems.
!
The UBCD996T scans a system for the duration you set using the System Hold
Time option (see “ Setting the System Hold Time” on Page70”). For trunked
systems, the scanner moves to the next system after the hold time expires, the
current transmission ends, and the channel delay expires.
Conventional systems operate similarly, but all unlocked channels are scanned at
least one time regardless of the hold time setting.
!
Each search range is searched for the amount of time you set using the “Set
Hold Time” option. See “ Setting the System Hold Time” on Page70 for more
information.
46
Page 47

Selecting Systems to Scan
To select systems to scan, press then press the quick key assigned to the
system or systems you want to scan. For quick keys , press the quick key’s
number. For quick keys 10-99, press then press the quick key’s 2-digit number.
To stop scanning the system(s), press (if the quick key is a 2-digit quick key)
then the number button or buttons again.
The Sx: (system) indicators on the display show the systems that are currently
selected.
To select or lock out a system that is not assigned to a key, press then rotate
the Scroll Control until the desired system is selected. Then, press within 2
seconds to either lock out or unlock the system.
Scan
[0] - [9]
[.No]
[.No]
[L/O]
Selecting System Channel Groups
Within a system, you can assign groups of channels to a group quick key (see “
Setting the Group Quick Key” on Page84).
Follow these steps to activate or deactivate a channel group within a system while
scanning.
1. Press to hold on the system or tap then turn the
2. While still appears on the display, press the number key corresponding to the
[HOLD/RESUME] Scroll
Control
channel group you want to activate or deactivate.
to select the system.
47
Page 48

Locking/Unlocking Systems
Follow these steps to lock out a system so that it does not scan even if its quick key
is selected.
1. Tap the Scroll Control to switch to the Function Mode then rotate the control
to select the desired system.
2. Press to temporarily lock out the system. appears. Or,
3. To unlock temporarily locked out systems, turn power off and then back on. To
[L/O]
quickly press twice to permanently lockout the system.
appears.
unlock permanently locked out systems, repeat Steps 1 and 2.
Unlocked
[L/O]
appears.
Temporary L/O
Locked Out
System
Locking/Unlocking Channels
If the scanner has stopped on a channel press once to temporarily lock it out
or quickly press twice to permanently lock it out. Cycling power off/on
automatically unlocks temporarily locked-out channels.
To lockout a channel when the scanner has not stopped on the channel, or to unlock
a permanently locked-out channel.
1. Press to hold on a channel.
2. Tap the to switch to the Function Mode , then rotate the
control to select the system where the channel is stored.
3. Tap the or wait 2 seconds, then rotate the to
select the channel you want to lock or unlock.
[L/O]
[HOLD/RESUME]
Scroll Control
Scroll Control Scroll Control
[L/O]
4. Press to temporarily lock or unlock the current the channel. Double-tap L/O
[L/O]
to permanently lockout the current channel.
ID Scan/ID Search Mode
While you are scanning a trunked system, the scanner can be in either ID Scan or
ID Search mode:
!
ID Scan — the scanner only stops on talk group ID’s (TGID) that you have
programmed into the system that are unlocked.
48
Page 49

! ID Search — the scanner stops on any unlocked talk group that becomes active.
To toggle between ID Scan and ID Search, press then press
while the scanner is scanning the system.
If the scanner does not scan the system long enough for you to easily do this, press
and rotate the Scroll Control to select the changed system. Then, press
[SCAN/SEARCH]
within 2 seconds.
[SCAN/SEARCH]
Holding On a System
To temporarily hold on a system, tap the . To hold on a different
system, tap the then rotate the control to select the system.
Normal scanning resumes 2 seconds after your last selection.
To permanently hold on a site or system, press and hold the for 2
seconds. flashes in the display’s upper left corner. The scanner continues to scan
only the current system. To hold on a different site or system, rotate the
Control [E ]
Scroll Control
to select the new site or system then press .
Scroll Control
Scroll Control
Scroll
YES
Holding On a Channel
To hold on a channel, press while the channel is active. To select
a different channel, turn the . If you scroll past the beginning or end of
the current system, the scanner selects channels in the previous or next system. To
resume scanning, press .
[HOLD/RESUME]
Scroll Control
[SCAN/SEARCH]
Quickly Storing an ID During ID Search
To quickly store an active talk group ID during ID search, press . You see:
Quick TGID Save?
To save the ID into a channel, press [E ]
you press , the scanner stores the ID into a channel group called
Grp
in the current system.
YES
[E ]
YES
. Otherwise, press . If
YES
[E ]
[.No]
Qck Save
Quick-Storing Channels or Talk Group ID’s (TGID)
1. Hold on an existing channel in any system.
2. Enter the frequency or talk group ID you want to store (press twice to enter
hyphens in talk group ID’s).
3. To quick-store the channel or talk group ID, press .
Otherwise, press .
[.No]
49
YES
[E ]
Page 50

If you enter a frequency then press , the scanner stores it in the
group in a system called . These groups are created if
Grp Qck Save Cnv Sys
YES
[E ]
Qck Save
they do not exist. Then, the scanner prompts you to save other channel settings.
If you enter a talk group ID then press , the scanner stores it into a channel
group named in the current system. If the talk group ID’s format is
Qck Save Grp
YES
[E ]
not the type used by the current system, the scanner displays an error message and
does not save the talk group ID.
If you pressed in Step 3, the scanner prompts you to select the system and the
[.No]
group where you want to store the frequency or talk group ID.
The scanner will warn you if you try to store two channels in the same system
Note:
that have the same frequency or Talk Group ID or if you try to store two systems with
the same name.
Trunking Activity Indicators
To get a visual indication of the activity on trunking systems, press
[HOLD/RESUME] Scroll Control
press The scanner replaces the third line on the display with trunking activity
[.No]
indicators. When the scanner is monitoring on EDACS or Motorola system, the
activity indicators will show which system frequencies have activity.
for Motorola systems you must program all system frequencies (control and
Note:
voice frequencies) for this feature to work.
to hold on any channel. Then tap the and then
50
Page 51

Toggling the Display Mode
To change the display so the channel and frequency or Talk Group ID appear
instead of extended channel information, hold on any channel then press .
The scanner displays . To return to Mode 1, press
Display Mode 2
+ [0]
+ [0]
Mode1 indicates the under the Channel Name.
Mode2 indicates the under the Channel Name.
channel data
frequencies
51
Page 52

Optimizing P25 Performance
You can optimize the scanner’s performance with digital APCO 25 systems. Follow
these steps for each system where you can hear APCO 25 traffic.
Notes:
These steps work only when you can clearly receive the system. If you are in a
weak-signal area or receive interference, these steps will not work. These steps do
not compensate for weak signals or signals subject to interference.
If you set an incorrect decode threshold level in Step 5, the scanner might stop
decoding all digital signals in the system. If this happens, change the setting to a
value between 8 and 12 then repeat these steps.
Conventional System
[MENU]
Select the system
Edit Sys Option
Adjust P25 Level
Trunked System
[MENU]
Select the system
Edit Site
Select the site
Adjust P25 Level
Program System
Program System
Make sure the system’s P25 Level option is set to .
Press on an active digital channel on the system. appears
[HOLD/RESUME]
Auto
HOLD
on the display.
Press then . disappears and
[VOL]
APCO Threshold Adjust Mode
appears at the bottom of the display.
This number shows the current threshold setting.
Threshold voltage levels.
*In Manual mode or Auto mode, if you rotate the knob
clockwise, the threshold level is adjusted wider than
default level. If you rotate the knob counterclockwise,
the level is adjusted narrower.
52
Page 53

!
The next to last line on the display now shows the digital error rate and the AUTO
decode threshold start level (0-20).
The last line on the display shows the decode threshold levels for the system.
!
Allow the scanner to monitor channel activity for several minutes. The error rate
should drop for each transmission and the threshold levels should automatically
adjust to a more optimal setting. Then, once the threshold level settles to a stable
setting, write down these values. This is the system’s optimum decode threshold.
Rotate the Scroll Control to set the AUTO decode threshold start level to a setting
that most closely matches the system’s optimum decode threshold. Now, when the
scanner stops on a system, it will use this threshold as the starting point for
automatic optimization.
To exit when the settings are complete, press then press .[VOL]
53
Page 54

Using the Menu
The UBCD996T incorporates an effective menu system that lets you make all the
necessary setting options required to program the scanner and effectively use the
many features. To use the menu, press .
You immediately see the screen display the menu title at the top and three of ten
menu options beneath. Using the Multifunction Scroll Control, you can rotate the
control left or right to quickly review all ten listings.
The depth of each menu selection is extensive. For the purpose of this manual, the
following chart indicates the primary menu selection, the purpose of that selection,
and a reference to the page or pages that provide the details associated with the
option.
[MENU]
54
Page 55

Programming General Settings
This section covers your scanners general settings.
Setting and Using the Backlight
The LCD has a backlight that can be set to green or red with three levels of intensity
for each color plus .
OFF
To make your selection, press . Each time you press the control, the backlight
cycles in the following order.
OFF — Low Intensity Green — Medium Intensity Green — High Intensity Green —
Low Intensity Red — Medium Intensity Red — High Intensity Red
When you stop at the desired level, the scanner remembers your setting the next
time you turn on the scanner.
You can also set the backlight using the menu.
[VOL]
Setting the Dimmer
If you connect the orange wire to a wire in your car that changes state when you turn
on the headlights, the scanner can automatically dim the display when you turn on
the headlights. If you have not connected the orange wire, set Dimmer to Manual
and manually select the dimmer level. If you have connected the orange wire, set
Dimmer to Auto, then select “+ Polarity” if the orange wire gets 12V when you turn
on the headlights or to “- Polarity” if the orange wire is switched to chassis ground
when you turn on the headlights.
Tapping overrides the menu setting and cycles through all backlight settings.
[MENU]
[VOL]
Settings
Set Backlight
Set Dimmer
Auto
— Use this setting if you have connected the scanner to your vehicle’s
headlights using the orange wire. If you select this option, the scanner automatically
dims the backlight when you turn on the headlights. After selecting this option,
select:
+ Polarity
are on pick this setting.
— If the headlight wire is connected to +12V when the headlights
55
Page 56

- Polarity
headlights are on, pick this setting.
— If the headlight wire is connected to vehicle ground when the
Manual High Middle Low
or . To guide you in your selection, at each setting the display shows what you
can expect to see.
— Use this setting to manually set the dimmer level to , , ,
Off
Setting the Backlight Color
[MENU]
Set Backlight
Set Color
Set this option to either Red or Green.
Settings
Adjusting the Key Beep
[MENU]
Adjust Key Beep
Auto
— the scanner automatically sets the key beep to match the master volume
setting level you select.
Level 1 15
levels. As you turn the , the beep gets louder. Press when you reach
the desired level.
Off
— the scanner turns the key beep off.
Settings
- — the scanner lets you manually select one of fifteen key beep
Scroll Control
Setting the Audio AGC
[MENU]
Set Audio AGC
This setting helps balance the audio level you hear as you listen to different radio
sources so you can hear them at a similar volume. Use this setting if you listen to an
audio source that has natural changes in audio level for which you want to
compensate.
You can set the Analog or the Digital mode to be on or off.
Analog
On
— Press to select.
Off
— Press to select.
Settings
to select either on or off specifically for receiving analog channels.
56
Page 57

Digital On Off
On
— Press to select.
Off
— Press to select.
to select either or specifically for receiving digital channels.
Setting the Display Orientation
[MENU]
Set Upside-down
Settings
This setting controls the orientation of the display. If you set Upside-down to , the
scanner inverts the display text and graphics.
On
Adjusting the Display Contrast
There are 15 contrast levels. As you scroll from level 1 to 15 you see the contrast
change. Press the to lock the desired level until the time you desire
to change it.
[MENU]
Adjust Contrast
Select a level to
Scroll Control
Settings
Level 1 Level 15
Setting the GPS Format
[MENU]
Set GPS Format
These settings control how the scanner handles GPS input when you are using the
location-based functions.
Setting the Position Format
[MENU]
Set GPS Format
Set Pos Format
Settings
Settings
This setting controls the format used for entering GPS coordinates into the scanner.
DMS: DDD MM'SS.ss — Enter the location in Degree, Minute, Second format.
DEG: DDD.dddddd — Enter the location in Degree and fraction format.
°
57
Page 58

Setting the Time Format
[MENU]
Set GPS Format
Set Time Format
This setting controls the format used for displaying the time on the GPS data
screens.
— the scanner displays time in 12-hour format using am for mornings and pm
12H
for evening times.
— the scanner displays time in 24-hour format using 0 for midnight and 23 for
24H
11 pm.
Settings
Setting the Time Zone
[MENU]
Set GPS Format
Set Time Zone
This setting controls the format used for adjusting Universal time to local time. Set
your local time’s from UTC (formally known as GMT).
Settings
offset
Setting the Distance Units
[MENU]
Set GPS Format
Set Unit
Settings
This setting controls the distance units shown in the GPS data screens and used for
entering distance for POI’s
— The scanner uses miles.
mile
— The scanner uses kilometers.
km
Setting the Serial Port Speed
[MENU]
Set Serial Port
Set Baud Rate
Set Front Port Set Rear Port
Use this setting to control the data rate used for the front and back panel serial ports.
You typically set the front port to match the speed used to communicate with
Settings
or
58
Page 59

your PC (default 115000 bps) and the back port to the speed used to communicate
with an attached GPS (default 4800 bps). Note that the back port is male. You may
need a gender changer and a null modem adapter to use a typical DB9 serial cable
from the rear port.
For Serial Port Speed (Baud Rate), you may select from
4800 bps
9600 bps
19200 bps
38400 bps
57600 bps
115200 bps
OFF
Displaying Scanner Information
Viewing Memory Used
[MENU]
See Scanner Info
% Memory Used
The scanner displays the percent of memory that is used and the number and the
percent of systems, sites and channels that are created.
Press any key to return to the previous menu, then press any key to exit the menu.
Settings
Viewing the Firmware Version and Electronic Serial Number
[MENU]
See Scanner Info
Firmware Version
Press any key to return to the previous menu, then press any key.
Settings
Initializing the Scanner’s Memory
Warning: you
data that has been deleted. You can, at a last step, restore only the original factory
data.
1. To initialize the scanner’s memory, turn off the scanner.
This clears data have entered. You cannot restore user programmed
59
Page 60

2. While pressing , , and at the same time, turn on power.
At that point anything you have programmed is gone.
You are given a last opportunity to keep the factory programmed data when you see
the question:
Restore Preprogram List? Yes=”E”/”No= ”.”
If you do not say Yes, the scanner is totally empty.
[2] [9] [HOLD]
Connecting Your Scanner to a Personal Computer
You can connect your scanner, by means of the
supplied cable, to a personal computer to
download data from the computer to the memory of
the scanner. Before you proceed, you must first set
the scanner’s communications speed as described
in the previous section. In addition you will need a
copy of Uniden Advanced Scanner Director
software. You can download the software from
www.uniden.com.au
Downloads link.
in the Customer Service
Important:
message, reduce the setting and start again until you get reliable, complete transfer
of data.
Start with a high baud rate setting. If, during transfer, you get an error
Volume/Squelch with PC Control
If you use a PC to control the scanner, and you change the scanner’s volume or
squelch setting using the PC, the scanner ignores the front-panel control’s current
setting. However, if you later change the volume or squelch setting using the frontpanel control, the scanner uses the control’s setting (i.e. the scanner pays attention
to the last method used).
Wired Cloning
Using the scanner in a cloning setup lets you transfer programmed data directly from
source target
a or UBCD996T to a or UBCD996T. Wired cloning
between other models to the UBCD996T is not possible.
[MENU]
and one as the slave)
master slave
Wired Clone Master Slave
or (select one as the master
60
Page 61

To clone (transfer) data directly from one UBCD996T scanner to another UBCD996T
scanner, you must first connect the scanners to each other using the included
connection cables and a DB9 null modem adapter and for the rear port, a DB9
gender changer (neither included), available at most computer stores. Then you
must set one scanner as the source and the other as the target.
1. Select the Front Port for the Master. Select the Rear Port for the Slave or vice
versa.
2. Plug the 9-pin serial connector into the unit designated as the Rear Port.
3. Plug the smaller connector into the front port of the unit designated as Front
Port.
4. When you are ready to clone the scanner, press on the slave scanner
, then on the master scanner. The master scanner checks the
first
connection between the two scanners, then transfers its data to the slave
scanner.
5. When the transfer is complete, appears on both scanners. If the
transfer did not work, appears on the master scanner. Readjust the baud
Error
Complete
rate to a lower setting and try again.
61
Page 62

Programming Your Scanner
To get the most out of your UBCD996T you can organize frequencies into
programmed radio systems.
To edit an existing system, use the menu to navigate to the system setting you
want to change. This section assumes you are programming a new system.
Programming radio systems is completed in two major steps. Don’t skip either
step!
1. Plan the system.
2. Program the system into your scanner according to the plan you prepared in
Step 1.
General Notes
You can store up to 6000 channels in up to 500 systems.
Each trunking system can have up to 256 sites and up to 250 trunked channels
(TGID). Each conventional system can have up to 1000 channels.
Your scanner can have up to a total of 1000 sites. Each system can have up to 20
channel groups.
The following table provides you the information to successfully perform various
steps connected with programming each of the systems: Conventional, Motorola,
EDACS, and LTR. Some operations are common to all of the systems while some
are specific to a given system. Use the following table to quickly locate the step you
want or need to perform (where required), the reference page for that step, and to
which system or systems it applies.
62
Page 63

636465
Page 64

Page 65

Page 66

Programming Conventional Systems
[MENU]
New System
Conventional
Confirm? Yes=”E” / No=”.”
Program System
The scanner creates an empty conventional system with a default name of
. Note that “n” is a number that increments as you add new systems. The on
nC C
the right side of the display indicates that this is a conventional system. After
creating the system:
1. Set system-level settings that apply to conventional systems in “Programming
System Settings.”
2. Create one or more channel groups with channels as described in “Programming
Channel Groups.”
66
System
Page 67

Programming Trunked Radio Systems
[MENU]
New System
Then, select the system type:
MOT TYPE1
MOT TYPE2/P25
EDCS WIDE/NARROW
EDCS SCAT
— LTR Systems
LT
The scanner creates an empty system with a default name of Note
that “n” is a number that increments as you add new systems. The “x” on the right
side of the display is M for Motorola system, E for EDACS systems, and L for LTR
systems. After creating the system:
1. Set the system-level settings in “Programming System Settings” that apply to the
type of system you selected.
2. Set up at least one site for the system as described in “Programming Sites”
on Page76.
Program System
— Motorola Type I systems
— Motorola Type II and APCO 25 systems
— EDACS Wide and Narrow systems
— EDACS SCAT systems
System n x.
3. To scan specific channels, create one or more channel groups with channels as
described in “Programming Channel Groups.”
Programming System Settings
Editing the System Name MECL
Each system name can be up to 16 characters. Abbreviate as necessary to fit. For
Motorola and EDACS Wide/Narrow systems, the system name only appears in the
scanner menu’s Program System listings. It is not shown during scanning. For other
systems, the system name alternates with the Channel group when the scanner
stops on a channel.
The default system names include the following letter in the 16th position to indicate
the system type:
MELC
= Motorola; = EDACS; = LTR; = Conventional;
67
Page 68

Throughout the balance of this manual you will see a designation such as
on the same line as a heading. This means that the section, in this example, applies
otorola, DACS, TR, onventional and EDACS CAT systems.
MELC S
MELCS
Specifying the Correct System Type
In order for trunk tracking to work properly, you have to specify the correct system
type when you create the system. Here are some tips for selecting the correct type:
Use online resources, such as the www.radioreference.com database, to identify the
system type.
Even though a system has digital channels, it is not necessarily a P25 system. To be
P25, the system type must be described as Project 25 (there are many Motorola 800
Standard systems that have some digital channels.
These should be entered as Motorola 800 Standard and not P25).
EDACS Wide is the same as EDAC Standard.
EDACS Networked sites are EDACS Narrow
Following these steps to change the system name.
[MENU]
Select the system
Edit Name
To enter a letter, turn the until the character you want appears. To
enter a decimal point, press . To move the cursor to the left, press . To move
the cursor to the right, press .
To clear a character, press twice. To clear all characters, press 3 times.
To accept an entry, press or .
Program System
Scroll Control
[.No] [4]
[6]
[.No] [.No]
YES
[E ]
Programming System Options MELCS
Editing the System Quick Key C
[MENU]
Select a conventional system
Edit Sys Option
Set Quick Key
Program System
68
Page 69

After selecting this option, select any number from 0-99 to assign the system to a
quick key or press to assign the system to no quick key, then press .
Notes:
!
Access single-digit system/site Quick Keys by pressing the single digit on the k
keypad during scanning. Access two-digit system Quick Keys by pressing
then both digits.
!
You can assign as many systems to the same quick key as you want.
!
To be scanned, a system’s Quick Key must be activated and the system must be
unlocked.
[.No]
[.No]
Setting the Startup Key C
[MENU]
Select a conventional system
Edit Sys Option
Set Startup Key
Select a startup key from 0-9 or select “.” for no startup key.
Notes:
!
To unlock the system at startup, press and hold the selected startup key while
you apply power. If you do not press the startup key at the time you turn on
power, you can still act while the opening screens are displayed.
!
The system Quick Key is also enabled.
Program System
g
!
If you press a different key at startup, the system is locked out.
!
If you do not assign the system a startup key, the system is not affected by any
key press during startup.
Setting the System Lockout C
[MENU]
Select a conventional system
Edit Sys Option
Set Lockout
Unlocked
Temporary L/O
Cycling power will remove the lockout.
Lockout
manually unlock the system.
Program System
— The system is scanned when its quick key is enabled.
— The system is not scanned, even if its quick key is enabled.
— The system is not scanned, even if its quick key is enabled. You must
69
Page 70

Setting the System Hold Time C
[MENU]
Select a conventional system
Edit Sys Option
Set Hold Time
Set how long the scanner will remain scanning on this system before moving to the
next system (up to 255 seconds). Note that the scanner will scan all unlocked
channels at least one time, regardless of the system hold time setting.
Program System
Setting ID Scan/ID Search MEL
[MENU]
Select a system
Edit Sys Option
ID Scan/Search
Sets whether the scanner only stops on talk groups you have programmed in (ID
Scan) or whether the scanner stops on any unlocked channel (ID Search).
Program System
Setting Channel Delay Time MELCS
[MENU]
Select a system
Edit Sys Option
Set Delay Time
Program System
This setting controls how many seconds the scanner waits after a transmission ends
before resuming scanning. Enter a value from to or , then press .
Notes:
!
The default setting is 2 seconds for each system.
This setting applies to all channels within the system.
[1] [5]
Off
Setting Data Skip C
[MENU]
Select a Conventional system
Edit Sys Option
Set Data Skip
This setting controls whether the scanner automatically skips channels it identifies
as data. This includes channels with either no audio or a constant-level audio
source. If turned on, the scanner resumes scanning as soon as it detects the data
signal.
Program System
70
Page 71

Setting Location Information C
[MENU]
Select a Conventional system
Edit Sys Option
Set LocationInfo
This setting control whether the system is automatically enabled and disabled when
you connect a GPS to the scanner.
Set Latitude — Enter the system’s latitude using the format you selected in the
system settings.
Set Longitude — Enter the system’s longitude using the format you selected in the
system settings.
Set Range — Set the system’s range using the units you selected in the system
settings.
Set GPS Enable — L/O status is automatically controlled by receiving data from
GPS.
Program System
Setting the Fleet Map M (Type I Only)
[MENU]
Select a Motorola Type I system
Edit Sys Option
Edit Fleet Map
Program System
Preset
Custom
each block. Press to select.
For Motorola Type I systems, you must enter a system fleet map in order for the
scanner to properly track and display talk group ID’s. The fleet map is usually
included in the same resource that provided system frequencies and talk group ID
lists.
Note:
Internet such as or the other websites we reference.
— select from the 16 most common fleet maps
— allows you to enter a custom fleet map. Enter the size code (0 to 14) for
If you don’t know the fleet map for your Motorola Type I system, check the
www.radioreference.com
71
Page 72

Setting the Status Bit M
[MENU]
Select a Motorola Type I or II system
Edit Sys Option
Set Status Bit
Program System
Ignore
default setting is .
Yes
Note:
that fall between these ID’s indicate special status flags for the system. This setting
determines how the scanner will handle ID’s that are not multiples of 16.
Select your setting then press .
— the scanner rounds all received ID’s down to the next interval of 16. The
Ignore
— the scanner treats all received ID’s as unique ID’s.
Motorola analog systems use talk group ID’s in multiples of 16. ID numbers
Setting End Code Operation M
[MENU]
Select a Motorola Type I or II system
Edit Sys Option
Set End Code
This setting determines how the scanner handles the transmission end code sent by
most Motorola systems. Select your setting then press .
— the scanner immediately returns to the control channel when it detects the
Yes
end code.
Ignore
Program System
— the scanner does not return to the control channel until the carrier drops.
Note:
The default setting is .
Yes
Setting I-Call Operation ME
[MENU]
Select a Motorola Type I, II or EDACS Wide/Narrow system
Edit Sys Option
Set I-Call
This setting determines how your scanner treats I-calls while ID Searching.
— the scanner tracks I-calls.
On
Program System
72
Page 73

Off Off
— the scanner ignores I-calls. The default setting is .
Only
— the scanner only tracks I-calls and ignores other radio traffic on the system.
Press to select.
To set the I-Call to a wildcard receive condition, press + .
Note: [.No] [0]
Setting the Emergency Alert Option ME
MENU]
Select a Motorola Type I, II or EDACS Wide/Narrow system
Edit Sys Option
Emergency Alert
Off
— the scanner does not alert you to emergency transmissions.
Program System
Alert 1 9
transmission. The default alert is . You can choose any of 9 different beep types.
Once you choose an alert tone, next:
Auto
volume level.
Level 1 15
- — the scanner sounds an alert beep to notify you of the emergency
Off
Set Level
— the scanner automatically sets the emergency alert beep to the master
- — the scanner adjusts the volume you hear to the level you select.
Setting the EDACS ID Format E
[MENU]
Select an EDACS Wide/Narrow system
Edit Sys Option
EDCS ID Format
EDACS Talk Group ID’s are commonly provided in one of two formats: and
Decimal
displays them.
AFS Format
Decimal Format
Program System
AFS
. This setting determines how you enter EDACS ID’s and how the scanner
— the scanner uses AFS format for Talk Group ID’s
— the scanner uses decimal format for Talk Group ID’s
The scanner defaults to AFS (agency, fleet, subfleet) format - the format used
Note:
in most EDACS systems.
73
Page 74

Setting the System Record Option MELCS
[MENU]
Select a system
Edit Sys Option
Set Record
This setting controls how the scanner handles the record option for channels in the
system.
Program System
All Channel
REC
jack, regardless of the channel’s record option setting.
Marked Channel
Record option turned on to the jack.
— The scanner does not send any audio from any channel in the system to the
Off
REC
jack, even if the record option is turned on for a channel.
Note for systems
record. You must also set the system’s record option to either (which
will record all channels regardless of the channel’s record setting) or
Channel
— The scanner sends the audio for all channels in the system to the
— The scanner only sends the audio for channels that have the
REC
: In order for the function to work, you must set the channel to
All Channel
Marked
(which only records the channels you’ve set to record).
Reviewing ID Search Lockouts MEL
[MENU]
Select a trunked system
Edit Sys Option
Rvw ID:Srch L/O
The scanner displays each locked out ID for the system and gives you the option to
Unlock the ID. To unlock an ID, rotate the scroll to select the locked out ID, then
press . If no ID’s are locked out, the scanner displays “
Press Any Key.
Program System
[E ]
YES
Nothing Locked /
”
Clearing All Locked Out ID’s MEL
[MENU]
Select a trunked system
Edit Sys Option
Clr All L/O IDs
To quickly unlock all IDs in the system, answer “Y” to “Confirm? Unlock All (Y/N).”
Program System
74
Page 75

Adjust the P25 Decode Threshold C
[MENU]
Select a conventional system
Edit Sys Option
Adjust P25 Level
This setting determines some system-specific parameters for digital channels. In
most cases, setting this to provides the best performance. However, you can
also manually set the digital decode threshold. This setting affects all channels in the
current system. See “ Optimizing P25 Performance” on Page52.
— the scanner automatically adjusts the digital decode threshold to match the
Auto
transmission you are hearing when it receives a strong signal and has a high
decode rate.
Program System
Auto
Manual
the P25 level, select .
Default
return to the value that usually provides adequate performance. This is handy as
you have manually adjusted the value to a setting that prevents proper decoding.
Note:
— lets you manually adjust the digital decode threshold. To manually adjust
Manual
— sets the digital decode threshold to the default value. Use this setting to
This setting has no effect on how these systems are received.
Editing Sites MESL
Use this option to enter and edit site information for the current system. See “
Programming Sites” on Page76 for instructions for each site option. Note that you
must program at least one site for each trunked system in order for your scanner to
scan the system.
Editing Channel Groups MECL
Use this option to enter and edit channel groups and channel information. See
“Programming Channel Groups” for instructions for each channel group and channel
option. Note that you must program at least one channel group and one channel for
each conventional system in your scanner. You do not have to enter channel group
information for trunked systems, but doing so makes it easier to follow specific talk
groups.
75
Page 76

Copying Systems MECSL
Occasionally you might want to copy and rename a system to highlight one group
over another.
One system might be called City - Fire and the same system City - PD with
adjustments to data within.
This lets you quickly locate the desired set of data.
To copy a system including all settings, groups, and channels:
[MENU] Program System
Select the existing system
Copy System
New Sys Name?
Enter your new name using the and and to traverse the
display and enter characters. Press when finished.
Scroll Control [4] [6]
Deleting Systems MECSL
[MENU]
Select the existing system
Delete System
Confirm Delete?
Yes=”E” / No= ”.”
Important:
Program System
Deleted systems cannot be restored. You must re-enter them.
Programming Sites MESL
This section covers settings that apply to trunked radio site. You must program at
least one site for each trunked radio system. When you program multiple sites, all
sites share the same channel groups and channels within the system.
You can only program one site in an EDACS SCAT and LTR system.
Note:
Setting the Site Name ME
Each site name can be up to 16 characters. Abbreviate as necessary to fit. The site
name alternates with the Channel group when the scanner stops on a channel.
The default site names include the following letter in the 16th position to indicate the
system type:
76
Page 77

MS1: Motorola 800 MHz Type I Standard
MS2: Motorola 800 MHz Type II Standard
MP1: Motorola 800 MHz Type I Splinter
MP2: Motorola 800 MHz Type II Splinter
P25: APCO 25 (all bands)
M92: Motorola 900 MHz
MV2: Motorola VHF
MU2: Motorola UHF
EDW: EDACS Wide
EDN: EDACS Narrow
Follow these steps to change the system name.
[MENU]
Program System
Select a trunked system
Edit Site
Select a Site
Edit Name
To enter a letter, turn the until the character you want appears. To
enter a decimal point, press . To move the cursor to the left, press . To move
the cursor to the right, press .
To clear a character, press twice. To clear all characters, press 3 times.
To accept an entry, press or .
Scroll Control
[.No] [4]
[6]
[.No] [.No]
YES
[E ]
Setting the Site Quick Key MESL
[MENU]
Select a trunked system
Edit Site
Select a Site
Set Quick Key
After selecting this option, select any number from 0-99 to assign the system to a
quick key or press to assign the system to no quick key, then press .
Program System
[.No]
77
Page 78

Notes:
!
Access single-digit system/site Quick Keys by pressing the single digit on the
keypad during scanning. Access two-digit system Quick Keys by pressing
then both digits.
!
You can assign as many systems to the same quick key as you want.
!
To be scanned, a system’s Quick Key must be activated and the system must be
unlocked.
[.No]
Setting the Site Startup Key MESL
[MENU]
Select a trunked system
Edit Site
Select a Site
Set Startup Key
Select a startup key from 0-9 or select “.” for no startup key.
Notes:
!
To unlock the system at startup, press and hold the selected startup key while
you turn on the scanner.
!
The system Quick Key is also enabled.
Program System
If you press a different key at startup, the system is locked out.
!
If you do not assign the system a startup key, the system is not affected by any
key press during startup.
Setting Site Frequencies MESL
[MENU]
Select a trunked system
Edit Site
Select the site
Set Frequencies
New Frequency
using the number keys and key, then press . If you are entering
frequencies for an LTR or EDACS system, the scanner will also prompt you to enter
the LCN for the frequency you just entered. LCN’s (logical channel numbers) are
provided from the same source where you got the other system information.
To enter additional frequencies, press , then to select
Then repeat the above.
Program System
(or select an existing frequency) Input a site frequency
[.No]
[MENU]
78
New Frequency.
Page 79
If you select Control Channel Only mode (see “Setting Control-Channel Only
Note:
(Motorola Systems Only)” on Page 81), you only need to enter the frequency(s) that
can be assigned as the control channel. Most frequency lists usually indicate which
of the frequencies are the control channel frequencies. Otherwise, you must enter all
of the frequencies.
Setting Site Modulation ML
[MENU]
Select a trunked system
Edit Site
Select a Site
Set Modulation
Auto
FM
— the scanner uses FM (frequency modulation) for the frequency band.
NFM
— the scanner uses narrowband FM for the frequency band.
Program System
— the scanner uses the default modulation for the frequency band.
Note:
The default setting is .
This setting controls the modulation method used for the frequency band. In most
cases, if you leave this set to , the scanner automatically selects the correct
modulation type for the system you are programming.
Auto
Auto
Setting Site Attenuation MESL
Enable Attenuation if you are near strong signal sources. Attenuation can help
reduce interference and desensitization that strong signals create. You can also turn
this setting on or off by holding on a trunked system, then pressing .
[MENU]
Select a trunked system
Edit Site
Select a Site
Set Attenuator
Off
— the attenuator is off.
On
— site frequencies are attenuated by about 20 dB.
Program System
+ [7]
Setting Site Lockout MESL
[MENU]
Select a trunked system
Program System
79
Page 80

Edit Siteg
Q
Q
Select a site
Q
Set Lockout
Select from the following choices
Q
g
Unlocked
Temporary L/O
Lockout
— the system is scanned when its quick key is enabled.
— the system is locked for this session.
— the system is not scanned.
Setting Site Hold Time MESL
[MENU]
Q
Q
Q
Q
This setting controls how many seconds the scanner looks at a site before moving
to the next unlocked site or system. Using the number keypad, enter a value from
0-255, then press to save the setting.
Notes:
!
!
gg
Program System
Select a trunked system
Edit Site
Select a site
Set Hold Time
If the scanner cannot detect a control channel on an EDACS or Motorola
system, it immediately moves to the next site or system. The scanner always
scans LTR or SCAT systems for at least 1 second to check for current activity.
If you select 0 and the control channel is received, the scanner stays on the
system for a minimal time (only long enough to check current system activity).
g
g
g
g
The default setting is 2 seconds for each system.
!
The scanner moves to the next system after the hold time expires, any current
transmission ends, and the channel delay time expires.
Editing the Band Plan M (VHF and UHF only)
In order for the scanner to scan Motorola VHF and UHF sites, you must enter
parameters that allow the scanner to determine the frequencies in use by the
system. This information is normally available at the same source where the other
system information is found.
[MENU]
Select a Motolora Type II/P25 system
Q
Edit Site
Q
Program System
gg
g
g
80
Page 81

Select a VHF or UHF site
Q
Q
Edit Band Plan
You can enter up to 3 band plans. Select the plan to enter or edit, then follow the
prompts to enter the Base Frequency, Channel Step, and Channel Offset for the site.
g
g
Setting P25 Band Plans (P25 Only)
The UBCD996T includes two operation modes for P25 systems: explicit mode and
implicit mode channel assignment. Explicit mode systems include all information
needed to determine voice frequencies on the control channel. You must supply the
system’s band plan for intrinsic systems for the scanner to correctly determine voice
frequencies.
To set the band plan for a P25 system:
[MENU] Program System
Q
Q
Q
Q
Then, follow these steps:
Q
Enter the base frequency for the table entry and .
Enter the spacing for the table entry (in kHz) and .
gg
Select a Motorola Type II/P25 system
Edit Site
Select a P25 site
Edit Band Plan
the Band Plan table entry you want to edit and .
g
g
g
g
g
g
g
Repeat 1-3 for additional table entries.
Notes:
For Explicit mode systems, leave all entries blank.
!
There is no way to determine the correct entries using the scanner (other than
trial and error). You must get this information from another source. Uniden
Australia Pty Ltd and Uniden NZ Ltd does not have this information.
Setting Control-Channel Only Mode M (except for P25)
[MENU]
Q
Select a trunked system
Q
Edit Site (current)
Q
Select a non-P25 site
Q
Set C-Ch Only
Program System
gg
g
g
g
g
81
Page 82

— You only need to enter control channel frequencies.
On
— You must enter all voice and control channel frequencies.
Off
The scanner defaults to .
Note:
On
Setting Site Location Information MESL
Program System
[MENU]
Qg
Qg
Qg
Qg
This setting control whether the system is automatically enabled and disabled when
you connect a GPS to the scanner.
Set Latitude
system settings.
Set Longitude
the system settings.
Set Range
settings.
Set GPS Enable
of the site is automatically controlled.
gg
Select a trunked system
Edit Site (current)
Select a site
Set LocationInfo
— Enter the system’s latitude using the format you selected in the
— Enter the system’s longitude using the format you selected in
— Set the system’s range using the units you selected in the system
— Depending on the data received from the GPS, the L/O status
Adjust P25 Level MEL
[MENU]
Select a trunked system
Q
Edit Site (current)
Q
Select a site
Q
Adjust P25 Level
Q
This setting determines some site-specific parameters for digital channels. In most
cases, setting this to provides the best performance. However, you can also
manually set the digital decode threshold. This setting affects all channels in the
current site. See “ Optimizing P25 Performance” on Page52.
Program System
gg
g
g
g
g
Auto
82
Page 83

— the scanner automatically adjusts the digital decode threshold to match the
Auto
transmission you are hearing when it receives a strong signal and has a high
decode rate.
Manual
the P25 level, select .
Default
return to the value that usually provides adequate performance. This is handy is you
have manually adjusted the value to a setting that prevents proper decoding.
Note:
— lets you manually adjust the digital decode threshold. To manually adjust
Manual
— sets the digital decode threshold to the default value. Use this setting to
This setting has no effect on how these sites are received.
Deleting Sites ME
[MENU]
Select a trunked system
Q
Edit Site
Qg
Select a site
Qg
Delete Site
Qg
Confirm Delete?
Yes=”E” / No= ”.”
Important:
Program System
gg
g
Deleted sites cannot be restored. You must re-enter them.
Programming Channel Groups MECL
Setting Up a Channel Group MECL
[MENU]
Select a system
Q
Edit Group
Q
New Group
Q
Program System
gg
g
g
The scanner creates a group with a default name of increments by one
for each new group you create within a system.
Group n. n
Editing a Channel Group Name MECL
[MENU]
Select a system
Q
Edit Group
Q
Select a Group
Qg
Edit Name
Qg
Program System
gg
g
g
83
Page 84

Follow these steps to enter/edit the group name.
1. The current name displays with the first character of the name highlighted.
2. Rotate the to select a new first letter. Press to move one
character to the right. Repeat the action to change the character.
To move one character to the left, press .
3. Repeat Step 2 until you have entered the system name. Then press to
accept the setting.
Notes:
!
Each group name can be up to 16 characters. Abbreviate as necessary to fit.
!
The group and system (for conventional, SCAT, and LTR systems) or site (for
Motorola and EDACS systems) name alternate in the top line of the display when
the scanner stops on a channel.
!
Press twice to delete the current character.
!
Press three times to clear the entire alpha tag.
Scroll Control [6]
Scroll Control
[4]
[.No]
[.No]
Setting the Group Quick Key
To assign a Quick Key to a Group, follow these steps.
Program System
[MENU]
Q
Q
Q
Q
gg
Select a system
Edit Group
Select the Group
Set Quick Key
g
g
g
g
Select a desired quick key for this Group.
Editing Channels MECL
Once you create a channel group, store channels in that group. See “ Programming
Channels” on Page85 for specific channel options.
Locking Out Channel Groups MECL
Program System
[MENU]
Qg
Qg
Qg
Qg
gg
Select an existing system
Edit Group
Select an existing group
Set Lockout
84
Page 85

This setting determines whether the scanner will scan this group of channels. Select
your setting, then press .
Lockout
Temporary L/O
when you cycle power.
Unlocked Unlocked
— the group is not scanned.
— the group is not scanned for this session. The L/O is cancelled
— the group is scanned. The default setting is .
Deleting Channel Groups MECL
[MENU]
Q
Q
Q
Q
Confirm Delete?
Yes=”E” / No= ”.”
gg
Program System
Select a system
Edit Group
Select a channel group
Delete Group
g
g
g
g
Important:
Deleted channel groups cannot be restored. You must re-enter them.
Programming Channels MECL
Creating a Channel MECL
[MENU]
Q
Select a system
Q
Edit Group
Q
Select a channel group
Q
Edit Channel
Select an existing channel to edit or “New Channel” to create a new channel. When
you create a new channel you are prompted to enter the frequency (for conventional
systems) or Talk Group ID (for Trunked systems). Enter the information for the
channel, then press to proceed to setting additional channel options.
Editing the Channel Name (Alpha Tag) MECL
[MENU]
Q
Select a system
Q
Edit Group
Q
Select the channel group
Q
E
Program System
gg
g
g
g
g
Program System
gg
g
g
g
dit Channel
g
85
Page 86

Q Select the channel
Edit Name
Q
Follow these steps to enter/edit the channel name.
1. The current name displays with the first character of the name highlighted.
g
g
2. Rotate the to select a new first letter.
3. Press to move one character to the right.
4. Repeat the action to change the character. To move one
character to the left, press . Press twice to delete the current character.
Press three times to clear the entire alpha tag.
5. Repeat Step 2 until you have entered the desired name. Then press to accept
the setting.
Notes:
!
Each channel name can be up to 16 characters. Abbreviate as necessary to fit.
!
The channel name appears on the second line of the display when the radio
scans or stops on a channel.
If you do not enter a channel name, the scanner displays the frequency (for
conventional systems) or the talk group ID (for trunked systems) when it stops on
a channel.
Scroll Control
[6]
Scroll Control
[4] [.No]
[.No]
Editing Frequencies C
[MENU]
Q
Select a conventional system
Edit Group
Q
Q
Select a channel group
Edit Channel
Q
Q
Select the channel
Edit Frequency
Q
Program System
gg
g
g
g
g
g
g
Use the to keys to enter or modify a frequency. When you press
the first place key, the cursor automatically moves one character to the right.
You can also , clockwise or counter-clockwise to highlight any digit.
[0] [9] and [.No]
Q
Editing the Talk Group ID MEL
[MENU]
Q
Select a trunked system
Edit Group
Q
Program System
gg
g
g
86
Page 87

Qg
Select a channel group
Edit Channel
Q
Select the channel
Q
Edit TGID
Q
To edit the Talk Group ID, enter the Talk Group ID you want using the number keys.
Then press .
g
g
g
Setting the Audio Type MECL
For each channel, you can select the audio type that the channel receives.
[MENU]
Select the system
Qg
Edit Group
Q
Select the channel group
Qg
Edit Channel
Qg
Select an existing channel
Qg
Set Audio Type
Q
Select from
All
— The scanner automatically determines whether the audio is analog or digital.
Program System
gg
g
All, Digital Only, Analog Only
g
Digital Only
25 digital audio
Analog Only
audio.
If you are programming a conventional system and select Analog Only, the scanner
prompts you to select the CTCSS/DCS tone setting. See the next section.
— The scanner only remains on the channel if it is carrying APCO
— The scanner only remains on the channel if it is carrying analog
Selecting CTCSS/DCS Tones C
To program a channel with a CTCSS or DCS setting, your conventional system
audio must be set to Analog Only first.
[MENU]
Q
Select the system
Edit Group
Q
Q
Select the channel group
Edit Channel
Q
Q
Select the channel
Program System
gg
g
g
g
g
g
87
Page 88

Qg
Set Audio Type
Qg
Analog Only
At this point you can scroll to CTCSS or DCS and select the subaudible frequency in
the CTCSS range or the DCS code.
— any signal opens squelch. The default setting is .
Off Off
Search
accompanies the transmission.
CTCSS
present with the signal. The scanner then prompts you to enter or scroll to the
desired tone.
DCS
with the signal. The scanner then prompts you to enter or scroll to the desired tone.
Set Lockout
present. The scanner prompts you to select a CTCSS or DCS tone.
Note:
search has CTCSS/DCS search turned on.
— the scanner searches for and displays any CTCSS or DCS tone that
— the scanner only opens squelch if the CTCSS tone you select is also
— the scanner only opens squelch if the DCS tone you select is also present
— the scanner does not stop on the channel if the tone you select is
The scanner does not detect or decode a P25 digital signal if the channel or
Quick CTCSS/DCS Save
If you set a channel to CTCSS/DCS Search and the scanner detects a tone, when
you press [E ], the first option is
YES
Set found CTCSS/DCS?
Setting Channel Modulation Method C
[MENU]
Qg
Select the conventional system
Edit Group
Qg
Select a channel group
Qg
Edit Channel
Qg
Select the Channel
Qg
Set Modulation
Qg
Program System
gg
88
Page 89

Auto
— the scanner uses the default modulation for the channel. The default setting
Auto
is .
AM
— the scanner uses AM (amplitude modulation) for the channel.
FM
— the scanner uses FM (frequency modulation) for the channel.
NFM
— the scanner uses narrowband FM for the channel.
WFM
— the scanner uses wideband FM for the channel.
WFM
(Broadcast) the scanner uses FM Broadcast for the channel.
This setting controls the modulation method used for the channel. In most cases, if
you leave this set to , the scanner automatically selects the correct modulation
type for the channel you are programming.
—
Auto
Setting Channel Attenuation C
gg
[MENU]
Qg
Select a conventional system
Qg
Edit Group
Qg
Select a channel group
Qg
Edit Channel
Qg
Select a channel
Qg
Set Attenuator
This setting controls whether the scanner attenuates signals on this channel. Select
your setting, then press .
Program System
(existing site)
On
— the channel is attenuated by about 20 dB.
Off Off
— the channel is not attenuated. The default setting is .
You can also toggle this setting by holding on the channel and pressing then
within 2 seconds.
Setting Channel Priority C
gg
[MENU]
Qg
Select a conventional system
Qg
Edit Group
Qg
Select a channel group
Qg
Edit Channel
Qg
Select the channel
Qg
Set Priority
Program System
89
[7]
Page 90

This setting controls whether the scanner treats the channel as a priority channel
while scanning. Select or , then press .
— when you turn on the Priority feature, the channel will be scanned every 2
On
seconds.
— the channel will not be treated with priority. The default setting is .
Off Off
On Off
Setting Channel Alert MECL
[MENU]
Qg
Qg
Qg
Qg
Qg
Qg
Off
gg
Program System
Select a system
Edit Group
Select a channel group
Edit Channel
Select the channel
Set Alert
— the scanner does not alert you when the channel becomes active.
Alert 1 9
become active. You can choose any of 9 different beep types. Once you choose an
alert tone, then:
Qg g
Auto
volume level.
Level 1 15
- — the scanner sounds an alert beep to notify you that the channel has
Set Level
— the scanner automatically sets the channel alert beep to match the master
- — the scanner adjusts the volume of the beep to the level you select.
Set Record MECL
[MENU]
Qg
Select a system
Edit Group
Qg
Select a channel group
Qg
Edit Channel
Qg
Select a channel
Qg
Set Record
Qg
On
— the scanner outputs the signal.
Off
— the scanner does not output any audio.
Program System
gg
90
Page 91

Setting Lockout MESL
[MENU]
Qg
Qg
Qg
Qg
Qg
Qg
gg
Program System
Select a system
Edit Group
Edit Channel
Select a channel
Set Lockout
Select a channel group
Unlocked
Temporary L/O
Lockout
— the channel is scanned when its quick key is enabled.
— the channel is locked for this session.
— the channel is not scanned.
Copying a Channel MESL
[MENU]
Select a system
Qg
Edit Group
Qg
Select a channel group
Qg
Edit Channel
Qg
Select a channel
Qg
Copy Channel
Qg
You see .
Press to return to one level before You see as the last list
item. At this point you can paste that channel information to another group or
compatible system.
Program System
gg
Copy Channel Copied to Buffer
[MENU]
Paste Channel
Deleting a Channel MESL
[MENU]
Select a system
Qg
Edit Group
Qg
Select a channel group
Qg
Edit Channel
Qg
Select a channel
Qg
Delete Channel
Qg
You see
Select one to delete the channel or to cancel.
Program System
gg
Confirm Delete? Yes= ”E” / No= ”.”
91
Page 92

Searching and Storing
Service Search
Service Search lets you select and search the scanner’s preprogrammed search
ranges. During service search, the scanner searches starting with the lowest
frequency in the search range you select to the highest frequency in the range.
There are three ways to do this.
Press
[SRVC]
[MENU]
Qg
Select the service search range
The other approach is:
Quick Search? Yes=”E” / No=”.”
Press then to select
The following search ranges appear as you scroll
gQ g
Service Search
+ [SCAN/SEARCH]
[.No]
Search for ...
g
g
Service Search
g
Air
CB Radio
UHF CB Radio
Racing
TV Broadcast
FM Broadcast
Police
Marine
Railroad
Q
The scanner searches the service you selected, stopping on any transmission it
finds and displaying the frequency. Turn the Scroll Control to change the search
direction. An arrow appears, showing the current search direction.
To pause searching, press . To resume searching, press
[SCAN/SEARCH] [HOLD/RESUME]
. Or, press .
[HOLD/RESUME] +
92
Page 93

To lock out a frequency found while searching, press one time to temporarily
lock it out ( appears) or twice to permanently lock it out (
Out
Notes:
!
If all frequencies in the search range you selected are locked out,
appears and the scanner does not search the range.
!
If the service range you select uses channels (such as CB Radio or Marine), the
scanner displays the service channel number.
Temporary Locked
appears).
L/O
[L/O]
All Locked!
Quick Search
Quick Search lets you search from the currently-tuned frequency if you are scanning
a conventional system or sets the system to ID search if you are scanning a trunked
system.
If you are on a conventional system or channel, press to
start quick search. appears. Press
[HOLD/RESUME]
Press to start quick search or to go to the search menu.
YES
[E ] [.No]
Quick Search? Yes = ”E” / No = ”.”
to go to quick search hold.
+ [SCAN/SEARCH]
Custom Search
Custom Search lets you program and search 10 custom search ranges. You can
search any of these ranges simultaneously and select each custom search range
you set. During custom search, the scanner searches starting with the lowest
frequency in the search range you select to the highest frequency in the range.
There are two methods to begin a custom search.
Notes:
!
Search ranges are preset. These ranges can be edited. See “ Editing a Custom
Search Range” on Page94 on Page to change the range.
!
You cannot turn off all custom search ranges.
[MENU]
Qg
The other approach is:
gQ g
Custom Search ...
Search for ...
+
[SCAN/SEARCH]
Quick Search? Yes=”E” / No=”.”
Press to .
[.No] then Custom Search
g
Qg
93
Page 94

The scanner starts custom search of the custom search range you selected,
stopping on any transmission it finds and displaying the frequency. Turn the Scroll
Control to change the search direction. An arrow appears, showing the current
search direction.
To turn search ranges on or off, press and . To hold searching, press
[HOLD/RESUME] [HOLD/RESUME]
To lock out a frequency found while searching, press . There are two different
results based on the number of times you press .
Press 1 time: appears
[L/O]
Press 2 times: appears and the scanner resumes custom
[L/O]
search.
If you turn off the active custom search range, the scanner skips to the next custom
search range and continues searching.
If all frequencies in all active custom search ranges are locked out,
Note:
Locked!
appears and the scanner does not stop.
. To resume searching, press .
Temporary L/O
Locked Out
[0] [1] - [9]
[L/O]
[L/O]
All
Editing a Custom Search Range
You can edit up to 10 custom search ranges. The names of the custom search
ranges appear on the display. The default custom search range names appear as
Custom 1 Custom 2
[MENU]
Qg
Edit Custom
Qg
Custom 1, Custom 2 Custom 10.
, , and so on.
gQ g
Search for ...
to
Another approach is
+
[SCAN/SEARCH]
Quick Search? Yes=”E” / No=”.”
Press to .
At this point you can edit each of the settings that comprise a custom search.
Edit Name
Edit Srch Limit
scanner prompts you to enter the upper and lower search limits.
[.No] then Edit Custom
— lets you edit the custom search range’s name.
Qg
— lets you view and select the frequency ranges to search. The
94
Page 95

Set Delay Time
continuing to search after a transmission ends.
— lets you set the amount of time the scanner will delay before
Set Modulation
Set Attenuator
20 dB during search.
Set Data Skip
during search.
Set Step
frequencies).
Set C-Ch Only
the scanner scans the system.
Set Record
received, choosing will send an audio signal to the connected audio recording
device.
Adjust P25 Level
transmission you are hearing when it receives a strong signal and has a high
decode rate.
Search with Scan
during scanning. If unlocked, the scanner first scans all selected systems, then
searches the selected service searches for the selected hold time (0-255 seconds).
Within this menu item are the following settable options
— lets you set the custom search range’s step (the gap between
— lets you set the custom search range’s modulation type.
— lets you set whether the scanner will attenuate reception by
— lets you set whether the scanner will skip data transmissions
— lets you search for a Motorola control channel. If it finds one,
— if during your listening to the selected service, if a transmission is
On
— adjusts the digital decode threshold to match the
sets whether the scanner includes the custom search
—
Set Quick Key
Set Startup Key
unlocked and scanned at power up
Set Lockout
permanently as with any other L/O action.
Set Hold Time
before the scanner moves to the next programmed entry.
— lets you assign a Quick Key for the custom search range.
— lets you decide which custom search range should be
— lets you lock the custom search range for this session or
— sets how long (seconds) the custom search range is checked
Search With Scan
When you press the UBCD996T starts a scan of those sites,
channels, etc you have manually programmed or the Uniden preprogrammed data
for your metropolitan area that are unlocked and have their System Quick key
enabled.
[SCAN/SEARCH]
95
Page 96

In addition to this scan you can search any of the preprogrammed service or custom
search ranges.
While scanning, press . Rotate the until you reach the desired
service or custom search range. Press to unlock it. You can also assign a
System Quick Key to the search to make it easy to quickly enable/disable the search
range for search and scan. The Search with Scan Hold time determines how long
the scanner stays on a search before moving on. The default is 2 seconds. See
Page 95 to change the Search with Scan settings.
Scroll Control
[L/O]
Editing a Service Search
You can change the way service search works for each service. There are also two
methods to reach the point of editing.
Method One
[MENU]
Qg
Q
Air, CB Radio, UHF CB Radio, Racing, TV Broadcast, FM
Broadcast, Police, Marine, Railroad
gQ g
Edit Service
Select a service range:
Search for ...
g
Method Two
+
[SCAN/SEARCH]
Quick Search? Yes=”E” / No=”.”
Press to .
[.No] then Edit Service
g
Qg
At this point you can edit each of the settings that comprise each custom search
range.
The following show you how to set the various option settings associated with a
Service. For each, your starting operation is
[MENU] Search for ...
Qg
Q
gQ g
Edit Service
Select a service range:
Set Delay Time
Qg
to select a value from ,,,,,and.
1 sec 2 sec 3 sec 4 sec 5 sec Off
96
Page 97

Set Attenuator
Qg
to select to choose an attenuation for all frequencies in the range.
— the frequencies are attenuated.
On
— the frequencies are not attenuated.
Off
Set Record
Qg
to select to enable a live audio output from to an audio recording device.
— the scanner outputs the signal.
On
— the scanner does not output any audio.
Off
REC
Assigning a Search Range to a Search Key
You can assign any of the Service or Custom Searches to the six Search keys for
quick access to your favorite searches.
[MENU]
Qg
Qg
Qg
Now, to access that search, hold on any channel, then press and the number
key to corresponding to the search range.
The default settings are:
SRCH 1: Custom 1
SRCH 2: Police
SRCH 3: Railroad
SRCH 4: Marine
SRCH 5: TV Broadcast
SRCH 6: FM Broadcast
gQ g
Set Search Key
Select the key to assign
Select a search range
[1] [6]
Search for ...
Saving a Found Channel (Quick Save)
Press to save a channel’s frequency if you hold on a channel or detect a
channel, instead of using Direct Entry at another time. The alpha data is also stored.
If a GPS unit is attached, the longitude and latitude data is saved and also becomes
the name of the channel. For example, if the position is latitude and
97°05’34.18 W 3257.33-09705.34
YES
[E ]
32°57’33.60 N
longitude, the name saved is .
97
Page 98

Auto Search and Store
Your scanner’s Auto Store feature lets you search for new frequencies in custom
search ranges or within a service search range on a conventional system, or new
talk group ID’s on a trunked system.
Selecting a System
To store frequencies or talk group ID’s you find during Auto Store, you must first
select a system where the frequencies or talk group ID’s will be stored.
[MENU]
Q
Q
If no systems are programmed, appears. If you have already
stored too many systems, appears.
gQ g
Search and Store
Select the system where you want to store the frequencies or talk group IDs
Conventional Search and Store
You can store frequencies into the system you selected in “Selecting a System”
above. Otherwise, the scanner stores frequencies in a new group it creates.
Follow the steps in the preceding section but be sure to select a Conventional
System. A search option appears that lets you choose from a
to the other service search ranges previously mentioned (Public Safety, News…etc).
Turn the Scroll Control
select it. One of the search ranges appears.
Search for ...
g
g
No System Stored
Over Limit
Custom Search
until the search range you want appears, then press to
If frequencies in your selected search range are all locked out,
appears and the scanner does not store any frequencies.
When you select a search range, the scanner looks for active frequencies within that
range. The top line of the display alternates between the system name and the
search range name while appears beneath it. The second line
changes to when the scanner detects a transmission while it is
checking to see if the frequency has already been stored.
When the scanner finds an active transmission, it checks to see if the frequency has
already been stored in the system. If the frequency has already been stored, the
scanner continues to search. If the frequency has not been stored, it stores the
frequency into a group named Found Channels, then resumes searching. The
scanner creates this group if it doesn’t already exist.
Memory Check
SEARCH AND STORE
98
All Locked!
Page 99

Trunked Search and Store
You can store talk group ID’s into the system you selected in “Selecting a System”.
Otherwise, the scanner stores talk group ID’s in a new group it creates.
Trunked system search and store does not work if an EDACS SCAT system is
Note:
selected, a system with no frequency is selected, the quick key to which the system
belongs is turned off, and the group you selected to store found talk group ID’s
contains more talk group ID’s than the maximum set in Max Auto Store.
To store a trunked system, follow the beginning steps in Selecting A System above.
When you select a Trunked System and press , the scanner enters TGID Search
and Store mode.
When you select a trunked system, the scanner looks for active talk group ID’s
within that range and appears and scrolls across the
display’s lower line while the system/site name appears on the display’s upper line.
When the scanner finds an active talk group ID, it checks if the talk group ID has
already been stored in the site. If it has, the scanner continues to search. If the talk
group ID has not been stored, it stores the talk group ID into a group named
Channels
already exist.
, then resumes searching. The scanner creates this group if it does not
ID SEARCH AND STORE
Found
99
Page 100

Using the Close Call Feature
Your scanner’s Close Call™ feature lets you set the scanner so it detects, displays
the frequency of, and lets you hear a nearby strong radio transmission. You can set
the scanner so the Close Call feature works “in the background” while you are
scanning other frequencies, turn off normal scanning while the Close Call feature is
working, or turn off the Close Call feature and use the scanner normally. You can set
the scanner so it alerts you when the Close Call feature finds a frequency. You can
also set the frequency band where you want the scanner to look for transmissions.
To toggle Close Call mode, press . When the feature is on, ( ) or
CC Pri
briefly interrupted about every 2 seconds.
Notes:
!
!
!
( ) and their indicating icons appear on the display. Normal operation is
The Close Call feature works well for locating the source of strong local
transmissions such as mobile and handheld two-way radios in areas with no
other strong transmission sources. Several factors affect Close Call performance,
however. Performance is increased with higher transmit power, receive antenna
tuned to the target band, and a low background RF level. Other than the antenna,
you have no control over these factors, but they explain why performance might
vary by both location and time.
The Close Call feature cannot detect satellite dishes or any transmitter with a
frequency above or below the frequency ranges listed under the Set CC Bands:
option on Page 102.
The Close Call feature works better with some types of transmissions than
others. It might not correctly display frequency information for transmitters using
a highly directional antenna (such as an amateur radio beam antenna) or if there
are many transmitters operating at the same time in the same area.
[SQ/ ]
CC DND
Setting Close Call Options
[MENU]
Next, turn the Scroll Control to select an option.
Close Call Only
scanner does not scan frequencies or channels when this option is turned on. To
select this option, press .
CC Auto Store
Call hits into channels. If you turn this option on, the scanner starts Close
gQ g
Close Call
Q
— Lets you set the scanner only for Close Call searching. The
— Lets you select whether the scanner automatically stores Close
100
 Loading...