

Page 1

UBC340CRS
Owner’s Manual
UBC340CRS OM.indd 1 7/5/08 4:28:00 PM
Page 2

1
Before you use this scanner, please read and observe the following.
EARPHONE WARNING!
Use only a genuine Uniden earphone. An incorrect earphone may be
hazardous to your hearing. Turn down volume before connecting the
earphone and then adjust volume to suit.
Precautions
Precautions
UBC340CRS OM.indd 1 7/5/08 4:28:01 PM
Page 3

2
WARNING!
Uniden does not represent this unit to be waterproof. To reduce the risk
of fire or electrical shock, do not expose this unit to rain or moisture.
Trademarks used throughout this manual are the property of their
respective holders.
Important: If you use the supplied AC adapter to power the scanner but
have not installed batteries in the scanner, never turn the scanner off by
disconnecting the AC adapter or unplugging it from the AC outlet. This
might corrupt the scanner’s memory. Always use POWER to turn the
scanner off before disconnecting AC power.
PrecautionsPrecautions
UBC340CRS OM.indd 2 7/5/08 4:28:01 PM
Page 4

3
Unpacking Your Scanner. . . . . . . . . . . . . . . . . . . . . . . . . . . . . . . . . . . . . 5
Introduction. . . . . . . . . . . . . . . . . . . . . . . . . . . . . . . . . . . . . . . . . . . . . . . .6
Features . . . . . . . . . . . . . . . . . . . . . . . . . . . . . . . . . . . . . . . . . . . . . . . . . .7
Controls . . . . . . . . . . . . . . . . . . . . . . . . . . . . . . . . . . . . . . . . . . . . . . . . . .9
Setting Up The Scanner. . . . . . . . . . . . . . . . . . . . . . . . . . . . . . . . . . . . .13
Connecting Power . . . . . . . . . . . . . . . . . . . . . . . . . . . . . . . . . . . . . . . . .13
Connecting an Antenna . . . . . . . . . . . . . . . . . . . . . . . . . . . . . . . . . . . . .14
Using the Backlight. . . . . . . . . . . . . . . . . . . . . . . . . . . . . . . . . . . . . . . . . 15
Country mode (Australia/New Zealand). . . . . ... . . . . . . . . . . . . . . . . .15
Using the Alarm Clock. . . . . . . . . . . . . . . . . . . . . . . . . . . . . . . . . . . . . .16
Setting the Current Time . . . . . . . . . . . . . . . . . . . . . . . . . . . . . . . . . . . . 16
Setting the Alarm Clock . . . . . . . . . . . . . . . . . . . . . . . . . . . . . . . . . . . . .16
Using Snooze . . . . . . . . . . . . . . . . . . . . . . . . . . . . . . . . . . . . . . . . . . . . .17
Listening to AM/FM/TV Channels . . . . . . . . . . . . . . . . . . . . . . . . . . . . . 18
Directly Selecting a Channel . . . . . . . . . . . . . . . . . . . . . . . . . . . . . . . . . 18
Using AM/FM/TV Channel Memory . . . . . . . . . . . . . . . . . . . . . . . . . . . .19
Using the Scanner Memories . . . . . . . . . . . . . . . . . . . . . . . . . . . . . . . .20
Programming Memories . . . . . . . . . . . . . . . . . . . . . . . . . . . . . . . . . . . . .20
Selecting a Memory . . . . . . . . . . . . . . . . . . . . . . . . . . . . . . . . . . . . . . . . 21
Scanning Memory Banks . . . . . . . . . . . . . . . . . . . . . . . . . . . . . . . . . . . .22
Locking/Unlocking Memories . . . . . . . . . . . . . . . . . . . . . . . . . . . . . . . . .22
Using Priority Scan. . . . . . . . . . . . . . . . . . . . . . . . . . . . . . . . . . . . . . . . .22
Setting Channel Delay . . . . . . . . . . . . . . . . . . . . . . . . . . . . . . . . . . . . . . 23
Searching for Active Frequencies . . . . . . . . . . . . . . . . . . . . . . . . . . . . 24
Using Limit Search . . . . . . . . . . . . . . . . . . . . . . . . . . . . . . . . . . . . . . . . .24
Programming an Upper/Lower Limit . . . . . . . . . . . . . . . . . . . . . . . . . .24
Searching the Selected Range . . . . . . . . . . . . . . . . . . . . . . . . . . . . . .24
Using Service Search. . . . . . . . . . . . . . . . . . . . . . . . . . . . . . . . . . . . . . .24
Selecting a Service to Search . . . . . . . . . . . . . . . . . . . . . . . . . . . . . . .24
Saving a Found Frequency into a Scan Memory. . . . . . . . . . . . . . . . . . 25
Search Lockouts. . . . . . . . . . . . . . . . . . . . . . . . . . . . . . . . . . . . . . . . . . . 25
Care and Maintenance . . . . . . . . . . . . . . . . . . . . . . . . . . . . . . . . . . . . . .26
General Use . . . . . . . . . . . . . . . . . . . . . . . . . . . . . . . . . . . . . . . . . . . . . .26
Contents
Contents
UBC340CRS OM.indd 3 7/5/08 4:28:02 PM
Page 5

4
Location . . . . . . . . . . . . . . . . . . . . . . . . . . . . . . . . . . . . . . . . . . . . . . . . .26
Cleaning . . . . . . . . . . . . . . . . . . . . . . . . . . . . . . . . . . . . . . . . . . . . . . . . .26
Repairs . . . . . . . . . . . . . . . . . . . . . . . . . . . . . . . . . . . . . . . . . . . . . . . . . .26
Birdies. . . . . . . . . . . . . . . . . . . . . . . . . . . . . . . . . . . . . . . . . . . . . . . . . . .26
Resetting the Scanner (Clearing all Memories) . . . . . . . . . . . . . . . . . . .26
Technical Specifications . . . . . . . . . . . . . . . . . . . . . . . . . . . . . . . . . . . .27
One-Year Limited Warranty . . . . . . . . . . . . . . . . . . . . . . . . . . . . . . . . . .29
ContentsContents
UBC340CRS OM.indd 4 7/5/08 4:28:02 PM
Page 6
5
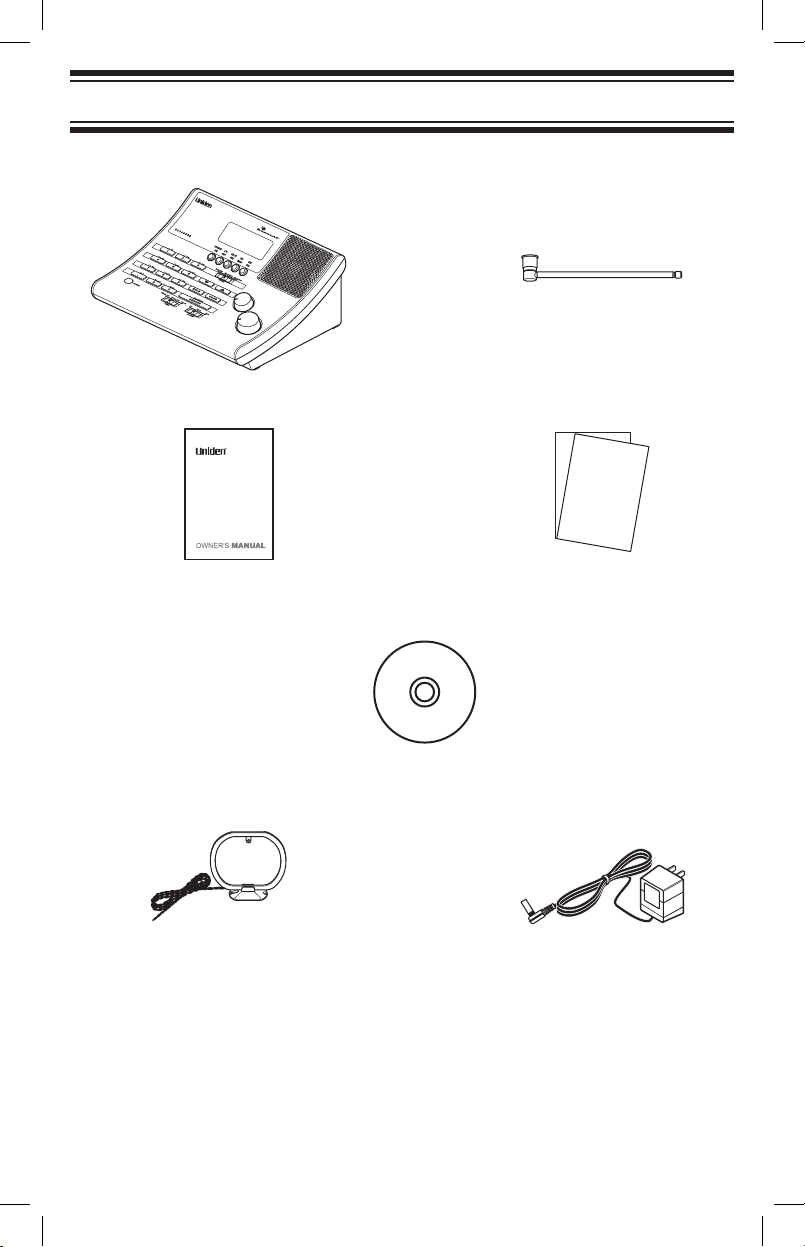
Please unpack this box carefully and make sure you have:
Unpacking Your Scanner
Unpacking Your Scanner
Band
No.
1 0.53000 1.70000 AM 10 AM Broadcast
2 25.00000 27.99500 AM 5 AM Band
3 28.00000 50.74500 FM 5
4
5 70.00000 87.98750 FM 12.5 VHF Low Band
6 88.00000 107.90000 WFM 100 FM Broadcast
7 108.00000 136.98750 AM 12.5 Aircraft Band
8 137.00000 147.99500 FM 5 2 Meter Amateur Band
9 148.00000 174.00000 FM 12.5 VHF High Band
10
11 400.00000 512.00000 FM 6.25 Land Mobile Radio
UBC340CRS Scanner
Note: If any of these items are missing or damaged, contact your place of
purchase.
This Owner’s Manual
Other Printed Material
AM Loop Antenna AC Adapter
Telescopic Antenna
UBC340CRS
Owner’s Manual
Australia Scanner
Frequencies CD
UBC340CRS OM.indd 5 7/5/08 4:28:05 PM
Page 7

6
Your UBC340CRS scanner is a multi-featured conventional channel
scanner. You can easily enter and store frequencies for police, marine,
air, amateur, and other radio services into 100 channels distributed over
ten banks. Use your scanner to monitor:
Police
Marine band
AM CB
UHF CB
Railroad
Air band
AM/FM Broadcast Stations
TV Channels (Australia 0-2, 6-10 and NZ 1-9)
Your scanner can monitor the following bands.
•
•
•
•
•
•
•
•
Introduction
IntroductionUnpacking Your Scanner
Band
No.
Lower Limit
(MHz)
Upper Limit
(MHz)
Modulation
Step
(kHz)
Service
1 0.53000 1.70000 AM 10 AM Broadcast
2 25.00000 27.99500 AM 5 AM Band
3 28.00000 50.74500 FM 5
10-6 Meter Amateur
Band
4
51.75000
WFM 7000
TV Broadcast Ch. 0 - 2
(AUS Mode)
62.75000
69.75000
5 70.00000 87.98750 FM 12.5 VHF Low Band
6 88.00000 107.90000 WFM 100 FM Broadcast
7 108.00000 136.98750 AM 12.5 Aircraft Band
8 137.00000 147.99500 FM 5 2 Meter Amateur Band
9 148.00000 174.00000 FM 12.5 VHF High Band
10
180.75000
WFM 7000
TV Broadcast Ch. 6 - 10
(AUS Mode)
187.75000
194.75000
201.75000
214.75000
11 400.00000 512.00000 FM 6.25 Land Mobile Radio
UBC340CRS OM.indd 6 7/5/08 4:28:06 PM
Page 8

7
Features
Channel Memory Scanning - Scans frequencies you have stored in any
of the channels or banks at a rate of up to 60 channels per second.
Memory Availability - Store and then scan any of up to 100 channels
distributed over 10 banks.
Direct Channel Access - Press 0 - 9 and HOLD to directly access any
stored frequency.
Channel Lockout/Frequency Lockout - Skip over stored frequencies
(channels) using the Lockout feature to enable faster scanning. Lets you
designate up to 50 frequencies to skip during a search (limit or service) to
increase the scanning speed.
Alarm Clock with Snooze - provides standard radio broadcasts that you
can set as your alarm sound.
AM/FM and TV Broadcast - lets you store up to 30 preset broadcast
channels (10 AM and 20 FM/TV) for quick access. TV Broadcast allows
tuning to the audio of CH 0-2 and 6-10 in Australian Mode and CH1-9 in
New Zealand Mode.
Air Band - separate search setting for Air band, 118MHz to
136.9875MHz.
Priority Channel - Designate a specific frequency as a Priority Channel.
Then the radio scans and checks that channel every 2 seconds. Select
and designate up to 10 frequencies as Priority Channels (one per bank).
Duplicate Channel Alert - Lets you know that a selected frequency has
already been programmed into memory if you attempt to store it again.
Limit Frequency Searching - Lets you designate lower and upper
frequency range and search within that range for active frequencies.
You can then store frequencies in memory as channels for later recall.
Service Search - Lets you designate one of the five preprogrammed
service channels (Police, Marine, Railroad, AM-CB, UHF-CB) to search.
Scan and Search Speed
Scan Speed 60 channels per second maximum in SCAN MODE.
Search Speed 60 steps per second maximum in SEARCH MODE.
TURBO MODE For frequency steps 5kHz apart, searching occurs in
Turbo Mode which is 180 steps per second.
•
•
•
Introduction
UBC340CRS OM.indd 7 7/5/08 4:28:06 PM
Page 9

8
Clock Display - the scanner, in standby mode, displays the time.
The clock also features an alarm that can sound up to 20 minutes or be
shut off manually. A convenient snooze button lets you silence the alarm
for an extra 5-minutes.
Delay - you can enable or disable the 2-second delay to resume
scanning when a transmission ends. Enabling this feature helps prevent
missing a response from one of the parties in the transmission.
LCD Backlight - you can enable or disable the LCD back lighted display.
Key Touch Tone - a tone sounds to confirm you have made a valid key
input while a different tone sounds to alert you to an invalid entry.
EEPROM Memory Backup - the scanner uses a non-volatile EEPROM
for memory backup.
Battery Alert - A battery icon alerts you to a no battery installed
condition, and a battery low voltage condition. An alert tone sounds when
the battery needs to be replaced. The backup provides backup for the
clock when power is off and will power scanning for a short time.
Auto Power Off - turns the scanner off when the battery power gets
too low.
IntroductionIntroduction
UBC340CRS OM.indd 8 7/5/08 4:28:07 PM
Page 10
9
Introduction
Air
U B C 3 40 C R S
1234567891011
12
13
14
15
16
17
18
19
2120
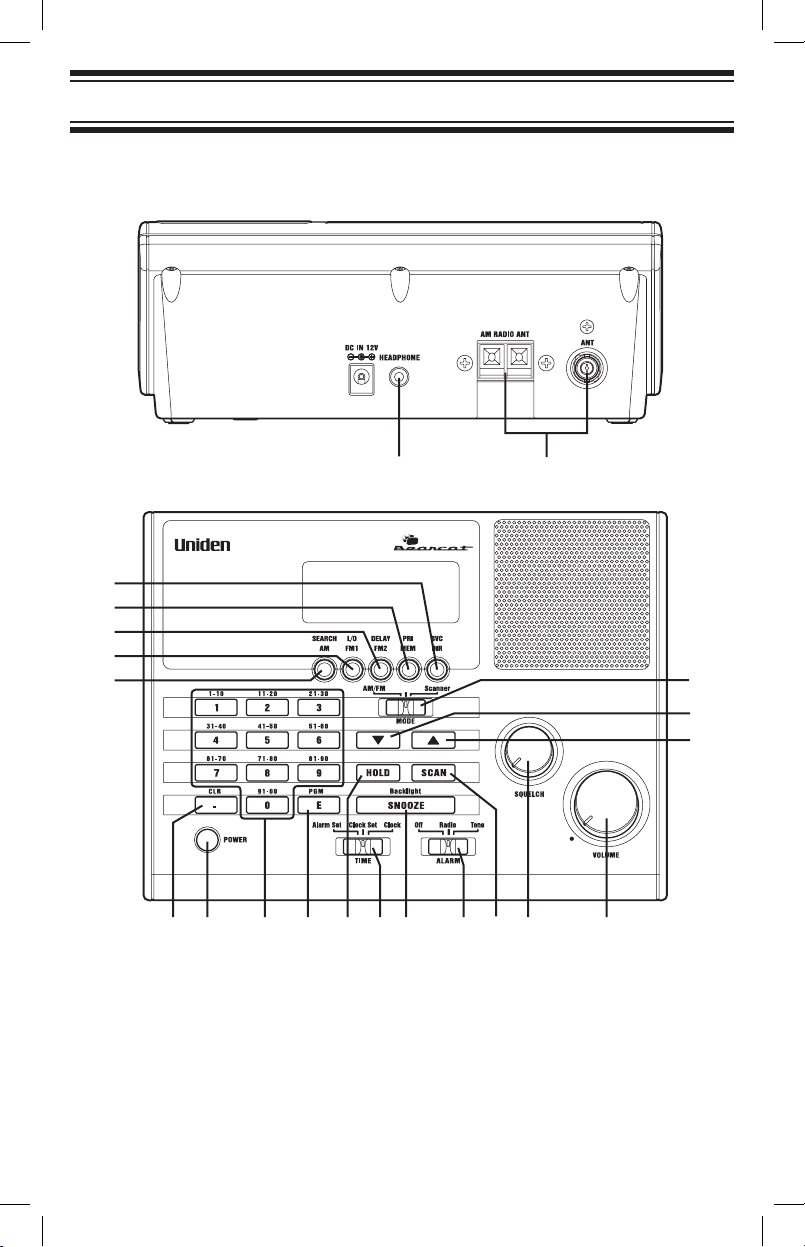
Controls
Scanner
UBC340CRS OM.indd 9 7/5/08 4:28:08 PM
Page 11

10
Introduction
1 VOLUME Control - lets you raise or lower the level of the sound.
2 SQUELCH
Control - lets you set the signal level required to receive a
transmission. If you open the squelch all the way, you will hear hissing
between transmissions. This lets you hear weak signals, but prevents
scanning. As you close squelch, a stronger signal is required to stop scanning
and open audio. You normally set the control to a point just where hissing on
all channels stops between transmissions.
3 SCAN
- press to begin scanning the channels or to resume scanning.
4 ALARM
Select - Set to Off to disable alarm; Set to Radio to enable the radio
alarm; Set to Tone to enable the tone alarm.
5 SNOOZE
/Backlight - Backlight: Tap to turn the LCD backlight on for 5
seconds. Press and hold to permanently turn on the backlight. Press and hold
again to turn off the backlight.
Snooze: Press while the alarm sounds to silence the alarm for 5 minutes.
6 TIME
Set - Use to select your desired operation: Alarm Set; Clock Set;
Clock.
7 HOLD
- press to temporarily stop scanning, limit searching, or AIR scanning
and remain on the channel. The scanner displays the channel on hold. Press
again to resume searching or scanning.
8 E/PGM
- Press to enter the Program Mode. In Program Mode, enter the
desired frequency using the numeric keys. Then press E/PGM to store that
frequency into the memory.
In
Limit Search Mode, after entering the frequency, press E/PGM to program
the upper and lower limit frequency.
9 0 to 9
- use the numeric keys in three basic operations:
• press a numeric key to enter a frequency.
• press a numeric key to change a channel using the Direct Channel Access
feature.
• press a numeric key while scanning to enable or disable the associated
scanning bank memory bands.
10 POWER
- Press and hold more than 500ms to turn power on and off. The
time displays when power is off (standby mode).
11 ./CLR
- this key has three functions:
• press to input a decimal point when you enter a frequency.
• press to cancel a numeric key input
- 0 to 9
• press to clear an error display.
UBC340CRS OM.indd 10 7/5/08 4:28:08 PM
Page 12

11
Introduction
12 SEARCH/AM - In Scanner mode press to start a Limit Search or to resume
searching. In AM/FM mode, press to select the AM memory bank.
In Service mode, press to select the POLICE service.
13 L/O FM1
- In Scanner mode, press to lock or unlock a channel memory in
SCAN (HOLD) or PROGRAM mode.
In Search mode, press to set or clear a selected frequency previously locked
out in the LIMIT SEARCH or SERVICE SEARCH (Hold) mode. In AM/FM
mode, press to select the FM1 memory bank.
In Service mode, press to select the MARINE service.
14 DELAY/FM2
- In Scanner mode, press to turn the delay option on/off. In AM/
FM mode, press to select the FM2 memory bank.
In Service mode, press to select the RAIL ROAD service.
15 PRI/MEM
- In Scanner mode, press to set a Priority channel for Scan Hold
mode and Program mode.
In Service mode, press to select AM CB service.
In Program mode, press to set the Priority channel setting. In SCAN and
SCAN HOLD, press to set Priority Scan on or off.
In AM/FM mode, press to select Memory Mode to allow quick channel recall
using the 0-9 keys.
16 SVC/DIR
- In Scanner mode press to change to Service Search mode.
In AM/FM mode, press to change to Direct Entry mode to allow channel
frequency selection using the up / down arrows or 0-9 keys.
In Service mode, press to select the UHF CB service.
17 MODE
Switch - Use to select the desired mode: AM/FM; Air; Scanner. (TIME
switch must be set to Clock)
18 t - Press and release to move down through channel numbers in the
following HOLD modes: SCAN, PROGRAM, SERVICE SEARCH, and AIR
or the step frequency in LIMIT SEARCH, and AM/FM mode. (refer to the
frequency and step table on page 6)
Press and hold for more than 1 second to have the changes run continuously.
19 s - Press and release to move up through channel numbers in the following
HOLD modes: SCAN, PROGRAM, SERVICE SEARCH, and AIR or the step
frequency in LIMIT SEARCH, and AM/FM mode. (refer to the frequency and
step table on page 6)
Press and hold for more than 1 second to have the changes run continuously.
20 HEADPHONE Jack
- lets you use an headphone for private listening.
21 Antenna Connector
- connect an external antenna using a BNC connector.
AM RADIO ANT connector - connect the supplied loop antenna and position it
for best AM Broadcast radio reception.
UBC340CRS OM.indd 11 7/5/08 4:28:09 PM
Page 13

12
Introduction
1 1 to 10 - Scan mode: indicates Channel memory Bank
AM/FM mode: indicates a radio station
2 L/O - Indicates a Locked Out channel or to skip a frequency while searching
3 SRCH - Indicates Limit Search mode, Service Search mode, and Direct
Entry mode
4 DELAY - Indicates a 2 second set delay for a channel before scanning
resumes
5 PGM - Indicates Program mode
6 Battery - Flashes when the battery power is low.
Non-flashing: no battery installed
7 ALARM - Indicates the alarm is enabled. Flashes when alarm sounds or
if Snooze is selected
8 PRI - Indicates the designated Priority channel
9 HOLD - Indicates a hold in Scan, Search, AIR, and Direct Entry mode
10 POLICE - Indicates a Police service search
11 MARINE - Indicates searching commercial and private watercraft
communications
12 AM/PM - Indicates AM/PM and appears in Clock mode
13 RAIL ROAD - Indicates searching Rail Road communications
14 AM-CB - Indicates searching AM CB band
15 UHF-CB - Indicates searching UHF CB band
Notes:
The backlight turns off automatically after 5 seconds from the last key
stroke (if not permanently turned on).
The scanner sounds special tones as follows:
• to confirm key entry.
• to indicate an error in key entry,
• to indicate low battery voltage.
1
10 11 12 13 14 15
7 9
8
2 43 5 6
LCD
UBC340CRS OM.indd 12 7/5/08 4:28:10 PM
Page 14

13
Setting Up The Scanner
Setting Up The Scanner
These guidelines will help you install and use your new scanner:
If your scanner receives interference or electrical noise, move the
scanner or its antenna away from the source. You might also try
changing the height or angle of the antennas.
Use an optional mono earphone or mono headset with proper
impedance for private listening.
Do not use the scanner in high-moisture environments such as in the
kitchen or bathroom.
Avoid placing the scanner in direct sunlight or near heating elements
or vents.
Connecting Power
Insert the supplied AC
Adapter’s barrel plug into the
power jack on the back of the
scanner. Then plug the Adapter
into a standard household outlet
that supplies 240V AC, 50Hz.
Do not plug the adapter into a
switch controlled outlet.
Open the battery compartment
and insert 3 AA batteries.
Be sure to note the polarity markings in
the battery compartment. You can use
either alkaline or rechargeable batteries,
but the scanner will not recharge
batteries in the compartment.
• Use only fresh alkaline AA batteries.
Rechargeable batteries can be used,
but battery life is shorter than with
alkaline batteries.
• Always remove old or weak batteries.
Batteries can leak chemicals that
destroy electronic circuits.
• Do not mix old and new batteries,
different types of batteries (standard,
alkaline, or rechargeable) or rechargeable batteries of different
capacities.
•
•
•
•
•
•
240
Model AAD-008S
UBC340CRS OM.indd 13 7/5/08 4:28:11 PM
Page 15

14
Setting Up The Scanner
Note that the batteries are intended to provide backup power for the clock
and for scanning for a short time. When the backup batteries becomes too
low, appears. Promptly replace the batteries.
When you either install batteries or connect the AC Adapter to a standard
Australia/New Zealand wall outlet, the scanner powers on and goes to
STANDBY mode. The display shows the initial clock time of 12:00 AM.
The scanner remains in STANDBY mode.
Connecting an
Antenna
The scanner uses an
external loop antenna to
receive AM broadcast
stations and an external
telescopic antenna to
receive all other signals.
Connect the supplied rod
antenna by pushing the
antenna’s connector onto
the antenna jack on the back of the scanner and twisting it to the desired
angle. Connect the two wires from the loop antenna to the AM RADIO
ANT terminals on the back of the scanner.
* Carefully remove the tube inserted before using the AM
Antenna Jack. When the Jack is not in use, keep the
tube mounted.
You can also use an external antenna (not supplied) to help to bring
in weaker signals. Use RG58, 50-Ohm lead with a BNC connector to
connect the antenna to the scanner. Connect and mount the antenna
according to the instructions provided with the antenna.
UBC340CRS OM.indd 14 7/5/08 4:28:13 PM
Page 16

15
CAUTION: Be sure to follow all safety warnings provided with the
antenna. Failure to do so could expose you to risk of injury or death and
could severely damage the scanner.
Using the Backlight
To turn on the backlight for 5 seconds, tap SNOOZE/Backlight. To turn
on the backlight permanently, press and hold SNOOZE/Backlight for over
2 seconds. To turn off the backlight, press and hold SNOOZE/Backlight
again.
Country Mode (Australia/New Zealand)
The UBC340CRS is set to the Australian mode by default.
Australian mode: Australian service search frequencies and TV channel
frequencies.
New Zealand mode: New Zealand service search frequencies and TV
channel frequencies.
The country mode can be switched between Australia (AUS) and New
Zealand (nL) as follows:
1. Turn on the power while pressing down the
[HOLD] key.
The display will momentarily show
AUS for Australian mode or nL for
New Zealand mode.
The country mode is remembered for the next power on.
2. To change the country mode again, repeat step 1.
Setting Up The Scanner
UBC340CRS OM.indd 15 7/5/08 4:28:13 PM
Page 17

16
Using the Alarm Clock
Using the Alarm Clock
Your scanner’s Clock displays whenever you turn off the radio functions.
It can also be used as a standard alarm clock.
Setting the Current Time
Follow the steps to set the current time:
1. Move the slide switch to
Clock Set.
The hour digits flash.
2. Press
s or t to change the hour by one
hour increments or press the number keys
to select the present hour. Then press
E/PGM to set the hour. The minutes digits
flash.
3. Press
s or t to change the minute setting by one minute or press the
appropriate number keys to enter the minutes. The seconds reset to
00. Press E/PGM, AM/PM flashes.
4. Press
s or t to select AM or PM. To make your selection, move the
slide switch to Clock. The scanner exits the clock setting mode.
Setting the Alarm Clock
Follow these steps to set the alarm time:
1. Move the slide switch to
Alarm Set.
The hours digits flash.
2. Press
s or t to change the hour by one
hour increments or press the number keys
to select the present hour. Then press
E/PGM to set the hour. The minutes digits
flash.
3. Press
s or t to change the minute setting by one minute or press the
appropriate number keys to enter the minutes. Press E/PGM to set the
minutes. The AM/PM display icon flashes.
4. Press
s or t to move from AM to PM and back. Press E/PGM to
make your selection. To lock in the alarm time, move the slide switch
to Clock.
UBC340CRS OM.indd 16 7/5/08 4:28:15 PM
Page 18

17
Using the Alarm Clock
To have the UBC340CRS alert you at the
selected time, slide Off/Radio/Tone to either
Radio or Tone. If you set the selector to
Radio, the alarm will sound with the selected
audio source (AM/FM, Scanner, or AIR). If
you set the selector to Tone, the scanner will
sound a tone at the set time. To silence the
alarm, slide Off/Radio/Tone to Off. If you
do not turn off the alarm, it will sound for 20
minutes, then reset to alert you again the
following day.
Using Snooze
When the alarm sounds, press the snooze
bar to silence the alarm for 5 minutes.
UBC340CRS OM.indd 17 7/5/08 4:28:16 PM
Page 19

18
Listening to AM/FM/TV Channels
Listening to AM/FM/TV Channels
To listen to AM/FM/TV channels, slide the
mode selector to AM/FM. Then, press the
button at the top of the scanner to select
the desired source (AM for AM Broadcast,
FM1 or FM2 for FM or TV Broadcast).
Directly Selecting a Channel
Press SVC/DIR to select the direct entry
mode. Use the s/t buttons to step through
the selected band. The scanner stops on
active channels. TV channels are scanned
after FM channels in FM mode.
You can also enter the channel frequency
using the keypad, enter the channel
frequency (for FM or AM) or the TV channel
number and press E/PGM.
UBC340CRS OM.indd 18 7/5/08 4:28:17 PM
Page 20

19
Using AM/FM/TV Channel Memory
Your scanner has 30 AM/FM memories
for quick channel recall (10 for AM, 20 for
FM/TV). To store a channel into memory,
first select the band (AM, FM1 or FM2).
Then, directly select the channel you want
to store (see above). While listening to the
channel, press and hold the number button
that corresponds to the memory you want
to save the channel into for 2 seconds. The
scanner switches to the Memory mode for the current band.
To quickly recall a channel, select the band, select the channel memory
mode by pressing PRI/MEM, then tap the number button that corresponds
to the memory where the channel is stored.
Listening to AM/FM/TV Channels
UBC340CRS OM.indd 19 7/5/08 4:28:18 PM
Page 21

20
Using the Scanner Memories
Using the Scanner Memories
Your scanner has 100 memories you can
store frequencies into for scanning. The
memories are arranged in 10 banks of 10
memories each. While scanning, you can
quickly select which bank to scan by pressing
the number button that corresponds to the
bank you want to turn on or off for scanning.
To select the scanner mode, slide the mode
switch to Scanner.
Programming Memories
You will first need to determine the frequencies you want to program.
This varies widely depending on what you want to listen to and your
geographic area. There are many frequency reference sources available
on the internet that can get you started. One such source,
http://www.radioreference.com, has a diverse listing of many conventional
frequencies.
Make a list of the frequencies you want to program, then organize them
in up to 10 groups of 10 or fewer and fill out the table below. It always
helps to plan and organize what you want to do before you start, so don’t
skip this important step. (The numbers in the left-hand columns below
correspond to your scanner’s memory numbers.)
Bank 1 Bank 2 Bank 3 Bank 4 Bank 5
1 11 21 31 41
2 12 22 32 42
3 13 23 33 43
4 14 24 34 44
5 15 25 35 45
6 16 26 36 46
7 17 27 37 47
8 18 28 38 48
9 19 29 39 49
10 20 30 40 50
UBC340CRS OM.indd 20 7/5/08 4:28:19 PM
Page 22

21
Using the Scanner Memories
Once you fill out the above chart, follow these steps to enter or change a
frequency in a memory:
1. Press
E/PGM to enter the program mode (the scanner turns on the
PGM icon).
2. If the current channel is not the one you want to program, enter the
memory number then press HOLD.
3. Enter the frequency including the decimal point, then press
E/PGM.
4. To program the next memory, press
s or t and repeat step 3. To
program a different memory, repeat from step 2.
5. To exit program mode, press
HOLD or SCAN or change the scanner’s
mode.
Notes:
• Any frequency you program replaces the previous memory contents.
• If you enter a frequency you have already stored in a different
memory in Step 3, the scanner beeps and displays the channel
where you have previously stored the frequency. If you want to store
the frequency anyway, press E/PGM a second time in Step 3.
• To clear the contents of a memory, enter “0” in Step 3.
• Channels you program are automatically unlocked (see “Locking/
Unlocking Memories) and have Delay turned on (See “Setting
Channel Delay”).
Selecting a Memory
To select a single memory to monitor, press HOLD. The scanner turns
Bank 6 Bank 7 Bank 8 Bank 9 Bank 10
51 61 71 81 91
52 62 72 82 92
53 63 73 83 93
54 64 74 84 94
55 65 75 85 95
56 66 76 86 96
57 67 77 87 97
58 68 78 88 98
59 69 79 89 99
60 70 80 90 100
UBC340CRS OM.indd 21 7/5/08 4:28:19 PM
Page 23

22
Using the Scanner Memories
on the HOLD icon. Then, select a memory by pressing s or t to go to the
memory or input the memory number then press HOLD.
Scanning Memory Banks
To scan the memories you have programmed, press SCAN. The scanner
scans all unlocked programmed memories in enabled memory banks,
stopping on a memory when it detects a transmission. To turn on/off
memory banks while scanning, press the number button that corresponds
to the memory bank you want to enable or disable.
Locking/Unlocking Memories
You can lock memories so that they are not scanned, even if their bank is
turned on. Simply press L/O when the scanner stops on a transmission on
the frequency or manually select the memory, then press L/O. The scanner
turns on the L/O icon when it is set to a memory that is locked out.
To unlock a memory, manually select the memory, then press L/O. The scanner
turns off the L/O icon and includes the memory when scanning its bank.
To unlock all memories, press and hold L/O for 2 seconds, the scanner
beeps twice and the L/O icon disappears.
Using Priority Scan
You can set one memory in each bank as a priority memory. If you turn
on the Priority feature, the scanner will check the priority memories in
enabled banks every 2 seconds, even if it has stopped on a transmission
on another memory.
To set the memory in a bank to be the priority memory, manually select
the memory then, while holding on the memory, press E/PGM to put the
scanner in program mode and press PRI. The scanner turns on the PRI
icon when it is stopped on a memory designated as priority.
To turn on Priority Scan, press PRI while the scanner is scanning or
holding on a memory (but not in program mode). You will notice a short
break in audio every 2 seconds as the scanner checks the enabled priority
memories. If there is a transmission on a priority memory, the scanner will
immediately tune to that memory.
UBC340CRS OM.indd 22 7/5/08 4:28:19 PM
Page 24

23
Setting Channel Delay
You can set the scanner to pause for 2 seconds at the end of a
transmission on a memory. This is useful to help prevent missed replies.
Delay is turned on by default when you program a memory. To turn Delay
off (or back on), first, select the channel. Then, press DELAY.
The scanner turns on the DELAY icon for memories that have been
programmed with delay.
Using the Scanner Memories
UBC340CRS OM.indd 23 7/5/08 4:28:20 PM
Page 25

24
Searching for Active Frequencies
Searching for Active Frequencies
Many people enjoy searching for the unknown frequencies that are in
use in their area but are not posted to any site or in any publication. The
UBC340CRS has two ways to search: Limit searching that searches
between two set frequencies and Service Searching that searches for
specific types of services.
Using Limit Search
Programming an Upper/Lower Limit
Follow these steps to program an Upper and Lower limit for the limit
search:
1. Press
SEARCH then HOLD. The scanner holds on the current search
frequency.
2. Enter one of the range limits, then press
E/PGM.
Press
s or t then enter the other range limit , and press E/PGM.
Searching the Selected Range
After entering the limits (or use the default limits), press SEARCH. The
scanner starts searching from the lower range up to the higher range.
To change the direction of the search, press s or t.
Using Service Search
You can select any of Police, Marine, Rail Road, AM-CB and UHF-CB
channels for active frequencies in your area.
Selecting a Service to Search
Press SVC to enter the service search mode, then press the button
corresponding to the service you want to search. When the scanner
stops on a transmission, you can force it to resume searching by pressing
s or t.
UBC340CRS OM.indd 24 7/5/08 4:28:20 PM
Page 26

25
Searching for Active Frequencies
Saving a Found Frequency into a Scan Memory
When the scanner stops on the frequency you want to save, press HOLD
to hold on that frequency. Then, press E/PGM. The scanner displays
the lowest-numbered empty memory (or the last-scanned memory if
all memories are used). Use s/t to select the memory to hold the
frequency, then press E/PGM to store the frequency into the memory.
Search Lockouts
If the scanner stops on a frequency that you don’t want to hear, you can
lock it out. When locked out, the scanner won’t stop on the frequency in
either Limit Search or Service Search.
Simply press L/O when the scanner stops on the frequency to lock the
frequency out. To unlock the frequency, during search press HOLD.
Then manually step to the frequency using the s/t keys. When you
have selected the frequency, press L/O.
UBC340CRS OM.indd 25 7/5/08 4:28:20 PM
Page 27

26
Care and Maintenance
Care and Maintenance
General Use
Turn the scanner off before disconnecting the power.
If memory is lost, simply reprogram each channel.
Always press each button firmly until you hear the entry tone for that
key entry.
Location
Do not use the scanner in high-moisture environments such as the
kitchen or bathroom.
Avoid placing the unit in direct sunlight or near heating elements or
vents.
If the scanner receives strong interference or electrical noise, move it
or its antenna away from the source of the noise. If possible, a higher
elevation might provide better reception.
Also try changing the height or angle of the antenna.
Cleaning
Disconnect the power to the unit before cleaning.
Clean the outside of the scanner with a mild detergent.
To prevent scratches, do not use abrasive cleaners or solvents. Be
careful not to rub the LCD window.
Do not use excessive amounts of water.
Repairs
Do not attempt any repair. The scanner contains no user serviceable
parts. Contact the Uniden Customer Service Center or take it to a
qualified repair technician.
Birdies
All radios can receive “birdies” (undesired signals). If your scanner stops
during Scan mode and no sound is heard, it might be receiving a birdie.
Birdies are internally generated signals inherent in the electronics of the
scanner. Press L/O to lock out the channel.
Resetting the Scanner (Clearing all Memories)
To reset the scanner to factory defaults, turn off the scanner. Then, while
holding down 2, 9, and HOLD, turn on the scanner. All scanner memory
contents are erased.
•
•
•
•
•
•
•
•
•
•
•
UBC340CRS OM.indd 26 7/5/08 4:28:21 PM
Page 28

27
Technical Specifications
Technical Specifications
Band Coverage : 11 Bands
Frequency Range :
Range (MHz) Step Mode
0.5300 to 1.7000 10 KHz AM AM Broadcast
25.0000 to 27.9950 5 kHz AM AM Band
28.0000 to 50.7450 5kHz FM 10-6 Meter Amateur Band
50.7500, 51.7500, 60.7500, 7 MHz WFM TV Broadcast Pickup
62.7500, 67.7500, 69.7500 0-2 (AUS), 1-3 (NZ)
70.0000 to 87.9875 12.5 kHz FM VHF Low Band
88.0000 to 107.9000 100 kHz WFM FM Broadcast
108.0000 to 136.9875 12.5 kHz AM Aircraft Band
137.0000 to 147.9950 5kHz FM 2 Meter Amateur Band
148.0000 to 174.0000 12.5 kHz FM VHF High Band (AUS)
148.0000 to 174.0000 6.25 kHz FM VHF High Band (NZ)
180.7500, 187.7500, 194.7500, 7 MHz WFM TV Broadcast Pickup
201.7500, 208.7500, 6-10 (AUS), 4-9 (NZ)
214.7500, 215.7500
400.0000 to 512.0000 6.25 kHz FM Land Mobile Radio
UBC340CRS OM.indd 27 7/5/08 4:28:21 PM
Page 29

28
Technical Specifications
Sensitivity (nominal) 12dB SINAD : 0.5 mV 0.53-1.70 MHz
0.4
mV 25-27.995 MHz
0.3
mV 28-40.84MHz
1.0
mV 51.75-107.9MHz
0.4
mV 108-136.9875 MHz
0.3
mV 137-174 MHz
1.0
mV 179.75-215.75 MHz
0.4
mV 400-512 MHz
Channels : 100 (10 channels x 10 Banks)
Scan Rate : Up to 60 channels per second
Search Rate : Up to 100 steps per second
Time Accuracy : +/
- 20 seconds per month at normal
temperature (25
°C ± 5°C)
Audio Output(normal) : 0.9W Max
Power Requirements : 240V AC (±10%) 50Hz
Antenna : Telescoping (included), AM Radio Loop
Antenna (included)
External Jacks : Antenna jack
AM Radio Antenna Jack
Headphone Jack
DC 12V Power Jack
Accessories : AC Adapter (AAD-008S)
Speaker : 8 ohm, 2 watt
Operating Temp :
-10°C to +50°C
Storage Temp :
-20°C to +60°C
Size : 209(W) x 147.75(D) x 80.7(H) mm
Weight : 600g (without AC Adapter and Batteries)
Features, specification, and availability of optional accessories are all
subject to change without notice.
UBC340CRS OM.indd 28 7/5/08 4:28:21 PM
Page 30

29
One-Year Limited Warranty
One-Year Limited Warranty
Important: Evidence of original purchase is required for warranty
service.
UNIDEN UBC340CRS Scanning Receiver
Warrantor: Uniden Australia Pty Limited A.B.N. 58 001 865 498
Uniden New Zealand Limited
Warranty only available in original country of purchase.
ELEMENT OF WARRANTY:
Uniden warrants to the original retail owner for the duration of this
warranty, its UBC340CRS (herein after referred to as the Product), to be
free from defects in materials and craftsmanship with only the limitations
or exclusions set out below.
WARRANTY DURATION:
This warranty to the original retail owner only, shall terminate and be of
no further effect ONE (1) year after the date of original retail sale. This
warranty will be deemed invalid if the Product is;
(A) Damaged or not maintained as reasonable and necessary,
(B) Modied, altered or used as part of any conversion kits,
subassemblies, or any congurations not sold by Uniden,
(C) Improperly installed,
(D) Repaired by someone other than an authorized Uniden Repair Agent
for a defect or malfunction covered by this warranty,
(E) Used in conjunction with any equipment or parts or as part of a system
not manufactured by Uniden, or
(F) Where the Serial Number label of the product has been removed or
damaged beyond recognition.
Warranty only valid in the country of original retail/sale.
PARTS COVERED:
This warranty covers for one (1) year, the Product and included
accessories.
STATEMENT OF REMEDY:
In the event that the Product does not conform to this warranty at any time
while this warranty is in effect, the warrantor at its discretion, will repair the
defect or replace the Product and return it to you without charge for parts
or service. This warranty does not provide for reimbursement or payment
of incidental or consequential damages.
UBC340CRS OM.indd 29 7/5/08 4:28:21 PM
Page 31

30
One-Year Limited Warranty
This EXPRESS WARRANTY is in addition to and does not in any
way affect your rights under the TRADE PRACTICES ACT 1974 (Cth)
(Australia) or the CONSUMER GUARANTEES ACT (New Zealand).
PROCEDURE FOR OBTAINING PERFORMANCE OR WARRANTY:
In the event that the Product does not conform to this warranty, the
Product should be shipped or delivered, freight pre-paid, with evidence of
original purchase (e.g. a copy of the sales docket), to the warrantor at:
UNIDEN AUSTRALIA PTY LIMITED
SERVICE DIVISION
345 Princes Highway,
Rockdale NSW 2216
Fx (02) 9599 3278
www.uniden.com.au
UNIDEN NEW ZEALAND LIMITED
SERVICE DIVISION
150 Harris Road,
East Tamaki, Auckland
Fx (09) 274 4253
www.uniden.co.nz
Customers in other States should ship or deliver the Product freight prepaid to their nearest Uniden Authorised Repair Centre (Contact Uniden
for the nearest Warranty Agent to you)
UBC340CRS OM.indd 30 7/5/08 4:28:22 PM
Page 32

© 2008 Uniden Australia Pty Limited/Uniden New Zealand Limited
Printed in China UBZZ01337AZ
UBC340CRS OM.indd 31 7/5/08 4:28:22 PM
 Loading...