

Page 1

UBC30XLT
SCANNER
200 Channels
Air band Receiver
with FM Radio
Page 2
UB333 Paper OM reduced size.fm Page 2 Friday, June 3, 2005 1:43 PM
Precautions
Before you use this scanner, please read and
observe the following.
EARPHONE WARNING!
Use only a genuine Uniden earphone. An incorrect
earphone may be hazardous to your hearing.
Turn down volume before connecting the earphone
and then adjust volume to suit.
WARNING!
Uniden does not represent this unit to be
waterproof. To reduce the risk of fire or electrical
shock, do not expose this unit to rain or moisture.
Trademarks used throughout this manual are the
property of their respective holders.
Precautions
2
Page 3
UB333 Paper OM reduced size.fm Page 3 Friday, June 3, 2005 1:43 PM
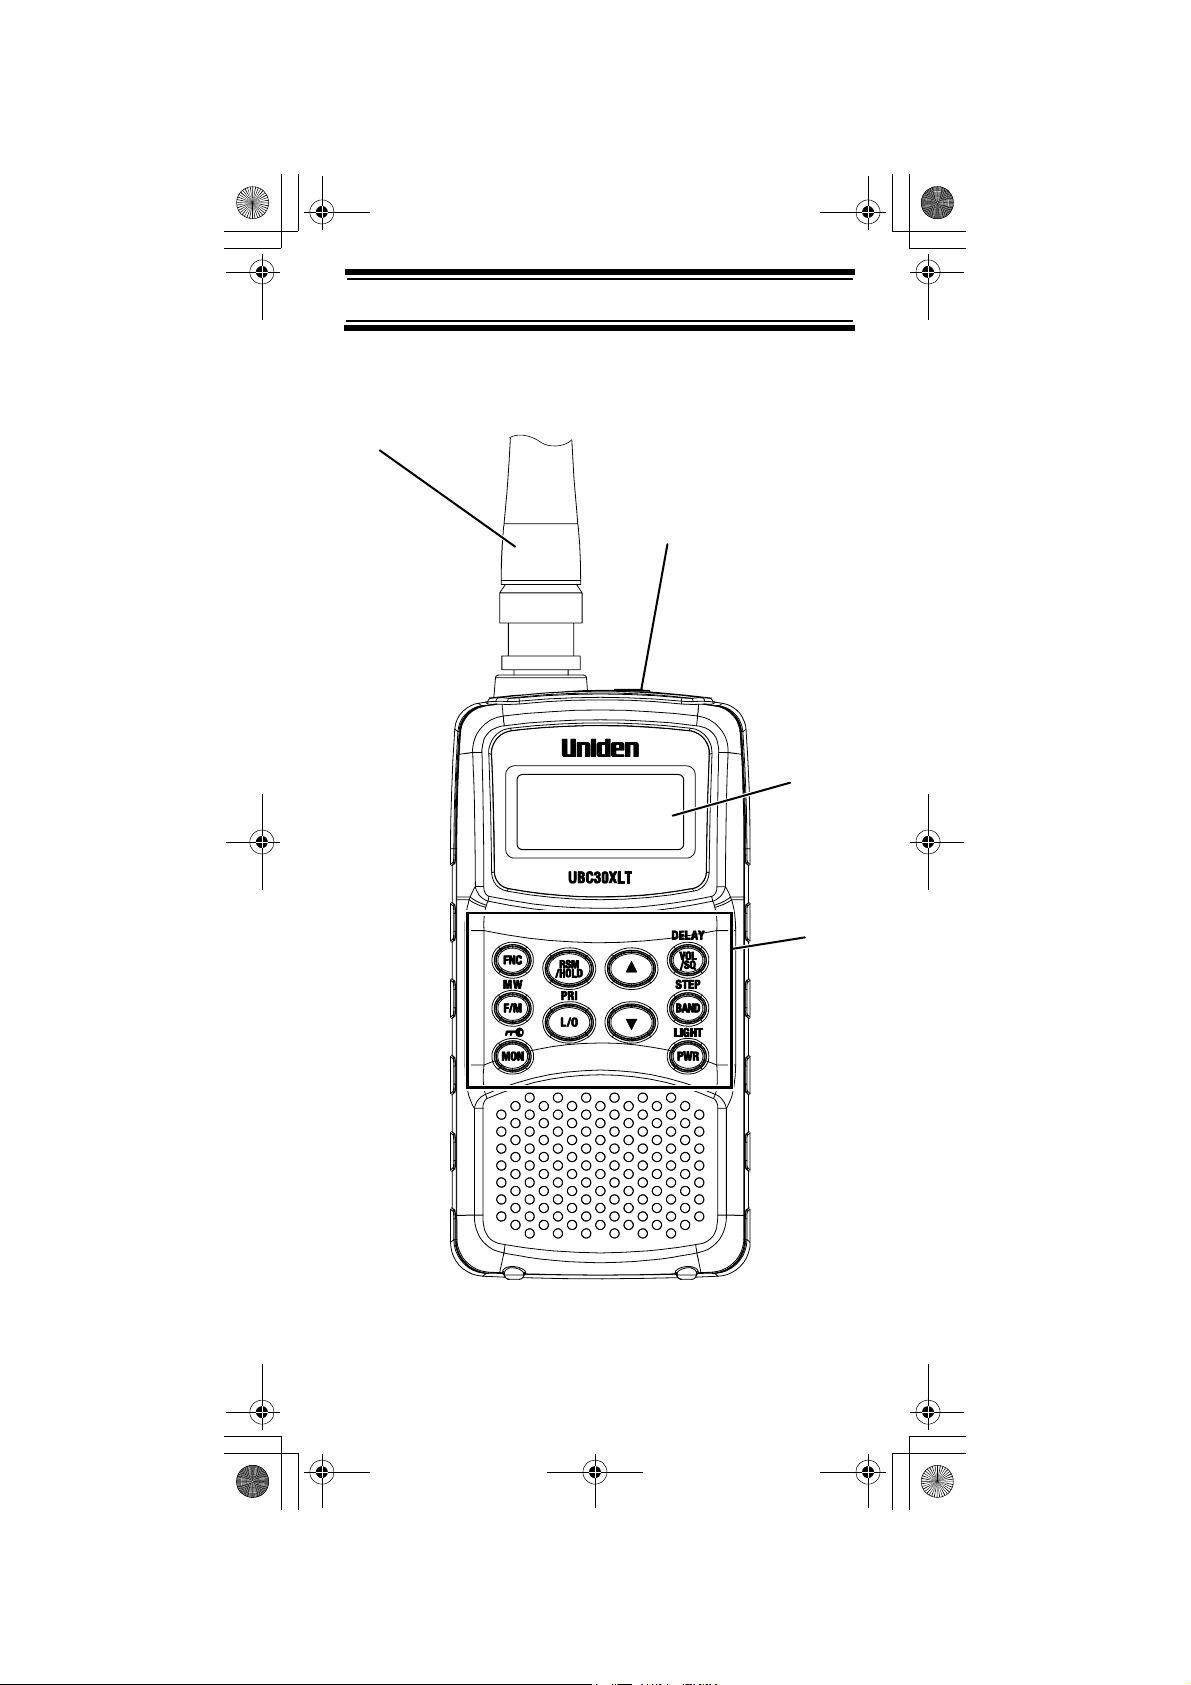
UBC30XLT Controls and Display
Antenna
Headphone Jack
Display
Keypad
UBC30XLT Controls and Display
3
Page 4

UB333 Paper OM reduced size.fm Page 4 Friday, June 3, 2005 1:43 PM
Contents
Introduction .......................................................... 6
Feature Highlights................................................ 8
About This Manual .......................................... 9
Understanding Scanning ..................................... 10
What is Scanning?.......................................... 10
What is Searching?......................................... 10
Conventional Scanning................................... 10
Where To Obtain More Information ................ 12
Included With Your Scanner................................ 13
Setting Up Your Scanner..................................... 14
Installing and Replacing Batteries................... 14
Connecting the Antenna ................................. 16
Connecting an Earphone/Headphone............. 17
Attaching the Belt Clip..................................... 18
About Your Scanner ............................................ 19
A Look At The Keypad.................................... 20
A Look At The Display .................................... 23
Understanding Banks...................................... 24
Operation............................................................. 25
Turning On The Scanner and
Setting Squelch............................................... 25
Adjusting the Volume Level ............................ 25
Frequency Search Mode................................. 25
Registering the Search Frequency
In Channel Memory......................................... 26
Scanning the Stored Channels
(Memory Scan) ............................................... 27
Manually Selecting a Channel ........................ 28
Switching the Mode......................................... 28
Special Features.................................................. 29
Delay ............................................................... 29
Search Skip..................................................... 29
Locking Out Channels in Memory Mode......... 30
Priority ............................................................. 30
Monitor ............................................................ 31
Using Keylock ................................................. 31
Using the Display Backlight ............................ 31
Troubleshooting................................................... 32
Contents
4
Page 5

UB333 Paper OM reduced size.fm Page 5 Friday, June 3, 2005 1:43 PM
Resetting the Scanner .................................... 33
Care and Maintenance ........................................ 34
General Use .................................................... 34
Location .......................................................... 34
Cleaning.......................................................... 34
Repairs............................................................ 35
Birdies ............................................................. 35
Specifications....................................................... 36
Optional Accessories........................................... 38
Declaration of Conformity .................................... 39
Contents
5
Page 6

UB333 Paper OM reduced size.fm Page 6 Friday, June 3, 2005 1:43 PM
Introduction
Thank you for purchasing a Uniden UBC30XLT
Handheld Scanner. The scanner is versatile,
compact, and easy to use.
You can program up to 200 frequencies into the
scanner's memory. The scanner lets you scan
transmissions and is preprogrammed with service
banks and search banks for your convenience.
You can quickly search those frequencies most
commonly used in Air band, FM radio and VHF
without tedious and complicated programming.
Use your scanner to monitor:
• Air band
• FM Radio
• VHF High band
Introduction
6
Page 7
UB333 Paper OM reduced size.fm Page 7 Friday, June 3, 2005 1:43 PM
This table lists the frequency ranges, default
frequency step, default mode (AM or FM), and type
of transmissions you can hear for each range.
BAND PLAN 1
Frequency Range
(MHz)
87.5000 - 107.9000 WFM 100 FM Radio
108.0000 - 136.9875 AM 12.5 AIRCRAFT
137.0000 - 157.9875 FM 12.5 2M AMATEUR
158.0000 - 160.5900 FM 10 VHF HIGH BAND
160.6000 - 162.5875 FM 12.5 VHF HIGH BAND
162.6000 - 173.9900 FM 10 VHF HIGH BAND
Mode Step (kHz) Transmission
BAND
BAND PLAN 2
RANGE (MHz) MODE STEP
(kHz)
87.5000 - 107.9000 WFM 100 FM Radio
108.0000 - 136.9875 AM 12.5 AIRCRAFT
137.0000 - 143.9950 FM 5 MILITARY LAND
144.0000 - 145.9875 FM 12.5 2M AMATEUR
146.0000 - 155.9900 FM 10 VHF HIGH BAND
156.0000 - 162.0250 FM 12.5 VHF MARINE
162.0300 - 173.9900 FM 10 VHF HIGH BAND
Program/
Subject
MOBILE
BAND
BAND
To switch the band plan between 1 and 2;
1. Make sure the power is turned off
2. While holding down BAND, turn on the scanner.
Note: Please reset the scanner (see page 33) after
band plan was changed.
Introduction
7
Page 8

UB333 Paper OM reduced size.fm Page 8 Friday, June 3, 2005 1:43 PM
Feature Highlights
MEMORY CHANNEL SCAN - lets you scan the
channel memory frequency.
FREQUENCY SEARCH MODE - specifies the
frequency where searching starts from.
Channel-Storage Banks - the scanner has 3 banks.
You can store up to 200 frequencies into the banks.
Selectable Scan Delay - delays scanning from 0 to
5 seconds according to your setting before moving
to another channel, so you can hear more replies
that are made on the same channel.
Lock-Out Function - lets you set your scanner to
skip over specified channels or frequencies when
scanning or searching.
Priority Channels - lets you program one channel
in each bank (3 in all) and then have the scanner
check that channel every 2 seconds while it scans
the bank, so you do not miss transmissions on those
channels.
Monitor - Opens the squelch to receive all the signal
regardless of its strength.
Key Lock - lets you lock the scanner's keys to help
prevent accidental changes to the scanner's
programming.
Display Backlight - makes the scanner easy to
read in low-light situations.
Flexible Antenna with BNC Connector - provides
adequate reception in strong signal areas and is
designed to help prevent antenna breakage.
Or, you can connect an external antenna for better
reception.
Memory Backup - keeps the frequencies stored in
memory for an extended time if the scanner loses
power.
Feature Highlights
8
Page 9
UB333 Paper OM reduced size.fm Page 9 Friday, June 3, 2005 1:43 PM
AUTO POWER OFF - allows the scanner to
automatically become low power consumption mode
of microcomputer, if the battery voltage is lower then
voltage where battery low alert is occurred. Once
power off feature starts, LCD is turned off and all
operations are not effective.
Key Confirmation Tones - the scanner sounds a
tone when you perform an operation correctly, and
an error tone if you make an error.
Battery Low Alert - warns you when battery power
gets low.
About This Manual
The screen displays used in this manual are
representations of what might appear when you use
your scanner. Since what you see depends on the
frequencies for your area and the settings you select,
you might notice some differences between what is
in this manual and what appears on your scanner.
To get the most from this manual, review the
contents to become familiar with the basic functions
available. If you are new to scanning, be sure to
read “Understanding Scanning” on Page 10 for a
quick background on the technology behind the
hobby. The first thing you’ll need to do is install
batteries in the scanner. Then you need to connect
the included antenna to the scanner. See “Installing
and Replacing Batteries” on Page 14 and
“Connecting the Antenna” on Page 16 if you need
any help doing this.
Feature Highlights
9
Page 10

UB333 Paper OM reduced size.fm Page 10 Friday, June 3, 2005 1:43 PM
Understanding Scanning
This section provides you with background on how
scanning works. You don’t really need to know all of
this to use your scanner, but some background
knowledge will help you get the most from your
UBC30XLT.
What is Scanning?
Unlike standard AM or FM radio stations, most twoway communications do not transmit continuously.
Your UBC30XLT scans programmed channels until
it finds an active frequency, then stops on that
frequency and remains on that channel as long as
the transmission continues. When the transmission
ends, the scanning cycle resumes until the scanner
receives another transmission.
What is Searching?
The UBC30XLT can search for active frequencies.
This is different from scanning because you are
searching for frequencies that have not been
programmed into the scanner. When you select
frequency bands to search, the scanner searches
for any active frequency within the lower and upper
limits you specify. When the scanner finds an active
frequency, it stops on that frequency as long as the
transmission lasts. If you think the frequency is
interesting, you can program it into one of the banks.
If not, you can continue to search.
Conventional Scanning
Conventional scanning is a relatively simple concept.
Each group of users in a conventional system is
assigned a single frequency (for simplex systems) or
two frequencies (for repeater systems). Any time one
of them transmits, their transmission always goes
out on the same frequency. Up until the late 1980’s
Understanding Scanning
10
Page 11
UB333 Paper OM reduced size.fm Page 11 Friday, June 3, 2005 1:43 PM
this was the primary way that radio systems
operated.
Even today, there are many 2-way radio users who
operate using a conventional system:
• Aircraft
• Amateur radio
• PMR users
• Broadcast AM/FM/TV stations
• Many business radio users
When you want to store a conventional system, all
you need to know is the frequencies they operate
on. When you are scanning a conventional system,
the scanner stops very briefly on each channel to
see if there is activity. If there isn’t, the scanner
quickly moves to the next channel. If there is, then
the scanner pauses on the transmission until it is over.
Simplex Operation
Simplex systems use a single frequency for both
transmit and receive. Most radios using this type of
operation are limited to line-of-sight operation. This
type of radio is frequently used at construction job
sites, and with inexpensive consumer radios such as
PMR radios. The range is typically 1.5-12 km,
depending upon the terrain and many other factors.
Repeater Operation
Repeater systems use two frequencies: one transmits
from the radio to a central repeater; the other
transmits from the repeater to other radios in the
system. With a repeater-based system, the repeater
is located on top of a tall building or on a radio tower
that provides great visibility to the area of operation.
When a user transmits (on an input frequency), the
signal is picked up by the repeater and retransmitted
(on an output frequency). The user’s radios always
Understanding Scanning
11
Page 12
UB333 Paper OM reduced size.fm Page 12 Friday, June 3, 2005 1:43 PM
listen for activity on the output frequency and
transmit on the input frequency. Since the repeater
is located very high, there is a very large line of
sight. Typical repeater systems provide coverage
out to about a 40 km radius from the repeater
location.
Where To Obtain More Information
By itself, this manual really only provides part of
what you need to know to have fun scanning – how
to program and use the scanner.
Information On The Internet
The Internet is a great source for current frequencies
and information about scanning.
Many web sites have lists of frequencies for your area.
You can use a search engine to find and use them.
Make a list of the agencies you want to listen to,
then look up the frequencies and systems used by
those agencies.
Understanding Scanning
12
Page 13

UB333 Paper OM reduced size.fm Page 13 Friday, June 3, 2005 1:43 PM
Included With Your Scanner
UBC30XLT
SCANNER
200 Channels
Air band Receiver
with FM Radio
Owners Manual
Scanner
with
Antenna
Belt Clip
Note: If any of these items are missing or damaged,
contact your place of purchase.
Included With Your Scanner
13
Page 14

UB333 Paper OM reduced size.fm Page 14 Friday, June 3, 2005 1:43 PM
Setting Up Your Scanner
These guidelines will help you install and use your
new scanner:
• If your scanner receives interference or electrical
noise, move the scanner or its antenna away
from the source.
• To improve the scanner’s reception, use an
optional external antenna designed for multiband coverage. (You can purchase this type of
antenna at a local electronics store). If the
optional antenna has no cable, use 50-70 ohm
coaxial cable for lead-in. A mating plug might be
necessary for the optional antennas.
• Use an optional mono earphone or mono
headset with proper impedance for private
listening. Read the precautions on the inside
front cover of this Owners Manual.
• Do not use the scanner in high-moisture
environments such as the kitchen or bathroom.
• Avoid placing the scanner in direct sunlight or
near heating elements or vents.
Installing and Replacing Batteries
You can power your scanner using three AA alkaline
batteries.
1. Make sure the power is turned off.
2. If the belt clip is attached, remove it (See
page 18).
3. Slide the battery compartment cover.
Setting Up Your Scanner
14
Page 15

UB333 Paper OM reduced size.fm Page 15 Friday, June 3, 2005 1:43 PM
4. Install three batteries in the compartment as
indicated by the polarity symbols (+ and -)
marked inside.
5. Replace the cover.
Using Rechargeable Batteries
You can also use three rechargeable batteries
(Ni-MH) to power your scanner. Before you use
rechargeable batteries, make sure the batteries are
fully charged.
Setting Up Your Scanner
15
Page 16

UB333 Paper OM reduced size.fm Page 16 Friday, June 3, 2005 1:43 PM
Cautions:
• Use only fresh batteries of the required size and
recommended type.
• Always remove old or weak batteries. Batteries
can leak chemicals that destroy electronic
circuits.
• Do not mix old and new batteries, different types
of batteries (standard, alkaline, or rechargeable),
or rechargeable batteries of different capacities.
Connecting the Antenna
To attach the supplied flexible antenna to the
connector on the top of your scanner, align the slots
around the antenna's connector with the tabs on the
scanner's BNC connector. Then slide the antenna's
connector down over the scanner's connector and
rotate the antenna connector's outer ring clockwise
until it locks into place.
Connecting an Optional Antenna
The scanner's BNC connector makes it easy to
connect a variety of optional antennas, including an
external mobile antenna or outdoor base station
antenna.
Setting Up Your Scanner
16
Page 17

UB333 Paper OM reduced size.fm Page 17 Friday, June 3, 2005 1:43 PM
Note: Always use 50-ohm, RG-58, or RG-8, coaxial
cable to connect an outdoor antenna. If the antenna
is over 15 metres from the scanner, use RG-8 lowloss dielectric coaxial cable. You can get a BNC
adapter at your local electronics store.
Connecting an Earphone/Headphone
For private listening, you can plug a 3.5mm miniplug earphone or mono headphones (not supplied)
into the headphone jack on top of your scanner. This
automatically disconnects the internal speaker.
WARNING!
If you connect an external speaker to the scanner's
headphone jack, never connect the audio output line
to a power supply and ground. This might damage
the scanner.
Setting Up Your Scanner
17
Page 18

UB333 Paper OM reduced size.fm Page 18 Friday, June 3, 2005 1:43 PM
Attaching the Belt Clip
Pinch
To make your scanner easier to carry when you are
on the go, use the supplied belt clip. Slide the belt
clip into the hanger piece on the back of the
scanner. To remove, slide up the belt clip pulling the
pinch at the middle of the belt clip.
Setting Up Your Scanner
18
Page 19

UB333 Paper OM reduced size.fm Page 19 Friday, June 3, 2005 1:43 PM
About Your Scanner
We use a few simple terms in this manual to explain
the features of the scanner. Familiarize yourself with
these terms and the scanner's features, and you can
put the scanner to work for you right away. Simply
determine the type of communications you want to
receive, then set the scanner to scan those
communications.
A frequency, expressed in kHz or MHz, is the tuning
location of a station. To find active frequencies, you
use the search function or refer to a frequency
reference.
Besides searching within a selected frequency
range, you can also search your scanner's service
banks. Service banks are preset groups of
frequencies categorized by the type of services that
use those frequencies.
When you search and find a desired frequency, you
can store it into a programmable memory location
called a channel. Channels are grouped into
channel-storage banks. The scanner has 3 channelstorage banks. You can scan the channel-storage
banks to see if there is activity on the frequencies
stored there.
About Your Scanner
19
Page 20

UB333 Paper OM reduced size.fm Page 20 Friday, June 3, 2005 1:43 PM
A Look At The Keypad
Your scanner's keys have various functions labeled
on the key tops and below the keys.
To select the function labeled on a key, simply press
the key. To select the function labeled below a key,
first press FNC then release it. appears on the
display. Then press the next key in the function key
sequence while appears. appears or
F F
disappears as you press FNC.
F
If your scanner's keys seem confusing at first, the
following information should help you understand
each key's function.
Key Name Description
FNC Lets you use various functions
by pressing this key in
combination with other keys.
About Your Scanner
20
Page 21

UB333 Paper OM reduced size.fm Page 21 Friday, June 3, 2005 1:43 PM
Key Name Description
F/M / MW F/M – Switches between
Frequency Mode and Memory
Mode.
FNC + MW briefly
– Register a
frequency into channel in
Frequency Search Mode and
Frequency hold mode.
FNC + MW for two seconds
Moves to frequency edit mode
in Memory Scan Mode, Memory
Scan Hold Mode, Frequency
Search Mode and Frequency
Search Mode and Frequency
Hold Mode.
MON
MON /
– Moves to Monitor Mode.
FNC +
– Locks and unlocks
the keypad.
RSM/HOLD Resume scanning or Holding
scanning.
L/O / PRI L/O
– Lets you lock out a
selected channel or skip a
specified frequency.
–
FNC + PRI
– Sets and turns the
priority function on or off.
Increment the channel number
and frequency, select the
search direction.
Decrement the channel number
and frequency, select the
search direction.
About Your Scanner
21
Page 22

UB333 Paper OM reduced size.fm Page 22 Friday, June 3, 2005 1:43 PM
Key Name Description
VOL/SQ /
DELAY
VOL/SQ – Switches volume
setting and squelch setting.
FNC + DELAY
delay time in Memory Scan
Mode, Memory Hold Mode,
Frequency Search Mode and
Frequency Hold Mode.
BAND / STEP BAND
Frequency Search Mode and
Memory Scan Mode.
FNC + STEP
steps in Memory Scan Mode,
Memory Hold Mode, Frequency
Search Mode or Frequency
Hold Mode.
PWR / LIGHT PWR
than 2 seconds to turn the
scanner on or off.
FNC + LIGHT – Turn the
display backlight on or off.
– Change the
– Select the band in
– Change the
– Press and hold for more
About Your Scanner
22
Page 23

UB333 Paper OM reduced size.fm Page 23 Friday, June 3, 2005 1:43 PM
A Look At The Display
The display has indicators that show the scanner's
current operating status. The display information
helps you understand how your scanner operates.
F
- appears only when the function mode is on.
FM - appears during FM Radio band is selected.
AIR - appears during Air band is selected.
VHF - appears during VHF High band is selected.
MEM - appears during Memory Mode is selected.
VOL - appears during volume setting.
SQ - appears during squelch setting.
P - appears when you select a priority channel.
FREQ - appears during Frequency Mode is selected.
HOLD - appears during Memory Hold Mode and
Frequency Hold Mode.
About Your Scanner
23
Page 24

UB333 Paper OM reduced size.fm Page 24 Friday, June 3, 2005 1:43 PM
L/O - appears when you manually select a channel
you locked out or a skip frequency.
PRI - appears when the priority feature is turned on.
DLY - appears when you select a delay.
- alerts you when the battery power gets low.
- appears when you lock the key pad.
Understanding Banks
To make it easier to identify and select the channels
you want to listen to, the 200 channels are divided
into 3 channel-storage banks. Use each channelstorage bank to group frequencies for FM Radio, Air,
and VHF High band.
The number programmed into each bank depends
on your choice.
For example, You may program 70 channels for FM
Radio band bank, 110 channels for Air band bank
and 20 channels for VHF High band bank. Or, it is
also possible to program 200 channels for only Air
band.
About Your Scanner
24
Page 25

UB333 Paper OM reduced size.fm Page 25 Friday, June 3, 2005 1:43 PM
Operation
Turning On The Scanner and
Setting Squelch
Note: Make sure the scanner's antenna is
connected before you turn it on.
1. Press and hold PWR for 2 seconds. The scanner
turns On.
2. Press VOL/SQ. SQ appears with the current
setting.
3. Repeatedly press or to select the squelch
level you want.
Squelch is fully open at level 0, and most tight at
level 10.
Note: Squelch can be adjusted both in Frequency
Mode and Memory Mode.
Adjusting the Volume Level
1. Repeatedly press VOL/SQ until VOL appears.
2. Use or to select the volume level you prefer
from 30 levels.
3. Press PWR or wait for 2 seconds to return to the
mode you were in.
Note: Volume level can be adjusted both in
Frequency Mode and in Memory Mode.
Frequency Search Mode
Changing the Step of Frequency
You can change the steps of each band.
1. Press FNC + STEP until a band you want to
change appears.
2. Use or to select steps from Auto, 5kHz,
6.25kHz, 8.33kHz, 10kHz, 12.5kHz, 15kHz,
20kHz, 25kHz, 50kHz and 100kHz.
Operation
25
Page 26

UB333 Paper OM reduced size.fm Page 26 Friday, June 3, 2005 1:43 PM
3. Press PWR or wait for 2 seconds to return to the
mode you were in.
You can search for Air, FM Radio and VHF High
band without knowing the specific frequencies used
in your area. Press or to change the search
direction.
When the scanner stops on a transmission, press
RSM/HOLD to stop searching and listen to the
transmission. HOLD appears. In this mode, you can
press or to increment or decrement the
frequency by 1 step. Press and hold or to
increment or decrement frequency continuously.
To release the hold and continue searching, press
RSM/HOLD.
Registering the Search Frequency
In Channel Memory
You can store frequencies you found during
Frequency Search Mode or Frequency Hold Mode
into channels.
1. Press FNC + MW. A blank channel and the
frequency you found are displayed alternately.
2. Repeatedly press or to select the channel
where you wants to register.
3. Press FNC + MW to complete the registration.
Registered channel frequency is distributed to
each bank according to the a frequency band.
If you entered a frequency that has already been
entered elsewhere, the scanner sounds an error
tone and displays the channel that was duplicated.
If you entered the frequency by mistake, press PWR
then enter the correct frequency. To enter the
frequency anyway, press FNC + MW to accept.
Operation
26
Page 27

UB333 Paper OM reduced size.fm Page 27 Friday, June 3, 2005 1:43 PM
Editing and Erasing a Frequency
Follow the steps to edit the frequency.
1. Press and hold FNC + F/M.
2. Repeatedly press or to move the cursor to
the digit you want to edit.
3. Repeatedly press FNC + or to change the
number.
4. To register the frequency, press FNC + MW.
To move to frequency mode to start searching
from the frequency, RSM/HOLD.
To erase the frequency, press L/O at step 2 and
FNC + WM to confirm. The channel is automatically
locked out.
Scanning the Stored Channels
(Memory Scan)
To begin scanning channels, press RSM/HOLD.
The scanner scans through all non-locked channels
in the Channel Memory (See “Locking Out Channels
in Memory Mode” on Page 30).
You can choose band during scanning from Air, FM
Radio and VHF High.
1. Repeatedly press BAND to select a band you
want to scan.
2. Press or to select turn On or OFF the band.
3. Press PWR or wait for 2 seconds to go back to
Memory Scan Mode.
Note: You can choose the band also in Frequency
Mode with the steps above.
When the scanner finds a transmission, it stops on
it. When the transmission ends, the scanner
Operation
27
Page 28

UB333 Paper OM reduced size.fm Page 28 Friday, June 3, 2005 1:43 PM
resumes scanning automatically after the delay time
(see Delay on Page 29).
Notes:
• If you have not stored frequencies into any
channels, the scanner does not scan.
• If the scanner picks up unwanted partial or very
weak transmissions, increase the squelch level.
Decrease the scanner's sensitivity to these
signals. To listen to a weak or distant station,
reduce the squelch level (0 is squelch open).
Manually Selecting a Channel
You can continuously monitor a single channel
without scanning. This is useful if you hear an
emergency broadcast on a channel and do not want
to miss any details - even though there might be
periods of silence - or if you want to monitor a
specific channel.
During scanning, if the radio stops at a channel you
want to listen to, press RSM/HOLD once.
(Repeatedly pressing RSM/HOLD at this time
causes the scanner to step through the channels.)
Press RSM/HOLD to resume automatic scanning.
Switching the Mode
Follow the steps below to switch between
Frequency Mode and Memory Mode.
1. Repeatedly press F/M to display FREQ.
Now the scanner is in Frequency Mode.
2. Repeatedly press F/M to display MEM.
Now the scanner is in Memory Mode.
Operation
28
Page 29

UB333 Paper OM reduced size.fm Page 29 Friday, June 3, 2005 1:43 PM
Special Features
Delay
You can program from 0 to 5 delay into any channel
or frequency. If you set delay time for 1 to 5
seconds, scanner continues to monitor the channel
frequency for 1 to 5 seconds after the transmission
stops before resuming scanning or searching. The
scanner automatically sets a delay when you store
frequencies into channels or when you search
frequencies. When the delay feature is on, DLY
appears. If you set to 0, delay feature turn to off.
Follow these steps to set the delay time.
1. Press FNC + DELAY.
2. Repeatedly press or to select delay time
you want to set.
3. Press PWR or wait for 2 seconds. The delay
time is stored, and the scanner returns to preset
mode.
Note: Delay can be set both in Frequency Mode and
Memory Mode.
Search Skip
You can skip up to 40 specified frequencies during a
search. This lets you avoid unwanted frequencies in
Search Mode.
To skip a frequency, press L/O when the scanner
stops on the frequency in Search Mode or when you
have selected frequency manually in Search Hold
Mode.
To cancel Search Skip for a single frequency,
manually select the frequency, then press L/O. L/O
disappears.
Special Features
29
Page 30

UB333 Paper OM reduced size.fm Page 30 Friday, June 3, 2005 1:43 PM
To cancel Search Skip for all the frequency you have
set Search Skip, press RSM/HOLD to stop
searching in Search Mode, then press and hold L/O.
A confirmation tone sounds.
Note: If you select more than 40 frequencies to skip,
the oldest frequency will be deleted automatically.
Locking Out Channels in Memory
Mode
You can increase the scanning speed by locking
out channels that have a continuous transmission
for all the channels in Channel Memory. To lock out
a channel, manually select the channel, then press
L/O. L/O appears.
Note: You can still manually select locked-out
channels.
To remove the lockout from a channel, manually
select the channel, then press L/O. L/O disappears.
To unlock all channels in the band, press RSM/
HOLD to stop scanning in Memory mode, then
press and hold L/O. A confirmation tone sounds.
Priority
The priority feature lets you scan through the
channels and still not miss important or interesting
calls on specific channels. You can program one
stored channel in each bank as a priority channel
(3 channels for total).
If the priority feature is turned on, as the scanner
scans the bank, it checks that bank's priority channel
for activity every 2 seconds.
The scanner automatically designates each bank's
first channel as its priority channel.
Special Features
30
Page 31

UB333 Paper OM reduced size.fm Page 31 Friday, June 3, 2005 1:43 PM
Follow these steps to select a different channel in a
bank as the priority channel.
1. Manually select the channel you want to select
as the priority channel.
2. Press FNC + PRI. P appears above the selected
channel number.
3. Repeat Steps 1 and 2 for the channel in each
bank you want to program as a priority channel.
Note: If all priority channel is locked out, All Loc
appears.
Monitor
1. While press and holding MON, Monitor Mode is
turned on.
2. To exit Monitor Mode, release MON.
Using Keylock
Use the scanner's keylock to protect it from
accidental program changes. When the scanner's
keys are locked, the only controls that operate are
, PWR, FNC, MON, LIGHT and RSM/HOLD.
To turn on keylock, press FNC + .
appears. To turn off keylock, press FNC + .
disappears.
Note: Using keylock does not prevent the scanner
from scanning channels.
Using the Display Backlight
To turn on the display light for easy viewing at night,
press FNC + LIGHT. The display lights for 15
seconds. To turn off the light sooner, press FNC +
LIGHT again.
Special Features
31
Page 32

UB333 Paper OM reduced size.fm Page 32 Friday, June 3, 2005 1:43 PM
Troubleshooting
If your UBC30XLT is not performing properly, try the
following steps.
Problem Possible Cause Suggestion
Improper
reception.
Scan
won’t
stop.
The scanner’s
antenna might
need to be
adjusted.
The squelch
might need to
be adjusted.
The antenna
might need to
be adjusted.
One or more
channels might
be locked out.
The channel’s
frequency
might not be
stored in
memory.
Check the antenna
connection or move
or reposition the
antenna.
Move the scanner.
You might be in a
remote area that
could require an
optional multi-band
antenna. Check
with your dealer or
local electronics
store.
Adjust the squelch
threshold. See
“Turning On The
Scanner and
Setting Squelch” on
Page 25.
Check the antenna
connection.
Make sure the
channels you want
to scan are not
locked out.
Make sure the
channel’s
frequency is stored
in the scanner’s
memory.
32
Troubleshooting
Page 33

UB333 Paper OM reduced size.fm Page 33 Friday, June 3, 2005 1:43 PM
Scan
won’t stop
(continued)
Scan
won’t
start.
The channel
might not be
active.
You must
press RSM/
HOLD to scan.
The squelch
might need to
be adjusted.
One or more
channels might
be locked out.
The antenna
might need to
be adjusted.
Resetting the Scanner
Wait for a
transmission on the
channel.
Press RSM/HOLD.
Adjust the squelch
threshold. See
“Turning On The
Scanner and
Setting Squelch” on
Page 25.
Make sure the
channels you want
to scan are not
locked out.
Check the antenna
connection.
If the scanner's display locks up or stops operating
properly, you might need to reset the scanner.
Caution: This procedure clears all the information
(except the band plan data) you have stored in the
scanner. Before you reset the scanner, try turning it
off and on to see if it begins working properly. Reset
the scanner only when you are sure it is not working
properly.
1. Turn off the scanner.
2. While holding down and , turn on the
scanner. It takes about 3 seconds to initialize
and CLEAr appears.
Troubleshooting
33
Page 34

UB333 Paper OM reduced size.fm Page 34 Friday, June 3, 2005 1:43 PM
Care and Maintenance
Keep the scanner dry. If it gets wet, wipe it dry
immediately. Use and store the scanner only in
normal temperature environments. Handle the
scanner carefully: do not drop it. Keep the scanner
away from dust and dirt, and wipe it with a damp
cloth occasionally to keep it looking new.
General Use
• Turn the scanner off before disconnecting the
power.
• Always write down the programmed frequencies
in the event of memory loss.
• If memory is lost, simply reprogram each
channel. The display shows ------ in all
channels when there has been a memory loss.
• Always press each button firmly until you hear
the entry tone for that key entry.
Location
• Do not use the scanner in high-moisture
environments such as the kitchen or bathroom.
• Avoid placing the unit in direct sunlight or near
heating elements or vents.
• If the scanner receives strong interference or
electrical noise, move it or its antenna away from
the source of the noise. If possible, a higher
elevation might provide better reception.
• Also try changing the height or angle of the
antenna.
Cleaning
• Disconnect the power to the unit before
cleaning.
Care and Maintenance
34
Page 35

UB333 Paper OM reduced size.fm Page 35 Friday, June 3, 2005 1:43 PM
• Clean the outside of the scanner with a mild
detergent.
• To prevent scratches, do not use abrasive
cleaners or solvents. Be careful not to rub the
LCD window.
• Do not use excessive amounts of water.
Repairs
Do not attempt any repair. The scanner contains no
user serviceable parts.
Birdies
All radios can receive “birdies” (undesired signals). If
your scanner stops during Scan mode and no sound
is heard, it might be receiving a birdie. Birdies are
internally generated signals inherent in the
electronics of the receiver.
Press L/O to lock out the channel, then press Scan
to resume scanning.
Care and Maintenance
35
Page 36

UB333 Paper OM reduced size.fm Page 36 Friday, June 3, 2005 1:43 PM
Specifications
Specifications
Channels: ........................................................... 200
Frequency Range (in MHz):
See page 7
Sensitivity (12 dB SINAD)
88.050 MHz (WFM) ......................................0.9 µV
98.550 MHz (WFM) ......................................0.9 µV
107.950 MHz (WFM) ....................................0.9 µV
119.250 MHz (AM) ......................................... 0.4 µV
127.175 MHz (AM).........................................0.4 µV
135.500 MHz (AM) ........................................0.4 µV
138.150 MHz (FM).........................................0.3 µV
162.400 MHz (FM) ........................................ 0.3 µV
173.225 MHz (FM) ........................................ 0.3 µV
Operating Temperature:
Normal ........................................... –20°C to +60°C
Scan Rate: .........25 channels per second (Nominal)
Search Rate ............ 25 steps per second (Nominal)
Priority Sampling ..................................... 2 seconds
IF Rejection (at 162.4 MHz) ............................ 70 dB
IF Frequencies
1st IF ....................................................51.750 MHz
2nd IF ........................................................ 450 kHz
Audio Output ............................. 400 mW maximum
Built-in Speaker ..........................32 mm dia, 24 ohm
Dynamic Type
Current Drain
Squelched .................................................... 36 mA
Full Output ................................................. 160 mA
Power Requirements:
3 AA Alkaline Batteries (4.5V DC),
or 3 AA Rechargeable Ni-MH Batteries (3.6V DC)
Antenna: ............................... 50 ohms (Impedance)
Specifications
36
Page 37

UB333 Paper OM reduced size.fm Page 37 Friday, June 3, 2005 1:43 PM
External Jacks: ................. Antenna Jack BNC Type
Ext. Speaker Jack 3.5 mm
Size (without antenna and belt clip):
........................ 53mm (W) x 28mm (D) x 104mm (H)
Weight (without Antenna and battery): ........... 100 g
Features, specifications, and availability of optional
accessories are all subject to change without notice.
37
Specifications
Page 38

UB333 Paper OM reduced size.fm Page 38 Friday, June 3, 2005 1:43 PM
Optional Accessories
Earphone
Optional Accessories
38
Page 39

UB333 Paper OM reduced size.fm Page 39 Friday, June 3, 2005 1:43 PM
Declaration of Conformity
We:
Uniden Corporation
2-12-7 Hatchobori
Chuo-Ku, Tokyo 104-8512
Japan
declare, under our sole responsibility, that this
equipment “Uniden Bearcat model UBC30XLT” is in
compliance with the essential requirements and
other relevant provisions of the EMC, R&TTE and
LVD Council Directives of the EU.
Declaration of Conformity
39
Page 40

UB333 Paper OM reduced size.fm Page 40 Friday, June 3, 2005 1:43 PM
© 2005 Uniden Corporation. All rights reserved.
UBZZ01333ZZ(0) Printed in P.R.C.
 Loading...