

Page 1

uniden
UBC3000XLT
400 Channel, 20-Bank
Scanning Radio with
25MHz to 1.3GHz
Scanning Range
OPERATING GUIDE
Page 2

Precautions
Before you use this scanner, please read
and observe the following:
Earphone Warning!
Be sure to use only the recommended
optional monaural earphone (EP009). You
may also use a 32Q stereo headset. Use of
an incorrect earphone or stereo headset
may be potentially hazardous to your
hearing. The output of the Phone jack Is
monaural, but you will hear it In both
headphones of a stereo headset.
Set the Volume to a comfortable audio level
coming from the speaker before plugging in
the monaural earphone or a stereo headset
of the proper impedance (32Q). Otherwise
you might experience some discomfort or
possible hearing damage if the Volume sud
denly becomes too ioud because of the Vol
ume Control or Squelch Control setting.
This may be particularly true of the type of
earphone that is placed in the ear canal.
WARNING!
Uniden does not represent this unit to be
waterproof. To reduce the risk of fire or
electrical shock, do not expose this unit to
rain or moisture.
General Battery Warning!
Do not short circuit any Battery.
Do not discard Batteries in a fire; they may
explode.
Nickel-Cadmium Battery Warning!
When using Nickel-Cadmium Batteries with
this product, take note of the following
warnings:
Do not charge Nickel-Cadmium Batteries with
any charger other than the one supplied with
this product. Using another charger may dam
age the Batteries, or cause them to explode.
______________________
Page 3
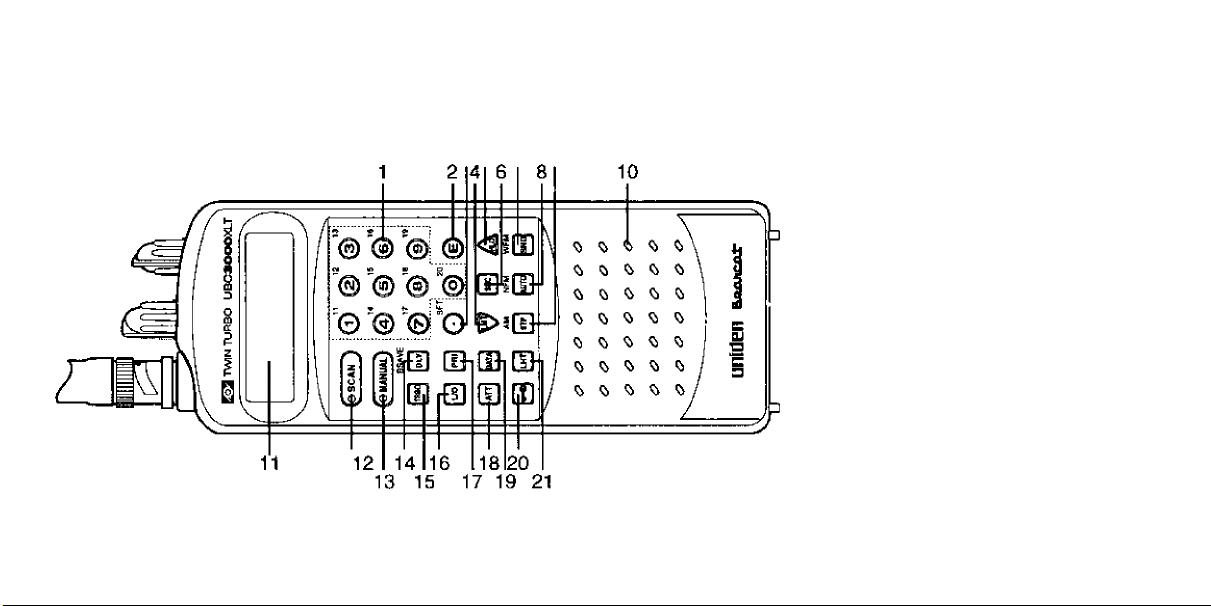
Controls and Indicators
3 5 7 9
1. Keypad
2. Enter
3. Shift / Decimal / Clear
4. Search DowiVLimit
5. Search Up/Hold
6. Search
7. SendAWFM Signal Mode
8. Auto Store/NFM Signal Mode
9. Frequency Step/AM Signal Mode
10. Speaker
11. Liquid Crystal Display
12. Scan Mode
13. Manual
14. Delay/Battery Save
15. Turbo Search
16. Lock out
17. Priority
18. Signal Attenuation
19. Data Skip
20. Key Lock
21. LCD Display Light
Page 4
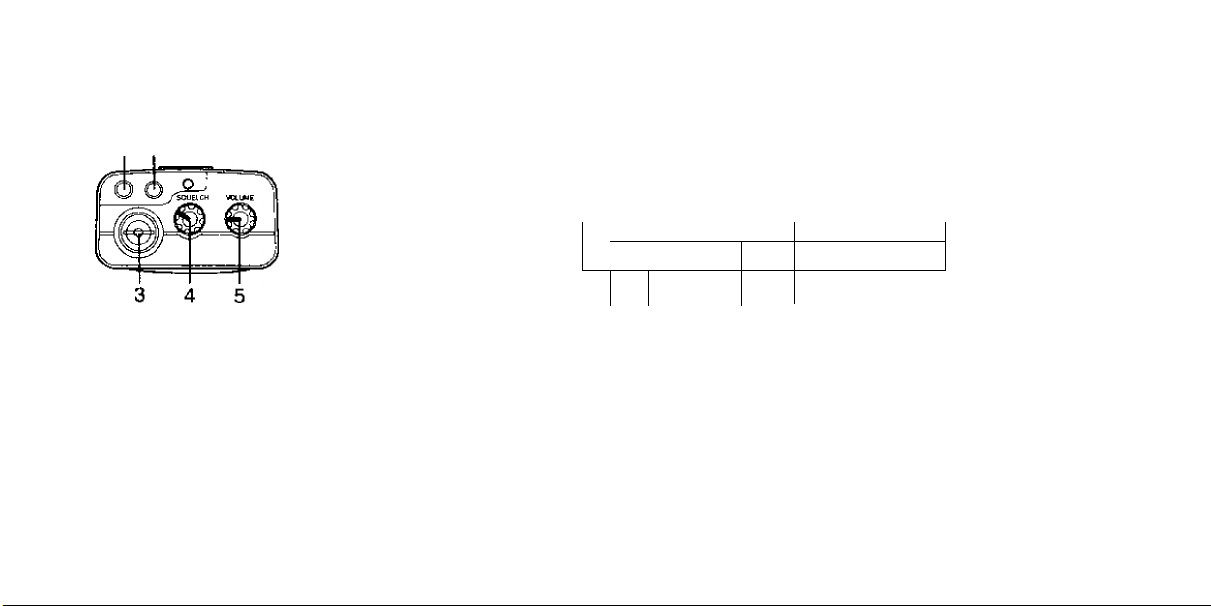
Controls and Indicators
1 2
BANK 1 234S67 B9 1D1112 134 15 IE IMS 1' 2S
14 —-SCAN DA?A PRI OLY AUTOTSRCH A ATT
13
raoa tooo.
12-
HOLDU0 12.50
.4.
:SFT-- 5
O O O D mz
KHz Al1 NFM.WFM w-e-
1
11 10 9 8 7
1.
External Speaker Jack 1. Bank Indicators 9. Frequency Step Indicators
2. Earphone Jack 2. Search Indicator to. Lockout Indicator
Antenna Connector
3.
4. Squelch Control 4. Low Battery Indicator
5.
On/Off Volume Control
Signal Attenuation Indicator
3.
Shift Indicator
5.
6, Keypad Lock Indicator
7. Signal Mode Indicators
8. Frequency Display
tl. Hold Indicator
t2.
Priority Channel Indicator
13.
Channel Number indicator
t4.
Mode Indicators
Page 5

Introduction....................................
Included with your Scanner....
Getting Started
Power...........................................
: Installing/Removing the Battery
Charging the Battery
Attaching the Antenna
Installing the Belt Clip................
Scanner Basics
Banks and Channels
Scanning Versus Searching . . .
How Squelch Works
Setting the Squelch ..................
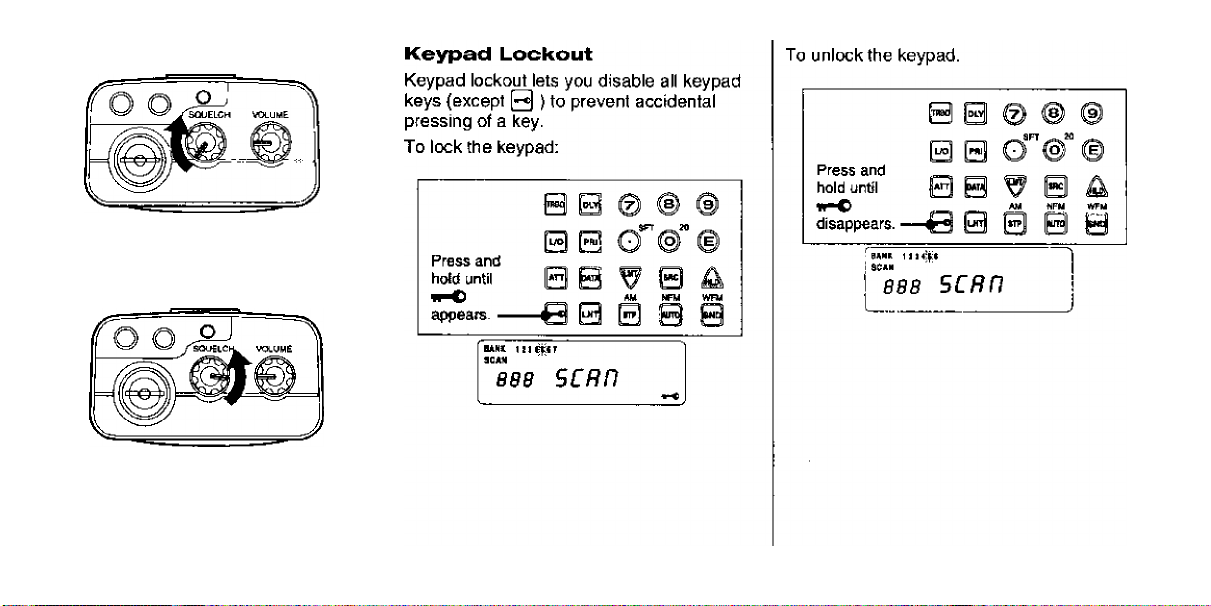
Keypad Lockout
Programming Channels
Manual Programming
Automatic Battery Save
Search Programming
Auto-Store Programming
...............................
.................
..................
..............................
....................
.....................
..........................
................
...................
...................
...............
.............
... 2
... 4
. . 5
. . 5
. . 6
. . 6
. . 6
. . 7
. . 7
. . 8
. . 8
. . 9
. 10
. 10
. 11
. 12
. 15
Translerring A Channel Frequency . . 17
Deleting A Stored Channel Frequency
The Scan Mode
Begin Scanning...................................
Turning Banks On or Off
Locking Out Channels
Lockout in Manual Mode
Locking a Channel While Scanning
Unlocking a Channel
Unlocking All Channels
Using Priority Scan
Selecting A New Priority Channel .
Using Scan Delay
The Search Mode..................................
Beginning A Search
Scrolling Frequencies......................
Using Turbo Search............................
Using Search Delay
Locking Out Frequencies
.....................................
.....................
........................
.................
.......................
...................
.............................
...............................
............................
....................
Contents
Locking Out a Frequency
18
20
20
20
21
21
22
22
23
24
24
25
27
27
28
29
30
30
Unlocking a Frequency
The Manual Mode
Scrolling Channeis...............................32
Selecting A Specific Channel...............33
Additional Scanner Features ................34
Using Data Skip...................................34
Changing the Frequency Step
Setting the Signal Mode
Using Signal Attenuation
Display Light........................................37
Optional Accessories & Replacement
Parts
........................................................
Care & Maintenance
Troubleshooting.....................................41
Technical Information
Specifications........................................44
..................................
..............................
.................
....................
......................
....................
...........................
.............
I
30
31
32
35
36
37
39
40
42
Page 6

Introduction
Your UBC3000XLT Scanner is a
sophisticated information radio that aiiows
you to monitor 16 different frequency bands.
These bands include radio information
sources such as
■ Police and Fire Departments
■ Airoraft
■ Business and industrial
■ Utility
■ Trucks, Buses, Taxis, and Trains
■ Marine and Amateur {ham) radio
■ Motion Picture and Press Relays
■ Public Service
■ Analogue Cellular Telephone Band
■ And Many More
You can program the UBC3000XLT with up
to 400 channels that are divided into 20
banks.
This arrangement of banks and channels
aiiows you to easily select which
frequencies you want to scan at any time.
See “Scanner Basics" on Page 7.
You can also contact a local scanning ciub
or go to your local library for more
information about interesting frequencies in
your area.
i/niden® and Searcal® are registered
trademarks of Uniden Corporation.
Twin Turbo™ is a trademark of
Uniden Corporation.
Additional Features
The UBC3000XLT has so many features, it
might take you a while to become familiar
with them all. But the following summary lets
you know what’s available and directs you
to the appropriate section of this Operating
Guide for more detailed information.
Twin Turbo™ ScaiVSeercb—Delivers a
maximum scan rate of 100 channels-per-second,
and lets you increase the search rate from the
normal 100 f requencies-per-second to 300
frequencies-per-second when searching by 5
kHz steps. See "Using Turbo Search" on Page
29.
25 MHz -1,3 GHz Range—Provides you
with almost limitless scanning possibilities.
Note: This range is not continuous. See
“Frequency Bands and Steps” on Page 42.
Automatic Battery Save - Switches the unit
to standby to conserve battery life.
Page 7

Auto-Store—Lets you automatically store
active frequencies in empty channels. See
"Auto-Store Programming” on Page 15.
Auto-Sort—In the Scan Mode, sorts the
channels in each bank by frequency to
increase scanner efficiency.
Priority Channels—Designates one
channel in each of the first 10 banks for
special scanning access. See “Using
Priority Scan” on Page 24.
Scan/Search Delay—In the Scan or Search
Mode, causes the scanner to remain on a
frequency two seconds after the last
transmission to wait for a possible reply.
See "Using Scan Delay” on Page 25 and
"Using Search Delay” on Page 30.
Direct Channel Access—Allows you to
manually select a specific channel without
scanning. See “Selecting a Specific
Channel” on Page 33.
Direct Frequency Programming—Allows
you to program a specific frequency into a
channel without searching. See “Manual
Programming" on Page 10.
Frequency Transfer—Lets you transfer a
frequency into an empty channel. See
"Transferring a Channel Frequency” on
Page 17.
Variable Frequency Steps
(lncrements>—In the search or Manual
Mode, lets you change the steps between
frequencies. See “Changing the Frequency
Step" on Page 35.
Channel/Frequency Lockout—Lets you
temporarily remove channels or frequencies
from the scanning or search cycle. See
"Locking Out Channels” on Page 21 and
"Locking Out Frequencies" on Page 30.
Signal Attenuation—Reduces the
scanner’s sensitivity for unusually strong
signals often found on the WFM (wide
frequency modulation) bands. See "Using
Signa! Attenuation" on Page 37.
Data Skip—Lets you set the scanner to
automatically continue searching or
scanning (after three seconds) when it
encounters an unmodulated or data signal.
See "Using Data Skip" on Page 34,
Keypad Lockout—Temporarily disables
the keypad to prevent accidental pressing of
keys. See "Keypad Lockout” on Page 9.
Battery-Free Memory—The stored
channels are retained in memory when the
Battery Pack is removed from the scanner.
External Speaker & Earphone
Jacks—Allow you to connect an external
speaker or earphone for custom listening.
See Included with your Scanner” on Page
4 and "Optional Accessories &
Replacement Parts" on Page 39.
Display Light—Lets you view the display
more easily in dark or low-light conditions.
See “Display Light” on Page 38.
I
Page 8
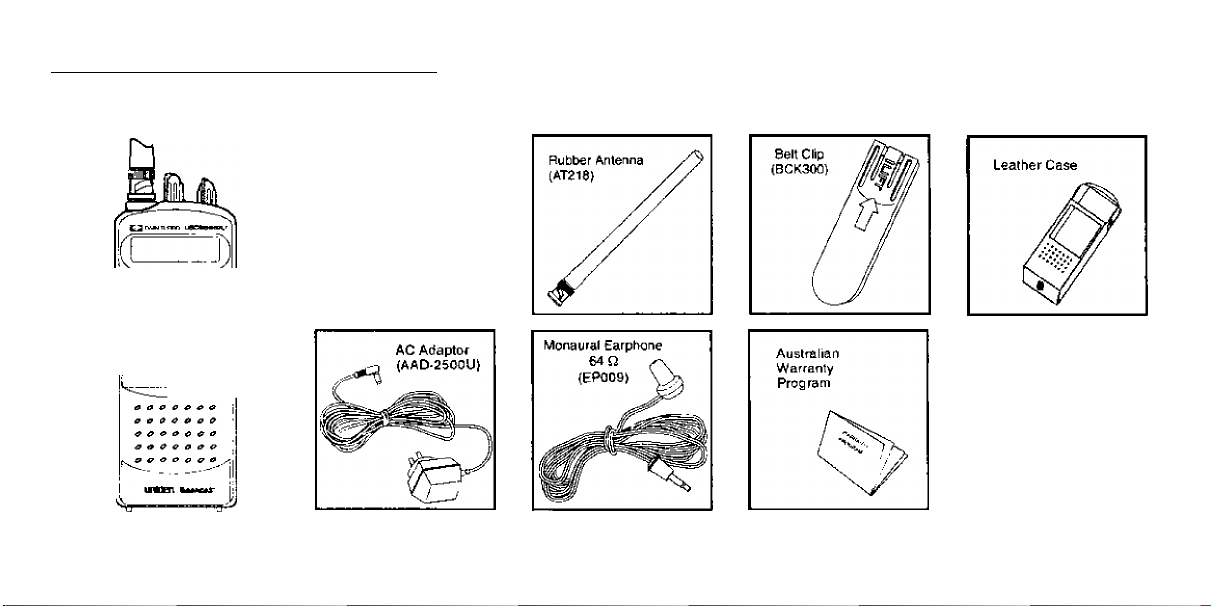
Included with your Scanner
Your UBC3000XLT Scanner comes with the following standard equipment. (See "Optional Accessories & Replacement Parts" on Page 39.)
operating Guide
(OMUBCSOOOXLTJ
V
UBC3000XLT
m
^ I I
«.MX-1 IIML
;[ ©_ ®
ji ® @
I' S 0 G>’ ©' ©'
¡3 B o' ©’ ©
BB t7 B a
' SB B B B
Read this Operating
Guide thoroughly before
you use the scanner.
If any of the above items
are missing or dam
aged, contact the place
of purchase.
Page 9
Getting Started
Power
Your scanner’s nickel-cadmium battery can
power the scanner for up to 5 hours on a full
charge.
Before you use the scanner the first time,
and whenever the [ВАТТ] indicator appears,
you should fully charge the battery.
Notes:
■ Install the battery before you charge if.
■ When the [ВАТТ] indicator appears,
there is alxiut 10 minutes of power left.
If you don’t turn off the scanner within 10
minutes, it automatically turns off to
prevent the battery from fully
discharging.
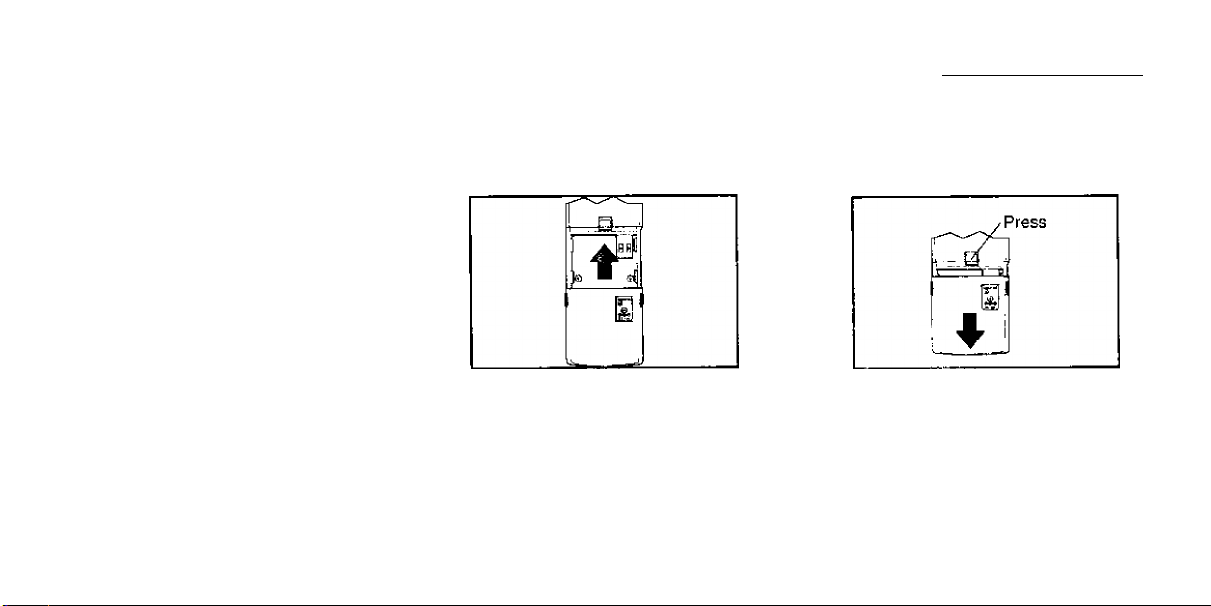
Install ingfRemoving the Battery
1. Turn off the scanner.
Slide the battery on.
2.
To remove the-battery, press the release
button and slide the battery off.
I
Page 10
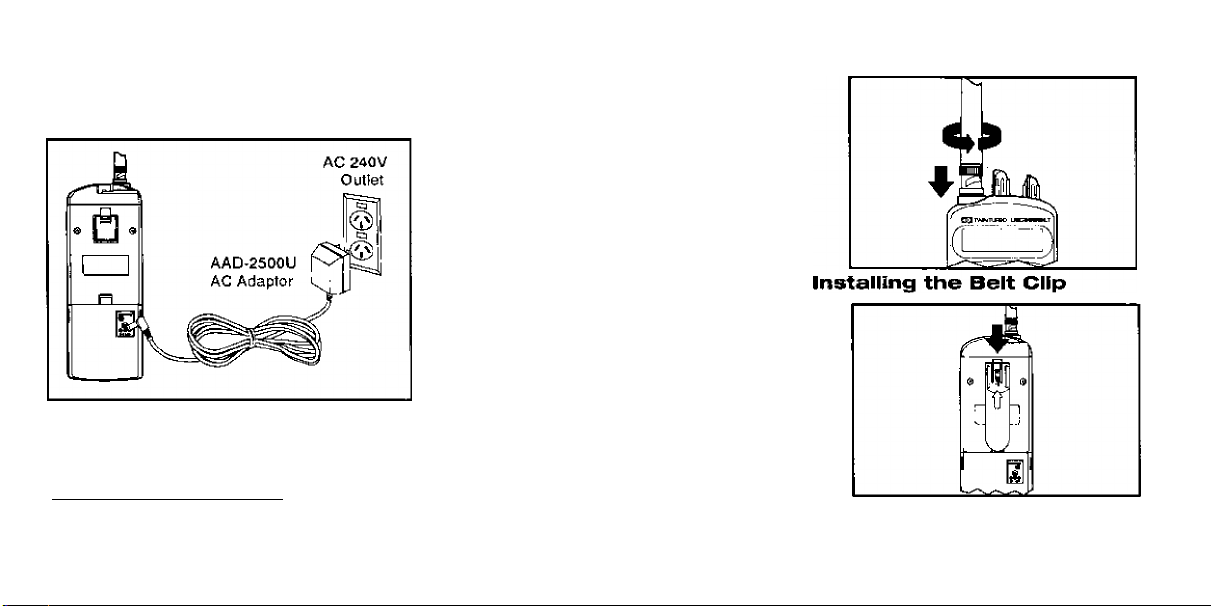
Charging the Battery
Use the AC Adaptor/Charger to power the
UBC3000XLT from an AC outlet.
Warning! Use only the supplied AC
adaptor/charger. Other external power
sources could cause overheating or
damage the scanner oircuits.
________
Notes:
■ It takes 14-16 hours to fully charge
the battery.
■ You can operate the scanner while
the battery charges.
■ Disconnect the adaptor/charger
during a power failure.
See also, “Battery Maintenance" on
Page 40.
Attaching the Antenna
To remove, lift where marked. Push in
direction of arrow.
Page 11

To use your scanner with confidence, it’s
extremely helpful to understand the
following scanner basics.
Banks and Channels
Banks and channels are the way stored
frequencies are organized in your scanner.
■ A channel \s a memory location where
you store a frequency. The channels in
the UBC3000XLT are numbered 1 - 400.
■ A bank is a group of channels. The
UBC3000XLT has 20 banks with 20
channels in each.
You can turn each bank on or off to control
whether its channels are included during
scanning. When you turn off a bank, its
channels are not erased, but are only
temporarily excluded from scanning. This
allows you to customise your scanning
without constantly deleting and
re-programming the channel frequencies.
You can also temporarily lock out
individual channels within a bank during
scanning. This lets you further
customise your scanning without
deleting channel frequencies. See
"Locking Out Channels” on Page 21.
Scanning Versus
Searching
Scanning and searching are similar in
that they both involve finding active
frequencies within a group of
frequencies. The difference isScanning
looks only at a group of programmed
frequencies that are stored in the scanner’s
channels and grouped into banks.
Scanner Basics
Crr
CHANNELS i 2 3 4 5 8 7 §9 10
Frequency Frequency
Leckied Out Not
(lyO) Entered
Searching looks at all the frequencies within
a pre-selected range of frequencies.
If you find an interesting frequency while
searching, you can store it in a channel for
easier access later. See "Search
Programming" on Page 12.
Page 12
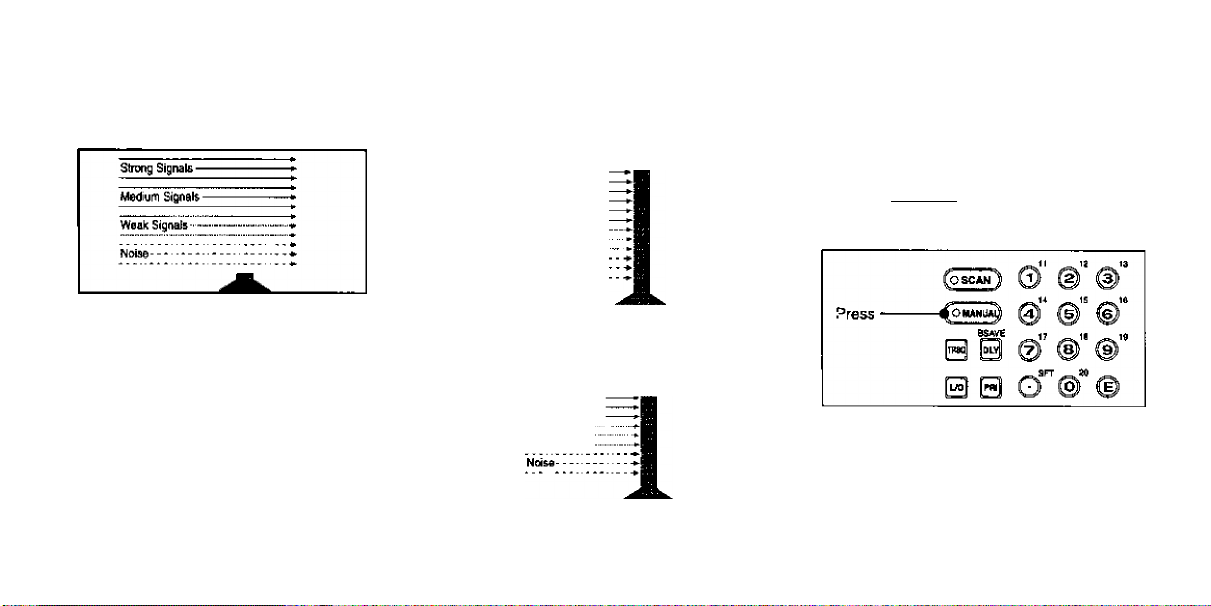
How Squelch Works
The squelch circuit in your scanner is like a
gate. If it is too low, everything gets through
... noise, weak signals, and strong signals.
If the gate is set too high, nothing gets
through ... not even the strong signals.
When the gate is correctly set, strong
signals get through, but weaker signals and
noise are blocked.
Strong Sign^ -
Medium Signals-
Waak Signals
Noise
--------------
Strong Signals
Medium Signals
Weak Signals
Setting the Squelch
Adjust VOLUME to a comfortable listening
level.
To set the Squelch, you must be in the
Manual Mode. No signal should be present
when adjusting Squelch.
1. Press (»mwi*!)until you do not hear a
signal.
Page 13
Turn until hiss heard.
This lowers the squelch gate so that
everything gets through.
Turn just until hiss stops.
This raises the “squelch gate” allowing
only strong signals to get through.
Page 14

Programming Channels
Belore you can scan, you must store two or
more frequencies into the scanner’s channel
memories. There are three ways to program
new frequencies into channels—Manual
Programming, Search Programming, and
Auto-Store Programming.
Manual Programming
1. Select a frequency.
10
2. Enter the Manual Mode.
4. Enter the frequency.
u6
Page 15
5. Store the frequency.
The channel number stops flashing and
a beep sounds.
If the frequency is stored in another
channel, you hear a beep and the other
channel appears in the display.
BANK 1
P / CH 3H
1L9 ICHI HFH
Further press ^ to store the frequency in
the selected channel, or press 0 twice to
cancel.
Repeat these steps to program more
channels.
Use the banks to store similar frequencies
{e.g., local police frequencies) together.
This helps the UBC3000XLT scan faster.
Notes;
■ If you make a mistake, press 0
twice and start over.
■ If you enter an invalid frequency, a
beep sounds and ERROR appears.
Repeat Step 4.
Automatic Battery Save
If you let the UBC3000XLT sit Idle while you
are programming channels (as you look up
more frequencies, for example), the scanner
may switch to the Battery Save Mode. The
display does not change.
To conserve batteries, the UBC3000XLT
switches to Battery Save when:
■ In Manual Mode
■ Delay is OFF
■ No signal is received for 60 seconds
11
Page 16

Search Programming
This procedure lets you search for active
frequencies in a selected range and store
any or all of those frequencies into channels.
For more information about searching, see
“The Search Mode,” page 27.
Note: Be sure to set SQUELCH before you
begin a search. See “Setting the Squelch"
on Page 8.
1, Select a frequency range.
12
2. Enter the Manual Mode.
4. Enter the lower limit of the range.
^1? _ 13
© f ©
' Enter the
© © ©
H 0
@0
BB
ud
©”
108.000
frequency
number.
Then,
press
Page 17

5. Enter the upper limit of the range.
6. Start the search.
The scanner stops on the first active
frequency it finds.
lANK 1
DIY »RCHAr
liOSOO
Il.i KHz AM
■ To store the frequency, stop searching.
Then, proceed to Step 6A, 6B, or 6C.
■ If you do not want to store the frequency,
press @ to continue searching.
6A,Store the frequency in the currently
displayed channel.
6B, To store the search frequency in
another selected channel:
[~aAHX T
I
lao.soo
[_
___
DLY
li,5 KMi AM
13
Page 18

Note: For channels 1 - 9, you can enter just
a single digit.
2. Press A ■ 'T'he display alternates
between the search frequer\cy and the
new channel/trequency.
P IB 1 000.000
L,'0 KHiJkU
DLY
IPO.SOO
KHz AH
3. Enter the new frequency.
12 _13
__
@ B @ ® ®
0 B o" ®" ^
@ ©
BSAVE IT 1# ,n 1*
■Press
6C.T0 store the search frequency in the first
empty channel in another bank:
1.
2. Select the bank.
iP 100.500 .H,
[
_____
11J KHl HU
3. Store the search frequency.
___
_
14
pifif lгo.50o
\l,l KHlAH
Page 19

Auto-Store Programming
This prcrcedure searches a frequency range
and automalically stores active frequencies
into empty channeis of the seiected bank(s).
Note; Be sure to set SQUELCH before you
begin a search. See “Setting the Squelch"
on Page 8,
1. Select the frequency range.
2. Enter the Manual Mode.
©” ©"
Press —
—© ©
eSAVE <9
a 0 © @ ©
0 s o"' ®
3. Enter the lower limit of the range.
_ 1Í ^ Pi'
CoKw)l Q ® i
S S; ® ® ® ;
■ ~Jh' "
0 @ ^0 A
p m ^00.000
..............
■ inter th«
frequency
©' ® i
numbec
......
press
4. Enter the upper limit of fhe range.
5, Enter the Auto-Store Programming Mode.
s s @ ® ®
0 0 0 © ©
0 B W 0 4
B0 0
—“ Press
llANK i I «i « U lV it IT It n
DATA *
P 180.500 NH.
ta.B KHz AH
15
Page 20

6. Select the bank(s).
7. Begin searching.
0 0 © ® ®
When all empty channels in the bank(s)
have been programmed, FULL appears
along with the last channel/frequency
programmed.
It “FULL” appears, all 20 channels of
the bank are full. Select another bank.
Note: For banks 11 - 20, press SFT then
the appropriate number. (Example - SFT-1
for Bank 11.)
16
0 0 O ® ©
BB V
__
AM NFW
0 0 0 0 0
IE ‘4>
m B88.88B
3^ tRCHA
nj KHl NFU
Active frequency stored.
AVTO MCHA
гг H08.3315.
ItJ EKt RFH
Search continues.
IE
11.B KKE NEH
tRCKA
888.888 RH.
Press
60 FULL
60 H53ms
If there are not enough active frequencies
found to fill the available empty channels,
the scanner continues searching until you
press A p Of 0 to manually stop
Auto-Store.
During Auto Store, you don’t hear audio
from the signals received and stored.
Auto Store will store every received
transmission. Be sure to review the
channels and delete any unwanted
frequencies.
Page 21

Transferring A Channel
Frequency
This procedure lets you transfer a stored
frequency to a channel in another bank.
1. Enter the Manual Mode.
2. Select the charnel with the frequency
you want to transfer.
3. Press [ SND ] key.
“BANK" Icon starts blinking.
59 H58.115
1t( KHx HFU
4. Select the desired bank. The selected
bank’s lowest empty channel flashes.
FULL appears if all channels in the
selected bank are already programmed.
1LS KHi NFH
17
Page 22

5. Transfer the frequency.
Channel & Frequency blinks twice
followed by a beep, indicating frequency
has transferred to the selected channel.
18
Deleting A Stored Channel
Frequency
Use this procedure when you want to delete
a frequency from a channel without storing a
new frequency in its place.
1. Find the frequency you want to delete.
2. Press [ 0 ] key.
H0B.3315.
11.1 KHl NFM
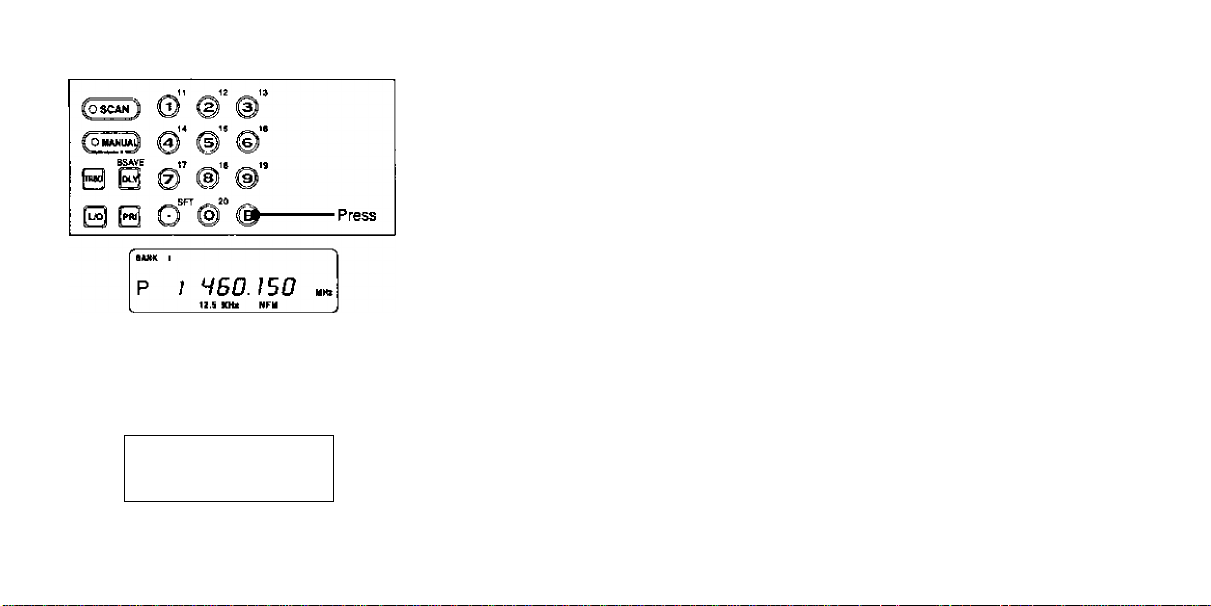
Page 23

3. Press [ E ] key.
For more information, see
- “The Scan Mode" on Page 20
- ‘The Manual Mode” on Page 32
Note: If you use the Scan Mode to
display the channel, press to
enter the Manual Mode before
proceeding to Step 2,
I
19
Page 24

The Scan Mode
Begin Scanning
There are two ways to begin scanning.
■ Turn on the scanner. Scanning begins
each time you turn the UBC3000XLT on.
■ While in the Manual Mode:
BUiK 11»
SCAN Mm i
8B6 5CRn
20
In the Scan Mode, the UBC3000XLT cycles
through all the channels you have
programmed in the banks that are currently
active.
For more information see
- “Scanner Basics" on Page 7
- “Programming Channels" on Page 10
- Turning Banks On or Off” on Page 20.
The soanner stops on each channel that is
broadcasting a signal and automatically
resumes scanning when the signal stops.
Or, you can press i*sc«n) to resume
scanning.
iiHK
"“AN
50 .
12.5 KNiAK
For more information see
- “Using Scan Delay" on Page 25
- "Using Data Skip" on Page 34
Turning Banks On Or Off
After you have programmed channels in
several of the scanner’s banks you can
customise which channels you scan by
turning the banks on or off.
1.
Page 25

2. Select the bank you want to turn on or
off. Example -1,2 and 3.
If the bank number appears at the top of
the display, the bank is on. If not, it is off.
Notes:
■ Use the zero key to select bank 10.
■ To select banks 11 - 20, press 0
followed by the appropriate number key,
(Example: 0 © } The numbers 11 -
20 appear next to the corresponding
number keys.
■ You can turn on a bank whether or not
you have stored frequencies in any of its
channels. The scanner still only scans
programmed channels.
■ One bank must always be on. If you try
to turn off all 20 banks, Bank 1 will
automatically activate.
Locking Out Channels
The lock-out feature lets you further
customise the channels that you want to
scan at a particular time.
For example, if a stored frequency
broadcasts almost ail the time, the scanner
will stop on it and stay. You can lock out that
channel when you are more interested in
the other channels for the current scanning
session.
When you lock out a channel, it is
temporarily excluded from scanning, but it
remains programmed so that you can easily
unlock it for scanning later.
You can select a locked out channel using
the Manual Mode. See The Manual Mode"
on Page 32.
Lockout in Manual Mode
1, Enter the Manual Mode.
21
Page 26

2. Select the channel.
22
For more information, see
- ‘The Manual Mode” on Page 32.
- “The Scan Mode" on Page 20.
Locking a Channel While Scanning
If the scanner keeps stopping on a particular
channel due to noise or too-frequent
transmissions, you may want to keep that
channel from scanning.
1. Wait until the scanner stops at the channel.
aAHn
SCAN
80
12.S KKi HfU
2. Then:
The scanner immediately resumes scanning
because that channel is no longer in the
scanning sequence.
Unlocking a Channel
Note: Empty channels are automatically
locked. You cannot unlock an empty
channel.
1. Enter the Manual Mode,
© © ©
Press ■
&SAVE ]7 IS
B B @ ® ©
_ _
SffT
©"
0 B G ® ©
Note: Because the channel is
locked-out, you cannot use the Scan
Mode to select it.
Page 27

2. Select the !ocked-ou1 channel.
3. Unlock the channel.
BO
11.S KHl NFU
Unlocking All Channels
If you have locked out many channels and
want to unlock them all. or if you have
forgotten exactly which channel you have
locked out, you can simply unlock all
channels at once,
1. While scanning, turn on each bank that
contains channels you want to unlock.
2. Enter the Manual Mode.
3. Unlock all channels.
3CAM '
888 5Cnn
You hear two beeps when all channels
are unlocked.
23
Page 28

Using Priority Scan
You can program one Priority Channel in each
of the first 10 banks. During Priority Scanning,
your seiner checks these special channels
every two seconds, whether or not the
scanner has located an active channel.
To activate Priority Scanning:
Press
--------^14 15 ^1«
© © ©
S B
B
©"
0
©"
©”
The scanner begins normal scanning, but if
it detects a signal on a priority channel, it
remains on that channel until the signal
ends. See “Using Scan Delay" on Page 25.
SANK i II
SCAN '
8B8 5CRH
SANK ^14 li
SCAN '' PNi
P IRD.BOO
Note: If you have more than one bank
selected that has a programmed priority
channel, the lower channel number has top
priority.
Data Skip is not active in this mode.
Selecting A New Priority Channel
There is one priority channel in each of the
first 10 banks. The scanner is
pre-programmed with the first channel of
each of these banks as a priority channel.
However, you can change the priority
channel to be any other channel within the
bank.
Note: When you select a new priority
channel, the old priority channel
automatically becomes a regular channel,
1. Enter the Manual Mode.
24
Press
--------
B
0
®” ©'■ ©’■
Page 29

I. Select the new channel.
3. Change the new channel to Priority.
transmission before resuming scanning, in
case there is a reply.
See also “Using Search Delay" on Page 30.
You must individually program each channel
you want to use Scan Delay feature.
■ After programming a new channel:
For more Information, see
- 'The Manual Mode" on Page 32
- "The Scan Mode" on Page 20
Note: If you use the Scan Mode to select
the channel, press (»miiiinlto enter the
Manual Mode before proceeding to Step 2.
You hear two beeps and P appears at
the left of the display.
Using Scan Delay
On some two-way channels there might be
short lapses in the signal while waiting for a
reply.
The Scan Delay feature causes the scanner
to wait two seconds after the end of a
25
Page 30

■ To add Scan Delay to an existing
programmed channel:
1. Enter the Manual Mode.
2. Select the channel.
26
3. Turn Scan Delay ON.
Page 31

The Search Mode
In the Search Mode, the scanner looks for any
active frequencies within a range of
frequencies you select. You can search the
entire range of the scanner, but it is best to
select a narrower range, so that you have a
better chance of finding all the active channels.
Use Search if you don’t have a frequency
directory handy, or if new stations have
been added since the directory was
published.
Beginning A Search
To set the limits and begin searching:
2. Enter the Manual Mode.
_ T1
® © ®
Press ■
© 0 © ® ©
0 0 d" ©
3. Enter the lower limit of the range.
® © ©
4. Enter the upper limit of the range
00 © ® @
0 0 o'" ©“ ©
0 0 w
___
AM NFW WM
S 0 0 0 0
-------
I
Press
27
Page 32

Notes
If you want to program any of the
frequencies you find during a search,
see “Search Programming" on Page 12.
You can change the direction of the
search.
0 ^ ® ©
____ ____
S 0 0 @ 0
0 0
sFT ^
i © © Then
d
W NFM Wn*
© © ®
sFT
I © 0 Then
d
0 0 ^ 0 A
S 0 0 @ @ frequencies.
28
------
--
Press [.] key
higher
frequencies.
------
Press J.) key
to search
Scrolling Frequencies
Scrolling temporarily suspends a search
and allows you to manually move up or
down through the frequertcies.
1. To begin scrolling:
2. Move up or down by the displayed frequency'
step.
0 E @ © ©
0 0 O ® 0
lANK I
OATlT OLY
0 A- to move up
« ICHt hfh
0 0
B 0 0
Note: The arrows next to the SRCH
indicator show the last direction you
scrolled.
if you want to change the frequency
step, see “Changing the Frequency
Step" on Page 35.
C3
131.SH5
Press
or
to move down.
Page 33

3. To continue the search;
B s ® ® ®
B 0 o ® ©
0 0^
BB 0 0 0
MT« bVt MCHa
^^^888.889
■ KKt NFM
Note; The search resumes in the
direction that you last scrolled.
Pr«ss
Using Turbo Search
If you are searching a frequency band that
has a 5 kHz step, or if you override the
default frequency step and set it to 5 kHz,
you can select Turbo Search. This
increases the search rate from 100
frequencies-per-secornt to 300
frequencies-per-second.
To select Turbo Search;
For more Information, see
- “Frequency Bands and Steps” on
Page 42.
- “Changing the Frequency Step" on
Page 35.
I
29
Page 34

Jsing Search Delay
3n some two-way channels there might be
short lapses in the signal before a reply. The
Search Delay feature causes the scanner to
wait two seconds after the end of a
jansmission before resuming searching, in
case there is a reply.
Unlike Scan Delay, you don't have to turn
on Search Delay for each frequency in the
search range. Search Delay works for the
entire frequency range you chose.
To turn on Search Delay:
C03C*w} ® @ @
Press —
S'® gi’®"®”
В в о“"®” ©
DATIC Dir IRCHa
Ш888.8в8
■ KHl Nn
30
Press DLY again, to turn off Search Delay.
Locking Out Frequencies
Note: This feature is similar to locking out a
programmed channel, except you can only
lock out 50 frequencies. You can lock out
any number of channels.
During a search, you might repeatedly
encounter frequencies that you are not
interested in. Also, all scanners are subject
to receiving internally generated frequencies
(called birdies) that stop your scanner’s
search when there is no real signal present.
See “UBC3000XLT Birdies" on Page 43,
In either case, you can lock out up to 50
such frequencies to make your scanner
search more efficiently. If you try to lock out
more than 50 channels, the 51st channel
replaces the first channel in memory.
Locking Out a Frequency
When the scanner stops on a frequency you
want to lock out:
Searching resumes immediately.
Page 35

Unlocking a Frequency
1. Stop the search.
3. Unlock the frequency.
1. Stop the search.
B 0 @ ® ©
B 0 © @ ®
0 0 G © ©
0 0 W 0 ^
NFM WFW
00 B S
2. Find the locked out frequency.
S 0 @ ®
B 0 G ®
0 0 to move up
00 0
AM wFu or
CMmi DtT SRCHA
tm 139.8HS
HOLDi/a 5 SHI NFU
Press
■to move down.
Press
Unlocking All Frequencies
If you have locked out many frequencies
and want to unlock them all, or if you have
forgotfen which ones you locked out, you
can unlock all frequencies at the same time.
0 0 d"®“ ©
0 B W 0 ^
0 0 0 0 B
2. Unlock all frequencies.
You hear two beeps. All locked out
frequencies are now unlocked.
— Press
I
31
Page 36

The Manual Mode
Scrolling Channels
When you scroll through the channels in the
manual mode, you see every channel, even
ones that are empty or locked out.
There are two ways to scroll through all the
scanner channels.
3?
To step through all channels one at a
time in ascending order:
вг
13. S KHI NFH
> To scroll up or down through all
channels:
B @ @ ® ©
0B ^9 to move up
S B 0
to move down.
Page 37

Selecting A Specific Channel
Using this procedure, you can select any
one of the scanner’s 400 channels. It does
not matter if the channel is locked out or
empty.
1. Enter the Manual Mode.
2, Select the desired channel.
Example: Channel 75
3.
6г
KHi NFy
I
33
Page 38

I
Using Data Skip
Some frequencies carry un-mod ulated
signals or data signals (such as pager
preamble signals). If your scanner detects
such a signal during scanning or searching,
it remains on the channel or frequency and,
after three seconds, resume SCAN or
SEARCH.
You can set the scanner to continue
scanning after a 3-second delay, when it
encounter such signals.
Note: Data Skip is not available for the AM
band and is not active during Priority scan.
Note: You can turn Dafa Skip on or off at
any time during scanning.
To turn on Data Skip while scanning:
34
«MR M I
SCAN '
8B8 SCRfi
Press ■
s @ © ® ®
^ 0 o’" ® ©
"0^ W S A
S B 0 B @
HR* WFW
Additional Scanner Features
SANK
SCAN '
888 5Cnn
The scanner defauits to Data Skip in the
Search Mode.
18H888.889
S RKe NF«
if you want to disable Data Skip during search:
0 0 @ ©
Press ■
SANK t
B 0 o’"®" ©
0^ ^ 0 A
__ __ M NFM WFM
00000
IRCMA
l38?,88d.988
i KH> NFy
Page 39

Changing The Frequency Step
The frequency step is the minimum space
between frequencies in fhe Manual or
Search Mode.
Your scanner is pre-programmed wifh a
default frequency step fer each of its 16
bands. See “Frequency Bands and Steps"
on Page 42. You can override the defauit
frequency step to search in larger or smaller
increments.
Note: For the Bands with 30 kHz default
frequency step, the frequency step
will not be shown on the display.
35
Page 40

Setting The Signal Mode
Your scanner is capable of receiving three
signal modes:
• AM........................ Amplitude Modulation
■ NFM,,.. Narrow Frequency Modulation
■ WFM
.........
Wide Frequency Modulation
Each of the scanner’s 16 frequency bands
is pre-programmed with a default signal
mode.
If you want to override the default signal
mode for a particular frequency:
1. Enter the Manual Mode.
36
2, Select a different signal mode,
0 0 © ® ®
0 0 Q^© ©
0 e w 0 A
___
..AM. - - MFlil- - aiEH.
S 0 ;0 @ Sf-
-
--------------------------
89 HS^.SIS y„,j
_______
».I KHl jljifll: j
Note: When you override the default
signal mode, the signal mode indicator
flashes.
■ Press
Then,
press
- mode.
^
3. To return to the default signal mode:
0 0©©®
0 0 gC®” ©
-------
Then,
mode.
0 B W 9 A
S 0 ;0 S B?—
89 .
I KHl KFH
^---------------------------
Note: In the search mode, press 0 twice.
‘—Stop blinking
Page 41

Using Signal Attenuation
You can use the Signal Attenuation feature
in the manual, search, or Scan Mode,
When the ATT indicator is on, the incoming
signal strength Is attenuated (reduced) by
about 14 dB. This prevents unusually strong
signals from over-loading the scanner.
In the Scan Mode, you must individually
program each channel you want to use the
Signal Attenuation feature.
In the Search Mode
1, Set the search limits and press @ ,
See “The Search Mode” on Page 27.
2. Turn Signal Attenuation on.
0 0 © ® ©
0 0 o © ©
Press ■
0
__ _
^ S
AM U WFW
B 0 0 @ 0
A
»CUATT
138 88B.888
12.» KHf NFM
All signals are reduced during the search.
Press 0 again during search to turn off
Signal Attenuation for the Search Mode.
tn the Scan Mode
When the scanner stops on a channel:
0 0 © © ©
0 0 d"®“ ©
Press ■
0 ^ 0 A
AM MFU HFU
B 0 0 0 0
P 31 H98.981
In the Manual Mode:
Turn Signal Attenuation on fora specific channel,
1.
00 © ® ©
0 0 G ® ©
Press
----
—0 B W 0 A
0 0 0 0 0
To change, press 0 again.
37
Page 42

Display Light
The display light lets you view the display in
dark or low-light conditions.
To turn on the light:
The light stays on for about 15 seconds.
Press']^ again as necessary. Holding
0 does not extend the lighted time.
38
Page 43

Optional Accessories & Replacement Parts
The following optional accessories and replacement parts are available for your UBC3000XLT scanner.
Operating Guide
<OMUBC3000XLT)
UBCaoooxLT
P
39
Page 44

Care & Maintenance
Battery Maintenance
Rechargeable nickel-cadmium batteries
typically suffer from a memory effect that
gradually reduces their capacity over time.
After two or three months of use, if you
notice that the battery provides power tor a
slightly shorter time on each charge, do the
following.
1. Leave the scanner on until the low
battery warning sounds and the [low
batt] indicator appears.
2. Recharge the battery for 14-16 hours to
ensure a full charge.
General Use
■ Turn off the scanner before removing
the battery.
■ Always write down the programmed
channels/frequencies in case of a
memory loss.
40
■ Always firmly press each scanner key
so that you hear the entry tone.
Location
■ If strong interference or electrical noise
is received, move the scanner. A higher
location usually results in better
reception.
■ Do not use the scanner is high-moisture
environments, such as a kitchen or
bathroom.
■ Avoid placing the scanner in direct
sunlight or near heating elements or
vents.
Cleaning
■ Disconnect the AC adaptor/charger
while you clean the scanner.
■ Clean only the outside of the scanner
with a mild detergent.
■ To prevent scratches, do not use
abrasive cleaners or solvents to clean
the scanner.
■ Do not rub the display window.
■ Do not use excessive amounts of water.
Repairs
■ Do not attempt any repairs. The scanner
contains no user-service able parts.
Contact the Uniden Customer Service
Division, or take the scanner to a
qualified repair technician.
Page 45

Troubleshooting
If your scanner is not working properly, try the solutions listed below.
Problem Possible Solutions
Scanner doesn’t
work at all
Poor reception
Scan won’t stop
Scan won’t start
• Be sure the battery is installed and properly
charged.
• Check the AC adaptor/charger connections.
• Be sure the scanner is turned on.
• Check the antenna connection.
• Move the scanner to a different location.
• Adjust the SQUELCH cohtrol,
• Check the antenna connection.
■ Trv a search. All channels might be inactive.
• Be sure the selected banks have channels
programmed.
• Adjust the SQUELCH control.
Problem Possible Solutions
Search won’t
start
Keypad won’t
work
• Adjust the squelch control.
• Check the Keypad Lock feature
If you still cannot get satisfactory results, and want more
information, or if you want to return the scanner for service, call or
write to
Uniden Service Division. The address and phone number
are listed in the Warranty at the end of this Operating Guide.
41
Page 46

Technical Information
Frequency Bands And Steps
The following table shows the 16 bands you can monitor with your scanner. The signal modes and the steps are default settings that you can
override. See "Setting the Signal Mode" on Page 36, and "Changing the Frequency Step” on Page 35.
Frequency
Coverage (MHz)
25.0000 to 28.9950 AM
29.0000 to 55.9950
56.0000 to 69.9500
70.0000 to 87.9950
88.0000 to 107.9500 WFM
108.0000 to 136.9875 AM 12.5
137.0000 to 173.9950
174.0000 to 221.9500
222.0000 to 399.9875 AM
400.0000 10 519,9875 NFM 12.5
520.0000 to 549.9500 WFM 50.0
760.0000 to 823.9875
42
Signal
Mode
NFM
WFM
NFM
NFM
WFM
NFM
Default
Steps (kHz)
5.0
5.0
50.0
5.0
50.0
5.0
50.0
12.5
12.5
Frequency
Coverage (MHz)
824.0100 to 848.9700
849.0000 to 858.9875
869.0100 to 893.9700
894.0000 to 1300.0000 NFM
Signal
Mode
NFM
NFM
NFM
Default
Steps (kHz)
30.0
12.5
30.0
12.5
Page 47

UBC3000XLT Birdies
Birdies are internally generated frequencies that cause the scanner to stop during search or scan. If you have prc4>!ems with these
frequencies, use the lockout features to keep the scanner from stopping.
Frequency (MHz) Frequency (MHz)
28.6350 159.2900
35.7950 159.2950
37.0950 161.0800
37.1000 161.0850
42.4000 169.3750
74.2000 230.4750
110.9625 288.1000
115.2375 312.4625
132.2750 312,4750
132.4500 350.8000
134,2375 368.7000
136.0250 377.6500
137.6400 403.3375
137,6500 428.6125
Frequency (MHz) Frequency (MHz)
137,8150 428.6250
139.6050 434,1500
141.3950 455.3500
143.1850
497.7500
144.9750 820.7000
146.7650 850.0875
148.5550 908.4500
150,3450 937.7000
152.1350 967.8000
153.6000
967.8375
153.9200 1083,9500
153.9250 1083.9875
155.7100
1114.0500
155.7150 1260,3000
1290.4000
43
Page 48

Specifications
Channels: 400
Banks: 20 with 20 channels per
Bands; 16
Frequency Range:
25.0000 to 28.9950 MHz (AM)
29.0000 to 55.9950 MHz (NFM)
56.0000 to 69.9500 MHz (WFM)
70.0000 to 87.9950 MHz (NFM)
88.0000 to 107.9500 MHz (WFM)
108.0000 to 136.9875 MHz (AM)
137.0000 to 173.9950 MHZ (NFM)
174.0000 to 221.9500 MHz (WFM)
222.0000 to 399.9875 MHz (AM)
400.0000 to 519.9875 MHz (NFM)
520.0000 to 549.9500 MHz (WFM)
760.0000 to 823.9875 MHz (NFM)
824.0100 to 848.9700 MHz (NFM)
849.0000 to 868.9875 MHz (NFM)
869.0100 to 893.9700 MHz (NFM)
894.0000 to 1300.0000 MHz (NFM)
44
bank
Operating Temperature: Antenna: Rubber antenna
-20'’CtO +60°C (included)
Scan Rate: 100 channels per
second
External Jacks: External earphone,
External speaker,
Search Rate: 100 steps per second - DC 12V power jack
normal
300 steps per second -
Size: 69.0(W) X 38.5(D)
X 187.0(H) (mm)
Turbo (Without Antenna)
Scan Delay; 2 seconds
Weight: 370 (g)
Audio Output: 0.5W nominal into QQ.
internal speaker;
3mW nominal into 32i3
stereo headphone;
8mW nominal into 64Q
supplied earphone.
Power Requirements;
BP2500(AUS) Ni-Cd
Battery 6VDC, 600mAH
AAD2500U AC Adaptor
Input AC240V 50Hz,
Output DC12V, 200mA
Page 49

One Year Limited Warranty
Note: Please keep your sales docket as it provides evidence of warranty.
WARRANTOR: Uniden Australia Pty. Limited ACN 001 865 498
ELEMENTS OF WA RRANTY: Uniden warrants to the original retail owner for the duration of this warranty, its UBC 3000XLT Scanner (hereinafter referred to as the Product), to be free
Irom defects in materials and craftsmanship with only the limitations or exclusions set out below.
WARRANTY DURATION: This warranty to the originafTetail owner only, shall terminate and be of no further effect ONE (1) Year after the date of original retail sale. This warranty will
be deemed invalid it the product is; (A) Damaged or not rfiaintained as reasonable and necessary, (B) Mod ¡lied, altered or used as part of any conversion kits, subassemWies, or any
configurations not sold by Uniden, (C) Improperly installed. (D) Repaired by someone other than an authorised Uniden Repair Agent for a defect or malfunction covered by this warranty,
(E) Used in conjunction with any equipment or parts or as a part ol a system not manutactured by Uniden, (F) Installed, programmed or serviced by anyone other than an authorised Uniden
Repair Agent, (G) Where the Serial Number label ol the product has been removed or damaged beyond recognition.
PARTS COVERED: This warranty covers for Oneyear, IheUBC SOOOXLTScanner unit only. Antenna, Belt Clip, NiCAD Battery, AC Adapior/Charger, Leather Case, Monaural Earphone.
and other accessories are covered for 90 days.
STATEMENT OF REMEDY: In the event that the product does not conform to this warranty at any time while this warranty is in effect, the warrantor at its discretion, will repair the defect
or replace the product and return it to you without charge lor parts or service. THIS WARRANTY DOES NOT COVER OR PROVIDE FOR THE REIMBURSEMENT OR PAYMENT OF
INCIDENTAL OR CONSEQUENTIAL DAMAGES.
WARRANTYCARD: IfawarrantycardhasbeenincludedwiththisproductthenpleaseftlliUnandreturntouswilhinlAdaysolpurchase YournameandtheSerialnumberoftheproduct
will then be registered in our database and this will help us process your claim with greater speed and efliciency should you require warranty service.
PHOCEDUREFOROBTAININGPERFORMANCEOFWARRANTY:intheeventthattheproductdoesnot conform to this warranty.theProductshouldbeshippedordelivered,I re ight
pre-paid, with evidence ol original purchase (egf a copy of the sales docket), to the warrantor at:
UNIDEN UBC 3000XLT 1 YEAR WARRANTY
UNIDEN AUSTRALIA PTY LIMITED
SERVICE DIVISION
345 Princess Highway, Rockdale, NSW 2216
Ph (02) 539 3100 FAX (02) 599 3278
Customers in other States should ship or deliver the Product
treight pre-paid to their nearest Uniden Authorised Repair Centre
(Contact Uniden for the nearest Warranty Agent to you)
Page 50

uniden
UBZZ01247AZ
©1995 Uniden Corporation.
All rights reserved.
Printed in the Philippines.
 Loading...