

Page 1
UBC 248CLT
• FULLY PROGRAMMABLE
• FULL FREQUENCY LCD READOUT
• ALARM CLOCK
• AM/FM RADIO
• CHANNEL LOCKOUT
• PRIORITY CHANNEL
• SCAN DELAY
• MEMORY BACKUP
• FREQUENCY SEARCH
8 BAND, 50 CHANNEL SCANNER with AM/FM RADIO
Reference Guide
Page 2

Precautions
Before you read anything else,
please observe the following:
Uniden®and Bearcat®are registered trademarks of Uniden Corporation.
Changes or modifications to this product not expressly approved by
Uniden, or operation of this product in any way other than as detailed by
this Reference Guide, could void your authority to operate this product.
Uniden DOES NOT represent this unit to be waterproof. To reduce the
risk of fire or electrical shock,
DO NOT expose this unit to rain or
moisture.
Page 3

Introduction . . . . . . . . . . . . . . . . . . . . . . . . . . . . . . . . . . . . . . . . . . . . . 1
About Scanning . . . . . . . . . . . . . . . . . . . . . . . . . . . . . . . . .1
Taking Proper Care of Your Scanner . . . . . . . . . . . . . . . . . .2
Unpacking . . . . . . . . . . . . . . . . . . . . . . . . . . . . . . . . . . . . .2
Getting Started . . . . . . . . . . . . . . . . . . . . . . . . . . . . . . . . . . . . . . . . . . . 3
Installing the UBC248CLT . . . . . . . . . . . . . . . . . . . . . . . . .3
Operation . . . . . . . . . . . . . . . . . . . . . . . . . . . . . . . . . . . . . . . . . . . . . . . 4
Controls and Functions . . . . . . . . . . . . . . . . . . . . . . . . . . .4
Scanning Overview . . . . . . . . . . . . . . . . . . . . . . . . . . . . . .7
Clock Set-Up . . . . . . . . . . . . . . . . . . . . . . . . . . . . . . . . . . . . . . . . . . . . . 8
Initial Clock Set-up . . . . . . . . . . . . . . . . . . . . . . . . . . . . . . .8
Using the Scanner . . . . . . . . . . . . . . . . . . . . . . . . . . . . . . . . . . . . . . . . . 9
Set the Squelch . . . . . . . . . . . . . . . . . . . . . . . . . . . . . . . . .9
Programming Tips for Scanner . . . . . . . . . . . . . . . . . . . . . .11
Programming Scanner Frequencies . . . . . . . . . . . . . . . . . . .12
Deleting a Scanner Frequency . . . . . . . . . . . . . . . . . . . . . . .13
About Memory Back-up . . . . . . . . . . . . . . . . . . . . . . . . . .14
Scanning Mode . . . . . . . . . . . . . . . . . . . . . . . . . . . . . . . .14
Bank Scanning . . . . . . . . . . . . . . . . . . . . . . . . . . . . . . . . .14
Manual Mode . . . . . . . . . . . . . . . . . . . . . . . . . . . . . . . . . .15
Direct Channel Access for Scanner . . . . . . . . . . . . . . . . . . .16
Priority Scanning . . . . . . . . . . . . . . . . . . . . . . . . . . . . . . .16
Channel Lockout . . . . . . . . . . . . . . . . . . . . . . . . . . . . . . .18
Restore All Locked Out Channel . . . . . . . . . . . . . . . . . . . .19
Delay . . . . . . . . . . . . . . . . . . . . . . . . . . . . . . . . . . . . . . . .19
To Set Delay in Scan Mode . . . . . . . . . . . . . . . . . . . . . . . .20
To Set Delay in Manual Mode . . . . . . . . . . . . . . . . . . . . . .20
Searching . . . . . . . . . . . . . . . . . . . . . . . . . . . . . . . . . . . . .21
Additional Features . . . . . . . . . . . . . . . . . . . . . . . . . . . . . . . . . . . . . . .23
LCD Backlight . . . . . . . . . . . . . . . . . . . . . . . . . . . . . . . . . 23
Programming Radio AM/FM Frequencies . . . . . . . . . . . . . . 23
Deleting a Stored Radio Frequency . . . . . . . . . . . . . . . . . . 25
Direct Channel Access for Radio Stations . . . . . . . . . . . . . . 25
Reset the Clock Time . . . . . . . . . . . . . . . . . . . . . . . . . . . . 26
Set the Alarm Time . . . . . . . . . . . . . . . . . . . . . . . . . . . . . . 27
Set Alarm to Tone Mode . . . . . . . . . . . . . . . . . . . . . . . . . . 28
Turn the Alarm Off . . . . . . . . . . . . . . . . . . . . . . . . . . . . . . 29
Set Alarm to Radio Mode . . . . . . . . . . . . . . . . . . . . . . . . . 30
Turn the Alarm Off . . . . . . . . . . . . . . . . . . . . . . . . . . . . . . 30
About the Unit. . . . . . . . . . . . . . . . . . . . . . . . . . . . . . . . . . . . . . . . . . . 31
Helpful Hints . . . . . . . . . . . . . . . . . . . . . . . . . . . . . . . . . .31
Troubleshooting . . . . . . . . . . . . . . . . . . . . . . . . . . . . . . . . . . . . . . . . . 32
Technical Specifications. . . . . . . . . . . . . . . . . . . . . . . . . . . . . . . . . . . . 34
One -Year Extended Warranty . . . . . . . . . . . . . . . . . . . . . . . . . . . . . . . 35
TABLE OF CONTENTS
Introduction
Getting
Started
Operation
Clock
Set-Up
Using the
Scanner
Additional
Features
About the
Unit
Troubleshooting
Specifications
Page 4
1
About Scanning
Scanning is easy and fun with the UBC248CLT 50-Channel Base Scanner with AM/FM Radio.
What is Scanning?
Unlike standard AM or FM radio stations, most 2-way communications do not transmit
continuously (see Types of Communication below).
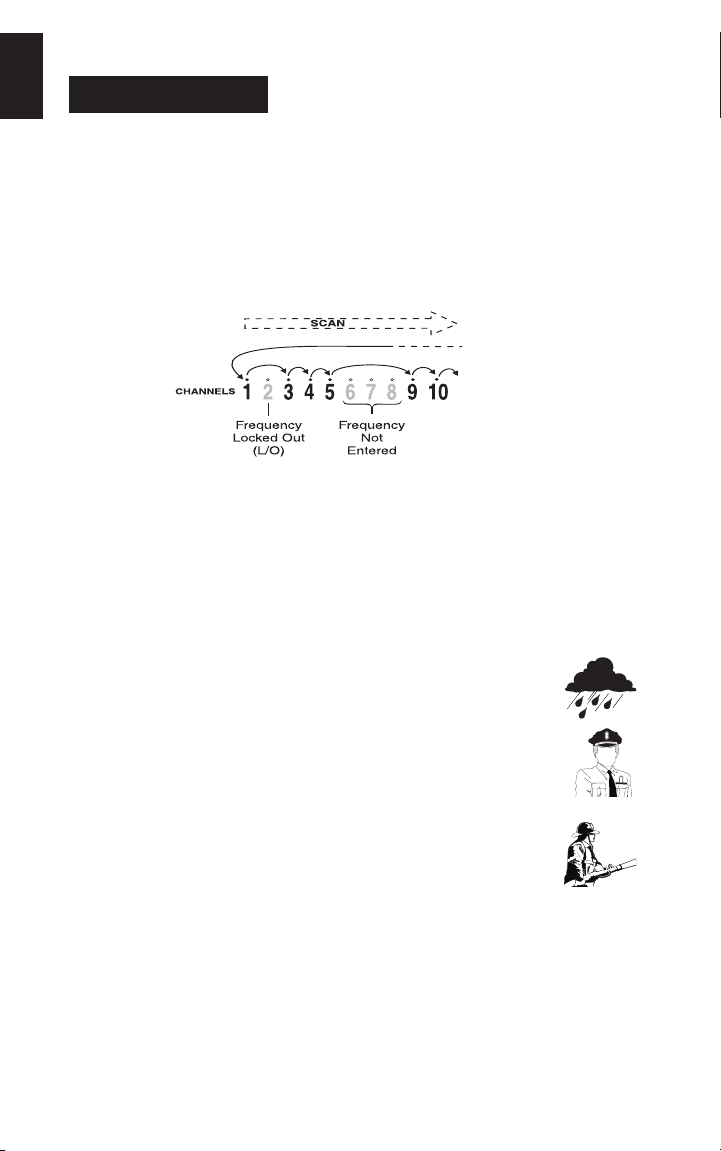
The UBC248CLT scans programmed channels at rate of up to 12 channels per second until
it locates an active frequency. When the scanning stops on an active frequency, it remains
on that channel as long as the transmission continues. When the transmission ends, the
scanner stays on the channel for 2 more seconds, waiting for a responding transmission. If
no responding transmission is detected, the scanning cycle resumes until another
transmission is received.
Types of Communication
You can monitor communications such as:
■
Police and fire departments (including rescue and paramedics)
■
Business/industrial radio
■
Utilities
■
Land transportation frequencies such as trucking firms, buses,
taxis, tow trucks, and railroads
■
Marine and amateur (ham radio) bands
INTRODUCTION
Page 5

2
■
Many more in the 66-88MHz, 137-174MHz, and
406-512MHz ranges
■
AM/FM radio
You must program a frequency into each channel you want to use.
Taking Proper Care of Your Scanner
■
Do not use the scanner in high-moisture environments such as the kitchen
or bathroom.
■
Avoid placing the unit in direct sunlight or near heating elements or vents.
■
Do not unplug the scanner for prolonged periods of time, lack of power will cause
the clock to reset.
Unpacking
Carefully check the contents against this list:
■
UBC248CLT Base Scanner
■
Telescopic Antenna
■
AM Radio Antenna
■
AC Adaptor (Model AC-144U)
■
This Reference Guide
■
Registration Form
☞
If any items are missing or damaged, contact the place of purchase
☞
Complete and mail your Registration Form immediately.
☞
Read this Reference Guide thoroughly before operating the scanner.
Page 6
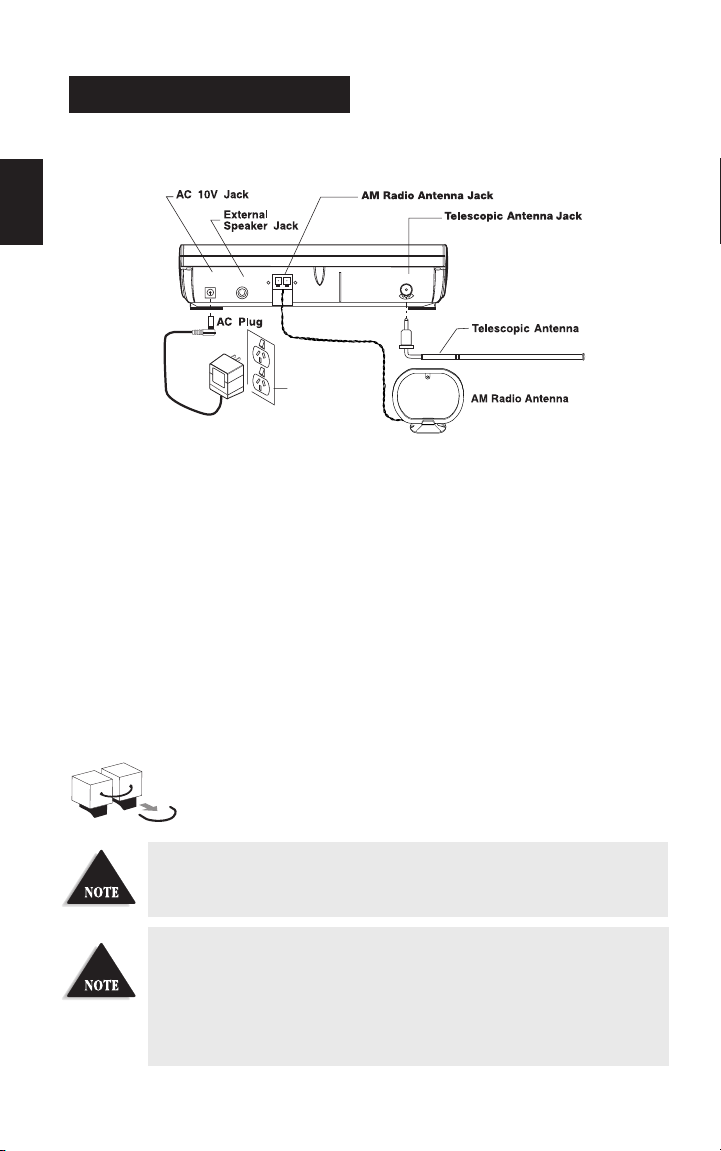
Installing the UBC248CLT
1. Insert the small plug at the end of the AC Adaptor cord into the AC 10V jack on
the scanner.
2. Plug the AC Adaptor into any standard 240V AC wall outlet. Do not plug into an outlet
controlled by a wall switch; it could cause clock reset.
3. Plug the Telescoping Antenna into the ANT. jack. Extend the antenna to its full height
vertically. For UHF frequencies, shortening the antenna may improve the reception.
4. Plug the AM Antenna into the AM Radio Antenna Jack
a. Press down to unlatch the 2 tabs at the bottom of the AM Radio Antenna Jack.
b. Insert the 2 leads into the holes. Make sure the leads are stripped to expose the wire.
c. Press up to latch the 2 tabs.
5. Plug an optional external speaker (8-ohm) into the EXT. SP. jack.
If you are operating the scanner in a fringe area or need to improve
reception, use an optional antenna designed for multi-band coverage.
(You can purchase this type of antenna at a local electronics store.) If the
optional antenna has no cable, use a 50-70 ohm coaxial cable for leadin. You may need a mating plug for the optional antennas.
If your scanner receives strong interference or electrical noise, relocate
the scanner or its antenna away from the source.
GETTING STARTED
*Carefully remove the tube inserted before using the AM Antenna Jack. When the Jack is
not in use, keep the tube mounted.
3
AC 10V
USE AC-144U ONLY EXT.SP
AM RADIO ANT
ANT
Standard 240V
AC Wall Outlet
AC Adapter
Model AC-144U
Page 7
4
Controls and Functions
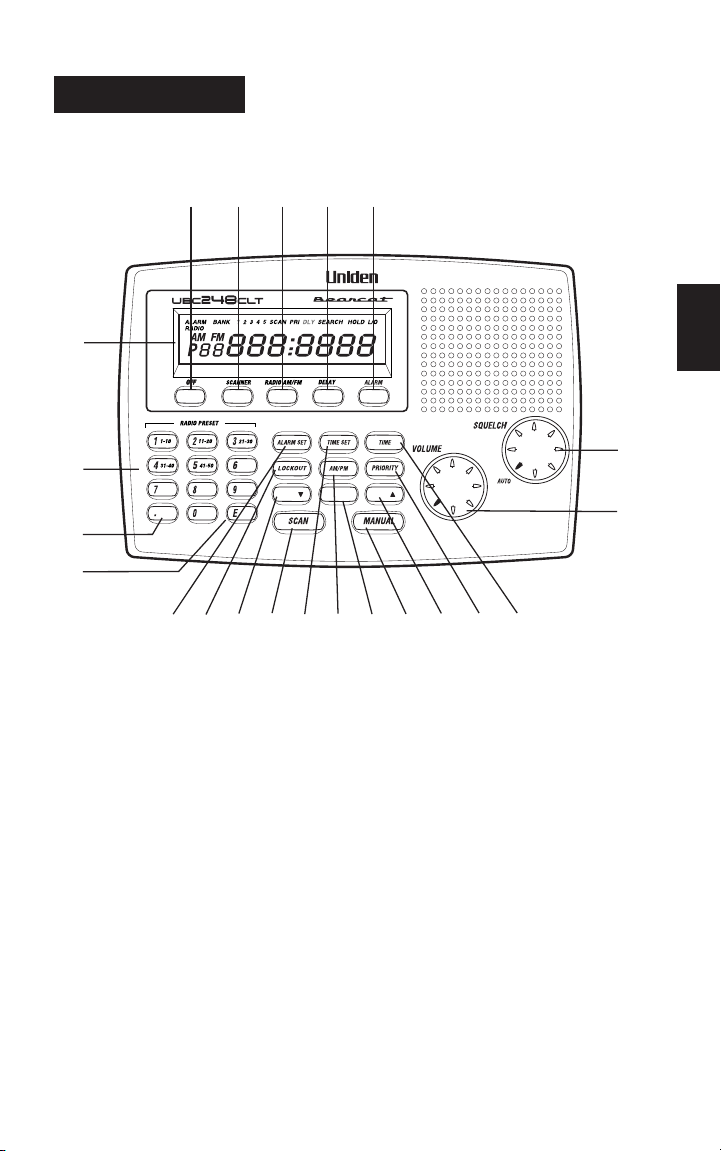
1. LCD Display Displays time, channel, frequency, and functions. (Page 6)
2. Numeric Keys Press to program a frequency into each channel for scanning.
Also, press for time entries and direct channel access with MANUAL key.
And press for channel presets in Radio Mode
3. Decimal Key Press to enter the decimal point in the frequency. Also, use for
clearing mistakes during entries by pressing twice.
4. E Key Enters the frequency or time setting into memory.
5. VOLUME Turn clockwise to increase the volume. Turn counterclockwise to
decrease the volume.
6. SQUELCH Adjusts the squelch threshold, or use AUTO for the factory setting.
7. OFF Key Turns scanner and radio off and Clock Mode on.
8. SCANNER Key Selects the Scanner Mode .
9.
RADIO AM/FM Key
Selects the Radio Mode. Also selects AM/FM in Radio Mode.
OPERATION
8 9 10 11
7
1
2
SEARCHLIMIT/ HOLD/
3
4
12 15 19 20 13 16 18 21 22 17 14
6
5
Page 8

5
10. DELAY Key Turns Delay function. When Scan stops on a channel it causes scanner to
remain on that channel for 2 seconds before the scanning resumes to wait
for a possible reply.
11. ALARM Key Turns the Tone Alarm. Turns the Radio Alarm ON/OFF by pressing
the key more than 2 seconds.
12.
ALARM SET Key
Press more than 2 seconds to enter the Alarm Time Set mode.
13. TIME SET Key Press more than 2 seconds to enter the Present Time Set mode.
14. TIME Key Press to review the clock time and cancel the Alarm time set and Present
Time Set mode.
15. LOCKOUT Key Prevents scanning of the displayed channel. The L/O indicator appears
when the current channel is locked out.
Press LOCKOUT again to unlock the channel. Lockout is active only when
the scanner stops on an active channel or a channel selected in Manual
Mode.
16. AM/PM Key Select a.m. or p.m. when setting the clock time or alarm time.
17. PRIORITY Key Turns Priority mode ON/OFF. In Priority mode the scanner samples the
designated Priority Channel every 2 seconds while in Scan or Manual mode.
If a transmission on the designated Priority Channel is detected, the scanner
monitors that channel until no signal is present.
18. SEARCH Key Press to start searching.
19. LIMIT /▼ Key Channel Down and Set Search, Frequency Limit in Search Mode.
20. SCAN Key Press to start CH scan.
21. MANUAL Key Press to stop scanning. Press MANUAL again to step to the next channel.
Also use for direct channel access by first entering the channel number and
then pressing MANUAL to go directly to that channel.
22. HOLD /▲ Key Channel Up and Hold Search in Search Mode.
Page 9

6
23. ALARM Appears when Alarm function is active. Flashes in the snooze
function mode.
24. BANK Appears when in Scan Mode, Manual Mode.
25. 1-5 In Scan Mode, displays the bank being scanned. In Manual Mode, displays
the bank number associated with the channel.
26. SCAN Appears when in Scan mode.
27. PRI Displays when priority function is active.
28. HOLD Displays when in Manual.
29. L/O Appears when the current channel is locked out.
30. RADIO Appears when in Radio Mode.
31. SEARCH Appears when in Search Mode.
32. AM,FM Appears when receiving band is AM or FM in Radio Mode.
33. P Appears next to the channel that has been assigned as the current priority
channel.
34. Channel Represents the current channel 1 through 50.
35.
Frequency/Time
7-digit display that shows the current frequency and time. Last digit shows
A for a.m. P for p.m.
263027 2831
29
32
33
34 35
Page 10

7
Scanning Overview
The UBC248CLT has 50 memory channels. Each can be programmed to store one frequency
within the band of frequency coverage. (For a listing of frequency ranges and bands, see
Technical Specifications on page 32.)
When you press SCAN, the UBC248CLT scans each programmed frequency for activity
(skipping channels that are locked out) at the rate of about 12 channels per second. As the
unit scans, the word SCAN moves across the display, and the bank number flashes.
When the scanning stops on an active frequency, it remains on that channel as long as the
transmission continues. When the transmission ends, the scanning cycle resumes. If you are in
the delay mode, the scanner stays on the channel for 2 more seconds, waiting for a responding
transmission. If no responding transmission is detected, the scanning cycle resumes.
Searching Overview
In contrast to Scanning which monitors only a group of frequencies that are stored in the
scanner’s channels, Searching monitors all the frequencies within a pre-selected range of
frequencies (bound by upper and lower limits). If you find an interesting frequency while
searching, you can store it in a channel for easier access later.
Page 11
8
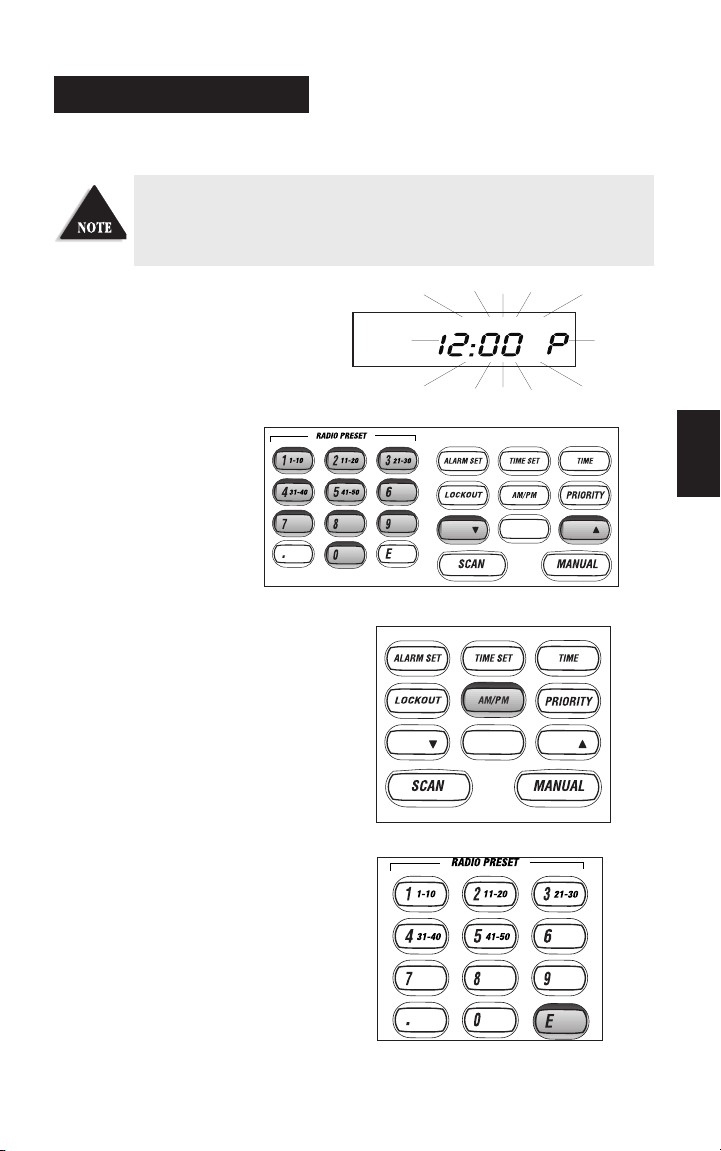
Initial Clock Set-up
1. When power is initially applied, the
display flashes
i2:00 P
after a
short delay.
2. Enter the time directly by
pressing the numeric keys.
OR
Enter the time by pressing the
▼ or ▲ keys. To scroll
through more quickly, press
and hold
▼ or ▲ .
3. Press AM/PM to select the desired setting,
either am. or pm.
4. Press E to complete the entry. The display
stops flashing.
You may bypass the steps to set the clock. The scanner will function as
normal, but the clock and alarm features will not function.
CLOCK SET-UP
SEARCHLIMIT/ HOLD/
SEARCHLIMIT/ HOLD/
Page 12
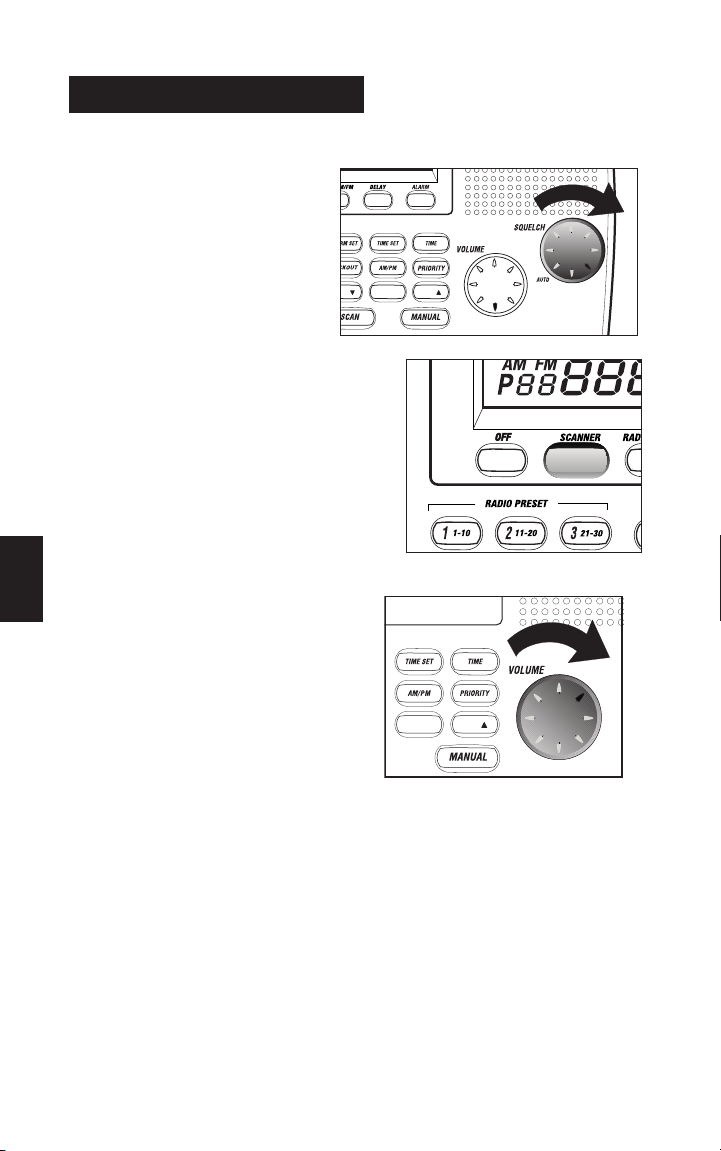
Set the Squelch
1. Turn SQUELCH fully clockwise to
the highest setting.
2. Press SCANNER to turn on the scanner.
3. Adjust the VOLUME control until you
can hear a steady noise.
USING THE SCANNER
9
SEARCH
IT/ HOLD/
SEARCH HOLD/
Page 13

10
4. To set the SQUELCH control to AU TO turn fully counter clockwise until control clicks into
place. Or, manually set squelch as follows:
■
Think of squelch as a gate. Turn SQUELCH fully counter clockwise. This raises the
“Squelch Gate” so high that only very strong signals can get through.
■
Turn SQUELCH fully clockwise until you hear a hiss. This lowers the “Squelch Gate”
so that everything gets through — noise, weak signals, and strong signals.
■
Turn SQUELCH back counter clockwise until the hiss stops. Now the “Squelch Gate”
allows only strong signals through.
HOLD/
HOLD/
HOLD/
Page 14

11
Programming Tips for Scanner
■
Program one frequency per channel.
■
Channel 1 is the location of the default priority channel. Program the most important
frequency, or the one of major interest, into Channel 1. You may also select any other
channel to be the priority channel.
■
To quickly program a series of channels, start with the lowest number channel. For
example, when you are programming five new frequencies into Channels 4 through 8,
start with Channel 4. After you complete the programming in one channel (by pressing
E), press MANUAL to step up to the next channel.
Channels are grouped by banks for easy scanning control. The channels associated with
the banks are as follows:
■
Bank Number Channel Number
1 1 through 10
2 11 through 20
3 21 through 30
4 31 through 40
5 41 through 50
■
If you make an error during programming, or the frequency is out of range,
appears on the frequency display.
■
If you program the same frequency in two channels, the display will indicate the
channel with the duplicate frequency. If you want to have two of the same frequencies
on different channels, accept the entry by pressing E again.
■
During numeric entry, if you know that you pressed the wrong number,
press . (decimal point) until the entry is cancelled out. When the previous frequency is
displayed, you may re-enter the frequency.
■
Above 406MHz, the frequency steps are in 12.5kHz increments. To enter a frequency
such as 450.4875, press each of the seven digits in sequence.
If
All Loc Out
appears in the display, when you first turn the
scanner on, this indicates that all the channel information has been
manually erased. All channels are set to 0.0MHz. To clear this
message, program the frequency and channel information as desired.
Page 15

12
Programming Scanner Frequencies
Before you can use your UBC248CLT scanner, you must program the channels. Follow these
steps:
Example: Program 420.0150 MHz into Channel 12.
Press scanner button to switch to scan mode.
1. Press MANUAL to stop scanning.
2. To select the channel (12),
press 1, then 2 on the
numeric keypad. Then press
MANUAL again.
OR
Press
▼or ▲ until channel
12 appears in the display.
3. Type in the frequency numbers, including the
decimal point, using the numeric keypad:
420.0150. Channel digits flash as you make entry.
SEARCHLIMIT/ HOLD/
SEARCHLIMIT/ HOLD/
Page 16

4. Press E to complete the entry. The channel
digits stop flashing.
Display shows
Deleting a Scanner Frequency
If you want to delete a stored frequency, follow these steps:
Example: Delete the frequency in Channel 12.
1. Press MANUAL to stop scanning.
2. To select the channel (12),
press 1, then 2 on the
numeric keypad. Then press
MANUAL again.
OR
Press
▼or ▲ until channel
12 appears in the display.
3. Press 0, then E to complete the entry.
The channel digits stop flashing.
13
ALARM
SEARCHLIMIT/ HOLD/
SEARCHLIMIT/ HOLD/
Page 17

14
4. The following
screen appears.
About Memory Back-up
Your UBC248CLT has a convenient memory back-up system. In the event of a power failure,
the scanner will retain channel information for an indefinite amount of time. Channel
information is stored in non-volatile memory.
Scanning Mode
Press SCAN. (When the scanner is first
turned on, it is automatically in Scan mode.)
Scanning automatically stops on any active
channel, except those channels locked out.
Bank Scanning
While scanning, you can select specific banks
to monitor. The bank numbers 1-5 appear in
the display as the active banks.
To deactivate a bank, press the bank number
on the keypad. The bank number on the screen
goes out.
.
SEARCHLIMIT/ HOLD/
Page 18

To restore the bank number, press the number
on the keypad. The bank number appears in
the display.
.
The bank number associated with channel
currently being monitored flashes.
Manual Mode
Press MANUAL any time to stop scanning.
The scanner remains on the displayed channel.
Press MANUAL to step up to the next channel.
If desired, you can press MANUAL repeatedly to
manually scan all 50 channels, one press per
channel, including the channels that are locked
out. To scroll through the channels more quickly,
press and hold MANUAL. Press SCAN to start
scanning again.
15
SEARCHLIMIT/ HOLD/
Page 19

16
Direct Channel Access for Scanner
This feature allows you to instantly access a specific channel you want to monitor.
Example: Select Channel 4.
1. Press MANUAL to exit scan mode.
2. Press 4.
3. Press MANUAL again to successfully complete the direct access to Channel 4.
Priority Scanning
Priority Scan works like a dual watch function. When you activate Priority Scan mode, the
scanner keeps track of the activity on the priority channel while listening to other channels. A
constant
PRI
appears on the display
Every two seconds, the scanner checks the priority channel for activity. If a signal is found, the
scanner remains on the priority channel until the transmission ends.
When you press 4, the display changes to 4, but the scanner still
monitors the previous channel.
SEARCHLIMIT/ HOLD/
Page 20

17
To Set the Priority Channel
Your UBC248CLT has one default Priority Channel per bank. Each priority channel is, set at
the first channel in the bank. To change the priority channel determine the frequency most
important to you and program it into the desired channel location.
Example: To set Channel 5 as the priority channel.
1. Press MANUAL to exit the Scan Mode.
2. Press 5 and MANUAL for direct
channel access. Or select channel 5
using the ▼ or ▲ keys.
3. Press and hold PRIORITY.
The
PRI
indicator appears in
the display and P appears to the
left of the selected channel.
To enter the Priority Scan Mode
When in Scan or Manual mode, press PRIORITY. The
PRI
indicator appears in the display.
To exit the Priority Scan Mode
Momentarily press PRIORITY again. The
PRI
indicator goes out.
SEARCHLIMIT/ HOLD/
SEARCHLIMIT/ HOLD/
SEARCHLIMIT/ HOLD/
Page 21

18
Channel Lockout
You can lock out a channel so it is not scanned. Channel Lockout does not erase the frequency
from the channel. You can lock out up to 50 channels, including the Priority channel.
Lockout information is retained in the memory when the scanner is turned off.
To Lock out a Channel
Example: Suppose you want to lock out Channel 2 because it stops on transmissions you
don't want to hear.
Press LOCKOUT when the scanner stops on
Channel 2.
The scanner locks out Channel 2, Then it
immediately advances to the next channel that is
not locked out, and resumes scanning.
In the Manual mode, press LOCKOUT to
lock out the displayed channel. Pressing
LOCKOUT does not advance to the next channel
in Manual mode.
L/O
appears in the display to indicate the
displayed channel is locked out.
Whenever you want to search for
channels that are locked out, press
MANUAL repeatedly to go
through all 50 channels. If a
channel is locked out,
L/O
appears in the display.
Restore a Locked Out Channel
To unlock a channel so that it can be monitored during scanning:
1. Press MANUAL repeatedly to find the locked
out channel.
SEARCHLIMIT/
SEARCHLIMIT/
SEARCHLIMIT/ HOLD/
Page 22

2. Press LOCKOUT again to unlock the displayed
channel.
L/O
no longer appears in the display.
Restore All Locked Out Channel
To unlock all channels, you must be in the Manual Mode.
1. Press MANUAL.
2. Press and hold LOCKOUT to unlock all
channels. The L/O indicator goes out on any
channel previously locked out.
DELAY
In the Scan Mode, the delay feature causes the scanner to remain on the frequency 2 seconds
after end of the transmission to wait for a possible reply. A Delay function can be set for each
programmed channel so that when searching stops on a channel there is a brief pause before
the scanning resumes. The delay can be set when your scanner stops on a channel while
scanning or when a channel is selected by Manual mode.
19
SEARCHLIMIT/
SEARCHLIMIT/ HOLD/
SEARCHLIMIT/ HOLD/
Page 23

20
To Set Delay in Scan Mode
1. Press SCAN.
2. When your scanner stops on a channel, press
DELAY. DLY appears in the display and
scanning resume 2 seconds after the transmission
ends.
To Set Delay in Manual Mode
1. Press MANUAL.
2. Select the channel you want using your keypad.
3. Press MANUAL again.
4. Press DELAY. DLY appears in the display. .
SEARCHLIMIT/ HOLD/
SEARCHLIMIT/ HOLD/
SEARCHLIMIT/ HOLD/
SEARCHLIMIT/ HOLD/
Page 24

21
SEARCHING
The UBC248CLT can search bands or range of frequencies you specify to find desired
frequencies. This is useful if user does not have a Frequency Directory handy, or if new stations
have been added since the Directory was published.
Follow the steps below in programming range of frequencies:
1. Press MANUAL to stop scanning.
2. Use numeric keypad to enter the lowest frequency
of the range you want to search.
3. Press LIMIT.
4. Enter highest frequency of the range you want
to search.
5. Press LIMIT.
6. Press SEARCH.
Programming Frequencies Using Search
The user can program interesting frequencies during search.
1. Select the channel wherein you want the frequency to be stored.
2. When “searching” stops on an interesting frequency,
press HOLD to stay on that frequency. The channel
you selected will be blinking on the display.
3. Press E to store the displayed frequency in that
channel.
4. Repeat steps 1 to 4 to continues storing frequency
using search.
Refer to above steps to operate the scanner in “Search” mode
Press HOLD at any time to stop the search on a frequency. When
searching is stopped, you can press
▲ or ▼ to move up or down
1 frequency step
LIMIT/ HOLD/
SEARCH
LIMIT/ HOLD/
SEARCH
Page 25

22
Locking Out Frequencies in Search
During search, you might repeatedly encounter frequencies that you are not interested in. Also,
all scanners are subject to receiving internally generated frequencies (called birdies) that stop
you scanner’s search when there is no real signal present.
In either case, you can lock out such frequencies to make your scanner search more efficiently.
To do this follow the steps below.
1. When the scanner stops on a frequency you want to
lock out. Press LOCKOUT.
2. Find the locked out frequency by pressing ▲ or ▼.
3. Unlock the frequency by pressing LOCKOUT.
Unlocking ALL Frequencies
If you have locked out many frequencies and want to unlock them all, or if you have forgotten
which ones you locked out, you can unlock all frequencies at the same time.
1. Stop search by pressing HOLD.
2. Press and hold LOCKOUT to unlock all locked frequencies. You will hear two beeps to
confirm that unlocking is done.
SEARCHLIMIT/ HOLD/
Page 26

23
LCD Backlight
The LCD Backlight comes on when the power is applied. In Scan Mode and Manual Mode, the
backlight stays on bright continuously. In the other modes, the backlight stays bright for ten
seconds and then switches to dim. Press any key and the display switches back to bright for ten
seconds.
Programming Radio AM/FM Frequencies
Before you can use the Radio Mode, you must program the channels with your favourite radio
stations. You can program up to 20 stations (10 AM/10 FM). Follow these steps:
Example: Program FM Channel 9 with 92.5000 MHz.
1. Press RADIO AM/FM to enter into the
Radio Mode. (The initial default setting is FM
Channel 1 with 000.0000 MHz for the
frequency). The RADIO and FM icons appear
in the display.
2. To select the channel (9), press 9 on
the numeric keypad.
Press 0 to select channel 10.
ADDITIONAL FEATURES
SEARCHLIMIT/ HOLD/
Page 27

3. Press ▼ or ▲ to set the desired frequency.
The channel number flashes. Continue to
press
▼ or ▲ to step through the
frequencies in 100kHz steps. Or, press and
hold
▼ or ▲ to step through the
frequencies more quickly until 92.5000MHz
appears in the display.
4. Press E to complete the entry. The channel
digits stop flashing.
5. Adjust the VOLUME control to a comfortable
listening level.
Continue to program your favourite radio stations in the other nine FM channels using the above
example.
To program the ten AM channels, press RADIO AM/FM to select the AM Mode. The AM icon
appears in the display. Then repeat Steps 2. through5. You will step through the frequencies in
10kHz steps.
To change a programmed Radio Frequency, repeat the steps above using the new frequencies.
24
HOLD/
Page 28

25
Deleting a Stored Radio Frequency
If you want to delete a stored frequency, follow these steps:
Example: Delete the frequency in Channel 9.
1. Press RADIO AM/FM to enter into the Radio
Mode.
2. To select the channel (9), press 9 on
the numeric keypad.
3. Press the
▼ or ▲ keys until
000.0000
appears
in the display. (In FM
000.0000
is between
I08.0000
and
87.5000
. In AM
000.0000
is between
I629
and
522
.)
4. Press E to complete the entry. The channel digits stop flashing.
5. The following screen appears.
Direct Channel Access for Radio Stations
Once the channels are programmed, to directly access the channel, follow these steps:
1. Press RADIO AM/FM until the AM or FM icon that you want appears in the display.
2. Press the desired channel number on the keypad. The frequency appears in the display.
3. Adjust the VOLUME control for a comfortable listening level.
Page 29

26
Reset the Clock Time
1. After the scanner has been turned on, to reset the
clock time simply press and hold the TIME SET
key. The display digits flash.
2. Enter the time directly by pressing
the numeric keys.
OR
Enter the time by pressing the
▼ or ▲ keys.
3. Press AM/PM to select the desired setting
either a.m. or p.m.
4. Press E to complete the entry. The display stops
flashing..
SEARCHLIMIT/ HOLD/
SEARCHLIMIT/ HOLD/
SEARCHLIMIT/ HOLD/
Page 30

27
Set the Alarm Time
There are two types of alarm sounds with this scanner., Tone Alarm and Radio Alarm. Both types
set the alarm time in the same manner.
1. After the clock time has been entered,
press and hold ALARM SET until the time
indicated and ALARM indicator flashes in
the display.
2. Enter the alarm time directly
by pressing the numeric keys.
OR
Enter the time by pressing the
▼or ▲keys.
3. Press AM/PM to select the desired setting,
either a.m. or p.m.
SEARCHLIMIT/ HOLD/
SEARCHLIMIT/ HOLD/
SEARCHLIMIT/ HOLD/
Page 31

28
4. Press E to complete the entry.
5. ALARM indicator and
time stop flashing, but
remain on.
6. The alarm time remains in the display for five seconds, then returns to current mode.
Set Alarm to Tone Mode
Press ALARM to turn on the alarm
function. The ALARM indicator and
current alarm time are displayed.
When the alarm goes off, it will sound as a series of beeps gradually growing louder.
The alarm will continue for approximately 15 minutes, if no action is taken.
Snooze function
To silence the alarm, simply press any key. This silences the alarm for about nine minutes.
You can repeat this cycle for over an hour. Also the display is backlit for about ten seconds to
view the current time.
Page 32

29
Turn the Alarm Off
Press ALARM to deactivate the alarm
function. When the alarm is off, the
ALARM indicator and current alarm
time are no longer displayed. Only the
current time displays.
If you find the Tone Alarm too loud, select the Radio Mode instead.
The volume is adjustable.
If you would like to listen to the scanner while waking up, turn the
scanner on. The snooze function continues to operate while the
scanner is turned on and in any mode.
Page 33

30
Set Alarm to Radio Mode
Before you set the Radio Alarm, make sure the AM or FM channel is selected and the
VOLUME control is set to the desired level.
The scanner must be turned off (Clock Mode), to be woken up by the radio alarm.
1. Press OFF.
2. Press and hold ALARM for more
than 2 seconds. When the alarm is
on, the ALARM and RADIO
icons flash for 5 seconds.
3. The ALARM remains on.
When the alarm goes off, it will play the radio station that was previously selected. The alarm
will continue for approximately 15 minutes, if no action is taken.
Snooze function
To silence the alarm, simply press any key. This silences the alarm for about nine minutes. You
can repeat this cycle for over an hour.
Turn the Alarm Off
Press ALARM to turn the alarm off.
When the alarm is off, the ALARM
icon and current alarm time are no
longer displayed, only the current time is
displayed.
Page 34

31
Helpful Hints
General Use
■
Turn the scanner off before disconnecting the power.
■
Always write down the programmed frequencies in the event of scanner memory loss.
■
If scanner memory is lost, simply reprogram each channel.
■
Always press each keypad button firmly until you hear the entry tone for
that key.
Location
■
If your scanner receives strong interference or electrical noise, relocate the scanner or its
antenna away from the source of the noise. A higher elevation may provide better
reception. Also, try changing the height or angle of
the antenna.
■
Avoid placing the unit in direct sunlight or near heating elements or vents.
■
Do not plug the scanner into an outlet controlled by a wall switch as prolonged periods
without power will cause the clock to reset.
Cleaning
■
Disconnect the power to the unit before cleaning.
■
To prevent scratches, do not use abrasive cleaners or solvents. Be careful not to rub the
display window.
■
Do not use excessive amounts of water.
Repairs
■
Do not attempt any repair. The scanner contains no serviceable parts. Contact the
Uniden Customer Service Center or take it to a qualified repair
technician.
Birdies
■
All radios are subject to receiving undesired signals or birdies. If your scanner stops
during Scan mode and no sound is heard, it may be receiving a birdie. Birdies are
internally-generated signals inherent in the electronics of the receiver. Press SCAN to
resume scanning.
If you still cannot get satisfactory results and want additional information, or to return the
unit for service, please call the Uniden Customers Service Division.
ABOUT THE UNIT
Page 35

32
Problem Solution
■
Check the connections at both ends of the
AC Adaptor.
■
Turn on the wall switch of your room.
You could be using an outlet controlled by the
wall switch.
■
Move the AC Adaptor to another wall outlet.
■
Scanner won’t power up.
■
Poor reception.
■
Check antenna connection.
■
Move the antenna.
■
If the programmed frequency is higher than
406MHz, a shorter antenna length may improve
the reception.
■
Relocate the scanner.
■
You may be in a fringe area. This could require
an optional multi-band antenna. Check with your
dealer or local electronics store.
■
Scan won’t start.
■
Press the SCAN key again.
■
Adjust the Squelch control.
■
Check to see if 50 channels are locked out. If so,
unlock the channels as needed.
If your UBC248CLT is not performing properly, try the following steps.
TROUBLESHOOTING
Page 36

33
Problem
Solution
■
Scan won’t stop.
■
Adjust squelch to the threshold (Page 9).
■
Check the antenna connection.
■
Check to see if many of the channels are locked
out. If so, the scanner has less chance of finding
an active channel.
■
Review each channel’s frequency to see if it is
correct and no memory has been lost.
■
It is possible that none of the programmed
frequencies are active at this time.
Page 37

34
Band Coverage:
8 bands plus and AM/FM Radio
Frequency Coverage: Scanner 66-88 MHz VHF Low Band
12.5 KHz step
137-144 MHz Land Mobile
144-148 MHz 2 Meter Amateur Band
Above bands in 5 kHz steps
148-174 MHz VHF High Band
406-420 MHz Federal Government
420-450 MHz 70cm Amateur Band
450-470 MHz UHF Standard Band
470-512 MHz UHF”T” Band
Above bands in 12.5kHz steps
Radio 520 to 1629 KHz (AM Radio Band)
9 KHz step
87.5 to 108 MHz (FM Radio Band)
100 KHz step
Sensitivity (nominal) 0.3 µV 66-88 MHz
12dB SINAD: 0.4 µV 137-174 MHz
0.6 µU 406-512 MHz
Channels: 50
Scan Rate: Up to 12 channels per second
Audio Output (nominal): 0.75 W to 0.85 W 10%THD
Power Requirements: 240V AC (±10%) 50Hz
Antenna: Telescoping (included), AM Radio Loop Antenna
External Jacks: Antenna jack
AM Radio Antenna Jack
External speaker
AC 10V power jack
AC Adaptor (AC-144U)
Speaker: 8 ohm, 2 watt
Operating Temp: -10°C — +50°C
Storage Temp: -20°C — +60°C
Size: 205 (W) x 139 (D) x 73 (H)mm
Weight: 620gm
Features, specifications, and availability of optional accessories are all subject to change
without notice.
TECHNICAL SPECIFICATIONS
Page 38

Uniden UBC248CLT
Note: Please keep your sales docket as it provides evidence of warranty.
WARRANTOR: Uniden Australia Pty. Limited ACN 001 865 498
Uniden New Zealand Limited
ELEMENT OF WARRANTY: Uniden warrants to the original retail owner for the
duration of this warranty, its UBC248CLT Scanner (herein after referred to as the
Product), to be free from defects in materials and craftsmanship with only the
limitations or exclusions set out below.
WARRANTY DURATION: This warranty to the original, shall terminate and be of no
further effect ONE (1) Year after the date of original retail sale. This warranty will be
deemed invalid if the product is; (A) Damaged or not maintained as reasonable and
necessary, (B) Modified, altered or used as part of any conversion kits,
subassemblies, or any configurations not sold by Uniden, (C) Improperly installed, (D)
Repaired by someone other than an authorised Uniden Repair Agent for a defect or
malfunction covered by this warranty, (E) Used in conjunction with any equipment or
parts or as part of a system not manufactured by Uniden, (F) Installed, programmed
or serviced by anyone other than an authorised Uniden Repair Agent, (G) Where the
Serial Number label of the product has been removed or damaged beyond
recognition.
PARTS COVERED: This warranty covers for One year, the UBC248CLT Scanner unit
only. Antennas and AC Adaptor are covered for 90 days.
STATEMENT OF REMEDY: In the event that the product does not conform to this
warranty at any time while this warranty is in effect, the warrantor at its discretion, will
repair the defect or replace the product and return it to you without charge for parts or
service. THIS WARRANTY DOES NOT COVER OR PROVIDE FOR THE
REIMBURSEMENT OR PAYMENT OF INCIDENTAL OR CONSEQUENTIAL
DAMAGES. THIS GUARANTEE IS IN ADDITION TO AND DOES NOT IN ANYWAY
AFFECT YOUR RIGHTS UNDER THE CONSUMER GUARANTEE ACT.
WARRANTY CARD: If a warranty card has been included with this product then
please fill it in and return to us within 14 days of purchase. Your name and the Serial
number of the product will then be registered in our database and this will help us
process your claim with greater speed and efficiency should you require warranty
service.
PROCEDURE FOR OBTAINING PERFORMANCE OR WARRANTY: In the event that
the product does not conform to this warranty, the Product should be shipped or
delivered, freight pre-paid, with evidence of original purchase (eg. a copy of the sales
docket), to the warrantor at:
UNIDEN AUSTRALIA PTY LIMITED UNIDEN NEW ZEALAND LIMITED
SERVICE DIVISION SERVICE DIVISION
345 Princes Highway, 150 Harris Road,
Rockdale NSW 2216 East Tamaki, Auckland
Ph (02) 9599 3577 Fx (02) 9599 3278 Ph (9) 273 8383 Fx (9) 274 4253
Customers in other States should ship or deliver the Product freight pre-paid to their
nearest Uniden Authorised Repair Centre (Contact Uniden for the nearest Warranty
Agent to you)
ONE-YEAR LIMITED WARRANTY
35
Page 39

36
Page 40

THANK YOU
FOR PURCHASING THIS UNIDEN PRODUCT!
© 2000 Uniden Corporation
UBZZ01299BZ
All rights reserved
 Loading...