

Page 1
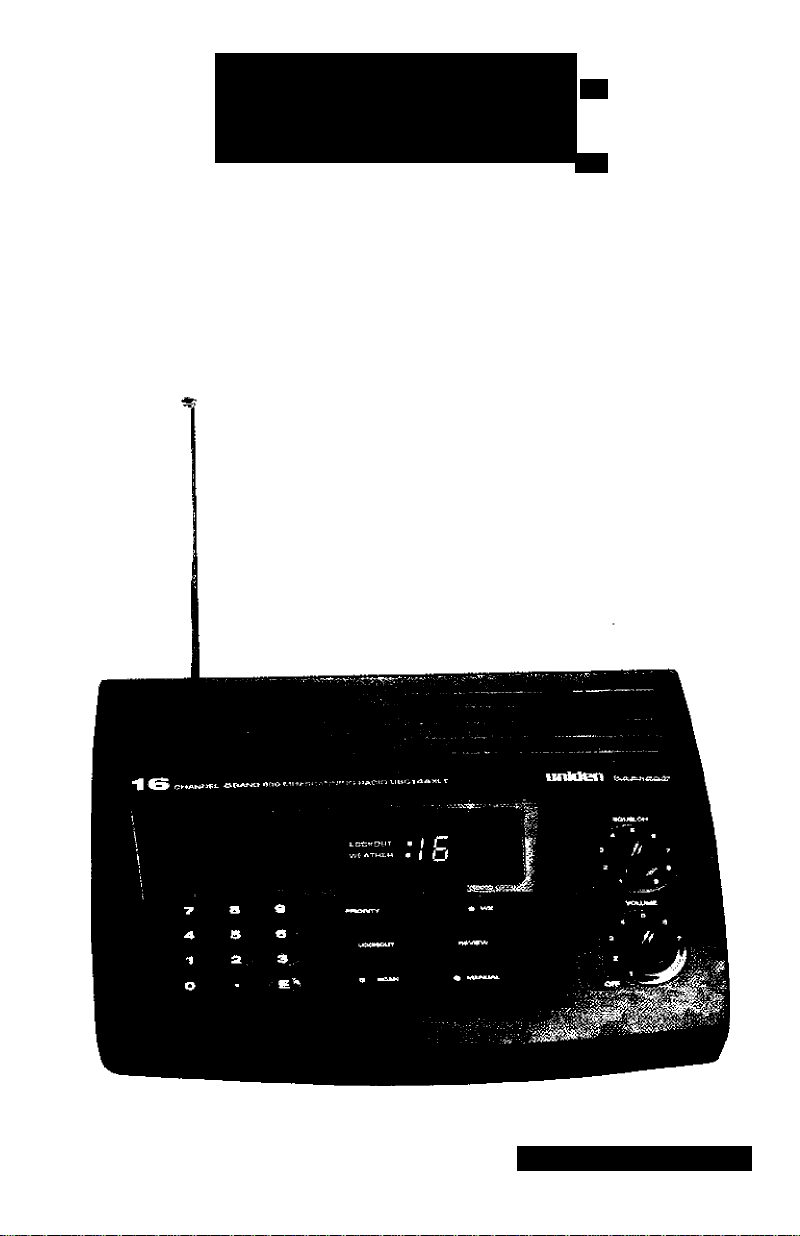
uniden
UBC144XLT
16-Channei Base Scanner
OPERATING GUIDE
Page 2

PRECAUTIONS
Before you read anything else,
please observe the following:
WARNING!
Uniden DOES NOT represent this unit to be waterproof. To
reduce the risk of fire or electrical shock, DO NOT expose this
unit to rain or moisture.
Uniden* is a registered trademaik of Uniden Corporation,
Bearcat* is a registered trademait of Uniden Corporation.
Page 3

Introduction
About Scanning...................................................................................................2
Taking Proper Care of Your Scanner..................................................................3
Unpacking...........................................................................................................3
Installation
Installing the UBC144XLT..............................................................................4
Operation
Controls and Functions .......................................................................................5
Scanning Overview............................................................................................. 7
Getting Started.....................................................................................................7
Adjusting the Squelch
Programming Tips...............................................................................................8
Programming Frequencies...................................................................................9
About Memory Back-up
Scanning..............................................................................................................10
Direct Channel Access........................................................................................10
Checking the Programmed Frequency...............................................................11
Weather Channel Scan
Priority Scanning................................................................................................12
Channel Lockout.................................................................................................12
About the Unit
Helpful Hints.......................................................................................................14
Troubleshooting..................................................................................................15
Technical Specifications.....................................................................................16
Warranty
Table of Contents
.........................................................................................
.....................................................................................
.......................................................................................
8
9
11
Page 4

About Scanning
Introduction
Scanning
Options
Types of
Communicatjon
Scanning is easy and fun with the UBC144XLT 16-Channcl
Base Scanner. You can scan in 2 ways:
■ Scan channels you have programmed
■ Scan pre-programmed weather channels.
Unlike standard AM or FM radio stations, most 2-way
communications (sec "Types of Communication" below) do
not transmit continuously. The UBC144XLT scans
programmed channels at the rate of about 15 channels per
second until it locates an active frequency. When the
scanning stops on an active frequency, it remains on that
channel as long as the transmission continues. When the
transmission ends, the scanner stays on the channel for
2 more seconds, waiting for a responding transmission. If
no responding transmission is detected, the scanning cycle
resumes until another transmission is received.
You can to monitor communication such as:
■ Police and fire department
(including rescue and paramedics) .
■ Weather broadcasts
■ Bu sines s/industrial radio
■ Motion picture and press relay
■ Utility
■ Land transportation frequencies such as trucking firms,
buses, taxis, tow trucks, and railroads
■ Marine and amateur (ham radio) bands
■ And many more
Page 5

Taking Proper Care of Your Scanner
Do not use the scanner in high-moisture environments such as the
kitchen or bathroom.
Avoid placing the unit in direct sunlight or near heating elements or
vents.
Unp>acking
Carefully check the contents against this list:
■ UBC144XLT Base Scanner
■ Telescopic Antenna
■ AC Adaptor (Model AC-144U)
■ This Operating Guide
If any items are missing or damaged, contact your place of purchase
immediately.
Read this Operating Guide thoroughly before operating the scanner.
Page 6
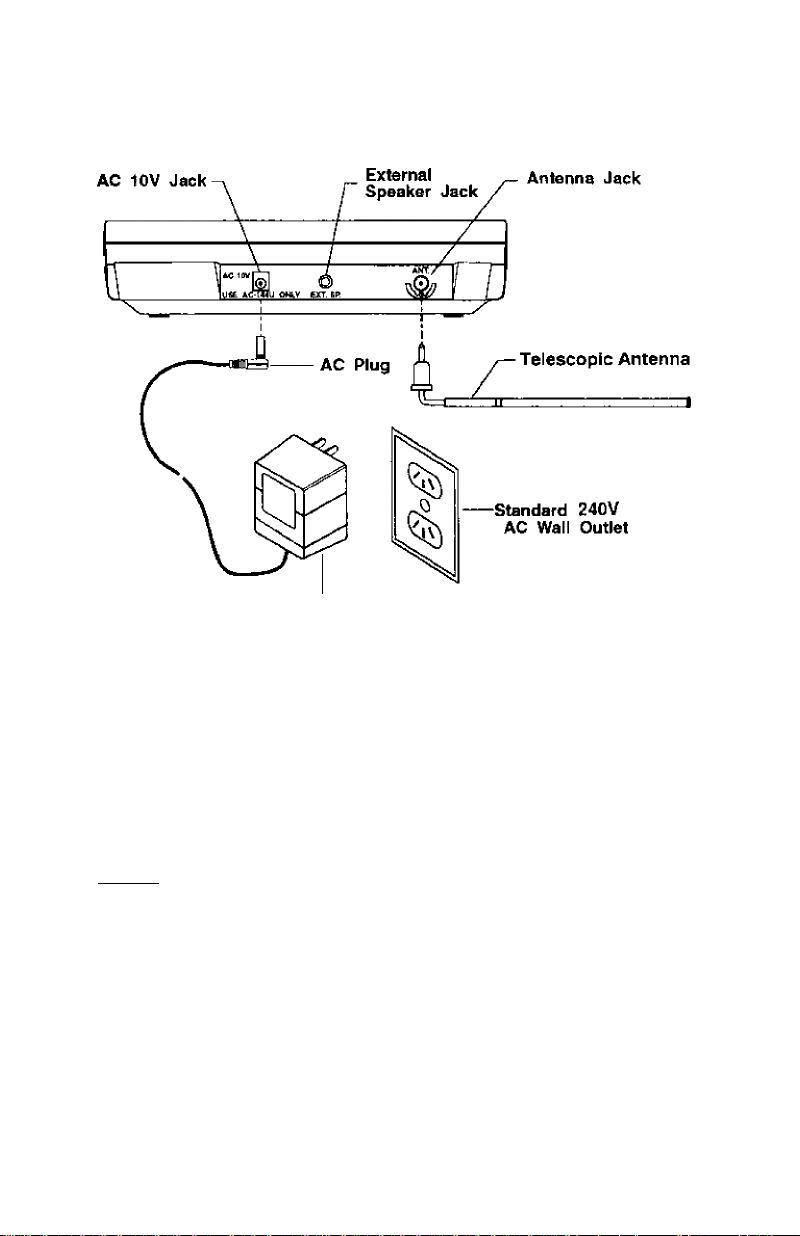
Installation
Installing the UBC144XLT
AC Adaptor
Model AC-144U
1. Insert the DC plug end of the AC Adaptor into the AC 10 V jack on the
scanner.
2. Plug the AC Adaptor into any standard 240 VAC wall outlet,
3. Plug the Telescopic Antenna into the ANT. jack. Extend the antenna to its
full height. For UHF frequencies, shortening the antenna may improve the
reception.
4. Plug an optional external speaker (8-ohm) into the E)Cr.SP. jack.
Notes
■ If strong interference or electrical noise is received, relocate the scanner or
its antenna away from the source.
■ If you arc operating the scanner in the fringe area or need to improve
reception, use an optional antenna designed for multi-band coverage.
(You can purchase this type of antenna at a local electronics store.) If the
optional antenna has no cable, use 50-70 ohm coaxial cable for lead-in.
A mating plug may be necessary for the optional antennas.
Page 7

Operation
Controls and Functions
1.
Numeric
Keys
2.
Enter Key
CD
3.
PRIORITY Key
Cpworit^
4.
LOCKOUT Key
(lockout)
Use to program a frequency into each channel for scanning.
Also, use for direct channel access with (• mamiaQ .
Press CD to complete the programming of a frequency to
the selected channel.
Press (priority) to turn Priority mode on or off. In Priority
mode, the scanner samples Channel 1 every 2 seconds,
regardless of any other mode the scanner is in. If a
transmission on Channel 1 is detected, the scanner monitors
Channel
cancelled when you turn off the scanner.
Press ixKouT) to prevent scanning of the displayed channel.
The LOCKOUT LED lights when the current channel is
locked out. Lockout is retained in memory. Press ^ockoit)
again to unlock the channel. The LOCKOUT LED turns off.
Lockout is active only when the scanner stops on an active
channel or a channel selected in Manual mode.
1 until no signal is present. Priority mode is
Page 8

5. Channel
Display
1 Display
1 Current channel.
Channel that was current before was
pressed.
Each numeric entry, decimal (-), and (T) if
entry error.
When (bevicti) is pressed, displays
programmed frequency, digit-by-digit.
L
P, when scanner stops on the Priority Channel,
Mode
Scan or Manual
Weather
Programming
Review
Memory Loss
Priority
6. WXKey
GZHK)
7. SQUELCH
Control
8. VOLUME
Control /
Power Switch
9. REVIEW Key
(BEViEw)
10. MANUAL Key
C* mmjuaO
11. SCAN Key
(»sc*«)
12. LOCKOUT
LED
13. Weather LED
Press (• wx ) to fintj the local weather channel.
Adjust SQUELCH to set the scan threshold. When you are
monitoring a single channel in Manual mode, adjust
SQUELCH to eliminate the background “rushing” noise
beard in the absence of an incoming signal.
Turn VOLUME clockwise to turn the scanner on to increase
the volume. Turn counterclockwise to decrease the volume
or turn the scanner off.
Press (hevibv) to review the frequency of the current channel.
Press to stop scanning. Press («~M*nuftO again to step
to the next channel. Also, use for direct channel access by
first entering the channel number and then pressing (* m*hu^)
to go directly to that channel.
Press (* sc*h) to start scanning.
Lights when the current channel
is locked out.
Lights when in Weather Search
(WX) mode. Flashes when
searching for the active weather
channel in your area.
LOCIOXrr
IB
Page 9

Scanning Overview
The UBC144XLT has 16 memory channels, each of which can be programmed to
store 1 frequency within the band of frequency coverage, (For a listing of frequency
ranges and bands, see "Technical Specifications" on page 16.)
When you press (• scah') , each of the programmed frequencies is scanned for an
active frequency (channels that are locked out are skipped) at the rate of about 15
channels per second.
When the scanning stops on an active frequency, it remains on that channel as long
as the transmission continues. When the transmission ends, the scanner will remain
on the same channel for 2 more seconds, waiting for a responding transmission. If
there is no responding transmission within 2 seconds, the scanning cycle resumes.
Getting Started
Turn SQUELCH fully c/oc/twise to the highest number
setting (9),
Turn on the power by turning VOLUME clockwise. Adjust
the volume to where you can hear a steady noise.
I
Set the squelch at the scanning threshold by turning
SQUELCH
disappears.
The scanner automatically starts scanning.
If you have not programmed any channel, press C* wx )
to hear your local weather broadcast.
Adjust the volume to a comfortable listening level.
cou/uerclockwise just until the noise
Page 10

Adjusting the Squelch
open the squelch by turning SQUELCH clockwise to
position 8 or 9. You should hear a steady sound
(scanning stops).
Now turn SQUELCH cotmterclockwise slowly until the
sound disappears. This is the threshold point at which
scanning starts. At the squelch threshold, an incoming
signal just slightly stronger than the noise will open the
squelch.
When squelch is open, you can hear the broadcast (scanning is stopped). If squelch
is set too tight (that is, too far counterclockwise from the threshold point), a stronger
signal is required to open the squelch.
If squelch is set on a point clockwise from the threshold, you hear a constant sound
(noise, if no signal is present); the scanner does not scan.
Programming Tips
■ You can program / frequency per channel,
■ Channel 1 is the fixed priority channel. Program the most important
frequency, or the one of major interest, into Channel 1.
■ To quickly program a series of channels, start programming at the lowest
number channel you want to program. For example, when you program five
new frequencies into Channels 4 through 8, start with Channel 4. After you
complete the programming in 1 channel by pressing CH), press to
step up to the next channel to be programmed.
■ If you make an error during programming, or the frequency is out of range,
“E" appears on the channel display.
■ During numeric entry, if you know that you pressed the wrong number,
press ( • ) twice. This cancels the entire numeric entry, and displays the
current channel number.
■ Above 406 MHz, the frequency steps are in 12.5 kHz increments. To enter
a frequency such as 450.4875, press each key in sequence. You will not
see the last digit entered in the display (even when reviewed). However, the
correct frequency is stored in the scanner.
■ Once you have programmed a channel, you cannot erase the frequency in
that channel. However, you can change the frequency in a specific channel
by programming a new frequency over the existing one.
■ If you want to manually er^e all the memory, first turn off the scanner.
Then, press and holdO wwiQ, C^, and(^£) simultaneously while you turn
the scanner back on. The channel chsplay shows "L", and all memory is
erased.
Page 11

Programming Frequencies
Before you can use your UBC144XLT, you must follow these steps to program the
channels, except weather frequencies.
Example: Program 420,150 MHz into Channel 12,
Press (*>t*w№L) to stop scanning.
To select the channel (12), press ( 1 ). then i~2 ) on the
numeric keypad.
Then press (■ m>mu>l) again.
Type in the frequency numbers, including the decimal
point using the numeric keypad;
CDCDCDCDCDCDCD
The decimal point (( • )) appears as a dash (-) on the
channel display.
CD CD CD
Press CH) to complete the entry.
CD CD CD
(DQ
About Memory Back-up
Your UBC144XLT has a convenient type of memory badc-up system. In the event of
a power failure, the scanner provides approximately 7 days of memory retention so
you don’t immediately lose the frequencies stored in any of the channels.
Page 12

Scanning
LOCKOUT ) Q HEViB
(When the scanner is turned on, it is automatically in
Scan mode.)
Turn on the power, or press (• scah) to start scanning,
(/^SCAN ) ( • MA№
Scanning stops on any active channel automatically,
except those channels programmed with (l^out) .
Scanning resumes automatically 2 seconds after the
channel becomes inactive.
Press O mmual) anytime to stop scanning. When you press
C* manual) , you are out of Scan mode, and the scanner
remains on the displayed channel.
Press (■ sc^) to start scanning again, or press C*“*w<*0 to
step up 1 channel.
You can press repeatedly to manually scan all 16
channels, 1 press per channel, including the channels that
are locked out.
Direct Channel Access
This feature allows you to instantly access a specific channel you want to monitor.
Example: Select Channel 4.
Press C5D-
Press (•hwmaC)
When you press (aD. the display changes to "4", but the scanner still monitors the
previous channel displayed. You must press (»mwAi) to successfully complete the
direct access to Channel 4.
10
Page 13

Checking the Programmed Frequency
Press (FiEviEw)to check the frequency programmed in the
display channel.
Each digit of the frequency is displayed individually, and
then the channel number returns.
Repeat these steps to review additional frequencies in the
other channels.
Note
If you enter a frequency that is not an exact step within the range
(e.g., 151.056 instead of 151.055), the nearest correct frequency will
autonnatically be stored and displayed when you press .
Weather Channel Scan (Weather channelsare not used
in Australia)
The UBC144XLT allows you to search for your local weather channel.
Press (' wx ) to find the active weather channel in your
area from 7 pre-programmed channels.
It is possible that your area is covered by more than 1
weadier station.
I
When you press C* wx ). the UBC144XLT immediately finds an active broadcast If the
broadcast sounds weak and distant, press (* wx ) j^ain to look for a closer station.
Note
All weather channels transmit continuous broadcasts. Once the Weather
scan stops on a transmission, it will remain on that channel. Weather scan
will not resume automatically. You must press (• wx ) again to reactivate
scanning.
In some parts of the country, you may not be able to monitor weather
broadcasts, as in low-lying areas. Normally, a higher location improves
reception.
^LOCKOUT ) ^ REVIEW
SOM • MANUA
To exit Weather mode, press (• scan) or (■ hwi«-) , or turn
off the scanner.
s
11
Page 14

Priority Scanning
Your UBC144XLT has fixed Priority Channel, Channel I. Priority Scan works like
a "dual watch" function. When you activate Priority Scan mode, the scanner starts
"sampling," or keeping track of the activity on Channel 1 while listening to other
channels.
Every 2 seconds, the scanner checks Channel 1 for activity. If a signal is present,
Channel 1 will be monitored until the transmission ends, and a constant "P" appears
on the channel display. When the signal stops for more than 2 seconds, normal
operation resumes.
First program the frequency most important to you into
Channel 1.
Press (pwoHiTif) to set the scanner in Priority Scan mode,
"P" appears on the display momentarily every 2 seconds
to indicate that the Priority scan is on.
To exit Priority scan, press (pRioHin).
Channel Lockout
You can lock out a channel so it is not scanned. This does not erase the frequency
from the channel when it is locked out. You can lock out up to 15 channels,
including the Priority channel, but not
Example: Suppose you want to lock out Channel 2 because it stops on transmissions
you don’t want to hear.
all 16 channels.
Press (lockoit) when the scanner stops on Channel 2. The
scanner locks out Channel 2 and immediately advances to
the next channel to resume scanning.
In the Manual mode, press (lockout) to lock out the
displayed channel, PressingTocKOur) does not advance to
the next channel in Manual mode.
The LOCKOUT LED lights to indicate the displayed
channel is locked out.
Whenever you want to search for channels that arc locked out, press C* manukO
repeatedly to go through all 16 channels. If a channel is locked out, the LOCKOUT
LED lights.
12
Page 15

Restoring a
Locked Out
Channel
To unlock a channel so that it can be monitored during
scanning:
Use C'MAHUftQ to find the locked out channel.
Press (pcKOur) to unlock the displayed channel.
The LOCKOUT LED for the displayed channel turns off.
I
13
Page 16

Helpful Hints
About the Unit
General Lise
Location
Cleaning
Turn the scanner off before disconnecting the power.
Always write down the programmed frequencies in the
event of memory loss.
If memory is lost, simply reprogram each channel. The
display shows "L" when memory is lost.
Always press each keypad button firmly until you hear the
entry tone for that key entry.
If strong interference or electrical noise is received,
relocate the scanner or its antenna away from the source of
the noise. If possible, a higher elevation may provide
better reception. Also, try changing the height or angle of
the antenna.
Do not use the scanner in high-moisture environments
such as the kitchen or bathroom.
Avoid placing the unit in direct sunlight or near heating
elements or vents.
Disconnect the power to the unit before cleaning.
Clean the outside of the scanner with a mild detergent
To prevent scratches, do not use abrasive cleaners or
solvents. Be careful not to rub the LED window.
Do not use excessive amounts of water.
Repairs
Birdies
14
Do not attempt any repair. The scanner contains no
serviceable parts. Contact the Uniden Customer Service
Division or take it to a qualified repair technician.
All radios are subject to receiving undesired signals or
"birdies". If your scanner stops during Scan mode and no
sound is heard, it may be receiving a birdie. Birdies arc
internally-generated signals inherent in the electronics of
the receiver. Pre^ 0 scan) to resume scanning.
Page 17

Troubleshooting
If your UBC144XLT is not performing properly, try the steps listed below.
Problem
Scanner won’t work • Check the connections at both ends of the AC Adaptor
• Turn on the wall switch of your room. You could be
using an outlet controlled by the wall switch
• Move the AC Adaptor to another wall outlet
Improper reception • Check antenna coimection
• Move or angle the antenna
• If programmed frequency is higher than 406 MHz, a
shorter antenna length may improve the reception
• Relocate the scanner.
• You may be in a fringe area. This may require an
optional multi-band antenna. Check with your dealer
or local electronics store.
Scan won’t stop. • Adjust Squelch to the threshold
(see page 8, "Adjusting the Squelch.")
• Check the antenna connection.
• Check to see if many of tire channels are locked out.
If so, the sc aimer has less chance of finding an active
channel.
• Review each channel’s frequency to see if it is correct
and no memory has been lost.
• It is possible that none of the programmed
frequencies are active at this time.
Sciui won’t start. • Press the Scan button again.
• Adjust the Squelch Control.
• Check to see if 15 channels are locked out. If so,
unlock the channels as needed.
Weather Scan won’t work.
• Adjust Squelch to the threshold
(see page 8, "Adjusting the Squelch.")
• Check antenna.
• No active station within range.
Solution
I
If you still cannot get satisfactory results and want additional information, or to
return the unit for service, please call or write the Uniden Customer Service Division.
The address and phone number are listed in the Warranty (at the end of this manual).
15
Page 18

Technical Specifications
Band Coverage: Frequency Coverage:
Sensitivity (nominal)
12 dB SINAD:
Selectivity (nominai):
Channels:
Scan Kate:
Scan Delay:
Audio Output (nominal);
8 bands
66.0-88.0 MHz
137-144 MHz
144-148 MHz
148-174 MHz
Above bands in 5 kHz steps
406-420 MHz
420-450 MHz
450-470 MHz
470-512 MHz
Above bands in 12.5 kHz steps
0.5 pV 66-88 MHz
0.4 pV 137-174 MHz
0.6 ^V406-5l2MHz
-6 dB at 18 kHz (162.4 MHz 20 dB QS)
-50 dB at 30 kHz (162.4 MHz 20 dB QS)
16
Up to 15 channels per second
2 seconds
0.9 W (max.) 10%THD
VHF Low Band
Land Mobile
2 Meter Amateur Band
VHF High Band
Land Mobile
70cm Amateur Band
UHF Standard Band
Land Mobile
Power Requirements:
Antenna:
External Jacks;
Size:
Weight:
Features, specifications, and availability of optional accessories are all subject to
change without notice.
16
10 VAC using AC-144U AC Adaptor
Telescopic (included)
Antenna jack
External speaker
AC lOV power jack
245 mm (W) x 200 mm (D) x 59.5 mm (H)
585g
Page 19

Warranty
Uniden UBC144XLT Scanning Receiver
Australian 1 Year Warranty
Note; Please keep your sales docket as it provides evidence of warranty.
WARRANTOR: Uniden Australia Pty. Limited ACN 001 865 498
ELEMENTS OF WARRANTY: Uniden warrants to the original retail owner for
the duration of this warranty, its UBCI44XLT Scanning Receiver (hereinafter
referred to as the Product), to be free from defects in materials and craftsmanship
with only the limitations of exclusions set out below.
WARRANTY DURATION; This warranty to the original retail owner only, shall
terminate and be of no further effect ONE (I) Year after the date of original retail sale.
This warranty will be deemed invalid if the product is; (A) Damaged or not main
tained as reasonable and necessary, (B) Modified, altered or used as pan of any
conversion kits, subassemblies, or any configurations not sold by Uniden, (C)
Improperly installed, (D) Repaired by someone other than an authorized Uniden
Repair Agent for a defect or malfunction covered by this warranty, (E) Used in
conjunction with any equipment or parts or as part of a system not manufactured by
Uniden, (F) Installed, programmed or serviced by anyone other than an authorized
Uniden Repair Agent, (G) Where the Serial Number label of the product has been
removed or damaged beyond recognition,
PARTS COVERED: This warranty covers for 1 year, the UBC144XLT Scanning
Receiver Unit Only. Telescopic Antenna, AC Adaptor and other accessories are covered
for 90 days.
STATEMENT OF REMEDY: In the event that the product does not conform to
this warranty at any time while this warranty is in effect, the warrantor at its
discretion, will repair the defect or replace the product and return it to you without
charge for parts and service.
THIS WARRANTY DOES NOT COVER OR PROVIDE FOR THE REIMBURSE
MENT OR PAYMENT OF INCIDENTAL OR CONSEQUENTIAL DAMAGES.
WARRANTY CARD: If a warranty card has been included with this product then
please fdl it in and return it to us within 14 days of purchase. Your name and serial
number of the product will then be registered in our database and this wilt help up
process your claim with greater speed and efficiency should you require warranty
service.
PROCEDURE FOR OBTAINING PERFORMANCE OF WARRANTY: In the
event that the Product does not conform to this warranty, the Product should be
shipped or delivered, freight pre-paid, with evidence of original purchase, (eg/ a
copy of the sales docket), to the warrantor at:
UNIDEN AUSTRALIA PTY. LIMITED
SERVICE DIVISION
345 Princes Highway, Rockdale, NSW 2216
Ph (02) 599 3100 FAX (02) 599 3278
Customers in other States should ship or deliver the Product
freight pre-paid to their nearest Uniden Authorized Repair Centre.
(Contact Uniden for the nearest Warranty Agent to you)
Page 20

®
uniden
©1994 Uniden Australia Pty. Limited. All rights reserved.
UBZZ0I236AZ Printed in the Philippines
 Loading...