

7586(5,(6
81,'(1
&25'/(66
7(/(3+21(6

Table of Contents
Welcome .......................................................................4
Accessibility...............................................................4
Installing the Phone ....................................................5
Choosing.the.Best.Location
Installing.the.Battery
Connecting.the.AC.adapter
To.the.base
To.the.charging.cradle.
Charging.the.Handset
Connecting.to.the.Phone.Line
Testing.the.Connection
Changing.the.dial.mode
Installing.the.Belt.Clip
Expanding.Your.Phone
Adding.accessory.handsets
Registering.accessory.handsets
Wall.Mounting.the.Base
Getting to Know Your New Phone ...........................15
Features...................................................................15
Answering.system.features
Terminology.Used.in.this.Manual
............................................................7
(for.multi-handset.packs.only)
....................................... 5
..................................................6
........................................7
.
.......................7
................................................ 8
....................................9
............................................10
......................................11
..............................................11
............................................12
................................12
.........................12
...........................................13
.................................15
............................. 16
Manual.Conventions
Parts.of.the.Handset
Parts.of.the.Base
Using the Interface ....................................................19
Reading.the.Display
Using.the.Four-way.Function.Key
Using.the.Menus
Entering.Text.from.Your.Phone
Basic Setup ................................................................22
Selecting.a.Language
Activating.Personal.Ring.(Handset.only)
Activating.the.Key.Touch.Tone
Setting Up the Phonebook ........................................24
Creating.Phonebook.Entries
Finding.a.Phonebook.Entry
Editing.an.Existing.Phonebook.Entry
Storing.Caller.ID.or.Redial.Numbers.in.the.
Phonebook..................................................26
Deleting.a.Single.Phonebook.Entry
Deleting.all.Phonebook.Entries
Copying.Phonebook.Entries.to.Another.Station
................................................16
................................................17
.....................................................18
.................................................19
............................20
...................................................... 20
................................21
..............................................22
.................23
.................................23
.................................... 24
......................................25
.......................25
.........................26
................................26
.......27
1

Customizing Your Handsets ..................................... 28
Changing.the.Handset.Banner
Selecting.a.Ring.Tone
Activating.
Activating.Any.Key.Answer
Using Your Phone ......................................................30
Making.a.Call.from.the.Phonebook
Switching.to.the.Handset.Speakerphone.
Using Caller ID, Call Waiting, and Redial Lists .......32
Using.the.Caller.ID.List.
Making.a.Call.from.a.Caller.ID.Record
Deleting.Caller.ID.Numbers
Using.Call.Waiting
Redialing.a.Number
Deleting.a.Redial.Record
Adjusting the Ringer, Earpiece and
Adjusting.the.Ringer.Volume
Muting.the.Ringer.(One.call.only)
Adjusting.the.Earpiece.Volume
Adjusting.the.Speaker.Volume
AutoTalk...................................................29
Chain.dialing.from.the.phonebook
During.a.Call
Seven-digit.dialing
Speaker Volume .............................................35
..............................................28
................................................31
...............................................33
....................................................34
.................................................34
.................................28
......................................29
..........................31
.......................31
.
...........................................32
....................32
.....................................33
......................................... 34
....................................35
............................35
................................ 35
.................................36
Adjusting.the.Audio.Tone.(Handset.only)
Finding a Lost Handset .............................................37
Using Hold, Conference and Transfer ..................... 37
Placing.a.Call.on.Hold
Conferencing............................................................37
Transferring.a.Call
Answering.a.transferred.call
Using Special Features ............................................. 39
Privacy.Mode
Using.the.Intercom
Making.an.intercom.page
Answering.an.intercom.page
Muting.the.Microphone
Tone.Dialing.Switch.Over
Using.a.Voice.Mail.Service
Resetting.the.voice.message.waiting.indicator
Installing.the.Optional.Headset
Setting Up the Answering System ........................... 42
Recording.a.Personal.Greeting
Selecting.a.Greeting
Deleting.Your.Personal.Greeting
Selecting.the.Language.for.Announcements
Setting.the.Number.of.Rings
...........................................................39
..............................................37
...................................................38
................................38
...................................................39
....................................39
...............................40
............................................40
.........................................40
......................................41
................................ 41
................................42
................................................42
..............................43
....................................43
.................36
...41
...........43
2

Setting.the.Day.&.Time............................................ 44
Setting.the.Record.Time.(or.Announce.only)
Activating.the.Message.Alert
Activating.the.Base.Call.Screen
Using the Answering System ................................... 46
Turning.Your.Answering.System.On.and.Off
Reviewing.Messages
Screening.Calls
Turning.Off.the.Message.Alert.Tone
Operating.the.Answering.System.
While.You.Are.Away.from.Home
Setting.a.security.code.or.
Personal Identication Number (PIN)..........48
Dialing.in.to.your.answering.system
Maintenance ...............................................................50
Specications...........................................................50
Battery.Information
Battery.life
Low.battery.alert.
Cleaning.the.charging.contacts
Battery.replacement.and.handling.
Power.Failures
........................................................48
...................................................50
...........................................................50
.................................................51
......................................................... 51
....................................45
...............................45
............................................... 47
.........................48
.
.
...........................51
...........44
............46
..................48
....................48
......................51
Troubleshooting ........................................................52
Common.Issues
Resetting.the.Handset
Resetting.the.Handset.Without.the.Base
Changing.the.Handset.to.Base.Code
Changing.the.Line.Mode.for.Multiple.Extensions
Traveling.Out.of.Range
Liquid.Damage
Precautions! ..............................................................58
Rechargeable.Nickel-Metal-Hydride.
Battery.Warning.
Important.Safety.Instructions.
The.FCC.Wants.You.To.Know.
Radio.interference.
Cordless.telephone.privacy
I.C..Notice
Terminal.equipment
Radio.equipment
One Year Limited Warranty .......................................61
Index .........................................................................62
Remote Operation Card ............................................64
....................................................... 52
.............................................54
................. 55
......................56
.....56
............................................56
.........................................................57
.
..........................................58
..................................58
.................................59
..............................................60
.................................60
................................................................60
.............................................60
.................................................60
3

Welcome
Thank.you.for.purchasing.a.Uniden.Multi-Handset.phone.
Note:. Illustrations.in.this.manual.are.used.for.explanation.purposes..Some.illustrations.in.this.manual.may.differ.
from.the.actual.unit.
As.an.Energy.Star
the.Energy.Star
Uniden.is.a.registered.trademark.of.Uniden.America.Corporation.
Accessibility
Uniden.provides.a.customer.service.hotline.for.accessibility.questions..If.you.have.a.disability.and.need.customer.
service.assistance.or.if.you.have.any.questions.about.how.Uniden’s.products.can.accommodate.persons.with.
disabilities,.please.call.the.accessibility.voice/TTY.line:.1-800-874-9314.
Our.customer.care.hours.as.well.as.accessibility.information.can.be.found.on.our.website,.www.uniden.com,.under.
the.“Accessibility”.link..If.your.call.is.received.outside.of.our.business.hours,.you.can.leave.us.a.message.and.we.will.
call.you.back.
May.be.covered.under.one.or.more.of.the.following.U.S..patents:
4,797,916
5,660,269 5,663,981 5,671,248 5,717,312 5,732,355 5,754,407 5,758,289 5,768,345
5,787,356 5,794,152 5,801,466 5,825,161 5,864,619 5,893,034 5,912,968 5,915,227
5,929,598 5,930,720 5,960,358 5,987,330 6,044,281 6,070,082 6,076,052 6,125,277
6,253,088 6,314,278 6,321,068 6,418,209 6,618,015 6,671,315 6,714,630 6,782,098
6,788,920 6,788,953 6,839,550 6,889,184 6,901,271 6,907,094 6,914,940 6,940,867
6,953,118 7,023,176 7,030,819 7,146,160
Other.patents.pending.
®
.Partner,.Uniden.has.determined.that.this.product.or.product.models.meets.
®
guidelines for energy efciency. Energy Star
5,426,690 5,491,745 5,493,605 5,533,010 5,574,727 5,581,598 5,650,790
®
.is.a.U.S..registered.mark.
7,203,307 7,206,403
Welcome
4
6
Installing the Phone
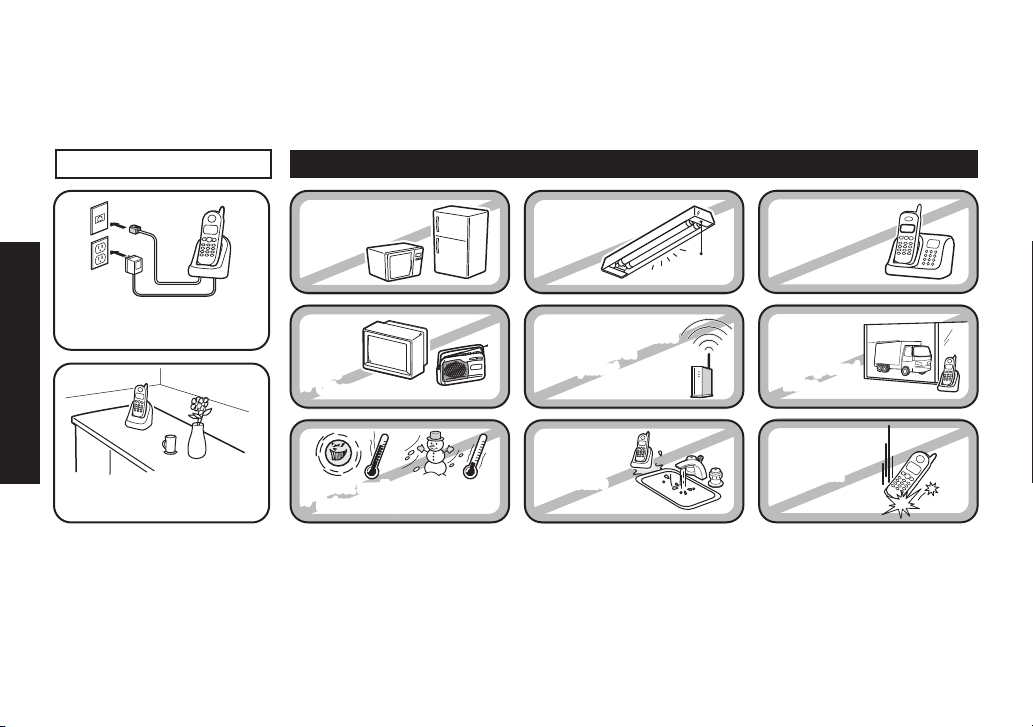
PLACE YOUR BASE
Near an AC outlet and
a telephone wall jack.
• Microwave ovens
• Refrigerators
• TVs
• Other electronics
• Direct sunlight
• Extreme temperatures
• Fluorescent
lighting
• Personal computers
• Wireless LAN
equipment
• Dust
• Excessive
moisture
• Other cordless
telephones
• Areas with
a lot of
background
noise
• Shock
• Vibration
In a centrally-located
open area.
TRY TO AVOID
• TVs
• Other electronics
• Direct sunlight
• Extreme temperatures
• Personal computers
• Wireless LAN
equipment
• Dust
• Excessive
moisture
• Areas with
a lot of
background
noise
• Shock
• Vibration
Choosing the Best Location
When.choosing.a.location.for.your.new.phone,.here.are.some.important.guidelines.you.should.consider:
Installing the Phone
Note:. For.maximum.range:.
•
Keep.both.the.base.and.handset.antennas.free.of.obstruction.
•
When.the.handset.is.not.in.use,.place.the.handset.in.an.upright.position.
•
Metal.and.reinforced.concrete.may.affect.cordless.telephone.performance.
5
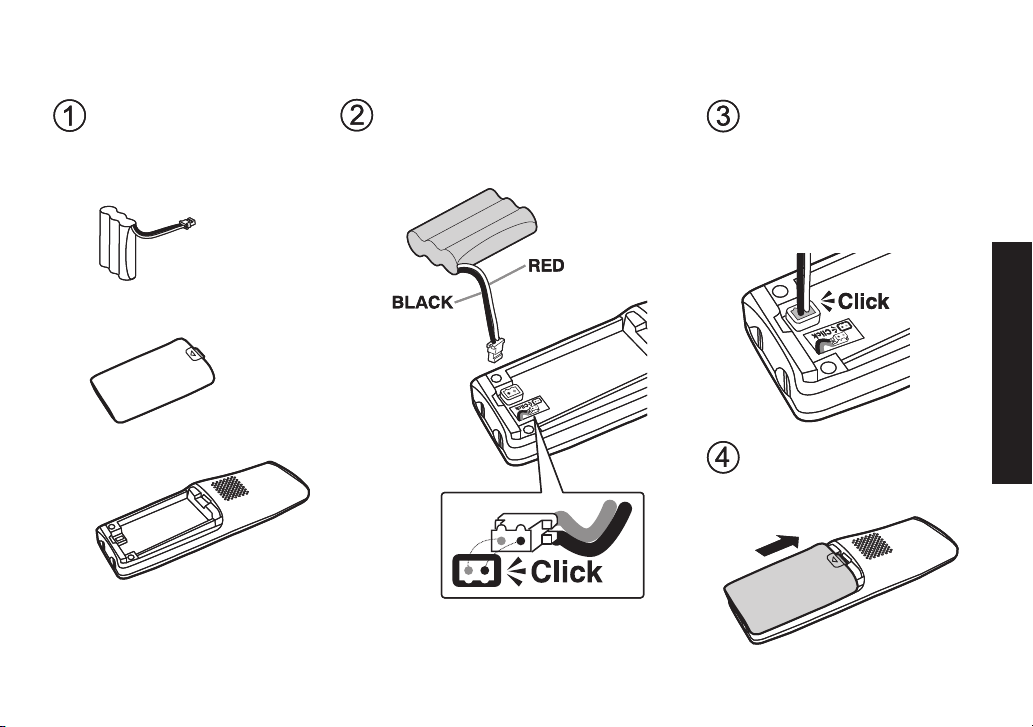
Installing the Battery
Locate the battery pack,
battery cover and the
handset.
Push the battery pack
connector in firmly. (You
should hear it click into
place.) Gently tug on the
battery wires to make
sure the connection is
secure.
Place the cover over the
battery compartment
and slide it up into
place.
Line up the red and black wires on
the battery pack connector with
the sticker in the handset’s battery
compartment.
Battery
pack
Battery
cover
Handset
Use.only.the.Uniden.BT-446.rechargeable.battery.pack.supplied.with.your.cordless.telephone.
6
Installing the Phone
8
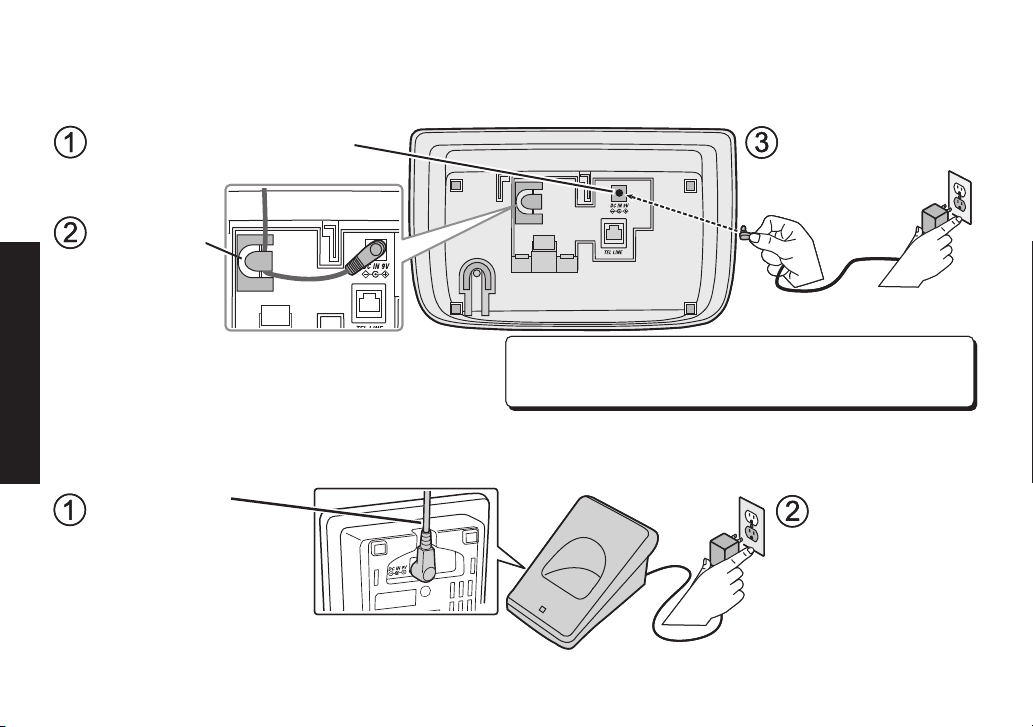
Connecting the AC adapter
Connect the AC adapter to the
DC IN 9V jack on the bottom
of the base.
Connect the AC
adapter to a
standard 120V
AC wall outlet.
Route the cord
through the
molded wiring
channel.
Don’t put any power cord where it people might trip
over it or step on it. If a power cord becomes chafed
or worn out, it can create a fire or electrical hazard.
Place the cord
through the molded
wiring channel.
Connect the AC
adapter to a
standard 120V
AC wall outlet.
Place the cord
through the molded
wiring channel.
Connect the AC
adapter to a
standard 120V
AC wall outlet.
To the base
To avoid risk of re and shock, only use the Uniden PS-0009 AC adapter with the base.
To the charging cradle (for multi-handset packs only)
Installing the Phone
Use.only.the.Uniden.PS-0007.AC.adapter.with.the.charging.cradle.
7
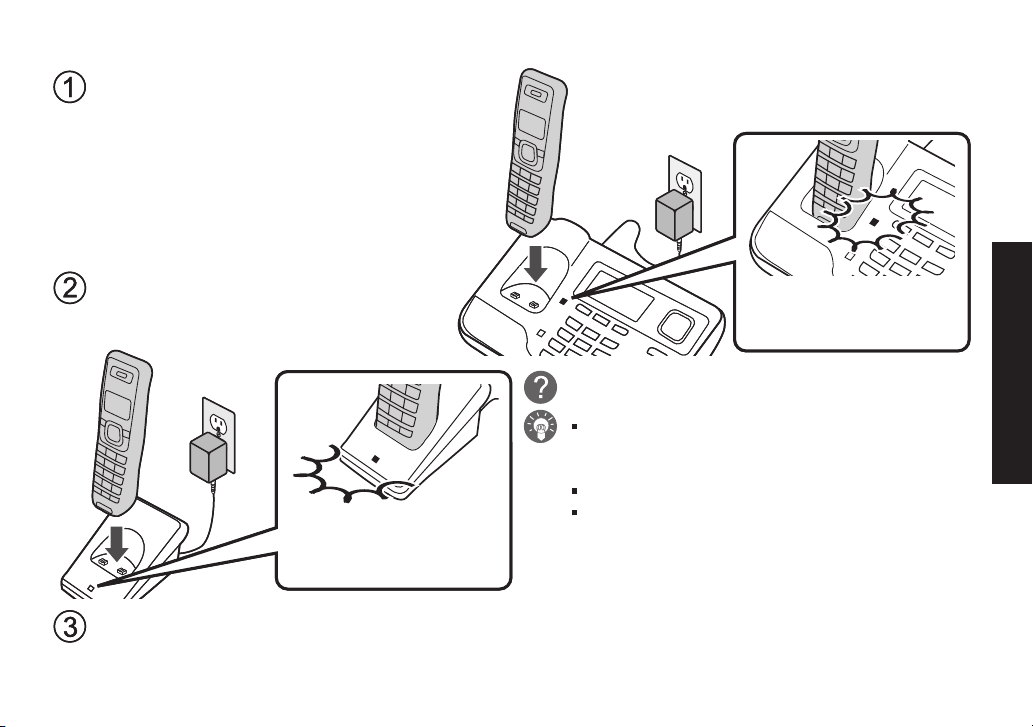
Charging the Handset
Place the handset in the base
cradle with the display facing
forward.
If you have an accessory handset,
place it in the charging cradle with
the display facing forward.
Make sure that the charge
LED illuminates when the
handset is seated.
What if the charge LED doesn’t light up?
Reseat the handset; make sure the contacts
on the bottom of the handset are lined up
with the contacts in the charging cradle.
Check the AC adapter connection.
Make sure you are not using an outlet that’s
controlled by a wall switch.
Make sure that the charge
LED illuminates when the
handset is seated.
Charge your handset at least 15 to 20 hours before plugging into the phone line.
Installing the Phone
8
10
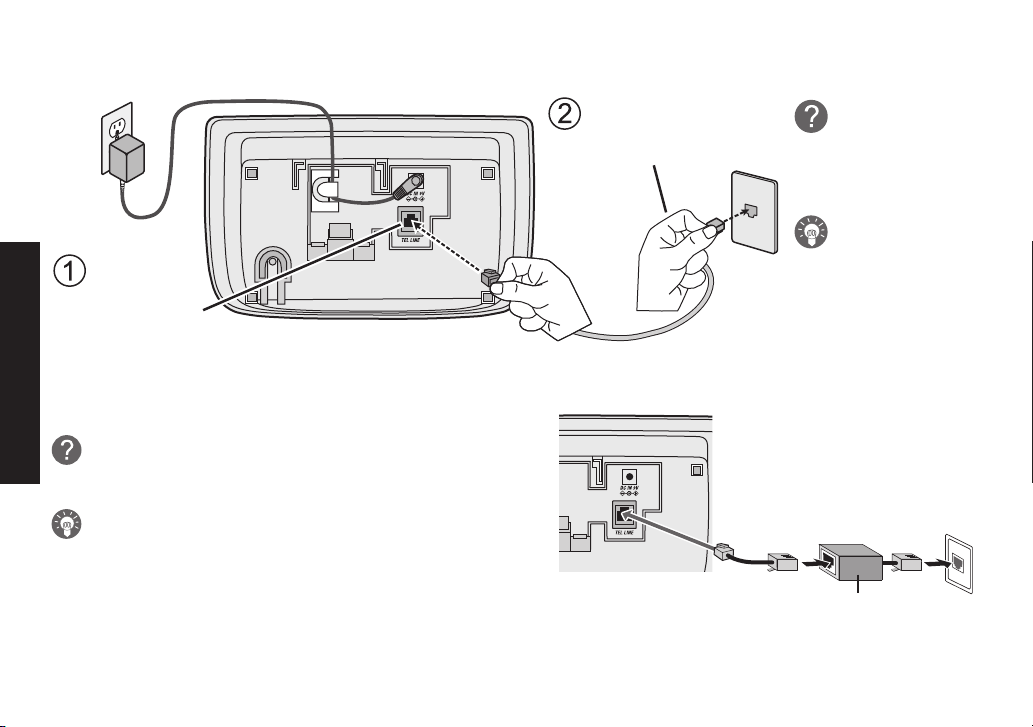
Connecting to the Phone Line
Connect the
telephone
cord to the
TEL LINE jack.
Connect the
telephone cord to a
telephone wall jack.
What if CHECK
TEL LINE
appears on the
base or handset
display?
The telephone
cord may not be
connected
correctly. Check
the telephone
cord connection.
Telephone cord
Telephone wall jack
DSL filter
Make.sure.that.the.battery.pack.is.fully.charged.
Installing the Phone
Do.you.have.DSL.or.any.high-speed.Internet.service.
delivered.through.your.phone.line?
Try putting a DSL lter between the base and the wall
jack. Without a lter, telephone-line-based Internet
services.can.interfere.with.standard.phones.
9
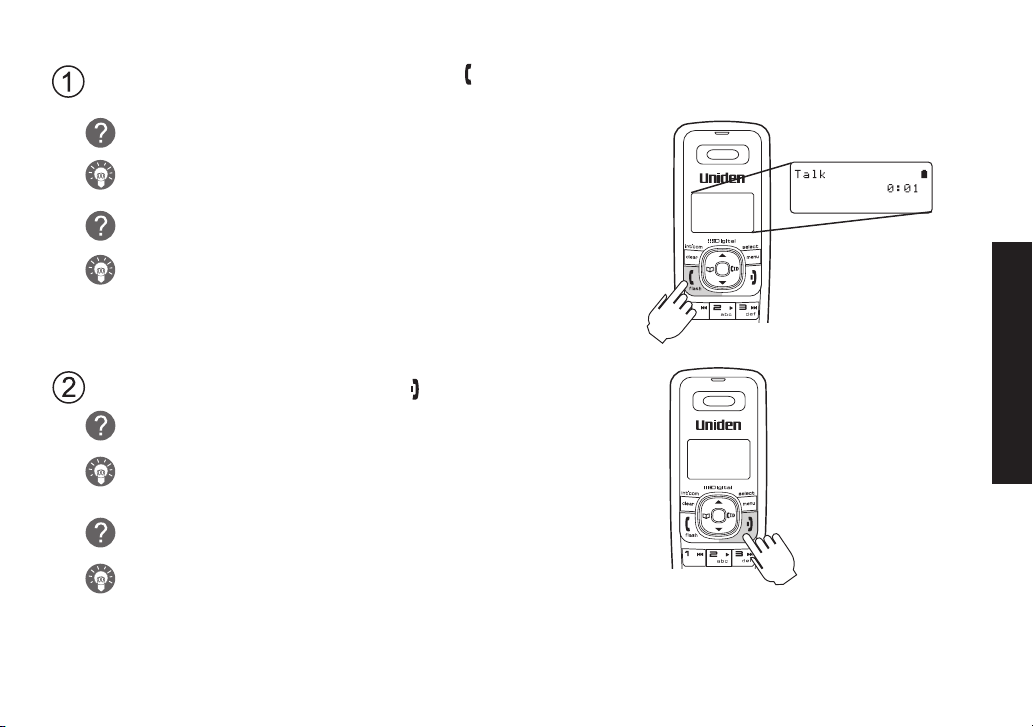
Testing the Connection
Pick.up.the.handset.from.the.base.and.press.[ /ash]..You.should.hear.a.dial.tone,.and.the.display.should.
show.TALK.
What.if.I.can’t.hear.a.dial.tone?
Check.the.telephone.cord.connection.on.the.base.
What.if.the.display.doesn’t.show.TALK?.
Check.the.battery.pack.connection.in.the.handset.
•
Make.sure.the.battery.pack.is.fully.charged..
•
Make.sure.the.AC.adapter.cord.is.securely.connected.to.the.
•
DC IN 9V.jack.and.a.standard.power.outlet.
Try.resetting.the.handset.(see.page.54).
•
.
Installing the Phone
Make.a.quick.test.call,.and.then.press.
What.if.there.is.a.lot.of.static?.
Check.the.sources.of.interference.described.in.Choosing.the.
Best.Location.(see.page.5):.is.the.base.near.any.of.those?
What.if.the.call.doesn’t.go.through?
Try.changing.the.dialing.mode.(see.the.next.section).
Note:. Make.sure.you.can.get.a.dial.tone.on.any.accessory.handsets.that.were.packaged.with.your.phone..
[ ].to.hang.up..
10

12
Changing the dial mode
Your.phone.can.communicate.with.the.telephone.network.in.two.different.ways:.tone.dialing.or.pulse.dialing..These.
days,.most.base.networks.use.a.method.called.tone.dialing,.so.your.phone.comes.programmed.for.tone.dialing..If.
your.phone.company.uses.pulse.dialing,.you.will.need.to.change.your.phone’s.dial.mode..If.you.don’t.get.a.dial.tone.
or.can’t.connect.to.the.telephone.network,.please.follow.the.steps.below.to.modify.your.phone’s.settings:
Press.
1)
2)
3)
4)
If.you.ever.need.to.change.the.dial.mode.back.to.tone.dialing,.follow.the.
same.procedure,.but.select.TONE.in.step.2.
[menu/select]..
Select.the.GLOBAL.SETUP.menu,.and.then.the.DIAL.MODE.
submenu.
Scroll.
[ ].to.highlight.PULSE.
Press.
[menu/select]. You will hear a conrmation tone.
NOW YOU ARE READY TO USE YOUR PHONE!
Installing the Phone
Installing the Belt Clip
Insert.the.tabs.on.the.sides.of.the.belt.clip.into.the.holes.on.either.side.of.the.handset..
Press.the.belt.clip.down.until.it.clicks.into.place..(Tug.on.the.clip.to.make.sure.it’s.secure.).
To.remove.the.belt.clip,.gently.pull.the.tabs.out.of.the.holes,.then.slide.the.belt.clip.off.of.
the.handset.
11
Expanding Your Phone
Adding accessory handsets
Your.phone.supports.a.total.of.ten.cordless.handsets,.including.any.that.were.supplied.with.your.phone..You.can.
now.place.a.fully-featured.cordless.handset.anywhere.AC.power.is.available.to.connect.the.charging.cradle.
Your.phone.is.compatible.with.the.TCX950.accessory.handset.
•
For.instructions.on.connecting.the.charging.cradle,.see.page.7.
•
If.you.purchase.any.accessory.handsets.separately,.you.must.register.the.handsets.to.the.base.before.you.can.
•
use.them..(Accessory.handsets.that.come.packaged.with.a.base.are.already.registered.to.that.base.)
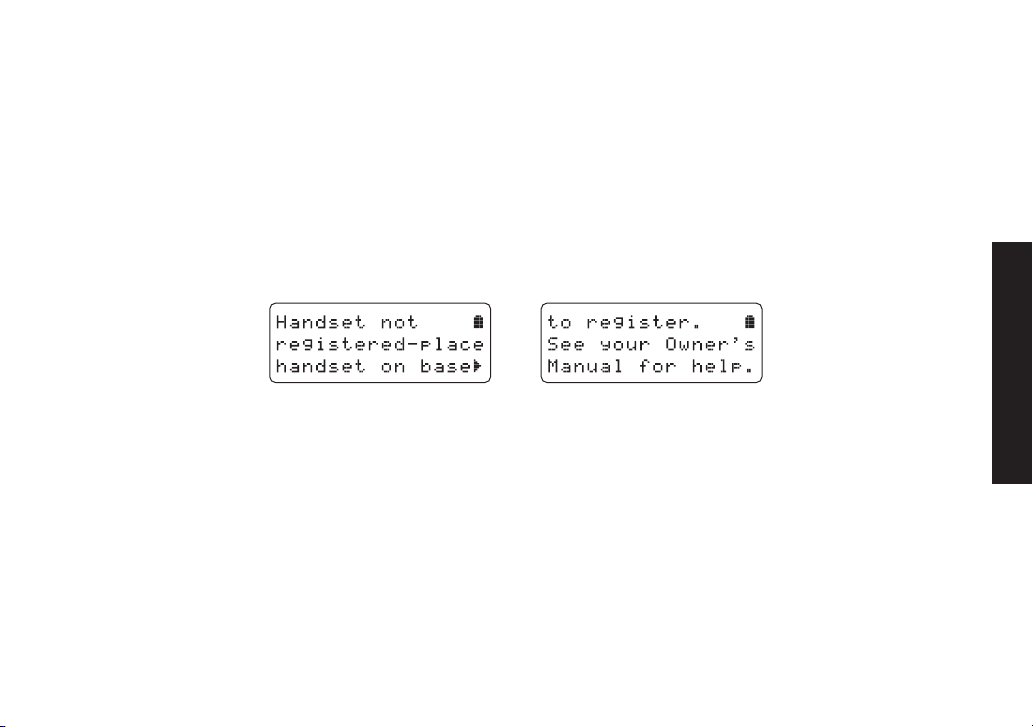
Registering accessory handsets
When.charged,.registered.handsets.display.a.handset.ID.number..Handsets.that.have.not.been.registered.display:
..↔..
To.register.a.TCX950.accessory.handset:
Charge.the.handset.for.15-20.hours.
1)
Place.the.handset.in.the.base.cradle.for.about.thirty.seconds..HANDSET.REGISTERING.will.appear.in.the.LCD..
2)
When.the.handset.has.registered.to.the.base,.the.LCD.will.display.REGISTRATION.COMPLETE.then.show.the.
3)
handset.ID.number..
If.REGISTRATION.FAILED.appears.in.the.LCD,.please.try.these.steps.again.
Note:. If.a.handset.has.ever.been.registered.to.a.base,.you.must.reset.the.handset.before.you.can.register.it.to.a.
new.base..See.Resetting.the.Handset.on.
page.54.
Installing the Phone
12
14
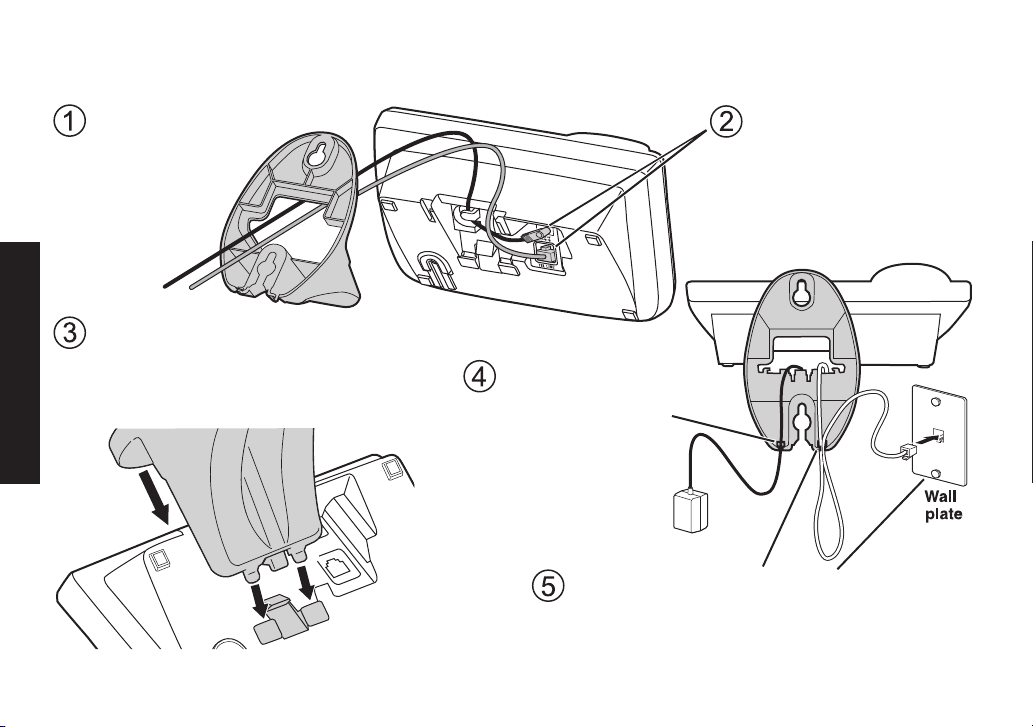
Wall Mounting the Base
Route the AC adapter
and the telephone
cord through the
hole of the wall
mount bracket.
Line up the four tabs on the wall
mount bracket (two at the top and two
at the bottom) with the four notches
on the bottom of the base. Slide the
bracket into place.
Plug the telephone cord into the wall jack.
Hook both sides of the telephone cord into
the larger notch OR tuck the excess cord
into the open space in the bracket.
Connect the AC adapter
and the telephone cords
as shown on pages 7 and
9. Remember to route the
AC adapter cord through
the channel.
Hook the AC adapter
cord into the smaller
notch at the bottom
of the bracket, and
let the cord hang
below the bracket.
(Bottom of the base)
(To AC outlet)
This.phone.can.be.mounted.on.any.standard.telephone.wall.plate.
Installing the Phone
13
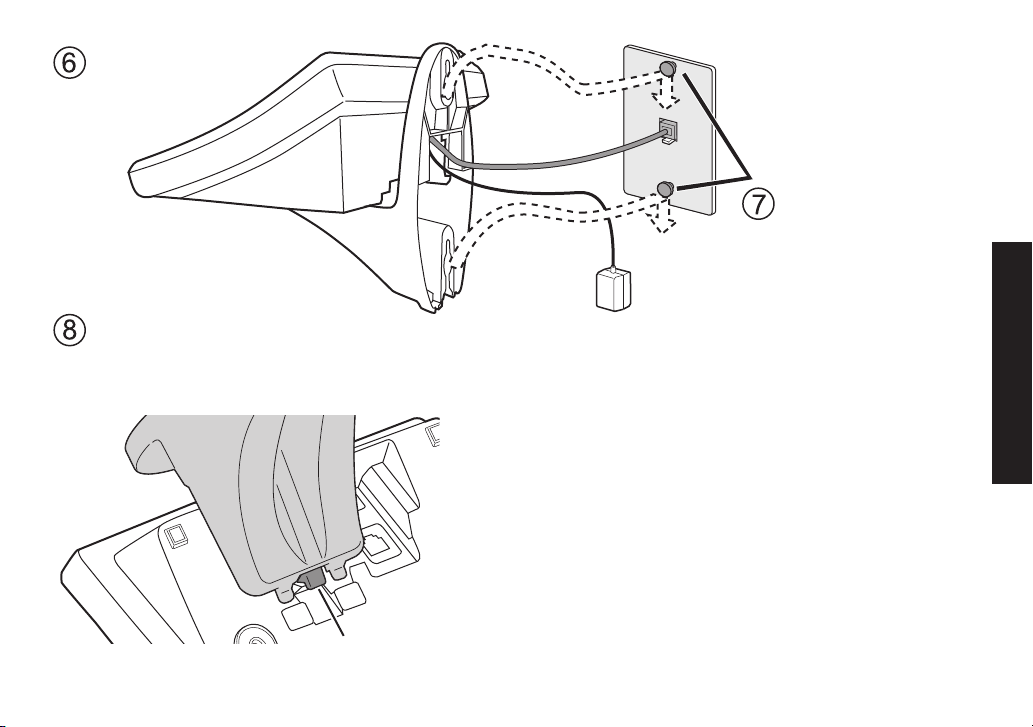
Place the mounting
slots over the pins
on the wall plate.
Slide the base
down to lock it
into place.
Wall plate
At the bottom of the base, lift up on
the release latch between the two
bottom tabs and push the bracket up.
Removing the wall-mount bracket
(To AC outlet)
Release latch
Note:. Mounting.the.phone.directly.on.the.wall
Be.sure.the.wall.is.capable.of.supporting.the.weight.
•
of.the.phone,.and.use.the.proper.type.of.anchoring.
device.for.the.wall.material.
Insert.two.#10.screws.(minimum.length.of.1.
•
inches,.not.supplied).into.the.wall,.3.
apart...
Leave.the.screw.heads.
•
1
/8.inch.away.from.the.wall.to.
15
allow.room.for.mounting.the.phone..
Align.the.mounting.slots.over.the.screws.and.slide.
•
the.base.down.into.place.as.shown.above.
14
3
/8.
/16.inches.
Installing the Phone

16
Getting to Know Your New Phone
Features
5.8GHz.FHSS.expandable.system
•
Expands.up.to.10.handsets
•
Integrated.digital.answering.system
•
Caller.ID/Call.Waiting
•
Base.keypad
•
Advanced.phonebook.features:
•
Store.70.phonebook.entries.on.base.&.each.
•
handset
Alphabetical.search
•
Personalized.ring.by.party.(on.handset)
•
Transfer.single.listing.or.entire.phonebook
•
Answering system features
•
Digital.tapeless.recording
•
Up.to.14.minutes.of.recording.time
•
Call.screening
Personal.or.pre-recorded.outgoing.messages
•
Bilingual.voice.prompts.
•
(for.US.models:.English.and.Spanish,
for.Canadian.models:.English.and.French)
.
.
Store.30.Caller.ID.numbers.on.base.&.each.handset
•
Speakerphone.on.base.&.handset
•
7.ringer.options.on.handset.(3.tones/4.melodies)
•
Last.5.number.redial
•
Bilingual.menu.displays
•
(for.US.models:.English.and.Spanish,
for.Canadian.models:.English.and.French)
Call.transfer
•
Conferencing
•
Intercom
•
•
Day.and.time.announcement
•
Remote.message.retrieval
•
Toll.saver
•
Message.alert
Records.up.to.59.messages
•
.
.
Getting to Know Your New Phone
15
Terminology Used in this Manual
Accessory
Handsets
Base The.main.part.of.the.phone.that.connects.to.your.phone.line.and.lets.you.make.and.receive.calls.
Charging
cradle
CID
CID/CW or
CIDCW
Global
Settings
Standby
Station Any.registered.handset.or.the.base.
Talk A.dial.tone.has.been.enabled,.so.you.can.dial.and.carry.on.a.conversation.with.an.outside.party.
Additional.handsets.that.can.register.to.the.base,.allowing.you.to.add.handsets.without.connecting.another.
phone.line..This.base.supports.a.total.of.ten.cordless.handsets;.see.page.12.for.compatible.handsets.
A.cradle.that.comes.with.an.accessory.handset.and.charges.the.handset.battery.pack.
It.connects.to.power.but.does.not.connect.to.a.phone.line.
Caller.ID.is.available.from.your.telephone.provider.and.is.offered.to.users.on.a.subscription.basis.
With.this.service,.you.will.be.able.to.see.the.incoming.caller.information.such.as.name.and.phone.number.
Caller.ID.with.Call.Waiting.is.available.by.subscription.from.your.telephone.provider.
With.this.service,.you.will.be.able.to.view.incoming.caller.information.while.on.a.call.with.another.user.
Any.settings.that.apply.to.all.registered.handsets.and.the.base.
These.features.are.available.by.selecting.
handset.or.the.base.can.change.global.settings.at.a.time,.and.you.have.to.make.sure.the.phone.is.not.
currently.being.used.
The.handset.and.the.base.are.not.in.use..(It.doesn’t.matter.whether.the.handset.is.in.the.cradle:.the.
or.[ ].on.the.handset.or.[ ].on.the.base.hasn’t.been.pressed,.and.there.is.no.dial.tone.).
“GLOBAL.SETUP”.in.the.handset.or.the.base.menu..Only.one.
[ /ash].
Manual Conventions
This.manual.uses.several.different.type.styles.to.help.you.distinguish.between.different.parts.of.the.phone:
Bold.text.with.“[ ]”.indicates.a.key.or.button.on.the.phone
•
ALL CAPITALS indicates text on the display, such as menu options, prompts, and conrmation messages
•
lower case bold.text.indicates.a.status.light.on.the.phone
•
ALL CAPITALS BOLD.indicates.a.connection.jack.on.the.base.or.charging.cradle
•
16
Getting to Know Your New Phone
18
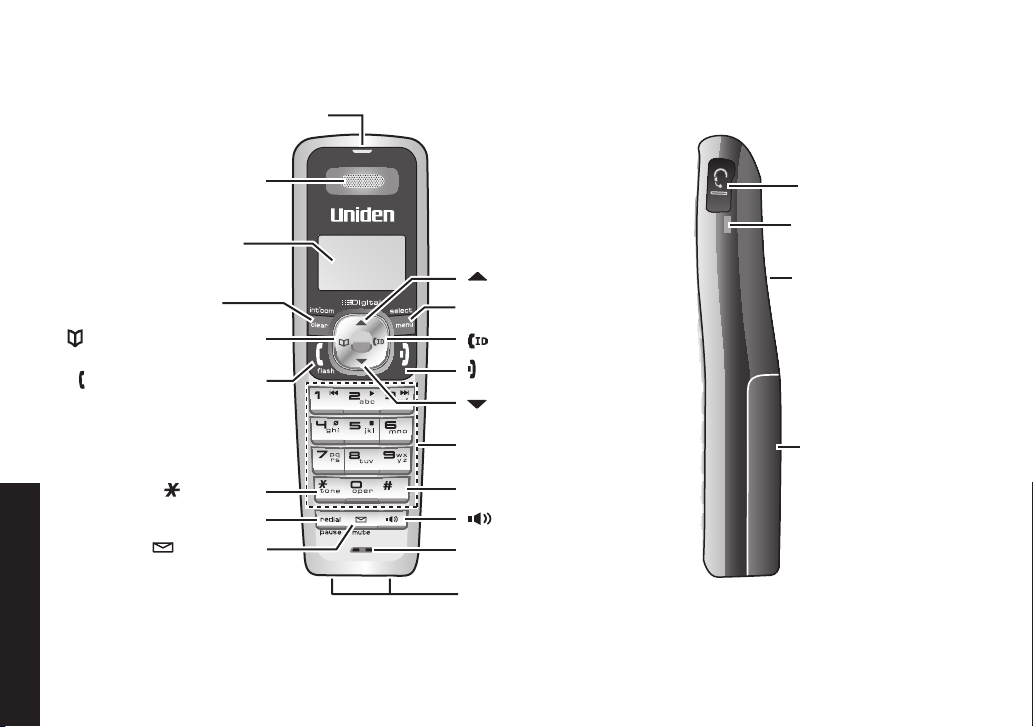
Parts of the Handset
Twelve-key dial pad
[ ] key (down)
[ ] key (caller ID/right)
[menu/select] key
[ /mute] key
(messages/mute)
[ ] key (end call)
[#] key
[ ] key (speaker)
Microphone
Charging contacts
[ /tone] key
[ ] key (up)
new message LED
Earpiece
Display (LCD)
[clear/int’com] key
(clear/intercom)
[ ] key (phonebook/left)
[redial/pause] key
[ /flash] key (talk/flash)
Headset jack cover
Belt clip hole
Speakerphone
speaker and ringer
Battery compartment
Getting to Know Your New Phone
17
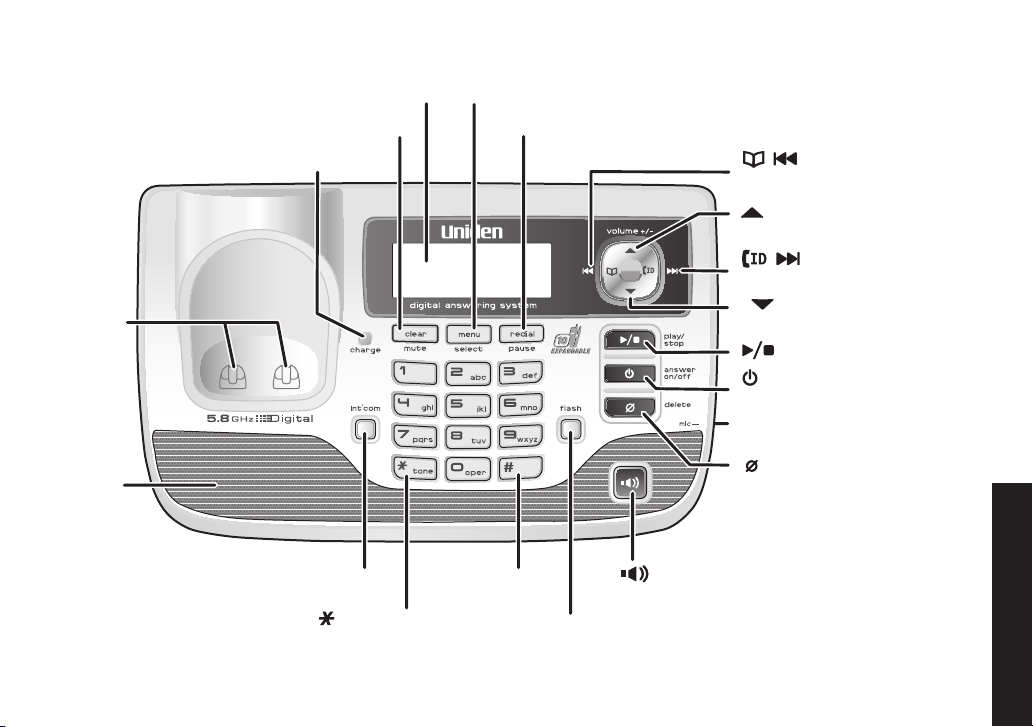
[ answer on/off] key
(answering system on/off)
[flash] key
[ ] key and LED (speaker)
[ ] key (up)
[ ] key (down)
[ / ] key
(phonebook/repeat/left)
[ / ] key
(caller ID/skip/right)
[ ] key and LED (play/stop)
[redial/pause] key
[menu/select] key
[clear/mute] key
Display (LCD)
[int'com] key (intercom)
Speaker
Charging
contacts
charge LED
[#] key
Microphone (on bottom)
[ /tone] key
[ ] key (delete)
Parts of the Base
18
Getting to Know Your New Phone
20
Using the Interface
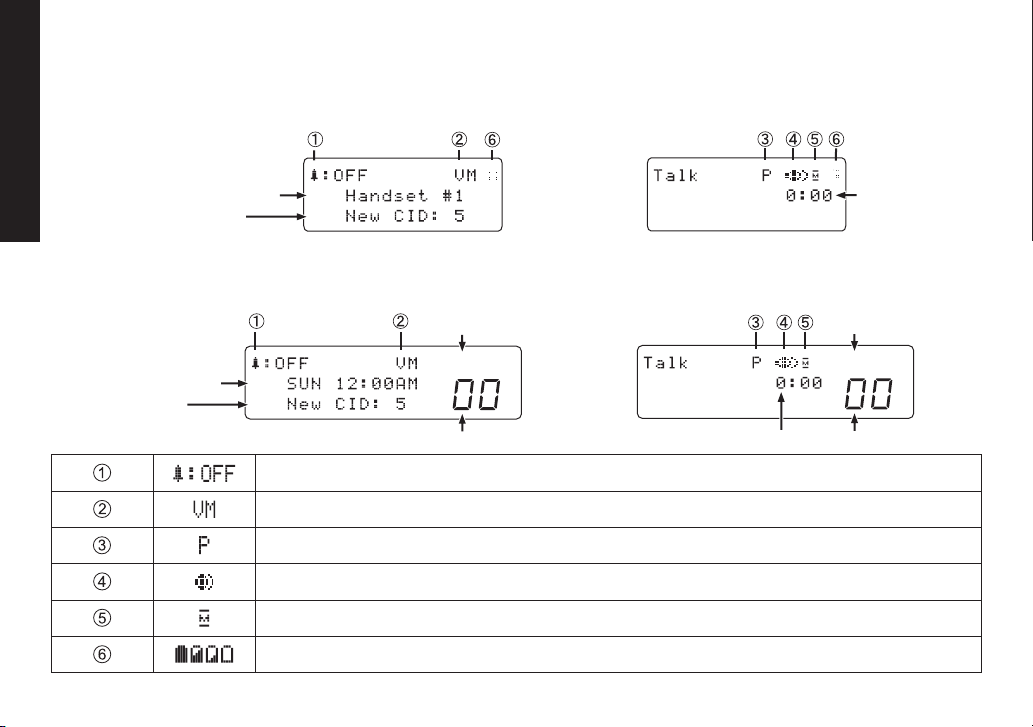
Handset ID and banner
Number of new
Caller ID calls received
Call duration
In standby During a call
Status of your
answering system
Message counter
Day of the week
and time
Number of new
Caller ID calls received
Answer ON OFF
Status of your
answering system
Message counter
Call duration
Answer ON OFF
In standby During a call
Reading the Display
Handset
Using the Interface
. Note:.The.handset.does.not.display.the.day.and.time.
Base
The.ringer off.icon.indicates.that.the.ringer.is.turned.off.
The.voice mail.icon.appears.when.you.have.messages.waiting.in.your.voice.mailbox.
The.privacy.icon.appears.when.the.Privacy.Mode.is.turned.on.
The.speaker.icon.appears.when.the.speaker.phone.is.in.use.
The.mute.icon.appears.while.the.microphone.is.muted.
The.battery.icon.indicates.the.handset.battery.status:.full,.medium,.low,.and.empty.
19
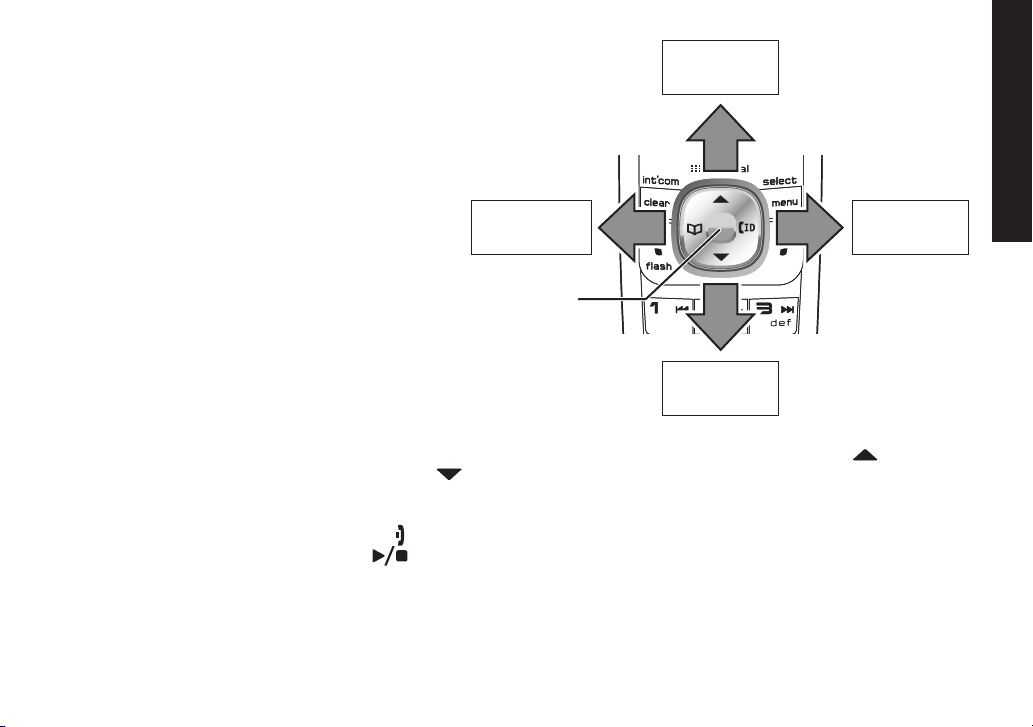
Using the Four-way Function Key
View the
phonebook
Four-way
Function Key
Up
View the
Caller ID
Down
View the
phonebook
Four-way
Function Key
Up
View the
Caller ID
Down
Your.handset.and.base.have.a.four-way.function.
key.that.allows.you.to.move.the.cursor.or.pointer.
on.the.display.and.access.the.most.commonly.
used.features.at.the.touch.of.a.button..By.moving.
this.key.to.the.left,.you.open.the.phonebook..
Move.the.key.to.the.right.to.access.Caller.ID.
information..To.use.this.four-way.key,.place.your.
thumb.over.the.key.and.move.to.the.four.positions.
to.get.the.feel.of.how.it.moves.and.operates.
Using the Interface
Using the Menus
The.menus.for.the.handset.and.the.base.work.in.
the.same.way:
To.open.the.menu,.press.the.
•
The.arrow.pointer.on.the.left.side.of.the.line.shows.which.menu.item.is.currently.highlighted..Use.
•
way.function.key.to.move.the.pointer.up.and.
To.select.the.highlighted.option,.press.
•
To.go.back.to.the.previous.screen,.press.
•
To.exit.the.menu.on.the.handset,.press.
•
To.exit.the.menu.on.the.base,.press.
•
If.you.don’t.press.any.keys.for.thirty.seconds,.the.phone.will.time.out.and.exit.the.menu..(When.setting.the.day.
•
and.time,.the.time-out.period.is.extended.to.two.minutes.)
For.ANSW..SETUP,.GLOBAL.SETUP,.DAY.&.TIME.and.REGISTER.HANDSET.(base.only).menu.options,.make.
•
sure.the.line.is.not.in.use.and.the.handsets.are.within.range.of.the.base.
[menu/select].key.
[ ].to.move.the.pointer.down.
[menu/select].
[left].on.the.four-way.function.key.
[ ]..
[ ].
20
[ ].on.the.four-
 Loading...