

Uniden TRU9385 Series, TRU9385-2 Owner's Manual

TRU9385
Series
TRU9385
Series
A World Without Wires
®
OWNER’S MANUAL
UNIDEN
CORDLESS
PHONES
tru9385_front_eng.pdf 5/17/2007 5:34:59 PM

1
Table of Contents
Welcome .......................................................................4
Accessibility..............................................................4
Terminology.Used.in.this.Manual
..............................5
Manual.Conventions
.................................................5
Product Overview ........................................................ 6
Features:...................................................................6
Answering.System.Features:
....................................6
Parts.of.the.Phone
....................................................7
Using the Interface ......................................................9
Reading.the.Display
..................................................9
Using.the.Four-way.Function.Key
...........................10
Using.the.Handset.Menus
......................................10
Entering.Text.from.Your.Handset
............................ 11
Installing the Phone ..................................................12
Choosing.the.Best.Location
....................................12
Installing.the.Battery
...............................................13
Installing.the.Belt.Clip
.............................................14
Connecting.the.Base.and.Charging.the.Handset
...14
Connecting.to.the.Phone.Line
................................15
Changing.the.Dial.Mode
.........................................15
Wall.Mounting.the.Base
..........................................16
Basic Setup ................................................................17
Selecting.the.Language
..........................................17
Activating.Personal.Ring
.........................................17
Activating.the.Key.Touch.Tone
................................18
Adding Accessory Handsets ....................................19
Compatible.Handsets
.............................................19
Charging.Accessory.Handsets
................................19
Registering.TCX930.Accessory.Handsets
..............20
Setting Up the Phonebook ........................................21
Creating.Phonebook.Entries
...................................21
Finding.a.Phonebook.Entry
....................................22
Editing.an.Existing.Phonebook.Entry
......................22
Storing.Caller.ID.or.Redial.Numbers.in.the.
Phonebook..............................................................23
Deleting.Phonebook.Entries
...................................23
Copying.Phonebook.Entries.to.Another.Handset
...24
Programming Base Speed Dial Numbers................25
Customizing Your Phone ..........................................26
Selecting.a.Ring.Tone.(Handset.only)
....................26
Activating.AutoTalk.(Handset.only)
.........................26
Activating.Any.Key.Answer.(Handset.only)
.............26

2
Using Your Phone ......................................................27
Making.a.Call.from.the.Phonebook
.........................28
Chain.Dialing.from.the.Phonebook
.........................28
Switching.to.the.Handset.Speakerphone
During.a.Call
...........................................................28
Making.a.Call.with.Base.Speed.Dial
.......................28
Using Caller ID, Call Waiting, and Redial Lists .......29
Using.the.Caller.ID.List.
..........................................29
Making.a.Call.from.a.Caller.ID.Record
...................29
Deleting.Caller.ID.Numbers
....................................30
Using.Call.Waiting
...................................................30
Redialing.a.Number
................................................30
Deleting.a.Redial.Record
........................................31
Finding a Handset .....................................................31
Adjusting the Ringer, Earpiece and
Speaker Volume .........................................................32
Adjusting.the.Ringer.Volume
..................................32
Adjusting.the.Earpiece.Volume
...............................32
Adjusting.the.Speaker.Volume
................................32
Adjusting.the.Audio.Tone
........................................33
Using.the.Clarity.Boost.Feature
..............................33
Using Hold, Conference and Transfer ..................... 34
Placing.a.Call.on.Hold
............................................34
Conferencing..........................................................34
Transferring.a.Call
..................................................34
Answering.a.Transferred.Call
.................................35
Using Special Features ............................................. 36
Privacy.Mode.(Handset.only)
..................................36
Using.the.Intercom
..................................................36
Muting.the.Ringer.(One.call.only)
...........................37
Muting.the.Microphone
...........................................37
Seven-Digit.Dialing
.................................................38
Tone.Dialing.Switch.Over
........................................38
Installing.the.Optional.Headset
...............................38
Setting Up the Answering System ........................... 39
Recording.a.Personal.Greeting
..............................39
Selecting.a.Greeting
...............................................40
Deleting.Your.Personal.Greeting
............................40
Selecting.the.Language
..........................................40
Setting.the.Number.of.Rings
...................................41
Setting.the.Day.&.Time
...........................................41
Setting.the.Record.Time.(or.Announce.only)
..........41
Activating.the.Message.Alert
..................................42
Activating.Call.Screening
........................................42
Setting.a.Security.Code.or
Personal Identication Number (PIN).....................42
Using the Answering System ................................... 43
Turning.Your.Answering.System.On.and.Off
..........43
Reviewing.Messages
..............................................44
Screening.Calls
.......................................................45
Turning.Off.the.Message.Alert.Tone
.......................45

3
Operating the Answering System
While You Are Away from Home ..............................46
Maintenance ...............................................................47
Specications..........................................................47
Battery.Replacement.and.Handling.
.......................47
Cleaning.the.Battery.Contacts
................................48
Low.Battery.Alert.
....................................................48
Battery.Life
..............................................................48
Power.Failures
........................................................48
Troubleshooting ........................................................49
Resetting.the.Handset
............................................49
Resetting.the.Handset.Without.the.Base
................50
Changing.the.Digital.Security.Code
........................50
Traveling.Out.of.Range
...........................................50
Common.Issues
......................................................51
Liquid.Damage
........................................................53
Precautions! ..............................................................54
Rechargeable.Nickel-Metal-Hydride.Battery
Warning.
..................................................................54
The.FCC.Wants.You.To.Know.
...............................55
I.C..Notice
...............................................................56
One Year Limited Warranty .......................................57
Index ...........................................................................58
Remote Operation Card ............................................60
At Uniden, we’ll take care of you! ............................62

4
Welcome
Thank.you.for.purchasing.a.Uniden.Multi-Handset.phone.
Note:. Illustrations.in.this.manual.are.used.for.explanation.purposes..Some.illustrations.in.this.manual.may.differ.
from.the.actual.unit.
As.an.Energy.Star
®
.Partner,.Uniden.has.determined.that.this.product.or.product.models.meets.
the.Energy.Star
®
guidelines for energy efciency. Energy Star
®
.is.a.U.S..registered.mark.
Uniden.is.a.registered.trademark.of.Uniden.America.Corporation.
Accessibility
Uniden.provides.a.customer.service.hotline.for.accessibility.questions..If.you.have.a.disability.and.need.customer.
service.assistance.or.if.you.have.any.questions.about.how.Uniden’s.products.can.accommodate.persons.with.
disabilities,.please.call.the.accessibility.voice/TTY.line:.1-800-874-9314
Our.customer.care.hours.as.well.as.accessibility.information.can.be.found.on.our.website,.www.uniden.com,.under.
the.“Accessibility”.link..If.your.call.is.received.outside.of.our.business.hours,.you.can.leave.us.a.message.and.we.will.
call.you.back.

5
Standby The.handset.is.not.in.use..If.it.is.off.the.cradle,.no.line.has.been.activated..No.dial.tone.is.present..
CID
Caller.ID.is.available.from.your.Telephone.provider.and.is.offered.to.users.on.a.subscription.basis.
With.this.service,.you.will.be.able.to.see.the.incoming.caller.information.such.as.name.and.phone.number..
CID/CW or
CIDCW
Caller.ID.with.Call.Waiting.is.available.by.subscription.from.your.Telephone.provider.
With.this.service,.you.will.be.able.to.view.incoming.caller.information.while.on.a.call.with.another.user.
Base The.main.part.of.the.phone.that.connects.to.your.phone.line.and.lets.you.make.and.receive.calls.
Charger
A.cradle.that.comes.with.an.accessory.handset.and.charges.the.handset.battery.
It.connects.to.power.but.does.not.connect.to.a.phone.line.
Accessory
Handsets
Additional.handsets.that.can.register.to.the.main.base,.allowing.you.to.add.stations.without.connecting.another.
phone.line..This.base.supports.a.total.of.ten.cordless.handsets;.see.page.19.for.Compatible.Handsets.
Global
Settings
This.term.relates.to.feature.settings.that.will.apply.to.all.registered.handsets.and.the.base.unit.
These.features.are.available.by.selecting."Global.Setup".in.the.handset.menu..Only.one.handset.or.the.base.
can.change.global.settings.at.a.time,.and.you.have.to.make.sure.the.phone.is.not.currently.being.used.
Station Any.handset.or.the.base.
Talk A.telephone.line.has.been.activated.on.the.handset.or.base,.enabling.a.dial.tone..
Manual Conventions
This.manual.uses.several.different.type.styles.to.help.you.distinguish.between.different.parts.of.the.phone:
lower case bold.text.with.“[ ]”.indicates.a.key.or.button.on.the.phone
ALL CAPITALS indicates text on the display, such as menu options, prompts, and conrmation messages
lower case bold.text.indicates.a.status.light.on.the.phone
ALL CAPITALS BOLD.indicates.a.connection.jack.on.the.base.or.charger
•
•
•
•
Terminology Used in this Manual

6
Product Overview
Features:
5.8GHz.FHSS.Expandable.System
Expands.up.to.10.Handsets
Integrated.Digital.Answering.System
Caller.ID/Call.Waiting
Base.Keypad
Store.30.Caller.ID.Numbers
Advanced.Phonebook.Features.on.Handset:
Store.70.Phonebook.Entries
Alphabetical.Search
Personalized.Ring.by.Party
Transfer.Single.Listing.or.Entire.Phonebook
•
•
•
•
•
•
•
•
•
•
•
10.Speed.Dial.Numbers.on.Base
Speakerphone.on.Base.&.Handset
7.Ringer.Options.on.Handset.(3.Tones/4.Melodies)
Last.5.Number.Redial.on.Handset;
Last.Number.Redial.on.Base
Bilingual.Menu.Displays.. . .
(for.US.models:.English.and.Spanish,
. .
for.Canadian.models:.English.and.French)
Call.Transfer
Conferencing
Intercom
•
•
•
•
•
•
•
•
Digital.Tapeless.Recording
Up.to.14.Minutes.of.Recording.Time
Call.Screening
Personal.or.Pre-recorded.Outgoing.Messages
Bilingual.Voice.Prompts.. . .
(for.US.models:.English.and.Spanish,
. .
for.Canadian.models:.English.and.French)
•
•
•
•
•
Day.and.Time.Announcement
Remote.Message.Retrieval
Toll.Saver
Message.Alert
Records.Up.to.59.messages
•
•
•
•
•
Answering System Features:
7
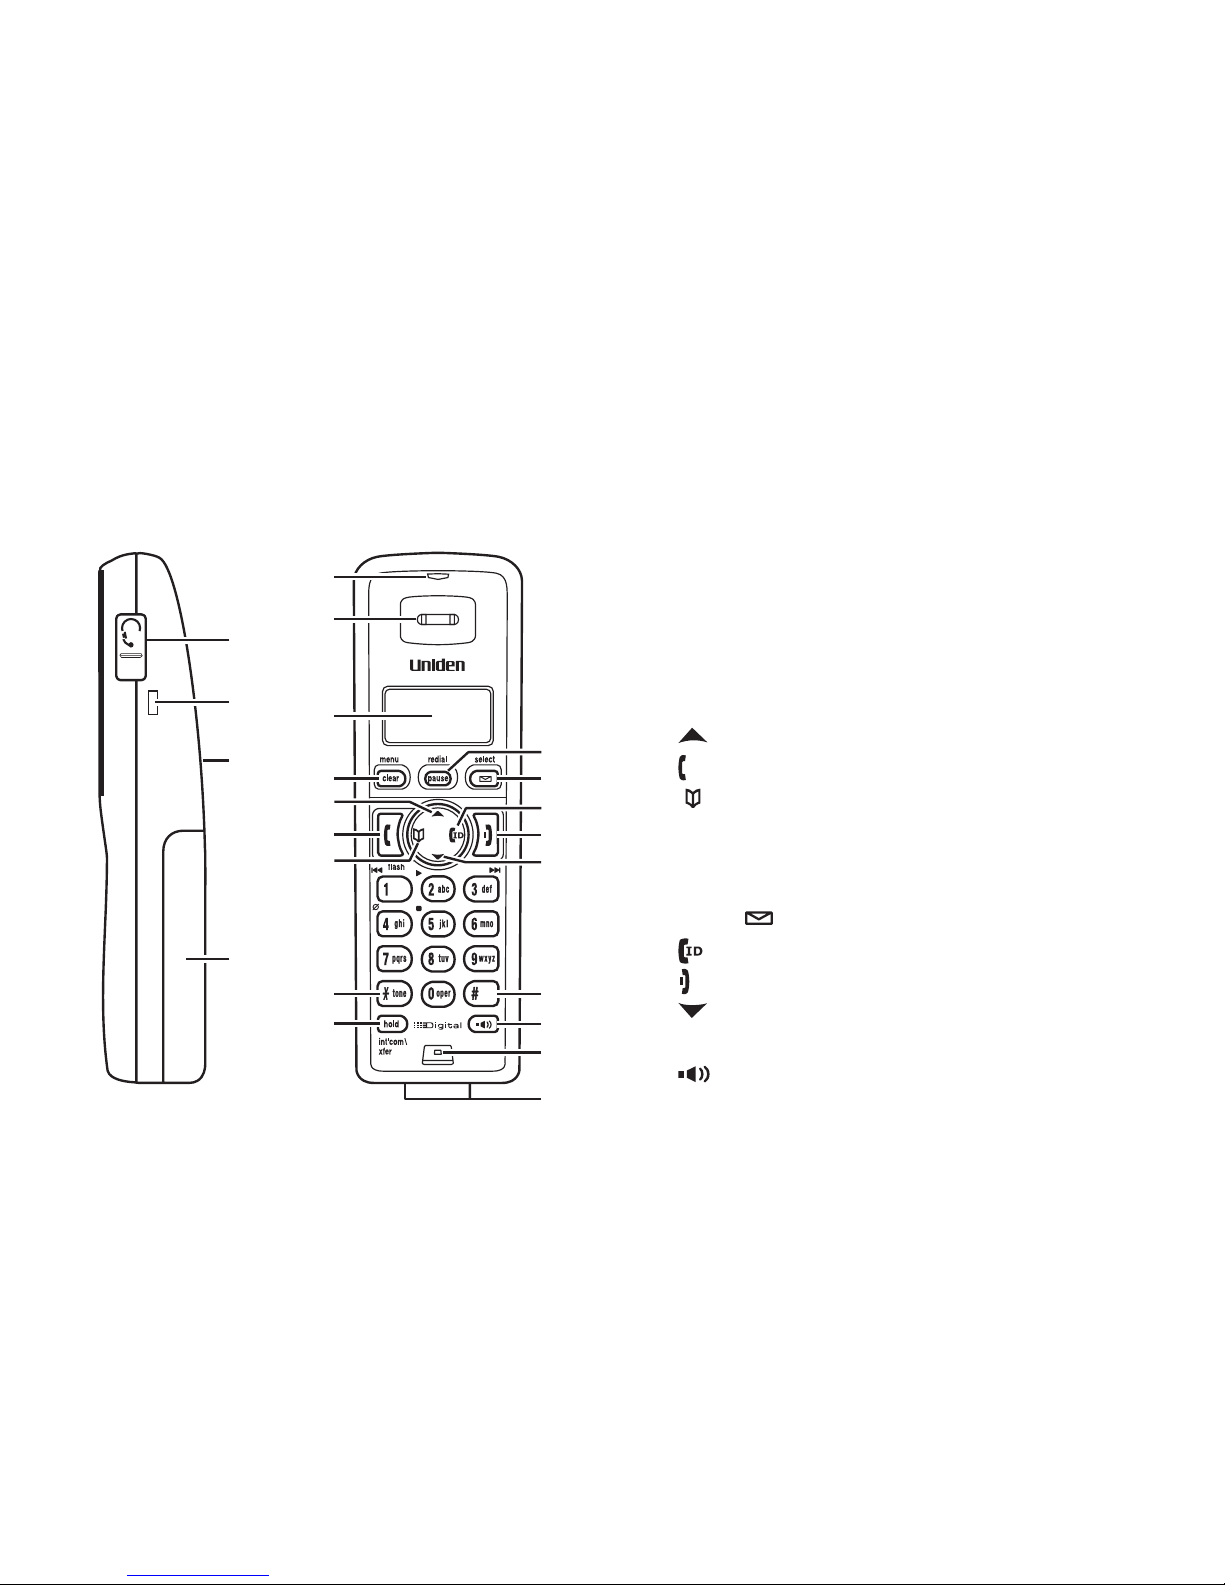
Parts of the Phone
The.following.illustrations.show.you.all.of.the.different.parts.of.your.phone.
Handset
1
5
6
7
8 15
17
19
20
21
22
10
12
13
14
2
3
4
11
16
9
18
Headset.Jack.Cover.
Belt.Clip.Hole
Speakerphone.Speaker.and.Ringer
Handset.Battery.Compartment
new message.LED
Handset.Earpiece
LCD.Display
[menu/clear].key
[ ].key.(up)
[ /ash] key (talk/ash)
[ ].key.(phonebook/left)
[*/tone].key
[hold/int’com/xfer].key.(hold/intercom/transfer)
[redial/pause].key
[select/ ].key.(select/messages)
[ ].key.(caller.ID/right)
[ ].key.(end.call)
[ ].key.(down)
[#].key
[ ].key.(speaker)
Handset.Microphone
Handset.Charging.Contacts
1.
2.
3.
4.
5.
6.
7.
8.
9.
10.
11.
12.
13.
14.
15.
16.
17.
18.
19.
20.
21.
22.
8
2523
42
36
37
38
353332 34
3130 44 454329
27 2824 26
414039
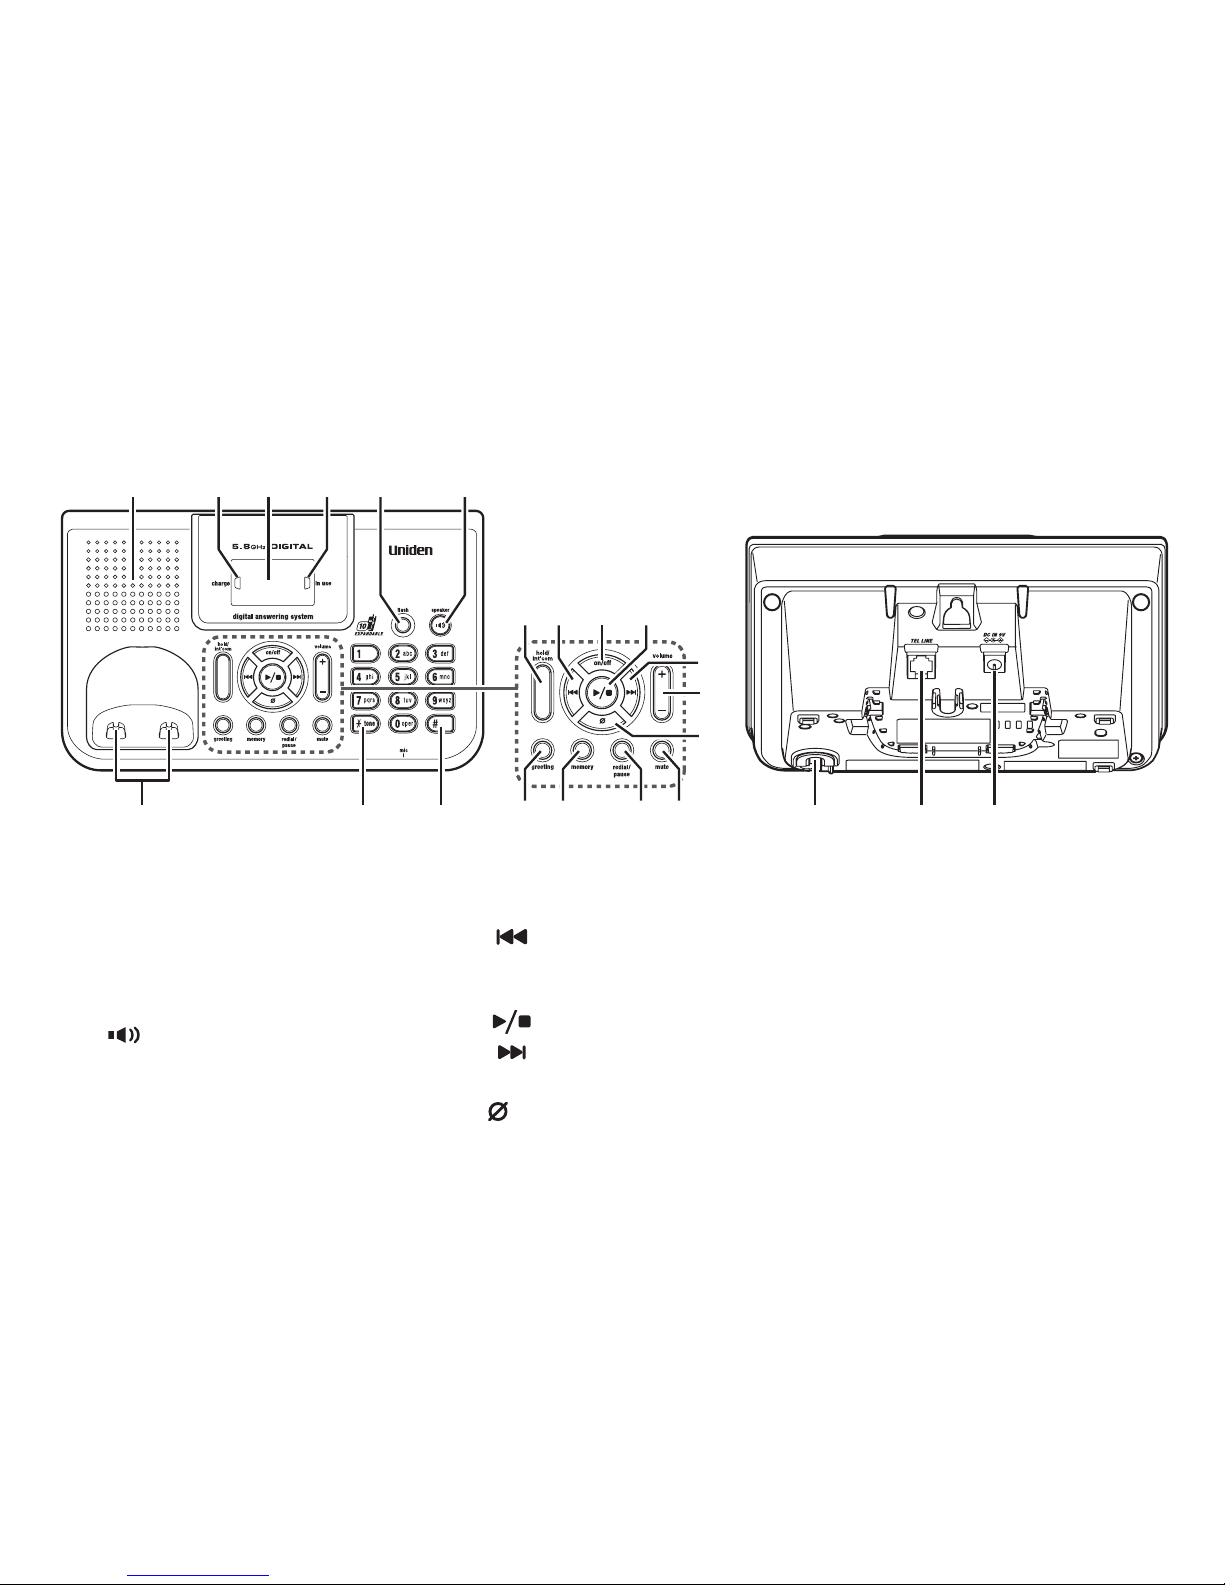
Base.speaker
charge.LED.
message counter.LED
in use.LED
[ash].key
[ ].key.(speaker)
Base.charging.contacts
[*/tone].key
[#].key
23.
24.
25.
26.
27.
28.
29.
30.
31.
[hold/int'com].key. . .
(hold/intercom)
[ ].key.(repeat)
[on/off].key. . .
(answering.system.on/off)
[ ].key.(play/stop)
[ ].key.(skip)
[volume +/-].key
[ ].key.(delete)
32.
33.
34.
35.
36.
37.
38.
[greeting].key.(record/greeting)
[memory].key
[redial/pause].key
[mute].key
Base.microphone
TEL LINE.jack
DC IN 9V.jack
39.
40.
41.
42.
43.
44.
45.
Base
9
Using the Interface
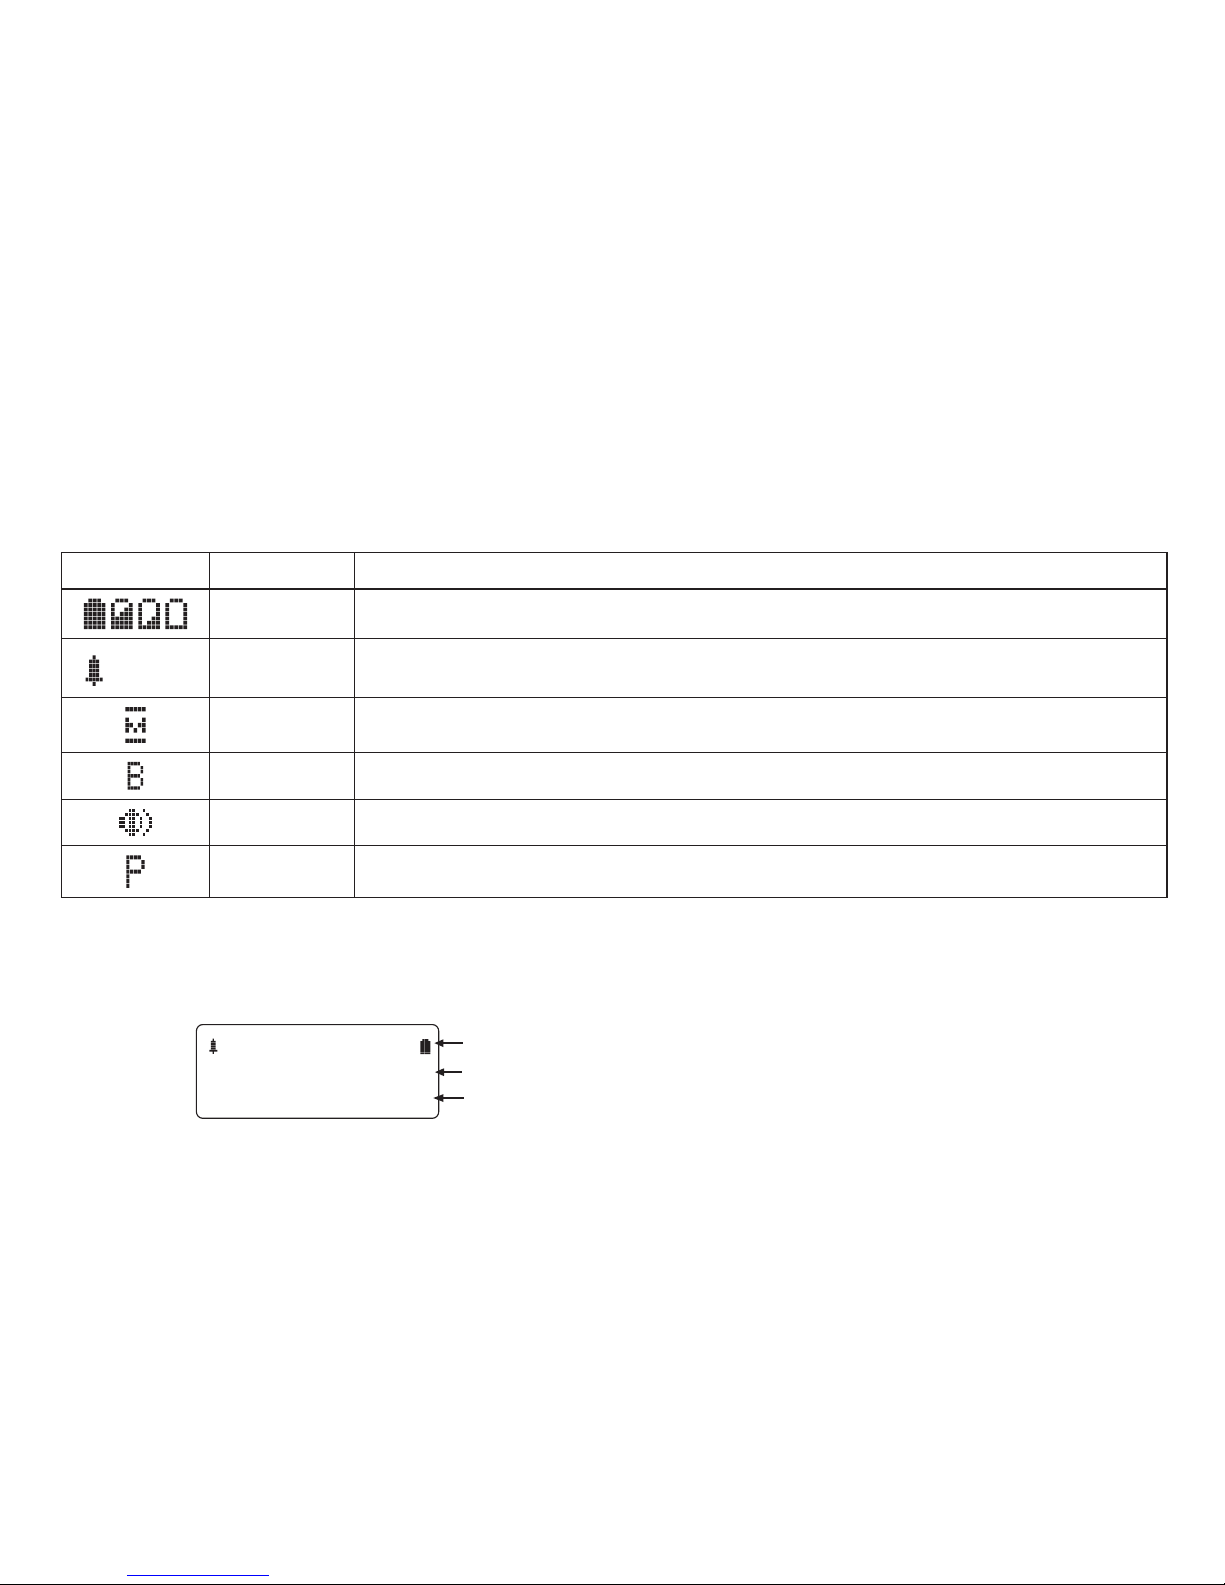
Reading the Display
The.handset.display.uses.icons.to.tell.you.the.status.of.your.phone..The.table.below.lists.the.icons.and.what.they.
mean.
Icon Status Description
Standby/Talk The.battery.icon.indicates.the.handset.battery.status:.full,.medium,.low,.and.empty.
:OFF
Standby The.ringer off.icon.indicates.that.the.ringer.is.turned.off.
Talk The.mute.icon.appears.while.the.handset.microphone.is.muted.
Talk The.boost.icon.appears.when.the.Clarity.Boost.feature.is.activated.
Talk The.speaker.icon.appears.when.the.handset.speaker.phone.is.in.use.
Talk The.privacy.icon.appears.when.the.Privacy.Mode.is.turned.on.
The Standby Screen
When.the.phone.is.in.standby,.the.handset.display.shows.the.following.items:
Ha nds e t #1
N e w C I D: 5
:
OF F
Ringer.off.icon.(when.the.ringer.is.off)./.battery.icon
Handset.ID
Number.of.new.Caller.ID.calls.received
10
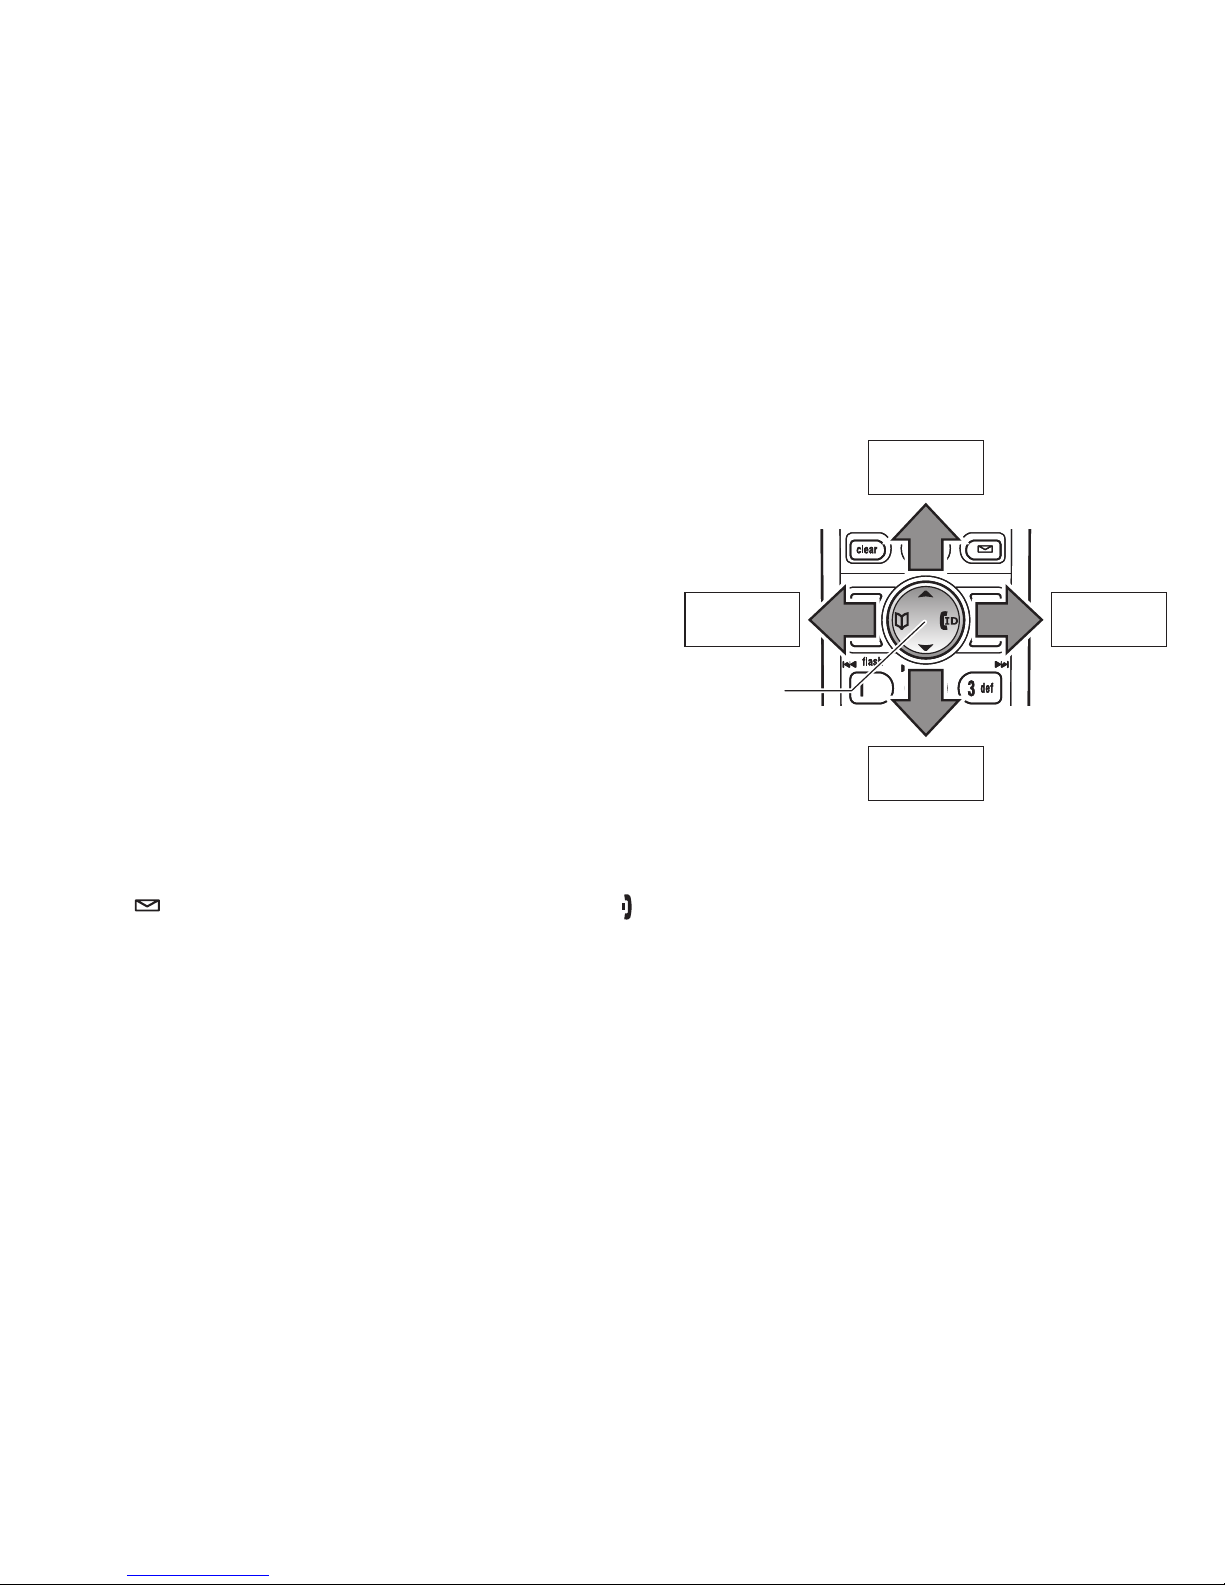
Using the Four-way Function Key
Your.handset.has.a.four-way.function.key.that.allows.you.to.
move.the.cursor.or.pointer.on.the.display.and.access.the.most.
commonly.used.features.at.the.touch.of.a.button..By.moving.
this.key.to.the.left,.you.open.the.phonebook..Move.the.key.to.
the.right.to.access.Caller.ID.information..To.use.this.four-way.
key,.place.your.thumb.over.the.key.on.the.handset.and.move.to.
the.four.positions.to.get.the.feel.of.how.it.moves.and.operates.
Using the Handset Menus
To.open.the.menu,.press.[menu/clear]..Highlight.the.option.you.want.by.pressing.the.four-way.function.key..This.will.
move.the.cursor;.the.option.currently.highlighted.has.a.triangle.beside.it..Activate.the.highlighted.option.by.pressing.
[select/ ]..To.exit.the.menu.and.return.to.standby,.press.[ ].
If.you.do.not.press.a.key.within.thirty.seconds,.the.phone.will.time.out.and.exit.the.menu..When.setting.the.day.and.
time,.the.time-out.period.is.extended.to.two.minutes.
Note:. For.ANSW..SETUP.and.GLOBAL.SETUP.menu.options,.make.sure.the.line.is.not.in.use.and.the.handsets.
are.within.range.of.the.base.
View the
phonebook
Four-way
Function Key
Up
View the
Caller ID
Down
View the
phonebook
Four-way
Function Key
Up
View the
Caller ID
Down
11
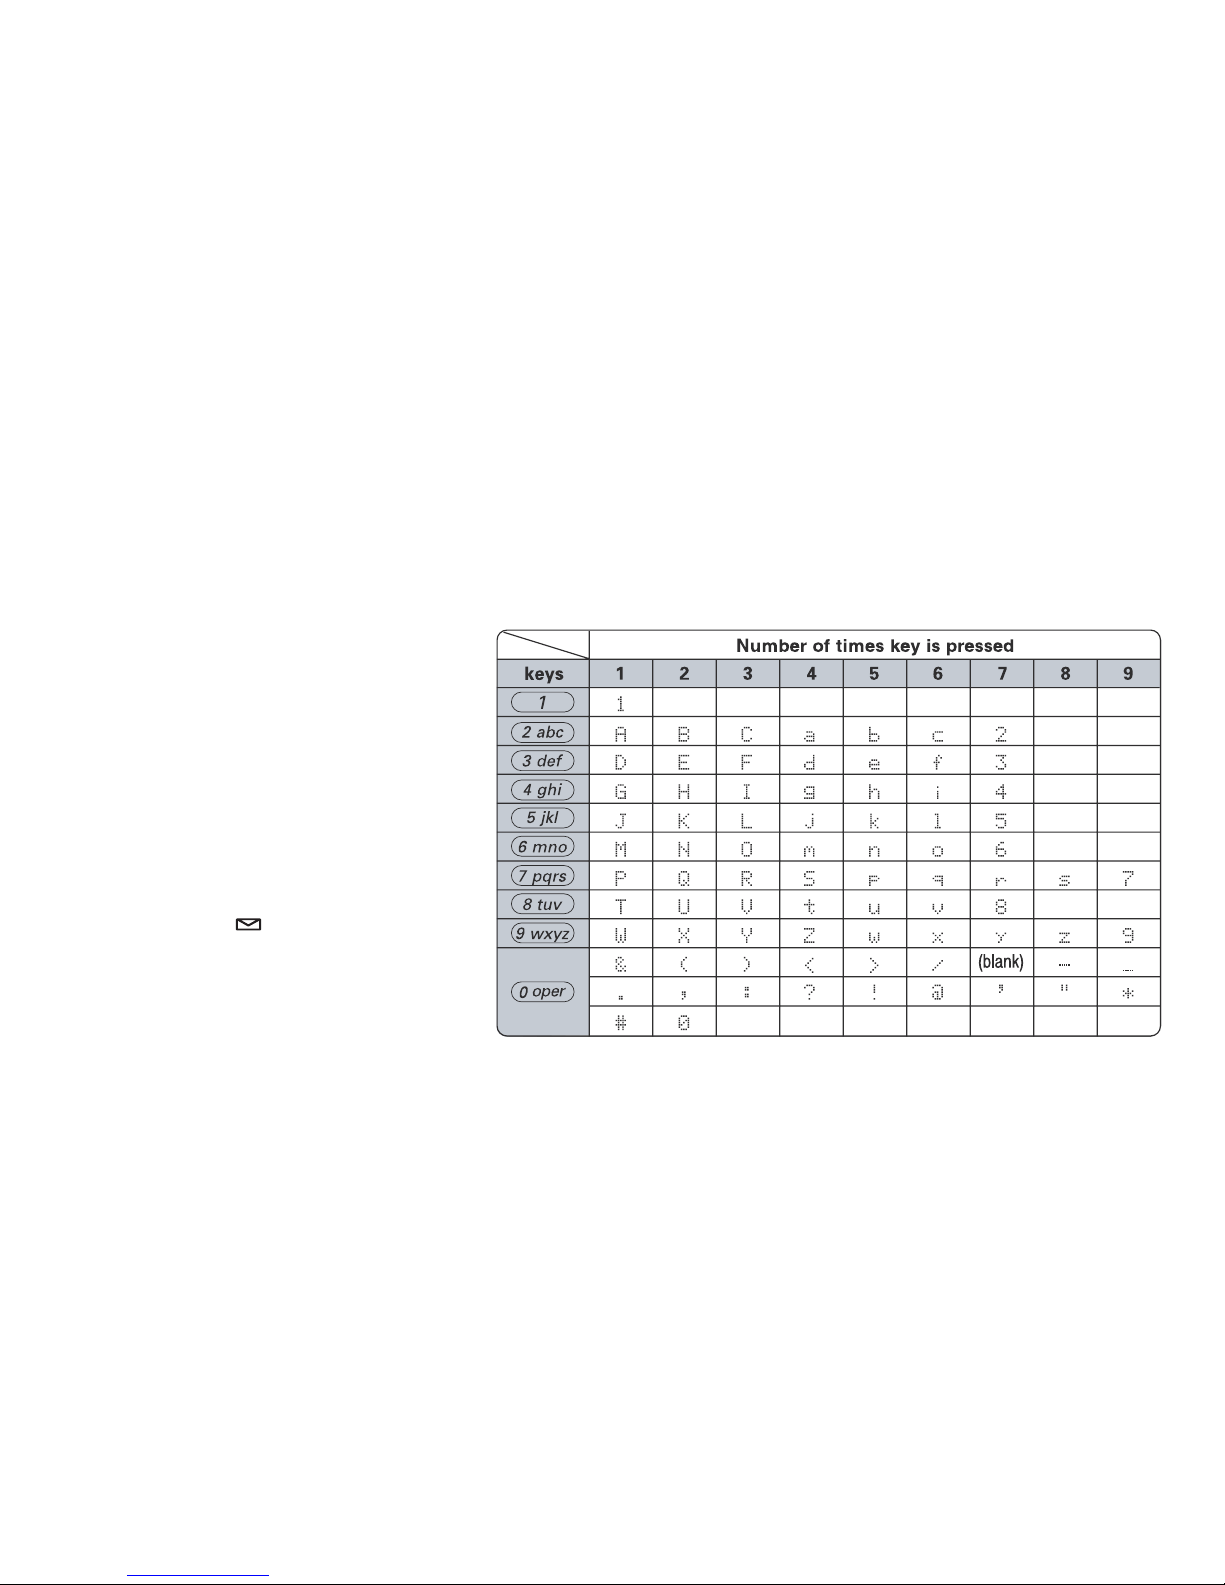
Entering Text from Your Handset
You.can.use.the.number.keypad.on.your.handset.to.enter.text.by.referring.to.the.letters.printed.on.each.number.
key. When you press the number key in a text entry eld, the phone displays the rst letter printed on the number
key..Press.the.number.key.twice.to.display.the.second.letter.and.three.times.to.display.the.third..Capital.letters.are.
displayed rst, then lower case letters, then the number on the key.
If two letters in a row use the same number key, enter the rst letter, then use [right] or [left] on.the.four-way.
function.key.to.move.the.cursor.to.the.next.position.to.enter.the.second.letter..For.example,.to.enter.the.word.
“Movies”:.
Press.
[6].once.to.enter.M.
Use.
[right].on.the.four-way.function.
key.to.move.the.cursor.to.the.right.
Press.
[6].six.times.to.enter.o.
Press.
[8].six.times.to.enter.v.
Press.
[4].six.times.to.enter.i.
Press [3] ve times to enter e.
Press.
[7].eight.times.to.enter.s.
Press.
[select/ ].to.end.your.text.
entry.
If.you.make.a.mistake.while.entering.a.name,.use.
[right] or.[left] on.the.four-way.function.key.to.move.the.cursor.to.
the.incorrect.character..Press.
[menu/clear].to.erase.the.wrong.character,.and.then.enter.the.correct.character..
To.delete.all.characters,.press.and.hold..
[menu/clear].
1)
2)
3)
4)
5)
6)
7)
8)

12
Installing the Phone
Choosing the Best Location
When.choosing.a.location.for.your.new.phone,.here.are.some.important.guidelines.you.should.consider:
The.location.should.be.close.to.both.a.phone.jack.and.a.continuous.power.outlet.(one.which.is.not.connected.to.a.
switch)..
For.optimum.range.and.reception,.place.the.base.in.an.open.area,.as.high.as.possible..
If.your.home.has.wired.alarm.equipment.connected.to.a.phone.line,.be.sure.that.installing.the.system.does.
not.disable.your.alarm.equipment..If.you.have.questions.about.what.will.disable.alarm.equipment,.contact.your.
telephone company or a qualied installer.
•
•
•
A
void television sets and other
electronic equipment
Choose a central location
Avoid excessive moisture, extremely low
temperatures, dust, mechanical vibration,
or shock
Avoid sources of electrical noise such as motors,
microwave ovens, and fluorescent lighting
Avoid personal computers
Avoid other cordless telephones
A
void heat sources, such as radiators,
air ducts, and sunlight
Avoid noise sources such as a window
by a street with heavy traffic
A
void television sets and other
electronic equipment
Choose a central location
Avoid excessive moisture, extremely low
temperatures, dust, mechanical vibration,
or shock
Avoid sources of electrical noise such as motors,
microwave ovens, and fluorescent lighting
Avoid personal computers
Avoid other cordless telephones
A
void heat sources, such as radiators,
air ducts, and sunlight
Avoid noise sources such as a window
by a street with heavy traffic
Note:. For.maximum.range:.
Keep.both.the.base.and.handset.antennas.free.of.obstruction.
When.the.handset.is.not.in.use,.place.the.handset.in.an.upright.position.
Metal.and.reinforced.concrete.may.affect.cordless.telephone.performance.
•
•
•
13
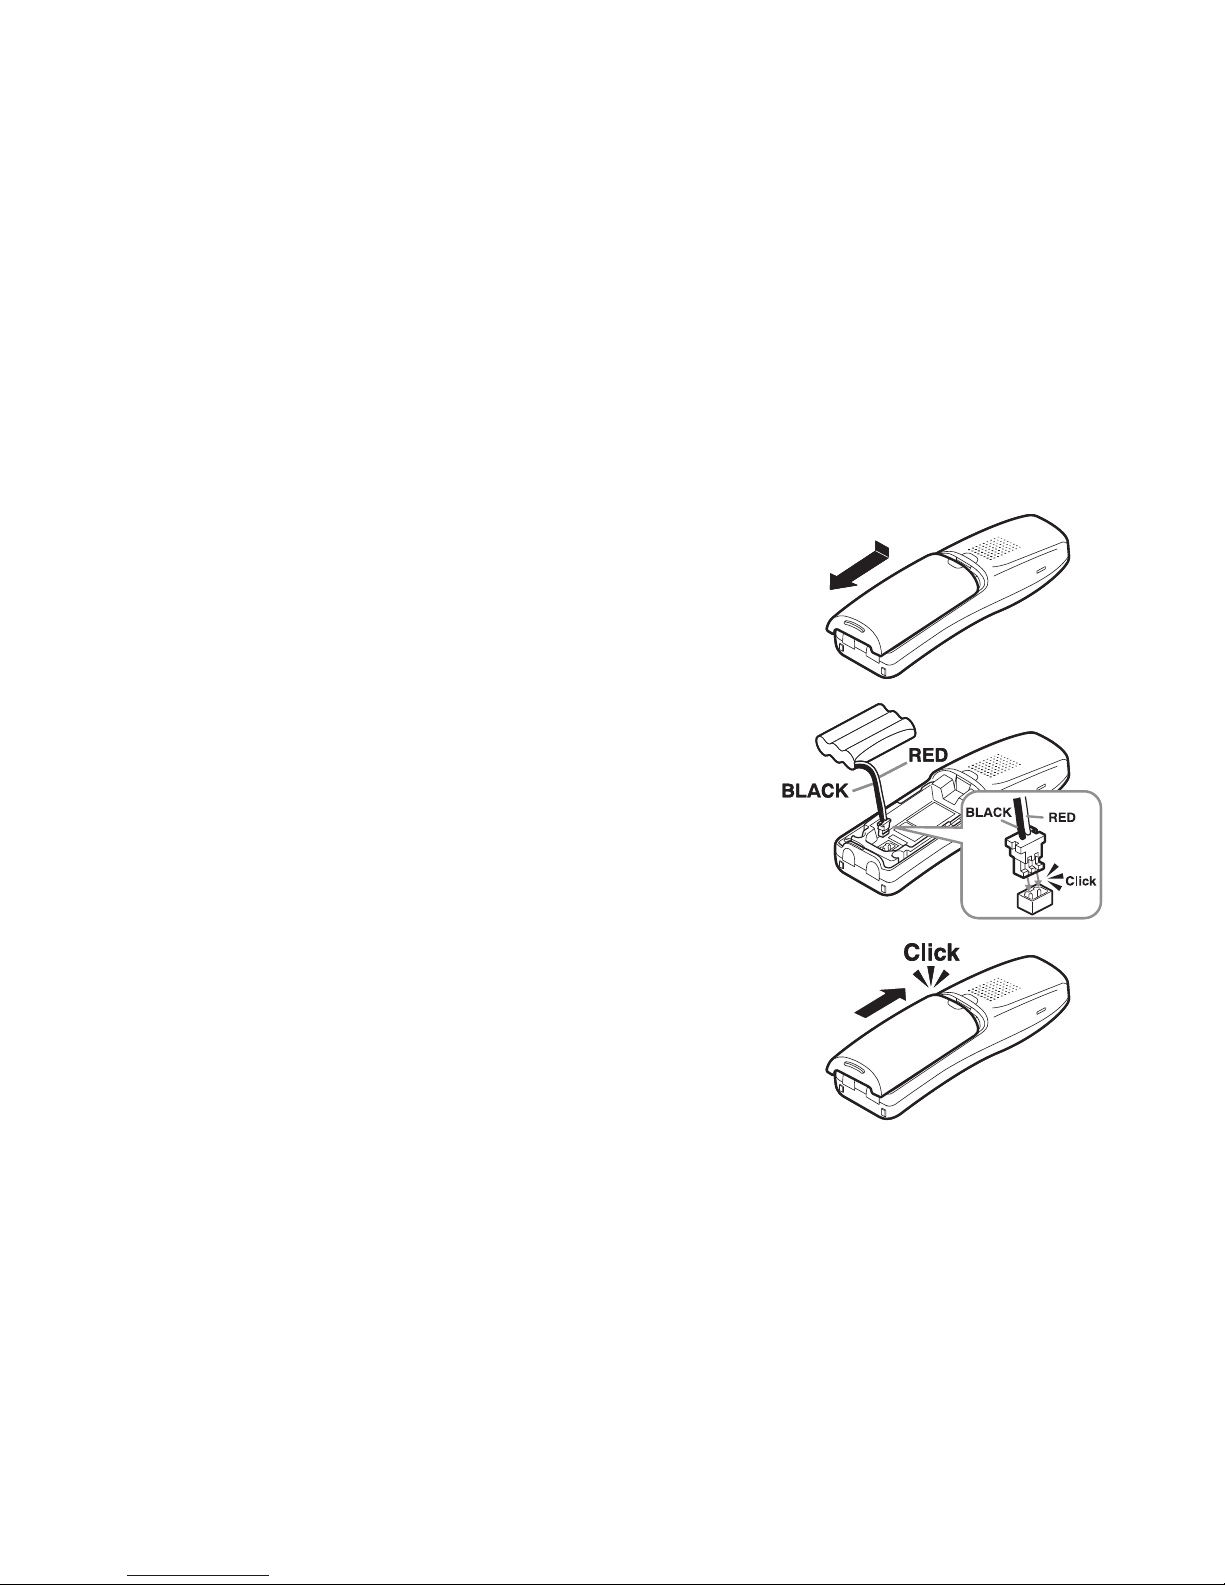
Installing the Battery
Use.only.the.Uniden.BT-1004.rechargeable.battery.pack.supplied.with.your.cordless.telephone.
Follow.the.steps.below.to.install.the.handset.battery.
Press in on the handset battery case cover (use the nger
indention.for.a.better.grip).and.slide.the.cover.downward.to.
remove.
Plug.the.battery.cable.into.the.battery.jack..Be.sure.to.match.the.
red.and.black.wires.to.the.label.near.the.jack..The.cable.should.
snap.into.place..Gently.pull.on.the.battery.cable..If.the.battery.
connector.comes.loose,.try.connecting.again.until.the.battery.
snaps.into.place.
Place.the.battery.case.cover.back.on.the.handset.and.slide.it.
upwards.until.it.clicks.into.place..
1)
2)
3)
14
Installing the Belt Clip
Line.up.the.holes.on.each.side.of.the.handset..To.attach.the.belt.clip,.insert.into.
the.holes.on.each.side.of.the.handset..Press.down.until.it.clicks.
To remove the belt clip,.pull.either.side.of.the.belt.clip.to.release.the.tabs.from.
the.holes.
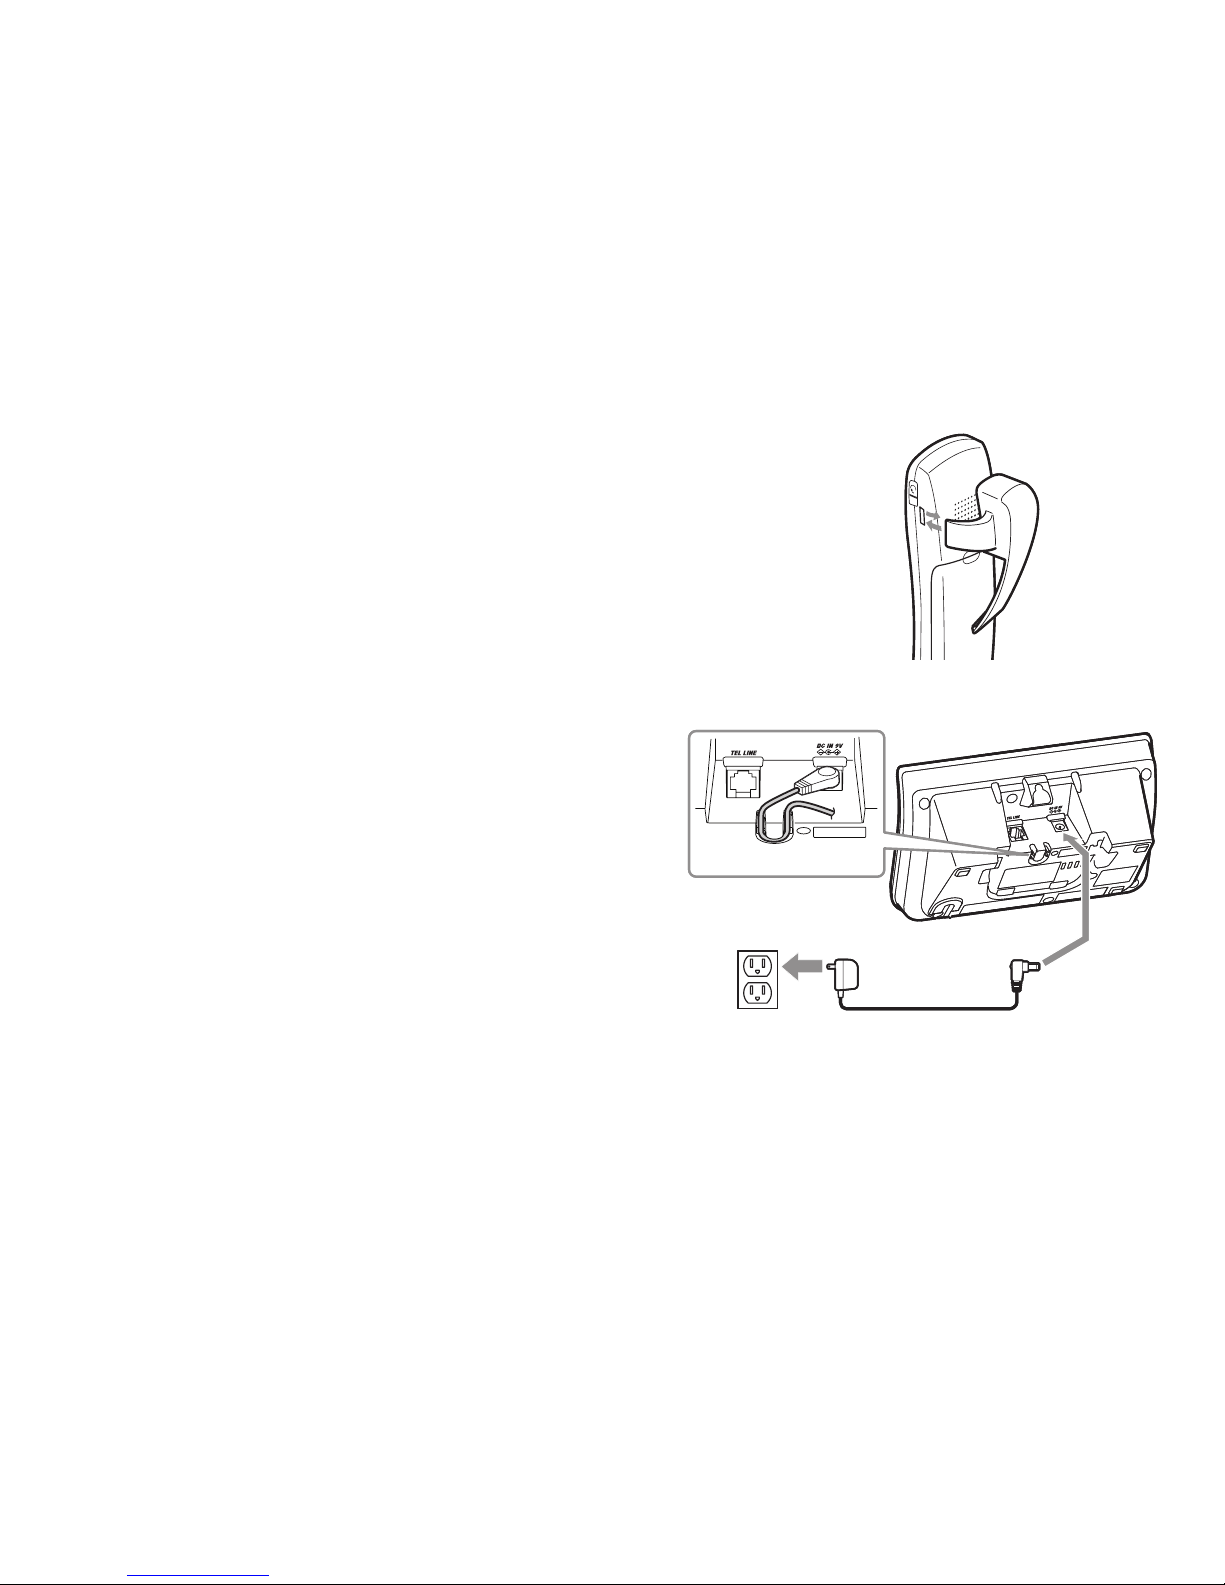
Connecting the Base and Charging the Handset
Connect.the.AC.adapter.(AD-800).to.the.DC IN 9V.jack.
Connect.the.AC.adapter.to.a.standard.120V.AC.wall.outlet..
DO.NOT.use.an.AC.outlet.controlled.by.a.wall.switch..
Place.the.handset.in.the.base.with.the.LCD.screen.facing.
forward.
Make.sure.that.the.
charge.LED.illuminates..If.the.LED.
does.not.illuminate,.check.to.see.that.the.AC.adapter.is.
plugged.in.and.the.handset.makes.good.contact.with.the.
charging.contacts.
Charge.your.handset.at.least.15.to.20.hours.before.
plugging.into.the.phone.line.
1)
2)
3)
4)
5)
To AC outlet
To DC IN 9V
AC adapter (supplied)
Route the cord.
Caution: To avoid risk of fire and shock, only
use the Uniden AD-800 AC adapter.
To AC outlet
To DC IN 9V
AC adapter (supplied)
Route the cord.
Caution: To avoid risk of fire and shock, only
use the Uniden AD-800 AC adapter.
15
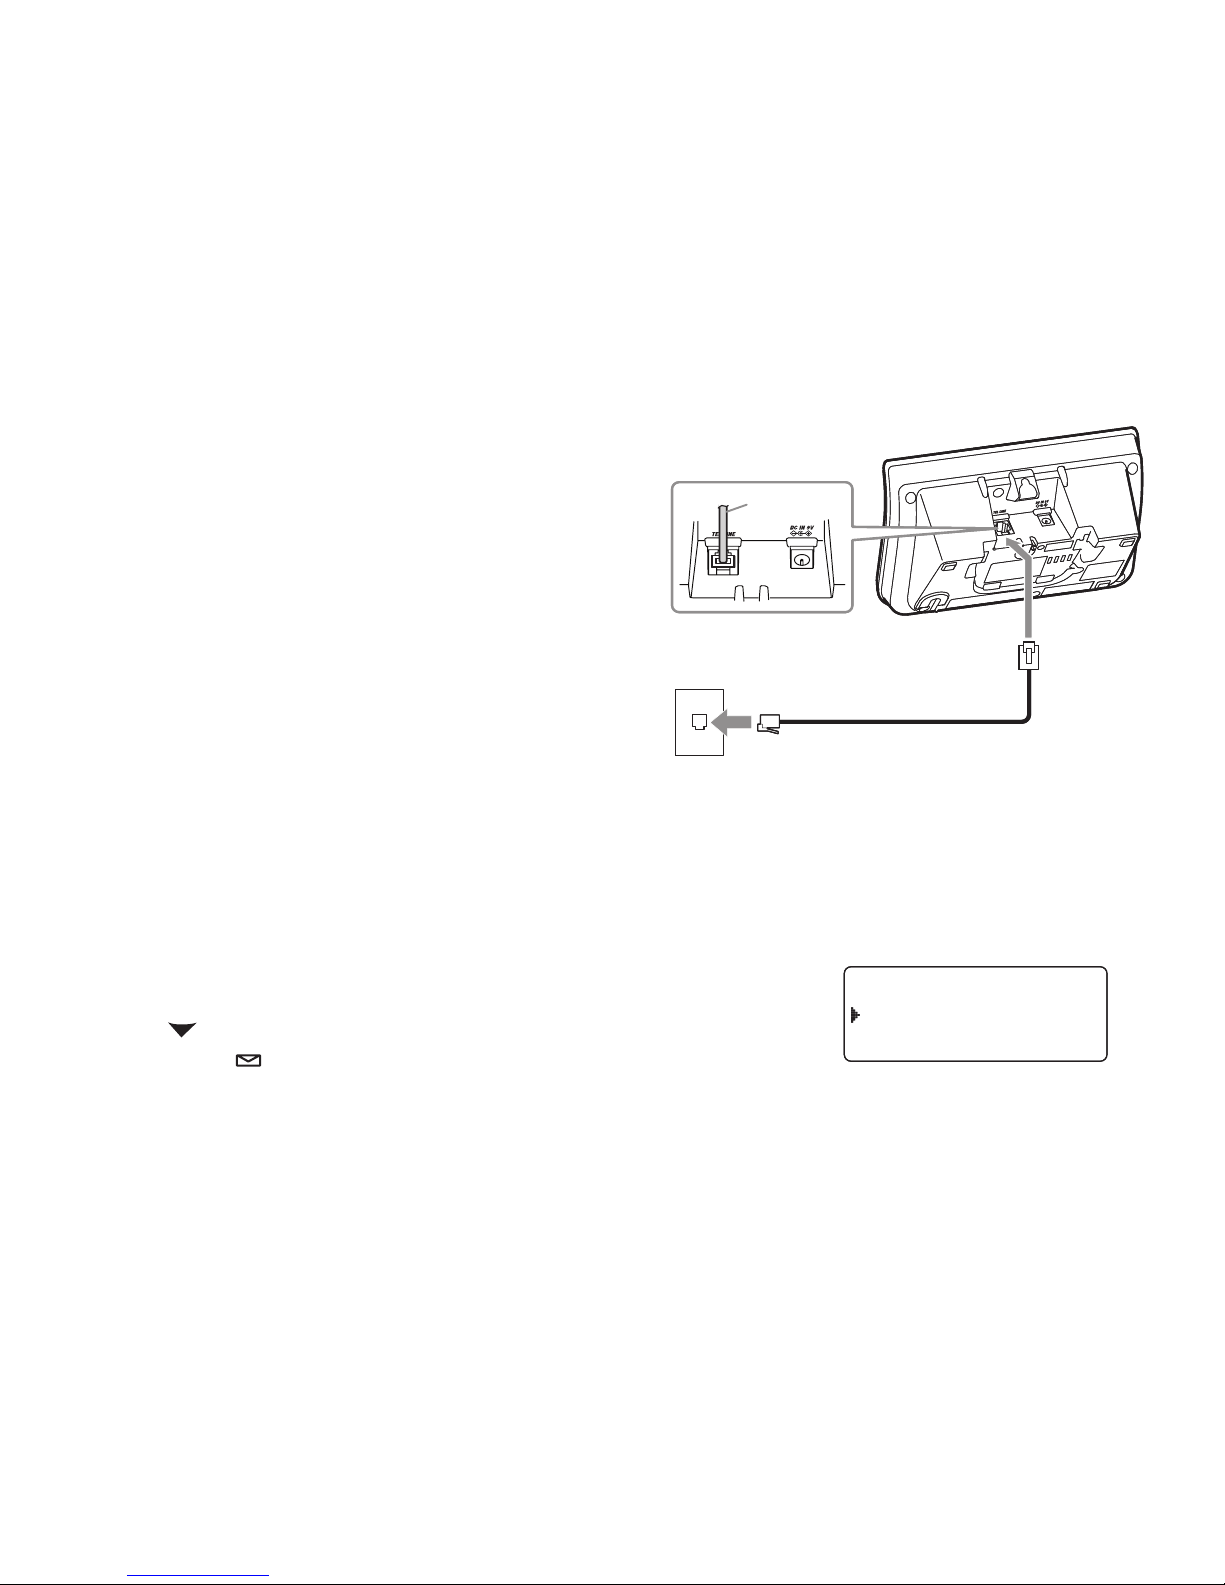
Connecting to the Phone Line
Once.the.battery.pack.is.fully.charged,.connect.the.telephone.
cord.to.the.
TEL LINE.jack.and.to.a.telephone.wall.jack..
Testing the Connection
Try.making.a.call..If.your.call.does.not.connect.or.you.cannot.
get.a.dial.tone,.try.the.following.steps:
Make.sure.the.AC.adapter.cord.is.securely.connected.to.
the.
DC IN 9V.jack.and.a.standard.power.outlet.
Check.to.make.sure.the.battery.is.fully.charged..(If.you.
don’t.see.the.“battery.full”.icon,.check.to.make.sure.the.
battery.is.properly.connected).
Change.the.dial.mode.
Changing the Dial Mode
Your.phone.can.communicate.with.the.telephone.network.in.two.different.ways:.tone.dialing.or.pulse.dialing.
These.days,.most.phone.networks.use.a.method.called.tone.dialing,.so.your.phone.comes.programmed.for.tone.
dialing..If.your.phone.company.uses.pulse.dialing,.you.will.need.to.change.your.phone’s.dial.mode..If.you.don’t.get
a.dial.tone.or.can’t.connect.to.the.telephone.network,.please.follow.the.steps.below.to.modify.your.phone’s.settings:
Press.
[menu/clear]..Select.the.GLOBAL.SETUP.menu,.and.then.the.
DIAL.MODE.submenu.
Scroll.
[ ].to.highlight.PULSE.
Press.
[select/ ]. You will hear a conrmation tone.
If.you.ever.need.to.change.the.dial.mode.back.to.tone.dialing,.follow.the.same.procedure,.but.select.TONE.in.step.2.
1)
2)
3)
1)
2)
3)
To telephone wall jack
To TEL LINE
Telephone cord (supplied)
TEL Cord
To telephone wall jack
To TEL LINE
Telephone cord (supplied)
TEL Cord
D i al M o de
To n e
Pu l s e
D i al M o de
To n e
Pu l s e
16
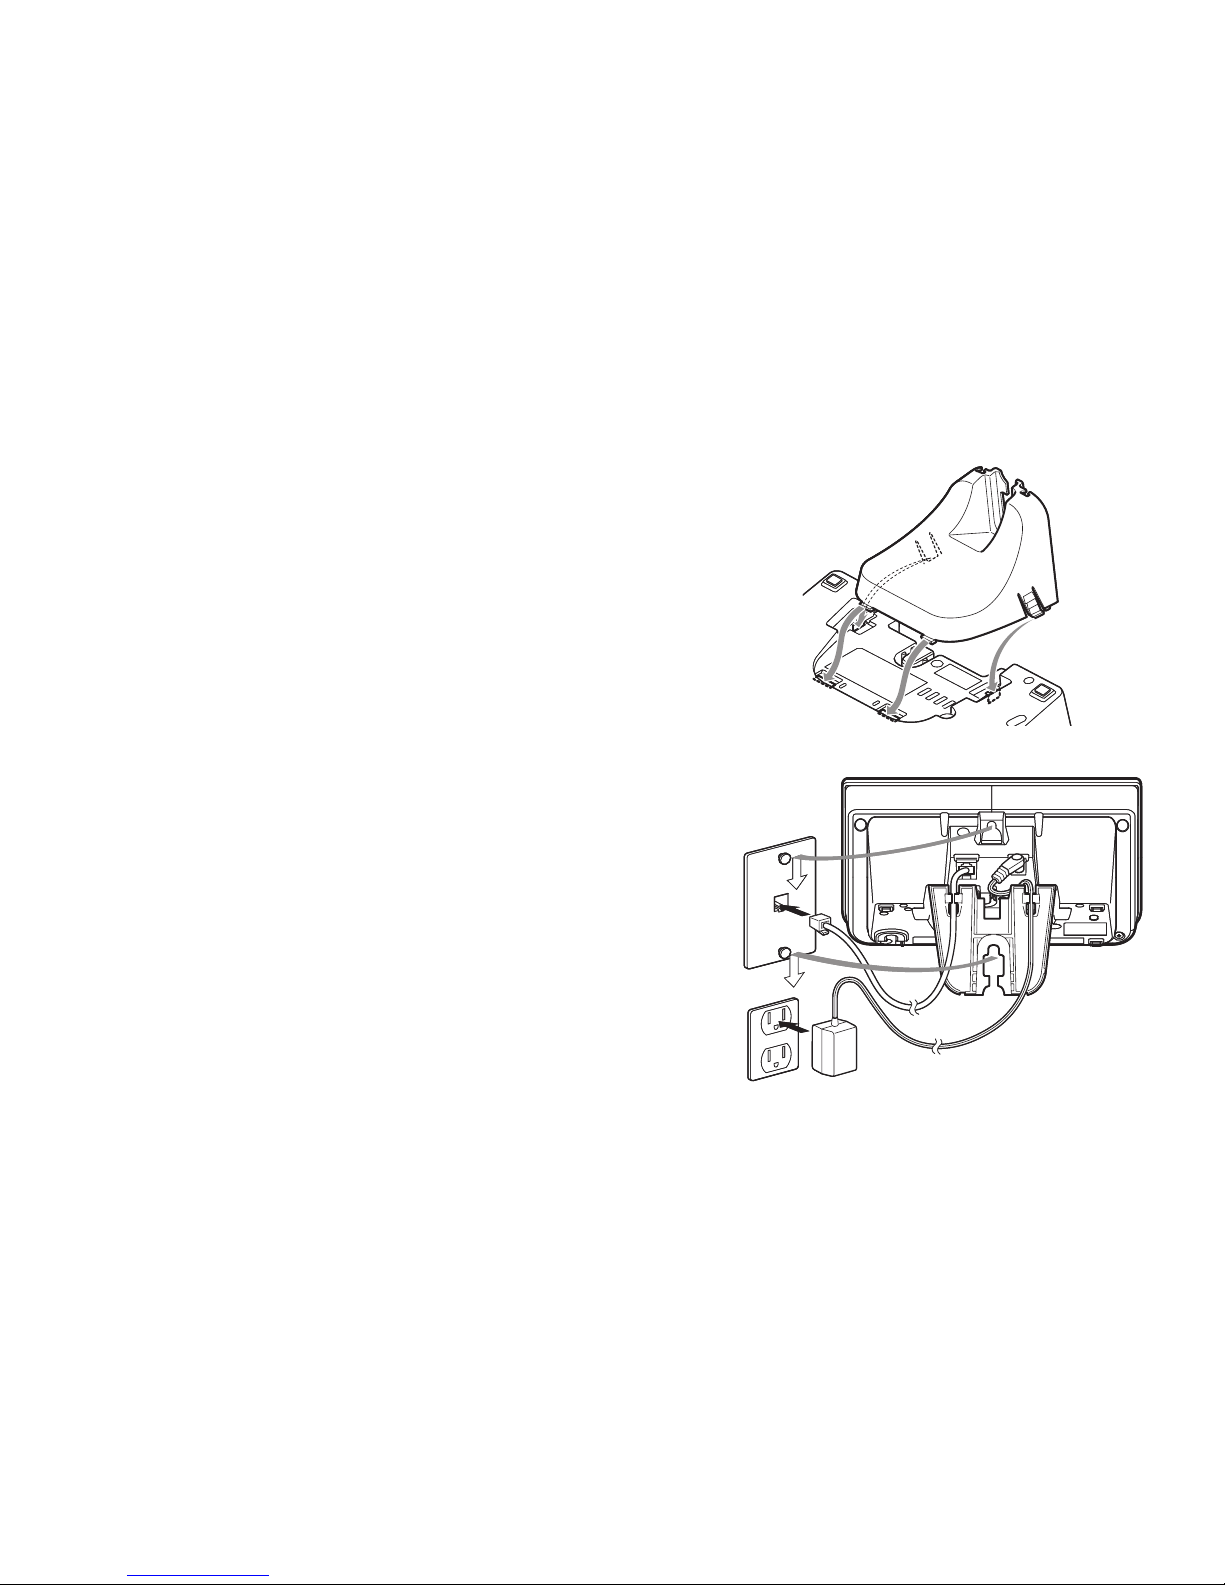
Wall Mounting the Base
This.phone.can.be.mounted.on.any.standard.wall.plate.
Snap.the.wall.mount.adapter.into.the.notches.on.the.base.top.
Plug.the.AC.adapter.into.the.
DC IN 9V.jack.
Wrap.the.AC.adapter.cord.inside.the.molded.wiring.channel.as.
shown.
Plug.the.AC.adapter.into.a.standard.120V.AC.wall.outlet.
Plug.the.telephone.cord.into.the.
TEL LINE.jack.
Plug.the.telephone.cord.into.the.telephone.wall.jack.
Align.the.mounting.slots.on.the.base.with.the.mounting.posts.on.
the wall. Then push in and down until the phone is rmly seated.
Notes:
DO.NOT.use.an.AC.outlet.controlled.by.a.wall.switch.
To.mount.the.phone.directly.on.the.wall,.insert.two.#10.screws.
(minimum.length.of.1.
3
/8.inches,.not.supplied).into.the.wall,.3.15/16.
inches.apart;.leave.the.screw.heads.
1
/8.inch.away.from.the.wall.to.
allow.room.for.mounting.the.phone..Be.sure.the.wall.is.capable.
of.supporting.the.weight.of.the.phone,.and.use.the.proper.type.of.
anchoring.device.for.the.wall.material.
1)
2)
3)
4)
5)
6)
7)
•
•
AC adapter (supplied)
Wall plate
AC outlet
AC adapter (supplied)
Wall plate
AC outlet

17
Basic Setup
Selecting the Language
Your.phone.supports.two.languages:.English.and.Spanish.for.US.models.
or.English.and.French.for.Canadian.models..Once.you.select.a.language,.
the.menus.on.the.phone.will.display.in.that.language..The.default.
language.is.English.
Press.
[menu/clear]..Select.the.HANDSET.SETUP.menu,.and.then.
the.HANDSET.LANGUAGE.submenu.
Move.the.cursor.to.choose.a.language.
for.US.models:.Choose.ENGLISH.or.ESPAÑOL.(Spanish)
.
for.Canadian.models:.Choose.ENGLISH.or.FRANÇAIS.(French).
Press.
[select/ ]. You will hear a conrmation tone.
Activating Personal Ring
You.can.assign.special.ringer.tones.to.anyone.in.your.phonebook..When.your.phone.gets.a.call,.it.looks.up.the.
Caller.ID.information.in.your.phonebook..If.you’ve.assigned.a.personal.ringer.to.that.number,.the.phone.uses.it.so.
you.know.who.is.calling..To.turn.on.personal.ringing,.follow.these.steps:
Press.
[menu/clear]..Select.the.HANDSET.SETUP.menu,.and.then.
the.PERSONAL.RING.submenu.
Move.the.cursor.to.select.ON.or.OFF.
Press.
[select/ ]. You will hear a conrmation tone.
1)
2)
3)
1)
2)
3)
Ha n d set L an g u a ge
E n g lis h
E s p aツo l
Ha n d set L an g u a ge
E n g lis h
E s p aツo l
Ha n d set L an g u a ge
E n g lis h
F r a nユa i s
Ha n d set L an g u a ge
E n g lis h
F r a nユa i s
P e r son a l R i n g
O n
O f f
P e r son a l R i n g
O n
O f f
for US models
for Canadian models

18
Activating the Key Touch Tone
Key.Touch.Tone.is.the.tone.your.keypad.makes.when.keys.are.pressed..You.can.turn.this.tone.on.or.off.
Press.
[menu/clear]..Select.the.HANDSET.SETUP.menu,.and.then.
the.KEY.TOUCH.TONE.submenu.
Move.the.cursor.to.select.ON.or.OFF.
Press.
[select/ ]. You will hear a conrmation tone.
1)
2)
3)
K e y To u c h T o n e
O n
O f f
K e y To u c h T o n e
O n
O f f
19
Adding Accessory Handsets
Your.phone.supports.a.total.of.ten.cordless.handsets..You.can.now.place.a.fully-featured.cordless.handset.anywhere.
AC.power.is.available.to.connect.the.handset.charger..All.the.handsets.ring.when.a.call.is.received.
Compatible Handsets
Your.phone.is.compatible.with.the.TCX930..If.you.purchased.an.accessory.handset.separately,.you.must.register.the.
handset.to.the.base.before.use..Accessory.handsets.will.not.operate.until.they.are.registered.
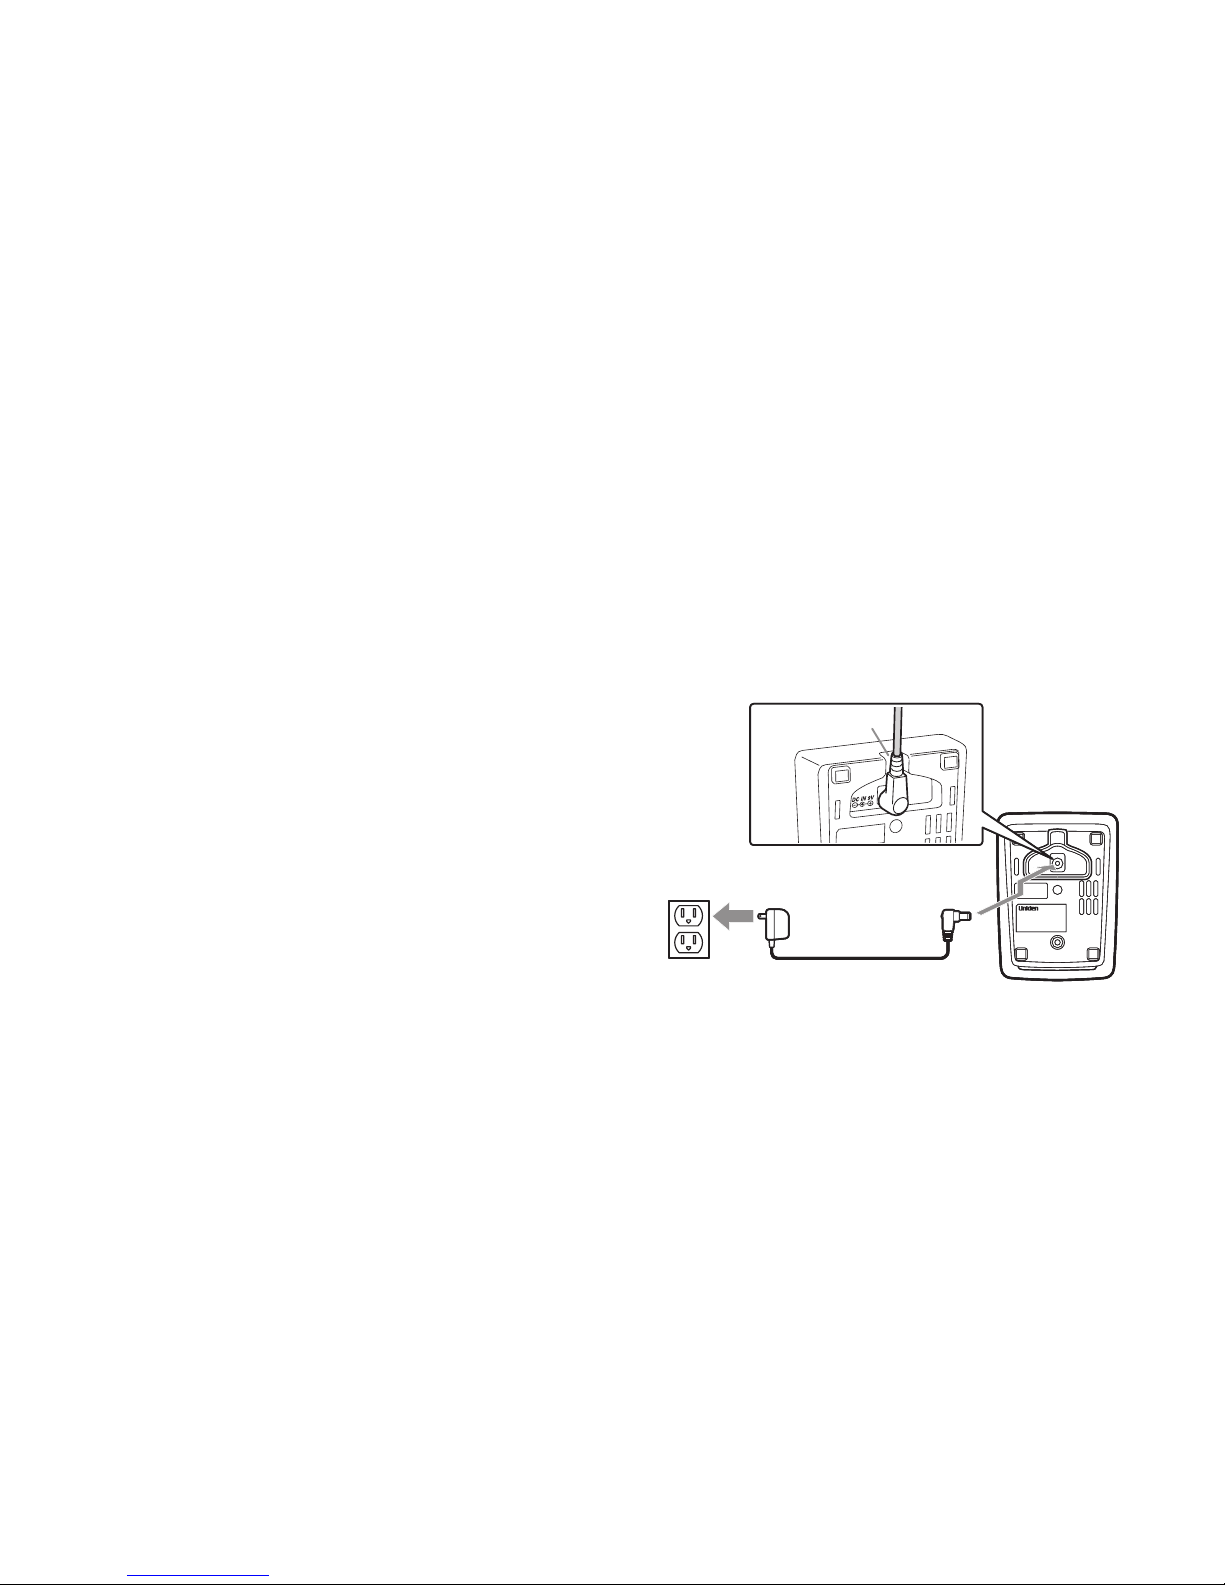
Charging Accessory Handsets
The.handset’s.battery.recharges.automatically.when.the.handset.is.placed.in.the.charger..
Use.the.supplied.AC.adapter.(AD-0005).to.connect.the.
DC IN 9V.jack.to.a.standard.120V.AC.outlet.
Set.the.charger.on.a.desk.or.tabletop,.and.place.the.
handset.in.the.charger.with.the.LCD.screen.facing.
forward.
Make.sure.that.the.
charge.LED.illuminates..If.the.LED.
does.not.illuminate,.check.to.see.that.the.AC.adapter.is.
plugged.in.and.the.handset.makes.good.contact.with.the.
charging.contacts.
Charge.the.handset.battery.pack.for.at.least.15-20.hours.
before using your new handset for the rst time.
1)
2)
3)
4)
To AC outlet To DC IN 9V
AC adapter (supplied)
Route the cord.
Caution: Use only the Uniden AD-0005 adapter.
To AC outlet To DC IN 9V
AC adapter (supplied)
Route the cord.
Caution: Use only the Uniden AD-0005 adapter.
 Loading...