

Uniden TRU 8885 Series, TRU8885-2 Owner's Manual

TRU 8885
SERIES
OWNER'S
MANUAL

Contents
WELCOME/FEATURES 2
TERMINOLOGY 3
CONTROLS & FUNCTIONS 4
DISPLAY AND ICONS 6
SOFT KEY FUNCTION 8
GETTING STARTED 9
Setting up the Phone 9
Mounting the Base Unit on a Wall 13
Main Menu Options 15
Setting Menu Options 16
BASICS 33
Making and Receiving Calls 33
Flash and Call Waiting 34
Placing a Call on Hold 34
Redialing a Call 35
Adjusting the Earpiece and Speaker Volume 37
Do Not Disturb (DND) 37
Mute Microphone 38
Tone Dialing Switch-over 39
Traveling Out of Range 39
Privacy Mode 40
3 or 4-Way Conferencing 40
PHONEBOOK 42
Phonebook (Storing Phone Numbers, Names,
Distinctive Rings and Speed Dial) 42
Chain Dialing 43
Steps for Entering Names and Special Characters 44
Viewing the Phonebook 46
Making Calls Using the Phonebook 47
Deleting a Caller ID Message 52
Using the Caller ID Message List 53
Call Waiting Deluxe Features 55
THE INTEGRATED ANSWERING DEVICE 56
The Integrated Telephone Answering Device 56
Turning the Answering System On/Off 57
Setting your outgoing message (Greeting) 57
Using the Answering Setup Menu 58
New Message LED 58
Using your Answering System 59
Remote Operation 63
EXPANDING YOUR PHONE 67
Expanding Your Phone 67
Connecting the Charger 68
Register the Handset 68
Using DirectLink Mode 70
Intercom/Call Transfer Feature 71
ADDITIONAL INFORMATION 74
Changing the Digital Security Code 74
Find Handset 74
Installing the Beltclip 75
Headset Installation 75
Note on Power Sources 76
Maintenance 76
General Information 77
TROUBLESHOOTING 78
Troubleshooting 78
Liquid Damage 81
PRECAUTIONS & WARRANTY 82
I.C. NOTICE 84

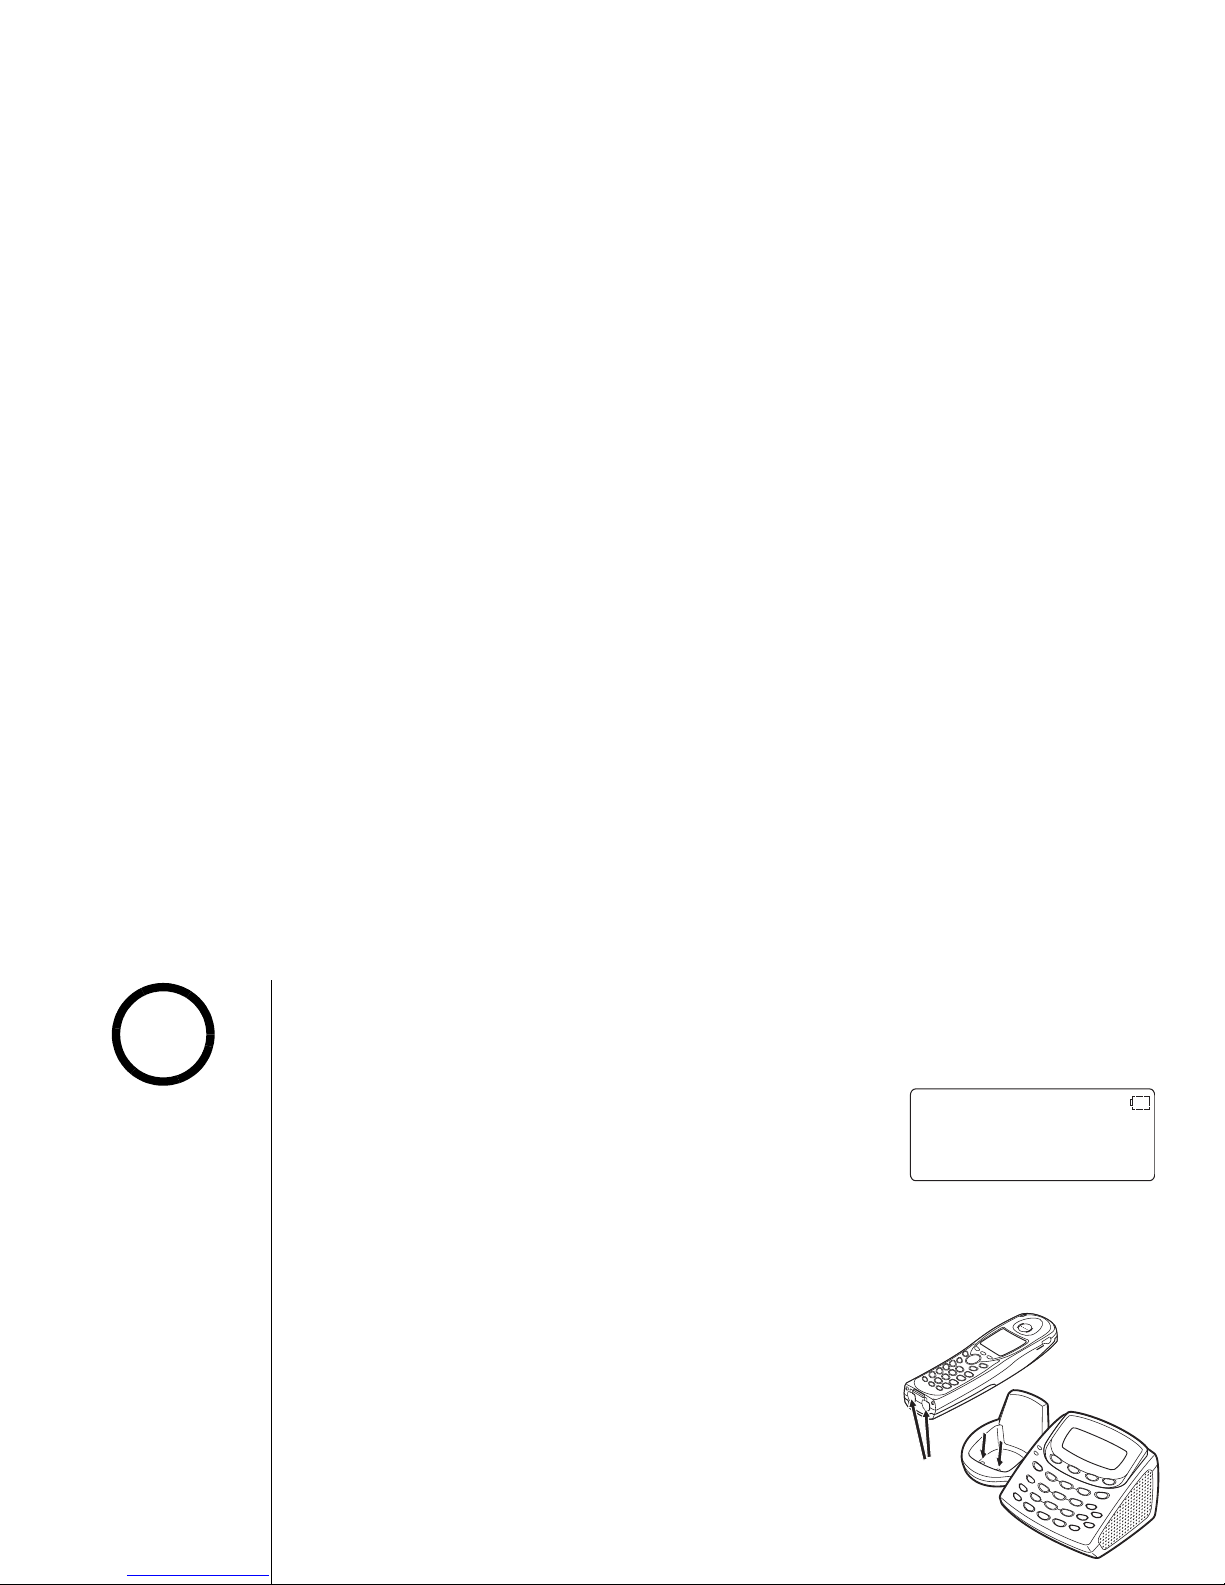
Congratulations on your purchase of the Uniden Multi-Handset Cordless System
telephone. This unit is different from conventional cordless telephones. When the base
unit is connected to AC power and a telephone line, it can support up to 10 handsets.
You can now place a fully-featured cordless handset anywhere in your home or office
where AC power is available to connect the handset chargers. Extra handsets also allow
you to establish a 4-way conference call among 2 handsets, the base speakerphone, and
an outside line.
Note: Some illustrations in this manual may differ from the actual unit for explanation
purposes.
As an Energy Star
®
Partner, Uniden has determined that this product or product
models meets the Energy Star
®
guidelines for energy efficiency.
Energy Star
®
is a U.S. registered mark.
• 5.8GHz Digital Expandable
• Integrated Answering Device
• Dual Keypad with LCD Screen at Base
• 10 Multi-Handset Expandability
• Hands-Free Speakerphone in the Handset and Base
• Caller ID/Caller ID on Call Waiting (subscribe through local telephone company)
• Call Waiting Deluxe (subscribe through local telephone company)
• 100 Programmable Memory Locations
• Trilingual Display Options and Voice Prompts (English, French and Spanish)
• Intercom/Call Transfer Between Handsets
• 20 Distinctive Ring Options (10 ringer tones and 10 melody ringers)
• Mute and Hold Features
• Do Not Disturb (DND) Feature
WELCOME/FEATURES
Welcome
Features

This series features AutoTalk™ and AutoStandby™. AutoTalk allows you to answer a call by just removing
the handset from the cradle so you don't have to waste time pushing buttons. AutoStandby allows you to
hang up by simply returning the handset to the cradle.
To protect you against mis-billed calls that might result from your phone being activated by other
equipment, this series has
Random Code™ digital security, which automatically selects one of over
approx. 65,000 digital security codes for the handset and base.
Digital Spread Spectrum Technology uses a wider frequency band than standard digital transmissions. The
result is a more secure conversation with the clarity of digital sound, extended range, and minimal
interference from other cordless phones.
IntegriSound™ Built in sound quality which provides life-like conversations.
With DirectLink™ mode, you can use 2 or more handsets as radio transceivers (walkie-talkies).
Be sure to visit our web site: www.uniden.com
Uniden
®
is a registered trademark of Uniden America Corporation.
AutoTalk, AutoStandby, DirectLink, IntegriSound and Random Code are trademarks of Uniden America.
Terminology
•Standby Mode - The handset is not in use, and talk/flash or speaker has not been pressed. No dial tone is
present.
TERMINOLOGY

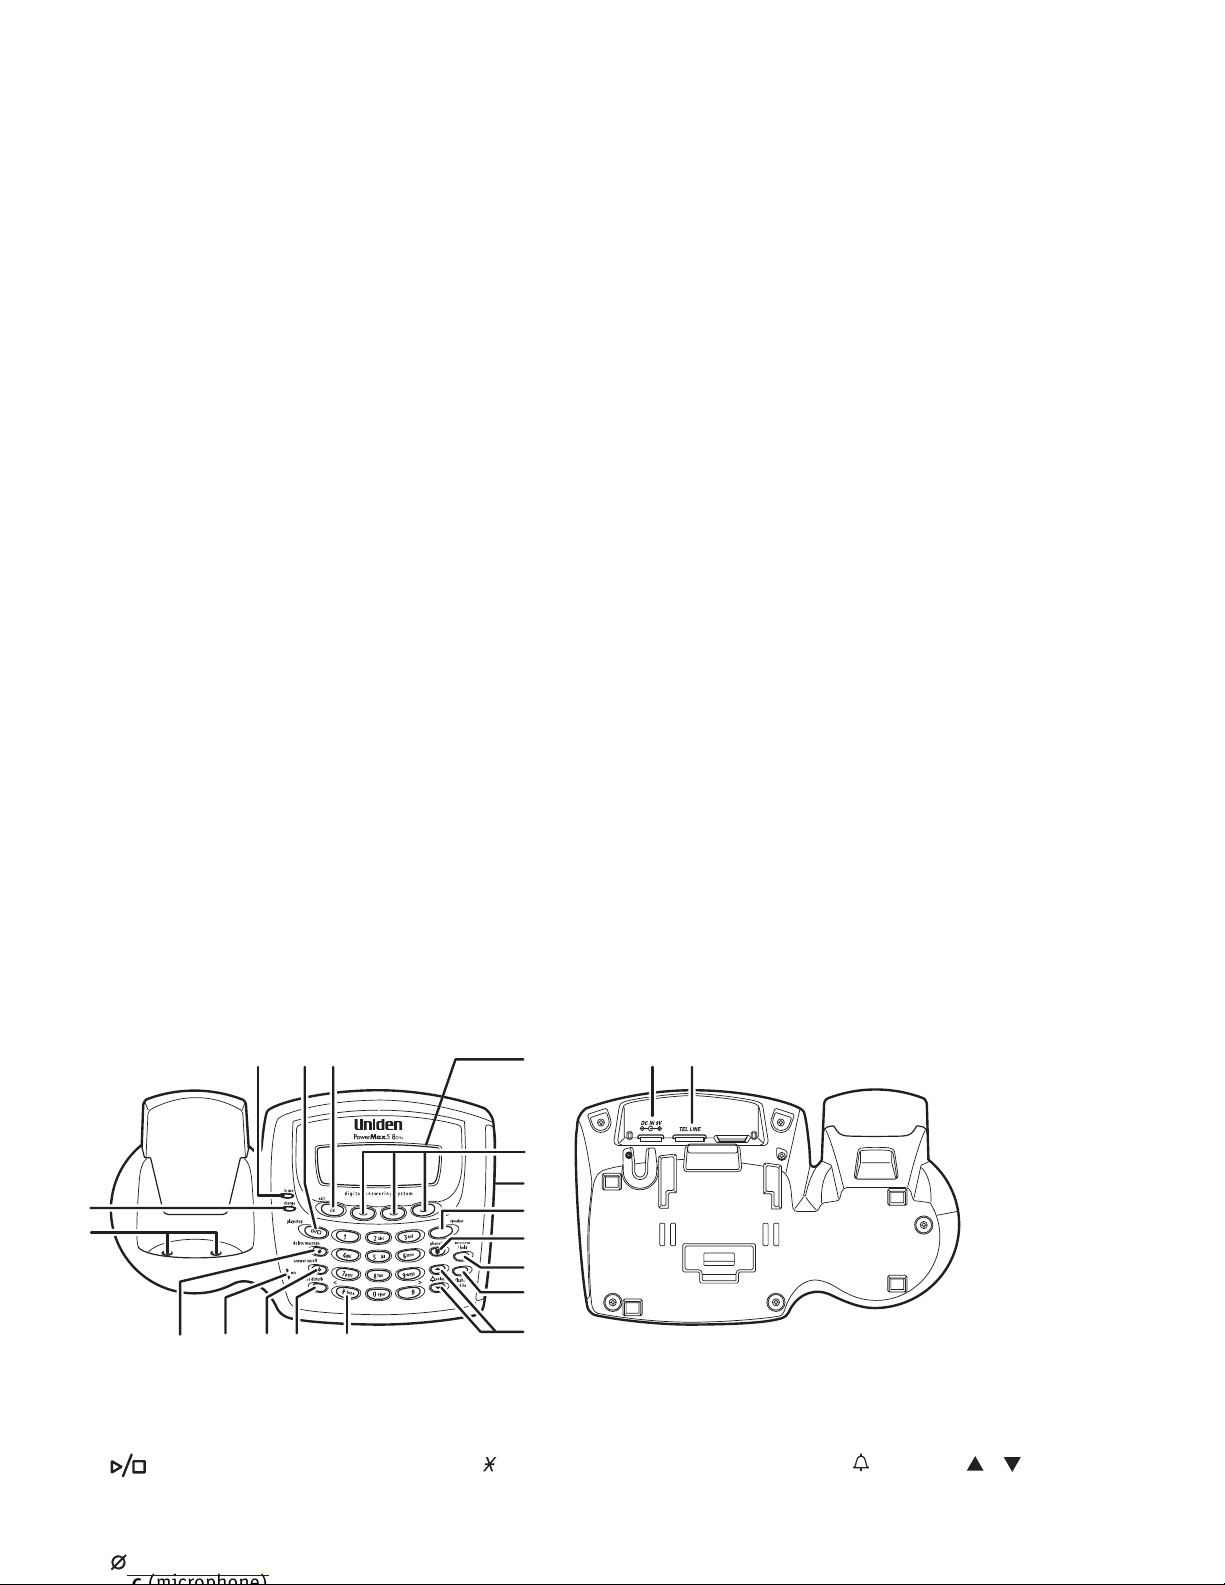
Controls & Functions
1. Handset Antenna
2. Beltclip Hole
3. Speakerphone Speaker and Ringer
4. Handset Battery Compartment
5. New Message LED
6. Handset Earpiece
7. LCD Display
8. soft Keys (P. 8)
9. cid/vol/ (volume up) (P. 37 & 16)
10.redial/p/vol/ (volume down) (P. 35, 33, 16 & 37)
11.
*
/tone/< (P. 39 & 44)
12.speaker (P. 33)
13.intcom/hold (P. 71 & 34)
14.Headset Jack Cover
15.talk/flash (P. 33 & 34)
16.end (P. 33)
17.phonebook (P. 42)
18.#/> (P. 44)
19. (Message) (P. 65)
20.Handset Microphone
21.Handset Charging Contacts
2
1
4
3
5
6
7
8
9
10
11
12
13
20
21
15
18
19
16
17
14
Play
Skip
Repeat
Retrieve TAD message
with Handset Remote keys
CONTROLS &
FUNCTIONS
25
26
24
33
34
3130292827
40 4122 23 32
36
37
38
39
35
22. In use LED
23. play/stop (P. 59)
24. cid/exit (P. 51)
25. Charge LED
26. Base Charging Contacts
27. delete message (P. 60)
30. do not disturb (P. 37)/DND LED
31. /tone (P. 39)
32. Message Counter Display
33. soft Keys (P. 8)
34. Base Speaker
35. speaker/speaker LED (P. 33)
38.
flash/find hs
Key (P. 34 & 74)
39.
/volume/ /
(volume up/down)
(P. 37 & 16)
40. DC IN 9V Jack
41. TEL LINE Jack
CONTROLS &
FUNCTIONS
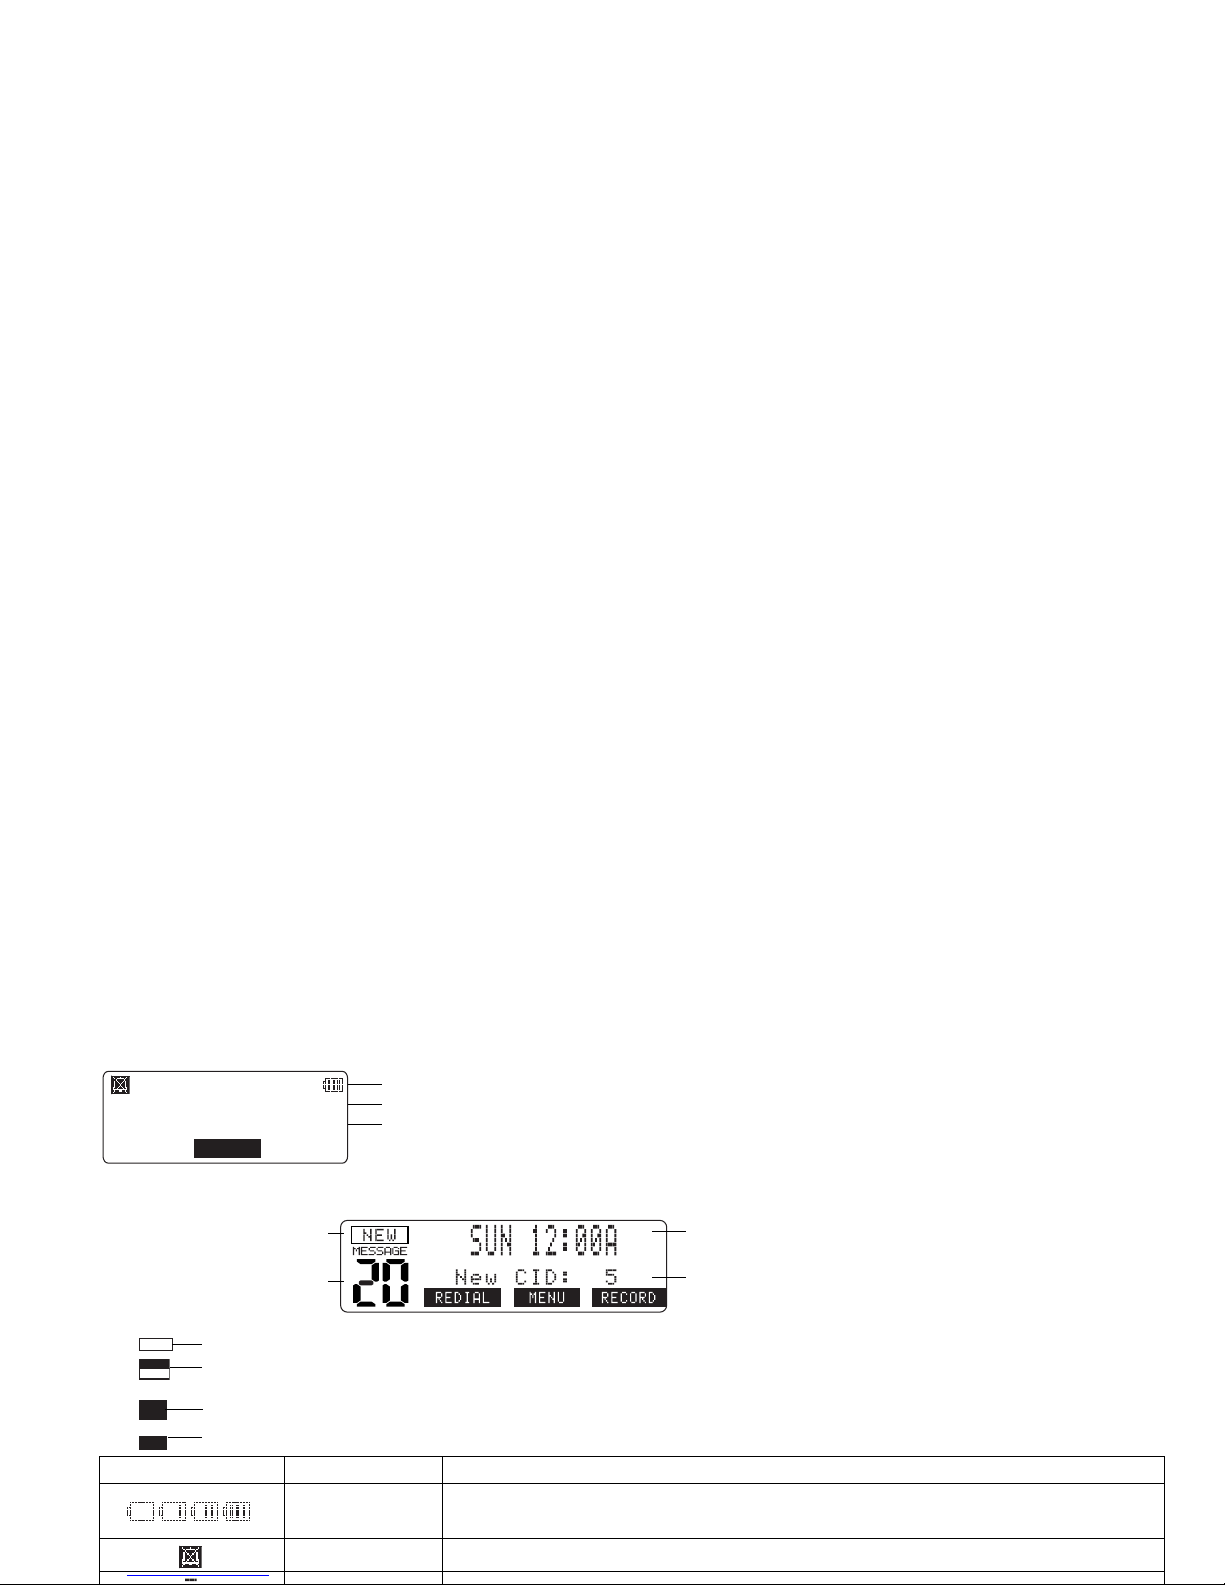
Display and Icons
Example of the standby mode display
•Handset
•Base
* appears if you have a new message.
appears if you turn your answering system off.
** appears when the message storage is full.
appears if you set your answering system to announce only.
ICON Appears During DESCRIPTION
Standby/Talk
Battery icons indicate the handset battery status. This icon changes depending on
the battery status (empty, low, medium and full).
Standby The Ringer off icon indicates that ringer is turned off.
570#
*CPFUGV
0GY%+&
/'07
Ringer off icon (when the ringer is off)/ day of the week and time / battery icon
Handset ID and Banner
Number of new Caller ID calls received (If there are no new Caller ID messages,
the Handset ID appears here.)
* Status of your
Answering machine
** Number of message
Day of the week and time
Number of new Caller ID calls received
0'9
1((
#059'4
(7..
#PPQWPEG
10.;
DISPLAY AND ICONS
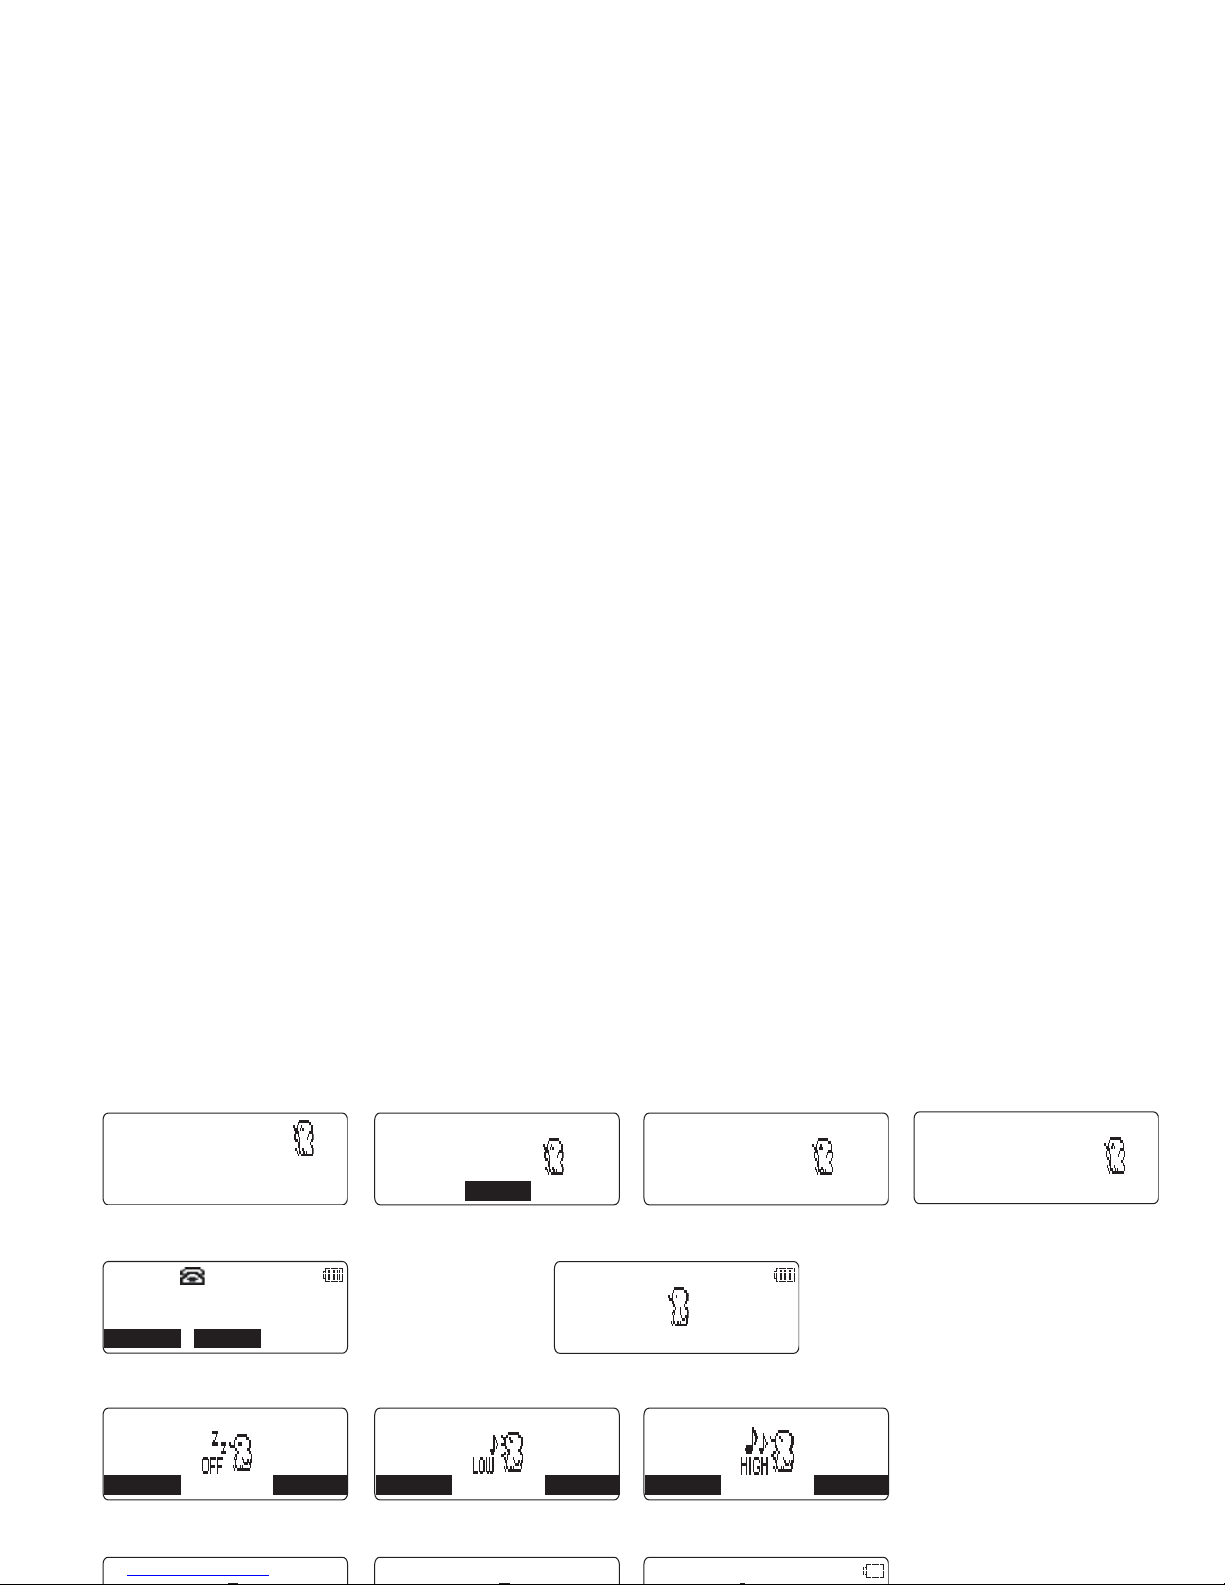
Animation Displays (Handset only)
The handsets have a variety of animation displays. Below are examples of the animation screens and
what they mean:
Turning on the phone Hanging up the phone Confirmation (Done!) Deleting (Deleted!)
Making a call Find Handset/Paging the Handset
Also, the animation display changes depending on the ringer volume setting.
Out of Range Unavailable Low Battery
9GNEQOG
2NGCUG9CKV
'PF
/'07
&QPG
&GNGVGF
6CNM
/76' /'07
2CIKPI
4KPIGT8QNWOG
$#%- 1- $#%- 1-
4KPIGT8QNWOG
?
$#%- 1-
4KPIGT8QNWOG
1WV1H4CPIG
7PCXCKNCDNG
.QY$CVVGT[
DISPLAY AND ICONS

Soft Key Function
"Soft" keys are keys that change function during the operation of the phone. There are three soft keys on
the base and three on each handset.
The function of each soft key is determined by the icon that appears directly above it. For example, when
the base is in standby mode, pressing soft key 1 will redial the last number. When the base is in talk
mode, pressing soft key 1 will mute the microphone.
Complete information on the features controlled by the soft keys can be found under each feature.
In standby mode
Handset Base
In talk mode
Handset Base
570#
*CPFUGV
0GY%+&
/'07
Soft key 2
570#
0GY%+&
4'&+#. /'07 4'%14&
Soft key 1 Soft key 2 Soft key 3
6CNM
/76' /'07
522JQPG
/76'
/'07
SOFT KEY FUNCTION
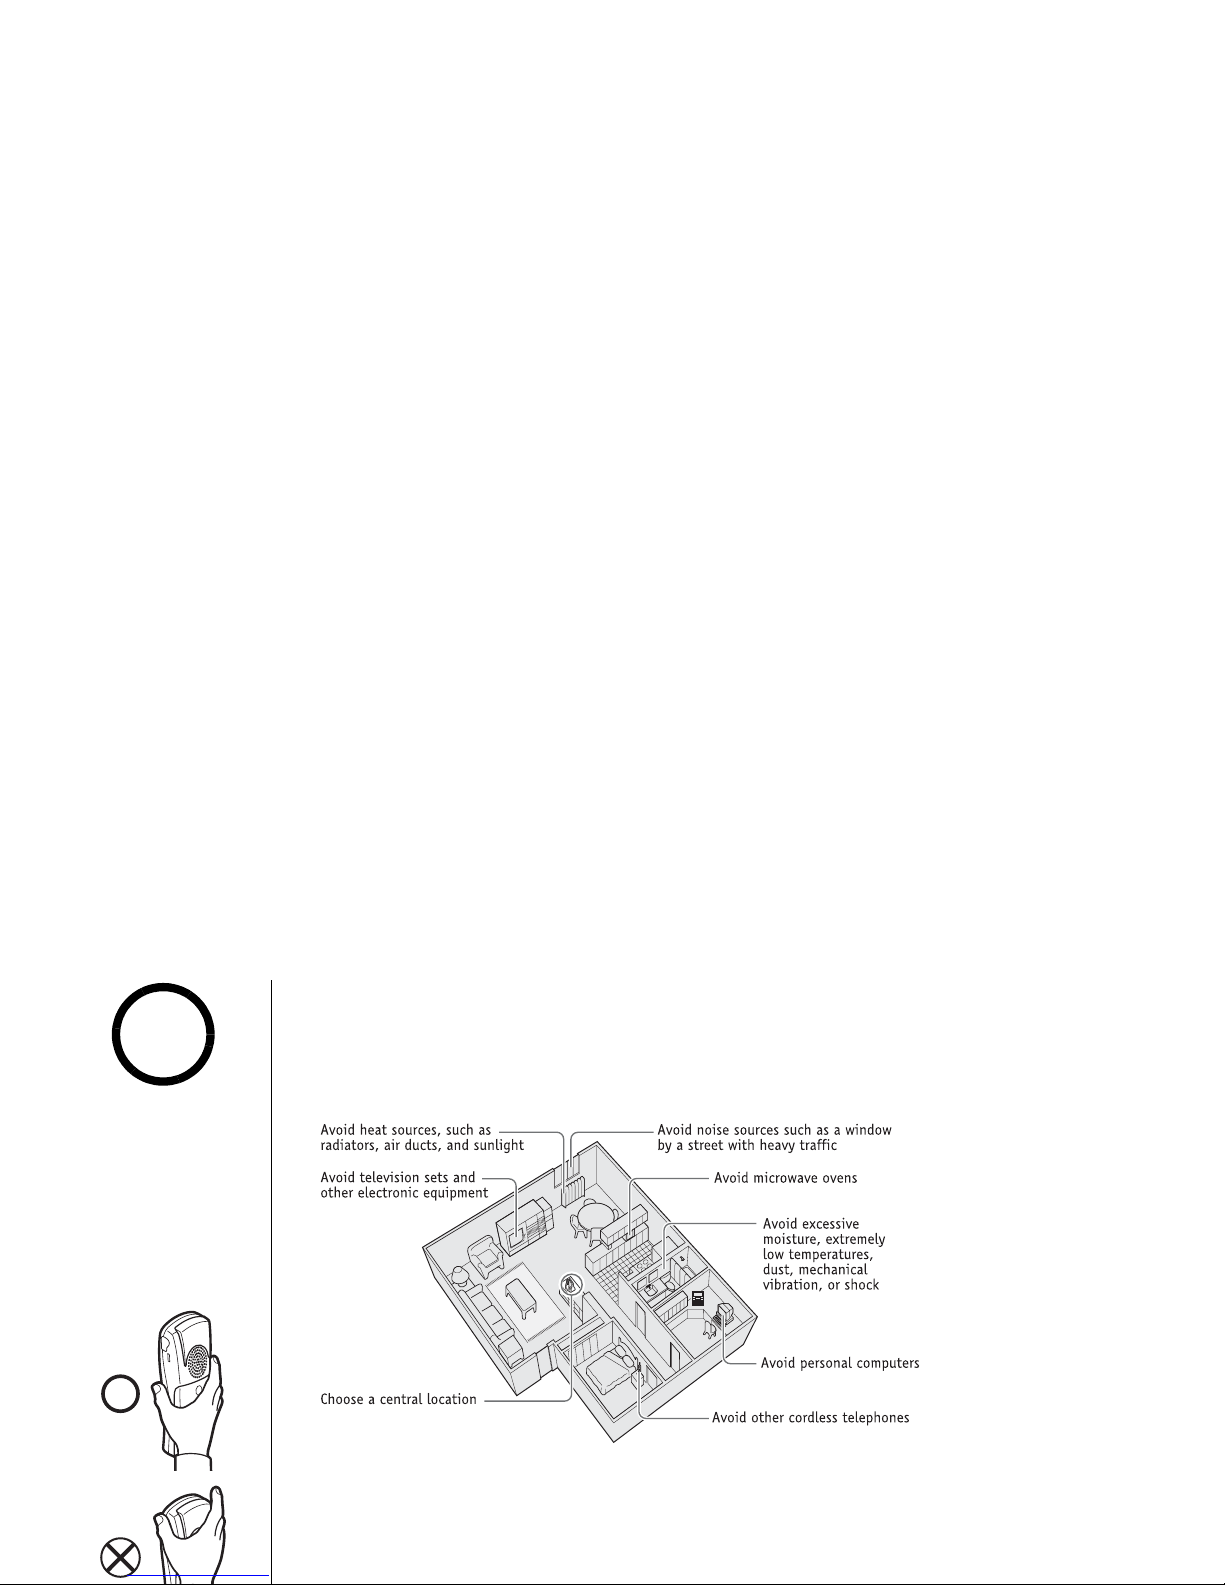
Setting up the Phone
A. Choose the best location
When choosing a location for your new phone, here are some important guidelines
you should consider:
• The location should be close to both a phone jack and a continuous power outlet (one
which is not connected to a switch).
• The base and handset should be kept away from sources of electrical noise such as motors,
microwave ovens, and fluorescent lighting.
• For better reception, place the base as high as possible.
For maximum range:
•Keep the antenna free
of obstruction.
•When the handset is
not in use place the
handset in an upright
position.
•Do not hold the
handset where you
would block the signal.
note
Correct
GETTING STARTED

B. Install the rechargeable battery pack into the handset, and
charge for at least 15-20 hours before using!
The handset is powered by a rechargeable battery pack. The battery recharges
automatically when the handset is placed in the base unit. To maximize the charge
capacity of your battery pack, DO NOT plug the telephone cord into the base unit
and wall jack until the battery is fully charged.
1) Press down on the handset battery case cover (use the
finger indention for a better grip) and slide the cover
downward to remove.
2) Turn the battery pack so that the connector with the red
and black wires is near the jack inside the battery
compartment. Match the connector's wire colors to the
polarity label in the battery compartment (the connector
notches fit into the grooves of the jack only one way).
Push the battery pack connector into the jack until it
clicks into place.
3) Make sure you have a good connection by gently pulling on
the battery wires. If the connection is secure, the battery
jack will remain in place.
4) Place the battery case cover back on the handset and slide
it upwards until it clicks into place.
5) Place the handset in the base unit for 15-20 hours without
interruption. The base unit's LED light (labeled charge)
The battery may be
purchased by calling
Uniden's Parts
Department (see back
cover page).
note
GETTING STARTED
Low battery alert
When the battery pack is very low, the phone is programmed to eliminate functions
in order to save power.
The battery pack needs to be charged when:
- The empty battery icon appears.
-
Low Battery
appears in the display.
If the phone is in standby mode, none of keys will
operate. If you are on a call, complete your conversation as quickly as possible, and
return the handset to the cradle.
Cleaning the battery charging contacts
To maintain a good charge, it is important to clean the
charging contacts on both the handset and the base
unit once a month. Using water only, dampen a cloth
to clean the charging contacts. Then make sure to go
back over the charging contacts with a dry cloth
before returning the handset to the base to charge.
Caution: Do not use paint thinner, benzene, alcohol,
or other chemical products. Doing so may discolor the
surface of the telephone and damage the finish.
.QY$CVVGT[
contacts
Even when the battery
pack is not being used,
it will gradually
discharge over a long
period of time.
For optimum performance,
be sure to return the
handset to the base unit
after each telephone call.
note
GETTING STARTED
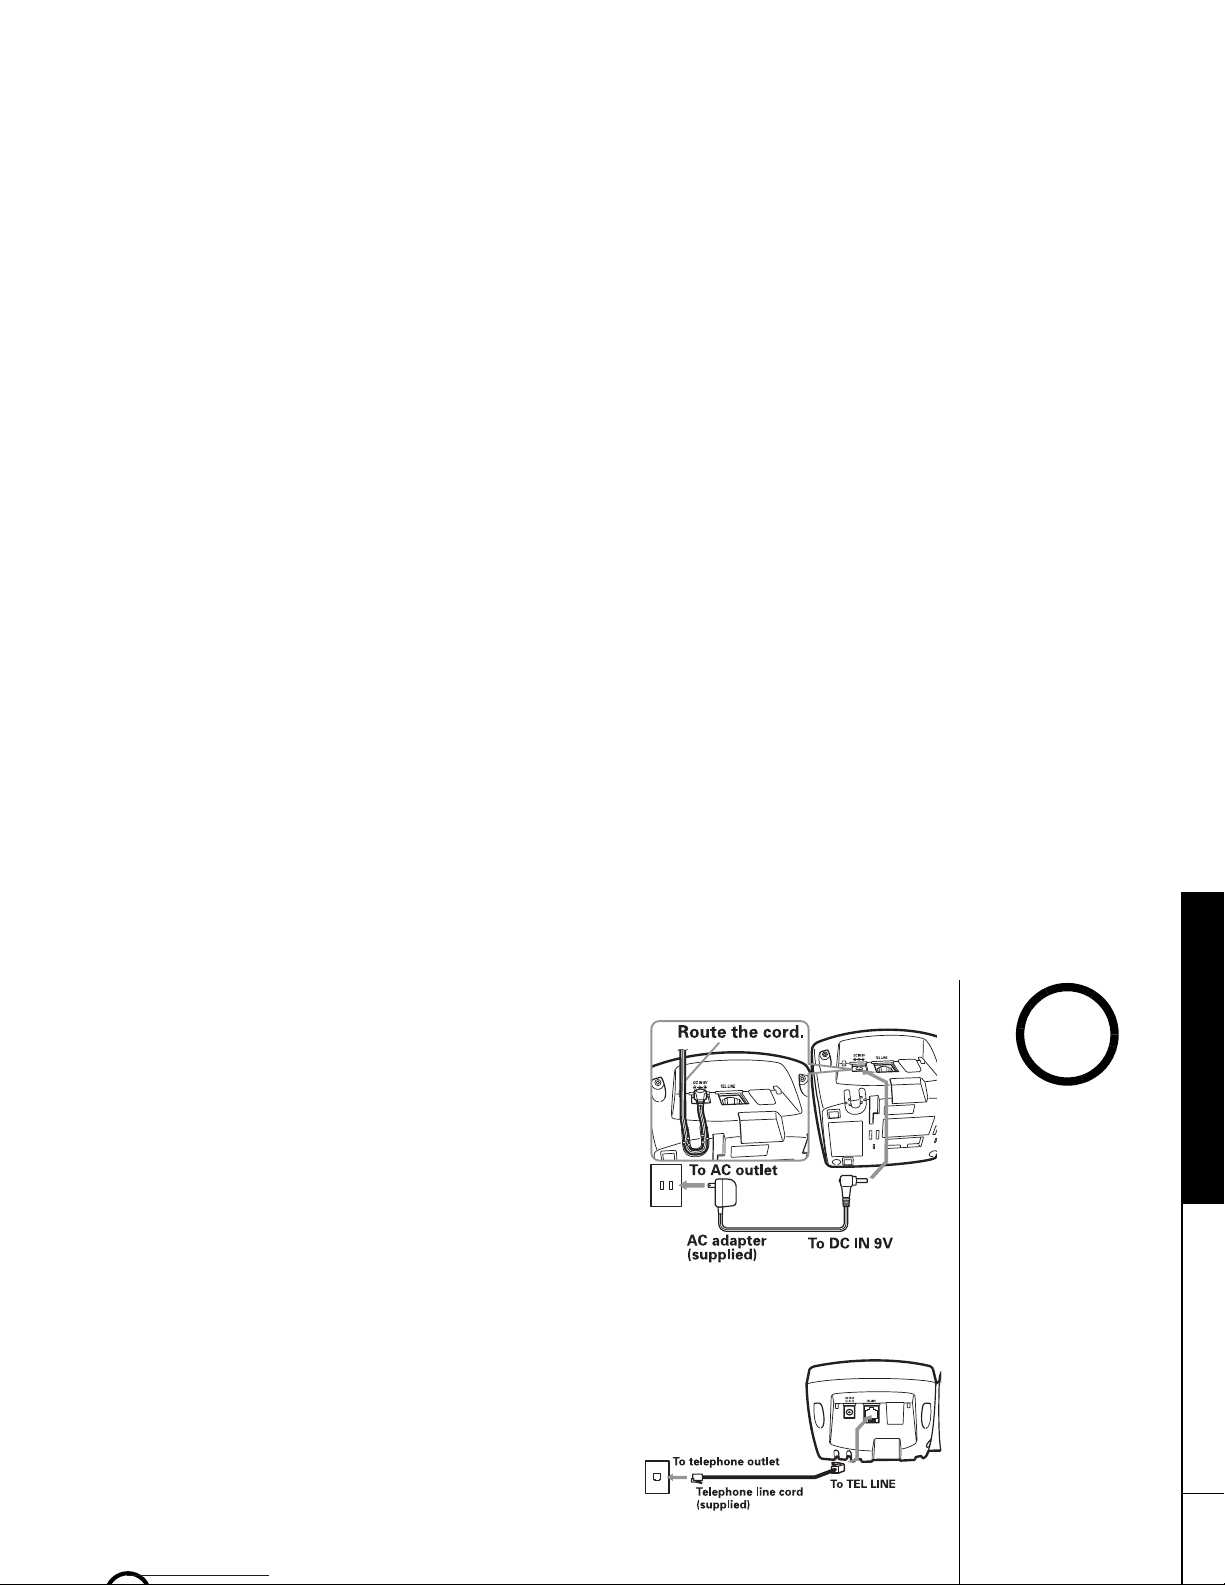
C. Connect the base unit
1) Connect the AC adapter to the DC IN 9V jack and to a
standard 120V AC wall outlet.
Connect the AC adapter to a continuous power supply
(i.e., an outlet that is not controlled by a switch).
2) Set the base on a desk or tabletop, and place the
handset in the base unit.
Place the base unit close to the AC outlet so that
you can unplug the AC adapter easily.
3) Make sure that the charge LED illuminates.
If the LED does not illuminate, check to see that the
AC adapter is plugged in and the handset makes
good contact with the base charging contacts.
After installing the battery pack in the handset,
charge your handset for at least 15-20 hours before
plugging into the phone line.
4) Once the handset battery pack is fully charged,
connect the telephone line cord to the TEL LINE jack
and to a telephone outlet.
If your telephone outlet isn't modular, contact
•Use only the supplied
[AD-830] AC adapter.
Do not use any other
AC adapter.
•Place the power cord
so that it does not
create a trip hazard or
where it could become
chafed and create a
fire or electrical
hazard.
note
GETTING STARTED

Mounting the Base Unit on a Wall
Standard wall plate mounting
This phone can be mounted on any standard wall plate.
1) Make the AC adapter and the telephone line cord
through the hole on the wall mount adapter.
2) Plug the AC adapter into the DC IN 9V jack.
3) Plug the telephone line cord into the TEL LINE
jack.
4) Slide the wall mount adapter into the notches on
the base.
5) Plug the AC adapter into a standard 120V AC wall
outlet. Hook the cord on the notch of the wall
mount adapter.
6) Plug the telephone line cord into the telephone
outlet. Hook the cord on the notch of the wall
mount adapter.
7) Align the mounting slots on the base with the
mounting posts on the wall. Then push in and
down until the phone is firmly seated.
DO NOT use an AC outlet
controlled by a wall
switch.
!
GETTING STARTED

Direct wall mounting
If you don't have a standard wall plate, you can mount your phone directly to the
wall. Before doing this, consider the following:
• Avoid electrical cables, pipes, or other items behind the mounting location that could
cause a hazard when inserting screws into the wall.
• Try to mount your phone within 5 feet of a working phone jack to avoid excessive lengths.
• Make sure the wall material is capable of supporting the weight of the base and handset.
• Use #10 screws (minimum length of 1 & 3/8 inches) with anchoring devices suitable for
the wall material where the base unit will be placed.
1) Insert two mounting screws into the wall (with their
appropriate anchoring device), 3 & 15/16 inches
apart. Allow about 1/8 of an inch between the wall
and screw heads for mounting the phone.
2) Refer to steps 1 through 7 on page 13 to mount the
telephone.
GETTING STARTED

Main Menu Options
Your phone has seven main menu options: DirectLink Mode, Room Monitor,
Handset Setup, Base Setup, Answ. Setup, Global Setup and Deregister HS. You
can change Room Monitor, Answering Setup, and Global Setup settings from the
base or from any handset. DirectLink Mode, Handset Setup, and Deregister HS are
only available from a handset. Base Setup is only available from the base.
Default Settings
The default settings set from the factory match the features that most people use.
You may not need to change them. However, there are a number of options you
must set and entries you must make in memory to take full advantage of all the
phone features. The table below lists the default settings.
Function Handset Base Function Handset Base
Ringer Tone
Flicker
Day & Time
SUN 12:00 AM
Ringer Volume
High
CW / CWDX
CW on/CWDX off
Distinctive Ring
On -
Dial Mode
Tone
Auto Talk
Off -
Area Code
None -
Anykey Answer
Off -
Security Code
80
Banner
“ “ -
Record Time
1 minute
Language
English
Ring Time
Toll Saver
(LCD) Contrast
Level 5
Message Alert
Off
Key Touc h Tone
On -
Call Screen
On
• For Global Setup,
Answ. Setup, and
Deregister HS menu
options, make sure
the line is not in use
and the handsets are
within range of the
base.
•For a flow chart of
the main menu, see
page 90.
note
GETTING STARTED

Setting Menu Options
Entering the Menu
1) In standby mode, press the MENU soft key.
2) Use volume up/down to move the pointer to a desired
main menu (DirectLink Mode, Room Monitor, Handset
Setup, Base Setup, Answ. Setup, Global Setup, and
Deregister HS).
3) Press the OK soft key to select the desired main menu.
To return to the previous screen, press the BACK soft
key.
4) Use volume up/down to select a desired submenu and
then press the OK soft key to enter.
5) In the submenu option, use volume up/down to select
an item. Press the OK soft key to confirm your
selection. For detailed instructions, see the following
sections for the desired submenu option. To return to
the previous screen, press the BACK soft key.
6) To exit the menu, press end on the handset or cid/exit on the base.
&KTGEV.KPM/QFG
4QQO/QPKVQT
*CPFUGV5GVWR
$#%- $#%- 1-
•Handset
4QQO/QPKVQT
$CUG5GVWR
#PUY5GVWR
$#%- $#%- 1-
•Base
GETTING STARTED

DirectLink Mode (Handset only)
In DirectLink mode, a pair of handsets can function as two-way radios. DirectLink
Mode allows two handsets to communicate with each other without the base unit or
a telephone line. Use them at sporting events or while shopping to stay in contact
with family members or friends. You must set both handsets to DirectLink Mode
activate this feature.
Using DirectLink Mode
1) Enter the DirectLink Mode menu.
To enter DirectLink
mode press [ENTER]
appears.
2) Press the ENTER soft key to enter the DirectLink Mode.
You will hear a confirmation tone, and
DirectLink Mode
Complete
appears.
3) To return back to the normal mode, press the CANCEL
soft key and then the OK soft key, or return the handset
to the cradle.
6QGPVGT
&KTGEV.KPMOQFG
RTGUU='06'4?
$#%- $#%- '06'4
You must have at least
two handsets to use
DirectLink Mode.
note
GETTING STARTED

Room/Baby Monitor
This feature allows you to monitor
sounds in another room. Place the base
or a handset in the room you wish to
monitor; it will function as a
microphone. A second handset can be
set to function as a remote speaker,
allowing you to monitor sounds in the
room.
Using Room/Baby Monitor
1) Enter the Room Monitor menu (see
"Entering the Menu" on page 16).
Listen to;
appears.
2) Select the handset or base you want
to monitor by using volume up/
down.
3) Press the OK soft key.
Monitoring
appears, and you hear sounds in the room
where the handset or the base is installed.
4) To turn off the Room Monitor, press the END soft key,
or end.
Monitor using
handset or
base unit
/QPKVQTKPI
㨭㨭
*CPFUGV
'0&
GETTING STARTED

Handset Setup / Base Setup
The following submenu options must be set separately for each handset and the
base.
Selecting a Ringer Volume
Ringer volume lets you choose from one of three ringer volumes.
From the handset
1) Press the MENU soft key. Select the Handset Setup menu, and then the Ringer
Volume submenu.
2) Press volume up/down to select
HIGH
,
LOW
, or
OFF
.
3) Press the OK soft key. You will hear a confirmation tone.
From the base
In standby mode, press volume up/down to select one of three ringer volumes (Off,
Low, or High).
Selecting a Ringer Tone (Handset only)
Ringer tone lets you choose from 10 ringer tones or 10 melodies:
- Ringers (Flicker, Clatter, Soft Alert, Wake Up, Light Bug, Beep Boop, Tone Board,
Chip Chop, Party Clap, Reminder)
GETTING STARTED

1) Enter the Handset Setup menu, and then the Ringer
Tones submenu (see "Entering the Menu" on page 16).
2) Press volume up/down to move the pointer. You will
hear the ringer or melody as you scroll through the
options.
3) Press the OK soft key. You will hear a confirmation tone.
Distinctive Ringer Setup (Handset only)
Distinctive Ringer allows you to assign a designated ring tone to a stored
phonebook number. When a call is received and the Caller ID information matches
the information in one of the phonebook memory locations, the phone uses the
distinctive ring assigned to that particular Caller. You can assign distinctive rings
to multiple phonebook memory locations. Switching the setting to Distinctive Off
disables distinctive ringing: all incoming calls will have a normal ring tone.
Switching to Distinctive On activates all programmed distinctive ring memory
locations.
1) Enter the Handset Setup menu, and then the Distinct.
Ring submenu (see "Entering the Menu" on page 16).
2) Press volume up/down to select
On
or
Off
.
3) Press the OK soft key. You will hear a confirmation
tone.
4KPIGT6QPGU
(NKEMGT
%NCVVGT
$#%- &'.'6' 1-
&KUVKPEVKXG4KPI
1P
1HH
$#%- &'.'6' 1-
GETTING STARTED

Setting the AutoTalk (Handset Only)
AutoTalk allows you to answer the phone simply by removing the handset from the
cradle. You do not have to press any buttons to answer the call.
1) Enter the Handset Setup menu, and then the AutoTalk
submenu (see "Entering the Menu" on page 16).
2) Press volume up/down to select
On
or
Off
.
3) Press the OK soft key. You will hear a confirmation
tone.
Setting the Anykey Answer (Handset only)
Anykey Answer allows you to answer the phone by pressing any number key,
*
/tone/<, or #/> on the handset.
1) Enter the Handset Setup menu, and then the Anykey
Answer submenu (see "Entering the Menu" on page 16).
2) Press volume up/down to select
On
or
Off
.
3) Press the OK soft key. You will hear a confirmation tone.
#WVQ6CNM
1P
1HH
$#%- &'.'6' 1-
#P[MG[#PUYGT
1P
1HH
$#%- &'.'6' 1-
GETTING STARTED

Setting the True Banner (Handset only)
True Banner lets you customize the name your handset displays.
The name will be displayed on the LCD screen during Standby Mode, Intercom,
Intercom Hold, Room Monitor and Copy Phonebook operation. The banner name will
be displayed on the receiving handset as well.
1) Enter the Handset Setup menu, and then the Banner
submenu (see "Entering the Menu" on page 16).
2) Use the number keypad (0-9),
*
/tone/<, #/>, or the
DELETE soft key to enter or edit the name.
3) Press the OK soft key. You will hear a confirmation
tone.
Selecting a Language
Language selects which language the menu display will use. Choose from English,
French, or Spanish.
1) Enter the Handset Setup or the Base Setup menu, and
then the Language submenu (see "Entering the Menu"
on page 16).
2) Press volume up/down to choose
English, Fran ユ ais
AAAAAAAAAA
$CPPGT
/QOU2JQPG
$#%- &'.'6' 1-
.CPIWCIG
'PINKUJ
(TCP㩟CKU
$#%- 1-
GETTING STARTED

Adjusting the LCD Contrast
Contrast adjusts the handset LCD brightness. Choose one from the 10 levels for
optimum viewing.
1) Enter the Handset Setup or the Base Setup menu, and then the LCD Contrast (for
handset) or the Contrast (for base) submenu (see "Entering the Menu" on
page 16).
2) Press volume up/down to adjust the contrast of the LCD (10 levels).
3) Press the OK soft key. You will hear a confirmation tone.
Setting the Key Touch Tone (Handset only)
Key Touch Tone is the tone your keypad makes when keys are pressed. You can turn
this tone on or off.
1) Enter the Handset Setup menu, and then the Key Touch
Tone submenu (see "Entering the Menu" on page 16).
2) Press volume up/down to select
On
or
Off
.
3) Press the OK soft key. You will hear a confirmation
tone.
-G[6QWEJ6QPG
1P
1HH
$#%- &'.'6' 1-
GETTING STARTED

Setting the Animation Screen (Handset Only)
The Animation Screen displays animation on the handset LCD (see page 7). The
animations will be displayed on the LCD screen during a call, ringer volume setting,
paging operation, when you hang up and so on.
1) Enter the Handset Setup menu, and then the Animation
Screen submenu (see "Entering the Menu" on page 16).
2) Press volume up/down to select
On
or
Off
.
3) Press the OK soft key. You will hear a confirmation
tone.
See "Animation Displays (Handset only)" on page 7 for all the available screens.
Answering System Setup
This main menu option allows you to set up the built in answering device.
Record a Personal Outgoing Message (Base Only)
Record Greeting allows you to record a personal outgoing message (greeting) which
the answering system automatically plays when you receive a call.
1) Enter the Answ. Setup menu, and then the
#PKOCVKQP5ETGGP
1P
1HH
$#%- &'.'6' 1-
6QTGEQTF
•The greeting must be
more than 2 seconds
long, or it will not be
recorded.
•To delete the personal
outgoing message,
press the DELETE soft
key while the message
is playing. The system
announces “Greeting
has been deleted.“
note
GETTING STARTED

3) Position yourself near the base microphone and record your greeting.
4) When you are finished recording, press the STOP soft key. Your greeting will
playback for confirmation.
Selecting Your Greeting (Base only)
Select Greeting allows you to choose between the two outgoing messages, a prerecorded message or your own greeting.
1) Enter the Answ. Setup menu, and then the
Select Greeting submenu (see "Entering the
Menu" on page 16).
Play back greeting
appears, and the current outgoing message is
played. LCD is an example if you recorded your greeting.
2) Once you have recorded a personal greeting, press the CHANGE soft key to
choose the greeting. The selected outgoing message is played. Each time you
press the CHANGE soft key, the phone switches the outgoing message between
the prerecorded and the personal outgoing message.
Setting a PIN Code
Security Code selects a two-digit Personal Identification Number (PIN) code. A PIN
code is required to play your messages from a remote location.
2NC[DCEM
ITGGVKPI
4'&+#. 5612 %*#0)'&'.'6'
GETTING STARTED

3) Press the OK soft key. You will hear a confirmation tone.
Setting the Ring Time
Ring Time allows you to set the number of rings the caller hears before your
answering system plays the outgoing message. You can set the ring time to answer
after two, four, or six rings. If you enable the Toll Saver (TS), the answering system
picks up after two rings if you have new messages and after four rings if there are
none.
1) Enter the Answ. Setup menu, and then the Ring Time
submenu (see "Entering the Menu" on page 16).
2) Press volume up/down to select a Ring Time (Toll
Saver, 2 Times, 4 Times, or 6 Times).
3) Press the OK soft key. You will hear a confirmation tone.
Setting the Record Time
Record Time sets the duration for recording the incoming messages. You have three
record time options. The options "1 minute" or "4 minutes" set the duration for
recording the incoming messages. "Announce only" answers the call but prevents
the caller from leaving a message.
1) Enter the Answ. Setup menu, and then the Record
4KPI6KOG
6QNN5CXGT
6KOGU
$#%- &'.'6' 1-
GETTING STARTED

Setting the Message Alert On or Off
Message Alert sounds an alert tone when you have an unheard message. If you set
the Message Alert on, the alert tone will sound every 15 seconds when a new
message is received.
1) Enter the Answ. Setup menu, and then the Message
Alert submenu (see "Entering the Menu" on page 16).
2) Press volume up/down to select
On
or
Off
.
3) Press the OK soft key. You will hear a confirmation
tone.
Turning the message alert tone off by pressing any key
To quickly turn off the Message Alert tone, press any key on the base unit; the tone
will automatically deactivate.
Turning the message alert tone off from a remote location
When all new messages are played back using the remote playback feature (see
pages 63 to 66), the Message Alert tone will automatically deactivate. The tone will
not deactivate until all new messages are played back.
/GUUCIG#NGTV
1P
1HH
$#%- &'.'6' 1-
GETTING STARTED

Setting the Language of your Answering System
Language allows you to set the language of your answering system announcements
to English, French, or Spanish.
1) Enter the Answ. Setup menu option, and then the
Language submenu (see "Entering the Menu" on
page 16).
2) Press volume up/down to choose
English, Fran ユ ais
(French), or
Espa ツ ol
(Spanish).
3) Press the OK soft key. You will hear a confirmation tone.
Setting the Call Screen
Call screen allows you to listen to an incoming call before answering.
1) Enter the Answ. Setup menu and then the Call Screen
submenu (see "Entering the Menu" on page 16).
2) Press volume up/down to select
On
or
Off
.
3) Press the OK soft key. You will hear a confirmation
tone.
.CPIWCIG
'PINKUJ
(TCPCKU
$#%- &'.'6' 1-
%CNN5ETGGP
1P
1HH
$#%- &'.'6' 1-
GETTING STARTED
 Loading...