


App Cam Solo PT
Series
Quick Start Guide
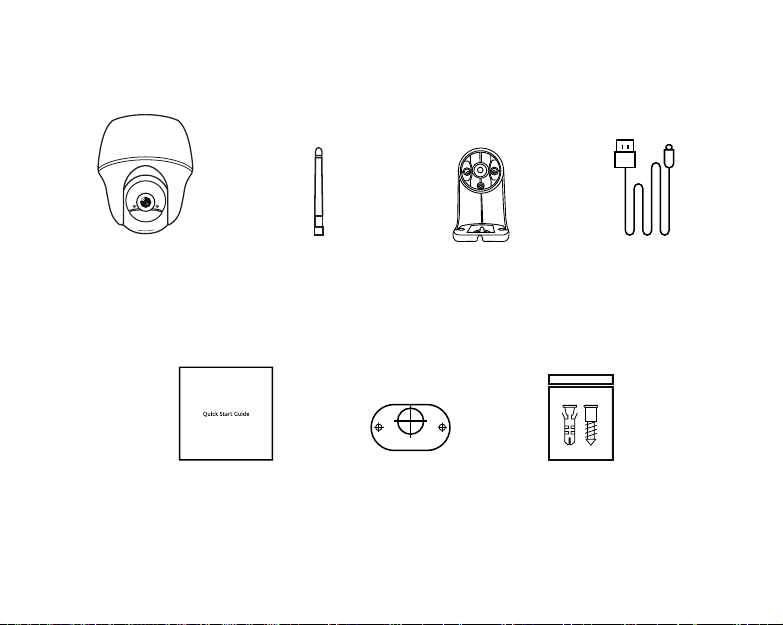
What’s in the Box
x1
x1
x1
App Cam Solo 4G PT
x1
Quick Start Guide
Antenna
x1
Plastic Mount
Mounting Template
1
Power Cable
x1
Screw Kit
x1
Optional Accessories
Solar Panel
(SPS-01)
Visit the App Cam Solo PT page on the website for more information on the availability
of optional accessories:
www.uniden.com.au for Australia
2

General Introduction
Lens
Daylight Sensor
Micro SD Card Slot
Battery Status LED
Speaker
Status LED
Built-in PIR Sensor
Built-in Mic
Reset Hole
Micro USB Port
Antenna
On/Off Switch
Red LED (WiFi connection failed)
Blinking: Standby status
On: Working status
Blue LED (WiFi connection succeeded)
Blinking: Standby status
On: Working status
3
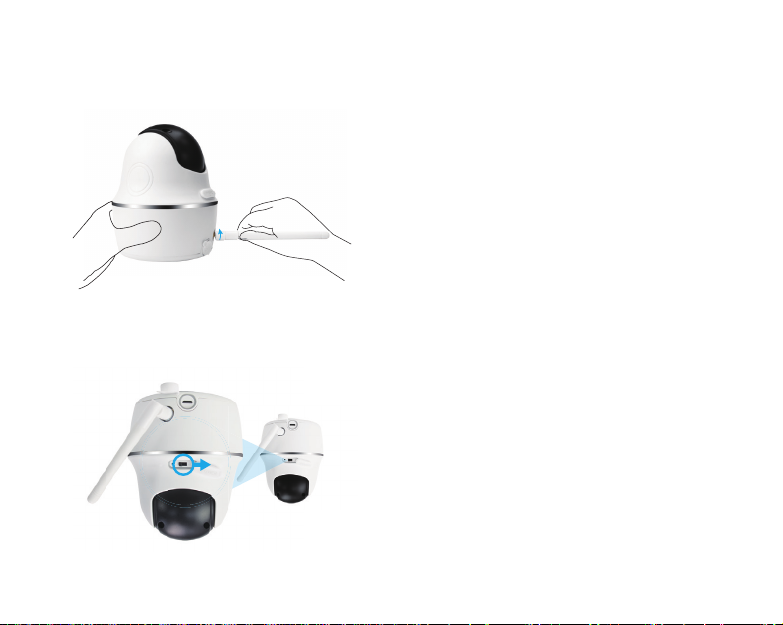
Install the Antenna
Please install the Antenna to the
camera. Turn the antenna base in a
clockwise motion to connect. Leave
the antenna in a vertical position for
best reception.
Turn on the Camera
The camera is turned off by default, please turn it on before setting up the camera.
Note:
If the camera will not be in
use for a very long time,
it’s suggested to turn it off.
4
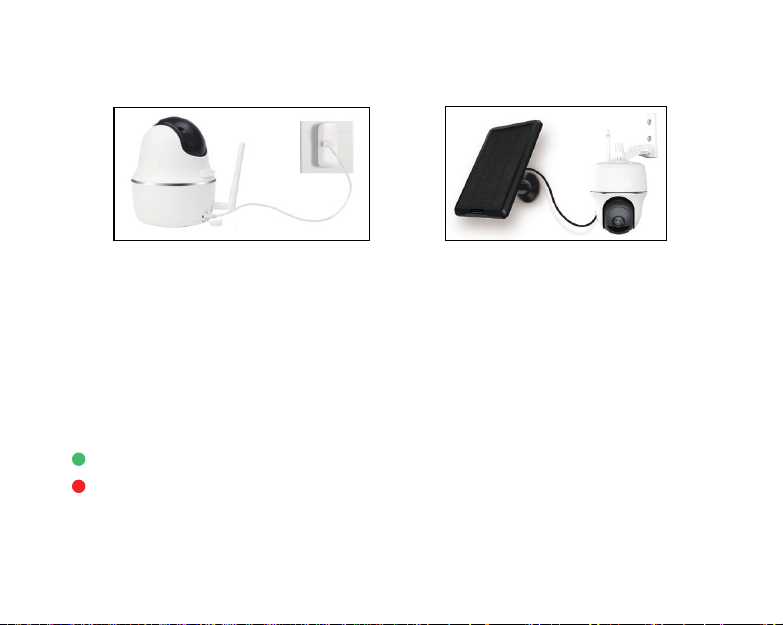
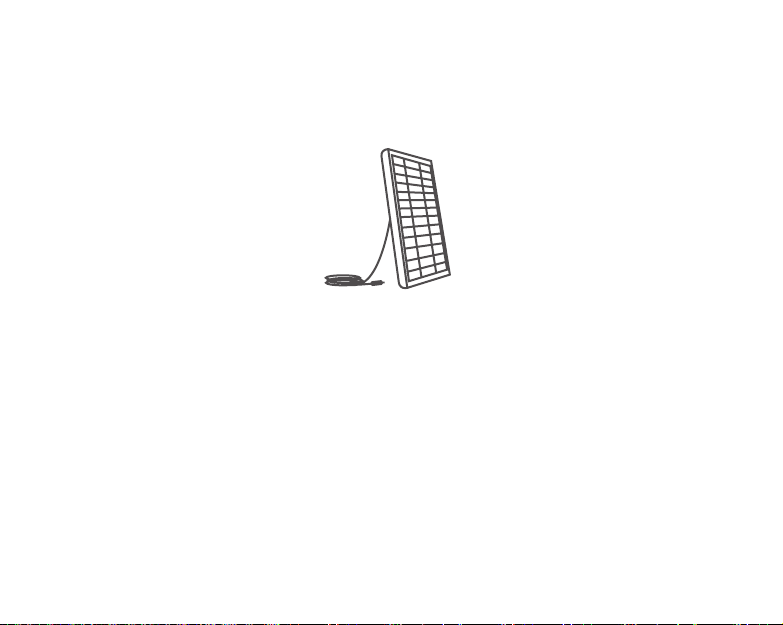
Charge the Battery
1. Charge the battery with a
power adapter.
* The battery is built-in,please do not remove it from the camera
* Please note that the USB charger and Solar Panel are NOT included in the package. You can buy the
solar panel separately.
2. Charge the camera with the
optional solar panel.
LED Battery Status
There is a status LED under the micro USB port of the camera, indicating the battery charging status.
Green LED: Fully charged
Red LED: Charging
5
Important Safeguards on Rechargeable Battery Use
!
App Cam Solo PT is not designed for 24/7 full capacity running or around-the-clock live streaming. It’s
designed to record motion events and remotely view live streaming only when you need it.
1. Please charge the rechargeable battery with a standard and high-quality DC 5V or 9V battery charger.
2. If you want to power the battery via the solar panel, please note that the battery is ONLY compatible with SPS-01 solar
panel. You cannot charge the battery with other solar panel brands.
3. Please charge the battery in temperatures between 0°C and 45°C.
4. Always use the battery in temperatures between -20°C and 60°C.
5. Please make sure the battery compartment is clean.
6. Please keep the USB charging port dry, clean and free of any debris and make sure the battery contacts are aligned.
7. Always make sure the USB charging port is clean. Please cover the USB charging port with the rubber plug after the
battery has been fully charged.
8. Never charge, use or store the battery near any ignition sources, such as re or heaters.
9. Always store the battery in a cool, dry and ventilated environment.
10. Never store the battery with any hazardous or combustible objects.
11. Do keep the battery away from children.
12. Do not short-circuit the battery by connecting wires or other metal objects to the positive (+) and negative (-)
terminals. Do NOT transport or store the battery with necklaces, hairpins or other metal objects.
13. Do NOT disassemble, cut, puncture, short-circuit the battery, or make it dispose of in water, re,microwave ovens and
pressure vessels.
14. Do NOT use the battery if it gives off an odor, generates heat, becomes discolored or deformed, or appears abnormal
in any ways. If the battery is being used or charged, remove the battery from the device or the charger immediately,
and stop using it.
15. Always follow the local waste and recycle laws when throwing the used battery away.
16. All rechargeable batteries are consumables and have a limited lifespan—eventually their capacity and performance
decline.
6
Install Uniden Solo App
There are two ways to get the Uniden Solo App:
• Search “Uniden Solo” in App Store (for iOS),
download and install the app.
• Search “Uniden Solo” in Google Play (for Android),
download and install the app.
Set up the Camera
Please follow the prompt tone to
congure the camera
Camera has been started
up. Please run app, add the
camera and set it up.
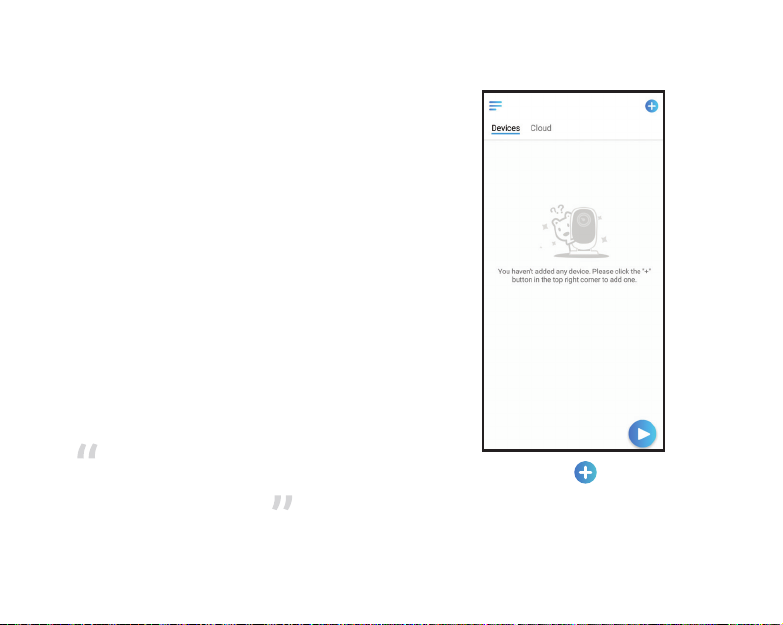
1. Please click the “ ” button in the
top right corner to add the camera.
7

Note:
When the setup for the
camera is completed, your
family can access the
camera simply by clicking
“Access Cameras” without
reconguring it.
App Cam Solo PT Camera
can only connect to 2.4GHz
Wi-Fi.
2. Scan the QR code on the back
of the camera.
3. Click “Connect to Wi-Fi” to
continue.
8

4. Click the button “I heard the voice” to
enter the next page.
If you did not hear the voice prompt, please
press “I didn’t hear the voice” for help.
5. Enter the Wi-Fi password of the selected
Wi-Fi network and tap “Next” to continue.
9

20 cm
Scan succeeds. Camera is connecting to the router. Please wait.
6. A QR code will be generated on the phone. Please place the QR code on your phone towards
App Cam Solo PT camera’ lens at a distance of about 30cm to let the camera scan the QR
code. Please make sure that you’ve ripped the protection lm of the camera’s lens.
Note: To help scanning, please tap the QR code to display in full screen
10

Connection to the router failed!
7. If you hear the above voice prompt, please
press “I heard ‘Wi-Fi connection failed’ ”
for help.
Connection to the router succeeded.
8. If you hear the above voice prompt, please
press “I heard ‘Connection to the router
succeeded.’ ” to nish the quick setup.
11

9. Create a password (at least 6 characters), name the camera and set the DST time. Then start live
view or go to “Device Settings” for more congurations.
Note:
“Name your camera” eld refers to the display name of the camera rather than the login username.
12

Device Menu
Menu
Add New Device
Enable/Disable PIR Motion Sensor
(the PIR sensor is enabled by default)
Device Settings
Access Live View
Battery Status
13

Attention for Camera Installation
For outdoor use, please install the App Cam Solo PT upside down in order to
maximize the weatherproof performance and the PIR motion sensor’s efciency.
For indoor use, the camera can be placed upright, but please make sure to place it at a maximum of
2.5 meters from the ground.
• PIR Sensor Detecting Distance
The PIR senor has 3 sensitivity levels for your adjustment: Low/Mid/High.
Higher sensitivity offers longer detecting distance. The default sensitivity of the PIR sensor is at “Mid”.
Path for adjusting distance in App: Device settings-PIR settings
Sensitivity Value
Low 0 - 50 Up to 4 meters Up to 10 meters
Mid 51 - 80 Up to 6 meters Up to 12 meters
High 81 - 100 Up to 10 meters Up to 15 meters
Note:
Higher sensitivity offers longer detecting distance, but it would lead to more false alarms.
You are advised to set up the sensitivity level to “Low” or “Mid” when you install the camera outdoors.
Detecting Distance
(For moving and
living things)
Detecting Distance
(For moving vehicles)
14

• PIR Sensor Installation Angle
Pease install the camera 2-3 meters
above the ground. The detection range of
the motion sensor would be maximized at
such a height.
For effective motion detection, please install
the camera angularly and the angle
between the PIR sensor and the detected
object must be larger than 10°.
Due to the limitation of PIR sensor
detection, if a moving object approaches
the PIR sensor vertically (the direction of the
orange arrow in the image), the camera
may fail to detect motion.
Mounting Height:
2-3 meters
PIR Detecting Disance:
2-10 Meters
15
A
B
θ

Important Notes for Reducing False Alarms
!
For reducing false alarms, please note that:
• Do not install the camera facing any objects with bright lights, including sunshine,
bright lamplights, etc.
• Do not place the camera too close to a place where there are frequently moving
vehicles. The recommended distance between the camera and the vehicle is
15 meters
• Stay away from the outlets, including the air conditioner vents, humidier outlets,
the heat transfer vent of projectors, etc.
• Do not install the camera facing the mirror.
• Do not install the camera where there are strong winds
• Keep the camera at least 1 meter away from any wireless devices, including Wi-Fi
routers and phones in order to avoid wireless interference.
Note:
• When in rotating status, the camera will record motion detection videos when the PIR
sensor is triggered, but will not send any push or email notications.
16

How to Install Plastic Mount
Step 1
Drill holes in accordance with the mounting
hole template and screw the plastic mount
to the wall. If you are mounting the camera
to a masonry or on any other hard surface,
remember to insert the plastic anchors into
the hole.
NOTE:
For better 4G
signal strength, it
is best to install the
antenna upwards or
horizontally.
Step 2
Install the antenna to the
camera.
Step 3
Screw the camera to the security mount
and adjust to the proper direction.
17

How to Mount the Camera to the Ceiling
Loosen the screw on security mount and remove the ceiling bracket from the mount.
1
4
2
5
3
18

1
4
How to Attach the Camera to a Tree
You are allowed to strap the camera to a tree with both the security mount and ceiling bracket.
Thread the provided strap to the plate and fasten it to a tree. Next, attach the camera to the
plate and you are good to go.
19


Specication
Video
WiFi
Battery
Model App Cam Solo PT
Image Sensor Starlight CMOS Image Sensor
Video Resolution 1920 x 1080 (2.0Megapixel) 15 fps
Video Compression H.264
Viewing Angle Diagonal: 105°
Pan Angle 355°
Tilt Angle 140°
PIR Detecting Distance Low: 2-4 Meters, Mid: 4-6 Meters, High: 6-10 Meters
PIR Detecting Angle Horizontal: 90°
Night Vision Up to 10 Meters
Standby Wake Up PIR Alarm, Remote Access, Reset Button
Record Mode PIR Alarm Record
WiFi 2.4 GHz IEEE 802.11b/g/n
Wireless Security WPA-PSK/WPA2-PSK
Battery Type Lithium battery/3.6V, 6500mAh
Battery Life Up to 3 Months in Standby Mode with one detection a day

Storage
Size & Weight
Other Parameters
SD Card Supports up to 64GB micro SD card, min class 10
Size Φ98 x 112 mm
Weight 470 g (including battery)
Temperature Operating Temperature : -10°C~+55°C
Humidity Operating Humidity: 20% ~ 85%
Waterproof Level IP64 Weatherproof

WARRANTY
Uniden App Cam Solo PT
Important:
Satisfactory evidence of the original purchase is required for warranty service. Please refer to our Uniden
website for any details or warranty durations offered in addition to those contained below.
Warrantor:
The warrantor is Uniden Australia P ty Limited ABN 58 001 865 498 (“Uniden Aust ”).
Terms of Warrant y: Uniden Aust warrants to the original retail purchaser only that the Uniden App Cam Solo PT
(“the Product”), will be free from defects in materials and craftsmanship for the duration of the warranty per iod,
subject to the limitations and exclusions set out below.
Warranty Period: This warrant y to the original retail purchaser is only valid in the original country of purchase for a
Product first purchased either in Australia or New Zealand and will expire, as indicated below, from the date of original
retail sale.
Product 2 Year
If a warranty claim is made, this warranty will not apply if the Product is found by Uniden to be:
A. Damaged or not maintained in a reasonable manner or as recommended in the relevant Owner’s Manual;
B. Modif ied, altered or used as par t of any conversion kits, subassemblies or any configurations not sold by Uniden
Aust;
C. Improperly installed contrary to instructions contained in the relevant Owner’s Manual
D. Repaired by someone other than an authorized Uniden Repair Agent in relation to a defect or malfunction
covered by this warranty; or
E. Used in conjunction with any equipment, parts or a system not manufactured by Uniden.

Parts Covered: This warranty covers the Product and inc luded accessories.
User-generated Data: This warranty does not cover any claimed loss of or damage to user-generated data
(including but without limitation phone numbers, addresses and images)that may be stored on your Product.
Statement of Remedy: If the Product is found not to conform to this warranty as stated above, the Warrantor, at its
discretion, will either repair the defect or replac e the Product without any charge for parts or service. This warranty
does not include any reimbursement or payment of any consequential damages claimed to arise from a Product ’s
failure to comply with the warrant y.
Our goods come with guarantees that cannot be excluded under the Australian Consumer Law. You are entitled
to a replacement or refund for a major failure and for compensation for any other reasonably foreseeable loss or
damage. You are also entitled to have the goods repaired or replaced if the goods fail to be of acceptable quality
and the failure does not amount to a major failure.
This warranty is in addition to and sits alongside your rights under either the COMPETITION A ND CONSUMER
ACT 2010 (Australia) or the CONSUMER GUAR ANTEES ACT (New Zealand) as the case may be, none of which
can be excluded.
Procedure for Obtaining Warranty Service: Depending on the country in which the Produc t was first purchased,
if you believe that your Product does not conform with this warranty, you should deliver the Product, together with
satisfactory evidence of your original purchase (such as a legible copy of the sales docket) to Uniden. Please refer
to the Uniden website for address details. You should c ontact Uniden regarding any compensation that may be
payable for your expenses incurred in making a warranty claim. Prior to delivery, we recommend that you make
a backup copy of any phone numbers, images or other data stored on your Product, in case it is lost or damaged
during warranty service.
UNIDEN AUSTR ALIA PTY LTD
Phone number: 1300 366 895
Email address: custservice@uniden.com.au


THANK YOU FOR BUYING A UNIDEN PRODUCT
© 2019 Uniden Australia Pty Limited V1.0
Printed in PRC
 Loading...