


ULTRASTAT® 23
Operating Instructions
For the MEC-110 with ENHANCED SMS 10-Product Cooking Controller
THIS APPLIANCE IS FOR PROFESSIONAL USE AND IS TO BE USED ONLY BY QUALIFIED PERSONNEL
302 Spencer Lane • P.O. Box 5369 |
San Antonio, Texas 78201 |
(800) 525-8130 • (210) 731-5000 • Fax: (210) 731-5099 |
|
www.ultrafryer.com |
|
30A216 July 2009

|
Operating Instructions |
|
|
Notices |
UFS is not liable for any use of product not in accordance |
|
with UFS’s installation and operating instructions. |
|
Before using this equipment, or for any questions on the |
|
operation of the appliance, consult and follow all instructions |
|
and safety warnings found in the appliance operator’s manual |
|
supplied from the manufacturer of the appliance. |
|
Not all features are available on some models. |
Controller
Operating
Environment
The solid state components in this controller are designed to operate reliably in a temperature range up to 158°F/70°C. Before installing this controller, it should be verified that the ambient temperature at the mounting location does not exceed 158°F/70°C.
Cleaning the
Controller
Using a clean damp cloth, wipe down your controller daily using a commercial quality foodser- vice-approved detergent.
Do not allow oil to build up on any part of the controller.
NEVER use chemical or abrasive cleaners on your controller. The controller’s overlay may be damaged.
Page 2 |
30A216 July 2009 |

Installation |
Tools Required |
|
|
|
- Straight Screwdriver |
|
|
|
1. Turn appliance power OFF. |
||
|
2. |
Connect the wire harness to the controller. |
|
|
3. |
Attach the 2 provided tinnerman nuts to the controller. Be sure to line up the holes. |
|
|
4. |
Hold the controller against the front panel. |
|
|
5. |
Secure the controller to the appliance using the 2 provided screws. |
|
|
|
|
|
Programming |
Product Programming |
1 7 2 4 |
|
Codes |
System Programming |
3 2 2 8 |
|
Controller
Features
|
|
|
|
|
|
|
1LARGE LED DISPLAY: 8-character, 14-segment. Displays programming and cook cycle information.
2 SERVICE WINDOW: Locate the controller’s serial number and tech support phone number easily.
3 INDICATOR LIGHTS: lit when there’s an active cook cycle and in programming mode.
4 PRODUCT KEYS: Press to start a cook cycle. Also used in programming. REPLACEABLE MENU STRIP: Make menu changes quickly and easily.
5 PROGRAMMING CENTER: Easy cell phone-like programming. Access programming mode and change cooking parameters.
6 FEATURE KEYS: Used to access programming functions and controller features; keys will vary by model.
NOTE: SCK LINK: Signifies that your control is communications-capable.
3 |
30A216 July 2009 |

Operating Instructions
Features |
Programmable Action Alarms |
|
Explained |
Up to three action alarms can be programmed for each product key. An action alarm alerts the |
|
operator to perform some action at a pre-programmed time. |
||
|
Programmable Appliance Type
A specific type of appliance; i.e., gas, electric or generic can be programmed into the controller.
Energy Saving Manual Setback
Setback, an energy-saving feature, will lower the temperature of the oil after a predetermined amount of inactive time (1 to 59 minutes). Temperature is programmable from 200-300°F (93.3- 148.8°C). Enter setback mode by pressing the SETBACK key. The controller will display COOL or SETBACK and will control the appliance to the programmed setback temperature.
Fahrenheit or Celsius Temperature Display
The controller can be configured to display the temperature in degrees Fahrenheit or Celsius (accessible through System Programming mode).
Programmable (FAST.Flex)TM Timing Mode
Flex or straight timing can be configured for each stage on each product key. To insure consistent, high-quality food product, flex time will adjust the actual cook time taking into consideration the temperature variation due to load size, initial product temperature, product moisture content, and other factors affecting the cook cycle. If cooking by straight time, the controller will cook only for the specified time without adjusting for these variances.
Programmable Filter/Polish Mode
To aid in extending the life of your oil, this Meridian Controller will alert the operator at preprogrammed times or number of products cooked when it is time to filter the oil by displaying the FILTER prompt. If the prompt is flashing, cooking can still be performed. If the prompt is solid, the filter procedure must be executed. A filter can also manually be forced at any time of the day.
Programmable Filter Lockout Cycle Count
Ensure good-tasting food is always served to your customers by requiring the oil be filtered after
“x” amount of times. Any product key with Filter Lockout programmed will cease to operate until the oil is filtered. A filter lockout cycle count (valid range is 0 to 99) can be programmed for each product key. To disable filter lockout, enter 0 for the filter lockout count.
Programmable Global Filter Lockout
A single filter lockout cycle count can be programmed to apply globally to all product keys.
Programmable Hold Time Linking
Each product key can be linked to an independent hold timer, or multiple product keys can be linked to a single hold timer.
CONTINUED ON NEXT PAGE
4 |
30A216 July 2009 |

Operating Instructions
Features |
Programmable Hold Times |
|
Explained |
Product key hold times can be programmed to track product quality through a specified holding |
|
period. Hold time countdown begins as soon as the cook cycle is complete. The controller will |
||
CONTINUED |
||
|
sound an alarm when the product's hold time has expired alerting the operator to discard the |
|
|
product. |
Automatic Least Hold Display
Product with the least amount of cook time remaining will be shown in the display. Pressing and hold the SCAN key allows you to view each active product’s remaining cook time.
Melt Cycle
If the vat temperature is below the Melt Limit Temperature and the controller is ON, it will control the melting of the oil.
Programmable Operating Mode
The controller can be programmed to operate as either a controller or timer.
Programmable Stage Temperatures
Cook temperatures for each stage on each product key can be programmed. The valid temperature range is 200°F to 400°F (93.3°C to 204.4°).
Programmable Stage Times
Cook times for each stage on each product key can be programmed. The controller is programmable in minutes (up to 99) and seconds (up to 59) and allows up to ten stages per product key.
Note: Multiple cook starts are not allowed if a product key has more than one stage programmed.
5 |
30A216 July 2009 |
Operating the |
Start a Cook Cycle |
Controller |
Press any product key to start a cook cycle. If the key is programmed, the cor- |
|
rect cooking time will be displayed and will immediately start to count down in |
|
minutes and seconds. DONE will display when the cook cycle has ended. The |
|
pressure solenoid will also close if programmed to do so, or a basket lift will |
|
lower if so equipped. If DONE is displayed immediately and the unit starts to |
|
signal, the product key being pressed is not programmed. |
Stop a Cook Cycle
Press and hold an active product key for 3 seconds. Timing will stop.
Respond to a DONE Alarm
Cancel the signal by pressing the same product key used to start the cook cycle.
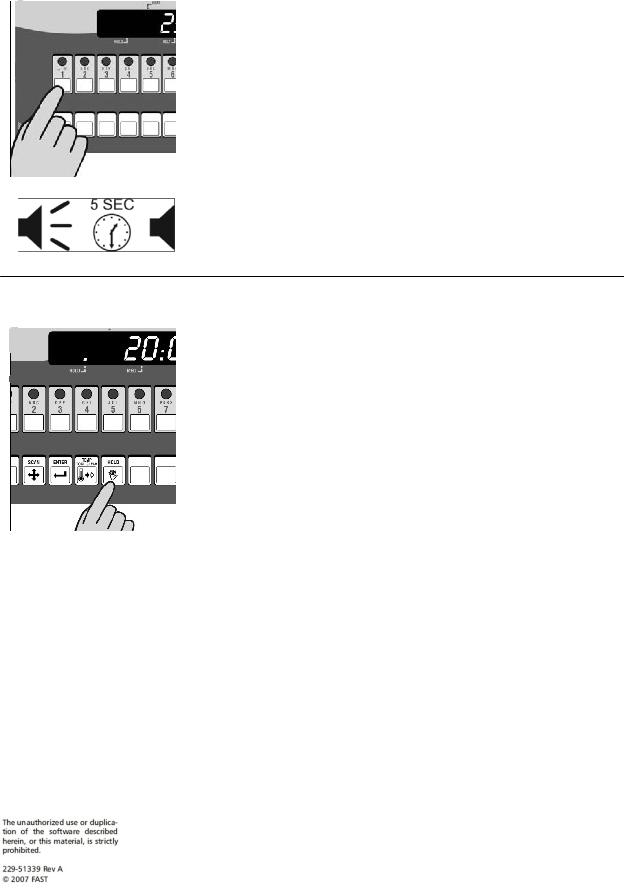
Action Alarms
If the controller is programmed for action alarms, they will signal at a preset time during the cooking cycle. The signal, a dual-rhythm beeping, will last 5 seconds and then self-cancel. The display will flash the action alarm time and the controller will start counting toward 0:00.
Holding Timers
If the controller is programmed with holding times, they will automatically start counting upon expiration of the cooking cycle.
When there are active hold times, the HOLD indicator light will be lit.
To View All Active Hold Times, press and hold the HOLD key. Upon expiration, the timer will display HOLD and pulse with an audible tone.
To Cancel, press the HOLD key.
6 |
30A216 July 2009 |
 Loading...