

U-Line Echelon 2115R, Echelon 2115RS01, Echelon 2175RFS00, Echelon 2175RFS01, Echelon 2175RS Installation Instructions Manual
...Page 1
™
Custom 1/4" Door Panel
Preparation and Installation
Instructions for
Models 2175, 2115 and CLR2160
Phone (414) 354-0300 • FAX (414) 354-7905
Service & Parts Tech Lines Phone (800) 779-2547 • FAX (414) 354-5696
www.U-LineService.com
OnlineService@U-Line.com
©2006 U-Line Corporation
04/2006
Page 2
Custom 1/4'' Door Panel Insert
A
Door Panel Preparation
A custom door panel can be inserted into the doorframe.
Custom door panels can be flat or raised, as long as the
maximum panel thickness where inserted into the door
reveal (channel) is 1/4"-thick. For raised panels, the depth
of the reveal is 1/4" on all four sides.
IMPORTANT
Raised panels will reduce the door’s 90° swing/zero
clearance if the unit is installed next to a wall or similar
type of structure.
For 2175 models cut the panel insert to the following
dimensions.
Custom 1/4" Dimensions:
Width: 23-1/32"
Height: 27-11/16"
For 2115 & CLR2160 models cut the panel insert to the
following dimensions.
Custom 1/4" Dimensions:
Width: 14-1/32"
Height: 27-11/16"
The door panel must not weigh more than 20 lbs.
Door Panel Installation
Install the insert as follows:
CAUTION
Use care when handling the insert. Insert edges may be
sharp.
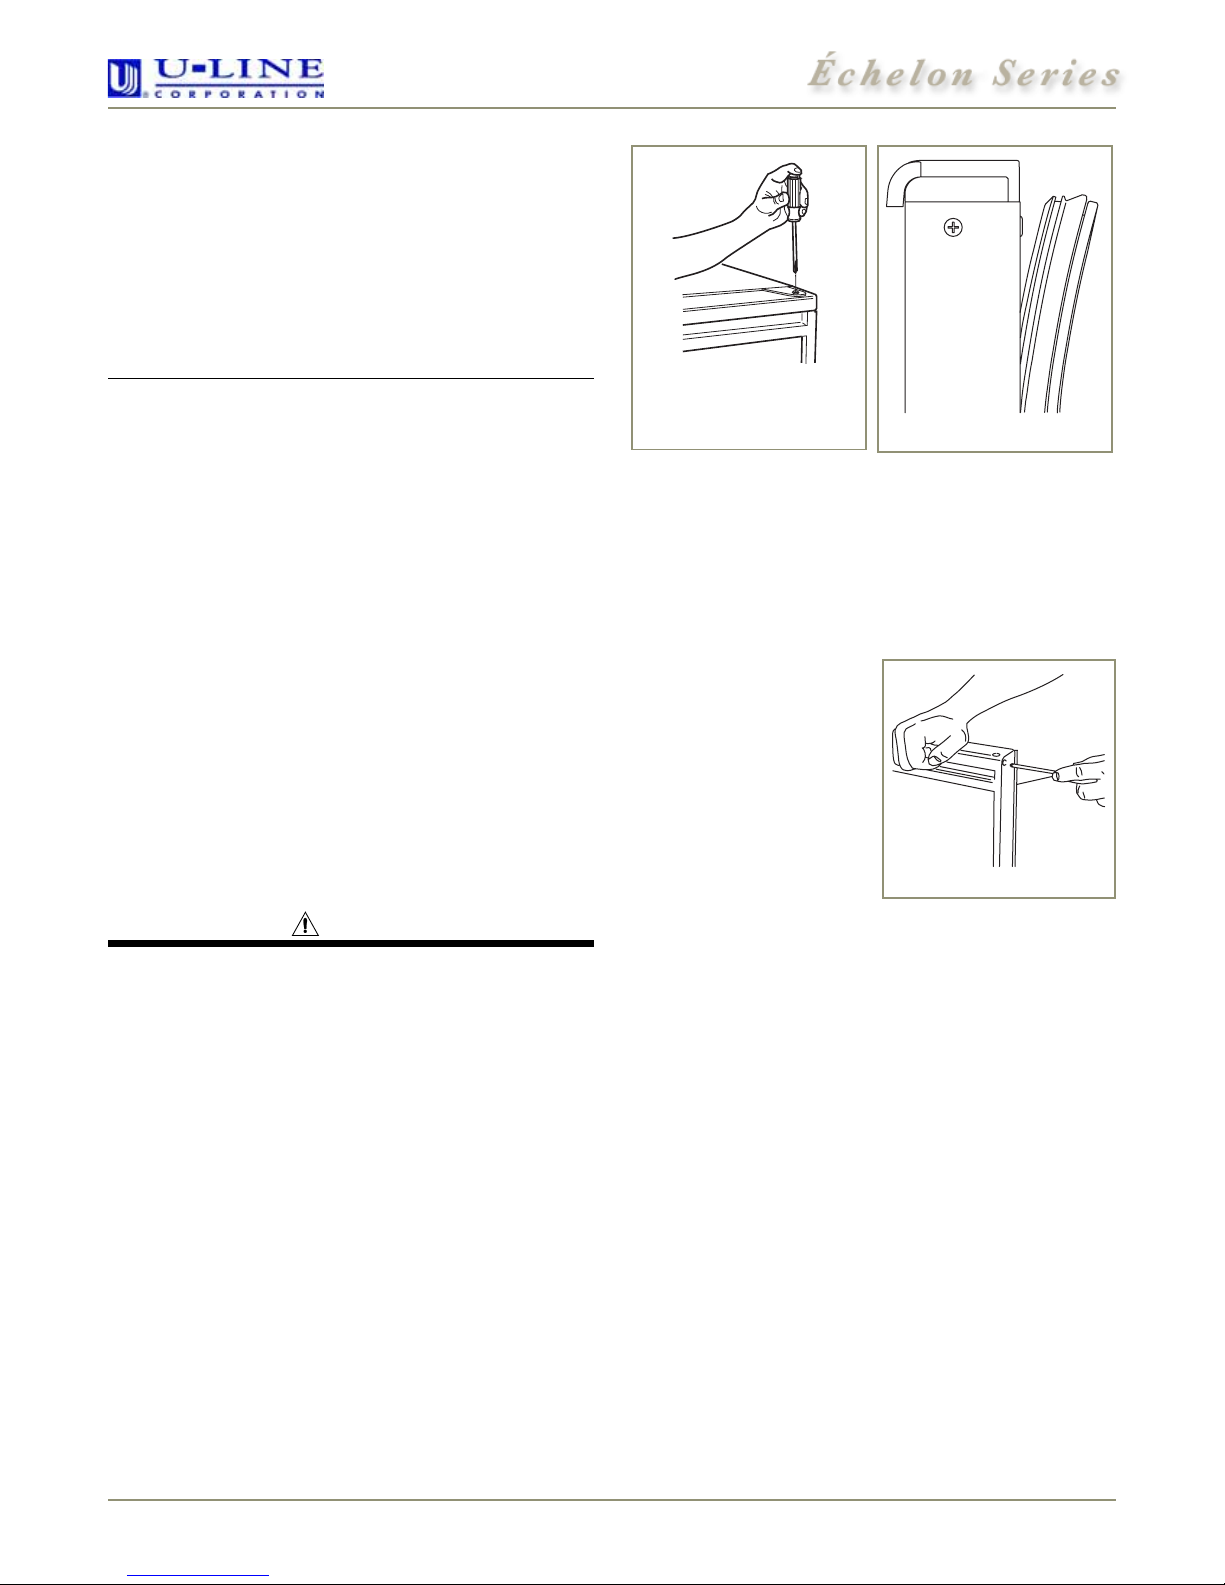
1. Remove top hinge screw pin (using a Phillips
screwdriver, see Figure 1). Remove door by tilting
forward and lifting off bottom hinge pin.
™
ULIN_0133a_
Figure 1 Figure 2
2. Pull door gasket out of groove (top edge of door only).
Start in the middle and pull outward, moving toward
the edge (see
Figure 2
). This may take some force.
3. Remove two outside screws holding door handle.
Slightly separate door handle from door (see
Figure 3
).
4. Pull handle up and off.
5. Remove and discard
existing panel and
cardboard spacer.
6. Slide custom door panel
insert into 1/4-inch
channel in door front.
7. Holding door gasket out
of the way, replace handle
Figure 3
on door, making sure it is
seated properly on insert
and that screw holes line up.
8. Install two small screws removed in Step 3.
9. Starting at the corners and working inward, push door
gasket into place on door.
10. Place door on bottom hinge pin and install upper hinge
screw.
www.U-LineService.com 2 04/2006
Page 3
™
Checking Door Alignment
The unit’s door is aligned at the factory before shipment.
However, its alignment could have been disturbed during
shipment or during door panel installation.
IMPORTANT
Properly aligned, the door should be 1/8" below the top of
the unit’s cabinet, NOT flush with the top (see
Figure 4
).
Slotted
Mounting
Holes
Notch
(must face toward
center of door)
1/8"
Figure 4
1. Compare the top edge of the door to the top edge of
the cabinet.
2. If the door edge is 1/8" below and parallel to the top of
the cabinet, the door is aligned. If it is not, note
whether the side opposite the hinge needs to be moved
UP or DOWN, and use the following procedure.
Adjusting Door Alignment
1. Remove top hinge screw
pin (using a Phillips
screwdriver, see Figure
5). Remove door by tilting
forward and lifting off
bottom hinge pin.
2. With door upside-down,
loosen but do not remove
the two screws on the
door’s bottom hinge plate.
Figure 5
Raise
Outside
Door Edge
Lower
Outside
Door Edge
Figure 6
3. See
Figure 6
. If the top far edge of the door needs to
move UP, move the hinge plate toward the outside of
the door and retighten screws. If the top far edge of the
door needs to move DOWN, move the hinge plate
toward the inside of the door and retighten screws.
4. Mount the door to recheck alignment and repeat Steps
2 and 3 if further adjustment is necessary.
5. When top edge of door is parallel to top edge of
cabinet, remove the door and ensure the two screws
are secure.
6. Remove the door closers from the bottom hinge, clean
thoroughly and lubricate the mating surfaces with
petroleum jelly.
7. Reinstall the closers, lining
up the bosses with holes in
hinge and hinge plate (see
Figure 7
8. Mount the door and install
top hinge pivot pin.
).
Door
Closer
Inserts
04/2006 3 www.U-LineService.com
Boss
Figure 7
Page 4
™
Who to Call
Service Information
If the need for service arises, contact the dealer from
whom the unit was purchased. State the Model Number
and Serial Number and explain the problem. The Model
and Serial Number plate is located inside unit at upper
right hand corner.
If you need to locate a service company, you can go online
at www.U-LineService.com and search for a service
company by zip code.
For more than four decades, U-Line has distinguished itself as the leader in built-in
undercounter ice making, refrigeration and wine storage appliances.
U-Line Corporation, located in Milwaukee, WI, is a family operated manufacturer of built-in
undercounter icemakers, Combo
refrigerators, refrigerated drawers and refrigerator/freezers.
©2006 U-Line Corporation
Publication No. 30154E
04/2006 Rev. A
®
icemaker/refrigerators, Wine Captain® wine storage units,
 Loading...