

Page 1

User Guide
Ulead Systems, Inc.
October 1999
Version 4.0
Page 2

Seocnd English edition for Ulead VideoStudio version 4.0, October 1999.
© 1992-1999 Ulead Systems, Inc.
All rights reserved. No part of this publication may be reproduced or transmitted in any form or by any
means, electronic or mechanical, including photocopying, recording or storing in a retrieval system, or
translated into any language in any form without the express written permission of Ulead Systems, Inc.
Software license
The software described in this document is furnished under a License Agreement which is included with
the product. This Agreement specifies the permitted and prohibited uses of the product.
Licenses and trademarks
ICI Library © 1991–1992 C-Cube Microsystems.
Ulead Systems, Inc., Ulead, the Ulead logo, and Ulead VideoStudio are trademarks of Ulead Systems, Inc.
PhotoDisc images copyright 1999, PhotoDisc. PhotoDisc is a trademark of PhotoDisc, Inc. All other
product names and any registered and unregistered trademarks mentioned in this manual are used for
identification purposes only and remain the exclusive property of their respective owners.
GoMotion (c) 1999 Ligos Corporation. All rights reserved. Ligos, the Ligos Logo, GoMotion and GoMotion
logo are trademarks of Ligos Corporation.
Sample files
Files provided as samples on the program CD can be used for personal demonstrations, productions and
presentations. No rights are granted for commercial reproduction or redistribution of any sample files.
Ulead Systems, Inc.
United States: International:
970 West 190th Street, Suite 520 10F, 45 Tung Hsing Rd.
Torrance, CA 90502 Taipei, Taiwan 110
Tel: 1-(310) 523-9393 Tel: +886 (2) 2764-8599
Fax: 1-(310) 523-9399 Fax: +886 (2) 2764-9599
URL: www.ulead.com URL: www.ulead.com
E-mail: info@ulead.com E-mail: info@ulead.com.tw
Europe: Japan:
Wolfenbütteler Str. 33 No. 202, TE Building
38102 Braunschweig 4-5-16 Yohga, Setagaya-ku
Germany Tokyo 158-0097
Japan
Tel: +49-531-220-7920 Tel: +81-3-5491-5661
Fax: +49-531-220-7999 Fax: +81-3-5491-5663
URL: www.ulead.de URL: www.ulead.co.jp
E-mail: info@ulead.de E-mail: info@ulead.co.jp
Page 3
Contents
Step by step
Effects
Adding that professional touch
between scenes with transition
effects.
Title
Beginning and ending titles,
credits, and captions.
Step by step
22
Map of Ulead VideoStudio
A map of the program and how to get
around.
18
The Video Wizard
An introduction to the Video
Wizard and how it can make your
life easier.
10
Installation
Getting the software onto your
computer.
8
The big picture
An overview of the world of digital
video and Ulead VideoStudio. Check
out What’s New? on p. 7.
4
Important stuff
Licenses, trademarks, and title page.
2
38
40
Voice & Music
Sound, background music, and
voiceovers.
44
Finish
Finishing your movie and outputting
a final cut. Special sections on DV
and MPEG movies.
50
Storyboard
Basic cutting, pasting, and
arranging your movie.
28
Start & Capture
Getting video onto your PC.
Special info on DV and MPEG!
24
Index
60
Glossary
Words you can use to sound like
an expert at cocktail parties.
58
Page 4
4
How it works
The software follows a step-by-step paradigm.
By working on one step at a time, editing
tasks remain uncomplicated throughout the
entire process, from start to finish. The two
distinct program modules, Video Wizard and
the main program, Ulead VideoStudio, both
utilize this concept.
An introduction to digital video
Tens of millions of camcorders have been sold around the
world and computers have become standard fare in the
home. It hasn’t taken long for video capture cards to
make the connection between the two. So what’s the big
deal with digital video?
Besides being really fun, digital video on a PC is also
quite revolutionary. Editing your video on your computer
offers you the ease of mouse clicks, drag and drop opera-
tions, and cut and paste editing. What’s more, with
VideoStudio, you have access to nearly a hundred transition effects, professional
titling capabilities and simple soundtrack creation tools. Learn in seconds, create
in minutes.
Ulead VideoStudio
Video Wizard is a complete digital video editing program. It is primarily a quick start application that
simplifies the creation of movies. Ulead VideoStudio
itself is also amazingly easy to use and offers advanced
editing controls and a fantastic array of tools and
effects.
The Video Wizard
The big picture
The big picture
Just a few years ago, digital video was something that was out of reach for the
average consumer. Powerful computers were too expensive and difficult to use.
Recently, PC prices have plummeted while processing speeds have skyrocketed.
Now, just about any new computer can do a decent job with home movies. And
with software programs like Ulead VideoStudio 4.0, you don’t need to be a rocket
scientist to figure it all out.
Page 5

5
Putting a transition effect in between clips is
as easy as select and apply. Adding titles and
credits is just like using a word processor. Type
in your text and choose a style. And with a few
more clicks, you can animate your titles to
scroll or fade.
A short section of video captured to your
computer is known as a video clip. You can
scroll through your movie as easily as you do
a Web page in a browser. With little effort, you
can edit frame by frame, as well as change
the order of scenes using the drag and drop
method.
Getting video off of your camera and onto your
PC’s hard drive is the first step in creating
digital video. This process is known as captur-
ing video. You will also need a capture card so
your computer can receive and interpret the
video data from your camera. To make sure
that everything works properly, follow your
capture card’s installation instructions.
Page 6
6
All of the tracks in your movie are organized into a video
project file. This project contains all of the information
about how your movie is put together, but it is not your
actual movie. All of the edits you make in your project do
not affect the original clips themselves. This means
that you can trim and edit without fear of making
permanent changes to your original clips. When it is all
ready to go, your computer collects all of the information
together to create your final video file. This process is
called rendering.
Ulead VideoStudio breaks your movie up into separate
tracks, which gives you broad creative freedom. While your
video probably already has a sound track, adding a
voiceover narration brings clarity to your personal videos.
Better still, add background music off of your favorite music
CDs to set the mood in your movie. These tracks are independent, so changes to one track don’t affect the other.
So follow along in Ulead VideoStudio’s
step-by-step path and you’ll find that
your friends are amazed at the professional quality of your home movies. The
only question you’ll hear more often
than “How’d you do that?” is “When’s the
sequel?”
Page 7
7
What’s New?
New! Improved!
Ulead VideoStudio 4.0 is a revolution in video. Smashing the 2GB file
limit, automatic music recording from your CDs, support for MP3 audio
files, a flexible titling engine, and automatic configuration are only a
few of the many improvements.
DV
Computer video technology has changed faster than anyone could
have predicted. Digital Video (DV) has taken the world by storm,
becoming the format of choice for enthusiasts. It is easy to config-
ure your computer to capture DV data from your camcorder, and
the quality is superior to S-VHS. Most DV camcorders allow you to transfer footage
from your computer back to tape, using the IEEE-1394 interface, with no loss of
quality. Ulead VideoStudio has always supported DV editing, but the 4.0 version
fully supports all aspects of DV.
Setting up (see page 9) your computer to work with DV is extremely easy. You
can even control your camcorder (see page 9) with Ulead VideoStudio and your
mouse! And the best part is, Ulead VideoStudio also lets you record your final
video back to your camcorder (see page 58) so that you can play the movie on big
screen television.
MPEG
The other Big Story in recent developments is MPEG. Ulead
VideoStudio gives you the power to edit MPEG-1 and MPEG-2
movies with amazing frame-accurate technology. The wide avail-
ability of CD writing hardware, or CD-R, allows anyone to create
their own Video CD (VCD). Ulead VideoStudio 4.0 lets you create WhiteBook
standard MPEG-1 movies (see page 56) that are ready to be written to a VCD.
Ulead VideoStudio 4.0 also allows you to create amazing DVD quality movies
using the MPEG-2 format, which is also used in direct digital satellite television.
Start by capturing MPEG video straight from your camcorder, if your hardware
supports it (see page 25), then trim and edit your movie with frame accuracy.
Finally, take advantage of DVD quality (see page 57) to create your final MPEG-2
movie.
This flexible technology allows you to create MPEG-2 movies from any source for a
truly professional solution. Possibly the best method is to capture and edit using
the lossless quality of DV and then output a highly compressed MPEG-2 movie.
Page 8
8
Installation
Installation
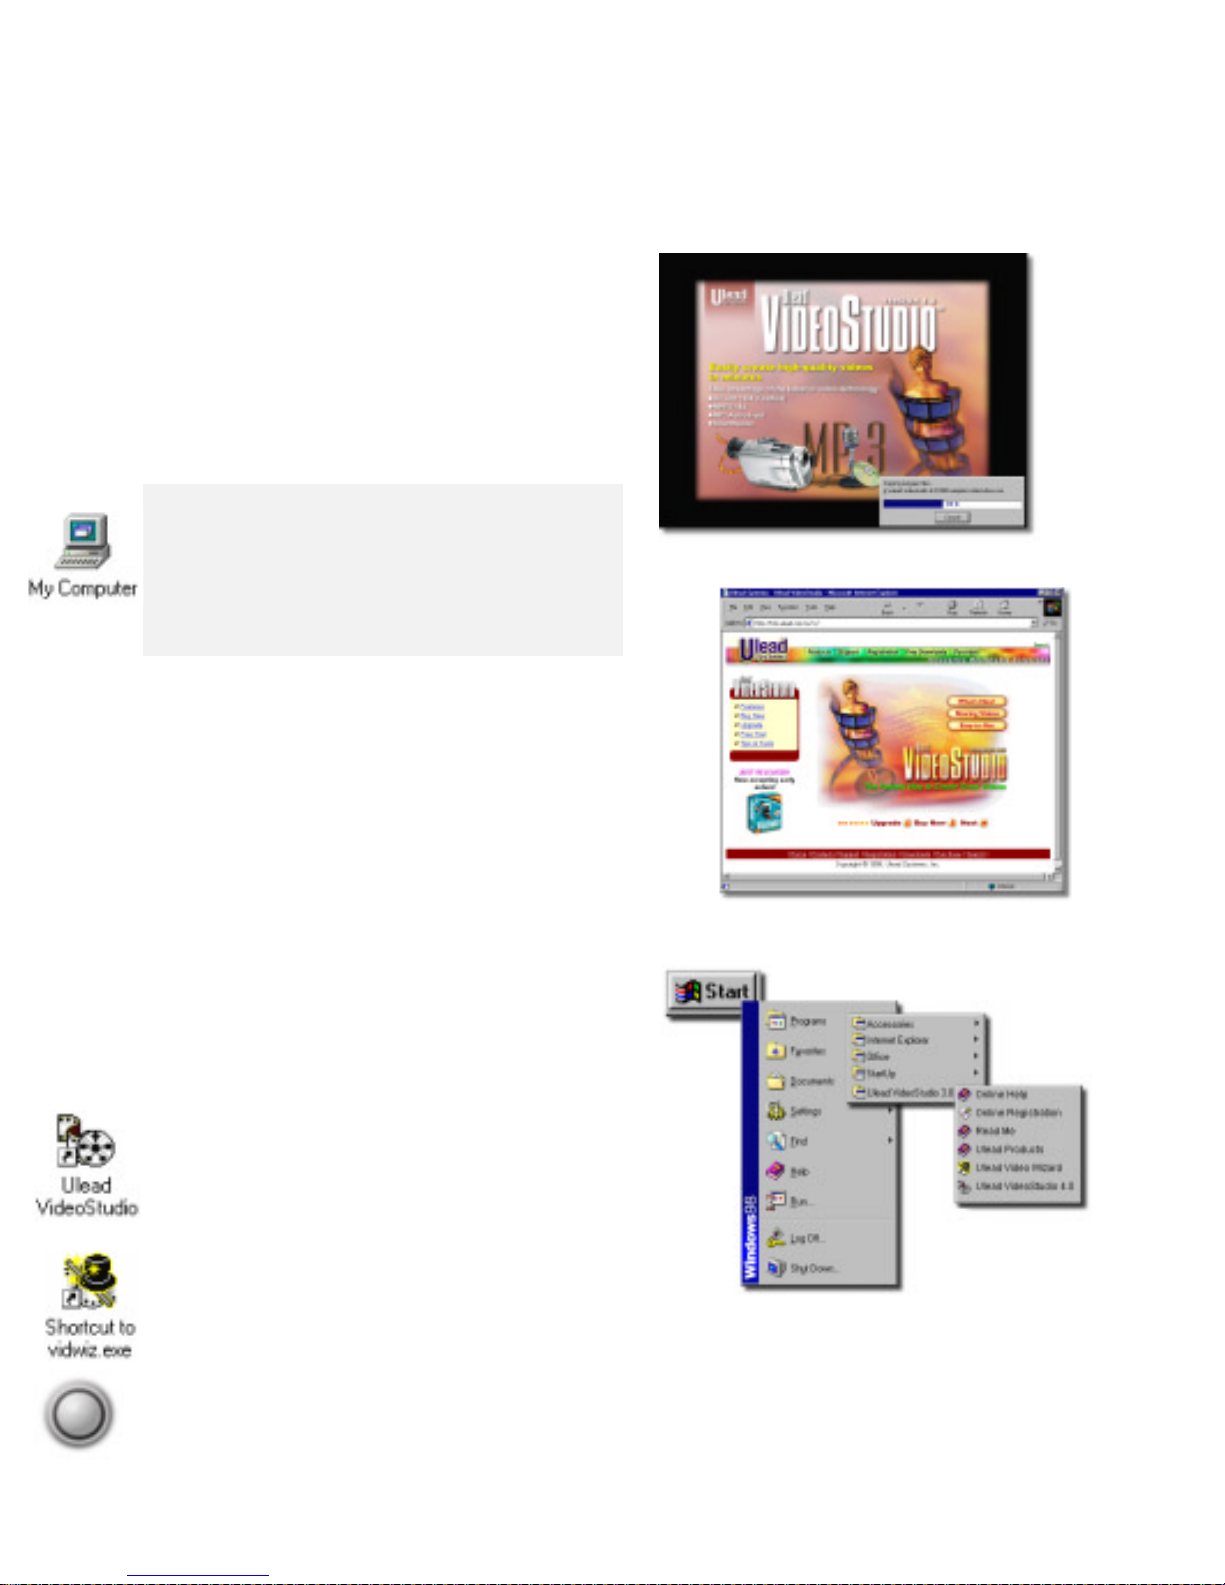
To install Ulead VideoStudio:
1. Place the Ulead V ideoStudio CD into your
CD-ROM drive.
2. When the Setup screen appears, follow the
instructions to install Ulead V ideoStudio onto
your computer.
Note:
If the Setup screen doesn’t appear after
loading the CD, then you can manually start it by
double-clicking the My Computer icon on your
desktop, then double-clicking the icon for the CD-
ROM drive. When the CD-ROM window opens,
double-click the Setup icon.
The following applications are important in
making digital video work well on your computer . The installation program will walk you
through installing:
• QuickTime 3
• NetShow Tools
To run Ulead VideoStudio:
• Double-click the Ulead V ideoStudio (or V ideo
Wizard) icon on your Windows desktop.
• Or select the Ulead V ideoStudio (or V ideo
Wizard) icon from the Ulead VideoStudio
program group on the Windows Start menu.
Ulead VideoStudio installation screen.
Ulead VideoStudio Web site.
Running Ulead VideoStudio
from Windows Start menu.
Page 9
9
Setting up Ulead VideoStudio for DV
1. Connect your camcorder to your IEEE-1394 capture card.
2. Turn on your camcorder and set it to Play mode (or VTR
mode). See your camcorder’s manual for specific instructions.
3. Run Ulead VideoStudio.
4. Click the Global Options button and select Change
Capture Plug-in.
5. Select the appropriate DV Capture Plug-in (this will vary
depending on your hardware): Ulead DirectShow Capture
Plug-in or Adaptec Capture Plug-in. If you have changed
to a new plug-in, please restart VideoStudio.
6. Go to the Capture step and test the new settings.
Setting up DV device control
1. Click the Global Options button and click Select Device
Control.
2. In the Device Control dialog box, click the Current
device list.
3. Select your device. This will vary depending on your
hardware: MS 1394 Device Control, TI 1394 Device
Control, or Adaptec 1394 Device Control.
Setting up DV support
With the advent of Digital Video (DV), it has never been easier to capture, edit, and record
video on your PC. Follow the installation instructions of your IEEE-1394 (AKA: FireWire,
iLink) capture card, and consult your camcorder’s manual for the proper hardware installation
procedures.
You also need to set up how Ulead V ideoStudio will control
your camcorder. The appropriate settings depend on your
particular capture card. You may have to try a few settings to
discover the one that works.
Page 10
10
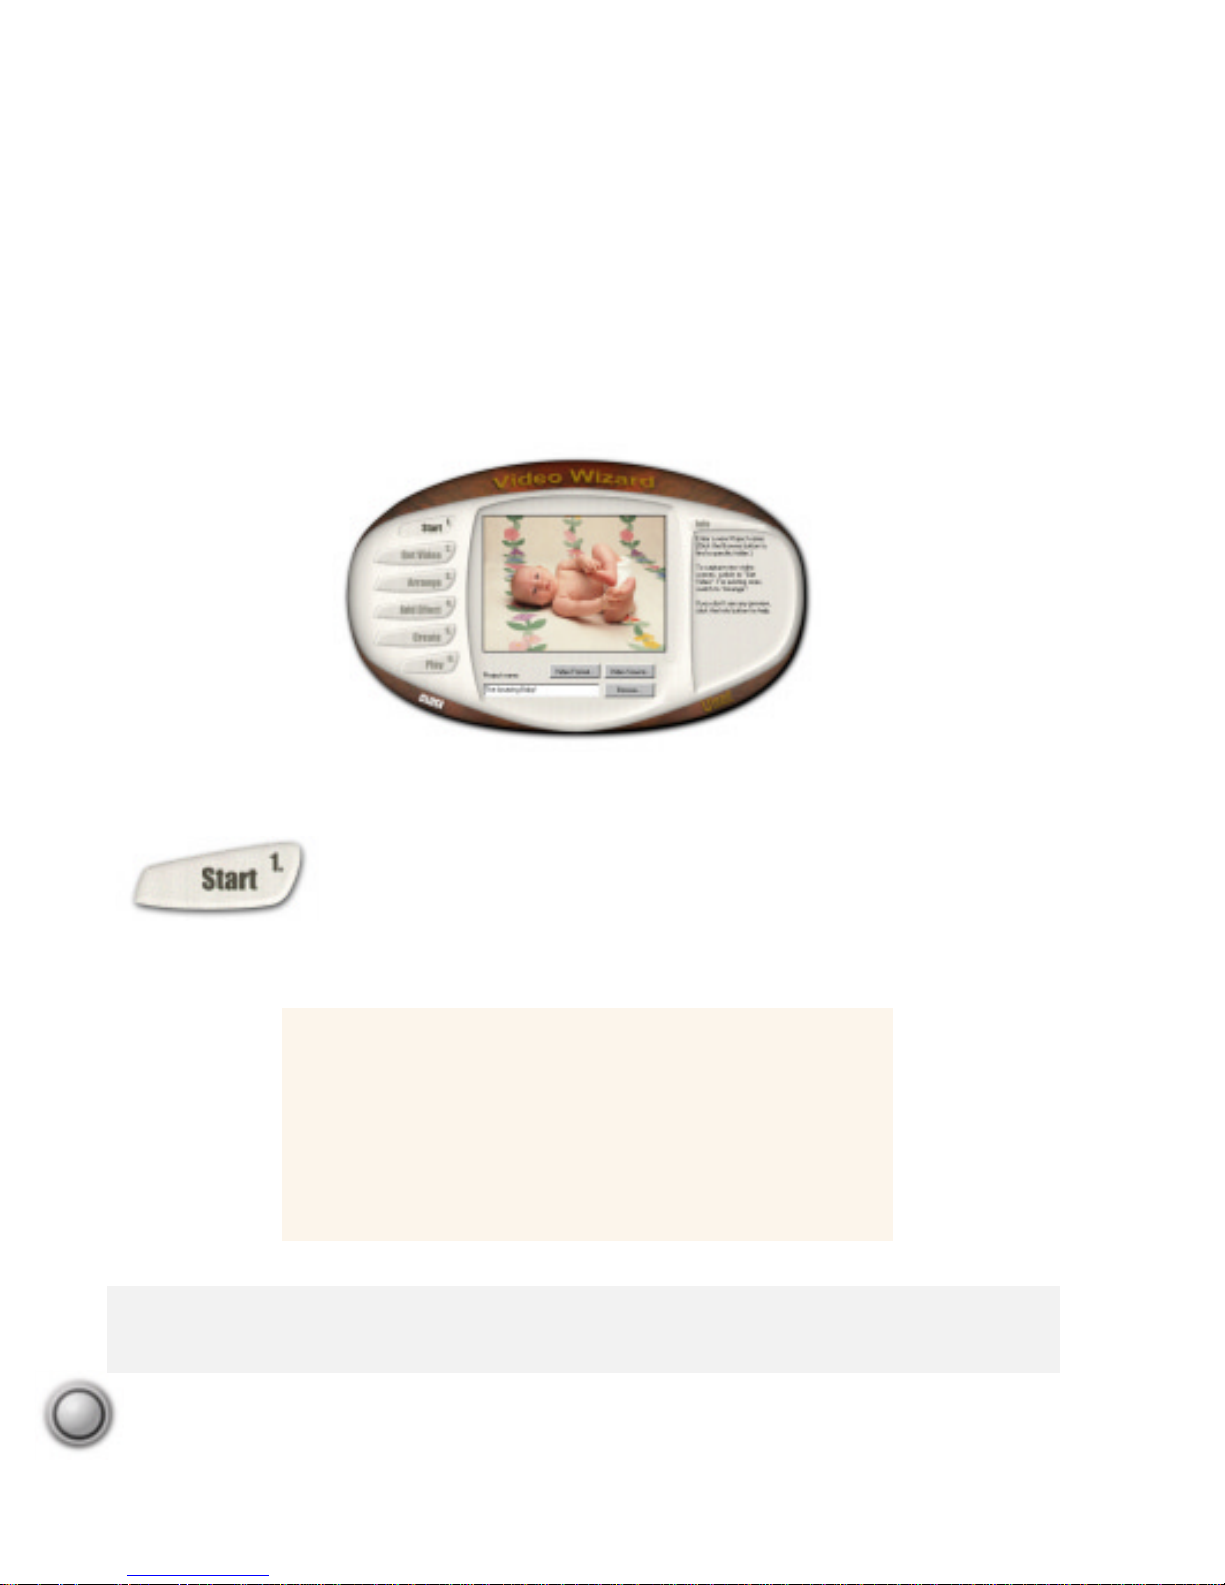
The V ideo W izard
The V ideo W izard
The Video Wizard is the fastest and easiest way to get video onto your PC, arrange the
various scenes, and create a finished movie. It is a great tool for setting up projects for editing
in Ulead VideoStudio.
In the Start step, you’ll be able to quickly check your computer ’s setup
and get your first project going. Begin by creating a Project. Just like a
professional production, a movie is composed of many separate elements.
In Ulead V ideoStudio, these elements are conveniently organized into a
single project file, or *.VSP.
Note:
Depending on the video source device (digital camera, camcorder, VCR, etc.) that is currently
connected to your computer, the output is displayed in the Preview Window . To check your video source
device’s settings, click the Video Source button.
Getting started
1. Enter a Project name.
2. Click the Browse button to specifically select a location
for your project file (optional).
3. Click the Get Video button to go to the next step and
start capturing new scenes for your project.
Starting Ulead Video Wizard.
Page 11

11
In the Get Video step, you will be able to capture, or record, all the
scenes that you want to use in your movie. When capturing, watch
the capture information below the Preview window.
Note:
Don’t worry about recording too much video. You can always go back to the clips later to trim them.
For more on trimming clips, see page 11. Y ou can remove any unwanted clips from the project in the next
step, Arrange.
Capturing video
1. Turn on your video source device and check all the
connections to your computer.
2. Watch the Preview window for the output of your video
source device (e.g. For recorded tapes, start playing the
tape. For cameras, adjust the focus and point to the
desired location.). When you see the part that you want
to start capturing, click the Begin button.
3. To pause or end the capturing process, click the Stop
button.
4. Repeat steps 2-3 to capture several video clips.
Ulead Video Wizard ready to capture video.
Note:
Right-click on the
Preview window to select
your capture card. See
pages 7 and 9 for more
information.
Page 12

12
In the Arrange step, a thumbnail representation of each video clip in
your project is visible in the main window. They are placed in the
order in which each clip is going to be played in your movie.
Now that you have arranged your clips in the correct sequence, you may want to cut (trim or
edit) unnecessary portions out of a clip. See the next page to learn more about trimming clips.
Notes:
•
To delete a clip from a project, simply click the thumbnail representing that clip to select it and then
click the Remove button.
•
T o add movie files that are already saved on your computer into your project, click the Add Video button.
Arranging your movie
1. Click on the clip that you want to move from the
sequence of clips. Selected clips are highlighted
in blue.
2. Drag the clip to a new location. This will automatically change the order of the other clips.
3. Click the Add Effect button to define how the
transition from one clip to another takes place.
In that section, you can also add music and titles
to your movie.
Arranging video clips. Selected clips
are highlighted in blue.
Page 13
13
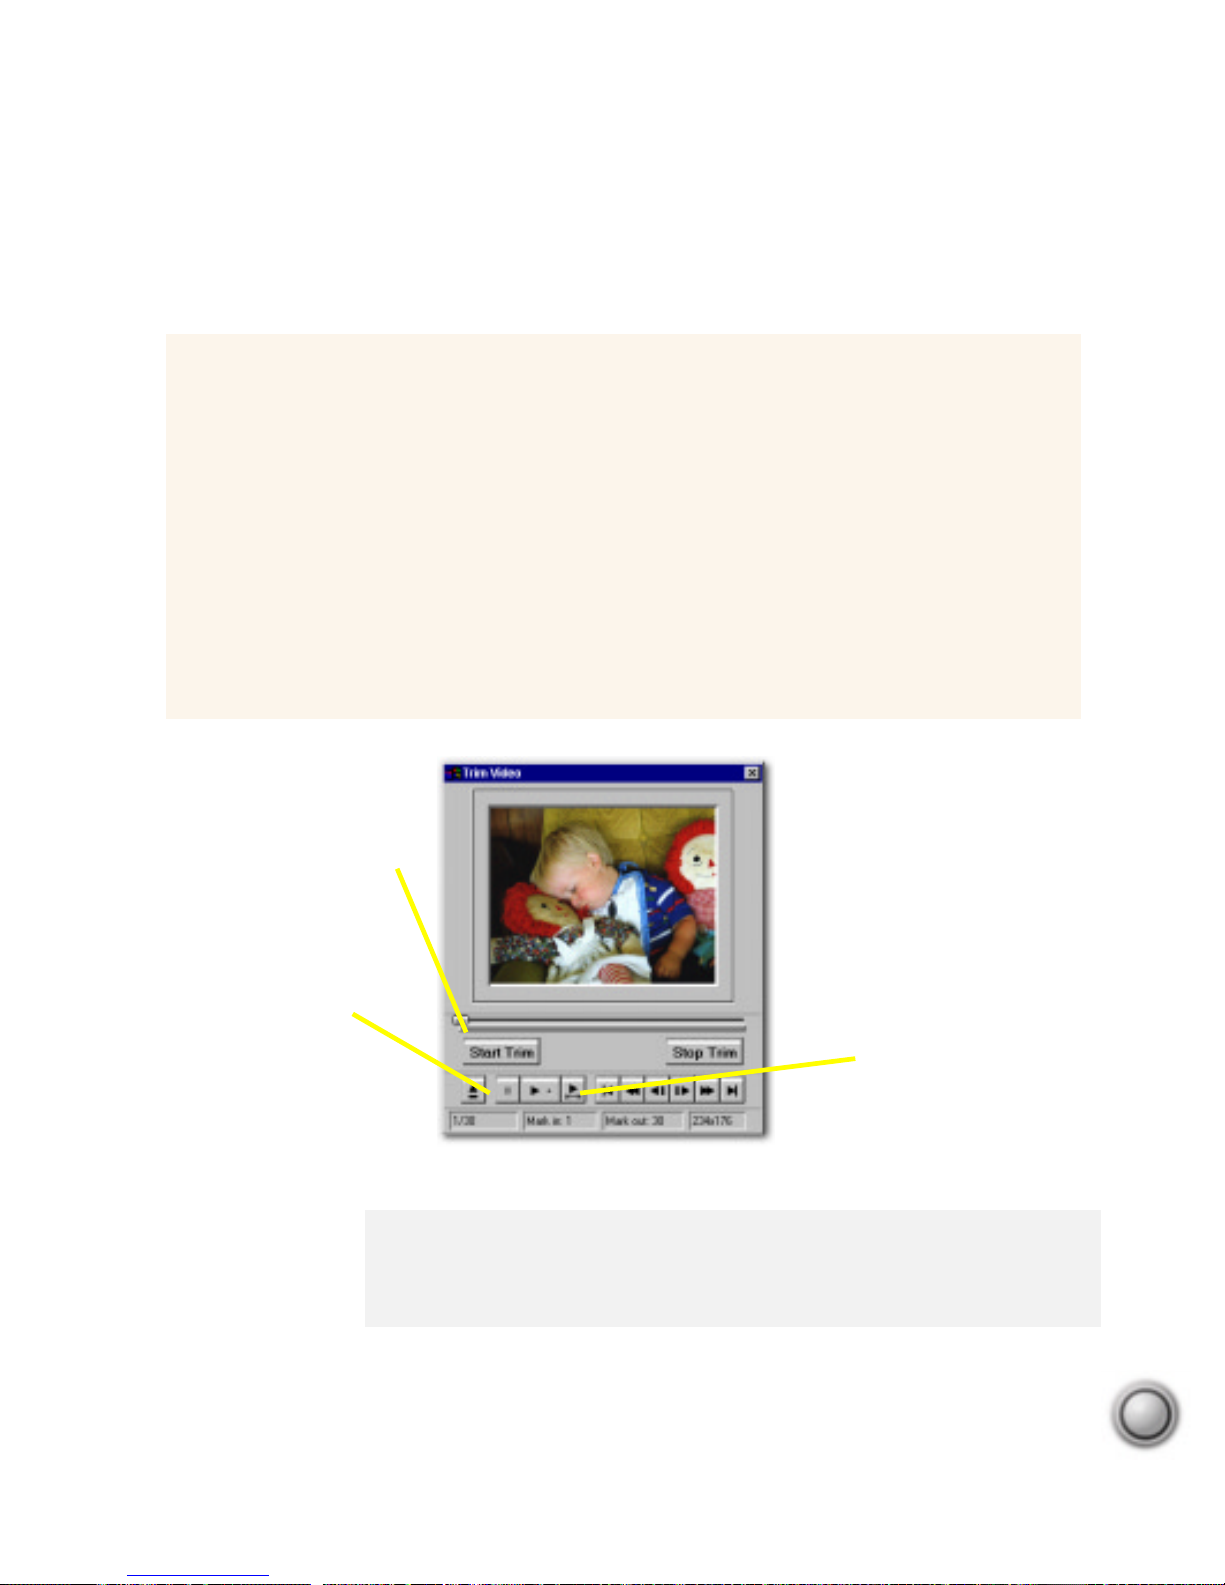
Note:
There are other helpful buttons in the T rim Video dialog box that you can
use to scroll through the frames of a clip. Watch the Status bar at the bottom of
the window for information about the Mark in and Mark out points, which you
can use for more accurate trimming.
Capturing video to your computer with frame by frame accuracy is not easy. Fortunately,
precise editing is really not a problem with V ideo W izard.
Trim handle
Click and drag
to trim a clip.
Return
Click to return to the main
Video Wizard interface.
Play trimmed clip
Plays the trimmed
portion of your clip.
The T rim V ideo dialog box.
Trimming a clip
1. Select a clip and click the Trim button.
2. In the Trim Video dialog box, slide the Handle to the right until you see the exact point
that you want to use as the starting point of the clip.
3. Click the Start Trim button to mark it as the first frame of the trimmed clip.
4. Slide the Handle further to the right until you find the point where you want the clip to
end.
5. Click the Stop Trim button to mark it as the last frame of the trimmed clip.
6. Click the Play trimmed clip button to see your edits.
7. Click the Return button to go back to Video Wizard.
Page 14
14
This step really completes three major parts of your project. Transitions between scenes, background music, and opening credits are
all taken care of here. The interface is simple and gives you a chance
to quickly spice up your production.
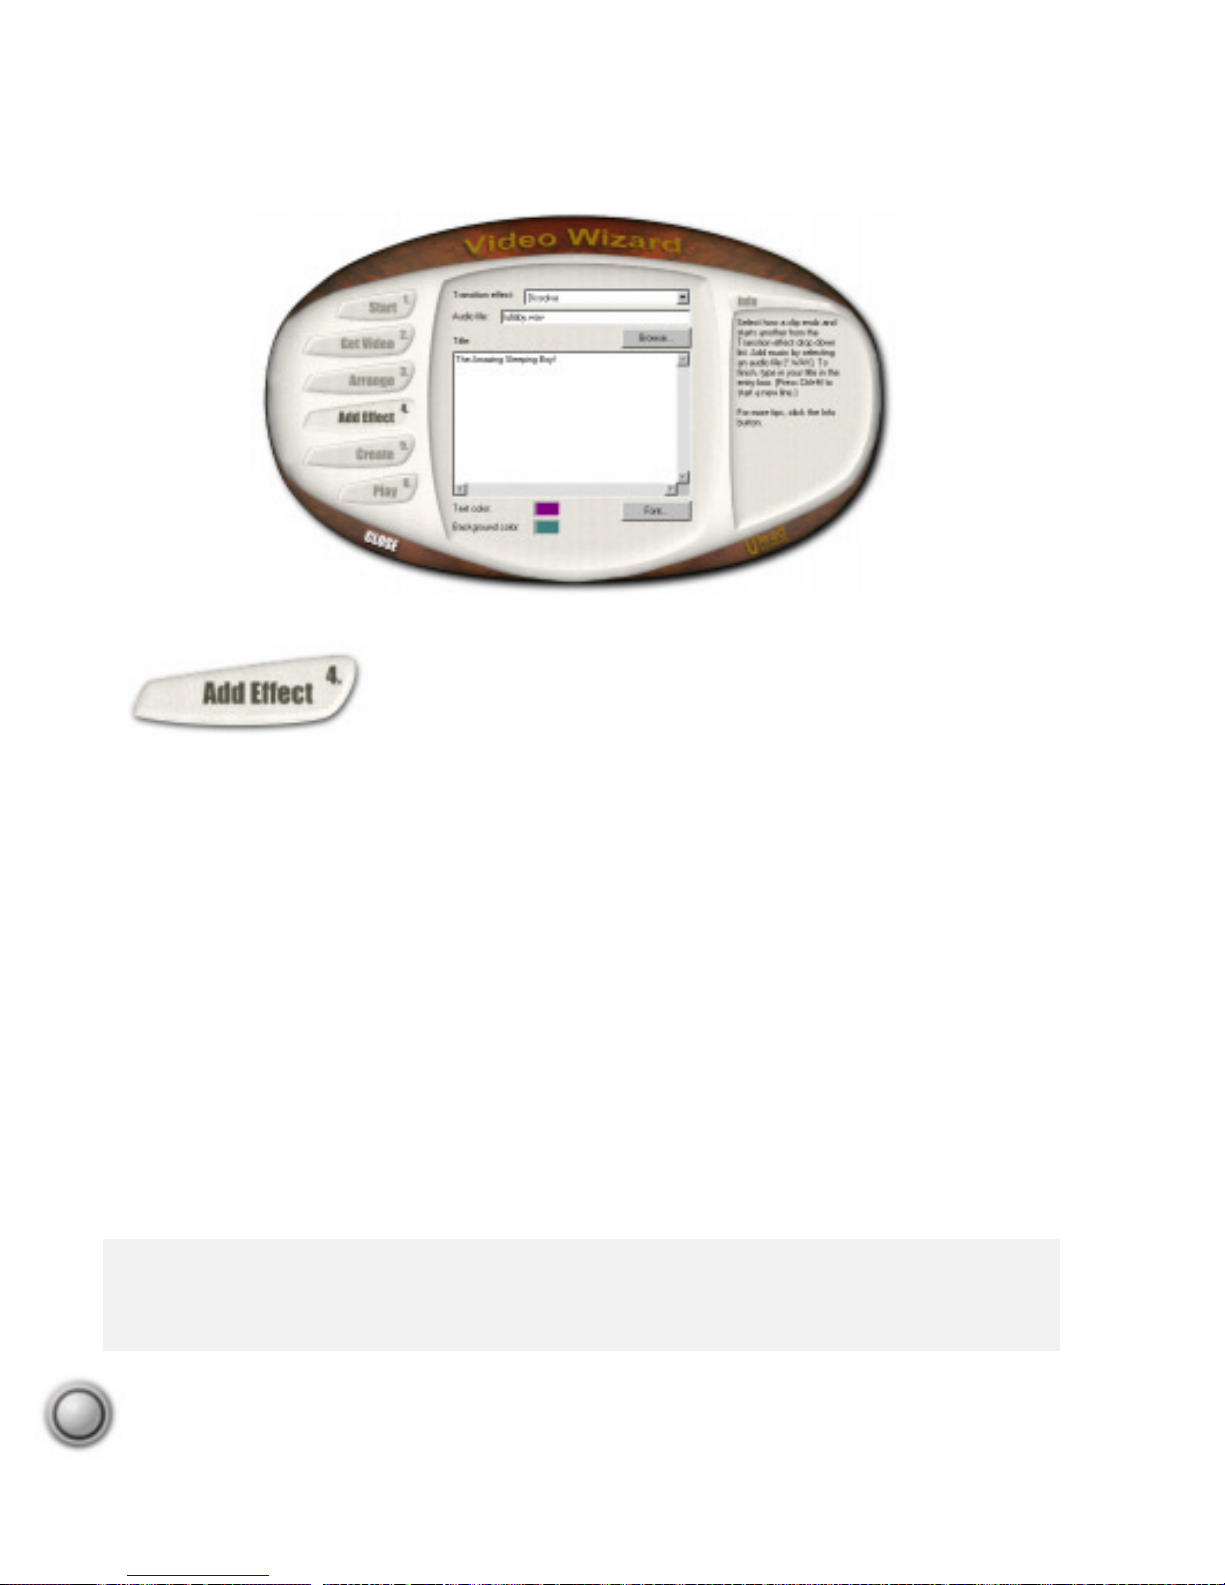
The most useful tool for your home movies is the Transition effect. A transition is what
occurs when one scene ends and another starts. By adding effects, you can take separate clips
and smoothly blend them into a complete movie.
Just below the Transition effect item is the Audio file entry box. Adding music to your movie
makes it more interesting to watch and helps to set the mood. You can use any Windows audio
file (e.g. *.WAV) or try the samples that are included on your Ulead VideoStudio CD.
The final section allows you to add a Title to your movie. As with the other two parts, the
Wizard’s incredibly simple method gets a quick working title into your movie. You can enhance these effects later in the main program, Ulead VideoStudio.
Notes:
•
The Video Wizard applies the same transition between all of the clips at this point ( unless you select
Random).
•
Ulead VideoStudio uses animated samples and instant previews to help you choose the perfect effect.
Adding effects to your movie in step four.
Page 15
15
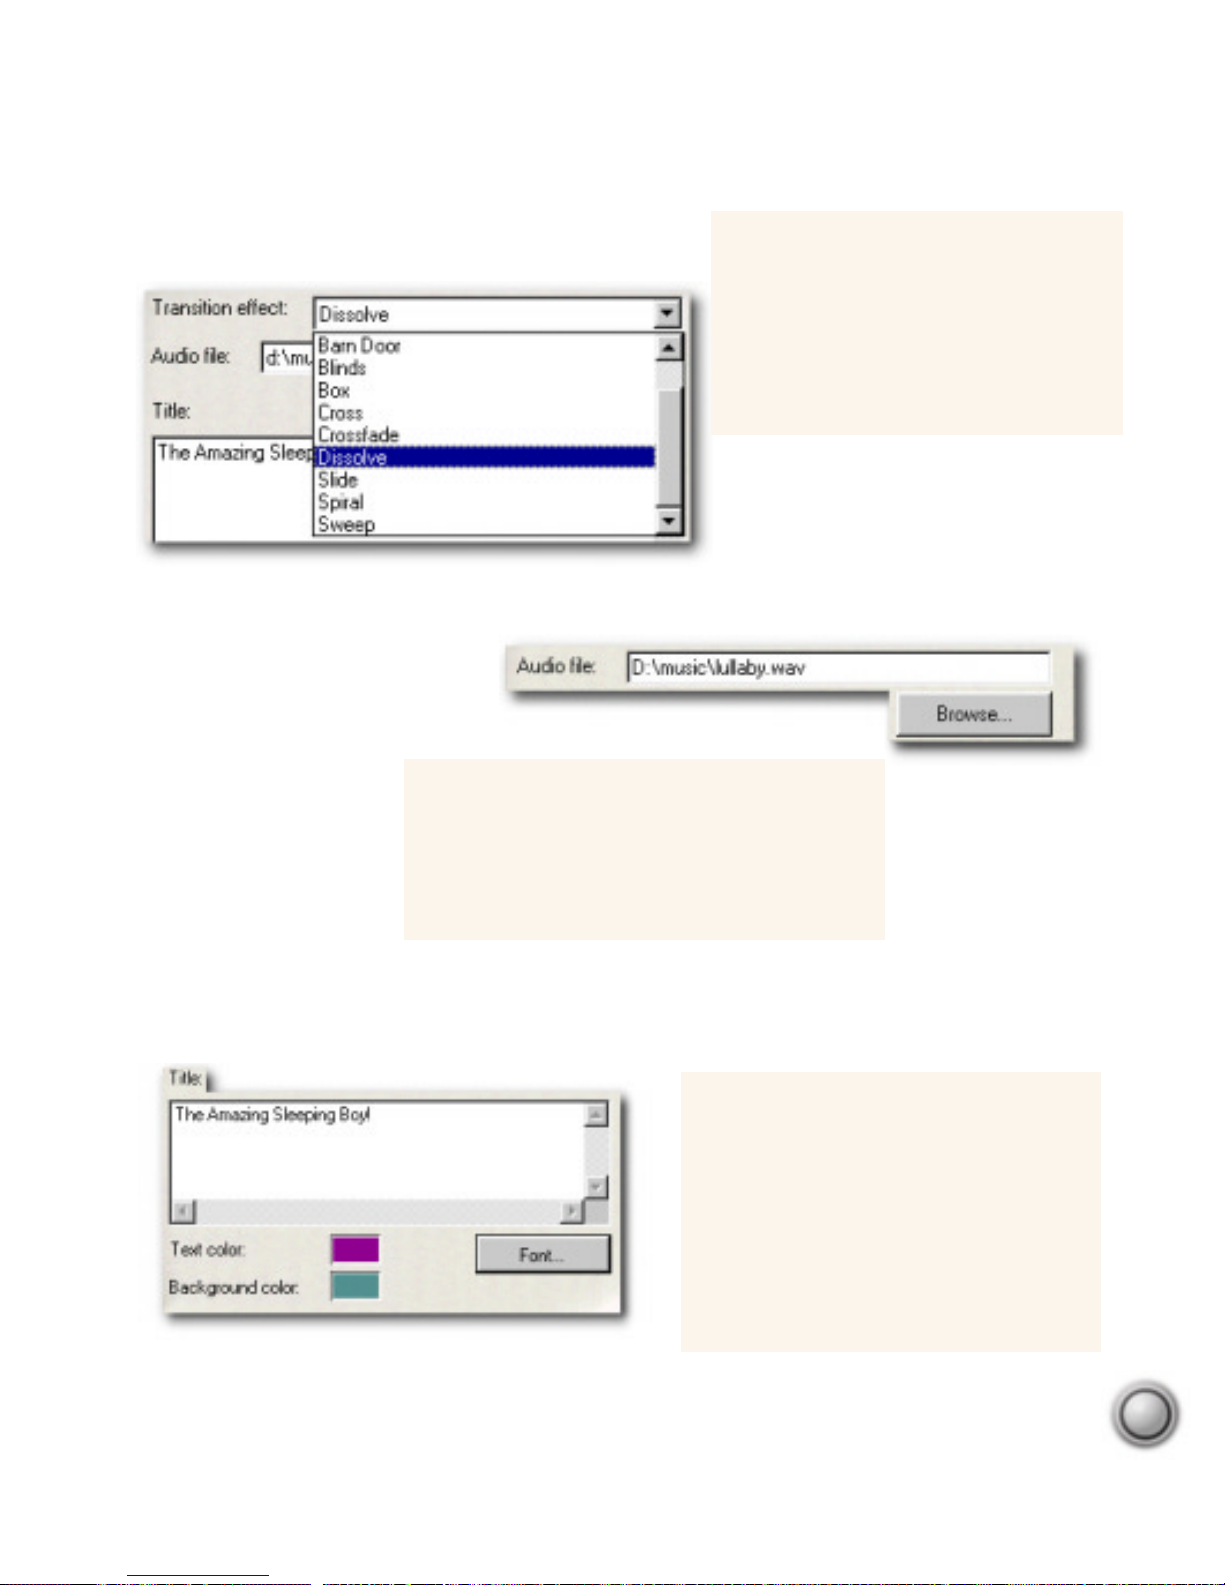
Creating opening credits
1. Click in the Text entry box.
2. Enter your title.
3. Click the Text color box to select the
colors for your message.
4. Click the Background color box to
set that color.
Adding an audio file
In the Audio file entry box, specify the path
and name of the audio file (*.WAV) that you
want to use in your movie. You can click the
Browse button to find the file yourself.
Adding a transition effect
1. Click the Transition effect drop
down menu.
2. From the drop down list, select the
method of transition to use between
your clips.
Selecting a transition effect.
Browsing for a music file.
Adding an opening credit.
Page 16

16
Creating a movie file
Click the Create Video File button. Video
Wizard will start rendering, or creating, the
actual movie file. Watch the progress clock
to estimate the length of time it will take to
make the movie. When it’s done, the
program will automatically switch to the
Play step where you can watch your
newly created movie.
In the Create step, you will be able to make the actual movie file.
How long it will take depends on the number of clips included in the
project, the duration of each clip, any effects you have added, and
your hardware’s capabilities.
So far, you have only been collecting the parts of your movie. The
information about these parts has been stored in a Project file (*.VSP).
The project file contains all of the information necessary to make your
movie, but it is not the movie itself.
Note:
If you want to use more powerful editing tools at this point, you can open your project in the main
program, Ulead VideoStudio. When you click the Open In VideoStudio button, the Video Wizard closes
and your project file opens in the Ulead VideoStudio workspace.
Ulead Video Wizard ready to render a movie.
Page 17
17
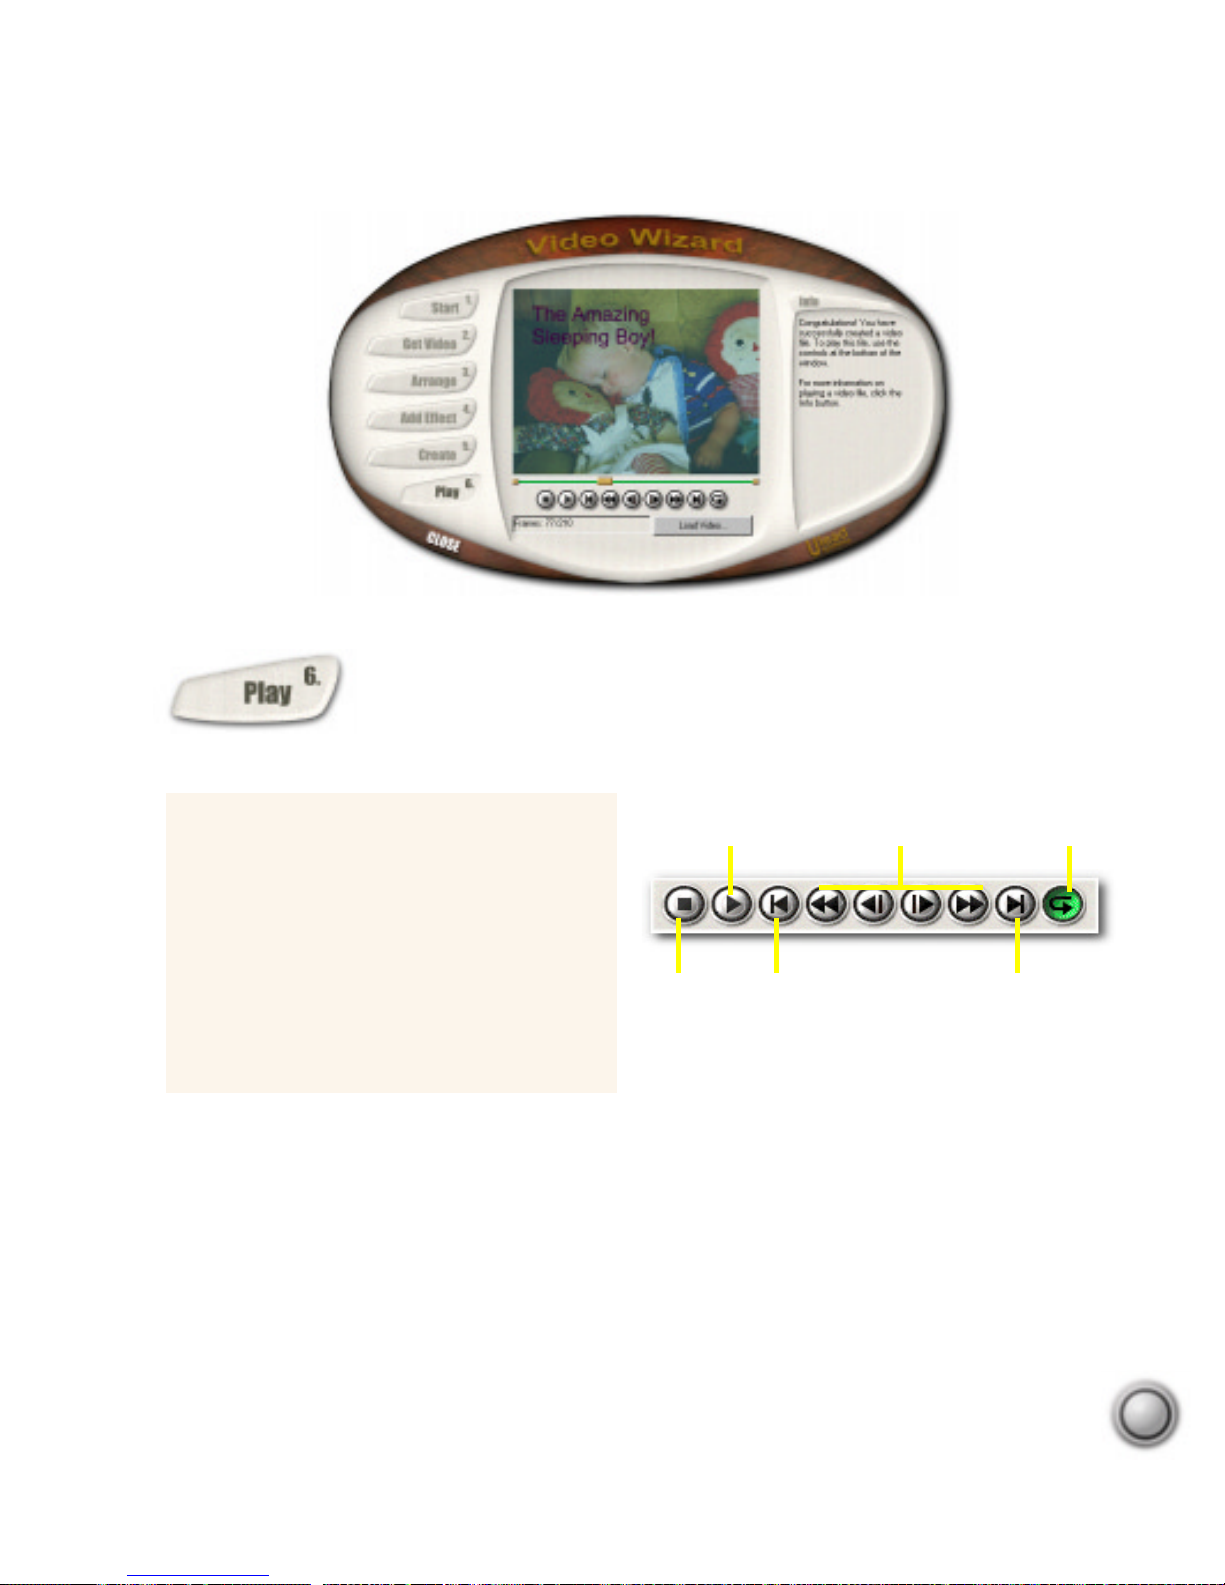
Now that you have a finished movie, the Play step is where you can
watch the entire picture. The movie you have created is now a video file
and is a completely finished product. So, sit back and relax while you play
back your movie.
Go ahead and play it again. By using Video Wizard, you have an excellent first draft of your
movie. The completed project is ready for further creative editing in Ulead VideoStudio.
While Video Wizard is not a required part of making a video project or creating a movie, you
may find it convenient to use in setting up all of your new projects. Later, you can use the
main program to fine tune and perfect your movie. That’s what the rest of this manual is
about.
Playing back a video file
Click the Play button to run the movie you
have just created in the Preview window.
While in the Play step, you can also play
back other movies (e.g. *.AVI), which are
saved in your computer. Simply click the
Load Video button and locate the file you
want to watch.
Reverse / ForwardPlay
Stop Home End
Loop
Playing a movie file with Video Wizard.
Page 18
18
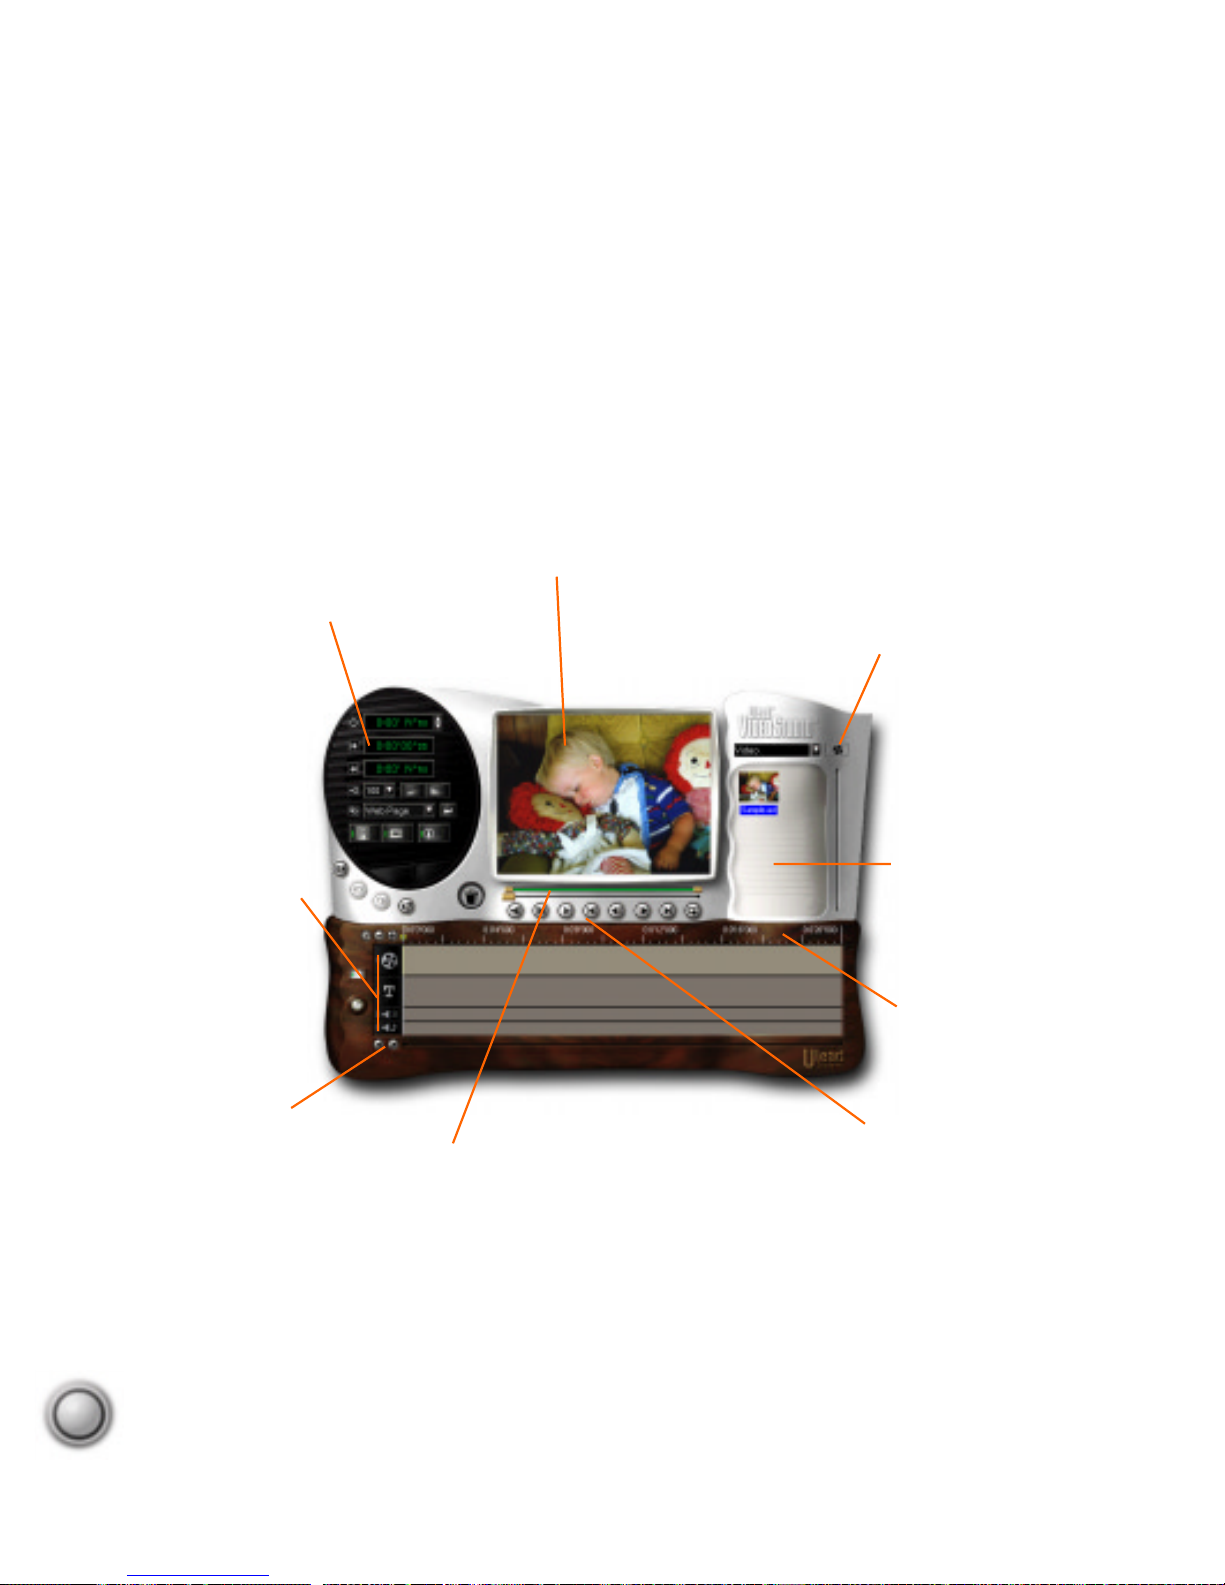
Options panel
Contains controls,
buttons, and other
information.
Preview window
Shows the current
clip, title, or effect.
Load media button
Click to add media files to
the Library .
Library
Stores and organizes all of your
media clips.
Timeline
Represents the
period of time that
a clip appears in
your movie.
Clip navigation buttons
Controls for moving
around and playing
your movie.
T rim bar
Used for trimming,
editing, and cropping
video clips.
Project scroll bar
The fastest way to
move around your
entire project.
T rack buttons
Each activates a track
to edit. Clicking a
button changes the
Preview window and
available options
accordingly.
Ulead VideoStudio 4.0 interface.
Map of Ulead VideoStudio
Map of Ulead VideoStudio
The Ulead V ideoStudio interface has been designed to make the sometimes complicated task of
editing movies on your PC intuitive and enjoyable. The illustration on this page shows an overview of
the entire program, while the next few pages detail more specific features. Note especially the Options
panel, which is highly context sensitive (meaning that it changes depending on the program’s mode)
and contains a ton of information.
Page 19
19
Time units
Represents the timing
of clips in hours :
minutes ‘ seconds “
milliseconds
Tool Tips
By holding your mouse
cursor over a button or
object, a balloon pops
up with the name of
the item.
Clip navigator
Click and drag these
controls to scroll
through a clip. The
position is shown in
the Preview
window’s contents.
Selected range
These color bars
represent the
trimmed or selected
part of a clip or
project.
Trim handle
Click and drag
to trim a clip.
Zoom controls
Change the view to
zoom in/out or fit the
entire project on the
screen.
Switch mode
Changes the
view from
Storyboard to
Timeline view.
(see page 28)
Add media
Displays a menu
allowing you to
place video, audio
or image clips
directly on the
Timeline.
Project scroll controls
Use the left and right
buttons or grab the scroll
bar to move around your
project.
The Workspace
Continued...
Page 20

20
Volume control
Controls loudness of
the music output. Drag
the slider to adjust the
volume of your
speakers.
Clip navigation buttons
These can be used to move
around a selected clip. The
button highlighted in yellow
plays the clip while the green
one means playing continuously.
Context sensitive help
This button activates the
Context sensitive help
feature. After you click
on it, your cursor changes
to look like the cursor pictured at
left. Move your cursor over an object
in the program and click it.
Play project
Click this button to render
(create) your project. This
can take some time, but is
an important feature: see
page 31.
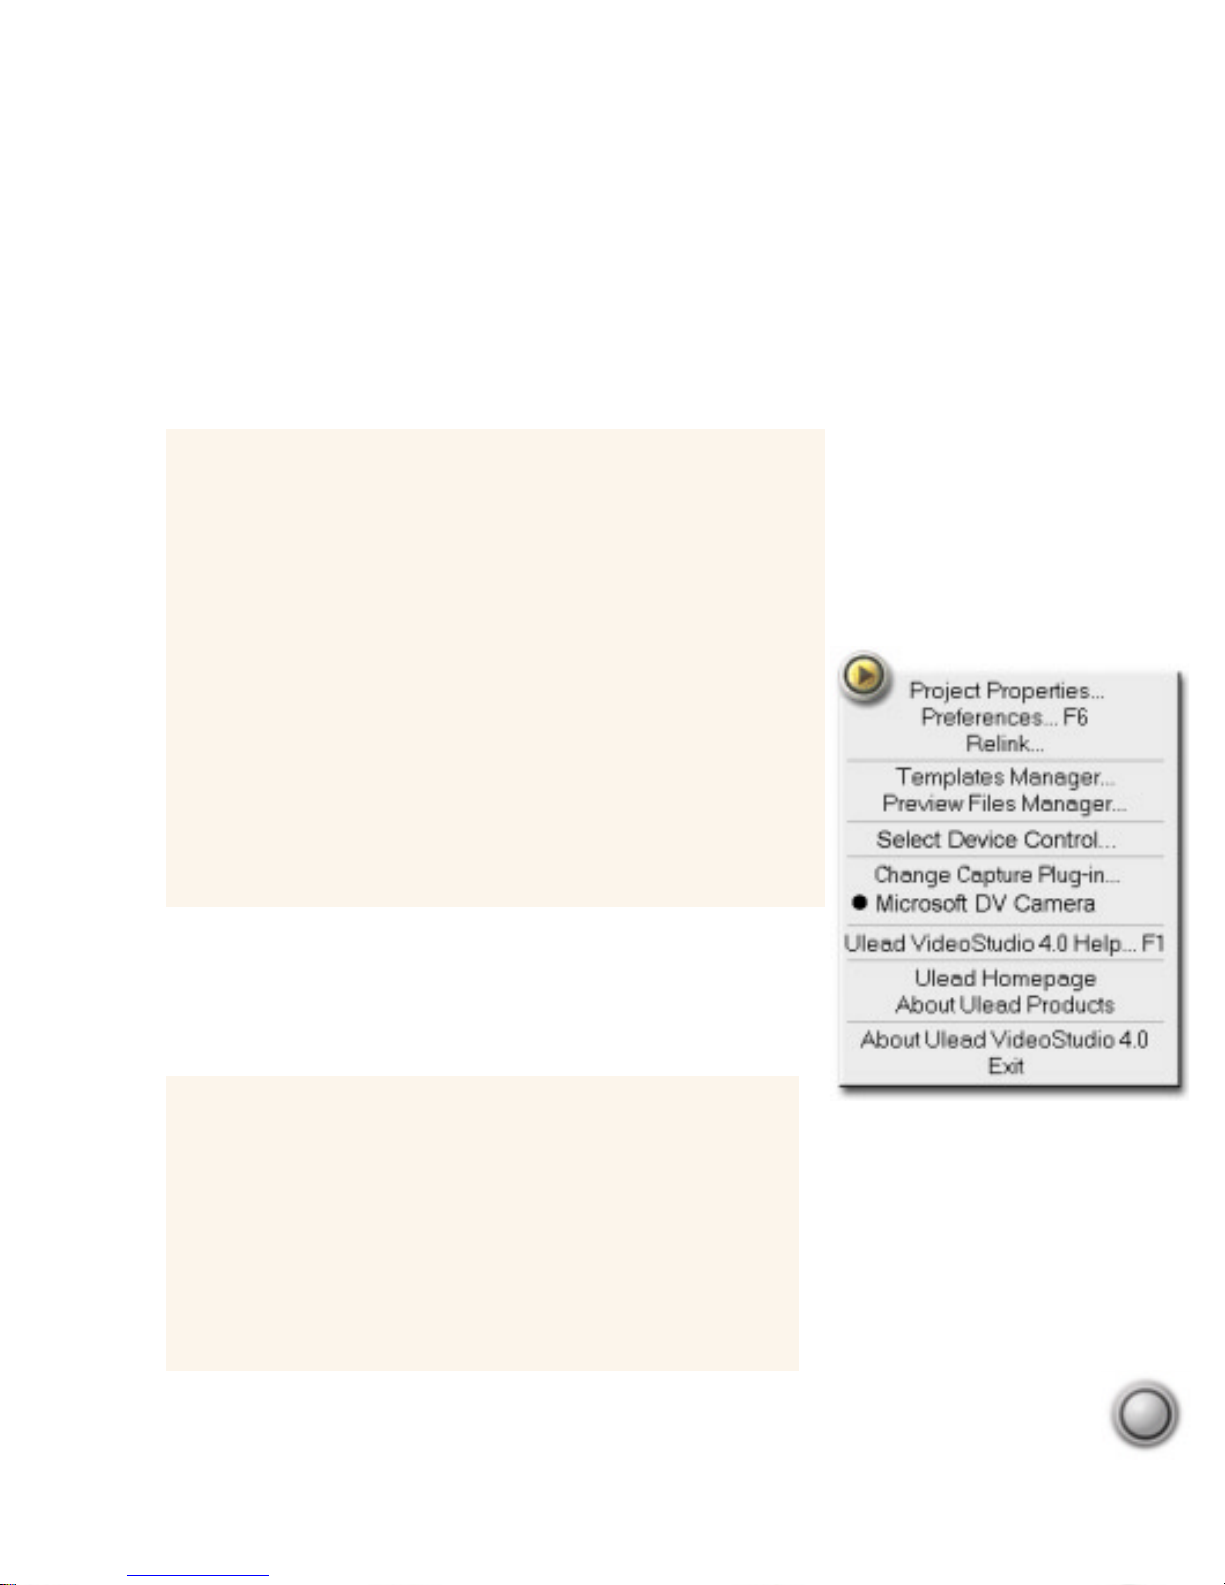
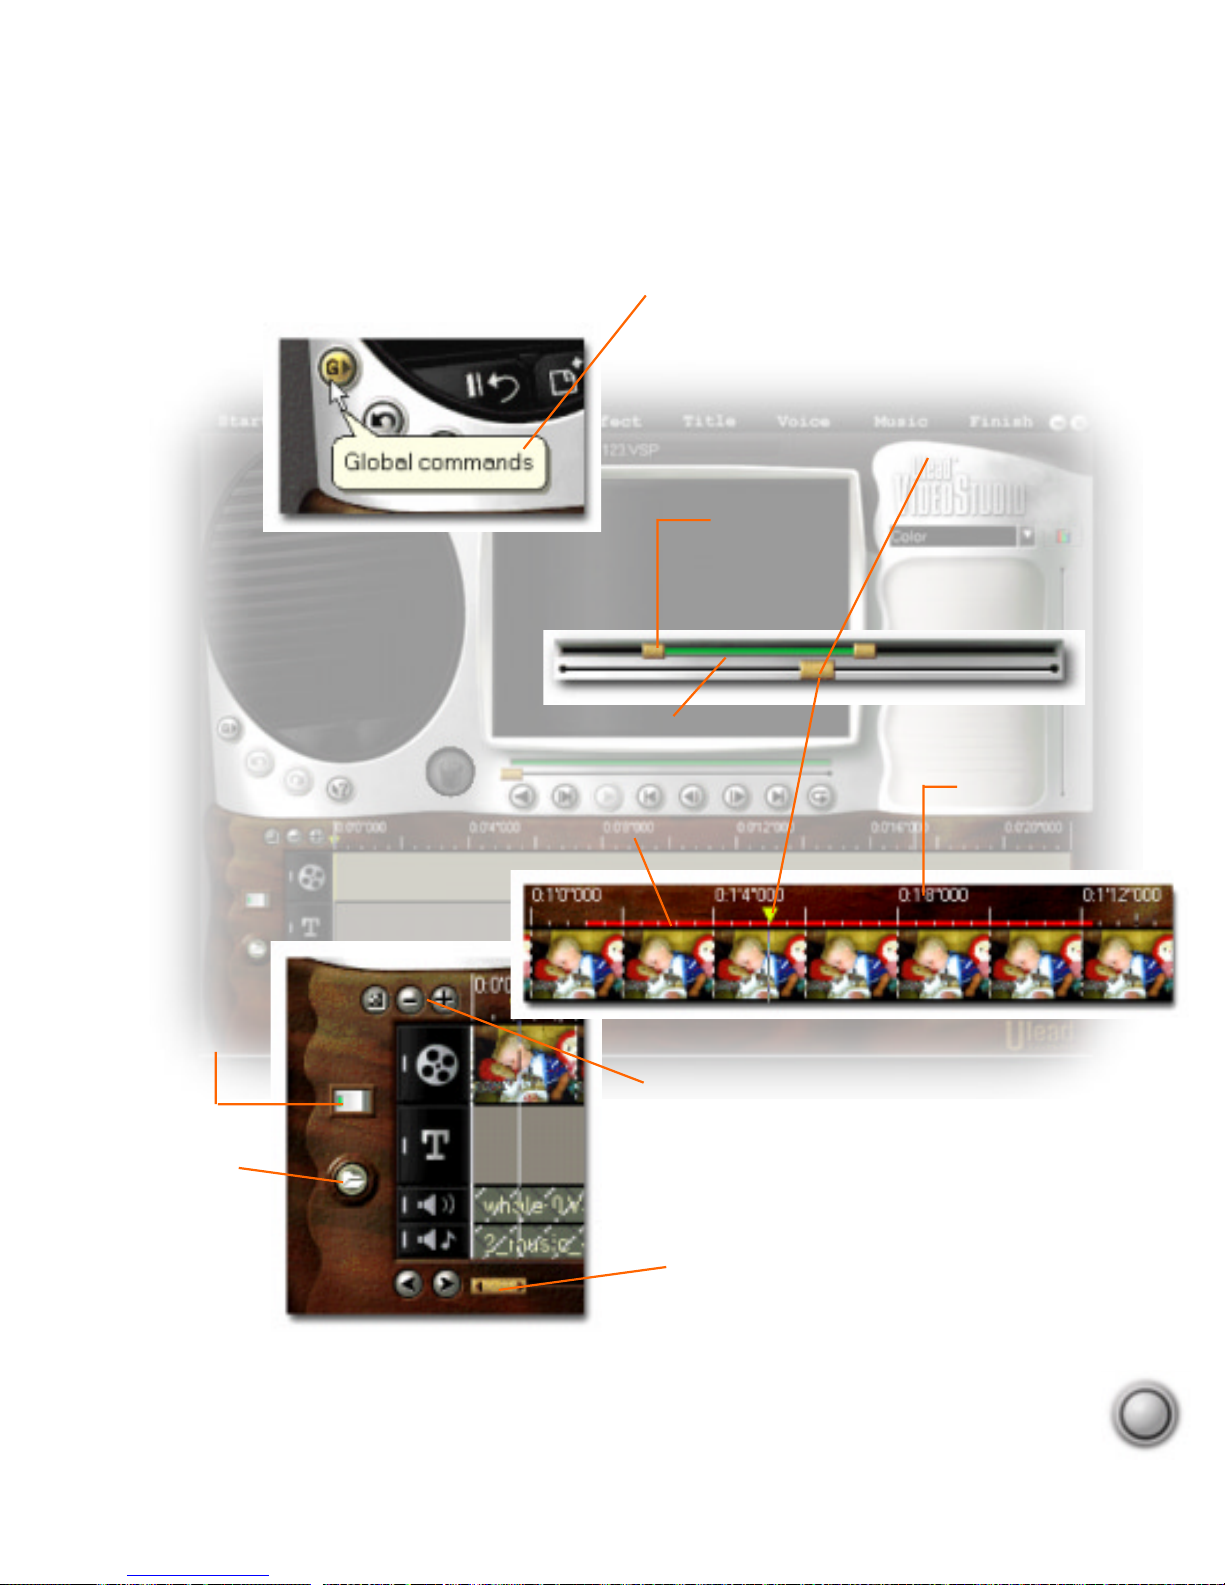
Global commands button
This button accesses a menu that contains many useful
tools to give you a hand when using Ulead VideoStudio.
One example is the item, Ulead VideoStudio 4.0 Help.
Important program attributes can be found under the
Preferences item and you can create and organize your
templates by clicking the Templates item.
Trash can
Drag and drop clips here to delete
them. You can also select a clip
and press Delete on your
keyboard.
Undo and Redo
Any changes you make
that you don’t like can be
instantly fixed or undone
by clicking the left
button. And if you change your
mind, just click Redo.
Page 21

21
The Library
The library is a storage depot for everything you need to create a movie: video clips, audio
clips, still images, transition effects, music files, titles and color clips. These are collectively
known as media clips. You can think of the Library as a general manager for all of the pieces
of your project.
The type of clip that can be inserted depends on which step you are working on (e.g. Title or
Music). The most convenient way of working with clips is using your mouse. If you want to
add clips to, or use clips from the Library, first select the desired clip, then drag and drop it to
its destination. You can even drag and drop files right from Windows Explorer into the Library
panel.
Adding media clips to the Library
1. Click the Load clip button to open a dialog
box for locating the media clip to insert in
the Library.
2. Select the desired file.
3. Click Open when you are finished.
Note:
Deleting source files from your hard disk permanently removes them from your computer. Y ou may
not be able to recover them again. Please make sure that those source files you are about to delete are
unnecessary .
T rash can.
Deleting media clips from the Library
1. Select the clip that you want to remove
from the Library.
2. Drag the selected clip to the Trash can or
press the Delete key.
3. When prompted, verify whether you also
want to delete the source file from your
hard disk.
Load clip buttons
These allow you to
locate the clip you
want to add to the
Library. A media clip
can be a video,
color, image, or
audio clip.
Page 22

Step by step
22
The Video Wizard quickly creates finished movies and is an excellent way to start any project.
Ulead V ideoStudio itself is similarly laid out in a step-by-step format, following the items in the
menu bar at the top of the program, from left to right. It’s not necessary to work through
every step every time, but the steps can serve as a guide to creating a complete movie. The
steps don’t necessarily need to be followed in the order that they are presented, either.
Your work is saved in a small project file (*.UPV) that organizes all of your media files
together. A project file is NOT the same as a movie and changes made to it do not affect your
media clips. It is possible to have a number of different projects using the same clips.
Start & Capture
The Start step is for creating new project files or opening existing ones. Once
a project is opened in the program, new video can be recorded onto your
computer’s hard drive in the Capture step. See page 24.
Storyboard
The Storyboard step and the Storyboard section of the program under the
Preview window are the heart of Ulead VideoStudio. This is where you
arrange, edit, and trim your masterpiece. See page 28.
Effects
Transition effects between scenes are fun and easy.
Thumbnail animations and drag-and-drop operations put
dozens of cool effects at your fingertips. See page 38.
Step by step
Step by step
Page 23

Step by step
23
Title
No movie would be complete without opening and closing titles.
Ulead VideoStudio lets you use any Windows True Type font on
your computer, of any color and size, and gives you the power to
animate them just like the pros. See page 40.
V oice & Music
Background music is probably one of the most important factors
determining the mood or feel of your movie. Add ambiance with tunes
off of your favorite CDs or record a voiceover narration to effec-
tively clarify important parts of your video. See page 44.
Finish
The final cuts have been made and the music has been synchronized with care. Now it’s time to put it all together and
make a master copy of your newest movie. See page 50.
Page 24

Step by step
24
Start
The Start step is where you create a new project file (*.VSP) or open an existing project. A
project file is a small file used by Ulead VideoStudio to store all of the information about your
movie: clips used, trimming information, duration of movie, size of frames, and type of movie
to make. A project file is not the finished movie and can only be opened in Ulead V ideoStudio.
The actual process of creating a movie from a project file is called rendering.
Templates save many complicated settings for capturing
video and for creating your movie in the Finish step. They
are an extremely important part of your project and should
not be overlooked. More information about template options
can be found starting on page 54.
Start & Capture
Start & Capture
Creating a new template
1. Click the Global commands button.
2. Select Template from the menu.
3. Click New and enter a name for your template, then click OK.
4. Set up the details of the template and click OK.
Creating a new project
1. Click the New project button.
2. In the dialog box that opens, enter a Project name.
3. Select a Template that most closely matches the type
of movie you want to create.
4. Click OK.
New project
Open project
Detail from the
Options panel.
Global Commands
button.
Notes:
•
Use the Open project button and the Recent file list to
open previously created projects.
•
Press Ctrl+ S to quickly save your project.
Page 25

Step by step
25
Capture
The process of recording video to your computer is called capturing. When everything is
ready to go, the video feed from your source device should be visible in the Preview window.
If your card supports a television monitor, you should also be able to watch your video there.
Capture video
Records video from
your source to your
hard disk.
Capture frame
Captures a single frame
from your source to
your hard disk.
Duration
Sets the length of time
for the capture.
Switch mode
Switches between Capture mode and
Playback mode for instant previews.
Capture to library
Keep this option selected to automatically take advantage of the organizational features of the video library.
Video menu
Displays a menu allowing you to
modify your capture settings.
Note:
If the Capture menu item is grayed
out or unavailable, your video capture
hardware may not be correctly installed.
Please follow your hardware manual’s
instructions carefully .
Capturing video
1. Hook up your video source device to your
capture card. On some cards, you also have to
connect the audio cables to your sound card.
2. Use your device’s controls to move around
and find what you want to capture.
3. Click the Capture video button to begin
recording.
4. When you have recorded what you want, click
the Capture video button again or press the
Esc key to stop capturing.
Page 26

Step by step
26
Capturing Digital Video (DV)
Digital Video (DV) is a video format that is fundamentally different from
traditional analog formats like VHS, Hi-8, and S-VHS. It is much easier for
your computer to capture DV video than it is to capture other formats because DV is widely
supported and the data rate is lower. In addition, the quality of the video is exceptional because
it is retained in a purely digital form, from capturing to editing, and finally back to your
camcorder.
Basically, the procedure for capturing DV is the same as presented on the previous page. Make
sure you have configured your hardware and software (see page 9 for details), and follow this
procedure:
The keys to a successful capture
Capturing video is one of the hardest things you will ever ask of your computer. Video takes
up a huge amount of disk space and, because of the high data rate, is difficult for your hard
disk to handle. Here are a few things you can do to ensure success:
* Shut down ALL other programs that are running. Use CTRL+ALT+DEL, select an item,
and click End Task to make sure nothing is running except Explorer and Ulead VideoStudio.
* Best results can be achieved by using a dedicated video hard drive. This doesn’t have to be
an expensive AV hard disk anymore, but the advantages of using a separate, dedicated,
video-only hard drive cannot be stressed enough.
* Defragmenting (or better yet, formatting) your hard drive between projects can dramatically
improve performace.
Capturing DV video
1. Turn on your camcorder and set it to Play mode (or VTR mode). See
you camcorder’s manual for specific instructions.
2. Run Ulead VideoStudio, open a project, and go to the Capture step.
3. Click the Play button in Ulead V ideoStudio.
4. When you get to the part of the video you want to record, click the
Record button in Ulead VideoStudio.
5. Click the Record button again (or press ESC) to stop recording.
Page 27

Step by step
27
Capturing MPEG video*
Capturing video directly from your camcorder straight to MPEG is one of
the most exciting developments in computer video since DV was introduced. Ulead V ideoStudio gives you the flexibility to choose MPEG-1 or
MPEG-2, depending on your needs. MPEG-1 is recommended for older computers and for
people who want to create VCDs, while MPEG-2 is more suitable for those with faster
computers who demand excellent quality in a highly compressed format.
* Note: This feature is only available if your video capture card supports RGB or YUV capture
(please see the manual for your capture card). Once you have configured your hardware and
software (as detailed above), you can capture video using the standard procedures described
on the preceding pages.
The Video Menu.
Setting up MPEG capture
1. Connect your camcorder to your capture card.
2. Turn on your camcorder and set it to Play mode (or VTR
mode). See your camcorder’s manual for specific instructions.
3. Run Ulead VideoStudio.
4. Click the Global Options button and select Change Capture
Plug-in.
5. Select Ulead MPEG DirectShow Capture Plug-in (or Ulead
MPEG VFW Capture Plug-in). Please restart Ulead
V ideoStudio.
6. Click the Video Menu button and select Video Properties.
Choose the type of MPEG you would like to capture.
7. Capture your video as you normally would.
Page 28

Step by step
28
A storyboard is an outline for a movie. It contains sketches and drawings, in chronological
order, of the events that occur in your story. The bottom half of the Ulead VideoStudio
interface is simply an electronic storyboard.
The Storyboard can be viewed in two distinct modes by clicking the Switch mode button.
Which mode you use depends entirely on personal preference, but most people find both
modes to be useful at different times. For example, the Storyboard mode is the fastest and
simplest way to add clips to your movie. Clips can be moved around by simply dragging them.
After arranging your scenes in Storyboard mode, some people prefer to switch to Timeline
mode to fine tune their effects and perform frame accurate trimming and editing of individual
clips.
Switching to the Timeline mode, Ulead VideoStudio show exactly when and where events in
your story occur and you can see at a glance the contents of various media clips. A clip can
be a video file, an audio file, a transition, a colored background or a title. If you’ve used the
Video Wizard to create your project, a rough storyboard was automatically created. If you’re
starting from scratch, you can drag clips from the Library and simply drop them on the
Timeline.
Storyboard
Storyboard
Timeline mode allows frame
accurate editing of individual clips.
Storyboard mode presents an overview of the
entire project’s video track.
Click the Switch mode button
to change between the two
display modes.
Page 29

Step by step
29
Storyboard mode
You may find that starting out in Storyboard mode is the easiest way to get your project
rolling. After starting a new project, switch to the Storyboard step and take a look at your
project. Each picture represents an event in your movie, an event being a video clip or a
transition. The thumbnails reveal at a glance the chronological order of events in your project,
but do not tell you much about the clips themselves.
You can drag and drop clips to arrange
them, and transition effects can be
inserted between clips. Selected clips
can be trimmed in the preview window. See page 32 for more informa-
tion on trimming.
Timeline mode
When Ulead V ideoStudio is in
Timeline mode, clips are
placed on the workspace as
short sequences. The length
of these clips accurately
represents the duration of the clip in your project. The
ruler units can be adjusted for your convenience.
Setting the ruler units to fractions of a second gives you
precise control over trimming and editing, while longer
ruler units allow you to view more of your project. Yo u
can control ruler units by using the Zoom control
buttons. Click the Fit project in window button if you
want to see the entire project displayed on one screen. If
you have a mouse with a scroll button, the scroll button
can be used to zoom.
Timeline mode.
Zoom control buttons
Fit project in
window button.
Selected clip.
T ransition effect.
Storyboard mode.
Page 30

Step by step
30
The T racks
The Timeline is divided horizontally into four different tracks. The Video and Transition
Effects, Title, Voice, and Music tracks all correspond to the Ulead VideoStudio steps of the
same name.
The four tracks, each with a clip
inserted. The Video track is active.
Title
Video and
Effects
Voiceover
Music
The Options panel
Ulead VideoStudio offers different controls in the Options panel depending on the step or
track you are working on. This way the workspace is kept simple and uncluttered. Just
remember that if you can’t find a control that you are sure you have seen before, try switching to the type of editing you want to do first.
Duration
Sets the length of time
of the clip.
Mark in/out
Displays the exact time
of trimming.
Volume controls
Use to adjust amplification
and fade in and out.
Export plug-ins
Special features used to
share your movie with
others.
Clip properties
Click to examine specific
information about a clip.
Trim to video file
Applies any trimming modifications to a clip and saves it to a
new video file.
Capture image
Saves the selected frame to an
image file.
Reset
Sets all values
back to defaults.
Apply
Applies changes made in the
Options panel to the selected clip.
Switching to different tracks
There are three ways to do this:
• Click on the Step menu item corre-
sponding to the track.
• Double-click on the track or clip you
want to work on.
• Click on the icon located left of each
track you want to work on.
Page 31

Step by step
31
The Play project button
While you are editing, there are many times that you will want to preview your work to see
how your project is progressing. The row of buttons below the Preview window are used to
navigate around your project, play clips, and create previews of your entire project.
Clip navigation buttons, with the Play project button circled
in yellow.
Any changes that you have made in the Options panel are applied to the clip when you click
the Apply button. All of the settings can be restored to their original values by clicking the
Reset button. As with any changes you make in Ulead VideoStudio, you can always undo
them by clicking the Undo button or by pressing Ctrl+Z.
A Ulead V ideoStudio project (*.VSP),
cannot be played until it has been
rendered, or created. Click the Play
project button to begin the process of
rendering your project for previewing.
Rendering is easy, but it can take some time. Fortunately, Ulead SmartRender technology
optimizes the rendering process by not re-rendering the parts of the project that have not
changed. Ulead VideoStudio performs this magic with heavy use of temporary files. These
files are stored in a location that you can set in the Preferences: Preview tab, found
on the Global commands button menu. By efficiently allocating disk space for
temporary files, you don’t need to worry about “Out of Memory” error messages.
The Preview Files Manager, also on the Global commands button menu, can be used for
specific manipulation of individual project preview files.
So the best advice we can offer is that you edit for a while and then when you need a break,
hit the Play project button and let Ulead V ideoStudio render your project. By doing this fairly
often, render times should be very reasonable.
Rendering a portion of your project, instead of the whole thing, can save you time and give
you a quick preview of an important section. This is especially useful for rendering across
transitions, title sequences, or to check the timing of audio clips in relation to the associated
video. If you only want to render the part of your project, hold the Shift key on your key-
board while clicking the Play project button. For more information about partial rendering, see
page 47.
Page 32

Step by step
32
Working with clips
The best part of editing your movie on your computer is the ease with which you can snip and
trim with frame by frame accuracy.
Video clip selected in the Library, ready to be
trimmed using the green T rim bar .
Trim handles
Inserting a video clip onto the Timeline
• From the Library, drag and drop the clip to the Timeline.
• To insert a clip directly to the Timeline, clip the Insert media files
button, located to the left of the Timeline.
Insert media
files button.
Trimming a clip using the Trim bar
1. Select a clip by clicking on it in the Library.
2. Click and drag a Trim handle to set the trim position.
3. When you have selected the area you want to trim, click the Apply
button.
4. You can selectively play only the trimmed portion of the clip by holding
the Shift key and clicking the Play button.
Notes:
• The green bar beneath the Preview window represents the selected portion of the clip. If the clip has
not been trimmed, the green bar extends for the entire length.
• Watch the Mark in/out displays on the Options panel to monitor your trimming. The Mark in/out points
can also be set by pressing F3 and F4, respectively.
•
For precise control, click on a Trim handle, hold it, and use the Arrow keys on your keyboard to trim
one frame at a time.
Apply button.
Page 33

Step by step
33
While trimming and editing, you may sometimes need to adjust the view of the clips on the
Timeline. Use the Zoom controls to control the view. The Scroll bar makes navigating
through your project quicker and easier. The wheel on a scrolling mouse (e.g. Microsoft
Intellimouse) can be used to scroll, and you can zoom by holding the Ctrl key while using the
wheel.
Don’t forget that you can always undo just about any changes you’ve made in your project by
pressing Ctrl+Z. You can set up to 99 levels of undo by pressing F6 to open the Preferences
dialog box.
T rimming a video clip that has been inserted onto the Timeline.
The key to making highly accurate cuts and edits is controlling the ruler scale in the Timeline.
When each unit represents one second, you can get pretty close in estimating your edits.
Trim handles
Scroll bar
Zoom buttons
Trimming a clip from the Timeline
1. Select a clip by clicking it on the Timeline.
2. The yellow Trim handles on either side of the
clip can be dragged to change the length of a clip.
3. The Preview window reflects the position of the
Trim handle in the clip.
4. Watch the Mark in/out displays on the Options
panel to numerically monitor your trimming.
5. Other clips in your project automatically reposition
themselves according to your edits.
Page 34

Step by step
34
The Library can store multiple versions or
copies of a single video clip. This means that
you can break large clips up into a number of
smaller clips using the trim tools and save
these clips to the Library as separate entries.
The source video file itself is not physically
altered, nor are actual copies made of the
original file. This is very useful since it allows
you to manage your production very creatively but does not take up any more disk
space since you still only have one video file
saved on your hard disk.
Duration
Sets the length of time of the clip.
Spin buttons
Use these to fine tune
your trimming.
Mark in/out
Displays the points in the
original clip where the
trimming takes place.
Apply button
Click to apply changes made
in the Options panel to the
selected clip.
Trimming a clip with the Options panel
1. Select a clip on the Timeline or in the Library.
2. Click the time in the Duration box. For example,
click on the seconds (“). The numbers begin blinking.
3. Enter a length of time for the clip. The Mark in
shows where the clip begins and the Mark out point
displays the end of the trimmed clip.
4. Click the Apply button.
Creating multiple versions of a
single clip
1. Select a clip from the Library.
2. Grab and drag a Trim handle to set the
trim position.
3. Click the Apply button.
4. Re-insert the original clip into the Library
by clicking the Load video button.
Load video button.
Page 35

Step by step
35
Many times, when you make an edit, you may wish to make a permanent change to the clip
and save the edited file. Again, Ulead V ideoStudio gives you a margin of safety in that it saves
the trimmed video to a new file and does not alter the original. You can go ahead and delete the
original to recover disk space when you are sure of your changes (press the Delete key or
drag the clip to the Trash can).
The method of trimming illustrated here allows you to use your original video file as the source
for a number of different clips in the Library. This type of editing does not affect the source
file anyway.
This Library contains four
versions of the same clip.
Selected clips are
highlighted in blue.
Breaking a clip into multiple files
1. Select a clip from the Library or Timeline.
2. Grab and drag a Trim handle to set the trim position.
3. Click the Trim to video file button.
4. You now have two different physical video files on
your hard disk, the original file (SOURCE.AVI), and a
trimmed copy (SOURCE-1.AVI) .
T rash can.
T rim to video
file button.
This clip is a trimmed version
of the original video file saved
on the hard disk. You can see
at a glance that it has indeed
been trimmed by selecting the
clip and looking at the Options
panel or the T rim bar. Y ou
should definitely rename the
clip in the Library because the
thumbnail will not change.
When the original clip is reinserted into the Library, the
Mark in point is zero and the
Mark out point is the last
frame. The duration is the
entire clip. The Trim bar
clearly shows that the clip has
not been trimmed.
Page 36

Step by step
36
Once an image is on the Timeline, you
can set it to any time span you like by
dragging its Trim handles or by directly
entering a Duration in the Options
panel.
Still images provide excellent backgrounds for title se-
quences. Since you can precisely control the duration,
images provide an easy way to control the total length of
your project. You can even create very effective “slide
show” movies composed entirely of still image clips. Images
that are the same size as your video frames work best. You
can resize your pictures in an image editor or have Ulead
VideoStudio do it for you when your movie is created.
Using image clips
While Ulead V ideoStudio by definition is primarily used to put together motion pictures, you
shouldn’t underestimate the value of still pictures in your video productions. You can use
images or pictures from any source, and even use individual frames from a video file.
Library selection menu.
Information about an image clip.
Trim handles
Load image button.
This button changes
depending on the
Library folder.
Inserting an image clip
1. Switch to the Image Library by clicking the
drop down list and selecting Image.
2. Click the Load image button and browse for
the picture you want to store in the Library.
3. Drag and drop the image onto the Timeline
just like any other clip.
Page 37

Step by step
37
Once a clip has been inserted into the Library, you can drag it to the Timeline to put it into
your movie project. Color clips are great for beginning a movie. Place your opening credits
over the top of the color clip and then use a cross fade effect to create smooth transition into
your movie.
Titles set against solid
backgrounds are often
easier to see than if set
against an image,
especially a moving one.
You can enter the red, green,
and blue values for your clip, or
click the color box to pick the
color visually.
Load color button.
Inserting a color clip
1. Switch to the Color Library by clicking
the drop down list and selecting Color.
2. Click the Load color button.
3. Choose a color. Click the color box and
select Ulead Color Picker to visually
select a color.
4. Set a Duration and click OK.
Using color clips
Color clips are simply solid colored backgrounds that are useful for titles and transitions. For
example, black clips can be used for an effective fade to black transition. They are added to a
project by selecting the Color Library, inserting a specific color clip into the Library and
dragging and dropping the clip into your project. The duration of a color clip can be controlled
just like an image clip.
Page 38

Step by step
38
Transitions give your home movies a truly professional touch. Fortunately, they are also the
easiest part of Ulead VideoStudio. For your first few videos, feel free to go a little crazy and
try out every transition in the Library. Once you’ve gotten used to using transition, you can
express your artistic side by modifying the preset transitions to your own liking. In any case,
you’re guaranteed to have fun in this section.
Simple jump cuts used to be all you could do with your home videos. This is when one scene
stops and the next scene starts immediately. Ulead VideoStudio, on the other hand, has tons of
styles of transitions you can use, from cross fades to explosions. We’ll deal with the details of
these effects later, but for now you just need a project with two video clips in it.
Note:
Y ou may find it easier to
work on transition effects when
you’re in the Storyboard mode.
Effects
Effects
Adding a transition
1. From the Effects step, use the drop down list in the
Library to select a category of effects.
2. Scroll through the effects thumbnails in the Library
panel and find one that you like to use.
3. Click and drag the effect to the Timeline, roughly be-
tween two video clips.
4. Drop your effect and it will snap into place.
Drag and drop transition effects right onto the Storyboard.
Page 39

Step by step
39
Your clips appear adjacent to each other on the Storyboard. You’ll recall that the Storyboard
has two different modes, Storyboard and Timeline, but transitions work the same way in both
modes. The illustrations on the previous page shows VideoStudio in Storyboard mode. The
mode can be switched by clicking the Switch mode button.
Transition magic
If you’ve tried a few simple transitions as outlined on the previous page, you really have
mastered all you need to know. Ulead VideoStudio pretty much takes care of all the details to
make your transitions smooth and professional. That doesn’t mean the program has taken
control of your movie for you, however. After you have added a transition to your project,
take a look at the Options panel. Below is an example of one of the transitions, from the
Slide effects, specifically the Barn door. In this effect’s settings, displayed in the Options
panel, you can change many parameters that will allow you to control exactly how the effect
is going to be used in your movie.
Duration
Sets the length of time for the
transition. You can also modify
the duration by using the yellow
Trim handles on the Timeline.
Border
Select a size for the border (in pixels) on the
left and choose a color by clicking on the
color box.
Soft edge
The soft edge applies to the border
of the effect. This blends the two
clips together more smoothly. If
you don’t have a border set on the
clip, these buttons are unavailable.
Title motion buttons
These buttons control the direction of
motion in the transition effect. In this
transition, the two doors can move in eight
different ways.
Add/Apply
Click to add the new transition to the
Timeline. When you are modifying a
transition that has already been inserted,
this button has a check mark on it. Click
to apply your changes to the selected clip.
Switch mode button.
Page 40

Step by step
40
While a picture may be worth a thousand words, there is no doubt that clarifying text here and
there throughout your movie adds to its comprehensibility. And what movie would be complete without opening and closing credits? If you can type, even with just two fingers, you can
create professional credits in minutes.
When entering a title, a faint rectangle is visible in the
Preview window. This represents the Title safe area,
and it is the recommended maximum size for your text.
Along with the rectangle, you should see a blinking
cursor.
The titler works like a very simple word processor.
Type your text, press Backspace to correct your
mistakes and press Enter to start a new line. You
can move around the text with the arrow keys. If
you want to change the attributes of text that has
already been entered, you need to highlight the text
by selecting it with your mouse.
Title track
button.
Title button on
the Options
panel.
Title
Title
Adding text
1. From the Title step, use the Clip navigation button on the
Trim bar to scroll through your movie.
2. When you see the frame where you would like your title to
appear, click the Title button or click on the Preview window.
Remember that you cannot create a new title over an existing
title clip.
3. Type in your title in the Preview window.
4. When you are finished, simply move on to the next step or
move to a different location to enter a new title.
A centered title being edited. Note the
Title safe area around the center of the
window.
The yellow triangle represents the
position of the title clip in the Timeline.
Page 41

Step by step
41
The Options panel, as with the other features, allows you to modify the settings of the tool
that you are currently using. Use this to design the look and feel of your text with just about
any style that is available in a standard word processing program.
Duration
Sets the length of time for the
title clip. You can also modify
the duration by using the yellow
Trim handles on the Timeline.
Alignment
Left, center or
right justification.
Font style
Bold, italic and
underline.
Title motion button
Select a type of animation for
your credits. Click to display
animation styles.
Line spacing
Sets the spacing, or leading,
between lines of text.
Font size
Set the size of the
text in points.
Font
Select any True Type font
installed on your computer.
Edit title clip button
Click to begin editing.
Reset
Reverts to original
settings.
Apply
Applies changes to
Title clip.
Color
Sets the color of
the selected text.
Once the title clip has been inserted onto the Storyboard, you can adjust its duration by
clicking and dragging on the handles, and you can see what your title looks like in the Preview
window using the Preview bar handles. The Library can also be used to store your title clips.
To add a title clip to the Library, just drag and drop from the Timeline.
As with other Ulead VideoStudio features, if you’ve already tried out this function, you know
all you need to know. But of course there’s more...
Modifying a title
1. Click on a title on the Timeline. The selected clip will be
surrounded by a broken line and two yellow handles.
2. With the pre-existing text in the Preview window, use the
Style buttons to change your text.
3. Again, you can simply move to another step to finish, or
click the Apply button. You can also use the Reset
button make your text go back to its original state.
Page 42

Step by step
42
Rolling & scrolling
One of the most common and effective techniques for presenting closing credits is the rolling
or scrolling credits. With Ulead VideoStudio, this is simply a matter of specifying a direction
and a duration for your text. After you have entered some text and inserted it onto the
Timeline, click the title clip you have created and look at the Options panel.
Most of the Animation style buttons, the last twelve in fact, represent scrolling animations. It
is a little difficult to explain in words, but not hard to understand.
For example, the button at left (A.) has a box with three arrows pointing down. This
represents a title that starts off of the top of the screen, scrolls downward across the
screen, and scrolls off the bottom.
The other button at left (B.) has two arrows, symbolizing motion that starts off screen
on top, scrolls down, and ends in the middle of the screen. If you hold your mouse
over a Title motion icon, a short pop up message briefly describing the motion appears.
But the best way to figure out what these really do is to select the effect and use the Preview
window to see the results. As usual, you can see the results of your changes by grabbing and
dragging the Preview handle beneath the Preview window.
The speed of scrolling is directly determined by the length of the clip: very slow title animations take longer to play. So if you need a scrolling title that lasts for less than a second, the
speed of scrolling is going to necessarily be quite rapid.
A.
B.
Animating titles
1. Select a title on the Timeline or create a new
one.
2. Click on the yellow Title motion button.
3. Select an Animation style from one of the
preset choices.
4. Click the Apply button on the Options panel.
Possible title animation effects
available on the Options panel.
Animation
styles
Title motion button
Apply button.
Page 43

Step by step
43
The default duration of a title clip is about three seconds, but you can adjust this to make it
longer or shorter by dragging the handles on the title clip on the Timeline, or by entering a
value in the Options panel.
Putting it all together
To create a long list of credits in a production, it is necessary to insert a series of title clips
into the Timeline.
You’ll end up with a number of separate, sequential title clips on the Timeline. Try adding a
small space between clips for a brief pause. Anyway you do it, test your titles to insure that
they are readable in the final version of your movie (see page 51 for information about previewing parts of a movie).
Fading in & out
Another incredibly useful, easy, and effective method of displaying your titles is to fade your
text in from invisible to crisp and clear and then back to invisible again. This works especially
well for opening credits with a slow fade, or as captions with a quicker fade.
Cross fade title animation options.
Fading titles
1. Start by creating a new Title or click on an existing one.
2. Click on the yellow Title motion button.
3. Select the last button, the Cross fade button.
Extended credits
1. Start by creating one clip with multiple lines of text.
2. Drag a copy of the Title clip from the Timeline to the Library. This is
the easiest way to maintain consistency on each title’s attributes.
3. Drag title copies from the Library back to the Timeline to create new
titles.
4. Modify the text in the copied title.
5. Now repeat this procedure until you have credited the whole gang.
Page 44

Step by step
44
The importance of music in a video production cannot be overstated, and a running narration
can be just as critical. Ulead VideoStudio has the tools to make sure your audio is top notch.
Like the other parts of VideoStudio, the audio tracks are activated by clicking on their respective Step on the menu at the top of the program interface, by clicking on the icons to the left
of the track, or by double-clicking on the track itself. The upper audio track is the Voice
track. This can be used to create a running narration of your movie. The lower audio track is
the Music track, and can be used for background music. You can even use music from your
favorites CDs.
Detail of the Timeline showing the two audio tracks with WA V file clips.
If you already have some audio files (including MP3 files) ready to be used in your movie, it is
just a matter of clicking the Add media button and inserting the clip onto the Timeline. The
Library can also be used to store your audio clips and dragging and dropping to
and from the Timeline is effortless. Click the Load audio button at the top right
of the Library panel to add audio clips.
Incidentally , the Ulead VideoStudio CD also comes with nearly one thousand audio clips ready
for you to use. These clips are mostly short sound effects clips and can be very humorous
when used in your movies, or can be used to create additional ambience.
Voice track
Music track
Voice & Music
Voice & Music
Load audio button.
Add media button.
Page 45

Step by step
45
V oiceover narration
Explaining exactly what is going on in your movie can really help your viewers understand and
enjoy it better. This technique is often used in television documentaries and news stories.
The easiest method of recording a narration for a video is to record in short ten or fifteen
second sessions. This allows you to prepare what you are going to say more easily and to
quickly fix mistakes. When you have mispoken and recorded a bad clip, just select the clip on
the Timeline and delete it. Some people are comfortable doing impromptu narrations, some
people prefer just an outline, and others like to have the complete text of what they want to
say written out beforehand. Don’t worry, this is still only the project and not the actual movie,
so you still have a lot of room to experiment.
Narrating a movie
1. Use the Preview bar to move to the section of
the video you want to narrate. Remember that
you cannot record over an existing clip, so make
sure none is selected by clicking on a blank
section of the Voice track.
2. Select the Record with preview option and then
click the Record button. A small lever meter
appears.
3. When you speak into your microphone, the
meter should light up. Use the Windows audio
mixer to adjust the level of the microphone.
4. Click the Start button and begin speaking.
Watch your video play in the Preview window to
synchronize the narration with the action.
5. Click the Stop button (or press Esc) when you
are finished recording.
Note:
Windows audio mixer can take any number of forms depending on your sound card. In general, it
can be found by going to the Start menu in Windows 95, clicking the Program menu item, Accessories:
Multimedia: Volume control. In Windows 98, substitute “Entertainment” for “Multimedia”. If a speaker icon
is visible on your Windows taskbar, you can right-click on it and select Open audio controls.
Adjust Volume level meter.
Detail of Voiceover Options panel.
Stop button.
Page 46

Step by step
46
Background music
The mood of your movie is determined as much by your video as it is by the background
music you use. Whether you choose Classical, Country, or Chinese folk music, the decision is
entirely up to you. The source of this music can be any CD in your collection.
To use the audio from a CD in your movie, you first have to record the music
you want with your computer. This creates a WAV file, which is the digital audio
data from your CD. Ulead VideoStudio now supports a number of addtional file
formats, including MP3. MP3s are an exciting new way to share music over the
Internet and there are thousands of songs availible for you to download.
After you have recorded a clip, the controls on the Options panel
have changed somewhat. The top numbers now represent the
total Duration of the inserted clip. As with other types of media
clips, you can now trim the inserted music file to better fit your
movie.
The Record button
turns red when
recording.
The Play button
changes to the Stop
button when playing
a CD.
Detail from Options
panel showing CD track
information, the Record
button and the Play
button.
WA V file trim information.
Recording music from a CD
1. Insert the CD in your CD-ROM.
2. On the Options panel, select a Music track.
3. Select the track (song number) on the CD that you want to play.
Important: Many computers automatically play CDs when they are
inserted. You must close all other CD players for this step to work
properly.
4. Click the Play button to listen to the CD to find the section of the
song that you want to record. Remember that you cannot record
over a WAV file on the Music track, so click on a blank portion of
the track if the CD controls are unavailable.
5. Click the Record button when you are ready.
6. Click the Stop button (or press Esc) to insert the recorded clip
onto the Timeline.
Page 47

Step by step
47
Working with background music
You can drag and drop audio clips to move
them or add them to the Library. From the
Timeline, a selected audio clip has two yellow
handles that can be used for trimming. Again,
just grab a handle and drag it to shorten a clip,
either from the beginning or end.
T rim handles beneath the Preview window.
Duration
Displays and lets you
change the duration of
the WAV file.
Mark in/out
Shows trimming information about the clip.
Fade in/out
Gradually fades the
beginning and/or ending
volume of a clip.
Info
Click to display detail
information about the clip.
Volume control
Sets the volume
for the entire clip.
Apply
Click to apply trimming
and volume changes to
the selected clip.
Play button.
Trimming an audio clip
1. Select a clip by clicking on it in the Library or the Timeline.
2. Click and drag a Trim handle to set the trim position.
3. When you have selected the area you want to trim, click the
Apply button.
4. You can selectively play only the trimmed portion of the clip by
holding the Shift key and clicking the Play button.
Selected WA V file with T rim handles.
Page 48

Step by step
48
Mixing it up
VideoStudio has two explicit sound tracks, one for voice and one for music. If you captured
your video with sound, then in reality, you also have a third sound track that is included with
the video file. This really gives you a lot of creative freedom. Vacation shots, scenery and
nature videos, and movies of parties all lend themselves very well to music video style productions. Or you can combine this format with a voiceover. And when someone talks to the
camera, you may want to eliminate the music all together for a short period of time. The key
to making this all work smoothly is to control the volume of the various clips. This is done
with the Options panel.
The control of your audio tracks is found on the Options panel. The panel shown below is
actually from a video clip, but you will notice that it is the same as the audio clip Options
panel. The first control is the volume control, expressed as a percentage of the original. Click
the control to select from a range of audio amplification options: 0 to 500% (where 100% is no change
and 0% will completely silence the clip). If you want a
completely silent part, it is probably
easiest to just delete the clip from one
of the audio tracks. This, however, is
not the best way to eliminate the
audio part of a video clip on the
Video track. Any changes made with
this control applies to the entire clip.
Ulead VideoStudio splits the audio into Voice and Music tracks for convenience as well as
simple mixing, but you shouldn’t feel limited by this. You may have noticed that you can insert
any sort of Windows audio file onto either track, regardless of the content. Music clips can go
on the Voice track and vice versa.
Volume amplification
control.
Audio controls for a video clip.
Page 49

Step by step
49
Fade away
Background music that starts and stops suddenly can be distracting. If you record an entire
song, this is probably not a problem since most songs have a beginning and ending. But,
smooth transitions are a different matter if you only want to use a portion of a song. Ulead
VideoStudio provides the tools necessary to seamlessly blend your music into the background.
Moving audio clips between tracks
1. To move an audio clip from the Music track to the Voice
track, you first need to drag the clip to the Library.
2. Delete the clip you have just copied from the Music track.
3. Switch to the Voice track by double-clicking on it.
4. Drag the clip from the Library to the Voice track.
Volume control
Sets the volume for the entire
length of a clip. Use this
control to lower the volume of
the audio on a video clip so
that your voiceover narration
can be clearly heard above the
background.
Fade in
Slowly fade the volume
of the first 30% of a
clip from zero to
100%.
Fade out
Slowly fades the volume
of the last 30% of a
clip from 100% to
zero. Active controls
are yellow.
Detail from the audio clip Options panel.
Page 50

Step by step
50
Finish
Finish
Currently, there is no single standard format for video on a PC. This is not an uncommon
issue in the early days of any new technology. There are dozens of choices you need to make
about the format of your final movie. Fortunately, in the case of digital video, choosing the
wrong format costs you nothing. In this sometimes complicated section, we’re going to walk
you through the universal procedure you need to follow to make a movie, talk about the
various options you need to consider, and discuss the actual formats’ strengths and weaknesses.
The speed at which your computer renders, or creates, a movie can vary greatly depending on
how complicated your project is, but it can take some time. Be patient and let your computer
do its thing. You may even want to let your computer render really big projects overnight or
while you’re at work.
Rendering a movie
1. Click the Finish step to display the Options
panel for making your actual movie file.
2. On the Options panel, click the Make
movie button. The Save As dialog box
appears.
3. Enter a File name for your movie and
select a file format from the Save as type
list.
4. Select a format that is the same as your
captured clips’ format (*.AVI or *.MPG).
5. To start the rendering process, click the
Save button.
Save As dialog box for making movies.
Make movie button.
Page 51

Step by step
51
Rendering quick previews of parts of your project is invaluable in fine tuning effects, titles,
and synchronizing audio in your projects. In the image above, you can see that the Preview
range covers a bit before and after a transition effect. The resulting video file will accurately
show how the transition will look in the final movie.
If you’ve gone through the process of creating a movie already, you know that rendering may
take quite a while. Sometimes, it is hard to know how your project is going to work until it is
actually rendered. Fortunately, Ulead VideoStudio lets you select a portion or range of your
project to render as a preview video for just this reason.
Partial Rendering
1. Make sure that no clips are selected (a selected clip has a broken line
around it). You can unselect a clip by clicking on the ruler at the top
of the Timeline.
2. The green bar and Trim handles now act on the entire project. Use
the handles to select a Preview range. You can tell that the Preview
range is working on the entire project because a red line appears on
the Timelime. This represents the range selected quite clearly.
3. Click the Make movie button on the Options panel.
4. In the resulting Save As dialog box, enter a file name and then click
the Options button. On the first tab, Ulead VideoStudio, select
Preview range instead of Entire project. (For more info on Video
Save Options dialog box and recommendations, see page 54.)
5. Click OK to return to the Save As dialog box and then click the Save
button.
Make movie button.
Video clip with selected preview area in red.
Page 52

52
Putting a movie on the Web
After you have created a movie that is suitable for posting to the Internet, Ulead VideoStudio
can assist you with the actual task of coding an HTML document.
Sending a movie by E-mail
When you select E-mail, Ulead VideoStudio automatically opens your default e-mail client and
inserts the selected video clip into a new message as an attachment. As with regular e-mail,
enter a recipient, a subject and a message and then send your message.
If you have problems getting this to work, get an error message about your e-mail not being
set up correctly, or get a MAPI error, see the Ulead VideoStudio help file for assistance.
Your default browser now opens, showing you how your page looks. You can, of course,
enhance this page by using your favorite HTML editor or even Windows NotePad. When you
upload this page to your Web server, you need to change one line of code to reflect the relative
links to the associated movie file:
<P ARAM NAME="FileName" VALUE="C:\My Project\my_movie.avi">
In this example of an ActiveMovie object, this line points to a local hard drive, so you need to
point it to its location on your Web site. You’ll also need to change the link if you don’t use the
ActiveMovie control. ActiveMovie is a small plug-in for your Internet browser (standard with
IE4.0), and your viewers will also need to have it installed. If you choose No, the page will be
set up with a simple link to the movie.
Export video
clip button.
Detail from Options panel.
Creating a Web page
1. Select a video clip. Make sure you have already rendered
your movie file if you want to use a project.
2. Select Web Page from the drop down list on the Options
panel.
3. Click the Export video clip button.
4. Choose whether you want to use an ActiveMovie control
(See below for more information.).
5. Enter a name and location for the new HTML file.
6. Click OK when you are finished.
Page 53

53
Creating a Greeting Card
1. Select a video clip by clicking on it.
2. Select Greeting Card from the drop down
menu.
3. Your video appears in a white box in the
Mulitmedia Greeting Card dialog box. Select
an image from the Background template
panel.
4. Adjust the position and size of your video.
5. Enter a name for the card in the Greeting
card file name box.
6. Click OK to create the card.
Electronic greeting cards
Multimedia greeting cards are an attractive way of sharing your video to friends. Instead of
sending your video as a simple attachment in an e-mail, Ulead V ideoStudio automatically
packages the movie into an executable (*.exe) file that automatically plays the video when the
user runs it. In addition, the video is displayed in an appealing frame complete with a message.
This procedure only works on finished, or rendered movies, and not on projects. You can
select individual clips or render your movie to include the whole thing in a card.
The templates that are provided with Ulead VideoStudio are JPG image files. If you are
artistically inclined, you can create your own templates in any graphics editor, or even use still
frames captured from your movies. Search for images with the top Browse button in the
Multimedia Greeting Card dialog box, and use the bottom one to select a location to save your
card.
Multimedia Greeting Card dialog box.
Export video clip drop down menu.
Page 54

54
Video Save Options and recommendations
If you click the Options button in a Save As dialog box, you’ll find a whole host of choices.
Ulead VideoStudio uses default values based on your Project template. These settings may
have been perfect for you, but it is still important to understand these variables.
General
If you have a sound track in your project, select
Audio and Video for the Data track. Frame rates
can be set anywhere between 15 and 30 frames per
second. Higher frame rates mean high quality, but
larger file sizes. Check your capture card manual for
possible frame rate recommendation. For example, it
is common to use 29.97fps for NTSC video going
back out to a VCR in North America. As with Frame
rate, a larger Frame size yields a larger file size. It’s
best to try to render your video with the same frame
rate and frame size as you captured. This results in
the highest quality video and the quickest rendering
times. In the Storyboard mode, select a clip and click
the Info button to find these settings.
Ulead VideoStudio
If you only want to render a small portion of your
movie, go back to the Storyboard step and create a
Preview area (see page 47), then come back here and
select Preview range. Otherwise, Entire project is
selected by default.
For computer video, a Frame-based frame type is
always fine. If you want to watch your movie right
after rendering your project, select Play project
after creating. You can, of course, play your movie
with Windows media player at any time after rendering.
Video Save Options: Ulead VideoStudio.
Video Save Options: General.
Page 55

55
Compression
This is where you choose the codec, or type of
compression software, you’ll use to create your
video. All digital video is compressed in some way,
and the video clips you captured to your computer
are already using some kind of codec. To maintain
the highest possible quality and keep render times to
a minimum, it is best to use the same codec to
capture your video and to create your final movie.
This information can be found by clicking the
Storyboard step, selecting a captured clip, and
clicking the Info button. Some video capture cards
record “uncompressed” video, in which case you
should select None as the compression type (this,
however, will create a very large file).
Advanced
In this tab, you can specify the data rate of your
video file by targeting a specific medium for play
back. Data rate is calculated in kilobytes per
second (Kb/Sec) of data that needs to move from
your source (disk drive, CD-ROM, modem, etc.)
through your computer. If you have a Target
playback device in mind right now, select it from
the list. You can set the Tolerance to let the data
vary a little, otherwise Ulead V ideoStudio will stop
and warn you if the data rate is too high. It may
well be impossible to compress 640x480 30fps
video down to a data rate of 150Kb/Sec, but this
depends on your video (e.g. whether it has a lot of
action) and how much quality you feel you can
sacrifice.
Many codecs allow you to select the Quality of the output as a percentage. In some, you can
set the Keyframe for every X frames; for now the default for the codec should be adequate,
but lower numbers mean longer render times and higher quality. The Data type is usually set
Video Save Options: Advanced.
Video Save Options: Compression.
Page 56

56
VCD
A VCD is simply a special version of a CD-ROM. The exciting thing about
this format is that it can be read by most newer stand-alone DVD players,
which are becoming very popular in the US.
The format used on a VCD is MPEG-1. The previous section explains how you can put a
video file on a CD to play back on a computer. This file can be just about any format: AVI,
MPEG-1, MPEG-2, etc. When you want to create a VCD file, however, you need to create a
special WhiteBook standard MPEG-1 file that has very technical specifications. Fortunately,
creating such a file is easy with Ulead V ideoStudio.
Creating an MPEG-1 VCD
1. Open your project and go to the Finish step.
2. Click the Make Movie icon.
3. Select MPEG files *.mpg from the File type list.
4. Click the Options button.
5. Click the Compression tab.
5. From the Media type list, select NTSC VCD (or PAL VCD,
depending on your TV standard).
6. Click OK. Enter a name and click OK to render your movie.
MPEG-1 is a highly compressed format that maintains very good quality. Once the file is
created, you have to use a special VCD creation program to write (burn) the CD on your CD
writer. Simply follow the instructions for those programs to write your movie to the correct
location on the CD. Keep in mind that the quality of the blank CD could be important and that
not all stand-alone players can play VCDs created on your computer.
by default, and again, should match your captured clips. Audio compression can also be set,
independent of the video compression. Data rates are listed, so you can easily see the impact
on your completed movie. There is no point in choosing a higher quality audio setting than
your original source audio files. And, like video, selecting the same audio compression as used
in your highest quality audio clip (usually music) is your best option.
Page 57

57
Creating MPEG movies
1. Click the Make Movie button.
2. Select MPEG Files (*.mpg).
3. Click the Options button.
4. Select the type of MPEG file you want to create.
5. Click OK.
6. Enter a File name for your MPEG movie and click OK.
MPEG-2 on a PC
The most exciting recent development is MPEG-2, which is used on DVDs
and digital satellite television. MPEG-2 yields highly compressed files of
extremely high quality. There are a couple things you should consider about
this format.
First of all, MPEG-2 files can only be played back on your PC and only with the proper
software player. In the future, it may be possible to create DVDs at home using this format,
but that is not currently feasible. Secondly, because MPEG-2 is so powerful, it requires a fast
CPU (or a dedicated MPEG-2 video card) not only to create the video files, but also to view
them (a 450MHz CPU is a recommended minimum).
With that in mind, MPEG-2 is an excellent choice for any type of movie. Ulead VideoStudio
lets you capture directly from your camcorder to the MPEG-2 format, perform frameaccurate editing, and then create a final movie in the same format. MPEG-2’s highly compressed nature means that you can fit about 16-20 minutes of video onto a CD-ROM. This is
plenty of space for most home movies.
The following is a general procedure for creating any type of MPEG movie.
When you set up the MPEG options in step 4, click the Help button for information about the
specific parameters. In the simplest scenario, you should select either MPEG-1 or MPEG-2.
Page 58

58
DV - Digital Video
All movies on a computer are composed of ones and zeros and are therefore
digital, but Digital Video with a capital “D” and a capital “V” stands for a
very specific format of video, just like VHS or High-8. This format can be
understood (played back, recorded) by your camcorder. When you have the proper hardware
(capture card) and software (DV codec), it can also be understood by your computer.
The most exciting thing about DV is that it can be copied from your camcorder to your
computer, and then back to your camcorder (after editing, of course) without any loss of
quality. While previous versions of Ulead VideoStudio supported even the very first DV
products on the market, this latest version now offers comprehensive support for DV in all of
its manifestations. This includes, but is not limited to, Type-1, Type-2, PAL, NTSC, and even
the device control of your camcorder.
Recording a movie to your DV camcorder
1. Turn on your camcorder and set it to Play mode (or VTR
mode). See you camcorder’s manual for specific instructions.
2. Go to the Finish step.
3. From the Ouput options list, select your DV Recording device
(for example: MS DV Recording).
4. Click the Export video clip button. The DV Recording -
Preview Window opens. Click Next.
5. In the DV Recording - Record Window, click the DV record-
ing button to begin the process.
The Ouput options list with the
Export video clip button to the right.
The controls in the DV Recording - Record Window dialog box.
Page 59

59
The Internet
The Internet is becoming an exciting new place to share your movies, but
there are a few things you need to watch out for. A short three minute
vacation video can easily run 60MB and take many, many hours to down-
load. But if you are reasonable, you can put your movies on the Net just as
easily as you place an image on a Web page. Effective use of video on the Internet requires
that you understand that you necessarily must use very high compression ratios that result in
very low quality movies. This means your movie should use a small window (320X240 or
preferably smaller), low frame rate (15fps), and radio quality mono audio (8bit). Videos with a
lot of motion or action are not well suited to this medium.
When you are ready to create your movie, the procedure is the same as any other method.
Click the Finish step, click the Make Movie button, and then select the Options button. On the
Compression options tab, select a codec. Cinepak and Indeo are good choices. Again, you
have to consider that these videos are going to be played on someone else’s computer, so you
need to use a popular codec found on many computers.
MPEG-1 (Moving Picture Coding Experts Group) is becoming the de-facto format for video
and audio on the Web. It is currently used in millions of commercial Video CDs around the
world and provides high compression ratios without loss of quality. This is an excellent choice
not only for the Internet, but for all movies that you plan to play on your computer.
Streaming video is an exciting new method of displaying video on the Internet. This means
that your video begins playing while your movie is still downloading. Some methods of
streaming require special software, a special Internet server and can be expensive, but there
are a number of alternatives appearing. Ulead VideoStudio allows you to compress your files
using RealNetwork’s RealVideo file format (*.RM), Microsoft’s Advanced Streaming
format (*.ASF) or Apple’s QuickTime format (*.QT). These formats also require your
viewer to install the appropriate player, but all are widely available for download on the
Internet. Excellent results can be achieved with any of these codecs.
Page 60

60
Glossary
Glossary
Analog
A signal that is not digital. Most VCRs, televisions
and stereos are analog. Computers are digital,
dealing in ones and zeros. Information from an
analog source must be digitized to be used on a
computer.
Capture
The recording of video or images to a computer
hard disk.
Clip
A short section or part of a movie. A clip can be
audio, video, still images or a title.
Codec
COmpress and DECompress. All video on a
computer uses a special algorithm or program to
process video. This program is called a codec.
Color Clip
A simple background color used in a movie. It is
often used for titles and credits since they stand
out clearly against the solid color.
Compression
Making a file smaller by removing redundant data.
Nearly all digital video is compressed in some way
or another. Compression is achieved through a
codec.
Data Rate
The amount of data per second that is transferred
from one part of your computer to another. In digital
video, the data rate of your source is very important: CD-ROMs have lower data rates than hard
disks. The data rate of the Internet is very low.
Digital
Computer data consisting of ones and zeros.
Contrast digital information with analog.
Effect
In Ulead VideoStudio, an effect is a special
computer generated transition between two video
clips.
Frame
A single image in a movie.
Frame Rate
The number of frames per second in a video.
NTSC video is commonly 29.97 frames per second
(fps), but smaller video files can be created on the
computer by using lower frame rates, like 15fps.
Library (Ulead VideoStudio)
The Library is the repository for all of your media
clips. You can store video, audio, titles, or color
clips in the Library and instantly retrieve them for
use in a project.
Mark In/Out
Points in a clip that have been marked for editing
and trimming purposes. A section can be selected
from a longer clip by setting its beginning (Mark
in) and ending (Mark out).
NLE
Non Linear Editing. Conventional editing on a VCR
is necessarily linear because you must access
clips on a video tape in order. Computer editing
can be done in any order that is convenient.
NTSC/P AL
NTSC is the video standard in North America and
some other places. Its frame rate is 29.97fps. P AL
is common in Europe and Asia and has a frame
rate of 30fps. There are other differences.
Plug-ins
Plug-ins are small utilities in a program that add
special functions or effects. In Ulead Video Studio,
there are a few output functions that let you send
videos by e-mail, create Web pages or send
multimedia greeting cards.
Page 61

61
Render
Rendering is the process of making a finished
movie from the source files in a project.
Source
The source or origin of your media, usually a
camcorder or VCR. Audio CDs are great sources
for music clips.
Storyboard
A storyboard is a visual representation of your
movie. Individual clips are represented as image
thumbnails on the timeline.
Streaming
This is a relatively new Internet technology that
allows large files to be played as they are being
downloaded. Streaming is commonly used for large
video and audio files.
Timecode
The timecode of a video file is a numerical way of
representing the position in a video. Timecodes
can be used to make very accurate edits.
Timeline
The timeline is a graphic representation of your
movie in chronological order. The relative size of
clips on the timeline gives you an accurate idea of
the length of your media clips.
Title
A title can be a movie title, a caption or credit. Any
text overlays in your movie can be referred to as
titles.
Transition effect
A transition is a method of sequencing between
two video clips, like fading from one into another.
In Ulead VideoStudio, there are a large variety of
special transitions available, and they are called
Effects.
Trim
The process of editing or cropping a movie clip.
Computer video can be trimmed frame by frame.
Voiceover
The narration of a video or movie is commonly
called the voiceover. This is most notable in
documentaries, especially nature shows.
Page 62

62
Index
Index
A
ActiveMovie control 52
Add Effect 12
Add media 44
Adding a transition effect 15, 38
Adding an audio file 15
Adding media clips to the Library 21
Adding text 40
Advanced Streaming format 59
Animating titles 42
Animation style buttons 42
Apply button 41
Arrange step 12
Audio 14
audio clips 44
B
Background color 15
Background music 46
backgrounds 37
Breaking a clip into multiple files 35
C
camcorder 25
Capture 25
capturing 5
Capturing Digital Video 26
Capturing MPEG video 27
Capturing video 5, 25
Capturing video (Video Wizard) 11
CD 44
Clip navigation buttons 31
closing credits 40, 42
codec 55
Color clips 37
color library 37
Compression 55
Create step 16
Creating a Greeting Card 53, 56, 57
Creating a movie file 16
Creating a new project 24
Creating a new template 24
Creating a Web page 52
Creating MPEG movies 57
Creating multiple versions of a clip 34
Creating opening credits 15
Cross fade 43
Ctrl+Z 33
D
Data rate 55
Deleting media clips to the Library 21
Digital Video 9
digital video 4
duration 41
DV 7, 9, 26, 58
DV Recording 58
DVD 57
DVD quality movies 7
E
E-mail 52
effect 14
Effects step 38
events 28
Export video clip 52
Extended credits 43
F
F6 33
Fade away 49
Fading in & out 43
Fading titles 43
Finish 50
Fit project in window button 29
Frame rates 54
Frame size 54
Page 63

63
G
Get Video 10
Global command 31
Glossary 61
green bar 32
H
Handle 32, 34, 35, 47
I
image clips 36
image library 36, 37
Insert 21
Insert image 36, 37
Inserting a color clip 37
Inserting an image clip 32, 36
Installing Ulead VideoStudio 8
interface 18
J
jump cuts 38
L
Library 21, 34
license 2
Load Audio button 44
Load clip button 21
Load image button 36
M
Make movie button. 50, 51
Map of Ulead VideoStudio 18
Mark in /out 13, 32, 33
media clips 21, 28
Mixing it up 48
modes 28
Modifying a title 41
Moving audio clips between tracks 49
MP3 44, 46
MP3 audio files 7
MPEG 7, 27
MPEG-1 56
MPEG-2 7, 57
Music & Voice 44
Music track 44, 46
N
Narrating a movie 45
narration 44
New 7
O
opening and closing credits 40
Options panel 30
Out of Memory 31
P
Partial Rendering 51
play only the trimmed 32, 47
Play project 31
Play step 17
Playing back a video file 17
Preview files manager 31
Preview range 51
Previewing 31
Project 10
project file 6, 16, 24
Project template 54
Q
Quick Time 59
R
RealVideo 59
Record 25
Recording a movie to your DV
camcorder 58
Recording music from a CD 46
rendering 16, 24, 31
Rendering a movie 50
Reset button 41
Page 64

64
Rolling & scrolling 42
ruler scale 33
ruler units 29
S
Scroll bar 33
scrolling animations 42
scrolling credits 42
Select a clip 33, 34
Sending a movie by E-mail 52
Setting up DV device control 9
Setting up DV support 9
SmartRender 31
Software license 2
solid colored backgrounds 37
Start step 10, 24
Step by step 4, 22
store your title clips 41
Storyboard 28
Streaming video 59
switch 28
Switching to different tracks 30
T
Template 24
temporary files 31
The Internet 59
The Library 21
tiles 5
timeline 28
Timeline mode 29
Title 14, 40
Title motion button 42, 43
Title safe area 40
Tracks 6, 30
Transition effects 14, 38
Trim 13, 32
trim handle 33, 36
Trimming a clip 13
Trimming a clip
from the Timeline 33, 34
Trimming a clip
using the Trim bar 32, 47
Trimming a clip
with the Options panel 34
Trimming an audio clip 47
U
Ulead VideoStudio project 31
Ulead VideoStudio 4, 7
Ulead VideoStudio CD 44
undo 33
Using still images 36
UVP 10
V
VCD 56
video capture hardware 25
video project 17
Video Save Options 54
Video Wizard 10
Voice track 44
Voiceover narration 6, 45
VSP 16, 24, 31
W
Web Page 52
Whats New? 7
Y
yellow Trim handles 33
Z
Zoom controls 29, 33
 Loading...