


 Loading...
User Guide
Ulead Systems, Inc.
March 2004
English edition for Ulead VideoStudio 8, March 2004.
© 1992-2004 Ulead Systems, Inc.
All rights reserved. No part of this publication may be reproduced or transmitted in any form or by any means, electronic or mechanical, including photocopying, recording or storing in a retrieval system, or translated into any language in any form without the express written permission of Ulead Systems, Inc.
Software license
The software described in this document is furnished under a License Agreement, which is included with the product. This Agreement specifies the permitted and prohibited uses of the product.
Licenses and trademarks
ICI Library © 1991–1992 C-Cube Microsystems.
All rights reserved. Ulead and the Ulead Systems logo are registered trademarks and Ulead VideoStudio is a trademark of Ulead Systems, Inc. Intel, Pentium and MMX are registered trademarks and/or trademarks of Intel Corporation. Microsoft, Windows, DirectX and/or other Microsoft products referenced herein are either trademarks or registered trademarks of Microsoft Corporation. Adobe, the Adobe logo, and Acrobat are trademarks of Adobe Systems Incorporated.
All other product names and any registered and unregistered trademarks mentioned in this manual are used for identification purposes only and remain the exclusive property of their respective owners.
Sample files
Files provided as samples on the program CD can be used for personal demonstrations, productions and presentations. No rights are granted for commercial reproduction or redistribution of any sample files.
North & South America |
International |
Ulead Systems Inc. |
Ulead Systems, Inc. |
http://www.ulead.com |
http://www.ulead.com |
Support: http://www.ulead.com/tech |
http://www.asiapac.ulead.com |
|
http://www.ulead.com.tw |
|
Support: |
|
http://www.ulead.com/tech |
|
http://www.asiapac.ulead.com/tech |
|
http://www.ulead.com.tw/tech |
Japan |
China |
Ulead Systems Inc. |
Ulead Systems, Inc. |
http://www.ulead.co.jp |
http://www.ulead.com.cn |
Support: http://www.ulead.co.jp/tech |
Support: http://www.ulead.com.cn/tech |
Germany |
United Kingdom |
Ulead Systems GmbH |
http://www.ulead.co.uk |
http://www.ulead.de |
Support: http://www.ulead.co.uk/tech |
|
|
Support: http://www.ulead.de/tech |
|
|
France |
|
http://www.ulead.fr |
|
Support: http://www.ulead.fr/tech |

|
3 |
ULEAD VIDEOSTUDIO USER GUIDE |
|
Welcome to Ulead VideoStudio .................................... |
7 |
How VideoStudio works ......................................... |
7 |
What's new .......................................................... |
8 |
System requirements ........................................... |
12 |
Installing and running VideoStudio ......................... |
13 |
Setting up your computer .......................................... |
15 |
Installing a capture card ....................................... |
15 |
Connecting a video camera to the computer ............ |
15 |
DV or Digital 8 camcorder ....................................... |
15 |
Analog video sources .............................................. |
19 |
USB camera .......................................................... |
24 |
Preparation for video capturing and editing ............. |
25 |
Getting started ........................................................... |
26 |
VideoStudio Movie Wizard ..................................... |
26 |
Step 1: Add video and images ................................. |
26 |
Step 2: Select a template ....................................... |
29 |
Step 3: Finish ........................................................ |
32 |
VideoStudio Editor ............................................... |
33 |
The user interface ................................................. |
33 |
The Step Panel ...................................................... |
34 |
The Menu Bar ..................................................... |
35 |
The Options Panel ................................................. |
36 |
The Navigation Panel .............................................. |
36 |
The project timeline ............................................... |
37 |
The Library ........................................................... |
41 |
Starting a new movie project ................................. |
44 |
Saving your project ................................................ |
45 |
Setting your preferences ......................................... |
46 |
Setting project properties ....................................... |
46 |
Adding clips .......................................................... |
47 |
Previewing ............................................................ |
47 |
Capture ...................................................................... |
49 |
Seamless DV and MPEG capture ............................ |
49 |
The Capture Step Options Panel ............................. |
50 |
Capturing video ................................................... |
51 |
Digital Video (DV) .................................................. |
53 |
Analog video ......................................................... |
55 |

4 |
ULEAD VIDEOSTUDIO USER GUIDE |
|
Direct video capturing to MPEG format ...................... |
58 |
Direct video capturing to Windows Media Video .......... |
59 |
Batch Capture ..................................................... |
62 |
Capturing still images ........................................... |
63 |
Edit ............................................................................. |
64 |
Adding clips to the Video Track .............................. |
64 |
Video clips ............................................................. |
64 |
Images ................................................................. |
65 |
Color clips ............................................................. |
65 |
The Edit Step Options Panel .................................. |
66 |
Split by Scene ..................................................... |
67 |
Trimming a clip ................................................... |
69 |
Multi-trim Video .................................................. |
71 |
Saving trimmed clips ............................................ |
73 |
Playback Speed ................................................... |
73 |
Capturing still images in the Edit Step .................... |
74 |
Pan & Zoom ........................................................ |
75 |
Applying video filters ............................................ |
77 |
Key frame settings ................................................. |
79 |
Effect .......................................................................... |
81 |
Adding transitions ................................................ |
81 |
The Effect Step Options Panel ................................ |
82 |
The Album transition ............................................ |
83 |
Overlay ....................................................................... |
87 |
Adding clips to the Overlay Track ........................... |
87 |
The Overlay Step Options Panel ............................. |
91 |
Adding decorations .............................................. |
92 |
Title ............................................................................ |
94 |
Adding text ......................................................... |
94 |
Modifying text attributes ....................................... |
97 |
The Title Step Options Panel ................................. |
98 |
Applying animation .............................................. |
99 |
Animation effects ................................................... |
99 |
Audio ........................................................................ |
103 |
The Audio Step Options Panel .............................. |
103 |

|
5 |
ULEAD VIDEOSTUDIO USER GUIDE |
|
Adding voiceover narration .................................. |
104 |
Adding background music ................................... |
106 |
Adding audio files .............................................. |
107 |
Trimming audio clips .......................................... |
108 |
Fading-in/out ................................................... |
108 |
Mixing audio tracks ............................................ |
109 |
Using the Clip Volume Control ................................ |
109 |
Using the Audio Mixing Panel .................................. |
109 |
Volume rubber banding ......................................... |
110 |
Applying audio filters .......................................... |
111 |
Share ........................................................................ |
112 |
The Share Step Options Panel .............................. |
112 |
Creating movie templates ................................... |
112 |
Creating and saving a video file ........................... |
114 |
Burning a DVD, VCD or SVCD .............................. |
116 |
Assembling files .................................................... |
117 |
Adding/Editing chapters ......................................... |
118 |
Creating selection menus ....................................... |
120 |
Previewing .......................................................... |
122 |
Burning your project onto a disc ............................. |
122 |
Project Playback ................................................ |
124 |
Exporting your movie ......................................... |
126 |
Exporting videos to Ulead DVD-VR Wizard ................ |
126 |
Recording back to a DV camcorder .......................... |
129 |
Posting your video on a Web page ........................... |
130 |
Sending a movie by e-mail ..................................... |
131 |
Electronic greeting cards ........................................ |
132 |
Creating an audio file ......................................... |
133 |
Appendix A: Menus and dialog boxes ...................... |
134 |
Menus .............................................................. |
134 |
File menu ............................................................ |
134 |
Edit menu ............................................................ |
135 |
Clip menu ............................................................ |
136 |
Tools menu .......................................................... |
137 |
Help menu ........................................................... |
138 |
Dialog boxes ..................................................... |
139 |
Audio Save Options ............................................... |
139 |
Batch Convert ...................................................... |
140 |

6 |
ULEAD VIDEOSTUDIO USER GUIDE |
|
Burner Advanced Settings ..................................... |
141 |
Border/Shadow/Transparency ................................ |
142 |
Capture Options ................................................... |
143 |
Change Capture Plug-in ......................................... |
144 |
Output Advanced Settings ..................................... |
144 |
Preferences: File menu .......................................... |
145 |
Preferences (Create Disc) ..................................... |
151 |
Preview Playback Options ...................................... |
152 |
Project Properties ................................................. |
153 |
Project Options .................................................... |
153 |
Project Settings (Create Disc) ................................ |
154 |
Preview Files Manager ........................................... |
155 |
Select Device Control ............................................ |
156 |
Video and Audio Capture Property Settings .............. |
157 |
Video Color Manager ............................................. |
159 |
Video Save Options ............................................... |
160 |
Appendix B: Shortcuts ............................................. |
166 |
Menu command shortcuts .................................. |
166 |
Step Panel shortcuts .......................................... |
166 |
Navigation Panel shortcuts .................................. |
167 |
Timeline shortcuts ............................................. |
168 |
Multi-trim Video shortcuts ................................... |
168 |
Others ............................................................. |
169 |
Appendix C: Technology Overview ........................... |
170 |
Analog vs. Digital .............................................. |
170 |
SmartRender Technology .................................... |
171 |
DV SmartPlay .................................................... |
171 |
DVD, VCD, and SVCD ......................................... |
172 |
Appendix D: System tweaks .................................... |
173 |
Enabling DMA for IDE disks ................................. |
173 |
Disabling Write-Behind Caching ........................... |
176 |
Setting the Paging File size ................................. |
179 |
Appendix E. Tips and techniques ............................. |
182 |
Glossary ................................................................... |
184 |
Index ........................................................................ |
194 |
ULEAD VIDEOSTUDIO USER GUIDE |
7 |
|
|
|
|
Welcome to Ulead VideoStudio
Thank you for purchasing VideoStudio, the video editing software that allows even beginners to come up with professional-looking movies. It provides you with a complete set of tools to capture videos, edit them, and share your final production on tape, DVD, CD, or the Web.
How VideoStudio works
VideoStudio follows a step-by-step paradigm so that editing tasks remain uncomplicated from start to finish. VideoStudio also offers more than a hundred transition effects, professional titling capabilities and simple soundtrack creation tools. Learn in seconds, create in minutes.
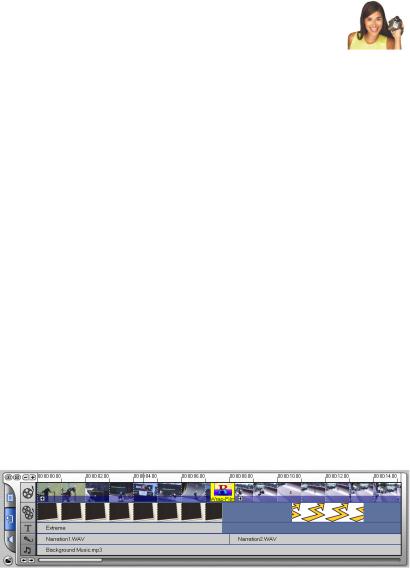
To make a movie production, first capture footage from a camcorder or another video source. You can then trim the captured videos, arrange their order, apply transitions, and add overlays, animated titles, voiceover narration, and background music. These elements are organized in separate tracks. Changes to one track do not affect other tracks.
Components of a project as displayed in Timeline View
A movie production is in the form of a VideoStudio project file (*.VSP), which contains information on the path location of the clips and how the movie has been put together. After you have finished your movie production, you can burn it to a DVD, VCD or SVCD or record the movie back to your camcorder. You can also output your movie as a video file for playback on the computer.
8 |
ULEAD VIDEOSTUDIO USER GUIDE |
|
VideoStudio uses the information in the video project file to combine all the elements in your movie into a video file. This process is called rendering.
What's new
Take advantage of VideoStudio's latest features and enhancements:
VideoStudio Movie Wizard
The new VideoStudio Movie Wizard helps novice users finish stylish movies in only three steps. Choose from preset styles such as romantic, travel, celebration and more. (See “VideoStudio Movie Wizard” on page 26).
Batch Convert
Batch Convert your video, audio and image files to other formats and save valuable time. (See “Batch Convert” on page 140).
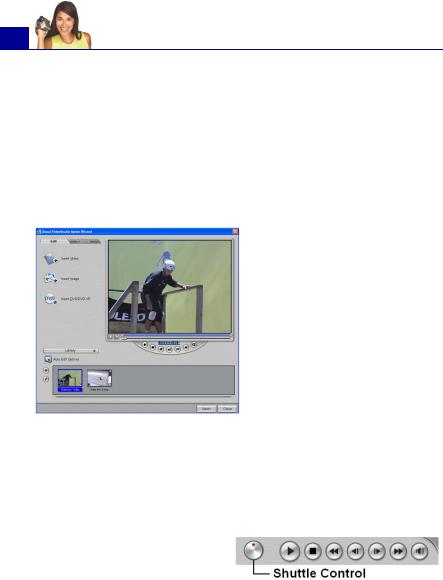
Shuttle Control
Shuttle Control lets you navigate to exact scenes in your DV camcorder. (See “Controlling the DV camcorder with the Navigation Panel” on page 54).
ULEAD VIDEOSTUDIO USER GUIDE |
9 |
|
|
|
|
More effects, filters and content
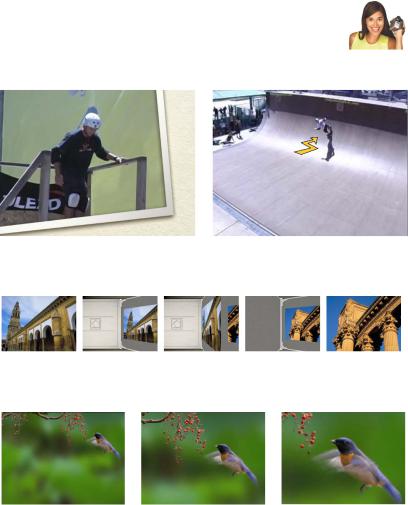
Stylize your videos with objects and frames. (See “Adding decorations” on page 92).
The Album transition simulates leafing through a book full of memories. (See “The Album transition” on page 83).
Pan and Zoom lets you scan over and gives you a closer view to add more emphasis to your still images. (See “Pan & Zoom” on page 75).
The Auto Exposure filter repairs uneven brightness. Amaze your viewers with effects like the Duotone Filter for tints on videos – perfect for creating scene flashbacks – or the Diffuse Glow Filter for a dream-like appearance. Filters are fully adjustable to match your theme. (For information on applying video filters, see “Applying video filters” on page 77).
10 |
ULEAD VIDEOSTUDIO USER GUIDE |
|
Audio Filters like Audio Normalization, Remove Noise, Amplify, Long Echo and Stadium, can repair tracks or add special effects. (See “Applying audio filters” on page 111).
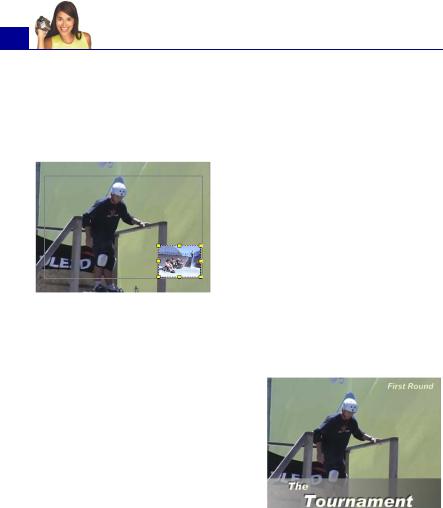
Enhanced Overlay Step
VideoStudio gives more flexibility in using video and image overlays. You can now apply filters and special effects on overlays; and also move and resize them directly on the screen. (See “Overlay” on
page 87).
Versatile title design
Easily make informative and eye-catching titles.
•Multiple Text Objects can be placed anywhere on a single title clip, each with its own look and animation, directly on the screen. (See “Adding text” on page 94).
•Title animations such as Drop, Swing, and Moving Path give new options in
making text move gracefully on the screen. directly on the screen. (See “Applying animation” on page 99).
•Add Solid and Gradient Bars behind Titles to increase the visibility of text. (See “Modifying text attributes” on page 97).
ULEAD VIDEOSTUDIO USER GUIDE |
11 |
|
|
|
|
Greater audio control
VideoStudio helps you match volume with particular scenes in the movie.
•Audio Mixer is ideal if you want to change the volume of specific points in your audio track or decrease background music during dialogue. (See “Using the Audio Mixing Panel” on page 109).
•Rubber Banding Timeline lets you visually adjust audio levels at any point simply by clicking and dragging. (See “Volume rubber banding” on page 110).
•Stereo Panning allows you to mix and balance the volume for left and right audio channels. This can be used to direct sounds to the left or right speaker. For example, make the realistic sound of an object moving from left and right. (See “Using the Audio Mixing Panel” on page 109).
Auto Music Generator
Need background music for a scene? VideoStudio’s Auto Music Generator uses award-winning SmartSound™ technology that provides original tunes to fit perfectly with each scene’s mood and duration. (See “Adding background music” on page 106).
Enhanced DVD authoring wizard
DVDs without Pre-Rendering can be accomplished by sending projects to the DVD Wizard directly from the Timeline.
Choose from a wider choice of DVD menu templates for more variety and customization in layout and design. (For information on creating movie projects on disc, see “Burning a DVD, VCD or SVCD” on page 116).
Full Screen Preview
Full Screen Preview lets you see your movie on the entire screen with no distortion at any time during the project. (See “Tools menu” on page 137).

12 |
ULEAD VIDEOSTUDIO USER GUIDE |
|
System requirements
Video demands a lot from your computer. When setting up your system for video editing, the basic factors to consider are the size and speed of your hard drive, RAM, and processor. These determine how much video you can store and how quickly you can process or render your files. If you can afford a bigger hard drive, more RAM, and faster chip, go with it. Just remember that technology is changing so rapidly and by evaluating first the kind of video editing projects you plan to do, you can better determine the setup that works best for you.
The following are the system requirements for VideoStudio:
•Intel® Pentium® III 800 MHz or higher
•Microsoft® Windows® 98 SE, ME, 2000, XP
•256MB of RAM (512MB or above for editing)
•600MB of available hard drive space for program installation
•4 GB+ hard drive space for video capture and editing
•Windows-compatible display with at least 1024x768 resolution
•Windows compatible sound card
•CDROM, CD-R/RW or DVD-R/RW
Real-time features perform best with at least:
•Pentium 4, 2.0 GHz CPU
•512 MB of RAM
•7200 rpm IDE hard drive
Input/Output device support
•1394 FireWire cards for use with DV/D8 camcorders
•Support for OHCI Compliant IEEE-1394 and 1394 Adaptec 8940/8945
•Analog capture cards for analog camcorders (VFW & WDM support)
•USB capture devices and PC Cameras

ULEAD VIDEOSTUDIO USER GUIDE |
13 |
|
|
|
|
•Windows-compatible DVD-R/RW, DVD+R/RW, CD-R/RW
•Sony MicroMV™
Tip: Follow the installation instructions of your hardware components carefully (especially your capture card), and consult the operating manual of your camcorder or capture device.
File format support
•Video: AVI, MPEG-1, MPEG-2, MICROMV, WMV, QuickTime, FLC, FLI, GIF, UIS
•Image: BMP, CLP, CUR, DCS, EPS, FPX, GIF, ICO, IFF, IMG, JPG, PCD, PCT, PCX, PIC, PNG, PSD, PXR, RAS, RLE, SCT, SHG, TGA, TIF, WMF
•Audio: AIF, AIFC, AIFF, AU, AVI, MOV, MP3, MPEG-1, MPEG-2, QT, WAV
Output formats
•Disc: DVD, Video CD (VCD), and Super Video CD (SVCD) movie titles
•Video: AVI, MPEG-1, MPEG-2, QuickTime, WMV, FLC, FLI, FLX, UIS, WMV
•Image: BMP, CLP, EPS, FPX, GIF, IFF, IMG, JPG, PCX, PNG, PSD, PXR, RAS, RLE, SCT, TGA, TIF, WMF
•Audio: WAV, MPA, RM, WMA
Installing and running VideoStudio
The VideoStudio CD has an autorun feature that automatically starts up the installation.
Back up your projects and media files first before installing the new version of VideoStudio.

14 |
ULEAD VIDEOSTUDIO USER GUIDE |
|
Note: If you have a previous version of Ulead VideoStudio installed in your system, it is recommended that you uninstall it only after installing Ulead VideoStudio 8. During installation, the Setup Wizard will auto-detect your capture device plug-in and specially supported codecs (such as MPEG-4, AC-3, 3GP, DivX) from the previous VideoStudio version and integrate them onto VideoStudio 8.
However, if you installed Ulead VideoStudio 8 then you uninstalled the older version, program files and fonts that are used by both versions will also be deleted. To install them back to VideoStudio 8, double-click Add or Remove Programs in the Control Panel, select
Ulead VideoStudio 8, click Change/Remove, then click Repair.
To install VideoStudio:
1.Insert the VideoStudio CD into your CD-ROM drive.
2.When the Setup screen appears, follow the instructions to install VideoStudio onto your computer.
Note: If the Setup screen does not appear after loading the CD, then you can manually start it by double-clicking the My Computer icon on your desktop, then double-clicking the icon for the CD-ROM drive. When the CD-ROM window opens, double-click the Setup icon.
3.Install also the following applications for playing back video files and for viewing the electronic file of this user guide. The installation program will walk you through the installation.
• |
QuickTime |
• |
Acrobat Reader |
• |
SmartSound |
• |
DirectX |
• |
Windows Media Format |
• |
Sony MicroMV |
• |
RealPlayer |
• |
Indeo |
Note: Skip this step if you already have newer versions of the above supporting applications installed in your PC.
To run VideoStudio:
•Double-click the VideoStudio icon on your Windows desktop. OR,
•Select the VideoStudio icon from the VideoStudio program group on the Windows Start menu.
ULEAD VIDEOSTUDIO USER GUIDE |
15 |
|
|
|
|
Setting up your computer
Before you can start making movie projects using your own video footage, you first need to capture video from your video camera into your computer. Your computer needs to be equipped with the proper capture card or interface port for connecting your video camera and for capturing video to your computer. Since capturing and video editing require a lot of computer resources, your computer must also be properly set up to ensure successful capturing and smooth editing of your videos.
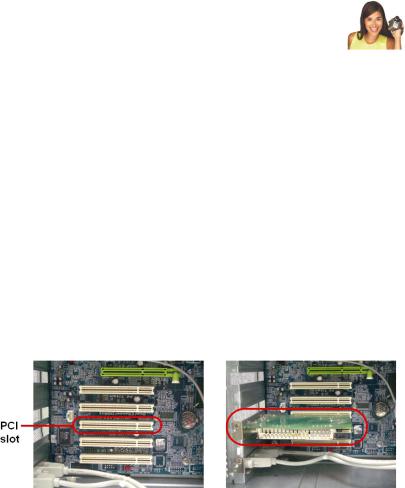
Installing a capture card
If your capture card is a PCI-based card, install the card on your computer by inserting it in an available PCI slot on the computer’s motherboard.
Connecting a video camera to the computer
To connect your video camera to your computer, the type of capture card or interface port that you will need depends on the type of video camera you are using.
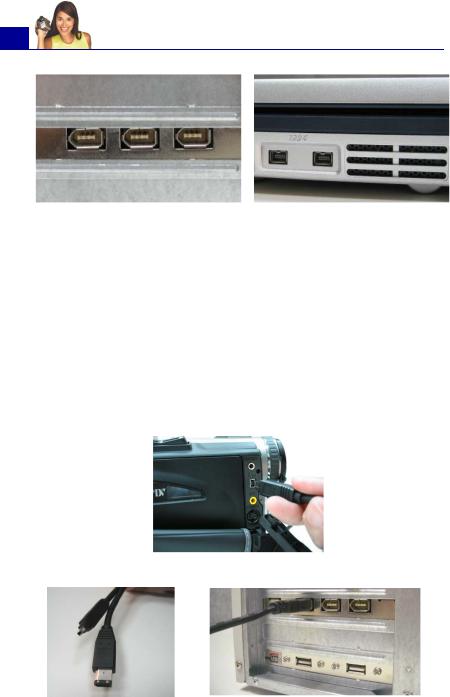
DV or Digital 8 camcorder
If you are using a DV (Digital Video) or Digital 8 camcorder, you will need an IEEE-1394 interface on your computer. Some newer computers already have built-in IEEE-1394 ports. If you do not have them on your computer, install an IEEE-1394 card.
16 |
ULEAD VIDEOSTUDIO USER GUIDE |
|
6-pin IEEE-1394 ports on a desktop computer
4-pin IEEE-1394 ports on a notebook computer
Connecting the camcorder to the IEEE-1394 interface
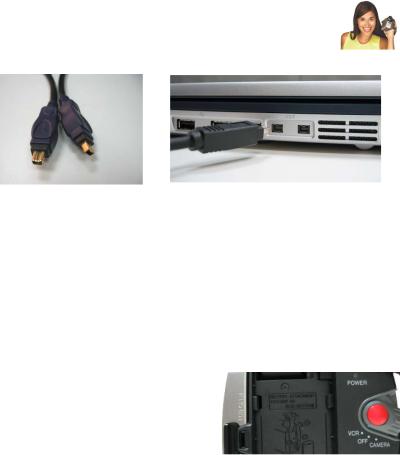
Use an IEEE-1394 cable to connect your digital camcorder to the IEEE-1394 port. Before purchasing one, check first the pin connectors used on your camcorder and your computer. Most DV and Digital 8 camcorders have a 4-pin connector, whereas desktop computers that come with IEEE-1394 ports or installed with IEEE1394 cards usually have 6-pin connectors. The IEEE-1394 cable that is required for desktop computers is a 4-pin to 6-pin cable. Most notebook computers have 4-pin connectors which require a 4- pin to 4-pin cable.
Connecting the IEEE-1394 cable to the DV camcorder
Connecting a 4-pin to 6-pin IEEE-1394 cable to a desktop computer
ULEAD VIDEOSTUDIO USER GUIDE |
17 |
|
|
|
|
Connecting a 4-pin to 4-pin IEEE-1394 cable to a notebook computer
Checking the hardware setup
After connecting your digital camcorder to the computer, check if the device is detected by your Windows system. If you installed an IEEE-1394 card on your computer, check also if the card is detected.
To check if the IEEE-1394 card and digital camcorder are detected:
1.Insert your video tape into the camcorder and switch it on. Make sure it is in playback mode (usually named VTR or VCR). Check your camcorder's manual for specific instructions.
2.Open the Control Panel, then open System: Hardware - Device Manager.
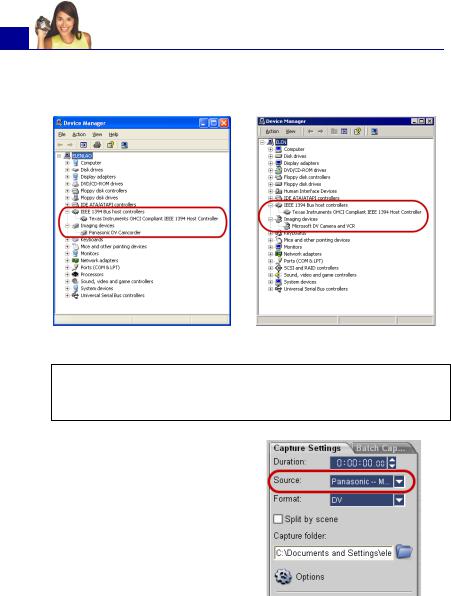
3.Make sure the following device names are listed in the Device Manager.
Under Windows XP or Windows Me:
•1394 Bus Controller
•<Brand name> DV Camcorder (The brand name depends on the DV camcorder connected to the IEEE-1394 interface.)
Under Windows 2000 or Windows 98SE:
•1394 Bus Controller
•Image Device: Microsoft DV Camera and VCR (For Microsoft DV driver only.)
18ULEAD VIDEOSTUDIO USER GUIDE
•Sound, video and game controllers: 1394 camcorder (For Texas Instruments DV driver only.)
Windows XP: Device Manager |
Windows 2000: Device Manager |
Note: In addition to commonly used Texas Instruments and Microsoft DV drivers, there are other drivers available. Consult your camcorder's manual for suitable drivers.
4.If your digital camcorder has been detected properly, it will be listed as a source device in VideoStudio's Options Panel. In VideoStudio, select the Capture Step and check if your camcorder is displayed under the
Source list in the Options Panel.
ULEAD VIDEOSTUDIO USER GUIDE |
19 |
|
|
|
|
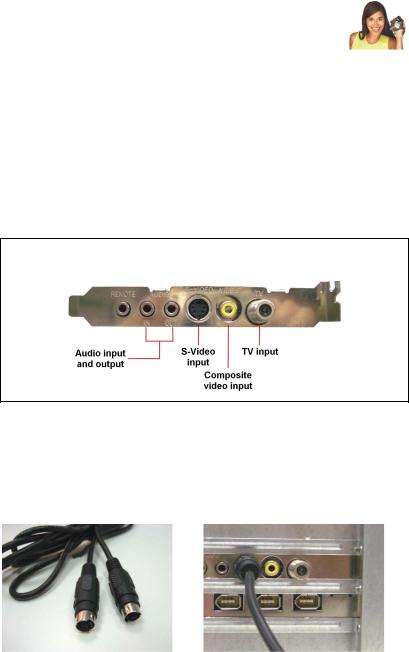
Analog video sources
VHS, S-VHS, Video-8, and Hi8 camcorders and VCRs are examples of analog video sources. To capture video from analog sources, you will need to install an analog capture card in your computer. (See “Installing a capture card” on page 15).
Conventional broadcast television is also an analog source. To capture TV footage, you need to have a TV tuner card installed in your computer.
Note: TV capture cards provide S-Video/Composite inputs and a TV tuner, which can be used to capture both video and TV footage.
Connecting the video device to the analog capture card
To connect your video device to the analog capture card, use either an S-Video or RCA Composite cable depending on your device's video output. If your video device has both types of output, use the S-Video connection for higher video quality captures.
S-Video cable |
Connecting the S-Video source to the |
|
capture card |
20 |
ULEAD VIDEOSTUDIO USER GUIDE |
|
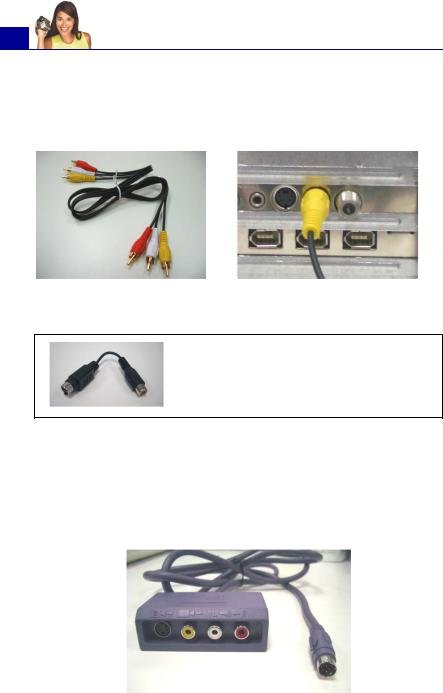
If you want to use the Composite output of your video device, connect the yellow plugs of the Composite cable to the video output of your video device and the video input port of the analog capture card.
Composite cable |
Connecting the Composite video |
|
source to the capture card |
Tip: If your analog capture card provides S- Video input only and you are using a Composite video source, you need a Composite to S-Video adapter to make the connection.
Most higher-end analog capture cards do not have the Composite/ S-Video input ports crowded on the side of the cards. Instead, these cards come with an external breakout box that provide all the video input ports at the front of the box. Video devices can be connected to the capture card more easily through the breakout box.
ULEAD VIDEOSTUDIO USER GUIDE |
21 |
|
|
|
|
Connecting a TV antenna to the tuner card
A tuner card has a TV antenna input just like the regular television monitor. Plug your TV antenna to the TV connector of the tuner card.
TV antenna cable |
Connecting TV antenna to the tuner card |
Note: When purchasing a tuner card, make sure you acquire one that provides the correct TV system (NTSC or PAL) for your region.
Connecting the capture or tuner card to the sound card
Most capture and tuner cards only allow video capture. To preview the audio from your video device or TV and to capture the audio into your computer, you need to connect the audio output of the capture or tuner card to the sound card's Line In port. The required cables for connecting to the sound card are different for each type of video source:
Line-in and audio cables for S-Video
S-Video connection

22 |
ULEAD VIDEOSTUDIO USER GUIDE |
|
Line-in and audio cables for Composite video
Line-in cable for TV tuner card
Line-in cable for high-end TV capture card
Composite video connection
TV tuner connection
High-end TV capture card connection
ULEAD VIDEOSTUDIO USER GUIDE |
23 |
|
|
|
|
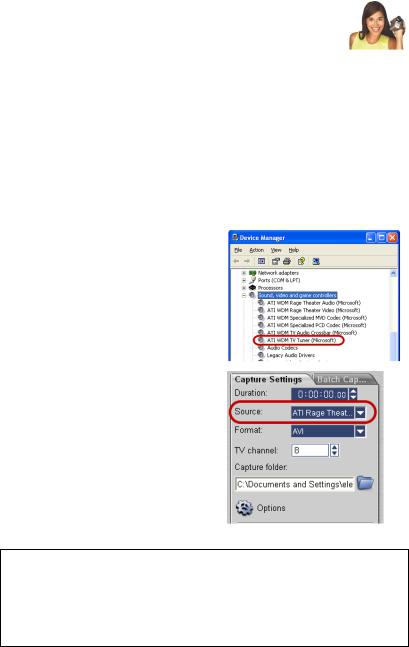
Checking the hardware setup
After connecting your analog source to the capture or tuner card, check if the card is detected by your Windows system.
To check if the capture or tuner card is detected:
1.If you are using a video device such as a camcorder as your source, insert your videotape into the video device and switch it on. Make sure it is in the playback mode (usually named VTR or VCR). See your machine's manual for specific instructions.
2.Open the Control Panel, then open System: Hardware - Device Manager.
3.In the Device Manager, doubleclick Sound, video and game controllers. Check if your capture or tuner card is listed in this folder.
4.If your capture or tuner card has been detected properly, it will be listed as a source device in VideoStudio's Options Panel. In VideoStudio, select the Capture Step and check if your capture or tuner card is displayed under the Source list in the Options Panel.
Note: If your capture device supports multiple video sources, the
Video and Audio Capture Property Settings dialog box allows you to select your desired video source such as Composite, Tuner, or S-Video. Likewise, if you have multiple audio sources, this dialog box allows you to select your desired audio source. (See “Video and Audio Capture Property Settings” on page 157).
24 |
ULEAD VIDEOSTUDIO USER GUIDE |
|
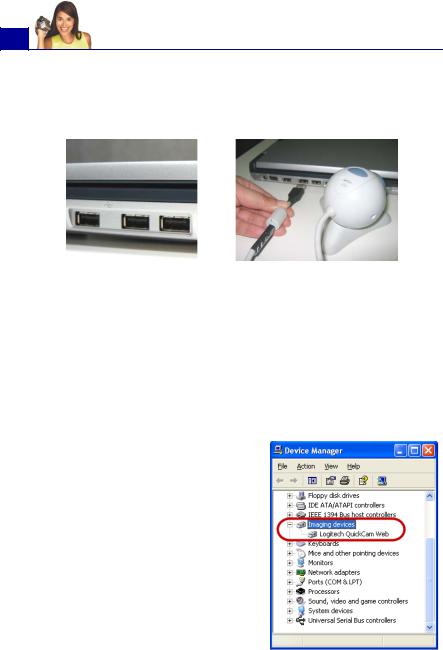
USB camera
To capture live video and still images from a USB camera, connect the camera to an available USB port on your computer.
USB ports |
Connecting a USB camera |
USB cameras may require installation of a device driver, depending on the Windows version you are using. For information on how to install your USB camera, refer to its accompanying manual.
After properly installing your USB camera, check if it is detected by your Windows system.
To check if the USB camera is detected:
1.Open the Control Panel, then open System: Hardware - Device Manager.
2.In the Device Manager, doubleclick Imaging devices. Check if your USB camera is listed in this folder.
3.If your USB camera has been detected properly, it will be listed as a source device in VideoStudio's Options Panel. In VideoStudio, select the Capture Step and check if your USB camera is displayed under the
Source list in the Options Panel.

ULEAD VIDEOSTUDIO USER GUIDE |
25 |
|
|
|
|
Preparation for video capturing and editing
Capturing and video editing are tasks that require a lot of computer resources. Your computer must be properly set up to ensure successful capturing and smooth video editing. Below are some tips on how to prepare your digital camcorder and optimize your computer for capturing and editing.
•For better workability of batch capture and camcorder device control, correct timecode on the DV tape is a must. To do this, before shooting your video, use the standard playback (SP) mode and shoot a blank video (for example, leaving the lens cover on while recording) without interruption from start to end of a tape.
•It is recommended that you close all other applications when working with VideoStudio. You should also turn off any automatically-launched software like screen savers to avoid possible interruptions while capturing.
•If you have two hard drives in your system, it is recommended that you install VideoStudio to your system drive (usually C:) and store captured videos in your other drive (usually D:).
The choice of what hard disk to use is also crucial. Using a dedicated video hard drive, preferably with Ultra-DMA/66 7200 rpm and 30GB free space, is recommended.
•Make sure DMA is enabled for your hard disk. (See “Enabling DMA for IDE disks” on page 173).
•Disable Write-Behind Caching on the hard drive used for video capture. (See “Disabling Write-Behind Caching” on
page 176).
•Increase the Paging File (Swap File) size to twice your amount of RAM. (See “Setting the Paging File size” on page 179).
26 |
ULEAD VIDEOSTUDIO USER GUIDE |
|
Getting started
When you run VideoStudio, a startup screen appears which allows you to choose between two modes of video editing:
•VideoStudio Movie Wizard is ideal for users who are new to video editing. It guides you through the movie production process in three quick, easy steps.
•VideoStudio Editor gives you the full editing features of VideoStudio. It
provides you total control over the movie production process, from adding clips, titles, effects, overlays, and music to making the final movie on disc or other medium.
VideoStudio Movie Wizard
If you are new to video editing or you want to quickly make a movie, you can use the VideoStudio Movie Wizard to assemble video clips and images, add background music and titles, then output the final movie as a video file, burn it onto a disc, or further edit the movie in VideoStudio Editor.
Step 1: Add video and images
Assemble your video and images into a movie.
To add video and images:
1.If you have not captured any video footage or images into your computer yet, click the Capture tab and capture. (See “To capture video and images:” on page 28).
2.Use these buttons to collect video and images for your movie.
ULEAD VIDEOSTUDIO USER GUIDE |
27 |
|
|
|
|
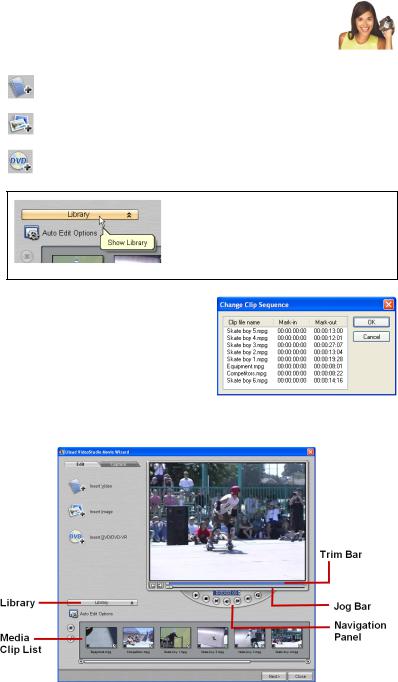
Click Insert Video to add video files of different formats such as AVI, MPEG, and, WMV.
Click Insert Image to add still images. (You can create a photo slideshow if you choose to only add images.)
Click Insert DVD/DVD-VR to add video from a DVDVideo or DVD-VR formatted disc.
Tip: Click Library to open the media library that contains media clips that come with VideoStudio. To import your own video or image files to the
Library, click  .
.
3.If you selected multiple clips, the
Change Clip Sequence dialog box will appear where you can arrange the order of the clips.
Drag the clips to the desired sequence then click OK.
4.The video and image clips that you selected for your movie will be added to the Media Clip List.
28 |
ULEAD VIDEOSTUDIO USER GUIDE |
|
Tip: You can also arrange clips in the Media Clip List by dragging them to the desired sequence.
5.To preview the clips, select each clip in the Media Clip List and use the Jog Bar and Navigation Panel buttons. When trimming a clip, drag the Mark-in and Mark-out handles on the Trim Bar to select the desired start and end points of the clip.
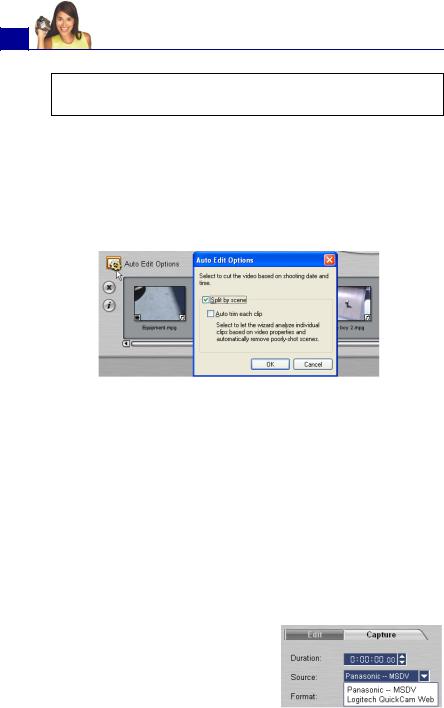
6.Click Auto Edit Options. In the Auto Edit Options dialog box, select Split by scene to automatically split lengthy video clips into smaller clips based on their shooting dates and times.
Select Auto-trim each clip if you want the wizard to analyze individual clips based on video properties such as color and lighting, and automatically remove poorly-shot scenes. Clips that have long audio pauses in between scenes (such as pauses in between dialogues) will also be segmented into smaller clips so that they can be blended smoothly to the background music's beat and tempo. This option is only available when Split by scene is selected.
7. Click Next.
To capture video and images:
1.Connect your camcorder to your computer and turn on the device. Set it to Play (or VTR / VCR) mode.
2.Check if your camcorder is selected in the Source list.
3.Click the Capture tab in the VideoStudio Movie Wizard.
ULEAD VIDEOSTUDIO USER GUIDE |
29 |
|
|
|
|
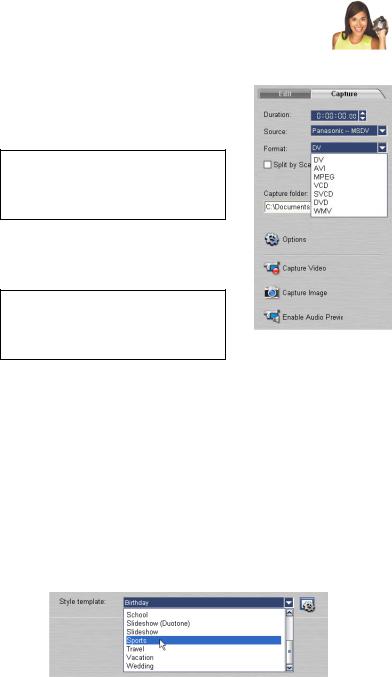
4.Select the video file format to use for saving captured video files from the Format list. Specify the Capture folder in which to save the files.
Note: Click Options to customize capture settings specific to your video device. For details, see “Capturing video” on page 51.
5.Play the videotape in your camcorder, and position the tape on the part of the video where to start capturing.
Tip: If you are capturing video from a DV camcorder, use the
Navigation Panel to play your videotape.
6.Click Capture Video to start capturing. Click Stop Capture or press [Esc] to stop capturing.
7.To capture a still image from the video footage, pause the video on the desired image then click Capture Image.
Step 2: Select a template
Select a style template to apply to your movie. Each template provides a different theme which comes with preset start and ending video clips, transitions, title and background music.
To apply a style template:
1. Select a template from the Style template list.
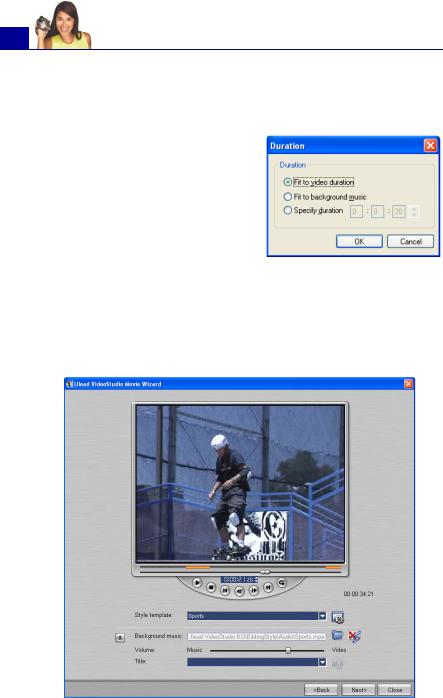
30ULEAD VIDEOSTUDIO USER GUIDE
2.To customize the overall length of your movie, click  . In the Duration dialog box, select how you want the movie duration to be adjusted:
•Fit to video duration: Keeps the current movie duration.
•Fit to background music:
Adjusts the movie duration to fit into the length of the background music. (The background music is added to your movie in the second step of the Movie Wizard.)
•Specify duration: Lets you define a custom duration for the whole movie.
3.Click  to view more options.
Loading...