

Page 1
User Guide
Ulead Systems, Inc.
March 2006
C28-1A0-110-0A0001
Page 2

English edition for Ulead® VideoStudio® 10, March 2006.
© 1992-2006 Ulead Systems, Inc.
All rights reserved. No part of this publication may be reproduced or transmitted in any form or by any
means, electronic or mechanical, including photocopying, recording or storing in a retrieval system, or
translated into any language in any form without the express written permission of Ulead Systems, Inc.
Software license
The software described in this document is furnished under a License Agreement, which is included with
the product. This Agreement specifies the permitted and prohibited uses of the product.
Licenses and trademarks
ICI Library © 1991–1992 C-Cube Microsystems.
All rights reserved. Ulead and the Ulead Systems logo are registered trademarks and Ulead VideoStudio is
a trademark of Ulead Systems, Inc. Intel, Pentium and MMX are registered trademarks and/or trademarks
of Intel Corporation. Microsoft, Windows, DirectX and/or other Microsoft products referenced herein are
either trademarks or registered trademarks of Microsoft Corporation. Adobe, the Adobe logo, and Acrobat
are trademarks of Adobe Systems Incorporated. QuickTime and the QuickTime logo are trademarks used
under license. QuickTime is registered in the U.S. and other countries. All other product names and any
registered and unregistered trademarks mentioned in this manual are used for identification purposes only
and remain the exclusive property of their respective owners.
Sample files
Files provided as samples on the program CD can be used for personal demonstrations, productions and
presentations. No rights are granted for commercial reproduction or redistribution of any sample files.
North & South America
Ulead Systems Inc.
http://www.ulead.com
Support: http://www.ulead.com/tech
Japan
Ulead Systems Inc.
http://www.ulead.co.jp
Support: http://www.ulead.co.jp/tech
Germany
Ulead Systems GmbH
http://www.ulead.de
Support: http://www.ulead.de/tech
France
http://www.ulead.fr
Support: http://www.ulead.fr/tech
International
Ulead Systems, Inc.
http://www.ulead.com
http://www.ulead.com.tw
Support:
http://www.ulead.com/tech
http://www.ulead.com.tw/tech
China
Ulead Systems, Inc.
http://www.ulead.com.cn
Support: http://www.ulead.com.cn/tech
United Kingdom
http://www.ulead.co.uk
Support: http://www.ulead.co.uk/tech
Page 3

ULEAD VIDEOSTUDIO USER GUIDE
Welcome to Ulead VideoStudio . . . . . . . . . . . . . . . . . . . . . . . . . . . . . 7
How VideoStudio works . . . . . . . . . . . . . . . . . . . . . . . . . . . . . . . . . . . . 7
Installing and running VideoStudio . . . . . . . . . . . . . . . . . . . . . . . . . . . . 8
Setting up your computer . . . . . . . . . . . . . . . . . . . . . . . . . . . . . . . . . 9
Installing a capture card . . . . . . . . . . . . . . . . . . . . . . . . . . . . . . . . . . . 9
Connecting a video camera to the computer . . . . . . . . . . . . . . . . . . . . . . 9
DV or Digital 8 camcorder . . . . . . . . . . . . . . . . . . . . . . . . . . . . . . . 9
Sony HDV camcorder . . . . . . . . . . . . . . . . . . . . . . . . . . . . . . . . . .13
Analog video sources . . . . . . . . . . . . . . . . . . . . . . . . . . . . . . . . . . .13
USB camera . . . . . . . . . . . . . . . . . . . . . . . . . . . . . . . . . . . . . . . . .18
Preparation for video capturing and editing . . . . . . . . . . . . . . . . . . . . . .19
Getting started . . . . . . . . . . . . . . . . . . . . . . . . . . . . . . . . . . . . . . . . . 20
DV-to-DVD Wizard . . . . . . . . . . . . . . . . . . . . . . . . . . . . . . . . . . . . . . .20
Step 1: Scan for scenes . . . . . . . . . . . . . . . . . . . . . . . . . . . . . . . . .20
Step 2: Apply a theme template and burn to DVD . . . . . . . . . . . . . .22
Movie Wizard . . . . . . . . . . . . . . . . . . . . . . . . . . . . . . . . . . . . . . . . . . .22
Step 1: Add video and images . . . . . . . . . . . . . . . . . . . . . . . . . . . .23
Step 2: Select a template . . . . . . . . . . . . . . . . . . . . . . . . . . . . . . .26
Step 3: Finish . . . . . . . . . . . . . . . . . . . . . . . . . . . . . . . . . . . . . . . .29
VideoStudio Editor . . . . . . . . . . . . . . . . . . . . . . . . . . . . . . . . . . . . . . .30
The user interface . . . . . . . . . . . . . . . . . . . . . . . . . . . . . . . . . . . . .30
The Step Panel . . . . . . . . . . . . . . . . . . . . . . . . . . . . . . . . . . . . . . .31
The Menu Bar . . . . . . . . . . . . . . . . . . . . . . . . . . . . . . . . . . . . . . . .32
The Toolbar . . . . . . . . . . . . . . . . . . . . . . . . . . . . . . . . . . . . . . . . .33
The Project Timeline . . . . . . . . . . . . . . . . . . . . . . . . . . . . . . . . . . .34
The Options Panel . . . . . . . . . . . . . . . . . . . . . . . . . . . . . . . . . . . . .37
The Library . . . . . . . . . . . . . . . . . . . . . . . . . . . . . . . . . . . . . . . . .38
Starting a new movie project . . . . . . . . . . . . . . . . . . . . . . . . . . . . . . . .40
Setting your preferences . . . . . . . . . . . . . . . . . . . . . . . . . . . . . . . .41
Setting project properties . . . . . . . . . . . . . . . . . . . . . . . . . . . . . . .42
Adding clips . . . . . . . . . . . . . . . . . . . . . . . . . . . . . . . . . . . . . . . . .42
Previewing . . . . . . . . . . . . . . . . . . . . . . . . . . . . . . . . . . . . . . . . . .42
Undoing and redoing actions . . . . . . . . . . . . . . . . . . . . . . . . . . . . .44
Showing and hiding grid lines . . . . . . . . . . . . . . . . . . . . . . . . . . . . .44
Saving your project . . . . . . . . . . . . . . . . . . . . . . . . . . . . . . . . . . . .44
Capture . . . . . . . . . . . . . . . . . . . . . . . . . . . . . . . . . . . . . . . . . . . . . . . 45
Seamless DV and MPEG capture . . . . . . . . . . . . . . . . . . . . . . . . . . . . . .45
The Capture Step Options Panel . . . . . . . . . . . . . . . . . . . . . . . . . . . . . .46
Capturing video . . . . . . . . . . . . . . . . . . . . . . . . . . . . . . . . . . . . . . . . .46
Digital Video (DV) . . . . . . . . . . . . . . . . . . . . . . . . . . . . . . . . . . . . .47
High Definition Videos . . . . . . . . . . . . . . . . . . . . . . . . . . . . . . . . . .49
Digital TV DVB-T video . . . . . . . . . . . . . . . . . . . . . . . . . . . . . . . . .50
Analog video . . . . . . . . . . . . . . . . . . . . . . . . . . . . . . . . . . . . . . . .50
Capturing TV footage . . . . . . . . . . . . . . . . . . . . . . . . . . . . . . . . . .52
DV Quick Scan . . . . . . . . . . . . . . . . . . . . . . . . . . . . . . . . . . . . . . .52
Importing from DVD/DVD-VR . . . . . . . . . . . . . . . . . . . . . . . . . . . . .52
Importing from Mobile Devices . . . . . . . . . . . . . . . . . . . . . . . . . . . .53
Direct video capturing to MPEG format . . . . . . . . . . . . . . . . . . . . . .54
3
Page 4

4
ULEAD VIDEOSTUDIO USER GUIDE
Direct video capturing to Windows Media Video . . . . . . . . . . . . . . . . 55
Selecting a profile . . . . . . . . . . . . . . . . . . . . . . . . . . . . . . . . . . . . 55
Editing and customizing a video profile . . . . . . . . . . . . . . . . . . . . . . 56
Capturing still images . . . . . . . . . . . . . . . . . . . . . . . . . . . . . . . . . . . . . 58
Edit . . . . . . . . . . . . . . . . . . . . . . . . . . . . . . . . . . . . . . . . . . . . . . . . . .59
The Edit Step Options Panel . . . . . . . . . . . . . . . . . . . . . . . . . . . . . . . . 59
Adding clips to the Video Track . . . . . . . . . . . . . . . . . . . . . . . . . . . . . . 60
Video clips . . . . . . . . . . . . . . . . . . . . . . . . . . . . . . . . . . . . . . . . . 61
Images . . . . . . . . . . . . . . . . . . . . . . . . . . . . . . . . . . . . . . . . . . . . 61
Color clips . . . . . . . . . . . . . . . . . . . . . . . . . . . . . . . . . . . . . . . . . . 61
Trimming a clip . . . . . . . . . . . . . . . . . . . . . . . . . . . . . . . . . . . . . . . . . 62
Saving trimmed clips . . . . . . . . . . . . . . . . . . . . . . . . . . . . . . . . . . . . . 64
Ripple Editing . . . . . . . . . . . . . . . . . . . . . . . . . . . . . . . . . . . . . . . . . . 64
Adding chapters using Chapter Point Bar . . . . . . . . . . . . . . . . . . . . . . . 65
Enabling Smart Proxy . . . . . . . . . . . . . . . . . . . . . . . . . . . . . . . . . . . . . 66
Converting multiple files . . . . . . . . . . . . . . . . . . . . . . . . . . . . . . . . . . . 66
Adjusting color and brightness . . . . . . . . . . . . . . . . . . . . . . . . . . . . . . 67
Playback Speed . . . . . . . . . . . . . . . . . . . . . . . . . . . . . . . . . . . . . . . . . 67
Reversing video playback . . . . . . . . . . . . . . . . . . . . . . . . . . . . . . . . . . 68
Capturing still images in the Edit Step . . . . . . . . . . . . . . . . . . . . . . . . . 68
Split by Scene . . . . . . . . . . . . . . . . . . . . . . . . . . . . . . . . . . . . . . . . . . 69
Multi-trimming your video . . . . . . . . . . . . . . . . . . . . . . . . . . . . . . . . . . 70
Using Ad-Zapper . . . . . . . . . . . . . . . . . . . . . . . . . . . . . . . . . . . . . 72
Applying video filters . . . . . . . . . . . . . . . . . . . . . . . . . . . . . . . . . . . . . 72
Key frame settings . . . . . . . . . . . . . . . . . . . . . . . . . . . . . . . . . . . . 74
Pan & Zoom . . . . . . . . . . . . . . . . . . . . . . . . . . . . . . . . . . . . . . . . . . . 76
Resizing and distorting clips . . . . . . . . . . . . . . . . . . . . . . . . . . . . . . . . 78
Effect . . . . . . . . . . . . . . . . . . . . . . . . . . . . . . . . . . . . . . . . . . . . . . . . . 79
Adding transitions . . . . . . . . . . . . . . . . . . . . . . . . . . . . . . . . . . . . . . . 79
The Effect Step Options Panel . . . . . . . . . . . . . . . . . . . . . . . . . . . . . . . 80
The Album transition . . . . . . . . . . . . . . . . . . . . . . . . . . . . . . . . . . . . . 81
The Flashback transition . . . . . . . . . . . . . . . . . . . . . . . . . . . . . . . . . . . 83
The Mask transitions . . . . . . . . . . . . . . . . . . . . . . . . . . . . . . . . . . . . . 84
Overlay . . . . . . . . . . . . . . . . . . . . . . . . . . . . . . . . . . . . . . . . . . . . . . . 86
Adding clips to the Overlay Track . . . . . . . . . . . . . . . . . . . . . . . . . . . . . 86
Multiple overlay tracks . . . . . . . . . . . . . . . . . . . . . . . . . . . . . . . . . 87
The Overlay Step Options Panel . . . . . . . . . . . . . . . . . . . . . . . . . . . . . . 92
Adding Objects or Frames . . . . . . . . . . . . . . . . . . . . . . . . . . . . . . . . . . 93
Adding Flash animations . . . . . . . . . . . . . . . . . . . . . . . . . . . . . . . . . . . 94
Title . . . . . . . . . . . . . . . . . . . . . . . . . . . . . . . . . . . . . . . . . . . . . . . . . .95
Adding text . . . . . . . . . . . . . . . . . . . . . . . . . . . . . . . . . . . . . . . . . . . . 95
Modifying text attributes . . . . . . . . . . . . . . . . . . . . . . . . . . . . . . . . . . . 98
The Title Step Options Panel . . . . . . . . . . . . . . . . . . . . . . . . . . . . . . . . 99
Applying animation . . . . . . . . . . . . . . . . . . . . . . . . . . . . . . . . . . . . . 100
Animation effects . . . . . . . . . . . . . . . . . . . . . . . . . . . . . . . . . . . . 100
Audio . . . . . . . . . . . . . . . . . . . . . . . . . . . . . . . . . . . . . . . . . . . . . . . .104
Page 5

ULEAD VIDEOSTUDIO USER GUIDE
The Audio Step Options Panel . . . . . . . . . . . . . . . . . . . . . . . . . . . . . . . 104
Adding voiceover narration . . . . . . . . . . . . . . . . . . . . . . . . . . . . . . . . .105
Adding background music . . . . . . . . . . . . . . . . . . . . . . . . . . . . . . . . .106
Importing music from an audio CD . . . . . . . . . . . . . . . . . . . . . . . .106
Adding audio files . . . . . . . . . . . . . . . . . . . . . . . . . . . . . . . . . . . . . . .107
Trimming and cutting audio clips . . . . . . . . . . . . . . . . . . . . . . . . . . . . .107
Stretching audio duration . . . . . . . . . . . . . . . . . . . . . . . . . . . . . . . . . .108
Fade-in/out . . . . . . . . . . . . . . . . . . . . . . . . . . . . . . . . . . . . . . . . . . . 109
Mixing audio tracks . . . . . . . . . . . . . . . . . . . . . . . . . . . . . . . . . . . . . .109
Using the Clip Volume Control . . . . . . . . . . . . . . . . . . . . . . . . . . .109
Using the Surround Sound Mixer . . . . . . . . . . . . . . . . . . . . . . . . . 110
Duplicating an audio channel . . . . . . . . . . . . . . . . . . . . . . . . . . . . 111
Volume rubber banding . . . . . . . . . . . . . . . . . . . . . . . . . . . . . . . .112
Applying audio filters . . . . . . . . . . . . . . . . . . . . . . . . . . . . . . . . . . . . . 113
Share . . . . . . . . . . . . . . . . . . . . . . . . . . . . . . . . . . . . . . . . . . . . . . . . 114
The Share Step Options Panel . . . . . . . . . . . . . . . . . . . . . . . . . . . . . .114
Creating movie templates . . . . . . . . . . . . . . . . . . . . . . . . . . . . . . . . .115
Creating and saving a video file . . . . . . . . . . . . . . . . . . . . . . . . . . . . .116
Burning a DVD, VCD, SVCD or HD DVD . . . . . . . . . . . . . . . . . . . . . . . . 118
Assembling files . . . . . . . . . . . . . . . . . . . . . . . . . . . . . . . . . . . . .119
Adding/Editing chapters . . . . . . . . . . . . . . . . . . . . . . . . . . . . . . . .120
Creating selection menus . . . . . . . . . . . . . . . . . . . . . . . . . . . . . . . 121
Previewing . . . . . . . . . . . . . . . . . . . . . . . . . . . . . . . . . . . . . . . . 123
Burning your project onto a disc . . . . . . . . . . . . . . . . . . . . . . . . . .124
Project Playback . . . . . . . . . . . . . . . . . . . . . . . . . . . . . . . . . . . . . . . .126
Exporting your movie . . . . . . . . . . . . . . . . . . . . . . . . . . . . . . . . . . . .128
Export to Mobile Device . . . . . . . . . . . . . . . . . . . . . . . . . . . . . . . . 128
Output video file to a different medium . . . . . . . . . . . . . . . . . . . . .129
Posting your video on a Web page . . . . . . . . . . . . . . . . . . . . . . . . 129
Sending a movie by e-mail . . . . . . . . . . . . . . . . . . . . . . . . . . . . . .130
Electronic greeting cards . . . . . . . . . . . . . . . . . . . . . . . . . . . . . . . 131
Setting your video as your Movie Screen Saver . . . . . . . . . . . . . . . 132
Creating an audio file . . . . . . . . . . . . . . . . . . . . . . . . . . . . . . . . . . . .132
Recording back to a DV camcorder . . . . . . . . . . . . . . . . . . . . . . . . . . . 133
Appendix A: Menus and dialog boxes . . . . . . . . . . . . . . . . . . . . . . 134
Menus . . . . . . . . . . . . . . . . . . . . . . . . . . . . . . . . . . . . . . . . . . . . . . .134
File menu . . . . . . . . . . . . . . . . . . . . . . . . . . . . . . . . . . . . . . . . . .134
Edit menu . . . . . . . . . . . . . . . . . . . . . . . . . . . . . . . . . . . . . . . . .135
Clip menu . . . . . . . . . . . . . . . . . . . . . . . . . . . . . . . . . . . . . . . . .135
Tools menu . . . . . . . . . . . . . . . . . . . . . . . . . . . . . . . . . . . . . . . .136
Help menu . . . . . . . . . . . . . . . . . . . . . . . . . . . . . . . . . . . . . . . . .137
Dialog boxes . . . . . . . . . . . . . . . . . . . . . . . . . . . . . . . . . . . . . . . . . . 138
Advanced Settings (DV-to-DVD Wizard) . . . . . . . . . . . . . . . . . . . .138
Audio Save Options . . . . . . . . . . . . . . . . . . . . . . . . . . . . . . . . . . . 138
Batch Convert . . . . . . . . . . . . . . . . . . . . . . . . . . . . . . . . . . . . . . 139
Border/Shadow/Transparency . . . . . . . . . . . . . . . . . . . . . . . . . . .139
Capture Options . . . . . . . . . . . . . . . . . . . . . . . . . . . . . . . . . . . . .140
Change Capture Plug-in . . . . . . . . . . . . . . . . . . . . . . . . . . . . . . . .140
Burning Options . . . . . . . . . . . . . . . . . . . . . . . . . . . . . . . . . . . . .140
5
Page 6

6
ULEAD VIDEOSTUDIO USER GUIDE
Preferences: File menu . . . . . . . . . . . . . . . . . . . . . . . . . . . . . . . . 141
Preferences (Create Disc) . . . . . . . . . . . . . . . . . . . . . . . . . . . . . . 145
Preview Playback Options . . . . . . . . . . . . . . . . . . . . . . . . . . . . . . 146
Project Properties . . . . . . . . . . . . . . . . . . . . . . . . . . . . . . . . . . . 147
Project Options . . . . . . . . . . . . . . . . . . . . . . . . . . . . . . . . . . . . . 147
Project Settings (Create Disc) . . . . . . . . . . . . . . . . . . . . . . . . . . . 147
Preview Files Manager . . . . . . . . . . . . . . . . . . . . . . . . . . . . . . . . 148
Select Device Control . . . . . . . . . . . . . . . . . . . . . . . . . . . . . . . . . 148
Video and Audio Capture Property Settings . . . . . . . . . . . . . . . . . . 149
Video Color Manager . . . . . . . . . . . . . . . . . . . . . . . . . . . . . . . . . 150
Video Save Options . . . . . . . . . . . . . . . . . . . . . . . . . . . . . . . . . . 150
Appendix B: Shortcuts . . . . . . . . . . . . . . . . . . . . . . . . . . . . . . . . . . 153
Menu command shortcuts . . . . . . . . . . . . . . . . . . . . . . . . . . . . . . . . 153
Step Panel shortcuts . . . . . . . . . . . . . . . . . . . . . . . . . . . . . . . . . . . . 153
Navigation Panel shortcuts . . . . . . . . . . . . . . . . . . . . . . . . . . . . . . . . 154
Timeline shortcuts . . . . . . . . . . . . . . . . . . . . . . . . . . . . . . . . . . . . . . 155
Multi-trim Video shortcuts . . . . . . . . . . . . . . . . . . . . . . . . . . . . . . . . . 155
Others . . . . . . . . . . . . . . . . . . . . . . . . . . . . . . . . . . . . . . . . . . . . . . 156
Appendix C: Technology Overview . . . . . . . . . . . . . . . . . . . . . . . .157
Analog vs. Digital . . . . . . . . . . . . . . . . . . . . . . . . . . . . . . . . . . . . . . . 157
HD Technology . . . . . . . . . . . . . . . . . . . . . . . . . . . . . . . . . . . . . . . . 158
SmartRender Technology . . . . . . . . . . . . . . . . . . . . . . . . . . . . . . . . . 158
DV SmartPlay . . . . . . . . . . . . . . . . . . . . . . . . . . . . . . . . . . . . . . . . . 159
DVD, VCD, SVCD and HD DVD . . . . . . . . . . . . . . . . . . . . . . . . . . . . . 159
Appendix D: System tweaks . . . . . . . . . . . . . . . . . . . . . . . . . . . . . .161
Enabling DMA for IDE disks . . . . . . . . . . . . . . . . . . . . . . . . . . . . . . . . 161
Disabling Write-Behind Caching . . . . . . . . . . . . . . . . . . . . . . . . . . . . . 163
Setting the Paging File size . . . . . . . . . . . . . . . . . . . . . . . . . . . . . . . . 165
Appendix E. Tips and techniques . . . . . . . . . . . . . . . . . . . . . . . . . .167
Glossary . . . . . . . . . . . . . . . . . . . . . . . . . . . . . . . . . . . . . . . . . . . . . .169
Index . . . . . . . . . . . . . . . . . . . . . . . . . . . . . . . . . . . . . . . . . . . . . . . .178
Page 7
ULEAD VIDEOSTUDIO USER GUIDE
Welcome to Ulead VideoStudio
Thank you for purchasing VideoStudio, the video editing software that allows even
beginners to produce professional-looking movies. VideoStudio provides you with a
complete set of tools to capture videos, edit them, and share your final production
on CD, DVD, HD DVD, or the Web.
Note: The availability of features depends on the VideoStudio version you have.
How VideoStudio works
VideoStudio follows a step-by-step paradigm that lets you easily capture, edit, and
share your video. VideoStudio also offers more than a hundred transition effects,
professional titling capabilities and simple soundtrack creation tools. Learn in
seconds, create in minutes.
To make a movie production, first capture footage from a camcorder or another
video source. You can then trim the captured videos, arrange their order, apply
transitions, and add overlays, animated titles, voiceover narration, and background
music. These elements are organized in separate tracks. Changes to one track do
not affect other tracks.
7
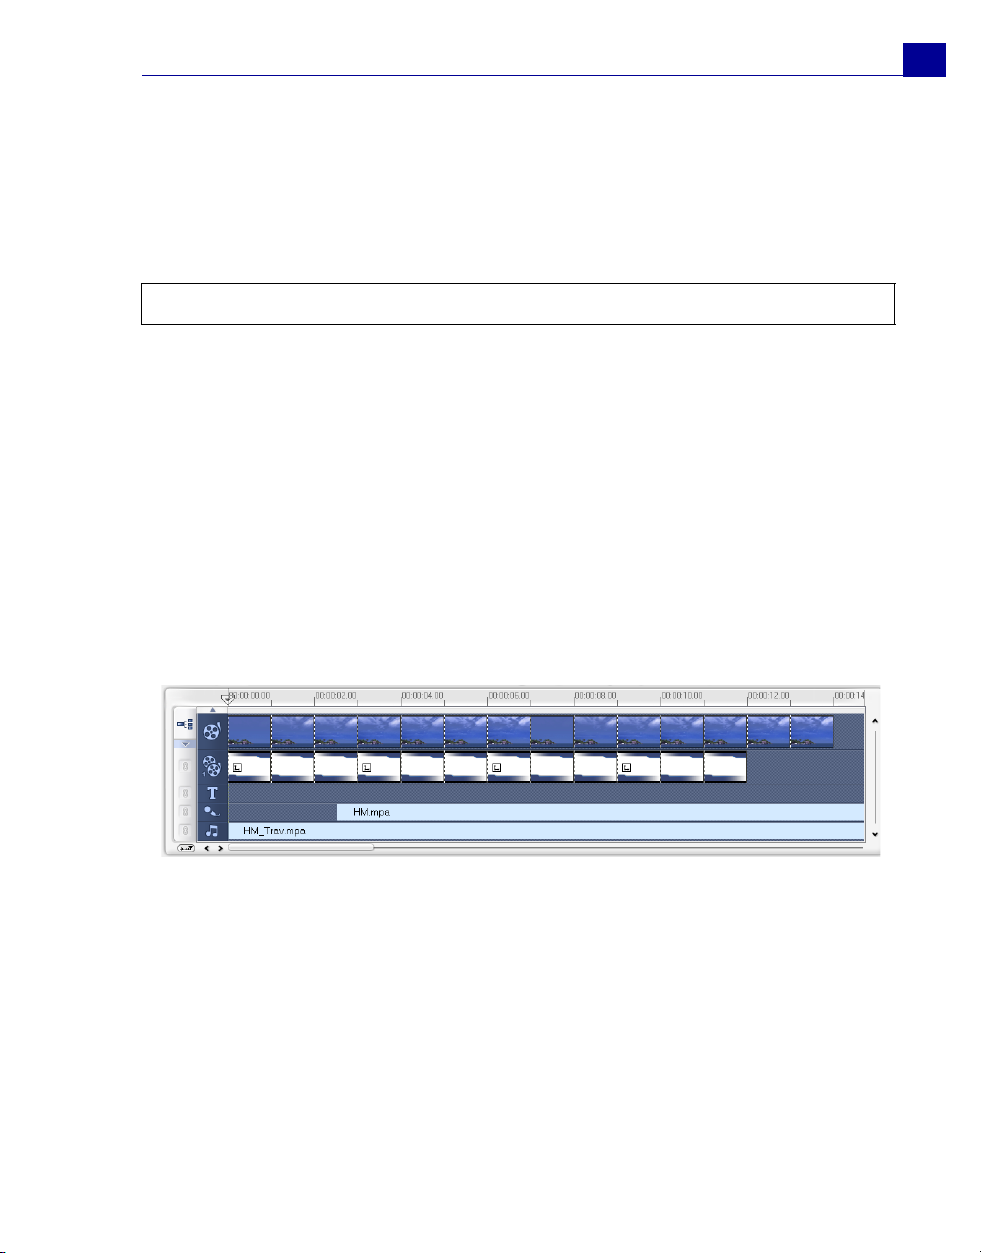
Components of a project as displayed in Timeline View
A movie production is in the form of a VideoStudio project file (*.VSP), which
contains information on the path location of the clips and how the movie has been
put together. After you have finished your movie production, you can burn it to a
VCD, DVD, HD DVD or record the movie back to your camcorder. You can also
output your movie as a video file for playback on the computer. VideoStudio uses
Page 8

8
ULEAD VIDEOSTUDIO USER GUIDE
the information in the video project file to combine all the elements in your movie
into a video file. This process is called rendering.
Installing and running VideoStudio
The VideoStudio CD has an auto-run feature that automatically starts up the
installation.
Back up your projects and media files first before installing the new version of
VideoStudio.
To install VideoStudio:
1. Insert the VideoStudio CD into your CD-ROM drive.
2. When the Setup screen appears, follow the instructions to install VideoStudio on
your computer.
Note: If the Setup screen does not appear after loading the CD, then you can
manually start it by double-clicking the My Computer icon on your desktop, then
double-clicking the icon for the CD-ROM drive. When the CD-ROM window opens,
double-click the Setup icon.
3. In addition to VideoStudio, these programs and drivers will be automatically
installed:
•QuickTime
• SmartSound
•DirectX
•Indeo
• Windows Media Format
To run VideoStudio:
• Double-click the VideoStudio icon on your Windows desktop.
OR,
• Select the VideoStudio icon from the VideoStudio program group on the
Windows Start menu.
Page 9
ULEAD VIDEOSTUDIO USER GUIDE
Setting up your computer
Before you can start making movie projects using your own video footage, you first
need to capture video from your video camera into your computer. Your computer
needs to be equipped with the proper capture card or interface port for connecting
your video camera and for capturing video to your computer. Since capturing and
video editing require a lot of computer resources, your computer must also be
properly set up to ensure successful capturing and smooth editing of your videos.
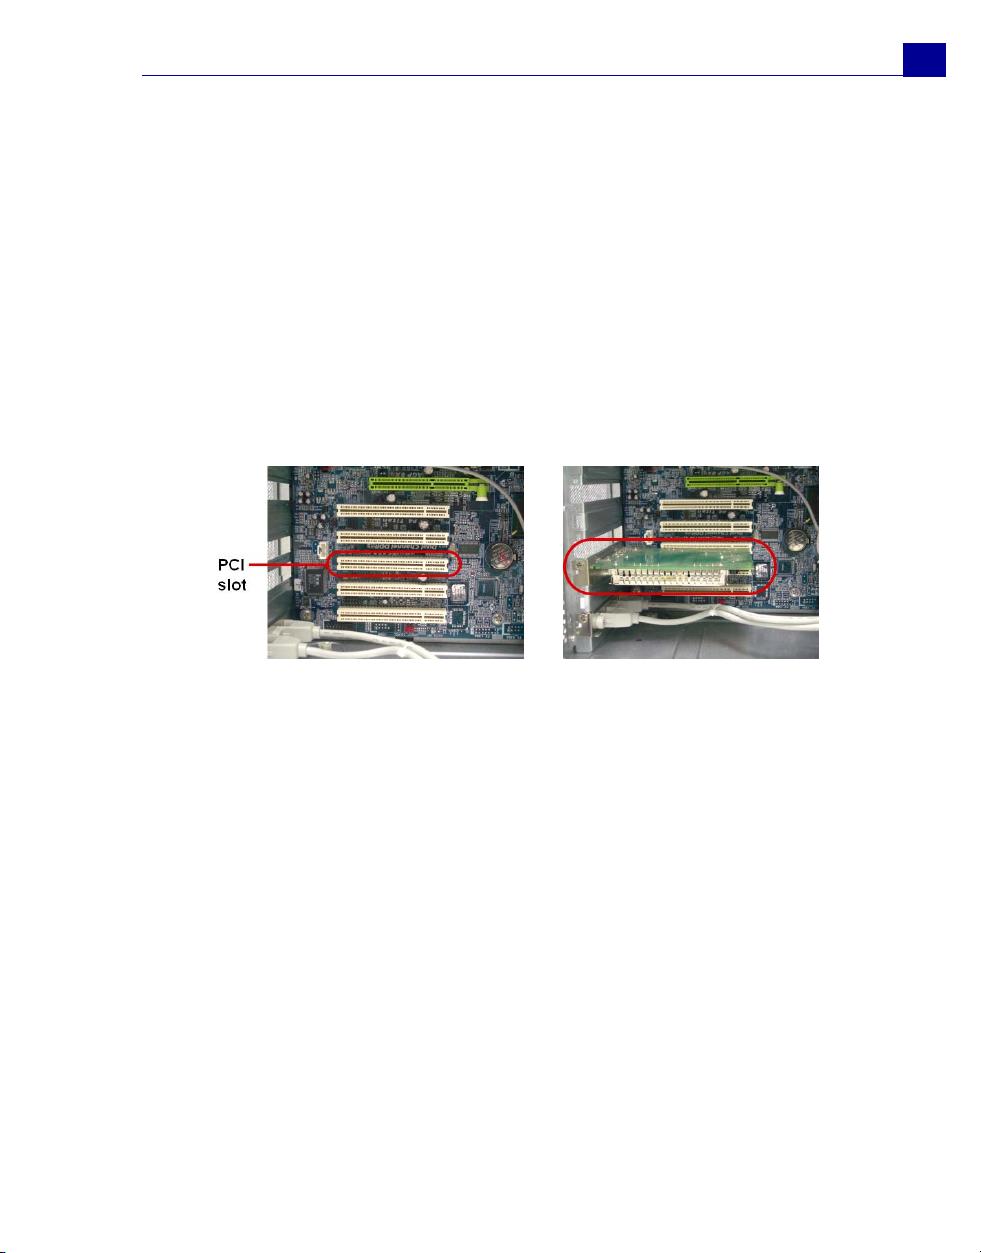
Installing a capture card
If your capture card is a PCI-based card, install the card on your computer by
inserting it in an available PCI slot on the computer’s motherboard.
9
Connecting a video camera to the computer
The type of capture card or interface port that you will need to connect your video
camera to your computer depends on the type of video camera you have.
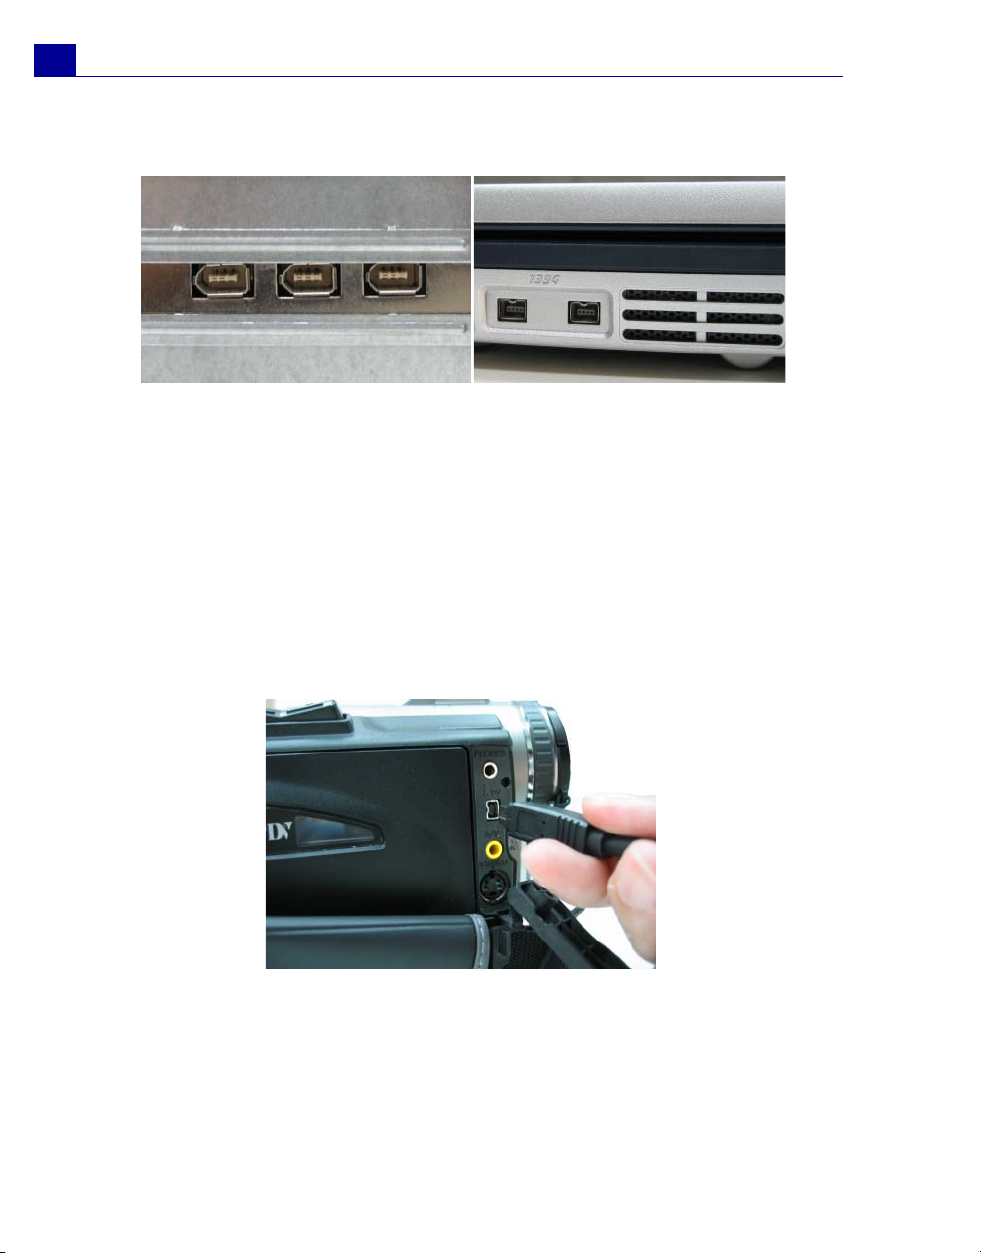
DV or Digital 8 camcorder
If you are using a DV (Digital Video) or Digital 8 camcorder, you will need an IEEE1394 interface on your computer. Some newer computers already have built-in
IEEE-1394 ports. If you do not have them on your computer, install an IEEE-1394
card.
Page 10
10
ULEAD VIDEOSTUDIO USER GUIDE
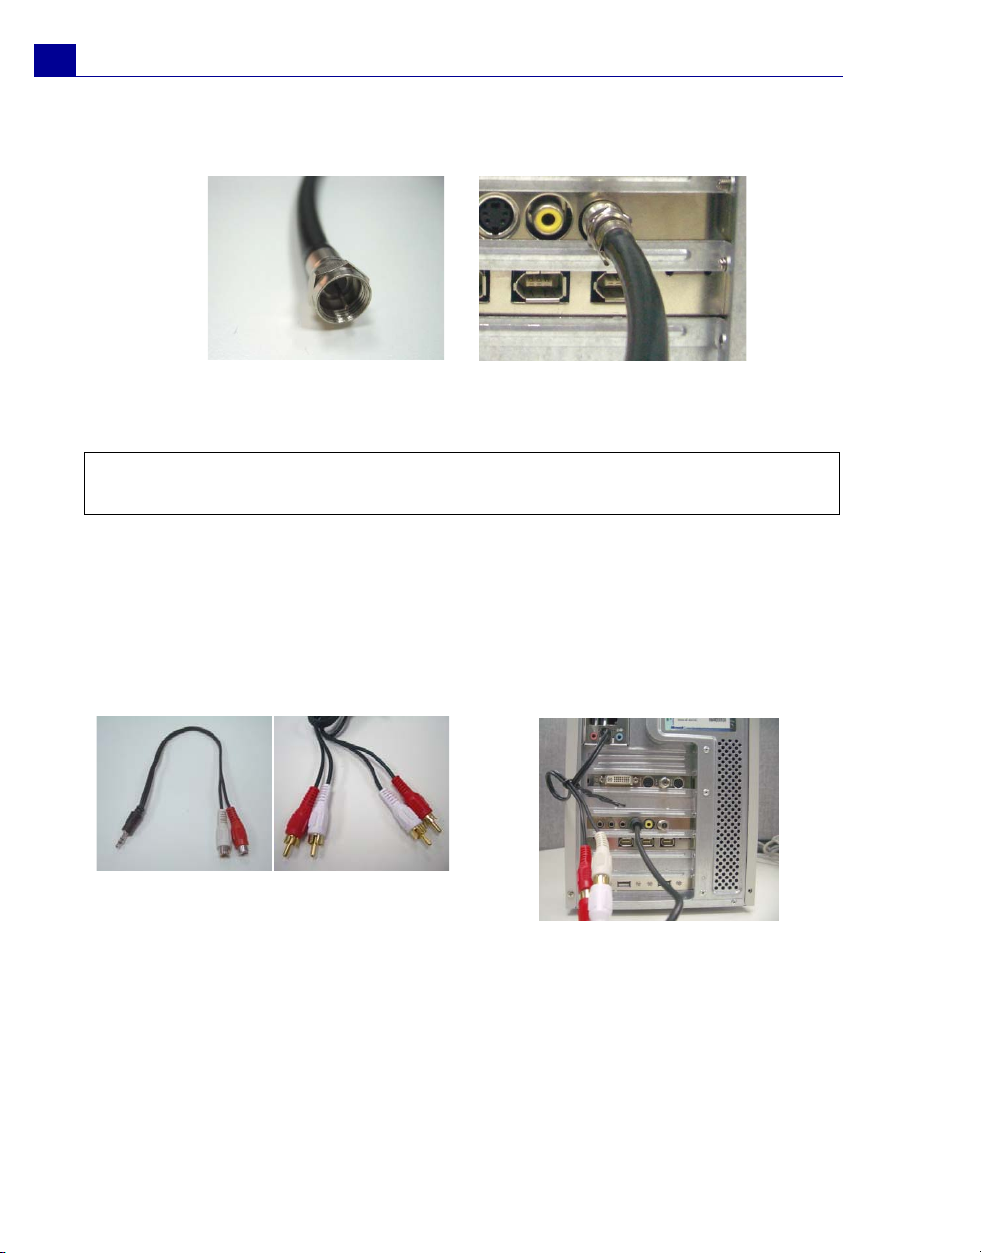
6-pin IEEE-1394 ports on a desktop
computer
4-pin IEEE-1394 ports on a notebook
computer
Connecting the camcorder to the IEEE-1394 interface
Use an IEEE-1394 cable to connect your digital camcorder to the IEEE-1394 port.
Before purchasing one, check first the pin connectors used on your camcorder and
your computer. Most DV and Digital 8 camcorders have a 4-pin connector, whereas
desktop computers that come with IEEE-1394 ports or installed with IEEE-1394
cards usually have 6-pin connectors. The IEEE-1394 cable that is required for
desktop computers is a 4-pin to 6-pin cable. Most notebook computers have 4-pin
connectors which require a 4-pin to 4-pin cable.
Connecting the IEEE-1394 cable to the DV
camcorder
Page 11

ULEAD VIDEOSTUDIO USER GUIDE
Connecting a 4-pin to 6-pin IEEE-1394 cable to a desktop computer
Connecting a 4-pin to 4-pin IEEE-1394 cable to a notebook computer
11
Checking the hardware setup
After connecting your digital camcorder to the computer, check if the device is
detected by your Windows system. If you installed an IEEE-1394 card on your
computer, check also if the card is detected.
To check if the IEEE-1394 card and digital camcorder are detected:
1. Insert your video tape into the camcorder
and switch it on. Make sure it is in playback
mode (usually named VTR or VCR). Check
your camcorder's manual for specific
instructions.
2. Open the Control Panel, then open
System: Hardware - Device Manager.
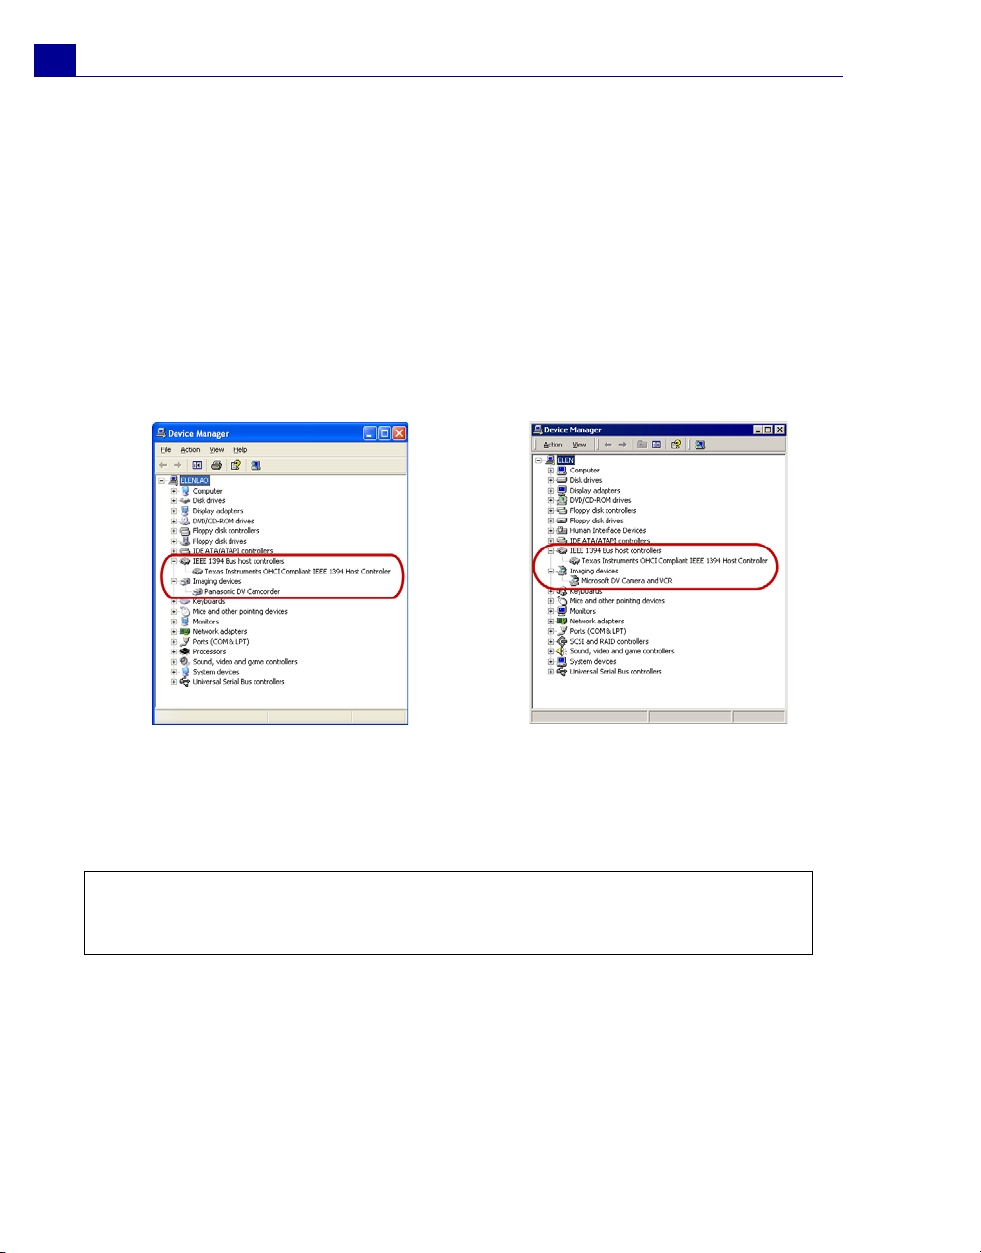
3. Make sure the following device names are listed in the Device Manager.
Page 12
12
ULEAD VIDEOSTUDIO USER GUIDE
Under Windows XP or Windows Me:
• 1394 Bus Controller
• <Brand name> DV Camcorder (The brand name depends on the DV
camcorder connected to the IEEE-1394 interface.)
Under Windows 2000:
• 1394 Bus Controller
• Image Device: Microsoft DV Camera and VCR (For Microsoft DV driver only.)
• Sound, video and game controllers: 1394 camcorder (For Texas Instruments
Windows XP: Device Manager DV driver only.)
Windows XP: Device Manager
Windows 2000: Device Manager
4. If your digital camcorder has been detected properly, it will be listed as a source
device in VideoStudio's Options Panel. In VideoStudio, select the Capture
Step and check if your camcorder is displayed under the Source list in the
Options Panel.
Note: In addition to commonly used Texas Instruments and Microsoft DV drivers,
there are other drivers available. Consult your camcorder's manual for suitable
drivers.
Page 13
ULEAD VIDEOSTUDIO USER GUIDE
Sony HDV camcorder
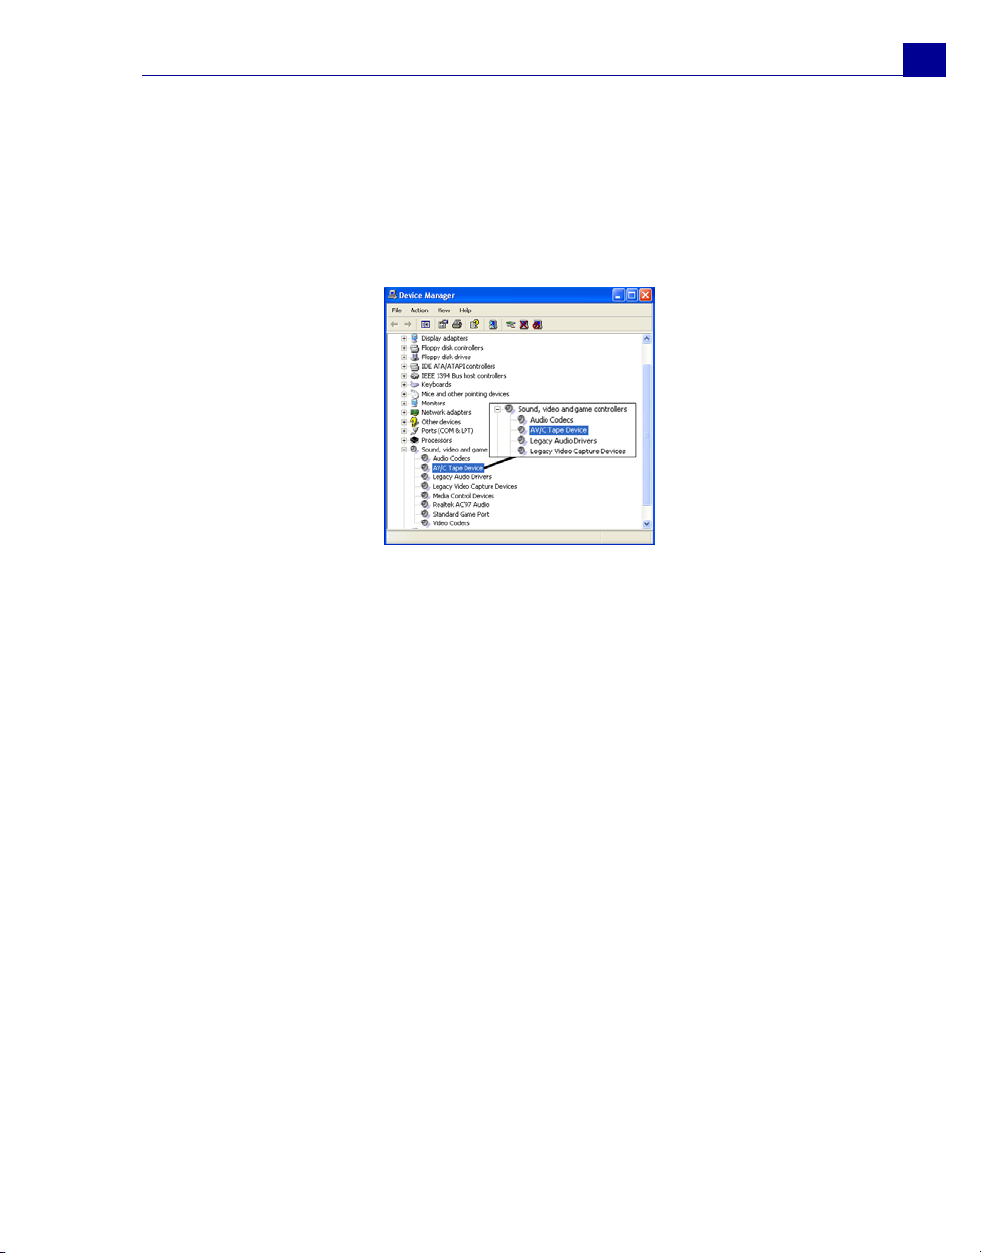
If you have connected your Sony HDV camcorder before to your computer, check
the Device Manager to see if your camcorder is detected as a DV device or AV/C
tape device (see image below). If the camcorder is detected as an AV/C tape
device, you can capture HDV footage.
HDV Mode
Analog video sources
VHS, S-VHS, Video-8, and Hi8 camcorders and VCRs are examples of analog video
sources. To capture video from analog sources, you will need to install an analog
capture card in your computer.
13
Conventional broadcast television is also an analog source. To capture TV footage,
you need to have a TV tuner card installed in your computer.
Page 14
14
ULEAD VIDEOSTUDIO USER GUIDE
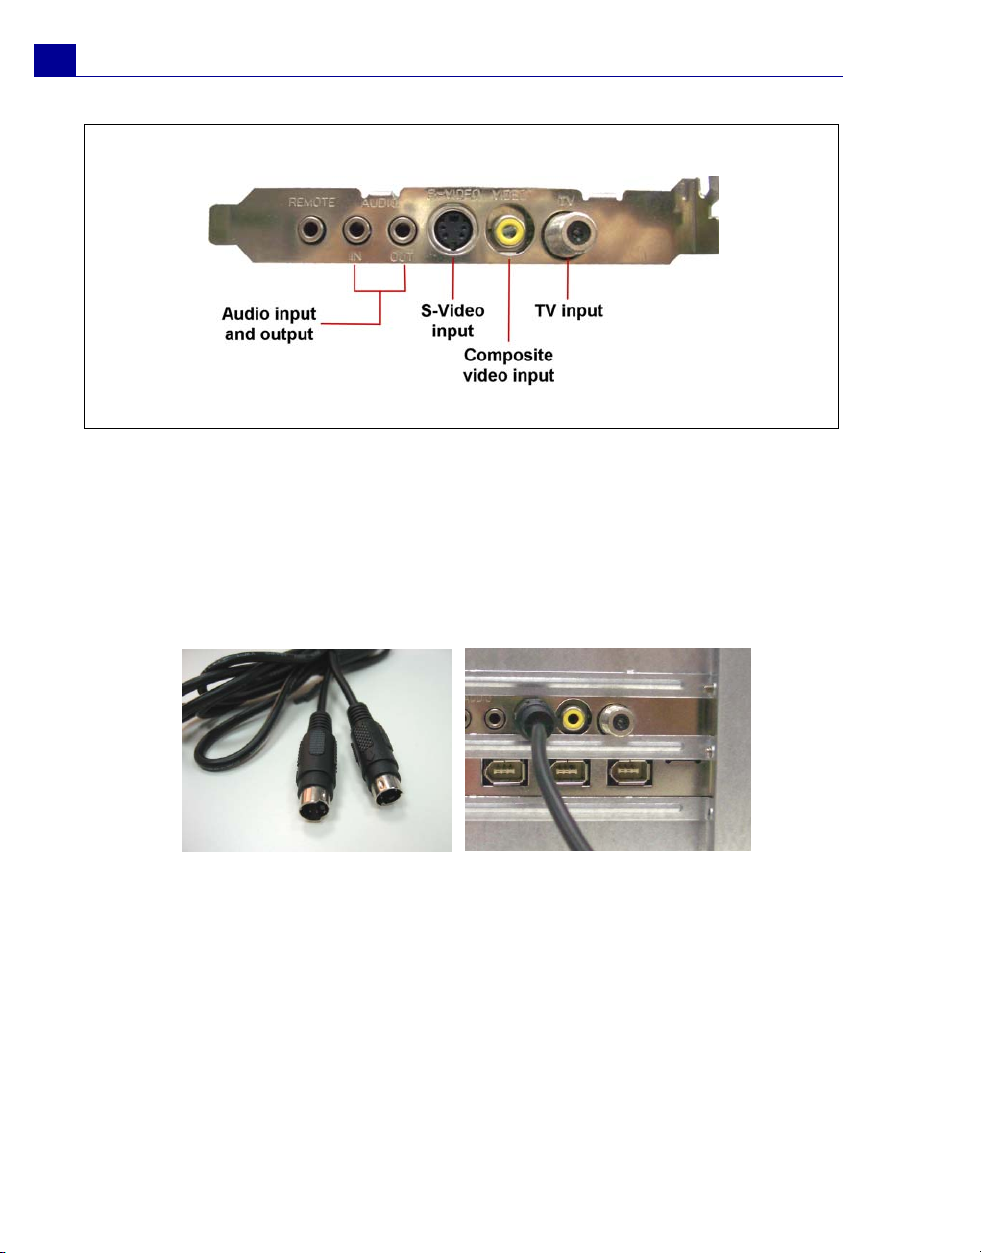
Note: TV capture cards provide S-Video/Composite inputs and a TV tuner, which can
be used to capture both video and TV footage.
Connecting the video device to the analog capture card
To connect your video device to the analog capture card, use either an S-Video or
RCA Composite cable depending on your device's video output. If your video device
has both types of output, use the S-Video connection for higher video quality
captures.
S-Video cable
Connecting the S-Video source to
the capture card
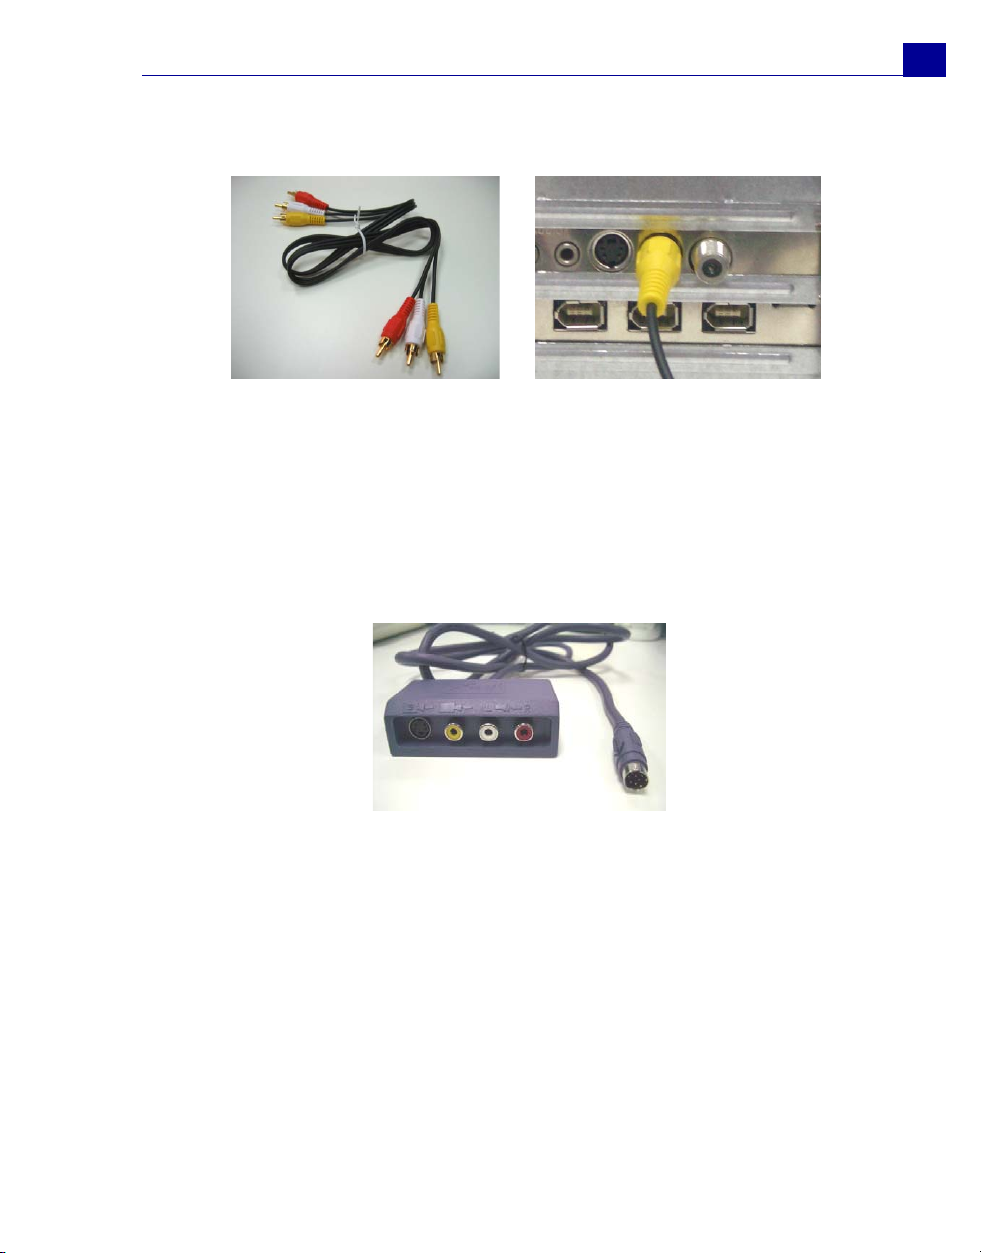
If you want to use the Composite output of your video device, connect the yellow
plugs of the Composite cable to the video output of your video device and the video
input port of the analog capture card.
Page 15
ULEAD VIDEOSTUDIO USER GUIDE
15
Composite cable Connecting the Composite video
source to the capture card
Most higher-end analog capture cards do not have the Composite/S-Video input
ports crowded on the side of the cards. Instead, these cards come with an external
breakout box that provide all the video input ports at the front of the box. Video
devices can be connected to the capture card more easily through the breakout
box.
Breakout box
Connecting a TV antenna to the tuner card
A tuner card has a TV antenna input just like the regular television monitor. Plug
your TV antenna to the TV connector of the tuner card.
Page 16
16
ULEAD VIDEOSTUDIO USER GUIDE
TV antenna cable
Connecting TV antenna to the
tuner card
Note: When purchasing a tuner card, make sure you acquire one that provides the
correct TV system (NTSC or PAL) for your region.
Connecting the capture or tuner card to the sound card
Most capture and tuner cards only allow video capture. To preview the audio from
your video device or TV and to capture the audio into your computer, you need to
connect the audio output of the capture or tuner card to the sound card's Line In
port. The required cables for connecting to the sound card are different for each
type of video source:
Line-in and audio cables for S-Video
S-Video connection
Page 17
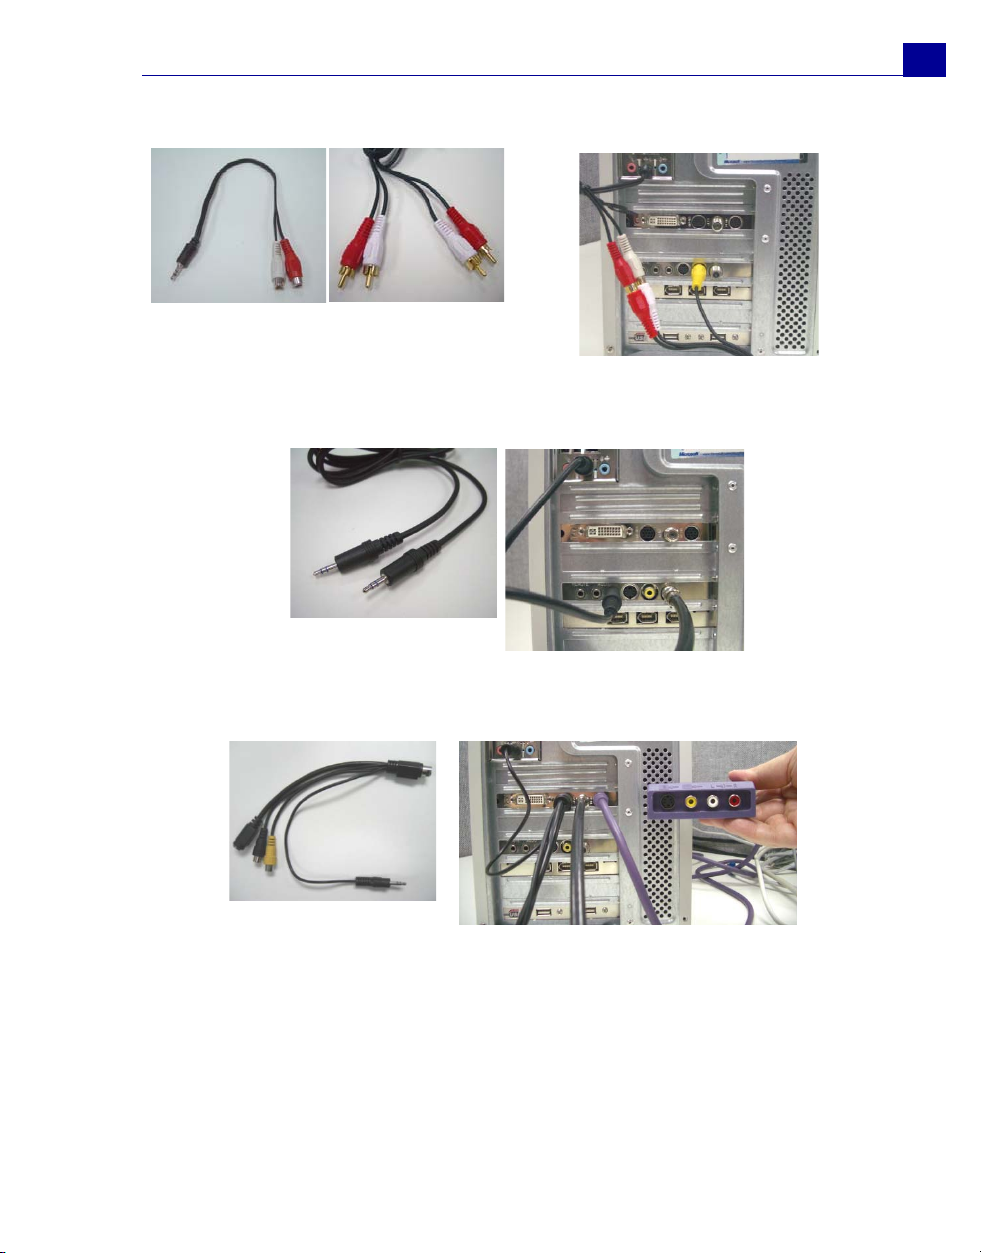
Line-in and audio cables for Composite video
Line-in cable for TV tuner
card
ULEAD VIDEOSTUDIO USER GUIDE
Composite video connection
TV tuner connection
17
Line-in cable for high-end
TV capture card
High-end TV capture card connection
Page 18

18
ULEAD VIDEOSTUDIO USER GUIDE
Checking the hardware setup
After connecting your analog source to the capture or tuner card, check if the card
is detected by your Windows system.
To check if the capture or tuner card is detected:
1. If you are using a video device such as a camcorder as your source, insert your
videotape into the video device and switch it on. Make sure it is in the playback
mode (usually named VTR or VCR).
2. Open the Control Panel, then open System: Hardware - Device Manager.
3. In the Device Manager, double-click Sound, video and game controllers.
Check if your capture or tuner card is listed in this folder.
4. If your capture or tuner card has been detected properly, it will be listed as a
source device in VideoStudio's Options Panel. In VideoStudio, select the
Capture Step and check if your capture or tuner card is displayed under the
Source list in the Options Panel.
Note: If your capture device supports multiple video sources, the Video and Audio
Capture Property Settings dialog box allows you to select your desired video
source such as Composite, Tuner, or S-Video. Likewise, if you have multiple audio
sources, this dialog box allows you to select your desired audio source.
USB camera
To capture live video and still images from a USB camera, connect the camera to an
available USB port on your computer.
USB cameras may require installation of a device driver, depending on the Windows
version you are using. For information on how to install your USB camera, refer to
its accompanying manual.
After properly installing your USB camera, check if it is detected by your Windows
system.
To check if the USB camera is detected:
1. Open the Control Panel, then open System: Hardware - Device Manager.
2. In the Device Manager, double-click Imaging devices. Check if your USB
camera is listed in this folder.
Page 19

ULEAD VIDEOSTUDIO USER GUIDE
3. If your USB camera has been detected properly, it will be listed as a source
device in VideoStudio's Options Panel. In VideoStudio, select the Capture
Step and check if your USB camera is displayed under the Source list in the
Options Panel.
Preparation for video capturing and editing
Capturing and video editing are tasks that require a lot of computer resources. Your
computer must be properly set up to ensure successful capturing and smooth video
editing. Below are some tips on how to prepare your digital camcorder and
optimize your computer for capturing and editing.
• For better workability of DV Quick Scan and camcorder device control,
correct timecode on the DV tape is a must. To do this, before shooting your
video, use the standard playback (SP) mode and shoot a blank video (for
example, leaving the lens cover on while recording) without interruption from
start to end of a tape.
• It is recommended that you close all other applications when working with
VideoStudio. You should also turn off any automatically-launched software
like screen savers to avoid possible interruptions while capturing.
• If you have two hard drives in your system, it is recommended that you
install VideoStudio to your system drive (usually C:) and store captured
videos in your other drive (usually D:).
The choice of what hard disk to use is also crucial. Using a dedicated video
hard drive, preferably with Ultra-DMA/66 7200 rpm and 30GB free space, is
recommended.
•Make sure DMA is enabled for your hard disk.
• Disable Write-Behind Caching on the hard drive used for video capture.
• Increase the Paging File (Swap File) size to twice your amount of RAM.
19
Page 20

20
ULEAD VIDEOSTUDIO USER GUIDE
Getting started
When you run VideoStudio, a startup screen appears which allows you to choose
between the following video editing modes:
• VideoStudio Editor gives you the full editing features of VideoStudio. It
provides you total control over the movie production process, from adding
clips, titles, effects, overlays, and music to making the final movie on disc or
other medium.
• Movie Wizard is ideal for users who are new to video editing. It guides you
through the movie production process in three quick, easy steps.
• DV-to-DVD Wizard allows you to capture video, add a theme template to it,
then burn it onto a disc.
Tip: Select 16:9 to use widescreen for your project.
DV-to-DVD Wizard
Use the DV-to-DVD Wizard to easily create a movie from the content of your DV
tape then burn it onto a disc.
Step 1: Scan for scenes
Scan the DV tape and select the scenes you want to add to your movie.
1. Connect your camcorder to your computer and turn on the device. Set it to Play
(or VTR/VCR) mode.
2. Select a recording device under DV Device.
3. Click the Capture format arrow to select a file format for captured videos.
4. Specify whether to burn all videos of the tape (Burn whole tape) or scan your
DV tape (Scene detection).
To burn whole tape:
1. Select Burn whole tape and then specify the tape duration under Duration.
2. Click Next to apply template and burn onto DVD.
Page 21
ULEAD VIDEOSTUDIO USER GUIDE
To use Scene detection:
1. After selecting Scene detention, choose whether to scan the tape From
beginning or From current position.
• From beginning: Scans the tape for scenes from the beginning. VideoStudio
will automatically rewind the tape if the tape position is not in the beginning.
• From current position: Scans the tape for scenes from the current tape
position.
2. Specify the scan speed, then click Start Scan to begin scanning the DV device
for scenes. Scenes are video segments that are distinguished by shooting date
and time.
21
Storyboard
3. In the Storyboard, choose the scenes you want to include in your movie. To do
this, select a scene then click Mark Scene.
Page 22
22
ULEAD VIDEOSTUDIO USER GUIDE
4. Click Next to go to the next step.
Tips:
• Click and select Save DV Quick Scan Digest to save scanned file and import
without having to scan again or Save DV Quick Scan Digest as HTML to manage
large number of tapes by printing this HTML file and attaching it with your tapes.
Step 2: Apply a theme template and burn to DVD
1. Specify a Volume name and Recording format for your movie.
Note:
If you have more than one burner installed in your computer or the default
drive is not a burner, specify the burner you want to use in the Advanced
Settings dialog box.
2. Select a theme template from one of the available presets to apply to your
movie then select its output video quality.
3. Click to burn your movie file to disc.
Tip: If you see at the bottom of the dialog box that the movie is too big to fit
onto a DVD, click Fit & Burn.
Movie Wizard
If you are new to video editing or you want to quickly make a movie, you can use
the VideoStudio Movie Wizard to assemble video clips and images, add
background music and titles, then output the final movie as a video file, burn it
onto a disc, or further edit the movie in VideoStudio Editor.
Page 23
ULEAD VIDEOSTUDIO USER GUIDE
Step 1: Add video and images
Assemble your video and images into a movie.
To add video and images:
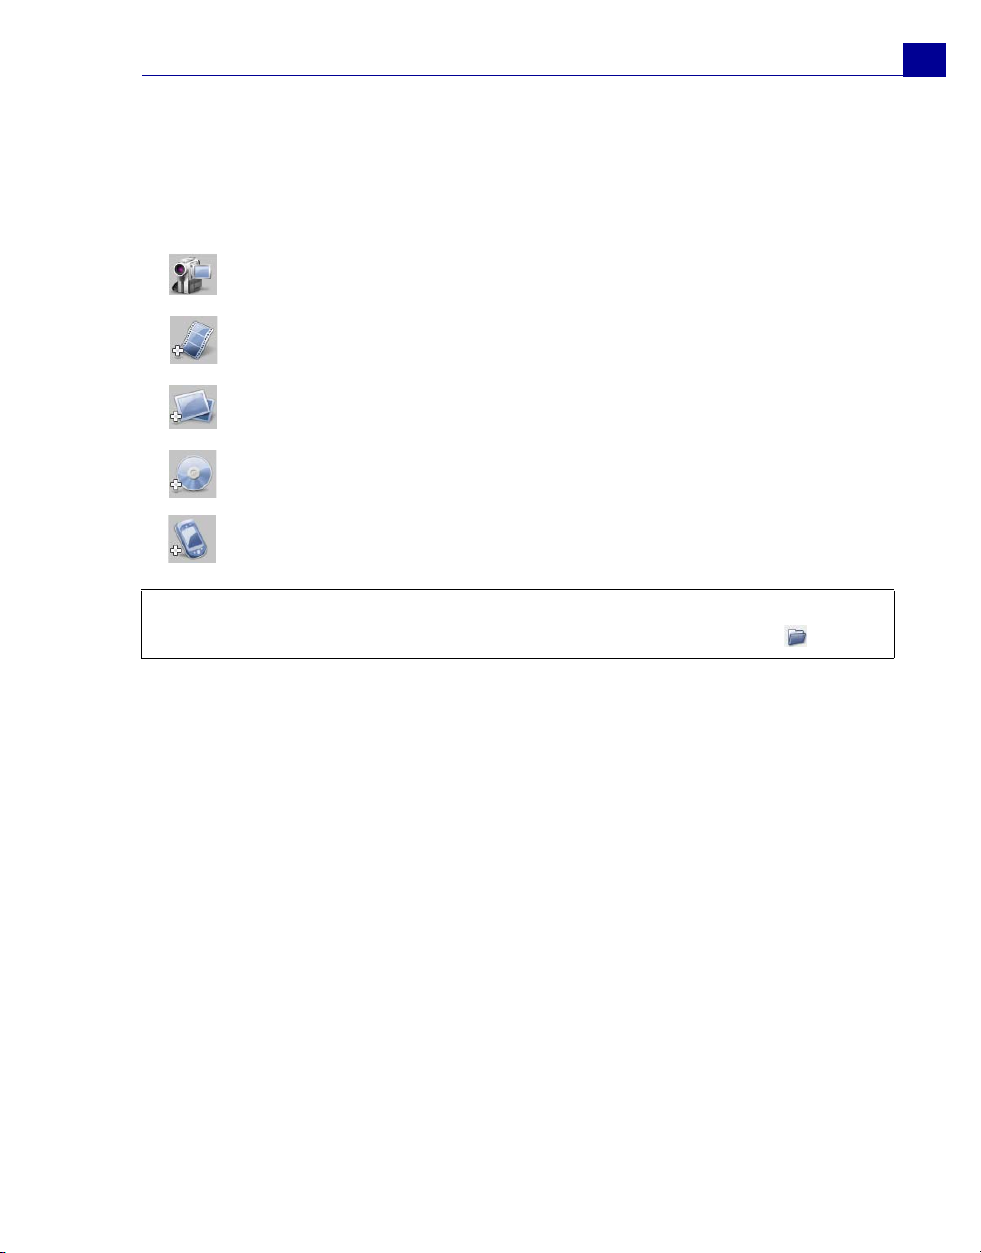
1. Click one the following buttons to add video and images to your movie.
Click Capture to import video footage or images into your computer.
Click Insert Video to add video files of different formats such as AVI,
MPEG, and WMV.
Click Insert Image to add still images. (You can create a photo
slideshow if you choose to only add images.)
Click Insert DVD/DVD-VR to add video from a DVD-Video/DVD-VR
formatted disc or from your hard drive.
Click Import from Mobile Devices to add video from MS Windowsrecognized devices.
Tip: Click Library to open the media library that contains media clips that come with
VideoStudio. To import your own video or image files to the Library, click .
23
2. If you selected multiple clips, the Change Clip Sequence dialog box will appear
where you can arrange the order of the clips.
Drag the clips to the desired sequence then click OK.
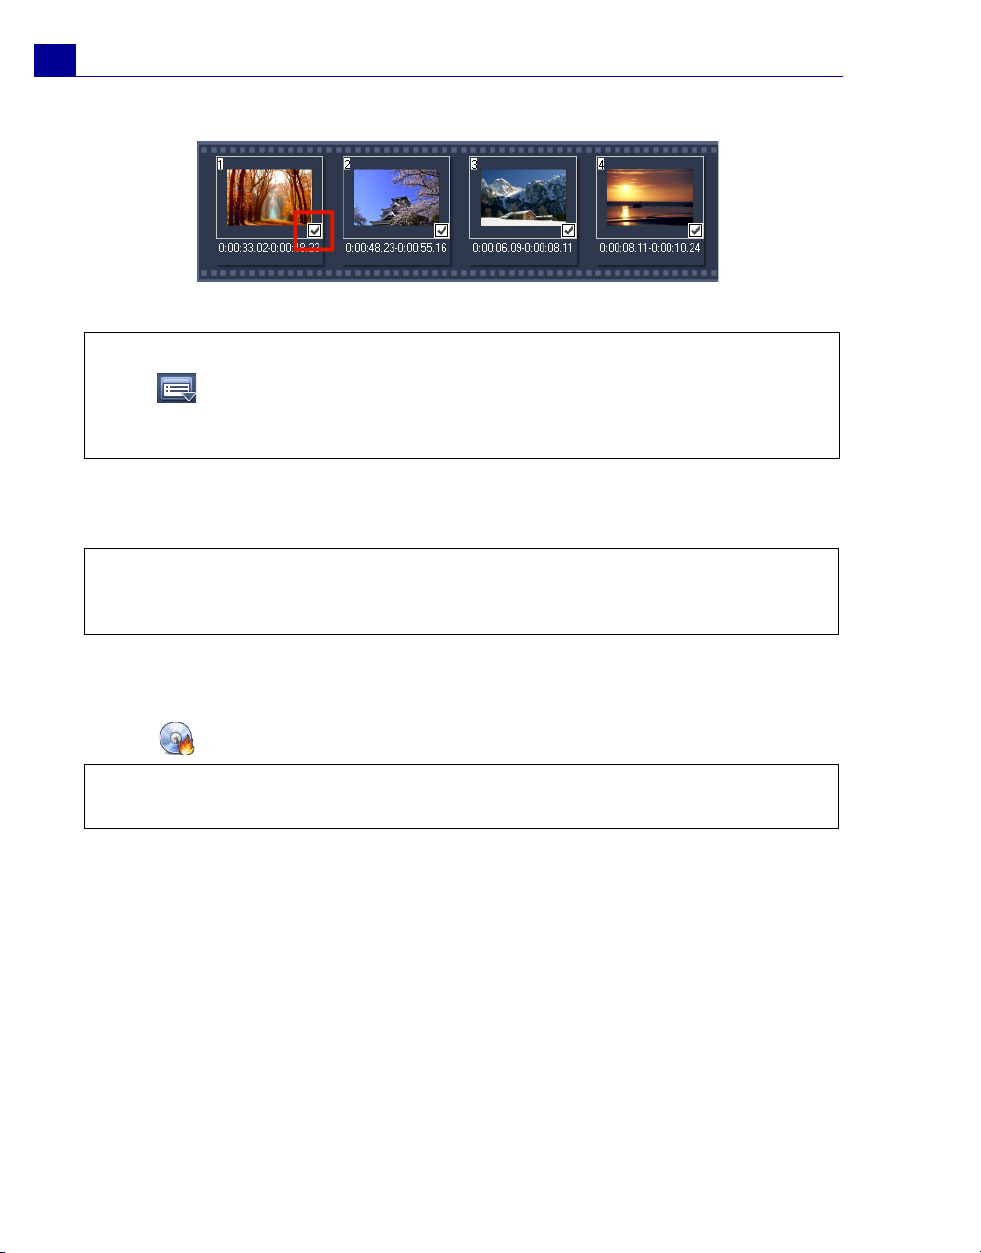
3. The video and image clips that you selected for your movie will be added to the
Media Clip List. Right-click a clip to open a menu with more options.
Page 24
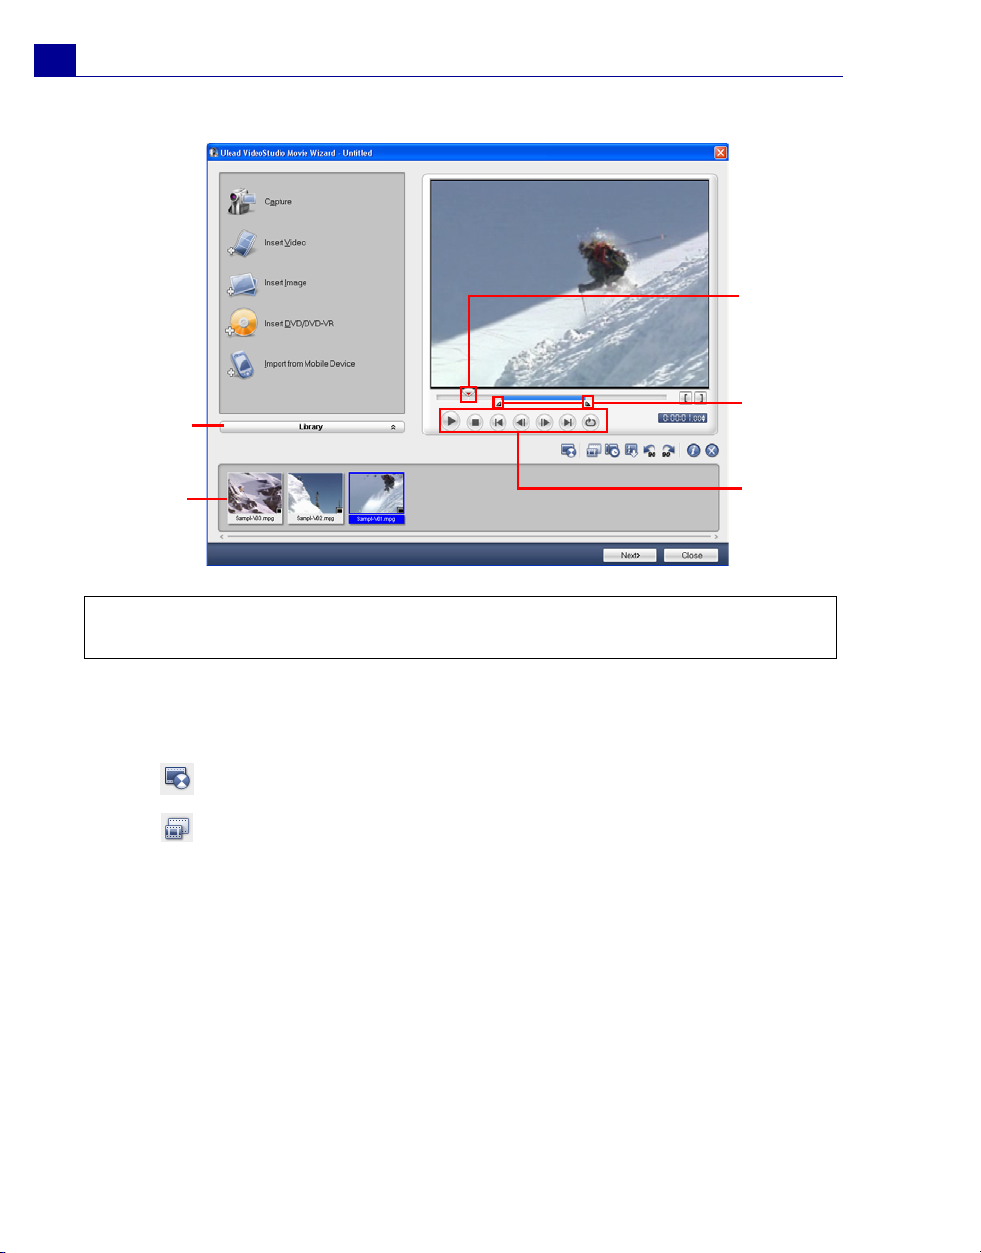
24
ULEAD VIDEOSTUDIO USER GUIDE
Library
Jog Slider
Mark-in/
Mark-out
handles
Media
Clip
List
Navigation
Panel
Tip: You can also arrange clips in the Media Clip List by dragging them to the
desired sequence.
4. To preview the clips, select each clip in the Media Clip List and use the Jog
Slider and Navigation Panel buttons. When trimming a clip, drag the Mark-in
and Mark-out handles to select the desired start and end points of the clip.
5. Click to retrieve lost data from captured videos.
Click to choose desired segments from a video file and extract them to the
Media Clip List.
Page 25
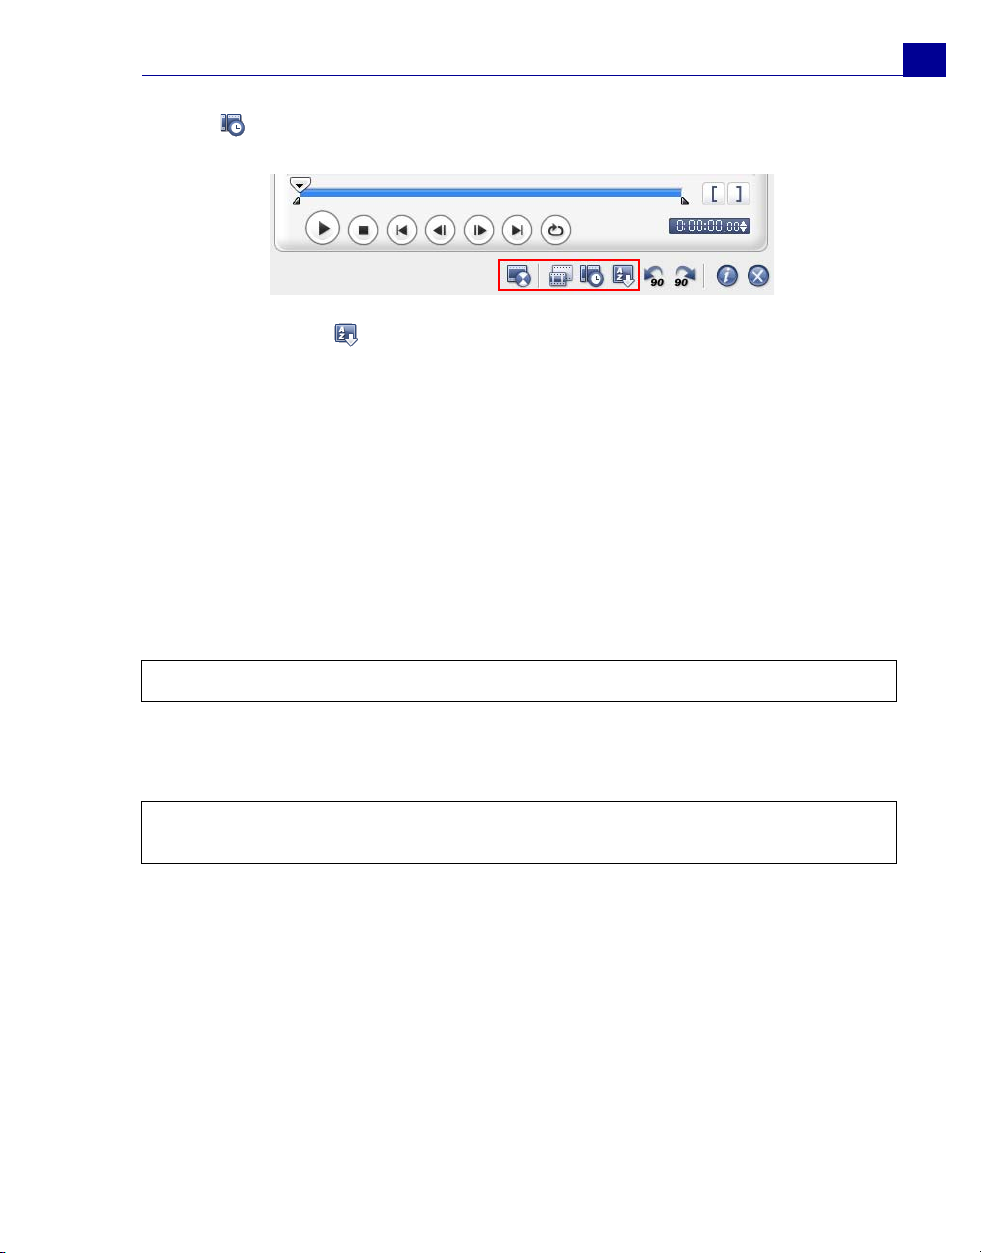
ULEAD VIDEOSTUDIO USER GUIDE
Click to automatically split video clips into smaller clips based on their
shooting date and time.
You can also click to sort clips in the Media Clip List according to their
Name or Date.
To capture video and images:
1. Connect your camcorder to your computer and turn on the device. Set it to Play
(or VTR / VCR) mode.
2. Check if your camcorder is selected in the Source list.
3. Click the Capture tab in the VideoStudio Movie Wizard.
4. Select the video file format to use for saving captured video files from the
Format list. Specify the Capture folder in which to save the files.
5. Choose Split by Scene to separate scenes in your DV video clip into several
clips based on frame content or shooting date and time.
25
Note: Click Options to customize capture settings specific to your video device.
6. Play the videotape in your camcorder, and position the tape on the part of the
video where to start capturing.
Tip: If you are capturing video from a DV or HDV camcorder, use the Navigation
Panel to play your videotape.
7. Click Capture Video to start capturing. Click Stop Capture or press [Esc] to
stop capturing.
8. To capture a still image from the video footage, pause the video on the desired
image then click Capture Image.
9. Click Enable/Disable Audio Preview to play or stop DV audio preview while
capturing.
Page 26
26
ULEAD VIDEOSTUDIO USER GUIDE
Step 2: Select a template
Select a movie template to apply to your project. Each template provides a
different theme which comes with preset start and ending video clips, transitions,
title and background music.
Notes:
• To save your project, click then select Save.
• If you accessed VideoStudio Movie Wizard from within VideoStudio Editor, the above
button will not appear and you will have to save from the File Menu when you go
back to the editor.
To apply a Theme template:
1. Select a theme template from the Theme template list. Home Movies
templates allow you to create movies that include both video and images while
Slideshow templates are used exclusively for creating image slideshows.
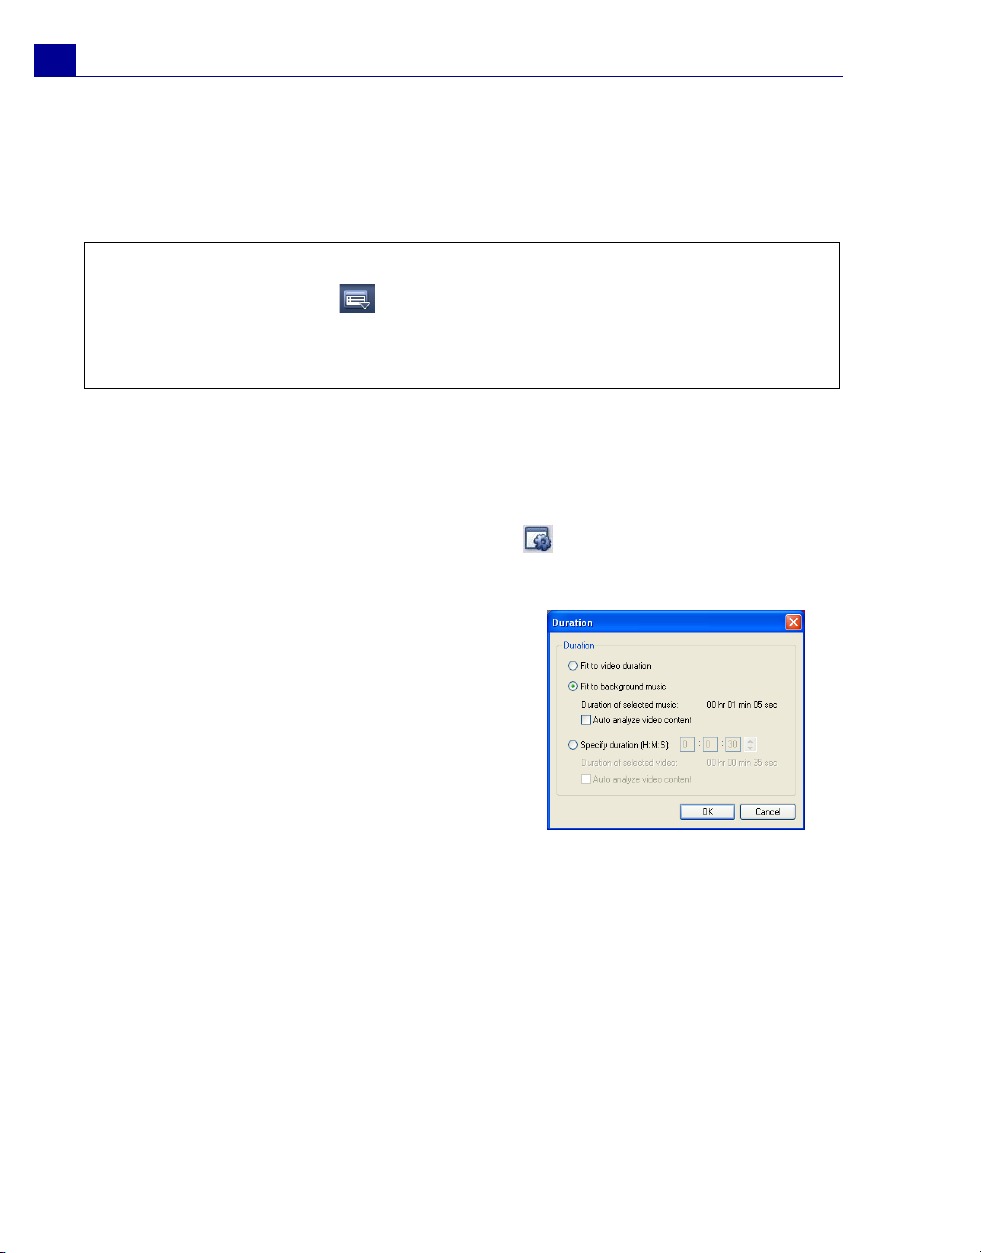
2. To set the overall length of your movie, click .
For Home Movies, specify the following options in the Duration dialog box:
• Fit to video duration: Keeps the
current movie duration.
• Fit to background music: Adjusts the
movie duration to fit into the length of
the background music. (The
background music is added to your
movie in the second step of the Movie
Wizard.)
• Specify duration: Lets you define a
custom duration for the whole movie.
Page 27
ULEAD VIDEOSTUDIO USER GUIDE
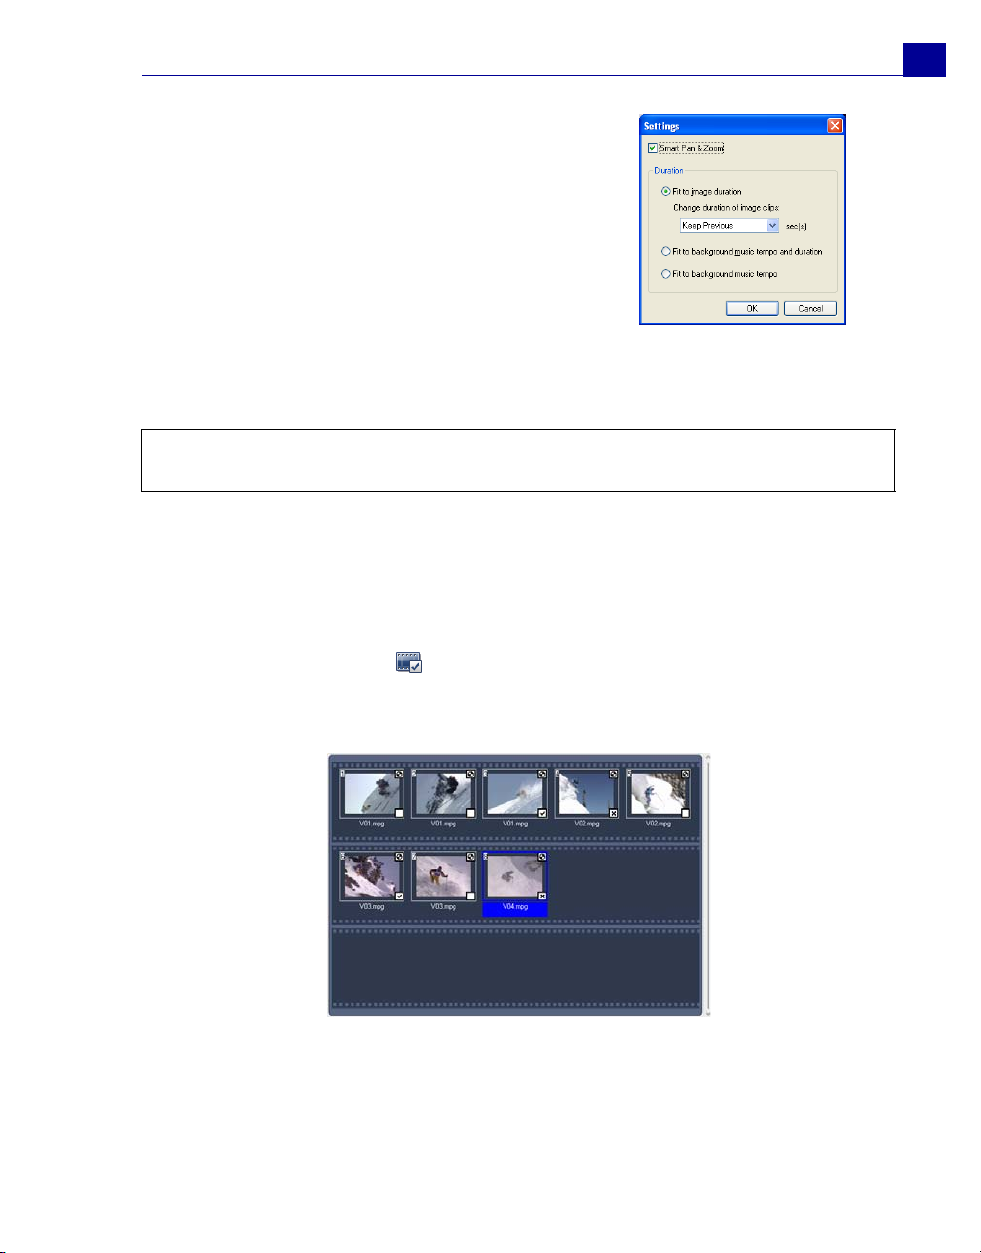
For Slideshow templates, specify Smart Pan &
Zoom in the Settings dialog box. Smart Pan &
Zoom automatically focuses the pan and zoom
motion to important parts of the image like the
face.
• Fit to image duration: Trims the music background to fit the total duration
of the slideshow.
Tip: Select Keep Previous to use the image duration you set in the previous page of
the Movie Wizard.
• Fit to background music tempo and duration: Adjusts the duration of
each clip and the total duration of the slideshow to fit the background music's
tempo and duration.
• Fit to background music tempo: Adjusts the duration of each clip to fit the
background music's tempo.
27
3. For Home Movies, click to open the Mark Clips dialog box. Select a clip
then click Must or Optional to specify whether or not to include the clip in the
show.
Page 28
28
ULEAD VIDEOSTUDIO USER GUIDE
Note: Click Auto to let the program decide which clips to retain or exclude.
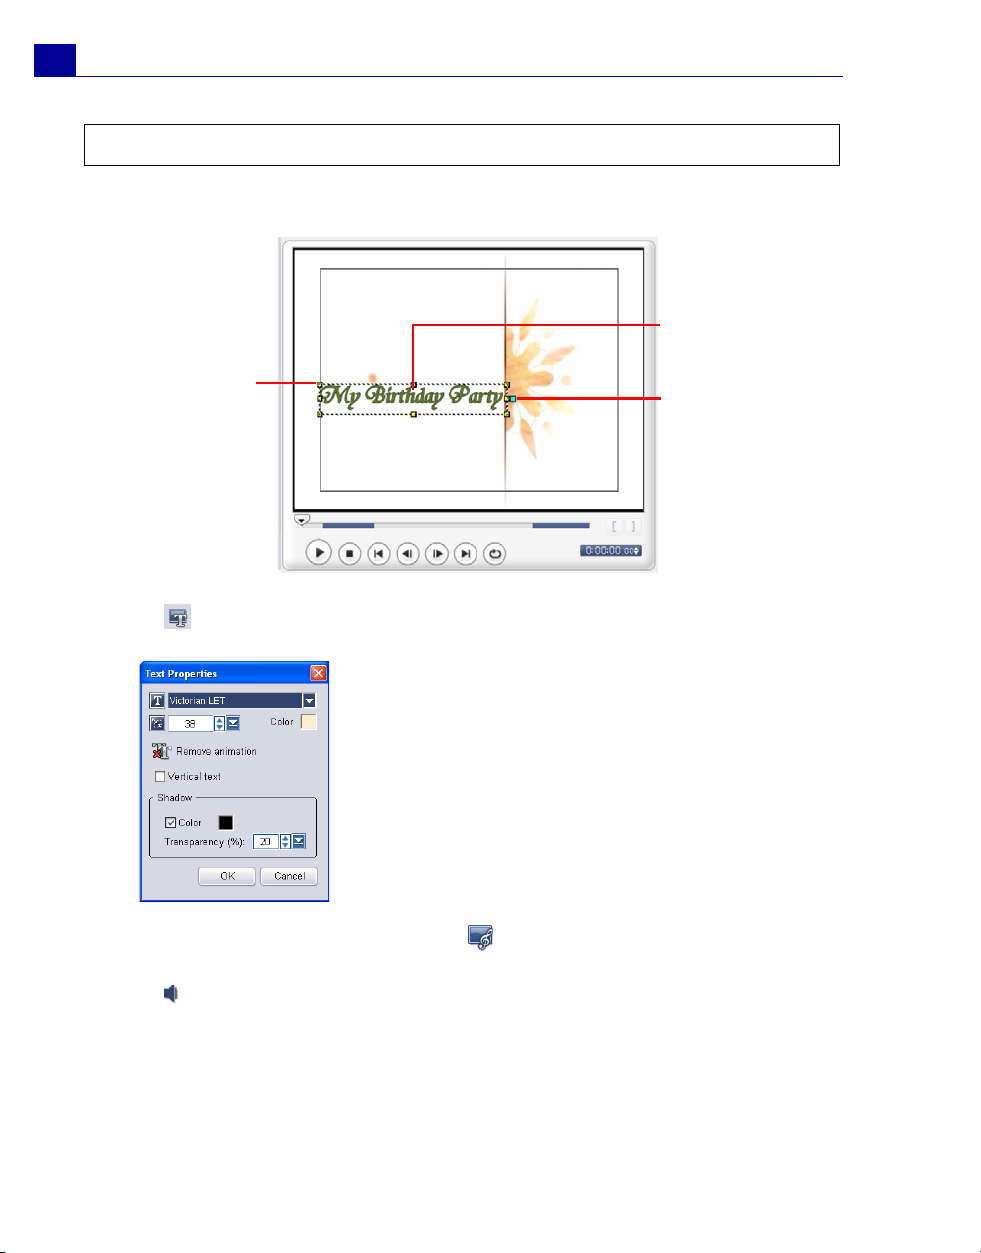
4. To replace the title, first select the preset title from the Title list. Double-click
the preset text in the Preview Window, then type in your text.
Double-click
to edit text
Drag
corner to
resize
text
Drag to
position
shadow
5. Click to change text formatting.
In the Text Properties dialog box, select a
font type, size and color for the text, and set
the desired shadow color and transparency.
6. To replace the background music, click to open the Audio Options window.
Locate and select the desired music file.
Click to specify music file settings.
Page 29
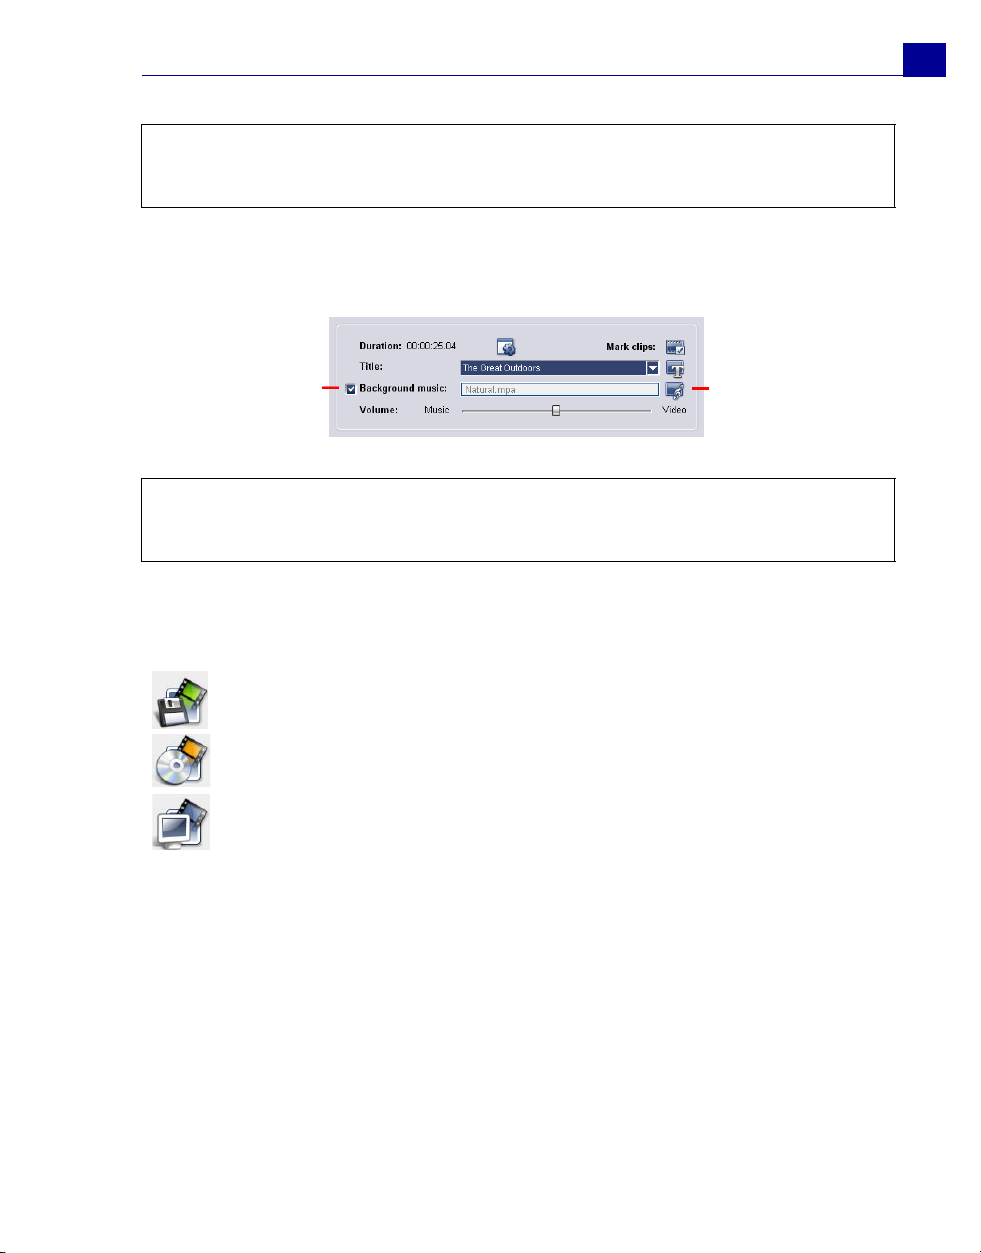
ULEAD VIDEOSTUDIO USER GUIDE
Note: Make sure that your background music is 30 seconds or longer if you want to
fit the video to the music. If the music duration is less than 30 seconds, the music will
not be looped leaving the remaining video without any background music.
7. Use the Volume slider to adjust the volume of the background music with
respect to the video's audio. Dragging the slider to the left increases the volume
of the background music and decreases the volume of the video's audio.
29
Remove
Background
Music
Load
Background
Music
8. Click Next.
Note: If you opened the VideoStudio Wizard within VideoStudio Editor, clicking Next
will skip the last step and directly insert the clips onto the Timeline in the VideoStudio
Editor.
Step 3: Finish
Select how to output the final movie:
Click Create Video File to output your movie as a video file that can be
played back on the computer.
Click Create Disc to burn your movie onto a disc.
Click Edit in Ulead VideoStudio Editor to make further edits to your
movie using VideoStudio Editor.
Page 30
30
ULEAD VIDEOSTUDIO USER GUIDE
VideoStudio Editor
VideoStudio Editor provides a step-by-step workflow that makes creating movies
simple and easy.
This section introduces you to the VideoStudio Editor interface and briefly explains
the steps involved in creating a movie. Refer to the succeeding chapters for more
in-depth information on each step.
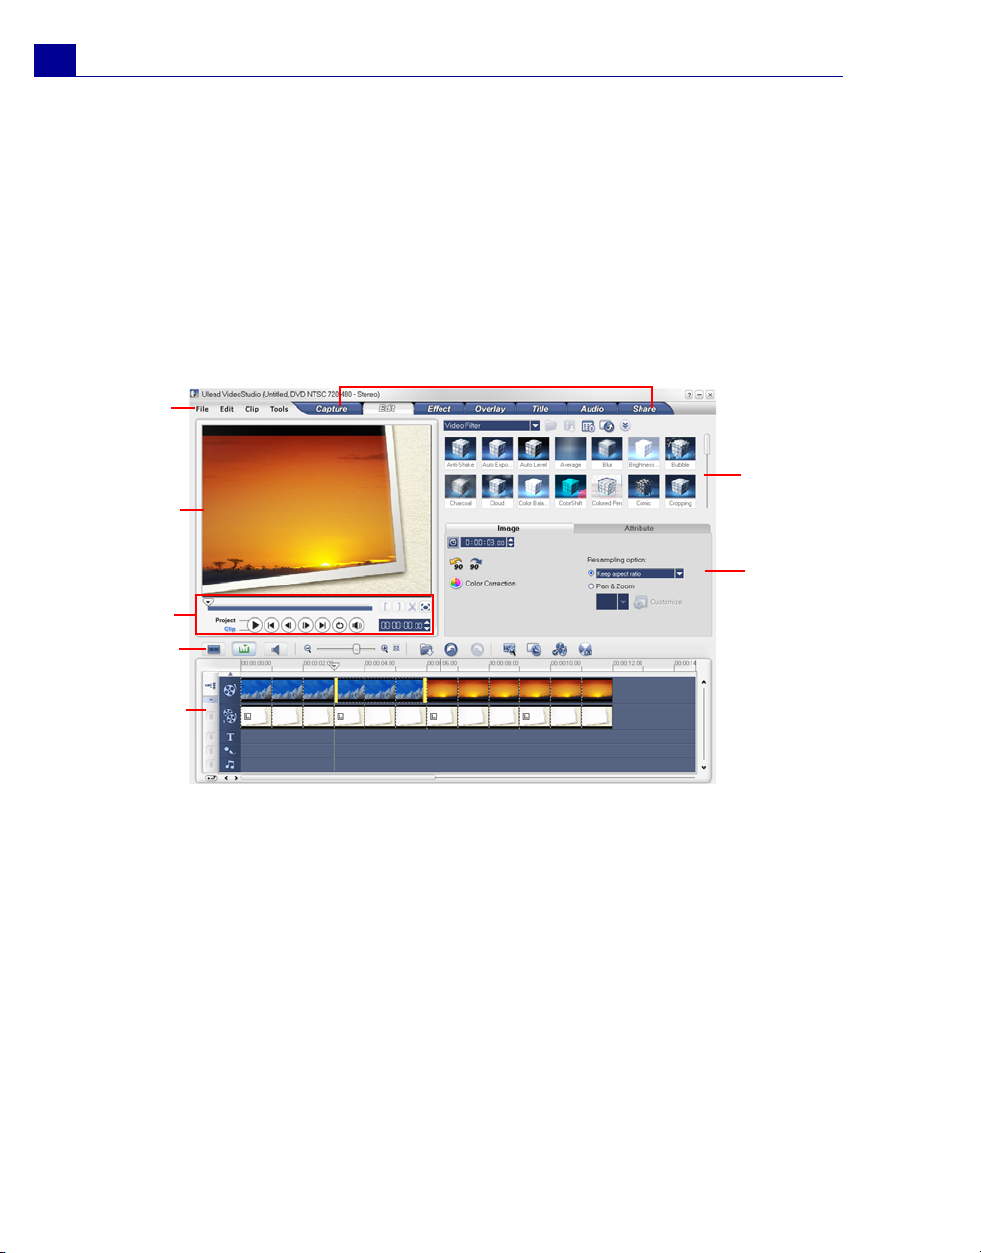
The user interface
1
2
8
3
4
7
5
6
1 Step Panel
Contains buttons that correspond to the different steps in video editing.
2 Menu Bar
Contains menus that provide different set of commands.
3Preview Window
Shows the current clip, video filter, effect, or title.
4 Navigation Panel
Provides buttons for playback and for precision trimming of clips. In the Capture Step,
this also acts as the device control for the DV or HDV camcorder.
Page 31

ULEAD VIDEOSTUDIO USER GUIDE
5Toolbar
Contains buttons for switching between three project views and other quick settings.
6 Project Timeline
Displays all the clips, titles, and effects included in your project.
7 Options Panel
Contains controls, buttons, and other information that you can use to customize the
settings of the selected clip. The contents of this panel change depending on the step you
are in.
8 Library
Stores and organizes all of your media clips.
Note: To change the user interface layout, click Preferences: UI Layout.
The Step Panel
VideoStudio simplifies the process of creating movies into seven simple steps. Click
the buttons in the Step Panel to switch between steps.
31
Once a project is opened in
VideoStudio, video can be recorded
directly to your computer's hard disk in
the Capture Step. Footage from a
videotape can be captured as a single
file or automatically divided into
multiple files. This step allows you to
capture video and still images.
The Effect Step lets you add
transitions between video clips in your
project. Choose from the variety of
transition effects in the Library.
The Edit Step and the Timeline are the
heart of VideoStudio. This is where you
arrange, edit, and trim your video clips.
Video filters can also be applied to your
video clips in this step.
The Overlay Step allows you to
superimpose multiple clips over another
to create a picture-in-picture effect.
Page 32

32
ULEAD VIDEOSTUDIO USER GUIDE
No movie would be complete without
opening titles, captions and closing
credits. In the Title Step, you can
create animated text titles or choose
from various presets in the Library.
When your movie is complete, you can
create a video file for sharing on the
Web or output the movie on tape,
DVD, or CD in the Share Step.
Note: These steps do not necessarily need to be followed in the order that they are
presented.
Background music sets the mood of your
movie. The Audio Step lets you select
and record music files from one or several
CD-ROM drives attached to your
computer. You can also dub over your
video in this step.
The Menu Bar
The Menu Bar provides various commands for customizing VideoStudio, opening
and saving movie projects, working with individual clips, and more.
The Navigation Panel
The Navigation Panel is used to preview and edit the clips used in your project.
Use the Navigation Controls to move around a selected clip or your project. Use
the Trim Handles and Jog Slider to edit your clips.
When capturing video from a DV or HDV camcorder, the Navigation Controls are
used for device control. Use these buttons to control your DV or HDV camcorder or
any other DV device.
Page 33

ULEAD VIDEOSTUDIO USER GUIDE
10
11
1
12
13
14
33
2
1Play Mode
Select whether you want to preview your
project or only the selected clip.
3Home
Returns to the starting frame.
5Next
Moves to the next frame.
7Repeat
Loops playback.
9Timecode
Allows you to directly jump to a part of
your project or selected clip by specifying
the exact timecode.
11 Jog Slider
Allows you to scrub through the project or
clip.
13 Cut Clip
Cuts the selected clip into two. Position
the Jog Slider to where you want the
first clip to end and the second one to
start, then click this button.
43
6
7
5
8
9
2Play
Plays, pauses or resumes the current
project or a selected clip.
4Previous
Moves to the previous frame.
6End
Moves to the end frame.
8 System Volume
Click and drag the slider to adjust the
volume of your computer's speakers.
10 Mark-in/out
Use these buttons to set a preview range in
the project, or to mark the start and end
points where to trim a clip.
12 Trim Handles
Allows you to set a preview range in the
project or trim a clip.
14 Enlarge Preview Window
Click to increase the size of the Preview
Window. You can only preview, not edit,
your clips when the Preview Window is
enlarged.
The Toolbar
The toolbar allows you to easily access buttons for editing. You can change your
project view or zoom your project timeline by adjusting your Timeline ruler. Click
Page 34

34
ULEAD VIDEOSTUDIO USER GUIDE
Smart Proxy Manager to speed up editing of your HD videos and other large
source files. Or use the Overlay Track Manager to add more overlay tracks.
1
3
2
4
1 Storyboard View
Shows image thumbnails of your movie on
the timeline.
3 Audio View
Shows the audio waveform view, allowing
you to visually adjust the volume levels of
your video clips, narration or background
music.
5 Fit Project in Timeline Window
Zooms in or out to display all the project’s
clips on the Timeline.
7Undo
Lets you undo a previous function.
9 Smart Proxy Manager
Creates working copies of your HD videos
with lower resolution.
11 Overlay Track Manager
Allows you to create multiple overlay tracks.
5
7
6
9
8
10
11
2 Timeline View
Allows you to perform frame-accurate
editing of your clips.
4Zoom controls
Allows you to change the timecode
increments in the Timeline ruler.
6 Insert media files
Displays a menu allowing you to place
video, audio or image clips directly on
the project.
8Redo
Allows you to redo an undone function.
10 Batch Convert
Converts multiple video files to one
video format.
12 Enable/Disable 5.1 Surround
Enables you to create 5.1 Surround
audio tracks.
12
The Project Timeline
The project timeline at the lower part of the VideoStudio Editor window is where
you assemble your movie project.
There are three types of views for displaying the project timeline: Storyboard,
Timeline and Audio View. Click the buttons at the left side of the toolbar to switch
between different views.
Page 35

ULEAD VIDEOSTUDIO USER GUIDE
Storyboard View
Storyboard View is the fastest and simplest way to add video clips to your movie.
Each thumbnail in the storyboard represents an event in you movie, an event being
a video clip or a transition. Thumbnails show at a glance the chronological order of
events in your project. The duration of each clip is shown at the bottom of each
thumbnail.
You can drag and drop video clips to insert and arrange them. Transition effects can
be inserted between video clips. A selected video clip can be trimmed in the
Preview Window.
Click Enlarge to maximize the storyboard display. With a larger workspace, you
can arrange video clips and apply transitions more easily. Furthermore, there is a
small screen at the bottom of the window where you can preview clips.
35
Page 36

36
ULEAD VIDEOSTUDIO USER GUIDE
Timeline View
Timeline View gives you the most comprehensive display of the elements in your
movie project. It divides a project into a separate tracks for video, overlay, title,
voice and music.
1
2
3
4
5
6
1 Chapter Point Bar
Click to set chapter points in your movie.
3 Track buttons
Click the buttons to switch between
different tracks.
5 Project scroll controls
Use the left and right buttons or drag the
Scroll Bar to move around your project.
7 Timeline ruler
Displays the project’s timecode increments
in hours: minutes:seconds.frames, which
helps you determine clip and project
length.
7
8
9
10
11
12
2 Ripple Editing
Enable/Disable Ripple Editing. When
enabled, allows you to select which tracks
to apply it to.
4 Timeline scroll control
Enable/disable scrolling along the Timeline
when previewing a clip that extends
beyond the current view.
6 Selected range
This color bar represents the trimmed or
selected part of a clip or project.
8Video Track
Contains video/image/color clips and
transitions.
9 Overlay track
Contains overlay clips, which can be video,
image or color clips.
11 Voice Track
Contains voiceover clips.
10 Title Track
Contains title clips.
12 Music Track
Contains music clips from audio files.
Page 37

ULEAD VIDEOSTUDIO USER GUIDE
To switch to different tracks:
• Click a Step button in the Step Panel that corresponds to the track.
• Click the Track buttons.
• Double-click the desired track, or click a clip on the track.
Tips:
• The wheel mouse can be used to scroll through the Timeline.
• When the pointer is over the Zoom Controls or Timeline ruler, you can use the
wheel to zoom in and out of the Timeline.
Audio View
Audio View allows you to visually adjust the volume levels of video, voice and
music clips.
Volume rubber band
37
Clips that contain audio are displayed with a volume rubber band that you can
click and drag to adjust their volume.
The Options Panel
The Options Panel changes depending on the program's mode and the step or
track you are working on. The Options Panel may contain one or two tabs. The
controls and options in each tab vary, depending on the selected clip.
Page 38

38
ULEAD VIDEOSTUDIO USER GUIDE
The Library
The Library is a storage depot for everything you need to create a movie: video
clips, video filters, audio clips, still images, transition effects, music files, titles and
color clips. These are collectively known as media clips.
Tips:
• You can print images directly from the library. Right-click the image to print then
select Print Image and select an image size.
• Right-click the image then select Print Options to specify print alignment and
borders.
To add media clips to the Library:
1. Click Load media to open a dialog box for locating the media clip to insert in the
Library.
Load media allows you to locate the
clip you want to add to the Library.
2. Select the desired file.
3. Click Open when you are finished.
Note: You can also drag and drop files from Windows Explorer straight to the
Library.
Right-click a clip in the Library to view the clip's properties as well as copy,
delete, or split by scene.
Hold [Ctrl] or [Shift] to select multiple clips.
Page 39

ULEAD VIDEOSTUDIO USER GUIDE
To delete media clips from the Library:
1. Select the clip to remove from the Library, then press [Delete].
Or, right-click the clip in the Library and select Delete.
2. When prompted, verify whether you want to delete the thumbnail from the
Library.
Sorting clips in the Library
To arrange clips in the Library, click in the Library to open the Options menu,
then select Sort by Name or Sort by Date.
The way video clips are sorted by date depends on the file format. DV AVI files
(i.e., AVI files captured from DV camcorders) will be arranged by order of the
shooting date and time of the footage. Other video file formats will be sorted by
order of file date.
Notes:
• You can also right-click on the Library then select the desired sorting type in the
Sort By submenu.
• To toggle between ascending and descending order, select Sort by Name or
Sort by Date again.
39
Library Manager
The Library Manager organizes your custom Library folders. These folders help
you store and manage all kinds of media files.
To use the Library Manager:
1. Click to launch the Library Manager dialog box. You can also click the
Folder arrow and select Library Manager from the drop-down list.
2. Select a media type from the Available custom folders list.
Page 40

40
ULEAD VIDEOSTUDIO USER GUIDE
3. Click New to display the New Custom Folder dialog box and create a new
folder. Specify a library Folder name and a Description. Click OK.
Click Edit to rename or modify the description of a selected custom folder.
Click Delete to remove a selected custom folder from the Library.
4. Click Close.
Exporting a video file
VideoStudio provides you with a number of ways to export and share a video file. A
video file can be exported to a Web page, converted to an executable greeting
card, sent by e-mail, or set as a desktop screen saver.
Select a video file in the Library and click . Choose the type of output for your
video.
Starting a new movie project
When you run VideoStudio, it automatically opens a new project and lets you start
composing your movie production. A new project always uses VideoStudio's default
settings. To check what these settings are, click File: Project Properties.
Project settings determine how your movie project is rendered when you preview
it. Rendering is the process by which VideoStudio converts raw video, titles,
sounds, and effects into a continuous stream of data which can be played back in
your computer. You can modify the project settings in the Project Properties
dialog box.
Page 41

ULEAD VIDEOSTUDIO USER GUIDE
When you capture or insert your first video clip into the project, VideoStudio
automatically checks the properties of the clip and your project. If properties such
as file format, frame size, etc. are not identical, VideoStudio automatically adjusts
the project settings to match the clip's properties. Changing the project settings to
conform with clip properties allows VideoStudio to perform the SmartRender
function.
Tip:
The above message box lets you change the project properties to be the same as the
first video clip inserted into the Timeline. To toggle between displaying and not
displaying the message box, select or clear Show message when inserting first
video clip into the Timeline in the Preferences dialog box.
41
Setting your preferences
Customize the program's working environment through the Preferences dialog
box. You can specify a working folder for saving files, set undo levels, choose
preferred settings for program behavior, enable Smart Proxy and more. To open the
Preferences dialog box, select File: Preferences [F6].
VideoStudio contains a sample finished project that lets you have a general
overview of most of the features that are available in the program. This sample
project also lets you experiment and get a general feel of how to use VideoStudio.
You can find the sample project in your specified working folder or the default
folder: My Documents\Ulead VideoStudio\10.0.
Page 42

42
ULEAD VIDEOSTUDIO USER GUIDE
Setting project properties
Project Properties serve as your template for previewing your movie projects.
The project settings in the Project Properties dialog box determine the appearance
and quality of a project when it is previewed on-screen. To customize project
settings, select File: Project Properties.
When customizing project settings, it is recommended that you make the settings
the same as the attributes of the video footage that will be captured to avoid
distorting the video images and have smooth playback without jumping frames.
When you customize project properties to be the same as the desired output
settings for your project (for instance, setting project properties to DVD settings if
you will output the project to a DVD disc), you can have more accurate previews of
your final movie.
Adding clips
There are three ways you can do to add clips to your project:
• Capture video clips from a video source. The video clips will be inserted onto
the Video Track.
• Drag clips from the Library onto the correct tracks.
• Click to directly insert media files to the different tracks.
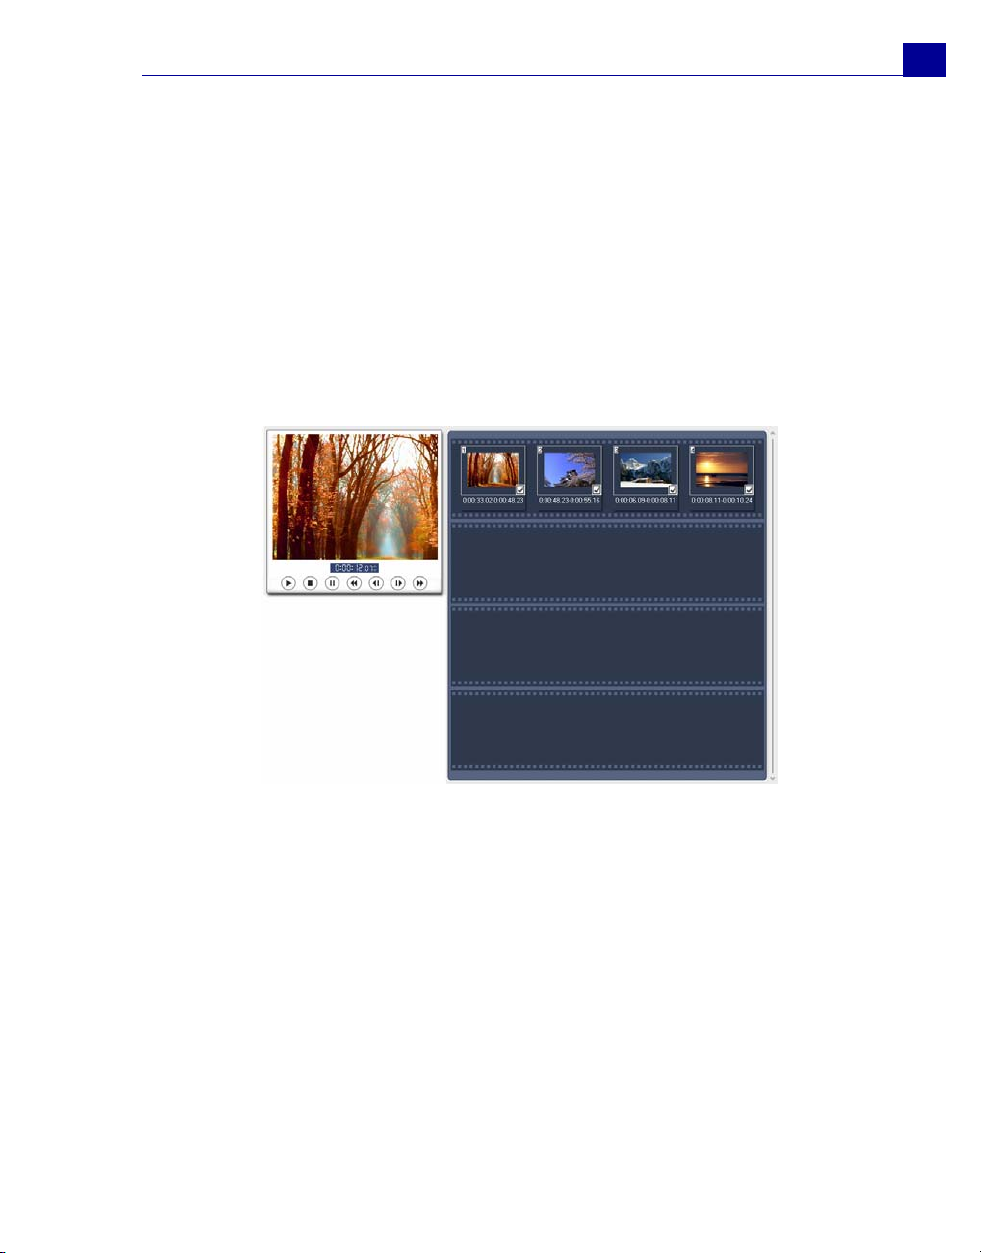
Previewing
The Play button in the Navigation Panel serves
two purposes: for playback of your entire project or
a selected clip. To play back, click Project or Clip,
then click Play.
While working on your project, you will want to preview your work frequently to see
how your project is progressing. VideoStudio offers you two preview options:
Instant Playback and High Quality Playback. Select File: Preferences General, then choose the preview method that you prefer in Playback method.
Page 43

ULEAD VIDEOSTUDIO USER GUIDE
• Instant Playback allows you to quickly preview changes in your project
without the need to create a temporary preview file, however, playback may
be jerky depending on your computer resources.
• High Quality Playback renders your project as a temporary preview file
then plays this preview file. Playback is smoother in High Quality Playback
mode, but rendering your project for the first time in this mode may take a
long time to complete depending on the size of your project and computer
resources.
Note: When Perform non-square pixel rendering is selected in the Project
Options dialog box (opened from Project Properties dialog box), Instant Playback
performance may be affected if computer resources are insufficient.
In High Quality Playback mode, VideoStudio uses SmartRender technology which
renders only the changes you made such as transitions, titles and effects, and
eliminates re-rendering the entire project. SmartRender saves time when
generating previews.
Setting a preview range
For faster previews, you may choose to play only a
part of your project. The selected range of frames to
preview is referred to as the preview range, and it
is marked as a red bar in the Ruler Panel.
43
To play the preview area only:
1. Use the Trim Handles or the Mark-in/out
buttons to select the preview range.
The Preview range mark-in and Preview
range mark-out timecodes will then be displayed
in the Options Panel.
2. To preview the selected range, select what you
want to preview (Project or Clip), then click
Play. To preview the entire clip, hold [Shift], then
click Play.
Page 44

44
ULEAD VIDEOSTUDIO USER GUIDE
Undoing and redoing actions
You can undo or redo the last set of actions that you performed while working on
your movie by clicking Undo [Ctrl+Z] or Redo [Ctrl+Y] in the toolbar.
Showing and hiding grid lines
You can use grid lines to guide you when repositioning or resizing images and
videos or when adding titles to your movie.
• To show grid lines in the Edit and Overlay steps, select a clip in the Timeline
then select the Attribute tab. Select Distort clip then select Show grid
lines.
• To show grid lines in the Title step, select Show grid lines in the Edit tab.
Tip: Click to adjust grid line settings.
Saving your project
While composing your movie project, select File: Save [Ctrl + S] to frequently
save your project and avoid accidental loss of your work. VideoStudio project files
are saved in .VSP file format.
To automatically save your work, select File: Preferences then select Auto save
duration and specify the time interval between saves.
To open an existing project, select File: Open Project [Ctrl + O]. To create a new
project again, select File: New Project [Ctrl + N].
Page 45

ULEAD VIDEOSTUDIO USER GUIDE
Capture
The bulk of video work involves working with raw footage. Transferring footage
from a source device to the computer involves a process called capturing.
When capturing, video data is transferred from a source (usually a video camera)
through a capture card to the computer’s hard drive.
Seamless DV and MPEG capture
VideoStudio runs on Windows operating systems and is subject to limitations in file
size when capturing or rendering video. VideoStudio automatically performs
seamless capture, saving video into a new file every time the maximum
allowable file size for a single video file has been reached.
45
Seamless capture will be performed only when capturing DV Type-1 or DV Type-2
(from DV camcorder), or when capturing MPEG video (from DV and HDV camcorder
or analog capture device). The maximum captured file size per video file is 4 GB in
Windows operating systems that use the FAT 32 partition file system. Captured
video data in excess of 4 GB are automatically saved to a new file. In Windows
2000 and Windows XP which can use the NTFS file system, there is no limit in the
captured file size.
Seamless capture is not available in VFW (Video For Windows) capture.
Note: VideoStudio automatically detects your file system and performs seamless
capture only in a FAT 32 partition file system.
Page 46

46
ULEAD VIDEOSTUDIO USER GUIDE
The Capture Step Options Panel
The Capture Step Options Panel consists of three options: Capture Video, DV
Quick Scan, Import from DVD/DVD-VR and Import from Mobile Device.
Capturing video
VideoStudio lets you capture video from DV or HDV camcorders, analog
camcorders, VCRs, and television. The steps on how to capture is similar for all
types of video sources except for the available capture settings in the Capture
Video Options Panel that can be selected for each type of source.
Capture Video Options Panel
• Duration: Sets the length of time for the capture.
• Source: Displays the detected capture device and lists other capture devices
installed in your computer.
• Format: Where you select a file format for saving your captured video.
• Capture folder: Where a copy of your captured file is saved.
• Split by scene: Automatically separates captured video into several files based on
changes in shooting date and time. (This feature can be used only when capturing
video from a DV camcorder.)
• Options: Displays a menu allowing you to modify your capture settings.
• Capture Video: Transfers video from your source to your hard disk.
• Capture Image: Captures the displayed video frame as an image.
• Enable/Disable Audio Preview: Disables audio preview on the computer while
capturing DV or HDV.
If the audio sounds choppy, there may be a problem with previewing audio on your
computer during DV capture. This does not affect the audio capture quality. If this
happens, click Disable Audio Preview to mute the audio while capturing.
Page 47

ULEAD VIDEOSTUDIO USER GUIDE
To capture video:
1. Click the Capture Step then click Capture Video.
2. To specify a capture duration, enter the values in the Duration box in the
Options Panel.
3. Select your capture device from the Source list.
4. Select a file format to use for saving your captured video from the Format list.
5. Specify a Capture folder in which to save video files.
6. Click Options to open a menu for customizing more capture settings.
7. Scan your video to search the part to capture.
8. When you get to the part of the video that you want to capture, click Capture
Video to start capturing.
9. If you specified a capture duration, wait for the capture to complete. Otherwise,
click Stop Capture or press [Esc] to stop capturing.
Notes:
• When your camcorder is in Record mode (usually named CAMERA or MOVIE), you
can capture live video.
• The available settings in the Video and Audio Capture Property Settings dialog
box vary, depending on the capture file format that you have chosen.
47
Digital Video (DV)
To capture Digital Video (DV) in its native format, select DV from the Format list in
the Options Panel. This saves the captured video as a DV AVI file (.AVI).
Note: You can also use the DV Quick Scan option to capture DV video.
DV AVI type-1 and type-2
When capturing DV, click Options in the Options Panel to open a menu, then
select DV Type in the menu and choose whether to capture DV as DV type-1 or
DV type-2.
DV is a data stream that itself contains video and audio. With DV Type-1, the
video and audio channels are stored unmodified as a single, interleaved stream in
Page 48

48
ULEAD VIDEOSTUDIO USER GUIDE
the AVI file. With DV Type-2 (which is the default), the video and audio channels
are stored as two separate streams in the AVI file.
The advantage of Type-1 is that the DV data does not need to be processed, and is
stored in its exact original format. The advantage of Type-2 is that it is compatible
with video software that is not specially written to recognize and process Type-1
files.
Note: To preview audio on the computer while capturing DV, click Enable Audio
Preview in the Options Panel.
If the audio sounds choppy, there may be a problem with previewing audio on your
computer during DV capture. This does not affect the audio capture quality. If this
happens, click Disable Audio Preview to mute the audio.
Split by scene
It often happens that a single DV tape contains several footage that were shot at
different times. VideoStudio saves you the hassle of having to capture the
segments one by one then save them as separate files. The Split by scene feature
will do that job for you.
To use Split by scene option in Capture Step:
1. Select the Split by scene option in the Options Panel.
2. Click Capture Video. VideoStudio will automatically look for the scenes
according to their shooting date and time and capture them as separate files.
Controlling the DV camcorder with the Navigation Panel
When capturing from a DV camcorder, use the Navigation Panel to scan your
footage and locate the scenes you want to capture.
Page 49

ULEAD VIDEOSTUDIO USER GUIDE
Shuttle Slider
Drag the Shuttle Slider to move forward and
back through the footage at variable speeds.
This is a quick way to find scenes you are
looking for in your video.
High Definition Videos
Once you have the HDV plug-in installed, you can import high definition video from
your HDV camcorder such as Sony HDR-HC1.
To capture from Sony’s HDR-HC1 HDV camcorder:
1. Connect your Sony HDV camcorder to your computer’s IEEE-1394 port using the
IEEE-1394 cable.
2. Turn on you r camco rder and switch it to Play/Edit mode and make su re that you r
Sony HDV camcorder is switched to HDV mode.
49
Note: To check that your Sony HDV camcorder is set to HDV mode, flip open the LCD
screen and see if HDVout I-Link is on the LCD screen. If you see DVout I-Link,
press P-MENU at the lower right of the screen. In the menu, press MENU>
STANDARD SET> VCR HDV/DV and press HDV.
3. Click Capture on the Step Panel. In the Options Panel, click .
Note: VideoStudio automatically detects your Sony HDV camcorder. The Source
should show Sony -- HDV.
Page 50

50
ULEAD VIDEOSTUDIO USER GUIDE
Digital TV DVB-T video
Before capturing, have the DVB-T source connected via a DVB-T compatible
capture card installed on your computer first.
To capture DVB-T video:
1. Click the Capture Step then click Capture Video.
2. In the Capture Step Options Panel, select Digital TV Source from the
Source list.
3. Click Options and select Video and Audio Capture Property Settings.
4. Click the Channel Scan tab. Select Channel List to start scanning for
channels.
Note: DVB-T channels are not automatically scanned. Make sure to manually scan
the channels first before capturing.
5. Click Capture Video.
6. Click Yes when prompted if you want to start capturing and autorecover DVB-T video.
7. Follow the remaining steps as described in the procedure for capturing videos.
To recover captured DVB videos
1. Click Tools in the Edit Step and select Recover DVB-T Video.
2. In the Recover DVB-T Video dialog box, click Add and browse for the videos
to recover.
3. Click Recover.
Analog video
When footage is captured from analog sources such as VHS, S-VHS, Video-8, or
Hi8 camcorders/VCRs, it is converted to a digital format that can be read and
stored by the computer. Before capturing, choose the desired file format to use for
saving the captured video in the Options Panel’s Format list.
Page 51

ULEAD VIDEOSTUDIO USER GUIDE
Click Options then select Capture Options to choose how you want footage to be
captured.
To specify the type of video source you are capturing from, click Options then
select Video and Audio Capture Property Settings. In the dialog box that
opens, you can customize the following capture settings:
•In the Source tab, choose whether you are capturing NTSC, PAL, or SECAM
video and select the Input source (Tuner, S-Video, or Composite).
•In the Color tab, you can fine tune the video source to ensure good quality
captures.
•In the Capture tab, set the frame size and compression method to use for
saving the captured video.
Adjusting source volume
VideoStudio has a Source Volume Panel that allows you to adjust the sound
volume of the analog source during capture. To use this panel, click Options,
select Capture Options, then select Display Source Volume Panel while
capturing.
51
Note: The Source Volume Panel is not available when you are capturing from an
analog device that has no audio source or a DV device.
To ensure that the sound volume of captured videos is clear, test capturing a short
video first and use the Source Volume Panel to adjust the volume level of the
analog source while capturing.
Page 52

52
ULEAD VIDEOSTUDIO USER GUIDE
After fine tuning the volume, you can start capturing footage from your analog
device. Use the controls on your analog device to scan your videotape and locate
the footage that you want to capture.
Tip: A delay in capture may be due to the confirmation dialog box or connection
between devices. It is better to rewind your tape to an earlier point before the actual
footage you want to capture and just trim the video later.
Capturing TV footage
VideoStudio allows you to capture TV footage through a TV tuner. Capture a
segment of your favorite television show on regular TV or cable then save it in your
hard drive in AVI, MPEG, or Windows Media Format.
Before capturing, you need to choose the following settings in the Options Panel:
1. Select your TV tuner device from the Source drop-down list.
2. In the TV channel box, specify the channel number from which to capture.
3. Click Options: Video and Audio Capture Property Settings to open the
Video and Audio Capture Property Settings dialog box. Check if the Video
Input source, TV system, and Audio Input source are set correctly. If not,
adjust the settings accordingly.
Click the Channel tab to choose Antenna or Cable TV, scan available channels in
your region, and more.
DV Quick Scan
Use this option to scan a DV device for scenes to import. To use DV Quick Scan,
refer to the first step in the DV-to-DVD Wizard section.
Importing from DVD/DVD-VR
You can import DVD/DVD-VR formatted video from a disc or from your hard drive
into VideoStudio.
To import from DVD/DVD-VR:
1. Click the Capture Step then click Import from DVD/DVD-VR.
2. Select your DVD drive and then click Import DVD Folder.
Page 53

ULEAD VIDEOSTUDIO USER GUIDE
3. Specify the location of the DVD folder in the Browse for folder window then
click OK.
4. In the Import DVD window, select which DVD tracks to import in Label. Use
the preview screen to view the selected tracks to import.
5. Click Import to finish. All imported videos will be added to the thumbnail list in
the Library.
Importing from Mobile Devices
You can insert media files from your mobile devices like Windows Mobile-based
Smartphones/PocketPC/PDA, iPod and PSP to your project.
53
Note: Make sure your device is properly connected and it can be recognized by
VideoStudio.
To import videos from a mobile device:
1. In Capture Step Options Panel, click Import from Mobile Device.
2. Click the device where you want to import files from in Device.
3. Click the type of media file you want to add. Click to display all your media
files in the device.
4. Select the media file and click OK.
Page 54

54
ULEAD VIDEOSTUDIO USER GUIDE
Tip: Click Settings to set where to browse for files and where to save imported and
exported files.
5. You can also trim your video and audio clips before you insert them to your
project.
To trim video and audio clips before inserting to project:
1. Select the clip you want to trim and click for preview of the clip.
2. At the bottom of the dialog box, drag the Jog Slider until you locate the point in
the video or audio clip that you want to set as the start of the clip. Click .
3. Drag the Jog Slider until you locate the point in the video or audio clip that you
want to set as the end of the clip. Click .
4. Click to listen to your trimmed clip. When finished, click OK.
Direct video capturing to MPEG format
VideoStudio supports real-time capturing from DV, analog, or any video source to
MPEG-1 and MPEG-2 formats. Capturing straight to MPEG saves hard drive space
as its file size is smaller compared with DV AVI.
To capture video in MPEG-1 or MPEG-2 format:
•In the Options Panel, select MPEG from the Format list to capture MPEG
files that are intended for playback on the computer or for sharing on the
Web.
You can also capture VCD, SVCD or DVD-ready MPEG files that can be burnt
onto disc by selecting one of these formats from the Format list.
Note: The Ulead DSW MPEG Capture Plug-in will be automatically detected. If
your capture device does not support this plug-in, you need to manually select this
plug-in the Change Capture Plug-in dialog box.
• Click Options and select Video and Audio Capture Property Settings. In
the dialog box that opens, click the Capture tab then click Advanced. The
Page 55

ULEAD VIDEOSTUDIO USER GUIDE
MPEG Settings dialog box then appears in which you can customize
attributes for the MPEG file.
Direct video capturing to Windows Media Video
Now you can capture directly from an analog source or DV camcorder straight to
Windows Media Video (WMV). WMV is an extensible file format that handles
synchronized multimedia data and supports "live content" transmission over a wide
array of networks. To directly capture to WMV format, select WMV from the
Format list.
Selecting a profile
The quality of a WMV file depends on the profile it is using. A Profile covers various
attributes for a Windows Media Format file such as bit rate, number and type of
streams, compression quality, frame size and so on. When capturing a video
directly to WMV format, VideoStudio uses the default profile to complete the
capturing process. You also have the option to select other profiles to attain
preferred captured file quality.
To select a profile:
1. Click Options: Video and Audio Capture Property Settings. In the dialog
box, click Select to open Select Profile.
2. Select the profile you want to use for capturing. Click OK.
55
Page 56

56
ULEAD VIDEOSTUDIO USER GUIDE
Editing and customizing a video profile
Profile Selection lists all the profiles available in your system. You can use the
Manage Profiles to edit, create, remove, and duplicate a profile.
System-defined profiles cannot be edited. However, You can create a customized
one base from it. A Custom profile can be edited by clicking Edit and changing
specific profile attributes.
You can also create a new profile by clicking New. This will launch a task wizard
that will guide you in creating your profile.
To edit and customize a profile:
1. Click Options: Video and Audio Capture Property Settings. In the dialog
box, click Select to open Select Profile.
2. Under Select Profile, click Customize.
3. Manage Profiles lists all the available profiles installed in your computer. The
profiles are categorized into two types: System-defined profiles and Custom
profiles. Simply click Edit to modify attributes of a Custom profile.
Page 57

ULEAD VIDEOSTUDIO USER GUIDE
57
Note: System-defined profiles cannot be edited directly. You must create a copy
before editing the corresponding attributes. To do this, select a system defined profile
and then click Copy. Select the created copy of the profile and then click Edit to
modify the attributes. Clicking Edit invokes Edit Profile. It will guide you in
specifying your preferred attributes.
Page 58

58
ULEAD VIDEOSTUDIO USER GUIDE
4. Under General Information, specify a reference name for the created or
edited profile in Name of Profile.
5. Select the media types supported by the profile in Media types.
6. Under Output, you may choose to allow the profile to compress the video file or
not. Enter a brief description of the profile under Description. Click Next.
Capturing still images
In addition to video, VideoStudio also allows you to capture still images. The image
format can be BMP or JPEG, and the size depends on its source video. To choose
your image format, click File: Preferences. In the Preferences dialog box click
the Capture tab and set the format.
To capture still images:
1. If you are capturing from a DV camcorder, click Play in the Navigation Panel
to play your videotape.
If you are capturing from an analog device, press the Play button on your device
to play your videotape.
2. When you see the image you want to capture, click Capture Image in the
Options Panel.
Page 59

ULEAD VIDEOSTUDIO USER GUIDE
Edit
The Edit Step is where you arrange, edit and trim the video clips used in your
project. In this step, you can apply fade-in/fade-out effects to the existing audio of
a video clip, multi-trim or split video, and adjust a clip's playback speed. You can
also choose from a wide selection of video filters to apply to your clips.
The Edit Step Options Panel
The Edit Step Options Panel allows you to edit the video, image and color clips
that you added to the Video Track. Video filters that you applied to your clips can
be fine tuned in the Attribute tab.
Video tab
• Duration: Displays the duration of the selected clip in
hours:minutes:seconds:frames. You can trim the selected clip by changing the clip
duration.
• Clip volume: Allows you to adjust the volume of the audio segment of your video.
• Mute: Silences the audio segment of your video without deleting it.
• Fade-in/out: Gradually increases/decreases the volume of the clip for a smooth
transition. Select File: Preferences - Edit to set the fade-in/out duration.
• Rotate: Rotates the video clip.
• Color Correction Allows you to adjust the hue, saturation, brightness, contrast, and
gamma of the video clip.
• Playback Speed: Launches the Playback Speed dialog box where you can adjust
the pace of your clip.
• Reverse video: Plays the video backward.
• Save as Still Image Saves the current frame as a new image file and places it in
the Image Library. All enhancements made to the file are discarded before saving.
• Split Audio Allows you to separate the audio from a video file and place it on the
Voice Track.
• Split by Scene Splits a captured DV AVI file based on the shooting date and time, or
the changes in video content (i.e., motion change, camera shifting, brightness
change, etc.).
• Multi-trim Video Allows you to choose desired segments from a video file and
extract them.
59
Page 60

60
ULEAD VIDEOSTUDIO USER GUIDE
Image tab
• Duration: Sets the duration of the selected image clip.
• Rotate: Rotates the image clip.
• Color Correction: Allows you to adjust the hue, saturation, brightness, contrast,
and gamma of the image.
• Resampling option: Sets how image size is adjusted. There are two options: Keep
aspect ratio maintains the relative width and height of the current image; Fit to
project size makes the size of the current image the same as the project’s frame
size.
• Pan & Zoom: Applies the Pan & Zoom effect to the current image.
• Presets: Provides various Pan & Zoom presets. Choose a preset from the drop-down
list.
• Customize: Allows you to define how to pan and zoom the current image.
Color tab
• Duration: Sets the duration of the selected color clip.
• Color: Click the color box to adjust the color.
Attribute tab
• Replace last filter: Allows the last filter applied to a clip to be replaced when you
drag a new filter onto the clip. Clear this option if you want to add multiple filters to
your clips.
• Applied filters: Lists the video filters that were applied to a clip. Click or to
arrange the order of the filters; click to remove a filter.
• Presets: Provides various filter presets. Choose a preset from the drop-down list.
• Customize Filter: Allows you to define how a filter transitions throughout the clip.
• Distort clip: Allows you to modify the size and proportions of the clip.
• Show grid lines: Select to display the grid lines. Click to open a dialog box
where you can specify settings for the grid lines.
Adding clips to the Video Track
You only work on the Video Track when you are in the Edit Step. On the Video
Track, you can insert three types of clips: video, image and color clips.
Page 61

ULEAD VIDEOSTUDIO USER GUIDE
Video clips
There are several ways of inserting video clips on the Video Track:
• Select a clip in the Library and drag and drop it to the Video Track. Multiple
clips can be selected by pressing [Shift] or [Ctrl].
• Right-click a clip in the Library then select Insert To: Video Track.
• Select one or more video files in Windows Explorer then drag and drop to the
Video Track.
• To insert a clip from a file folder directly to the Video Track, click Insert
Media Files located to the left of the Timeline.
Notes:
• Aside from video files, you can also add video from DVD or DVD-VR formatted discs.
•Use the Fade-in/out buttons to make the audio of the video clips in your
project smoothly fade from one clip to the next.
Images
The ways of adding still images to the Video Track are the same as when adding
video clips.
61
Before you start adding images to your project, determine first the image size that
you want for all your images. By default, VideoStudio adjusts the size to keep the
image’s aspect ratio. To make the size of all inserted images the same as your
project’s frame size, select
resampling option default to Fit to project size.
File: Preferences - Edit then change the Image
Color clips
Color clips are solid colored backgrounds that are useful for titles. For example,
insert a black color clip as background for end credits. You can use the preset color
clips or create new color clips in the Library.
To select a color clip in the Color Library:
1. Select Color from the Library drop-down menu.
Page 62

62
ULEAD VIDEOSTUDIO USER GUIDE
2. Choose your desired color displayed in the Library and drag to the Video or
Overlay Track.
3. To load another color that is not in the Library, click the
color box beside the Color Picker. Here, you can select a
color either from Ulead Color Picker or the Windows Color
Picker.
4. Set the Duration of the color clip in the Options Panel.
Trimming a clip
The best part of editing your movie on your computer is the ease with which you
can snip and trim your work with frame by frame accuracy. There are three ways of
trimming a clip:
To split a clip into two:
1. Select the clip you want to split on the Storyboard or Timeline.
2. Drag the Jog Slider to the point where you want to cut the clip.
Tip: Click or to set the cutting point more precisely.
3. Click to cut the clip into two clips. To remove one of these clips, select the
unwanted clip and press [Delete].
To trim a clip with the Trim Handles:
1. Select a clip on the Storyboard or Timeline.
2. Click and drag the Trim handles to set the Mark-in/Mark-out points on the clip.
Page 63

ULEAD VIDEOSTUDIO USER GUIDE
For more precise trimming, click on a Trim handle, hold it, and use the left or
right arrow keys on your keyboard to trim one frame at a time. The Mark-in/
Mark-out points can also be set by pressing [F3] and [F4], respectively.
63
Trim handles
Mark-in/
Mark-out
3. Click Play Clip to preview the trimmed clip.
Tip: You can also use Zoom controls to display each frame of your video in the
Timeline and trim one frame at a time. The Scroll Bar makes navigating through
your project quicker and easier. A wheel mouse can also be used to scroll, and to
zoom by pressing [Ctrl].
To trim a clip directly on the Timeline:
1. Click a clip in the Timeline to select it.
2. Drag the yellow Trim handles on either side of the clip to change its length.
The Preview Window reflects the position of the Trim handle in the clip.
Or, click the timecode in the Duration box in the Options Panel and enter the
desired clip length
Duration
Trim Handles
3. Other clips in your project automatically reposition themselves according to
changes made.
Note: Changes made in the video Duration box only affect the Mark-out point. The
Mark-in point remains unchanged.
Page 64

64
ULEAD VIDEOSTUDIO USER GUIDE
Saving trimmed clips
Frequently, when you make changes (i.e., after auto-splitting clips using Split by
Scene, extracting clips using Multi-trim Video, or manually trimming clips), you
may wish to make a permanent change to the clip and save the edited file.
VideoStudio gives you a margin of safety in that it saves the trimmed video to a
new file and does not alter the original file.
To save, select a trimmed clip in the Storyboard, Timeline or the Library and select
Clip: Save Trimmed Video.
Ripple Editing
Ripple Editing allows you to insert clips while automatically moving other clips
(including empty spaces) aside, to make room for it on the Timeline. Use this mode
to maintain the original track synchronizations when inserting additional clips.
Ripple Editing is enabled for the tracks where content is inserted.
A color clip is inserted before the original clip and all clips where Ripple
Editing is applied shift accordingly
Page 65

ULEAD VIDEOSTUDIO USER GUIDE
To insert clips in Ripple Editing mode:
1. Click Ripple Editing to activate the panel, then select the corresponding box for
each track where you want to apply Ripple Editing.
2. Drag the clip to insert from the Library to the desired position on the Timeline.
As soon as the new clip is in place, all clips where Ripple Editing is applied will
shift accordingly while maintaining their track positions relative to one another.
Note: Ripple Editing can be applied from any of the three project views.
Ripple Editing also works when removing clips. In the example below, Overlay
and Title tracks maintain their position relative to the video after the clip in the
middle has been removed.
65
Adding chapters using Chapter Point Bar
You can add chapter pointers by clicking . Select Add to specify the chapter
name and the specific timecode you want to set as a new chapter. Notice that,
below your Timeline ruler, chapter pointers are set as markers in your movie.
Page 66

66
ULEAD VIDEOSTUDIO USER GUIDE
To edit a chapter, click on a chapter pointer you want to edit and drag to a new
position.
To rename, double click a chapter pointer and then enter a new chapter name.
Click OK.
To remove, simply drag the pointer outside the timeline ruler and then drop.
Enabling Smart Proxy
Proxy files are lower resolution working copies of video files. They are reduced in
resolution or compression bit rate for only one reason --to speed up editing of HDV
and other large video source files. Proxy files are source-dependent rather than
project-dependent. In other words, proxy files can be shared among different
projects.
When you edit and preview your project in Instant Play mode, proxy files will be
used as substitutes for their large video source counterparts. Whereas when you
preview your project in high-quality playback mode or when you render a video
file, the original video source files will be used.
To enable the creation of proxy files, go to File: Preferences - Smart Proxy, then
select the Enable Smart Proxy option. In the Smart Proxy tab of the
Preferences dialog box, you can set the condition when proxy files need to be
generated and choose a proxy file format.
Once Smart Proxy is enabled, proxy files will automatically be created and used in
your project whenever you insert video files into the Timeline.
In the toolbar, click to see the list of video files to be generated as proxy files.
Select the files you want to include in your queue and then click OK.
Converting multiple files
Batch Convert allows you to simultaneously convert a large number of files to
another format.
Page 67

ULEAD VIDEOSTUDIO USER GUIDE
To do Batch Convert:
1. Click .
2. Click Add and then choose the files you want to convert.
3. Select an output folder in Save in folder.
4. In Save as type, choose your desired output type.
5. Click Convert.
6. The result is shown in the Task Report dialog box. Click OK to finish.
Adjusting color and brightness
Adjust color and brightness settings of images and video in the Timeline by clicking
Color Correction in the Options Panel.
Playback Speed
You can modify the playback speed of your videos. Set your video in slow motion to
emphasize a movement, or set it to play at lightning speed and give your movie a
comical air. Simply adjust the speed attributes for your video clip by clicking
Playback Speed under the Options Panel of the Edit Step. Drag the slider
according to your preferences (i.e., slow, normal or fast), or enter a value. The
higher the value you set, the faster the playback of your clip. (Values range from
10-1000%). You can also specify a set duration for the clip in Time stretch. Click
Preview to view the results of your settings then click OK when finished.
67
Page 68

68
ULEAD VIDEOSTUDIO USER GUIDE
Tips:
•Hold [Shift] then drag the end of the clip on the Timeline to change the playback
speed.
• The black arrow means you are trimming or extending the clip, while the white
arrow means that you are changing the playback speed.
Reversing video playback
Reverse the playback of the video by clicking Reverse video in the Options
Panel.
Capturing still images in the Edit Step
A still image can be captured in the Edit Step by selecting a specific frame in the
Timeline and saving it as an image file. In this manner, possible distortions are
avoided since the image is not acquired from a running video, unlike in the
Capture Step.
To capture still images:
1. Select File: Preferences - Capture. Choose Bitmap or JPEG as the Captured
still image save format. If you selected JPEG, also set the Image quality.
2. Select a video clip in your project
3. Drag the Jog Slider to the frame you want to capture.
Page 69

ULEAD VIDEOSTUDIO USER GUIDE
4. Switch to an image folder in the Library. The folder can be the default Image
folder, or the one created by yourself.
5. Select Clip: Save as Still Image. The new image file is saved to the hard disk
and is represented as a thumbnail in the image folder you assigned.
Split by Scene
Use the Split by Scene feature in the Edit Step to detect different scenes in a video
file and automatically break it down into several clip files.
The way VideoStudio detects scenes depends on the type of video file. In a
captured DV AVI file, scenes can be detected in two ways:
• DV Recording Time Scan detects scenes according to their shooting date
and time.
• Frame Content detects content changes, such as motion change, camera
shifting, brightness change, etc., and splits them into separate files.
In an MPEG-1 or MPEG-2 file, scenes can only be detected based on content
changes (i.e., by Frame Content).
To use Split by Scene on a DV AVI or MPEG file:
1. Go to the Edit Step and select a captured DV AVI file or an MPEG file in the
Timeline.
69
2. Click Split by Scene in the Options Panel. This will open the Scenes dialog
box.
3. Choose your preferred scan method (DV Recording Time Scan or Frame
Content).
4. Click Options. In the Scene Scanning Sensitivity dialog box, drag the slider
to set the Sensitivity level. A higher value means more precision in the scene
detection.
5. Click OK.
6. Click Scan. VideoStudio then scans through the video file and lists all the
detected scenes.
7. You may merge some of the detected scenes into a single clip. Simply select all
the scenes that you want to join together then click Join. The plus sign (+) and
Page 70

70
ULEAD VIDEOSTUDIO USER GUIDE
a number indicates how many scenes are merged into that particular clip. Click
Split to undo any Join actions that you have done.
8. Click OK to split the video.
Multi-trimming your video
The Multi-trim Video feature is another method for breaking down a clip into
multiple segments. While Split by Scene is automatically done by the program,
Multi-trim Video gives you complete control over the clips you wish to extract,
making it even easier for you to manage your project.
1
1Timeline zoom
Drag up and down to sub-divide a video
clip into frames per second.
3Jog Wheel
Use to scroll to different parts of the clip.
2 AccuCut Timeline
Scan a video clip frame by frame for
accurate mark-in and mark-out positions.
4 Shuttle Slider
Preview the clip at different playback
speeds.
2
3
To trim a video file into multiple clips:
1. Go to the Edit Step and click Multi-trim Video in the Options Panel.
4
Page 71

ULEAD VIDEOSTUDIO USER GUIDE
2. In the Multi-trim Video dialog box, view the whole clip first by clicking to
determine how you want to mark segments.
3. Choose the number of frames to display by dragging the Timeline zoom. You can
choose to display the smallest subdivision of one frame per second.
4. Drag the Jog Slider until you get to the part of the video that you want to use
as the beginning frame of the first segment. Click Start.
5. Drag the Jog Slider again, this time, to the point where you want the segment
to end. Click End.
6. Do steps 4 and 5 repeatedly until you have marked all the segments you want
kept or removed.
Tips:
• To mark segments, you can also press [F3] and [F4] while playing the video.
• Click Invert Selection to toggle between marking segments that you want to
retain or marking segments that you want taken out from the clip.
7. Click OK when finished. The video segments that you kept are then inserted
onto the Timeline.
71
Navigation controls in the Multi-trim Video dialog box:
Reverses or advances through the video in fixed increments. By
[F5] [F6]
default, these buttons move up or down through the video in
increments of 25 seconds.
Plays a preview of the final trimmed video.
Plays the video file. Hold [Shift] then click to play only the selected
segments.
Moves to the start or end frame of a trimmed segment.
Moves to the previous/next frame in the video.
Page 72

72
ULEAD VIDEOSTUDIO USER GUIDE
Using Ad-Zapper
VideoStudio lets you search your videos for commercial intervals. Clicking this
feature extracts the commercials to the media list.
• Program detection sensitivity allows you to control the rate of
distinguishing between commercials.
• Quick search interval allows you to set a fixed interval between frames and
and browse through the movie using the set value.
• Merge CF merges all your extracted clips so that they appear as on
thumbnail in your media list.
Applying video filters
Video filters are effects that you can apply to clips in order to change their style or
appearance. For example, you can improve the color balance of a clip, or make it
look like a painting.
Video filter samples:
Anti-shake allows you to correct or stabilize sub-standard videos due to
camera shake.
Before
After
Page 73

ULEAD VIDEOSTUDIO USER GUIDE
Fish Eye distorts the video to give your audience a feel of looking through a
glass ball.
Before
After
Enhance Lighting improves video exposure which is ideal to correct poorly lit
videos.
73
Before After
To apply a video filter to a clip (video or image) in the Video Track:
1. Select a clip in the Timeline.
2. Click the Attribute tab in the Edit Step Options Panel.
3. Choose a video filter from the Video Filter folder in the Library to apply to your
clip (by clicking the thumbnail).
4. Drag and drop the video filter onto your clip in the Video Track.
Page 74

74
ULEAD VIDEOSTUDIO USER GUIDE
Note: By default, the filter applied to a clip is always replaced with the new filter
dragged onto the clip. Clear Replace last filter to apply multiple filters to a single
clip. VideoStudio allows you to apply a maximum of five filters to a single clip.
5. Click Customize Filter in the Options Panel to customize the attributes of the
video filter. Available options depend on the selected filter.
6. Preview how your clip looks with the video filter applied to it using the Navigator.
Notes: When there is more than one video filter applied to a clip, you can change the
order of filters by clicking or . Changing the order of the video filters will have
drastic effects on your clip.
Key frame settings
VideoStudio allows you to customize video filters in a variety of ways. One way is
by adding key frames to your clips. Key frames are frames in a clip where you can
specify a different attribute or behavior for your video filter. This gives you the
flexibility to determine how your video filter will look like at any point in a clip.
To set key frames for your clips:
1. Drag and drop a video filter from the Library onto a clip in the Timeline.
2. Click Customize Filter. The dialog box for the video filter opens.
Note: Settings available in the dialog box are different for each video filter.
3. In the Key frame controls, drag the Jog Slider or use the arrows to go to the
frame where you'd like to change the attributes of your video filter.
Page 75

ULEAD VIDEOSTUDIO USER GUIDE
Key frame
Controls
Note: You can use the mouse wheel to zoom in or out of the Timeline Control bar for
precise placement of key frames.
4. Click Add key frame to set that frame as a key frame in the clip. You can
adjust the video filter settings for that particular frame.
Note: A diamond-shaped mark on the Timeline Control bar will appear. This
indicates the frame is a key frame in the clip.
5. Repeat steps 3 and 4 to add more key frames to your clip.
6. Use the Timeline controls to edit or to go to a key frame in the clip.
75
• To delete a key frame, click Remove key frame .
• Click Reverse key frames to reverse the sequence of key frames in the
Timeline such that the sequence starts with the last key frame and ends with
the first key frame.
• To move to the succeeding key frame, click Go to next key frame .
• To move to the key frame prior to the one selected, click Go to previous key
frame .
7. Adjust the video filter settings according to your preferences.
8. Preview the changes you've made by clicking Play in the Preview Window
of the dialog box.
9. Click OK when finished.
Page 76

76
ULEAD VIDEOSTUDIO USER GUIDE
Tip: You can preview the clip with applied video filter on VideoStudio’s Preview
Window or an external device such as a TV monitor or DV camcorder.
Click , then click to open the Preview Playback Options dialog box where
you can choose the display medium.
Pan & Zoom
Pan & Zoom is applied to still images, and it emulates the pan and zoom effect of
a video camera. To apply this effect to an image, select an image clip in the
Timeline, then select Pan & Zoom and click Customize Pan & Zoom.
Note: Pan & Zoom cannot be applied to masked images.
In the Pan & Zoom dialog box, the crosshairs in the Image Window represent
the key frames in the image clip where settings can be customized to produce the
pan and zoom effect. When customizing each key frame, use the Image Window to
focus on an area or to pan the image; use the Options tab settings to customize the
zooming effect.
The procedure below shows an example of how to first zoom in on a subject, then
pan and zoom out to show the whole image.
Page 77

ULEAD VIDEOSTUDIO USER GUIDE
To apply Pan & Zoom:
1. Drag the Start key frame, represented by a crosshair in the Image Window, to
the subject that you want to focus.
77
Image
Preview
2. Zoom in on the subject by minimizing the marquee box or by increasing the
Zoom ratio.
Image
Preview
3. Drag the crosshair of the End key frame to your desired final point.
Image
Preview
Image
Preview
Page 78

78
ULEAD VIDEOSTUDIO USER GUIDE
4. Click to preview the effect.
5. Click OK to apply the effect to the image.
Tips:
• Click the Anchor boxes to move the marquee box at fixed positions in the Image
Window.
• To zoom in or out of a fixed area without panning the image, select No panning.
• To include a fade-in/out effect, increase the Transparency. The image will fade to
the Background color. Click the color box to choose a background color, or click
to select a color on the Image Window.
Resizing and distorting clips
To resize or distort a clip:
1. Select a clip in the Timeline then select the Attribute tab under the Options
Panel.
2. Select Distort clip then drag any of the following handles:
• Yellow handles at the corners to resize the clip proportionally (A).
• Yellow handles at the sides to resize without maintaining proportions (B).
• Green handles at the corners to skew the clip (C).
AB
C
Page 79

ULEAD VIDEOSTUDIO USER GUIDE
Effect
Transition effects make your movie smoothly change from one scene to the next.
They are applied between clips in the Video Track and their attributes can be
modified in the Options Panel. Effective use of this feature can add a professional
touch to your movie.
Adding transitions
The Library provides a wide range of preset transitions from crossfades to
explosions that you can add to your project.
You can add
transitions either
in Storyboard View
or Timeline View.
79
Note: By default, you need to manually add transitions to your project. If you want
VideoStudio to automatically add transitions between clips, select File: Preferences
- General then select Use default transition effect. This saves you time in
selecting transitions, especially when you are creating a slideshow project that
contains images only, since transitions are randomly chosen from the Library and
automatically added between images.
To add a transition:
1. Click the Effect Step, then select one of the categories of transitions from the
Folders list.
Page 80

80
ULEAD VIDEOSTUDIO USER GUIDE
2. Scroll through the effects thumbnails in the Library. Select and drag an effect to
the Timeline, roughly between two video clips. Drop your effect and it will snap
into place. You can only drag and drop one clip at a time.
Tip: Double-clicking a transition in the Library automatically inserts it into the first
empty transition slot between two clips. Repeating this process will insert a transition
into the next empty transition slot.
To replace a transition in your project, drag the new transition from the Library
onto the transition thumbnail to be replaced on the Storyboard or Timeline.
The Effect Step Options Panel
VideoStudio pretty much takes care of all the details to make your transitions
smooth and professional. You can, however, further customize your transitions
after adding them to your project. The Effect Step Options Panel displays the
settings of your selected transition so that you can change their various
parameters. This gives you complete control of exactly how your transitions will
behave in your movie.
Note: The attributes in the Options Panel vary depending on the type of transition
effect that is selected and applied to your project.
• Duration: Shows the duration of the applied effect on the selected clip in
hours:minutes:seconds:frames. You can adjust the duration by changing the
timecode values.
• Border: Determines the thickness of the border. Enter 0 to remove the border.
• Color: Determines the hue of the transition effect's border or flap.
• Soft edge: Specifies how well you want the transition effect to blend with the clips. A
Strong soft edge results in a less pronounced transition, thus creating a smooth
progression from one clip to another. This option works best for irregular shapes and
angles.
• Direction: Specifies the direction of a transition effect. (This is only applicable to
some of the transition effects.)
Page 81

ULEAD VIDEOSTUDIO USER GUIDE
The Album transition
One of the transitions you will find in the Library is the Album transition. Album
simulates the turning pages similar to that of flipping photo album pages. You can
choose from a variety of album layouts, change the album cover, background, size,
and position, and more.
To apply the Album transition:
1. Click the Effect Step then select Album from the Library.
Apply one of the preset transitions by dragging a transition thumbnail in
between two clips on the Video Track.
81
2. In the Options Panel, click Customize to open the Flip-Album dialog box.
3. In the Layout section, choose the desired look for the album.
Page 82

82
ULEAD VIDEOSTUDIO USER GUIDE
4. In the Album tab, set the album’s Size, Position and Orientation.
To change the album cover, select a preset from Album cover templates, or
select Custom album cover then import your own cover image.
5. Click the Background and Shadow tab.
To change the background of the album, select a preset from Background
templates, or select Custom background then import your own background
image.
To add a shadow, select Shadow. Set the shadow position by adjusting the X-
offset and Y-offset values. To make the shadow look softer, increase Soft
edge.
Note: To change the shadow color, click the color box and choose the desired color.
6. Click the Page A tab. Customize the first page of the album.
To change the image on the page, select a preset from Album page templates,
or select Custom album page then import your own image.
Page 83

ULEAD VIDEOSTUDIO USER GUIDE
To adjust the size and position of the clip on the page, adjust the Size, X, and Y
values.
7. Click the Page B tab. Customize the second page of the album.
Follow step 6 to make adjustments.
8. Use the slider and buttons below the Preview Window in the dialog box to
preview the results.
9. Click OK to apply the adjustments.
The Flashback transition
You can use the Flashback transition to simulate a flashback or introduce a dream
sequence for the next scene. Light is added to the dissolving scenes to create a
dreamy effect.
The Flashback transition contains the following options:
83
• Fade level: Set the thickness of the soft edge of the mask.
• Halo brightness: Set the intensity of the light.
• Halo size: Set the coverage of the light.
• Contrast: Set the color contrast between the two clips.
• Middle flash: Adds an element of light to the dissolving mask.
• Inverse: Reverses the effect of the mask.
Page 84

84
ULEAD VIDEOSTUDIO USER GUIDE
The Mask transitions
Different patterns or objects such as shapes, leaves, balls, and more can be used in
transition effects by rendering them as masks. You can select from preset masks or
import a BMP file and use it as a mask for your transition.
MaskA
MaskB
MaskC
MaskD
MaskE
MaskF
Page 85

ULEAD VIDEOSTUDIO USER GUIDE
Mask transition options
The Mask transitions contain the following options. The availability of the option
depends on the type of mask selected.
• Rotation: Specify how many degrees the mask will rotate.
• Fade level: Set the thickness of the soft edge of the mask.
• Size: Set the size of the mask.
• Sync Clip: Matches the motion of the clip to the motion of the mask.
• Inverse: Reverses the effect of the mask.
• X/Y Opposite: Reverses the path direction of the Mask.
• Mask: Select a preset template to use as mask for the transition.
• Current: Click to open a dialog box where you can browse BPMP files to use as the
transition’s mask.
• Interval: Specify the distance between each copy of the mask.
• Path: Select how the mask will move during the transition.
• Middle flash: Adds an element of light to the dissolving mask.
• Apply on: Select whether to apply the mask on the before or after clip.
85
Page 86

86
ULEAD VIDEOSTUDIO USER GUIDE
Overlay
The Overlay Step allows you to add overlay clips to combine with your videos in
the Video Track. Use an overlay clip to create a picture-in-picture effect or add a
lower-third graphic to create more professional-looking movie productions.
Adding clips to the Overlay Track
Drag media files to the Overlay Track on the Timeline to add them as overlay clips
for your project.
To add a clip to the Overlay Track:
1. In the Library, select the media folder that contains the overlay clip that you
want to add to your project.
Tip: To load media files into the Library, click . In the dialog box that opens,
locate the media file and click Open.
2. Drag the media file from the Library to the Overlay Track on the Timeline.
Tips:
• To insert a media file directly to the Overlay Track, right-click the Overlay Track and
select the type of file you want to add. The file will not be added into the Library.
• You can also use color clips as overlay clips.
3. Customize the overlay clip using the options available in the Edit tab.
Page 87

ULEAD VIDEOSTUDIO USER GUIDE
4. Click the Attribute tab. The overlay clip is then resized to a preset size and
positioned at the center. Use the options in the Attribute tab to apply motion to
the overlay clip, add filters, resize and reposition the clip, and more.
Tips:
• To make overlay clips with transparent backgrounds, you can create a 32-bit alpha
channel AVI video file or an image file with an alpha channel. You can use an
animation program such as Ulead COOL 3D Production Studio or an image editing
program such as Ulead PhotoImpact to create these video and image files.
• Another alternative is to use VideoStudio’s Mask & Chroma Key function to mask a
specific color on an image.
Multiple overlay tracks
You can also insert media files on another overlay track for added impact for your
movie. You can either show or hide these overlay tracks in your project. Click
Overlay Track Manager to open the Overlay Track Manager dialog box. Select
the overlay tracks to display.
87
Page 88

88
ULEAD VIDEOSTUDIO USER GUIDE
To apply motion to the current overlay clip:
In the Attribute tab, select where the overlay clip will Enter and Exit the screen
under Direction/Style. Click a specific arrow as to where you want your clip to
enter and exit in your movie.
Tip: Pause Duration determines how long your pause will be in the designated area
before the clip exists the screen. If you applied motion to the overlay clip, drag the
Trim handles to set the Pause Duration.
Pause Duration
To apply transparency to the current overlay clip:
In the Attribute tab, click Mask & Chroma Key
to go to the Overlay Options Panel. Drag the
Transparency slider to set the opacity of the
overlay clip.
To specify Chroma Key settings to the current overlay clip:
1. Click Mask & Chroma Key in the Attribute tab to go to the Overlay Options
Panel.
2. Select Apply Overlay Options then Chroma Key in Type.
Page 89

ULEAD VIDEOSTUDIO USER GUIDE
3. Click the Color Box then select the color to be rendered as transparent.
Without Chroma Key With Chroma Key
Tips:
• Select then click on a color in the image that will be rendered as transparent.
•Drag the Similarity Slider to specify the color range of the selected color that will
be rendered as transparent.
To add a border around the current overlay clip:
In the Attribute tab, click Mask & Chroma Key
to go to the Overlay Options Panel. Drag the
Border slider to set the thickness of the border of
the overlay clip. Set the color of the border by
clicking the Color Box beside the slider.
89
Page 90

90
l
ULEAD VIDEOSTUDIO USER GUIDE
To resize the current overlay clip:
In the Attribute tab, drag a handle on the overlay clip
on the Preview Window to resize it. If you drag a
yellow corner handle, it will keep the aspect ratio when
you resize the clip.
It is recommended that you keep the overlay clip
within the title safe area.
You can also right-click the overlay clip on the Preview
Window to open a menu where you can resize the
overlay clip to keep the aspect ratio, revert it to the
default size, use the original size of the overlay clip, or
resize it to occupy the entire screen.
The Keep Aspect Ratio option resizes the overlay clip based on the width or
height, depending on which is longer in length, of the overlay clip.
onger side
Note: When you resize or distort the overlay clip then go back to the Edit tab, the
clip will appear to have resized back to its original size. This is only for editing
purposes, the overlay clip retains its properties.
Page 91

ULEAD VIDEOSTUDIO USER GUIDE
To distort the current overlay clip:
Each corner of the marquee of the overlay clip have green nodes which you can use
to distort the overlay clip. Drag the green nodes to distort the overlay clip.
Tip: Hold [Shift] while dragging the green nodes to keep the distortion within the
current clips’s marquee.
To reposition the current overlay clip:
In the Attribute tab, drag the overlay clip to the desired area on the Preview
Window.
You can also right-click the overlay clip on the Preview Window to open a menu
where you can automatically place the overlay clip in a preset position on the
video. It is recommended that you keep the overlay clip within the title safe area.
91
To apply a filter to the current overlay clip:
You can apply video filters to your overlay clips. For more details on how to apply,
you can refer to Edit: Applying video filters.
To use the same attributes for different overlay clips:
You can use the attributes (size and position) of one overlay clip and apply it to a
different overlay clip on your movie project. To apply the same attributes, first
right-click the source overlay clip then select Copy Attributes. Next, right-click
the target overlay clip then select Paste Attributes.
Page 92

92
ULEAD VIDEOSTUDIO USER GUIDE
The Overlay Step Options Panel
There are two tabs in the Overlay Step Options Panel: Edit tab and Attribute
tab.
Edit tab
The Edit tab allows you to customize properties such as clip duration, playback
speed, and audio properties of the overlay clip. The available options in this tab will
depend on the selected overlay clip.
Attribute tab
The Attribute tab allows you to apply motion, transparency, filters and border to
the overlay clip.
• Replace last filter: Allows the last filter applied to a clip to be replaced when you drag a
new filter onto the clip. Clear this option if you want to add multiple filters to your clips.
• Applied filters: Lists the video filters that were applied to a clip. Click or to
arrange the order of the filters.
• Delete filter: Removes the selected filter from the overlay clip.Click to remove a filter.
• Presets: Opens a menu where you can select a preset for the selected filter to apply to
the overlay clip.
• Customize Filter: Opens a dialog box where you can define settings and options for the
selected filter.
• Show grid lines: Select to display the grid lines. Click to open a dialog box where
you can specify settings for the grid lines.
• Direction/Style: Determines the type of movement to be applied to the overlay clip.
Enter/Exit: Set the directions in which the clip will enter and leave the screen.
Fade-in/Fade-out: Select to gradually increase or decrease the transparency of the clip
when it enters or leaves the screen.
Rotate before/after pause duration: Select to rotate the clip before or after pause
duration.
• Mask & Chroma Key: Opens the Overlay Options Panel where you can specify the
transparency and overlay options to be applied to the overlay clip.
: Goes back to the previous Options Panel.
Transparency: Sets the opacity of the clip. Drag the slider or enter a value to adjust the
transparency.
Border: Enter a value to set the thickness of the border. Click the Color Box to select the
border color.
Page 93

ULEAD VIDEOSTUDIO USER GUIDE
Apply overlay options: Select to specify how transparent section of the overlay clip will
be rendered.
Type: Select whether to apply preset masks on an overlay clip or specify a color to be
rendered as transparent.
Similarity: Specify the color range of a selected color’s pixels that will be rendered as
transparent. Click the Color Box then select the color that will be rendered as
transparent. Click to select a color in the overlay clip.
Crop: Removes unwanted borders from your overlay clip. Set how much of the clip's
Height and Width you want cropped.
Adding Objects or Frames
Add decorative objects or frames for your videos as overlay clips.
To add an object or frame:
1. In the Library, select Decoration: Object/Frame in the Folder list.
2. Select an object/frame then drag it onto the Overlay Track on the Timeline.
3. Click the Attribute tab to resize and reposition the object/frame.
93
Object
Frame
Page 94

94
ULEAD VIDEOSTUDIO USER GUIDE
Adding Flash animations
Give more life to your videos by adding Flash animations as overlay clips.
To add a Flash animation:
1. In the Library, select Flash Animation in the Folder list.
2. Select a Flash animation then drag it onto the Overlay Track on the Timeline.
3. Click the Attribute tab to resize and reposition the object/frame.
To customize the current object, frame, or Flash animation:
Use the various options available in the Edit and Attribute tabs to customize your
object and frame. You can add animation, apply transparency, resize the object or
frame, and more.
Page 95

ULEAD VIDEOSTUDIO USER GUIDE
Title
While a picture may be worth a thousand words, the text in your video production
(i.e., subtitles, opening and closing credits, etc.) adds to the clarity and
comprehensibility of your movie. In VideoStudio's Title Step, create professionallooking titles, complete with special effects, in minutes.
Adding text
Ulead VideoStudio allows you to add text either in multiple text boxes or in a single
text box. Using multiple text boxes gives you the flexibility to position the different
words of your text anywhere on the video frame and allows you to arrange the
stacking order of the text. Use a single text box when you are creating opening
titles and end credits for your projects.
To add multiple titles:
1. In the Options Panel, select Multiple titles.
2. Use the buttons in the Navigation Panel to scan your movie and select the
frame where you want to add the title.
3. Double-click the Preview Window and type in your text.
95
Click outside the text box when you are done typing. To add another set of text,
double-click again on the Preview Window.
4. Repeat step 3 to add more sets of text.
Page 96

96
ULEAD VIDEOSTUDIO USER GUIDE
If you switch to Single title before adding to the Timeline the multiple text that
you entered, only the selected text or the first text that you typed in (when no text
box is selected) will be retained. The other text boxes will be removed and the Text
backdrop option will be disabled.
To add a single title:
1. In the Options Panel, select Single title.
2. Use the buttons in the Navigation Panel to scan your movie and select the
frame where you want to add the title.
Double-click the Preview Window and type in your text.
3. In the Options Panel, set the Line spacing.
4. When you are done typing the text, click the Timeline to add the text to your
project.
It is recommended to keep your text within the title safe area. The title safe area is
the rectangular box on the Preview Window. By keeping the text within the
bounds of the title safe area, the whole text will not be truncated when viewed on a
TV screen. You can display or hide the title safe area by selecting File:
Preferences - General tab - Display title safe area in Preview Window.
To edit the text:
• For single titles, select the title clip on the Title Track and click the Preview
Window.
Page 97

ULEAD VIDEOSTUDIO USER GUIDE
• For multiple titles, select the title clip on the Title Track and click the Preview
Window then click the text that you want to edit.
Notes:
• Once a title clip has been inserted onto the Timeline, you can adjust its duration by
either dragging the handles of the clip, or entering a Duration value in the
Options Panel.
• To see how the title appears on the underlying video clip, select the title clip and
then click Play Trimmed Clip or drag the Jog Slider.
Tip: When you are creating multiple title clips that share the same attributes such as
font type and style, it is a good rule of thumb to store one copy of your title clip in the
Library. (Just drag and drop the title clip from the Timeline into the Library.) This
way, you can easily duplicate the title clip (by dragging it from the Library back onto
the Title Track) and then change the title.
To add preset text to your project:
The Library contains various preset text that you can use for your projects. To use
these preset text, select Title in the Library Folder list then drag the preset text
onto the Title Track.
To insert subtitles to your project:
You can also use your own movie subtitle files for your project. To insert your own,
click Open Subtitle File. In the Open dialog box, locate the file you want to use
and click Open.
97
To save text files:
Saving movie subtitles allows you to reuse them in the future. Click Save Subtitle
File to open the Save As dialog box. Locate where to save your movie subtitle and
click Save.
Note: Movie subtitles will automatically be saved as *.utf files.
Page 98

98
ULEAD VIDEOSTUDIO USER GUIDE
Modifying text attributes
Modify the attributes of your text, such as font face, style, size, and more, by using
the available settings in the Options Panel.
More options allow you to set the style and alignment, apply a Border, Shadow
and Transparency and add a Text backdrop to your text.
A text backdrop superimposes your text on a horizontal color bar that stretches
across the video frame. Click to open the Text Backdrop dialog box to select
whether to use a solid or gradient color and to set the transparency of the text
backdrop.
To rearrange the stacking order for multiple titles:
In the Preview Window, click the text box you want to rearrange. After selecting,
right-click it then on the menu that opens, select how you want to restack the text.
To reposition a text in a multiple-title clip:
Drag the text box to the new position.
Page 99

ULEAD VIDEOSTUDIO USER GUIDE
The Title Step Options Panel
The Title Step Options Panel allows you to modify text properties such as font,
size, and color.
Edit tab
• Duration: Displays the duration of the selected clip in hours:minutes:seconds:frames.
You can adjust the duration by changing the timecode values.
• Vertical text: Click to make the orientation of the title vertical.
• Font face: Where you select your desired font style.
• Font size: Where you set your desired font size.
• Color: Click on this to specify your preferred font color.
• Line spacing: Sets the spacing, or leading, between lines of text.
• Multiple titles: Select to use multiple text boxes for your text.
• Single title: Select to use a single text box for your text. This is automatically selected
when opening a project file from older versions of VideoStudio.
• Text backdrop: Select to apply a horizontal color bar as background for your text. Click
to use a solid or gradient color and to set the transparency of the text backdrop.
• Border/Shadow/Transparency: Sets the border and intensity of the shadow and
transparency of the text.
• Open Subtile File: Inserts a previously saved movie subtitle.
• Save Subtitle File: Saves the movie subtitle to a file for future use.
99
• Show grid lines: Select to display the grid lines. Click to open a dialog box where
you can specify grid line settings.
Animation tab
• Apply Animation: Enables or disables animation of the title clip.
• Type: Where you can select your preferred animation effect for your title.
• Presets: Select a preset for the selected animation type to apply to your text.
• Customize animation attributes: Opens a dialog box where you can specify animation
settings.
Page 100

100
ULEAD VIDEOSTUDIO USER GUIDE
Applying animation
Apply motion to your text with VideoStudio’s text animation tools such as Fade,
Moving Path, and Drop.
To apply animation to the current text:
1. In the Animation tab, select Apply Animation.
2. Select the animation category to use in Type.
3. Select a preset animation from the box under Type.
Tip: Click to open a dialog box where you can specify animation attributes.
4. Drag the Pause duration handles to specify how long the text will pause after
it enters and before it exits the screen.
Animation effects
Drop dialog box
• Accelerate: Select to start animating the next unit of the title clip before the current unit
exits the screen.
• Unit: Determines how the title appears in the scene:
Text: The whole title appears in the scene.
Character: The title appears in the scene one character at a time.
Word: The title appears in the scene one word at a time.
Line: A line of text appears in the scene one at a time.
 Loading...