

Page 1
User Guide
Ulead Systems, Inc.
September 2005
P/N: C22-180-110-0A0001
Page 2

First edition for Ulead® MediaStudio Pro® 8, September 2005.
© 1992-2005 Ulead Systems, Inc.
All rights reserved. No part of this publication may be reproduced or transmitted in an y form or b y any means, ele ctronic or
mechanical, including photocopying, recording, or storing in a retrieval system, or translated into any langua ge in any form
without the express written permission of Ulead Systems, Inc.
Software license
The software described in this document i s furn ished under a License Agreement which i s included with the pro duct. This
Agreement specifies the permitted and prohibited uses of the product.
Licenses and trademarks
All rights reserved. Ulead, the Ulead Systems logo, and MediaStudio are registered trademarks of Ulead Systems, Inc.
Intel, Pentium and MMX are registered trademarks and/or trademarks of Int el Corporation. Microsoft, Windows, DirectX
and/or other Microsoft products referenced herein are either trademarks or registered trademarks of Microsoft
Corporation. Adobe, the Adobe logo, and Acrobat are trademarks of Adobe Systems Incorporated. QuickTime and the
QuickTime logo are trademarks used under license. QuickTime is registered in the U.S. and other countries. All other
product names and any registered and unregistered trademarks mentioned in this manual are used for identification
purposes only and remain the exclusive property of their respective owners.
Sample files
Files provided as samples on the program CD can be used for personal demonstrations, productions and presentations.
No rights are granted for commercial reproduction or redistribution of any sample files.
North & South America
Ulead Systems Inc.
http://www.ulead.com
Support: http://www.ulead.com/tech
Japan
Ulead Systems Inc.
http://www.ulead.co.jp
Support: http://www.ulead.co.jp/tech
International
Ulead Systems, Inc.
http://www.ulead.com
http://www.asiapac.ulead.com
http://www.ulead.com.tw
Support:
http://www.ulead.com/tech
http://www.asiapac.ulead.com/tech
http://www.ulead.com.tw/tech
Germany
Ulead Systems GmbH
http://www.ulead.de
Support: http://www.ulead.de/tech
China
Ulead Systems, Inc.
http://www.ulead.com.cn
Support: http://www.ulead.com.cn/tech
United Kingdom
http://www.ulead.co.uk
Support: http://www.ulead.co.uk/tech
France
http://www.ulead.fr
Support: http://www.ulead.fr/tech
Page 3

Table of Contents
INTRODUCTION
Welcome to MediaStudio Pro ........................................... 13
Getting started ................................................................... 14
Installation ................................................................ ......... 15
Running the programs ........................................................ 16
Readme .............................................................................. 16
PART I: VIDEO EDITOR
Chapter 1: Getting Started ............................................... 18
Understanding the workspace .......................................... .. 19
Standard Toolbar .............................................................20
Panel Manager ................................................................20
Timeline Toolbar ..............................................................21
Personalizing the workspace ..............................................21
Saving the layout ............................................................22
Setting up a video project .................................................. 22
Creating a new video project .............................................22
Opening an existing project ..............................................24
Customizing a video project ..............................................25
Project Options dialog box .................................................25
Saving project settings as a template .................................. 27
Enabling Smart Proxy .......................................................27
Saving a video project ......................................................27
Capturing video .................................................................. 28
Video Capture ............................... ..................................28
Batch Capture .................................................................30
Scan DV Tape ..................................................................30
Creating project segments in Smart Compositor ................ 31
Using the Production Library .............................................. 36
Placing clips into the Production Library ..............................36
Page 4

4 ULEAD MEDIASTUDIO PRO
Using the Storyboard .......................................................37
Nested timelines ............... ..............................................38
Working with folders ........................... .............................38
Drag and drop ................................................................39
Viewing Production Library thumbnails ...............................39
Adding effects to the Production Library ................... ..........39
Preferences ........................................................................ 40
Chapter 2: Working with the Timeline ..............................45
Inserting clips .................................................................... 46
Inserting video, audio and image clips ................................46
Extracting extra audio tracks ..............................................47
Inserting voiceover ..........................................................47
Inserting title, color, and silence clips .................................49
Inserting Ulead video file types .........................................49
Inserting UIS files ...........................................................50
Inserting soundtracks from third-party music ......................50
Inserting Video Editor projects ..........................................51
Push Away insertion ........................................................51
Working with tracks ........................................................... 52
Single-track editing .........................................................52
Adding or deleting tracks ..................................................52
The Track buttons ........... ................................................52
Determining the visibility of clips .......................................53
Displaying clips on the Timeline .........................................53
Zooming in/out of the Timeline .........................................54
General Timeline and Summary Timeline ............................54
Creating nested timelines ................................................... 56
Inserting nested timelines ................................................56
Editing a timeline ............................... .............................57
Working with virtual clips .................................................. 57
Viewing virtual clips in the Source Window ..........................58
Adding virtual clips to the Production Library .......................58
Chapter 3: Editing .............................................................59
Making selections in the Timeline ....................................... 60
Using the Clip Selection Tool ............................................60
Page 5

TABLE OF CONTENTS 5
Using the Time Selection Tool ...........................................61
Using the Track Selection Tool ..........................................61
Using the Track buttons ....................................................62
Grouping clips .................................................................62
Working with clips .............................................................. 63
Pasting attributes ............................................................63
Aligning clips ...................................................................64
Splitting the audio from video clips ....................................64
Changing the volume of clips .............................................65
Changing the speed of clips ..............................................65
Reversing the frames of a clip ...........................................67
Relinking clips .................................................................67
Calibrating video clips ......................................................68
Freezing a frame .............................................................68
Setting field options for video clips .....................................69
Working with cues .............................................................. 71
Placing project cues .................................... .....................71
Placing clip cues ..............................................................72
Placing chapter cues ............................................. ..........73
Locating clips ..................................................................... 73
Locating an empty time slot ..............................................74
Trimming clips .................................................... ................ 74
Trimming in the Source Window ........................................75
Trimming in the Preview Window ........................................76
Using the Trim Window ....................................................76
Using the Scissors Tool to trim clips ..................................77
Defining trim options ........................................................78
Smart Trim .....................................................................79
Multi-trim Video ................................................................. 79
Split by Scene ....................... .............................................. 81
Ripple Editing ..................................................................... 82
Ripple Editing examples ....................... .............................83
Inserting clips into the middle of an existing clip ..................84
Using the Source Window ................................................... 85
Previewing your work ........................................................ 88
Previewing ......................................................................89
Page 6

6 ULEAD MEDIASTUDIO PRO
Instant Play .............................. .....................................90
Using DV SmartPlay .........................................................92
Performing scrub previews ................................................92
Previewing on an external device .......................................93
Managing preview files .....................................................93
Chapter 4: Adding Effects and Titles .................................95
Using transition effects ...................................................... 96
Transition effects basics ....................................................96
Customizing a transition ................................................. ..97
Commonly used transitions ...............................................99
The Flashback transition ................................................. 100
The Mask transitions ................................................. ..... 101
Mask transition options ....................................................102
Audio transitions ........................................................... 102
Using key frame controls in dialog boxes ......................... 103
Effects Manager ............................................................... 105
Previewing the applied effects .........................................106
Editing in the Preview Window .........................................107
Organizing effects .........................................................108
Overlay ............................................................... ........ ...... 109
Overlay Options dialog box .............................................110
Overlay key types ..........................................................111
Understanding Alpha Channels ........................................112
Using Gamma correction ................................................113
Working with mattes ................................................. ..... 114
Creating image and video mattes ......................................114
Using Grayscale mattes .............................. .. .. .. ...............115
Applying video filters ....................................................... 115
Applying a regional matte to a video filter .........................118
Video enhancement filters ................................................120
Enhance Lighting Tool ...................................................120
Color Correction Tool ....................................................121
Color correcting selected regions ...................................122
Color correcting with the HSL wheel ...............................122
Color correcting with Curves .......................................... 123
Global filters .................................................................124
Page 7

TABLE OF CONTENTS 7
Creating a moving path ...................................... .............. 124
Moving Path dialog box .............................................. .....125
Creating 3D moving paths ..............................................129
Managing key frames on a moving path ............................130
Inserting an image with moving path attributes .................131
Applying audio filters ....................................................... 131
Filling the left or right audio channel ................................132
Removing vocals ...........................................................133
Creating titles ................................................................... 133
Insert Title Clip dialog box ..............................................135
Chapter 5: Audio Mixing .................................................139
Audio Mixing Panel ............... ............................................ 140
Grouping audio tracks ....................................................142
Modifying volume in real-time .........................................143
Chapter 6: Dolby Digital 5.1 Surround Sound .................145
Working with Dolby Digital 5.1
in Video Editor .................................................................. 146
Surround sound hardware requirements ...........................146
Setting up surround sound projects ..................................146
Mixing Dolby Surround ................................................... 147
Creating a surround sound audio file ................................150
Chapter 7: Creating and Exporting Final Video ...............151
Creating a video file ......................................................... 152
Creating MPEG-1 or MPEG-2 files .....................................153
Creating HDV or HD video files ......................................... 153
Creating WMV HD files ...................................................154
Creating WMV/ QuickTime streaming file ..........................155
Determining your video save options ................................156
Performing a batch video creation ....................................159
Creating a VCD ................................................................. 160
Creating an SVCD ............................................................. 160
Creating a DVD ................................................................. 161
Creating an audio file ................................. ...................... 162
Page 8

8 ULEAD MEDIASTUDIO PRO
Creating an image sequence ............................................ 163
Analyzing a video file's data rate ...................................... 164
Recording to a digital video camcorder ............................ 165
External preview ................................ ...........................166
Creating an Edit Decision List (EDL) file ........................... 167
Posting timecode ...........................................................168
Outputting to analog video tape ....................................... 169
Exporting to Ulead DVD MovieFactory and Ulead DVD
DiskRecorder ............................................... ..................... 171
Chapter 8: Managing Video Projects ................. ..............173
Smart Package ................................................................. 174
Smart Relink .................................................................... 175
Converting files ................................................................ 175
Smart Check & Convert ..................................................176
Batch Convert ...............................................................176
Using the Quick Command Panel ...................................... 177
Chapter 9: Integration with Ulead Products ...................179
VideoStudio project files .................................................. 180
PhotoImpact UFO files ............................................... ...... 180
Importing masks from PhotoImpact ................................ 180
COOL 3D Production Studio files ...................................... 1 81
Chapter 10: Shortcuts .....................................................183
PART II: VIDEO CAPTURE
Chapter 1: Getting started ............................................. 194
Understanding the basics ................................................. 195
Standard Toolbar ..........................................................196
Navigation Bar ..............................................................196
Preparation ...................................................................... 197
Connecting a DV or Digital 8 camcorder ............................ 197
Connecting an HDV camcorder ........................................198
Page 9

TABLE OF CONTENTS 9
Sony HDV camcorder ...................................................... 199
JVC HD camcorder .......................................................... 199
Connecting an analog video source ..................................202
Connecting a USB camera ...............................................203
Previewing video from your video source ..........................203
Setting preview options ..................................................203
Resizing the program window ..........................................204
Defining audio input when capturing analog video ..............204
Improving video signal when capturing analog video ....... 205
Calibrating your display ..................................................205
Typical calibration settings ........................ ... .. .................. 207
Adjusting color with your video capture board ...................207
Preferences ...................................................................... 208
Chapter 2: Capturing Video .............................................209
Tips for capturing video .................................................... 210
Before capturing ............................................................... 211
Enabling device control ...................................................211
Choosing a capture plug-in .............................................212
Capturing video ................................................................ 213
Capture options .............................................................215
Capturing video from a DV camcorder ..............................216
Capturing video from an HDV/HD camcorder .....................217
Direct MPEG capturing from a DV camcorder .....................218
Seamless DV and MPEG capture ......................................219
Direct WMV capturing .....................................................220
Selecting a profile ........ .. .. ............................................. . 220
Editing and customizing a video profile .............................. 221
About dropped frames ....................................................221
Capturing single frames ..................................................222
Capturing a sequence of still frames .................................223
Capture history .............................................................223
Scanning a DV tape .......................................................... 224
Batch capturing ................................................................ 226
Importing and editing a batch list ....................................228
Changing a file's properties .............................................. 229
Chapter 3: Shortcuts ......................................................231
Page 10

10 ULEAD MEDIASTUDIO PRO
PART III: AUDIO EDITOR
Chapter 1: Getting Started ............................................. 236
Understanding the basics ................................................. 237
Playing audio files .........................................................239
Creating a new audio file ................................................ 239
Saving files ...................................................................239
Saving files to a video .....................................................240
Changing audio properties ..............................................240
Zooming ......................................................................240
Changing the view of a waveform ......................................241
Controlling the display and time unit of waveforms ..............242
Recording sound .............................................................. 243
Tips for determining audio quality ....................................244
Preferences ...................................................................... 245
Chapter 2: Editing Audio Files .........................................247
Working with selections ................................................... 248
Making selections ..........................................................248
Creating precise selections .................. ...........................249
Clearing audio data ..................................................... ..249
Inserting audio data ......................................................250
Working with cues ........................................................... 251
Managing cues ..............................................................252
Using cues with Video Editor ...........................................252
Enhancing sound .............................................................. 253
Changing the audio level ................................................ 253
Changing pitch ..............................................................254
Quantizing a waveform .................................................. 254
Working with silence ......................................................255
Removing background noise ...........................................255
Muting a waveform .........................................................256
Calibrating files recorded from different sources ................256
Mixing tracks .................................................................... 257
Removing a mixed track .................................................257
Page 11

TABLE OF CONTENTS 11
Applying special effects . ................................................... 258
Performing a fade ............................... ...........................258
Changing speed .............................................................259
Performing a stereo pan .................................................259
Reversing a file ........................................ .....................260
Performing an echo ........................................ ................260
Performing a cross fade ................................................ ..261
Using DirectX Audio plug-ins ...........................................262
Chapter 3: Shortcuts ......................................................263
PART IV: MORE PROGRAMS
Ulead DVD MovieFactory ................................................ 269
Launching DVD MovieFactory ........................................... 269
Start Project ..................................................................... 269
Add Media ........................................................................ 270
Adding/Editing chapters ..................................................271
Export selected clips ......................................................272
Setup Preferences, Project Settings and other options ..... 273
Settings and options .....................................................273
Preferences ................................................................... 273
Project settings .................................................. ..........275
16:9 DVD ...................................................................... 276
Play and edit media .......................................................... 276
The right-click menu ......................................................277
Trimming a video ..........................................................278
Setup menus .................................................................... 278
Manipulating objects ......................................................281
Displayed thumbnail and text style ..................................281
Layout settings ............................................. ................282
Preview ............................................................................ 282
Burn ................................................................................. 283
Burning options .............................................................284
The Burning Options dialog box .......................................285
Page 12

12 ULEAD MEDIASTUDIO PRO
Ulead DVD DiskRecorder ................................................287
System requirements ....................................................... 287
Hardware checkup and configuration ............................... 287
Running DVD DiskRecorder .............................................. 287
Important terms to know ................................................. 288
Preferences ...................................................................... 288
Create Disc ....................................................................... 289
Introduction to the workspace .........................................289
Adding video files ..........................................................290
Editing programs ...........................................................290
Protecting programs ......................................................290
Playlist .........................................................................291
Setting the name for a program, playlist, or entry point ......291
Exporting video or image files .........................................292
Burning your disc ....................... ...................................293
Edit Disc ........................................................................... 294
Formatting a disc .................................. ........................294
Protecting a disc ............................................................294
Certifying a disc ............................................................ 295
INDEX
Index ............................................................................... 298
Page 13

INTRODUCTION
WELCOME TO MEDIASTUDIO PRO
Congratulations on purchasing Ulead MediaStudio Pro, the ultimate video
editing solution for desktop professionals and digital video enthusiasts. Built
around a powerful suite of versatile and high performance programs,
MediaStudio Pro is the first choice for anyone wanting to work with video.
MediaStudio Pro offers Real-time MPEG capture, Real-time preview and Realtime output. With intuitive controls and seamless integration, creating video
has never been easier or more accessible.
Page 14

14 ULEAD MEDIASTUDIO PRO
Getting started
If you ever worked with digital video before, you can start working in MediaStudio
Pro right away. The program is equally intuitive for both - the novice users and
professionals. The fastest way to learn the program is direct interaction with its
tools. The more advanced features, however, are not on the surface and you might
well refer to the manual for particular answers on specific questions.
There are several sources of information that will help you explore the broad range
of MediaStudio Pro features: the manual, online help, and the MediaStudio Pro
Web site that contains tutorials and a host of other useful informative content.
All the information required to master MediaStudio Pro is in the manual and online
help. These are the primary sources of information.
The MediaStudio Pro Web site (www.ulead .com/msp/runme.htm) also has a
number of resources you will find useful.
The Web-based learning center has excellent tutorials that will guide you through
the program in a brief and intense wa y. Spending a few hours on the tutorial page
(http://www.ulead.com/learning/msp .htm) will empower you with an intimate
knowledge of MediaStudio Pro tools.
There are also a few private Web sites that have great tutorials and sample
projects. One of the best is the MediaStudio User’s Group, or MUG, at
www.mugcentral.com. This is the home base for the MUG mailing list, which you
can subscribe to at this site. Everyday, dozens of users, including quite a few video
professionals, ask and answer questions in an amazingly useful forum.
Page 15

WELCOME TO MEDIASTUDIO PRO 15
Installation
The MediaStudio Pro installation program runs from within Windows and contains
complete instructions to take you through the installation process.
To install MediaStudio Pro:
1. Read the license agreement that comes with the MediaStudio Pro package. The
license agreement contains important legal requirements that you need to be
aware of. If you agree to abide by it, continue with the installation.
Please take a moment to fill out the registration card during installation.
Becoming a registered user entitles you to product updates and upgrade
information, as well as technical support. You can also instantly register
online (electronically) after installing the program.
2. Insert the MediaStudio Pro CD into your CD-ROM drive. Windows should detect
the CD and then automatically run the installation program. If the automatic
detection feature is turned off, use Windows Explorer to run the SETUP.EXE
program directly from your CD-ROM drive.
Follow the installation program instructions. While the progr am is installing files, a
window will appear, displaying information about MediaStudio Pro and the
installation status.
If you want to browse the contents of the MediaStudio Pro CD, run AUT OEXEC.EXE
found in the Setup folder from your CD-ROM drive.
Installing Acrobat Reader
An electronic copy of this user guide is also available in the Adobe Acrobat format
(Portable Document Format - PDF). To view this, first run the AR500ENU.EXE file
(in the \Driver folder of the first MediaStudi o Pro CD) and follow the installation
instructions. After successfully installing the Reader program, run the program and
click File: Open to open the file MediaStudio Pro 8 User Guide.PDF that is in the
\Document folder of the CD. You can then view the user guide.
Page 16

16 ULEAD MEDIASTUDIO PRO
Running the programs
To run the MediaStudio Pro programs, click on the desired program in the Start:
Programs - Ulead MediaStudio Pro 8 submenu. This submenu may differ
depending on the choices you made during installation. If you are already working
in any of these programs, the easiest method to run another MediaStudio Pro
program is by using the Switch menu, located on the right of the Menu Bar.
Readme
In the fast paced world of software, changes occur almost daily. While we have
tried to keep this manual as up-to-date as possible, there will inevitably be some
things that did not make it into the book by press time. Please browse through the
Readme file installed in the Ulead MediaStudio Pro program folder to find out about
the latest notes, drivers, and troubleshooting tips.
Page 17

PART I: VIDEO EDITOR
Page 18

1
GETTING STARTED
This chapter introduces the Video Editor user interface, beginning with a
walkthrough of the workspace and its various components, followed by ways
on customizing and saving the workspace. You will also learn how to capture
video directly in Video Editor, manage your media using the Production
Library, and use some of the basic program functions.
This chapter includes the following sections:
Understanding the workspace
Setting up a video project
Capturing video
Creating project segments in Smart Compositor
Using the Production Library
Preferences
Page 19

CHAPTER 1: GETTING STARTED 19
Understanding the workspace
The Timeline Window is where you assemble and edit your video project. It is
laid out horizontally and composed of several independent layers or 'tracks.' These
tracks hold the clips that make up a video project. The other windows in the Video
Editor workspace, such as the Preview Window and Effects Manager, are there to
help you in the editing process.
7 Timeline Window
8 Track buttons;
Lock, Hide and Solo buttons
9 Video clip in the video track
10 Transition effect clip
11 Audio clip in the audio track
1 Standard Toolbar
2 Panel Manager
3 Effects Manager
4 Production Library and Project Tray
5 Source Window and Preview Window
6 Timeline Toolbar
6
8
1
5
3 4
7
91110
2
Page 20
20 VIDEO EDIT OR
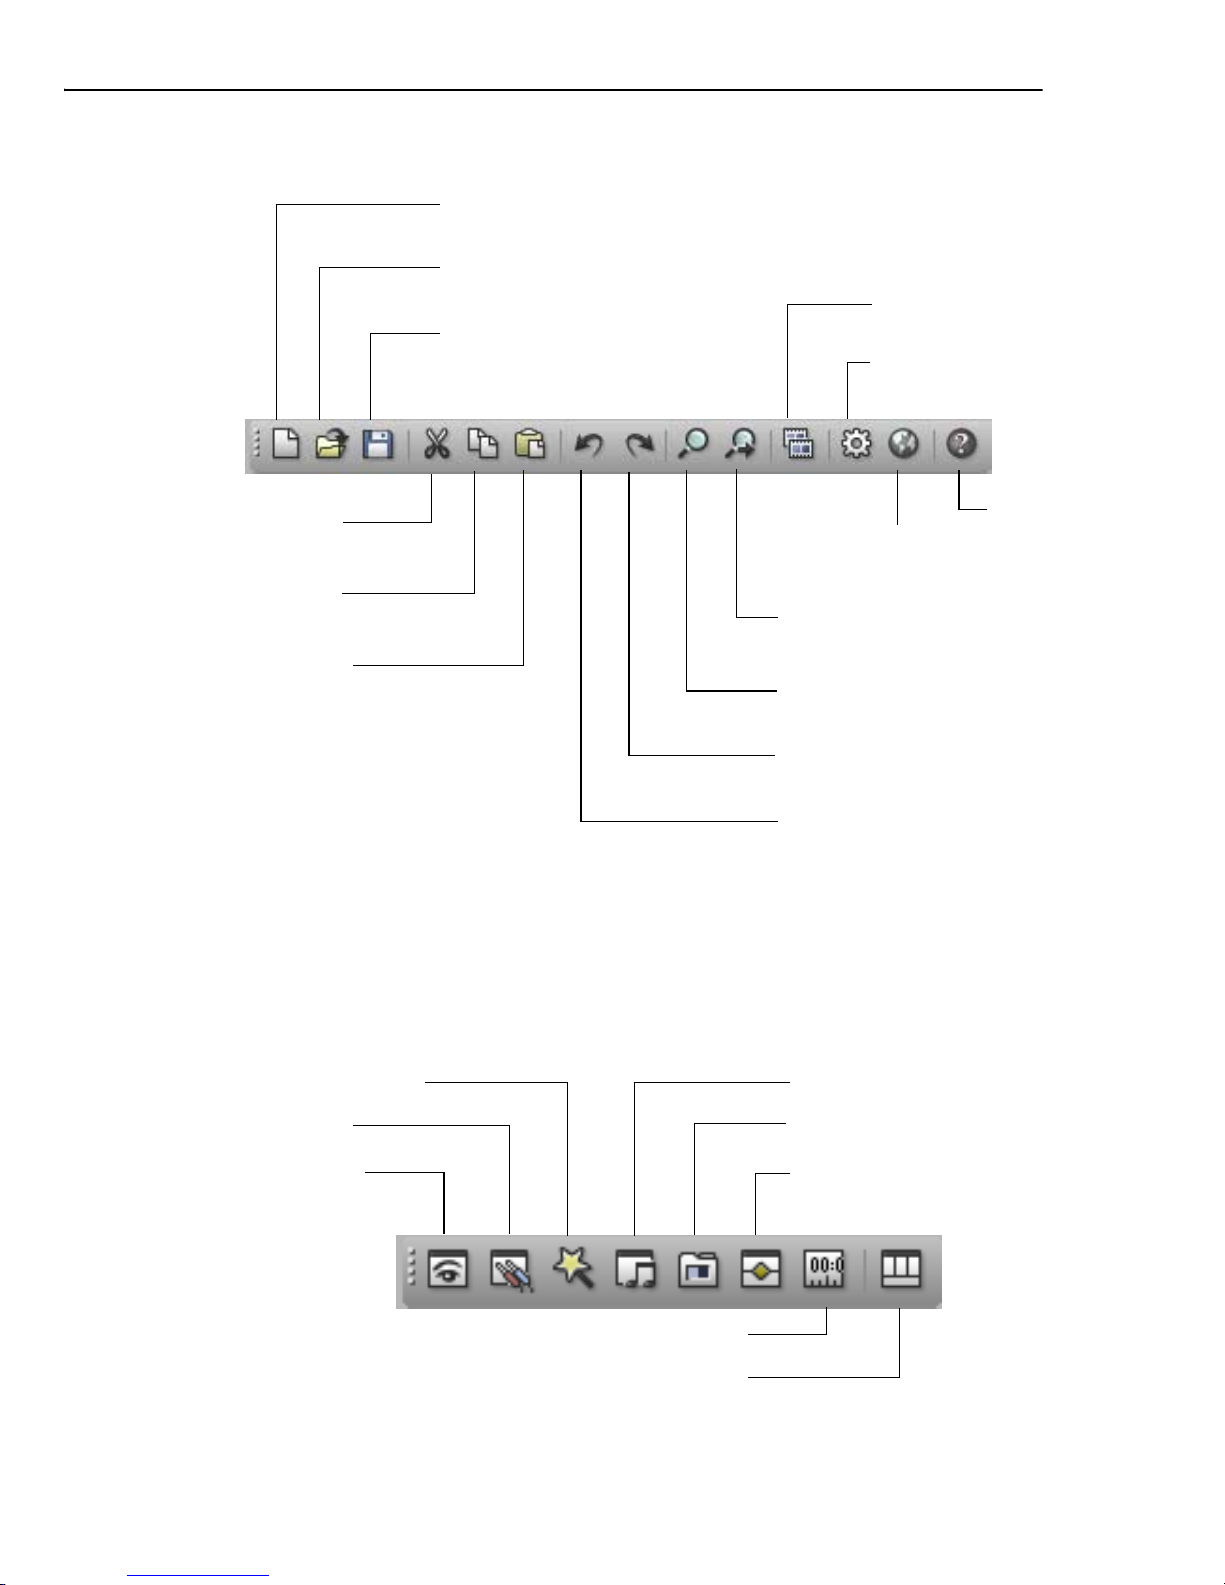
Standard Toolbar
Panel Manager
The Panel Manager allows you to show or hide the different windows in the
workspace. You may dock it beside or below the Standard Toolbar, or float it
anywhere in the workspace as a separate toolbar panel.
Create a
new project
Open a
project file
Save a Video
Editor project
Show and edit
Project Settings
Cut a clip
from a project
Copy a clip
from a project
Paste a clip into
the Timeline
Find the next
clip in a project
Find a clip in
a project
Redo an undone
function
Undo a previous
action
Help
Open Ulead
Home page
Create a video file
Preview Window
Source Window
Quick Command Panel Audio Mixing Panel
Production Library
Effect Manager
Dock/Float Timeline Window
Layout Template
Page 21

CHAPTER 1: GETTING STARTED 21
Timeline Toolbar
Personalizing the workspace
The different windows in Video Editor can be floated or docked in the workspace.
To dock a window, click on its title bar then drag it to the edge of another window
or to the edge of the workspace. You can also double-click on a window to make it
floating or docked.
Insert Image File
Insert Voice File
Insert Audio File
Insert Video File
Zoom
Clip Selection
Stitch Trim
Overwrite Trim
Normal Trim
Insert Title Clip
Insert Color Clip
Insert Silence Clip
Time Selection
Track Selection
Timeline Display Mode
Save Project Templ a te
Single-track Ripple Editing
Multi-track Ripple Editing
Enable/Disable Video Proxy
General Timeline
Summary Timeline
Insert Project File
Auto Music
Insert from Smart Compositor
Time Stretch
No Ripple
Scissors
Add/Delete Tracks
Page 22

22 VIDEO EDIT OR
Saving the layout
Use the Layout Manager in the Window menu to save time arranging the
windows in the workspace. To save your custom layout, type a Layout Template
Name, then click Save To. Giving your layouts intelligible names like “Audio Video Editing” or “Timeline Only” will help you work faster and more enjoyable.
Y ou can assign hotkeys for quickly switching between different layouts. Just select
a layout, then choose any [Alt + Number] combination from the Hot-Key
Mapping menu in the upper right of the dialog box.
To use a layout on the Video Editor workspace, select it from the Existing Layout
Templates list, then click OK.
You can also click in the Panel Manager to choose a workspace layout.
Setting up a video project
In Video Editor, the Timeline and its associated clips are referred to as a video
project, which is saved as a DVP (Digital Video Project) file. When you save a
video project, Video Editor only saves the positions and attributes of the clips in
the Timeline, not the actual source files themselves. The advantage to this is that
the DVP file has a relatively small file size and that any editing done is
nondestructive – that is, the editing doesn’t affect the original source files. The
next time you open a DVP file, Video Editor links the clips in the project to the
source files accordingly.
Creating a new video project
To get started in Video Editor, you first need to create a video project. The video
project not only holds the clips that you place into the Timeline, but also defines
the properties for the resulting video, such as the television standard and the size
of the frames used. Any clips that you place into the project subsequently adopt
those properties, regardless of their original attributes.
Page 23

CHAPTER 1: GETTING STARTED 23
To create a new video project:
1. Click the New button on the Standard Toolbar or File: New [Ctrl+N]. The
New dialog box opens displaying a list of project templates.
2. Select a video format (AVI or MPEG) to use for clips in your project from the
Edit file format drop-down list.
3. Click on the template you want to use. (Its properties, as well as an annotated
description, are displayed on the right side of the dialog box). You can choose
one of the following templates:
• DV - for editing and producing standard DV.
• DV 16:9 - for editing or producing widescreen 16:9 DV.
• DV 24P - for editing footage from a Panasonic AG-DVX100 camcorder
that was recorded in 24P or 24PA (24P Advanced) modes.
• DVD-Dolby Digital 5.1 channel - for editing and producing DVDs
encoded with Dolby Digital 5.1 channel surround sound.
• HDV templates - for editing and producing HDV- or HD-encoded video.
•And more...
4. Click OK. The dialog box closes and a new project is created.
Page 24

24 VIDEO EDIT OR
When you start a new project, you may find that none o f the existing templates in
the New dialog box contains the exact attributes you want to use. You therefore
have the option of creating a custom template to suit your particular needs.
To create a template:
1. In the New dialog box, click the Create button. The Template Options dialog
box opens up.
2. Select and set the attributes for your new template.
3. Click OK. The Save New Template dialog box opens up.
4. Select Save the current settings, and then type in a name and description for
your new template.
5. Click OK.
Y our video project will now have the specified settings, and the next time you open
a new project, your customized template will be listed in the New dialog box.
Opening an existing project
To open an existing project on your hard drive or from a network, select File Open or click
on the Standard Toolbar. Locate your project folder, choose
the project file to load, and click Open.
For a more detailed explanation of setting up a template, see “Project
Options dialog box” on page 25. Also, it is a good idea to consult th e
manual of your particular video capture board to see the recommended
specifications.
When you run Video Editor for the first time, the New dialog box opens
automatically. If you regularly use the same properties for a video project,
you can hide the New dialog box each time you click New by clearing the
Always show this dialog box option. (Another way is to clear the Display
New dialog box option in the File: Preferences: General tab). Any
subsequent projects take their properties from the current project.
To locate your project files fast, click Browse and navigate to your project
directory. Click Scan to perform a quick search for files with default
extensions *.dvp (Video Editor projects) or *.vsp (VideoStudio projects).
Page 25

CHAPTER 1: GETTING STARTED 25
Customizing a video project
When you create a new project, its properties are determined by the New dialog
box settings. These settings are integral to your project and determine not only
how previews are created, but also the format of the final movie. You can change
these properties and customize your project through the Project Settings dialog
box.
To view and/or alter your project settings while in the project:
1. Click the Project Settings button or select Project: Project Settings
[ALT+ENTER]. This opens the Project Settings dialog box where you can
view the properties of your project.
2. To change any of the settings, click the Edit button to open the Project
Options dialog box. Click through the various tabs and then specify the
television standard you are using, such as NTSC or PAL, the frame rate, and the
frame size.
Project Options dialog box
As mentioned earlier, the Project Options dialog box gives you direct control over
an existing project. There are three tabs in this dialog box:
Video Editor tab
• Select the desired TV standard.
• Choose whether or not to preview applied video filters when you view your
project in Video Editor.
• Specify the type of audio channel, Stereo or Multi-Channel Surround Sound,
that you will use for your project.
General tab
• Set the project Frame rate and Frame size.
Project settings directly determine the default settings in the Video Save
Options dialog box which in turn determines your final video format. (See
“Determining your video save options” on page 156 for details).
The Frame rate option determines the number of frames for any
resulting video file. The appearance of the clip on the Timeline will not
change.
Page 26

26 VIDEO EDIT OR
•The Frame type option determines interlacing properties.
If your final output video is meant for interlaced playback, set frame type to
either Lower Field First or Upper Field First.
If your output video allows for progressive frames (LCD monitors, plasma TVs,
TFT monitors, etc.), use the Frame-based option. This setting is more film-like
and less complicated to handle when editing or retiming your video.
• You can set the size for the target display and output screen to 4:3 (for
traditional letterbox TVs, computer monitors, or some DV camcorders) or 16:9
(widescreen used in HDTV, theaters, or some DV camcorders).
To use the 16:9 display, select Perform non-square pixel rendering on the
Video Editor tab first and choose 16:9 as the display aspect ratio on the
General tab.
AVI / Compression tab
This tab has all the video and audio compression controls.
One thing to remember in dealing with compression and data rate is output file
size. To minimize the size of your rendered projects, compress your files with the
best and the most recent compression algorithm possible.
Bit size is another way of saving your hard drive space. The bigger it is, the more
space you will need.
Y ou will need to balance between compression, bit depth and quality of your video.
Experiment to preserve as much fidelity as possible using less memory space on
your storage.
• Be aware of the aspect ratio of the video files you are using and the
display aspect ratio of the intended playback screen for your videos. This
will help you determine which display aspect ratio to use in y our projects.
• The aspect ratio is also important when dealing with moving paths in a
project. The moving path's aspect ratio should be similar to the aspect
ratio being used by the project.
Changing a project's properties clears the undo/redo history.
Page 27

CHAPTER 1: GETTING STARTED 27
Saving project settings as a template
After you have customized your video project, you can save your project settings
as a template by clicking the File: Save Project Template command. In the
dialog box that opens, give the template a name as well as a description. Presets
and previously created templates are also displayed in the Existing templates list
box. If you wish to replace one of these templates with the properties of the
current video project, select it and then click OK.
Enabling Smart Proxy
Proxy files are lower resolution working copies of video files. They are reduced in
resolution or compression bit rate for only one reason - to speed up editing of HDV
and other large video source files. Proxy files are source-dependent rather than
project-dependent. In other words, proxy files can be shared among different
projects.
When you edit and preview your project in Instant Play mode, proxy files will be
used as substitutes for their large video source counterparts. Whereas when you
preview your project in high-quality playback mode or when you render a video
file, the original video source files will be used. (See
“Previewing your work” on
page 88 to know more on playback modes).
T o enable the creation of proxy files, click in the Timeline Toolbar, or go to File:
Preferences - Smart Proxy, then select the Enable video proxy option. In the
Smart Proxy tab of the Preferences dialog box, you can set the condition when
proxy files need to be generated and choose a proxy file format. For more details
on the settings, see
“Preferences” on page 40.
Once video proxy is enabled, proxy files will automatically be created and used in
your project whenever you insert video files into the Timeline.
Saving a video project
When you save a video project, it is saved as a DVP (Digital Video Project) file.
This is a small file that contains all of the information about your project, like which
clips to include, their position on the Timeline, and any transitions that you have
used. This file is not a movie and can only be opened in Video Editor. To sa ve your
current project, select File: Save.
You can customize Video Editor to save backups of your project automatically by
selecting the Automatically save every option in the General tab of the
Preferences dialog box. Set a desired time interval between saves and the
maximum number of backups to keep.
Page 28
28 VIDEO EDIT OR
Capturing video
From within Video Editor, you can directly capture footage from your video camera
for editing. Alternatively, you can also use the separate Video Capture program
that is included with MediaStudio Pro.
In both the Video Editor and Video Capture programs, you will find three tools for
capturing footage in the Capture menu: Video Capture, Batch Capture, and
Scan DV Tape. Before you start capturing with these tools, make sure you have
your capture card installed in your computer and your video camera is connected
and switched on.
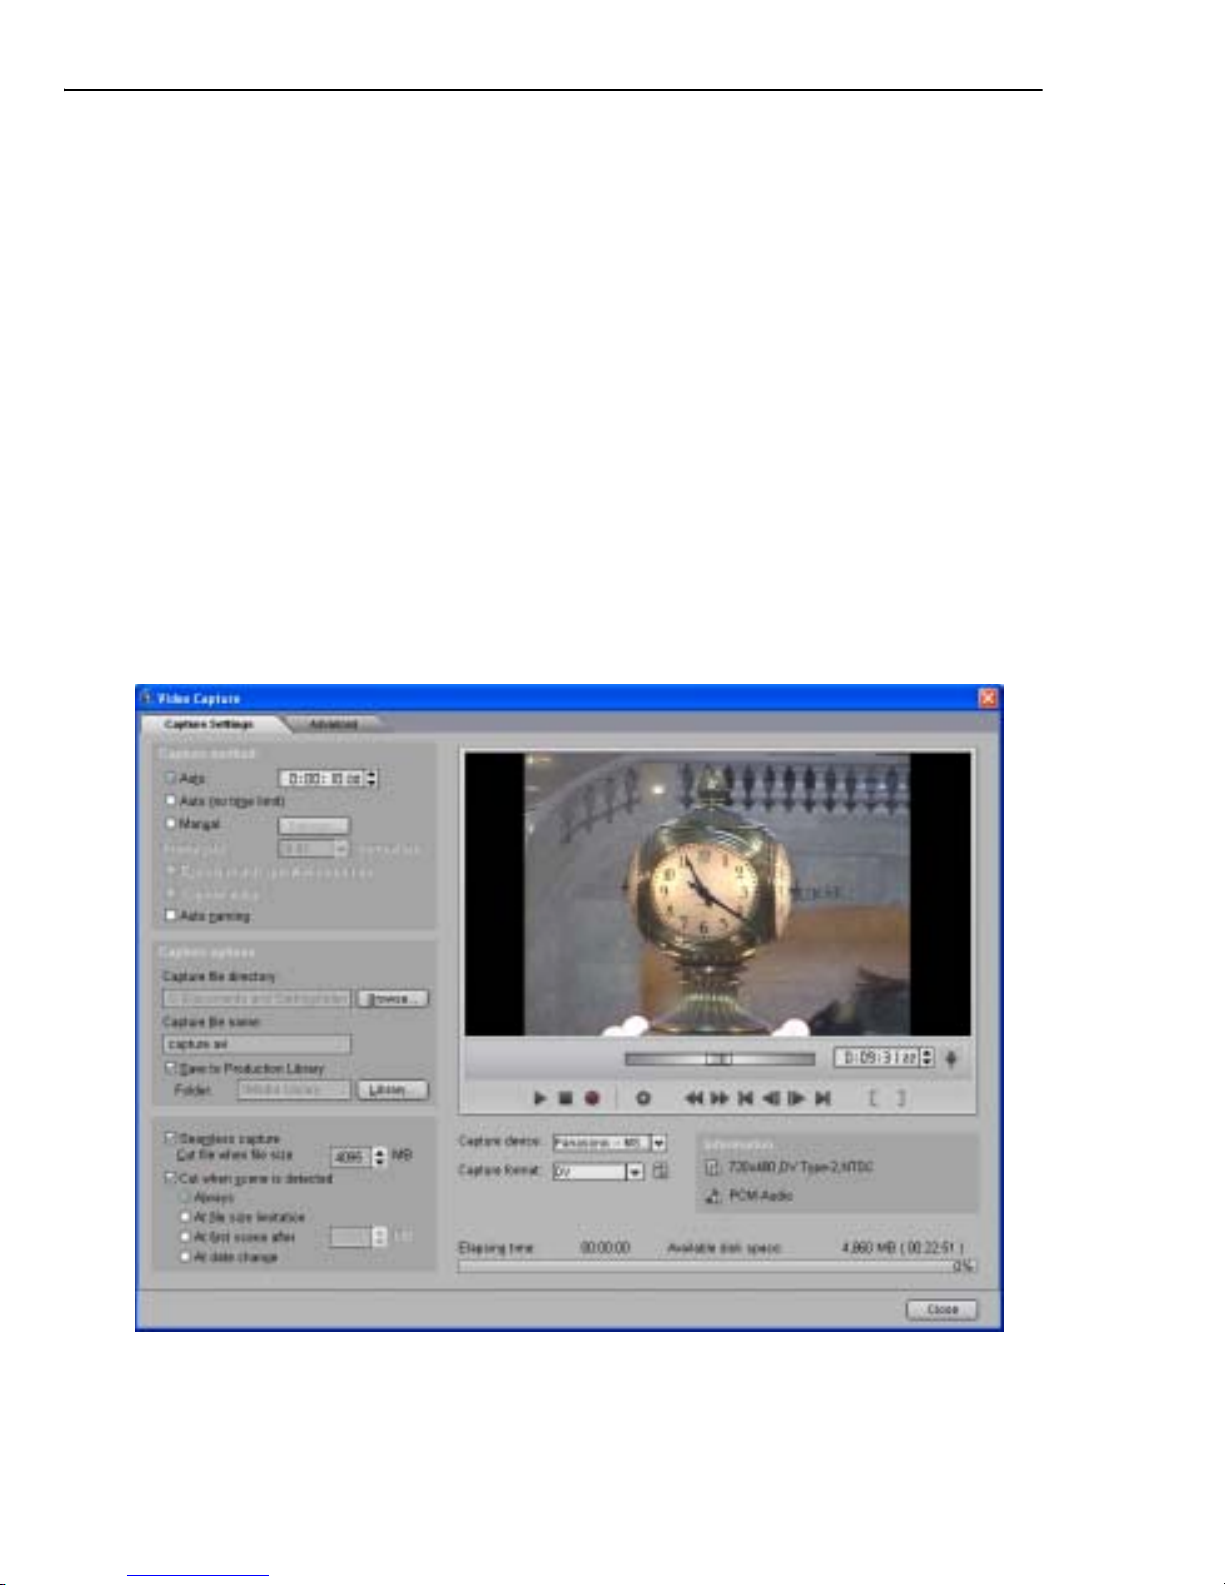
Video Capture
Video Capture allows you to capture a video clip at a time. The Video Capture
dialog box in Video Editor looks slightly different from the one in the Video Capture
program, but the capture settings are mostly the same.
Page 29

CHAPTER 1: GETTING STARTED 29
To capture a video sequence:
1. Select Capture: Video Capture.
2. If you have several video devices connected to your computer, select your
desired source device from the Capture device list.
3. Click Capture Options, then select Change Capture Plug-in from the pop-
menu.
The Change Capture Plug-in dialog box provides special plug-ins that enable
capturing footage from HDV, Sony MICROMV, and miniDV camcorders as well as
DVD and DVD-VR discs. You need to choose the proper plug-in to be able to
capture footage from such devices.
If you are capturing video as MPEG or WMV files, you also need to choose the
proper plug-in in this dialog box.
After you have selected a capture plug-in, click OK.
4. Check if the Capture format is set to the target file format that you want to
use for saving captured video files. If not, choose your desired file format from
the Capture format list.
5. In the Capture Settings tab, set your preferences for performing the capture:
• Capture method - Choose to auto capture with specified duration, auto
capture with no time limit, or manual capture. Select Auto naming to
save each captured segment as a separate file.
• Capture options - Specify the prefix file name and folder to use for
saving captured videos.
Click the Advanced tab to see more settings and customize them according to
your needs.
For details on all the capture settings in the Advanced tab, see “Capture Video
dialog box: Advanced tab” on page 215.
6. After customizing all capture settings, play your videotape and stop at the part
of the footage that you want to capture. If you have a DV or HDV source, you
can directly use the Navigation controls in the dialog box for playback.
7. Click Capture Video to start capturing.
8. If you specified a capture duration, wait for the capture to complete. Otherwise,
click Stop Capture or press [Esc] to stop capturing.
If you are capturing TV footage via a TV capture card, choose your desired
TV channel as well.
Page 30

30 VIDEO EDIT OR
Batch Capture
Batch Capture allows you to choose multiple video segments from your footage
and capture them all at once. You can use Batch Capture when capturing video
from DV and HDV sources.
Select Capture: Batch Capture to open a dialog box where you can play back
your footage, and at the same time, mark your desired video segments. The mark in and mark-out times of the video segments will be logged into a task list. After
you have finished marking, click the Capture Video button.
To save the task list for future use, click Save .
The Batch Capture dialog box in Video Editor is just the same as the one in the
Video Capture program. For more details on this dialog box, see
“Batch capturing”
on page 226 under “Part II: Video Capture”.
Scan DV Tape
Scan DV Tape quickly scans an entire DV tape and automatically detects scenes
based on the recording date and time (that is, based on stops and starts of video
recordings).
To use this function, select Capture: Scan DV Tape. In the Scan DV Tape dialog
box, first choose how to perform the scan from the Scan/Capture method list,
then click Start to begin scanning the DV tape. As each scene is detected, a
thumbnail frame will be created and added to the list at the left side of the dialog
box. After the entire tape has been scanned, click Capture Video to capture the
detected scenes.
To save the scenes list and information for future use, click Save .
The Scan DV Tape dialog box in Video Editor is just the same as the one in the
Video Capture program. For more details on this dialog box, see
“Scanning a DV
tape” on page 224 under “Part II: Video Capture”.
Page 31

CHAPTER 1: GETTING STARTED 31
Creating pr oject segments in Smart
Compositor
The Smart Compositor in the Insert menu allows you to quickly compose
themed segments and use them in your project. This tool provides ready-made
theme templates that you can easily customize with your own video clips, titles,
audio clips, and effects.
Basically, you will only need to complete two stages in Smart Compositor before
inserting a movie segment into your project:
• First, select a template in the Theme Template tab.
1. Select a theme category from
this drop-down menu.
2. Click a thumbnail to
choose a template.
3. Use the Navigation buttons to
preview the selected template.
Page 32

32 VIDEO EDIT OR
• Click Next to go to the Options tab. Here, choose which template elements
you want to replace or customize. These elements can be video clips, titles,
filters, audio, and more.
The succeeding procedures explain how to customize the elements in a template in
greater detail.
1. Expand the Tree
View, then select
clips to be replaced
or effects to be
customized.
3. Click Save if you
want to save
your changes as
a new template.
4. Click Insert to insert
the customized
template as a project
segment into the
Timeline.
2. Use the Settings panel to customize the elements in a templat e. You can
replace clips, adjust overlay settings, and tweak filters and moving path
effects.
Trim
Bar
Page 33

CHAPTER 1: GETTING STARTED 33
To replace the media clips:
1. First, make sure that your own clips have already been added to the Media
Library in the Production Library before opening Smart Compositor.
If you have not done so, you can still add them in Smart Compositor. In the
Options tab, click in the Media Library window then import your video
files. To import images, click .
2. Click on the small triangle icon next to the Media Clip item to expand its tree
view and to see the current clips in the template. The clips here may be video,
image or color clips.
3. Select a preset clip, for instance, Media Clip 1.
4. To replace the preset with your own clip, drag
your video or image file from the Media Library
and drop it onto the first thumbnail in the
Storyboard.
5. T o append another clip, drag y our video or image
file from the Media Library and drop it onto the
placeholder (that is, the black thumbnail) in the
Storyboard.
Repeat this step to append more video or image
clips.
6. Repeat steps 3 to 5 to replace the other preset
media clips with your own video or image clips.
The process for replacing audio clips is just the same as that of media clips.
The clips that you add to the Storyboard will be fit into the length of the
original preset clip. If the length of your clips is longer than the preset,
your last appended clip will be trimmed to fit the original length.
These icons indicate that there are effects
applied to a clip. From left to right: Filter,
Overlay, Moving Path. Refer to the succeeding
procedures to know more on customizing
these effects.
Page 34

34 VIDEO EDIT OR
To trim a clip segment in the Storyboard:
1. Double-click the clip that you want to trim in the Storyboard.
2. Click to play back.
3. Click Pause when you reach the desired part, then click to set the mark-in
point.
4. Resume playback, then click Pause again when you reach the desired end point
and click to set the mark-out point.
5. Click to trim the clip.
To replace and customize the titles:
1. Click on the small triangle icon next to the Title item to expand its tree view
and to see the title clips in the template.
2. Select a default clip, for instance, Title Clip 1.
3. Type your text in the Title edit box, then change the font and text settings.
4. Use the Trim bar to adjust the title duration.
5. Repeat steps 2 to 4 to replace the other default title clips with your own text.
To enable or disable filters:
1. Click on the small triangle icon next to the Filter item to expand its tree view
and to see the media clips that are applied with filters.
2. Select a clip, for instance, Filter Clip 1.
3. Select Remove Filter to disable the filter. Clear this checkbox to enable the
filter.
4. Repeat steps 2 and 3 to enable or disable filters in the other clips.
To customize overlay clips:
1. Click on the small triangle icon next to the Overlay item to expand its tree view
and to see the overlay clips that are in the template.
2. Select a clip, for instance, Overlay Clip 1.
3. From the Type drop-down list, select Blue Key if the overlay clip has a
bluescreen. On the Preview Window in Smart Compositor, click on the
bluescreen to make it transparent.
Otherwise, choose from the other overlay key types in the drop-down list. See
“Overlay key types” on page 111 for details.
Page 35

CHAPTER 1: GETTING STARTED 35
4. If the background of the overlay clip is not removed completely, increase the
Similarity value until the background is totally transparent.
5. For a smoother overlay effect, apply a soft edge.
6. Repeat steps 2 to 5 to customize the other overlay clips in the template.
To customize moving path effects:
1. Click on the small triangle icon next to the Moving Path item to expand its tree
view and to see the media clips that have moving path effects.
2. Select a clip, for instance, Moving Path Clip 1.
3. To resize the clip dimensions, change the width and height settings.
4. Specify the initial clip position before the moving path effect starts by setting
the X and Y coordinates.
5. Specify the degree of Rotation for the clip.
6. You can also apply a soft edge and add a surrounding border to the clip.
7. Repeat steps 2 to 6 to customize moving path effects for the other clips in the
template.
After creating the project segment in Smart Compositor:
When you have completed your work and clicked OK in Smart Compositor, insert
the piece you created into your project. It will be inserted as a virtual clip on the
Timeline.
For details on how to edit virtual clips, see “Working with virtual clips” on page 57.
Page 36

36 VIDEO EDIT OR
Using the Production Library
Video Editor's Production Library
stores everything you need to
create your movie. It has two parts
- the Production Library and
Project Tray tabs.
When you start a project, the
Production Library tab already
contains all of the transitions,
filters, and other special effects
that come with Video Editor.
Whereas the Project Tray tab is
your organizer - it is ready to be
filled with the various clips that
you will use in your current
project. In both tabs, clips are
categorized by subject and
represented by small thumbnail
pictures.
If the Production Library is not yet
open in the program, select
Window: Production Library or
click
on the Panel Manager to
open it.
Placing clips into the Production Library
To share clips among different projects, import them to the Media Library folder
of the Production Library tab. To use clips only in a particular project, import
them to the Media Pool folder of the Project Tray tab.
To import media files into the Production Library:
1. Click either the Import Video File, Import Audio File, Import Image File,
or Import Project File button from the toolbar.
2. Browse for and select your file. Click Open to import the file.
Production Library (Transition Effects Gallery ).
Effect and filter thumbnails with are the
ones that can be played back in real-time.
Page 37

CHAPTER 1: GETTING STARTED 37
To add title, color and silence clips from the Timeline to the Production Library,
drag them to the Production Library’s Media Library folder or to the Project Tray’s
Media Pool folder.
Using the Storyboard
The Project Tray’s Storyboard folder allows you to arrange your images or video
clips before inserting them into the Timeline.
To use the Storyboard function:
1. Click the Project Tray tab, then
open the Storyboard folder.
2. Import or copy images or video
files (from other folders inside the
Production Library) you want to
use into the Storyboard folder.
3. Arrange the sequence of the
images or video clips by dragging
them to the desired positions.
4. Select all the images or video files,
then right-click and select Add to
Timeline.
5. In the Add to Timeline dialog
box, determine the layout option
for your clips.
To be able to apply transitions
between clips, select Overlap.
6. If you have images, set their duration.
Y ou can also add files to the Production Library when you click File: Create to
generate video or audio files. You can add effects or filters to the Production
Library while creating them.
If you want to create new folders, right-click on the Media Library or Media
Pool folder and select Create.
Storyboard
folder
Page 38

38 VIDEO EDIT OR
7. Choose a transition effect to apply. Either select Random, or select Customize
then click Select to choose your desired transition effect. Also specify the
Transition effect duration.
8. Select Use default pan and zoom filter, then either select Random or select
Customize then click Select to choose your desired effect.
9. Click OK.
10.Place the hand cursor over the Video track position on the Timeline where you
want to place the images or video clips then click the mouse button.
Hand cursor over the Video track position
Nested timelines
When you create nested timelines in your project, they are automatically added to
the Timeline folder in the Project Tray tab. You can drag the timelines in this
folder to other parts of your project. For details on nested timelines, see
“Creating
nested timelines” on page 56.
Working with folders
When you view the Production Library, the contents of the currently selected
gallery appear on the right side of the Production Library window. To the left are
folders which organize the various thumbnails of the particular gallery. You can
manage these folders by right-clicking on them and choosing a command from the
pop-up menu that appears. This menu offers commands for creating, renaming,
• Select Apply auto audio cross fade to automatically apply a fade in/
fade out audio effect between overlapping video clips.
• Select Clear clips from the Storyboard folder to remove the files from
the Storyboard folder after inserting them into the Timeline.
Page 39

CHAPTER 1: GETTING STARTED 39
deleting and copying folders. You can also sav e the contents of a folder as a gallery
file as well as load the contents from a previously saved gallery file.
Drag and drop
The mouse is a powerful tool in Video Editor. You will find that it is effortless to
drag and drop clips among many parts of the program. Try dragging a clip from
Windows Explorer to the Production Library to organize your project. Then drag
the clip's thumbnail from the Production Library to the Source Window to do a little
trimming. Finally , dr ag the clip from the Source Window directly to the Timeline for
insertion into your movie.
Viewing Production Library thumbnails
Click in the Production Library Toolbar to open a pop-up menu where you
can choose whether to display clips in Thumbnail, Description, or List View.
The Menu button opens a pop-up menu that provides additional commands for
viewing the properties of a selected thumbnail, as well as editing, deleting, and
customizing the Production Library preferences (this menu can also be accessed by
right-clicking on a thumbnail).
When customizing the preferences, you can choose to control the size of the
thumbnails as well as to display or hide the name below each of the thumbnails. If
you want to maximize the space available for displaying thumbnails, clear the
Show border option.
The Search command allows you to search for particular thumbnails, while the
Sort command allows you to arrange them based on their name, description,
annotation, or date and time.
Adding effects to the Production Library
In the Production Library, you can edit any clip or effect without having to first
insert it into the Timeline. This is a great way to define and save unique attributes
for clips and effects and allows you to expand and customize the Production
Library indefinitely.
To see all the contents of the folders (including subfolders) in a particular
library, click All in the selected library's folder tree.
Page 40

40 VIDEO EDIT OR
To modify and add an effect:
1. Select the thumbnail.
2. Right-click the thumbnail and click the Edit command on the pop-up menu.
3. Specify the attributes in the dialog box for that thumbnail.
4. Click the Add button. Enter a name below the thumbnail and click OK.
Preferences
The Preferences dialog box (double–click the Status Bar or click File:
Preferences [F6]) provides options for customizing certain aspects of Video
Editor’s behavior. Understanding these options will improve the way you work as
well as help optimize Video Editor for each project.
Preferences dialog box: General tab
• Enable undo specifies the maximum levels of undo/redo allowed by Video Editor (up
to 99). As Video Editor allocates more memory for each level of undo/redo, you may
find that too high a level adversely affects performance. In such cases, restrict the
level to 3-4 only. You can, of course, choose not to have undo/redo to maximize
performance, but any editing done will be final.
• Number of recently opened files specifies how many file names are stored in the
Recent History list found on the File menu.
• Return to the first frame after playing returns any sequence in the Source and
Preview windows to the first frame after it has been played (like a CD player). When
left cleared, the sequence stops on the last frame in the sequence after playing (like
coming to the end of a tape in a VCR).
• Use temporary file when creating 8-bit optimized palettes uses a temporary
file whenever you create an optimized palette for Indexed-Color video. This option
speeds up the creation process significantly and should be selected whenever you
plan on creating Indexed-Color video files.
• Display Options dialog box opens the Options dialog box for any video filter,
transition effect, audio filter, or moving path dropped directly into the Timeline from
the Production Library.
• Display data rate warning message halts the creation process of any video file
once it exceeds the specified data rate. Leave this cleared i f the data rate is not
important or you are creating video files unattended and do not want the creation
process to be stopped.
Page 41

CHAPTER 1: GETTING STARTED 41
• Display New dialog box opens the New dialog box whenever the New button or
File: New command is clicked. If left cleared, any new video project is automatically
created based on the attributes of the current project. If you often create video
projects using the same attributes then leave this option clear.
• Automatically save every automatically saves the video project at the time
interval specified. In the event of the program crash, you will be presented with an
option to restore the latest backup when you restart the program. Y ou can specify an
auto-save time interval and the number of backups to keep.
• Default background color sets the color for any color clips.
• Title safe area margin specifies the margin percentage for displaying any titles in a
video project. This is useful if you intend on sending your video back out to video
tape or for broadcasting, as television has a different resolution than a computer
monitor, and edges which are viewable on screen may disappear. As a guideline, for
NTSC devices choose 12%, for PAL 10%.
• Default inserted clip duration determines the duration of Image Fil e, Title Clip,
Color Clip and Silence Clip being placed in the Timeline. Specify a number from 1
to 9999 frames.
• Check Ulead's Web site at start of every _ day(s) automatically checks Ulead
Web site at a specified number of days interval for product news and updates.
• Temporary folder defines the folder that Video Editor uses as a temporary
workspace for compiling, compressing, or decompressing files. By assigning a
temporary folder for these types of operations you prevent Video Editor from using
the default hard drive folder. This will minimize the chances of Video Editor
interfering with other processes your computer may be running in the background.
• Display DV timecode on Source Window allows the DV timecode to be shown in
Video Editor's Source Window. (You need a VMR-compatible display card to use this
option).
• Default number of tracks specifies the number of video/audio tracks populating
the Timeline upon a new project creation. The maximum su pported number of tr acks
is 99.
Preferences dialog box: Edit tab
• Apply color filter allows you to control how colors are displayed in Video Editor,
based on the NTSC or PAL color models. Select the appropriate option if you plan on
having your video played back over an NTSC or PAL device such as a television. If
you are designing for monitor display only, leave this option clear.
• Double-click on video track to insert determines whether to open the Insert
Video File dialog box or the Insert Image File dialog box whenever you double-click
on an empty portion of a video track.
Page 42

42 VIDEO EDIT OR
• Resample quality allows you to set the quality of any video data resampling. Best
quality results in better video reproduction, but takes longer to render. Good quality
will give you faster previews. If you are preparing for final output and are using the
original source files, select Best.
• Apply auto audio cross-fade automatically applies a fade in/fade out audio effect
between overlapping clips.
• Auto cross-fade resampling lets you choose the audio fading algorithm to be used
for audio cross-fade. Logarithmic requires longer processing time but produces
smoother audio fading than Linear.
• Default field order option sets the default field options for the selected video clips
whose field options are unknown. Field-based video stores video data as two distinct
fields of information for each frame. If your video is only for computer playback,
select Frame-based.
• Default display aspect ratio sets the default display aspect ratio for the selected
video clips whose display aspect ratio is unknown.
• Default stretch mode sets how you want your video to be displayed in the Preview
Window. Select Stretch to extend your video to fill out the entire frame without
keeping the aspect ratio. Keep aspect ratio (with letterbox) fits the entire video
into the Preview Window while Keep aspect ratio (no letterbox) keeps the video
proportioned and crops the areas that exceeds the Preview Window.
• Default transition effect sets a default transition effect for video clips. When two
clips in the same track overlap, a defaul t transition clip will be automatically added to
the overlapped region.
• Save image deinterlace allows you to save image files and at the same time
eliminates the blinking effect from images derived from interlaced video output.
• Append project as lets you choose how to insert an existing Video Editor project file
into the Timeline. Select Virtual clip if you want to insert it as a single clip just like
any normal media clip. Select Part of current project if you want to insert the
complete content of the project file into the Timeline.
Preferences dialog box: Associate tab
• File type specifies the type of file (such as AVI or WA V) you want to associ ate with a
program.
• Associated program indicates the program to open whenever the Edit: Open in
Associated Program command is selected.
• Include trim information allows a video clip opened in the associated program to
display any marked portions that you have created in Video Editor.
Page 43

CHAPTER 1: GETTING STARTED 43
Preferences dialog box: Preview tab
• Specify additional folders for preview files indicates which folder Video Editor
can use to save preview files. Specify other folders if you have additional drives or a
partitioned drive. If you only have one drive, leave the other boxes empty.
• Hard disk displays how much free space you have left on your hard drive.
• Limit hard disk usage to specifies how much memory you want to allocate ju st f or
Video Editor’s purposes. If you are only using Video Editor and want to optimize
performance, select the maximum amount poss ible. If y ou are using other pr ogr ams
in the background, you may want to limit this to about half. If left clear, Video Editor
uses your system's memory management to control the use and distribution of
memory.
Preferences dialog box: Smart Proxy tab
• Enable video proxy automatically creates proxy files whenever a video source file is
inserted into the Timeline.
• Create proxy when video size is (or above) allows you to set the condition as to
when proxy files will be gener ated. If the f rame size of a video source file i s the same
as or is higher than the chosen frame size here, a proxy file will be created for the
video file.
• Proxy folder sets the folder location to store proxy files.
• Video proxy options indicate the settings to be used in generating proxy files. To
change the proxy file format or other settings, click Template to choose a template
that already contains predefined settings, or click Options to tweak detailed
settings.
Page 44

44 VIDEO EDIT OR
Page 45

2
WORKING WITH THE TIMELINE
While organizing your media clips in the Production Library is a necessary first
step, the real work occurs on the Timeline. As the name implies, the Timeline
is a chronological workspace that allows you to visually lay out your clips,
transitions, and overlays.
This chapter includes the following sections:
Inserting clips
Working with tracks
Creating nested timelines
Working with virtual clips
Page 46

46 VIDEO EDIT OR
Inserting clips
Clips are the objects that make up your movie. A clip can be an image, a video, a
transition, a title, a background color, or an audio file. Following insertion into the
Timeline, clips can be trimmed and special effects can be applied without
modifying the original source files. This is designed to give you greater confidence
in editing your video. To start work on a video project, you need to first insert clips
into the Timeline. Once inserted, you can begin to edit and arrange them into your
final video production.
Inserting video, audio and image clips
The easiest way to insert a video, audio, or image clip into the Timeline is to click
the appropriate Insert button on the Timeline Toolbar. You can also choose its
corresponding command from the Insert menu or the right-click pop-up menu. A
dialog box opens allowing you to select a file that Video Editor supports. Supported
formats include MPEG-1, MPEG-2, MPEG-4, DV type 1 & 2 AVI, as well as
QuickTime and Flash files.
If you choose a video file that contains both video and audio data, the clips are
placed in both the video and audio tracks: these clips remain connected to
maintain synchronicity. (You can separate them by clicking the Clip: Split
command.) Clips already in the Production Library can simply be dragged onto the
Timeline. Y ou can also drag-and-drop clips directly from Windows Explorer.
When you insert clips, they are placed at the position of your pointer. How inserted
clips affect any neighboring clips is determined by the Ripple Editing mode. If
you are in Ripple Editing mode, you can insert the clip anywhere you like on a
compatible track (even over existing clips) and the clip pushes along any other
clips which appear in the same track. If you are not in Ripple Editing mode, you
can only insert the clip into an empty clip slot. An empty clip slot starts from the
Double-clicking an empty time portion of a video track opens either the Insert
Video or Insert Image File dialog box depending on the settings in the Edit
tab of the File: Preferences dialog box.
The files you insert should match the properties of your video project to
ensure the best possible output results.
Page 47

CHAPTER 2: WORKING WITH THE TIMELINE 47
end of one clip and continues to the beginning of the next. (See “Ripple Editing” on
page 82 for details).
Extracting extra audio tracks
In the Insert Video File dialog box, the Tracks button allows you to extract audio
files from a video that contains multiple audio clips. With this feature, you can
extract any or all the audio clips and insert them on the various audio tr acks on the
Timeline.
To extract an audio track:
1. Select Insert: Video File.
2. Select the file containing the audio
clip for extraction.
3. Click Tracks. The Extract Extra
Audio Tracks dialog box will
appear.
4. A list of all available tracks will
appear in the Audio Tracks
window. Select the file you want
to extract by clicking on it.
5. Determine the file name, audio
file type, and other options.
6. Click OK.
Inserting voiceover
In the case of documentaries and presentation videos, narration often helps
viewers understand and appreciate the movie’s content. Video Editor’s voiceover
function allows you to incorporate narration and voiceovers into y our videos using
the following procedure.
To insert a voice over:
1. Use the Preview bar to determine the section of the video where you want to
add your narration.
If the selected file has only one audio track, the Tracks button is disabled.
Click the Play button to listen to the track you have selected.
Page 48

48 VIDEO EDIT OR
2. Select Insert: Voice File.
3. In the Insert Voice File dialog box, test the sensitivity of the microphone by
looking at the level meter.
4. Under Audio track selection, choose the audio track where to insert the
voiceover.
5. Under Select audio file folder, click the ellipsis button to choose a folder
where to save the voiceover file.
6. Click Start to begin recording your voice. Press [ESC] to stop recording.
Make sure the Project cursor is not over an existing audio clip on the
selected Audio track.
You can adjust the recording level of the microphone by going into the
Windows Volume Control.
Click Run Mixer to adjust the recording volume and other recording
options.
Page 49

CHAPTER 2: WORKING WITH THE TIMELINE 49
Inserting title, color, and silence clips
Apart from video, audio, voice over, and image clips, you can also insert title, color,
and silence clips into the Timeline. Title clips are often used in conjunction with
moving path effects (they are described in detail in Chapter 4). Silence and color
clips can be used as placeholder clips which can ‘stand in’ for other clips you want
to insert later. For example, you may want to start working on a video project, but
you have yet to acquire all your source files or some may still be in the editing
stage. Y ou can use a color clip to substitute for an image or video clip and a silence
clip for an audio clip that will serve as default clips. When it is time to utilize your
finished source files, use the Clip: Replace With command to insert these files
into the positions that the default clips occupy. Any existing filters, special effects,
and/or moving paths are retained by the new clip.
You can also use color clips as a background for other clips in the project, such as
when performing fades or to create certain types of effects. You can set key frames
to create impressive gradient effects with each frame of the clip gradually shifting
from one color to the next.
To insert a color clip:
1. Click the Insert Color Clip button in the Timeline Toolbar (You can also click
Insert: Color Clip or right-click on a video track and select Color C lip from the
pop-up menu.)
2. In the Insert Color Clip dialog box, specify the duration of the clip in the
Duration spin box.
3. Choose the color of the clip by clicking the color square or entering RGB values.
Click the Pure Color button to quickly insert a solid color clip.
4. Click OK. Drop the clip into position on a video track.
If you choose different colors for the start and end key frames, you can create a
gradient effect, such as a fade from black to white. The more key f rame s y ou add,
the greater the variety of colors you can hav e. For more on adding k ey frames, see
“Using key frame controls in dialog boxes” on page 103.
Inserting Ulead video file types
MediaStudio Pro supports a number of proprietary file formats for use with the
MediaStudio Pro suite of programs. These are Ulead Image Sequence (*.UIS),
Ulead CG Infinity (*.UCG) and Ulead Video Paint (*.UVP). You can insert these
files into the Timeline whenever you open the Insert Video File dialog box and
Page 50

50 VIDEO EDIT OR
choose their respective file types from the Files of type list. It is always best to
insert the actual project files for any projects you have created in one of these
other programs as they have not been rendered or compressed in any way and
thus maintain the highest quality.
Inserting UIS files
The UIS file type is a special format that allows you to select a sequence of images
to be loaded into a video project with the Insert Video File command. These
images can be from any source, such as animation Targa files or even a hand
drawn series of images created in a drawing program. The only restriction is that
these files must have consecutively numbered file names, such as vid0001.tga,
vid0002.tga, vid0003.tga and so on.
Inserting soundtracks from third-party music
Video Editor’s Auto Music feature lets you easily create composer-quality
soundtracks from royalty-free music and use them as background music in your
project. Y ou can hav e different tempos or musical instrument variations per music.
To create soundtracks using Auto Music:
1. Select Insert: Auto Music.
2. To choose from the royalty-free music library that’s supplied with Video Editor,
select Owned from the Scope menu, then choose the music that you want
from the Music list.
Ulead CG Infinity and Video Paint files are not supported in the MediaStudio
Pro Standard Edition.
Any image sequence can easily be converted to a UIS by using the File:
Convert command.
Auto Music Maker utilizes the patented SmartSound Quicktracks technology in
soundtrack creation and features a variety of SmartSound royalty-free music.
To view the complete selection of SmartSound libraries, select All from the
Scope menu. When you choose a music that is not supplied with Video
Editor, it will be downloaded for preview only. You need to purchase the
music if you want to use it.
Page 51

CHAPTER 2: WORKING WITH THE TIMELINE 51
3. Select a Variation of the selected music. Click Play to listen to the music with
the variation applied.
4. Set the Duration for the music. Alternatively, select Fit to project length to
make the music clip the same length as your project.
5. Click OK, then insert the music into an audio track in the Timeline.
Inserting Video Editor projects
You can insert another Video Editor project (.DVP) file into the current project by
clicking Insert: Project File, or by dragging a project file from the Production
Library or Windows Explorer and dropping it into the Timeline.
Before insertion, you can choose first how DVP projects will be inserted into the
Timeline through the Edit tab of the Preferences dialog box.
By default, a DVP project will be inserted as a Virtual clip. That is, all the media
files, transitions and effects in it will be combined as a single clip and placed at the
insertion point in the Main Timeline. Once the virtual clip has been placed in the
timeline, you can treat it as any other ordinary video clip. For details on what
operations can be applied to virtual clips,
see “Working with virtual clips” on
page 57.
If you prefer to have the DVP project expanded on the timeline, select Part of
current project from the Append project as drop-down menu. In this case, all
of the media clips, transitions, and effects contained in it will be completely placed
at the insertion point in the Main Timeline and you can replace or edit them.
Push Away insertion
Push Away insertion is related to Ripple Editing and controls how inserted clips
affect other clips in the Timeline. Y o u must be in No Ripp le mode for this to work
and it only works on a single track. The key to this technique is to press [SHIFT]
while inserting clips.
To use Push Away insertion:
1. Click the No Ripple button, then click the Insert Video Fil e button in the
Timeline Toolbar.
2. In the Insert Video File dialog box, select a clip (click it once) then click Open.
3. While you press (and hold) the [SHIFT] key, place your clip in a video track.
Push Away insertion also works on clips that are being dragged from one location
to another or that are being pasted into the Timeline.
Page 52

52 VIDEO EDIT OR
Working with tracks
The Timeline consists of two types of tracks - video and audio. There is one
primary video track, while the others are overlay tracks. (For details on overlay
tracks, see
“Overlay” on page 109).
Single-track editing
Single-track editing means that clips and transitions share the same video track.
When you insert and overlap two video clips on a video track, a default transition
(as defined in the Preferences dialog box) will automatically be applied to the
overlapping section. If you want to apply your own transition, you can overlap
video clips, then drag a transition from the Production Library and drop it onto the
overlapping segment of the clips.
Adding or deleting tracks
Depending on the scale of your project, you can add or remove tracks in the
Timeline. To do so, right-click on the leftmost area of a track to open a menu. You
can then choose whether to add or remove the current track, or to add or remove
multiple tracks.
The Track buttons
Track name button
When this button is pressed down, all the clips on the track
are selected.
Lock or Unlock track button
When a track is locked, the clips cannot be moved or edited. You can lock
individual clips by first selecting a clip and then select Edit: Lock.
When you have more tracks available that can fit on the screen at one time,
you can use the scroll bars to move up and down through the tracks. To lock
both the video and audio tracks when scrolling, click the Scroll Lock button
at the top of the vertical scroll bar or the View: Scroll Lock command. The
next time you scroll, both tracks move in unison.
Track name button
Page 53

CHAPTER 2: WORKING WITH THE TIMELINE 53
Solo button
When pressed down, only the current track will be included in the preview or
rendered file and all other tracks will be disabled.
Hide button
When pressed down, the current track will be hidden and not included in the
preview or rendered file.
Determining the visibility of clips
Often you will have a number of clips that will be playing at the same time in a
project. It is common, for example, to have one main clip in Video1 and a second
clip with titles in Video2. Clips that are in the upper tracks in the Timeline will
always play over (on top of) clips located in lower tracks. Since Video2 is higher in
the Timeline than Video1, it will play over Video1.
Displaying clips on the Timeline
Click the Display Mode button on the Timeline Toolbar (or click View:
Timeline Display Mode) to choose how clips are displayed: Filmstrip,
Waveform, Thumbnail, or Filename modes.
Filmstrip and Waveform modes display clips graphically (video clips as frames,
audio clips as waveforms) allowing you to see the entire contents of a clip. While
the graphic modes may be easier to work with, it takes time for your computer to
redraw clips every time they have been modified. To help improve performance,
but still retain some visual cues as to the contents of a clip, select the Thumbnail
mode (video only). This shows the first and last frames of a video clip separated by
the file name of the clip. The last mode, File name, represents clips by their file
names only with no graphical information. This is the fastest mode as it is the
quickest to display, but offers no visual reference to the clip’s contents.
Underneath the timecode ruler in the Timeline Window, you can show a project cue
bar which is useful for marking areas on a project for future edits, or show a
chapter point cue bar if you will be marking chapter points for a DVD project. A cue
bar can also be displayed underneath each video and audio track for placing clip
cues.
Page 54

54 VIDEO EDIT OR
Moreover, you can set the size of video and audio clips in the tracks. Changing the
size of clips is especially useful if you are running in a high resolution display mode
and find it hard to identify clips and their contents.
Zooming in/out of the Timeline
The Timeline can represent your project at any magnification. You can display
every frame in a clip or view the entire project on the screen at one time. This
zooming is achieved by changing the time measurement unit used in the Timeline.
For example, at 1 second (the default) each division on the Timeline represents 30
frames (using the NTSC standard), and at 1 minute each division represents 1,800
frames, and so on. To change the unit of measurement you have two options:
• Select View: Ruler Unit to open a submenu and choose the preferred time unit
to do your editing. You can also select Zoom In/Out, single Frame, Fit In
Window, or Previous Zoom to toggle between the previous zoom ratio and the
current one.
•Drag the Timeline Zoom slider to the left to zoom out or to the
right to zoom in. Alternatively, click the Zoom Out or Zoom In
button that is above the slider.
• Click the Zoom tool and then click on the Timeline. Each
mouse click zooms in one ruler unit (toward displaying each frame). Holding
down the [SHIFT] key as you click zooms out one ruler unit (toward Fit in
Window). This method is best if you are zooming in on a particular clip or frame
and want it to remain in view at all times. You can also use the "+" and "-" keys
found on the keyboard to zoom in and out.
General Timeline and Summary Timeline
Video Editor provides two types of timeline views: General Timeline and
Summary Timeline.
Press and hold the [Z] key on your keyboard to temporarily switch to the
Zoom tool. The [SHIFT+Z] allows you to zoom out.
Page 55

CHAPTER 2: WORKING WITH THE TIMELINE 55
General Timeline
Summary Timeline
General Timeline provides the traditional linear style for all timecodes
and tracks. This means that your clips are displayed in their real time
showing their actual length. This may cause some clips in your project
not to be visible in the Timeline window all at the same time. You may
need to use the scroll bar to view desired clips. You may also adjust the
Ruler Unit while editing in the General Timeline mode to select short clips
and to see all the clips in your project.
In the Summary Timeline mode, you get an overall picture of the
whole project similar to a storyboard. Clips are displayed in similar
thumbnail sizes regardless of the clip's actual time length making it
easier to select it. The number of thumbnails you will see will depend on
the number of segments your project has. The numbers on the
illustration below display an example of what segments are in a project
Timeline.
You can toggle between these two modes by clicking the corresponding
button or selecting the mode from the Window menu.
Page 56

56 VIDEO EDIT OR
Creating nested timelines
Having just one timeline in the workspace usually is enough for a simple editing
job. But what if you have multiple projects in production, or you need to include
multiple sets of independent files for ongoing editing? The answer is to have
nested timelines in your project. To create a nested timeline, right-click on the
Main Timeline tab to open a pop-up menu, then select Create New Timeline.
A blank new Timeline1 will be created and becomes active in the workspace.
When you create several nested timelines, each will be numbered sequentially
(Timeline1, Timeline2, Timeline3...).
Inserting nested timelines
After you are done editing in a nested timeline, you can insert it into your main
project timeline. Video Editor will wrap the whole timeline as a single virtual clip
and insert it into the Main Timeline.
To insert a nested timeline into the Main Timeline, you can:
• While in the main project timeline, right-click on the Main Timeline tab. In the
pop-up menu that open s, click Insert from Timeline, then select the nested
timeline that you want to insert into the Main Timeline.
• While in a nested timeline, for instance Timeline1, right-click on its tab. In the
pop-up menu that opens, select Add to Timeline: Main Timeline.
At most, you can have up to two levels of nested timelines. For instance, the Main
Timeline can be inserted with Timeline1, and Timeline1 can be inserted with
Timeline2. Timeline2 cannot be further inserted with Timeline3.
Everytime you create a nested timeline, it will be stored in the Timeline folder of
the Project Tray tab. If you want to insert a duplicate of this nested timeline,
simply drag it from the Timeline folder and place it in the desired part of your
project.
Page 57

CHAPTER 2: WORKING WITH THE TIMELINE 57
Editing a timeline
Double-click a virtual clip in the Main Timeline to edit its contents. This will create
a new Timeline tab, showing the media clips and effects expanded in the
workspace. After you have finished your edits, all of the changes will be
automatically updated into the virtual clip in the Main Timeline.
Double-clicking the virtual clip, Timeline1, will open a new Timeline tab for you to edit its
contents.
Working with virtual clips
Virtual clips have the same editing attributes as ordinary video clips. All tools
applicable to video clips can be used with virtual clips, such as trimming and Ripple
modes.
You can also apply video and audio filters, moving paths, freeze frame, speed,
reverse, color calibration, overlay options, and other features. The only limitation
is the unavailability of the Split by Scene function in the Clip menu when working
with virtual clips.
To delete a specific timeline, set it active then right-click on its tab to open a
pop-up menu. Select Close Timeline from the menu.
Page 58

58 VIDEO EDIT OR
Audio attributes in a virtual clip (such as audio filters, speed and reverse) can be
added, modified, or deleted. You can adjust its sound volume just like in audio
clips.
Viewing virtual clips in the Source Window
Just like video clips, you can view virtual clips in the Source Window.
To view a virtual clip in the Source Window, you can:
• Double-click a virtual clip on the Timeline,
• Drag and drop the virtual clip from the timeline onto the Source Window,
• Load a DVP project file by using the Import command from the Source
Window Menu.
After you have successfully loaded a virtual clip into the Source Window, you can
set mark-in/mark-out points, add cues, play a preview range, and apply many
other operations to the virtual clip through the Source Window.
Unlike normal video clips, however, there are some limitations when working with
virtual clips in the Source Window:
• Shuttle playback is not supported.
•The Export Video submenu is disabled.
• The VU-Meter is not available.
Adding virtual clips to the Production Library
Apart from viewing virtual clips in the Source Window, you can load them into the
Production Library.
To import a virtual clip into Production Library, you can:
• Drag and drop a virtual clip from the timeline or Source Window into the
Production Library or Project Tray.
• Drag and drop a DVP project file from Windows Explorer. Alte rnatively, click
Import Project File on the Production Library Toolbar or right-click and select
Import Project File in the pop-up menu, then choose a DVP project file to
import.
Working with virtual clips in the Production Library is similar to normal video/
audio clip operations. The only limitation is the unavailability of the Split by
Scene function in the right-click pop-up menu.
Page 59

3
EDITING
Frame accurate editing and drag-and-drop simplicity is what digital video is all
about. This is the heart of Video Editor.
This chapter includes the following sections:
Making selections in the Timeline
Working with clips
Working with cues
Locating clips
Trimming clips
Multi-trim Video
Split by Scene
Ripple Editing
Using the Source Window
Previewing your work
Page 60

60 VIDEO EDIT OR
Making selections in the Timeline
In order to edit clips, you must first select them. This can be as easy as clicking on
a clip, but more advanced techniques can be very useful. There are two types of
selections that you can make: clip-based and time-based. Clip-based
selections are horizontal, moving left, and right across tracks, whereas time-
based selections are vertical, encompassing all clips in all tracks within the
selected duration. You can make selections in Video Editor using either the Clip or
Time Selection tools.
Using the Clip Selection Tool
The Clip Selection Tool allows you to select clips in any of the tracks in the
Timeline. Y ou can select individual clips by clicking them. Once you have selected a
clip, you can move it or drag on its borders to trim the clip.
To select all the clips in a particular track, click the Track button on the left side of
the track. To select all the clips in the Timeline, select Edit: Select: All [CTRL+L].
To select multiple clips:
1. Select the Clip Selection tool.
2. Press and hold the [SHIFT] key on your keyboard.
3. Click and drag in the Video or Audio (but not both) Timeline to make a
selection.
4. Any clips included (in whole or in part) in the selection area will be selected
when you release the mouse button.
This is the original Timel ine. The selection area is shaded above. It was
created while holding the [CTRL+SHIFT]
keys and extends across multiple video
tracks. Note that the audio clip in Audio1 is
not selected.
Page 61

CHAPTER 3: EDITING 61
Using the Time Selection Tool
The Time Selection Tool allows you to select a period of time, including any clips
(or portions of clips) that occur within that time period.
To perform a time selection:
1. Select the Time Selection Tool. The pointer now has a Timeline icon
under it when placed over the Timeline.
2. Drag your mouse over the area of the Timeline you want to select.
If you need to select a period of time more precisely, you can manually enter the
exact location by selecting the Time Selection Tool, and then selecting Edit:
Time Selection. Choosing this command opens the Time Selection dialog box
where you can specify the duration. The Mark-in time corresponds to the start of
the selection area and the Mark-out time the end of the selection area. Click OK
to automatically create a selection marquee over the specified area of the
Timeline.
Using the Track Selection Tool
The Track Selection Tool is useful when you want to select en tire tr acks or parts o f
tracks.
To select a track or part of a track with the Track Selection tool:
1. Click the Track Selection Tool on the Timeline Toolbar.
2. Click on a clip. The clip, along with the rest of the track to the right of the clip, is
selected. Therefore, if you click on the first clip in a track you will then select the
entire track.
• The corresponding audio is automatically selected for video clips that have
audio.
• Hold down the [CTRL+SHIFT] keys while creating a selection area to also
select any audio clips on the related audio tracks. For example, when
selecting a video clip on Video1, any audio clip on Audio1 will also be
selected.
If you press [SHIFT] while clicking on a clip, you will select all clips in all of
the tracks in the Timeline to the right of the clip.
Page 62

62 VIDEO EDIT OR
Using the Track buttons
Enable or Disable track button
When this is disabled, the track will not show up in a preview. That is, it is
temporarily hidden. By default it is enabled.
Lock or Unlock track button
When a track is locked, the clips cannot be moved or edited. You can lock
individual clips by first selecting a clip and then select Edit: Lock or Clip: Locked.
Solo button
When this button is pressed down, all the video/audio tracks on the Timeline are
turned off except for the one which solo button is pressed down. The track
becomes the only one activated or simply, solo.
Grouping clips
As your project becomes more and more complex, it may be useful to group some
clips together so that they may be moved around as a unit.
To group clips:
1. Select the clips by pressing [SHIFT] while dragging over clips to be included.
2. Click Edit: Group (to ungroup click Edit: Ungroup).
Additional clips can be added to the grou p by selecting the group and then the new
clip. Different groups of clips can also be grouped into a higher level group, that is,
groups of clips can be grouped together. If you want to separate some clips from a
multi-level group, you need to ungroup at each level until you reach the level
where the clips are.
All actions performed to any grouped clip will affect all of the clips in the
group.
Page 63

CHAPTER 3: EDITING 63
Working with clips
Clips, whether audio, video, images or effects, are the foundation of your project
and manipulating them is the most important skill you can master. The next few
pages cover the basics: cutting, copying, pasting, and trimming.
To cut or copy a selected clip (to the Clipboard), you can:
• Click either the Cut or Copy button on the Standard Toolbar.
• Select either the Edit : Cut or Copy command.
• Hold down [Ctrl] and drag the clip to a different location.
• Use the keyboard shortcuts: Cut [Ctrl+X] or Copy [Ctrl+C].
• Right-click the clip and select Cut or Copy from the pop-up menu.
To paste a clip (from the Clipboard), you can:
• Click the Paste button.
•From the Edit menu, select Paste [Ctrl+V].
After performing one of the above actions you will have to click on the location
where you want to paste the clip.
Pasting attributes
Sometimes you may want to paste only the attributes (Video Filters, Audio Filters,
Overlay Options, and Moving Paths) of one clip to another. This is a very powerful
technique that allows you to maintain perfect consistency between clips.
To paste the attributes of a clip only:
1. Select the clip.
2. Right-click the clip (or use the Edit: Paste Attributes command).
3. From the drop-down menu, select Paste Attributes.
Cutting a clip removes it from its original location, and pasting transfers it to
your designated location. Copying leaves the original clip in place, and pasting
then effectively duplicates it. You can use the Cut and Copy commands to
transfer a clip to a different project. The Production Libr ary cont ains copies of
your clips. You can drag a clip from the Production Library to the Timeline as
many times as you need to.
Page 64

64 VIDEO EDIT OR
This will open the Paste Attributes dialog box which allows you to select
individual attributes to paste. When pasting filters, there are two additional
options: Append and Replace. Append adds the new filters to any existing filters
and Replace overwrites any existing filters with those from the pasted clip.
To clear (remove) a clip from the Timeline:
1. Select a clip (or a period of time) on the Timeline.
2. Click Edit: Clear [Delete] or right-click the selected clip and click Clear.
Aligning clips
Snapping helps to align clips precisely and effortlessly. Select Edit: Snap to make
clips snap to the Vertical Preview Line, edge of other clips, transitions, and even
project cues (for more on cues, see
“Working with cues” on page 71).
Splitting the audio from video clips
Video clips commonly also have audio. In the Timeline, the accompanying audio
clip is placed into the corresponding audio track (Video1 with Audio1, Video2 with
Audio2) and the two clips are locked together as a unit. To delete or move either of
the clips separately, the two must first be split. This is useful when you are
creating a music video and the audio track is not needed. Y ou will also need to split
the audio from a video clip in order to perform a freeze frame effect (see
“Freezing a frame” on page 68).
To split the audio from video clips:
1. Select the clip.
2. Click Clip: Split (or right-click a selected clip and, from the pop-up menu,
select Split).
• This does not affect the source files in any way.
• If clearing a period of time, any clips that are included in the time selection
are removed. (Clips partially selected are trimmed to the selection
boundary.)
• If you do not want to create an empty clip or time slot, make sure that the
Single-Track or Multi-Track Ripple Editing button on the Timeline
Toolbar is selected (see “Ripple Editing” on page 82). The next time you use
the Clear command any following clips will move backward to the left to
occupy the vacated space.
Page 65

CHAPTER 3: EDITING 65
Changing the volume of clips
Audio clips and the soundtracks of video clips have a volume rubber band in the
middle that is used for adjusting sound volume. Simply drag the rubber band up or
down to change the volume.
To change the sound volume of a clip from the Timeline:
1. Select the clip whose sound volume you want to change.
2. Click on the rubber band (baseline) that appears in the middle of the clip. A
control point is placed at the position of your pointer.
Changing the sound volume from the Timeline
3. Drag the control point up to increase volume at this point, down to decrease.
(All the way to the top doubles the volume; all the way down means no sound).
To add additional control points, repeat steps 2 and 3.
Changing the speed of clips
Retiming clips is a very powerful feature that allows you into the “time domain” of
video playback. It empowers you to speed up or slow down the clips. On the
technical side it’s important to know that every media clip has a certain playback
speed expressed in frame rate. Let’s assume you have a video clip with a normal
speed of thirty frames per second. The motion is life-like.
Suppose you want to speed up the pace of the action two folds - make it move
faster twice. In this case, you will need to tell the program to cram all your thirty
frames in just a half a second time. Flip this concept and you will know how to slow
down things in your clip, make it twice slower - simply extend the thirty frames of
natural motion throughout sixty frames of video.
To reunite clips, select Unite. For the two clips to be successfully reunited
they need to be of exactly the same duration and in corresponding positions
in the Timeline. This command is therefore usually limited to clips that were
previously joined and then split.
To remove a control point, drag it off the top or bottom of the clip. If you
hold down the [SHIFT] key before adjusting the control points, you will see
values (in dB and %) for the exact volume.
Page 66

66 VIDEO EDIT OR
To change the speed of your video in Video Editor, you will not need to bother
altering the actual amount of frames played per second. All y ou need to do is drag
on a clip’s edges.
By default, a clip is trimmed every time you drag on its edges. Thus to be able to
retime clips, you will need to activate a special mode in the Timeline that allows
you interactive retiming, Time Stretch. Dragging the edges of a clip in Time
Stretch mode will actually add or remove real frames in your video. Visual
shrinking of a clip leads to reducing the number of frames and speeding up the
video, whereas expanding a clip past its original borders slows down the motion.
All the retiming is done internally, source video files remain unchanged. Retiming
information is stored in the project file and is applied at rendering.
To retime a clip:
1. Click the Time Stretch Tool in the Timeline Toolbar.
2. Click-drag on any edge of a clip to either left or right.
Another way to retime your clip is by entering numerical v alues for speed, duration
or variable speed in the Speed dialog box (Clip: Speed). This feature is extremely
useful if you need to achieve fast and slow motion effects having in mind exact
percentage by which to speed up or slow down the playback.
Here are the three methods in the Speed dialog box that allow direct access to clip
retiming:
• Speed - enter a value between 10 and 1000 percent to retime in a linear
fashion. Once entered, the speed value will be applied to the whole duration of
the clip.
• Duration - set the end time in the timecode boxes. Setting the end time before
the end of the original duration will speed up the clip, setting it past the mark
will slow down the motion of the video.
Time Stretch and Clip: Speed can also be applied to audio clips.
Altering the speed of clips will remove Freeze Frame settings if they were
set on the clip prior to retiming. Freeze Frame is also removed when you
apply Speed attribute in the Timeline.
Page 67

CHAPTER 3: EDITING 67
• Variable Speed - enter a value between 10 and 1000 percent to retime in a
linear fashion with an option to key frame the v alues at different points in time.
Placing key frames with different speed values across your clip will vary its
playback speed interpolating from one value to another in a linear fashion.
Reversing the frames of a clip
Select Clip: Reverse (the Reverse command can also be accessed by rightclicking the clip) to reverse the position of the frames in a clip and create a
backwards effect. Any audio accompanying the clip will also be reversed.
Relinking clips
Whenever you open a project, Video Editor performs a cross-check between the
clips in the project and their associated source files. If the source files are missing,
the Relink dialog box opens prompting you to relink the clips by browsing for the
correct folder or folders.
Video Editor includes a feature that works completely transparent (meaning that
you won't even notice it), called Smart Relink. If you have moved your files to
another drive or folder, but have basically maintained their positions relative to one
another, Smart Relink will automatically find all of the clips in the project that have
missing file links and locate the rest of the source files. This can be a huge time
saver.
If you click the Ignore button in the Relink dialog box, the clips on the Timeline
will appear blacked out. You can still work with them, but you won’t be able to
create previews or final video files.
Another way of relinking source files to their clips is by clicking Search: Find
Unlinked Clips. The dialog box that opens displays a list of the missing source
files, their associated file names, as well as options to relink, delete, or go to the
clip on the Timeline in question. If you choose to relink, the Relink Video File
dialog box opens allowing you to browse for the missing files.
The Duration dialog box (Clip: Duration) is for trimming only. It doesn’t
retime your clips.
If you choose Variable Speed mode, the audio of the clip will be removed.
Page 68

68 VIDEO EDIT OR
Calibrating video clips
If you have captured or inserted a video file whose colors you were unable to
properly calibrate (adjust) in Video Capture, you can do so directly from Video
Editor with the Clip: Color Calibration command (or right-click the clip and select
Color Calibration). This method uses Video Editor as a post production tool to
adjust the color. To properly use the Color calibration command, your video file
needs to have a color bar test pattern which was created by the video source, and
included with the file at the time of capture, otherwise this command has no
benefit.
For more on color calibration, see “Calibrating your display” on page 205 under
“Part II: Video Capture”.
Freezing a frame
A common technique in video editing is freezing a frame during playback. In Video
Editor, this is done by selecting Clip: Freeze Frame.
To freeze a frame during playback:
1. Select a clip and then split the audio from the video (see “Splitting the audio
from video clips” on page 64).
2. Right-click the clip and select Freeze Frame. The Freeze Frame dialog box
opens.
3. Use the slider under the Preview Window to find the frame you want to freeze.
4. Check Freeze before frame or Freeze after frame, or both, and then click
the corresponding arrow button. You can also directly enter the timecode and
set it as the frame to freeze. (See notes below for details.)
5. Ent e r how long you want the selected frames t o be "frozen" in Freeze
duration.
6. Click OK.
If you need to edit the freeze frame attributes, select then right-click the clip and
choose Freeze Frame from the pop-up menu. If you only need to change the
freeze duration, you can press [Shift] and drag the end of the video clip in the
Timeline.
If your video file is field-based, select De-interlace freeze frame to
produce better video quality.
Page 69

CHAPTER 3: EDITING 69
Setting field options for video clips
Video Editor allows you to work with both field-based and frame-based video files.
Field-based video stores video data as two distinct fields of information for each
frame. This allows the video to play back flicker free on a television which
interlaces both of these fields in odd/even scan lines. If your video is only for
computer playback, you should save your work as frame-based.
To specify the type of video you are working with:
1. Select the clip.
2. Select Clip: Media Source Options. (Right-click the clip and from the pop-up
menu, select Media Source Options.) This will open the Media Source
Options dialog box.
• Freeze before frame. When the clip is played back, it will "freeze" on the
designated frame from the beginning of the clip, up to and including the
frame itself, and then resume normal playback.
• Freeze after frame. When the clip is played back, it will playback normally
until it comes to the designated frame and then "freeze" to the end of the
clip.
If both boxes are checked, the clip will freeze both before a particular frame
and after a particular frame. See the illustration below for an example.
In the above illustration, the top row represents a normal clip of fifteen
frames. In the second row, Freeze before frame was selected and frame 5
was frozen. Frame 5 is then repeated (frozen) until frame 6 is reached.
Normal playback resumes. Freeze after frame was also selected with the
value of 10, and the frame is repeated (frozen) until the end of the clip. So
this clip freezes at two different points. If you want to freeze more frames
within this one clip, you must first use the Scissors Tool to cut your clip into
separate clips.
Freeze before frame Freeze after frame
Page 70

70 VIDEO EDIT OR
If you are working on frame-based video, select the Frame-based option in the
Frame type list. For field-based video, select either the Lower Field First or
Upper Field First option. Exactly which one depends on the type of video capture
board used to digitize the original video. (For more information, see the
documentation accompanying your video capture board.) If you cannot determine
the correct order, switch betwee n the two and render a section of your movie to
see which gives you the best results.
If your video was originally field-based but yo u are editing the vide o as framebased, select the Deinterlace option. This helps combine the two fields into one
frame. For frame-based video that you are editing as field-based, select the
Flicker reduction option to help Video Editor create the two fields necessary for
each frame. This may require some initial experimentation, and may only be
apparent when you output your movie to a video tape. Click OK when you are
done setting the options.
• Display aspect ratio may be disabled if Perform non-square pixel
rendering is not selected in the Project Options dialog box or if the video
clip has a ratio of 16:9 or 4:3.
• If you already determined the aspect ratio settings in the Preferences dialog
box, you don't need to change the aspect ratio again in the Media Source
Options dialog box unless you want to use a different aspect ratio for a
particular video clip.
Page 71

CHAPTER 3: EDITING 71
Working with cues
Cues are simply bookmarks for your video project. As your projects get larger and
more complex, you can use cues to quickly jump from one place to another, easily
align clips when inserting them, or mark the location of a particular event. Y ou can
name the cues and add descriptions. Cues can be added to the Timeline as a whole
(project cues) or to individual clips (clip cues). Also, there is a special kind called
chapter cues used only in projects that will be exported for DVD authoring in
programs like Ulead DVD MovieFactory.
Placing project cues
You can place cues either directly on the cue bar or in the Preview Window.
To place a project cue on the cue bar:
1. Move the pointer to the cue bar (the bottom part of the ruler). The cursor
changes to the cue cursor.
2. Click on the appropriate location on the Timeline. A triangular blue cue marker
appears on the cue bar.
To place a project cue using the Preview Window:
1. Click Play [ENTER] to preview the project in the Preview Window or use the
Navigation bar to move to the place where you want to add a cue.
Project cues
Clip cues
Page 72

72 VIDEO EDIT OR
2. Press [F5] on your keyboard when you want to add a cue (or click the Menu
button and choose Add/Delete Cue).
3. Cues (blue triangles) appear on the Timeline Cue Bar.
The default name of the clip (the variable &p) is the location of the cue on the
Timeline. For example, the default name of a cue at the 1 minute, 30 second point
would be ‘01:30:00’. Right-click a cue to view its name. If you wish to move a cue,
drag it to a new location. To remove a cue, drag it off the edges of the Timeline.
Select View: Cue Manager to delete cues, rename them or jump to a specific
cue.
Placing clip cues
You can also place cues on individual clips. They are quite useful for aligning clips
in different tracks and for accurately combining video and audio clips. In th is case,
the cues are black and appear on the Timeline immediately below the clip. These
cues cannot be named but can be used as na vigation poin ts in the Source Wi ndow
by clicking the Next/Previous Edit Point buttons.
To place clip cues using the Source Window:
1. Open a clip in the Source Window (double-click the clip or drag it to the
Source Window).
2. Play the clip or use the Navigation Bar to move to the place where you want
to place a cue.
3. Press [F5] (or click the Menu button and choose Add/Delete Cue).
4. Continue adding cues and click the Apply button when finished.
To view clip cues on the Timeline:
1. Click View: Timeline Display Mode or the Timeline Display Mode button.
2. Select Show cue bar for video and/or audio tracks.
• The Source Window displays an audio cue bar when you have an audio
clip. Click on the cue bar to add audio cues. To remove cues, drag them
off of the cue bar.
• Alternatively , click the Source Window Menu . Y ou can select Cl ip Cue
Manager from the menu to add, delete, and rename clip cues.
Project cues are always visible at the top of the Timeline.
Page 73

CHAPTER 3: EDITING 73
Placing chapter cues
The third type is chapter cues. You will only need to set them if you plan to export
your project to either Ulead DVD Workshop or Ulead DVD MovieFactory. There,
your chapter cues will be used for easy navigation through DVD movies. All the
chapter points set in Video Editor will be recognized by both - DVD Workshop and
MovieFactory.
To set chapter cues in the Timeline:
1. Click Display Mode . Alternatively, click View: Timeline Display Mode.
2. Select Chapter point cue bar.
3. Click OK.
4. The horizontal bar beneath the Timeline Ruler now becomes the chapter point
cue bar. Click on this bar to set more chapter points. A green triangle indicator
appears as you add a chapter point. (To remove a Chapter point, drag the
triangle icon all the way to the left).
Locating clips
You can use cues to jump to a specific location in your project instantly.
To locate a specific clip:
1. Click the Find Clip button or Search: Find Clip [CTRL+F]. This displays
the start time, duration, track and name of all the cues contained within the
current video project.
2. To go directly to a clip, select it under Start Time in the list box.
3. Click OK.
To go to another clip from the same source file, click the Find Next button on
the Standard Toolbar or click Search: Find Next [F2].
You can also use the DVD Chapter Point Mana ger in the View menu to
manage your chapter cues.
Page 74

74 VIDEO EDIT OR
You can also use the Production Library to view all the clips in the current video
project and search through text annotated to the clips.
To jump to a cue or a specific time:
1. Click Searc h: Go To.
2. In the Go To dialog box, enter a time or select a cue.
3. Click the To button. The Timeline jumps to your selection with a yellow arrow
pointing to the specific jump.
Locating an empty time slot
In the course of creating a large project, you may have left blank spaces in the
Timeline to fill at a later time. Click Search: Find Empty Time Slots to find
these.
Trimming clips
Trimming and editing clips is the basis of making movies. There are a number of
convenient methods for doing this in Video Editor. Each of these offers different
advantages depending on the type of clip and the operations you wish to perform.
To trim using the Clip Selection Tool:
1. Click the Clip Selection Tool .
2. Drag the left or right border of the clip.
You can also use the Production Library to view all the clips in the current
video project and search through text annotated to the clips.
When you view the Find Empty Time Slot dialog box, there will always be one
time slot listed. This is the time slot at the end of the video project and cannot
be deleted.
Page 75

CHAPTER 3: EDITING 75
How far you can drag depends on the type of clip and/or its duration. For example,
you cannot extend the length of a video or audio clip to exceed the duration of its
source file. Image, title, and color clips can be extended indefinitely. Zooming in
[+] on the Timeline will help in trimming a clip with accuracy.
Trimming in the Source Window
One way which you can use to trim your videos is to use the Source window.
To trim a video in the Source Window:
1. Double-click a video clip in the Timeline.
2. In the Source Window, drag the Jog slider to the position you want as the mark in point and then press [F3].
3. Drag the Jog slider to the position you want as the mark-out point and then
press [F4].
4. Click Apply in the Source Window.
Y ou can also use the Source Window to cut your video clips. Video Editor gives you
two options on how you can cut your video clips: Cut by Position and Cut by
Cue. Cut by Position slices the video clip based on the position of the Jog slider.
Cut by Cue slices the video clip based on the cue positions.
Select Clip: Duration if you need extreme precision for the clip length. In the
Duration dialog box, type the desired length for the clip.
• Use the left-arrow or right-arrow key on your keyboard to go through your
video frame by frame. Each key press moves you one fr ame forward or back.
You can also hold down [Shift] and use the mouse to drag the Jog slider.
This feature is particularly useful if the video clip duration i s very long or you
want to make precise trimming.
• This displays the clip duration. You can enter new values here to change the
length of the clip.
Page 76

76 VIDEO EDIT OR
Trimming in the Preview Window
As you trim, Preview Window will display the real-time result of your actions. This
is a preferable way of trimming if precision is not critical but time is important.
To trim a video in the Preview Window:
1. Click-select a video clip in the Timeline.
2. Drag its edges to trim the clip. Notice the realtime preview of the trimming
operation in the Preview Window.
Setting preview range in Preview Window is different from the trimming in the
Source Window or Trim Window. After you set the mark-in and mark-out points in
the Preview Window, your project preview range will be limited to the “trimmed”
duration that was set in the Preview Window.
To set a preview range in the Preview Window:
1. Open the Preview Window.
2. Drag the little triangle trim handle on the left end to the desired play-in point.
Alternatively, drag the Jog slider to the position you want as the mark-in point
and then press [F3].
3. Drag the trim handle on the right to desired play-out point. Alternatively, drag
the Jog slider to the position you want as the mark-out point and press [F4].
4. Click Play Preview Range in the Preview Window to play the trimmed
segment.
Using the Trim Window
The Trim Window is the most precise method of trimming your clips, frame by
frame.
To use the Trim Window:
1. Select Window: Trim Window.
If the Preview Window and Trim Window are open simultaneously, the
feedback will be streamed to the Trim Window only.
Page 77

CHAPTER 3: EDITING 77
2. Select Edit: Trim Options and select how you want to trim the clip. See
“Defining trim options” on page 78.
3. Grab the edge of the clip you want to trim. The Trim Window displays two
frames. The clip will be trimmed between these two frames when you release
the mouse button.
Using the Scissors Tool to trim clips
To cut a clip:
1. Click the Scissors Tool (or hold down the [S] key o n your keyboard ).
2. Click on the place where you want to cut the clip.
Cutting a clip breaks the clip at the pointer position, creating two separate clips
that you can then move around the Timeline. If you place two previously cut clips
back in their original positions you can reattach them together by clicking (with the
Scissors Tool selected) over the cut line.
If you have the Stitch trim option selected, only the previous frame is
displayed whenever you use the Trim Window.
• Hold down the mouse button and use the arrow keys to move frame by
frame.
• T o trim a title clip using the Trim Window, press [Shift] as you drag the edge
of the title clip.
• The Trim Window has no effect if you are using the Time Selection Tool.
Page 78

78 VIDEO EDIT OR
Defining trim options
While trimming is a basic operation, it does have more advanced features. The
effect of trimming on neighboring clips is determined by the Trim Options. Select
Edit: Trim Options to choose the following:
An example of stitching one clip over another
Cutting a clip with the Scissors tool
Hold down the [SHIFT] key on your keyboard to cut across multiple tracks.
Normal allows you to trim a clip only within the available free clip slot.
Overwrite allows you to trim a clip so that it extends over a
neighboring clip, thereby replacing the overlapped portion with the new
clip (if you then trim the clip back it will still leave an empty slot).
Stitch allows you to trim a clip over another, trimming the neighboring
clip instead of overwriting it (if you then trim the clip back, it will reveal
the underlying portion of the other clip which is then "untrimmed"). This
is useful if you want to merge two clips together and need to see the
frames of each clip in the Trim Window. (If the two clips are not adjacent
you can only trim the active clip to the duration of the clip slot.)
Page 79

CHAPTER 3: EDITING 79
Smart Trim
The trimming procedures described on the preceding pages are completely nondestructive and do not affect the original source files in any way. While this is a
major advantage to editing video on a computer, there may be times where,
because of a lack of free hard disk space, you want to actually trim your source
files according to your edits.
In the Project menu, select Smart: Smart Trim. In the dialog box that opens,
you can select the clip or clips that you want to permanently alter.
Multi-trim Video
Sometimes, marking only the start and the end points to trim a clip just isn’t
enough. There could be situations when you will need to mark multiple start/end
points. Let’s say you recorded a TV program and you want to trim out all the nine
commercials in the clip. For that, you will need to use the Multi-trim Video
function available from the Production Library toolbar.
1 Shuttle Slider - Preview the clip at different playback speeds.
2 Jog Wheel -
Use to scroll to different parts of the clip.
Page 80

80 VIDEO EDIT OR
To trim a video file into multiple clips:
1. Import your video file into the Production Library. Select the video file, then
click Multi-trim Video .
2. In the Multi-trim Video dialog box, view the whole clip first by clicking to
determine how you want to mark segments.
3. Drag the Jog Slider until you get to the part of the video that you want to use
as the beginning frame of the first segment. Click Start .
4. Drag the Jog Slider again, this time, to the point where you want the segment
to end. Click End .
5. Do steps 3 and 4 repeatedly until you have marked all the segments you want
kept or removed.
6. Click OK when finished. The video segments that you kept are then inserted
onto the Timeline.
• To mark segments, you can also press [F3] and [F4] while playing the
video.
• Click Invert Selection to toggle between marking segments that
you want to retain or marking segments that you want taken out from the
clip.
Navigation controls in the Multi-trim Video dialog box:
Reverses or advances through the video in fixed increments. By default,
these buttons move up or down through the video in increments of 25
seconds.
Plays a preview of the final trimmed video.
Plays the video file. Hold [Shift] then click to play only the selected
segments.
Moves to the start or end frame of a trimmed segment.
Moves to the previous/next frame in the video.
[F5] [F6]
Page 81

CHAPTER 3: EDITING 81
Split by Scene
Split by Scene allows you to separate scenes in your DV video clip into several
clips. This function is very useful when wanting to insert transition effects between
segments in a single DV video clip. It can be accessed in three different locations:
Insert Video File dialog box, right-click pop-up menu in the Production Library ,
and in the right-click menu on the Timeline.
To use Split by Scene:
1. Select the DV video clip then access the Split by Scene function.
2. The Scenes & Recording Cuts dialog box appears.
3. Preview, join, or split videos if needed.
4. When done, select the Open scenes & recording cuts as multiple clips
option.
5. Click OK. The file will then be split into multiple clips according to different
scenes.
Each separated clip is merely a trimmed version of the captured video file. Each of
the clips is not an independent file. Hence, notice that the clips all bear the same
file name indicating that they actually come from a single video file.
The Split by Scene option is disabled when the selected video clip does
not contain any scene information.
When the different scenes of the video cl ip are not dis pla yed, click Scan to
generate the scene information.
The Split by Scene function will be disabled when the DV clip has been
trimmed or an effect has been applied.
Page 82

82 VIDEO EDIT OR
Ripple Editing
Ripple editing is a mode in Video Editor that allows you to insert clips and
automatically push other clips out of the way so the new clip will fit on the
Timeline.
To select a Ripple Editing mode click one of three Ripple Editing buttons on the
Timeline toolbar or choose from the Edit: Ripple Editing menu list. See the next
two pages for specific examples.
No Ripple mode means that newly inserted clips are trimmed to fit the
available empty time slot.
Single-Track Ripple editing will move everything (including empty
space) out of the way to make room for the inserted clip, but only on the
target track.
Multi-Track Ripple editing will move everything (including empty space)
out of the way to make room for the inserted clip, moving all clips (audio
and transitions included) on all tracks.
When you are in No Ripple mode, select a file to insert and hold down
the [SHIFT] key while placing the clip on the Timeline. When this file
is dropped on the Timeline, it will push all downstream clips in a single
track out of the way. Empty spaces will NOT be preserved if the clip
length fits perfectly or is longer than the available slot.
• With any of the Ripple Editing modes selected, you cannot trim clips toward
the start of the project (frame 0), unless there is an empty clip slot for the
preceding clip to occupy.
• Ripple Editing only has an effect when the Normal Trim option is selected.
• Ripple Editing has no effect when dragging clips around the Timeline. It is
only enacted when inserting, trimming, cutting, clearing or pasting clips.
• With either Single or Multi-track Ripple mode selected, hold down the
SHIFT key while inserting a clip onto an occupied slot. This will split the
existing clip on the Timeline and insert your clip in between.
• When Ripple Editing is turned on and you delete a clip, all downstream clips
move left to fill in the space vacated by the deleted clip.
Page 83

CHAPTER 3: EDITING 83
Ripple Editing examples
The following illustrations will help you understand the sometimes complex, but
extremely important and useful aspects of Ripple Editing.
Automatically overlaying an inserted clip (No Ripple)
No Ripple mode allows you to insert clips without temporal changes in other clips
position. In other words, inserting clips in No Ripple editing mode will not affect
positions of the clips on the Timeline. In the following example, two clips are
already on the Timeline while the third is being inserted. After insertion, the third
clip gets overlaid over the two neighbors without shifting them.
.
Inserting a clip into a full Timeline (Ripple)
In this example, the third clip is again inserted between the two clips. This time,
Single Track Ripple is selected.
As the clip is being inserted, the clip to the right is moved to the right two seconds.
The entire track is shifted, spaces and all. (If you don't w ant the spaces preserved,
use Push Away Insertion. See “Push Away insertion” on page 51.)
All of the following examples involve the initial insertion of a clip from outside
of the Timeline. When moving already inserted clips around within the
Timeline, results will differ.
Page 84

84 VIDEO EDIT OR
This time, Multi-Track Ripple is selected:
Everything downstream, including spaces, is shifted to the right three seconds.
This will include transitions and clips on all of the other tracks. The entire project
(to the right of the insertion point) is moved a few seconds to accommodate the
new clip.
Inserting clips into the middle of an existing clip
Clips can be inserted right into the middle of an existing clip, automatically cutting
the clip at the insertion point.
To insert a clip into another:
1. Select Edit: Ripple Editing: Single- or Multi-Track.
2. Click the Insert Video Fil e button.
3. In the Insert Video dialog box, select the clip you want to insert.
4. Click the Open button.
5. Press and hold the [SHIFT] key while clicking in the middle of the clip on the
Timeline that you want to insert the new clip into.
Here green.avi is inserted into red.avi. Multi-Track Ripple is on. In the first
image, you can see where the inserted clip overlaps the existing clips. Notice how
the red clip is split into two parts and the green clip is dropped into the middle.
Again, the entire project (to the right of the insertion point) is shifted right three
seconds.
Ripple editing modes are valid only for the clips being inserted. Once you
place your clips on the Timeline, changing their position will have no ripple
effect whatsoever.
Page 85

CHAPTER 3: EDITING 85
Using the Source Window
The Source Window is a single, integrated tool that lets you easily view the
contents of any audio, video, or image clip, perform trimming operations, and
place clip specific cues. Clips can be dragged to and from the Source Window and
into the Timeline or Production Library. A quick double-click will immediately open
up a clip in the Source Window. The Source Window itself is made visible by
selecting the Source Window button on the Standard Toolbar or by using the
Window: Source Window command. Once a clip is opened you can use the
menu list to select any other clip which you have previously opened in the Source
Window, listed by track and start time. The next few pages cover the Source
Window in more detail.
Source Window
1 Playback slider slides back and forth to scrub the clip.
2 Trim handles determine the Mark-in and Mark-out points of the trim area.
3 Current position displays, and allows you to edit, the time of the current positi on of
the Playback slider.
4 Jog wheel use to scroll to different parts of the clip.
5 Shuttle slider preview the clip at different playback speeds.
1
2
3
4
5
6
7
8
9
10
11
Page 86

86 VIDEO EDIT OR
6 Trim bar shows the trimmed portion of the clip (between the Trim Handles).
7 Trim area displays, and allows you to edit the current duration of the trim area.
8 Clip menu displays, and allows you to choose, any of the clips loaded into the
Source Window.
9 Source Window Menu button displays several options for resizing the Source Win-
dow, impo rting files, v iewing t he prope rties of the clip, finding the clip in the Timeline
and adding, deleting, and managing cues.
10 Apply button applies all editing done in the Source Window to the clip in the Time-
line.
11 Navigation bar (See details below.)
Source Window Navigation Bar
1 Play (Pause) plays the entire clip from beginning to end.
2 Play Mark Area (Pause) plays only the trim area from Mark-in to Mark-out portion.
3 Play from the current position to Mark-out (Pause) plays the clip from the cur-
rent position of the Playback slider to the Mark-out point.
4 Previous Edit Point moves the Pla yb ack s lider to th e pr evious cu e or the begi nning
of the clip.
5 Previous Frame moves the Playback slider to the previous frame.
6 Next Frame allows you to maneuver the Playback slider one frame at a time.
7 Next Edit Point moves the Playback slider to the previous or next cue or the end of
the clip.
8 Repeat plays the active clip continuously.
9 Mark-in and Mark-out allows you to position the Trim Handles at the current loca-
tion of the Playback slider and adjust the Trim Area.
When trimming videos in the Source Window, the entire trim area can be
repositioned by dragging it. The
Playback slider automatically slides along with
while dragging on the Trim handle.
12 345678 9
Page 87

CHAPTER 3: EDITING 87
The pointer will change to a hand when placed over the trim area. Use this hand to
drag the two trim handles when trimming and moving the trim area as a whole.
Right-click on the trim area to automatically reset both trim handles to their
original positions at the beginning and end of the original clip. Both the Current
Position display and Trim Area display boxes can be manually edited. Just click
on the box and key in the new numbers to automatically re-adjust the Jog slider
and/or Trim handle.
To trim an audio clip:
1. Place the red vertical line where you want to begin the trim selection area.
2. Click the Mark-in button. The unselected area changes to a blue waveform on a
gray background.
3. Repeat steps 1 and 2 with the Mark-out button.
Alternatively, to mark an audio clip segment, press the [Shift] key and
drag the mouse over a selection.
4. Click the Apply button. The clip on the Timeline is adjusted.
Additional unlabeled controls are the same as the Source Window for video
clips (see “Using the Source Window” on page 85). T rimming the audio tr ack of
a clip with attached video will also trim the corresponding video track.
Mark-in
point
Trim area
Mark-out
point
Visible area
Zoom tool
Page 88

88 VIDEO EDIT OR
Previewing your work
Video Editor allows you to see a portion of your project without performing a full
save. It lets you render a small section of your project before you create y our final
video at the end. This way you can view a few seconds of a transition between two
clips without having to take the time to render the whole thirty minute project. If
your capture board supports an external monitor, you can also preview the output
there.
The Preview Window itself is very similar to the Source Window. Where the Source
Window is used to view, trim and add cues to individual clips, the Preview Window
is used to view your project, either in full or in part, or to add project cues.
Preview Window
1 Play/Pause plays a preview of all the clips in the video project.
2 Play the Preview Range plays only the clips in the preview area.
3 Play to Mark-out plays clips starting from the current pointer position.
4 Timeline History Menu allows you to choose a timeline to playback from. Select it
from the list of available timelines.
123 4 5 6
Page 89

CHAPTER 3: EDITING 89
5 Preview Window Menu displays a pop-up menu for adding/deleting project cues,
changing the video frame size, playing video in full screen, and more.
6 Instant Play swithes between Instant Playback and High-quality playback render-
ing.
Previewing
Video Editor offers real-time previewing for your projects. With this feature, you
can instantly see how filters and effects you apply look on your video. Y ou can then
make the necessary adjustments when needed.
When you want to preview your work, press [ENTER] or click Play on the Preview
Window. If your project is long, this could take some time. Often you will only w ant
to preview part of your project, for example, a few seconds of a transition
sequence or an overlay effect. There are three different ways to select the portion
of your project you want to preview:
• Create a preview area on the Preview bar over the Timeline. The cursor
appears with a little hand icon under it when over the Preview bar. A blue bar in
the Preview Window indicates the period for preview. Drag the edges of the
white Preview bar in the Timeline or the little triangle icons in the Preview
Window to set the in and out points of the preview. Alternatively, place the jog
slider on a mark-in point in the Preview Window and press [F3]; press [F4] for
the mark-out point. A right-click on the cue bar in the Timeline will delete the
preview range.
• Use the Preview Window to create a preview range. Use the Trim handles to
define the preview range. This is also represented as a blue line, both in the
Preview Window and on the Preview bar above the Timeline.
• Click Edit: Preview Range and enter specific timecode values to define
the preview area.
• This displays the duration of the marked preview area. You can enter new
values to change the length of the Preview range.
After selecting the preview range, click the Play [SPACE BAR] button to begin
the preview. You can change the size of the Preview Window by clicking on the
Preview Window Menu button, then selecting Frame Size List, and choosing a
predefined size from the list that appears.
Page 90

90 VIDEO EDIT OR
Instant Play
Instant Play lets you quickly see the changes you have made in your project in the
Preview Window. Simply click the Instant Play button or access it in the Preview
Window Menu to enable or disable it.
Since the complexity of a project may vary (e.g. a lot of special effects) in different
segments, you can set the Performance Level (by right-clicking the Toggle button)
to determine whether Video Editor renders a preview file or not when you are
previewing your video clip.
Video Editor renders only when a segment's complexity level is above the
performance level you set. The Performance Level you set should be relative to
your CPU speed.
You may also force a particular segment to be rendered to have a smoother
preview.
To force a segment to render:
1. Right-click on the Complexity bar just below the Timescale.
2. Select Force To Render Segment & Preview. Video Editor creates a preview
file of the particular segment even when in Instant playback mode then
automatically previews the rendered segment.
3. You can also set the preview range by selecting Set Preview Range or force
the segment to render at the same time by selecting Set Preview Range &
Render Preview.
A segment refers to a vertical stack in the Timeline.
Page 91

CHAPTER 3: EDITING 91
In addition to Instant Playback, Video Editor offers a variety of playback
monitoring options. This feature can be accessed from File: Playback Options or
the pop-up menu when clicking the Preview Window Menu button.
Depending on the project settings, the display card, and the external monitor type
you have, you can preview your work in the target display devices you choose.
This feature is useful when you want to preview your work in the device where you
will actually play your project.
Toggle button to High Quality Playback to render the whole project before
previewing. This produces better image quality and smoother transition of clips.
T oggle button (Instant Playback
or High-Quality Playback)
Preview Window Menu button
Performance Level
Playback Options
Page 92

92 VIDEO EDIT OR
Using DV SmartPlay
DV SmartPlay plays your project (with a DV file format templates only) directly
from the Timeline out to a DV camcorder or other IEEE-1394 devices without
rendering a final movie file. It also lets you view a project on an external monitor
at any time.
To use DV SmartPlay:
1. Select Project: Project Settings and click Edit. Here, select the options
corresponding to your video clip attributes. (For example, on the AVI tab, make
sure the audio format is set to DV Audio -- NTSC/PAL.)
2. Connect your DV camcorder or other IEEE-1394 device to the PC and turn it on.
3. Select File: Select Devi ce Control to make sure a proper device control is
activated.
4. Select File: Print to Tape - Timeline. Here, choose Entire project or Preview
range, and then click OK.
Performing scrub previews
You can instantly preview your video "on-the-fly" at any time. This is known as
scrubbing and is the quickest way to get an idea of how your project is going.
When you scrub, you can preview your transitions and the timing of your video,
but filters and effects will not be visible unless your hardware supports them.
Unlike performing a regular preview, however, scrubbing an area with too many
effects may not be smooth.
Before performing a scrub preview, set scrubbing preferences such as preferred
preview playback source in the Scrubbing Options dialog box. You can access
this through the Preview Window menu.
To perform a scrub preview:
1. Move the pointer up to the top of the ruler above the Timeline. It will change to
a star .
2. Drag your mouse across the top of the ruler to view your
preview in the Preview Window. Y ou can also use the Jog
slider to scrub from within the Preview Window.
Page 93

CHAPTER 3: EDITING 93
Previewing on an external device
Preview your video and transition effects on an external device. You can use your
TV (if you have a dual-head display card) and even your DV camcorder's LCD
screen to preview your project. Y ou can set the external preview viewing device by
selecting File: Playback Options.
To set an external preview viewing device for your transition effects, click in
the transition effect's dialog box.
Managing preview files
The files that are created for the preview (if high-quality playback is selected) are
saved in a temporary folder that can be set from File: Preferences on the
Preview tab. Preview files can take up a huge amount of disk space, so it is
important to set these folders up properly. Sometimes, MediaStudio Pro will
generate a "Not enough disk space" error when previewing. This error often occurs
because you need to specify additional space for these files on another disk.
Specific preview files can be controlled by going to File: Preview Files Manager.
You can see how much disk space your preview files occupy and then decide
whether or not to delete them.
Page 94

94 VIDEO EDIT OR
Page 95

4
ADDING EFFECTS AND TITLES
From transition effects between scenes to stunning video filters and amazing
animated moving paths, MediaStudio Pro has it all. Let your creativity run wild
as you learn about the most fun and exciting features of Video Editor.
This chapter includes the following sections:
Using transition effects
Using key frame con trols in dialog boxes
Effects Manager
Overlay
Applying video filters
Creating a moving path
Applying audio filters
Creating titles
Page 96

96 VIDEO EDIT OR
Using transition effects
An integral part of any video or film presentation is the transition effects used to
enhance the way clips merge, fade, and cut from one scene to another. An
appropriate and well placed transition effect can make your video sequence flow
better and add impact to your work.
Transition effects basics
After you drop clips on a video track, clips can either have an empty space in
between, sit frame by frame next to each other or overlap. When they overlap, a
default transition clip will be automatically added to the overlapped region.
The amount of overlap determines the effect duration, which will automatically
adjust when you readjust the overlapping region.
To specify a default transition for overlapping clips you will need to set it in the
Preferences dialog box.
To set a default transition:
1. Select File: Preferences
2. Click the Edit tab.
3. In Default transition effect click the Select button.
4. Choose any transition from the list in the Production Library pop-up window.
5. Click OK to apply the settings.
The added transition clip must be attached to a video clip. You can trim or
delete the transition clip.
Page 97

CHAPTER 4: ADDING EFFECTS AND TITLES 97
To manually add a transition effect:
1. Place two video clips on a video track, making sure the clips overlap a little.
2. Open the Production Library and select the Transition Effect folder to
display its gallery of effects.
3. Drag-and-drop an effect onto the overlapping clips.
4. Double-click on the transition in timeline, Transition Options dialog box
appears. Click OK and preview.
The Transition Options dialog box is where you can customize your transitions. You
can alter the speed, the direction, the border, and apply any number of little
nuances to your transition with the Key Frame Controller. Each effect has slightly
different controls. Refer to the next section for details.
Customizing a transition
There are a number of options available in the Transition Options dialog box that
let you customize your transition. The variety of these available options depends
on the type of transition you are applying. Th e fol lowi ng is just one example
among hundreds.
Transition Options dialog box (for the Box-Wipe transition effect)
The Transition Effect gallery displays all the available transition effects in
Video Editor. There are over one hundred transitions which are conveniently
grouped into folders. Each effect is displayed as an animated thumbnail for
easy identification.
1
2
8
7
6
5
4
3
15
14
13
12
11
10
9
16
Page 98

98 VIDEO EDIT OR
1 Transition selects which video clip starts the transition.
2 Divide X/Y by divides the screen horizontally/vertically to produce duplicates.
3 Color square specifies the color for the border.
4 Border specifies the size of the border at the edge of the transition.
5 Soft edge softens the transition edges.
6 Direction buttons set the movement of the transition.
7 Sample window displays a preview of the selected transition.
8 Key Frame Controller specifies the key frames at which different settings are
applied to the clip.
9 Speed control selects the preview play speed.
10 Show background displays actual video in the sample window.
11 Preview button plays the effect with its current settings.
12 Preview Playback Options opens a dialog box where you can specify where to
preview the filter/effect.
13 Play in Preview Window or External Monitor outputs the results in Video Edi-
tor's Preview and/or an external monitor.
14 Transition degree specifies the degree of completion at the current frame.
15 X and Y indicate the coordinates for the starting point of the transition.
16 Reverse changes the direction of the transition.
To customize a transition effect:
1. Insert a Box-Wipe transition effect between two clips.
2. In the Transition Options dialog box, adjust the Divide by X value to 2. This
divides the screen vertically to produce two box-wipe effects on the screen at
the same time.
Every transition effect clip placed between the clips contains a horizontal
“switch” which allows you to change the direction of the transition without
having to open the Transition Options dialog box. Clicking the green arrow
switch changes the direction of the transition effect from Forward to
Backward.
Double-click a previously inserted transition to open the Transition
Options dialog box. It is automatically opened when you insert a new
transition only when the Display Options dialog box option is selected in
File: Preferences: General tab.
Page 99

CHAPTER 4: ADDING EFFECTS AND TITLES 99
3. Enter a Border value of 1. Change the color of the border by clicking on the
Color square and selecting a color.
4. Select one of the two Direction buttons to set the movement of the transition.
5. Enter an X value of 60 and a Y value of 50. This is the starting position of the
transition effect.
6. Click OK to close the dialog box and apply the attributes to the transition
effect. Preview the new transition.
Y ou now have a customized transition. When y ou hav e done this, it is an excellent
idea to save this customized effect to the Production Library for future use.
To save a transition effect:
1. Modify a preset transition as detailed above.
2. In the Transition Options dialog box, click Add to send the effect to the
Production Library.
3. Enter a name and a description. Click OK.
Commonly used transitions
While Video Editor has dozens and dozens of different transition effects to choose
from, the jump cut with no transition and the crossfade are probably the only two
that are commonly used in Hollywood movies. Another popular technique is to fade
to black at the end of a program or scene.
To fade to black:
1. Place a video clip onto the Video1 track.
2. Create a black color clip (see “Inserting title, color, and silence clips” on
page 49) and drag onto the same Video1 track, making sure the start of the
color clip overlaps the end of the video clip.
3. From the F/X folder, drag the Crossfade transition effect onto the overlapping
region between the clips.
4. Adjust the Transition Options dialog box (make sure the transition is selected
as Forward) and click OK. Preview the effect.
You can also set the starting position by dragging the control point that
appears in the center of the sample image. This option may not be
available for all effects.
Page 100

100 VIDEO EDITOR
Using Crossfade to create a fade to black effect
It is of course trivial to reverse this effect to fade from black at the start of your
movie. Just make sure that the color clip precedes the video clip in the Timeline
and then make sure that you change the direction of the transition to go from the
black color clip to the video clip.
Another common effect is called the Turn Page effect, located in the Film folder of
the Production Library. Simply drag the effect onto the transition between two
overlapping clips to replace it with the Turn Page effect.
Turn Page transition effect
Depending on your hardware, it may take a little time for the effect to be created
by your computer. This is called rendering time. To see your transition effect
without rendering your project, use the Instant Play function (see
“Instant Play”
on page 90). A jump cut, where the clips are simply placed beside each other on
the same track, requires no rendering time and is sometimes just as useful. Video
Editor offers so many fun and interesting transition effects that it is sometimes
easy to get carried away and use them between every clip. A fancy tr ansition is not
always the best artistic choice however, and can at times be distracting. Simple
jump cuts or fades are often your best choices.
The Flashback transition
Y ou can use the Flashback transition to simulate a flashback or introduce a dream
sequence for the next scene. Light is added to the dissolving scenes to create a
dreamy effect.
 Loading...