

Page 1

New Features Guide
Page 2

2
First English edition for MediaStudio Pro 6.5, August 2001
© 1992-2001, Ulead Systems, Inc.
All rights reserved. No part of this publication may be reproduced or
transmitted in any form or by any means, electronic or mechanical,
including photocopying, recording, or storing in a retrieval system, or
translated into any language in any form without the express written
permission of Ulead Systems, Inc.
Software License
The software described in this document is furnished under a License
Agreement which is included with the product. This Agreement specifies
the permitted and prohibited uses of the product.
Licenses and trademarks
Ulead Systems, Inc., the Ulead logo and MediaStudio Pro are
trademarks of Ulead Systems, Inc. All other product names and any
registered and unregistered trademarks mentioned in this manual are
used for identification purposes only and remain the exclusive property
of their respective owners.
Sample files
Files provided as samples on the program CD can be used for personal
demonstrations, productions and presentations. No rights are granted for
commercial reproduction or redistribution of any sample files.
Page 3

3
MediaStudio Pro 6.5
MediaStudio Pro 6.5 has added powerful, advanced features to the
earlier version 6.0. Not only does it provide great enhancements in
Video Editor and Video Capture but also improved the usability of
functions and solved known problems. What’s more, it comes with the
Ulead DVD Plug-in*, allowing you to instantly create VCDs, SVCDs or
DVDs!
The new and enhanced features in MediaStudio Pro 6.5 are centered on
the Video Capture and Video Editor modules. Some of the features that
you can expect include:
•
Automatic DV scene detection
•
Seamless capturing
•
Extraction of extra audio files
•
Voice over function
•
DVD/VCD/SVCD support*
•
MPEG VBR encoding support*
*Availability of the Ulead DVD Plug-in and MPEG 2 support depends on the product specifications
in your region. Visit the Ulead Web site (http://www.ulead.com) for the latest tips, tutorials &
product info.
Table of Contents
MediaStudio Pro 6.5 .......................................................................................... 3
Video Capture...................................................................................................................4
Capture Plug and Play .................................................................................................................4
Seamless DV Capture .................................................................................................................. 5
Video Editor ......................................................................................................................6
Instant Playback .......................................................................................................................... 6
Voice Over ................................................................................................................................... 7
Extracting Extra Audio Tracks ....................................................................................................8
Using the Storyboard...................................................................................................................9
Using Split by Scene on DV Video Clips ................................................................................ 10
Title Rolling with Shadow Attribute ....................................................................................... 11
Using DV SmartPlay ................................................................................................................ 11
Cutting in the Source Window................................................................................................. 12
MPEG VBR Encoding ............................................................................................................. 1 2
DVD/VCD/SVCD Compatible MPEG Files ........................................................................... 1 2
Full Support for Types 1 & 2 DV Codecs ............................................................................... 13
Support for Software-based MJPEG Codec............................................................................. 13
Improved Support for Streaming Formats ............................................................................... 13
Page 4
4
Video Capture
The Video Capture program is the launching pad of your project. This is
where you preview and capture video footage. Capturing is the process
of recording video from a camcorder or other devices to a computer’s
hard drive. MediaStudio Pro 6.5 has advanced its Video Capture
capabilities for easier handling of huge video files and better device
control.
Capture Plug and Play
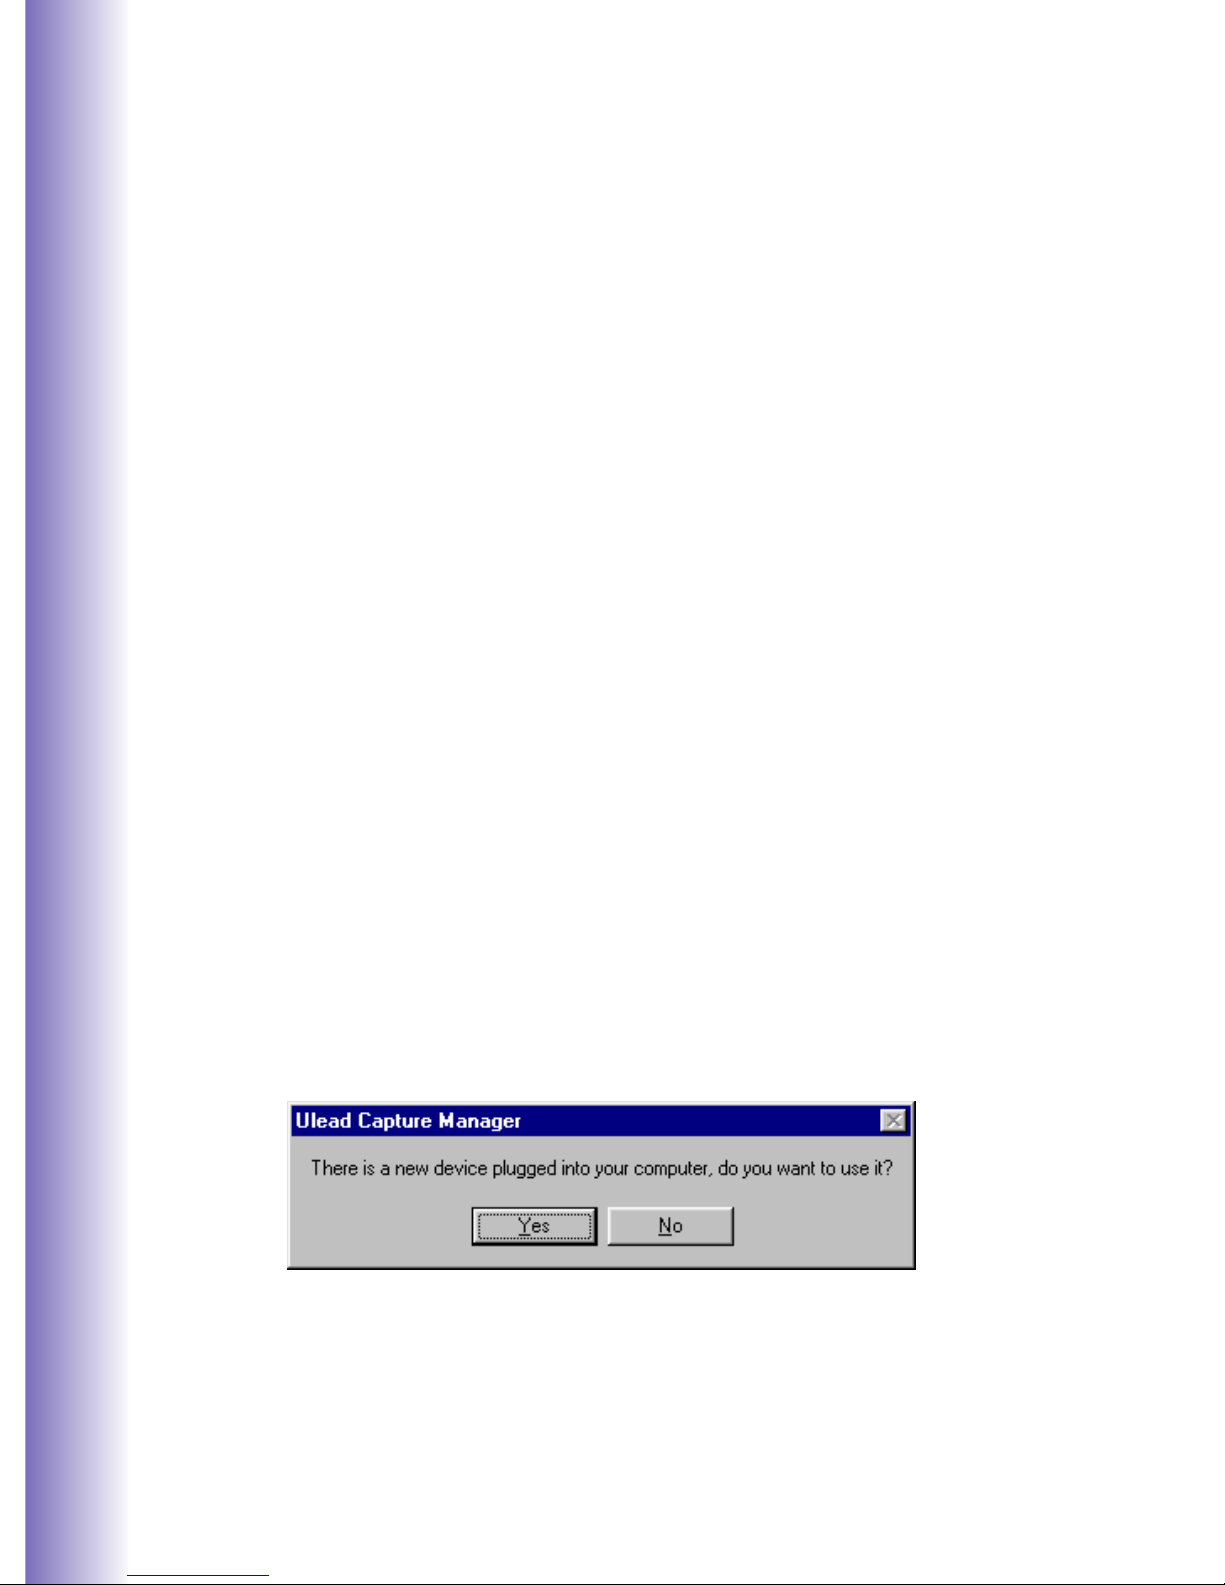
Video Capture automatically detects any Plug and Play video device
(such as a DV camcorder or a USB PC camera) connected to the
computer. The moment the device is switched on, Video Capture
prompts a message asking if you want to use the new device. There is no
need to restart the program when switching to a different capture plugin.
MediaStudio Pro 6.5 is also optimized to create peak performance when
working with CPUs like Intel Pentium III & IV as well as AMD
3DNow!. The latest Windows Media streaming format is supported too.
Other improvements include a new Fade to Black transition effect, direct
Ulead VideoStudio project file import, enhanced smart rendering,
resizable trim window, and many more. Check out the following sections
for more details.
Page 5
5
Seamless DV Capture
When using the DirectShow driver, the maximum file size is 4 GB under
the FAT 32 file system in your hard drive. Yet, you can go beyond this
limitation when using Windows 2000 and Windows NT with a NTFS
formatted hard drive partition that allows a file size to exceed 4 GB.
Seamless capture gets around this 4 GB file size limitation. Once a DV
AVI file reaches 4 GB, the remaining video is automatically saved as an
another file. The capturing process remains uninterrupted no matter how
long the video footage is.
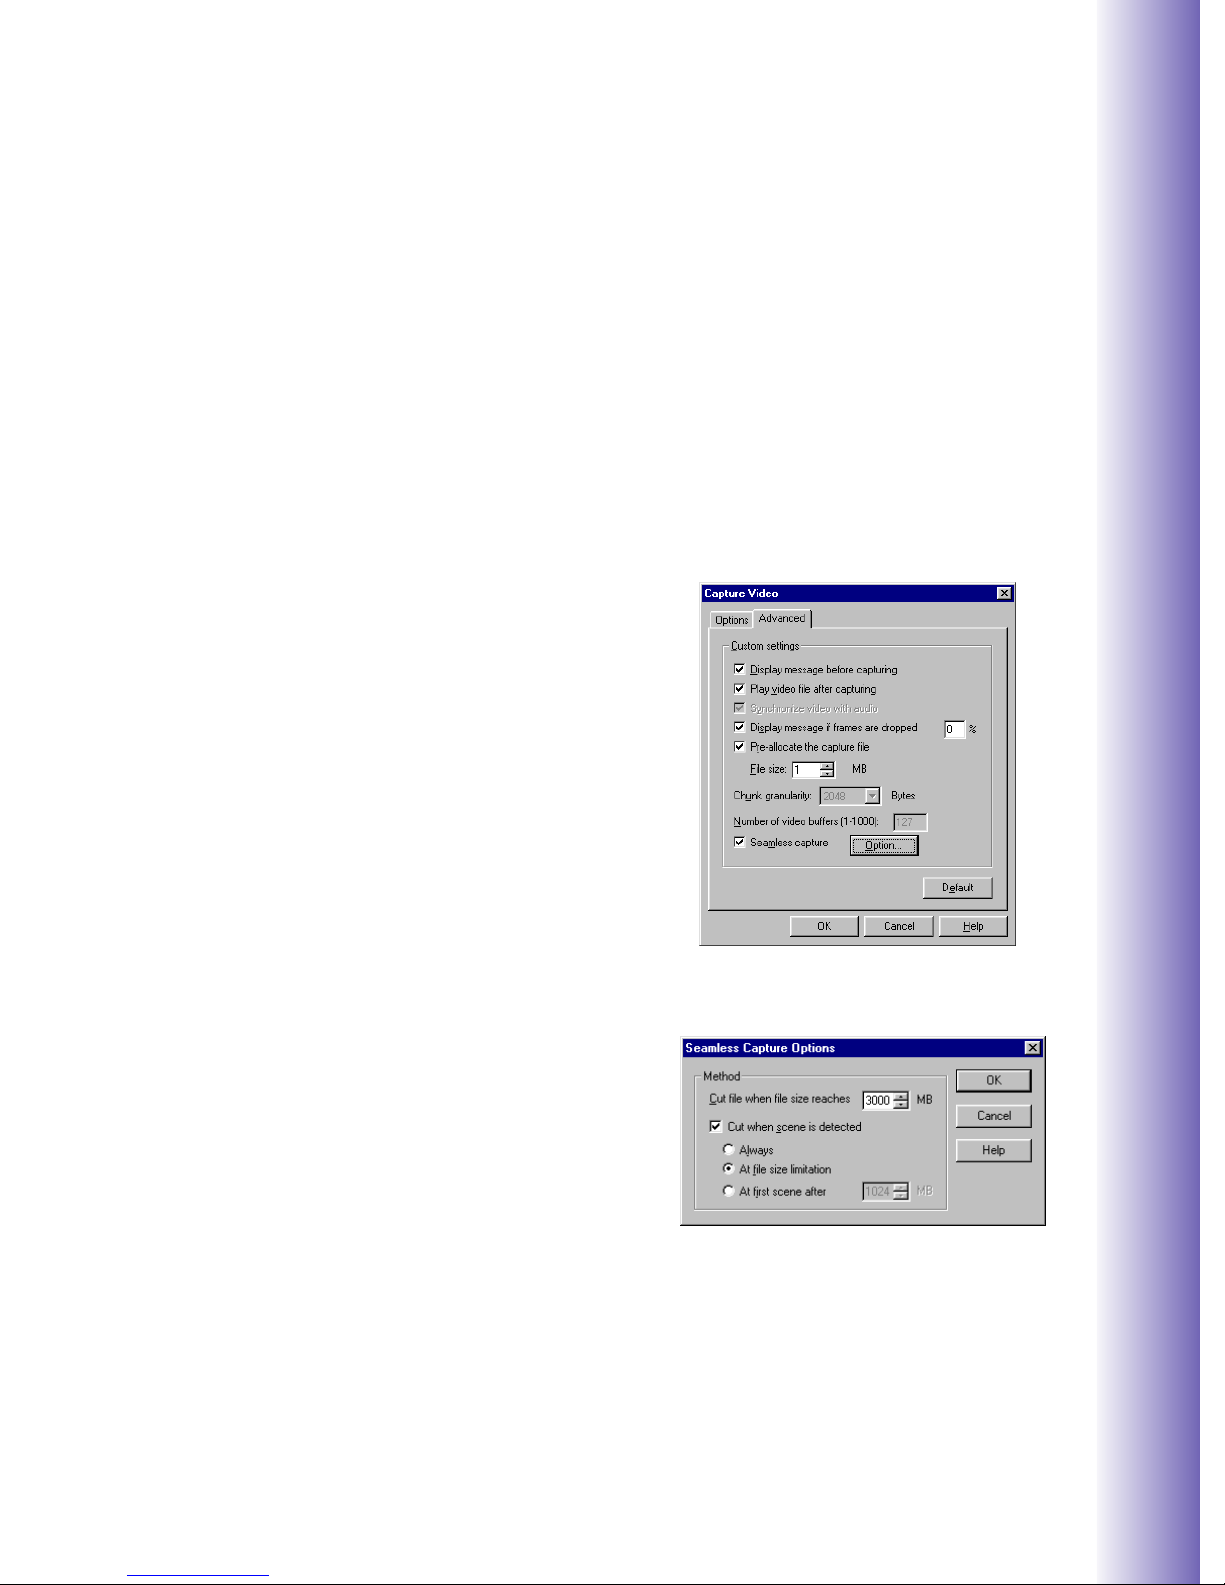
To enable Seamless Capture:
1. Make sure the DirectShow capture
plug-in is selected and a DV driver
is used.
2. Select Seamless capture in the
Advanced page of the Capture
video dialog box then click the
Options button.
3. In the Seamless Capture Options
dialog box, specify the desired
maximum video file size in the Cut
file when file size reaches box.
4. Select the Cut when scene is
detected option and select the
desired method.
a. Always Cuts the file whenever there
is a scene change.
b. At file size limitation Cuts the file
when the size reaches the value in
the Cut file when file size reaches
box.
c. At first scene after Cuts the file
when the captured video file size
exceeds the value entered in the box.
5. Click OK.
Capture Video dialog box
Seamless Capture Options
dialog box
Page 6

6
Video Editor
The Video Editor program is the mixing plate of a project. It is where
video, sound, titles, and effects are put together and saved as a file. This
version of Video Editor is a significant upgrade from its predecessor in
MediaStudio Pro 6.0. Enjoy using its new features and take advantage of
improved support for the latest hardware and software products.
Instant Playback
MediaStudio Pro 6.5 now features instant playback using its own video
rendering engine. Users can now go directly to playback without the
need to create a preview file for play project.
The Instant Playback function can be enabled/disabled on the pop-up
menu of the preview window. Access this pop-up menu by clicking on
the Preview window menu button.
Note:
The Title bar of the Preview window displays the current play mode
selected.
Preview window
menu button
Title bar
Page 7

7
Voice Over
In the case of documentaries and presentation videos, narration often
helps viewers understand and appreciate the movie’s content. This is
why MediaStudio Pro 6.5 now offers a voice over function to meet the
voice-over requirements of narrated videos. The Voice Over function
allows you to incorporate narration and voice overs into your videos
using five easy steps.
To insert a voice over:
1. Use the Preview bar to
determine the section of the
video where you want to add
your narration.
Note
: Make sure the Project cursor
is not over an existing audio clip on
the selected Audio track.
2. Select Insert: Voice File.
3. In the Insert Voice File dialog
box, test the sensitivity of the
microphone by looking at the
level meter.
Note:
You can adjust the recording
level of the microphone by going into
the Windows Volume Control.
4. Determine the Audio track
selection option. Also, click the
ellipsis button to locate a file in
your computer for use as voice
over.
5. Press Start to begin recording
your voice. To stop recording,
press the ESC button.
Project cursor over a blank area
on the selected Audio track
Level
meter
Insert Voice File dialog box
Ellipsis button
Page 8

8
Extracting Extra Audio Tracks
MediaStudio Pro 6.5 provides users with a way to extract extra audio
clips from video files to standalone audio files. Video Editor allows you
to use multiple audio clips for your projects. For a video file with
multiple audio clips, only the first audio clip can be used. MediaStudio
Pro 6.5 has added a new button, Tracks, in the Insert Video File dialog
box that allows you to extract audio files from a video that contains
multiple audio clips. With this new feature, users can extract any or all
the audio clip and insert them on the various audio tracks on the
timeline.
Extract Extra Audio Tracks
dialog box
Insert Video dialog box
Tracks button
Audio Tracks window
Play button
To extract an audio track:
1. Select Insert: Video File.
2. Select the file containing the
audio clip for extraction.
Note:
If the selected file has only
one audio track, the Tracks button is
disabled.
3. Click Tracks. The Extract
Extra Audio Tracks dialog box
will appear.
4. A list of all available tracks will
appear in the Audio Tracks
window. Select the file you
want extracted by clicking on it.
5. Determine the file name, audio
file type, and other options.
6. Press OK.
Tip:
Press the Play button to listen
to the track you have selected.
Page 9

9
Using the Storyboard
The Production Library stores everything needed to create a movie.
This includes transitions, filters, and other special effects that come with
the program. Captured video clips are also placed here. They are
categorized by subject and represented by small thumbnail pictures.
Video Editor’s new Storyboard folder allows you to view, arrange, and
overlap video clips from different tracks before inserting them into the
Timeline.
Using the Storyboard function:
1. Import or copy the video files
(from other folders inside the
Production Library) you want to
use into the Storyboard folder.
Note:
You can only use the Add to
A/B Roll function when you are
inside the Storyboard folder.
2. Arrange the sequence of the
video clips by dragging them to
the desired positions.
3. Right-click on a clip and select
Add to A/B Roll to open the
Layout Options dialog box.
4. In the Layout Options dialog
box, determine the desired
options then click OK.
5. Place the hand cursor over the
Video track position on the
Timeline where you want to
place the video clips then click
the mouse button.
Storyboard folder
Hand cursor over the Video track position
Add A/B Roll option
Page 10

10
Insert Video dialog box
Click Scenes
to access Split
by Scene
Open scenes & recording cuts as multiple
clips option
Scenes & Recording Cuts dialog box
Scan button
Using Split by Scene on DV Video Clips
Split by Scene allows you to separate scenes in your DV video clip into
several clips. This function is very useful when wanting to insert
transition effects between segments in a single DV video clip. It can be
accessed in three different locations: Insert Video File dialog box, rightclick pop-up menu in the Production Library, and in the right-click
menu on the Timeline.
To use Split by Scene:
1. Select the DV video clip then
access the Split by Scene
function.
Note:
The Split by Scene option is
disabled when the selected video clip
does not contain any scene
information.
2. The Scenes & Recording Cuts
dialog box appears.
Note:
When the different scenes of
the video clip are not displayed, click
Scan to generate the scene
information.
3. Preview, join, or split videos if
needed.
4. When done, select the Open
scenes & recording cuts as
multiple clips option.
5. Click OK. The file will then be
split into multiple clips
according to different scenes.
Note:
The Split by Scene function
will be disabled when the DV clip has
been trimmed or an effect has been
applied.
Timeline
Production Library
Page 11

11
Title Rolling with Shadow Attribute
In video projects, opening and closing credits are often presented using
rolling or scrolling text. Title text can be formatted in Video Editor by
applying color, outline, transparency, and other attributes. MediaStudio
Pro 6.5 now allows users to create rolling text with shadows.
To create rolling text with shadow:
1. Select Insert: Title Clip to open
the Insert Title Clip dialog box.
2. Type the text in the Title text
window.
3. In the Font tab, select the
Enable rolling and Shadow
options.
4. In the Rolling tab, determine the
rolling attributes, duration, and
loop count of the text then click
OK.
Using DV SmartPlay
DV SmartPlay plays your project (with a DV file format templates only)
directly from the Timeline out to a DV camcorder or other 1394 device
without rendering a final movie file. It also lets you view a project on an
external monitor at any time.
To use DV SmartPlay:
1. Select File: Project Settings and click Edit. Here, select the options
corresponding to your video clip attributes. (For example, on the
Compression tab, make sure the audio format is set to DV Audio -NTSC/PAL.)
2. Connect your DV camcorder or other 1394 device to the PC and turn it on.
3. Select File: Select Device Control to make sure a proper device control is
activated.
4. Select File: Print to Tape - Timeline. Here, choose Entire project or
Preview range and then click OK.
Font tab Rolling tab
Enable rolling
option
Shadow option
Page 12

12
MPEG VBR Encoding
MediaStudio Pro 6.5 now features
enhanced quality of MPEG videos
with the option of choosing the
variable bit rate (VBR) encoding
method. This method produces
better picture quality with a smaller
file size. This also results in DVDs
and SVCDs having better picture
quality.
Cutting in the Source Window
You can now use the Source
window to cut your video clips.
Video Editor gives you two
options on how you can cut your
video clips: Cut by Position and
Cut by Cue. Cut by Position slices
the video clip based on the
position of the Jog bar. Cut by Cue
slices the video clip based on the
cue positions.
Video Save Options dialog box
Variable bit rate
encoding option
Source window
Cut options
Jog bar
To help users create DVD/VCD/
SVCD files, Video Editor now has
three MPEG subsets under Media
Type in the Video Save Options
dialog box. Users can now easily
save their videos as DVD/VCD/
SVCD (NTSC or PAL) by simply
selecting the desired media type
from the drop-down menu.
Note:
Availability of MPEG 2 support
depends on the product
specifications in your region.
DVD/VCD/SVCD Compatible MPEG Files
DVD/VCD/SVCD save options
Video Save Options dialog box
Page 13

13
Support for Software-based MJPEG Codec
MediaStudio Pro 6.5 comes with the Microsoft Direct X 8.0a that
supports software-based MJPEG codec. In other words, unlike hardwarebased compression, a video file with this type of codec does not require
a hardware device to work with during playback.
Improved Support for Streaming Formats
In the previous version, Video Editor can create Advanced Streaming
Format (ASF) files. Now, the latest version of Video Editor supports the
latest Windows Media technology that allows you to create Windows
Media (WMV) files.
Full Support for Types 1 & 2 DV Codecs
Microsoft defines two methods of storing DV video data in AVI files,
type 1 and type 2. Accordingly, Video Editor fully supports both
DirectShow and VFW codec for DV type 1 and type 2 format. For OHCI
complaint IEEE-1394 capture cards, select the DV Video Encoder type 1
codec in the Compression tab in the Video Save Options dialog box.
Page 14

 Loading...