

Page 1

GIF Animator
USER GUIDE
Page 2

a
First English edition for GIF Animator 4.0, September 1999
© 1996-99 Ulead Systems, Inc.
All rights reserved. No part of this publication may be reproduced or transmitted in any form
or by any means, electronic or mechanical, including photocopying, recording,
or storing in a retrieval system, or translating into any language in any form without
the express written permission of Ulead Systems, Inc.
Software license
The software described in this document is furnished under a License Agreement which is
included with the product. This Agreement specifies the permitted and prohibited uses of the
product.
Licenses and trademarks
ICI Library © 1991–1992 C-Cube Microsystems.
Ulead Systems, Inc., the Ulead logo, Ulead GIF Animator, VideoStudio and MediaStudio Pro
are trademarks of Ulead Systems, Inc. All other product names and any registered and unregistered trademarks mentioned in this manual are used for identification purposes only and
remain the exclusive property of their respective owners.
Sample files
Files provided as samples on the program CD-ROM can be used for personal
demonstrations, productions and presentations. No rights are granted for commercial reproduction or redistribution of any sample files.
United States Headquarters:
Ulead Systems, Inc., 970 W. 190th Street, Torrance, CA 90502, USA
International Headquarters:
Ulead Systems, Inc., 10F #45 Tung Hsing Rd., Taipei 110, Taiwan
For more information on our products, please visit our website or send e-mail to
INFO@ULEAD.COM.
www.ulead.com
Page 3

Welcome to GIF Animator 4
What’s new in this version 6
Getting started 7
GIF Animator at a glance 8
Customizing how you work 9
Creating a new animation 10
Working with the Layer pane 11
Editing image layers 12
Duplicating image layers
12
Cropping and resampling images
13
Retouching image layers
14
Merging image layers
15
Other editing tools
16
Working with layer attributes 17
Global Information layer
17
Positioning images in the Workspace
18
Setting an image layer’s transparency
19
Removing image layers
20
Other image layer attributes
21
Using plug-in filters 22
Using video F/X 23
Saving GIF images 24
Exporting image layers
25
Appendix I: About GIF animation 28
Appendix II: GIF color palettes 29
Appendix III: Creating compact animations 30
Appendix IV: Glossary 31
Table of Contents
Page 4
4
Welcome to GIF Animator
Welcome to Ulead GIF Animator, the industry standard for GIF animation. From its drag-anddrop simplicity to its numerous customization options, GIF Animator takes all the hard work
out of building web-animations while giving you room to flex your creative muscles. Its builtin, top-notch optimization engine makes your animation compact and web-ready in seconds
while retaining its overall quality. And, when you’re ready to embed them in your web pages,
GIF Animator generates all the necessary HTML code for you.
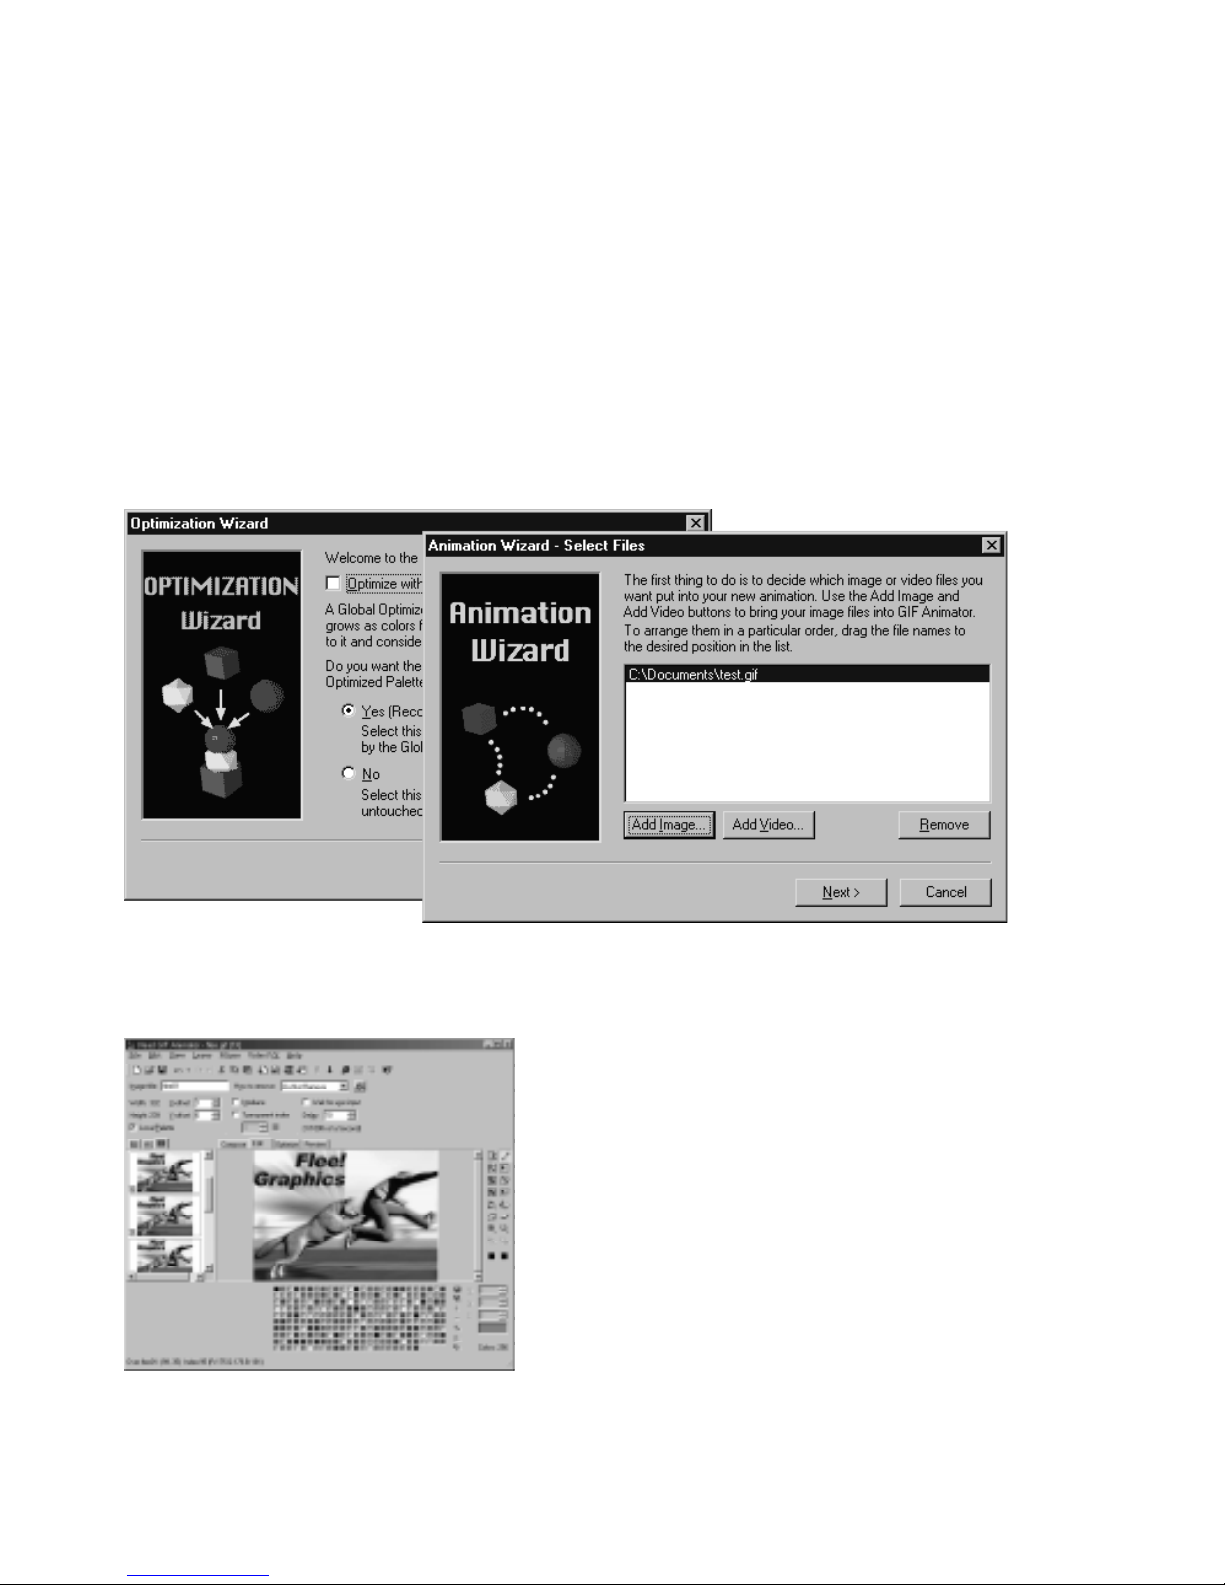
The Animation Wizard walks you through the creative process in three quick and easy steps. When you’re
finished, run the Optimization Wizard to make your animation as compact as possible for faster download
times on the Internet.
GIF Animator’s intuitive layout makes working with
animations a snap. The Layer pane lists each image
layer in the animation, either as thumbnails or as a
list, and the Workspace allows you to adjust and
position image layers. You can also work with multiple
image layers simultaneously . Its mode structure allows
you to switch between composition, editing, optimization and preview tasks quickly and easily .
Page 5
5
GIF Animator, while primarily a post-production tool, does give you the capability to work on
image layers directly within the program. You can perform minor touch-ups and edits right on
an image layer, rather than having to open it in an outside image editor.
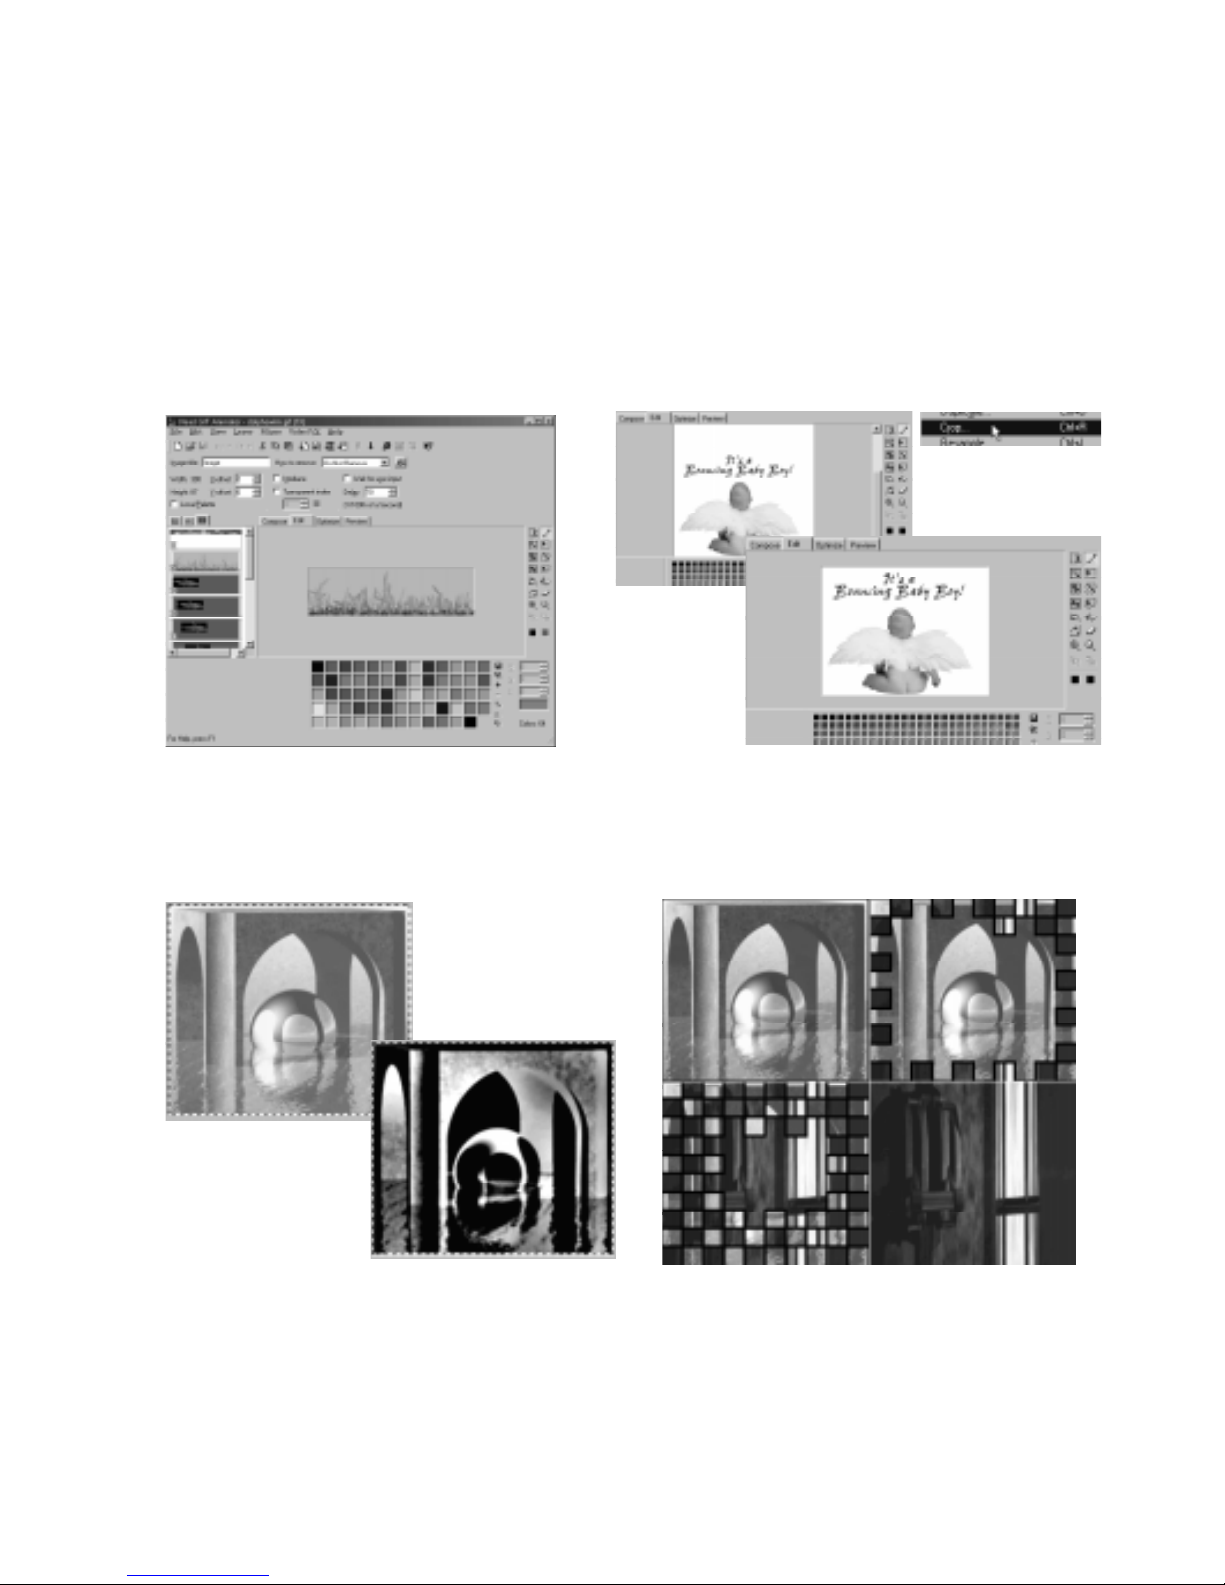
Edit mode lets you add, remove and adjust the pixels in each image layer. It can help you clean up the
residue from bad scans, or adjust the color and lines that you want to emphasize on an object. The Edit
toolbar also contains tools for manipulating your image layers. The Crop tool pares away excess portions
of an image and the Resample tool resizes your animation, just to name a couple.
Additionally , GIF Animator supports APS 32-bit plug-ins: any plug-in that you can use in PhotoImpact,
Photoshop and Paint Shop Pro can now be used directly within GIF Animator for enhancing image layers.
GIF Animator comes with more than 30 custom video filters and effects, borrowed from Ulead’s awardwinning MediaStudio Pro, and is also capable of both importing and exporting video files.
Page 6
6
What’s new in this version*
This version of GIF Animator contains some significant improvements and additions to the last
version, including:
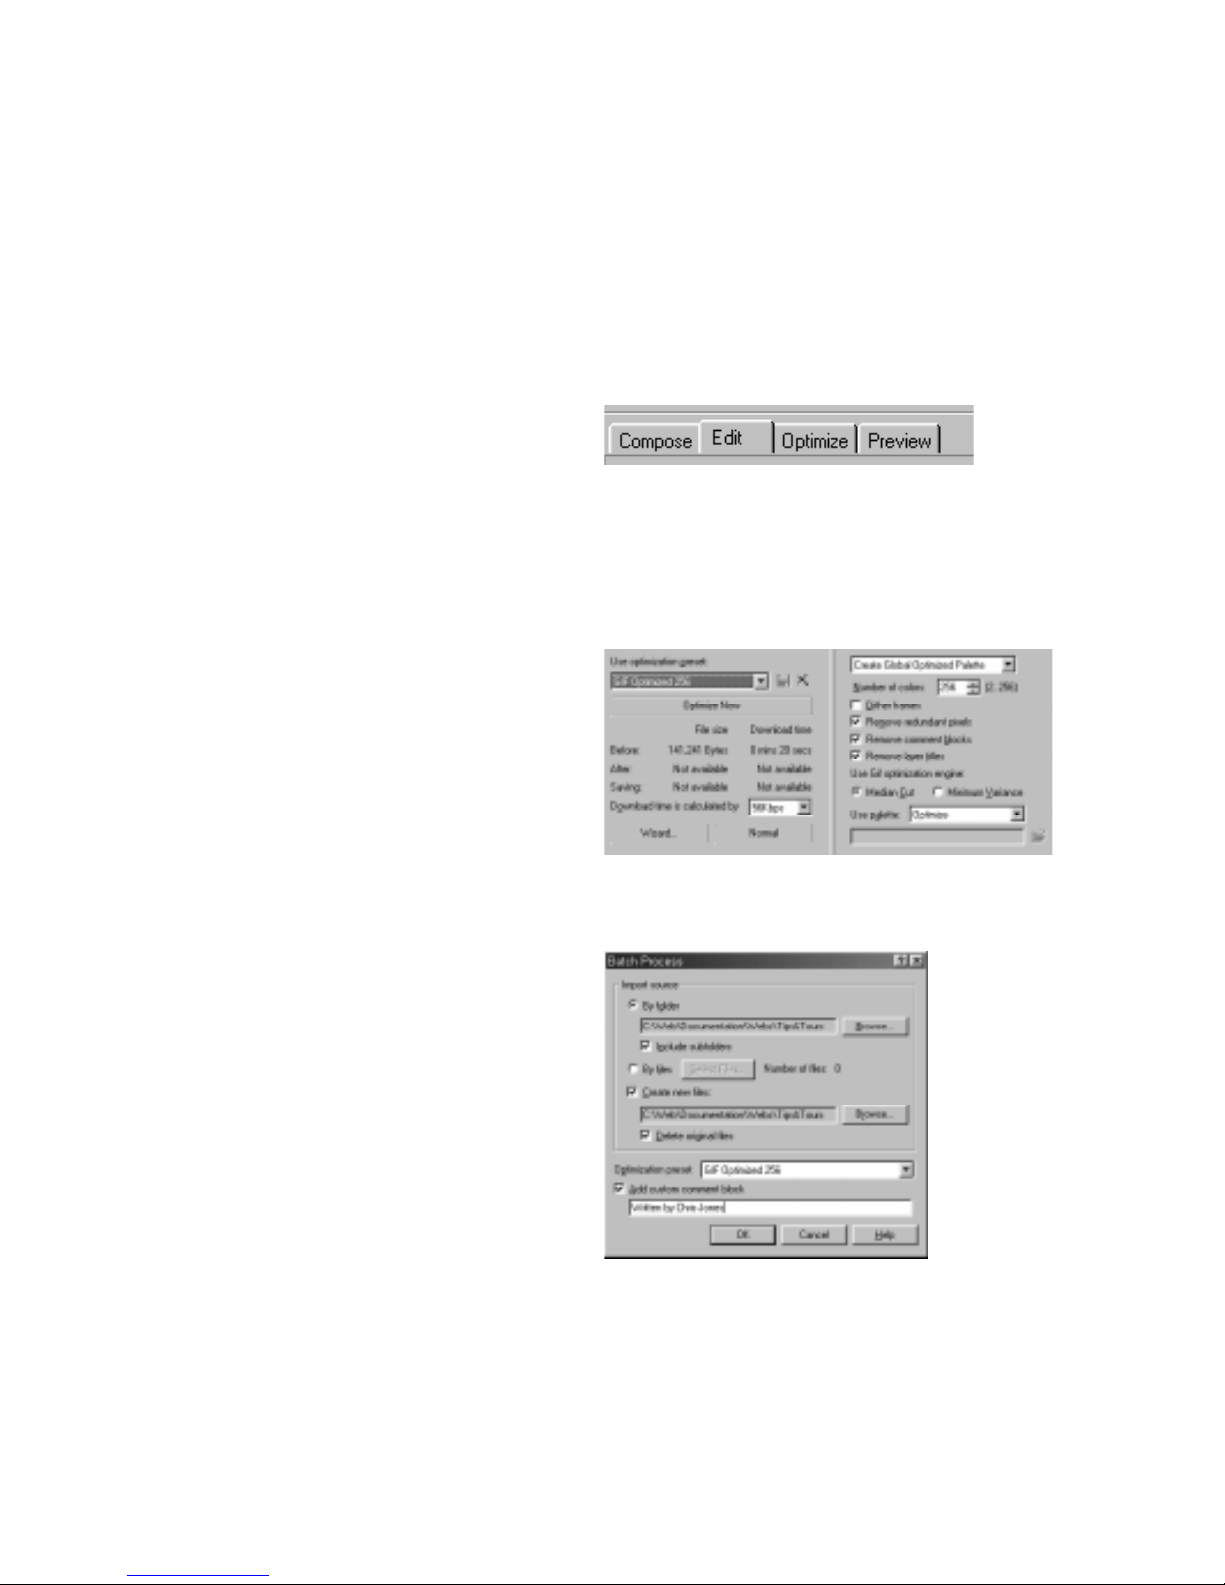
New work modes – An improved user
interface lets you do your layout, edits and
touch-ups all directly within the main program window. The work modes are: Compose, Edit, Optimize, and Preview. Intuitively
placed tabs let you switch modes instantly
while you create your animations.
Improved optimization – A new algorithm
makes your animated GIF files even smaller
than before, and easy-to-access optimization
presets in Optimize mode make optimizing
your files a snap. Once you create and save a
preset, you no longer have to concern
yourself will all the different optimization
options. Simply click the Optimize button and
GIF Animator does the rest.
Batch Process your web site – If you have
an entire web site of animated GIF files that
you want to optimize, then GIF Animator is
the solution for you. With Batch Process, you
can run every animated GIF file through the
GIF Animator optimization engine and see the
results in seconds. Smaller files mean faster
loading web sites.
More Special F/X – Added special effects
expand your creative potential while designing animations. The new effects include
Neon, Gradient, and Marquee banner text,
among others.
The Batch Process dialog box
The four work modes in GIF Animator: Compose,
Edit, Optimize and Preview.
The Optimize mode settings and the Advanced
optimization presets in GIF Animator.
* See the GIF Animator online Help for a complete
list of new features.
Page 7
7
Getting started
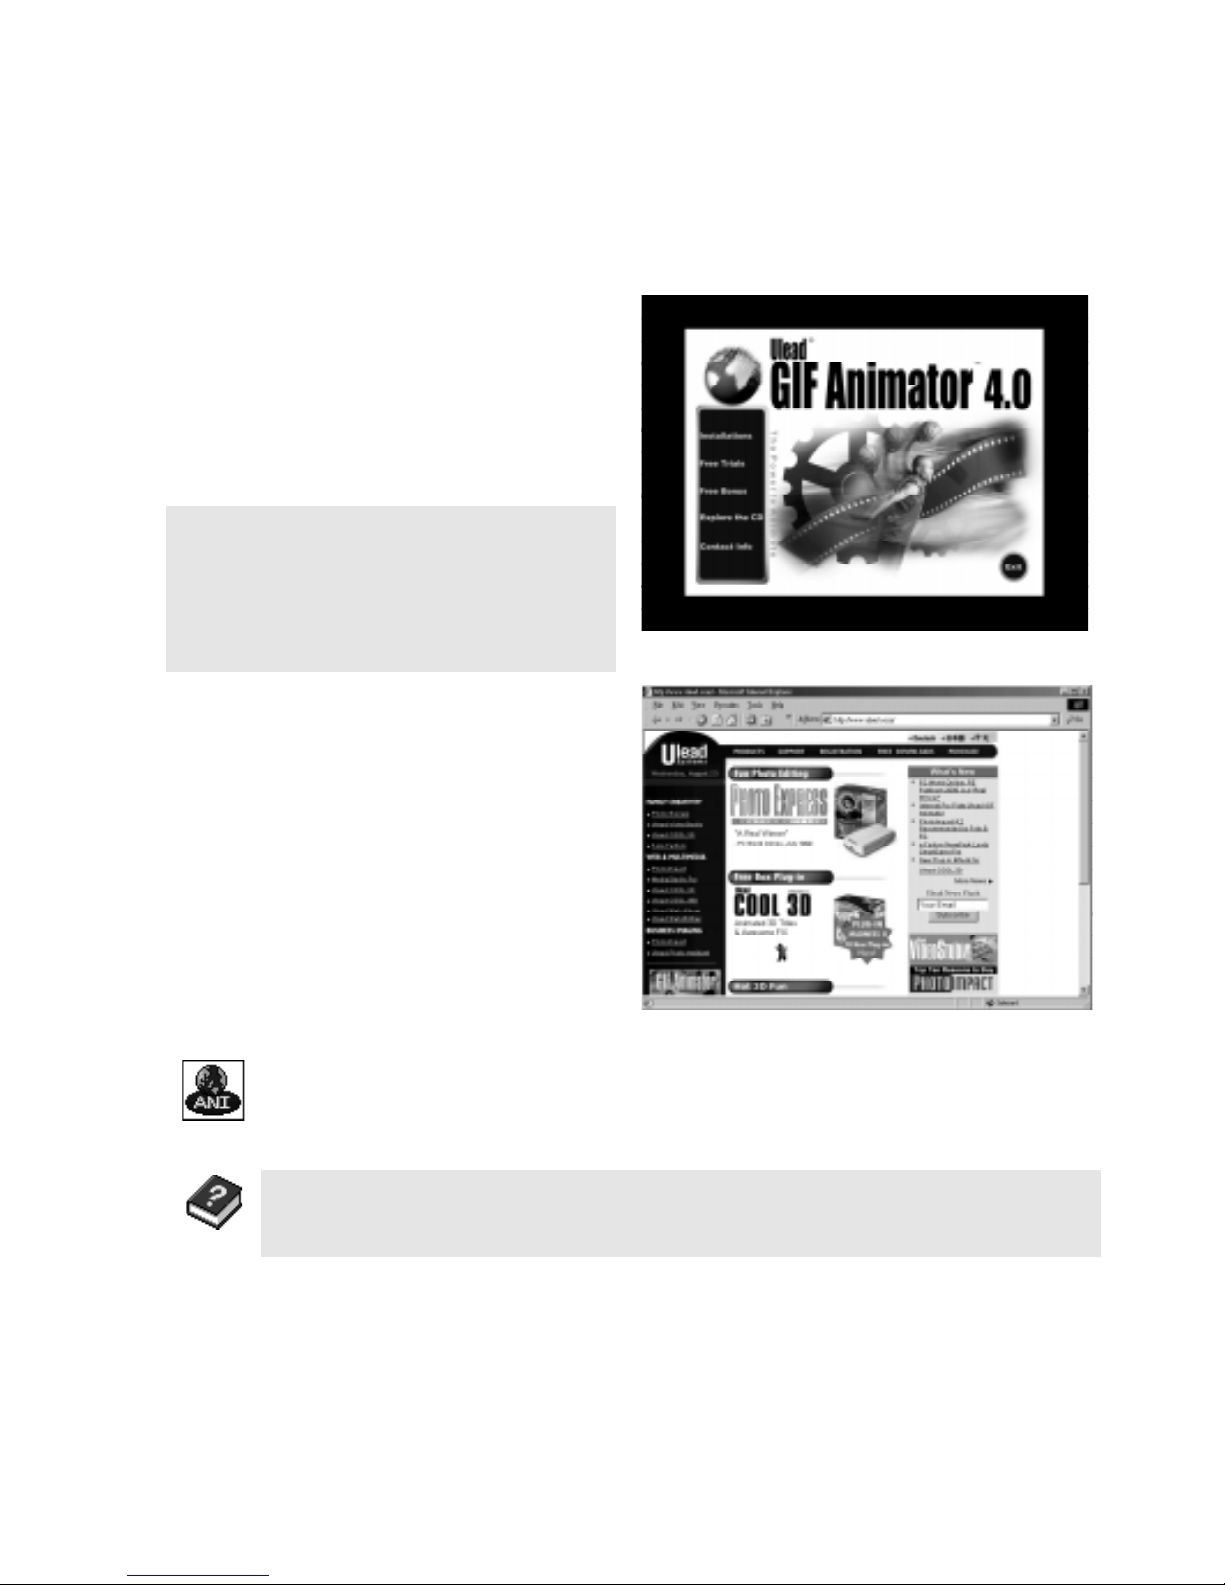
Once you’ve installed GIF Animator, take a
moment to register online. Just point your
web browser to the Ulead web site (
HTTP://
WWW.ULEAD.COM). Becoming a registered user
entitles you to product and information
updates, as well as technical support if you
encounter any problems with the GIF
Animator program.
To run the GIF Animator program:
• Click the Start Menu and then click the GIF Animator icon from the Programs:
Ulead W ebUtilities - GIF Animator subfolder .
Note: If you get stuck at any time when using GIF Animator, you can always use the online
help. Simply click the Help: Contents menu command to open it. Y ou can also visit the tutorials
on our web site to learn more tips & tricks by clicking the Help: Tutorials menu command.
To install GIF Animator:
1 Place the GIF Animator CD into your CD-
ROM drive.
2 When the setup screen appears, follow the
instructions to install GIF Animator onto
your computer.
Note:
If the setup screen doesn’t appear
automatically , click the Start button on your
Windows task bar and then click the Run
command. When the Run dialog box opens,
enter
D:\setup.exe
and click OK (
where D
is
the letter of your CD-ROM drive).
Page 8
8
GIF Animator at a glance
Everything you need to build great animations is included in GIF Animator’s single, what-yousee-is-what-you-get interface. With its drag-and-drop capabilities and the power to import files
from more than 30 different file formats, the sky’s the limit to what GIF Animator can help
you create.
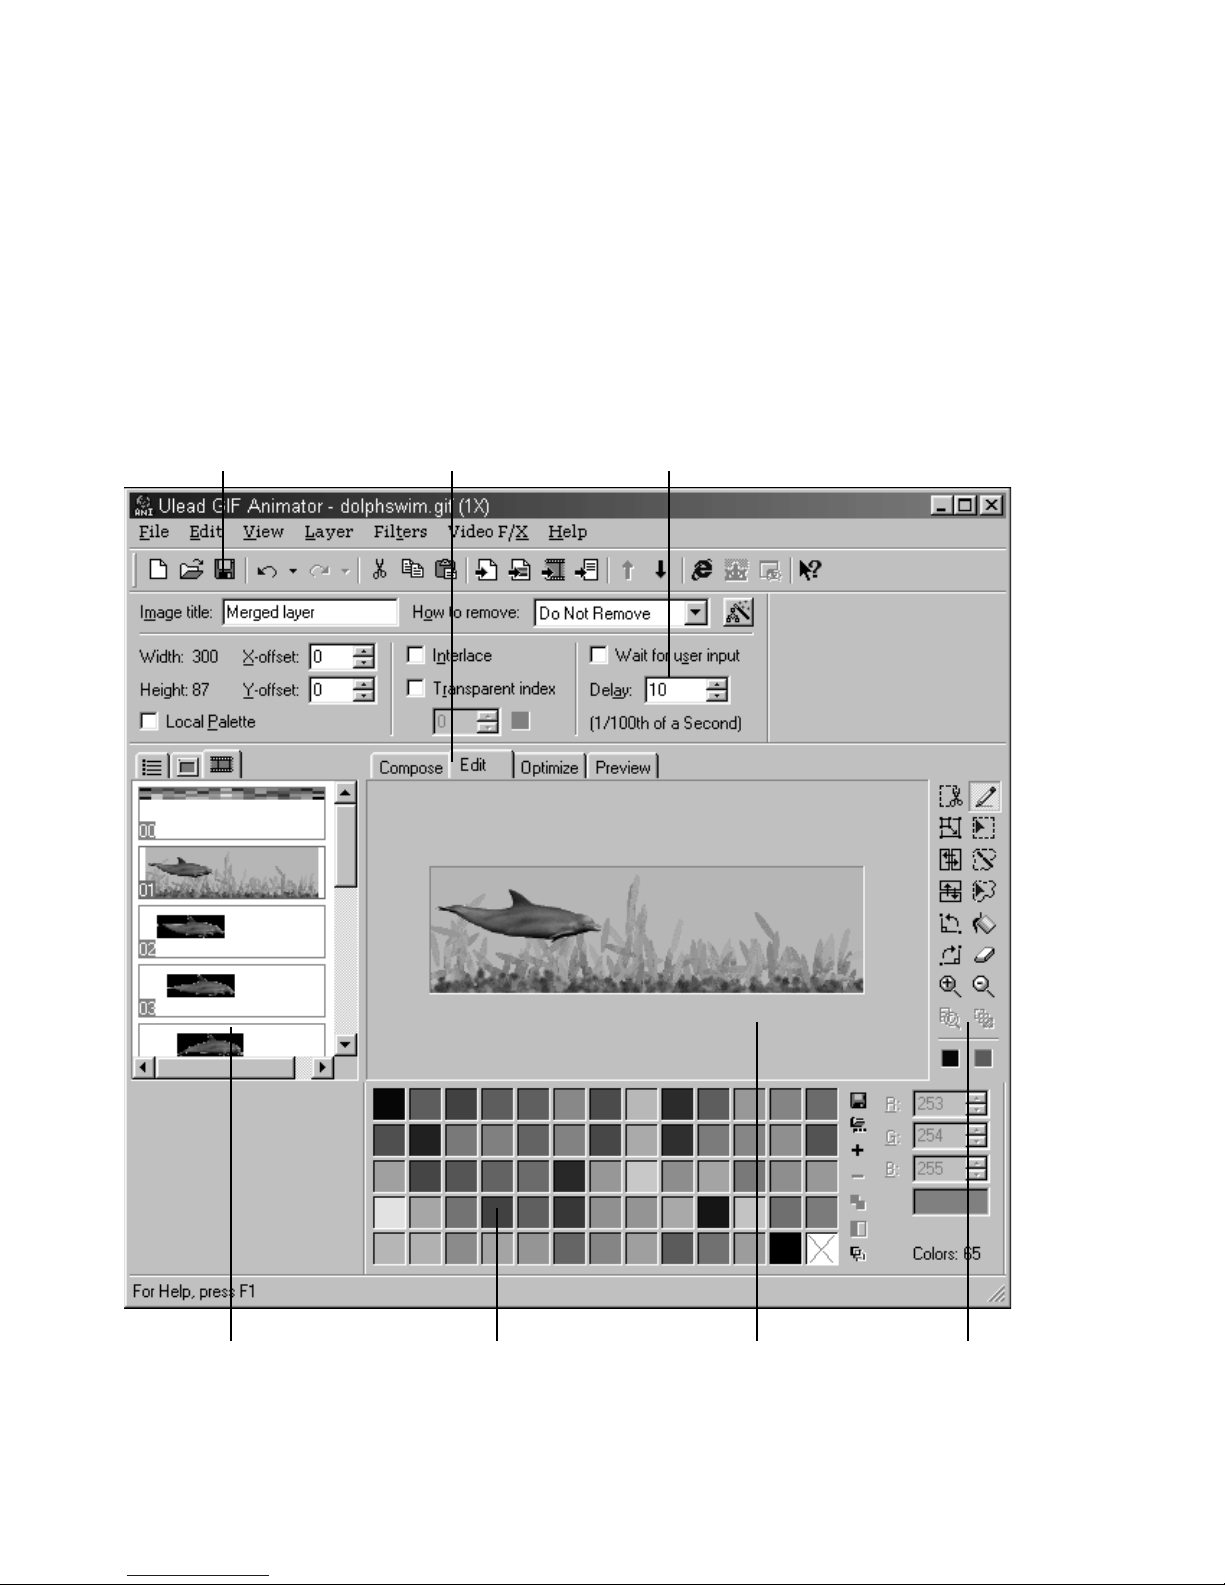
Attribute toolbarStandard toolbar
Layer pane WorkspacePalette toolbar
Mode tabs
Edit toolbar
Page 9

9
Customizing how you work
With the Preferences dialog box, GIF Animator lets you customize how you work. For
example, you can define how images are converted from high color formats down to the basic
GIF color palette of 256 colors, append a personalized comment to each animation, and set up
the number of undo levels available while working. The Preferences dialog box can be opened
by clicking the File: Preferences menu command.
Important Preferences options:
• On the General tab, create a custom color
index for the Global Palette - you can build
this palette based on the first imported
image, or use a pre-defined palette of
‘browser-safe’ colors. You can also use a
previously saved color palette file. Generally speaking, the first option (Use the
palette of the first layer image) offers
the most flexibility .
• Because all palettes, including the Global
Palette and all Local Palettes, can only
contain a maximum of 256 colors, you
should select the Automatically expand
Global Palette option on the General tab
in order to fill the Global Palette with as
many colors as possible from imported
images. This frees up space in each of the
Local Palettes for storing colors specific to
image layers, making the GIF smaller.
• On the Image Layer tab, select the Show
Preview Image dialog box option to
manually build the color palette of each
image layer as it’s imported. If you want
GIF Animator to do this automatically,
deselect this option and then set the default
Palette conversion options for each
imported image layer .
Page 10
10
Creating a new animation
Getting started with GIF Animator is a snap. All animations consist of a series of ‘stacked’
images, with each image being a single ‘frame’ in the animation. You can build frames (called
layers in GIF Animator) by inserting individual images manually or by inserting portions of
digitized videos. You can also insert the contents of an entire folder or a range of selected files.
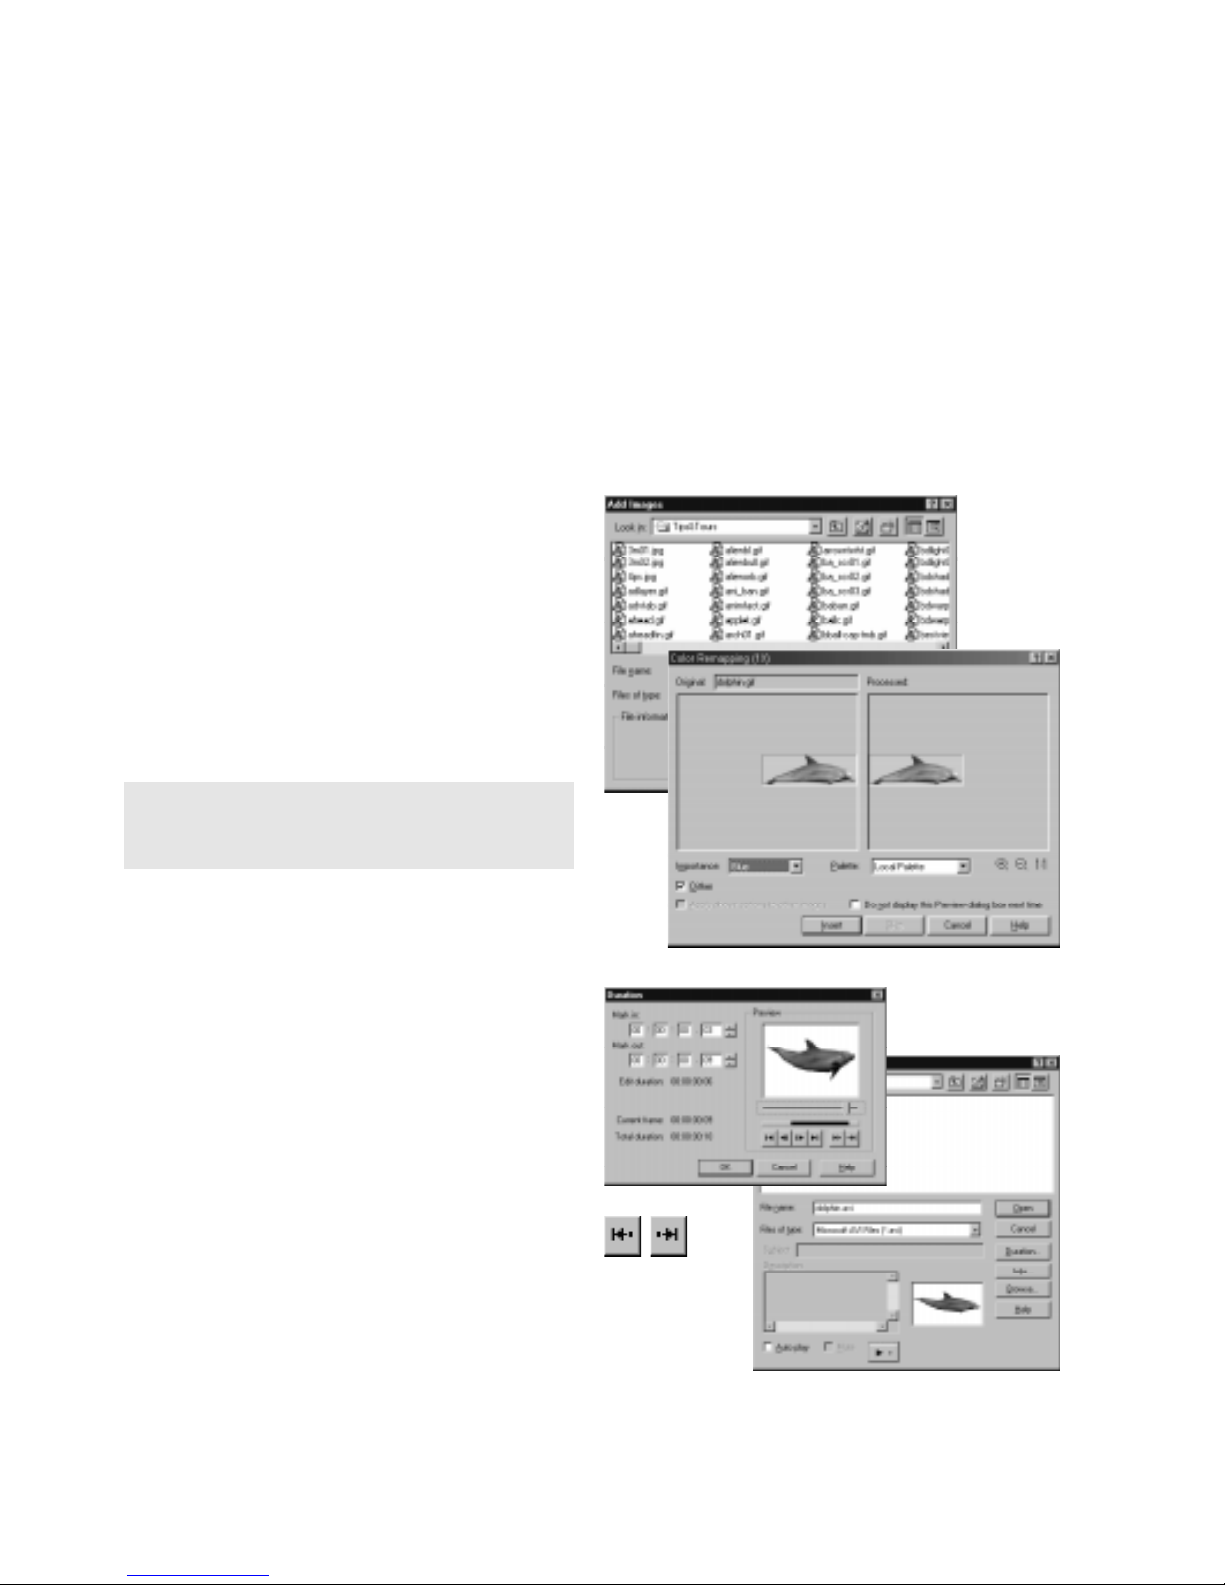
To create a new animation:
1 Click the Layer: Add Images menu
command or the Add Images button on
the Standard toolbar. The Add Images
dialog box opens.
2 Browse for the images you want to add
and select them.
3 Click OK. The images are added in
alphanumerical order to the Layer pane.
Tip: Y ou can also add images to GIF Animator
by dragging them from the Windows Explorer
and dropping them directly into the program.
To import video frames:
1 Click the Layer: Add Video menu
command or the Add Video button on the
Standard toolbar. The Add Video dialog
box opens.
2 Browse for the video file from which you
want to extract a sequence.
3 In the Add Video Dialog box, click the
Duration button and then use the Mark-
in and Mark-out buttons to select the
sequence. Click OK when you’re done to
close the dialog box.
4 Click OK to insert the sequence.
Page 11

11
Working with the Layer pane
Understanding how to work with image layers (also called frames or cels) in the Layer pane, is
the key to understanding how animations are built in GIF Animator. Once you comprehend the
basics of image layers, everything else is easy.
Image Layer Modes:
You can set the Layer Mode through the
View: Layer Pane - Mode submenu.
• List - Displays image layers as a list in the
Layer pane. Each image layer’s default
name is based on its original file name (if it
was inserted via the Clipboard, then it is
assigned a default name).
• Thumbnail - Displays each image layer as
a thumbnail image. All thumbnails are the
same size (sizes can be selected from the
V iew: Thumbnail Size- Size submenu).
• Filmstrip - Displays the layers as thumb-
nail images, each one sized in relation to
the others in the animation to show how
they correspond with one another.
To move image layers in the Layer pane:
• Select the layer you want to move and then
click either the Move up or Move down
buttons on the Standard toolbar.
Tip: Select multiple layers using either the Ctrl or
Shift keys while clicking the mouse button.
To use the context menu:
• Right-click over any layer in the Layer
pane to get the pop-up context menu of
common layer-editing commands.
Page 12

12
Editing image layers
When building animations, you’ll often find that the work you did in your image editor to
prepare the images was not quite right - perhaps the colors didn’t quite convert from high
color to 256-color as well as you had hoped and visual residue was introduced into the layers,
or maybe the frames are too large. Whatever the reason, GIF Animator provides you with
simple tools for performing basic edits directly to your image layers within the program rather
than having to open them in an outside image editor.
Duplicating image layers
A useful tool for creating moving sprites from a single, still image is Duplicate. This allows
you to import a small, sprite-like image and place it over a larger background image. Using the
Duplicate command is one method of taking a single image and moving it across a larger
background. You can also using the Layer: Moving Sprite menu command to achieve similar
results with an animation rather than a single image
To duplicate image layers:
1 Select the sprite.
2 Click the Edit: Duplicate menu com-
mand. The Duplicate dialog box opens.
3 Enter the number of Copies you want to
make of the sprite.
4 Enter the number of pixels that each
subsequent copied sprite should be moved
from the preceding one in the Horizontal
and Vertical shifting boxes.
For example, if you enter -10 in each, the
first sprite is duplicated and then positioned -10 pixels in both directions away
from the original. The second sprite is
positioned -10 pixels in both directions
away from the first copy, and so on.
5 Click OK to close the dialog box.
Tip: If the sprite is not duplicated exactly as
you had intended, simply hit the Undo button
and try it again. Experiment a little.
Page 13

13
Retouching image layers
GIF Animator comes with a small, built-in image editor that you can use while in Edit mode.
While not a full-fledged image editor, it does let you make minor corrections and adjustments
to your image layers. This is especially handy for cleaning up resampled layers and scanned
images that may have residue.
To work in Edit mode:
1 Select the layer you want to edit in the
Layer pane.
2 Click the Edit tab to switch modes.
3 Select a tool from the Edit toolbar on the
right hand side of the Workspace and
begin editing.
4 When you’re finished editing, click the
Compose tab or select another layer from
the Layer pane and continue editing.
The Tools:
• Pencil - Draws lines using the Foreground (left-click) or Background (right-click) colors.
• Selection Tools - The 3 selection tools let you make any-shape selections on an image
layer . Filters are applied across all image layers in the region delineated.
• Fill Tool – Fills an area of similarly colored pixels with either the Foreground or Back-
ground colors.
• Eraser Tool – Erases pixels and replaces them with either the Foreground or Background
colors.
• View tools - Lets you zoom-in on and zoom-out of the image, or return it to its normal
view.
• Crop - Opens the Crop dialog box, letting you pare away excess portions of the image.
• Resample - Opens the Resample dialog box, letting you resize the image.
• Flip tools - Let you re-orient the image either horizontally, vertically, left or right.
• Color boxes - Set the Foreground and Background colors respectively. Click to select a
color from either the Workspace or the Palette toolbar.
Page 14

14
Cropping and resampling images
Another common situation when building GIF animations is to discover, after working on
your image layers in an outside editor, that they are too large to display properly on a web
page. One way to remedy this is to pare away the excess space around the core animation
using the Crop tool. Another solution is to resize the entire animation (or just portions of it)
with the Resample tool. Both tools can be found on the Edit toolbar in Edit mode.
To crop image layers:
1 Click the Crop button on the Edit toolbar
while in Edit mode. The Crop dialog box
opens.
2 Select the image that you want to crop
from the Select source image menu. The
crop settings you apply here can be applied
to all image layers or just to selected
layers.
3 Use the Crop Box in the preview window
to establish which portions of the image
you want to retain (everything inside the
box). You can drag the blue handles to
resize the box and drag the center of it to
position it.
4 Click OK. The crop settings are applied.
To resample image layers:
1 Select the layers you want to resample.
2 Click the Resample button on the Edit
toolbar in Edit mode. The Resample dialog
box opens.
3 Enter the new Width and Height. If you
want the resampled image layers to retain
their relative dimensions, select the Keep
aspect ratio option.
4 Click OK . The image layers are resampled.
Page 15

15
Merging image layers
There are two ways to merge images in GIF Animator. Simple cross-layer merging allows you
to combine one image layer with another, creating a new image layer that is a hybrid of the
two. Background merging allows you to select multiple layers and then merge each one with a
common background layer.
To merge images:
1 Click the Layer: Merge Images menu
command. The Merge Images dialog box
opens.
2 Select the images you want to merge
together. Images are merged so that the
higher-numbered layers apear in front of
(on top of) the lower numbered layers.
3 Select the Replace original layers option
to remove the selected layers and replace
them with the new merged layer.
4 Click OK to apply the merge settings.
To merge image layers to a background:
1 Click the Layer: Background Merge
menu command. The Background Merge
dialog box opens.
2 Select the background to which you want
to merge the other image layers from the
Background menu.
3 Select the layers to be individually merged
with the chosen background layer.
4 Click OK to apply the merge settings.
Page 16

16
Other editing tools
GIF Animator comes with other tools to help you edit image layers, offering you a complete
and convenient toolkit to use for your projects.
Aligning images:
T o change an image’s physical alignment,
you can use GIF Animator’s built-in transform tools.
1 Select the image layer(s) you want to re-
align.
2 In the Edit mode, click one of the Flip
buttons on the Edit toolbar.
3 The effect is applied to the selected image
layer(s).
Rebuilding ‘broken’ image layers:
Sometimes, after optimizing and then saving
an image, you’ll want to return and edit it
again - but once it’s been optimized, the
frames are ‘broken’. The solution to this is
the Frame Regeneration function.
1 Select the image layer(s) you want to
regenerate.
2 Click the Edit: Regenenerate Frames
menu command. The frames are automatically rebuilt and can be edited.
Note: In some cases, selected frames may not
regenerate properly due to massive disparity
between them and their preceding frames.
¦
Page 17

17
Working with layer attributes
Each image layer has its own set of ‘controls’ that dictate how that image layer is displayed;
you can decide whether or not it has a Local Palette, define its general position, and select
which color is the transparent color. All the attributes assigned to an image layer, however,
work in conjunction with the other layers, and together they create the properties of the
animation as a whole. Image layers can be selected in the Layer pane, located to the left of the
Workspace.
Global information layer
In addition to the image layers that constitute the animation, there is one layer that contains the
universal properties of the animation as a whole, the Global information layer. Here you can
work with the Global Palette (the color palette from which all image layers can draw color
information), define whether the animation is played non-stop or a set number of times, and
set the dimensions of the Logical Screen. The Logical Screen contains the dimensions of the
entire animation as a whole. It is usually determined automatically by GIF Animator as layers
are inserted and moved around.
To manually adjust the Logical Screen:
1 Select the Global information layer in the
Layer pane. The Attribute toolbar
changes to display the layer’s properties.
2 Deselect the Automatic option under
Logical Screen on the Attribute toolbar.
3 Enter in a new Width and Height. The
Logical Screen (in the Workspace)
changes accordingly.
Note: The Logical Screen cannot be smaller than
the largest image layer in the animation.
To have the animation play endlessly:
1 Select the Global information layer in the
Layer Pane.
2 On the Attribute toolbar, under Looping,
select the Infinite option.
Page 18

18
Positioning images in the Workspace
Each image layer contains its own set of attributes that pertain only to that layer, even though
the attributes may be the same for every layer. One of the more important attributes is the
ability to position image layers anywhere within the Logical Screen.
To position image layers:
1 Select the layer you want to position from
the Layer pane list.
2 On the Attribute toolbar, enter in the X-
and Y- coordinates for the image (the
coordinate position 0,0 is the top left
corner of the Logical screen).
OR
In the Workspace, click the layer and
drag it to its new position. If you drag it
outside the boundaries of the Logical
Screen, the Logical Screen’s dimensions
are updated accordingly.
Note: Because the coordinates for the Logical
Screen always originate at 0,0 you cannot
enter negative values for an image layer’s
position.
To view other layers as you work:
• In the Layer pane, check the layers that
you want to be visible while you work. By
default, when you’re dragging an image
layer around inside the Workspace, you
can’t see the layers that are under it. By
checking them, you make them visible.
Page 19

19
To set an image layer’s transparency:
1 Select the layer to which you want to
apply transparency.
2 On the Attribute toolbar, select the Trans-
parent index option.
3 If you know the indexed color value for
the color in the image you want to make
transparent, enter it in the Transparent
index box.
Otherwise, click the Edit tab to switch to
that mode.
4 On the Attribute toolbar, click the Color
box under the Transparent index setting.
Your mouse cursor becomes a color
picker.
5 Select the color you want to make trans-
parent from either the image layer itself
(this only works in Edit mode), or from
the Palette toolbar .
Note: Y ou can make multiple layers transparent
simultaneously by selecting them all and then
clicking the Transparent index option. Selecting a
different color for each one, however , must still
be done manually .
Setting an image layer’ s transparency
One of the special features about the GIF file format is the transparency attribute, which
allows you to select a specific color and then make it effectively invisible to all dedicated GIF
viewing software, including web browsers. This lets you create custom shapes that don’t
conflict with the content of your web pages. For example, if you have an image of a basketball
on a black background, and you want your web page to show through the background, you
would make the black color transparent.
Page 20

20
Removing image layers
In the course of the animation, each image layer must be ‘removed’ from the screen once it
has been displayed. The removal method affects the overall appearance of the animation some web browsers, however, don’t support all the removal methods available. You can set an
image layer’s removal method on the Attribute toolbar in the How to remove option. The four
removal methods are described below:
• Web Browser Decides - The image layer
is removed using the browser’s default
method. This method is not recommended
because you will probably get different
effects with different browsers.
• Do Not Remove - The image layer is not
cleared from the screen and all subsequent
image layers are stacked on top of it.
• To Background Color - The image is
removed and replaced with the background color. This can cause flashing if
used improperly.
• To Previous State - The image layer
disappears in the same manner it appeared. This is generally the best removal
method, but unfortunately, only Microsoft
Internet Explorer supports this at this
time.
Note: In order to make GIF Animations that are
completely cross-browser compatible, make all
your image layers full size and then use ‘Do not
remove’. When you run the Optimization Wizard,
GIF Animator removes all the redundant pixels
between images. With the
Do not remove
option
set for each layer, just enough overlap is
retained during optimization that image layers
mask out the differences from previous layers
as they are stacked during the animation.
Page 21

21
Other image layer attributes
The final three image layer attributes are Delay, Wait for user input, and Interlace. Like all
the image layer attributes, their presence is required by the file format (GIF89a), but only one
has any visible effect on an animation as it plays in a web browser. They are described below:
• Delay - Of the three image layer attributes,
this is the perhaps the most useful. The
delay time measures the time that the
image remains on screen before being
removed and replaced by subsequent
images. The delay time is measured in
hundredths of a second.
• Wait for user input - This option is
currently not supported in the major
browsers, but it is implemented in dedicated GIF viewers. Setting this option on
an image layer forces the layer to pause the
animation until the user either clicks the
mouse button or presses a key on the
keyboard.
• Interlace - Interlacing breaks an image
into two separate fields, allowing one field
to download first while waiting for the
other. This gives users an immediate
preview of the image rather than having to
wait for the entire picture to finish downloading. Static GIF images (i.e., those with
single image layers) support this, but in an
animated GIF this feature doesn’t work on
any image layer except the first. If you
import any GIF images with their interlacing enabled, be sure to deselect the option
inside GIF Animator so that web browsers
won’t encounter any problems with them.
Page 22

22
Using Plug-in Filters
GIF Animator lets you apply wild plug-in effects directly to the image layers in your animation
rather than having to open each layer in an outside editor to apply effects there. You can apply
the effect to a single layer or to a range of selected layers. Any Adobe Photoshop 32-bit
compliant plug-in can be used in GIF Animator.
Loading plug-ins into GIF Animator:
1 Click the File: Preferences menu
command to open the Preferences dialog
box.
2 Click the Plug-ins tab to bring it to the
foreground.
3 Click a Browse button next to one of the
empty slots. When the Browse dialog box
opens, locate the folder that contains the
plug-ins you want to use.
4 Click OK and restart GIF Animator. The
plug-ins are added to the Filters menu.
To apply plug-in filters:
1 Select the layer(s) to which you want to
apply the plug-in filter.
2 Click the Filter: Filter Name menu
command. The filter’s dialog box opens.
3 Adjust the filter’s settings until you get the
desired effect.
4 Click OK to apply the filter to the selected
layer(s). If you created a selection area in
the Edit mode, the filter is applied only to
that selection, across all layers.
Note: Some plug-ins use ‘foreground’ and
‘background’ colors when applying the effect.
In GIF Animator, the background color used is
the color of the Logical Screen, while the
foreground color is white.
Page 23

23
Using Video F/X
Video F/X is a collection of special filters for GIF Animator. Borrowed from Ulead’s awardwinning digital video software, MediaStudio Pro and V ideoStudio, they are professional level
video transitions and filter effects. Each filter automatically creates a string of new image
layers once it’s engaged, so it’s usually best to have only one or two image layers at most in
your animation when using them. Otherwise, the additional layers generated by the Video F/X
may make your animation too large and unwieldy.
To apply a video effect:
1 Select the layer you want to use as the
template image in the transition.
2 Click the Video F/X: Transition or Filter
Name menu command (transition effects
occupy the top-half of the menu, filters are
on the bottom-half). A dialog box opens
for that filter.
3 Enter the number of Frames over which
you want the effect to occur (these are the
image layers that will be added to your
animation).
4 Enter the Delay time for the transition
itself. (The delay time for the image layers
themselves is decided by a combination of
this and the total number of frames
specified in step 3).
5 Set up the custom options for the effect,
then click OK. The new image layers are
added to the animation.
Page 24

24
Saving GIF images
There are a number of ways to save your work. The first step, obviously, is to save it as an
animated GIF file. However, GIF Animator offers you other output methods to meet your
specific needs. You can save the image layers of an animation individually, export the animation as a stand-alone executable file, or even output it as a digital movie file.
To save an animation:
1 Click the File: Save or Save As menu
command. The Save dialog box opens.
2 Locate the folder to which you want to
save the file, then enter the animation’ s
file name.
3 Click Save.
To save an optimized animation:
1 Click the File: Optimization Wizard
menu command. The Optimization Wizard
opens.
2 Follow the steps outlined by the Optimiza-
tion Wizard.
3 Click Finish. The animation file is opti-
mized. Click the Preview button to check
out your animation. If you are satisfied
with the color reduction and the quality of
the animation, click the Save As button.
Tip: Use the Optimize mode to create optimization presets so that in the future you can save
your animations quickly and with little hassle.
The Optimize mode is a slightly more advanced
version of the Optimization Wizard built directly
into the main program window.
Page 25

25
Exporting image layers
Sometimes you may want to open the image layers in your animations outside GIF Animator in
order to edit them - the Export function lets you do that quickly and easily. You can also
export your work as a stand-alone packaged animation. This file can be conveniently played in
any Windows environment outside of your web browsers, making it ideal for sending animated
greetings, birthday wishes, and fun messages to friends and family.
To export image layers:
1 Click the File: Export - Image Layers
menu command. The Export dialog box
opens.
2 Select the layer(s) you want to export
from the Images list.
3 Click the As a single file option to output
the selected image layers as a new GIF
animation, or select the As a sequence of
files to export each image layer as its own
individual file.
4 Click OK. A Save dialog box opens. Enter
the base name of the image sequence (all
images will have this name plus a sequence
number) and their location.
5 Click Save.
To export HTML:
1 Click the File: Export - As HTML Code
menu command.
2 The save dialog box opens. Enter the name
of the HTML file.
3 Click OK.
Page 26

26
To export as a Packaged Animation:
1 Click the File: Export - As Animated
Package menu command. The Animation
Packager dialog box opens.
2 Select a Message box style from the list
of those provided (or select the None
option to forego this). This creates a
virtual notepad or greeting card in which
to play your message and animation.
Tip: You can customize the message files used
in the Animation Packager by opening them up
in a vector-imaging program, such as
CorelDraw or Adobe Illustrator, and then
modifying them. Similarly, you can create your
own files from scratch and then save them to
the ‘Msgfiles’ folder in the GIF Animator 4.0
directory .
3 Select a Sound file to play along with
your animation. Click the Browse button
next to the entry line and locate it on your
computer. The Animation Packager
supports both Midi and Wav files.
4 In the Generate executable file line,
enter the name and location to which you
want to save the new packaged animation.
5 Select a Start frame position - this is the
position on the viewer’s Windows desktop
where the animation begins.
6 Select an End frame position - this is the
position on the viewer’s Windows desktop
where the animation terminates.
7 Enter a message and select the font.
8 Click OK .
¦
Page 27

27
To export as a video file:
1 Click the File: Export - As Video File menu
command. The Save V ideo File dialog box
opens.
2 Enter a filename for the new video and the
location to which you want to save it.
3 Select the type of video file you want to
create. The choices here are dependent on
the digital video codecs you have installed
on your system. In most Windows
environments you should at least have the
Microsoft AVI option. The compression
settings you’ll choose later are also
dependent on the codec you select here.
4 Enter a subject and description for the file
(this information will only be available to
you when working with the file in select
video editors).
5 Click Options. The V ideo Save Options
dialog box opens.
6 Set the video options - you can adjust the
video’s size to be larger or smaller than
the original animation, set the frame rate
(to control how smooth the animation
plays), set the target playback speed (to
optimize the files for playing on specific
types of computers), and customize the
compression options of the video file
itself. Click OK when you’re finished.
7 Click Save.
Page 28

28
Appendix I: About GIF animation
GIF is an acronym for Graphics Interchange Format, an image file format created by
CompuServe for conveniently storing and displaying image libraries online. Because of its
completely ‘lossless’ compression and relatively small file size, the GIF file format has become
one of the most widely used image file formats on the Internet today. GIF has undergone two
major revisions since its inception in 1987, the most recent being the GIF89a specification.
GIF uses the Lempel-Ziv-Welch (LZW) compression method to store and reduce single or
multiple images within the file by up to 40% of their original size. These images can contain up
to 256 colors, and they do lose any of their original quality when being compressed down to
more web-friendly sizes as long as they originally contained 256 colors or less. Even though
GIF is a lossless format, images that are imported from other file formats and converted to
GIF may lose some of their quality in the transition from True Color to 256-color. This is
often the case when working with outside image editors to create the individual frames of the
animation. GIF files also possess transparency attributes so that one color in the image is not
displayed. This allows users to create clear backdrops for their images, letting the background
colors of a web page show through. The file format also supports image interlacing, allowing
users to watch the image “fade-in” as it downloads, although for multiple image GIFs (animations), interlacing is disabled beyond the first image layer.
If multiple images are stored within a GIF file, they can be viewed sequentially, much like a
slide show or an animated movie. The way they appear is defined by control extensions built
into the file. With an appropriate tool, such as Ulead GIF Animator, you can set these controls
yourself and bring your web site to life with exciting cartoons, banner ads, glowing bullets,
and other animations.
Page 29

29
Appendix II: GIF color palettes
Every GIF image file contains an index table that defines the number of colors within an image
and exactly which colors each index represents. Every color in the 256-color ‘spectrum’ has
its own unique identification, which is stored in the image’s color index (the color palette). In
GIF files, every color in the index requires 3 or 4 bytes of data to define it (depending on how
it was originally stored). Therefore, an image with a 256-color palette could have a color index
of up to 1024 bytes in size.
There are two kinds of palettes for animated GIFs: a Global Palette, which defines the colors
all images in the animation use by default; and a Local Palette, which is unique to each image
in the file. When an image is inserted into a GIF animation, you can select to use either its
Local Palette or the Global Palette. When building the Global Palette, there are two ways to add
colors to it from a newly inserted image: the Safe Palette, which matches an image’s original
palette with colors found in a predefined ‘web-safe’ palette of 216 specific colors, then adds
them to the Global Palette; and the Optimized Palette, which adds only the most predominant
colors from an image’s color palette to the existing Global Palette.
When you are ready to insert image layers into your animation file, you should decide how you
want to manage your color palettes. If every image contains virtually identical colors, then
there is no reason to fatten your animation file with redundant information by including a Local
Palette in each layer. When you insert the first image into your empty animation file, GIF
Animator prompts you to choose how you want to build your Global Palette. If you choose
Original Palette, then the Global Palette will be based upon the original palette of that image.
After that, Color Remapping prompts you to add a palette each time you insert another image.
This dialog box gives you the choice of either adapting the new image to the Global Palette, or
keeping its own color palette. If the image contains the same colors as the original, then
choose the Global Palette to save space. However, if it has colors not found in the Global
Palette, you can add them to it by choosing Safe or Optimized palette, or choose to retain the
image’s own color palette as a specialized Local Palette instead.
It’s not always recommended that you use the Global Palette. Reducing the animation’s file
size is not as important as maintaining the quality of your work, but it should be a serious
consideration. The best time to use a Local Palette instead of a Global Palette is when the
image being inserted is drastically different from the original image.
Page 30

30
Appendix III: Creating compact animations
There are three ways you can significantly reduce the size of your animated GIF files: reduce
the color palettes, reduce the number of image layers, and optimize the individual image layers.
There are pros and cons to using the first two methods, and they should be implemented
judiciously. Keep in mind that the goal of creating animated GIF files is NOT to make them as
compact as possible - creating compelling animations for the web is. However, until data
transmission speeds increase and everyone on the net has faster access, file size should still be
a significant consideration when composing your animation.
The best way to reduce color palettes is to use the Global Palette as often as possible for
displaying the colors of individual layers. If one or more layers have slightly different colors
included in their palettes, set your General Preferences to accumulate new colors. This way
you needn’t create a Local Palette for a layer that varies only by a few colors from the rest. If
a layer has radically different colors from the others in the animation, your best bet is to give it
a Local Palette and then reduce it by removing the colors that it shares with the Global Palette.
Otherwise, the image may not display properly. The best reduced palettes are 16-, 32-, 64-,
and 128-color palettes.
The second method of reducing the file size of your animation is to delete any unnecessary
layers. In some cases, this may not be desirable due to the adverse affects it may have on the
quality of your animation. But if you can get away with cutting out a few layers here and there
then you should do it.
Ulead GIF Animator allows you to greatly reduce the file sizes of the individual layers through
a third method: optimization. When you select the File: Optimization Wizard command, GIF
Animator analyzes the image layers in your animation, compares them with one another, and
then removes all the redundant pixels that the layers share with one another. In some cases,
this method can reduce your overall file size by as much as 200%.
Finally, you should consider image layer sizes. If the motion of the animation occurs within a
smaller field than the size of the “backdrop”, then you shouldn’t necessarily use image layers
that are the same size as your background. With GIF animations, you can easily overlap much
smaller GIFs to create small areas of animation set against a static backdrop. This will reduce
your file size considerably, but again, do this only if the quality of your animation doesn’t
suffer as a result.
Page 31

31
Appendix IV : Glossary
Aspect ratio
Keeps the basic intrinsic shape of the image
layers as they are resized.
Broken frame
Any image layer that has been previously
optimized and is subsequently missing pixels.
Browser-Safe
Any color palette that contains the 216
predefined colors used by all web browsers.
Guarenteed to always display within those
browsers.
Comment layer
The third, optional layer type that allows you
to put comments in your animation.
Delay
The duration that the image layer is displayed
before being removed and replaced by
another.
Global Palette
The GIF file’ s main palette of 256 indexed
colors that all image layers can reference.
Image layer
A single image within the GIF animation.
Each image layer contains controls for delay,
transparency, and interlacing, among others.
Local Palette
An image layer’s individual color palette of
up to 256 indexed colors. Image layers need
not have a local palette.
Logical Screen
The dimensions of the animation as a whole.
Looping
The number of times that an animation plays.
Can be set to a finite number or for infinite
looping.
Optimization
Th process of making an animation as small
as possible for the fastest download time on
the web. Designed to preserve an animation’s
quality .
Optimized Palette
A palette built from the most commonly
occuring colors in an image layer. Optimized
for that particular layer.
Palettes
The colors contained within an animation
(Global) or an image layer (Local).
Removal method
The technique used to ‘wipe’ an image layer
from the screen before replacing it with a new
layer.
Sprite
Any image layer that is smaller than a central
background image and designed to be animated over it.
Safe Palette
Any palette with the standard 216 browsersafe colors.
Page 32

32
Ulead® WebUtilities FX Razor
™
Ulead Systems is pleased to announce the availability of FX Razor, a web development suite
for Windows 95/98 and NT. FX Razor puts the power of high-end imaging right at every web
designer's finger tips.
FX Razor is the essential digital artist's special effects toolkit. It comes with 10 powerful 32bit Adobe Photoshop plug-ins designed for graphic artists who want to turbo-charge their
favorite image editing tool with hot special effects plug-ins and make it instantly web-ready
with cool web plug-ins.
• Ulead Web.Plugins 2.0 — A comprehensive suite of 6 effects plug-ins designed to make
your image editor web-ready. Included in Web.Plugins are: Button Designer, Background
Designer, Shadow Designer and more.
• Ulead Type.Plugin 1.0 — Make your text and images blaze with fire, shimmer with ice,
glow with neon brightness, sparkle like glass, and more.
• Ulead Particle.Plugin 1.0 — Eight natural particle effects for images and selections --
Smoke, Fire, Bubbles, Clouds, Rain, and more.
• Ulead ArtTexture.Plugin 1.0 — Explore the possibilities of digital tie-dye by creating multi-
color patterns swirl, and backgrounds.
• Ulead FantasyWarp.Plugin 1.0 — Take any image or selection and warp, distort, and twist
it into surreal patterns.
For more information on features, or to download a full working 15-day trial version, visit the
Ulead WebUtilities web site. While there, be sure to look at our other award winning software
programs: WebRazor Pro, Button.Applet, SmartSaver Pro and more.
Ulead FX Razor sells for $89, and is available now for online purchase (electronic download
only) from: http://www.webutilities.com
www.ulead.com
 Loading...