

Ubiquiti B-DB-AC-US Quick Start Guide

Dual-Band airMAX® ac Radio with
Dedicated Wi-Fi Management
Model: B-DB-AC

Introduction
Thank you for purchasing the Ubiquiti Networks® Bullet
AC. This Quick Start Guide is designed to guide you through
installation and also includes warranty terms.
™
Package Contents
Dual-Band airMAX® ac Radio with
Dedicated Wi-Fi Management
Bullet AC Compression
Seal
Model: B-DB-AC
Quick Start Guide
Installation Requirements
• Shielded Category 5 (or above) cabling with drain wire
should be used for all outdoor wired Ethernet connections
and should be grounded through the AC ground of the PoE.
We recommend that you protect your networks from
harmful outdoor environments and destructive ESD events
with industrial‑grade, shielded Ethernet cable from Ubiquiti
Networks. For more details, visit
www.ubnt.com/toughcable
• Surge protection should be used for all outdoor installations.
We recommend that you use two Ethernet Surge Protectors,
model ETH‑SP, one near the B‑DB‑AC and the other at the
entry point to the building. The ETH‑SP will absorb power
surges and safely discharge them into the ground.
To Antenna
ETH-SP
TERMS OF USE: Ubiquiti radio devices must be professionally
installed. Shielded Ethernet cable and earth grounding must
be used as conditions of product warranty. TOUGHCable™
is designed for outdoor installations. It is the professional
installer’s responsibility to follow local country regulations,
including operation within legal frequency channels, output
power, and Dynamic Frequency Selection (DFS) requirements.
ES-8-150W
B-DB-AC
ETH-SP
To LAN

Hardware Overview
N-Type
Connector
Ethernet
Port
LEDs
Cable Gland
Body
Compression
Seal

Hardware Installation
1. Unscrew the Cable Gland Body and detach it from
the Bullet.
2. Feed the Ethernet cable through the Cable
Gland Body.
3. Slip the Compression Seal around the cable.
4. Seat the CompressionSeal into the
CableGlandBody.
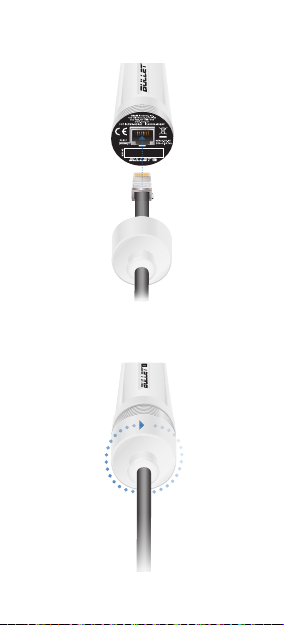
5. Connect the Ethernet cable to the port located on
the bottom of the Bullet.
6. Securely attach the Cable Gland Body onto the
Bullet. Ensure the Compression Seal is securely
compressed and tightly sealed around the cable.
RESET
M/N: BM5HP
24V 1A PoE

7. Connect the Bullet to the N‑Type connector of
the antenna.
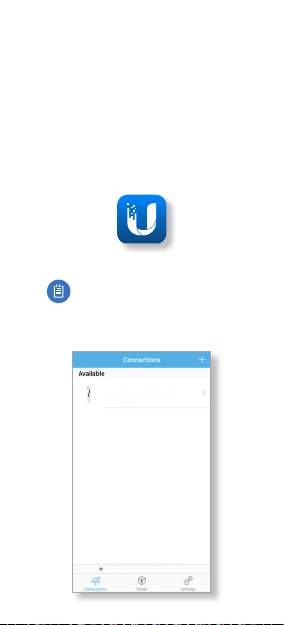
Accessing airOS via Wi‑Fi
Verify connectivity in the airOS Configuration
Interface. There are two methods, the UNMS™ App
and Web Portal. Both are available for 15minutes
immediately after you power on the device. If
necessary, you can power cycle the Bullet AC to
re‑enable its Wi‑Fi.
Proceed to the appropriate instructions:
UNMS App
1. Download the UNMS app from the AppStore
(iOS) or Google Play™ (Android).
2. Connect your device’s Wi‑Fi to the Bullet AC SSID
named: B-DB-AC:<MAC Address>
Note: Ensure that DHCP is enabled
on your Wi‑Fiadapter.
3. Launch the app.
4. Tap the Bullet AC on the Connections screen.
Bullet AC
192.168.172.1
:F08FC2552017
BDBAC

5. Tap Connect on the Login screen.
192.168.172.1
BDBAC:F09FC25EXXXX
6. Select your Country and tap Done.
United Kingdom
Argentina
Armenia
Aruba
Australia
Austria
Azerbaijan
Bahrain
Barbados
Belarus
Note:
For the Country setting, U.S. product
versions are restricted to a choice of Canada,
Puerto Rico, or the U.S. to ensure compliance
with FCC/IC regulations.
Bullet AC
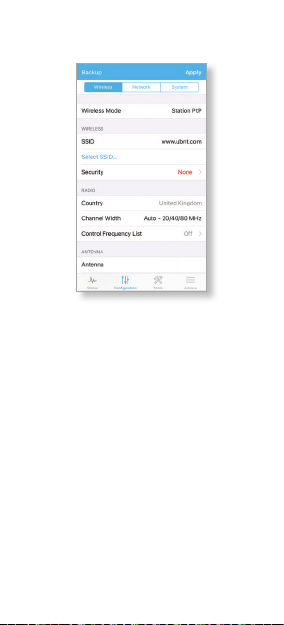
7. Under Configuration, customize your settings
as needed.
Bullet AC
(Not Applicable)
 Loading...