

Page 1

ADEMD4B Series Net DVR
User Manual
Model: ADEMD4B000TV
ADEMD4B000TVS
V.1.0
Page 2

Digital Video Recorder User Manual
Index
Chapter1 Product Introduction..................................................................................... 7
1.1 Summary.......................................................................................................................7
1.2 Features.........................................................................................................................7
Chapter2 Installation ................................................................................................. 10
2.1 Check DVR and It’s Accessories................................................................................10
2.2 HDD Installation.........................................................................................................10
2.3 DVR Rear Panel..........................................................................................................12
2.4 External Alarm In/Out Connection .............................................................................13
Chapter3 Operational Instructions............................................................................. 14
3.1 DVR Front Panel.........................................................................................................14
3.2 Remote Controller.......................................................................................................16
3.3 OSD Menu Description...............................................................................................18
3.3.1 Main Menu Items ..........................................................................................18
3.3.2 Menu Operation ............................................................................................ 19
3.4 Character Input............................................................................................................21
Chapter4 Basic Operation Guide............................................................................... 22
4.1 Power on .....................................................................................................................22
4.2 Live Preview ...............................................................................................................22
4.3 Login...........................................................................................................................24
4.4 PTZ Control ................................................................................................................24
4.5 Manual Record............................................................................................................26
4.6 Playback......................................................................................................................27
4.7 Backup Recorded Files ...............................................................................................30
4.8 Turn off DVR..............................................................................................................31
4.9 Video spot output........................................................................................................32
Chapter5 Advanced Operation Guide ....................................................................... 33
5.1 User Management.......................................................................................................34
5.1.1 Add User ........................................................................................................35
5.1.2 Delete User....................................................................................................36
5.1.3 Password Modification .................................................................................37
5.1.4 User Rights ....................................................................................................38
5.2 Device ID....................................................................................................................40
5.3 Video Format and VGA Resolution............................................................................40
5.4 Date and Time Setup...................................................................................................41
5.4.1 Date and Time Setting .................................................................................41
5.4.2 Date and Time Display Mode......................................................................42
5.4.3 Daylight Saving Time Setup........................................................................43
5.5 Camera Setting............................................................................................................43
5.5.1 Camera Title ..................................................................................................43
5.5.2 Video Parameters Setup .............................................................................45
5.6 Mask Area Setup .........................................................................................................45
5.7 View Tampering Alarm...............................................................................................47
5.7.1 Enable Tamper Alarm...................................................................................47
2
Page 3

Digital Video Recorder User Manual
5.7.2 Select tampering area..................................................................................48
5.7.3 Alarm handling ..............................................................................................48
5.7.4 Temple Alarm schedule................................................................................49
5.8 Video Loss Alarm........................................................................................................50
5.9 Motion Detection Alarm .............................................................................................52
5.10 Live View Setup.........................................................................................................55
5.11 Recording Setup.........................................................................................................56
5.12 Alarm I/O Setup..............................................................................................................60
5.13 Network Setup.................................................................................................................63
5.13.1 Network Basic Settings................................................................................64
5.13.2 Network Advanced Settings ........................................................................65
5.13.3 DHCP Function .............................................................................................65
5.13.4 PPPoE Function ...........................................................................................66
5.13.5 IP Server Solution for DHCP.......................................................................66
5.14 PTZ Setup ..................................................................................................................67
5.14.1 Typical PTZ Connection ..............................................................................67
5.14.2 PTZ Settings..................................................................................................68
5.14.3 PTZ Control ...................................................................................................70
5.14.4 Preset Setup..................................................................................................70
5.14.5 Sequence Setup ...........................................................................................71
5.14.6 Pattern Setup ...............................................................................................73
5.15 Exceptions Setup........................................................................................................74
Chapter6 Utilities ....................................................................................................... 75
6.1 Restore Parameters......................................................................................................75
6.2 Hard Disk Management ..............................................................................................77
6.3 Clear Alarm Out ..........................................................................................................77
6.4 Reboot.........................................................................................................................77
6.5 Power Off....................................................................................................................77
6.6 View Log.....................................................................................................................78
6.7 System Information.....................................................................................................78
Chapter7 Firmware Upgrade ..................................................................................... 79
7.1 Upgrade from USB Flash............................................................................................79
7.2 Upgrade from FTP Server...........................................................................................79
7.2.1 FTP Server Setup.........................................................................................79
7.2.2 Use DVR FTP Upgrade Function...............................................................81
7.3 Use Client Software to Upgrade..................................................................................83
1 RS485 Connection ..........................................................................................................85
2 UTP Network Connection...............................................................................................85
3
Page 4

Digital Video Recorder User Manual
Safety Precaution
Caution:
To reduce the risk of electric shock, do not remove cover, unless you are ready to install
hard disks, please refer to the section "Hard Disk Installation".
Only qualified service technician can perform the service.
Important Safeguards:
1. Read the instruction carefully before using the unit.
2. Keep this instruction in a safe place for future reference.
3. Do not use this apparatus near water.
4. Clean only with a dry cloth.
5. Do not block any ventilation openings. Install in accordance with the manufacturer's
instructions.
6. Do not install near any heat sources such as radiators, stoves, or other apparatus
(including amplifiers) that produce heat.
7. Do not defeat the safety purpose of the polarized or grounding plug. A polarized plug
has two blades with one wider than the other. A grounding-type plug has two blades
and a third grounding prong. The wider blade and the third prong are provided for
your safety. If the provided plug does not fit into the outlet, consult an electrician for
replacement of the obsolete outlet.
8. Protect the power cord from being walked on or pinched particularly at plugs,
convenience receptacles, and the point where they exit from the apparatus.
9. Only use attachments/accessories specified by the manufacturer.
10. Use only with the cart, stand, tripod, bracket, or table specified by the manufacturer,
or sold with the apparatus. When a cart is used, use caution when moving the
cart/apparatus combination to avoid injury from tip-over.
11. Unplug this unit during lightning storms or when unused for a long period of time.
12. Refer all servicing to qualified service personnel. Servicing is required when the
apparatus has been damaged in any way, such as power-supply cord or plug is
4
Page 5

Digital Video Recorder User Manual
damaged, liquid has been spilled or objects have fallen into the apparatus, the
apparatus has been exposed to rain or moisture, does not operate normally, or has
been dropped.
13. Moving - Disconnect the power before moving the unit. The unit should be moved with
care. Excessive force or shock may result in damage to the unit and the hard disk
drives.
14. Power Sources - This unit should be operated only from the type of power source
indicated on the marking label. If you are not sure of the type of power supply you
plan to use, consult your appliance dealer or local power company.
15. Overloading - Do not overload outlets and extension cords as this can result in a risk
of fire or electric shock.
16. Object and Liquid Entry - Never push objects of any kind into this unit through
openings, as they may touch dangerous voltage points or short out parts that could
result in a fire or electric shock. Never spill liquid of any kind on the unit.
17. Replacement Parts - When replacement parts are required, be sure the service
technician has used replacement parts specified by the manufacturer or have the
same characteristics as the original parts. Unauthorized substitutions may result in
fire, electric shock, or other hazards.
18. Coax Grounding - If an outside cable system is connected to the unit, be sure the
cable system is grounded. U.S.A. models only--Section 810 of the National Electrical
Code, ANSI/NFPA No.70-1981, get information from professional electrician to proper
grounding of the mount and supporting structure, grounding of the coax to a
discharge unit, size of grounding conductors, location of discharge unit, connection to
grounding electrodes, and requirements for the grounding electrode.
19. To reduce the risk of fire or electric shock, this apparatus should not be exposed to
rain or moisture and objects filled with liquids, such as vases, should not be placed on
this apparatus.
20. Danger of explosion if battery is incorrectly replaced. Replace only with the same or
equivalent type. Dispose of the replaced battery in an environmentally friendly way.
5
Page 6

Digital Video Recorder User Manual
Cleaning
You can clean the unit with a moist fluff-free cloth or leather cloth.
Warning
This device is intended for use in public areas only. Surreptitious recording of oral
communications may be prohibited by law.
Unpacking
Check the package for visible damage. If any item appears to have been damaged in
shipment, notify the shipping company. Unpack carefully. This is electronic equipment and
should be handled with care to prevent damage to the unit. Do not attempt to use the unit
if any component is damaged. If any item is missing, notify the dealer.
Please save the carton and all packing materials for future use. If the unit must be
returned, use the original packing materials.
Packaging contents
The package should contain the following items:
1. Digital Video Recorder 1 pcs
2. Accessories box 1 pcs
6
Page 7

Digital Video Recorder User Manual
Product Introduction
Chapter1 Product Introduction
1.1 Summary
ADEMD series network digital video recorders utilize the latest IT technologies, e.g. H.264
video compression, large capacity HDD recording, TCP/IP etc. With embedded MCU and
DSP chip, it delivers digital video recording with extremely reliability in an economical
package. Firmware can be easily upgrade from local or remote site.
It can either work stand alone or be built into a large scaled video surveillance system. It is
an ideal solution for numerous applications, e.g. bank, telecommunication, transportation,
government infrastructures, resident areas, warehouses, hydraulic facilities etc.
1.2 Features
Compression
z Supports up to 4 channels video inputs (PAL/NTSC). Each channel is
independent, H.264 hardware compression and real time (PAL: 25 FPS, NTSC:
30FPS) display
z Supports both variable bit rate and variable frame rate
z Supports 1 channel audio input. Each channel use the same audio, OggVorbis
compression at 16Kbps bit rate
z Compressed video and audio are synchronized. You can select either mixed
stream or video stream only
z Supports CIF and QCIF resolution
z Supports multi-areas motion detection
z Supports WATER-MARK
7
Page 8

Digital Video Recorder User Manual
Local processing
Record
z Supports multiple record modes, including real time, manual record, motion
detection, alarm inputs, Motion & Alarm in, motion or alarm in
z Supports 1 SATA HDD, up to 2TB/HDD.
z Supports FAT32 file system
z Supports HDD S.M.A.R.T technology
z Supports cycle or none cycle record
z Supports backup the recorded files and clips
z Supports variable storage medias: Flash, USB HDD, USB CD/DVD writer
Preview and playback
z Supports BNC analog monitor and VGA output(available on
ADEMD4B000TVS)
z Supports multiple preview modes (1/4)
z Supports area mask function
1
z Supports camera tamper alarm
z Supports 1-ch playback
z Supports multi-speed playback
z Supports playback by files or by time
z Local record status display
PTZ
z Supports majority of industrial PTZ protocols
z Supports preset, sequence and cruise control
2
Alarms
z Supports exceptional alarm, motion detection alarm, external alarm inputs, etc
Others
z Support IR remote control
z Supports multi-levels user management
1
For fixed camera only.
2
Not available on all SpeedDome cameras, refer to manufacturer’s user manual for details.
8
Page 9

Digital Video Recorder User Manual
Network
z Supports TCP/IP
z Supports PPPoE for broad band dialup
z Supports DHCP
z Supports remote parameters setup via client software
z Support real-time preview via TCP, UDP, RTP, broadcast
z Alarm information can be sent to remote host
z Network control PTZ
z Network record the real time stream
z Network download and playback of recorded files in DVR
z Supports firmware remote upgrade
z Supports bi-directional voice talk or one-way voice broadcast
z Supports preview and configuration via Windows IE
z Supports event log
9
Page 10

Digital Video Recorder User Manual
Installation
Chapter2 Installation
2.1 Check DVR and It’s Accessories
Upon receiving the device, check that all the items are included in your product package.
There is a list in the package. If any of the items is missing, please contact your dealer
immediately.
2.2 HDD Installation
Installation of the hard disks must be done by qualified personnel only. Unauthorized
installation of hard disks may result in permanent damage of the disk and the recorder.
Caution:
When working with electrostatic sensitive devices such as a hard disk or the DVR unit,
make sure you use a static-free workstation. Any electrostatic energy coming in contact
with the hard disk or DVR main board may damage it permanently.
1. Before installation of the HDD, switch the recorder off and unplug the power cable.
2. Place the recorder on a flat table, and make sure you take proper ESD precautions.
Wear an ESD bracelet at all times. A cross head screwdriver should be used to screw
and unscrew the various parts.
3. Open the metal top cover by removing the screws on the side and back of the cover.
4. Place the hard disks you wish to install on and fasten hard disk with 4 screws.
Connect each hard disk to the main board PCB using the provided cables. Make sure
that the cables does not blocking any airflow through the DVR.
5. Connect the power connector from the internal power supply to each hard disk. Make
sure that the cables does not blocking any airflow through the DVR.
6. Check all connections, and mount the metal cover of the DVR.
7. Switch on the DVR.
8. Press [MENU] key to enter into DVR main menu. Go to the "Utilities" menu and
10
Page 11

Digital Video Recorder User Manual
choose "Hard disk" to format the hard disks, Check if all installed disks are detected
by the DVR, and if the capacity is OK. Choose "Format" and select "All" to format all
hard disks. When all disks are formatted, a confirmation message will be shown on
the screen. Check if all installed disks have the status "OK".
9. The installation of HDD is complete. The DVR unit is ready to use.
11
Page 12
Digital Video Recorder User Manual
2.3 DVR Rear Panel
ADEMD4B000TVS Rear panel
① Video in USB interface⑦
② Video out Audio in⑧
③ VGA interface Audio out⑨
④ Alarm out UTP interface⑩
⑤ RS485 T+ T- R+ R-
⑪ Alarm in
Power switch⑥
⑫ DC12V power supply
ADEMD4B000TV does not have a VGA interface.
12
Page 13
Digital Video Recorder User Manual
2.4 External Alarm In/Out Connection
Alarm inputs
Alarm input port (dry contact):
G (GND): Connect the GND of sensor.
1~4: Alarm input,
support normally open/normally close.
Alarm output:
1G: 1 relay output.
Alarm output connection
Connect with DC device
Connect with AC device
13
Page 14
Digital Video Recorder User Manual
Operational Instructions
Chapter3 Operational Instructions
3.1 DVR Front Panel
Index Type Name Description
1 IR Sensor IR receiver for remote controller.
2 State
Lamps
Power
STATUS
Tx/Rx
Green = DVR is working;
Red = DVR is powered off;
Green = Numeric keys is enabled;
Twinkle = Data transmitting;
Numeric
Keys
Input number, lower case, upper case character and
symbols.
3
Function
Keys
MENU
ESC
EDIT
PLAY
REC
PTZ
PREV
A
Switch of preview mode and menu mode;
Cancel and back to parent menu.
1. Enter edit mode
2. Edit check box
3. Select clips while playback
Local playback;
Manual record;
Enter into PTZ control mode;
1. Multi screen preview switch;
2. Switch menu mode into preview;
1. Switch between text input method (number,
lower case, upper case and symbol);
14
Page 15

Digital Video Recorder User Manual
SHIFT
2. In preview mode, display or hide the channel
status bar.
Switch between numeric keys and function keys
4 Control
Keys
Direction
Keys
ENTER
Composed of 【Ç】,【È】,【Å】 and 【Æ】.
1. Menu mode, use【Å】/【Æ】 select,【Ç】/【È】
to edit;
2. PTZ direction control;
3. Playback speed control.
1. Confirm in menu mode.
2. Edit check box
3. Pause while playback
15
Page 16

Digital Video Recorder User Manual
3.2 Remote Controller
Index Name Description
1 POWER Turn On/Off device
2 DEV Enable/Disable remote controller
3 Numeric Keys
Select video channel, entry
password
4 EDIT Same as [EDIT] key on front panel
5 A Switching character input method
6 REC Same as [REC] key on front panel
7 PLAY
Same as [PLAY] key on front
panel
8 INFO Reserved
9 VOIP Reserved
10 MENU
Same as [MENU] key on front
panel.
11 PREV Switch preview mode.
12
Direction Keys
ENTER
Same as direction keys on front
panel
13 PTZ Same [PTZ] key on front panel
16
Page 17

Digital Video Recorder User Manual
14 ESC Same as [ESC] key of front panel
15 Reserved Reserved for future function
16 F1 Reserved for future function
17 Lens control
IRIS, FOCUS ZOOM for lens
control
18 F2 Reserved for future function
Loading the batteries into the remote controller
1. Remove the battery cover.
2. Insert the battery. Please make sure that the polarities (+ and -) are correctly
positioned.
3. Replace the battery cover.
Start to use remote controller
Press [DEV] key, input the DVR device ID (default is “88”, can be changed in “Display”
menu) and then press [ENTER] key.
Stop using remote controller
Press [DEV] key again, the remote controller is disconnected from the DVR. Please note
there is no audible warning given by this unit. You may switch the DVR ID to “255”, thus
the remote controller will be always connected, you don’t have to establish the connect
between the RC and DVR after rebooting the unit.
Switch the DVR off
When IR controller status is on, press [POWER] key for several seconds, the DVR will be
powered off.
If the remote controller is not work properly
z Check batteries polarities.
z Check the batteries capacity.
z Check whether IR sensor is covered.
z Check whether the remote controller has been linked to the DVR.
Please change another remote controller to try again. If the problem still exists,
please contact your dealer for repair or replacement.
17
Page 18

Digital Video Recorder User Manual
3.3 OSD Menu Description
3.3.1 Main Menu Items
Menu Name Function Menu Name Function
Display
Language
Device ID
Enable/Disable password
Screen saver
Output video format
Brightness
Menu transparency
VGA resolution
Date and Time
Preview
Camera
Camera name and position
Color
OSD Display mode, position
and OSD format setup
Motion detection
Advanced settings
Recording
Overwrite/Stop recording
Stream type
Resolution
Frame rate
Bit rate
Record schedule
PreRecord time
PostRecord time
Network
DVR IP address
DNS IP
Multicast IP address
Remote host IP and port
NAS IP and name
PPPoE setup
Alarms
Alarm input type (Normal
open/ Normal close)
Alarm response and PTZ
linkage
Alarm output and schedule
Exception setup
PTZ
PTZ parameters
Preset
Sequence
Cruise
User
Add or delete user
Password
User rights
User MAC address
User rights on channels
Utilities
Restore factory parameters
Upgrade firmware
HDD management
Stop alarm output
Reboot
Power off
View log
System information
18
Page 19
Digital Video Recorder User Manual
3.3.2 Menu Operation
How to enter into menu mode
z Press [MENU] key to enter into DVR main menu
z Press [PLAY] key to enter into playback menu
z Press [REC] key to enter into manual record menu
z Press [PTZ] key to enter into PTZ control mode
Notes: You may be required to input user name and password. The default user name is
“admin” and password is “12345”.
1
Main Menu Description
The main menu interface is shown in below:
There is one small rectangle frame named “Active Frame”. It can be moved from one item
to another by using direction keys ([↑] [↓] [Æ] [Å]). When the “Active Frame” is located on
one item and highlight it, you can press [ENTER] key to enter into the sub menu. For
example, move the “Active Frame” to “Camera”, press [ENTER] to enter into the
secondary menu as below:
1
If the “Enable Password” feature has been checked.
19
Page 20

Digital Video Recorder User Manual
Each menu contains different kinds of items:
a) Check Box: Provide 2 options, “9” means enabled and “×” means disabled. You
can use [ENTER] or [EDIT] key to check/uncheck the box.
b) List Box: Provide more than 2 options. However, only one of them can be
selected. You can press [ENTER] or [EDIT] to enter into edit mode, then use [↑]
and [↓] to select one option.
c) Edit Box: The edit box is used to input characters. Press [EDIT]key to enter into
edit mode, you can input characters as following:
Press [A] key on the remote controller to select input method: number,
upper case, lower case or symbols;
Use [Æ] and [Å] keys to move cursor;
Use [EDIT] key to delete the previous character;
Press [ENTER] or [ESC] to exit edit.
d) Button: Execute a special function or enter into next sub-menu. For example,
press “Policy” button to enter into sub-menu. Press [Done] to save parameters
and return to parent menu. Press [Cancel] button to cancel and return to parent
menu.
How to exit menu
Press [ESC] key to exit menu and return to preview mode.
20
Page 21
Digital Video Recorder User Manual
3.4 Character Input
In the menu interface, if you enter into edit status, for example, in the “camera name” edit
box at the bottom of screen, the input status is appeared:
Here you can press numeric keys to input digital number.
Press [A] key to change input methods. You can select “number”, “Uppercase”,
“Lowercase” or “Symbol”.
Uppercase
Lowercase
Symbol
There are 24 symbols available. You can press [0] key to switch to the next page.
21
Page 22
Digital Video Recorder User Manual
Basic Operation Guide
Chapter4 Basic Operation Guide
4.1 Power on
Note: make sure the user must have the rights to particular operation, otherwise a
warning screen will shown as below.
If [POWER] lamp is off, please do as following:
Step1: Connect AC cable correctly;
Step2: Switch on the power button on the rear panel. .
Note: If HDD is not installed or not detected, there is “No Disk” text string in DVR
preview screen.
4.2 Live Preview
DVR will enter into live preview mode after it is started.
Press numeric keys to switch over individual camera live view.
22
Page 23

Digital Video Recorder User Manual
Press [EDIT] key to manually switch to the next camera. You can set the preview mode in
the menu.
Press [Enter] key to pause/start sequence display.
Press [->]/[<-] key to switch multi-screen mode.
23
Page 24

Digital Video Recorder User Manual
4.3 Login
Note: The default administrator named is “admin”, and password is“12345”. You
may change the administrator password after initial login. The administrator can
create 15 users and its privileges.
Login dialog is shown as below:
Use [Ç] / [È] keys to select one user, press [Æ] key to enter into “Password” edit box,
input corresponding password, press [ENTER] key to exit edit box. Press [Done] to
confirm and enter the main menu. If there is a beeper alarm, it means the user name and
password are not matched. After three failures, DVR will go back to live preview mode.
4.4 PTZ Control
PTZ control mode
In preview mode, Press [PTZ] key and system will go into PTZ mode, a text string “PTZ
Control” will be displayed on the bottom of the screen.
24
Page 25

Digital Video Recorder User Manual
Select channel
In PTZ control mode, you can press channel buttons or numeric keys to select channel.
When a dome camera is selected, you may use the multi-function keys to control PTZ.
PTZ control key assignment
Direction control: [↑], [↓], [←], [→]
ZOOM: [ZOOM+], [ZOOM-] (on remote controller)
FOCUS: [FOCUS+], [FOCUS-] (on remote controller)
IRIS: [IRIS+], [IRIS-] (on remote controller)
Exit PTZ control mode
Press [ESC] to exit the PTZ mode and return to live preview mode.
25
Page 26

Digital Video Recorder User Manual
4.5 Manual Record
Manual record
In either preview of menu mode, press [REC] key to enter the Manual Record screen as
shown in below.
Description
Channel: List the available channels on the DVR.
Status: There are four available statuses.
=idle; Green=Recording; Red=Network
transmission; Orange=Recording and network transmission.
Start/Stop: “9” =Start recording; “×” = Stop recording.
Start All: Press to start all channels recording.
Stop All: Press to stop all channel recording.
Exit manual record
Press [ESC] key to exit the manual record mode.
26
Page 27

Digital Video Recorder User Manual
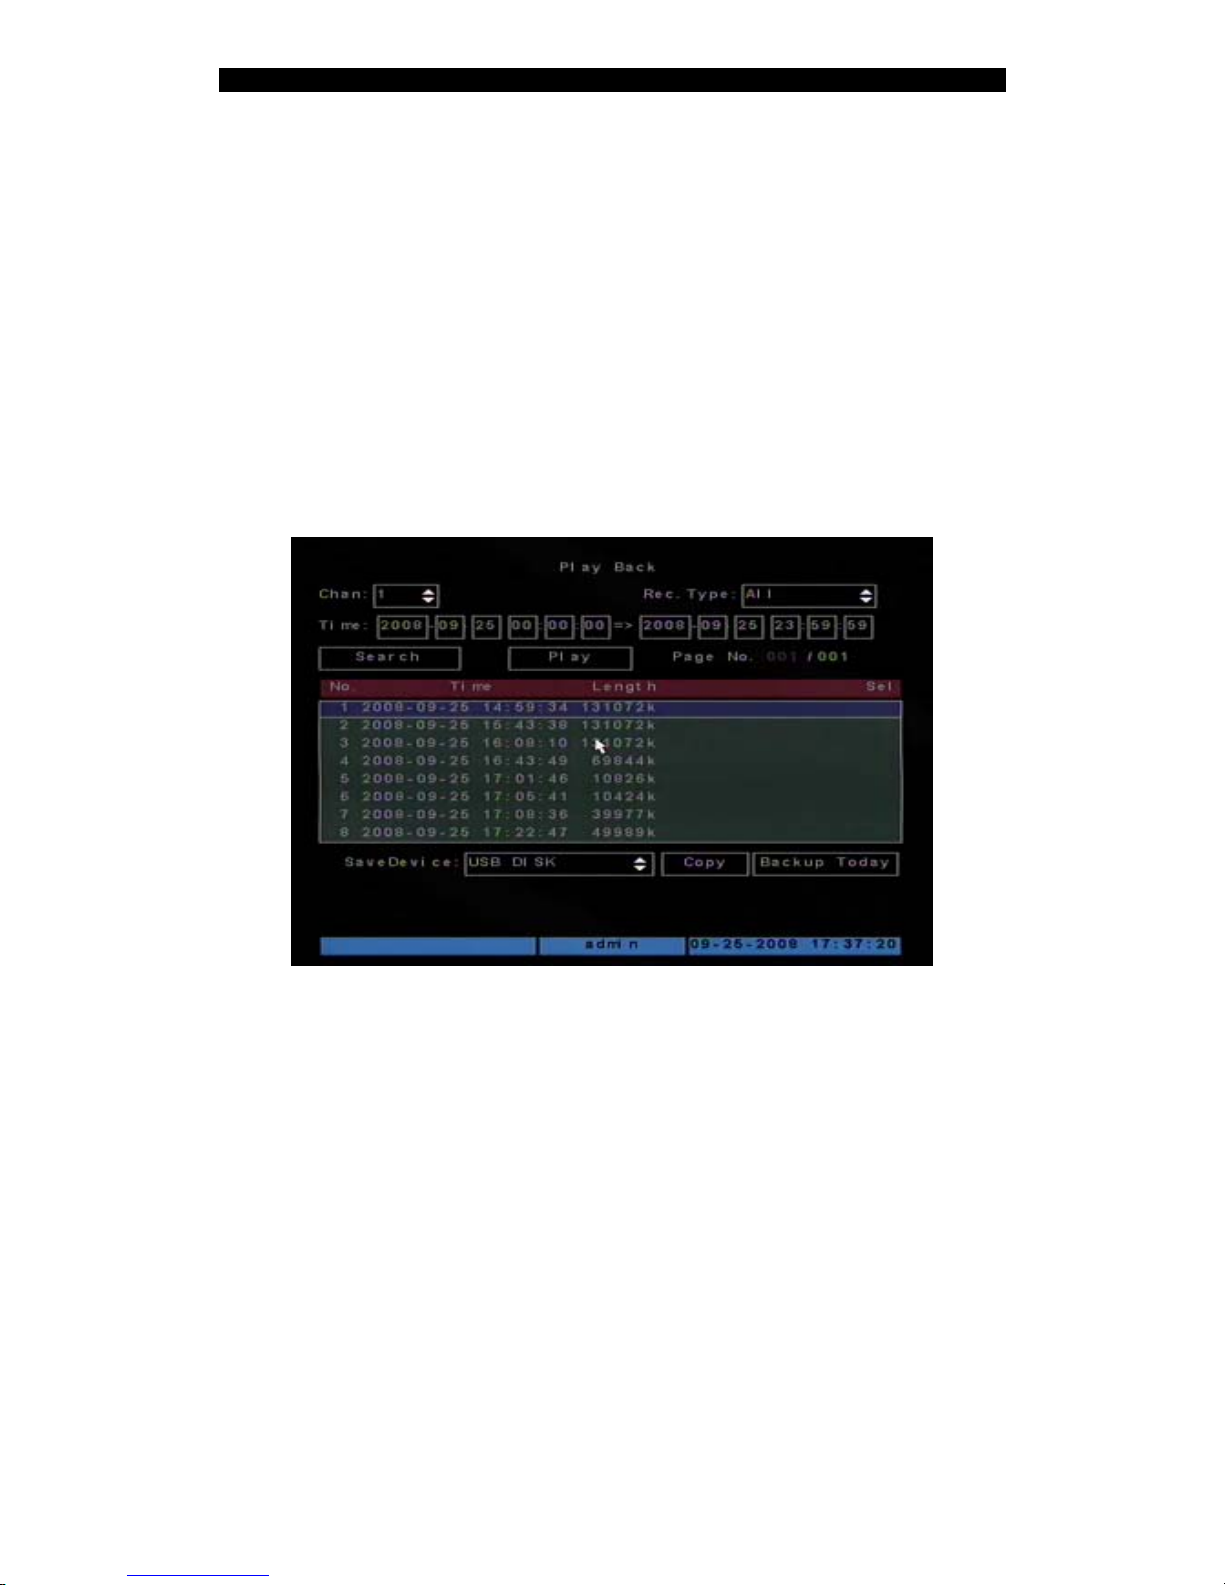
4.6 Playback
Playback interface
In either preview of menu mode, press [PLAY] key to enter the “Playback” interface as
shown in below.
Description
Chan: Use [↑] or [↓] key to select the channel you want to playback.
Rec Type: Use [↑] or [↓] to select recorded file type. The available options are: “All”, “All
Time”, “Motion Detect”, “Alarm” and “Manual”.
Time: Define the search time period. Move “Active Frame” to the time edit box, use
numeric keys to input the desired time.
Search: Search the matched recorded files and display them in the list window. If there is
no matched file found, a corresponding dialog box will be popped-up.
Play (by Time): Playback the recorded video clip directly based on the time section.
Select Page: In the file list window, a max. 8 files can be displayed in one window. If the
matched files are more than 8, you can select page by using the numeric keys or [↑] [↓]
keys to list the others. 500 pages (4000 files) can be searched at one time.
File List Window: List the matched files with the start time and size. You can use [↑] [↓]
keys to move the scroll bar to select file.
27
Page 28
Digital Video Recorder User Manual
Backup Devices: You can select USB flash, USB HDD, USB CD/DVD or SATA CD/DVD
writer to backup the files or clips.
Copy: Start to backup.
Backup Today: Backup all recorded files of today.
Two playback modes
1. Search and playback file: In the playback interface, you can select channel, record
type, time section. Move “Active Frame” to “Search” button and press [ENTER] key,
DVR will search and list the matched files.
One channel search
If the matched files are more than 8, you can use “Page No.” to select page (use numeric
keys or [↑] [↓] keys to select page). In the file list window, use [↑] [↓] keys to move the
scroll bar to the file, press [ENTER] key to playback the file.
If no matched found, a message dialog will be pop-up.
2. Playback by Time: In the playback interface, select channel, record type and time
section, move “Active Frame” to “Play” button, press [ENTER] key, DVR will start to
playback based on time section.
28
Page 29

Digital Video Recorder User Manual
Operation on playback
Below images shown the playback:
One Channel Playback
At the bottom of image, there is an information bar indicates Speaker Volume, play
progress in %, play speed, run rime and total rime of the file.
You may do the following operation during the playback:
z Display/Hide information bar: [MENU]
z Open/Close sound: [PLAY]
z Adjust play progress: [←] (Backward), [→] (Forward). The unit is “%”.
z Adjust play speed: Normal speed is “1x”. Use [↑] to increase play speed (2X,
4X, 8X and MAX). Use [↓] to decrease play speed (1/2X, 1/4X, 1/8X and
Frame by Frame)
z Pause/Continue: Press [ENTER] to pause/continue playback. If played
frame by frame, Press [ENTER] to play one frame.
z Copy segment: [EDIT]
z Exit: [ESC]
Exit playback
In playback interface, press [ESC] key to enter the preview mode.
29
Page 30

Digital Video Recorder User Manual
4.7 Backup Recorded Files
Backup intraday recorded files
In the playback interface, move “Active Frame” to “Backup Today” button, press [ENTER]
key, all intraday recorded files of all channels will be backup to the save device. A pop-up
dialog will display the backup status.
If backup device is not detected, or DVR do not detect a record media, “Device Error”
message dialog will be pop-up. Please ask administrator for more information.
Backup the files that matched your requirement
Step 1: Search the matched files:
In the playback interface, select the channel and record type, input the time period, move
“Active Frame” to “Search” button, press [ENTER] key, DVR will start to find and list the
matched files.
Step 2: Select the files that you want to backup:
In the file list window, use [↑] or [↓] keys to move the scroll bar. When the scroll bar stays
at the file you wan to backup, press [EDIT] key to select it. The symbol “9” indicate the
selection tag. You can use the same method to select other files you want to backup.
Step 3: Select backup device:
Please select the backup device: USB flash memory, USB HDD, USB CD/DVD.
Step 4: Start and finish backup:
Move “Active Frame” to “Copy” button and press [ENTER] key to start backup.
When backup is started, a message box will be popped-up to indicate the result.
30
Page 31

Digital Video Recorder User Manual
Backup video clips
You also can backup the video clips when the file is being playback. The steps are:
Step 1: Enter into the playback interface, and play the video by files or by time;
Step 2: Press [EDIT] key to start selecting the current position, and press [EDIT] again to
stop selecting. The segment is selected;
Step 3: You can repeat step 2 to select as many as 30 segments;
Step 4: After you select all segments, press [ESC] key, a message window will pop-up. If
you press “Confirm” button, DVR will start to backup the selected segments, or press
“Cancel” to abort backup.
Playback backup video files
You can use our file player software to playback the video files in PC. You can find the
player software in attached CD.
4.8 Turn off DVR
To Shut down DVR
Via Menu
31
Page 32

Digital Video Recorder User Manual
Enter into “Utilities” menu, move “Active Frame” to “Power Off” button and enter into
power off dialog, press “Yes" to shut down the DVR.
Use [POWER] key
Press [POWER] key on IR for 3seconds. DVR will be shut off.
Note: Do not switch off the power switch at real panel directly or disconnect the
power cable during DVR recording, it may damage the HDD and the DVR
permanently.
4.9 Video spot output
Make sure the numeric button is in “function” mode. (the status lamp is off) You may press
【shift】button to switch between “numeric” mode and “function” mode.
Step1: Connect the secondary monitor to VIDEO OUT2 port on the real panel.
Step2: Press 【3】to enter into spot out mode.
Step3: Press 【shift】to enter into numeric mode
Step4: Press 【1】 to 【4】 button to switch video spot out from channel 1 to
channel 4
Note: make sure there is video signal inputs on the DVR, otherwise the spot out will
not show image.
32
Page 33

Digital Video Recorder User Manual
Advanced Operation Guide
Chapter5 Advanced Operation Guide
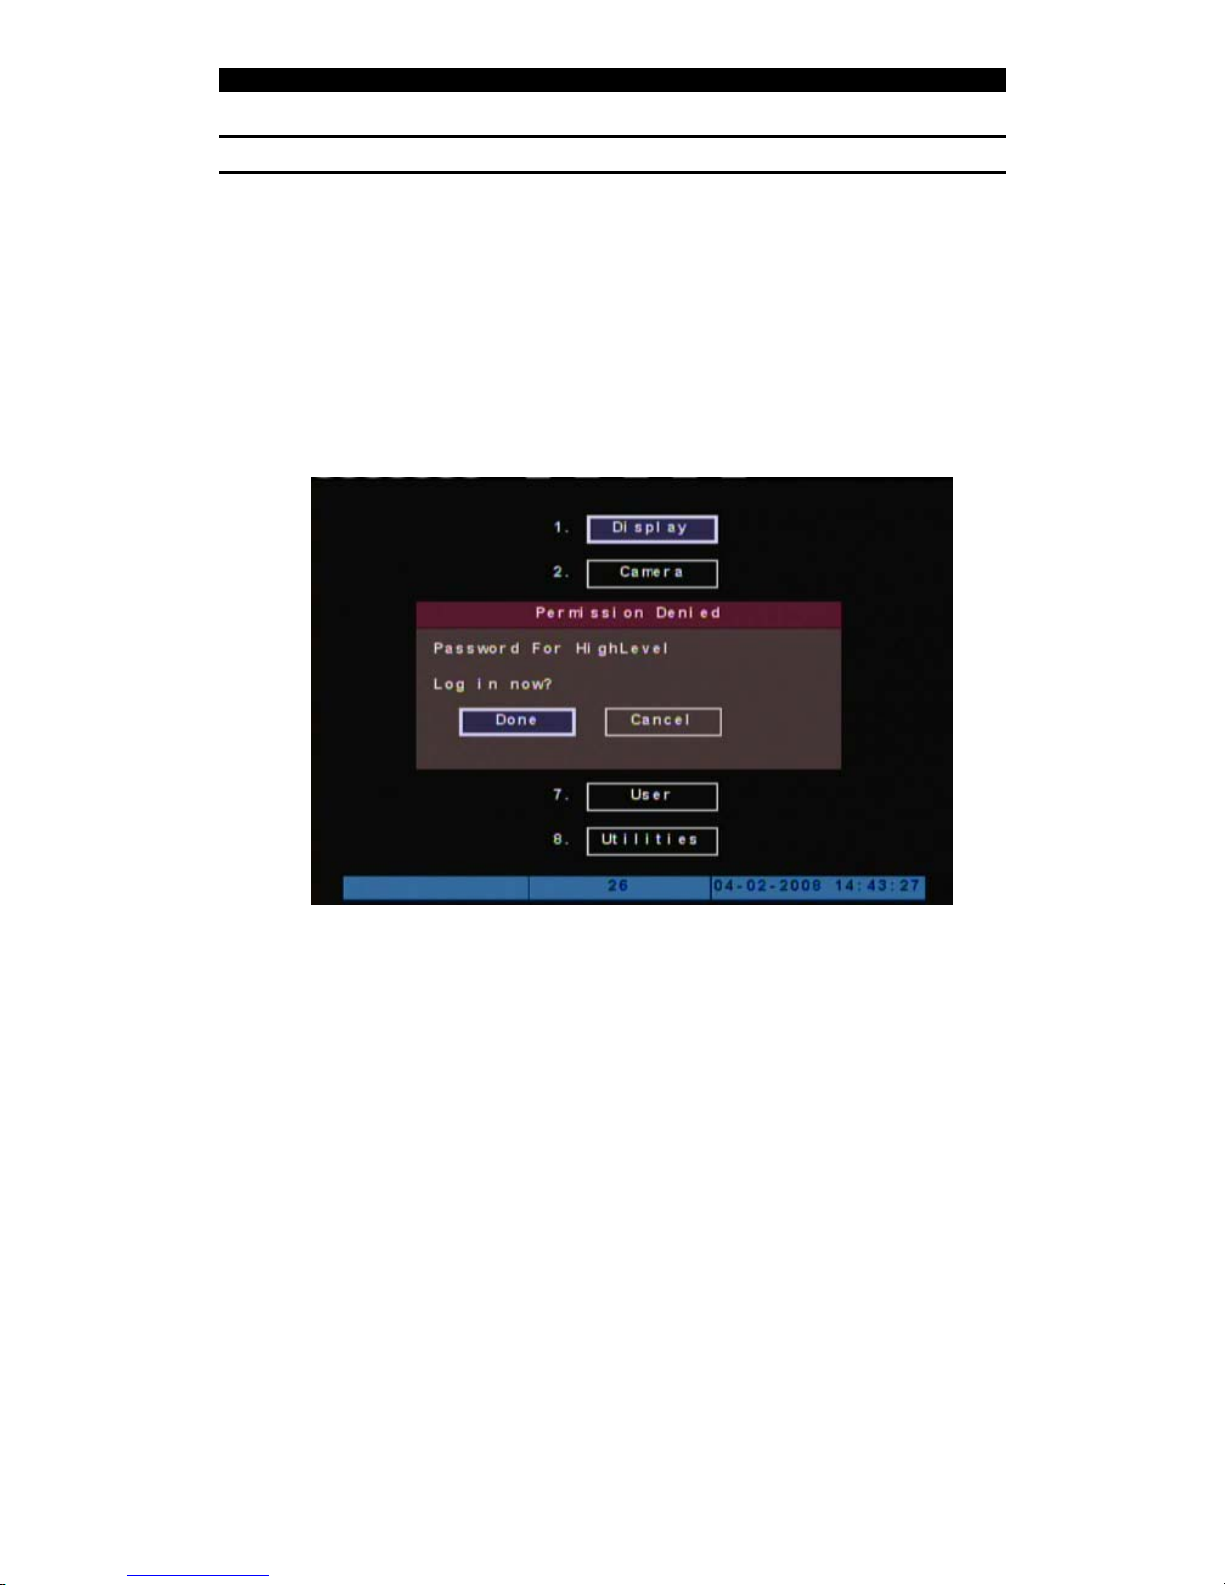
Note: Only the users with “Parameters Setup” right have the access to the
advanced operation. When the following parameters are modified and saved, you
must reboot the DVR to make the new parameters effective. Modifications on other
parameters do not require reboot.
z Any network parameters in “Network” menu
z Stream type, resolution and record schedule in “Recording” menu
z External alarm sensor type in “Alarms” menu
z Tamper alarm schedule in “Camera” menu
z Video lost alarm schedule in “Camera” menu
z Motion detection alarm schedule in “Camera” menu
z External alarm schedule in “Alarms” menu
z Alarm output schedule in “Alarms” menu
33
Page 34

Digital Video Recorder User Manual
5.1 User Management
There is one default administrator from the manufacturer. The default usename is “admin”
and password is “12345”. The administrator’s name can not be changed, you may change
the password after initial login.
Move “Active Frame” to “User”, press [ENTER] key to enter into “User Management”
window.
34
Page 35

Digital Video Recorder User Manual
5.1.1 Add User
Step 1: Enter into “User Management” menu:
Step 2: Add new user name:
Move to “Add” button and press [ENTER], in the pop-up menu, input the new user name,
press [ENTER] and return to “User Management” menu. Max. 15 users can be added.
35
Page 36

Digital Video Recorder User Manual
Step 3: Setup the password for new user:
After you add one new user, the password is null. You can use [Ç] [È] keys to move the
“Active Frame” to “Password”, press [Edit] to go into the edit mode, enter your password
twice and press [Done] to confirm.
5.1.2 Delete User
You can use [Ç] [È] keys to select one user, then use [Æ], move “Active Frame” to “Del”
button, press [ENTER], in the pop-up window, press [Done] to delete the selected user
and return. Press “Cancel” or [ESC] to abort.
36
Page 37

Digital Video Recorder User Manual
5.1.3 Password Modification
Move “Active Frame” to “User” icon, press [ENTER] key to enter into “User Management”
menu.
Use [Ç][È] keys to select one user, and use [→] key to move “Active Frame” to password
edit box, and press [EDIT] key to enter into edit mode. Press numeric keys to input the
new password. The password should be Max. 16 digits. Press [ENTER] key to exit. Move
“Active Frame” to “Verify password” edit box, repeat password. Move “Active Frame” to
“Confirm” button, and press [ENTER] to confirm.
37
Page 38

Digital Video Recorder User Manual
If the two entries do not match, an error message will shown as above, please press
[ENTER] to return password edit box, and enter the new password again.
5.1.4 User Rights
The new user does not have any operation rights. You must setup rights for it.
On the “User Management” menu, use [Ç] [È] keys to select the new user, then use [Æ]
key to [Default Privileges] button, press [ENTER], the user will have the default rights.
The default rights include local playback, remote playback and view log.
If you want to define the specific rights for a user, move “Active Frame” to [Set Privileges]
button and press [ENTER] to enter into the window as below:
Operational rights are divided into “Local Rights” and “Remote Rights”. You can assign the
necessary rights to the user. Use [Æ] [Å] key to move “Active Frame” to the
corresponding right items, press [ENTER] or [EDIT] key to enable or disable the item.
“9” means the right is assigned to that user
After assignment, press [Done] to exit to “User Management” window, press [Done]
button again to confirm the changes. Otherwise your setting will not be saved.
38
Page 39

Digital Video Recorder User Manual
User rights description
“Local Rights”:
Local rights represent the operation on the DVR. E.g. Operate via front panel, remote
controller and RS-485 keyboard.
PTZ control: Locally control PTZ;
Record: Manual start/stop recording;
Playback: Local playback and backup the recorded files;
Parameters Setup: Locally setup the DVR parameters;
Log: Locally view the log on DVR;
Utilities: Upgrade firmware, format HDD, reboot DVR and shut down DVR, etc.
“Remote Rights”:
Remote rights represent the operation via the network client software.
PTZ Control: Remote control PTZ;
Record: Remote manual start/stop recording;
Playback: Remote playback, download the recorded files on DVR;
Parameters Setup: Remote setup the DVR parameters;
Log: Remote view the log on DVR;
Utilities: Remote upgrade firmware, format HDD, reboot DVR and shut down DVR,
etc.
Voice: Voice talk with DVR from client software;
Preview: Network live preview;
Alarm: Remote control DVR alarm output;
Local Out: Control DVR via remote front panel simulator; Note: The simulator is not
delivered with standard package;
Com Control: DVR RS-485 transparent channel function.
MAC address
This MAC address is not the address of DVR but the PC that will access DVR. If you setup
this MAC address, only the PC with this MAC address can access this DVR.
39
Page 40

Digital Video Recorder User Manual
5.2 Device ID
The default device ID of DVR is “88”. If there are more than one DVR in one place, please
make sure to set different device ID for each DVR.
In “Display” menu, move “Active Frame” to the device ID edit box, in the edit mode, you
can use numeric keys to input new device ID. The valid device ID is 001~255.
Press [Done] button to save the setting and back to the previous menu.
5.3 Video Format and VGA Resolution
Video Format
You can modify video standard to match video input.
In “Display” menu, move to “Video Format”, use [Ç] [È] key to select PAL or NTSC video
format. Press [Done] button to save, or press [Cancel] to abort.
VGA Resolution
There is one VGA interface at the real panel of DVR
1
. You can use it to connect with VGA
monitor. You can define the resolution of VGA, refresh frequency in “Display” menu.
There are following options: 1024*768/60Hz, 1280*1024/60Hz and 800*600/60Hz.
1
Only available on ADEMD4B000TVS.
40
Page 41

Digital Video Recorder User Manual
Press [Done] button to save, or press [Cancel] to abort.
5.4 Date and Time Setup
5.4.1 Date and Time Setting
In “Display” menu, you can setup DVR system date and time. Date/Time setting window is
shown in below:
41
Page 42

Digital Video Recorder User Manual
5.4.2 Date and Time Display Mode
You can setup display properties for each camera, including display format, position and
format. And you can copy the properties of one camera to the others.
In “Image Setup” menu as following, select one camera:
Display mode: There are several display modes: Opaque&Steady, Transparent& Steady,
Transparent&Flashing, Opaque&Flashing,
Move “Active Frame” to “Date OSD”, you can select one mode out of 4 options.
42
Page 43

Digital Video Recorder User Manual
5.4.3 Daylight Saving Time Setup
DST means Daylight Saving Time, select the check box to enable the function, and you
can set DST start time and end time in your region.
5.5 Camera Setting
5.5.1 Camera Title
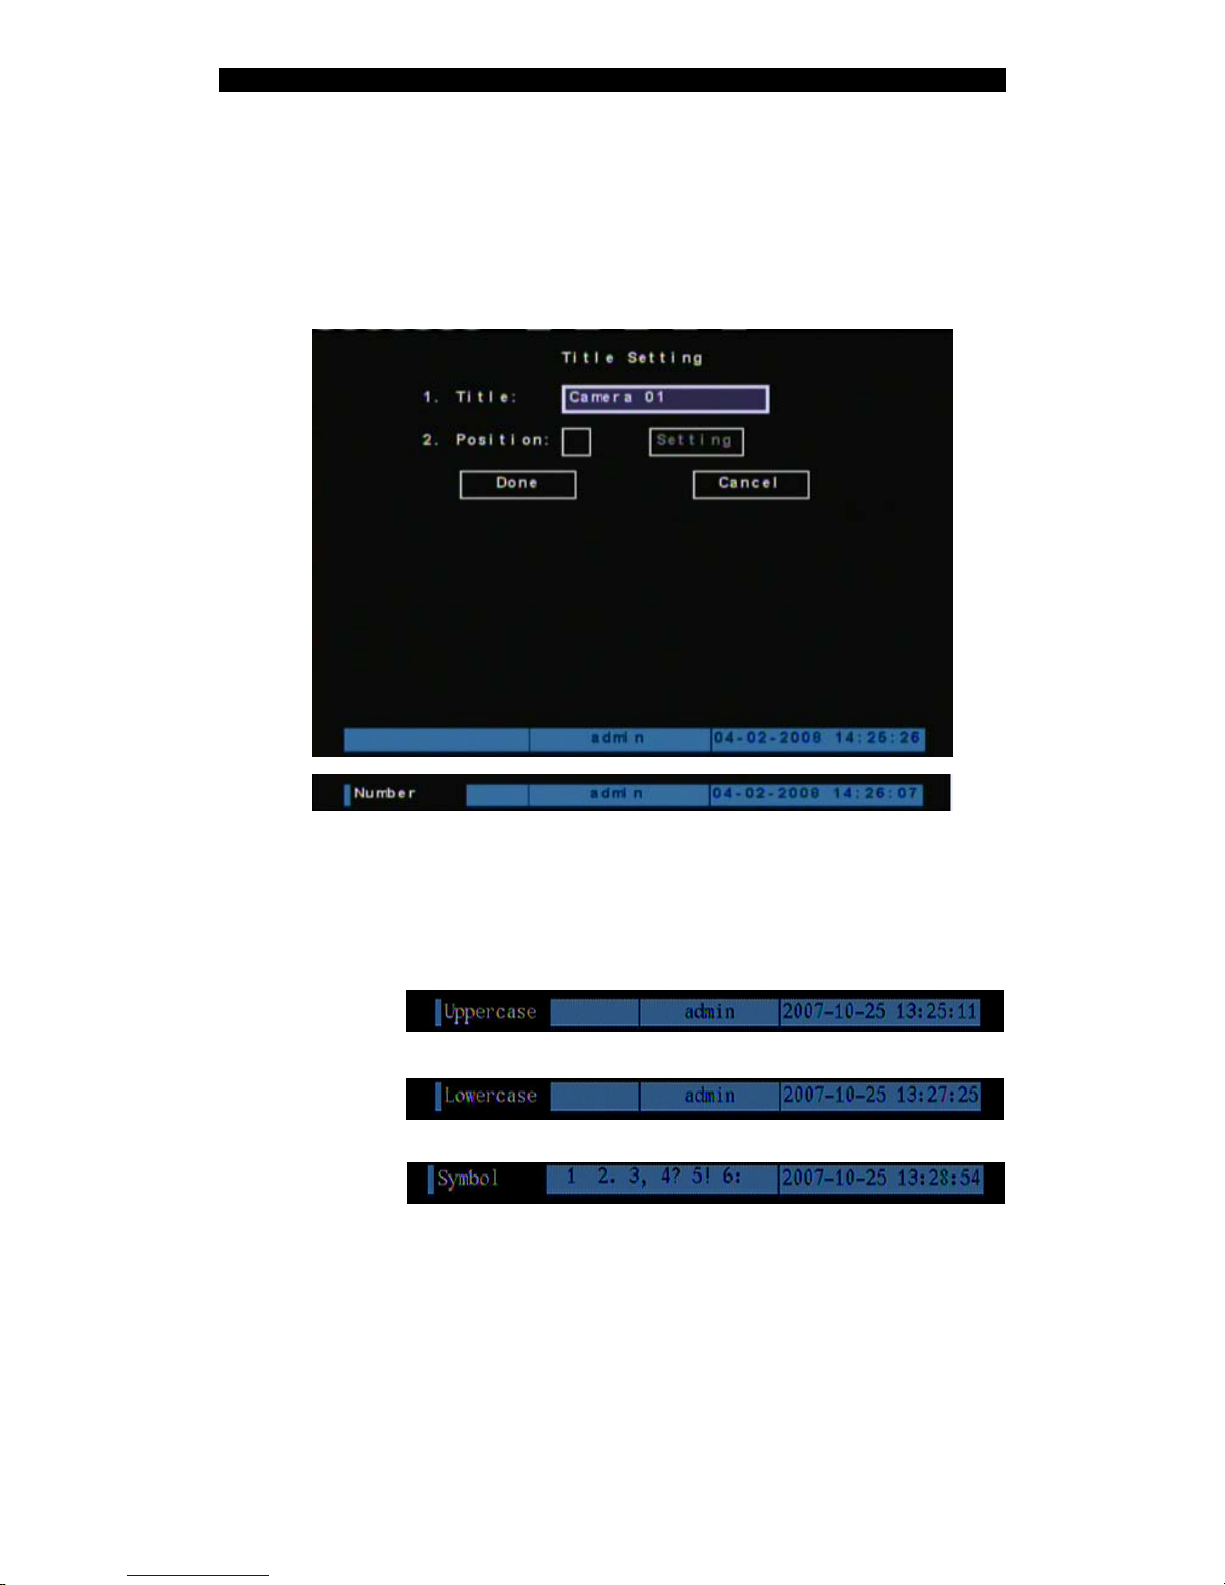
In “Camera Setting” menu, you can define title for each camera.
43
Page 44

Digital Video Recorder User Manual
The steps to setup camera title are listed below:
Step 1: Select one camera.
Step 2: Move “Active Frame” to “camera Title” edit box, press [Enter] key to enter into edit
window, move to Title, you can input numbers, uppercase and lowercase characters (refer
to Chapter 3.4). The camera name can support max.32 characters.
Step 3: Press [Done] to save the setting.
Change Camera Title Display Position
If you do not want to display camera name, just disable the check box -Position below.
Then the disable flag is “×”. If you enable the check box, you can setup the display
position. Position setting can be copied to the others. The setup steps are listed below:
Step 1: Enter into “Camera” menu.
Step 2: Select one camera.
Step 3: Enter “Camera Title”.
Step 4: Enable the check box-“Position”, move “Active Frame” to “Position” button, press
[Setting] to enter into camera title position setup windows. Use [È] [Ç] [Æ] [Å] keys to
move camera name position, press [ENTER] to return to “Camera Setting” menu, and
press [Done] button to save settings or press[Cancel] to abort.
44
Page 45

Digital Video Recorder User Manual
5.5.2 Video Parameters Setup
To get the best video quality, you may need to adjust video parameters for each individual
camera.
Video parameter can be setup individually, or you can copy the setting from one to the
others. Following are the steps to set the video parameter:
Step 1: Enter into “Camera” menu.
Step 2: Please use [È] [Ç] keys to select one camera.
Step 3: Click “Color” setup button and enter into sub menu. Adjust brightness, contrast,
Tone and saturation to get the best image quality.
Step 4: Press [Done] to save the setting or press [Cancel] to abort.
5.6 Mask Area Setup
In some circumstances, you may need to mask some sensitive area on the scene. The
masked areas will not be previewed and recorded. To setup the mask, please follow the
steps in below:
Step 1: Enter into “Camera” menu.
Step 2: Use [È] [Ç] keys to select one camera.
Step 3: Click “Advanced settings” setup menu:
45
Page 46

Digital Video Recorder User Manual
Step4: Enable “Privacy Mask” option, click [Area] button to enter into mask setup window.
Step 5: Setup mask area: Setup the masks as prompted on screen.
Step 6: Save mask area: Repeat step2~4 to setup mask area for other cameras. In
“Advanced Setting” menu, press [Done] to save the mask areas or press [Cancel] to
abort.
A sample image with mask is shown in below:
46
Page 47

Digital Video Recorder User Manual
5.7 View Tampering Alarm
5.7.1 Enable Tamper Alarm
Step 1: Enter into “Camera” menu.
Step 2: Select camera: use [È] [Ç] keys to select one camera.
Step 3: Enter into “Advanced settings” setup menu.
Step 4: Select sensitivity.
Move to the drop-down list to select the sensitivity for Tampering Alarm, you can use [È]
[Ç] keys to select the sensitivity. (Low, Normal, High) Choose one of the sensitivity and
47
Page 48

Digital Video Recorder User Manual
the Tamper alarm is enabled.
5.7.2 Select tampering area
Step 1: Enter the “Area” setting window.
Step 2: Select tamper area as prompt on screen.
Only one tamper area can be setup.
5.7.3 Alarm handling
Step 1: Press [Action] to save the setting
Step 2: Enter “Alarm Handling”.
48
Page 49

Digital Video Recorder User Manual
Step 4: Set Temple Alarm handling.
Step 5: Press [Done] to save configuration or press [Cancel]
5.7.4 Temple Alarm schedule
Step 1: Enter “Event Schedule”.
Step 2: Set schedule as desired. Max. 4 time periods allowed for one day. Schedule can
be copied from one day to the others.
In case of temper alarm occurs, DVR will handle the alarm based on the schedule. Y
Notes: Time periods can not be overlapped.
49
Page 50

Digital Video Recorder User Manual
5.8 Video Loss Alarm
DVR will generate alarm in case of video loss, if this feature is enabled. Please follow the
steps in below to setup the video loss alarm:
Step 1: Follow the Step1~3 as described in chapter 5.7.1.
Step 2: enable check box next to ”Video Loss”
Step 3: Enter “Action”.
Step 4: Setup alarm schedule: Set the schedule. DVR will only response to the video loss
alarm occurs within the schedule.
50
Page 51

Digital Video Recorder User Manual
Step 5: Set the alarm handling.
Step 6: Save alarm setup: Press [Done] to return to “Advanced Setting” menu or press
[Cancel] to abort. DO REMEMBER to press [Done] again to save your setting.
51
Page 52

Digital Video Recorder User Manual
5.9 Motion Detection Alarm
If you enable this function, when there is a motion detected, DVR will make alarm.
Step 1: Enter “Camera” menu:
Step 2: Select camera: Use [È] [Ç] key to select one camera.
Step 3: Enter “Motion Detection”.
Step 4: Select motion detection sensitivity range from 0~5 and off.
Step 5: Area setup: Enter the “Area” setting window. Set the sensitive area as prompted
on screen.
52
Page 53

Digital Video Recorder User Manual
Step 6: Motion alarm handling: Enter the “Motion Alarm Handle” menu:
Step 7: Motion alarm record channel setting: In case of motion alarm occurs, DVR can
trigger related camera to start recording. In “Motion Alarm Handle” menu, you can select
one or more record channels. Please use [ENTER] or [EDIT] key to check the box as
needed.
Note: In order to make motion alarm recording take effect, you must set the “Rec. Type” as
“Motion Detection” or “Motion|Alarm”. Please refer to chapter 5.11 for recording setup.
Step 8: Motion alarm schedule: Set the schedule as desired. DVR will only response to
the motion alarm occurs within the schedule.
53
Page 54

Digital Video Recorder User Manual
Step 9: Motion alarm handling: Set the alarm handling as needed.
Description: If “On Screen Warning” is enabled, in case of motion alarm occurs and DVR
is in preview mode, it will pop-up the live image of related camera. If more than one
camera are assigned, DVR will pop-up the live image in sequence with a interval of 10
seconds. When the motion alarm is disappeared, DVR will go back to preview mode.
Step 10: Save motion alarm setup: Press [Done] to return to “Advanced Setting” menu
or press [Cancel] to abort. DO REMEMBER to press [Done] again to save your setting.
Note: Motion alarm area can not be copied.
If you want to disable motion alarm area and motion alarm handling, simply set motion
alarm sensitivity to “Off”.
54
Page 55

Digital Video Recorder User Manual
5.10 Live View Setup
In “Display” menu, you can setup live preview properties.
Enter the “Preview” setting window, you can setup preview mode, display interval for
sequence, enable/disable audio preview and preview layout etc..
Preview mode: For preview mode item, you can use [↑] [↓] key to select one mode.
Display interval: Set the interval for sequence display. For Main Chan, if “Never” is
selected, sequence display is switched off. For Aux Chan, you can configure from 0 to 180
seconds, 0 means switch off sequence display. You may press[3] at function mode, and
55
Page 56

Digital Video Recorder User Manual
select the channel to be displayed on the auxiliary(spot) monitor.
Audio preview: Play the audio with live image.
Alarm display time: Time to display the alarm live video.
Preview layout setup: To set the video layout. First select the preview mode, then move
the “Active Frame” to the matrix below, select desire position on the matrix and press
[Enter] or [EDIT] key to enter into “Edit” mode, you may use [↑] [↓] keys or numeric keys to
select a particular camera for this position, or you can select “X” to covert this camera.
Save setting: Press [Done] to save your setting or press [Cancel] to abort.
5.11 Recording Setup
You may enter the “Recording Setting” windows from main menu.
Recording menu description:
If HD Full: There are two options in case of hard disk full: “Overwrite” and “Stop recording”.
If you select “Overwrite”, when all HDDs in DVR are full, DVR will overwrite the earliest
recorded files and continue recording. If you select “Stop recording”, when all HDDs are all
full, DVR will stop recording and generate “Exception” alarm. Please refer to chapter 5.16
for exception menu.
Camera: Use [↑][↓] keys to select camera.
Stream Type: You may choose from “Audio & Video” stream or “Video” stream only.
56
Page 57

Digital Video Recorder User Manual
Resolution: Recording resolution. You may choose from QCIF, CIF.
Bit Rate: Set the maximum bit rate of video stream. The bit rate value has following
options (bps): 32K, 48K, 64K, 80K, 96K, 128K, 160K, 192K, 224K, 256K, 320K, 384K,
448K, 512K, 640K, 768K, 896K, 1M, 1.25M, 1.5M, 1.75M, 2M and “User define”.
The max bit rate selection depends on the recording resolution and frame rate. A typical
setting is recommended in below:
CIF @ Real time: 384K~768Kbps
The actual setting may depends on the camera, background and image quality etc.
Frame Rate: Frames per second. You may choose from: Full (PAL @ 25 FPS, NTSC@
30FPS), 20, 16, 12, 10, 8, 6, 4, 2, 1, 1/2, 1/4, 1/8, 1/16. For lower frame rate, you may
select low bit rate size.
PreRecord Time: When the alarm recording is enabled, you may set the prerecord time
at here. The available options are: No PreRecord, 5 Seconds (default), 10 Seconds, 15
Seconds, 20 Seconds, 25 Seconds, 30 Seconds and Max PreRecord.
PostRecord Time: The available options are: 5 Seconds (default), 10 Seconds, 30
Seconds, 1 Minute, 2 Minutes, 5 Minutes, 10 Minutes, 15minutes and 30 mintues.
Enable Rec: Enable/Disable recording for the selected camera.
Schedule: When camera recording is enabled, you can set recording schedule at here.
All day recording:
Step 1: Enter into recording schedule window
In recording menu, use [ENTER] or [EDIT] key to enable record function, press
“Schedule” button to enter into recording schedule menu.
57
Page 58

Digital Video Recorder User Manual
Step 2: Select one day and enable all day recording option
Move the “Active Frame” to “Day”, select a day and check the “All Day” box.
Step 3: Record type
Select “Rec Type” from: All Time, Motion Detect, Alarm, Motion|Alarm, or Motion&Alarm.
For all day record mode, only one record type can be selected.
Step 4: Copy to other days
You can repeat step2 and step3 to setup for other days. Or you can copy the current day
to others.
Step 5: Save setting
Press [Done] and exit to the “Recording” menu. Press [Done] again to save the setting, or
press [Cancel] to abort.
Scheduled recording:
Step 1: Enter into recording schedule menu
In recording menu, use [ENTER] or [EDIT] key to enable record function, press
“Schedule” button to enter into recording schedule menu.
58
Page 59

Digital Video Recorder User Manual
Step 2: Select one day and disable all day recording option
Move the “Active Frame” to “Day”, select a day and uncheck the “All Day” box.
Step 3: Setup time period and record type
There are 4 time periods for one day, enter the start time and stop time for each time
period, and select record type.
Note: Please make sure the time periods is not overlapped.
Step 4: Copy to other days
You can repeat step2 and step3 to setup for other days. Or you can copy the current day
to others.
Step 5: Save
Press [Done] and exit to the “Recording” menu. Press [Done] again to save the setting, or
press [Cancel] to abort.
Note:
1) If record type is “Motion Detect” or other related types, y ou must setup “Motion
Detection” in order to trigger motion recording (refer to chapter 5.9).
2) If record type is “Alarm” or other related types, you must setup “Alarms” in
order to trigger alarm recording (refer to chapter 5.12).
3) The valid time period is between 00:00~24:00.
59
Page 60

Digital Video Recorder User Manual
5.12 Alarm I/O Setup
From the main menu, move “Active Frame” to “Alarms” and press [ENTER] key to enter
into alarms setting page:
External alarm input setup:
Step 1: Select alarm input: Use [↑] [↓] keys to select one alarm input.
Step 2: Select input type: Select from N.O. or N.C.
Step 3: Alarm handling: Check the “Alarm Handling” box to enable “Action” and “PTZ
Control”. Enter the “Action” setting window.
60
Page 61

Digital Video Recorder User Manual
Step 4: Alarm trigger record channel setup
You can select channels to record for each alarm input. In the sub menu, you can use
[ENTER] or [EDIT] key to enable record channel.
Note: In order to trigger the channel recording, in “Recording” menu, you must enable
recording and select record type as “Alarm” or other related type. Please refer to section
5.11.
Step 5: Schedule for alarm inputs
You may set the schedule for alarm inputs, DVR will automatically set the inputs into
Arm/disarm according to the schedule, and take action according to the alarm handling
setting.
Step 6: Alarm handle method
You can select one or more handle method: “On Screen Warning”, “Upload to Center” and
“Trigger Alarm Output”.
Step 7: Save setup
In “Alarm in Handling” sub menu, press [Done] and return “Alarms” menu. In “Alarms”
menu, press [Done] again to save the setting.
Step 8: PTZ Control
Move “Active Frame” to “PTZ” button, press [ENTER] key to enter into “PTZ Control”
window.
61
Page 62

Digital Video Recorder User Manual
First select one camera, and then select one of following PTZ linkage:
z Preset: Check the “Enable Preset” box to enable recall preset, and enter the
preset # in the following box. In case of alarm input activated, DVR will trigger
SpeedDome to an assigned preset. Please refer to chapter 5.14 for preset setup.
z Sequence: Check the “Enable Sequence” box to enable recall sequence, and
enter the sequence # in the following box. Please refer to chapter 5.14 for
sequence setup.
z Pattern: Check the “Enable Pattern” box to enable recall pattern. Only pattern # 1
will be recalled. Please refer to chapter 5.14 for cruise setup.
Press [Done] to save and return to “Alarms” menu. Press [Cancel] to abort.
Note: Not all PTZ cameras are supported. Please refer to manufacturer’s instruction for
details.
Step 9: Copy the parameters to other external alarm input: You can copy the parameters
of current alarm input to other external inputs.
Step 10: Save setup In “Alarms” menu, press [Done] to save the parameters or Press
[Cancel] to abort.
Alarm relay output setup
Step 1: In “Alarms” menu, use [↑] [↓] keys to select one alarm output.
62
Page 63

Digital Video Recorder User Manual
Step 2: Select delay time:
Set the output delay time from: 5 Seconds, 10 Seconds, 30 Seconds, 1 Minute, 2 Minutes,
5 Minutes, 10 Minutes and Manual Stop. If you select “Manual’, the alarm output will not
be deactivated until you press “Clear Alarm” button in the “Utilities” menu. So the actual
alarm output time is made up of alarm input time and the delay time.
Step 3: Enter into alarm out schedule:
You can set the schedule to make alarm output into effective.
Step 4: Copy one alarm output parameters to other alarm output
In “Alarms” menu, you can copy parameters of current alarm output to the others.
Step 6: Save setup
In “Alarms” menu, press [Done] to save the parameters or Press [Cancel] to abort.
5.13 Network Setup
If you want to get access to DVR from network, you must setup network parameters.
In main menu, move “Active Frame” to “Network” icon and press [ENTER], the network
setting window is indicated as below:
63
Page 64

Digital Video Recorder User Manual
5.13.1 Network Basic Settings
IP address: This IP address must not be conflict with other IP. If there is DHCP server in
network, you can set the IP as “0.0.0.0”, save and reboot DVR. In reboot process, DVR
will search the DHCP server and get one dynamic IP address. This box will display the
dynamic IP address. If DVR uses PPPoE function, it can dialup into internet and this box
will display the dynamic internet IP address.
Port: Network access port number, must be greater than 2000.
Mask: Sub net mask.
Gateway: The gateway IP is used to communicate in different network segments
Http Port: The port is for IE browser. The default value is 80. It can be modified.
64
Page 65

Digital Video Recorder User Manual
5.13.2 Network Advanced Settings
NIC type: Default is “10M/100M Auto”, the other options are: 10M Half-Dup, 10M Full-Dup,
100M Half-Dup and 100M Full-Dup.
IP Server
1
: If DVR uses PPPoE function, and get one dynamic IP address. If you set IP
server with one fixed Internet IP, DVR will send some information such as DVR name,
DVR serial number, DVR current IP to that fixed IP address. We call that fixed Internet IP
as IP server. The IP server with that fixed Internet IP can receive DVR information and
used to resolve DVR dynamic IP.
Multicast IP: It is one D-class IP address, among 224.0.0.0 --- 239.255.255.255. If you do
not use multicast function, you do not need to set the Multicast IP.
Remote Host IP and Port: If you set this IP and port and enable “Upload to Center”
option, when there is alarm and exception alarm occurs, DVR will send information to that
host IP. The Client center with this IP can receive alarm and exception information from
DVR.
5.13.3 DHCP Function
In DVR “Network” menu, if you set the IP as “0.0.0.0”, save and reboot DVR, in reboot
process, DVR will search the DHCP server and get one dynamic IP address. This box will
1
IP server is an application software. Not delivered with standard package.
65
Page 66

Digital Video Recorder User Manual
display the dynamic IP address obtained from DHCP server.
5.13.4 PPPoE Function
Enter into DVR “Network” menu, press “PPPoE” setup menu:
Step 1: Enable “PPPoE” option
Step 2: Input PPPoE username provided by ISP
Step 3: Input PPPoE password provided by ISP
Step 4: Input PPPoE password again
Step 5: Save parameters. In “PPPoE” menu, press [Done] to exit to the previous menu,
press [Done] again in “Network” menu to save the setting. Reboot DVR to make
parameters into effect. In reboot process, DVR will start dialup using PPPoE parameters.
If DVR dialup internet successfully, DVR will display the dynamic internet IP address in
“Network” menu.
5.13.5 IP Server Solution for DHCP
If DVR uses PPPoE function, and get one dynamic Internet IP address. If you set IP
server with one fixed Internet IP in DVR Network advanced settings, DVR will send some
information such as DVR name, DVR serial number, DVR current IP to that fixed IP
address. We call that fixed Internet IP as IP server. The IP server with that fixed Internet IP
66
Page 67

Digital Video Recorder User Manual
can receive DVR information and used to resolve DVR dynamic IP.
IP server is one software run on the computer; The following figure illustrate the typical
window of the IP server software. You may develop your own IP server SW to fit your
particular project needs based on the DVR SDK.
5.14 PTZ Setup
The RS-485 port at DVR rear panel is reserved for PTZ camera control.
5.14.1 Typical PTZ Connection
The below figure illustrate a typical PTZ camera connection with DVR.
67
Page 68

Digital Video Recorder User Manual
Connect DVR RS-485 port Pin “T+” with PTZ Pin “A”.
Connect DVR RS-485 port Pin “T-“with PTZ Pin “B”.
5.14.2 PTZ Settings
Please make sure RS-485 parameters setting is match to the PTZ protocol
1
. In main
menu, move “Active Frame” to “PTZ” and press [ENTER] key, you can see the PTZ
setting windows as below:
PTZ menu description
Select channel: Select one PTZ camera.
RS-485 parameters: Including baud rate, data bit, stop bit, parity, flow control, etc. These
1
Refer to PTZ camera manufacturer’s instruction for details.
68
Page 69

Digital Video Recorder User Manual
parameters must be the same as those of PTZ protocol.
PTZ address: Set PTZ camera address.
Protocol: DVR had the following PTZ protocol: TYCO_AD422, Pelco-p, Pelco-D,
Samsung, Panasonic, infinova, YouLi, LinLin-1016, LinLin-820, DM DynaColor, HD600,
JC-4116, Pelco-d WX, VCOM VC-2000, NetStreamer, SAE/YAAN, Kalatel-312, CELOTEX,
TLPelco-p, TLHHX-2000, BBV, RM110, KC3360S, ACES, ALSON, INV3609HD, Howell,
Tc Pelco P, Tc Pelco D, AUTO-M, AUTO-H, ANTEN, CHANGLIN, DeltaDome, XYM-12,
ADR8060, EVI-D30, DEMO-SPEED, DM-PELCO-D, ST832, LC-D2104, HUNTER, A01,
TECHYIN, WEIHAN, LG, D-MAX, KTD-348, PIH-7625, LCU, DennarDome, etc.
69
Page 70

Digital Video Recorder User Manual
5.14.3 PTZ Control
In “Preview” mode, press [PTZ] button on IR, you can enter into PTZ control mode.
Use jog shutter or [Ç]/[È] [->]/[<-], DVR will check PTZ protocol and send
corresponding PTZ control commands through RS-485 port.
5.14.4 Preset Setup
1
Preset is using one number to represent the camera’s position, zoom, focus and iris.
Move “Active Frame” to “PTZ-Advanced Setting-Preset” press [ENTER] key to enter into
preset setting window. You can save up to 128 preset numbers. Please make sure the
PTZ support preset function before you setup preset.
1
Feature may vary on different PTZ cameras, refer to manufacturer’s instruction for details.
70
Page 71

Digital Video Recorder User Manual
Add preset number: You can input preset number (among 1-128) in the edit box. Then
press [Setting] button to enter into PTZ control interface. In PTZ control interface, you can
use direction keys to adjust PTZ position, and use [IRIS+] [IRIS-] [FOCUS+] [FOCUS-]
[ZOOM+] [ZOOM-] keys to adjust iris, focus and zoom. Press [ENTER] and press [Save]
button to save the preset. You can repeat this step to setup new presets.
After you setup all preset numbers, press [Return] button to return “PTZ” menu. In “PTZ”
menu, press [Done] button to save all settings.
Delete preset number: In “Preset” setup menu, input one preset number, press [Delete]
button, and you’ve deleted this preset number.
After deleting, press “Return” button to “PTZ” menu. In “PTZ” menu, press [Done] button
to save all changes.
Please make sure the PTZ camera you are using supports preset function.
5.14.5 Sequence Setup
1
Each sequence is made up of several cruise points. Each cruise point includes one preset
number, dwell time and dwell speed. Please make sure the PTZ you are using can
support sequence function before you start to setup. You can save to 16 sequences.
1
Feature may vary on different PTZ cameras, refer to manufacturer’s instruction for details. Tyco will only
provide technical support for Tyco SpeedDome Ultra & Optima series.
71
Page 72

Digital Video Recorder User Manual
In “PTZ” menu, press “Setup” button on the right side of “Sequence No” item, you can
enter into “Sequence” setup menu:
In “Sequence” setup menu, you can input the sequence number.
If you use Tyco SpeedDome, you should go to SpeedDome menu to set the Sequence,
and only SpeedDome Ultra 7 and later version supports recall on Sequence.
After you finish setup the sequence, press “StartSeq” to check the current sequence
setting. Press “StopSeq” button to stop.
Press [Return] button back to “PTZ” menu. In “PTZ” menu, press [Done] to save all
settings.
Please make sure the PTZ cameras you are using can support sequence function.
72
Page 73

Digital Video Recorder User Manual
5.14.6 Pattern Setup
1
A Pattern is a series of programmed pan/tilt/zoom dome movements. Please make sure
the PTZ cameras you are using support patterns function.
In “PTZ” menu, press ““PTZ-Advanced Setting-Pattern” to enter into “Pattern” setup menu:
Press [Rec Pat] button, you will enter into “PTZ control” interface. You can start controlling
PTZ to record the pattern, press [ENTER] to save the track and return to “Cruise” setup
menu. Press [Start Pat] button to repeat the PTZ track until you press [Stop] button. Note:
Only TYCO_AD422 protocol supports pattern recording. (Please double check the max. #
of patterns.)
Press [Return] button back to “PTZ” menu. In “PTZ” menu, press [Done] button to save all
settings.
1
Feature may vary on different PTZ cameras, refer to manufacturer’s instruction for details. Tyco will only
provide technical support for Tyco SpeedDome Ultra & Optima series.
73
Page 74

Digital Video Recorder User Manual
5.15 Exceptions Setup
The exceptions alarm includes the followings: hard disk full, hard disk error, illegal access,
IP address conflict, network failure, and NTSC/PAL differ.
Enter into DVR “Alarms” menu, move active frame to “Exceptions” and press [Enter] to
enter into exception menu.
In case of exceptional alarm, you can set the handling methods in below:
Upload to Center: Send exception information to center host PC.
Trigger Alarm Output: trigger local relay output.
You can select more than one handle methods.
After you finish setup, press [Done] key to save settings or press [ESC] key to abort.
74
Page 75

Digital Video Recorder User Manual
Utilities
Chapter6 Utilities
“Utilities” menu provides many useful features of the DVR.
The “Utilities” setting window is shown in below:
6.1 Restore Parameters
Restore factory default parameters for DVR. Please note the IP address, gateway and
port number can not be restored.
75
Page 76

Digital Video Recorder User Manual
76
Page 77

Digital Video Recorder User Manual
6.2 Hard Disk Management
HDD status
Display the Hard Disk Capacity, Free space, Idle, status.
Format HDD
Please make sure you stop all recording before run the format. Reboot the unit after
format.
6.3 Clear Alarm Out
Reset the alarm output manually.
6.4 Reboot
Manually reboot the DVR.
6.5 Power Off
Shut off the DVR.
77
Page 78

Digital Video Recorder User Manual
6.6 View Log
To view log file of the DVR.
In “Utilities” menu, press “View Log” to enter into “Log” menu:
If you want to view the log based on default option, just press [ENTER] key. DVR will list
all matched information. You may also search the log files by different criteria and time
period.
6.7 System Information
Display the system information includes unit name, model, serial #, firmware version etc.
78
Page 79

Digital Video Recorder User Manual
Firmware Upgrade
Chapter7 Firmware Upgrade
7.1 Upgrade from USB Flash
In DVR “Utilities” menu, click firmware “Upgrade” button, in the popup dialog box:
You can select either upgrade via FTP mode or USB mode. If you select USB mode,
please make sure that firmware file is placed in USB FLASH root directory, and USB
FLASH should be FAT32 file system.
Press [USB] button, DVR will search corresponding firmware file from connected USB
FLASH, and update firmware. After upgrading successfully, please reboot the DVR as
prompted.
7.2 Upgrade from FTP Server
7.2.1 FTP Server Setup
FTP server software can be found on the CD. Please follow the steps below to setup the
software:
Step 1: Run wftpd32.exe (FTP server software).
79
Page 80

Digital Video Recorder User Manual
Step 2: Select “Logging” in the menu,choose Log Options in the sub menu, and make
selection as following:
Step 3: Select “Users/rights” under “Security” menu item. The following dialog box will be
pop-up.
Step 4: Create new user: Click “new user’. New user dialog pops up. Input user name
“target”. Click “OK”.
80
Page 81

Digital Video Recorder User Manual
Step 5: In the password dialog, input password “target” in “New Password” and “Verify
Password” edit box. Click “OK” to save and exit the dialog box.
Step 6: In the “User/Rights Security” Dialog, select “User Name” as “target”. In “Home
Directory” edit box, input the path where the firmware file (digicap.dav) is placed. Then
press “Done” to exit.
7.2.2 Use DVR FTP Upgrade Function
Select [FTP] function under the “Upgrade” sub menu. You need one host PC to run FTP
server software and place firmware file (digicap.dav), and make sure DVR and PC are in
the same sub net, input FTP server IP and press [ENTER].
81
Page 82

Digital Video Recorder User Manual
Upgrading will start and prompt to reboot the device once the process is done.
82
Page 83

Digital Video Recorder User Manual
7.3 Use Client Software to Upgrade
You can use client software to upgrade, please refer to user manual of client software for
how to configure the DVR and some other configurations, then enter the menu
“configuration” → ”remote config” → ”others”, press explore to import the path of firmware
“digicap”, click “Upgrade” to start to upgrade.
83
Page 84

Digital Video Recorder User Manual
Appendix A HDD Capacity Calculation
Please use the below formula to calculate total HDD capacity needed for the DVR
according to video recording requirement (Recording resolution and Time period).
Step 1: Use the Formula (1) to calculate storage capacity that is the capacity for one
camera/hour, in unit Mbyte.
i
q
102436008
÷×÷
=
ii
dq (1)
In the formula: = Bit rate, unit Kbit/s
i
d
Step 2: Based on the requirement on “Recording Time”, use the Formula (2) to calculate
the storage capacity , in unit Mbyte.
i
m
i
m = × × (2)
iqihi
D
In the formula:
i
h = Recording time for each day (hour)
i
D = Number of days for which the video shall be kept
Step 3: Use the Formula (3) to calculate total capacity (accumulation) that is needed
for all channels in the DVR during scheduled video recording.
T
q
∑
=
=
c
i
iT
mq
1
(3)
In the formula:
c
= Total number of cameras in one DVR
Step 4: Use the Formula (4) to calculate total capacity (accumulation) that is needed
for all channels in DVR during alarm video recording (including motion detection).
T
q
∑
=
=
c
i
iT
mq
1
×a% (4)
In the formula: a% = alarm occurrence rate
84
Page 85

Digital Video Recorder User Manual
Appendix B DVR Connector Definition
1 RS485 Connection
RJ45 introduction
Pin definition
To make the connect cable according the follows.
T+, T- = TXD+, TXD-
R+, R- = RXD+, RXD-
2 UTP Network Connection
Pin definition
To make the network cable according to the actual situation, there are two options:
(1) Connect via a hub/switcch
Standard Ethernet Patch Cable
(2) Connect directly to PC
85
Page 86

Digital Video Recorder User Manual
Ethernet Crossover Cable
86
Page 87

Digital Video Recorder User Manual
Appendix C Specifications
Model Name
ADEMD4B000TV ADEMD4B000TVS
Video
compression
H.264
Preview
resolution
PAL: 352*288 (CIF), NTSC: 352*240 (CIF)
Playback
resolution
PAL: 352*288 (CIF), NTSC: 352*240 (CIF)
Video input
4-ch BNC (Electrical Level: 1.0Vp-p, resistance: 75Ω)
Composite video
output
1-ch, BNC (Electrical Level: 1.0Vp-p, resistance: 75Ω)
Spot video Output
1-ch, BNC (Electrical Level: 1.0Vp-p, resistance: 75Ω)
Max frame rate
PAL: 25FPS, NTSC: 30FPS
Audio
compression
OggVorbis 16Kbps
Audio input
1-ch RCA (Electrical Level: 2.0Vp-p, Resistance: 1000Ω)
Audio output
1-ch RCA (Linear Electrical Level, Resistance: 600Ω)
Stream type
Video/Video&Audio
Max bit rate
32Kbps--2Mbps, self-define
HDD IDE
interface
1 SATA interface, support 1 SATA HDD (2000GB maximum)
Network interface
1 RJ45 10M/100M Self-adaptive Ethernet Interface
USB interface
1 USB2.0, can support USB memory/HDD, USB CD/DVD burner
VGA interface No
1 VGA interface,
support resolution:
800×600/60Hz,
1024×768/60Hz,
1280 ×1024/60Hz
External alarm in
4
Relay output
1
PTZ control
T+, T-, R+, R-
Voice talk
Same as audio input and audio output
Dual stream
Yes
Power supply
DC 12V
Power
consumption
Less than 10W (without HDD)
Working
temperature
-10℃--+55℃
Working humidity
10%--90%
87
Page 88

Digital Video Recorder User Manual
Size
315mm x 230mm x 45mm
88
Page 89

Digital Video Recorder User Manual
Appendix D Quick Reference
Type Name Description Index
User
management
Create and delete users. System has one
default administrator. The administrator can
create 15 users and define their rights.
5.1
Safety
Password
Management
Modify password. 5.1
HDD
management
Format HDD, HDD information. 6.2
Recording
mode
Manual record, All time record, Motion
detection record, Alarm record, Motion and
Alarm record, Motion or Alarm record.
5.11
Recording
parameters.
Bit rate, Frame rate, Image quality, etc 5.11
Playback
Playback by time, Playback by file. Fast, Slow,
Pause, Frame by frame.
4.6
HDD
recording
Backup Backup record files and video clips. 4.7
Preview mode
Monitor and VGA display. 1 screen/4 screen
preview mode. Auto switch or manual switch.
5.10
PTZ control
Control pan, tilt, zoom, focus and iris. Setup
and adjust preset, sequence and cruise.
4.4
5.14
Motion
detection
Motion detection area, sensitivity and
response policy setup.
5.9
Alarm input Alarm input response policy, schedule setup. 5.12
Relay output Alarm output parameters setup. 5.12
Mask Sensitive mask area setup. 5.6
View
tampering
Camera spiteful block setup. 5.7
Local
monitoring
Exceptions
Exception response, such as HDD error, HDD
full, illegal access, etc.
5.16
ASDL Use PPPoE dialup function, support DNS. 5.13.4
Preview TCP, UDP, RTP, Multicast. *
Control Control DVR through network. *
Alarm
Send alarm information to host PC through
network.
*
PTZ control Remote control PTZ. *
Remote setup Remote setup DVR parameters. *
Network
Remote record Remote record real time stream. *
89
Page 90

Digital Video Recorder User Manual
Remote
playback
Remote playback the recorded files in DVR *
Download Download recorded files in DVR. *
Remote
upgrade
Remote upgrade firmware. *
Web Using IE to access DVR *
OSD OSD setup 5.4, 5.5
LOGO Logo setup 5.4, 5.5
View log View log 6.6
Utilities
Voice talk
Two way voice talk or one way voice
broadcast
*
90
Page 91

Digital Video Recorder User Manual
Appendix E Troubleshooting
Failure Possible reasons
“POWER” light in front Panel does not turn on, and fan
does not work.
1) Power cable is broken.
2) Power supply is broken.
DVR continuously reboots after start up every 10
seconds.
1) Upgraded the wrong
firmware
2) Failure on Compression
board
3) Failure on main board.
No video out from DVR. (VOUT) 1) The cable connected with
the monitor is broken.
2) Failure on DVR rear panel.
3) Failure on main board.
Cannot find the hard disk in reboot process. 1) Hard disk cable is
connected or broken.
2) Power cable of hard disk is
not connected or broken.
3) Hard disk is broken.
DVR can not control PTZ through RS-485 port. 1) RS-485 cable is not
connected correctly or
broken.
2) PTZ parameters are not
correctly set.
3) RS-485 port of DVR is
broken.
Can not view DVR live image via client software. 1) Network connect is down.
2) DVR is not properly
programmed on client
software.
3)
Product specification subjects to change without notice.
Certain product names mentioned herein may be trade names and / or registered trademarks of other companies.
91
 Loading...