

Page 1
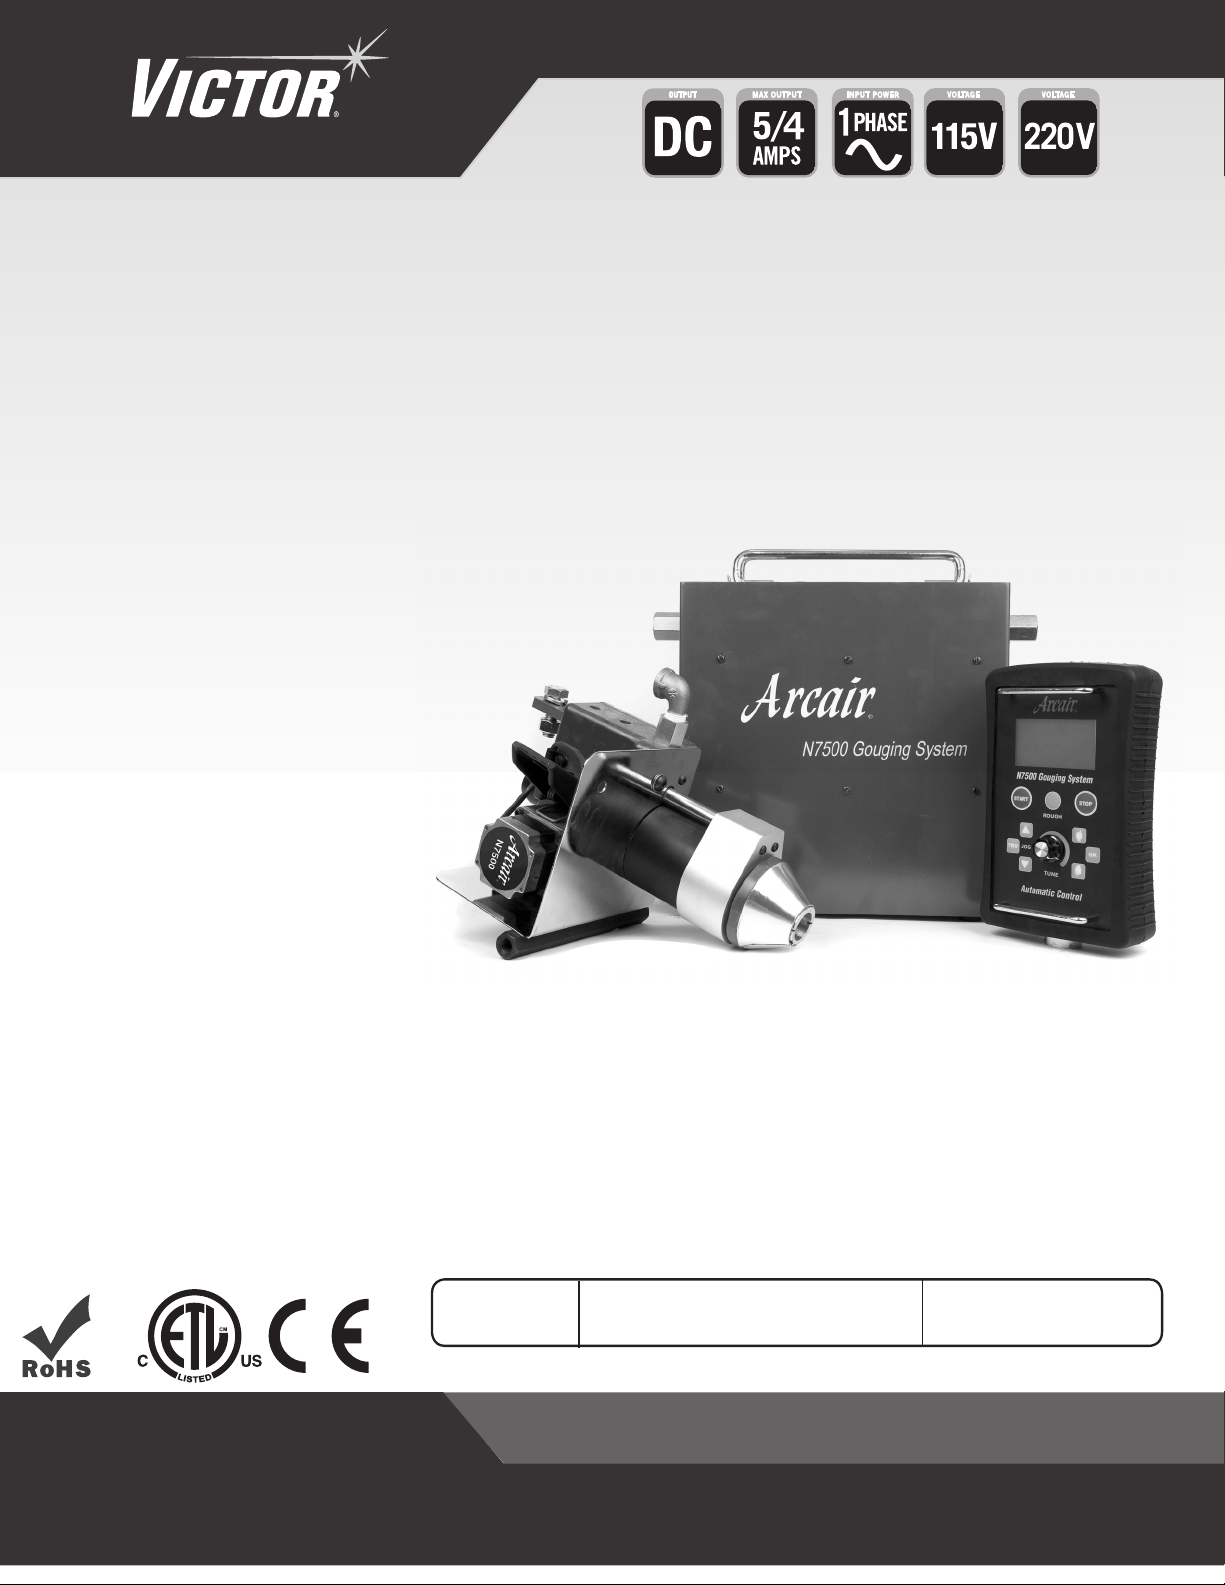
N7500
Arcair-Matic® Gouging System
Operating
Manual
English
Français Canadien
Revision: AF Issue Date: Feb. 19, 2014 Manual No.: 89250890
VictorTechnologies.com/Arcair
ART# A-10837_AB
ARCAIR
®
Cutting and Gouging Systems
Page 2

WE APPRECIATE YOUR BUSINESS!
Congratulations on receiving your new Victor® Arcair® product. We are proud to have you as our
customer and will strive to provide you with the best service and support in the industry. This product
is backed by our extensive warranty and world-wide service network.
We know you take pride in your work and we feel privileged to provide you with this high performance
product that will help you get the job done.
For more than 60 years Victor Arcair has provided quality products you can trust, when your reputation
is on the line.
YOU ARE IN GOOD COMPANY!
Victor Arcair is a global brand of cutting products for Victor Technologies™ Inc. We distinguish
ourselves from our competition through market-leading innovation and truly dependable products that
will stand the test of time.
We strive to enhance your productivity, efficiency and welding performance, enabling you to excel in
your craft. We design products with the welder in mind delivering- advanced features, durability, ease
of use and ergonomic comfort.
Above all, we are committed to a safer working environment within the welding industry. Your
satisfaction with this product and its safe operation is our ultimate concern. Please take the time to
read the entire manual, especially the Safety Precautions.
If you have any questions or concerns regarding your new Victor Arcair product, please contact our
friendly and knowledgeable Customer Service Team at:
1-800-462-2782 (USA) and 1-905-827-4515 (Canada),
or visit us on the web at www.victortechnologies.com/arcair
Page 3

WARNINGS
Read and understand this entire Manual and your employer’s safety practices before installing,
operating, or servicing the equipment.
While the information contained in this Manual represents the Manufacturer's best judgement,
the Manufacturer assumes no liability for its use.
Arcair-Matic® N7500 Gouging System
Operating Manual
Operating Manual Guide Number: 89250890
Published by:
Victor Technologies, Inc. 940-566-2000
2800 Airport Rd. www.victortechnologies.com/arcair
Denton, TX. 76208 U.S. Customer Care: 800-426-1888
International Customer Care: 905-827-9777
Copyright © 2012, 2013 Victor Technologies, Inc. All rights reserved.
Reproduction of this work, in whole or in part, without written permission of the publisher
is prohibited.
The publisher does not assume and hereby disclaims any liability to any party for any loss
or damage caused by any error or omission in this Manual, whether such error results from
negligence, accident, or any other cause.
Publication Date: January, 2012
Revision Date: Feb. 19, 2014
Patent Pending
Record the following information for Warranty purposes:
Where Purchased:
Purchase Date:
Part Number Serial Number
Control Box: _____________________ ________________________
Pendant: _____________________ ________________________
Torch Head: _____________________ ________________________
Page 4

TABLE OF CONTENTS
SECTION 1: GENERAL INFORMATION ................................................................... 1-1
1.01 Notes, Cautions and Warnings ........................................................................ 1-1
1.02 Arc Welding Hazards ....................................................................................... 1-1
1.03 Principal Safety Standard Publications ........................................................... 1-4
1.04 Declaration of Conformity ............................................................................... 1-5
SECTION 2: SPECIFICATIONS ............................................................................. 2-1
2.01 Arcair-Matic N7500 Gouging System .............................................................. 2-1
2.02 N7500 Specifications ...................................................................................... 2-2
SECTION 3: SYSTEM COMPONENT DESCRIPTION .................................................... 3-1
3.01 Control Box ..................................................................................................... 3-1
3.02 Torch Head ...................................................................................................... 3-4
3.03 Remote Pendant ............................................................................................. 3-6
3.04 Electrodes ....................................................................................................... 3-7
3.05 Gouging Operation Settings ............................................................................ 3-8
3.06 Selecting the Proper Electrode Diameter ........................................................ 3-9
3.07 Keeping Electrodes Dry ................................................................................... 3-9
3.08 Secondary Power Cables (Welding Leads) ..................................................... 3-9
3.09 Compressed Air ............................................................................................ 3-10
3.10 Main Air Line ................................................................................................ 3-10
SECTION 4: ASSEMBLY AND INSTALLATION ........................................................... 4-1
4.01 Receiving and Handling .................................................................................. 4-1
4.02 Assembly ........................................................................................................ 4-3
4.03 Miscellaneous Cable/Plumbing Assemblies .................................................... 4-3
4.04 Control Box Installation .................................................................................. 4-4
4.05 Torch Head Installation ................................................................................... 4-7
4.06 Remote Pendant Installation ........................................................................... 4-8
4.07 Remote Pendant Storage ................................................................................ 4-9
SECTION 5: OPERATING THE N7500 SYSTEM .......................................................... 5-1
5.01 Remote Pendant Operation ............................................................................. 5-1
5.02 Position Torch Head ........................................................................................ 5-2
5.03 Insert the Electrode ......................................................................................... 5-2
5.04 Remote Pendant Programming ...................................................................... 5-3
SECTION 6: N7500 SYSTEM USES ....................................................................... 6-1
6.01 SYSTEM USES ................................................................................................ 6-1
6.02 Zero Force Rough Machining .......................................................................... 6-1
Page 5

TABLE OF CONTENTS
SECTION 7: MAINTENANCE ............................................................................... 7-1
7.01 Introduction .................................................................................................... 7-1
7.02 Remote Pendant ARCTIME ............................................................................. 7-2
SECTION 8: TROUBLESHOOTING GUIDE ................................................................ 8-1
8.01 Arcair-Matic N7500 Gouging System .............................................................. 8-1
8.02 N7500 General ................................................................................................ 8-1
8.03 Torch Head ...................................................................................................... 8-2
8.04 Remote Pendant ............................................................................................. 8-4
8.05 Control Box ..................................................................................................... 8-5
SECTION 9: REPLACEMENT PARTS ...................................................................... 9-1
9.01 Control Box Replacement Parts ...................................................................... 9-1
9.02 Torch Head Replacement Parts ....................................................................... 9-2
9.03 Remote Pendant Replacement Parts ............................................................... 9-3
9.04 110V Power Supply Cable Assembly .............................................................. 9-4
9.05 220V Power Supply Cable Assembly .............................................................. 9-4
9.06 Pendant Cable Assembly ................................................................................ 9-4
9.07 Motor Cable Assembly .................................................................................... 9-4
9.08 Power Supply Communication Cable Assembly .............................................. 9-4
9.09 Power Cables .................................................................................................. 9-4
9.10 Air Hose Assembly .......................................................................................... 9-4
SECTION 10: APPENDIX ................................................................................... A-1
10.01 Wiring Schematic ........................................................................................... A-2
PUBLICATION HISTORY ................................................................................... A-4
Statement of Warranty .................................................................. Inside Rear Cover
Page 6

Figures and Tables
SECTION 2: SPECIFICATIONS ............................................................................. 2-1
Table 2-1: N7500 Specifications .............................................................................. 2-2
SECTION 3: SYSTEM COMPONENT DESCRIPTION .................................................... 3-1
Figure 3-1: Control Box ........................................................................................... 3-1
Table 3-2: Control Box Features .............................................................................. 3-2
Figure 3-3: LEFT Side of Control Box ...................................................................... 3-3
Figure 3-4: RIGHT Side of Control Box ................................................................... 3-3
Figure 3-5: BACK of Control Box ............................................................................. 3-3
Figure 3-6: Torch Head ............................................................................................ 3-4
Figure 3-7: Torch Head Components ....................................................................... 3-4
Table 3-8: Torch Head Features ............................................................................... 3-5
Figure 3-9: Remote Pendant ................................................................................... 3-6
Table 3-10: Remote Pendant Controls ..................................................................... 3-6
Chart 3-11: Electrode Selection ............................................................................... 3-7
Table 3-12: Operating Parameters ........................................................................... 3-8
Table 3-13: Power Cable Requirements ................................................................ 3-10
Table 3-14: Compressed Air Input Requirements .................................................. 3-10
SECTION 4: ASSEMBLY AND INSTALLATION ........................................................... 4-1
Figure 4-1: Control Box .......................................................................................... 4-1
Figure 4-2: Torch Head ............................................................................................ 4-1
Figure 4-3: Remote Pendant ................................................................................... 4-1
Figure 4-4: Control Box Nameplate ......................................................................... 4-2
Figure 4-5: Remote Pendant and Torch Head Nameplates ...................................... 4-2
Figure 4-6: Nameplate Locations ............................................................................ 4-2
Table 4-7: Cable Identification ................................................................................. 4-3
Figure 4-8: Assembly Stage 1 ................................................................................. 4-4
Figure 4-9: Power Supply Comm. Cable Pin Configuration ..................................... 4-5
Table 4-10: Standard Wiring Connections ............................................................... 4-6
Figure 4-11: Assembly Stage 2 ............................................................................... 4-7
Figure 4-12: Assembly Stage 3 ............................................................................... 4-8
Figure 4-13: Pendant Mounting .............................................................................. 4-9
Figure 4-14: Pendant Mounted ................................................................................ 4-9
Page 7

SECTION 5: OPERATING THE N7500 SYSTEM .......................................................... 5-1
Figure 5-1: Remote Pendant ................................................................................... 5-1
Table 5-2: Remote Pendant Controls ....................................................................... 5-1
Figure 5-3: Torch Head Parts .................................................................................. 5-2
Figure 5-4: Default Pendant Screen CC or CV mode ............................................... 5-3
Table 5-5: Parameter Table ...................................................................................... 5-4
Figure 5-6: Parameter Guide Screen ....................................................................... 5-5
Figure 5-7: Parameter Guide Setting Examples ....................................................... 5-5
Figure 5-8: Current Setting Example ....................................................................... 5-5
Figure 5-9: Travel Delay Screen ............................................................................... 5-6
Table 5-10: Travel Delay Setting .............................................................................. 5-6
Figure 5-11: No Current Detect screens .................................................................. 5-7
SECTION 6: N7500 SYSTEM USES ....................................................................... 6-1
Figure 6-1: N7500 DC Straight Polarity (DCEN) ...................................................... 6-1
SECTION 7: MAINTENANCE ............................................................................... 7-1
Figure 7-1: Maintenance ......................................................................................... 7-1
Figure 7-2: Arctime Screen ..................................................................................... 7-2
SECTION 8: TROUBLESHOOTING GUIDE ................................................................ 8-1
Table 8-1: General Troubleshooting ......................................................................... 8-2
Table 8-2: Torch Head Motor 6 PIN Wire Schedule ................................................. 8-2
Table 8-3: Torch Head Troubleshooting ................................................................... 8-2
Table 8-4: Pendant Cable Pin Identification ............................................................. 8-4
Table 8-5: Remote Pendant Troubleshooting .......................................................... 8-4
Table 8-6: Control Box Troubleshooting .................................................................. 8-5
Table 8-7: Power Supply Cable Pin Identification .................................................... 8-5
SECTION 9: REPLACEMENT PARTS ...................................................................... 9-1
Figure 9-1: Control Box PARTS ............................................................................... 9-1
Table 9-2: Control Box PARTS ................................................................................. 9-1
Figure 9-3: Torch Head PARTS ................................................................................ 9-2
Table 9-4: Torch Head PARTS ................................................................................. 9-2
Figure 9-5: Remote Pendant PARTS ....................................................................... 9-3
Table 9-6: Remote Pendant PARTS ......................................................................... 9-3
SECTION 10: APPENDIX ................................................................................... A-1
Figure 10-1: N7500 Wiring Schematic .................................................................... A-3
Page 8

This Page Intentionally Blank
Page 9
GENERAL INFORMATION N7500
SECTION 1:
GENERAL INFORMATION
1.01 Notes, Cautions and Warnings
WARNING
PROTECT YOURSELF AND OTHERS FROM POSSIBLE SERIOUS INJURY OR DEATH. KEEP CHILDREN AWAY. PACEMAKER WEARERS KEEP AWAY UNTIL CONSULTING YOUR DOCTOR. DO NOT LOSE THESE INSTRUCTIONS. READ
OPERATING/INSTRUCTION MANUAL BEFORE INSTALLING, OPERATING OR SERVICING THIS EQUIPMENT.
Welding products and welding processes can cause serious injury or death, or damage to other equipment or property,
if the operator does not strictly observe all safety rules and take precautionary actions.
Safe practices have developed from past experience in the use of welding and cutting. These practices must be learned
through study and training before using this equipment. Some of these practices apply to equipment connected to
power lines; other practices apply to engine driven equipment. Anyone not having extensive training in welding and
cutting practices should not attempt to weld.
Safe practices are outlined in the American National Standard Z49.1 entitled: SAFETY IN WELDING AND CUTTING.
This publication and other guides to what you should learn before operating this equipment are listed at the end of
these safety precautions. HAVE ALL INSTALLATION, OPERATION, MAINTENANCE, AND REPAIR WORK PERFORMED
ONLY BY QUALIFIED PEOPLE.
WARNING
SERIOUS INJURY OR DEATH may result if welding and cutting equipment is not properly installed, used, and
maintained. Misuse of this equipment and other unsafe practices can be hazardous. The operator, supervisor, and helper must read and understand the following safety warnings and instructions before installing
or using any welding or cutting equipment, and be aware of the dangers of the welding or cutting process.
Training and proper supervision are important for a safe work place. Keep these instructions for future
use. Additional recommended safety and operating information is referenced in each section.
1.02 Arc Welding Hazards
WARNING
ELECTRIC SHOCK can kill.
Touching live electrical parts can cause fatal
shocks or severe burns. The electrode and
work circuit is electrically live whenever the
output is on. The input power circuit and
machine internal circuits are also live when
power is on. In semi-automatic or automatic
wire welding, the wire, wire reel, drive roll
housing, and all metal parts touching the
welding wire are electrically live. Incorrectly
installed or improperly grounded equipment
is a hazard.
1. Do not touch live electrical parts.
2. Wear dry, hole-free insulating gloves and body protection.
3. Insulate yourself from work and ground using dry
insulating mats or covers.
4. Disconnect input power or stop engine before installing or servicing this equipment. Lock input power
disconnect switch open, or remove line fuses so power
cannot be turned on accidentally.
5. Properly install and ground this equipment according
to its Owner’s Manual and national, state, and local
codes.
6. Turn off all equipment when not in use. Disconnect
power to equipment if it will be left unattended or out
of service.
7. Use fully insulated electrode holders. Never dip holder
in water to cool it or lay it down on the ground or the
work surface. Do not touch holders connected to two
welding machines at the same time or touch other
people with the holder or electrode.
Manual 89250890 1-1 GENERAL INFORMATION
Page 10
N7500 GENERAL INFORMATION
8. Do not use worn, damaged, undersized, or poorly
spliced cables.
9. Do not wrap cables around your body.
10. Ground the workpiece to a good electrical (earth)
ground.
11. Do not touch electrode while in contact with the work
(ground) circuit.
12. Use only well-maintained equipment. Repair or replace
damaged parts at once.
13. In confined spaces or damp locations, do not use a
welder with AC output unless it is equipped with a
voltage reducer. Use equipment with DC output.
14. Wear a safety harness to prevent falling if working
above floor level.
15. Keep all panels and covers securely in place.
WARNING
ARC RAYS can burn eyes and skin; NOISE can
damage hearing. Arc rays from the welding
process produce intense heat and strong
ultraviolet rays that can burn eyes and skin.
Noise from some processes can damage
hearing.
1. Wear a welding helmet fitted with a proper shade of
filter (see ANSI Z49.1 listed in Safety Standards) to
protect your face and eyes when welding or watching.
2. Wear approved safety glasses. Side shields recommended.
3. Use protective screens or barriers to protect others
from flash and glare; warn others not to watch the arc.
4. Wear protective clothing made from durable, flameresistant material (wool and leather) and foot protection.
5. Use approved ear plugs or ear muffs if noise level is
high.
FUMES AND GASES can be hazardous to your
health.
Welding produces fumes and gases. Breathing
these fumes and gases can be hazardous to
your health.
1. Keep your head out of the fumes. Do not breath the
fumes.
2. If inside, ventilate the area and/or use exhaust at the
arc to remove welding fumes and gases.
3. If ventilation is poor, use an approved air-supplied
respirator.
4. Read the Material Safety Data Sheets (MSDSs) and the
manufacturer’s instruction for metals, consumables,
coatings, and cleaners.
5. Work in a confined space only if it is well ventilated,
or while wearing an air-supplied respirator. Shielding
gases used for welding can displace air causing injury
or death. Be sure the breathing air is safe.
6. Do not weld in locations near degreasing, cleaning, or
spraying operations. The heat and rays of the arc can
react with vapors to form highly toxic and irritating
gases.
7. Do not weld on coated metals, such as galvanized,
lead, or cadmium plated steel, unless the coating is
removed from the weld area, the area is well ventilated,
and if necessary, while wearing an air-supplied respirator. The coatings and any metals containing these
elements can give off toxic fumes if welded.
WELDING can cause fire or explosion.
WARNING
WARNING
Sparks and spatter fly off from the welding arc.
The flying sparks and hot metal, weld spatter,
hot workpiece, and hot equipment can cause
fires and burns. Accidental contact of electrode
or welding wire to metal objects can cause
sparks, overheating, or fire.
1. Protect yourself and others from flying sparks and hot
metal.
2. Do not weld where flying sparks can strike flammable
material.
GENERAL INFORMATION 1-2 Manual 89250890
Page 11
GENERAL INFORMATION N7500
3. Remove all flammables within 35 ft. (10.7 m) of the
welding arc. If this is not possible, tightly cover them
with approved covers.
4. Be alert that welding sparks and hot materials from
welding can easily go through small cracks and openings to adjacent areas.
5. Watch for fire, and keep a fire extinguisher nearby.
6. Be aware that welding on a ceiling, floor, bulkhead, or
partition can cause fire on the hidden side.
7. Do not weld on closed containers such as tanks or
drums.
8. Connect work cable to the work as close to the welding
area as practical to prevent welding current from
traveling long, possibly unknown paths and causing
electric shock and fire hazards.
9. Do not use welder to thaw frozen pipes.
10. Remove stick electrode from holder or cut off welding
wire at contact tip when not in use.
WARNING
FLYING SPARKS AND HOT METAL can cause
injury.
Chipping and grinding cause flying metal. As
welds cool, they can throw off slag.
1. Wear approved face shield or safety goggles. Side
shields recommended.
2. Wear proper body protection to protect skin.
WARNING
MOVING PARTS can cause injury.
NOTE
The following is a quotation from the General Conclusions
Section of the U.S. Congress, Office of Technology
Assessment, Biological Effects of Power Frequency Electric
& Magnetic Fields - Background Paper, OTA-BP-E-63
(Washington, DC: U.S. Government Printing Office, May
1989): “...there is now a very large volume of scientific
findings based on experiments at the cellular level and from
studies with animals and people which clearly establish
that low frequency magnetic fields interact with, and
produce changes in, biological systems. While most of
this work is of very high quality, the results are complex.
Current scientific understanding does not yet allow us to
interpret the evidence in a single coherent framework.
Even more frustrating, it does not yet allow us to draw
definite conclusions about questions of possible risk or to
offer clear science-based advice on strategies to minimize
or avoid potential risks.”
To reduce magnetic fields in the workplace, use the
following procedures.
1. Keep cables close together by twisting or taping
them.
2. Arrange cables to one side and away from the
operator.
3. Do not coil or drape cable around the body.
4. Keep welding power source and cables as far away
from body as practical.
ABOUT PACEMAKERS:
The above procedures are among those
also normally recommended for pacemaker
wearers. Consult your doctor for complete
information.
Moving parts, such as fans, rotors, and belts can cut
fingers and hands and catch loose clothing.
1. Keep all doors, panels, covers, and guards closed and
securely in place.
2. Stop engine before installing or connecting unit.
3. Have only qualified people remove guards or covers
for maintenance and troubleshooting as necessary.
4. To prevent accidental starting during servicing, disconnect negative (-) battery cable from battery.
5. Keep hands, hair, loose clothing, and tools away from
moving parts.
6. Reinstall panels or guards and close doors when servicing is finished and before starting engine.
Manual 89250890 1-3 GENERAL INFORMATION
Page 12

N7500 GENERAL INFORMATION
1.03 Principal Safety Standard Publications
1. Code of Federal Regulations (OSHA) Section 29, Part 1910.95, 132, 133, 134, 139,
251, 252, 253, 254, and 1000. U.S. Government Printing Office, Washington, DC 20402
http://www.osha.gov/pls/oshaweb/owasrch.
search_form?p_doc_type=STANDARDS&p_toc_
level=1&p_keyvalue=1910
2. ANSI Z49.1 “Safety in Welding and Cutting”
http://www.nssn.org/
3. ANSI Z87.1 “Practice for Occupational
and Educational Eye and Face Protection”
http://www.nssn.org/
4. ANSI Z88.2. “Standard Practice for Respiratory Protection.” American National Standards
Institute, 1430 Broadway, New York, NY 10018
http://www.nssn.org/
5. AWS F4.1. “Recommended Safe Practices for Welding and Cutting Containers”
http://www.aws.org/w/a/technical/index.html
6. AWS C5.3. “Recommended Practices for
Air Carbon-Arc Gouging and Cutting.” The
American Welding Society, 550 NW Lejeune
Rd., P.O. Box 351040, Miami, FL 33135
http://www.aws.org/w/a/technical/index.html
7. NFPA 51B. “Fire Prevention in Cutting and Welding Processes.”
http://www.nfpa.org/aboutthecodes/list_of_
codes_and_standards.asp
8. NFPA-7. “National Electrical Code” National Fire Protection Association, Battery Park, Quincy, MA 02269
http://www.nfpa.org/aboutthecodes/list_of_
codes_and_standards.asp
9. CSA W117.2. “Safety in Welding, Cutting and Allied
Processes”. Canadian Standards Association, 178
Rexdale Blvd., Rexdale, Ontario, Canada M9W 1R3
http://ccinfoweb.ccohs.ca/
10. ANSI Z535 Safety Alerting Standards
http://www.nssn.org/
11. Refer to your local codes.
GENERAL INFORMATION 1-4 Manual 89250890
Page 13

GENERAL INFORMATION N7500
1.04 Declaration of Conformity
Manufacturer: Victor Technologies
Address: 2800 Airport Rd.
Denton, TX 76208
USA
Description of equipment: Gouging Equipment (GMAW, MMAW, GTAW, CAG and wirefeeders). Including, but not
limited to Arcair-Matic N7500 Gouging System and associated accessories.
Serial numbers are unique with each individual piece of equipment and details the description and parts that are used
to manufacture a unit and date of manufacture.
The equipment conforms to all applicable aspects and regulations of the ‘Low Voltage Directive’ (Directive 73/23/EU,
as recently changed in Directive 93/68/EU and to the National legislation for the enforcement of the Directive.
National Standard and Technical Specifications
The product is designed and manufactured to a number of standards and technical requirements among them are:
• AS1966-1 applicable to welding equipment and associated accessories.
• AS/NZS 3652-(EMC Directive EN50199) applicable to arc welding equipment - generic emissions and regulations.
• EN60974-1 applicable to welding equipment and associated accessories.
• AS60974.1 applicable to welding equipment and associated accessories.
• IEC 60974-1 applicable to welding equipment and associated accessories
• 2002/95/EC RoHS directive
Extensive product design verification is conducted at the manufacturing facility as part of the routine design and
manufacturing process, to ensure the product is safe and performs as specified. Rigorous testing is incorporated into
the manufacturing process to ensure the manufactured product meets or exceeds all design specifications.
Victor Arcair has been manufacturing and merchandising an extensive equipment range with superior performance,
ultra safe operation and world class quality for years and will continue to achieve excellence.
Manual 89250890 1-5 GENERAL INFORMATION
Page 14

N7500 GENERAL INFORMATION
This Page Intentionally Blank
GENERAL INFORMATION 1-6 Manual 89250890
Page 15

SPECIFICATIONS N7500
SECTION 2:
SPECIFICATIONS
2.01 Arcair-Matic N7500 Gouging System
The Arcair-Matic N7500 Gouging System adds new dimensions of flexibility and control in modern weld preparation. It’s the most advanced air carbon-arc gouging/grooving system in the world. The N7500 System assures
improved productivity in the following ways:
• Higheryieldsofoptimumqualityendproduct
• Dramaticreductionsofman-hoursandprocesscost
• Expandedareasofapplicability
FEATURES
Remote Pendant providing complete control of the gouging operation where it needs to be .... in the welder/
operator hands.
All functions from determining gouge parameters, start/stop function, travel delay, and the capability to manually
feed or retract the electrode in the Torch Head. The welder/operator can view the amperage and voltage during
gouging sequence easily while maintaining the electrode on the weld seam that’s being back gouged.
A single electrode contact shoe assembly accepts the entire range of Victor Arcair gouging electrodes from
5/16” (7.9 mm) through 3/4” (19.1 mm).
The N7500 Torch Head eliminates the necessity of stocking or changing contact shoe assemblies when changing electrode sizes.
The gouging system uses the Power Supply “contactor” to ensure that the gouging current is only present
when the welder/operator presses the “start” button on the Remote Pendant.
System is easily connected to the various power supplies available in the industry.
Ensures conformity to pre-determined, pre-selected groove depth and width specifications.
Welder/Operator can use the “Parameter Guide” option on the Remote Pendant to view the recommended
amperage and travel speed once the electrode and gouge depth is chosen.
A unique “travel delay” function assures excellent groove geometry at the very beginning of the groove.
This function eliminates a sloped groove at the beginning of the gouge, eliminating the need for a starting pad.
No current detect and low voltage functions shut down the system when these conditions are sensed.
These functions ensure optimum groove quality and prevent damage to the equipment and work.
Redesigned Torch Head
Redesigned Torch Head with extended front end to give the welder/operator better range of viewing during the
gouging operation ensuring the electrode is maintained in the correct position to the weld seam.
Manual 89250890 2-1 SPECIFICATIONS
Page 16
N7500 SPECIFICATIONS
2.02 N7500 Specifications
Rated Output
Output Current
Duty Cycle
Open Circuit Voltage Minimum of 60VDC
Rated Input
Rated Input Voltage 110V - 220V
Rated Input Amperage
Input Frequency 50/60 Hz
Control Box Controls
5A Circuit Breaker ON/OFF Switch w/reset ON/OFF Switch w/reset
110V/220V Control Box Power Input 3-Pin Socket
110V Auxiliary Outlet 4A, 110V
220V Auxiliary Outlet 4A, 220V
(2) 5A Circuit Breaker
Circuit Interface to Remote Pendant 7-Pin Socket
1 off push-button circuit breaker for the 110V outlet
1 off push-button circuit breaker for the 220V outlet
MAX. 1600A/42V @ 100%
400-1600
5A
Circuit Interface to Torch Head 6-Pin Socket
Circuit Interface to Power Supply 6-Pin Socket
Signal Interface to Work Piece 1-Pin Socket
Table 2-1: N7500 Specifications
N7500 SYSTEM
The N7500 System produces in a single pass uniform “U” or “J” grooves of various depths up to 1-1/8” (28.6
mm). Two or more passes produce grooves of greater depth. Through continuous control of arc voltage or amperage and a constant travel speed, the groove is held within 0.025” (0.635 mm) target depth. Victor Arcair Jointed
Jetrods® Electrodes, with tapered male and female ends, make it possible to produce grooves of unlimited length.
Control elements and circuitry for the N7500 System are housed in a Control Box and a splash-proof Pendant.
Gouging operations are managed remotely using the Remote Pendant with a multi-function LCD display and touch
pad controls.
Groove depth and width are controlled in two ways:
• By changing the travel carriage’s forward speed or by changing the work piece rotational speed.
• By changing the electrode’s diameter and increasing or decreasing amperage.
NOTE
Remote Pendant is NOT submersible.
This manual has been structured to provide the user with all the information required for assembly, operation and
troubleshooting of the N7500 System. Illustrations, charts and other supporting data are provided to bridge the
gap between theory and practice.
In addition, the N7500 System can be integrated with any mechanized travel system that provides forward travel
over a steel plate while in the flat, vertical, or over-head positions. The N7500 Torch Head can also be mounted
in a stationary position for work on rotating shafts, round steel, or a vessel. In a stationary set up the work-piece
rotates in a
For additional information, contact your local Victor Arcair Distributor or Victor Technologies.
SPECIFICATIONS 2-2 Manual 89250890
counter-clockwise direction
and the Torch Head is generally located at the work-piece’s 4 o’clock position.
Page 17
SYSTEM COMPONENT DESCRIPTION N7500
ART# A-10928_AC
SECTION 3:
SYSTEM COMPONENT DESCRIPTION
There are three (3) main components making up the Arcair-Matic N7500 Gouging System; Torch Head, Control
Box, and Remote Pendant.
3.01 Control Box
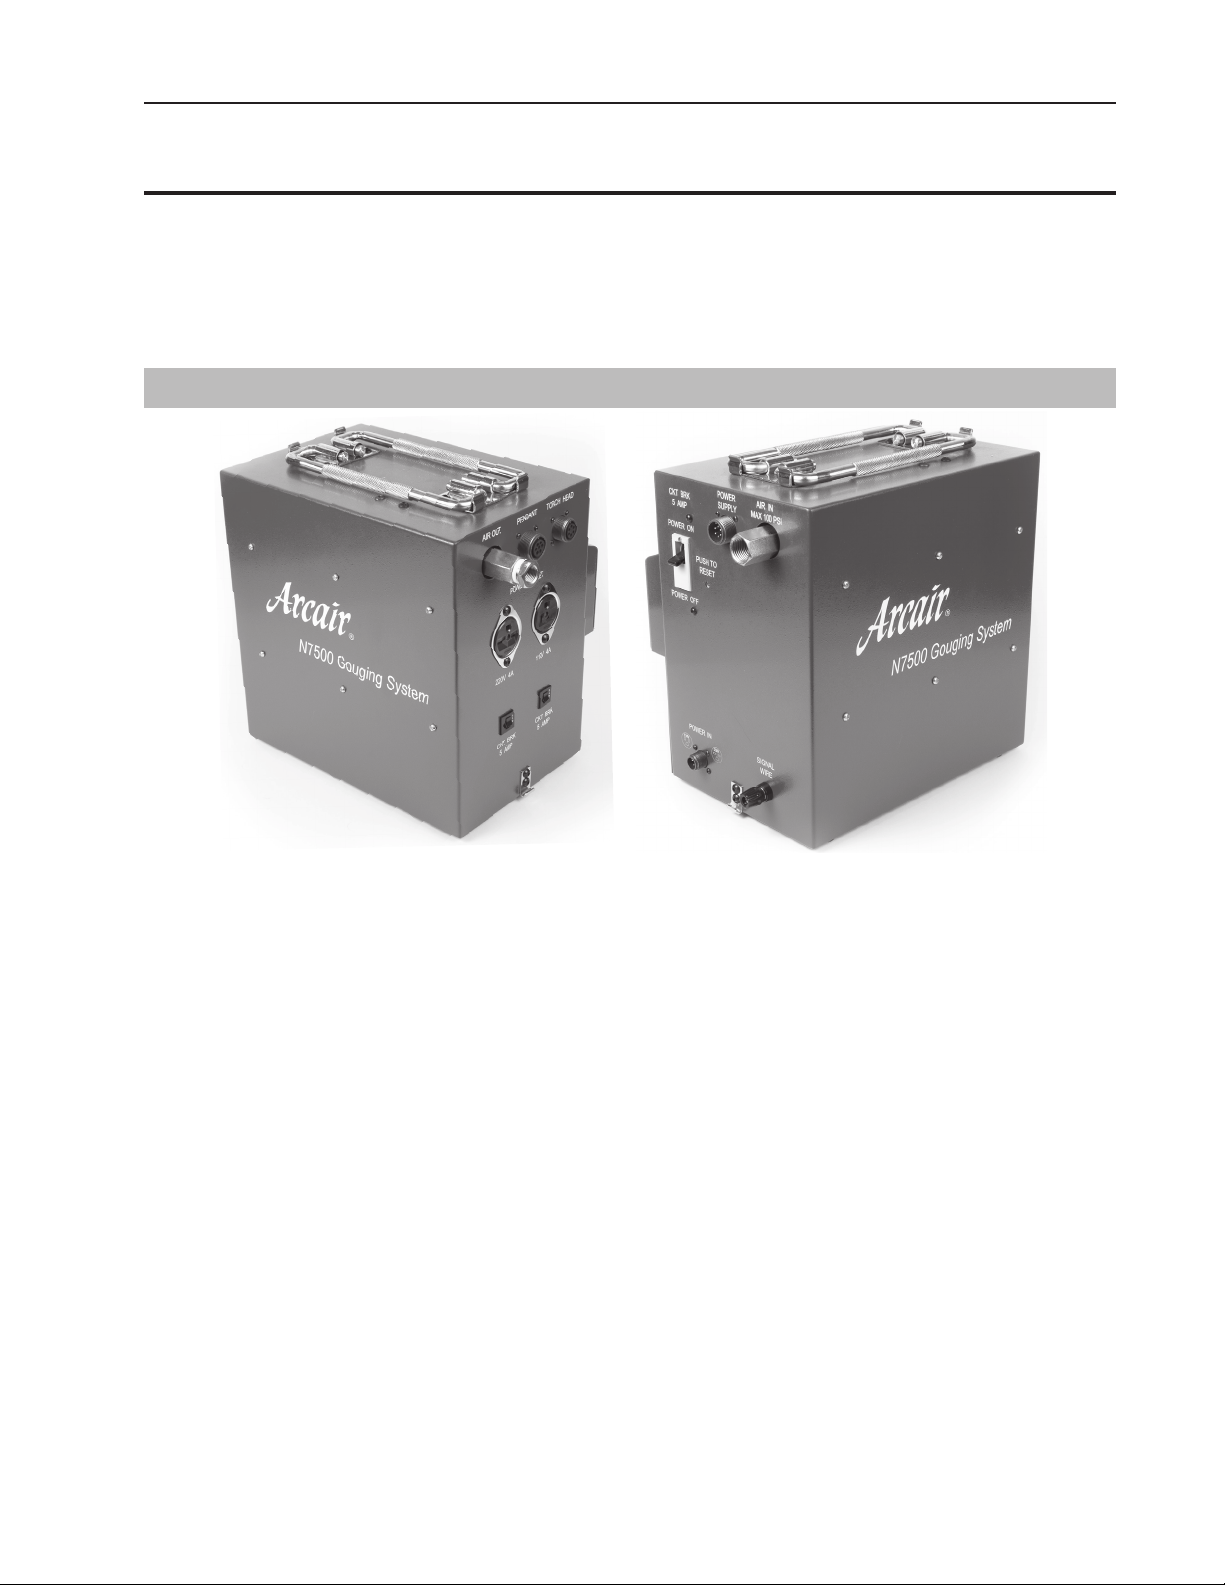
ART# A-10855_AC
Figure 3-1: Control Box
The Control Box controls the system’s operation before, during and after gouging. Under command of the Remote
Pendant, the Control Box supplies DC power and compressed air to the Torch Head. The unit has a power cord
for required AC voltage, clamping fixtures, and handles for secure lifting. See “Table 3-2: Control Box Features”
for each of the Control Box’s connectors/fittings and the function of each component.
Manual 89250890 3-1 SYSTEM COMPONENT DESCRIPTION
Page 18

N7500 SYSTEM COMPONENT DESCRIPTION
Item Fitting Function
Two (2) 4 amp AC power receptacles provide AC power for a travel system
1
Travel System
Power Connector
if needed, 110 VAC or 220 VAC. The Remote Pendant controls when these
receptacles receive AC power through the Remote Pendant travel delay
circuitry. Only the AC power voltage (110V or 220V from the Input Power
AC) that the Control Box is connected to will be delivered.
2 Air Out Conn.
Delivers compressed shop air to the Torch Head when the
START
“Start”
button is pressed on the Remote Pendant.
Connector to
3
Torch Head Elec-
trode Motor
Remote Pendant
4
5
Connector
Circuit Breaker
w/reset
6 ON/OFF switch
Input and Output
7
DC Power Conn.
Delivers the signal from the Control Box to the Torch Head to either
feed or retract the electrode to maintain the preset arc voltage.
Links the Remote Pendant to the Control Box to initiate start/stop of
the gouging operation.
Circuit breaker reset push button for 110 VAC and 220 VAC AC Travel
System Power Connector receptacles.
Control Box ON/OFF control switch with built in 5 amp circuit breaker
and reset.
Output and Input DC (+) positive power buss connections.
8 Air In Conn. This port accepts compressed shop air to the Control Box.
9
Power Supply
Connector
Links the Control Box to the Power Supply. On demand from the Remote Pendant the internal contactor of the Power Supply can be closed
and opened to deliver the current to the Torch Head.
10 Input Power (AC) Delivers AC voltage to the Control Box from a standard wall receptacle.
11 Signal Wire Conn.
Control Box Hold
12
13
Down Fixture
Remote Pendant
Cradle
Allows the Control Box to detect open circuit voltage when the Power
Supply contactor is closed.
Hold down fixtures located on both sides of the Control Box to allow
fastening to a base.
Secure holding fixture for Remote Pendant.
Table 3-2: Control Box Features
NOTE
The 110V and 220V power supply receptacles may be used to run any device that has the same linevoltage requirements and that require “ON-OFF” or “Start-Stop” control. However, any such device
must be rated with a maximum current draw of 4 amperes.
SYSTEM COMPONENT DESCRIPTION 3-2 Manual 89250890
Page 19
SYSTEM COMPONENT DESCRIPTION N7500
13
7
6
(Rear panel assembly
not shown for clarity)
7
10
12
Figure 3-3: LEFT Side of Control Box
MAX 100 psi
8
9
11
ART# A-10851_AC
2
1
(Rear panel assembly
not shown for clarity)
3
4
7
5 AMP
5
12
Figure 3-4: RIGHT Side of Control Box
5 AMP
5
ART# A-10844_AB
13
8
2
WARNING! AVERTISSEMENT!
Protect yourself and others. Wear ear, eye, and body protection.
Protégez-vous et d'autres. Portez l'oreille, l'oeil, et la protection de corps.
Insure good ground from power supply to workpiece. Poor ground may cause
damage to any or all components. Use only with compressed air. See manual.
Assurez la bonne terre de l'alimentation d'énergie à l'objet. La terre pauvre peut endommager
quelques des ou tous composants. Employez seulement avec l'air comprimé. Voir le manuel.
Noise can damage hearing.
Le bruit peut endommager l’ouïe.
Smoke, fumes, and gases can be dangerous to your health. Use adequate
ventilation. Keep your head out of the smoke.
La fumée, les émanations et les gaz peuvent être dangereux pour votre santé.
Employez à ventilation proportionnée. Gardez votre tête hors de la fumée.
Arc rays, hot slag, and sparks can injure eyes and burn skin.
L les rayons de l’arc,
es scories et les étincelles chauds peuvent blesser les yeux et brûler la peau.
Welding sparks can cause res and explosions.
Les étincelles de soudage peuvent causer des incendies et des explosions.
Electric shock can cause injury or death. Disconnect power before servicing.
Un choc électrique peut causer des blessures ou la mort. Déconnectez la puissance
avant l'entretien.
POWER
SUPPLY OUT
POWER
SUPPLY IN
6
ART# A-10853_AB
(rear cover plate not shown for clarity)
Figure 3-5: BACK of Control Box
Manual 89250890 3-3 SYSTEM COMPONENT DESCRIPTION
Page 20
N7500 SYSTEM COMPONENT DESCRIPTION
4
3.02 Torch Head
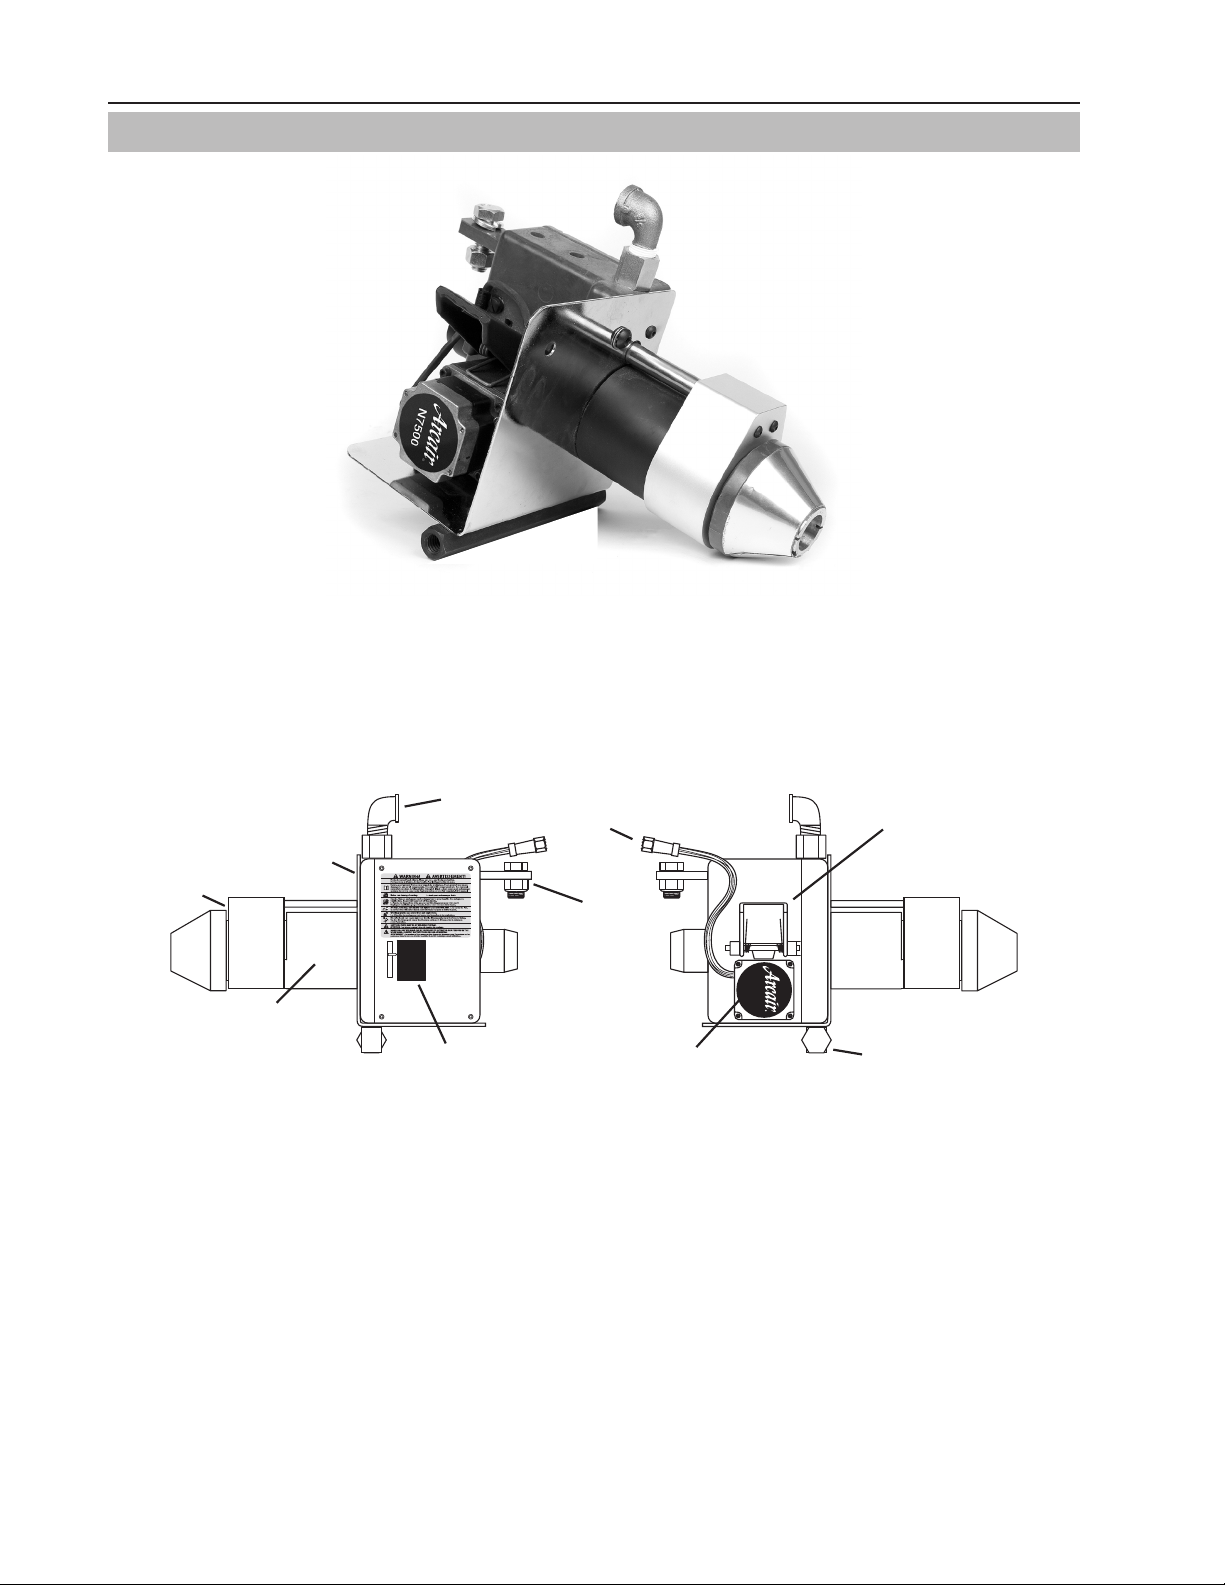
ART# A-10838_AB
Figure 3-6: Torch Head
The N7500 Torch Head feeds the jointed electrodes down to the work surface. The Control Box controls and signals the motor on the Torch Head to feed or retract the electrode. This action maintains arc voltage or current, set
on the Remote Pendant. The Control Box (See “Figure 3-1: Control Box” on page 3-1) channels the DC current
from the DC Welding Power Supply to the Torch Head using standard welding cables. Compressed air coming
from the Control Box connects at the Torch Head with a 3/8” NPT female pipe elbow.
9
ART# A-10833_AB
2
6
10
3
- 5/16 3/8
- 1/2
- 5/8
- 3/4
N7500
5
7
1
Figure 3-7: Torch Head Components
8
SYSTEM COMPONENT DESCRIPTION 3-4 Manual 89250890
Page 21

SYSTEM COMPONENT DESCRIPTION N7500
Item Fitting Function
1 Motor
2 Motor Cable
DC Power Cable
3
4 Air Inlet
5 Air Plenum
6
7 Electrode Size
8
9 Air Plenum Shield
10 Torch Head Shield
Busbar
Electrode Release
Lever
Carriage Mounting
Fixture
This motor feeds the electrode away from and towards the work. The
Motor’s action is controlled by the Pendant settings.
This Motor Cable end is connected to the Control Box via a cable assembly that comes in 3, 15, 25, or 50 foot lengths. See “9.07 Motor
Cable Assembly” on page 9-4 for part numbers.
This is the connection point on the Torch Head for the DC power cables
from the Control Box.
Air is fed into a 3/8” NPT fitting on the Torch Head using an air supply
line from the Control Box.
This housing circulates air around electrode housing before releasing
in a directed spray to remove gouging slag.
This lever is used to open the Motor Feed assembly allowing the operator to manually remove or replace an Electrode.
The guide inside helps the insertion of the electrode through the Torch
Head.
The mounting bracket that comes with the Torch Head allows it to
fasten to a vertical adjustment assembly which is either mounted on a
travel system or stationary fixture.
This metal shield protects the Air Plenum housing from slag splash
back.
This metal shield protects the motor and housing from slag splash
back.
Table 3-8: Torch Head Features
Manual 89250890 3-5 SYSTEM COMPONENT DESCRIPTION
Page 22

N7500 SYSTEM COMPONENT DESCRIPTION
4
3.03 Remote Pendant
Remote Pendant provides the welder/operator the ability to:
• Start/stop the gouging operation,
• Manually jog of the air carbon-arc electrode in the Torch Head prior to gouging,
• Pre-set options to ensure proper operation of the system.
2
11
7
6
1
5
3
10
9
12
8
ART# A-10856_AB
Figure 3-9: Remote Pendant
Item Feature Item Feature
1 Mode-indicator Display 7
Jog Up/Down Travel
START
2
8
Start Button
STOP
3
9
Stop Button
4
10 Connector
Mode Selector
OK
OK Button
Rough (Machining)
5
11 Bumper
Rotary Dial
TRV
6
12 Grip Feet
Travel Button
Table 3-10: Remote Pendant Controls
For additional details on the operation of the Remote Pendant see “5.04 Remote Pendant Programming” on page
5-3. For storage information see “4.07 Remote Pendant Storage” on page 4-9.
SYSTEM COMPONENT DESCRIPTION 3-6 Manual 89250890
Page 23

SYSTEM COMPONENT DESCRIPTION N7500
3.04 Electrodes
The most important part of the N7500 System is the electrode. Since the N7500 system uses only DC power, the
electrodes must be formulated and manufactured for use exclusively with Direct Current.
The use of Victor Arcair Jointed Jetrods Copperclad DC Electrodes is highly recommended. These electrodes are
manufactured to Victor Arcair specifications to provide the best electrical conductivity, to maintain proper electrode
diameter at the point of the arc, and to minimize carbon sublimation. A male/female joint enables electrodes to
be joined together while the gouging operation is taking place.
Electrode Diameter Gouge Width Amperage
Inch mm Inch mm Min Max
⁄
⅜
½
⅝
¾
The formulation and design of the Jetrods Electrodes embody numerous laboratory-proven advantages under the
user’s production conditions. Among these advantages are:
7.9
9.5
12.7
15.9
19.1
Chart 3-11: Electrode Selection
⁄
½
⁄
⁄
1⁄
11.1 400 450
12.7 450 600
20.7 800 1000
24.9 1000 1250
27.0 1250 1600
• Cooler operation due to a small incandescent area at the tip and joint
• Excellent arc stability
• High metal-removal rates
• Uniformity of diameter
• Clean grooves or cuts
Manual 89250890 3-7 SYSTEM COMPONENT DESCRIPTION
Page 24

N7500 SYSTEM COMPONENT DESCRIPTION
3.05 Gouging Operation Settings
“Table 3-12: Operating Parameters”” shows recommended operating amperage by electrode sizes. The travel
speeds listed for each size carbon and gouge depth were derived in the laboratory using a 1500 amp Power Supply.
Your results may vary depending on the arc current, voltage and other parameters you use.
Automatic Gouging Operating Data
Electrode Diameter Desired Depth DC Current Travel Speed Per Min.
Inch mm Inch mm Amps Inch mm
⁄
⁄
⁄
⁄
⁄
⅜
⅜
⅜
⅜
⅜
½
½
½
½
½
⅝
⅝
⅝
⅝
⅝
¾
¾
¾
¾
¾
¾
7.9
7.9
7.9
7.9
7.9
9.5
9.5
9.5
9.5
9.5
12.7
12.7
12.7
12.7
12.7
15.9
15.9
15.9
15.9
15.9
19.1
19.1
19.1
19.1
19.1
19.1
⅛
⁄
¼
⁄
⁄
⅛
⁄
¼
⅜
⁄
⅛
¼
⅜
½
¾
¼
⅜
½
⅝
⁄
¼
⅜
½
⅝
¾
1⅛
Table 3-12: Operating Parameters
3.2 400 65 1651
4.8 400 45 1143
6.4 450 36 914
7.9 450 33 838
11.1 500 22.5 572
3.2 500 70 1778
4.8 500 44 1118
6.4 500 35 889
9.5 500 20 508
14.3 500 17.5 445
3.2 850 96 2438
6.4 850 57 1448
9.5 850 35 889
12.7 850 24 610
19.1 850 17.5 445
6.4 1250 72 1829
9.5 1250 48 1219
12.7 1250 37 940
15.9 1250 30 762
23.8 1250 19.5 495
6.4 1400 72 1829
9.5 1400 42 1068
12.7 1400 34 865
15.9 1400 27 687
19.1 1400 22 560
28.6 1400 13 330
NOTE
If you want a groove depth that is greater than 1-1/2 times the diameter of the electrode being used,
make the groove in two or more passes.
SYSTEM COMPONENT DESCRIPTION 3-8 Manual 89250890
Page 25

SYSTEM COMPONENT DESCRIPTION N7500
3.06 Selecting the Proper Electrode Diameter
Your choice should be based on the depth and width of
the gouge you need. If you want a gouge 1-1/2 times
greater than the diameter of the electrode being used,
make the groove in two or more passes or oscillate
the Torch Head.
3.07 Keeping Electrodes Dry
Keep electrodes dry. Damp electrodes should be dried
before using. (Ten hours at 300°F [176.7°C]) Wet
electrodes may shatter from internal steam pressure
when an arc is struck.
POWER SUPPLY (SUPPLIED BY USER) FOR THE
N7500 SYSTEM
WARNING
Direct current/electrode positive (reverse
polarity) is required for the N7500 System. Use direct current/electrode negative
(straight polarity) for special applications.
DO NOT use alternating current with the
system.
CAUTION
Power Supplies must be rated for 100%
duty cycle at the amperage required for the
size (diameter) electrode used. Contact the
manufacturer of the Power Supply for paralleling procedures or with questions concerning
amperage ratings and duty cycles.
NOTE
Recommendations are based on a 4 volt DC
drop per 100 ft. (30.48 m) length given is onehalf the sum of lengths of electrode and ground
leads. Inadequate grounding may cause cable
overheating. There should be at least 1 square
inch (6.45 cm2) of contact per 1000 amps.
DC Welding Power Supply with a minimum Open-Circuit
Voltage (OCV) of 60 volts and 45 volts at rated load supply
the DC current for the N7500 System. Use single Power
Supplies rated at 1,000 or 1,500 amperes to get enough
amperage for larger diameter electrodes. Power Supplies
may be paralleled in combinations of two or more similar
units.
3.08 Secondary Power Cables (Welding Leads)
Recommended Number and Size of Secondary Cables
Amps
100 4 4 1 1 1/0 1 2/0 1 4/0
200 3 2 1 1/0 1 3/0 1 3/0 3 3/0
300 2 1 1 3/0 2 2/0 2 4/0 4 4/0
400 2 1 1/0 1 4/0 3 3/0 3 4/0
500 1 1 2/0 2 2/0 3 4/0 4 4/0
600 1 1 3/0 2 3/0 3 4/0
800 1 3/0 1 4/0 2 4/0 5 4/0
1000 1 4/0 2 2/0 3 3/0
1200 2 2/0 2 3/0 3 4/0
1400 2 4/0 2 4/0 4 3/0
1600 3 3/0 2 4/0 4 4/0
1800 2 4/0 3 3/0
2000 3 4/0 3 4/0
25 ft. (7.5 m) 50 ft. (15 m) 100 ft. (30 m) 150 ft. (46 m) 200 ft. (61 m) 250 ft. (76 m)
No. Size No. Size No. Size No. Size No. Size No. Size
Table 3-13: Power Cable Requirements
Choose the number and size of secondary power cables on the basis of the combined length of both the positive
(Electrode) and negative (work piece/ground) cables to ensure greatest efficiency and safe operation in terms of
100% duty cycle.
Manual 89250890 3-9 SYSTEM COMPONENT DESCRIPTION
Page 26

N7500 SYSTEM COMPONENT DESCRIPTION
3.09 Compressed Air
Compressed air flows from an air nozzle in the N7500 Torch Head, travels parallel along the axis of the electrode,
and is directed into the molten puddle. The air solenoid included in the N7500 Control Box accepts ordinary shop
compressed air. An air regulator (supplied by user) should be mounted on the air line and adjacent to the Control
Box. Use at least 60 psi, but not greater than 100 psi input of compressed air to the regulator. “Table 3-14: Compressed Air Input Requirements” shows recommended pressure and volume inputs:
Compressed Air Requirements
Air Pressure Air Volume
psi* kg/cm
60 4.2 46 1.3
80 5.6 63 1.8
100 7.0 81 2.3
Table 3-14: Compressed Air Input Requirements
*To convert psi to kpa (kilopascals), multiply by 6.895
3.10 Main Air Line
Up to the air regulator mounted (see “Figure 4-9: Assembly Stage 1” on page 4-4) on the N7500 system, the
Primary Air Line may be either rigid or flexible. The inside diameter of the Primary Air Line varies with the length
of the line between compressor and regulator.
2
CFM m3/min.
Recommended Air Line Requirements
Line length up to 25’ (7.6 m): 1/2” (12.7 mm) inside diameter
Line length above 26’ (7.9 m): 5/8” (15.9 mm) inside diameter
SYSTEM COMPONENT DESCRIPTION 3-10 Manual 89250890
Page 27

ASSEMBLY AND INSTALLATION N7500
SECTION 4:
ASSEMBLY AND INSTALLATION
CAUTION
Be sure to read this manual completely before trying to install or use this equipment. Call your Victor
Arcair Representative or Distributor if you have any questions.
4.01 Receiving and Handling
Remove all components from the boxes. Using the packing lists, check to be sure you have all parts. Inspect each
part for damage. Buyers may file claims for loss or damage with the carrier.
Unpacking Components
Write down the Part Number and Serial Number for the Control Box, Remote Pendant, and Torch Head on the
Warranty page in the back of this book.
ART# A-10855_AC
ART# A-10838_AB
Figure 4-1: Control Box
ART# A-10865_AC
Figure 4-3: Remote Pendant
Manual 89250890 4-1 ASSEMBLY AND INSTALLATION
Figure 4-2: Torch Head
Page 28

N7500 ASSEMBLY AND INSTALLATION
MAX 100 p
!
When asking about your equipment, be sure to give its full serial and model number(s) that appear on the nameplate of each component. The N7500 has name plates on each major component; Control Box, Torch Head, and
Remote Pendant. The Torch Head and the Pendant have smaller nameplates than the Control Box. The Control
Box nameplate is located on the rear plate. The nameplate for the Torch Head is located on the inside shield and
the nameplate for the Pendant is on it’s back surface.
Art# A-10857_AB
Art# A-10845_AC
Figure 4-4: Control Box Nameplate
Art# A-10849_AB
Figure 4-5: Remote Pendant and Torch Head
Nameplates
Remote Pendant
Control Box
Torch Head
ART# A-10924_AC
Figure 4-6: Nameplate Locations
NOTE
When using the Arcair-Matic N7500 Gouging System with a travel system, the Control Box should be
centrally placed.
Prior to installing the N7500 components please have the following components or items in place:
WARNING
Connections to ‘live’ or “hot” are inherently dangerous. DO NOT service or repair equipment with power
ON. DO NOT operate equipment with protective insulators or covers removed.
• Confirm that your Power Supply cable size is rated for the work and the cable ends have fittings that will
mount on the Control Box Power Supply buss poles (See Step 6). See "Table 3-13: Power Cable Requirements" on page 3-10.
• Confirm that your air supply is rated for the work (See Step 6). See "Table 3-14: Compressed Air Input
Requirements" on page 3-10.
ASSEMBLY AND INSTALLATION 4-2 Manual 89250890
Page 29

ASSEMBLY AND INSTALLATION N7500
4.02 Assembly
The assembly instruction steps are divided into five groups; Miscellaneous Cable/Plumbing Assemblies, Control Box,
Torch Head, Remote Pendant, and Final Connections. Remote Pendant Storage is located at the end of this section.
4.03 Miscellaneous Cable/Plumbing Assemblies
Cable assemblies required to operate the N7500 system come in various lengths and must be specified by the end
user to meet their specific needs.
Cable
Description
Routing
AC Power Cable Assembly
Plug rated for 110VAC 60Hz or 220VAC 50Hz with
3 pin connector at opposite end.
Outside power to Control Box
ART# A-10858_AB
ART# A-10863_AB
ART# A-10854_AB
Remote Pendant Cable Assembly
Large 7 pin connector with male/female ends.
Pendant to Control Box
Motor Cable (on Torch Head) Assembly
6 pin connector with male/female connectors.
Control Box to Torch Head
Power Supply Communication Assembly
6 pin connector with female connector and a cut
end.
Control Box to Power Supply
DC Power Cable Assembly
Based on customer requirements.
Control Box to Torch Head
Air Hose Assembly
ART# A-10862_AC
ART# A-10859_AB
ART# A-10839_AC
ART# A-10860_AC
Based on customer requirements.
Control Box to Torch Head
Table 4-7: Cable Identification
Manual 89250890 4-3 ASSEMBLY AND INSTALLATION
Page 30

N7500 ASSEMBLY AND INSTALLATION
4.04 Control Box Installation
Determine where the Control Box should be located in relationship to where the gouging will take place. It is not
recommended to carry the Control Box on any travel system other than the Victor Arcair Titan® Machine Carriage
due to the added weight of the Control Box and the weight of the power cables coming from the DC Power Supply.
The Control Box can be secured to a stationary surface with the mounting brackets on both sides. Refer to "Table
3-2: Control Box Features" on page 3-2 for the mounting brackets and "Figure 3-4: RIGHT Side of Control Box"
and "Figure 3-5: BACK of Control Box" on page 3-3 for bracket locations.
NOTE
DO NOT force connections. All connectors should be fastened easily. Be sure to tighten connections
as you go through each step. Avoid crimping hoses or wires.
WARNING
Select the receptacle voltage that correctly matches the plug and power requirements of the Carriage
System.
WARNING
Confirm that the Power Supply and Control Box Power In switches are OFF.
Make the following connections from Power Supply to Control Box and work piece. See "Figure 4-8: Assembly
Stage 1".
POWER SUPPLY
POWER
SUPPLY
DC POWER CABLE (+) IN
GROUND CABLE (–)
CONTROL BOX INPUT
AC POWER CABLE
120V
OR
220V
COMMUNICATION CABLE
(Rear panel assembly
not shown for clarity)
MAX 100 psi
CONTROL BOX
AIR REGULATOR
SIGNAL WIRE
INCOMING
AIR LINE
(VIEWED FROM CABINET LEFT SIDE)
ART# A-10850_AC
GROUND CABLE (–)
WORK PIECE
Figure 4-8: Assembly Stage 1
1. Connect the air regulator to the side of the Control Box labeled “AIR IN”. Preset the regulator to the recommended operating pressure based on "Table 3-14: Compressed Air Input Requirements" on page 3-10.
(The compressed air inlet and outlet fittings on the Control Box are 1/2-14 NPT.)
2. Connect the incoming shop compressed air line to the air regulator. Charge the shop compressed air supply to the air regulator on the Control Box’s AIR IN side to confirm air pressure is within recommended
specifications. Refer to the specifications listed on the Control Box nameplate.
3. Attach the AC Power Cable to the connector labeled “POWER IN”.
4. Loosen the screws holding the Control Box rear cover plate. Re-position and tighten one screw.
ASSEMBLY AND INSTALLATION 4-4 Manual 89250890
Page 31

ASSEMBLY AND INSTALLATION N7500
WARNING
Confirm the DC Power Supply is OFF before beginning the next step.
5. Connect the positive (+) Power Supply cable(s) of the DC Power Supply to the busbar terminal on the back
side of the Control Box labeled “POWER SUPPLY IN”. This connection must be wrench tight to avoid over
heating of the connection. Refer to "Table 3-13: Power Cable Requirements" on page 3-10 in this manual
for proper amount and size Power Supply cabling that you plan to use.
NOTE
It is recommended to use a minimum of two Power Cable assemblies with the N7500. The cables should
be connected at the same points on the Control Box. Refer to "Table 3-13: Power Cable Requirements"
on page 3-10.
6. Connect the negative (-) cable(s) of the DC Power Supply to the work piece.
7. A signal wire (not supplied) must be attached to the work piece and the other end to the ground post on
the left side of the Control Box labeled “SIGNAL WIRE”.
NOTE
Use standard #12 insulated copper wire as your signal wire. It must be long enough to prevent stress
on the Control Box connection.
8. Connect the Power Supply Communication Cable Assembly (6 pin female connector) to the side of the
Control Box labeled “POWER SUPPLY” and run it back to the Power Supply. Refer to "Table 4-7: Cable
Identification" on page 4-3 for cable identification. "Figure 4-9: Power Supply Comm. Cable Pin Configuration" below illustrates the pin arrangement for the Power Supply Communication Cable and "Table 4-10:
Standard Wiring Connections" has the wire connection schedule for several common power supplies. If
your Power Supply is not listed here please refer to the Owner’s manual of your Power Supply for correct
wiring instructions.
DE
F
C
BA
PIN F BLACK #2
PIN A BLACK #1
CONTROL BOX POWER SUPPLY
COMMUNICATION CABLE PIN LAYOUT
ART# A-10832_AD
Figure 4-9: Power Supply Comm. Cable Pin Configuration
Manual 89250890 4-5 ASSEMBLY AND INSTALLATION
Page 32

N7500 ASSEMBLY AND INSTALLATION
Power Supply Control Connection Chart
N7500 Control Box Power Supply
Brand Model
Lincoln Idealarc® DC 600 2 4
Lincoln Idealarc DC 600 PRO 2 4
Lincoln Idealarc DC 650 PRO 2 4
Lincoln Idealarc DC 655 - EUROPE 2 4
Lincoln Idealarc DC 655 2 4
Lincoln Idealarc DC 750 2 4
Lincoln
Lincoln Idealarc DC 1000 (Prior to Nov 1991) 2 4
Lincoln Idealarc DC 1000 (for code numbers 9919 - 9925,
10293, 11305, 11330, 11331, 11332, 11333, 11334, 11681
thru 11684)
Pin 1 Pin 2 Pin 3 Pin 4 Pin 5
2 4
Comm. Cable
Miller
ESAB
Lincoln Idealarc DC 1500 (Prior to May 1979) 2 4
Lincoln Idealarc 1500 (for Code Numbers 8294 and above) 2 4
Lincoln RED-D-ARC DC 600 2 4
Miller BIG BLUE 500D - 600X A or I B or J
Miller Deltaweld® 450-650 A or I B or J
Miller Deltaweld SERIES A or I B or J
Miller Dimension™ 650 A or I B or J
Miller Dimension 1000 A or I B or J
Miller Dimension SUBARC A or I B or J
Miller Dynasty® 700 - MAXSTAR 700 A B
Miller Gold Star® 300SS - 400SS - 600SS A B
ESAB 653 CVCC U V
ESAB MULTIPOWER 460 PULSE U V
Table 4-10: Standard Wiring Connections
ASSEMBLY AND INSTALLATION 4-6 Manual 89250890
Page 33

ASSEMBLY AND INSTALLATION N7500
G
)
G
AIR LINE
POWER
S
Y
A
C
P
C
E
WO
CE
SIGNAL
G
CO
AC PO
E
O
V
4.05 Torch Head Installation
Make connections from Control Box to the Torch Head. See "Figure 4-11: Assembly Stage 2".
OWER SUPPLY
OMMUNICATION CABL
UPPL
AIR HOSE
MOTOR CABLE -
CONTROL BOX TO
TORCH HEAD
INCOMIN
AIR REGULATOR
DC POWER CABLE (+) IN
NTROL BOX INPUT
WER CABL
120V
R
220
ROUND CABLE (–
RT# A-10848_A
TORCH HEADPENDANTAIR OUT
5 AMP
5 AMP
ON OTHER SIDES
THESE CONNECTIONS
WIR
CONTROL BOX
(VIEWED FROM CABINET RIGHT SIDE)
ROUND CABLE (–)
DC POWER
CABLE (+) OUT
(Rear panel assembly
not shown for clarity)
N7500
MOUNTING
FIXTURE
AIR INLET
TORCH HEAD
RK PIE
Figure 4-11: Assembly Stage 2
9. Mount the Torch Head to the vertical adjustment assembly located on the travel system or fixed stationary
fixture using the mounting hardware supplied with the Torch Head. Further adjustments will be discussed
in the operating section of this manual. See "5.02 Position Torch Head" and "5.03 Insert the Electrode"
on page 5-2.
NOTE
Tuning the mounting position of the Torch Head or adjusting the traveler fixture or carriage system may
be required to achieve best gouging results.
10. Connect the DC power cable(s) to the Torch Head busbar and to the busbar terminal on the back side of the
Control Box labeled “POWER SUPPLY OUT”. These connections must be wrench tight to avoid overheating
the connection. Slide the cable boot over the busbar on the Torch Head. Use the 1/2”-13 hex head bolt
and nut supplied for the cable connection on the Torch Head busbar.
11. Return the Control Box Power Supply cover plate to its original position and tighten both screws.
12. Connect the Air Hose Assembly to the Torch Head and to the side of the Control Box labeled “AIR OUT”.
Slide the rubber boot over the connection on the Torch Head.
13. Connect the Torch Head Motor Cable Assembly to the connector on the side of the Control Box labeled
“TORCH HEAD” and the other end to the motor cable connection on the Torch Head. This cable has a 6
pin connector at each end. Refer to "Table 4-7: Cable Identification" on page 4-3.
Manual 89250890 4-7 ASSEMBLY AND INSTALLATION
Page 34

N7500 ASSEMBLY AND INSTALLATION
n for clarity
CO
O
A
OSE
R
C
TORC
G
)
G
AIR LINE
POWER
S
Y
G
A
B
P
C
E
OU
WO
CE
SIGNAL
E
G
CO
AC PO
E
O
V
4.06 Remote Pendant Installation
Make the following connections from the Pendant to the Control Box. See "Figure 4-12: Assembly Stage 3".
REMOTE PENDANT
N7500 Gouging System
TRV
JOG
START
Automatic Control
TUNE
ROUGH
STOP
OK
UPPL
OWER SUPPLY
OMMUNICATION CABL
REMOTE PENDANT CABLE
IR H
TORCH HEADPENDANTAIR OUT
DC POWE
ABLE (+) OUT
MOTOR CABLE -
NTROL BOX T
TORCH HEAD
AIR INLET
INCOMIN
AIR REGULATOR
DC POWER CABLE (+) IN
NTROL BOX INPUT
WER CABL
120V
R
220
ROUND CABLE (–
RT# A-10854_A
ON OTHER SIDES
THESE CONNECTIONS
WIR
(VIEWED FROM CABINET RIGHT SIDE)
5 AMP
5 AMP
CONTROL BOX
(Rear panel assembly
not shown for clarity)
ROUND CABLE (–)
MOUNTIN
FIXTURE
H HEAD
RK PIE
Figure 4-12: Assembly Stage 3
14. Connect the Remote Pendant Cable Assembly to the Remote Pendant and the Control Box. Cable has a
large 7 pin connector at each end. Refer to "Table 4-7: Cable Identification" on page 4-3.
15. Plug the travel system grounded power cord into the receptacle labeled “POWER OUTLET”.
WARNING
Select the receptacle voltage that correctly matches the plug and power requirements of the Carriage
System.
ASSEMBLY AND INSTALLATION 4-8 Manual 89250890
Page 35

ASSEMBLY AND INSTALLATION N7500
4.07 Remote Pendant Storage
Use safe storage practices when storing the Remote Pendant and cable. When not in use, mount the Remote
Pendant to the top of the Control Box as shown below.
Automatic Control
TUNE
STOP
N7500 Gouging System
ROUGH
START
MAX 100 psi
ART# A-10831_AC
Figure 4-13: Pendant Mounting
Automatic Control
TUNE
STOP
ROUGH
START
ART# A-10830_AC
Figure 4-14: Pendant Mounted
N7500 Gouging System
MAX 100 psi
Manual 89250890 4-9 ASSEMBLY AND INSTALLATION
Page 36

N7500 ASSEMBLY AND INSTALLATION
This Page Intentionally Blank
ASSEMBLY AND INSTALLATION 4-10 Manual 89250890
Page 37

SYSTEM OPERATION N7500
4
SECTION 5: OPERATING THE N7500 SYSTEM
5.01 Remote Pendant Operation
2
7
6
5
10
12
8
11
9
ART# A-10856_AB
Figure 5-1: Remote Pendant
Item No. Feature Function
1
2
3
4
Mode-indicator
Display
START
Start Button
STOP
Stop Button
Rough
Digital display of current mode setting/adjustment value/rate.
Signals the Power Supply to close it’s internal contactor to supply current to the
Torch Head and the electrode in the Torch Head feeds down to begin the gouging
operation.
Signals the Power Supply to open it’s internal contactor shutting OFF the current to
the Torch Head and the electrode in the Torch Head will retract away from the work
surface.
Stalls the Torch Head feed motor while maintaining current to the electrode to avoid
gouging to irregular surface defects.
(Machining)
1
3
5
Potentiometer to adjust settings based on operation mode.
Rotary Dial
TRV
6
Travel Button
7
Jog Up/Down
When pressed, supplies AC voltage to the travel system that is plugged into the
Control Box. Used when adjustments are required to locate the electrode to the
start point of gouging.
Feeds or retracts the electrode in the Torch Head
Travel
8
Mode Selector
OK
9
10 Connector Cable connection running from the Remote Pendant to Control Box
OK Button
Shifts mode (program display) selection in digital display to access a setting or
adjustment.
Enters and Accepts data adjustments for the mode of operation.
11 Bumper Protective housing.
12 Grip Feet Plastic snap on feet to fasten Remote Pendant to Control Box.
Table 5-2: Remote Pendant Controls
Determine whether you will use a Constant Current (CC) or Constant Voltage (CV) Power Supply. A menu option
on the Remote Pendant LED will prompt you to choose CC or CV to match your Power Supply.
Manual 89250890 5-1 SYSTEM OPERATION
Page 38

N7500 SYSTEM OPERATION
3/8” NPT AIR INLET
WARNING! AVERTISSEMENT!
Insure good ground from power supply to workpiece. Poor ground may cause
damage to any or all components.
gg p
gg
U
ppyp g
ppyp g
See manual.
y
y
Smoke, fumes, and gases can be dangerous to your health.
ventilation. Keep your head out of the smoke.
gg
,,gg
l.
L les rayons de l’arc,
.
5.02 Position Torch Head
1. Position the Torch Head above the work piece you want to start gouging.
2. Using the Angle Gauge supplied with the N7500, adjust the Torch Head to the work piece. The angle gauge
sets the torch angle, electrode stick-out and aligns the air nozzle.
3. The air should flow between the electrode and the work piece.
Charts, graphs and other data in this manual are based on a 45° electrode angle, but you can use electrode angles
from 45° to 60°. Users should develop their own standards based on shop conditions and application.
5.03 Insert the Electrode
1. Adjust the Electrode Guide Block for the electrode diameter being used. Loosen thumbscrew, adjust, and
then tighten the thumbscrew again (See “Figure 5-3: Torch Head Parts”).
2. Push the Electrode Release (clamping) Lever down and insert the electrode FEMALE END FIRST into the
rear of the Torch Head until it protrudes through the nozzle. The two-legged spring and protective shield
should rest squarely on top of the electrode. To check their positions, look down the rear of the torch. If
the spring and shield are pushed to either side, withdraw the electrode and insert it again. Release the
clamping lever.
ELECTRODE
TORCH HEAD
Protect yourself and others. Wear ear, eye, and body protection.
Protégez-vous et d'autres. Portez l'oreille, l'oeil, et la protection de corps.
se only with compressed air.
Assurez la bonne terre de l'alimentation d'énergie à l'objet. La terre pauvre peut endommager
quelques des ou tous composants. Employez seulement avec l'air comprimé. Voir le manue
Noise can damage hearing.
Le bruit peut endommager l’ouïe.
Use adequate
La fumée, les émanations et les gaz peuvent être dangereux pour votre santé.
Employez à ventilation proportionnée. Gardez votre tête hors de la fumée.
Arc rays, hot slag, and sparks can injure eyes and burn skin.
es scories et les étincelles chauds peuvent blesser les yeux et brûler la peau.
Welding sparks can cause res and explosions.
Les étincelles de soudage peuvent causer des incendies et des explosions
Electric shock can cause injury or death. Disconnect power before servicing.
Un choc électrique peut causer des blessures ou la mort. Déconnectez la puissance
- 5/16 3/8
- 1/2
- 5/8
- 3/4
MOTOR CABLE
DC POWER
CABLE
BUSBAR
N7500
RELEASE
LEVER
AIR PLENUM HOUSING
MOUNTING
FIXTURE
ART# A-10834_AB
ELECTRODE
GUIDE BLOCK
MOTOR
Figure 5-3: Torch Head Parts
3. Flip the power switch located on the side of the Control Box labeled “POWER OFF” & “POWER ON” to the
“ON” position.
4. The electrode will retract for several seconds and stop.
5. The Mode Indicator Display on the Remote Pendant will light up showing the various menu options preprogrammed in the unit.
“Menu Setting” is the default display whenever the unit is powered up.
SYSTEM OPERATION 5-2 Manual 89250890
Page 39

SYSTEM OPERATION N7500
e4
5.04 Remote Pendant Programming
The first (default) menu setting option is “Power Mode”, see “Figure 5-4: Default Pendant Screen CC or CV mode”.
This setting must match the DC Power Supply being used.
1. Select the CC or CV mode setting. To set the CC or CV mode;
a. Press the “OK” OK button on the Pendant. Once pressed, the CC or CV letters will begin blinking.
b. Rotate the Rotary Dial to switch between CC or CV modes. The screen displays as follows:
Menu Setting
Power Mode CV
Parameter Guide
Current1400A
ART# A-10825_AC
Figure 5-4: Default Pendant Screen CC or CV mode
c. Press the “OK” OK button on the Pendant. The CC or CV choice displayed on the screen is entered.
If the “OK” button is not pressed within one minute, the blinking will stop and the mode will be whatever
is shown.
2. Using the down “Mode Selector” button move the cursor to highlight “Parameter Guide” and press
the “OK” OK button. See “Figure 5-6: Parameter Guide Screen”.
3. There are 2 Parameter Guide settings based on the work performed. Use the “Mode Selector” or
buttons to scroll up or down the choices. Press the “OK” OK button and use the dial to select a value
for any of these settings. Use the “Mode Selector” button again to exit a setting choice. The displayed
setting value is accepted when you move to another setting.
NOTE
Menu Setting
Power Mode CC
Parameter Guide
Voltag
ART# A-10826_AC
2.0V
Unit - (of measurement) Inches or Millimeters
Diameter - Electrode diameter. Available settings are listed in the Parameter Table.
Depth - Gouging depth. Available settings (based on the electrode diameter) are listed in the Parameter Table.
Current - Defaults based on the recommended operating current.
Manual 89250890 5-3 SYSTEM OPERATION
Page 40

N7500 SYSTEM OPERATION
Travel Speed - Travel Speed output provides a starting point to set the travel speed to obtain the gouge depth
selected. Adjust by resetting parameter variables accordingly once the gouging process is started as needed.
Remember that the slower the travel speed the deeper the gouge and vice versa.
Electrode Diameter Gouge Depth Current Travel speed/min
INCH MM INCH MM AMPS INCH MM
5/16 7.9 1/8 3.2 400 65.0 1651
5/16 7.9 3/16 4.8 400 45.0 1143
5/16 7.9 1/4 6.4 450 36.0 914
5/16 7.9 5/16 7.9 450 33.0 838
5/16 7.9 7/16 11.1 450 22.5 572
3/8 9.5 1/8 3.2 500 70.0 1778
3/8 9.5 3/16 4.8 500 44.0 1118
3/8 9.5 1/4 6.4 500 35.0 889
3/8 9.5 3/8 9.5 500 20.0 508
3/8 9.5 9/16 14.3 500 17.5 445
1/2 12.7 1/8 3.2 850 96.0 2438
1/2 12.7 1/4 6.4 850 57.0 1448
1/2 12.7 3/8 9.5 850 35.0 889
1/2 12.7 1/2 12.7 850 24.0 610
1/2 12.7 3/4 19.1 850 17.5 445
5/8 15.9 1/4 6.4 1250 72.0 1829
5/8 15.9 3/8 9.5 1250 48.0 1219
5/8 15.9 1/2 12.7 1250 37.0 940
5/8 15.9 5/8 15.9 1250 30.0 762
5/8 15.9 15/16 23.8 1250 19.5 495
3/4 19.1 1/4 6.4 1400 72.0 1829
3/4 19.1 3/8 9.5 1400 42.0 1067
3/4 19.1 1/2 12.7 1400 34.0 864
3/4 19.1 5/8 15.9 1400 27.0 686
3/4 19.1 3/4 19.1 1400 22.0 559
3/4 19.1 1 1/8 28.6 1400 13.0 330
Table 5-5: Parameter Table
SYSTEM OPERATION 5-4 Manual 89250890
Page 41

SYSTEM OPERATION N7500
t8
t5
t8
Menu Setting
Power Mode CV
Parameter Guide
Curren
ART# A-10824_AC
Figure 5-6: Parameter Guide Screen (using CV mode)
Back
Unit Inch
Diameter
Depth
ART# A-10841_AB
Figure 5-7: Parameter Guide Setting Examples
4. Press the “OK” OK button to exit the Parameter Guide choices.
5. Set the DC Power Supply to obtain the recommended current as noted in the Parameter Guide. Set the
travel speed to the recommended speed per the Parameter Guide.
6. Use the up or down “Mode Selector” or buttons to scroll to “<- Back” and press the “OK” OK
button. You are returned to the main screen highlighting “Parameter Guide”.
7. Use the up or down “Mode Selector” or buttons to scroll to Current and press the “OK” OK button. See “Figure 5-8: Current Setting Examples”.
3/8
9/16
Curren
Travel Speed
ART# A-10842_AB
50A
Back
00A
17.5 Inch/Min
When operating in the “CC” mode, set “Voltage” at any point between 40 - 44 Volts. The Remote Pendant
is set at 42 Volts from the factory.
When working in the “CV” mode, set the “Current”.
CV EXAMPLE:
Electrode Diameter = 1/2” (12.7 mm)
Amperage Required = 850
“OUTPUT LEVEL” setting = 850
Menu Setting
Power Mode CV
Parameter Guide
Curren
ART# A-10829_AB
Figure 5-8: Current Setting Example
8. Use the potentiometer dial to obtain the correct “Current” setting required when using CV mode.
Press the “OK” OK button to set the Current value.
50A
Manual 89250890 5-5 SYSTEM OPERATION
Page 42

N7500 SYSTEM OPERATION
e4
9. Use the up or down “Mode Selector” or buttons to scroll to “Travel Delay.” See “Figure 5-9: Travel
Delay Screen.”
Press the “OK” OK button and rotate the potentiometer dial to adjust the time delay for any time
length between 0 and 6.0 seconds.
Press the “OK” OK button to set the Travel Delay time setting.
Menu Setting
Parameter Guide
Voltag
Travel Delay
ART# A-10828_AB
Figure 5-9: Travel Delay Screen
Travel Delay Setting
Approximate
Setting
0.0
0.5
1.0
1.5
2.0
2.5
3.0 3/4” (19.05 mm)
3.5 3/4” (19.05 mm)
4.0 3/4” (19.05 mm)
5/16” (7.9 mm) through 3/4” (19.05 mm)
5/16” (7.9 mm) through 3/4” (19.05 mm)
5/16” (7.9 mm) through 3/4” (19.05 mm)
3/8” (9.53 mm) through 3/4” (19.05 mm)
1/2” (12.7 mm), 5/8” (15.88 mm), 3/4” (19.05 mm)
5/8” (15.88 mm), 3/4” (19.05 mm)
Electrode Size
Table 5-10: Travel Delay Setting
2.0V
Target Depth
Inches mm
⅛
¼
⁄
⅜
½
⅝
⁄
¾
⅞
3.2
6.4
7.9
9.5
12.7
15.9
17.5
19.0
22.2
10. Use the up or down “Mode Selector” or buttons to scroll to “No Current Detect”. See “Figure
5-11: No Current Detect screens“.
The N7500 System contains a “No-Current Detect” circuit. This circuit monitors Arc Current. Should the
arc increase or decrease outside set limits or the arc stop, the “No-Current Detect” circuit will shut down
the gouging sequence. “Normal” mode is preset from the factory.
This program can be set for one of three response levels:
NORMAL - Setting provides 0.4 second System shutdown delay.
SPECIAL - Setting provides 0.8 second System shutdown delay.
OFF - System continues to operate regardless of Arc Current level. System shutdown is manually
controlled.
SYSTEM OPERATION 5-6 Manual 89250890
Page 43

SYSTEM OPERATION N7500
Set the “No Current Detect” option as needed. To change the setting press the “OK” OK button and using
the Potentiometer knob select the setting that meets your needs.
Menu Setting
0.2 Sec
NoCurrent Detect
ART# A-10823_AB
Normal
Menu Setting
0.2 Sec
NoCurrent Detect
ART# A-10827_AB
Special
Menu Setting
0.2 Sec
NoCurrent Detect
ART# A-10822_AB
OFF
Figure 5-11: No Current Detect screens
Press the “OK” OK button again to retain the setting chosen.
11. Turn ON the compressed air.
12. Turn ON the Power Supply.
13. Press the “Start”
START
button.
The DC Power Supply contactor closes and the electrode will feed down to the work piece. The air solenoid
inside the Control Box will open to release compressed air to the Torch Head air nozzle. An arc will be
struck as soon as the tip of the electrode reaches the work piece. The proper arc gap will be maintained,
even while the electrode feeds downward. Once the electrode reaches the target depth, the travel system
will be energized.
NOTE
If a short out interrupts the operation; check the air nozzle and the electrode guide block in the Torch
Head for signs of arcing. If arcing is evident make appropriate repairs. If NO signs of arcing are present, retry starting the gouge procedure by pressing the “Start” button on the Pendant.
WARNING
Wear protective gear and be sure the work area is clear. The system is ready to begin gouging. If the
unit is attached to a travel system, be sure the travel system is ready to operate. Stand clear of the
Torch Head.
CAUTION
If the unit doesn’t respond, turn OFF the Power Supply and Control Box power. Refer to the Troubleshooting Guide.
14. To adjust arc voltage while operating in “CC” mode, push down on the rotary dial while turning clockwise
to increase or counterclockwise to decrease the arc voltage under load. Range of adjustment is +/- 5 volts
from initial arc voltage value shown on the Remote Pendant before pressing the “Start”
START
button. If the
gouging is stopped for any reason, the arc voltage value displayed at that point will be the new value that
can be increased or decreased by 5 volts.
To adjust current while operating in “CV” mode, push down on the potentiometer dial while turning
clockwise to increase or counterclockwise to decrease the current under load. Range of adjustment is +/100 amperes from initial current value shown on the Remote Pendant before pressing the “Start” button.
If the gouging is stopped for any reason, the current value displayed at that point will become the new
value that can be increased or decreased by 100 amperes.
Manual 89250890 5-7 SYSTEM OPERATION
Page 44

N7500 SYSTEM OPERATION
Gouging operations can be stopped using the Remote Pendant controls.
15. Press the “STOP”
STOP
button and the electrode will retract, compressed air stops flowing through to the
Torch Head, and the DC power supply contactor opens.
If you press the “Start”
START
button again the N7500 will resume operations again in the same mode set-
tings.
NOTE
LOW VOLTAGE SHUTDOWN can occur when the DC voltage supplied to the N7500 System drop below
28 volts. This feature protects the system from serious damage. If this occurs determine the cause of
the voltage drop, take corrective action and restart the system.
SYSTEM OPERATION 5-8 Manual 89250890
Page 45

SYSTEM USES N7500
SECTION 6:
N7500 SYSTEM USES
6.01 SYSTEM USES
This section briefly describes some uses for the N7500 System. If you have any questions concerning a specific
application for this system contact Victor Technologies Technical Services Department at 800-426-1888 or 940-
566-2000.
GOUGING NON-FERROUS METALS
The N7500 System can be connected to DC Straight Polarity (DCEN) to gouge non-ferrous metals, such as nickel,
copper alloys, etc. “Figure 6-1: N7500 DC Straight Polarity (DCEN)” shows the proper connections for the system
to run on DC Straight Polarity.
REMOTE PENDANT
Automatic Control
DC POWER
CABLE (+) OUT
(Rear panel assembly
not shown for clarity)
TRV
JOG
TUNE
OK
MOUNTING
N7500 Gouging System
START
ROUGH
STOP
AIR HOSE
TORCH HEAD CABLE
FIXTURE
CONTROL BOX
AIR INLET
N7500
TORCH HEAD
WORK PIECE
POWER
SUPPLY
INCOMING
AIR LINE
DC POWER CABLE (-) IN
CONTROLLER INPUT
AC POWER CABLE
120V
OR
220V
GROUND CABLE (–)
ART# A-10852_AC
POWER SUPPLY
COMMUNICATION CABLE
AIR REGULATOR
(VIEWED FROM CABINET RIGHT SIDE)
SIGNAL
WIRE
PENDANT CONTROL BOX CABLE
5 AMP
ON OTHER SIDES
THESE CONNECTIONS
CONTROL BOX
TORCH HEADPENDANTAIR OUT
5 AMP
GROUND CABLE (+)
Figure 6-1: N7500 DC Straight Polarity (DCEN)
NOTE
Use standard #12 insulated copper wire as your signal wire. It must be long enough to prevent stress
on the Contactor connection.
6.02 Zero Force Rough Machining
The N7500 system can work with an automated travel system to remove hardsurfacing material from steel mill
rolls; kiln rolls and shafts which needs re-working. Remove as much as 1-1/2” (3.81 cm) of old material from the
outside diameter in a single pass and as little as 1/8” (3.18 cm) for the finish pass.
OSCILLATION GOUGING TO REMOVE MATERIAL
The N7500 can be mounted on a welding oscillator to remove material. Normal uses for an oscillated gouge would
be to remove cladded material from plates requiring a beveled edge and to remove backup bars and excessive
weld crowns.
Manual 89250890 6-1 SYSTEM USES
Page 46

N7500 SYSTEM USES
This Page Intentionally Blank
SYSTEM USES 6-2 Manual 89250890
Page 47
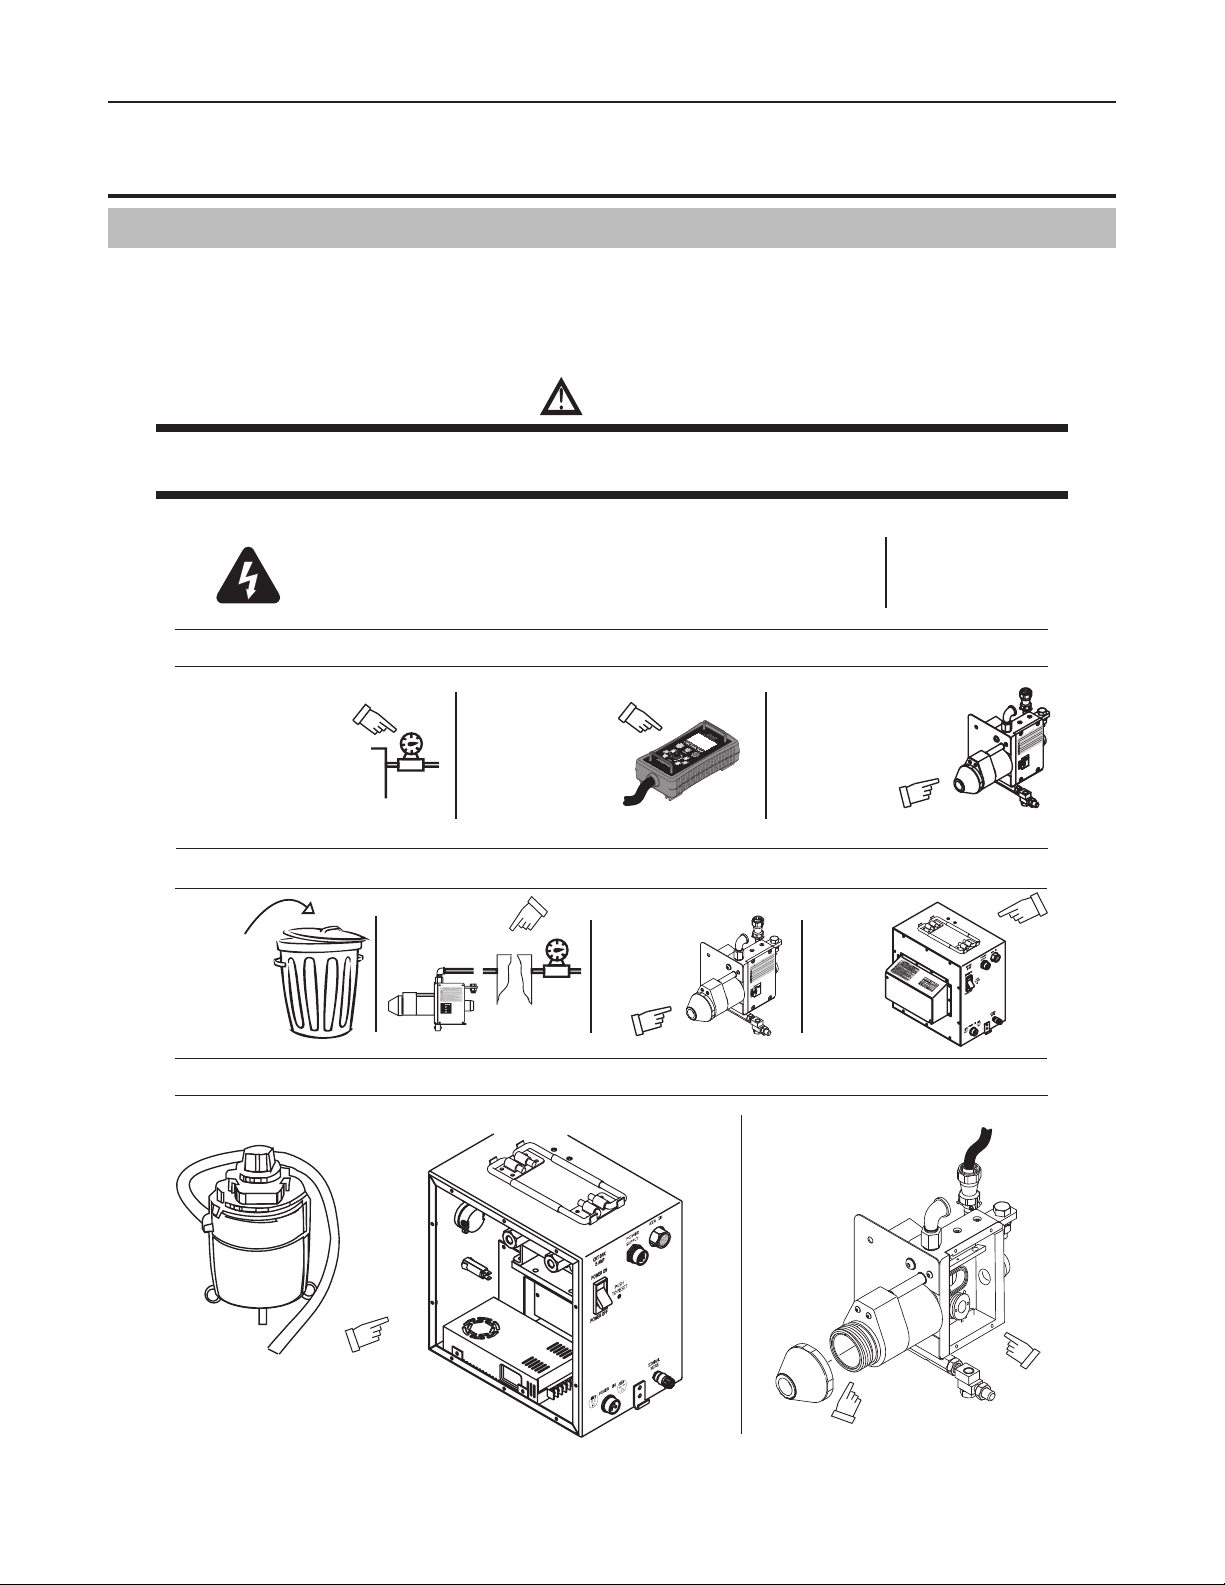
MAINTENANCE N7500
Maintain more often
SECTION 7:
MAINTENANCE
7.01 Introduction
If this equipment does not operate properly, stop work immediately and investigate the cause of the malfunction.
Maintenance work must be performed by an experienced, qualified person only. Any electrical work must be performed
by an electrician or other person properly trained in servicing electrical equipment. Do not permit untrained persons
to inspect, clean or repair this equipment. Use only recommended replacement parts when servicing this machine.
WARNING
Danger: HIGH VOLTAGE may be present internally even with the Control Box power switch in the OFF position. Before inspecting, cleaning, or servicing, disconnect and lock out the input power from the Mains.
Warning!
Disconnect input power before maintaining.
Each Use
Visual check of
regulator and pressure
Air lines
Replace all
broken parts
Visually check and use a vacuum to carefully clean the interior
Visual check of
Remote Pendant
- 5/16 3/8
- 1/2
- 5/8
- 3/4
3 Months
Clean exterior
of Torch
Head
6 Months
Visual check of
Torch Head
Use only with compressed air. See manual.
Use adequate
énergie à l'objet. La terre pauvre peut endommager
WARNING! AVERTISSEMENT!
yez seulement avec l'air comprimé. Voir le manuel.
yons de l’arc,
Le bruit peut endommager l’ouïe.
Protect yourself and others. Wear ear, eye, and body protection.
Protégez-vous et d'autres. Portez l'oreille, l'oeil, et la protection de corps.
L les ra
Insure good ground from power supply to workpiece. Poor ground may cause
damage to any or all components.
Assurez la bonne terre de l'alimentation d'
quelques des ou tous composants. Emplo
Noise can damage hearing.
Smoke, fumes, and gases can be dangerous to your health.
ventilation. Keep your head out of the smoke.
La fumée, les émanations et les gaz peuvent être dangereux pour votre santé.
Employez à ventilation proportionnée. Gardez votre tête hors de la fumée.
Arc rays, hot slag, and sparks can injure eyes and burn skin.
es scories et les étincelles chauds peuvent blesser les yeux et brûler la peau.
Welding sparks can cause res and explosions.
Les étincelles de soudage peuvent causer des incendies et des explosions.
Electric shock can cause injury or death. Disconnect power before servicing.
Un choc électrique peut causer des blessures ou la mort. Déconnectez la puissance
avant l'entretien.
Clean
exterior
of Control Box
if used under severe
conditions
avec l'air comprimé. Voir le manuel.
Use only with compressed air. See manual.
Use adequate
'énergie à l'objet. La terre pauvre peut endommag
WARNING! AVERTISSEMENT!
yez seulement
ayons de l’arc,
Le bruit peut endommager l’ouïe.
Protect yourself and others. Wear ear, eye, and body protection.
Protégez-vous et d'autres. Portez l'oreille, l'oeil, et la protection de corps.
L les r
Insure good ground from power supply to workpiece. Poor ground may cause
damage to any or all components.
Assurez la bonne terre de l'alimentation d
quelques des ou tous composants. Emplo
Noise can damage hearing.
Smoke, fumes, and gases can be dangerous to your health.
ventilation. Keep your head out of the smoke.
La fumée, les émanations et les gaz peuvent être dangereux pour votre santé.
Employez à ventilation proportionnée. Gardez votre tête hors de la fumée.
Arc rays, hot slag, and sparks can injure eyes and burn skin.
es scories et les étincelles chauds peuvent blesser les yeux et brûler la peau.
Welding sparks can cause res and explosions.
Les étincelles de soudage peuvent causer des incendies et des explosions.
Electric shock can cause injury or death. Disconnect power before servicing.
Un choc électrique peut causer des blessures ou la mort. Déconnectez la puissance
avant l'entretien.
er
Clean
interior of Nozzle
and
MAX 100 psi
Torch
Head
Art # A-10847_AB
Figure 7-1: Maintenance
Manual 89250890 7-1 MAINTENANCE
Page 48

N7500 MAINTENANCE
The following checklist can be used as a guide for routine maintenance.
• Check warning labels for readability.
• Check sheet metal panels, plates, and covers on the Control Box, Remote Pendant, and Torch Head. All screws,
fasteners, and connectors should be firmly secured. Heavily corroded or damaged panels, damaged fasteners
or connectors should be replaced.
• Check all wiring and hoses to the Control Box, Remote Pendant, and Torch Head. Repair or replace any wires,
cables, or hoses that have cracked or damaged insulation or frayed connections.
• Check Control Box internal connections including circuit board connectors. Any loose or corroded connections
should be repaired.
• Check any connections to travelers, fixtures, etc.
• Check all Control Box switches and controls. Damaged or broken switches or controls should be replaced.
• Check Remote Pendant control panel surface, bumper, connector, and controls. Cracked, torn, or peeling Remote
Pendant control panel surface should be replaced. If any of the control buttons or rotary dial are inoperable the
Remote Pendant should be replaced. If the rotary dial knob is broken, missing, or malfunctioning the rotary
dial knob should be replaced.
• Check Torch Head nozzle, air plenum housing, shield, motor, busbar connection, and motor cable. Heavily
corroded or damaged nozzle, air plenum housing, or shield should be replaced.
• Check and log N7500 Arctime hours using the Remote Pendant.
7.02 Remote Pendant ARCTIME
Arctime will show the N7500 arctime when the unit is turned ON. This display will update as the N7500 is used.
1. Position the power switch located on the side of the Control Box labeled “POWER OFF” & “POWER ON” to the
“ON” position. Notice the electrode will retract for several seconds and stop.
2. The Mode Indicator Display on the Remote Pendant will light up on the “Menu Setting” (Default display whenever
the unit is powered up).
3. Using the down “Mode Selector” button move the cursor to highlight “Arctime” and press the “OK” OK
button.
0.2 Sec
NoCurrent Detect
Normal
ART# A-10840_AB
Figure 7-2: Arctime Screen
4. Log the Arctime hours and the date the reading was taken onto a log sheet for your maintenance record.
0.0HRArctime
MAINTENANCE 7-2 Manual 89250890
Page 49

TROUBLESHOOTING GUIDE N7500
SECTION 8:
TROUBLESHOOTING GUIDE
8.01 Arcair-Matic N7500 Gouging System
In all troubleshooting cases turn power OFF before performing work on the system unless otherwise directed to do so.
CAUTION
Use appropriate Lock OUT and tag OUT measures when working with electrical equipment or electrical
components.
8.02 N7500 General
General
Problem Possible Cause Possible Remedy
Torch Head
nozzle melting
No power
No operation
with power
supplied to
Remote Pendant
N7500 starts
operation but
Torch Head
does not begin
traveling or
delays start of
travel
Low air pressure at nozzle
Power Supply not turned ON Turn ON Power Supply.
AC Power Cable not connected to
N7500
N7500 Control Box ON/OFF switch
not turned ON
Power Supply wiring not correct
DC Power Cables not connected or
improperly connected
DC Power Cable size too small
No low current
No ground
Incorrect control wiring to Power
Supply or from AC Power
Programming on Remote Pendant
incomplete
Incomplete, loose, or broken connector
Signal Wire not connected Connect Signal Wire.
Travel Delay improperly set
Traveler controls improperly set
Increase air regulator pressure.
Dismantle Torch Head nozzle, clean and reassemble.
Check Air Solenoid Valve.
Check AC Power Cable connection.
Turn ON N7500.
Check wiring connections to Power Supply. Refer to "Figure 4-10: Power Supply Comm. Cable Pin Configuration"
on page 4-5 for recommended control wiring.
Check DC Power Cable connections. NOTE: Connections
must be wrench tight.
Refer to "Table 3-13: Power Cable Requirements" on page
3-10
Check ground wire, ground wire connections, work piece
clamp, Power Supply DC Power Cables and wiring connections to Power Supply.
Review "Table 4-11: Standard Wiring Connections" on
page 4-6.
Review "4.04 Control Box Installation" on page 4-4.
Complete Pendant programming. Refer to "5.04 Remote
Pendant Programming" on page 5-3.
Check all N7500 connections. Repair or replace.
Review "Table 5-10: Travel Delay Setting" on page 5-6
and reprogram as necessary.
Review connections from Control Box to Traveler.
Confirm Traveler is ON. Review the Traveler’s Owner /
Operation manual and correct.
Manual 89250890 8-1 TROUBLESHOOTING GUIDE
Page 50

N7500 TROUBLESHOOTING GUIDE
General
Problem Possible Cause Possible Remedy
N7500 starts
operation but
Torch Head
stops
Electrical Arc
at Power supply, Control
Box or Torch
Head Buss Bar
Low voltage shutdown
Improper wiring connections
8.03 Torch Head
Table 8-1: General Troubleshooting
PIN # WIRE COLOR
Table 8-2: Torch Head Motor 6 PIN Wire Schedule
DC voltage has dropped below 28 volts. Determine cause
of voltage drop, take corrective action, and restart the
system.
Confirm proper wiring, check for damage to components,
repair or replace.
A EMPTY
B RED
C BLACK
D EMPTY
E GREEN
F BLUE
Torch Head
Problem Possible Cause Possible Remedy
See "No air flow through Control
Box when system is activated" in
Control Box Troubleshooting
No air or little
air from Torch
Head nozzle
Electrode
does not feed
through Torch
Head
Shop air issue Check Shop air.
Control Box to Torch Head air line
kinked
Ports in Torch Head nozzle are
clogged
White nozzle insulator ring on air
nozzle missing or destroyed
Torch Head motor not operating
Joint separated
or
Electrode stub jammed inside
housing
Electrode release lever jammed
open
Remove kink in air line.
Clean slag from Torch Head nozzle.
Replace with new nozzle insulator ring. See Item number
"27" in "Table 9-4: Torch Head PARTS" on page 9-2.
See "8.04 Remote Pendant" Troubleshooting section.
Check Motor cable connectors. Repair or replace cable.
See "SYSTEM CABLES" on page 9-4.
Check Motor. See "Figure 9-3: Torch Head PARTS" on
page 9-2.
Realign electrodes or replace damaged electrode.
Shut N7500 down, disconnect Torch Head from Control
Box, open housing cover plate and remove electrode. See
"Figure 9-3: Torch Head PARTS" on page 9-2.
Remove electrode(s) from Torch Head, inspect release lever, repair or replace. See "Figure 9-3: Torch Head PARTS"
on page 9-2.
TROUBLESHOOTING GUIDE 8-2 Manual 89250890
Page 51

TROUBLESHOOTING GUIDE N7500
Torch Head
Problem Possible Cause Possible Remedy
Air leaking
from Air Plenum Housing
Busbar corrosion, arcing,
overheating,
or screws
loose inside
head
Electrode
short out
Electrode
retracts during
normal operation
Electrode does
not retract
Electrode does
not retract
and reposition
itself at start
up
Electrode does
not arc
O-rings on Air Plenum supply tube
worn
Top assembly of Air Plenum Housing not fastened securely to lower
Air Plenum Housing
Top assembly of Air Plenum Housing is distorted from excessive heat
Cable connections are NOT wrench
tight
DC Voltage setting is incorrect Adjust DC voltage to 40 to 44 DC Volts.
Current set too low for electrode
being used
Arc out on air nozzle or the electrode guide block
Power supply and N7500 not on
same CC/CV setting
DC Voltage setting is incorrect Adjust DC voltage to 40 to 44 volts.
STOP button pushed Press START button.
Torch Head motor not working Check Torch Head motor and cable. Repair or replace.
Joint separated
or
Electrode stub jammed inside
housing
Torch Head Motor Cable not attached or improperly attached
No or low current
Table 8-3: Torch Head Troubleshooting
Check air tube o-rings, replace if necessary.
Tighten screws on Plenum.
Replace.
Tighten busbar leads connection wrench tight.
Adjust DC current.
If NO signs of arcing are present, retry starting the gouge
procedure by pressing the “Start” button on the Pendant.
If signs of arcing are present, repair or replace components. See "Figure 9-3: Torch Head PARTS" on page 9-2.
Reset both to the same CC or CV setting.
Realign electrodes or replace damaged electrode.
Shut N7500 down, disconnect Torch Head from Control
Box, open housing cover plate and remove electrode. See
"Figure 9-3: Torch Head PARTS" on page 9-2.
Attach motor cable.
Check the Power Supply current output.
Adjust the Power Supply output current to match the rated
current for the Electrode size. Refer to "Table 5-5: Parameter Table" on page 5-4.
Manual 89250890 8-3 TROUBLESHOOTING GUIDE
Page 52

N7500 TROUBLESHOOTING GUIDE
8.04 Remote Pendant
PENDANT CABLE
PIN COLOR LOCATION
A WHT (#1) PIN A
B BK (#1) PIN B
C BK (#2) PIN C
D NOT USED PIN D
E WHT (no #) PIN E
F WHT (#2) PIN F
G NOT USED PIN G
Table 8-4: Pendant Cable Pin Identification
Remote Pendant
Problem Possible Cause Possible Remedy
Pendant Cable not attached Attach Pendant Cable.
Absence of appropriate power Check power to Control Box.
Remote Pendant has no
power
No Remote
Pendant
display
Rotary Dial
does not work
“No-Current
Detect” shut
down
Mode Selector
button(s) on
Pendant do
not respond to
touch
Tripped ON/OFF Switch circuit
breaker
Break in cable which links Control
Box to Remote Pendant
Defective Remote Pendant Replace Remote Pendant.
Pendant Cable not attached Attach Pendant Cable.
Power to Remote Pendant is OFF
Defective Remote Pendant Replace Remote Pendant.
Power to Remote Pendant is OFF
Rotary Dial is loose Tighten set screw on Rotary Dial.
No Current Detect setting is OFF
Power supply and N7500 not on
same CC/CV setting
Arc Current not reporting
Defective Remote Pendant Replace Remote Pendant.
Table 8-5: Remote Pendant Troubleshooting
Turn power OFF, check for and repair fault.
Check cable connections.
Repair/replace cable.
Check cable connections.
Repair/replace cable.
Check cable connections.
Repair/replace cable.
Change Remote Pendant No Current Detect programming to ‘Normal’ or ‘Special‘. See page 5-7 for
instructions.
Reset both to the same CC or CV setting.
Check signal wire for continuity, min wire size, clamp
and connections at work piece and Control Box.
TROUBLESHOOTING GUIDE 8-4 Manual 89250890
Page 53

TROUBLESHOOTING GUIDE N7500
8.05 Control Box
Control Box
Problem Possible Cause Possible Remedy
No AC power
to Control Box
No DC “+”
power to Control Box
No output
from Travel
System Power
Connection on
Control Box
No air flow
through
Control Box
when system
is activated
Power Supply In/Out
Busbars corroded, arcing,
overheating
110/220VAC power to Control Box
NOT turned ON
Disconnected AC Power Cable Connect AC Power cable
Defective AC Power cable
Tripped ON/OFF Switch circuit
breaker
Power Supply Comm Cable not
connected or improperly connected
Circuit breaker tripped
Defective power cable Check for fault. Repair or replace cable.
Defective power outlet on Control
Box
Shop compressed air is OFF,
regulator is closed or improperly
adjusted
Air solenoid is faulty
DC cable connection is NOT
wrench tight
Table 8-6: Control Box Troubleshooting
Check connections and turn power ON. See "Table
3-2: Control Box Features" on page 3-2.
Repair/replace cable. See "9.04 110V Power Supply
Cable Assembly" on page 9-4.
Turn AC power OFF, check for and repair fault, then
reset.
Connect Power Supply Comm Cable to Power Supply.
Review "Table 4-11: Standard Wiring Connections" on
page 4-6 and "Figure 4-10: Power Supply Comm.
Cable Pin Configuration" on page 4-5 for proper wiring points.
Check for and repair fault. Reset. See "Table 3-2:
Control Box Features" on page 3-2.
Replace outlet. See "Figure 9-1: Control Box PARTS"
on page 9-1.
Check shop air, check regulator at Control Box Air
In inlet. Turn shop air ON and adjust regulator to
operating psi.
WARNING
Do not exceed N7500 system max air pressure.
Replace air solenoid. See "Figure 9-1: Control Box
PARTS" on page 9-1.
Tighten busbar connection wrench tight.
AC POWER SUPPLY CABLE
PIN COLOR VOLTAGE
A WHT NEUTRAL
B GN GROUND
C BK LINE
Table 8-7: AC Power Supply Cable Pin Identification
Manual 89250890 8-5 TROUBLESHOOTING GUIDE
Page 54

N7500 TROUBLESHOOTING GUIDE
This Page Intentionally Blank
TROUBLESHOOTING GUIDE 8-6 Manual 89250890
Page 55

REPLACEMENT PARTS N7500
POWER
POWER
SU
PPLY IN
SUP
PLY OUT
SECTION 9:
REPLACEMENT PARTS
9.01 Control Box Replacement Parts
14
13
12
16
3
17
4
2
5
17
6
7
MAX 100 psi
8
9
10
15
11
1
ART# A-10846_AC
Figure 9-1: Control Box PARTS
Item
No.
Qty Part Number Description
1 1 96-881-091 Power Supply With Brackets
2 1 96-169-334 Torch Head Connector
3 1 96-169-069 AC Power Receptacle - 110 VAC
4 1 96-169-337 Remote Pendant Connector
5 1 96-169-070 AC Power Receptacle - 220VAC
6 1 96-921-005 Solenoid Valve
7 1 96-174-079 Control Box Base - w/Handles
8 1 96-110-007 Circuit Breaker
9 1 96-169-333 Power Supply Communication Connector
10 1 96-644-007 Signal Wire Connector
11 1 96-169-332 AC Power Supply Connector
12 1 96-698-038 Current Sensor
13 1 94-111-046 Electrical Plate Bracket Assy
14 2 94-013-092 Poles
15 1 96-162-738 Main PCBA w/Standoffs
16 1 96-174-069 Rear Panel Assembly w/Cover
17 2 96-110-010 Circuit Breaker - 5 Amp
Table 9-2: Control Box PARTS
Manual 89250890 9-1 REPLACEMENT PARTS
Page 56

N7500 REPLACEMENT PARTS
9.02 Torch Head Replacement Parts
17
21
12
24
ART# A-10843_AC
26
25
6
3
5
8
27
20
19
9
28
7
10
23
4
18
1
13
16
14
11
15
Figure 9-3: Torch Head PARTS
Item Part Number Description Item Part Number Description
05-124-001 N7500 Torch Head
1 94-395-106 Torch Housing 94-079-008 Beam & Pin
94-949-053 Wheel Assembly
15
2 94-171-278 Cover 94-949-052 Wheel (2 Required)
3 94-565-092 Locknut 16 94-800-184 Shoe Spring
4 94-013-098 Electrode Tube Adapter 17 94-476-067 Clamping Lever
5 94-096-132 Vee Block 18 94-949-051 Drive Wheel
6 94-784-076 Nozzle Sleeve 19 94-433-184 Insulator
7 94-636-002 Extended Plenum 20 96-524-100 Drive Motor & Gear Housing
8 94-556-071 Air Nozzle w/Insulator 21 94-893-082 Electrode Holder Tube
9 94-395-107 Air Inlet Housing Assembly 22 94-105-016 Cable Boot
10 94-433-190 Extension Insulator 23 94-306-151 Air Inlet Fittings
11 96-070-029 Bus Bars 24 94-096-133 Guide Block
12 96-458-025 Tinned Flat Copper Braid 25 94-777-105 Shield
13 96-168-028 Jumper Clamp 26 94-079-013 Mounting Beam Components
14 96-774-095 Shoe 27 94-433-189 Nozzle Insulator
28 94-800-186 Nozzle Spring and Guard
22
2
Table 9-4: Torch Head PARTS
REPLACEMENT PARTS 9-2 Manual 89250890
Page 57

REPLACEMENT PARTS N7500
9.03 Remote Pendant Replacement Parts
1
2
ART# A-10835_AB
Figure 9-5: Remote Pendant PARTS
Item No. Qty Part Number Description
1 1 72-008-020 Remote Pendant (with bumper guard)
2 1 94-105-030 Rubber Bumper Guard
Table 9-6: Remote Pendant PARTS
Manual 89250890 9-3 REPLACEMENT PARTS
Page 58

N7500 REPLACEMENT PARTS
SYSTEM CABLES
9.04 110V Power Supply Cable Assembly
Part No. Description Application
96-130-304 10 ft. (3m) length For the Control Box Power Supply IN
9.05 220V Power Supply Cable Assembly
Part No. Description Application
96-130-305 10 ft. (3m) length For the Control Box Power Supply IN
9.06 Pendant Cable Assembly
Part No. Description Application
96-170-069
96-170-070 15 ft. (5m) length
96-170-071 25 ft. (8m) length
96-170-072 50 ft. (15m) length
14 inches (0.36m)
length
Connects the Control Box to the Pendant
9.07 Motor Cable Assembly
Part No. Description Application
96-130-335 3 ft. (0.9m) length
96-130-336 15 ft. (5m) length
96-130-337 25 ft. (8m) length
96-130-338 50 ft. (15m) length
Connects the Control Box to the Torch Head motor
9.08 Power Supply Communication Cable Assembly
Part No. Description Application
96-130-339 15ft. (5m) length
Connects the Control Box to the Power Supply96-130-340 25ft. (8m) length
96-130-341 50ft. (15m) length
9.09 Power Cables
Part No. Description Application
96-130-254 4ft. (1.22M) Length
Connects the Torch Head to the Control Box buss bar96-130-256 15ft. (5M) Length
96-130-300 25ft. (7.62M) Length
NOTE: Minimum 2 Power Cables Required
9.10 Air Hose Assembly
Part No. Description Application
94-396-051 4ft. (1.22M) Length
94-396-049 15ft. (5M) Length
94-396-048 25ft. (7.62M) Length
REPLACEMENT PARTS 9-4 Manual 89250890
Supplies compressed air from the Control Box to the
Torch Head
Page 59

APPENDIX N7500
SECTION 10:
APPENDIX
This Page Intentionally Blank
Manual 89250890 A-1 APPENDIX
Page 60

N7500 APPENDIX
10.01 Wiring Schematic
ART# A-10836_AC
Figure 10-1: N7500 Wiring Schematic
Manual 89250890 A-2 APPENDIX
Page 61

APPENDIX N7500
Manual 89250890 A-3 APPENDIX
Page 62

N7500 APPENDIX
PUBLICATION HISTORY
Manual No. 89250890
Cover Date Rev Change(s)
Jan, 2012 AA First issue
Mar, 2012 AB Added UL logo, changed duty cycle rating from 1600A to 1500A, changed Motor Cable
from 5 pin to 6 pin and Power Supply Communication cable from 7 pin to 6 pin.
April, 2012 AC Updated wiring pin colors in Table 8-2: Torch Head Motor 6 PIN Wire Schedule, changed
duty cycle rating from 1500A to 1600A, converted all images to greyscale.
June, 2012 AD Corrected text and drawings on pages 2-2, 3-6, 3-10, 5-3 and 5-5. Changed Thermadyne
to Victor Technologies International, Inc.
Aug, 2013 AE Updated photos on pages 3-1, 4-1, and 4-3. Changed Arcair to Victor Arcair. Corrected
text on page 4-4. Updated drawing on page 4-5. Updated tables in Section 8. Corrected
drawing and table on page 9-2. Updated Wiring Schematic on page A-2. Updated text on
page 2.
Feb. 2014 AF Rebranded. Added new step om page 5-7.
NOTE
*Victor Arcair uses the date on the manual cover to indicate the most recent revision of the manual.
Manual 89250890 A-4 APPENDIX
Page 63

Statement of Warranty
This warranty supersedes all previous Victor Technologies warranties.
Effective 08/01/2011 Effective 08/01/2011
LIMITED WARRANTY:
the
time period applicable to the
operated, and maintained in accordance with
alteration, or accident, correct such defects by suitable repair or replacement, at
be defective.
THIS WARRANTY IS EXCLUSIVE AND IS IN LIEU OF ANY WARRANTY OF MERCHANTABILITY OR FITNESS FOR A PARTICULAR PURPOSE.
LIMITATION OF LIABILITY:
purchased or replacement goods, or claims of customers of distributor (hereinafter “Purchaser”) for service interruption.
The remedies of the Purchaser set forth herein are exclusive and the liability of Victor Technologies with respect to any contract, or anything done in connection therewith such as
the performance or breach thereof, or from the manufacture, sale, delivery, resale, or use of any goods covered by or furnished by
negligence, strict tort, or under any warranty, or otherwise, shall not, except as expressly provided herein, exceed the price of the goods upon which such liability is based.
THIS WARRANTY BECOMES INVALID IF REPLACEMENT PARTS OR ACCESSORIES ARE USED WHICH MAY IMPAIR THE SAFETY OR PERFORMANCE OF ANY VICTOR TECHNOLOGIES
PRODUCT.
THIS WARRANTY IS INVALID IF THE PRODUCT IS SOLD BY NON-AUTHORIZED PERSONS.
The warranty is effective for the time stated below beginning on the date that the authorized distributor delivers the products to the Purchaser. Notwithstanding the foregoing, in no event
shall the warranty period extend more than the time stated plus 1 year from the date Victor Technologies delivered the product to the authorized distributor.
1 year parts and Labor Unless specified 4 Years Parts and Labor
180 days parts / No Labor Water recirculators
90 days parts and Labor Unless specified180 days parts and Labor Unless specified
30 days parts / No Labor Replacement repair parts
5 Years Parts / No Labor * 5 years on the Original Main Power Transformer and Inductors not
3 Years Parts / No Labor 2 Years Parts and Labor Unless specified
2 Years Parts / No Labor
1 Years Parts / No Labor
90 days parts / No Labor Remote Controls
Consult your STOODY® representative for warranty information on this product MIG Torch for Fabricator 181i
Victor Technologies limited warranty shall not apply to:
Consumable Parts for MIG, TIG, Plasma welding, Plasma cutting and Oxy fuel torches, O-rings, fuses, filters or other parts that fail due normal wear
* Warranty repairs or replacement claims under this limited warranty must be submitted by an authorized Victor Technologies repair facility within thirty (30) days of the repair.
* No employee, agent, or representative of Victor Technologies is authorized to change this warranty in any way or grant any other warranty, and Victor Technologies shall not be bound
by any such attempt. Correction of non-conformities, in the manner and time provided herein, constitutes fulfillment of Victor Technologies ’s obligations to purchaser with respect to the
product.
* This warranty is void, and seller bears no liability hereunder, if purchaser used replacement parts or accessories which, in Victor Technologies 's sole judgment, impaired the safety or
performance of any Victor Technologies product. Purchaser’s rights under this warranty are void if the product is sold to purchaser by unauthorized persons.
Victor Technologies warrants that its products will be free of defects in workmanship or material. Should any failure to conform to this warranty appear within
Victor Technologies
Victor Technologies
QRC-2000 Nozzle Cleaning Stations CutMaster TRUE
TC and TCV Water Coolers (No Labor)
TSC-96 Smoke Collector (No Labor) 2 Years Parts / 1 Year Labor
ESG-1, EPG-CR1, CR2 Control DragGun Plus, PAK 200, PAK 45
Boxes for Spool & Pull Guns (No Labor) AutoCut and UltraCut
Professional Eliminator® Spool Guns (No Labor)
Arcair® N7500 (No Labor) 1 Year Parts and Labor Unless specified
Professional MIG Guns (i.e. PulseMaster™ MIG Guns & PullMaster™, Stand Off Controls, Remote Controls, other Consols
Spray Master™, Eliminator®, Supra, Professional No. #, SEFC, etc)
Robotic Deflection Mounts All other “Torch and Leads” Packages
QRM-1 and QRM-2 Anti-Spatter Applicator
All other products including:
Weldskill® MIG and Spool Guns (No Labor)
(from the date sold by authorized distributor to purchaser)
Victor® Slimlite Medical mounted on PCBoards.
Victor® Professional * 3 years on Power Supply Components
TurboTorch
CutSkill®, Oxygen Conservers, Victor® VSP, 1 Years Parts and Labor Unless specified
HP&I Brass regulators/manifolds 95S, Water recirculators
All other Victor® Medical product All Plasma Welding consols (i.e WC-1 Controller, WT Timer,
FirePower® 180 days parts and Labor Unless specified
Steel Cylinders, Cutting Machine Motors (i.e. VCM 200) Plasma Welding Torch and leads packages
HP&I Stainless regulators/manifolds Gas Regulators "Supplied with power sources" (No Labor)
Parts in Rental Applications
HP&I Corrosive Gas Regulators/Manifolds MIG and TIG Torches (Supplied with power sources)
®
products as stated below,
Victor Technologies
shall not under any circumstances be liable for special or consequential damages, such as, but not limited to, damage or loss of
(from the date sold by seller to authorized distributor)
specifications, instructions, recommendations and recognized standard industry practice, and not subject to misuse, repair, neglect,
Victor Technologies
Victor Technologies
shall, upon notification thereof and substantiation that the product has been stored, installed,
’s sole option, of any components or parts of the product determined by
Victor Technologies
AirCut 15, CutSkill® units,
1Torch, Surelok, XT300 / XT301 and Maximizer torches
90 days parts / No Labor
5 Years Parts* / 3 Years Labor
ArcMaster, Excelarc, Fabricator, Fabstar, PowerMaster
Portafeed, Ultrafeed, Ultima 150, WC 100B
Auto-Darkening Welding Helmet (electronic Lens), **
Victor Regulator for Fabricator 181i (No labor)
WF-100 Capstain Feeder, etc)
90 days parts / No Labor
Replacement repair parts
30 days parts / No Labor
5-2-1 years Parts / No Labor
FirePower® Welders
Victor Technologies
whether arising out of contract,
to
1 Month Harness Assy
Page 64

THE AMERICAS
Denton, TX USA
U.S. Customer Care
Ph 1-800-426-1888 (tollfree)
Fax: 1-800-535-0557 (tollfree)
International Customer Care
Ph 1-940-381-1212
Fax: 1-940-483-8178
Miami, FL USA
Sales Office, Latin America
Ph 1-954-727-8371
Fax: 1-954-727-8376
Oakville, Ontario, Canada
Canada Customer Care
Ph 1-905-827-4515
Fax: 1-800-588-1714 (tollfree)
EUROPE
Chorley, United Kingdom
Customer Care
Ph +44 1257-261755
Fax: +44 1257-224800
Milan, Italy
Customer Care
Ph +39 0236546801
Fax: +39 0236546840
ASIA/PACIFIC
Cikarang, Indonesia
Customer Care
Ph 6221-8990-6095
Fax: 6221-8990-6096
Rawang, Malaysia
Customer Care
Ph +603 6092-2988
Fax: +603 6092-1085
Melbourne, Australia
Australia Customer Care
Ph 1300-654-674 (tollfree)
Ph 61-3-9474-7400
Fax: 61-3-9474-7391
International
Ph 61-3-9474-7508
Fax: 61-3-9474-7488
Shanghai, China
Sales Office
Ph +86 21-64072626
Fax: +86 21-64483032
Singapore
Sales Office
Ph +65 6832-8066
Fax: +65 6763-5812
INNOVATION TO SHAPE THE WORLD™
U.S. Customer Care: 800-426-1888 / FAX 800-535-0557
Canada Customer Care: 905-827-4515 / FAX 800-588-1714
International Customer Care: 940-381-1212 / FAX 940-483-8178
© 2012 Victor Technologies International, Inc. www.victortechnologies.com Printed in China
 Loading...