

TVLogic LVM-074W User Manual
Multi Format Broadcast
LCD Monitor
4
v
2
.
_
l
a
u
n
M
a
o
n
i
t
a
e
p
r
O
LVM-074W
SRM-074W


Contents
.
.
.
.
.
.
.
.
.
.
.
.
.
1. Caution
2. Main Features
3. Controls & Functions
4. Menu Tree & Adjustment
5. Menu Operations
[1] Picture
[2] Color
[3] Marker
[4] GPI/UMD
[5] Waveform
[6] Audio
[7] Display & Set
6. Button Functions
7. Other Functions
8. Product Specications
9. Optional Accessories
.
.
.
.
.
.
.
.
.
.
.
.
.
.
.
.
.
.
.
.
.
.
.
.
.
.
.
.
.
.
.
.
.
.
.
.
.
.
.
.
.
.
.
.
.
.
.
.
.
.
.
.
.
.
.
.
.
.
.
.
.
.
.
.
.
.
.
.
.
.
.
.
.
.
.
.
.
.
.
.
.
.
.
.
.
.
.
.
.
.
.
.
.
.
.
.
.
.
.
.
.
.
.
.
.
.
.
.
.
.
.
.
.
.
.
.
.
.
.
.
.
.
.
.
.
.
.
.
.
.
.
.
.
.
.
.
.
.
.
.
.
.
.
.
.
.
.
.
.
.
.
.
.
.
.
.
.
.
.
.
.
.
.
.
.
.
.
.
.
.
.
.
.
.
.
.
.
.
.
.
.
.
.
.
.
.
.
.
.
.
.
.
.
.
.
.
.
.
.
.
.
.
.
.
.
.
.
.
.
.
.
.
.
.
.
.
.
.
.
.
.
.
.
.
.
.
.
.
.
.
.
.
.
.
.
.
.
.
.
.
.
.
.
.
.
.
.
.
.
.
.
.
.
.
.
.
.
.
.
.
.
.
.
.
.
.
.
.
.
.
.
.
.
.
.
.
.
.
.
.
.
.
.
.
.
.
.
.
.
.
.
.
.
.
.
.
.
.
.
.
.
.
.
.
.
.
.
.
.
.
.
.
.
.
.
.
.
.
.
.
.
.
.
.
.
.
.
.
.
.
.
.
.
.
.
.
.
.
.
.
.
.
.
.
.
.
.
.
.
.
.
.
.
.
.
.
.
.
.
.
.
.
.
.
.
.
.
.
.
.
.
.
.
.
.
.
.
.
.
.
.
.
.
.
.
.
.
.
.
.
.
.
.
.
.
.
.
.
.
.
.
.
.
.
.
.
.
.
.
.
.
.
.
.
.
.
.
.
.
.
.
.
.
.
.
.
.
.
.
.
.
.
.
.
.
.
.
.
.
.
.
.
.
.
.
.
.
.
.
.
.
.
.
.
.
.
.
.
.
.
.
.
.
.
.
.
.
.
.
.
.
.
.
.
.
.
.
.
.
.
.
.
.
.
.
.
.
.
.
.
.
.
.
.
.
.
.
.
.
.
.
.
.
.
.
.
.
.
.
.
.
.
.
.
.
.
.
.
.
.
.
.
.
.
.
.
.
.
.
.
.
.
.
.
.
.
.
.
.
.
.
.
.
.
.
.
.
.
.
.
.
.
.
.
.
.
.
.
.
.
.
.
.
.
.
.
.
.
.
.
.
.
.
.
.
.
.
.
.
.
.
.
.
.
.
.
.
.
.
.
.
.
.
.
.
.
.
.
.
.
.
.
.
.
.
.
.
.
.
.
.
.
.
.
.
.
.
.
.
.
.
.
.
.
.
.
.
.
.
.
.
.
.
.
.
.
.
.
.
.
.
.
.
.
.
.
.
.
.
.
.
.
.
.
.
.
.
.
.
.
.
.
.
.
.
.
.
.
.
.
.
.
.
.
.
.
.
.
.
.
.
.
.
.
.
.
.
.
.
.
.
.
.
.
.
.
.
.
.
.
.
.
.
.
.
.
.
.
.
.
.
.
.
.
.
.
.
.
.
.
.
.
.
.
.
.
.
.
.
.
.
.
.
.
.
.
.
.
.
.
.
.
.
.
.
.
.
.
.
.
.
.
.
.
.
.
.
.
.
.
.
.
.
.
.
.
.
.
.
.
.
.
.
.
.
.
.
.
.
.
.
.
.
.
.
.
.
.
.
.
.
.
.
.
.
.
.
.
.
.
.
.
.
.
.
.
.
.
.
.
.
.
.
.
.
.
.
.
.
.
.
.
.
.
.
.
.
.
.
.
.
.
.
.
.
.
.
.
.
.
.
.
.
.
.
.
.
.
.
.
.
.
.
.
.
.
.
.
.
.
.
.
.
.
.
.
.
.
.
.
.
.
.
.
.
.
.
.
.
.
.
.
.
.
.
.
.
04
.
.
.
.
.
.
.
.
06
.
.
.
.
.
.
.
.
07
.
.
.
.
.
.
.
.
11
.
.
.
.
.
.
.
.
12
.
.
.
.
.
.
.
.
12
.
.
.
.
.
.
.
.
12
.
.
.
.
.
.
.
.
13
.
.
.
.
.
.
.
.
14
.
.
.
.
.
.
.
.
16
.
.
.
.
.
.
.
.
18
.
.
.
.
.
.
.
.
19
.
.
.
.
.
.
.
.
21
.
.
.
.
.
.
.
.
23
.
.
.
.
.
.
.
.
31
.
.
.
.
.
.
.
.
33
.
.
.
.
.
.
.
.
.
.
.
.
.
.
.
.
.
.
.
.
.
.
.
.
.
.
.
.
.
.
.
.
.
.
.
.
.
.
.
.
.
.
.
.
.
.
.
.
.
.
.
.
.
.
.
.
.
.
.
.
.
.
s
t
i
n
a
c
i
o
n
d
l
r
a
e
e
F
C
(
C
F
m
n
e
h
t
p
a
u
q
i
e
s
h
T
i
o
f
t
h
e
F
C
C
.
R
e
s
u
l
m
p
u
q
i
e
s
h
T
i
e
a
c
c
o
r
d
s
t
h
i
q
e
U
C
I
T
A
d
c
o
u
l
i
s
p
D
i
l
p
A
(
p
y
s
s
h
T
i
a
t
w
e
.
s
r
t
o
c
e
l
e
c
q
o
e
n
s
h
a
i
l
n
d
T
n
e
t
s
e
i
o
p
m
n
e
t
p
u
q
i
g
a
n
c
e
t
h
i
w
t
m
n
e
t
p
u
n
i
i
N
:
O
h
a
C
e
n
g
v
d
o
i
t
h
e
e
u
s
l
s
o
a
f
o
O
e
n
a
l
c
i
b
t
h
e
o
t
n
h
o
l
m
b
t
n
e
a
s
d
t
I
i
m
c
n
p
i
u
q
i
e
u
n
o
c
e
e
r
f
n
t
g
o
f
s
t
h
r
i
p
u
m
m
o
C
n
e
t
e
e
b
s
e
m
h
e
s
i
l
a
r
d
t
e
n
i
a
a
r
n
e
e
t
e
s
h
e
u
r
t
c
n
s
i
n
e
d
r
i
e
s
a
o
r
m
o
d
s
’
a
r
u
t
h
o
l
d
E
l
e
E
u
e
a
r
o
p
n
r
u
o
d
p
e
e
h
a
s
l
b
l
n
e
.
t
B
y
e
h
e
n
e
r
v
o
i
.
t
u
o
d
c
h
T
o
a
d
u
t
e
n
d
f
n
d
s
s
t
a
i
r
e
c
o
m
,
e
u
s
o
n
t
i
a
t
i
l
t
a
c
f
t
i
i
y
t
t
i
r
t
c
r
i
n
i
U
o
t
r
c
h
a
n
d
n
u
s
i
r
n
m
e
e
c
r
e
d
g
n
e
i
e
s
d
a
m
r
e
i
c
l
n
e
v
s
a
n
d
a
c
n
m
a
n
u
a
,
l
m
a
o
t
c
o
c
r
r
t
h
e
o
n
s
i
n
o
t
x
e
o
a
r
e
o
p
t
e
t
h
l
a
c
&
E
l
e
o
n
a
n
d
o
t
h
e
a
p
c
s
t
o
i
n
d
e
r
e
o
v
t
o
n
g
s
t
h
r
i
o
d
p
n
t
a
n
d
h
u
m
n
g
i
o
l
c
f
m
y
i
s
m
m
C
t
o
t
o
r
o
i
a
r
y
e
i
r
p
e
c
r
E
k
n
i
t
h
u
a
n
a
t
s
o
c
o
m
r
o
p
v
n
m
e
a
i
d
t
a
c
u
s
n
t
r
e
y
l
s
e
s
u
q
i
e
t
r
o
u
r
o
n
i
g
e
a
p
t
s
c
i
h
e
a
a
i
r
e
l
n
i
)
o
t
h
t
h
e
i
w
y
l
p
e
d
i
r
e
a
o
n
a
s
n
e
e
e
f
p
n
p
d
p
d
l
s
b
.
t
o
q
a
r
r
e
i
d
f
h
a
u
l
n
m
r
t
f
i
r
n
c
e
e
a
t
h
i
r
o
a
p
v
p
d
e
b
m
n
e
.
t
i
c
E
q
i
p
u
e
a
n
c
o
u
n
r
t
a
c
t
h
a
t
i
e
s
t
e
a
l
c
c
o
b
l
i
l
d
e
o
s
o
p
s
f
i
c
t
h
,
h
c
h
c
i
w
o
p
l
l
t
h
e
o
l
i
w
a
o
r
s
l
c
s
f
s
t
m
i
i
l
u
s
i
l
o
e
l
e
r
e
o
y
m
e
s
t
e
o
u
c
n
t
i
r
o
p
c
t
e
y
r
n
e
y
e
g
n
c
r
e
n
c
e
e
f
t
o
r
e
n
e
s
n
p
w
x
e
t
h
e
m
a
n
u
f
t
n
e
t
h
a
i
p
e
r
w
s
t
r
u
o
d
c
p
s
h
i
o
n
n
o
t
t
i
i
p
c
y
,
t
l
o
u
c
r
r
e
y
s
i
w
d
o
r
t
h
e
l
e
v
n
a
o
r
e
n
t
s
e
c
v
a
e
d
u
,
t
l
g
i
A
i
d
a
t
g
a
n
s
i
h
a
n
d
f
i
o
a
i
d
c
o
m
u
t
a
r
r
e
c
r
a
t
c
e
e
l
c
o
l
n
o
h
a
s
l
l
o
r
f
t
h
e
p
l
l
h
e
l
i
w
e
e
a
c
b
u
s
u
a
r
l
o
r
e
s
r
i
p
a
u
n
l
m
r
t
e
i
f
e
n
o
a
l
t
t
n
l
s
i
m
a
o
c
u
n
n
t
i
i
e
l
b
o
n
i
s
p
e
s
t
m
e
s
o
n
t
i
y
s
r
t
e
e
a
b
t
t
e
n
g
i
o
l
c
y
c
r
e
r
e
v
p
n
e
t
o
p
n
a
i
d
p
y
e
b
u
.
r
c
e
s
Multi Format LCD Monitor 3
u
s
a
a
f
r
d
a
.
s
O
o
r
f
s
)
a
d
s
f
l
e
t
n
e
t
r
o
p
p
5
n
c
e
n
p
c
c
e
a
i
r
1
t
t
a
t
o
p
r
n
h
e
w
t
h
e
d
d
n
e
u
s
i
a
r
e
o
n
t
i
o
f
a
i
n
c
e
o
l
m
p
d
h
o
h
o
e
u
l
s
a
c
l
i
r
t
a
n
d
e
l
g
a
v
n
e
t
i
a
i
t
e
a
t
w
e
s

1. Caution
• Always use set voltage. (DC 12V)
• When using a DC Adapter other than the
one supplied by the manufacturer, please
be advise d that the adapter with DC 12V/3A
~ 6A can be compatible with the monitor.
• All operating instructions must be read and
understood before the product is operated.
These safety and operating instructions must
be kept in a safe place for future reference.
• All warnings on the product and in the
instructions must be observed closely.
• All operating instructions must be followed.
• Do not use attachments not recommended
by the manufacturer. Use of inadequate
attachments can result in accidents.
• This produc t must be operated on a power
source specied on the specication label.
• If you are not sure of the type of power supply
used in your home, consult your dealer or local
power company. For units designed to operate
on batteries or another power source, refer to
the operating instructions.
• The power cords must be routed properly
to prevent people from stepping on them or
objects from resting on them. Check the cords
at the plugs and product.
• In case of using other 12V DC adapters instead
of the standard adapter provided by the
manufacturer, please check the proper load
capacit y (or current capacity) and use an
adapter with stable voltage.
• Do not overload DC outlets or extension cords.
Overloading can cause or electric shock.
• Never insert an object into the product through
vents or openings. High voltage in the
product, and inserting an object can cause
electric shock and/or short internal parts. For
the same reason, do not spill water or liquid on
the product.
• Do not attempt to repair the product yourself.
Removing cover s can expose you to high vo ltage
and other dangerous conditions. Request a
qualied service person to perform servicing.
• If any of the following conditions occur, unplug
the power cord from the DC outlet, and request
a qualied service person to perform repairs.
a. When the power cord or plug is damaged.
b. When a liquid was spilled on the produc t or
when objects have fallen into the product.
c. When the product has been exposed to rain
or water.
d. When the product does not operate properly
as described in the operating instructions.
Do not touch the controls other than those
described in the operating instructions.
Improper adjustment of controls not described
in the instructions can cause damage,
which often requires extensive adjustment
work by a qualied technician.
e. When the product has been dropped or
damaged.
f. When the product displays an abnormal
condition. Any noticeable abnormality in the
product indicates that the product needs
servicing.
• In the case the product needs replacement
parts, make sure that the service person uses
replacement parts specied by the manufacturer,
or those with the same characteristics and
performance as the original par ts. Use of
unauthorized parts can result in re, electric
shock and/or other danger.
• Upon completion of ser vice or repair work,
request th e service technician to p erform safet y
checks to ensure that the product is in proper
operating condition.
4 Multi Format LCD Monitor

1. Caution
• When mounting the p roduct on a wall or ceil ing,
be sure to install the product according to the
method recommended by the manufacturer.
• Unplug the power cord from the DC outlet
before cleaning the product. Use a damp cloth
to clean the product. Do not use liquid cleaners
or aerosol cleaners.
• Unplug the power cord from the AC outlet if
you do not use the product for considerably
long time.
• Do not use the product near water, such as
bathtub, washbasin, kitchen sink and laundry
tub, swimming pool and in a wet basement.
• Keep the product away from direct rays of the
Sunlight.
• Do not place the product on an unstable cart,
stand, tri pod or table. Placing the product on an
unstable base can cause the product to fall,
resulting in serious personal injuries as well as
damage to the product. Use only a cart, stand,
tripod, bracket or table recommended by the
manufacturer or sold with the product. When
mounting the product on a wall, be sure to
follow the manufacturer’s instruction. Use only
the mounting hardware recommended by the
manufacturer.
• When relocating the product placed on a cart, it
must be moved with the utmost care.
• Sudden stops, excessive force and uneven
oor surface can cause the produc t to fall from
the cart.
• The vents and other openings in the
cabinet are designed for ventilation. Do not
cover or block these vents and openings since
insucient ventilation can cause overheating
and/or shorten the life of the product. Do not
place the product on a bed, sofa, rug or other
similar surface, since they can block ventilation
openings. This product is not designed for
built-in installation; do not place the product
in an enclosed place such as a bookcase or rack,
unless proper ventilation is provided or the
manufacturer’s instructions are followed.
• In the case of installing the product on a rack,
the inside of the product may be overheated
due to the heat from other devices nearby and
the decrease of air circulation, which could
damage to the monitor. To prevent the damage,
please have enough space for the monitors
and use a fan to avoid overheating and
maintain the operating temperature. (Refer to
the specication of the product).
• The LCD panel used in this product is made of
glass. Therefore, it can break when the product
is dropped or applied with impact. Be careful
not to be injured by broken glass pieces in case
the LCD panel breaks.
• Keep the product away from heat sources
such as radiators, heaters, stoves and other heat
generating products (including ampliers).
Multi Format LCD Monitor 5

2. Main Features
LVM-074W/SRM-074W Monitors contain the following features:
• Compatible with various SDI signals
formats (SD/HD/3G)
- This product is compatible with various SDI
signals - SD/HD/3G(A/B)-SDI 480i, 576i, 1080i,
1080p, 1080psf
• Compatible with various analog signals
- This product is compatible with various
analog signals such as CVBS(Composite),
S-Video and YPbPr(Component).
• HDMI(with HDCP) Signal
- HDMI(w/ HDCP) input is available without any
other accessory.
• HDMI To HDMI Throughout
- This product features an HDMI To HDMI
Throughout.
• HDMI To SDI Conversion Output
- This product features an HDMI To SDI
conversion output.
• Temperature Adaptive Color
- This product provides a self-adjustment
function for white balance(or color temperature)
utilizing internal sensor that measures the
temperature of the LCD panel
• All-in-one type system
- Slim and all-in -one type mo nitor that support s
various video formats.
• Wide Screen / Wide Viewing Angle
• WaveForm/Vectorscope/Audio Level Meter
Function
- WaveForm & Vectorscope
- 2 X Zoom
- Embedded Audio Level Meter
• Audio Out
- Internal Speaker(actives only with input
signals with Embedded Audio)
- Stereo Audio Out through phone Jack.
• Knob Control
- Easy to adjust user conguration using the
control knob on the front of the monitor.
• BLUE ONLY/MONO/Focus Assist/H/V Delay
Function
• Range Error/Luma(Y’) Zone Check (Color/
Zebra Type) Function
• Internal Pattern Generator (0~100% Gray/
ColorBar+Pluge)
• Markers & Safety Areas
- Center Marker, Safety Area Marker, Aspect
Marker, Display Size(Scan)
• Pixel To Pixel/Zoom mode
- Used to display the original image resolution
without scaling to match a certain resolution
or an aspect ratio.
- Select ‘Pixel to pixel’ to display unscaled
images, and select ‘Zoom’ to enlarge the
original image.
- Zoom Scroll Function (Lef t/Right,Top/Bottom)
• Power
- Basically, the product is powered by normal
DC source.
- The product can be battery-powered.
* DC 12V (Typical)
* When using a DC Adapter other than the one
supplied by the manufacturer, please be
advised that the adapter with DC 12V/3A ~ 6A
can be compatible with the monitor.
• Additional features
- Camera Mounting Hole x 4, VESA Mounting
Standard, External Tally Function, 400cd/m2
Brightness, 800 : 1 Contrast, OSD user interface
• Additional features (SRM-074W)
- Camera Mounting Hole x 4, VESA Mounting
Standard, External Tally Function, 1000cd/m2
Brightness, 900 : 1 Contrast, OSD user interface
6 Multi Format LCD Monitor
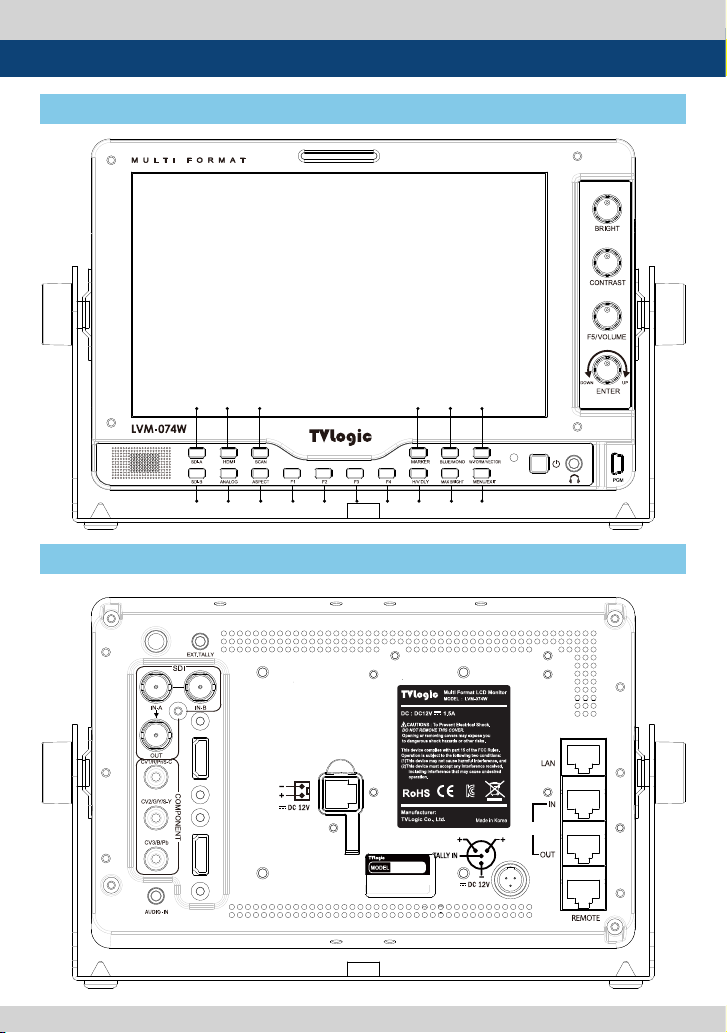
3. Controls & Functions
SDI-B ANALOG ASPECT F1 F2 F3 F4 H/V DLY. MAX BRIGHT MENU/EXIT
SDI-A HDMI SCAN MARKER BLUE/MONO W-FORM/VECT OR
LVM-074W / SRM-074W : FRONT
SDI-A HDMI SCAN MARKER BLUE/MONO W-FORM/VECT OR
SDI-B ANALOG ASPECT F1 F2 F3 F4 H/V DLY. MAX BRIGHT MENU/EXIT
LVM-074W / SRM-074W : REAR
HDMI-OUT HDMI-IN
TVL-LVM-074W(A
)
RS 422
Multi Format LCD Monitor 7

3. Controls & Functions
FRONT
• [SDI-A] Button/Lamp
- Used to select SDI-A input.
• [SDI-B] Button/Lamp
- Used to select SDI-B input.
• [HDMI] Button/Lamp
- Used to select HDMI input.
• [ANALOG] Button/Lamp
- Used to select desired Analog input.
(CVB1/2/3, S-Video, Component, RGB)
- Press the button to activate the analog input
menu-selection, then use UP and DOWN
button to select desired input.
* See section “Other Functions [1]ANALOG
Button” for more information.
• [F1][F2][F3][F4] Button/Lamp
- Used to activate the function.
* See section “6.But ton Functions -> [4]
Function key set button” for more
information.
• [SCAN] Button/Lamp
- Used to change the scan mode.
- Press the button to activate through the scan
modes: [UNDERSCAN] -> [OVERSCAN] ->
[PIXEL TO PIXEL] -> [USER ASPECT] ->
[UNDERSCAN]
#PIXEL TO PIXEL mode is not available in
graphic mode.
#[USER ASPECT]: User can adjust width and
height of the display.
* See section “7. Other Functions -> [1] Pixel to
Pixel and [2] User Aspect” for more
information.
• [ASPECT] Button/Lamp
- Used to change the display variout ratio.
- Activates in order of [16:9]-[4:3]-[2.35:1]-[1.85:1]
- [15:9]-[16:10]-[AUTO]-[16:9].
• [H/V DELAY] Button/Lamp
- Used to check horizontal sync and ver tical
sync simultaneously by moving the display
to the left, right, up and down.
- In this mode, the brightness of image
automatically increase for easy verication of
synchronized signals.
• [BLUE ONLY]/[MONO] Button/Lamp
- Activates in the order of [OFF]-[Blue Only] [Mono]-[OFF].
- Press the button to remove red and green
from the input signal and display the screen
only under a blue signal. Press the button
again to activate mono mode.
- They are not available in RGB, DVI ANALOG,
DVI DIGITAL and HDMI modes.
• [MAX BRIGHT] Button/Lamp
- Used to activate the MAX BRIGHT.
• [WAVEFORM]/[VECTOR SCOPE] Button/Lamp
- Pressing the button activate features in the
order of: [O]-[Waveform]-[Vector Scope] [Waveform Wide]-[Waveform YCbCr]-[Wave &
Vector]- [Vector_YCbCr]-[Full Waveform(Y)]
-[Full Vectorscope]-[OFF].
- [Waveform YCbCr] : Displays each waveform
for elements of the luminance and Cb/Cr of
the input signal.
- [Wave & Vector] : Displays waveform and
vector scope simultaneously.
- [Vector YCbCr] : Displays Vector scope and Y/
Cb/Cr waveform simultaneously.
* See section “7. Other Functions [3]Waveform
function and [4]Line Select” for more
information.
• [MENU/EXIT] Button/Lamp
- Used to activate the OSD menu.
- When the OSD menu is activated, press this
button to exit from the menu.
• [MARKER] Button/Lamp
- Used to activate/deactivate the Marker. The
type of marker at work may be selected on
the main menu.
8 Multi Format LCD Monitor

3. Controls & Functions
FRONT
• [OPE RATE ] Lamp
- Indicates condition and power status of unit.
- Light turns o when th e power is disconnected.
- Standby mode is indicated by a red LED light.
- Normal (active) mode is indicated by a Green
LED light.
- Restores to previous state when monitor
power turns o and comes back on.
• [POWER] Button
- Used to turn power on and o.
• AUDIO OUT (Phone Jack)
- Used for Stereo Audio Output through Phone
Jack. (video signals with emb edded audio only)
• PGM (Mini USB)
- This terminal is used to upgrade the rmware
or color calibration made by TVLogic.
• [TALLY] Lamp
- Tally lamp that can be toggled in green or red
using the REMOTE(RJ- 45) port.
• [BRIGHT] Knob
- Used to adjust the degree of brightness.
- The value is selectable between -100 ~ 100.
• [CONTRAST] Knob
- Used to adjust the contrast.
- The value is selectable between -100 ~ 100.
• [F5/VOLUME] Knob
- Used to adjust the volume for internal speaker
and external output.
- The value is selectable between 0 ~ 30.
- [F5] : Press F5 Knob for 2 second to set the
function. Available functions are [VOLUME] [CHROMA]-[APERTURE]-[PHASE]-[FOCUS
LEVEL].
• [UP/DOWN/ENTER] Knob
- Used to move within the menu when OSD
menu is activated, and is also used to
decrease or increase the value of the selected
feature.
- Press the knob to select the main menu and
sub menus.
Multi Format LCD Monitor 9
3. Controls & Functions
REAR
• EXT.TALLY IN
- This terminal uesd to External tally input.
• [TALLY] Lamp
- Tally lamp that can be toggled in green or red
using the REMOTE(RJ-45) por t.
• [SDI-IN A] (BNC)
- HD/SD SDI signal input terminal for SDI A.
• [SDI-OUT A] (BNC)
- HD/SD-SDI signal output terminal for SDI A
signal.
• [SDI-IN B] (BNC)
- HD/SD SDI signal input terminal for SDI B.
• [CVSBS1/Pr/R/S-C] (BNC)
- Signal input terminal used to feed themonitor
COMPOSITE 3, S-VIDEO C, COMPONENT Pr
and RGB R signals.
• [CVBS2/Y/G/S-Y] (BNC)
- Signal input terminal used to feed the monitor
COMPOSITE 1, S-VIDEO Y, COMPONENT Y and
RGB G signals.
• [CVSBS3/Pb/B] (BNC)
- Signal input terminal used to feed the monitor
COMPOSITE 2, RGB B and COMPONENT Pb
signals.
Connector Composite Component S-Video
1 CV BS1 Pr C
2 CVBS2 Y Y
3 CVBS3 Pb No Con.
• AUDIO IN (phone jack)
- Internal speakers stereo audio input terminal.
• [HDMI] IN
- Signal input terminal for HDMI signal.
• [HDMI] OUT
- Signal output terminal for HDMI signal.
• LAN
- Used for easy rmware updates.
• [RS422 IN/OUT] (RJ-45)
- Used to control the monitor with protocol
provided by TVLogic or to support TSL
protocol.
• [REMOTE] (RJ-45)
- Provides connection to control equipment for
external monitor control.
- Features can be changed in the REMOTE(1/2)
section of OSD menu.
• BATTERY IN
- Battery Power Input : DC 12V
* Rated Power Input : DC 12V (1.5A)
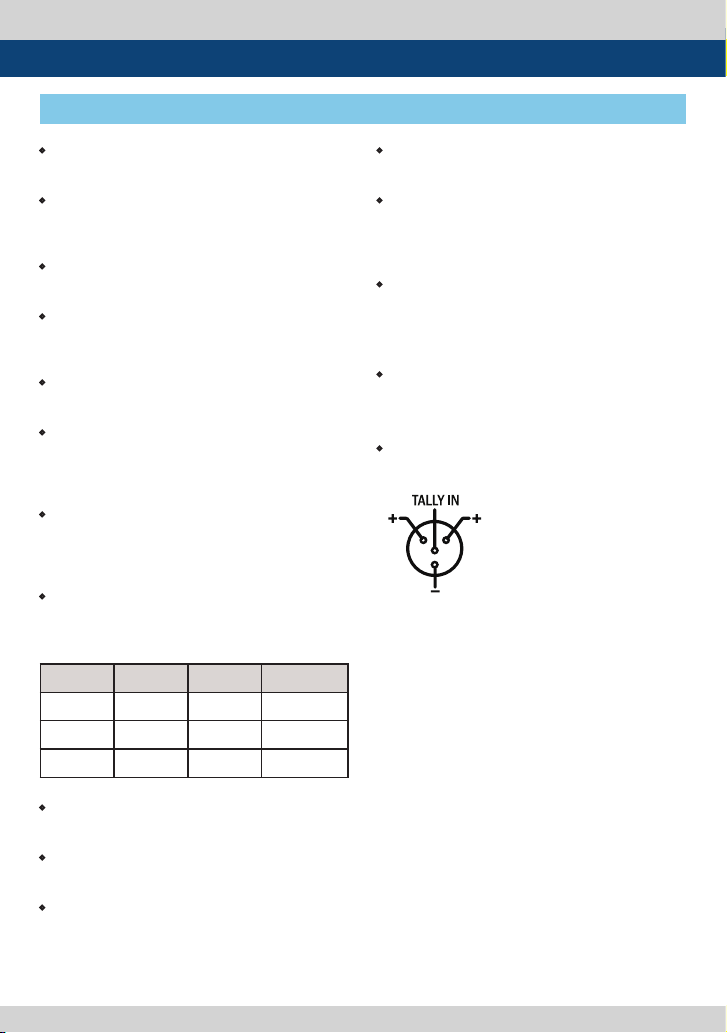
• DC POWER IN / TALLY (XLR 4P)
- DC power input terminal for DC 12V.
* When using a DC Adapter other than the one
supplied by the manufacturer, please be
advised that the adapter with DC 12V/3A ~ 6A
can be compatible with the monitor.
<Warning!!>
When using the product make sure to ground,
whenever possible, before connecting the
input signal cable in order to prevent any
possible damage to the product or connected
devices. The damage may include signal noise,
malfunction of main board or display panel.
And the connected devices such as camera or
video source player may also be inuenced
through signal cable. Please check if the AC
power source and the power extender or
power distributor is grounded.
10 Multi Format LCD Monitor
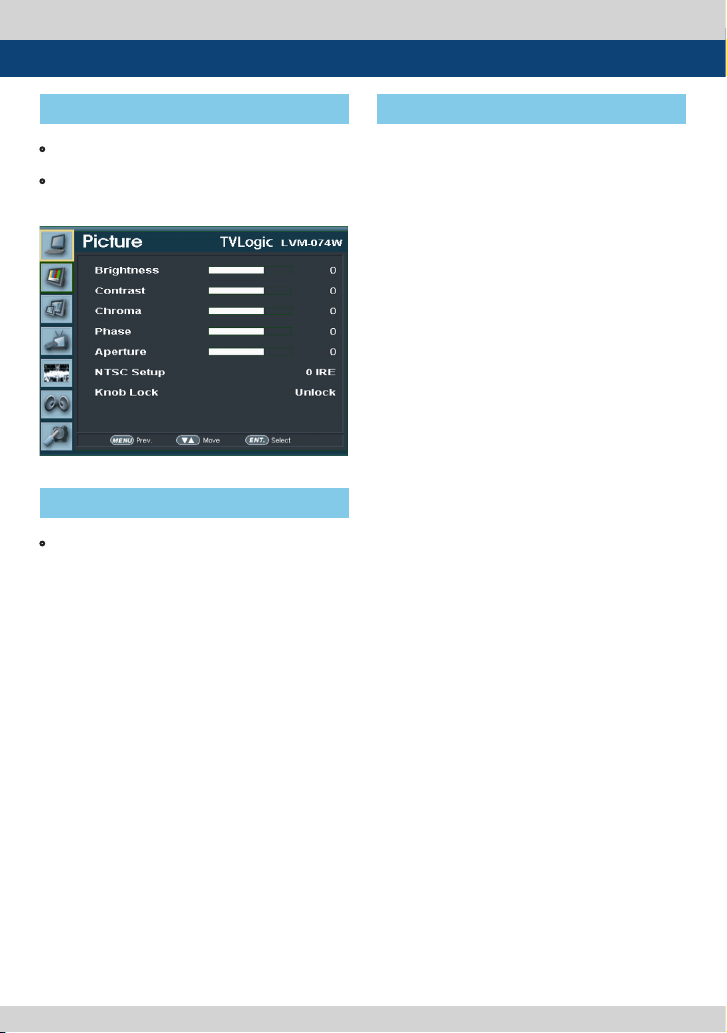
4. Menu Tree & Adjustment
[1] Menu Tree
• OSD(On-Screen Display) Menu helps you use
various functions.
• This Picture is the menu structure for
LVM -074W(SR M-074W)
[2] Menu Control
• User may control various functions using MENU
button on the back and the Knob on the side of
the monitor.
[3] Menu Control Sequence
1. Press MENU button to activate the OSD menu.
2. Move to a desired menu by rotating the Knob.
3. Press the Knob to select a menu and move to
select a sub-menu by rotating the Knob.
4. Press the Knob to select the desired sub
menu. (The selec ted sub-menu will be
highlighted)
5. Press ENTER button or MENU button to
save the new value after adjusting the value
by rotating the Knob.
6. Press MENU button to return to previous menu
and if there is n o previous menu, the OSD me nu
will be removed from the screen.
Multi Format LCD Monitor 11
 Loading...