

TVLogic LQM-171W User Manual
Multi Format
multi
LCD Monitor
u
O
p
LQM Series
LQM-171W
e
r
a
t
M
o
i
n
a
n
a
l


Contents
.
.
.
.
.
.
.
.
.
.
.
.
.
.
.
.
.
.
.
.
.
.
.
.
.
.
.
.
.
.
.
.
.
.
.
.
.
.
.
.
.
.
.
.
.
.
.
.
.
.
.
.
.
.
.
.
.
.
.
.
.
.
.
.
.
.
.
.
.
.
.
.
.
.
.
.
.
.
.
.
.
.
.
.
.
.
.
.
Caution 4
Features 6
Controls, Indicators and Connections 7
Menu Organization & Adjustment 12
Menu Contents 13
Optional Accessories 25
.
.
.
.
.
.
.
.
.
.
.
.
.
.
.
.
.
.
.
.
.
.
.
.
.
.
.
.
.
.
.
.
.
.
.
.
.
.
.
.
.
.
.
.
.
.
.
.
.
.
.
.
.
.
.
.
.
.
.
.
.
.
.
.
.
.
.
.
.
.
.
.
.
.
.
.
.
.
.
.
.
.
.
.
.
.
.
.
.
.
.
.
.
.
.
.
.
.
.
.
.
.
.
.
.
.
.
.
.
.
.
.
.
.
.
.
.
.
.
.
.
.
.
.
.
.
.
.
.
.
.
.
.
.
.
.
.
.
.
.
.
.
.
.
.
.
.
.
.
.
.
.
.
.
.
.
.
.
.
.
.
.
.
.
.
.
.
.
.
.
.
.
.
.
.
.
.
.
.
.
.
.
.
.
.
.
.
.
.
.
.
.
.
.
.
.
.
.
.
.
.
.
.
.
.
.
.
.
.
.
.
.
.
.
.
.
.
.
.
.
.
.
.
.
.
.
.
.
.
.
.
.
.
.
.
.
.
.
.
.
.
.
.
.
.
.
.
.
.
.
.
.
.
.
.
.
.
.
.
.
.
.
.
.
.
.
.
.
.
.
.
.
.
.
.
.
.
.
.
.
.
.
.
.
.
.
.
.
.
.
.
.
.
.
.
.
.
.
.
.
.
.
.
.
.
.
.
.
.
.
.
.
.
.
.
.
.
.
.
.
.
.
.
.
.
.
.
.
.
.
.
.
.
.
.
.
.
.
.
.
.
.
.
.
.
.
.
.
.
.
.
.
.
.
.
.
.
.
.
.
.
.
d
e
F
C
(
C
F
T
F
i
T
w
i
C
v
D
(
T
I
e
f
p
m
p
u
s
q
i
h
e
i
C
C
.
R
e
s
u
l
s
n
A
n
o
T
a
r
e
o
p
t
d
e
m
s
h
p
i
u
q
i
e
n
s
t
i
t
h
h
e
i
n
e
d
i
r
e
s
a
N
C
:
O
U
I
T
A
d
o
i
t
h
e
e
u
s
i
s
l
p
s
a
o
e
a
l
c
b
i
l
p
p
s
h
y
i
o
s
m
b
s
t
t
e
i
a
s
d
m
n
e
p
t
u
q
i
n
e
t
h
e
r
v
.
t
r
u
o
d
c
h
T
m
o
a
e
C
n
e
t
h
a
n
e
e
t
d
s
t
e
b
s
t
m
e
h
e
s
i
i
l
n
i
c
a
o
m
m
n
e
t
r
n
e
e
g
o
m
n
t
i
t
u
r
c
a
t
i
l
t
o
c
o
r
r
e
h
a
o
r
n
e
g
s
’
a
r
u
t
h
o
r
i
f
o
O
d
l
E
n
i
t
h
e
E
u
r
o
l
o
n
t
h
e
r
p
h
a
e
b
h
a
l
l
.
B
y
n
n
e
u
s
r
i
r
o
n
m
i
n
a
e
t
n
g
i
c
l
y
e
c
r
e
a
e
s
o
n
u
d
n
a
r
e
a
r
e
c
i
a
t
e
s
a
n
u
t
c
t
m
o
d
y
t
o
t
c
l
e
e
a
p
u
o
d
e
n
d
g
t
h
h
n
d
o
f
m
f
d
n
g
e
i
e
t
s
d
l
,
a
h
i
t
n
c
d
i
o
e
u
,
l
e
c
o
p
r
U
t
o
s
u
m
a
t
p
n
r
v
o
n
m
i
n
e
e
s
s
a
n
d
a
c
n
a
c
e
u
s
y
m
a
r
n
e
c
e
f
n
t
r
i
e
a
n
o
o
n
t
s
t
i
a
r
e
t
e
t
h
e
e
l
a
i
c
&
E
l
e
o
n
n
i
a
n
d
o
o
r
o
n
s
t
p
i
t
t
o
h
r
e
e
v
t
r
u
o
s
d
c
p
i
a
h
e
a
t
n
h
l
l
h
a
l
s
r
i
e
i
l
w
s
t
n
i
o
a
i
c
n
u
m
l
r
i
s
m
s
m
o
C
d
t
o
c
o
r
o
e
d
v
i
.
t
a
a
r
i
d
t
h
a
u
m
r
f
e
a
t
s
h
i
r
e
s
p
x
e
m
p
u
q
i
t
r
c
o
t
r
h
e
E
u
a
c
k
n
g
i
i
l
a
p
p
o
s
p
s
i
d
c
h
h
i
w
,
p
l
t
e
o
n
)
i
o
t
h
i
t
w
y
l
m
p
r
e
a
e
o
n
s
a
l
b
e
o
a
r
q
r
i
e
d
f
r
n
e
e
f
n
t
r
i
e
l
s
e
n
c
e
c
n
e
o
n
p
w
x
e
e
r
o
a
p
v
p
y
l
n
.
t
i
c
E
q
i
p
u
e
a
r
o
p
n
c
o
u
a
c
t
i
n
d
e
s
i
t
h
c
e
l
c
o
e
l
a
l
b
d
o
f
c
o
c
r
r
e
o
t
d
c
h
e
o
u
l
e
v
n
a
o
r
e
n
s
o
r
s
f
t
c
l
m
i
h
i
e
l
o
n
t
i
r
o
p
t
c
a
e
g
y
y
n
r
e
e
u
e
c
e
e
s
d
m
n
a
t
i
y
t
l
w
r
t
u
g
n
c
t
o
o
c
a
r
o
i
d
m
t
h
e
a
n
y
b
t
n
e
t
e
h
s
i
t
r
i
w
e
s
t
s
t
h
i
r
u
o
d
p
o
f
n
o
t
i
p
o
n
,
o
l
u
y
h
e
l
i
w
a
c
e
u
s
b
e
s
i
a
r
l
o
u
r
e
s
r
c
e
a
a
t
e
c
v
d
s
s
g
A
i
d
t
a
n
s
i
h
a
a
n
d
f
n
i
m
m
c
u
n
i
t
u
a
r
c
u
f
a
p
a
r
t
e
c
t
c
h
a
l
s
l
r
e
t
h
e
r
p
r
e
l
v
p
i
y
b
d
e
.
s
e
l
,
i
i
u
u
s
a
r
p
n
t
t
o
t
a
5
1
o
p
t
r
f
h
e
a
c
f
e
u
n
l
m
r
f
o
t
n
i
a
o
n
t
i
r
e
s
r
e
t
c
e
l
o
l
n
o
t
b
n
i
c
l
y
c
n
e
t
p
r
n
a
p
p
t
r
i
e
h
n
e
w
t
h
e
q
e
d
e
a
l
a
t
l
n
s
d
d
e
u
n
s
i
a
c
q
e
s
t
h
a
r
e
p
.
O
s
e
l
b
o
n
i
s
p
t
s
o
n
y
i
s
e
t
r
e
a
t
e
l
e
o
f
g
o
t
a
n
e
t
i
l
a
r
i
o
t
p
e
i
o
o
n
f
t
i
a
i
n
c
o
r
o
l
m
f
p
m
e
s
)
d
a
s
h
o
h
o
e
u
s
a
e
a
c
n
d
l
t
r
i
c
e
e
a
g
n
v
e
c
o
t
i
n
a
w
h
t
i
a
e
s
l
n
d
m
n
e
p
t
u
i
c
o
a
r
d
n
c
e
m
n
e
p
t
u
i
d
c
c
e
o
u
l
d
l
a
w
t
e
.
s
c
t
r
o
n
i
c
e
l
u
n
q
c
e
e
e
s
s
t
h
i
o
n
f
g

Caution
◦ Power Requirements
- AC 100 ~ 240V
- DC 12V/24V
◦ All operating instructions must be read and understood before the product is operated.
◦ These safety and operating instructions must be kept in safe place for future reference.
◦ Do not use attachments not recommended by the manufacturer. Use of inadequate attachments
can result in accidents.
◦ This product must be operated on a power source specied on the specication label.
4
4
If you are not sure of the type of power supply used in your location, consult your dealer or local
power company.
◦ The power cords must be routed properly to prevent stepping on them or objects from resting on
them. Check the cords at the plugs and product.
◦ Do not overload AC outlets or extension cords. Overloading can cause re or electric shock.
Multi Format LCD Monitor
◦ Never insert an object into the product through vents or openings. High voltage ows in the
Multi Format LCD Monitor
product and inserting an object can cause electric shock and/or short internal parts.
For the same reason, do not spill water or liquid on the product.
◦ Do not attempt to service the product yourself. Removing covers can expose you to high voltage
and other dangerous conditions. Utilize a qualied electronics service specialist for all repairs.
◦ If any of the following conditions occurs, unplug the power cord from the AC outlet and request a
qualied service person to perform repairs.
a. When the power cord or plug in damaged.
b. When a liquid was spilled on the product or when objects have fallen into the product.
c. When the product has been exposed to rain or water.
d. When the product does not operate properly as described in the operating instructions.
Do not touch the controls other than those described in the operating instructions.
Improper adjustment of controls not described in the instructions can cause damage,
which often requires extensive adjustment work by a qualied technician.
e. When the product has been dropped or damaged.
f . When the product displays an abnormal condition. Any noticeable abnormality
in the product indicates that the product needs servicing.

Caution
◦ In case the product needs service, consult an authorized TVLogic Reseller.
◦ Unplug the power cord from the AC outlet before cleaning the product. Use a damp cloth to clean
the product. Do not use liquid cleaners or aerosol cleaners.
◦ Keep the product away from direct Sun light.
◦ Do not place the product on an unstable cart, stand, tripod or table. Placing the product on an
unstable base can cause the product to fall, resulting in serious personal injuries as well as damage
to the product. Use only a cart, stand, tripod, bracket or table recommended by the manufacturer
or sold with the product. When mounting the product on a wall, be sure to follow the manufacturer's
instruction. Use only the mounting hardware recommended by the manufacturer.
◦ The vents and other openings in the cabinet are designed for ventilation. Do not cover or block
these vents and openings since insucient ventilation can cause overheating and/or shorten the
life of the product. Do not place the product in an enclosed place such as a bookcase or rack, unless
proper ventilation is provided or the manufacturer's instructions are followed.
◦ The LCD panel used in this product is made of glass. Therefore, it can break when the product is
dropped or exposed to impact.
◦ Keep the product away from heat sources such as radiators, heaters, stoves and other
heat generating products (including ampliers).
5
Multi Format LCD Monitor

Features
LQM-071W/LQM-171W MONITORS CONTAIN THE FOLLOWING FEATURES AND ADVANTAGES :
◦ 4 x SDI Inputs.
◦ 4 x Analog CVBS Inputs.
◦ HD-SDI, SD-SDI, CVBS Auto-detecting.
◦ 1 x SD/HD SDI Output.
◦ Embedded Audio Level Meter.
6
6
◦ Built in audio disembedder and internal speakers.
◦ Stereo audio out using mini jacks.
◦ External audio in for line and speaker out.
◦ Wide Variety of Markers & Safety Areas.
Multi Format LCD Monitor
◦ The monitor can be powered by a 12V DC power source.
Multi Format LCD Monitor
◦ Remote control function using RS232 or RS422.
◦ User programmable function keys (F1, F2).
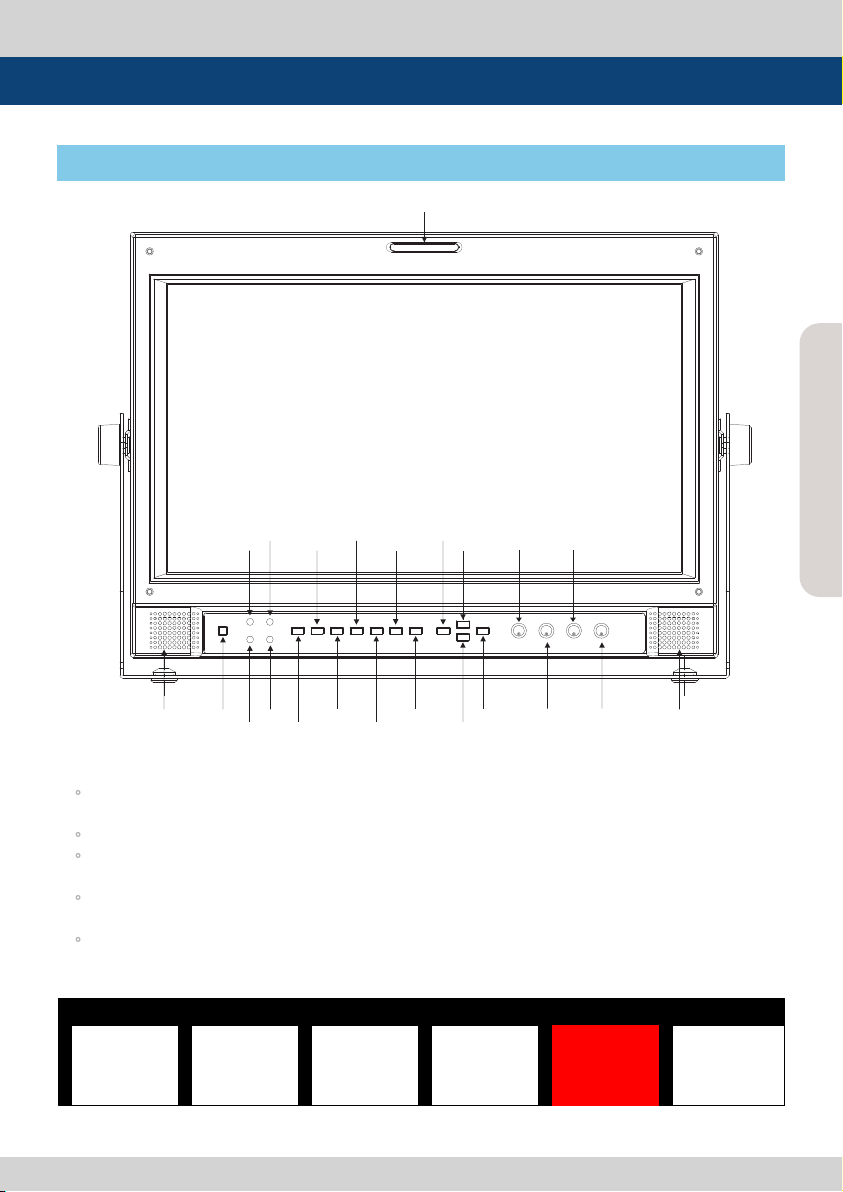
Controls, Indicators and Connections
LEFT
SPEAKER
POWER CONFIG LED
STATUS LED
USB LED CH SEL SDI OUT UP F1
TALLY
ETHERNET LED MARKER MENU
SELECT
/BRIGHT
ENCODER
CHROMA
ENCODER
DISPLAY MODE VOLUME
DN/F2
CONTRAST
ENCODER
MENU
ENCODER
PEAKING WAVE INTENSITY ENTER
RIGHT
SPEAKER
D P M OD E
4 P
C H S E L
C H 1
P E A KIN G
C H 1
5
M A RK ER
C H 1
O F F
V O LU M E
1 2
SD I OUT
CH1
LQM-071W : FRONT
7
Multi Format LCD Monitor
<LQM-171W-FRONT>
1. Buttons
◦ Press any button to bring up the OSD display as shown in picture 4. The selected item will display
in red. The OSD display disappears after 5 seconds if no other control is made.
◦ Each button OSD indicates feature, channel and value.
◦ For features with a channel selection, press the button repeatedly to change and select the desired
channel. Select ALL to change all channels with the same value.
◦ For the button features with individual value selections, press the button repeatedly to increase
the value of the feature by 1. The value goes back to minimum after reaching the maximum value.
◦ Rotate the SELECT ENC knob to change the value of selected item. The value will automatically
will be stored in the memory (EEPROM) once the OSD disappears.
<LQM-071W Button OSD>

Controls, Indicators and Connections
2. BUTTON FUNCTION
◦ [DISPLAY MODE] Used to select display mode. (See Chart 2.)
◦ [CH SEL] Used to select active input channel.
◦ [PEAKING] Used to control the sharpness of the selected input display.
◦ [MARKER] Used to select Marker On/O of the selected input channel.
◦ [VOLUME] Used to control the volume.
8
◦ [SDI OUT] Used to select the SDI output source.
8
◦ [WAVE INTENSITY] Used to control the intensity of waveform and vector scope display.
◦ [MENU] Used to pop-up MENU OSD.
◦ [UP/F1] [DN/F2] Are used to navigate the menu, which works same way as the MENU ENC.
It is also used to activate the user’s selected feature when the MENU OSD is not active. (See chart 4.)
Multi Format LCD Monitor
Multi Format LCD Monitor
◦ [ENTER] Used to conrm a chosen value in the MENU, which works the same way as pressing
the MENU ENC button.

Controls, Indicators and Connections
3. LED INDICATOR
◦ [USB] Indicates the connectivity between USB Port and PC. The LED will start to blink when
transmitting data with the PC to indicate the current status.
◦ [ETHERNET] Indicates the connectivity between Ethernet Port and Network. The LED will start to
blink when transmitting packets with PC to indicate the current status.
◦ [STAT] Indicates the current status of the Monitor. (Not supported under rmware V1.2)
◦ [CFG] LED turns on when the Monitor is updating its rmware. If the LED is on, do not turn o
the power of the monitor.
4. SELECT / BRIGHT ENCODER
◦ Rotate : Used to adjust the value of the selected feature and brightness.
◦ Press : Used to control the brightness of selected display.
5. CONTRAST ENCODER
◦ Rotate: Used to adjust the value of the contrast.
◦ Press: Used to control the contrast of selected display.
6. CHROMA ENCODER
◦ Rotate: Used to adjust the value of the saturation.
◦ Press: Used to control the saturation of selected display.
7. MENU ENCODER
◦ Rotate: Used to navigate the menu or to control the value of the selected feature.
◦ Press: Used to move to the next menu or to conrm a chosen value. Also, Press and hold for
1 second to return to the previous menu.
9
Multi Format LCD Monitor
8. TALLY
◦ By using the remote, the tally light can be used for each input channel in either red or green.
At the same time, the selected channel’s image displays the Red/Green tally graphic.
 Loading...