

Page 1

PS3™ Amplied
Stereo Gaming Headset
PC / Mac® Setup
Copyright © 2011, Voyetra Turtle Beach, Inc. (VTB). All rights reserved. No part of this document may be reproduced
without prior written consent from Voyetra Turtle Beach, Inc. Turtle Beach, the Turtle Beach logo, Voyetra, Ear Force and
Chat Boost are either trademarks or registered trademarks of VTB. Playstation and PS3 are either trademarks or registered trademarks of Sony Corporation. Windows, Vista are registered trademarks of Microsoft Corporation. Apple and Mac
are registered trademarks of Apple Inc. All other trademarks are properties of their respective companies and are hereby
acknowledged. Made in China. V1 1.20.11
Page 2
Connecting the P11 to a PC
Windows Vista® & Windows 7 Setup Procedure
When used as a PC gaming headset, the P11 functions as two independent
headsets in one package:
Amplied Stereo Headphones: The green 3.5mm plug is used for sending the
stereo game signal from the PC sound card to the P11 headphone amplier so
you can hear game sounds, music and other sounds from your PC. The overall
volume level is set by the Game volume control on the P11 amplier.
USB Stereo Headset: The USB connection is used for mic and chat signals and
appears as “Turtle Beach P11” in Windows operating systems. This lets you
assign the P11 mic and chat in your game software as a USB audio device.
You can set the microphone and chat levels independently with the Windows
mixer software, as described below. After conguring these volume settings,
you can set the chat level with the Chat volume control on the P11 amplier.
Note that each time you disconnect the P11 from the USB port, the volume
settings described below may revert back to their default settings. As such, you
might have to go back and set them again each time you remove and insert
the P11 USB connector.
3.5mm audio
plug (green)
USB
[Windows 7-specic instructions are in italics]
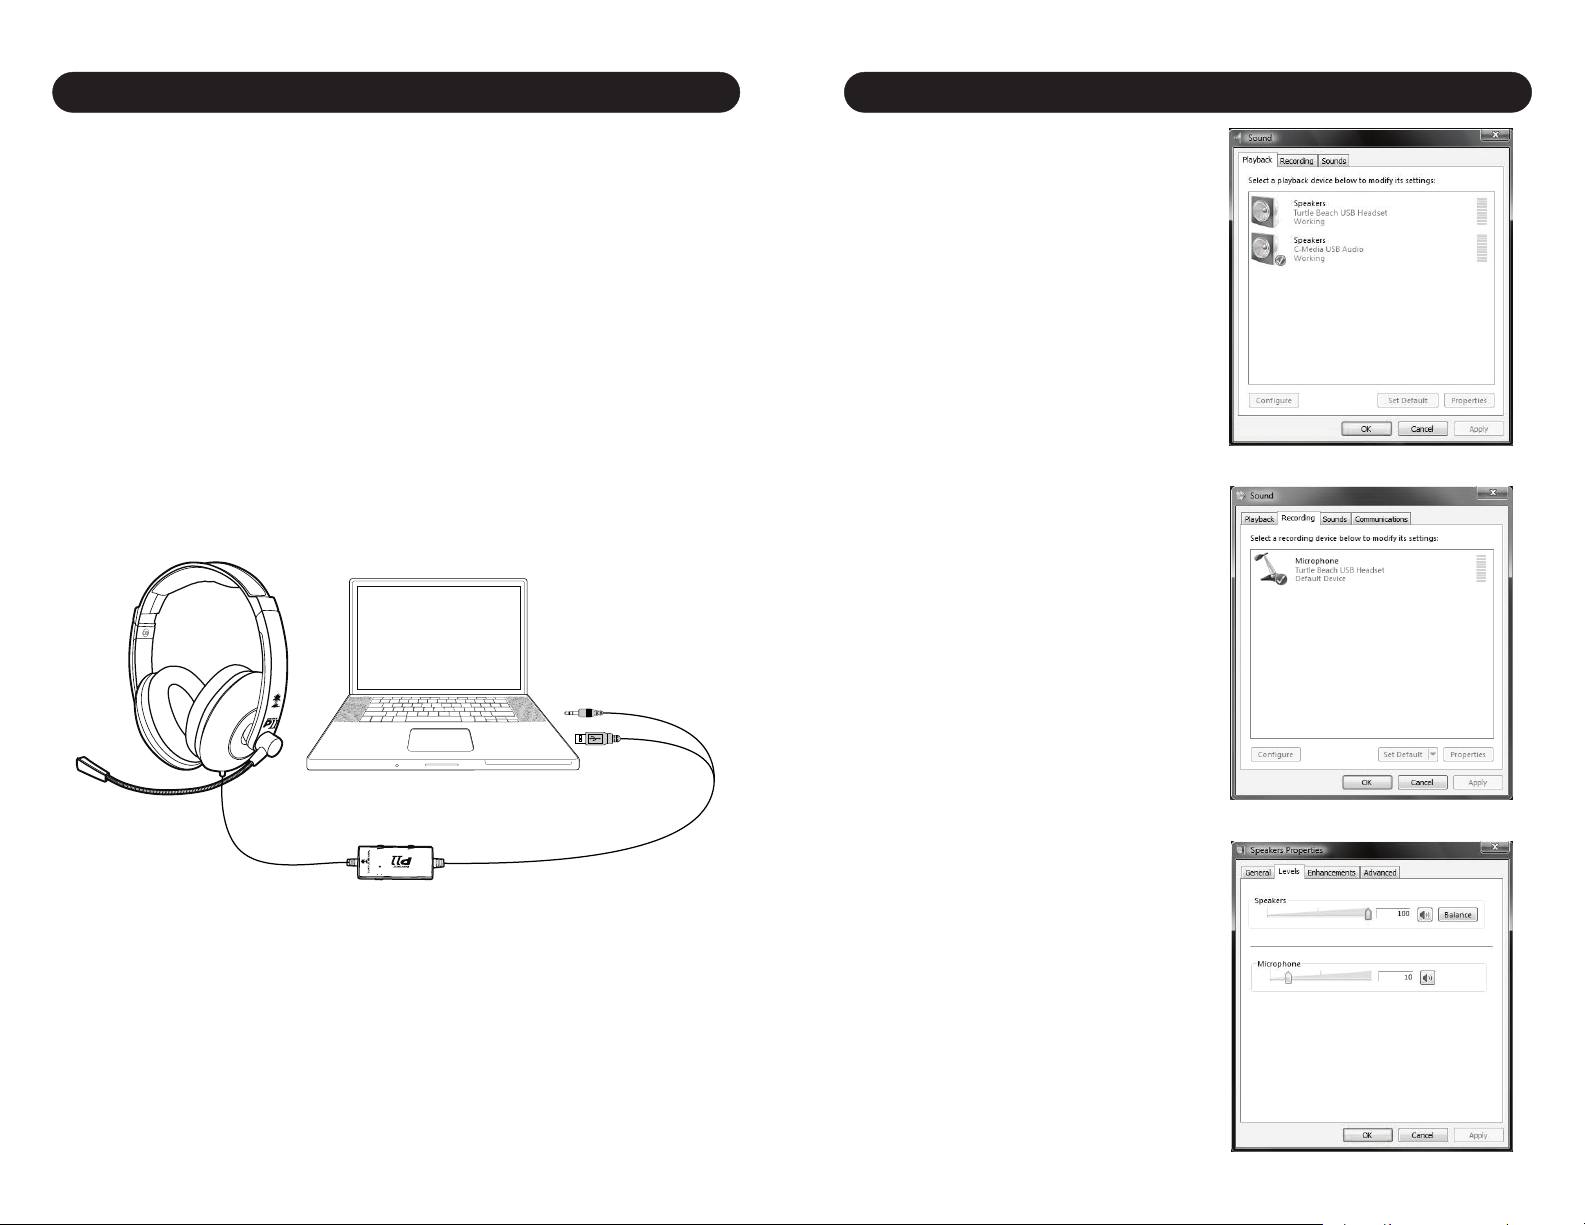
1. Insert the 3.5mm green plug into the
sound card or headphone output. This
connects the stereo output signal to the
P11 amplier so you can set the level
with the Game Volume control.
2. Insert the P11 USB connector into
a USB port. After Windows indicates
that it found a new USB audio device,
click on Start (circular Windows logo) →
Control Panel → [Win7: Hardware and
Sound] → Sound.
3. In the dialog box (shown here), click
the Playback tab, right-click “Turtle
Beach P11” and select “Set as Default
Device”. A green circle with a check
mark will appear to indicate that this is
now your default sound device. (If the
green circle is already indicating that the
P11 is selected, skip to the next step).
4. Under the Recording tab, right-click
on “Turtle Beach P11” and select “Set
as Default Device” [Win7: and “Set as
Default Communications Device”]. A
green circle with a microphone icon will
appear to indicate that this is now your
default communication device. (If the
green circle is already indicating that the
P11 is selected, skip to the next step).
5. [Win7: Under the Communications
GAME
CHAT
ON MIC MUTE
tab, select “Do Nothing”].
6. Under the Playback tab, double-click
on “USB Audio Device” to bring up the
Speakers Properties mixer panel.
7. Click on the Levels tab.
8. Set the Speakers slider to maximum.
This, along with the Chat dial on the P11
amplier, will determine the level of chat
you hear in the P11.
Page 1 Page 2
Page 3

Windows Vista & Windows 7 Setup Procedure (cont’d)
Windows XP Setup Procedure
9. The Microphone slider in this mixer
panel determines the volume of your voice
heard in the P11 speakers as you speak
into the mic. Since the P11 has a builtin mic monitor, you can adjust this level
to your liking. (We recommend you set it
below 10%). Click OK to go back to the
general Sound control panel.
10. Under the Recording tab, double-click
on “Turtle Beach P11” to bring up the
Microphone Properties mixer panel.
11. Click on the Levels tab, which will
bring up the Microphone volume slider.
This determines how loud your voice will
sound when you speak to others online.
Try balancing the mic
position and volume setting for the optimum voice level. (We recommend you
set this at 25%).
12. Close the open dialog boxes and the P11 USB headset should now be
ready for use in chat programs such as Skype®, Ventrilo™, Teamspeak®, etc.
1. Insert the green 3.5mm plug
into the sound card or headphone
output. This connects the stereo
output signal to the P11 amplier
so you can set the level with the
Game volume control.
2. Insert the P11 USB connector
into a USB port on your PC or laptop. After Windows indicates that
it found a new USB audio device,
click on Start → Control Panel →
Sounds and Audio Devices.
3. In the dialog box (shown here),
click on the Audio tab. Note the device that’s selected under the Playback and Recording menus, as you
may want to set these back once
you’re done setting up the P11.
4. Select “Turtle Beach P11” in the pull down menus for Sound Playback
and Sound Recording. You can change these back to the original settings
Connecting the P11 to a Mac
The P11 connects to a Mac with its 3.5mm audio plug and USB connector,
allowing you to control the game and chat volume independently just as you
would on a PS3.
The 3.5mm connection is used for sound card audio which can be controlled
by the Game volume on the P11 amplier.
The USB connection is used for mic and chat signals and appears as “Turtle
Beach P11” in the Mac O/S. This lets you assign the P11 mic and chat in your
game software as a USB audio device. You can set the microphone and chat
levels independently with the Mac mixer, as described in the next section. After
conguring these volume settings, you can set the chat level with the Chat
volume control on the P11 amplier.
Step 1
Connect the green 3.5mm
audio plug to the sound card
line output on your Mac.
after you’re done setting the P11 volume levels.
5. Click on the Volume button in the Sound Playback section to activate the
mixer panel (shown here).
6. Click on Options → Properties in the top menu. In the dialog
box, click on Playback and check
Speaker, WAV and Microphone.
This determines which volume controls will appear in the mixer. Click
OK to activate the playback mixer
(shown here).
7. Turn up the Speaker and Wave
volume sliders to maximum. These
determine the level of chat you
hear in the P11. Since the P11 has
a Chat volume control on the am-
plier, setting these to maximum
allows you to adjust the incoming
Step 2
Connect the P11 USB
plug into a USB socket
on your Mac.
GAME
CHAT
ON MIC MUTE
Page 3 Page 4
chat volume on the amplier without having to access these mixer controls.
Page 4

Windows XP Setup Procedure (cont’d)
Mac® Setup Procedure
8. The Microphone slider on the far right of this mixer panel determines
the volume of your voice heard in the P11 speakers as you speak into the
mic. Since the P11 has a built-in mic monitor, you should turn this volume
slider down to minimum or mute it. Or, if you want to hear more of your
voice in the headset, turn up this volume to the desired setting. Keep in
mind that increasing this volume will also increase the sound level picked
up by the mic, so you will hear more ambient sounds as well as your
voice.
9. Go back to the Sounds and Audio Devices dialog
box and click on the Volume button in the Sound Re-
cording section to activate the mic recording volume
slider (shown here). This determines how loud your
voice will sound when you speak to others online.
Set the slider to about 50%. If you nd that your
voice isn’t loud enough, move the slider up (or move
it down if your voice is too loud.)
10. Position the mic several inches away from your
mouth so it doesn’t overload when you speak. Try
balancing the mic position and the volume setting
for optimum voice level.
11. After you’re done setting up the proper levels,
go back to the Sounds and Audio Devices dialog box
and set the default audio devices for playback and
recording back to their original settings if you don’t
want the P11 USB headset to be the default device
for Windows sounds.
12. Close the open dialog boxes and the P11 USB headset should now be
ready for use in chat programs such as Skype®, Ventrilo™, Teamspeak®, etc.
1. Insert the green 3.5mm
plug into the sound card
or headphone line output.
This connects the stereo
audio output to the P11
amplier so you can set the
level with the Game volume
control.
2. Insert the P11 USB connector into a USB port. The
P11 should be automatically recognized as a new
USB audio device and be
designated as the default
audio device and microphone.
3. Click on the Apple® menu icon and go to System Preferences → Sound.
4. Select the Output tab
and make sure that “Turtle
Beach P11” is designated
as the default audio device.
If not, select it now.
5. Set the Output volume
slider on the bottom of the
screen to max. This, along
with the Chat volume con-
trol on the P11 amplier, will
determine the level of chat
you hear in the P11.
6. Select the Input tab and
make sure that “Turtle
Beach P11” is designated
as the default microphone.
If not, select it now.
7. You can adjust the volume level of the P11 microphone with the Input
volume slider, which determines how loud others will hear your voice. Set it
at about 75%, but be sure to test the level to ensure that your voice can be
heard by others. If you nd that your voice isn’t loud enough, move the slider
up (or move the slider down if your voice is too loud).
8. Close the open dialog boxes and the P11 USB headset should now be
ready for use in chat programs such as Skype®, Ventrilo™, Teamspeak®, etc.
Page 5 Page 6
Page 5

Using the Amplier
Mic Mute
Indicator LED
Incoming
Chat Volume
CHAT
Mic Mute
Switch
GAME
Game Audio
Volume
ON MIC MUTE
Mic Mute LED
Turns RED when the mic is muted and GREEN when the mic is on.
Mic Mute Switch
When “ON”, the microphone is muted so you won’t be heard by other
players online.
Chat Volume
Sets the minimum level of incoming chat from other players.
Game Audio Volume
Sets the game sound level.
Mic Monitor (not shown)
When the mic is not muted, you’ll hear yourself speak in the headphones.
Page 7
 Loading...