

Page 1

WorkSpace for PC
User Guide
9.4
Page 2

WorkSpace for PC 2
TABLE OF CONTENTS
ABOUT WORKSPACE 4
Technical Requirements
Getting Started
Downloading and Installing WorkSpace
Registering the Software
Checking for Software Updates
Setting Up WorkSpace Connect
Setting Up MobiView
Setting Up Mobi Learners
Setting Up the DualBoard via USB
Setting Up the DualBoard via Wireless Kit
Setting Up the Touch Board and Touch Board Plus via USB
Connecting the Touch Board Plus
Mouse Actions
Touch Gestures
The WorkSpace Toolbar
WorkSpace Modes
WorkSpace Window
4
5
5
5
6
6
6
7
8
8
9
9
10
10
11
11
12
PREFERENCES 13
Options
New Page Setup
Transparency and Language
Toolbar Settings
Creating a Custom Button
Customize Toolbar
Adding a Tool to the Toolbar
Removing a Tool from the Toolbar
Creating a Custom Scheme
Gradient Page Setup
Changing a Gradient
Tablet Settings
THE WORKSPACE TOOLBAR AND MENUS 20
Toolbar
Table 1: WorkSpace Modes
Table 2: Tools Available in Lesson and Annotate Over Desktop Mode
Table 3: Tools Available in Office Mode
Menus
Other Options
Selecting the SRS
Creating a Flow Question
Asking a Flow Question
Device Manager
13
15
16
17
17
18
18
18
19
19
19
19
20
20
21
25
26
28
28
29
29
30
einstruction.com/workspace-overview
Page 3

WorkSpace for PC 3
Selecting Device Manager
30
WORKSPACE MODES 31
Lesson Mode
Accessing Lesson Mode
WorkSpace Tools
Mouse Mode
Enabling Mouse Mode
Capture
Annotate Over Desktop Mode
Annotating Over the Desktop
Multi-User Mode
Selecting the Multi-User Menu
Setting Up Multi-User Mode
Setting Up Quick Start
Selecting the Presenter
Presenter Tools
Locking Tablets and Clickers (If Applicable)
Exiting Multi-User Mode
Office Mode
Whiteboard Mode
Enabling Whiteboard Mode
Using Whiteboard Mode
31
31
32
33
33
33
33
34
34
34
35
36
36
36
37
38
38
39
39
39
USING WORKSPACE 40
Using Layers
Copying an Object
Locking and Unlocking an Object
Creating Page Transitions
Exporting a Presentation Object or Entity
Distributing Files
Distributing Files as GWB (PC Only)
Distributing Files as IWB
Exporting Files
40
41
41
42
42
42
43
43
43
THE GALLERY 44
Searching the Gallery
Selecting a Gallery Object
Adding a File to the Gallery
Building a Database
Importing a File from a Device
Editing Gallery Files
Exporting Gallery Files
Adding a New Category
Adding a File to Favorites
Deleting a File from the Gallery
45
45
45
46
46
46
47
47
47
47
CONTACT US 49
einstruction.com/workspace-overview
Page 4

WorkSpace for PC 4
ABOUT WORKSPACE
WorkSpace allows instructors to create, assemble and present content while engaging students. The software can be used
with any program - content or curriculum - and features more than 50 tools for building, displaying, annotating, organizing,
controlling, importing, capturing, recording and sharing teaching materials.
WorkSpace allows you to interact with any form of digital content and can be used in combination with DualBoard™, Touch
Board, Touch Board Plus, MobiView™, Mobi™Learner tablets, Student Response Systems (Pulse) or ResponseCard NXT.
This chapter covers the following sections:
Technical Requirements
Getting Started
The WorkSpace Toolbar
WorkSpace Modes
WorkSpace Window
Technical Requirements
The following are required for WorkSpace to properly function:
NOTE
Administrative privileges are required to install the software.
l Microsoft Windows® XP SP 2, Vista, 7 or 8
l Intel® Pentium® dual-core processor, 2 GHz or higher (or equivalent)
l 2 GB RAM
l 1 GB hard disk space for installation (600 MB for additional Gallery content)
l DVD-ROM drive for installation
l USB port
l XVGA (1024x768) or higher resolution with minimum 24-bit color
l Video card with support for DirectX 9 or greater
l Speakers and microphone for audio and video files
l Adobe® Flash® Player 9.0 or higher
einstruction.com/workspace-overview
Page 5

WorkSpace for PC 5
Getting Started
This section covers the following topics:
Downloading and Installing WorkSpace
Registering the Software
Checking for Software Updates
Setting Up WorkSpace Connect
Setting Up MobiView
Setting Up Mobi Learners
Setting Up the DualBoard via USB
Setting Up the DualBoard via Wireless Kit
Setting Up the Touch Board and Touch Board Plus via USB
Connecting the Touch Board Plus
Downloading and Installing WorkSpace
WorkSpace can be installed from a disc, www.turningtechnologies.com/responsesystemsupport/downloads or from a direct
setup file.
Prerequisites
Verify that your system meets the Technical Requirements.
1
Insert the WorkSpace disc into the CD-ROM drive.
2
Double-click Setup.exe.
The WorkSpace Software window is displayed.
3
Click Install Software.
4
Select the appropriate language from the drop-down menu and click OK.
The InstallShield Wizard opens.
5
Click Next.
6
Select the I accept the terms in the license agreement radio button if you agree to the End User License Agreement
(EULA).
7
Click Next.
8
Select Complete and click Next.
9
Click Install.
10
Click Finish.
11
Restart your computer before using WorkSpace.
Registering the Software
Registering the WorkSpace software allows you to receive notices of software updates.
1
Open WorkSpace.
2
Click the Main Menu icon on the toolbar, mouse over Help and select Register Online.
Your default web browser opens the product registration web page.
einstruction.com/workspace-overview
Page 6

WorkSpace for PC 6
3
Enter the required information in the fields provided and click Submit.
Checking for Software Updates
Periodically, Turning Technologies releases software updates. Follow the steps below to check for WorkSpace updates.
1
Click the Main Menu icon on the toolbar, mouse over Help and select Check for Updates.
NOTE
If Check for Updates is gray in color, the most up-to-date version of WorkSpace is installed.
Setting Up WorkSpace Connect
The Turning Technologies Device Manager must be installed on your computer prior to using WorkSpace Connect.
WorkSpace Connect turns your tablet into an interactive mobile whiteboard that is compatible with most Android and iPad
tablets.
NOTE
Using WorkSpace Connect is optional. Skip this task if you do not want to use the WorkSpace Connect
app.
1
Open WorkSpace.
2
Click the Main Menu icon on the toolbar and select Preferences.
The WorkSpace Preferences window opens.
3
Click the Tablet Settings tab.
4
Check the box labeled Allow Tablet Connection.
5
Enter the Host Name and Password in the boxes provided.
6
Click Save/Update to save your changes, and click OK to close the Preferences window.
Next Steps
Download and install the WorkSpace Connect app for your tablet from the appropriate app store. See the WorkSpace Connect
User Guide for Technical Requirements and instructions on how to use the app.
Setting Up MobiView
The Turning Technologies Device Manager must be installed on your computer prior to using the MobiView. The MobiView
communicates with Turning Technologies software through the wireless MobiView receiver. The receiver is a USB device
stored in the charging stand or on the backside of the MobiView.
1
Turn on the classroom computer on which WorkSpace is installed.
2
Insert the Mobi receiver into a USB port on the classroom computer. The blue LED on the Mobi receiver will light up.
NOTE
If a USB hub is needed, you must ensure that you use a powered USB hub.
3
Turn on the MobiView by pressing the blue Power button on top of the unit.
The message Attempting to Connect is displayed on the MobiView screen.
einstruction.com/workspace-overview
Page 7

WorkSpace for PC 7
When the MobiView connects to the Mobi receiver, the Home Screen appears.
TIP
If the message, Unable to Connect is displayed, verify that the Mobi receiver is inserted into a
working USB port.
When the two devices have been successfully paired, the blue button on the Mobi receiver will stop blinking and remain
a solid blue until one of the following three instances occur:
l the Mobi receiver is removed from the computer
l the MobiView is turned off
l the computer is turned off
Pairing the device is a one-time operation.
Setting Up Mobi Learners
The Turning Technologies Device Manager must be installed on your computer prior to using the Mobi Learners. Mobi Learners
must be able to communicate with the WorkSpace software. Communication is established either by a USB connection or
through wireless (RF). The RF (Radio Frequency) receiver plugs into a USB port on the computer or a powered USB Hub.
1
Turn on the classroom computer on which WorkSpace is installed.
2
Insert the Mobi receiver into a USB port on the classroom computer. The blue LED on the Mobi receiver will light up.
NOTE
If a USB hub is needed, you must ensure that you use a powered USB hub.
3
Press the activation button on the Mobi receiver. The blue light will begin to blink.
4
Turn on the Mobi.
5
Press the blue activation button on the back of the Mobi to activate the RF signal. The button is located next to the
battery opening.
IMPORTANT
You have two minutes to press the activation button.
When the two devices have been successfully paired, the blue button on the Mobi receiver will stop blinking and remain
a solid blue until one of the following three instances occur:
l the Mobi receiver is removed from the computer
l the Mobi is turned off
l the computer is turned off
Pairing the device is a one-time operation.
einstruction.com/workspace-overview
Page 8

WorkSpace for PC 8
Setting Up the DualBoard via USB
The Turning Technologies Device Manager must be installed on your computer prior to using the DualBoard. Device Manager
is automatically installed with the following software: WorkSpace, CPS, Response and Flow.
1
Connect the AC/DC power adapter to the controller box.
2
Plug the opposite end of the AC/DC power adapter into a wall outlet.
3
Connect the USB cable to the DualBoard controller box.
4
Plug the opposite end of the USB cable into an available USB port on your computer.
5
Click the Power switch to the On position.
NOTE
The AC/DC power adapter is only used to charge the electronic pens.
Setting Up the DualBoard via Wireless Kit
The Turning Technologies Device Manager must be installed on your computer prior to using the DualBoard. Device Manager
is automatically installed with the following software: WorkSpace, CPS, Response and Flow.
An RF (Radio Frequency) receiver plugs into a USB port on your computer or a powered USB Hub. A second receiver is
connected to the DualBoard controller box via USB cable. The receiver is seated in a holster that slips over the frame at the top
of the board.
The RF receiver works best when it is not plugged into a computer that is under a podium or a desk. If necessary, use a
powered USB extension cable to remove the RF receiver from under furniture that may shield the RF signal.
1
Connect the AC/DC power adapter to the DualBoard controller box.
2
Plug the opposite end of the AC/DC power adapter into a wall outlet.
3
Plug the end of the USB cable (RJ12) into the DualBoard controller box located on the back of the board. The
controller box is located on the bottom left of the board, if the board has already been hung up.
4
Slide the RF COM plastic grey holster over the board’s frame at the top of the DualBoard.
5
Seat the receiver into the plastic grey holster.
6
Click the Power switch to the On position.
7
Plug the RF receiver into an available USB port on your computer.
8
Press the pairing button on the receiver.
9
Press the pairing button on the RF receiver. The blue light will begin to blink.
IMPORTANT
You have two minutes to press the pairing button.
When the two devices have been successfully paired, the blue buttons on the receivers will stop blinking and remain a
solid blue until one of the following three instances occur:
l the RF receiver is removed from the computer
l the DualBoard is turned off
l the computer is turned off
Pairing the device is a one-time operation.
einstruction.com/workspace-overview
Page 9
WorkSpace for PC 9
Setting Up the Touch Board and Touch Board Plus via USB
The Turning Technologies Device Manager must be installed on your computer prior to installing the Touch Board. Device
Manager is automatically installed with the following software: WorkSpace, CPS, Response and Flow.
The RF receiver works best when it is not plugged into a computer that is under a podium or a desk. If necessary, use a
powered USB extension cable to remove the RF Hub from under furniture that may shield the RF signal.
1
Connect the AC/DC power adapter to the controller box.
2
Plug the opposite end of the AC/DC power adapter into a wall outlet.
3
Connect the USB cable to the Touch Board controller box.
4
Plug the opposite end of the USB cable into an available USB port on your computer.
5
Click the Power switch to the On position.
Connecting the Touch Board Plus
Turning Technologies Device Manager version 7.3 or higher must be installed on your computer prior to installing the Wireless
Kit.
The MultiHub plugs into a USB port on your computer or a powered USB Hub. The RFCOM (Radio Frequency Communicator)
plugs into a wall outlet while positioned in the RFCOM clip that slips over the frame at the side of the Touch Board Plus.
1
Slide the plastic gray clip over the frame at the side of the Touch Board Plus.
2
Seat the RFCOM into the plastic gray clip.
3
Connect the appropriate end of the power cord into the power cord terminal and the opposite end into a nearby wall
outlet.
4
Connect the USB cable from the Touch Board Plus to the RFCOM .
5
Turn on the RFCOM power switch . The amber light will turn on to show a successful connection to the Touch
Board Plus.
6
Plug the MultiHub into a working USB port on your computer or a powered USB hub.
7
Press the pairing button on the MultiHub. The blue light will begin to blink.
8
Press the pairing button on the RFCOM.
IMPORTANT
You have two minutes to press the pairing button.
When the two devices have been successfully paired, the blue light on the RFCOM will stop blinking and remain a solid
blue. The light will dim when connection to the MultiHub is lost.
Pairing the device is a one-time operation.
einstruction.com/workspace-overview
Page 10
WorkSpace for PC 10
Mouse Actions
Mouse Command Use Mouse Action Action
Left-click Open items Touch and release to click
Double-click Open files and folders Two quick finger taps
Right-click
Drag Drag items across screen Move one finger left or right
Access content sensitive dropdown menu
Touch with two fingers slightly
apart
**menu appears by first touch
Touch Gestures
NOTE
Touch Gestures are native to Windows 7 and 8 and are not compatible on Windows XP, Vista, OS X or
Linux platforms.
Gesture Use Gesture Action Action
Zoom
Zoom in/out on an image
or web page
Use two fingers in a pinching
or pull apart motion
Rotate Rotate content
Flicks
Pan
einstruction.com/workspace-overview
Flick or throw objects
across the screen
Scroll through content or
web page
Use two fingers in a clockwise or counterclockwise
motion
Make a quick flick motion in
desired direction
Drag finger up or down on
content or scrollable window
Page 11
WorkSpace for PC 11
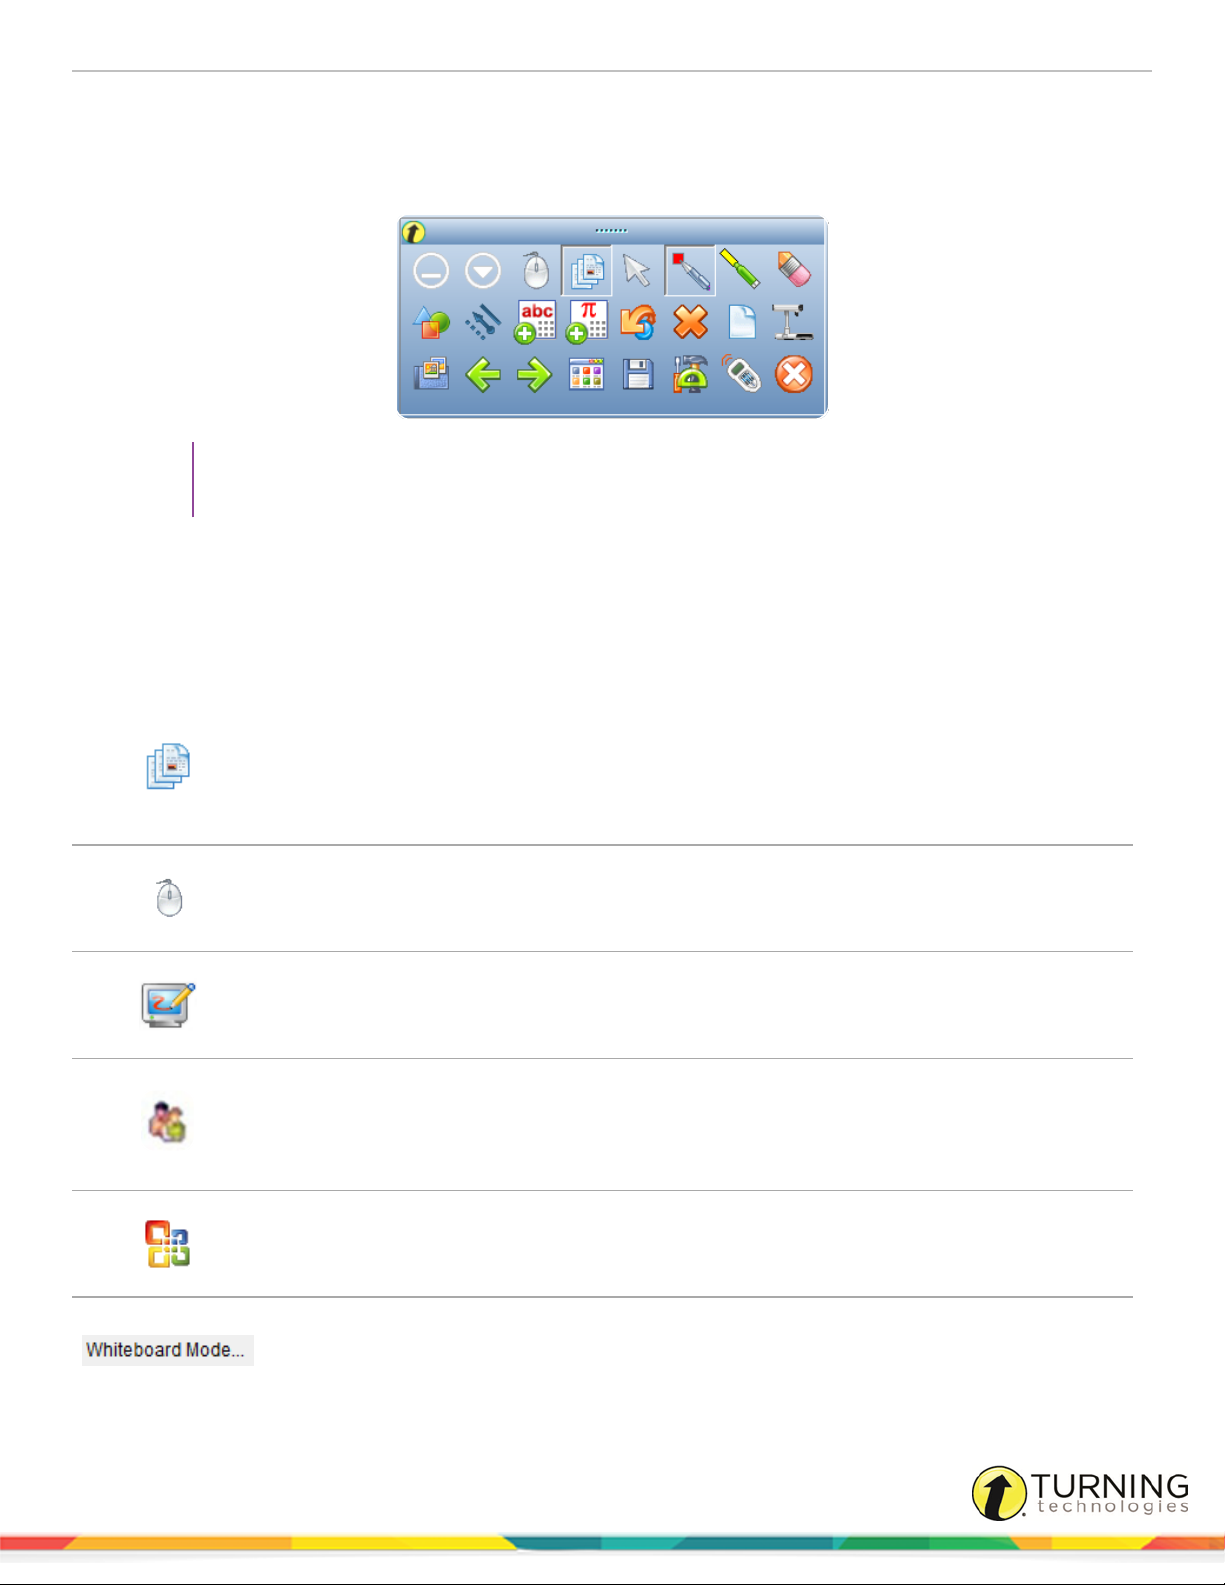
The WorkSpace Toolbar
By default, WorkSpace opens in Lesson Mode with the WorkSpace toolbar floating on the desktop. The WorkSpace toolbar
can be customized. See Customize Toolbar.
TIP
The WorkSpace toolbar will become transparent if not in use. Click anywhere on the toolbar to reactivate
it.
WorkSpace Modes
WorkSpace allows you to capture text, graphics, or virtually any image from any application that you can project from your
computer. The software is categorized into six "modes," each consisting of different capabilities.
By default, WorkSpace opens in Lesson Mode. In Lesson Mode, WorkSpace takes a screenshot of
the desktop allowing you to annotate over the static image - write, draw, insert images, highlight,
interact with, and annotate over prepared material. A blank page can be used as a whiteboard in a
lesson without leaving the WorkSpace presentation.
For more information, see Lesson Mode.
In Mouse Mode, the internet can be accessed using the Mouse tool. Additionally, select any of the
annotation tools while in Mouse Mode to change/return to Lesson Mode.
See Mouse Mode for more information.
By selecting Annotate Over Desktop Mode, the desktop is turned into a canvas. Use the
Annotation Tools, Page Tools or Capture Tools to write and draw on the desktop.
Refer to Annotate Over Desktop Mode.
Multi-User Mode allows two or more participants to interact with Turning Technologies whiteboards
using collaborative (shared) or defined (one person per defined area) space. Multiple Mobi devices
can be displayed on the whiteboard at the same time.
Refer to Multi-User Mode.
Open and interact with Microsoft Office applications directly from the WorkSpace software in Office
Mode.
For more information, see Office Mode.
All notes made on the whiteboard can be captured and saved as pages within WorkSpace for
distribution, without the use of the projector in Whiteboard Mode.
See Whiteboard Mode for more information.
einstruction.com/workspace-overview
Page 12
WorkSpace for PC 12
TIP
Icons can be made available by customizing the toolbar. See Customize Toolbar for more
information.
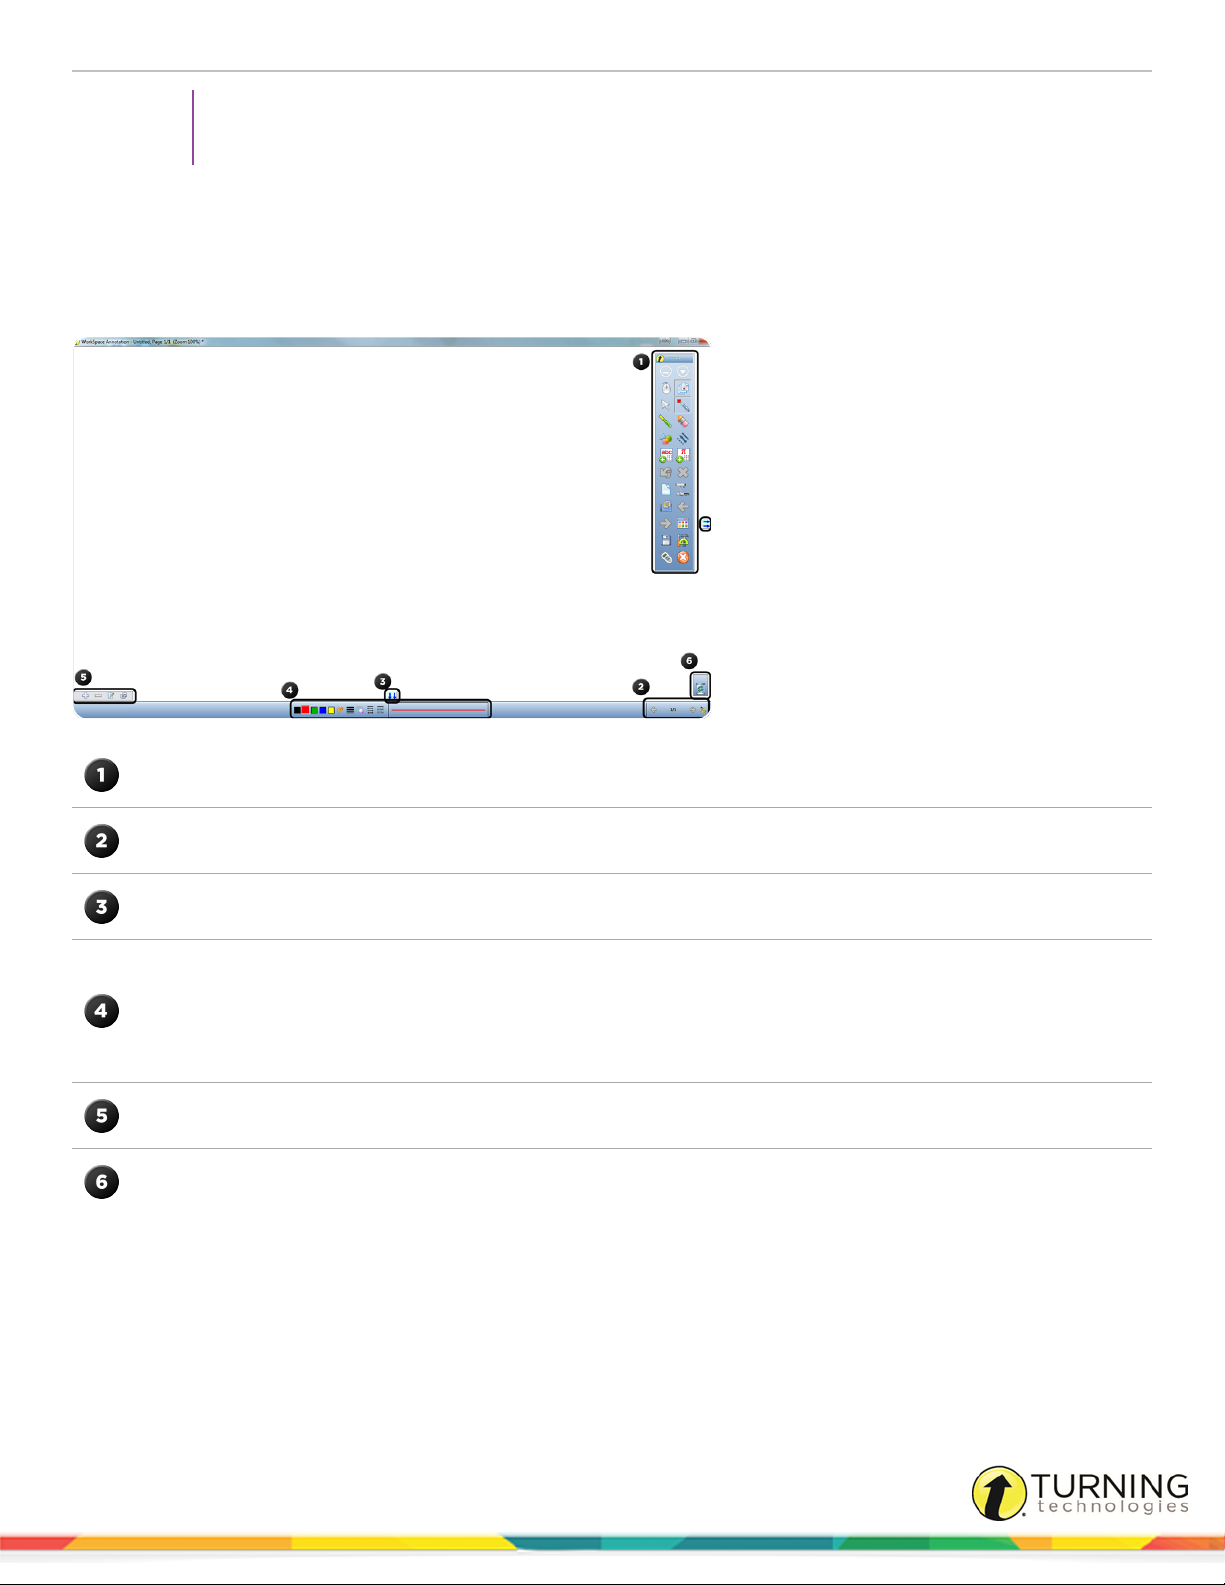
WorkSpace Window
Once in WorkSpace, the WorkSpace Window is displayed. The WorkSpace Window consists of a page in the presentation file
and several toolbars on the right side and bottom of the window. By default, the window can be sized and moved.
The Toolbar displays when WorkSpace is opened in Lesson Mode. The default toolbar scheme is set to Intermediate.
The Page Navigation Toolbar displays the tools used to navigate through the presentation file, including the Pan
Page, Previous Page, Page Counter, Next Page and Multi-User Mode tools.
Click the Extend/Scroll Page arrows to extend the page.
The Properties Bar provides options to change the properties of the selected annotation tool (pen, highlighter, shape).
For example, the pen tool Properties Bar includes color, width, transparency, line ends and line styles.
The Properties Bar also contains the Page Properties, including backgrounds, color and transparency, which can be
accessed by clicking the Selection tool on the WorkSpace Toolbar.
To the left of the Properties Bar is the LayersToolbar. The Layers window appears when using the Layers Toolbar. By
default, all annotations on a page are arranged in a single layer. Add, delete, show, hide, and arrange different layers.
Use the Recycle Bin to delete selected objects from the page. Drag the selected object and drop it in the Recycle Bin.
Click the Undo tool to retrieve objects dropped into the Recycle Bin.
einstruction.com/workspace-overview
Page 13
WorkSpace for PC 13
PREFERENCES
The Preferences window features the following tabs:
Options
New Page Setup
Transparency and Language
Toolbar Settings
Customize Toolbar
Gradient Page Setup
Tablet Settings
To access the Preferences window, click the Main Menu icon and select Preferences.
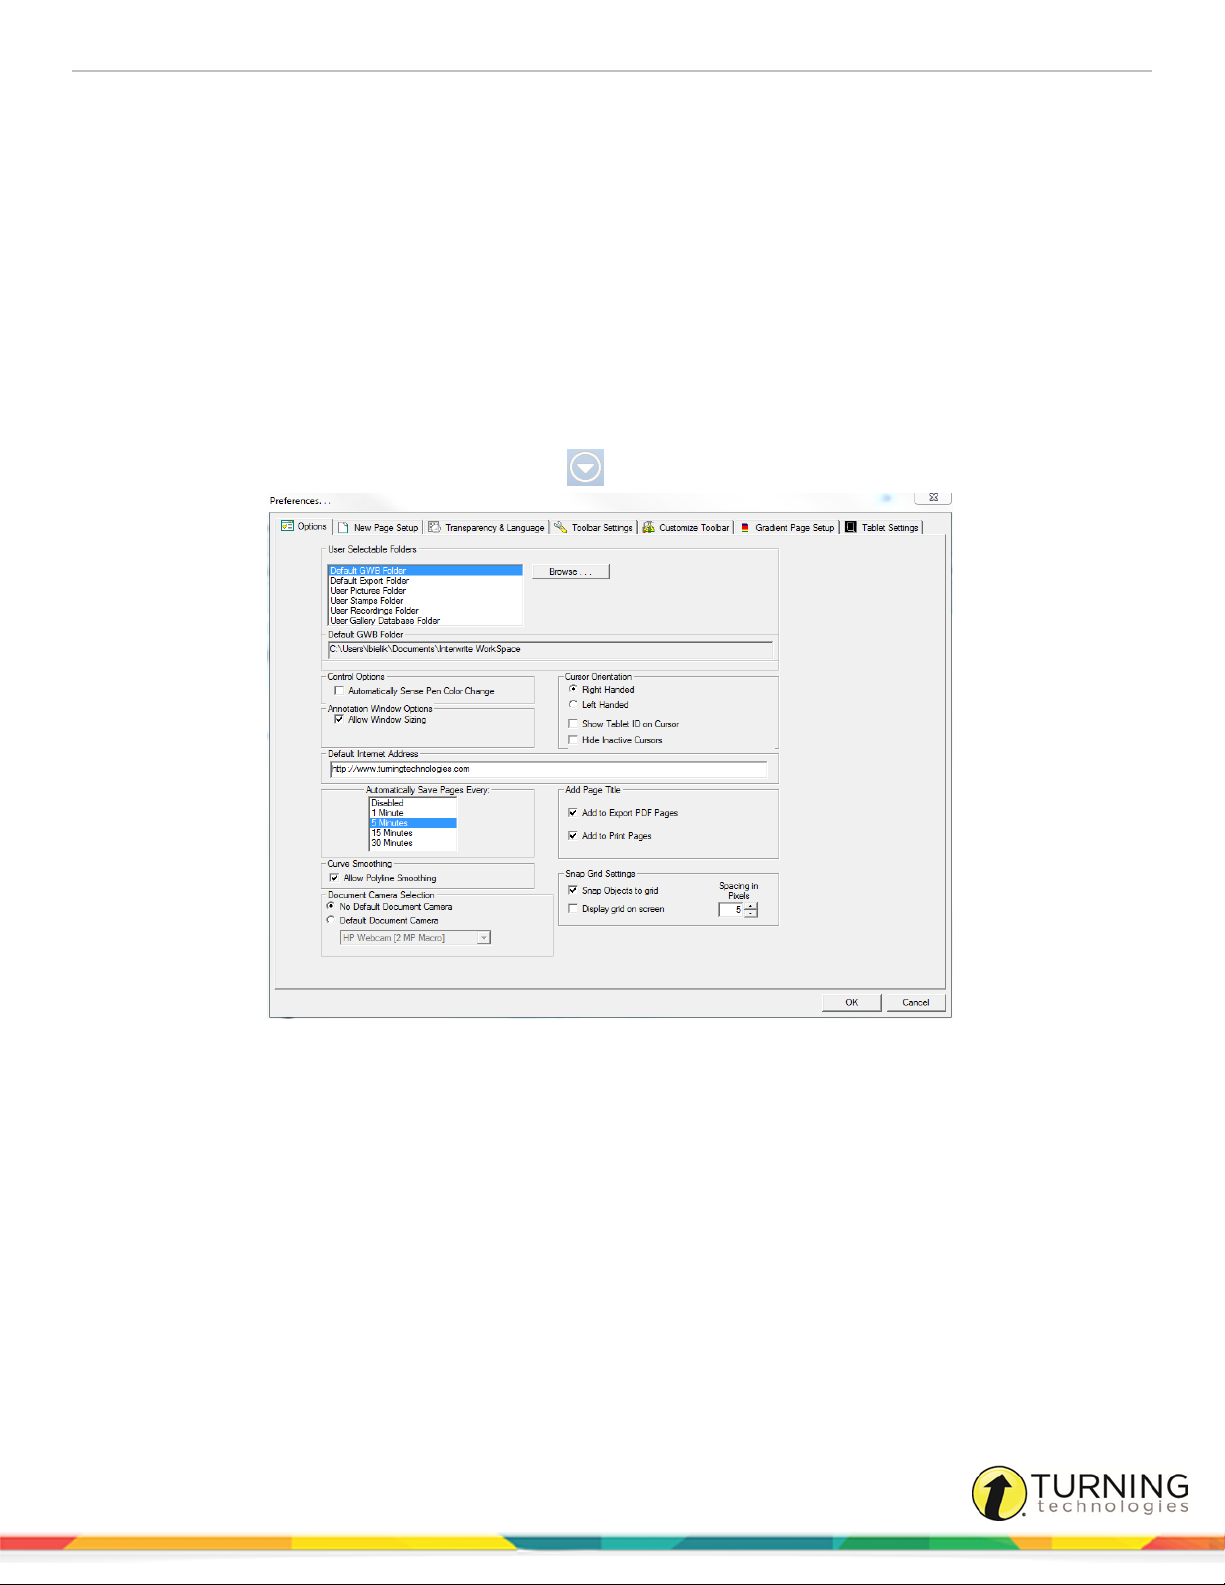
Options
Use the Options tab to configure a variety of WorkSpace features.
User Selectable Folders
When WorkSpace is installed, four User Selectable Folders are created in the Documents\InterWrite WorkSpace folder.
These folders provide default locations for GWB image files, exported presentation files, images for the Gallery, graphics to
use with the Stamper tool and AVI files.
l Images stored in the User Pictures Folder can be accessed in My Gallery, which is opened from the Gallery Menu.
Images can also be used by the Create Image Page tool as Image Page backgrounds, or inserted on a page in the
Annotation Window using the Insert Media tool.
einstruction.com/workspace-overview
Page 14

WorkSpace for PC 14
l User-supplied stamps will be displayed in the Properties Bar for the Stamper tool. Both images and stamps must be in
BMP, GIF, JPEG, TIFF or PNG format.
l The Record and Playback tool will play any AVI or WMV recording stored in the User Recordings Folder by opening the
default video player on the system.
l To change the location of a folder, select the folder in the User Selectable Folders list, click Browse and navigate to a
new location.
Control Options
Check this box if you use a legacy electronic pen for the DualBoard and would like WorkSpace to automatically sense when
the electronic pen is changed. When this option is checked, the color of the virtual ink on the projected image will match the
colored rings of the electronic pen being used.
Annotation Window Options
By default, the Allow Window Sizing checkbox is selected. This option allows you to easily move the WorkSpace window
around the desktop. If you would like WorkSpace to open in full screen mode, uncheck the Allow Window Sizing checkbox.
Cursor Orientation
By default, the pen tools are set to right-handed orientation. If you are using more than one Mobi during the presentation, or the
WorkSpace Connect application, click the Show Tablet ID on Cursor checkbox to identify which Mobi is interacting with the
presentation.
Default Internet Address
The Internet Browser tool points to the company website by default. Enter another URL in this field to display a different
internet start-up page.
Automatically Save Pages
Presentation files are automatically saved as they are created. By default, the Auto Save option is set to save every five (5)
minutes. Auto Save can be disabled, or the frequency can be changed, by selecting a different time interval.
Add Page Title
By default, the title that appears on the Annotation window title bar is automatically added to the pages of exported and printed
presentation files. These options can be turned off by clearing the respective checkboxes.
Curve Smoothing
Selecting this checkbox creates smoother writing when using annotation tools.
Snap Grid Settings
Selecting this checkbox forces drawn objects to be drawn at a set grid point. You also can choose to display the grid on-screen
and determine the grid spacing.
Document Camera Selection
Select a default camera from the drop-down menu.
einstruction.com/workspace-overview
Page 15

WorkSpace for PC 15
New Page Setup
The New Page Setup tab features preferences for new pages and captures.
Setting up Blank Pages
Use this option to configure blank pages, including the default background color and the default capture options. Set a
background color for the Create Blank Page tool and Create Grid Page tool.
Setting up Captures
By default, WorkSpace switches to Annotation Mode, captures the screen, and displays it in the Annotation window. Selecting
a different Capture Option only works when it is selected while in Mouse Mode. The Preference settings do not affect the way
the Capture tool functions.
Capture Option Use
Always capture partial
Always capture
freeform area
Always capture
a window
Always capture screen Take a snapshot of the full screen and display it on a new page in the Annotation Window.
Prompt at capture time
Setting up Annotate Over Desktop
By default, WorkSpace opens a window prompting to save a document prior to exiting the software. This option can be
changed to Always Save, Prompt or Never Save. If Always Save is selected, WorkSpace will save every document without
notification.
Setting up Grid Pages
Configure lined grid pages, pages with columns and true grid pages with both horizontal and vertical lines.
Select To
Click and drag the cursor around the object to be captured. The partial capture will display on
a new blank page.
Freehand drag the cursor around the object to be captured. The capture will display on a new
blank page.
As the cursor is moved, a grid will appear that defines the boundaries of the selectable window. Move the cursor to the window to be captured and click. The window will display on a
new blank page.
Select the checkbox to have the capture placed on a new blank page. After the capture is
placed, select the capture option.
Horizontal
Vertical
Center Grid Center the grid to place the configured grid in the middle of the page.
einstruction.com/workspace-overview
Create horizontal lines on a page. Set the amount of space (in pixels) between
the horizontal lines.
Create columns on a page. Set the amount of space (in pixels) between the
vertical lines. Clear the Horizontal checkbox if you do not want pages with rows.
Set identical Snap Grid Setting pixels (under the Options tab) and Grid Lines
pixels (horizontal and vertical) so that any lines drawn on a Grid Page will “snap”
into place.
Page 16

WorkSpace for PC 16
Select To
Add Title Box
Add a title box positioned at the top of the grid page, as shown in the Preview
box.
Line Color Change the color of the grid lines.
Line Type Select a line type from the drop-down list of options.
Line Width Adjust the line width in pixels (1 - 16).
Change Background Color Change the background color of the grid page.
Transparency and Language
From the Transparency and Language tab, you can select the background transparency and choose the WorkSpace interface
language.
Transparency
Use this option to control the background transparency of inserted images. By default, only images with white backgrounds are
rendered transparent.
l The Transparency feature is enabled by default. Uncheck the checkbox to disable the Transparency feature.
l Click the Change Transparent Color icon to select a different color. Only the images with the newly selected
background color will now be transparent.
Select Language
This Preferences option allows you to select the preferred language for the WorkSpace interface, including menu and dialog
text.
NOTE
Language packs are separate installs available at www.einstruction.eu/downloads.
l Select the Use the System Default radio button to let the system determine which language should be used for the
interface display. To manually choose the language, select the second radio button and choose a language from the
drop-down menu.
l The Text Recognition Language drop-down menu displays a list of supported languages. Select a language to be used
in conjunction with the Freehand Text and Freehand Text Recognition tools.
einstruction.com/workspace-overview
Page 17

WorkSpace for PC 17
Toolbar Settings
The Toolbar Settings tab provides several options for customizing the toolbar.
Toolbar Button Options
Set the shape and size of the toolbar buttons.
l By default, the shape of the toolbar icons is Classic Rectangle. The toolbar icon shape can be changed to barrel, circle
or pentagon. Each selection is displayed in the Preview box.
l The toolbar icons can be sized at either 22 x 22 pixels or 40 x 40 pixels.
Toolbar Options
The following options deal with the size and color options for selected tools within the toolbar.
Option Use To
Use Right-click for
Display the settings of the selected tool when right-click is used (mouse or pen).
Settings/Properties
Hide Tool Settings when not
Hide right-click menus when not in use.
being used
Show Simplified Toolbar Display a simplified toolbar with larger icons.
When this option is selected, the WorkSpace toolbar becomes transparent after a set time of inactivity.
Option Use To
Use Transparency Activate the transparency feature for the WorkSpace toolbar.
Delay in Seconds Sets the amount of time before the WorkSpace toolbar becomes transparent.
Custom Buttons
Create custom buttons that open macros or web pages. Up to five buttons can be customized and added to the toolbar.
Creating a Custom Button
1
Select a button (P1-P5) from the Custom Buttons field.
2
Enter a description for the new button in the Description field.
3
To set a Macro for the button:
a
Click the Application Path icon.
b
Enter the path or click Search Application.
The Search Application window is opened. Navigate to path needed and click OK.
c
Click OK.
The custom button is added to the Customize Tools Preferences.
einstruction.com/workspace-overview
Page 18

WorkSpace for PC 18
4
To set a URL for the button:
a
Click the URL icon.
b
Enter the URL into the Search field.
c
Click OK.
The custom button is added to the Customize Tools Preferences.
Customize Toolbar
The WorkSpace toolbar can be completely customized depending on the tools you use most frequently.
Use this option to organize, add or remove tools on the toolbar and in the Toolbox.
Toolbar Scheme Description
Basic Includes a basic set of commonly used tools such as Pen, Blank Page, Gallery and Page Sorter.
Intermediate (Default) Includes the most commonly used tools and setup options on the toolbar.
Advanced
Includes more graphically oriented options on the toolbar such as Document Camera,
Compass,Curtain and Shapes.
Adding a Tool to the Toolbar
1
Locate the tool to be added from the Available Tools menu.
2
Select the tool with a mouse click or with the electronic pen.
3
Drag the tool to its new location.
4
Repeat steps 2 and 3 as needed.
5
Click OK.
The tool is saved to its new location.
Removing a Tool from the Toolbar
1
Select the tool to be removed with a mouse click or with the electronic pen.
2
Drag the tool away from the box in which it is housed.
3
Repeat steps 1 and 2 as needed.
4
Click OK.
The tools are removed from the main toolbar, the Toolbox or the right-click toolbar.
5
Optionally, click the Remove All button to delete all tools from the Current Tools list.
Custom Schemes
A customized Toolbar or Toolbox can be saved to a custom scheme. The custom scheme can be deleted if it is not needed.
einstruction.com/workspace-overview
Page 19

WorkSpace for PC 19
Creating a Custom Scheme
1
Click Save Scheme.
The Enter Name window is displayed.
2
Enter the name of the new scheme.
3
Click OK.
The new scheme is added to the Scheme drop-down list.
NOTE
To delete a custom scheme, select the scheme from the Scheme drop-down menu and click
Delete Scheme.
Gradient Page Setup
Select the Gradient Page tab from the Preferences window to determine gradient settings. Gradient page options include twocolor or four-colors and the direction of the gradient.
Changing a Gradient
1
Click a colored box.
The Colors window is opened.
2
Select a color and click OK.
The new color is displayed on the button and on the Gradient Examples.
3
Select the Gradient Example to preview the new gradient.
4
Click OK.
The preference is saved.
Tablet Settings
The Tablet Settings tab allows you configure the WorkSpace Connect connection. For more information on how to set up
WorkSpace Connect, see Setting Up WorkSpace Connect.
einstruction.com/workspace-overview
Page 20

WorkSpace for PC 20
THE WORKSPACE TOOLBAR AND MENUS
This chapter covers the following sections:
Toolbar
Menus
Other Options
Toolbar
Intermediate Toolbar
Table 1: WorkSpace Modes
Icon Mode Description
Mouse In Mouse Mode, your computer mouse functions as a normal mouse.
Lesson
Annotate Over
Desktop Mode
Annotate Over Office
Mode
Create and annotate lessons, presentations, blank pages or images while in Lesson
Mode.
Annotate over moving images such as videos, flash applications or animations
without pausing or freezing the images.
Access and insert annotations inside Microsoft Excel, PowerPoint and Word.
einstruction.com/workspace-overview
Page 21

WorkSpace for PC 21
Table 2: Tools Available in Lesson and Annotate Over Desktop Mode
Icon Name Description
Pen Use the Pen tool to write or draw on a blank page.
Draw colorful lines with the Multi-color Pen tool. The Multi-color Pen has two different
styles:
Multi-color pen
Picture Pen
Line Use this tool to draw lines on a blank page.
Freehand Text
Freehand Shape
Highlighter Highlight anything on the current page with the Highlighter tool.
Shapes Draw different shapes - including squares, circles and triangles - with the Shapes tool.
Gradient - The properties to the left of the Gradient Style button define the starting
color, while the properties to the right define the ending color.
Color on Color - The properties to the left of the Gradient Style button define the outside
border color, while the properties to the right define the inside color.
Draw a path of images with the Picture Pen tool. The selected picture is displayed on
the left side of the properties bar.
Convert handwritten text into typed text and insert the typed text into a blank page or an
active application, such as Excel, PowerPoint, Word (in Office Mode).
Convert an object drawn freehand, such as a rectangle, into a true rectangle with 90
degree corners and straight perimeter lines with the Freehand Shape tool.
Adding SWF files to the presentation:
Flash Player
Type Text
einstruction.com/workspace-overview
1
Click the Flash Player icon from the toolbar and select a file from the directory.
2
Click the green arrow to activate the flash file.
3
Use the Selection tool to move, resize or delete the flash file.
Only two flash files are permitted per page.
Adding typed text to the presentation:
1
Click the Type Text tool. Change font properties prior to typing.
2
Click to insert a Text box and begin typing.
3
When you have finished typing, click the Selection tool. The Text box closes
and the text is placed on the page.
Page 22

WorkSpace for PC 22
Icon Name Description
Use the Stamper tool to add stamps. Personalize the Stamper by adding images to the
Documents\Interwrite WorkSpace\User Stamps folder. The images must be in a BMP,
Stamper
GIF, JPEG, TIFF or PNG format. If images are added to the User Stamps folder while
WorkSpace is open, the stamps will not be available for use until WorkSpace is closed
and re-opened.
Add audio files to the presentation file. WorkSpace supports WAV, MP2, MP3, MPA,
Audio File
MPEG, SND and WMA files. Audio files made with the Record and Playback tool, and
those downloaded from other sources (e.g., iTunes), are also supported.
Video File
Add video files to the presentation. The following file types are supported: AVI, WMV,
MOV, and MPG.
Pan Page Use the Pan Page tool to move the page around in the Annotation window.
Select and size, move, cut, copy, paste, delete, reorder, rotate, group, ungroup export
Selection
objects with the Selection tool. Additionally, objects can also be moved to the
background and added to the Gallery.
Eraser From the toolbar, click the Eraser icon to erase annotated content.
Zoom Magnify the page with the Zoom tool.
Create Blank Page Add a blank page to the presentation file.
Create Duplicate Page
Add a duplicate of the current page to the presentation file directly after the current
page.
Add a calendar page to the presentation file. Select and preview a one week or one-,
Create Calendar Page
two-, three-, or four-month calendar. Indicate a starting month and year (the current
month and year is the default) and choose a background color for the calendar.
Create Grid Page Add a grid page to the presentation.
Create Image Page Add an image page to the presentation.
Gallery
Spotlight
einstruction.com/workspace-overview
The Gallery contains an extensive collection of images and interactive Flash
simulations called Interwrite Sims.
Create interest and draw attention to an area of the screen. The spotlight opening is
transparent and reveals the item or text below it on the screen. Click and drag the
cursor to move the spotlight around the screen.
Page 23

WorkSpace for PC 23
Icon Name Description
Use the Page Sorter to view thumbnails of pages in a presentation file. To select a
page, simply click the page you wish to view. The Page Sorter also allows you to click
Page Sorter
and drag a page to a different location in the presentation file.
(not available in Annotate Over Desktop mode)
Previous Page Go to the previous page in the presentation file.
Next Page Go to the next page in the presentation file.
Clear
Document Camera
Delete the selected object or objects. If nothing is selected on the page, the Clear tool
deletes everything on the page.
Obtain images, documents or other files from a device such as a scanner, digital
camera or document camera, and insert them into WorkSpace.
Save the current presentation file. By default, the Auto Save feature automatically
Save
saves the presentation file every five minutes. Disable Auto Save or change the
frequency in the Preferences window.
On-screen Keyboard Use the On-screen Keyboard to type characters on the desktop.
Lock all connected devices (clickers or tablets), preventing them from providing input to
Lock Pads
the current session. Locked devices remain connected unless they are turned off. Click
the Unlock icon that appears in its place to reactivate connected devices.
Internet Browser Open an internet browser to the web page indicated in the Preferences window.
Page Up
Page Down
Go to the previous page in a PowerPoint slide show while saving the annotated page in
the Annotation window to the presentation file.
Go to the next page in a PowerPoint slide show while saving the annotated page in the
Annotation window to the presentation file.
Curtain Hide the current page, or hide the current desktop screen, with the Curtain tool.
Insert Media
Capture
Undo Undo the most recent action.
Redo Redo the last Undo action.
einstruction.com/workspace-overview
Insert any type of media file including BMP, JPEG, GIF, EMF, WMF, TIFF PNG, ICO,
audio files, video files and Flash files.
Capture a snapshot of the full screen, a selected window or a selected portion of the
screen.
Page 24

WorkSpace for PC 24
Icon Name Description
Preferences
Open the Preferences window to configure settings for many of the WorkSpace tools
and functions.
Convert handwritten text into typed text and insert the typed text into an active
Freehand Text
Recognition
application, such as Word or Excel. The Freehand Text Recognition Window provides
a spell checker and the ability to insert carriage return, space, tab and backspace
characters into the text.
Freehand Equation Pen Convert any written numeric characters into typed text.
Adding typed equations to the presentation:
1
Click the Equation icon. Click where the Equation window is to display and
Equation
begin typing.
2
When you have finished typing, select Insert Equation. The Equation window
closes and the equation is placed on the page.
Record and Playback
Export PDF File
E-mail PDF File
Record and play back events, with sound, as they occur. Events are stored in an AVI
file for playback.
Export the current presentation file to a PDF format. By default, the PDF file is saved in
the Documents\Interwrite WorkSpace\Export folder.
Export the current presentation file to a PDF format and automatically attach it to an e-
mail message.
Timer Use the Timer tool to time classroom activities, exams, or quizzes.
Student Response
System
Click the Start SRS icon to display the polling question menu if using a Student
Response System, such as Pulse or NXT.
ExamView Click the ExamView icon to open ExamView.
Ruler Demonstrate how to use measurements between two points with the Ruler tool.
Triangle Demonstrate triangle measurements with the Triangle tool.
Protractor Demonstrate angle measurements with the Protractor tool.
Compass Demonstrate circles and arcs, and measure distances with the Compass tool.
Link History
Follow the link history for the current session. This tool is available only when a
presentation file is open and a GWB link has been clicked.
einstruction.com/workspace-overview
Page 25

WorkSpace for PC 25
Icon Name Description
New Page Setup Click the New Page Setup icon to set the page options for a new page.
Fill
Gradient Page Add a gradient page to the presentation.
Exit Close WorkSpace.
Toolbox
Device Manager Click the Device Manager icon to open the Device Manager application.
Minimize Toolbar Minimize or restore the toolbar to full size.
WorkSpace Menu Open the WorkSpace Main Menu.
Fill any object with color, or change the background of the page if no object is selected,
with the Fill tool.
Display all available WorkSpace tools. Customize the organization of the tools on this
menu and on the toolbar in the Preferences window.
Table 3: Tools Available in Office Mode
Icon Name Description
Start PowerPoint/Excel/Word Start the selected Microsoft Office application.
Insert All Annotations
Insert Selected Annotations
Add Blank Slide
Save as Slide in PowerPoint
Clear
Insert all annotations into the current PowerPoint slide, Word
document or Excel spreadsheet.
Insert selected annotations into the current PowerPoint slide,
Word document or Excel spreadsheet.
Add a blank slide to the current PowerPoint slide show. This
feature is available only when a PowerPoint Slide Show is
running.
Save the current annotated screen as a slide in the open
PowerPoint presentation. The slide will be appended to
PowerPoint file.
Delete the selected object or objects. If nothing is selected on
the page, the Clear tool deletes everything on the page.
einstruction.com/workspace-overview
Page 26

WorkSpace for PC 26
Menus
The WorkSpace toolbar Main Menu icon reveals a list of sub-menus. The following table provides an overview of each
available menu.
Menu Item Description
The File Menu provides options for saving and distributing WorkSpace presentation files.
The Edit Menu provides options for the WorkSpace editing tool. The tools are only active when
WorkSpace is in Annotation Mode and when the Selection tool is active.
The Tools Menu is displayed when the Toolbox is selected. It displays the less frequently used
tools.
The Pages Menu includes the page creation tools such as Create Blank Page, Create Grid
Page, Create Image Page, Create Calendar Page, Gradient Page, Create Duplicate Page and
New Page Setup.
The Help Menu opens the WorkSpace for PC User Guide and the following options: Check for
Updates, Register Online and About.
File Menu
l New - Create a new presentation file.
l Open - Open an existing presentation file.
l Save - Save the current presentation file. You will be prompted to save the presentation when you close the file or exit
WorkSpace. The Save function is also available on the DualBoard Features Menu.
NOTE
Presentation files are automatically saved and titled as the current date and lesson number: e.g.,
May 11, 2014_1.GWB
l Save As - Save the presentation file with a different file name.
l Close - Close the presentation file.
l Print - Print the presentation file.
l Export - Export the current presentation file to a WorkSpace file (GWB) or a common file format (IWB). For more
information, refer to Distributing Files.
l E-mail - E-mail a presentation file. Before the message form is displayed, you are given the option to e-mail the selected
file either as a GWB file, or as a PDF file. The recipient must have Interwrite WorkSpace installed in order to view a
GWB file. Make your selection and click the E-mail icon to display an e-mail message form with the attachment already
in place.
l Export PDF File - Export the currently opened presentation file to PDF. By default, the PDF file is saved in the
Documents\Interwrite WorkSpace\Export folder.
einstruction.com/workspace-overview
Page 27

WorkSpace for PC 27
Edit Menu
l Undo - Use this option to undo the most recently performed action.
l Redo - Use this option to redo the last undo action. The tool is unavailable until something has been undone.
l Cut - Remove the selected object or objects with the Cut option. Cut is only available when one or more objects have
been selected. Objects that are cut are moved to the Clipboard, making them available for pasting. Alternatively, press
Ctrl + X on the keyboard to cut an object or objects.
l Copy - The Copy option duplicates a selected object or objects. Copy is only available when one or more objects have
been selected. Alternatively, pressCtrl+ C on the keyboard to copy an object or objects.
l Paste - Paste the copied or cut object or objects onto the current page. Paste is only available when an object has been
cut or copied to the Clipboard. Text pasted into a presentation file from another application, such as Word, retains the
text attributes of the first character of the pasted text. Those attributes will be applied to the characters of the pasted
text. Alternatively, press Ctrl + V on the keyboard to paste an object or objects.
l Select All - Use this option to select all of the objects on the current page. Alternatively, press Ctrl + A on the keyboard
to select all objects on the current page.
l Clear - Delete the selected object or objects. If nothing is selected on the page, the Clear Page tool deletes everything
on the page.
l Change Authorizations - Enter a valid Authorization Code for WorkSpace (if applicable).
Tools Menu
Refer to Table 2: Tools Available in Lesson and Annotate Over Desktop ModeTable 2: Tools Available in Lesson and
Annotate Over Desktop ModeTable 2: Tools Available in Lesson and Annotate Over Desktop Mode.
Pages Menu
l Create Blank Page - Add a blank page to the presentation.
l Create Grid Page - Add a grid page to the presentation.
l Create Image Page - Add an image page to the presentation.
l Create Duplicate Page - Add a duplicate of the current page in the Annotation Window to the presentation. The
duplicate page is added to the presentation file immediately following the original page.
l Create Calendar Page - Add a new page with a calendar to the presentation.
l Create Gradient Page - Add a page with a Gradient element. See Changing a Gradient.
l Open ExamView File - Access ExamView files from your computer or network.
l Annotate Over Desktop - Access the Annotate Over Desktop function within WorkSpace.
l Import from a Device - Save images or documents from a device, such as a scanner or digital camera, to WorkSpace.
l Previous Page - Go to the previous page in the presentation. This tool is unavailable when the first page of the
presentation is in the Annotation Window.
l Next Page - Go to the next page in the presentation file. This tool is unavailable when the last page in the is in the
Annotation Window.
l Page Sorter - View thumbnails of the pages in a presentation. Additionally, select a page by clicking on it, click and
drag a page to a different location within the presentation, or use the Up and Down arrows to move pages around the
presentation.
Help Menu
einstruction.com/workspace-overview
Page 28

WorkSpace for PC 28
l Help - Opens the current WorkSpace user guide.
l Check for Updates - Checks for WorkSpace software updates. If the text is gray in color, the software is up-to-date.
l Register Online - Opens the Product Registration page, where you can submit your registration information.
l About - This window provides contact information, a copy of the End User License Agreement (EULA) and copyright
information.
Other Options
l Preferences
l Student Response System
l Flow Integration
l Device Manager
Preferences
TIP
The Preferences window can be accessed from the Main Menu icon.
From the Preferences window, Toolbar settings can be adjusted and customized, WorkSpace Connect can be enabled and
language settings can be defined - among other options.
For more information on the Preferences window, see Preferences.
Student Response System
Use the Student Response System window to interact with participants using the Student Response System (SRS). Create,
edit and pose questions during a session while participants respond using the SRS.
Selecting the SRS
The SRS window displays all of the Student Response options that interact with WorkSpace.
1
Close WorkSpace.
2
Install the SRS, following the instructions per the SRS.
3
Open WorkSpace.
4
Click the Main Menu icon, mouse over File and select Student Response System.
The Student Response System window is displayed.
5
Verify that the appropriate SRS is selected. If it is not selected, select the appropriate SRS.
IMPORTANT
The file path displays the install location of the file. If the file was installed in another location,
click the Browse icon to locate the file.
6
Click OK.
einstruction.com/workspace-overview
Page 29

WorkSpace for PC 29
Flow Integration
WorkSpace integrates with Flow, allowing users to create, edit and ask questions.
Creating a Flow Question
Prerequisites
A plugged in receiver and an open WorkSpace page.
1
Click the Main Menu icon and select Student Response System.
The Student Response System window opens.
2
Select Flow and click OK.
TIP
If the correct file path is not listed, click Browse and locate the following path: C:\Program Files
(x86)\Turning Technologies\Flow\Flow.exe
3
From the WorkSpace toolbar, click the Student Response System tool.
4
Click Create Question.
The Flow question window opens.
5
Enter the question title in the Question Name field.
6
Select the question type from the Question Type box.
Optionally, set the question parameters to the right of the Question Type box.
Optionally, select Automatically start question, Finish current question when time is up and/or Advance page
when question ends.
7
Click OK.
8
To add more questions, insert a new page and repeat steps 5 - 9.
Asking a Flow Question
Prerequisites
Plug in the appropriate receiver.
1
Click the Student Response System tool on the WorkSpace toolbar.
2
Select Start Flow.
Flow opens.
3
Register participants.
4
After all participants have registered, click the Student Response System tool on the WorkSpace toolbar and select
Ask Question.
einstruction.com/workspace-overview
Page 30

WorkSpace for PC 30
Device Manager
Use the Device Manager window to manage devices used with WorkSpace. Device Manager detects connected devices and
establishes communication with WorkSpace.
The following devices can be used with WorkSpace:
l DualBoard
l Touch Board
l Touch Board Plus
l MobiView
l Mobi Learner tablets
l Mobi 501
l Clickers
l WorkSpace Connect
Device Manager runs in the background of your computer to discover, connect and manage devices.
Selecting Device Manager
1
Verify that the receiver is plugged in to a working USB port.
2
Open WorkSpace.
3
Click the Main Menu icon, mouse over File and select Device Manager.
Device Manager opens.
4
Verify that the receiver is recognized. A verified receiver will have a green checkmark.
IMPORTANT
For assistance with Device Manager, click Help from the Device Manager Menu and select Help
to display the Device Manager User Guide.
einstruction.com/workspace-overview
Page 31

WorkSpace for PC 31
WORKSPACE MODES
A WorkSpace mode is a specific environment in which a set of pre-defined tools and functions is available.
The following modes are available in WorkSpace:
Lesson Mode
Mouse Mode
Annotate Over Desktop Mode
Multi-User Mode
Office Mode
Whiteboard Mode
Lesson Mode
Lesson Mode is the primary operational mode of WorkSpace. In Lesson Mode, participants can view the presentation while
you interact with your computer or other projection surface such as DualBoard™. The Annotation tools allow you to write and
draw on the blank page. The Page tools create additional pages and the Multimedia tools add a variety of multimedia files to the
pages in the presentation file.
TIP
Use the Previous Page or Next Page icons to toggle from mode to mode.
Accessing Lesson Mode
WorkSpace opens in Lesson Mode, however Lesson Mode can be accessed from the WorkSpace toolbar at any time while in
any other mode.
1
From the toolbar, click the Lesson Mode icon.
If you were in another mode, you will be prompted to save the current document. WorkSpace will take a full-screen
capture of the desktop.
WorkSpace will remain in Lesson Mode until you select a different mode.
einstruction.com/workspace-overview
Page 32

WorkSpace for PC 32
WorkSpace Tools
WorkSpace tools can be used to annotate, add to or edit the pages of the presentation.
Other tools are used during the presentation to draw attention to important points and to move between the pages of the
presentation.
Group Tool Description
Annotation tools manipulate text. Available tasks include:
l Drawing
Annotation
Multimedia
l Writing
l Typing
l Initiating the Capture function from Mouse Mode (WorkSpace
will switch to Lesson Mode)
Multimedia tools are used to import various types of media into a
presentation. Use the WorkSpace Gallery to integrate media.
Multimedia content can be dragged and dropped directly onto a Blank
Page.
Editing
Editing tools change or revise the pages and objects in a presentation
file.
Page Page tools are used to create pages in WorkSpace.
File Management
Presentation
Navigation
File Management tools organize and manage WorkSpace presentation
files.
Presentation tools are used to manipulate the WorkSpace window
during a presentation.
Navigation tools are used to maneuver through the pages in a
WorkSpace presentation file or the slides in a PowerPoint Slide Show.
Set Up Setup tools are used to set up a WorkSpace presentation.
Multi-Purpose
Multi-Purpose tools include the Toolbox and several WorkSpace tools
that can be used with other applications.
einstruction.com/workspace-overview
Page 33

WorkSpace for PC 33
Mouse Mode
Mouse Mode allows you to select and start applications and perform all the functions you would typically perform with the
mouse and keyboard. The Mouse Mode cursor on the toolbar is unavailable while in Mouse Mode.
Enabling Mouse Mode
The Mouse Mode icon is unavailable until the Blank Page icon, Shapes icon or one of the writing tool icons is selected.
1
Open WorkSpace.
2
Click the Blank Page icon or one of the writing tool icons to annotate over the desktop.
The Mouse Mode icon becomes active.
3
Click the Mouse Mode icon.
You can now access your mouse.
4
Click any of the available tools from the toolbar to annotate over a screenshot of the desktop.
5
Click the Mouse Mode icon to access your mouse.
Capture
A capture is a screenshot of either the full screen, a selected window or a selected portion of the screen. The available capture
options differ based on your selected WorkSpace mode.
In Lesson Mode, the Capture dialog appears as:
In Mouse Mode, the Capture dialog appears as:
Annotate Over Desktop Mode
The Annotate Over Desktop tool is used like the Annotation window, however your desktop is underneath and accessible for
use. The Annotation tools, Page tools and Capture tools are available and can be selected. Elements of the desktop can be
called out and highlighted for interactive use.
einstruction.com/workspace-overview
Page 34

WorkSpace for PC 34
NOTE
Zooming, scrolling, selecting items on the desktop and using the Gallery are all unavailable while in
Annotate Over Desktop Mode.
Annotating Over the Desktop
1
Open WorkSpace.
2
Click the Main Menu icon, mouse over Pages and select Annotate Over Desktop.
The desktop becomes an annotation area.
TIP
Alternatively, click the Annotate Over Desktop icon from the toolbar to annotate the area. Refer
to Adding a Tool to the Toolbar for more information about adding a tool/icon to the main
toolbar.
3
Use any of the annotation tools to annotate the desktop area.
TIP
To manipulate any of the windows or applications on the desktop, click the Selection tool on
the WorkSpace toolbar.
4
Click the Save icon on the WorkSpace toolbar to save the annotation.
Multi-User Mode
Multi-User Mode allows up to nine participants to interact using collaborative (shared) or defined (one person per defined area)
space. Multiple mobile devices such as Mobi Learner, MobiView, DualBoard or Touch Board can be displayed on the board at
the same time.
Multi-User Menu
From the Multi-User Menu:
l Set up multiple participants to interact with Turning Technologies products. Define the number of areas for multi-user
use and determine if participants will use a collaborative or defined workspace. In Multi-User Mode, participants can
select objects on any Multi-User layer within their area. Additionally, you can save pre-defined Multi-User pages as
GWB files without any connected devices.
l Start Multi-User Mode from a Non-Multi-User page (options include full screen and 2, 4, 6, and 9 areas) Quick Start.
l Toggle Multi-User Mode on and off using the Multi-User option.
l Add, remove and move Mobi tablets to different areas using Edit Devices. Each multi-user page will remember specific
device placement when moving between pages or returning from Mouse Mode.
Selecting the Multi-User Menu
The type of devices connected to WorkSpace determine how many participants can work simultaneously on the whiteboard.
Up to nine devices may be used, but only two of those devices may include DualBoards with pens.
NOTE
The white pens used with DualBoard and Mobi tablets are the same pens.
einstruction.com/workspace-overview
Page 35

WorkSpace for PC 35
Follow the steps below to allow more than one participant to write on the interactive or virtual whiteboard.
1
Open WorkSpace.
2
Click the Multi-User Menu icon on the Page Functions toolbar.
A menu is displayed with the following options:
l Multi-User Page Setup
l Quick Start
3
Select either Multi-User Page Setup or Quick Start.
If Multi-User Page Setup is selected, refer to Setting Up Multi-User Mode. If Quick Start is selected, refer to Setting
Up Quick Start.
Setting Up Multi-User Mode
1
Connect up to nine devices in Device Manager.
IMPORTANT
Do not add the device that will be used to control the main toolbar or the other devices unless it is
set to "presenter" within Device Manager. Refer to Selecting the Presenter.
2
Click the Multi-User Menu icon on the Page Functions toolbar.
3
Select Multi-User Page Setup.
The Multi-User Page Setup window opens.
4
Select either a Collaborative or Defined work area.
Select Work Area Use To
Collaborative
Defined
Defined
Defined
When this option is selected, all devices will be able to work
within the same area.
When this option is selected, two devices will work within their
own defined space.
When this option is selected, up to four devices will work within
their own defined space.
When this option is selected, up to six devices will work within
their own defined space.
einstruction.com/workspace-overview
Defined
When this option is selected, up to nine devices will work within
their own defined space.
Page 36

WorkSpace for PC 36
5
Drag and drop a device to the area needed.
NOTE
It is recommended to leave one device out to keep control of all users. Ideally, this will be the
"presenter" device.
6
Click OK after all devices have been dropped into place.
Setting Up Quick Start
1
Connect up to nine devices in Device Manager.
IMPORTANT
Do NOT add the device that will be used to control the main toolbar or the other devices unless it
is set to Presenter within Device Manager.
2
Click the Multi-User Menu icon on the Page Functions toolbar.
3
Mouse over Quick Start and select either Full Screen or a specified area.
4
Click the Multi-User Menu icon to access Edit Devices.
The View Devices window opens.
Drag and drop, or remove devices. If necessary, click the Device Manager icon in the lower right corner to access
Device Manager.
5
To close Quick Start, click the Multi-User Menu icon and select Multi-User.
Selecting the Presenter
The “presenter” in Multi-User Mode controls when multi-user mode
begins and ends.
1
Open Device Manager.
Images of each available device appear in the main window.
2
Select the icon for the desired presenter device.
3
From the menu bar, click Options and select Set Presenter.
The selected device is now the presenter device.
Presenter Tools
In Multi-User Mode, the following tools are available to the presenter in addition to those on the main toolbar:
Presenter Functions
Icon Name Description
Zoom User Selects an individual user and enlarges their work within the entire multi-user window
Return to
Settings
Returns the user back to Multi-User view
einstruction.com/workspace-overview
Page 37

WorkSpace for PC 37
Icon Name Description
Move User
User Functions
Icon Name Description
Select Allows the user to select within the window
Eraser Manually removes annotations within the user's window
Clear
Pen Annotate within the user window; change pen color
Pen Width Increases the width of the pen line
Export Entities
Once selected, allows the presenter to move the user to another area within the WorkSpace
page
Delete the selected text or objects. If nothing is selected on the page, the Clear tool
deletes everything on the page within that user's window.
Allows the instructor to export that particular user's work to save into another format. See
Exporting a Presentation Object or Entity for more information.
If selected device is designated as the presenter, this button appears on the toolbar,
Mouse Mode
Show/Hide
Multi-User
allowing the device to leave Multi-User Mode and act as the mouse. Once activated, the
presenter has full control of the WorkSpace and Multi-User toolbars.
Allows the instructor to show or hide that particular user's window
Locking Tablets and Clickers (If Applicable)
If using student tablets or clickers with WorkSpace, the presenter can lock any devices in use and regain control of the
session.
1
Open Device Manager.
Images of each available device appear in the main window.
2
Select the icon for the device to be locked.
3
Select the Lock icon.
To unlock a device, select the Unlock icon.
TIP
You can also lock all devices by clicking the Toolbox icon on the WorkSpace toolbar and
selecting Lock.
einstruction.com/workspace-overview
Page 38

WorkSpace for PC 38
Exiting Multi-User Mode
1
Click the Multi-User Mode icon on the Properties Bar.
2
Select Turn Multi-User Off.
The devices are no longer available for simultaneous input, however the screen with the annotations is still available.
Office Mode
Office Mode allows you to interact directly with Microsoft Excel, PowerPoint and Word. In Office Mode, you can add
annotations directly to a slide, document or spreadsheet. The annotations become part of the native application file, rather than
being saved as a page in an WorkSpace file.
NOTE
Text entered with the Text, Freehand Text Pen and Freehand Text Recognition tools is considered real
text.
einstruction.com/workspace-overview
Page 39

WorkSpace for PC 39
Whiteboard Mode
When Whiteboard Mode is selected, all notes made on the whiteboard can be captured and saved as pages within WorkSpace
for distribution, without the use of the projector.
The communication in Whiteboard Mode is one-way between the DualBoard and the computer. A projector is not involved and
computer input is not communicated back to the Dualboard. A special dry erasable pen is needed.
Enabling Whiteboard Mode
Whiteboard Mode must be enabled through Device Manager.
1
Plug the Whiteboard USB cable into an available USB port on your computer. Alternatively, use the Wireless Kit. See
Setting Up the DualBoard via Wireless Kit for more information.
2
Select Whiteboard Mode from the Device Manager Tools menu.
An image of the whiteboard is displayed on the desktop.
Using Whiteboard Mode
A special dry erasable pen is needed.
1
Put the cap on the Marker Pen and click the Save icon on the DualBoard Features Menu.
2
Click the Clear icon twice.
The electronic image of the whiteboard on the computer will now be blank.
3
Erase the dry-erase ink from the whiteboard's surface.
4
Begin writing and drawing on the new page.
5
Use the whiteboard tools on the Whiteboard Mode toolbar to save and print the presentation file.
einstruction.com/workspace-overview
Page 40

WorkSpace for PC 40
USING WORKSPACE
This chapter covers the following topics:
Using Layers
Copying an Object
Locking and Unlocking an Object
Creating Page Transitions
Exporting a Presentation Object or Entity
Distributing Files
Distributing Files as GWB (PC Only)
Distributing Files as IWB
Exporting Files
Using Layers
Use the Layers tool to manage all of the items that make up your WorkSpace page. A layer in WorkSpace is analogous to a
clear folder that contains artwork. For example, if you reshuffle the folders, you change the stacking order of the items in your
artwork. You also can move items between folders.
The Layers function allows you to list, organize and edit the objects in a document. By default, every new page contains a
single layer, and each object you create is listed under that layer. However, you can create new layers and rearrange items to
best suit your needs.
Creating Layers within WorkSpace
Use the Layers toolbar to edit layer properties.
Layers Toolbar
Add Layer
Remove Layer
Edit Layer
Max. Layer Controls
Min. Layer Controls
Show/Hide Layers
einstruction.com/workspace-overview
Page 41

WorkSpace for PC 41
Move Layers Up/Down
How to use layers...
1
Open a Blank Page within Lesson Mode.
2
Annotate or add an image to the page.
3
Click the Add Layer icon.
A new layer is added to the page. The active layer is highlighted in black.
4
Continue to annotate and add layers. Optionally, click the:
l Remove Layer icon to remove a layer
l Up/Down Arrows to change the layer order
5
Click the Save icon on the WorkSpace toolbar to save the file.
Dragging an Object Between Layers
To drag an object between layers, select the object to be moved and drag it to the desired layer. The “plus” sign indicates that
the layer has been moved.
NOTE
When reopening a page the includes layers, a prompt appears warning you that the page contains layers.
To annotate the page, click the Maximize Layer Controls icon and drag to the last layer to the top of the
list. You may now annotate the page.
Copying an Object
Objects can be copied within the blank page.
1
Place or draw an object on the blank page.
2
Select the object to make it active.
The Picture Options toolbar is displayed at the bottom of the blank page.
3
Click the Copy icon.
4
Select the object and drag the new copy to another area within the page or click Blank Page to paste it into another
window.
Locking and Unlocking an Object
Use the Lock command to make an object visible, but not selectable. A locked object is unable to be selected, edited, copied,
moved or resized.
How to lock an object...
1
Place or draw an object on the blank page.
2
Select the object to make it active.
The Object Options toolbar is displayed on the Properties Bar.
3
Click the Lock icon.
einstruction.com/workspace-overview
Page 42

WorkSpace for PC 42
How to unlock an object...
1
Select the locked object.
The Object Options toolbar is displayed on the Properties Bar.
2
Click the Unlock icon.
Creating Page Transitions
Slide transitions are the animation-like effects that occur when you move from one page to the next during an on-screen
presentation. You can control the speed of each slide transition effect. There are more than 40 transition options.
1
Open a Blank Page while in Lesson Mode.
2
Click the Page Transitions icon on the Properties Bar.
NOTE
The Page Transitions icon is located on the Page Properties toolbar (also called the Properties
Bar), which can be accessed by clicking the Selection tool on the WorkSpace toolbar.
3
Select the transition from the Effect drop-down menu.
4
Select the transition speed from the Speed drop-down menu.
5
Click Apply All to apply the same transition to all pages.
6
Click OK.
Exporting a Presentation Object or Entity
From the Presenter Tools, a selected presentation object (entity) can be exported and saved to the desired file type.
1
Select the Export Entities icon.
2
Select the save format from the File Type drop-down menu.
3
Enter the file name in the File Name field.
4
Click Browse to export the file to a location other than the default location. The default location path is
Documents\WorkSpace\Export.
5
Select an export background from the Background menu.
6
Click Export.
Distributing Files
WorkSpace files can be distributed in a number of formats.
TIP
To simply save a WorkSpace file in its native format, click the Save icon from the WorkSpace toolbar. If
the Save icon is not on the WorkSpace toolbar, click the Main Menu icon, mouse over File and
select Save.
einstruction.com/workspace-overview
Page 43

WorkSpace for PC 43
Distributing Files as GWB (PC Only)
The GWB file format is native to WorkSpace. Files saved with the GWB extension can be easily opened and edited in
WorkSpace as needed.
1
Click the Main Menu icon.
2
Mouse over File and select Save.
The Save GWB File window is displayed.
3
Name the file and click Save.
Distributing Files as IWB
Content saved as a Common File Format (IWB) can be shared with any interactive whiteboard and software if the whiteboard
and software accept the IWB formatting. It is important to note that some formatting and interactive content may be lost due to
the inability to exchange information between the software applications.
1
Click the Main Menu icon.
2
Mouse over File and select Save As.
The Save GWB File window is displayed.
3
Name the file.
4
From the Files of Type drop-down menu, select IWB.
5
Click Save.
Exporting Files
IMPORTANT
You must save the file prior to export.
1
Click the Main Menu icon.
2
Mouse over File and select Export.
The Export Current Pages window is displayed.
3
Select an export option from the Export As drop-down menu.
4
Enter a file name in the Export File Name field.
Optionally, click Browse to change the Export Directory.
5
Click Export.
TIP
To print, email, export as PDF or email as PDF, click the Main Menu icon, mouse over File
and select the appropriate export option.
einstruction.com/workspace-overview
Page 44

WorkSpace for PC 44
THE GALLERY
The WorkSpace Gallery tool provides more than 4000 resources to supplement your lesson planning. The Gallery stores
images, background pages, teaching tools and Flash content called Interwrite Sims.
The WorkSpace Content component must be installed prior to using the Gallery. If you have not installed it, visit
www.turningtechnologies.com/responsesystemsupport/downloads.
Before using the Gallery for the first time, you will be prompted to build the Gallery. Click Yes to build the Gallery database.
This chapter covers the following topics:
Searching the Gallery
Selecting a Gallery Object
Adding a File to the Gallery
Building a Database
Importing a File from a Device
Editing Gallery Files
Exporting Gallery Files
Adding a New Category
Adding a File to Favorites
Deleting a File from the Gallery
einstruction.com/workspace-overview
Page 45

WorkSpace for PC 45
Searching the Gallery
Search for content by file name, keyword, media type or subject.
How to search the Gallery by file name...
1
Click the Search box and enter the search criteria.
2
Click the Search icon or press the Enter key.
How to perform an advanced search...
1
Click the Advanced Search tab.
The Advanced Search tab opens.
2
In the Media Type window, select the type of file(s) from the list.
3
In the Search For field, enter the keyword(s).
4
Click the Search icon or press the Enter key.
The results are displayed in the bottom pane of the Gallery.
Selecting a Gallery Object
1
From the WorkSpace toolbar, click the Gallery icon.
The Gallery window is displayed.
2
Select the Content tab.
3
Click a category listed within the Content tab.
4
Click a sub-category.
5
Continue clicking on sub-categories until the desired object is displayed in the bottom window.
6
Drag and drop the object on the WorkSpace area.
7
Alternatively, right-click the object and Add to Favorites for later use or Export as a PNG.
Adding a File to the Gallery
A file can be added via the File menu or by the drag and drop method.
How to add a file to the Gallery...
1
From the Gallery menu, click File and select Add Files to Gallery.
The Add Files to Gallery window opens.
2
Click Browse to locate the file to be added. Alternatively, manually enter the path and file name.
3
Select the file and click Open.
The Importing Files dialog box opens and displays the import progress. After completed, the new file displays in the
selected category or sub-category.
einstruction.com/workspace-overview
Page 46

WorkSpace for PC 46
How to add files to the Gallery by the drag and drop method...
1
Navigate to or create the category were the file is to be added.
2
Locate the file, link, image, PDF or WorkSpace Lesson and drag it into the Gallery with your mouse or pen.
Once the object is saved into the Gallery, a thumbnail of the object is displayed.
Building a Database
The Build Gallery Database window allows for easy maintaining and building of user-specific gallery databases. The default
directories for files to be built are housed in the Gallery Repository installed in Libraries\Documents, the default Gallery and the
online Learning Gallery Database.
1
Click File and select Build Gallery Database.
The Build Gallery Preferences window opens.
2
Click Add.
The Browse for Folder window opens. Add any additional directories to the Additional Search Directories field and click
Add.
3
Click OK.
4
Click Build.
The files are added to the Gallery.
Importing a File from a Device
A file can be imported from a device such as a scanner.
IMPORTANT
Any device used for image import must have TWAIN drivers installed for it to be recognized within
WorkSpace.
1
From the Gallery menu, click File and select Import from Device.
The Device Selection window opens.
2
Select the appropriate device.
3
Click OK.
4
Select the appropriate file.
5
Click OK.
The file is placed into the Gallery.
Editing Gallery Files
Once files have been added to the gallery, their properties can be edited.
1
From the Gallery, right-click the object thumbnail.
The Gallery Options menu is displayed.
2
Click Properties.
The Properties window is displayed.
einstruction.com/workspace-overview
Page 47

WorkSpace for PC 47
Within the Properties window, the Display Name, Keywords, Background and Image Position can be adjusted.
3
Click OK.
Exporting Gallery Files
1
From the Gallery, right-click the object thumbnail.
The Gallery Options menu is displayed.
2
Click Export.
The Export window is displayed.
3
Browse to the desired save location and click Save.
Adding a New Category
The Add New Category function allows you to create a new root category and add a sub-category to an existing category.
How to create a category...
1
From the Gallery, click the New Category icon.
A new category is displayed in the Gallery pane.
2
Enter a name for the new category.
The new category is added to the Gallery.
How to add a sub-category...
1
While in a current category, click the New Category icon.
A new sub-category is displayed in the Gallery pane.
2
Enter a name for the new sub-category.
The new sub-category is added to the Gallery.
Adding a File to Favorites
Save frequently used files to the Favorites tab.
1
Select the file to be saved.
2
Click Favorites and select Add to Favorites.
The file is added to the Favorites tab for future use.
Deleting a File from the Gallery
1
From the Gallery, select the object to be deleted.
2
Click File and select Delete.
A confirmation box is displayed.
einstruction.com/workspace-overview
Page 48

WorkSpace for PC 48
3
Click Yes to proceed.
The file is removed from the Gallery.
NOTE
The file is removed from the Gallery but remains in the WorkSpace main directory.
einstruction.com/workspace-overview
Page 49

WorkSpace for PC 49
CONTACT US
For additional help, contact Turning Technologies Technical Support.
Technical Support is available from 7 a.m. - 9 p.m. EST.
From within the contiguous United States, you can reach Technical Support toll-free by calling 866.746.3015. If you are calling
from outside of the United States, please call +1 330.746.3015.
Technical Support may also be reached via e-mail at support@turningtechnologies.com or support@einstruction.com, a brand
of Turning Technologies.
Office Locations
Ohio
255 West Federal Street
Youngstown, Ohio 44503
Toll-Free: 866.746.3015
Direct: 330.746.3015
International: +1 330.746.3015
Paris
26/36 rue Alfred Nobel
93600 Aulnay-sous-Bois
France
Direct/Support: +33 (0)1 58 31 10 60
Belfast
19 Colvin House
Inspire Business Park
Carrowreagh Road
Belfast BT16 1QT
United Kingdom
Direct: +44 (0)28 9048 7898
Amsterdam
Keizersgracht 75, Garden
1015 CE, Amsterdam
The Netherlands
Direct: +31 (0)85 4011 040
einstruction.com/workspace-overview
 Loading...